

Page 1
Page 2

H.264 Network Media Player
Contents
Warnings and Precautions ...................................................... 4
Warranty .................................................................................... 5
Standard Warranty ................................................................ 5
Two Year Warranty ................................................................ 5
Disclaimer of Product & Services .......................................... 6
Disposal ................................................................................. 6
Packing List ........................................................................... 6
Product Overview ..................................................................... 7
Features ................................................................................ 7
Example Workflows.................................................................. 8
Front Panel ................................................................................ 8
Rear Panel ................................................................................. 9
How to find the NVP-20 on an IP network ............................ 10
NVP-20 Login using a web browser ..................................... 11
NVP-20
Default Login details ............................................................ 11
NVP-20 web browser Home page ......................................... 12
Settings option ..................................................................... 12
Settings > Audio Setup .......................................................... 12
Settings > Display Setup ....................................................... 13
Output To ............................................................................. 13
HDMI (Digital) ...................................................................... 13
Composite (Analogue)......................................................... 14
Settings > Network Setup ...................................................... 14
Settings > Media Player Setup .............................................. 15
To preview clips directly from the USB storage ................... 16
Adding clips to a playlist ...................................................... 16
2
Page 3

H.264 Network Media Player
Playlist settings .................................................................... 16
Playback mode .................................................................... 17
Skip Seconds ...................................................................... 17
Loop play ............................................................................. 17
Auto-Play on boot ................................................................ 17
Saving and loading playlists ................................................. 18
Playing a Playlist ................................................................. 19
Settings > Account set up ..................................................... 20
Settings > GPI set up ............................................................. 21
Level Trigger ........................................................................ 21
Pulse Trigger ....................................................................... 21
Transfer clips via FTP ............................................................ 22
FileZilla ................................................................................ 24
Keyboard + Mouse Control.................................................... 26
Contour Shuttle Express Control ......................................... 27
NVP-20
Port Forwarding on your firewall / router ............................ 28
Automatic Updates ................................................................. 29
Example Set Up ...................................................................... 30
Specifications ......................................................................... 31
Service & Support .................................................................. 32
3
Page 4

H.264 Network Media Player
NVP-20
Warnings and Precautions
1. Read all of these warnings and save them for later reference.
2. Follow all warnings and instructions marked on this unit.
3. Unplug this unit from the wall outlet before cleaning. Do not use liquid or aerosol
cleaners. Use a damp cloth for cleaning.
4. Do not use this unit in or near water.
5. Do not place this unit on an unstable cart, stand, or table. The unit may fall,
causing serious damage.
6. Slots and openings on the cabinet top, back, and bottom are provided for
ventilation. To ensure safe and reliable operation of this unit, and to protect it from
overheating, do not block or cover these openings. Do not place this unit on a bed,
sofa, rug, or similar surface, as the ventilation openings on the bottom of the
cabinet will be blocked. This unit should never be placed near or over a heat
register or radiator. This unit should not be placed in a built-in installation unless
proper ventilation is provided.
7. This product should only be operated from the type of power source indicated on
the marking label of the AC adapter. If you are not sure of the type of power
available, consult your Datavideo dealer or your local power company.
8. Do not allow anything to rest on the power cord. Do not locate this unit where the
power cord will be walked on, rolled over, or otherwise stressed.
9. If an extension cord must be used with this unit, make sure that the total of the
ampere ratings on the products plugged into the extension cord do not exceed the
extension cord’s rating.
10. Make sure that the total amperes of all the units that are plugged into a single wall
outlet do not exceed 15 amperes.
11. Never push objects of any kind into this unit through the cabinet ventilation slots,
as they may touch dangerous voltage points or short out parts that could result in
risk of fire or electric shock. Never spill liquid of any kind onto or into this unit.
12. Except as specifically explained elsewhere in this manual, do not attempt to
service this product yourself. Opening or removing covers that are marked “Do Not
Remove” may expose you to dangerous voltage points or other risks, and will void
your warranty. Refer all service issues to qualified service personnel.
13. Unplug this product from the wall outlet and refer to qualified service personnel
under the following conditions:
a. When the power cord is damaged or frayed;
b. When liquid has spilled into the unit;
c. When the product has been exposed to rain or water;
d. When the product does not operate normally under normal operating
conditions. Adjust only those controls that are covered by the operating
instructions in this manual; improper adjustment of other controls may result in
damage to the unit and may often require extensive work by a qualified
technician to restore the unit to normal operation;
e. When the product has been dropped or the cabinet has been damaged;
f. When the product exhibits a distinct change in performance, indicating a need
for service.
4
Page 5

H.264 Network Media Player
NVP-20
Warranty
Standard Warranty
• Datavideo equipment is guaranteed against any manufacturing defects for
one year from the date of purchase.
• The original purchase invoice or other documentary evidence should be
supplied at the time of any request for repair under warranty.
• Damage caused by accident, misuse, unauthorized repairs, sand, grit or
water is not covered by this warranty.
• All mail or transportation costs including insurance are at the expense of
the owner.
• All other claims of any nature are not covered.
• Cables & batteries are not covered under warranty.
• Warranty only valid within the country or region of purchase.
• Your statutory rights are not affected.
Two Year Warranty
• All Datavideo products purchased after 01-Oct.-2008 qualify for a free one
year extension to the standard Warranty, providing the product is
registered with Datavideo within 30 days of purchase. For information on
how to register please visit www.datavideo.com or contact your local
Datavideo office or authorized Distributors
• Certain parts with limited lifetime expectancy such as LCD Panels, DVD
Drives, Hard Drives are only covered for the first 10,000 hours, or 1 year
(whichever comes first).
Any second year warranty claims must be made to your local Datavideo office
or one of its authorized Distributors before the extended warranty expires.
5
Page 6
H.264 Network Media Player
Item No.
Description
Quantity
1
NVP-20 Unit
1
2
Mains Power Supply
1
3
Instruction Manual
1
4
CD Containing IP Finder Software
1
NVP-20
Disclaimer of Product & Services
The information offered in this instruction manual is intended as a guide only.
At all times, Datavideo Technologies will try to give correct, complete and
suitable information. However, Datavideo Technologies cannot exclude that
some information in this manual, from time to time, may not be correct or may
be incomplete. This manual may contain typing errors, omissions or incorrect
information. Datavideo Technologies always recommend that you double
check the information in this document for accuracy before making any
purchase decision or using the product. Datavideo Technologies is not
responsible for any omissions or errors, or for any subsequent loss or damage
caused by using the information contained within this manual. Further advice
on the content of this manual or on the product can be obtained by contacting
your local Datavideo Office or dealer.
Disposal
For EU Customers only - WEEE Marking
This symbol on the product indicates that it will not be
treated as household waste. It must be handed over to the
applicable take back scheme for the recycling of Waste
Electrical and Electronic Equipment. For more detailed
information about the recycling of this product, please
contact your local Datavideo office.
Packing List
The following items should be in the box. If any items are missing please
contact your supplier.
6
Page 7

H.264 Network Media Player
NVP-20
Product Overview
The Datavideo NVP-20 is a fully automated, remote controlled H264
video player. The NVP-20 can use any USB 2.0 storage device as its
media source. Video files can then be added to the media player by
copying them to the USB storage device or by transferring these files
over an IP network/LAN using FTP.
The Media Player’s feature rich web interface allows the user to create
and load playlists as well as remotely control video playback.
The NVP-20 can also be used completely stand alone without IP
connectivity. Simply connect a USB keyboard and mouse [not
supplied], then use the on screen playlist manager to create and
control playlists.
Alternatively video playback can also be triggered via GPI connection
or by using the Contour Shuttle Express jog wheel [separate
purchase].
Features
• Operates on standard 10/100Mb Ethernet networks
• IP,GPI, Keyboard and jog shuttle control options
• Supports multiple playlists
• Excellent image quality up to 1080p60
• Supports mp4,.h264,.mkv,.mov,.ts files
• IP control supports play next clip, play all clips, loop play all, pause,
resume and seek
• Pre-load feature for instant clip playback
• Supports NTFS and FAT/FAT32 formatted USB storage
• Feature-rich Web interface for configuration and control
• Built in video scaler - HD to SD or SD to HD
• Supports Full HD 1080p video and audio
• Supports concurrent HDMI and Composite video output
• Supports simultaneous digital embedded and analogue audio output
• Small form factor, rack mountable using RMK-1
• 12V DC input
7
Page 8
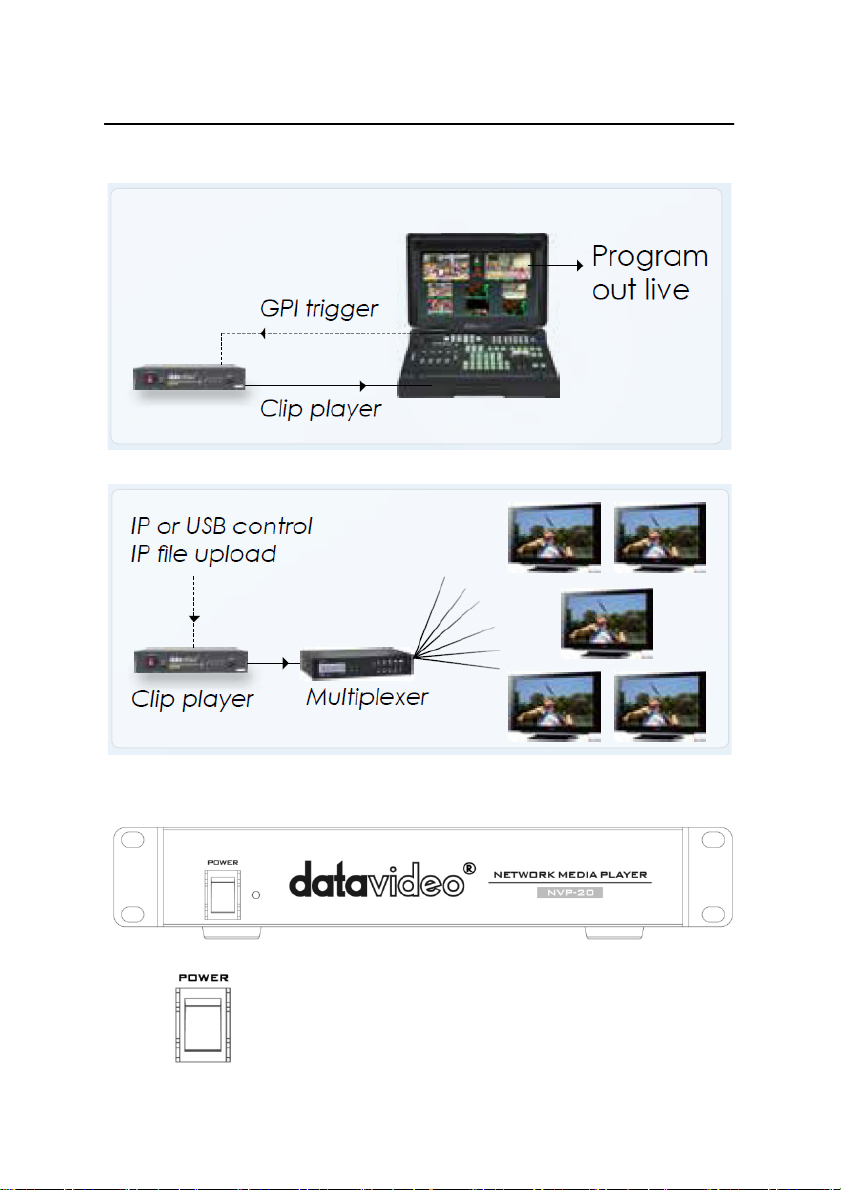
Example Workflows
H.264 Network Media Player
NVP-20
Front Panel
Power On/Off Switch
Switches the power On / Off
8
Page 9
g external storage,
connection can be secured by screwing the outer
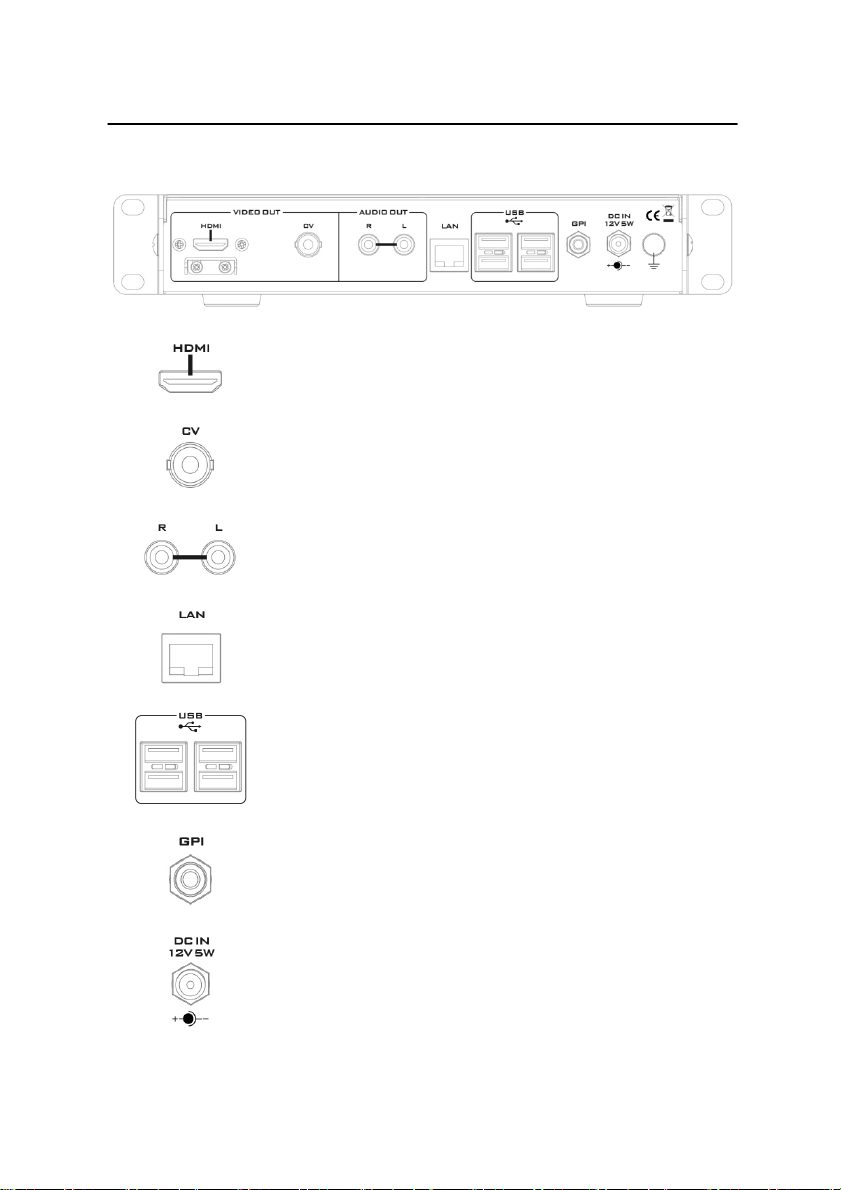
Rear Panel
H.264 Network Media Player
NVP-20
HDMI OUT
HDMI digital signal output connector
CVBS OUT (BNC)
Composite video output
AUDIO OUT (RCA)
RCA stereo for a line level analogue audio
Ethernet Port (RJ-45)
10/100M base Ethernet Network Interface
USB x 4
USB 2.0 interface for connectin
keyboard, mouse or shuttle controller.
GPI
A contact closure GPI (General Purpose Interface) switch
DC In Socket
Connect the supplied 12V PSU to this socket. The
fastening ring of the DC-IN plug to the socket
9
Page 10
H.264 Network Media Player
NVP-20
How to find the NVP-20 on an IP network
By default, once the physical connections have been made, the NVP-20 will
try to obtain an IP Address from a DHCP network server. As we will see
this can be changed later to a Static IP address if required.
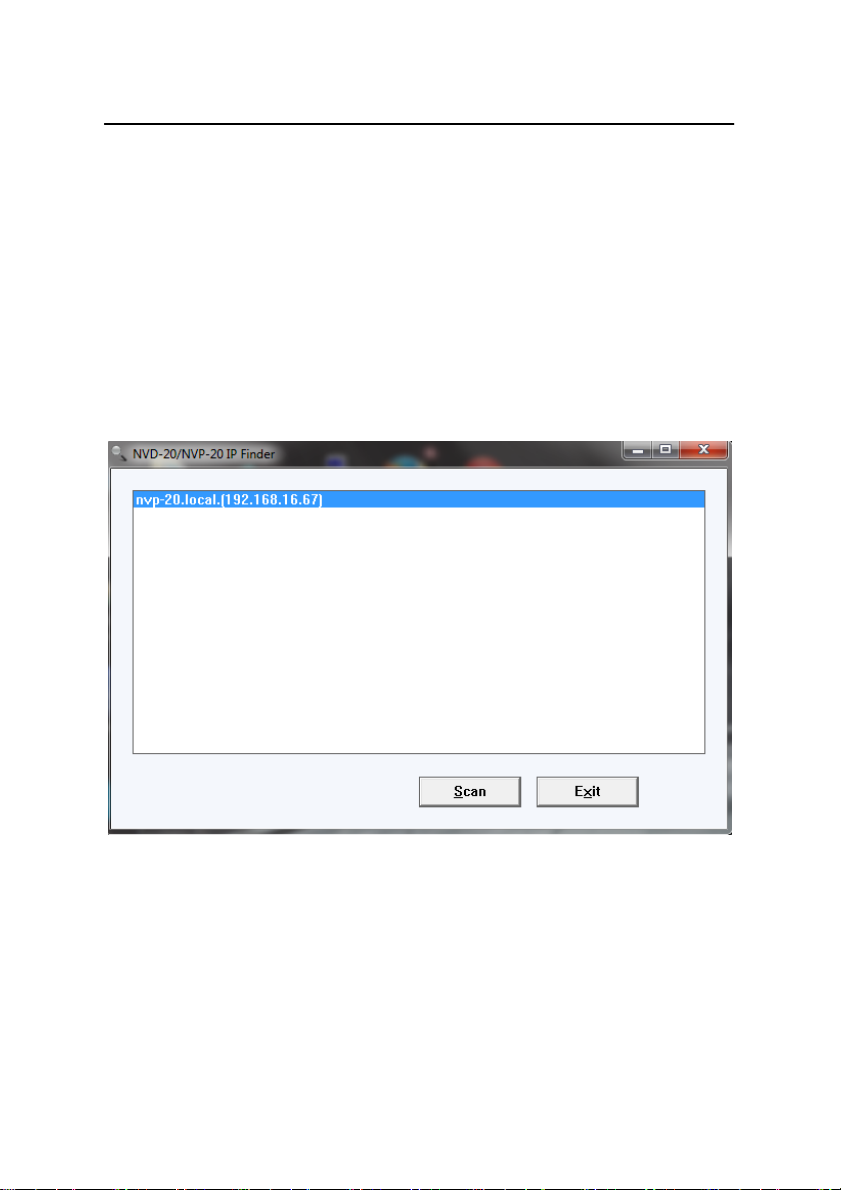
How to use the NVP-20 IP Finder utility software
Datavideo supply a free, Windows based utility, called NVP-20 IP Finder.
The first time this software is used on the computer you may need to allow it
permission through your computers firewall / anti-virus software in order for it
to be able to scan or search the local network.
When the utility scans the LAN that the computer is connected to, it displays
the current IP address for any NVP-20 units found on this local IP network.
Double clicking on the device listed will automatically open your computers
default web browser and navigate to the login page of the NVP-20.
If you are using an Apple computer then you can use an alternative utility app
such as Fing or Network Analyzer Lite.
10
Page 11

H.264 Network Media Player
NVP-20
NVP-20 Login using a web browser
Type the numbers of the IP address for the NVP-20 into the search bar of the
browser. Remember to include the dots in between the numbers. When
entered you will then be asked to login to the NVP-20.
Alternatively you can simply double click the IP address listed in the NVP-20
IP finder.
Please Note: We recommend the Mozilla Firefox web browser
Default Login details
All NVP-20 units are delivered from the factory with the same default user
name and password. This can be changed at a later stage to suit your needs.
User = admin Password = 000000 [Zero six times]
11
Page 12

H.264 Network Media Player
NVP-20
NVP-20 web browser Home page
Once we have logged into the NVP-20 we are presented with the Home page.
Settings option
When clicked, the Settings option tab will open a new page. There are five
sections of settings which can be looked at. These are: Audio Setup, Display
Setup, Network Setup, Media Player Set Up, Account Setup and GPI
Setup.
Settings > Audio Setup
By default the NVP-20 will output audio over the digital HDMI connection and
the analogue stereo connections. Alternatively you can choose to output
digital or analogue audio only.
12
Page 13

H.264 Network Media Player
NVP-20
Settings > Display Setup
By default the NVP-20 will output video over the digital HDMI port at a
resolution of 720P 50 fps and YUV colourspace.
Please note: The set resolution is only applied once the device has booted,
the device will output your monitors preferred resolution as it boots.
Output To
Here you can select to output video digitally over HDMI or over the SD
analogue composite connection.
HDMI (Digital)
When digital is selected you can select a screen resolution from SD
PAL/N T S C right up to HD 1080P60. The NVP-20 will scale your source video
to match the output resolution however the aspect ratio (4:3 or 16:9) should be
matched to avoid black space on the output, for optimal performance match
the output resolution to the source video. The colourspace can be switched
between YUV and RGB, most video equipment will use the YUV colourspace
however if the colors appears wrong on your display please try RGB.
13
Page 14

H.264 Network Media Player
NVP-20
Composite (Analogue)
When analogue is selected the UI will change and you can only select
between PAL and NTSC resolution with a 4:3 or 16:9 aspect ratio.
Settings > Network Setup
By default the NVP-20 will obtain its IP addres automatically from a DHCP
server. If this behaviour is not desired or if you intend to use the NVP-20
directly connected to a PC or network without a DHCP server you should
assign a manual address by selecting ‘Static Configuration’
We recommend only advanced users that are aware of how IP addressing
fucntions to set a manual IP address, the address assigned to the NVP-20
must be on the same subnet as the rest of your network for it to be accessible.
14
Page 15

H.264 Network Media Player
NVP-20
Settings > Media Player Setup
From this page you can control and configure the media player.
15
Page 16

H.264 Network Media Player
NVP-20
To preview clips directly from the USB storage
The USB Storage box lists all compatible video clips found on the USB
storage device (H264 files with .mp4, h264, .mkv, .mov, and .ts wrappers).
To refresh the contents of this list hit the refresh button.
To preview a clip first select the clip in the list (It will be highlighted blue when
selected) and then hit the preview button, you can stop the preview using the
main stop button.
However, once stopped, the clip cannot be replayed.
Adding clips to a playlist
First add clips to the playlist one by one. Select the clip you need in the ‘USB
Storage’ list and then hit the red left button to add that clip to the playlist, to
remove a clip from the playlist select it in the ‘Playlist’ list and hit the red X
button.
To change the order of the playlist select a clip in the list and move it up or
down using the green arrows.
Playlist settings
All the following settings are saved on a per playlist basis.
saved before the settings are in effect.
The playlist must be
16
Page 17

H.264 Network Media Player
NVP-20
Playback mode
Auto – In this mode once playback is triggered the NVP-20 will automatically
play all clips sequentially until it reaches the end of the playlist.
Manual – In this mode the NVP-20 will only play one clip at a time and wait for
playback of the next clip to be manually triggered.
Manual (Pre-Load) – The same as manual mode except that clips are loaded
into memory and a freeze frame displayed on screen ready for instant
playback. In this mode the first clip must be pre-loaded by triggering the play
function. When you create a ‘Manual (Pre-Load)’ playlist the first clip must be
loaded on screen by pressing the play button or triggering the GPI
subsequent clips are automatically loaded on screen ready for playback. If you
want the first clip to be loaded on screen when you boot the device simply
check the ‘Auto-play on boot’ option.
Skip Seconds
This option sets the amount of video that is skipped at a time when using the
seek forward and seek backwards buttons.
Please Note: It is not recommended to set a value less than 5 seconds, this
could cause the player to stall when seeking.
Loop play
When checked the NVP-20 will return to the first clip in the list when playback
of the last has completed.
Auto-Play on boot
When checked the NVP-20 will play the previously loaded playlist on boot.
Please Note: When in manual playback mode only the first clip will be played.
17
Page 18

H.264 Network Media Player
NVP-20
Saving and loading playlists
Please Note: A playlist must be saved before it can be used.
played from the first clip but not from any in-between.
Saving a playlist
Once you are done creating your playlist, you can save it. To do this, simply
enter a name into the “Name” box and click to save the
playlist. A message will appear below this button to let you know the playlist
was successfully saved.
It can only be
To create additional playlists, simply make the required changes to the current
playlist contents, enter a different name and click the ‘Save Playlist’ button
again.
Loading a playlist
To load a playlist, simply select the name of the playlist from the pull-down
menu located at the top of the page.
18
Page 19

H.264 Network Media Player
NVP-20
Deleting playlist
To delete a playlist, simply select the name of the playlist from the pull-down
menu at the top of the page and press the grey button marked X to the right of
the drop down list.
Playing a Playlist
To play a playlist, locate the row of buttons shown below. Click on the
corresponding buttons to control the playback of a playlist.
19
Page 20

H.264 Network Media Player
NVP-20
Settings > Account set up
The NVP-20 has one admin user account and password. This account is used
to keep the NVP-20 secure and gives access to the streaming settings.
Default user name = admin Default password = 000000 [Zero six times]
This section describes how to change the default username and password
shown above to something new which is more secure.
1. Log in with the NVP-20 server as normal using the computer web
browser.
2. Click Setting
3. Click Account Setup
4. Click admin and then enter the new user name and password.
5. Click ‘Save Changes’
Please Note: Please be careful and memorize the new login details as the old
or default login is deleted during this process.
20
Page 21

H.264 Network Media Player
NVP-20
Settings > GPI set up
The NVP-20 can be controlled externally via a GPI (General Purpose Interface)
switch.
This could be a push button, foot switch, switcher or any relay or circuit that is
able to provide a simple contact closure. Contact closure between the Outer
and Inner contacts on the jack plug will trigger a user selected event.
The GPI interface is a 3.5mm Jack Socket which is situated on the rear panel
of the NVP-20.
Please Note: Power is supplied by the NVP-20 and is less than 5V DC.
SAFETY FIRST
The cabling required needs to be designed specifically to connect the NVP-20
to the chosen GPI source as they are not all the same. The cabling required
can be made by yourself or a competent technician. Please speak with your
Dealer or local Datavideo office to get further help and advice.
The NVP-20 supports two GPI trigger modes selectable via the web interface.
Level Trigger
Contact closure between the Outer and Inner contacts on the jack plug will
trigger the PLAY button to be pressed once, if the contacts are released
during clip playback the PAUSE button will be pressed once.
Pulse Trigger
Momentary contact closure. Contact closure between the Outer and Inner
contacts on the jack plug will trigger the PLAY button to be pressed once, if
GPI is triggered during clip playback the PAUSE/RESUME button will be
pressed.
21
Page 22

H.264 Network Media Player
NVP-20
Transfer clips via FTP
The NVP-20 allows you to transfer clips to the connected USB storage device
over a network using FTP. This feature means you can add, remove and
rename clips remotely over IP as well as controlling playback and managing
playlists.
To use the FTP feature you must first ensure that FTP is enabled under
account setup, please see the previous page.
Then you simply need to connect to the NVP-20 using your favorite FTP client,
Filezilla and Windows explorer are examples of FTP clients. Below I will
connect using Windows explorer as it is built in to Windows.
1. Open a windows explorer window
2. Enter ftp://nvp20ipaddress
into the bar at the top
3. Hit enter and you will be asked for a username and password.
Login with the same details you use to access the NVP-20s
web interface.
By default the User = admin and Password = 000000
22
Page 23

H.264 Network Media Player
4. You will see a folder named after the ID of your USB storage
device.
NVP-20
5. Open this folder
6. You can now copy and paste or simply drag and drop your
clips on to the NVP-20.
23
Page 24

H.264 Network Media Player
NVP-20
FileZilla
FileZilla is a free FTP solution that allows the user to gain access to the
remote storage device such as the USB storage media connected to the NVP-
20.
Open FileZilla and configure (File Site Manager) the site information as
shown in the diagram below. Enter the IP address of the NVP-20 into the host
box. The login credential will either be the default login information or
something that you create. Port number is 21 for establishing FTP connection.
Click on the “Connect” button and you will be directed to the directory where
the clips are saved as depicted in the diagram below.
24
Page 25

H.264 Network Media Player
NVP-20
On FileZilla, the user is then allowed to copy and paste clips between your
computer and the NVP-20, delete clips on the NVP-20, and add clips to the
NVP-20.
25
Page 26

H.264 Network Media Player
SPACE
>
<
Esc
NVP-20
Keyboard + Mouse Control
NVP-20 playback can be controlled with a USB keyboard, the control keys are
as follows:
Play / Pause
and
Please Note: Pressing the ‘Stop’ button when already in the stop state will
display the on screen playlist manager.
Optionally a USB mouse can also be connected, this allows the on screen
playlist manager to be used to create and edit playlists standalone with no IP
connectivity.
next / previous clip in playlist
Seek forward
Seek back
Stop
26
Page 27

H.264 Network Media Player
1 2 3 4 5
Small Wheel
Not currently used
Big Wheel
Fast Seek Forward & Fast Seek Backward
1
2 3 4
5
Small
Wheel
Big Wheel
NVP-20
Contour Shuttle Express Control
NVP-20 playback can also be controlled by connecting a Contour Shuttle
Express controller, the control keys are as follows:
Previous Clip Stop Play & Pause Reset Playlist Next Clip
Please Note: Pressing the ‘Stop’ button when already in the stop state will
display the on screen playlist manager.
27
Page 28

H.264 Network Media Player
Web Server
FTP
80 (Over TCP)
20 (over TCP)
NVP-20
Port Forwarding on your firewall / router
So that the NVP-20 can be used seen on the internet (beyond the default
gateway) certain network related ‘ports’ should be opened on your router or
firewall. Your local network administrator or I.T. support should be able to help
you with this.
Enable the “port forwarding” function or open below ports within the router
settings.
21 (over TCP)
28
Page 29

H.264 Network Media Player
NVP-20
Automatic Updates
The NVP-20 features an automatic update system to avoid the need for the
user to have to manually install firmware upgrades. The NVP-20 will
automatically check for updates in the background whenever it is connected to
the internet.
You will be notified if an update is available when the unit is next booted, a
message will appear for 10 seconds on the selected video output (HDMI or
Composite) to update simply click the Yes button on the prompt.
Please note: A USB mouse must be connected to install updates.
29
Page 30

Example Set Up
H.264 Network Media Player
NVP-20
30
Page 31

Specifications
Audio Output
Video Output
H.264 Network Media Player
NVP-20
2 x Phono Connectors
HDMI embedded audio
Composite (analogue)
HDMI (digital)
Network Feature
Supported Video
Resolutions
Control
Update
Power
Environmental
Conditions
1x RJ-45 Female (10/100M Ethernet)
DHCP/Static IP
480 i60 (NTSC)
576 i50 (PAL)
720 @ 50p / 60p
1080 @ 50i / 60i
1080 @ 24p / 25p / 30p / 60p
Web UI for system configuration and control over I P,
as well as GPI, USB Keyboard, USB Mouse and jog
shuttle control options
Automatic firmware upgrade
Input AC 100 ~ 240V Switching Adaptor
Output DC 12V / 0.5 A
Operating temperature.:0~50°C
Storage temperature:-10~60°C
31
Page 32

Service & Support
H.264 Network Media Player
NVP-20
32
 Loading...