

Page 1
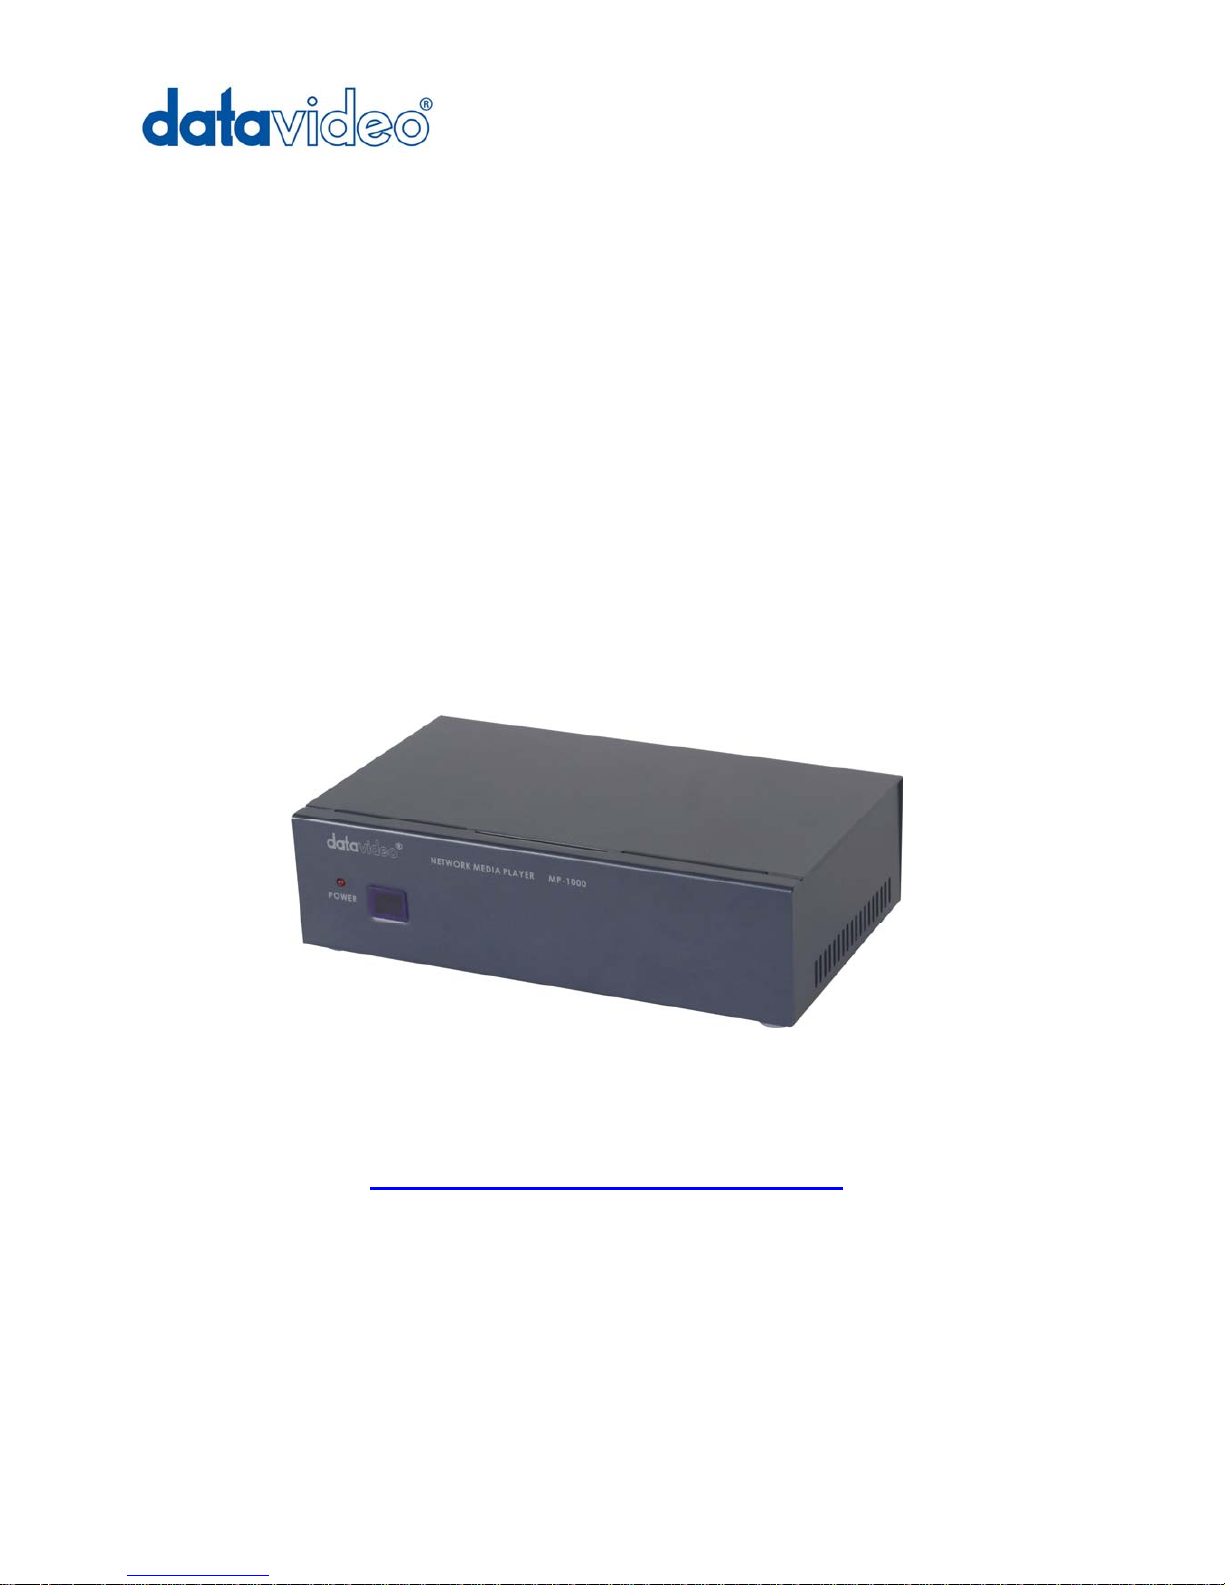
MP-1000
User’s Manual
(Preliminary)
Network Media Player
http:// www.datavideo-tek.com
Page 2

1
Table of Contents
Warnings and Precautions ………………………………………………………… 2
Introduction ……………………………………….………………………………….. 3
What's in the Package …………………………………………………….…………. 3
Front Panel & Rear Panel ……………………………………………….………... 4
Playlist and Operation ...………………………………………………….………... 5
MP-1000 Device Setup ……………………………………………….………...…… 6
-. MP-1000 Installation
-. MP-1000 Setup Menu
-. MP-1000 Network Setup Screen
-. MP-1000 Remote Controller
-. Scrolling Text Format
MP-1000 ADMINISTRATION TOOL Software ………………………….…… 12
HTTP Server Setup …………………………………………………………………..... 25
Service and Support ……………………………………………………............ 34
Page 3

2
Warnings and Precautions
1. Read all of these warnings and save them for later reference.
2. Follow all warnings and instructions marked on this unit.
3. Unplug this unit from the wall outlet before cleaning. Do not use liquid or aerosol cleaners. Use a damp
cloth for cleaning.
4. Do not use this unit in or near water.
5. Do not place this unit on an unstable cart, stand, or table. The unit may fall, causing serious damage.
6. Slots and openings on the cabinet top, back, and bottom are provided for ventilation. To ensure safe and
reliable operation of this unit, and to protect it from overheating, do not block or cover these openings.
Do not place this unit on a bed, sofa, rug, or similar surface, as the ventilation openings on the bottom
of the cabinet will be blocked. This unit should never be placed near or over a heat register or radiator.
This unit should not be placed in a built-in installation unless proper ventilation is provided.
7. This product should only be operated from the type of power source indicated on the marking label of
the AC adapter. If you are not sure of the type of power available, consult your Datavideo dealer or your
local power company.
8. Do not allow anything to rest on the power cord. Do not locate this unit where the power cord will be
walked on, rolled over, or otherwise stressed.
9. If an extension cord must be used with this unit, make sure that the total of the ampere ratings on the
products plugged into the extension cord do not exceed the extension cord’s rating.
10. Make sure that the total amperes of all the units that are plugged into a single wall outlet do not exceed
15 amperes.
11. Never push objects of any kind into this unit through the cabinet ventilation slots, as they may touch
dangerous voltage points or short out parts that could result in risk of fire or electric shock. Never spill
liquid of any kind onto or into this unit.
12. Except as specifically explained elsewhere in this manual, do not attempt to service this product yourself.
Opening or removing covers that are marked “Do Not Remove” may expose you to dangerous voltage
points or other risks, and will void your warranty. Refer all service issues to qualified service personnel.
13. Unplug this product from the wall outlet and refer to qualified service personnel under the following
conditions:
a. When the power cord is damaged or frayed;
b. When liquid has spilled into the unit;
c. When the product has been exposed to rain or water;
d. When the product does not operate normally under normal operating conditions. Adjust only
those controls that are covered by the operating instructions in this manual; improper
adjustment of other controls may result in damage to the unit and may often require extensive
work by a qualified technician to restore the unit to normal operation;
e. When the product has been dropped or the cabinet has been damaged;
f. When the product exhibits a distinct change in performance, indicating a need for service.
Page 4

3
1. Introduction
MP-1000, a Media Player with built in CF card storage, video outputs and networking
capability. Connecting MP-1000 to a local Ethernet network or Internet, digital
media files (JPEG, MP3, MPEG 1/2/4) can then be stored onto the CF Card from a
host content server, a playlist editor allows user to create a playlist remotely and
pre-schedule the play sequence of the media content on CF card. Support fixed IP,
DHCP IP, Password security, RSS feeds and Scrolling text banner… multiple MP-1000
can be installed in the field such as in a shopping mall, Department stores, MRT
stations, schools and classroom… for Scheduling Media playback as well as a
real-time news broadcast.
What’s in the box?
Items Description Q’ty
1 BNC to BNC cable 1.2M 3
2 S-Video cable 1.2M 1
3
2RCA to 2RCA 5ft 1
4 Ether cable 8P to 8P 1M
1
5
2G CF CARD 1
6
MP-1000 Remote controller 1
7
MP-1000 Software CD 1
8 Switching Adaptor DC 12V / 0.5A
1
9
User’s Manual 1
Page 5
4
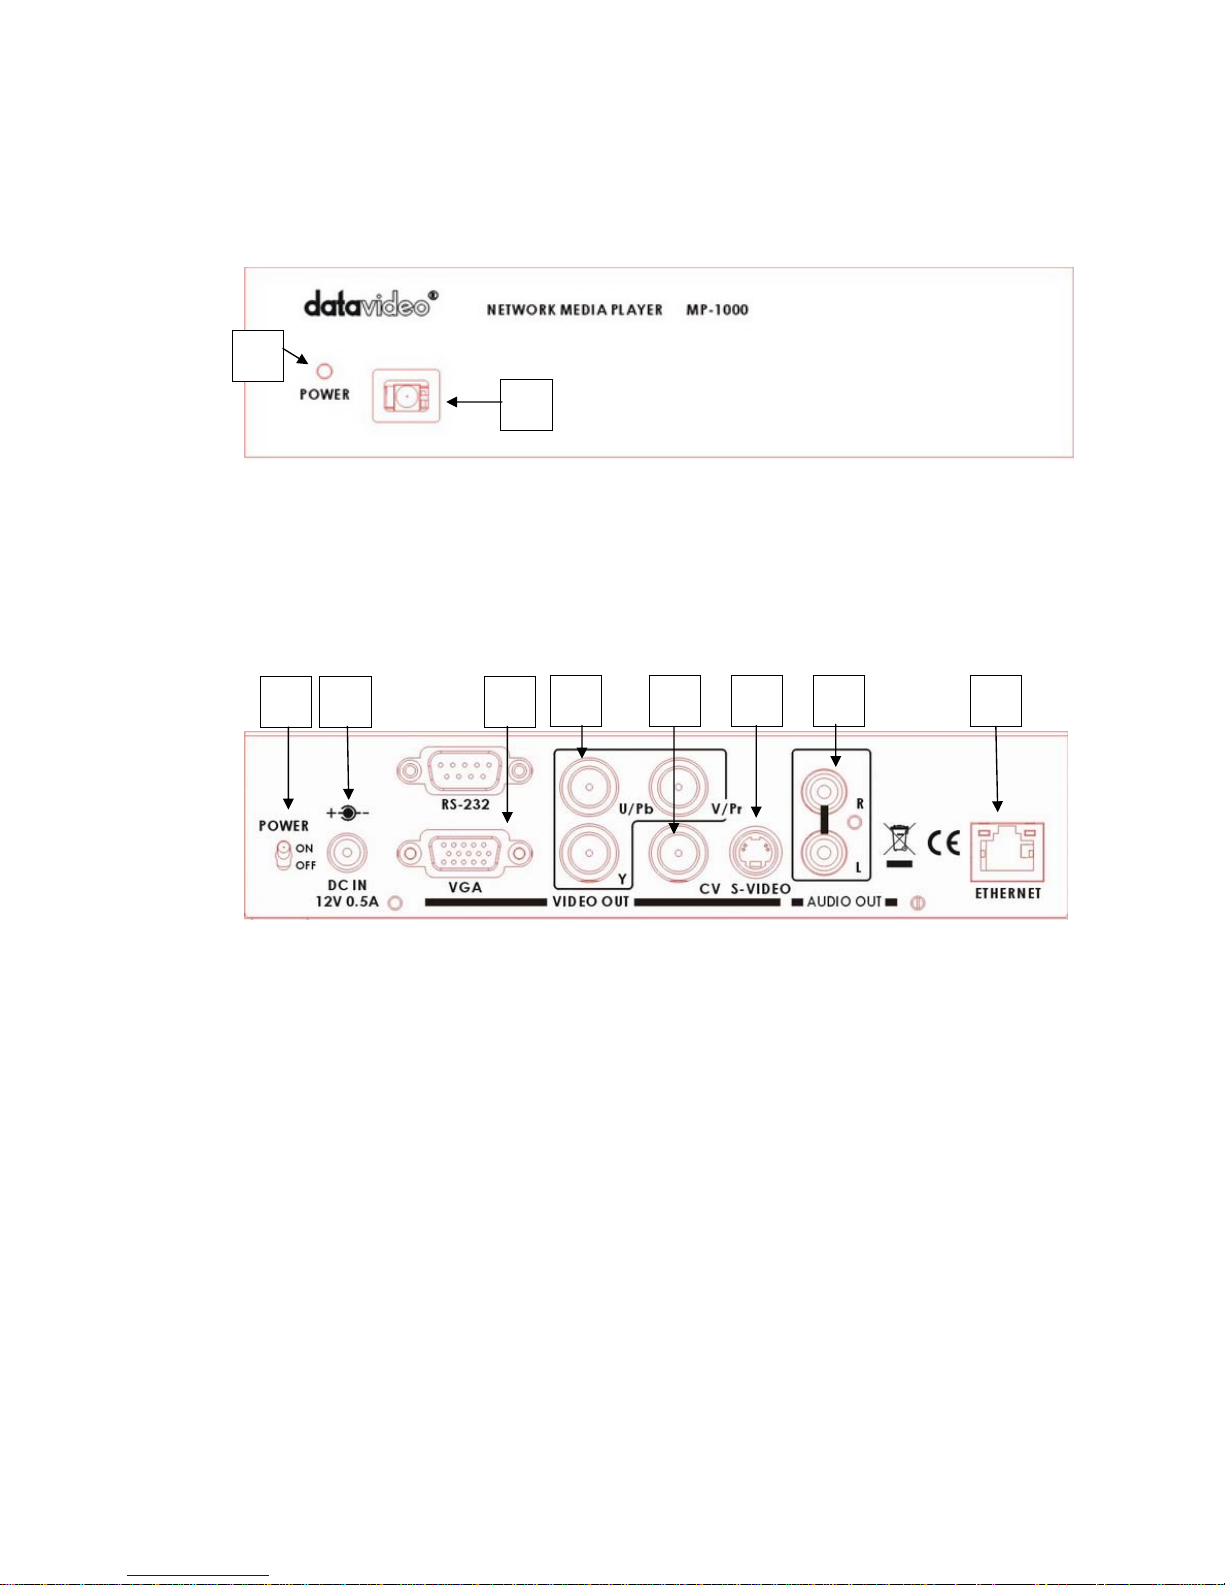
2. Front Panel and Rear Panel
2.1 Front Panel:
1. LED indicator: LED light in Green color for POWER ON and Stand by status, and
no light in disconnecting DC in.
2. IR receiver: To receive the IR signal from MP-1000 remote controller
2.2 Rear Panel:
1. Power Switch: Power ON/ OFF
2. DC plug in: DC 12V, 0.5A input
3. VGA Output: D-sub 15pin VGA connector output to PC Monitor
4. YUV Output: 3 x BNC connectors for component YUV video signal output
5. CVBS Output: 1 x BNC connector composite signal.
6. S-Video Output: 1x 4-Pin DIN Plug connector for S-Video (Y/C) signal output
7. Audio output: 2x RCA connectors for Stereo unbalance audio outputs
8. RJ-45 (Ethernet port): 100/10M base Ethernet Network interface
P.S. RS-232 Function still not work
1
2
1 2 3
4 6 7 8 5
Page 6

5
3. Playlist and Operation
1. Playlist:
Playlist is a script text file including command, time schedule, download filename
and content server IP address for MP-1000 player to execute line by line.
Playlist is created by the MP-1000 Client Administration Tool administrator
software from the Host PC
2. Basic Operation:
Use Administrator tool to upload playlist file into the specific URL path of HTTP or FTP
server
Connect audio/video output to a TV display and Ethernet RJ-45 to a Network
Turn on MP-1000, it will initialize Network LAN devices, download playlist from the
specific URL and store it onto CF card automatically
MP-1000 will interpret the playlist file and execute tasks including download files,
playback files, time schedule …etc. or to playback a media files repeatedly until stop
or reboot command
Administrator can update new playlist by using the same filename on URL, MP-1000
will load this new playlist file when it is powered-up manually, or by a pre-scheduled
daily reboot time, or by a preset interval time that allow player to visit the URL.
3. Server Monitoring and MP-1000- Client Administration Tool
Server Monitoring is a Windows application software to manage multiple MP-1000
devices thru Local Network or Internet connection
MP-1000- Client Administration Tool has many useful commands and editor
tools to monitor and control client devices
Page 7

6
4. MP-1000 Device Setup
1. MP-1000 Installation
- High speed CF (Compact Flash) memory card is required (e.g. Scandisk Ultra II)
- Format CF card to FAT32 by a PC for better performance
- Plug in CF card into MP-1000 CF card slot
- Connect MP-1000 thru Ethernet LAN cable to your Local Network or to Internet
- Connect video cable (RCA or S-Video) to your TV Monitor or connect the VGA output
to a PC monitor
- Connect audio cable to Monitor’s audio input
- Power on MP-1000 (Monitor screen will display ‘Initializing’)
2. MP-1000 Setup Menu
- TV screen will show “Initializing”, “Initializing LAN”, “Connecting DHCP Server..”, “IP
Address”, “CF Card” then stop at main menu
*. Note: It will take some time on the “Connecting to DHCP Server”
section, which is depending on the speed of network router to assign an
IP for MP-1000
- Main menu will show the following items on left side
• Client Local IP: xxx.xxx.xxx.xxx
• Server IP: xxx.xxx.xxx.xxx or Host name
• Time: YYYY/MM/DD HH:MM
• MAC Address: xx-xx-xx-xx-xx-xx
• Server Connection: ON or OFF or Error
• Storage: xxxx MB
- Main Menu will show the following items on the right side
• Setup : press ENTER key to go into MP-1000 Setup screen
• Storage : Press ENTER key to go to file folder of CF card
3. MP-1000 Network Setup Screen
- Use the remote controller to navigate and make changes
- Press ENTER from main menu to Setup screen
- Setup has ‘Network’, ‘Time’, ‘Device Schedule’, ‘Auto Start’, ‘Factory Default’, ‘Save
and Reboot’ and ‘Return to menu’ selections.
- Press ENTER on an item to go to its page
Page 8

7
‘Network’ Setup Screen
a. User Name and Password: Use “Select” or “Go to” key to open virtual
keyboard. Move cursor to any letter and press ENTER, or use ‘0’ (zero) to erase
letter. After finished, press “Select” or “Go to” key again to exit virtual
keyboard mode. Press ENTER key on ‘user name’ or ‘password’ to go to next
page
b. Server IP and Host Name: Move cursor to select ‘Server static IP’ or ‘Host
Name’. Use numeric key pad of remote to type 3 digits for static IP or use
virtual keyboard to type ‘Host Name’. Press ENTER to next page. (Server IP is
the PC’s IP where your MP-1000 ADMINISTRATION TOOL program is running.
Host Name is go out to Internet server)
c. Server Port (new feature): default is 5021. If not please use remote control
to enter ‘5021’. This port number must match with MP-1000 Administration
Tool’s. Please go to MP-1000 Administration Tool’s Server Setup Utility to
modify server’s port number if 5021 is already occupied. After port changed,
close MP-1000 Administration Tool and open again to make new port effective.
d. Client DHCP or Static IP: Move cursor to select ‘DHCP’ or ‘Static IP’ and
press ENTER on ‘Static IP’ to Static IP page or DHCP to Setup screen. (DHCP is
recommended.)
‘Time’ Setup Screen
a. Time Server: Use cursor left or right to select ‘time.nist.gov’ or
‘windows.time.com’. Use cursor down to next item
b. Date: you can ignore this because client board will get internet time during
power up initialization unless you don’t have internet connection
c. Time: Same as Date
d. Time Zone: Use cursor left or right to select your local time zone
e. DST(Day Saving Time): Use cursor to select On or OFF. If On, it will add
one hour
f. Reboot Time: Move cursor to select ‘OFF’ or type 2 digits for daily reboot
time. When time is up, client will reboot itself.
g. Press ENTER on any field to go back to Setup screen
Page 9

8
‘Device Schedule’ Setup Screen
a. Reboot Time: Move cursor to select ‘OFF’ or type 2 digits for daily reboot
time. When time is up, client will reboot itself. If auto start is set to network
mode, it will download new playlist file. Also player will send playback
log data back to server for further usage.
b. Device Schedule: Move cursor to ‘OFF’ or ‘ON’. If ‘ON’, another line below
will display ‘HH MM to HH MM’. Device ON time will turn on video and start
to play from existing playlist file in the CF card. Device OFF time will turn off
video and stop playing.
Auto Start Screen
a. OFF: After power up, client will do nothing and wait for server’s command
b. Local CF: After power up, client will playback according to playlist file stored
in the CF card or playback A-Z order files if no playlist file is found.
c. HTTP URL: Use CAT’s client setup utility to enter network URL path. After
power up, client will go to this URL path to download playlist file and
execute action item listed in the playlist file.
d. iCAT: This is a web based management software like CAT, but iCAT allows
user to use browser to access from any PC, anywhere. iCAT is not like CAT
has more interactive commands. iCAT is more schedule-oriented automatic
method.
Get 10 digit ID from iCAT program’s “Add player”. When player powers up,it
will login to iCAT server, user will see its on-line. For more detailed, please
refer to iCAT user guide document.
Language:
If revision # on the main menu has ‘U’ which means European fonts are
installed.
Selections are ‘English’, ‘East-South European’, ‘Western European’, and
‘Turkish’. This font is used for RSS and instant message display on the scroll
bar.
Factory Default: load pre-defined values into Setup settings. For example;
a. Device Name: NDSP01
b. Password: 123
c. Server IP: 192.168.1.106
d. Server Port: 5021
e. Device IP: DHCP
Page 10

9
Save and Reboot: save all the changes and reboot client
Return to menu: just return to main menu
[Note-1]: All these client setup settings can be modified in the “Client Setup Utility”
of MP-1000 ADMINISTRATION TOOL software. You can save as “autoconfig.mia”
filename into CF card then plug into CF slot and power up client board. It will show
“Auto Updating” message and save into EEPROM. Remove CF card and delete this
file to avoid reload again.
[Note-2]: You can save as “autoconfig.mib” file name, it will do the same thing to
update EEPROM except this autocinfig.mib file will be deleted after update.
Page 11

10
4. MP-1000 Remote Controller
Label Remote Key Function
Main Menu Switch to main menu screen from SmartNavi screen
Video Mode Switch between S-Video/Composite Video and VGA output
Keyboard
Only available in Setup screen to enter or exit virtual
keyboard page (use key ‘0” as erase key)
MUTE Mute/Un-mute sound
VOL + Sound level control
VOL - Sound level control
Position + Adjust down scrolling text bar position
Position - Adjust up scrolling text bar position
Background
Color
Background color for scrolling text bar (8 colors)
Foreground
Color
Foreground color for scrolling text bar (white and black)
Transparent Scrolling text transparent level (0%, 25%, 50%, 75%, 100%)
Speed Scrolling text speed settings (fast, normal and slow)
Scroll Bar Clock Turn On/off Clock display on the scrolling text bar
EZ-Play
Do auto download/playback files in A-Z order from CF card or
execute “playlist.mpl” file in the CF card
Page 12

11
5. Scrolling Text Format
A regular .txt file can be used to store any text data including English, Chinese or
Japanese. This text file data will be scrolled like stock symbol or news ticker along
with any photo or video file.
At the 1
st
line of the text file, user can program some settings for the text color, and
position.
osd_settings=[B/G color], [F/G color], [Transparent], [Speed], [Font Size],
[Clock]
e.g. “osd_settings=2,1,0,0,0,0
1. B/G color: a digital number from 0 to 7 (0blue, 1grey, 2red, 3ligh blue, 4green,
5yellow, 6magenta, 7orange)
2. F/G color: 0(white). 1(black)
3. Transparent: 0(no transparent effect), 1(75%), 2(50%), 3(25%), 4(100%)
4. Speed: 1(slow),2(normal), 4(fast)
5. Font size: 1(small), 2(medium), 3(large)
6. Clock/Date: 1(On), 0(Off)
[Note]: Defaults are white color text on grey color background if no OSD_Setting line.
Page 13

12
5. MP-1000 ADMINISTRATION TOOL Software
1. MP-1000 ADMINISTRATION TOOL can be executed on any Windows XP system.
Just click on MP-1000 ADMINISTRATION TOOL.exe, it will display like photo below.
Home is the default group.
2. Account is to create or manage group name and user account name. You can create
multiple groups and assign different account names. When any client logs into
MP-1000 ADMINISTRATION TOOL, it will go under its corresponding group if account
name is matched. If not matched, it will go under default Home group.
Page 14

13
AutoPlay When players power up and log in to MP-1000 ADMINISTRATION TOOL,
MP-1000 ADMINISTRATION TOOL will automatically send playlist file and its content
media files as specified here. Instead of EZ-Play (manual mode), this AutoPlay mode
can be more useful for users. For AutoPlay mode, make sure AutoStart=OFF in the
player Setup. It conflicts with AutoSart=http URL.
Page 15

14
4. Sever Setup is for administrator to make changes for server. Server port 5021 is for
port forwarding function of network router to access MP-1000 ADMINISTRATION
TOOL program. Current version will be limited to 100 client devices to log in. You need
to contact your supplier for more users copy.
Note: MP-1000 ADMINISTRATION TOOL is required to be closed for new port change!
Then open to be effective.
5. Client Setup is an editor to create or open autoconfig.mia file. This file is used to
update client’s setup values. Save autoconfig.mia into CF card, then plug into
network player and power up. It will show “Auto Updating” message and then reboot
again.
Page 16

15
a) IP or Hostname: Type in static IP for local LAN server or hostname for remote
set Example: 192.168.1.100 or
www.test.com
b) Port: default is 5021. If 5021 is used on the server side, then change to
different number. But make sure also change same port # in MP-1000
ADMINISTRATION TOOL and router’s port forwarding setting.
c) Client Account Name and Password: Type in user name and password for
this client device. After client powers up and logs into MP-1000
ADMINISTRATION TOOL server, it will go to its matched group.
d) DHCP or Static IP: Select Dynamic IP by router or fixed static IP for client
device
e) Time Zone: Select your local time zone
f) Daylight Saving: Check will add one hour
g) Reboot time: Check will reboot client when time is hit
h) Device On: will turn on video and start to play from existing playlist file in the
CF card when time is hit
i) Device Off: will turn off video and stop playing when time is hit
j) Video output: select S-Video(including Composite video), VGA, YPbPr output.
You can use “Video mode” key on remote control to switch
k) Off/ CF/HTTP URL Address:
Off: After power up, client will do nothing and wait for server’s command
CF: After power up, client will playback according to playlist file stored
in the CF card or playback A-Z order files if no playlist file is found.
HTTP URL: Use CAT’s client setup utility to enter network URL path. After
power up, client will go to this URL path to download playlist file and
execute action item listed in the playlist file.
l) Update Client is a remote command. It will send current settings to all client
devices of the selected group. Client device will reboot after save settings into
EEPROM. It will take approximately 40-50 seconds to reboot till re-login.
Page 17

16
6. Graphics ICON:
From ‘Start’ to ‘Options’ Icon is the group command. Highlight cursor on the group is
the active group. Command will be sent to all the client devices under active group.
From ‘Status’ to ‘Playlist’ Icon is the client command. Highlight cursor on the user
name is the active client. Command will sent to this client only.
a) Account: create group and account user name for group management
Below is command that goes to all clients of same group, one by one.
b) Play: Send ‘Playback’ command manually to group of clients
c) Stop: Send ‘Stop’ command manually to group of clients
d) Message: Instant message editor will pop up. You can select any .txt file or
manually type in text message, then send to group of clients. A news ticker type
of OSD will scroll text from right to left on the bottom of client screen
e) Message Off: Send “Message Off” command to group of clients
f) RSS: Send RSS news ticker message to group of clients. Bundled ‘RSS
Advantage’ software must be pre-installed. And Microsoft .net Framework 1.1 or
2.0 is also required for RSS to run.
g) Volume: It has Mute and 15 levels of volume. Will send volume command
manually
h) Video: It has video ON or OFF to turn On/Off client’s screen
i) Options: Less frequent use commands are located here. It has ‘Send playlist’,
‘Download’, ‘Playback’, ‘Format’, ‘Reboot’, ‘Shutdown”, and “Group Status”
- Send Playlist: Similar to Playlist button, only send playlist file to group clients
- Download: Only send Download command to group clients
- Playback: same as ‘Playback’ Icon, only send Playback command to group
clients
- Format: Send format CF card command to client. All files in CF card will be
erased.
- Reboot: Send reboot client command to client.
- Shutdown: Send shutdown command to client. All clients will power OFF.
Page 18

17
MP-1000 ADMINISTRATION TOOL can’t power it back on. The only way to turn
on is from remote control or power cycle.
- Group Status: inquire all clients in the same group to send status back, similar
to j as below)
Below is individual client command, not group command
j) Status: inquire client to send back current status data including time, current
playback filename, music and instant message. Example: Playing [01:54:30]
BATMANBEGINS_1.DIVX(5/11,16) 0:0:6, Scrolling Text: IntoTheBlue.txt
k) Capacity: inquire client to report CF card capacity and firmware version #.
Example: Storage Total Size: 1952MB, Free Space: 762MB. F/W version:
V2.2.87.0618U
l) CF Data: Inquire client to report all the filenames on the CF card. It will display
filenames on the CF tab screen of MP-1000 ADMINISTRATION TOOL.
m) CF Data [Delete]: Click right mouse button on CF window, a ‘Delete’ will pop up.
You can check all the files to be deleted first then click ‘Delete’. MP-1000
ADMINISTRATION TOOL will send delete command to client to remove those
checked files and update CF Data screen.
n) Playlist: Inquire client to report current playlist file. It will display the playlist file
order on the playlist tab screen of MP-1000 ADMINISTRATION TOOL
7. RSS Advantage Software
Firstly, install RSS software (RssAdvantage-1.0.2.3-miaticker.zip) bundled by
manufacturer (not from www.rssadvantage website). This is a RSS Feeds 2.0
application that allows administrator to manage their favorite RSS links. All the news
tickers scrolling on PC screen will be mirrored to client device as long as RSS Icon
button is pressed.
Page 19

18
This is a basic version without some useful features. For example, there is no
“Enable/Disable” on each individual RSS link. If you prefer to get full features, please
click ‘Help->About’ to purchase upgrade version from here to get 10% discount.
[Note1]: RSS must be installed under C:\Program Files\RSS Advantage\Newsticker
for MP-1000 ADMINISTRATION TOOL to fetch news ticker file.
[Note2]: Microsoft .net Framework 2.0 is required to install before RSS Advantage is
operational. Search “Microsoft download framework” from any search engine or
http://www.microsoft.com/downloads/details.aspx?FamilyID=0856EACB-43
62-4B0D-8EDD-AAB15C5E04F5&displaylang=en
8. Playlist Commander
a. Local Directory: Load media files from local PC’s directory. Once files are moved
to right window, press ‘EZ-Play’ on selected group, server will transfer files to
clients.
b. Remote HTTP Server: Type URL address and filename from remote HTTP server
c. Remote FTP Server: allow to log in any FTP and browse files to generate playlist
d. File Type: mpl file filter check box is for playlist extension (.mpl) only. This
feature is to support multiple playlist with time range settings.
e. Open: Open existing playlist file
f. Save: Save new playlist file or overwrite existing one
g. >: move single file to playlist window
h. >>: move all files to playlist window
i. Select Group: user must specify which group to execute “EZ-Play” and “Playlist”
buttons
j. EZ-Play: all the media files on the right playlist window will be downloaded to
client and playback immediately. This is manual mode, controlled by user.
Page 20

19
k. AutoPlay: Create Autoplaylist.mpl file under that group and enable Autoplay
mode.This will not be effective until player reboot or power up next time. User
can pre-assign playlist file for particular group’s players.
l. Duration/Times: allow to enter loop counter for video file or duration time
(seconds) for JPEG file
m. Start Time/End Time: (format:HHMM)
1. If time range is “blank” that means “always playback, no time limit for 24
hours”.
2. Allow each media file to playback in its time range. For example, abc.jpg 30
0800 to 1200 means abc.jpg will be active for 4 hours, each time its duration
is 30 seconds. Start to playback from 0800 onward, and stop to playback after
12pm.
Page 21

20
Examples:
Filename Duration
/Counter
From
hh:mm
To
hh:mm
Comments
A000.jpg
Blank Blank Blank A000 will display 3 seconds for 24 hours
A001.jpg
30 Blank Blank A001 will display for 30 seconds for 24 hours
A002.jpg
Blank 0800 1200 A002 will display 3 seconds from 8am to 12pm
A003.mpg
Blank Blank Blank A003 video will play 1 time each loop for 24 hours
A004.mpg
3 0800 1200 A004 video will play 3 times each loop from 8am-12pm
P001.mpl
Blank 0800 1200 P001 playlist file will start from 8am to 12pm
P002.mpl
Blank 1200 1800 P002 playlist file will start from 12pm to 6pm
n. Del: Remove single file from playlist window
o. Clear: Remove all files from playlist window and reset values in the Setting menu
p. Up/Down arrows: Move up or down on the highlight filename to proper position
q. Settings: Some useful settings for playlist file
r. Picture Play Time: control interval time between JEPG files
s. Picture Transition Mode: 3 modes (Full screen, Random, and Cross Fade) are
available to change picture transition effect
t. Mute Sound: Mute sound in the playlist, all the content playback will be silent.
Page 22

21
Delete Files:
a. No Action:
default value, do nothing.
b. Format CF card: Will delete all files in the CF card then download new files based on
playlist mpl.
c. Files not in the playlist: If CF card has many files, the files not in the playlist will be
deleted. If on the playlist, will be kept to avoid download again.
d. Files in the playlist: This is like multiple file deletion command. It will only delete files
in the playlist.
e. Download schedule: will write download time into playlist file. When time is hit, client will
start to download content according to playlist file.
Note:
It depends on the PC [MP-1000 Tool]'s time, not player's time.
9. Playlist Scheduler
I. Instruction
This new feature allows user to manage advanced and flexible playlist schedule, not
just time of day only. User can program multiple playlist files with different date
range and weekday choices. Player will check internal time clock and <filename>.sch
file to download today’s playlist file from HTTP server or local MP-1000 Tools.
II. Operation
1. Use MP-1000 Tools playlist editor to create your daily playlist file and save. For local
autoplay mode to use this feature, you must save playlist file into same group’s folder.
For example, if for Home group, then save under <Home>.
Page 23

22
2. Go to Tools and select playlist Scheduler
3. Browse your playlist files and select your date range and weekday and click “Add”
or “Update” or ”Delete” for any change on the cursor highlighted file. And then save
as a .sch file into same folder.
4. There are two places that can do this advanced schedule.
One is MP-1000 tools autoplaymode (AutoStart=Off in Setup)
One is HTTP URL path (Auto Start= Http URL).
Page 24

23
4.1 For first case, you need to go to Account and browse this .sch file and enable
Autoplay mode.
After demo.sch is enabled, MP-1000 TOOLS will read this .sch file and determine today’s
playlist file and return to player when player login to MP-1000 TOOLS. So Player can
download today’s content and playback.
4.2 For case 2 (Http URL), you need to use a FTP client tool to upload all your .sch
and .mpl files to this Http URL folder. (ex. http://192.168.1.60/1000 folder)
Then use client setup utility to set the Http URL path into player’s eeprom.
When player powers up, it will download demo.sch file first and determine today’s
playlist file and download again.
Note: For player to get today’s playlist file, you can set a daily reboot time in Setup
under Setup-> Device-> Restart. Ex. 08:00. Player will reboot every morning at 8am
to start a new playlist file.
10. Remote HTTP Server
Playlist commander also supports HTTP server. Just type URL path and filenames in
HTTP server storage. Click EZ-Play or save playlist file for future use.
Page 25

24
11. Remote FTP Server
The feature allows user to access FTP server and create a FTP playlist. All the
navigation is the same as local directory. But need to enter your regular FTP
information including user name, password ..etc. You can click EZ-Play to execute
immediately or save playlist for future use.
When click, it will save the playlist file into FTP server where the file folder is instead
of local hard drive directory. For example, ‘EZplaylist.mpl’ has been saved and
uploaded under (1000) folder. It can combine with auto start=FTP url to update
your playlist file and reflect to player within 3 minutes. No need to use another FTP
client software to upload playlist separately.
Please enter Login name and Password, if FTP has need.
Page 26

25
.6. HTTP Server Setup
Microsoft IIS
You need to setup your PC as HTTP server, so it can become a content server to send
media files to client devices. Your Windows XP must be Professional version. Home
edition has no IIS (Internet Information Services) to be used. (Note: But you can
download freeware http server software from
http://httpd.apache.org/)
Microsoft XP Pro IIS (Internet Information System) installation procedure:
1. Go to Control panel and select Add/Remove programs
2. Select Add/Remove Windows Components on the left column
3. Check “IIS (Internet Information Services)” and install, you may be asked to put
Microsoft Installation CD.
4. After the installation is done, a subfolder will be created under
C:\inetpub\wwwroot
5. You can create your subfolder to put your media files, also let wwwroot becomes
a shared folder. So all the subfolders under wwwroot can be accessed from
client’s request.
Page 27

26
6. Important note:
If you encounter an http download error on MP-1000 ADMINISTRATION TOOL,
it’s possible that the anonymous access is not checked on the IIS property.
Please follow below photo to check.
Procedure: Go to Control Panel->#1.Administrative Tools->#2.IIS Shortcut->
#3. shared subfolder -> #4 property/Directory Security -> #5. Edit -> #6.
Anonymous Access
Page 28

27
Apache HTTP Server Installation Procedure:
1. Go to
http://httpd.apache.org/download.cgi to download
apache_2.2.4-win32-x86-no_ssl.msi
2. Follow instructions to install
3. Copy content files to C:\Program Files\Apache Group\Apache\htdoc\ for
download
Page 29

28
7. Firewall and Anti-Virus program Configuration
Also your anti-virus program or firewall may block MIAICS program.
A. Firewall: Set XP’s Firewall to OFF, otherwise client is not able to log in to
MIAICS.
Page 30

29
B. Zone Alarm: If you use Zone Alarm, add MIAICS as trusted program and
IP range for clients.
C. Norton Anti-Virus:
If you are using Norton Anti-Virus program, make sure to add MIAICS as
trusted program and also set IP ranges for client devices to go thru. Easiest
way is to set Personal Firewall to OFF.
Page 31

30
8
. Router Setup
Router Setup [Important]
1. Make sure to set DMZ to ON and its IP address to the IP of the PC that run
MP-1000 ADMINISTRATION TOOL.
For example if PC that run MP-1000 ADMINISTRATION TOOL is 192.168.1.10,
then turn on DMZ and set IP to 192.168.1.10.
So data and command between Client device and MP-1000 ADMINISTRATION
TOOL server can communicate each other.
2. Make sure to enable “Port Forwarding” settings to Start:80, End:5021, IP:
192.168.1.10
Otherwise only commands between client and this server PC can go thru, but
not data file like playlist.mpl
3. MIAICS uses port 80 and port 5021, so these two ports must be open to let
MIAICS command and files go thru between client device and MIAICS program.
Setup MP-1000 Client to 5021 port
Setup FTP to 20 and 21 port
Setup HTTP to 80 port
Page 32

31
- Turn on DMZ server and input your PC server’s IP address
Page 33

32
- Turn on DHCP and set a range (optional)
If your PC server’s IP is assigned by ADSL or cable modem with dynamic IP, not
static IP. Then you need to setup a DNS host name, please register your DNS
host name at
www.dyndns.org. And program your user name and password
in your router. When router powers up, it will log in to dyndns.org with your
host name. And you set your client’s server as host name instead of IP in the
Setup screen, for example:
www.miatech.blogdns.com . Client will log in to
dyndns.org site to get your router’s IP address of your PC server. So Client will
connect to your PC server.
Page 34

33
Page 35

34
Service and Support
It is our goal to make your products ownership a satisfying experience. Our supporting staff
is available to assist you in setting up and operating your system. Please refer to our web
site www.datavideo-tek.com for answers to common questions, support requests or contact
your local Datavideo office below.
Datavideo Corporation (USA)
12300-U East Washington Blvd., Whittier, CA 90606 USA
Tel: +1 562 696 2324
contactus@datavideo.
us
www.datavideo.us
Datavideo Technologies Europe BV
Floridadreef 106, 3565 AM Utrecht, The Netherlands
Tel: +31 30 261 9656
info@datavideo.nl www.datavideo.info
Datavideo UK Limited
Unit 2 Waterside Business Park, Hadfield, Glossop, Derbyshire SK13 1BE UK
Tel: +44 1457 851000
sales@datavideo.co.u
k
www.datavideo.info
Datavideo Technologies Co., Ltd.
10F, 176 Jian-Yi Rd, Chung Ho City, Taipei Hsien, Taiwan 235
Tel: +886 2 8227 2888
service@datavideo.com.
tw
www.datavideo.com.t
w
Datavideo Technologies China Co.
2F-D, 2 Lane 777, West Guangzhong Rd, Zhabei District, Shanghai, China
Tel: +86 21 5603 6599
service@datavideo.cn www.datavideo.cn
Datavideo Technologies (S) PTE Ltd.
No. 22 Lorong 21A Geylang, #09-02 Prosper Industrial Building, Singapore 388431
Tel: +65 6749 6866
info@datavideo.sg www.datavideo.sg
Datavideo Hong Kong Limited
G/F., 26 Cross Lane, Wanchai, HK
Tel: +852 2833 1981
info@datavideohk.co
m
www.datavideohk.com
All the trademarks are the properties of their respective owners.
Datavideo Technologies Co., Ltd. All rights reserved 2018.
 Loading...