

Page 1
DV STREAMING SERVER
IN THE CLOUD
DVS-200
Instruction manual
Page 2

Contents
FCC Compliance Statement .................................................................................................................... 3
Warnings and Precautions ..................................................................................................................... 3
Warranty ................................................................................................................................................. 4
Standard Warranty ............................................................................................................................ 4
Three Year Warranty .......................................................................................................................... 4
Disposal ................................................................................................................................................... 5
1. System resource recommendations .............................................................................................. 6
1.1 On-Premise Installations ........................................................................................................ 6
1.2 Cloud hosting installations ..................................................................................................... 6
Digital Ocean .................................................................................................................................. 6
Amazon AWS .................................................................................................................................. 6
Massive Grid ................................................................................................................................... 6
2. Installation Walkthroughs .............................................................................................................. 7
2.1 Digital Ocean .......................................................................................................................... 7
2.2 Installation on Amazon AWS Cloud ..................................................................................... 11
2.3 Generic Installation Instructions (All Providers) ................................................................. 17
Automated Script ......................................................................................................................... 17
Manual installation (Advanced Users) ........................................................................................ 17
Hardware I/O Card Support ......................................................................................................... 17
3. Web UI Overview ......................................................................................................................... 18
3.1 Creating a live channel ......................................................................................................... 18
Inputs ............................................................................................................................................ 19
Outputs ......................................................................................................................................... 22
Access Control .............................................................................................................................. 23
Recording ...................................................................................................................................... 23
General ......................................................................................................................................... 26
Transcoding and encoding options .............................................................................................. 27
Applying changes .......................................................................................................................... 28
Live channel list overview ............................................................................................................ 28
3.2 Creating a VOD channel ....................................................................................................... 29
General ......................................................................................................................................... 29
3.3 Stats ...................................................................................................................................... 32
3.4 Users - Creating and managing user accounts .................................................................... 33
3.5 Groups - Creating and managing user groups ..................................................................... 35
Page 3

Creating channel tags ................................................................................................................... 36
3.6 Settings ................................................................................................................................. 37
UI Settings ..................................................................................................................................... 38
Server Settings .............................................................................................................................. 38
RTMP Settings .............................................................................................................................. 40
HLS Settings .................................................................................................................................. 41
Global Player Settings .................................................................................................................. 41
4. Socket commands / API ............................................................................................................... 42
5. License Installation Guide ............................................................................................................ 43
5.1 Licence Terms ....................................................................................................................... 43
5.2 Software Disclaimer ............................................................................................................. 43
5.3 Licence installation ............................................................................................................... 43
5.4 Troubleshooting ................................................................................................................... 45
Disclaimer of Product & Services
The information offered in this instruction manual is intended as a guide only. At all times, Datavideo
Technologies will try to give correct, complete and suitable information. However, Datavideo
Technologies cannot exclude that some information in this manual, from time to time, may not be
correct or may be incomplete. This manual may contain typing errors, omissions or incorrect
information. Datavideo Technologies always recommend that you double check the information in
this document for accuracy before making any purchase decision or using the product. Datavideo
Technologies is not responsible for any omissions or errors, or for any subsequent loss or damage
caused by using the information contained within this manual. Further advice on the content of this
manual or on the product can be obtained by contacting your local Datavideo Office or dealer.
Page 4

FCC Compliance Statement
Warnings and Precautions
This device complies with part 15 of the FCC rules. Operation is subject to the following two
conditions:
(1) This device may not cause harmful interference, and
(2) This device must accept any interference received, including interference that may cause
undesired operation.
1. Read all of these warnings and save them for later reference.
2. Follow all warnings and instructions marked on this unit.
3. Unplug this unit from the wall outlet before cleaning. Do not use liquid or aerosol cleaners. Use a
damp cloth for cleaning.
4. Do not use this unit in or near water.
5. Do not place this unit on an unstable cart, stand, or table. The unit may fall, causing serious
damage.
6. Slots and openings on the cabinet top, back, and bottom are provided for ventilation. To ensure
safe and reliable operation of this unit, and to protect it from overheating, do not block or cover
these openings. Do not place this unit on a bed, sofa, rug, or similar surface, as the ventilation
openings on the bottom of the cabinet will be blocked. This unit should never be placed near or
over a heat register or radiator. This unit should not be placed in a built-in installation unless
proper ventilation is provided.
7. This product should only be operated from the type of power source indicated on the marking
label of the AC adapter. If you are not sure of the type of power available, consult your
Datavideo dealer or your local power company.
8. Do not allow anything to rest on the power cord. Do not locate this unit where the power cord
will be walked on, rolled over, or otherwise stressed.
9. If an extension cord must be used with this unit, make sure that the total of the ampere ratings
on the products plugged into the extension cord do not exceed the extension cord rating.
10. Make sure that the total amperes of all the units that are plugged into a single wall outlet do not
exceed 15 amperes.
11. Never push objects of any kind into this unit through the cabinet ventilation slots, as they may
touch dangerous voltage points or short out parts that could result in risk of fire or electric
shock. Never spill liquid of any kind onto or into this unit.
12. Except as specifically explained elsewhere in this manual, do not attempt to service this product
yourself. Opening or removing covers that are marked “Do Not Remove” may expose you to
dangerous voltage points or other risks, and will void your warranty. Refer all service issues to
qualified service personnel.
13. Unplug this product from the wall outlet and refer to qualified service personnel under the
following conditions:
a. When the power cord is damaged or frayed;
b. When liquid has spilled into the unit;
c. When the product has been exposed to rain or water;
Page 5

d. When the product does not operate normally under normal operating conditions. Adjust
only those controls that are covered by the operating instructions in this manual; improper
adjustment of other controls may result in damage to the unit and may often require
extensive work by a qualified technician to restore the unit to normal operation;
e. When the product has been dropped or the cabinet has been damaged;
f. When the product exhibits a distinct change in performance, indicating a need for service.
Warranty
Standard Warranty
• Datavideo equipment is guaranteed against any manufacturing defects for one year from the
date of purchase.
• The original purchase invoice or other documentary evidence should be supplied at the time of
any request for repair under warranty.
• The product warranty period beings on the purchase date. If the purchase date is unknown, the
product warranty period begins on the thirtieth day after shipment from a Datavideo office.
• All non-Datavideo manufactured products (product without Datavideo logo) have only one year
warranty from the date of purchase.
• Damage caused by accident, misuse, unauthorized repairs, sand, grit or water is not covered
under warranty.
• Viruses and malware infections on the computer systems are not covered under warranty.
• Any errors that are caused by unauthorized third-party software installations, which are not
required by our computer systems, are not covered under warranty.
• All mail or transportation costs including insurance are at the expense of the owner.
• All other claims of any nature are not covered.
• All accessories including headphones, cables, batteries, metal parts, housing, cable reel and
consumable parts are not covered under warranty.
• Warranty only valid in the country or region of purchase.
• Your statutory rights are not affected.
Three Year Warranty
• All Datavideo products purchased after July 1st, 2017 qualify for a free two
years extension to the standard warranty, providing the product is
registered with Datavideo within 30 days of purchase.
• Certain parts with limited lifetime expectancy such as LCD panels, DVD drives, Hard Drive, Solid
State Drive, SD Card, USB Thumb Drive, Lighting, Non-PCIe Card and third party provided PC
components are covered for 1 year.
• The three-year warranty must be registered on Datavideo's official website or with your local
Datavideo office or one of its authorized distributors within 30 days of purchase.
Page 6

Disposal
For EU Customers only - WEEE Marking
This symbol on the product or on its packaging indicates that this product must
not be disposed of with your other household waste. Instead, it is your
responsibility to dispose of your waste equipment by handing it over to a
designated collection point for the recycling of waste electrical and electronic
equipment. The separate collection and recycling of your waste equipment at
the time of disposal will help to conserve natural resources and ensure that it is
recycled in a manner that protects human health and the environment. For more information about
where you can drop off your waste equipment for recycling, please contact your local city office,
your household waste disposal service or the shop where you purchased the product.
CE Marking is the symbol as shown on the left of this page. The letters "CE" are
the abbreviation of French phrase "Conformité Européene" which literally
means "European Conformity". The term initially used was "EC Mark" and it was
officially replaced by "CE Marking" in the Directive 93/68/EEC in 1993. "CE
Marking" is now used in all EU official documents.
Page 7

DVS-100/200 Installation Guide
1. System resource recommendations
1.1 On-Premise Installations
Network Speed
Viewers (Per Instance)
10 Mbps
8
100 Mbps
80
1000 Mbps
800
1.2 Cloud hosting installations
Digital Ocean
Hosting Plan
Viewers (Per Instance)
$5 USD PM
50
$10 USD PM
150
Amazon AWS
Hosting Plan
Viewers (Per Instance)
M1.small
120
M1.medium
285
m1.xlarge
570
Massive Grid
Hosting Plan
Viewers (Per Instance)
Managed Dedicated I
800
DVS-100/200 can be installed on any system running the Ubuntu 14.04 64 bit Linux operating
system, the guide below covers some common installation scenarios.
The installation procedure for DVS-100 and DVS-200 is the same. Once installed the software will be
running in free mode (DVS-100) you must install a valid licence to enable DVS-200 features.
The guide below makes some recommendations on system specifications, please use these as
guidelines only. We assume one 1Mbps video stream with 96Kbps audio, the max viewer count is
per instance (per server).
8GB of RAM and a SSD (Solid state drive) is recommended for larger audiences, approximate
network limitations are as below.
Add more instances or additional network interfaces as audience size increases
For encoding / transcoding HD video we recommend a 4 core 7
minimum.
th
generation i7 CPU and 8GB ram at
Digital Ocean is ideal for scenarios with low viewer counts.
All Digital Ocean instances share a 1Gbps connection to the internet, Digital Ocean recommend
consistently not exceeding 300Mbps I/O.
Add more instances as audience size increases
Add more instances as audience size increases
Massive grid offer affordable dedicated servers with dedicated 1Gbps connectivity.
Add more instances as audience size increases
Page 8

2. Installation Walkthroughs
2.1 Digital Ocean
Visit www.digitalocean.com and sign up for a new account
Once you have created your account click the ‘Create Droplet’ button
You will see the page below.
Finally you need to select an image, please choose
Ubuntu 14.04 x64.
Page 9
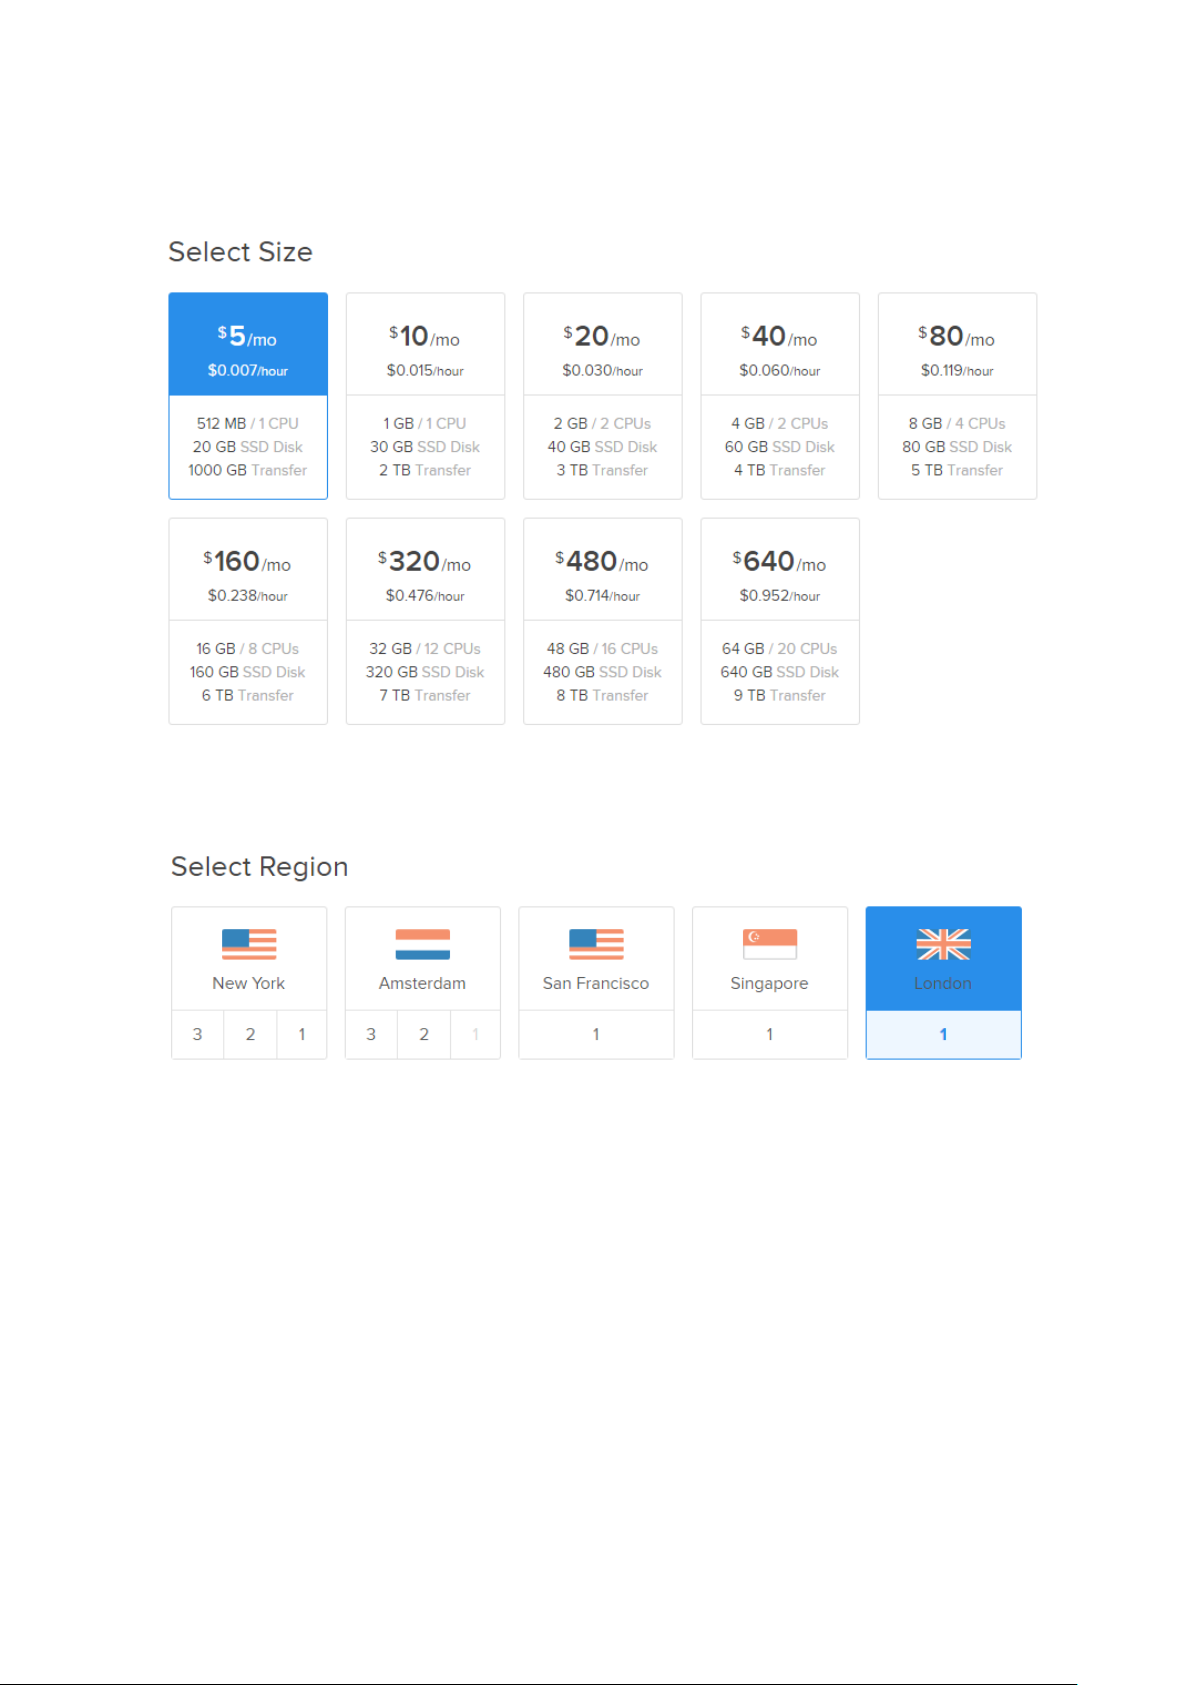
Next choose a size, the size required depends on how many users you need to serve. Use the guide
at the beginning of this document to help with selection.
Next select the region closest to you for best performance.
Now check the ‘User data box’ and copy the text below into the text box.
#cloud-config
runcmd:
- wget http://updates.datavideo.co.uk/install-dvss.sh
- bash install-dvss.sh
Please ensure it looks like the image below.
Page 10
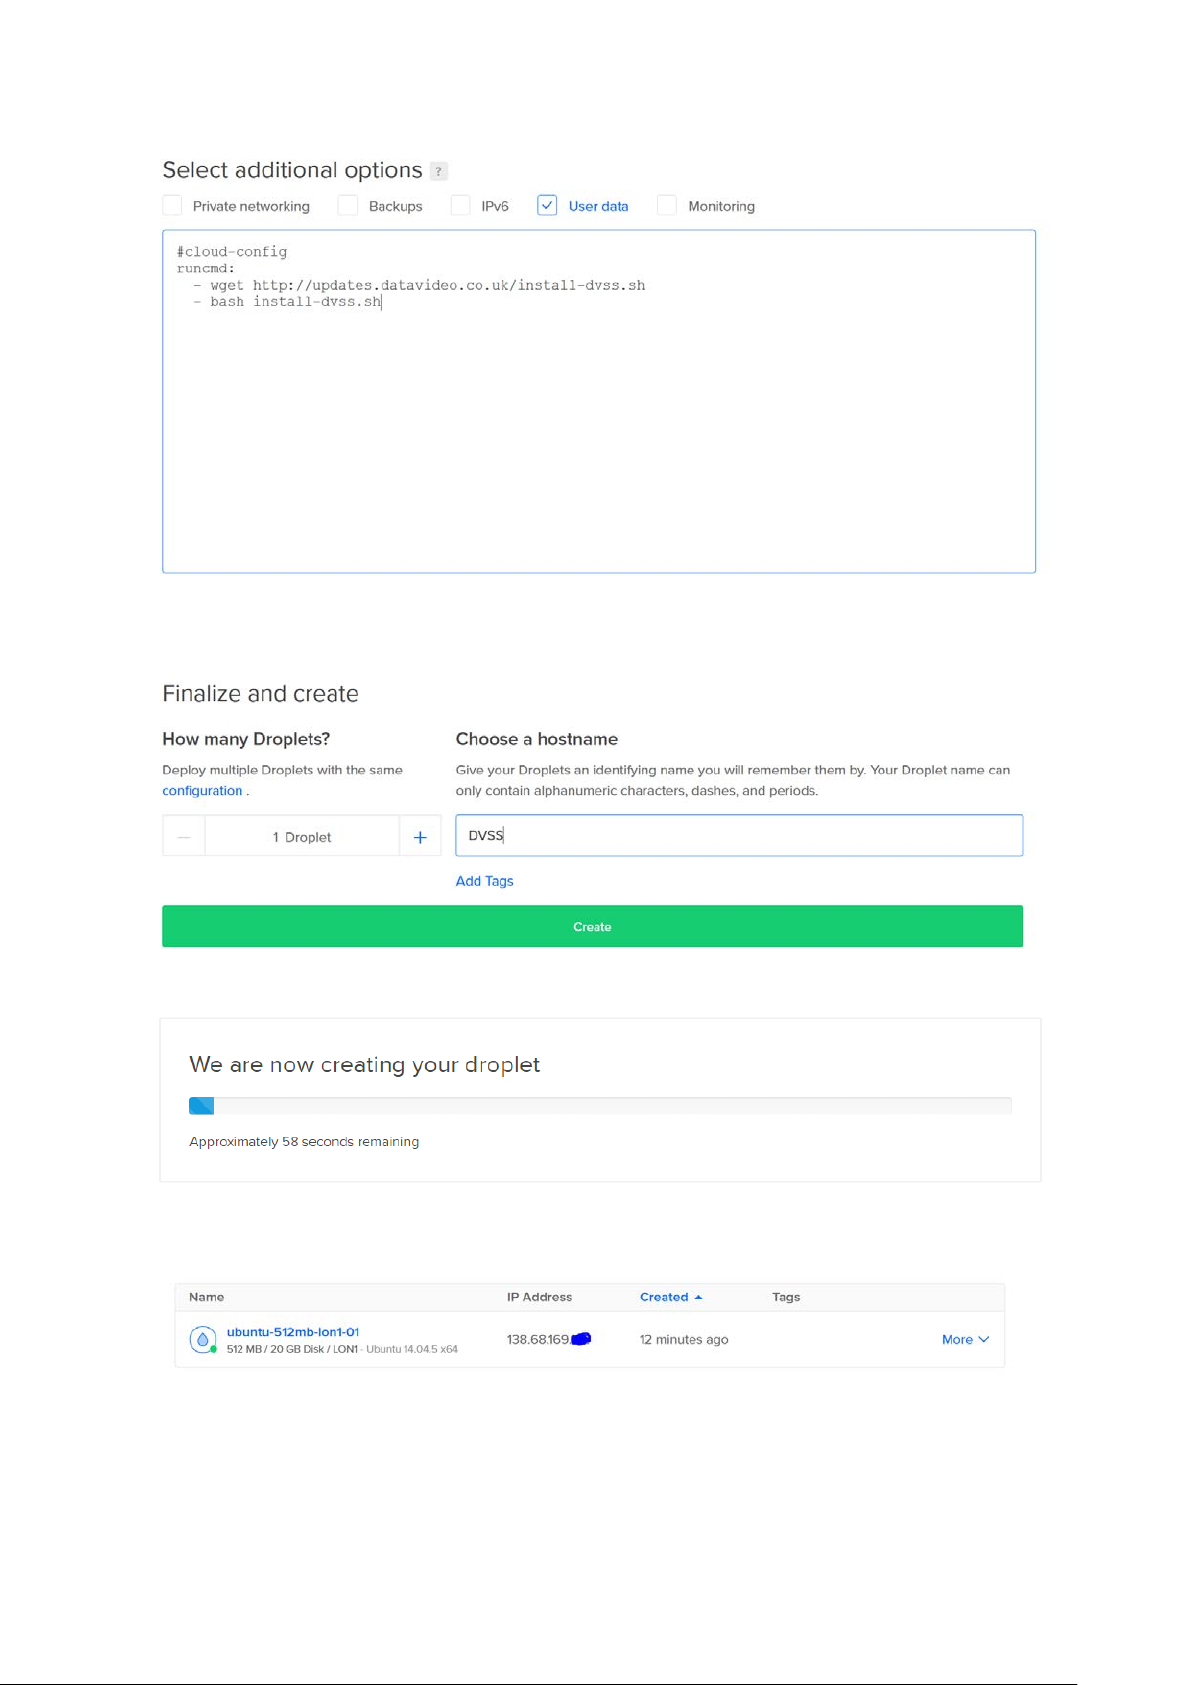
Finally give your Droplet a hostname (here I have chosen DVSS) and Click create the droplet to finish.
Once complete the IP address will be shown.
Simply enter the Droplets IP address into a web browser to access the login page. If the login page
doesn’t show please wait 60 seconds for the installation to complete.
Page 11
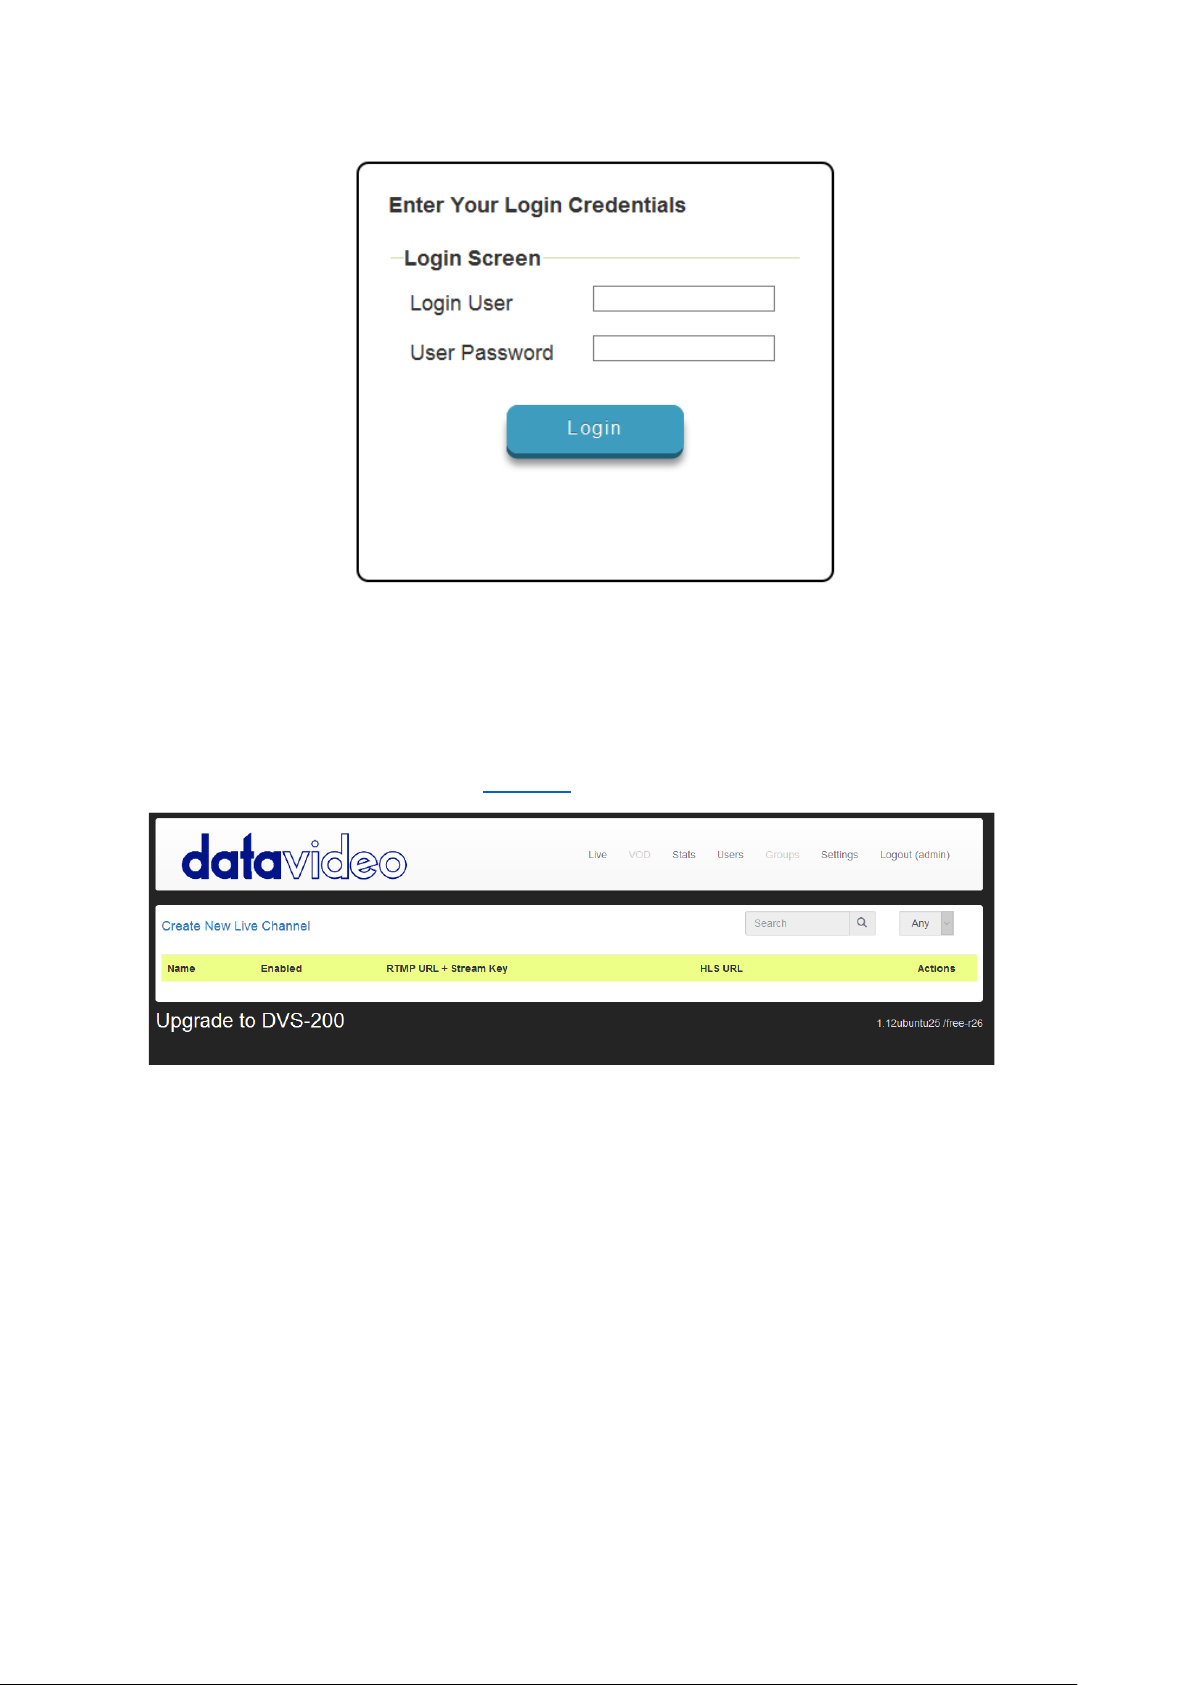
The default credentials are:
• User: admin
• Password: 000000
After logging in you will see the software is running in free (DVS-100) mode, to enable DVS-200
features you need a valid licence. See Section 5
for license installation.
Page 12
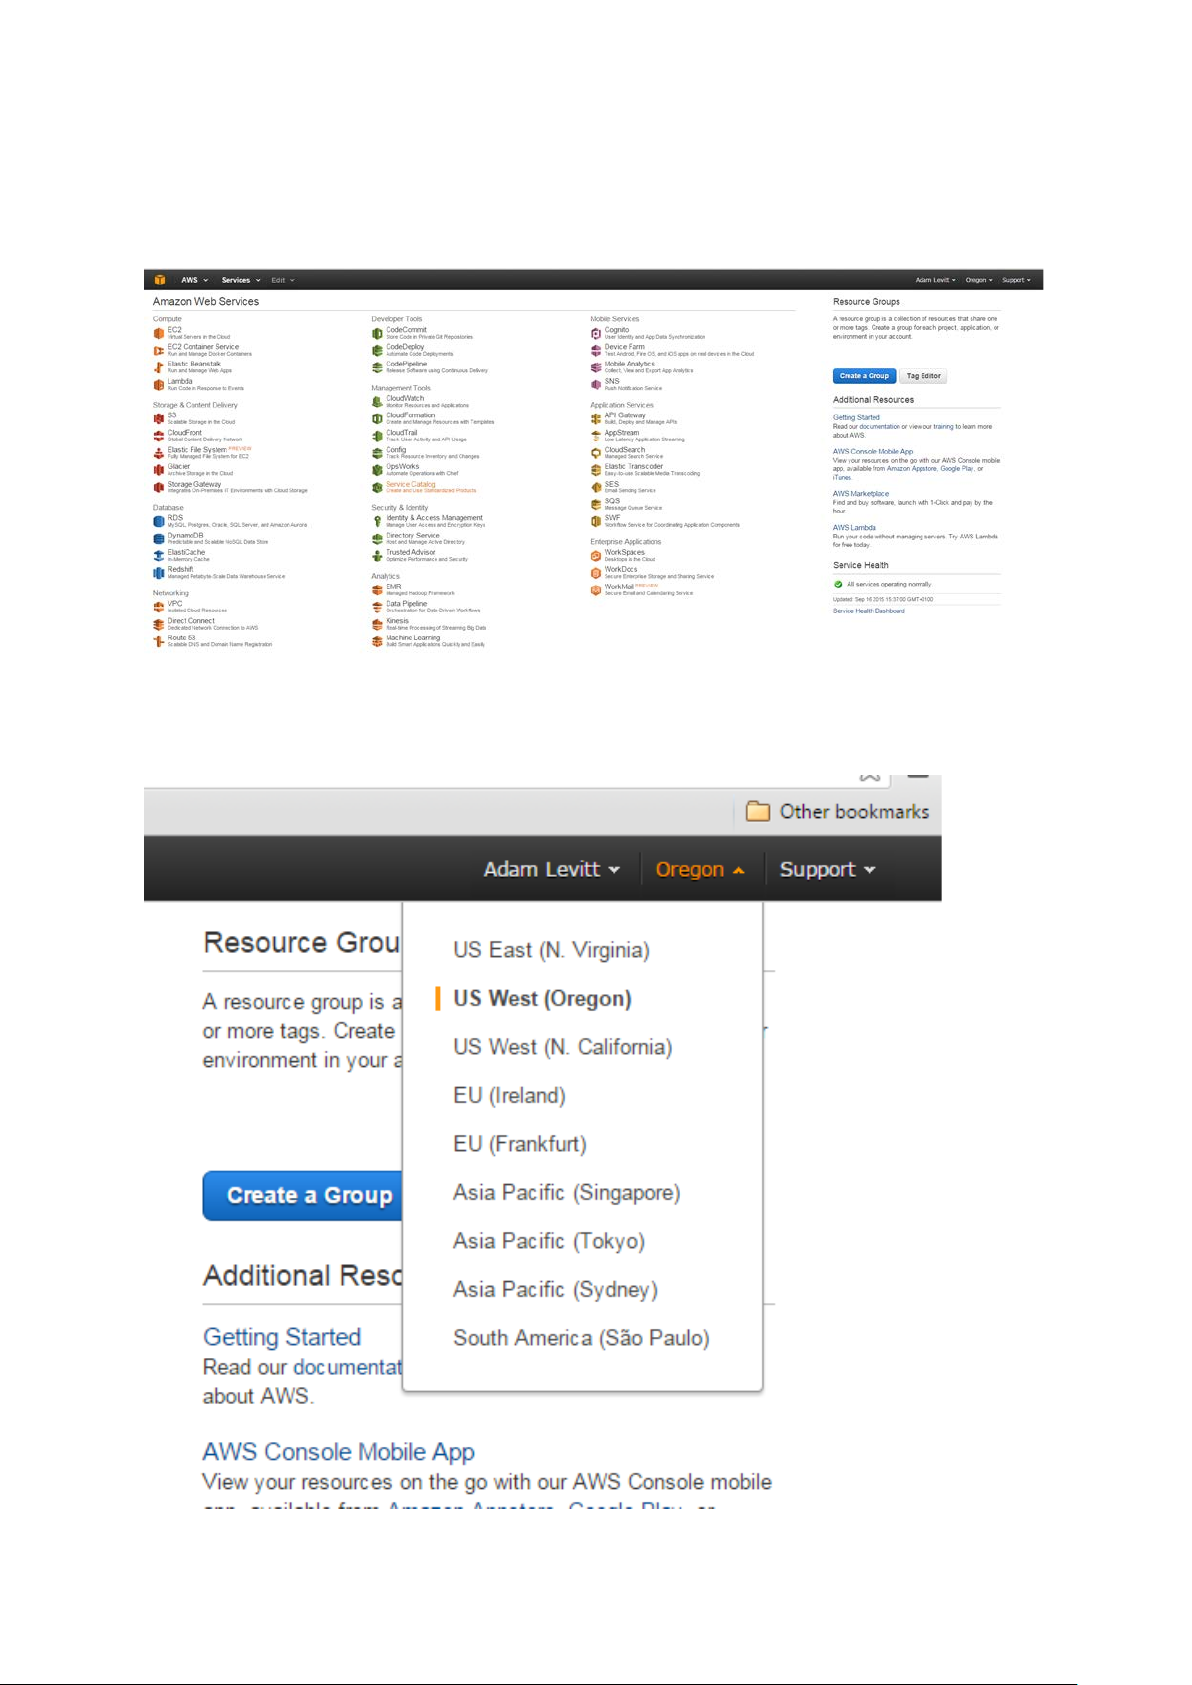
2.2 Installation on Amazon AWS Cloud
Visit http://aws.amazon.com and sign up for a new account
Once you have created your account sign in and you will see the page below
First change the region in the top right corner to the region where you would like to setup your
cloud server
Page 13

Now click the ‘EC2’ link under compute to the left of the page
Click the ‘Launch Instance’ button
Select the Ubuntu 14.04 64 bit image as shown below
Page 14
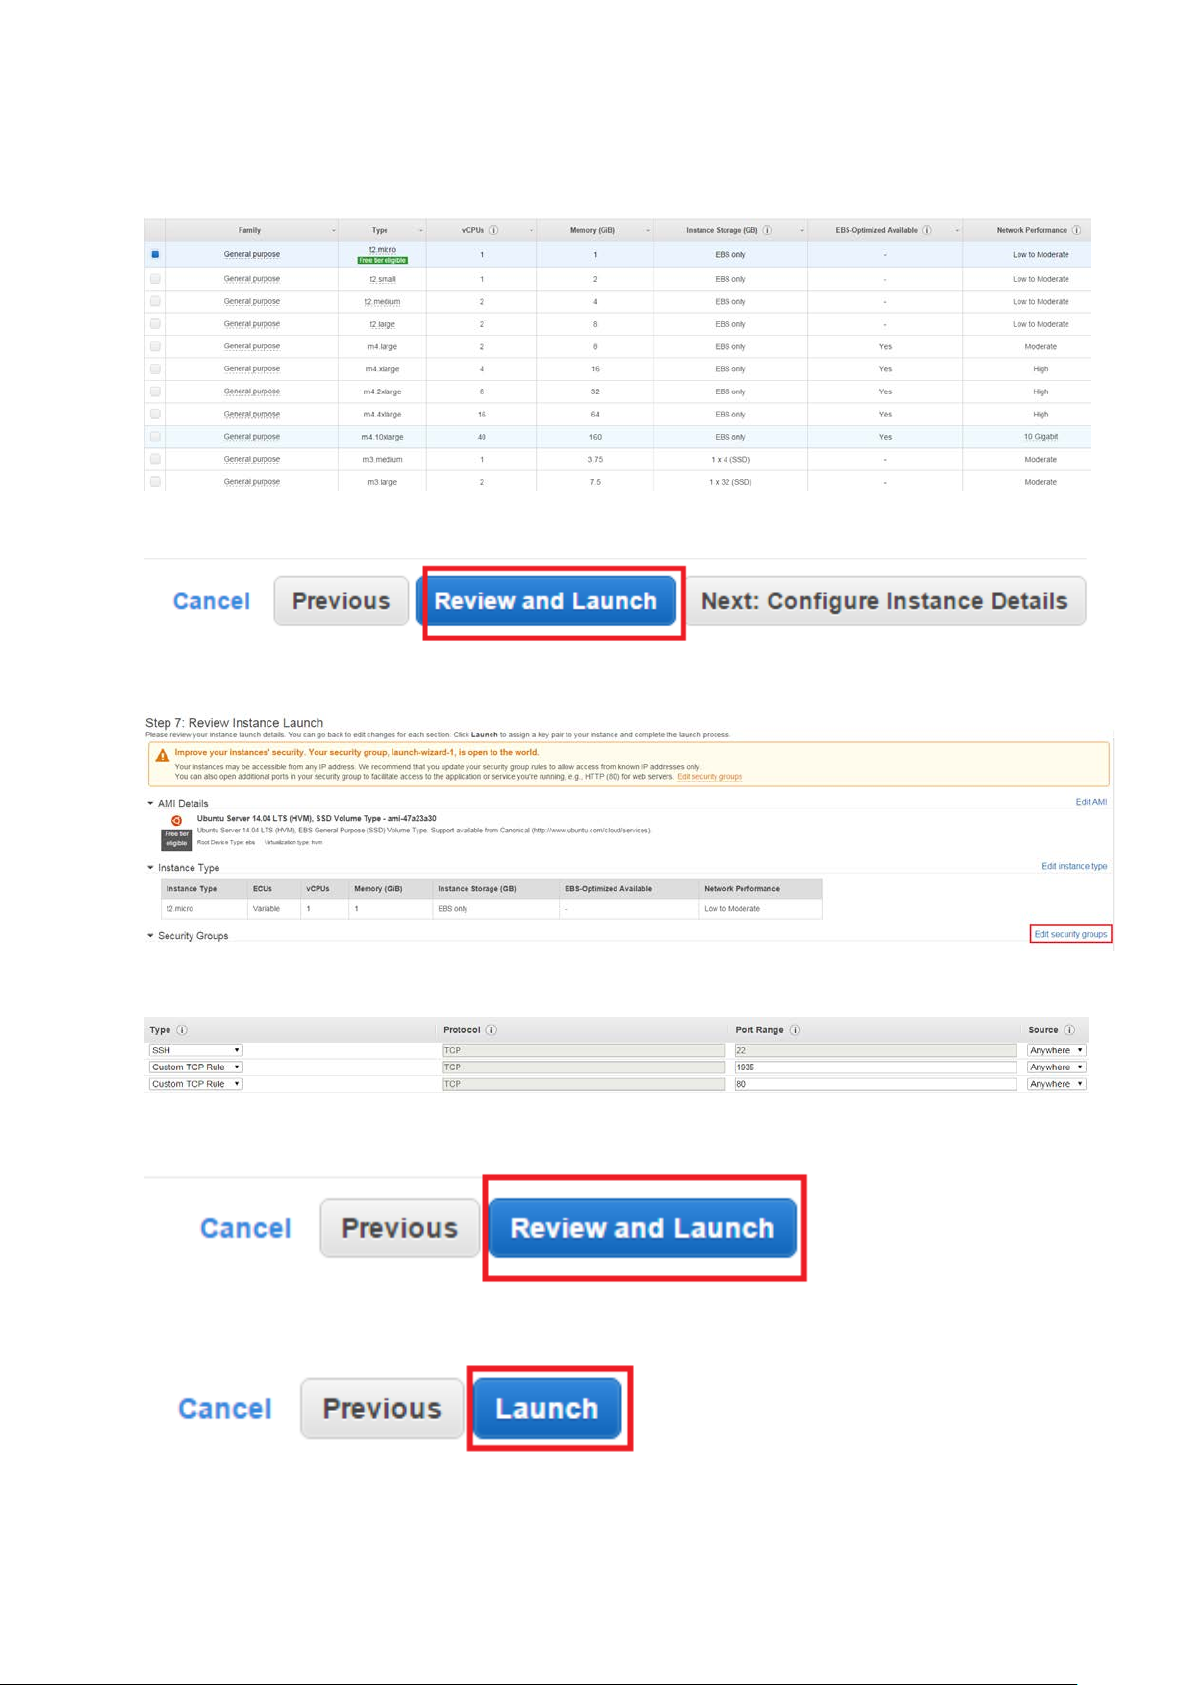
Now select your instance type, the size required depends on how many users you need to serve. Use
the guide at the beginning of this document to help with selection.
One you have selected and instance size proceed and click the ‘Review and Launch’ button.
Click the ‘Edit security groups’ link
Add two new custom TCP rules for ports 80 and 1935 as shown below.
Click the ‘Review and launch’ button again
Click the ‘Launch’ button
Page 15
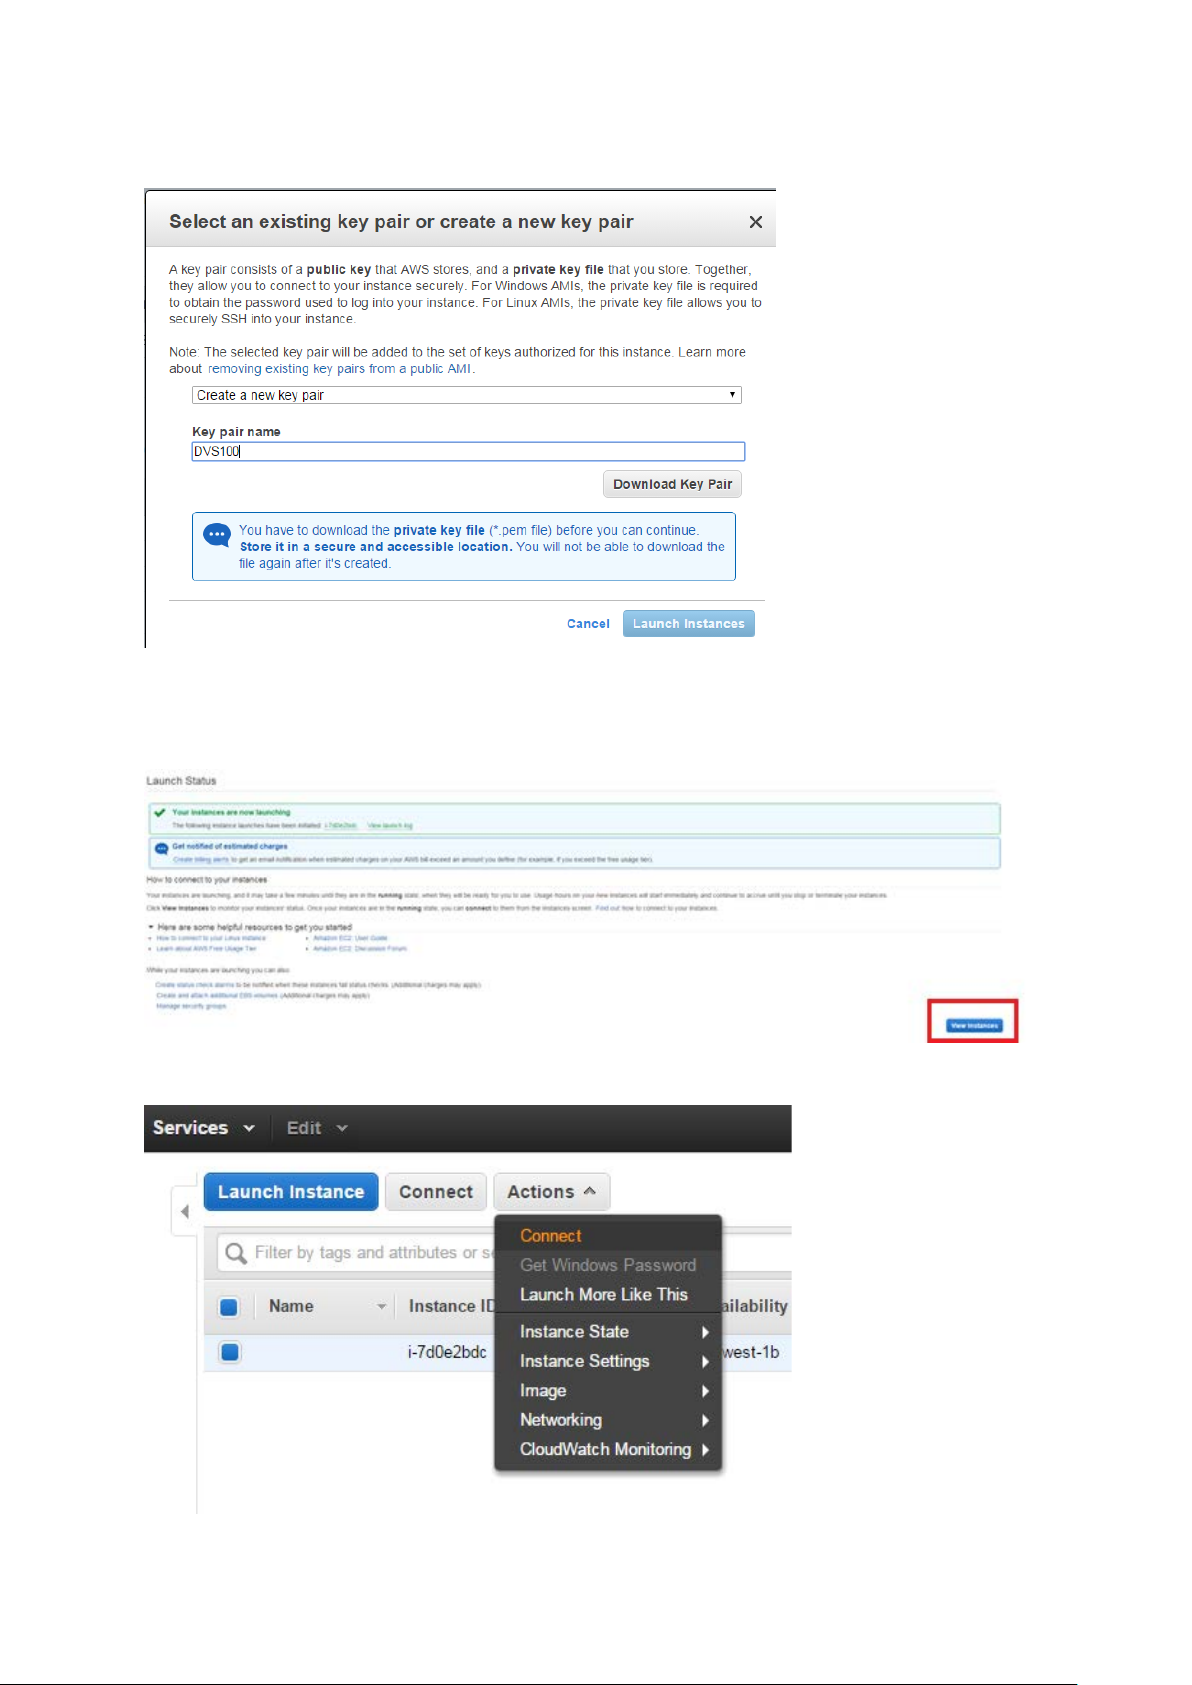
You will see the prompt below. Choose to create a new key pair and give the key pair a name.
Click the ‘Download Key Pair’ button and save the file somewhere safe (you will need it later) before
clicking the ‘Launch Instance’ button. You will see the page below, click the ‘View Instances’ button
to proceed.
Select ‘Connect’ from the actions menu
Page 16

You will see the prompt below. Follow the instructions to connect to your instance via SSH.
Once connected via SSH execute the following commands on the server.
wget http://updates.datavideo.co.uk/install-dvss.sh -O - | bash
Once installation is complete enter the instances public IP or public DNS into a web browser to
connect to the DVS-200 web interface.
The default credentials are:
• User: admin
• Password: 000000
Page 17

After logging in you will see the software is running in free (DVS-100) mode, to enable DVS-200
features you need a valid licence. See Section 5
for license installation.
Page 18

2.3 Generic Installation Instructions (All Providers)
Automated Script
Manual installation (Advanced Users)
Prerequisites
Packa g es
Hardware I/O Card Support
Datavideo
Blackmagic Design
The following command can be executed on any system running the Ubuntu 14.04 64 bit Linux
operating system.
Ensure the system has internet access and execute the commands below as the root user to install
DVS-200.
wget http://updates.datavideo.co.uk/install-dvss.sh -O - | bash
After a successful installation the stream server’s web interface will be running on port 80.
libv4lconvert0 libv4l-0 libv4l2rds0 v4l-utils libasound2 libyaml-0-2 libass4 libmp3lame0 libopencoreamrnb0 libopencore-amrwb0 libopus0 libpulse0 libsdl2-2.0-0 libsoxr0 libspeex1 libva-drm1 libvax11-1 libva1 libvdpau1 libwavpack1 libx264-142 libxcb-shape0 libxcb-shm0 libxv1 libxvidcore4
libluajit-5.1-2 libluajit-5.1-common libdouble-conversion1 liblz4-1 libpq5 libsnappy1 php5-fpm php5cli binutils ghostscript gsfonts imagemagick-common libavahi-client3 libavahi-common-data libavahicommon3 libboost-context1.54.0 libboost-filesystem1.54.0 libboost-program-options1.54.0
libboost-regex1.54.0 libboost-system1.54.0 libboost-thread1.54.0 libc-client2007e libcups2
libcupsfilters1 libcupsimage2 libfftw3-double3 libgd3 libgflags2 libgoogle-glog0 libgs9 libgs9common libijs-0.35 libjasper1 libjbig0 libjbig2dec0 libjemalloc1 libjpeg-turbo8 libjpeg8 liblcms2-2
liblqr-1-0 libltdl7 libmagickcore5 libmagickwand5 libmcrypt4 libmemcached10 libmysqlclient18
libonig2 libpaper-utils libpaper1 libsqlcipher0 libtbb2 libtiff5 libunwind8 libvpx1 libxpm4 libxslt1.1
mlock mysql-common poppler-data php5-curl libgmp10 alsa alsa-tools alsa-utils
http://updates.datavideo.co.uk/updates/debian/hhvm_3.15.2~trusty_amd64.deb
http://updates.datavideo.co.uk/updates/debian/nginx-dvss_1.8.0-4ubuntu50_amd64.deb
http://updates.datavideo.co.uk/updates/debian/nginx-dvss-webui_1.12ubuntu35_all.deb
http://updates.datavideo.co.uk/updates/debian/ffmpeg_3.1.4+git1~trustyubuntu21_amd64.deb
Datavideo have a range of hardware encoding cards, all are supported by the driver package below.
http://updates.datavideo.co.uk/updates/debian/datavideo+h264+cards_1.1.0.101.600_amd64.deb
We support all Decklink, Mini Monitor and Mini Recorder cards by Blackmagic Design. You must
install Desktop Video version 10.8.4 or newer.
Page 19

3. Web UI Overview
3.1 Creating a live channel
Once you login (Default credentials are User: admin / Password: 000000), there are five options
available:.
• Live – Create and manage live streaming channels
• VOD – Create and manage on demand channels
• Stats – View live server statistics
• Users – Create and manage user accounts
• Groups – Create and manage user groups and channel tags
• Settings – Manage global server settings
When creating a new live channel you will be presented with the screen shown below.
Page 20

You have the following options:
Inputs
Channel Name
Here you must choose a name for your live channel. The channel name can contain uppercase and
lowercase characters but no white space.
Channel Description
Here you can add a brief description of the channels content, this is used by the NVD-30/35 set top
boxes.
Player Page title
Here you can change the text that is displayed at the top of the web player’s page for this channel
only.
HLS streaming
Here you can enable or disable HLS streaming, if HLS is disabled the inbuilt web player is also
disabled.
HLS Playlist Type
Here you can select Live or Event, Live mode should be used in most cases. In Live mode the player
will play from the end of the HLS playlist (live position) in Event mode the player will always start
from the beginning of the Playlist (the start of streaming). When using Event mode you must ensure
the HLS playlist length (On the settings page) is set to a value greater than the planned event time.
Please Note: Event mode is currently only supported by the NVD-3X in STB mode.
Once you have created a live channel you will be given a RTMP URL that will allow any encoder to
push live video to the channel. You can also feed your channel by pulling in an existing stream or
using an input card from Black magic design.
Pull URL
Here you can pull any existing IP stream into the channel, RTMP, UDP, RTSP and HTTP streams are
supported. You can setup multiple source streams and select the one you want to use using the
enable/disable buttons on the far right. To stop pulling in any streams select ‘Select No Pull URL’.
Page 21

By default, the audio and video will be set to ‘passthrough’ in this mode no transcoding is
performed, alternatively you can choose to transcode the source audio and or video. Please note
that if the source is MPEG2 you must transcode the video and audio.
Convert TS Audio – Should be used when the source has MPEG TS audio and audio is set to
passthrough.
For details of transcoding options please see the transcoding and encoding options section of this
guide.
Decklink Source
Here you can use an input card from Blackmagic Design to feed the channel directly from HDMI or
SDI sources. We currently support all Blackmagic Decklink, mini monitor and mini recorder cards
using the Desktop video 10.8.4 or newer driver version.
Please Note: You must ensure you select the correct resolution and frame rate to match your input
signal, failure to do so will result in colour bars being displayed as the live stream. If your card
features HDMI and SDI inputs you must use the Blackmagic Desktop Video Utility to set the input
type outside of the DVS-200 software.
Page 22

As Blackmagic cards feed the system with uncompressed video you must set the H264 video and
AAC audio encoding options as required.
You can setup multiple sources if your card has more than one input or you are using multiple cards.
Select the source you want to use using the enable/disable buttons on the far right. To stop pulling
in any source select ‘Select No Pull URL’.
For details of the encoding options available for Blackmagic sources please see the transcoding and
encoding options section of this guide.
Datavideo Source
Here you can use an input card from Datavideo to feed the channel directly from HDMI or SDI
sources. The Datavideo cards use hardware video compression and software audio compression.
Datavideo input cards will automatically detect the source resolution a frame rate of the connected
source.
Please Note: If the source resolution or frame rate is changed while the source is active you should
disable and re-enable the source or restart all services from the settings menu, failure to do so may
result in incorrect timestamps or aspect ratio in the output stream.
You can setup multiple sources if your card has more than one input or you are using multiple cards.
Select the source you want to use using the enable/disable buttons on the far right. To stop pulling
in any source select ‘Select No Pull URL’.
Page 23

Please Note: Bitrate is used when in CBR mode and Quality is used when in VBR mode. 1000 is the
Outputs
lowest quality settings and 10000 is the highest.
Bitrate – Set the video bitrate when in CBR mode
Quality – Set the video quality when in VBR mode (1000 is the lowest quality settings and 10000 is
the highest)
Video Kbps – Set the video bitrate when not set to passthrough
Resolution – Set the video resolution when not set to passthrough
Deinterlace – Deinterlace the source video. Please note this option can be used to disable the
hardware de-interlacer, however the card will always output progressive frames even with a
interlaced source and the deinterlacer disabled.
H264 Profile – Select Baseline, Main or High compression profiles
H264 GOP Size – Set the size of the GOP (group of pictures)
Push URL`s
Push URL`s are optional. Here you can push the incoming stream on to one or more destinations
simultaneously. We can push to destinations using RTMP or MPEG-TS protocols.
RTMP
Using RTMP you can push a single stream out to various streaming platforms such as YouTube,
Facebook, Wowza etc.
Simply enter the RTMP URLs you would like the stream to be pushed to. By default, the audio and
video will be set to ‘passthrough’ in this mode no transcoding is performed, alternatively you can
choose to transcode the source audio and or video.
Please Note: Transcoding requires CPU power, please monitor your CPU usage.
MPEG-TS
Here you can send out a unicast or multicast MPEG-TS stream, examples below.
Unicast
Page 24

Multicast
Access Control
Recording
Decklink Output
Here you can use an output card from Blackmagic Design to decode the channel to HDMI or SDI. We
currently support all Blackmagic Decklink, mini monitor and mini recorder cards using the Desktop
video 10.8.4 or newer driver version.
You can setup multiple outputs if your card has more than one output or you are using multiple
cards. If your card features HDMI and SDI inputs you must use the Blackmagic Desktop Video Utility
to set the input type outside of the DVS-200 software.
Here you can restrict what IP addresses can publish or playback using RTMP. In whitelist mode, only
the listed IPs can publish or playback, in blacklist mode all but the listed IPs can publish or playback.
You must enter the IP address followed by its abbreviated subnet mask, for example 255.255.255.0
is a 24-bit mask so is represented as /24. Please consult your IT department if unsure about these
settings.
Here we can enable recording, you have three options:
Always – Audio & Video
The software will record as soon as an input stream is detected and will stop recording when the
stream is stopped. Audio and video are recorded together.
Always – Audio Only
The software will record as soon as an input stream is detected and will stop recording when the
stream is stopped. Only audio is recorded.
Manually start/stop – Audio & Video
Recording will not happen automatically, the user must start and stop recording manually. When
enabled button to start and stop recording will be displayed next to the channel name. Audio and
video are recorded together.
Page 25

Recorded files Suffix
Managing recordings
By default, the recorded file is name after the channel name, this option allows you to add additional
text into the file name.
Give each recording a unique time stamp
When checked a unique time stamp will be inserted into the file name of each recording. When this
option is not checked the recorded file name will always be the same, this means subsequent
recording will overwrite the previous file.
Append to recorded file
This option should only be used when ‘Give each recording a unique time stamp’ is not checked.
When checked subsequent recording will be joined to the previous file creating one long recording.
Max. Recorded file size
Here we can limit the recorded file length by size, when this limit is reached a new file will be
created. No limit is set by default.
Max. Recorded file interval
Here we can limit the recorded file length by time, when this limit is reached a new file will be
created. No limit is set by default.
Auto publish recorded file when done
When enabled a recording will be published as soon as recording is stopped.
Include in group record
Any channel with this checked will start and stop recording together, this can only be used in manual
recording mode.
Redirect to VOD if offline
When enabled the DVS-200 web player will redirect to the last published VOD content if the live
stream is offline.
Delete recordings older than
Automatically delete recordings older than a certain age.
Delete Older Mode
Choose to delete the recording only or delete the source recording and unpublish the recording.
Recordings are listed at the top of the channel settings page, a maximum of 10 files are listed per
page.
Page 26

You have the following options:
Publish
Will publish the selected files, this makes them available to playback and embed (Converts the
original file to HLS).
Page 27

Delete
General
Will delete the selected files but won’t delete the published (HLS) files.
Unpublish (Delete)
Will delete the published (HLS) files but not the original uploaded files.
To publish a file, select its check box, ensure the option to ‘Publish’ is selected and save the channel.
You will be redirected back to the main web interface and see the file is now available to play and
embed.
Delete & Unpublish
Will delete the selected files and the published (HLS) files.
Visibility level
By default channels are visible to all users. To change this behaviour you should remove the ‘All
Users’ marker and then select only the user accounts you wish to be able to see this channel.
Please Note: Administrators and Power Users can always view all channels; this option only affects
viewer and contributor accounts.
Authentication required (Play)
By default, authentication is not required to view a player page or an embedded player. This means
if a player was embedded in an external website or if the URL of a player page was sent to someone
they would be able to view the channel without having to login. Checking this option will require
that the user login with a valid account before the player loads.
Authentication required (Publish)
When enabled the currently logged in user’s username and hashed password are added to the RTMP
URL, these are required to be included in the RTMP URL to publish to the channel. Only
Administrators, Power users and contributors can publish when this mode is enabled.
Random stream key
By default, the channel name is used for the stream key, when enabled and random hashed value is
used instead. Optionally you can also set for this value to change daily.
Upload channel logo
Here you can upload a logo, this can be displayed as an overlay on the DVS-200s built in web player,
it will also be used by the NVD-30/35 decodes when operating in set top box mode. You can select
its position using the Logo Position dropdown, selecting STB Only will result in it not being shown on
the web player.
Upload channel poster
The channel poster is the image shown by the web player before the user hits play. By default, the
channel poster uses a snapshot from the live MJPEG preview, alternatively you can upload a static
image.
Page 28

Browser Auto play
Transcoding and encoding options
When enabled the web player will start playback as soon as the page is loaded.
Channel tag
Here you can assign a channel to a tag, tags are like groups that make it easier to find channels. Tags
are used by the DVS-200 web interface and the NVD-30/35 decoders in set top box mode to group
channels.
Once your assign channels tags you can quickly find all channels with that tag using the dropdown
menu on the DVS-200 web interface.
The following options are available when transcoding or encoding from Blackmagic Design sources.
Encoding or transcoding is done in software and will use CPU resources.
Live Stream – Uncheck only if the source is a static video file
Low latency – Disables buffering to reduce delay
Video Kbps – Set the video bitrate when not set to passthrough
Resolution – Set the video resolution when not set to passthrough
Deinterlace – Deinterlace the source video and output progressive, only use with interlaced sources
H264 Profile – Select Baseline, Main or High compression profiles
H264 level – Select the H264 level
Page 29

Compression efficiency – Faster compression uses less CPU resources but results in a larger average
Applying changes
Live channel list overview
output bitrate, this setting does not affect visual quality.
H264 Key Interval – Set the frequency of a key frame (I frame)
H264 GOP Type – Select Open or Closed, if all b-frames from one GOP references only to I- and P-
frames of the same GOP then it is commonly called a closed GOP (all frames can be decoded without
the need of another GOP).
After you save channel settings you will be redirected back to the main web interface. Whenever
you see this message across the top of the page you know that the service must be restarted to
apply some of your settings.
Please Note: You should only restart the service when you are not live streaming.
Enable and disable the channel.
Start recording (only visible when manual recording is enabled).
Stop recording (only visible when manual recording is enabled).
Setup scheduled recoding times (only visible when manual recording is enabled). You can setup
as many schedules as you need. Please note that recoding will only commence if the channel is live
when the recording is scheduled to start, expired schedules will be hidden after 30 minutes.
Page 30

The RTMP URL is used to configure your encoder, for most encoders the part after
3.2 Creating a VOD channel
General
the last / should be used as the stream key. This URL can be decoded by Datavideo NVD decoders
with low latency.
The HLS URL can also be decoded by Datavideo NVD decoders, HLS will
perform better over poor internet connections but latency will be considerably higher.
Open a new tab with the web video player.
Generate the code required to embed the web video player in another website.
A VOD channel is automatically created for each live channel, this is where published recordings will
appear.
To upload content, you must manually create a VOD channel.
Channel Name
Here you must choose a name for your VOD channel. The channel name can contain uppercase and
lowercase characters but no white space.
Channel Description
Here you can add a brief description of the channels content, this is used by the NVD-30/35 set top
boxes.
Player Page title
Here you can change the text that is displayed at the top of the web player’s page for this channel
only.
Visibility level
By default, channels are visible to all users. To change this behaviour, you should remove the ‘All
Users’ marker and then select only the user accounts you wish to be able to see this channel.
Please Note: Administrators and Power Users can always view all channels; this option only affects
viewer and contributor accounts.
Page 31

Authentication required (Play)
By default, authentication is not required to view a player page or an embedded player. This means
if a player was embedded in an external website or if the URL of a player page was sent to someone
they would be able to view the channel without having to login. Checking this option will require
that the user login with a valid account before the player loads.
Upload channel logo
Here you can upload a logo, this can be displayed as an overlay on the DVS-200s built in web player,
it will also be used by the NVD-30/35 decodes when operating in set top box mode. You can select
its position using the Logo Position dropdown, selecting STB Only will result in it not being shown on
the web player.
Browser Auto play
When enabled the web player will start playback as soon as the page is loaded.
Channel tag
Here you can assign a channel to a tag, tags are like groups that make it easier to find channels. Tags
are used by the DVS-200 web interface and the NVD-30/35 decoders in set top box mode to group
channels.
Once your assign channels tags you can quickly find all channels with that tag using the dropdown
menu on the DVS-200 web interface.
After you save the channel you will be redirected back to the main web interface, to upload content
select your newly created channel. You will see the screen below.
Page 32

Click ‘Browse’ and select the video file to upload, save the channel to start the upload.
Once the upload is complete the page will refresh, you will see the screen below.
Page 33

You have the following options:
3.3 Stats
Publish
Will publish the selected files, this makes them available to playback and embed (Converts the
original file to HLS).
To publish a file select its check box, ensure the option to ‘Publish’ is selected and save the channel.
You will be redirected back to the main web interface and see the file is now available to play and
embed.
Delete
Will delete the selected files but won’t delete the published (HLS) files.
Unpublish (Delete)
Will delete the published (HLS) files but not the original uploaded files.
Delete & Unpublish
Will delete the selected files and the published (HLS) files.
The stats tab provides real time statistics relating to the server and streaming channels.
Page 34

Server Statistics
3.4 Users - Creating and managing user accounts
Shows global statistics.
• Incoming Bytes – Shows the amount of data that has been sent into the server
• Outgoing Bytes – Shows the amount of data the has been pulled out of the server
• In Bandwidth – Shows the incoming bandwidth usage for the entire server
• Out Bandwidth - Shows the outgoing bandwidth usage for the entire server
• Server Uptime – Shows the amount of time the server has been powered up
• CPU Usage – Shows the real-time CPU usage as a percentage out of 100
• RAM Usage – Shows the real-time RAM (memory) usage in MB
• Disk Free – Shows the amount of free disk space on the drive that is being used for media
storage. By default, this will be the drive DVS-200 is installed on, the media directory can be
changed under global settings.
Channel Statistics
Shows channel specific statistics.
• Stream – Displays the stream name
• Video codec – Displays the video codec used, usually H264
• Width – Displays the video width (if supported by the encoder)
• Height - Displays the video height (if supported by the encoder)
• Audio Codec - Displays the audio codec used, usually AAC or MP3
• Channels – Displayed the number of audio channels, usually 2
To create a new user account click ‘Create New User’, you will see the screen below.
Page 35

User
Here you must choose a logon name for the user. The name can contain uppercase and lowercase
characters but no white space.
Login Role
• Viewer – This role only allows the user to view streams and change their own password.
Viewer accounts cannot view stream URLs, create or modify channels or change settings.
• Viewer Plus – This role has all viewer rights but can also download recordings and VOD
content
• Admin - This role gives the user full control, users with admin rights cab view all channels
even if they are not assigned to them.
• Power User – This role has the user the same rights as an admin however power users
cannot change global server settings or change other user accounts.
• Contributor – This role has the same rights as a power user except they cannot create
channels, change channel visibility, change global settings or view channels not assigned to
them. Contributors also won’t see system update or service restart messages so cant
interrupt streaming.
Concurrent IP`s
Limit the number of IP addresses than can use play content using the web player (HLS)
simultaneously, default is no limit.
Page 36

Concurrent Connex per IP
3.5 Groups - Creating and managing user groups
Limit the number of connections that can play content using the web player (HLS) from the same IP
address. For example, you may have set concurrent IP`s to a value of 1, this would still allow multiple
connections from the same public IP address.
Active Upto
Allows you to set an expiry date for the account, if left blank the account will never expire.
Group Membership
Make the user a member of a user group, groups can be manged using the ‘Groups’ tab.
Password
Here you must choose a password for the user.
Confirm Pass
Here you must confirm the password.
User groups can be used to make managing users easy, you can manually create users and groups
within the DVS-200 or you can link DVS-200 to active directory.
For active directory setup instructions please see the Settings section of this guide. To manually
create a user group simply click the Create New Group link, enter a group name and add its
members.
You can also add a user to a group from the user settings page.
Once created you can add a group to any channels Visibility Level.
Page 37

Creating channel tags
Tags are like groups that make it easier to find channels. Tags are used by the DVS-200 web interface
and the NVD-30/35 decoders in set top box mode to group channels.
Tags can be created from the Groups tab as shown below.
Once created you can assign any live or VOD channel to a tag.
Page 38

Once your assign channels tags you can quickly find all channels with that tag using the dropdown
3.6 Settings
menu on the DVS-200 web interface.
Page 39

UI Settings
Server Settings
Custom UI Title
Here you can change the title of the DVS-200 web page, the default is ‘dv Stream Server’.
Upload Custom UI logo
Upload a custom logo to replace the default Datavideo logo
Max VOD file upload size
Set the maximum allowed file size for uploads
Media storage directory (HLS & recordings)
Change the directory used to store recordings, VOD content, HLS fragments and recording
schedules.
Please Note: If you are going to use a folder on a second hard disk for media storage you must first
set the permissions of the drive as below. These options can be found by right clicking the drive
within the file manager and selecting properties.
You must also manually mount the drive as shown below, to do this first open the disks utility and
choose to edit the mount options for the second hard drive,
The mount point can be customised for example /mnt/media could also be used, this mount point is
the path that must be entered into the DVS-200 software as the media directory path.
Page 40

HLS Access
Here you can restrict what IP addresses can playback using HLS (The web player). In whitelist mode,
only the listed IPs can playback, in blacklist mode all but the listed IPs can playback.
You must enter the IP address followed by its abbreviated subnet mask, for example 255.255.255.0
is a 24-bit mask so is represented as /24. Please consult your IT department if unsure about these
settings.
Poll for DVS Updates
By default, the system will check for updates every time you switch tabs, this can cause slow
operation when operating offline. Unchecking this option will disable automatic updates.
SSL/TLS Support
When enabled you can upload a SSL certificate and access the DVS-200 using HTTPS. You must
upload the certificate and key file at minimum, the chain file is optional.
External Users & Groups via Active Directory
When enabled active directory users and groups can be used for authentication.
To enable active directory:
Page 41

1. Enter the Active Directory DNS Domain for example yourdomain.local.
RTMP Settings
2. Enter the Active Directory Server Hostname for example ADSERVER, you can also enter its IP
address.
3. Select the Active Directory Server Port, this can be plaintext or SSL.
4. Enter the Active Directory Username and Active Directory Password.
5. Save the settings, click the prompt to reload the service at the top of the page.
6. You will now have option to map your AD groups to the DVS-200 Admin, Power User, Viewer
Plus and Contributor groups. Any AD user not in these groups will automatically receive viewer
only privileges.
Please Note: Active directory users and groups are cached local and updated periodically, changes to
AD user or Groups may take 15 minutes to take effect.
RTMP Port
The default port of 1935 should generally not be changed, for advanced users only.
Always start on key frame
When enabled clients that connect to the RTMP stream will always start playback on a key frame,
this may increase delay.
Disable audio until first video frame is sent
When enabled no audio will be sent until after the first video frame (RTMP clients only).
AV Sync Interval
If the RTMP client’s bandwidth is not enough to receive data at the publisher’s (encoders) rate, some
frames are dropped by server leading to a synchronization problem. When the timestamp difference
exceeds the value specified as sync argument an absolute frame is sent fixing that.
Max message size
This setting relates to how much memory the RTMP server can use, the default 10MB should be fine
for most cases but if you have issues with very high bitrate streams disconnecting this should be
increased.
Idle Streams
If disabled, the server prevents subscribers from connecting to idle/non-existent live streams and
disconnects all subscribers when stream publisher disconnects. Default is on.
Page 42

HLS Settings
Global Player Settings
HLS fragment length
HLS works by creating multiple .TS video files (chunks) from the incoming RTMP stream, the player
then downloads these chunks in order. This setting defines how log each chunk is, larger chunk sizes
will increase delay.
HLS Playlist Length
This setting defines how many .TS chunks are stored on the server, longer playlists lengths means
live streams can be paused for longer.
HLS AV Sync Interval
Sets the HLS timestamp synchronization threshold. This feature prevents crackling noises after
conversion from low-resolution RTMP (1KHz) to high-resolution MPEG-TS (90KHz). Default is 2ms.
HTML5 Support
By default, the web player will use HTML5 extensions if the browser supports them, if not it will use
FLASH extensions. This setting allows HTML5 extensions to be disabled for all or desktop only
browsers.
Maximum Buffer Length
This setting defines how much video the web player can buffer (in seconds) locally, larger buffer
sizes result in more delay but better stability on poor networks.
Maximum Buffer Size
This setting allows the buffer to be limited by size, this setting will override the buffer length option
(the size can never be exceeded).
Display browser support
To be used to debugging only, when enabled the player will display a message to tell you if it is using
FLASH or HTML5 extensions.
Minimum DVR Length
Sets the amount of HLS chunks that must be available on the server before the player displays the
pause button, this must be set to a value less than the HLS playlist length for the pause button to be
enabled.
Page 43

4. Socket commands / API
Using third party applications, users can easily connect to the DVS-200 using Telnet. To establish a
connection with the DVS-200 simply open a Telnet connection to the units IP address on port 23.
Please Note: Socket commands are disabled by default, to enable socket commands first ensure you
have purchased the optional remote control license and then check the appropriate option in the
‘Settings Tab’.
The DVS-200 has three responses to commands:
• FAILED: shows that the command could not be executed successfully.
• OK: shows that the command is executed without any problem.
• Invalid Command: shows that the command was not recognized.
The control commands are as follows:
Add and remove push and pull URLs
add [channel] [push/pull] [URL – For example ‘add mychannel push rtmp://test.com/test/stream or
add pull mychannel rtsp://192.168.1.23/stream’
remove [channel] [push/pull] [url] - For example ‘remove mychannel push
rtmp://test.com/test/stream or remove pull mychannel rtsp://192.168.1.23/stream’
Please note: Pull URLs will be set to enabled when added.
Start and stop recording
Start [channel] – For example start mychannel
Stop [channel] – For example stop mychannel
start all – Starts all channels recording
stop all – Stops all channels recording
restart – restarts all services
Page 44

5. License Installation Guide
5.1 Licence Terms
5.2 Software Disclaimer
5.3 Licence installation
• Each licence can be installed on one computer/server only, the licence is locked to the first
computer/server it is activated on.
• To move a licence from one computer/server to another the licence must first be deactivated.
Please contact your local Datavideo office quoting your licence code to request this.
• As standard all licences issued are “Online”, this means the DVS-200 software must be able to
connect to the internet in order to verify its activation status, if you require the DVS-200
software to work without an internet connection an “Offline” licence can be issued after the
initial online activation is successful. Please note that offline systems will not receive automatic
updates.
This SOFTWARE PRODUCT is provided by Datavideo "as is" and "with all faults." Datavideo makes no
representations or warranties of any kind concerning the safety, suitability, lack of viruses,
inaccuracies, typographical errors, or other harmful components of this SOFTWARE PRODUCT. In no
event, unless required by applicable law or agreed to in writing, shall Datavideo, or any person be
liable for any loss, expense or damage of any type or nature arising out of the use of or inability to
use this software or program. You are solely responsible for the protection of your equipment and
backup of your data, and Datavideo will not be liable for any damages you may suffer in connection
with using, modifying, or distributing this SOFTWARE PRODUCT.
Once the DVS-200 software has been successfully installed you will be presented with the login page
below.
The default credentials are:
• User: admin
• Password: 000000
Page 45

After logging in you will see the software is running in free (DVS-100) mode, to enable DVS-200
features you need to upload a valid licence. The DVS-200 software MUST be able to access the
internet in order to complete the activation process.
1. Click the ‘Settings’ link on the top menu
2. Scroll to the bottom of the page and click the ‘Manage Licences’ link
3. Click the ‘Browse’ button and select the digital licence (.lic) file you were sent via e-mail.
Now click the ‘Upload’ button, you will see the screen below while the software is activating. The
activation process can take up to one minute depending on the speed of your internet connection.
Page 46

Upon successful activation you will be presented with main DVS-200 control panel.
5.4 Troubleshooting
My DVS-200 software will not activate?
Please check:
1. The DVS-200 can access the internet?
2. The licence has not been used before? If the licence has already been activated on different
hardware, you must contact your local Datavideo office to have it deactivated and a new
licence issued.
My DVS-200 software was working but now displays the licensing page?
1. Was it a trial licence valid only for a set period of time?
2. Have you made any major changes to the hardware? The copy protection system will
deactivate the software if it detects major hardware changes, you must contact your local
Datavideo office to have it deactivated and a new licence issued.
Page 47

DATAVIDEO WORLDWIDE OFFICES
Service & Support
It is our goal to make owning and using Datavideo products a satisfying experience. Our support sta is available
to assist you to set up and operate your system. Contact your local office for specific support requests. Plus,
please visit www.datavideo.com to access our FAQ section.
China Shanghai
Datavideo Technologies China Co
601,Building 10,No.1228,
Rd.Jiangchang,
Jingan District,Shanghai
Tel: +86 21-5603 6599
Fax:+ 86 21-5603 6770
E-mail: service@datavideo.cn
China Beijing
Datavideo Technologies China Co
No. 812, Building B, Wankai Center,
No.316, Wan Feng Road, Fengtai District,
Beijing, China
Tel: +86 10-8586 9034
Fax:+86 10-8586 9074
E-mail: service@datavideo.cn
China Chengdu
Datavideo Technologies China Co
B-823,Meinian square,No.1388,
Middle of Tianfu Avenue,Gaoxin District,
Chengdu,Sichuan
Tel: +86 28-8613 7786
Fax:+86 28-8513 6486
E-mail: service@datavideo.cn
China Fuzhou
Datavideo Technologies China Co
A1-2318-19 Room,No.8, Aojiang Road,
Taijiang District,Fuzhou,Fujian,China
Tel: 0591-83211756,0591-83210187
Fax:0591-83211262
E-mail: service@datavideo.cn
China Jinan
Datavideo Technologies China Co
902, No. 1 business building,
Xiangtai Square, No. 129,
Yingxiongshan Road, Shizhong District,
Jinan City, Shandong Province, China
Tel: +86 531-8607 8813
E-mail: service@datavideo.cn
Hong Kong
Datavideo Hong K ong Ltd
G/ F.,26 Cross Lane
Wanchai, Hong Kong
Tel: +852-2833-1981
Fax:+ 852-2833-9916
E-mail: info@dat avideo.com.hk
India Noida
Datavideo India Noida
A-132, Sec-63,Noida-201307,
India
Tel: +91-0120-2427337
Fax:+91-0120-2427338
E-mail: sales@datavideo.in
India Kochi
Datavideo India Kochi
2nd Floor- North Wing, Govardhan Building,
Opp. NCC Group Headquaters, Chittoor Road,
Cochin- 682035
Tel: +91 4844-025336
Fax:+91 4844-047696
Netherlands
Data video Technologies Europe B V
Floridadreef 106
3565 AM Ut rech t,
Th e Netherlands
Tel: +31-30-261-9 6-56
Fa x: +31-30-261-9 6-57
E-mail: info@dat av ideo.n l
Singapore
Datavideo Visual Technology(S) Pte Ltd
No. 178 Paya Lebar Road #06-07
Singapore 409030
Tel: +65-6749 6866
Fa x:+65-6749 3266
E-mail:info@datavideovirtualset.com
Singapore
Data video Technologies (S ) PTE Lt d
No. 178 Paya Lebar Road #06-03
Singapore 409030
Tel: +65-6749 6866
Fa x:+65-6749 3266
E-mail:s ales@dat av ideo.sg
Taiwan
Datavideo Technologies Co. Lt d
10F. No. 176, Jian 1st Rd.,Chung Ho
District, New Taipei City 235, Taiwan
Tel: +886-2-8227-2888
Fax:+886-2-8227-2777
E-mail:service@dat avideo.com.tw
United States
Datavideo Corporat ion
7048 Elmer Avenue.
Whittier, C A 90602,
U.S.A.
Tel: +1-562-696 2324
Fax:+1-562-698 6930
E-mail:sales@datavideo.comE-mail: sales@datavideo.in
United Kingdom
Data video U K Limi te d
Brookfield House, Brookfield Industrial
Estate, Peakdale Road, Glossop,
Derbyshire, SK13 6LQ
Tel: +44-1457 851 000
Fa x: +44-1457 850 964
E-mail: sales@dat avideo.co. uk
France
Datavideo France s.a.r.l.
Cité Descartes 1, rue Albert Einstein
Champs sur Marne 774477 –
Marne la Vallée cedex 2
Tel: +33-1-60370246
Fa x: +33-1-60376732
E-mail: info@datavideo.fr
Please visit our website for latest manual update.
www.datavideo.com/product/DVS-200
All the trademarks are the properties of their respective owners. Datavideo Technologies Co., Ltd. All rights reserved 2018
Jul-20.2018
Jul-17.2017
 Loading...