

Page 1
Colour Television Chassis
SK5.0L
CA
H_17220_000.eps
210607
Contents Page
1. Technical Specifications, Connections, and Chassis
Overview 2
2. Safety Instructions, Warnings, and Notes 4
3. Directions for Use 5
4. Mechanical Instructions 6
5. Service Modes, Error Codes, and Fault Finding 8
6. Block Diagrams, Test Point Overview, and
Waveforms
Block Diagram Chassis 9
Schematic Overview Chassis 10
7. Circuit Diagrams and PWB Layouts
Mono Carrier: Power Supply (A1) 11 19-20
Mono Carrier: Line Deflection (A2) 12 19-20
Mono Carrier: Frame Deflection (A3) 13 19-20
Mono Carrier: Tuner IF (A4) 14 19-20
Mono Carrier: AV Switch (A5) 15 19-20
Mono Carrier: Tone Control (Optional) (A6) 16 19-20
Mono Carrier: Audio Amplifier (A7) 17 19-20
Mono Carrier: CPU & Decoder (A8) 18 19-20
CRT Board (B) 21 19-20
Keyboard Control Panel (D) 22 23
Mains Filter Panel (E) 24 24
Side A/V Panel (G) 25 25
8. Alignments 29
9. Circuit Descriptions, Abbreviation List, and IC Data
Sheets 34
Abbreviation List 35
IC Data Sheets 36
10. Spare Parts List 51
11. Revision List 54
©
Copyright 2007 Philips Consumer Electronics B.V. Eindhoven, The Netherlands.
All rights reserved. No part of this publication may be reproduced, stored in a
retrieval system or transmitted, in any form or by any means, electronic,
mechanical, photocopying, or otherwise without the prior permission of Philips.
Published by JY 0768 BU CD Customer Service Printed in the Netherlands Subject to modification EN 3122 785 17460
Page 2
EN 2 SK5.0l CA1.
Technical Specifications, Connections, and Chassis Overview
1. Technical Specifications, Connections, and Chassis Overview
Index of this chapter:
1.1 Technical Specifications
1.2 Connection Overview
1.3 Chassis Overview (Mechanical chassis)
Note: Data below can deviate slightly from the actual situation,
due to the different set executions.
1.1 Technical Specifications
1.1.1 Vision
Display type : CRT
Screen size : 29” (72 cm), 4:3
Tuning system : PLL
TV Colour systems : NTSC, PAL M, N
Video playback : NTSC,
Presets/channels : 181 channels
Tuner bands : VHF
1.1.2 Sound
Sound systems : Stereo, SAP
Maximum power (W
):2 x 5
RMS
1.1.3 Miscellaneous
Power supply:
- Mains voltage (V
) : 100 - 240
AC
- Mains frequency (Hz) : 50 / 60
Ambient conditions:
- Temperature range (°C) : -5 to +45
- Maximum humidity : 90% R.H.
: UHF
1.2 Connection Overview
Note: The following connector colour abbreviations are used
(acc. to DIN/IEC 757): Bk= Black, Bu= Blue, Gn= Green, Gy=
Grey, Rd= Red, Wh= White, and Ye= Yellow.
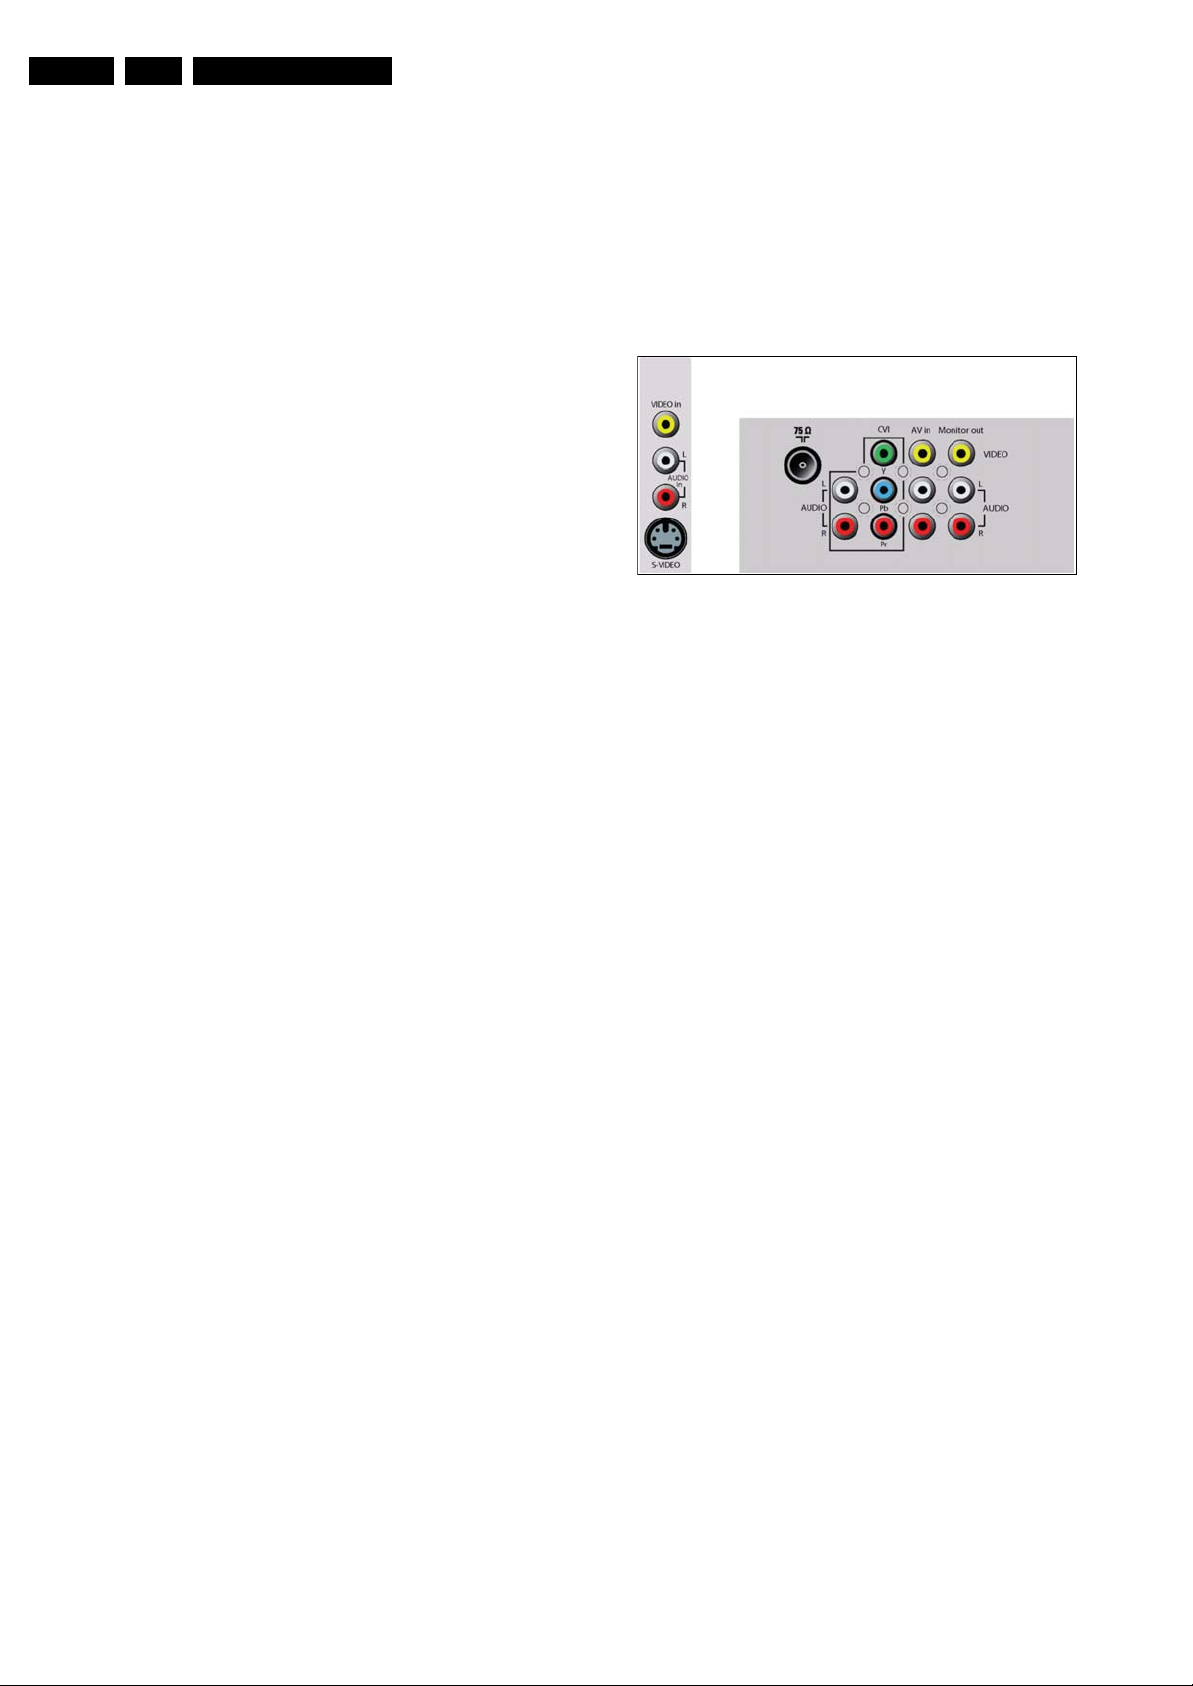
1.2.1 Rear and Side Connections
Figure 1-1 Rear and Side Connections
Aerial - In
- -F-connector Coax, 75 ohm D
Cinch: Video YPbPr - In
Gn -Video Y 1 V
Bu -Video Pb 0.7 V
Rd - Video Pr 0.7 V
Wh -Audio L 0.5 V
Rd - Audio R 0.5 V
Cinch: Video CVBS - In, Audio - In
Ye -Video CVBS 1 V
Wh -Audio L 0.5 V
Rd - Audio R 0.5 V
/ 75 ohm jq
PP
/ 75 ohm jq
PP
/ 75 ohm jq
PP
/ 10 kohm jq
RMS
/ 10 kohm jq
RMS
/ 75 ohm jq
PP
/ 10 kohm jq
RMS
/ 10 kohm jq
RMS
H_17220_035.eps
280607
Power consumption
- Normal operation (W) : ≈ 105
- Stand-by (W) : < 3
Cinch: Video CVBS - Out, Audio - Out
Ye -Video CVBS 1 V
Wh -Audio L 0.5 V
Rd - Audio R 0.5 V
/ 75 ohm kq
PP
/10 kohm kq
RMS
/ 10 kohm kq
RMS
Page 3
Technical Specifications, Connections, and Chassis Overview
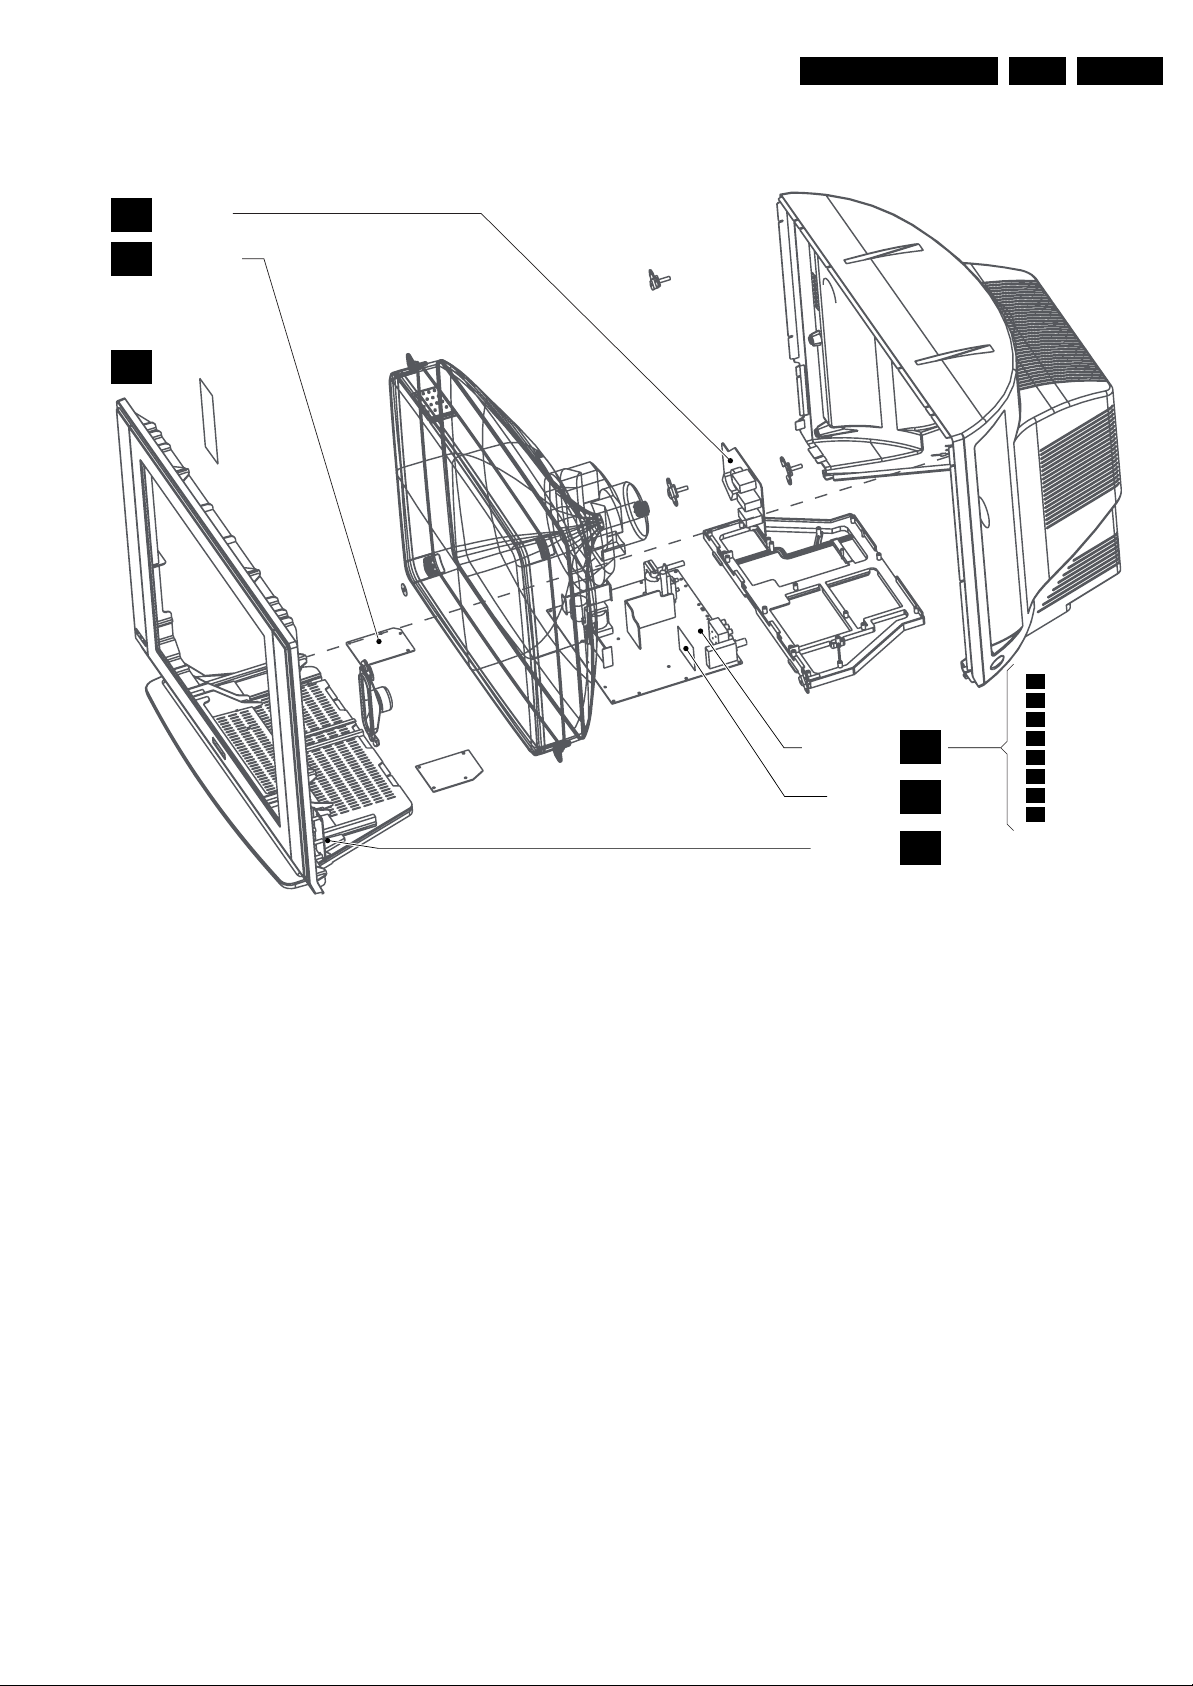
1.3 Chassis Overview (Mechanical chassis)
CRT BOARD
B
MAINS FILTER
E
CONTROL PANEL
D
EN 3SK5.0l CA 1.
Figure 1-2 PWB location
MONO CARRIER
BTSC PANEL
SIDE AV PANEL
A
M
G
POWER SUPPLY
A1
A2
LINE DEFLECTION
A3
FRAME DEFLECTION
A4
TUNER IF
A5
AV SWITCH
A6
TONE CONTROL
A7
AUDIO AMPLIFIER
A8
CPU & DECODER
H_17220_024.eps
280607
Page 4
EN 4 SK5.0l CA2.
Safety Instructions, Warnings, and Notes
2. Safety Instructions, Warnings, and Notes
Index of this chapter:
2.1 Safety Instructions
2.2 Maintenance Instructions
2.3 Warnings
2.4 Notes
2.1 Safety Instructions
Safety regulations require the following during a repair:
• Connect the set to the Mains/AC Power via an isolation
transformer (> 800 VA).
• Replace safety components, indicated by the symbol h ,
only by components identical to the original ones. Any
other component substitution (other than original type) may
increase risk of fire or electrical shock hazard.
• Wear safety goggles when you replace the CRT.
Safety regulations require that after a repair, the set must be
returned in its original condition. Pay in particular attention to
the following points:
• General repair instruction: as a strict precaution, we advise
you to re-solder the solder connections through which the
horizontal deflection current flows. In particular this is valid
for the:
1. Pins of the line output transformer (LOT).
2. Fly-back capacitor(s).
3. S-correction capacitor(s).
4. Line output transistor.
5. Pins of the connector with wires to the deflection coil.
6. Other components through which the deflection current
flows.
Note: This re-soldering is advised to prevent bad connections
due to metal fatigue in solder connections, and is therefore only
necessary for television sets more than two years old.
• Route the wire trees and EHT cable correctly and secure
them with the mounted cable clamps.
• Check the insulation of the Mains/AC Power lead for
external damage.
• Check the strain relief of the Mains/AC Power cord for
proper function, to prevent the cord from touching the CRT,
hot components, or heat sinks.
• Check the electrical DC resistance between the Mains/AC
Power plug and the secondary side (only for sets that have
a Mains/AC Power isolated power supply):
1. Unplug the Mains/AC Power cord and connect a wire
between the two pins of the Mains/AC Power plug.
2. Set the Mains/AC Power switch to the "on" position
(keep the Mains/AC Power cord unplugged!).
3. Measure the resistance value between the pins of the
Mains/AC Power plug and the metal shielding of the
tuner or the aerial connection on the set. The reading
should be between 4.5 Mohm and 12 Mohm.
4. Switch "off" the set, and remove the wire between the
two pins of the Mains/AC Power plug.
• Check the cabinet for defects, to prevent touching of any
inner parts by the customer.
2.2 Maintenance Instructions
We recommend a maintenance inspection carried out by
qualified service personnel. The interval depends on the usage
conditions:
• When a customer uses the set under normal
circumstances, for example in a living room, the
recommended interval is three to five years.
• When a customer uses the set in an environment with
higher dust, grease, or moisture levels, for example in a
kitchen, the recommended interval is one year.
• The maintenance inspection includes the following actions:
1. Perform the “general repair instruction” noted above.
2. Clean the power supply and deflection circuitry on the
chassis.
3. Clean the picture tube panel and the neck of the picture
tube.
2.3 Warnings
• In order to prevent damage to ICs and transistors, avoid all
high voltage flashovers. In order to prevent damage to the
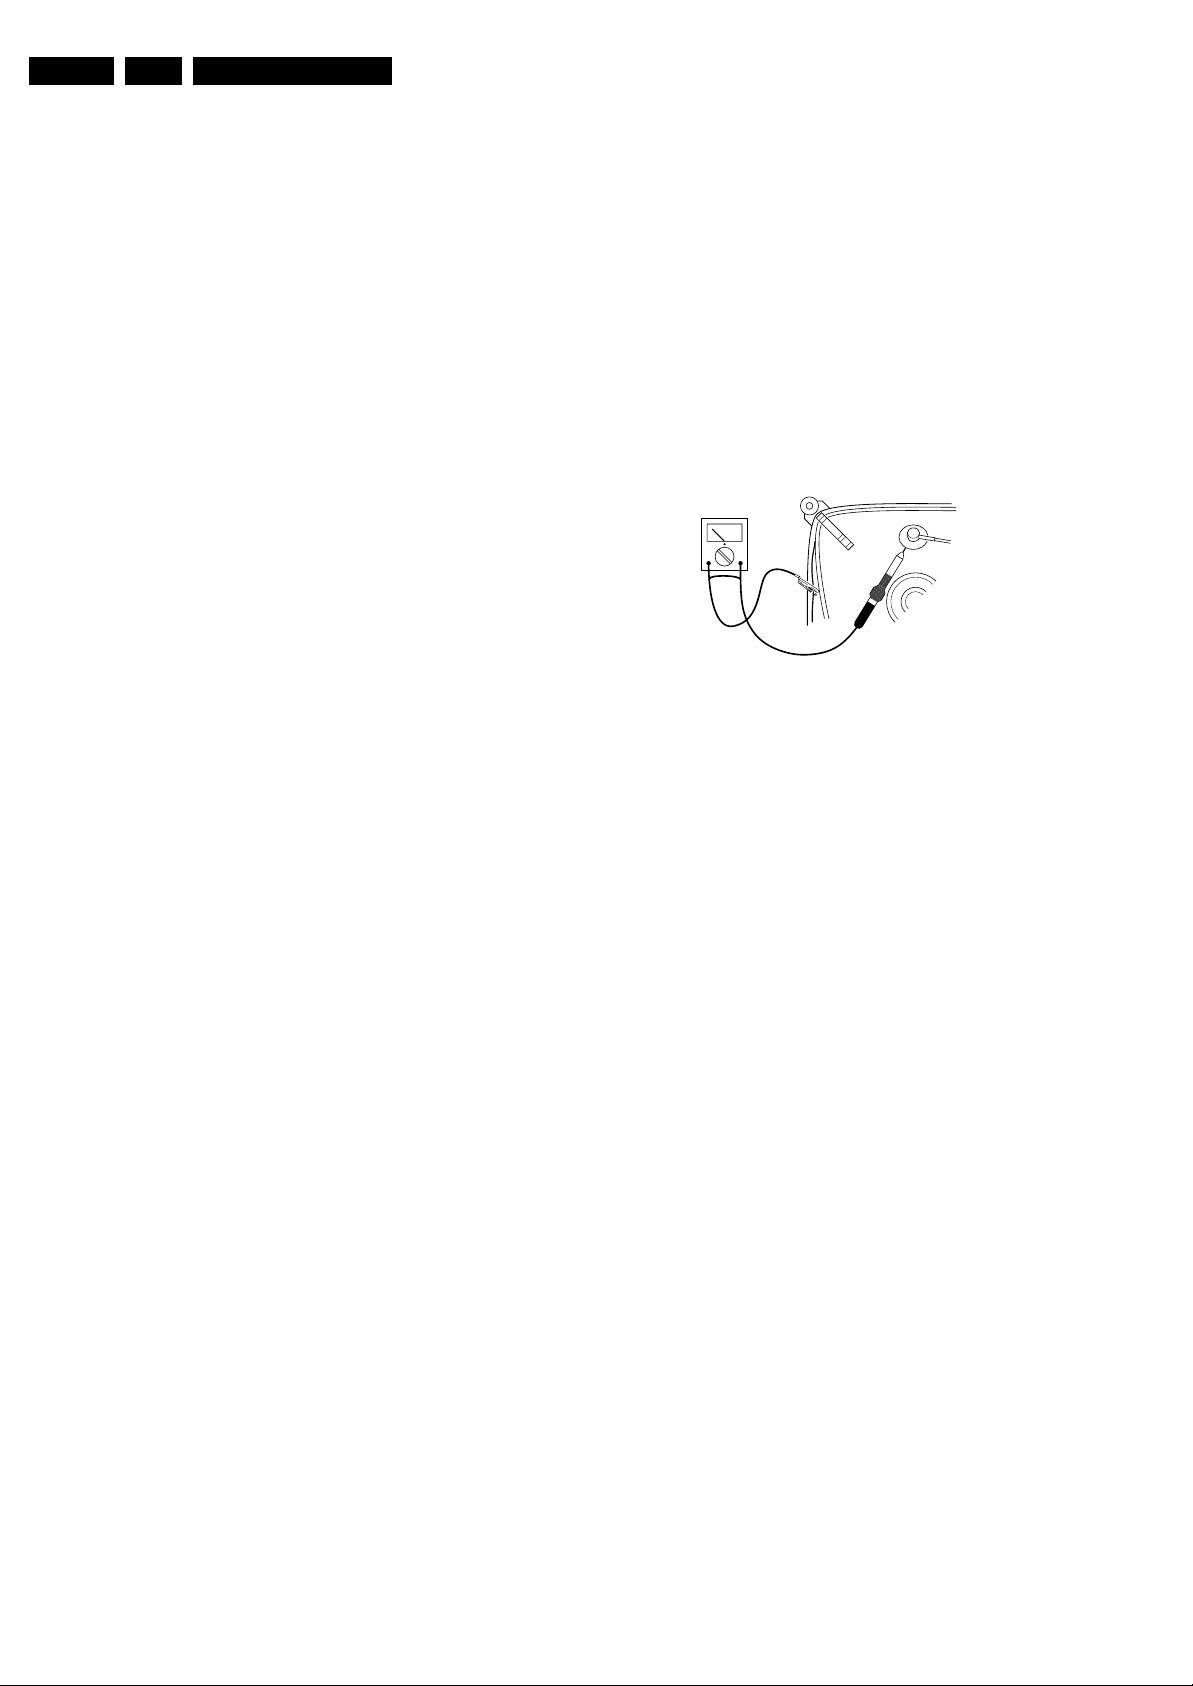
picture tube, use the method shown in figure “Discharge
picture tube”, to discharge the picture tube. Use a high
voltage probe and a multi-meter (position V
until the meter reading is 0 V (after approx. 30 s).
V
E_06532_007.eps
250304
Figure 2-1 Discharge picture tube
• All ICs and many other semiconductors are susceptible to
electrostatic discharges (ESD w ). Careless handling
during repair can reduce life drastically. Make sure that,
during repair, you are connected with the same potential as
the mass of the set by a wristband with resistance. Keep
components and tools also at this same potential.
• Be careful during measurements in the high voltage
section.
• Never replace modules or other components while the unit
is switched "on".
• When you align the set, use plastic rather than metal tools.
This will prevent any short circuits and prevents circuits
from becoming unstable.
2.4 Notes
2.4.1 General
• Measure the voltages and waveforms with regard to the
chassis (= tuner) ground (H), or hot ground (I ), depending
on the tested area of circuitry. The voltages and waveforms
shown in the diagrams are indicative. Measure them in the
Service Default Mode (see chapter 5) with a colour bar
signal and stereo sound (L: 3 kHz, R: 1 kHz unless stated
otherwise) and picture carrier at 475.25 MHz for PAL, or
61.25 MHz for NTSC (channel 3).
• Where necessary, measure the waveforms and voltages
with (D ) and without (E ) aerial signal. Measure the
voltages in the power supply section both in normal
operation (G ) and in stand-by (F ). These values are
indicated by means of the appropriate symbols.
• The semiconductors indicated in the circuit diagram and in
the parts lists, are interchangeable per position with the
semiconductors in the unit, irrespective of the type
indication on these semiconductors.
• Manufactured under license from Dolby Laboratories.
“Dolby”, “Pro Logic” and the “double-D symbol”, are
trademarks of Dolby Laboratories.
). Discharge
DC
Page 5

Directions for Use
EN 5SK5.0l CA 3.
2.4.2 Schematic Notes
• All resistor values are in ohms, and the value multiplier is
often used to indicate the decimal point location (e.g. 2K2
indicates 2.2 kohm).
• Resistor values with no multiplier may be indicated with
either an "E" or an "R" (e.g. 220E or 220R indicates
220 ohm).
• All capacitor values are given in micro-farads (μ= x10
nano-farads (n= x10
• Capacitor values may also use the value multiplier as the
decimal point indication (e.g. 2p2 indicates 2.2 pF).
• An "asterisk" (*) indicates component usage varies. Refer
to the diversity tables for the correct values.
• The correct component values are listed in the Spare Parts
List. Therefore, always check this list when there is any
doubt.
2.4.3 Lead-free Soldering
Due to lead-free technology some rules have to be respected
by the workshop during a repair:
• Use only lead-free soldering tin Philips SAC305 with order
code 0622 149 00106. If lead-free solder paste is required,
please contact the manufacturer of your soldering
equipment. In general, use of solder paste within
workshops should be avoided because paste is not easy to
store and to handle.
• Use only adequate solder tools applicable for lead-free
soldering tin. The solder tool must be able:
– To reach a solder-tip temperature of at least 400°C.
– To stabilize the adjusted temperature at the solder-tip.
– To exchange solder-tips for different applications.
• Adjust your solder tool so that a temperature of around
360°C - 380°C is reached and stabilized at the solder joint.
Heating time of the solder-joint should not exceed ~ 4 sec.
Avoid temperatures above 400°C, otherwise wear-out of
tips will increase drastically and flux-fluid will be destroyed.
To avoid wear-out of tips, switch “off” unused equipment or
reduce heat.
• Mix of lead-free soldering tin/parts with leaded soldering
tin/parts is possible but PHILIPS recommends strongly to
-9
), or pico-farads (p= x10
-12
avoid mixed regimes. If this cannot be avoided, carefully
clear the solder-joint from old tin and re-solder with new tin.
2.4.4 Alternative BOM identification
In September 2003, Philips CE introduced a change in the way
the serial number (or production number, see Figure 2-2) is
-6
),
).
composed. From this date on, the third digit in the serial
number (example: AG2B0335000001) indicates the number of
the alternative BOM (Bill of Materials used for producing the
specific model of TV set). It is possible that the same TV model
on the market is produced with e.g. two different types of
displays, coming from two different O.E.M.s.
By looking at the third digit of the serial number, the service
technician can see if there is more than one type of B.O.M.
used in the production of the TV set he is working with. He can
then consult the At Your Service Web site, where he can type
in the Commercial Type Version Number of the TV set (e.g.
28PW9515/12), after which a screen will appear that gives
information about the number of alternative B.O.M.s used.
If the third digit of the serial number contains the number 1
(example: AG1B033500001), then there is only one B.O.M.
version of the TV set on the market. If the third digit is a 2
(example: AG2B0335000001), then there are two different
B.O.M.s. Information about this is important for ordering the
correct spare parts!
For the third digit, the numbers 1...9 and the characters A...Z
can be used, so in total: 9 plus 26 = 35 different B.O.M.s can
be indicated by the third digit of the serial number.
2.4.5 Practical Service Precautions
• It makes sense to avoid exposure to electrical shock.
While some sources are expected to have a possible
dangerous impact, others of quite high potential are of
limited current and are sometimes held in less regard.
• Always respect voltages. While some may not be
dangerous in themselves, they can cause unexpected
reactions that are best avoided. Before reaching into a
powered TV set, it is best to test the high voltage insulation.
It is easy to do, and is a good service precaution.
3. Directions for Use
You can download this information from the following websites:
http://www.philips.com/support
http://www.p4c.philips.com
Page 6
EN 6 SK5.0l CA4.
Mechanical Instructions
4. Mechanical Instructions
Index of this chapter:
4.1 Set Disassembly
4.2 Assembly / Board Removal
4.3 Set Re-assembly
Note: Figures below can deviate slightly from the actual
situation, due to the different set executions.
4.1 Set Disassembly
Follow the disassemble instructions in described order.
4.1.1 Rear Cover Removal
Warning: disconnect the mains power cord before you remove
the rear cover.
1. Remove all the fixation screws of the rear cover.
2. Now, pull the rear cover backwards and remove it.
4.2 Assembly / Board Removal
4.2.1 Power Switch and Control Panel removal
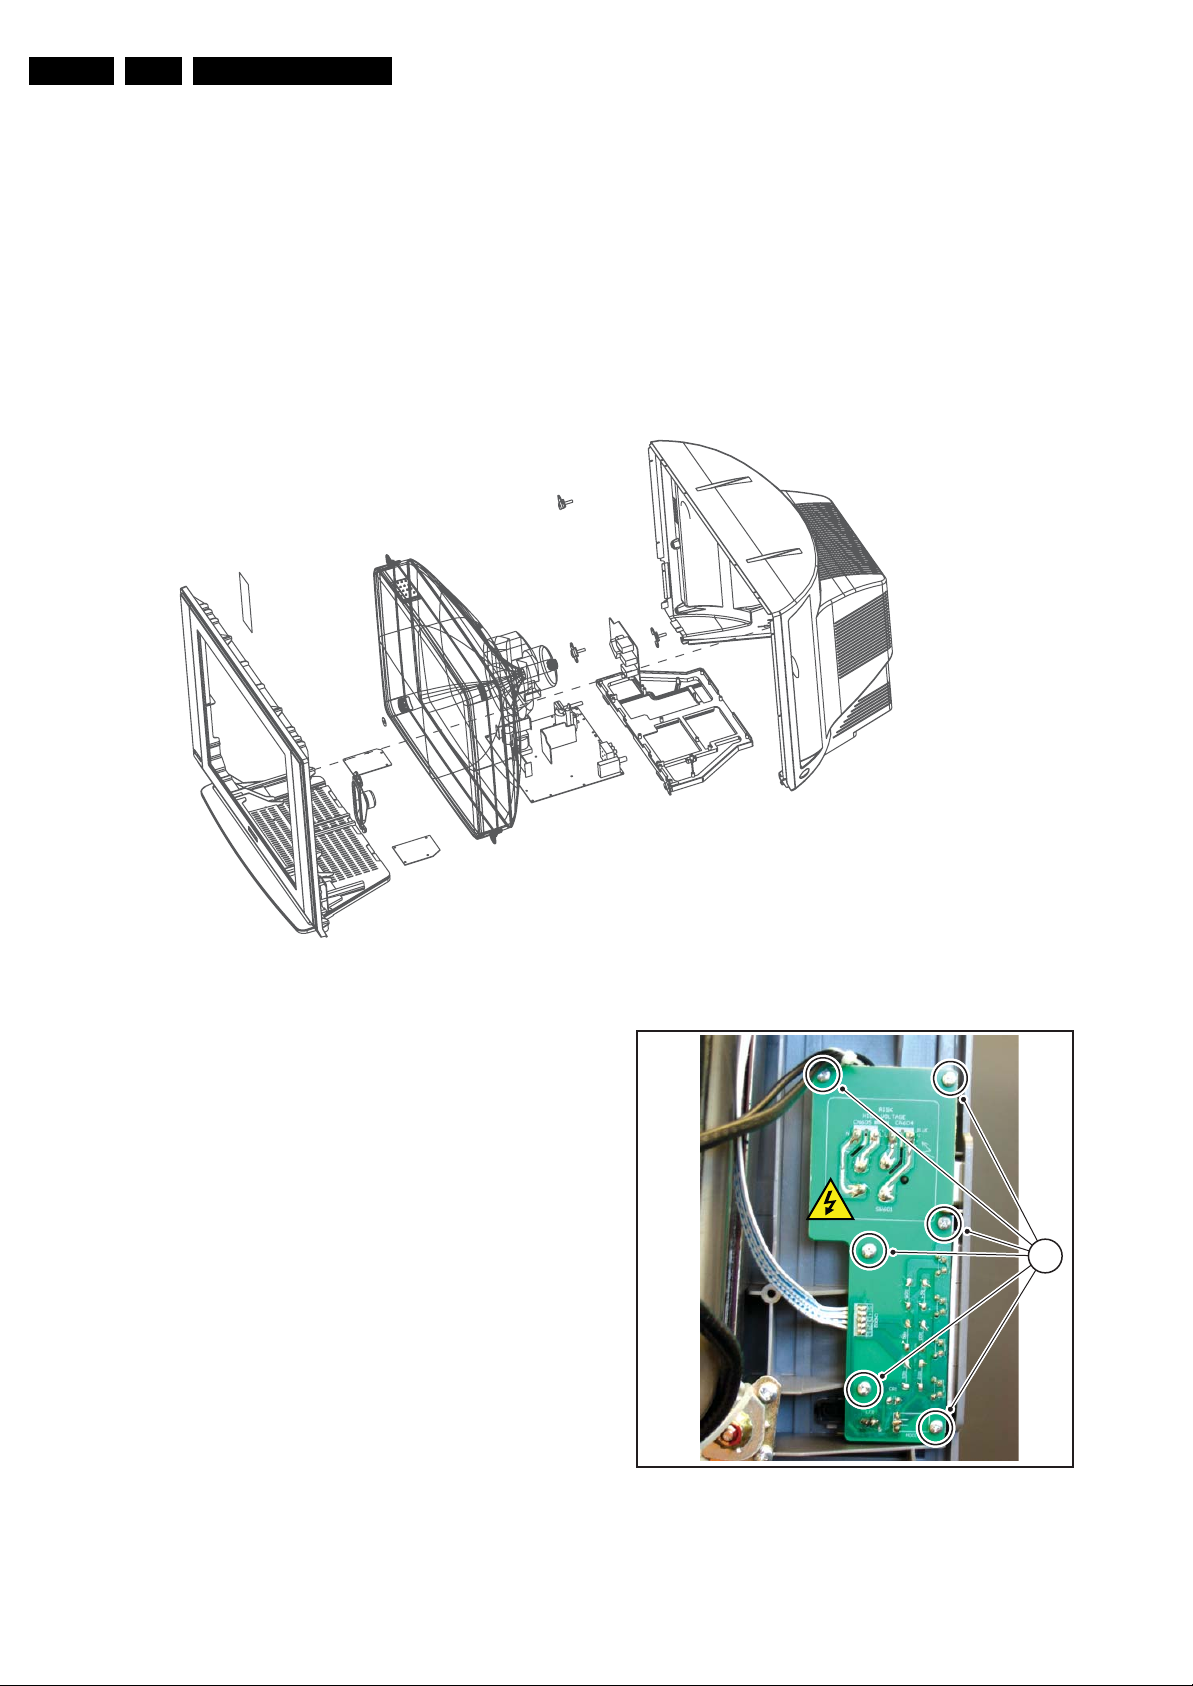
1. From the mono carrier disconnect the main power and the
keyboard circuit cables. Release the main power cord and
the keyboard circuit cable from it’s strain reliefs.
2. Then, remove the six fixation screws [1] of the power
switch and control panel and remove the board.
Figure 4-1 Rear Cover removal
H_17220_036.eps
280607
1
H_17230_027.eps
290607
Figure 4-2 Power Switch and Control Panel removal
Page 7
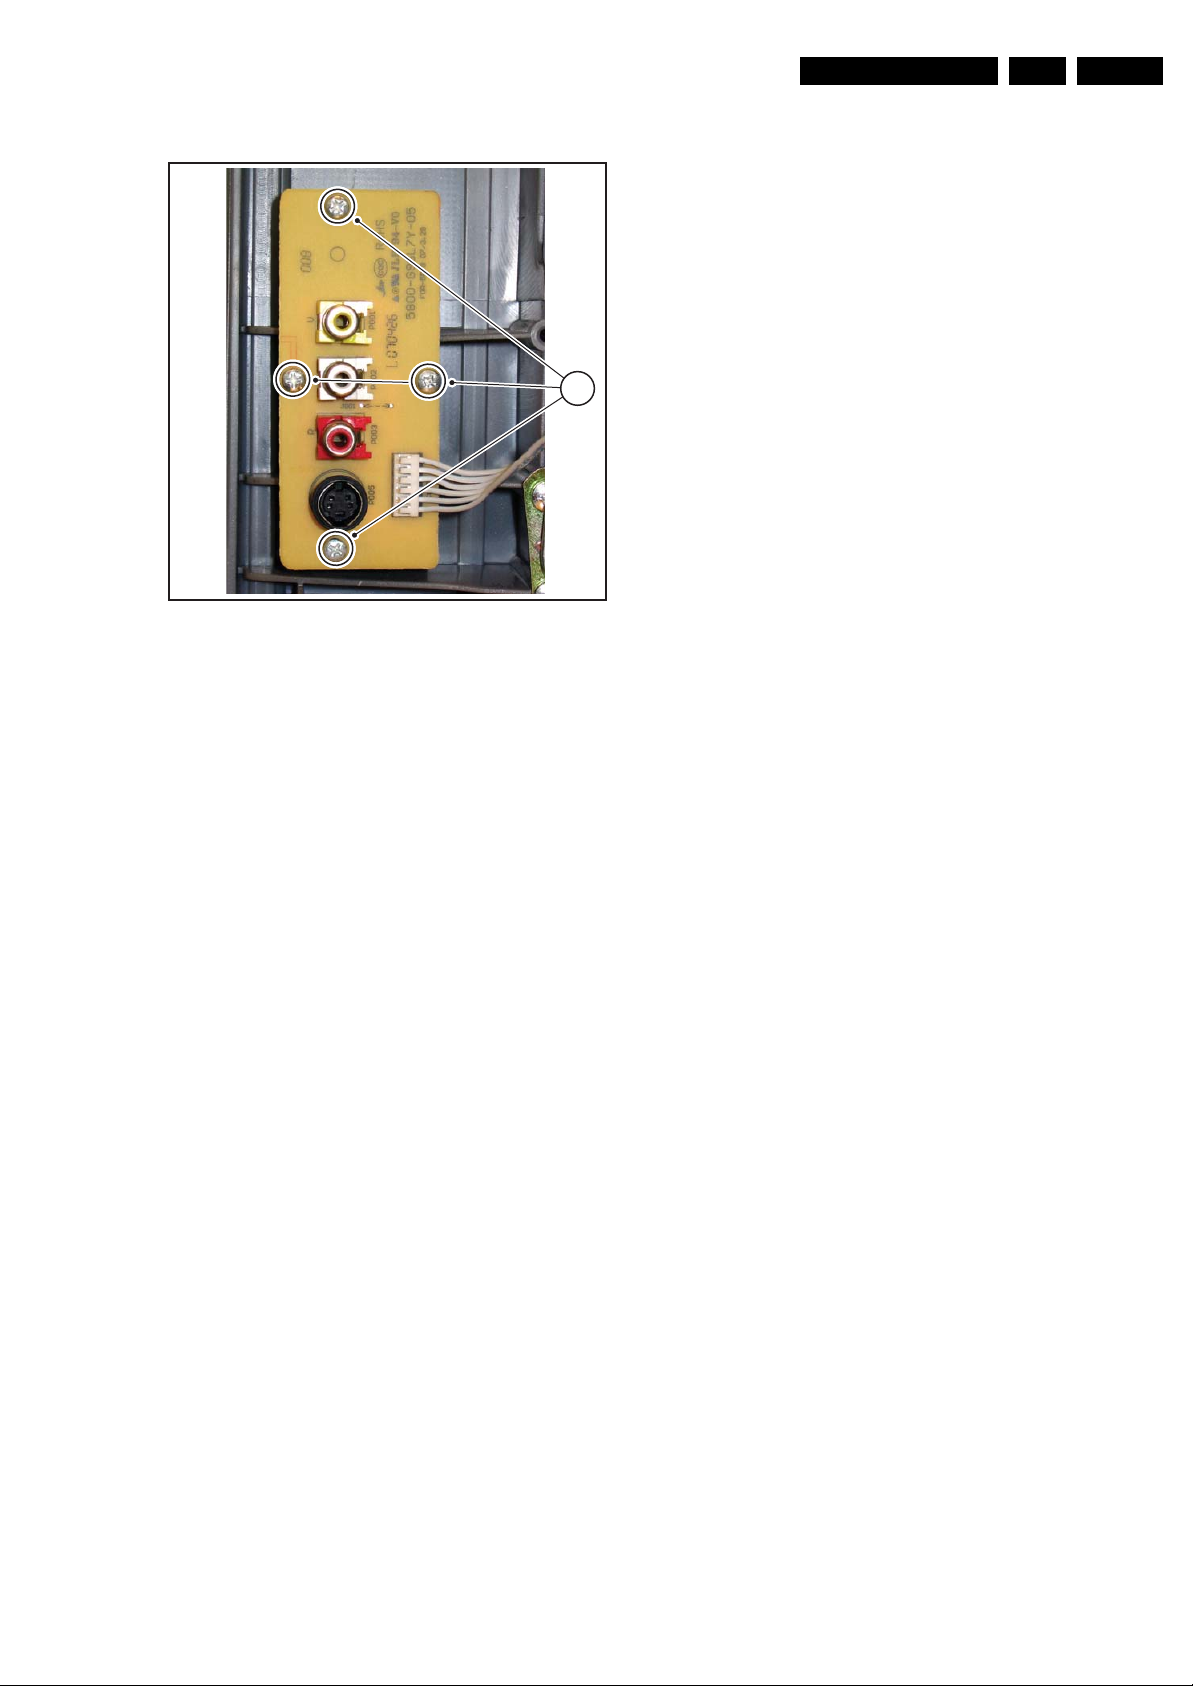
4.2.2 Side I/O Panel removal
Mechanical Instructions
1
H_17220_023.eps
210607
EN 7SK5.0l CA 4.
Figure 4-3 Side-I/O panel removal
1. Disconnect the side panel cable from the mono carrier and
remove the cable from it’s strain reliefs.
2. Then, remove the four fixation screws [1] and remove the
board.
4.3 Set Re-assembly
To re-assemble the whole set, do all processes in reverse
order.
Be sure that, before the rear cover is mounted:
• The mains cord is positioned correctly in its guiding
brackets (make sure that the strain reliefs are replaced in
its correct position and that it will function correctly!).
• All wires/cables are returned in their original positions.
Page 8

EN 8 SK5.0l CA5.
Service Modes, Error Codes, and Fault Finding
5. Service Modes, Error Codes, and Fault Finding
Index of this chapter:
5.1 Test Points
5.2 Service Modes
5.3 Error Codes
5.4 Fault Finding
5.1 Test Points
See chapter 6 "Block Diagrams, Testpoint Overviews, and
Waveforms".
Perform measurements under the following conditions:
• Service Default Mode.
• Video: colour bar signal.
• Audio: 3 kHz left, 1 kHz right.
5.2 Ser vice Modes
This chassis does not contain a specific Service Mode. Service
and Alignment of the TV set can be done via the Factory Mode
by the service technician, see further down in this manual.
5.3 Error Codes
Not applicable.
5.4.6 Picture not or incorrect Coloured
• Check the circuit from IC201 to R.G.B. three gun circuit.
• Check the IC soldering and relevant circuitry on physical
damage or check for defective capacitors.
5.4.7 Picture with Horizontal Bright Line and Sound
Check both supply voltages of vertical IC301 and relevant
circuitry on correctness. Also check the vertical synchronizing
signal from IC201.
5.4.8 Remote Control Malfunction
Check the voltage on pin 64 of IC201. The normal value should
be 5.15 V. If this is correct check front control panels soldering
connections. If can't be solved, check the remote control,
crystal or transmitting diode of the remote control are in good
condition.
5.4.9 No Sound
Check power supply of sound IC (IC402) and relevant circuitry.
Check as well the BTSC board, check the power supply of
IC801 and relevant output signal pins 21 and 27 of this IC. Do
not exclude IC801 and/or IC402 to be defective. If needed
replace the speakers.
5.4 Fault Finding
5.4.1 Power on Failure
Check whether the power supply is working properly and
whether the values of voltages normal. If those are correct,
check line transistor and transformer are working properly or
check fore or back line for defects.
5.4.2 Horizontal Deflection Transistor Defective: No Picture, No Sound.
To find the fault for a defect horizontal deflection transistor
please check the following items:
• Over voltage to breakdown.
• Over current to burn.
• Horizontal frequency too low.
• Horizontal drive inefficient.
5.4.3 Picture Interference
• Check if the signal line contact is good.
• Change Tuner if is necessary.
5.4.4 Can't find any TV program
Checking method: Check the closed circuit from tuner to
picture decoder IC to detect whether there are defective
components. Or check whether the resistance of R117, R118,
R203 and R204 has increased which also could cause the
problem.
5.4.10 Poor Sound Quality
Check the sound system after searching the channel which
should set at NTSC or AUTO. If still has problem, check
accompany board circuit on chassis good or not.
5.4.5 No Good Picture or Double Image
Check the correctness of the signal from IF1/IF2 to Q101 and
relevant circuit. In this case the problem can be Q101 and/or
SAW101.
Page 9
Block Diagrams, Test Point Overview, and Waveforms
A1
A2
A3
A4
A5
A6
A7
A8
B
M
G
6. Block Diagrams, Test Point Overview, and Waveforms
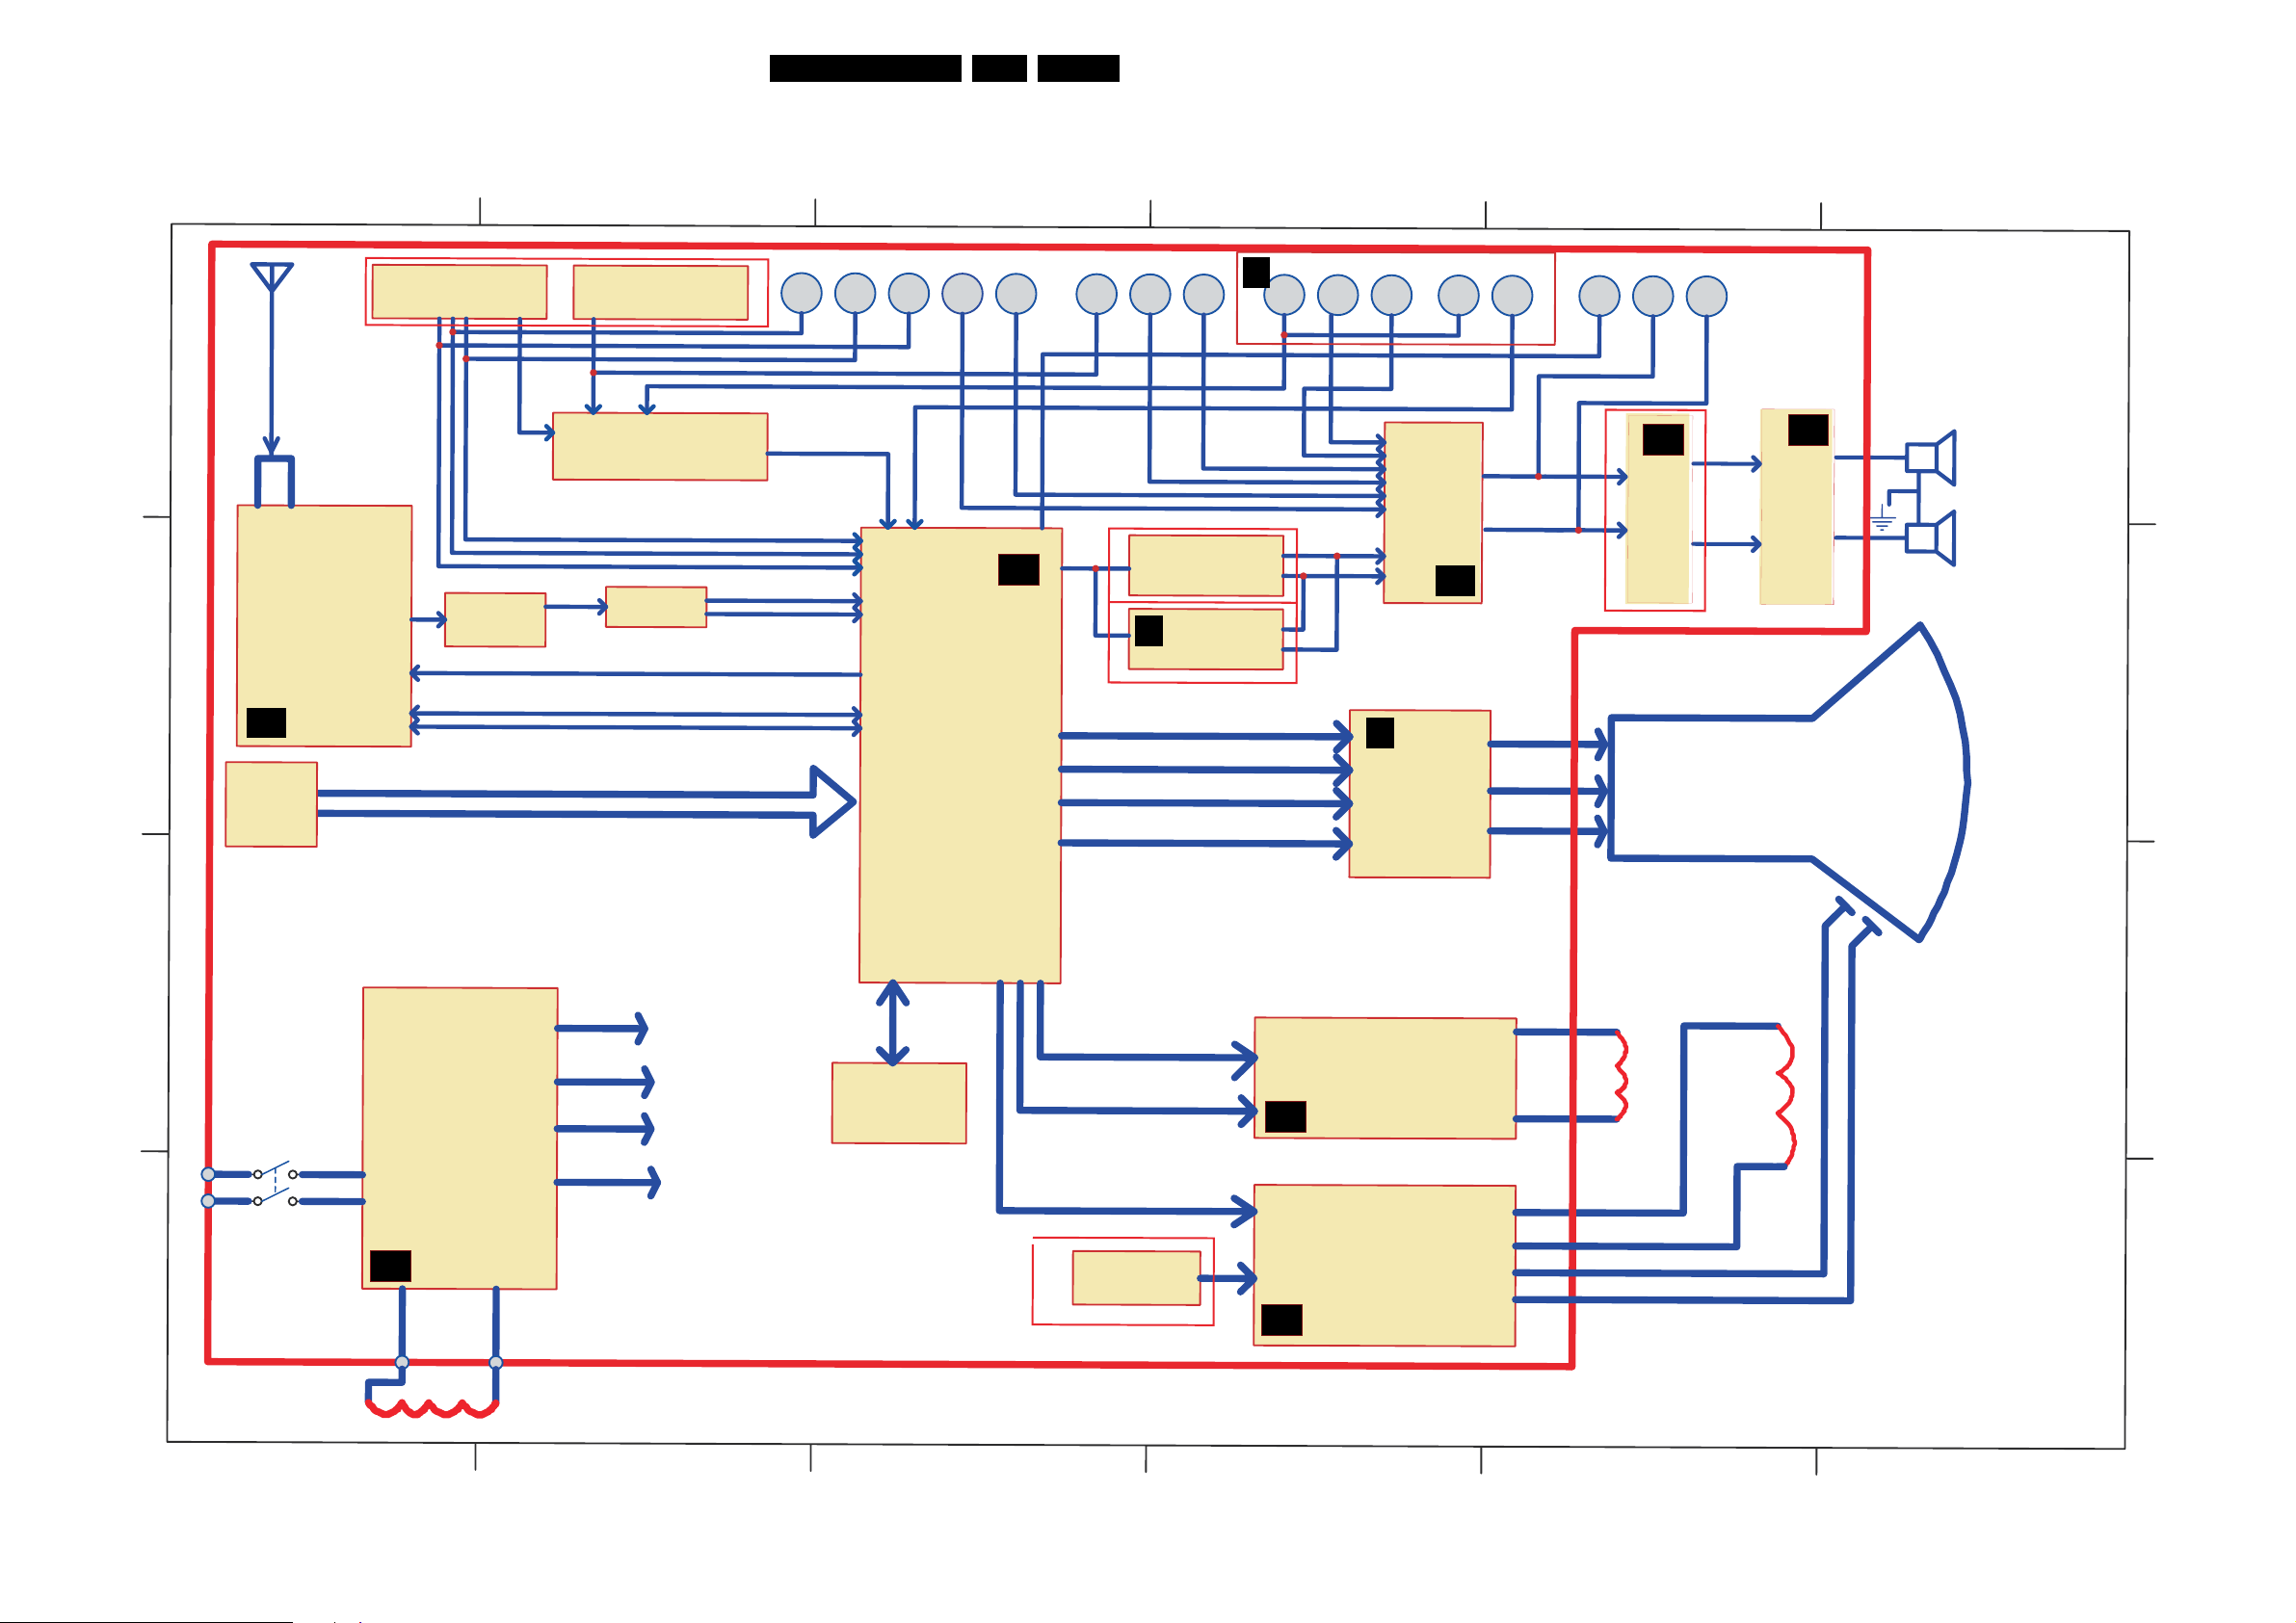
Block Diagram Chassis
EN 9SK5.0A CA 6.
<
75$&6
1(71$
$1
'
187
(
&
A4
4
H.
R&\
UWQ
OR
QL9
%*5
,5
),
30$)
/&6
$'6
75$&6
QL9
RHGL9
QX7
9HGLV
)(+:6
:$6
&*$UH
8
9
$
9
L
Q
&
),
$'7
7'$$3?0(
2,'8$
/
5
QL
&9%6 287
A8
&2863,/,+3
DLGQ,
$(5
5
9$
9
/
$'70$&,1
$'7670
5
*
%
9
$96: +()
$2%75&
5
'
A5
6+969$(',6
/
5
7829$
&<5/95
9
A6
5/
'
A7
/
5
/36
536
7'$
721( &21752/
7825
782*
782%
$037'$
75&
&
)5520,/6
%
$
99
9
)
2
%5
23
:
:6
$:
</33865(
9
)
52
G+
U
HYL
&
)9
2
5
1,$0
)9
2
30$5
+
XR
A1
RD9
X
W
$'730$9
RE9
WX
-$
A3
W
/6
,
0
3
75$
(9,5'+
9'<
+'<
A2
/,2&*('
H_17460_008.eps
%
$
280907
Page 10
Block Diagrams, Test Point Overview, and Waveforms
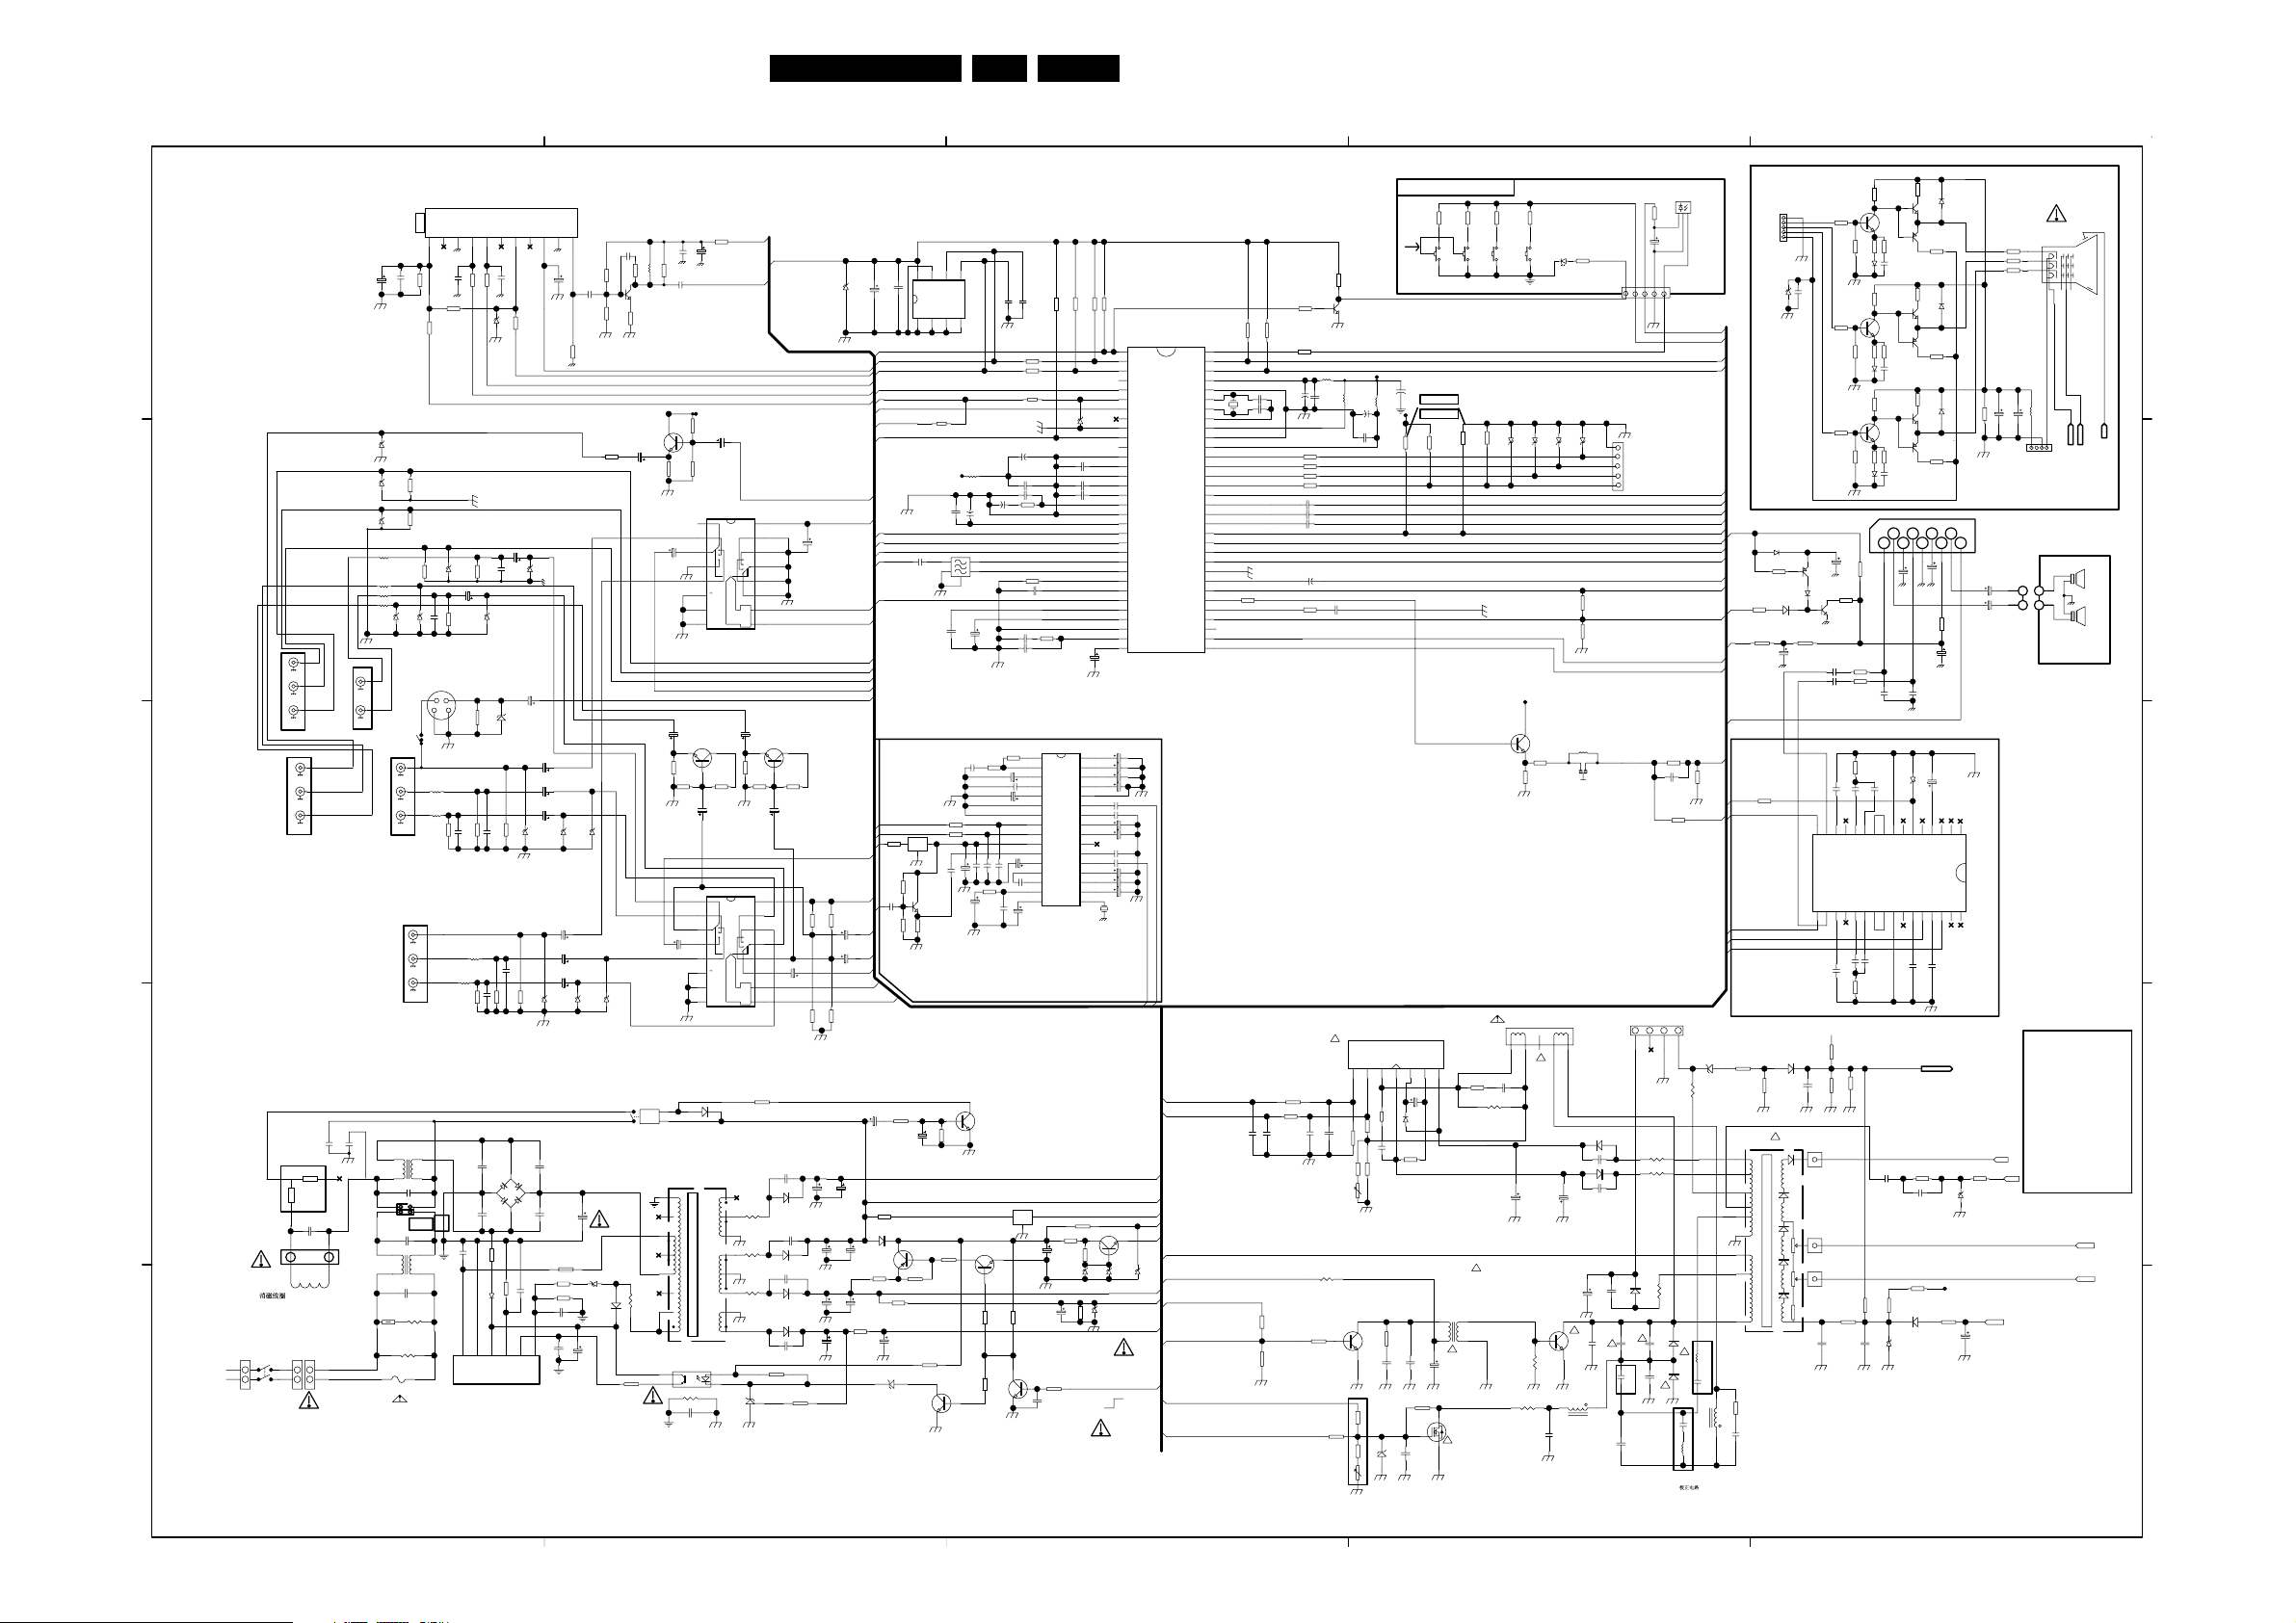
EN 10SK5.0A CA 6.
Schematic Overview Chassis
C110
E
VO
V
Y
U
D
LO
RO
Y
P701
U
YUV
V
V out
L out
P701
AV OUT
R out
C
B
AC220V 470PF
Rs
23
PTC601
Rp
9RM
1
C600
0.1uF/250V
CN603
DEGAUSSING
BLUE
CN601A
CN601B
SW601
1
1
AC90-270V
A
2
2
BROWN
C109
NC
10uF
8V2
ZD714
8V2
ZD705
8V2
L705
15uH
L702
33uH
L706
15uH
L701
33uH
ZD703
8V2
L
R
P701
SIDE AV IN
P701
REAR AV IN
C611
AC220V 470PF
C612
25mH
CN604
N
N
CN602
25mH
0.22uF/250V
VDR601
GAS DISCHAR GE
TUBE
CN601
N
2
1
L
1 2 3 4 5
R601
2.2M 1/2W
F601
T3.15A
AC250V
AGC1NC2SAS3SCL4SDA5NC6BM +5V7NC8BT +33V9IFGND10IF
C111
C112
R111
R113
47K
P702
V IN
L IN
R IN
PFC 15mH×2
0.22uF/250V
C601
R721
75
R722
100
Y
C603
0.22uF
AC250V
L
L
FOR EMC
C602
L601
R603
R112
100
100
100pF
100pF
R109
10K
ZD713
8V2
R701
47K
C003
1000p
C717
10uF
C
R780
47K
L704
15uH
L703
15uH
R776
47K
C604
1000pF
1
D
ZD101
5V1
R702
C702
47K
1000p
ZD701
8V2
ZD707
R779
8V2
75
R778
100
C002
1000p
R775
47K
C776
1000p
C603A
4700pF
AB
D603
C603D
4700pF
R602
2
200K
D604
0
3
4
5FB6
VCC
S/GND
IC601
STR-W6556A
C716
10uF
ZD706
C783
1000p
R604
39K
OLP/SS
R110
180
R723
75
C701
1000pF
S-VHS
L002
15uH
L003
15uH
R777
47K
V IN
L IN
R IN
L603
FOR CB
R600
L602
NTC
5RM
4321
KEYBOARD CIRCUIT
M001
234
5V
KEY
CN102
TV AUDIO OUT
CN401
CONNECT TO H502
4
R450
0.22
R451
0.22
D433
BA158
!
630V
123
RR1
100
CR1
10uF/16V
5
IR
GND
+5V_VCC
KEY
A2
A1
BCL
U / B in
Y / G in
V / R in
BLANK
TV L+R
C IN
CVBS/Y IN
TV CVBS IN
8V
X-RAY
AFC
H-out
R728
TV CVBS IN
1K
R729
C?
1K2
220PF/50V
R727
CVBS OUT
100
123
ZD402
18V
R423
6.2 2W
2W
R433
0.33
1W
D430
BY228
C431
3n9
!
L432
790uH
D431
RU4B
C433
C465
33nF
!
0.47uF
C464
0.18uF
L431
160uH
FOR SLIM
S
RD4
U101
45.75MHz
11
C103
0.82uH
NG
R106NGL101
R103
5.6K
C405
C101
47uF
0.01u
Q101
+5V
R108
1
33
VIDEO OUT
ZD702
8V2
C785
10uF
C777
10uF
C772
10uF
C774
10uF
8V2
ZD711
ZD709
8V2
8V2
C778
10uF
C770
10uF
C773
10uF
R719
ZD712
100
8V2
C603B
4700pF
CD
C607
C603C
4700pF
220uF
450V
L604
R606
C605
6K8
0.1uF
R605
100V
220
C606
470pF
7
C609
10nF
OCP/BD
C2717
R102
1K2
R105
22
R101
75
Q703
C1815
C710
R717
68
470uF
ZD710
ZD708
8V2
8V2
RL601
RELAY
ZD602
18V
R607
22
D605
BA158
C608
10uF
R608
2K2
L109
1
100uH
C163
C164
100nF
220uF
R107
820
C105
10nF
+12V
R713
22K
C720
10uF
R711
R712
75
22K
IC761
HEF4052
1
2
SIDE AV
REAR AV
0
C779
OUT
3
1
10uF
2
3
4
5
6
E
7
Vee
89
Vss
VIDEO SWITCH
AUDIO L out
C708
10uF
Q702
C1815
R706
1K8
R710
R708
20K
20K
R?
ELECTRO1
OUT L
IC762
HEF4052
L
1
SIDE L
2
0
3
1
2
C775
3
4
10uF
5
REAR L
6
E
7
Vee
89
Vss
AUDIO SWITCH
D627
1N4148
T603
16 1
15
14
13
12
11
10
TRANSFORMER
IC622
OPTOISO1
R610
C610 0.0022uF
2
3
4
5
6
<45V>
7
89
8.2M
<20V>
<12V>
<135V>
+8V_VCC
Vdd
0
1
2
3
AUDIO R out
R705
1K8
Vdd
0
1
2
3
R624
0.22 2W
R622
0.22 2W
R621
0.22 2W
+5V_VCC
IF
C118
ZD102
C117
5V1
100uF
100nF
STANDBY
SCL
+32V_BT
SDA
+8V_VCC
SDA
OPTION
SCL
KEY
AGC
VOL
+3.3V
MUTE
CVBS OUT
Q701
C1815
R707
20K
R
C771
10uF
680pF 500V
C462
560pF 2KV
D623
RU4YX
680pF 500V
D622
BYW36
C620
D621
BA158
D620
RU4B
R627
6.2K
+12V_VCC
R746
47K
R747
47K
C625
1000uF
16V
C622
470uF
C621
100uF
200V
CVBS/Y IN
C742
10uF
C741
10uF
50V
V in
Y in
U in
TV L
+12V_VCC
AUDIO L
AUDIO R
TV R
C628
1000uF
25v
C626
1000uF
C629
1500uF
50V
R609
0.18 / 5W
EW
VDRB
VDRA
IF
AGC
A1
A2
C IN
SDA
SCL
+12V
C879
QSS
1uF
A1
A2
C640
220uF
R632
1
D626
BA158
16V
R647
0.51 2W
3
250V
C780
100uF
R745
47K
R744
47K
C627
1000uF
25V
C623
50V
16
15
14
13
12
11
10
C707
10uF
R709
20K
R?
ELECTRO1
OUT R
16
15
SIDE R
14
REAR R
13
12
11
10
R640
0
C624
680pF 500V
R630
680
IC621
SE120
R854
10
R644
R633
5K1
C632
47uF
IC852
L7809
R857
47K
R858
47K
10K
ZD620
5V1
Vdd8PTC7SCL
WP1n.c.2A23Vss
only for scart
0.1U/63V
C105
10nF
In Out
Gnd
Q851
C1815
R860
1K
C639
47uF
Q624
A1013
R639
10K
R631
1K
6
5
SDA
IC102
24C08
4
R122
10K
L205
+8V
10uH
C120
C119
+
10uF/16V
4
1
5
2
SAW101
3
Q1976M
C136
C137
33PF
10UF
C863
47nF
R855
100
R856 100
C878
C877
0.1uF
C851
10uF
1uF
R851
2K2
C853
4.7uF
BTSC BOARD
Q625
C1815
R643
47K
+12V
R649
2K2
Q622
C1815
R635
22K
R634
10K
Q621
C1815
C108
100pF
R133 100
R134
R135
10uF/16V
C128
C133
+
1uF/50V R138
R151
39K
C138
4.7nF
R852
R853
8K2
150
C864
10uF
C865
0.1uF
C866
4.7uF
C876
C875
100pF
100pF
C854
0.22uF
FOR LATAM
IC104
In Out
L7808
R648
22K
C107
100pF
47
C129
+
10nF
4n7
18K
0.1U/63V
C139
330pF
1
2
3
4
5
6
7
8
9
10
11
C869
12
100uF
13
C852
14
0.47uF
15
16 17
C855
10uF
Gnd
16V
Q623
C1815
R145
22K
100
C135
R139
3.9K
TDA9850
VEO
VEI
Cnr
Cm
Cdec
AGND
DGND
SDA
SCL
Vcc
COMP
Vcap
Cp1
Cp2
Cph
Cadj CER
C641
2200uF
C114
47uF
C634
0.1uF
50V
R120
100uF
R460
100
R457
1K
R121
Q106
C1815
10K
R140
100
L105
C145
+
C727
0.1uF
0.1uF
C726
C725
0.1uF
C116
+
R147
390
100
C460
1nF/50V
50V
R404
100
10uH
C146
0.1uF
R144 100
R143
R142
R141
1uF
R406
1K/1W
R443
470
NTC
100
100
10K
C144
0.1U/63V
!
C461
1nF
R468
5.1
R469
5 OHM
NTC
R464
50K
+3.3V
L107
L106
10uH
10uH
+
C150
100uF
C149
10nF
TDA4865AJ
INP7INN6V out5 VP4 -17.5V4Vp3 pump3VP3-2VP1 +17.5V
35V
R452
5.6
J408
1K8
R459
1K8
0.1uF/100V
2W
R462
0.82
Q401
C2482
R467
33K
R466
39K
ZD440
8.2V
R132
R130
R131
3.3K
3.3K
3.3K
R149
R148
3.3K
IC201
1
STANDBY
2
SCL
3
SDA
4
AV3/TUNING
5
SCART ID
6
KEY
7
VOL
8
BAND
ZD103
8V2
9
Vss C/P
10
MUTE
11
PAL/NTSC
12
C127
C130
C131
IC851
Cs
Cw
Cts
Ctw
MAD
OUTL
Cnd
CL
Vref
SAP
Csde
OUTR
Cr
Css
Cmo
VssA
220nF
13
SECPLL
14
Vp2
220nF
15
DECDIG
2200pC132
16
PH2LF
17
PH1LF
18
GND3
19
DECBG
20
AVL/EWD
21
VDRB
22
VDRA
23
IF1
24
IF2
25
IREF
26
VSC
27
TUNER AGC
28
AUDEEM/S IF1
29
DECSDEM/SIF2
30
GND2
31
SNDPLL/SIFAGC
32
AVL/REFO
C140
4.7uF
C862
32
1uF
31
C861
1uF
30
C860
10uF
C809
29
10uF
28
27
C872
1uF
C867
26
0.1uF
25
C874
2.2uF
24
C868
100uF
23
C858
22
15nF
21
C871
1uF
20
C873
2.2uF
19
C877
4.7uF
C856
18
4.7uF
X851
503KHz
TDA9363 for AP
TDA9373 FOR Latam
AUDOUT/AMOUT
AUDEXT/QS SO
BTSC out R
BTSC out L
TV L
TV R
VDRA
VDRB
XTAL OUT
XTAL IN
TDA9384 for India
BLANKING
B / U IN
CVBS/Y IN
CVBSINT
IFVO/SVO
IRin
AV2
AV1
VddP
RESET
OscGnd
VddC
VpE
VddA
B OUT
G OUT
R OUT
BCL IN
G / Y IN
R / V IN
BLANK
C IN
GND1
Vp1
PLL IF
EHTO
FBISO
H. OUT
3.3K
64
63
62
61
60
59
58
57
56
55
54
53
52
51
50
49
48
47
46
45
44
43
42
41
40
39
38
37
36
35
34
33
X101
12MHz
R125
220
C160
470P
C147
33pF
C148
33pF
C161
470P
+21V_VCC
+12V_VCC
+8V_VCC
390
+5V_VCC
R645
R638
22
R114
J615
10K
+3.3V_VCC
Q626
+135V_VCC
C1815
R650
430
ZD621
ZD622
ZD105
5V1
+48V_VCC
+32V_BT
+135V_VCC
STANDBY
H:WORKING
L:STANDBY
+48V_VCC
+8V_VCC
H-out
+8V
R401
4K7
R403
NC
3V9
3V9
IC103
33V
39K
16V
EW
RD5
18K
10K
MENU
VOL-
VOL+
SW003
SW004
C151
+
100uF/16V
RCA :
R724 33K
R725 10K
SCART: R724 10 K
+8V
R725 75
R724
R725
33K
R414
10K
39K
TV CVBS OUT
IC301
1
R461
C455
100uF/50V
D452
BA158
C459
R463
220/2W
R405
5K6
C402
2200pF
500V
C441
0.01uF
50V
5.6 1/4W
100V
T401
5
1
4
3
!
C403
C404
220pF
4.7uF
50V
500V
R441
56K
Q440
F630
!
RD2
RD3
2K7
100
RD1
PRO+
SW002
R425
27K
C456
0.1uF/100V
R453
270 1W
LED
PROSW001
ZD104
8V2
R126
180
V - DEF
6
C453
2200uF/25V
100
LED
1
LED
ZD108
ZD107
ZD106
8V2
8V2
+8V
Q107
C1815
R127
XT155
100
XT-4.5
CN301
H-DEF
5
!
100V
+16.2V
-16.2V
C452
2200uF/25V
GND
8V2
1
B
2
G
3
R
4
BL
5
R413
100K
R412
27K
L103
12uH
GND
D450
BYW36
470pF
D451
BYW36
470pF
!
C437
C436
10uF
560pF
250V
2KV
N401
D2553
!
C432
C438
!
7n2
2n7 /2KV
R454
33
R440
2.2 2W
L440
C440
4.7uF
50V
2KV 2KV
C435
0.56uF
2.8mH
C463
0.39uF/ 400V
FOR SLIM
H501
GND
R
G
B
BL
ZD501
8V2
CRT AMPLIFY CIRCUIT
+8V_VCC
D763 IN4148
R766
47K
D761
R137
MUTE
1K
1N4148
PWM
15K
+20V_VCC
R748
+12V_VCC
150
SCL
SDA
AUDIO L
AUDIO R
TONE CONTROL
D404
R421
180
1N4148
R422
680
!
T402
4
+16.2V
5
-16.2V
8
HEATER
6
AFC
9
FBP
3
2
B+
10
180V
1
HY
FLYBACK
R432
270
L430
36uH
C442
2200PF
R OUT
C760
10uF/16V
C508
1000PF
R764
6.2KR763
L OUT
C407
NC
R515
2
15K
R510
Q504
22
C4544
R512
R511
R513
22
2K2
270
C502
D503
330PF
1N4148
R525
2
15K
R521
Q507
22
C4544
R522
R520
R523
22
2K2
270
C503
D505
330PF
1N4148
R506
2
15K
R501
Q501
22
C4544
R504
R502
R503
22
2K2
270
C501
D501
330PF
1N4148
123456789
C728
RO
RI
R768
100uF
Q760
91K
A1015
D762
R765
1N4148
1K
Q761
C1815
C750
R770 1K
1uF
R769 1K
C749
15
16
SCL
LOUT_R
SDA17LOUT_L18C_TL19N.C.20C_BL221C_BL122LIN_L23MOUT_L24MAD25SCOUT_L26C_PS227AIN_L28C_PS129AIN_R30P231SCIN_R
C748
5n6
C765
1uF
4700PF
R742
13K
C752
C753
C754
6n8
68nF
0.15uF/63V
9
10
12
13
14
N.C.
C_TR
LIN_R
C_BR111C_BR2
MOUT_R
C746
C745
0.15uF
68nF
R743
13K
8V
R413
100K
R412
R418
27K
NC
HV TO CRT
C445
2n2F/100V
FOCUS
SCREEN
7
ABL
C443
0.056uF
250V
R416
R419
1K
270K
R420
1K
C409
D403
0.1uF
5
R516
1
220
D504
Q506
BA158
BF420
Q505
BF421
R
R514
1
270
R526
1
220
D506
Q509
BA158
BF420
Q508
G
BF421
R524
1
270
R507
1
220
Q503
BF420
Q502
BF421
L in
C764
47uF
C761
50V
C766
4700PF
ZD715
8V2
5
6
7
8
V_P
GND
MIN_R
SCOUT_R
C744
15nF
X-ray
R407
22K
C444
39PF/50V
R417
3K3
D402
1N4148
8V2
R528
D502
2
BA158
220K
B
R505
1
270
IC760
TFA9843AJ---10W
TFA 9842AJ---6W
L out
C767
220uF
C769
470uF
C768
R771
470uF
10K
1uF
C740
100uF/16V
1P12
3
4
MIN_L
C_SMO
SCIN_L
IC740
TDA9859
32
C743
15nF
X-ray
R409
27K
ZD401
8V2
+8V_VCC
R424
ABL
2K
C410
10uF/16V
R517
2K7
R527
2K7
R508
2K7
C506
NC
H502
Lout
SW2
Rout
EHT
AFC
AFC
ABL
CRT
KR
KG
KB
C507
L501
10uH
NC
SCREEN
GND
+180V
HEATER
CN760
1
1
2
2
SW2
FOR RF Tube
R462 1 OHM ( 2W )
R417 4.7K ( 1/6W)
R419 390K (1/6W)
C463 0.36uF (400V)
C438 1500pF (2000V)
C431 6800pF (2000V)
C432 6800pF (2000V)
L440 790uH
L430 30uH
R423 5.6 (2W)
C433 18nF (630V)
R441 75K (1/6W)
R440 6.8 (2W)
C435 0 OHM
L431 not used
L432 not used
C464 not used
C465 not used
H_17460_002.eps
FOCUS
SCREEN
FOCUS
SPL
4RM 10W
8RM 6W
SPR
4RM 10W
8RM 6W
E
EHT
D
C
B
A
240907
Page 11
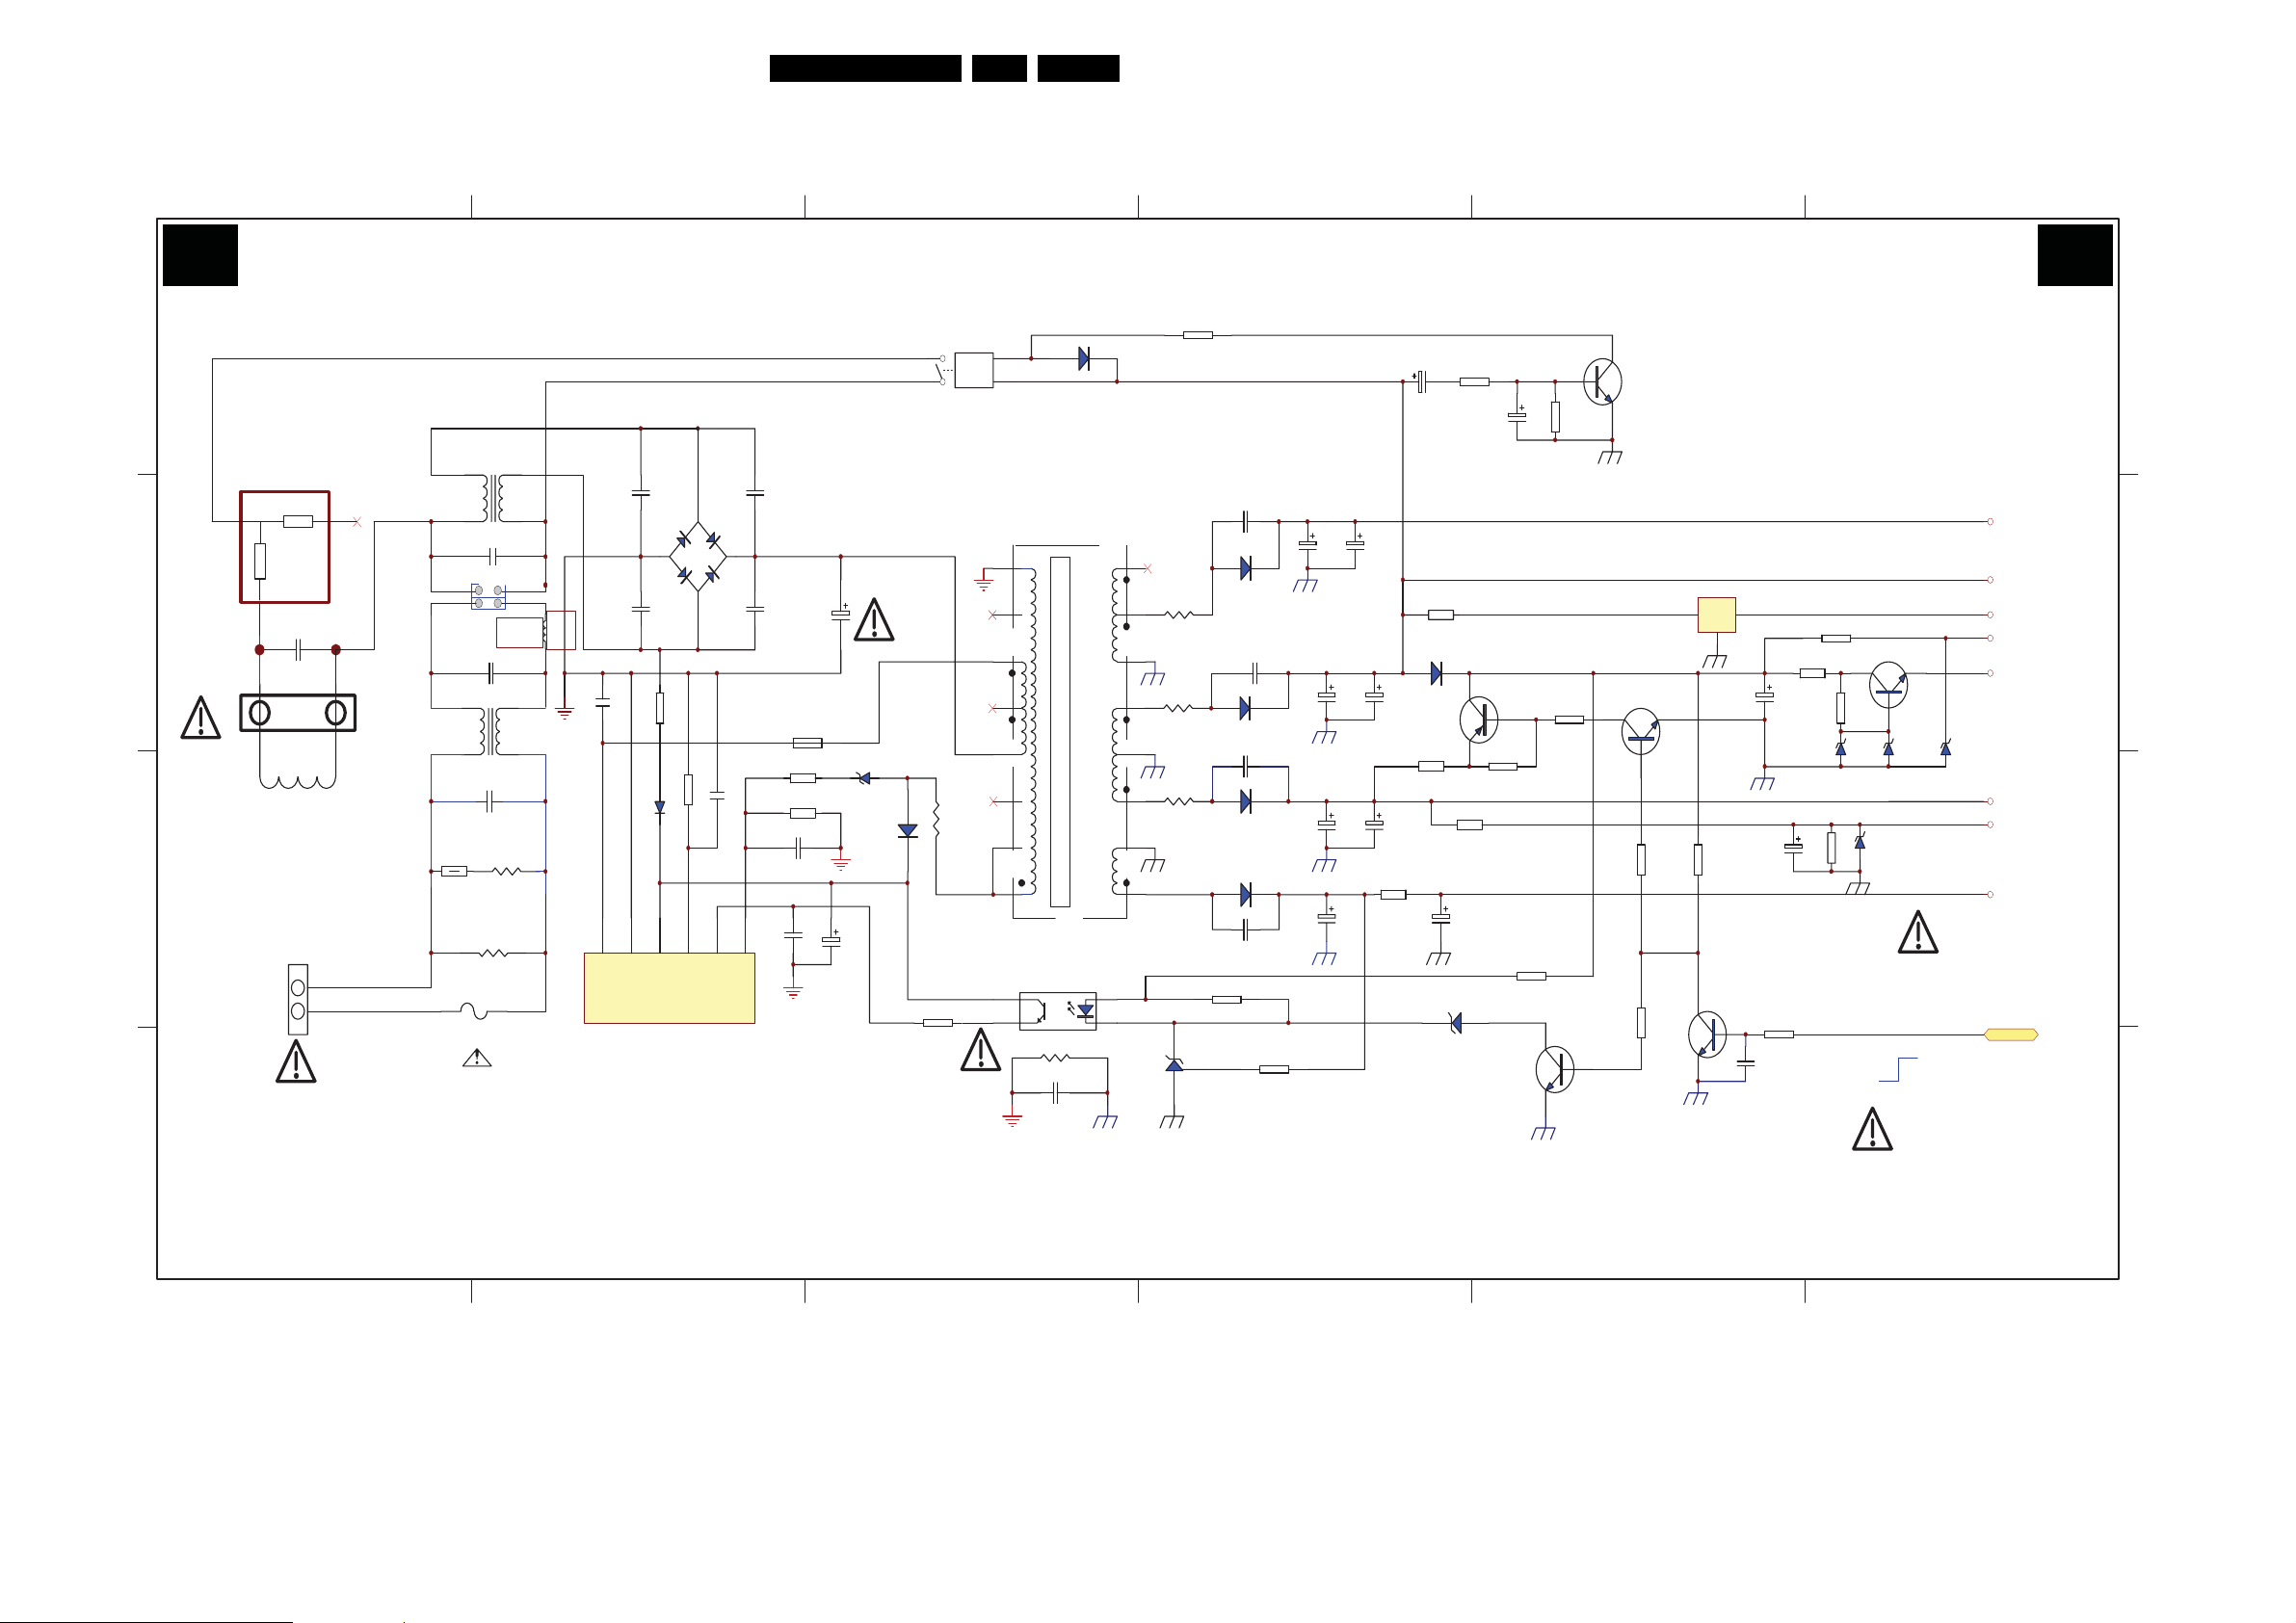
Circuit Diagrams and PWB Layouts
7. Circuit Diagrams and PWB Layouts
Mono Carrier: Power Supply
EN 11SK5.0A CA 7.
54321
6
A1 A1
D
C
B
POWER SUPPLY
Rs
23
PTC601
9RM
????
CN601
AC90-270V
Rp
1
C600
0.1uF/250V
CN603
DEGAUSSING
BLUE
BROWN
2
1
N
L
CN604
N
N
CN602
FOR EMC
L602
PFC 15mH×2
C602
0.22uF/250V
15mH
C601
0.22uF/250V
R603
VDR601
GAS DISCHARGE
TUBE
R601
2.2M 1/2W
F601
T3.15A
AC250V
T601
C603
0.22uF
AC250V
L
L
L601
FOR CB
R600
NTC
5RM
C604
1000pF
D604
0
3
1
D
S/GND
STR-W6556A
C603A
4700pF
AB
D603
CD
C603D
4700pF
R602
2
200K
R604
39K
C605
0.1uF
100V
4
5
6
VCC
FB
OLP/SS
IC601
C603B
4700pF
C603C
4700pF
7
OCP/BD
L604
R606
6K8
R605
220
C607
220uF
450V
C606
470pF
C609
10nF
C608
10uF
ZD602
18V
D605
BA158
R608
2K2
RL601
RELAY
R607
22
D627
1N4148
T603
16 1
15
14
13
12
11
10
TRANSFORMER
IC622
OPTOISO1
R610
8.2M
C610 0.0022uF
<20V>
2
3
<12V>
4
5
6
<45V>
7
<135V>
89
R640
0
R624
0.22 2W
R622
0.22 2W
R621
0.22 2W
IC621
SE120
680pF 500V
R630
680
C624
D623
RU4YX
C623
680pF 500V
D622
BYW36
C620
680pF 500V
D621
BA158
D620
RU4B
C462
560pF 2KV
R627
6.2K
50V
C627
1000uF
25V
C625
1000uF
16V
C622
470uF
50V
C621
100uF
200V
C628
1000uF
25v
0.18 / 5W
C626
1000uF
C629
1500uF
50V
R609
3
C640
220uF
16V
R647
0.51 2W
R632
1
D626
BA158
R633
5K1
C632
47uF
250V
R644
10K
ZD620
5V1
Q624
A101 3
R639
10K
C639
47uF
R631
1K
R643
47K
+12V
R649
2K2
Q621
C1815
Q622
C1815
Q625
C1815
R635
22K
R634
10K
IC104
L7808
In Out
Gnd
R648
22K
16V
Q623
C1815
C114
C634
0.1uF
50V
C641
2200uF
47uF
J615
10K
R638
22
R114
39K
390
R645
R650
430
ZD622
3V9
16V
+12V_VCC
Q626
C1815
ZD621
3V9
IC103
33V
+135V_VCC
+20V_VCC
+8V_VCC
+5V_VCC
+3.3V_VCC
ZD105
5V1
+48V_VCC
+32V_BT
STANDBY
H:WORKING
L:STANDBY
+20V_VCC
+12V_VCC
+8V_VCC
+5V_VCC
+3.3V_VCC
+48V_VCC
+32V_BT
+135V_VCC
STANDBY
D
C
B
A
5800-A5P190-00
1 2 3 4 65
H_17220_001.eps
180607
A
Page 12
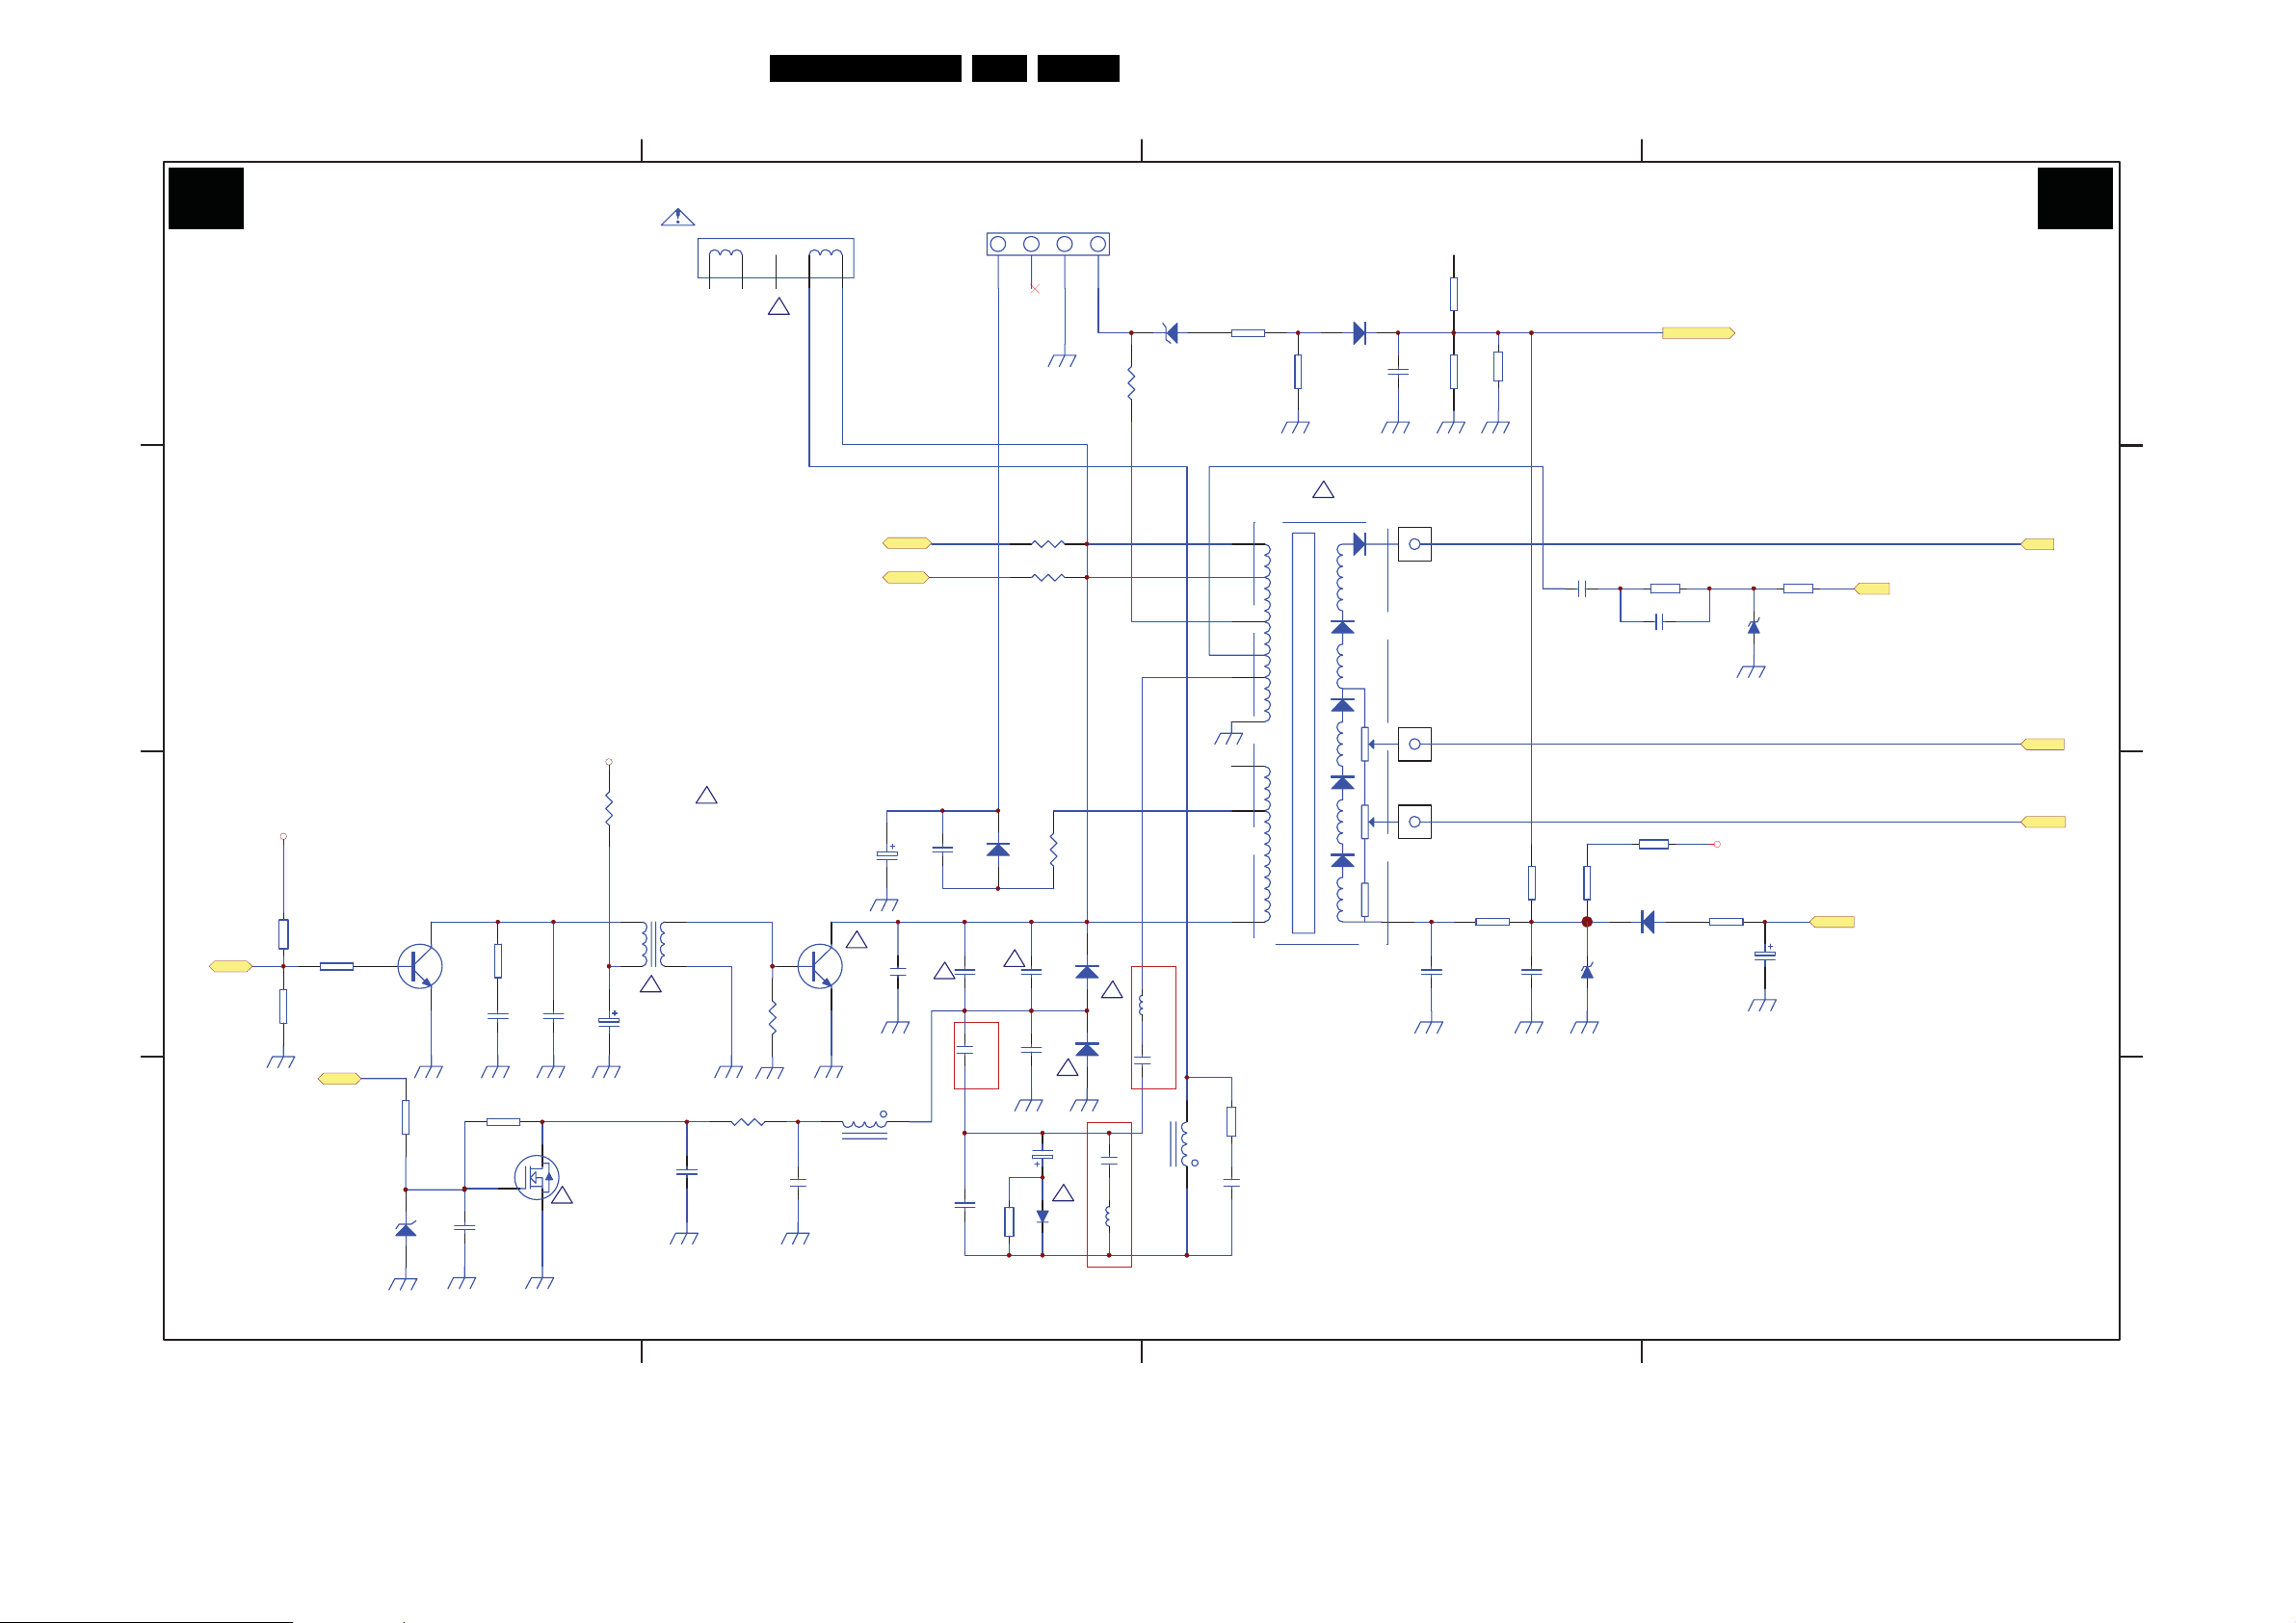
Circuit Diagrams and PWB Layouts
Mono Carrier: Line Deflection
EN 12SK5.0A CA 7.
321
4
A2 A2
LINE DEFLECTION
CN301
H-DEF
CN401
TO CRT
8V
5
D
6
!
4
R423
3.9 2W
ZD402
18V
R421
180
R422
680
D404
1N4148
C407
NC
R413
100K
R418
NC
R412
27K
X-ray
X-ray
1
2
3
!
T402
+V
-V
C
+48V_VCC
R450
0.22
R451
0.22
2W
+13V
-13V
HEATER
AFC
FBP
4
5
8
6
9
3
2
HV TO CRT
FOCUS
C445
2n2F/100V
R407
22K
C444
27PF/50V
ZD401
8V2
R409
27K
AFC
EHT
AFC
FOCUS
B+
R406
C403
220pF
500V
Q440
F630
!
1K/1W
T401
5
4
C404
4.7uF
50V
+8V_VCC
B
H-out
A
R401
4K7
R403
NC
R404
100
Por t
ZD440
8.2V
R443
470
Q401
C2482
C441
0.01uF
50V
R441
75K
R405
5K6
C402
2200pF
500V
!
D433
C437
C436
10uF
560pF
250V
2KV
1
3
!
0.01uF
100V
R440
6.8 2W
N401
D2553
R454
33
C440
4.7uF
50V
L440
!
790uH
C438
2n7 /2KV
!
C463
0.33uF
C432
8n2
2KV 2KV
C435
0.47uF
R430
15K
BA158
!
C406
1uF
250V
D432
BA158
C431
6n8
C433
33nF
630V
R433
0.33
1W
!
!
D430
BY228
!
D431
RU4B
160uH
C464
0.18uF
L431
L432
1.12mH
C465
0.47uF
10
180V
1 7
HY
R432
270
L430
20uH
C442
2200PF
FLYBACK
ABL
SCREEN
C443
0.056uF
250V
R420
1K
C409
0.1uF
R419
560K
R416
1K
D403
8V2
R417
5K6
D402
1N4148
R424
1K
+8V_VCC
ABL
C410
10uF/16V
SCREEN
ABL
D
C
B
A
5800-A5P190-00
FOR SLIM TUBE
????
S
1 2 3 4
H_17220_002.eps
180607
Page 13
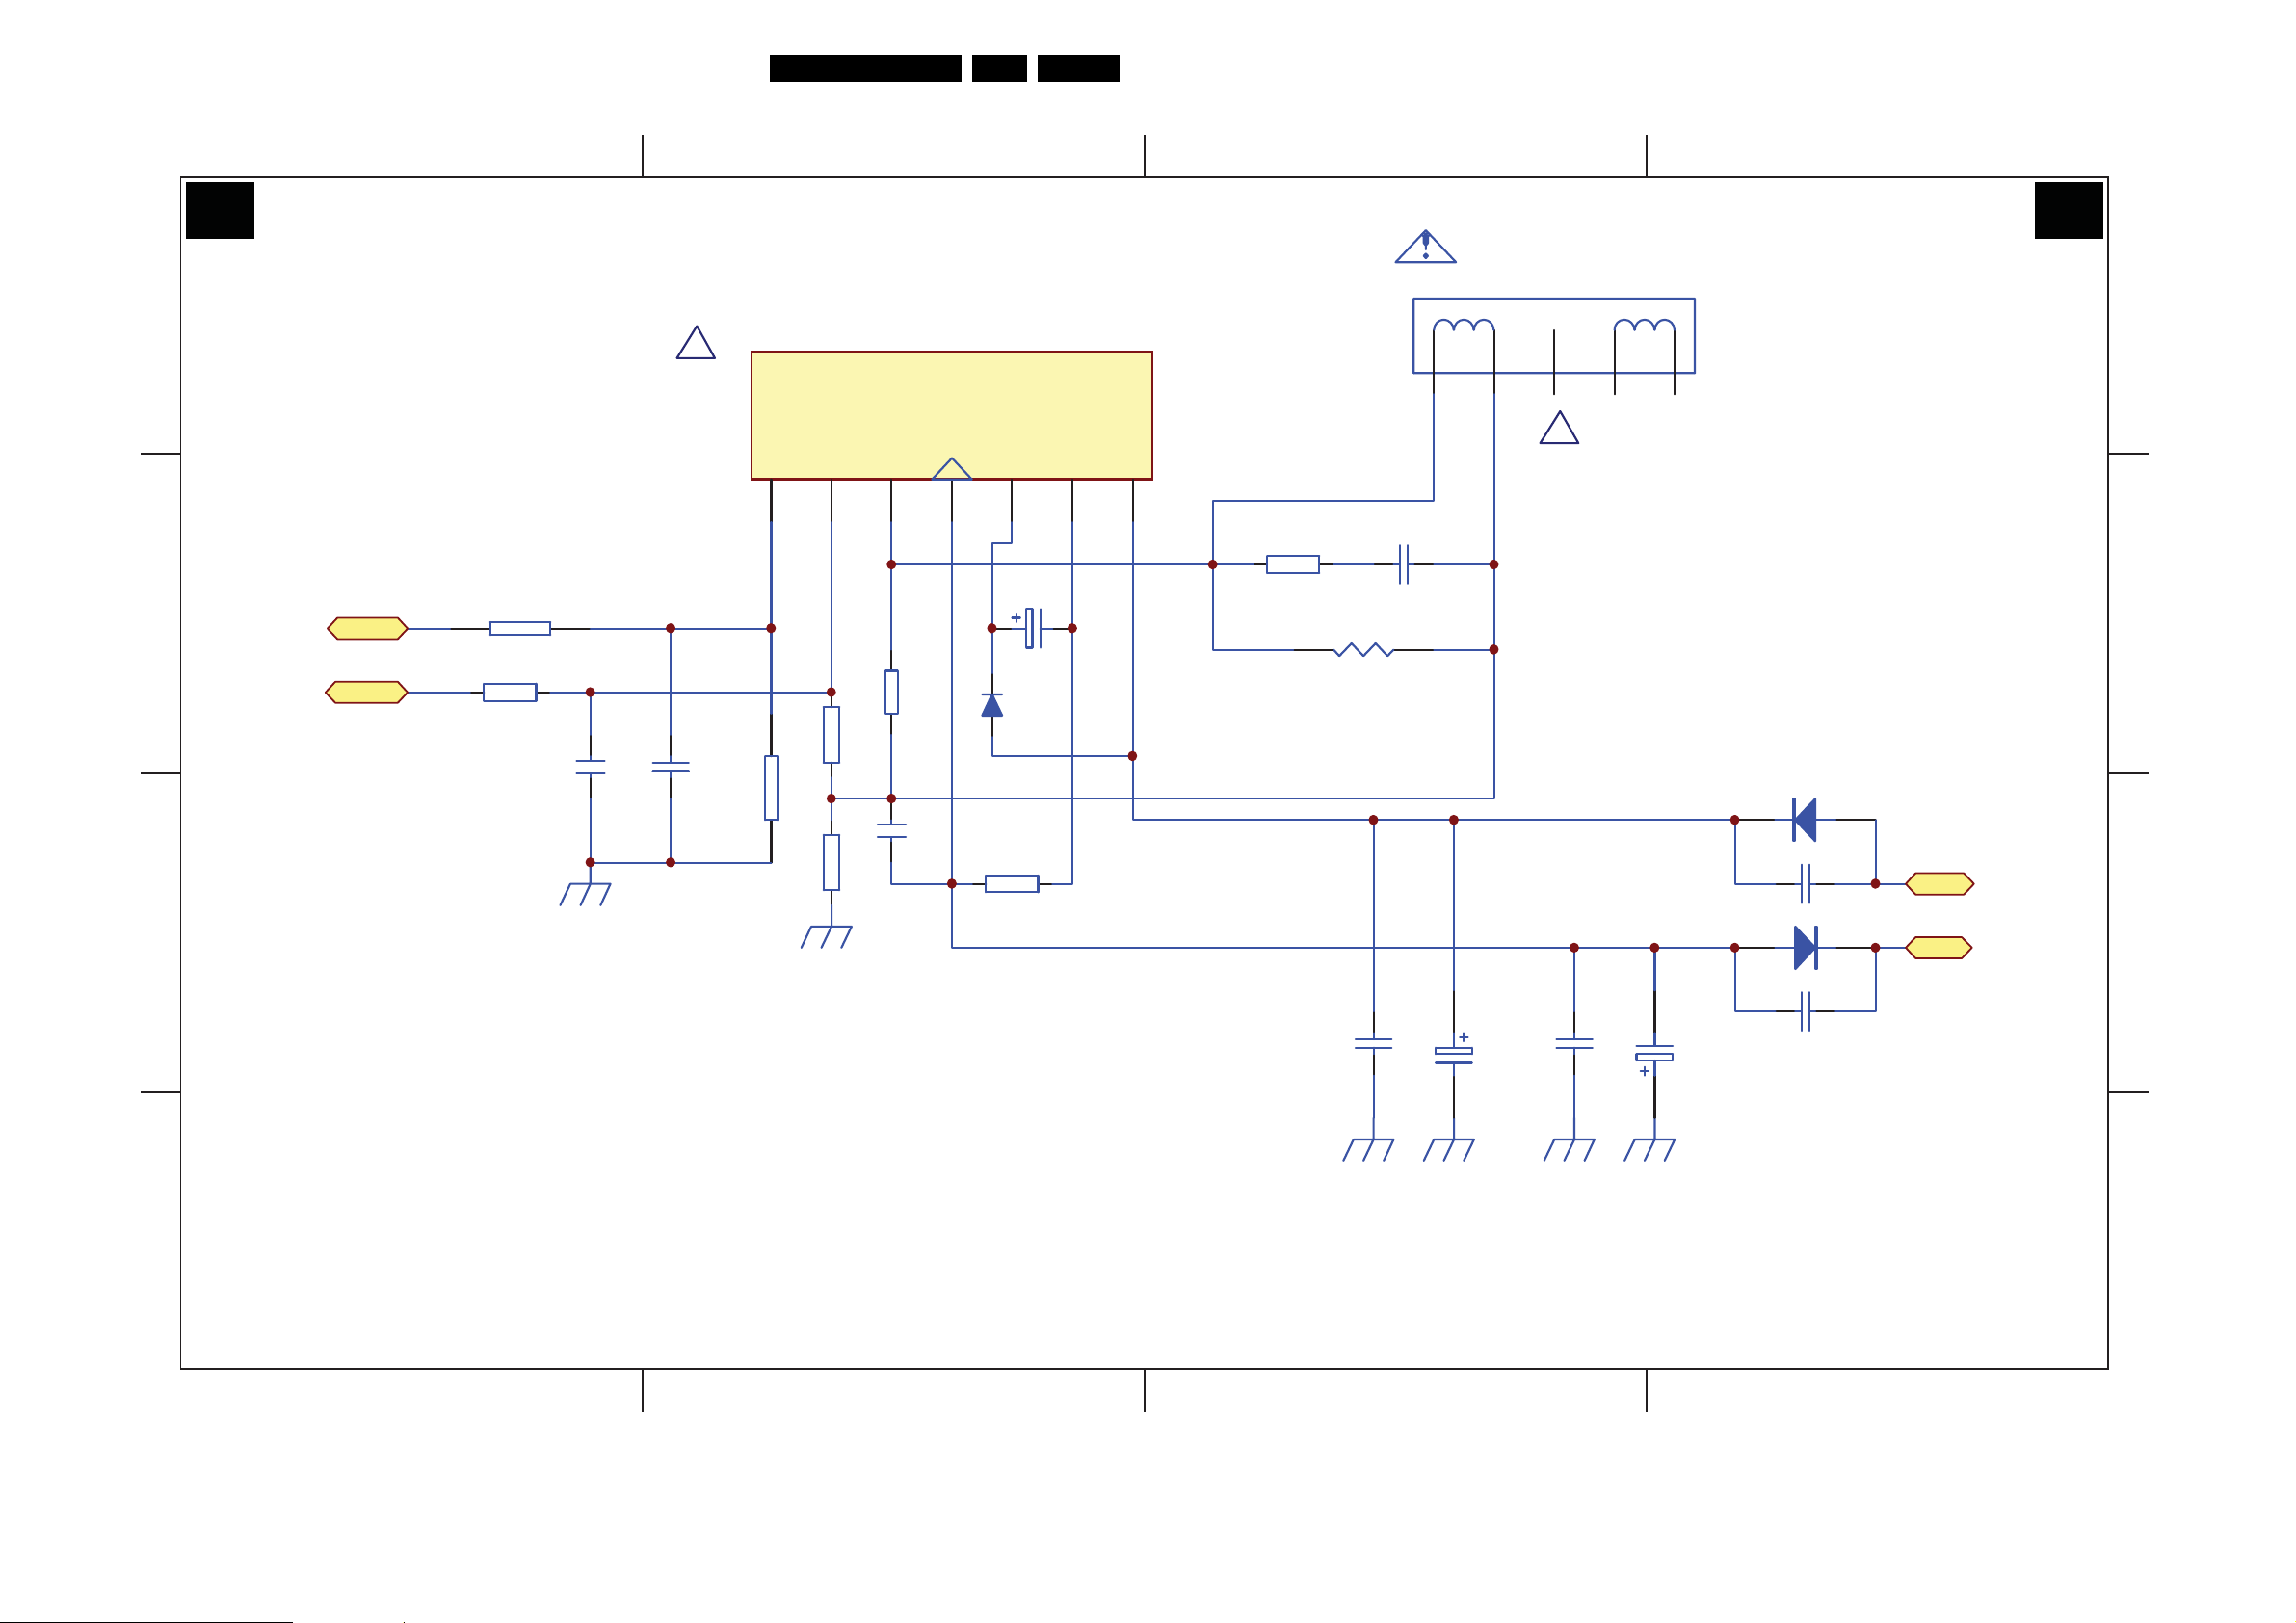
Circuit Diagrams and PWB Layouts
Mono Carrier: Frame Deflection
EN 13SK5.0A CA 7.
321
A3 A3
D
FRAME DEFLECTION
CN301
IC301
!
TDA4863AJ
6
5
4
!
INP
7
VDRA
C
VDRA
VDRB
VDRB
R460
100
R457
100
C460
1nF/50V
50V
C461
1nF
2W
B
INN
6
R459
1K8
R462
1
V out
5
35V
J408
1K8
0.1uF/100V
R452
5.6
C459
VP4 -13V
4
Vp3 pump
3
C455
100uF/50V
D452
BA158
R463
220/2W
2
VP3-
VP1 +13V
1
R461
5.6 1/4W
100V
C456
0.1uF/100V
R453
270 1W
100V
+14V
D450
BYW36
470pF
+V
-14V
D451
BYW36
+V
D
C
B
A
5800-A5P190-00
0.1uF
1 2 43
C453
0.1uF
1000uF/25V
C452
1000uF/25V
470pF
H_17220_003.eps
180607
A
Page 14
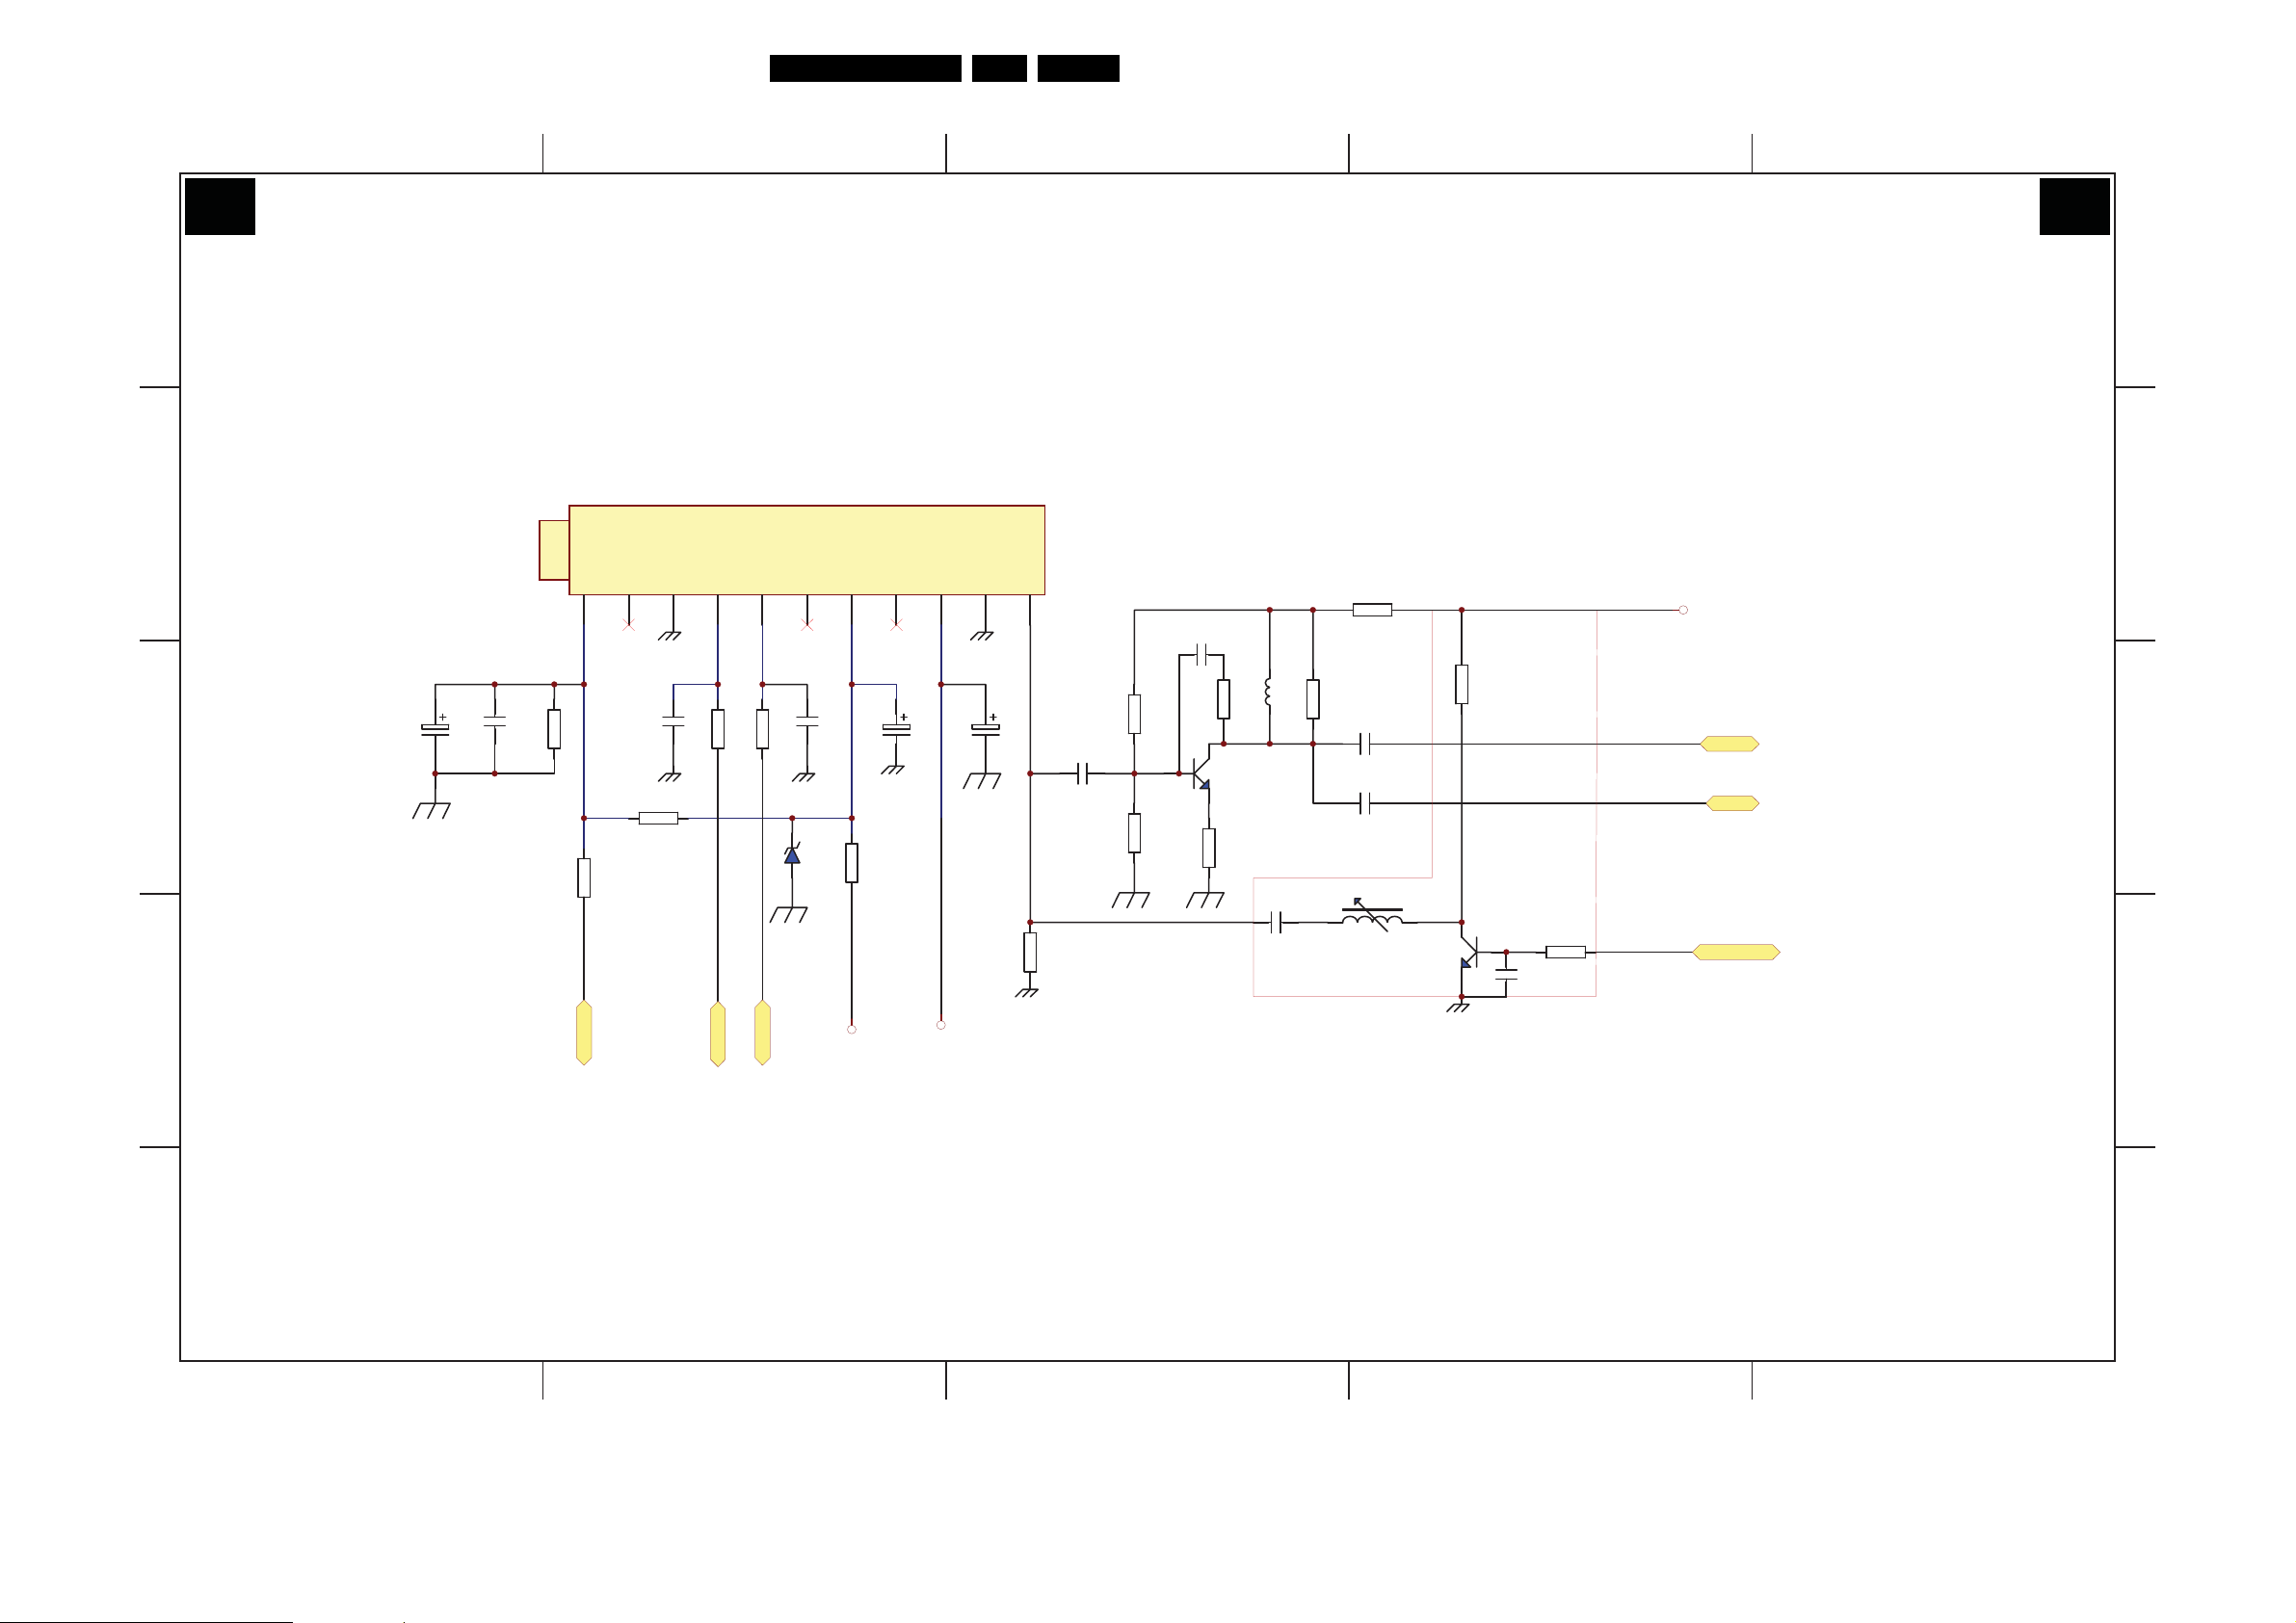
Mono Carrier: Tuner IF
Circuit Diagrams and PWB Layouts
EN 14SK5.0A CA 7.
4321
A4 A4
TUNER IF
5
E
D
C109
10uF
C110
NC
R113
47K
AGC
NC2SAS
1
3
C112
100pF
SCL
4
R112
100
5
SDA
R111
100
NC
6
C111
100pF
BM +5V
7
NC
8
C113
220uF
BT +33V
IFGND
IF
9
10
11
C405
47uF
C
R109
10K
R110
180
AGC
B
AGC
SCL SDA
SCL
ZD101
5V1
SDA
+5V
R108
1
33
+8V_VCC
+8V_VCC
R101
75
+32V_BT
+32V_BT
U101
38.9MHz
R103
C101
0.01u
5.1K
R102
1K5
C103
10nF
R1061KL101
Q101
C2717
R105
22
1uH
C102
10nF
R107
470
R104
1
220
C105
10nF
C106
10nF
L102
31.9MHz
Q102
C1815
R116
10K
NTSC
C115
10nF
R117
10K
+5V
IF
SIF
SYSTEM
+5V
IF
SIF
SYSTEM
E
D
C
B
A
5800-A5P190-00
A
H_17220_004.eps
180607
1 2 3 45
Page 15
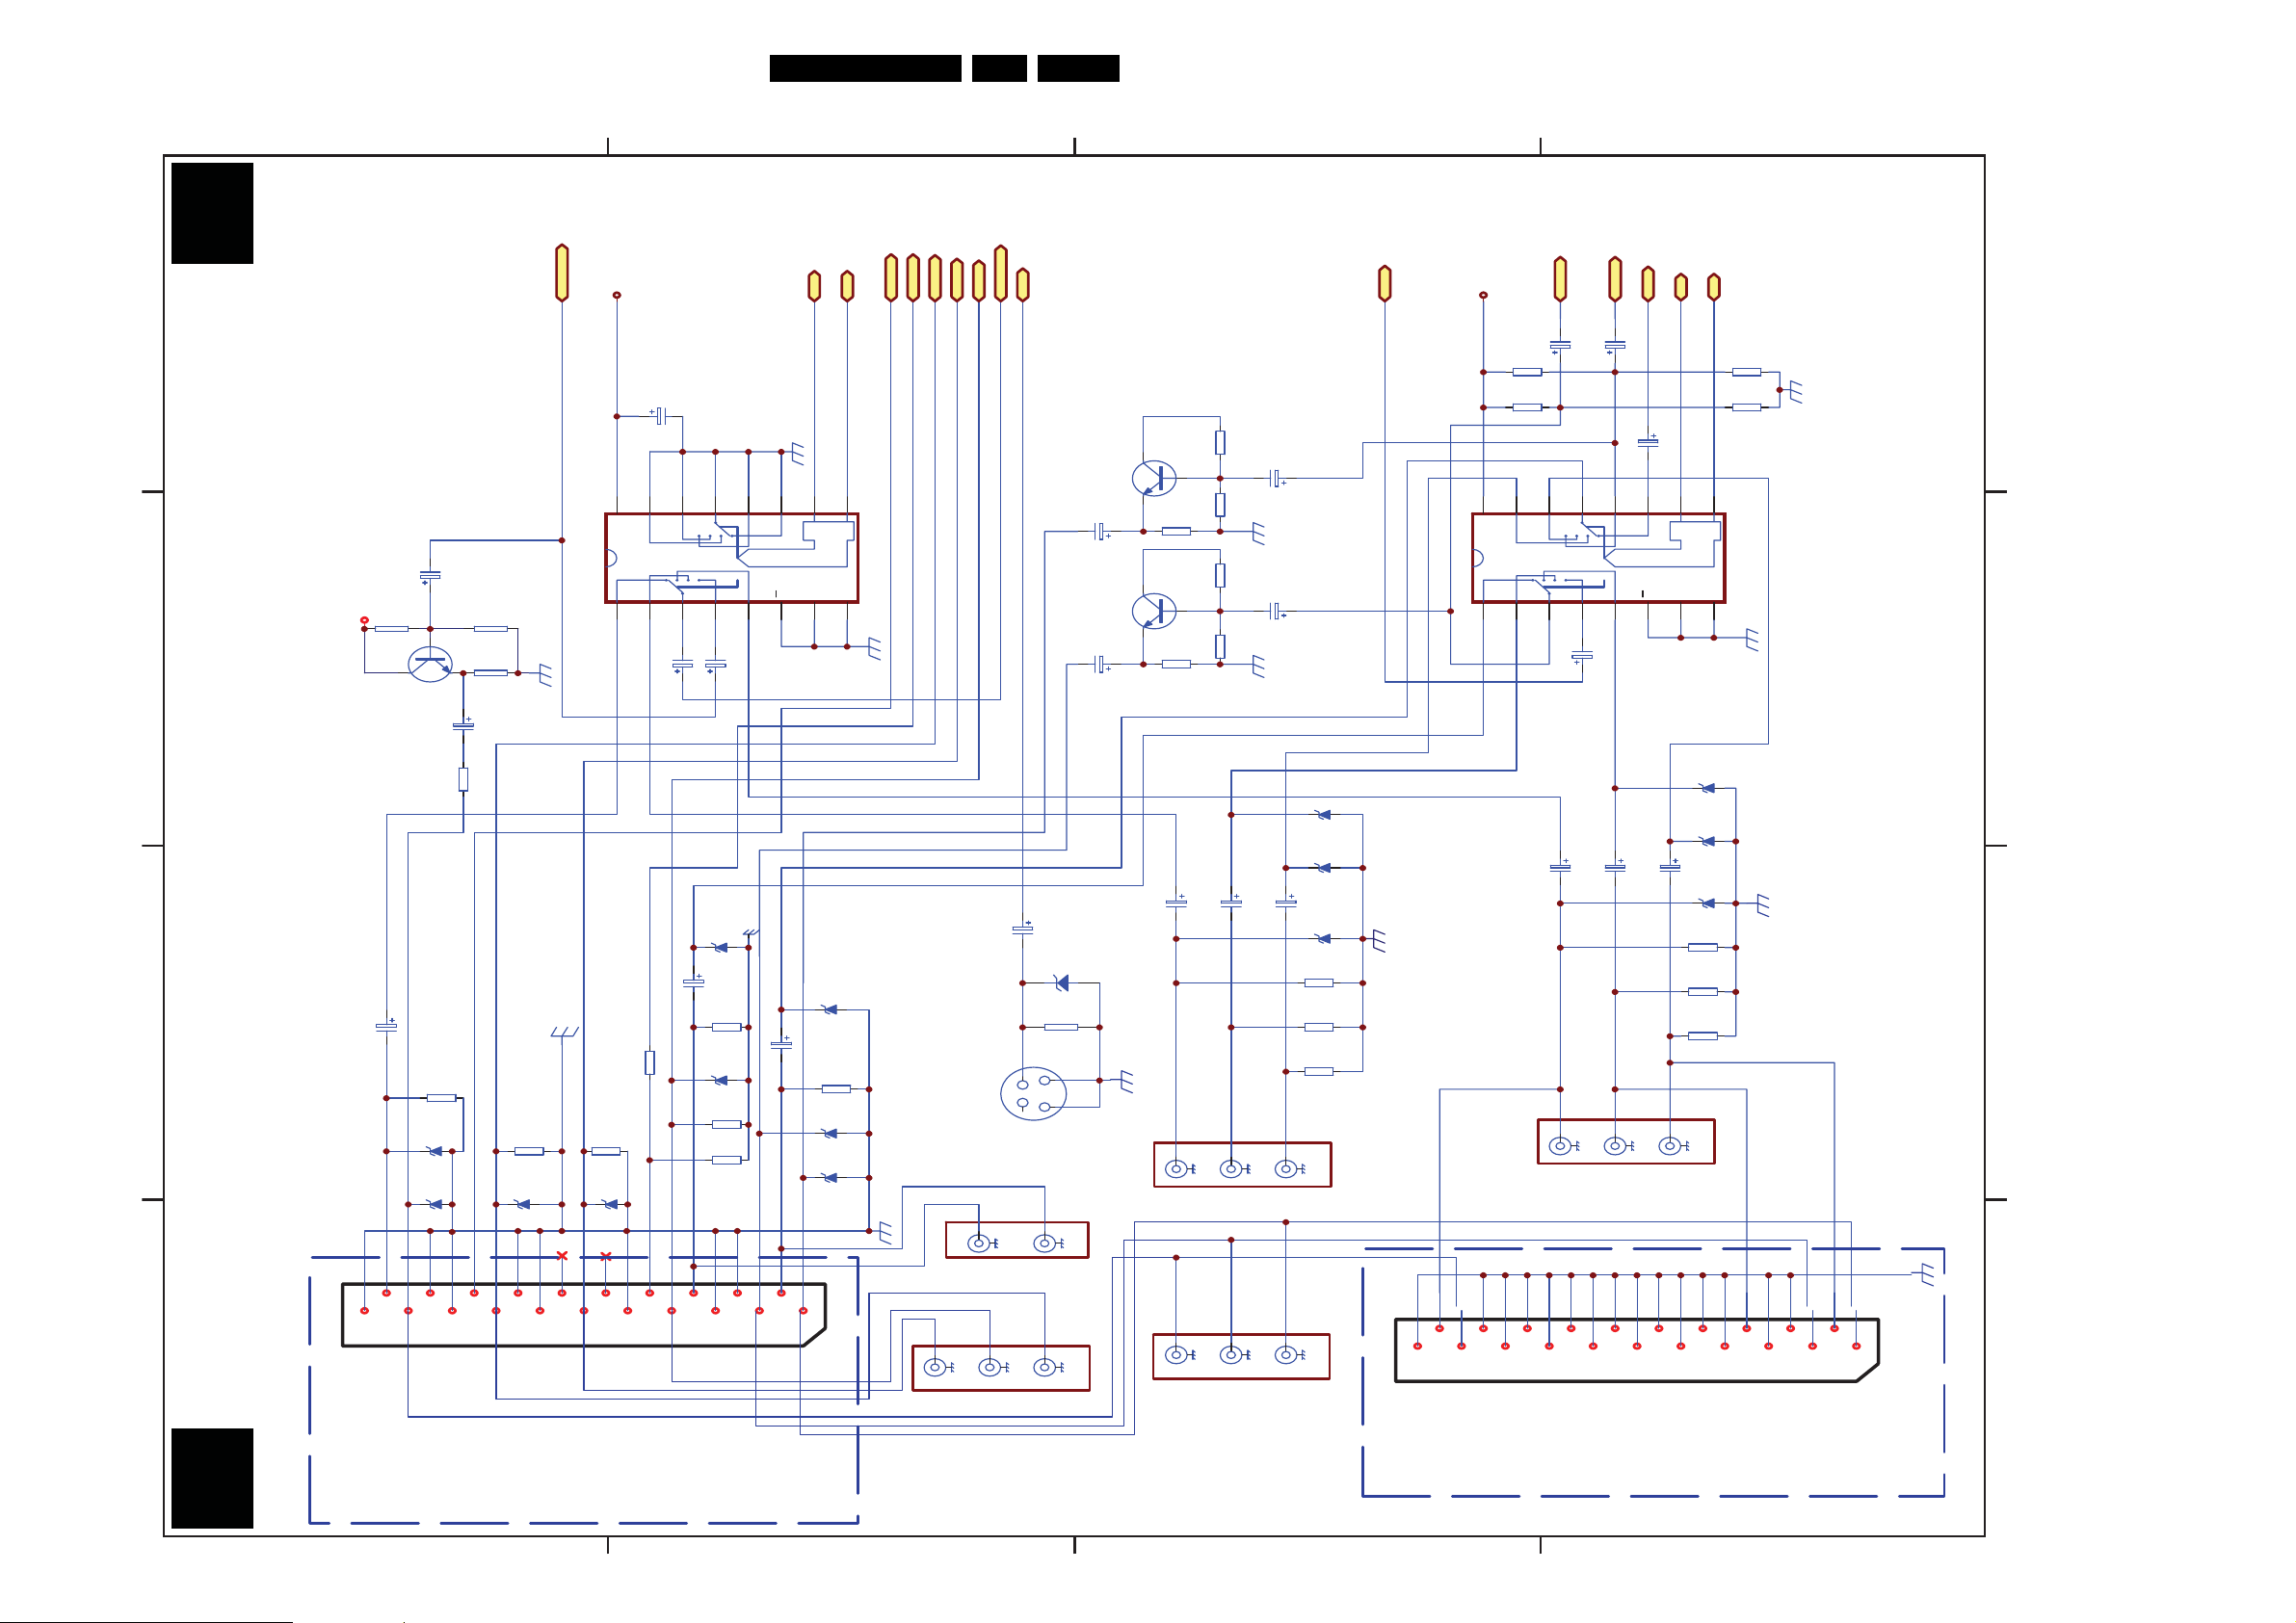
Mono Carrier: AV Switch
D
Circuit Diagrams and PWB Layouts
EN 15SK5.0A CA 7.
C
B
A
180607
H_17220_005.eps
IC762
HEF4052
+8V_VCC
16
1
L
+8V_VCC
Vdd
AUD IO L
AUD IO R
AUDIO L
AUDIO R
C741
C742
47K
47K
10uF
R
REAR R
12
13
14
012
3
3
2
0
1
3
4
5E6
C775
10uF
C778
10uF
C770
V IN
R746
R745
SIDE R
15
2
SIDE L
REAR L
L IN
10uF
C771
10uF
A1
TV R
TV R
11
C773
A2
A2
A1
R747
47K
R744
47K
10uF
10
Vee7Vss
R IN
AUDIO SWITCH
89
8V2
ZD710
8V2
ZD708
10uF
8V2
ZD712
75
R719
47K
R775
47K
R776
REAR AV IN
P701
R
L
+8V_VCC
CVBS OUT
4
+8V_VCC
C780
CVBS OUT
IC761
C720
10uF
+8V
R713
20K
321
Q703
C1815
C710
R717
R712
R711
470uF
68
75
HEF4052
100uF
12
13
14
15
16
Vdd
1
SCART1 AV
012
3
3
2
0
1
2
3
4
5E6
TV
OUT
10uF
C784
10uF
C779
SIDE AV
A1
A2
A2
A1
10
11
Vee7Vss
VIDEO SWITCH
89
V / R in
BLANK
OPTION
Y / G in
Y / G in
V / R in
BLANK
OPTION
only for scart
C IN
U / B in
CVBS/Y IN
C IN
U / B in
CVBS/Y IN
R707
1K8
1K8
R709
R708
R710
20K
20K
20K
20K
R?
ELECTRO1
OUT R
R?
ELECTRO1
OUT L
Q701
C1815
C707
10uF
AUDIO R out
C708
10uF
AUD IO L ou t
R705
Q702
C1815
R706
REAR AV
ZD711
VIDEO OUT
C774
R IN
10uF
ZD706
R778
ZD709
R780
R777
C719
10uF
75
R715
8V2
8V2
R721
ZD714
75
C777
10uF
C772
10uF
8V2
ZD702
10uF
C716
47K
R702
8V2
ZD701
C785
10uF
ZD707
8V2
R779
75
only for scart
C717
10K
J743
75
R722
8V2
8V2
ZD705
8V2
ZD713
75
R723
R731
820
10uF
47K
R701
8V2
ZD703
S-VHS
P702
V IN
L IN
P701
L
R
TV L
TV L
8V2
8V2
8V2
75
47K
47K
SIDE AV IN
AV SWITCH
A5 A5
21
GND
D
VI
17
19
VO
VIG
BL
VOG
15
V / R
BG
13
NC
RGND
Y / G
11
NC
9
OPT
GGND
5
7
L in
GND
U / B
BGND
NO USE
3
LO
1
R in
Y
U
RO
P701 21PIN
P701
V
YUV
V out
L out
P701
AV OUT
R out
21
GND
20
19
V inVOVIG
18
17
VOG
BL
16
14
BG
13
15
R
RG
NC
12
10
9
11
NC
G
GG
6
8
LI
5
7
OPT
B
BG
4
GND
LO
2
RI
1
3
P701 21PIN
RO
1 2 3 4
NO USE
2
4
6
8
10
12
14
16
18
20
5800-A5P190-00
C
B
A
Page 16

Circuit Diagrams and PWB Layouts
Mono Carrier: Tone Control (Optional)
1 2345678910
EN 16SK5.0A CA 7.
SCL
+8V_VCC
+8V_VCC
A6 A6
TONE CONTROL
A
AUDIO R
AUDIO L
AUDIO R
AUDIO L
SDA
SCL
SDA
R748
0
A7
Audion Amplifier
B
R OUT
L OUT
IC740
C
D
E
F
13K
R743
5n6
15nF
15nF
C748
0.15uF
C746
C745
68nF
C744
C743
17
18
19
20
21
22
23
24
25
26
27
28
29
30
31
32
SDA
LOUT_L
C_TL
N.C.
C_BL2
C_BL1
LIN_L
MOUT_L
MAD
SCOUT_L
C_PS2
AIN_L
C_PS1
AIN_R
P2
SCIN_R
TDA9859
SCL
LOUT_R
C_TR
N.C.
C_BR2
C_BR1
LIN_R
MOUT_R
GND
SCOUT_R
V_P
MIN_R
C_SMO
MIN_L
P1
SCIN_L
16
15
14
13
12
11
10
9
8
7
6
5
4
3
2
1
6n8
0.15uF/63V
68nF
C753
C754
100uF/16V
C752
R742
13K
ZD715
8V2
C740
A
B
C
D
E
F
G
5800-A5P190-00
12345
678910
H_17220_006.eps
180607
G
Page 17
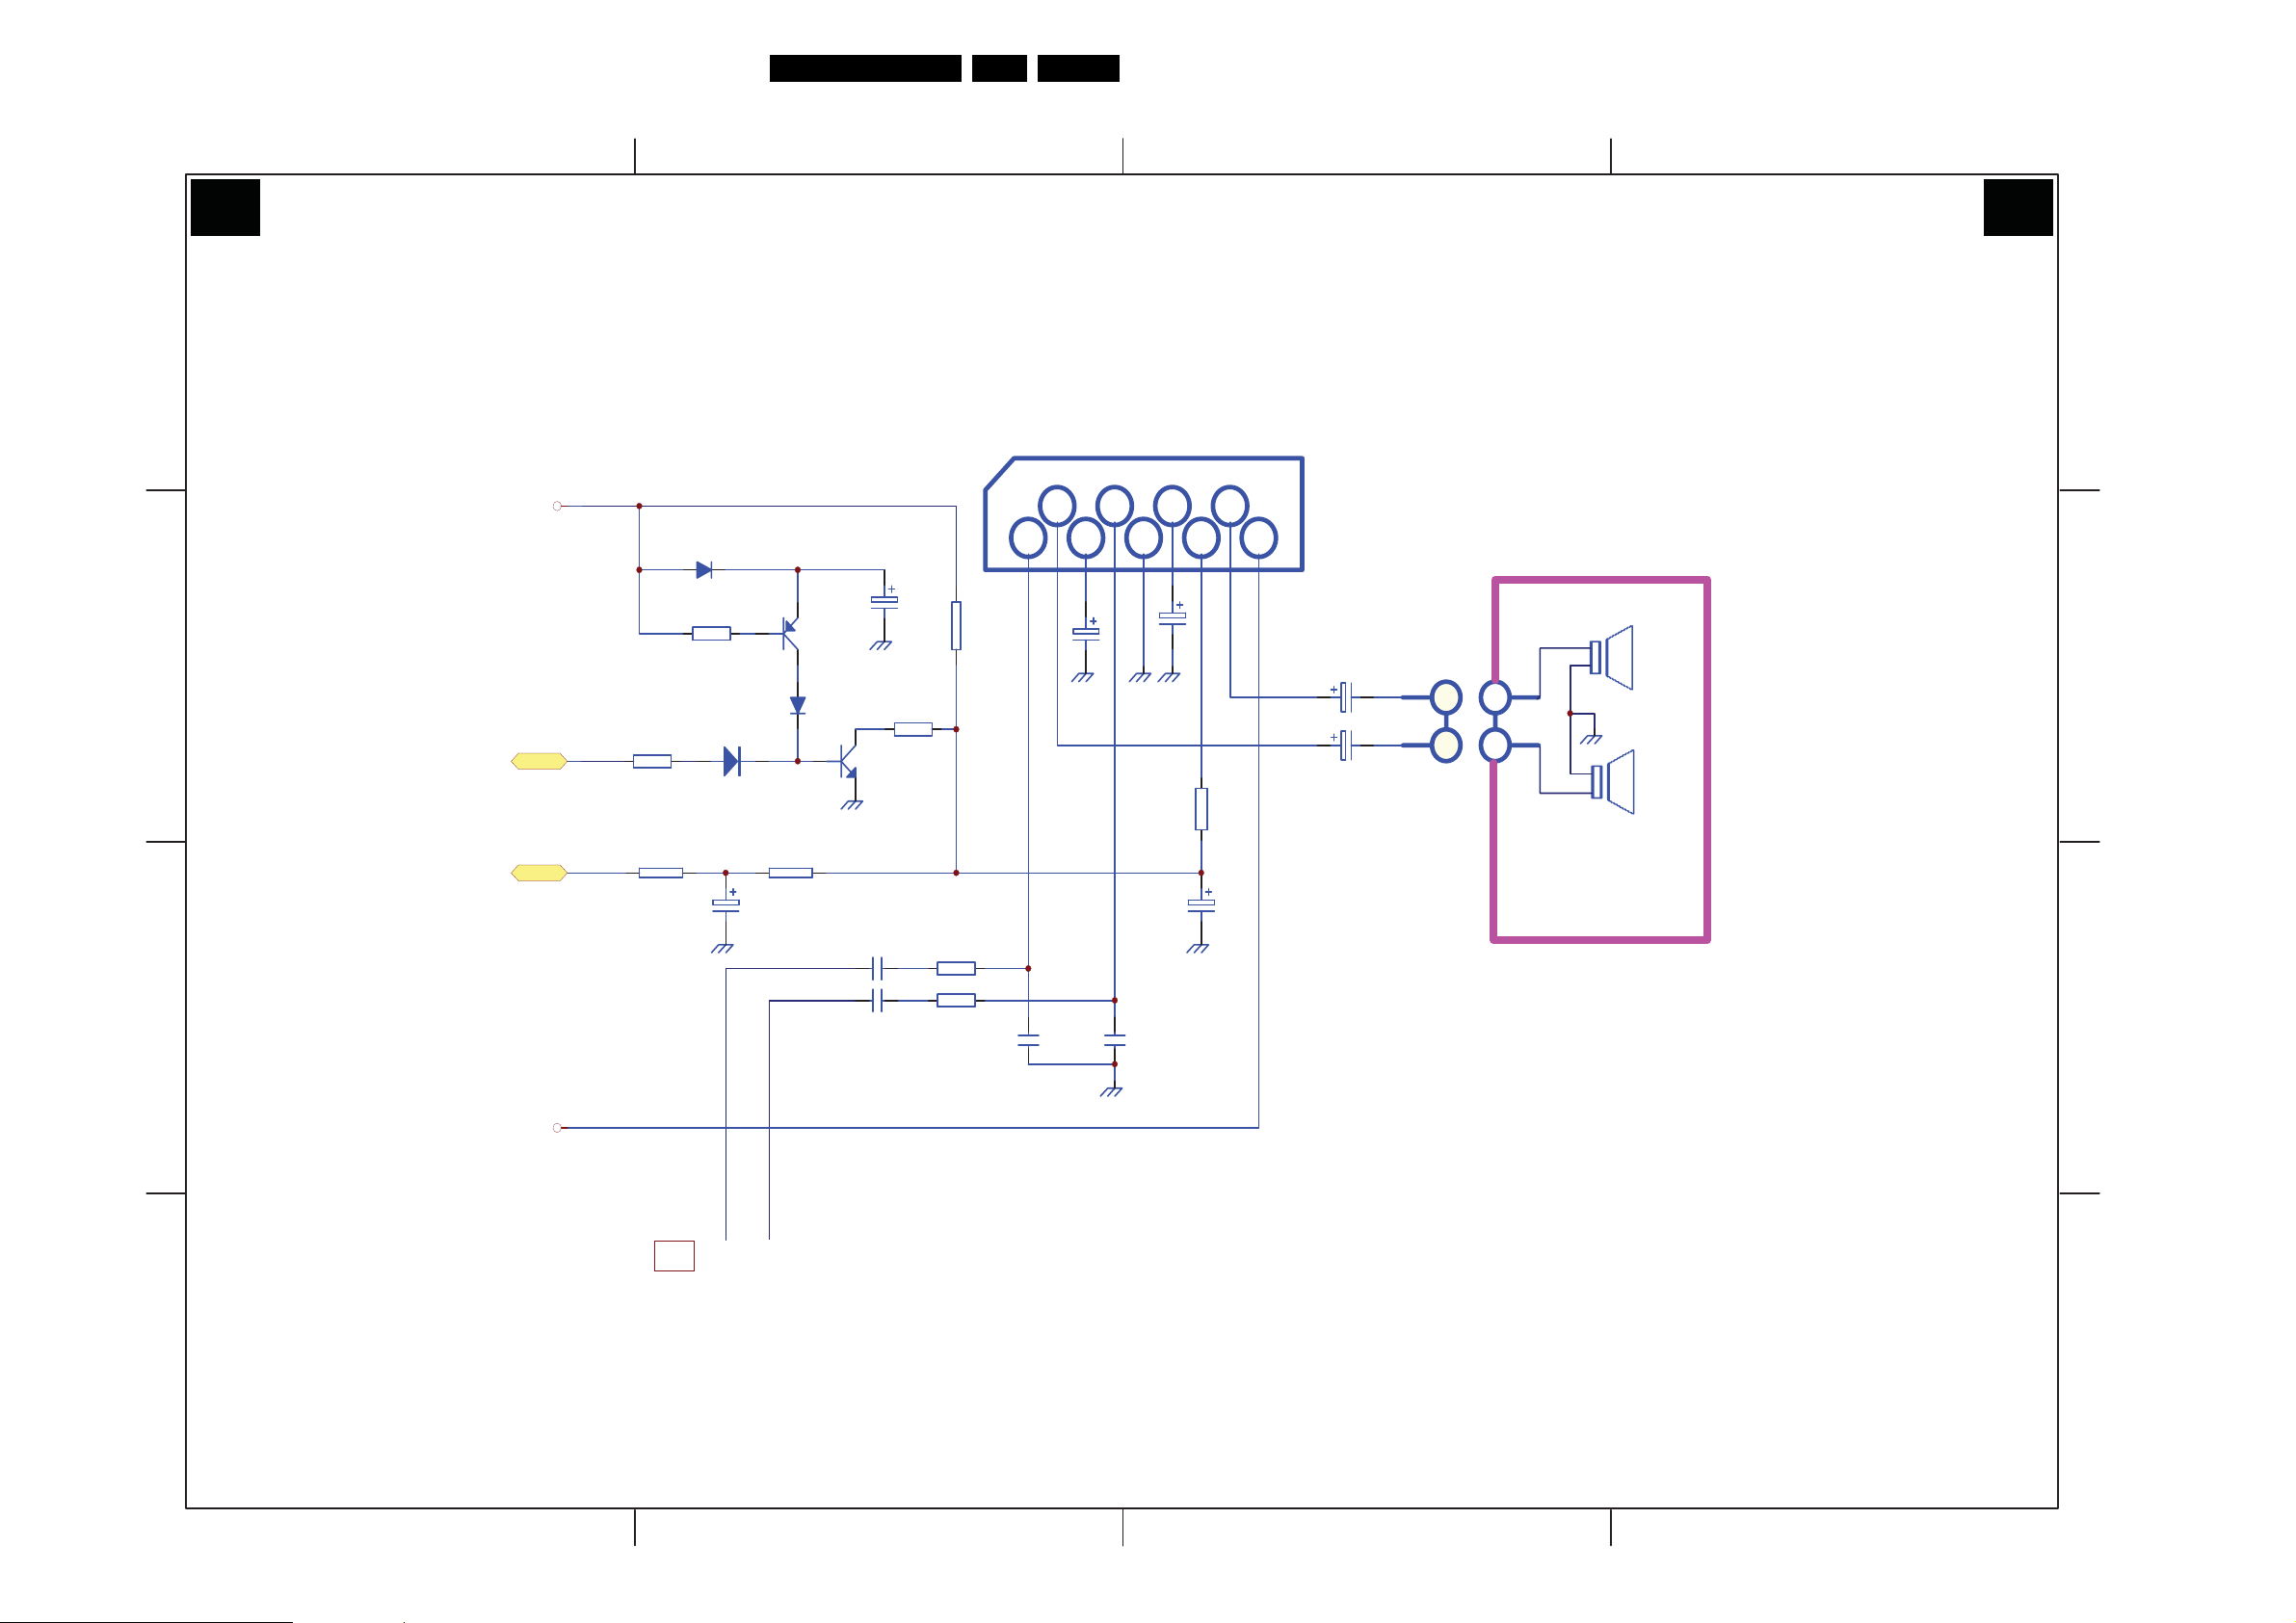
Circuit Diagrams and PWB Layouts
Mono Carrier: Audio Amplifier
EN 17SK5.0A CA 7.
321
A7 A7
D
C
AUDIO AMPLIFIER
+8V_VCC
MUTE
PWM
+8V_VCC
MUTE
PWM
D763 IN4148
R137
1K
R763
15K
R766
47K
D761
1N4148
C760
10uF/16V
R OUT
R764
10K
Q760
A1015
D762
1N4148
Q761
C1815
C750
R765
1K
1uF
C728
100uF
R768
100K
R770 1K
RI
IC760
2
1
RO
3
C764
47uF
4
L in
6
5
C761
1uF
7
C767
220uF
8
R771
10K
L out
TFA9843AJ---10W
9
TFA 9842AJ---6W
C769
470uF
C768
470uF
Lout
SW2
Rout
CN760
1
2
1
2
SW2
SPL
4RM 10W
8RM 6W
SPR
4RM 10W
8RM 6W
50V
4
D
C
B
A
5800-A5P190-00
L OUT
+20V_VCC
1 2
+20V_VCC
Tone Control
A6
Pin 18
Pin 15
IC740 TDA9859
C749
1uF
R769 1K
C765
4700PF
C766
4700PF
B
A
H_17220_007.eps
180607
34
Page 18
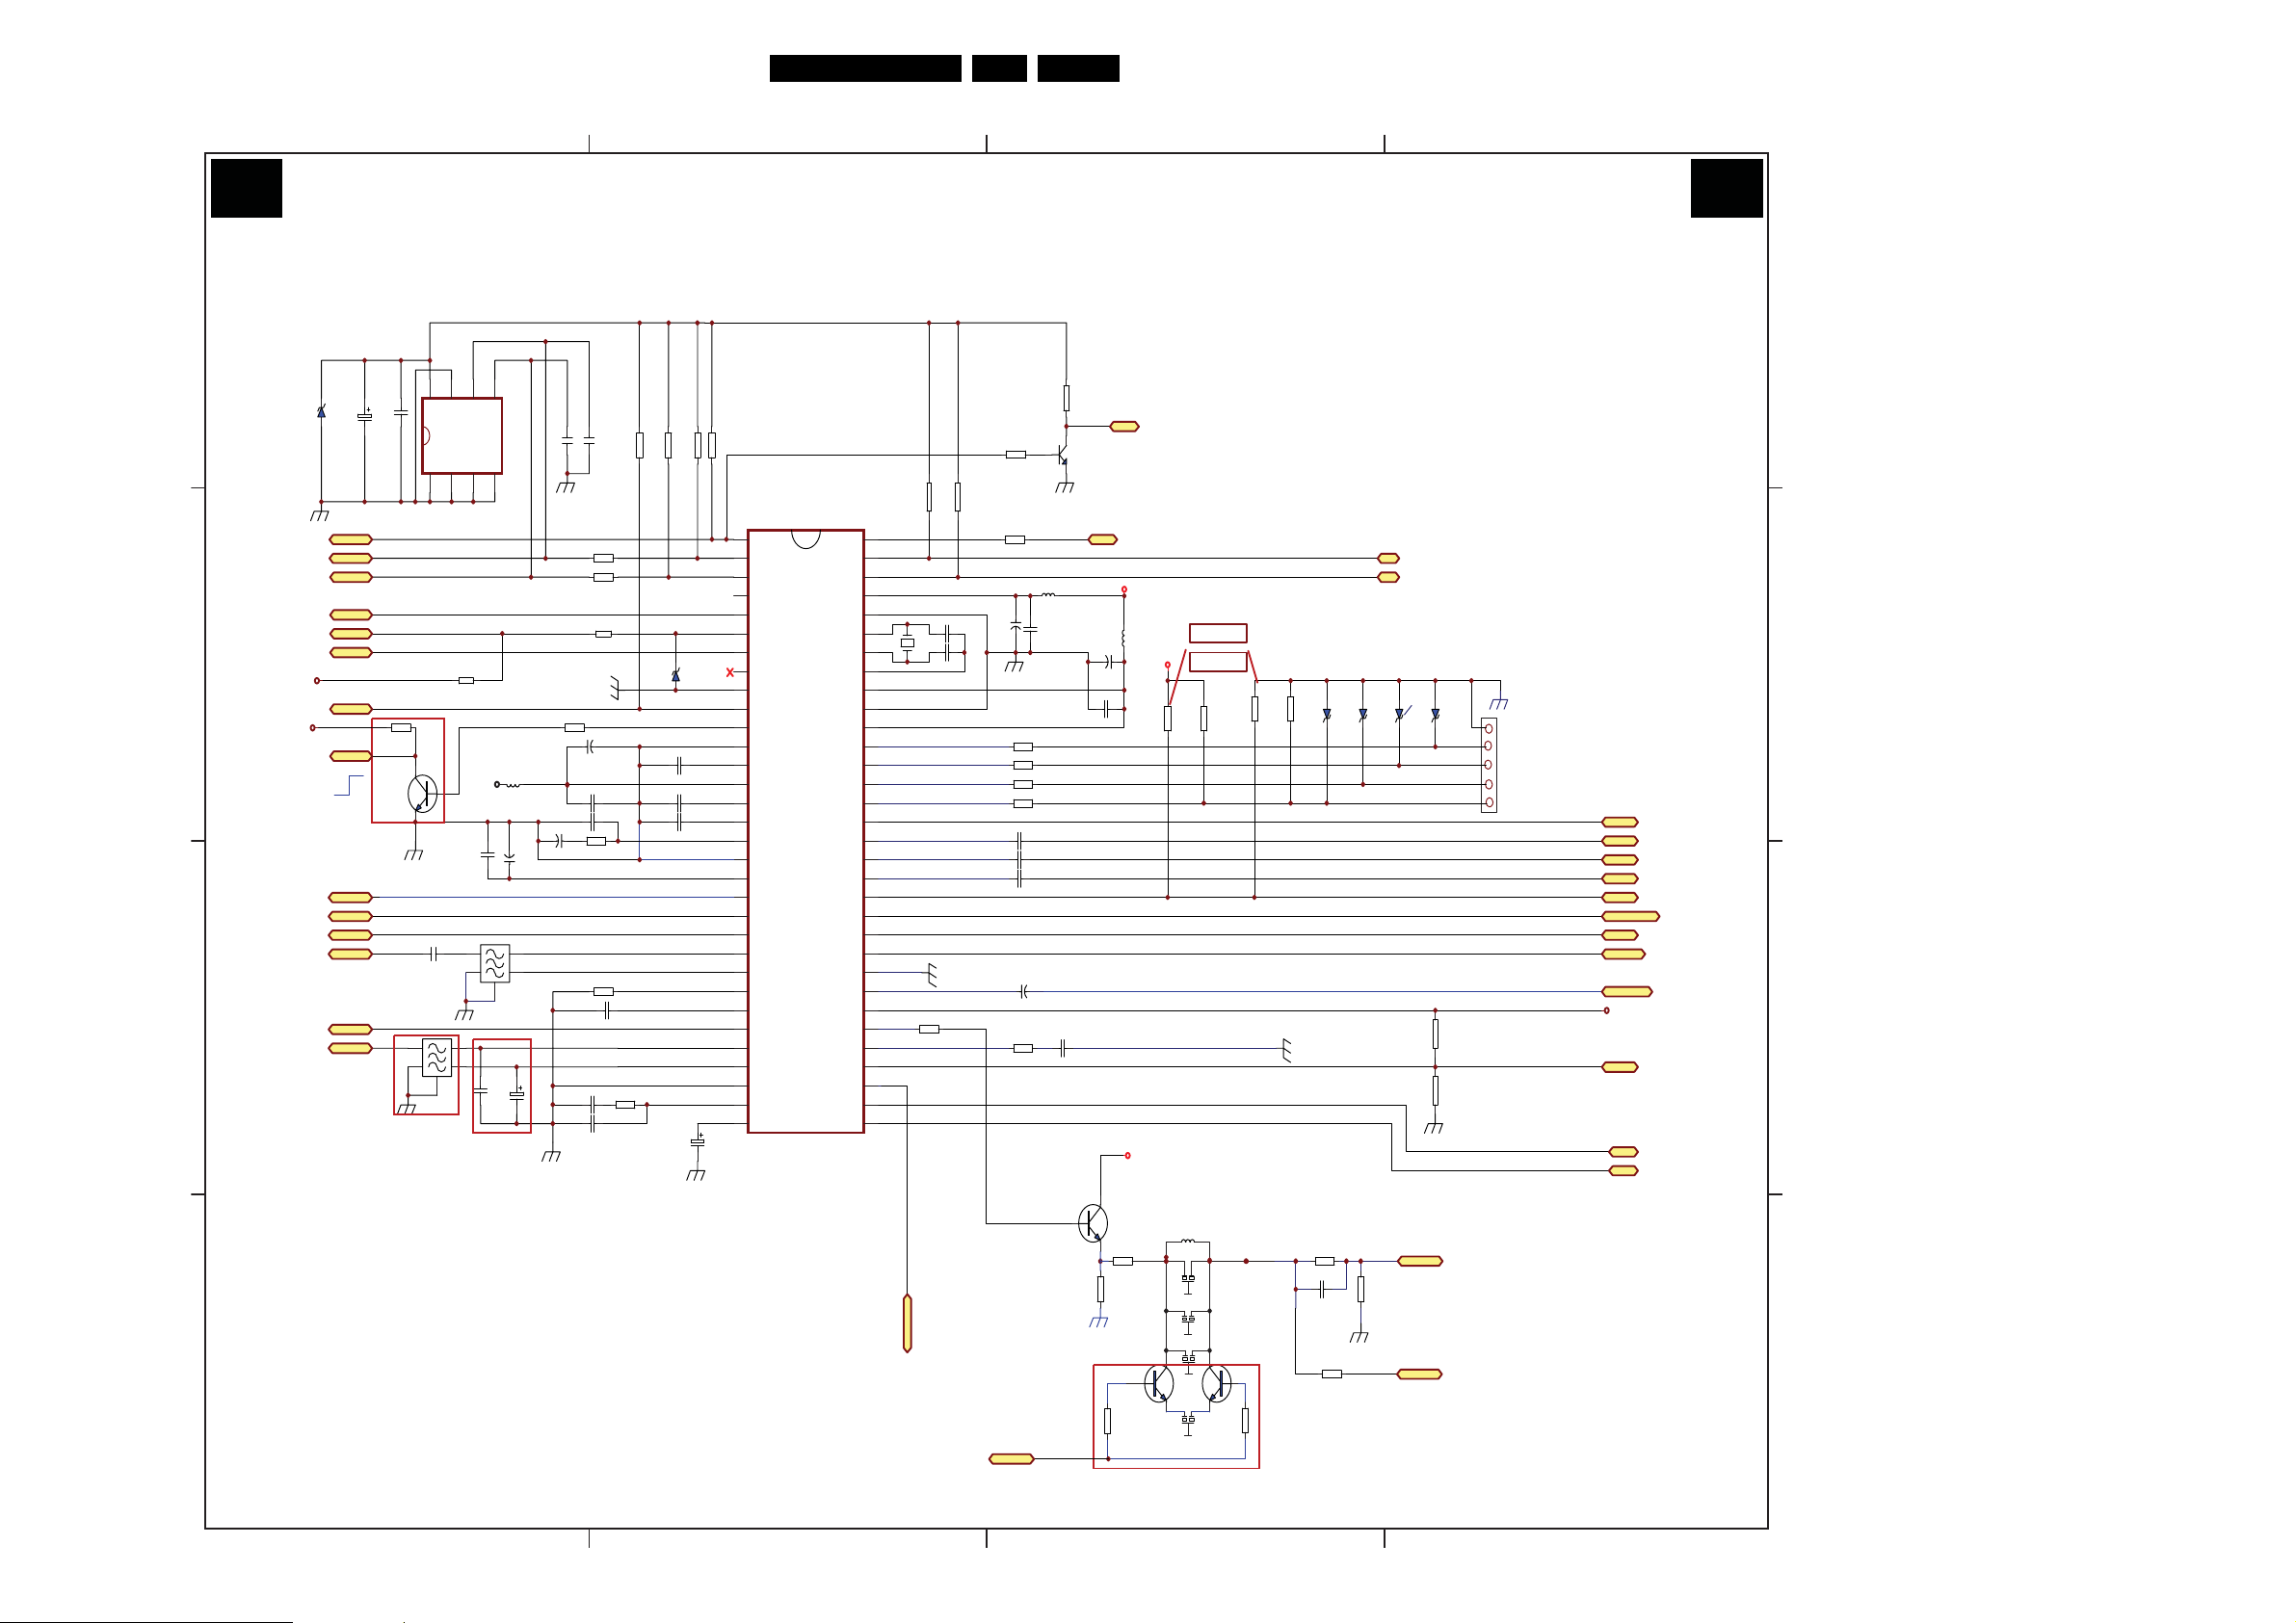
Circuit Diagrams and PWB Layouts
Mono Carrier: CPU & Decoder
EN 18SK5.0A CA 7.
4321
A8 A8
D
C
B
CPU & DECODER
8
7
6
5
C117
100uF/16V
100nF
STANDBY
STANDBY
SCL
SCL
SDA
SDA
OPTION
OPTION
KEY
KEY
VOL
VOL
+3.3V
MUTE
MUTE
+5V
SYSTEM
SYSTEM
EW
EW
VDRB
VDRB
VDRA
IF
IF
AGC
AGC
SIF
SIF
C118
R115
4K7
Q103
C1815
VDRA
NTSC
C105
10nF
1
2
NICAM
Vdd
PTC
n.c.
WP
1
2A23
only for scart
0.1U/63V
SAW102
3
Q9362M
SCL
R122
10K
+8V
C120
1
2
4
5
NO NICAM
SDA
Vss
4
3
C136
2n2
IC102
24C08
L205
C119
+
10uF/16V
4
5
SAW101
SW02B
C137
10uF
10uH
C133
1uF/50V
ZD102
+3.3V
+5V
5V1
C108
C107
100pF
100pF
R133 100
R134
R135
R119
3K3
C129
+
10uF/16V
10nF
C128
4n7
C132
+
R138
18K
R151
39K
C138
1.5nF
C139
330pF
R145
R130
22K
3.3K
100
47
C127
C130
C131
C135
0.1U/63V
R139
2.7K
R131
3.3K
ZD103
8V2
220nF
220nF
2200p
C140
4.7uF
R132
3.3K
1
2
3
4
5
6
7
8
9
10
11
12
13
14
15
16
17
18
19
20
21
22
23
24
25
26
27
28
29
30
31
IC201
STANDBY
SCL
SDA
AV3/TUNING
SCART ID
KEY
VOL
BAND
Vss C/P
MUTE
PAL / NT S C
VssA
SECPLL
Vp2
DECDIG
PH2LF
PH1LF
GND3
DECBG
AVL/EWD
VDRB
VDRA
IF1
IF2
IREF
VSC
TUNER AGC
AUDEEM/SIF1
DECSDEM/SIF2
GND2
SNDPLL/SIFAGC
AVL/REFO32H. OUT
VddP
RESET
XTAL OUT
XTAL IN
OscGnd
VddC
VddA
B OUT
G OUT
TDA9363 for AP
TDA9373 FOR Latam
TDA9384 for India
R OUT
BLANKING
BCL IN
B / U IN
G / Y IN
R / V IN
BLANK
AUDOUT/AMOUT
C IN
CVBS/Y IN
GND1
CVBSINT
IFVO/SVO
PLL IF
EHTO
AUD EXT /Q SS O
FBISO
IRin
AV2
AV1
VpE
R120
1K
R121
10K
R149
R148
3.3K
3.3K
C147
33pF
C145
100uF
C727
C726
C725
C116
R140
100
L105
+
0.1uF
0.1uF
+
R147
390
10uH
C146
0.1uF
C150
100uF/16V
R144100
R143
R142
R141
0.1uF
1uF
64
63
62
61
60
59
X101
58
12MHz
57
56
55
54
53
52
51
50
49
48
47
46
45
44
43
42
41
40
39
Vp1
38
37
36
35
34
33
R125
220
C148
33pF
Q106
C1815
IR
L106
10uH
100
100
10K
C144
0.1U/63V
LED
+3.3V
+
C149
10nF
+8V
+8V
R724
33K
RCA :
R724 33K
R725 10K
SCART:R724 10K
R725 75
R414
39K
R725
10K
R425
27K
ZD104
8V2
A2
A1
ZD106
8V2
A2
A1
SYSTEM
ZD107
8V2
ZD108
8V2
R413
100K
R412
27K
GND
1
B
2
G
3
CN102
R
4
BL
5
BCL
U / B in
Y / G in
V / R in
BLANK
TV AUDIO OUT
C IN
CVBS/Y IN
TV CVBS IN
8V
X-RAY
AFC
H-out
BCL
U / B in
Y / G in
V / R in
BLANK
TV AUDIO OUT
C IN
CVBS/Y IN
TV CVBS IN
+8v
X-RAY
AFC
H-out
D
C
B
A
5800-A5P190-00
TV CVBS OUT
AUDE XT
SYSTEM
Q107
C1815
R127
100
R126
180
R124
4K7
L103
8.2uH
XT165
XT-6.5
GND
XT160
XT-6.0
GND
XT155
Q105
XT-5.5
GND
C1815
XT145
XT-4.5
GND
Q104
C1815
R123
4K7
R728
1K
C?
220PF/50V
R727
100
TV CVBS IN
TV CVBS IN
R729
1K2
CVBS OUT
CVBS OUT
NTSC
1 2 3 4
H_17220_008.eps
180607
A
Page 19
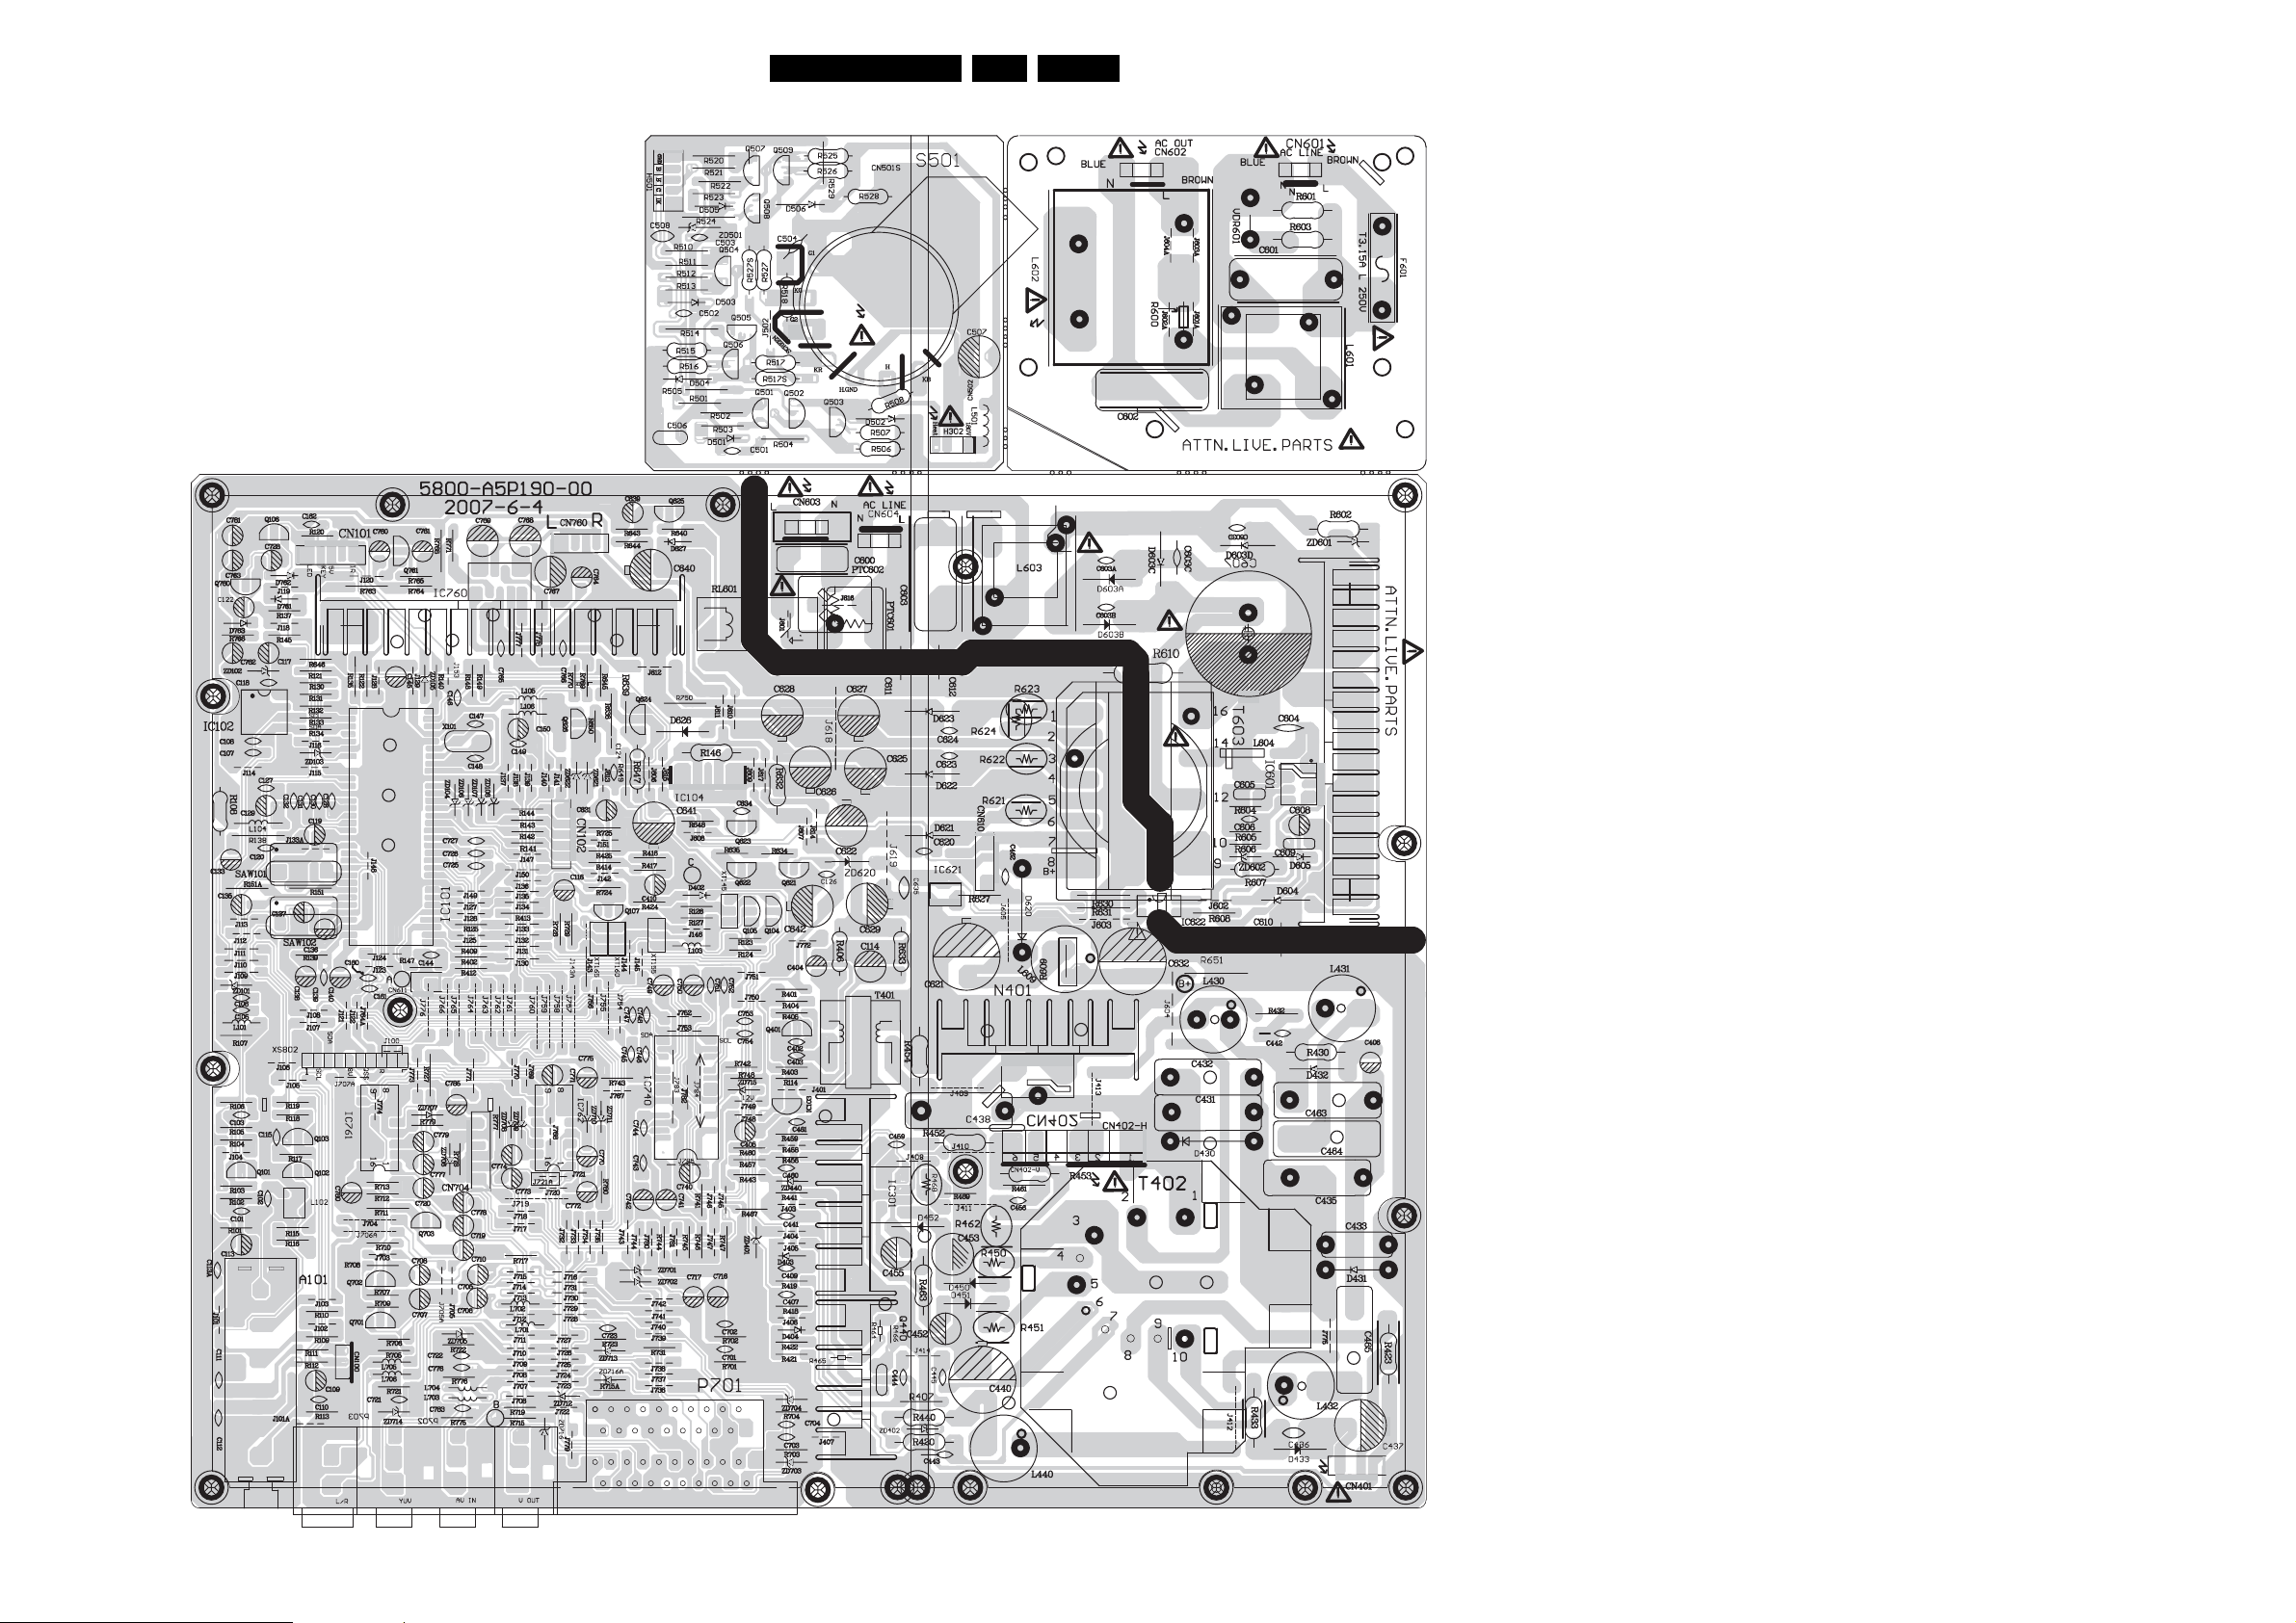
Circuit Diagrams and PWB Layouts
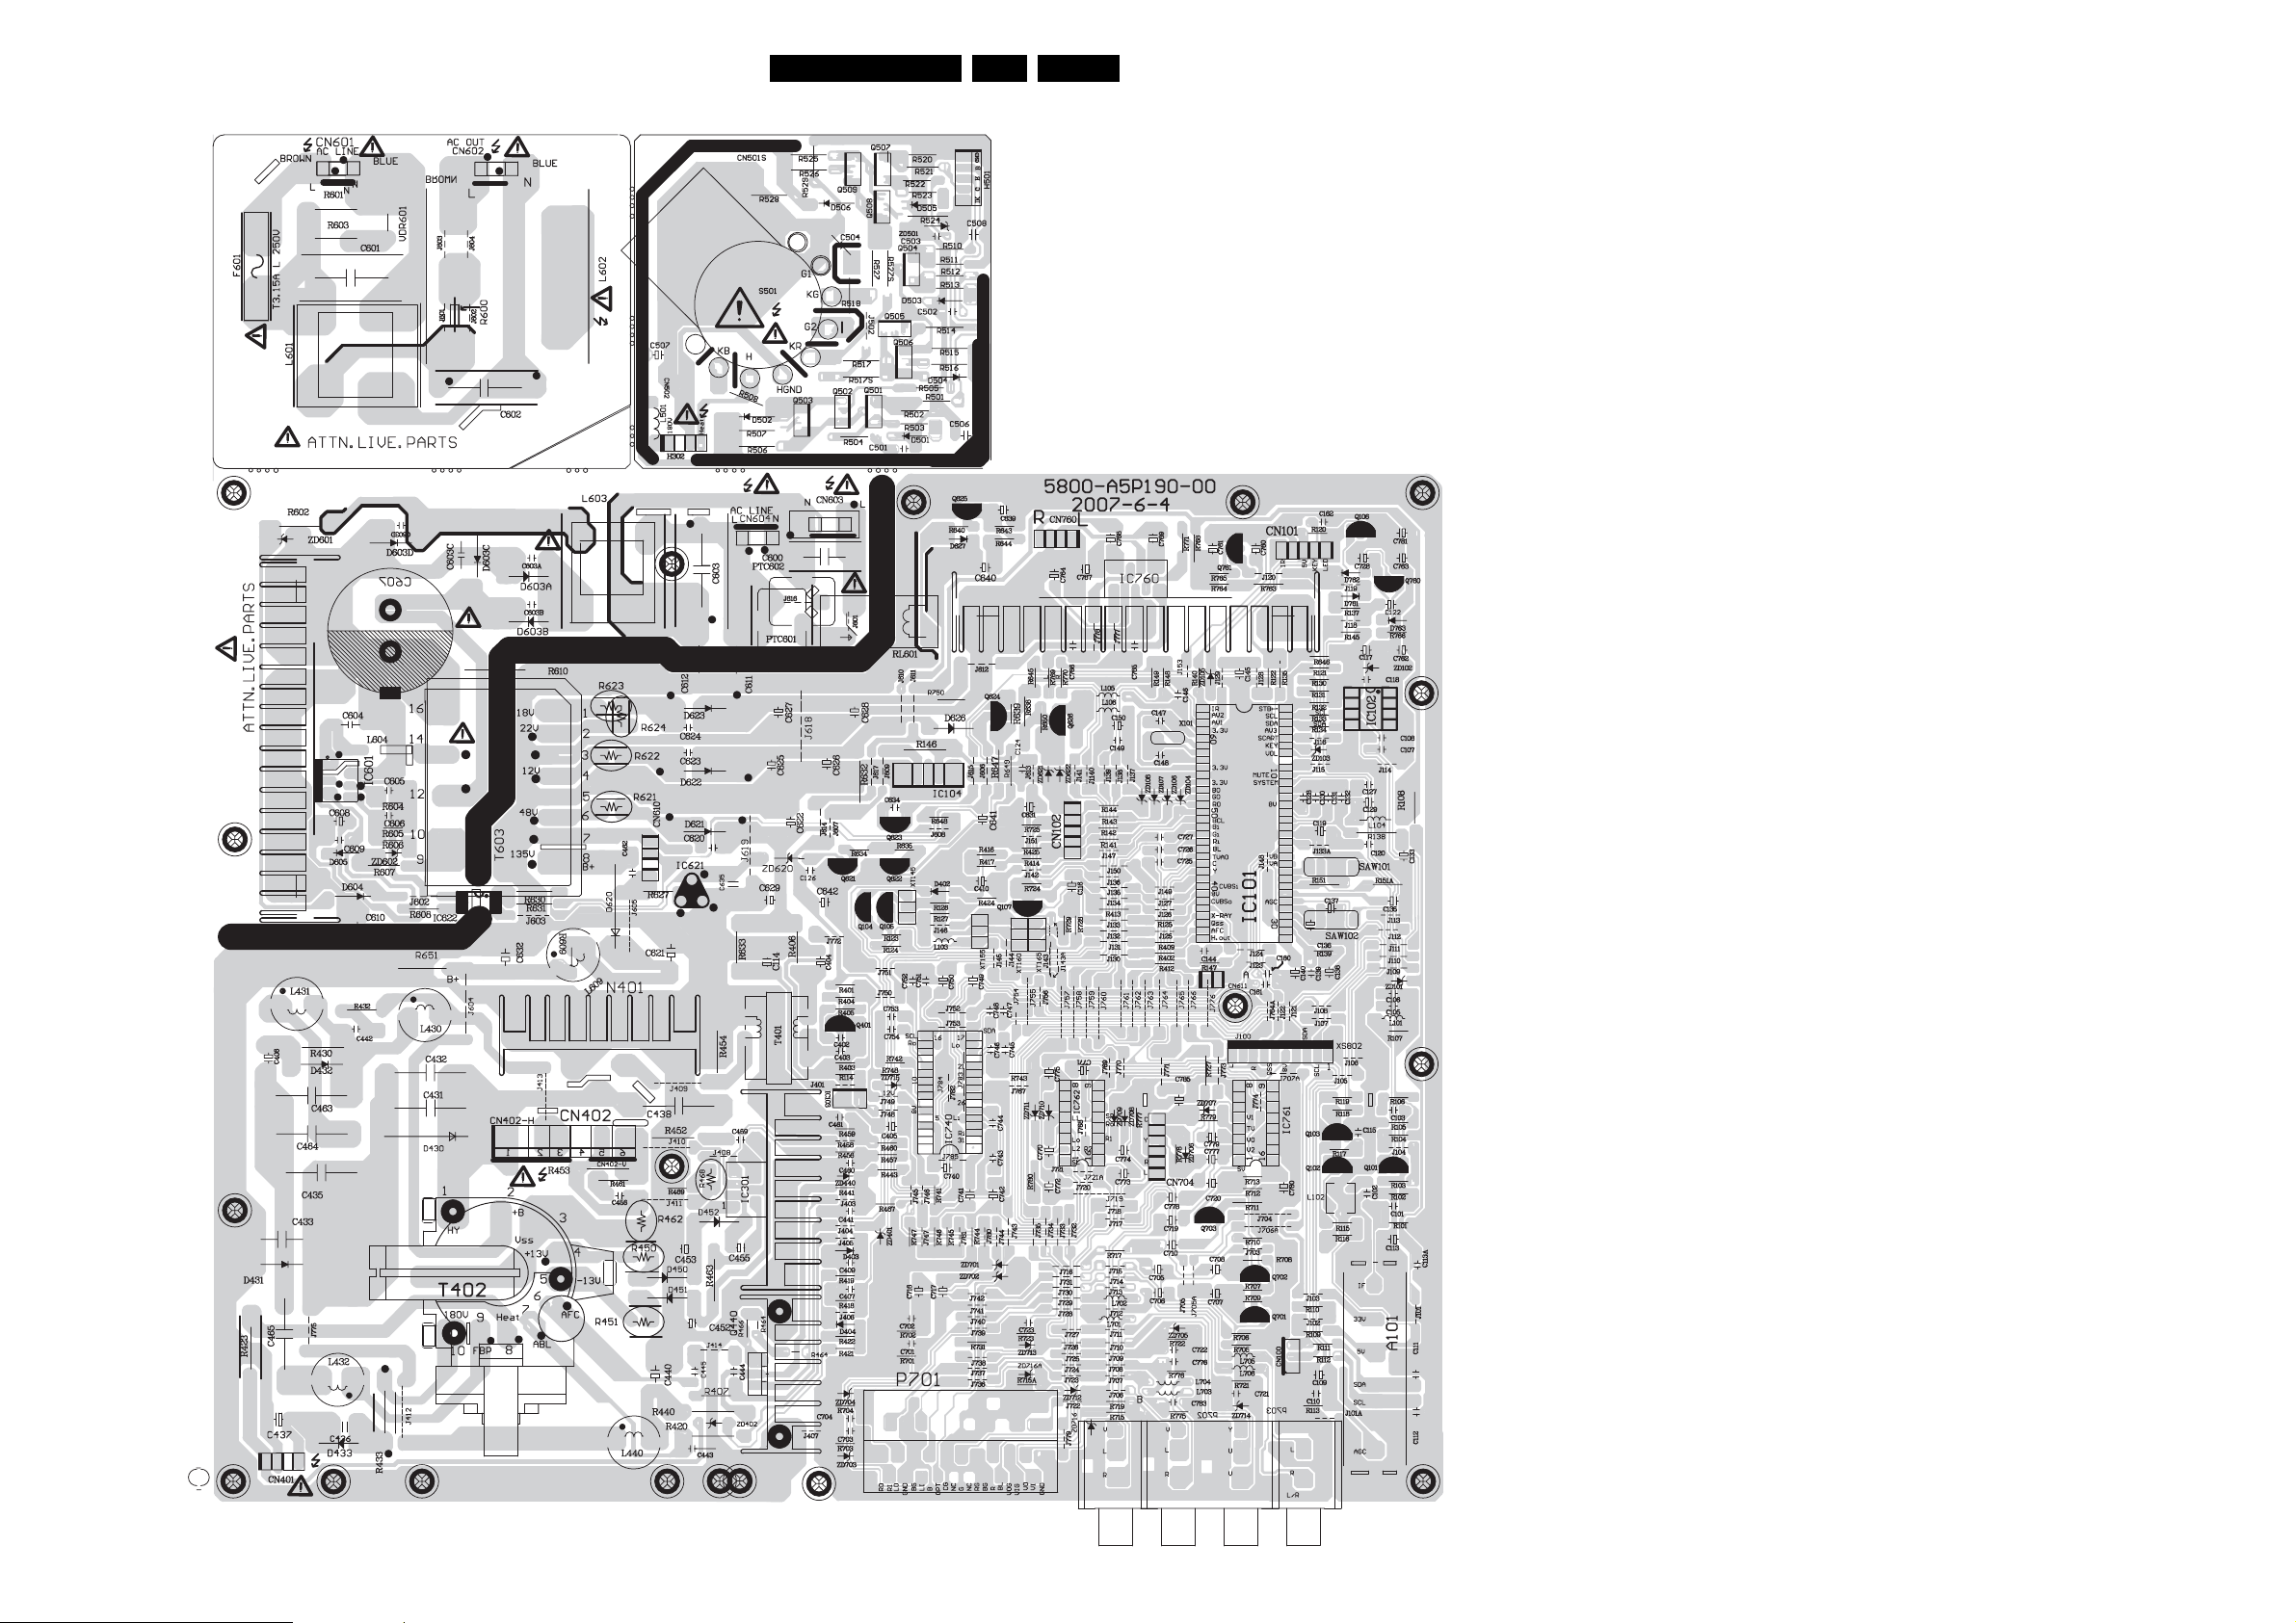
Layout Mono Carrier (Top Side)
EN 19SK5.0A CA 7.
5800-A5P190-00
H_17220_011.eps
280607
Page 20
Circuit Diagrams and PWB Layouts
Layout Mono Carrier (Bottom Side)
EN 20SK5.0A CA 7.
5800-A5P190-00
H_17220_012.eps
280607
Page 21
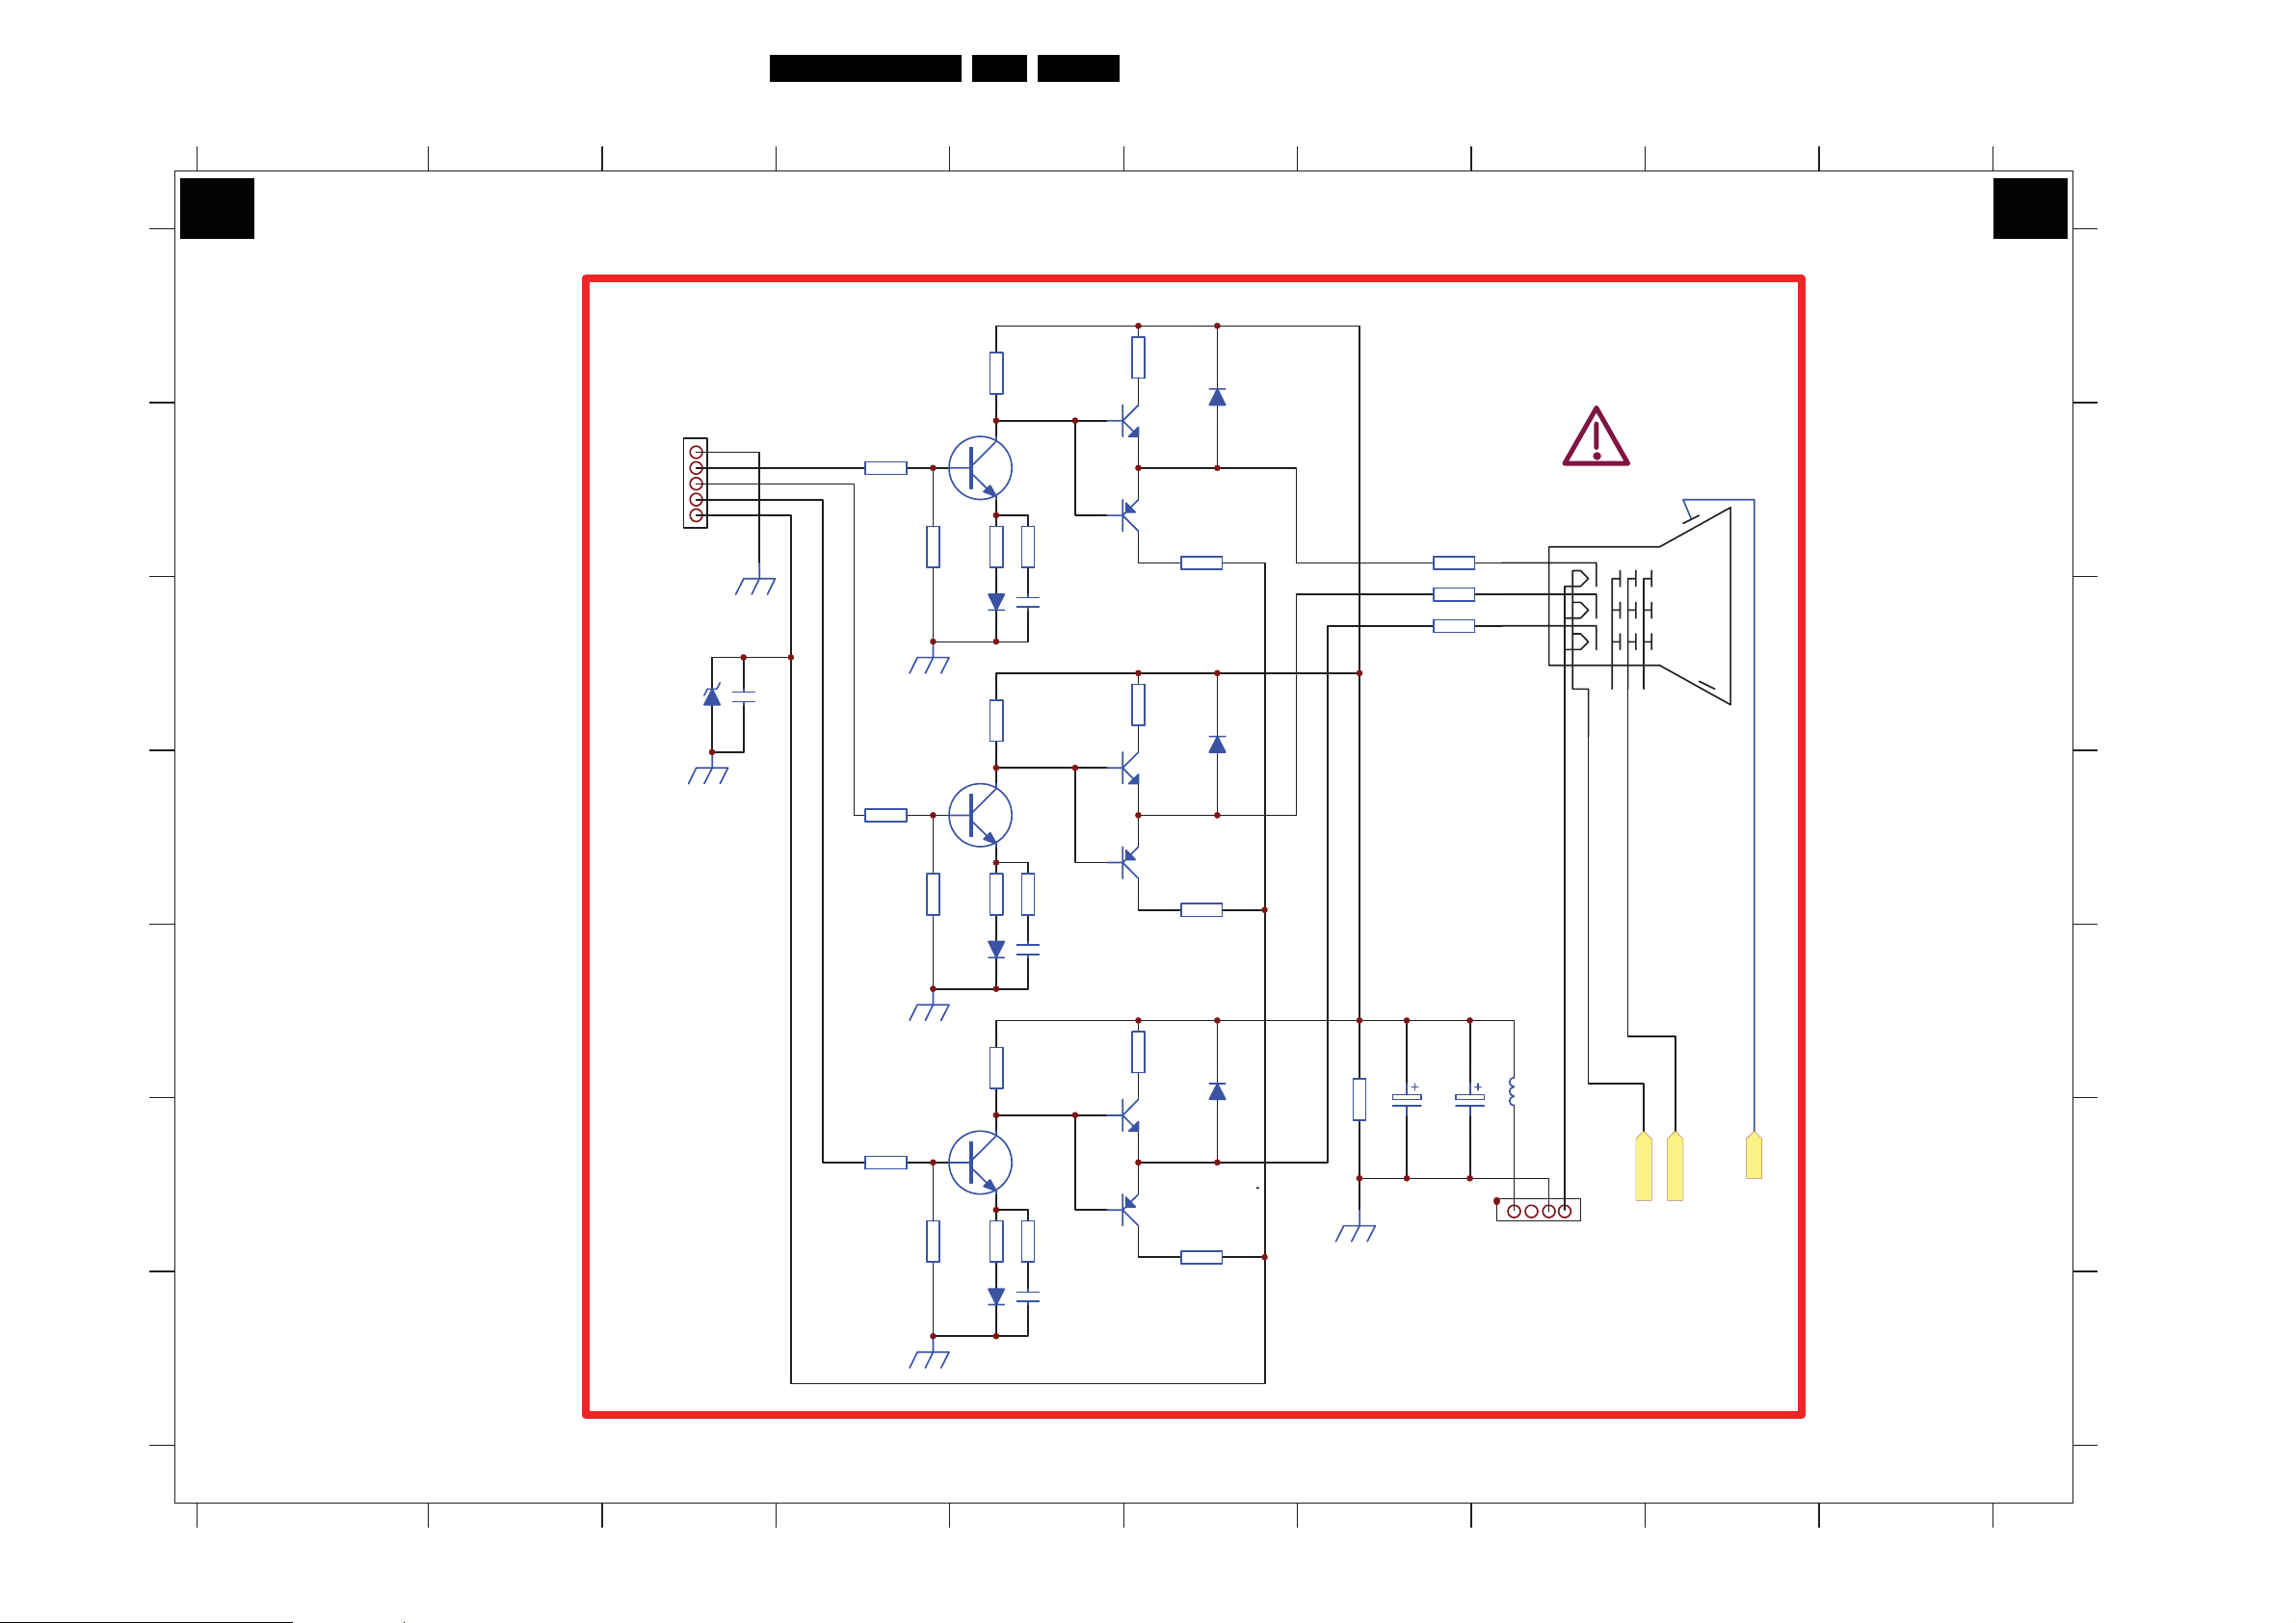
CRT Board
Circuit Diagrams and PWB Layouts
EN 21SK5.0A CA 7.
1 2345678910
A
B
C
D
B B
CRT BOARD
GND
R
H501
R510
22
R515
15K
2
Q504
C4544
R516
1
220
Q506
BF420
D504
BA158
G
B
BL
ZD501
8V2
C508
82PF
R521
22
R511
2K2
R520
2K2
R513
270
D503
1N4148
R525
15K
R523
270
D505
1N4148
R512
22
C502
470PF
2
Q507
C4544
R522
22
C503
470PF
Q505
BF421
R526
1
220
Q509
BF420
Q508
BF421
R514
270
R524
270
1
1
D506
BA158
G
R
R517
2K7
R527
2K7
R508
2K7
CRT
KR
KG
KB
A
B
C
D
E
F
G
5800-C3P512-00
R507
R506
2
15K
R501
22
R502
2K2
CRT AMPLIFY CIRCUIT
1N4148
R503
270
D501
Q501
C4544
R504
22
C501
470PF
12345
1
220
Q503
BF420
Q502
BF421
R505
1
270
678910
D502
BA158
B
R528
2
220K
C506
NC
H502
C507
NC
L501
10uH
+180V
GND
HEATER
FOCUS
SCREEN
EHT
H_17220_013.eps
190607
E
F
G
Page 22
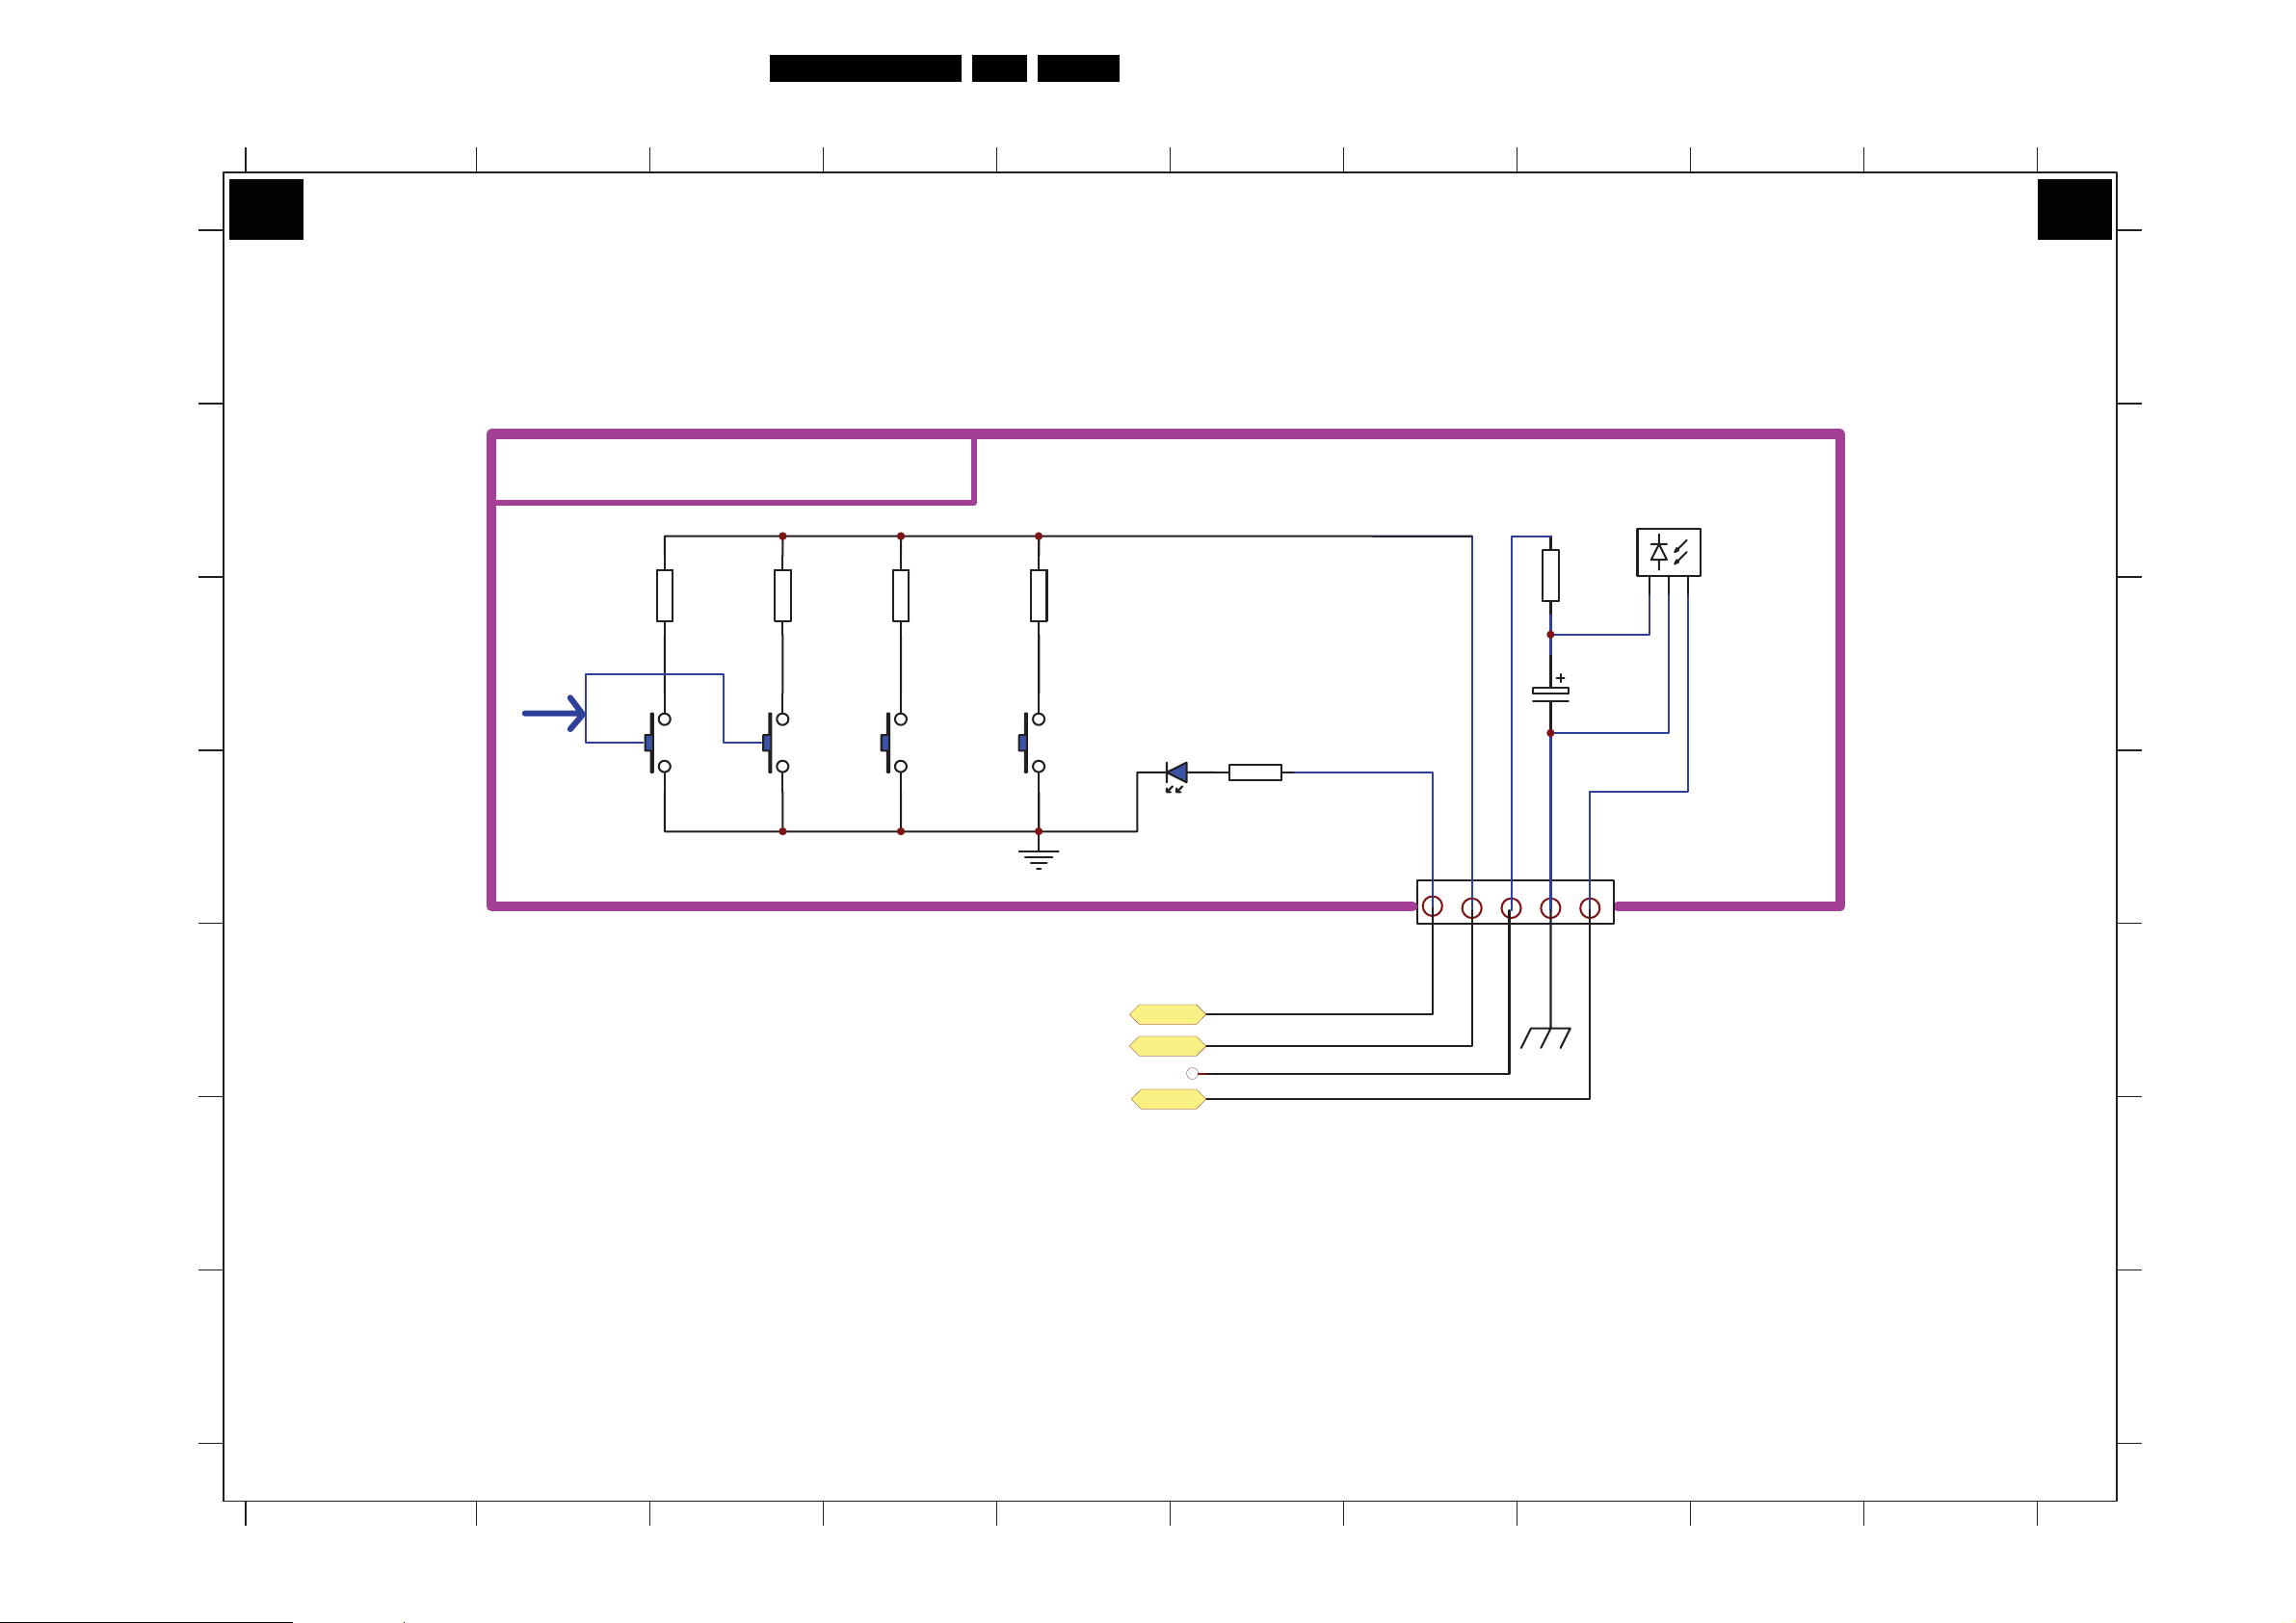
Keyboard Control Panel
1 2345678910
Circuit Diagrams and PWB Layouts
EN 22SK5.0A CA 7.
A
B
C
D D
KEY CONTROL
KEYBOARD CIRCUIT
KEYBOARD CIRCUIT
M001
123
MENU
VOL+
SW004
RD5
10K
VOLSW003
RD4
18K
PRO+
SW002
RD3
100
PROSW001
RD2
2K7
LED
LED
RR1
100
CR1
10uF/16V
RD1
100
A
B
C
D
E
F
G
LED
KEY
+5V_VCC
IR
1
LED
2
KEY
3
D
5
4
GND
IR
E
5V
F
G
5800-D9SL7Y-05
12345
H_17220_014.eps
190607
678910
Page 23
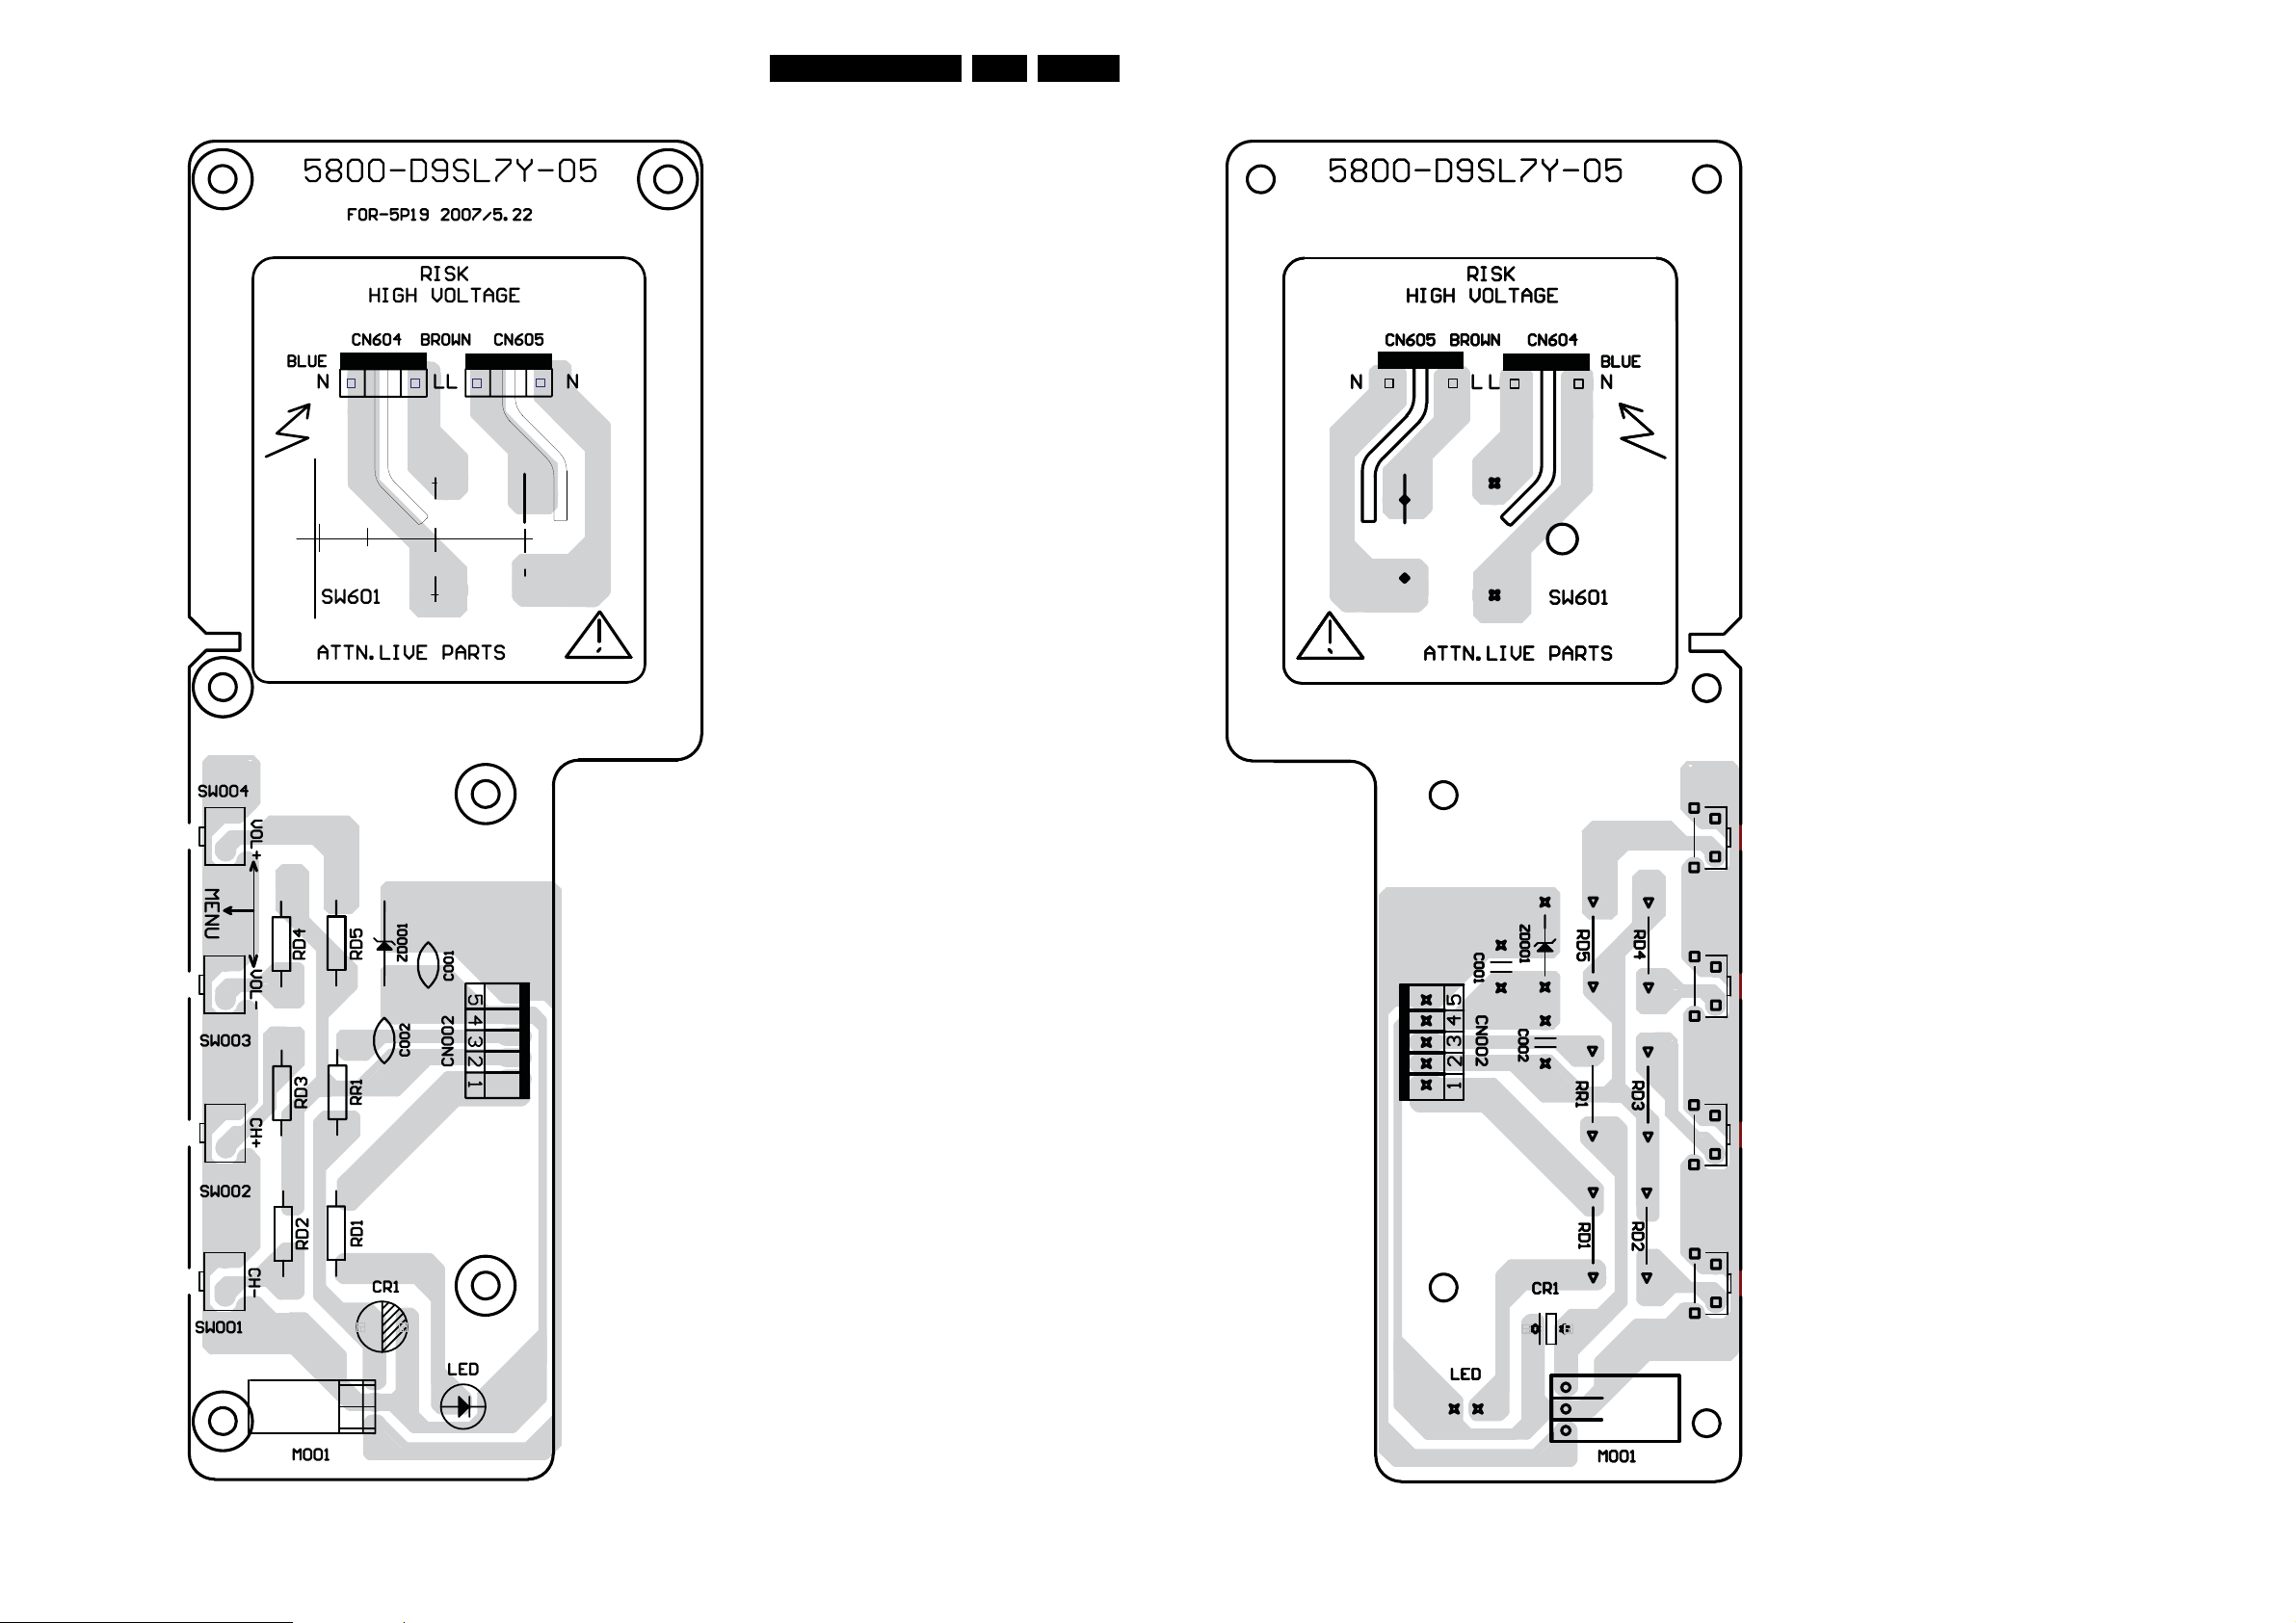
Circuit Diagrams and PWB Layouts
EN 23SK5.0A CA 7.
Layout Keyboard Control Panel (Top Side)
Layout Keyboard Control Panel (Bottom Side)
5800-D9SL7Y-05
H_17220_015.eps
190607
5800-D9SL7Y-05
H_17220_038.eps
290607
Page 24
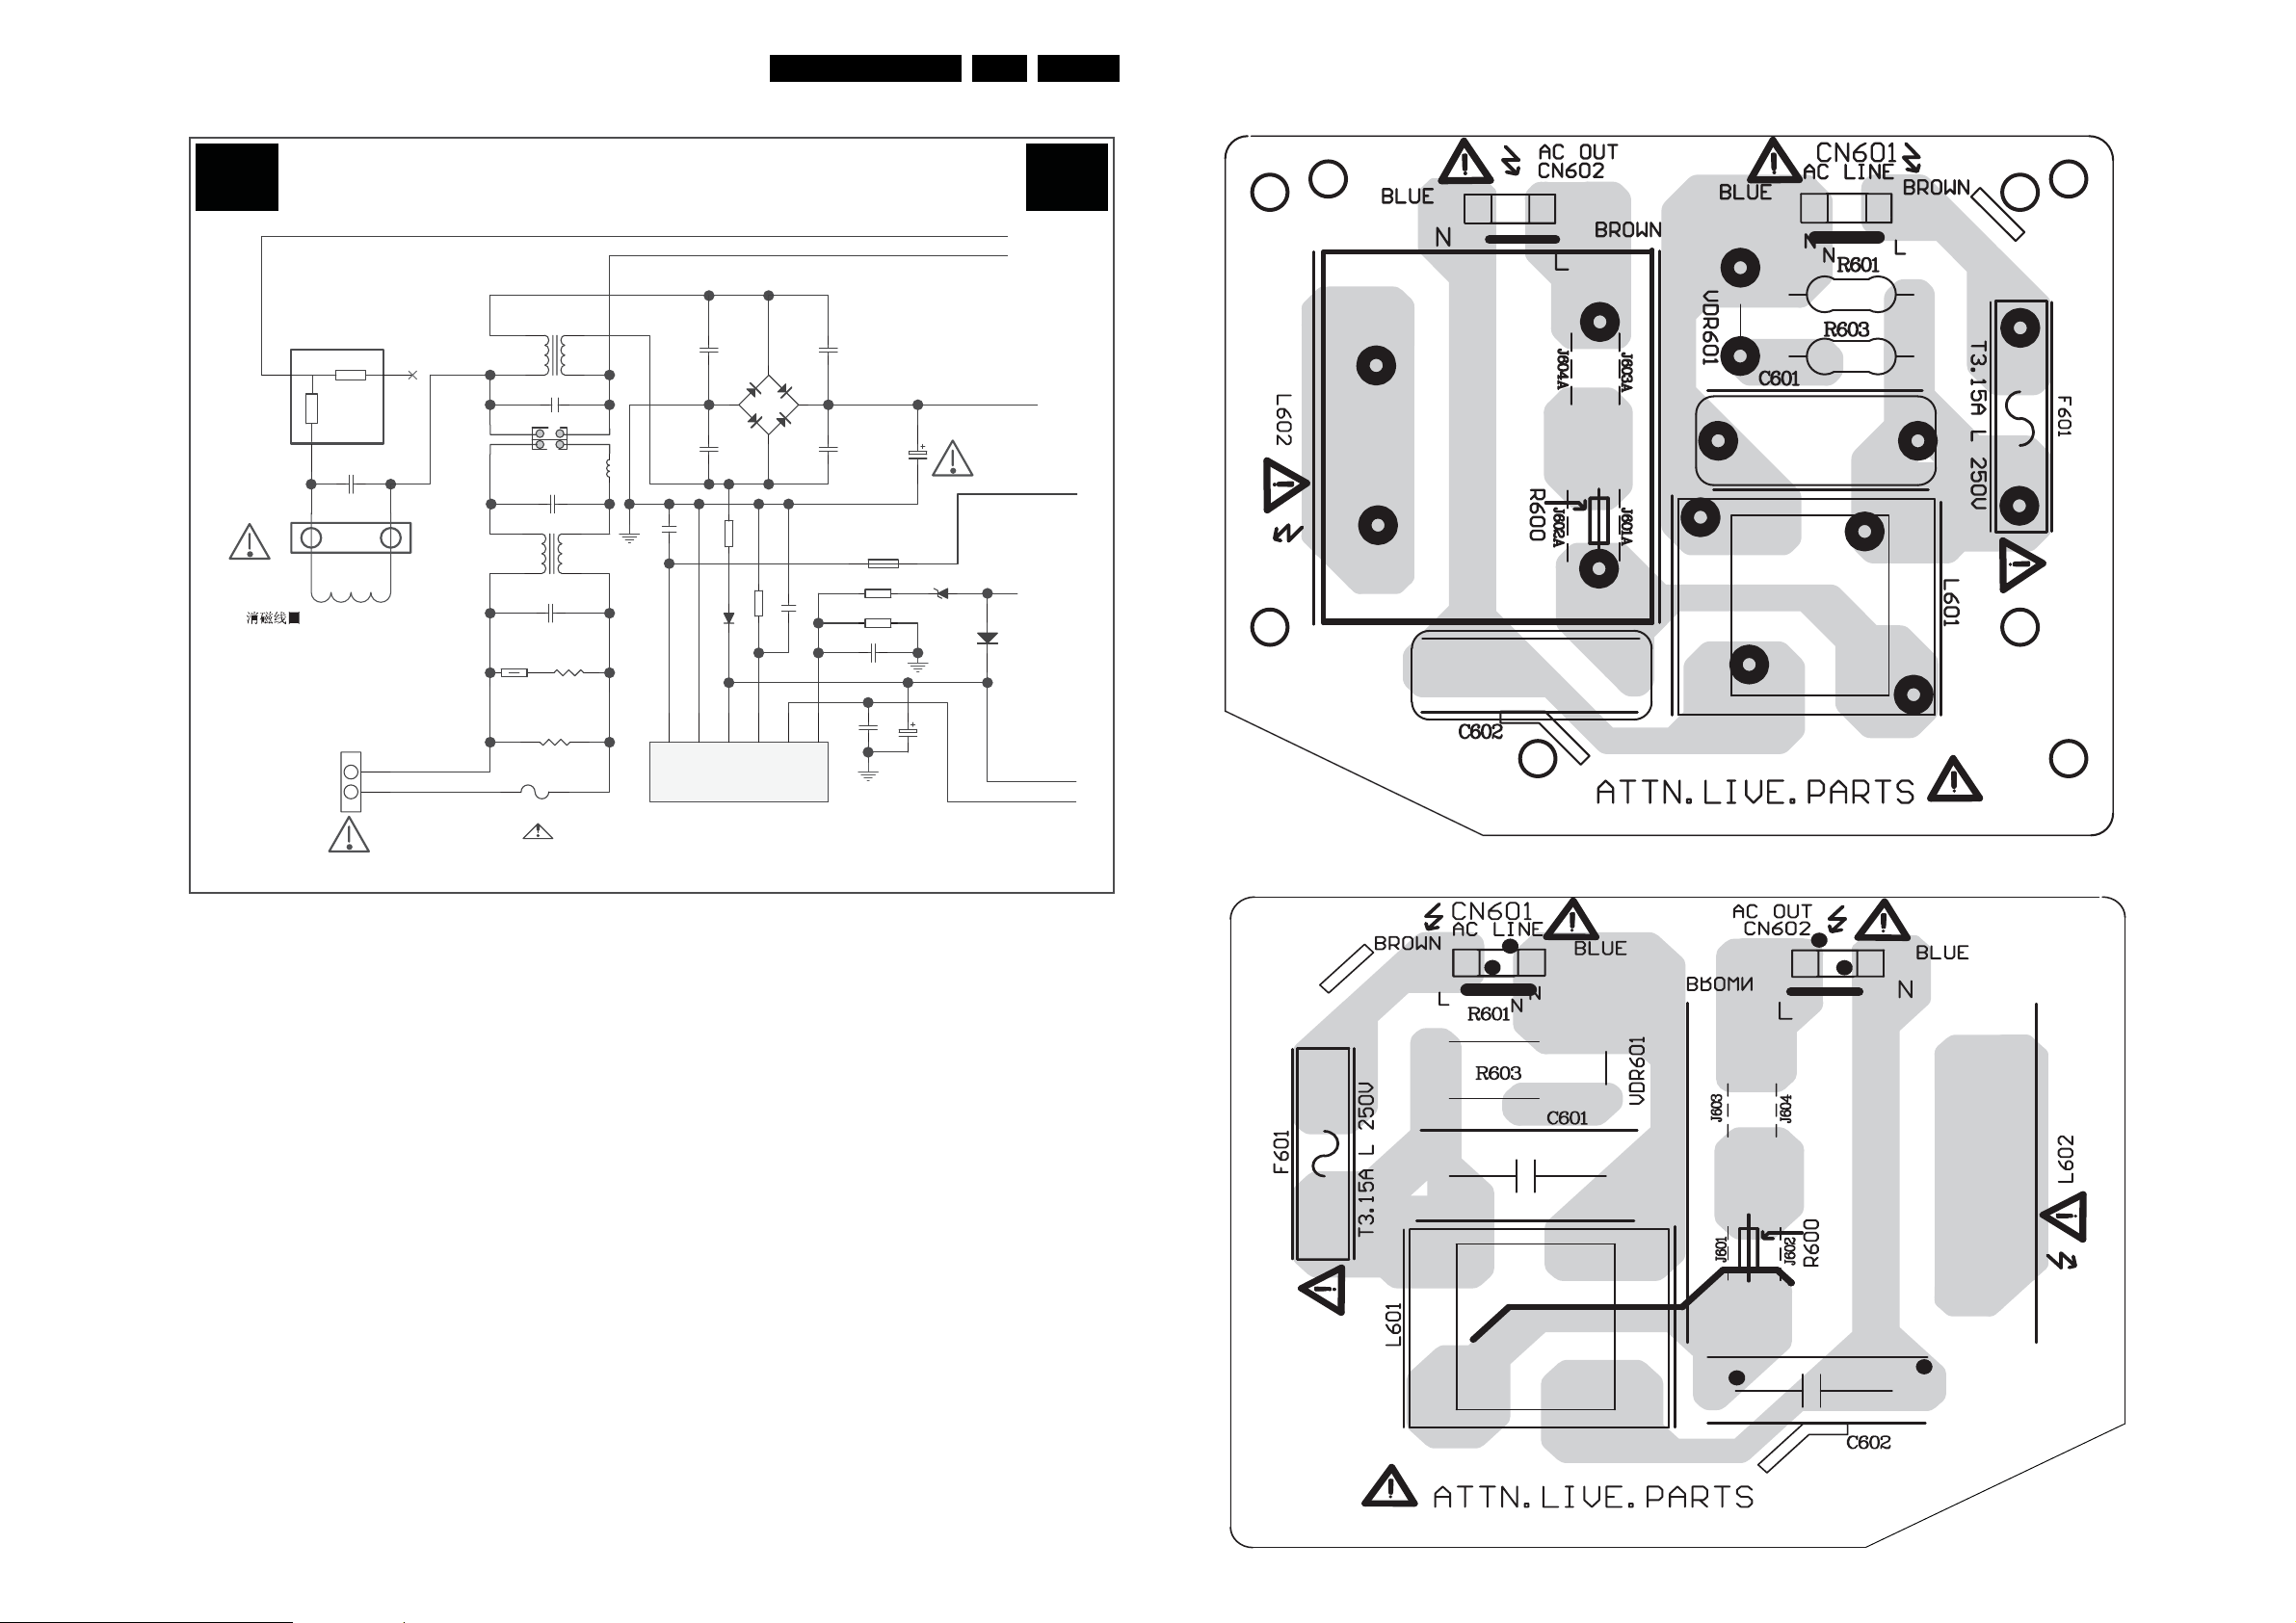
Circuit Diagrams and PWB Layouts
EN 24SK5.0A CA 7.
Mains Filter Panel
MAINS FILTER
E E
PTC601
9RM
CN601
AC90-270V
Rs
23
Rp
1
C600
0.1uF/250V
CN603
DEGAUSSING
N
BLUE
BROWN
2
1
L
CN604
N
N
CN602
15mH
0.22uF/250V
VDR601
GAS DISCHARGE
TUBE
R601
2.2M 1/2W
F601
T3.15A
AC25 0V
T601
C603
0.22uF
AC25 0V
L
L
FOR EMC
L602
PFC 15mH×2
C602
0.22uF/250V
L601
C601
R603
FOR CB
R600
NTC
5RM
C604
1000pF
1
3
D
STR-W6556A
C603A
4700pF
AB
D603
C603D
4700pF
R602
2
200K
R604
D604
S/GND
39K
0
4
5FB6
VCC
OLP/SS
IC601
CD
C605
0.1uF
100V
7
OCP/BD
C60 3B
4700pF
C603C
4700pF
R606
R605
220
L604
6K8
C606
470pF
C609
10nF
C607
220uF
450V
C608
10uF
ZD602
18V
D605
BA158
Layout Mains Filter (Top Side)
5800-5P190-00
H_17220_033.eps
180607
5800-5P190-00
H_17220_017.eps
270607
Layout Mains Filter (Bottom Side)
5800-5P190-00
H_17220_034.eps
270607
Page 25
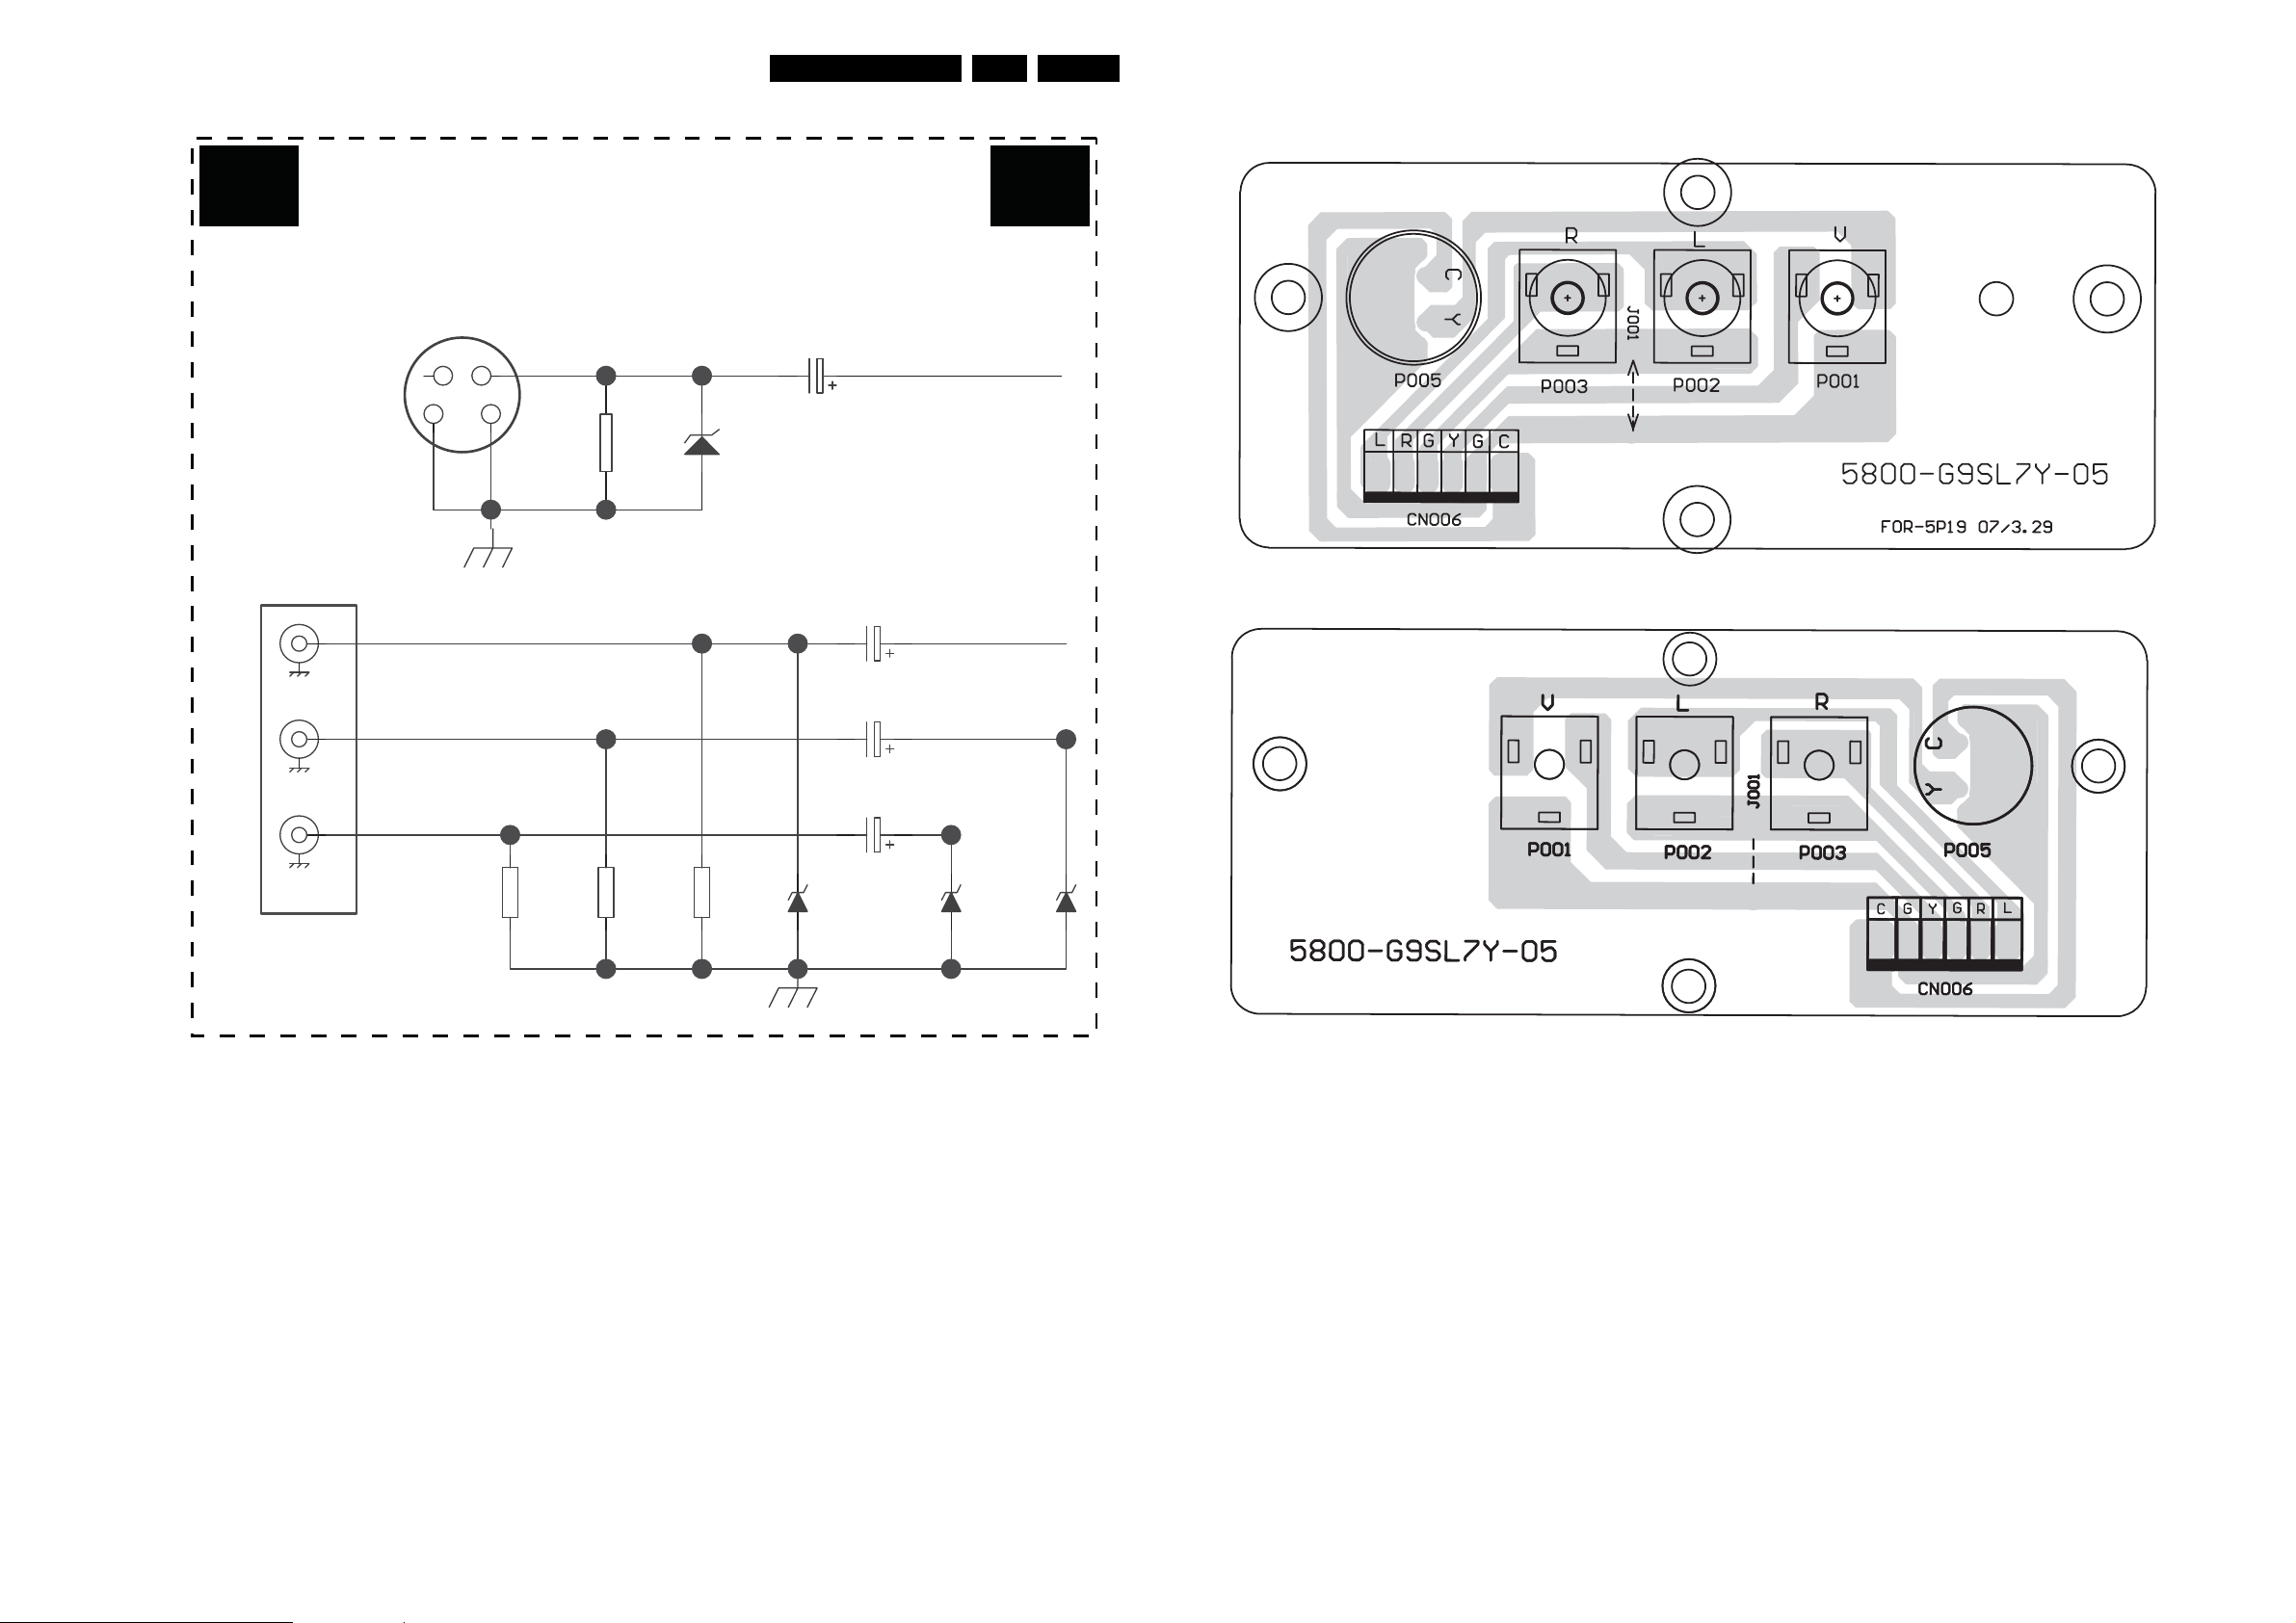
Circuit Diagrams and PWB Layouts
EN 25SK5.0A CA 7.
Side A/V Panel
Side AV Panel
G G
S-VHS
C785
10uF
C777
10uF
P701
P702
V IN
R779
75
ZD707
8V2
Layout Side A/V Panel
Side AV Top Layer
Side AV Bottom Layer
L IN
R IN
SIDE AV IN
5800-G9SL7Y-05
R777
R780
47K
R778
C772
10uF
C774
10uF
75
ZD706
8V2
ZD709
8V
ZD711
8V2
H_17220_018.eps
250607
5800-G9SL7Y-05
H_17220_019.eps
250607
Page 26
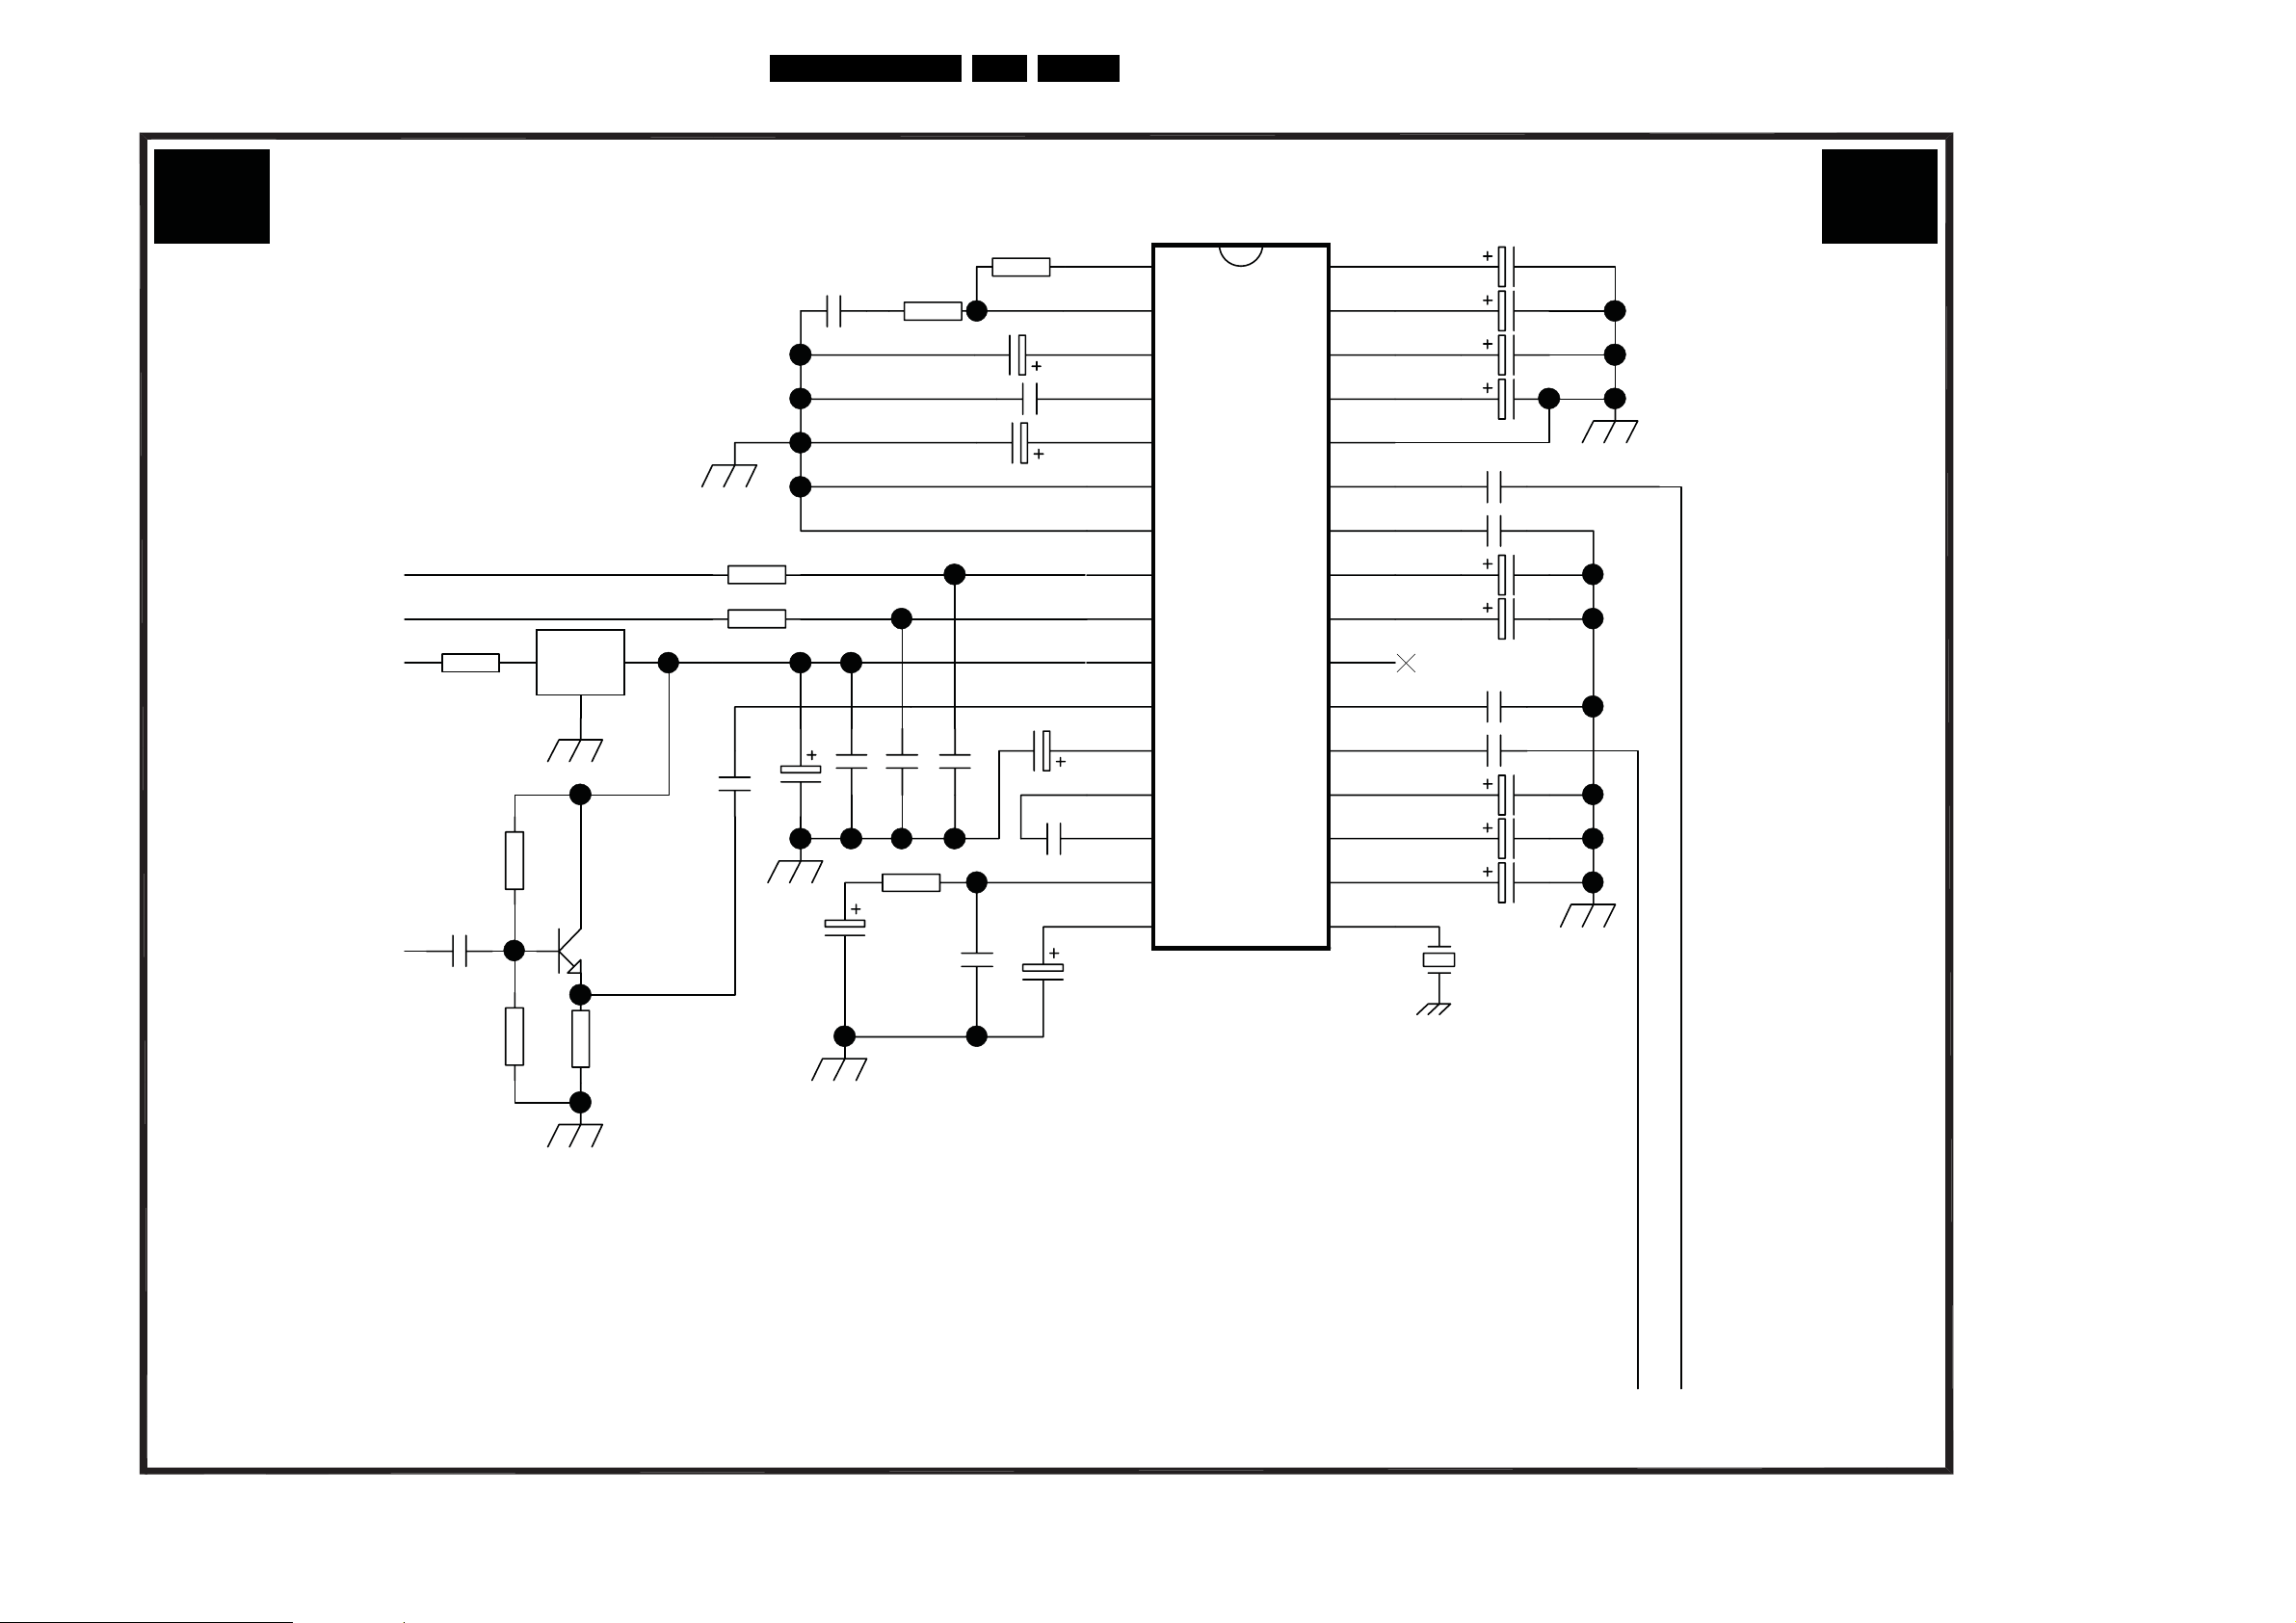
BTSC Panel
Circuit Diagrams and PWB Layouts
EN 26SK5.0A CA 7.
BTSC BOARD
M M
FOR LATAM
SDA
SCL
R854
+12V
QSS
10
C879
1uF
IC852
L7809
R857
47K
In
Out
Gnd
Q851
C1815
R855
R856 100
C851
1uF
100
C877
10uF
C853
4.7uF
C863
47nF
C878
0.1uF
R853
150
C876
100pF
R851
2K2
C854
0.22uF
C864
10uF
C865
0.1uF
C866
4.7uF
C875
100pF
R852
8K2
C869
100uF
C852
0.47uF
C855
10uF
1
VEO
2
VEI
3
Cnr
4
Cm
5
Cdec
6
AGND
7
DGND
8
SDA
9
SCL
10
Vcc
11
COMP
12
Vcap
13
Cp1
14
Cp2
15
Cph
16
Cadj CER
IC851
TDA9850
Ctw
MAD
OUTL
Vref
SAP
Csde
OUTR
Cmo
Cs
Cw
Cts
Cnd
CL
Cr
Css
32
31
30
29
28
27
26
25
24
23
22
21
20
19
18
17
C809
10uF
503KHz
C862
1uF
C861
1uF
C860
10uF
C872
1uF
C867
0.1uF
C874
2.2uF
C868
100uF
C858
15nF
C871
1uF
C873
2.2uF
C877
4.7uF
C856
4.7uF
X851
5800-M5P190-00
R858
47K
R860
1K
BTSC out R
BTSC out L
TV L
TV R
H_17460_003.eps
240907
Page 27
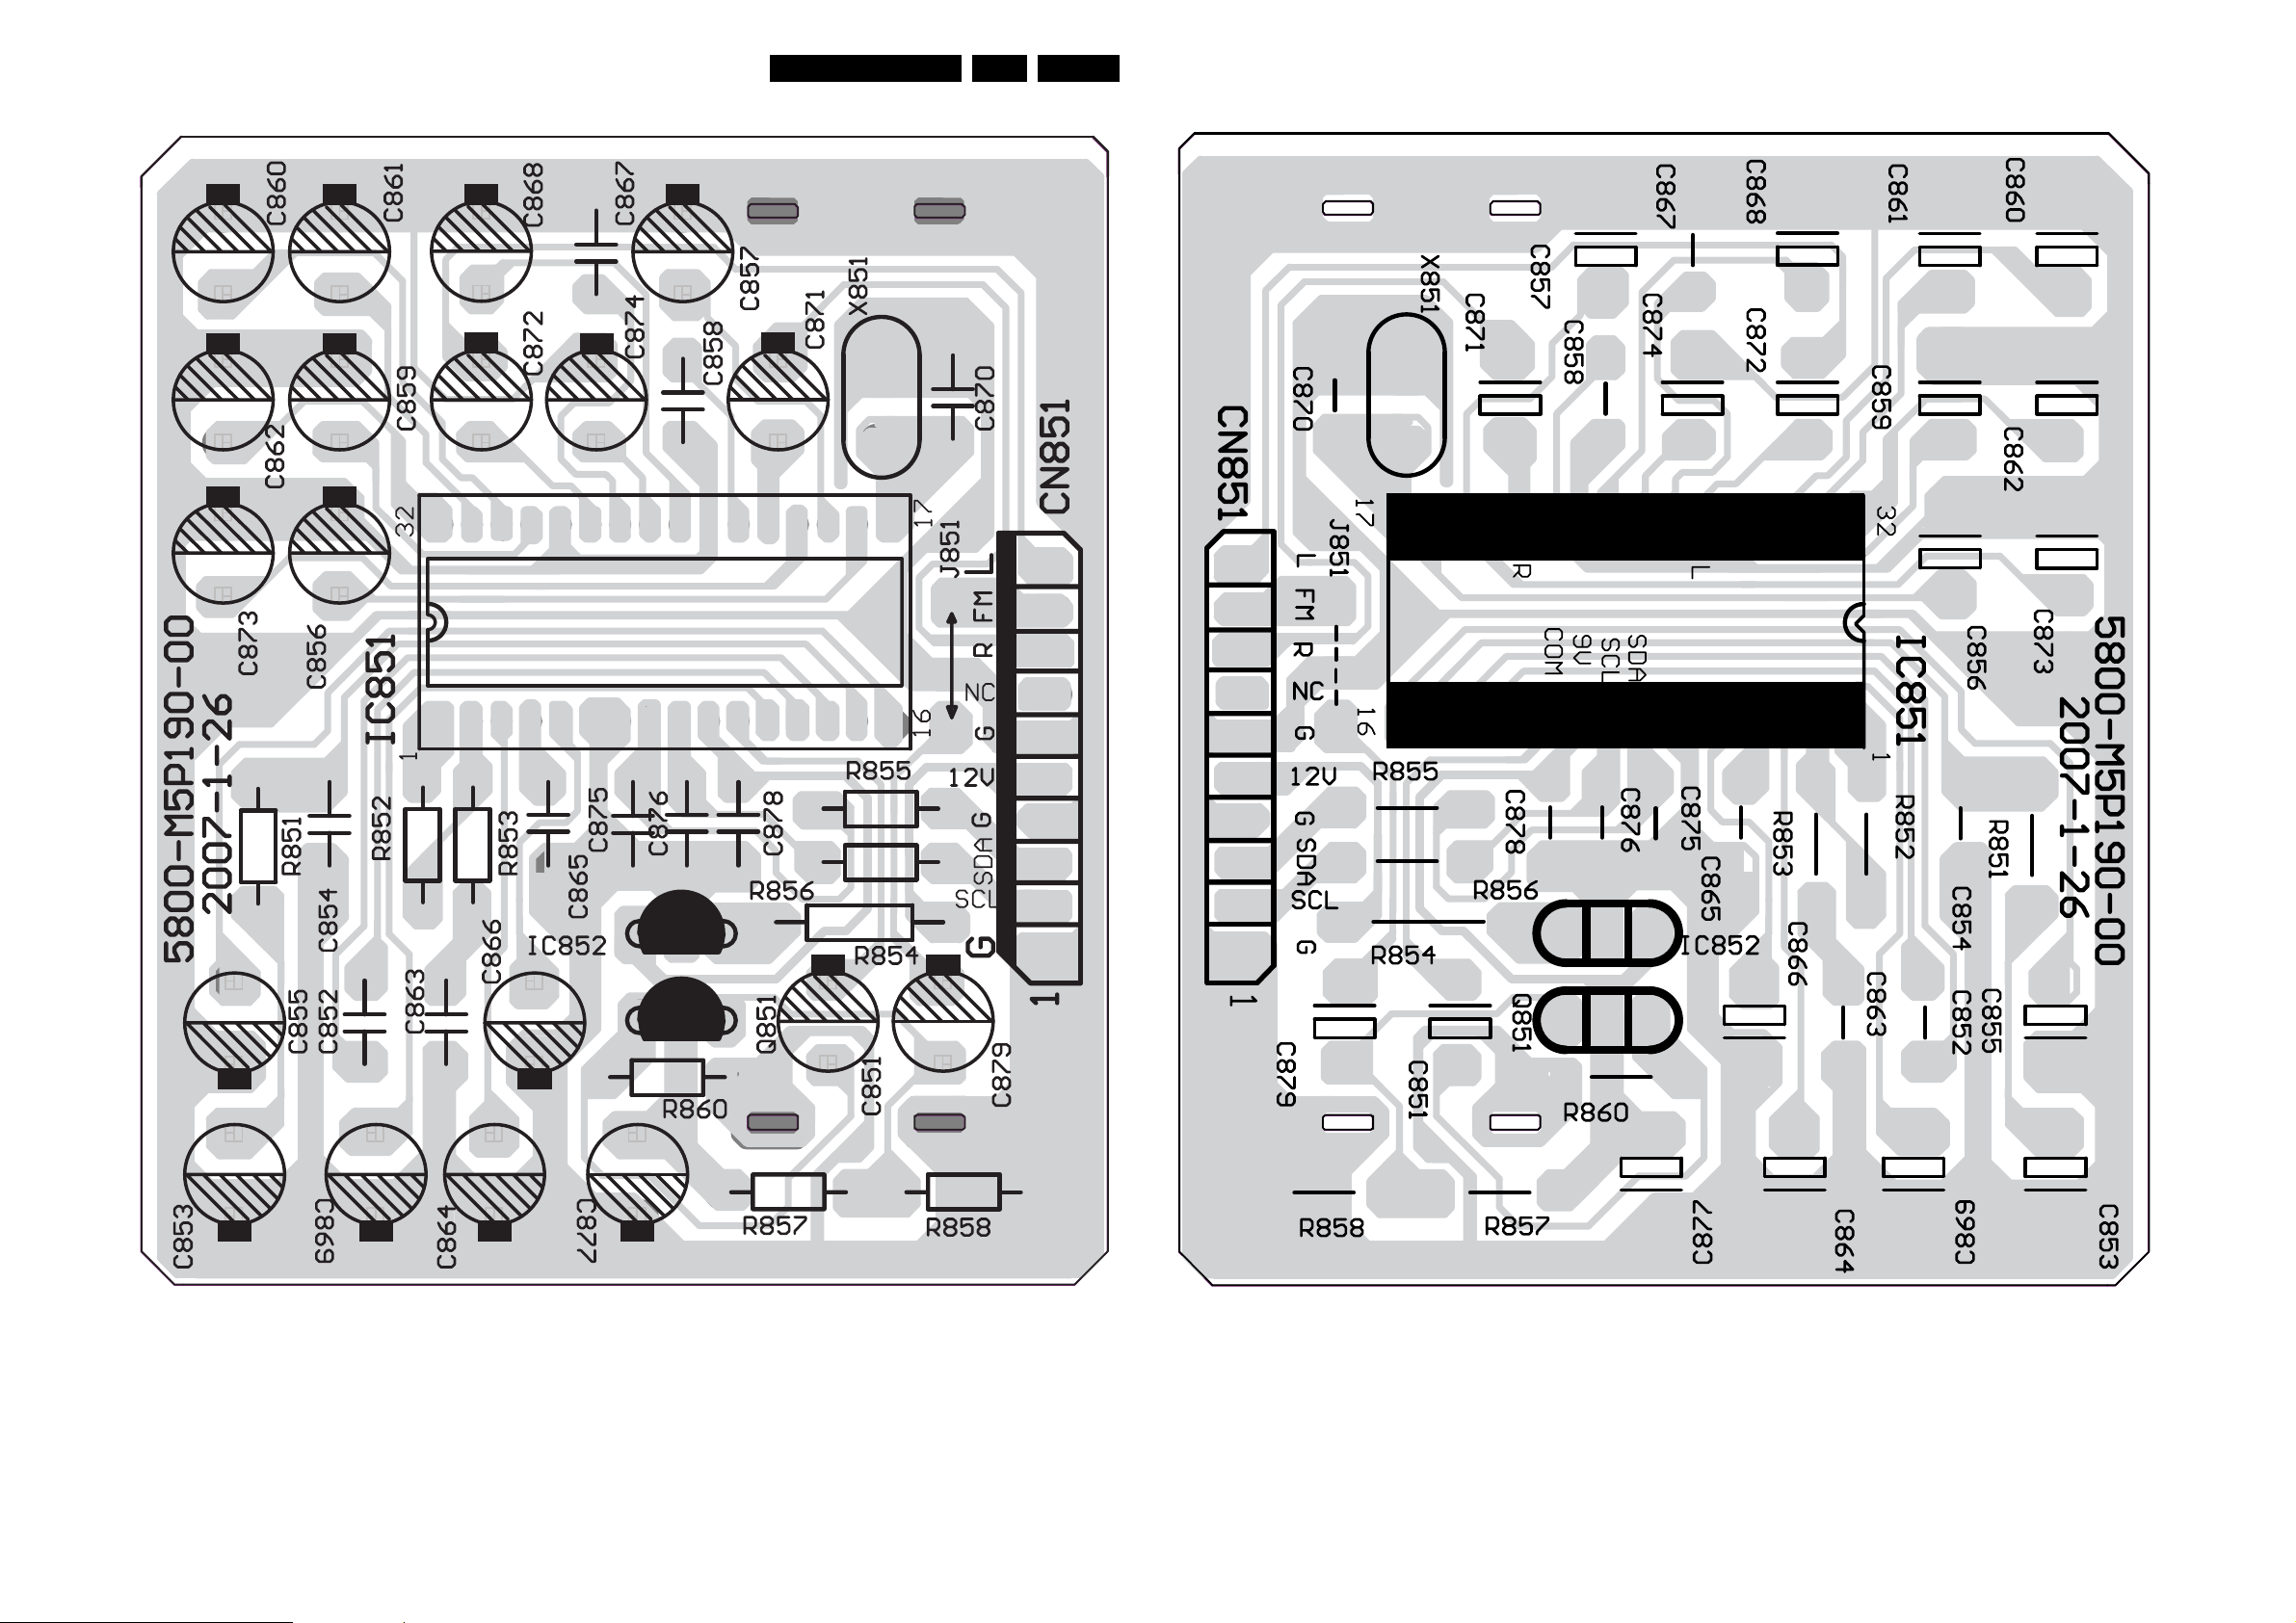
Circuit Diagrams and PWB Layouts
EN 27SK5.0A CA 7.
Layout BTSC Panel (Top Side)
Layout BTSC Panel (Bottom Side)
5800-M5P190-00
H_17460_004.eps
240907
5800-M5P190-005800-M5P190-00
H_17460_005.eps
240907
Page 28
Personal Notes:
Circuit Diagrams and PWB Layouts
EN 28SK5.0A CA 7.
E_06532_013.eps
131004
Page 29
8. Alignments
Alignments
EN 29SK5.0L CA 8.
Index of this chapter:
8.1 General Alignment Conditions
8.2 Hardware Alignments
8.3 Software Alignments
8.4 Factory mode Settings
8.1 General Alignment Conditions
8.1.1 Default Alignment Settings
Perform all electrical adjustments under the following
conditions:
• Power supply voltage: 230 V
• Connect the set to the mains via an isolation transformer
with low internal resistance.
• Allow the set to warm up for approximately 20 to 30
minutes.
• Measure voltages and waveforms in relation to chassis
ground (with the exception of the voltages on the primary
side of the power supply).
Caution: never use heatsinks as ground.
• Test probe: 100: 1, Ri > 10 Mohm, Ci < 3.5 pF.
• Use an isolated trimmer/screwdriver to perform
alignments.
/ 50 Hz (± 10%).
AC
8.2 Hardware Alignments
8.3.3 Screen Voltage Adjust
1. Set picture to “Standard” mode, without signal input.
2. Press the keys [i+], “Smart sound” and “Smart picture” to
enter the factory menu. When in “B/W BALANCE” page,
press “mute” on the RC. There will be a level light line
displays.
3. Adjust flyback transformers Screen knob till the level bright
line just can be seen.
4. When in the light-line screen, CUT R and CUT G can be
adjusted if needed with the following RC key mapping:
To increase /decrease CUT R (See table 8-1)
To increase /decrease CUT G (See table 8-2)
5. Press “MUTE” key to return to the “B/W BALANCE” page.
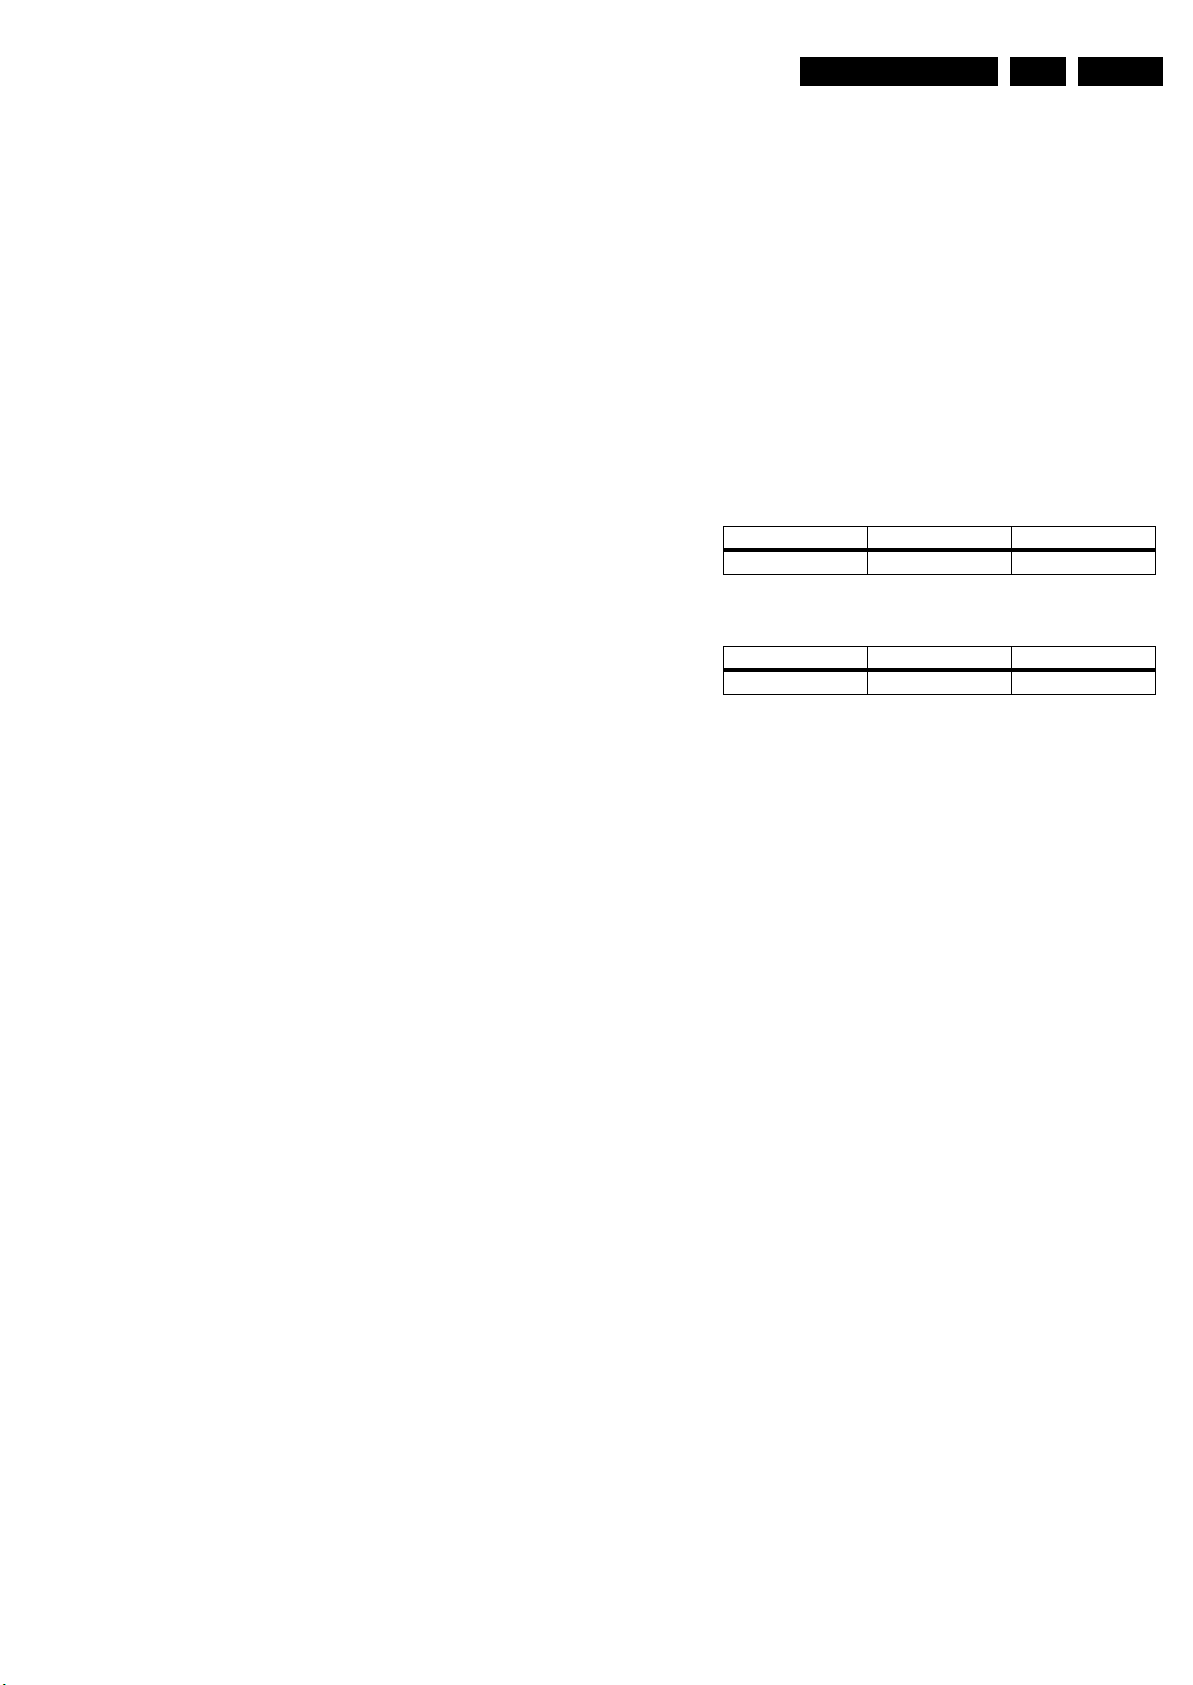
Table 8-1 To increase /decrease CUT R
Function CUT R+ CUT R-
RC key 1 4
Table 8-2 To increase /decrease CUT G
Function CUT G+ CUT G-
RC key 2 5
8.3.4 Horizontal Adjustment (Key 1)
For this TV set there are no hardware alignments.
8.3 Software Alignments
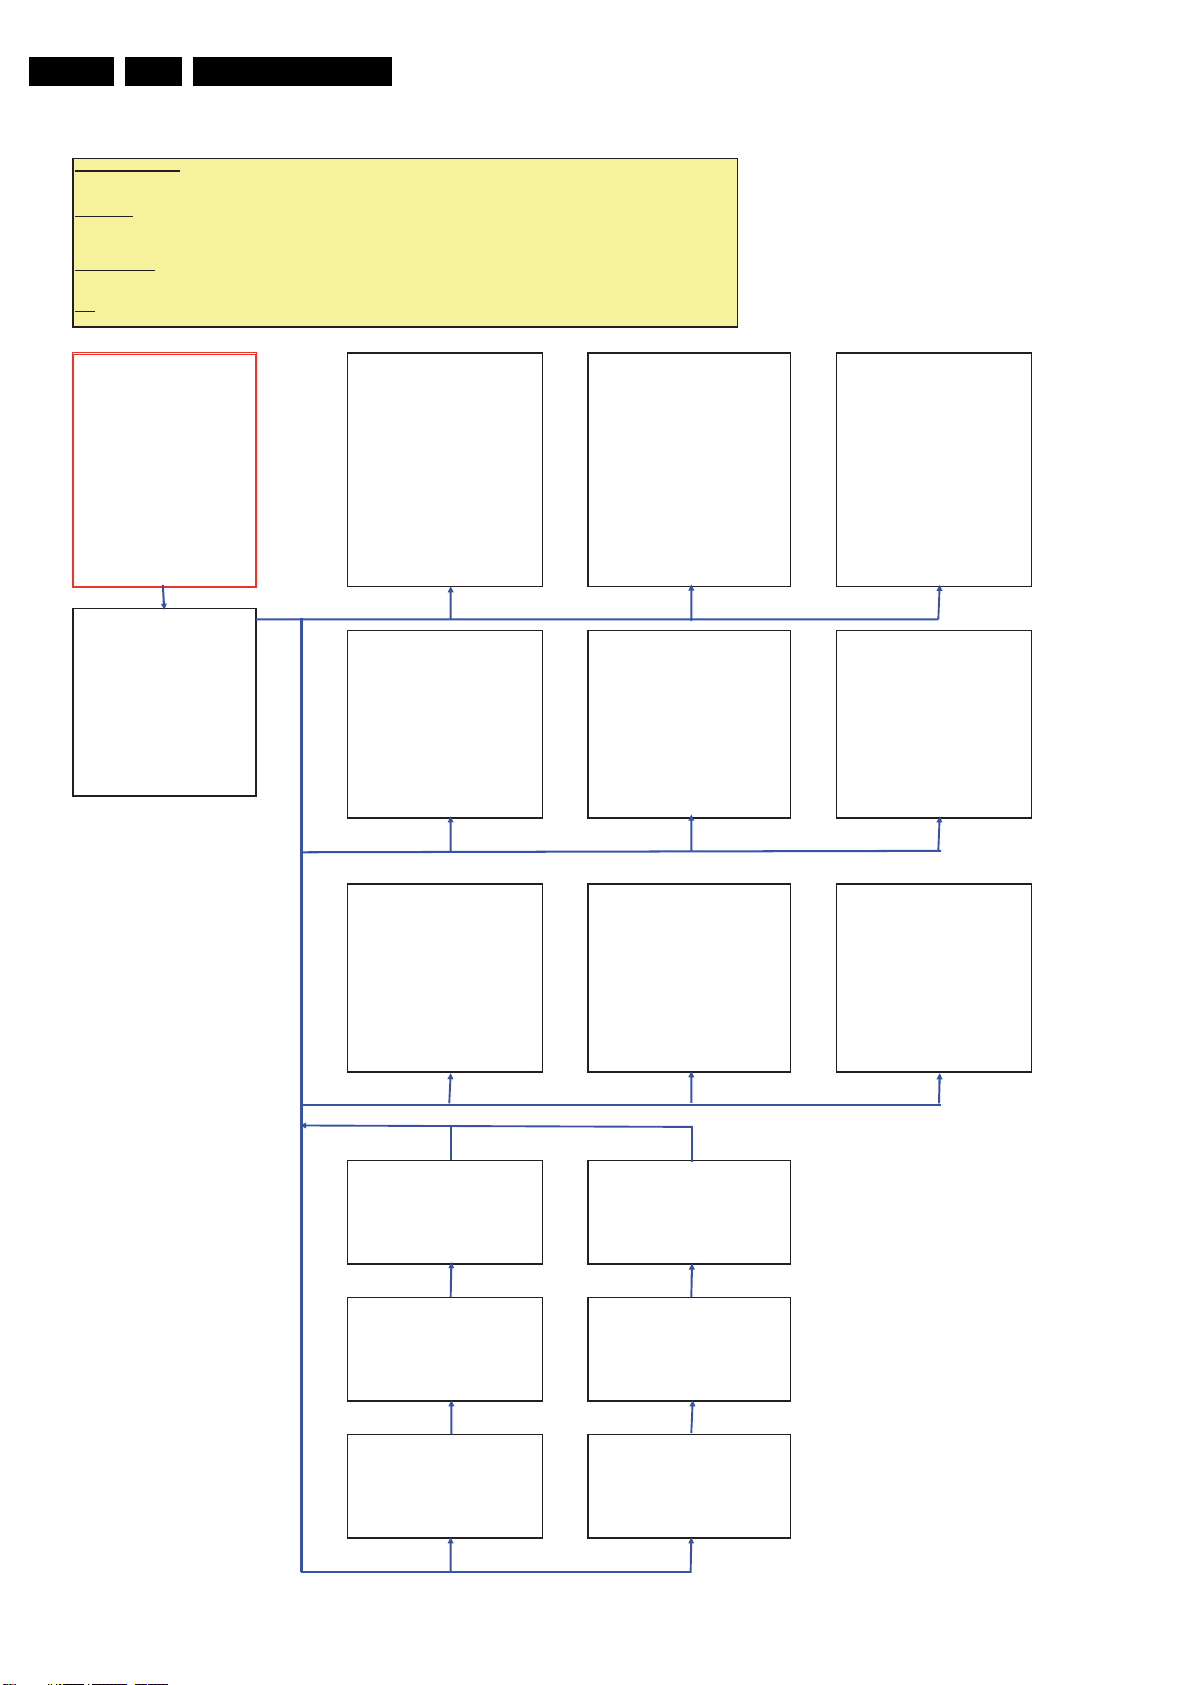
Put the set in its MENU mode (factory mode) as follows (see
also figure “Factory Mode” on the next page):
• Press the keys [i+], “smart sound” and “smart picture” to
enter the factory menu.
• Press the keys [i+] again and “ADJUST” appear on screen.
• Press the number keys to enter the adjust page, press B /
y to choose the items that to be adjusted, Press z /A to
adjust its value.
• Press [i+] to quit factory mode.
The different alignment parameters are described further on.
8.3.1 Rf AGC Voltage Adjust
1. Provide a 294.25 MHz, 60 dB half colour bar signal.
2. Enter factory mode and press key 1.
3. Measure tuner AGC point voltage, adjust AGC item till the
voltage is 2.2 V, or till picture noise just disappears. (typical
value is at 32).
8.3.2 Focus Fine Adjust
1. Provide a cross-hatch pattern signal.
2. Set state to “Rich” mode.
3. Adjust flyback transformers Focus knob till picture is clear.
1. Provide a 50 Hz monoscope pattern.
– Press the keys [i+], “Smart sound” and “Smart picture”
to enter the factory menu.
– Press the keys [i+] again and “ADJUST” appear on
screen.
2. Press key “0” and adjust “HPH” to set picture horizontal
centre to CRT horizontal centre.
8.3.5 Vertical & YUV/RGB Horizontal Adjust (Key 2)
1. Provide a 50 Hz cross hatch signal, set TV to standard
mode. Adjust VSL so that half picture of the pane cross
appears. The picture’s vertical line is just at the bottom of
the half picture. Adjust VSL to make the centre of the
picture’s vertical line and the kinescope are in
superposition.
2. Adjust VSI to obtain picture’s vertical re-display ratio more
than 90%.
3. Provide a 60 Hz cross hatch signal, do step 1 and 2 again
to adjust.
4. If necessary, fine adjust above items.
8.3.6 OSD Position (Key 4)
1. Menu OSD position adjustment: Provide a 50/60 Hz cross
hatch pattern. Put the set in MENU mode.
– Press the keys [i+], “Smart sound” and “Smart picture”
to enter the factory menu.
– Press the keys [i+] again and “ADJUST” appears on
screen.
2. Press key 4 to enter the factory mode. Adjust VP and HP
item, to obtain menu OSD at the centre of CRT screen.
3. Provide a RGB or YUV cross hatch signal, set the TV in the
standard mode, adjust “YUV OSD HS” till picture horizontal
centre is at the CRT centre (optional).
Page 30
EN 30 SK5.0L CA8.
B/W BALANCE
DRI R
32
Y
Z
W
DRI G
26
V
A
DRI B
39
V
A
CUT R
35
V
CUT G
35
V
C
CT
35
L
T
COOL DR
6
A
T
COOL DG
6
R
t
COOL DB
11
R
A
COOL CR
1
A
COOL CG
0
W
WARM DR
7
E
WARM DG
2
WARM DB
4
WARM CR
4
WARM CG
3
T
4
5
V
T
V
Y
P
Y
V
0
V
S
Y
6
W
R
A
R
Y
L
V
Y
C
Y
V
R
E
K
K
V
Alignments
Enter Factory Mode:
Press sequentially:
Main Menu in red box.
Navigation:
Navigate parameters in "Main Page" : From the first menu, use the arrow Up or Down to navigate to different pages.
Navigate to individual Service page:
Selecting the number "0 - 8", "Smart Picture" and "Smart Sound" on the remote control to go directly to the pages.
Changing value
Move to the intended parameter with the arrow "up" and "down" key on the RC.
Use the arrow "Right" and "Left" to increse and decrease the value respectively.
Exit
Enter " I+ " on the RC to exit factory mode.
+
I
---> Smart Sound ---> Smart Picture
Main Page
BT 34 84niag VAFFOMETSYS ITLUM72CS V
+
+
+
+
+
+
+
-
+
FREQUENC
H PH 36-T
SL 35
EW PAR
UP CORNE
LO CORNE
H -PAR
H-BO
EW TRAP
ZOOM 44
60H
59 XD
33 XDT Coun
WP43HTDIW WE
RI&CRH15IS
"I+"
ADJUS
AV OPT 0
2 A
PIN 7
PIN 8 MUTE BTSC-ST
MUTEPIN OFF BTSC-ADJ Start
CC HP 13 MTS DETECT 50
CC LINE 21 MTS FILTER 20
CC DELA
HCO ON R: 0F 13
OSVE OFF D: MONO ST SAP
OFF
OL1 BTSC-TC 4
12 W: 00 00 40 09 0F 93 04
ECIVRES3 ECIVRES
18070-2YKS-REBYSCSTN5 NIP
2 ECIVRES1 ECIVRES0 ECIVRES
S LOV COU>EDOMPIHS
1 VOL 10 45
30 VOL 25 55
SUSVM13
NOTAM83 VPL 80 90
1BPB53 VOL 100 100
UPNI 9589551
VOL 50 80
"1""0"
SERVICE
S-CSTB04PH3GFC VA
S-CSTB44SH DSO VU
BTSC-A2 19
OFF
0
0SWMF3GNIROC52
0
0
9IL-CSTB0L DSOFFODVD/C
ON
04LOV LWP/COU23CG
25NIAG ONOM1DEEPS CG
25NIAG OERETSM57.54FI92HS
35NIAG PASFF0
511A-CSTBNOENOTFLAHSBVCTUO OEDI
FFOTPO LVAFFOOSO
"2"
oeretSEDOM-CSTB35P
SERVICE
PO
PHILIPS RC ON
CHIP OFF
GAME OFF
CALENDA
BLUE BAC
BLACK BAC
Soft
BRIGHT
CONTRAST
COLOR
SHARP
YUV SHARP
COLOR TEMP
50
70
50
70
70
WARM
"Smart Picture"
BRIGHT
CONTRAST
COLOR
SHARP
YUV SHARP
COLOR TEMP
55
100
55
90
90
COOL
"3"
"6"
HS BUSNOLBN
DL PA
DL NTS
DL A
oice
BASS
TREBLE
SURROUND
cisuMhciR
BASS
TREBLE
SURROUND
"4"
3IRB BUS2 YUV D
2NOC BUS21MIT NO REWOP YUV DG +2
03LOC BUSNOBKA YUV DB +0
32 YUV C
21IT BUSNOGODHCTAW YUV CG +0
25IRB XAMNOTPO MOOZ
72IRB DIMNO
36NOC XAM1+HTDIW BB
82NOC DIMFFO
8IRB .CSFFOBTS
8 ECIVRES7 ECIVRES
SEUGUTROP3EHTACFFO
"7"
"dnuoS tramS""erutciP tramS"
30
50
OFF
"Smart Sound"
55
60
OFF
"5"
+0
+0
NOHSILGNE01
NOHSIAPS4
FFOHCNARF0
ON
"8"
"Smart Picture"
BRIGHT
CONTRAST
COLOR
SHARP
YUV SHARP
COLOR TEMP
"Smart Picture"
55
80
50
80
80
NORMAL
ertaehTlarutaN
BASS
TREBLE
SURROUND
"Smart Sound"
80
70
ON
"Smart Sound"
H_17460_007.eps
270907
Figure 8-1 Software Alignments
Page 31
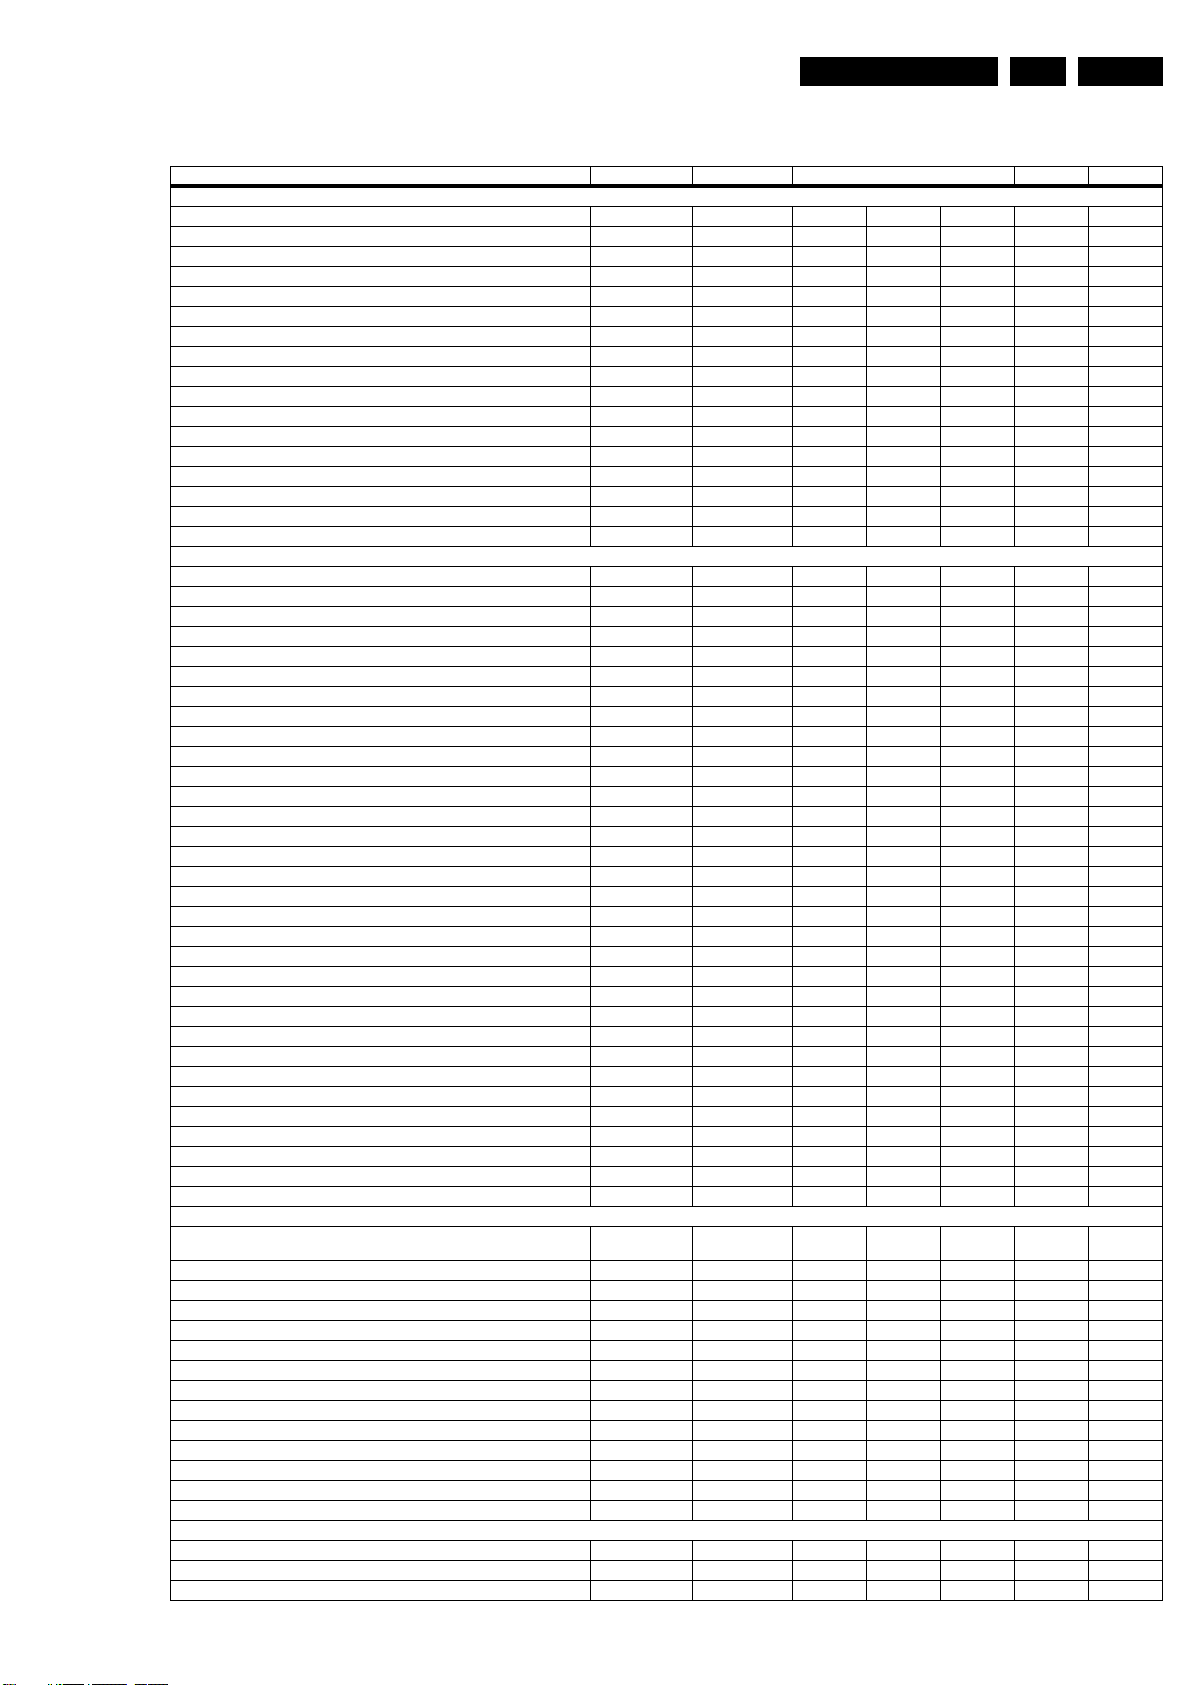
8.4 Fac tory mode Settings
Description of the factory menu Storage address Display string Range (Index value) Default SK5.0L CA
B/W balance
White point R adjustment.
White point G adjustment 0x00e DRI G 0-63 32 32
White point B adjustment 0x00f DRI B 0-63 32 32
Black level off-set R adjustment 0x010 CUT R 0-63 32 32
Black level off-set G adjustment. 0x011 CUT G 0-63 32 32
“BRIGHTNESS” of “White Balance Adjustment page” setting 0x02f BT 0-63 32 32
“CONTRAST” of “White Balance Adjust ment page” setting 0x030 CT 0-63 32 32
COOL offset according to “DRI R” value of tv, white point R of “COOL”
COOL offset according to “DRI G” value of tv, white point G of “COOL”
COOL offset according to “DRI B” value of tv, white point B of “COOL” 0x019 COOL DB 0-63 10 13
COOL offset according to “CUT R” value of tv, black level off-set R of “COOL”
COOL offset according to “CUT G” value of tv, black level off-set R of “COOL” 0x01b COOL CG 0-63 0 0
WARM offset according to “DRI R” value of tv, white point R of “COOL” 0x01c WARM DR 0-63 10 7
Warm offset according to “DRI G” value of tv, white point G of “COOL”
Warm offset according to “DRI B” value of tv, white point B of “COOL” 0x01e WARM DB 0-63 0
Warm offset according to “CUT R” value of tv, black level off-set R of “COOL” 0x01f WARM CR 0-63 0 0
Warm offset according to “CUT G” value of tv, black level off-set R of “COOL”
Direct key “0”
50hz/60hz Frequency 60 Hz
Horizontal center ox008 H PH 0-TV-63-TV 31-TV 33-TV
Vertical slope ox009 V SL 0-63 24 40
Vertical center ox00a V SH 0-63 21 28
Vertical amplitude. ox00b V SI 0-63 33 51
Vertical s-correction. ox00c V SC 0-63 27 27
EW WIDTH 0x04b EW WIDTH 0-63 32 45
EW parabola/width 0x04c EW PARA 0-63 32 49
EW upper/lower corner parabola 0x04d UP CORNER 0-63 32 28
Bottom curve
Horizontal parallelogram 0x04f H-PARA 0-63 32 35
Horizontal bow 0x050 H-BOW 0-63 32 39
EW trapezium 0x051 EW TRAPE 0-63 32 21
Expand 4:3 mode horizontal WIDTH adjust
50hz/60hz Frequency 50 Hz
Horizontal center 0x003 H PH 0-TV-63-TV 31-TV 31-TV
Vertical slope 0x004 V SL 0-63 24 40
Vertical center 0x006 V SH 0-63 21 28
Vertical amplitude. 0x005 V SI 0-63 33 52
Vertical s-correction. 0x007 V SC 0-63 27 27
EW WIDTH 0x044 EW WIDTH 0-63 32 45
EW parabola/width 0x045 EW PARA 0-63 32 48
EW upper/lower corner parabola 0x046 UP CORNER 0-63 32 32
Bottom curve
Horizontal parallelogram 0x048 H-PA R A 0-63 32 35
Horizontal bow 0x049 H-BOW 0-63 32 32
EW trapezium 0x04a EW TRAPE 0-63 32 26
Expand 4:3 mode horizontal WIDTH adjust
Horizontal center in AV source.
Horizontal center in AV source. 0x05f H PH +5-AV 32 32
Horizontal center in YUV source. 0x05c H PH +0-YUV 32 32
Horizontal center in YUV source. 0x05d H PH +0-YUV 32 32
Direct key “1”
Out of box setting, Smart Picture: Rich, Contrast +: On, NR: Off,
Smart Sound: Theatre, Tuner Mode: Auto, Volume: 30, CC: Off
RF.AGC adjust 0x002 AGC 0-63 24 32
AGC speed 0x0de (bit5, bit4) AGC SPEED 0-63 1 1
IF choose 0x0dd (bit7, bit6) IF 58.75 Mhz 45.75 Mhz 45.75 Mhz 45.75 Mhz
HRC and IRC of N system for auto search selection 0x0ea (bit4) HRC & IRC OFF ON OFF OFF
ON: PAL M/N ON, OFF: PAL M/N OFF 0x0ea (bit1) MULTI SYSTEM OFF ON ON ON
White apex limit 0x0cb (bit7-bit4) PWL 0-15 0 15
X ray protect 0x0e1 (bit2, bit3) XDT 0-2 1 1
X ray protection detect count 0x073 XDT COUNT 0-255 30 30
NTSC decode matrix 0x0e7(bit2) MUS USA JAP USA USA
PAL, NTSC decode matrix 0x0ed (bit0) MAT OFF ON OFF ON
Bypass of sound bandpass filter 0x0e1 (bit5, bit4) BPB 0-2 1 1
Video dependent coring 0x0de (bit3, bit2) CORING 0-3 3 3
Switch-off in vertical overscan 0x0e7 (bit7) OSO OFF ON ON ON
Direct key “2”
UOC control volume switch 0x0e8 (bit7) UOC VOL SW OFF ON OFF OFF
UOC/PWM modify volume value 0x02e UOC/PWM VOL 0-63 41 40
Volume of 9859 modify value when sound is mono 0x052 MONO GAIN 0-63 48 52
Alignments
0x00d
0x017 COOL DR 0-63 -2 6
0x018 COOL DG 0-63 0 6
0x01a COOL CR 0-63 0 0
0x01d WARM DG 0-63 0 0
0x020 WARM CG 0-63 0 0
0x04e LO CORNER 0-63 32 34
0x0ed(bit4)
0x047 LO CORNER 0-63 32 32
0x062
0x05e H PH +5-AV 32 32
DRI R 0-63 32 32
ZOOM 0-63 44 44
ZOOM 0-63 44 44
SHIPMODE OFF ON
EN 31SK5.0L CA 8.
-6
Page 32
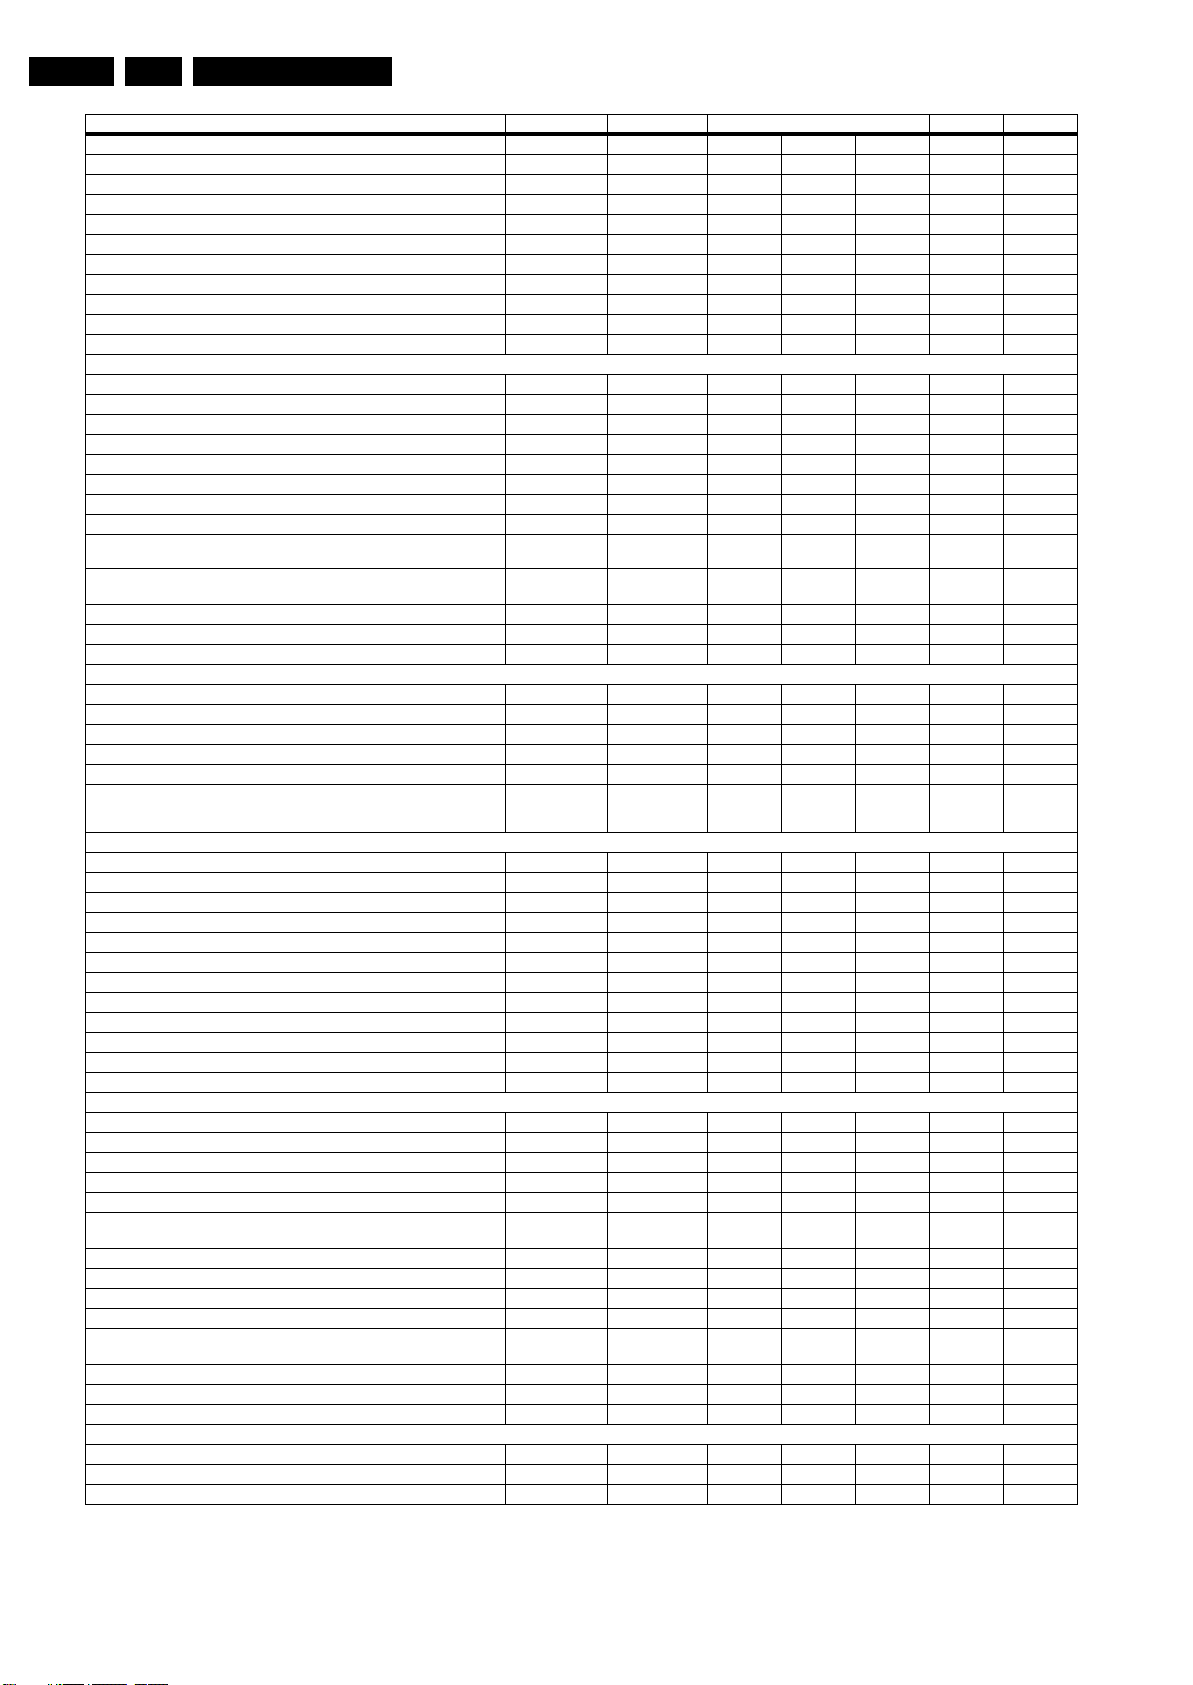
EN 32 SK5.0L CA8.
Description of the factory menu Storage address Display string Range (Index value) Default SK5.0L CA
Volume of 9859 modify value when sound is stereo 0x053 STEREO GAIN 0-63 48 52
Volume of 9859 modify value when sound is SAP 0x054 SAP GAIN 0-63 48 50
Volume of 9859 modify value when system is AV state 0x055 AV GAIN 0-63 48 48
9859 control pin output state
10% volume point 0x026 VOL 10 0-100 25 20
25% volume point 0x027 VOL 25 0-100 50 45
50% volume point 0x028 VOL 50 0-100 75 60
80% volume point 0x029 VOL 80 0-100 90 80
100% volume point 0x02a VOL 100 0-100 100 100
FM demodulate frequency width 0x0de (bit1, bit0) FMWS 0-2 0 0
AVL function switch
Direct key “3”
AV control logic choose 0x0e1 (bit7, bit6) AV OPT 0-3 1 0
AV choose 0x0cc (bit7-bit4) AV CFG 0-7 3 3
AV2 choose 0x0ea (bit5) 2 AV OFF ON OFF OFF
DVD choose 0x0e9 (bit4) YC/DVD OFF ON OFF OFF
Video output 0x0e7 (bit4)
Pin 5 choose function 0x0cc (bit3-bit0)
Pin 7 choose function 0x0cd (bit7-bit4)
Pin 8 choose function 0x0cd (bit3-bit0)
MUTE pin mode 0x0e9 (bit0)
OFF: Pin 7 control volume curve
ON: Pin 4 control volume curve
CCD Horizontal width adjust 0x05a
CCD scan Horizontal row when PAL N system 0x060
CCD delay adjustment 0x0d1 (bit3-bit0)
Direct key “4”
OSD up down position 0x02b
OSD left right position 0x02c
RGB/YUV OSD Horizontal Center 0x05b
OSD output contrast 0x0df (bit7, bit6)
Menu translucence 0x0e9 (bit1)
Software version number
Direct key “5”
Sound mode
Stereo noise limit 0x0ce (bit7-bit4)
SAP noise limit 0x0ce(bit3-bit0)
Sound input level adjustment 0x040
Separate 0x041
Separate 0x042
Time constant 0x0cf (bit7-bit4)
Stereo level switch 0x0e8 (bit3)
Stereo adjustment on/off 0x0e8 (bit2)
MTS detect time delay 0x001
STEREO and SAP detect count 0x072
MONO detect count 0x074
Direct key “6”
POWER ON MODE 0x0dd (bit3, bit2)
POWER ON time delay 0x0cb (bit3-bit0)
Black current stabilization 0x0e8 (bit0)
Black current loop detect 0x0e9 (bit7)
WATCH DOG 0x0eb (bit7)
ON: Philips RC
OFF: Skyworth RC
VCHIP FUNCTION SWITCH 0x0ea (bit7)
GAME FUNCTION SWITCH 0x0eb (bit5)
CALENDER FUNCTION SWITCH 0x0eb (bit4)
4:3 expand function choose 0x0ec (bit6)
ON: Blue Screen
OFF: Black Screen
EW WIDTH offset according to “EW WIDTH” value when TV is no signal 0x06d
Video mute during change to program 0x0e1 (bit1, bit0)
RGB BLANKING 0x0ee (bit7)
Direct key “7”
Sub contrast 0x057
Sub brightness 0x059
Sub color 0x023
Alignments
0x0e0 (bit3, bit2)
0x0e8 (bit6)
0x0ee (bit6)
0x0eb (bit6)
0x0e9 (bit6)
9859INPUT 0-2 2 0
AVL OPT OFF ON OFF OFF
VIDEO OUT
PIN 5
PIN 7
PIN 8
MUTEPIN
MODE
MUTEPIN SEL
CC HP
CC LINE
CC DELAY
VP
HP
YUV OSD HS
OSD L
HALFTONE
SOFTWARE
VERSION
NUMBER
BTSC-MODE
BTSC-ST
BTSC-SP
BTSC-LI
BTSC-A1
BTSC-A2
BTSC-TC
BTSC-STS
BTSC-ADJ
MTS DETECT
MTS FILTER
MTS FILTER2
POW
POWER ON TIM
AKB
NBL
WATCHDOG
PHILIPS RC
VCHIP
GAME
CALENDER
ZOOM OPT
BLUE BLACK
BB WIDTH
BLACK BACK
RGB BLANKING
SUB BRI
SUB CON
SUB COL
IF CVBS CVBS CVBS
NTSC NTSC
VOL1 VOL1
MUTE MUTE
OFF ON OFF
OFF
0-15 13 13
0-60 21 21
8-23 20 12
0-63 52 51
0-63 54 42
0-60 38 44
0-3 0 0
OFF ON ON ON
MONO STEREO SAP
0-15 0 0
0-15 0 0
0-15 7 9
0-31 23 14
0-31 22 6
0-7 4 3
OFF ON OFF ON
BUSY START START START
0-255 50 50
0-255 20 20
0-255 20 3
0-2 2 2
2-17 12 12
OFF ON ON ON
OFF ON ON ON
OFF ON OFF ON
OFF ON ON ON
OFF ON OFF OFF
OFF ON OFF OFF
OFF ON OFF OFF
OFF ON ON ON
OFF ON ON ON
53-10 +0 1
0-2 0 0
OFF ON ON ON
0-63 0 3
0-63 0 2
0-63 30 30
Page 33
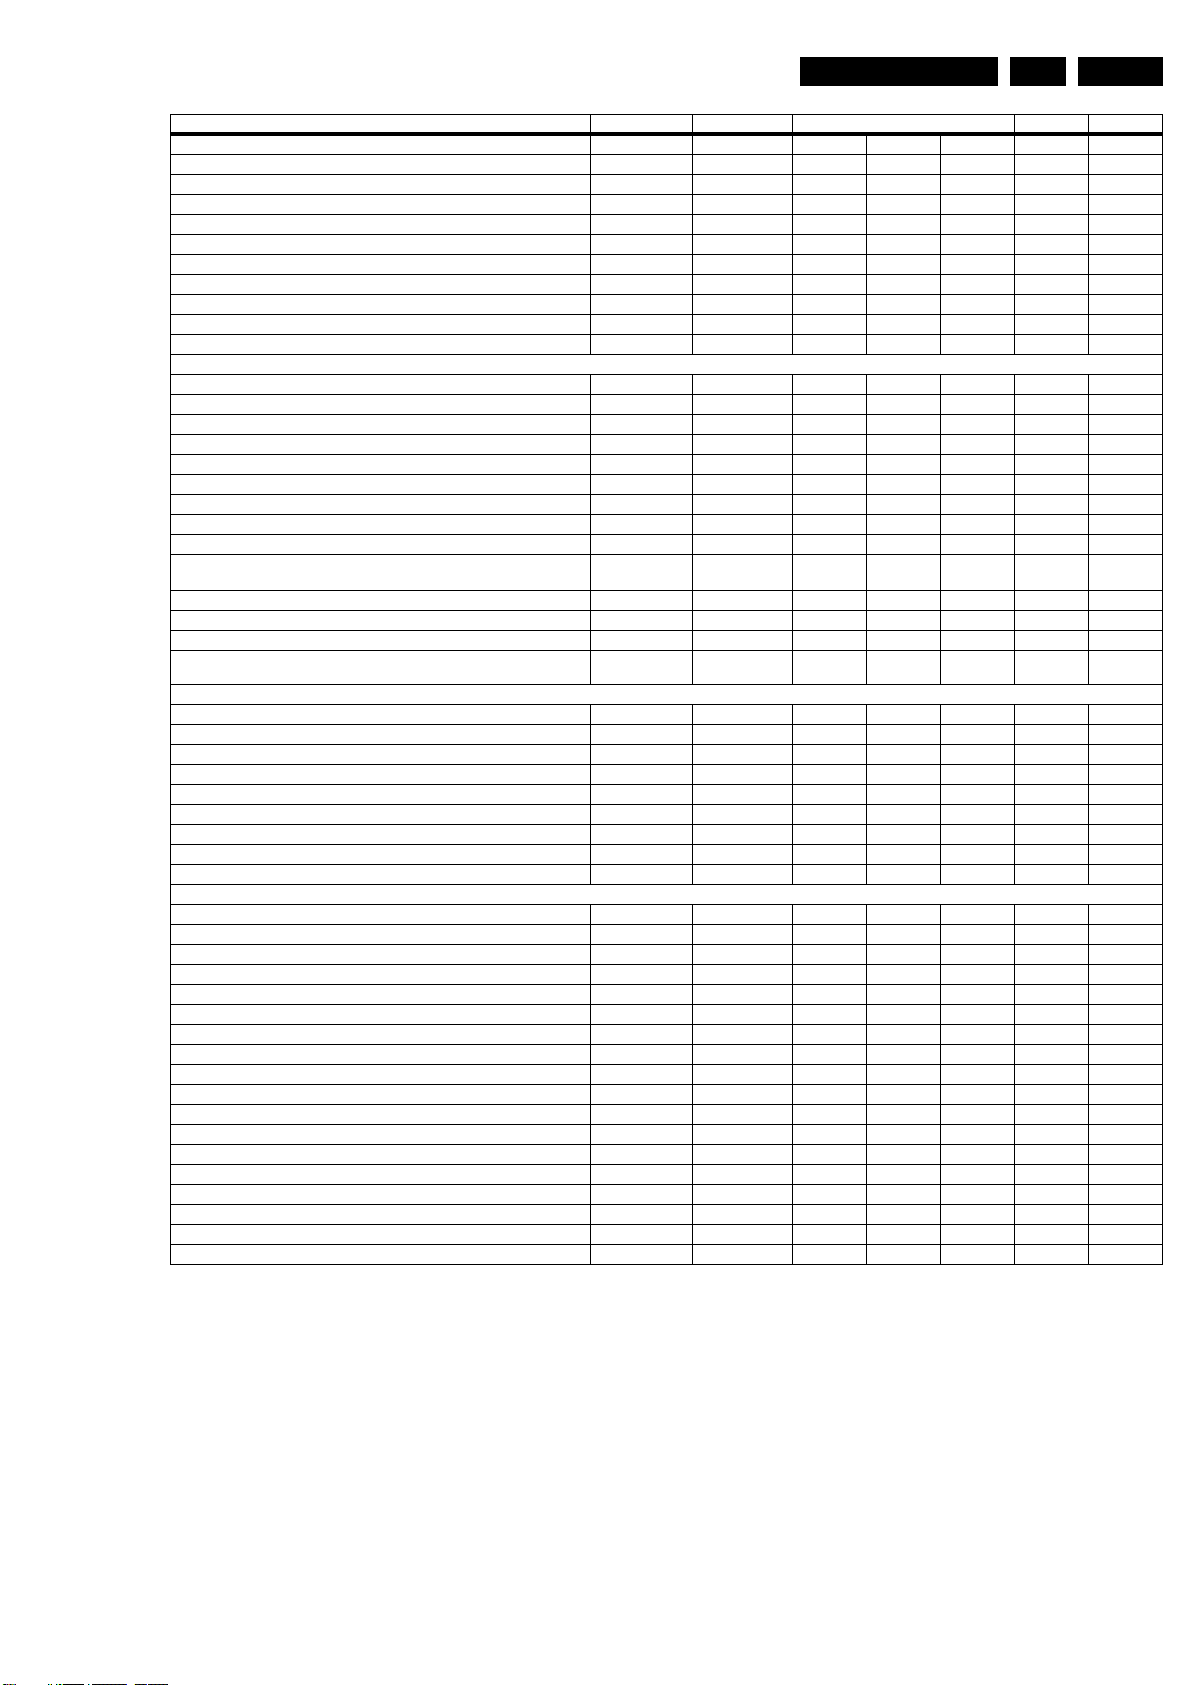
Alignments
Description of the factory menu Storage address Display string Range (Index value) Default SK5.0L CA
Sub Sharpness 0x024
TV Sub tint 0x025
AV Sub tint 0x075
PAL Luminance delay 0x0c9 (bit3-bit0)
NTSC Luminance delay 0x0c9 (bit7-bit4)
AV Luminance delay 0x0ca(bit7-bit4)
Maximum brightness 0x056
Middle brightness 0x021
Maximum contrast 0x058
Middle contrast 0x022
Line-level of brightness 0x02d
Direct key “8”
YUV offset according to “DRI R” value of TV, white point R of YUV. 0x012
YUV offset according to “DRI G” value of TV, white point G of YUV 0x013
YUV offset according to “DRI B” value of TV, white point B of YUV 0x014
YUV offset according to “CUT R” value of TV, black level offset R of YUV 0x015
YUV offset according to “CUT G” value of TV, black level offset G of YUV 0x016
English OSD switch 0x0eb (bit3)
Spanish OSD switch 0x0eb (bit2)
French OSD switch 0x0eb (bit1)
Portuguese OSD switch 0x0eb (bit0)
External Y (Luminance) input gain during YPRPB.
OFF: gain 0 dB reduced, ON: gain 3 dB reduced
Cathode drive level 0x0ca (bit3-bit0)
EHT tracking mode 0x0ea (bit6)
Black current measuring lines in overscan 0x0e9 (bit2)
Manual INIT E2PROM
Key “Smart sound”
BASS set value in Voice state 0x064
TREBLE set value in Voice state 0x065
SURROUND set value in Voice state 0x066
BASS set value in Music state 0x067
TREBLE set value in Music state 0x068
SURROUND set value in Music state 0x069
BASS set value in Theatre state 0x06a
TREBLE set value in Theatre state 0x06b
SURROUND set value in Theatre state 0x06c
Key “Smart image”
Bright set value in Soft state 0x036
Contrast set value in Soft state 0x037
Color set value in Soft state 0x038
Sharpness set value in Soft state 0x039
Sharpness set value in Soft state of YUV 0x070
COLOR TEMP set value in Soft state 0x03a
Bright set value in Rich state 0x03b
Contrast set value in Rich state 0x03c
Color set value in Rich state 0x03d
Sharpness set value in Rich state 0x03e
Sharpness set value in Rich state of YUV 0x071
COLOR TEMP set value in Rich state 0x03f
Bright set value in Natural state 0x031
Contrast set value in Natural state 0x032
Color set value in Natural state 0x033
Sharpness set value in Natural state 0x034
Sharpness set value in Natural state of YUV 0x06f
COLOR TEMP set value in Natural state 0x035
0x0ee (bit4)
SUB SHA
SUB TIN
SUB TIN-AV
YDL PAL
YDL NTSC
YDL AV
MAX BRI
MID BRI
MAX CON
MID CON
SC.BRI
YUV DR
YUV DG
YUV DB
YUV CR
YUV CG
ENGLISH
SPANISH
FRANCE
PORTUGUESE
YGN
CATHE
HCO
OSVE
INITEEP
BASS
TREBLE
SURROUND
BASS
TREBLE
SURROUND
BASS
TREBLE
SURROUND
BRIGHT
CONTRAST
COLOR
SHARP
YUV SHARP
COLOR TEMP
BRIGHT
CONTRAST
COLOR
SHARP
YUV SHARP
COLOR TEMP
BRIGHT
CONTRAST
COLOR
SHARP
YUV SHARP
COLOR TEMP
0-63 32 32
0-31 16 16
0-31 16 16
0-15 2 10
0-15 2 10
0-15 4 10
0-63 63 52
0-63 18 27
0-63 63 63
0-63 15 28
0-63 8 8
(-32) - (+31) +0 +0
(-32) - (+31) +0 +0
(-32) - (+31) +0 +0
(-32) - (+31) +0 +0
(-32) - (+31) +0 +0
OFF ON ON ON
OFF ON ON ON
OFF ON OFF OFF
OFF ON ON ON
OFF ON OFF ON
33
ON ON
OFF OFF
30 30
50 50
OFF OFF
55 55
60 60
OFF OFF
80 80
70 70
ON ON
55 55
50 50
45 45
45 45
50 50
WARM WARM
70 70
85 85
70 70
70 70
80 80
COOL COOL
50 50
75 75
50 50
50 50
50 50
NORMAL NORMAL
EN 33SK5.0L CA 8.
Page 34

EN 34 SK5.0L CA9.
Circuit Descriptions, Abbreviation List, and IC Data Shee ts
9. Circuit Descriptions, Abbreviation List, and IC Data Sheets
Index of this chapter:
9.1 Introduction
9.2 The various circuits
9.3 Abbreviation List
9.4 IC Data Sheets
9.1 Introduction
The SK5.0L CA is a CRT TV for the year 2007, based on the
5P19 platform. In this chapter, only a general description of the
various circuits is given. For more detailed information, see the
circuit diagrams in this manual.
9.2 The various circuits
9.2.1 Tuner
The function of the tuner is to select the channel to be received
and suppress the interference of neighboring channels, to
amplify the high frequency signal, to improve the receiving
sensitivity and SNR, and to generate a PIF signal through
frequency conversion.
9.2.2 IF Channel
The IF Channel mainly ensures the sensitivity and selectivity of
the complete TV set. The IF AMP integrated in the UOCIII is
made up of a three-stage dual-differential amplifier with a gain
value above 70dB, a SNR of 55dB and a bandwidth of 7 MHz.
The video demodulation circuit is made from the built-in PLL
Sync Detector. The spectrum of the demodulation carrier is
unitary and it is not affected by the content of the video signal.
The tuner features stable receptivity while the signal output
from the video detector features high fidelity. The built-in PLL
circuit of the UOCIII generates a 38.0 MHz or 38.9 MHz
demodulation reference signal for the sync detector to
demodulate the video signal; this is called “PLL sync
demodulation”.
9.2.3 Sound Channel
An external ceramic filter is used to select the second SIF
signal for the sound channel of UOCIII from the signal output of
the video detector. The audio signal is obtained after limiting
amplification and demodulation by the intermediate frequency
detector for the SIF signal, and then the audio signal is fed to
the BTSC stereo/SAP decoder TDA9850. From that it is output
to the audio amplifier TFA9842, which drives the speakers to
provide the sound. The intermediate frequency detector and
volume-control attenuator that are built in the UOCIII are set
and adjusted via the CPU.
9.2.4 BTSC stereo/SAP decoder
resonator. The stereo channel separation is adjusted by an
automatic procedure to be performed during set production.
The stereo identification can be read by the I
different pilot thresholds (data STS = 1; STS = 0) can be
selected via the I
SAP Demodulator
The composite signal is fed from the output of the input level
adjustment stage to the SAP demodulator circuit through a 5fH
band-pass filter. The demodulator level is automatically
controlled. The SAP demodulator includes an internal field
strength detector that mutes the SAP output in the event of
insufficient signal conditions. The SAP identification signal can
be read by the I
Noise Detector
The composite input noise increases with decreasing antenna
signal. This makes it necessary to switch stereo or SAP off at
certain thresholds. These thresholds can be set via the I
bus. With ST0 to ST3 the stereo threshold can be selected and
with SP0 to SP3 the SAP threshold. A hysteresis can be
achieved via software by making the threshold dependent of
the identification bits STP and SAPP.
Mode Selection
The stereo/SAP switch feeds either the L - R signal or the SAP
demodulator output signal via the internal dbx noise reduction
circuit to the dematrix/switching circuit. Different switch modes
provided at the output pins OUTR and OUTL are available.
dbx Decoder
The dbx circuit includes all blocks required for the noise
reduction system in accordance with the BTSC system
specification. The output signal is fed through a 73 ms fixed deemphasis circuit to the dematrix block.
SAP Output
Independent of the stereo/SAP switch, the SAP signal is also
available at pin SAP. At SAP, the SAP signal is not dbx
decoded. The capacitor at SDE provides a recommended deemphasis (150 ms) at SAP.
Integrated Filters
The filter functions necessary for stereo and SAP demodulation
and part of the dbx filter circuits are provided on-chip using
transconductor circuits. The required filter accuracy is attained
by an automatic filter alignment circuit.
9.2.5 CRT Drive Circuit
In the driver circuit, both the voltage and current of the R/G/B
signal are amplified, after which the CRT drive circuit
modulates the cathode beam current of the CRT. The R/G/B
signal input into the driver circuit is of negative polarity.
2
C-bus.
2
C-bus.
2
C-bus. Two
2
C-
Input Level Adjustment
The composite input signal is fed to the input level adjustment
stage. The control range is from -3.5 to +4.0 dB in steps of
0.5 dB. The maximum input signal voltage is 2 V (RMS).
Stereo Decoder
The output signal of the level adjustment stage is coupled to a
low-pass filter which suppresses the baseband noise above
125 kHz. The composite signal is then fed into a pilot detector/
pilot cancellation circuit and into the MPX demodulator. The
main L + R signal passes a 75 ms fixed de-emphasis filter and
is fed into the dematrix circuit. The decoded sub-signal L - R is
sent to the stereo/SAP switch. To generate the pilot signal the
stereo demodulator uses a PLL circuit including a ceramic
9.2.6 Power Supply Circuit
The function of the power supply circuit is to supply various
stabilized operating voltages and to provide protections against
excessive voltages and currents.
Page 35

Circuit Descriptions, Abbreviation List, and IC Data Sheets
EN 35SK5.0L CA 9.
9.3 Abbreviati on List
2CS 2 Carrier Sound
A2 Commonly known as 2 Carrier Sound
(2CS) system
AC Alternating Current
ACI Automatic Channel Installation:
algorithm that installs TV channels
directly from a cable network by
means of a predefined TXT page
ADC Analogue to Digital Converter
AFC Automatic Frequency Control: control
signal used to tune to the correct
frequency
AGC Automatic Gain Control: algorithm that
controls the video input of the feature
box
AM Amplitude Modulation
ANC Automatic Noise Reduction; One of
the algorithms of Auto TV
AP Asia Pacific
AR Aspect Ratio: 4 by 3 or 16 by 9
AV Audio Video
AVL Automatic Volume Level control
B/G Monochrome TV system. Sound
carrier distance is 5.5 MHz
BCL Beam Current Limiter
CBA Circuit Board Assembly (or PWB)
CFR Carbon Film Resistor
ComPair Computer aided rePair
CRT Cathode Ray Tube (or picture tube)
CVBS Composite Video Blanking and
Synchronisation
CVI Component Video Input
D/K Monochrome TV system. Sound
carrier distance is 6.5 MHz. D= VHF-
band, K= UHF-band
DAC Digital to Analogue Converter
DC Direct Current
DC-filament Filament supply voltage
DFU Directions For Use: owner's manual
DPL Dolby Pro Logic
DRAM Dynamic RAM; dynamically refreshed
RAM
DVD Digital Versatile Disc
EEPROM Electrically Erasable and
Programmable Read Only Memory
EHT Extreme High Tension; the voltage
between the cathode and the shadow
mask that accelerates the electrons
towards the screen (around 25 kV)
EMI Electro Magnetic Interference;
Leakage of high-frequency radiation
from a transmission medium
EU EUrope
EW East West, related to horizontal
deflection of the set
EW-DRIVE East -West correction drive signal.
EXT EXTernal (source), entering the set by
SCART or by cinches (jacks)
FBL Fast Blanking: DC signal
accompanying RGB signals
FE Front End; Tuner and RF part together
Field Each interlaced broadcast FRAME is
composed of two Fields, each Field
consists of either Odd or Even lines
Filament Filament of CRT
FM Field Memory / Frequency Modulation
Frame A complete TV picture comprising all
lines (625/525)
FTV Flat TeleVision
G Green
H H_sync to the module
H-DRIVE Horizontal Drive
H-FLYBACK Horizontal Flyback
H-OUT H_sync output of the module /
HA Horizontal Acquisition; horizontal sync
HFB Horizontal Flyback Pulse; Horizontal
HW Hardware
I Monochrome TV system. Sound
2
I
C Inter IC bus (also called IIC)
2
I
S Inter IC Sound bus
IC Integrated Circuit
IF Intermediate Frequency
IIC Inter IC bus (also called I2C)
Interlaced Scan mode where two fields are used
IO In/Out
IR Infra Red
L Left audio channel
L/L’ Monochrome TV system. Sound
LATAM LATin AMerica
LED Light Emitting Diode
LOT Line Output Transformer (also called
LS Loud Speaker
M/N Monochrome TV system. Sound
MOFR Metal Oxide Film Resistor
MOSFET Metal Oxide Semiconductor Field
MPX MultiPleX
NAFTA North American Free Trade
NC Not Connected
NICAM Near Instantaneously Companded
NTC Negative Temperature Coefficient,
NTSC National Television Standard
NVM Non Volatile Memory; IC containing
OB Option Byte
OC Open Circuit
OP OPtion byte
OSD On Screen Display
P50 Project 50; Communication protocol
PAL Phase Alternating Line; Colour system
PCB Printed Circuit Board (or PWB)
PLL Phase Locked Loop; Used for e.g.
Horizontal Output pulse
pulse
sync pulse from large signal deflection
carrier distance is 6.0 MHz. VHF- and
UHF-band
to form one frame. Each field contains
half the number of the total amount of
lines. The fields are written in "pairs",
causing line flicker.
carrier distance is 6.5 MHz. L' is Band
I, L is all bands except for Band I
FBT); The transformer in which the
EHT is generated
carrier distance is 4.5 MHz. M= 525
lines @ 60 Hz, N= 625 lines @ 50 Hz
Effect Transistor
Association: Trade agreement
between Canada, USA and Mexico
Audio Multiplexing; This is a digital
sound system, mainly used in Europe
non-linear resistor (resistance
decreases if temperature increases)
Committee. Colour system used
mainly in North America and Japan.
Colour carrier NTSC M/N = 3.579545
MHz, NTSC 4.43 = 4.433619 MHz
(this is a VCR norm, it is not
transmitted off-air)
data such as alignment values, preset
stations
between TV and peripherals
mainly used in West Europe (colour
carrier= 4.433619 MHz) and South
America (colour carrier PAL M=
3.575612 MHz and PAL N= 3.582056
MHz)
FST tuning systems. The customer
Page 36

EN 36 SK5.0L CA9.
Circuit Descriptions, Abbreviation List, and IC Data Shee ts
can directly provide the desired
frequency
Progressive Scan Scan mode where all scan lines are
PTC Positive Temperature Coefficient, non
PWB Printed Wiring Board (also called PCB
QSS Quasi Split Sound
R Right audio channel / Red
RAM Random Access Memory
RC Remote Control transmitter
RC5 (6) Remote Control system 5 (6), the
RF Real Flat (picture tube) or Radio
RGB Red, Green, and Blue colour space;
RGBHV Red, Green, Blue, Horizontal sync,
RMS Root Mean Square value
ROM Read Only Memory
SAP Secondary Audio Program; Generally
SAW Surface Acoustic Wave
SC SandCastle: two-level pulse derived
S/C Short Circuit
SCL Serial Clock signal on I
SD Standard Definition
SDA Serial Data line of I
SDRAM Synchronous DRAM
SIF Sound Intermediate Frequency
SMC Surface Mounted Component
SMD Surface Mounted Device
SMPS Switched Mode Power Supply
SND SouND
SRAM Static RAM
STBY STandBY
SVHS Super Video Home System
TBD To Be Defined
TXT Teletext; TXT is a digital addition to
µC Microcontroller
UOC Ultimate One Chip
µP Microprocessor
UV Colour difference signals
VV_sync
V-BAT Main supply for deflection (usually 141
VA Vertical Acquisition
VBI Vertical Blanking Interval; Time during
VCR Video Cassette Recorder
VGA Video Graphics Array
VIF Video Intermediate Frequency
WE Write Enable control line
WST World System Teletext
XTAL Quartz crystal
Y Luminance signal
displayed in one frame at the same
time, creating a double vertical
resolution.
linear resistor (resistance increases if
temperature increases)
or CBA)
signal from the remote control receiver
Frequency
The primary colour signals for TV. By
mixing levels of R, G, and B, all colours
(Y/C) are reproduced
and Vertical sync
used to transmit audio in a second
language
from sync signals
2
C bus
2
C bus
analogue TV signals that contain
textual and graphical information (25
rows x 40 columns). The information is
transmitted within the first 25 lines
during the Vertical Blank Interval (VBI)
V)
which the video signal is blanked when
going from bottom to top of the display
9.4 IC Data Sheets
This section shows the internal block diagrams and pin layouts
of ICs that are drawn as “black boxes” in the electrical
diagrams.
Page 37
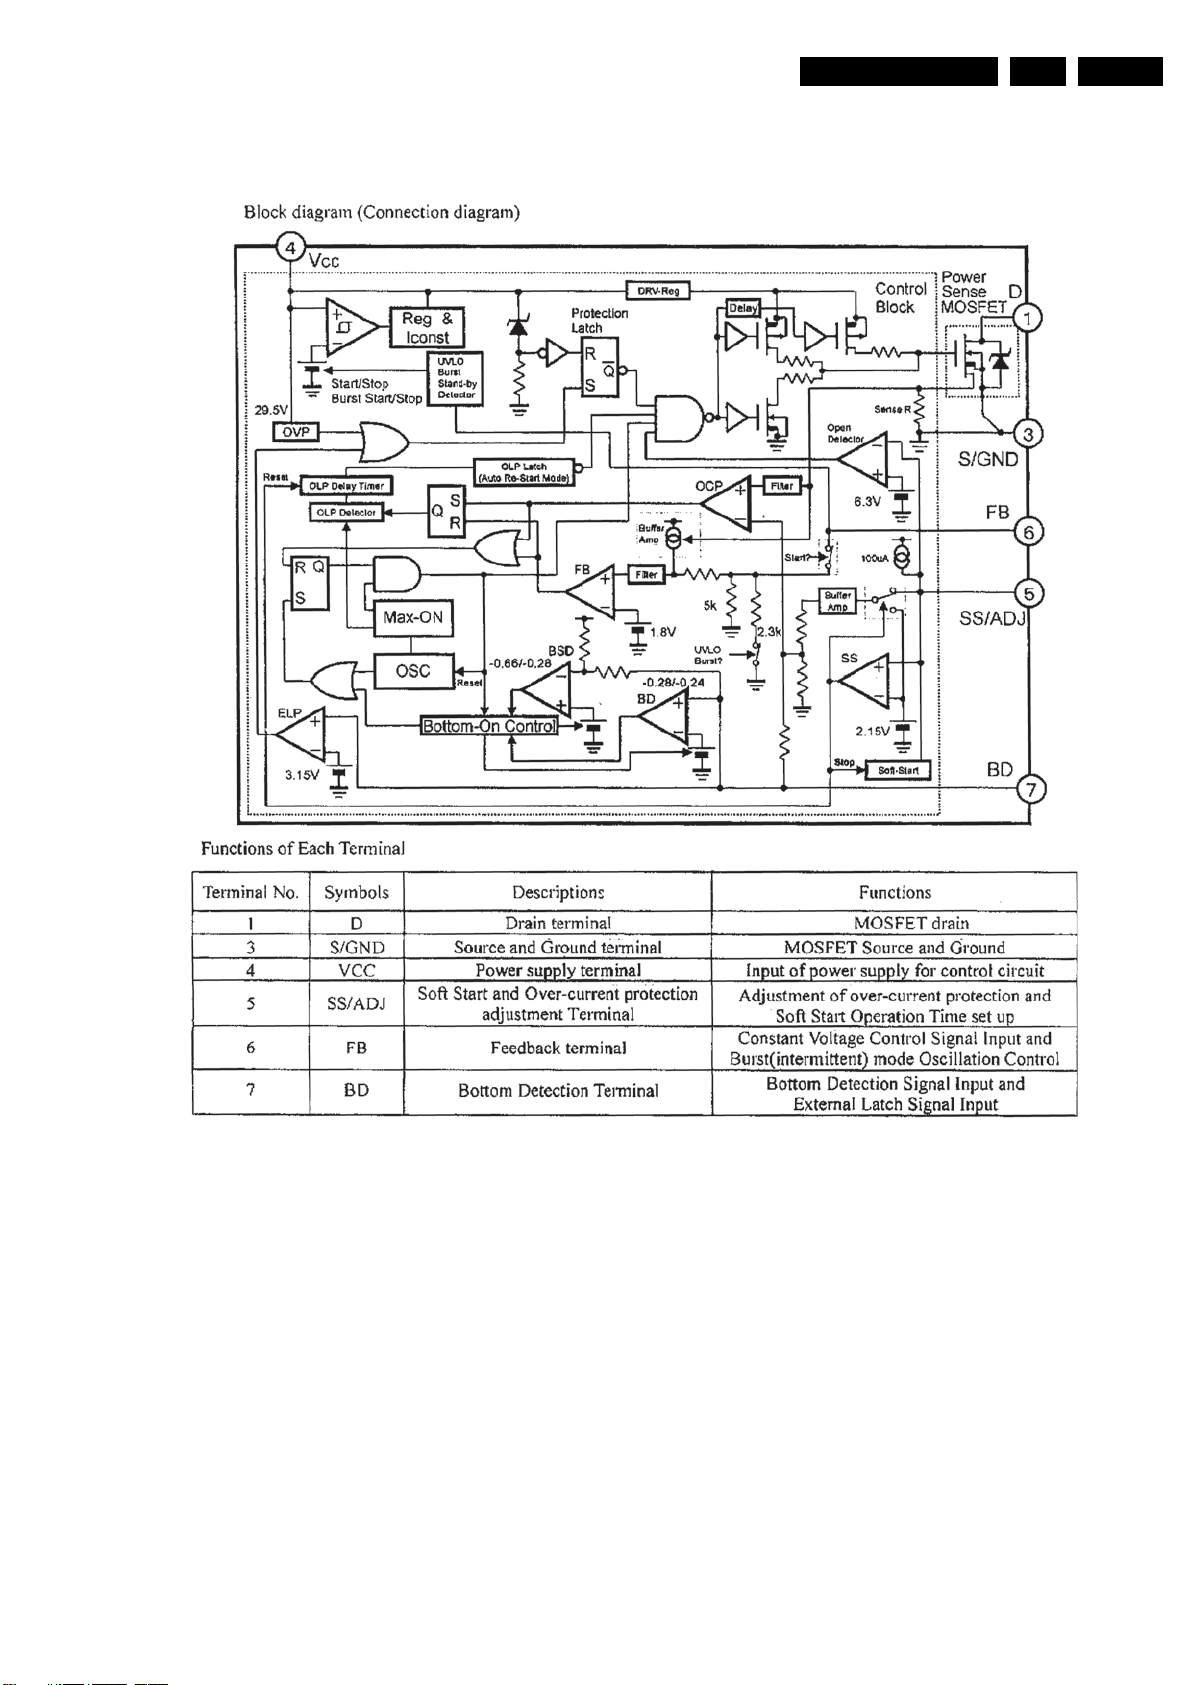
Circuit Descriptions, Abbreviation List, and IC Data Sheets
9.4.1 Diagram A1, W6554A, (IC601)
EN 37SK5.0L CA 9.
Figure 9-1 Block Diagram and Pin Configuration
H_17210_039.eps
120607
Page 38
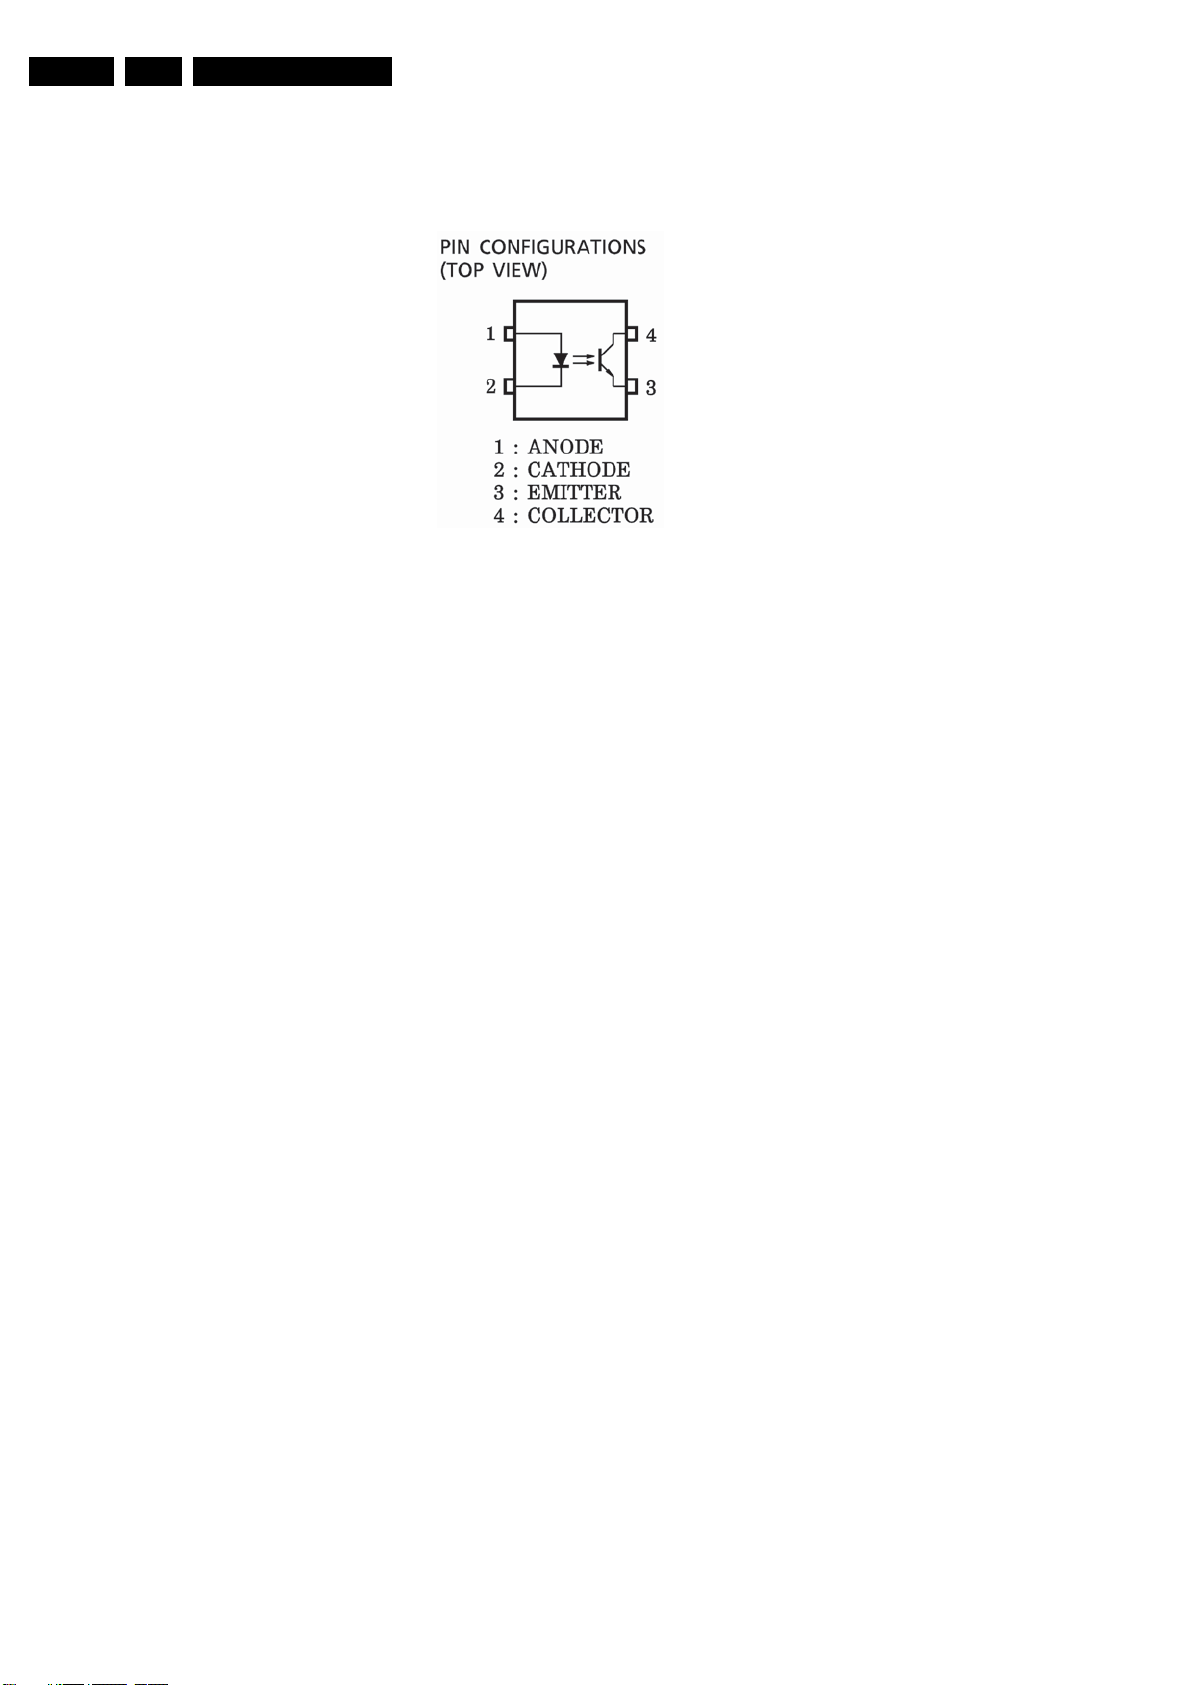
EN 38 SK5.0L CA9.
9.4.2 Diagram A1, P412, (IC602)
Circuit Descriptions, Abbreviation List, and IC Data Shee ts
H_17210_039.eps
120607
Figure 9-2 Block Diagram and Pin Configuration
Page 39
Circuit Descriptions, Abbreviation List, and IC Data Sheets
9.4.3 Diagram A3, TDA486x, (IC301)
Block Diagram
EN 39SK5.0L CA 9.
DIFFERENTIAL
INPUT
STAGE
7
INP INN
from
deflection controller
Block diagram of TDA4865AJ
Pin Configuration
THERMAL
TDA4865AJ
PROTECTION
VERTICAL
OUTPUT
FLYBACK
GENERATOR
REFERENCE
CIRCUIT
65432 1
VOUT GND V
C
R
S1
S1
deflection
R
P
R3
R2
coil
R1
V
N
P2
R5
C1
V
P3
C
F
V
P1
D1
C2
R6
V
P
V
1
P1
V
2
P3
V
3
P2
4
GND
VOUT
INN
INP
TDA4865AJ
5
6
7
Pin configuration for DBS7P
(TDA4865AJ)
Figure 9-3 Block Diagram and Pin Configuration
H_17210_038.eps
120607
Page 40
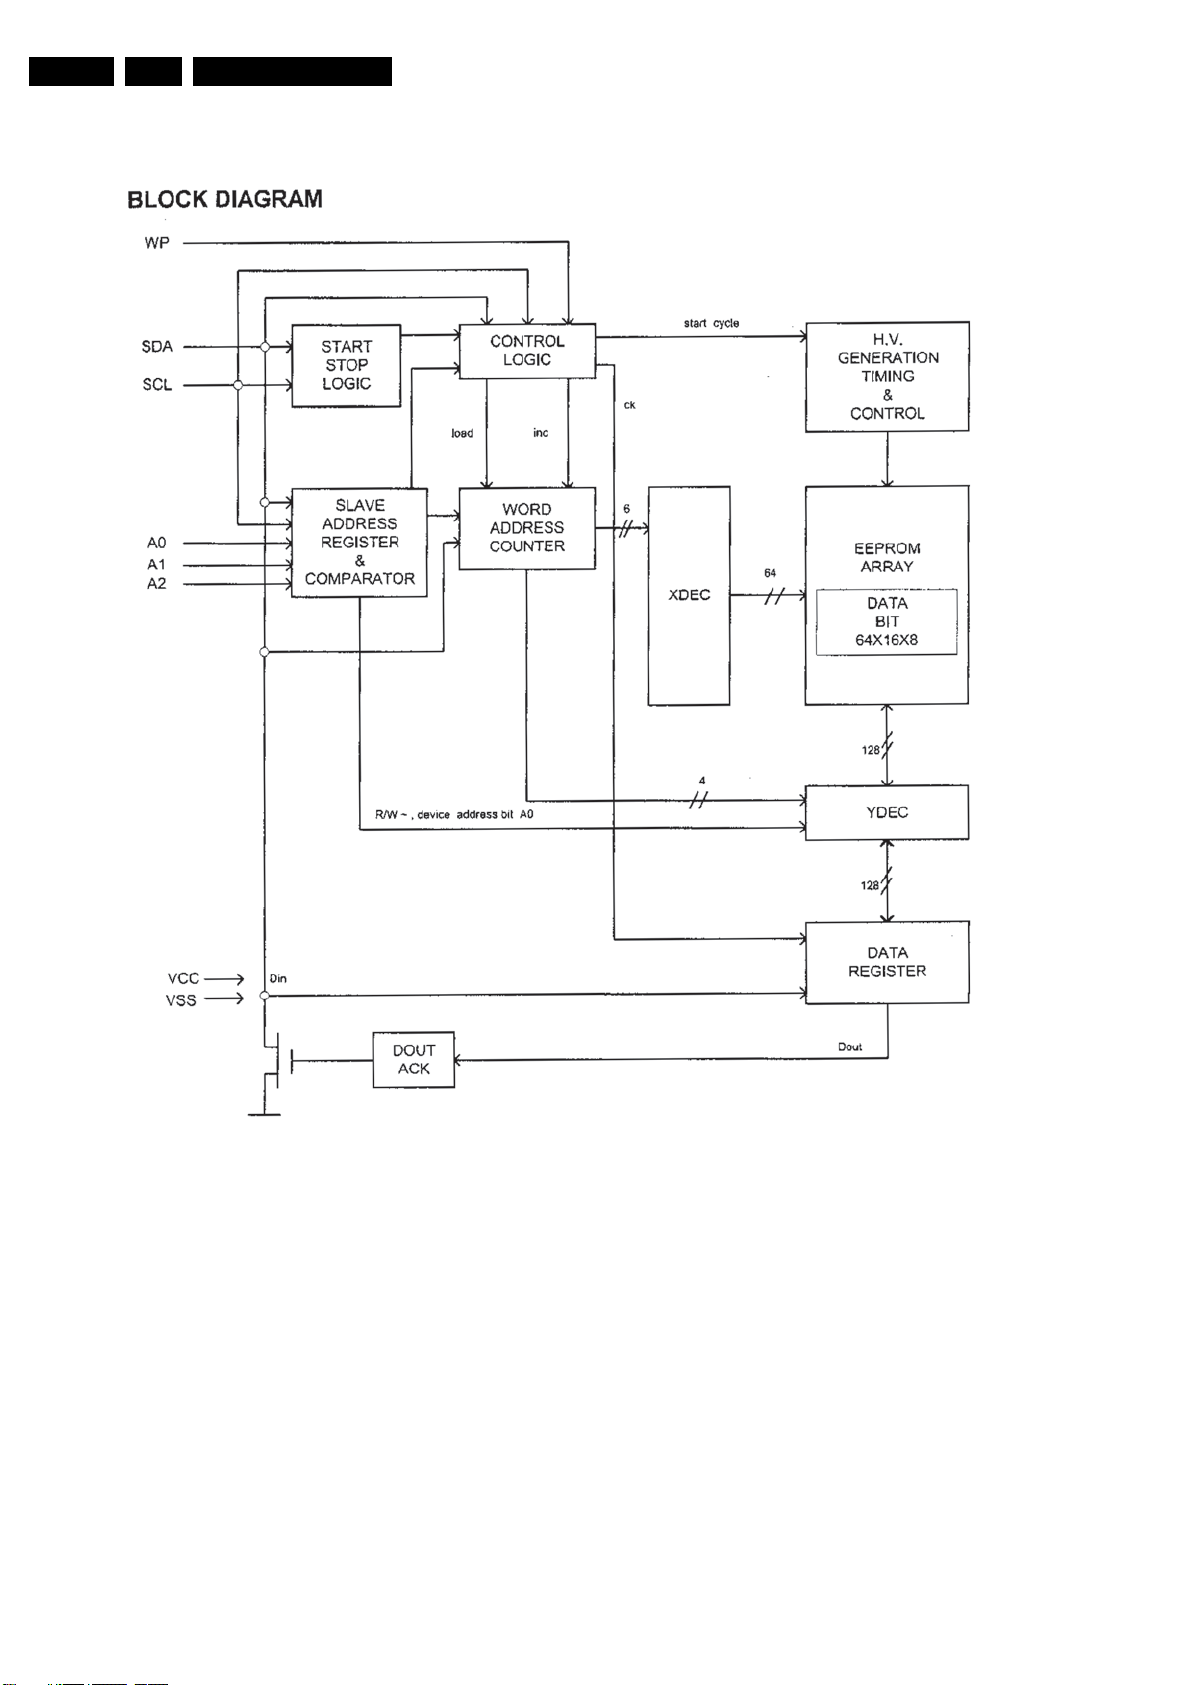
EN 40 SK5.0L CA9.
Circuit Descriptions, Abbreviation List, and IC Data Shee ts
Figure 9-4 Block Diagram
H_17210_035.eps
120607
Page 41
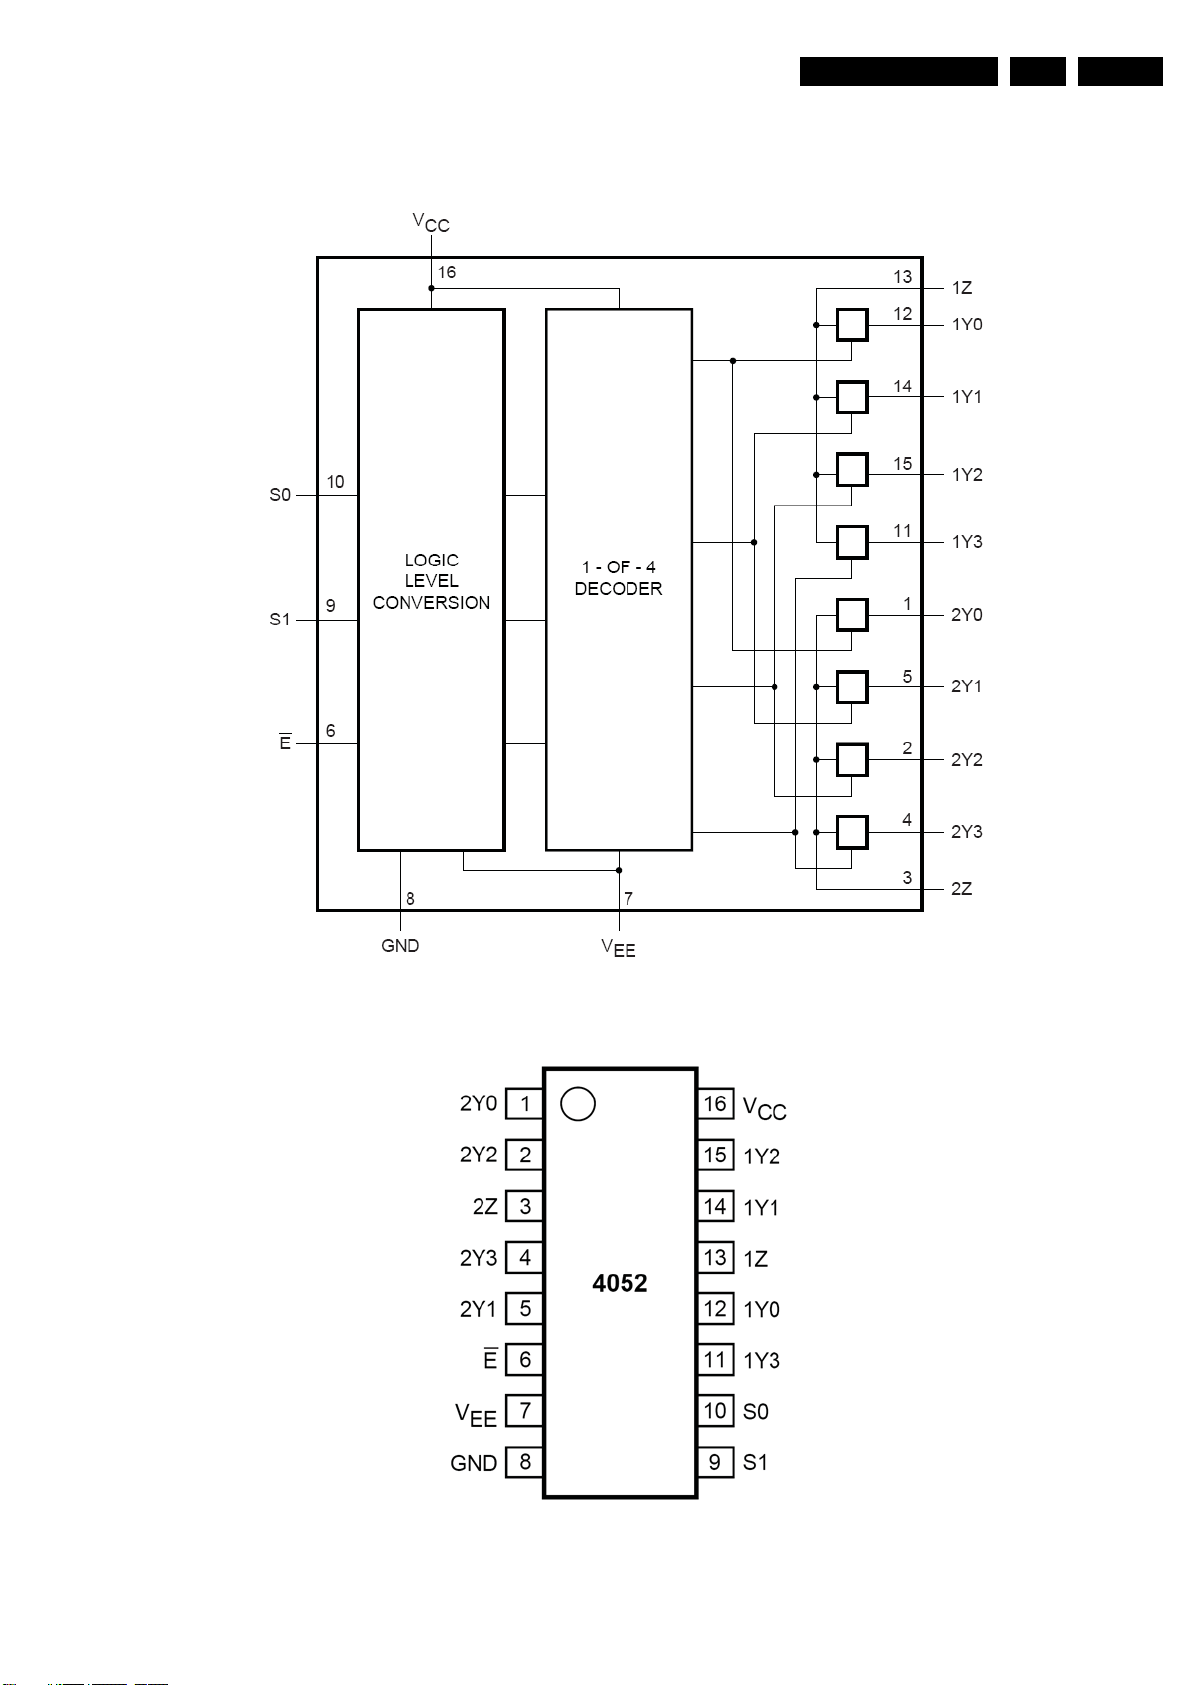
Circuit Descriptions, Abbreviation List, and IC Data Sheets
9.4.4 Diagram A5, 4052, (IC102)
Block Diagram
EN 41SK5.0L CA 9.
Pin Configuration
Figure 9-5 Block Diagram and Pin Configuration
H_17210_041.eps
120607
Page 42
EN 42 SK5.0L CA9.
9.4.5 Diagram A7, TDA9842, (IC402)
Block Diagram
IN1
Circuit Descriptions, Abbreviation List, and IC Data Shee ts
V
CC
9
4
60
kΩ
8
OUT1
1
IN2
60
kΩ
3
CIV
7
VC
Pin Configuration
IN2
OUT2
CIV
IN1
GND
SVR
VC
OUT1
V
CC
VOLUME
CONTROL
TFA9842AJ
1
2
3
4
5
TFA9842AJ
6
7
8
9
V
REF
GND
5
SHORT-CIRCUIT
AND
TEMPERATURE
PROTECTION
V
CC
0.5V
CC
2
OUT2
6
SVR
H_17210_033.eps
Figure 9-6 Block Diagram and Pin Configuration
110607
Page 43
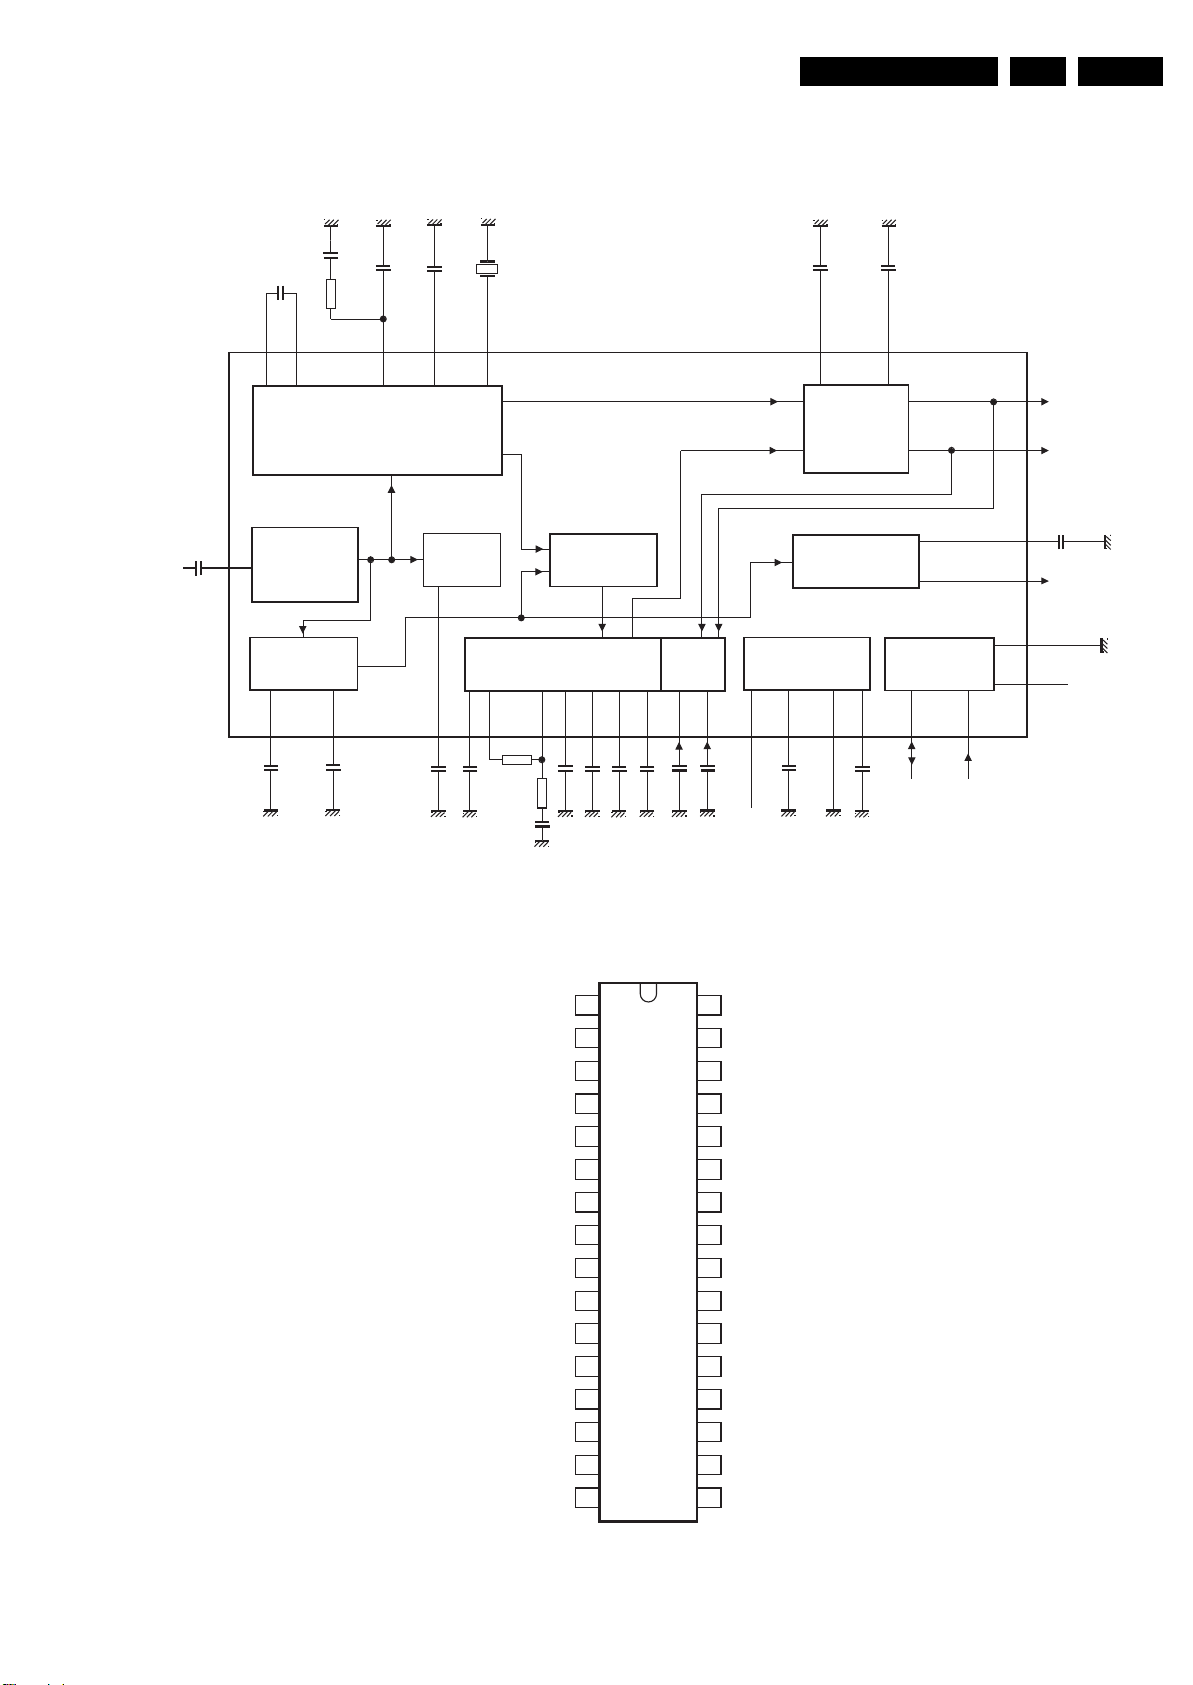
Circuit Descriptions, Abbreviation List, and IC Data Sheets
9.4.6 Diagram A7, TDA9850, (IC801)
Block Diagram
C3
+
C2
C4
R1
EN 43SK5.0L CA 9.
Q1
ceramic
resonator
C5
+
C6
C7
+
+
13
composite
baseband
input
+
C1
INPUT
11
LEVEL
ADJUST
DEMODULATOR
5
+
C16
SAP
Pin Configuration
14
STEREO DECODER
4
C15
15
C17
16
NOISE
DETECTOR
26
3
+
C14
17
L+R
L − R/SAP
18
DEMATRIX
+
MODE
SELECT
19
OUTL
OUTR
stereo
mono
SAP
to
audio
processing
27
21
TDA9850
C8
22
STEREO/SAP
SWITCH
DBX
32
2
1
R2
R3
C13
31
+
+
C12
C11
STEREO
ADJUST
20
25
29
30
+
+
+
+
C
C
C9
C10
L
only during
adjustment
R
V
CC
10
DE-EMPHASIS
SUPPLY
12
+
C19
V
CAP
6
+
V
TRANSCEIVER
24
C18
SDA SCL
ref
LOGIC, I
8
23
SAP without DBX
7
2
C-
28
9
MAD
C
VEO
VEI
C
NR
C
C
DEC
DGND
SDA
SCL
V
CC
COMP
V
CAP
C
P1
C
P2
C
PH
C
ADJ
1
2
3
4
M
5
6
7
8
TDA9850
9
10
11
12
13
14
15
16
32
S
C
31
W
C
30
TS
C
29
TW
MAD
28
LTUODNGA
27
C
26
ND
C
25
L
V
24
ref
SAP
23
C
22
SDE
OUTR
21
C
20
R
C
19
SS
C
18
MO
CER
17
Figure 9-7 Block Diagram and Pin Configuration
H_17450_004.eps
200907
Page 44
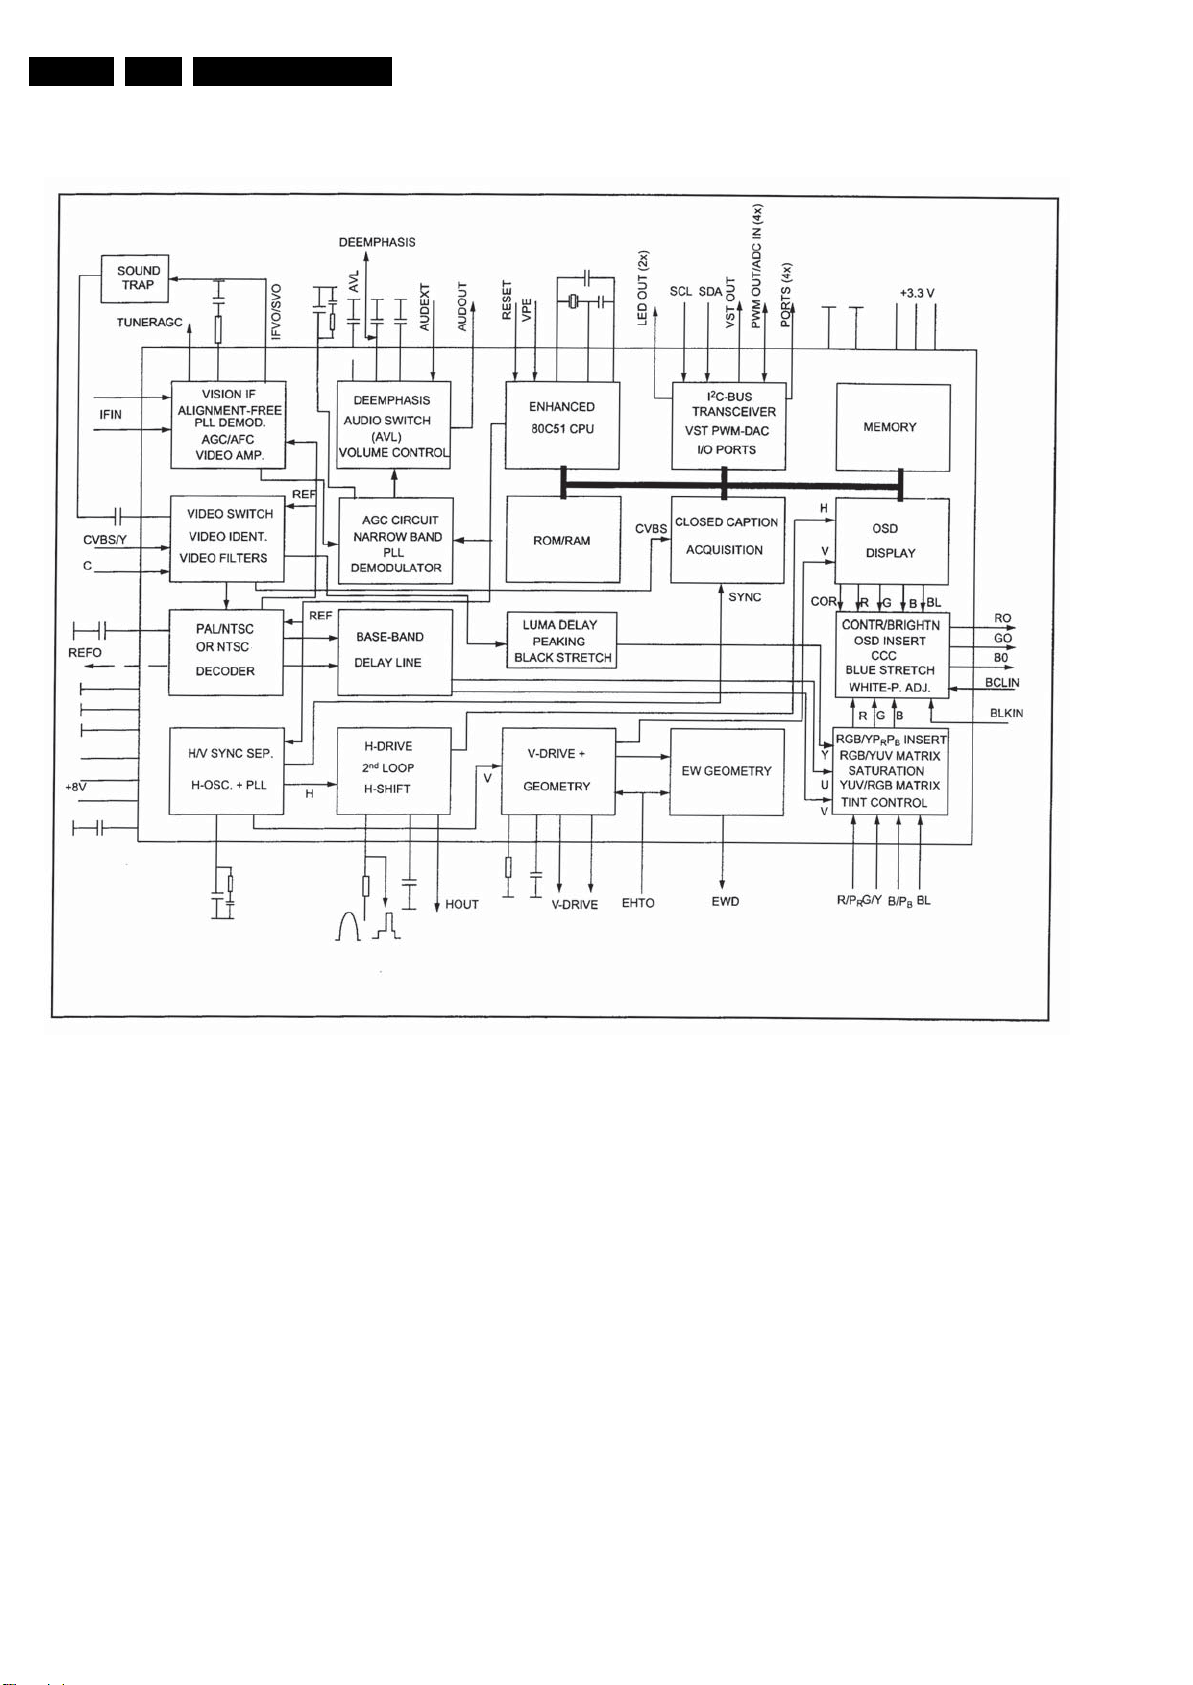
EN 44 SK5.0L CA9.
9.4.7 Diagram A8, OM837x (IC201)
Block Diagram
Circuit Descriptions, Abbreviation List, and IC Data Shee ts
Figure 9-8 Block Diagram
H_17210_034.eps
130607
Page 45
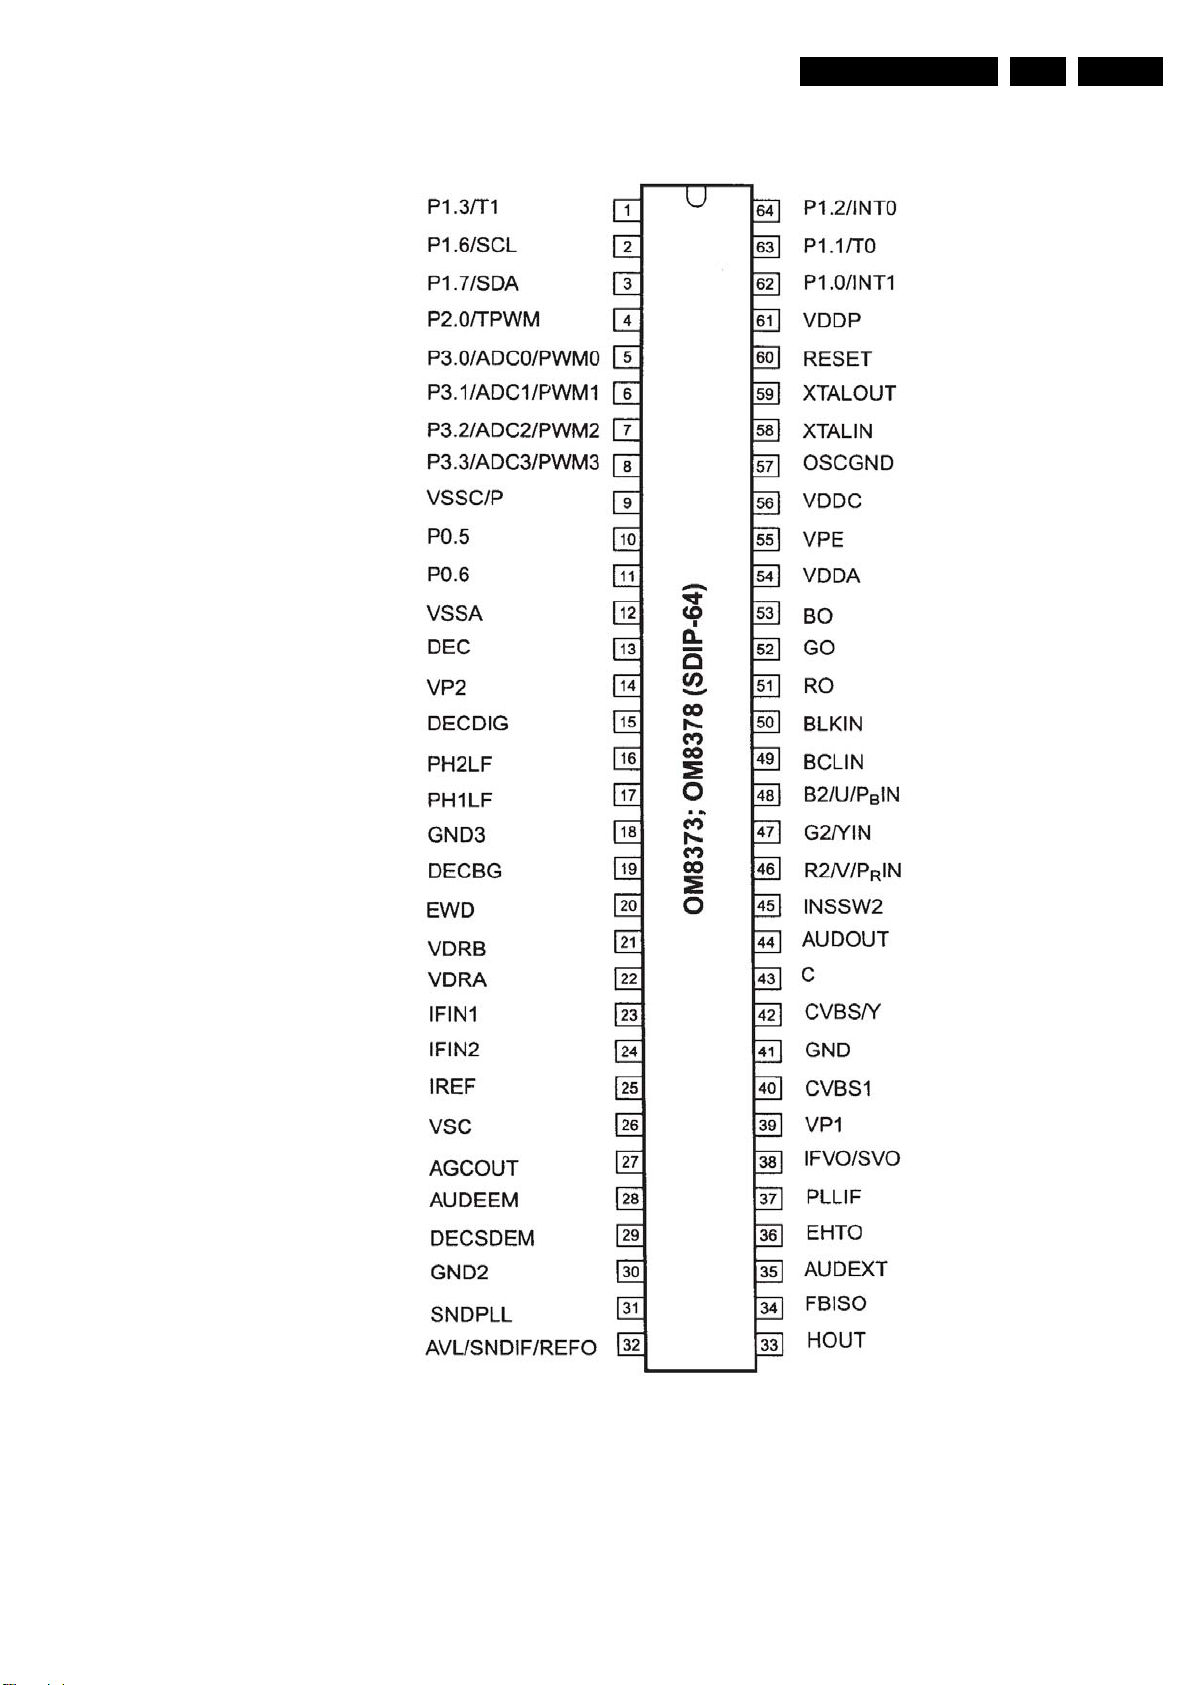
Circuit Descriptions, Abbreviation List, and IC Data Sheets
Pin Configuration
EN 45SK5.0L CA 9.
Figure 9-9 Pin Configuration
H_17210_029.eps
130607
Page 46
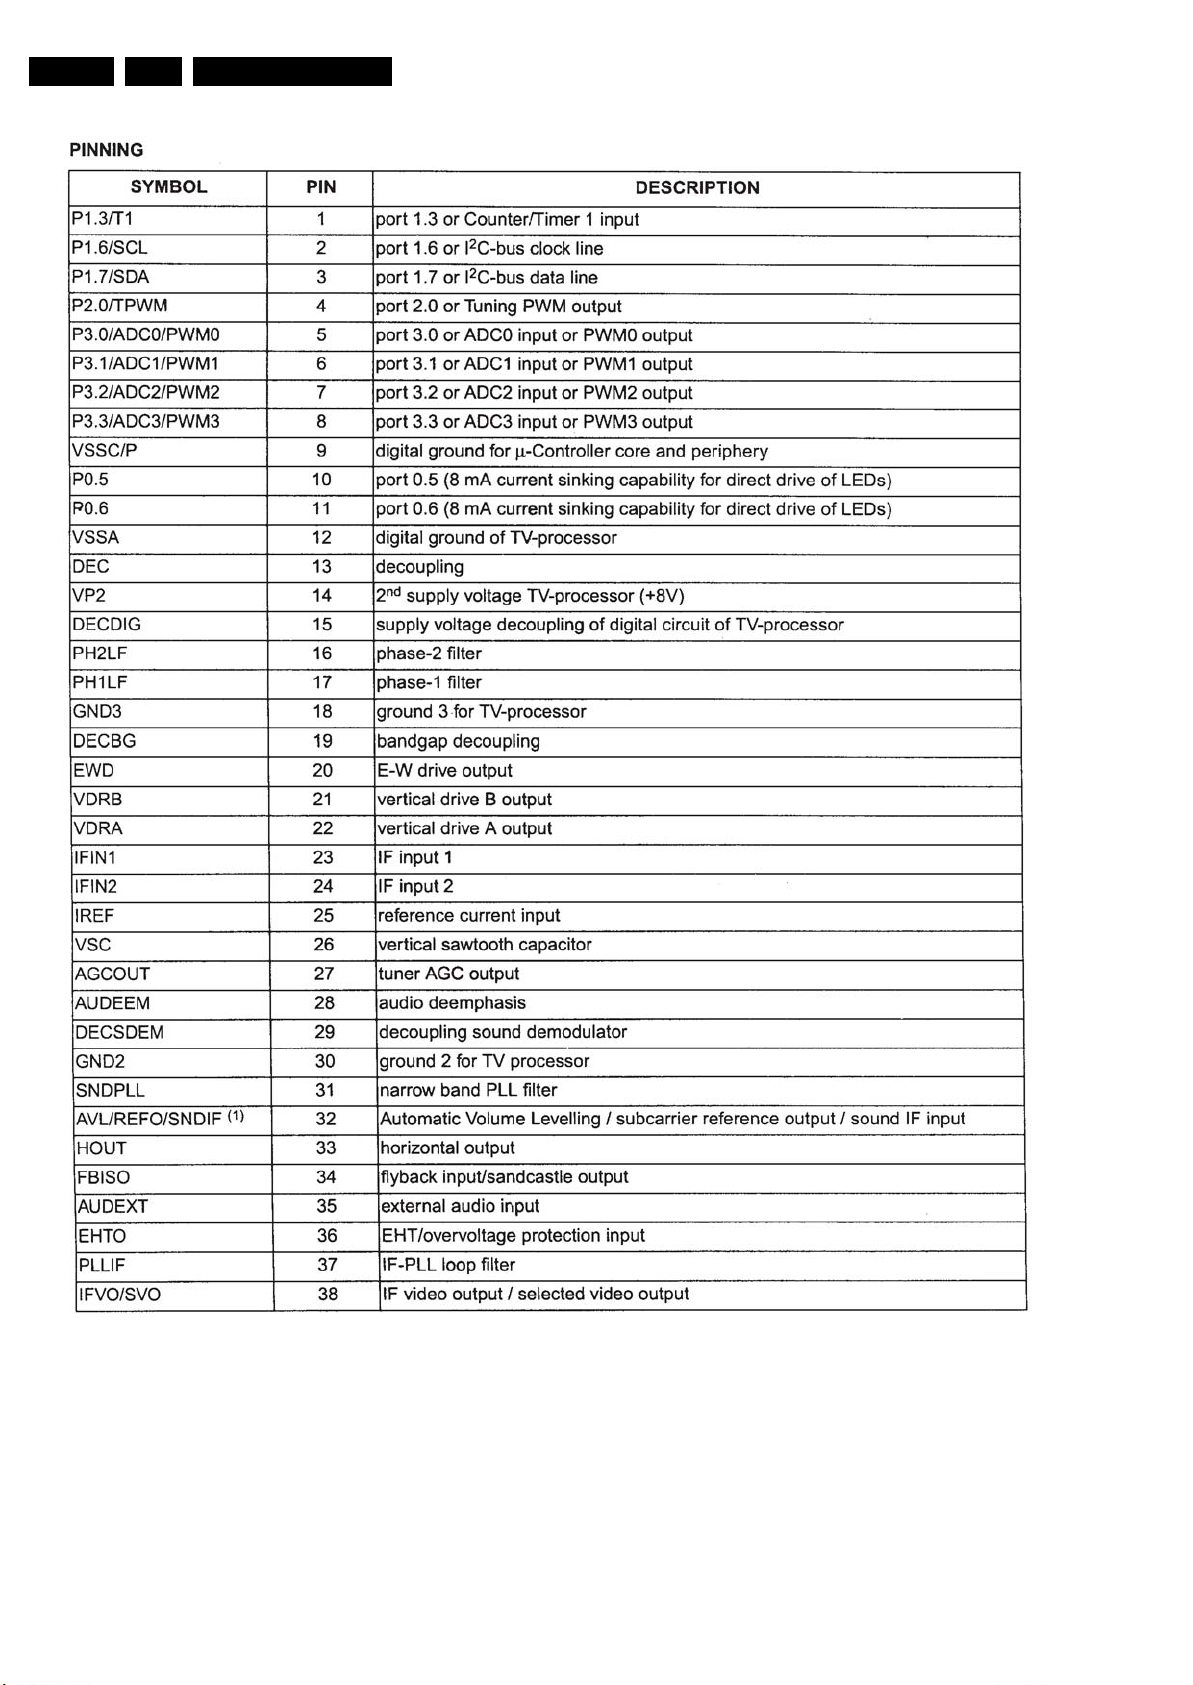
EN 46 SK5.0L CA9.
Circuit Descriptions, Abbreviation List, and IC Data Shee ts
Figure 9-10 Pin Configuration
H_17210_030.eps
130607
Page 47
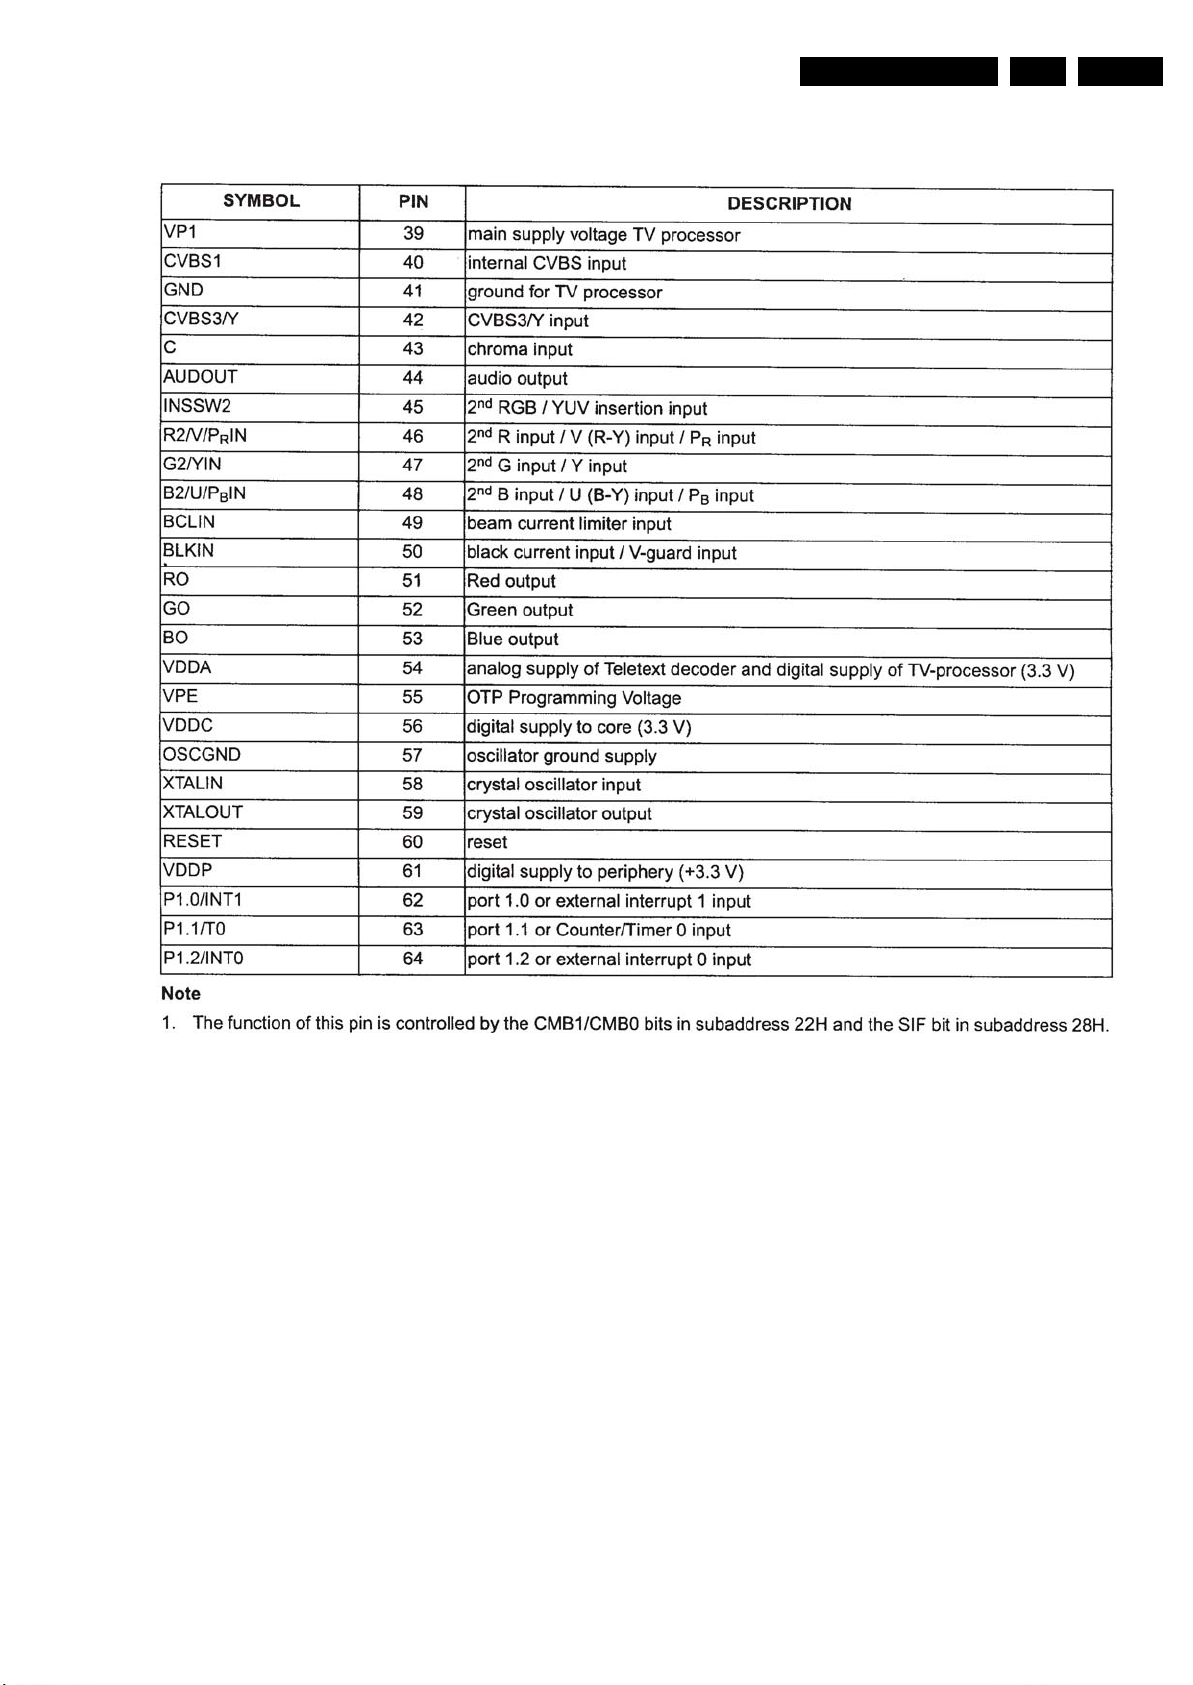
Pinning
Circuit Descriptions, Abbreviation List, and IC Data Sheets
EN 47SK5.0L CA 9.
Figure 9-11 Pin Configuration
H_17210_031.eps
130607
Page 48
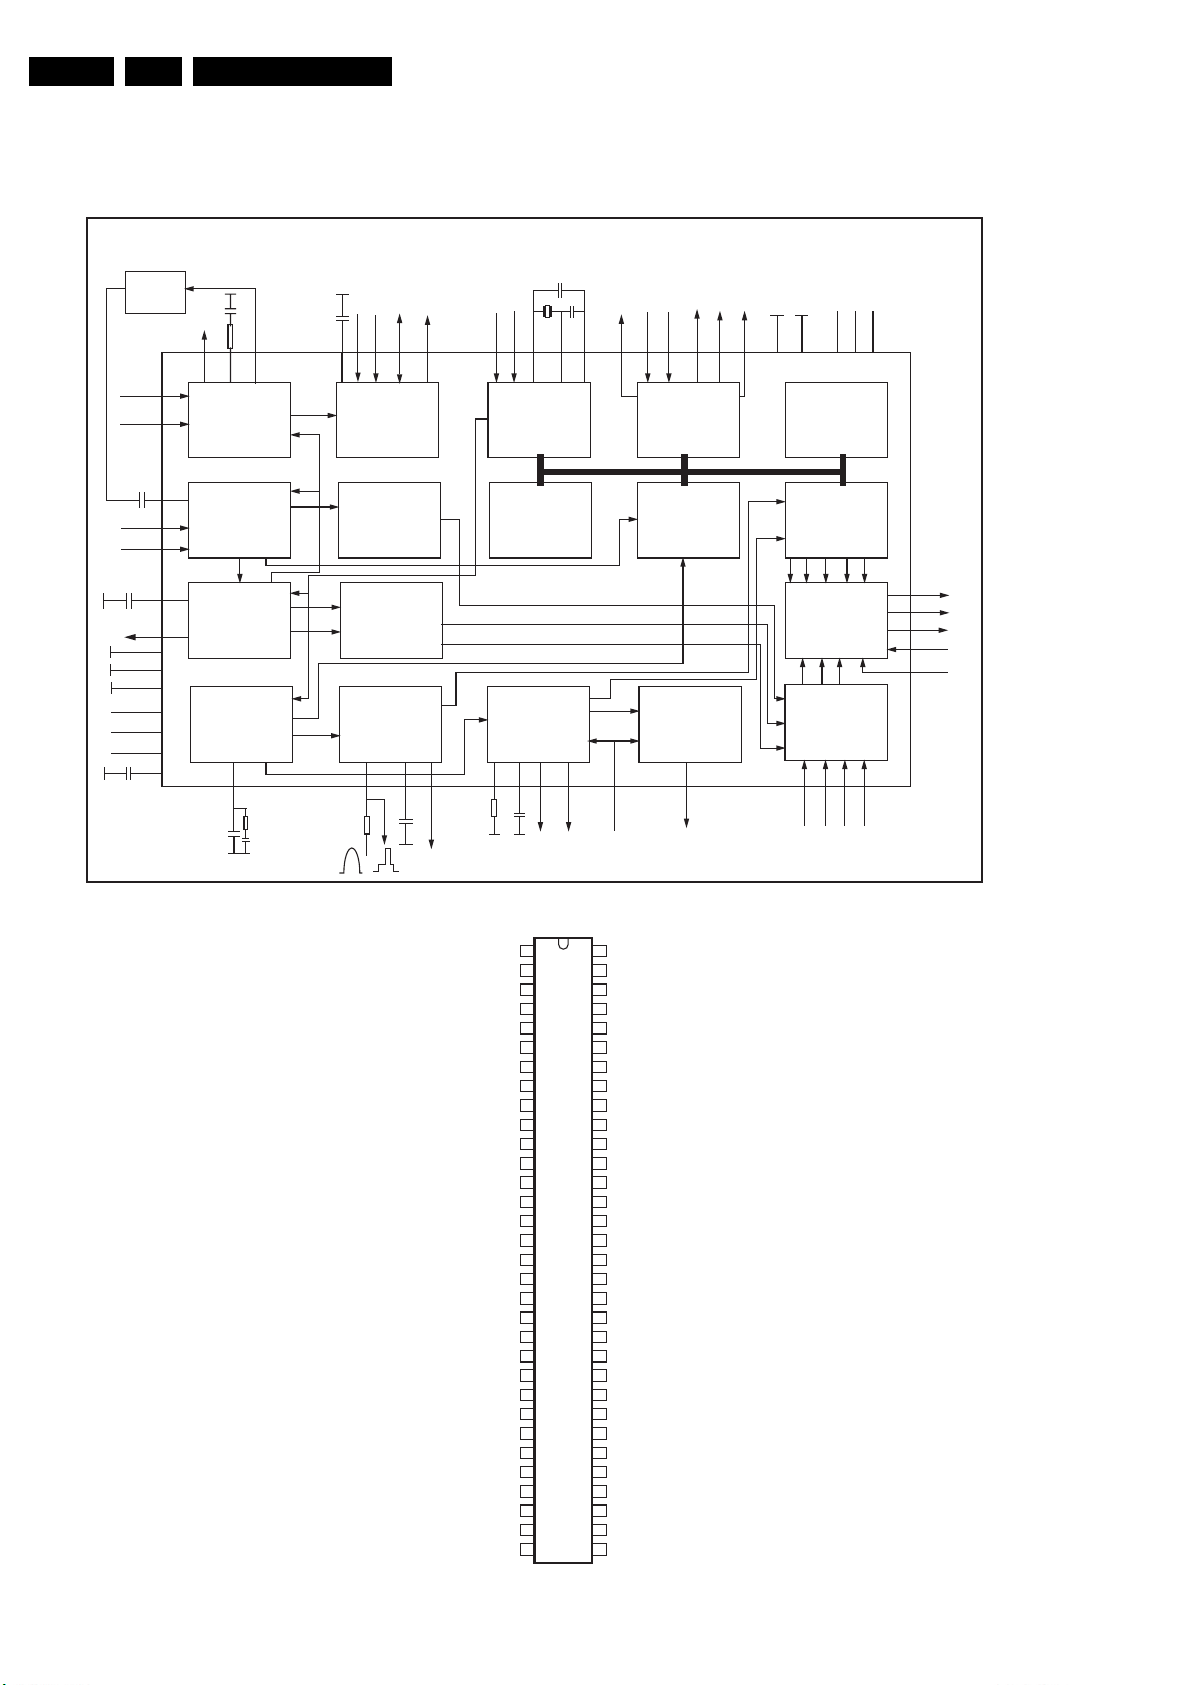
EN 48 SK5.0L CA9.
9.4.8 Diagram A8, TDA937x (IC201)
Block Diagram
SOUND
TRAP
TUNERAGC
IFVO/SVO
VISION IF
IFIN
CVBS/Y
C
(REFOUT)
+8V
ALIGNMENT-FREE
PLL DEMOD.
AGC/AFC
VIDEO AMP.
VIDEO SWITCH
VIDEO IDENT.
VIDEO FILTERS
PAL/NTSC
DECODER
H/V SYNC SEP.
H-OSC. + PLL
REF
REF
H
Circuit Descriptions, Abbreviation List, and IC Data Shee ts
SIFIN
QSSO/AMOUT/AUDEXT
QSS SOUND IF
AGC
QSS MIXER
AM DEMODULTOR
LUMA DELAY
PEAKING
BLACK STRETCH
BASE-BAND
DELAY LINE
H-DRIVE
nd
LOOP
2
H-SHIFT
AUDOUT/AMOUT
V
RESET
VPE
ENHANCED
80C51 CPU
ROM/RAM
V-DRIVE +
GEOMETRY
SCL
LED OUT (2x)
CLOSED CAPTION
CVBS
SDA
VST OUT
2
C-BUS
I
TRANSCEIVER
VST PWM-DAC
I/O PORTS
ACQUISITION
SYNC
EW GEOMETRY
I/O PORTS (4x)
ADC IN (4x)
MEMORY
H
OSD
V
DISPLAY
COR
RG
CONTR/BRIGHTN
OSD/TEXT INSERT
CCC
WHITE-P. ADJ.
R
RGB/YUV INSERT
Y
RGB/YUV MATRIX
SATURATION
U
YUV/RGB MATRIX
V
GB
+3.3 V
B
BL
RO
GO
BO
BCLIN
BLKIN
Pin Configuration
HOUT V-DRIVE
handbook, halfpage
P1.3/T1
P1.6/SCL
P1.7/SDA
P2.0/TPWM
P3.0/ADC0/PWM0
P3.1/ADC1/PWM1
P3.2/ADC2/PWM2
P3.3/ADC3/PWM3
VSSC/P
P0.5
P0.6
VSSA
I.C.
VP2
DECDIG
PH2LF
PH1LF
GND3
DECBG
AVL/EWD/
DECSDEM
VDRB
VDRA
IFIN1
IFIN2
IREF
VSC
AGCOUT
AUDEEM/SIFIN1
DECSDEM/SIFIN2
GND2
SNDPLL/SIFAGC
AVL/SNDIF/REFO/
AUDEEM
1
2
3
4
5
6
7
8
9
10
11
12
13
14
15
16
17
18
19
20
21
22
23
24
25
26
27
28
29
30
31
32
EHTO
P1.2/INT0
64
63
P1.1/T0
P1.0/INT1
62
61
VDDP
60
RESET
59
XTALOUT
58
XTALIN
OSCGND
57
VDDC
56
55
VPE
54
VDDA
53
BO
GO
52
51
RO
50
BLKIN
49
XXX
BCLIN
48
B2/U/P
47
G2/YIN
46
R2/V/P
45
INSSW2
AUDOUT
44
C
43
TDA937X PS/N2 series (SDIP-64)
CVBS/Y
42
41
GND1
40
CVBS1
39
VP1
IFVO/SVO
38
PLLIF
37
EHTO
36
AUDEXT/QSSO
35
FBISO
34
HOUT
33
EWD
IN
B
IN
R
R/V
G/Y B/U BL
H_17450_012.eps
210907
Figure 9-12 Block diagram and pin configuration
Page 49
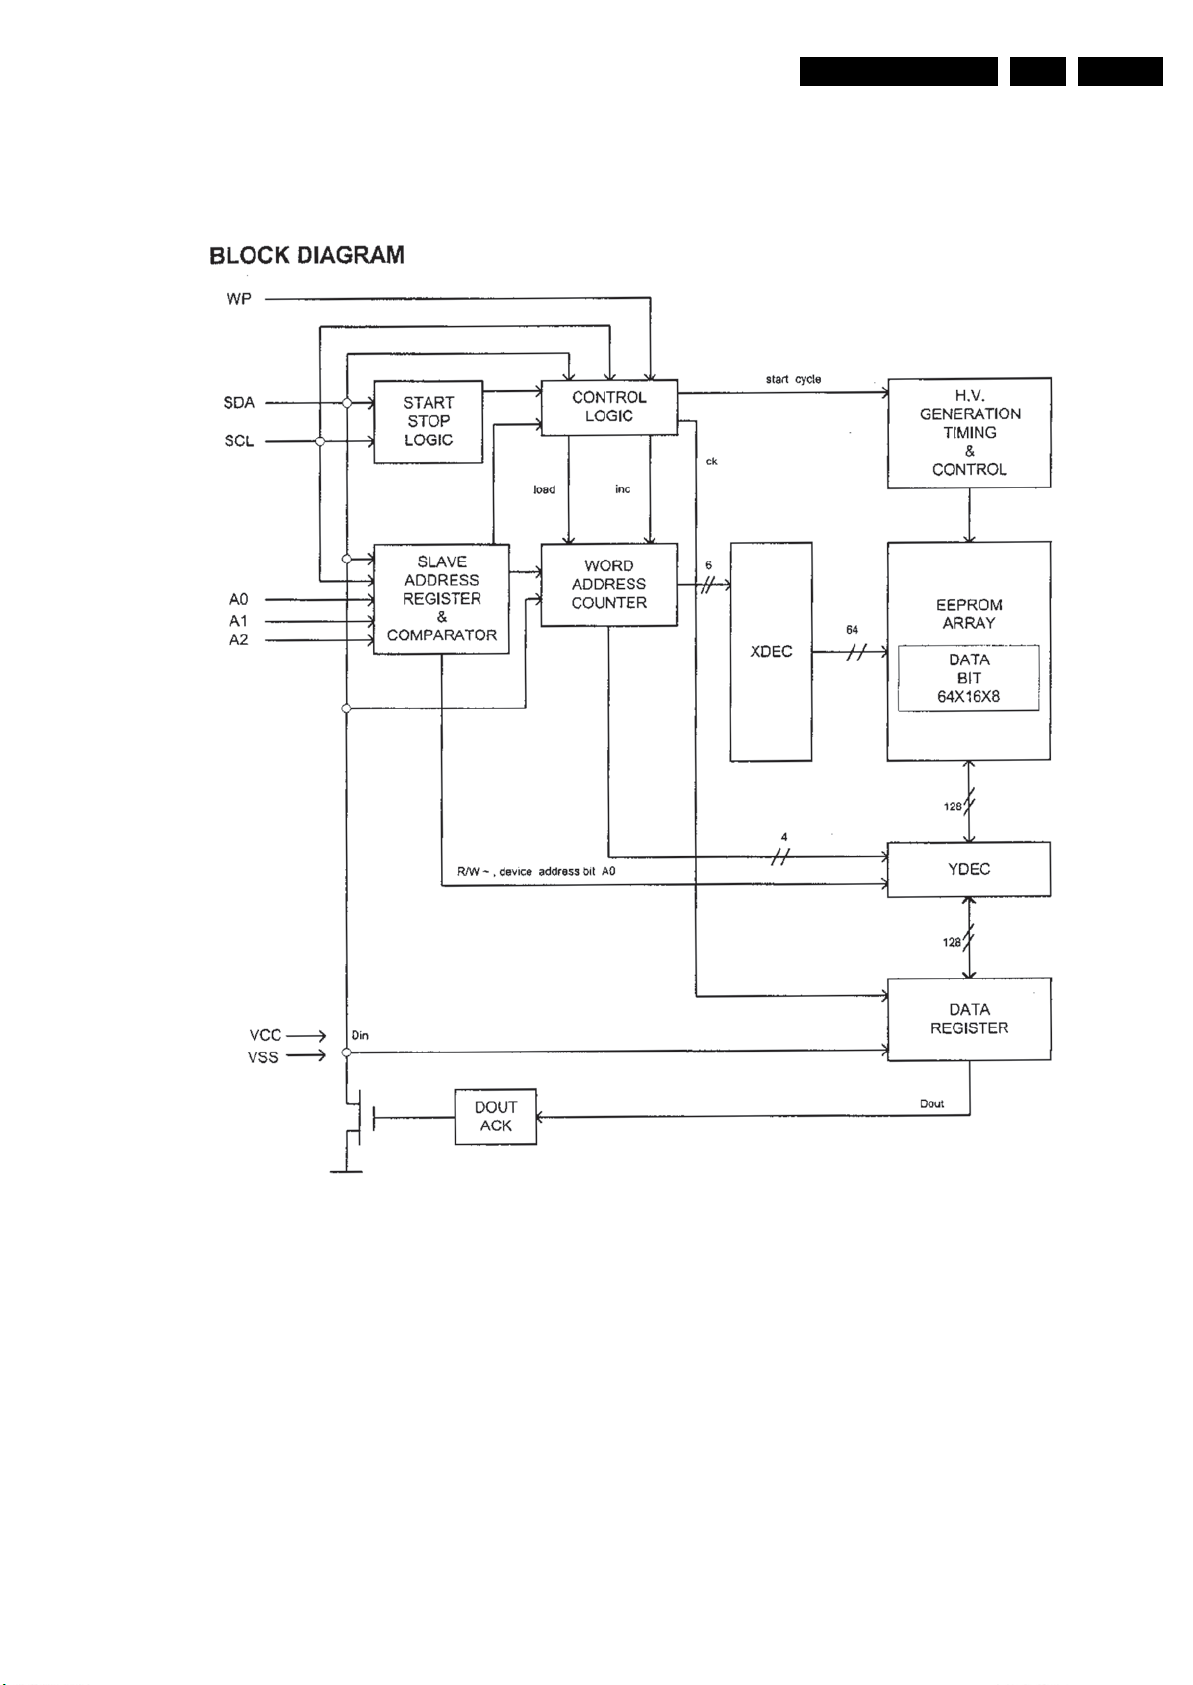
Circuit Descriptions, Abbreviation List, and IC Data Sheets
9.4.9 Diagram A8, 24C08 (IC202)
EN 49SK5.0L CA 9.
Figure 9-13 Block Diagram
H_17210_035.eps
120607
Page 50
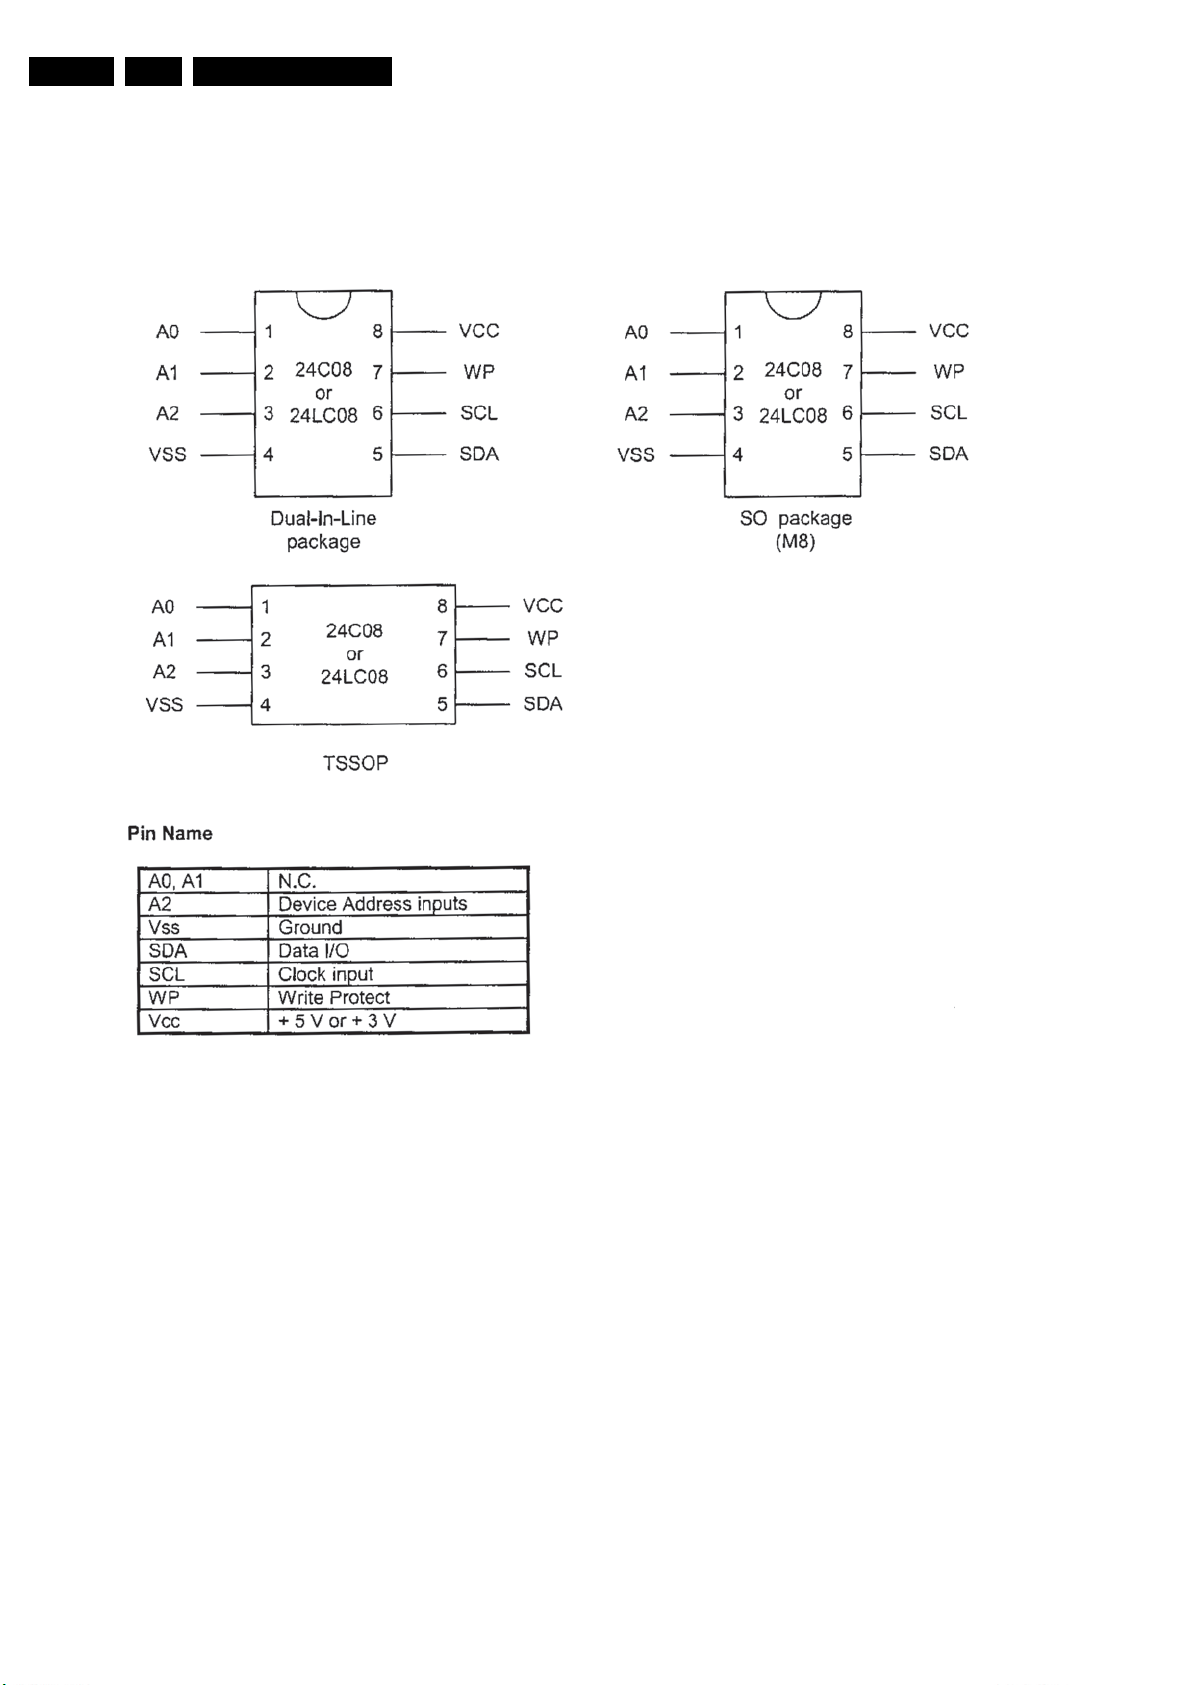
EN 50 SK5.0L CA9.
Pin Configuration
Circuit Descriptions, Abbreviation List, and IC Data Shee ts
Figure 9-14 Pin Configuration
H_17210_036.eps
120607
Page 51
10. Spare Parts List
Spare Parts List
EN 51SK5.0L CA 10.
CTN’s Listed:
1) 8670 000 34071 29PT9457/44
2) 8670 000 34069 29PT9457/55
Mono Carrier [A]
Various
F601 9965 000 40615 Fuse T3.15A 250V
P702 9965 200 31263 RCA Jack
PTC601 9965 100 04865 Ther Resistor 9Ω for 29"
S501 9965 100 05376 CRT Socket GZS10
SAW101 9965 100 07702 SAW SW05 45.75MHz
X101 9965 000 40264 Xtal 12.0MHz HC-49/U
X851 9965 100 07714 Ceramic Res. 503kHz
XT155 9965 100 07703 Ceramic Trap 4.5MHz
ZD101 9965 000 40221 Zener 5V1 1/2W 5%
ZD102 9965 000 40221 Zener 5V1 1/2W 5%
ZD103 9965 000 40224 Zener 8V2 1/2W 5%
ZD104 9965 000 40224 Zener 8V2 1/2W 5%
ZD105 9965 000 40221 Zener 5V1 1/2W 5%
ZD106 9965 000 40224 Zener 8V2 1/2W 5%
ZD107 9965 000 40224 Zener 8V2 1/2W 5%
ZD108 9965 000 40224 Zener 8V2 1/2W 5%
ZD401 9965 000 40224 Zener 8V2 1/2W 5%
ZD402 9965 100 04909 Zener Diode 18V 1/2W
ZD440 9965 000 40224 Zener 8V2 1/2W 5%
ZD501 9965 000 40224 Zener 8V2 1/2W 5%
ZD602 9965 100 04909 Zener Diode 18V 1/2W
ZD620 9965 000 40221 Zener 5V1 1/2W 5%
ZD621 9965 000 40220 Zener 3V9 1/2W 5%
ZD622 9965 000 40220 Zener 3V9 1/2W 5%
ZD701 9965 000 40224 Zener 8V2 1/2W 5%
ZD702 9965 000 40224 Zener 8V2 1/2W 5%
ZD705 9965 000 40224 Zener 8V2 1/2W 5%
ZD706 9965 000 40224 Zener 8V2 1/2W 5%
ZD707 9965 000 40224 Zener 8V2 1/2W 5%
ZD708 9965 000 40224 Zener 8V2 1/2W 5%
ZD709 9965 000 40224 Zener 8V2 1/2W 5%
ZD710 9965 000 40224 Zener 8V2 1/2W 5%
ZD711 9965 000 40224 Zener 8V2 1/2W 5%
ZD712 9965 000 40224 Zener 8V2 1/2W 5%
ZD713 9965 000 40224 Zener 8V2 1/2W 5%
ZD714 9965 000 40224 Zener 8V2 1/2W 5%
ZD715 9965 000 40224 Zener 8V2 1/2W 5%
g
C101 9965 000 40156 0.01μF 50V
C103 9965 000 40156 0.01μF 50V
C105 9965 000 40156 0.01μF 50V
C107 9965 000 41097 100pF 50V
C108 9965 000 41097 100pF 50V
C109 9965 000 40171 10μF 20% 16V
C111 9965 000 41097 100pF 50V
C112 9965 000 41097 100pF 50V
C113 9965 000 40174 220μF 20% 16V
C114 9965 100 04885 0.47uF 20% 50V
C116 9965 000 40178 1μF 20% 50V
C117 9965 000 40172 100μF 20% 16V
C118 9965 000 40156 0.01μF 50V
C119 9965 000 40171 10μF 20% 16V
C120 9965 100 04891 0.1μF 5% 63-100V
C126 9965 000 40157 0.1μF 50V
C127 9965 100 04892 0.22μF 5% 63-100V
C128 9965 000 40156 0.01μF 50V
C129 9965 000 40171 10μF 20% 16V
C130 9965 100 04892 0.22μF 5% 63-100V
C131 9965 100 04867 0.0022μF +80-20% 50V
C132 9965 100 04870 0.0047μF +80-20% 50V
C133 9965 000 40178 1μF 20% 50V
C135 9965 100 04891 0.1μF 5% 63-100V
C136 9965 100 07709 180pF 50V
C137 9965 000 40171 10μF 20% 16V
C138 9965 000 40208 Mylar 0.0015μF 100V
C139 9965 000 40159 330pF 50V
C140 9965 000 41112 4.7μF 20% 16V
C144 9965 100 05386 0.01μF 5% 100V
C145 9965 000 40172 100μF 20% 16V
C146 9965 000 40157 0.1μF 50V
C147 9965 000 40529 33pF 50V
C148 9965 000 40529 33pF 50V
C149 9965 000 40156 0.01μF 50V
C150 9965 000 40172 100μF 20% 16V
C160 9965 000 40531 470pF 50V
C161 9965 000 40531 470pF 50V
C162 9965 000 40529 33pF 50V
C402 9965 000 40164 0.0022μF 500V
C403 9965 000 40163 220pF 500V
C404 9965 000 40181 4.7μF 50V-100V 20%
C405 9965 100 04885 0.47uF 20% 50V
C409 9965 000 40157 0.1
C410 9965 000 40179 10μF 20% 50V-63V
C431 9965 000 40557 0.0039μF 5% 2kV
C432 9965 100 04895 0.0072uF 5% 2kV
C433 9965 000 41145 PFC 0.033μF 5% 630V
C435 9965 100 07716 0.56µF 5% 400V
C436 9965 100 05384 560pF 10% 2kV
C437 9965 000 40185 10μF 20% 250V
C438 9965 100 04894 0.0027μF 5% 2kV
C440 9965 100 05402 4.7μF 5%
C441 9965 000 40156 0.01μF 50V
C442 9965 100 05383 0.0022μF 10% 2kV
C443 9965 000 40202 MP 0.056μF 250V 5%
C444 9965 100 05367 39pF 5% 50V
C445 9965 000 40209 Mylar 0.0022μF 100V
C452 9965 100 07700 2200µF
C453 9965 100 07700 2200µF
C455 9965 100 07710 220μF
C456 9965 000 40560 Mylar 0.1μF 100V
C459 9965 000 40560 Mylar 0.1μF 100V
C460 9965 000 40526 0.001μF 50V
C461 9965 000 40526 0.001μF 50V
C462 9965 100 05384 560pF 10% 2kV
C463 9965 100 07715 PFC.0.39uF 400V +/-5%
C464 9965 100 05626 PFC
C465 9965 100 05627 0.47μF 5% 400V
C501 9965 000 40159 330pF 50V
C502 9965 000 40159 330pF 50V
C503 9965 000 40159 330pF 50V
C504 9965 100 04876 0.001μF 10% 2kV
C508 9965 100 04866 0.001uF 5% 50V
C600 9965 000 40567 0.1μF A C250V-500V
C601 9965 000 40217 0.22μF 250V - 500V
C602 9965 000 40217 0.22μF 250V - 500V
C603 9965 000 40217 0.22μF 250V - 500V
C603A 9965 000 41100 0.0047μF 500V
C603B 9965 000 41100 0.0047μF 500V
C603C 9965 100 05399 0.0047μF 10% 500V
C603D 9965 000 41100 0.0047μF 500V
C604 9965 000 41105 CerCap 0.001mF 2kV
C605 9965 100 04891 0.1μF 5% 63-100V
C606 9965 100 04874 470pF 10% 500V
C607 9965 000 40564 220μF
C608 9965 000 40179 10μF 20% 50V-63V
C609 9965 100 05386 0.01μF 5% 100V
C610 9965 000 40216 Safety CerCap 0.002
C611 9965 000 40566 470pF 10% 400Vac
C612 9965 000 40566 470pF 10% 400Vac
C620 9965 000 40166 680pF 500V
C621 9965 100 05401 100μF 2% 200V
C622 9965 100 05400 1000μF 20% 63V
C623 9965 000 40166 680pF 500V
C624 9965 000 40166 680pF 500V
C625 9965 000 40173 1000μF
C626 9965 000 40173 1000μF
C627 9965 100 04883 1000μF 20% 25V
C628 9965 100 04883 1000μF 20% 25V
C629 9965 100 05400 1000μF 20% 63V
C631 9965 000 40172 100μF 20% 16V
C632 9965 100 05317 47μF 20% 250V
C634 9965 000 40157 0.1μF 50V
C639 9965 000 40175 47μF 20% 16V
C640 9965 000 40174 220μF 20% 16V
C641 9965 000 41109 2200μF 20% 16V
C642 9965 000 40173 1000μF
C701 9965 100 04866 0.001uF 5% 50V
C702 9965 100 04866 0.001uF 5% 50V
C705 9965 000 40171 10μF 20% 16V
C706 9965 000 40171 10μF 20% 16V
C707 9965 000 40171 10μF 20% 16V
C708 9965 000 40171 10μF 20% 16V
C710 9965 000 40176 470μF 20% 16V
C716 9965 000 40171 10μF 20% 16V
C717 9965 000 40171 10μF 20% 16V
C720 9965 000 40171 10μF 20% 16V
C725 9965 100 04891 0.1μF 5% 63-100V
C726 9965 100 04891 0.1μF 5% 63-100V
C727 9965 100 04891 0.1μF 5% 63-100V
C728 9965 000 40172 100μF 20% 16V
C740 9965 000 40172 100μF 20% 16V
C741 9965 100 05388 1μF 20% 50V
C742 9965 100 05388 1μF 20% 50V
C743 9965 000 40561 Mylar 0.015μF 100V
C744 9965 000 40561 Mylar 0.015μF 100V
μF 50V
μF
C745 9965 100 05389 0.068μ
C746 9965 100 05387 0.15μF 5% 100V
C747 9965 000 41097 100pF 50V
C748 9965 000 40563 Mylar 0.0056UF 100V
C749 9965 100 05388 1μF 20% 50V
C750 9965 100 05388 1μF 20% 50V
C751 9965 000 41097 100pF 50V
C752 9965 000 40563 Mylar 0.0056UF 100V
C753 9965 100 05387 0.15μF 5% 100V
C754 9965 100 05389 0.068μF 10% 100V
C760 9965 000 40171 10μF 20% 16V
C761 9965 000 40178 1μF 20% 50V
C762 9965 000 40172 100μF 20% 16V
C764 9965 100 04885 0.47uF 20% 50V
C765 9965 100 04870 0.0047μF +80-20% 50V
C766 9965 100 04870 0.0047μF +80-20% 50V
C767 9965 000 40545 220μF 20% 25V
C768 9965 100 05385 470μF 20% 35V
C769 9965 100 05385 470μF 20% 35V
C770 9965 000 40171 10μF 20% 16V
C771 9965 000 40171 10μF 20% 16V
C772 9965 000 40171 10μF 20% 16V
C773 9965 000 40171 10μF 20% 16V
C774 9965 000 40171 10μF 20% 16V
C775 9965 000 40171 10μF 20% 16V
C776 9965 100 04866 0.001uF 5% 50V
C777 9965 000 40171 10μF 20% 16V
C778 9965 000 40171 10μF 20% 16V
C779 9965 000 40178 1μF 20% 50V
C780 9965 000 40172 100μF 20% 16V
C783 9965 100 04866 0.001uF 5% 50V
C785 9965 000 40171 10μF 20% 16V
C851 9965 100 05388 1μF 20% 50V
C852 9965 100 07708 0.47μF 10% 63-100V
C853 9965 000 41112 4.7μF 20% 16V
C854 9965 100 07706 0.22μF 50V
C855 9965 000 40171 10μF 20% 16V
C856 9965 000 41112 4.7μF 20% 16V
C857 9965 000 41112 4.7μF 20% 16V
C858 9965 000 40561 Mylar 0.015μF 100V
C859 9965 000 40171 10μF 20% 16V
C860 9965 000 40171 10μF 20% 16V
C861 9965 000 40178 1μF 20% 50V
C862 9965 000 40178 1μF 20% 50V
C863 9965 100 07707 0.047μF 50V
C864 9965 000 40171 10μF 20% 16V
C865 9965 000 40157 0.1μF 50V
C866 9965 000 41112 4.7μF 20% 16V
C867 9965 000 40157 0.1μF 50V
C868 9965 000 40172 100μF 20% 16V
C869 9965 000 40172 100μF 20% 16V
C871 9965 100 05388 1μF 20% 50V
C872 9965 100 05388 1μF 20% 50V
C873 9965 000 40180 2.2μF20% 50V
C874 9965 000 40180 2.2μF20% 50V
C875 9965 000 41097 100pF 50V
C876 9965 000 41097 100pF 50V
C877 9965 000 40171 10μF 20% 16V
C878 9965 000 40157 0.1μF 50V
C879 9965 100 05388 1μF 20% 50V
F 10% 100V
f
R101 9965 000 39984 CFR 75Ω 1/16W
R102 9965 000 40685 CFR 1.5kΩ 1/16W
R103 9965 100 05144 5.1kΩ 5% 1/16-1/6W
R104 9965 000 40691 CFR 220Ω 1/16W
R105 9965 000 40690 CFR 22Ω 1/16W
R106 9965 000 40304 CFR 1KΩ 1/16W
R107 9965 000 40699 CFR 470Ω 1/16W
R108 9965 100 05396 RESIS 33 OHM 1W 5%
R109 9965 000 39976 CFR 10kΩ 1/16W
R110 9965 100 04838 180Ω 5% 1/16-1/6W
R111 9965 000 39975 CFR 100Ω 1/16W
R112 9965 000 39975 CFR 100Ω 1/16W
R113 9965 000 40701 CFR 47kΩ 1/16W
R114 9965 000 40698 CFR 39kΩ 1/16W
R120 9965 000 40304 CFR 1KΩ 1/16W
R121 9965 000 39976 CFR 10kΩ 1/16W
R122 9965 000 39976 CFR 10kΩ 1/16W
R125 9965 000 40691 CFR 220Ω 1/16W
R126 9965 100 04838 180Ω 5% 1/16-1/6W
R127 9965 000 39975 CFR 100Ω 1/16W
R130 9965 000 40695 CFR 3.3kΩ 1/16W
R131 9965 000 40695 CFR 3.3kΩ 1/16W
R132 9965 000 40695 CFR 3.3kΩ 1/16W
R133 9965 000 39975 CFR 100Ω 1/16W
R134 9965 000 39975 CFR 100Ω 1/16W
R135 9965 000 40311 Peaking coil 33μH 10%
Page 52
EN 52 SK5.0L CA10.
Spare Parts List
R137 9965 000 40304 CFR 1KΩ 1/16W
R138 9965 000 40688 CFR 18kΩ 1/16W
R139 9965 000 40693 CFR 2.7kΩ 1/16W
R140 9965 000 39975 CFR 100Ω 1/16W
R141 9965 000 39976 CFR 10kΩ 1/16W
R142 9965 000 39975 CFR 100Ω 1/16W
R143 9965 000 39975 CFR 100Ω 1/16W
R144 9965 000 39975 CFR 100Ω 1/16W
R145 9965 000 39980 CFR 22kΩ 1/8W
R147 9965 000 40687 CFR 1.8kΩ 1/16W
R148 9965 000 40695 CFR 3.3kΩ 1/16W
R149 9965 000 40695 CFR 3.3kΩ 1/16W
R151 9965 000 40122 MOFR 39kΩ
R401 9965 000 40700 CFR 4.7kΩ 1/16W
R404 9965 000 39975 CFR 100Ω 1/16W
R405 9965 100 04848 5.6kΩ 5% 1/16-1/6W
R406 9965 000 40774 MOFR 1kΩ
R407 9965 000 40001 CFR 22kΩ
R409 9965 100 04841 27kΩ 5% 1/16-1/6W
R412 9965 100 04841 27kΩ 5% 1/16-1/6W
R413 9965 000 39977 CFR 100kΩ
R414 9965 000 40698 CFR 39kΩ 1/16W
R416 9965 000 40304 CFR 1KΩ 1/16W
R417 9965 000 40695 CFR 3.3kΩ 1/16W
R419 9965 100 05142 270kΩ 5W 1/16-1/6W
R420 9965 000 39988 CFR 1kΩ 1/4W
R421 9965 100 04838 180Ω 5% 1/16-1/6W
R422 9965 100 04849 680Ω 5% 1/16-1/6W
R423 9965 100 07328 6.2Ω 5% 2W
R424 9965 000 40689 CFR 2kΩ 1/16W
R425 9965 100 04841 27kΩ 5% 1/16-1/6W
R432 9965 000 40491 CFR 270Ω 1W
R433 9965 000 40520 Fusible Res. 0.33Ω 1W
R440 9965 100 07699 Fusible Res. 2.2Ω 2W
R441 9965 100 05218 56kΩ 5% 1/16-1/6W
R443 9965 000 40699 CFR 470Ω 1/16W
R450 9965 100 05160 0.22Ω 5% 2W
R451 9965 100 05160 0.22Ω 5% 2W
R452 9965 100 05395 RESIS 5.6 OHM 1W 5%
R453 9965 000 41086 MOFR 270Ω
R454 9965 000 41087 MOFR 33Ω
R457 9965 000 39975 CFR 100Ω 1/16W
R459 9965 000 40687 CFR 1.8kΩ 1/16W
R460 9965 000 39975 CFR 100Ω 1/16W
R461 9965 000 39985 CFR 5.6Ω
R462 9965 100 05312 0.82Ω 2W
R463 9965 000 40138 MOFR 220Ω
R464 9965 100 05624 NTC 50kΩ 5%
R466 9965 000 40698 CFR 39kΩ 1/16W
R467 9965 000 39980 CFR 22kΩ 1/8W
R468 9965 100 07705 MOFR
R469 9965 000 40524 NTC 5/5A
R501 9965 000 39998 CFR 22Ω 1/4W
R502 9965 000 40000 CFR 2.2kΩ
R503 9965 000 40491 CFR 270Ω 1W
R504 9965 000 39998 CFR 22Ω 1/4W
R505 9965 000 40509 MOFR 270Ω
R506 9965 000 40517 MOFR 15kΩ
R507 9965 000 40129 MOFR 220Ω
R508 9965 000 40525 CCR 2.7kΩ
R510 9965 000 39998 CFR 22Ω 1/4W
R511 9965 000 40000 CFR 2.2kΩ
R512 9965 000 39998 CFR 22Ω 1/4W
R513 9965 000 40491 CFR 270Ω 1W
R514 9965 000 40509 MOFR 270Ω
R515 9965 000 40517 MOFR 15kΩ
R516 9965 000 40129 MOFR 220Ω
R517 9965 000 40525 CCR 2.7kΩ
R520 9965 000 40000 CFR 2.2kΩ
R521 9965 000 39998 CFR 22Ω 1/4W
R522 9965 000 39998 CFR 22Ω 1/4W
R523 9965 000 40491 CFR 270Ω 1W
R524 9965 000 40509 MOFR 270Ω
R525 9965 000 40517 MOFR 15kΩ
R526 9965 000 40129 MOFR 220Ω
R527 9965 000 40525 CCR 2.7kΩ
R528 9965 000 40503 CFR 220kΩ 1W
R529 9965 000 40492 CFR 33Ω
R600 9965 000 40524 NTC 5/5A
R601 9965 100 05373 2.2MΩ 5% 1/2W
R602 9965 100 05397 200kΩ 5% 2W
R604 9965 000 40698 CFR 39kΩ 1/16W
R605 9965 000 40691 CFR 220Ω 1/16W
R606 9965 000 40706 CFR 6.8kΩ 1/16W
R607 9965 000 40128 MOFR 22Ω
R608 9965 000 40000 CFR 2.2kΩ
R609 9965 100 05410 Coke 200μH
R610 9965 000 40154 High Volt. 8.2MΩ 1W
R621 9965 100 05160 0.22Ω 5% 2W
R622 9965 100 05160 0.22Ω 5% 2W
R624 9965 100 05160 0.22Ω 5% 2W
R627 9965 100 05366 6.2kΩ 5% 1/4W
R630 9965 000 40113 CFR 680Ω
R631 9965 000 39988 CFR 1kΩ 1/4W
0.25W
R632 9965 000 40513 MOFR 1Ω
R633 9965 000 40108 CFR 5.1kΩ
R634 9965 000 39976 CFR 10kΩ 1/16W
R635 9965 000 39980 CFR 22kΩ 1/8W
R638 9965 000 41085 MOFR 22Ω
R639 9965 000 39976 CFR 10kΩ 1/16W
R643 9965 000 40701 CFR 47kΩ 1/16W
R644 9965 000 39976 CFR 10kΩ 1/16W
R645 9965 100 04844 390Ω 5% 1/6W
R647 9965 100 05394 RESIS 0.51 OHM 1W 5%
R648 9965 000 39980 CFR 22kΩ 1/8W
R649 9965 000 40000 CFR 2.2kΩ
R650 9965 100 05380 430Ω 5% 1/16-1/6W
R701 9965 000 40701 CFR 47kΩ 1/16W
R702 9965 000 40701 CFR 47kΩ 1/16W
R705 9965 000 40687 CFR 1.8kΩ 1/16W
R706 9965 000 40687 CFR 1.8kΩ 1/16W
R707 9965 000 40701 CFR 47kΩ 1/16W
R708 9965 000 40701 CFR 47kΩ 1/16W
R709 9965 000 40701 CFR 47kΩ 1/16W
R710 9965 000 40701 CFR 47kΩ 1/16W
R711 9965 000 39984 CFR 75Ω 1/16W
R713 9965 000 39980 CFR 22kΩ 1/8W
R717 9965 000 40705 CFR 68Ω 1/16W
R719 9965 000 39975 CFR 100Ω 1/16W
R721 9965 000 39984 CFR 75Ω 1/16W
R722 9965 000 39975 CFR 100Ω 1/16W
R723 9965 000 39984 CFR 75Ω 1/16W
R724 9965 000 39982 CFR 33kΩ 1/16W
R725 9965 000 39976 CFR 10kΩ 1/16W
R727 9965 000 39975 CFR 100Ω 1/16W
R728 9965 000 40304 CFR 1KΩ 1/16W
R729 9965 100 04836 1.2kΩ 5% 1/16-1/6W
R742 9965 100 05138 13kΩ 5% 1/16-1/6W
R743 9965 100 05138 13kΩ 5% 1/16-1/6W
R744 9965 000 40701 CFR 47kΩ 1/16W
R745 9965 000 40701 CFR 47kΩ 1/16W
R746 9965 000 40701 CFR 47kΩ 1/16W
R747 9965 000 40701 CFR 47kΩ 1/16W
R748 9965 000 39979 CFR 150Ω 1/6W
R763 9965 000 40686 CFR 15kΩ 1/16W
R764 9965 000 40704 CFR 6.2kΩ 1/16W
R765 9965 000 40304 CFR 1KΩ 1/16W
R766 9965 000 40701 CFR 47kΩ 1/16W
R768 9965 100 05150 91kΩ 5% 1/4W
R769 9965 000 40304 CFR 1KΩ 1/16W
R770 9965 000 40304 CFR 1KΩ 1/16W
R771 9965 000 39976 CFR 10kΩ 1/16W
R775 9965 000 40701 CFR 47kΩ 1/16W
R776 9965 000 40701 CFR 47kΩ 1/16W
R777 9965 000 40701 CFR 47kΩ 1/16W
R778 9965 000 39975 CFR 100Ω 1/16W
R779 9965 000 39984 CFR 75Ω 1/16W
R780 9965 000 40701 CFR 47kΩ 1/16W
R851 9965 100 04839 2.2kΩ
R852 9965 100 05146 8.2kΩ 5% 1/16-1/6W
R853 9965 000 39979 CFR 150Ω 1/6W
R854 9965 000 39986 CFR 10Ω 1/4W
R855 9965 000 39975 CFR 100Ω 1/16W
R856 9965 000 39975 CFR 100Ω 1/16W
R857 9965 000 39976 CFR 10kΩ 1/16W
R858 9965 000 39976 CFR 10kΩ 1/16W
R860 9965 000 40304 CFR 1KΩ 1/16W
RL601 9965 100 05413 OMIT-SS-112LM
VDR601 9965 000 40275 Gas Tube CMQX0680
5% 1/6W
b
L101 9965 000 40602 Peaking coil 1μH 10%
L103 9965 100 07711 Peaking coil 12μH 10%
L104 9965 000 40252 Peaking coil 10μH 10%
L105 9965 000 40252 Peaking coil 10μH 10%
L106 9965 000 40252 Peaking coil 10μH 10%
L430 9965 100 07718 Linear Coil 36μH
L431 996 5 100 05629 Chock Coil 160μH 10%
L432 996 5 100 04924 Choke Coil 790μH
L440 996 5 100 07717 Choke Coil 2.8MHz 10%
L501 9965 000 40252 Peaking coil 10μH 10%
L601 996 5 000 40607 AC Line Filter 15MHz
L603 996 5 100 05411 AC Line Filter 15mH
L604 9965 000 41227 Bead 3.5 x 1 x 9mm
L701 9965 000 40311 Peaking coil 33μH 10%
L702 9965 000 40311 Peaking coil 33μH 10%
L703 9965 000 40254 Peaking coil 15μH 10%
L704 9965 000 40254 Peaking coil 15μH 10%
L705 9965 000 40254 Peaking coil 15μH 10%
L706 9965 000 40254 Peaking coil 15μH 10%
T401 9965 100 05412 Transformer BCT-19G
T402 9965 100 05371 29" Flyback Transformer
T603 9965 100 05372 Switching Transformer
d
D402 9965 000 40218 1N4148 150mA/100V
D403 9965 000 40224 Zener 8V2 1/2W 5%
D404 9965 000 40218 1N4148 150mA/100V
D430 9965 000 40569 BY228
D431 9965 100 04906 3A/800V(DO-27)
D433 9965 000 40219 BA158 600V/1A
D450 9965 100 05390 TBYW362A/600V
D451 9965 100 05390 TBYW362A/600V
D452 9965 000 40219 BA158 600V/1A
D501 9965 000 40218 1N4148 150mA/100V
D502 9965 000 40219 BA158 600V/1A
D503 9965 000 40218 1N4148 150mA/100V
D504 9965 000 40219 BA158 600V/1A
D505 9965 000 40218 1N4148 150mA/100V
D506 9965 000 40219 BA158 600V/1A
D603A 9965 100 05391 Rectifier 800V/1.5A
D603B 9965 100 05391 Rectifier 800V/1.5A
D603C 9965 100 05391 Rectifier 800V/1.5A
D603D 9965 100 05391 Rectifier 800V/1.5A
D605 9965 000 40219 BA158 600V/1A
D620 9965 100 07483 High Speed Rect. RU4
D621 9965 000 40219 BA158 600V/1A
D622 9965 100 05390 TBYW362A/600V
D623 9965 100 05406 HSRD 200V/3A
D626 9965 000 40219 BA158 600V/1A
D627 9965 000 40218 1N4148 150mA/100V
D761 9965 000 40218 1N4148 150mA/100V
D762 9965 000 40218 1N4148 150mA/100V
D763 9965 000 40218 1N4148 150mA/100V
ce
IC101 9965 100 07701 uP
IC102 9965 000 40597 8k-BIT IIC EEPROM
IC103 9965 000 40249 KA33V
IC104 9965 000 40247 L7808CV
IC301 9965 100 04918 TDA4865AJ DBS7P
IC601 9965 100 05407 W6556A SANKEN
IC621 9965 100 05369 SE120N SANKEN (120V)
IC622 9965 000 40601 PC817C Sharp
IC740 9965 000 40596 TDA9859
IC760 9965 100 04917 TFA9842AJ PHILIPS
IC761 9965 000 40309 HCF4052BF SGS
IC762 9965 000 40309 HCF4052BF SGS
IC851 9965 100 07712 TDA9850 (IIC Bus)
IC852 9965 100 07713 L78L09CZ SGS TO-92
Q101 9965 000 40237 2SC2717
Q106 9965 000 40232 2SC1815Y/2PC1815
Q107 9965 000 40232 2SC1815Y/2PC1815
Q401 9965 000 40234 2SC2482/3DG2482Y
Q440 9965 000 41191 Trans. FQPF630
Q501 9965 000 40585 2SC4544/3DA4544Y
Q502 9965 000 40239 BF423 PNP (-250V)
Q503 9965 000 40238 BF422 NPN (250V)
Q504 9965 000 40585 2SC4544/3DA4544Y
Q505 9965 000 40239 BF423 PNP (-250V)
Q506 9965 000 40238 BF422 NPN (250V)
Q507 9965 000 40585 2SC4544/3DA4544Y
Q508 9965 000 40239 BF423 PNP (-250V)
Q509 9965 000 40238 BF422 NPN (250V)
Q621 9965 000 40232 2SC1815Y/2PC1815
Q622 9965 000 40232 2SC1815Y/2PC1815
Q623 9965 000 40232 2SC1815Y/2PC1815
Q624 9965 100 04912 2SA1013
Q625 9965 000 40232 2SC1815Y/2PC1815
Q626 9965 000 40232 2SC1815Y/2PC1815
Q701 9965 000 40232 2SC1815Y/2PC1815
Q702 9965 000 40232 2SC1815Y/2PC1815
Q703 9965 000 40232 2SC1815Y/2PC1815
Q760 9965 000 40231 2SA1015Y\2PA1015
Q761 9965 000 40232 2SC1815Y/2PC1815
Q851 9965 000 40232 2SC1815Y/2PC1815
A101 9965 100 07704 TUNER
J120 9965 000 40304 CFR 1KΩ 1/16W
J615 9965 000 39976 CFR 10kΩ 1/16W
N401 9965 000 40588 2SD2553/3DD2553 1.7
Keyboard & Control Panel [D]
Various
SW001 9965 100 05199 Tact Switch
SW002 9965 100 05199 Tact Switch
SW003 9965 100 05199 Tact Switch
SW004 9965 100 05199 Tact Switch
SW601 9965 100 05423 MPS.SDDF-3-03 W
Page 53
g
C001 9965 000 40529 33pF 50V
CR1 9965 100 04879 10μF 20% 10V
f
RD1 9965 000 39986 CFR 10Ω 1/4W
RD2 9965 000 40003 CFR 2.7kΩ
RD3 9965 000 39987 CFR 100Ω
RD4 9965 000 40489 CFR 18kΩ 1W
RD5 9965 000 39989 CFR 10kΩ 1/4W
RR1 9965 000 39986 CFR 10Ω 1/4W
b
LED 9965 000 40273 LED 3.1mm red
d
D001 9965 000 40221 Zener 5V1 1/2W 5%
M001 9965 100 05378 IR Rec. HS0038B 38KHz
Spare Parts List
EN 53SK5.0L CA 10.
Page 54

EN 54 SK5.0L CA11.
11. Revision List
Manual xxxx xxx xxxx.0
• First release.
Revision List
 Loading...