

Page 1
LM2702
TFT Panel Module
LM2702 TFT Panel Module
November 2002
General Description
The LM2702 is a compact bias solution for TFT displays. It
has a current mode PWM step-up DC/DC converter with a
2A, 0.2Ω internal switch. Capable of generating 8V at
170mA from a Lithium Ion battery, the LM2702 is ideal for
generating bias voltages for large screen LCD panels. The
LM2702 operates at a switching frequency of 600kHz allowing for easy filtering and low noise. An external compensation pin gives the user flexibility in setting frequency compensation, which makes possible the use of small, low ESR
ceramic capacitors at the output. The LM2702 uses a patented internal circuitry to limit startup inrush current of the
boost switching regulator without the use of an external
softstart capacitor. An external softstart pin enables the user
to tailor the softstart to a specific application. The LM2702
has an internal controllable PMOS switch used for controlling the row driver voltages. The switch can be controlled
externally with a control pin and delay time. The LM2702
contains a Vcom amplifier and a Gamma buffer capable of
supplying 50mA source and sink. The TSSOP-16 package
ensures a low profile overall solution.
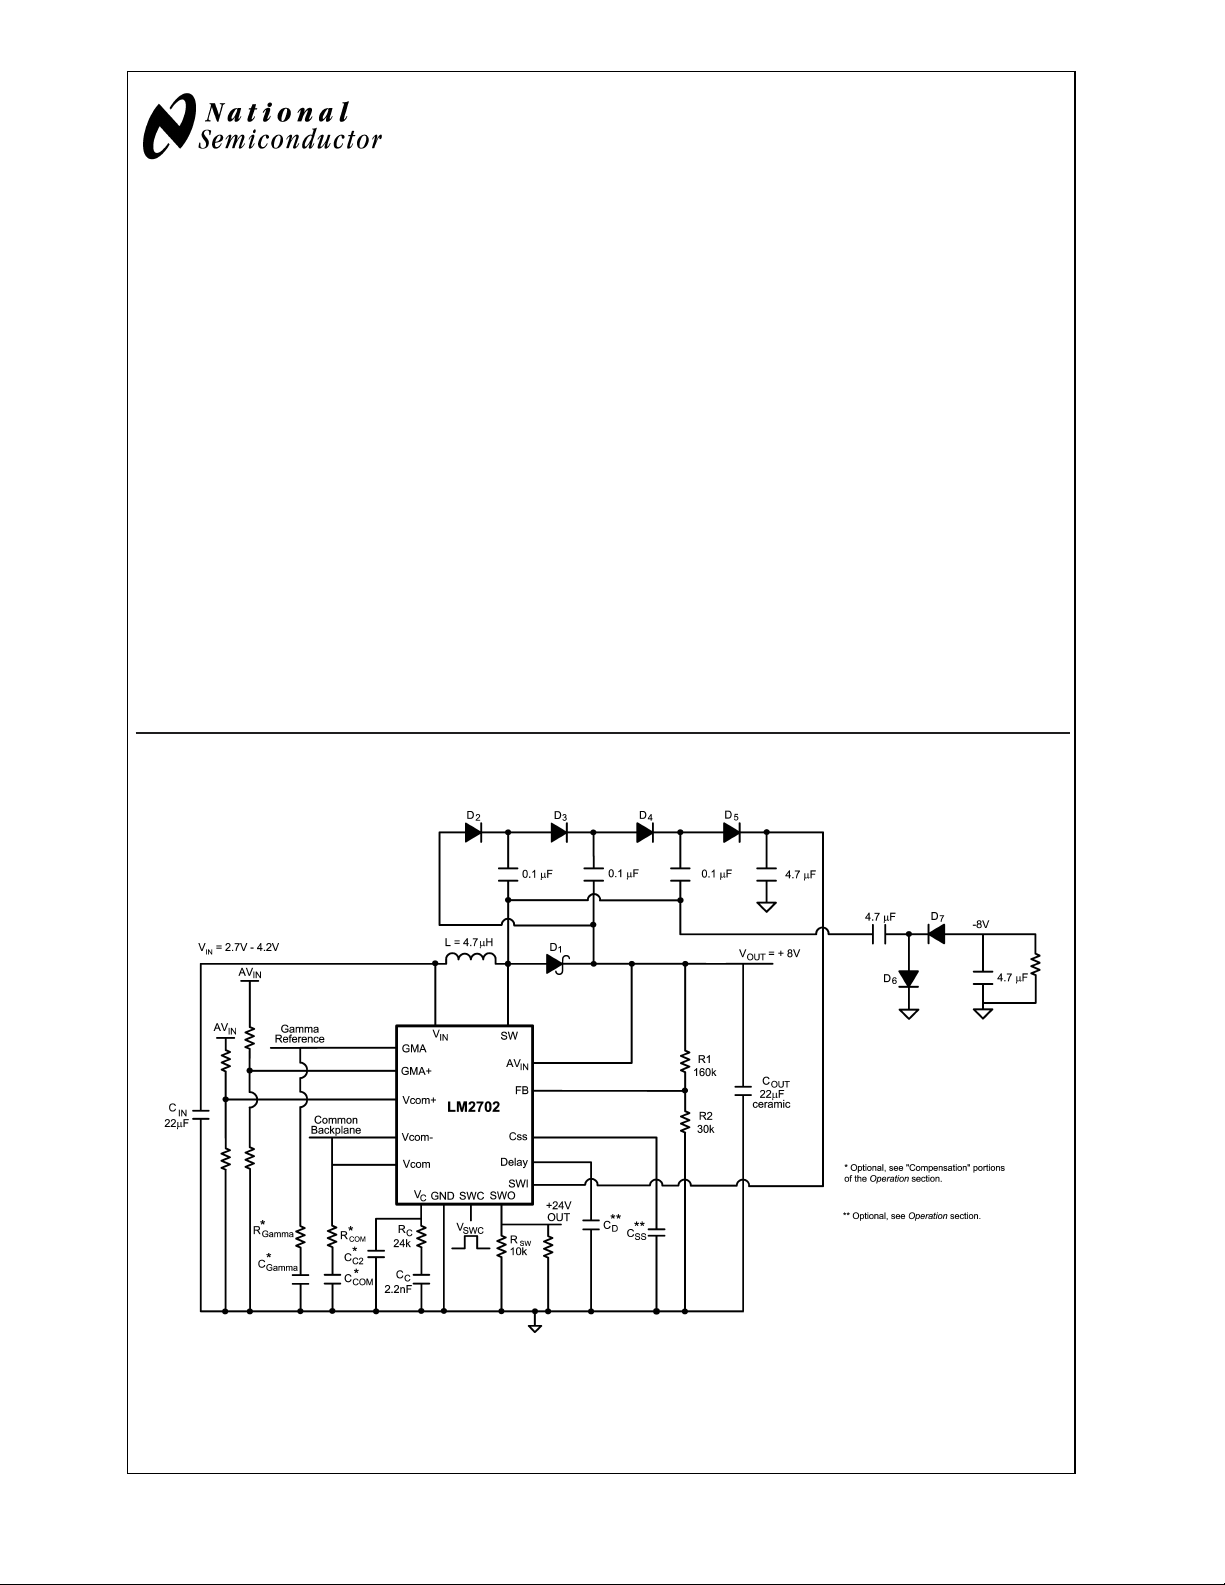
Typical Application Circuit
Features
n 2A, 0.2Ω, internal power switch
n V
operating range: 2.2V to 12V
IN
n 600kHz switching frequency step-up DC/DC converter
n Inrush current limiting circuitry
n External softstart override
n Internal 7.3Ω PMOS switch
n PMOS switch control pin
n PMOS switch delay pin
n Vcom amplifier
n Gamma buffer
n 16 pin TSSOP package
Applications
n LCD Bias Supplies
20051131
© 2002 National Semiconductor Corporation DS200511 www.national.com
Page 2
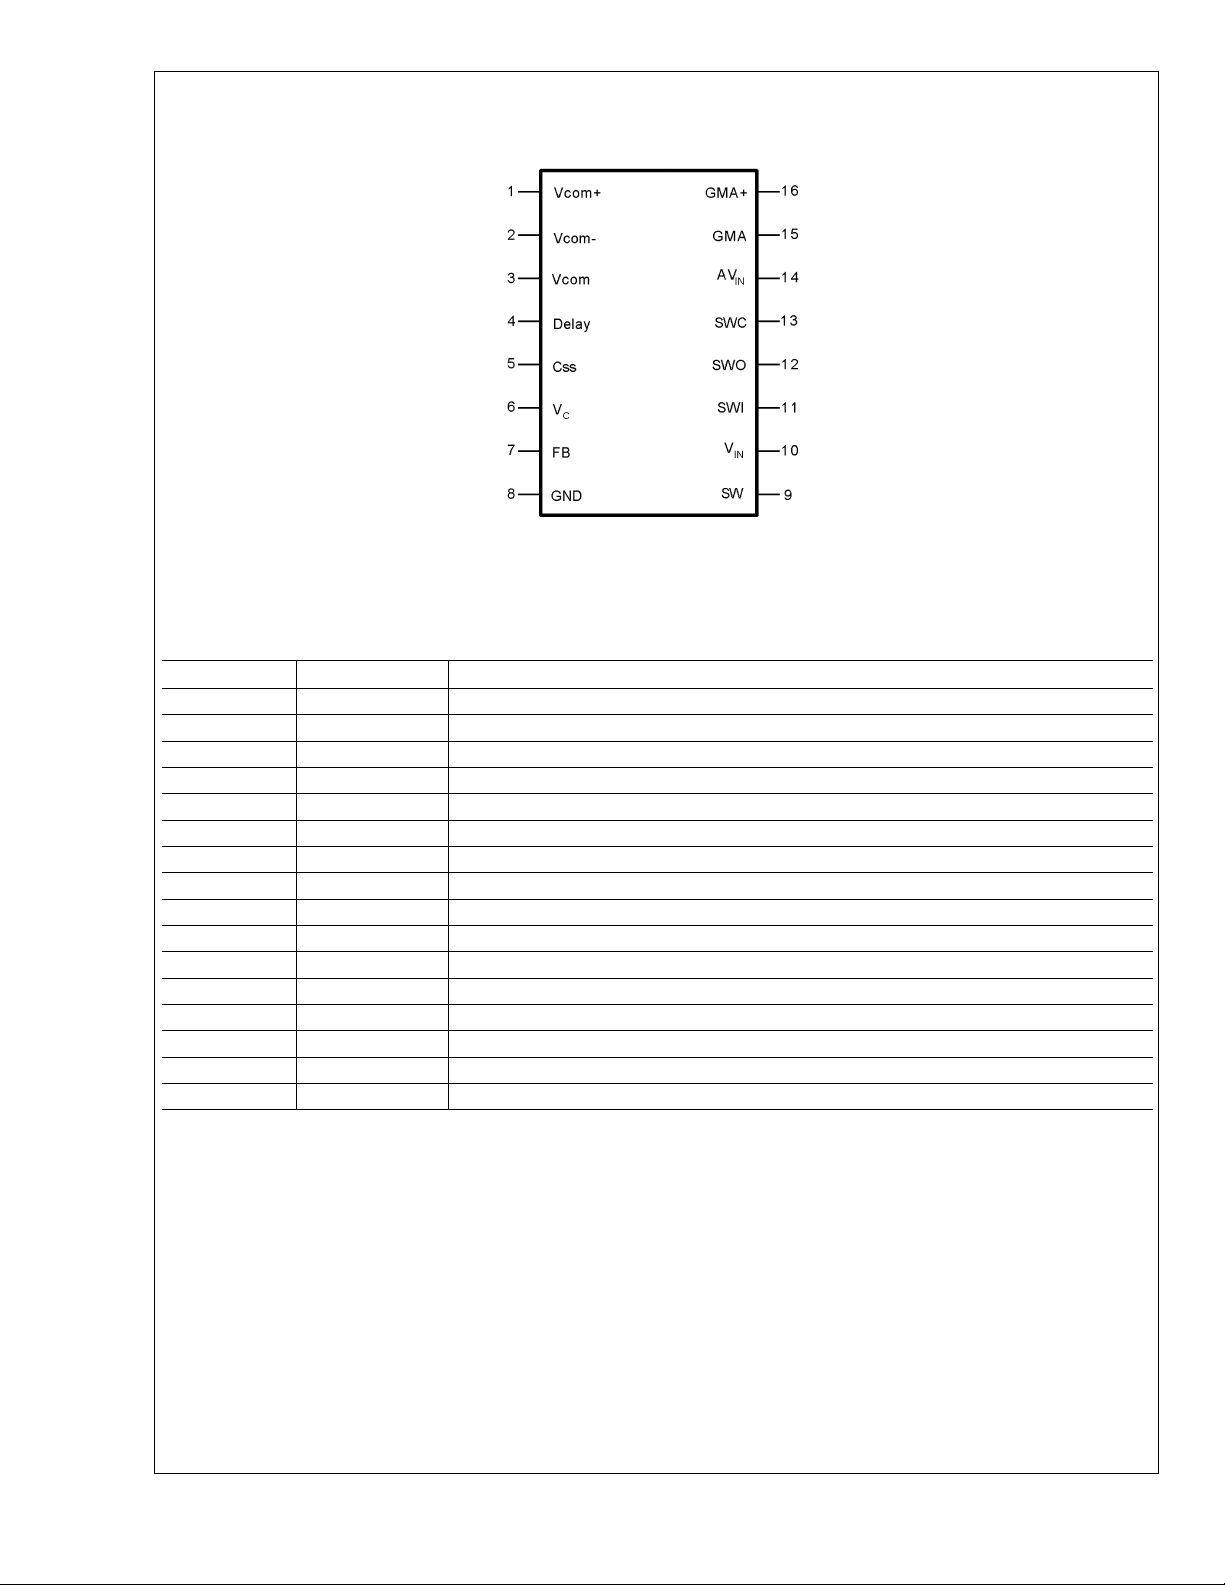
Connection Diagram
LM2702
Top View
TSSOP 16 package
= 125˚C, θJA= 120˚C/W (Note 1)
T
JMAX
Pin Description
Pin Name Function
1 Vcom+ Vcom Amplifier positive input.
2 Vcom− Vcom Amplifier negative input.
3 Vcom Vcom Amplifier output.
4 Delay Switch delay.
5 Css Soft start pin.
6V
C
7 FB Output Voltage Feedback input.
8 GND Ground.
9 SW NMOS power switch input.
10 V
IN
11 SWI PMOS switch input.
12 SWO PMOS switch output.
13 SWC PMOS switch control pin.
14 AV
IN
15 GMA Gamma buffer output.
16 GMA+ Gamma buffer input.
Boost Compensation Network Connection.
Main power input, step-up and switch circuitry.
Analog power input (buffers).
20051104
www.national.com 2
Page 3
Pin Functions
Vcom+(Pin 1): Positive input terminal of Vcom amplifier.
Vcom−(Pin 2): Negative input terminal of Vcom amplifier.
Vcom(Pin 3): Output terminal of Vcom amplifier.
Delay(Pin 4): PMOS switch delay control pin. See Operation
section for setting the delay time.
The delay time begins when the output voltage of the DC/DC
switching regulator reaches 85% of its true output voltage.
This corresponds to a FB voltage of about 1.1V. The PMOS
switch is controlled with both the delay time and the switch
control pin, SWC. If no Cdelay capacitor is used, the PMOS
switch is controlled solely with the SWC pin.
Css(Pin 5): Softstart pin. Connect capacitor to Css pin and
AGND plane to slowly ramp inductor current on startup. See
Operation section for setting the softstart time.
(Pin 6): Compensation Network for Boost switching regu-
V
C
lator. Connect resistor/capacitor network between V
and AGND for boost switching regulator AC compensation.
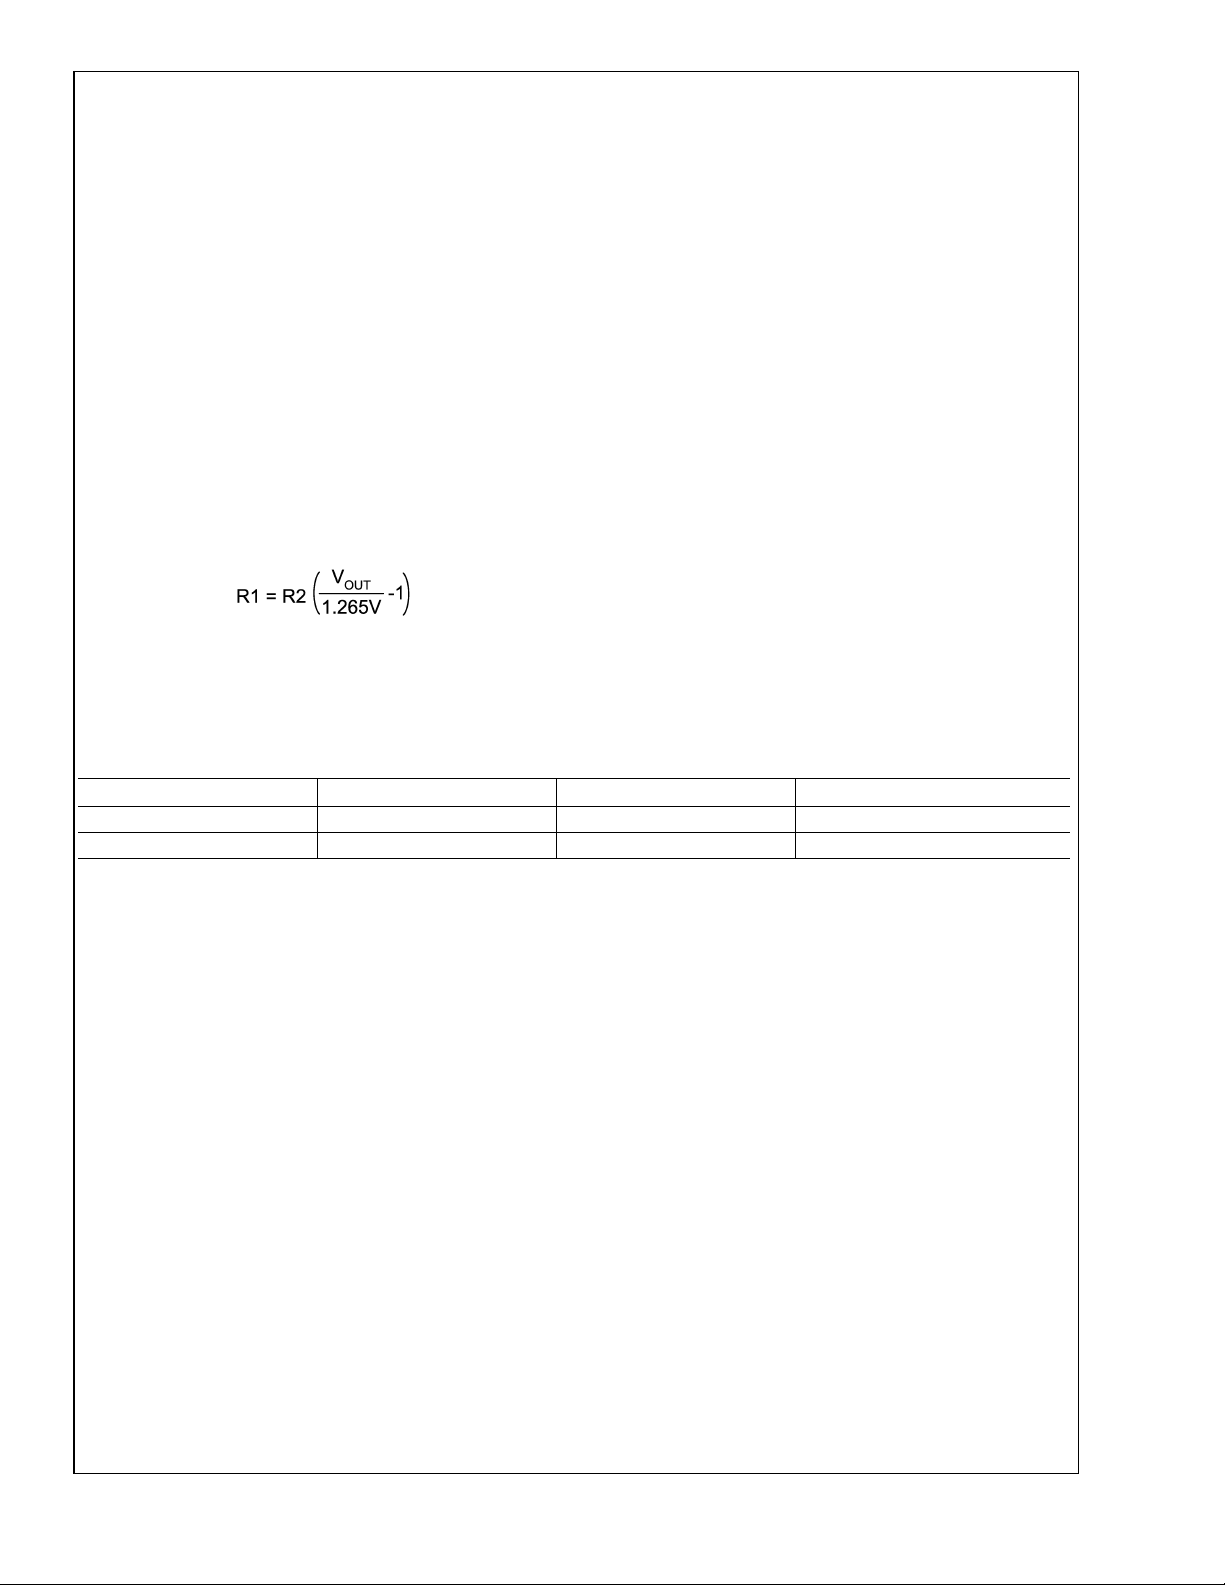
FB(Pin 7): Feedback pin. Set the output voltage by selecting
values of R1 and R2 using:
Connect the ground of the feedback network to the AGND
plane, which should be tied directly to the GND pin.
GND(Pin 8): Ground connect for LM2702. Connect all sensitive circuitry, ie. feedback resistors, softstart capacitor, de-
pin
C
lay capacitor, and compensation network to a dedicated
AGND plane which connects directly to this pin. Connect all
power ground components to a PGND plane which should
also connect directly to this pin. Please see Layout Considerations under the Operation section for more details on
layout suggestions.
SW(Pin 9): This is the drain of the internal NMOS power
switch. Minimize the metal trace area connected to this pin to
minimize EMI.
(Pin 10): Input Supply Pin. Bypass this pin with a capaci-
V
IN
tor as close to the device as possible. The capacitor should
connect between V
and GND.
IN
SWI(Pin 11): PMOS switch input. Source connection of
PMOS device.
SWO(Pin 12): PMOS switch output. Drain connection of
PMOS device.
SWC(Pin13): PMOS switch control pin. This pin creates an
AND function with the delay time after the output of the
switching regulator has reached 85% of its nominal value. To
ensure the PMOS switch is in the correct state, apply a
voltage above 1.5V to this pin to turn on the PMOS switch
and apply a voltage below 0.7V to turn off the PMOS switch.
(Pin 14): Supply pin for the Vcom opamp and the
AV
IN
Gamma buffer. Bypass this pin with a capacitor as close to
the device as possible, about 100nF. The capacitor should
connect between AV
and PGND.
IN
GMA(Pin 15): Gamma Buffer output pin.
GMA+(Pin 16): Gamma Buffer input pin.
LM2702
Ordering Information
Order Number Package Type NSC Package Drawing Supplied As
LM2702MT-ADJ TSSOP-16 MTC16 73 Units, Rail
LM2702MTX-ADJ TSSOP-16 MTC16 2500 Units, Tape and Reel
www.national.com3
Page 4
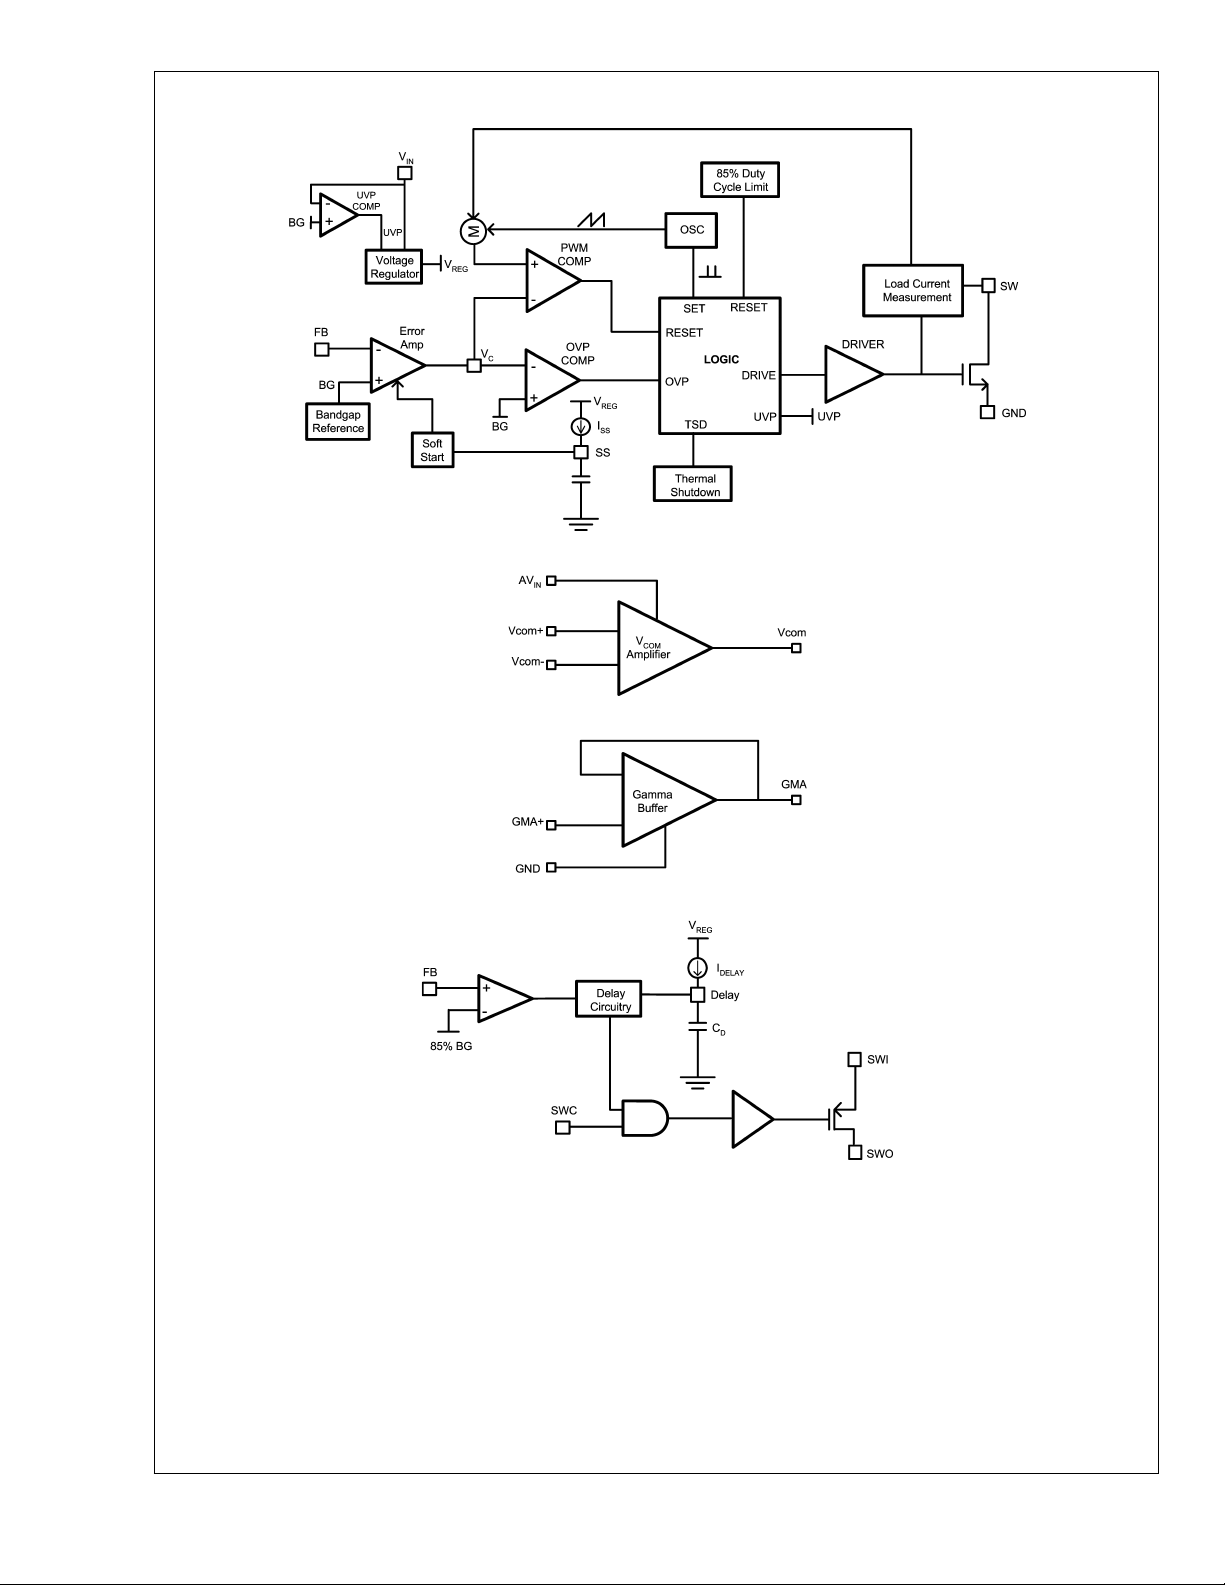
Block Diagrams
LM2702
20051103
20051151
20051157
www.national.com 4
Page 5
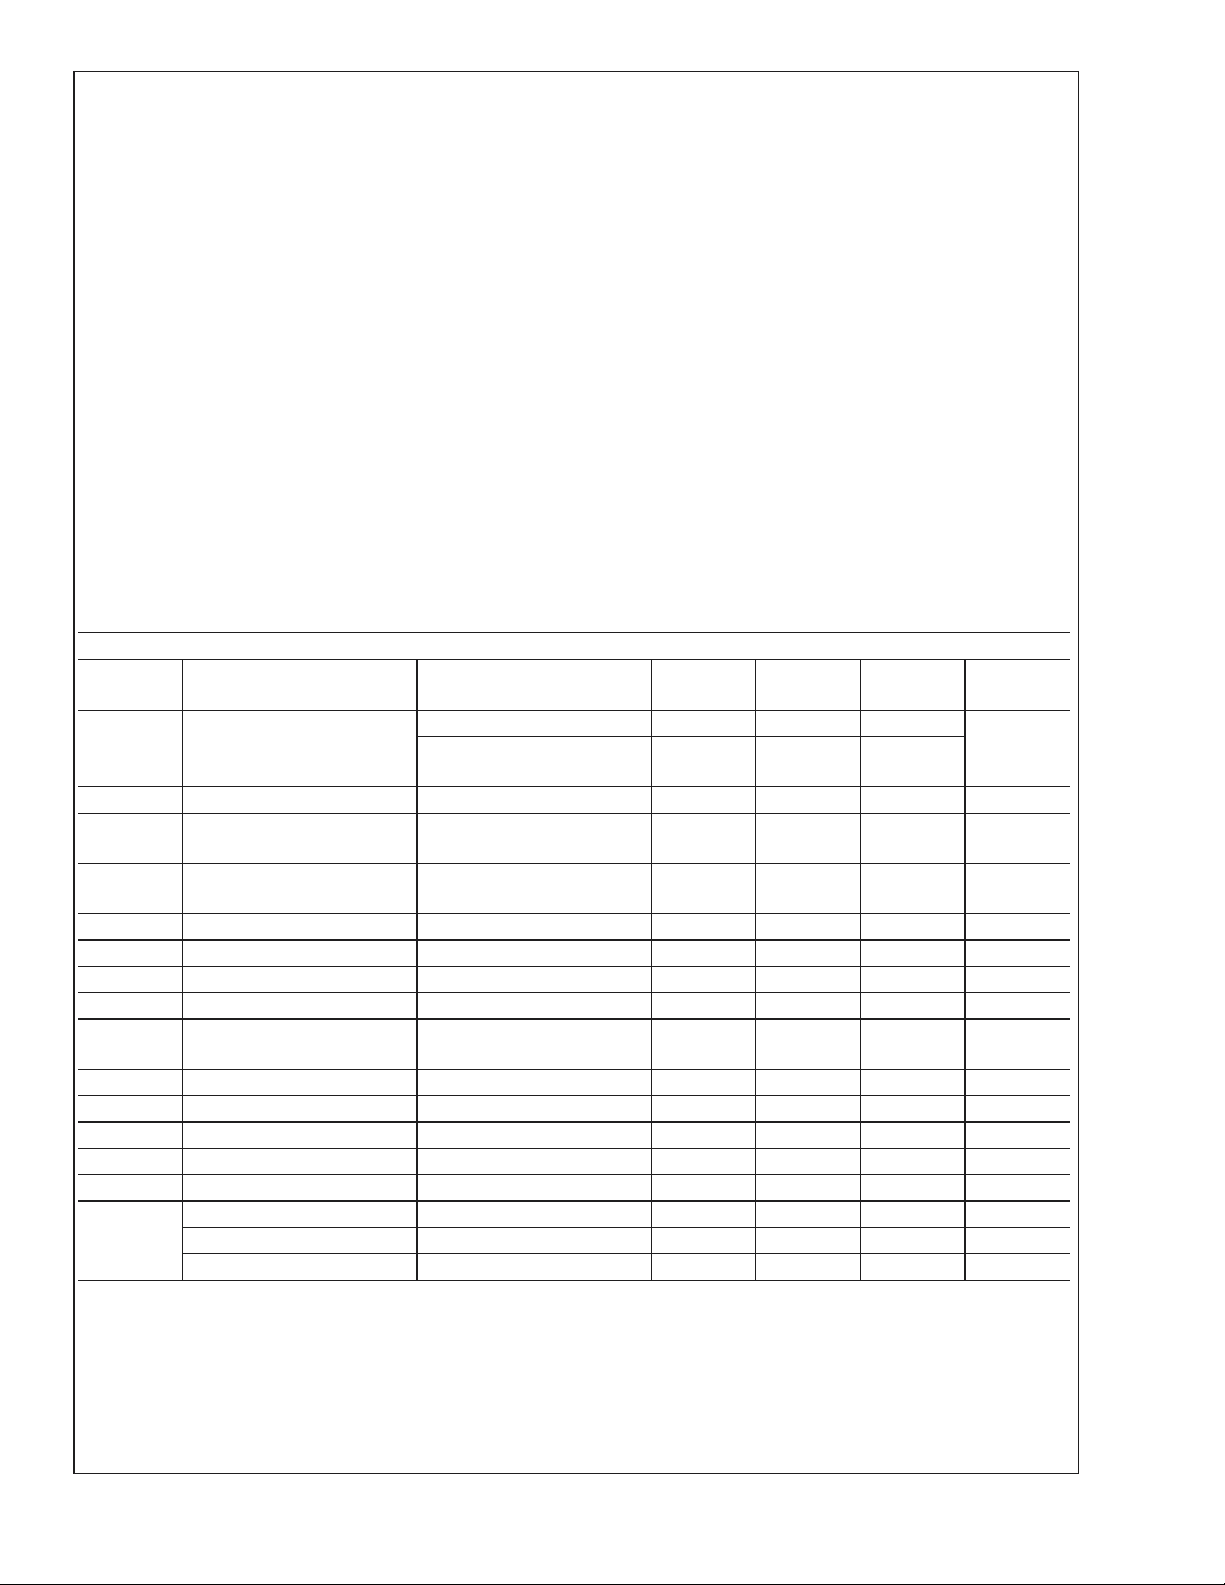
Absolute Maximum Ratings (Note 2)
If Military/Aerospace specified devices are required,
please contact the National Semiconductor Sales Office/
Distributors for availability and specifications.
V
IN
-0.3V to 12V
SW Voltage -0.3V to 18V
FB Voltage -0.3V to 7V
V
Voltage 0.96V to 1.56V
C
Css Voltage -0.3V to 1.2V
SWC Voltage -0.3V to 12V
Supply Voltage, AV
IN
Amplifier/Buffer Input/Output
-0.3V to 12V
Rail-to-Rail
Voltage
Delay GND to 1.3V
SWI -0.3V to 30V
SWO -0.3V to 30V
ESD Ratings
(Notes 3, 4)
Human Body Model 2kV
Machine Model 200V
Operating Conditions
Operating Temperature −40˚C to +125˚C
Storage Temperature −65˚C to +150˚C
Supply Voltage, V
IN
SW Voltage 17.5V
Supply AV
IN
SWI 2.2V to 30V
2.2V to 12V
4V to 12V
Electrical Characteristics
Specifications in standard type face are for TJ= 25˚C and those with boldface type apply over the full Operating Temperature Range (T
GAMMA
= 1nF.
C
= −40˚C to +125˚C). Unless otherwise specified, VIN=2.2V and AVIN= 8V, R
J
COM=RGAMMA
Switching Regulator
Symbol Parameter Conditions
I
Q
Quiescent Current Not Switching, FB = 2V 1.6 2.3
Switching, switch open, FB =
0.1V
V
FB
%V
/∆VINFeedback Voltage Line
FB
Feedback Voltage 1.239 1.265 1.291 V
Regulation
I
CL
Switch Current Limit
VIN= 2.7V
(Note 7)
R
I
V
I
T
DSON
B
IN
SS
SS
Switch R
(Note 8) VIN= 2.7V 200 mΩ
DSON
FB Pin Bias Current (Note 9) 60 500 nA
Input Voltage Range 2.2 12 V
Soft Start Current 5 12 15 µA
Internal Soft Start Ramp
Time
g
m
A
V
D
MAX
f
S
I
L
Error Amp Transconductance ∆I = 5µA 40 135 290 µmho
Error Amp Voltage Gain 135 V/V
Maximum Duty Cycle 78 85 %
Switching Frequency 480 600 720 kHz
Switch Leakage Current VSW= 18V 0.1 20 µA
Min
(Note 5)
1.4 2 2.6 A
Typ
(Note 6)
2.6 5.2
0.01 0.1 %/V
7 10 mS
UVP On Threshold 1.79 1.92 2.05 V
Off Threshold 1.69 1.82 1.95 V
Hysteresis 100 mV
Max
(Note 5)
=50Ω,C
COM
Units
mA
LM2702
=
www.national.com5
Page 6
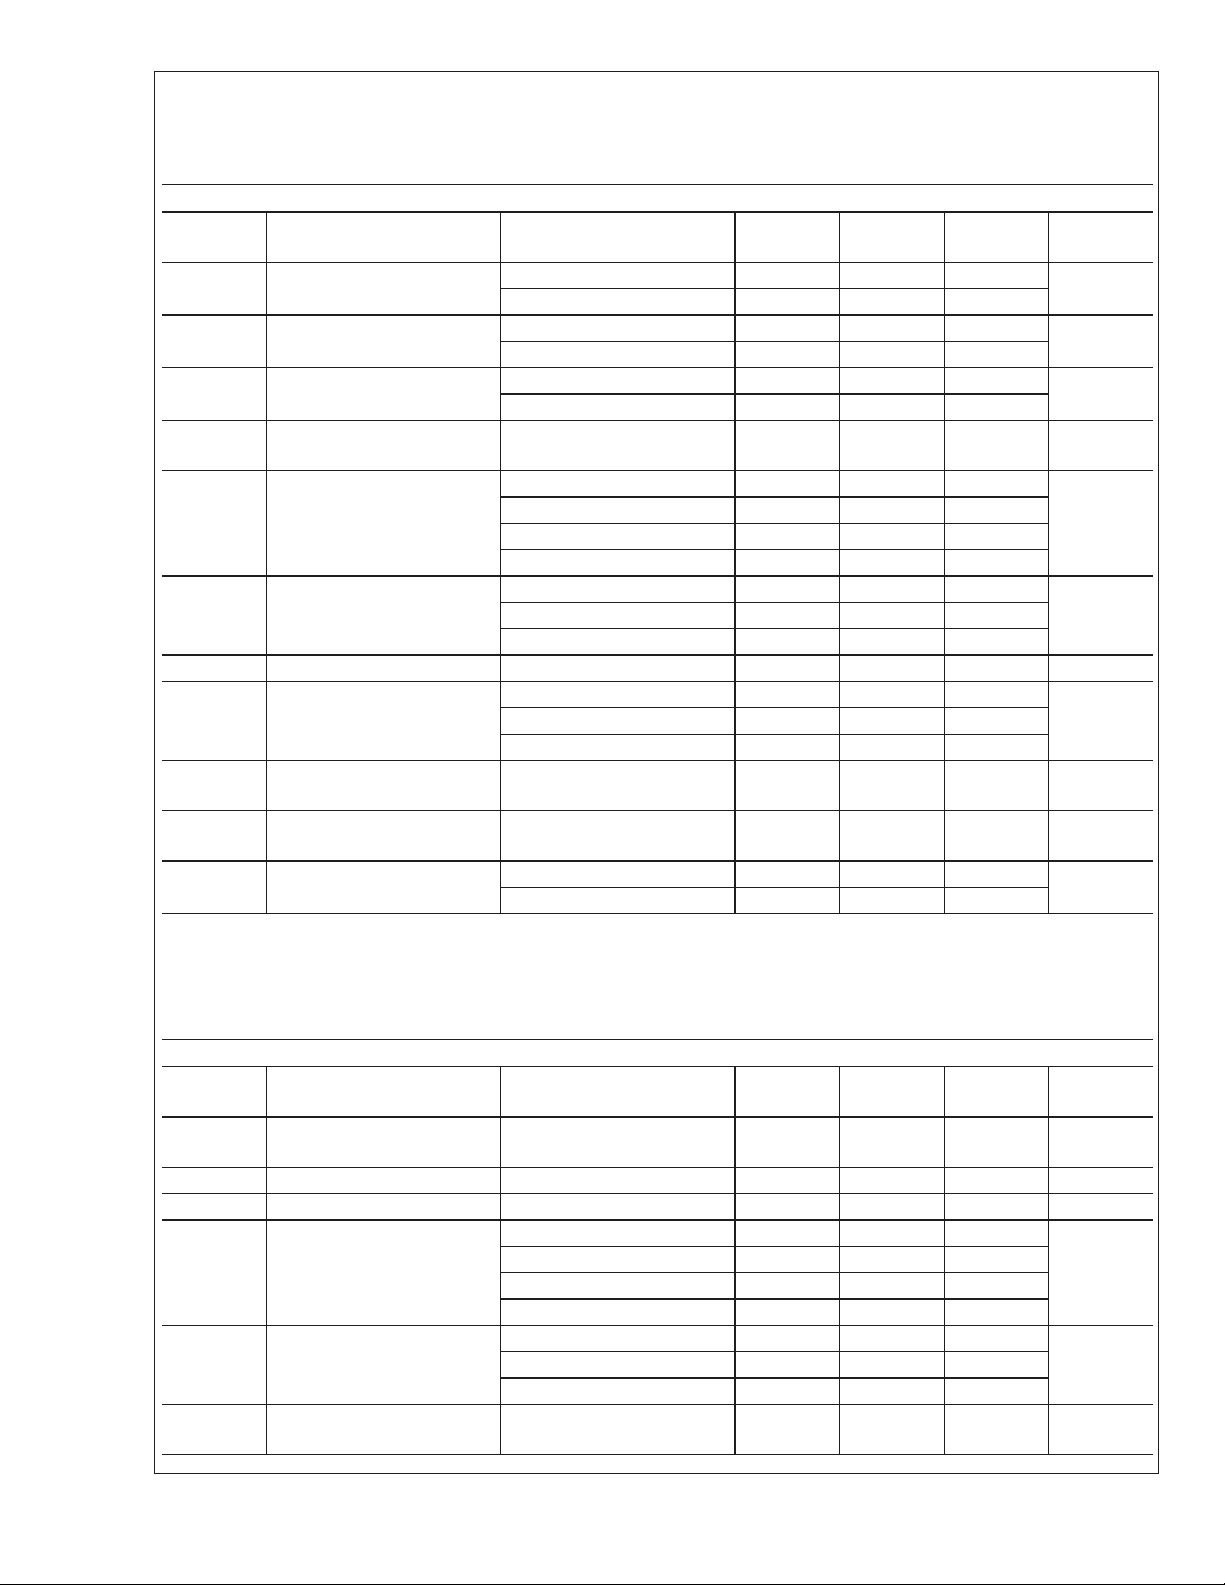
Electrical Characteristics
Specifications in standard type face are for TJ= 25˚C and those with boldface type apply over the full Operating Tempera-
LM2702
ture Range (T
GAMMA
= 1nF.
C
Vcom Amplifier
Symbol Parameter Conditions
V
OS
I
B
I
OS
CMVR Input Common-mode Voltage
V
Swing RL=10k, Vo min. 0.003 .02
OUT
A
VOL
AV
IN
CMRR Common Mode Rejection
PSRR Power Supply Rejection
Is+ Supply Current (Amplifier +
I
SC
= −40˚C to +125˚C). Unless otherwise specified, VIN=2.2V and AVIN= 8V, R
J
Min
(Note 5)
Input Offset Voltage (Note
10)
VCM= 1V 3.5 10
V
= 7.5V 3 10
CM
COM=RGAMMA
Typ
(Note 6)
=50Ω,C
Max
(Note 5)
Input Bias Current VCM= 1V 65 200
V
= 7.5V 190 300
CM
Input Offset Current VCM= 1V 45 130
V
= 7.5V 5 110
CM
Range
R
=10k, Vo max. 7.94 7.98
L
R
=2k, Vo min. 0.003 .02
L
R
=2k, Vo max. 7.9 7.95
L
08V
Large Signal Voltage Gain No Load, Vo = 2V to 7V 74.8 87.6
=10 kΩ,Vo=2Vto7V 66.8 75.1
L
R
=2 kΩ, Vo = 2V to 7V 55.8
L
Supply Voltage 412V
V
stepped from 0V to 1.1V 72 91.7
CM
Ratio
Ratio
Buffer)
stepped from 3V to 8V 80 105
CM
V
stepped from 0V to 8V 57 80.7
CM
V
= 0.5V, AVIN=4to12V
CM
Vo=AV
/2, No Load
IN
70 77 dB
2.2 4 mA
Output Short Circuit Current Source 40 50 70
Sink 40 50 60
COM
Units
mV
nA
nA
V
dBR
dBV
mA
=
Electrical Characteristics
Specifications in standard type face are for TJ= 25˚C and those with boldface type apply over the full Operating Temperature Range (T
GAMMA
= 1nF.
C
= −40˚C to +125˚C). Unless otherwise specified, VIN=2.2V and AVIN= 8V, R
J
Gamma Buffer
Symbol Parameter Conditions
V
OS
Input Offset Voltage (Note
Min
(Note 5)
Typ
(Note 6)
110mV
10)
I
B
V
GR
V
Swing RL=10k, Vo min. 0.05 0.075
OUT
A
VCL
PSRR Power Supply Rejection
www.national.com 6
Input Bias Current 170 300 nA
Gamma Input Voltage Range 08V
R
=10k, Vo max. 7.9 7.94
L
R
=2k, Vo min. 0.05 0.075
L
R
=2k, Vo max. 7.865 7.9
L
Voltage Gain No Load, Vo = 2V to 7V 0.995 0.999
=10 kΩ,Vo=2Vto7V 0.995 0.999
L
R
=2 kΩ,Vo=2Vto7V 0.993 0.998
L
AV
=4to12V
IN
Ratio
70 77 dB
COM=RGAMMA
=50Ω,C
Max
(Note 5)
COM
Units
V
V/VR
=
Page 7
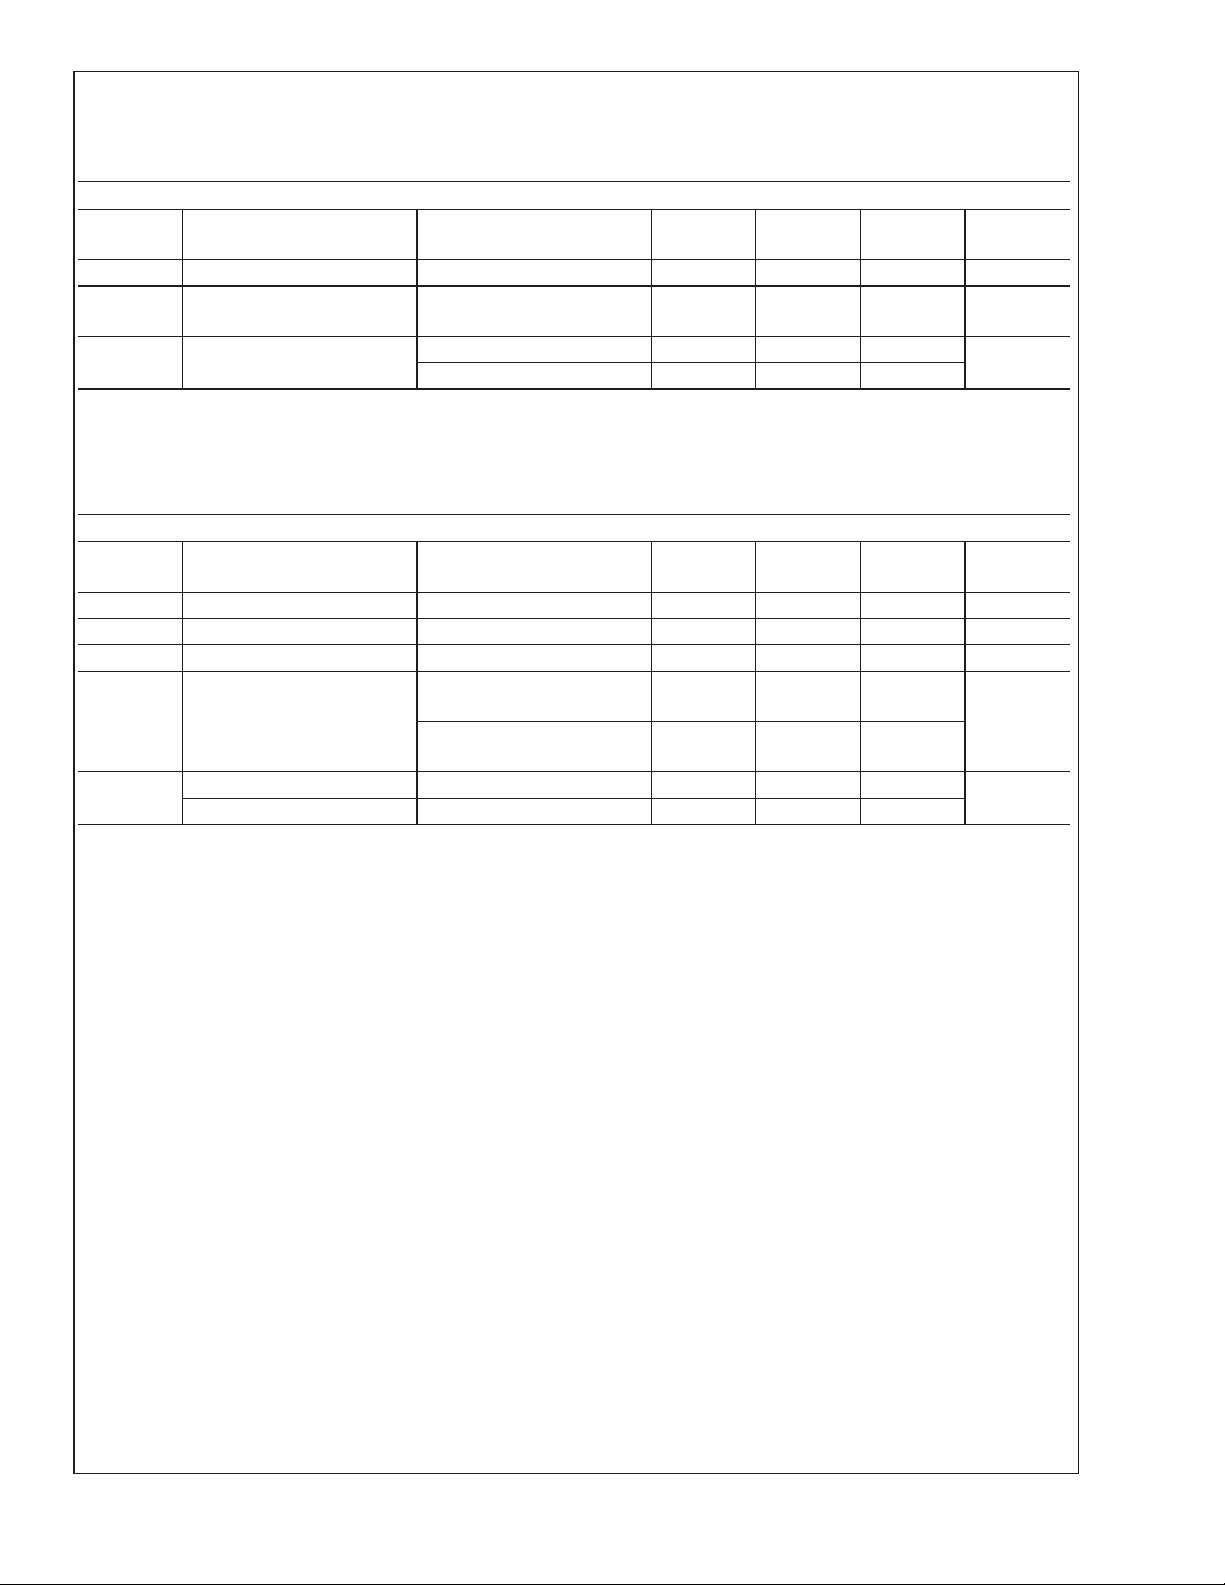
Electrical Characteristics (Continued)
Specifications in standard type face are for TJ= 25˚C and those with boldface type apply over the full Operating Temperature Range (T
GAMMA
= 1nF.
C
= −40˚C to +125˚C). Unless otherwise specified, VIN=2.2V and AVIN= 8V, R
J
COM=RGAMMA
=50Ω,C
Gamma Buffer
Symbol Parameter Conditions
AV
IN
Is+ Supply Current (Amplifier +
Supply Voltage 412V
Vo=AV
/2, No Load
IN
Buffer)
I
SC
Output Short Circuit Current Source 50 66 75
Min
(Note 5)
Typ
(Note 6)
Max
(Note 5)
2.2 4 mA
Units
Sink 40 56 65
Electrical Characteristics
Specifications in standard type face are for TJ= 25˚C and those with boldface type apply over the full Operating Temperature Range (T
GAMMA
= 1nF.
C
= −40˚C to +125˚C). Unless otherwise specified, VIN=2.2V and AVIN= 8V, R
J
COM=RGAMMA
PMOS Switch Logic Control
Symbol Parameter Conditions
I
DELAY
R
DSON
I
SWO
I
SWI
Delay Current 5.1 5.7 6.1 µA
PMOS Switch ON Resistance 7.3 20 Ω
PMOS Switch Current Switch ON 20 mA
PMOS Switch Input Current SWC = 0V, SWO Open, SWI
= 30V
SWC = 1.7V, SWO Open,
SWI = 30V
V
SWC
Switch ON 1.5 1.1
Min
(Note 5)
Typ
(Note 6)
32
118
Switch OFF 1.1 0.7
Note 1: The maximum allowable power dissipation is a function of the maximum junction temperature, TJ(MAX), the junction-to-ambient thermal resistance, θJA,
and the ambient temperature, T
at any ambient temperature is calculated using: P
temperature, and the regulator will go into thermal shutdown.
Note 2: Absolute maximum ratings are limits beyond which damage to the device may occur. Operating Ratings are conditions for which the device is intended to
be functional, but device parameter specifications may not be guaranteed. For guaranteed specifications and test conditions, see the Electrical Characteristics.
Note 3: The human body model is a 100 pF capacitor discharged through a 1.5kΩ resistor into each pin. The machine model is a 200pF capacitor discharged
directly into each pin.
Note 4: Vcom pin is rated for 1.5kV Human Body Model and 150V Machine Model.
Note 5: All limits guaranteed at room temperature (standard typeface) and at temperature extremes (bold typeface). All room temperature limits are 100%
production tested or guaranteed through statistical analysis. All limits at temperature extremes are guaranteed via correlation using standard Statistical Quality
Control (SQC) methods. All limits are used to calculate Average Outgoing Quality Level (AOQL).
Note 6: Typical numbers are at 25˚C and represent the most likely norm.
Note 7: Duty cycle affects current limit due to ramp generator. Current limit is at 0% duty cycle and will decrease with higher duty cycles. See Typical Performance
Characteristics for a graph of Power Switch Current Limit vs. V
Note 8: See the graph titled "R
Note 9: Bias current flows into FB pin.
Note 10: Refer to the graphs titled "Input Offset Voltage vs. Common Mode Voltage".
. See the Electrical Characteristics table for the thermal resistance of various layouts. The maximum allowable power dissipation
A
vs. VIN" for a more accurate value of the power switch R
DSON
(MAX) = (T
D
J(MAX)−TA
and Power Switch Current Limit vs. Temp.
IN
)/θJA. Exceeding the maximum allowable power dissipation will cause excessive die
.
DSON
Max
(Note 5)
=50Ω,C
Units
COM
mA
COM
µA
LM2702
=
=
V
www.national.com7
Page 8
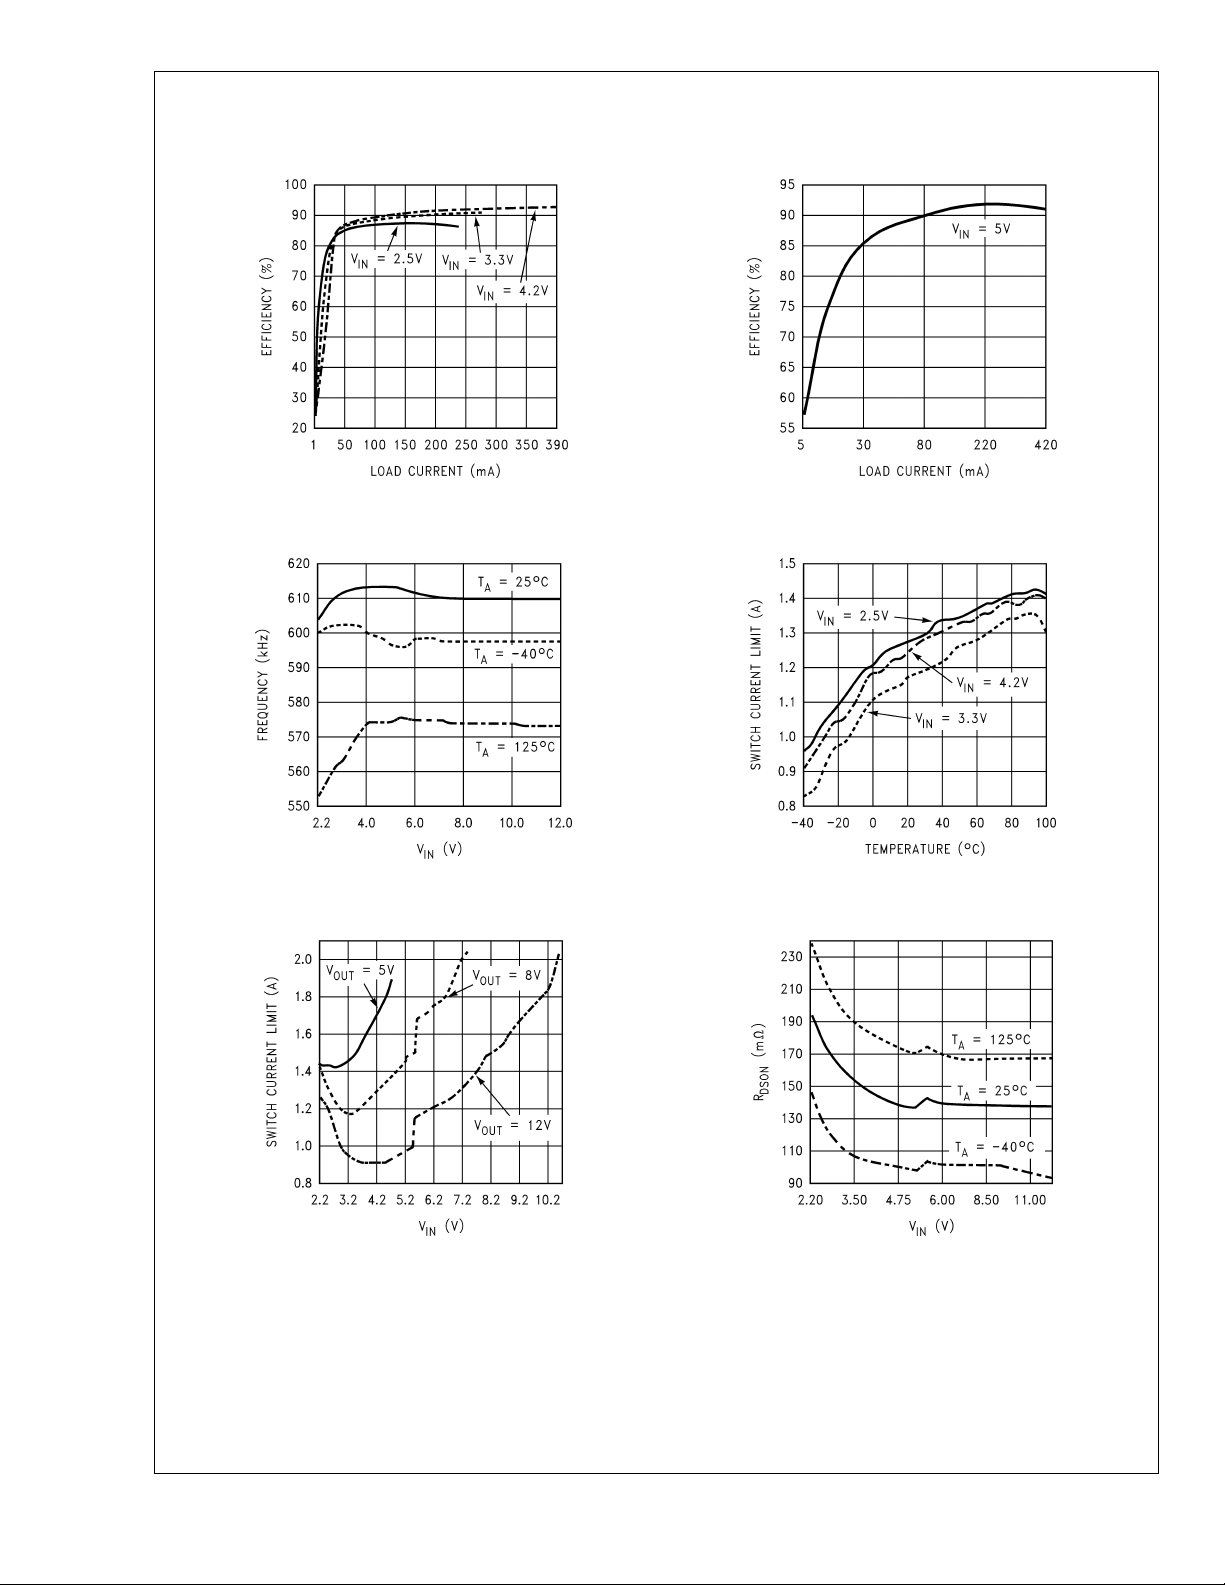
Typical Performance Characteristics
LM2702
Efficiency vs. Load Current
= 8V)
(V
OUT
Frequency vs. V
IN
20051126 20051173
Efficiency vs. Load Current
(V
= 10V)
OUT
Power Switch Current Limit vs. Temperature
= 8V)
(V
OUT
Power Switch Current Limit vs. V
20051122
20051125
IN
R
DSON
(ISW= 1A)
vs. V
20051120
IN
20051127
www.national.com 8
Page 9
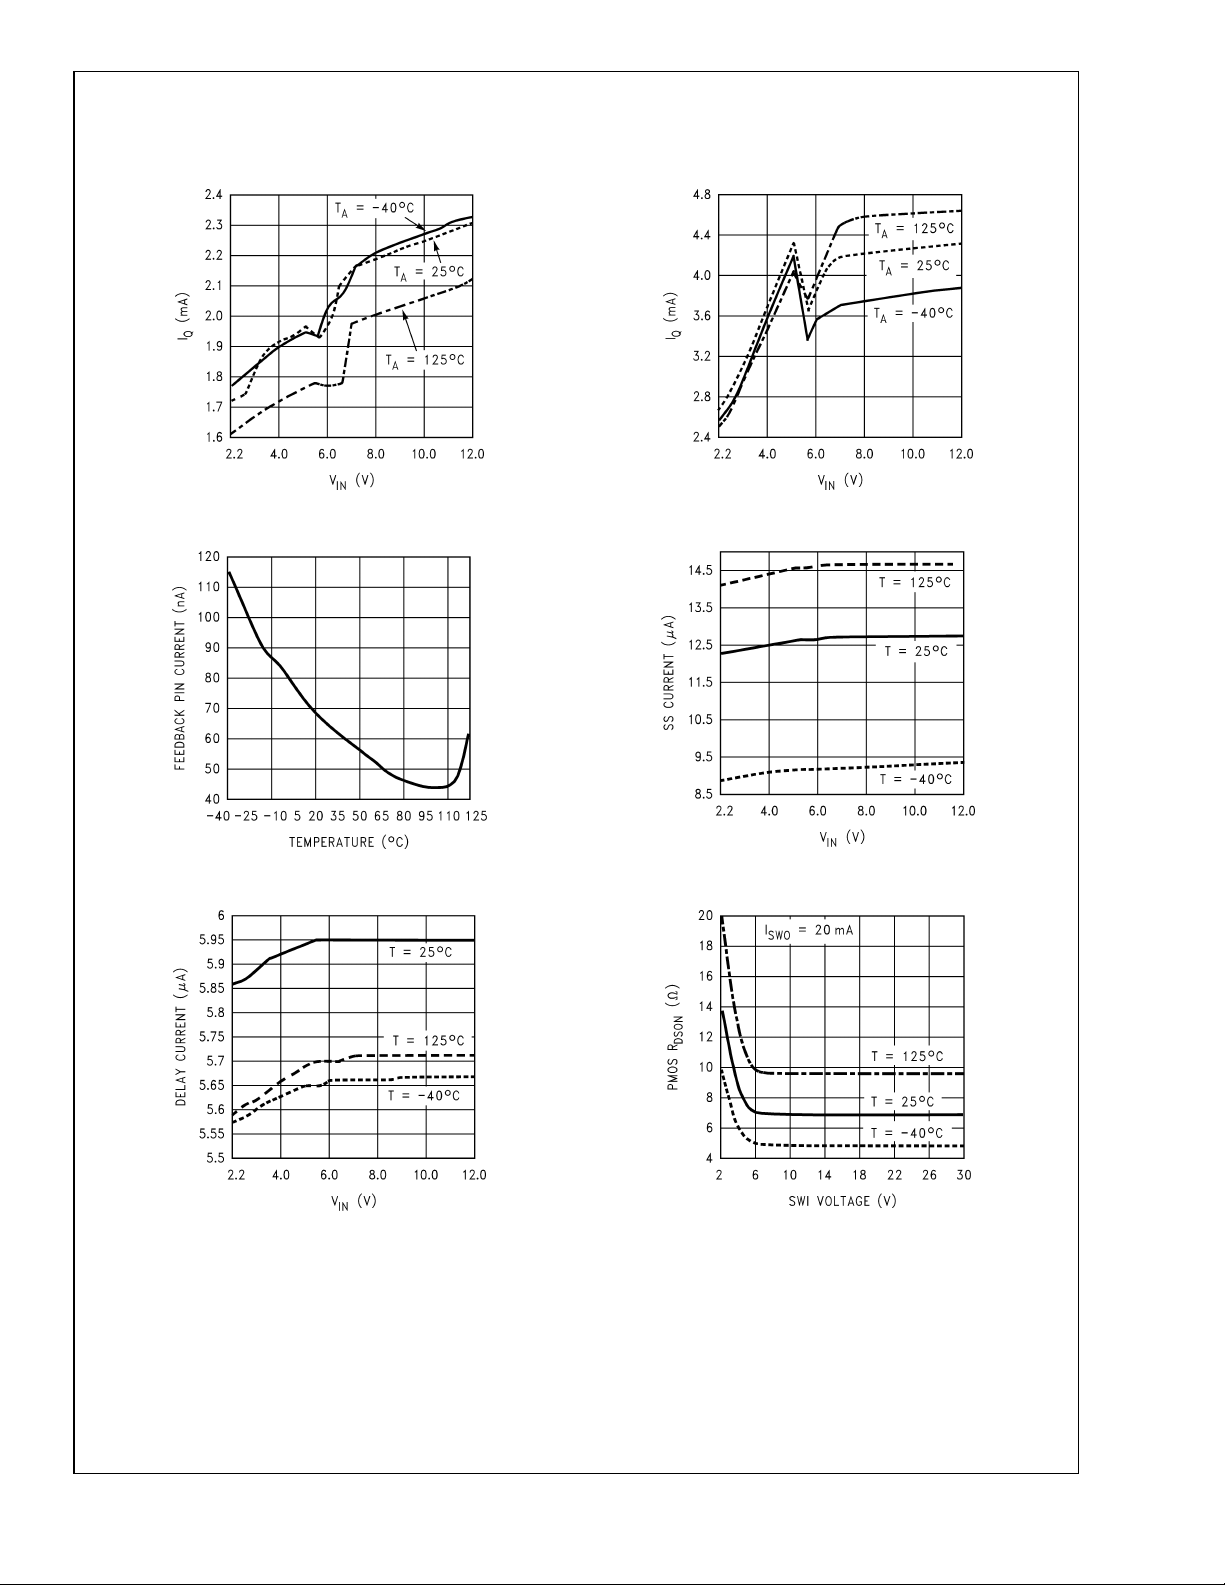
Typical Performance Characteristics (Continued)
LM2702
I
vs. V
Q
IN
(not switching)
20051121
I
vs. V
Q
IN
(switching)
Feedback Current vs. Temperature Soft Start Current vs. V
20051129
IN
Delay Current vs. V
20051163
IN
20051165
PMOS R
vs. SWI Voltage
DSON
20051164
20051166
www.national.com9
Page 10
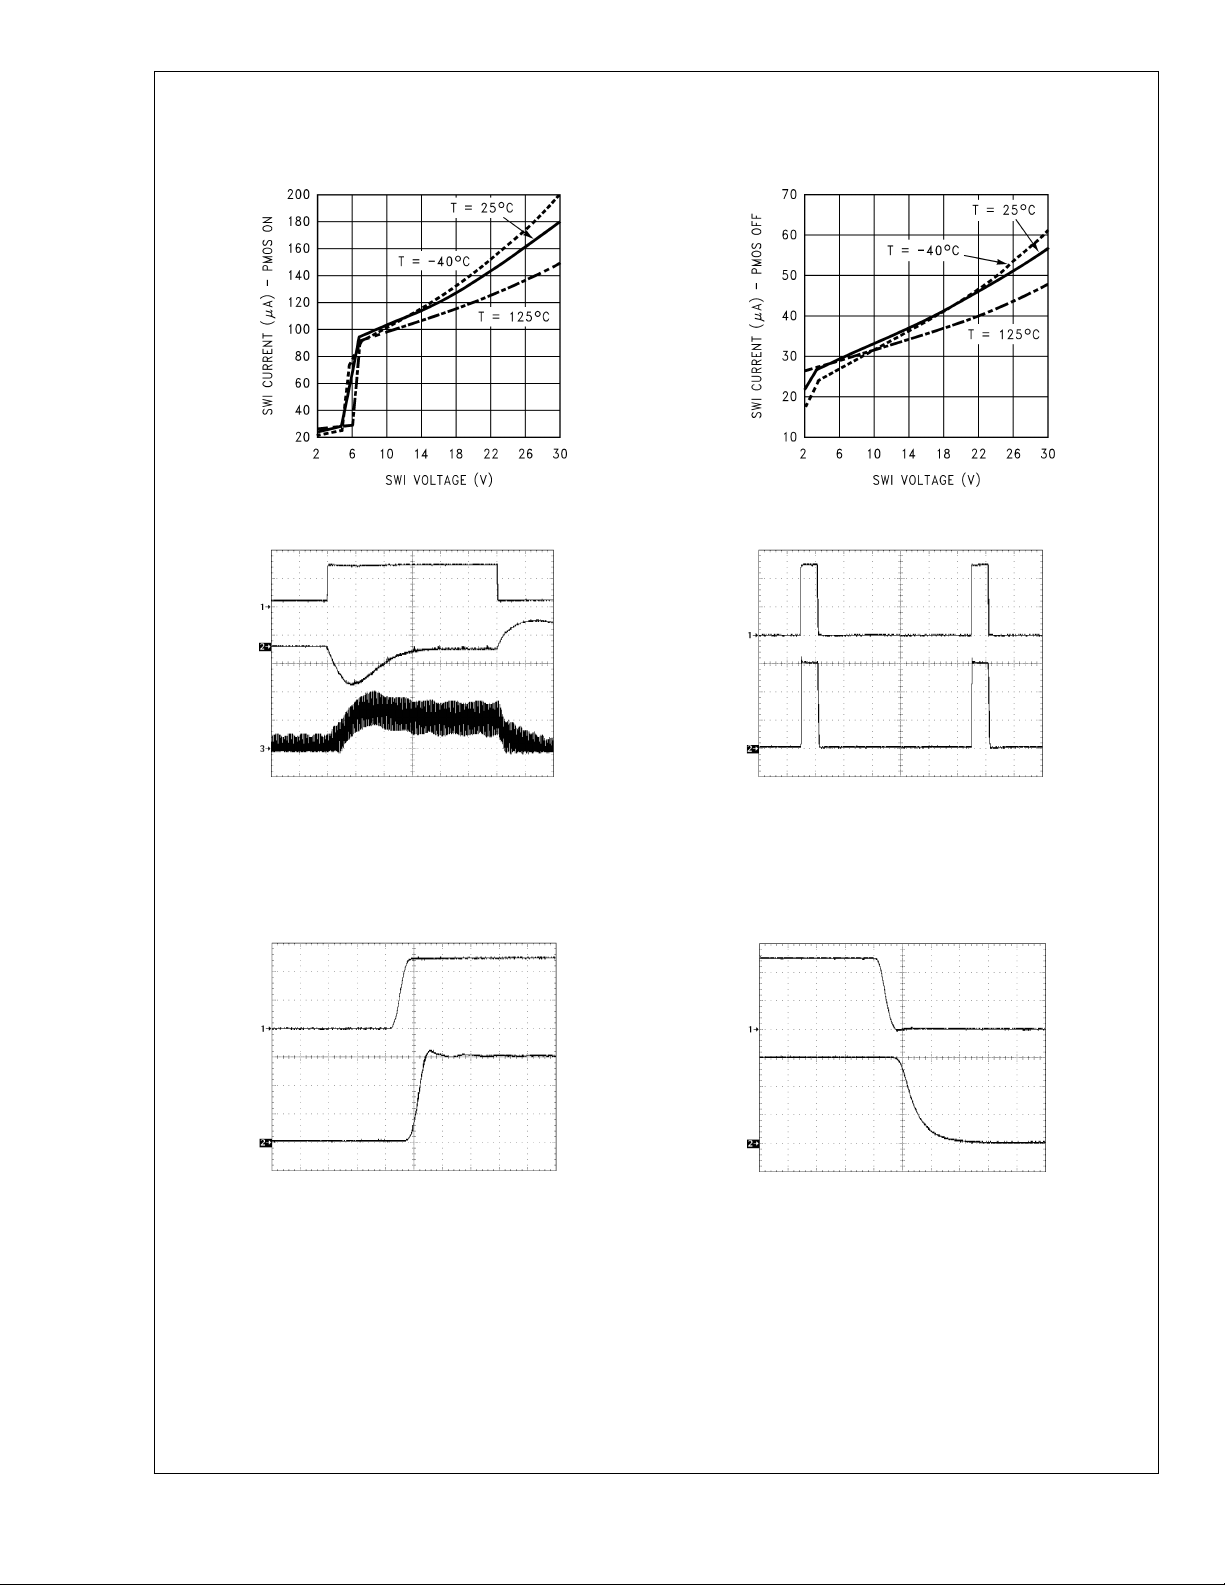
Typical Performance Characteristics (Continued)
LM2702
SWI Current vs. SWI Voltage
(PMOS ON)
20051167
SWI Current vs. SWI Voltage
(PMOS OFF)
Load Transient Response PMOS Switching Waveform
20051168
V
= 8V, VIN= 2.5V
OUT
1) Load, 20mA to 155mA to 20mA, DC
, 200mV/div, AC
2) V
OUT
, 500mA/div, DC
3) I
L
T = 50µs/div
PMOS Rising Edge PMOS Falling Edge
V
= 8V, VIN= 2.5V, R
OUT
= 100nF, RSW= 10k\1.5k, SWI = 30V
C
D
1) SWC, 1V/div, DC
2) SWO, 10V/div, DC
T = 50ns/div
=40Ω,CSS= none
LOAD
20051116
20051159
V
= 8V, VIN= 2.5V, R
OUT
= 100nF, RSW= 10k\1.5k, SWI = 30V, 10% duty cycle
C
D
=40Ω,CSS= none
LOAD
1) SWC, 1V/div, DC
2) SWO, 10V/div, DC
T = 2.5µs/div
V
= 8V, VIN= 2.5V, R
OUT
= 100nF, RSW= 10k\1.5k, SWI = 30V
C
D
=40Ω,CSS= none
LOAD
1) SWC, 1V/div, DC
2) SWO, 10V/div, DC
T = 50ns/div
20051158
20051160
www.national.com 10
Page 11
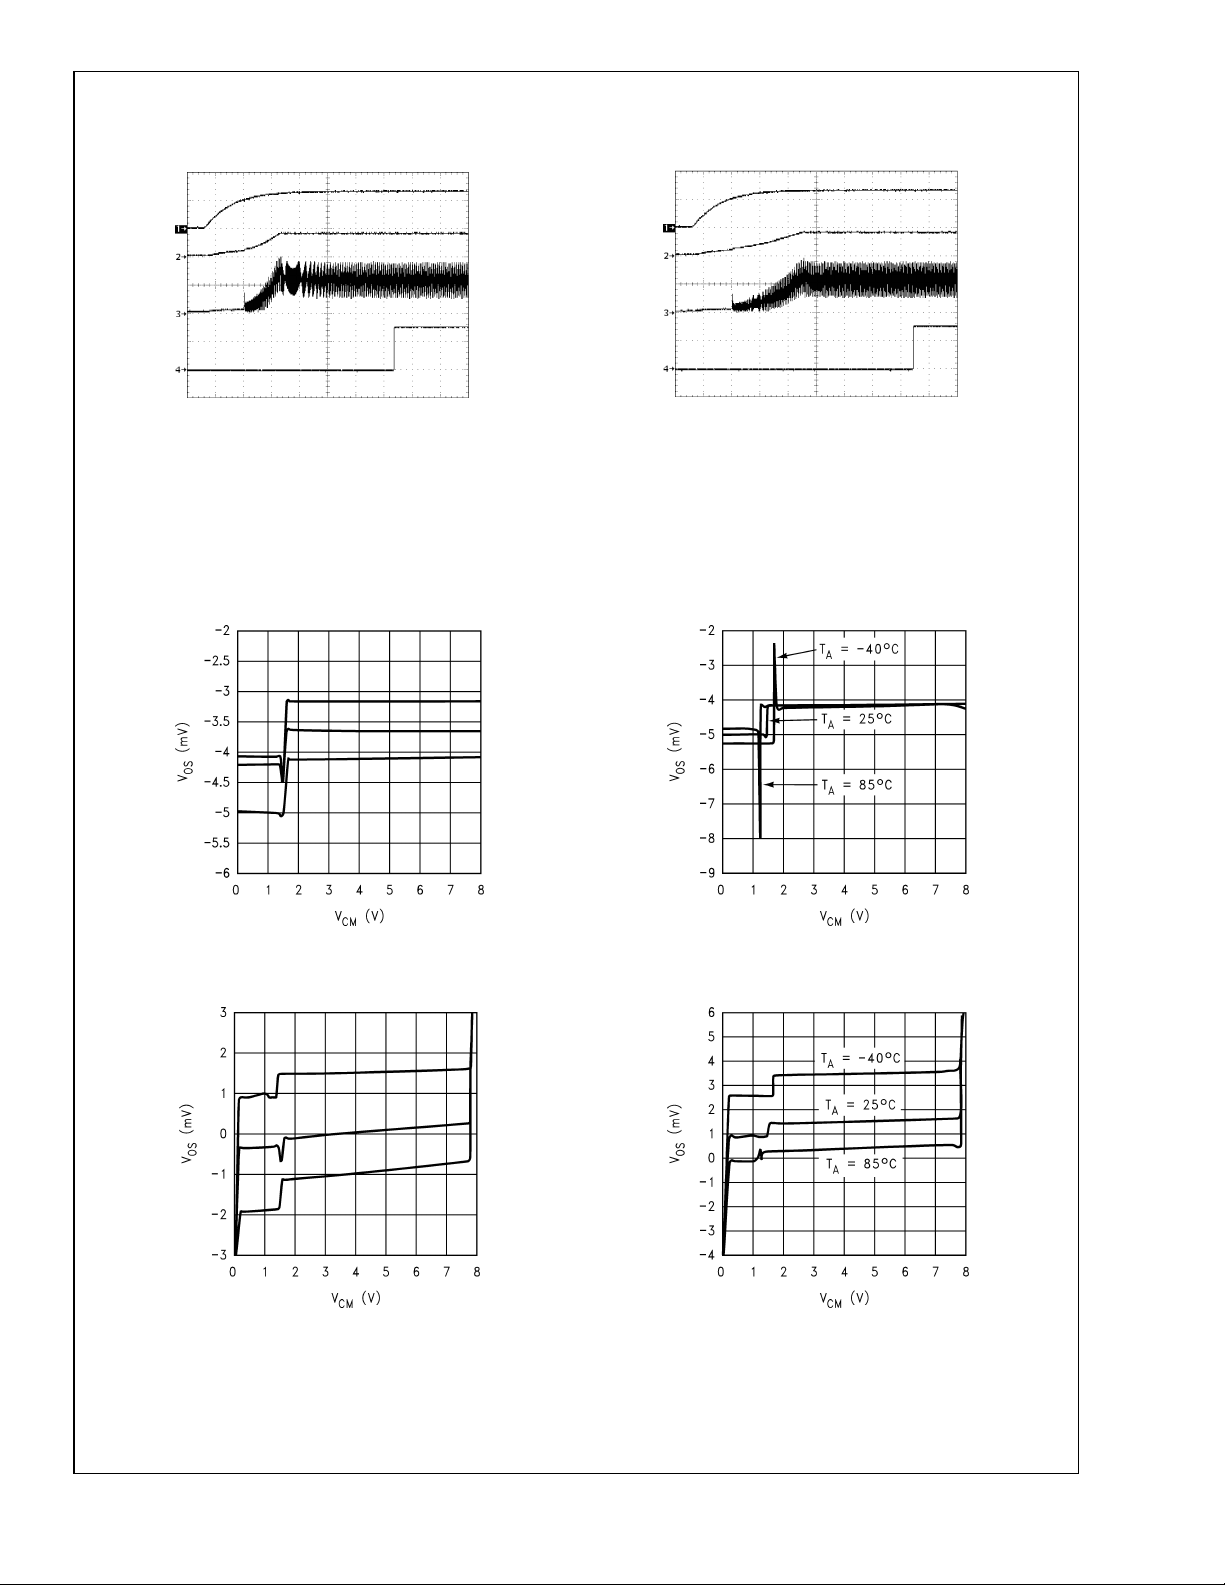
Typical Performance Characteristics (Continued)
Internal Soft Start and PMOS Delay External Soft Start and PMOS Delay
LM2702
V
= 8V, VIN= 2.5V, R
OUT
= 100nF, RSW= 10k\1.5k, SWI = 30V, SWC = V
C
D
1) VIN, 2V/div, DC
, 10V/div, DC
2) V
OUT
, 500mA/div, DC
3) I
L
4) SWO, 20V/div, DC
T = 5ms/div
=40Ω,CSS= none
LOAD
IN
Input Offset Voltage vs. Common Mode Voltage
(Vcom, 3 units)
Input Offset Voltage vs. Common Mode Voltage
(Gamma, 3 units)
20051161
20051174
V
= 8V, VIN= 2.5V, R
OUT
= 100nF, RSW= 10k\1.5k, SWI = 30V, SWC = V
C
D
1) VIN, 2V/div, DC
, 10V/div, DC
2) V
OUT
, 500mA/div, DC
3) I
L
4) SWO, 20V/div, DC
T = 5ms/div
=40Ω,CSS= 330nF
LOAD
IN
Input Offset Voltage vs. Common Mode Voltage
(Vcom Over Temperature)
Input Offset Voltage vs. Common Mode Voltage
(Gamma Over Temperature)
20051162
20051175
20051176
20051177
www.national.com11
Page 12
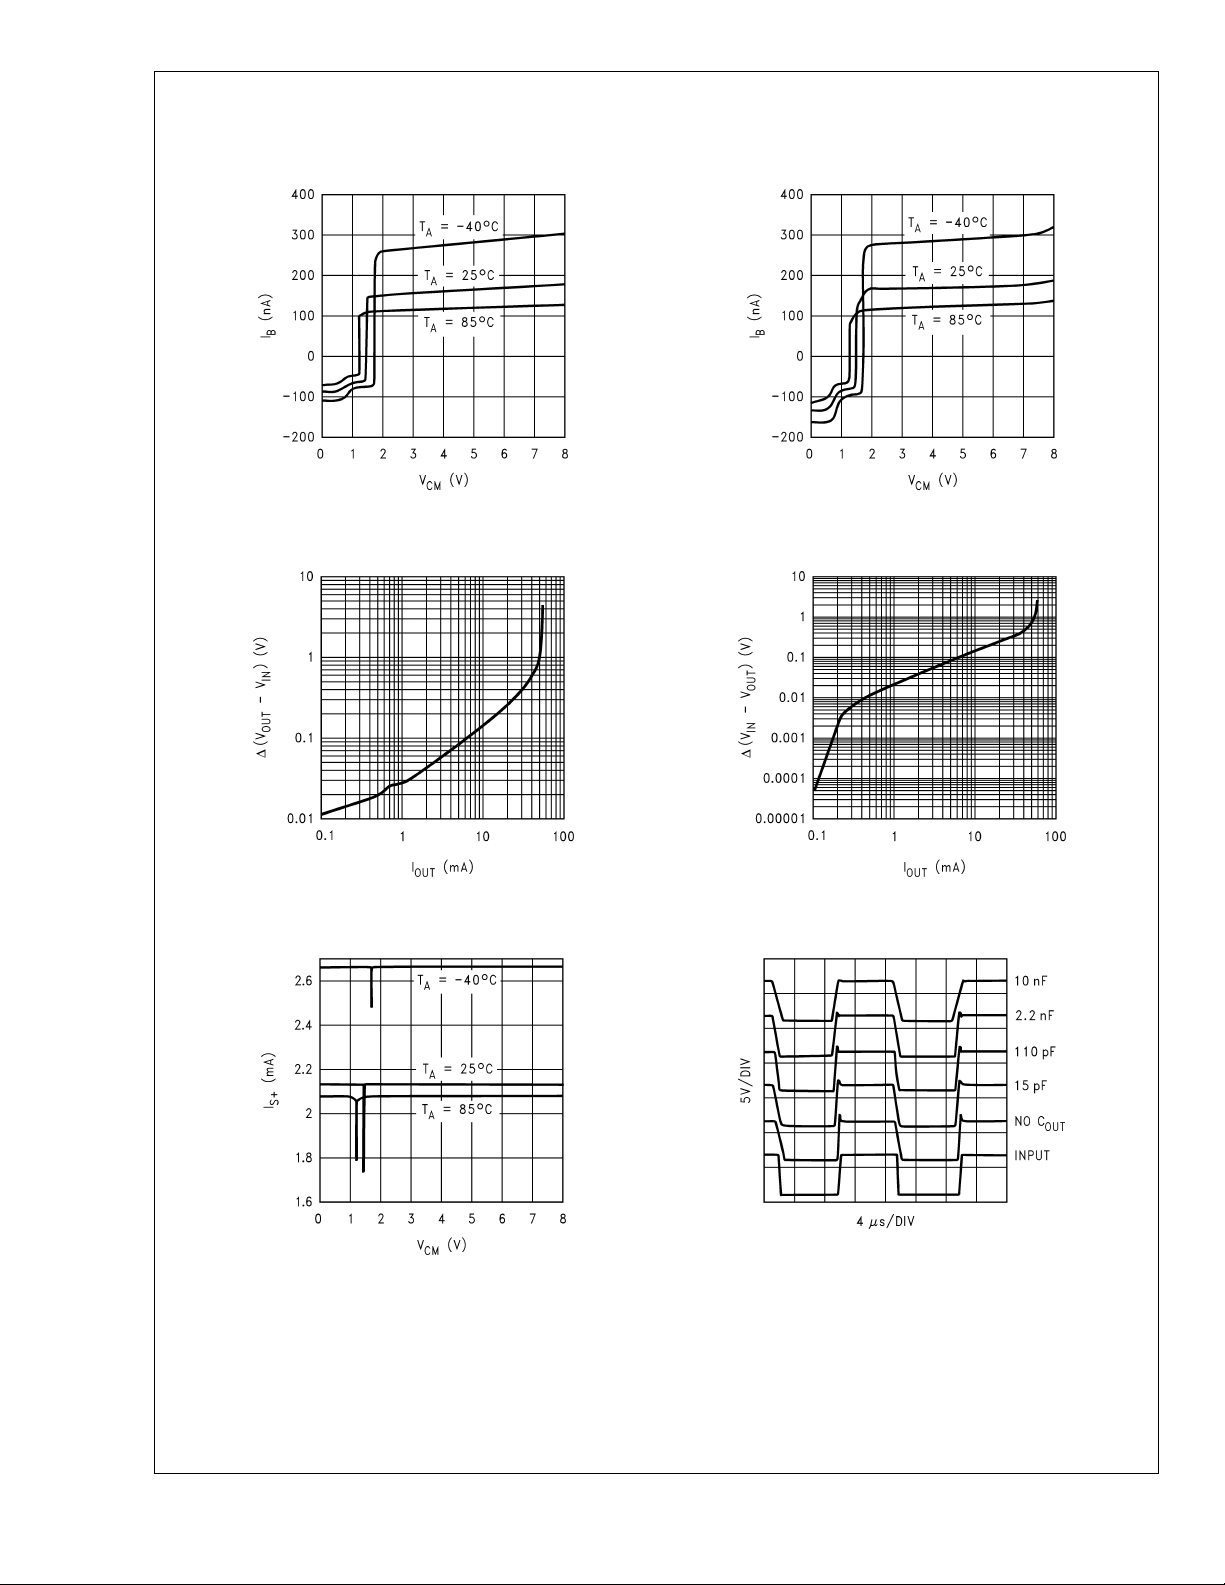
Typical Performance Characteristics (Continued)
LM2702
Input Bias Current vs. Common Mode Voltage
(Vcom)
20051178 20051179
Output Voltage vs. Output Current
(Vcom or Gamma, sinking)
Input Bias Current vs. Common Mode Voltage
(Gamma)
Output Voltage vs. Output Current
(Vcom or Gamma, sourcing)
20051180 20051181
Supply Current vs. Common Mode Voltage
(Both Amplifiers)
20051182
Large Signal Step Response
(50Ω, 1nF ext. compensation)
20051183
www.national.com 12
Page 13
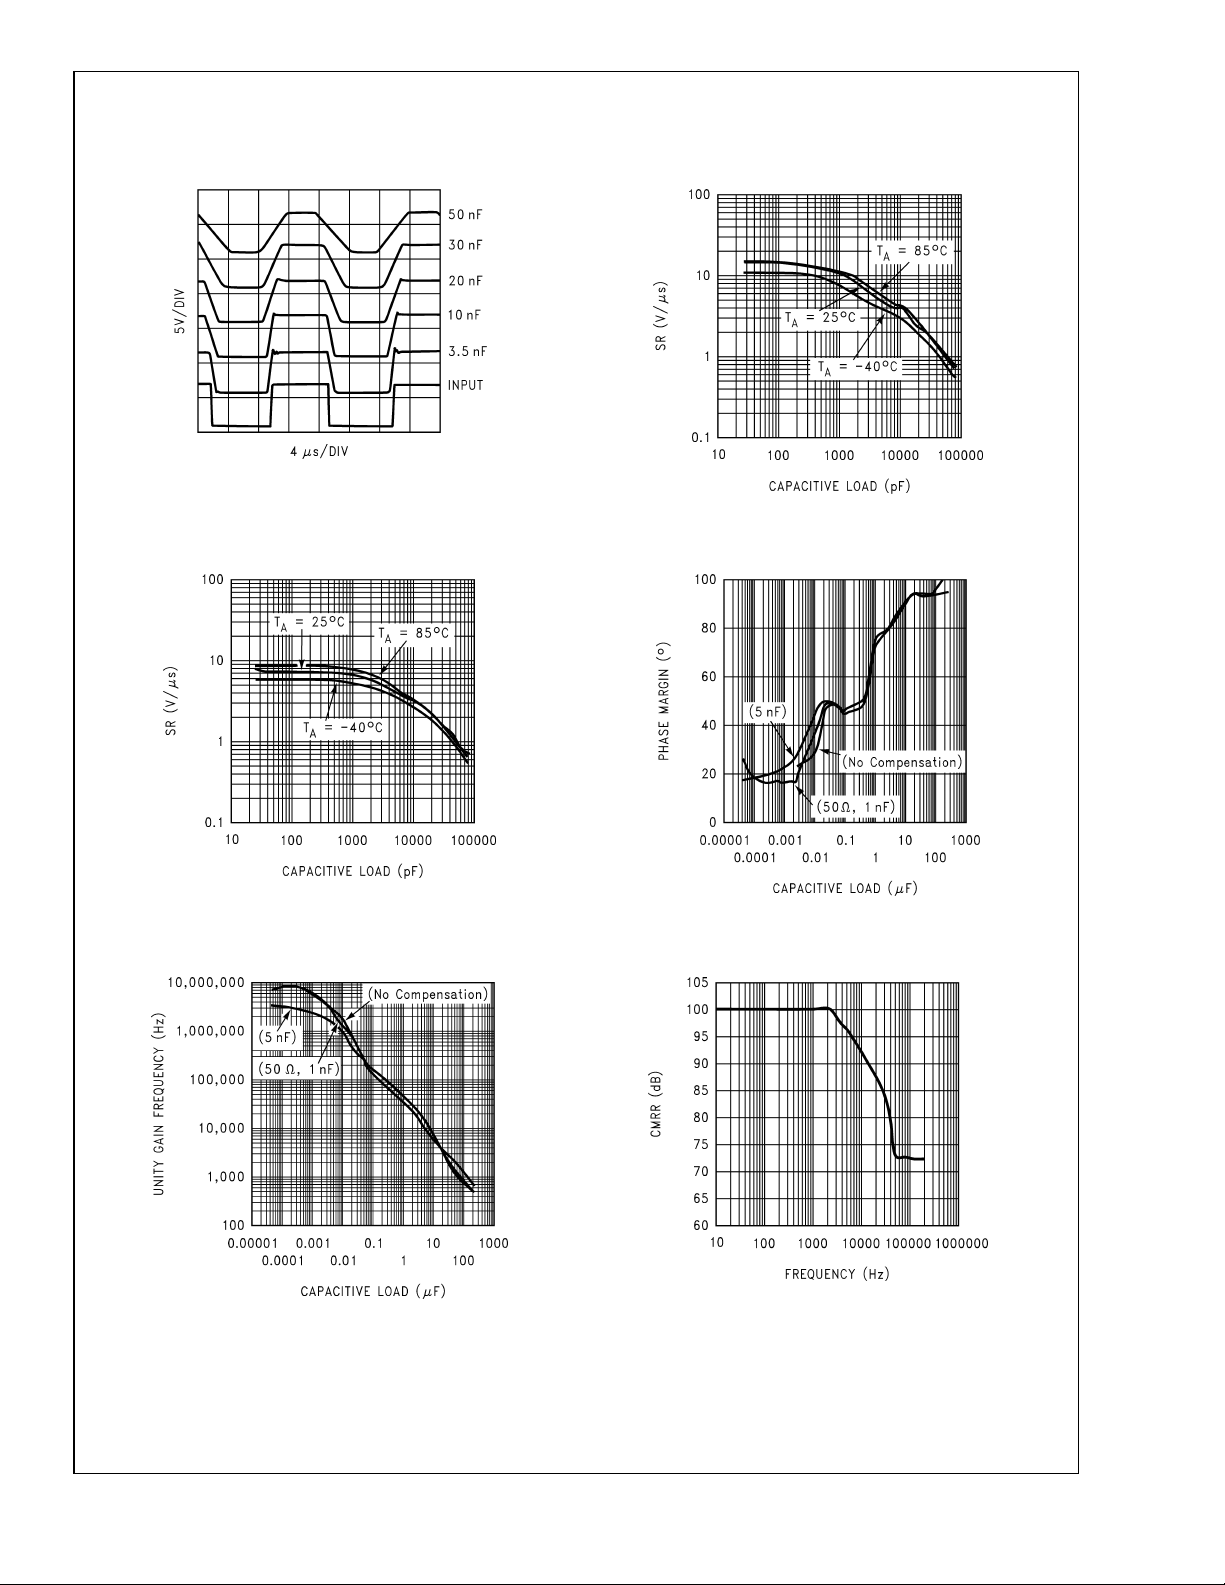
Typical Performance Characteristics (Continued)
LM2702
Large Signal Step Response
(no ext. compensation)
20051184
Negative Slew Rate vs. Capacitive Load
(Vcom or Gamma)
Positive Slew Rate vs. Capacitive Load
(Vcom or Gamma)
20051190
Phase Margin vs. Capacitive Load
(Vcom)
20051185
Unity Gain Frequency vs. Capacitive Load
(Vcom)
20051187
20051186
CMRR vs. Frequency
(Vcom)
20051188
www.national.com13
Page 14
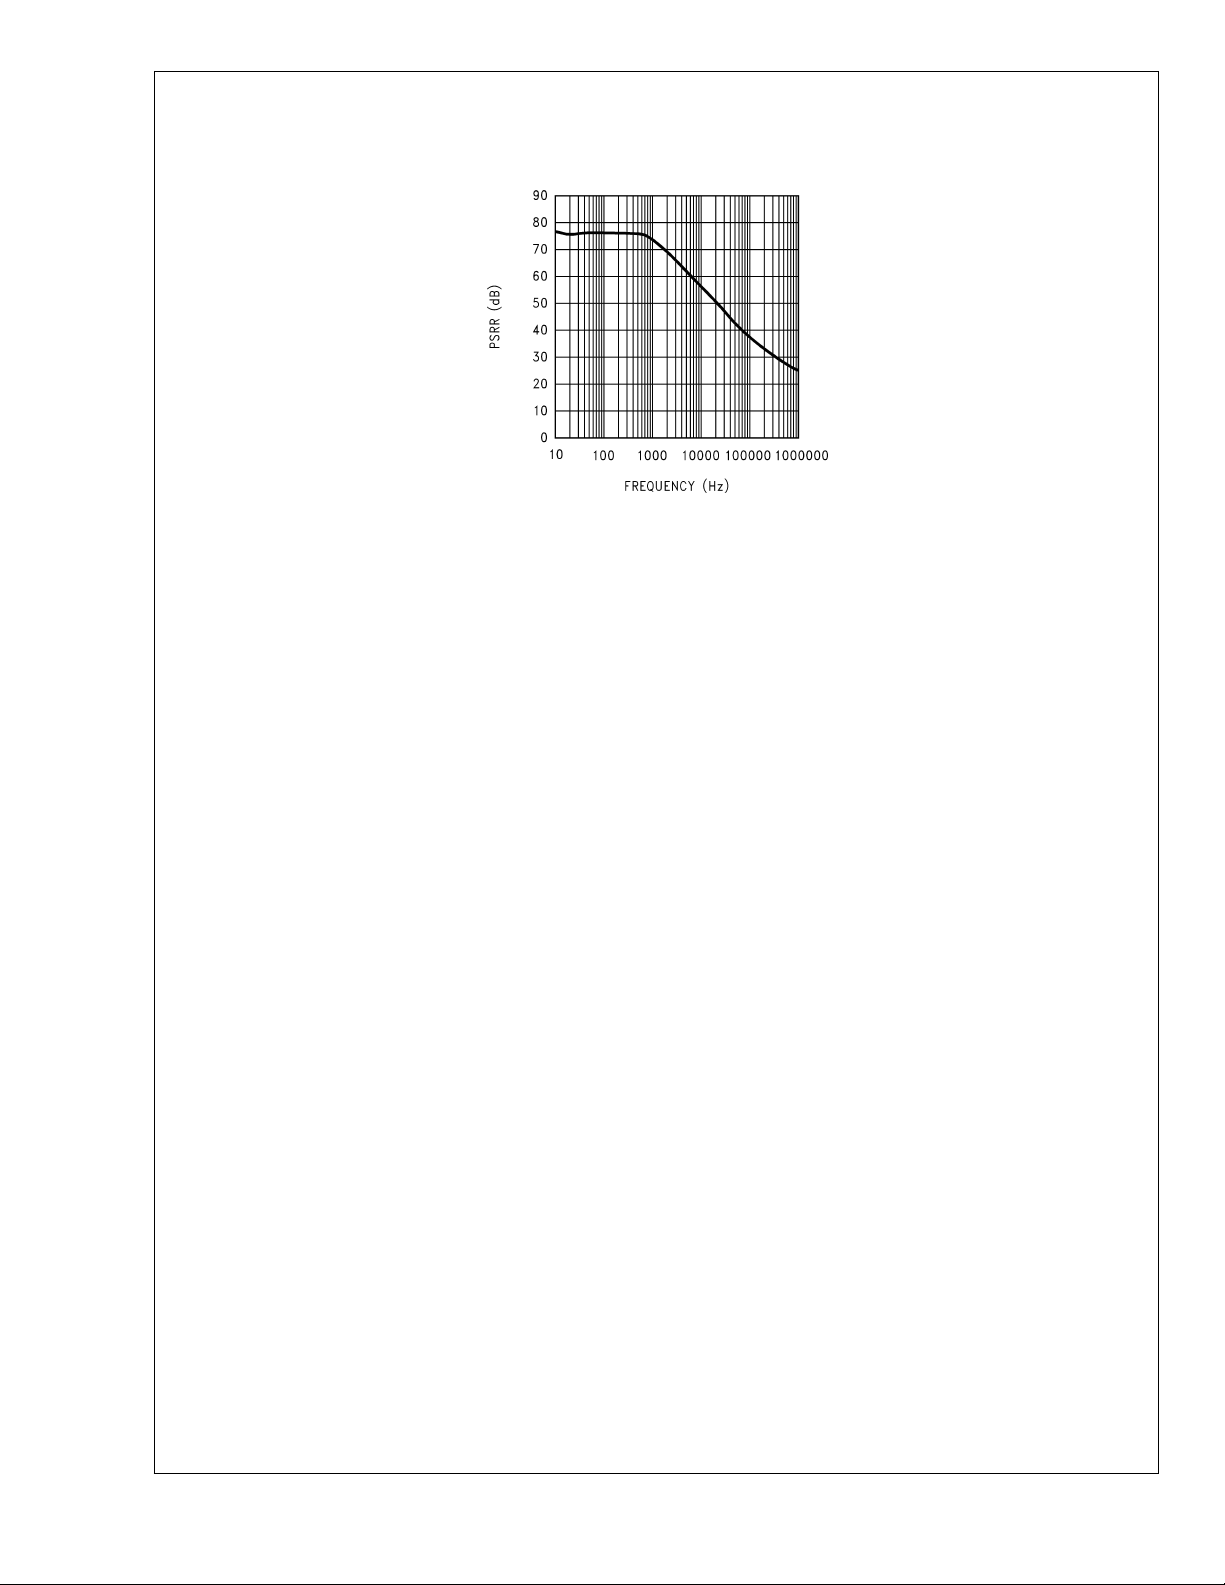
Typical Performance Characteristics (Continued)
LM2702
PSRR vs. Frequency
(Vcom)
20051189
www.national.com 14
Page 15
Operation
LM2702
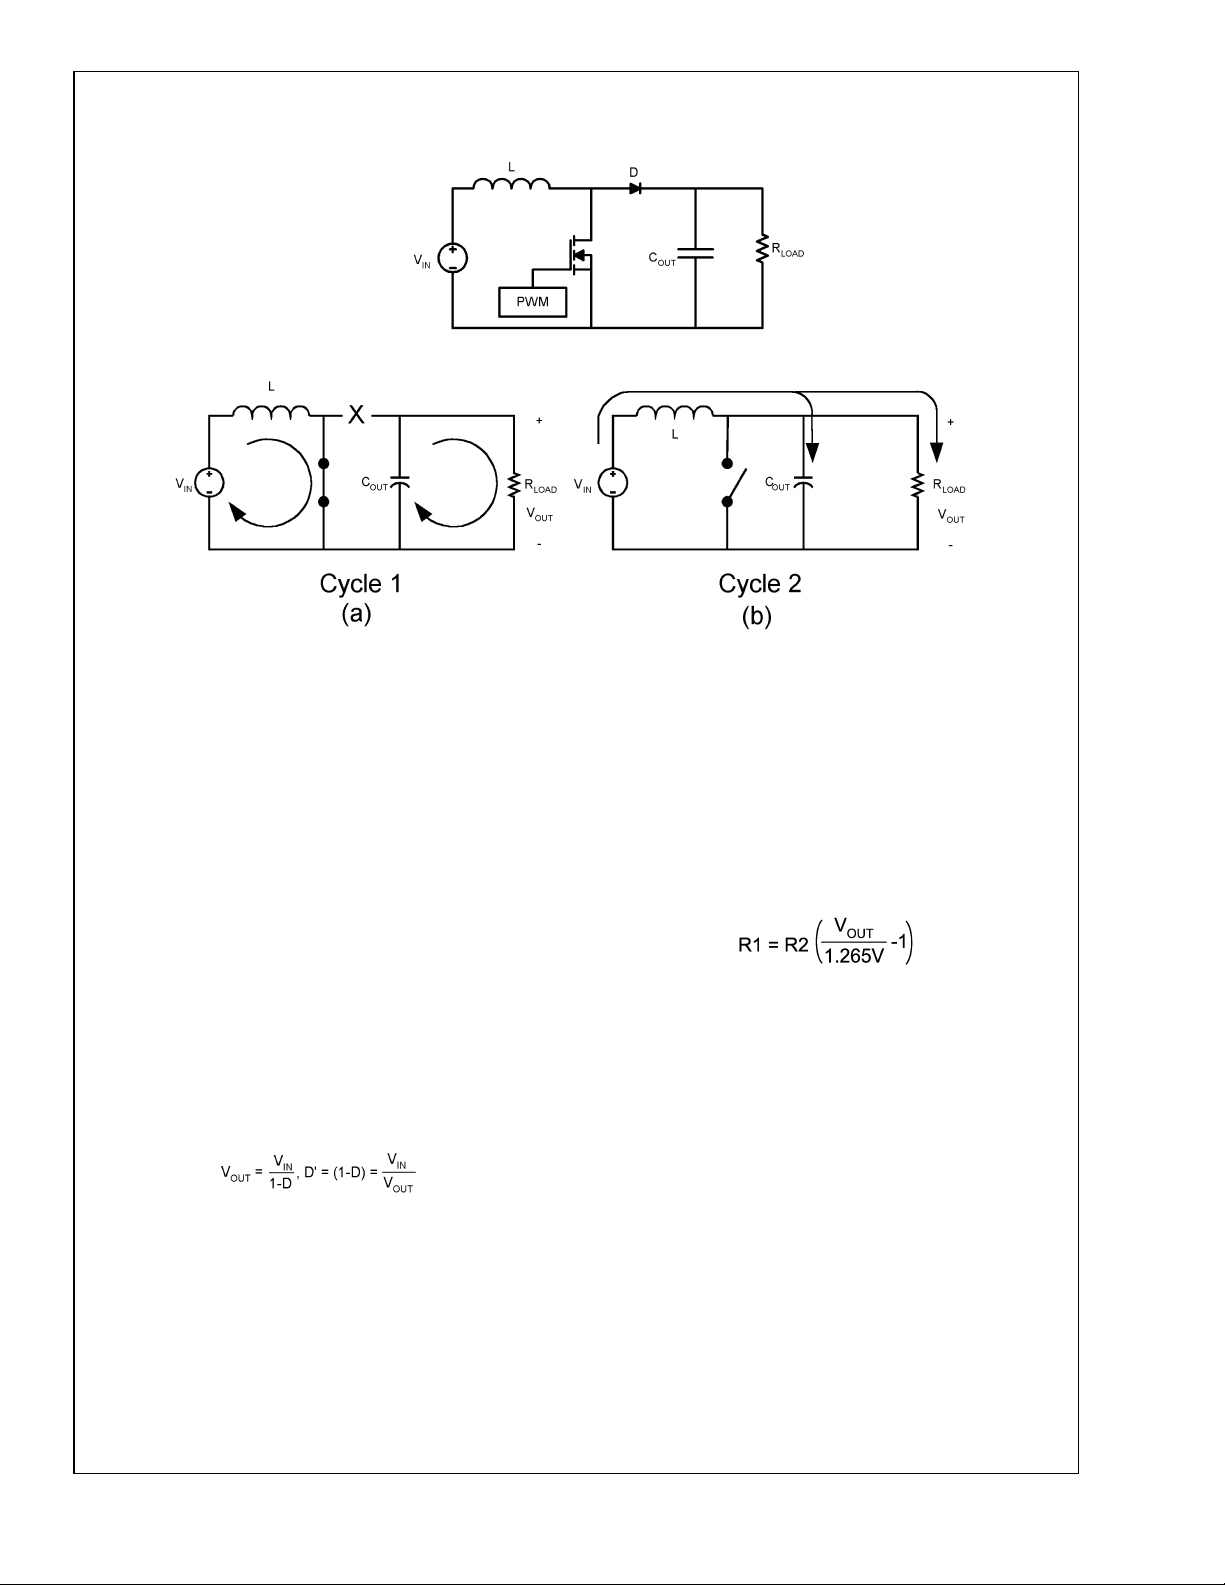
FIGURE 1. Simplified Boost Converter Diagram
(a) First Cycle of Operation (b) Second Cycle Of Operation
CONTINUOUS CONDUCTION MODE
The LM2702 is a TFT Panel Module containing a
current-mode, PWM boost regulator. A boost regulator steps
the input voltage up to a higher output voltage. In continuous
conduction mode (when the inductor current never reaches
zero at steady state), the boost regulator operates in two
cycles.
In the first cycle of operation, shown in Figure 1 (a), the
transistor is closed and the diode is reverse biased. Energy
is collected in the inductor and the load current is supplied by
.
C
OUT
The second cycle is shown in Figure 1 (b). During this cycle,
the transistor is open and the diode is forward biased. The
energy stored in the inductor is transferred to the load and
output capacitor.
The ratio of these two cycles determines the output voltage.
The output voltage is defined approximately as:
where D is the duty cycle of the switch, D and D' will be
required for design calculations
20051102
SETTING THE OUTPUT VOLTAGE
The output voltage is set using the feedback pin and a
resistor divider connected to the output as shown in the
typical operating circuit. The feedback pin voltage is 1.265V,
so the ratio of the feedback resistors sets the output voltage
according to the following equation:
SOFT-START CAPACITOR
The LM2702 has patented internal circuitry that is used to
limit the inductor inrush current on start-up of the boost
DC/DC switching regulator. This inrush current limiting circuitry serves as a soft-start. However, many applications
may require much more soft-start than what is available with
the internal circuitry. The external SS pin is used to tailor the
soft-start for a specific application. A 12µA current charges
the external soft-start capacitor, C
. The soft-start time can
SS
be estimated as:
T
SS=CSS
*0.6V/12µA
The minimum soft-start time is set by the internal soft-start
circuitry, typically 7ms. Only longer soft-start times may be
implemented using the SS pin and a capacitor C
SS
.Ifa
shorter time is designed for using the above equation, the
internal soft-start circuitry will override it.
Due to the unique nature of the dual internal/external softstart, care was taken in the design to ensure temperature
stable operation. As you can see with the Iss data in the
Electrical Characterisitcs table and the graph "Soft-Start
Current vs. V
"intheTypical Performance Characterisitcs
IN
www.national.com15
Page 16
Operation (Continued)
section, the soft start curent has a temperature coefficient
LM2702
and would lead one to believe there would be significant
variation with temperature. Though the current has a temperature coefficient the actual programmed external soft
start time does not show this extreme of a temperature
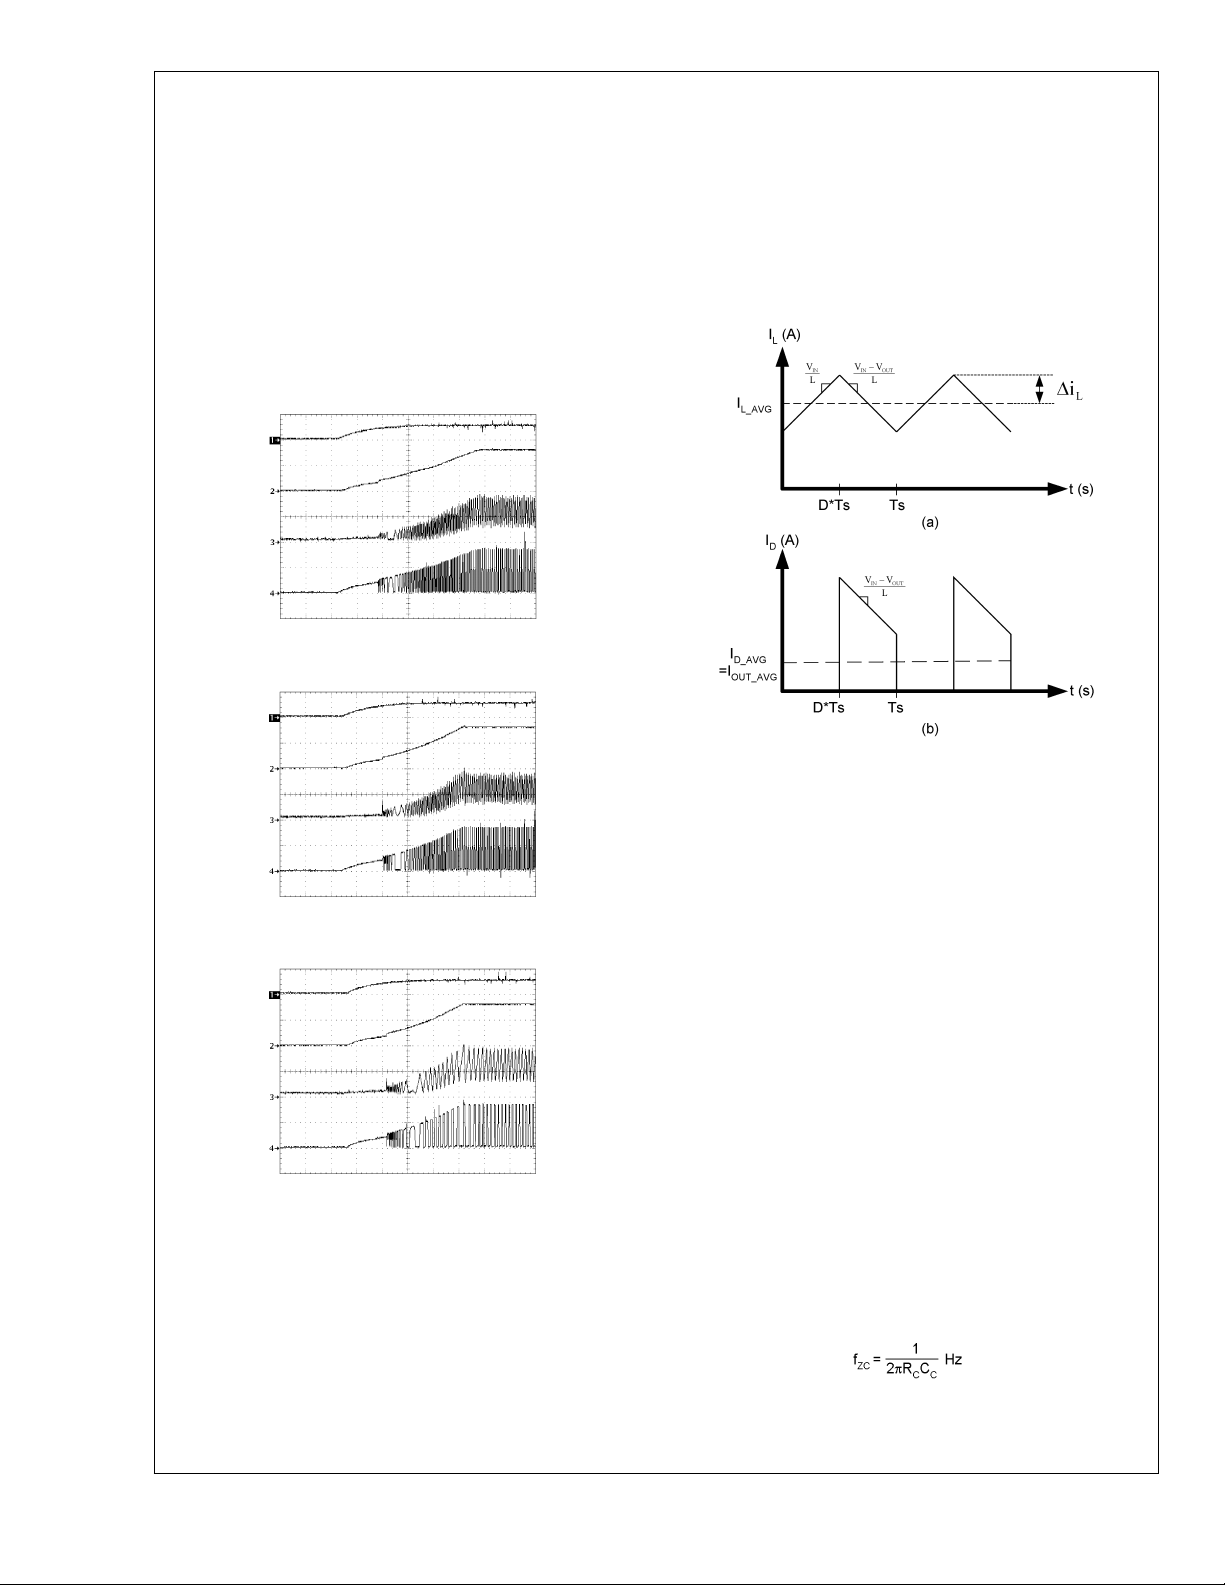
variation. As you can see in the following transient plots:
=8V,VIN= 2.5V, RL=51Ω,CSS= 330nF, T = 4ms/div.
V
OUT
Trace:
, 5V/div, DC Coupled
1) V
IN
, 5V/div, DC Coupled
2) V
OUT
3) I
, 0.5A/div, DC Coupled
L
, 5V/div, DC Coupled
4) V
SW
reaches 85% of the nominal output voltage. When this occurs, C
begins to charge. When the voltage on the Delay
D
pin reaches 1.265V the PMOS switch will become active and
can be controlled using the SWC pin. If no C
PMOS switch can be controlled immediately after V
is used, the
D
OUT
reaches 85% of the nominal output voltage. The delay time
can be calculated using the equation:
D=CD
* (1.265V/5.7µA)
T
INTRODUCTION TO COMPENSATION
TA= −20˚C
20051169
20051170
TA= 27˚C
20051171
TA= 85˚C
When programming the softstart time externally, simply use
the equation given in the Soft-Start Capacitor section above.
This equation uses the typical room temperature value of the
soft start current, 12µA, to set the soft start time.
20051105
FIGURE 2. (a) Inductor current. (b) Diode current.
The LM2702 contains a current mode PWM boost converter.
The signal flow of this control scheme has two feedback
loops, one that senses switch current and one that senses
output voltage.
To keep a current programmed control converter stable
above duty cycles of 50%, the inductor must meet certain
criteria. The inductor, along with input and output voltage,
will determine the slope of the current through the inductor
(see Figure 2 (a)). If the slope of the inductor current is too
great, the circuit will be unstable above duty cycles of 50%.
A 4.7µH inductor is recommended for most applications. If
the duty cycle is approaching the maximum of 85%, it may
be necessary to increase the inductance by as much as 2X.
See Inductor and Diode Selection for more detailed inductor
sizing.
The LM2702 provides a compensation pin (V
) to customize
C
the voltage loop feedback. It is recommended that a series
combination of R
and CCbe used for the compensation
C
network, as shown in the typical application circuit. For any
given application, there exists a unique combination of R
and CCthat will optimize the performance of the LM2702
circuit in terms of its transient response. The series combination of R
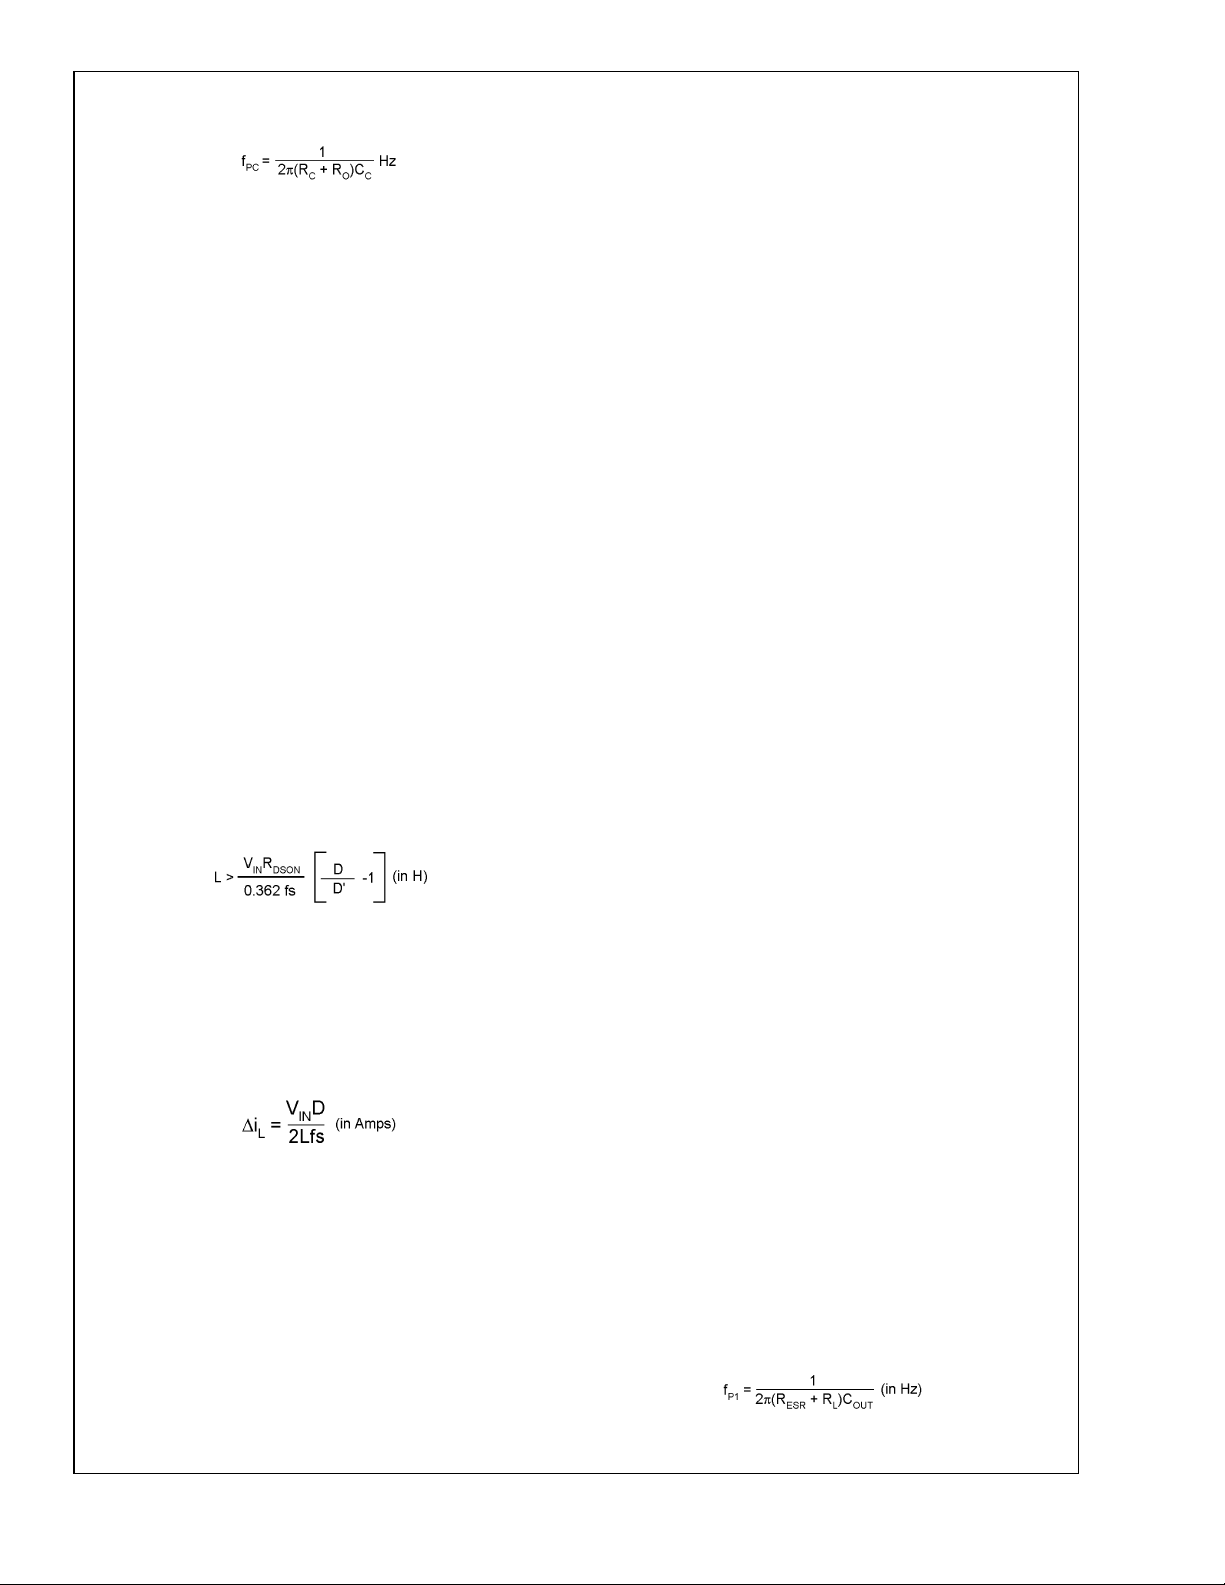
and CCintroduces a pole-zero pair according to
C
the following equations:
C
DELAY CAPACITOR
The LM2702 has internal circuitry that can be used to set a
delay time preventing control of the PMOS switch via SWC
until a desired amount of time after the switcher starts up.
The PMOS control circuitry remains inactive until V
www.national.com 16
OUT
Page 17
Operation (Continued)
where ROis the output impedance of the error amplifier,
approximately 1MΩ. For most applications, performance can
be optimized by choosing values within the range 5kΩ≤R
≤ 40kΩ (RCcan be up to 200kΩ if CC2is used, see High
Output Capacitor ESR Compensation) and 680pF ≤ C
4.7nF. Refer to the Typical Application Circuit and the Applications Information section for recommended values for spe-
cific circuits and conditions. Refer to the Compensation section for other design requirement.
COMPENSATION FOR BOOST DC/DC
This section will present a general design procedure to help
insure a stable and operational circuit. The designs in this
datasheet are optimized for particular requirements. If different conversions are required, some of the components may
need to be changed to ensure stability. Below is a set of
general guidelines in designing a stable circuit for continuous conduction operation (Inductor current never reaches
zero), in most all cases this will provide for stability during
discontinuous operation as well. The power components and
their effects will be determined first, then the compensation
components will be chosen to produce stability.
C
LM2702
The output diode for a boost regulator must be chosen
correctly depending on the output voltage and the output
current. The typical current waveform for the diode in continuous conduction mode is shown in Figure 2 (b). The diode
must be rated for a reverse voltage equal to or greater than
the output voltage used. The average current rating must be
greater than the maximum load current expected, and the
peak current rating must be greater than the peak inductor
C
≤
current. During short circuit testing, or if short circuit conditions are possible in the application, the diode current rating
must exceed the switch current limit. Using Schottky diodes
with lower forward voltage drop will decrease power dissipation and increase efficiency.
DC GAIN AND OPEN-LOOP GAIN
Since the control stage of the converter forms a complete
feedback loop with the power components, it forms a closedloop system that must be stabilized to avoid positive feedback and instability. A value for open-loop DC gain will be
required, from which you can calculate, or place, poles and
zeros to determine the crossover frequency and the phase
margin. A high phase margin (greater than 45˚) is desired for
the best stability and transient response. For the purpose of
stabilizing the LM2702, choosing a crossover point well below where the right half plane zero is located will ensure
sufficient phase margin. A discussion of the right half plane
zero and checking the crossover using the DC gain will
follow.
INDUCTOR AND DIODE SELECTION
Although the inductor size mentioned earlier is fine for most
applications, a more exact value can be calculated. To ensure stability at duty cycles above 50%, the inductor must
have some minimum value determined by the minimum
input voltage and the maximum output voltage. This equation is:
where fs is the switching frequency, D is the duty cycle, and
is the ON resistance of the internal switch taken from
R
DSON
the graph "R
vs. VIN"intheTypical Performance Char-
DSON
acteristics section. This equation is only good for duty cycles
>
greater than 50% (D
0.5), for duty cycles less than 50% the
recommended values may be used. The corresponding inductor current ripple as shown in Figure 2 (a) is given by:
The inductor ripple current is important for a few reasons.
One reason is because the peak switch current will be the
average inductor current (input current or I
/D’) plus ∆iL.
LOAD
As a side note, discontinuous operation occurs when the
inductor current falls to zero during a switching cycle, or ∆i
is greater than the average inductor current. Therefore, continuous conduction mode occurs when ∆i
is less than the
L
average inductor current. Care must be taken to make sure
that the switch will not reach its current limit during normal
operation. The inductor must also be sized accordingly. It
should have a saturation current rating higher than the peak
inductor current expected. The output and input voltage
ripples are also affected by the total ripple current.
INPUT AND OUTPUT CAPACITOR SELECTION
The switching action of a boost regulator causes a triangular
voltage waveform at the input. A capacitor is required to
reduce the input ripple and noise for proper operation of the
regulator. The size used depends on the application and
board layout. If the regulator will be loaded uniformly, with
very little load changes, and at lower current outputs, the
input capacitor size can often be reduced. The size can also
be reduced if the input of the regulator is very close to the
source output. The size will generally need to be larger for
applications where the regulator is supplying nearly the
maximum rated output or if large load steps are expected. A
minimum value of 10µF should be used for the less stressful
conditions while a 22µF to 47µF capacitor may be required
for higher power and dynamic loads. Larger values and/or
lower ESR may be needed if the application requires very
low ripple on the input source voltage.
The choice of output capacitors is also somewhat arbitrary
and depends on the design requirements for output voltage
ripple. It is recommended that low ESR (Equivalent Series
Resistance, denoted R
) capacitors be used such as
ESR
ceramic, polymer electrolytic, or low ESR tantalum. Higher
ESR capacitors may be used but will require more compensation which will be explained later on in the section. The
ESR is also important because it determines the peak to
peak output voltage ripple according to the approximate
equation:
) 2∆iLR
∆V
L
A minimum value of 10µF is recommended and may be
OUT
ESR
(in Volts)
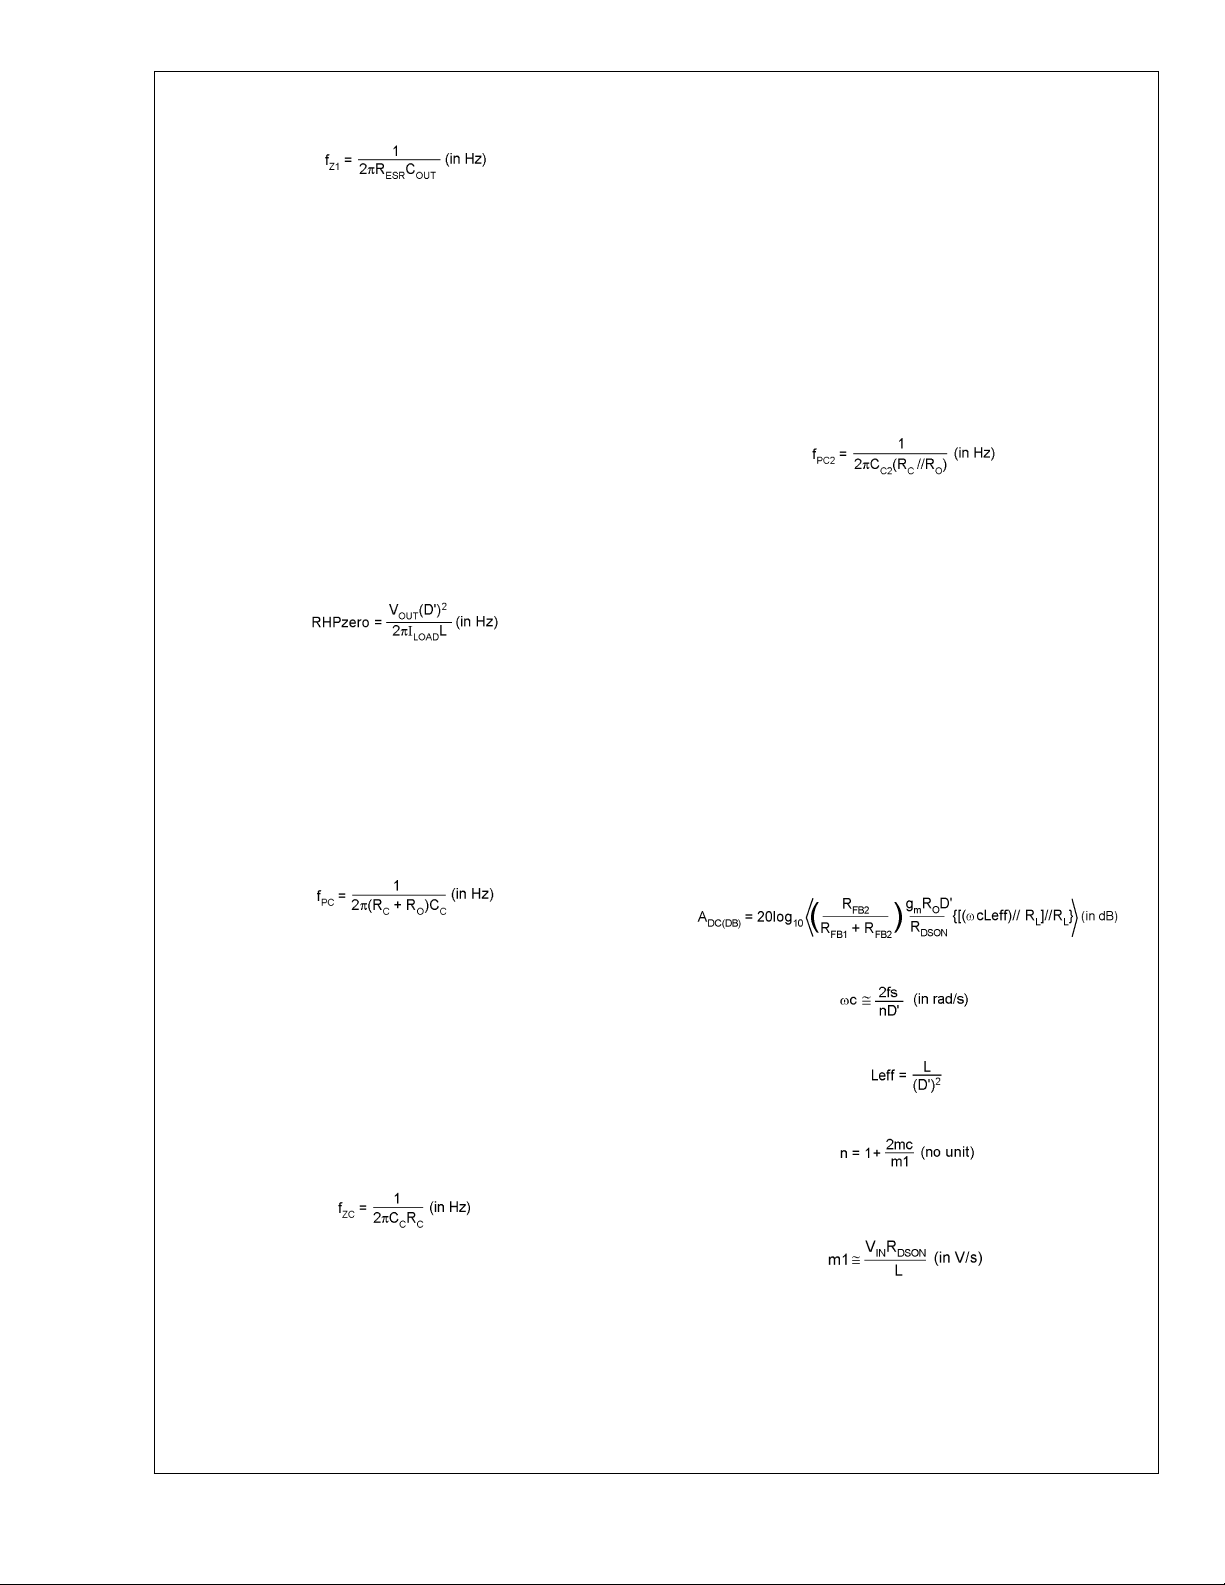
increased to a larger value. After choosing the output capacitor you can determine a pole-zero pair introduced into the
control loop by the following equations:
www.national.com17
Page 18
Operation (Continued)
LM2702
Where RLis the minimum load resistance corresponding to
the maximum load current. The zero created by the ESR of
the output capacitor is generally very high frequency if the
ESR is small. If low ESR capacitors are used it can be
neglected. If higher ESR capacitors are used see the High
Output Capacitor ESR Compensation section.
RIGHT HALF PLANE ZERO
A current mode control boost regulator has an inherent right
half plane zero (RHP zero). This zero has the effect of a zero
in the gain plot, causing an imposed +20dB/decade on the
rolloff, but has the effect of a pole in the phase, subtracting
another 90˚ in the phase plot. This can cause undesirable
effects if the control loop is influenced by this zero. To ensure
the RHP zero does not cause instability issues, the control
loop should be designed to have a bandwidth of less than
the frequency of the RHP zero. This zero occurs at a frequency of:
where I
SELECTING THE COMPENSATION COMPONENTS
The first step in selecting the compensation components R
and CCis to set a dominant low frequency pole in the control
loop. Simply choose values for R
given in the Introduction to Compensation section to set this
pole in the area of 10Hz to 500Hz. The frequency of the pole
created is determined by the equation:
is the maximum load current.
LOAD
and CCwithin the ranges
C
circuit. For improved transient response, higher values of R
C
should be chosen. This will improve the overall bandwidth
which makes the regulator respond more quickly to transients. If more detail is required, or the most optimal performance is desired, refer to a more in depth discussion of
compensating current mode DC/DC switching regulators.
HIGH OUTPUT CAPACITOR ESR COMPENSATION
When using an output capacitor with a high ESR value, or
just to improve the overall phase margin of the control loop,
another pole may be introduced to cancel the zero created
by the ESR. This is accomplished by adding another capaci-
, directly from the compensation pin VCto ground, in
tor, C
C2
parallel with the series combination of R
should be placed at the same frequency as f
and CC. The pole
C
, the ESR
Z1
zero. The equation for this pole follows:
1
⁄
2
To ensure this equation is valid, and that CC2can be used
without negatively impacting the effects of R
and CC,f
C
PC2
must be greater than 10fZC.
CHECKING THE DESIGN
The final step is to check the design. This is to ensure a
bandwidth of
This is done by calculating the open-loop DC gain, A
1
⁄2or less of the frequency of the RHP zero.
. After
DC
this value is known, you can calculate the crossover visually
by placing a −20dB/decade slope at each pole, and a
+20dB/decade slope for each zero. The point at which the
C
gain plot crosses unity gain, or 0dB, is the crossover frequency. If the crossover frequency is less than
1
⁄2the RHP
zero, the phase margin should be high enough for stability.
The phase margin can also be improved by adding C
discussed earlier in the section. The equation for A
as
C2
is
DC
given below with additional equations required for the calculation:
where ROis the output impedance of the error amplifier,
approximately 1MΩ. Since R
, it does not have much effect on the above equation and
R
O
can be neglected until a value is chosen to set the zero f
is created to cancel out the pole created by the output
f
ZC
capacitor, f
. The output capacitor pole will shift with differ-
P1
is generally much less than
C
.
ZC
ent load currents as shown by the equation, so setting the
zero is not exact. Determine the range of f
pected loads and then set the zero f
ZC
over the ex-
P1
to a point approximately in the middle. The frequency of this zero is determined by:
Now RCcan be chosen with the selected value for CC.
Check to make sure that the pole f
is still in the 10Hz to
PC
500Hz range, change each value slightly if needed to ensure
both component values are in the recommended range.After
checking the design at the end of this section, these values
can be changed a little more to optimize performance if
desired. This is best done in the lab on a bench, checking the
load step response with different values until the ringing and
overshoot on the output voltage at the edge of the load steps
is minimal. This should produce a stable, high performance
www.national.com 18
mc ) 0.181fs (in V/s)
where RLis the minimum load resistance, VINis the minimum input voltage, g
is the error amplifier transconduc-
m
tance found in the Electrical Characteristics table, and R
is the value chosen from the graph "R
SON
DSON
vs. VIN"in
the Typical Performance Characteristics section.
-
D
Page 19
Operation (Continued)
Vcom AND Gamma COMPENSATION
The architecture used for the amplifiers in the LM2702 requires external compensation on the output. Depending on
the equivalent capacitive load of the TFT-LCD panel, external components at the amplifier outputs may or may not be
necessary. If the capacitance presented by the load is equal
to or greater than 5nF no external components are needed
as the TFT-LCD panel will act as compensation itself. Distributed resistive and capacitive loads enhance stability and
increase performance of the amplifiers. If the capacitance
presented by the load is less than 5nF external components
will be required as the load itself will not ensure stability. No
external compensation in this case will lead to oscillation of
the amplifier and an increase in power consumption. Asingle
5nF or greater capacitor on the output will ensure a stable
amplifier with no oscillations. For applications requiring a
higher slew rate, a good choice for compensation is to add a
50Ω (R
C
GAMMA
or R
COM
) capacitor from the output of the amplifier to ground.
This allows for driving zero to infinite capacitance loads with
no oscillations, minimal overshoot, and a higher slew rate
than using a large capacitor. The high phase margin created
by the external compensation will guarantee stability and
good performance for all conditions.
For noise sensitive applications greater output capacitance
may be desired. When the power supply for the amplifiers
) is connected to the output of the switching regulator,
(AV
IN
the output ripple of the regulator will produce ripple at the
output of the amplifiers.
) in series with a 1nF (C
GAMMA
COM
LM2702
LAYOUT CONSIDERATIONS
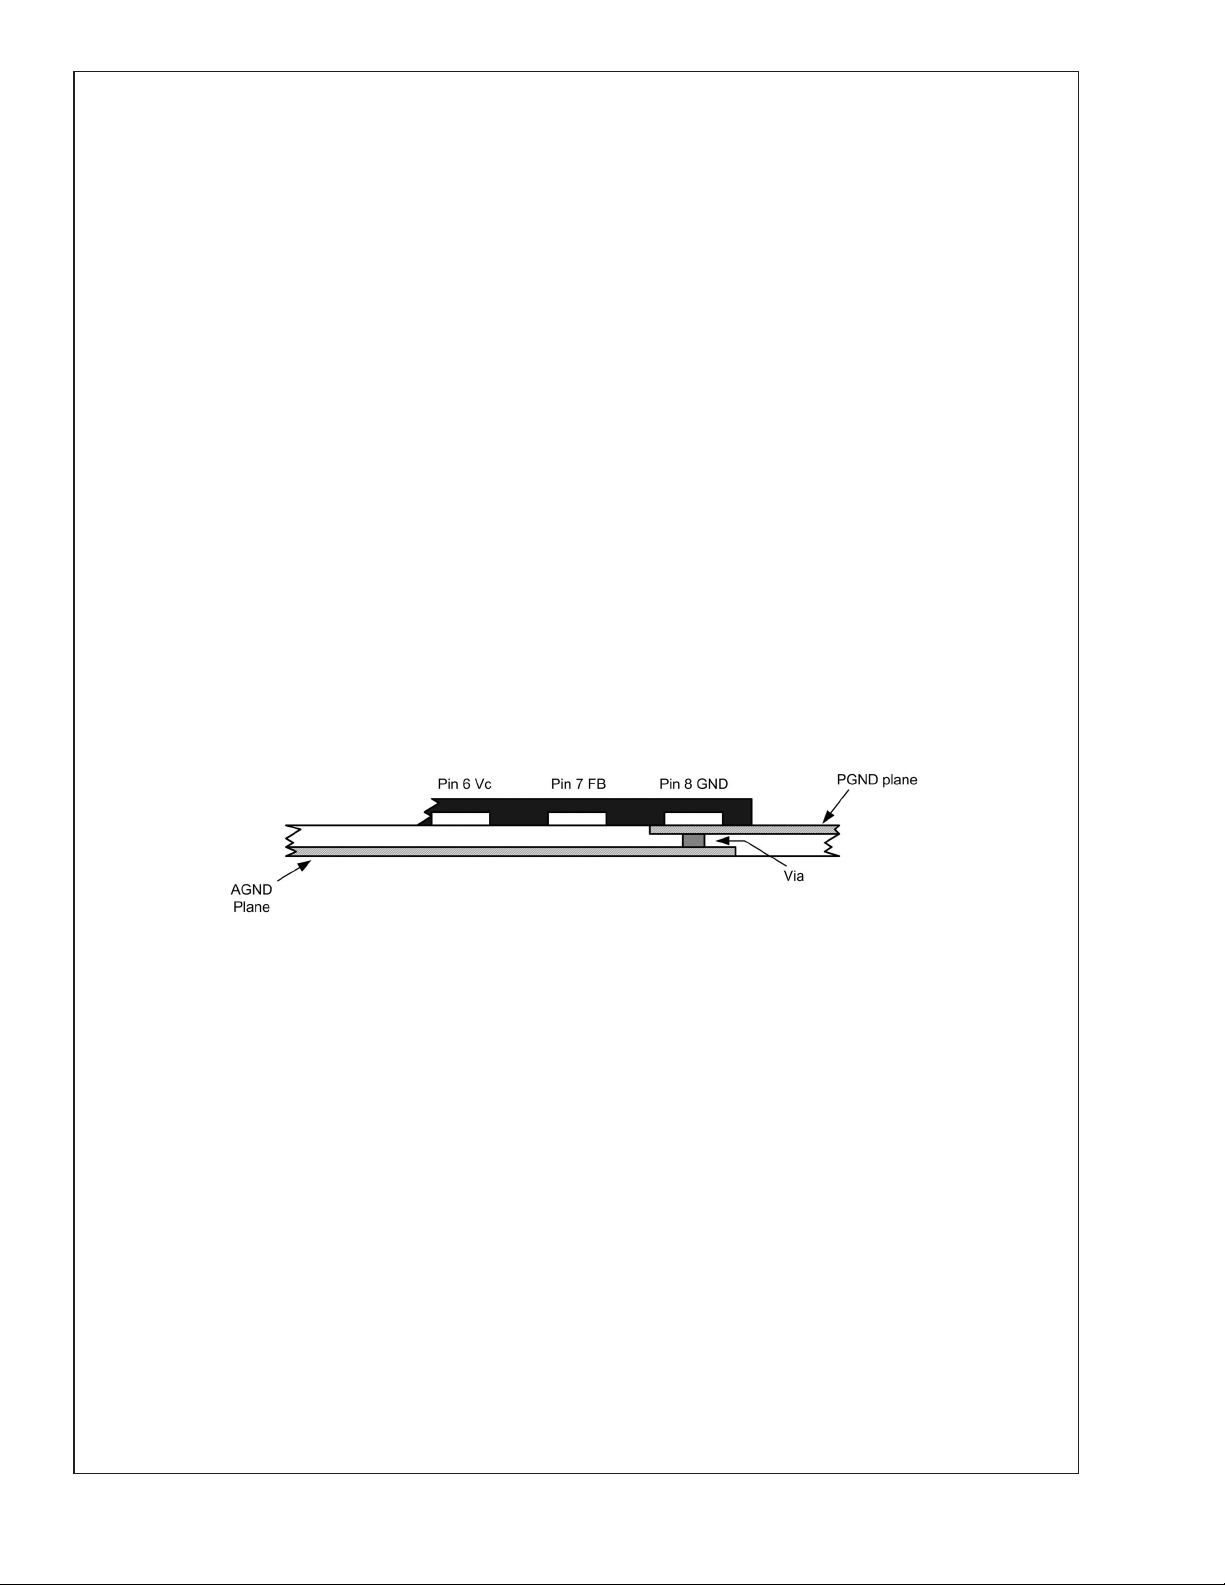
The LM2702 uses a single ground connection, GND. The
feedback, softstart, delay, and compensation networks
should be connected directly to a dedicated analog ground
plane and this ground plane must connect to the GND pin, as
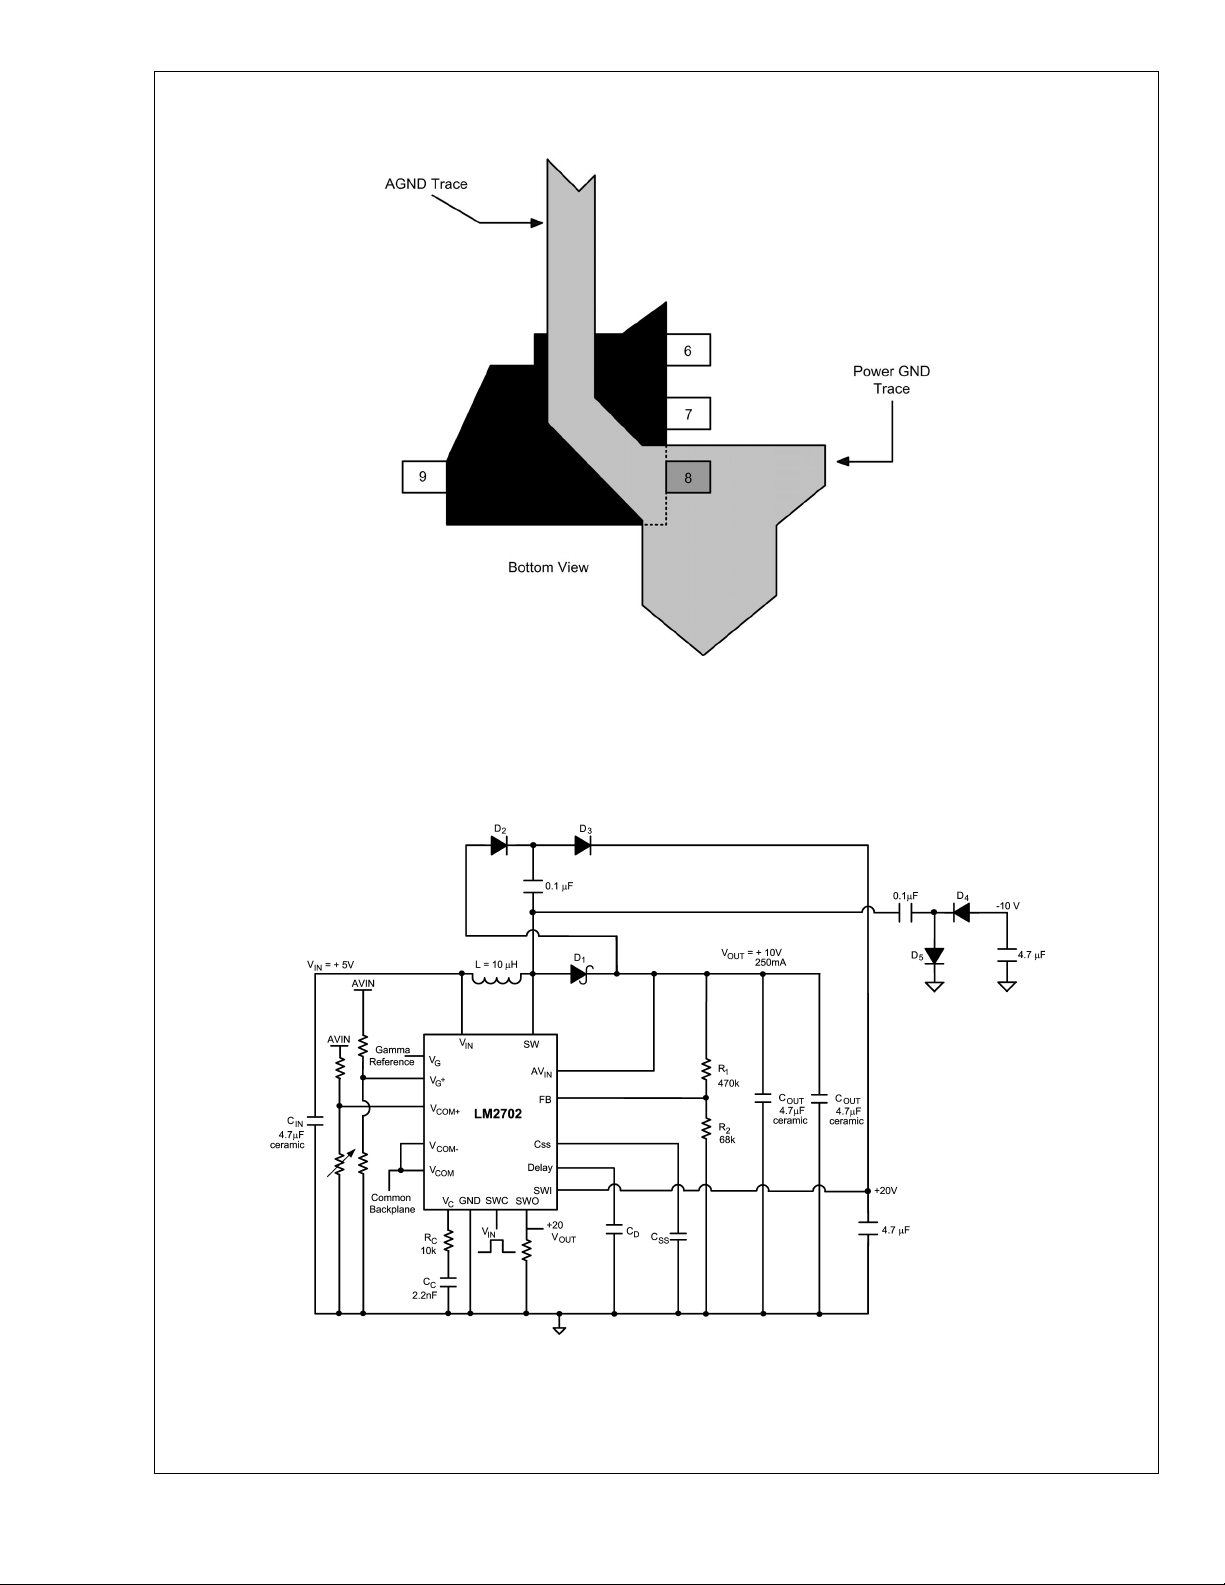
shown in Figure 3. If no analog ground plane is available
then the ground connections of the feedback, softstart, delay, and compensation networks must tie directly to the GND
pin, as show in Figure 4. Connecting these networks to the
PGND plane can inject noise into the system and effect
performance.
The input bypass capacitor C
IC. This will reduce copper trace resistance which effects
input voltage ripple of the IC. For additional input voltage
filtering, a 100nF bypass capacitor can be placed in parallel
with C
, close to the VINpin, to shunt any high frequency
IN
noise to ground. The output capacitor, C
placed close to the IC. Any copper trace connections for the
capacitor can increase the series resistance, which
C
or
OUT
directly effects output voltage ripple and efficiency. The feedback network, resistors R1 and R2, should be kept close to
the FB pin, and away from the inductor, to minimize copper
trace connections that can inject noise into the system.
Trace connections made to the inductor and schottky diode
should be minimized to reduce power dissipation and increase overall efficiency.
must be placed close to the
IN
, should also be
OUT
FIGURE 3. Multi-Layer Layout
20051152
www.national.com19
Page 20
Operation (Continued)
LM2702
20051153
Application Information
FIGURE 4. Single Layer Layout
FIGURE 5. 5V to 10V TFT Application
www.national.com 20
20051172
Page 21
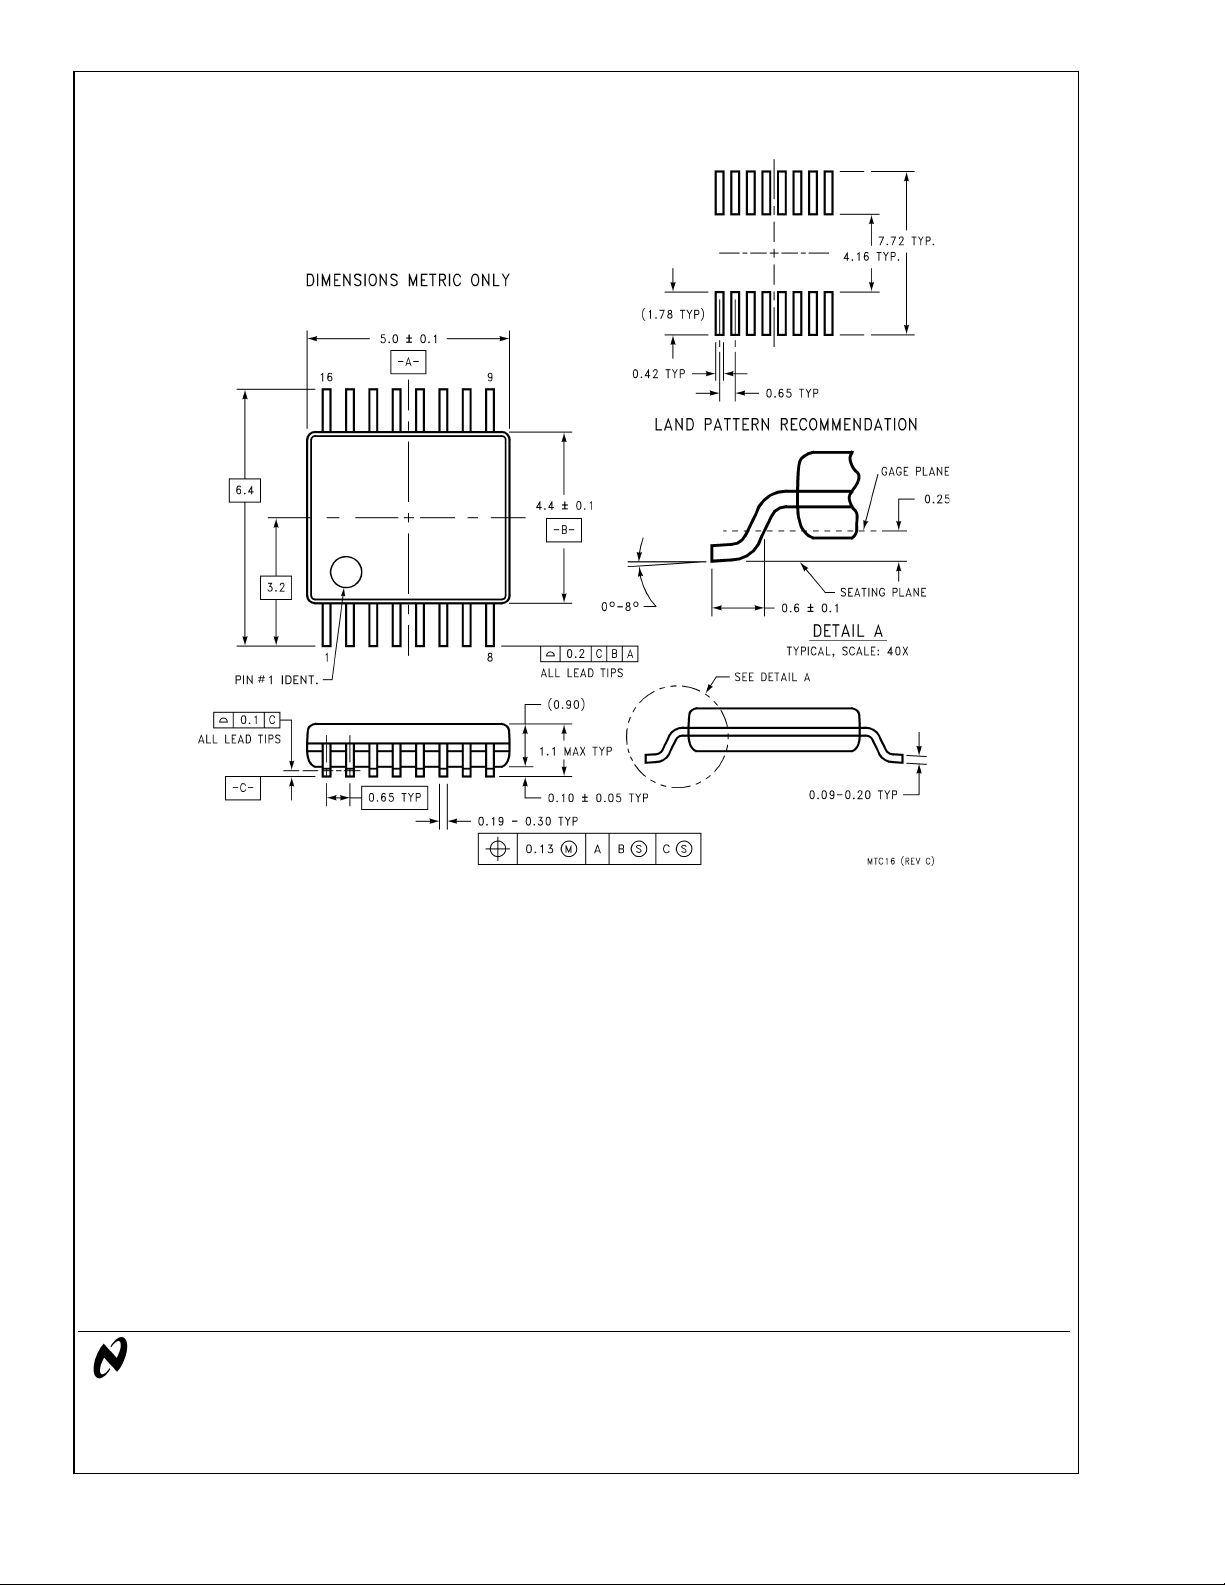
Physical Dimensions inches (millimeters)
unless otherwise noted
LM2702 TFT Panel Module
TSSOP-16 Pin Package (MTC)
For Ordering, Refer to Ordering Information Table
NS Package Number MTC16
LIFE SUPPORT POLICY
NATIONAL’S PRODUCTS ARE NOT AUTHORIZED FOR USE AS CRITICAL COMPONENTS IN LIFE SUPPORT
DEVICES OR SYSTEMS WITHOUT THE EXPRESS WRITTEN APPROVAL OF THE PRESIDENT AND GENERAL
COUNSEL OF NATIONAL SEMICONDUCTOR CORPORATION. As used herein:
1. Life support devices or systems are devices or
systems which, (a) are intended for surgical implant
into the body, or (b) support or sustain life, and
whose failure to perform when properly used in
accordance with instructions for use provided in the
2. A critical component is any component of a life
support device or system whose failure to perform
can be reasonably expected to cause the failure of
the life support device or system, or to affect its
safety or effectiveness.
labeling, can be reasonably expected to result in a
significant injury to the user.
National Semiconductor
Corporation
Americas
Email: [email protected]
www.national.com
National Semiconductor
Europe
Fax: +49 (0) 180-530 85 86
Email: [email protected]
Deutsch Tel: +49 (0) 69 9508 6208
English Tel: +44 (0) 870 24 0 2171
Français Tel: +33 (0) 1 41 91 8790
National Semiconductor
Asia Pacific Customer
Response Group
Tel: 65-2544466
Fax: 65-2504466
Email: [email protected]
National Semiconductor
Japan Ltd.
Tel: 81-3-5639-7560
Fax: 81-3-5639-7507
National does not assume any responsibility for use of any circuitry described, no circuit patent licenses are implied and National reserves the right at any time without notice to change said circuitry and specifications.
 Loading...