

Page 1

XJ POWER LOCK SYSTEMS 8P - 1
POWER LOCK SYSTEMS
TABLE OF CONTENTS
page page
GENERAL INFORMATION
INTRODUCTION ..........................1
POWER LOCK SYSTEM ....................1
REMOTE KEYLESS ENTRY SYSTEM ..........1
DESCRIPTION AND OPERATION
POWER LOCK SWITCH ....................2
DOOR MODULE ..........................2
POWER LOCK MOTOR.....................2
REMOTE KEYLESS ENTRY TRANSMITTER .....2
REMOTE KEYLESS ENTRY RECEIVER.........2
DIAGNOSIS AND TESTING
POWER LOCK SYSTEM AND REMOTE
KEYLESS ENTRY SYSTEM ................3
DOOR MODULE ..........................3
GENERAL INFORMATION
INTRODUCTION
Power locks are optional factory-installed equipment on this model. The power window system and
the power mirror system are included on vehicles
equipped with the power lock option. The Remote
Keyless Entry (RKE) system is an additional option
available on vehicles equipped with the power lock
option. Refer to 8W-61 - Power Door Locks in Group
8W - Wiring Diagrams for complete circuit descriptions and diagrams.
NOTE: This group covers both Left-Hand Drive
(LHD) and Right-Hand Drive (RHD) versions of this
model. Whenever required and feasible, the RHD
versions of affected vehicle components have been
constructed as mirror-image of the LHD versions.
While most of the illustrations used in this group
represent only the LHD version, the diagnostic and
service procedures outlined can generally be
applied to either version. Exceptions to this rule
have been clearly identified as LHD or RHD, if a
special illustration or procedure is required.
POWER LOCK SYSTEM
The power lock system allows all of the doors and
the liftgate to be locked or unlocked electrically by
operating the switch on either front door trim panel.
This system operates with battery power supplied
POWER LOCK MOTOR.....................4
REMOTE KEYLESS ENTRY TRANSMITTER .....5
REMOTE KEYLESS ENTRY RECEIVER.........5
SERVICE PROCEDURES
REMOTE KEYLESS ENTRY TRANSMITTER
BATTERY REPLACEMENT .................6
REMOTE KEYLESS ENTRY TRANSMITTER
PROGRAMMING ........................6
REMOTE KEYLESS ENTRY RECEIVER
PROGRAMMING ........................6
REMOVAL AND INSTALLATION
DOOR MODULE ..........................7
POWER LOCK MOTOR.....................7
REMOTE KEYLESS ENTRY RECEIVER.........8
through a fuse in the junction block, independent of
the ignition switch.
The power lock system includes a lock inhibit feature, which prevents the doors from being locked by
the power lock system if the driver door is open with
the key in the ignition switch or with the headlamp
switch in the On position. However, the lock inhibit
feature will not prevent manual locking of the vehicle
using the manual lock buttons or the key cylinders.
The power lock system includes the front door
power lock switches integral to the driver and passenger door modules, and the power lock motors
mounted in each door and the liftgate. The power
lock control circuitry and the power lock and unlock
relays are integral to the Passenger Door Module
(PDM).
Following are general descriptions of the major
components in the power lock system. Refer to the
owner’s manual in the vehicle glove box for more
information on the features, use and operation of the
power lock system.
REMOTE KEYLESS ENTRY SYSTEM
The Remote Keyless Entry (RKE) system is a radio
frequency system that allows the use of a remote battery-powered radio transmitter to control the power
lock system. On vehicles with the RKE option, the
power locks can be operated by depressing the Lock
or Unlock buttons of the RKE transmitter. The RKE
system includes an illuminated entry feature, which
turns on the courtesy lamps for a timed interval
Page 2

8P - 2 POWER LOCK SYSTEMS XJ
GENERAL INFORMATION (Continued)
(about thirty seconds), when the power locks are
unlocked using the RKE transmitter.
The RKE system for this vehicle also features a
customer programmable horn chirp feature. This feature allows the customer the option of enabling or
disabling the horn chirp request that the RKE
receiver issues as an audible indication that a valid
Lock signal has been received from the RKE transmitter. See Remote Keyless Entry Receiver Programming in this group for more information on this
feature.
The RKE system can retain the vehicle access
codes of up to four transmitters. The transmitter
codes are retained in memory, even if the battery is
disconnected. If a transmitter is faulty or lost, new
transmitter vehicle access codes can be programmed
into the system using a DRB scan tool and the
proper Diagnostic Procedures manual.
The RKE system consists of the remote key fob
transmitter and a radio receiver with program logic.
The RKE receiver is installed in an RKE housing on
the headliner of the vehicle, or in the housing of the
optional overhead console, depending upon how the
vehicle is equipped.
Following are general descriptions of the major
components in the RKE system. Refer to the owner’s
manual in the vehicle glove box for more information
on the features, use and operation of the RKE system.
DESCRIPTION AND OPERATION
PDM contains the control circuitry and the power
lock and unlock relays for the entire power lock system.
In its role as the power lock control module, the
PDM receives inputs from the battery, the ignition
switch, the DDM, the driver door ajar switch, the
key-in ignition switch, and the headlamp switch. It
also receives a hard-wired input from the remote
Keyless Entry (RKE) receiver, if the vehicle is so
equipped. In response to these inputs, the PDM
sends the proper outputs to control the power lock
motors through its integral power lock and unlock
relays.
The DDM and the PDM are mounted to their
respective front door trim panels. The DDM and
PDM are serviced individually and cannot be
repaired. If the DDM or PDM, or any of the switches
and circuitry that they contain are faulty or damaged, the complete DDM or PDM unit must be
replaced.
POWER LOCK MOTOR
In the power lock and Remote Keyless Entry
(RKE) systems, the locks are actuated by a reversible
electric motor mounted within each door and the liftgate. The power lock motor direction is controlled by
the battery and ground feeds from the power lock
and unlock relays integral to the Passenger Door
Module (PDM).
The power lock motors cannot be repaired and, if
faulty or damaged, the entire motor must be
replaced.
POWER LOCK SWITCH
The power locks are controlled by a two-way switch
that is integral to the Driver Door Module (DDM)
and the Passenger Door Module (PDM) mounted in
the trim panel of its respective front door. Each
switch is illuminated by a light-emitting diode when
the ignition switch is turned to the On position. The
power lock switches provide a hard-wired lock or
unlock signal to the power lock system control circuitry, which is located in the PDM.
The power lock switches and their lamps cannot be
repaired. If the switches are damaged or faulty, the
entire PDM or DDM unit must be replaced.
DOOR MODULE
A Driver Door Module (DDM) and a Passenger
Door Module (PDM) are used on all models equipped
with power locks and power windows. Each door
module houses both the front door power lock and
power window switches. In addition to the switches
for its own door, the DDM houses individual switches
for each passenger door power window, a power window lockout switch and the power mirror switch. The
REMOTE KEYLESS ENTRY TRANSMITTER
The Remote Keyless Entry (RKE) system transmitter is equipped with two buttons, labeled Lock and
Unlock. It is also equipped with a key ring and is
designed to serve as a key fob. The operating range
of the transmitter radio signal is up to 7 meters (23
feet) from the RKE receiver.
Each transmitter has a different vehicle access
code, which must be programmed into the memory of
the RKE receiver in the vehicle in order to operate
the RKE system. See Remote Keyless Entry Transmitter Programming in this group for more information.
The transmitter operates on two Panasonic
CR2016 (or equivalent) batteries. Typical battery life
is from one to two years. The transmitter cannot be
repaired and, if faulty or damaged, it must be
replaced.
REMOTE KEYLESS ENTRY RECEIVER
On models with the Remote Keyless Entry (RKE)
option, an RKE receiver is mounted in an RKE housing, or in the overhead console housing on the vehicle
Page 3

XJ POWER LOCK SYSTEMS 8P - 3
DESCRIPTION AND OPERATION (Continued)
headliner. The RKE receiver is a radio frequency unit
that also contains the RKE system program logic.
The RKE receiver also performs as a smart relay for
the illuminated entry feature.
The RKE receiver has a memory function to retain
the vehicle access codes of at least one, but no more
than four RKE transmitters. The receiver is designed
to retain the transmitter codes in memory, even if
the battery is disconnected.
The RKE receiver receives inputs from the battery,
the driver door ajar switch, and the Chrysler Collision Detection (CCD) data bus. It also receives the
radio signal input from the RKE transmitter. In
response to those inputs, it is programmed to control
outputs to the power lock motors, the courtesy lamp
circuits, and the vehicle horn.
The RKE system for this vehicle also features a
customer programmable horn chirp feature. This feature allows the customer the option of enabling or
disabling the horn chirp request that the RKE
receiver issues as an audible indication that a valid
Lock signal has been received from the RKE transmitter. See Remote Keyless Entry Receiver Programming in this group for more information on this
feature.
The RKE receiver cannot be repaired and, if faulty
or damaged, it must be replaced.
DIAGNOSIS AND TESTING
POWER LOCK SYSTEM AND REMOTE KEYLESS ENTRY SYSTEM
On models without the Remote Keyless Entry
(RKE) option, proceed directly to the Door Module
diagnosis. As a preliminary diagnosis for models with
the RKE system, note the power lock system and
illuminated entry system operation while you actuate
both the Lock and Unlock functions with the power
lock switches and the RKE transmitter. Then, proceed as follows:
• If the entire power lock system fails to function
with either the power lock switches or the RKE
transmitter, unplug the wire harness connector from
the RKE receiver and test the power lock system
operation again using the power lock switches. If the
power lock system now operates, see the Remote
Keyless Entry Receiver diagnosis in this group. If the
power lock system still fails to operate, see the Door
Module diagnosis in this group.
• If the power lock system functions with both
power lock switches, but not with the RKE transmitter, see the Remote Keyless Entry Transmitter diagnosis in this group.
• If one power lock motor fails to operate with
both of the power lock switches and/or the RKE
transmitter, see the Power Lock Motor diagnosis in
this group.
• If the RKE and power lock systems are functioning, but the illuminated entry system fails to operate,
see the Remote Keyless Entry Receiver diagnosis in
this group.
DOOR MODULE
If the power lock system is inoperative with either
front door power lock switch, test the Passenger Door
Module (PDM). If the power lock system is inoperative with only the driver side front door power lock
switch, test the Driver Door Module (DDM). For circuit descriptions and diagrams, refer to 8W-61 Power Door Locks in Group 8W - Wiring Diagrams.
DRIVER DOOR MODULE
The only function of the Driver Door Module
(DDM) in the power lock system is to provide a Lock
or Unlock signal to the power lock system control circuitry contained within the Passenger Door Module
(PDM). The DDM signals the PDM by providing a
hard-wired ground path through the DDM ground
circuit and the driver side power lock switch contacts
to the lock request or unlock request terminals of the
PDM. The DDM power lock switch function can be
tested as follows:
(1) Disconnect and isolate the battery negative
cable. Remove the driver side front door trim panel
and unplug the 12-way DDM wire harness connector
(C-2) from the DDM. Check for continuity between
the ground circuit cavity of the 12-way DDM wire
harness connector and a good ground. There should
be continuity. If OK, go to Step 2. If not OK, repair
the open circuit to ground as required.
(2) If the problem being diagnosed is inoperative
power lock switch illumination, proceed as follows. If
the problem is not power lock switch illumination, go
to Step 4. Connect the battery negative cable. Turn
the ignition switch to the Accessory or On positions.
Check for battery voltage at both sides of the power
window circuit breaker in the junction block. If OK,
go to Step 3. If not OK, replace the faulty circuit
breaker.
(3) With the ignition switch still in the On or
Accessory position, check for battery voltage at the
fused ignition switch output circuit cavity of the
12-way DDM wire harness connector. If OK, replace
the faulty DDM. If not OK, repair the open circuit to
the junction block as required.
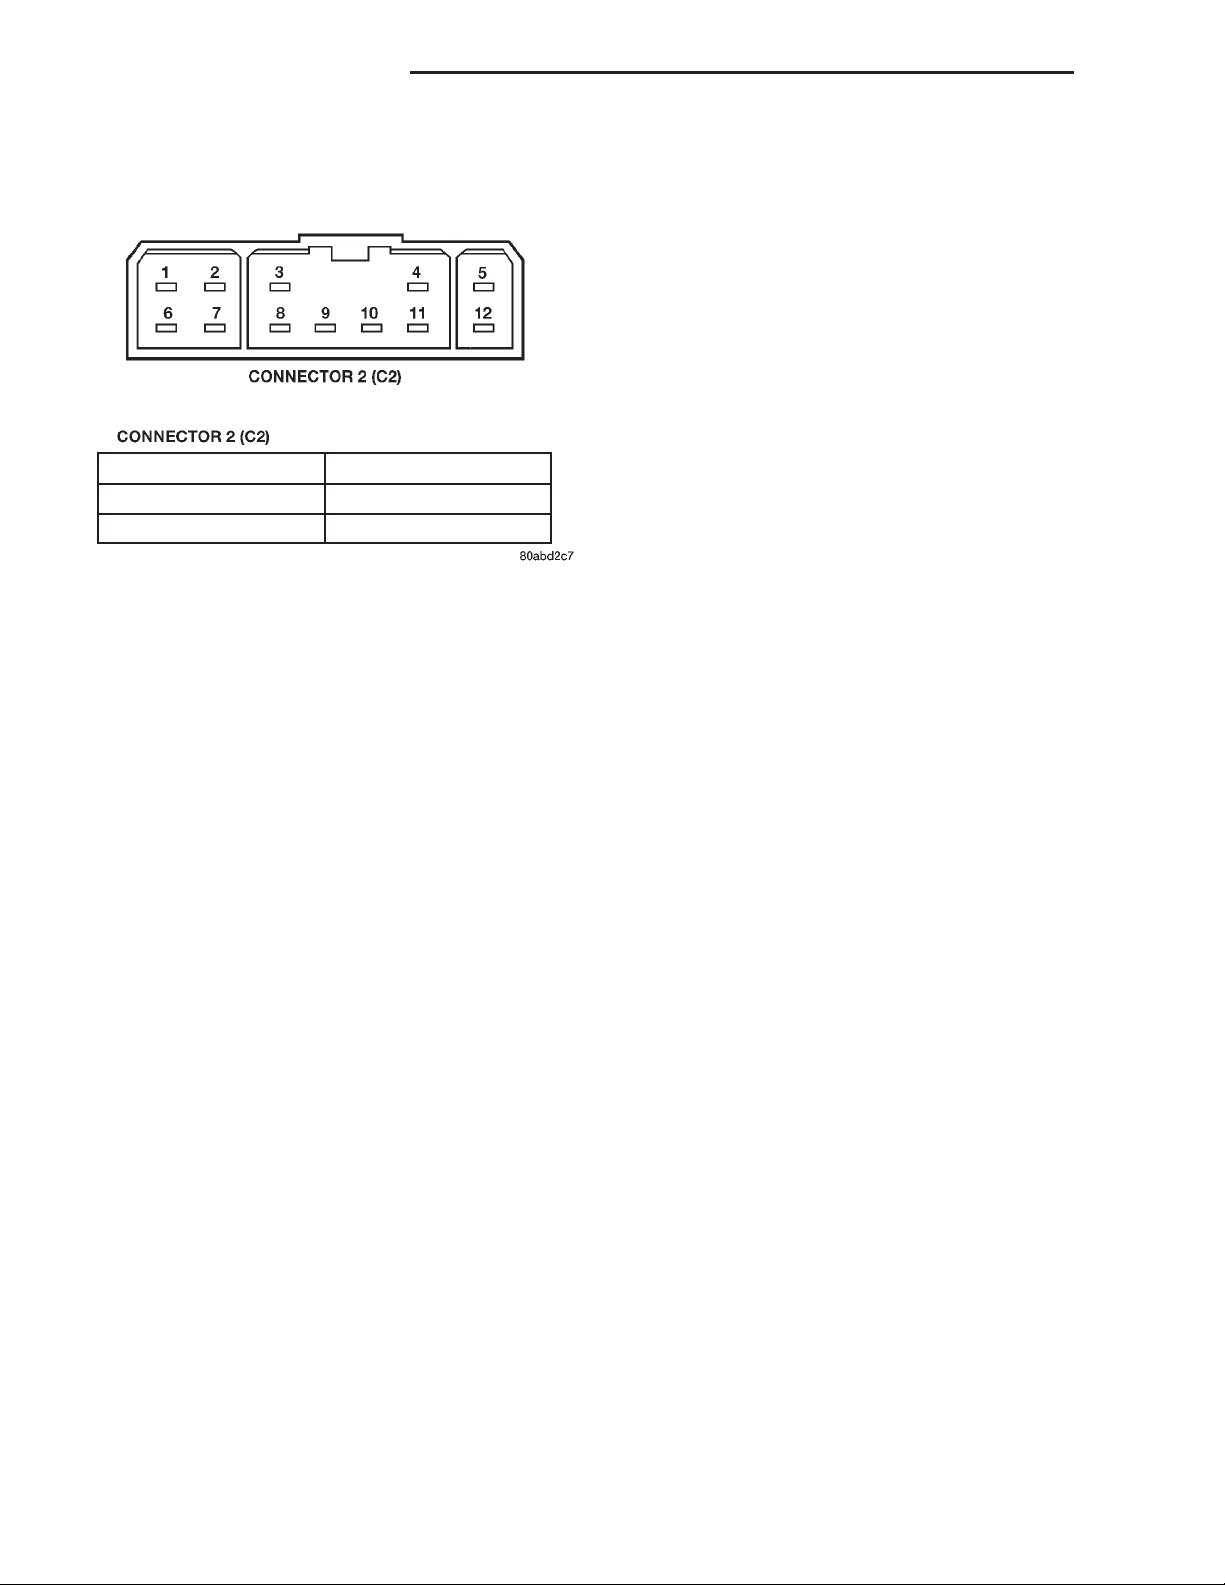
(4) Test the power lock switch continuity through
the DDM 12-way wire harness connector receptacle.
See the DDM Power Lock Switch Continuity chart
(Fig. 1) to determine if the continuity is correct in
both the Lock and Unlock switch positions. If OK,
repair the lock request circuit and/or the unlock
Page 4
8P - 4 POWER LOCK SYSTEMS XJ
DIAGNOSIS AND TESTING (Continued)
request circuit between the DDM and the PDM as
required. If not OK, replace the faulty DDM.
SWITCH POSITION CONTINUITY BETWEEN
LOCK 7 & 8
UNLOCK 11 & 8
Fig. 1 DDM Power Lock Switch Continuity
PASSENGER DOOR MODULE
The Passenger Door Module (PDM) contains the
passenger side front door power lock switch and the
power lock system control circuitry. In its role as a
power lock switch, it provides the power lock system
control circuitry with a ground path through the
PDM ground circuit and the driver side power lock
switch contacts to indicate a lock request or unlock
request.
In its role as the power lock control module, the
PDM receives inputs from the battery, the ignition
switch, the DDM, the driver door ajar switch, the
key-in ignition switch, and the headlamp switch. It
also receives a hard-wired input from the RKE
receiver, if the vehicle is so equipped. In response to
these inputs, the PDM sends the proper outputs to
control the power lock motors through its integral
power lock and unlock relays. The PDM power lock
system functions can be tested as outlined below. If
the power lock system operates, but the RKE system
lock and/or unlock functions are inoperative, see the
diagnosis for the Remote Keyless Entry Transmitter
in this group.
(1) Check the fuse in the junction block. If OK, go
to Step 2. If not OK, repair the shorted circuit or
component as required and replace the faulty fuse.
(2) Disconnect and isolate the battery negative
cable. Remove the passenger side front door trim
panel and unplug the 8-way PDM wire harness connector (C-1) from the PDM. Check for continuity
between the ground circuit cavity of the 8-way PDM
wire harness connector and a good ground. There
should be continuity. If OK, go to Step 3. If not OK,
repair the open circuit to ground as required.
(3) If the problem being diagnosed is inoperative
power lock switch illumination, proceed as follows. If
the problem is not power lock switch illumination, go
to Step 5. Connect the battery negative cable. Turn
the ignition switch to the Accessory or On positions.
Check for battery voltage at both sides of the power
window circuit breaker in the junction block. If OK,
go to Step 4. If not OK, replace the faulty circuit
breaker.
(4) With the ignition switch still in the Accessory
or On positions, check for battery voltage at the
fused ignition switch output circuit cavity of the
8-way PDM wire harness connector. If OK, replace
the faulty PDM. If not OK, repair the open circuit to
the junction block as required.
(5) If the problem being diagnosed is an inoperative door lock inhibit feature or a power lock system
that responds to an Unlock command, but not a Lock
command, proceed as follows. Otherwise, go to Step
7. With the driver side front door closed, check for
continuity between the door ajar/key-in circuit cavity
of the 8-way PDM wire harness connector and a good
ground. There should be no continuity. If OK, go to
Step 6. If not OK, repair the shorted door ajar and/or
key-in ignition circuits as required. Refer to Group
8U - Chime/Buzzer Warning Systems for more information.
(6) Open the driver side front door with the key in
the ignition switch or with the headlamp switch in
the On position. Check for continuity between the
door ajar/key-in circuit cavity of the 8-way PDM wire
harness connector and a good ground. There should
be continuity. If OK, go to Step 8. If not OK, repair
the open door ajar and/or key-in ignition circuits as
required. Refer to Group 8U - Chime/Buzzer Warning
Systems for more information.
(7) Connect the battery negative cable. Check for
battery voltage at the fused B(+) circuit cavity of the
8-way PDM wire harness connector. If OK, go to Step
8. If not OK, repair the open circuit to the fuse in the
junction block as required.
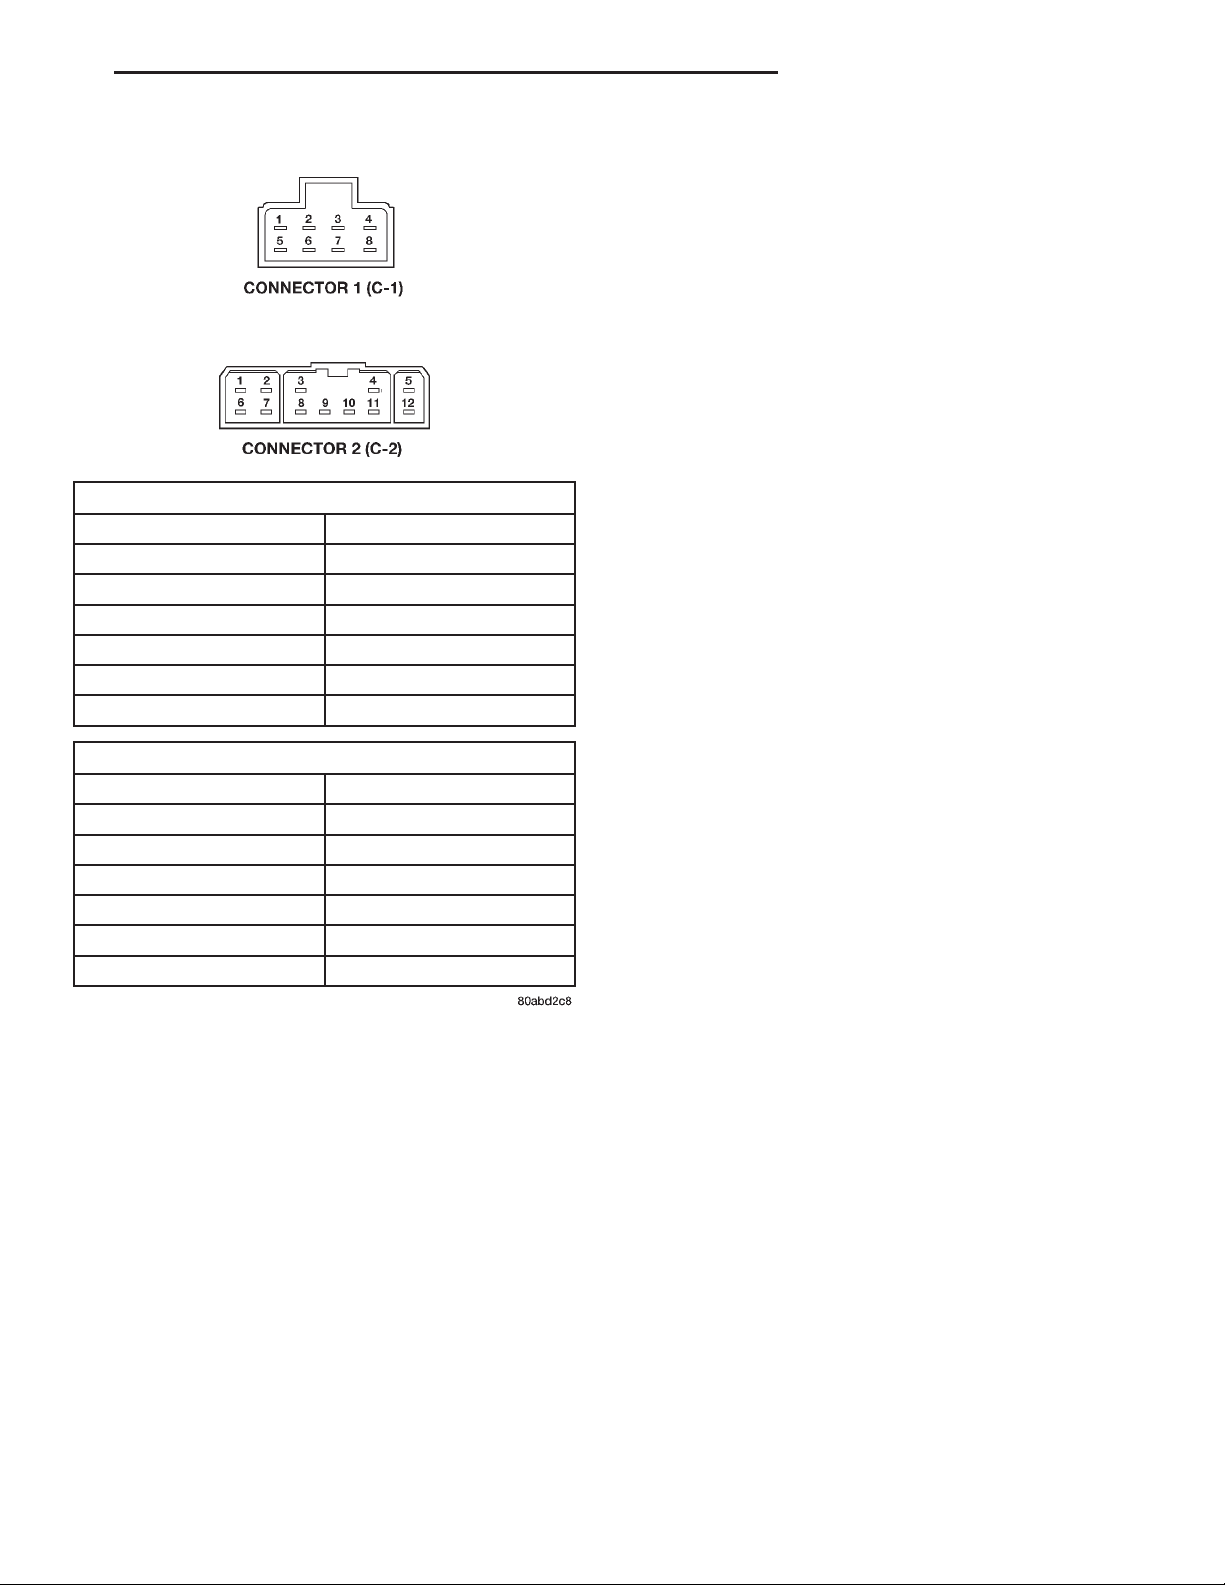
(8) Test the PDM power lock switch continuity
through the two PDM wire harness connector receptacles. See the PDM Power Lock Switch Continuity
chart (Fig. 2) to determine if the continuity is correct
in both the Lock and Unlock switch positions. If OK,
see the diagnosis for Power Lock Motors in this
group. If not OK, replace the faulty PDM.
POWER LOCK MOTOR
Before you proceed with this diagnosis, confirm
proper power door lock switch operation. See Door
Module in this group for the diagnostic procedures.
Remember, the Passenger Door Module (PDM) circuitry controls the output to each of the power lock
motors. For circuit descriptions and diagrams, refer
to 8W-61 - Power Door Locks in Group 8W - Wiring
Diagrams.
Page 5
XJ POWER LOCK SYSTEMS 8P - 5
DIAGNOSIS AND TESTING (Continued)
(3) Once it is determined which power lock motor
is inoperative, that motor can be tested as follows.
Unplug the wire harness connector at the inoperative
power lock motor. Apply 12 volts to the motor terminals to check its operation in one direction. Reverse
the polarity to check the operation in the other direction. If OK, repair the short or open circuits between
the power lock motor and the PDM as required. If
not OK, replace the faulty power lock motor.
REMOTE KEYLESS ENTRY TRANSMITTER
(1) Replace the Remote Keyless Entry (RKE)
transmitter batteries. See Remote Keyless Entry
Transmitter Battery Replacement in this group for
LEFT-HAND DRIVE (LHD)
SWITCH POSITION CONTINUITY BETWEEN
LOCK C1 PIN3&C1PIN6
C1PIN3&C2PIN1
C1PIN3&C2PIN5
UNLOCK C1 PIN6&C1PIN7
C1PIN7&C2PIN1
C1PIN7&C2PIN5
RIGHT-HAND DRIVE (RHD)
SWITCH POSITION CONTINUITY BETWEEN
LOCK C1 PIN 7& C1 PIN 6
C1PIN7&C2PIN1
C1PIN7&C2PIN5
UNLOCK C1 PIN6&C1PIN3
C1PIN3&C2PIN1
C1PIN3&C2PIN5
the procedures. Test each of the transmitter functions. If OK, discard the faulty batteries. If not OK,
go to Step 2.
(2) Perform the Remote Keyless Entry Transmitter
Programming procedure with the suspect transmitter
and another known good transmitter. Use a DRB
scan tool, as described in the proper Diagnostic Procedures manual.
(3) Test the RKE system operation with both
transmitters. If both transmitters fail to operate the
power lock system, see the diagnosis for the Remote
Keyless Entry Receiver in this group. If the known
good transmitter operates the power locks and the
suspect transmitter does not, replace the faulty
transmitter.
NOTE: Be certain to perform the Remote Keyless
Entry Transmitter Programming procedure again
following this test. This procedure will erase the
access code of the test transmitter from the RKE
receiver.
Fig. 2 PDM Power Lock Switch Continuity
(1) Check each power lock motor for correct operation while moving the power lock switch to both the
Lock and Unlock positions. If all of the power lock
motors are inoperative, go to Step 2. If one power
lock motor is inoperative, go to Step 3.
(2) If all of the power lock motors are inoperative,
the problem may be caused by one shorted motor.
Unplugging a shorted power lock motor from the
power lock circuit will allow the good power lock
motor to operate. Unplug each power lock motor wire
harness connector, one at a time, and recheck both
the lock and unlock functions by operating the power
lock switch. If all of the power lock motors are still
inoperative after the above test, check for a short or
open circuit between the power lock motors and the
PDM. If unplugging one power lock motor causes the
other motors to become functional, go to Step 3 to
test the unplugged motor.
REMOTE KEYLESS ENTRY RECEIVER
If the problem being diagnosed is an inoperative
Remote Keyless Entry (RKE) horn chirp feature, be
certain that the horn chirp feature has not been disabled. See Remote Keyless Entry Receiver Programming in this group for the procedures. Also be certain
that the vehicle horn system is operational. Refer to
Group 8G - Horn Systems for more information.
If the problem being diagnosed is an inoperative
RKE illuminated entry system, be certain that the
interior courtesy lamp system is operational. Refer to
Group 8L - Lamps for more information.
Before you proceed with diagnosis of the RKE
receiver, see the diagnosis for Remote Keyless Entry
Transmitter in this group. For circuit descriptions
and diagrams, refer to 8W-61 - Power Door Locks in
Group 8W - Wiring Diagrams.
(1) Check the fuses in the Power Distribution Center (PDC) and the junction block. If OK, go to Step 2.
Page 6

8P - 6 POWER LOCK SYSTEMS XJ
DIAGNOSIS AND TESTING (Continued)
If not OK, repair the shorted circuit or component as
required and replace the faulty fuse.
(2) Disconnect and isolate the battery negative
cable. Remove the Remote Keyless Entry (RKE)
receiver from the headliner. Unplug the wire harness
connector from the RKE receiver.
(3) Check the wire harness connector and the
receptacle in the RKE receiver for loose, corroded, or
damaged terminals and pins. If OK, go to Step 4. If
not OK, repair as required.
(4) Check for continuity between each of the two
ground circuit cavities of the RKE receiver wire harness connector and a good ground. In each case,
there should be continuity. If OK, go to Step 5. If not
OK, repair the circuit to ground as required.
(5) Connect the battery negative cable. Check for
battery voltage at each of the two fused B(+) circuit
cavities of the RKE receiver wire harness connector.
If OK, go to Step 6. If not OK, repair the open circuit
to the PDC or the junction block as required.
(6) If the problem being diagnosed involves only
the RKE horn chirp feature, go to Step 10. If the
problem being diagnosed involves only the RKE illuminated entry feature, go to Step 9. If the problem
being diagnosed involves only the RKE power lock
feature, go to Step 7.
(7) Disconnect and isolate the battery negative
cable. Unplug the 8-way Passenger Door Module
(PDM) wire harness connector. Check for continuity
between the lock request circuit cavity of the RKE
receiver wire harness connector and a good ground.
Repeat the test between the unlock request circuit
cavity of the RKE receiver wire harness connector
and a good ground. In each case, there should be no
continuity. If OK, go to Step 8. If not OK, repair the
shorted circuit as required.
(8) Check for continuity between the lock request
circuit cavities of the RKE receiver wire harness connector and the 8-way PDM wire harness connector.
Repeat the test between the unlock request circuit
cavities of the RKE receiver wire harness connector
and the 8-way PDM wire harness connector. In each
case, there should be continuity. If OK, replace the
faulty RKE receiver. If not OK, repair the open circuit as required.
(9) Check for continuity between the door ajar circuit cavity of the RKE receiver wire harness connector and a good ground with the driver door closed.
There should be no continuity until the driver door is
opened. If OK, replace the faulty RKE receiver. If not
OK, repair the circuit or replace the faulty driver
door ajar switch as required.
(10) Unplug the horn relay from the junction
block. Check for continuity between the horn relay
output circuit cavity of the RKE receiver wire harness connector and a good ground. There should be
no continuity. If OK, go to Step 11. If not OK, repair
the short circuit to the horn relay as required.
(11) Check for continuity between the horn relay
output circuit cavity of the RKE receiver wire harness connector and the junction block cavity for the
horn relay coil ground terminal (85). There should be
continuity. If OK, replace the faulty RKE receiver. If
not OK, repair the open circuit to the junction block
as required.
SERVICE PROCEDURES
REMOTE KEYLESS ENTRY TRANSMITTER BATTERY REPLACEMENT
The Remote Keyless Entry (RKE) transmitter case
snaps open and shut for battery access. To replace
the RKE transmitter batteries:
(1) Using a trim stick or another suitable wide
flat-bladed tool, gently pry at the center seam of the
transmitter case halves near the key ring until the
two halves unsnap.
(2) Lift the back half of the transmitter case off of
the transmitter.
(3) Remove the two batteries from the transmitter.
(4) Replace the two batteries with new Panasonic
CR2016, or their equivalent. Be certain that the batteries are installed with their polarity correctly oriented.
(5) Align the two transmitter case halves with
each other, and squeeze them firmly together until
they snap back into place.
REMOTE KEYLESS ENTRY TRANSMITTER PROGRAMMING
To program the Remote Keyless Entry (RKE)
transmitter access codes into the RKE receiver
requires the use of a DRB scan tool. Refer to the
proper Diagnostic Procedures manual for more information.
REMOTE KEYLESS ENTRY RECEIVER PROGRAMMING
The optional Remote Keyless Entry (RKE) system
for this vehicle has a customer programmable horn
chirp feature. The horn chirp is requested by the
RKE receiver through a hard-wired circuit to the
horn relay, whenever a valid Lock message is
received from a programmed RKE radio transmitter.
The purpose of the horn chirp is to provide the
vehicle operator with an audible verification that the
Lock request has been received by the RKE receiver.
However, for any number of reasons, some customers
may prefer that this feature be disabled. This RKE
system allows them that option.
Page 7
XJ POWER LOCK SYSTEMS 8P - 7
SERVICE PROCEDURES (Continued)
To program the Remote Keyless Entry (RKE)
receiver so that the horn chirp feature is disabled,
proceed as follows:
(1) While within the reception range of the RKE
receiver, press and hold the Lock button of a programmed RKE transmitter depressed for five to ten
seconds.
(2) While holding the RKE transmitter Lock button depressed, press and release the RKE transmitter Unlock button.
(3) The RKE horn chirp feature is now disabled.
Repeating the preceding steps will again enable
the RKE horn chirp feature.
REMOVAL AND INSTALLATION
DOOR MODULE
(1) Disconnect and isolate the battery negative
cable.
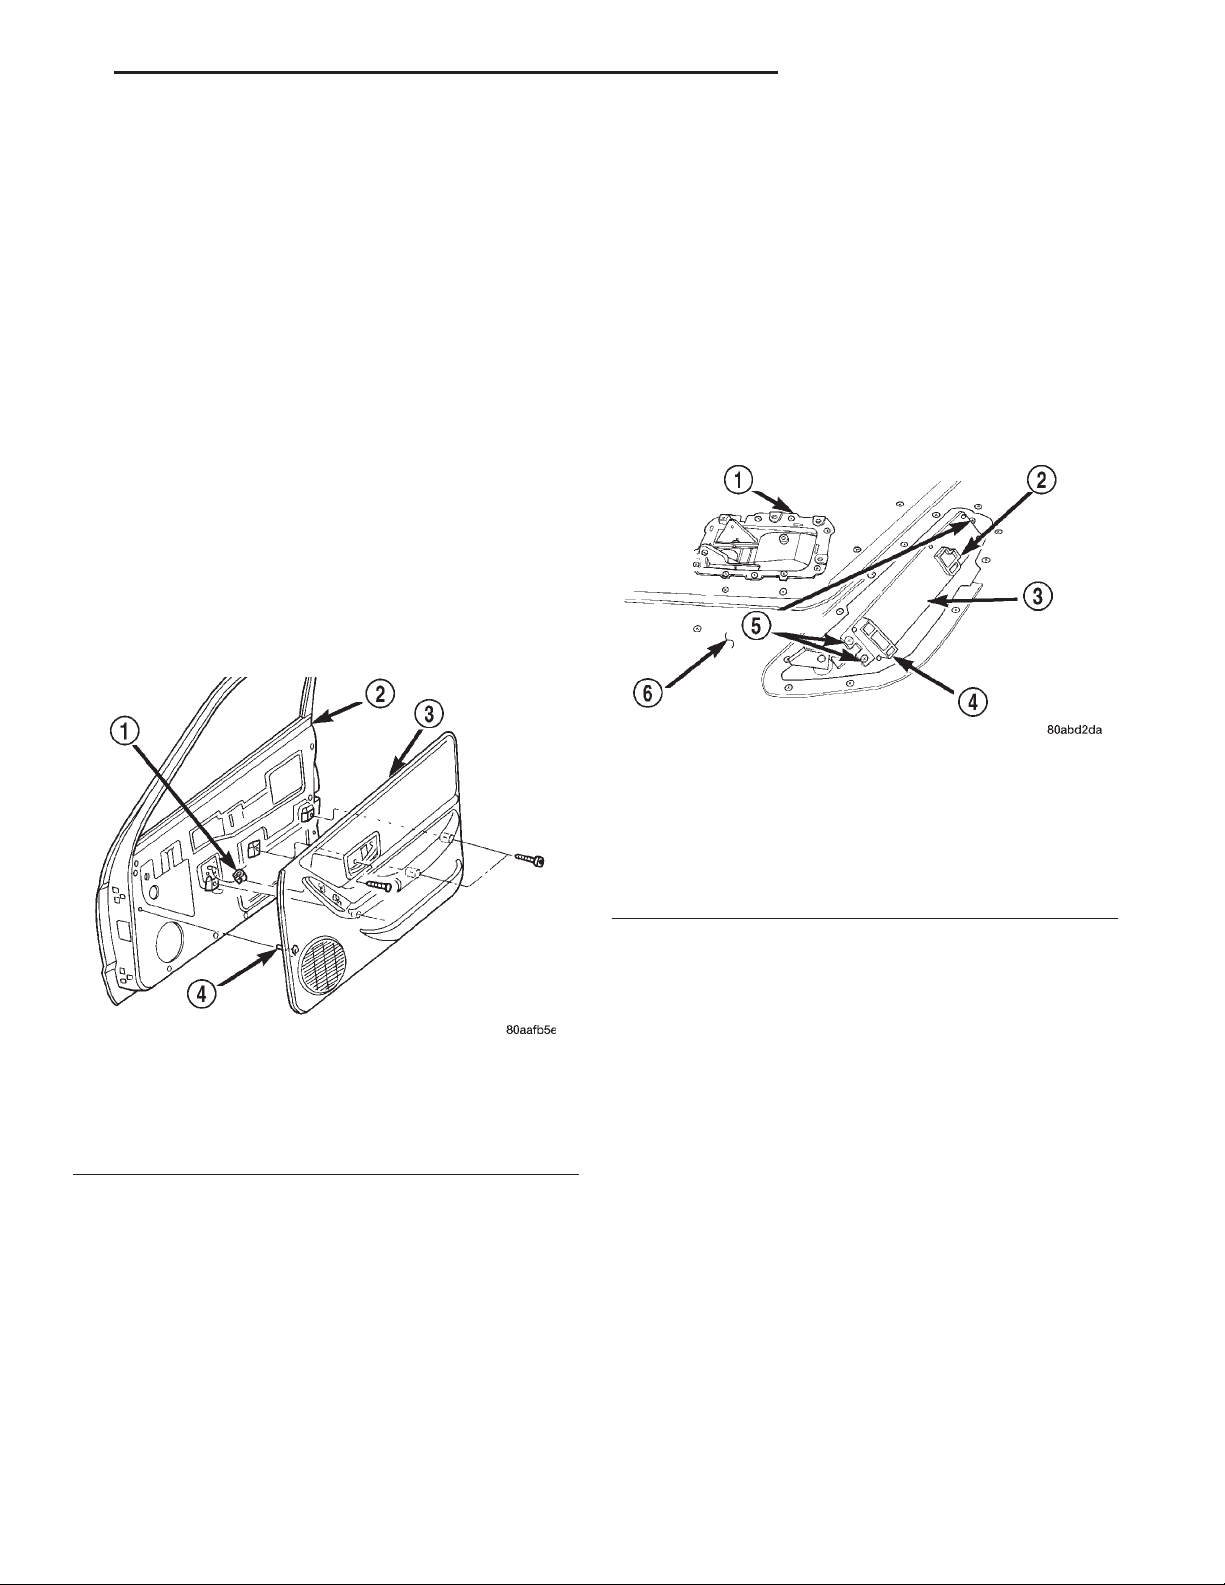
(2) Remove the screws that secure the front door
trim panel to the inner door panel (Fig. 3).
(5) Pull the front door trim panel away from the
inner door panel far enough to access the inside door
latch release and lock linkage rods near the back of
the inside door remote controls.
(6) Unsnap the plastic retainer clips from the
inside door remote control ends of the latch release
and lock linkage rods, and remove the rod ends from
the inside door remote controls.
(7) Unplug the wire harness connectors from the
door module.
(8) Remove the trim panel from the front door.
(9) Remove the three screws that secure the door
module to the front door trim panel (Fig. 4).
Fig. 3 Front Door Trim Panel Remove/Install
1 – U-NUT
2 – DOOR
3 – TRIM PANEL
4 – PUSH-IN FASTENER
(3) Using a trim stick or another suitable wide
flat-bladed tool, gently pry the front door trim panel
away from the door around the perimeter to release
the trim panel retainers.
NOTE: To aid in the removal of the trim panel, start
at the bottom of the panel.
(4) Lift the front door trim panel upwards and
away from the inner door panel far enough to disengage the top of the panel from the inner belt weatherstrip.
Fig. 4 Door Module Remove/Install
1 – INSIDE DOOR LATCH AND LOCK REMOTE CONTROLS
2 – CONNECTOR 1 RECEPTACLE
3 – DOOR MODULE
4 – CONNECTOR 2 RECEPTACLE
5 – SCREWS
6 – DOOR TRIM PANEL
(10) Remove the door module from the front door
trim panel.
(11) Reverse the removal procedures to install.
Tighten the mounting screws to 2.2 N·m (20 in. lbs.).
POWER LOCK MOTOR
FRONT DOOR
The front door power lock motor is integral to the
front door latch unit. If the front door power lock
motor is faulty or damaged, the entire latch unit
must be replaced. Refer to Group 23 - Body for the
front door latch service procedures.
REAR DOOR
The rear door power lock motor is integral to the
rear door latch unit. If the rear door power lock
motor is faulty or damaged, the entire latch unit
must be replaced. Refer to Group 23 - Body for the
rear door latch service procedures.
Page 8
8P - 8 POWER LOCK SYSTEMS XJ
REMOVAL AND INSTALLATION (Continued)
LIFTGATE
(1) Disconnect and isolate the battery negative
cable.
(2) Open the liftgate.
(3) Remove the liftgate trim panel from the lift-
gate. Refer to Group 23 - Body for the procedures.
(4) Reach through the liftgate inner panel access
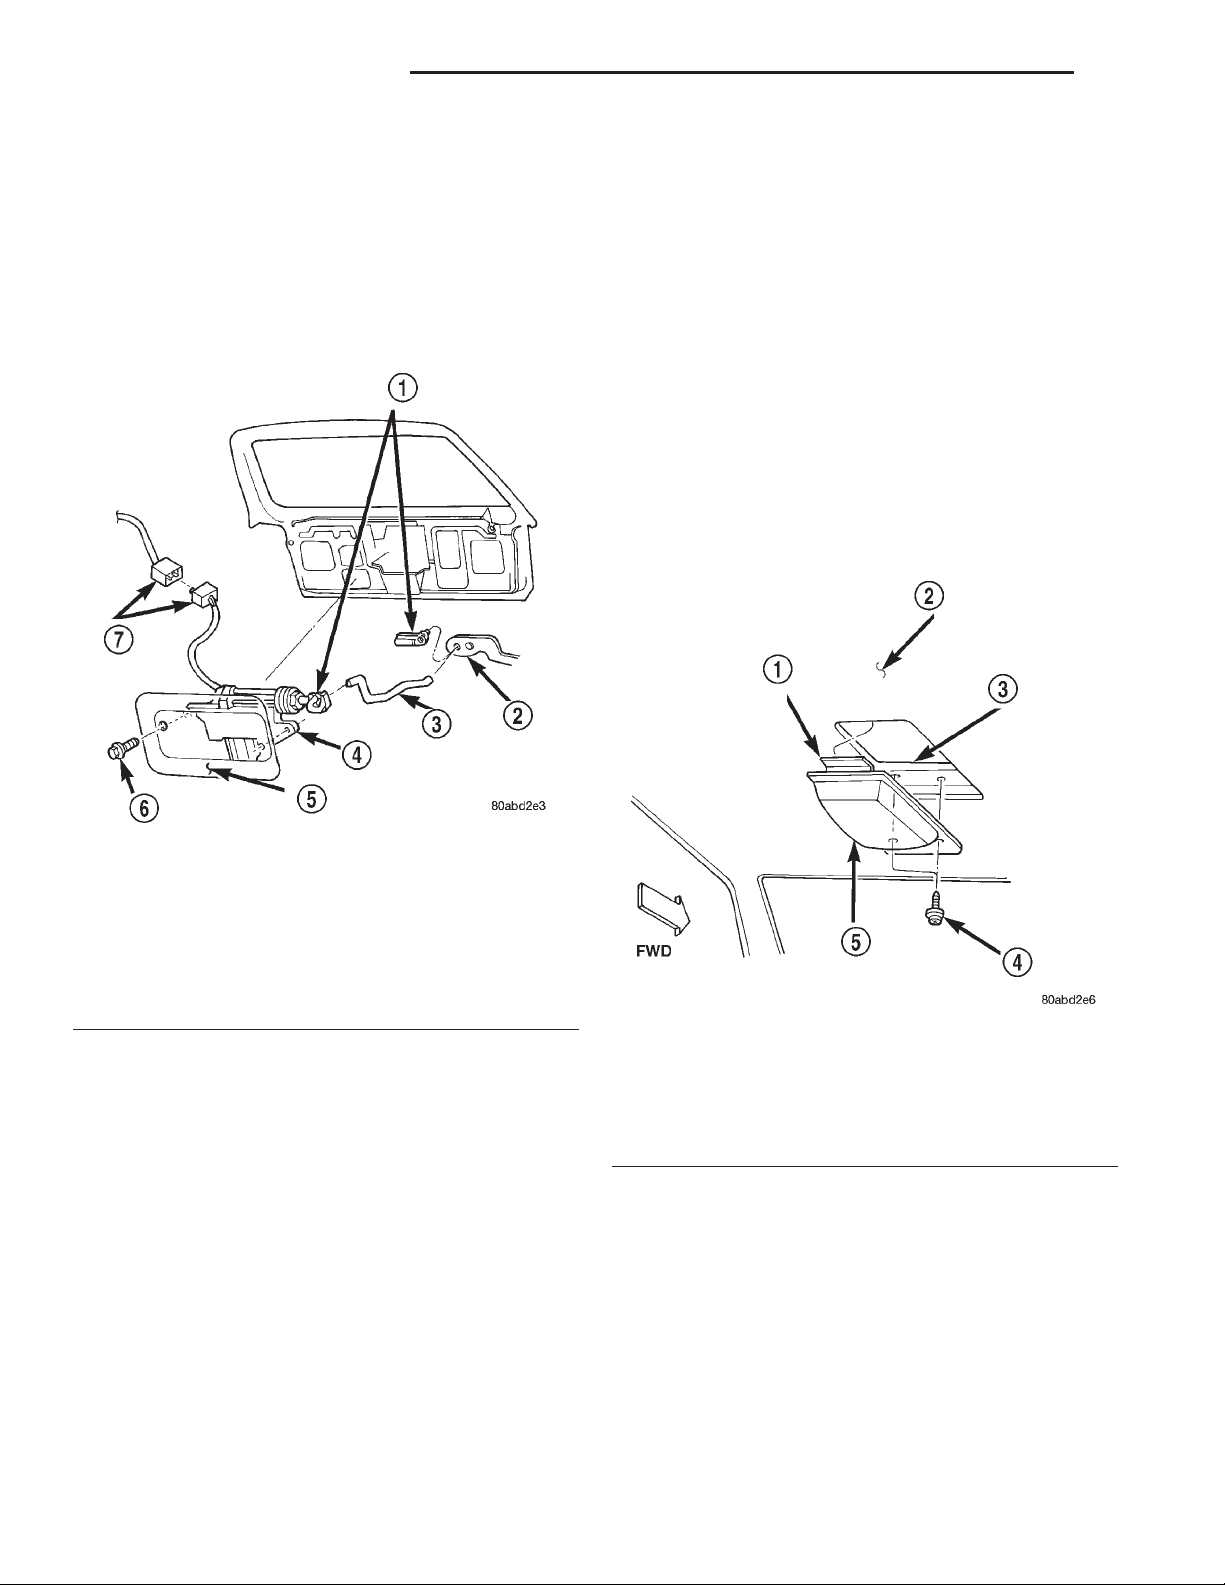
hole and disconnect the link from the clip on the
power lock motor (Fig. 5).
cotton clothing, not synthetic fabric clothing; and,
should ground themselves before and during all
handling and service procedures. Electrically conductive wrist or heel straps are recommended, or
static dissipating shoes are also acceptable. Work
and storage areas should be free of static generative materials such as: dry air, glass, nylon, wool,
fur, silk, rayon, acrylic, polystyrene foam, polyester,
saran, polyethylene, polypropylene, PVC, and
teflon.
MINI-DOME MOUNTED TYPE
(1) Disconnect and isolate the battery negative
cable.
(2) Remove the two screws that secure the Remote
Keyless Entry (RKE) mini-dome housing to the roof
panel reinforcement (Fig. 6).
Fig. 5 Liftgate Power Lock Motor Remove/Install
1 – CLIPS
2 – LOCK LEVER
3 – LINK
4 – MOTOR
5 – LIFTGATE INNER PANEL
6 – SCREW
7 – CONNECTORS
(5) Remove the two screws that secure the power
lock motor to the liftgate inner panel.
(6) Pull the power lock motor out through the liftgate inner panel access hole far enough to access the
wire harness connector.
(7) Unplug the wire harness connector from the
power lock motor.
(8) Remove the power lock motor from the liftgate.
(9) Reverse the removal procedures to install.
Tighten the power lock motor mounting screws to 3
N·m (28 in. lbs.).
REMOTE KEYLESS ENTRY RECEIVER
CAUTION: A discharge of static electricity may
damage this unit. At no time should any source of
static electricity be permitted near this unit. Technicians handling or servicing the unit should wear
Fig. 6 Mini-Dome Housing Remove/Install
1 – MOUNTING TAB
2 – HEADLINER
3 – REINFORCEMENT
4 – SCREW
5 – MINI-DOME HOUSING
(3) Lower the front of the mini-dome housing and
slide the unit forward to disengage the rear mounting tab from the headliner.
(4) Lower the mini-dome housing far enough to
access the RKE receiver wire harness connector.
(5) Unplug the wire harness connector from the
RKE receiver.
(6) Remove the RKE mini-dome unit from the
headliner.
(7) Reverse the removal procedures to install.
Tighten the mounting screws to 2.8 N·m (24 in. lbs.).
Page 9
XJ POWER LOCK SYSTEMS 8P - 9
REMOVAL AND INSTALLATION (Continued)
OVERHEAD CONSOLE MOUNTED TYPE
(1) Disconnect and isolate the battery negative
cable.
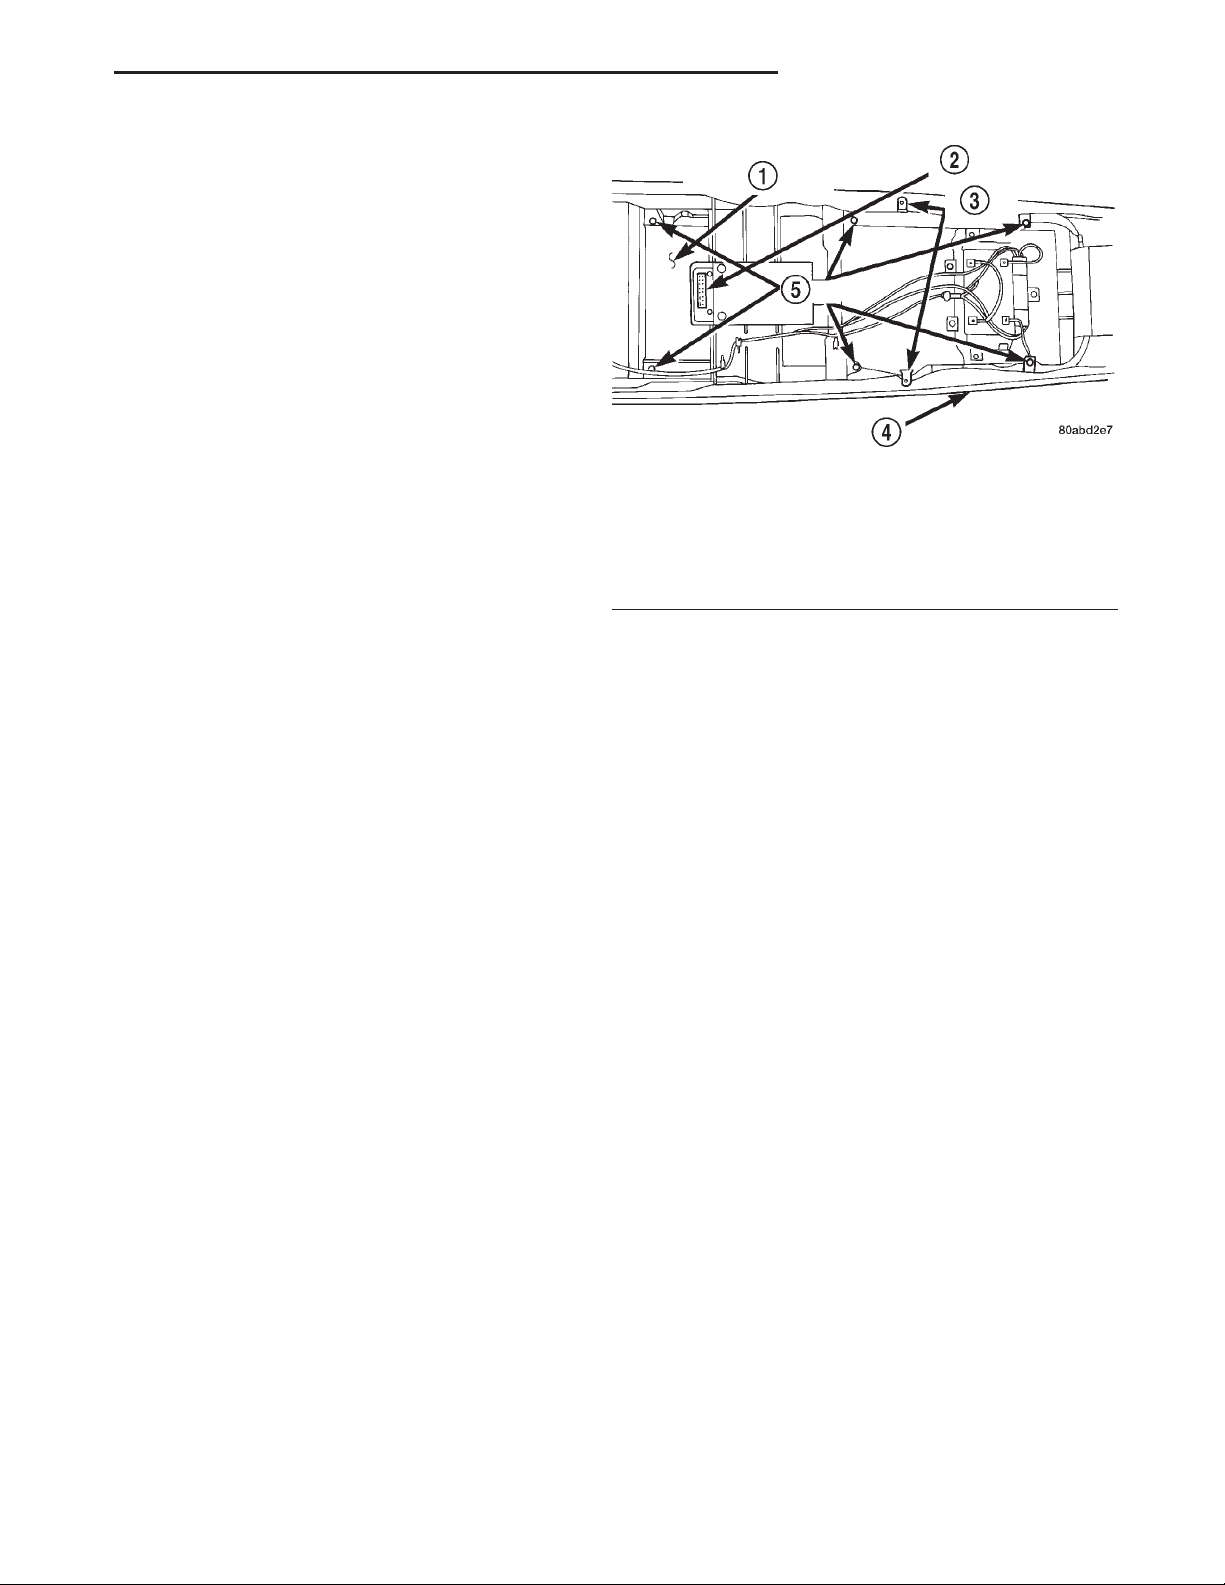
(2) Remove the overhead console from the headliner. Refer to Overhead Console in Group 8V - Overhead Console Systems for the procedures.
(3) Remove the six screws that secure the rear
overhead console housing to the overhead console
bezel (Fig. 7).
(4) Gently flex the sides of the overhead console
bezel far enough to clear the tabs on the rear console
housing and remove the housing from the bezel.
(5) Remove the two screws that secure the RKE
receiver circuit board to the rear overhead console
housing.
(6) Remove the RKE circuit board from the rear
overhead console housing.
(7) Reverse the removal procedures to install.
Tighten the mounting screws to 2.2 N·m (20 in. lbs.).
1 – REAR OVERHEAD CONSOLE HOUSING
2 – RKE RECEIVER
3–TABS
4 – OVERHEAD CONSOLE BEZEL
5 – SCREWS
Fig. 7 RKE Receiver Remove/Install
Page 10

 Loading...