

Page 1

XJ SPEED CONTROL SYSTEM 8H - 1
SPEED CONTROL SYSTEM
TABLE OF CONTENTS
page page
DESCRIPTION AND OPERATION
SPEED CONTROL SYSTEM .................1
SPEED CONTROL SERVO...................2
SPEED CONTROL SOLENOID CIRCUITS .......2
SPEED CONTROL SWITCHES ...............2
BRAKE LAMP SWITCH.....................3
SERVO CABLE ...........................3
VACUUM RESERVOIR .....................3
VEHICLE SPEED SENSOR (SPEED CONTROL
OPERATION) ...........................4
DESCRIPTION AND OPERATION
SPEED CONTROL SYSTEM
DESCRIPTION
The speed control system is electronically controlled and vacuum operated. Electronic control of
the speed control system is integrated into the Powertrain Control Module (PCM). The controls consist
of two steering wheel mounted switches. The
switches are labeled: ON/OFF, RES/ACCEL, SET,
COAST, and CANCEL.
The system is designed to operate at speeds above
30 mph (50 km/h).
WARNING: THE USE OF SPEED CONTROL IS NOT
RECOMMENDED WHEN DRIVING CONDITIONS DO
NOT PERMIT MAINTAINING A CONSTANT SPEED,
SUCH AS IN HEAVY TRAFFIC OR ON ROADS THAT
ARE WINDING, ICY, SNOW COVERED, OR SLIPPERY.
OPERATION
When speed control is selected by depressing the
ON switch, the PCM allows a set speed to be stored
in PCM RAM for speed control. To store a set speed,
depress the SET switch while the vehicle is moving
at a speed between 35 and 85 mph. In order for the
speed control to engage, the brakes cannot be
applied, nor can the gear selector be indicating the
transmission is in Park or Neutral.
The speed control can be disengaged manually by:
• Stepping on the brake pedal
• Depressing the OFF switch
• Depressing the CANCEL switch.
DIAGNOSIS AND TESTING
ROAD TEST .............................4
VACUUM SUPPLY TEST....................4
REMOVAL AND INSTALLATION
SPEED CONTROL SERVO...................5
SPEED CONTROL SWITCH..................5
SERVO CABLE ...........................6
VACUUM RESERVOIR .....................6
SPECIFICATIONS
TORQUE CHART..........................7
• Depressing the clutch pedal (if equipped).
NOTE: Depressing the OFF switch or turning off
the ignition switch will erase the set speed stored
in the PCM.
For added safety, the speed control system is programmed to disengage for any of the following conditions:
• An indication of Park or Neutral
• A rapid increase rpm (indicates that the clutch
has been disengaged)
• Excessive engine rpm (indicates that the trans-
mission may be in a low gear)
• The speed signal increases at a rate of 10 mph
per second (indicates that the coefficient of friction
between the road surface and tires is extremely low)
• The speed signal decreases at a rate of 10 mph
per second (indicates that the vehicle may have
decelerated at an extremely high rate)
Once the speed control has been disengaged,
depressing the RES/ACCEL switch (when speed is
greater than 30 mph) restores the vehicle to the target speed that was stored in the PCM.
While the speed control is engaged, the driver can
increase the vehicle speed by depressing the RES/ACCEL switch. The new target speed is stored in the
PCM when the RES/ACCEL is released. The PCM
also has a “tap-up9 feature in which vehicle speed
increases at a rate of approximately 2 mph for each
momentary switch activation of the RES/ACCEL
switch.
Page 2

8H - 2 SPEED CONTROL SYSTEM XJ
DESCRIPTION AND OPERATION (Continued)
A “tap down” feature is used to decelerate without
disengaging the speed control system. To decelerate
from an existing recorded target speed, momentarily
depress the COAST switch. For each switch activation, speed will be lowered approximately 1 mph.
SPEED CONTROL SERVO
DESCRIPTION
The servo unit consists of a solenoid valve body,
and a vacuum chamber. The solenoid valve body contains three solenoids:
• Vacuum
• Vent
• Dump
The vacuum chamber contains a diaphragm with a
cable attached to control the throttle linkage.
OPERATION
The Powertrain Control Module (PCM) controls the
solenoid valve body. The solenoid valve body controls
the application and release of vacuum to the diaphragm of the vacuum servo. The servo unit cannot
be repaired and is serviced only as a complete assembly.
Power is supplied to the servo’s by the PCM
through the brake switch. The PCM controls the
ground path for the vacuum and vent solenoids.
The dump solenoid is energized anytime it receives
power. If power to the dump solenoid is interrupted,
the solenoid dumps vacuum in the servo. This provides a safety backup to the vent and vacuum solenoids.
The vacuum and vent solenoids must be grounded
at the PCM to operate. When the PCM grounds the
vacuum servo solenoid, the solenoid allows vacuum
to enter the servo and pull open the throttle plate
using the cable. When the PCM breaks the ground,
the solenoid closes and no more vacuum is allowed to
enter the servo. The PCM also operates the vent solenoid via ground. The vent solenoid opens and closes a
passage to bleed or hold vacuum in the servo as
required.
The PCM duty cycles the vacuum and vent solenoids to maintain the set speed, or to accelerate and
decelerate the vehicle. To increase throttle opening,
the PCM grounds the vacuum and vent solenoids. To
decrease throttle opening, the PCM removes the
grounds from the vacuum and vent solenoids. When
the brake is released, if vehicle speed exceeds 30
mph to resume, 35 mph to set, and the RES/ACCEL
switch has been depressed, ground for the vent and
vacuum circuits is restored.
SPEED CONTROL SOLENOID CIRCUITS
OPERATION
When all of the speed control parameters are met,
and the SET button is pressed, the PCM actuates the
vent solenoid and “duty-cycles” the vacuum solenoid
to open the throttle and bring the vehicle up to target speed. When the vehicle is at target speed, it will
actuate the vent solenoid with the vacuum solenoid
de-activated to maintain the vehicle at target speed.
When the vehicle is above target speed, the PCM will
“duty-cycle” the vent solenoid with the vacuum solenoid still de-activated to close the throttle to return
to target speed.
SPEED CONTROL SWITCHES
DESCRIPTION
There are two separate switch pods that operate
the speed control system. The steering-wheelmounted switches use multiplexed circuits to provide
inputs to the PCM for ON, OFF, RESUME, ACCELERATE, SET, DECEL and CANCEL modes. Refer to
the owner’s manual for more information on speed
control switch functions and setting procedures.
The individual switches cannot be repaired. If one
switch fails, the entire switch module must be
replaced.
OPERATION
When speed control is selected by depressing the
ON, OFF switch, the PCM allows a set speed to be
stored in its RAM for speed control. To store a set
speed, depress the SET switch while the vehicle is
moving at a speed between approximately 35 and 85
mph. In order for the speed control to engage, the
brakes cannot be applied, nor can the gear selector
be indicating the transmission is in Park or Neutral.
The speed control can be disengaged manually by:
• Stepping on the brake pedal
• Depressing the OFF switch
• Depressing the CANCEL switch.
The speed control can be disengaged also by any of
the following conditions:
• An indication of Park or Neutral
• The VSS signal increases at a rate of 10 mph
per second (indicates that the co-efficient of friction
between the road surface and tires is extremely low)
• Depressing the clutch pedal.
• Excessive engine rpm (indicates that the trans-
mission may be in a low gear)
• The VSS signal decreases at a rate of 10 mph
per second (indicates that the vehicle may have
decelerated at an extremely high rate)
• If the actual speed is not within 20 mph of the
set speed
Page 3

XJ SPEED CONTROL SYSTEM 8H - 3
DESCRIPTION AND OPERATION (Continued)
The previous disengagement conditions are pro-
grammed for added safety.
Once the speed control has been disengaged,
depressing the ACCEL switch restores the vehicle to
the target speed that was stored in the PCM’s RAM.
NOTE: Depressing the OFF switch will erase the
set speed stored in the PCM’s RAM.
If, while the speed control is engaged, the driver
wishes to increase vehicle speed, the PCM is programmed for an acceleration feature. With the
ACCEL switch held closed, the vehicle accelerates
slowly to the desired speed. The new target speed is
stored in the PCM’s RAM when the ACCEL switch is
released. The PCM also has a “tap-up” feature in
which vehicle speed increases at a rate of approximately 2 mph for each momentary switch activation
of the ACCEL switch.
The PCM also provides a means to decelerate without disengaging speed control. To decelerate from an
existing recorded target speed, depress and hold the
COAST switch until the desired speed is reached.
Then release the switch. The ON, OFF switch operates two components: the PCM’s ON, OFF input, and
the battery voltage to the brake switch, which powers
the speed control servo.
Multiplexing
The PCM sends out 5 volts through a fixed resistor
and monitors the voltage change between the fixed
resistor and the switches. If none of the switches are
depressed, the PCM will measure 5 volts at the sensor point (open circuit). If a switch with no resistor is
closed, the PCM will measure 0 volts (grounded circuit). Now, if a resistor is added to a switch, then the
PCM will measure some voltage proportional to the
size of the resistor. By adding a different resistor to
each switch, the PCM will see a different voltage
depending on which switch is pushed.
Another resistor has been added to the ’at rest circuit’ causing the PCM to never see 5 volts. This was
done for diagnostic purposes. If the switch circuit
should open (bad connection), then the PCM will see
the 5 volts and know the circuit is bad. The PCM will
then set an open circuit fault.
Refer to the Brake section for more information on
brake lamp switch service and adjustment procedures.
The brake switch is equipped with three sets of
contacts, one normally open and the other two normally closed (brakes disengaged). The PCM sends a
12 volt signal to one of the normally closed contacts
in the brake switch, which is returned to the PCM as
a brake switch state signal. With the contacts closed,
the 12 volt signal is pulled to ground causing the signal to go low. The low voltage signal, monitored by
the PCM, indicates that the brakes are not applied.
When the brakes are applied, the contacts open,
causing the PCM’s output brake signal to go high,
disengaging the speed control, cutting off PCM power
to the speed control solenoids.
The second set of normally closed contacts supplies
12 volts from the PCM any time speed control is
turned on. Through the brake switch, current is
routed to the speed control servo solenoids. The
speed control solenoids (vacuum, vent and dump) are
provided this current any time the speed control is
ON and the brakes are disengaged.
When the driver applies the brakes, the contacts
open and current is interrupted to the solenoids. The
normally open contacts are fed battery voltage. When
the brakes are applied, battery voltage is supplied to
the brake lamps.
SERVO CABLE
DESCRIPTION
The speed control servo cable is connected between
the speed control vacuum servo diaphragm and the
throttle body control linkage.
OPERATION
This cable causes the throttle control linkage to
open or close the throttle valve in response to movement of the vacuum servo diaphragm.
VACUUM RESERVOIR
DESCRIPTION
The vacuum reservoir is a plastic storage tank connected to an engine vacuum source by vacuum lines.
BRAKE LAMP SWITCH
DESCRIPTION
The switch is mounted on the brake pedal mount-
ing bracket under the instrument panel.
OPERATION
Vehicles equipped with the speed control option use
a dual function brake lamp switch. The PCM monitors the state of the dual function brake lamp switch.
OPERATION
The vacuum reservoir is used to supply the vacuum needed to maintain proper speed control operation when engine vacuum drops, such as in climbing
a grade while driving. A one-way check valve is used
in the vacuum line between the reservoir and the
vacuum source. This check valve is used to trap
engine vacuum in the reservoir. On certain vehicle
applications, this reservoir is shared with the heat-
Page 4

8H - 4 SPEED CONTROL SYSTEM XJ
DESCRIPTION AND OPERATION (Continued)
ing/air-conditioning system. The vacuum reservoir
cannot be repaired and must be replaced if faulty.
VEHICLE SPEED SENSOR (SPEED CONTROL OPERATION)
DESCRIPTION
The Vehicle Speed Sensor (VSS) is mounted to an
adapter near the transmission output shaft. The sensor is driven through the adapter by a speedometer
pinion gear.
OPERATION
The VSS is a pulse generator. The VSS pulse signal to the speedometer/odometer is monitored by the
PCM speed control circuitry to determine vehicle
speed and to maintain speed control set speed.
DIAGNOSIS AND TESTING
ROAD TEST
Perform a vehicle road test to verify reports of
speed control system malfunction. The road test
should include attention to the speedometer. Speedometer operation should be smooth and without flutter at all speeds.
Flutter in the speedometer indicates a problem
which might cause surging in the speed control system. The cause of any speedometer problems should
be corrected before proceeding. Refer to Group 8E,
Instrument Panel and Gauges for speedometer diagnosis.
If a road test verifies a system problem and the
speedometer operates properly, check for:
• A Diagnostic Trouble Code (DTC). If a DTC
exists, conduct tests per the Powertrain Diagnostic
Procedures service manual.
• A misadjusted brake (stop) lamp switch. This
could also cause an intermittent problem.
• Loose, damaged or corroded electrical connections at the servo. Corrosion should be removed from
electrical terminals and a light coating of Mopar
MultiPurpose Grease, or equivalent, applied.
• Leaking vacuum reservoir.
• Loose or leaking vacuum hoses or connections.
• Defective one-way vacuum check valve.
• Secure attachment of both ends of the speed con-
trol servo cable.
• Smooth operation of throttle linkage and throttle
body air valve.
• Failed speed control servo. Do the servo vacuum
test.
CAUTION: When test probing for voltage or continuity at electrical connectors, care must be taken
not to damage connector, terminals or seals. If
these components are damaged, intermittent or
complete system failure may occur.
VACUUM SUPPLY TEST
(1) Disconnect vacuum hose at speed control servo
and install a vacuum gauge into the disconnected
hose.
(2) Start engine and observe gauge at idle. Vacuum gauge should read at least ten inches of mercury.
(3) If vacuum is less than ten inches of mercury,
determine source of leak. Check vacuum line to
engine for leaks. Also check actual engine intake
manifold vacuum. If manifold vacuum does not meet
this requirement, check for poor engine performance
and repair as necessary.
(4) If vacuum line to engine is not leaking, check
for leak at vacuum reservoir. To locate and gain
access to reservoir, refer to Vacuum Reservoir Removal/Installation in this group. Disconnect vacuum line
at reservoir and connect a hand-operated vacuum
pump to reservoir fitting. Apply vacuum. Reservoir
vacuum should not bleed off. If vacuum is being lost,
replace reservoir.
(5) Verify operation of one-way check valve and
check it for leaks.
(a) Locate one-way check valve. The valve is
located in vacuum line between vacuum reservoir
and engine vacuum source. Disconnect vacuum
hoses (lines) at each end of valve.
(b) Connect a hand-operated vacuum pump to
reservoir end of check valve. Apply vacuum. Vacuum should not bleed off. If vacuum is being lost,
replace one-way check valve.
(c) Connect a hand-operated vacuum pump to
vacuum source end of check valve. Apply vacuum.
Vacuum should flow through valve. If vacuum is
not flowing, replace one-way check valve. Seal the
fitting at opposite end of valve with a finger and
apply vacuum. If vacuum will not hold, diaphragm
within check valve has ruptured. Replace valve.
Page 5
XJ SPEED CONTROL SYSTEM 8H - 5
REMOVAL AND INSTALLATION
SPEED CONTROL SERVO
REMOVAL
(1) Disconnect negative battery cable at battery.
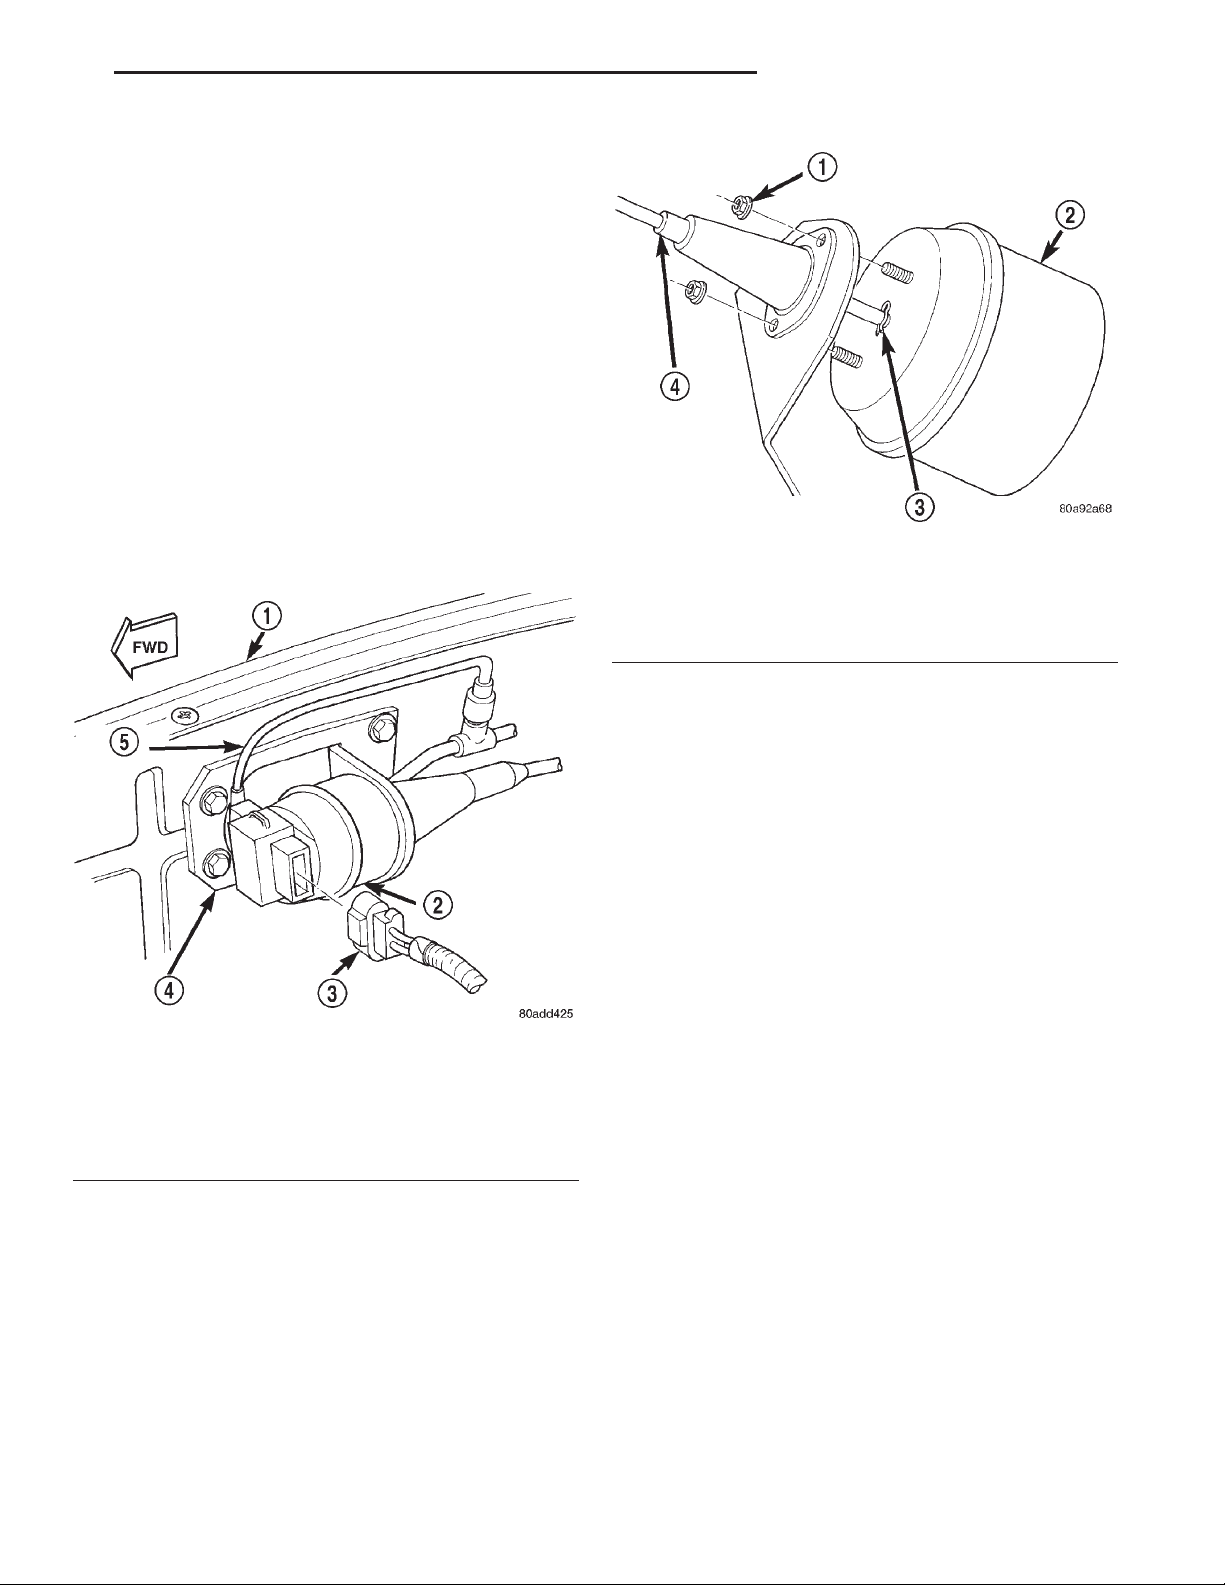
(2) Disconnect vacuum line at servo (Fig. 1).
(3) Disconnect electrical connector at servo.
(4) Disconnect servo cable at throttle body. Refer to
Servo Cable Removal/Installation.
(5) Remove 2 mounting nuts holding servo cable
sleeve to bracket (Fig. 2).
(6) Pull speed control cable sleeve and servo away
from servo mounting bracket to expose cable retaining clip (Fig. 2) and remove clip. Note: The servo
mounting bracket displayed in (Fig. 2) is a typical
bracket and may/may not be applicable to this model
vehicle.
Fig. 2 Servo Cable Clip Remove/Install—Typical
1 – SERVO MOUNTING NUTS (2)
2 – SERVO
3 – CABLE RETAINING CLIP
4 – SERVO CABLE AND SLEEVE
Fig. 1 Speed Control Servo Location
1 – R. F. FENDER
2 – SPEED CONTROL SERVO
3 – ELECTRICAL CONNECTOR
4 – MOUNTING BRACKET
5 – VACUUM LINE
(7) Remove servo from mounting bracket. While
removing, note orientation of servo to bracket.
INSTALLATION
(1) Position servo to mounting bracket.
(2) Align hole in cable connector with hole in servo
pin. Install cable-to-servo retaining clip.
(3) Insert servo mounting studs through holes in
servo mounting bracket.
(4) Install servo mounting nuts and tighten to 8.5
N·m (75 in. lbs.).
(5) Connect vacuum line at servo.
(6) Connect electrical connector at servo.
(7) Connect servo cable to throttle body. Refer to
Servo Cable Removal/Installation.
(8) Connect negative battery cable to battery.
(9) Before starting engine, operate accelerator
pedal to check for any binding.
SPEED CONTROL SWITCH
WARNING: BEFORE ATTEMPTING TO DIAGNOSE,
REMOVE OR INSTALL ANY AIRBAG SYSTEM OR
RELATED STEERING WHEEL AND STEERING COLUMN COMPONENTS YOU MUST FIRST DISCONNECT AND ISOLATE THE BATTERY NEGATIVE
(GROUND) CABLE. WAIT 2 MINUTES FOR SYSTEM
CAPACITOR TO DISCHARGE BEFORE FURTHER
SYSTEM SERVICE. FAILURE TO DO SO COULD
RESULT IN ACCIDENTAL DEPLOYMENT AND POSSIBLE PERSONAL INJURY.
Page 6
8H - 6 SPEED CONTROL SYSTEM XJ
REMOVAL AND INSTALLATION (Continued)
REMOVAL
(1) Disconnect and isolate negative battery cable
from battery.
(2) Remove airbag module. Refer to Group 8M,
Passive Restraint Systems.
(3) From underside of steering wheel, remove
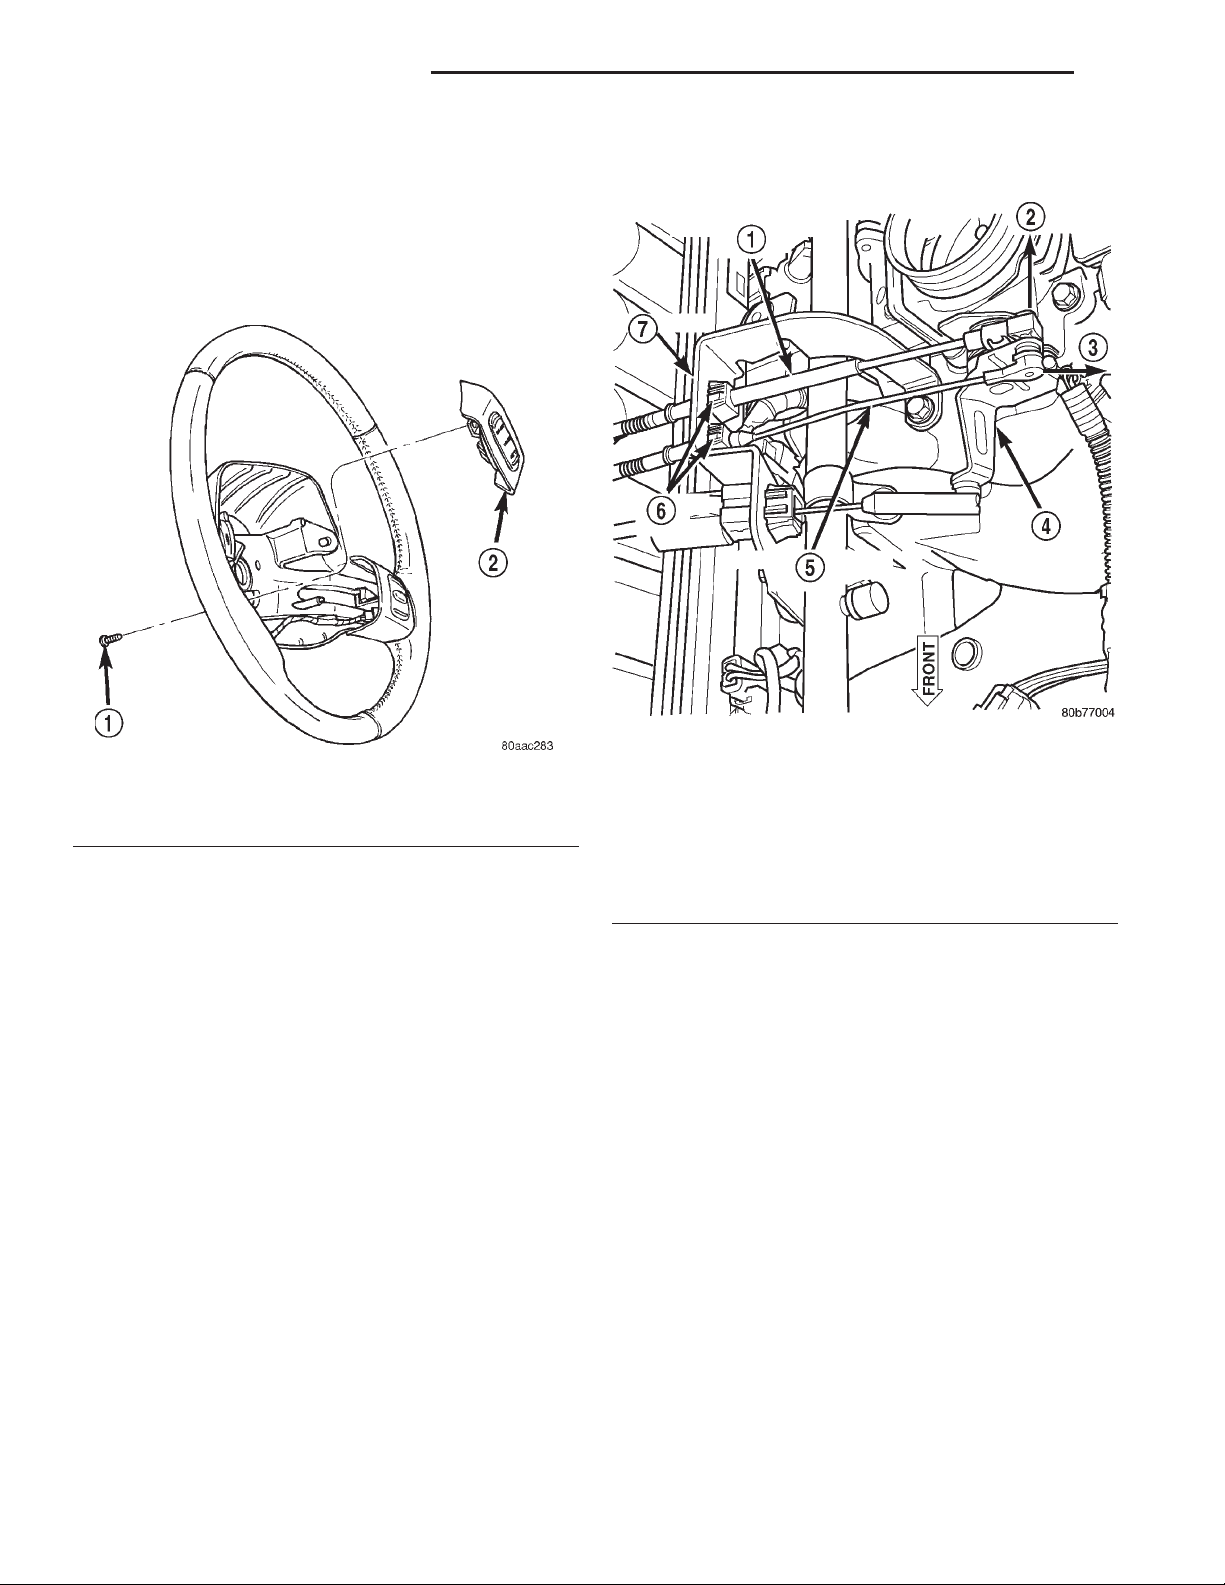
speed control switch mounting screw (Fig. 3).
(5) Disconnect servo cable at servo. Refer to Speed
Control Servo Removal/Installation.
Fig. 3 Speed Control Switch Remove/Install
1 – MOUNTING SCREW
2 – SPEED CONTROL SWITCH
(4) Remove switch from steering wheel and unplug
electrical connector.
INSTALLATION
(1) Plug electrical connector into switch.
(2) Position switch to steering wheel.
(3) Install switch mounting screw and tighten to
1.5 N·m (14 in. lbs.) torque.
(4) Install airbag module. Refer to Group 8M, Passive Restraint Systems.
(5) Connect negative battery cable to battery.
SERVO CABLE
REMOVAL
(1) Disconnect negative battery cable at battery.
(2) Using finger pressure only, remove cable connector by pushing connector off the throttle body
bellcrank pin (Fig. 4). DO NOT try to pull cable
connector off perpendicular to the bellcrank
pin. Connector will be broken.
(3) Two release tabs are located on sides of speed
control cable at cable bracket (Fig. 4). Squeeze tabs
together and push cable out of bracket.
(4) Unclip cable from cable guide at valve cover.
Fig. 4 Speed Control Servo Cable at Throttle Body
1 – ACCELERATOR CABLE
2 – OFF
3 – OFF
4 – THROTTLE BODY BELLCRANK
5 – SPEED CONTROL CABLE
6 – RELEASE TABS
7 – BRACKET
INSTALLATION
(1) Attach end of cable to speed control servo.
Refer to Speed Control Servo Removal/Installation.
(2) Install cable into cable bracket (snaps in).
(3) Install cable connector at throttle body
bellcrank pin (snaps on).
(4) Clip cable to cable guide at valve cover.
(5) Connect negative battery cable to battery.
(6) Before starting engine, operate accelerator
pedal to check for any binding.
VACUUM RESERVOIR
REMOVAL
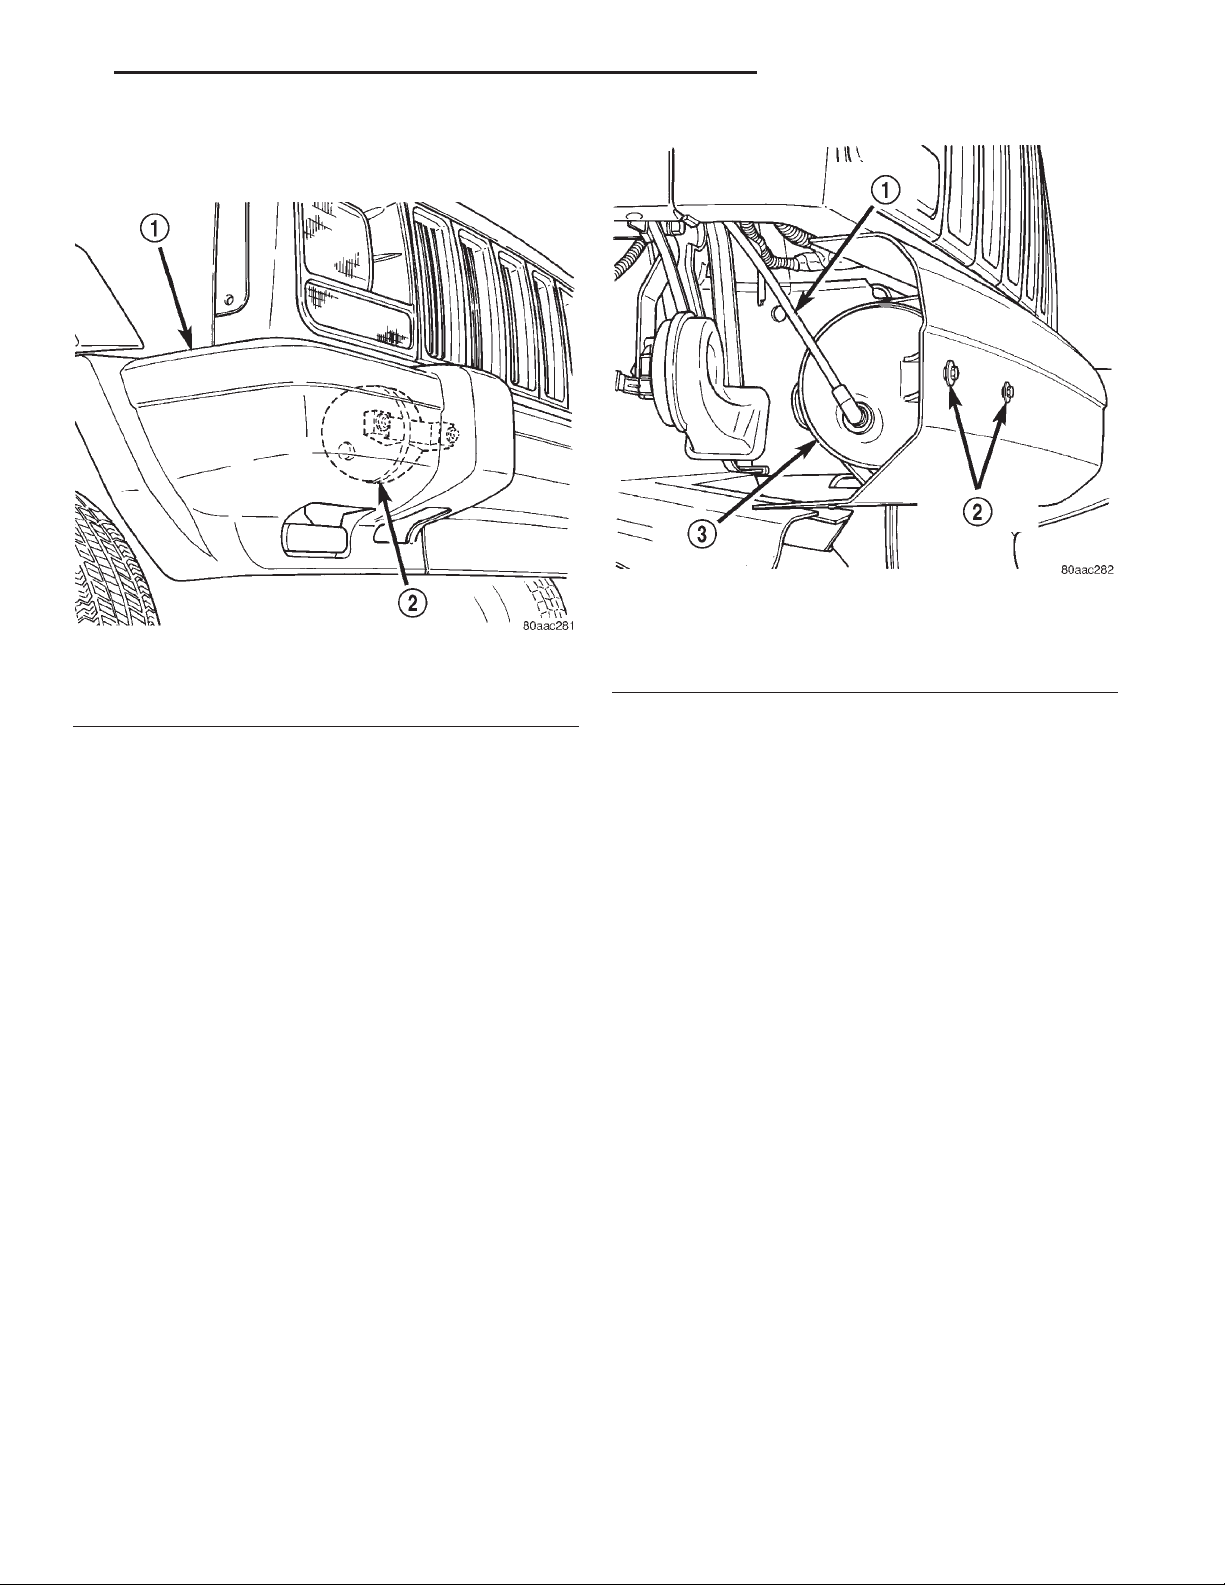
The vacuum reservoir is located behind right front
bumper end cap on vehicles equipped with LHD (Left
Hand Drive) (Fig. 5). It is located behind left front
bumper end cap on vehicles equipped with RHD
(Right Hand Drive).
(1) Remove front bumper end cap. Refer to Front
Bumper End Cap Removal/Installation.
(2) Remove vacuum line at reservoir (Fig. 6).
Page 7
XJ SPEED CONTROL SYSTEM 8H - 7
REMOVAL AND INSTALLATION (Continued)
(3) Remove 2 reservoir mounting screws.
(4) Remove reservoir from bumper bar.
Fig. 6 Vacuum Reservoir Removal/Installation
1 – VACUUM LINE
Fig. 5 Vacuum Reservoir Location
1 – BUMPER END CAP
2 – VACUUM RESERVOIR
2 – RESERVOIR SCREWS
3 – VACUUM RESERVOIR
SPECIFICATIONS
INSTALLATION
(1) Position reservoir to bumper bar and install
mounting screws. Tighten screws to 8 N·m (72 in.
lbs.) torque.
(2) Install vacuum line to reservoir
(3) Install front bumper end cap. Refer to Front
Bumper End Cap Removal/Installation.
TORQUE CHART
Description Torque
Servo Mounting Bracket-to-Servo Nuts . . . 8.5 N·m
(75 in. lbs.)
Servo Mounting Bracket-to-Body Bolts ..... 2N·m
(20 in. lbs.)
Speed Control Switch Mounting Screws . . . 1.5 N·m
(14 in. lbs.)
Vacuum Reservoir Mounting Bolts ........ 8N·m
(72 in. lbs.)
Page 8

 Loading...