

Page 1
XJ BATTERY 8A - 1
BATTERY
TABLE OF CONTENTS
page page
DESCRIPTION AND OPERATION
BATTERY................................1
BATTERY CABLES ........................3
BATTERY HOLD DOWNS ...................4
BATTERY THERMOGUARD..................5
BATTERY TRAY...........................5
DIAGNOSIS AND TESTING
BATTERY................................5
BATTERY CABLES .......................14
SERVICE PROCEDURES
BATTERY CHARGING .....................16
DESCRIPTION AND OPERATION
BATTERY
DESCRIPTION
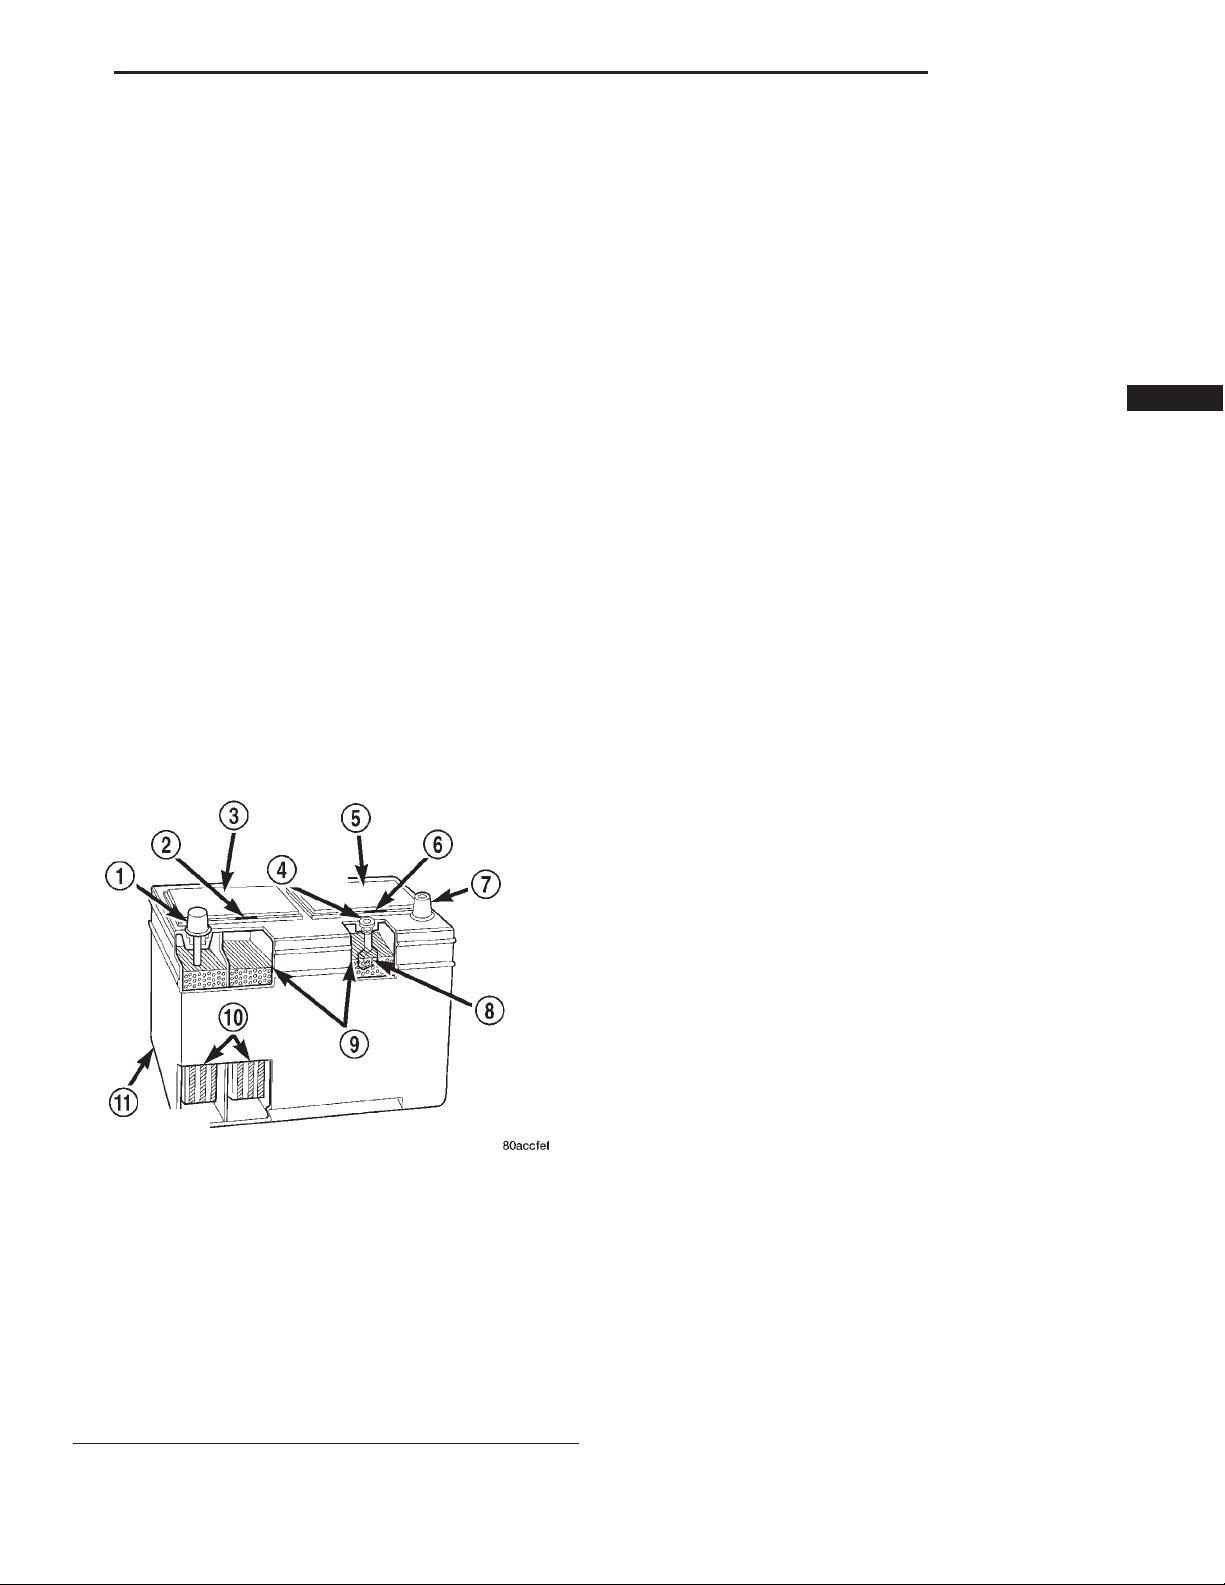
Fig. 1 Low-Maintenance Battery - Typical
1 – POSITIVE POST
2 – VENT
3 – CELL CAP
4 – TEST INDICATOR
5 – CELL CAP
6 – VENT
7 – NEGATIVE POST
8 – GREEN BALL
9 – ELECTROLYTE LEVEL
10 – PLATE GROUPS
11 – LOW-MAINTENANCE BATTERY
REMOVAL AND INSTALLATION
BATTERY CABLES .......................18
BATTERY HOLD DOWNS ..................20
BATTERY...............................21
BATTERY THERMOGUARD.................22
BATTERY TRAY..........................22
CLEANING AND INSPECTION
BATTERY...............................23
SPECIFICATIONS
BATTERY...............................24
A large capacity, low-maintenance storage battery
(Fig. 1) is standard factory-installed equipment on
this model. Male post type terminals made of a soft
lead material protrude from the top of the molded
plastic battery case to provide the means for connecting the battery to the vehicle electrical system. The
battery positive terminal post is visibly larger in
diameter than the negative terminal post, for easy
identification. The letters POS and NEG are also
molded into the top of the battery case adjacent to
their respective positive and negative terminal posts
for additional identification confirmation. Refer to
Battery Cables in the index of this service manual
for the location of more information on the battery
cables that connect the battery to the vehicle electrical system.
This battery is designed to provide a safe, efficient
and reliable means of storing electrical energy in a
chemical form. This means of energy storage allows
the battery to produce the electrical energy required
to operate the engine starting system, as well as to
operate many of the other vehicle accessory systems
for limited durations while the engine and/or the
charging system are not operating. The battery is
made up of six individual cells that are connected in
series. Each cell contains positively charged plate
groups that are connected with lead straps to the
positive terminal post, and negatively charged plate
groups that are connected with lead straps to the
negative terminal post. Each plate consists of a stiff
mesh framework or grid coated with lead dioxide
(positive plate) or sponge lead (negative plate). Insulators or plate separators made of a non-conductive
material are inserted between the positive and negative plates to prevent them from contacting or short-
Page 2

8A - 2 BATTERY XJ
DESCRIPTION AND OPERATION (Continued)
ing against one another. These dissimilar metal
plates are submerged in a sulfuric acid and water
solution called an electrolyte.
The factory-installed battery has a built-in test
indicator (hydrometer). The color visible in the sight
glass of the indicator will reveal the battery condition. For more information on the use of the built-in
test indicator, refer to Battery in the index of this
service manual for the location of the proper battery
diagnosis and testing procedures. The factory-in-
stalled low-maintenance battery has removable
battery cell caps. Water can be added to this bat-
tery. The battery is not sealed and has vent holes in
the cell caps. The chemical composition of the metal
coated plates within the low-maintenance battery
reduces battery gassing and water loss, at normal
charge and discharge rates. Therefore, the battery
should not require additional water in normal service. If the electrolyte level in this battery does
become low, water must be added. However, rapid
loss of electrolyte can be caused by an overcharging
condition. Be certain to diagnose the charging system
after replenishing the water in the battery for a low
electrolyte condition and before returning the vehicle
to service. Refer to Charging System in the index of
this service manual for the location of the proper
charging system diagnosis and testing procedures.
For battery maintenance schedules and jump starting procedures, see the owner’s manual in the vehicle
glove box. Optionally, refer to Maintenance Sched-
ules and Jump Starting, Towing and Hoisting in
the index of this service manual for the location of
the recommended battery maintenance schedules and
the proper battery jump starting procedures. While
battery charging can be considered a maintenance
procedure, the battery charging procedures and information are located in the service procedures section
of this service manual. This was done because the
battery must be fully-charged before any battery
diagnosis or testing procedures can be performed.
Refer to Battery Charging in the index of this service manual for the location of the proper battery
charging procedures.
NOTE: This group covers both Left-Hand Drive
(LHD) and Right-Hand Drive (RHD) versions of this
model. Whenever required and feasible, the RHD
versions of affected vehicle components have been
constructed as mirror-image of the LHD versions.
While most of the illustrations used in this group
represent only the LHD version, the diagnostic and
service procedures outlined can generally be
applied to either version. Exceptions to this rule
have been clearly identified as LHD or RHD, if a
special illustration or procedure is required.
BATTERY SIZE AND RATINGS
The battery Group Size number, the Cold Cranking
Amperage (CCA) rating, and the Reserve Capacity
(RC) rating or Ampere-Hours (AH) rating can be
found on the original equipment battery label. Be
certain that a replacement battery has the correct
Group Size number, as well as CCA, and RC or AH
ratings that equal or exceed the original equipment
specification for the vehicle being serviced. Refer to
Battery in the index of this service manual for the
location of the proper factory-installed battery specifications. Battery sizes and ratings are discussed in
more detail below.
• Group Size
The outside dimensions and terminal placement of
the battery conform to standards established by the
Battery Council International (BCI). Each battery is
assigned a BCI Group Size number to help identify a
correctly-sized replacement.
• Cold Cranking Amperage
The Cold Cranking Amperage (CCA) rating specifies
how much current (in amperes) the battery can
deliver for thirty seconds at -18° C (0° F). Terminal
voltage must not fall below 7.2 volts during or after
the thirty second discharge period. The CCA required
is generally higher as engine displacement increases,
depending also upon the starter current draw
requirements.
• Reserve Capacity
The Reserve Capacity (RC) rating specifies the time
(in minutes) it takes for battery terminal voltage to
fall below 10.5 volts, at a discharge rate of 25
amperes. RC is determined with the battery fullycharged at 26.7° C (80° F). This rating estimates how
long the battery might last after a charging system
failure, under minimum electrical load.
• Ampere-Hours
The Ampere-Hours (AH) rating specifies the current
(in amperes) that a battery can deliver steadily for
twenty hours, with the voltage in the battery not falling below 10.5 volts. This rating is also sometimes
identified as the twenty-hour discharge rating.
OPERATION
When an electrical load is applied to the terminals
of the battery, an electrochemical reaction occurs.
This reaction causes the battery to discharge electrical current from its terminals. As the battery discharges, a gradual chemical change takes place
within each cell. The sulfuric acid in the electrolyte
combines with the plate materials, causing both
plates to slowly change to lead sulfate. At the same
time, oxygen from the positive plate material combines with hydrogen from the sulfuric acid, causing
the electrolyte to become mainly water. The chemical
changes within the battery are caused by the move-
Page 3
XJ BATTERY 8A - 3
DESCRIPTION AND OPERATION (Continued)
ment of excess or free electrons between the positive
and negative plate groups. This movement of electrons produces a flow of electrical current through
the load device attached to the battery terminals.
As the plate materials become more similar chemically, and the electrolyte becomes less acid, the voltage potential of each cell is reduced. However, by
charging the battery with a voltage higher than that
of the battery itself, the battery discharging process
is reversed. Charging the battery gradually changes
the sulfated lead plates back into sponge lead and
lead dioxide, and the water back into sulfuric acid.
This action restores the difference in the electron
charges deposited on the plates, and the voltage
potential of the battery cells. For a battery to remain
useful, it must be able to produce high-amperage current over an extended period. A battery must also be
able to accept a charge, so that its voltage potential
may be restored.
The battery is vented to release excess hydrogen
gas that is created when the battery is being charged
or discharged. However, even with these vents,
hydrogen gas can collect in or around the battery. If
hydrogen gas is exposed to flame or sparks, it may
ignite. If the electrolyte level is low, the battery may
arc internally and explode. If the battery is equipped
with removable cell caps, add distilled water whenever the electrolyte level is below the top of the
plates. If the battery cell caps cannot be removed, the
battery must be replaced if the electrolyte level
becomes low.
In addition to producing and storing electrical
energy, the battery serves as a capacitor and voltage
stabilizer for the electrical system of the vehicle. It
absorbs most abnormal or transient voltages caused
by the switching of any of the electrical components
in the vehicle.
BATTERY CABLES
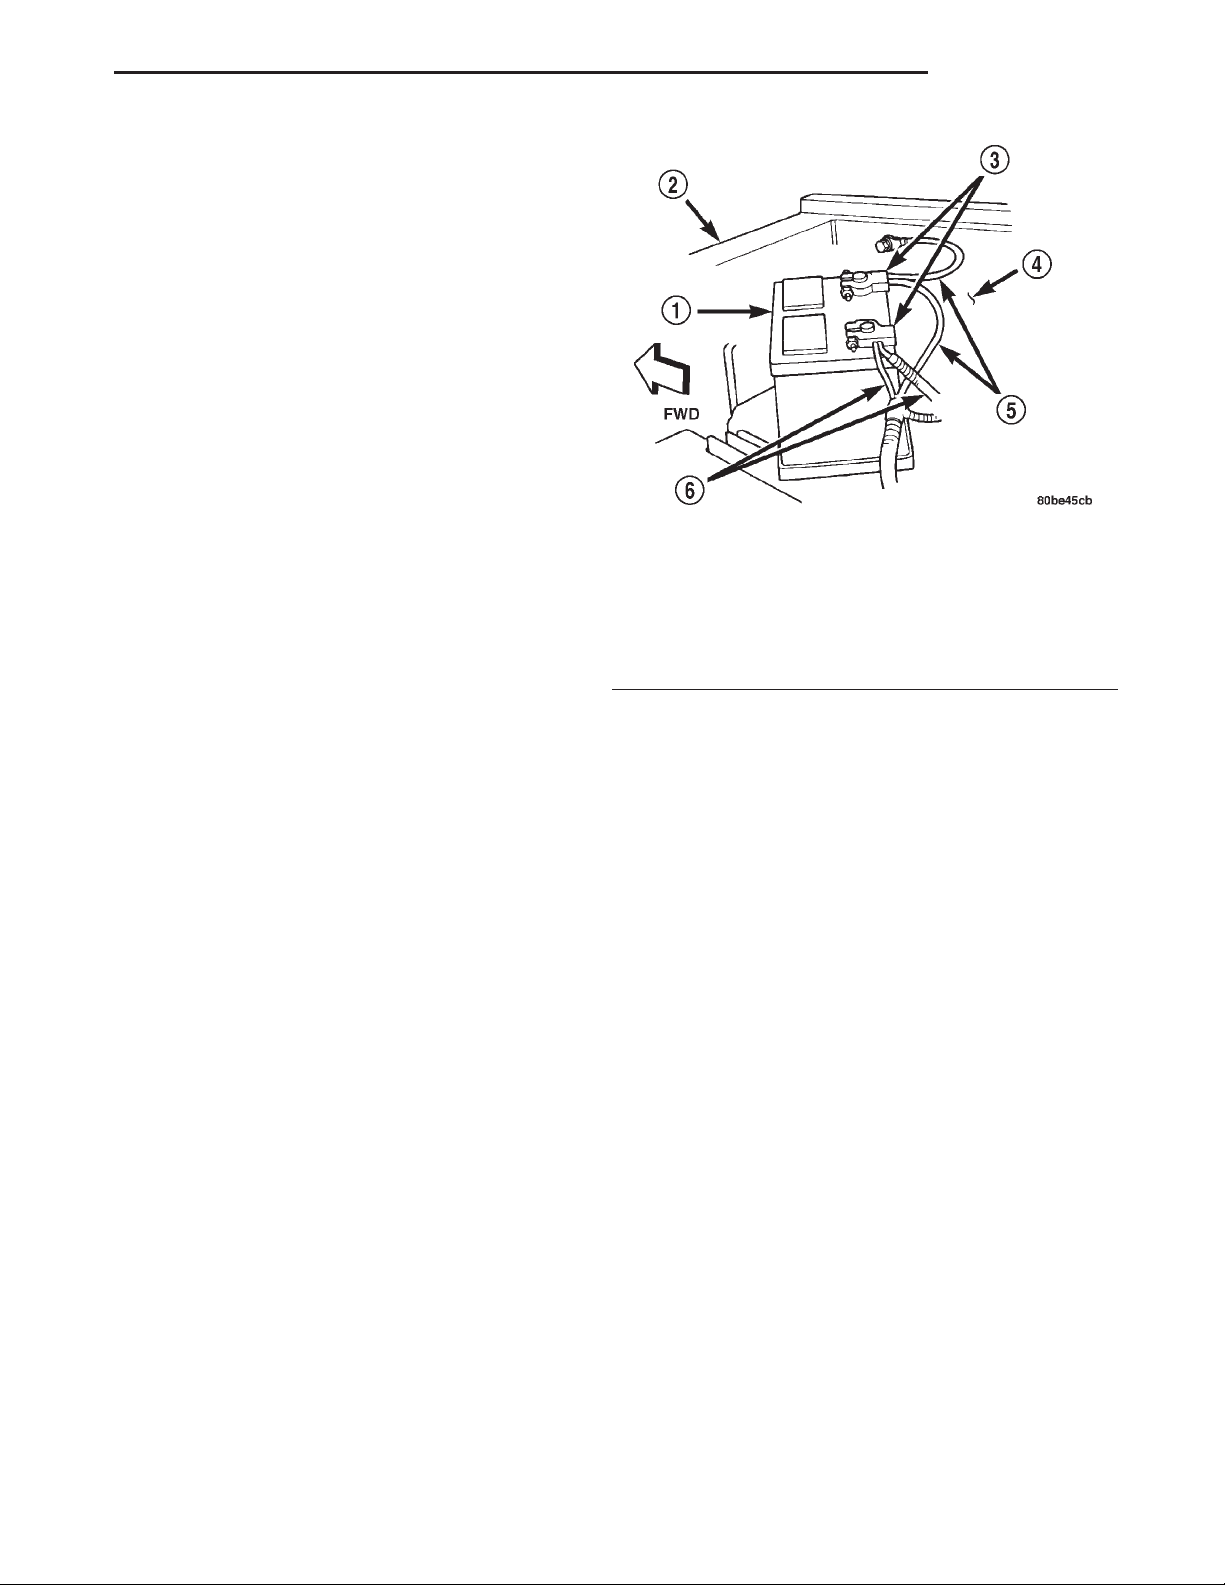
DESCRIPTION
The battery cables (Fig. 2) are large gauge,
stranded copper wires sheathed within a heavy plastic or synthetic rubber insulating jacket. The wire
used in the battery cables combines excellent flexibility and reliability with high electrical current carrying capacity. Refer to Wiring Diagrams in the index
of this service manual for the location of the proper
battery cable wire gauge information.
A clamping type female battery terminal made of
soft lead is die cast onto one end of the battery cable
wire. A square headed pinch-bolt and hex nut are
installed at the open end of the female battery terminal clamp. Large eyelet type terminals are crimped
onto the opposite end of the battery cable wire and
then solder-dipped. The battery positive cable wires
1 – BATTERY
2 – RADIATOR CROSSMEMBER
3 – TERMINAL CLAMPS
4 – FENDER INNER SHIELD
5 – NEGATIVE CABLE
6 – POSITIVE CABLE
have a red insulating jacket to provide visual identification and features a larger female battery terminal
clamp to allow connection to the larger battery positive terminal post. The battery negative cable wires
have a black insulating jacket and a smaller female
battery terminal clamp.
The battery cables cannot be repaired and, if damaged or faulty they must be replaced. Both the battery positive and negative cables are available for
service replacement only as a unit with the battery
wire harness, which may include portions of the wiring circuits for the generator and other components
on some models. Refer to Wiring Diagrams in the
index of this service manual for the location of more
information on the various wiring circuits included in
the battery wire harness for the vehicle being serviced.
OPERATION
The battery cables connect the battery terminal
posts to the vehicle electrical system. These cables
also provide a return path for electrical current generated by the charging system for restoring the voltage potential of the battery. The female battery
terminal clamps on the ends of the battery cable
wires provide a strong and reliable connection of the
battery cable to the battery terminal posts. The terminal pinch bolts allow the female terminal clamps
to be tightened around the male terminal posts on
the top of the battery. The eyelet terminals secured
to the ends of the battery cable wires opposite the
female battery terminal clamps provide secure and
Fig. 2 Battery Cables
Page 4
8A - 4 BATTERY XJ
DESCRIPTION AND OPERATION (Continued)
reliable connection of the battery to the vehicle electrical system.
The battery positive cable terminal clamp is die
cast onto the ends of two wires. One wire has an eyelet terminal that connects the battery positive cable
to the B(+) terminal stud of the Power Distribution
Center (PDC), and the other wire has an eyelet terminal that connects the battery positive cable to the
B(+) terminal stud of the engine starter motor solenoid. The battery negative cable terminal clamp is
also die cast onto the ends of two wires. One wire
has an eyelet terminal that connects the battery negative cable to the vehicle powertrain through a stud
on the right side of the engine block. The other wire
has an eyelet terminal that connects the battery negative cable to the vehicle body through a ground
screw on the right front fender inner shield, near the
battery.
BATTERY HOLD DOWNS
DESCRIPTION
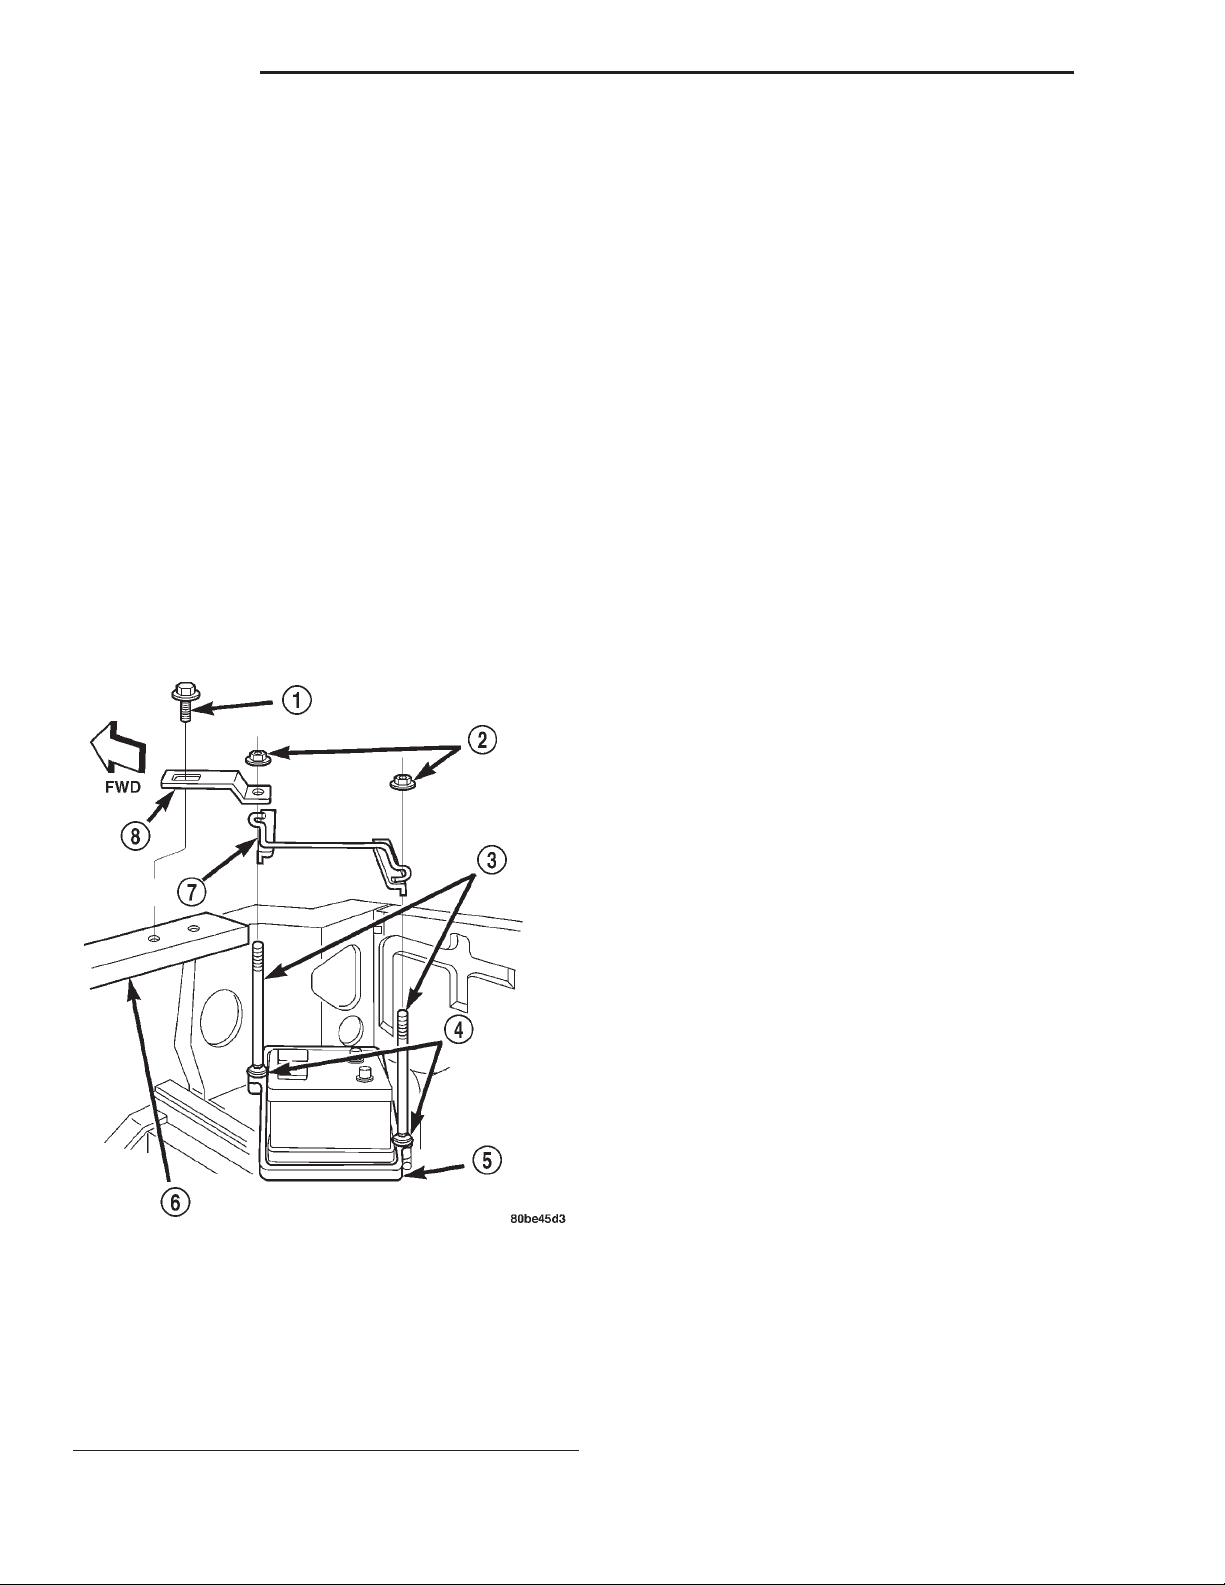
Fig. 3 Battery Hold Downs
1 – SCREW AND WASHER (1)
2 – NUT AND WASHER (2)
3 – T-BOLT (2)
4 – RETAINER (2)
5 – BATTERY TRAY
6 – UPPER RADIATOR CROSS MEMBER
7 – BRACKET
8 – STRAP
The battery hold down hardware (Fig. 3) includes
two T-bolts with plastic push-on retainers, a hold
down bracket, a stamped steel battery support strap,
two hex nuts with coned washers and a single hex
screw with a coned washer. The battery hold down
bracket consists of a formed steel rod with a stamped
steel angle bracket welded to each end. The hold
down bracket assembly is then plastic-coated for corrosion protection.
When installing a battery into the battery tray, be
certain that the hold down hardware is properly
installed and that the fasteners are tightened to the
proper specifications. Improper hold down fastener
tightness, whether too loose or too tight, can result in
damage to the battery, the vehicle or both. Refer to
Battery Hold Downs in the index of this service
manual for the location of the proper battery hold
down installation procedures, including the proper
hold down fastener tightness specifications.
OPERATION
The battery hold down hardware secures the battery to the battery tray in the engine compartment.
The hold down support strap provides an additional
anchor point for the upper end of the battery and
hold down hardware at the upper radiator crossmember. This hardware is designed to prevent battery
movement during vehicle operation. Unrestrained
battery movement during vehicle operation can
result in damage to the vehicle, the battery or both.
The hold down T-bolts are installed onto the battery tray before the tray is installed in the engine
compartment. The T-bolts are inserted through a hole
in a molded formation integral to each side of the
battery tray from underneath, with the threaded
ends of the bolts extending upward. A plastic push-on
retainer is installed over each T-bolt to secure the
T-bolts to the battery tray for ease of assembly during the vehicle manufacturing process. However,
these plastic push-on retainers are not available or
required for service replacement.
The battery hold down bracket is installed across
the top of the battery case and over the two upright
threaded ends of the T-bolts. The round hole in the
support strap is then installed over the threaded end
of the forward T-bolt and the slotted hole of the strap
is secured by a screw with washer to the upper radiator cross member. A hex nut with coned washer is
then installed and tightened onto each of the T-bolts
to securely hold down the battery in the battery tray.
Page 5
XJ BATTERY 8A - 5
DESCRIPTION AND OPERATION (Continued)
BATTERY THERMOGUARD
DESCRIPTION
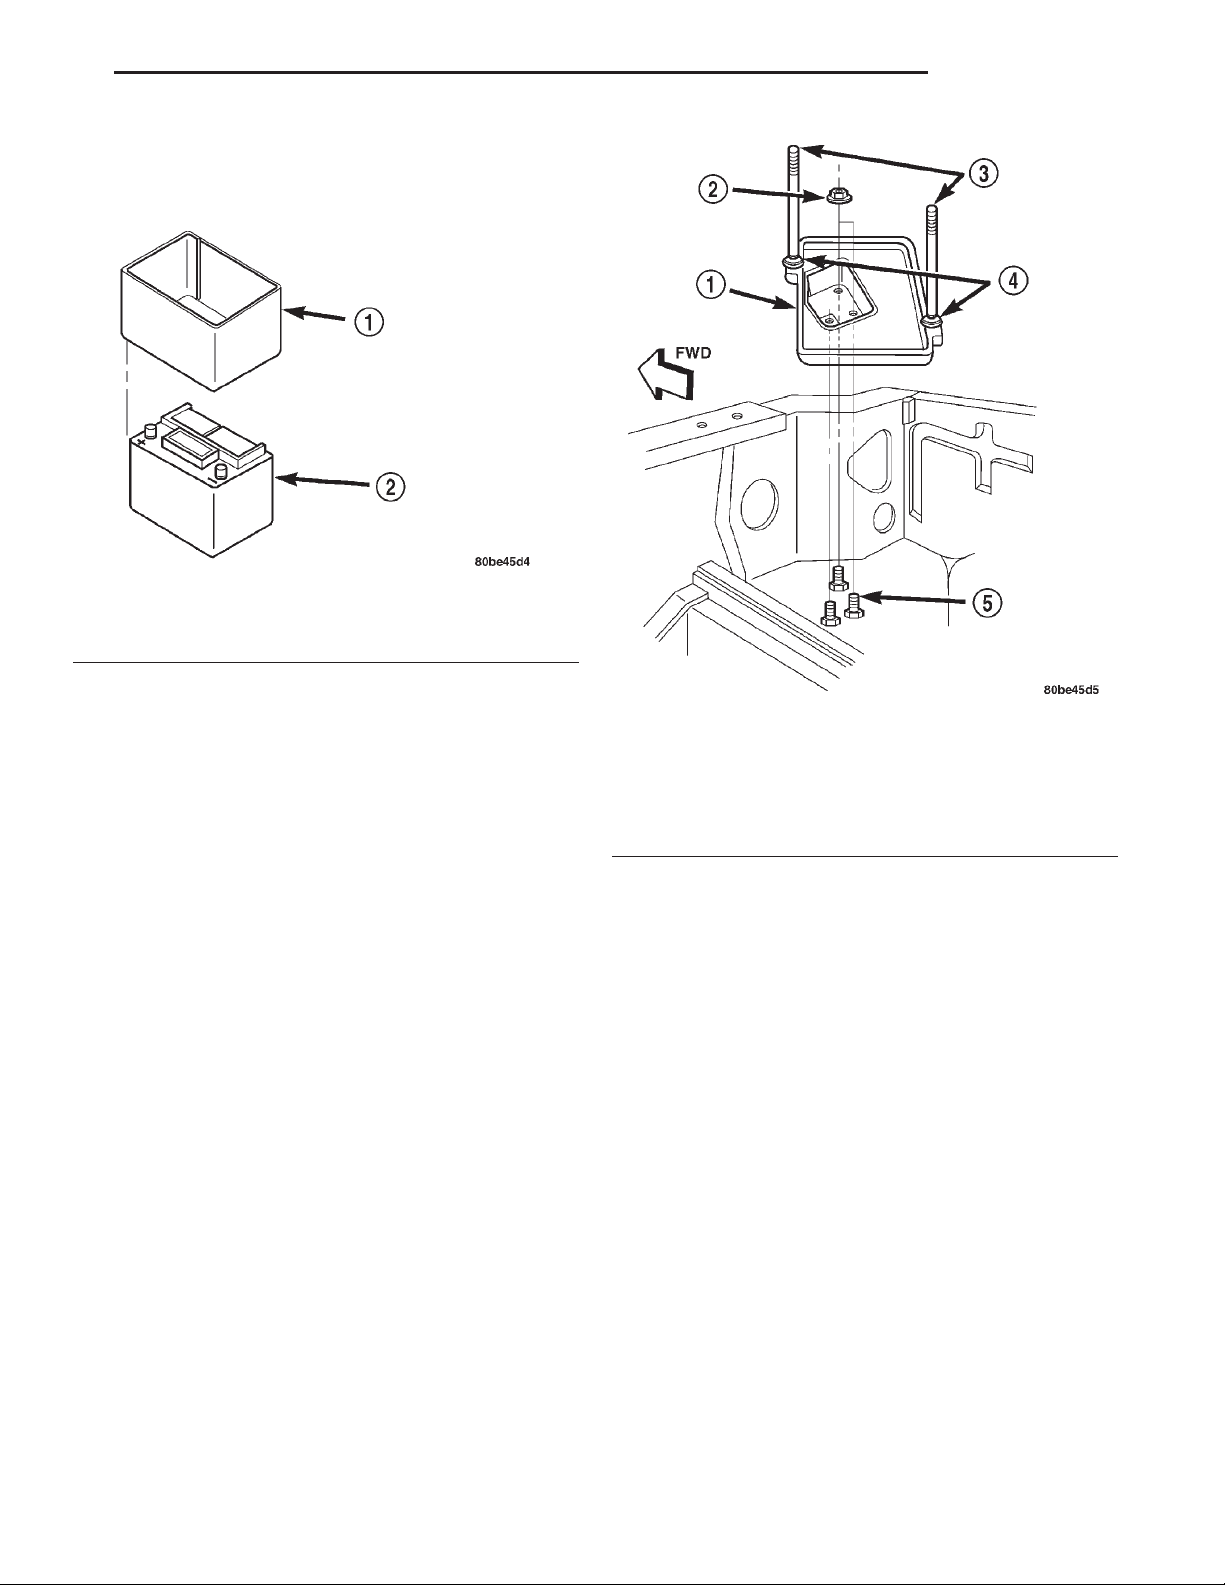
Fig. 4 Battery Thermoguard
1 – THERMOGUARD
2 – BATTERY
A flexible plastic bubble-wrap style thermoguard
(Fig. 4) slides over the battery case to enclose the
sides of the battery. The thermoguard consists of a
heavy black plastic outer skin and two lighter plies of
plastic that have been formed into a sheet with hundreds of small air pockets entrapped between them.
The resulting material is very similar to the bubblewrap used to protect items in many parcel packaging
and shipping applications.
OPERATION
The thermoguard protects the battery from engine
compartment temperature extremes. The air trapped
between the plastic plies of the thermoguard create a
dead air space, which helps to insulate the sides of
the battery case from the surrounding engine compartment air temperature.
BATTERY TRAY
DESCRIPTION
The battery is mounted in a molded plastic tray
(Fig. 5) located in the right front corner of the engine
compartment. Two T-bolts that are part of the battery hold down hardware are assembled to the battery tray before the tray is installed in the vehicle.
The battery tray is secured by three hex nuts with
coned washers to three weld studs located on the
front extension of the right front wheelhouse inner
panel, forward of the right front wheel.
A hole in the bottom of the battery tray is fitted
with a battery temperature sensor. Refer to Battery
Temperature Sensor in the index of this service
Fig. 5 Battery Tray
1 – TRAY
2 – NUT AND WASHER (3)
3 – T-BOLT (2)
4 – RETAINER (2)
5 – WELD STUD (3)
manual for the location of more information on the
battery temperature sensor. Refer to Battery Hold
Downs in the index of this service manual for the
location of more information on the battery hold
down hardware.
OPERATION
The battery tray provides a mounting location and
support for the vehicle battery. The battery tray also
provides anchor points for the battery hold down
hardware. The battery tray and the battery hold
down hardware combine to secure and stabilize the
battery in the engine compartment, which prevents
battery movement during vehicle operation. Unrestrained battery movement during vehicle operation
can result in damage to the vehicle, the battery or
both.
DIAGNOSIS AND TESTING
BATTERY
DIAGNOSIS
The battery, starting system and charging system
in the vehicle operate with one another, and must be
Page 6

8A - 6 BATTERY XJ
DIAGNOSIS AND TESTING (Continued)
tested as a complete system. In order for the engine
to start and the battery to charge properly, all of the
components that are used in these systems must perform within specifications. It is important that the
battery, starting system and charging system be thoroughly tested and inspected any time a battery needs
to be charged or replaced. The cause of abnormal discharge, overcharging or early battery failure must be
diagnosed and corrected before a battery is replaced
and before a vehicle is returned to service. The service information for these systems has been separated within this service manual to make it easier to
locate the specific information you are seeking. However, when attempting to diagnose any of these systems, it is important that you keep their
interdependency in mind.
The diagnostic procedures used for the battery,
starting system and charging system include the
most basic conventional diagnostic methods, to the
more sophisticated On-Board Diagnostics (OBD) built
into the Powertrain Control Module (PCM). Use of an
induction-type milliampere ammeter, a volt/ohmmeter, a battery charger, a carbon pile rheostat (load
tester) and a 12-volt test lamp may be required. All
OBD-sensed systems are monitored by the PCM.
Each monitored circuit is assigned a Diagnostic Trouble Code (DTC). The PCM will store a DTC in electronic memory for any failure it detects. Refer to
Charging System, On-Board Diagnostic Test in
the index of this service manual for the location of
the proper on-board diagnostic test procedures.
The battery must be completely charged and the
top, posts and terminal clamps should be properly
cleaned and inspected before diagnostic procedures
are performed. Refer to Battery in the index of this
service manual for the location of the proper battery
cleaning and inspection procedures. Refer to Battery
Charging in the index of this service manual for the
location of the proper battery charging procedures.
WARNING:
• IF THE BATTERY SHOWS SIGNS OF FREEZING, LEAKING, LOOSE POSTS, OR LOW ELECTROLYTE LEVEL, DO NOT TEST, ASSIST-BOOST, OR
CHARGE. THE BATTERY MAY ARC INTERNALLY
AND EXPLODE. PERSONAL INJURY AND/OR VEHICLE DAMAGE MAY RESULT.
• EXPLOSIVE HYDROGEN GAS FORMS IN AND
AROUND THE BATTERY. DO NOT SMOKE, USE
FLAME, OR CREATE SPARKS NEAR THE BATTERY.
PERSONAL INJURY AND/OR VEHICLE DAMAGE
MAY RESULT.
• THE BATTERY CONTAINS SULFURIC ACID,
WHICH IS POISONOUS AND CAUSTIC. AVOID CONTACT WITH THE SKIN, EYES, OR CLOTHING. IN
THE EVENT OF CONTACT, FLUSH WITH WATER
AND CALL A PHYSICIAN IMMEDIATELY. KEEP OUT
OF THE REACH OF CHILDREN.
• IF THE BATTERY IS EQUIPPED WITH REMOVABLE CELL CAPS, BE CERTAIN THAT EACH OF
THE CELL CAPS IS IN PLACE AND TIGHT BEFORE
THE BATTERY IS RETURNED TO SERVICE. PERSONAL INJURY AND/OR VEHICLE DAMAGE MAY
RESULT FROM LOOSE OR MISSING CELL CAPS.
The condition of a battery is determined by two cri-
teria:
1. State-Of-Charge
This can be determined by checking the specific gravity of the battery electrolyte (built-in test indicator or
hydrometer test), or by checking the battery voltage
(open-circuit voltage test).
2. Cranking Capacity
This can be determined by performing a battery load
test, which measures the ability of the battery to
supply high-amperage current.
First, determine the battery state-of-charge. This
can be done in one of three ways. If the battery has a
built-in test indicator, view the test indicator to
determine the state-of-charge. If the battery has no
test indicator but does have removable cell caps, perform the hydrometer test to determine the state-ofcharge. If the battery cell caps are not removable, or
a hydrometer is not available, perform the open-circuit voltage test to determine the state-of-charge.
The battery must be charged before proceeding
with a load test if:
• The battery built-in test indicator has a black or
dark color visible.
• The temperature corrected specific gravity of the
battery electrolyte is less than 1.235.
• The battery open-circuit voltage is less than 12.4
volts.
A battery that will not accept a charge is faulty,
and must be replaced. Further testing is not
required. A fully-charged battery must be load tested
to determine its cranking capacity. A battery that is
fully-charged, but does not pass the load test, is
faulty and must be replaced.
NOTE: Completely discharged batteries may take
several hours to accept a charge. Refer to Battery
Charging in the index of this service manual for the
location of the proper battery charging procedures.
A battery is fully-charged when:
All battery cells are gassing freely during charging.
•
• A green color is visible in the sight glass of the
battery built-in test indicator.
• Three corrected specific gravity tests, taken at
one-hour intervals, indicate no increase in the specific gravity of the battery electrolyte.
• Open-circuit voltage of the battery is 12.4 volts
or greater.
Page 7
XJ BATTERY 8A - 7
DIAGNOSIS AND TESTING (Continued)
Battery Diagnosis
Condition Possible Causes Correction
The battery seems weak or
dead when attempting to start
the engine.
1. The battery has an
incorrect size or rating for
this vehicle.
2. The battery is physically
damaged.
3. The battery terminal
connections are loose or
corroded.
4. The battery is discharged.
5. The electrical system
ignition-off draw is excessive.
6. The battery is faulty.
7. The starting system is
faulty.
8. The charging system is
faulty.
1. Refer to Battery in the index of this service
manual for the location of the proper battery
specifications. Replace an incorrect battery, as
required.
2. Inspect the battery for loose terminal posts or a
cracked and leaking case. Replace the damaged
battery, as required.
3. Refer to Battery Cables in the index of this
service manual for the location of the proper
battery cable diagnosis and testing procedures.
Clean and tighten the battery terminal
connections, as required.
4. Determine the battery state-of-charge. Refer to
Built-In Test Indicator, Hydrometer Test, or
Open-Circuit Voltage Test in this section for the
proper test procedures. Charge the faulty battery,
as required.
5. Refer to Ignition-Off Draw Test in this section
for the proper test procedures. Repair the faulty
electrical system, as required.
6. Determine the battery cranking capacity. Refer
to Load Test in this section for the proper test
procedures. Replace the faulty battery, as
required.
7. Determine if the starting system is performing
to specifications. Refer to Starting System in the
index of this service manual for the location of the
proper starting system diagnosis and testing
procedures. Repair the faulty starting system, as
required.
8. Determine if the charging system is performing
to specifications. Refer to Charging System in the
index of this service manual for the location of the
proper charging system diagnosis and testing
procedures. Repair the faulty charging system, as
required.
Page 8
8A - 8 BATTERY XJ
DIAGNOSIS AND TESTING (Continued)
Battery Diagnosis
Condition Possible Causes Correction
The battery state-of-charge
cannot be maintained.
The battery will not accept a
charge.
1. The battery has an
incorrect size or rating for
this vehicle.
2. The battery terminal
connections are loose or
corroded.
3. The generator drive belt is
slipping.
4. The electrical system
ignition-off draw is excessive.
5. The battery is faulty.
6. The starting system is
faulty.
7. The charging system is
faulty.
8. Electrical loads exceed the
output of the charging
system.
9. Slow driving or prolonged
idling with high-amperage
draw systems in use.
1. The battery is faulty. 1. Refer to Battery Charging in the index of this
1. Refer to Battery in the index of this service
manual for the location of the proper battery
specifications. Replace an incorrect battery, as
required.
2. Refer to Battery Cables in the index of this
service manual for the location of the proper
battery cable diagnosis and testing procedures.
Clean and tighten the battery terminal
connections, as required.
3. Refer to Accessory Drive Belt Diagnosis in the
index of this service manual for the location of the
proper accessory drive belt diagnosis and testing
procedures. Replace or adjust the faulty
generator drive belt, as required.
4. Refer to Ignition-Off Draw Test in this section
for the proper test procedures. Repair the faulty
electrical system, as required.
5. Determine the battery cranking capacity. Refer
to Load Test in this section for the proper test
procedures. Replace the faulty battery, as
required.
6. Determine if the starting system is performing
to specifications. Refer to Starting System in the
index of this service manual for the location of the
proper starting system diagnosis and testing
procedures. Repair the faulty starting system, as
required.
7. Determine if the charging system is performing
to specifications. Refer to Charging System in the
index of this service manual for the location of the
proper charging system diagnosis and testing
procedures. Repair the faulty charging system, as
required.
8. Inspect the vehicle for aftermarket electrical
equipment which might cause excessive electrical
loads.
9. Advise the vehicle operator, as required.
service manual for the location of the proper
battery charging procedures. Charge or replace
the faulty battery, as required.
ABNORMAL BATTERY DISCHARGING
Any of the following conditions can result in abnor-
mal battery discharging:
1. Corroded or loose battery posts and terminal
clamps.
2. A loose or worn generator drive belt.
3. Electrical loads that exceed the output of the
charging system. This can be due to equipment
installed after manufacture, or repeated short trip
use.
4. Slow driving speeds (heavy traffic conditions) or
prolonged idling, with high-amperage draw systems
in use.
5. A faulty circuit or component causing excessive
ignition-off draw.
6. A faulty or incorrect charging system component. Refer to Charging System in the index of this
service manual for the location of the proper charging system diagnosis and testing procedures.
Page 9
XJ BATTERY 8A - 9
DIAGNOSIS AND TESTING (Continued)
7. A faulty or incorrect starting system component.
Refer to Starting System in the index of this service manual for the location of the proper starting
system diagnosis and testing procedures.
8. A faulty or incorrect battery.
TESTING
BUILT-IN TEST INDICATOR
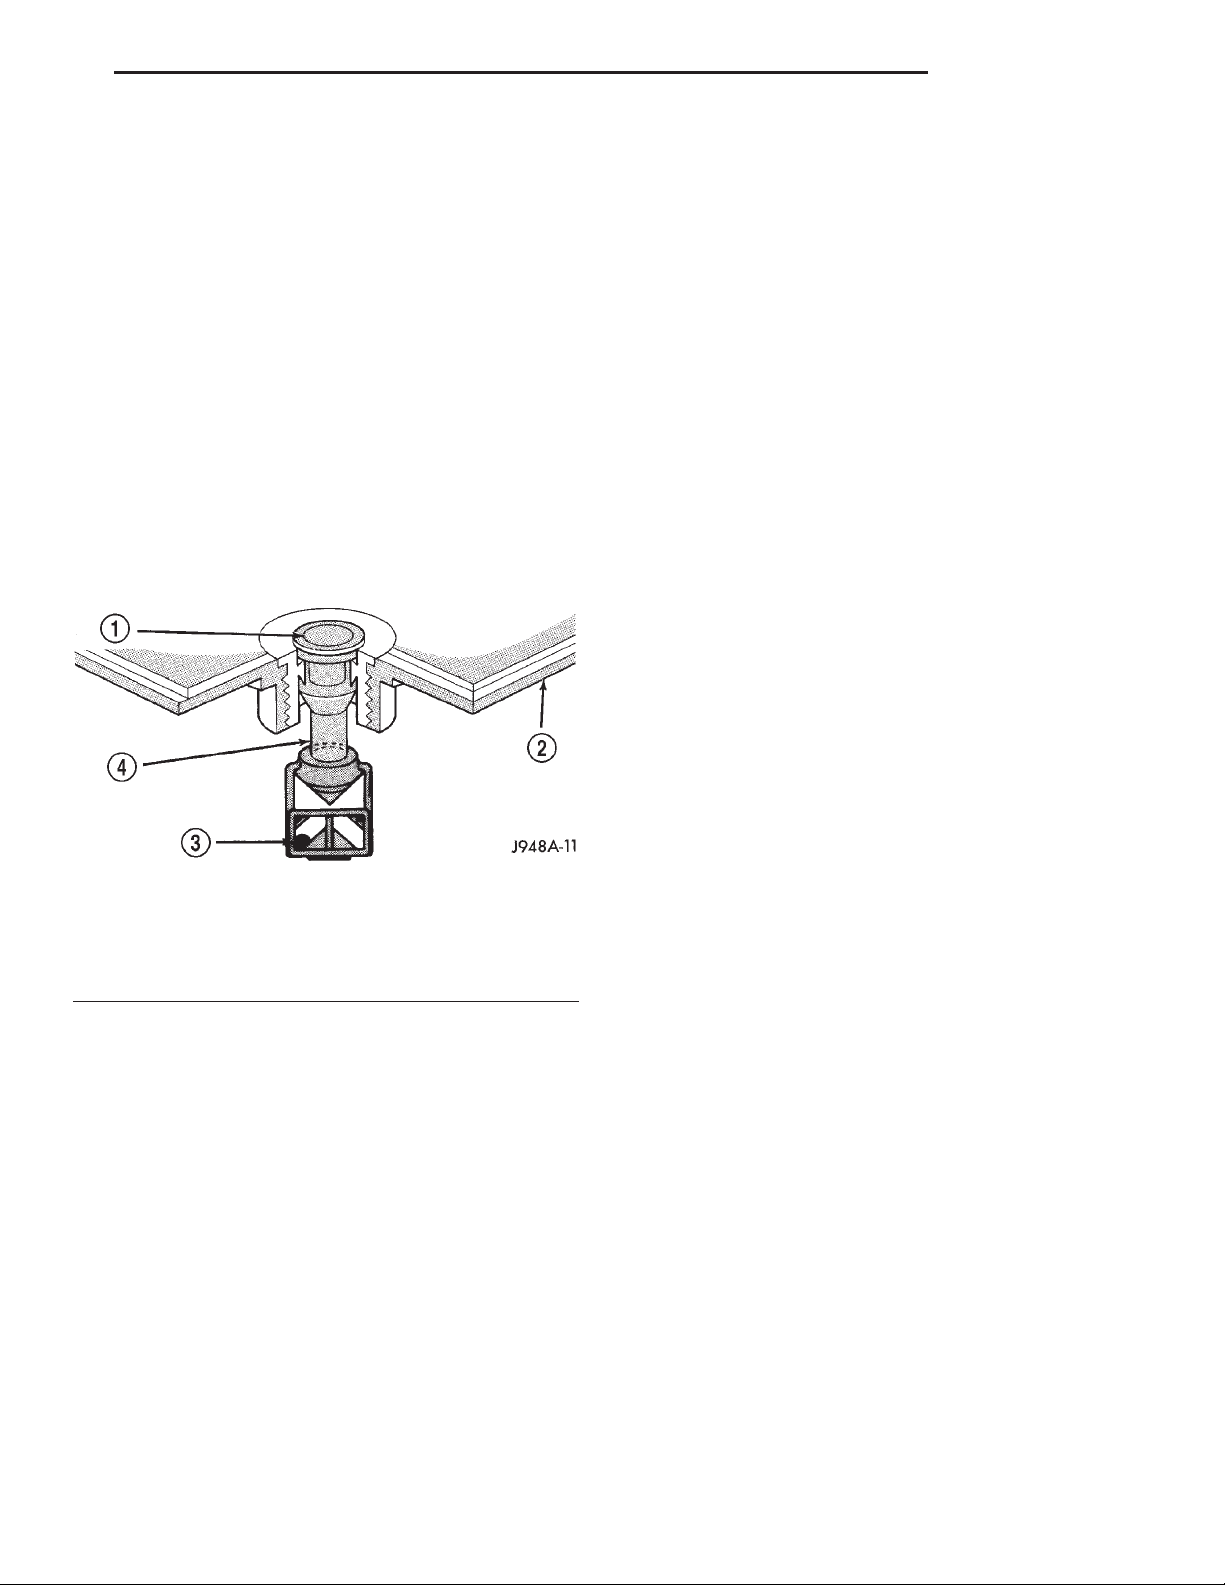
A test indicator (hydrometer) built into the top of
the battery case provides visual information for battery testing (Fig. 6). Like a hydrometer, the built-in
test indicator measures the specific gravity of the
battery electrolyte. The test indicator reveals the battery state-of-charge; however, it will not reveal the
cranking capacity of the battery. A load test must be
performed to determine the battery cranking capacity. Refer to Load Test in this section for the proper
battery load testing procedures.
Fig. 6 Built-In Test Indicator
1 – SIGHT GLASS
2 – BATTERY TOP
3 – GREEN BALL
4 – PLASTIC ROD
WARNING:
• IF THE BATTERY SHOWS SIGNS OF FREEZING, LEAKING, LOOSE POSTS, OR LOW ELECTROLYTE LEVEL, DO NOT TEST, ASSIST-BOOST, OR
CHARGE. THE BATTERY MAY ARC INTERNALLY
AND EXPLODE. PERSONAL INJURY AND/OR VEHICLE DAMAGE MAY RESULT.
• EXPLOSIVE HYDROGEN GAS FORMS IN AND
AROUND THE BATTERY. DO NOT SMOKE, USE
FLAME, OR CREATE SPARKS NEAR THE BATTERY.
PERSONAL INJURY AND/OR VEHICLE DAMAGE
MAY RESULT.
• THE BATTERY CONTAINS SULFURIC ACID,
WHICH IS POISONOUS AND CAUSTIC. AVOID CONTACT WITH THE SKIN, EYES, OR CLOTHING. IN
THE EVENT OF CONTACT, FLUSH WITH WATER
AND CALL A PHYSICIAN IMMEDIATELY. KEEP OUT
OF THE REACH OF CHILDREN.
• IF THE BATTERY IS EQUIPPED WITH REMOVABLE CELL CAPS, BE CERTAIN THAT EACH OF
THE CELL CAPS IS IN PLACE AND TIGHT BEFORE
THE BATTERY IS RETURNED TO SERVICE. PERSONAL INJURY AND/OR VEHICLE DAMAGE MAY
RESULT FROM LOOSE OR MISSING CELL CAPS.
Before testing, visually inspect the battery for any
damage (a cracked case or cover, loose posts, etc.)
that would cause the battery to be faulty. In order to
obtain correct indications from the built-in test indicator, it is important that the battery be level and
have a clean sight glass. Additional light may be
required to view the indicator. Do not use open
flame as a source of additional light.
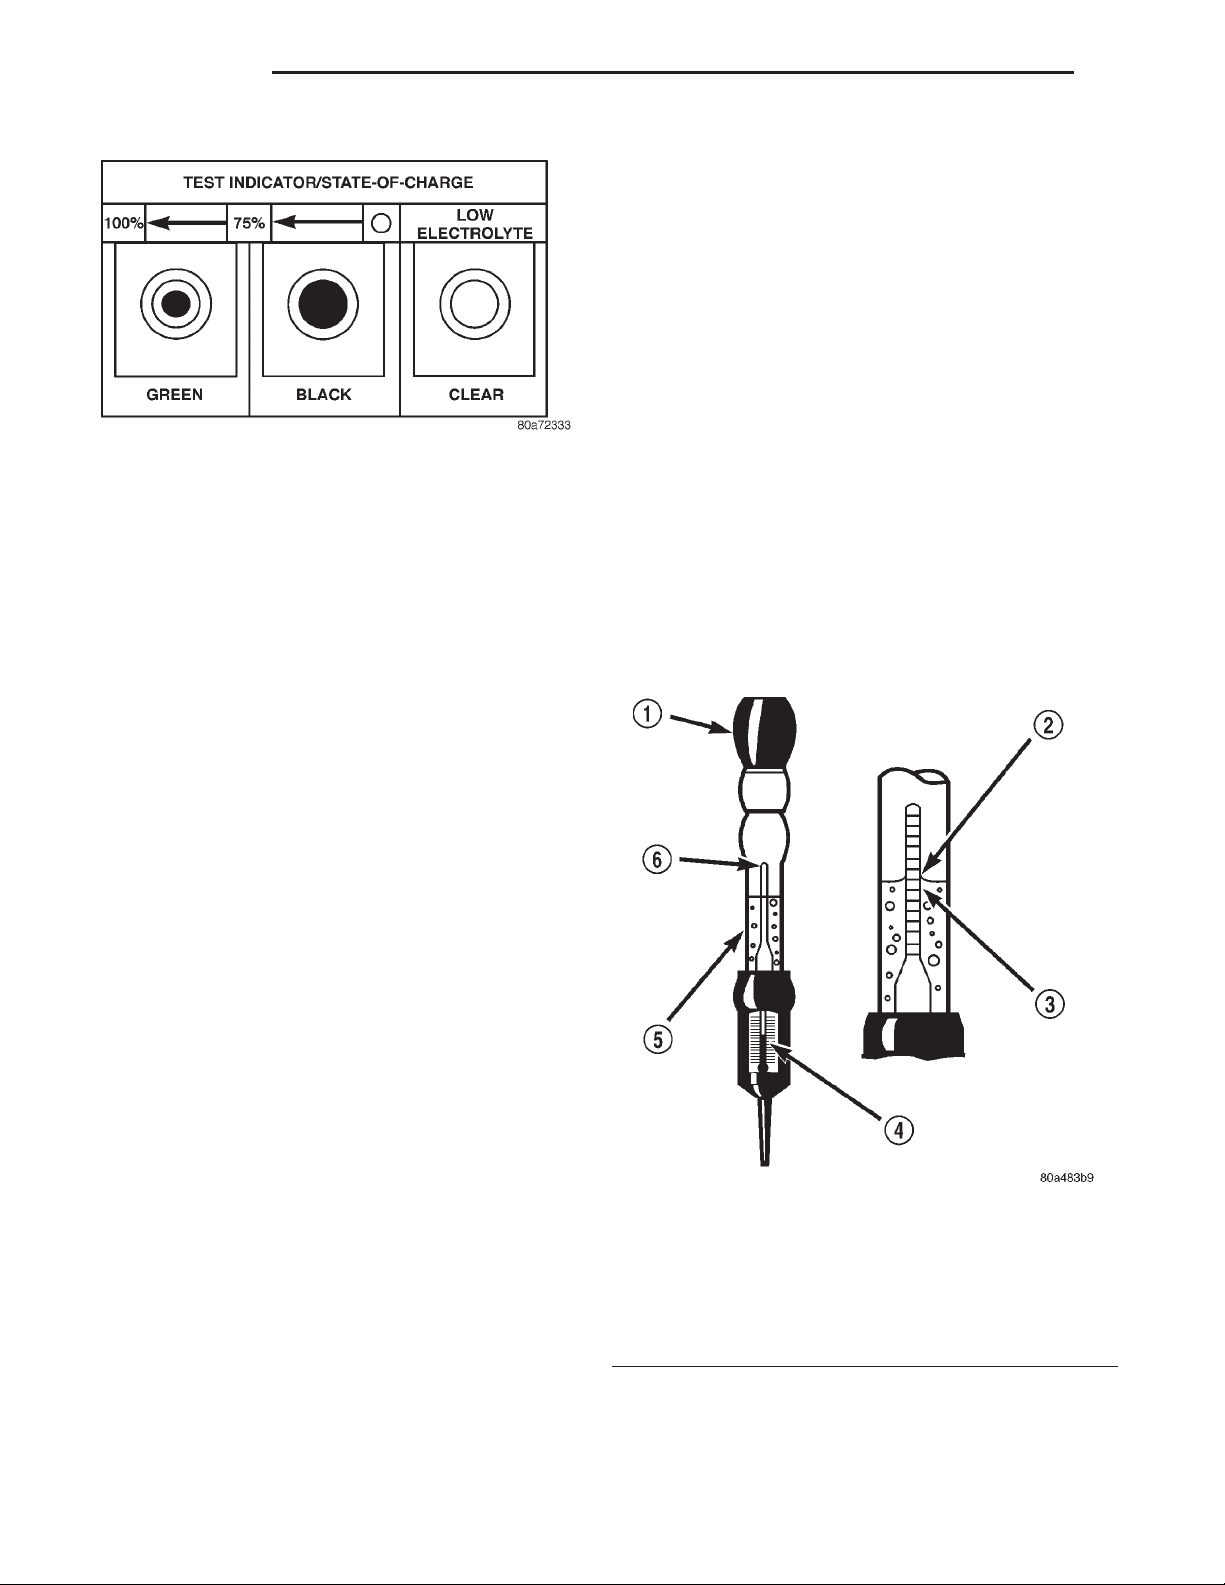
To read the built-in test indicator, look into the
sight glass and note the color of the indicator (Fig. 7).
The battery condition that each color indicates is
described in the following list:
• Green
Indicates 75% to 100% battery state-of-charge. The
battery is adequately charged for further testing or
return to service. If the starter will not crank for a
minimum of fifteen seconds with a fully-charged battery, the battery must be load tested. Refer to Load
Test in this section for the proper battery load testing procedures.
• Black or Dark
Indicates 0% to 75% battery state-of-charge. The battery is inadequately charged and must be charged
until a green indication is visible in the sight glass
(12.4 volts or more), before the battery is tested further or returned to service. Refer to Battery Charg-
ing in the index of this service manual for the
location of the proper battery charging procedures.
Also refer to Abnormal Battery Discharging in
this section for the possible causes of the discharged
battery condition.
• Clear or Bright
Indicates a low battery electrolyte level. The electrolyte level in the battery is below the test indicator. A
maintenance-free battery with non-removable cell
caps must be replaced if the electrolyte level is low.
Water must be added to a low-maintenance battery
with removable cell caps before it is charged. Refer to
Battery Charging in the index of this service manual for the location of the proper battery charging
procedures. A low electrolyte level may be caused by
an overcharging condition. Refer to Charging Sys-
tem in the index of this service manual for the location of the proper charging system diagnosis and
testing procedures.
Page 10
8A - 10 BATTERY XJ
DIAGNOSIS AND TESTING (Continued)
THE BATTERY IS RETURNED TO SERVICE. PERSONAL INJURY AND/OR VEHICLE DAMAGE MAY
RESULT FROM LOOSE OR MISSING CELL CAPS.
Before testing, visually inspect the battery for any
damage (a cracked case or cover, loose posts, etc.)
that would cause the battery to be faulty. Then
remove the battery cell caps and check the electrolyte
level. Add distilled water if the electrolyte level is
below the top of the battery plates.
See the instructions provided by the manufacturer
of the hydrometer for recommendations on the correct use of the hydrometer that you are using.
Fig. 7 Built-In Test Indicator Sight Glass
HYDROMETER TEST
The hydrometer test reveals the battery state-ofcharge by measuring the specific gravity of the electrolyte. This test cannot be performed on
maintenance-free batteries with non-removable
cell caps. If the battery has non-removable cell caps,
refer to Built-In Test Indicator or Open-Circuit
Voltage Test in this section for the proper proce-
dures for performing these alternate tests of the battery state-of-charge.
Specific gravity is a comparison of the density of
the battery electrolyte to the density of pure water.
Pure water has a specific gravity of 1.000, and sulfuric acid has a specific gravity of 1.835. Sulfuric acid
makes up approximately 35% of the battery electrolyte by weight, or 24% by volume. In a fully-charged
battery the electrolyte will have a temperature-corrected specific gravity of 1.260 to 1.290. However, a
specific gravity of 1.235 or above is satisfactory for
battery load testing and/or return to service.
Remove only enough electrolyte from the battery cell
so that the float is off the bottom of the hydrometer
barrel with pressure on the bulb released. To read
the hydrometer correctly, hold it with the top surface
of the electrolyte at eye level (Fig. 8).
CAUTION: Exercise care when inserting the tip of
the hydrometer into a battery cell to avoid damaging the plate separators. Damaged plate separators
can cause early battery failure.
WARNING:
• IF THE BATTERY SHOWS SIGNS OF FREEZING, LEAKING, LOOSE POSTS, OR LOW ELECTROLYTE LEVEL, DO NOT TEST, ASSIST-BOOST, OR
CHARGE. THE BATTERY MAY ARC INTERNALLY
AND EXPLODE. PERSONAL INJURY AND/OR VEHICLE DAMAGE MAY RESULT.
• EXPLOSIVE HYDROGEN GAS FORMS IN AND
AROUND THE BATTERY. DO NOT SMOKE, USE
FLAME, OR CREATE SPARKS NEAR THE BATTERY.
PERSONAL INJURY AND/OR VEHICLE DAMAGE
MAY RESULT.
• THE BATTERY CONTAINS SULFURIC ACID,
WHICH IS POISONOUS AND CAUSTIC. AVOID CONTACT WITH THE SKIN, EYES, OR CLOTHING. IN
THE EVENT OF CONTACT, FLUSH WITH WATER
AND CALL A PHYSICIAN IMMEDIATELY. KEEP OUT
OF THE REACH OF CHILDREN.
• IF THE BATTERY IS EQUIPPED WITH REMOVABLE CELL CAPS, BE CERTAIN THAT EACH OF
THE CELL CAPS IS IN PLACE AND TIGHT BEFORE
Fig. 8 Hydrometer - Typical
1 – BULB
2 – SURFACE COHESION
3 – SPECIFIC GRAVITY READING
4 – TEMPERATURE READING
5 – HYDROMETER BARREL
6 – FLOAT
Hydrometer floats are generally calibrated to indicate the specific gravity correctly only at 26.7° C (80°
F). When testing the specific gravity at any other
temperature, a correction factor is required. The cor-
Page 11
XJ BATTERY 8A - 11
DIAGNOSIS AND TESTING (Continued)
rection factor is approximately a specific gravity
value of 0.004, which may also be identified as four
points of specific gravity. For each 5.5° C above 26.7°
C (10° F above 80° F), add four points. For each 5.5°
C below 26.7° C (10° F below 80° F), subtract four
points. Always correct the specific gravity for temperature variation.
EXAMPLE: A battery is tested at -12.2° C (10° F)
and has a specific gravity of 1.240. Determine the
actual specific gravity as follows:
(1) Determine the number of degrees above or
below 26.7° C (80° F): 26.6° C - -12.2° C = 38.8° C
(80° F - 10° F = 70° F)
(2) Divide the result from Step 1 by 5.5° C (10° F):
38.8° C 4 5.5°C=7(70° F 4 10°F=7)
(3) Multiply the result from Step 2 by the temperature correction factor (0.004): 7 X 0.004 = 0.028
(4) The temperature at testing was below 26.7° C
(80° F); therefore, the temperature correction factor
is subtracted: 1.240 - 0.028 = 1.212
(5) The corrected specific gravity of the battery cell
in this example is 1.212.
Test the specific gravity of the electrolyte in each
battery cell. If the specific gravity of all cells is above
1.235, but the variation between cells is more than
fifty points (0.050), the battery should be replaced. If
the specific gravity of one or more cells is less than
1.235, charge the battery at a rate of approximately
five amperes. Continue charging the battery until
three consecutive specific gravity tests, taken at onehour intervals, are constant. If the cell specific gravity variation is more than fifty points (0.050) at the
end of the charge period, replace the battery.
When the specific gravity of all cells is above 1.235,
and the cell variation is less than fifty points (0.050),
the battery may be load tested to determine its
cranking capacity. Refer to Load Test in this section
for the proper battery load testing procedures.
PERSONAL INJURY AND/OR VEHICLE DAMAGE
MAY RESULT.
• THE BATTERY CONTAINS SULFURIC ACID,
WHICH IS POISONOUS AND CAUSTIC. AVOID CONTACT WITH THE SKIN, EYES, OR CLOTHING. IN
THE EVENT OF CONTACT, FLUSH WITH WATER
AND CALL A PHYSICIAN IMMEDIATELY. KEEP OUT
OF THE REACH OF CHILDREN.
• IF THE BATTERY IS EQUIPPED WITH REMOVABLE CELL CAPS, BE CERTAIN THAT EACH OF
THE CELL CAPS IS IN PLACE AND TIGHT BEFORE
THE BATTERY IS RETURNED TO SERVICE. PERSONAL INJURY AND/OR VEHICLE DAMAGE MAY
RESULT FROM LOOSE OR MISSING CELL CAPS.
Before proceeding with this test, completely charge
the battery. Refer to Battery Charging in the index
of this service manual for the location of the proper
battery charging procedures.
(1) Before measuring the open-circuit voltage, the
surface charge must be removed from the battery.
Turn on the headlamps for fifteen seconds, then
allow up to five minutes for the battery voltage to
stabilize.
(2) Disconnect and isolate both battery cables, negative cable first.
(3) Using a voltmeter connected to the battery
posts (see the instructions provided by the manufacturer of the voltmeter), measure the open-circuit voltage (Fig. 9).
OPEN-CIRCUIT VOLTAGE TEST
A battery open-circuit voltage (no load) test will
show the state-of-charge of a battery. This test can be
used in place of the hydrometer test when a hydrometer is not available, or for maintenance-free batteries with non-removable cell caps.
WARNING:
• IF THE BATTERY SHOWS SIGNS OF FREEZING, LEAKING, LOOSE POSTS, OR LOW ELECTROLYTE LEVEL, DO NOT TEST, ASSIST-BOOST, OR
CHARGE. THE BATTERY MAY ARC INTERNALLY
AND EXPLODE. PERSONAL INJURY AND/OR VEHICLE DAMAGE MAY RESULT.
• EXPLOSIVE HYDROGEN GAS FORMS IN AND
AROUND THE BATTERY. DO NOT SMOKE, USE
FLAME, OR CREATE SPARKS NEAR THE BATTERY.
Fig. 9 Testing Open-Circuit Voltage - Typical
See the Open-Circuit Voltage chart. This voltage
reading will indicate the battery state-of-charge, but
will not reveal its cranking capacity. If a battery has
an open-circuit voltage reading of 12.4 volts or
greater, it may be load tested to reveal its cranking
capacity. Refer to Load Test in this section for the
proper battery load testing procedures.
Page 12
8A - 12 BATTERY XJ
DIAGNOSIS AND TESTING (Continued)
Open Circuit Voltage
Open Circuit Volts Charge Percentage
11.7 volts or less 0%
12.0 volts 25%
12.2 volts 50%
12.4 volts 75%
12.6 volts or more 100%
LOAD TEST
A battery load test will verify the battery cranking
capacity. The test is based on the Cold Cranking
Amperage (CCA) rating of the battery. See the label
affixed to the battery case, or refer to Battery in the
index of this service manual for the location of the
proper factory-installed battery specifications to
determine the battery CCA rating.
WARNING:
• IF THE BATTERY SHOWS SIGNS OF FREEZING, LEAKING, LOOSE POSTS, OR LOW ELECTROLYTE LEVEL, DO NOT TEST, ASSIST-BOOST, OR
CHARGE. THE BATTERY MAY ARC INTERNALLY
AND EXPLODE. PERSONAL INJURY AND/OR VEHICLE DAMAGE MAY RESULT.
• EXPLOSIVE HYDROGEN GAS FORMS IN AND
AROUND THE BATTERY. DO NOT SMOKE, USE
FLAME, OR CREATE SPARKS NEAR THE BATTERY.
PERSONAL INJURY AND/OR VEHICLE DAMAGE
MAY RESULT.
• THE BATTERY CONTAINS SULFURIC ACID,
WHICH IS POISONOUS AND CAUSTIC. AVOID CONTACT WITH THE SKIN, EYES, OR CLOTHING. IN
THE EVENT OF CONTACT, FLUSH WITH WATER
AND CALL A PHYSICIAN IMMEDIATELY. KEEP OUT
OF THE REACH OF CHILDREN.
• IF THE BATTERY IS EQUIPPED WITH REMOVABLE CELL CAPS, BE CERTAIN THAT EACH OF
THE CELL CAPS IS IN PLACE AND TIGHT BEFORE
THE BATTERY IS RETURNED TO SERVICE. PERSONAL INJURY AND/OR VEHICLE DAMAGE MAY
RESULT FROM LOOSE OR MISSING CELL CAPS.
Before proceeding with this test, completely charge
the battery. Refer to Battery Charging in the index
of this service manual for the location of the proper
battery charging procedures.
(1) Disconnect and isolate both battery cables, negative cable first. The battery top and posts should be
clean.
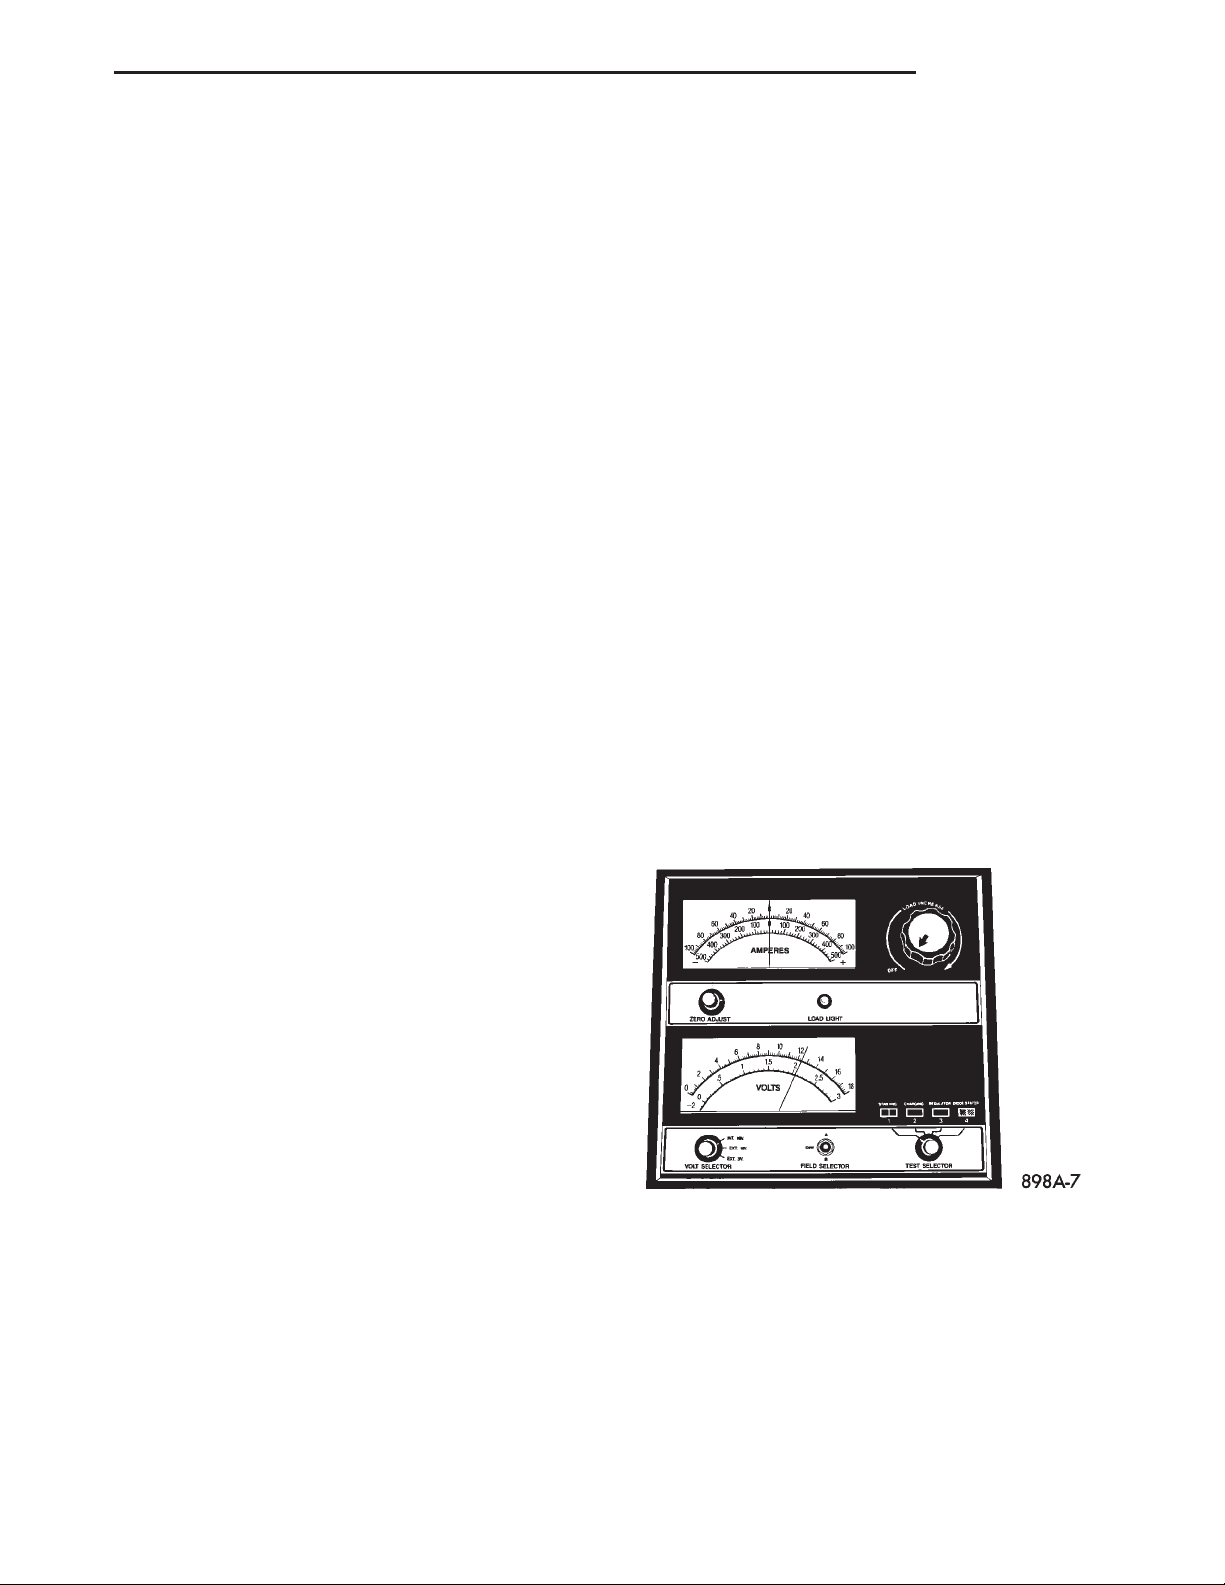
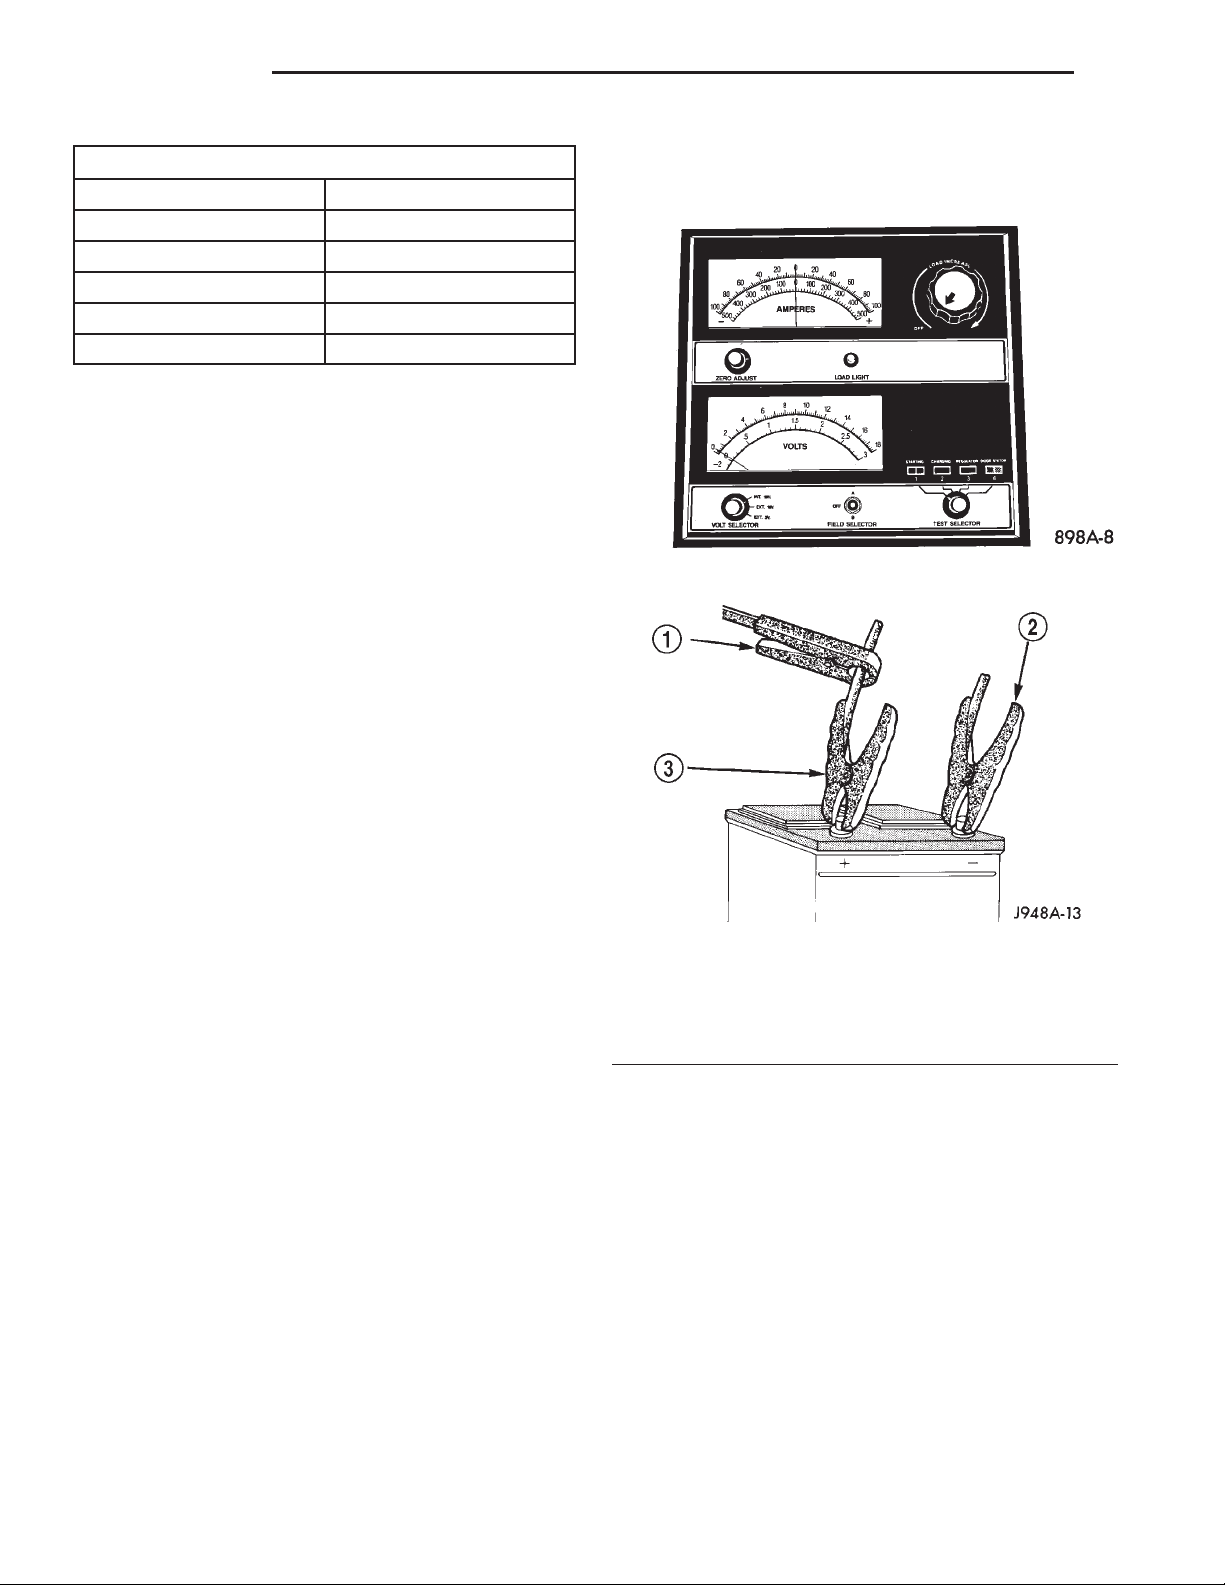
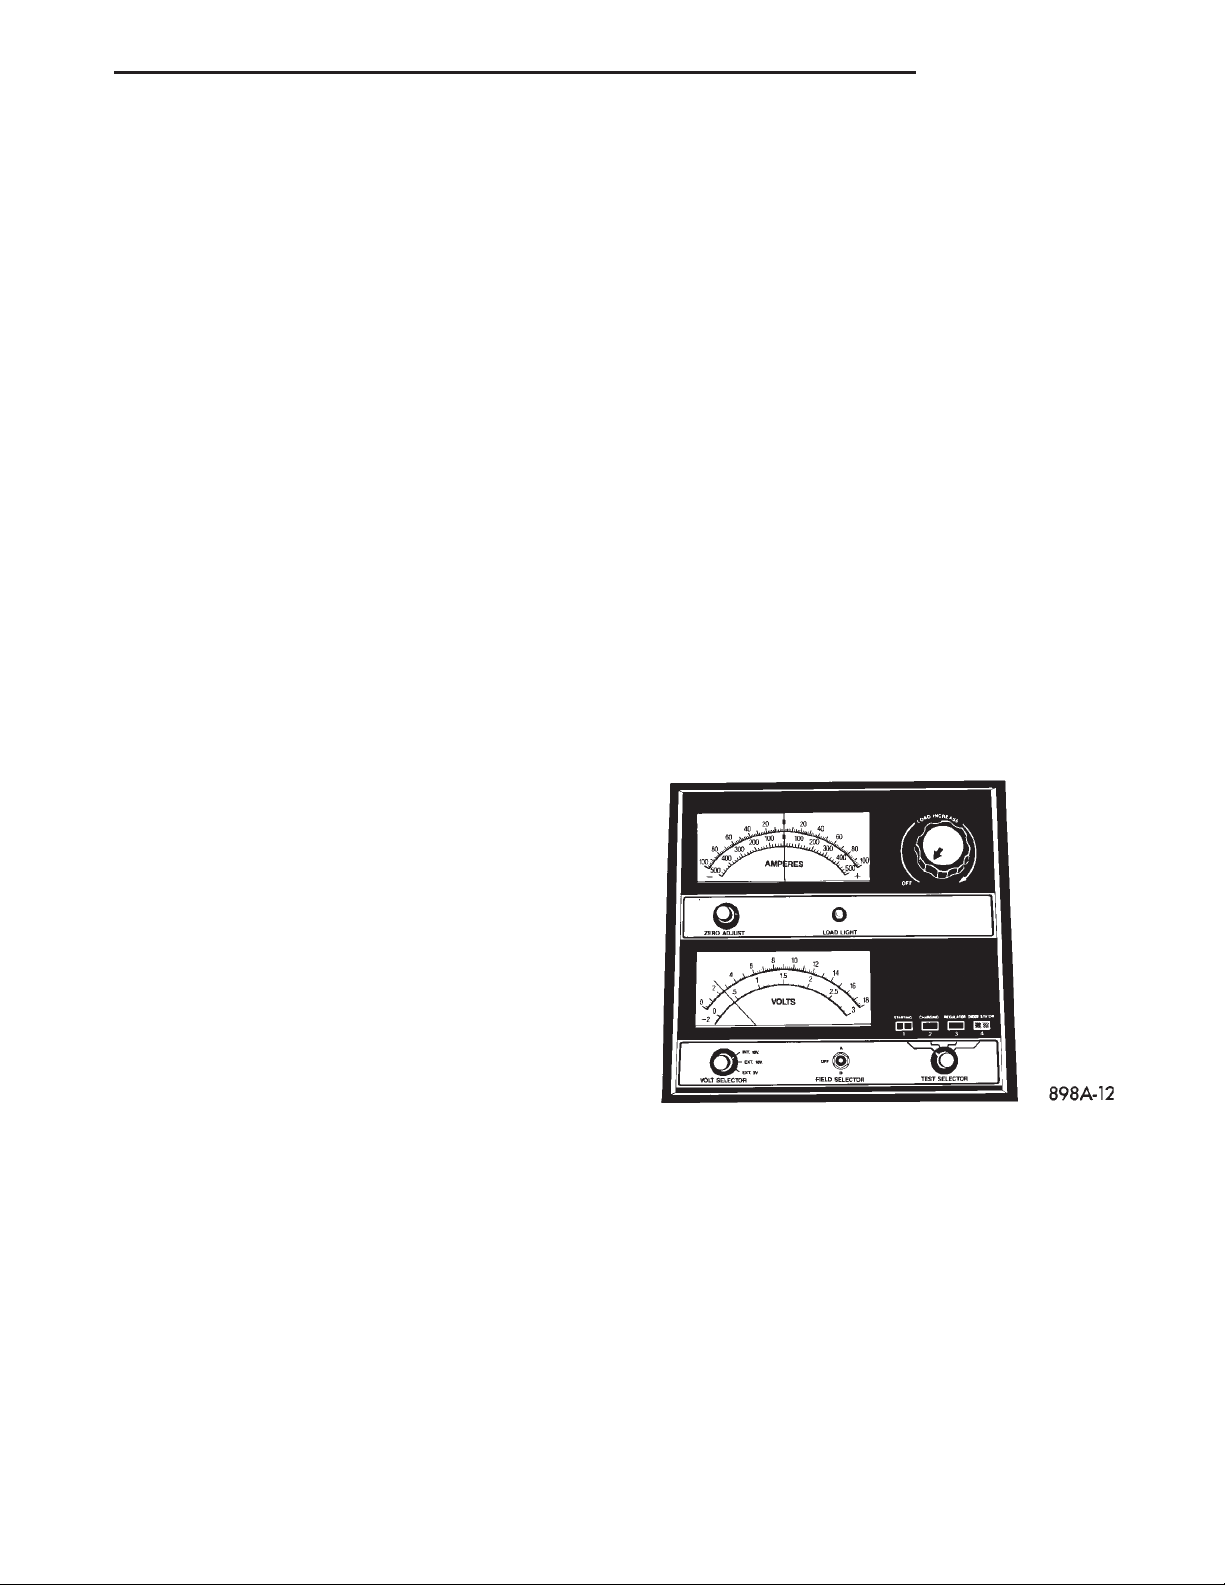
(2) Connect a suitable volt-ammeter-load tester
(Fig. 10) to the battery posts (Fig. 11). See the
instructions provided by the manufacturer of the
tester you are using. Check the open-circuit voltage
(no load) of the battery. Refer to Open-Circuit Volt-
age Test in this section for the proper battery opencircuit voltage test procedures. The battery opencircuit voltage must be 12.4 volts or greater.
Fig. 10 Volt-Ammeter-Load Tester - Typical
Fig. 11 Volt-Ammeter-Load Tester Connections -
Typical
1 – INDUCTION AMMETER CLAMP
2 – NEGATIVE CLAMP
3 – POSITIVE CLAMP
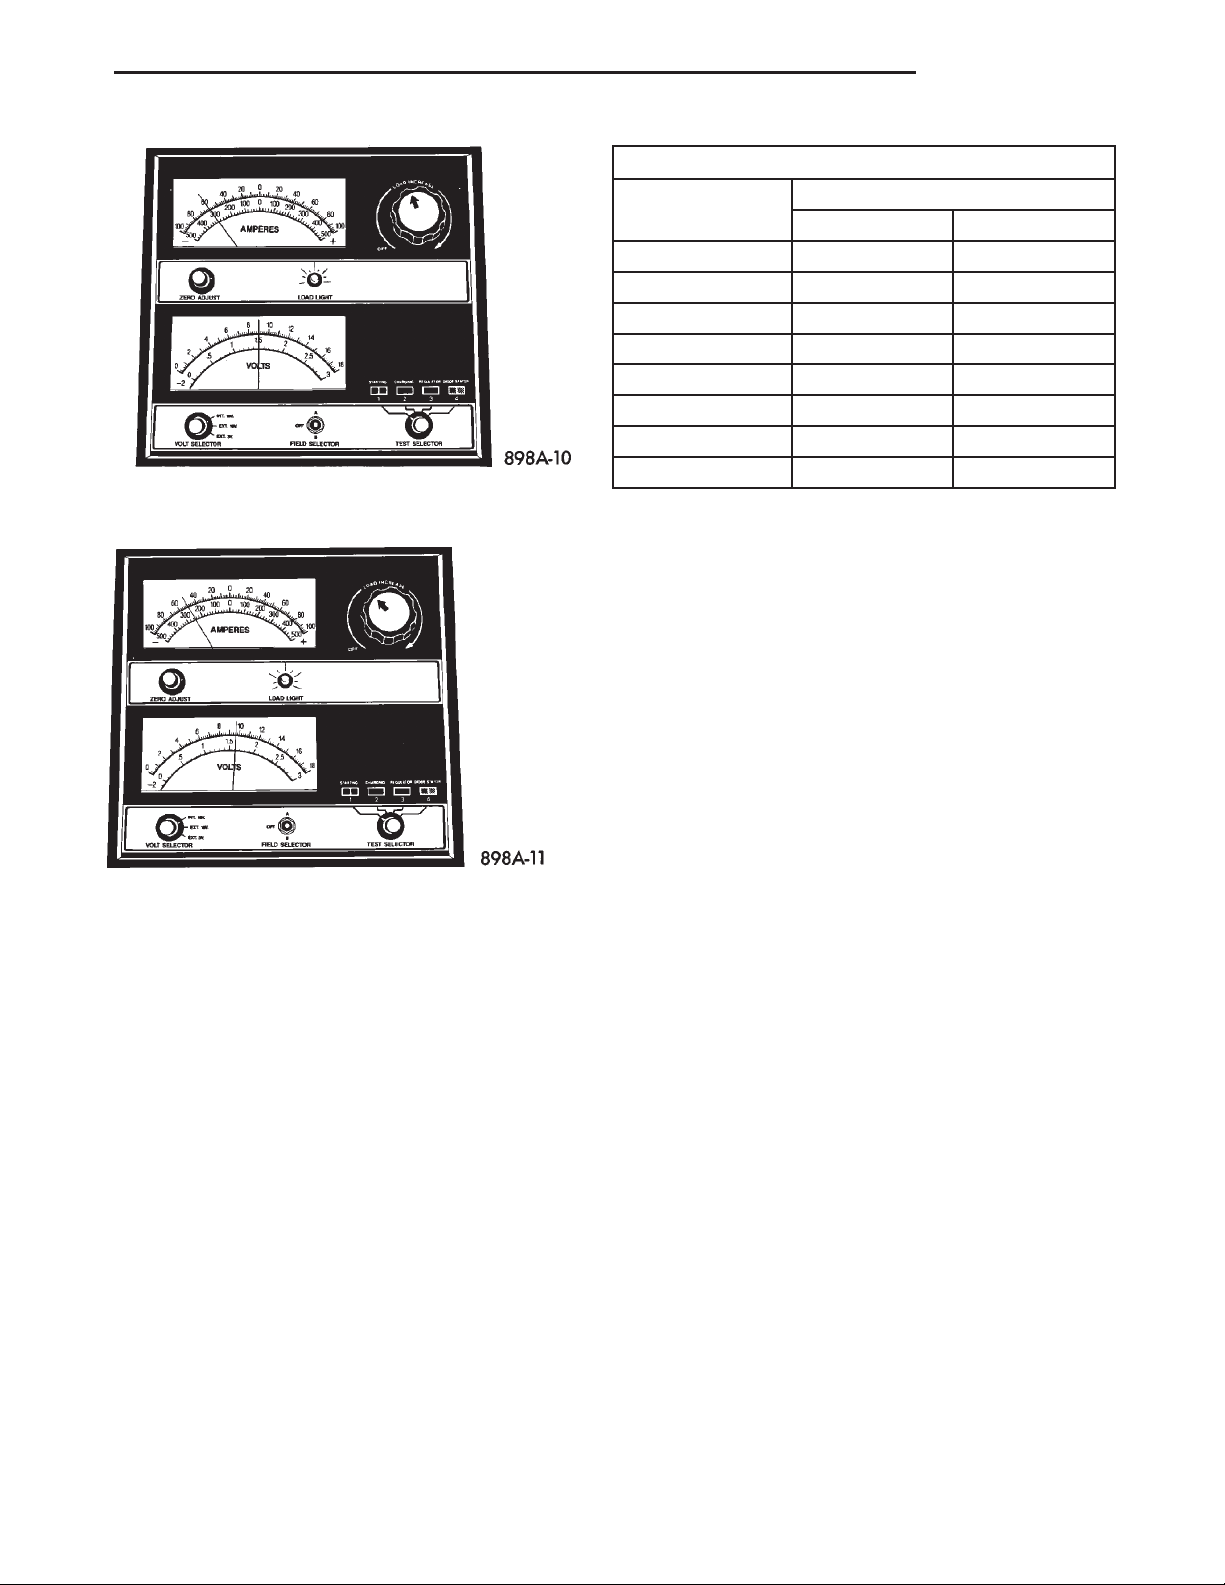
(3) Rotate the load control knob (carbon pile rheostat) to apply a 300 ampere load to the battery for
fifteen seconds, then return the control knob to the
Off position (Fig. 12). This will remove the surface
charge from the battery.
(4) Allow the battery to stabilize to open-circuit
voltage. It may take up to five minutes for the battery voltage to stabilize.
(5) Rotate the load control knob to maintain a load
equal to 50% of the CCA rating of the battery (Fig.
13). After fifteen seconds, record the loaded voltage
reading, then return the load control knob to the Off
position.
(6) The voltage drop will vary with the battery
temperature at the time of the load test. The battery
temperature can be estimated by using the ambient
temperature during the past several hours. If the
Page 13
XJ BATTERY 8A - 13
DIAGNOSIS AND TESTING (Continued)
Load Test Temperature
Temperature
°F °C
Fig. 12 Remove Surface Charge from Battery -
Typical
Fig. 13 Load 50% CCA Rating - Note Voltage -
Typical
battery has been charged, boosted, or loaded a few
minutes prior to the test, the battery will be somewhat warmer. See the Load Test Temperature chart
for the proper loaded voltage reading.
(7) If the voltmeter reading falls below 9.6 volts, at
a minimum battery temperature of 21° C (70° F), the
battery is faulty and must be replaced.
IGNITION-OFF DRAW TEST
The term Ignition-Off Draw (IOD) identifies a normal condition where power is being drained from the
battery with the ignition switch in the Off position. A
normal vehicle electrical system will draw from five
to twenty-five milliamperes (0.005 to 0.025 ampere)
with the ignition switch in the Off position, and all
Minimum Voltage
9.6 volts 70° and above 21° and above
9.5 volts 60° 16°
9.4 volts 50° 10°
9.3 volts 40° 4°
9.1 volts 30° -1°
8.9 volts 20° -7°
8.7 volts 10° -12°
8.5 volts 0° -18°
non-ignition controlled circuits in proper working
order. The twenty-five milliamperes are needed to
enable the memory functions for the Powertrain Control Module (PCM), digital clock, electronically tuned
radio, and other modules which may vary with the
vehicle equipment.
A vehicle that has not been operated for approximately twenty days, may discharge the battery to an
inadequate level. When a vehicle will not be used for
twenty days or more (stored), remove the IOD fuse
from the Power Distribution Center (PDC). This will
reduce battery discharging.
Excessive IOD can be caused by:
• Electrical items left on.
• Faulty or improperly adjusted switches.
• Faulty or shorted electronic modules and compo-
nents.
• An internally shorted generator.
• Intermittent shorts in the wiring.
If the IOD is over twenty-five milliamperes, the
problem must be found and corrected before replacing a battery. In most cases, the battery can be
charged and returned to service after the excessive
IOD condition has been corrected.
(1) Verify that all electrical accessories are off.
Turn off all lamps, remove the ignition key, and close
all doors. If the vehicle is equipped with an illuminated entry system or an electronically tuned radio,
allow the electronic timer function of these systems
to automatically shut off (time out). This may take
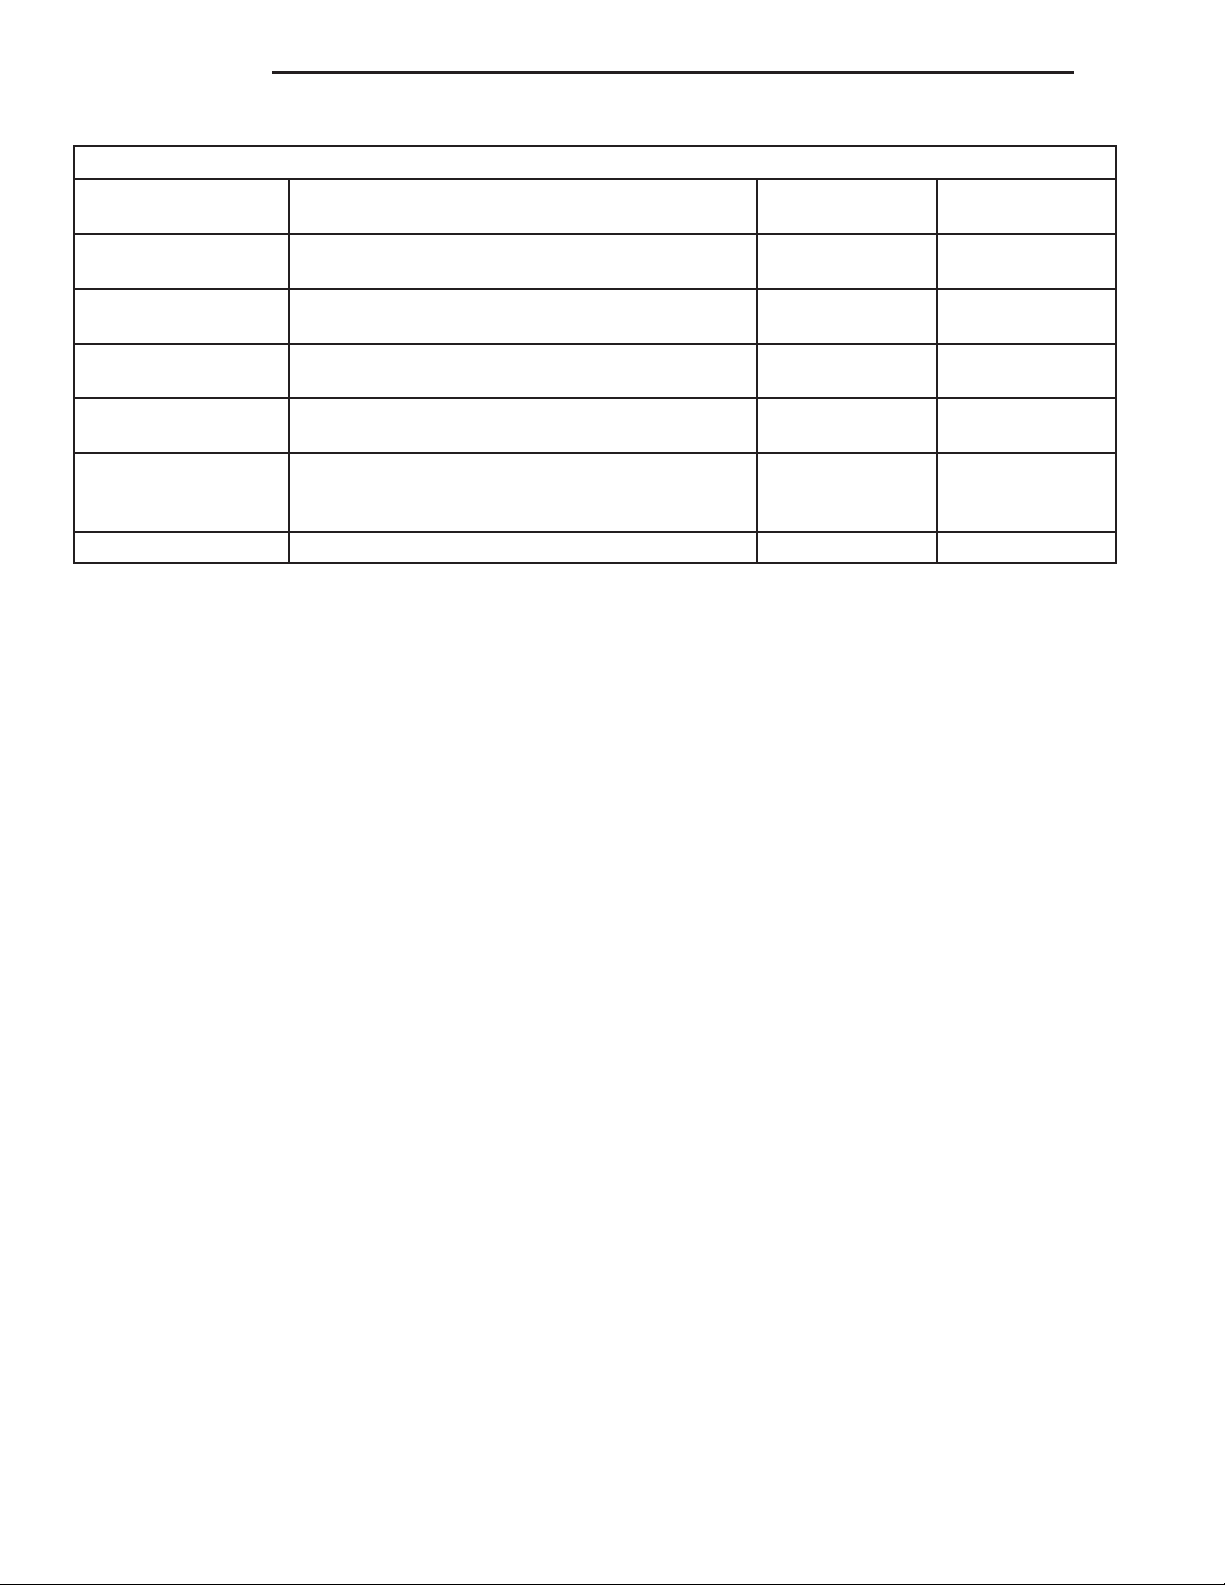
up to three minutes. See the Electronic Module Ignition-Off Draw table for more information.
Page 14
8A - 14 BATTERY XJ
DIAGNOSIS AND TESTING (Continued)
Electronic Module Ignition-Off Draw (IOD)
Module
Radio No
Audio Power
Amplifier
Central Timer Module
(CTM)
Powertrain Control
Module (PCM)
ElectroMechanical
Instrument Cluster
(EMIC)
Combination Flasher No 0.08 milliampere N/A
(If Yes, Interval and Wake-Up Input)
Time Out?
No
No
No 0.95 milliampere N/A
No 0.44 milliampere N/A
IOD
1to3
milliamperes
up to 1
milliampere
4.75
milliamperes
IOD After Time
Out
N/A
N/A
N/A
(2) Determine that the under-hood lamp is operating properly, then disconnect the lamp wire harness
connector or remove the lamp bulb.
(3) Disconnect the battery negative cable.
(4) Set an electronic digital multi-meter to its
highest amperage scale. Connect the multi-meter
between the disconnected battery negative cable terminal clamp and the battery negative terminal post.
Make sure that the doors remain closed so that the
illuminated entry system is not activated. The multimeter amperage reading may remain high for up to
three minutes, or may not give any reading at all
while set in the highest amperage scale, depending
upon the electrical equipment in the vehicle. The
multi-meter leads must be securely clamped to the
battery negative cable terminal clamp and the battery negative terminal post. If continuity between the
battery negative terminal post and the negative cable
terminal clamp is lost during any part of the IOD
test, the electronic timer function will be activated
and all of the tests will have to be repeated.
(5) After about three minutes, the high-amperage
IOD reading on the multi-meter should become very
low or nonexistent, depending upon the electrical
equipment in the vehicle. If the amperage reading
remains high, remove and replace each fuse or circuit
breaker in the Power Distribution Center (PDC) and
then in the Junction Block (JB) one at a time (refer
to Power Distribution Center and Junction
Block in the index of this service manual for the
location of complete PDC and JB fuse and circuit
breaker identification contained in the wiring diagrams) until the amperage reading becomes very low,
or nonexistent. This will isolate each circuit and
identify the circuit that is the source of the high-amperage IOD. If the amperage reading remains high
after removing and replacing each fuse and circuit
breaker, disconnect the wire harness from the generator. If the amperage reading now becomes very low
or nonexistent, refer to Charging System in the
index of this service manual for the location of the
proper charging system diagnosis and testing procedures. After the high-amperage IOD has been corrected, switch the multi-meter to progressively lower
amperage scales and, if necessary, repeat the fuse
and circuit breaker remove-and-replace process to
identify and correct all sources of excessive IOD. It is
now safe to select the lowest milliampere scale of the
multi-meter to check the low-amperage IOD.
CAUTION: Do not open any doors, or turn on any
electrical accessories with the lowest milliampere
scale selected, or the multi-meter may be damaged.
(6) Observe the multi-meter reading. The low-amperage IOD should not exceed twenty-five milliamperes (0.025 ampere). If the current draw exceeds
twenty-five milliamperes, isolate each circuit using
the fuse and circuit breaker remove-and-replace process in Step 5. The multi-meter reading will drop to
within the acceptable limit when the source of the
excessive current draw is disconnected. Repair this
circuit as required; whether a wiring short, incorrect
switch adjustment, or a component failure is at fault.
BATTERY CABLES
DIAGNOSIS
A voltage drop test will determine if there is excessive resistance in the battery cable terminal connections or the battery cables. If excessive resistance is
found in the battery cable connections, the connection point should be disassembled, cleaned of all corrosion or foreign material, then reassembled.
Following reassembly, check the voltage drop for the
Page 15
XJ BATTERY 8A - 15
DIAGNOSIS AND TESTING (Continued)
battery cable connection and the battery cable again
to confirm repair.
When performing the voltage drop test, it is important to remember that the voltage drop is giving an
indication of the resistance between the two points at
which the voltmeter probes are attached. EXAM-
PLE: When testing the resistance of the battery positive cable, touch the voltmeter leads to the battery
positive cable terminal clamp and to the battery positive cable eyelet terminal at the starter solenoid
B(+) terminal stud. If you probe the battery positive
terminal post and the battery positive cable eyelet
terminal at the starter solenoid B(+) terminal stud,
you are reading the combined voltage drop in the
battery positive cable terminal clamp-to-terminal
post connection and the battery positive cable.
TESTING
VOLTAGE DROP TEST
WARNING:
• IF THE BATTERY SHOWS SIGNS OF FREEZING, LEAKING, LOOSE POSTS, OR LOW ELECTROLYTE LEVEL, DO NOT TEST, ASSIST-BOOST, OR
CHARGE. THE BATTERY MAY ARC INTERNALLY
AND EXPLODE. PERSONAL INJURY AND/OR VEHICLE DAMAGE MAY RESULT.
• EXPLOSIVE HYDROGEN GAS FORMS IN AND
AROUND THE BATTERY. DO NOT SMOKE, USE
FLAME, OR CREATE SPARKS NEAR THE BATTERY.
PERSONAL INJURY AND/OR VEHICLE DAMAGE
MAY RESULT.
• THE BATTERY CONTAINS SULFURIC ACID,
WHICH IS POISONOUS AND CAUSTIC. AVOID CONTACT WITH THE SKIN, EYES, OR CLOTHING. IN
THE EVENT OF CONTACT, FLUSH WITH WATER
AND CALL A PHYSICIAN IMMEDIATELY. KEEP OUT
OF THE REACH OF CHILDREN.
• IF THE BATTERY IS EQUIPPED WITH REMOVABLE CELL CAPS, BE CERTAIN THAT EACH OF
THE CELL CAPS IS IN PLACE AND TIGHT BEFORE
THE BATTERY IS RETURNED TO SERVICE. PERSONAL INJURY AND/OR VEHICLE DAMAGE MAY
RESULT FROM LOOSE OR MISSING CELL CAPS.
The following operation will require a voltmeter
accurate to 1/10 (0.10) volt. Before performing this
test, be certain that the following procedures are
accomplished:
• The battery is fully-charged and load tested.
Refer to Battery Charging in the index of this service manual for the location of the proper battery
charging procedures. Refer to Battery in the index of
this service manual for the location of the battery
diagnosis and testing procedures, including the
proper battery load test procedures.
• Fully engage the parking brake.
• If the vehicle is equipped with an automatic
transmission, place the gearshift selector lever in the
Park position. If the vehicle is equipped with a manual transmission, place the gearshift selector lever in
the Neutral position and block the clutch pedal in the
fully depressed position.
• Verify that all lamps and accessories are turned
off.
• To prevent the engine from starting, remove the
Automatic ShutDown (ASD) relay. The ASD relay is
located in the Power Distribution Center (PDC), in
the engine compartment. See the fuse and relay layout label affixed to the underside of the PDC cover
for ASD relay identification and location.
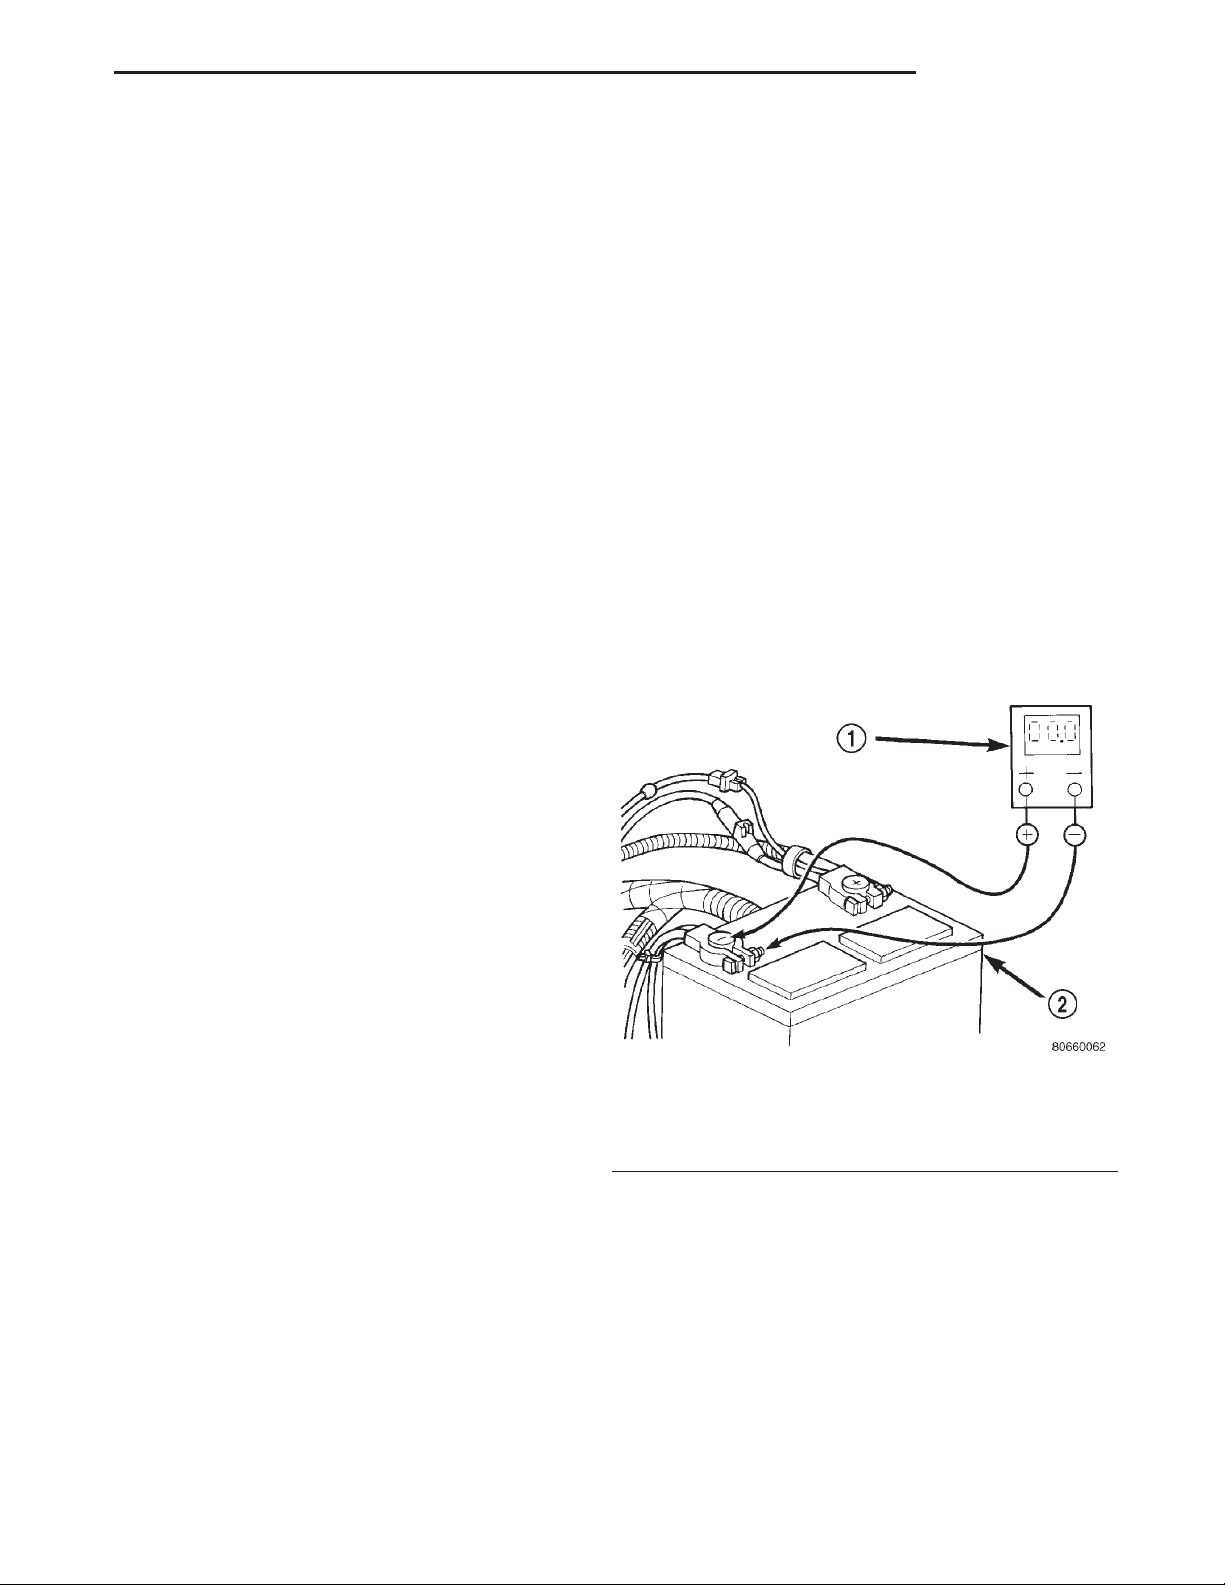
(1) Connect the positive lead of the voltmeter to
the battery negative terminal post. Connect the negative lead of the voltmeter to the battery negative
cable terminal clamp (Fig. 14). Rotate and hold the
ignition switch in the Start position. Observe the
voltmeter. If voltage is detected, correct the poor connection between the battery negative cable terminal
clamp and the battery negative terminal post.
Fig. 14 Test Battery Negative Connection
Resistance - Typical
1 – VOLTMETER
2 – BATTERY
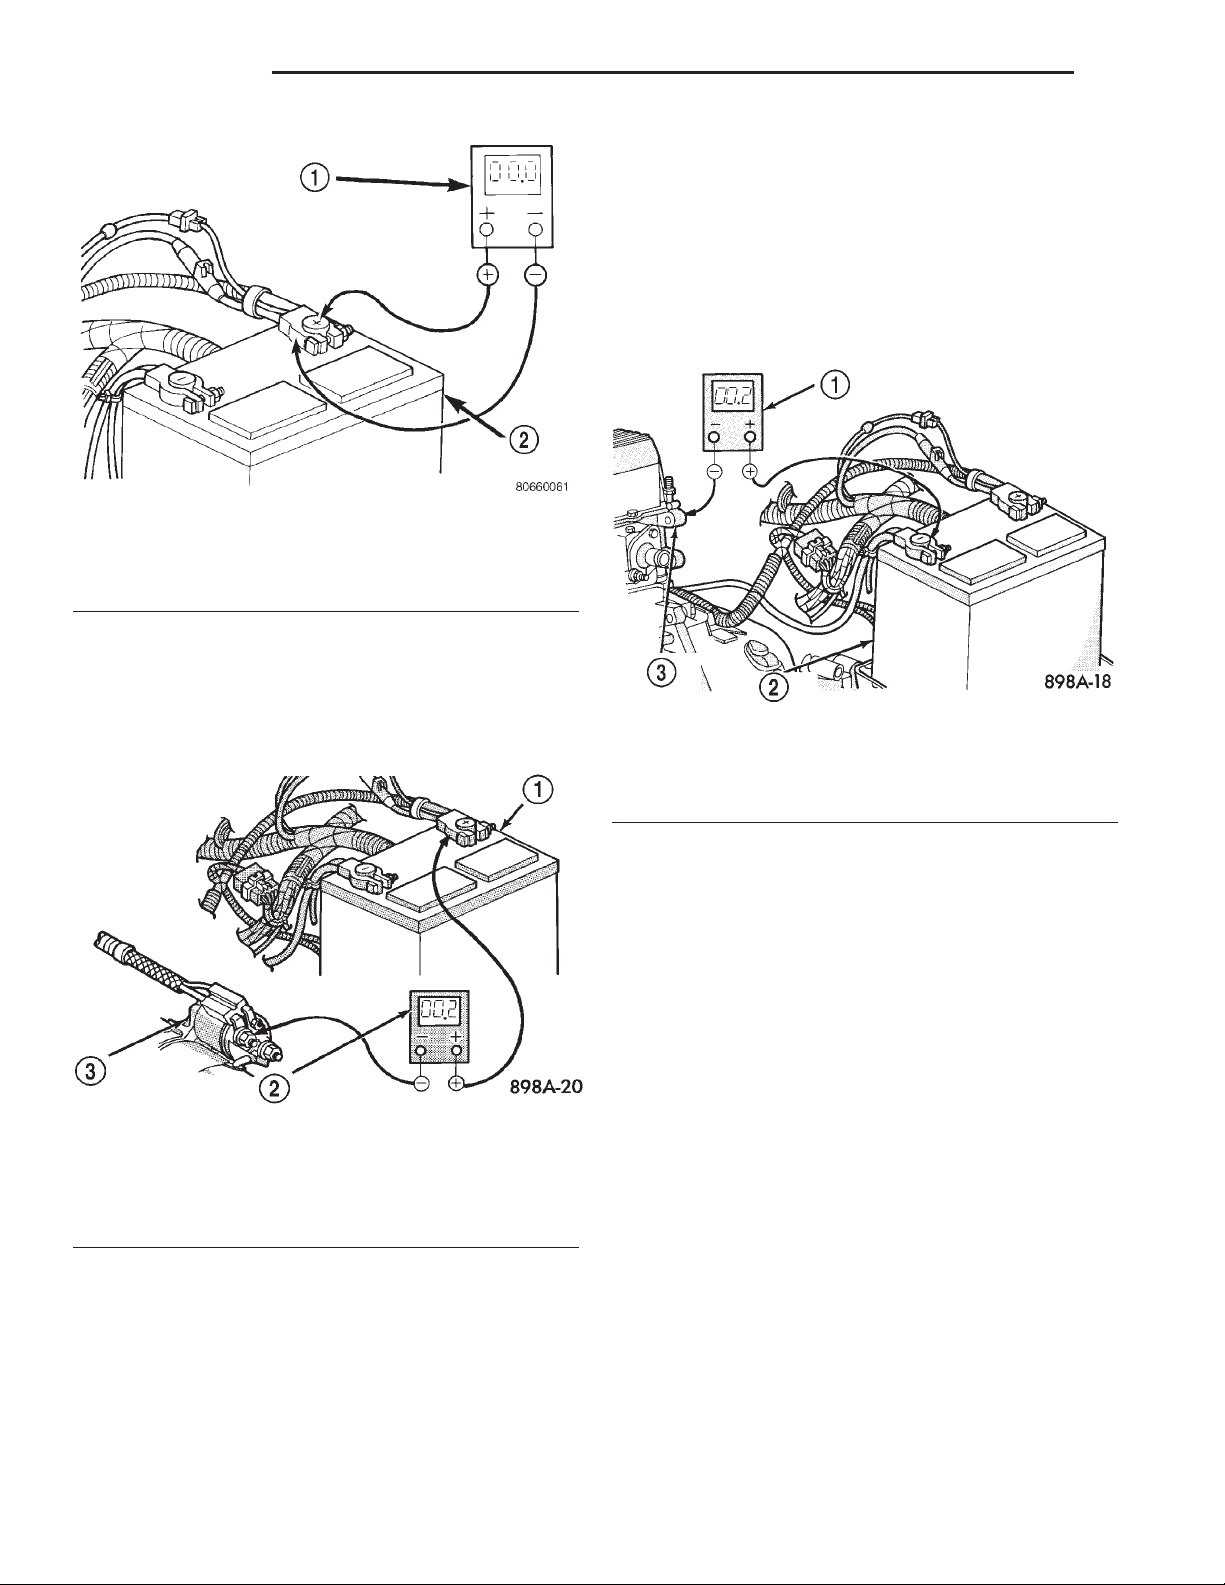
(2) Connect the positive lead of the voltmeter to
the battery positive terminal post. Connect the negative lead of the voltmeter to the battery positive cable
terminal clamp (Fig. 15). Rotate and hold the ignition
switch in the Start position. Observe the voltmeter. If
voltage is detected, correct the poor connection
between the battery positive cable terminal clamp
and the battery positive terminal post.
(3) Connect the voltmeter to measure between the
battery positive cable terminal clamp and the starter
solenoid B(+) terminal stud (Fig. 16). Rotate and hold
the ignition switch in the Start position. Observe the
Page 16
8A - 16 BATTERY XJ
DIAGNOSIS AND TESTING (Continued)
(4) Connect the voltmeter to measure between the
battery negative cable terminal clamp and a good
clean ground on the engine block (Fig. 17). Rotate
and hold the ignition switch in the Start position.
Observe the voltmeter. If the reading is above 0.2
volt, clean and tighten the battery negative cable
eyelet terminal connection to the engine block.
Repeat the test. If the reading is still above 0.2 volt,
replace the faulty battery negative cable.
Fig. 15 Test Battery Positive Connection Resistance
- Typical
1 – VOLTMETER
2 – BATTERY
voltmeter. If the reading is above 0.2 volt, clean and
tighten the battery positive cable eyelet terminal connection at the starter solenoid B(+) terminal stud.
Repeat the test. If the reading is still above 0.2 volt,
replace the faulty battery positive cable.
Fig. 17 Test Ground Circuit Resistance - Typical
1 – VOLTMETER
2 – BATTERY
3 – ENGINE GROUND
Fig. 16 Test Battery Positive Cable Resistance -
Typical
1 – BATTERY
2 – VOLTMETER
3 – STARTER MOTOR
SERVICE PROCEDURES
BATTERY CHARGING
Battery charging is the means by which the battery can be restored to its full voltage potential. A
battery is fully-charged when:
• All of the battery cells are gassing freely during
battery charging.
• A green color is visible in the sight glass of the
battery built-in test indicator.
• Three hydrometer tests, taken at one-hour intervals, indicate no increase in the temperature-corrected specific gravity of the battery electrolyte.
• Open-circuit voltage of the battery is 12.4 volts
or above.
Page 17
XJ BATTERY 8A - 17
SERVICE PROCEDURES (Continued)
WARNING:
• IF THE BATTERY SHOWS SIGNS OF FREEZING, LEAKING, LOOSE POSTS, OR LOW ELECTROLYTE LEVEL, DO NOT TEST, ASSIST-BOOST, OR
CHARGE. THE BATTERY MAY ARC INTERNALLY
AND EXPLODE. PERSONAL INJURY AND/OR VEHICLE DAMAGE MAY RESULT.
• EXPLOSIVE HYDROGEN GAS FORMS IN AND
AROUND THE BATTERY. DO NOT SMOKE, USE
FLAME, OR CREATE SPARKS NEAR THE BATTERY.
PERSONAL INJURY AND/OR VEHICLE DAMAGE
MAY RESULT.
• THE BATTERY CONTAINS SULFURIC ACID,
WHICH IS POISONOUS AND CAUSTIC. AVOID CONTACT WITH THE SKIN, EYES, OR CLOTHING. IN
THE EVENT OF CONTACT, FLUSH WITH WATER
AND CALL A PHYSICIAN IMMEDIATELY. KEEP OUT
OF THE REACH OF CHILDREN.
• IF THE BATTERY IS EQUIPPED WITH REMOVABLE CELL CAPS, BE CERTAIN THAT EACH OF
THE CELL CAPS IS IN PLACE AND TIGHT BEFORE
THE BATTERY IS RETURNED TO SERVICE. PERSONAL INJURY AND/OR VEHICLE DAMAGE MAY
RESULT FROM LOOSE OR MISSING CELL CAPS.
CAUTION:
• Always disconnect and isolate the battery negative cable before charging a battery. Do not exceed
sixteen volts while charging a battery. Damage to
the vehicle electrical system components may
result.
• Battery electrolyte will bubble inside the battery case during normal battery charging. Electrolyte boiling or being discharged from the battery
vents indicates a battery overcharging condition.
Immediately reduce the charging rate or turn off the
charger to evaluate the battery condition. Damage
to the battery may result from overcharging.
• The battery should not be hot to the touch. If
the battery feels hot to the touch, turn off the
charger and let the battery cool before continuing
the charging operation. Damage to the battery may
result.
Some battery chargers are equipped with polaritysensing circuitry. This circuitry protects the battery
charger and the battery from being damaged if they
are improperly connected. If the battery state-ofcharge is too low for the polarity-sensing circuitry to
detect, the battery charger will not operate. This
makes it appear that the battery will not accept
charging current. See the instructions provided by
the manufacturer of the battery charger for details
on how to bypass the polarity-sensing circuitry.
After the battery has been charged to 12.4 volts or
greater, perform a load test to determine the battery
cranking capacity. Refer to Battery in the index of
this service manual for the location of the battery
diagnosis and testing procedures for more information on the proper battery load testing procedures. If
the battery will endure a load test, return the battery to service. If the battery will not endure a load
test, it is faulty and must be replaced.
Clean and inspect the battery hold downs, tray,
terminals, posts, and top before completing battery
service. Refer to Battery in the index of this service
manual for the location of the proper battery cleaning and inspection procedures.
CHARGING A COMPLETELY DISCHARGED BATTERY
The following procedure should be used to recharge
a completely discharged battery. Unless this procedure is properly followed, a good battery may be
needlessly replaced.
(1) Measure the voltage at the battery posts with a
voltmeter, accurate to 1/10 (0.10) volt (Fig. 18). If the
reading is below ten volts, the battery charging current will be low. It could take some time before the
battery accepts a current greater than a few milliamperes. Such low current may not be detectable on the
ammeters built into many battery chargers.
Fig. 18 Voltmeter Accurate to 1/10 Volt Connected -
Typical
(2) Disconnect and isolate the battery negative
cable. Connect the battery charger leads. Some battery chargers are equipped with polarity-sensing circuitry. This circuitry protects the battery charger and
the battery from being damaged if they are improperly connected. If the battery state-of-charge is too
low for the polarity-sensing circuitry to detect, the
battery charger will not operate. This makes it
appear that the battery will not accept charging current. See the instructions provided by the manufacturer of the battery charger for details on how to
bypass the polarity-sensing circuitry.
Page 18
8A - 18 BATTERY XJ
SERVICE PROCEDURES (Continued)
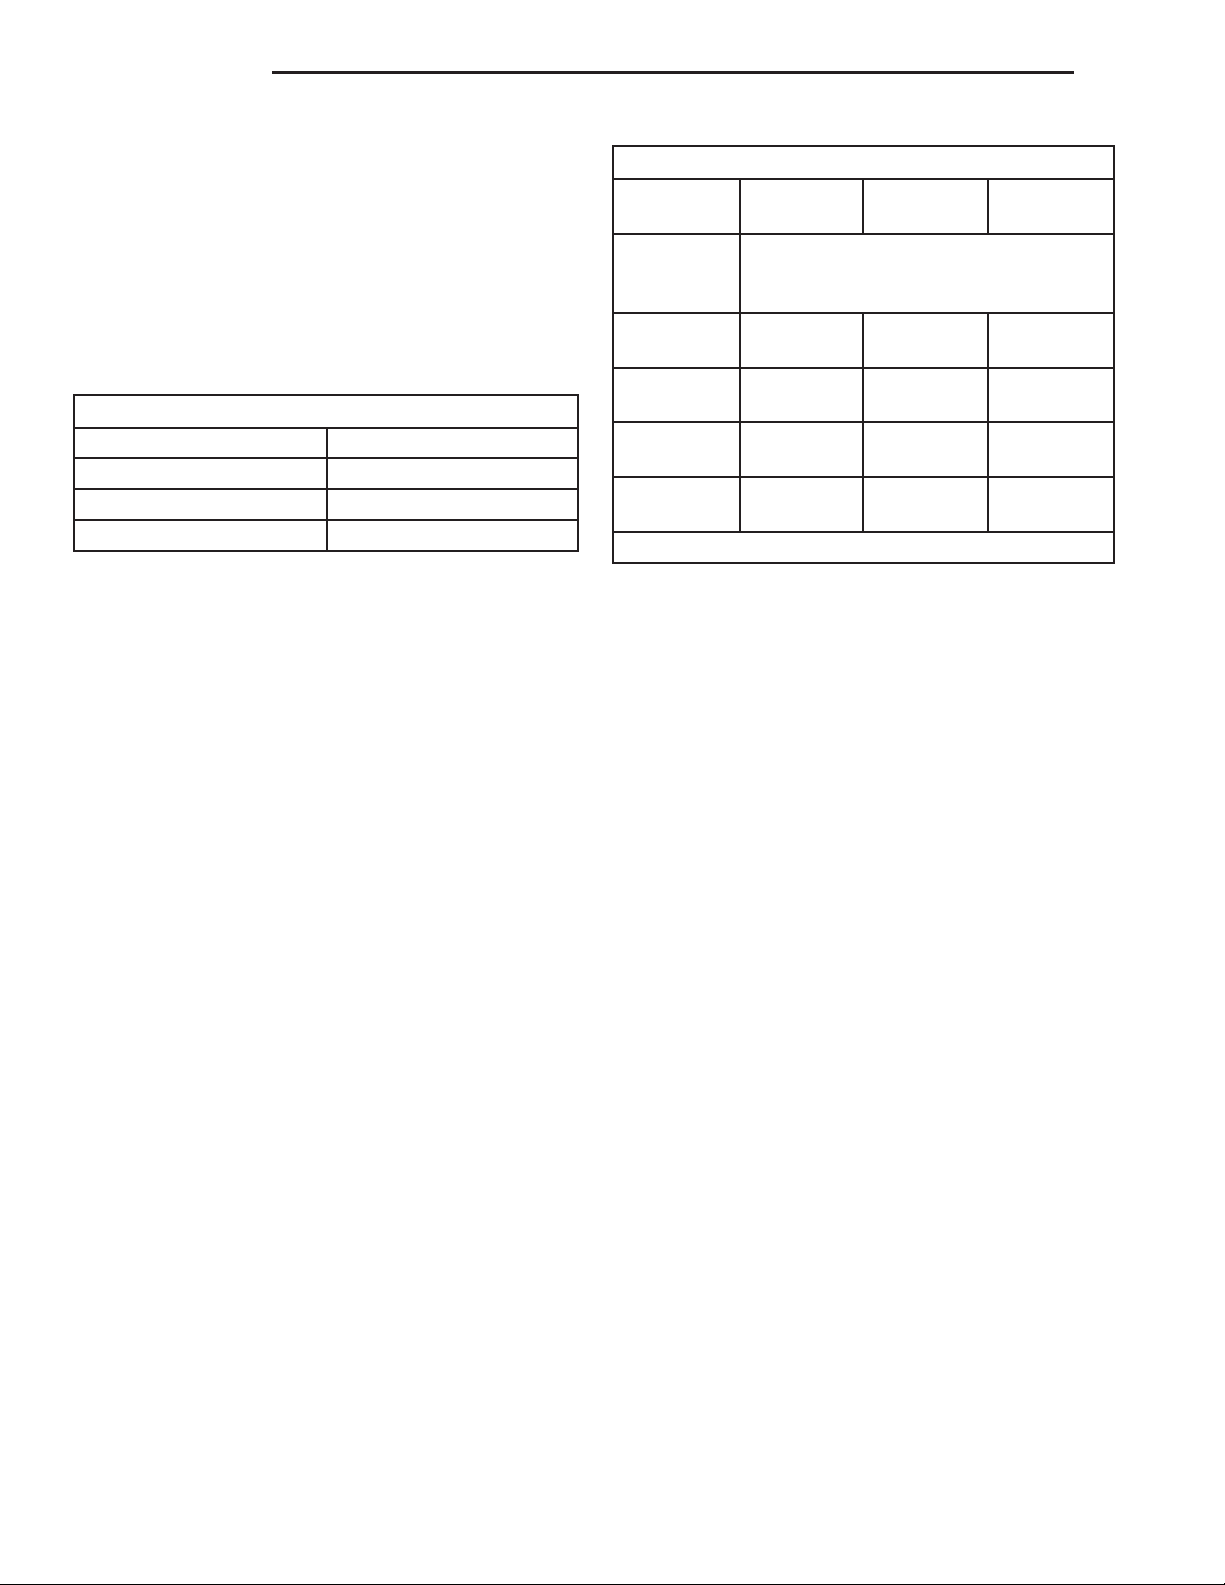
(3) Battery chargers vary in the amount of voltage
and current they provide. The amount of time
required for a battery to accept measurable charging
current at various voltages is shown in the Charge
Rate chart. If the charging current is still not measurable at the end of the charging time, the battery
is faulty and must be replaced. If the charging current is measurable during the charging time, the battery may be good and the charging should be
completed in the normal manner.
Charge Rate
Voltage Hours
16.0 volts maximum up to 4 hours
14.0 to 15.9 volts up to 8 hours
13.9 volts or less up to 16 hours
CHARGING TIME REQUIRED
The time required to charge a battery will vary,
depending upon the following factors:
• Battery Capacity
A completely discharged heavy-duty battery requires
twice the charging time of a small capacity battery.
• Temperature
A longer time will be needed to charge a battery at
-18° C (0° F) than at 27° C (80° F). When a fast battery charger is connected to a cold battery, the current accepted by the battery will be very low at first.
As the battery warms, it will accept a higher charging current rate (amperage).
• Charger Capacity
A battery charger that supplies only five amperes
will require a longer charging time. A battery charger
that supplies twenty amperes or more will require a
shorter charging time.
• State-Of-Charge
A completely discharged battery requires more charging time than a partially discharged battery. Electrolyte is nearly pure water in a completely discharged
battery. At first, the charging current (amperage) will
be low. As the battery charges, the specific gravity of
the electrolyte will gradually rise.
WARNING: NEVER EXCEED TWENTY AMPERES
WHEN CHARGING A COLD (-1° C or 30° F) BATTERY. THE BATTERY MAY ARC INTERNALLY AND
EXPLODE. PERSONAL INJURY AND/OR VEHICLE
DAMAGE MAY RESULT.
Battery Charging Timetable
Charging
Amperage
Open
Circuit
Voltage
12.25 to
12.49
12.00 to
12.24
10.00 to
11.99
*Below
10.00
*Refer to Charging A Completely Discharged Battery
5
Amperes
Hours Charging at 21° C (70° F)
6 hours 3 hours 1.5 hours
10 hours 5 hours 2.5 hours
14 hours 7 hours 3.5 hours
18 hours 9 hours 4.5 hours
10
Amperes
20
Amperes
REMOVAL AND INSTALLATION
BATTERY CABLES
Both the battery negative cable and the battery
positive cable are serviced in the battery wire harness. If either battery cable is damaged or faulty, the
battery wire harness unit must be replaced.
REMOVAL
(1) Turn the ignition switch to the Off position. Be
certain that all electrical accessories are turned off.
(2) Loosen the battery negative cable terminal
clamp pinch-bolt hex nut.
(3) Disconnect the battery negative cable terminal
clamp from the battery negative terminal post. If
necessary, use a battery terminal puller to remove
the terminal clamp from the battery post.
(4) Loosen the battery positive cable terminal
clamp pinch-bolt hex nut.
(5) Disconnect the battery positive cable terminal
clamp from the battery positive terminal post. If necessary, use a battery terminal puller to remove the
terminal clamp from the battery post.
(6) Unlatch and remove the B(+) terminal stud
cover from the front of the Power Distribution Center
(PDC).
(7) Remove the nut that secures the battery positive cable eyelet terminal and the generator output
cable eyelet terminal to the B(+) terminal stud on the
PDC.
(8) Remove the battery positive cable eyelet terminal and the generator output cable eyelet terminal
from the B(+) terminal stud on the PDC.
(9) Disconnect the battery wire harness connector
from the headlamp and dash wire harness connector
located below the front of the PDC.
Page 19

XJ BATTERY 8A - 19
REMOVAL AND INSTALLATION (Continued)
(10) Remove the screw that secures the battery
negative cable eyelet terminal to the inner fender
shield near the battery.
(11) On LHD models with air conditioning, disconnect the compressor clutch wire harness connector
from the battery wire harness connector.
(12) Unlatch and remove the cover from the generator output terminal stud housing on the back of the
generator.
(13) Remove the nut that secures the generator
output cable eyelet terminal to the generator output
terminal stud.
(14) Remove the generator output cable eyelet terminal from the generator output terminal stud.
(15) Disconnect the battery wire harness connector
from the generator field terminal connector receptacle on the back of the generator.
(16) Remove the nut that secures the battery negative cable ground eyelet terminal to the stud on the
right side of the engine block.
(17) Remove the battery negative cable ground
eyelet terminal from the engine block stud.
(18) On models with a 2.5L engine, remove the nut
that secures the battery wire harness locator clip to
the stud on the right side engine block oil pan rail
below and forward of the engine oil filter adapter.
(19) On models with a 4.0L engine, remove the
screw that secures the battery wire harness locator
clip to the right side of the engine block between and
below the right engine mount and the oil filter
adapter.
(20) Remove the nut that secures the battery positive cable eyelet terminal to the B(+) terminal stud
on the starter solenoid.
(21) Remove the battery positive cable eyelet terminal from the B(+) terminal stud on the starter
solenoid.
(22) Disconnect the battery wire harness connector
from the connector receptacle on the starter solenoid.
(23) Remove the battery wire harness from the
engine compartment.
INSTALLATION
(1) Clean and inspect the battery cable terminal
clamps and the battery terminal posts. Refer to Bat-
tery in the index of this service manual for the location of the proper battery cable terminal clamp and
battery terminal post cleaning and inspection procedures.
(2) Position the battery wire harness into the
engine compartment.
(3) Reconnect the battery wire harness connector
to the connector receptacle on the starter solenoid.
(4) Install the battery positive cable eyelet terminal onto the B(+) terminal stud on the starter solenoid.
(5) Install and tighten the nut that secures the
battery positive cable eyelet terminal to the B(+) terminal stud on the starter solenoid. Tighten the nut to
10 N·m (90 in. lbs.).
(6) On models with a 2.5L engine, install and
tighten the nut that secures the battery wire harness
locator clip to the stud on the right side engine block
oil pan rail below and forward of the engine oil filter
adapter. Tighten the nut to 8.4 N·m (75 in. lbs.).
(7) On models with a 4.0L engine, install and
tighten the screw that secures the battery wire harness locator clip to the right side of the engine block
between and below the right engine mount and the
oil filter adapter. Tighten the screw to 8.4 N·m (75 in.
lbs.).
(8) Install the battery negative cable ground eyelet
terminal onto the stud on the right side of the engine
block.
(9) Install and tighten the nut that secures the
battery negative cable ground eyelet terminal to the
stud on the right side of the engine block. Tighten
the nut to 15.8 N·m (140 in. lbs.).
(10) Reconnect the battery wire harness connector
to the generator field terminal connector receptacle
on the back of the generator.
(11) Install the generator output cable eyelet terminal onto the generator output terminal stud.
(12) Install and tighten the nut that secures the
generator output cable eyelet terminal to the generator output terminal stud. Tighten the nut to 8.4 N·m
(75 in. lbs.).
(13) Position the cover for the generator output
terminal stud housing onto the back of the generator
and snap it into place.
(14) On LHD models with air conditioning, reconnect the compressor clutch wire harness connector to
the battery wire harness connector.
(15) Install and tighten the screw that secures the
battery negative cable eyelet terminal to the inner
fender shield near the battery. Tighten the screw to
24.8 N·m (220 in. lbs.).
(16) Reconnect the battery wire harness connector
to the headlamp and dash wire harness connector
located below the front of the PDC.
(17) Install the battery positive cable eyelet terminal and the generator output cable eyelet terminal
onto the PDC B(+) terminal stud.
(18) Install and tighten the nut that secures the
battery positive cable eyelet terminal and the generator output cable eyelet terminal to the PDC B(+)
terminal stud. Tighten the nut to 10.7 N·m (95 in.
lbs.).
(19) Engage the tabs on the lower edge of the B(+)
terminal stud cover in the slots on the front of the
PDC housing, then engage the latch on the top of the
cover with the latch tabs on the PDC housing.
Page 20
8A - 20 BATTERY XJ
REMOVAL AND INSTALLATION (Continued)
(20) Reconnect the battery positive cable terminal
clamp to the battery positive terminal post. Tighten
the terminal clamp pinch-bolt hex nut to 8.4 N·m (75
in. lbs.).
(21) Reconnect the battery negative cable terminal
clamp to the battery negative terminal post. Tighten
the terminal clamp pinch-bolt hex nut to 8.4 N·m (75
in. lbs.).
(22) Apply a thin coating of petroleum jelly or
chassis grease to the exposed surfaces of the battery
cable terminal clamps and the battery terminal
posts.
BATTERY HOLD DOWNS
All of the battery hold down hardware except for
the T-bolts can be serviced without removal of the
battery or the battery tray. The battery tray must be
removed from the vehicle to service the T-bolts. If the
T-bolts require service replacement, refer to Battery
Tray in the index of this service manual for the location of the proper battery tray removal and installation procedures.
REMOVAL
(1) Turn the ignition switch to the Off position. Be
certain that all electrical accessories are turned off.
(2) Loosen the battery negative cable terminal
clamp pinch-bolt hex nut.
(3) Disconnect the battery negative cable terminal
clamp from the battery negative terminal post. If
necessary, use a battery terminal puller to remove
the terminal clamp from the battery post.
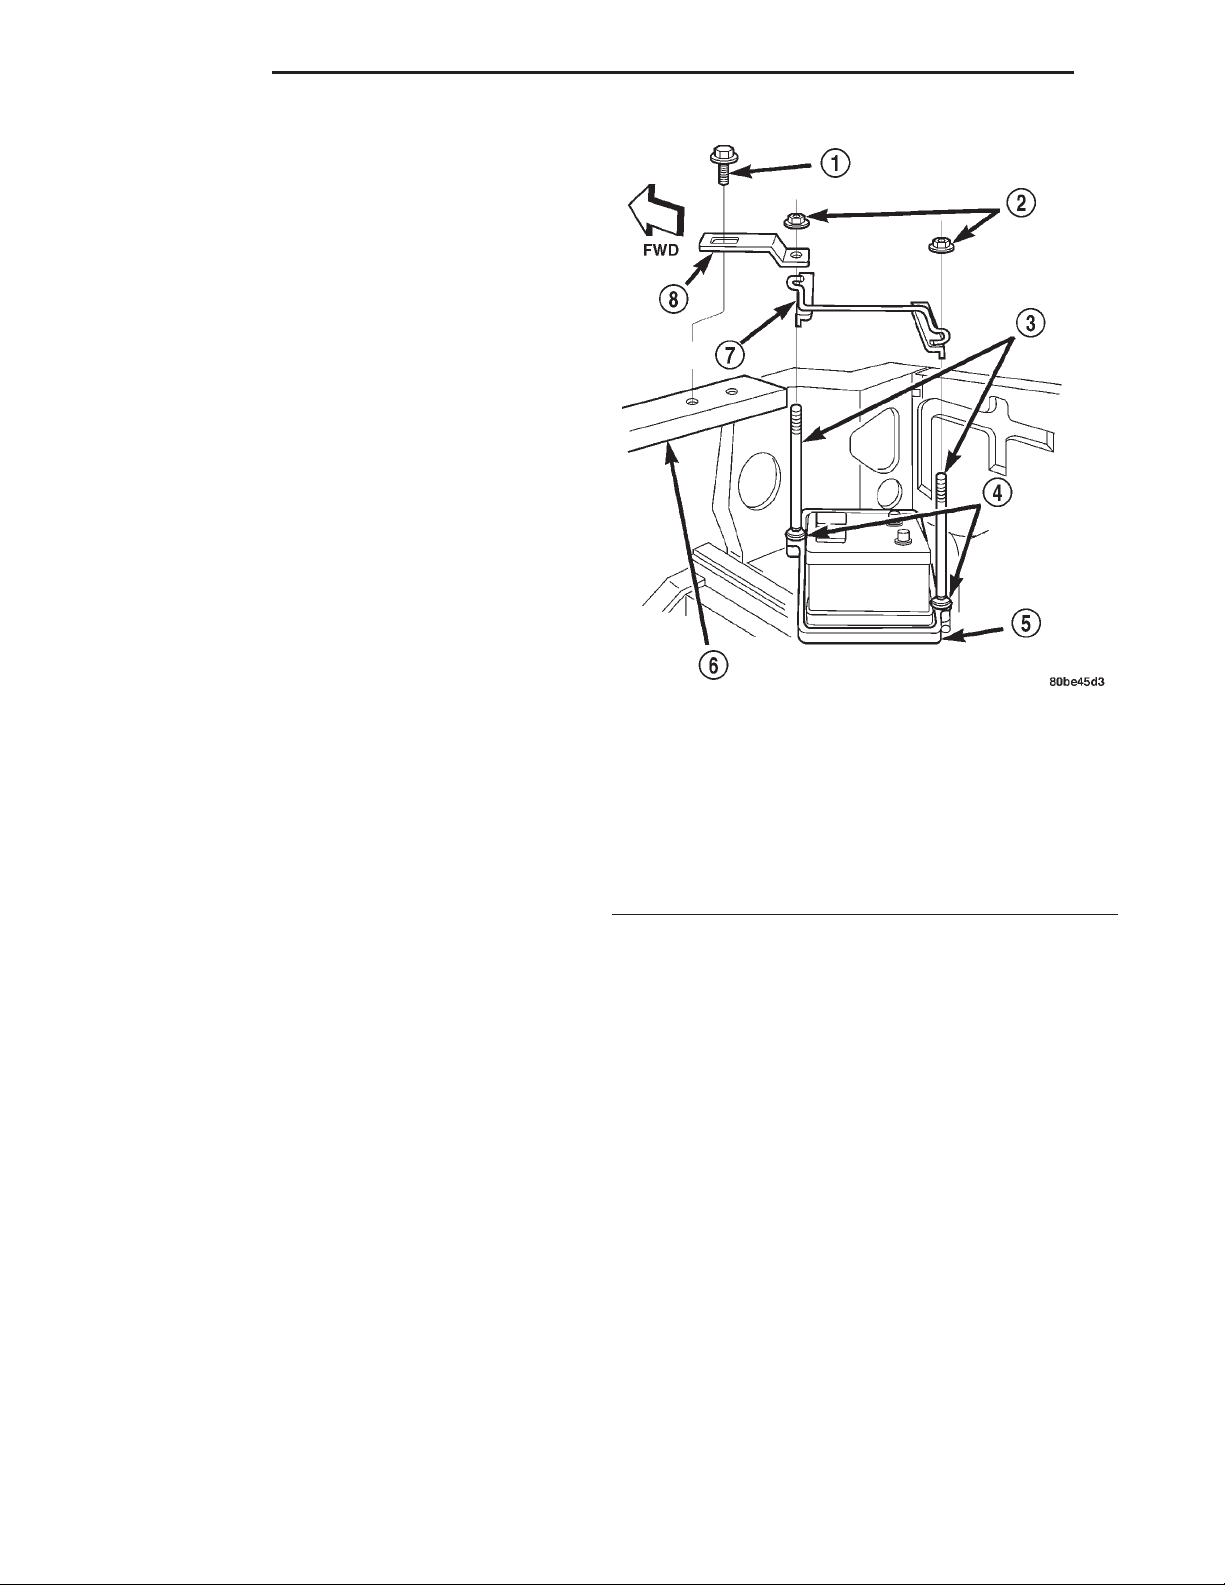
(4) Remove the nut with washer from the threaded
end of each of the two T-bolts (Fig. 19).
(5) Remove the screw with washer that secures the
end of the battery support strap with a slotted hole
to the top of the upper radiator crossmember.
(6) Remove the battery support strap from the
threaded end of the T-bolt nearest to the front of the
vehicle.
(7) Remove the battery hold down bracket from
the threaded ends of the two T-bolts and the top of
the battery case.
INSTALLATION
(1) Clean and inspect the battery hold down hardware. Refer to Battery in the index of this service
manual for the location of the proper battery hold
down hardware cleaning and inspection procedures.
(2) Position the battery hold down bracket onto the
threaded ends of the two T-bolts and across the top of
the battery case.
Fig. 19 Battery Hold Downs Remove/Install
1 – SCREW AND WASHER (1)
2 – NUT AND WASHER (2)
3 – T-BOLT (2)
4 – RETAINER (2)
5 – BATTERY TRAY
6 – UPPER RADIATOR CROSS MEMBER
7 – BRACKET
8 – STRAP
(3) Position the battery support strap with the
round hole over the threaded end of the T-bolt nearest to the front of the vehicle and the slotted hole
over the mounting hole in the top of the upper radiator crossmember.
(4) Install and tighten the screw with washer that
secures the end of the battery support strap with a
slotted hole to the top of the upper radiator crossmember. Tighten the screw to 8.7 N·m (77 in. lbs.).
(5) Install and tighten the nut with washer onto
the threaded end of each of the two T-bolts. Tighten
the nuts to 2.2 N·m (20 in. lbs.).
(6) Reconnect the battery negative cable terminal
clamp to the battery negative terminal post. Tighten
the terminal clamp pinch-bolt hex nut to 8.4 N·m (75
in. lbs.).
Page 21
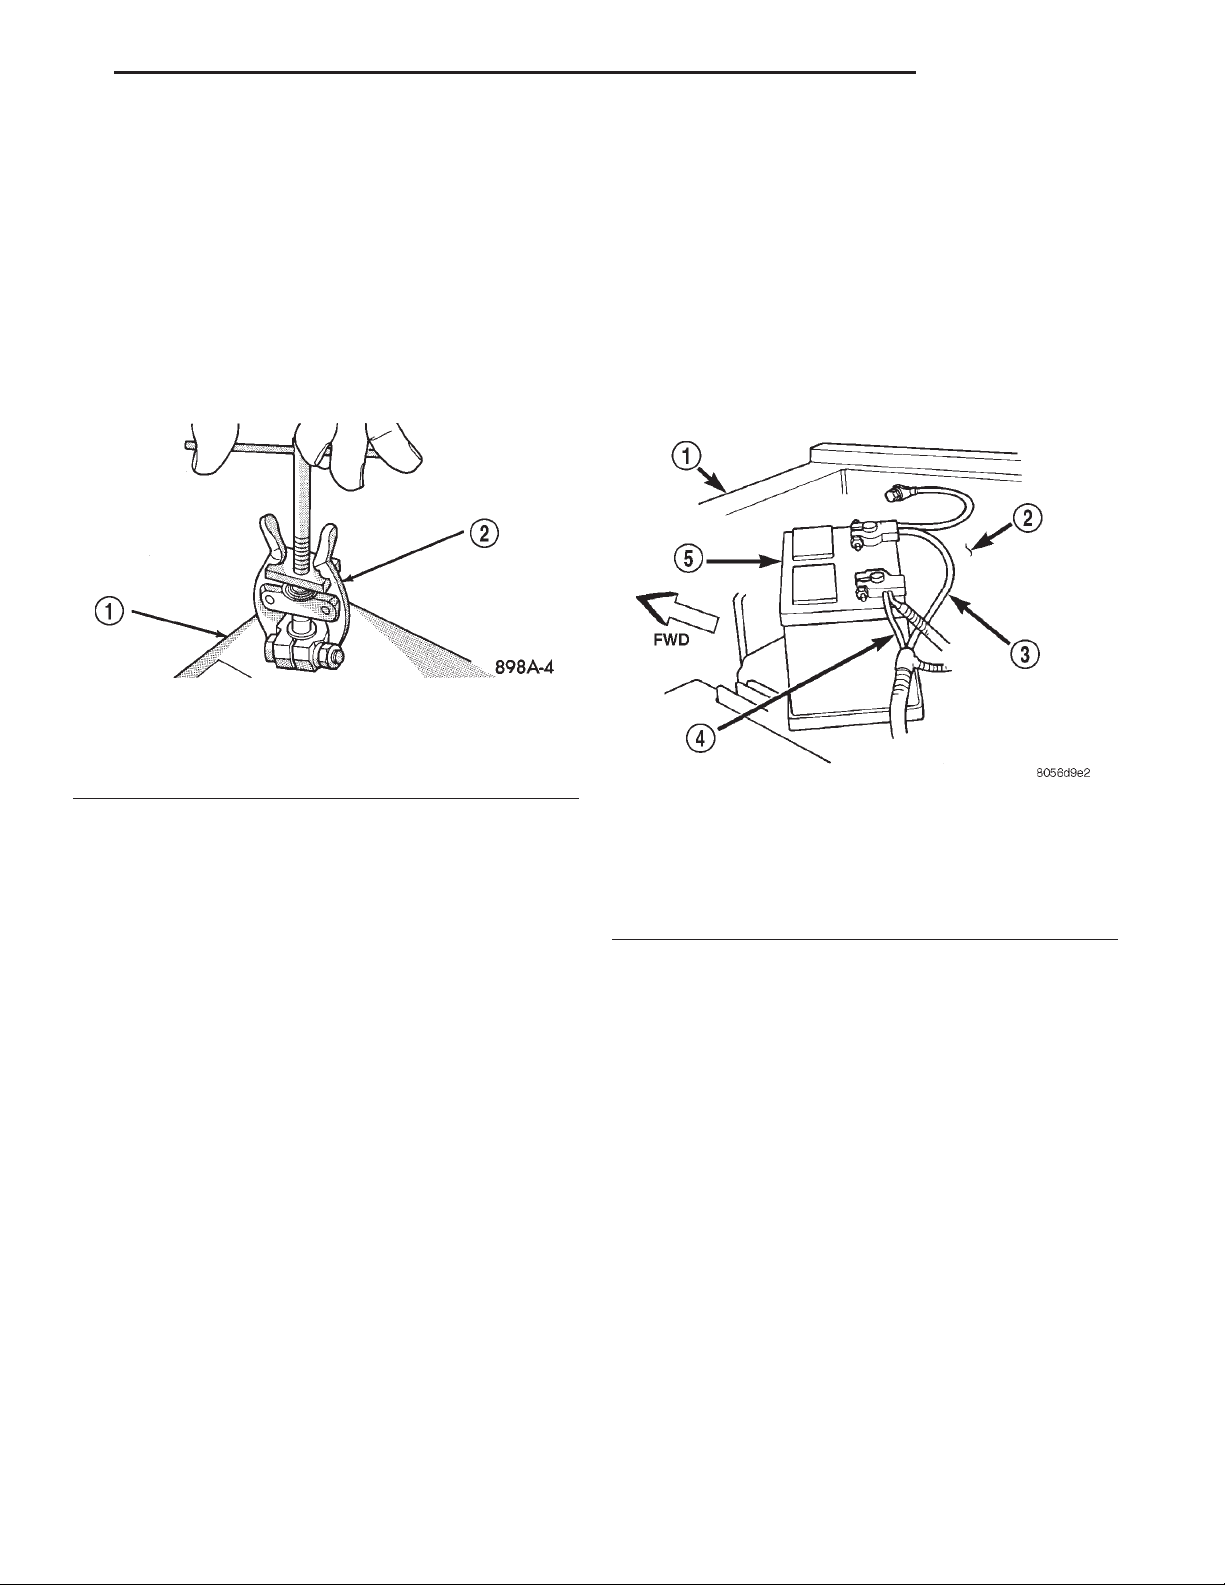
XJ BATTERY 8A - 21
REMOVAL AND INSTALLATION (Continued)
BATTERY
REMOVAL
(1) Turn the ignition switch to the Off position. Be
certain that all electrical accessories are turned off.
(2) Loosen the battery negative cable terminal
clamp pinch-bolt hex nut.
(3) Disconnect the battery negative cable terminal
clamp from the battery negative terminal post. If
necessary, use a battery terminal puller to remove
the terminal clamp from the battery post (Fig. 20).
Fig. 20 Remove Battery Cable Terminal Clamp -
Typical
1 – BATTERY
2 – BATTERY TERMINAL PULLER
(4) Loosen the battery positive cable terminal
clamp pinch-bolt hex nut.
(5) Disconnect the battery positive cable terminal
clamp from the battery positive terminal post. If necessary, use a battery terminal puller to remove the
terminal clamp from the battery post.
(6) Remove the battery hold downs from the battery. Refer to Battery Hold Downs in the index of
this service manual for the location of the proper battery hold down removal procedures.
tion of the proper battery cleaning and inspection
procedures.
(2) Reinstall the battery thermoguard onto the
battery case. Refer to Battery Thermoguard in the
index of this service manual for the location of the
proper battery thermoguard installation procedures.
(3) Position the battery and the battery thermoguard onto the battery tray as a unit. Ensure that
the battery positive and negative terminal posts are
correctly positioned. The battery cable terminal
clamps must reach the correct battery terminal post
without stretching the cables (Fig. 21).
Fig. 21 Battery Cables
1 – RADIATOR CROSSMEMBER
2 – WHEELHOUSE INNER PANEL
3 – NEGATIVE CABLE
4 – POSITIVE CABLE
5 – BATTERY
(4) Reinstall the battery hold downs onto the battery. Refer to Battery Hold Downs in the index of
this service manual for the location of the proper battery hold down installation procedures.
WARNING: WEAR A SUITABLE PAIR OF RUBBER
GLOVES (NOT THE HOUSEHOLD TYPE) WHEN
REMOVING A BATTERY BY HAND. SAFETY
GLASSES SHOULD ALSO BE WORN. IF THE BATTERY IS CRACKED OR LEAKING, THE ELECTROLYTE CAN BURN THE SKIN AND EYES.
(7) Remove the battery and the battery thermo-
guard from the battery tray as a unit.
(8) Remove the battery thermoguard from the battery case. Refer to Battery Thermoguard in the
index of this service manual for the location of the
proper battery thermoguard removal procedures.
INSTALLATION
(1) Clean and inspect the battery. Refer to Battery in the index of this service manual for the loca-
CAUTION: Be certain that the battery cable terminal
clamps are connected to the correct battery terminal posts. Reversed battery polarity may damage
electrical components of the vehicle.
(5) Clean the battery cable terminal clamps and
the battery terminal posts. Refer to Battery in the
index of this service manual for the location of the
proper battery cleaning and inspection procedures.
(6) Reconnect the battery positive cable terminal
clamp to the battery positive terminal post. Tighten
the terminal clamp pinch-bolt hex nut to 8.4 N·m (75
in. lbs.).
(7) Reconnect the battery negative cable terminal
clamp to the battery negative terminal post. Tighten
the terminal clamp pinch-bolt hex nut to 8.4 N·m (75
in. lbs.).
Page 22
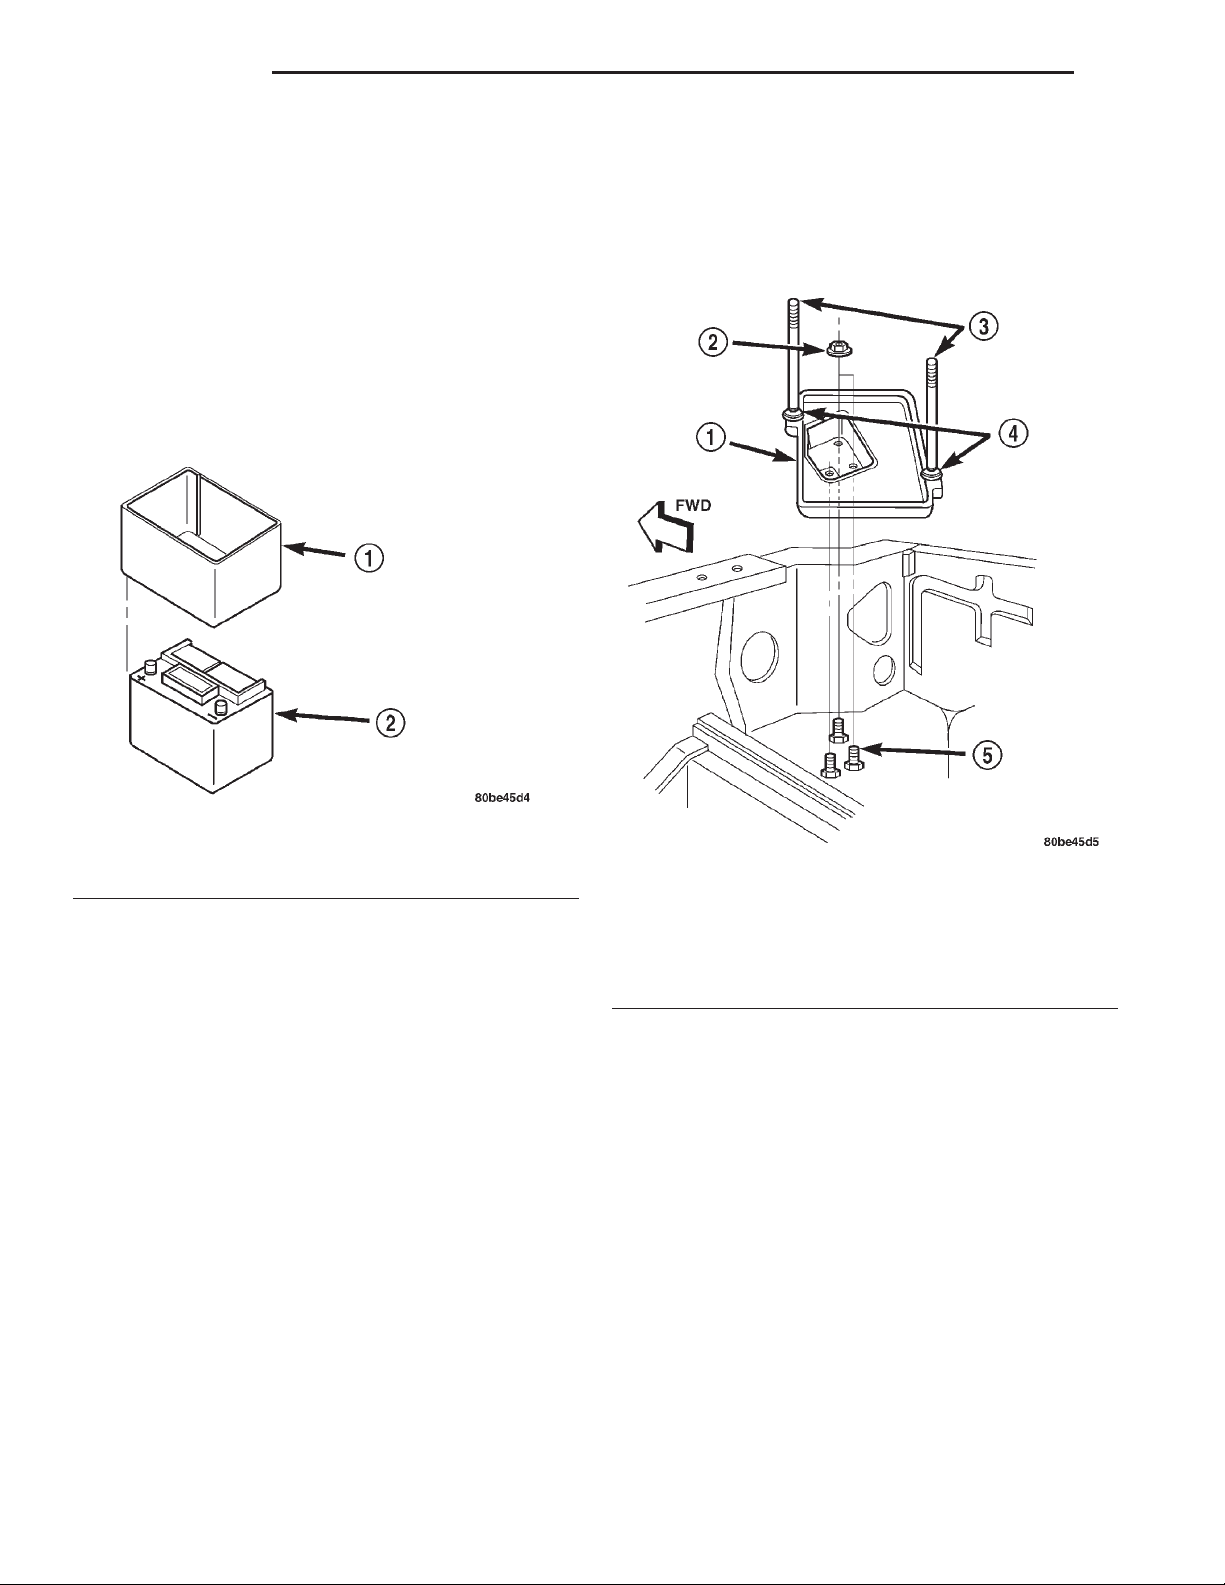
8A - 22 BATTERY XJ
REMOVAL AND INSTALLATION (Continued)
(8) Apply a thin coating of petroleum jelly or chassis grease to the exposed surfaces of the battery cable
terminal clamps and the battery terminal posts.
BATTERY THERMOGUARD
REMOVAL
(1) Remove the battery and the battery thermoguard from the battery tray as a unit. Refer to Bat-
tery in the index of this service manual for the
location of the proper battery removal procedures.
(2) Carefully and evenly slide the battery thermoguard up off of the battery case (Fig. 22).
location of the proper battery temperature sensor
removal procedures.
(3) Remove the three nuts with washers that
secure the battery tray to the weld studs on the front
extension of the right front wheelhouse inner panel
(Fig. 23).
Fig. 22 Battery Thermoguard Remove/Install
1 – THERMOGUARD
2 – BATTERY
INSTALLATION
(1) Clean and inspect the battery thermoguard.
Refer to Battery in the index of this service manual
for the location of the proper battery thermoguard
cleaning and inspection procedures.
(2) Carefully and evenly slide the battery thermoguard down over the battery case.
(3) Install the battery and the battery thermoguard into the battery tray as a unit. Refer to Bat-
tery in the index of this service manual for the
location of the proper battery installation procedures.
BATTERY TRAY
REMOVAL
(1) Remove the battery from the battery tray.
Refer to Battery in the index of this service manual
for the location of the proper battery removal procedures.
(2) Remove the battery temperature sensor from
the battery tray. Refer to Battery Temperature
Sensor in the index of this service manual for the
Fig. 23 Battery Tray Remove/Install
1 – TRAY
2 – NUT AND WASHER (3)
3 – T-BOLT (2)
4 – RETAINER (2)
5 – WELD STUD (3)
(4) Remove the battery tray from the weld studs
on the front extension of the right front wheelhouse
inner panel.
(5) From the top of the battery tray, remove the
plastic push-on retainers from the T-bolts that secure
them to the tray.
(6) From the bottom of the battery tray, remove
the two T-bolts from the T-bolt mounts on the tray.
INSTALLATION
(1) Clean and inspect the battery tray. Refer to
Battery in the index of this service manual for the
location of the proper battery tray cleaning and
inspection procedures.
(2) From the bottom of the battery tray, position
the two T-bolts into the T-bolt mounts on the tray.
(3) From the top of the battery tray, install the
plastic push-on retainers onto the T-bolts to secure
them to the tray.
Page 23
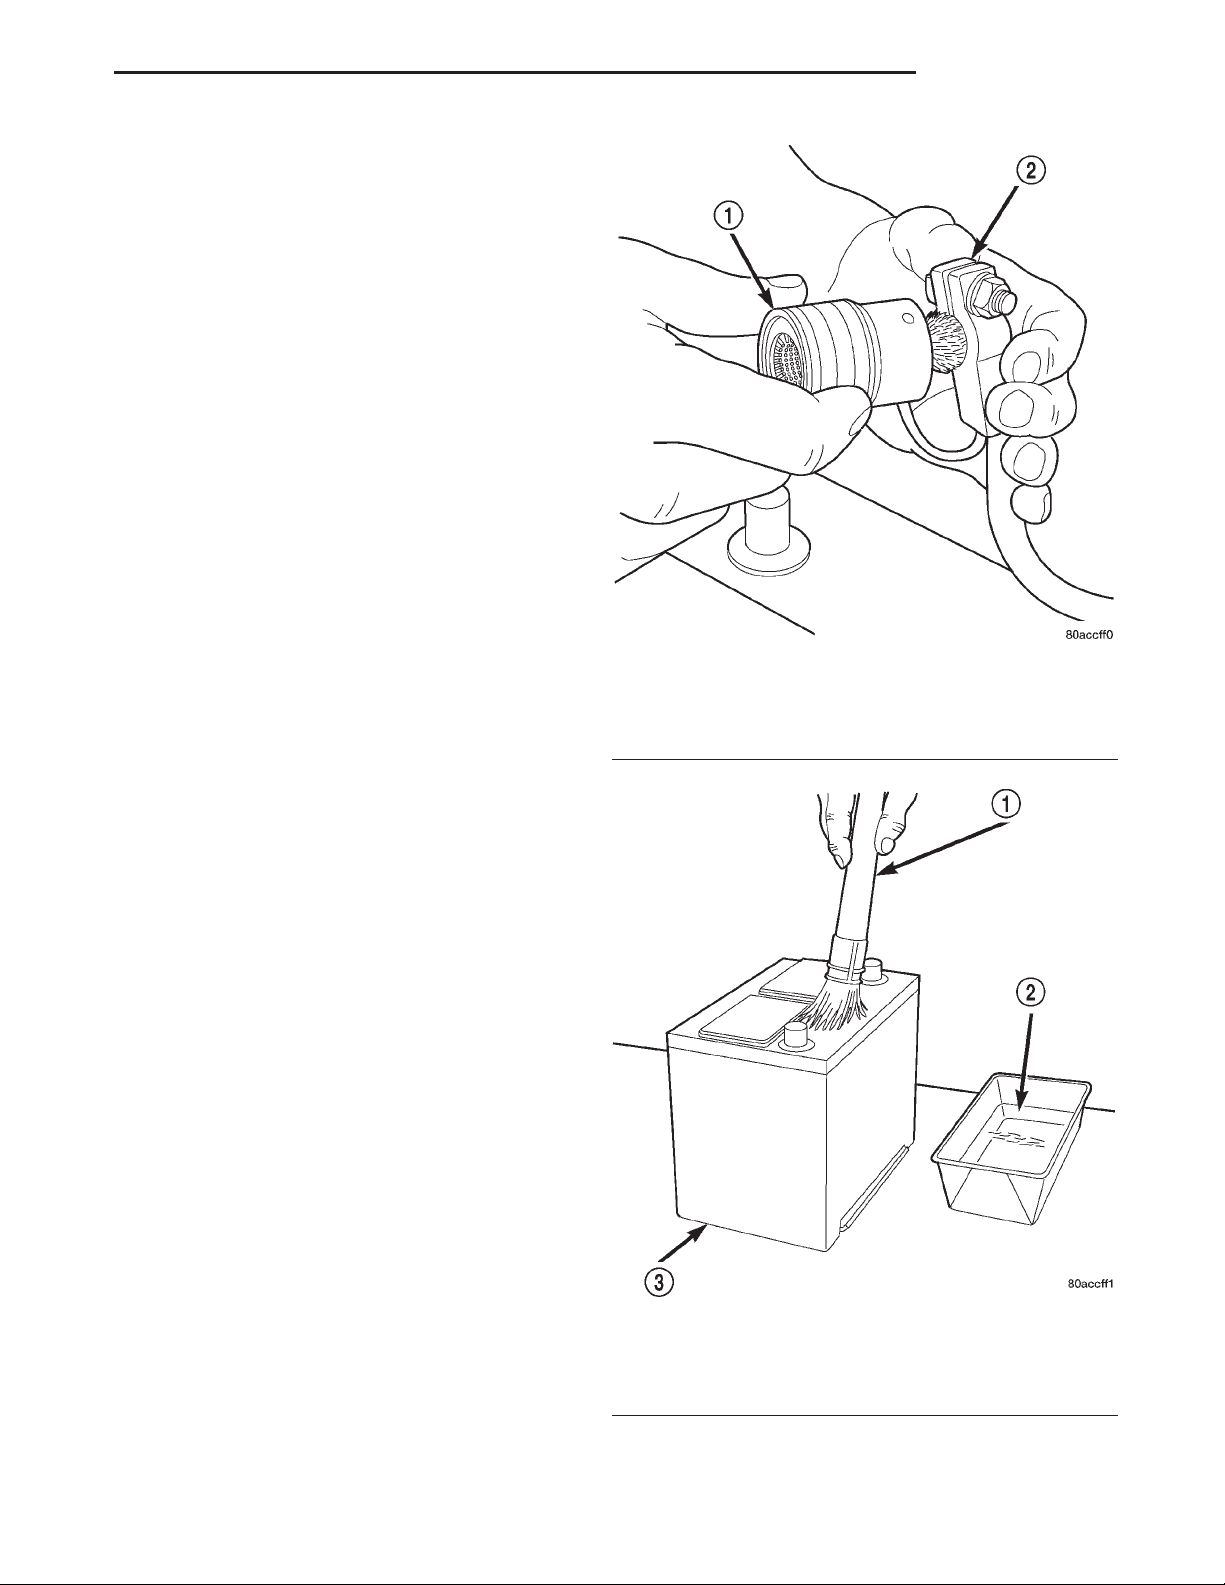
XJ BATTERY 8A - 23
REMOVAL AND INSTALLATION (Continued)
(4) Position the battery tray onto the weld studs
on the front extension of the right front wheelhouse
inner panel.
(5) Install and tighten the three nuts with washers
that secure the battery tray to the weld studs on the
front extension of the right front wheelhouse inner
panel. Tighten the nuts to 5 N·m (45 in. lbs.).
(6) Install the battery temperature sensor onto the
battery tray. Refer to Battery Temperature Sensor
in the index of this service manual for the location of
the proper battery temperature sensor installation
procedures.
(7) Install the battery onto the battery tray. Refer
to Battery in the index of this service manual for
the location of the proper battery installation procedures.
CLEANING AND INSPECTION
BATTERY
The following information details the recommended
cleaning and inspection procedures for the battery
and related components. In addition to the maintenance schedules found in this service manual and the
owner’s manual, it is recommended that these procedures be performed any time the battery or related
components must be removed for vehicle service.
Fig. 24 Clean Battery Cable Terminal Clamp -
Typical
1 – TERMINAL BRUSH
2 – BATTERY CABLE
CLEANING
(1) Clean the battery cable terminal clamps of all
corrosion. Remove any corrosion using a wire brush
or a post and terminal cleaning tool, and a sodium
bicarbonate (baking soda) and warm water cleaning
solution (Fig. 24).
(2) Clean the battery tray and battery hold down
hardware of all corrosion. Remove any corrosion
using a wire brush and a sodium bicarbonate (baking
soda) and warm water cleaning solution. Paint any
exposed bare metal.
(3) If the removed battery is to be reinstalled,
clean the outside of the battery case and the top
cover with a sodium bicarbonate (baking soda) and
warm water cleaning solution using a stiff bristle
parts cleaning brush to remove any acid film (Fig.
25). Rinse the battery with clean water. Ensure that
the cleaning solution does not enter the battery cells
through the vent holes. If the battery is being
replaced, refer to Battery in the index of this service
manual for the location of the factory-installed battery specifications. Confirm that the replacement battery is the correct size and has the correct ratings for
the vehicle.
(4) Clean the battery thermoguard with a sodium
bicarbonate (baking soda) and warm water cleaning
solution using a stiff bristle parts cleaning brush to
remove any acid film.
Fig. 25 Clean Battery - Typical
1 – CLEANING BRUSH
2 – WARM WATERAND BAKING SODA SOLUTION
3 – BATTERY
Page 24
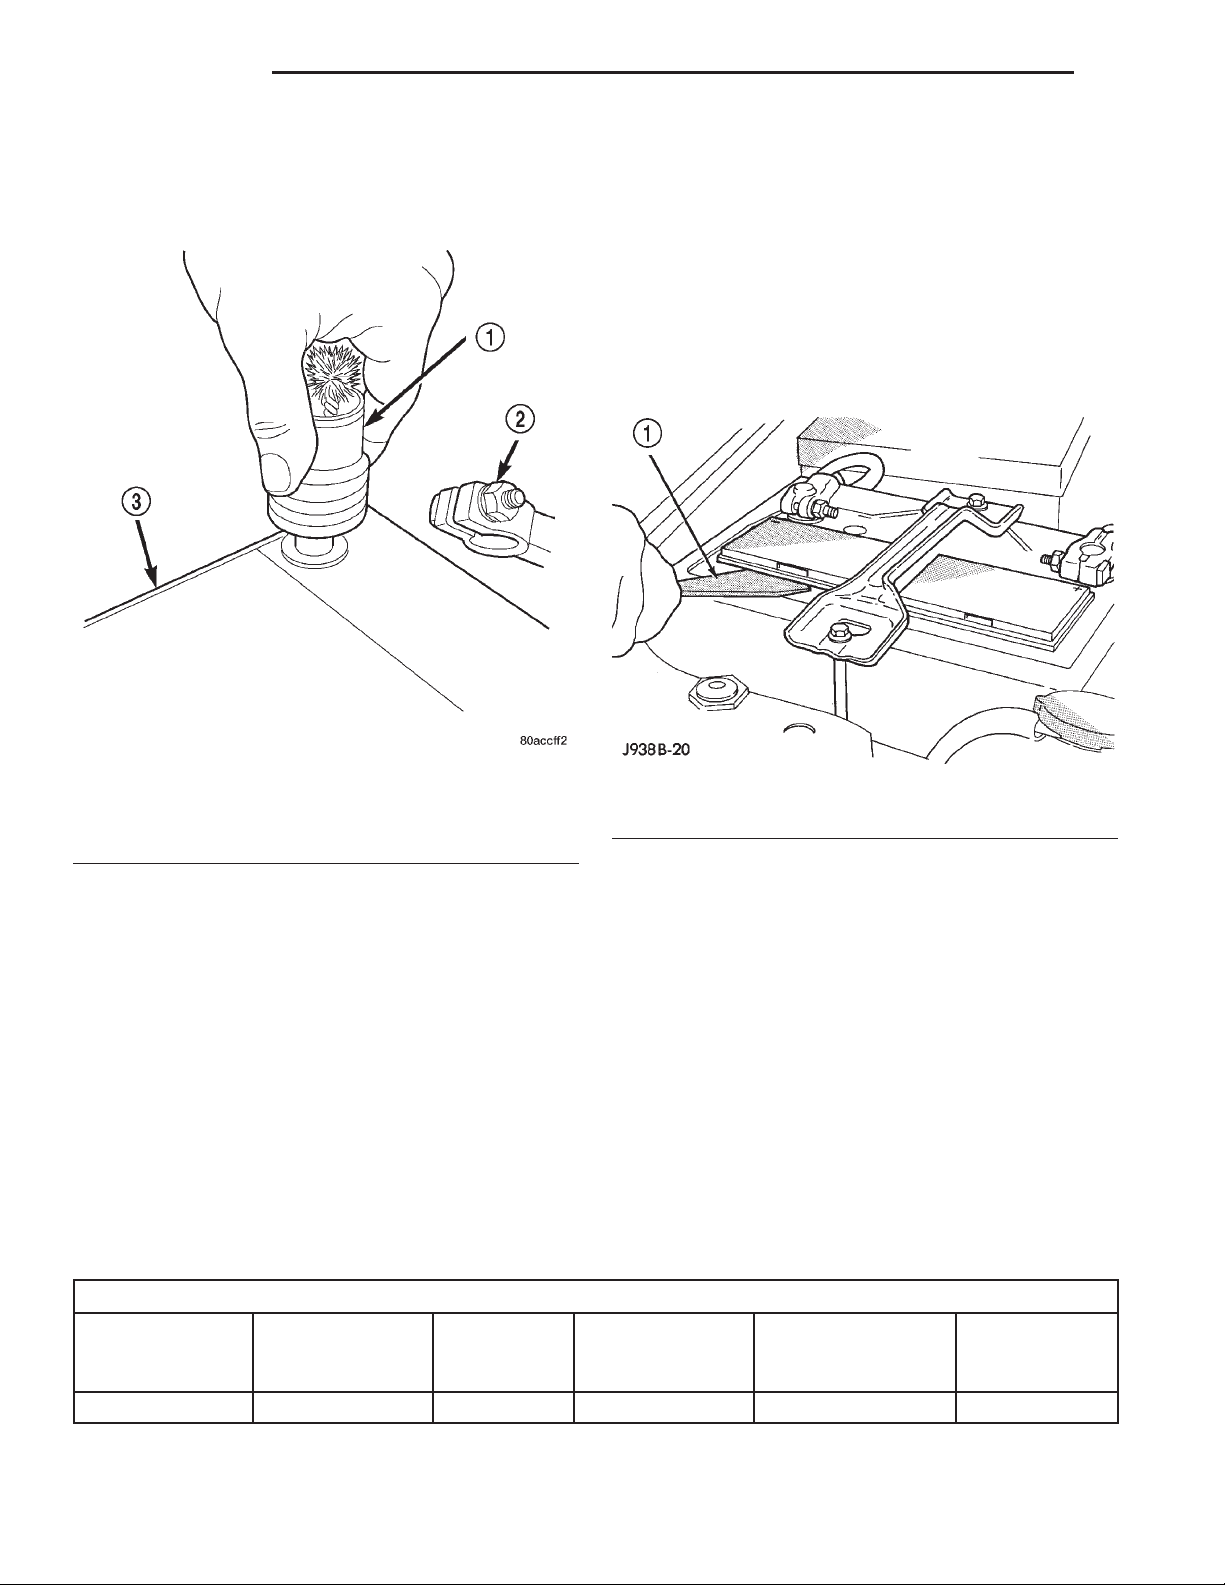
8A - 24 BATTERY XJ
CLEANING AND INSPECTION (Continued)
(5) Clean any corrosion from the battery terminal
posts with a wire brush or a post and terminal
cleaner, and a sodium bicarbonate (baking soda) and
warm water cleaning solution (Fig. 26).
damaged cases or loose terminal posts must be
replaced.
(4) Inspect the battery thermoguard for tears,
cracks, deformation or other damage. Replace any
battery thermoguard that has been damaged.
(5) Inspect the electrolyte level in the battery. Use
a putty knife or another suitable wide flat-bladed tool
to pry the cell caps off (Fig. 27). Do not use a screwdriver. Add distilled water to each cell until the liquid reaches the bottom of the vent well. DO NOT
OVERFILL.
Fig. 26 Clean Battery Terminal Post - Typical
1 – TERMINAL BRUSH
2 – BATTERY CABLE
3 – BATTERY
INSPECTION
(1) Inspect the battery cable terminal clamps for
damage. Replace any battery cable that has a damaged or deformed terminal clamp.
(2) Inspect the battery tray and battery hold down
hardware for damage. Replace any damaged parts.
(3) Slide the thermoguard off of the battery case.
Inspect the battery case for cracks or other damage
that could result in electrolyte leaks. Also, check the
battery terminal posts for looseness. Batteries with
Fig. 27 Removing Battery Cell Caps - Typical
1 – PUTTY KNIFE
(6) Inspect the battery built-in test indicator sight
glass for an indication of the battery condition. If the
battery is discharged, charge as required. Refer to
Battery in the index of this service manual for the
location of the proper battery diagnosis and testing
procedures for more information on the use of the
battery built-in test indicator. Also refer to Battery
Charging in the index of this service manual for the
location of the proper battery charging procedures.
SPECIFICATIONS
BATTERY
Battery Classifications and Ratings
Part Number
56041105AB 34 500 110 Minutes 60 250
BCI Group Size
Classification
Cold
Cranking
Amperage
Reserve
Capacity
Ampere-Hours
Load Test
Amperage
 Loading...