

Page 1
XJ BRAKES 5 - 1
BRAKES
TABLE OF CONTENTS
page page
REMOVAL AND INSTALLATION
BRAKE BOOSTER – RHD DIESEL ............1
MASTER CYLINDER – RHD DIESEL ..........3
REMOVAL AND INSTALLATION
BRAKE BOOSTER – RHD DIESEL
REMOVAL
(1) Open hood and disconnect the negative battery
cable
NOTE: Pump the brake pedal several times to
relieve vacuum in the brake booster. This will prevent booster from sucking any contaminants when
master cylinder is removed.
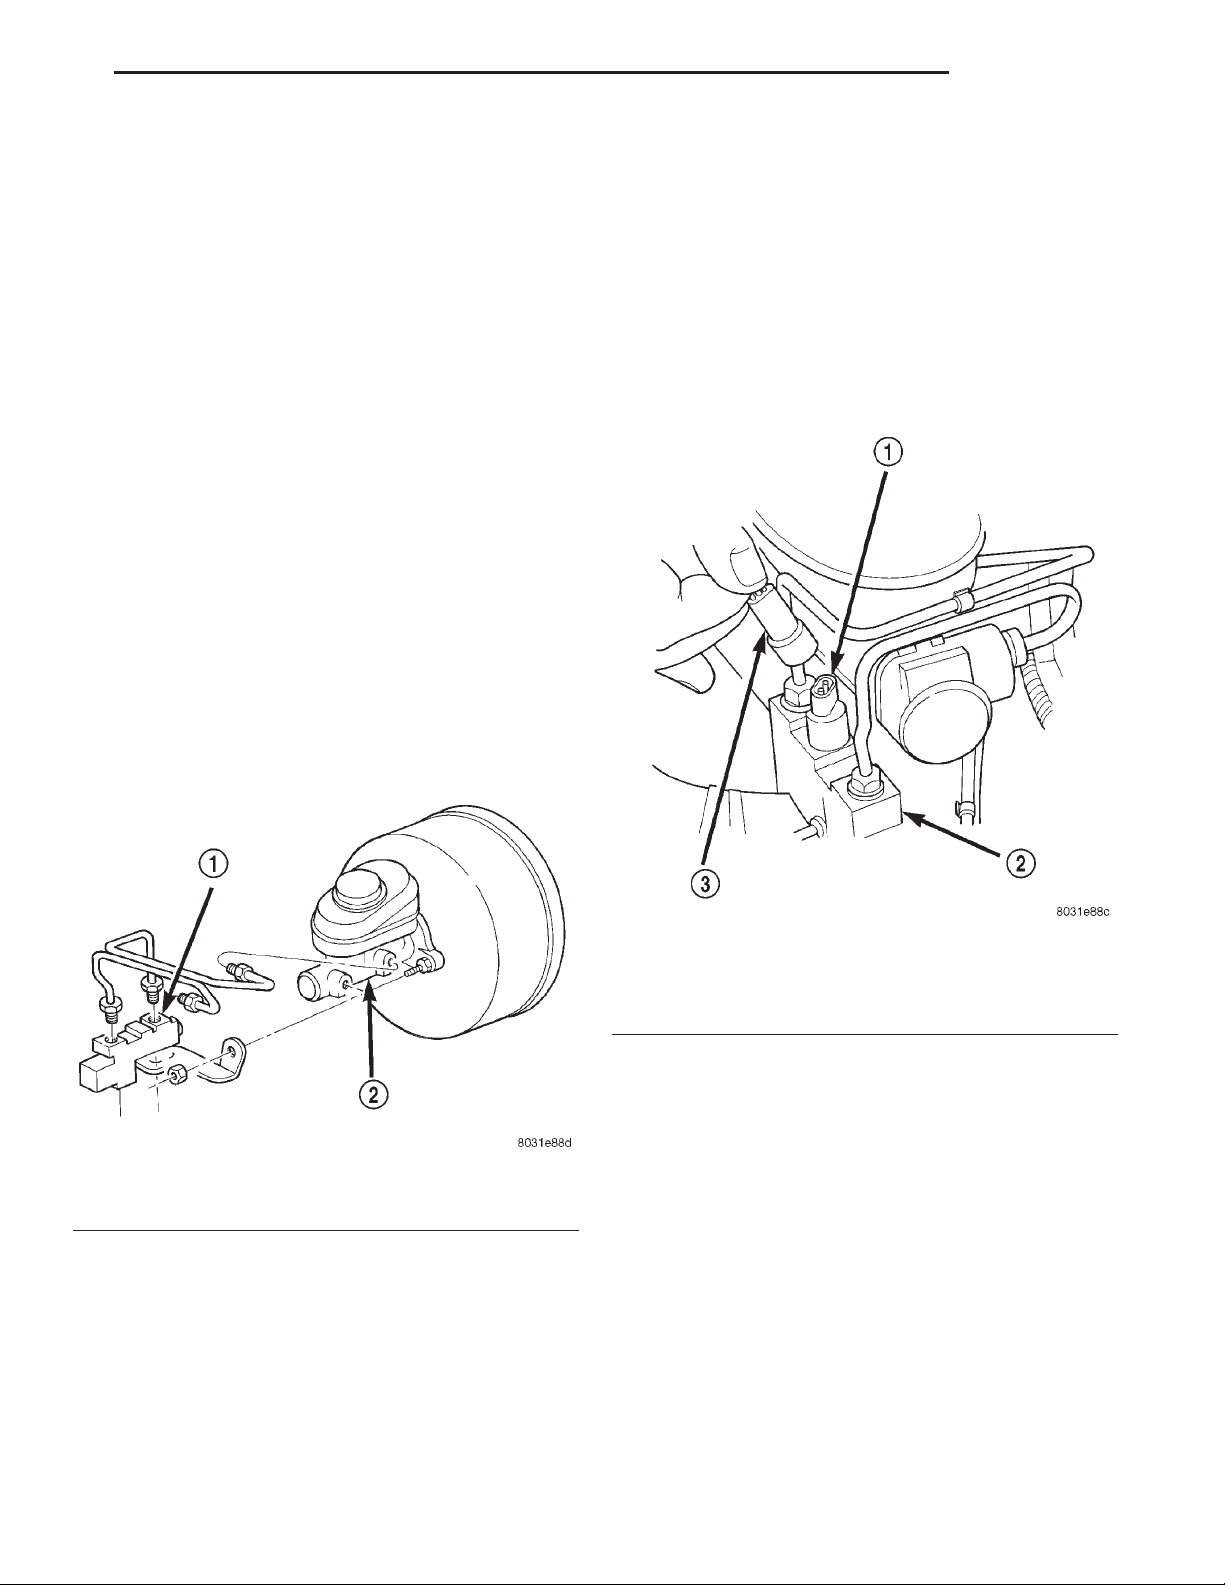
(2) Remove the short brake lines leading from the
master cylinder to the combination valve (Fig. 1).
SPECIFICATIONS
TORQUE SPECIFICATIONS..................4
Fig. 1 Brake Line Orientation
1 – COMBINATION VALVE
2 – MASTER CYLINDER
(3) Disconnect differential pressure switch wire
from the combination valve. Lift the release tab on
the underside of the electrical connector and pull
straight off (Fig. 2).
(4) Remove the combination valve support bracket
retaining nuts and remove the valve and bracket
assembly from the vehicle.
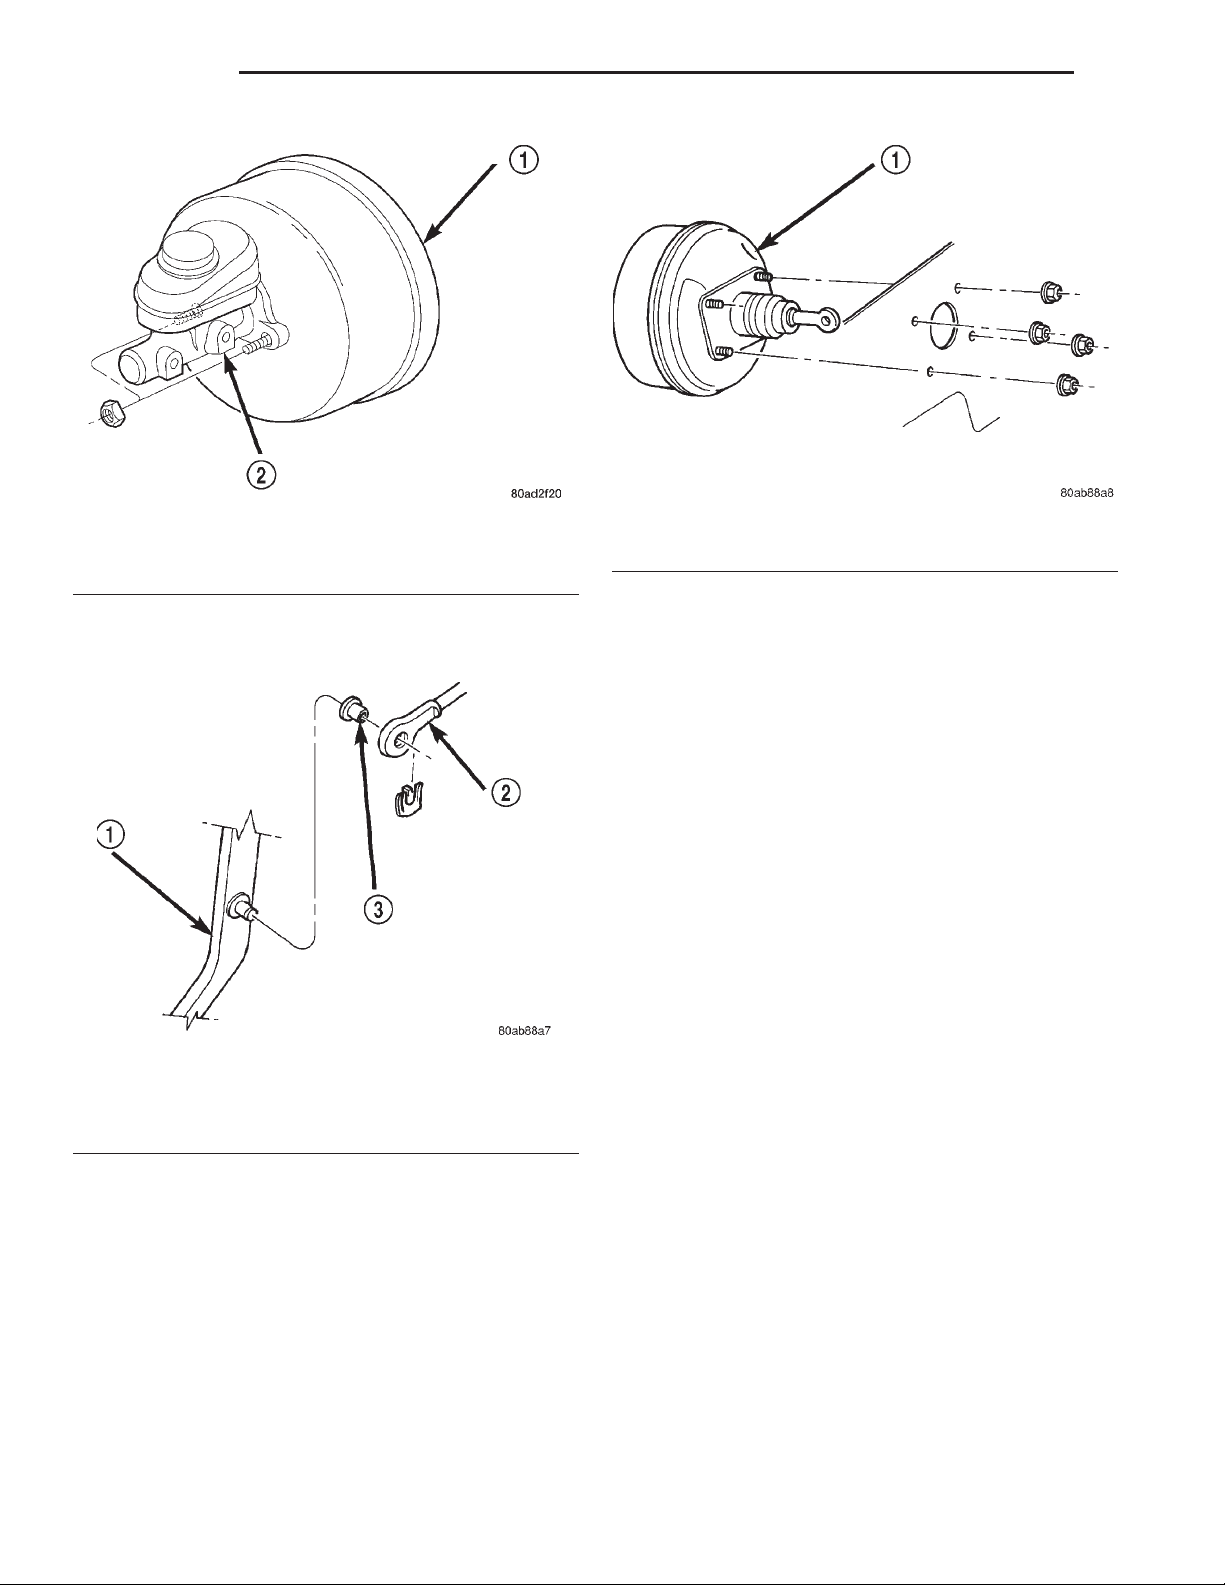
(5) Remove the master cylinder retaining nuts
(Fig. 8) and remove the master cylinder from the
brake booster by sliding straight off mounting studs.
Fig. 2 Differential Pressure Switch Electrical
1 – SWITCH TERMINAL
2 – COMBINATION VALVE
3 – WIRE HARNESS CONNECTOR
(6) Disconnect the vacuum supply hose from the
brake booster.
(7) Disconnect the coolant level switch electrical
connector. Located on the side of the coolant reservoir.
NOTE: It is not necessary to drain the cooling system to perform this procedure.
(8) Remove the coolant reservoir retaining screws
so reservoir can be positioned out of the way.
(9) Working inside the vehicle, remove the hood
release cable handle retaining screws from the
underside of the instrument panel.
(10) Remove the plastic and steel knee blockers
from the vehicle. Refer to Group 23, Body for the procedure.
Page 2
5 - 2 BRAKES XJ
REMOVAL AND INSTALLATION (Continued)
Fig. 3 Master Cylinder
1 – BOOSTER
2 – MASTER CYLINDER
(11) Remove the retaining clip that secures the
booster push rod to the brake pedal (Fig. 4).
Fig. 4 Booster Push Rod
1 – BRAKE PEDAL
2 – BOOSTER ROD
3 – BUSHING
(12) Remove nuts attaching booster to passenger
compartment side of dash panel (Fig. 5).
(13) Working inside the engine compartment, position the coolant reservoir out of the way and remove
the brake booster by pulling straight out.
INSTALLATION
NOTE: Be certain rubber o-ring vacuum seal is
installed in the master cylinder mounting flange
prior to installation.
Fig. 5 Booster Mounting
1 – BOOSTER
NOTE: If a new master cylinder is being installed,
cylinder must be bench bleed prior to installation.
(1) Install the brake booster on the bulkhead, be
certain dash seal is installed on booster studs prior
to installation.
(2) From under the instrument panel, install
booster mounting nuts. Tighten nuts just enough to
hold booster in place.
NOTE: Lubricate the pedal pin and bushing with
Mopar multi-mileage grease before installation.
(3) Slide booster push rod onto the brake pedal
pin. Then secure push rod to pedal pin with retaining
clip.
(4) Torque booster mounting nuts to 39 N·m (29 ft.
lbs.).
(5) Install the steel and plastic knee blocker in the
vehicle. Refer to Group 23, Body for the procedure.
(6) Install the hood release cable handle.
(7) Install the coolant reservoir bottle retaining
screws and connect the coolant level switch.
(8) Connect the vacuum supply hose on the brake
booster.
(9) Install master cylinder on brake booster and
install retaining nuts. Torque the nuts to 17.5 N·m
(155 in. lbs.).
(10) Install combination valve/bracket and retaining nuts.
(11) Install brake lines on cylinder and valve.
Torque brake lines to 19 N·m (170 in. lbs.).
(12) Connect differential pressure switch wire on
the combination valve.
(13) Fill and bleed the brake system. Refer to the
procedure in this group.
(14) Connect the negative battery cable.
Page 3
XJ BRAKES 5 - 3
REMOVAL AND INSTALLATION (Continued)
(15) Adjust the brake lamp switch. Refer to the
procedure in this group.
WARNING: Be certain a firm brake pedal is
achieved prior to attempting to operate the vehicle.
MASTER CYLINDER – RHD DIESEL
REMOVAL
(1) Open hood and disconnect the negative battery
cable
NOTE: Pump the brake pedal several times to
relieve vacuum in the brake booster. This will prevent booster from sucking any contaminants when
master cylinder is removed.
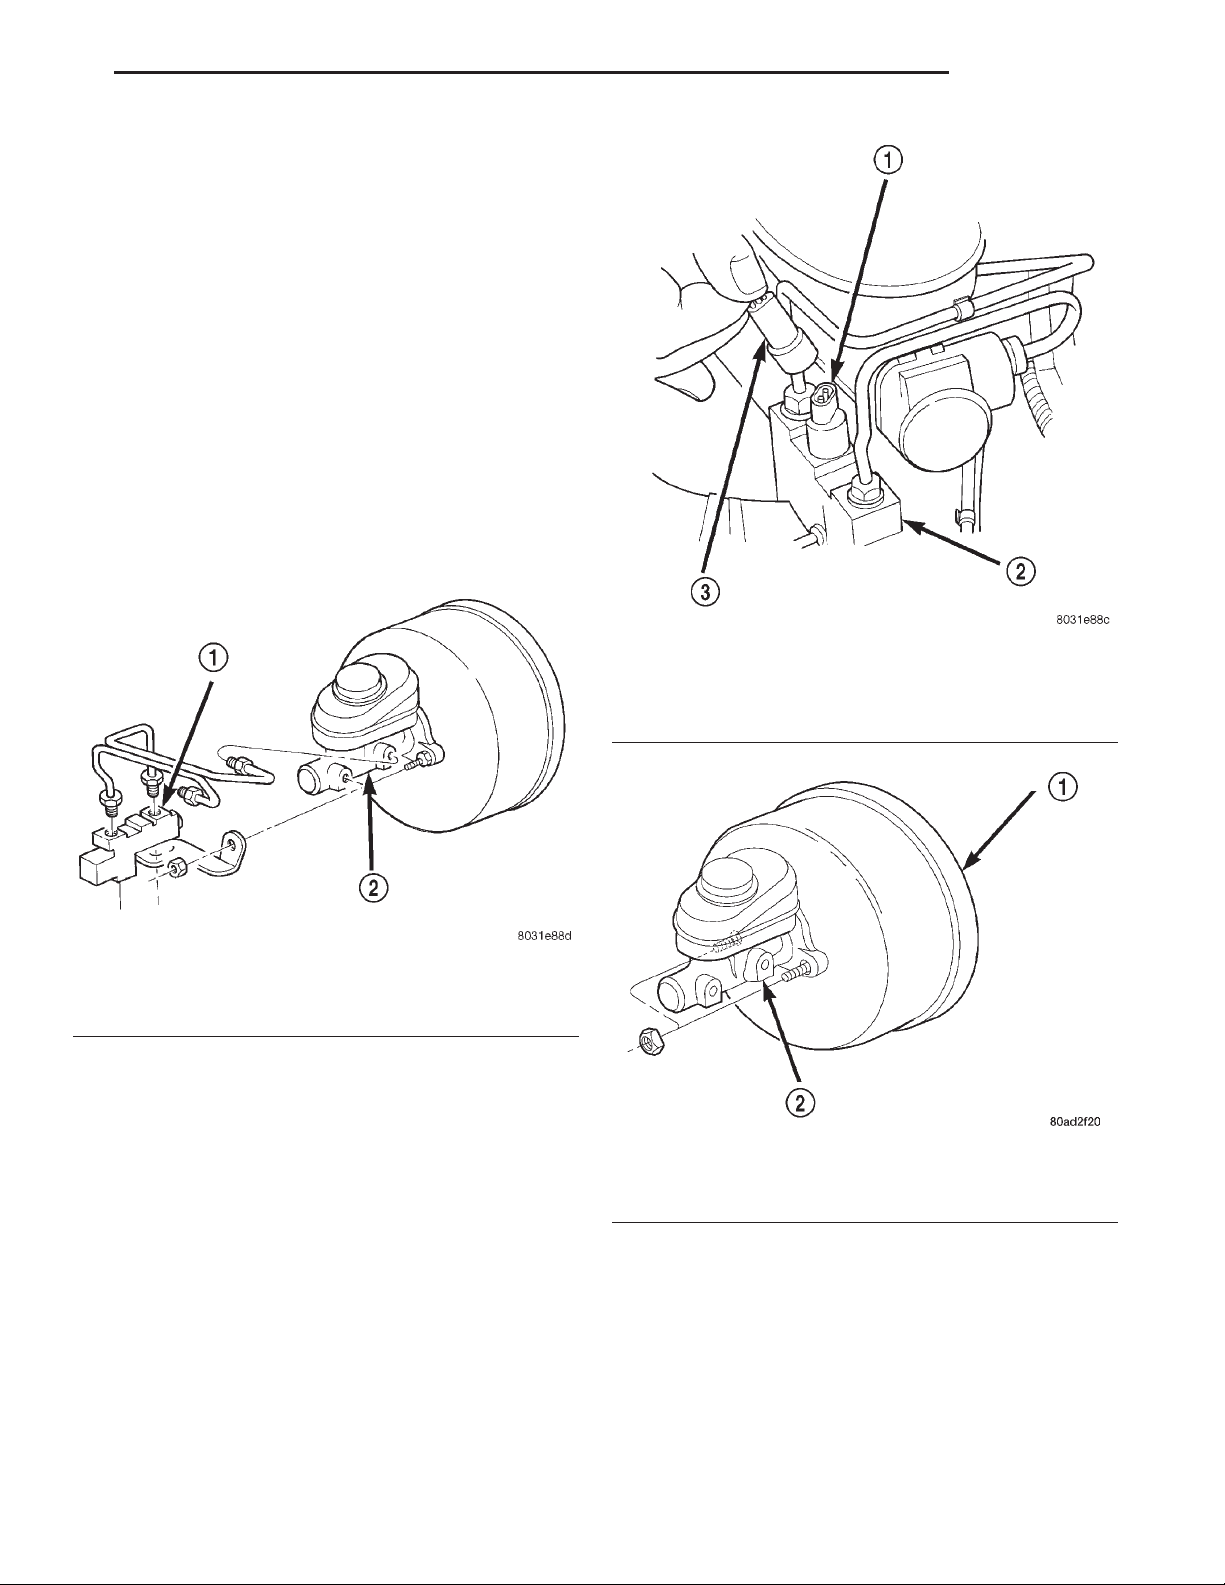
(2) Remove the short brake lines leading from the
master cylinder to the combination valve (Fig. 6).
Fig. 6 Brake Line Orientation
1 – COMBINATION VALVE
2 – MASTER CYLINDER
(3) Disconnect differential pressure switch wire
from the combination valve. Lift the release tab on
the underside of the electrical connector and pull
straight off (Fig. 7).
(4) Remove the combination valve support bracket
retaining nuts and remove the valve and bracket
assembly from the vehicle.
(5) Remove the master cylinder retaining nuts
(Fig. 8) and remove the master cylinder from the
brake booster by sliding straight off mounting studs.
Fig. 7 Differential Pressure Switch Electrical
1 – SWITCH TERMINAL
2 – COMBINATION VALVE
3 – WIRE HARNESS CONNECTOR
Fig. 8 Master Cylinder
1 – BOOSTER
2 – MASTER CYLINDER
NOTE: If a new master cylinder is being installed,
cylinder must be bench bleed prior to installation.
INSTALLATION
NOTE: Be certain rubber o-ring vacuum seal is
installed in the master cylinder mounting flange
prior to installation.
(1) If equipped, remove protective sleeve from pri-
mary piston shank on new master cylinder.
(2) Clean cylinder mounting surface of brake
booster.
(3) Install master cylinder on brake booster and
install retaining nuts. Torque the nuts to 17.5 N·m
(155 in. lbs.).
Page 4

5 - 4 BRAKES XJ
REMOVAL AND INSTALLATION (Continued)
(4) Install combination valve/bracket and retaining
nuts.
(5) Install brake lines on cylinder and valve.
Torque brake lines to 19 N·m (170 in. lbs.).
(6) Connect differential pressure switch wire on
the combination valve.
(7) Fill and bleed the brake system. Refer to the
procedure in this group.
(8) Connect the negative battery cable.
(9) Adjust the brake lamp switch. Refer to the pro-
cedure in this group.
WARNING: Be certain a firm brake pedal is
achieved prior to attempting to operate the vehicle.
SPECIFICATIONS
TORQUE SPECIFICATIONS
DESCRIPTION TORQUE
Brake Booster to Cowl Panel
Nuts ..................... 39N·m(29ft.lbs.)
Brake Lines at Master Cylinder and
Combination Valve
Tube Nuts ................ 19N·m(170 in. lbs.)
Master Cylinder to Vacuum Booster
Nuts ................... 17.5 N·m (155 in. lbs.)
 Loading...