

Page 1
XJ BODY 23 - 1
BODY
TABLE OF CONTENTS
page page
DESCRIPTION AND OPERATION .............. 1
SAFETY PRECAUTIONS ..................... 3
PAINT ................................... 4
DESCRIPTION AND OPERATION
TABLE OF CONTENTS
page
DESCRIPTION AND OPERATION
BODY COMPONENTS ......................1
DESCRIPTION AND OPERATION
BODY COMPONENTS
PAINT
DESCRIPTION
The original equipment finish is a multi-step process that involves cleaning, electrodeposition (e-coat),
base coat, and clear coat steps. Additionally, selected
areas of the vehicle may be coated with an anti-chip
finish.
OPERATION
On most vehicles a two-stage paint application
(base coat/clear coat) is used. Color that is applied to
primer is called base coat. The clear coat protects the
base coat from ultraviolet light and provides a durable high-gloss finish.
STATIONARY GLASS
DESCRIPTION
Windshields and selected stationary glass are
structural members of the vehicle. The windshield
glass is bonded to the windshield frame with urethane adhesive.
OPERATION
Windshields are made of two pieces of glass with a
plastic inner layer. Windshields and other stationary
glass protect the occupants from the effects of the
STATIONARY GLASS........................ 6
SEATS.................................. 13
BODY COMPONENT SERVICE ............... 21
elements. Windshields are also used to retain some
airbags in position during deployment. Urethane
bonded glass is difficult to salvage during removal.
The urethane bonding is difficult to cut or clean from
any surface. Before removing the glass, check the
availability of replacement components.
SEATS
DESCRIPTION
Seat modules are made up of a seat frame, seat
cushion, seat back cushion, a covering material, and
the electrical components used for power operation, if
equipped. Some seat systems also contain seat belt
components and supplemental restraint systems.
OPERATION
Seat assemblies transport the occupants in comfort
and safety. Seat assemblies also help position occupants correctly in the event of airbag deployment.
Seat cushions, coverings, and electrical components
are serviceable. Refer to the appropriate group in
this manual.
EXTERIOR COMPONENTS
DESCRIPTION
Exterior sheet metal components make up the
exterior of the vehicle. Some exterior metal systems
are welded assemblies, such as doors and hoods.
Some exterior trim items are made of composite.
Page 2

23 - 2 BODY XJ
DESCRIPTION AND OPERATION (Continued)
OPERATION
The exterior is finished in various metal stampings
and composite moldings. These assemblies give the
vehicle a finished appearance and protect the occupants from the elements. Some components are part
of the energy absorbing system used to protect the
occupants in collisions. The exterior sheet metal is
repairable and adjustable for fit and finish. Welded
component systems are adjustable as a system. Trim
components made of composite are stamped with the
type of material used. DaimlerChrysler uses various
fasteners to retain trim items. At times, it is not possible to remove trim items without damaging the fastener. If it is not possible to remove an item without
damaging a component, cut or break the fasteners
and use new ones when installing the component.
Page 3

XJ BODY 23 - 3
SAFETY PRECAUTIONS
TABLE OF CONTENTS
page
SERVICE PROCEDURES
SAFETY PRECAUTIONS AND WARNINGS ......3
SERVICE PROCEDURES
SAFETY PRECAUTIONS AND WARNINGS
DESCRIPTION
WARNING: USE A OSHA APPROVED BREATHING
FILTER WHEN SPRAYING PAINT OR SOLVENTS IN
A CONFINED AREA. PERSONAL INJURY CAN
RESULT.
AVOID PROLONGED SKIN CONTACT WITH
PETROLEUM OR ALCOHOL – BASED CLEANING
SOLVENTS. PERSONAL INJURY CAN RESULT.
DO NOT STAND UNDER A HOISTED VEHICLE
THAT IS NOT PROPERLY SUPPORTED ON SAFETY
STANDS. PERSONAL INJURY CAN RESULT.
CAUTION: When holes must be drilled or punched
in an inner body panel, verify depth of space to the
outer body panel, electrical wiring, or other components. Damage to vehicle can result.
Do not weld exterior panels unless combustible
material on the interior of vehicle is removed from
the repair area. Fire or hazardous conditions, can
result.
Always have a fire extinguisher ready for use
when welding.
Disconnect the negative (-) cable clamp from the
battery when servicing electrical components that
are live when the ignition is OFF. Damage to electrical system can result.
Do not use abrasive chemicals or compounds on
painted surfaces. Damage to finish can result.
Do not use harsh alkaline based cleaning solvents on painted or upholstered surfaces. Damage
to finish or color can result.
Do not hammer or pound on plastic trim panel
when servicing interior trim. Plastic panels can
break.
DaimlerChrysler Corporation uses many different
types of push-in fasteners to secure the interior and
exterior trim to the body. Most of these fasteners can
be reused to assemble the trim during various repair
procedures. At times, a push-in fastener cannot be
removed without damaging the fastener or the component it is holding. If it is not possible to remove a
fastener without damaging a component or body, cut
or break the fastener and use a new one when
installing the component. Never pry or pound on a
plastic or pressed-board trim component. Using a
suitable fork-type prying device, pry the fastener
from the retaining hole behind the component being
removed. When installing, verify fastener alignment
with the retaining hole by hand. Push directly on or
over the fastener until it seats. Apply a low-force pull
to the panel to verify that it is secure.
When it is necessary to remove components to service another, it should not be necessary to apply
excessive force or bend a component to remove it.
Before damaging a trim component, verify hidden
fasteners or captured edges holding the component in
place.
Page 4

23 - 4 BODY XJ
PAINT
TABLE OF CONTENTS
page page
DESCRIPTION AND OPERATION
PAINT CODE .............................4
BASE COAT/CLEAR COAT FINISH.............4
FINESSE SANDING, BUFFING, AND
POLISHING.............................4
DESCRIPTION AND OPERATION
PAINT CODE
The paint code is identified on the Vehicle Safety
Certification Label which is located on the drivers
door shut face. The color names provided in the Paint
and Trim Code Description chart are the color names
used on most repair product containers.
BASE COAT/CLEAR COAT FINISH
DESCRIPTION
On most vehicles a two-part paint application (base
coat/clear coat) is used. Color paint that is applied to
primer is called base coat. The clear coat protects the
base coat from ultraviolet light and provides a durable high-gloss finish.
CAUTION: Do not use abrasive chemicals or compounds on painted surfaces. Damage to finish can
result.
Do not use harsh alkaline based cleaning solvents on painted surfaces. Damage to finish or
color can result.
FINESSE SANDING, BUFFING, AND POLISHING
DESCRIPTION
Minor acid etching, orange peel, or smudging in
clear coat or single-stage finishes can be reduced
with light finesse sanding, hand buffing, and polishing. If the finish has been finesse sanded in the
past, it cannot be repeated. Finesse sanding
operation should be performed by a trained
automotive paint technician.
CAUTION: Do not remove clear coat finish, if
equipped. Base coat paint must retain clear coat for
durability.
PAINTED SURFACE TOUCH-UP ..............4
SPECIFICATIONS
AFTERMARKET PAINT REPAIR PRODUCTS .....5
PAINTED SURFACE TOUCH-UP
DESCRIPTION
When a painted metal surface has been scratched
or chipped, it should be touched-up as soon as possible to avoid corrosion. For best results, use Mopart
Scratch Filler/Primer, Touch-Up Paints and Clear Top
Coat. Refer to Introduction group of this manual for
Body Code Plate information.
WARNING: USE A OSHA APPROVED BREATHING
FILTER WHEN SPRAYING PAINT OR SOLVENTS IN
A CONFINED AREA. PERSONAL INJURY CAN
RESULT.
OPERATION
(1) Scrape loose paint and corrosion from inside
scratch or chip.
(2) Clean affected area with Mopart Tar/Road Oil
Remover, and allow to dry.
(3) Fill the inside of the scratch or chip with a coat
of filler/primer. Do not overlap primer onto good surface finish. The applicator brush should be wet
enough to puddle-fill the defect without running. Do
not stroke brush applicator on body surface. Allow
the filler/primer to dry hard.
(4) Cover the filler/primer with color touch-up
paint. Do not overlap touch-up color onto the original
color coat around the scratch or chip. Butt the new
color to the original color, if possible. Do not stroke
applicator brush on body surface. Allow touch-up
paint to dry hard.
(5) On vehicles without clear coat, the touch-up
color can be lightly finesse sanded (1500 grit) and
polished with rubbing compound.
(6) On vehicles with clear coat, apply clear top coat
to touch-up paint with the same technique as
described in Step 4. Allow clear top coat to dry hard.
If desired, Step 5 can be performed on clear top coat.
Page 5
XJ BODY 23 - 5
DESCRIPTION AND OPERATION (Continued)
WARNING: AVOID PROLONGED SKIN CONTACT
WITH PETROLEUM OR ALCOHOL – BASED CLEANING SOLVENTS. PERSONAL INJURY CAN RESULT.
AVOID PROLONGED SKIN CONTACT WITH
PETROLEUM OR ALCOHOL – BASED CLEANING
SOLVENTS. PERSONAL INJURY CAN RESULT.
SPECIFICATIONS
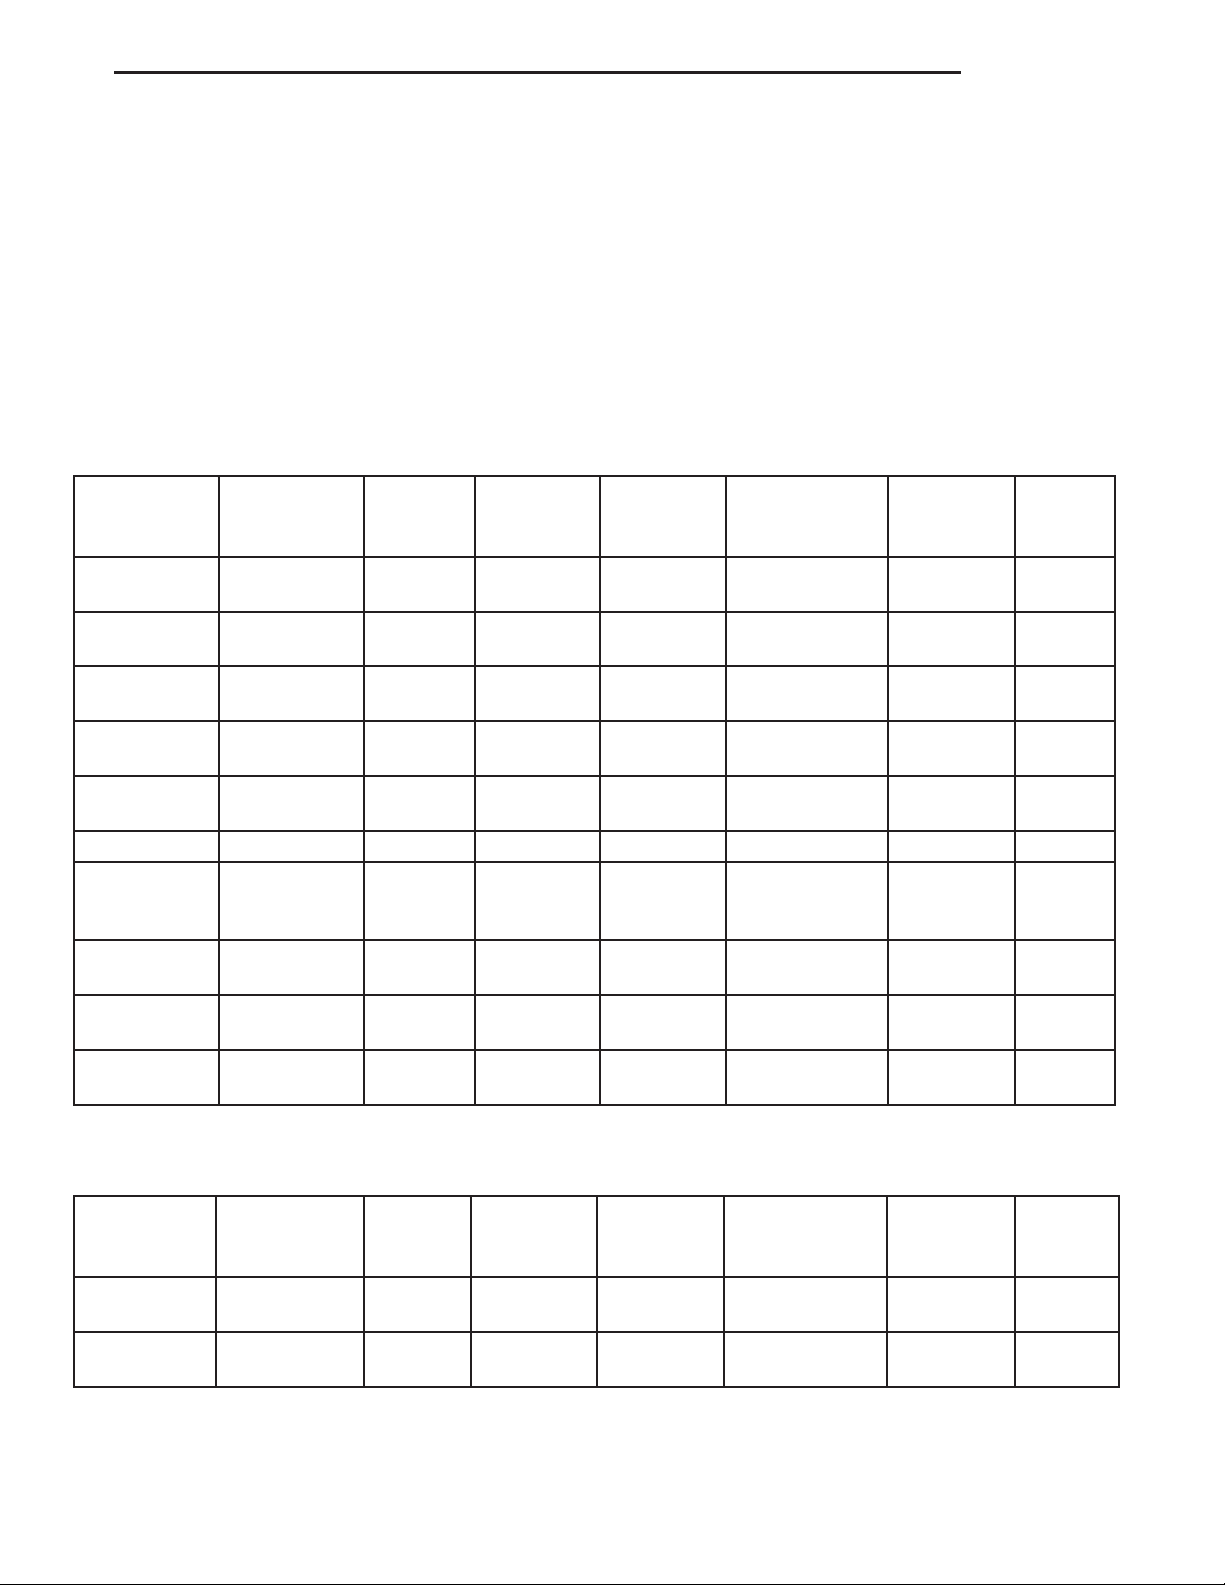
AFTERMARKET PAINT REPAIR PRODUCTS
EXTERIOR COLOR
EXTERIOR
COLOR
Flame Red
Clear Coat
Chili Pepper
Red
Medium Fern
Pearl Coat
Forest Green
Pearl Coat
Intense Blue
Pearl Coat
Desert Sand WTD 5474 B9884 56153 CHA99:WTD 81764 KGC7B
Deep
Amethyst
Pearl Coat
Black Clear
Coat
Gunmetal
Pearl Coat
Stone White
Clear Coat
DAIMLER
CHRYSLER
CODE
PR4 4679 B9326 46916 CHA93:PR4
VEA 5361 B9823 54470 CHA98:VEA
RJP 4969 B9524 50270 CHA99:RJP
SG8 5065 B9609 51062 CHA95:SG8
VB3 5357 B9822 54468 CHA98:VB3
TCN 5246 B9736 52026 CHA97:TCN
DX8 9700 99 34858 CHA85:DX8
TQ7 5248 B9735 52952 CHA97:TQ7
SW1 83542 B9622 51539 CHA96:SW1
PPG DuPONT
S-W**
M-S**
AKZO
NOBEL
SIKKENS
SPIES
HECKER
30116 2NN6B
33688 HMT3B
61088
61633
55321
54755 FNE4B
73328 TC60B
73320 ERA9B
15069 8KY5B
ICI**
7CD6B
7MR8B
HMR9B
INTERIOR COLOR
INTERIOR
COLOR
Agate AZ
Camel / Dark
Green
NOTE: *Herberts Standox and BASF use the
Chrysler paint code as listed on the Body Code
Plate and the Vehicle Safety Certification label. **
DIAMLER
CHRYSLER
CODE*
KG N/A N/A N/A
PPG DuPONT
9856 /
2-1461
C9208 45994
S-W**
M-S**
S-W = Sherwin-Williams, M-S = Martin Senour, ICI =
ICI Autocolor.
AKZO
NOBEL
SIKKENS
CHALAZI 75016 7WC8
N/A NA K5/G8
SPIES
HECKER
ICI**
Page 6

23 - 6 BODY XJ
STATIONARY GLASS
TABLE OF CONTENTS
page page
DESCRIPTION AND OPERATION
WINDSHIELD SAFETY PRECAUTIONS .........6
REMOVAL AND INSTALLATION
WINDSHIELD.............................6
DESCRIPTION AND OPERATION
WINDSHIELD SAFETY PRECAUTIONS
DESCRIPTION
WARNING: DO NOT OPERATE THE VEHICLE
WITHIN 24 HOURS OF WINDSHIELD INSTALLATION.
IT TAKES AT LEAST 24 HOURS FOR URETHANE
ADHESIVE TO CURE. IF IT IS NOT CURED, THE
WINDSHIELD MAY NOT PERFORM PROPERLY IN
AN ACCIDENT.
URETHANE ADHESIVES ARE APPLIED AS A SYSTEM. USE GLASS CLEANER, GLASS PREP SOLVENT, GLASS PRIMER, PVC (VINYL) PRIMER AND
PINCH WELD (FENCE) PRIMER PROVIDED BY THE
ADHESIVE MANUFACTURER. IF NOT, STRUCTURAL
INTEGRITY COULD BE COMPROMISED.
DAIMLERCHRYSLER DOES NOT RECOMMEND
GLASS ADHESIVE BY BRAND. TECHNICIANS
SHOULD REVIEW PRODUCT LABELS AND TECHNICAL DATA SHEETS, AND USE ONLY ADHESIVES
THAT THEIR MANUFACTURES WARRANT WILL
RESTORE A VEHICLE TO THE REQUIREMENTS OF
FMVSS 212. TECHNICIANS SHOULD ALSO INSURE
THAT PRIMERS AND CLEANERS ARE COMPATIBLE
WITH THE PARTICULAR ADHESIVE USED.
BE SURE TO REFER TO THE URETHANE MANUFACTURER’S DIRECTIONS FOR CURING TIME
SPECIFICATIONS, AND DO NOT USE ADHESIVE
AFTER ITS EXPIRATION DATE.
VAPORS THAT ARE EMITTED FROM THE URETHANE ADHESIVE OR PRIMER COULD CAUSE
PERSONAL INJURY. USE THEM IN A WELL-VENTILATED AREA.
SKIN CONTACT WITH URETHANE ADHESIVE
SHOULD BE AVOIDED. PERSONAL INJURY MAY
RESULT.
ALWAYS WEAR EYE AND HAND PROTECTION
WHEN WORKING WITH GLASS.
CAUTION: Protect all painted and trimmed surfaces
from coming in contact with urethane or primers.
REAR DOOR STATIONARY WINDOW GLASS ....9
REAR QUARTER WINDOW GLASS ...........10
LIFTGATE GLASS ........................11
Be careful not to damage painted surfaces when
removing moldings or cutting urethane around
windshield.
OPERATION
The windshield is attached to the window frame
with urethane adhesive. The urethane adhesive is
applied cold and seals the surface area between the
window opening and the glass. The primer adheres
the urethane adhesive to the windshield.
It is difficult to salvage a windshield during the
removal operation. The windshield is part of the
structural support for the roof. The urethane bonding
used to secure the windshield to the fence is difficult
to cut or clean from any surface. If the moldings are
set in urethane, it would also be unlikely they could
be salvaged. Before removing the windshield, check
the availability of the windshield and moldings from
the parts supplier.
REMOVAL AND INSTALLATION
WINDSHIELD
The windshield is positioned in the reveal molding
and is bonded to the windshield frame with urethane
adhesive.
Depending on the circumstances, either one of two
windshield glass installation methods can be used:
• The short method.
• The extended method.
The short method is used when the windshield
glass is removed intact, and the body opening and
the pinchweld flanges do not require repair.
The extended method must be used when the body
opening or a flange is damaged. The extended
method must also be used when urethane no longer
adheres to either the windshield glass or the pinchweld flanges.
REMOVAL
(1) Cover the interior and exterior body surface
areas with a protective covering.
Page 7
XJ BODY 23 - 7
REMOVAL AND INSTALLATION (Continued)
(2) Remove the windshield wiper arms and the
rearview mirror.
(3) Using a razor knife, slide the blade between
the windshield glass and the inboard edge of the
reveal molding.
(4) Cut around the interior perimeter of the reveal
molding and sever the cap of the reveal molding.
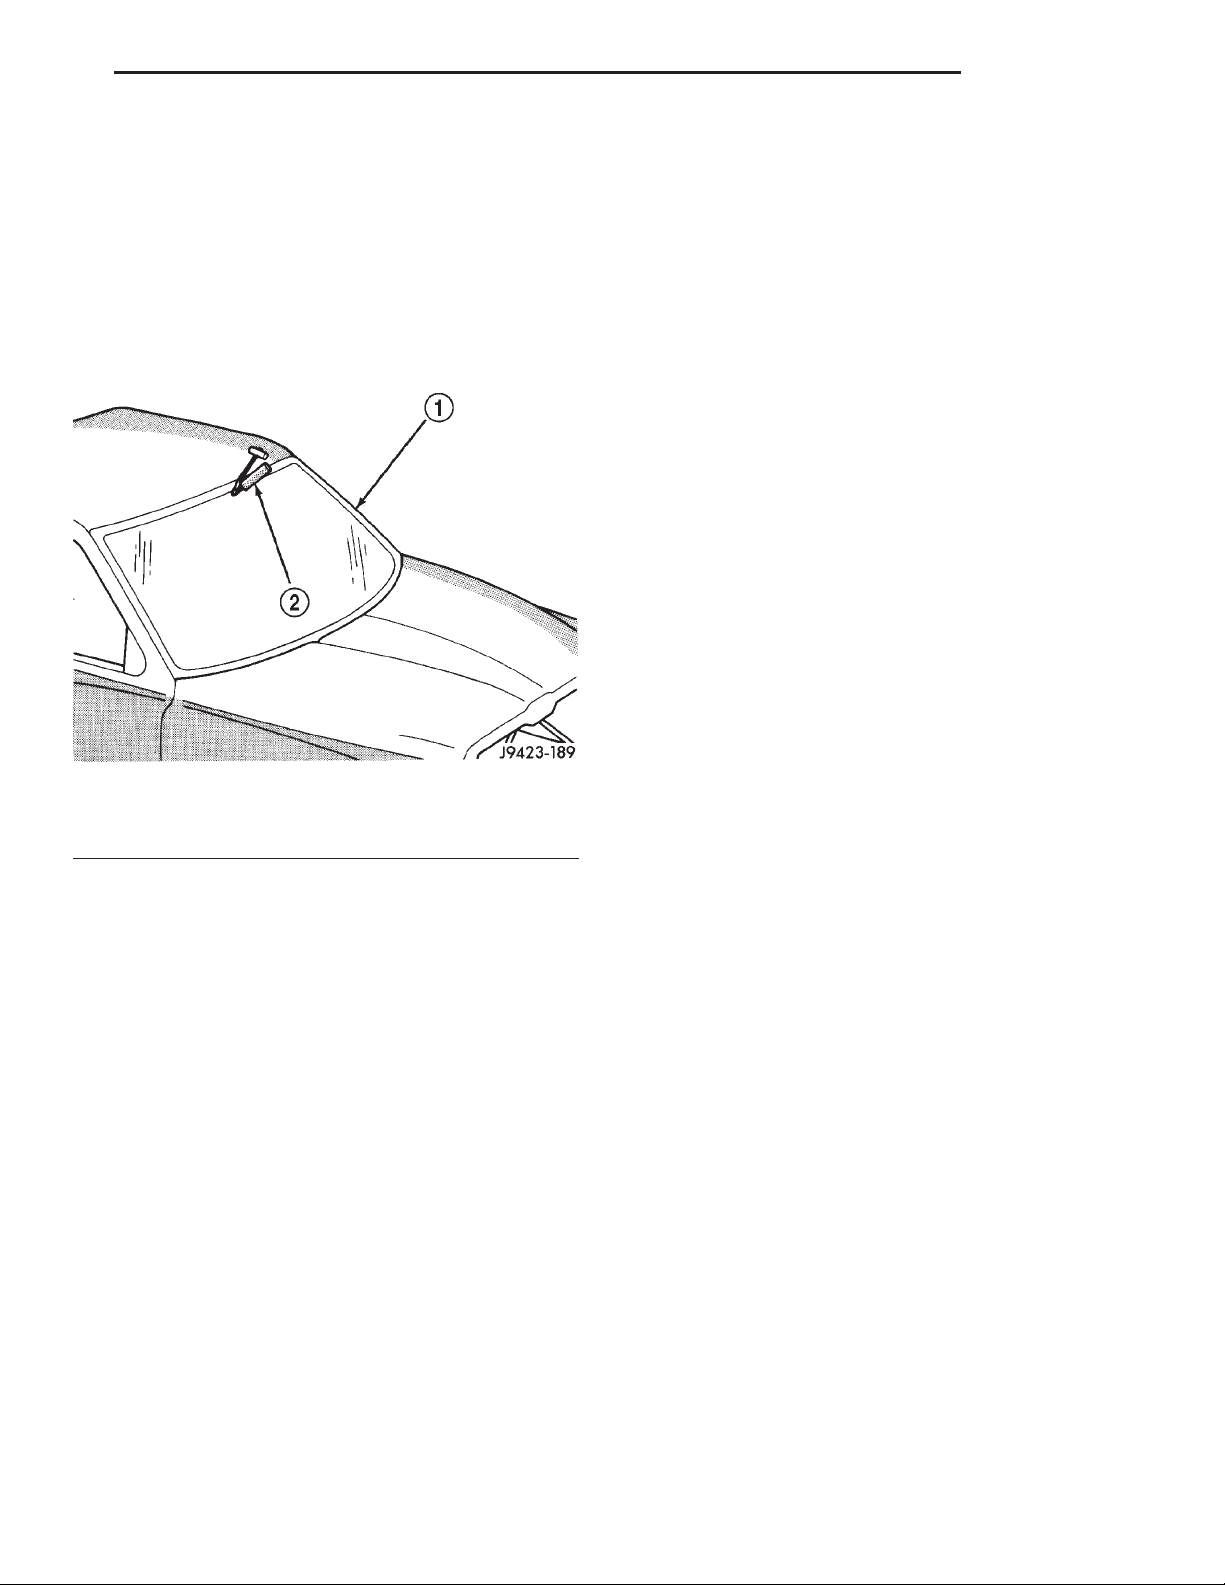
(5) Using a cold knife, cut the urethane around the
perimeter of the windshield (Fig. 1).
(6) Remove the windshield glass from the frame.
(4) Apply the molding to the windshield:
• With the molding at room temperature, press
the molding onto the windshield corners.
• From corner to corner, work the molding to the
center of each side. (Some stretching of the molding
may be required during this procedure.)
(5) Place the glass on the pinchweld flanges and
inspect for gaps in the urethane. Gaps in excess of 3
mm (1/8 inch) must be filled with urethane.
(6) Adjust windshield glass position until it is
aligned with the flanges and adhesive.
(7) Using a grease pencil or equivalent, make
alignment marks on the glass and body.
(8) Remove replacement windshield from windshield opening.
(9) Position the windshield inside up on a suitable
work surface with two padded, wood 10 cm by 10 cm
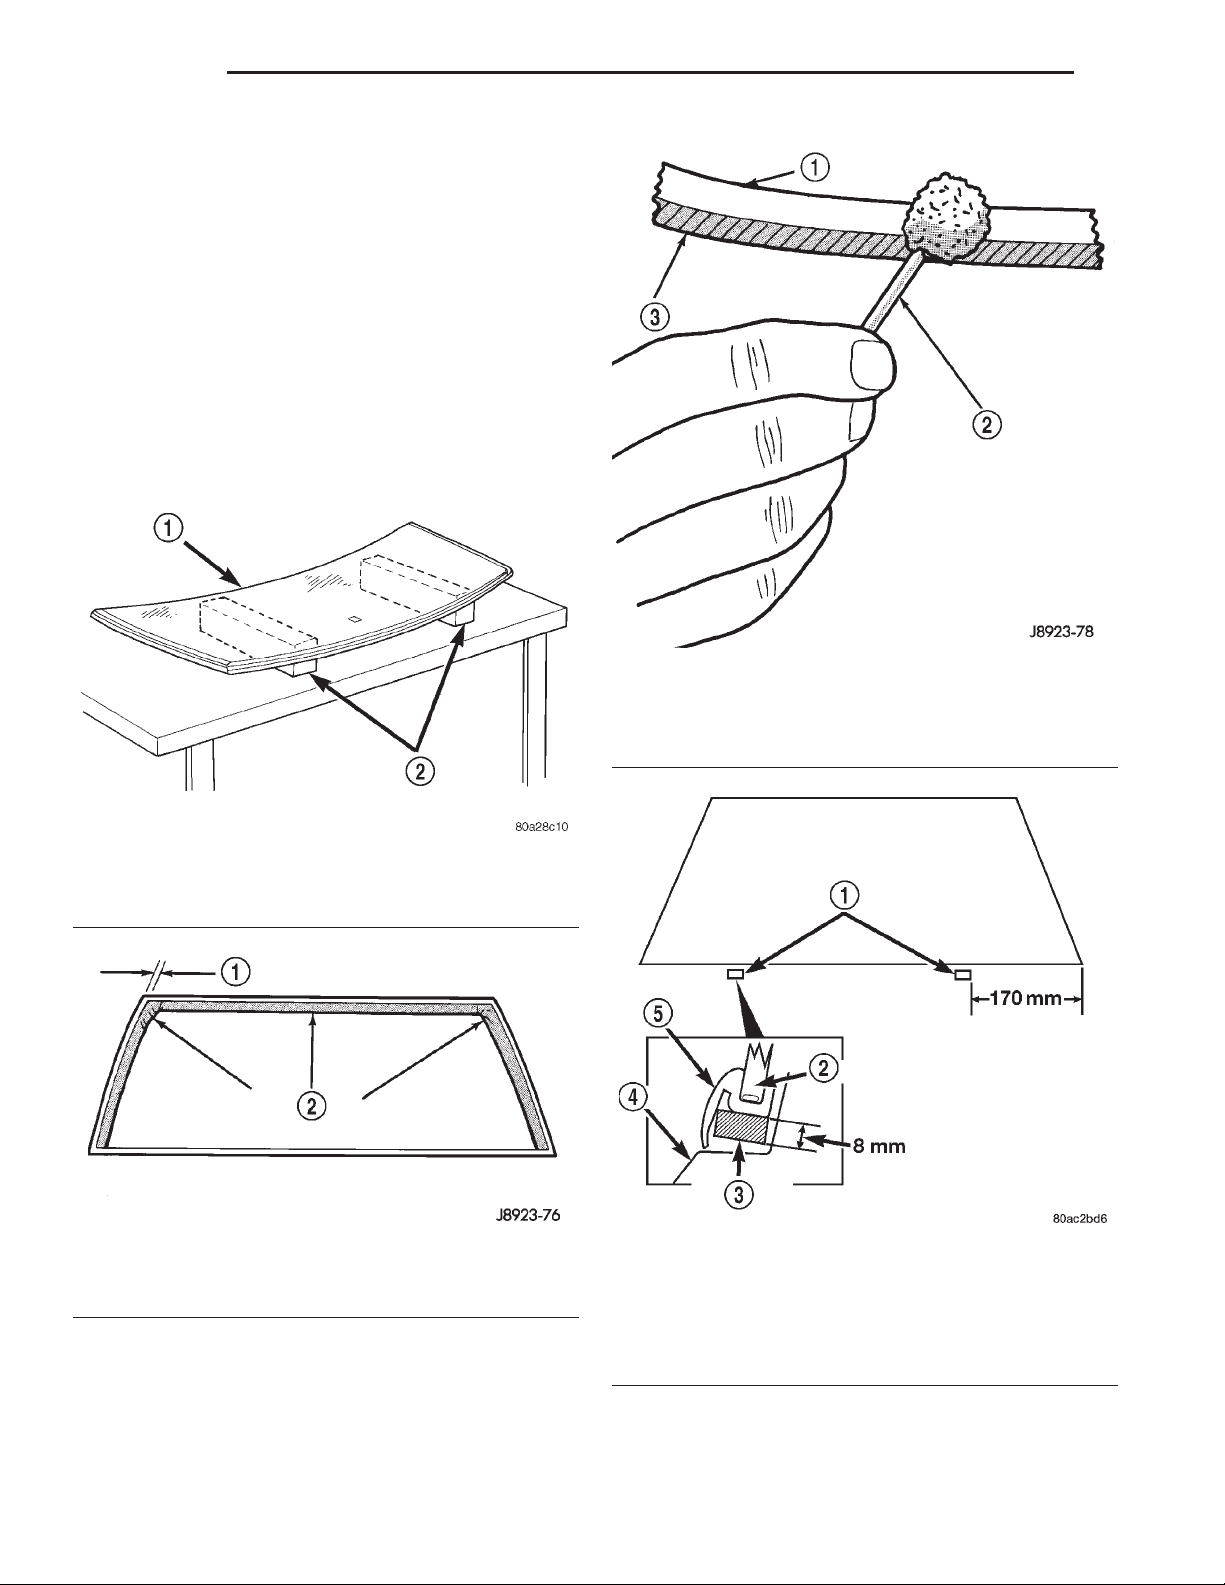
by 50 cm (4 in. by 4 in. by 20 in.) blocks, placed parallel 75 cm (2.5 ft.) apart (Fig. 2).
CAUTION: Avoid spilling or dripping primer on
painted surfaces. Clean spills or drips immediately.
The primer will damage the paint if it remains on
the surface for any length of time.
Fig. 1 Cutting Urethane Around Windshield—Typical
1 – WINDSHIELD
2 – COLD KNIFE
INSTALLATION—SHORT METHOD
WARNING: REVIEW ALL WARNINGS AND CAUTIONS IN THIS GROUP BEFORE PRECEDING WITH
INSTALLATION.
(1) Trim the urethane from the pinchweld flanges.
Leavea3mm(0.1 in.) level base of urethane on the
pinchweld flanges.
WARNING: DO NOT USE SOLVENT BASED GLASS
CLEANER TO CLEAN WINDSHIELD BEFORE
APPLYING GLASS PREP AND PRIMER. POOR
ADHESION CAN RESULT.
(2) Clean inside of windshield with ammonia based
glass cleaner and lint-free cloth.
(3) Prime outer perimeter of interior side of glass
16 mm (5/8 inch) from edge. Use a wipe-off type urethane primer and wipe glass dry after primer application.
NOTE: The reveal molding has an adhesive applied
to the windshield contact surface to help secure the
molding to the windshield during the installation
procedure.
(10) If the replacement windshield glass does not
have blackout primer:
• Attach a 25 mm (1 in) wide masking tape band
around the interior side of the glass 16 mm (5/8 in)
from the edge of the glass (Fig. 3).
• Do not attach tape along the bottom of the glass
and attach it only to the inside of the glass.
• Clean the 16-mm (5/8-in) wide surface area
around the glass with isopropyl alcohol.
• Thoroughly mix and apply glass blackout primer
to the 16 mm (5/8 in) surface area around the interior side of the glass (Fig. 4).
• Allow the primer to dry for at least 10-12 minutes.
(11) Apply a small amount of adhesive to the bottom support spacers and attach the support spacers
to the bottom of the windshield, 170 mm inboard
from the outer windshield edge (Fig. 5).
(12) Cut the urethane adhesive applicator nozzle
(Fig. 6).
CAUTION: Be prepared to install the glass immediately after applying the adhesive, as the adhesive
will begin to cure in less than 10 minutes.
(13) Apply a continuous, 6-mm (1/4-in) diameter
bead of urethane adhesive to the surface area.
(14) Align the glass with the reference marks and
position the glass on the pinchweld flanges. Ensure
that the windshield glass is correctly seated on the
support spacers.
Page 8
23 - 8 BODY XJ
REMOVAL AND INSTALLATION (Continued)
(15) Force the windshield glass inward just enough
to wet-out and set the urethane. Use care to avoid
excessive squeeze-out of adhesive.
(16) Water test the windshield with a water spray
after installation. Do not direct high pressure
streams of water directly at urethane. If any leaks
are detected, apply urethane as necessary.
(17) If used, remove the masking tape from the
inner surface of the glass.
(18) Install all components and clean the vehicle.
(19) Open the vehicle windows to prevent interior
pressure while the urethane is curing. If not
vented, pressure in the interior of the vehicle
may interfere with proper glass bonding.
(20) Install the rearview mirror.
Fig. 2 Work Surface Set up
1 – WINDSHIELD AND MOLDINGS
2 – BLOCKS
Fig. 3 Masking Tape Location For Blackout Primer
1 – POSITION TAPE 5/8 INCH FROM EDGE OF GLASS
2 – 1-INCH WIDE MASKING TAPE
INSTALLATION—EXTENDED METHOD
Fig. 4 Blackout Primer Application
1 – APPLY PRIMER TO THIS AREA OF GLASS
2 – BLACKOUT PRIMER APPLICATOR
3–TAPE
Fig. 5 Windshield Bottom Support Spacers
1 – SUPPORT SPACERS
2 – WINDSHIELD
3 – SUPPORT SPACER
4 – COWL
5 – MOLDING
WARNING: REVIEW ALL WARNINGS AND CAUTIONS IN THIS GROUP BEFORE PRECEDING WITH
INSTALLATION.
(1) Remove the all of urethane from all pinchweld
flanges.
Page 9
XJ BODY 23 - 9
REMOVAL AND INSTALLATION (Continued)
tape) will be used for installation alignment reference.
(8) If the replacement windshield does not have
blackout primer:
• Attach a 25-mm (1-in) wide masking tape band
around the interior side of glass 16 mm (5/8 in) from
edge of glass (Fig. 3).
• Do not attach tape along the bottom of the glass
and attach only to the inside of glass.
• Thoroughly mix and apply blackout primer to
the 16 mm (5/8 in) surface area around the interior
side of the glass (Fig. 4).
• Allow the primer to dry for at least 10-12 minutes.
(9) Apply a small amount of adhesive to the bot-
Fig. 6 Applicator Nozzle Preparation
1 – CUT NOZZLE THIS SHAPE FOR EXTENDED PROCEDURE
2 – CUT NOZZLE THIS SHAPE FOR SHORT PROCEDURE
(2) Inspect and repair the windshield opening and
pinchweld flanges.
(3) Prime the pinchweld flanges with a urethane
base primer. However, if the flange is color-coated
with paint, prime the flanges with a paint finish
primer. This is important because urethane
adhesive will not adhere to all color-coat
paints. Allow primer sufficient time to dry.
NOTE: The reveal molding has an adhesive applied
to the windshield contact surface to help secure the
molding to the windshield during the installation
procedure.
(4) Apply the reveal molding to the windshield:
• With the molding at room temperature, press
the molding onto the windshield corners.
• From corner to corner, work the molding to the
center of each side. (Some stretching of the molding
may be required during this procedure).
(5) Install and inspect the fit of the windshield on
the pinchweld flanges as follows:
• Position windshield until it is aligned within
windshield opening.
• Measure the gap between the pinchweld flanges
and glass around perimeter of the glass and flange.
• The reveal molding should equally cover the
A-Pillars on both sides.
• The flanges should also extend above the glass
edge equally around the perimeter of the opening.
(6) If the pinchweld flanges require repair, remove
the windshield glass and straighten, align, or repair
the flange(s) as necessary.
(7) Position the windshield in the opening and
inspect the windshield fit again. Mark the windshield
final position on the glass and body with a wax pencil (or use masking tape). The marks (or masking
tom support spacers and attach the support spacers
to the bottom of the windshield, 170 mm inboard
from the outer windshield edge (Fig. 5).
(10) Cut the urethane applicator nozzle (Fig. 6).
(11) Apply a continuous bead of urethane to the
surface area with blackout primer on the interior
side of glass. The bead should be 9-mm (3/8-in) wide
by 12.7-mm (1/2-in) deep for best results.
CAUTION: Be prepared to install the glass immediately after applying the adhesive, as the adhesive
will begin to cure in less than 10 minutes.
(12) Align the windshield with the wax pencil
installation alignment reference marks (or the tape
strips). Position the windshield on pinchweld flanges
and spacers.
(13) Force the windshield inward just enough to
wet-out and set the urethane. Use care to avoid
excessive squeeze-out of adhesive.
(14) Water test the windshield with a water spray
after installation. Do not direct high pressure
streams of water directly at the urethane. If any
leaks are detected, apply urethane as necessary.
(15) If used, remove the masking tape from the
inner surface of glass.
(16) Install all components and clean the vehicle.
If necessary, refer to the installation procedures.
(17) Open the vehicle windows to prevent interior
pressure while the urethane adhesive is curing. If
not vented, pressure in the interior of vehicle
will interfere with glass bonding.
(18) Install the rearview mirror on the bracket.
REAR DOOR STATIONARY WINDOW GLASS
REMOVAL
The rear door stationary window glass is bonded to
the division bar and is serviced as an assembly.
(1) Lower the window glass.
(2) Remove the inner and outer beltline weatherstrip.
Page 10
23 - 10 BODY XJ
REMOVAL AND INSTALLATION (Continued)
(3) Remove the trim panel and waterdam from
door inner panel.
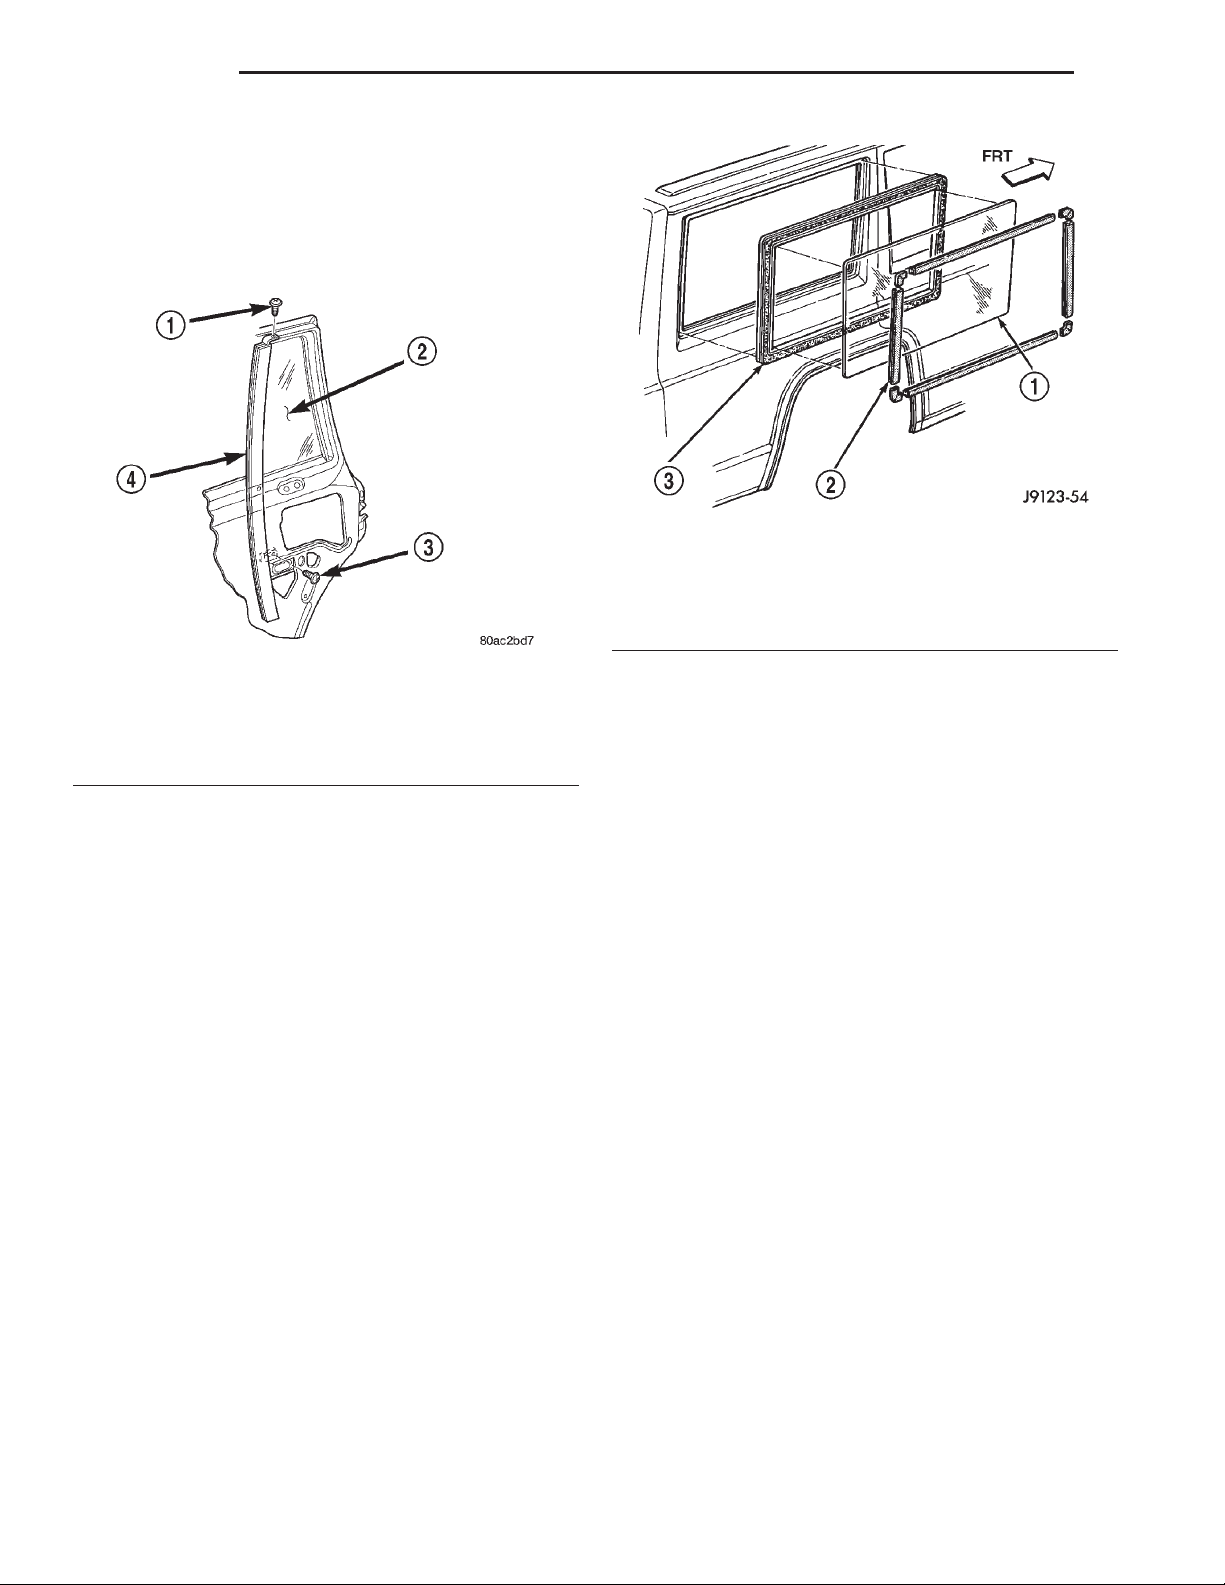
(4) Remove the screws attaching the division bar/
glass to the door (Fig. 7).
(5) Tilt the division bar/glass forward and remove
it from the door.
Fig. 8 Quarter Window Reveal Molding, Glass and
Seal
1 – GLASS
2 – REVEAL MOULDING
3 – WEATHERSTRIP SEAL
Fig. 7 Division Bar/Stationary Glass
1 – UPPER SCREW
2 – GLASS
3 – LOWER SCREW
4 – DIVISION BAR
INSTALLATION
(1) Position the division bar/glass in the door.
(2) Install the screws attaching the division bar/
glass to the door. Finger tighten the screws.
(3) Tighten the upper screw to 6 N·m (5 ft-lbs)
torque.
(4) Tighten the lower screw to 6 N·m (5 ft-lbs)
torque.
(5) Install the beltline weatherstrip.
(6) Install the door waterdam and trim panel.
REAR QUARTER WINDOW GLASS
REMOVAL
(1) If equipped, remove the quarter window reveal
molding (Fig. 8).
(2) Remove the quarter window interior trim cov-
ers.
(3) Separate the weatherstrip seal lip from the
window opening flanges. Use a pry tool and carefully
push the window glass and seal outward.
(4) Remove the weatherstrip seal and window
glass from window opening.
(5) Remove the weatherstrip seal from the window
glass.
INSTALLATION
(1) Clean the original sealant from the weather-
strip channels and window opening flanges.
(2) Apply a 4-mm (1/6-in) diameter bead of sealant
to the window channel in the weatherstrip seal.
(3) Install the weatherstrip on the window glass.
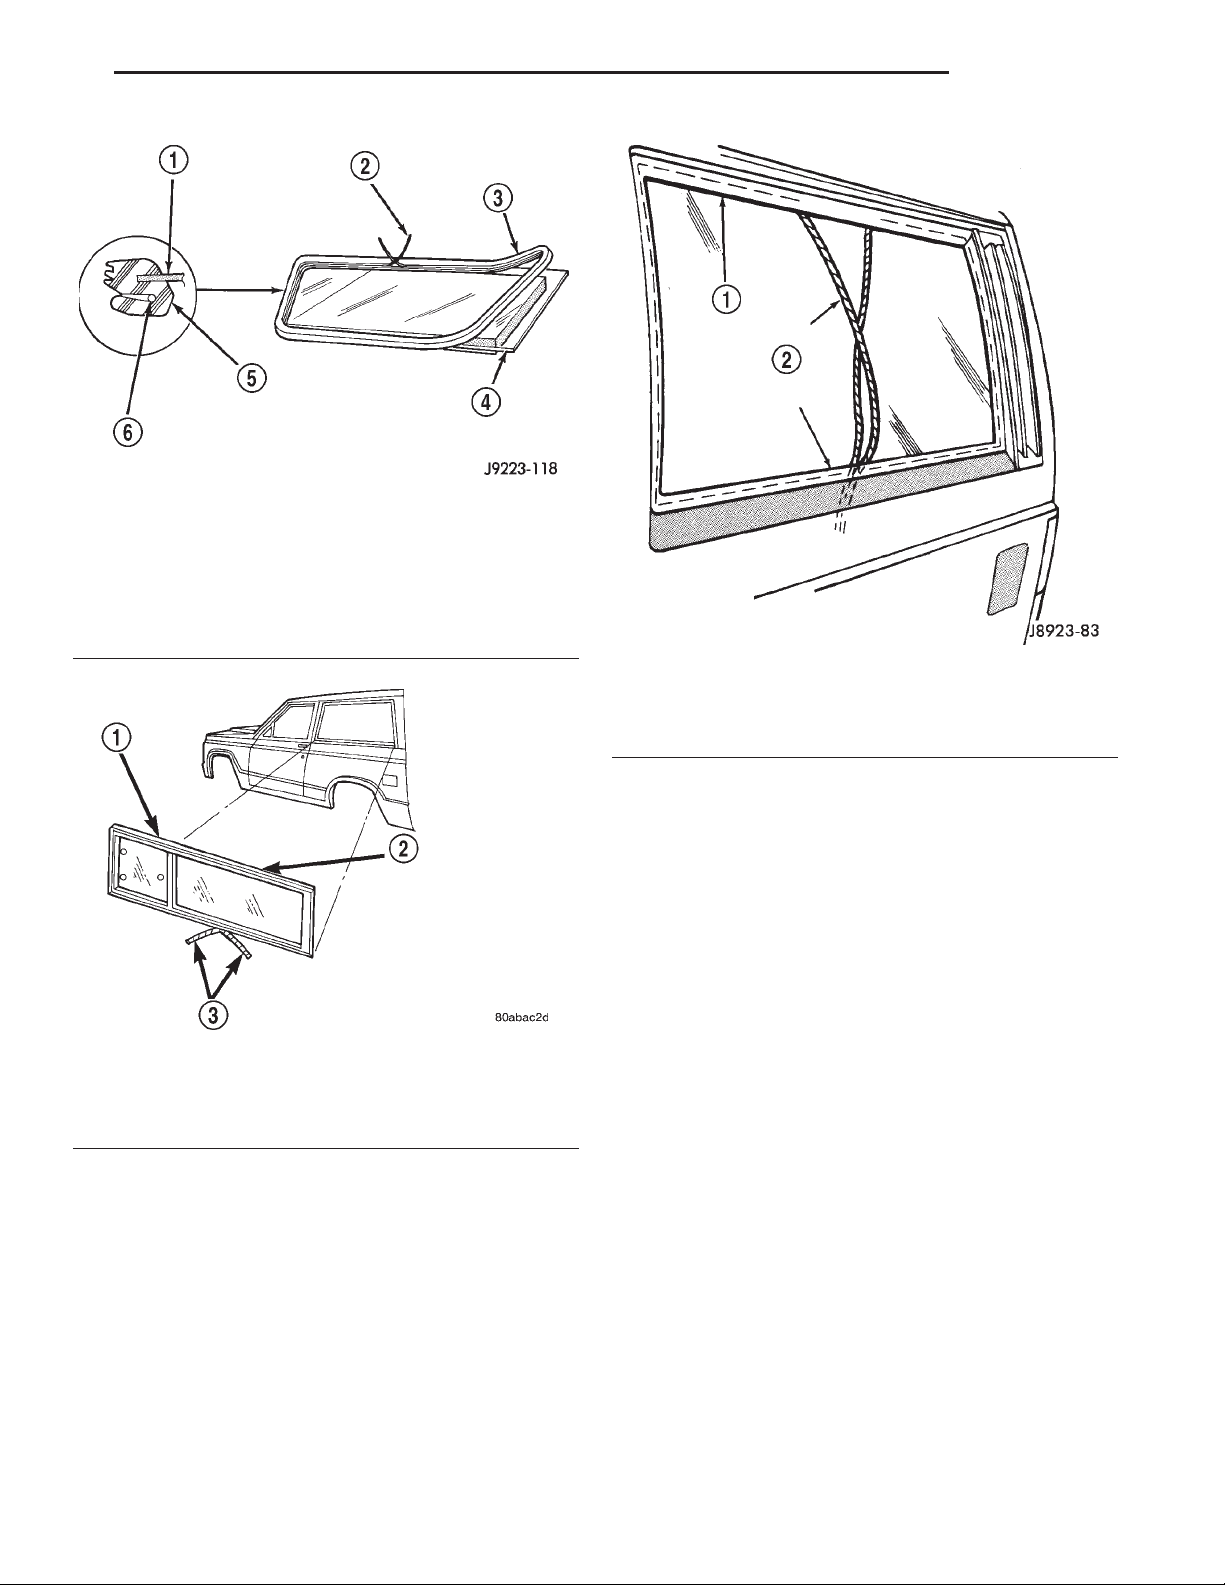
Install the seal installation cord in the window opening flange channel (Fig. 9) as follows:
• Moisten a length of 6-mm (1/4-in) diameter cord
with a soap and water solution.
• Ensure that the cord is long enough to go all the
way around the perimeter of the weatherstrip.
• Insert the cord into the window opening flange
channel in the weatherstrip seal.
(4) Apply a 6-mm (1/4-in) diameter bead of sealant
to the window opening flanges.
(5) For two-door vehicles, apply a 3-mm (1/8-in)
diameter bead of sealant at the quarter panel applique and liftgate pillar seam.
(6) Position the quarter window glass and the
weatherstrip seal in the window opening (Fig. 10)
with the free ends of the cord inside the vehicle (Fig.
11).
(7) Pull on each end of the cord to pull the weatherstrip seal channel lip over the window opening
flanges.
(8) Test the vent window for water leaks.
(9) Install the interior trim cover.
(10) If equipped, install the quarter window reveal
molding.
Page 11
XJ BODY 23 - 11
REMOVAL AND INSTALLATION (Continued)
Fig. 9 Weatherstrip Seal and Cord Installation
1 – WINDOW GLASS
2 – INSTALLATION CORD END
3 – WEATHERSTRIP SEAL
4 – WINDOW GLASS
5 – WEATHERSTRIP SEAL
6 – INSTALLATION CORD
Fig. 10 Quarter Window With Vent
1 – QUARTER WINDOW W/VENT
2 – WEATHERSTRIP SEAL
3 – INSTALLATION CORD
LIFTGATE GLASS
REMOVAL
(1) Open liftgate.
(2) Remove liftgate trim panel.
(3) Disconnect heated backlite (HBL) connector.
(4) Remove wiper arm.
(5) Remove CHMSL lens.
(6) Using a razor knife, slide the blade between
the liftgate glass and the inboard edge of the reveal
molding.
(7) Cut around the interior perimeter of the reveal
molding and severe the cap of the reveal molding.
Fig. 11 Quarter Window Glass and Seal Installation
1 – WEATHERSTRIP
2 – 1/4-INCH DIAMETER CORD (POSITION IN WEATHERSTRIP
GLASS CHANNEL)
(8) Using a cold knife, cut urethane bonding from
around liftgate glass. A pneumatic cutting device can
be used if available.
(9) Separate glass from Liftgate.
INSTALLATION
CAUTION: Open a window before installing glass.
This will avoid pressurizing the passenger compartment. If a door or liftgate is slammed before urethane is cured, water leaks can result.
(1) Trim the urethane from the liftgate glass opening flanges. Leavea3mm(0.1 in.) level base of urethane on the flanges.
(2) Starting in the corners, press reveal molding
onto glass.
(3) Place replacement glass into liftgate opening
and position glass in the center of the opening
against flange.
(4) Verify the glass lays evenly against the fence at
the sides, top and bottom. If not, the flange must be
formed to the shape of the new glass.
(5) Using a grease pencil or equivalent, make references marks on the glass and body.
(6) Remove replacement glass from liftgate opening.
(7) Position the glass inside up on a suitable work
surface.
Page 12

23 - 12 BODY XJ
REMOVAL AND INSTALLATION (Continued)
WARNING: DO NOT USE SOLVENT BASED GLASS
CLEANER TO CLEAN WINDSHIELD BEFORE
APPLYING GLASS PREP AND PRIMER. POOR
ADHESION CAN RESULT.
(8) Clean inside of glass with Mopar Glass Cleaner
and lint-free cloth.
(9) Apply PVC (vinyl) primer 25 mm (1 in.) wide
around edge of glass. Wipe with clean/dry lint-free
cloth.
(10) If necessary, apply fence primer around edge
of fence. Allow at least eighteen minutes drying time.
(11) Apply a 10 mm (0.4 in.) bead of urethane
around glass border.
(12) Position glass into liftgate opening and reference marks.
(13) Push the glass inward until the reveal molding is seated onto the liftgate frame. Use care to
avoid excessive squeeze-out of adhesive.
(14) Open windows to prevent pressure build-up
while the urethane is curing.
(15) Apply 150 mm (6 in.) lengths of 50 mm (2 in.)
masking tape spaced 250 mm (10 in.) apart to hold
glass in place until urethane cures.
(16) Install the wiper arm.
(17) Install CHMSL lens.
(18) Connect heated backlite (HBL) connector.
(19) After urethane has cured, remove tape strips
and water test to verify repair.
(20) Install liftgate trim panel.
Page 13
XJ BODY 23 - 13
SEATS
TABLE OF CONTENTS
page page
REMOVAL AND INSTALLATION
HEAD RESTRAINT SLEEVE.................13
HEAD RESTRAINT COVER .................14
BUCKET SEAT...........................15
BUCKET SEAT TRACK.....................15
BUCKET SEAT PLATFORM .................15
BUCKET SEATBACK COVER................16
BUCKET SEATBACK ......................16
BUCKET SEAT CUSHION COVER ............17
REMOVAL AND INSTALLATION
HEAD RESTRAINT SLEEVE
REMOVAL
NOTE: When replacing a head restraint sleeve, the
retaining tabs on the sleeve will be damaged during
the removal process. Check the availability of
replacement parts before servicing.
(1) Raise head restraint to the full up position.
(2) Turn head restraint lock thumbwheel to release
head restraint and pull head restraint upward to
remove from seat back.
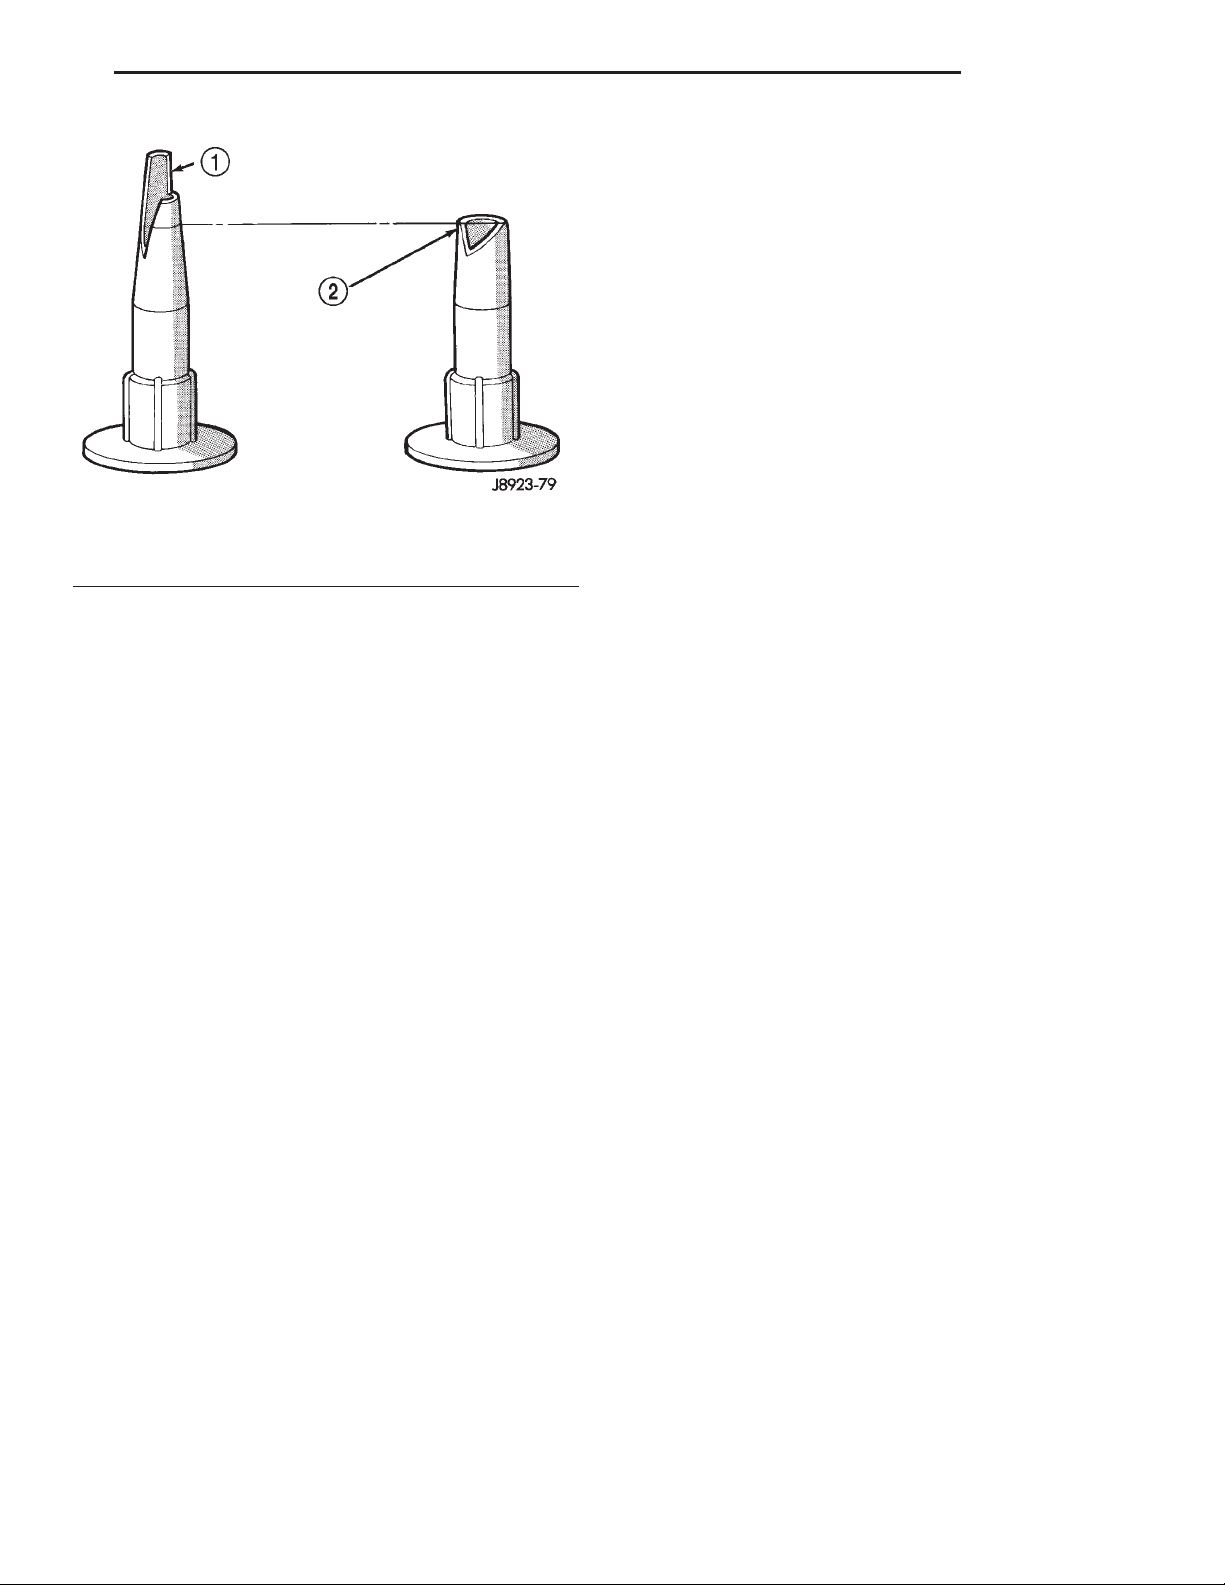
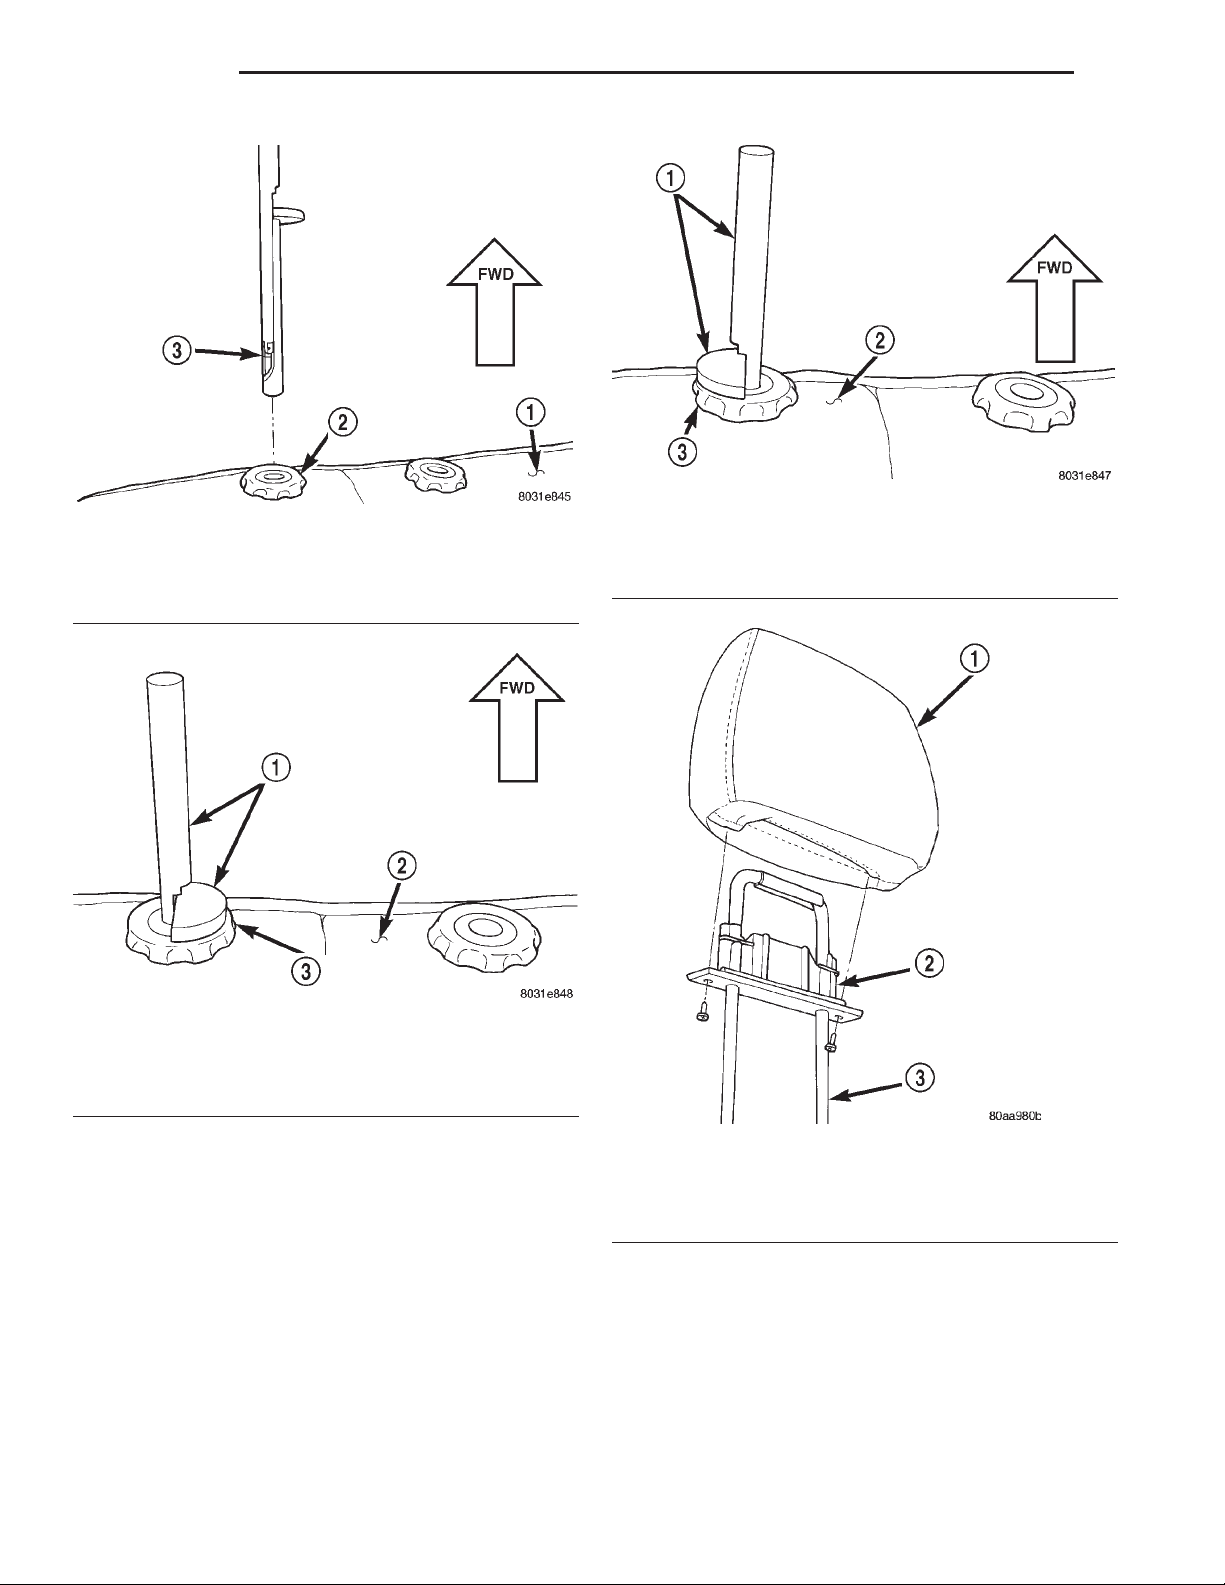
(3) Insert head restraint sleeve extractor (special
tool 6773) (Fig. 1) and (Fig. 2) into the seat back.
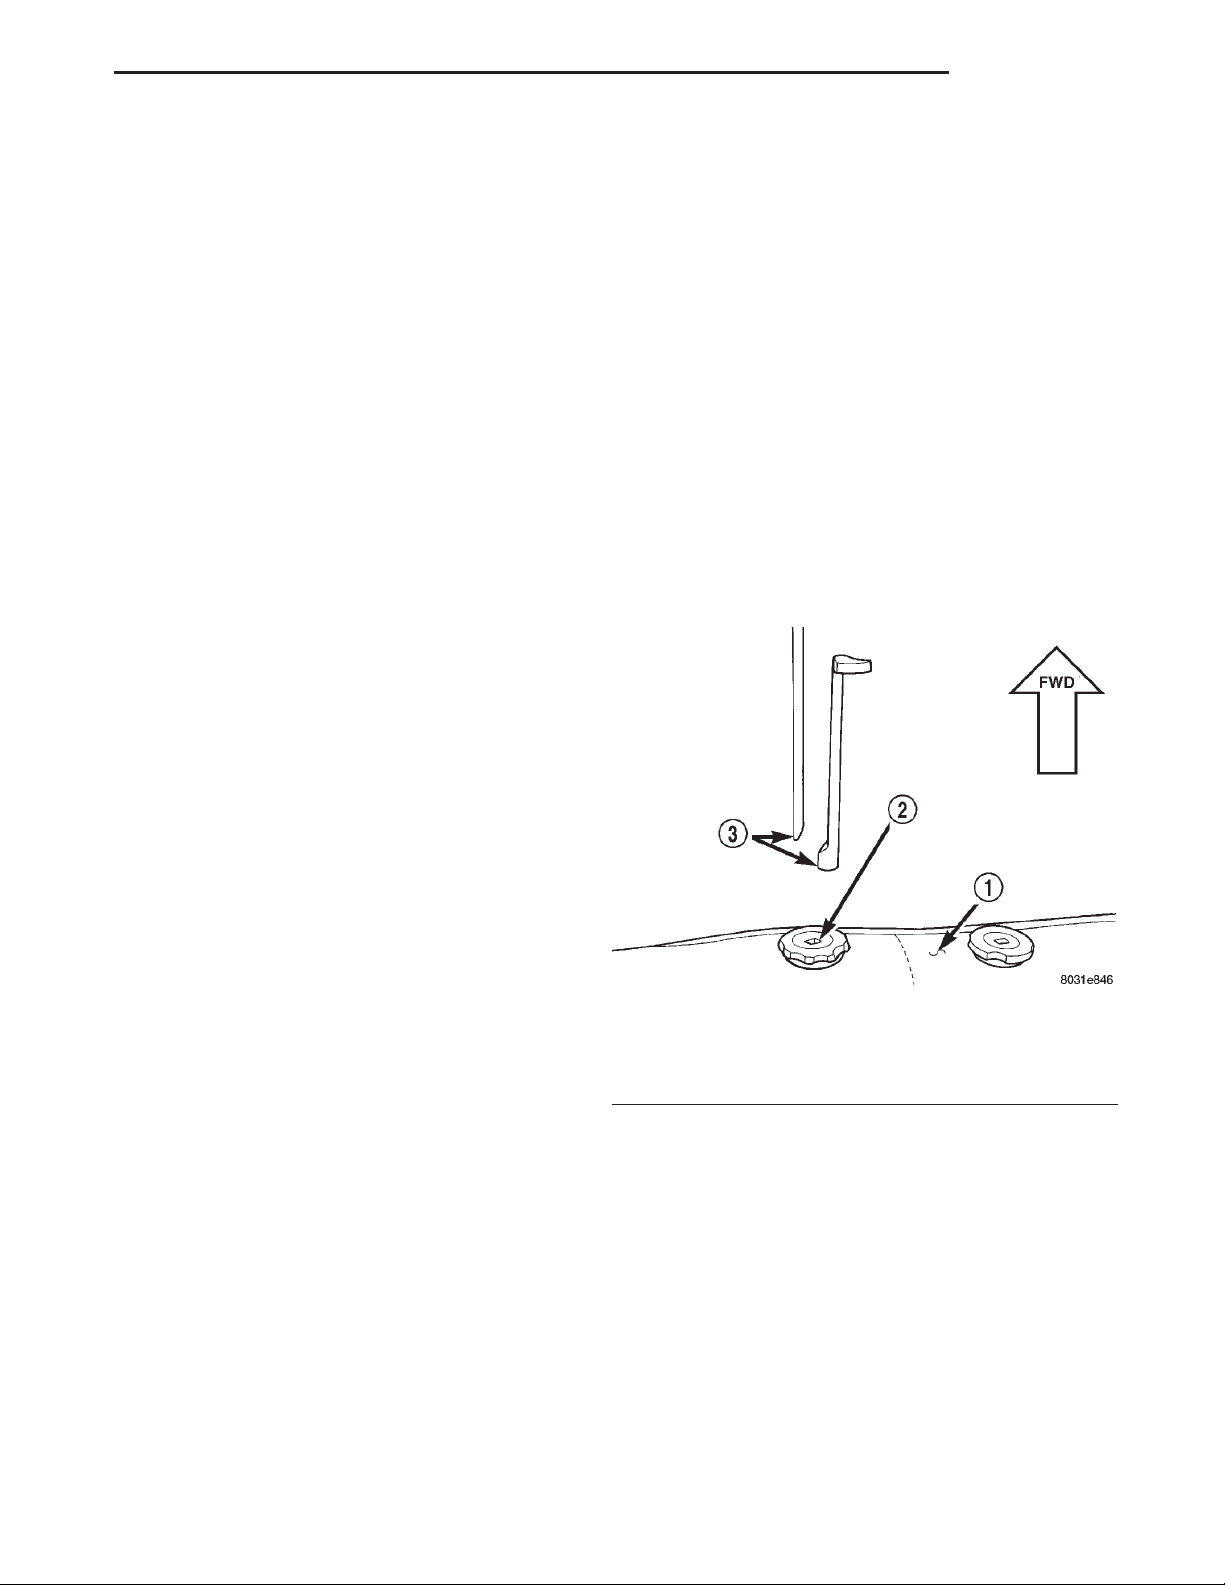
(4) The retaining tabs are positioned on each side
of the sleeve, when inserting the extractor, ensure
that the flat of the collar is facing the side of the
seatback (Fig. 3).
(5) Using a small hammer, tap extractor downward to release sleeve retaining tab.
(6) Remove extractor tool from sleeve, rotate tool
180 degrees (Fig. 4) and repeat steps 3 and 4.
BUCKET SEAT RECLINER..................17
REAR SEAT CUSHION.....................17
REAR SEATBACK ........................18
REAR SEAT CUSHION COVER ..............19
REAR SEATBACK LATCH STRIKER AND
BUMPER..............................19
REAR SEATBACK COVER..................20
SPECIAL TOOLS
SPECIAL TOOLS—SEATS ..................20
(7) Remove extractor tool from sleeve and remove
sleeve from seat back.
Fig. 1 Head Restraint Sleeve Extractor
1 – SEAT BACK
2 – HEAD RESTRAINT SLEEVE
3 – EXTRACTOR TOOL 6773
Page 14
23 - 14 BODY XJ
REMOVAL AND INSTALLATION (Continued)
Fig. 4 Head Restraint Sleeve Extractor Positioning
Fig. 2 Head Restraint Sleeve Extractor Installation
1 – SEAT BACK
2 – HEAD RESTRAINT SLEEVE
3 – EXTRACTOR TOOL 6773
1 – EXTRACTOR TOOL 6773
2 – SEAT BACK
3 – LOCK RELEASE THUMBWHEEL
Fig. 3 Head Restraint Sleeve Extractor Positioning
1 – EXTRACTOR TOOL 6773
2 – SEAT BACK
3 – LOCK RELEASE THUMBWHEEL
INSTALLATION
(1) Position the sleeve in the seat back.
(2) Firmly, push sleeve down to snap into place.
(3) Install head restraint.
HEAD RESTRAINT COVER
REMOVAL
(1) Remove head restraint from the bucket seat.
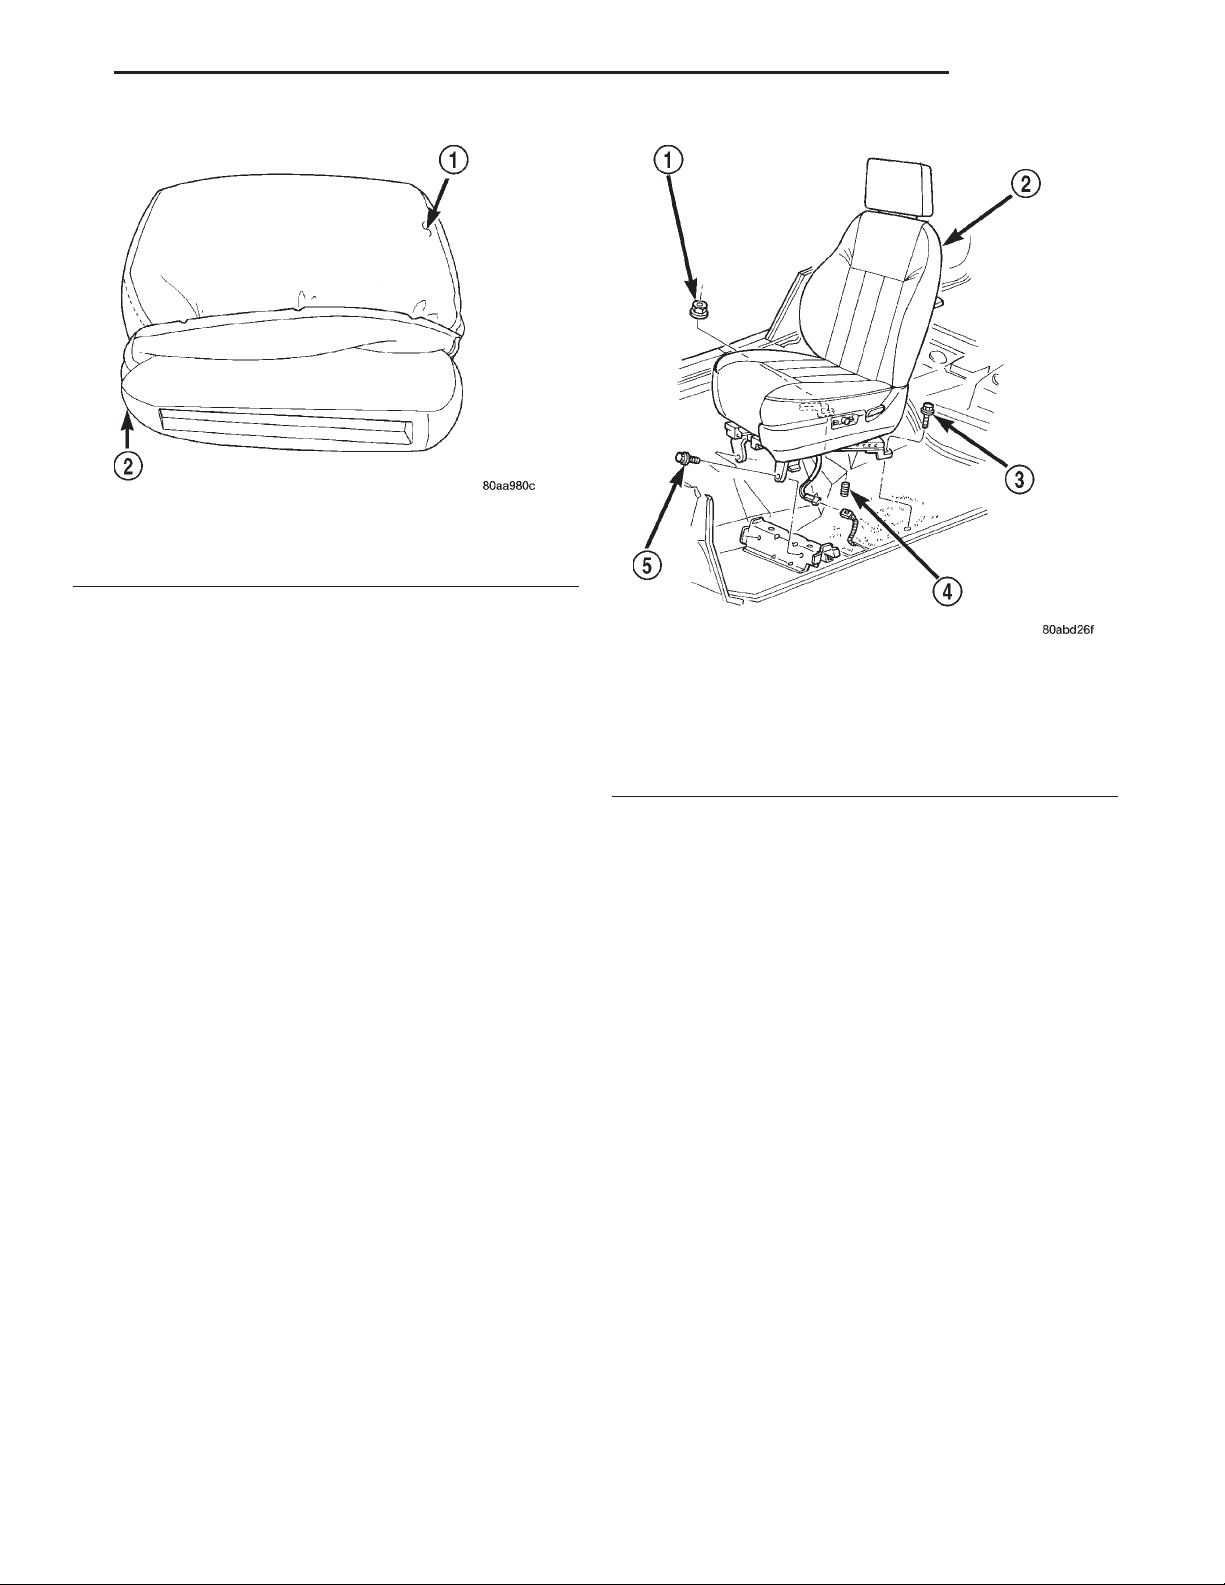
(2) Remove the screws attaching the bezel and
adjuster bar to the head restraint (Fig. 5).
(3) Pull the adjuster bar from the head restraint.
(4) Roll the cover upward and separate from the
head restraint cushion (Fig. 6).
Fig. 5 Head Restraint
1 – HEAD RESTRAINT
2 – BEZEL
3 – ADJUSTER BAR
INSTALLATION
(1) Position the cover on the head restraint cush-
ion and roll the cover downward.
(2) Position the adjuster bar in the head restraint.
(3) Install the screws attaching the bezel and
adjuster bar to the head restraint.
(4) Install head restraint in the bucket seat.
Page 15
XJ BODY 23 - 15
REMOVAL AND INSTALLATION (Continued)
Fig. 6 Head Restraint Cover
1 – HEAD RESTRAINT COVER
2 – HEAD RESTRAINT CUSHION
BUCKET SEAT
REMOVAL
(1) Remove bolts attaching seat to floor pan (Fig.
7).
(2) Remove nut attaching seat to floor pan.
(3) For power seat, disconnect wire harness connector. If equipped, disconnect wire harness for
heated seat.
(4) Disconnect seat belt buckle warning wire harness connector.
(5) Separate seat from floor panel.
INSTALLATION
(1) Position seat on floor pan.
(2) Connect seat belt buckle warning wire harness
connector.
(3) For power seats, connect wire harness connector. If equipped, connect harness for heated seat.
(4) Install front fasteners attaching seat to floor
pan. Tighten to 27 N·m (20 ft. lbs.) torque.
(5) Install rear fasteners attaching seat to floor
pan. Tighten to 27 N·m (20 ft. lbs.) torque.
(6) Install nut attaching seat to floor pan. Tighten
to 40 N·m (30 ft. lbs.) torque.
BUCKET SEAT TRACK
REMOVAL
NOTE: If the vehicle is equipped with manually
adjusted bucket seats, the inboard or outboard seat
track may be serviced separately.
(1) Remove bucket seat from vehicle.
(2) Remove screws attaching the side shield trim
cover from the seat.
Fig. 7 Bucket Seat—Power Seat
1 – NUT
2 – DRIVER SIDE FRONT SEAT
3 – SCREW
4 – STUD
5 – SCREW
(3) If equipped, disengage the power seat connec-
tor from the power seat switch.
(4) Remove the nuts attaching the seat track to
the bucket seat platform.
(5) When separating the seat track from the platform, route the power seat switch connector through
the access hole in the seat cushion frame, if
equipped.
INSTALLATION
(1) While positioning the seat track on the bucket
seat platform, route the power seat switch connector
through the access hole in the seat cushion frame, if
equipped.
(2) Install the nuts attaching the seat track to the
bucket seat platform.
(3) If equipped, engage the power seat connector to
the power seat switch.
(4) Install screws attaching the side shield trim
cover to the seat.
(5) Install bucket seat.
BUCKET SEAT PLATFORM
Bucket seat platforms are not repairable. If the
seat platform is damaged, replace platform as a unit.
Page 16
23 - 16 BODY XJ
REMOVAL AND INSTALLATION (Continued)
BUCKET SEATBACK COVER
REMOVAL
(1) Remove seat.
(2) Remove head restraint, if equipped.
(3) Remove screws attaching side shield trim cover
to bucket seat.
(4) If equipped, disengage power seat wire connec-
tor from power seat switch.
(5) Remove the inboard seatback pivot bolt and
large plastic washer.
(6) Position the seatback in the full forward or full
recline position.
(7) Remove the seatback cover J straps from the
base of the seatback.
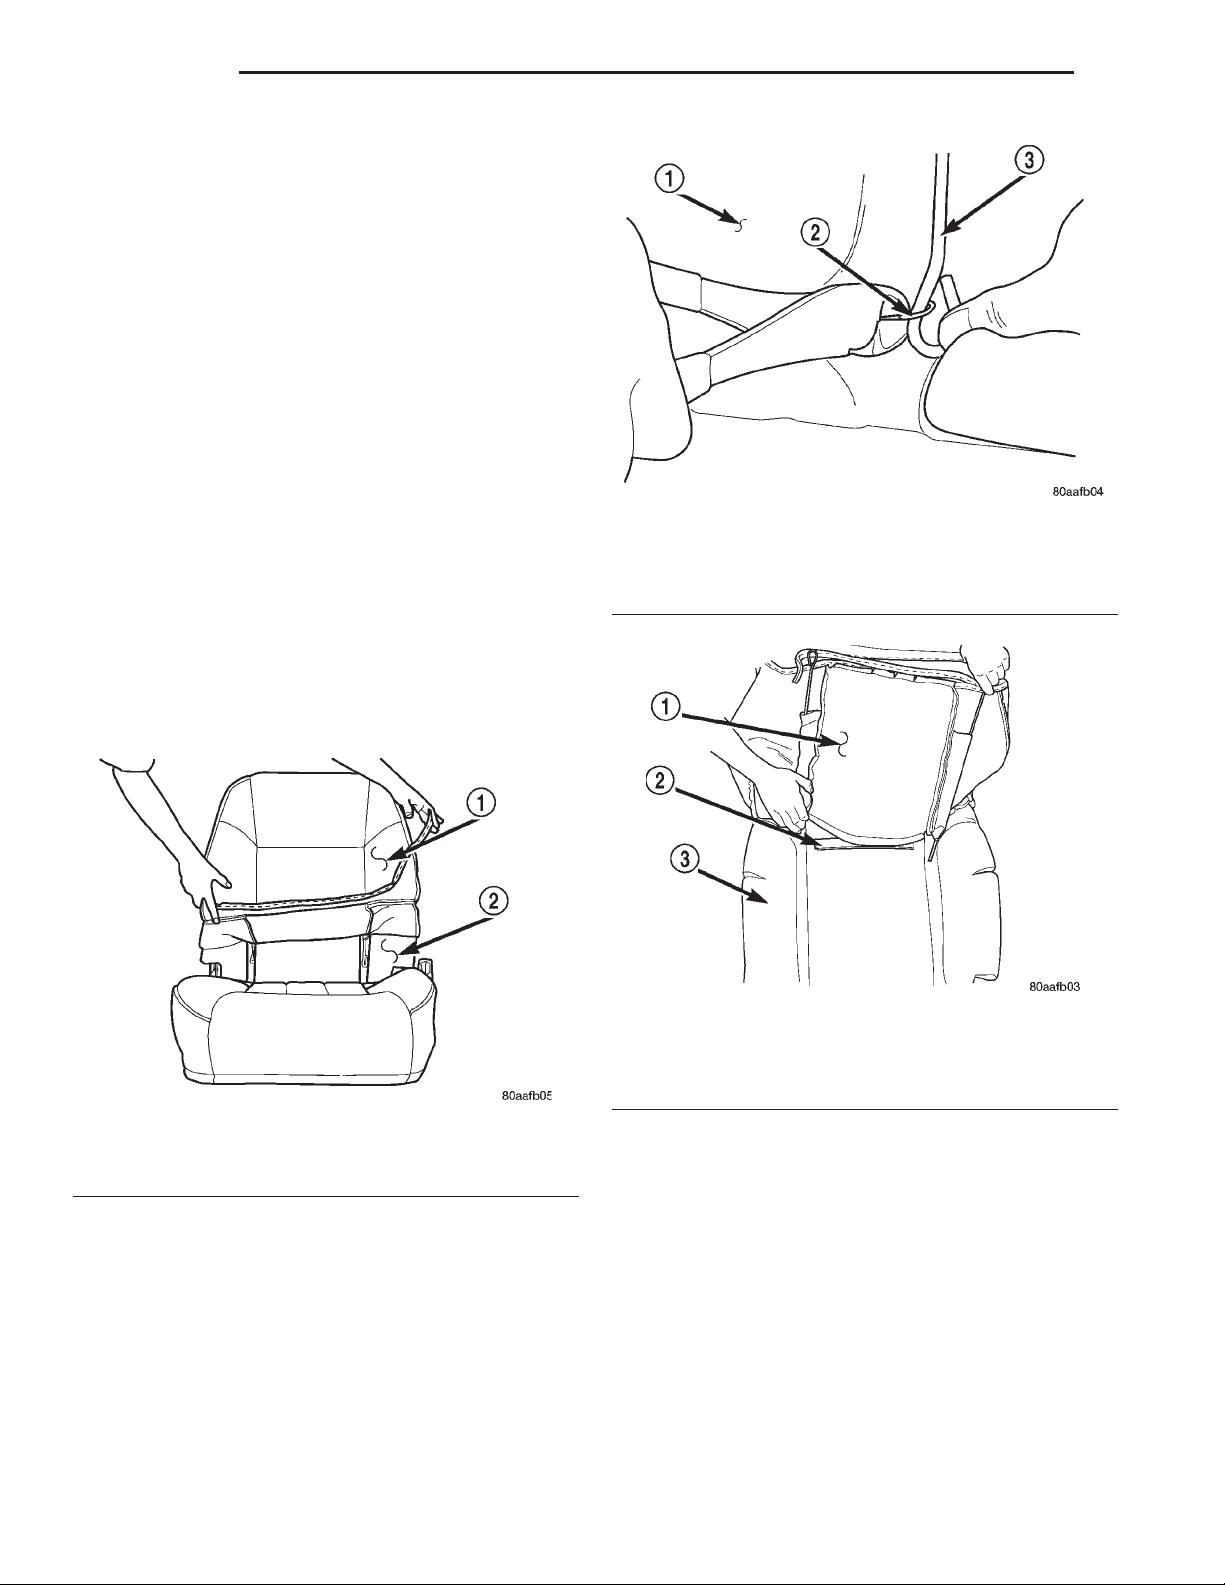
(8) Roll the seatback cover upward, disengage electrical connectors for heated seat grid, if equipped.
(Fig. 8).
(9) Disengage the hogrings attaching the seatback
cover to the seatback cushion support wires (Fig. 9).
(10) Roll the seatback cover upward and disengage
the hook and loop fastener (Fig. 10).
(11) Roll seatback cover up and over the head
restraint sleeves, if equipped and separate from the
seatback.
1 – SEAT BACK CUSHION
2 – HOG RING
3 – SUPPORT
Fig. 9 Hog Ring
Fig. 8 Seatback Cover
1 – SEAT BACK COVER
2 – SEAT BACK CUSHION
INSTALLATION
(1) Position the seatback cover on the seatback
cushion and roll seatback cover down over the head
restraint sleeves. Route the sleeves through the
access holes in the cover, if equipped.
(2) Roll the seatback cover downward and engage
the hook and loop fastener. Engage electrical connectors for heated seat grid, if equipped.
(3) Continue rolling the cover downward and
engage the hogrings attaching the seatback cover to
the seatback cushion support wires.
Fig. 10 Hook And Loop Fastener
1 – SEAT BACK COVER
2 – HOOK AND LOOP FASTENER
3 – SEAT BACK CUSHION
(4) Engage the seatback cover J straps to the base
of the seatback.
(5) Install the inboard seatback pivot bolt and
large plastic washer.
(6) Install the side shield trim cover.
(7) Install head restraint, if equipped.
(8) Install seat.
BUCKET SEATBACK
REMOVAL
(1) Remove seat.
(2) Remove side shield trim cover.
(3) Remove inboard seatback pivot bolt and
washer.
Page 17
XJ BODY 23 - 17
REMOVAL AND INSTALLATION (Continued)
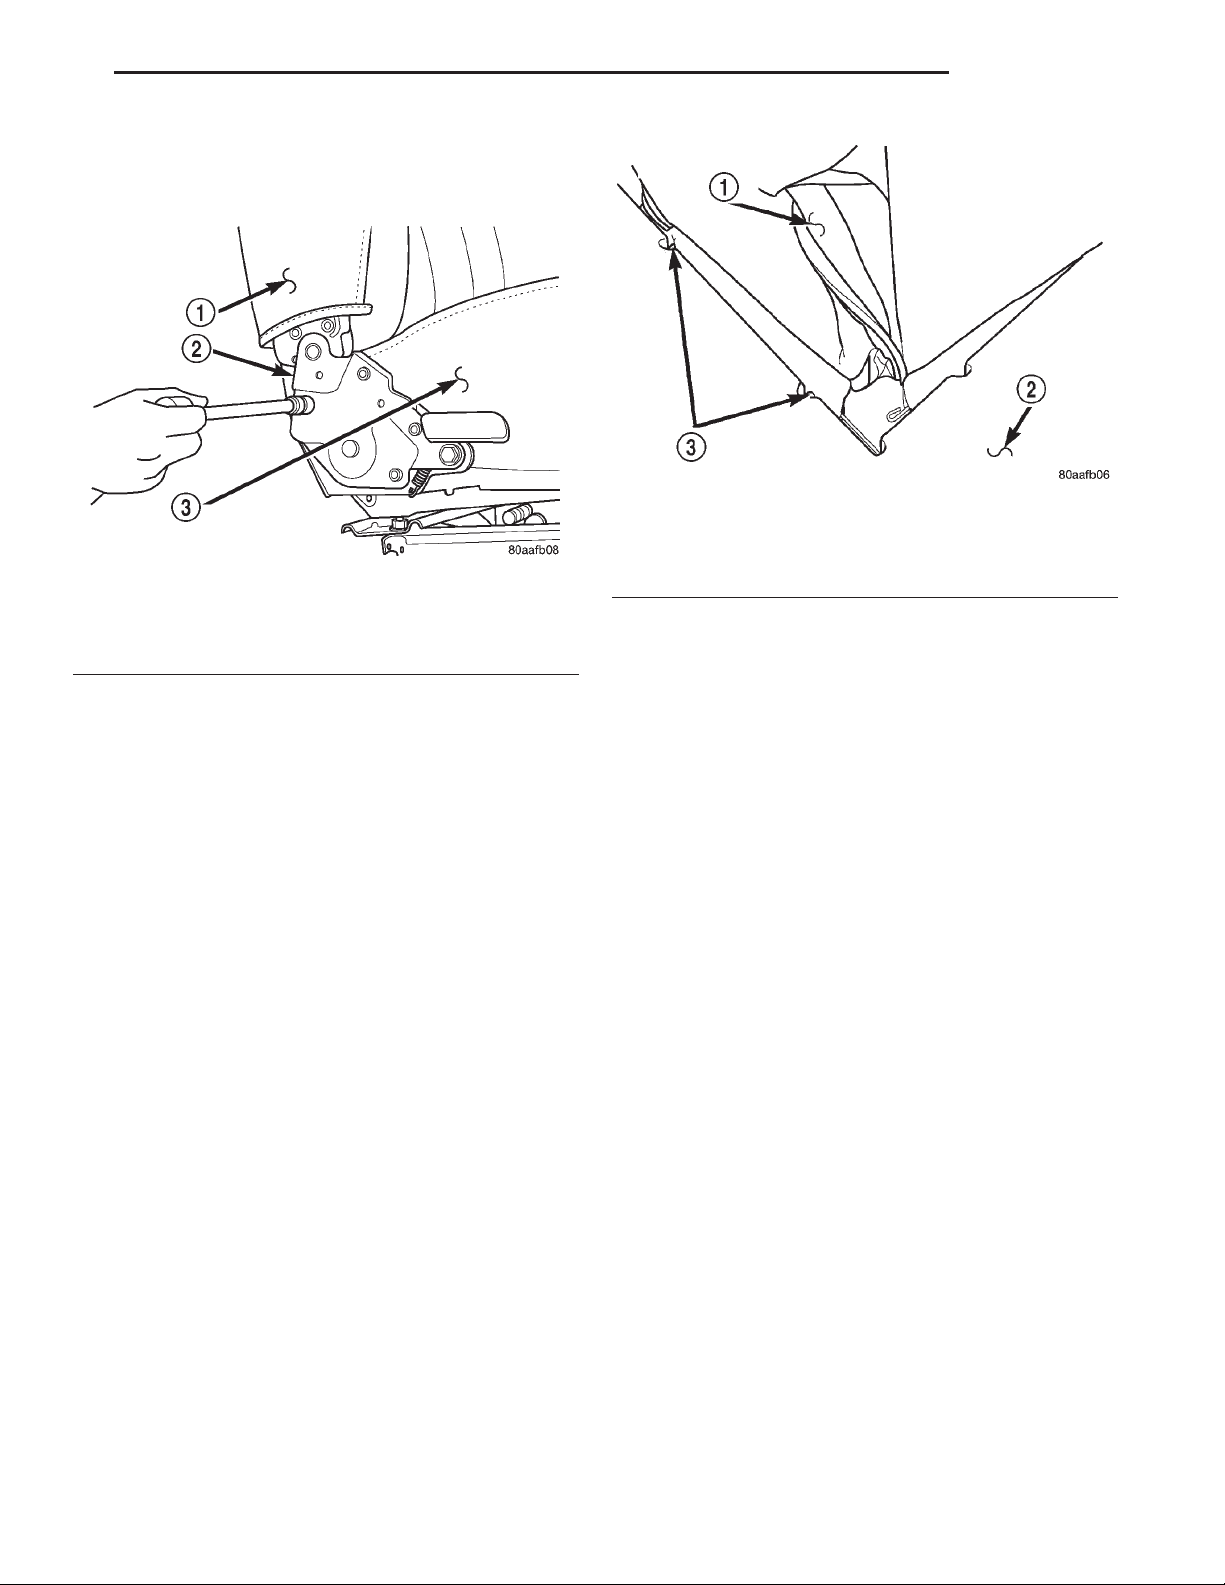
(4) Remove bolts attaching recliner to seat cushion
frame (Fig. 11).
(5) Separate seatback from vehicle.
Fig. 12 Seat Cushion Cover Hog Rings
1 – SEAT CUSHION COVER
2 – SEAT CUSHION
Fig. 11 Bucket Seatback
1 – SEAT BACK
2 – RECLINER
3 – SEAT CUSHION
INSTALLATION
(1) Position seatback on seat cushion frame.
(2) Install inboard seatback pivot bolt and washer.
(3) Install bolts attaching recliner to seat cushion
frame.
(4) Install side shield trim cover.
(5) Install seat.
BUCKET SEAT CUSHION COVER
REMOVAL
(1) Remove seat from vehicle.
(2) Remove side shield trim cover.
(3) Remove seatback.
(4) With the cushion side down, disengage the forward, rearward and inboard J-straps.
(5) Disengage the clips attaching the outboard side
of the cover to the cushion frame.
(6) Turn the cushion over and roll the cover off the
cushion.
(7) Disengage the electrical connectors for the
heated seat, if equipped.
(8) Remove the hog rings attaching the cover to
the cushion support wires (Fig. 12).
(9) Separate the cover from the cushion.
INSTALLATION
(1) Position the cover on the cushion.
(2) Engage the electrical connectors for the heated
seat, if equipped.
(3) Install the hog rings attaching the cover to the
cushion support wires.
3 – HOG RING
(4) With the cushion side down, engage the for-
ward, rearward and inboard J-straps.
(5) Engage the clips attaching the outboard side of
the cover to the cushion frame.
(6) Install seatback.
(7) Install side shield trim cover.
(8) Install seat.
BUCKET SEAT RECLINER
REMOVAL
(1) Remove side shield trim cover.
(2) Disengage seatback cover zipper.
(3) Roll outer seatback cover upward.
(4) Remove bolts attaching recliner to seatback
and seat cushion frames (Fig. 13).
(5) Separate recliner from seat.
INSTALLATION
(1) Position recliner on seat.
(2) Install bolts attaching recliner to seatback and
seat cushion frames (Fig. 13).
(3) Roll seatback cover downward.
(4) Engage seatback cover zipper.
(5) Install side shield trim cover.
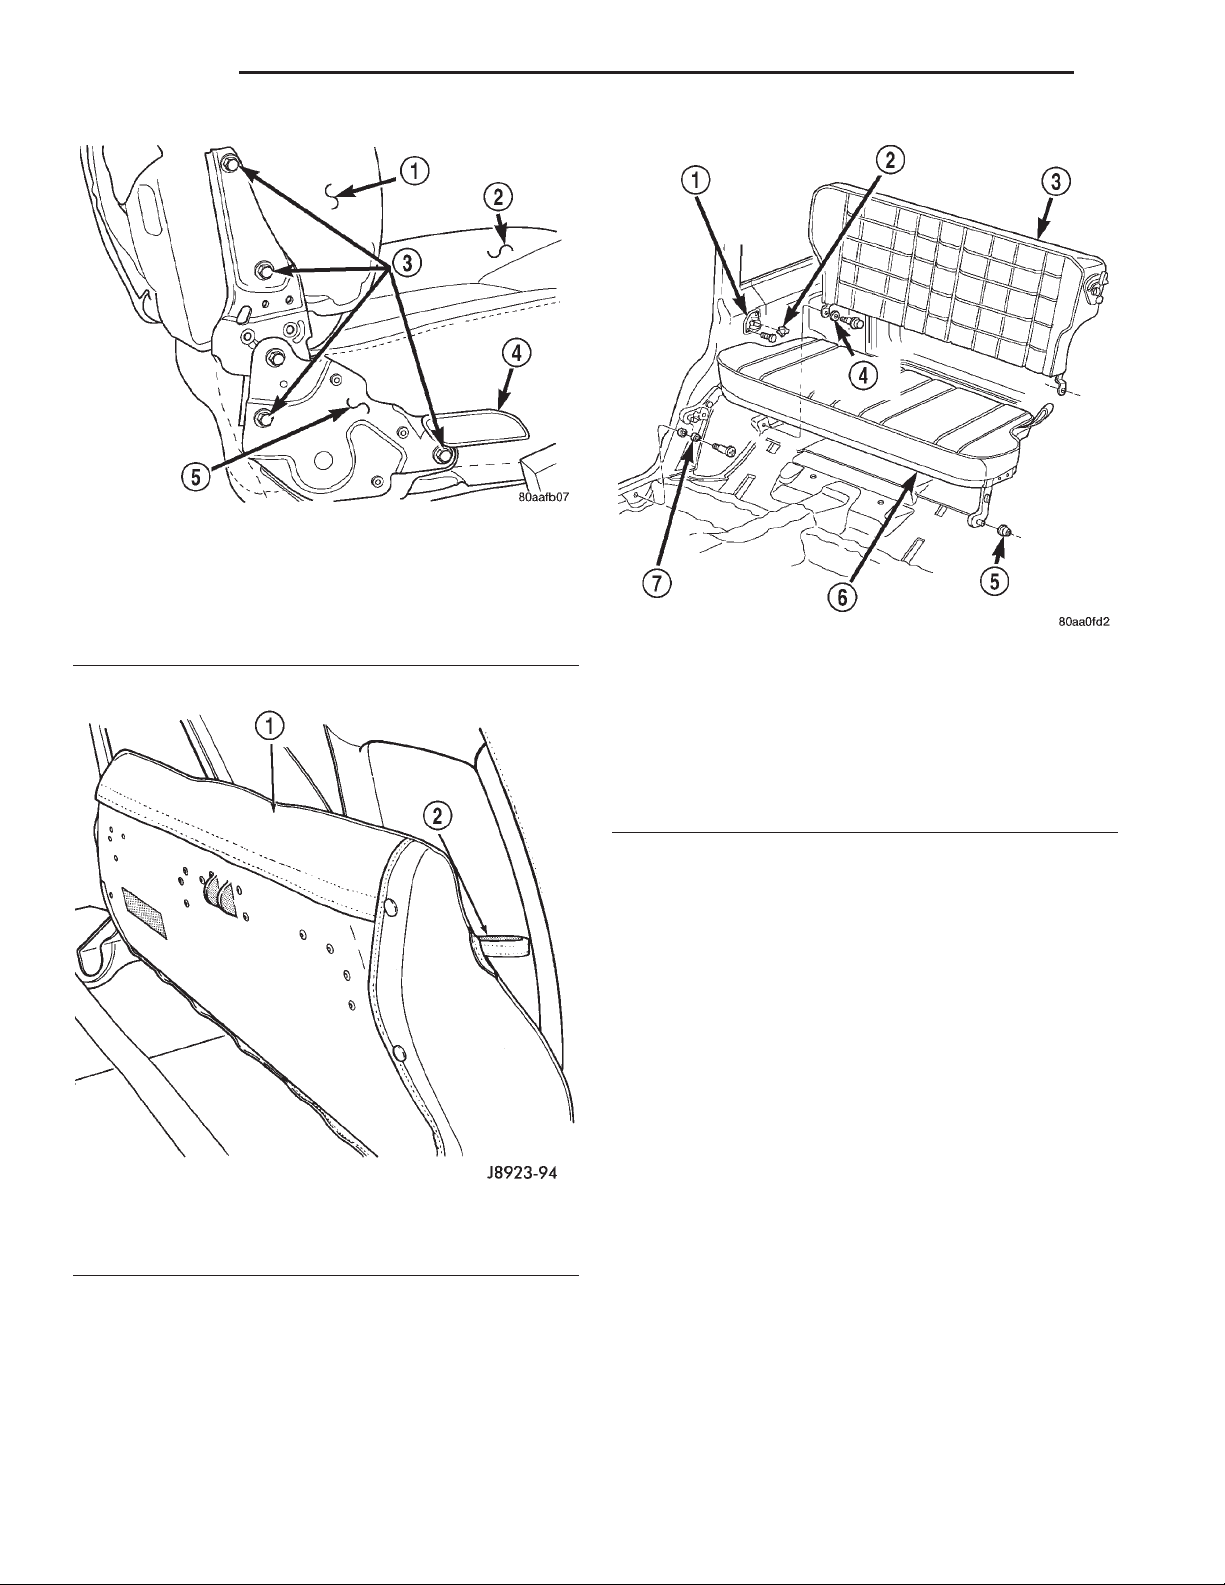
REAR SEAT CUSHION
REMOVAL
(1) Disengage seat cushion at rear by pulling
upward on release strap (Fig. 14).
(2) Tilt seat cushion forward.
(3) Disengage seat cushion latch with right side
release lever. Separate right side latch and left side
seat bracket from floor anchor bolts, and remove
cushion from vehicle (Fig. 15).
Page 18
23 - 18 BODY XJ
REMOVAL AND INSTALLATION (Continued)
Fig. 13 Bucket Seat Recliner
1 – SEAT BACK CUSHION
2 – SEAT CUSHION
3 – REMOVE
4 – RECLINER HANDLE
5 – RECLINER
1 – SEAT BACK LATCH STRIKER BRACKET
2 – SEAT BACK LATCH STRIKER
3 – SEAT BACK
4 – PIVOT SPACER
5 – GROMMET
6 – SEAT CUSHION
7 – BUSHING
Fig. 15 Rear Seat Cushion/Seat Back
Fig. 14 Seat Cushion Release Strap
1 – REAR SEAT CUSHION
2 – RELEASE STRAP
INSTALLATION
(1) Position seat cushion in vehicle.
(2) Insert left pivot in anchor grommet.
(3) Force right side latch onto anchor bolt and
pivot seat cushion to horizontal position.
(4) Lock seat cushion in-place by pressing firmly
on center of cushion until latch engages.
REAR SEATBACK
REMOVAL
(1) Disengage the seat cushion at the rear by pulling upward on the release strap.
(2) Tilt the seat cushion forward.
(3) Remove the shoulder/lap belt buckles from the
elastic straps.
(4) Release the seatback latch from the striker.
(5) Remove the pivot bolts and the washers from
the wheelhouse panel anchors (Fig. 15).
(6) Tilt the seatback forward, lift it upward and
remove it from the vehicle.
INSTALLATION
(1) Position the seatback in the vehicle.
(2) Install the pivot bolts and the washer. Tighten
the bolts with 33 N·m (25 ft. lbs.) torque.
(3) Engage the seatback latch with the striker.
(4) Insert the shoulder/lap belt buckles in the elastic straps.
(5) Pivot the seat cushion to the horizontal position and lock it in-place by pressing firmly on the
center of the cushion until the latch engages.
Page 19
XJ BODY 23 - 19
REMOVAL AND INSTALLATION (Continued)
REAR SEAT CUSHION COVER
REMOVAL
(1) Remove the seat cushion from the vehicle.
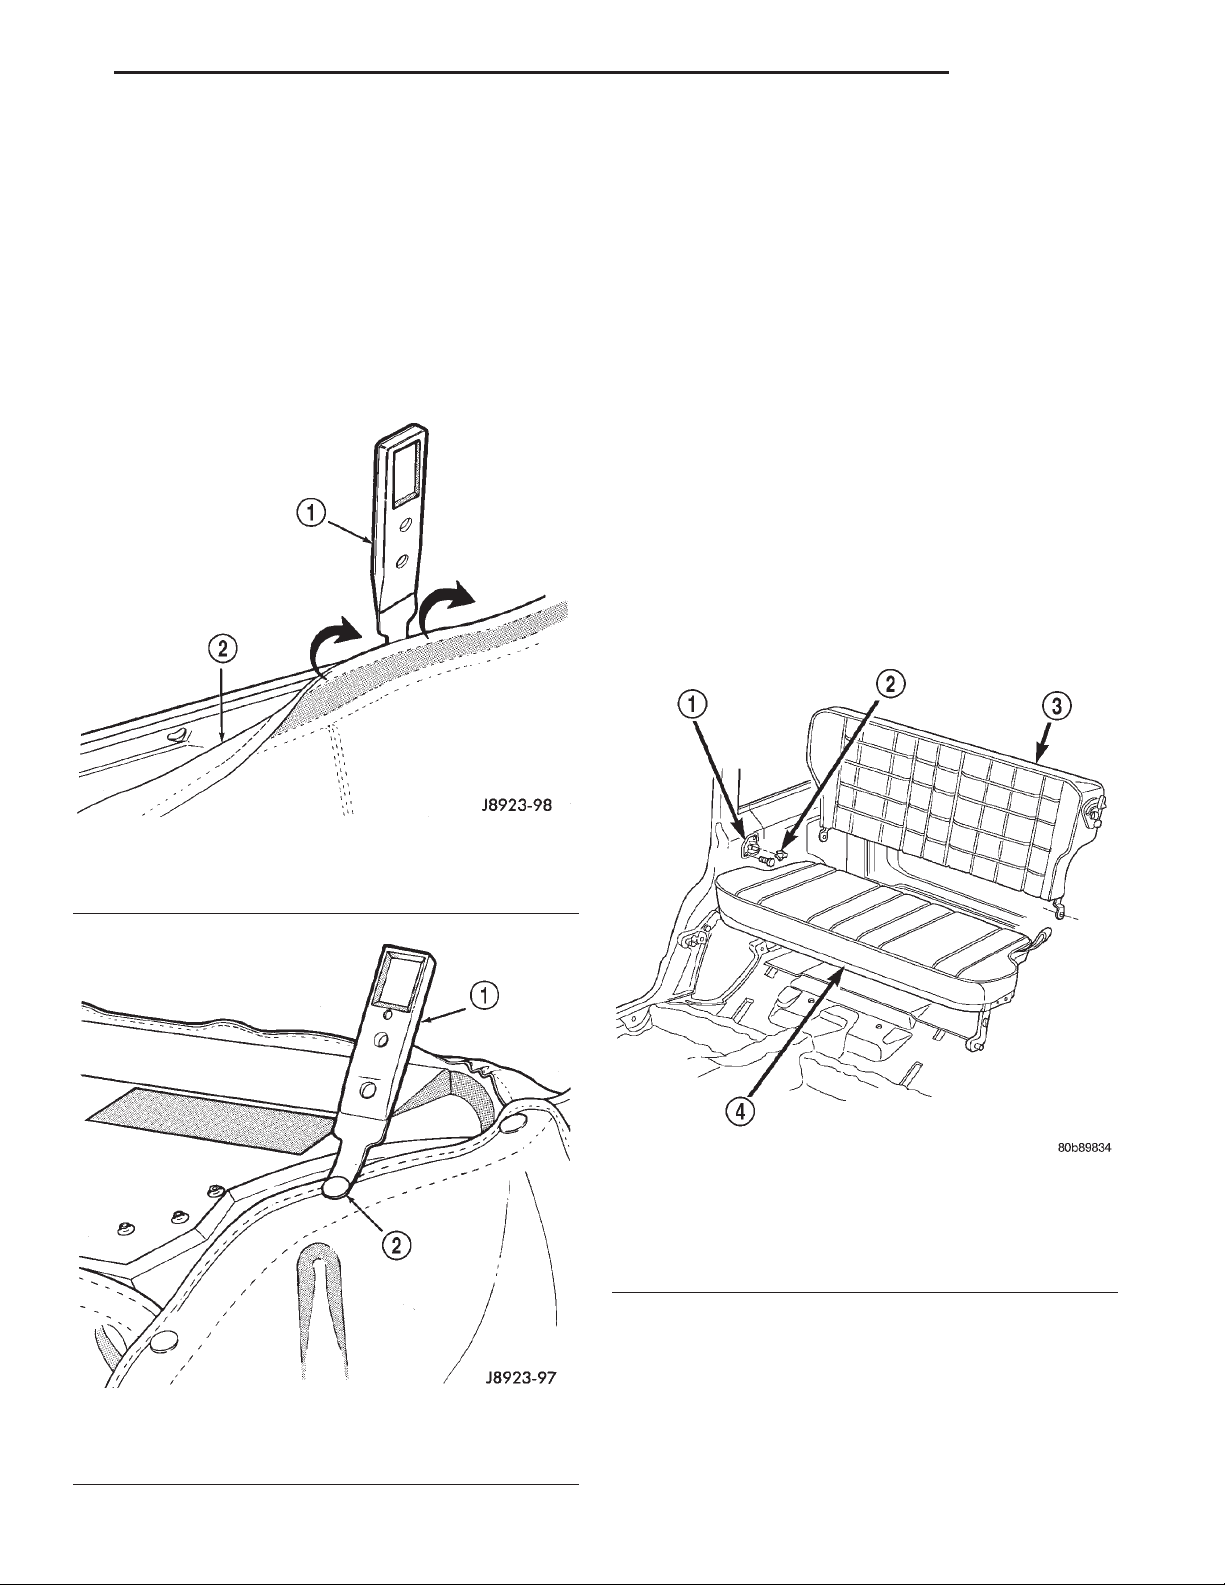
(2) Remove the cover side, front and rear retaining
clips from the wire retainers with an appropriate
removal tool (Fig. 16).
(3) Remove the serrated retainers from the front
ends of the cover with a trim panel removal tool (Fig.
17).
(4) Remove the seat cover from the cushion.
INSTALLATION
(1) Position the replacement cover on the cushion.
(2) Compress the cover and attach the retaining
clips to the front and rear wire retainers.
(3) Install the serrated retainers at the ends of the
cover.
(4) Install the seat cushion in the vehicle. If neces-
sary, refer to the installation procedure.
REAR SEATBACK LATCH STRIKER AND BUMPER
REMOVAL
(1) Disengage seat cushion at the rear by pulling
upward on the release strap.
(2) Tilt seat cushion forward.
(3) Release seatback latch from striker.
(4) Tilt seatback forward for access to striker
bracket.
(5) Remove screws (Fig. 18) attaching latch striker
bracket and shims to trim panel.
Fig. 16 Seat Cushion Cover Retaining Clip Removal
1 – REMOVER TOOL
2 – SEAT COVER
Fig. 17 Seat Cushion Cover Retaining Clip Removal
1 – CLIP REMOVER TOOL
2 – SEAT COVER CLIPS
Fig. 18 Seatback Latch Striker Bracket
1 – SEAT BACK LATCH STRIKER BRACKET
2 – SEAT BACK LATCH STRIKER
3 – SEAT BACK
4 – SEAT CUSHION
INSTALLATION
(1) Position shims and latch striker bracket on
trim panel.
(2) Install screws attaching latch striker bracket
and shims to trim panel. Tighten screws to 6 N·m (50
in. lbs.) torque.
(3) Engage seatback latch with striker.
Page 20
23 - 20 BODY XJ
REMOVAL AND INSTALLATION (Continued)
(4) Pivot seat cushion to horizontal position and
lock it in-place by pressing firmly on center of the
cushion until latch engages.
REAR SEATBACK COVER
REMOVAL
(1) Remove the seatback from the vehicle.
(2) Remove the seatback latch release handle and
bezel from the seatback.
(3) Disengage the cover zippers.
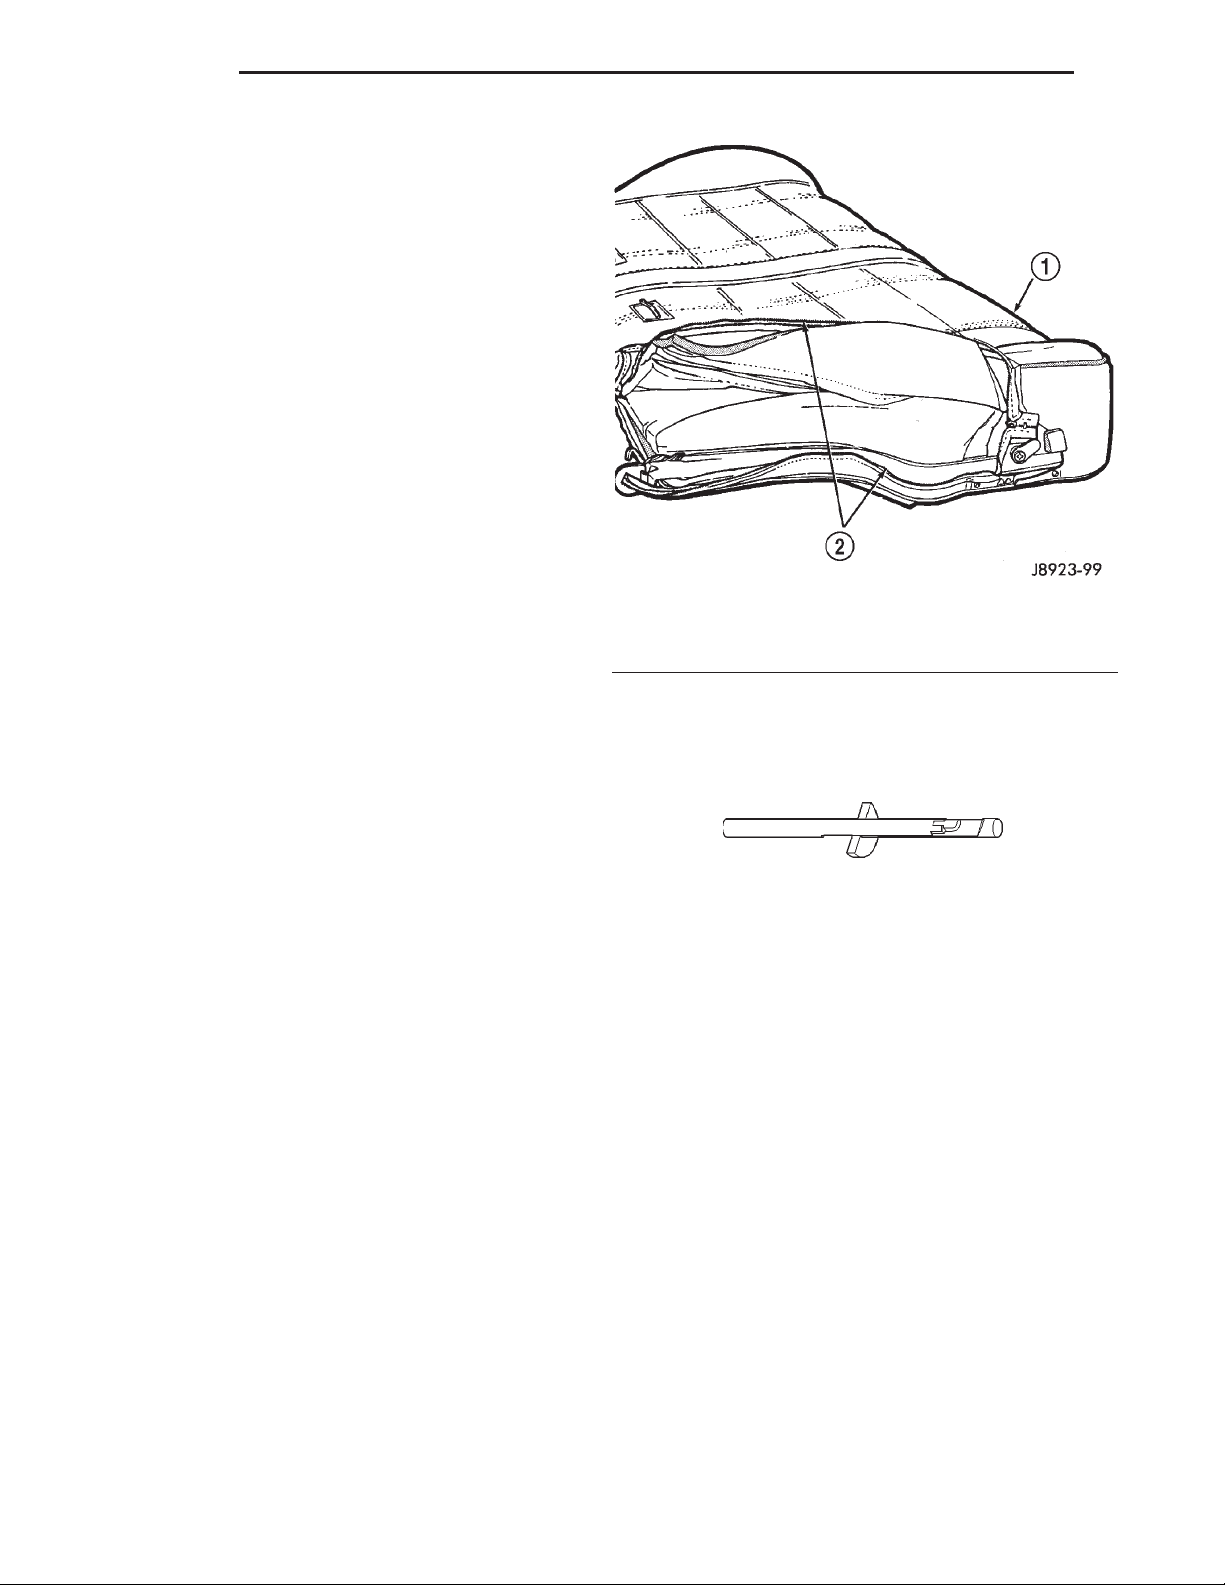
(4) Disengage the J-strap attaching the cover to
the seat back frame (Fig. 19).
(5) Remove the cover from the seatback pad.
INSTALLATION
(1) Install the cover on the seatback.
(2) Attach the cover J-strap to the seatback frame.
(3) Engage the cover zippers.
(4) Install the seat latch release bezel and handle.
(5) Install the seatback in the vehicle.
1 – SEAT BACK
2 – COVER ZIPPER
Fig. 19 Seatback Cover Removal
SPECIAL TOOLS
SPECIAL TOOLS—SEATS
Extractor Head Restraint Sleeve 6773
Page 21

XJ BODY 23 - 21
BODY COMPONENT SERVICE
TABLE OF CONTENTS
page page
DIAGNOSIS AND TESTING
WATER LEAKS ..........................22
WIND NOISE............................23
SERVICE PROCEDURES
BODY LUBRICATION......................23
REMOVAL AND INSTALLATION
GRILLE ................................24
GRILLE OPENING PANEL (GOP) .............24
HOOD .................................24
HOOD HINGE ...........................26
HOOD LATCH ...........................26
HOOD LATCH STRIKER....................26
HOOD RELEASE CABLE ...................27
HOOD SAFETY LATCH ....................27
SAFETY LATCH STRIKER ..................27
HOOD SILENCER PAD ....................27
COWL WEATHERSTRIP....................28
COWL GRILLE...........................28
BODY DECALS ..........................29
EXTERIOR NAMEPLATES ..................30
SIDE VIEW MIRROR ......................31
FRONT FENDER FLARE ...................31
FRONT WHEELHOUSE LINER...............32
RIGHT FRONT FENDER ...................32
LEFT FRONT FENDER.....................32
FRONT DOOR TRIM PANEL ................33
FRONT DOOR WATERDAM.................34
FRONT DOOR ...........................35
FRONT DOOR HINGE .....................35
FRONT DOOR RESTRAINT .................35
FRONT DOOR OUTSIDE HANDLE............35
FRONT DOOR LOCK CYLINDER .............36
LOCK CYLINDERS........................37
FRONT DOOR LATCH .....................37
FRONT DOOR LATCH STRIKER .............37
FRONT DOOR INSIDE HANDLE ACTUATOR ....37
FRONT DOOR INNER BELT WEATHERSTRIP . . . 37
FRONT DOOR OUTER BELT WEATHERSTRIP . . 38
FRONT DOOR GLASS RUN CHANNEL
WEATHERSTRIP........................38
FRONT DOOR OPENING WEATHERSTRIP .....38
FRONT DOOR OPENING SECONDARY
WEATHERSTRIP........................39
FRONT DOOR GLASS EXTERIOR MOLDING . . . 39
FRONT DOOR WINDOW REGULATOR ........39
FRONT DOOR SPACER BLOCKS—TWO-
DOOR VEHICLES .......................41
FRONT DOOR GLASS .....................41
REAR DOOR TRIM PANEL..................42
REAR DOOR WATERDAM ..................42
REAR DOOR............................43
REAR DOOR RESTRAINT ..................43
REAR DOOR HINGE ......................43
REAR DOOR OUTSIDE HANDLE.............44
REAR DOOR LATCH ......................44
REAR DOOR LATCH STRIKER ..............45
REAR DOOR INSIDE HANDLE ACTUATOR .....45
REAR DOOR INNER BELT WEATHERSTRIP ....45
REAR DOOR OUTER BELT WEATHERSTRIP . . . 45
REAR DOOR GLASS RUN CHANNEL
WEATHERSTRIP........................46
REAR DOOR GLASS EXTERIOR MOLDING.....46
REAR DOOR WEATHERSTRIP ..............46
REAR DOOR WINDOW REGULATOR .........47
REAR DOOR WINDOW GLASS ..............47
BODY SIDE MOLDING.....................48
REAR FENDER FLARE ....................49
QUARTER WINDOW APPLIQUE .............49
DRIP RAIL MOLDING......................49
LUGGAGE RACK .........................50
AIR EXHAUST GRILLE.....................50
A-PILLAR TRIM ..........................51
LOWER A-PILLAR COWL TRIM ..............51
FRONT INNER SCUFF PLATE ...............52
DOOR SILL SCUFF PLATE .................52
ASSIST HANDLE .........................52
B-PILLAR TRIM ..........................52
C-PILLAR TRIM ..........................53
QUARTER PANEL TRIM EXTENSION .........54
QUARTER PANEL TRIM AND WHEELHOUSE
COVER...............................54
LIFTGATE PILLAR TRIM ...................55
LIFTGATE OPENING UPPER TRIM ...........55
LIFTGATE SCUFF PLATE...................55
FRONT SHOULDER BELT/BUCKLE ...........55
REAR SHOULDER/LAP BELT/BUCKLE ........57
FULL FLOOR CONSOLE ...................57
FRONT CARPET/MAT .....................58
REAR CARPET/MAT ......................58
REARVIEW MIRROR ......................59
REARVIEW MIRROR SUPPORT BRACKET .....59
SUNVISORS ............................60
HEADLINER.............................60
LIFTGATE TRIM PANEL ....................61
LIFTGATE ..............................62
LIFTGATE HINGE.........................62
LIFTGATE SUPPORT ROD CYLINDER.........63
LIFTGATE SUPPORT ROD BALL STUD ........63
Page 22

23 - 22 BODY XJ
LIFTGATE OUTSIDE HANDLE ...............63
LIFTGATE LOCK CYLINDER ................64
LIFTGATE LATCH ........................64
LIFTGATE LATCH STRIKER.................64
LIFTGATE WEATHERSTRIP.................65
ADJUSTMENTS
HOOD .................................65
DOOR .................................65
DOOR LATCH ADJUSTMENT................66
LIFTGATE ..............................67
REAR SEATBACK ........................67
DIAGNOSIS AND TESTING
WATER LEAKS
Water leaks can be caused by poor sealing,
improper body component alignment, body seam
porosity, missing plugs, or blocked drain holes. Centrifugal and gravitational force can cause water to
drip from a location away from the actual leak point,
making leak detection difficult. All body sealing
points should be water tight in normal wet-driving
conditions. Water flowing downward from the front of
the vehicle should not enter the passenger or luggage
compartment. Moving sealing surfaces will not
always seal water tight under all conditions. At
times, side glass or door seals will allow water to
enter the passenger compartment during high pressure washing or hard driving rain (severe) conditions. Overcompensating on door or glass
adjustments to stop a water leak that occurs under
severe conditions can cause premature seal wear and
excessive closing or latching effort. After completing
a repair, water test vehicle to verify leak has stopped
before returning vehicle to use.
VISUAL INSPECTION BEFORE WATER LEAK TESTS
Verify that floor and body plugs are in place, body
drains are clear, and body components are properly
aligned and sealed. If component alignment or sealing is necessary, refer to the appropriate section of
this group for proper procedures.
WATER LEAK TESTS
WARNING: DO NOT USE ELECTRIC SHOP LIGHTS
OR TOOLS IN WATER TEST AREA. PERSONAL
INJURY CAN RESULT.
When the conditions causing a water leak have
been determined, simulate the conditions as closely
as possible.
• If a leak occurs with the vehicle parked in a
steady light rain, flood the leak area with an openended garden hose.
SPECIFICATIONS
BODY LUBRICANTS ......................67
WELD LOCATIONS .......................68
BODY SEALING LOCATIONS...............112
STRUCTURAL ADHESIVE LOCATIONS .......124
BODY GAP AND FLUSH MEASUREMENTS ....127
BODY OPENING DIMENSIONS .............128
TORQUE SPECIFICATIONS................135
SPECIAL TOOLS
BODY.................................135
• If a leak occurs while driving at highway speeds
in a steady rain, test the leak area with a reasonable
velocity stream or fan spray of water. Direct the
spray in a direction comparable to actual conditions.
• If a leak occurs when the vehicle is parked on an
incline, hoist the end or side of the vehicle to simulate this condition. This method can be used when
the leak occurs when the vehicle accelerates, stops or
turns. If the leak occurs on acceleration, hoist the
front of the vehicle. If the leak occurs when braking,
hoist the back of the vehicle. If the leak occurs on left
turns, hoist the left side of the vehicle. If the leak
occurs on right turns, hoist the right side of the vehicle. For hoisting recommendations refer to Group 0,
Lubrication and Maintenance, General Information
section.
WATER LEAK DETECTION
To detect a water leak point-of-entry, do a water
test and watch for water tracks or droplets forming
on the inside of the vehicle. If necessary, remove interior trim covers or panels to gain visual access to the
leak area. If the hose cannot be positioned without
being held, have someone help do the water test.
Some water leaks must be tested for a considerable
length of time to become apparent. When a leak
appears, find the highest point of the water track or
drop. The highest point usually will show the point of
entry. After leak point has been found, repair the
leak and water test to verify that the leak has
stopped.
Locating the entry point of water that is leaking
into a cavity between panels can be difficult. The
trapped water may splash or run from the cavity,
often at a distance from the entry point. Most water
leaks of this type become apparent after accelerating,
stopping, turning, or when on an incline.
MIRROR INSPECTION METHOD
When a leak point area is visually obstructed, use
a suitable mirror to gain visual access. A mirror can
also be used to deflect light to a limited-access area
to assist in locating a leak point.
Page 23

XJ BODY 23 - 23
DIAGNOSIS AND TESTING (Continued)
BRIGHT LIGHT LEAK TEST METHOD
Some water leaks in the luggage compartment can
be detected without water testing. Position the vehicle in a brightly lit area. From inside the darkened
luggage compartment inspect around seals and body
seams. If necessary, have a helper direct a drop light
over the suspected leak areas around the luggage
compartment. If light is visible through a normally
sealed location, water could enter through the opening.
PRESSURIZED LEAK TEST METHOD
When a water leak into the passenger compartment cannot be detected by water testing, pressurize
the passenger compartment and soap test exterior of
the vehicle. To pressurize the passenger compartment, close all doors and windows, start engine, and
set heater control to high blower in HEAT position. If
engine can not be started, connect a charger to the
battery to ensure adequate voltage to the blower.
With interior pressurized, apply dish detergent solution to suspected leak area on the exterior of the
vehicle. Apply detergent solution with spray device or
soft bristle brush. If soap bubbles occur at a body
seam, joint, seal or gasket, the leak entry point could
be at that location.
WIND NOISE
Wind noise is the result of most air leaks. Air leaks
can be caused by poor sealing, improper body component alignment, body seam porosity, or missing plugs
in the engine compartment or door hinge pillar areas.
All body sealing points should be airtight in normal
driving conditions. Moving sealing surfaces will not
always seal airtight under all conditions. At times,
side glass or door seals will allow wind noise to be
noticed in the passenger compartment during high
cross winds. Over compensating on door or glass
adjustments to stop wind noise that occurs under
severe conditions can cause premature seal wear and
excessive closing or latching effort. After a repair procedure has been performed, test vehicle to verify
noise has stopped before returning vehicle to use.
Wind noise can also be caused by improperly fitted
exterior moldings or body ornamentation. Loose
moldings can flutter, creating a buzzing or chattering
noise. An open cavity or protruding edge can create a
whistling or howling noise. Inspect the exterior of the
vehicle to verify that these conditions do not exist.
VISUAL INSPECTION BEFORE TESTS
Verify that floor and body plugs are in place and
body components are aligned and sealed. If component alignment or sealing is necessary, refer to the
appropriate section of this group for proper procedures.
ROAD TESTING WIND NOISE
(1) Drive the vehicle to verify the general location
of the wind noise.
(2) Apply 50 mm (2 in.) masking tape in 150 mm
(6 in.) lengths along weatherstrips, weld seams or
moldings. After each length is applied, drive the vehicle. If noise goes away after a piece of tape is applied,
remove tape, locate, and repair defect.
POSSIBLE CAUSE OF WIND NOISE
• Moldings standing away from body surface can
catch wind and whistle.
• Gaps in sealed areas behind overhanging body
flanges can cause wind-rushing sounds.
• Misaligned movable components.
• Missing or improperly installed plugs in pillars.
• Weld burn through holes.
SERVICE PROCEDURES
BODY LUBRICATION
All mechanisms and linkages should be lubricated
when necessary. This will maintain ease of operation
and provide protection against rust and excessive
wear. The weatherstrip seals should be lubricated to
prolong their life as well as to improve door sealing.
All applicable exterior and interior vehicle operating mechanisms should be inspected and cleaned.
Pivot/sliding contact areas on the mechanisms should
then be lubricated.
(1) When necessary, lubricate the operating mechanisms with the specified lubricants.
(2) Apply silicone lubricant to a cloth and wipe it
on door seals to avoid over-spray that can soil passenger’s clothing.
(3) Before applying lubricant, the component
should be wiped clean. After lubrication, any excess
lubricant should be removed.
(4) The hood latch, latch release mechanism, latch
striker, and safety latch should be lubricated periodically.
(5) The door lock cylinders should be lubricated
twice each year (preferably autumn and spring).
• Spray a small amount of lock cylinder lubricant
directly into the lock cylinder.
• Apply a small amount to the key and insert it
into the lock cylinder.
• Rotate it to the locked position and then back to
the unlocked position several times.
• Remove the key. Wipe the lubricant from it with
a clean cloth to avoid soiling of clothing.
Page 24
23 - 24 BODY XJ
REMOVAL AND INSTALLATION
GRILLE
REMOVAL
(1) Remove the headlamp/park lamp bezels.
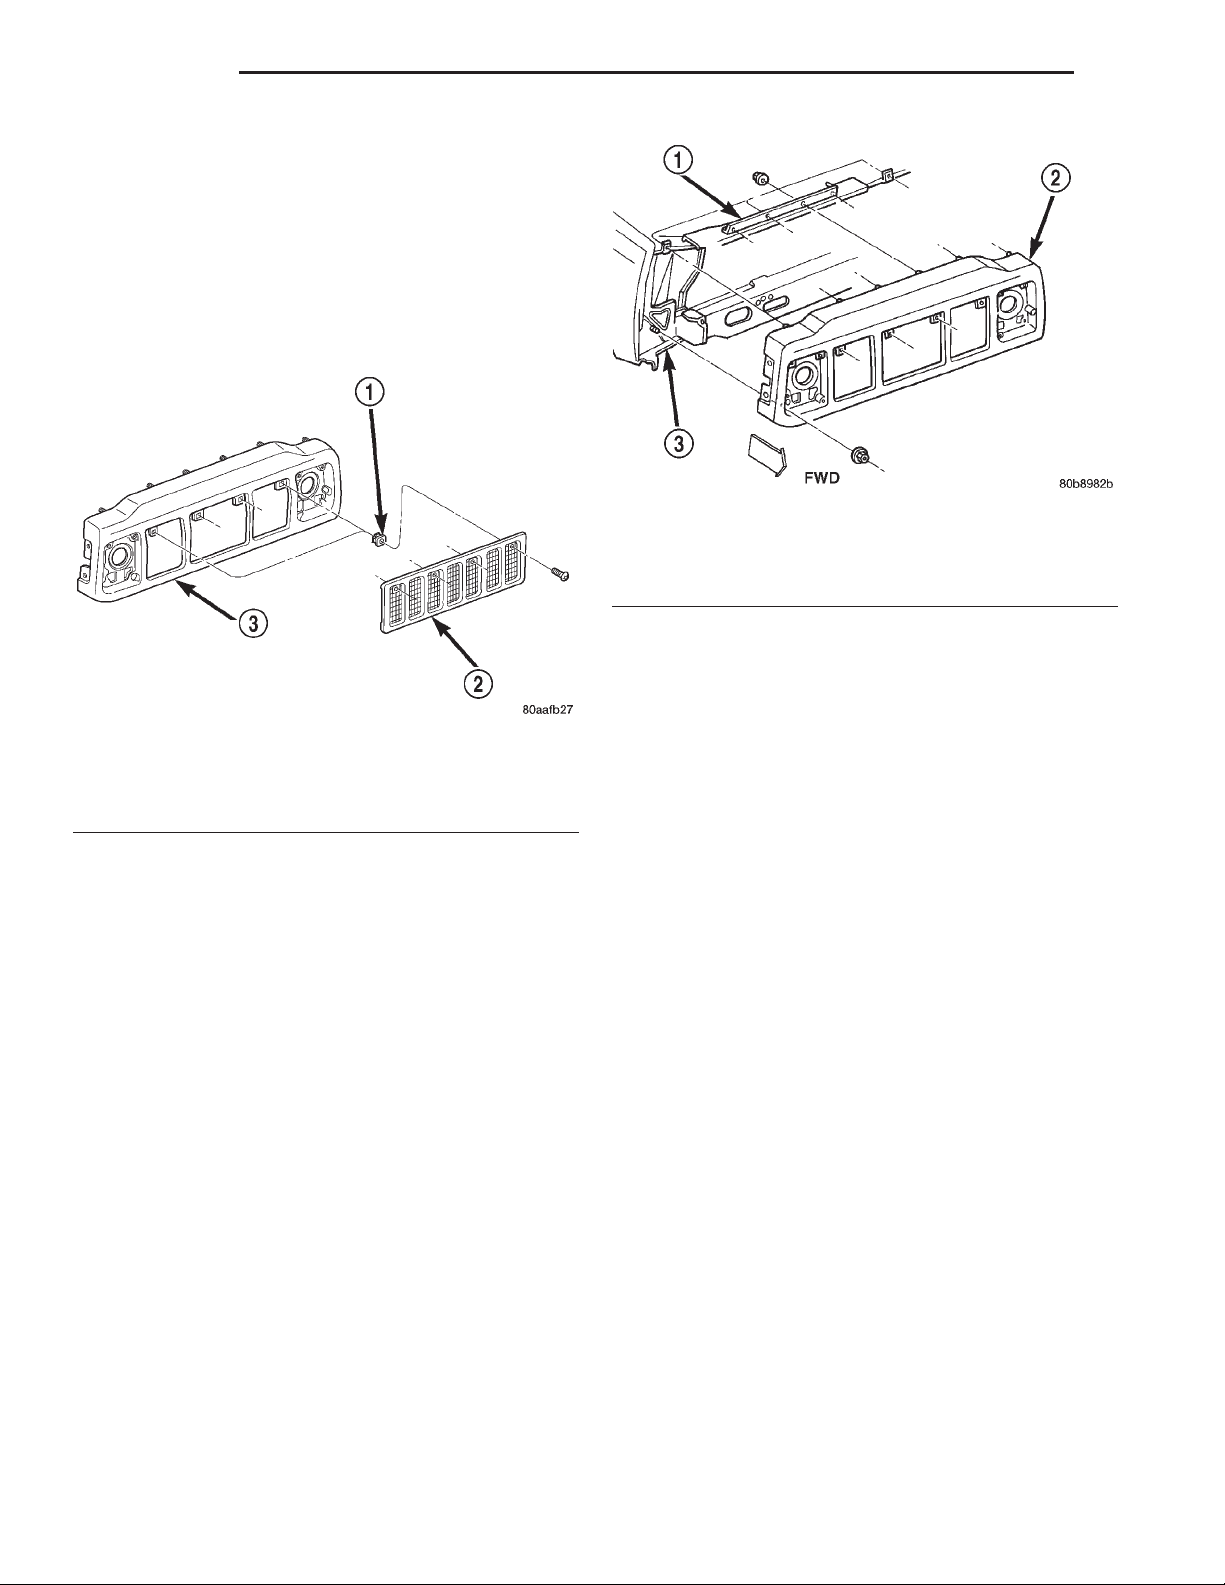
(2) Remove the screws attaching the grille to the
grille opening panel (GOP) (Fig. 1).
(3) Separate the grille from the GOP.
Fig. 2 Grille Opening Panel
1 – SUPPORT BRACKET
2 – GRILLE OPENING PANEL
3 – BODY
(3) Position GOP on vehicle.
(4) Install nuts attaching GOP to front fenders.
Tighten nuts to 4 N·m (38 in-lbs) torque.
(5) Install nuts attaching GOP to support bracket.
Fig. 1 Grille
1 – NUT
2 – GRILLE
3 – GRILLE OPENING PANEL
INSTALLATION
(1) Position the grille in the GOP.
(2) Install the screws.
(3) Install the headlamp/park lamp bezels.
GRILLE OPENING PANEL (GOP)
REMOVAL
(1) Remove headlamp bezels.
(2) Remove grille.
(3) Remove side marker lamps.
(4) Remove headlamps and park/turn signal
lamps.
(5) Open hood.
(6) Remove nuts that attach GOP to front fenders
(Fig. 2).
(7) Remove nuts attaching GOP to support
bracket.
(8) Pull GOP forward and disconnect harness clips
and front lamp harness connectors.
(9) Remove GOP from vehicle.
INSTALLATION
(1) Place GOP on bumper and secure all harness
clips.
(2) Connect all lamp wire harness connectors.
Tighten nuts to 4 N·m (38 in-lbs) torque.
(6) Install headlamps and park/turn signal lamps.
(7) Install grille.
(8) Install side marker lamps.
(9) Install headlamp bezels.
(10) Adjust headlamp aim, if necessary.
HOOD
REMOVAL
(1) Raise hood.
(2) Disconnect underhood lamp wire harness connector, if equipped.
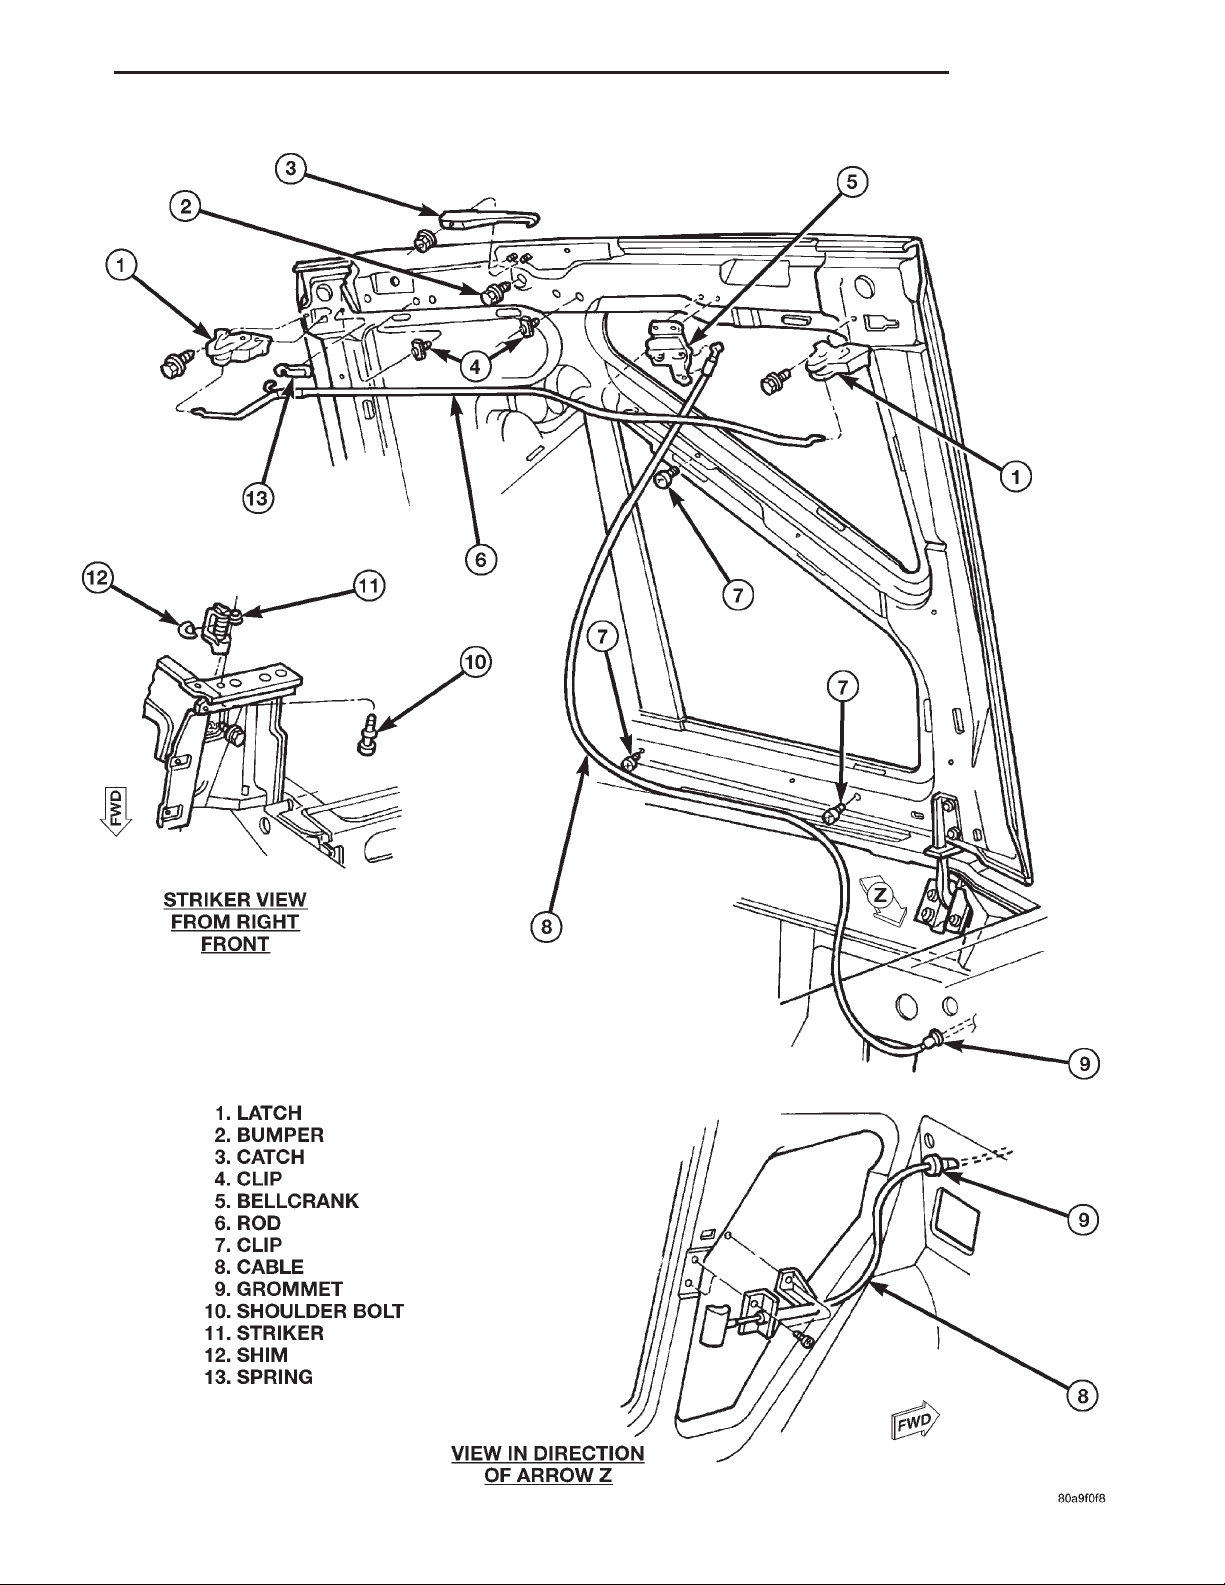
(3) Disconnect release cable from latch release
bellcrank.
(4) Remove latch release cable clips and remove
cable from hood (Fig. 3).
(5) Mark location of hood, hinges and hinge shims
for installation.
(6) Remove bolts that attach hinges to hood.
(7) Remove hood from vehicle with aid of a helper.
INSTALLATION
(1) Position hood on shims and hinges; fingertighten hinge bolts.
(2) Align hinges and shims with reference marks
and tighten hinge bolts.
(3) Connect latch release cable and latch connecting rod to bellcrank.
(4) Attach latch release cable to clips.
(5) Connect underhood lamp wire harness connector.
Page 25
XJ BODY 23 - 25
REMOVAL AND INSTALLATION (Continued)
Fig. 3 Hood Components
Page 26
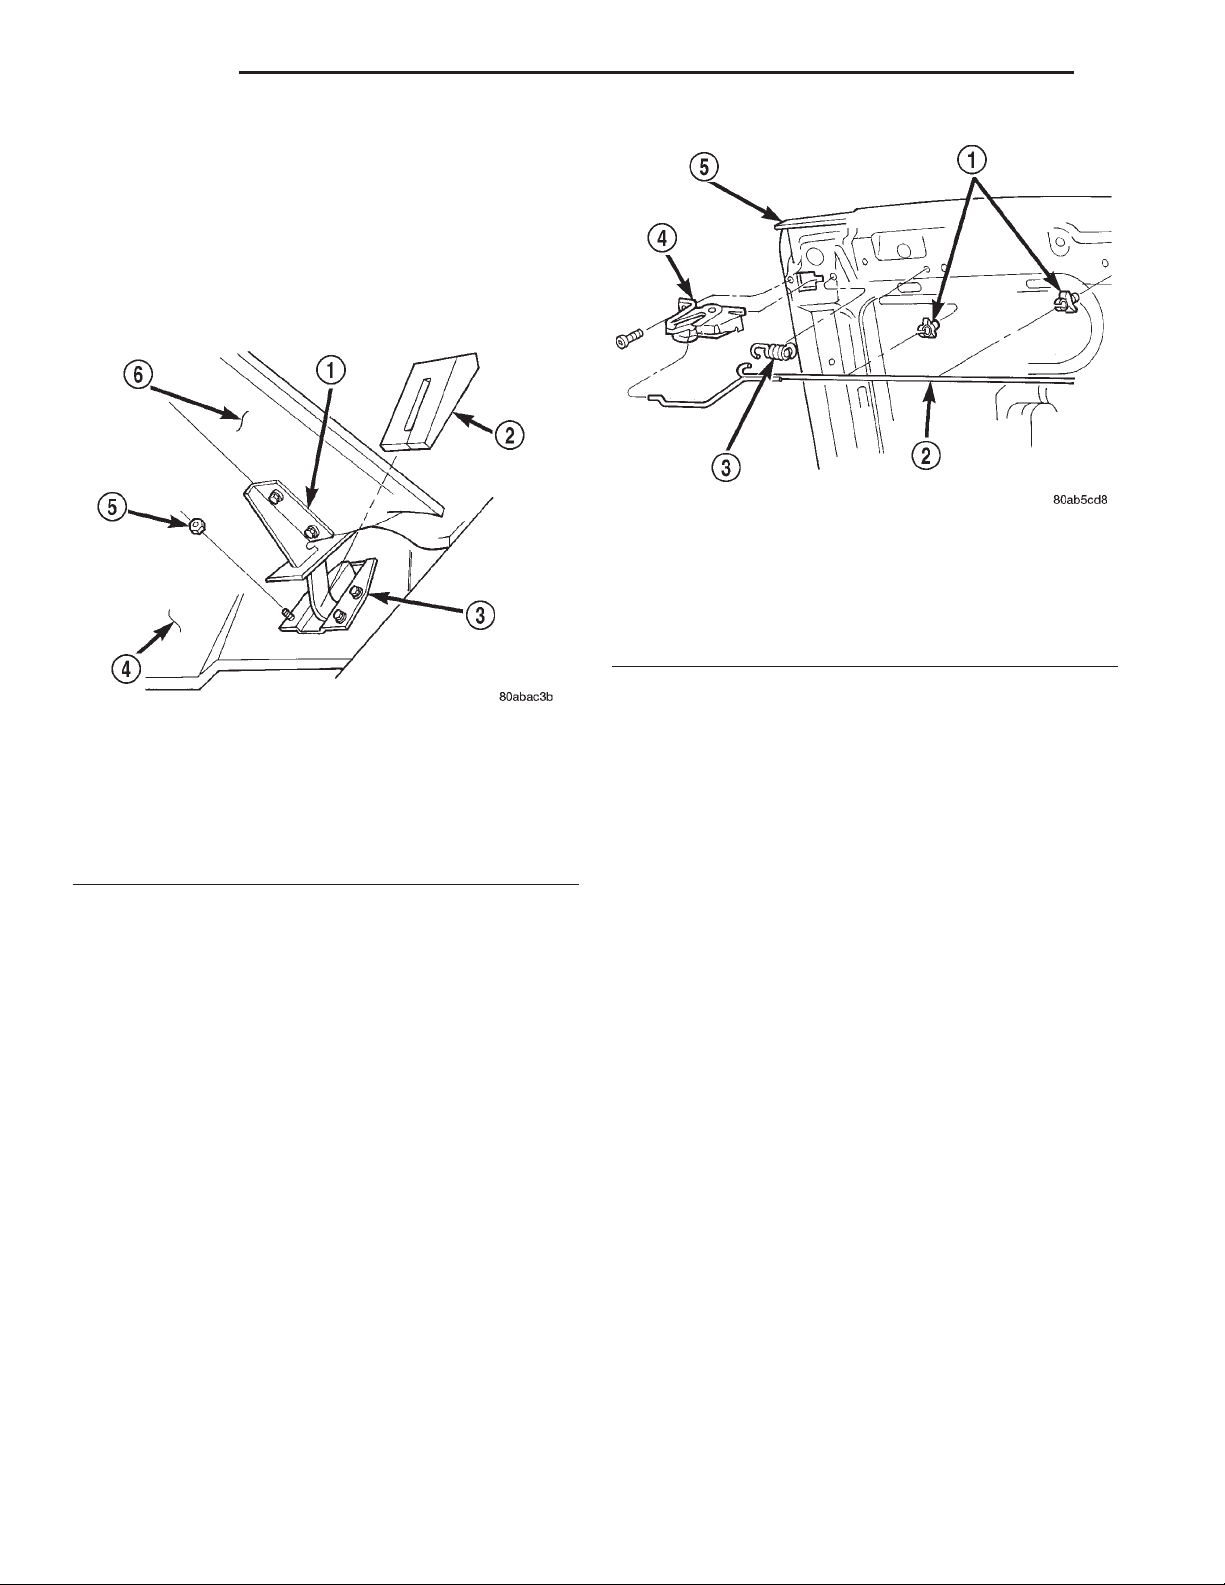
23 - 26 BODY XJ
REMOVAL AND INSTALLATION (Continued)
HOOD HINGE
REMOVAL
(1) Raise and support hood.
(2) Using a grease pencil or equivalent, mark posi-
tion of hood.
(3) Remove seal from hinge base (Fig. 4).
(4) Remove hinge retaining nuts from studs.
Fig. 5 Hood Latch
1 – RETAINER CLIP
2 – LATCH CONNECTING ROD
3 – ROD SPRING
4 – HOOD LATCH
5 – HOOD
Fig. 4 Hood Hinge and Seal
1 – HINGE
2 – SEAL
3 – HINGE BASE
4 – DASH PANEL
5 – NUT
6 – HOOD
INSTALLATION
(1) Position hinge over studs and align with refer-
ence marks.
(2) Install nuts.
NOTE: If a replacement hinge seal is being
installed, position it around hinge arm, force it
against hinge base.
(3) Position hinge seal around hinge arm and on
hinge base.
(4) Adjust hood as necessary.
HOOD LATCH
REMOVAL
(1) Remove the screw that attaches the latch to
the hood inner panel (Fig. 5).
(2) Disconnect the latch connecting rod.
(3) Remove the latch from the hood.
(2) Position the latch on the hood inner panel.
(3) Install the screw that attaches the latch to the
hood inner panel.
HOOD LATCH STRIKER
REMOVAL
(1) Remove headlamp bezel.
(2) Remove parklamp.
(3) Release the spring attaching the headlamp
mounting bucket to the grille opening panel (GOP).
(4) Remove the headlamp with mounting bucket
attached from the adjusting screws.
(5) Remove the upper bolt attaching the striker to
the top of the (GOP).
(6) Remove the lower bolt attaching the striker to
the (GOP).
(7) Remove the striker and shims.
INSTALLATION
(1) Position the shims and striker on the (GOP)
and install the bolts.
(2) Install the headlamp and mounting bucket.
(3) Install parklamp.
(4) Install the headlamp bezel.
(5) Test the striker/hood alignment by opening and
closing the hood several times. Adjust the striker, if
necessary.
INSTALLATION
(1) Connect the latch to the latch connecting rod
and
Page 27
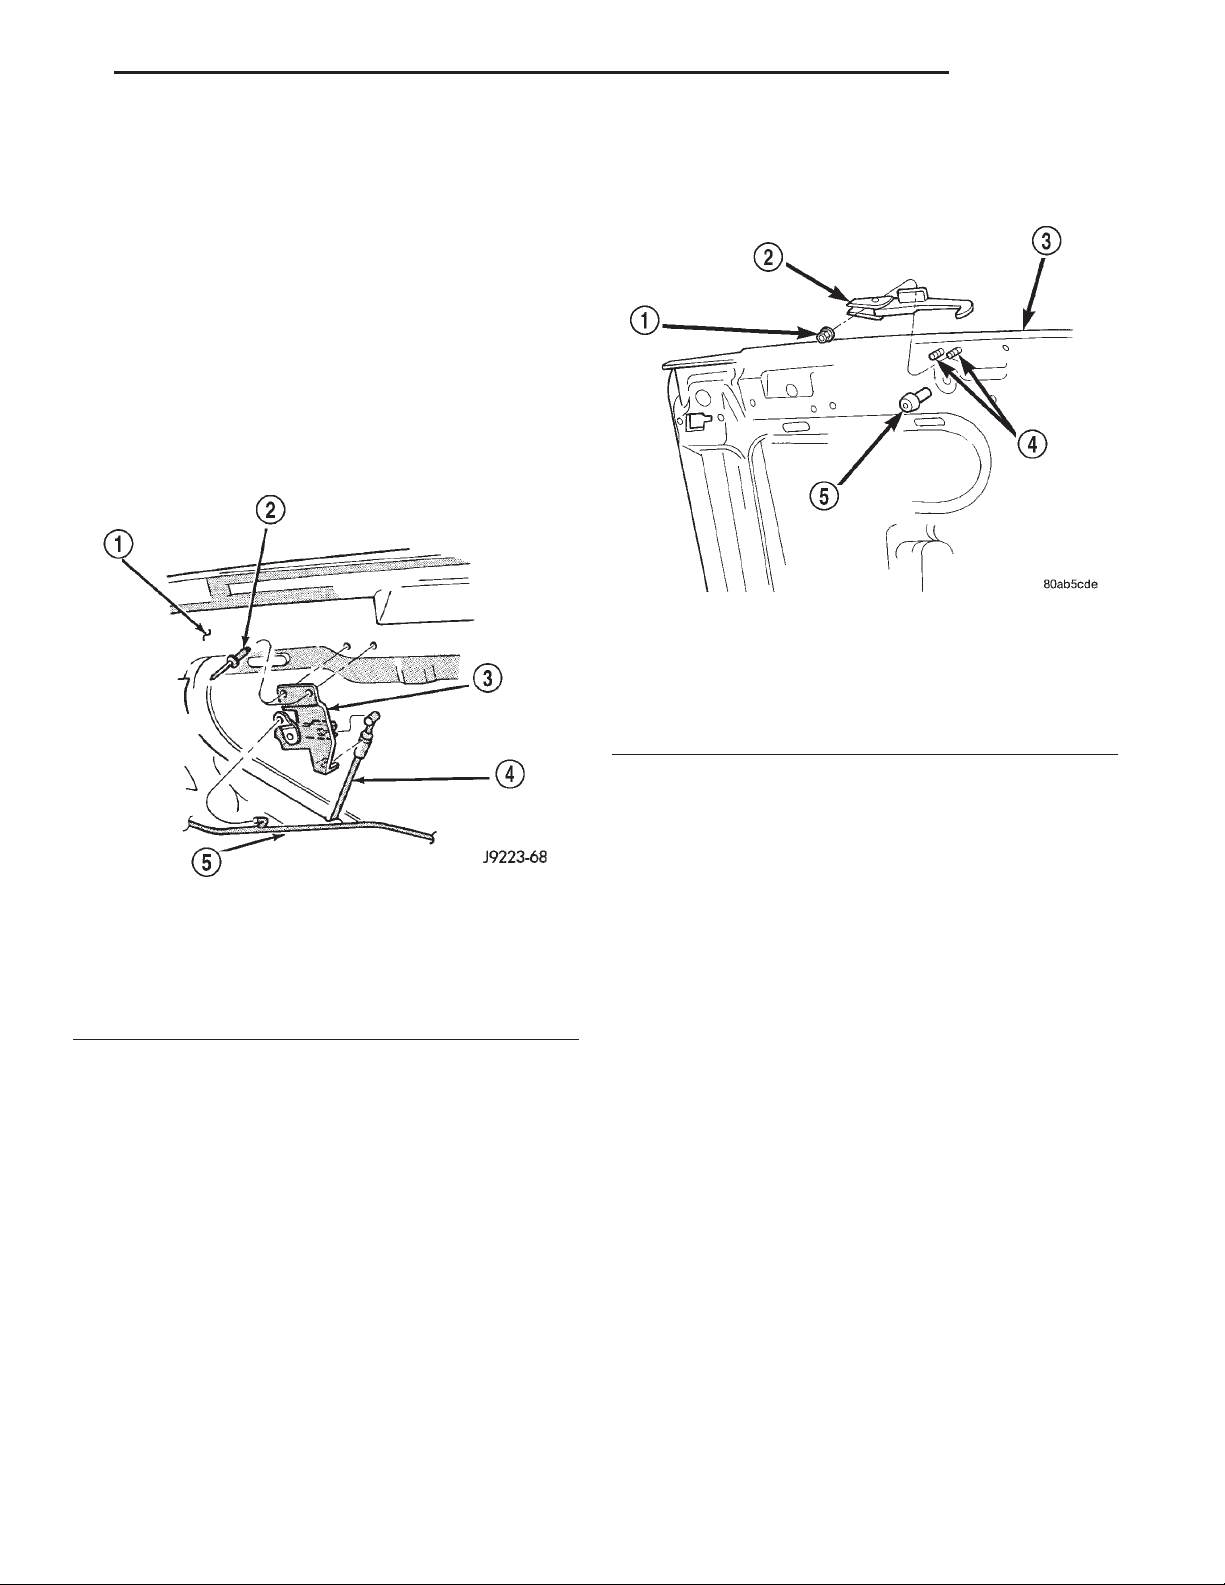
XJ BODY 23 - 27
REMOVAL AND INSTALLATION (Continued)
HOOD RELEASE CABLE
REMOVAL
(1) Drill out bellcrank to hood rivet heads and
remove rivets (Fig. 6).
(2) Disconnect bellcrank from latch rod and hood
release cable. Remove bellcrank from hood.
(3) Disconnect hood release cable from clips on
hood.
(4) Remove left cowl side trim panel.
(5) Remove cable bracket screws from cowl side
panel.
(6) Route cable through dash panel and remove it
from under instrument panel.
(2) Remove the nuts attaching the safety latch to
the inner hood panel (Fig. 7).
(3) Separate the safety latch from the hood.
Fig. 7 Hood Safety Latch
1 – NUT
2 – HOOD SAFETY LATCH
3 – HOOD
4 – STUD
5 – HOOD BUMPER
Fig. 6 Hood Release Cable Bellcrank
1 – HOOD INNER PANEL
2 – RIVET
3 – BELLCRANK
4 – LATCH RELEASE CABLE
5 – LATCH CONNECTING ROD
INSTALLATION
(1) Insert replacement cable end through hole in
dash panel into engine compartment.
(2) Route cable forward and seat grommet in dash
panel.
(3) Position cable bracket on cowl side panel and
install screws.
(4) Install left cowl side trim panel.
(5) Connect cable and latch rod to bellcrank.
(6) Position bellcrank on hood and install rivets.
(7) Attach cable to clips.
(8) Test release cable for proper operation.
HOOD SAFETY LATCH
REMOVAL
(1) Open and support hood.
INSTALLATION
(1) Position the safety latch on the hood.
(2) Install the nuts attaching the safety latch to
the inner hood panel.
(3) Close hood.
SAFETY LATCH STRIKER
REMOVAL
(1) Remove striker screws from radiator support
crossmember (Fig. 8).
(2) Remove striker from crossmember.
INSTALLATION
(1) Position striker on radiator support crossmember and install screws.
(2) Test safety latch operation.
HOOD SILENCER PAD
REMOVAL
(1) Open and support hood.
(2) Remove the hood latch release bellcrank.
(3) Remove the clips attaching the latch connecting rod to the hood inner panel.
(4) Remove the retainers attaching the hood
silencer pad to the inner hood panel (Fig. 9).
(5) Separate the hood silencer pad from the hood.
Page 28
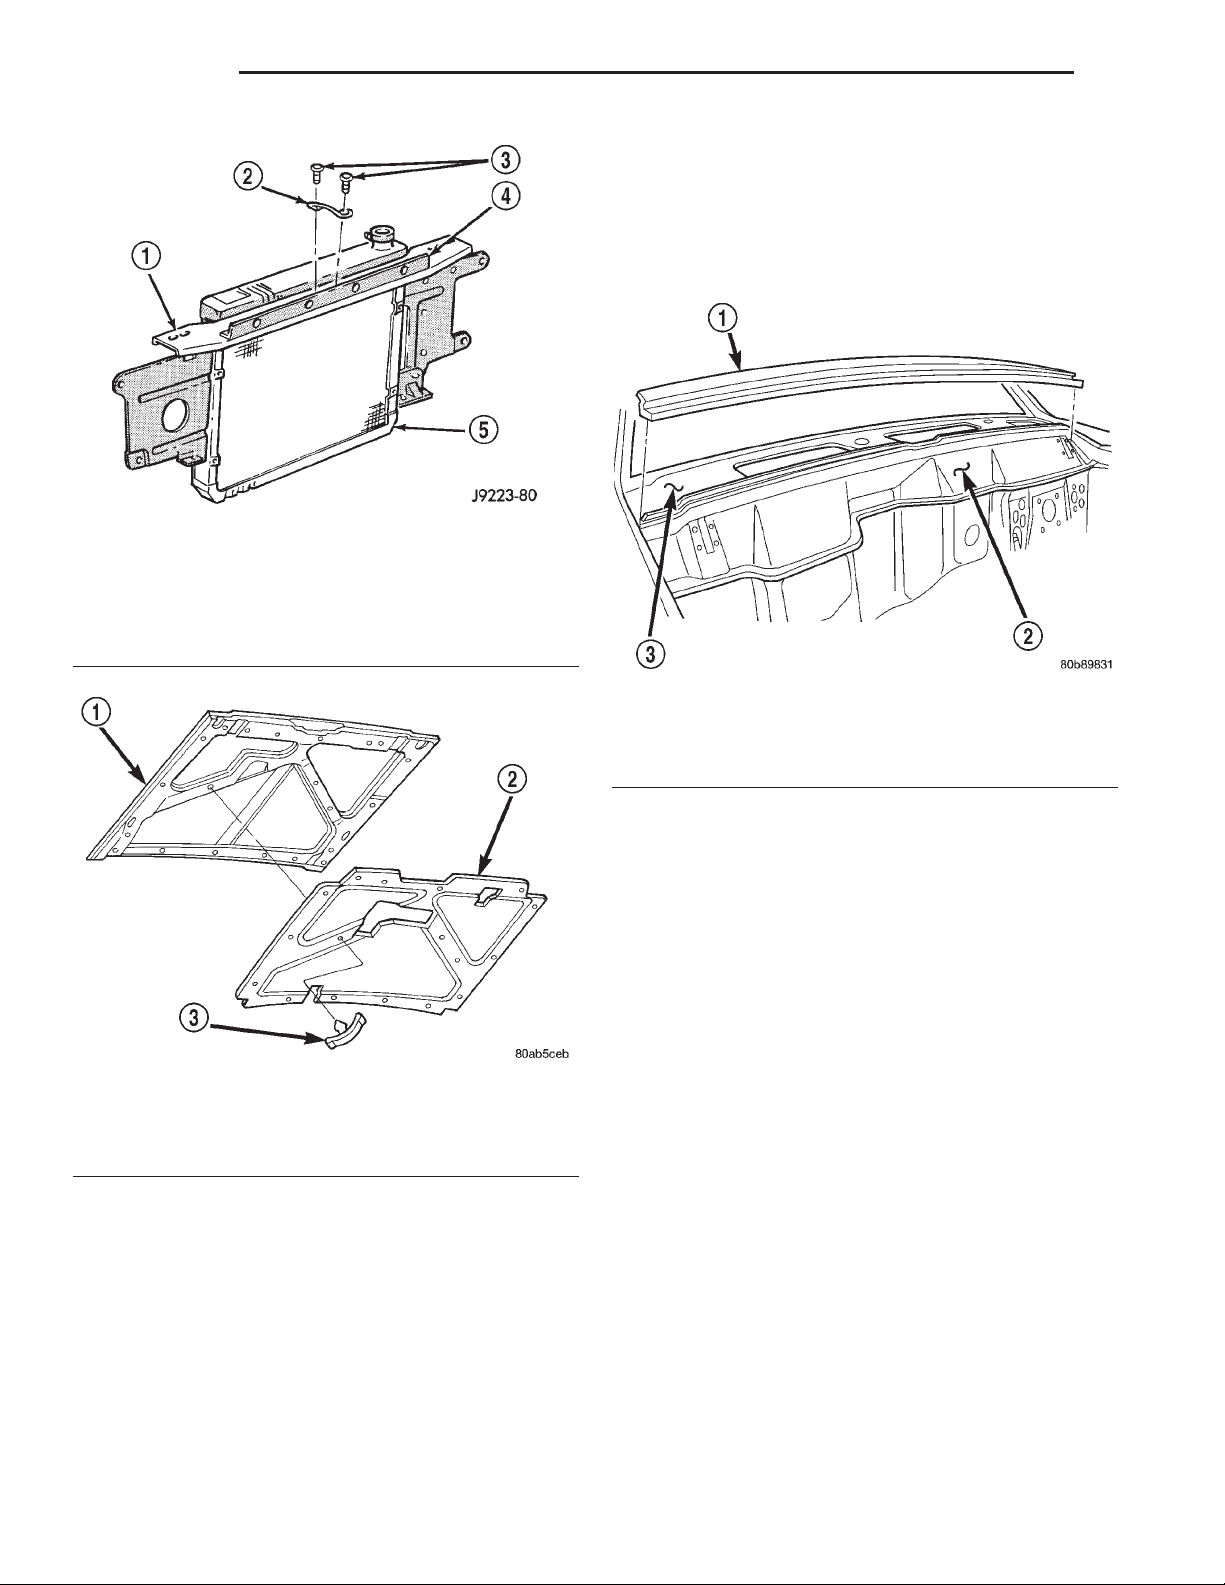
23 - 28 BODY XJ
REMOVAL AND INSTALLATION (Continued)
COWL WEATHERSTRIP
REMOVAL
The cowl weatherstrip is attached to the cowl with
adhesive tape.
(1) Peel weatherstrip from cowl (Fig. 10).
Fig. 8 Hood Safety Latch Striker
1 – RADIATOR SUPPORT CROSSMEMBER
2 – HOOD SAFETY LATCH STRIKER
3 – SCREW
4 – GOP BRACKET
5 – RADIATOR
Fig. 9 Hood Silencer Pad
1 – HOOD
2 – SILENCER PAD
3 – RETAINER
INSTALLATION
(1) Position the hood silencer pad on the hood
inner panel.
(2) Install the retainers attaching the hood
silencer pad to the inner hood panel.
(3) Install the clips attaching the latch connecting
rod to the hood inner panel.
(4) Install the hood latch release bellcrank.
(5) Close hood.
Fig. 10 Cowl Weatherstrip
1 – WEATHERSTRIP
2 – DASH PANEL
3 – COWL
INSTALLATION
(1) Clean contact surface with Mopar Super Kleen
or equivalent.
(2) Position weatherstrip on cowl.
(3) Press weatherstrip into place.
COWL GRILLE
REMOVAL
(1) Remove the windshield wiper arms from the
pivots.
(2) Remove the screws that attach the grille to the
cowl.
(3) Remove the windshield washer tubes from the
nozzles.
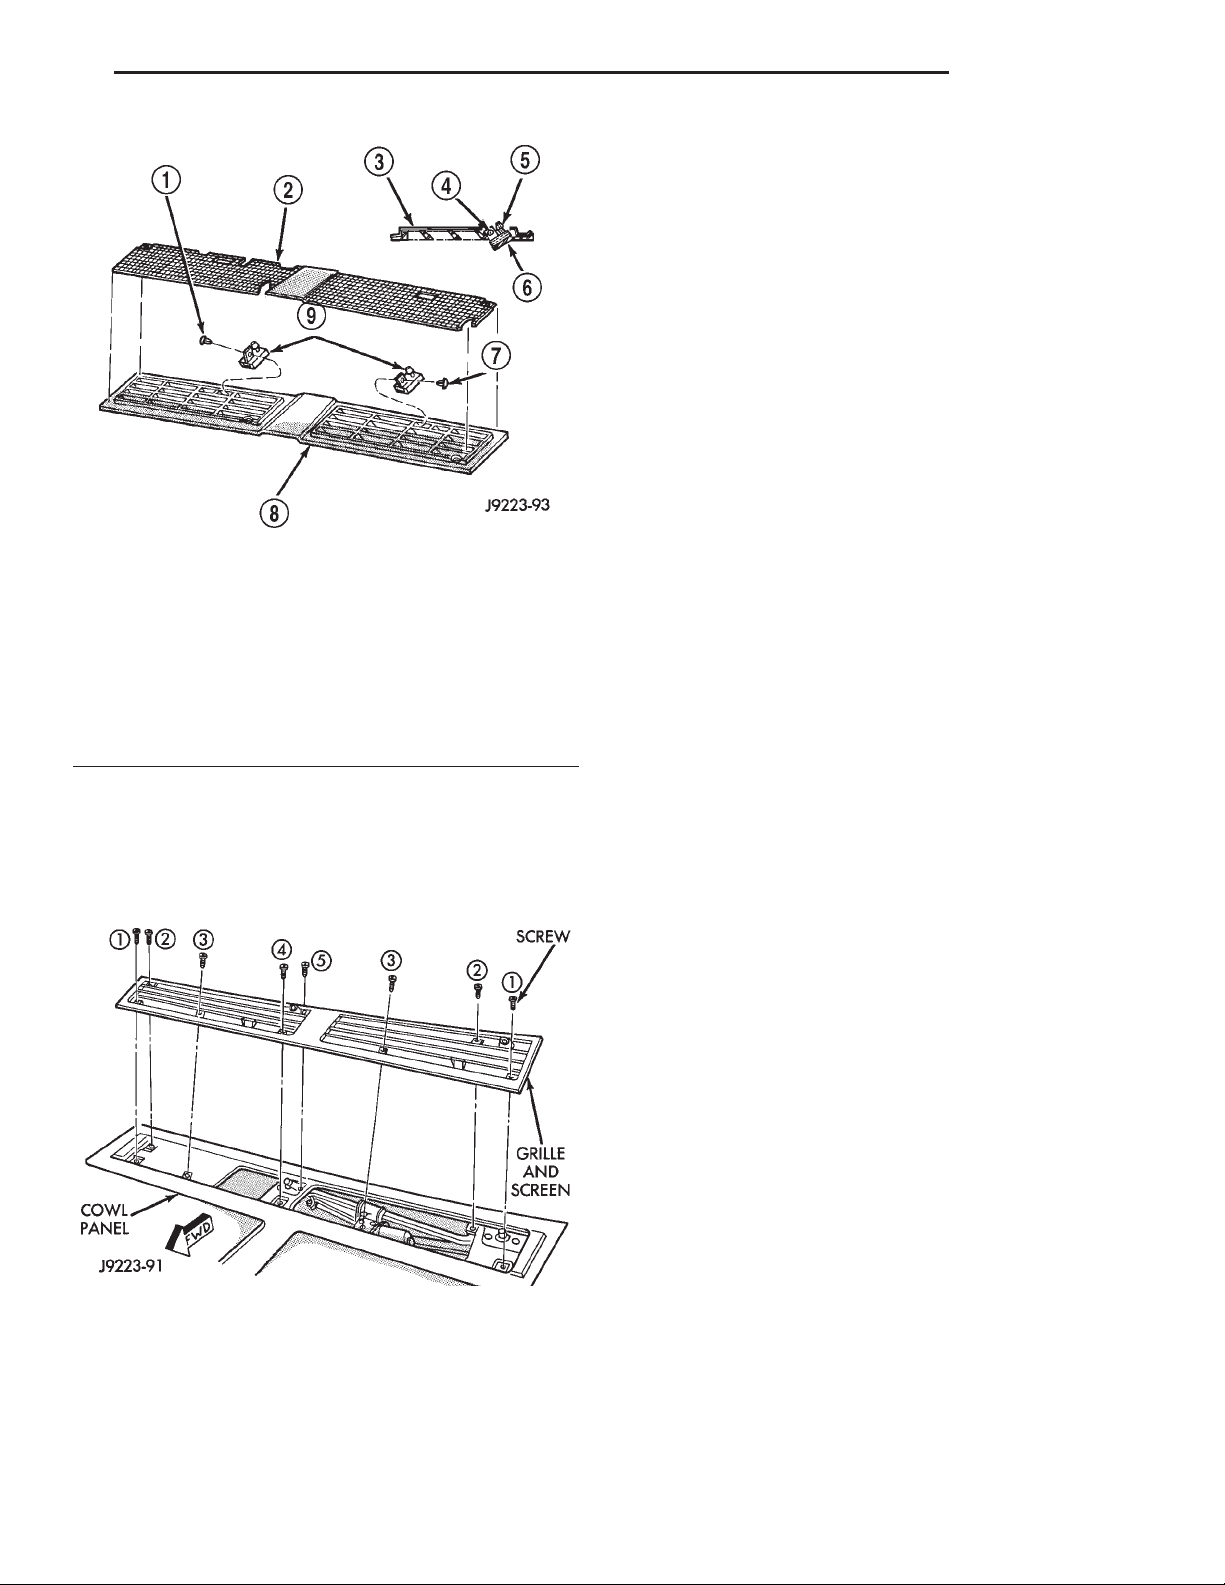
(4) Remove the cowl grille and screen from the
cowl (Fig. 11).
INSTALLATION
CAUTION: The washer fluid tubes must be routed
and installed so that they are not pinched.
(1) Position the cowl grille and screen on the cowl.
(2) Install the windshield washer tubes on the nozzles.
(3) Install the cowl screen and grille screws with
new sealer. Tighten in sequence (Fig. 12).
Page 29
XJ BODY 23 - 29
REMOVAL AND INSTALLATION (Continued)
Decal replacement requires that the metal repair
and paint refinish be completed first.
The work area temperature should be between
21°C (70°F) and 32°C (90°F). A decal should not be
replaced if the work area temperature is less
than 21°C (70°F).
The following equipment and material are necessary for removal and installation:
• Liquid dish detergent (for the wetting solution).
• Mixture of wetting solution.
• Commercial wax and silicone removal solution.
• Isopropyl (rubbing) alcohol.
• Small squeegee (plastic or hard rubber).
• Water bucket and sponge.
• Clean wiping rags or paper towels.
• Heat gun (or infra-red heat bulb).
Fig. 11 Cowl Grille, Screen & Washer Nozzles
1 – PLASTIC PUSH-RIVET
2 – SCREEN
3 – SCREEN
4 – RIVET
5 – NOZZLE
6 – GRILLE
7 – PLASTIC PUSH-RIVET
8 – GRILLE
9 – NOZZLE
NOTE: Force the cowl grille rearward while tightening the screws.
• Wax pencil.
• Sharp knife, single edge razor blade or X-acto
knife.
• Pair of scissors.
• Needle or pin.
WARNING: USE DECAL REMOVAL SOLUTION IN A
WELL-VENTILATED AREA ONLY.
A decal removal solution can be used for removal
at areas where a heat gun is ineffective. Follow the
manufacturers instructions whenever this type of
product is used.
(4) Install the windshield wiper arms on the piv-
ots.
Fig. 12 Cowl Grille Screw Tightening Sequence
BODY DECALS
Small nicks, scratches and other surface marks in
a decal can be touched-up with paint.
To eliminate blisters and air bubbles in a decal,
pierce them with a needle or pin.
A heat gun can also be used to remove small wrin-
kles in a decal.
REMOVAL
(1) Clean the repaired surface as necessary.
(2) Start at one end of the decal and apply heat
with a heat gun. Slowly peel the decal from the panel
by pulling it back. Do not pull the decal outward
from panel.
INSTALLATION
(1) The area that will be covered by the decal must
be cleaned with cleaning solution.
(2) Freshly painted surfaces must be thoroughly
dry.
(3) Clean the painted surface with a commercial
wax and silicone removal solution. Wipe the surface
with a clean cloth and allow it to dry.
(4) Prepare a wetting solution by mixing two or
three teaspoons of dish detergent with 1 gallon of
water. Do not use soap.
NOTE: Too much detergent will reduce the effectiveness of the mixture.
(5) Use a clean sponge and apply the wetting solution to the adhesive side of the decal and to the
painted panel surface. The wetting solution will permit ease of decal movement when positioning it.
Page 30
23 - 30 BODY XJ
REMOVAL AND INSTALLATION (Continued)
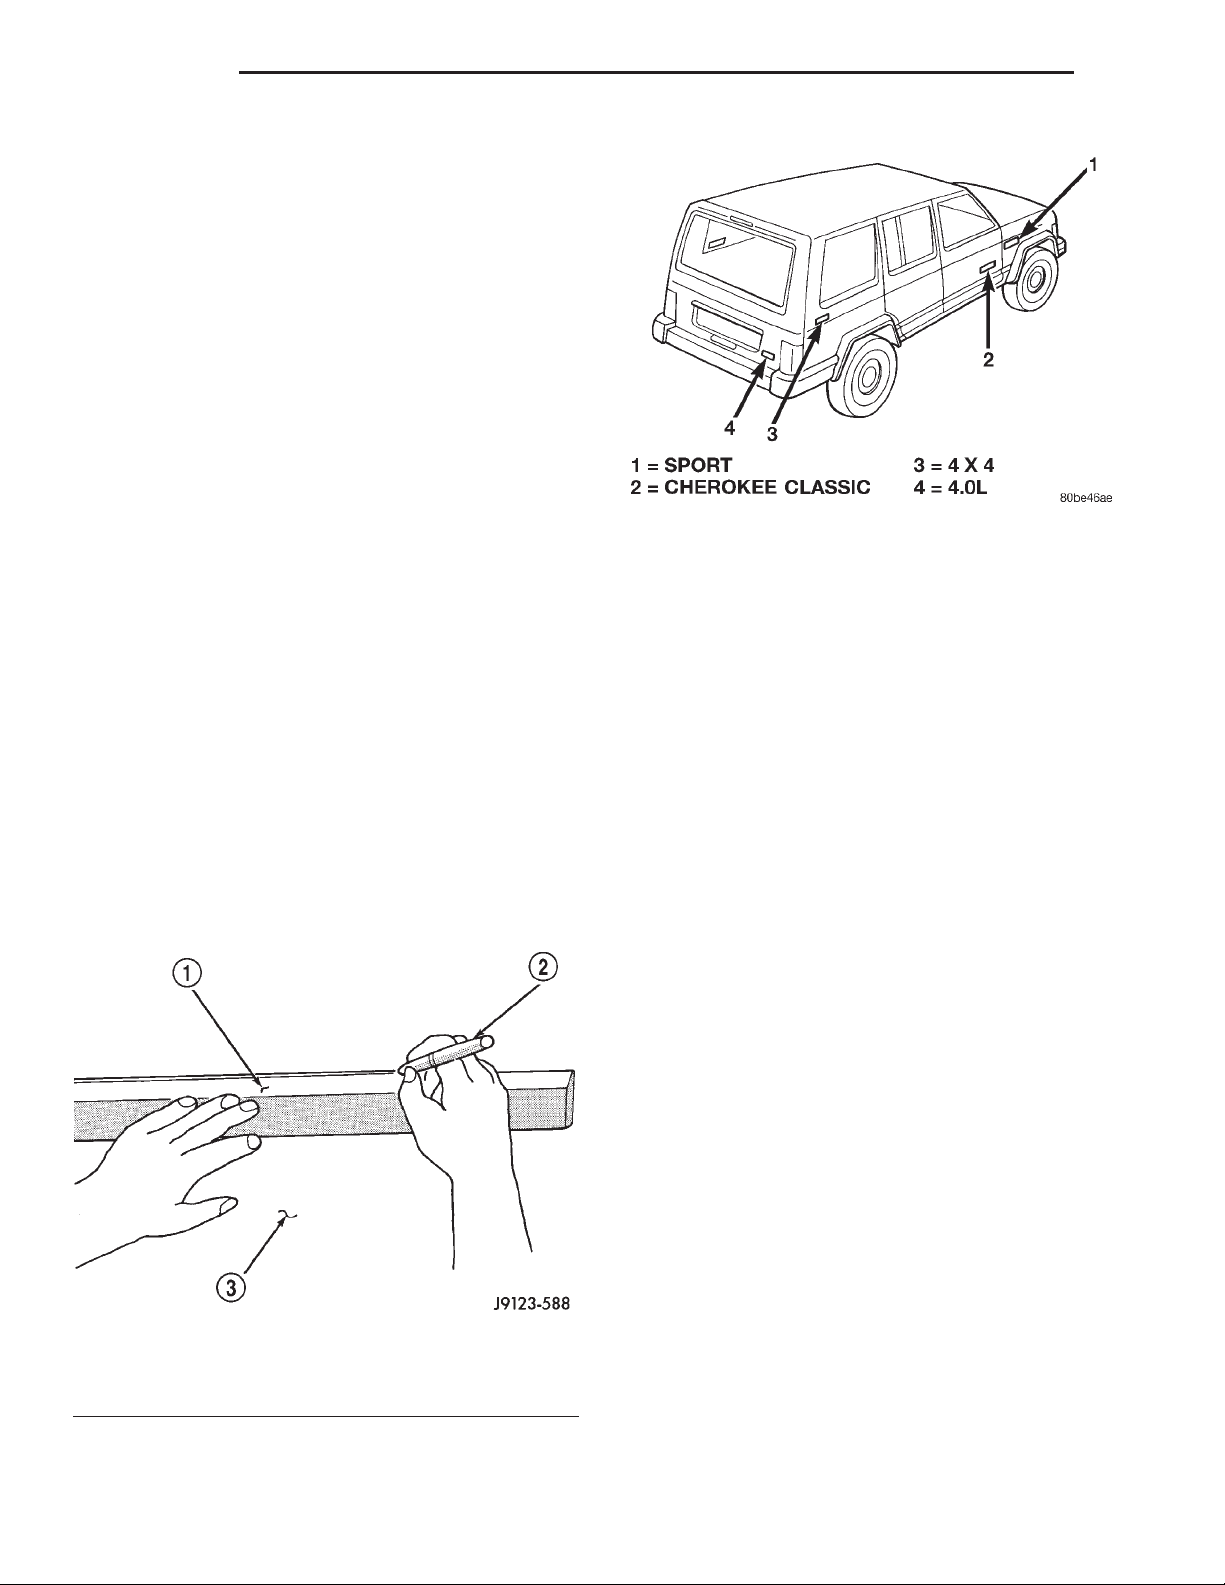
(6) Align a straight edge with the existing decal
ends (Fig. 13).
NOTE: If applicable, the body panel character line
can be used as the decal alignment reference.
(7) Position the decal and carrier on the body
panel (Fig. 14) and the mark length with a wax pencil.
(8) Position the decal and carrier on the body
panel and hold it in-place with masking tape.
(9) Lift the bottom edge of decal and carrier. Use
the tape sections as hinges, and reverse the position
of decal and carrier.
CAUTION: Always remove the carrier from the
decal, never remove the decal from carrier
Fig. 14 Body Decals
(10) Bend a corner of carrier outward and then,
with a flick of the finger, separate the corner of carrier from the decal.
(11) Return the decal back to its original position.
If a solution is being used, position adhesive side of
the decal on panel. Apply the solution to the outside
of the decal.
(12) Hold the decal against the panel surface while
separating the carrier from the decal.
(13) If applicable, remove the cover from face of
decal.
(14) Using a squeegee smooth out the decal to
remove wrinkles and/or air bubbles.
(15) Inspect the decal with reflected light to find
any damage. Remove all the air and/or moisture bubbles.
EXTERIOR NAMEPLATES
REMOVAL
NOTE: Exterior nameplates are attached to body
panels with adhesive tape.
(1) Apply a length of masking tape on the body,
parallel to the top edge of the nameplate to use as a
guide, if necessary.
(2) If temperature is below 21°C (70°F) warm
emblem with a heat lamp or gun. Do not exceed 52°C
(120°F) when heating emblem.
(3) Insert a plastic trim stick or a hard wood
wedge behind the emblem to separate the adhesive
backing from the body.
(4) Clean adhesive residue from body with MOPAR
Super Clean solvent or equivalent.
INSTALLATION
(1) Remove protective cover from adhesive tape on
back of emblem.
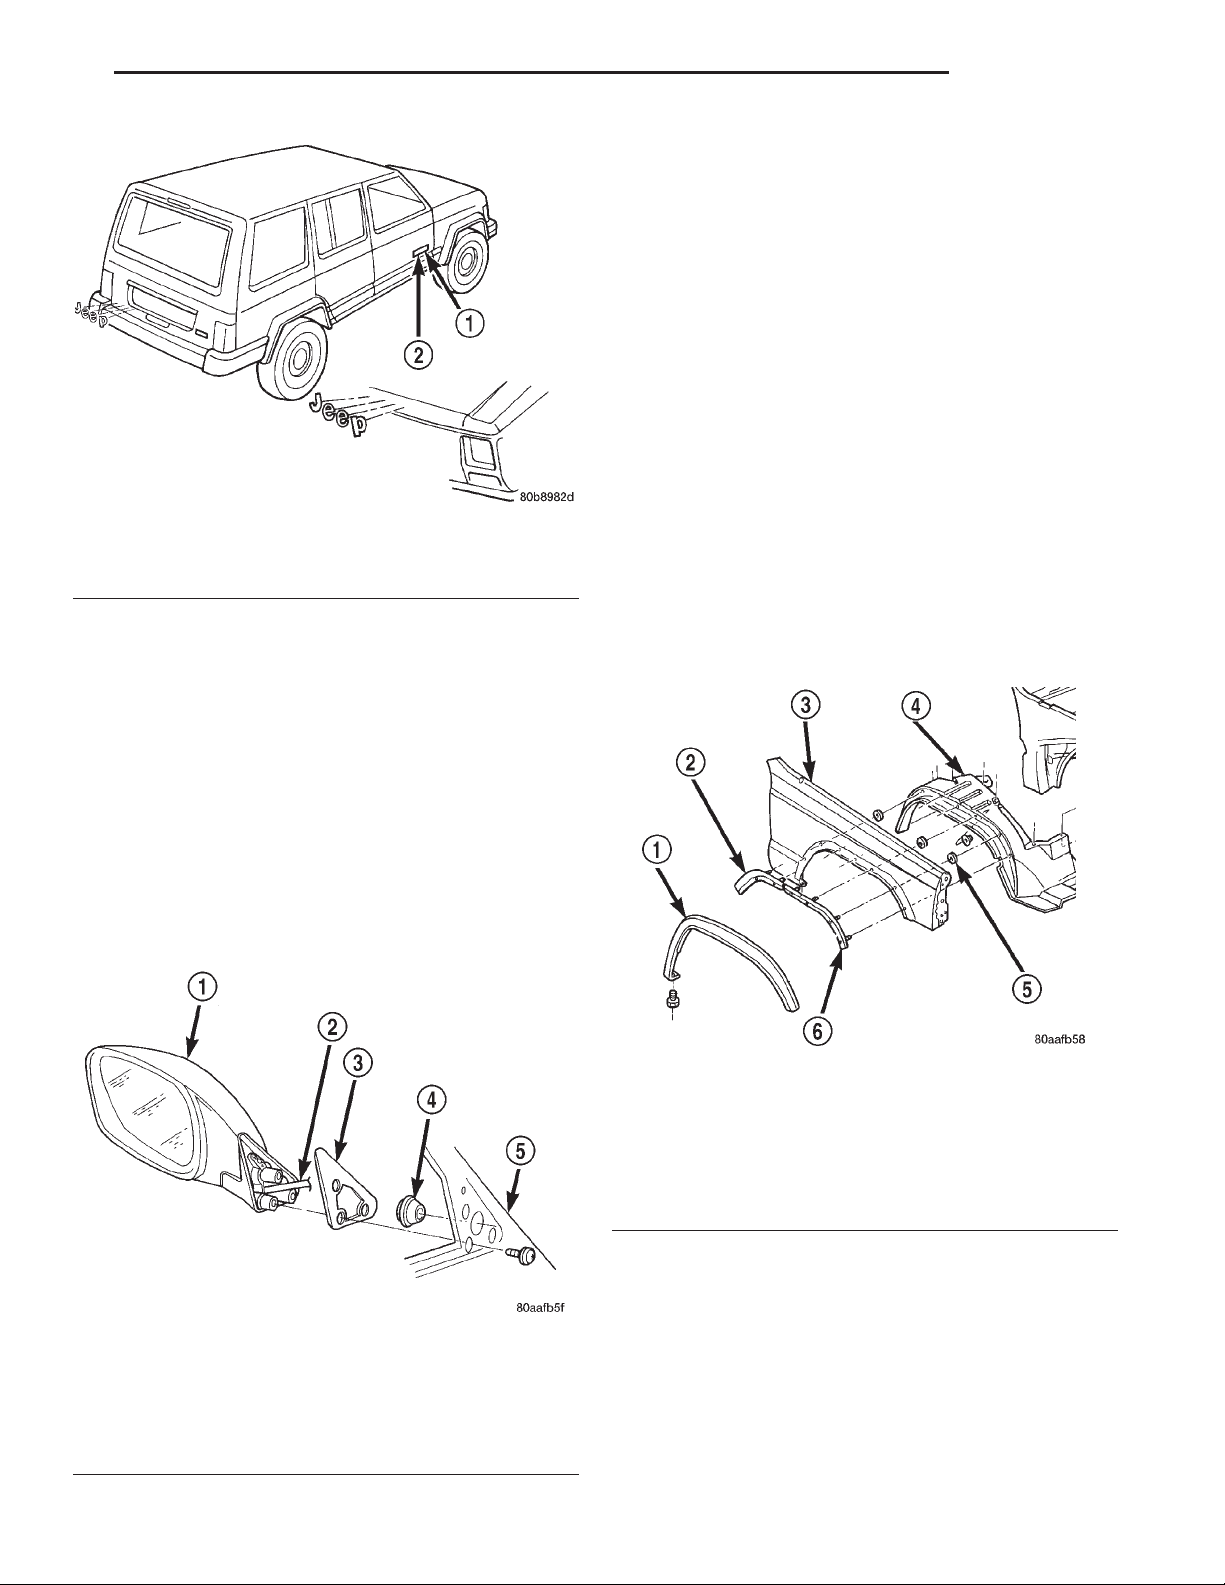
(2) Position emblem properly on body (Fig. 15).
(3) Press emblem firmly to body with palm of
hand.
(4) If temperature is below 21°C (70°F) warm
emblem with a heat lamp or gun to assure adhesion.
Do not exceed 52°C (120°F) when heating emblem.
Fig. 13 Decal Alignment Reference Mark
1 – STRAIGHT EDGE
2 – GREASE PENCIL
3 – BODY PANEL
Page 31
XJ BODY 23 - 31
REMOVAL AND INSTALLATION (Continued)
INSTALLATION
(1) Position the mirror on the door.
(2) Install the screws attaching the mirror to the
door.
(3) Connect the power mirror wire connector, if
equipped.
(4) Install new push-in fastener.
(5) Install the mirror trim cover/speaker grille.
(6) Install the door trim panel.
FRONT FENDER FLARE
REMOVAL
(1) Remove the screw attaching the lower part of
flare to the bottom of the fender.
Fig. 15 Exterior Nameplates
1 – CHEROKEE
2 – LIMITED-SPORT-CLASSIC
SIDE VIEW MIRROR
REMOVAL
(1) Remove the door trim panel.
(2) Remove the screw attaching the mirror trim
cover/speaker grille to the door inner panel.
(3) remove push-in fastener attaching trim cover
to door inner panel (use special tool C-4829).
(4) Disconnect the power mirror wire connector, if
equipped.
(5) Remove the screws attaching the mirror to the
door (Fig. 16).
(6) Separate the mirror from the door.
(2) Remove the nuts attaching the fender flare
retainer to the wheelhouse splash shield (Fig. 17).
(3) Remove the liner from the fender.
(4) Remove the fasteners attaching the fender flare
and retainer to the fender.
(5) Separate the fender flare and retainer from the
fender.
Fig. 16 Side View Mirror
1 – SIDE VIEW MIRROR
2 – WIRE HARNESS
3 – SEAL
4 – GROMMET
5 – DOOR
Fig. 17 Fender Flare
1 – FENDER FLARE
2 – RETAINER
3 – FENDER
4 – LINER
5 – PUSH NUT
6 – RETAINER
INSTALLATION
(1) Position the fender flare and retainer on the
fender.
(2) Install the nuts attaching the fender flare and
retainer to the wheelhouse fender.
(3) Install the screw attaching the lower part of
flare to the bottom of the fender.
Page 32
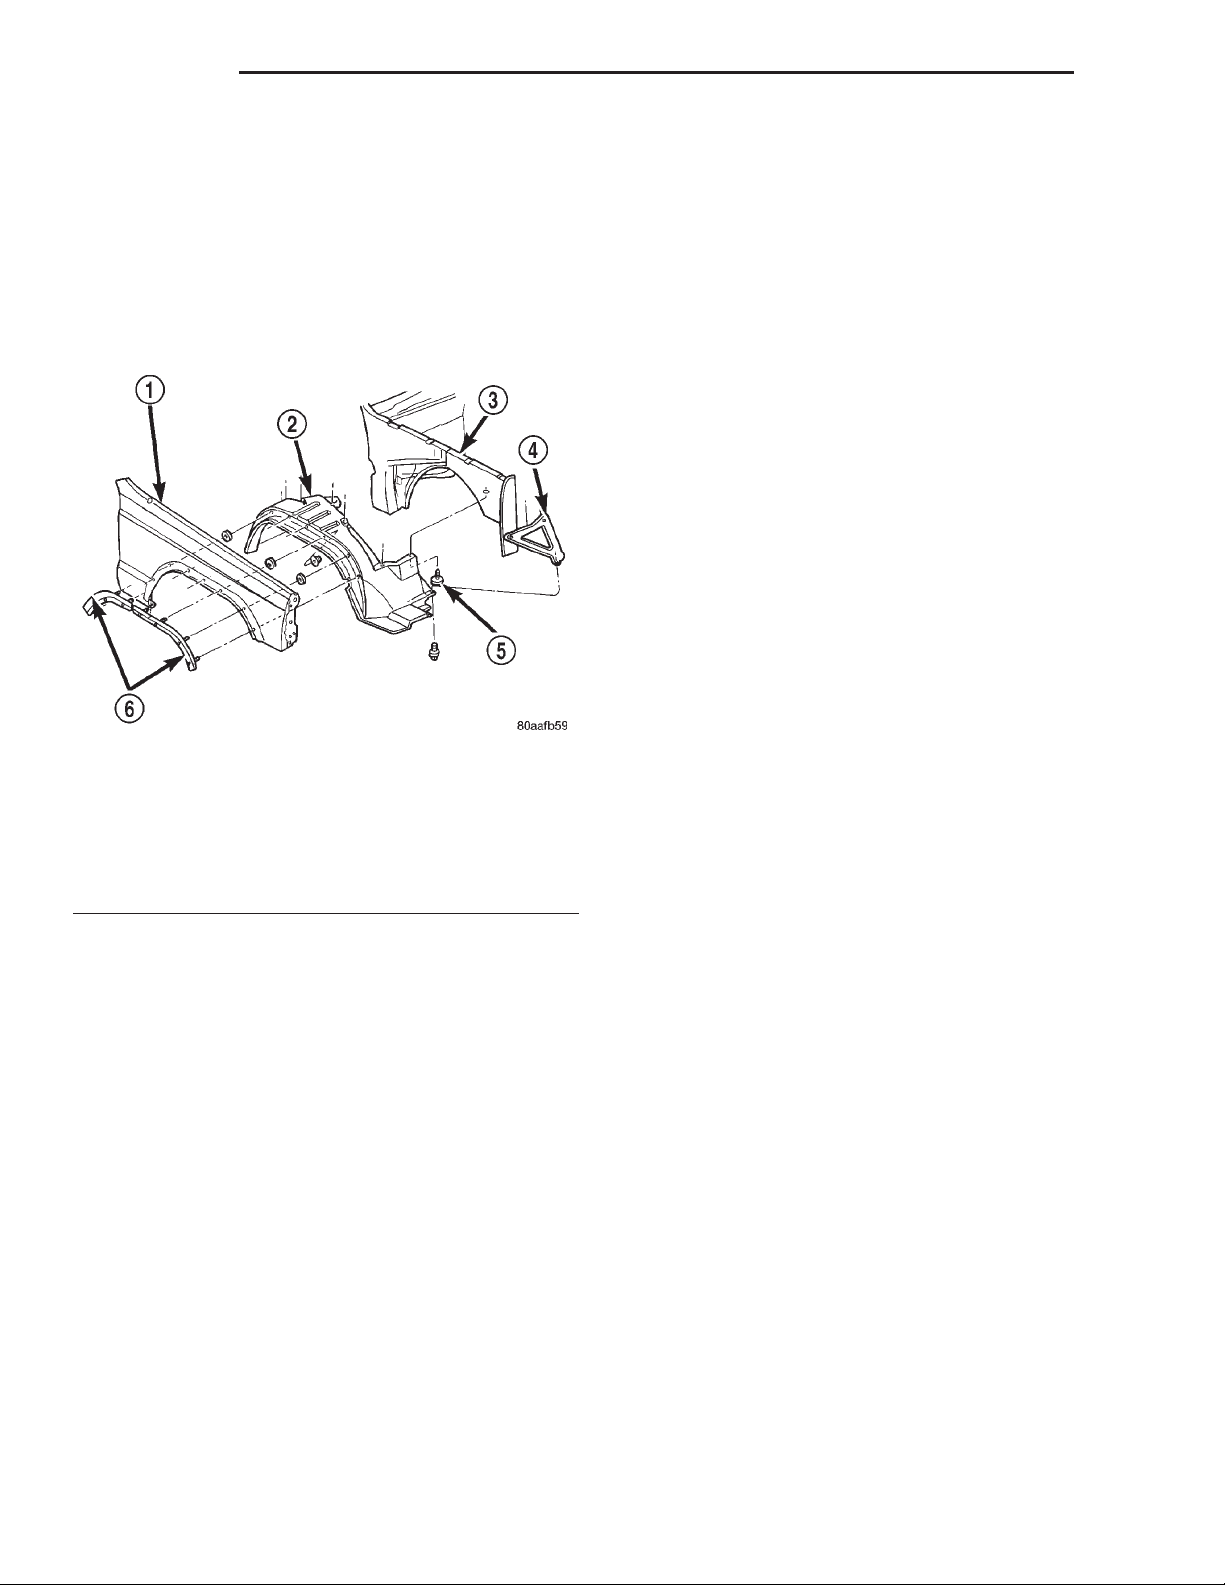
23 - 32 BODY XJ
REMOVAL AND INSTALLATION (Continued)
FRONT WHEELHOUSE LINER
REMOVAL
(1) Hoist vehicle.
(2) Remove tire.
(3) Remove the push-in fasteners attaching the
wheelhouse liner to the inner fender.
(4) Separate the wheelhouse liner from the fender
(Fig. 18).
Fig. 18 Front Wheelhouse Liner
1 – FENDER
2 – WHEELHOUSE LINER
3 – INNER FENDER PANEL
4 – BRACE
5 – PUSH-IN FASTENER
6 – RETAINER
INSTALLATION
(1) Position the wheelhouse liner in the fender.
(2) Install new push-in fasteners attaching the
wheelhouse liner to the inner fender.
(3) Install tire.
(4) Lower vehicle.
(13) Remove the fender top, front and the rear
screws.
(14) Remove the screws attaching the fender to the
inner support bracket (Fig. 20).
(15) Separate the fender from the inner fender
panel.
INSTALLATION
(1) Position the fender on the inner fender panel.
(2) Install all fender screws finger-tight.
(3) Align the fender with the body panels and
tighten the screws attaching the fender to the body
panels.
(4) Install the air deflector.
(5) Install the fender flare and retainers.
(6) Install the wheelhouse liner.
(7) Install the front bumper end cap.
(8) Install the wheel, remove the support and
lower the vehicle.
(9) Install the grille opening panel (GOP).
(10) Install the radio antenna.
LEFT FRONT FENDER
REMOVAL
(1) Raise and support the hood.
(2) Remove the grille opening panel (GOP).
(3) Raise and support the vehicle.
(4) Remove the left front wheel.
(5) Remove the front bumper end cap.
(6) Remove the fender flare and retainers.
(7) Remove the wheelhouse liner.
(8) Remove the air deflector.
(9) Remove the fender lower screws.
(10) Remove the fender top, front and the rear
screws.
(11) Remove the screws attaching the fender to the
inner support bracket.
(12) Separate the fender from the inner fender
panel.
RIGHT FRONT FENDER
REMOVAL
(1) Raise and support the hood.
(2) Remove the grille opening panel (GOP).
(3) If equipped, remove the radio antenna mast,
and components from the fender.
(4) Remove the coolant recovery bottle.
(5) Raise and support the vehicle.
(6) Remove the right front wheel.
(7) Remove the front bumper end cap.
(8) Remove the wheelhouse liner.
(9) Remove the fender flare and retainers.
(10) Disconnect all wire harness connectors.
(11) Remove the air deflector.
(12) Remove the fender lower screws (Fig. 19).
INSTALLATION
(1) Position the fender on the inner fender panel.
(2) Install all fender screws finger-tight.
(3) Align the fender with the body panels and
tighten the screws attaching the fender to the body
panels.
(4) Install the air deflector.
(5) Install the wheelhouse liner.
(6) Install the fender flare and retainers.
(7) Install the front bumper.
(8) Install the wheel, remove the support and
lower the vehicle.
(9) Install the grille opening panel (GOP).
Page 33
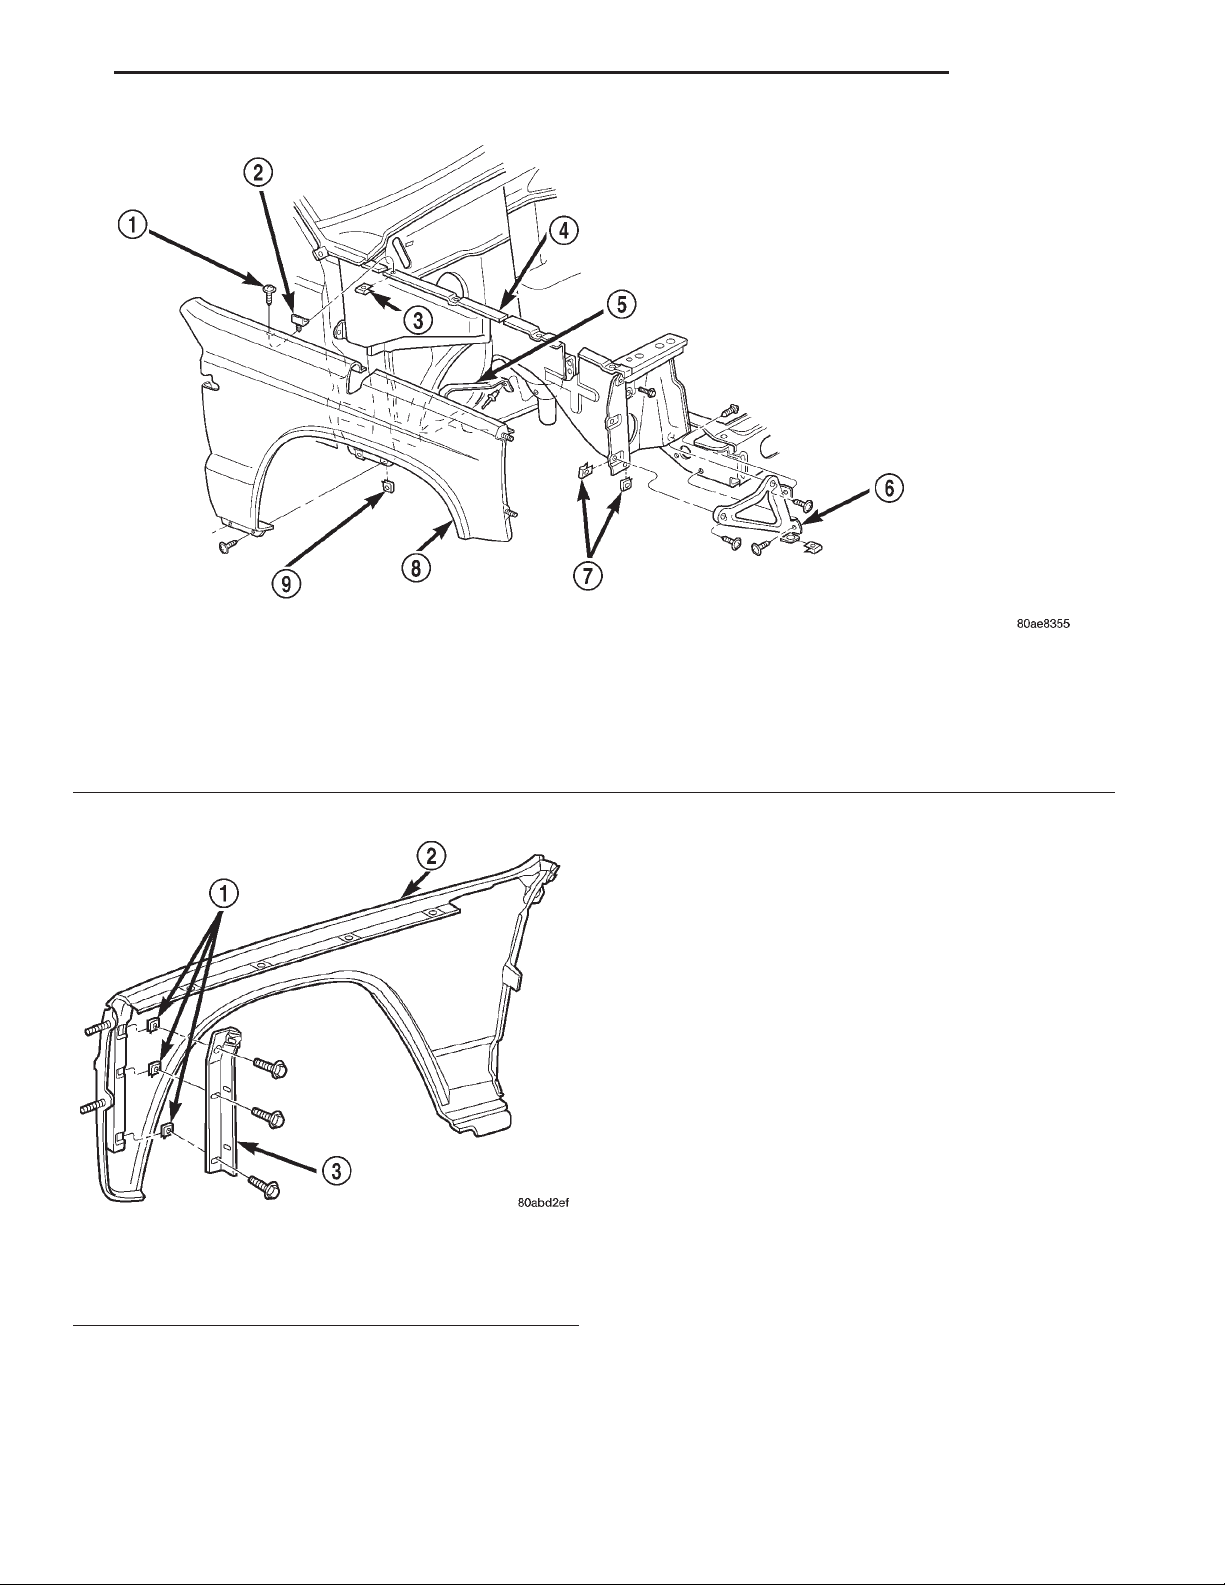
XJ BODY 23 - 33
REMOVAL AND INSTALLATION (Continued)
Fig. 19 Right Front Fender
1 – SCREW
2 – HOOD BUMPER
3 – U-NUT
4 – INNER FENDER PANEL
5 – FENDER BRACE
Fig. 20 Inner Support Bracket
1 – U-NUT
2 – FRONT FENDER
3 – SUPPORT BRACKET
FRONT DOOR TRIM PANEL
REMOVAL
(1) Roll window down.
(2) Remove window crank, if equipped (Fig. 21).
6 – FRAME SILL-TO-BAFFLE BRACE
7 – U-NUT
8 – OUTER FENDER PANEL
9 – U-NUT
(3) Remove the screws attaching the trim panel to
the door inner panel (Fig. 22) and (Fig. 23).
(4) Separate the trim panel fasteners from door
inner panel with a pry tool (use special tool C-4829)
(Fig. 24).
(5) Lift the trim panel up and outward to separate
from the inner belt seal.
(6) Move the door trim panel outward and disconnect the handle-to-latch rods.
(7) Disconnect the power door locks/windows/mirrors wire harness connectors, if equipped.
(8) Remove the trim panel from door.
INSTALLATION
(1) Replace any broken or damaged push-in fasteners.
(2) Connect the power door locks/windows/mirrors
wire harness connectors, if equipped.
(3) Move the door trim panel outward and connect
the handle-to-latch rods.
(4) Position the trim panel on the inner belt seal
and push down to seat.
(5) Align the locating pins and push- (Fig. 25) in
fasteners. Press inward to secure.
(6) Install the screws attaching the trim panel to
the door inner panel.
(7) Install the window crank, if equipped.
Page 34
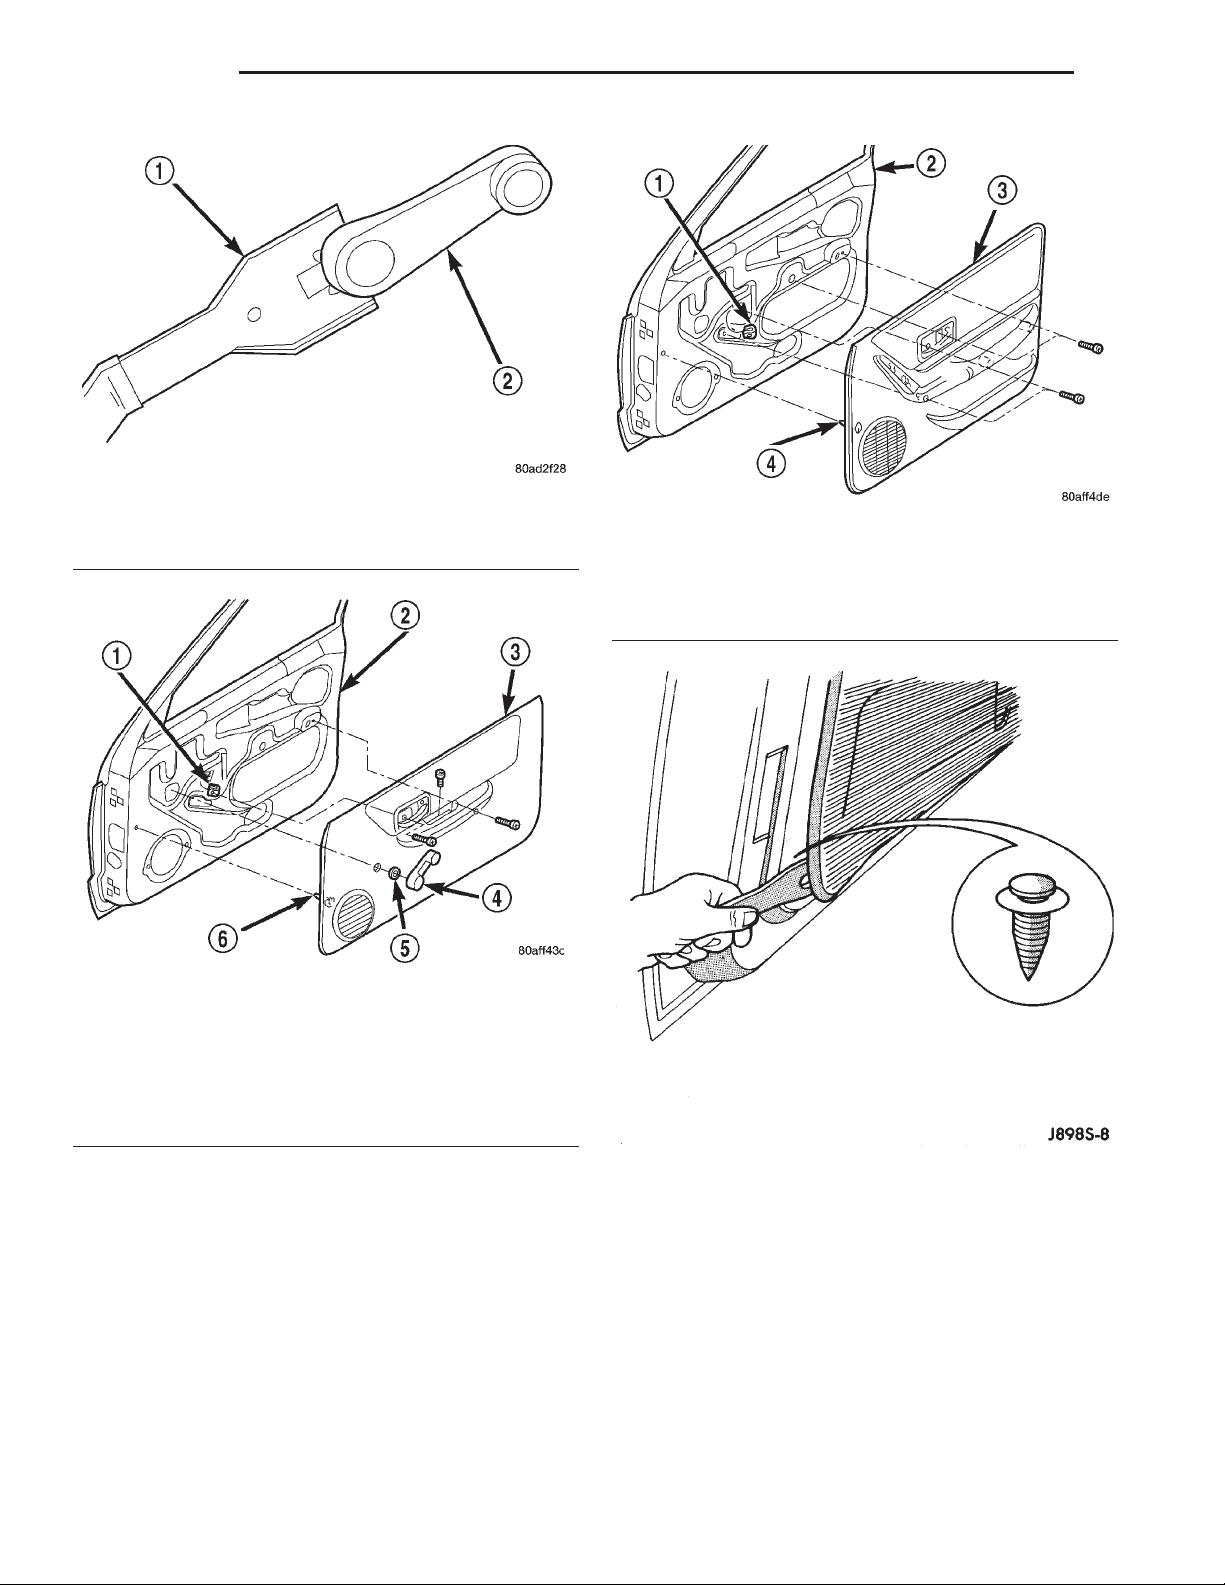
23 - 34 BODY XJ
REMOVAL AND INSTALLATION (Continued)
Fig. 21 Window Crank—Typical
1 – WINDOW CRANK REMOVAL TOOL
2 – WINDOW CRANK
Fig. 23 Front Door Trim Panel-Power Window
1 – U-NUT
2 – DOOR
3 – TRIM PANEL
4 – PUSH-IN FASTENER
Fig. 22 Front Door Trim Panel-Manual Window
1 – U-NUT
2 – DOOR
3 – TRIM PANEL
4 – WINDOW CRANK
5 – SPACER
6 – PUSH-IN FASTENER
FRONT DOOR WATERDAM
REMOVAL
The waterdam is attached to the door inner panel
with a butly adhesive. If cohesive separation of the
butly between the waterdam and door inner panel
occurs during the removal process, cut the strands of
butly with a razor knife or equivalent.
(1) Remove door trim panel.
(2) Disengage clips attaching wire harnesses to the
door inner panel.
(3) Push the harnesses/connectors through the
waterdam and into the door.
Fig. 24 Detaching Trim Panel Push-In Fasteners
(4) Grasp the upper and lower rearward corners of
the waterdam and rapidly peel back the waterdam
from the door inner panel.
(5) Separate the waterdam from the door inner
panel.
INSTALLATION
(1) Route the latch rods through the waterdam.
(2) Position the waterdam on the door, apply adhesive as necessary and press into place.
(3) Route the harnesses/connectors through the
waterdam.
Page 35
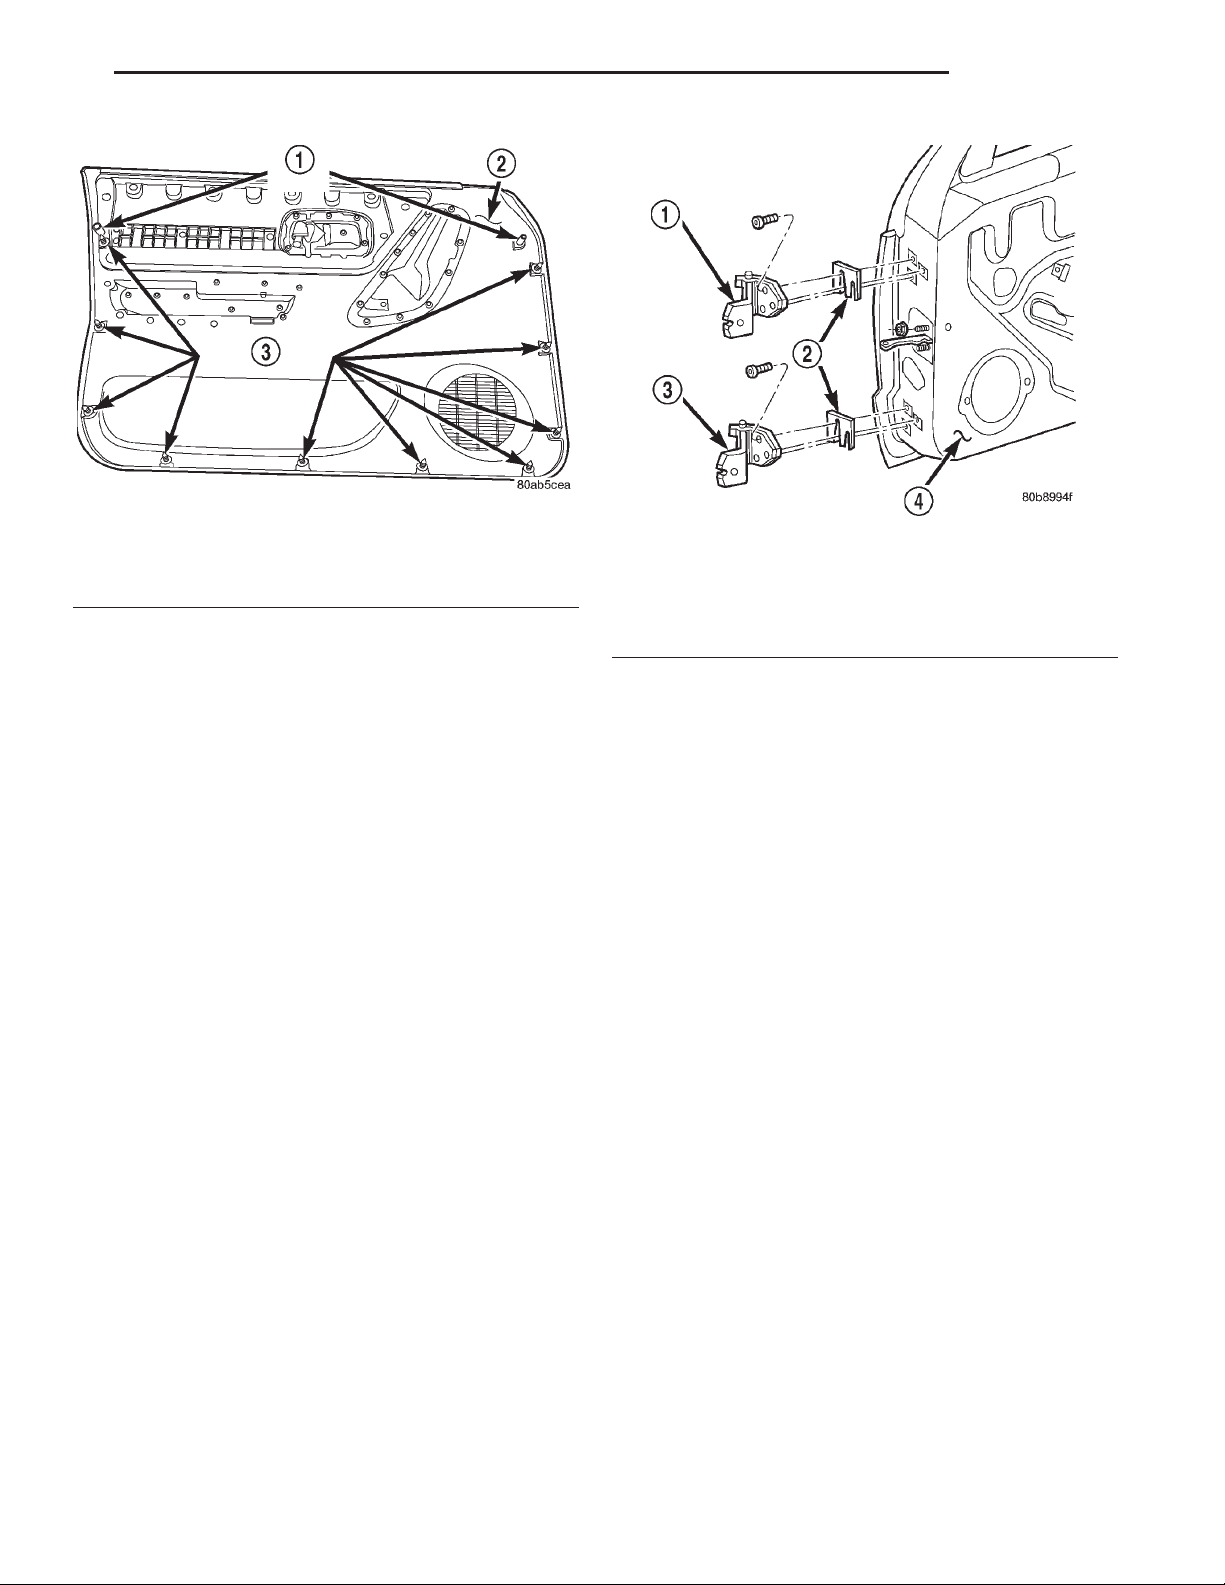
XJ BODY 23 - 35
REMOVAL AND INSTALLATION (Continued)
Fig. 25 Push-In Fasteners
1 – LOCATING PINS
2 – TRIM PANEL
3 – PUSH-IN FASTENERS
(4) Engage clips attaching wire harnesses to the
door inner panel.
(5) Install door trim panel.
FRONT DOOR
REMOVAL
(1) Remove door restraint (check) retaining pin.
(2) For vehicles equipped with power windows,
power mirrors and power door locks, remove trim
panel and waterdam. Disconnect all components and
route wire harness out of door.
(3) Remove bolts that attach hinge to door (Fig.
26).
(4) Remove door from vehicle.
INSTALLATION
(1) Position door in body opening.
(2) Align door hinges, plates and shims and install
bolts. Tighten bolts to 3 N·m (2 ft. lbs.) torque.
(3) Install door restraint (check) pin.
(4) If applicable, route and connect wire harness
connectors.
(5) Install door waterdam and trim panel.
FRONT DOOR HINGE
1 – UPPER HINGE
2 – SHIM
3 – LOWER HINGE
4 – FRONT DOOR
(2) Align door hinges and shims with bolt holes
and install hinge bolts. Tighten bolts to 3 N·m (2 ft.
lbs.) torque.
(3) Adjust/align latch striker and latch as necessary.
(4) Install door restraint (check) retaining pin.
FRONT DOOR RESTRAINT
REMOVAL
(1) Remove door trim panel.
(2) Remove door radio speaker from door inner
panel.
(3) Remove door restraint (check) retaining pin
from bracket with a punch.
(4) Remove nuts and remove restraint via speaker
opening. (Fig. 27).
INSTALLATION
(1) Position door restraint in door by way of opening and install nuts.
NOTE: Ensure the spring on the door restraint is
facing outward.
Fig. 26 Front Door Hinge
REMOVAL
(1) Remove door restraint (check) retaining pin.
(2) Remove door hinge bolts and shims (Fig. 26).
(3) Retain door hinge shims for correct installa-
tion.
INSTALLATION
(1) Position hinge plates and shims on door face.
(2) Position door restraint in bracket with holes
aligned and insert retaining pin.
(3) Install radio speaker and door trim panel.
FRONT DOOR OUTSIDE HANDLE
REMOVAL
(1) Remove the door trim panel and waterdam.
Page 36
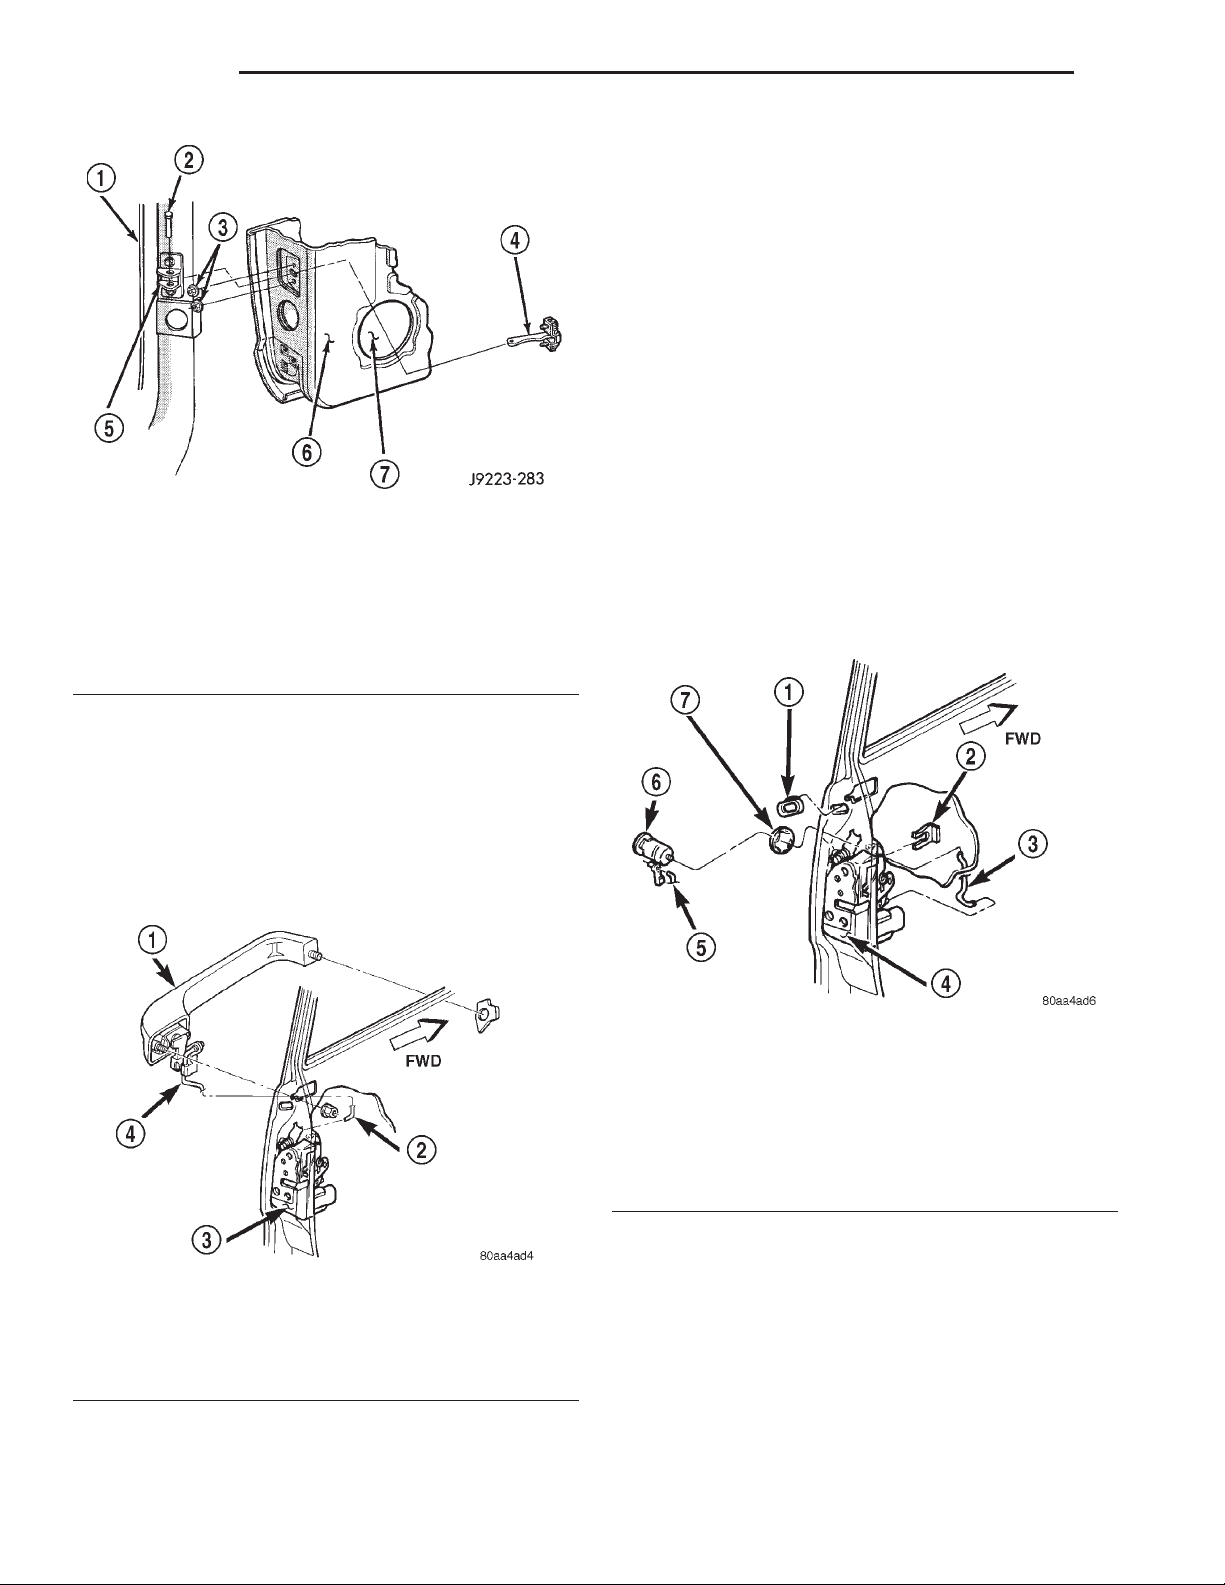
23 - 36 BODY XJ
REMOVAL AND INSTALLATION (Continued)
(2) Install the forward nut attaching the handle to
the door.
(3) Connect the latch to handle rod, to the handle
latch release lever arm.
(4) Install the rearward nut attaching the door
handle to the door.
(5) Install the access hole cover.
(6) Install the door waterdam and trim panel.
FRONT DOOR LOCK CYLINDER
REMOVAL
(1) Remove the door trim panel.
(2) Peel back waterdam to access lock cylinder.
(3) Disconnect the door latch-to-lock cylinder rod
Fig. 27 Door Restraint (Check)
1 – A-PILLAR
2 – RETAINING PIN
3 – NUT
4 – DOOR RESTRAINT
5 – RESTRAINT BRACKET
6 – DOOR INNER PANEL
7 – SPEAKER OPENING
at the door latch (Fig. 29).
(4) Remove the lock cylinder retainer clip.
(5) Remove the lock cylinder.
(6) If applicable, remove the door latch-to-lock cylinder rod from the original lock cylinder. Connect it
to the replacement lock cylinder.
(2) Remove the access hole cover and remove the
rearward nut attaching the door handle to the door.
(Fig. 28).
(3) Disconnect the handle-to-latch rod from the
handle latch release lever arm.
(4) Remove the forward nut attaching the handle
to the door.
(5) Separate the handle from the door.
Fig. 28 Front Door Outside Handle
1 – OUTSIDE DOOR HANDLE
2 – OUTSIDE HANDLE TO LATCH ROD
3 – DOOR LATCH
4 – OUTSIDE HANDLE TO LATCH ROD
INSTALLATION
(1) Position the handle in the door.
Fig. 29 Door Lock Cylinder
1 – ACCESS PLUG
2 – RETAINER
3 – LOCK CYLINDER TO LATCH ROD
4–LATCH
5 – LOCK CYLINDER TO LATCH ROD
6 – LOCK CYLINDER
7 – GASKET
INSTALLATION
(1) Position the lock cylinder and in the door open-
ing.
(2) Install the retainer clip.
(3) Connect the door latch-to-lock cylinder rod to
the door latch.
(4) Press the waterdam into position.
(5) Install the door trim panel.
Page 37
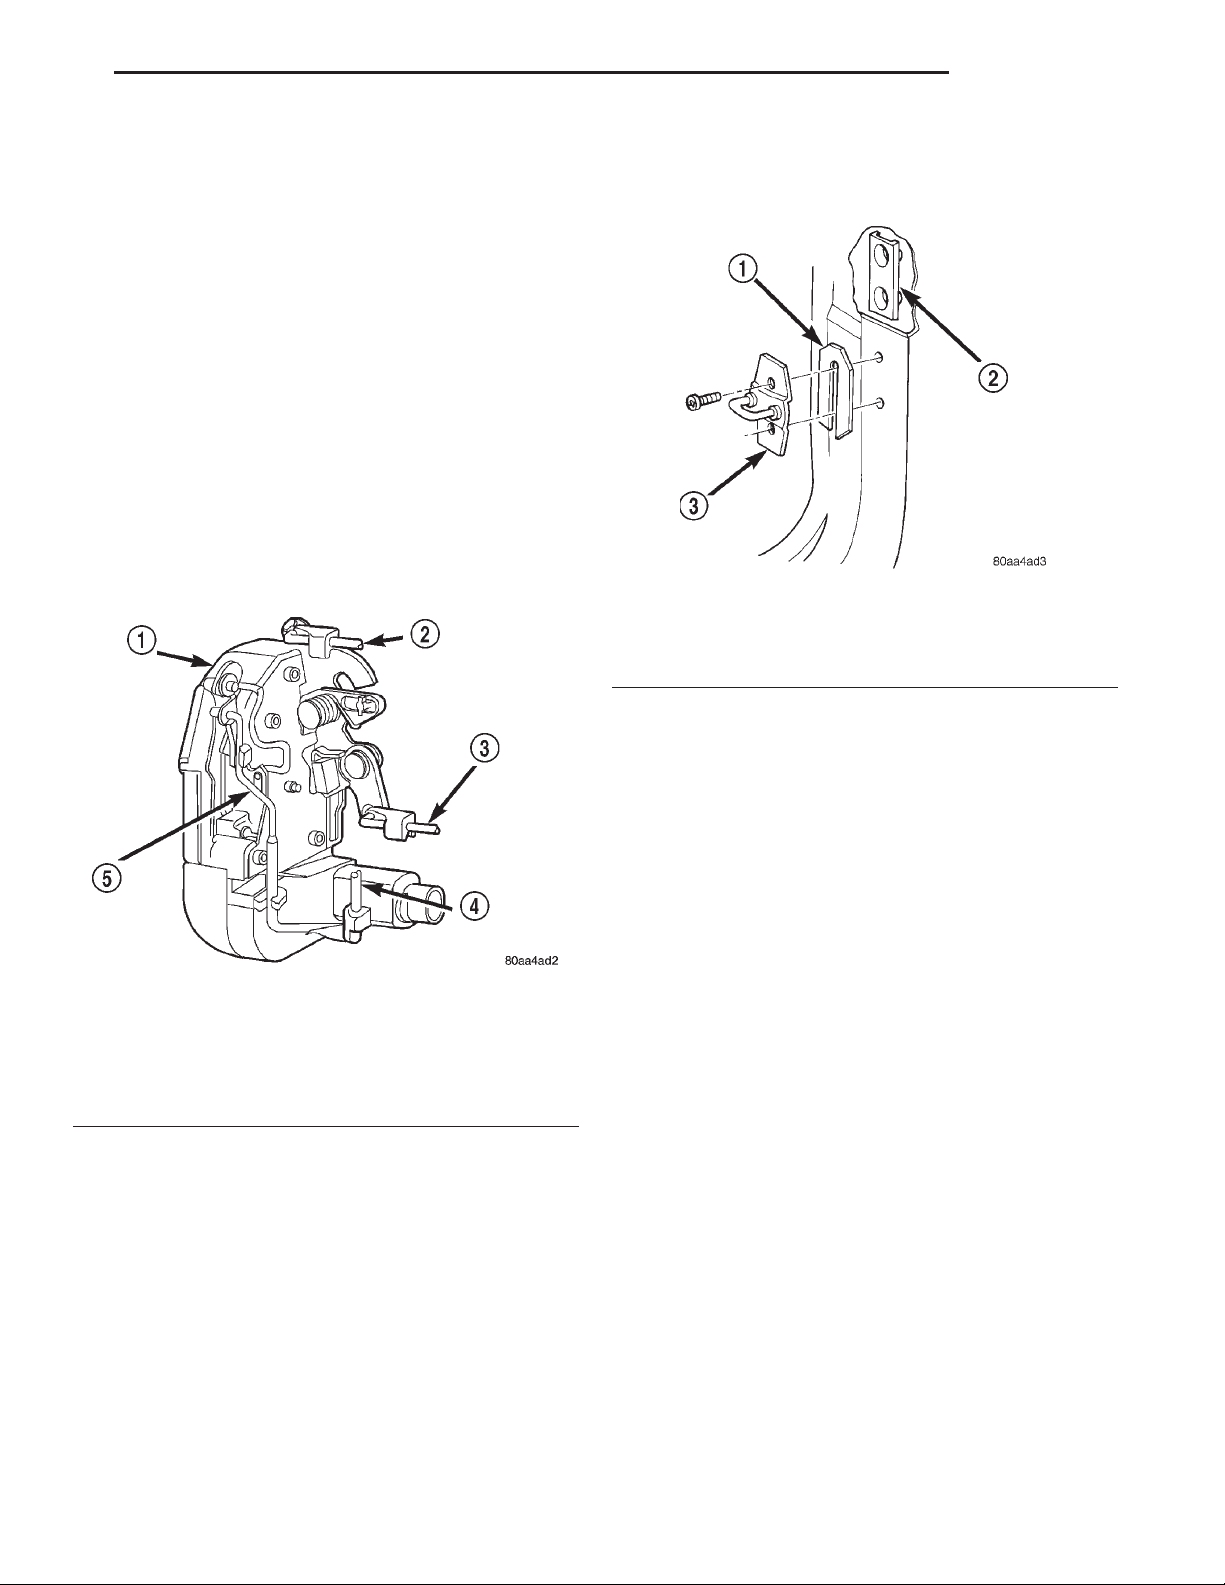
XJ BODY 23 - 37
REMOVAL AND INSTALLATION (Continued)
LOCK CYLINDERS
Ignition, door, deck lid, and rear hatch lock cylinders are all codable to the key. Lock barrels, tumblers, and tumbler springs are available to allow the
technician to change replacement locks cylinders to
match the customer’s original key set. See the appropriate section in this manual for lock cylinder
removal. See the Mopart catalogue for part numbers
and lock coding procedures.
FRONT DOOR LATCH
REMOVAL
(1) Remove door trim panel and waterdam.
(2) Remove screws attaching latch to door.
(3) Disconnect all rods from latch (Fig. 30).
(4) Disconnect power lock motor wire connector, if
equipped.
(5) Remove latch from door face.
(2) Remove screws attaching striker to B-pillar
(Fig. 31).
(3) Separate striker from B-pillar.
Fig. 31 Front Door Latch Striker
1 – SPACER
2 – TAPPING PLATE
3 – STRIKER
INSTALLATION
(1) Position and align striker on B-pillar.
(2) Install screws attaching striker to B-pillar.
Tighten screws to 28 N·m (20 ft. lbs.) torque.
Fig. 30 Door Latch
1 – FRONT DOOR LATCH
2 – LOCK BUTTON TO LATCH ROD
3 – INSIDE HANDLE TO LATCH ROD
4 – OUTSIDE HANDLE TO LATCH ROD
5 – LOCK CYLINDER TO LATCH ROD
INSTALLATION
(1) Position latch on door face.
(2) Connect power lock motor wire connector, if
equipped.
(3) Connect all rods to latch.
(4) Install screws attaching latch to door. Tighten
screws to 11 N·m (8 ft. lbs.) torque.
(5) Install waterdam and door trim panel.
FRONT DOOR LATCH STRIKER
REMOVAL
(1) Using a grease pencil or equivalent, mark position of striker.
FRONT DOOR INSIDE HANDLE ACTUATOR
REMOVAL
The front door inside handle actuator is heat
staked to the front door trim panel during the manufacturing process.
(1) Remove the door trim panel.
(2) Using an X-ACTO knife or equivalent, cut the
melted tabs securing the inside handle to the door
trim panel.
(3) Separate the inside handle from the trim
panel.
INSTALLATION
(1) Position the inside handle in the trim panel.
(2) Heat stake the inside handle to the trim panel.
(3) Install the door trim panel.
FRONT DOOR INNER BELT WEATHERSTRIP
REMOVAL
(1) Roll window down.
(2) Remove door trim panel.
(3) Pull up on the rear corner of the weatherstrip
and lift from the door (Fig. 32).
Page 38
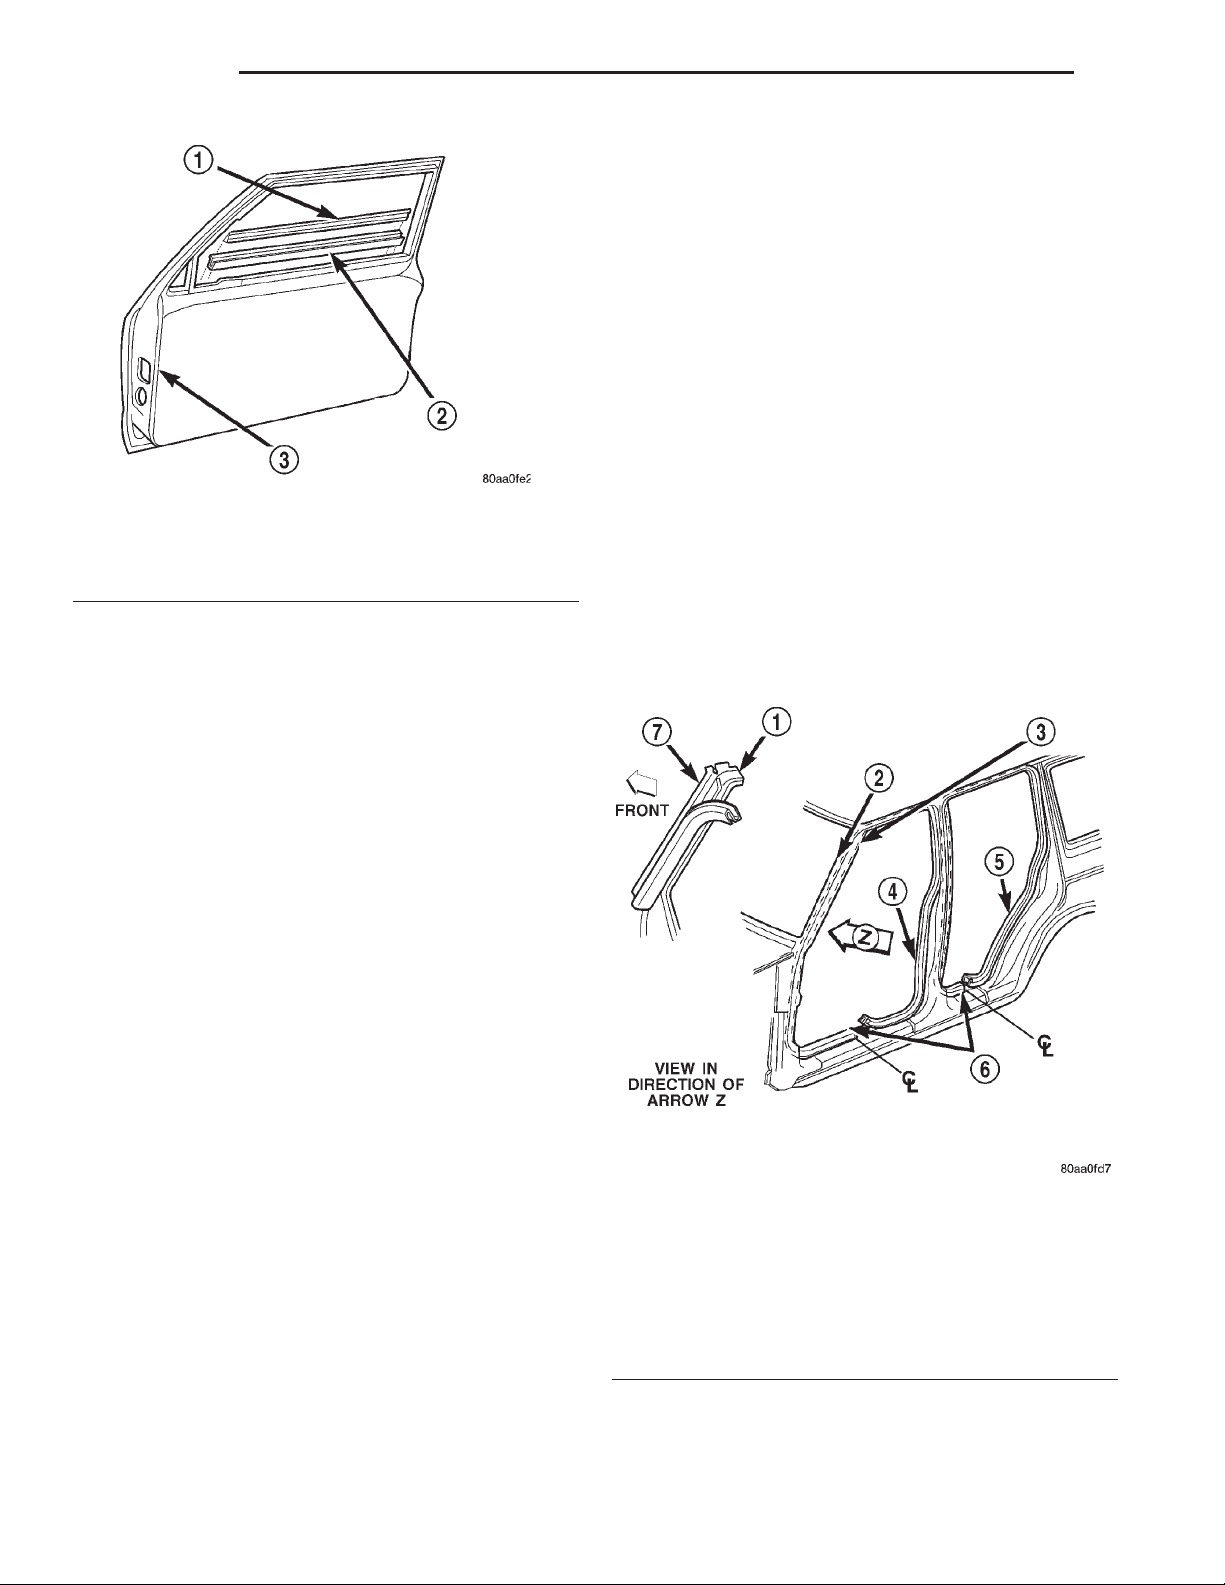
23 - 38 BODY XJ
REMOVAL AND INSTALLATION (Continued)
• Continue working/pressing the weatherstrip into
the channel along the upper window frame.
• Press weatherstrip into lower rear corner.
• Work/press the weatherstrip upward and to the
upper rear corner, seat the weatherstrip into the
channel.
• Press the weatherstrip to seat into the front
lower glass run channel.
(2) As applicable, move upward and forward
evenly until the weatherstrip seal is fully seated in
the channel.
(3) Install waterdam.
(4) Install door trim panel.
FRONT DOOR OPENING WEATHERSTRIP
Fig. 32 Front Door Inner/Outer Belt Weatherstrip
1 – OUTER BELT WEATHERSTRIP
2 – INNER BELT WEATHERSTRIP
3 – DOOR INNER PANEL
INSTALLATION
(1) Position the weatherstrip on the door.
(2) Push weatherstrip down to seat onto door.
(3) Install door trim panel.
REMOVAL
(1) Remove A-pillar trim panel.
(2) Remove B-pillar upper trim panel.
(3) Remove cowl side trim panel.
(4) Remove inner scuff plate.
(5) Remove B-pillar lower trim panel.
(6) Grasp seal and separate from door opening.
FRONT DOOR OUTER BELT WEATHERSTRIP
REMOVAL
(1) Roll window down.
(2) Using a trim stick, pry up the rear outer corner
of the weatherstrip.
(3) Lift the weatherstrip up to separate from the
door (Fig. 32).
INSTALLATION
(1) Position the weatherstrip on the door.
(2) Push weatherstrip down to seat onto door.
FRONT DOOR GLASS RUN CHANNEL WEATHERSTRIP
REMOVAL
(1) Remove door trim panel.
(2) Remove waterdam.
(3) Starting at rear corner, peel weatherstrip from
around door frame.
INSTALLATION
(1) Install the weatherstrip in the following
sequence:
• Press weatherstrip into upper rear corner.
• Press weatherstrip into lower front corner.
• Work/press the weatherstrip upward and to the
upper front corner, seat the weatherstrip into the
channel.
Fig. 33 Door Opening Weatherstrip
1 – FRONT DOOR SEAL
2 – A PILLAR
3 – SECONDARY DOOR SEAL
4 – FRONT DOOR SEAL
5 – REAR DOOR SEAL
6 – ENDS MEET AT CENTERLINE
7 – A PILLAR
Page 39
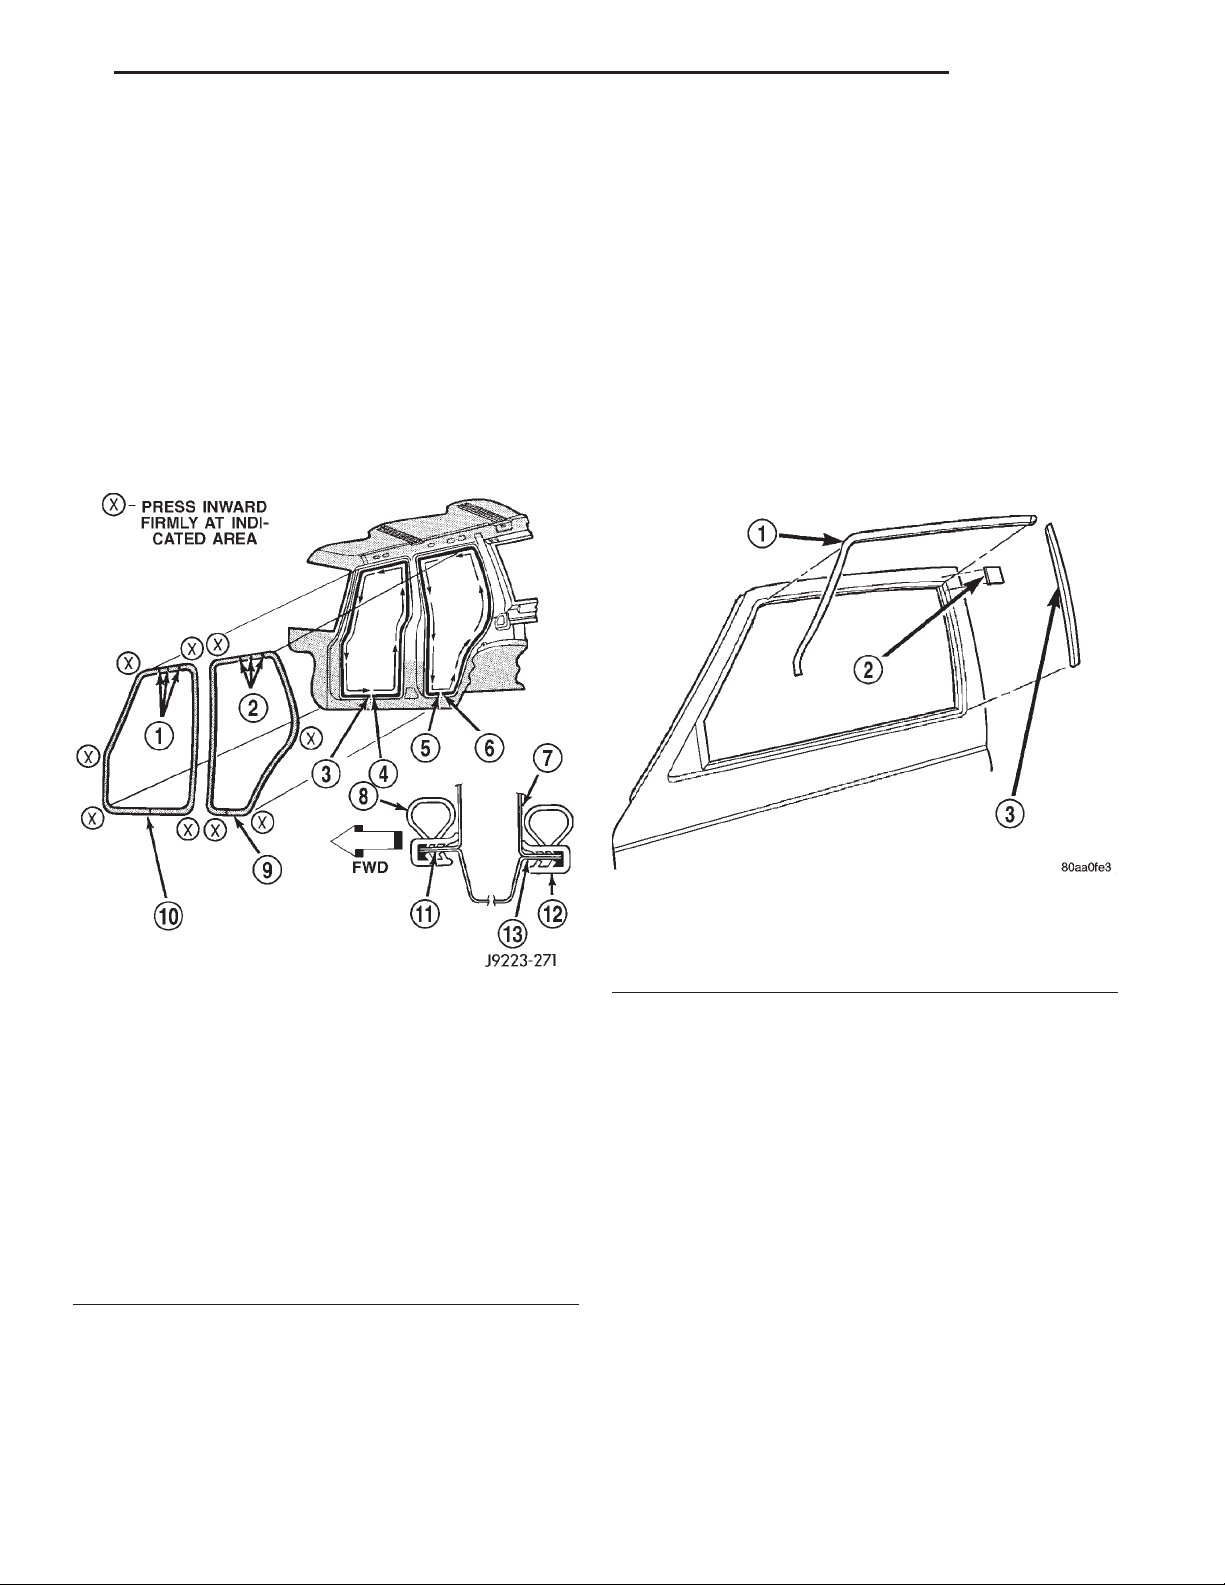
XJ BODY 23 - 39
REMOVAL AND INSTALLATION (Continued)
INSTALLATION
(1) Position weatherstrip at corners.
(2) Move upward and around edge of door opening.
Seat seal on flange.
(3) When installing a door opening weatherstrip
seal, start at the door sill center line.
(4) Move upward and around the perimeter of the
door opening and seat the weatherstrip on the flange
(Fig. 34).
(5) Install cowl side trim panel.
(6) Install inner scuff plate.
(7) Install B-pillar lower trim panel.
(8) Install B-pillar upper trim panel.
(9) Install A-pillar trim panel.
(1) Using a heat gun, heat the weatherstrip and
slowly peel the weatherstrip from the A-pillar
INSTALLATION
(1) Clean the contact surface on the A-pillar.
(2) Remove the carrier backing and position the
weatherstrip on the A-pillar. Press into place.
FRONT DOOR GLASS EXTERIOR MOLDING
REMOVAL
(1) Open the window completely.
(2) Remove the outer belt weatherstrip.
(3) Pry and pull the molding sections from the
door panel flange (Fig. 35).
Fig. 34 Door Opening Weatherstrip
1 – VENT HOLES
2 – VENT HOLES
3 – FINISH
4–START
5 – FINISH
6–START
7 – B-PILLAR
8 – SEAL
9 – REAR DOOR WEATHERSTRIP SEAL
10 – FRONT DOOR WEATHERSTRIP SEAL
11 – FLANGE
12 – SEAL
13 – FLANGE
FRONT DOOR OPENING SECONDARY WEATHERSTRIP
REMOVAL
The front door opening secondary weatherstrip is
attached to the A-pillar with adhesive tape (Fig. 33).
Fig. 35 Front Door Glass Exterior Molding
1 – UPPER MOLDING
2 – SHIM
3 – REAR MOLDING
INSTALLATION
(1) Start at the forward end of the upper molding,
force the molding onto the door panel and continue
rearward until it is completely seated on the flange.
(2) Mate the rear molding with the upper molding
and force the molding edge inward.
(3) Continue pressing and moving downward to
complete the installation.
(4) Install the outer belt weatherstrip.
FRONT DOOR WINDOW REGULATOR
REMOVAL
(1) Remove the door trim panel.
(2) Remove the waterdam.
(3) Remove the window glass
Page 40
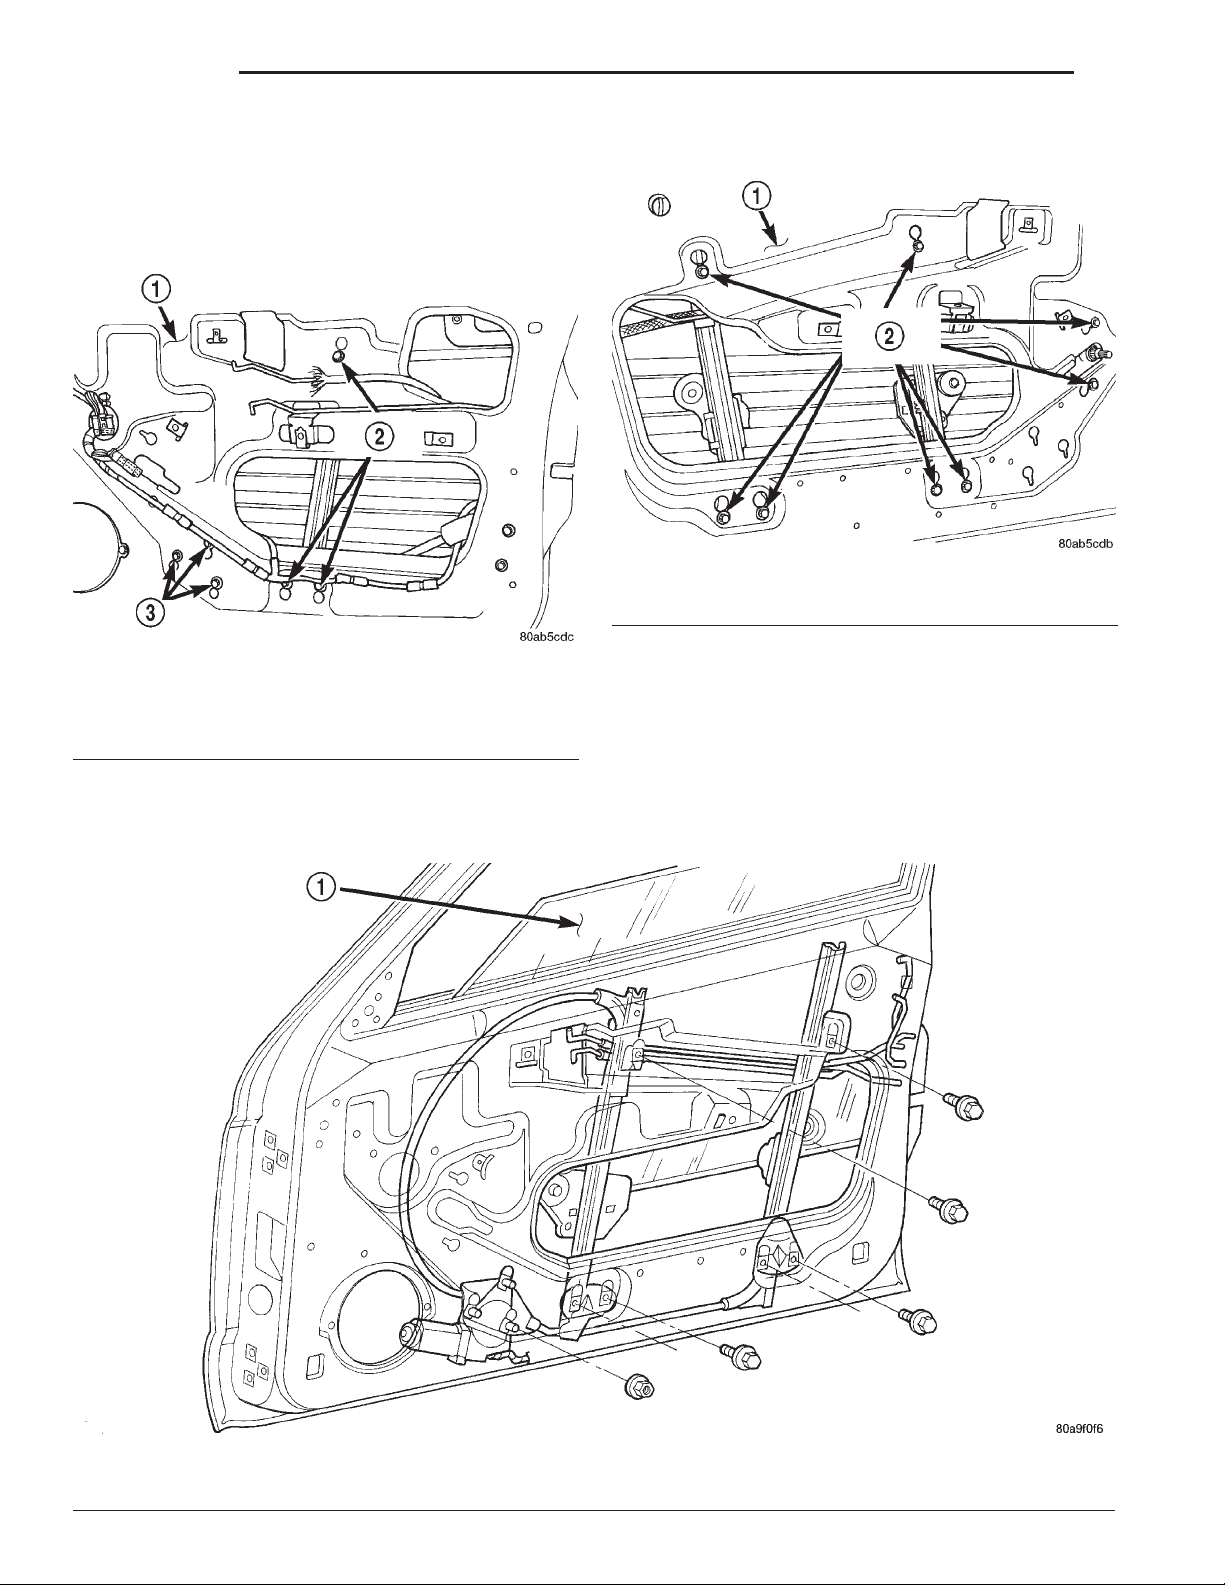
23 - 40 BODY XJ
REMOVAL AND INSTALLATION (Continued)
(4) Loosen the bolts attaching the regulator to the
inner door panel (Fig. 36) and (Fig. 37) as applicable.
(5) Lift the regulator upward to release it from the
key hole slots and remove it through the access hole
in the door inner panel.
Fig. 36 Power Window Regulator
1 – FRONT DOOR
2 – LOOSEN BOLTS
3 – LOOSEN NUTS
INSTALLATION
Fig. 37 Manual Window Regulator
1 – FRONT DOOR
2 – LOOSEN BOLTS
(1) Position the regulator in the door and align
with key hole slots.
(2) Attach the regulator to door inner panel with
bolts (Fig. 38).
(3) Install the window glass
(4) Install the waterdam.
(5) Install the trim panel.
1 – GLASS
Fig. 38 Front Door Regulator
Page 41
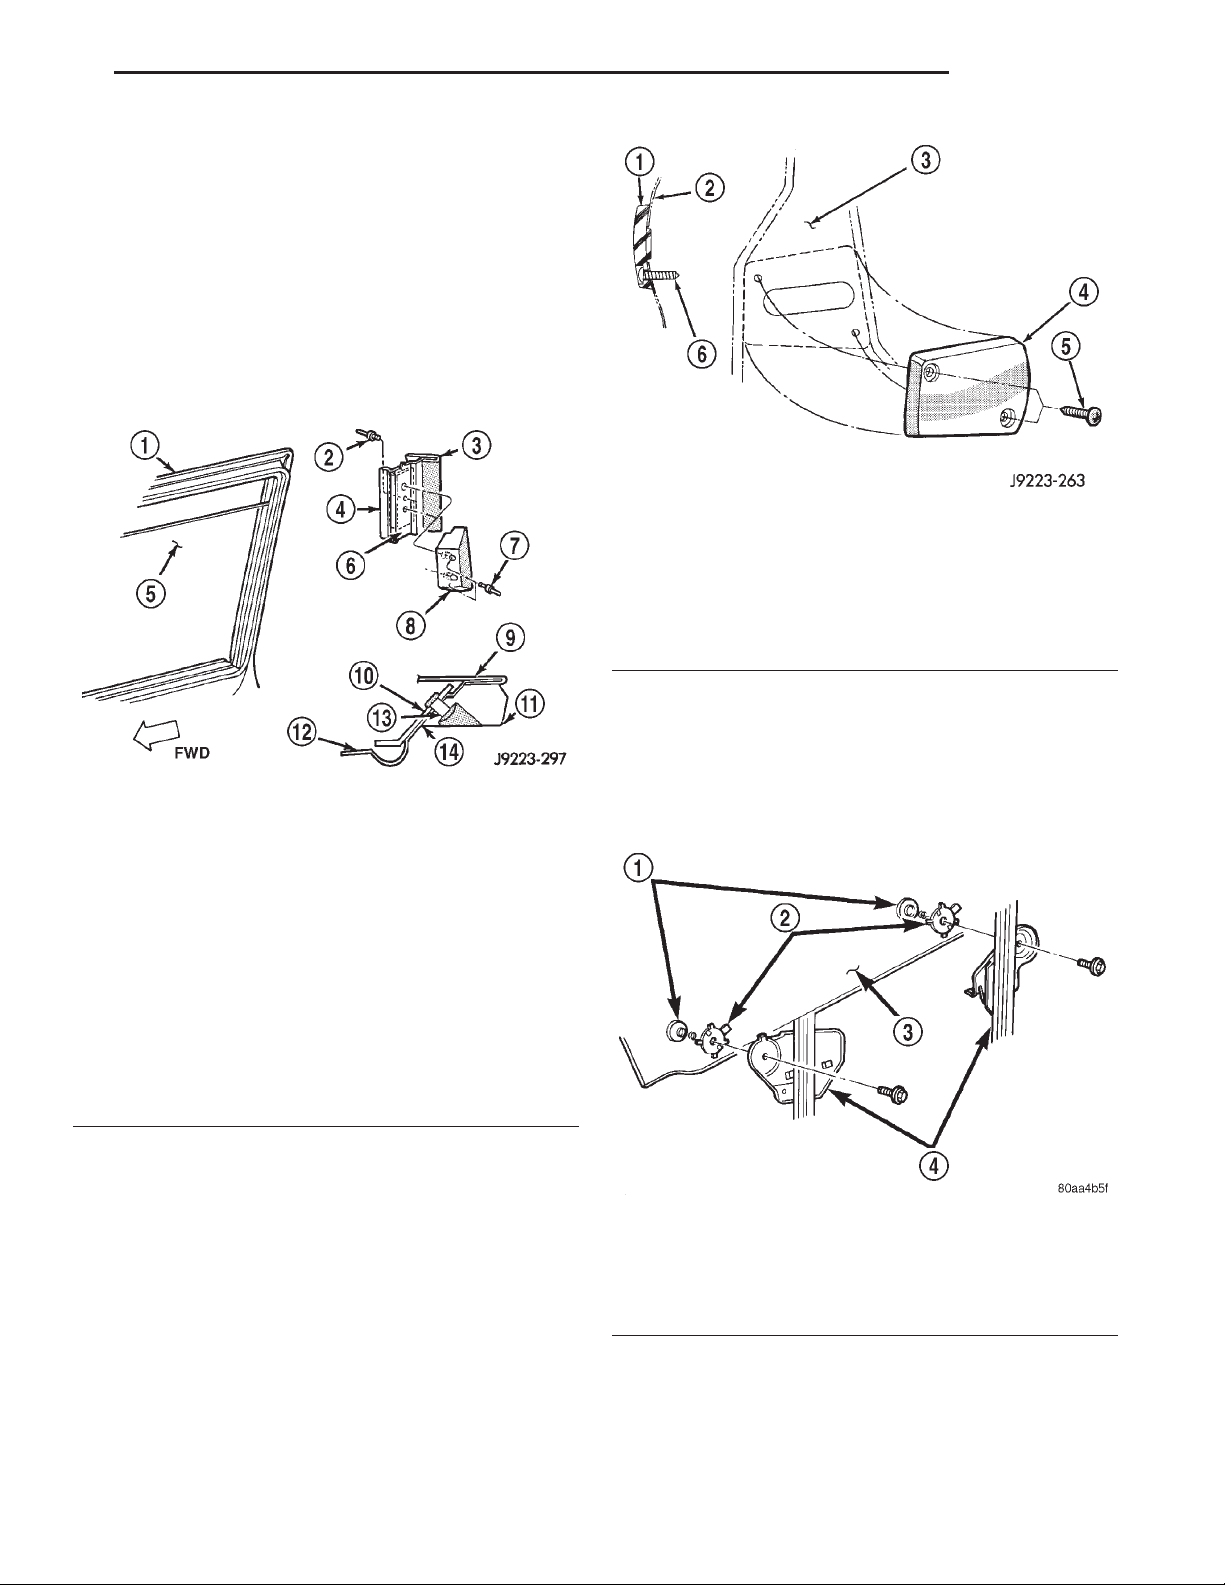
XJ BODY 23 - 41
REMOVAL AND INSTALLATION (Continued)
FRONT DOOR SPACER BLOCKS—TWO-DOOR
VEHICLES
REMOVAL
(1) Upper spacer block: drill-out the rivet heads
and remove them from the reinforcement plate (Fig.
39).
(2) Lower spacer block: remove the screws from
the door face (Fig. 40).
(3) As applicable, remove the spacer block from the
door window frame or door face.
Fig. 40 Front Door Lower Spacer Block—Two-Door
1 – DOOR SPACER
2 – DOOR FACE
3 – DOOR FACE
4 – DOOR SPACER
5 – SCREW
6 – SCREW
Fig. 39 Front Door Upper Spacer Block—Two-Door
1 – FRONT DOOR WINDOW FRAME
2 – RIVET
3 – WINDOW OUTER FRAME
4 – WINDOW INNER FRAME
5 – WINDOW GLASS
6 – REINFORCEMENT PLATE
7 – RIVET
8 – DOOR UPPER SPACER BLOCK
9 – WINDOW OUTER FRAME
10 – REINFORCEMENT PLATE
11 – DOOR UPPER SPACER BLOCK
12 – WINDOW INNER FRAME
13 – RIVET
14 – ADHESIVE
INSTALLATION
(1) As applicable, position the spacer block on the
door window frame or door face.
(2) Upper spacer block: Install the replacement
rivets in the spacer block and reinforcement plate.
(3) Lower spacer block: install the screws in the
door face. Tighten the screws to 1 N·m (11 in-lbs)
torque.
(3) Remove inner and outer belt weatherstrip.
(4) Roll glass up to expose the bolts attaching the
glass to the regulator.
(5) Remove the bolts attaching the glass to the
regulator (Fig. 41).
(6) Lift the glass upward and out of the door.
Fig. 41 Front Door Glass
1 – NUT
2 – RETAINER
3 – WINDOW GLASS
4 – REGULATOR
FRONT DOOR GLASS
REMOVAL
(1) Remove the door trim panel.
(2) Remove the waterdam.
INSTALLATION
(1) Position the glass in the door.
(2) Install the bolts attaching the glass to the reg-
ulator Tighten the bolts to 4 N·m (36 in-lbs) torque.
(3) Install inner and outer belt weatherstrip.
Page 42
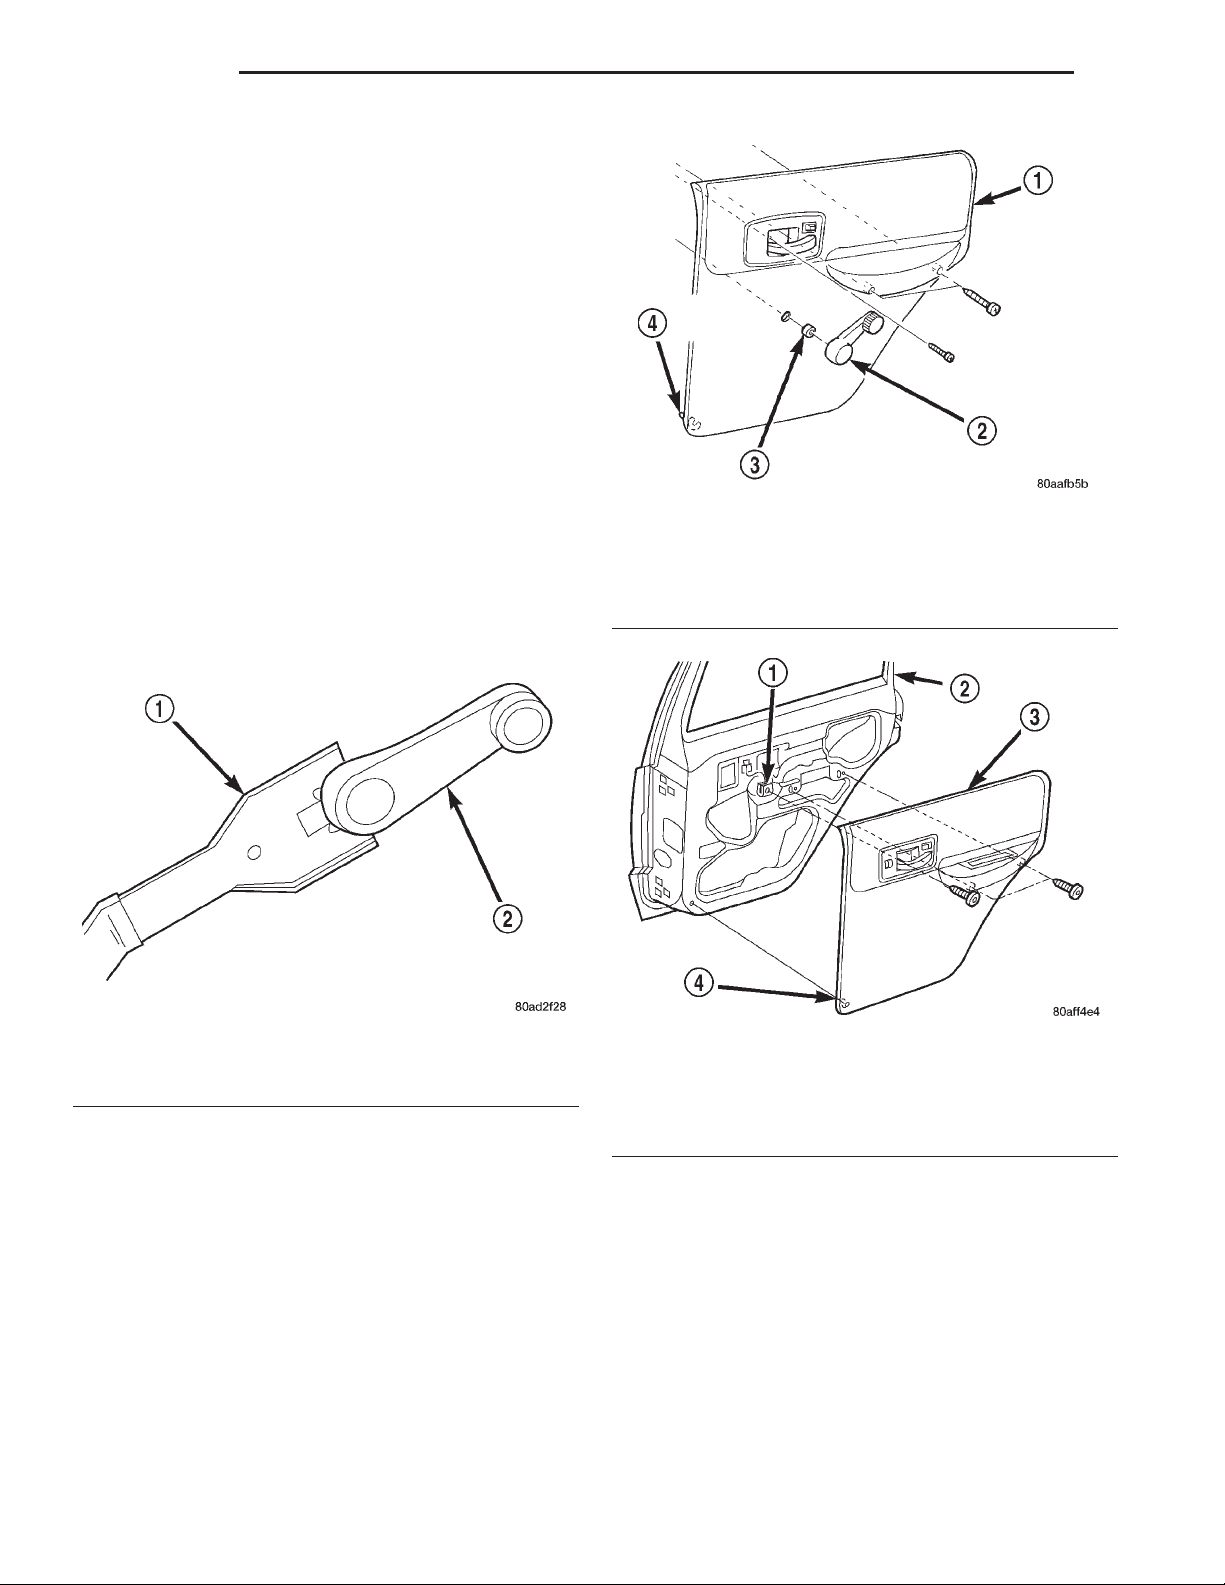
23 - 42 BODY XJ
REMOVAL AND INSTALLATION (Continued)
(4) Attach the door waterdam to the door inner
panel with adhesive/sealant.
(5) Install the waterdam.
(6) Install the door trim panel.
REAR DOOR TRIM PANEL
REMOVAL
(1) Roll window down.
(2) Remove window crank, if equipped (Fig. 42).
(3) Remove the screws attaching the trim panel to
the door inner panel (Fig. 43) and (Fig. 44).
(4) Separate the trim panel fasteners from door
inner panel with a pry tool (use special tool C-4829)
(Fig. 45).
(5) Lift the trim panel up and outward to separate
from the inner belt seal.
(6) Move the door trim panel outward and disconnect the handle-to-latch rods (Fig. 46).
(7) Disconnect the power windows wire harness
connectors, if equipped.
(8) Remove the trim panel from door.
Fig. 43 Rear Door Trim Panel—Manual Window
1 – TRIM PANEL
2 – WINDOW CRANK
3 – SPACER
4 – PUSH-IN FASTENER
Fig. 42 Window Crank—Typical
1 – WINDOW CRANK REMOVAL TOOL
2 – WINDOW CRANK
INSTALLATION
(1) Replace any broken or damaged push-in fasteners.
(2) Connect the power window wire harness connectors, if equipped.
(3) Move the door trim panel outward and connect
the handle-to-latch rods.
(4) Position the trim panel on the inner belt seal
and push down to seat.
(5) Align the locating pins and push-in fasteners
(Fig. 47). Press inward to secure.
(6) Install the screws attaching the trim panel to
the door inner panel.
(7) Install the window crank, if equipped.
Fig. 44 Rear Door Trim Panel—Power Window
1 – U-NUT
2 – REAR DOOR
3 – TRIM PANEL
4 – PUSH-IN FASTENER
REAR DOOR WATERDAM
REMOVAL
(1) Remove door trim panel.
(2) Peel the waterdam from the door.
(3) Route the latch rods and wire harnesses
through the waterdam.
(4) Separate the waterdam from the door inner
panel.
INSTALLATION
(1) Route the latch rods and wire harnesses
through the waterdam.
Page 43
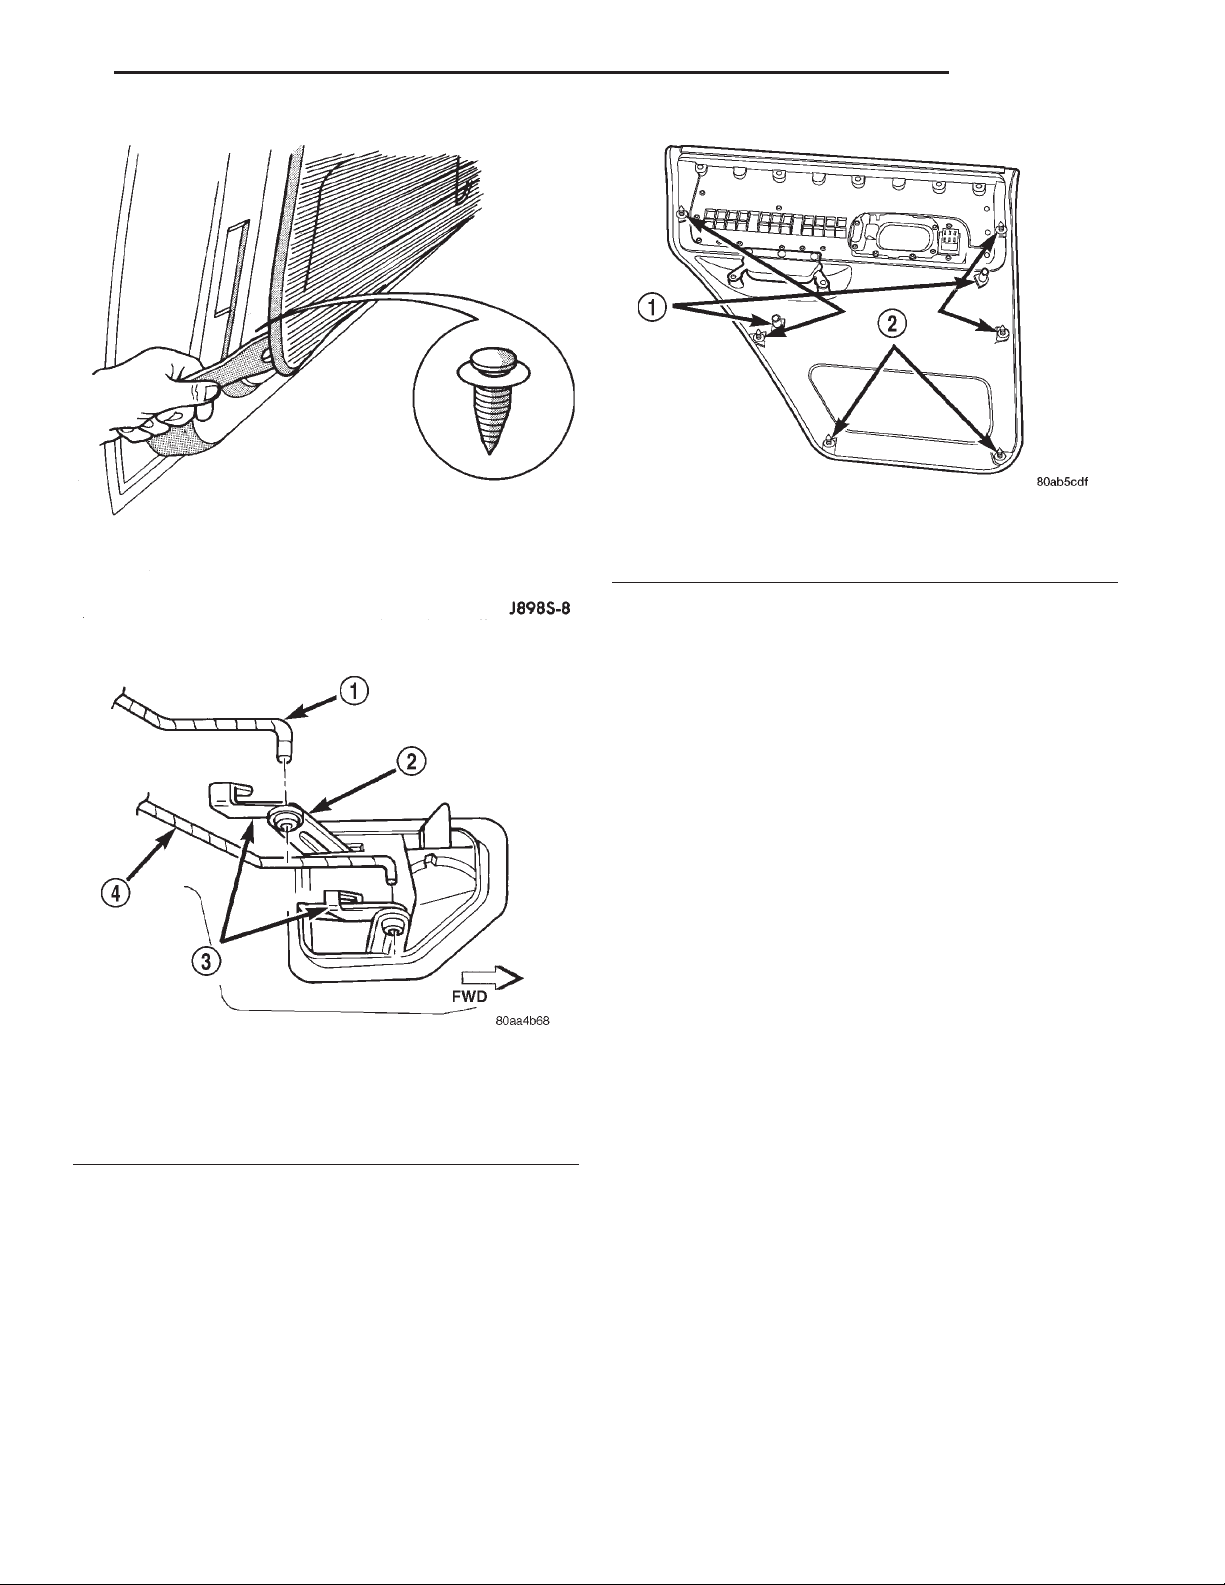
XJ BODY 23 - 43
REMOVAL AND INSTALLATION (Continued)
Fig. 47 Push-In Fasteners
1 – LOCATING PINS
2 – PUSH-IN FASTENERS
(3) Remove bolts attaching hinge to door face.
Fig. 45 Detaching Trim Panel Push-In Fasteners
(4) Separate door from vehicle.
Fig. 46 Latch Rods
1 – INSIDE HANDLE TO LATCH ROD
2 – INSIDE HANDLE ACTUATOR
3 – CLIP
4 – LOCK TO LATCH ROD
(2) Position the waterdam on the door, apply adhesive as necessary and press into place.
(3) Install door trim panel.
REAR DOOR
REMOVAL
(1) Remove door restraint (check) retaining pin.
(2) For vehicles equipped with power windows and
power door locks, remove trim panel and waterdam.
Disconnect all components and route wire harness
out of door.
INSTALLATION
(1) Position door in body opening.
(2) Align door hinges, plates and shims and install
bolts. Tighten bolts to 3 N·m (2 ft. lbs.) torque.
(3) Install door restraint (check).
(4) If applicable, route and connect wire harness
connectors.
(5) If necessary, install door waterdam and trim
panel.
REAR DOOR RESTRAINT
REMOVAL
(1) Remove the door trim panel.
(2) Remove the door restraint (check) retaining pin
from the bracket with a punch.
(3) Remove the nuts and remove the restraint via
the access opening in the door inner panel (Fig. 48).
INSTALLATION
(1) Position the door restraint in the door by way
of the opening and install the nuts. Tighten the nuts
to 10 N·m (7 ft-lbs) torque.
(2) Position the door restraint in bracket with the
holes aligned and insert the retaining pin.
REAR DOOR HINGE
REMOVAL
(1) Remove door restrain (check) pin.
(2) Remove door hinge bolts and shims.
(3) Retain bolts and shims for correct installation.
Page 44
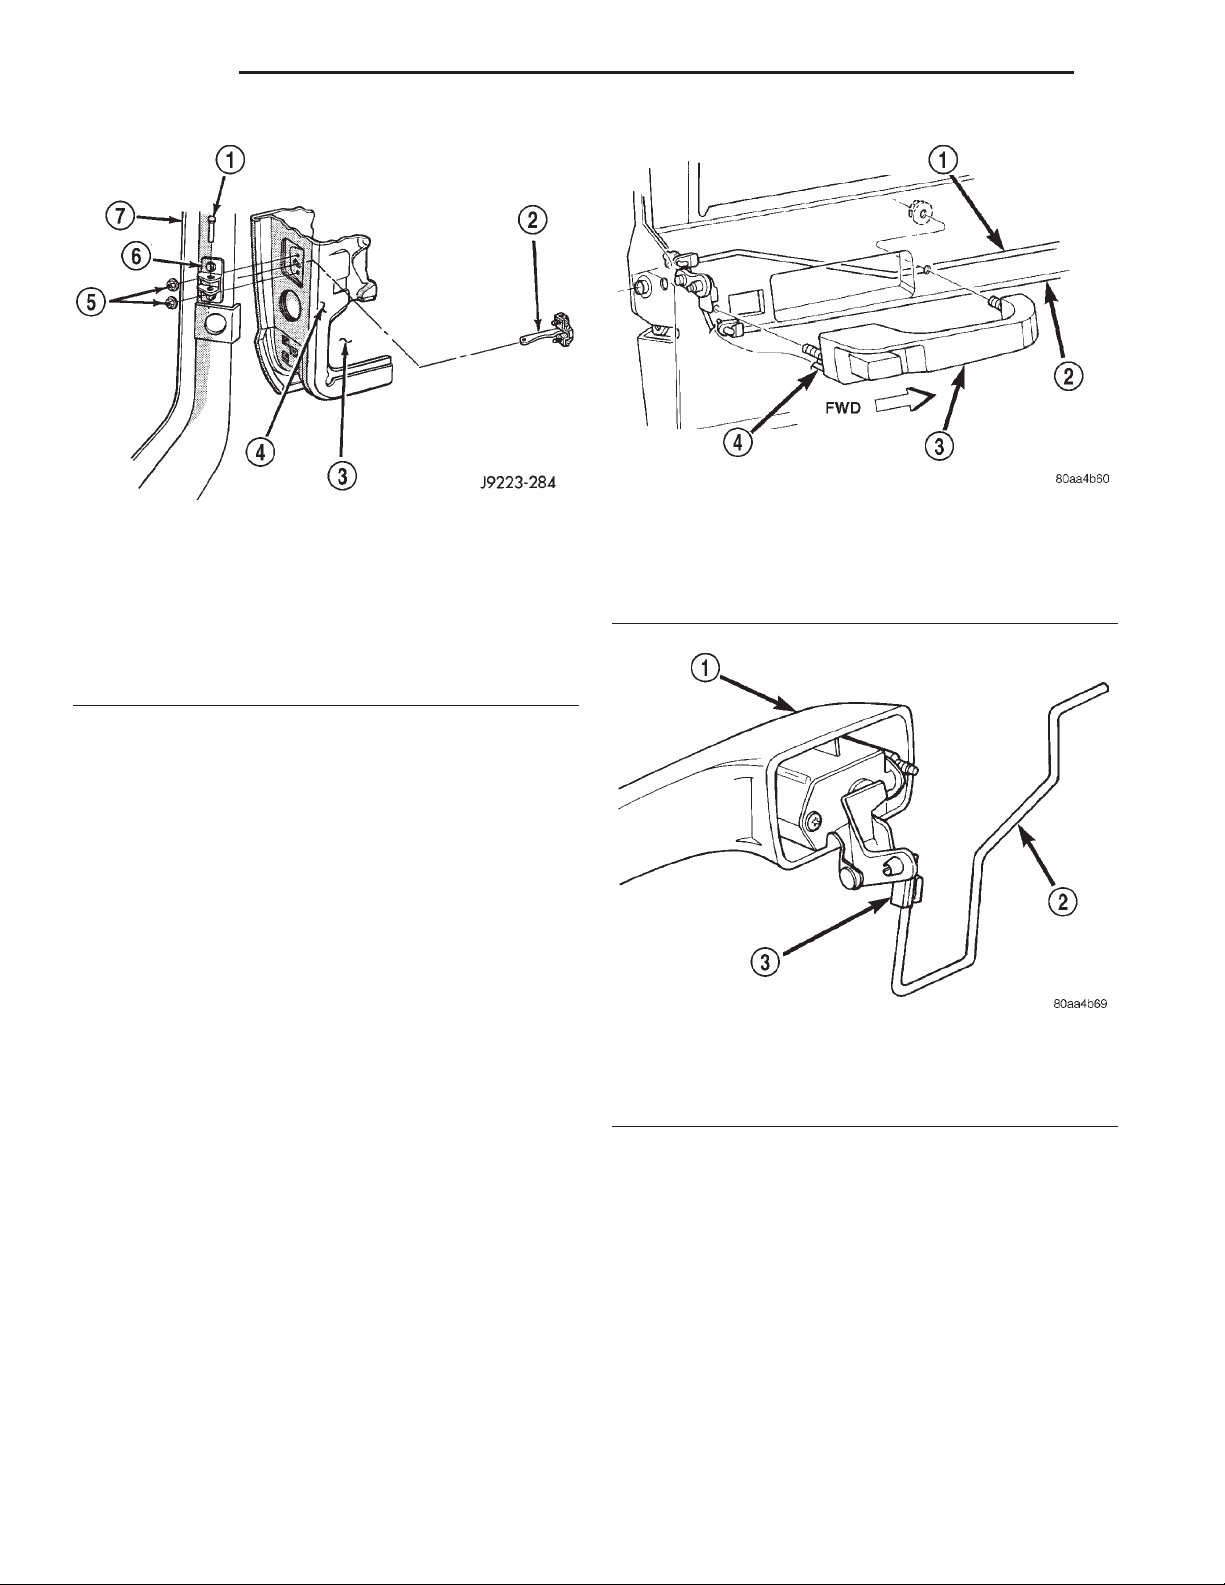
23 - 44 BODY XJ
REMOVAL AND INSTALLATION (Continued)
Fig. 48 Door Restraint (Check)
1 – RETAINING PIN
2 – DOOR RESTRAINT
3 – ACCESS OPENING
4 – DOOR INNER PANEL
5 – NUT
6 – RESTRAINT BRACKET
7 – B-PILLAR
INSTALLATION
(1) Position hinge plates and shims on door face.
(2) Align door hinges and shims with bolt holes
and install hinges. Tighten bolts to 3 N·m (2 ft. lbs.).
(3) Adjust/align latch striker and latch as neces-
sary.
(4) Install door restrain (check) retaining pin.
REAR DOOR OUTSIDE HANDLE
REMOVAL
(1) Remove the door trim panel.
(2) Roll the window to the full up position.
(3) Peel back the waterdam to access the fasteners
for the outside handle.
(4) Remove the latch.
(5) Remove the access hole cover.
(6) Remove the nuts attaching the door handle to
the door (Fig. 49).
(7) Disconnect the handle-to-latch rod from the
handle latch release lever arm (Fig. 50).
INSTALLATION
(1) Position the handle at the door panel.
(2) Connect the latch-to-handle rod to the handle
latch release lever arm.
(3) Install nuts attaching the door handle to the
door.
(4) Install the latch.
(5) Install the waterdam.
(6) Install the trim panel.
Fig. 49 Rear Door Outside Handle
1 – INSIDE HANDLE TO LATCH ROD
2 – LOCK TO LATCH ROD
3 – OUTSIDE HANDLE
4 – OUTSIDE HANDLE TO LATCH ROD
Fig. 50 Latch Rod
1 – OUTSIDE HANDLE
2 – OUTSIDE HANDLE TO LATCH ROD
3 – CLIP
REAR DOOR LATCH
REMOVAL
(1) Remove access plug.
(2) Remove door trim panel.
(3) Remove waterdam.
(4) Remove screws attaching door latch to door
(Fig. 51).
(5) Disconnect all rods from door latch.
(6) Remove door latch from door.
INSTALLATION
(1) Position door latch in door.
(2) Connect all rods to door latch.
Page 45
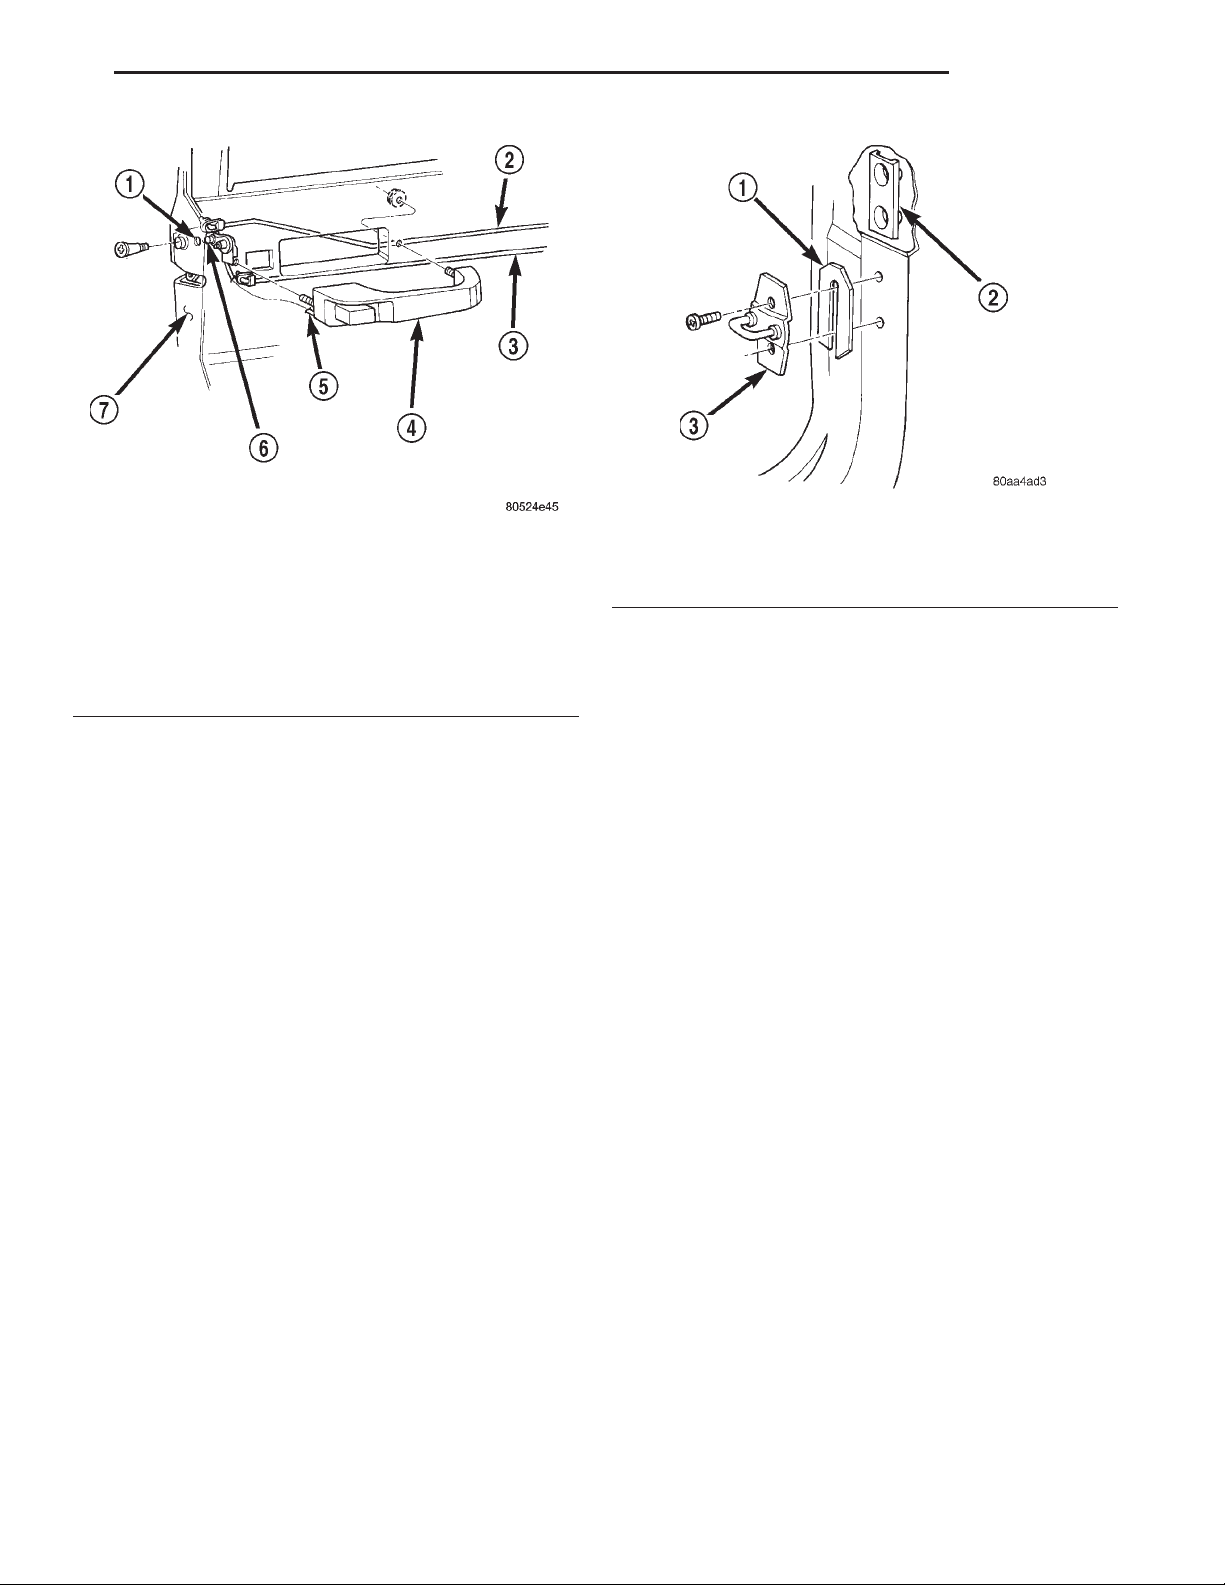
XJ BODY 23 - 45
REMOVAL AND INSTALLATION (Continued)
Fig. 52 Rear Door Latch Striker
Fig. 51 Rear Door Latch
1 – ACCESS HOLE
2 – INSIDE RELEASE TO LATCH ROD
3 – INSIDE LOCK TO LATCH ROD
4 – HANDLE
5 – LATCH ROD
6 – LATCH ADJUSTMENT SCREW
7 – REAR DOOR
1 – SPACER
2 – TAPPING PLATE
3 – STRIKER
(3) Separate the inside handle from the trim
panel.
INSTALLATION
(3) Install screws attaching door latch to door.
Tighten screws to 11 N·m (8 ft. lbs.) torque.
(4) Install waterdam.
(5) Install door trim panel.
(6) Install access plug.
(1) Position the inside handle in the trim panel.
(2) Heat stake the inside handle to the trim panel.
(3) Install the door trim panel.
REAR DOOR INNER BELT WEATHERSTRIP
REAR DOOR LATCH STRIKER
REMOVAL
(1) Using a grease pencil or equivalent, mark posi-
tion of striker.
(2) Remove screws attaching striker to C-pillar
(Fig. 52).
(3) Separate striker from C-pillar.
INSTALLATION
(1) Position and align striker on C-pillar.
(2) Install screws attaching striker to C-pillar.
Tighten screws to 28 N·m (20 ft. lbs.) torque.
REAR DOOR INSIDE HANDLE ACTUATOR
REMOVAL
The rear door inside handle actuator is heat staked
to the rear door trim panel during the manufacturing
process.
(1) Remove the door trim panel.
(2) Using an X–ACTO knife or equivalent, cut the
melted tabs securing the inside handle to the door
trim panel.
REMOVAL
(1) Roll window down.
(2) Remove door trim panel.
(3) Pull up on the rear corner of the weatherstrip
and lift from the door (Fig. 53).
INSTALLATION
(1) Position the weatherstrip on the door.
(2) Push weatherstrip down to seat onto door.
(3) Install door trim panel.
REAR DOOR OUTER BELT WEATHERSTRIP
REMOVAL
(1) Roll window down.
(2) Using a trim stick, pry up the rear outer corner
of the weatherstrip.
(3) Slowly and carefully, lift the weatherstrip up to
separate from the door (Fig. 53).
Page 46
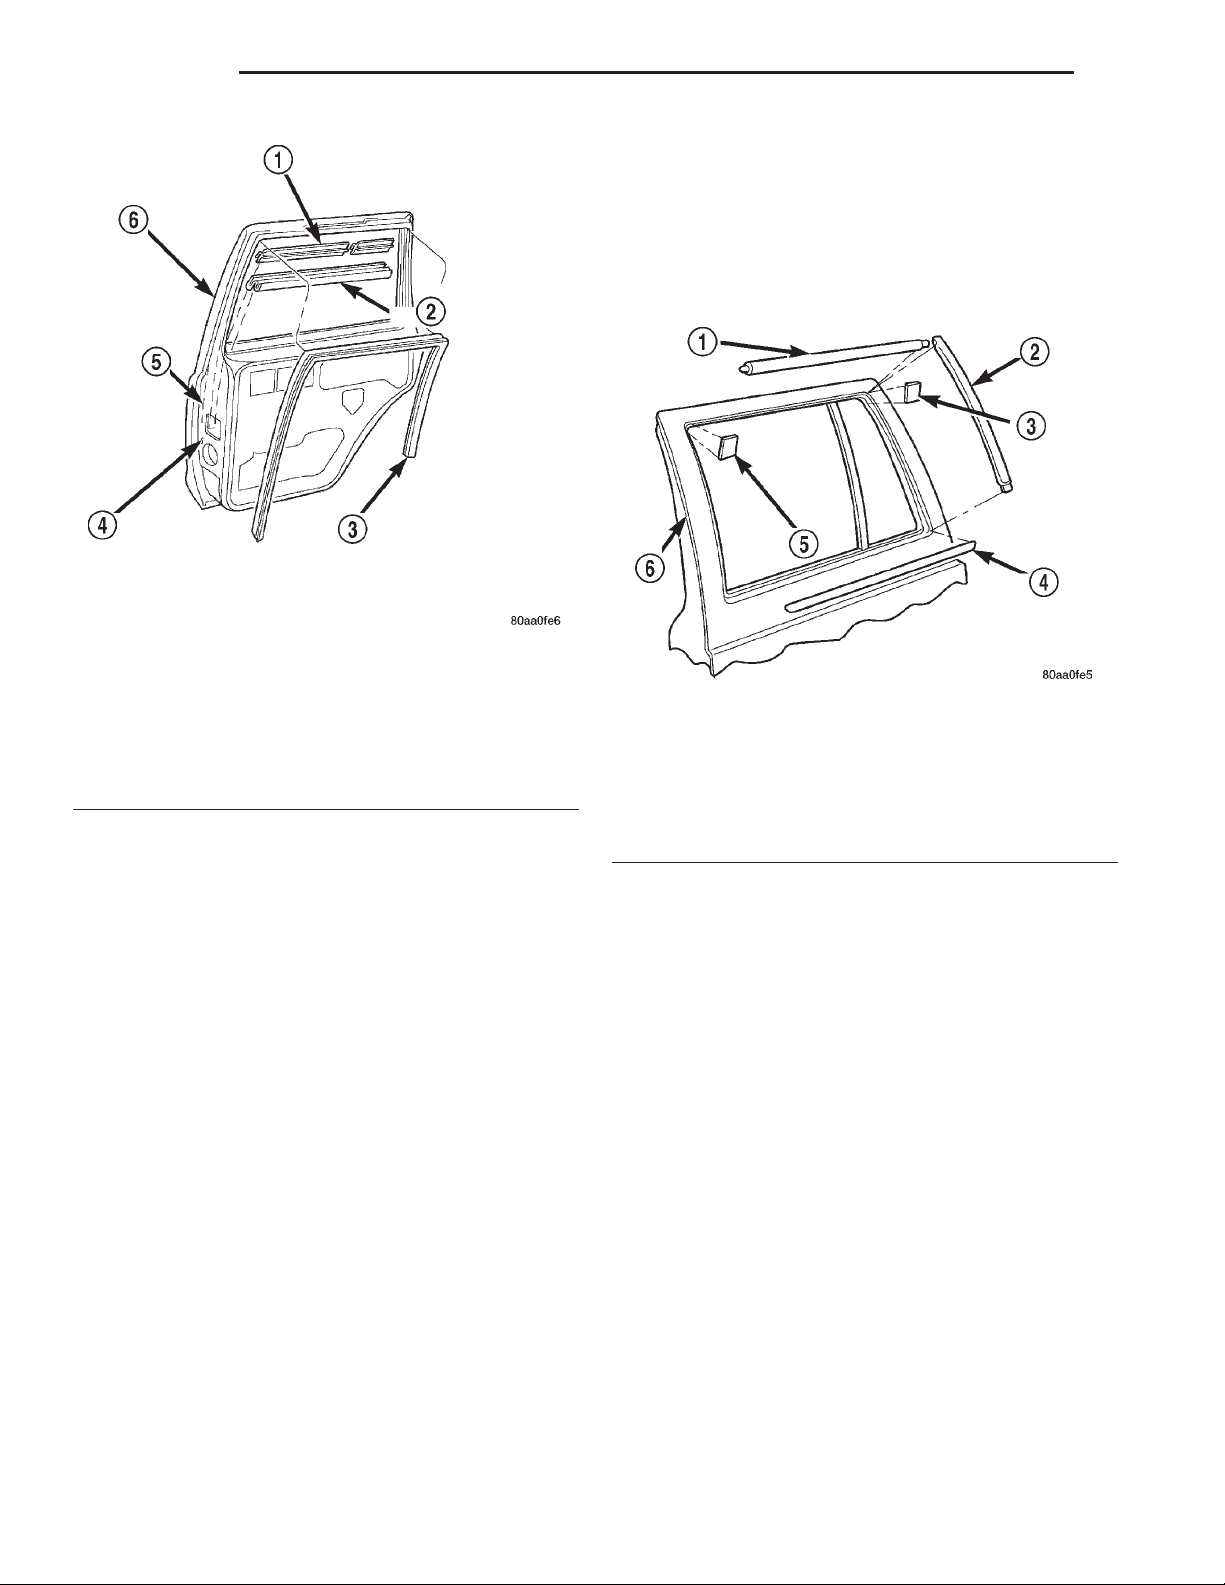
23 - 46 BODY XJ
REMOVAL AND INSTALLATION (Continued)
REAR DOOR GLASS EXTERIOR MOLDING
REMOVAL
(1) Open the window.
(2) Remove the outer belt molding.
(3) Pry and pull the molding sections from the
door panel flange (Fig. 54).
Fig. 53 Rear Door Inner/Outer Belt Weatherstrip
1 – OUTER BELT WEATHERSTRIP
2 – INNER BELT WEATHERSTRIP
3 – GLASS CHANNEL WEATHERSTRIP
4 – DOOR INNER PANEL
5 – GLASS CHANNEL
6 – DOOR OUTER PANEL
INSTALLATION
(1) Position the weatherstrip on the door.
(2) Push weatherstrip down to seat onto door.
REAR DOOR GLASS RUN CHANNEL WEATHERSTRIP
REMOVAL
(1) Remove door trim panel.
(2) Remove waterdam.
(3) Remove window glass.
(4) Starting at rear corner, peel weatherstrip from
around door frame (Fig. 53).
INSTALLATION
(1) Starting at the top corner, press seal into place.
A small amount of adhesive can be used to hold the
weatherstrip in-place, if necessary.
(2) As applicable, move downward evenly until the
weatherstrip seal is fully seated in the channel.
(3) Install window glass.
(4) Install waterdam.
(5) Install door trim panel.
Fig. 54 Rear Glass Exterior Molding
1 – UPPER MOLDING
2 – MOLDING
3 – SHIM
4 – OUTER BELT MOLDING
5 – SHIM
6 – OUTER DOOR PANEL
INSTALLATION
(1) Starting at the forward end of the upper molding, force the molding onto the door panel flange and
continue rearward until it is completely seated on
the flange.
(2) Mate the rear molding with the upper molding
and force the molding edge inward.
(3) Continue pressing and moving downward to
complete the installation.
(4) Install the outer belt molding.
REAR DOOR WEATHERSTRIP
REMOVAL
(1) Remove B-pillar upper trim.
(2) Remove inner scuff plate.
(3) Remove B-pillar lower trim.
(4) Remove upper door opening trim.
(5) Grasp seal and separate from door opening
(Fig. 55).
Page 47
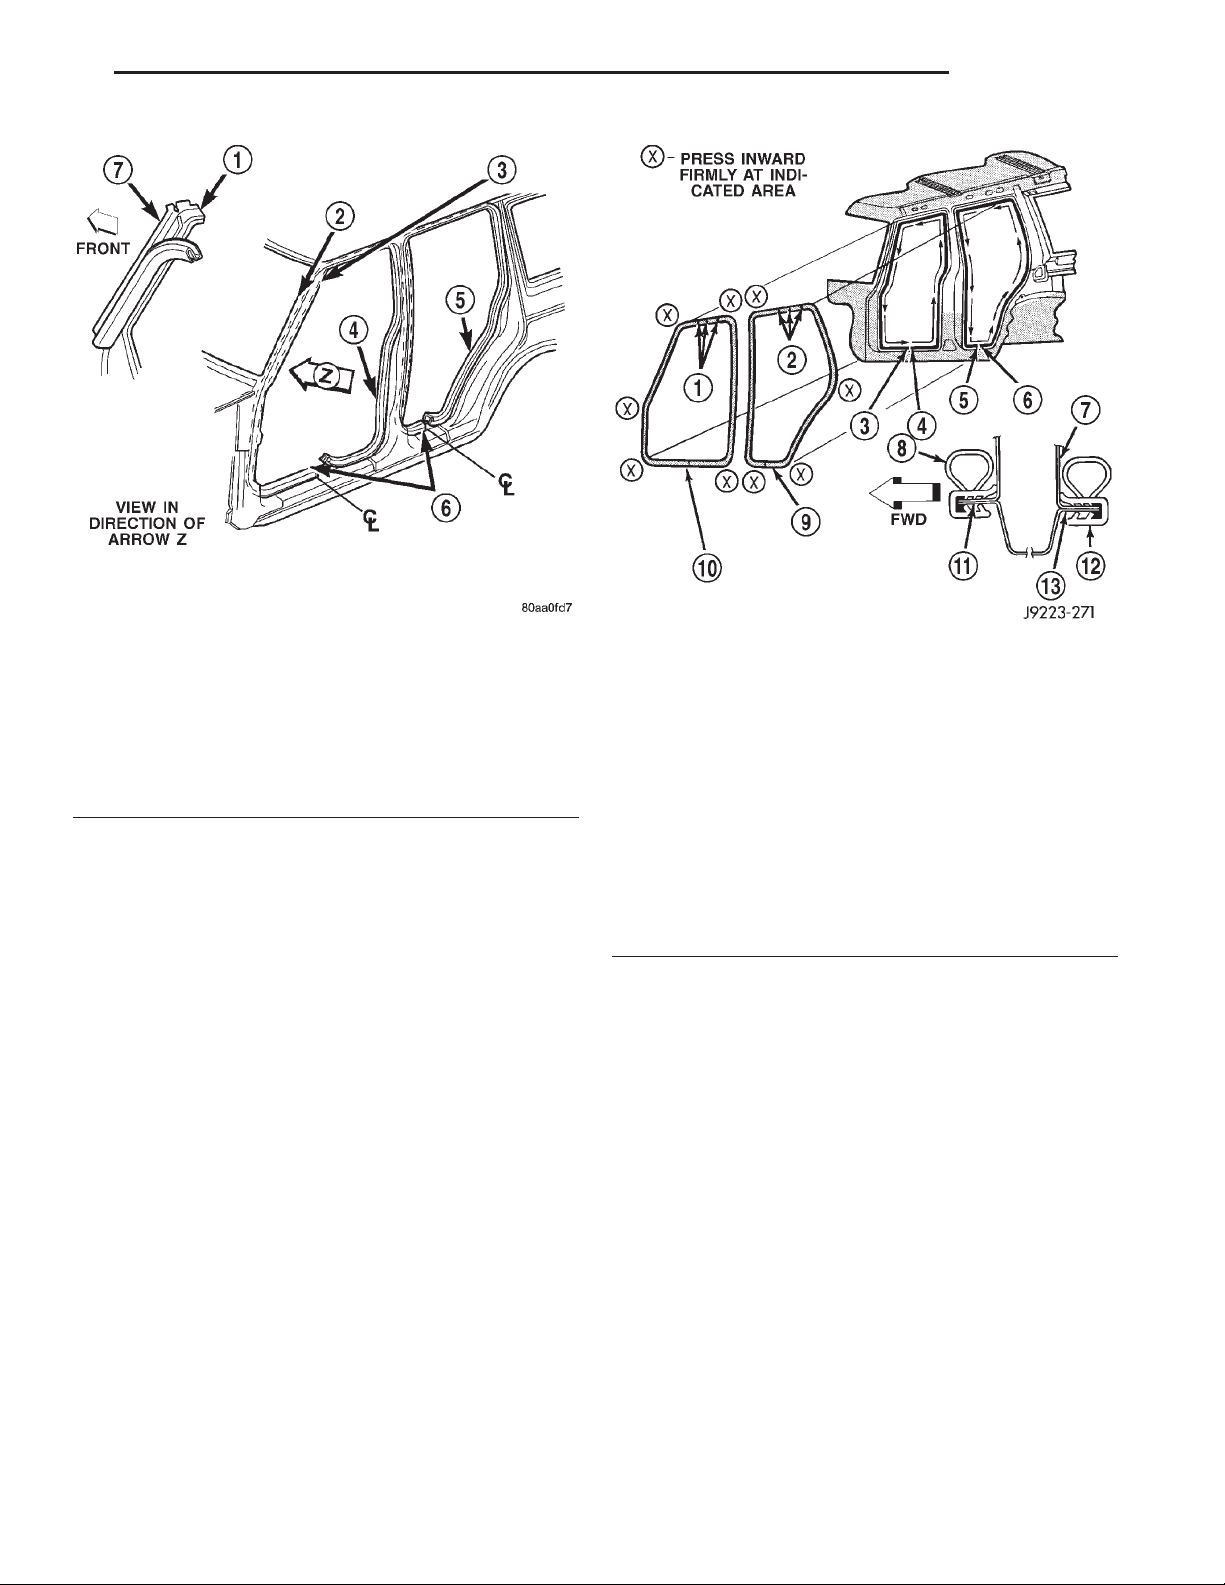
XJ BODY 23 - 47
REMOVAL AND INSTALLATION (Continued)
Fig. 55 Door Opening Weatherstrip
1 – FRONT DOOR SEAL
2 – A PILLAR
3 – SECONDARY DOOR SEAL
4 – FRONT DOOR SEAL
5 – REAR DOOR SEAL
6 – ENDS MEET AT CENTERLINE
7 – A PILLAR
INSTALLATION
(1) When installing a door opening weatherstrip
seal, start at the door sill center line.
(2) Move upward and around edge of door opening.
Seat seal on flange.
(3) Move upward and around the perimeter of the
door opening and seat the weatherstrip on the flange
(Fig. 56).
(4) Install upper door opening trim.
(5) Install inner scuff plate.
(6) Install B-pillar lower trim panel.
(7) Install B-pillar upper trim panel.
REAR DOOR WINDOW REGULATOR
REMOVAL
(1) Remove the door trim panel.
(2) Remove the waterdam.
(3) Remove the bolt attaching the window glass to
the regulator and support the glass (Fig. 57).
(4) Remove the lower bolts attaching the regulator
to the inner door panel (Fig. 58).
(5) Remove the nuts attaching the regulator motor
to the inner door panel, if equipped.
(6) Loosen the upper bolt that attaches the regulator to the inner door panel.
Fig. 56 Door Opening Weatherstrip
1 – VENT HOLES
2 – VENT HOLES
3 – FINISH
4–START
5 – FINISH
6–START
7 – B-PILLAR
8 – SEAL
9 – REAR DOOR WEATHERSTRIP SEAL
10 – FRONT DOOR WEATHERSTRIP SEAL
11 – FLANGE
12 – SEAL
13 – FLANGE
(7) Disconnect the wire harness connector from the
regulator drive motor, if equipped.
(8) Remove the regulator and drive motor, if
equipped.
INSTALLATION
(1) Position window regulator and, if equipped,
drive motor within the door panels.
(2) Install the fasteners attaching the regulator to
the door inner panel.
(3) Connect the regulator wire harness connector.
(4) Position the window glass at the regulator and
install the retainer, bushing and bolt.
(5) Install the waterdam.
(6) Install the trim panel.
REAR DOOR WINDOW GLASS
REMOVAL
(1) Lower the window glass.
(2) Remove the trim panel.
Page 48
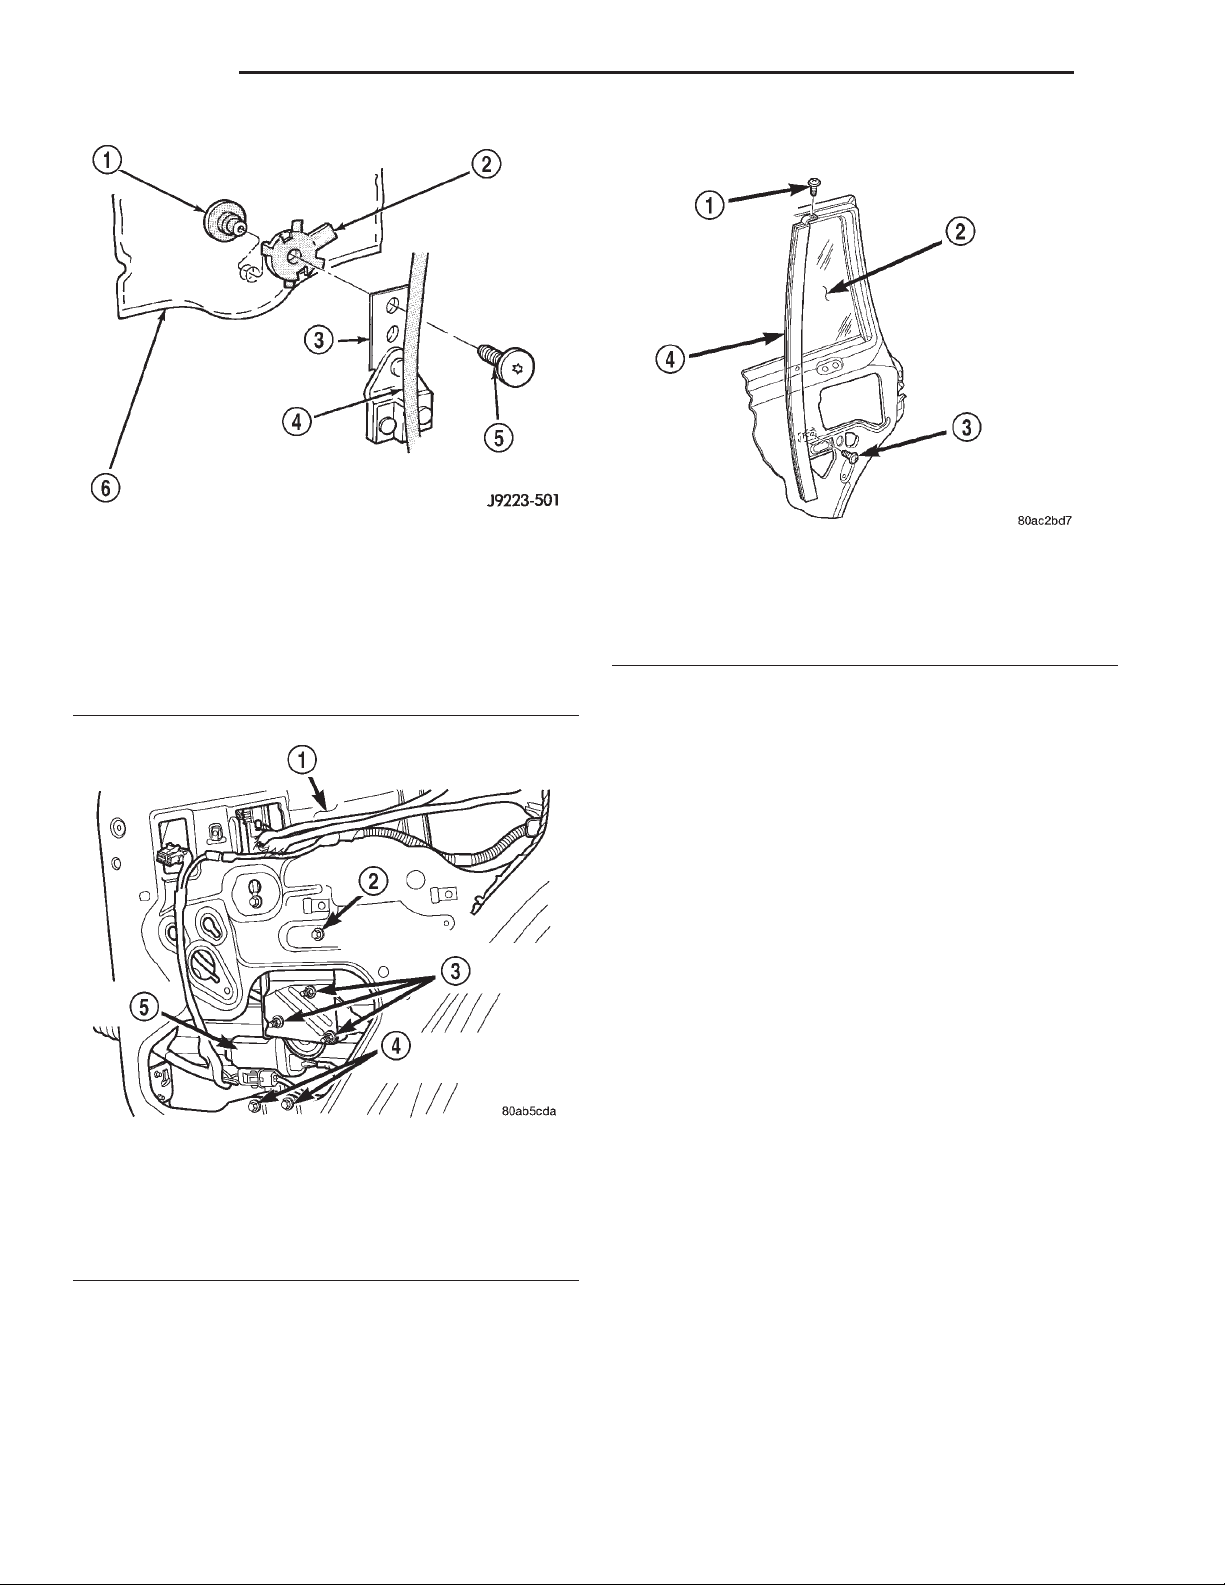
23 - 48 BODY XJ
REMOVAL AND INSTALLATION (Continued)
(8) Remove the window glass from door.
Fig. 57 Regulator To Glass Screw Removal/
Installation
1 – ANCHOR
2 – RETAINER (WITH TABS)
3 – BRACKET
4 – REGULATOR
5 – SCREW AND BUSHING
6 – WINDOW GLASS
Fig. 58 Rear Door Window
1 – REAR DOOR
2 – LOOSEN BOLT
3 – REMOVE NUTS
4 – REMOVE BOLTS
5 – REGULATOR MOTOR
(3) Remove the waterdam.
(4) Remove inner and outer beltline weatherstrip.
(5) Remove the window weatherstrip from the
door.
(6) Remove the division bar/stationary glass (Fig.
59).
(7) Remove the window glass screw, bushing and
retainer from the regulator.
Fig. 59 Division Bar/Stationary Glass
1 – UPPER SCREW
2 – GLASS
3 – LOWER SCREW
4 – DIVISION BAR
INSTALLATION
(1) Install the glass in the door, and install the
retainer, bushing and screw.
(2) Tighten the glass attaching screw 6 N·m (53 in-
lbs) torque.
(3) Install the division bar/stationary glass in the
door.
(4) Install the glass run channel weatherstrip.
(5) Install the inner and outer beltline weather-
strip.
(6) Install the waterdam.
(7) Install the trim panel.
BODY SIDE MOLDING
REMOVAL
(1) Loosen the body side molding (Fig. 60) with a
heat gun.
(2) Lift edge of molding with a putty knife and
peel molding from body panel. Apply heat to any
location where the molding remains adhered to a
panel.
(3) Remove the adhesive from the body panel with
Mopar Super Clean solvent or equivalent.
(4) If the original molding will be installed, also
remove all adhesive from it.
INSTALLATION
(1) If the original molding will be installed, apply
3M 5344 double-sided tape on the molding.
(2) For vertical alignment, use masking tape or a
string as reference.
Page 49
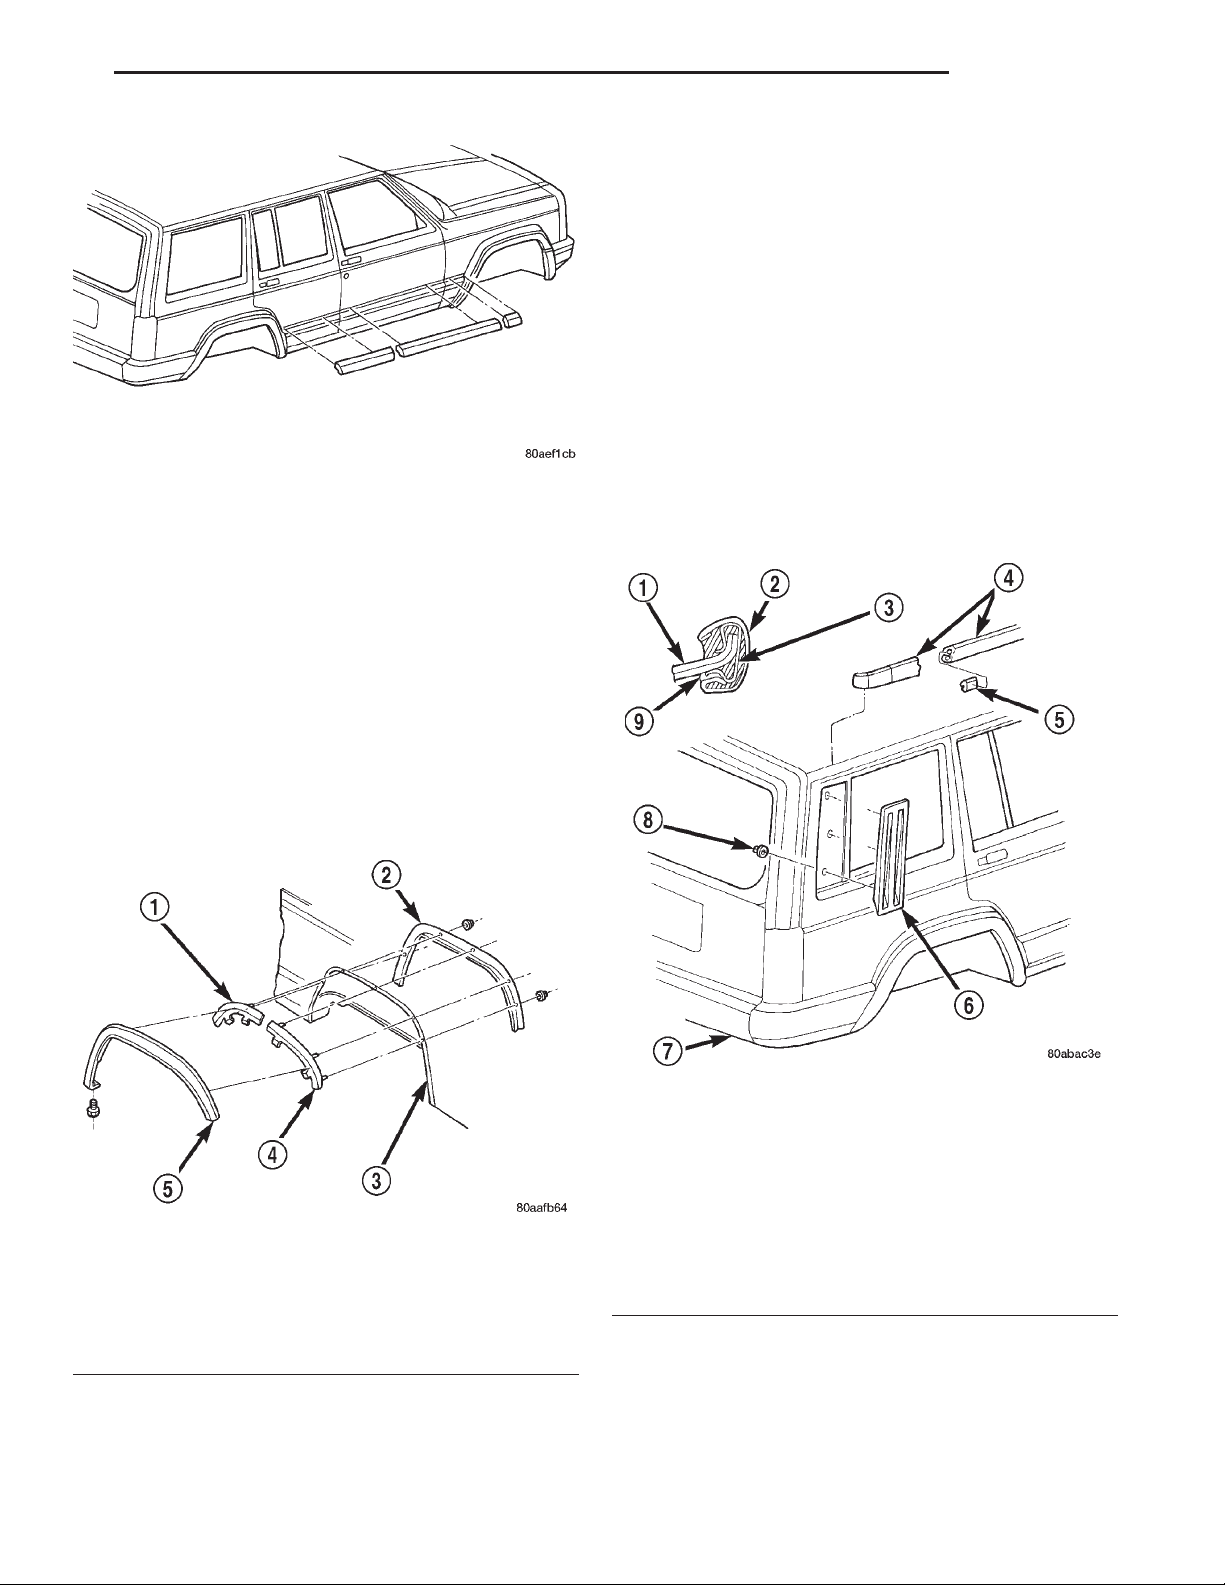
XJ BODY 23 - 49
REMOVAL AND INSTALLATION (Continued)
(2) Install the nuts attaching the fender flare and
retainer to the wheelhouse liner.
(3) Install the screw attaching the lower part of
flare to the bottom of the fender.
QUARTER WINDOW APPLIQUE
REMOVAL
(1) Remove the liftgate pillar trim.
(2) Remove nuts from inside vehicle (Fig. 62).
(3) Using a trim sick or equivalent, carefully pry
the applique the from panel.
INSTALLATION
Fig. 60 Body Side Molding—4-Door
(3) Remove the backing from the tape, align the
molding and position it on the body panel.
(4) Press the molding onto the body panel with a
roller or hand pressure.
(1) Position the replacement applique the on panel
and install the nuts.
(2) Install the liftgate pillar trim.
REAR FENDER FLARE
REMOVAL
(1) Remove the screw attaching the lower part of
flare to the bottom of the fender.
(2) Remove the nuts attaching the fender flare
retainer to the wheelhouse liner (Fig. 61).
(3) Separate the fender flare and retainer from the
fender.
Fig. 61 Fender Flare
1 – CENTER RETAINER
2 – WHEELHOUSE LINER
3 – BODY
4 – REAR RETAINER
5 – FENDER FLARE
Fig. 62 Quarter Window Applique and Drip Molding
1 – VEHICLE ROOF
2 – DRIP MOLDING
3 – DRIP MOLDING CLIP
4 – DRIP MOLDING
5 – CLIP
6 – QUARTER WINDOW APPLIQUE
7 – VEHICLE BODY
8 – NUT
9 – SEALANT
DRIP RAIL MOLDING
INSTALLATION
(1) Position the fender flare and retainer on the
fender.
REMOVAL
(1) Pry the clips from the roof flange.
(2) Remove the clips and molding from the roof
flange (Fig. 62).
Page 50
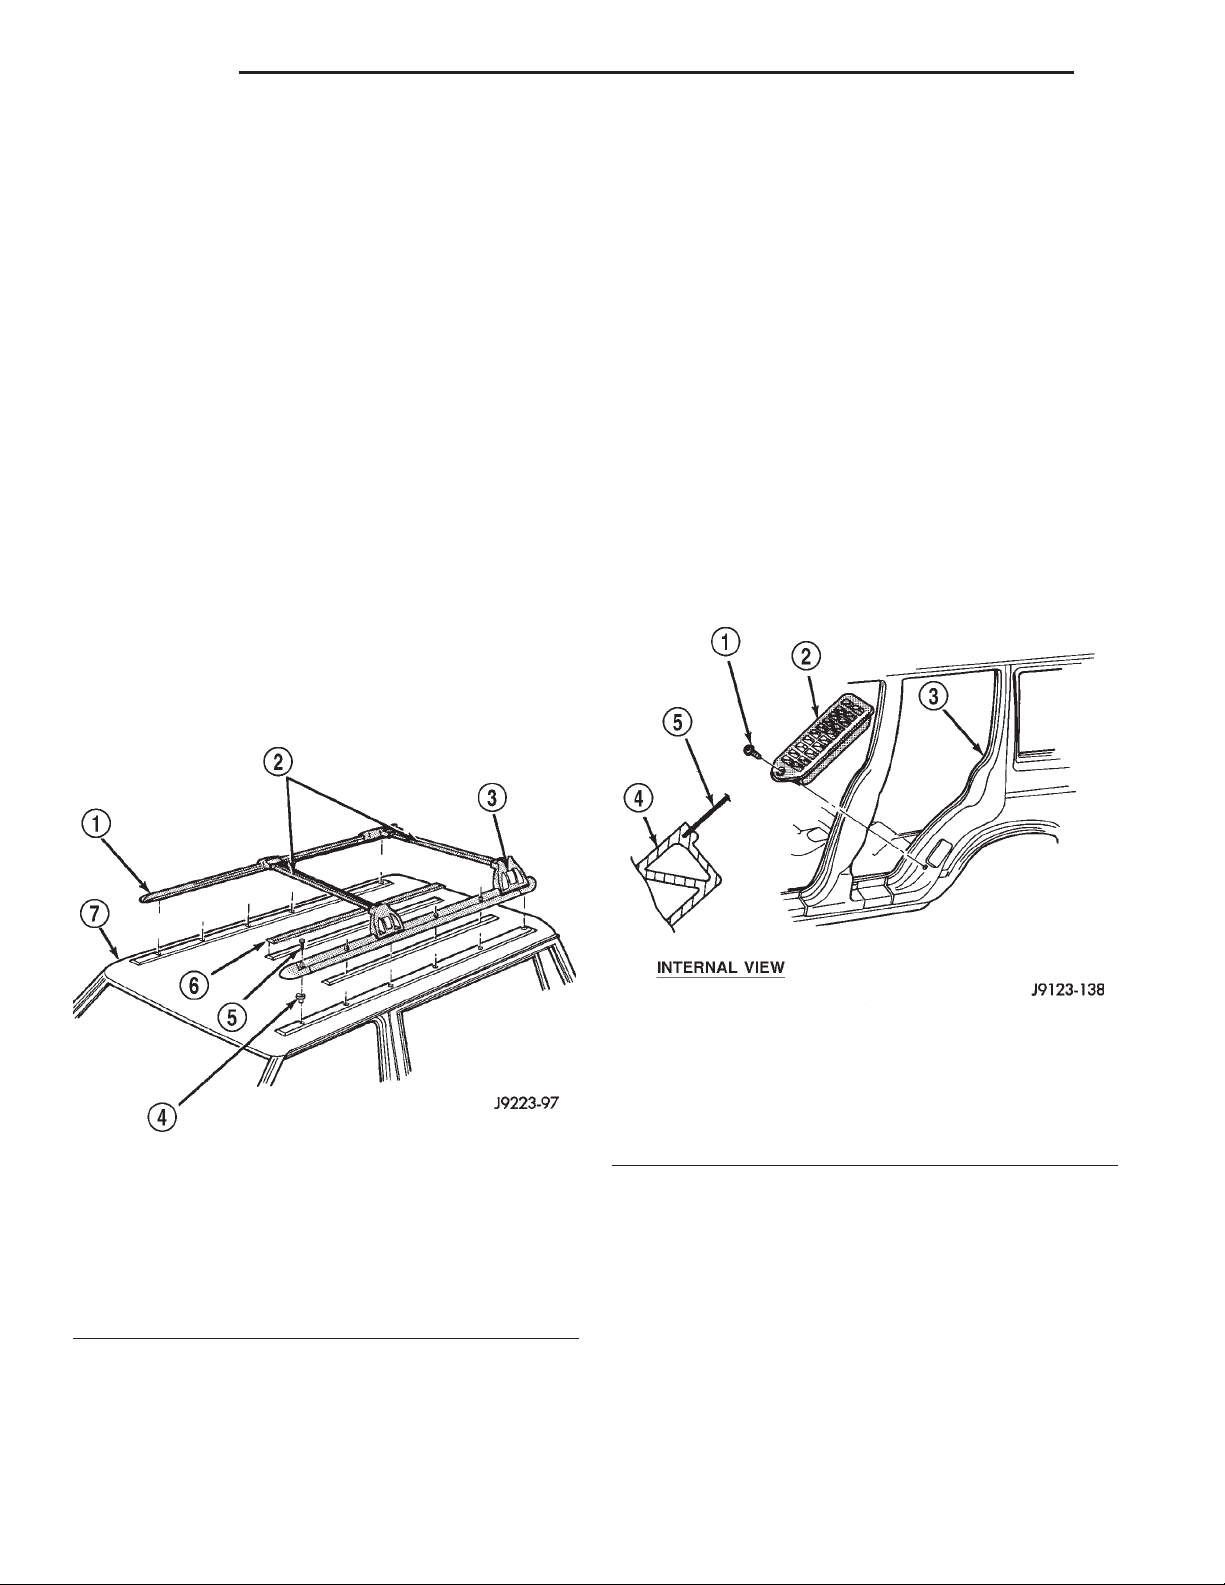
23 - 50 BODY XJ
REMOVAL AND INSTALLATION (Continued)
(3) Remove the remaining sealant and clean the
roof flange.
INSTALLATION
(1) Position the drip rail molding with clips at the
roof flange and force the clips onto the roof flange.
(2) Apply sealant to the inner side of the molding
to seal the roof flange.
LUGGAGE RACK
REMOVAL
(1) Remove slide rail screws (Fig. 63).
(2) Remove luggage rack from roof.
NOTE: Skid strips are attached to roof panel with
adhesive.
(3) Loosen each skid strip with a heat gun.
(4) Lift one edge of each skid strip with a putty
knife and peel it from roof panel.
(5) Remove original adhesive from roof with an
adhesive removal solution.
(6) If original skid strips are installed, remove all
original adhesive from m.
(3) Verify that each skid strip is properly aligned.
(4) Press each skid strip onto roof panel with a
roller (or use hand pressure).
NOTE: To prevent water leaks, apply 3M Drip-Chek
Sealant, or equivalent.
(5) Position luggage rack on roof with screw holes
aligned.
(6) Install and tighten slide rail screws.
AIR EXHAUST GRILLE
REMOVAL
(1) Remove the screw that attaches the grille to
door the opening panel (Fig. 64).
(2) Pry the bottom edge of the grille from the door
opening panel.
(3) Pull downward and remove the grille from
exhaust port in the door opening panel.
Fig. 63 Luggage Rack
1 – SIDE RAIL
2 – CROSS RAIL
3 – CROSS RAIL ADJUSTMENT RELEASE BUTTON
4 – RIVET-NUT
5 – SCREW
6 – SKID STRIP
7 – ROOF
INSTALLATION
(1) Install 3M 06379 double-sided tape, or an
equivalent on skid strips.
(2) Remove backing from double-sided tape, align
each skid strip on roof, and position it on roof panel.
Fig. 64 Door Opening Air Exhaust Grille
1 – SCREW
2 – AIR EXHAUST GRILLE
3 – C-PILLER
4 – AIR EXHAUST GRILLE
5 – DOOR OPENING PANEL
INSTALLATION
(1) Position the slot located in the upper end of
replacement grille at the exhaust port and insert
edge in the slot.
(2) Push inward and seat the grille in the exhaust
port.
(3) Install the screw to attach the grille to the door
opening panel.
Page 51
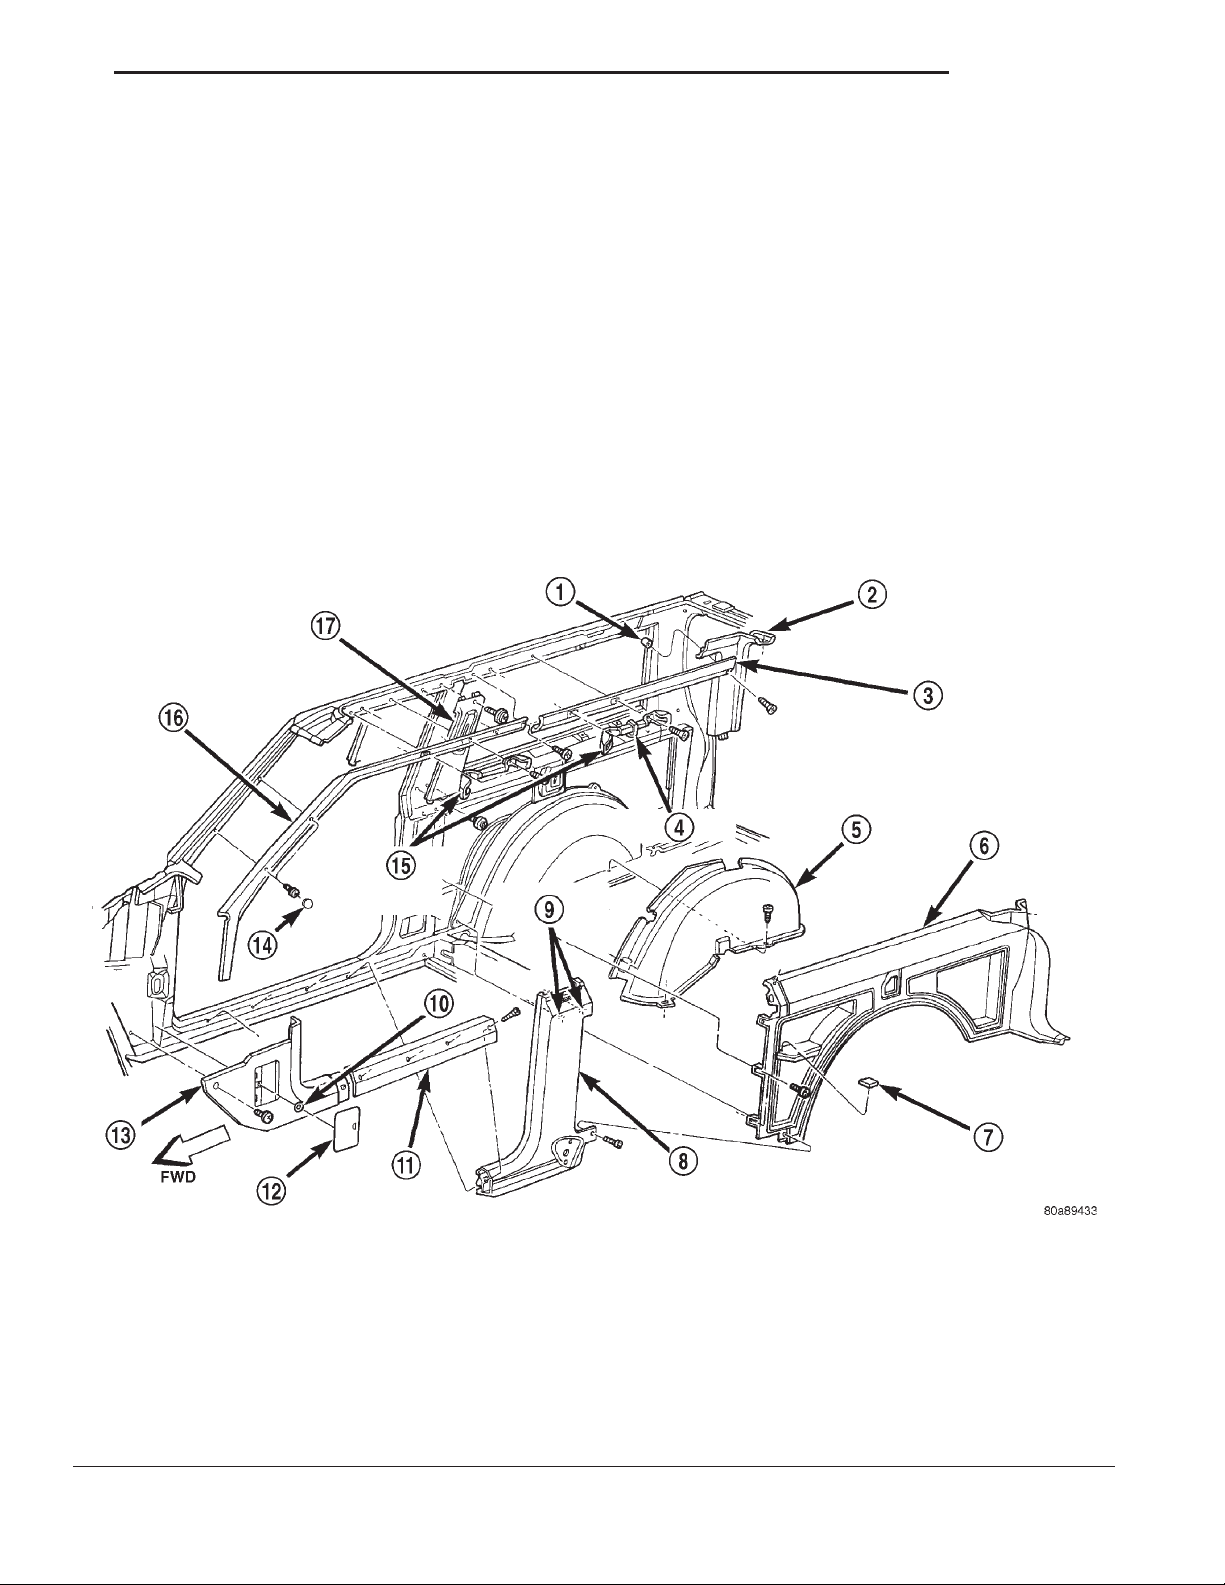
XJ BODY 23 - 51
REMOVAL AND INSTALLATION (Continued)
A-PILLAR TRIM
REMOVAL
(1) Remove front and rear assist handles, if
equipped.
(2) Remove the inner scuff plate.
(3) Remove the lower A-pillar cowl trim.
(4) Using a small flat blade, pry the trim plugs
from the A-pillar trim.
(5) Remove the screws attaching the A-pillar trim
to the A-pillar (Fig. 65).
(6) Separate the A-pillar trim from the A-pillar.
INSTALLATION
(1) Position the A-pillar trim on the A-pillar.
(2) Install the screws attaching the A-pillar trim to
the A-pillar.
(3) Install the trim plugs.
(4) Install the lower A-pillar cowl trim.
(5) Install the inner scuff plate.
(6) Install the assist handles.
LOWER A-PILLAR COWL TRIM
REMOVAL
(1) Remove the inner scuff plate.
(2) Remove the nut behind the fuse panel access
door (Right side only) (Fig. 66).
(3) Remove the fasteners attaching the lower A-pillar cowl trim to the A-pillar lower cowl.
(4) Separate the lower A-pillar cowl trim from the
A-pillar lower cowl.
1 – SPACER
2 – LIFTGATE PILLAR TRIM
3 – UPPER QUARTER PANEL TRIM
4 – COAT HOOK
5 – WHEELHOUSE COVER
6 – LOWER QUARTER PANEL TRIM
7 – COVER
8 – LOWER B-PILLAR TRIM
9 – PUSH-IN FASTENER
Fig. 65 Trim Panels—2-Door Vehicles
10 – NUT
11 – INNER SCUFF PLATE
12 – ACCESS DOOR
13 – COWL PANEL TRIM
14 – TRIM PLUG
15 – OVERHEAD ASSIST HANDLE
16 – A-PILLAR TRIM
17 – UPPER B-PILLAR TRIM
Page 52
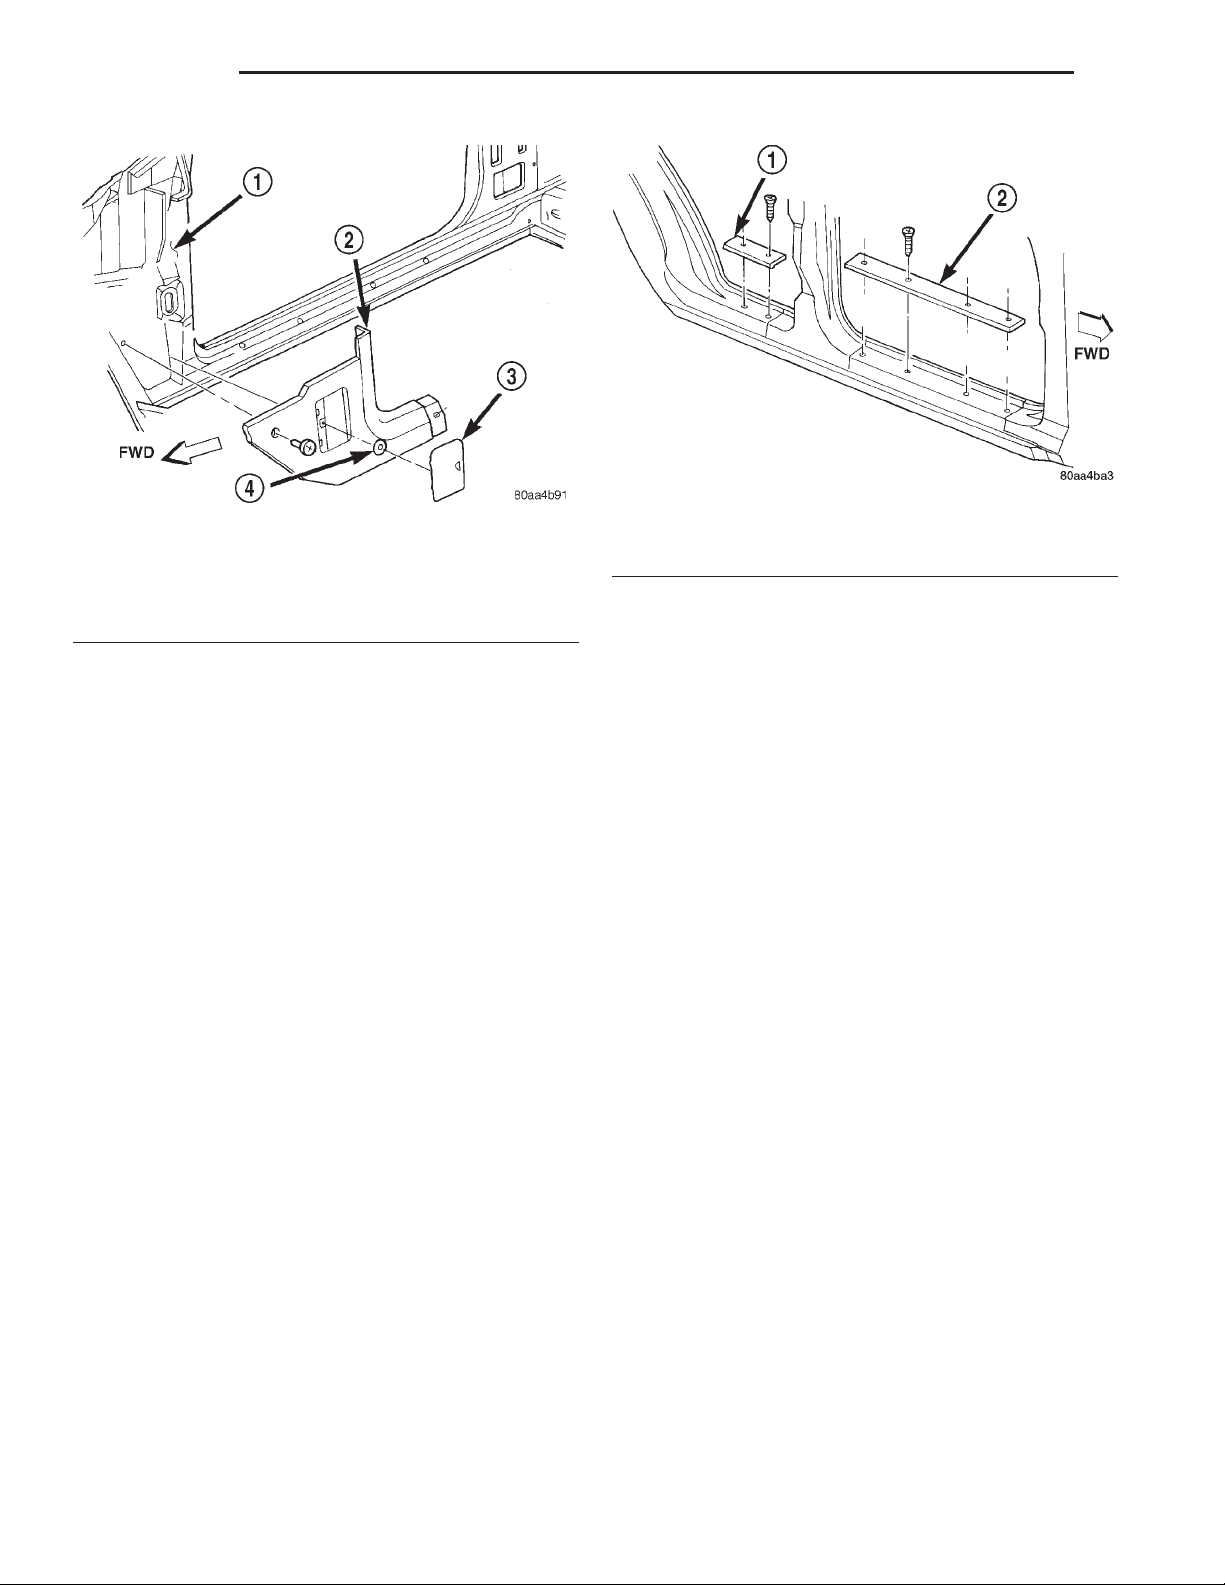
23 - 52 BODY XJ
REMOVAL AND INSTALLATION (Continued)
Fig. 67 Door Sill Scuff Plate
Fig. 66 Lower A-Pillar Cowl Trim
1 – COWL PANEL
2 – COWL PANEL TRIM
3 – ACCESS DOOR
4 – NUT
INSTALLATION
(1) Position the lower A-pillar cowl trim on the
A-pillar lower cowl.
(2) Install the screws attaching the lower A-pillar
cowl trim to the A-pillar lower cowl.
(3) Install the nut behind the fuse panel access
door (Right side only).
(4) Install the inner scuff plate.
1 – REAR DOOR SILL SCUFF PLATE
2 – FRONT DOOR SILL SCUFF PLATE
INSTALLATION
(1) Position the scuff plate on the door sill.
(2) Install the screws attaching the door sill scuff
plate to the door sill.
ASSIST HANDLE
REMOVAL
(1) Using a trim stick or equivalent, open the end
covers to access the screws.
(2) Remove the screws (Fig. 65).
(3) Separate the assist handle from the trim.
FRONT INNER SCUFF PLATE
REMOVAL
(1) If necessary, remove the bucket seat side shield
trim cover.
(2) Remove the screws attaching the inner scuff
plate to the front door sill (Fig. 65).
(3) Separate the inner scuff plate from the door
sill.
INSTALLATION
(1) Position the inner scuff plate on the front door
sill.
(2) Install the screws attaching the inner scuff
plate to the front door sill.
(3) If removed, install the bucket seat side shield
trim cover.
DOOR SILL SCUFF PLATE
REMOVAL
(1) Remove the screws attaching the door sill scuff
plate to the door sill (Fig. 67).
(2) Separate the scuff plate from the door sill.
INSTALLATION
(1) Position the handle on the trim.
(2) Install the screws.
(3) Install the covers.
B-PILLAR TRIM
REMOVAL
(1) Remove the inner scuff plate.
(2) Remove the upper door opening trim (4-door
vehicles) (Fig. 68).
(3) Remove the upper quarter panel trim (2-door
vehicles) (Fig. 65).
(4) Remove the rear A-pillar trim screw.
(5) Remove the shoulder belt turning loop.
(6) Remove the seat/shoulder belt anchor bolt.
(7) Remove the screws attaching the B-pillar trim
to the B-pillar (2-door vehicles).
(8) Route the shoulder belt through the lower
B-pillar trim (2-door vehicles).
(9) Separate the B-pillar trim from the B-pillar.
Page 53
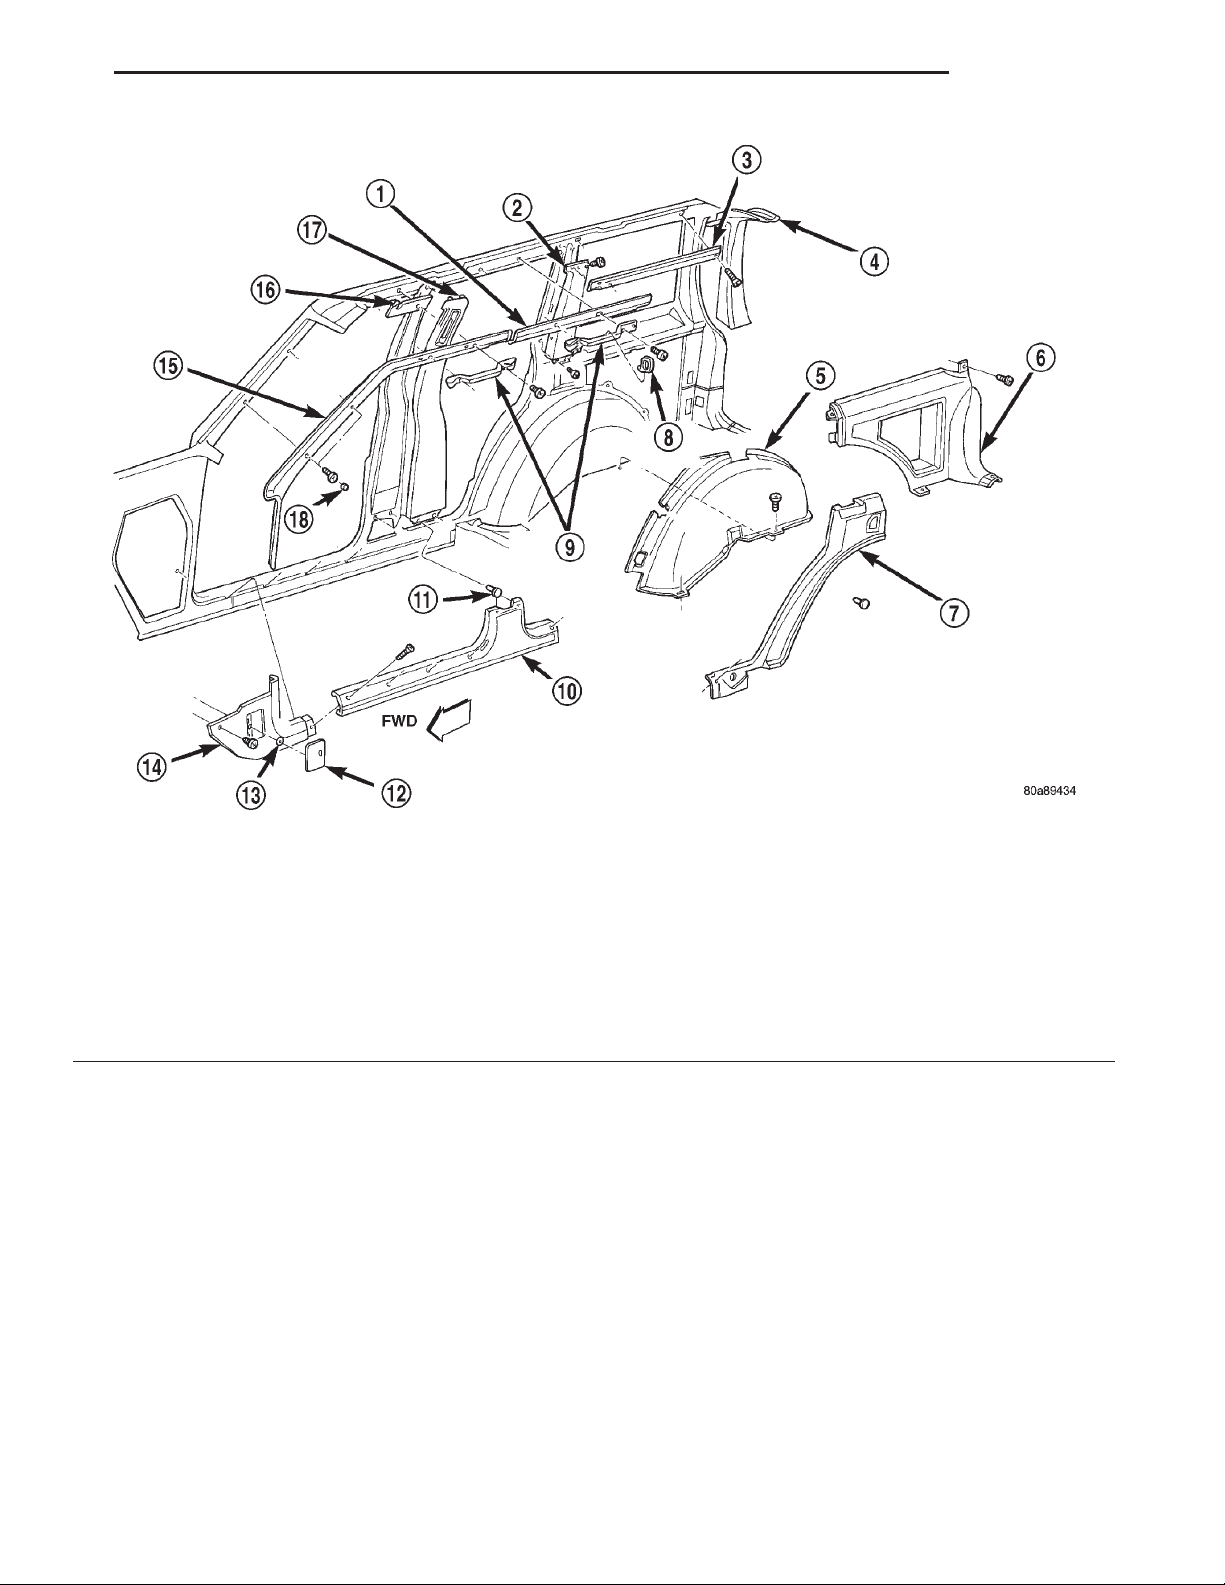
XJ BODY 23 - 53
REMOVAL AND INSTALLATION (Continued)
Fig. 68 B-Pillar Trim—4-Door Vehicles
1 – UPPER DOOR OPENING TRIM
2 – C-PILLAR TRIM
3 – UPPER QUARTER PANEL TRIM
4 – LIFTGATE PILLAR TRIM
5 – WHEEL HOUSE COVER
6 – LOWER QUARTER PANEL TRIM
7 – QUARTER PANEL TRIM EXTENSION
8 – COAT HOOK
9 – OVERHEAD ASSIST HANDLE
INSTALLATION
(1) Route the shoulder belt through the lower
B-pillar trim (2-door vehicles).
(2) Position the B-pillar trim on the B-pillar and
align push-in fasteners.
(3) Press the B-pillar trim on the B-pillar to
secure.
(4) Install the screws attaching the B-pillar trim to
the B-pillar (2-door vehicles).
(5) Install the seat/shoulder belt anchor bolt.
(6) Install the shoulder belt turning loop.
(7) Install the A-pillar trim.
(8) Install the upper quarter panel trim (2-door
vehicles) (Fig. 65).
(9) Install the upper door opening trim (4-door
vehicles) (Fig. 68).
10 – INNER SCUFF PLATE
11 – PUSH-IN FASTENER
12 – ACCESS DOOR
13 – NUT
14 – COWL PANEL TRIM
15 – A-PILLAR TRIM
16 – HEADLINER
17 – B-PILLAR TRIM
18 – TRIM PLUG
(10) Install the inner scuff plate.
C-PILLAR TRIM
REMOVAL
(1) Remove the inner scuff plate.
(2) Remove the upper door opening trim.
(3) Remove the upper quarter panel trim.
(4) Remove the quarter panel trim extension.
(5) Remove the screws attaching the C-pillar trim
to the C-pillar (Fig. 68).
(6) Separate the C-pillar trim from the C-pillar.
INSTALLATION
(1) Position the C-pillar trim on the C-pillar.
Page 54
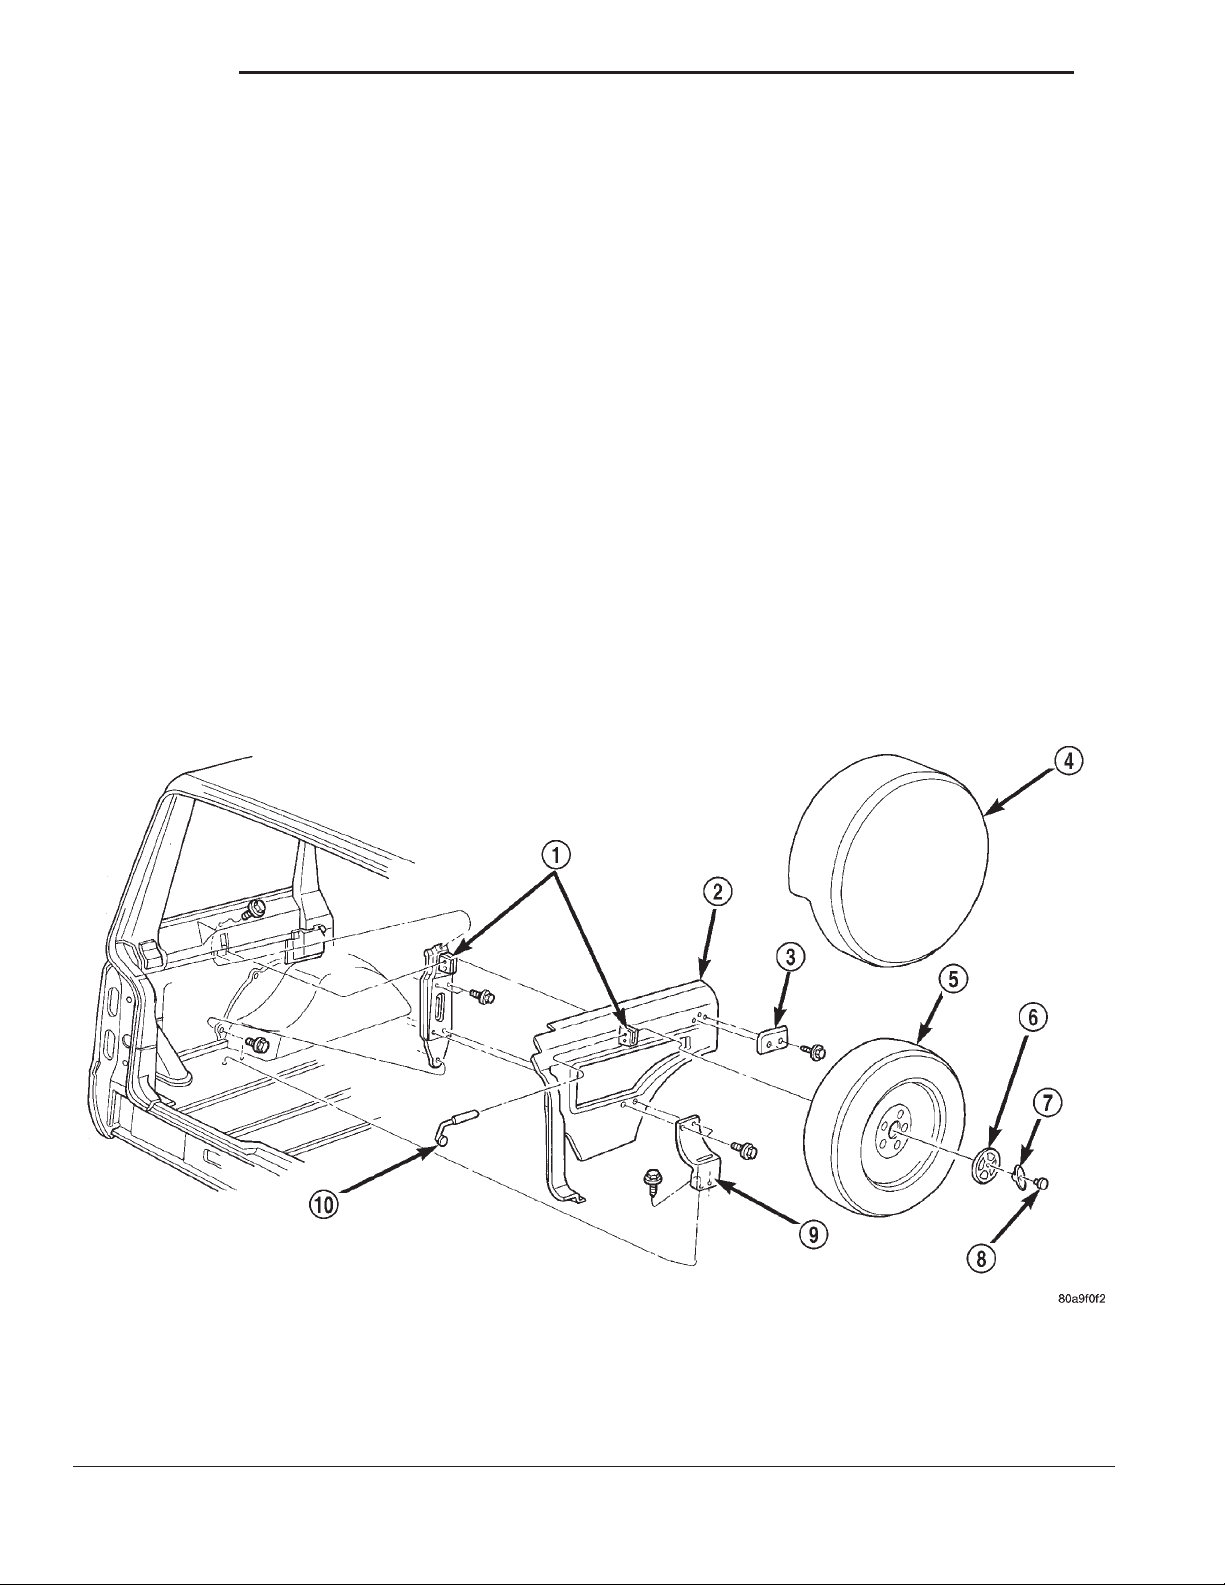
23 - 54 BODY XJ
REMOVAL AND INSTALLATION (Continued)
(2) Install the screws attaching the C-pillar trim to
the C-pillar.
(3) Install the quarter panel trim extension.
(4) Install the upper quarter panel trim.
(5) Install the upper door opening trim.
(6) Install the inner scuff plate.
QUARTER PANEL TRIM EXTENSION
REMOVAL
(1) Remove the inner scuff plate.
(2) Separate quarter panel trim extension from the
wheelhouse and quarter trim panels (Fig. 68).
INSTALLATION
(1) Position the quarter panel trim extension on
the wheelhouse and quarter trim panels.
(2) Install the inner scuff plate.
QUARTER PANEL TRIM AND WHEELHOUSE COVER
REMOVAL
(1) Remove the inner scuff plate.
(2) Remove quarter panel trim extension.
(3) Remove liftgate scuff plate.
(4) Remove the screws attaching the quarter panel
trim from the quarter panel and wheelhouse trim
cover (Fig. 68) and (Fig. 65).
(5) If necessary, remove the tire and mounting
brackets from the left quarter panel trim (Fig. 69).
(6) Remove the screws attaching the wheelhouse
cover to the wheelhouse.
(7) Separate the wheelhouse cover from the wheelhouse
INSTALLATION
(1) Position the wheelhouse cover on the wheelhouse.
(2) Install the screws attaching the wheelhouse
cover to the wheelhouse.
(3) If removed, install the tire and mounting
bracket on the left quarter panel trim.
1 – MOUNTING BRACKET
2 – QUARTER TRIM
3 – TIRE REST
4 – COVER
5 – TIRE/WHEEL
Fig. 69 Spare Tire
6 – CUP
7 – WING NUT
8 – CAP
9 – MOUNTING BRACKET
10 – HOLD DOWN BOLT
Page 55
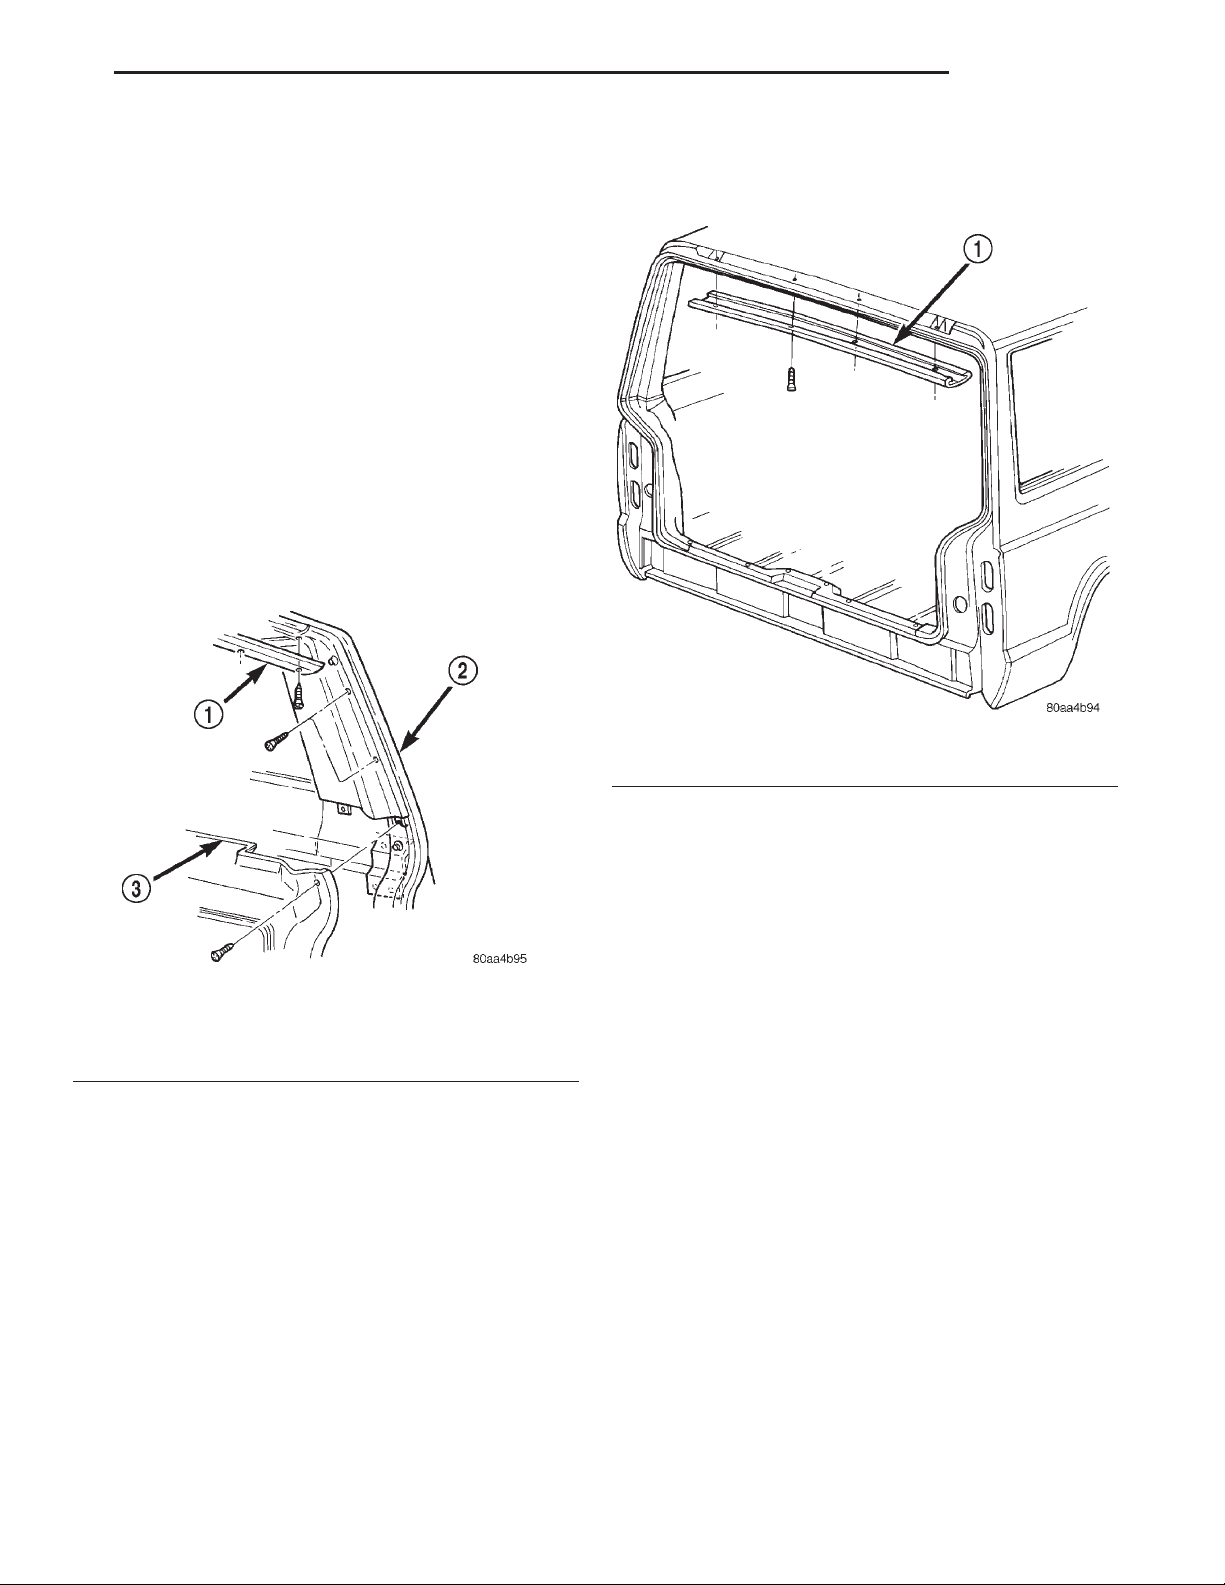
XJ BODY 23 - 55
REMOVAL AND INSTALLATION (Continued)
(4) Position the quarter panel trim on the quarter
panel and wheelhouse cover.
(5) Install the screws attaching quarter panel trim
on the quarter panel and wheelhouse cover
(6) Install liftgate scuff plate.
(7) Install quarter panel trim extension.
(8) Install the inner scuff plate.
LIFTGATE PILLAR TRIM
REMOVAL
(1) Remove the liftgate opening upper trim.
(2) Remove the liftgate pillar trim screws (Fig. 70).
(3) Remove the screws attaching the lower quarter
panel trim to the liftgate pillar.
(4) Pull the trim panel outward to detach the
spring steel clips attaching the trim panel to the pillar (2-dr vehicles).
(5) Remove liftgate pillar trim.
(2) Pull downward to disengage steel clips attach-
ing the liftgate opening upper trim to the roof panel.
(3) Separate trim from vehicle.
Fig. 70 Liftgate Pillar Trim
1 – UPPER LIFTGATE OPENING TRIM
2 – UPPER LIFTGATE PILLAR TRIM
3 – LOWER QUARTER TRIM
INSTALLATION
(1) Position the liftgate pillar trim on the liftgate
pillar.
(2) Press the trim panel into place to engage the
spring steel clips attaching the trim panel to the pillar (2-dr vehicles).
(3) Install the screws attaching the lower quarter
panel trim to the liftgate pillar.
(4) Install the liftgate pillar trim screws.
(5) Install the liftgate opening upper trim.
LIFTGATE OPENING UPPER TRIM
REMOVAL
(1) Remove the screws attaching the liftgate opening upper trim to the roof panel (Fig. 71).
Fig. 71 Liftgate Opening Upper Trim
1 – UPPER LIFTGATE OPENING TRIM
INSTALLATION
Steel clips are used for manufacturing purposes
and are not required for service.
(1) Position trim on roof panel.
(2) Install the screws attaching the liftgate open-
ing upper trim to the roof panel.
LIFTGATE SCUFF PLATE
REMOVAL
(1) Remove the screws attaching the liftgate scuff
plate to the floor pan (Fig. 72).
(2) Separate the scuff plate from the vehicle.
INSTALLATION
(1) Position the scuff plate on the vehicle.
(2) Center striker in opening.
(3) Install the screws attaching the liftgate scuff
plate to the floor pan.
FRONT SHOULDER BELT/BUCKLE
CAUTION: Inspect the front shoulder belts and
buckles. Replace any belt that is either cut, frayed,
torn or damaged in any way. Replace the shoulder
belt if the retractor is damaged or inoperative.
Page 56
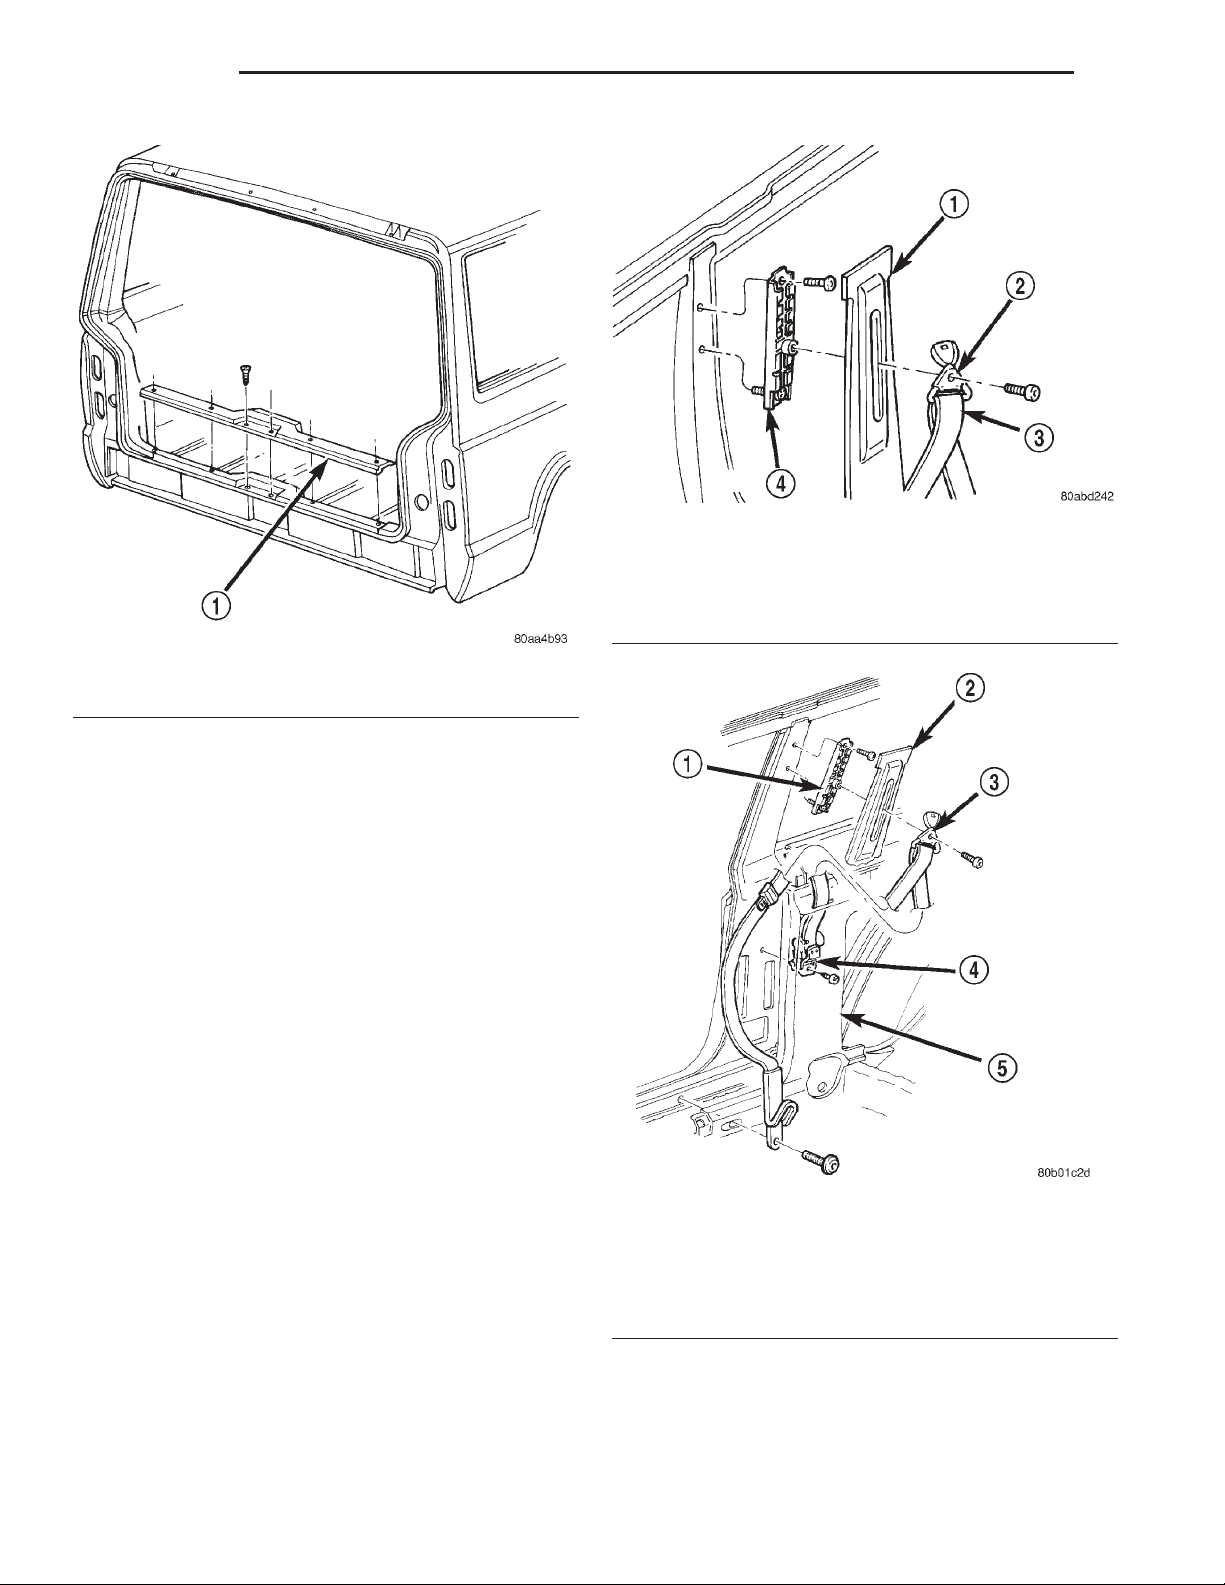
23 - 56 BODY XJ
REMOVAL AND INSTALLATION (Continued)
Fig. 73 Anchor Bolt
1 – TRIM PANEL
2 – TURNING LOOP
3 – BELT
4 – ADJUSTER
Fig. 72 Liftgate Scuff Plate
1 – LIFTGATE SCUFF PLATE
REMOVAL
(1) Slide the front seats all the way forward for
access to the belt anchor bolt.
(2) Disconnect the belt wire harness connector.
(3) Remove the anchor bolt cover.
(4) Remove the anchor bolt attaching the buckle to
the seat.
(5) Remove the turning loop cover concealing the
shoulder belt upper anchor bolt.
(6) Use a Torx bit to remove the upper anchor bolt
(Fig. 73). Remove the support/guide washer.
(7) Remove the inner scuff plate/trim panel from
the door sill and remove the shoulder belt lower
anchor bolt(s) with a Torx bit (Fig. 74) and (Fig. 75).
(8) Remove the shoulder belt and the retractor.
INSTALLATION
(1) Position the shoulder belt retractor in the
shield and install the lower anchor bolt with a Torx
bit. Tighten bolt to 43 N·m (32 ft. lbs.) torque.
(2) Position the support/guide washer and shoulder
belt upper anchor plate on the trim panel. Install the
upper anchor bolt with a Torx bit.
(3) Route belt through trim panel.
(4) Tighten the upper and lower anchor bolts to 43
N·m (32 ft. lbs.) torque.
(5) Install the door sill inner scuff plate/trim panel
and install the cap over the upper anchor bolt.
(6) Install the shoulder belt buckle and anchor
bolt. Connect the wire harness connectors. Tighten
the buckle anchor bolt to 43 N·m (32 ft. lbs.) torque.
Fig. 74 Front Shoulder Belt—2-Door Vehicles
1 – ADJUSTER
2 – TRIM PANEL
3 – TURNING LOOP
4 – RETRACTOR
5 – TRIM PANEL
Page 57
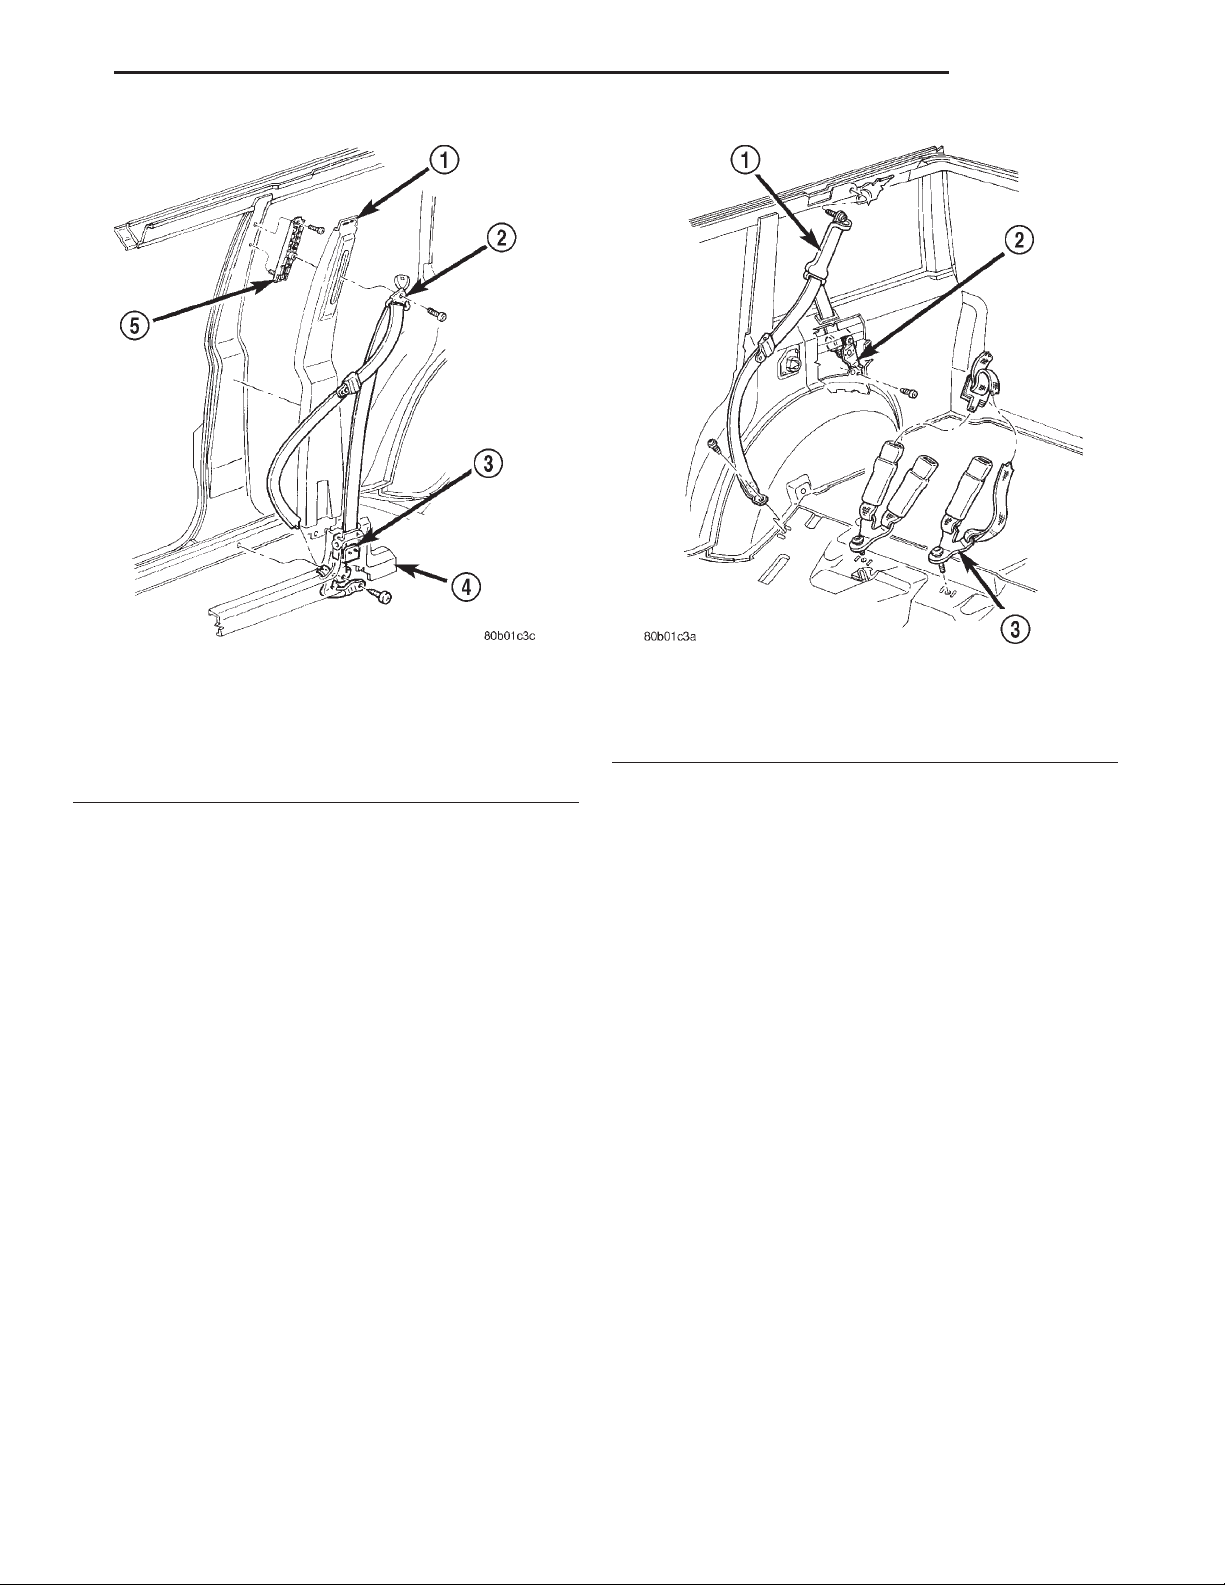
XJ BODY 23 - 57
REMOVAL AND INSTALLATION (Continued)
Fig. 75 Front Shoulder Belt—4-Door Vehicles
1 – TRIM PANEL
2 – TURNING LOOP
3 – RETRACTOR
4 – TRIM PANEL
5 – ADJUSTER
REAR SHOULDER/LAP BELT/BUCKLE
WARNING: Inspect rear shoulder/lap belts and
buckles. Replace any belt that is either cut, frayed,
torn or damaged in any way. Replace shoulder belt
if retractor is damaged or inoperative.
REMOVAL
(1) Pull rear seat release strap and tilt seat cushion forward.
(2) Remove shoulder belt buckle and lap belt/
buckle anchor plate bolts from floor pan (Fig. 76).
(3) Remove shoulder belt lower outer anchor bolt.
(4) Remove quarter trim panel. If necessary, refer
to removal procedure.
(5) Remove shoulder belt upper anchor bolt.
(6) Remove bolt attaching retractor to rear quarter
rail.
(7) Separate retractor and shoulder belt from trim
panel.
INSTALLATION
(1) Position shoulder belt buckle and lap belt/
buckle anchor plates on floor panel.
(2) Install anchor bolts. Tighten bolts to 43 N·m
(32 ft. lbs.) torque.
Fig. 76 Rear Seat Shoulder/Lap Belts and Buckles
1 – TURNING LOOP
2 – RETRACTOR
3 – LAP BELT AND BUCKLE
(3) Install retractor support on rear quarter rail.
Tighten screw.
(4) Route shoulder belt through quarter trim panel
slot.
(5) Position shoulder belt at roof rail and install
upper anchor bolt. Tighten bolt to 43 N·m (32 ft. lbs.)
torque.
(6) Install quarter trim panel.
(7) Install shoulder belt lower anchor bolt. Tighten
bolt to 43 N·m (32 ft. lbs.) torque.
(8) Return rear seat cushion to normal position
and engage latch.
FULL FLOOR CONSOLE
REMOVAL
(1) Remove the transmission shift lever handle/
knob:
• Automatic transmissions, pull the handle
straight upward to remove it.
• Insert a thin-blade tool under the edge of the
transmission shift indicator bezel and pry up to
remove.
• Manual transmissions, loosen the locknut and
un-thread the shift knob from the shaft.
• Pull the shift boot up to remove.
(2) Insert a thin-blade tool under the edge of the
transfer case shift indicator bezel or cover plate and
pry up to remove.
Page 58
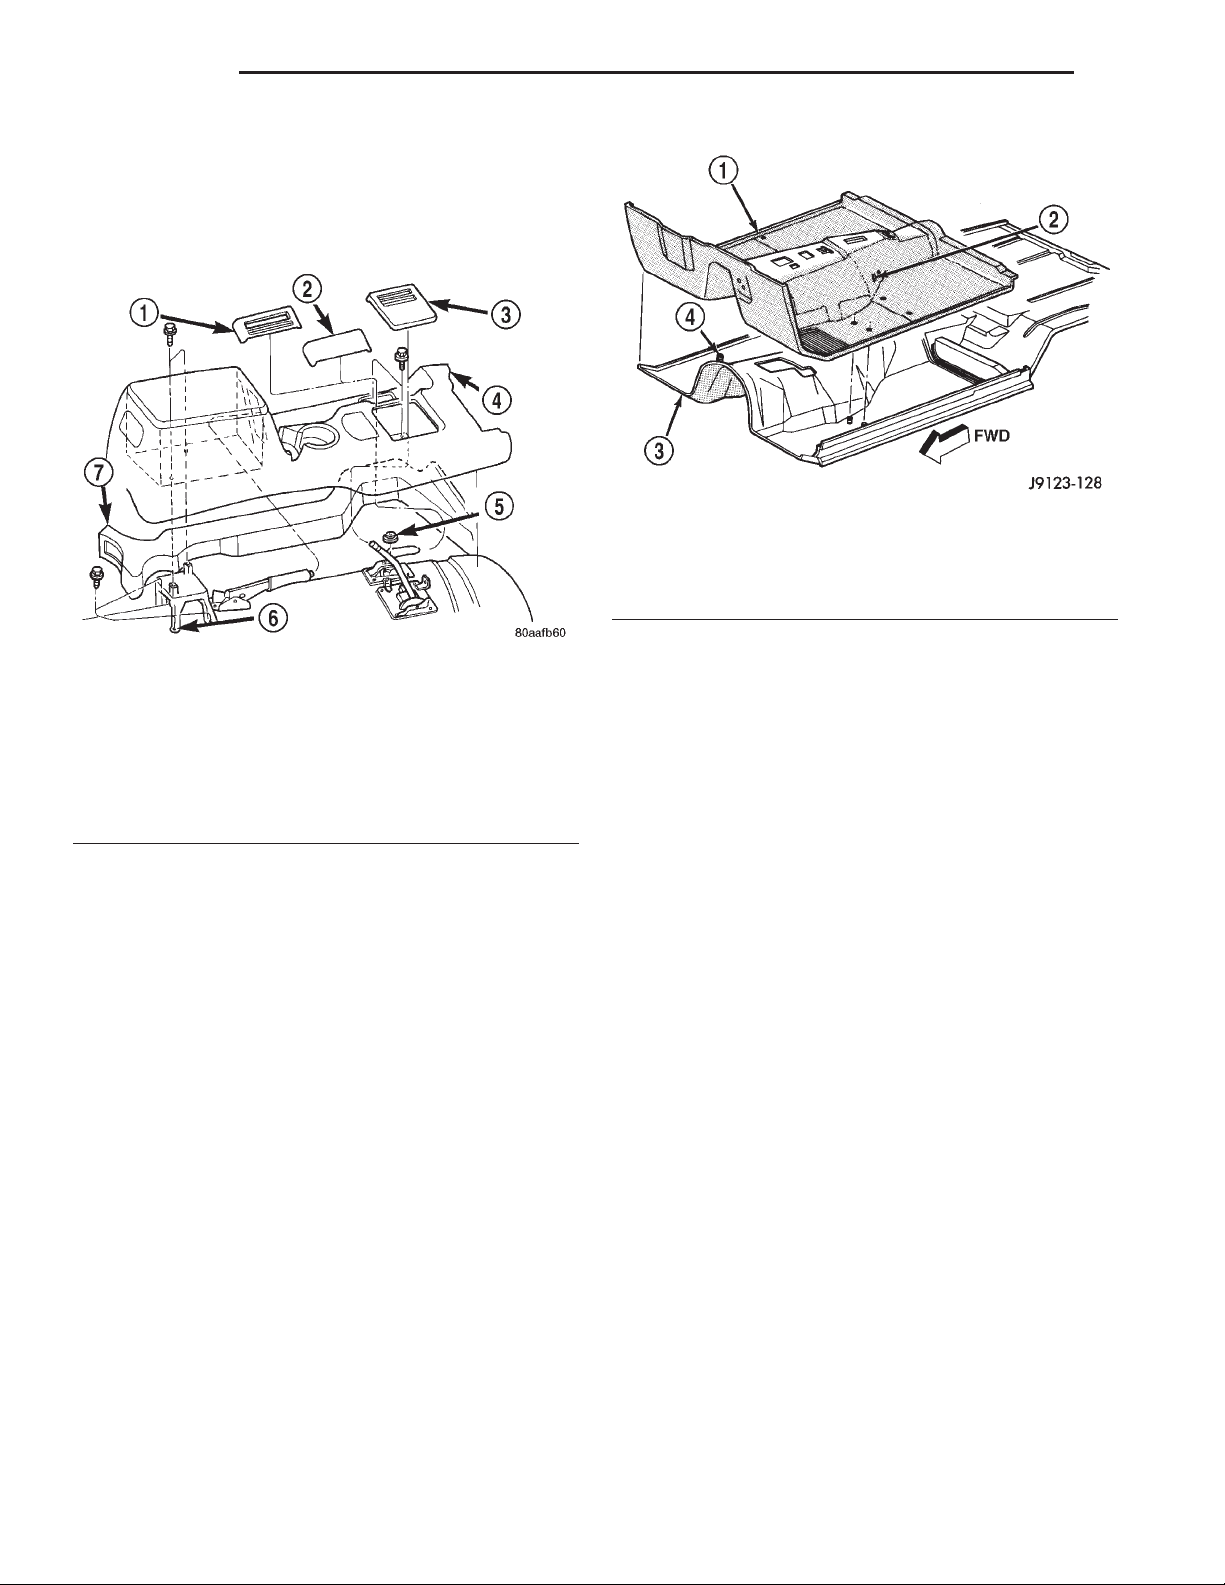
23 - 58 BODY XJ
REMOVAL AND INSTALLATION (Continued)
(3) Open the console lid.
(4) Remove the screws attaching the console to the
floor and mounting bracket (Fig. 77).
(5) Disconnect the wire harness connector.
(6) Separate the console from the floor.
Fig. 78 Front Carpet and Mat
1 – CARPETAND MAT
2 – POWER SEAT WIRE HARNESS SLOT
3 – FLOOR PANEL
4 – SEAT FRAME STUD
Fig. 77 Floor Console
1 – TRANSFER CASE SHIFT BEZEL
2 – COVER
3 – TRANS SHIFT BEZEL
4 – FLOOR CONSOLE
5 – WASHER (2WD)
6 – BRACKET
7 – DUCT
INSTALLATION
(1) Position the console on the floor.
(2) Attach the air duct to the air outlet duct.
(3) Connect the wire harness connectors.
(4) Install the screws attaching the console to the
mounting bracket.
(5) Install the shift indicator bezels (or cover
plate).
(6) Install the shift lever handle/knob.
FRONT CARPET/MAT
REMOVAL
(1) Remove the door sill inner scuff plates.
(2) Remove the front and rear seats (as applica-
ble).
(3) Remove floor console.
(4) As necessary, remove the trim panels and
moldings.
(5) Remove all other interfering components.
(6) Remove the carpet and mat from the floor
panel (Fig. 78).
INSTALLATION
(1) Position the carpet and mat on the floor panel.
(2) Install all the components that were removed
to facilitate carpet/mat removal.
(3) Install the trim panels and moldings.
(4) Install the door sill inner scuff plates.
(5) Install floor console.
(6) Install the front and rear seats (as applicable).
REAR CARPET/MAT
REMOVAL
(1) Remove the liftgate latch striker and scuff
plate.
(2) Drill-out the retaining rivet heads and remove
the cargo tie-down footman loops from the carpet.
(3) As necessary, remove the trim panels and
moldings.
(4) Remove the all other interfering components.
(5) Remove the carpet and mat from the floor
panel.
(6) If necessary, remove the insulation from the
wheelhouse (Fig. 79).
INSTALLATION
(1) If removed, install the insulation on the wheelhouses.
(2) Position the mat on the floor panel.
(3) Position the carpet on the mat.
(4) Install all the components that were removed
to facilitate carpet and mat removal.
(5) Install the trim panels and moldings.
(6) Install the cargo tie-down footman loops on the
carpet with replacement rivets.
(7) Install the liftgate scuff plate and latch striker.
Page 59
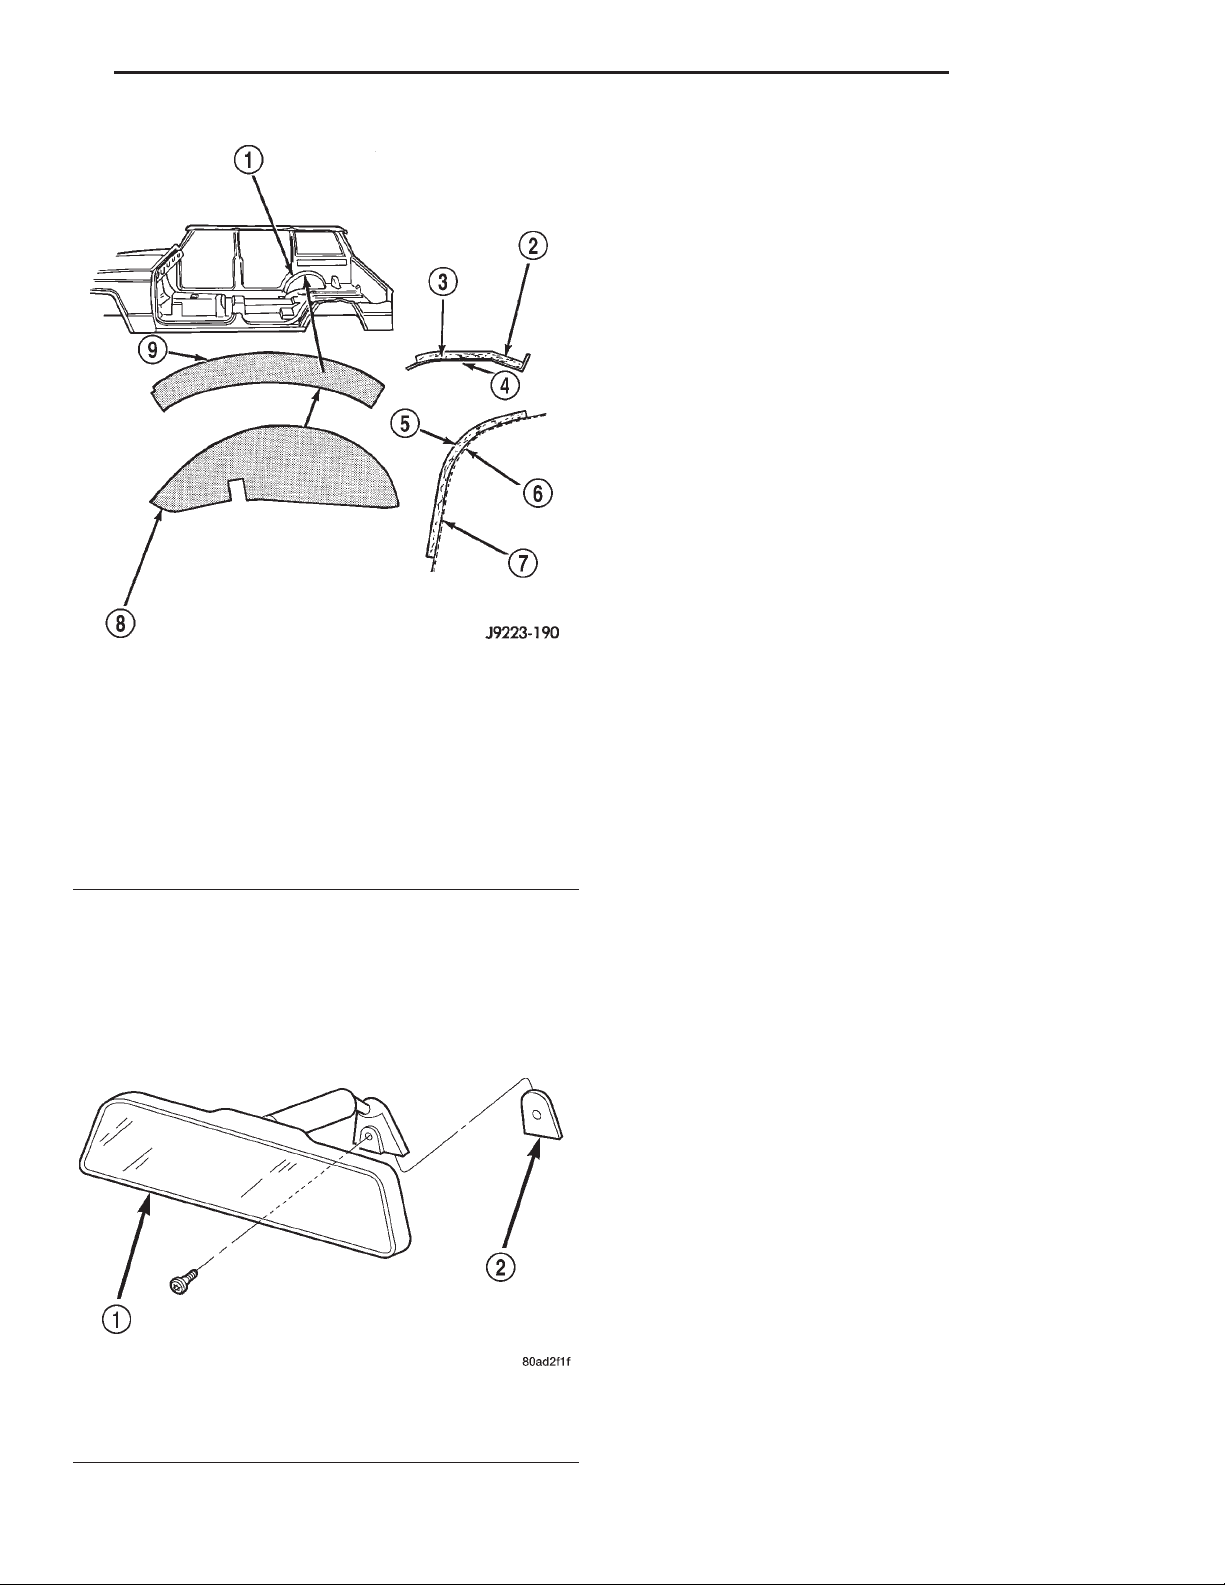
XJ BODY 23 - 59
REMOVAL AND INSTALLATION (Continued)
INSTALLATION
(1) Position the mirror base at the bracket and
slide it downward onto the support bracket.
(2) Tighten setscrew to1 N·m (9 in. lbs.) torque.
REARVIEW MIRROR SUPPORT BRACKET
INSTALLATION
(1) Mark the position for the mirror bracket on the
outside of the windshield glass with a wax pencil.
(2) Clean the bracket contact area on the glass.
Use a mild powdered cleanser on a cloth saturated
with isopropyl (rubbing) alcohol. Finally, clean the
glass with a paper towel dampened with alcohol.
(3) Sand the surface on the support bracket with
fine grit-sandpaper. Wipe the bracket surface clean
with a paper towel.
(4) Apply accelerator to the surface on the bracket
according to the following instructions:
• Crush the vial to saturate the felt applicator.
• Remove the paper sleeve.
Fig. 79 Wheelhouse Insulation
1 – REAR WHEELHOUSE
2 – FACE SIDE
3 – ADHESIVE
4 – WHEELHOUSE PANEL
5 – FACE SIDE
6 – ADHESIVE
7 – WHEELHOUSE PANEL
8 – LOWER INSULATION
9 – UPPER INSULATION
REARVIEW MIRROR
REMOVAL
(1) Loosen the mirror base setscrew (Fig. 80).
(2) Slide the mirror base upward and off the
bracket.
• Apply accelerator to the contact surface on the
bracket.
• Allow the accelerator to dry for five minutes.
• Do not touch the bracket contact surface after
the accelerator has been applied.
(5) Apply adhesive accelerator to the bracket contact surface on the windshield glass. Allow the accelerator to dry for one minute. Do not touch the glass
contact surface after the accelerator has been
applied.
(6) Install the bracket according to the following
instructions:
• Apply one drop of adhesive at the center of the
bracket contact-surface on the windshield glass.
• Apply an even coat of adhesive to the contact
surface on the bracket.
• Align the bracket with the marked position on
the windshield glass.
• Press and hold the bracket in place for at least
one minute.
Fig. 80 Rearview Mirror
1 – MIRROR
2 – SUPPORT BUTTON
NOTE: Verify that the mirror support bracket is correctly aligned, because the adhesive will cure rapidly.
(7) Allow the adhesive to cure for 8-10 minutes.
Remove any excess adhesive with an alcohol-dampened cloth.
(8) Allow the adhesive to cure for an additional
8-10 minutes before installing the mirror.
Page 60
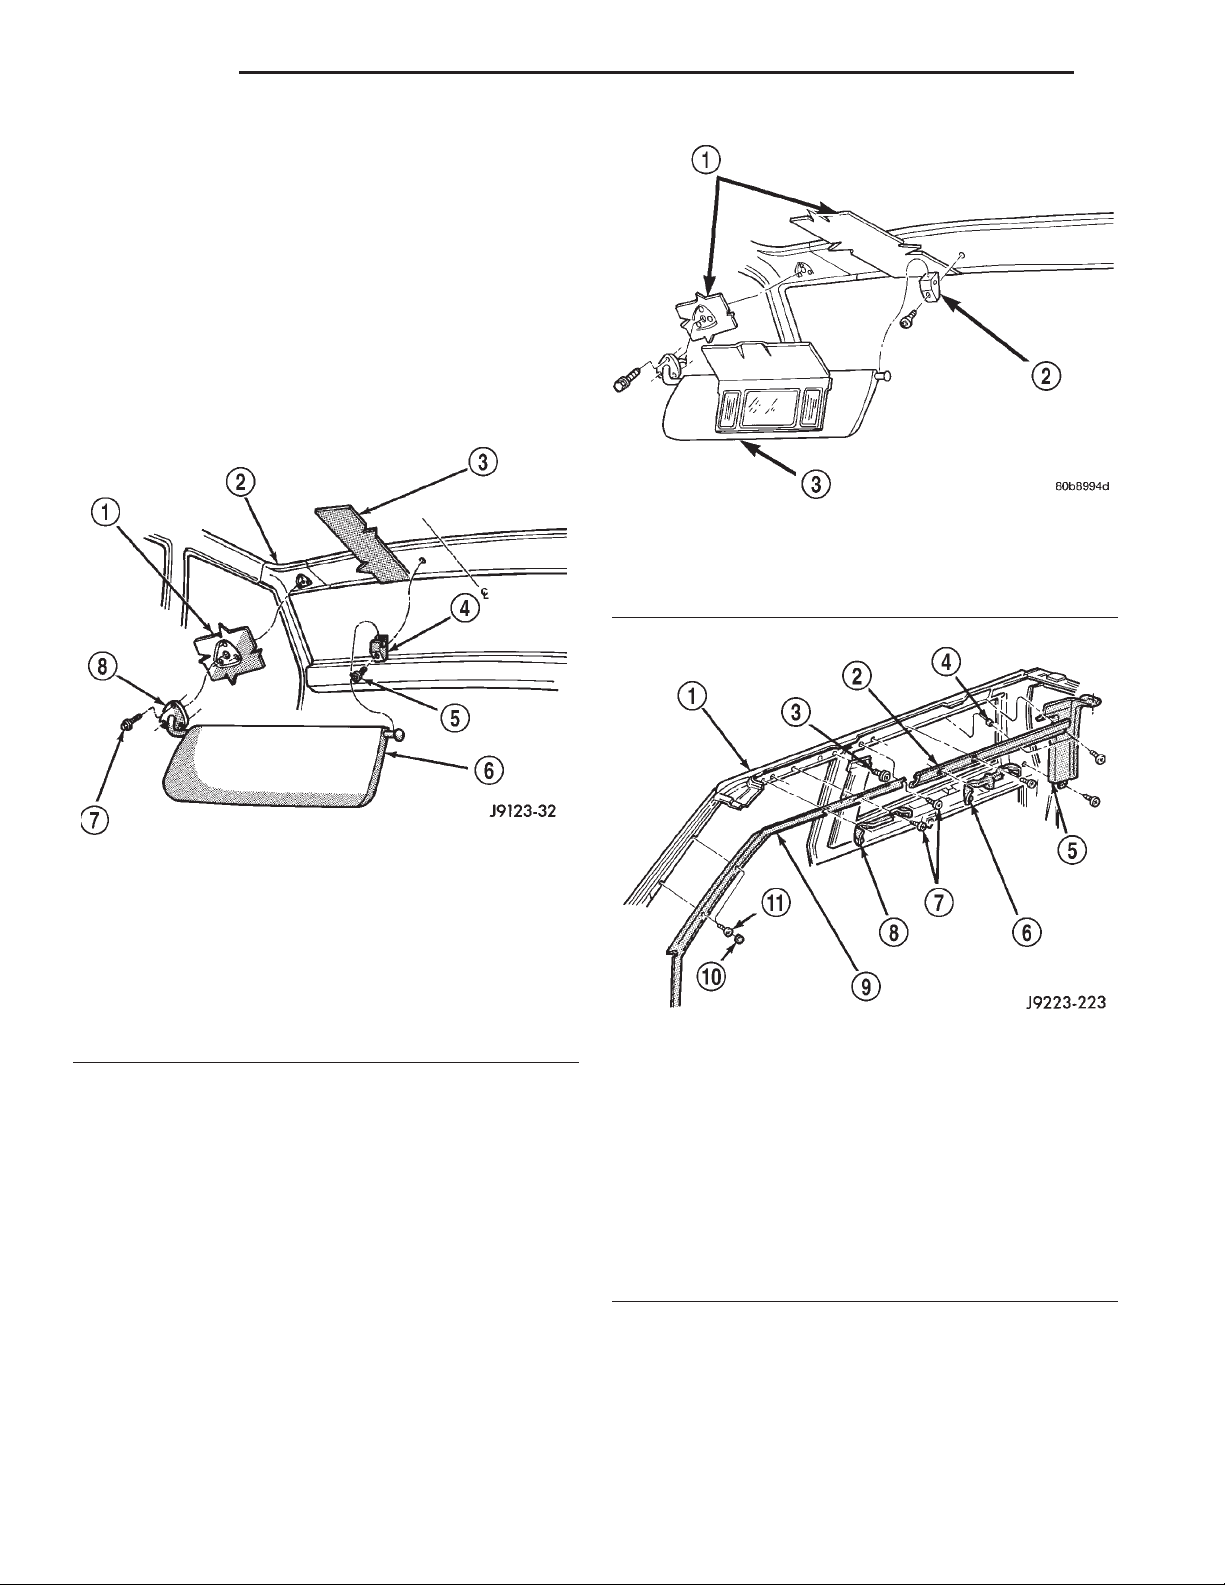
23 - 60 BODY XJ
REMOVAL AND INSTALLATION (Continued)
SUNVISORS
REMOVAL
(1) Remove the screws that attach the sunvisor
arm support bracket to the headliner and the roof
panel (Fig. 81) and (Fig. 82).
(2) Disconnect vanity lamp connector, if equipped.
(3) Detach the sunvisor from the support clip.
(4) Remove the sunvisor from the vehicle.
(5) Remove the retaining screw and support clip.
On vehicles equipped with an overhead console, the
support clip is integral with the overhead console.
Fig. 82 Sunvisor w/Vanity Lamp
1 – HEADLINER
2 – SUPPORT CLIP
3 – SUNVISOR
Fig. 81 Sunvisor
1 – HEADLINER
2 – VEHICLE ROOF
3 – HEADLINER
4 – SUPPORT CLIP
5 – SCREW
6 – SUN VISOR
7 – SCREW
8 – SUN VISOR ARM SUPPORT BRACKET
INSTALLATION
(1) Install the support bracket and the retaining
screw.
(2) Connect vanity lamp connector, if equipped.
(3) Position the sunvisor in the support clip and
align the arm support bracket holes with the headliner holes.
(4) Install the screws that attach the sunvisor arm
support bracket to the headliner and the roof panel.
HEADLINER
The upper trim moldings and the headliner are
attached to the roof rail with a combination of
screws, clip retainers and rail retainers (Fig. 83).
To remove a headliner, all of the upper trim moldings must be removed from the perimeter of the
headliner along with (as applicable):
Fig. 83 Headliner Trim Moldings
1 – ROOF RAIL
2 – HEADLINER MOULDING
3 – SCREW
4 – SPACER
5 – LIFTGATE PILLAR TRIM COVER
6 – ASSIST HANDLE
7 – SCREW
8 – ASSIST HANDLE
9 – WINDSHIELD SIDE MOULDING
10 – COVER PLUG
11 – SCREW
• Assist handles.
• Sunvisors.
• Dome/cargo lamps.
• Overhead console.
• All other attached/overlapping components.
Page 61
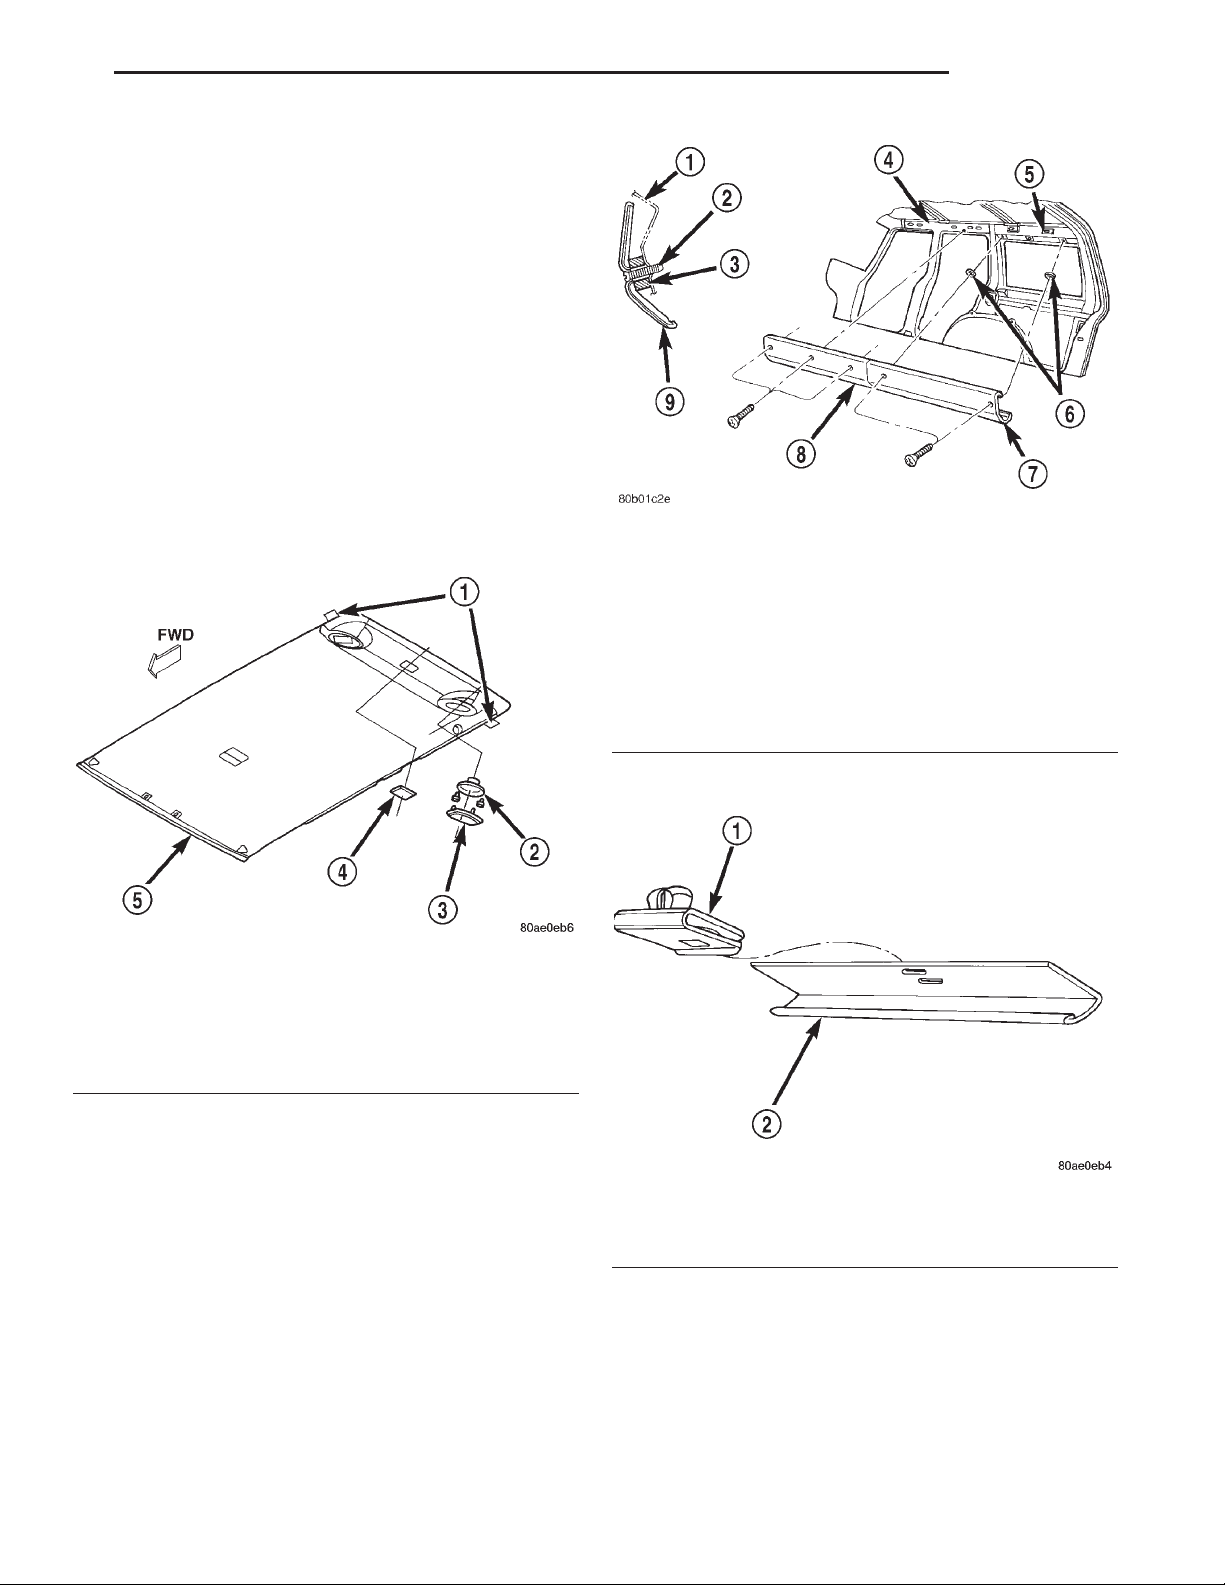
XJ BODY 23 - 61
REMOVAL AND INSTALLATION (Continued)
Refer to the appropriate removal and installation
procedure locate in this section or in Group 8, Electrical.
REMOVAL
CAUTION: The headliner is a one-piece, molded
component (Fig. 84). It has limited flexibility and
must not be bent during removal/installation.
(1) Remove the upper trim moldings from the
perimeter of the headliner (Fig. 85).
(2) Ensure that all the retainer clips and screws
are disengaged before removing the headliner.
(3) Disengage tabs attaching headliner/speaker
structure to roof rail, if equipped (Fig. 84).
(4) Disengage rear speaker harness connector, if
equipped.
1 – ROOF RAIL
2 – SCREW
3 – SPACER
4 – ROOF RAIL
5 – HEADLINER SLOT
6 – SPACER
7 – REAR HEADLINER TRIM MOLDING
8 – FRONT HEADLINER TRIM MOLDING
9 – TRIM MOLDING
Fig. 85 Upper Trim Molding—4-Door
Fig. 84 Headliner
1–TAB
2 – SPEAKER
3 – GRILLE
4 – CARGO LAMP
5 – HEADLINER
INSTALLATION
(1) Engage tabs attaching headliner/speaker structure to roof rail, if equipped. (Fig. 84)
(2) On vehicles without headliner speakers, ensure
that the retainer clips on upper liftgate opening trim
and rails are installed. (Fig. 86)
(3) Engage rear speaker harness connector.
(4) Install the upper trim moldings around the
perimeter of the headliner. Tighten the retaining
screws to 1 N·m (11 in. lbs.) torque.
(5) As applicable, install:
• Assist handles.
• Sunvisors.
• Dome/cargo lamps.
• Overhead console.
• All other attached/overlapping components.
Fig. 86 Headliner Retainer Clip and Retainer Rail
1 – CLIP
2 – RETAINER REAR
LIFTGATE TRIM PANEL
REMOVAL
(1) Using a small flat blade, pry out the trim plugs
from the liftgate assist handle.
(2) Remove the screws attaching the assist handle
to the liftgate (Fig. 87).
Page 62
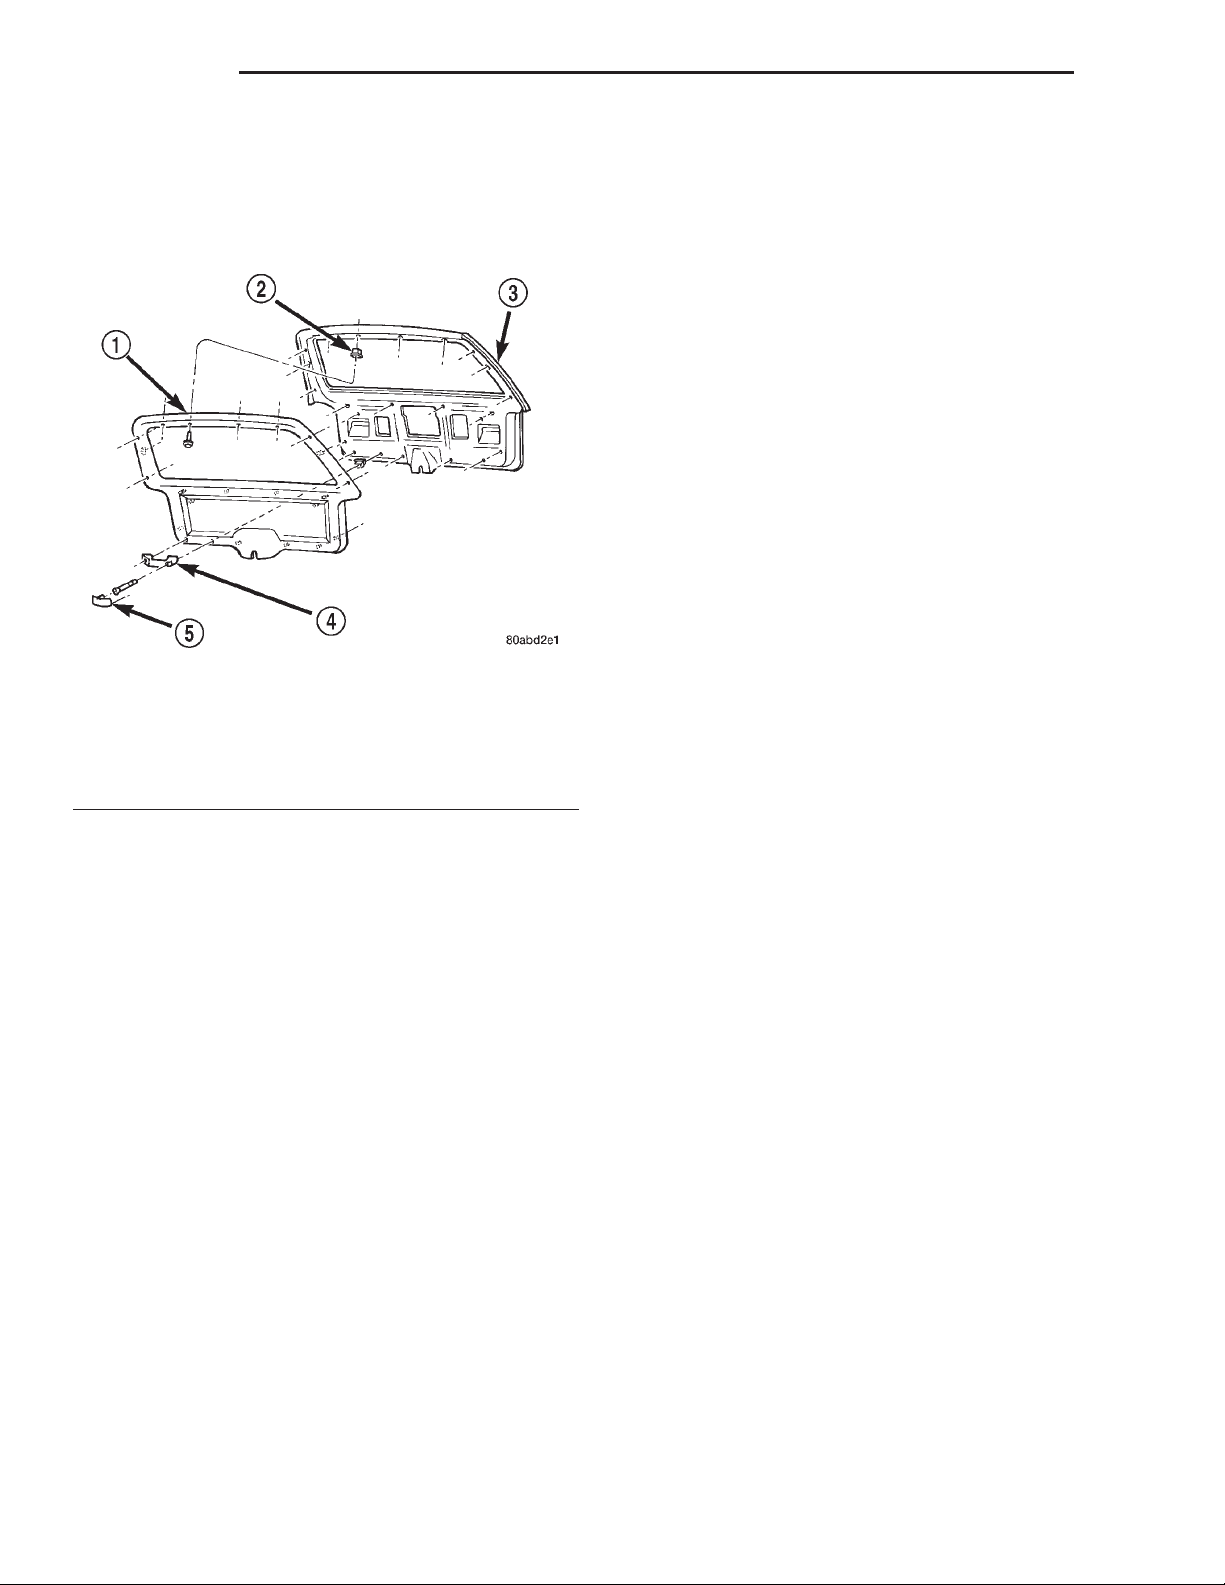
23 - 62 BODY XJ
REMOVAL AND INSTALLATION (Continued)
(3) Remove the screws that attach the liftgate trim
panel to the liftgate.
(4) Using a trim panel removal tool, detach the
push-in fasteners from the liftgate.
(5) Remove the trim panel from the liftgate.
Fig. 87 Liftgate Trim Panel
1 – TRIM PANEL
2 – PUSH NUT
3 – LIFTGATE
4 – ASSIST HANDLE
5 – PLUG
INSTALLATION
(1) Position the trim panel on liftgate.
(2) Using new push-in fasteners, align the push-in
fasteners with the holes in the liftgate inner panel
and press the trim panel into place.
(3) Install the screws to attach the liftgate trim
panel to the liftgate.
(4) Install the screws attaching the assist handle
to the liftgate.
(5) Press the trim plugs into the liftgate assist
handle.
LIFTGATE
REMOVAL
WARNING: DO NOT DISCONNECT SUPPORT ROD
CYLINDERS WITH LIFTGATE CLOSED. SUPPORT
ROD PISTONS ARE OPERATED BY HIGH PRESSURE GAS. THIS COULD CAUSE DAMAGE AND/OR
PERSONAL INJURY IF THEY ARE REMOVED WHILE
PISTONS ARE COMPRESSED.
(1) Remove center high mounted stop lamp
(CHMSL).
(2) Open and support liftgate.
(3) Remove liftgate trim panel.
(4) Disconnect and plug backlite washer fluid sup-
ply line.
(5) Remove screws that attach rear wiper and liftgate power lock wire harness connectors to liftgate
and disconnect connectors.
(6) Using access hole created by removal of
CHMSL, route backlite washer fluid supply line and
rear wiper and liftgate power lock wire harness/
grommets through access hole and separate from liftgate.
(7) Remove retainer clips that secure support rods
to ball studs.
(8) Remove support rods from ball studs.
(9) Remove bolts attaching hinges to liftgate.
(10) Remove liftgate from vehicle.
INSTALLATION
(1) Position and support liftgate at opening in body
and install bolts attaching hinges to liftgate. Tighten
bolts to 26 N·m (19 ft. lbs.) torque.
(2) Connect liftgate support rods to ball studs and
install retainer clips.
(3) Route backlite washer fluid supply line and
rear wiper and liftgate power lock wire harnesses/
grommets through access hole.
(4) Connect connectors and install screws that
attach rear wiper and liftgate power lock wire harness connectors to liftgate
(5) Unplug and connect backlite washer fluid supply line.
(6) Install liftgate trim panel.
(7) Remove supports and close liftgate.
(8) Install (CHMSL).
LIFTGATE HINGE
REMOVAL
It is not necessary to remove the liftgate to replace
one or both hinges.
(1) Open and support the liftgate.
(2) Remove the liftgate opening upper trim.
(3) Remove the bolts attaching the hinge to the
header panel (Fig. 88).
(4) Remove the bolts attaching the hinge to the
liftgate.
Page 63
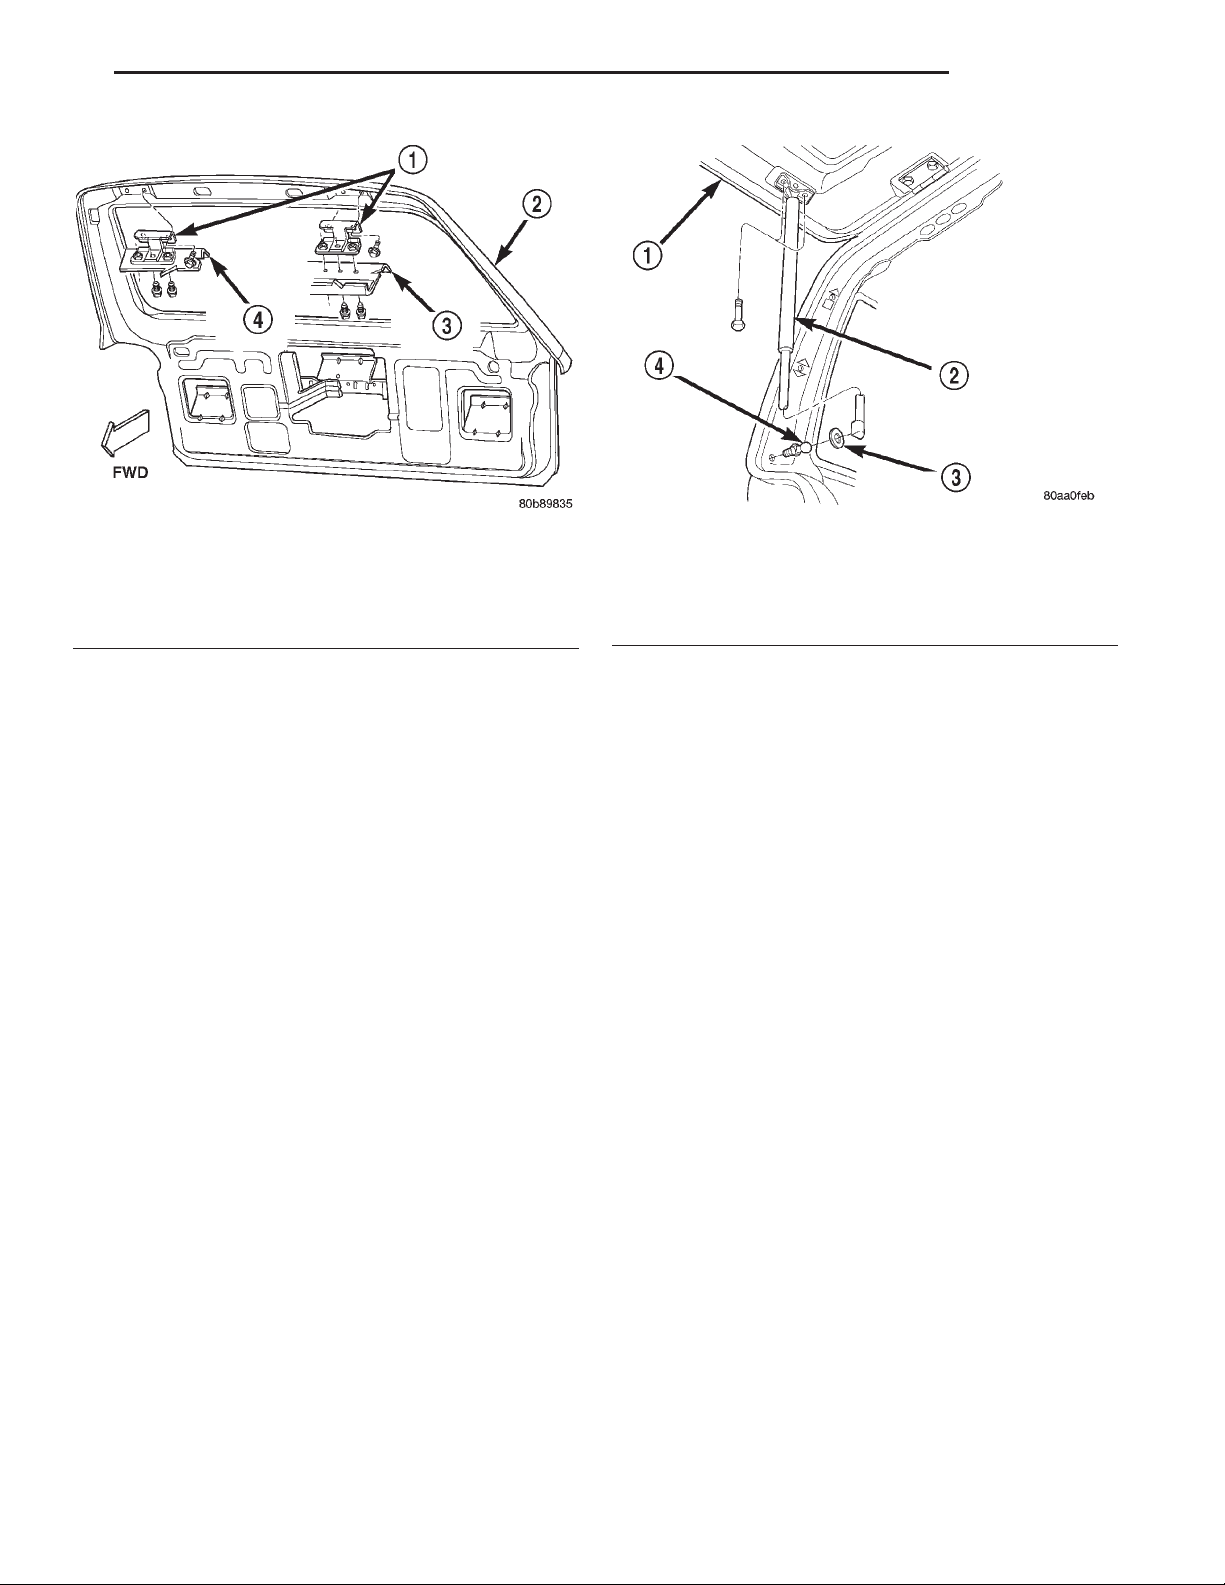
XJ BODY 23 - 63
REMOVAL AND INSTALLATION (Continued)
Fig. 88 Liftgate Hinge
1 – LIFTGATE HINGE
2 – LIFTGATE
3 – HEADER PANEL
4 – HEADER PANEL
INSTALLATION
(1) Position the hinge on the liftgate.
(2) Install the bolts attaching the hinge to the lift-
gate. Tighten to 26 N·m (19 ft. lbs.) torque.
(3) Install the bolts attaching the hinge to the
header panel. Tighten to 26 N·m (19 ft. lbs.) torque.
(4) Install the liftgate opening upper trim.
(5) Remove the support and close the liftgate.
LIFTGATE SUPPORT ROD CYLINDER
REMOVAL
WARNING: DO NOT REMOVE A SUPPORT ROD
CYLINDER WITH THE LIFTGATE CLOSED. EACH
SUPPORT ROD PISTON IS OPERATED BY HIGH
PRESSURE GAS. IT CAN CAUSE DAMAGE AND/OR
PERSONAL INJURY IF IT IS REMOVED WITH THE
PISTON COMPRESSED. DO NOT ATTEMPT TO DISASSEMBLE OR REPAIR A SUPPORT ROD CYLINDER.
(1) Open the liftgate.
(2) Support the liftgate in the open position.
(3) Remove the clip attaching the support rod to
the ball stud.
(4) Disconnect the support rod from the ball stud.
(5) Remove the bolts attaching the support rod to
the liftgate (Fig. 89).
(6) Separate the support rod from the liftgate.
INSTALLATION
(1) Position the support rod on the liftgate.
Fig. 89 Liftgate Support Rod
1 – LIFTGATE
2 – SUPPORT ROD CYLINDER
3 – WASHER
4 – BALL STUD
(2) Install the bolts attaching the support rod to
the liftgate.
(3) Connect the support rod to the ball stud.
(4) Secure the support rod to the ball stud with
the retainer clip.
(5) Remove the support from the liftgate.
LIFTGATE SUPPORT ROD BALL STUD
REMOVAL
(1) Open the liftgate.
(2) Support the liftgate in the open position.
(3) Remove the retainer clip attaching the support
rod to the ball stud.
(4) Disconnect the support rod from the ball stud.
(5) Remove the ball stud.
INSTALLATION
(1) Install the replacement ball stud.
(2) Connect the support rod to the ball stud.
(3) Secure the support rod to the ball stud with
the clip.
(4) Remove the support from the liftgate.
LIFTGATE OUTSIDE HANDLE
REMOVAL
(1) Remove liftgate trim panel.
(2) Disconnect liftgate actuator linkages.
(3) Disconnect liftgate outside handle to latch rod.
(4) Remove nut attaching outside handle to liftgate
(Fig. 90).
(5) Separate outside handle from liftgate.
(6) If necessary, remove lock cylinder (Fig. 91).
Page 64
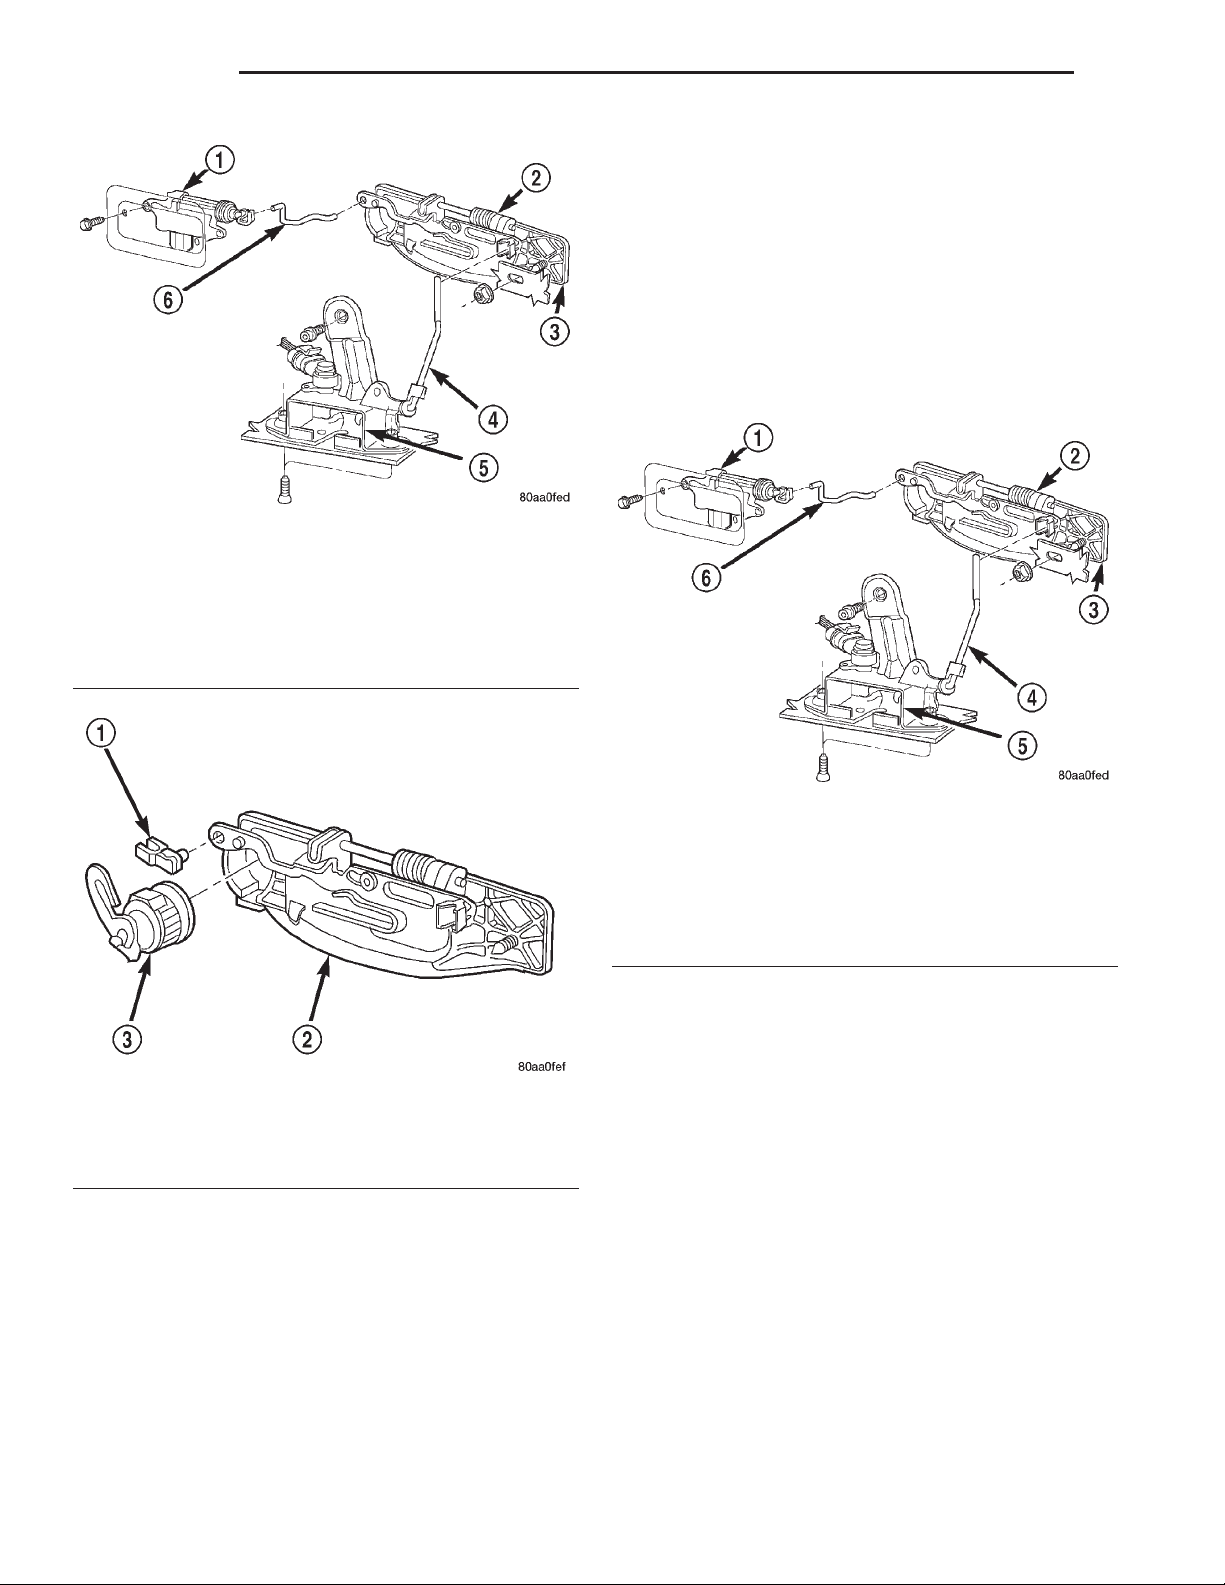
23 - 64 BODY XJ
REMOVAL AND INSTALLATION (Continued)
LIFTGATE LATCH
REMOVAL
(1) Raise liftgate.
(2) Remove liftgate trim panel.
(3) Remove screws attaching latch to liftgate (Fig.
92).
(4) Disconnect rod from latch.
(5) Disconnect power lock connector from handle, if
equipped.
(6) Remove latch from liftgate.
Fig. 90 Liftgate Outside Handle
1 – POWER ACTUATOR
2 – LIFTGATE LOCK
3 – OUTSIDE HANDLE
4 – OUTSIDE HANDLE TO LATCH ROD
5 – LIFTGATE LATCH
6 – ACTUATOR TO LIFTGATE LOCK ROD
Fig. 91 Liftgate Lock Cylinder
1 – CLIP
2 – OUTSIDE HANDLE
3 – LOCK CYLINDER
INSTALLATION
(1) If necessary, install lock cylinder.
(2) Position outside handle on liftgate.
(3) Install nut attaching outside handle to liftgate.
(4) Connect liftgate outside handle to latch rod.
(5) Connect liftgate actuator linkages.
(6) Install liftgate trim panel.
LIFTGATE LOCK CYLINDER
For service procedures, refer to the Liftgate Out-
side Handle Removal/Installation procedures.
Fig. 92 Liftgate Latch
1 – POWER ACTUATOR
2 – LIFTGATE LOCK
3 – OUTSIDE HANDLE
4 – OUTSIDE HANDLE TO LATCH ROD
5 – LIFTGATE LATCH
6 – ACTUATOR TO LIFTGATE LOCK ROD
INSTALLATION
(1) Position latch in liftgate.
(2) Connect power lock connector to handle, if
equipped.
(3) Connect latch rod.
(4) Install screws attaching latch to liftgate.
Tighten screws to 13 N·m (9 ft. lbs.) torque.
(5) Install liftgate trim panel.
LIFTGATE LATCH STRIKER
REMOVAL
(1) From underside of vehicle, remove nuts attaching striker to floor pan (Fig. 93).
(2) Separate striker from vehicle.
INSTALLATION
(1) Position striker on vehicle.
(2) Install nuts. Tighten nuts to 54 N·m (40 ft.
lbs.) torque.
Page 65
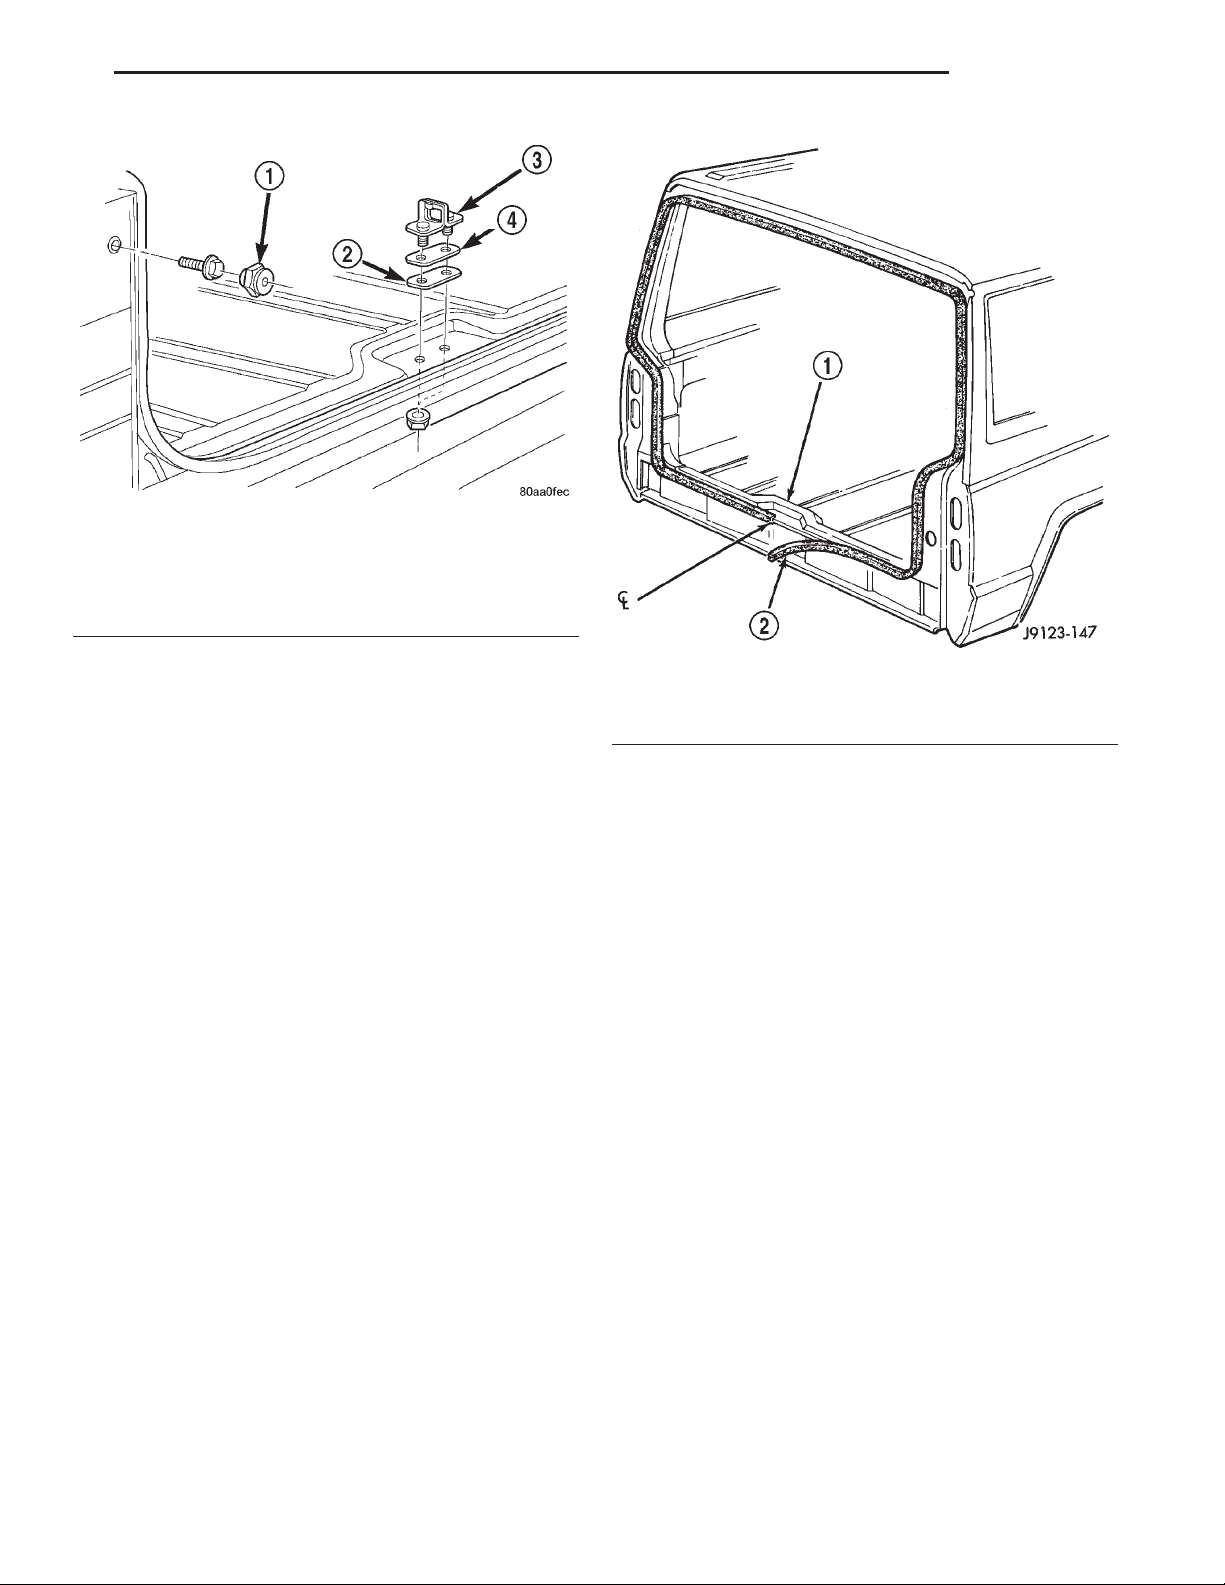
XJ BODY 23 - 65
REMOVAL AND INSTALLATION (Continued)
Fig. 93 Liftgagte Striker
1 – OVERSLAM BUMPER
2 – STRIKER PLATE
3 – STRIKER
4 – SHIM
LIFTGATE WEATHERSTRIP
REMOVAL
(1) Pull the seal away from the flange around the
perimeter of liftgate opening and remove it.
(2) Clean the flange as necessary.
INSTALLATION
(1) Position weatherstrip seal in the opening with
the left end of the seal at the opening centerline.
Install the seal in a clockwise direction.
(2) Move to the left and mate the seal with the
bottom-left flange (Fig. 94).
(3) Move upward and mate the seal with the leftside flange.
(4) Move to the right and mate the seal with the
top-left roof flange.
(5) Seat the installed part of the seal with a roller.
Move the roller from the left-bottom end of seal to
the top-left half of the seal.
(6) Move to the right and mate the seal with the
top-right roof flange.
(7) Move downward and mate the seal with the
right-side flange.
(8) Move to the left and mate the seal with the
bottom-right flange.
(9) Center and butt seal the ends together at the
centerline.
(10) Seat the remaining part of the seal with a
roller. Move the roller the from top-left half of the
seal to the right-bottom end of the seal.
Fig. 94 Liftgate Weatherstrip Installation
1 – LIFTGATE OPENING
2 – WEATHERSTRIP SEAL
ADJUSTMENTS
HOOD
The hood bolt holes are elongated for fore and aft
and side-to-side adjustment.
(1) If hood is low to the cowl panel, insert shims
between the hinge and hood at the rear hinge bolts.
(2) Adjust the hood bumper (Fig. 95) in or out to
provide proper hood-to-fender height alignment.
(3) Adjust the hood strikers (Fig. 96) with shims
as necessary. Tighten the screws to 22 N·m (16 ft-lbs)
torque after adjustment.
(4) Align each latch and striker so that the striker
enters latch squarely.
DOOR
IN AND OUT—MINOR ADJUSTMENT
(1) Loosen the latch striker.
(2) Tap the latch striker inward if the door character line is outboard of the body character line or tap
the latch striker outward if the door character line is
inboard of the body character line.
(3) Inspect alignment. If correct, tighten striker
with 28 N·m (20 ft. lbs.) torque.
Page 66
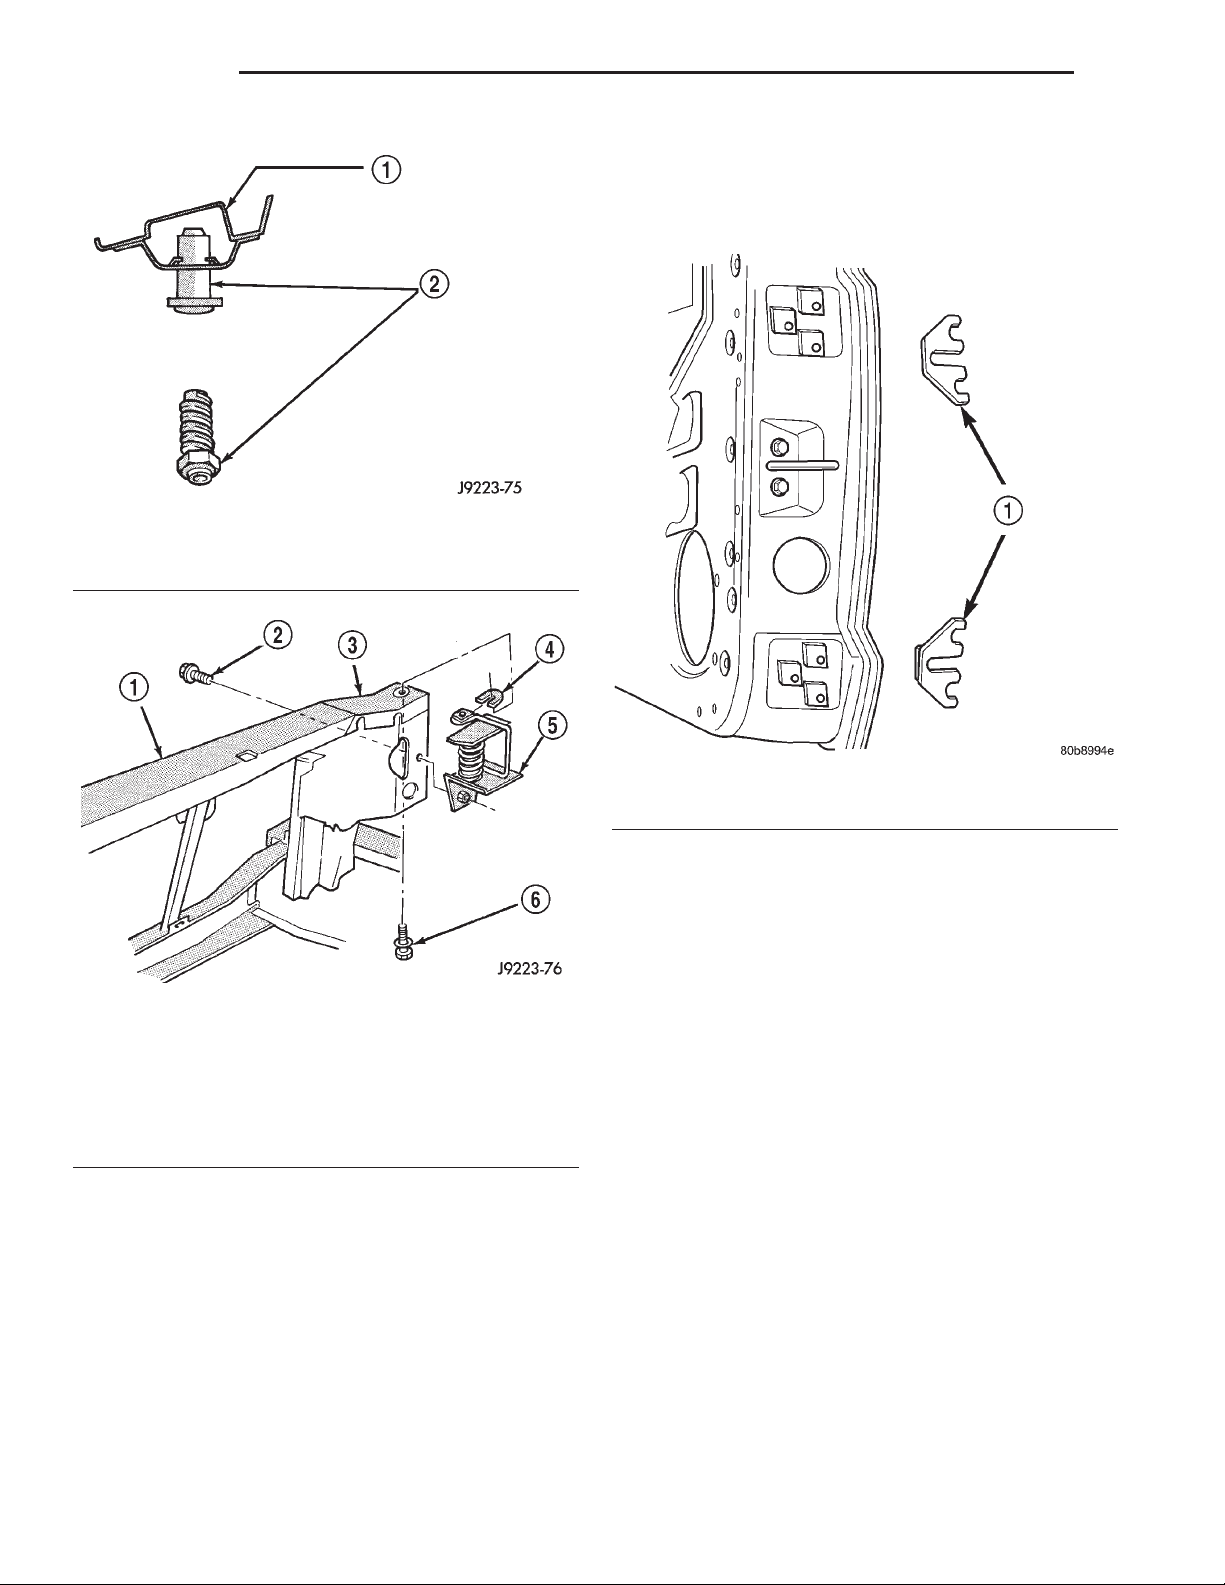
23 - 66 BODY XJ
ADJUSTMENTS (Continued)
ALIGNMENT MAJOR—ADJUSTMENT
Adjustment for alignment of the door is made by
installing shims between hinge and door face (Fig.
97).
Fig. 95 Hood Bumper
1 – HOOD LATCH STRIKER REINFORCEMENT PANEL
2 – HOOD BUMPER
Fig. 96 Hood Latch Striker
1 – RADIATOR SUPPORT CROSSMEMBER
2 – SCREW
3 – RADIATOR BAFFLE
4 – SHIM
5 – HOOD LATCH STRIKER
6 – SCREW
UP AND DOWN—MINOR ADJUSTMENT
(1) Loosen the latch striker.
(2) Tap the latch striker downward if the door
character line is higher than the body character line
or tap the latch striker upward if the door character
line is lower than the body character line.
(3) Inspect alignment. If correct, tighten striker
with 28 N·m (20 ft. lbs.) torque.
Fig. 97 Door Adjustment Shims
1 – ADJUSTMENT SHIMS
(1) If not loosened, loosen the door hinge bolts.
(2) Add or remove shims as necessary to obtain
the best door fit.
(3) Tighten door hinge bolts to 3 N·m (2 ft-lbs)
torque after adjustment is completed.
(4) Apply general purpose sealant around the door
hinges/door face mating area.
DOOR LATCH ADJUSTMENT
(1) Locate access hole (Fig. 98).
(2) Insert a 5/32-inch hex-wrench through hole and
into adjustment screw. Loosen screw.
(3) Operate outside handle button several times to
release any restriction because of mis-alignment.
(4) Tighten adjustment screw to 3 N·m (30 in-lbs)
torque.
(5) Test handle button and lock cylinder for proper
operation.
Page 67
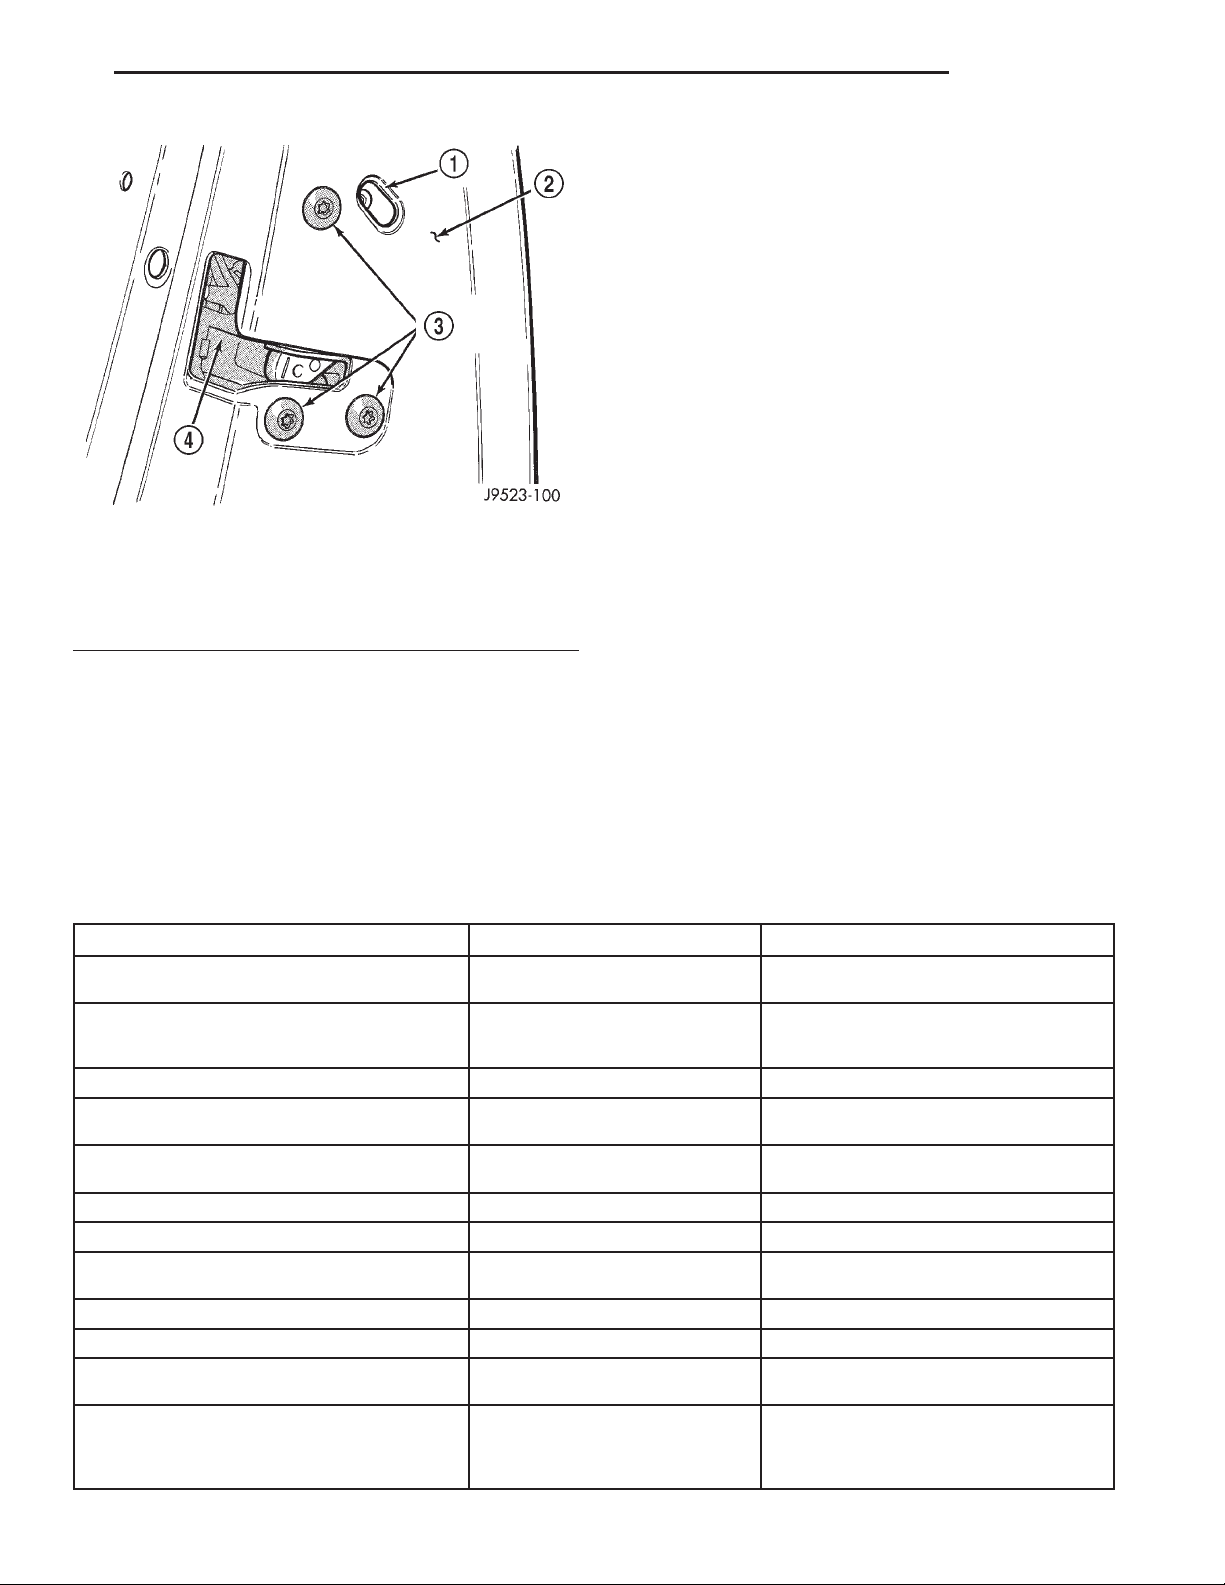
XJ BODY 23 - 67
ADJUSTMENTS (Continued)
LIFTGATE
The position of liftgate can be adjusted upward or
downward by use of slots in the hinge. An inward or
outward adjustment is achieved by use of slots in the
body. If an inward or outward adjustment is needed,
use 3My Fast and Firm or equivalent on the hinge
to body mating surface as a sealant.
REAR SEATBACK
(1) Unlatch and position seatback in cargo position.
(2) Loosen the screws attaching the strikers to the
rear wheelhouse.
(3) Position the seat back in the full upright position and secure the latch into the strikers.
(4) From the cargo area of the vehicle, push the
Fig. 98 Door Latch Adjustment
1 – ACCESS HOLE
2 – DOOR
3 – LATCH MOUNTING BOLTS
4–LATCH
rear of the seatback forward.
(5) Unlatch and position seatback in cargo position.
(6) Tighten the screws attaching the strikers to
the rear wheelhouse.
(7) Position the seat back in the full upright position and secure the latch into the strikers.
(8) Verify latch operation.
SPECIFICATIONS
BODY LUBRICANTS
COMPONENT SERVICE INTERVAL LUBRICANT
Door Latches As Required Multi-Purpose Grease NLGI GC-LB
Hood Latch, Release Mechanism & Safety
Latch
Hood Hinges As Required Engine Oil
Seat Track & Release Mechanism As Required Multi-Purpose Grease NLGI GC-LB 2 EP
Liftgate Hinge As Required Multi-Purpose Grease NLGI GC-LB 2 EP
Liftgate Support Arms As Required Engine Oil
Liftgate Latches As Required White Spray Lubricant (3)
Liftgate Release Handle (Pivot & Slide
Contact Surfaces)
Window System Components As Required White Spray Lubricant (3)
Lock Cylinders Twice A Year Lock Cylinder Lubricant (4)
Parking Brake Mechanism As Required Multi-Purpose Grease NLGI GC-LB 2 EP
1 = Mopar Wheel Bering Grease (High Temp)
2 = Mopar Multi-Mileage Lubricant
3 = Mopar Spray White Lube
4 = Mopar Lock Cylinder Lubricant
As Required
(When Performing Other
Underhood Service)
As Required Multi-Purpose Grease NLGI GC-LB 2 EP
(Water Resistant) (1)
Multi-Purpose Grease NLGI GC-LB 2 EP
(2)
(2)
(2)
(2)
(1)
Page 68
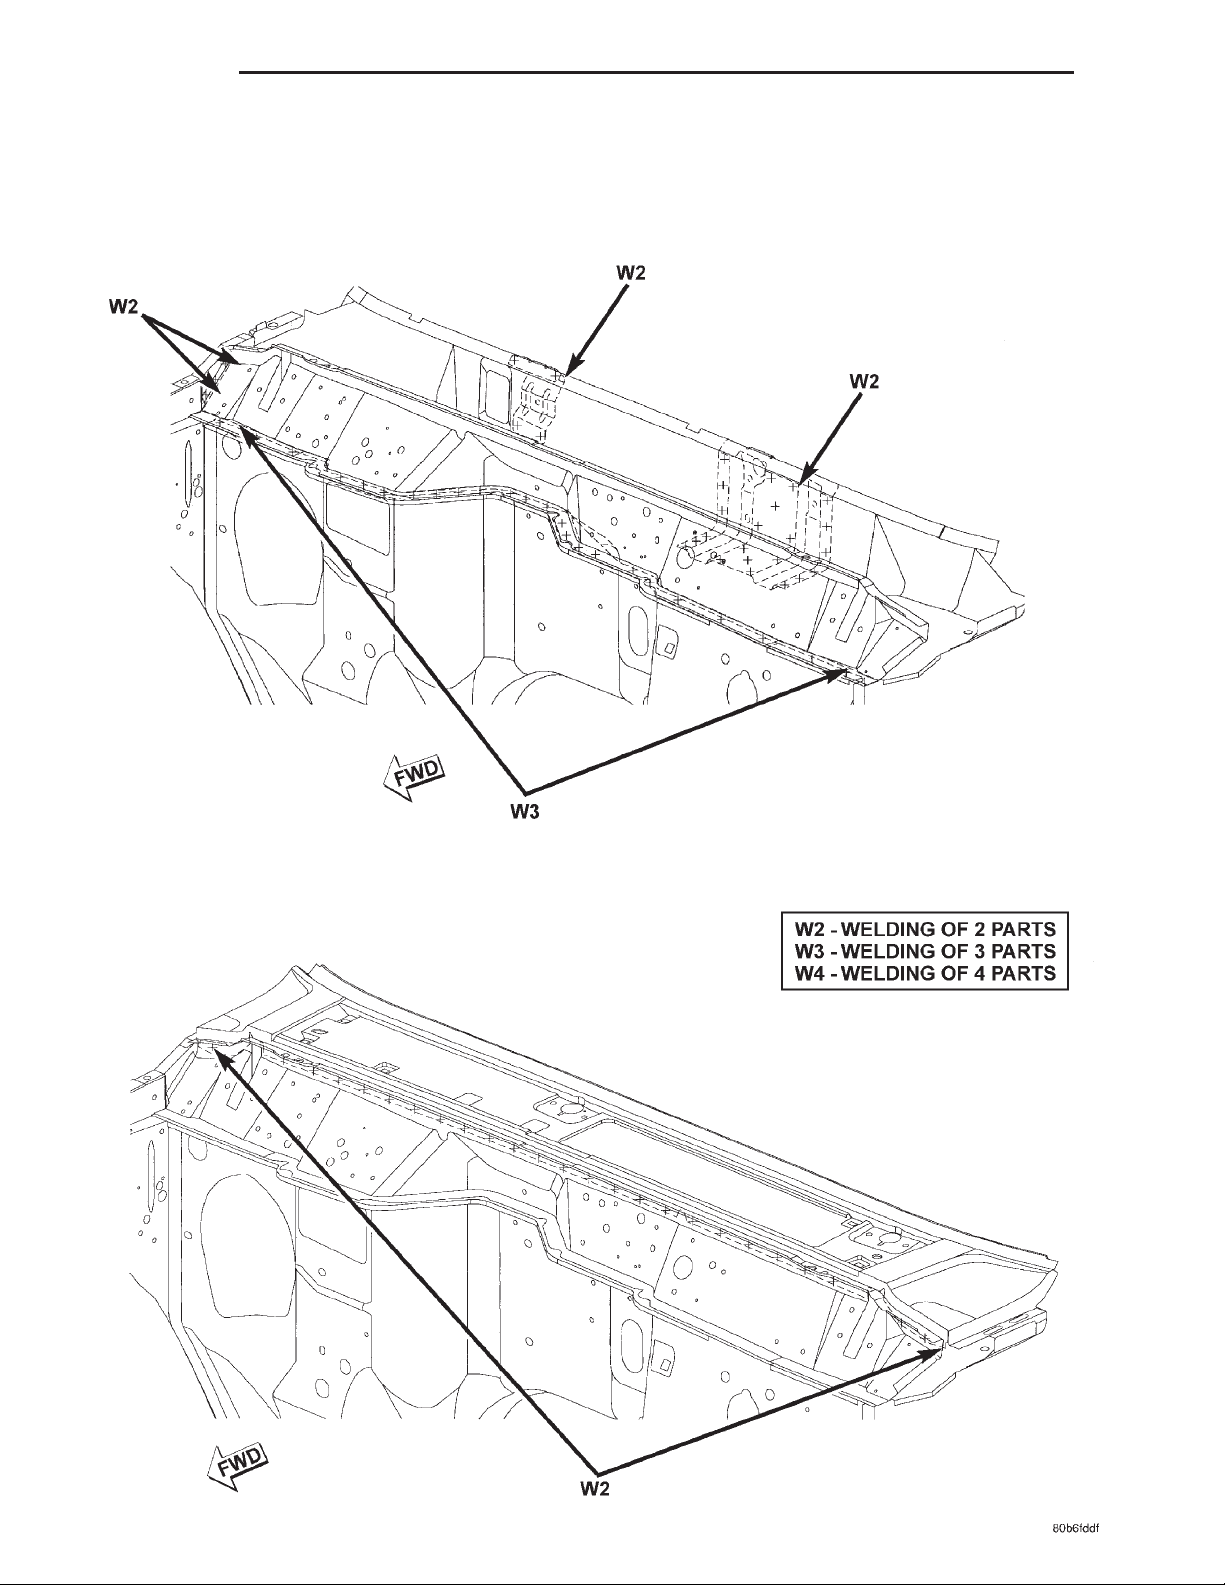
23 - 68 BODY XJ
SPECIFICATIONS (Continued)
WELD LOCATIONS
UPPER COWL
Page 69
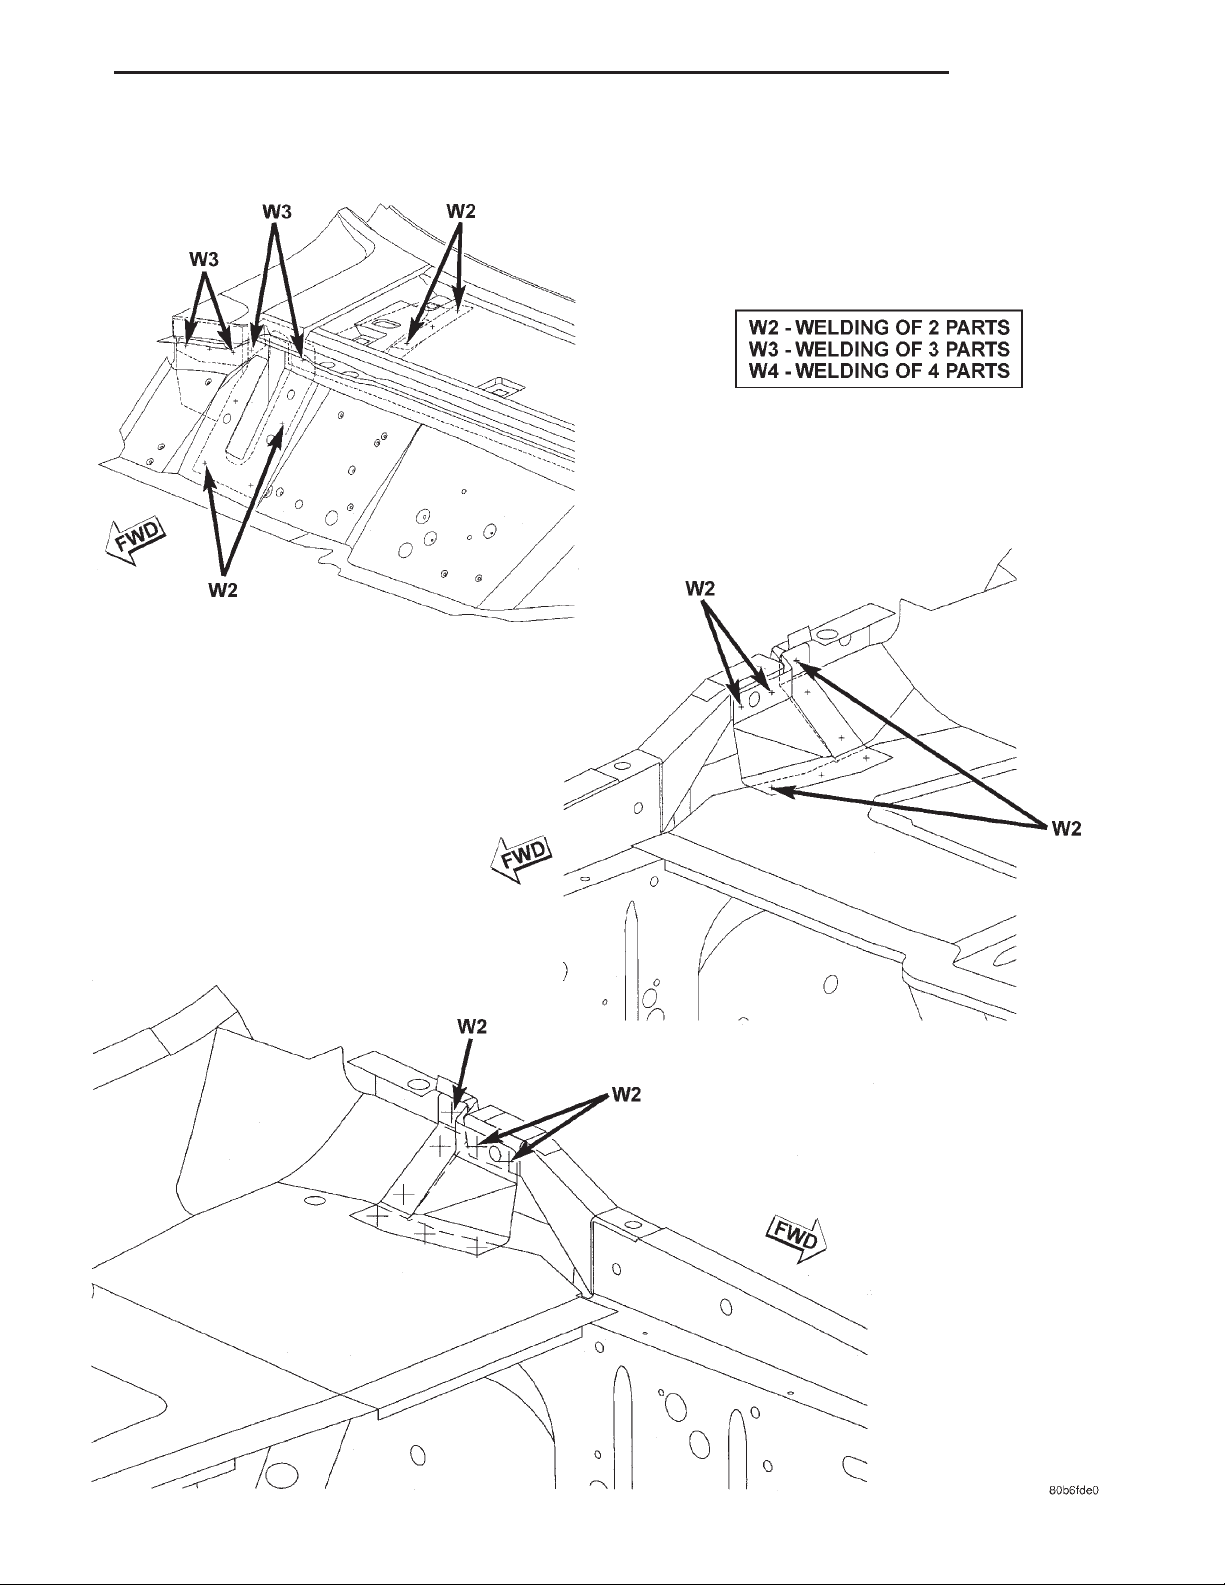
XJ BODY 23 - 69
SPECIFICATIONS (Continued)
UPPER COWL
Page 70
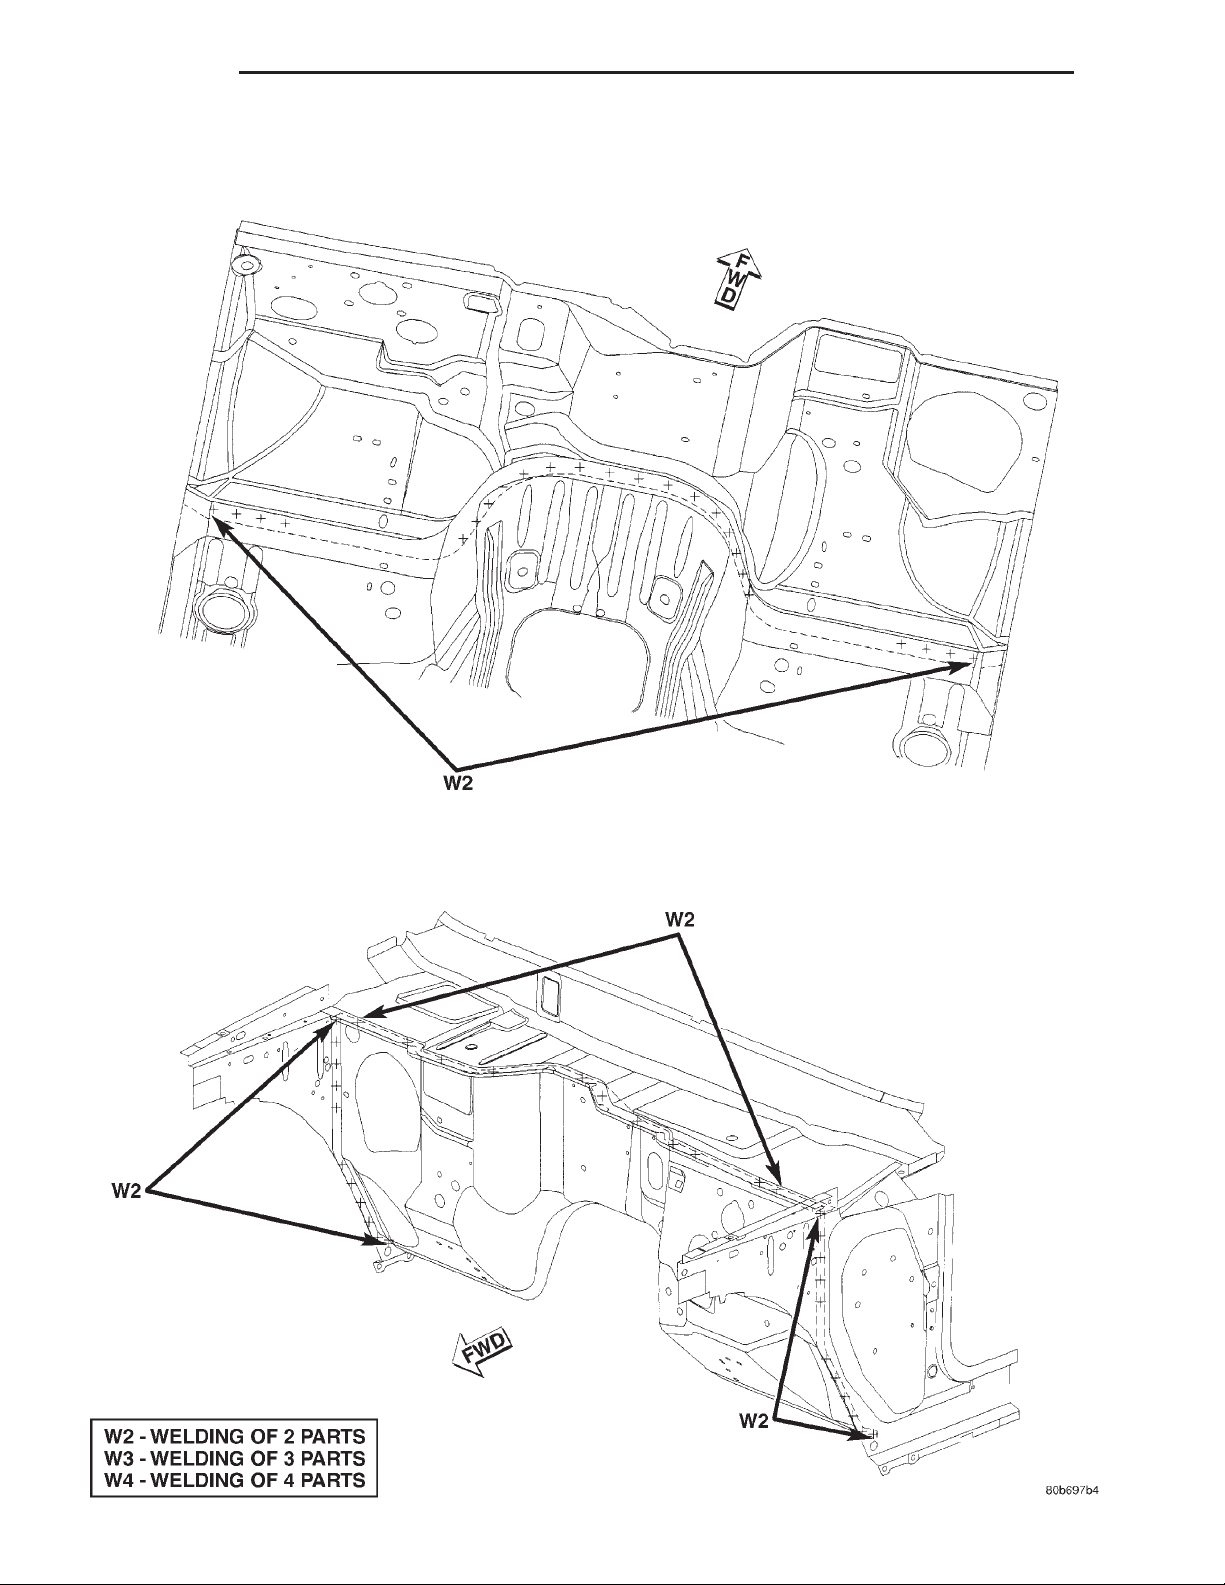
23 - 70 BODY XJ
SPECIFICATIONS (Continued)
COWL
Page 71
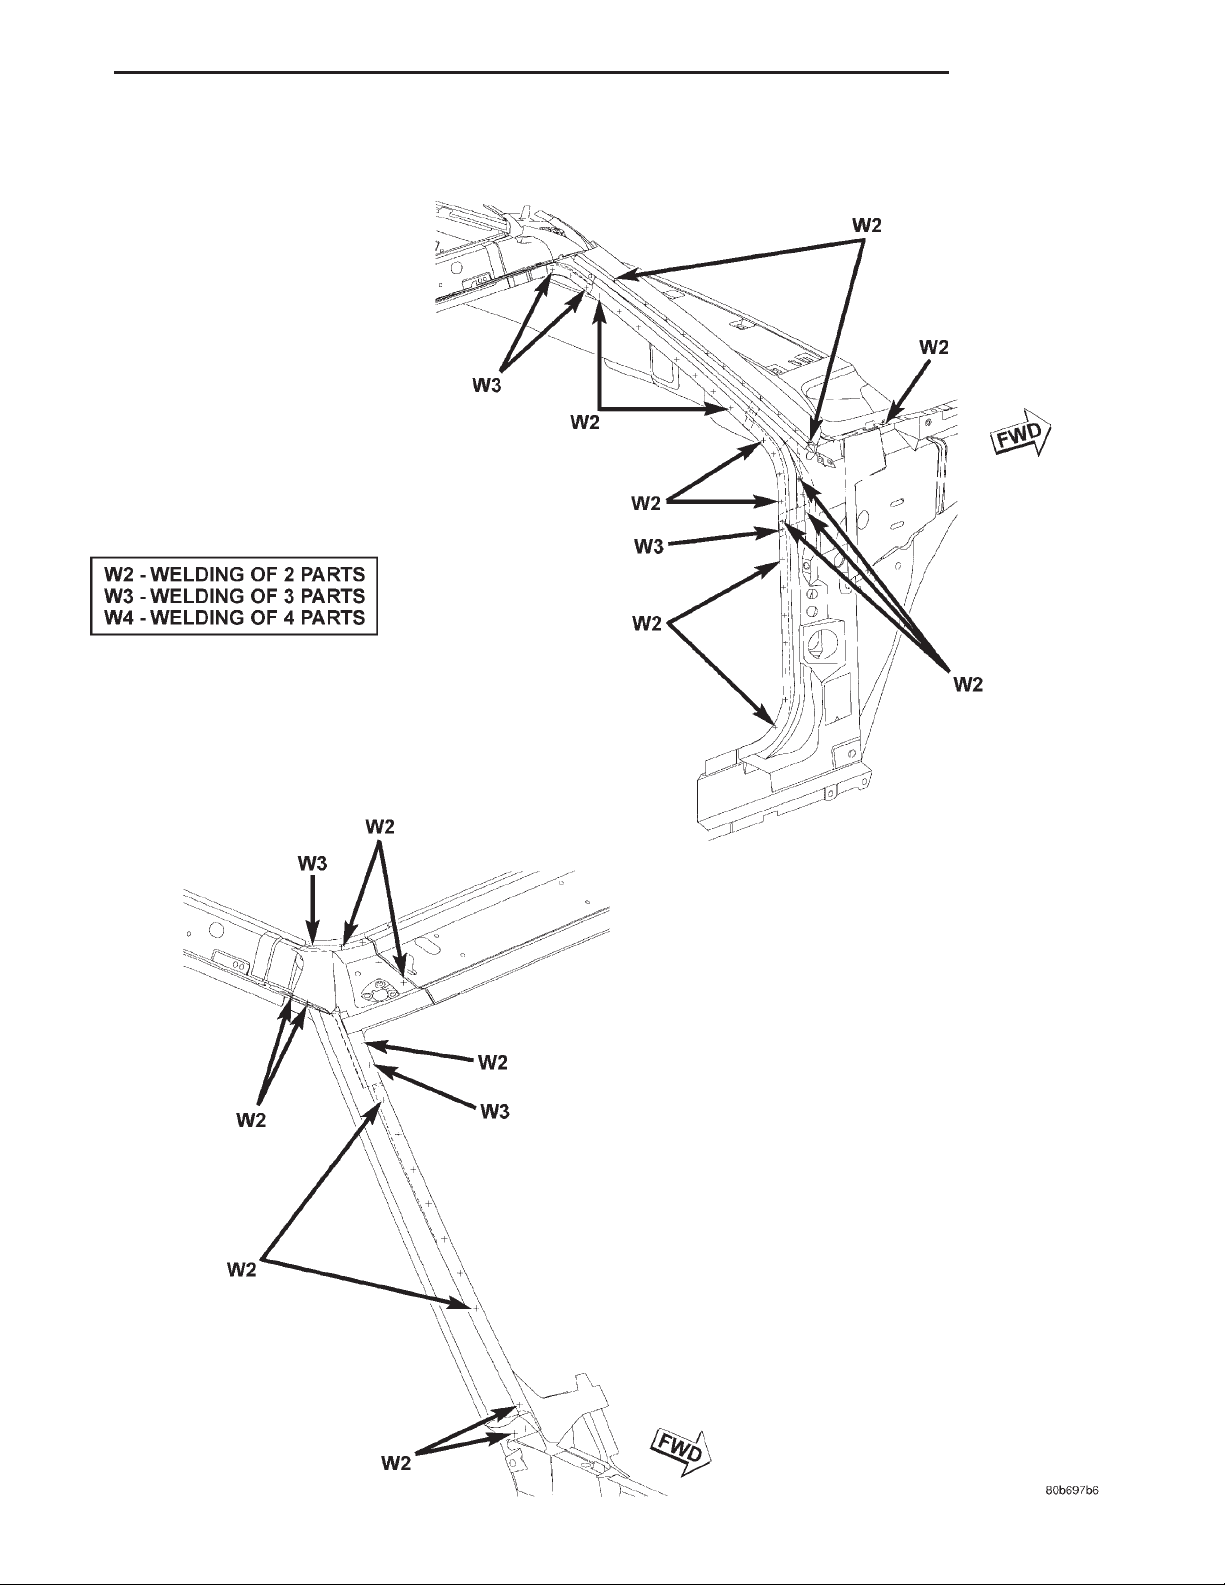
XJ BODY 23 - 71
SPECIFICATIONS (Continued)
A—PILLAR
Page 72
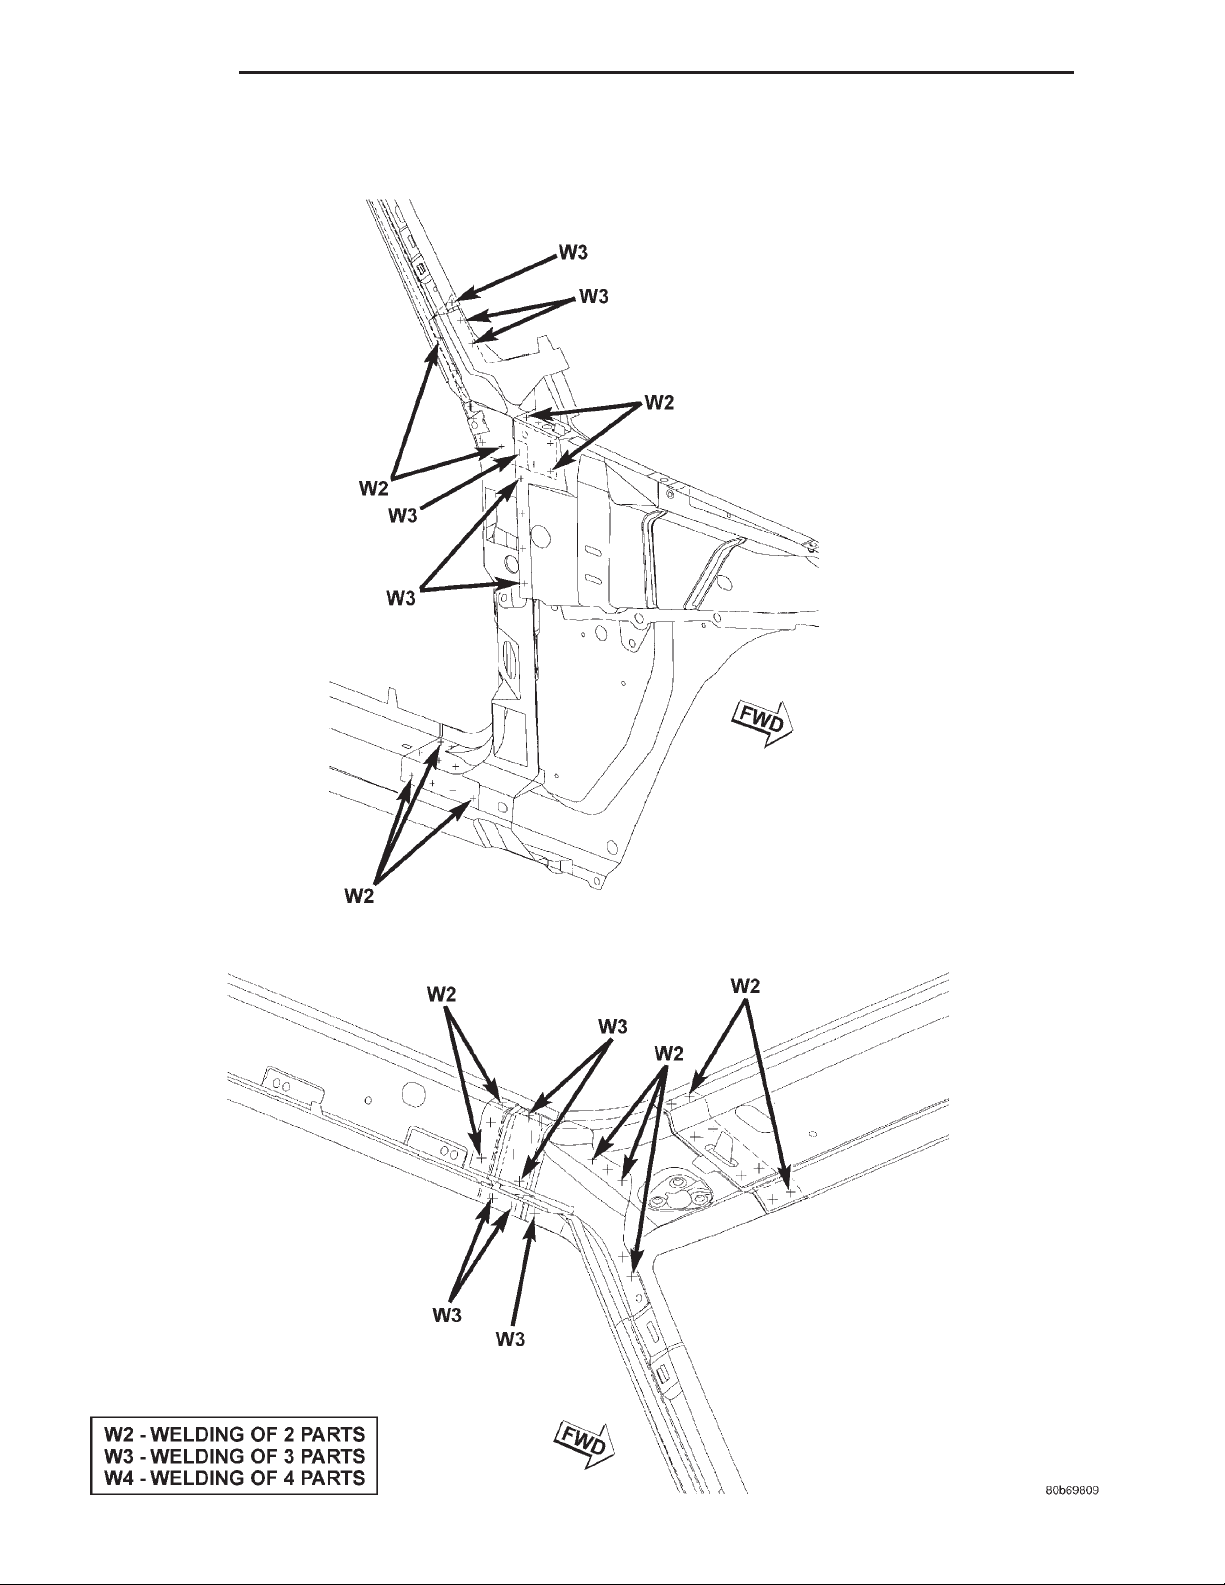
23 - 72 BODY XJ
SPECIFICATIONS (Continued)
A—PILLAR
Page 73
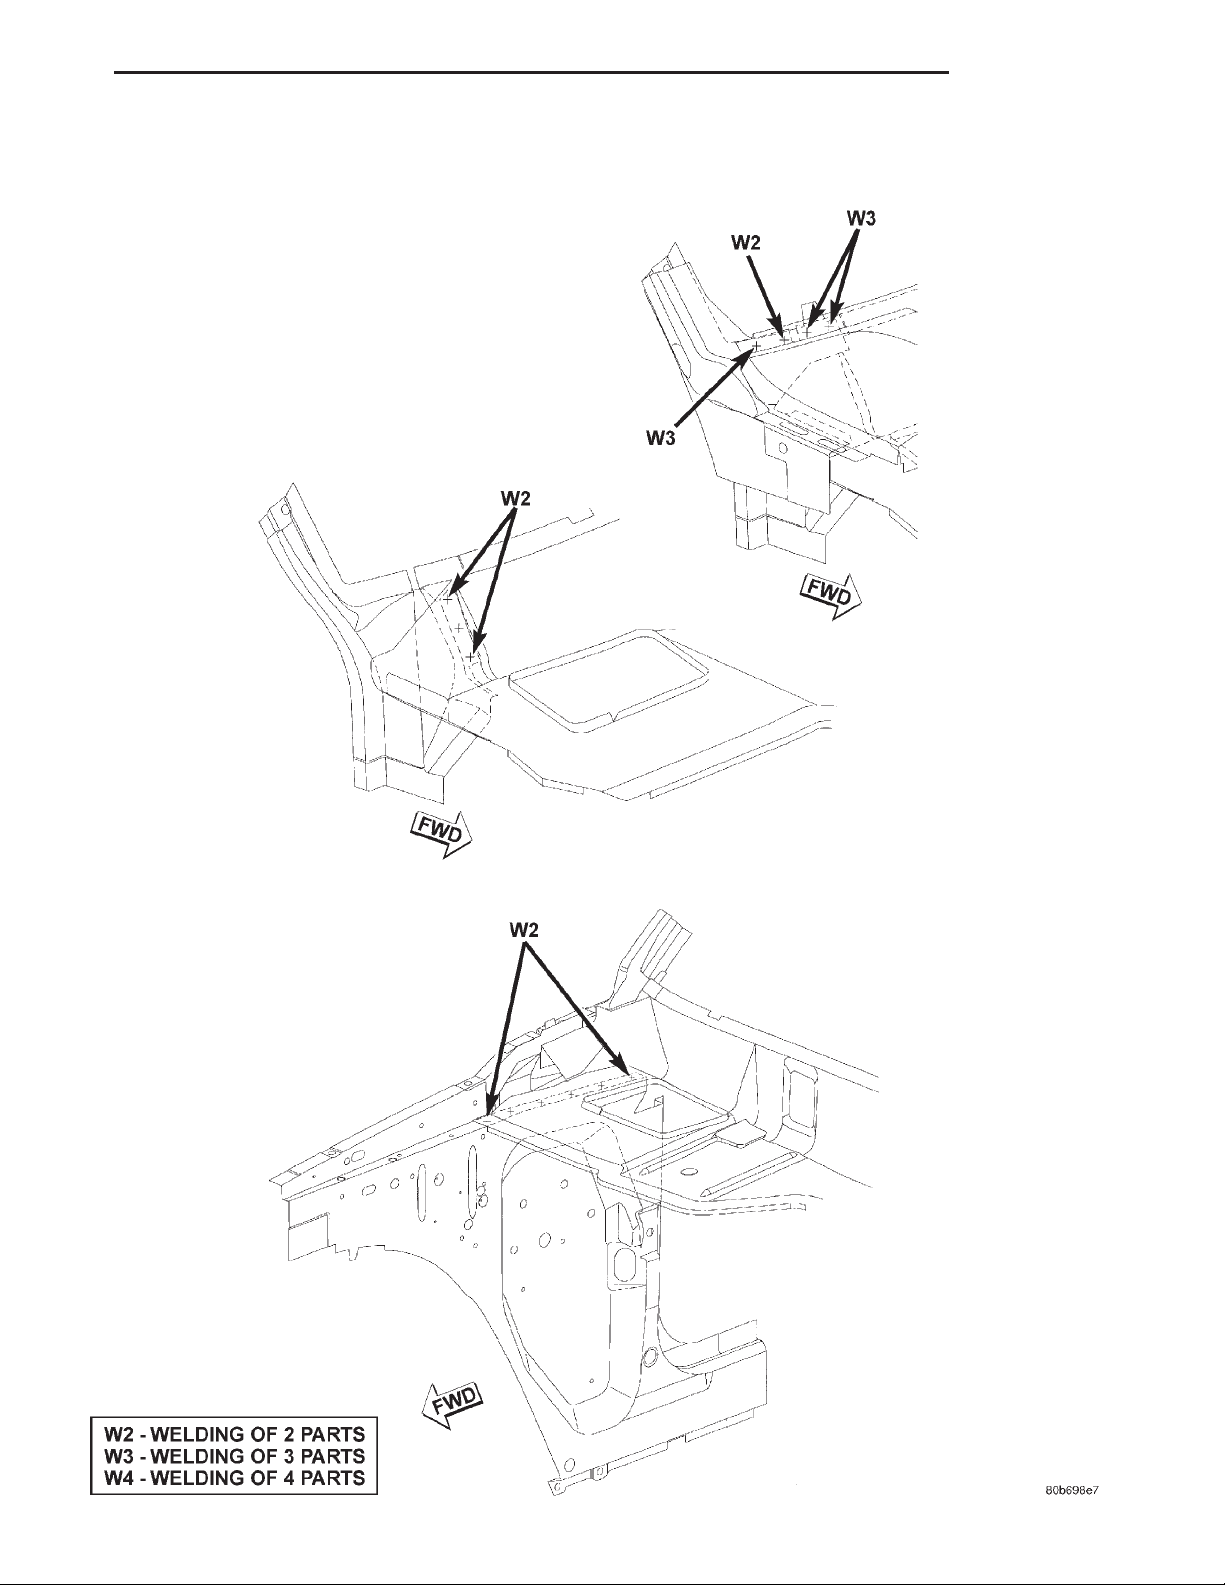
XJ BODY 23 - 73
SPECIFICATIONS (Continued)
A—PILLAR
Page 74
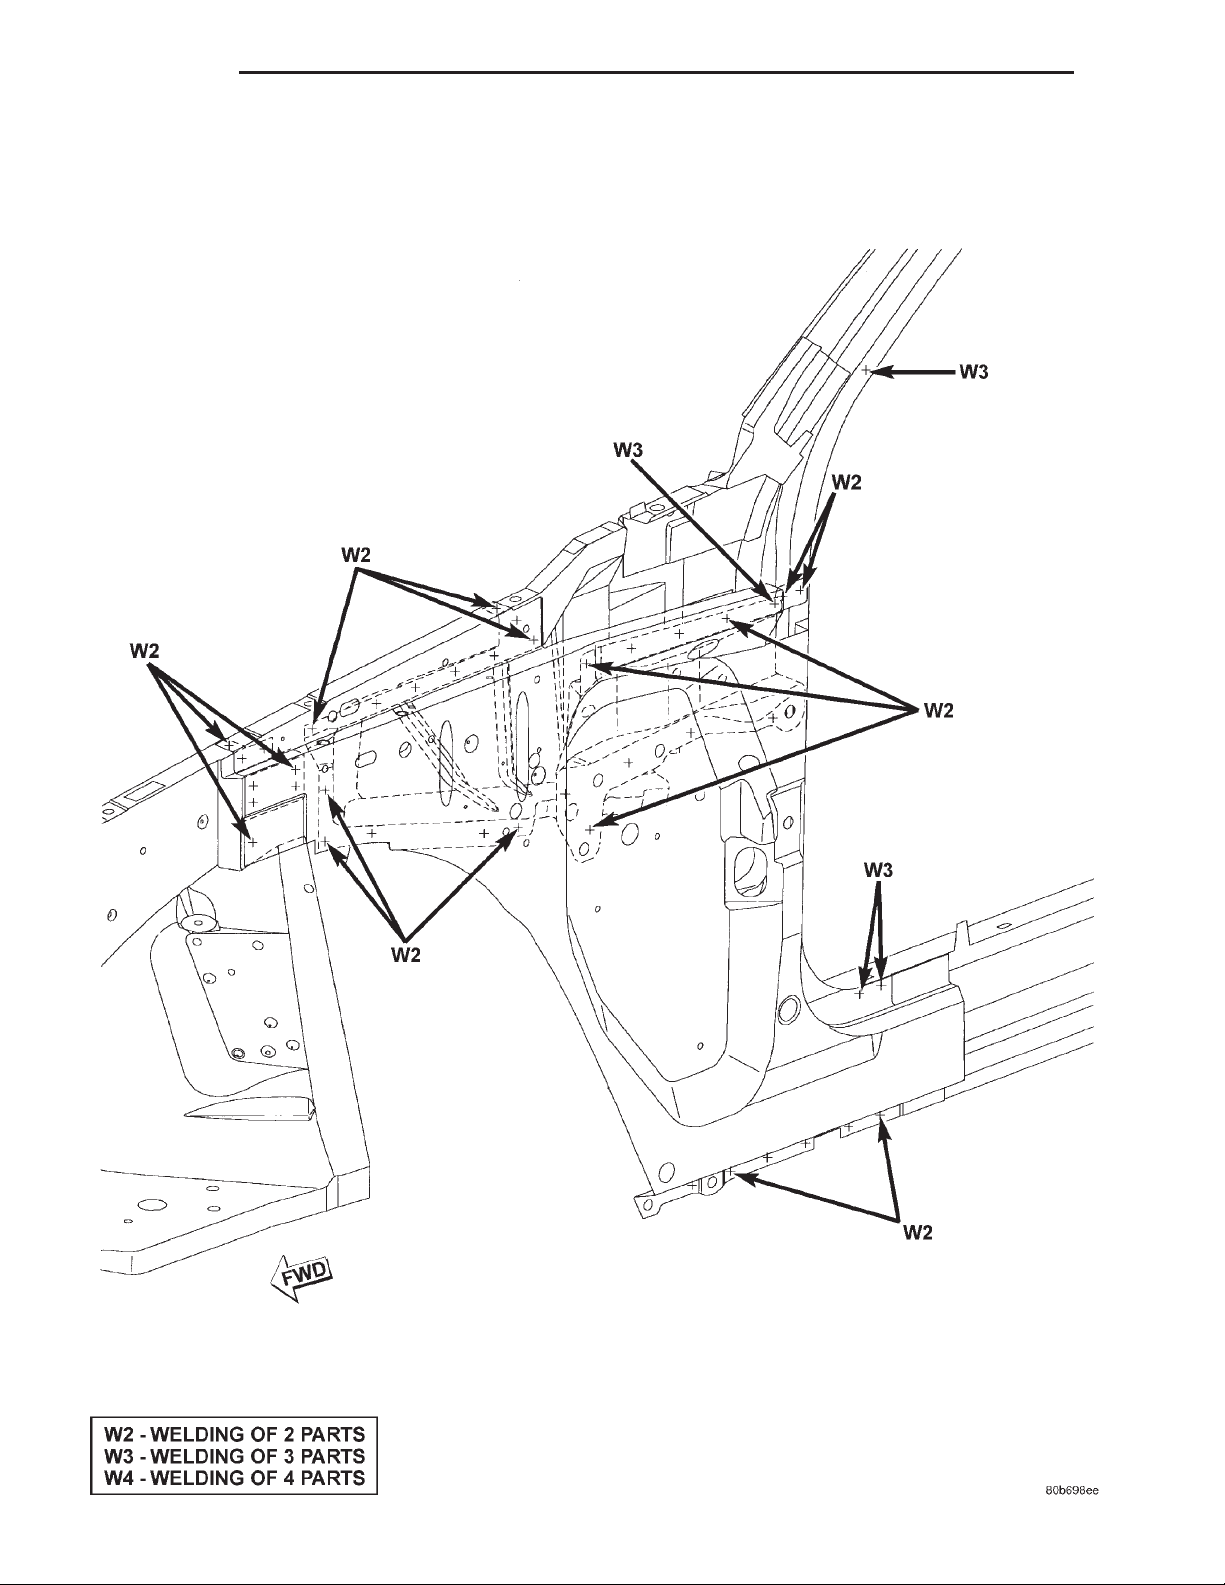
23 - 74 BODY XJ
SPECIFICATIONS (Continued)
A—PILLAR
Page 75
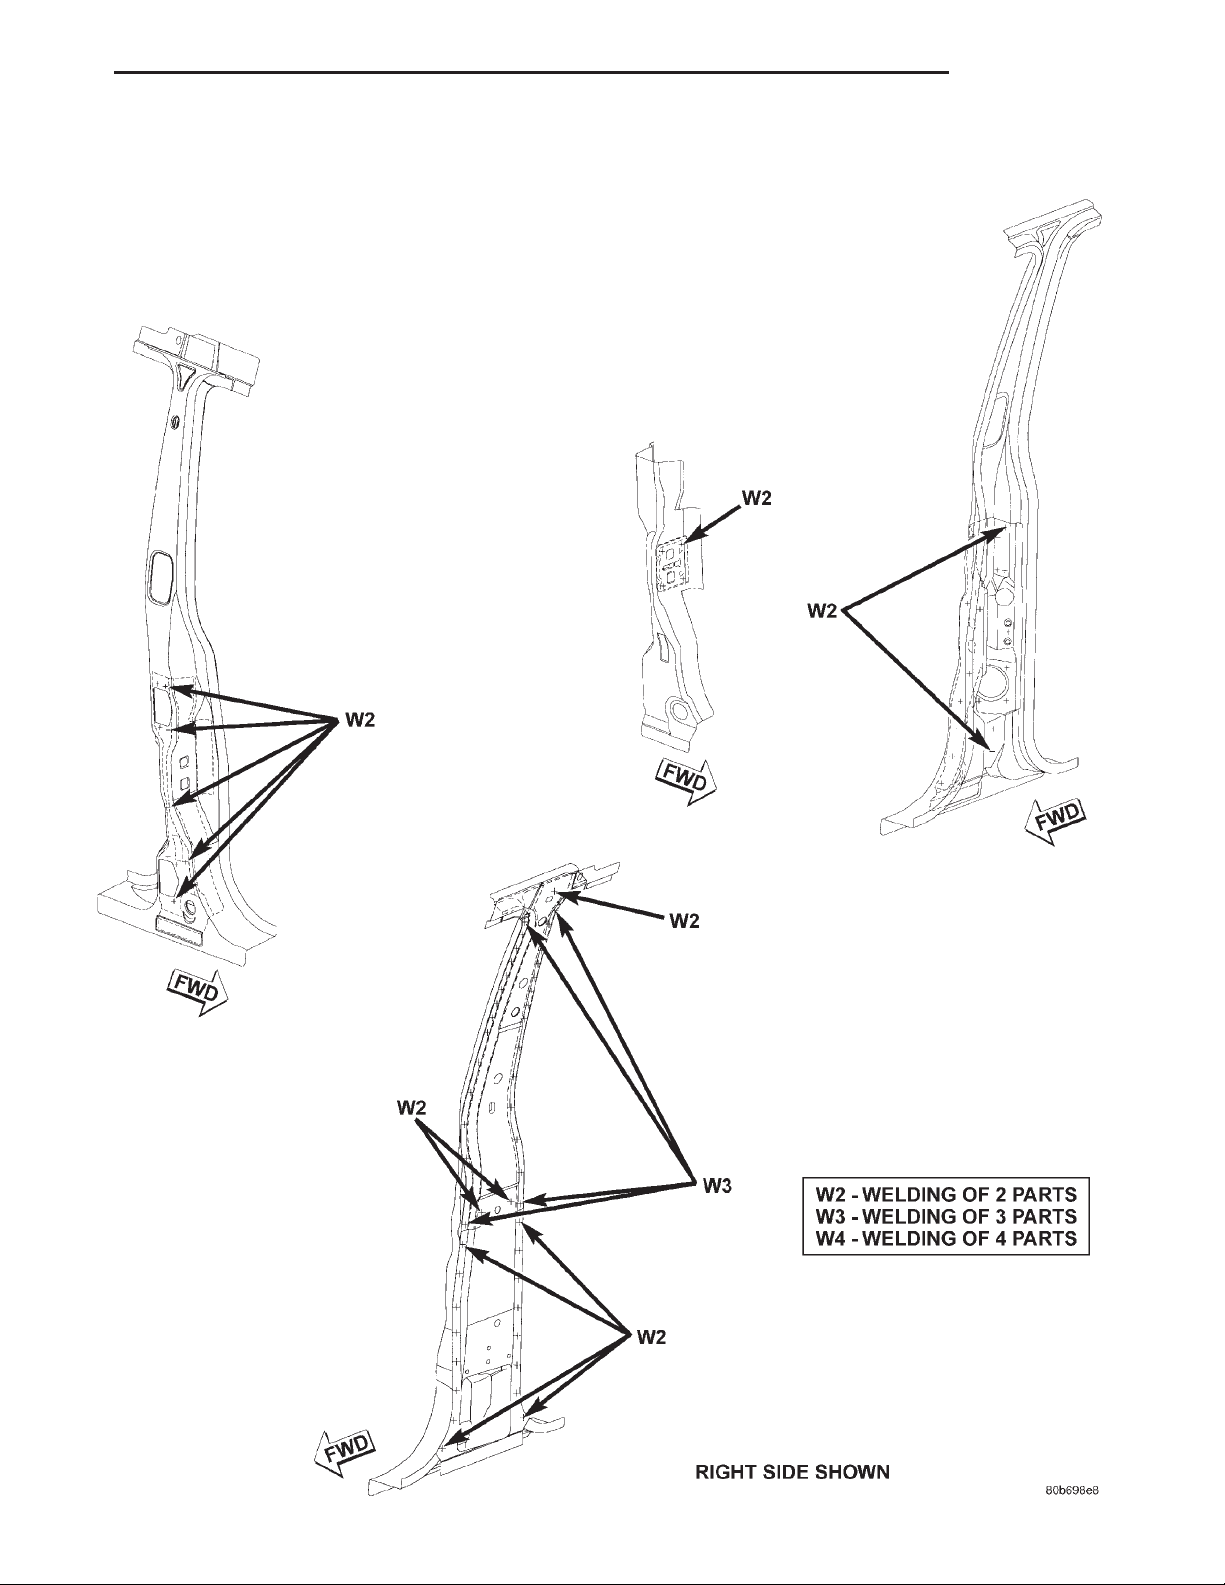
XJ BODY 23 - 75
SPECIFICATIONS (Continued)
B—PILLAR
Page 76
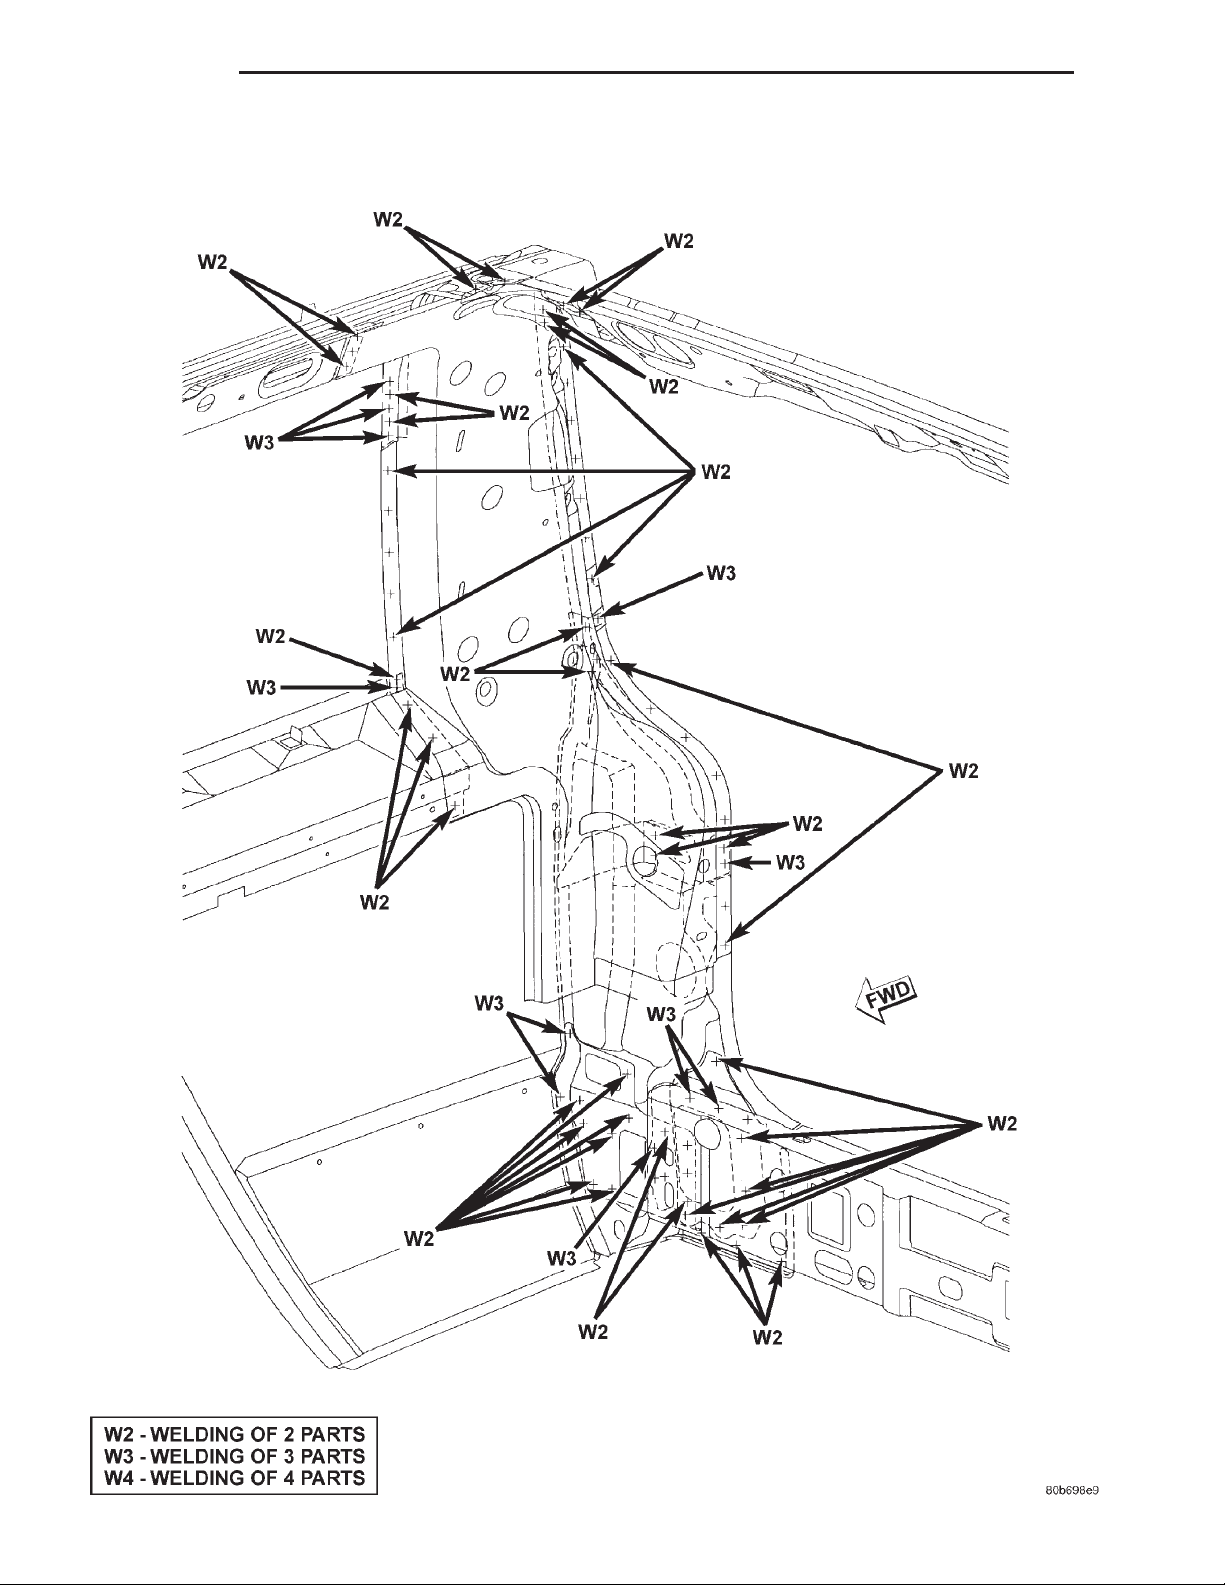
23 - 76 BODY XJ
SPECIFICATIONS (Continued)
D—PILLAR
Page 77
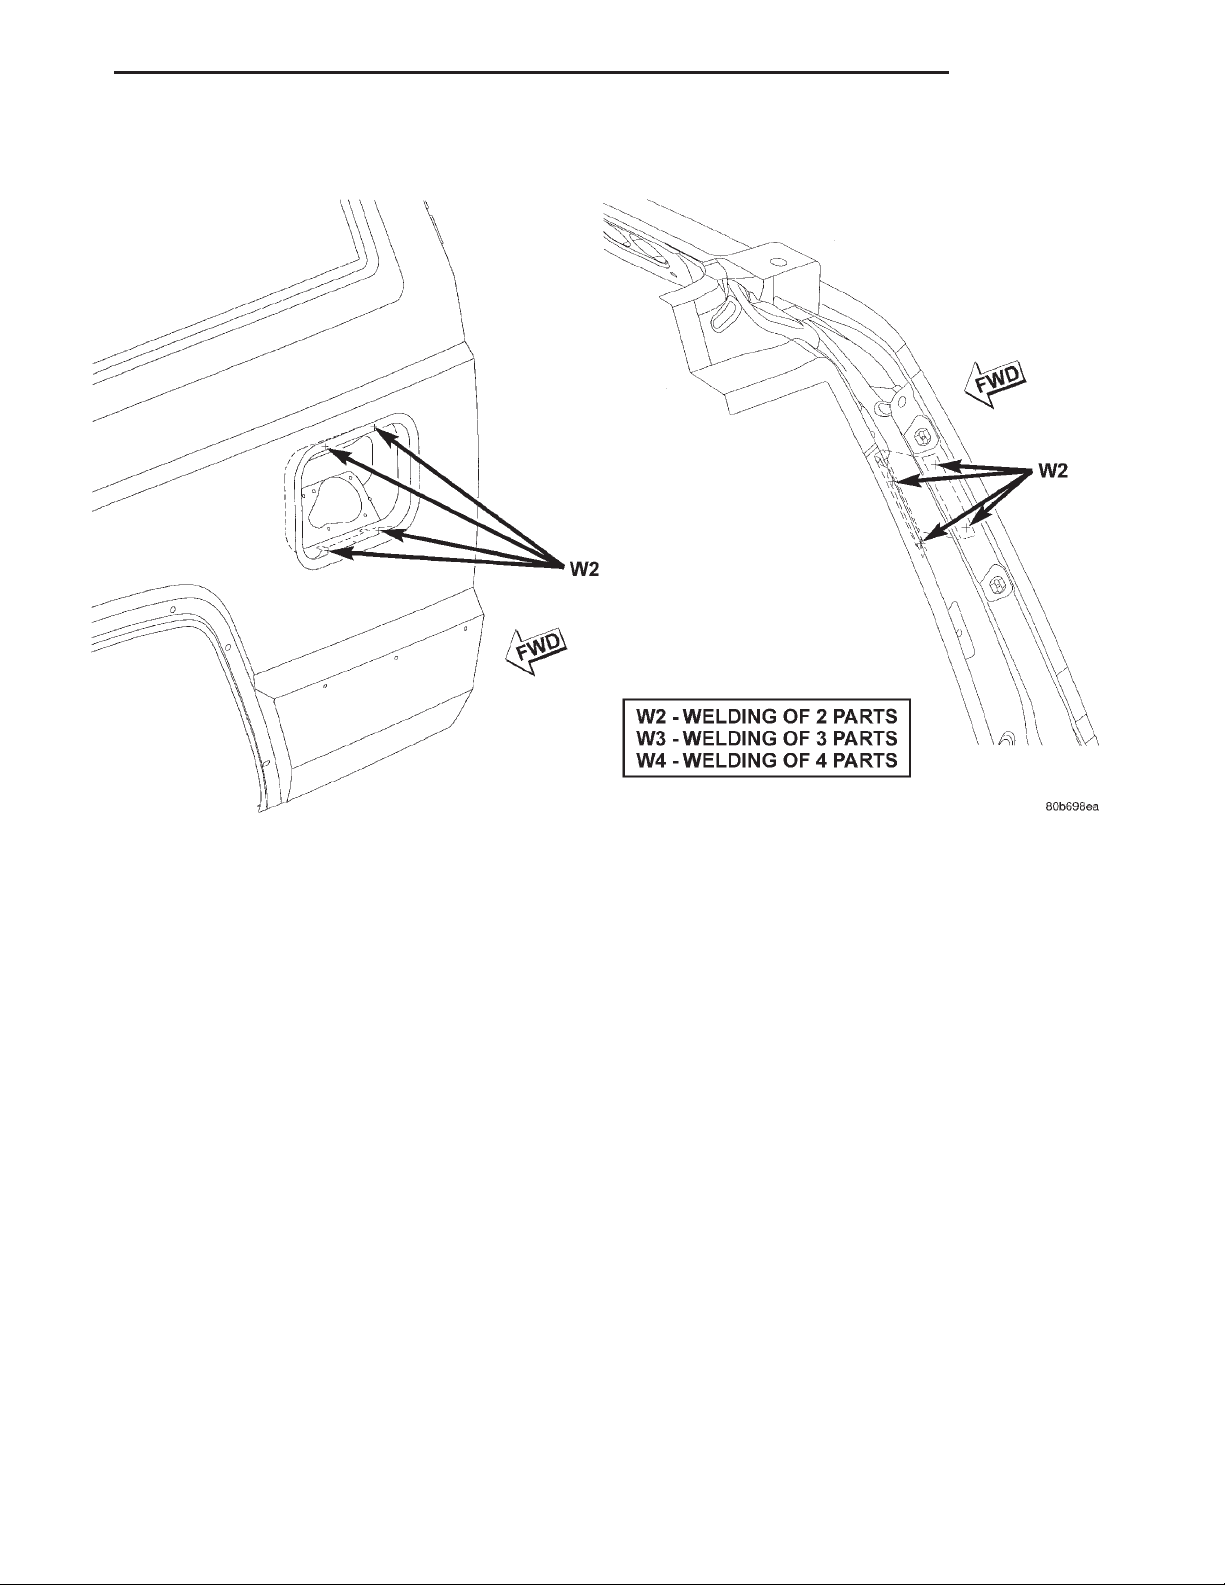
XJ BODY 23 - 77
SPECIFICATIONS (Continued)
FUEL FILLER OPENING
Page 78
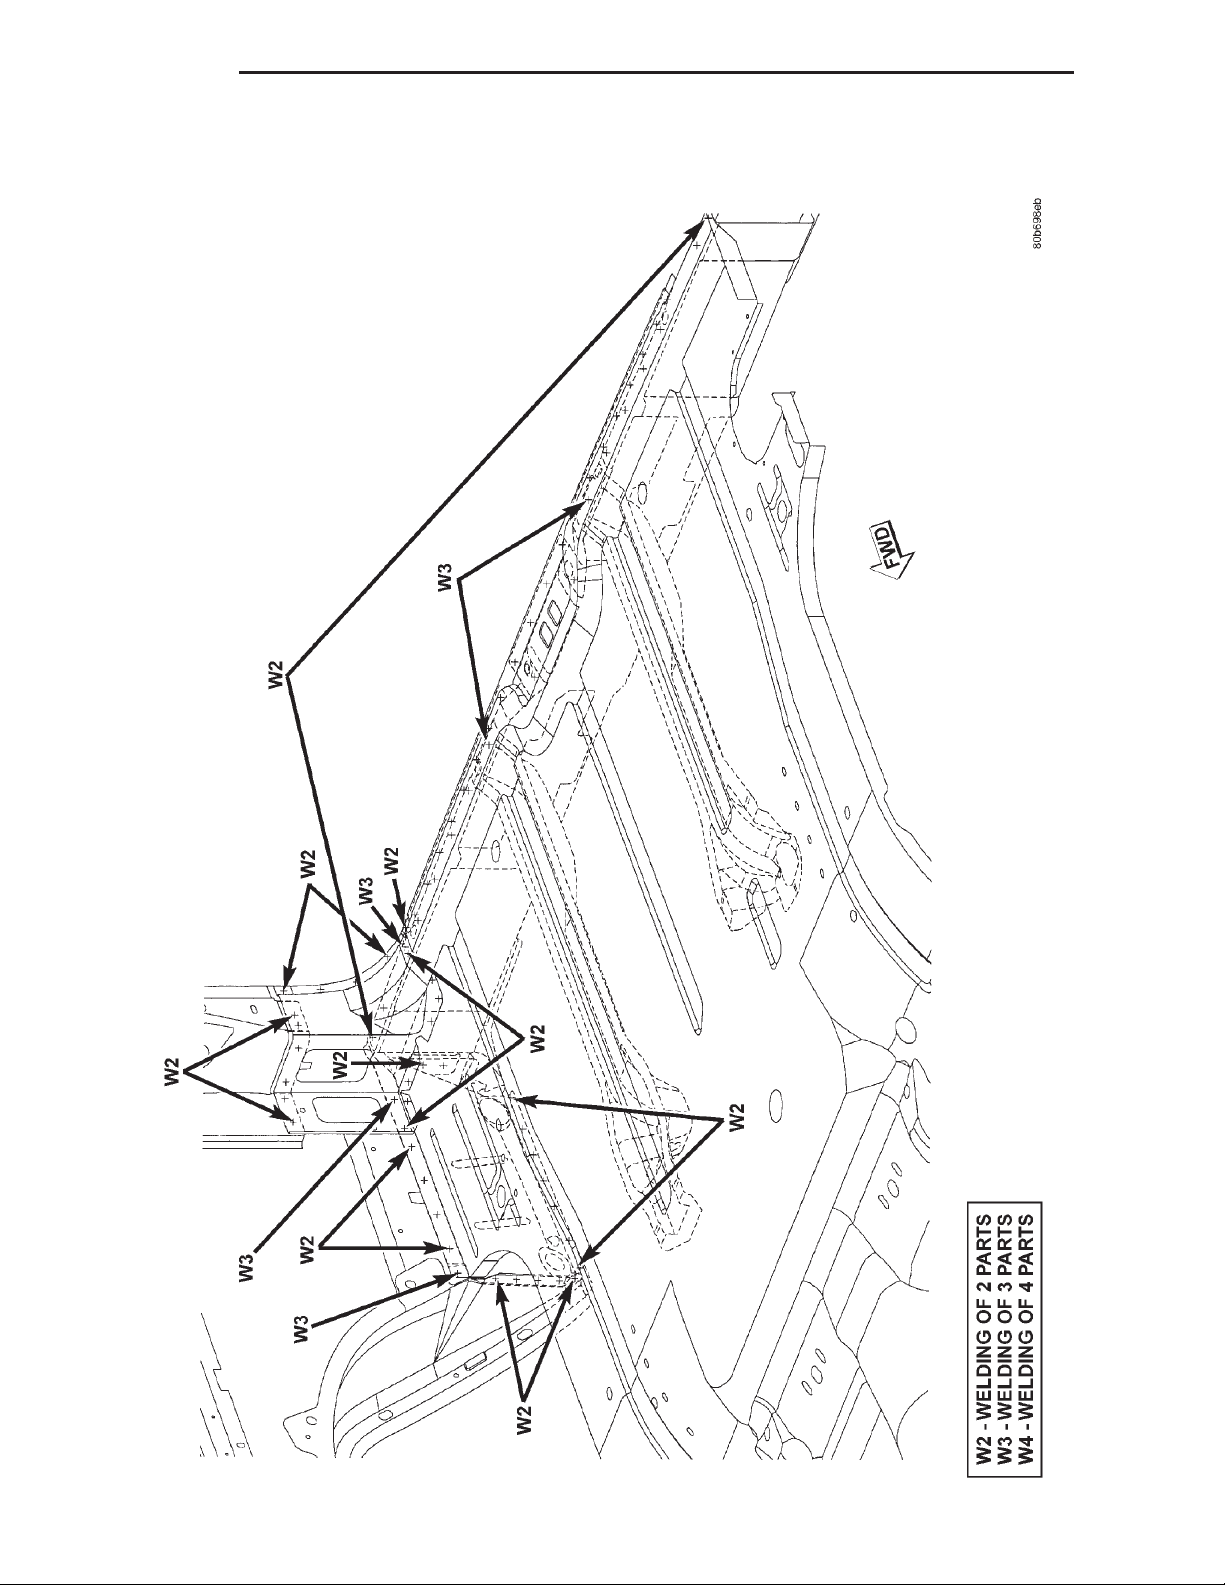
23 - 78 BODY XJ
SPECIFICATIONS (Continued)
CARGO AREA FLOOR PAN
Page 79
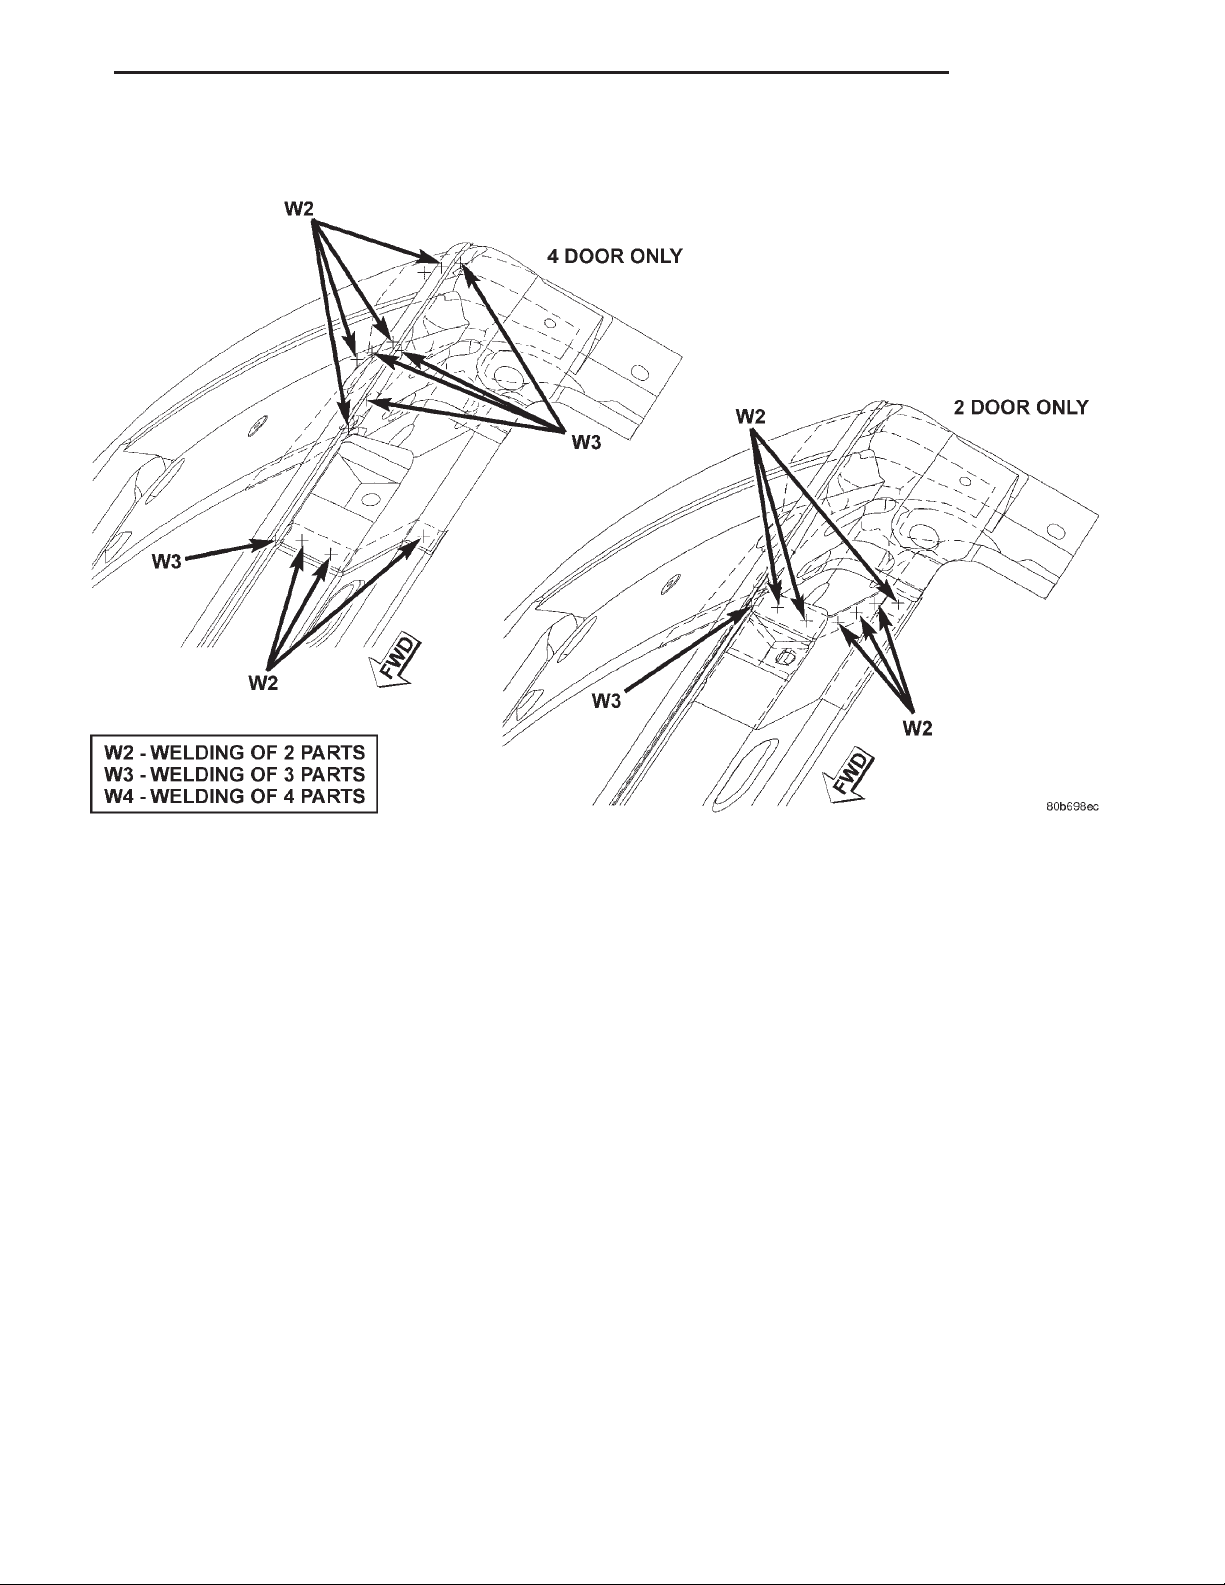
XJ BODY 23 - 79
SPECIFICATIONS (Continued)
ROOF AND D—PILLAR
Page 80
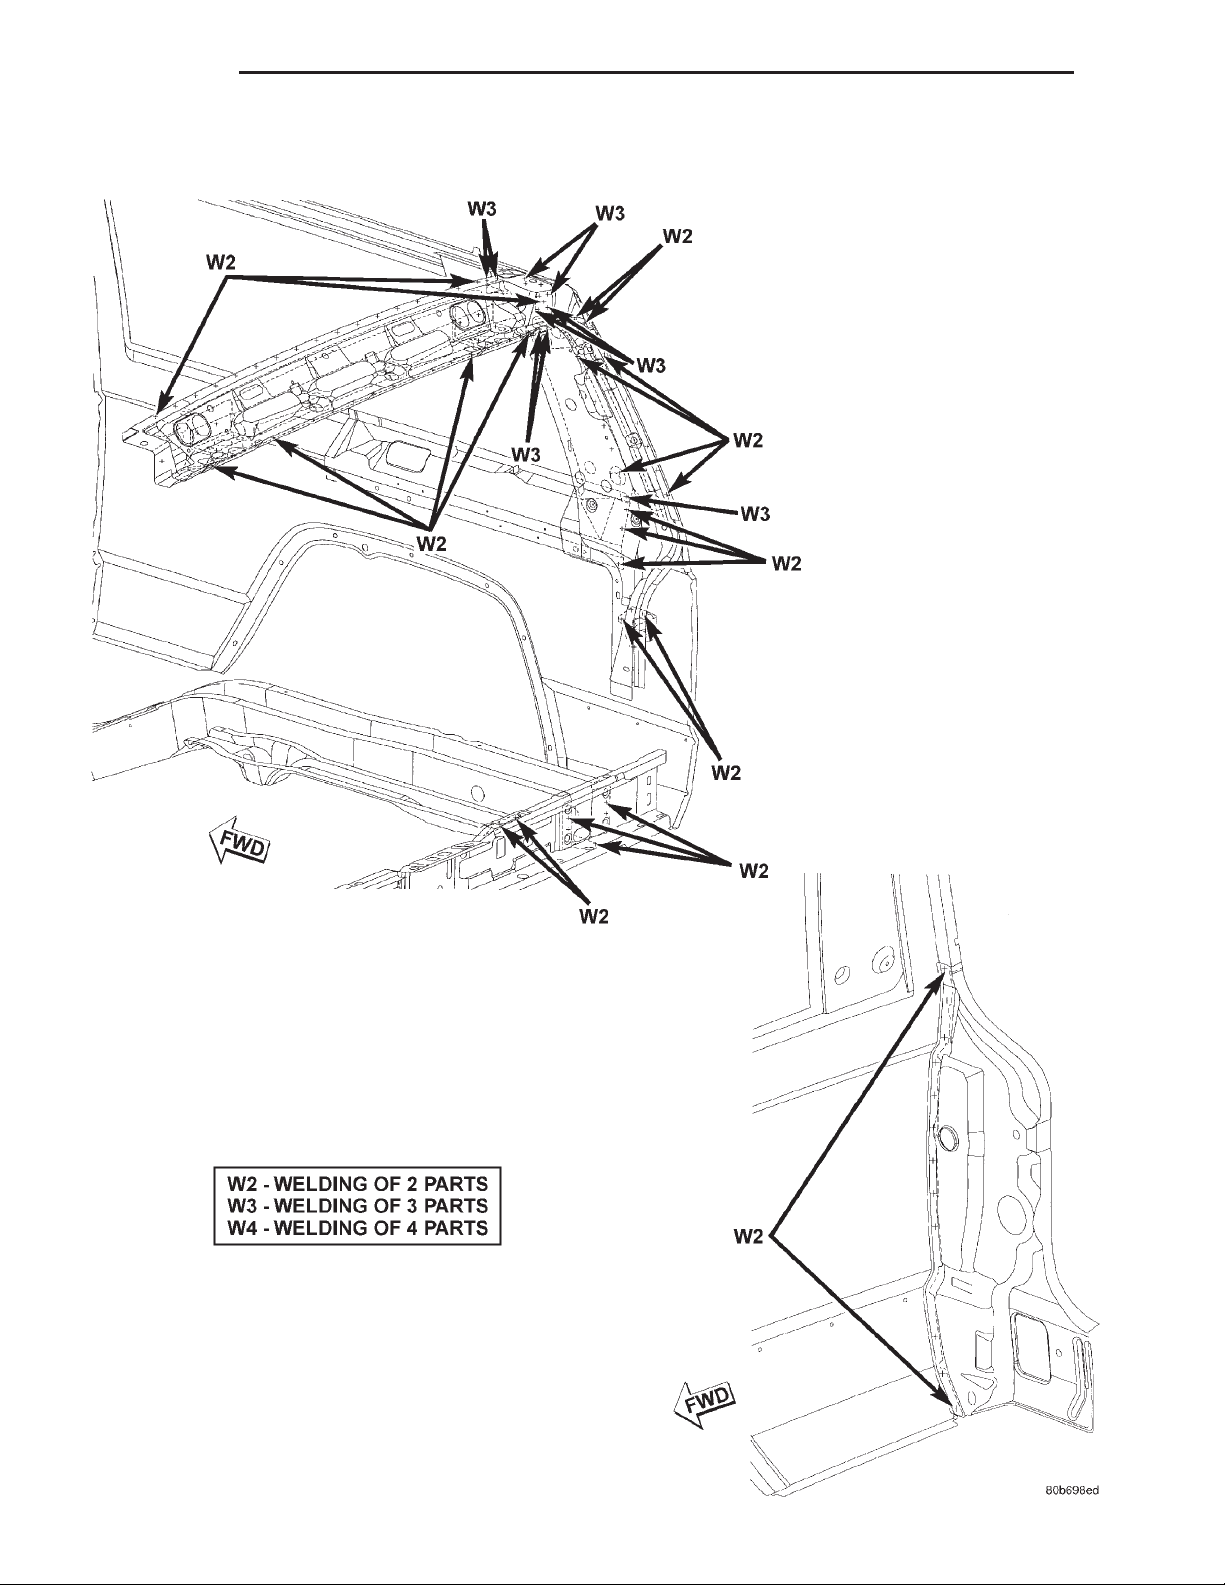
23 - 80 BODY XJ
SPECIFICATIONS (Continued)
LIFTGATE OPENING
Page 81
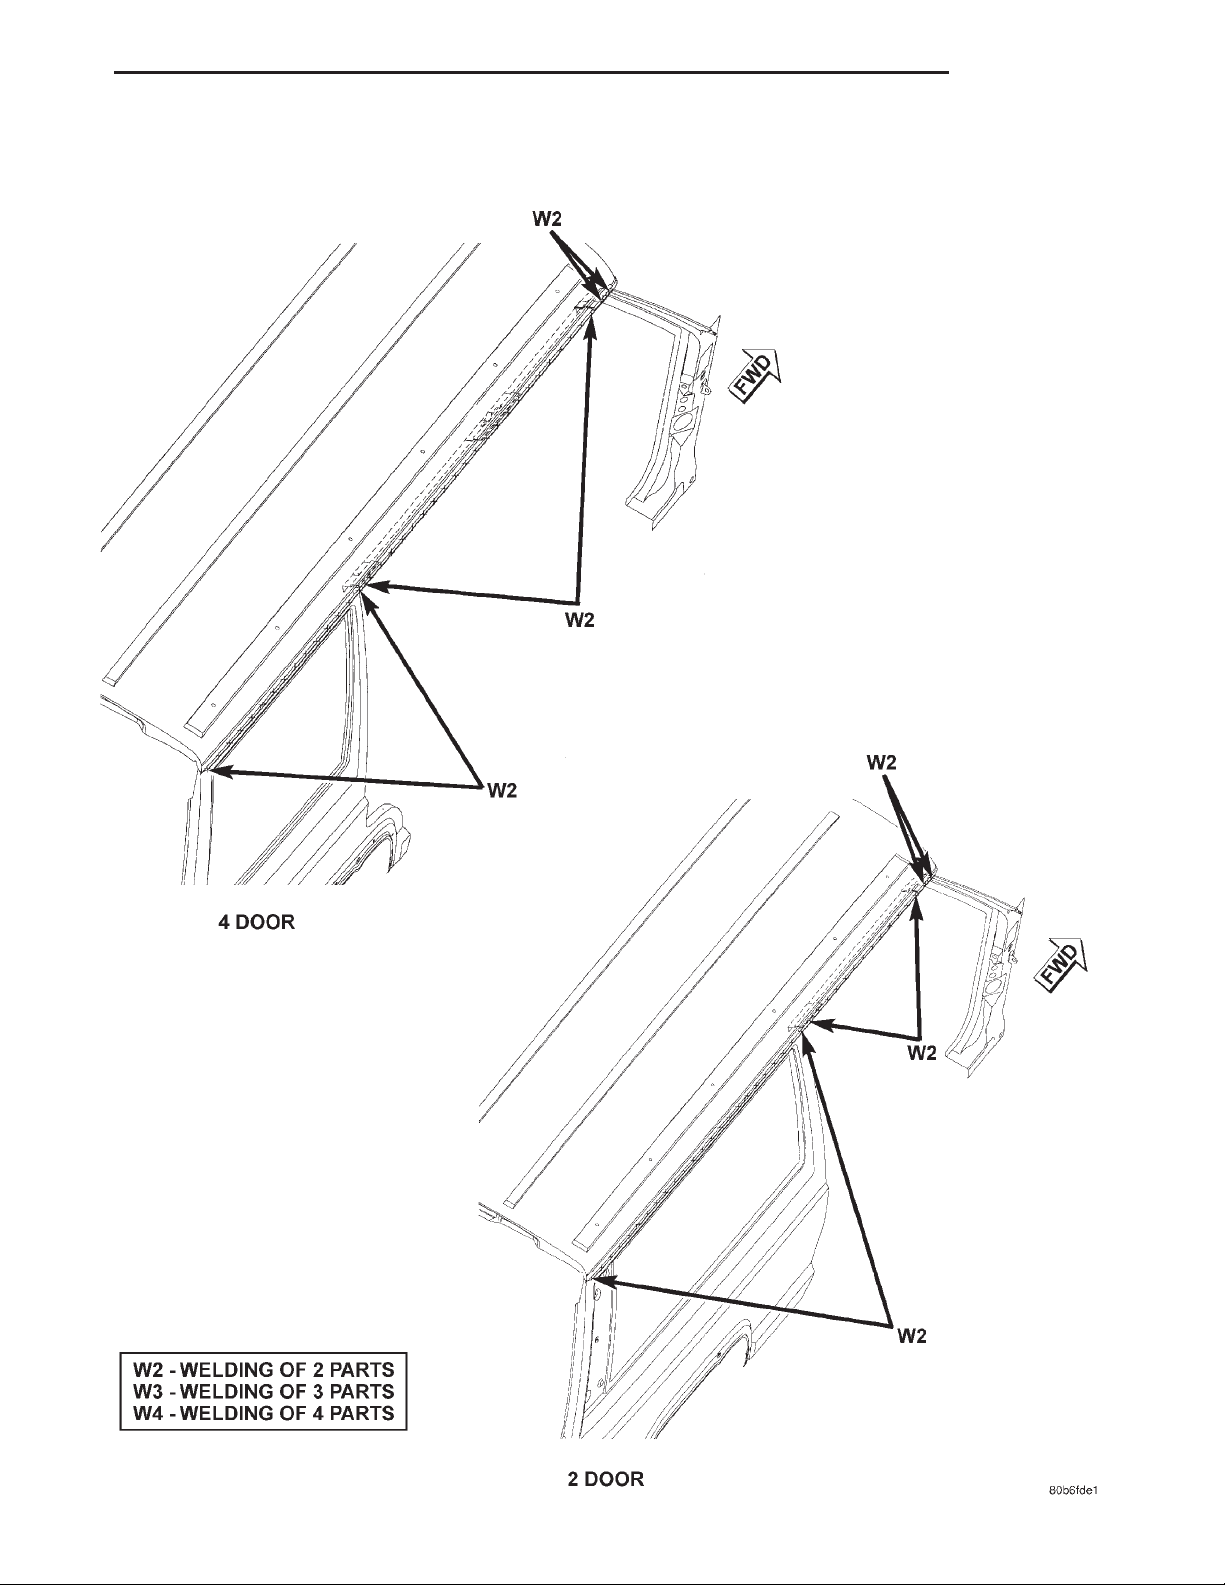
XJ BODY 23 - 81
SPECIFICATIONS (Continued)
ROOF
Page 82
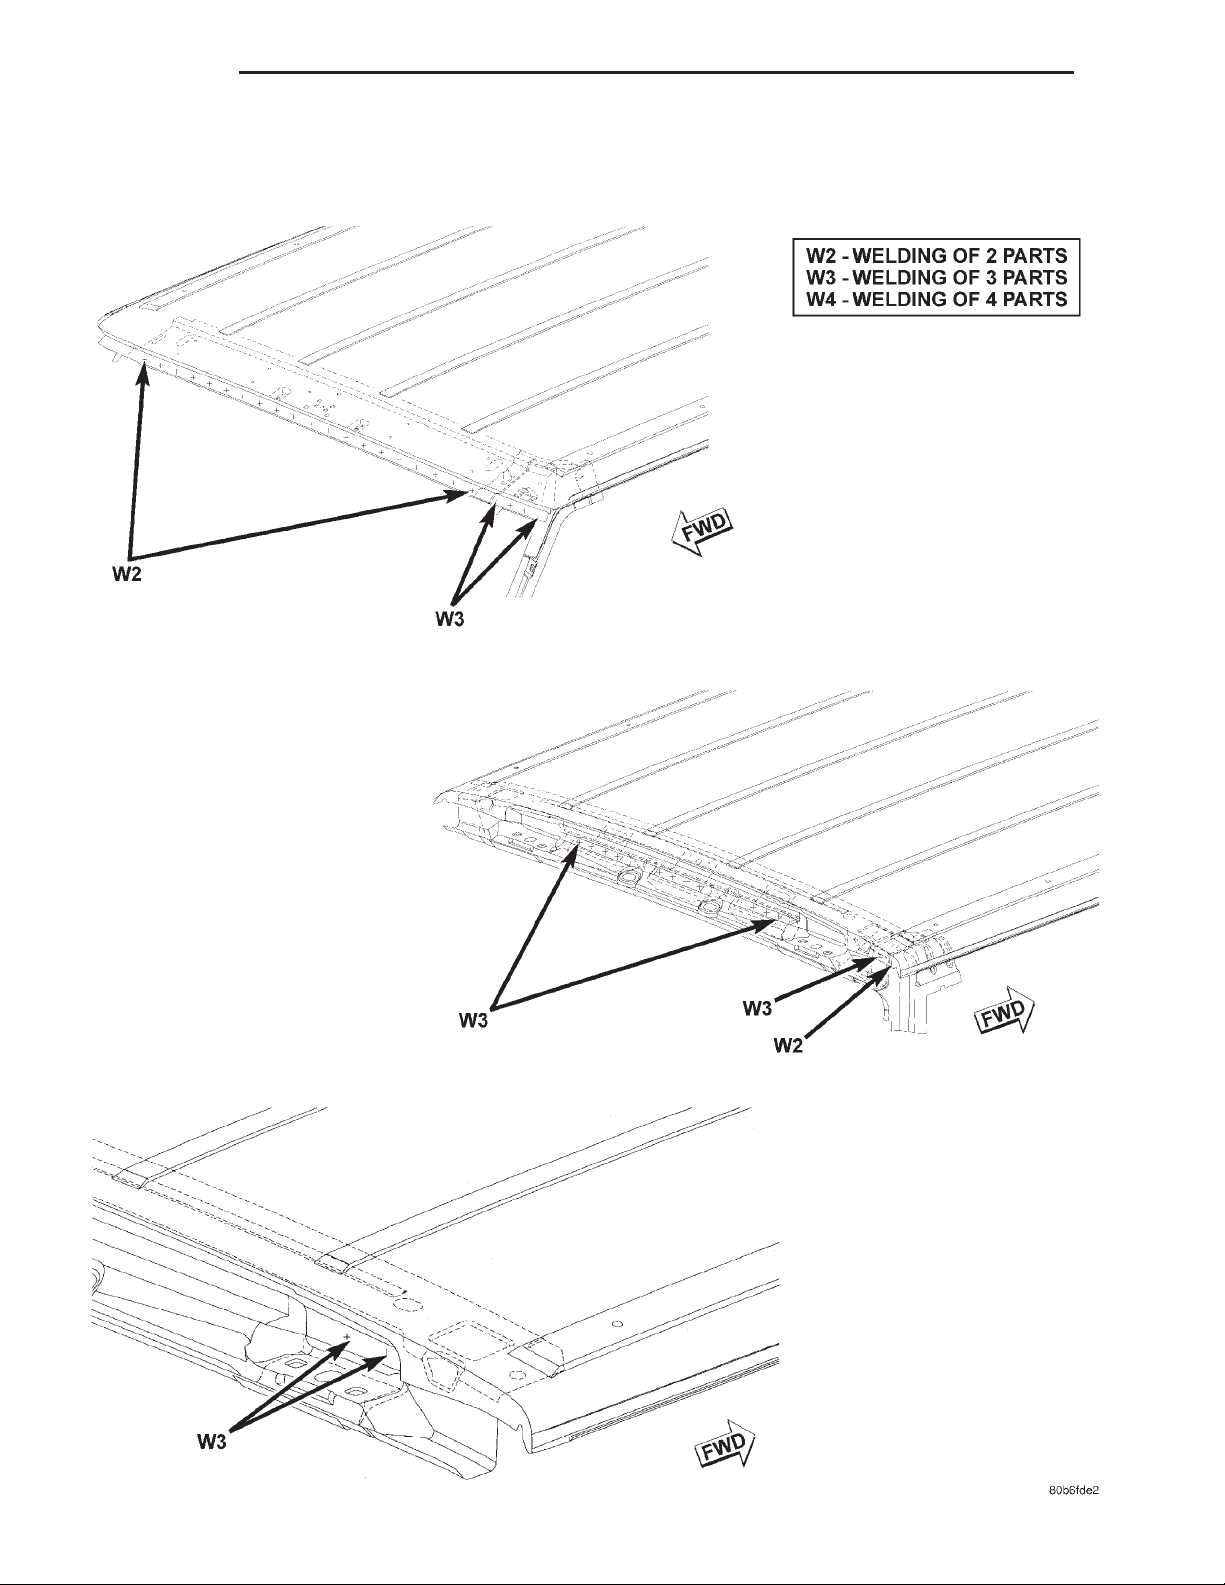
23 - 82 BODY XJ
SPECIFICATIONS (Continued)
ROOF
Page 83
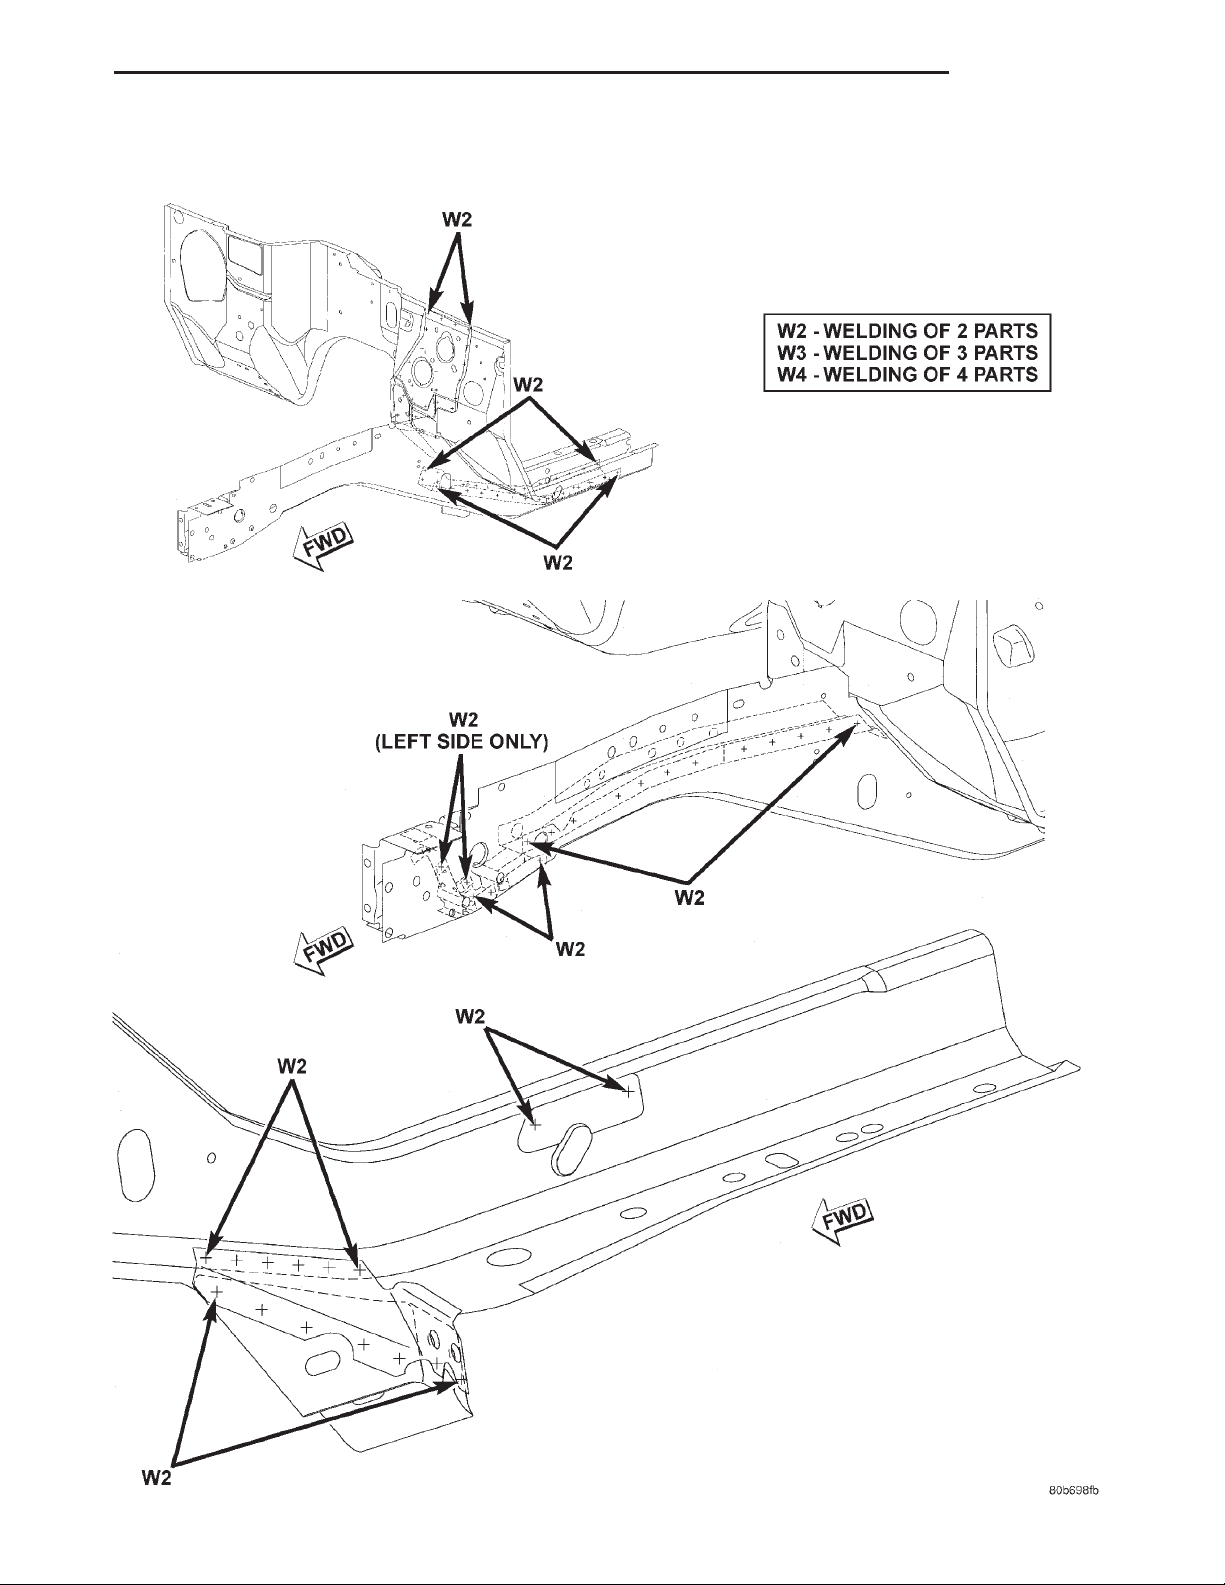
XJ BODY 23 - 83
SPECIFICATIONS (Continued)
FRAME RAIL
Page 84
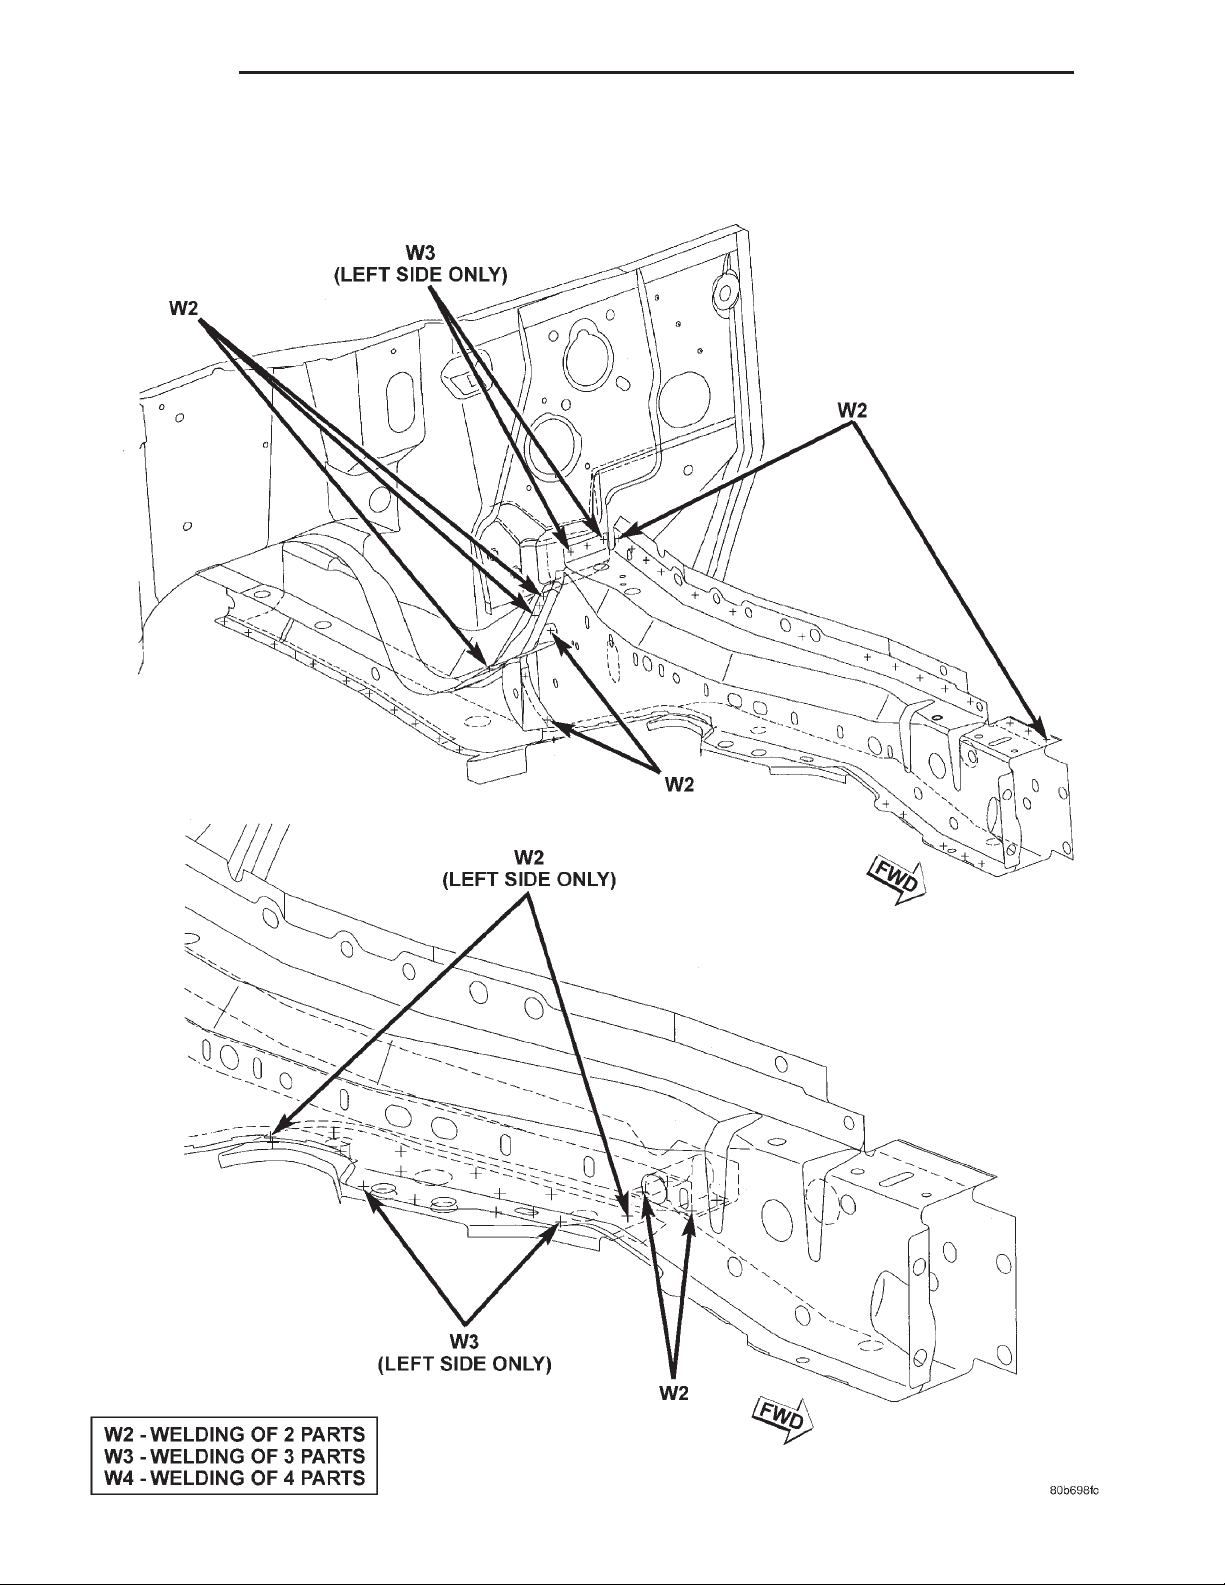
23 - 84 BODY XJ
SPECIFICATIONS (Continued)
FRAME RAIL
Page 85
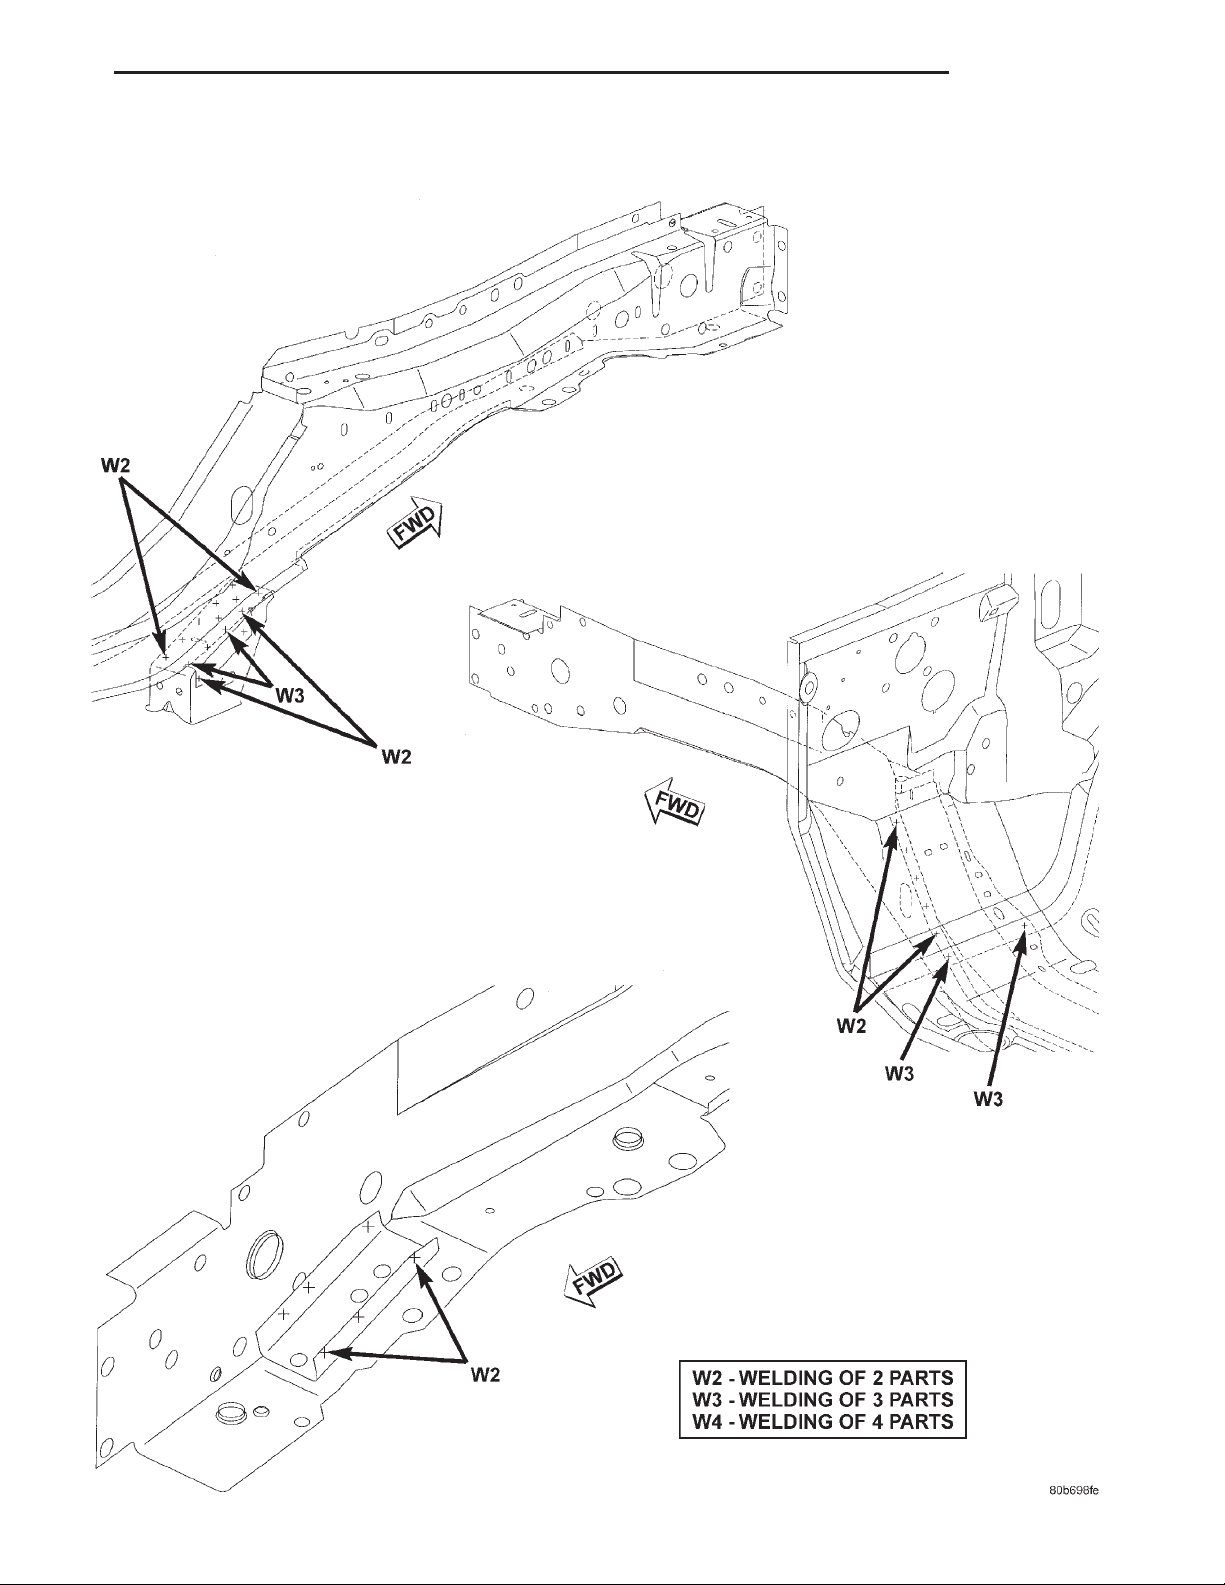
XJ BODY 23 - 85
SPECIFICATIONS (Continued)
FRAME RAIL
Page 86
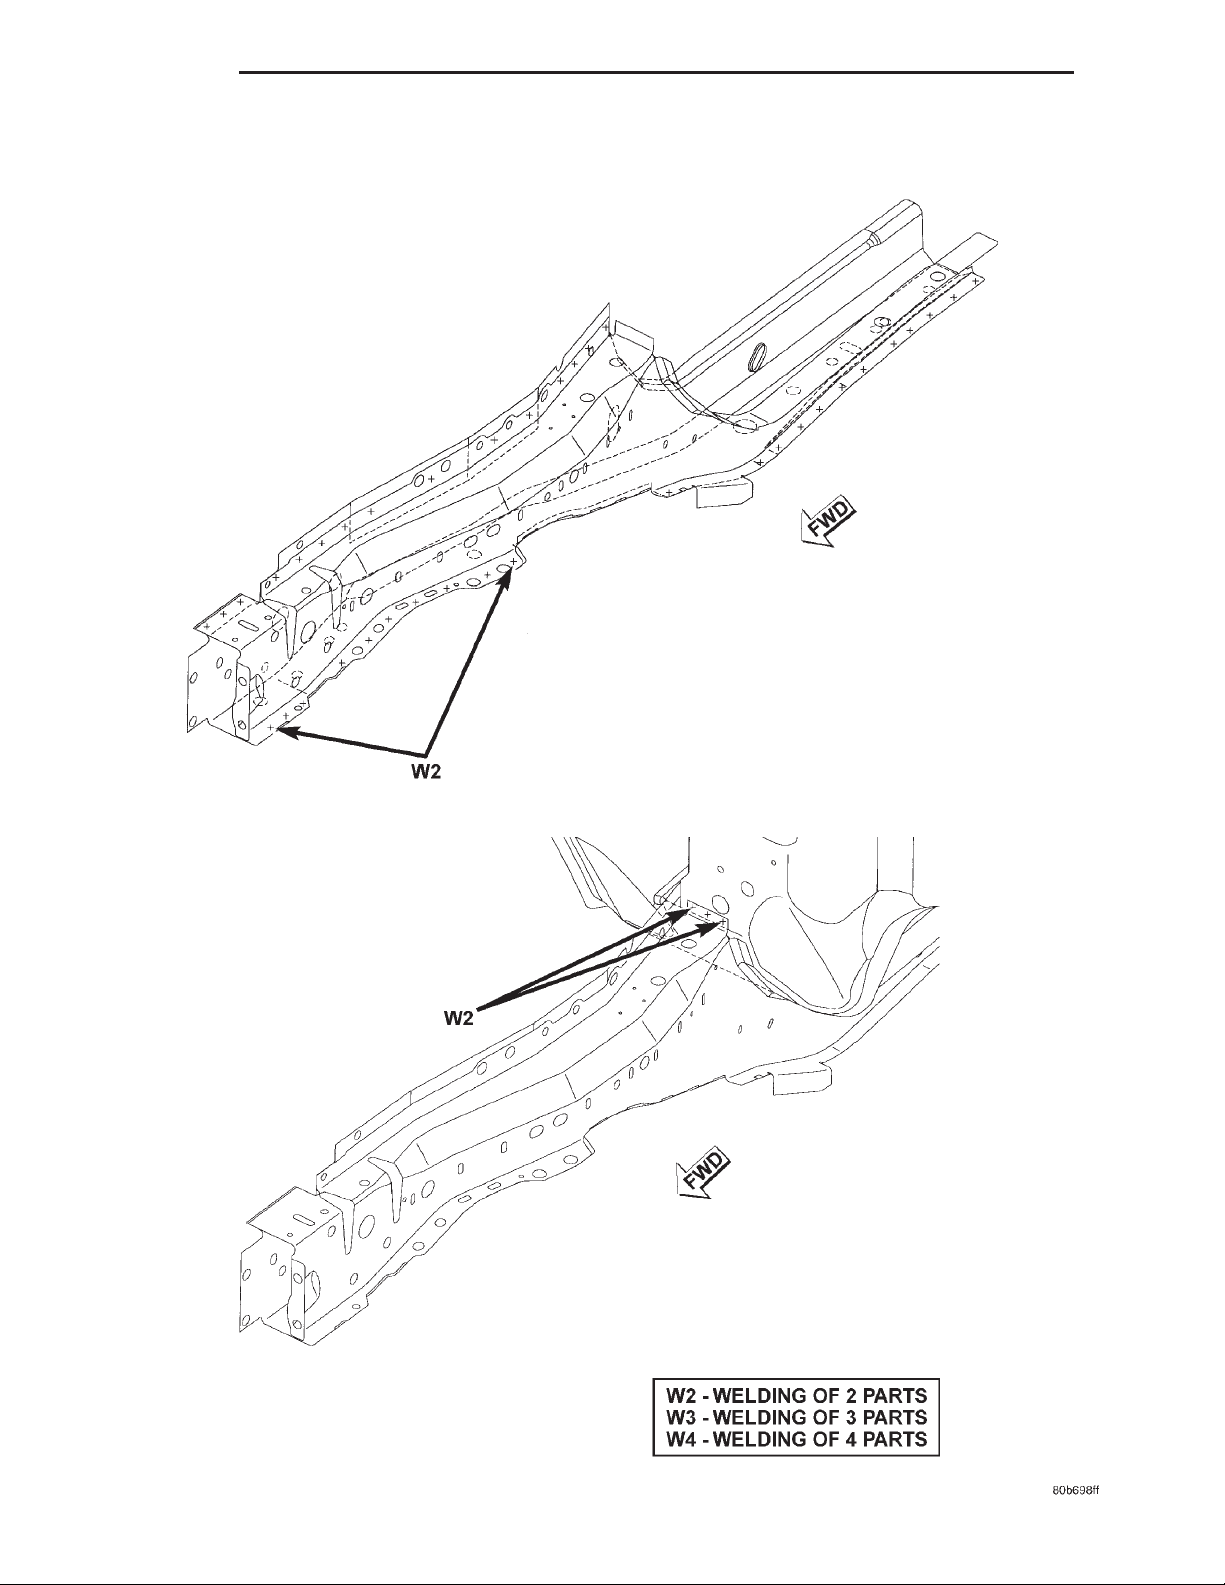
23 - 86 BODY XJ
SPECIFICATIONS (Continued)
FRAME RAIL
Page 87
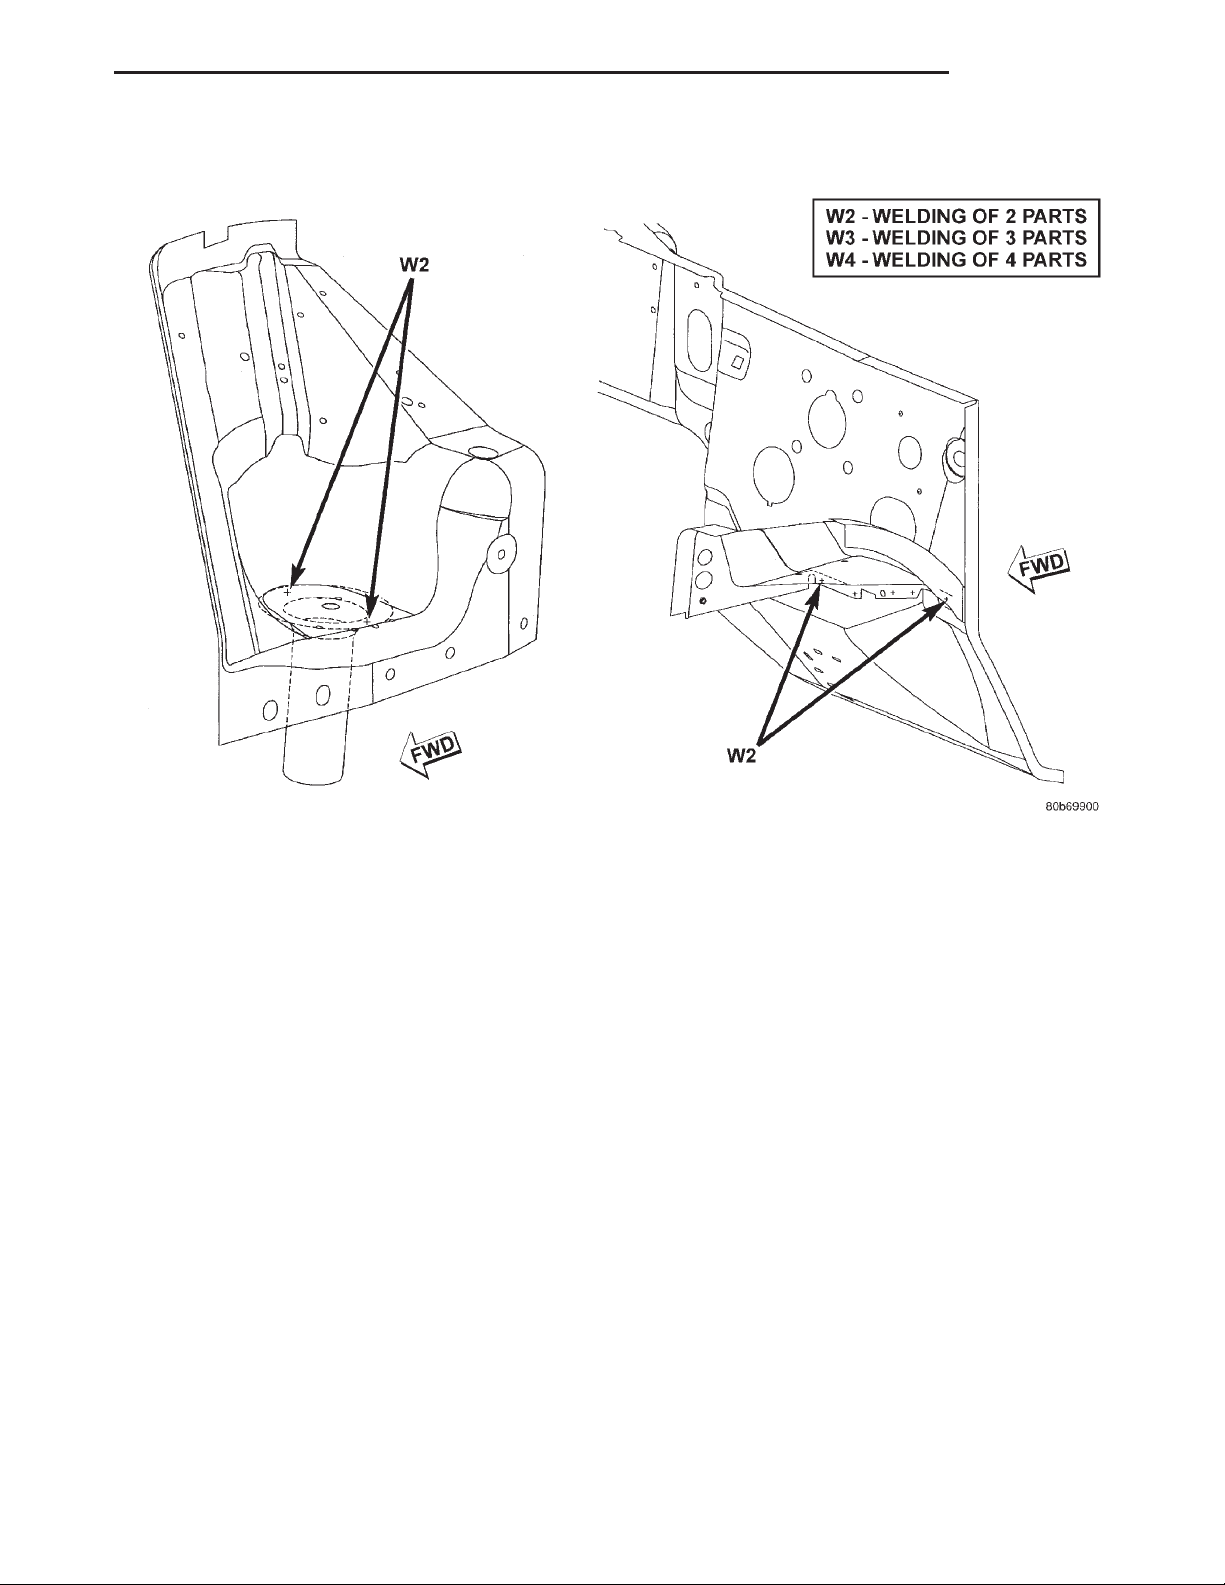
XJ BODY 23 - 87
SPECIFICATIONS (Continued)
REINFORCEMENT
Page 88
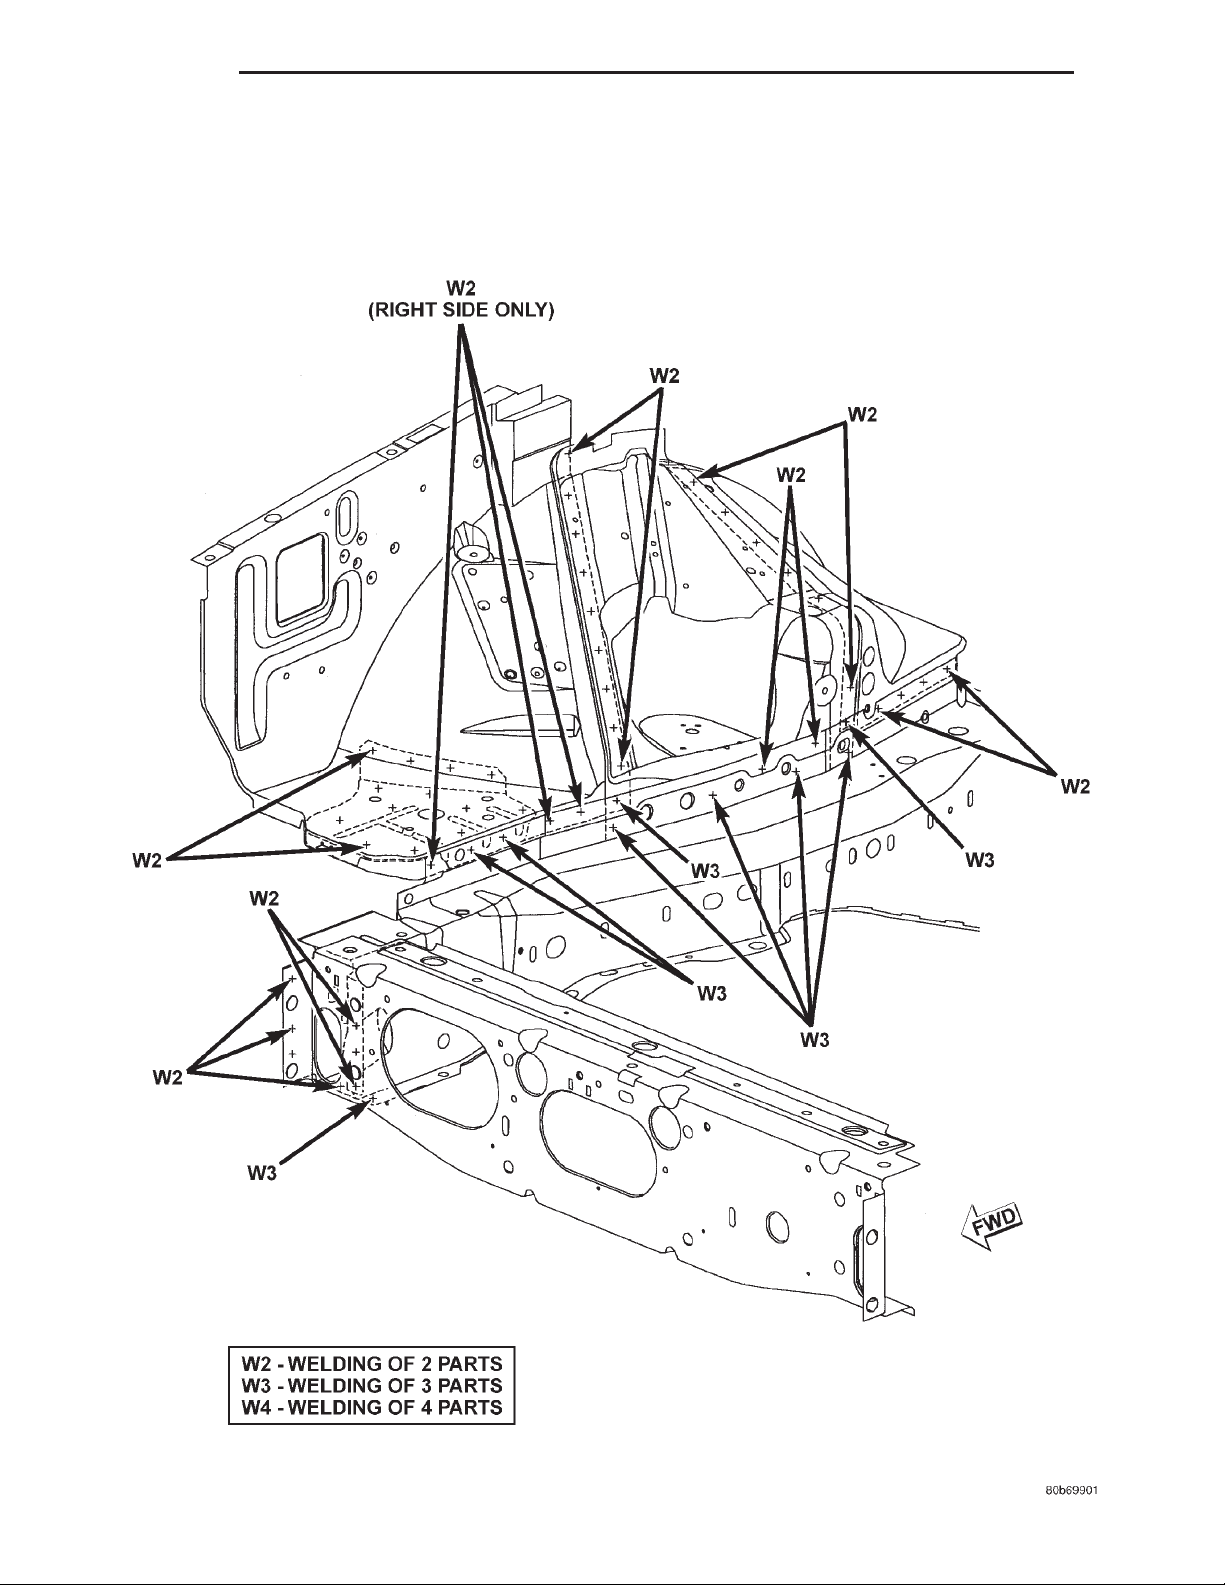
23 - 88 BODY XJ
SPECIFICATIONS (Continued)
FRONT INNER FENDER
Page 89
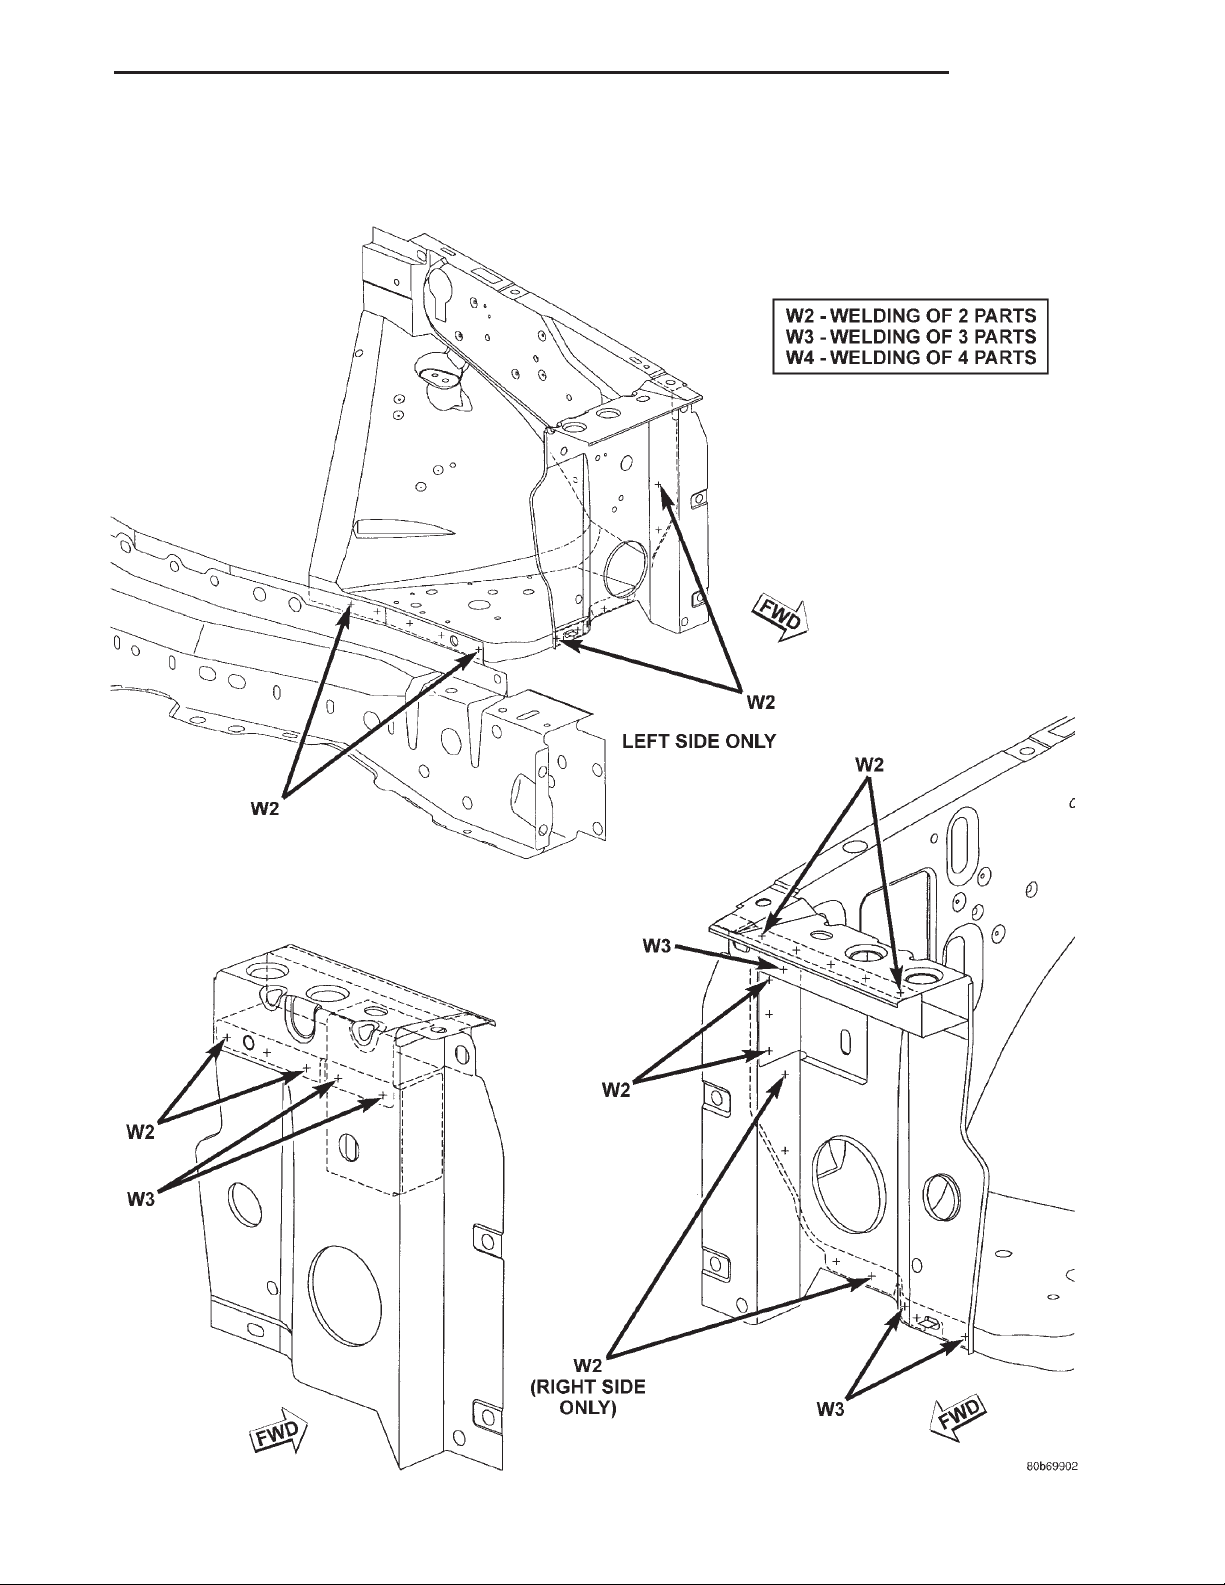
XJ BODY 23 - 89
SPECIFICATIONS (Continued)
FRONT INNER FENDER AND RADIATOR CLOSURE PANEL
Page 90
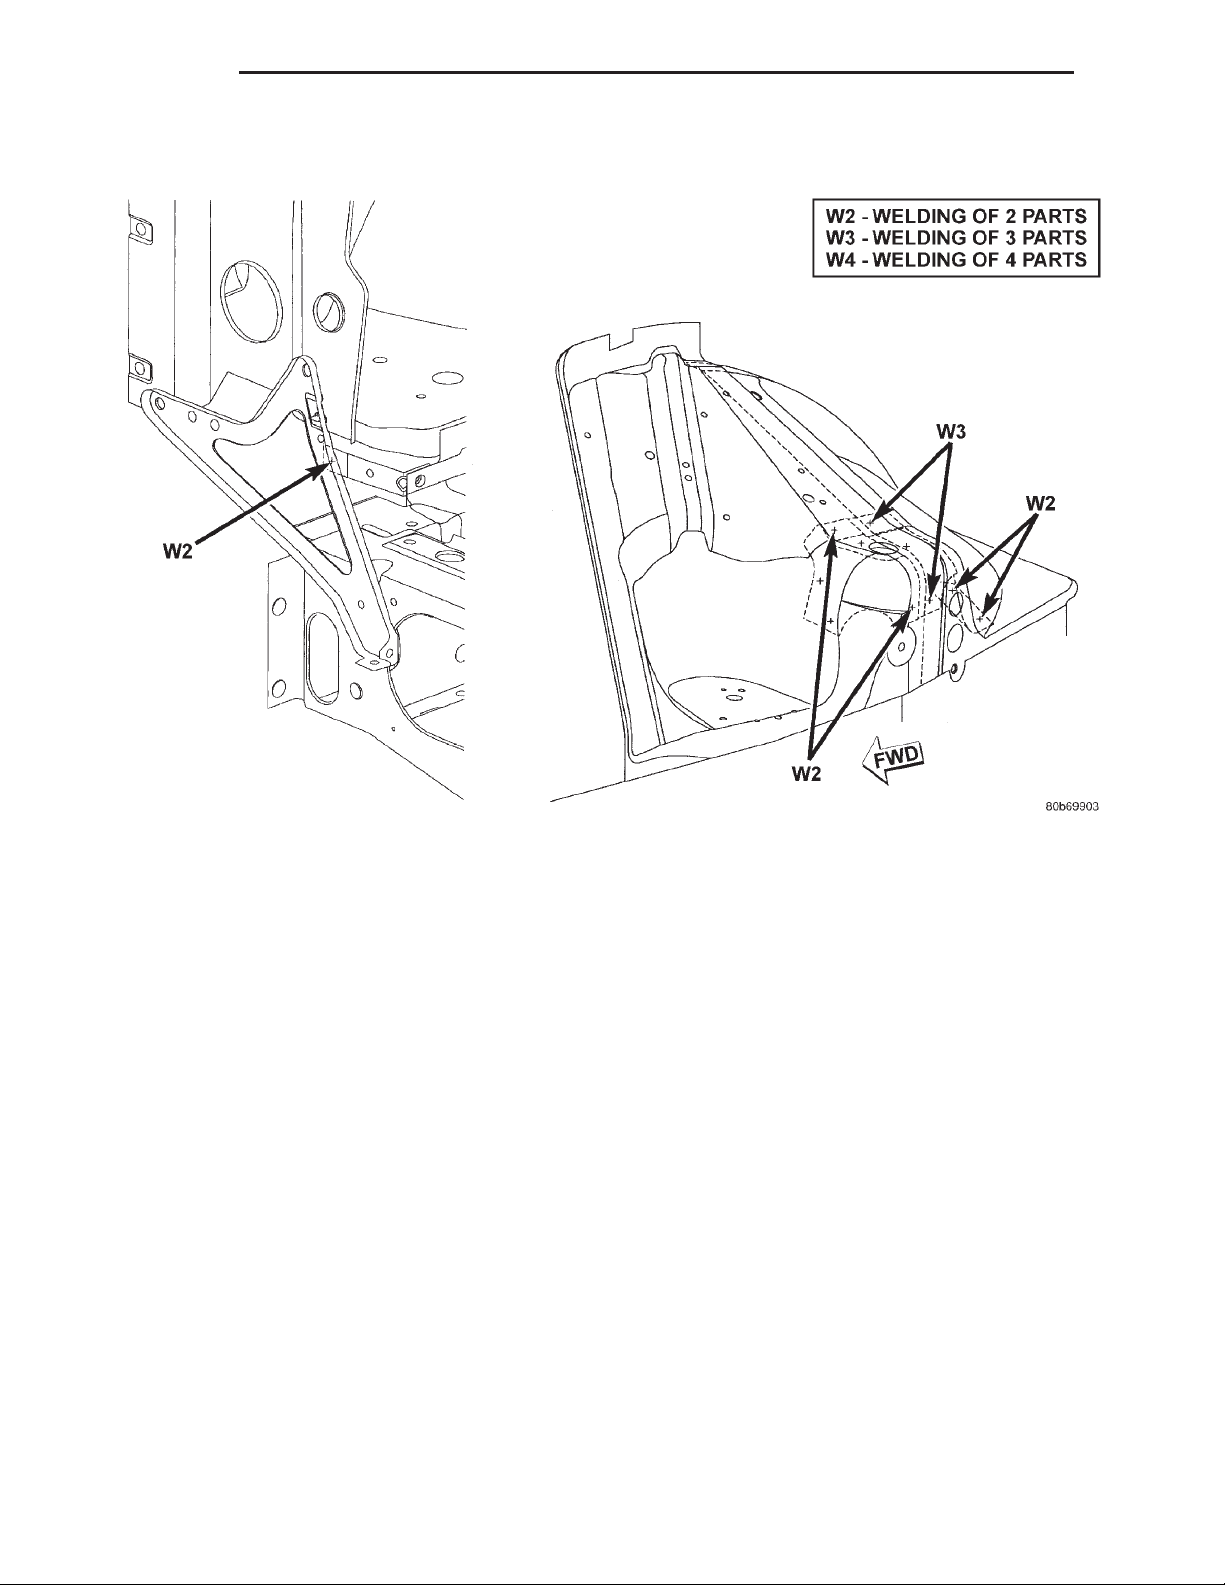
23 - 90 BODY XJ
SPECIFICATIONS (Continued)
REINFORCEMENT
Page 91
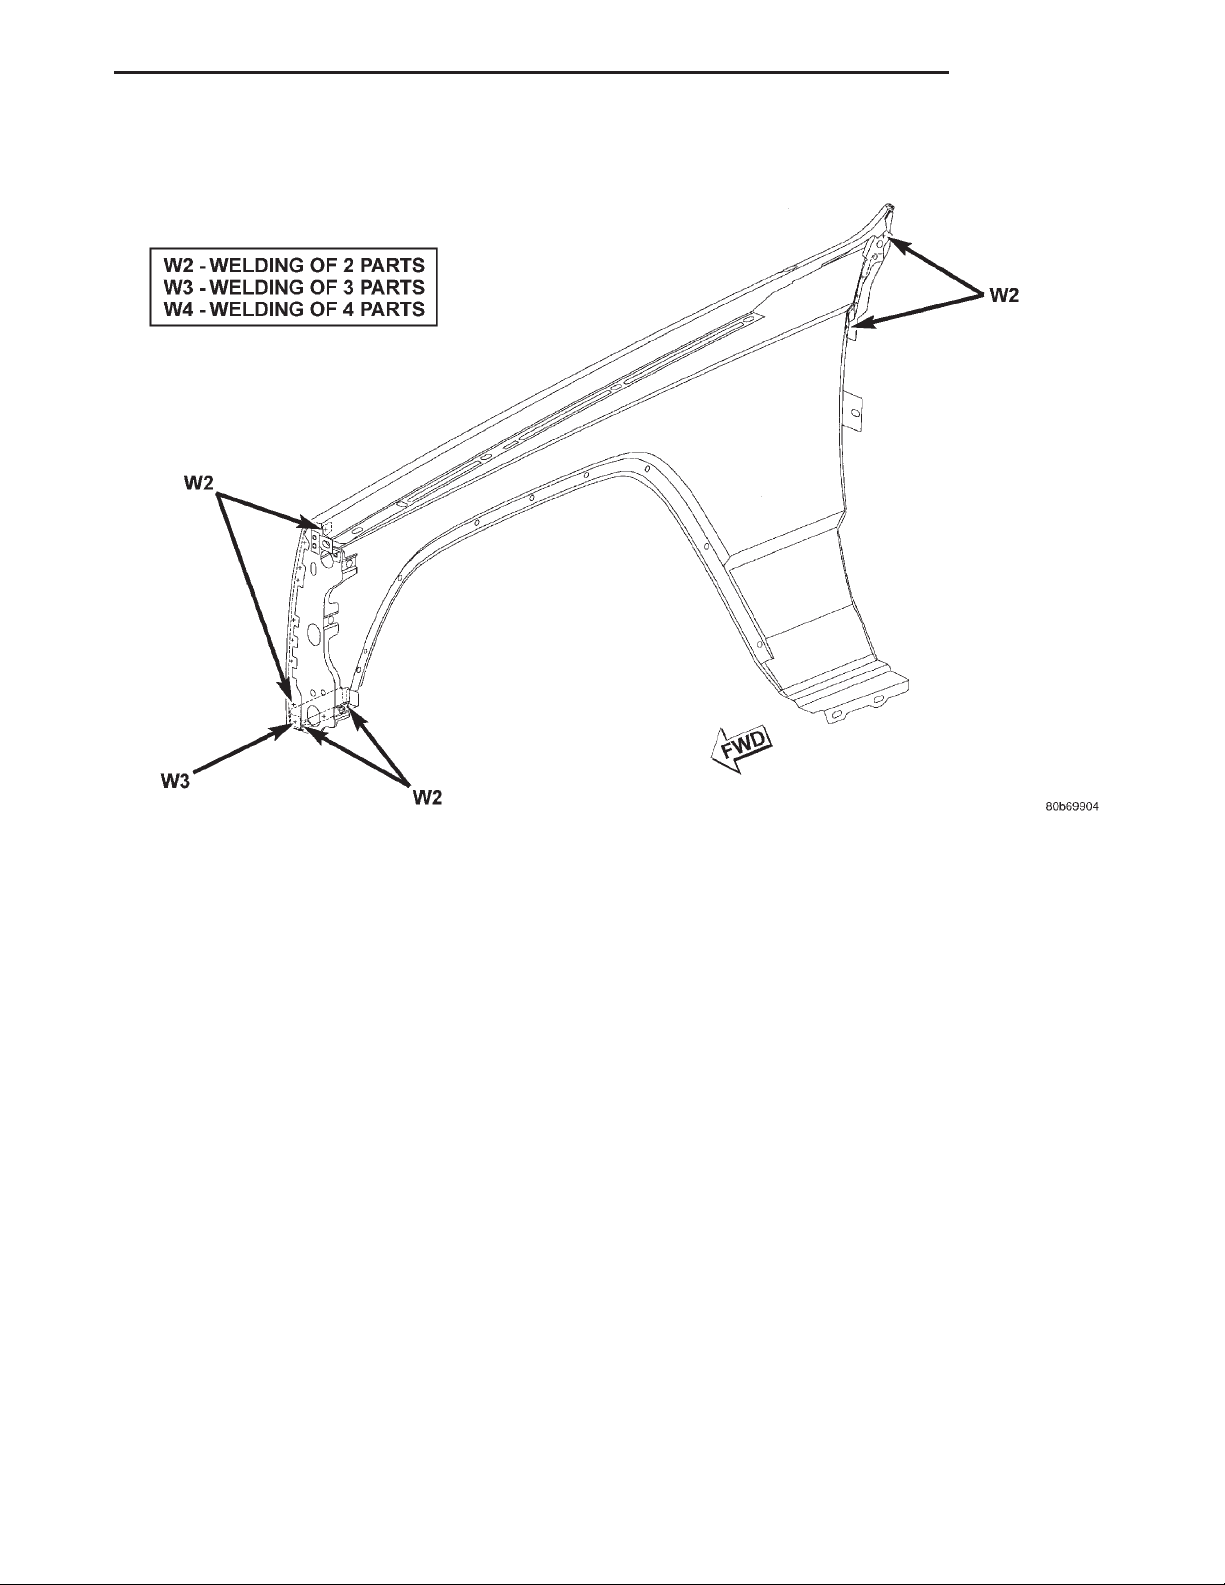
XJ BODY 23 - 91
SPECIFICATIONS (Continued)
FRONT FENDER
Page 92
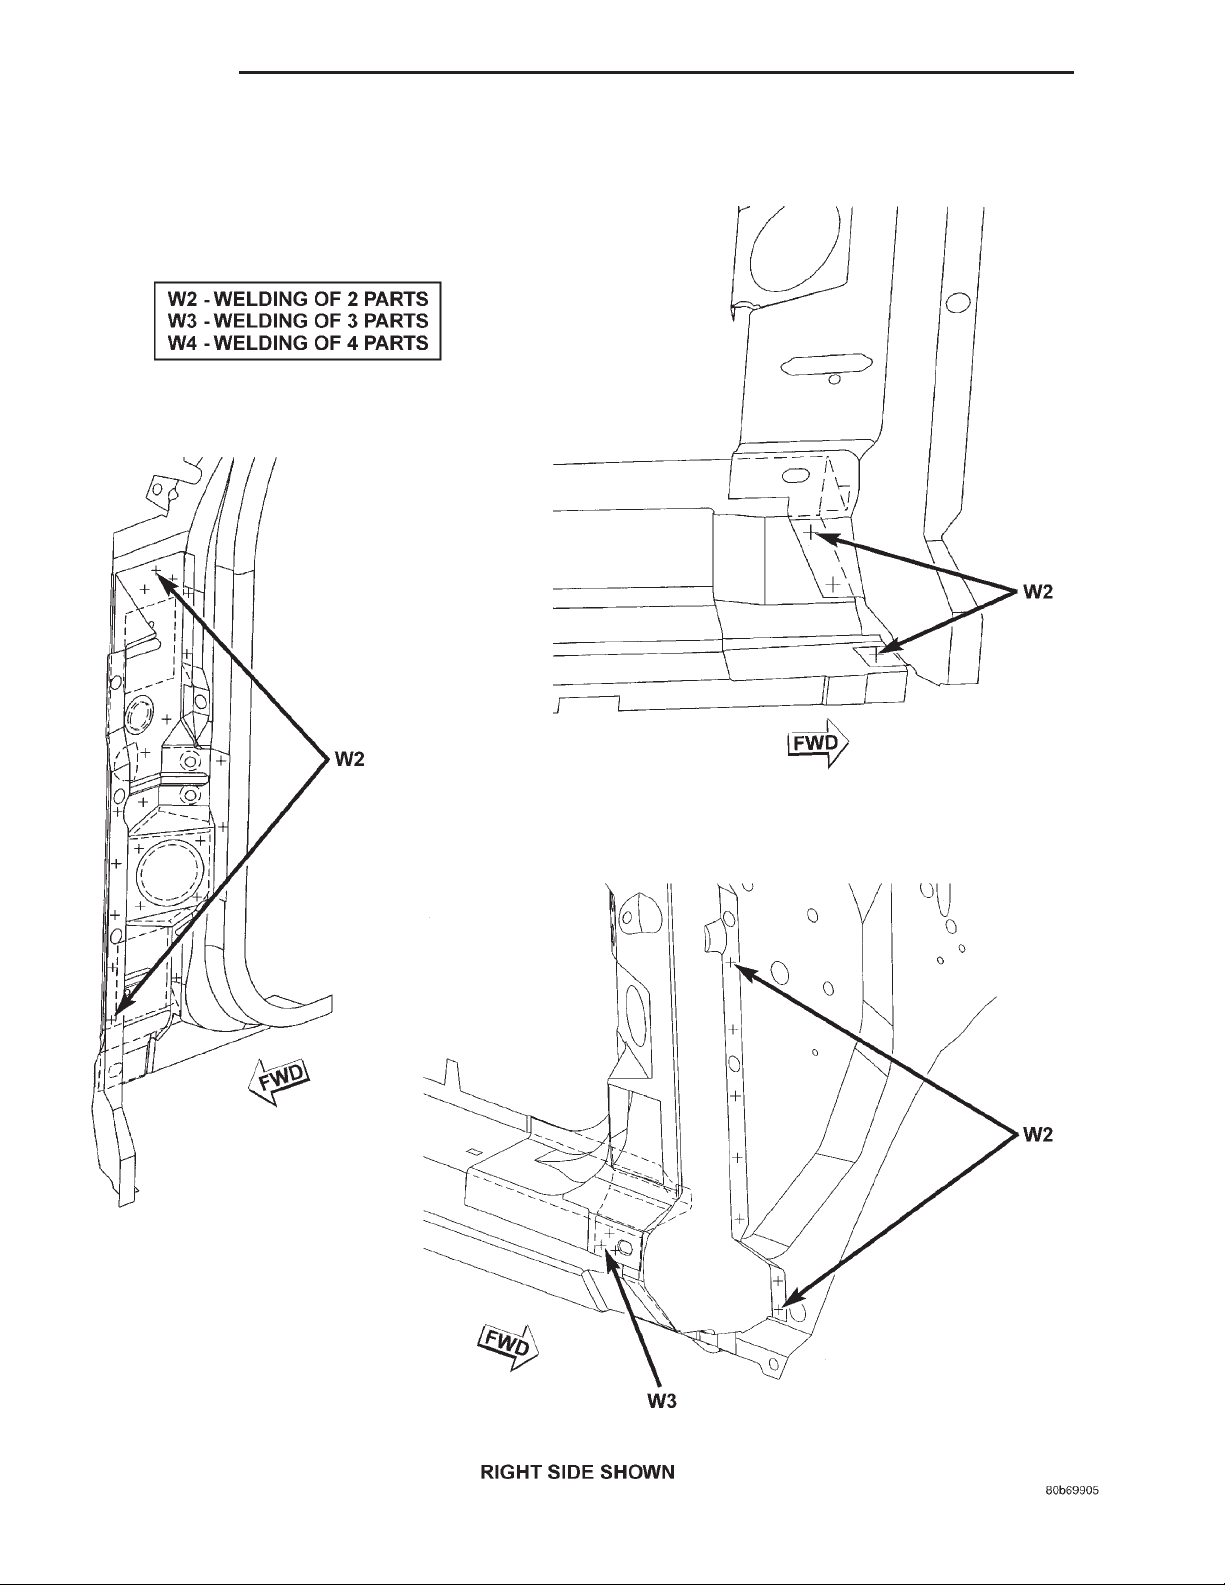
23 - 92 BODY XJ
SPECIFICATIONS (Continued)
BODY SIDE
Page 93
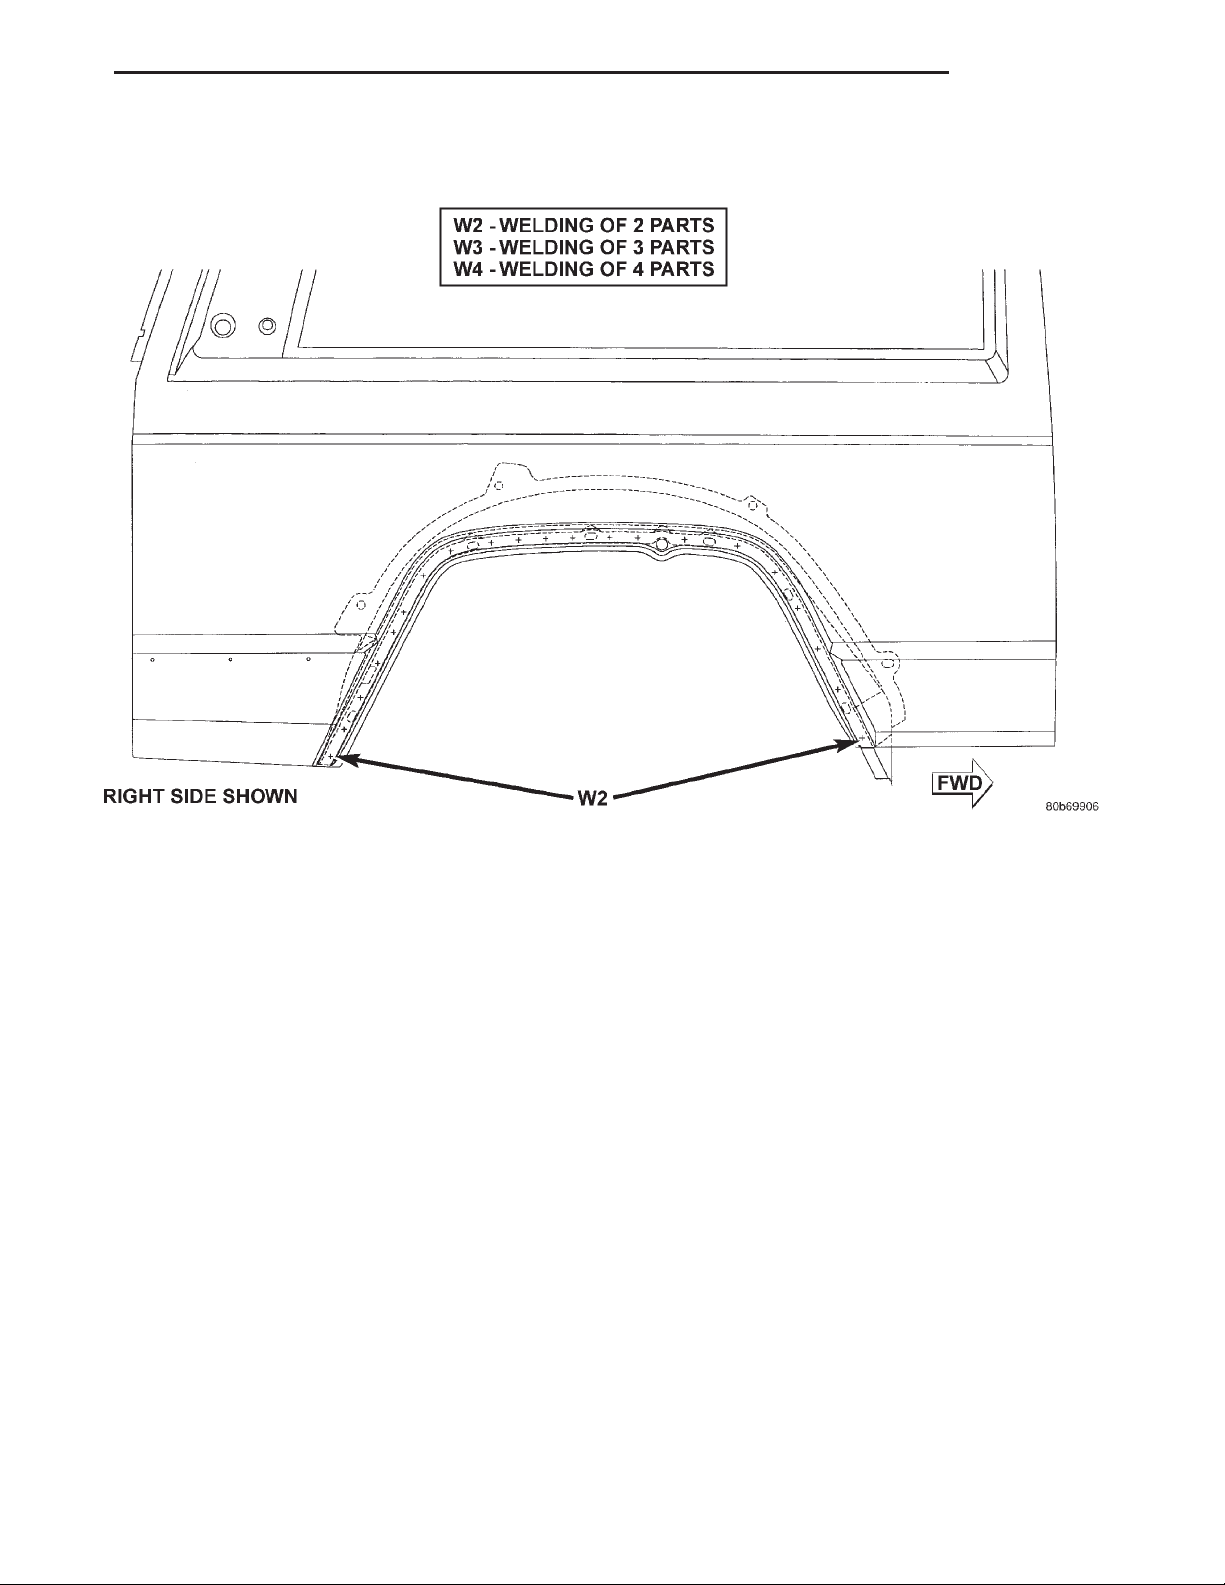
XJ BODY 23 - 93
SPECIFICATIONS (Continued)
REAR WHEELHOUSE
Page 94
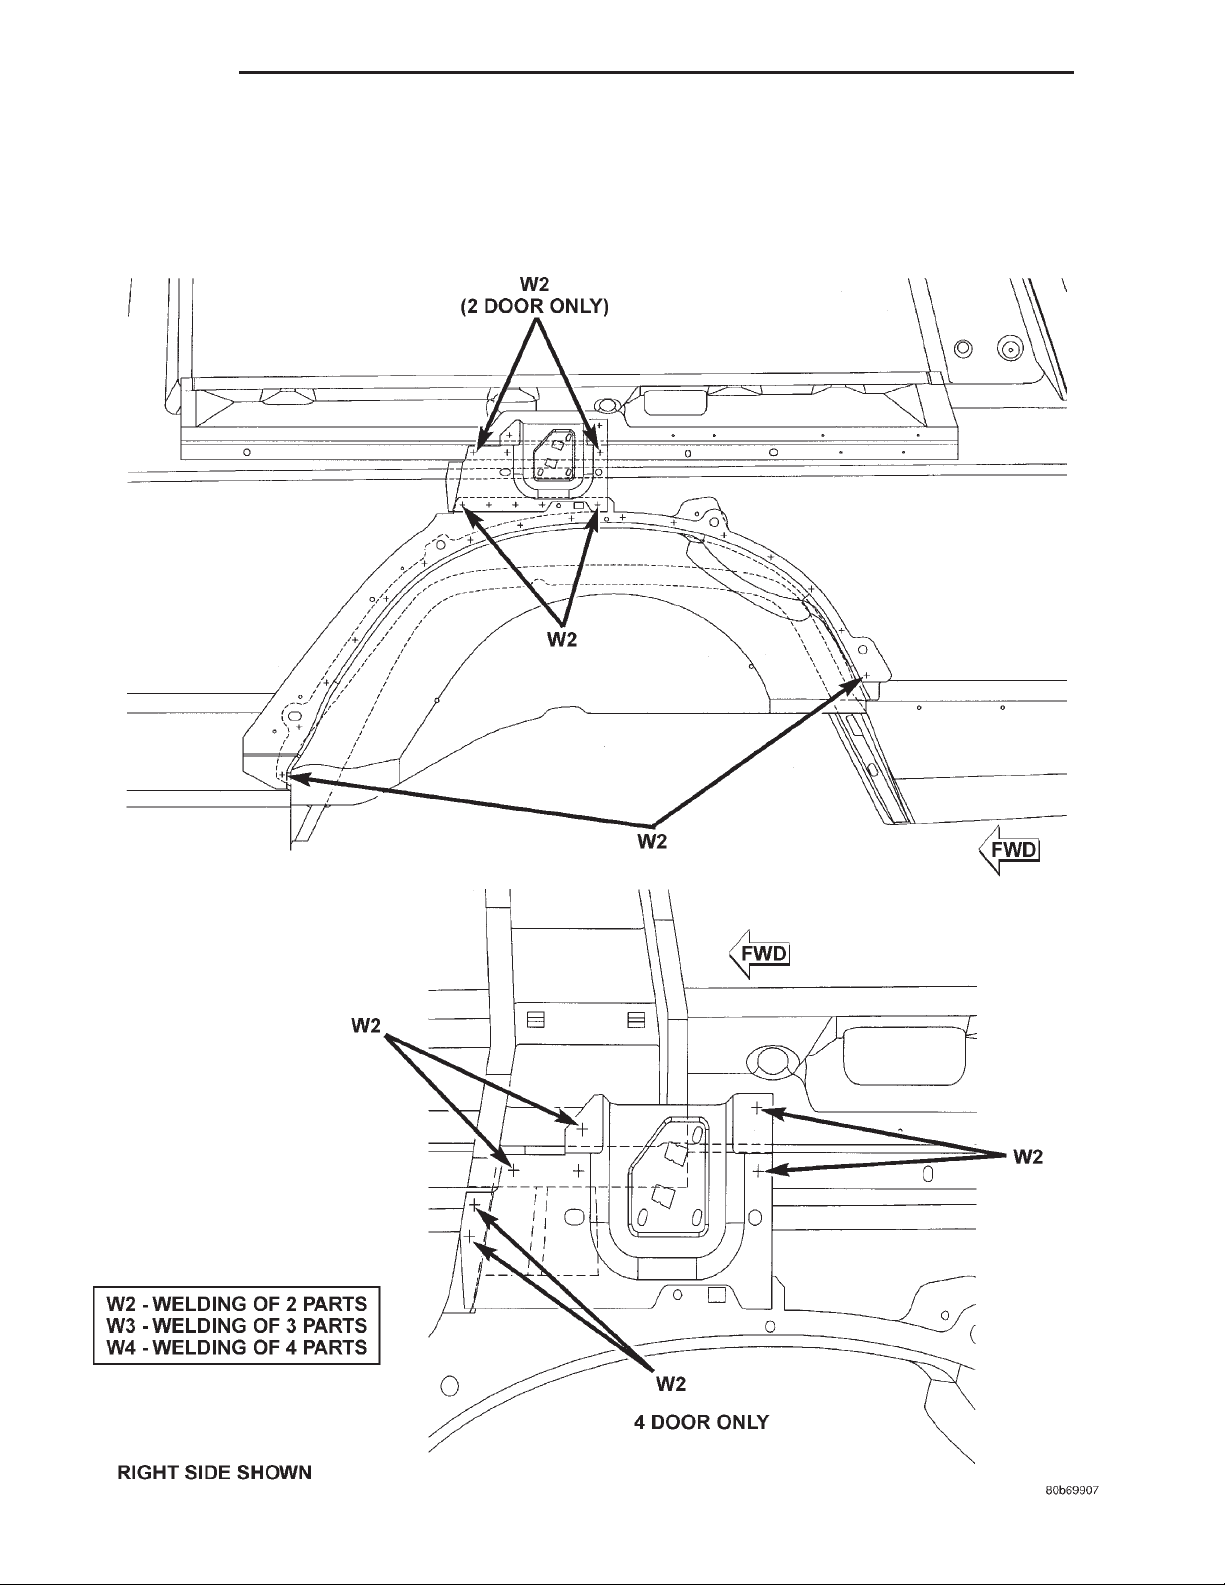
23 - 94 BODY XJ
SPECIFICATIONS (Continued)
REAR INNER WHEELHOUSE
Page 95
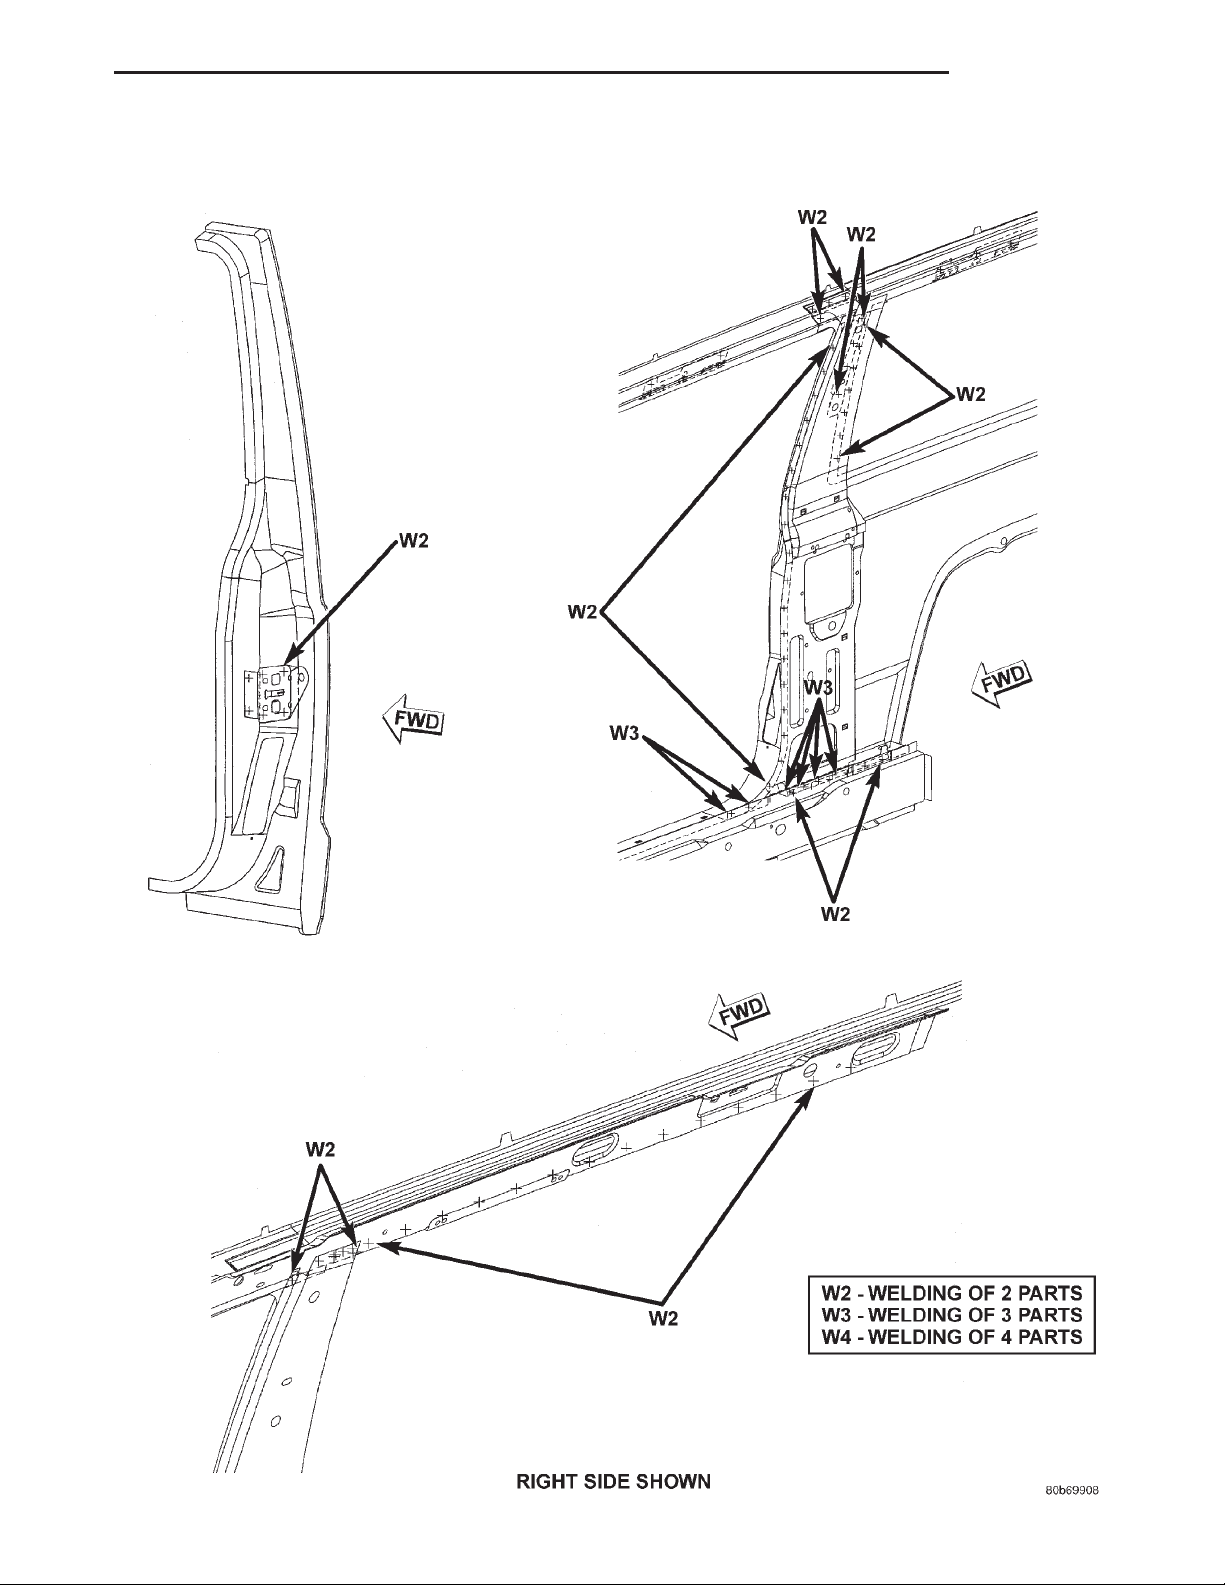
XJ BODY 23 - 95
SPECIFICATIONS (Continued)
BODY SIDE
Page 96
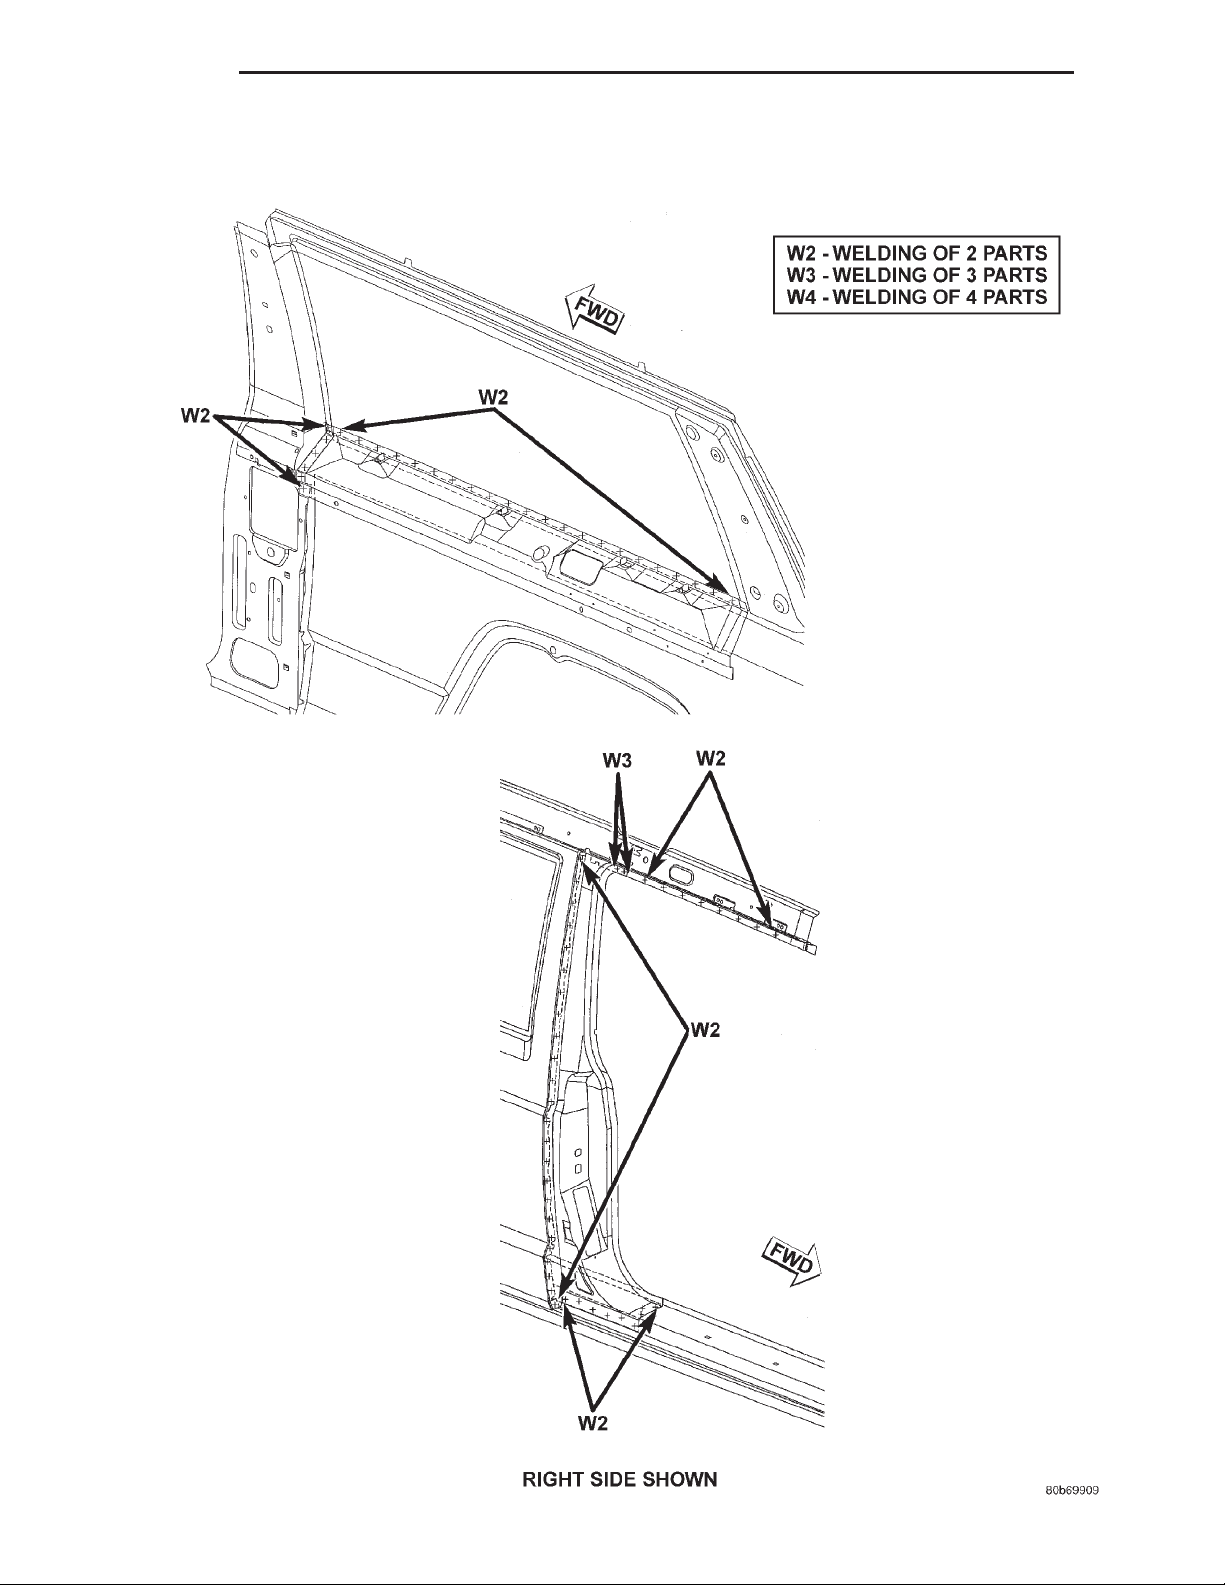
23 - 96 BODY XJ
SPECIFICATIONS (Continued)
BODY SIDE
Page 97
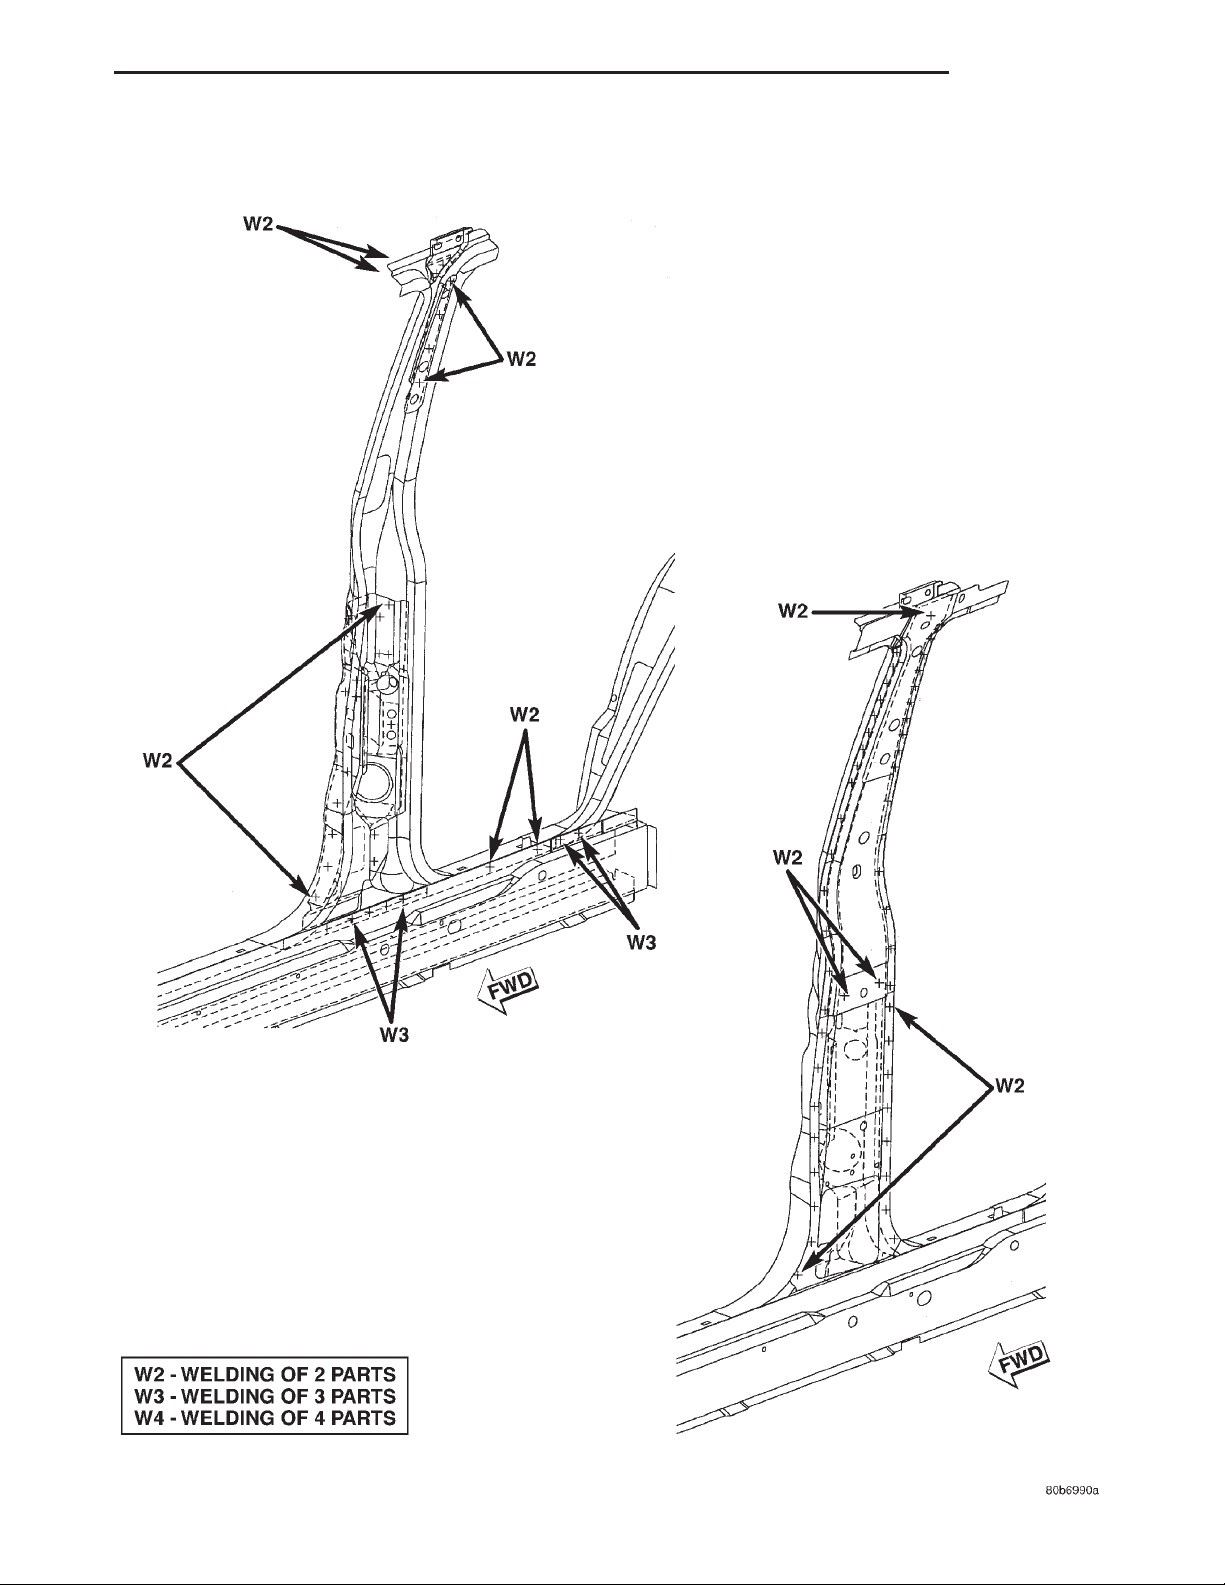
XJ BODY 23 - 97
SPECIFICATIONS (Continued)
BODY SIDE
Page 98
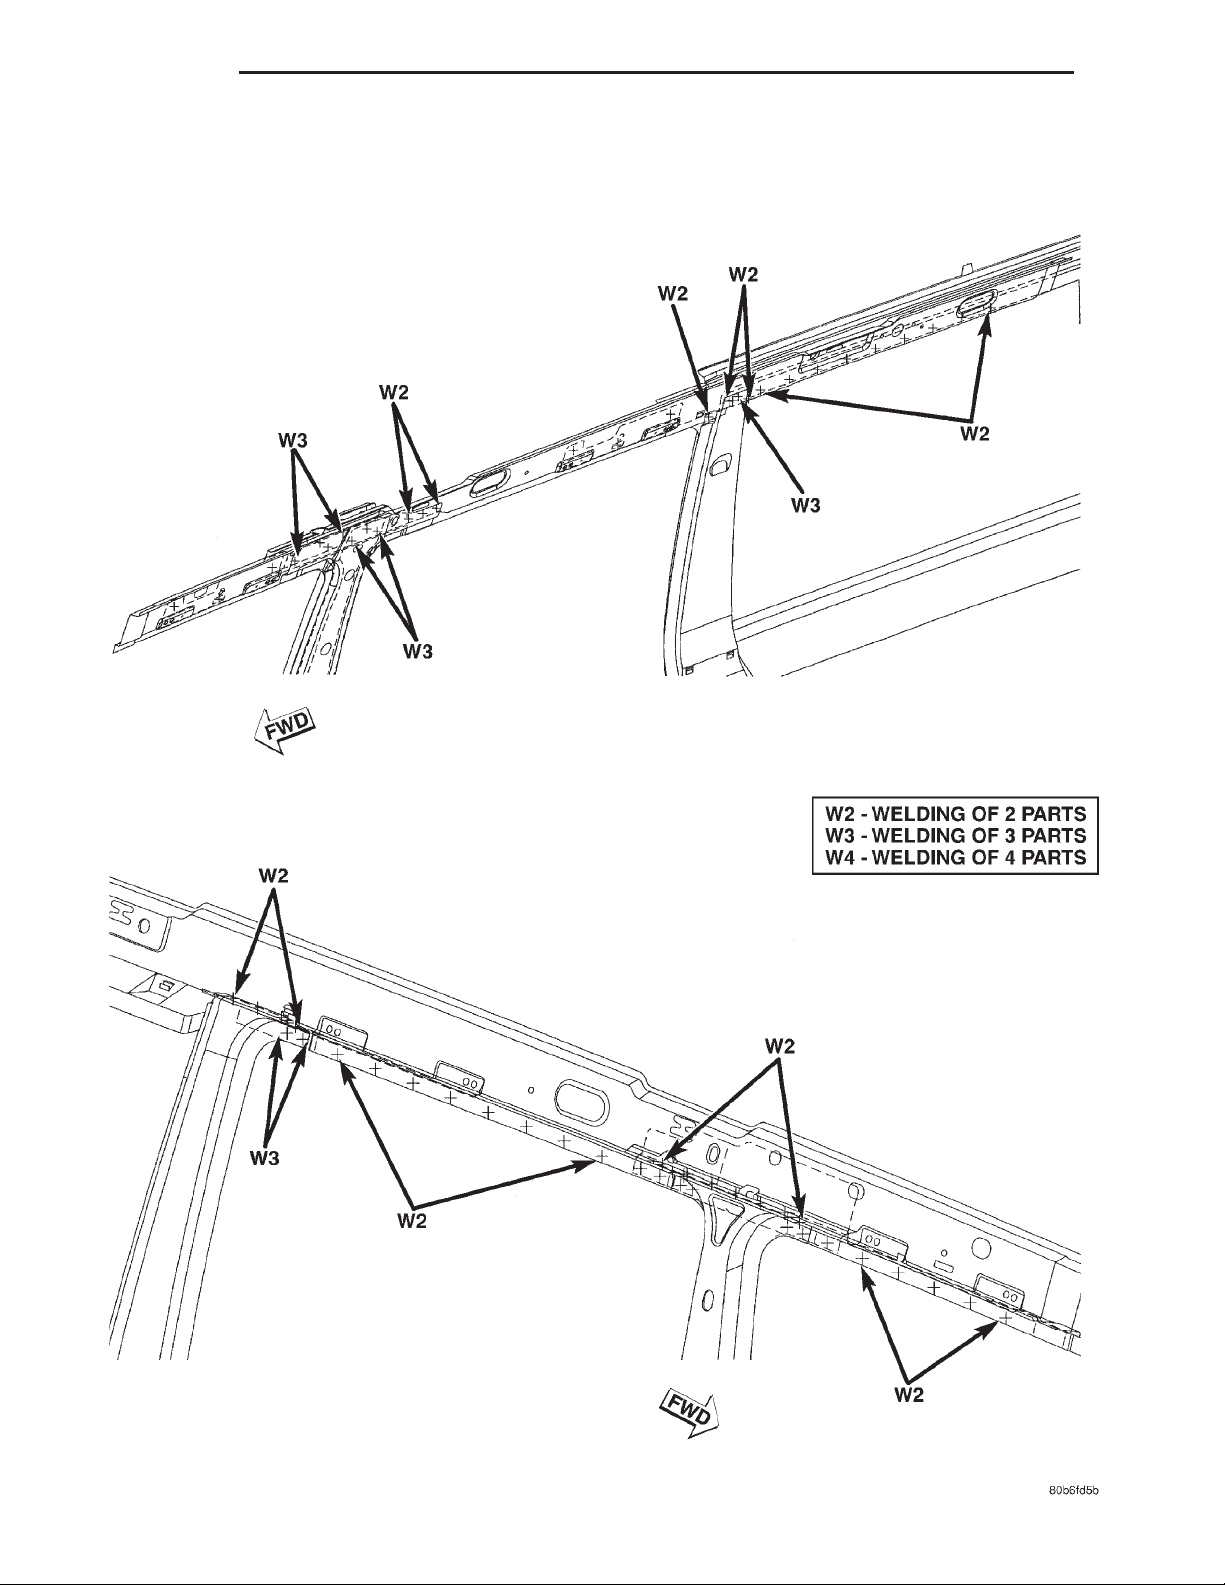
23 - 98 BODY XJ
SPECIFICATIONS (Continued)
BODY SIDE
Page 99
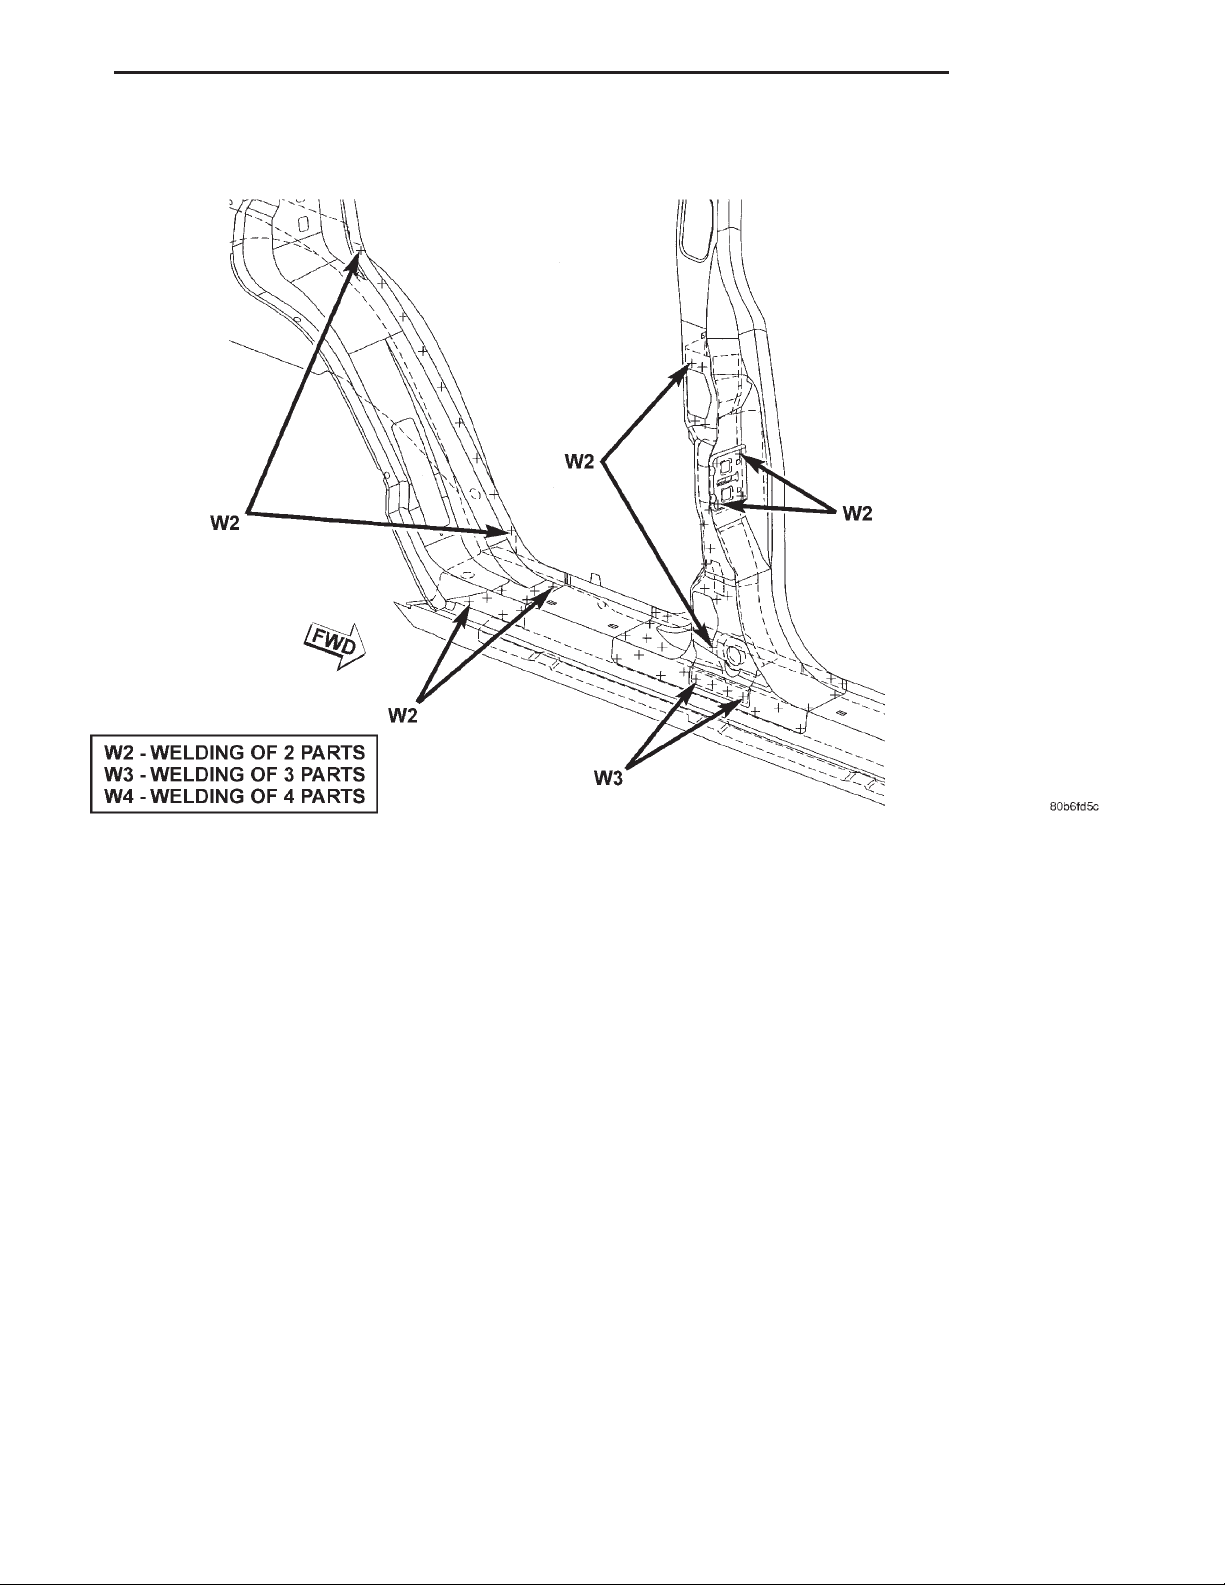
XJ BODY 23 - 99
SPECIFICATIONS (Continued)
BODY SIDE
Page 100
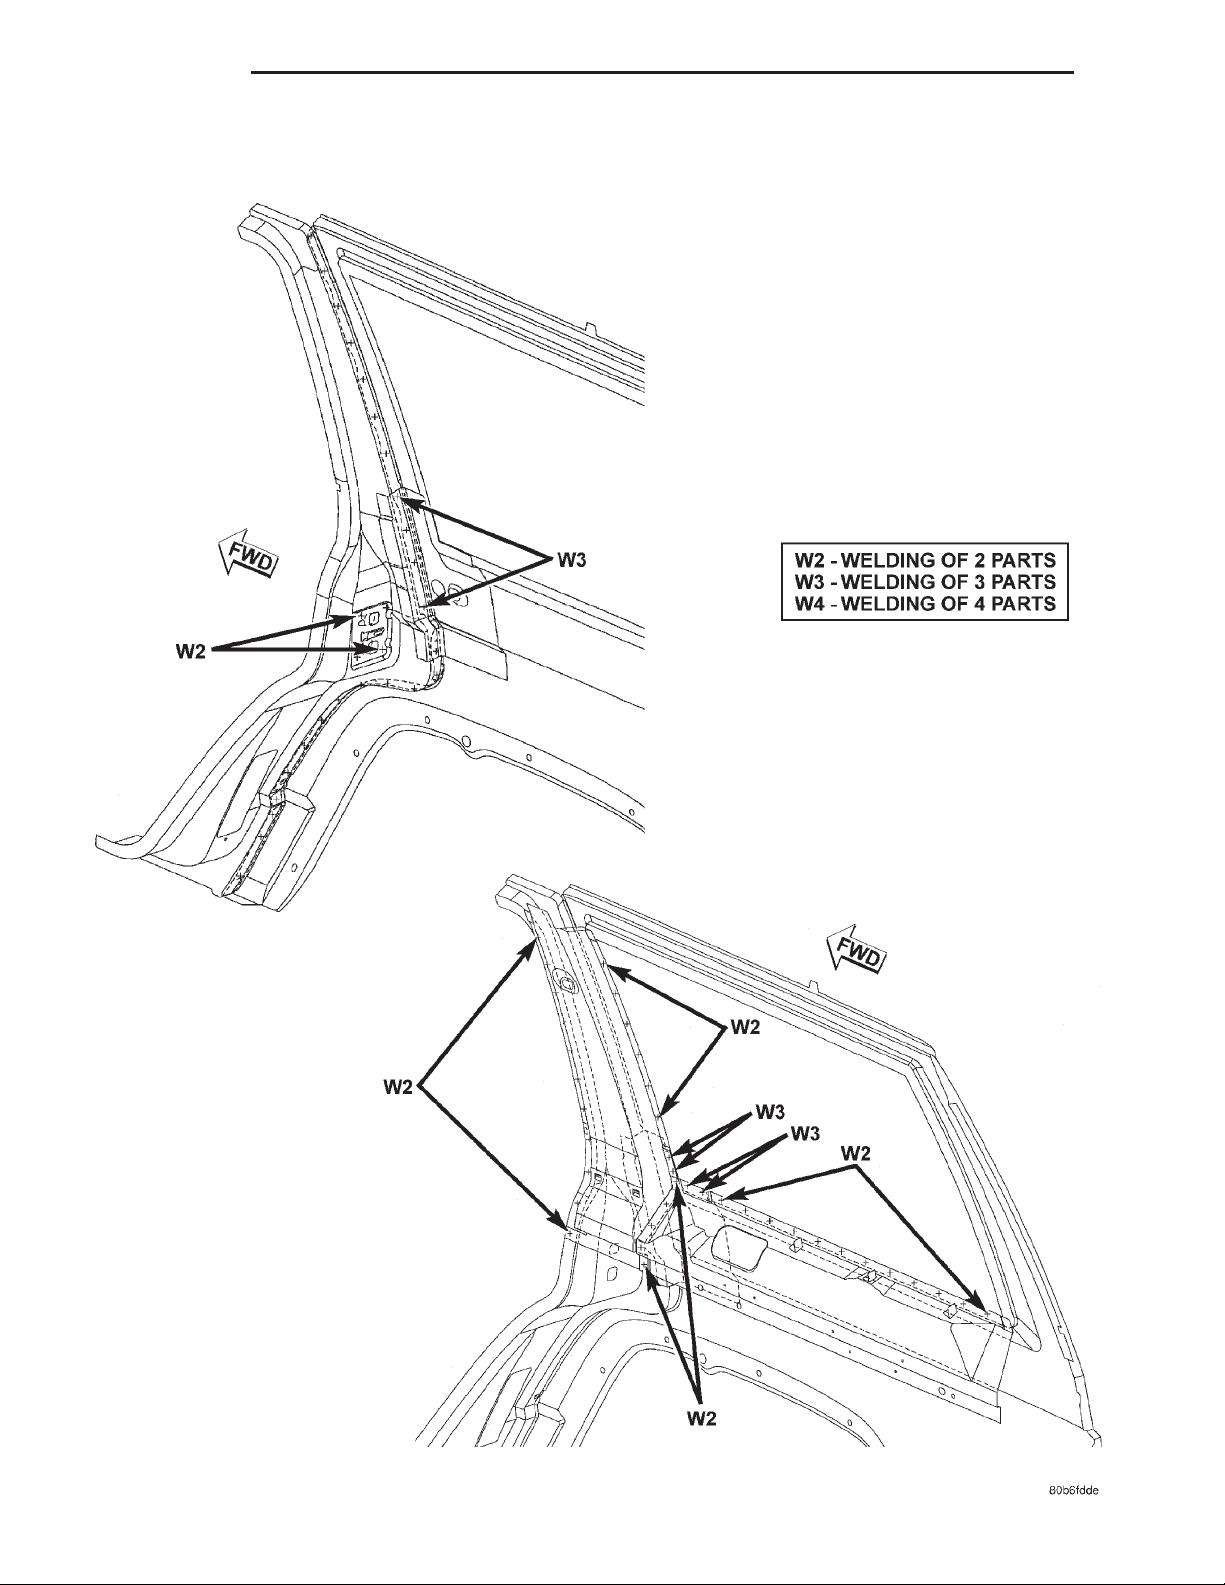
23 - 100 BODY XJ
SPECIFICATIONS (Continued)
BODY SIDE
 Loading...