

Page 1

PL CHIME WARNING/REMINDER SYSTEM 8U - 1
CHIME WARNING/REMINDER SYSTEM
CONTENTS
page page
GENERAL INFORMATION
INTRODUCTION ........................ 1
DIAGNOSIS AND TESTING
CHIME SYSTEM CONDITIONS ............. 1
FASTEN SEAT BELTS .................... 1
HEADLAMPS LEFT ON ................... 1
GENERAL INFORMATION
INTRODUCTION
WARNING: ON VEHICLES EQUIPPED WITH AN
AIRBAG, REFER TO THE AIRBAG PORTION OF
THIS SECTION FOR STEERING WHEEL OR SWITCH
REMOVAL AND INSTALLATION PROCEDURES.
The seat belt reminder system uses both visual
and audible signals. A combined seat belt and key
reminder chime with a red light on the instrument
panel.
The system will always illuminate the seat belt
reminder lamp for four to eight seconds when the
ignition switch is turned to the ON position. The
CHIME will sound during the same time interval if
the driver’s seat belt is not fastened. Passenger belts
are not connected to the system. The chime will activate if the drivers door is opened and:
• The key is in the ignition switch, with the ignition switch in either the OFF or accessory (ACC)
position
• The head lamps are ON.
The chime is part of the instrument cluster.
NOTE: This group covers both Left-Hand Drive
(LHD) and Right-Hand Drive (RHD) versions of this
model. Whenever required and feasible, the RHD
versions of affected vehicle components have been
constructed as mirror-image of the LHD versions.
While most of the illustrations used in this group
represent only the LHD version, the diagnostic and
service procedures outlined can generally be
applied to either version. Exceptions to this rule
have been clearly identified as LHD, RHD, or Export
if a special illustration or procedure is required.
KEY LEFT IN IGNITION SWITCH ............ 1
REMOVAL AND INSTALLATION
CHIME ................................ 2
HEADLAMP SWITCH ..................... 2
KEY-IN SWITCH ......................... 2
SEAT BELT BUCKLE ..................... 2
DIAGNOSIS AND TESTING
FASTEN SEAT BELTS
To test the fasten seat belts function, turn the ignition switch to the ON position with the driver’s seat
belt unbuckled and fully retracted. The seat belt
warning lamp should light for four to eight seconds
and the tone should sound three to five times.
HEADLAMPS LEFT ON
To test the headlamps left on function:
• Turn headlamps
• Driver’s door open
• Key removed from the ignition switch
Chime should sound until headlamps are turned
off or driver’s door is closed.
KEY LEFT IN IGNITION SWITCH
To test the key left in ignition function, insert key
into the ignition and open driver’s door. Chime
should sound until key is removed from ignition or
driver’s door is closed.
CHIME SYSTEM CONDITIONS
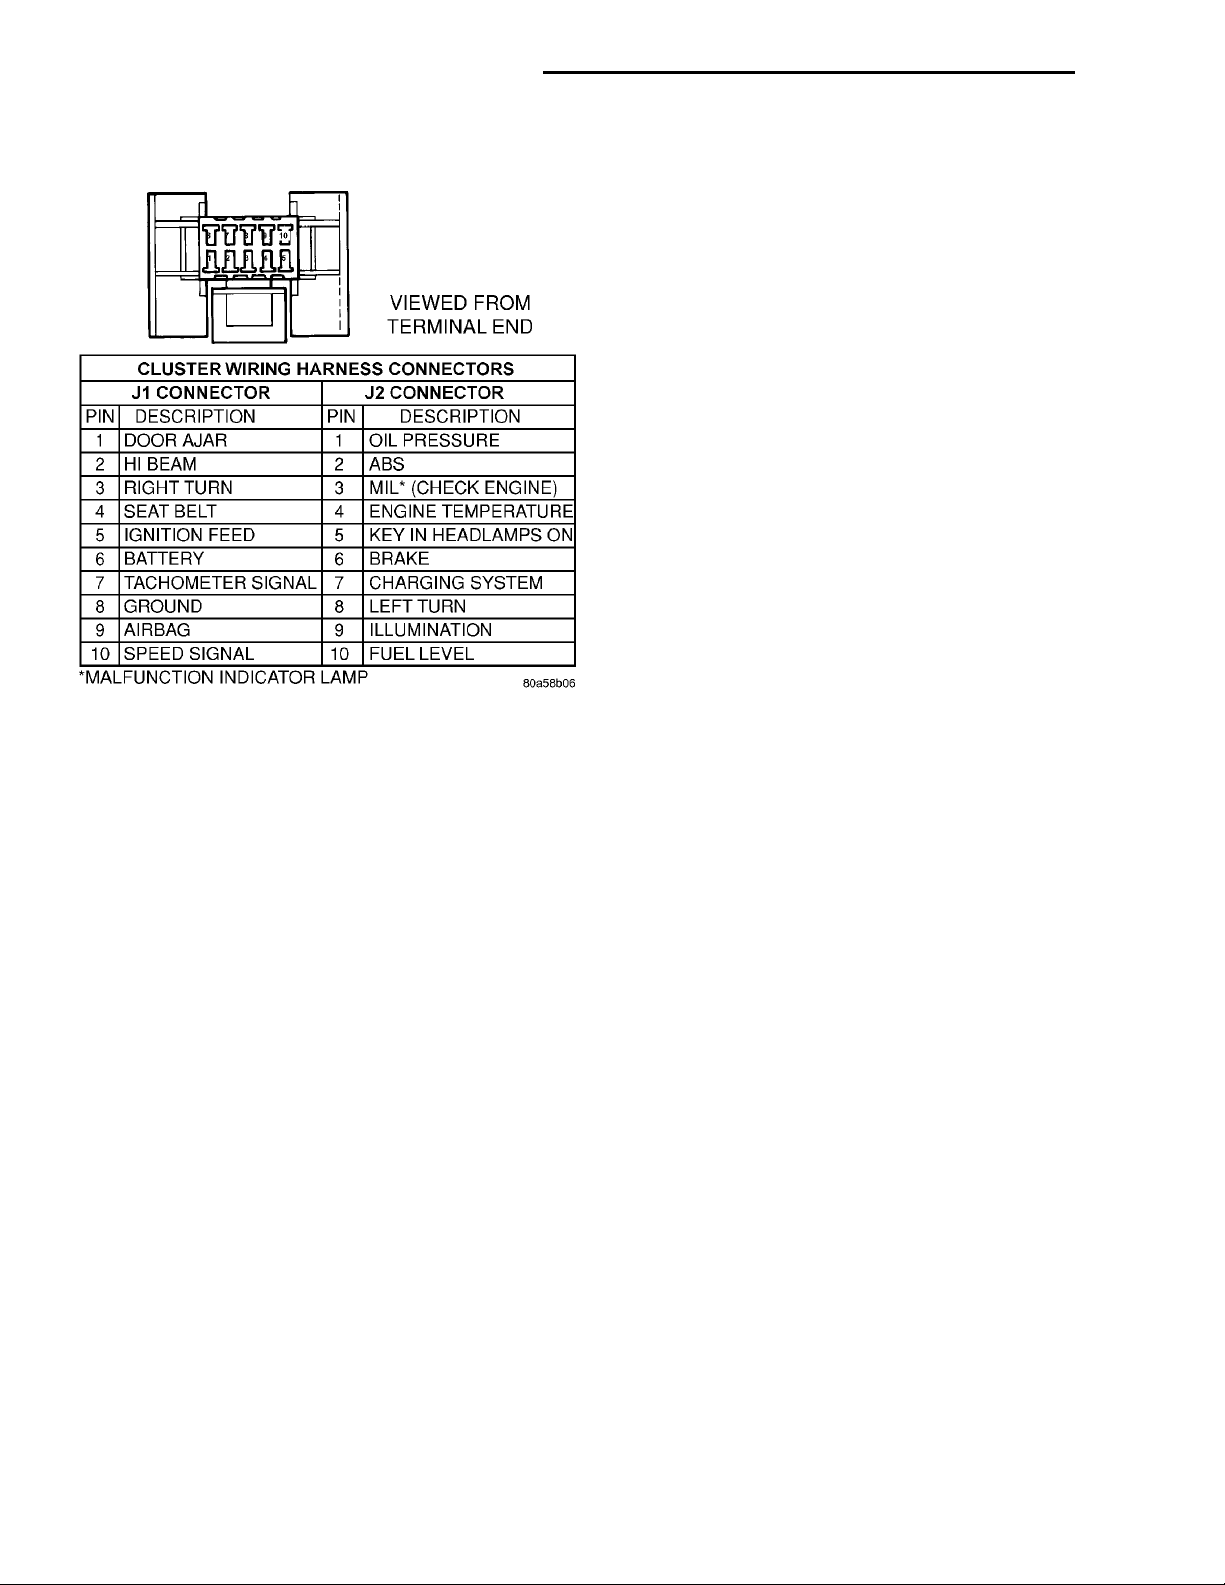
The cluster harness connector, J1 is car right and
the J2 is car left.
NO TONE WHEN IGNITION SWITCH IS TURNED ON AND DRIVERS SEAT BELT IS UNBUCKLED
(1) Using an ohmmeter, with the seat belt fully
retracted, check for continuity to ground at Pin 4 of
the J1 wire harness connector (Fig. 1). If OK, go to
step 2. If not OK, repair as necessary.
(2) Check for continuity to ground at Pin 8 of the
J1 wire harness connector. If OK, go to Step 3. If not
OK, repair as necessary.
(3) Using voltmeter, check for battery feed at Pin 6
of the J1 wire harness connector. Check for ignition
feed at Pin 5 of the J1 wire harness connector. If not
OK, repair as necessary.
Page 2
VIEWED FROM TERMINAL END
8U - 2 CHIME WARNING/REMINDER SYSTEM PL
DIAGNOSIS AND TESTING (Continued)
(2) Using voltmeter, check for battery feed at Pin 6
of the J1 wire harness connector. Check for NO ignition feed at Pin 5 of the J1 wire harness connector. If
OK, go to Step 3. If not OK, repair as necessary.
(3) Open driver’s door and ensure the ignition key
is in the OFF or ACC position. Check for continuity
to ground at Pin 5 of the J2 wire harness connector.
If ground OK, replace cluster printed circuit board. If
no ground, check key-in switch or door switch wiring
and repair as necessary.
CHIMES CONTINUE WHEN HEADLAMPS ARE TURNED OFF AND/OR KEY IS REMOVED FROM IGNITION
Check for ground at J2-5. If grounded the chime
should activate. Make sure the door is closed, key is
in ignition and parking lamps are OFF. If ground is
still present check door switch, key in switch, headlamp switch and repair as necessary.
Fig. 1 Cluster Wire Harness Connectors
NO FASTEN SEAT BELT LAMP WHEN IGNITION SWITCH IS ON.
(1) Check for burned out lamp.
(2) Check for battery feed at cluster wire harness
connector terminal J1-6 (Fig. 1).
(3) Check for ignition feed at cluster wire harness
connector terminal J1-5. Repair as necessary.
NO TONE WHEN HEADLAMPS ARE ON AND
DRIVERS DOOR IS OPEN
(1) Check left door jamb switch for good ground
when drivers door is open.
(2) Check for ground at J2-5.
(3) Check for battery feed at cluster wire harness
connector terminal J1-6 (Fig. 1).
(4) Check for NO voltage at J1-5. Ignition voltage
must not be present for the chime to work.
(5) Check headlamp switch.
NO TONE WHEN KEY IS LEFT IN IGNITION AND DRIVERS DOOR IS OPEN
(1) Check for continuity to ground at Pin 8 of the
J1 wire harness connector. If OK, go to Step 3. If not
OK, repair as necessary.
REMOVAL AND INSTALLATION
CHIME
The chime is built into the instrument cluster print
circuit board. Refer to Group 8E, Instrument Panel
and Gauges.
SEAT BELT BUCKLE
Refer to Group 23, Body of this service manual.
HEADLAMP SWITCH
Refer to Group 8E, Instrument Panel and Systems.
KEY-IN SWITCH
The Key-in switch is built into the ignition switch
assembly. Should the Key-in switch require service,
the ignition switch assembly must be replaced. Refer
to Group 8D Ignition System of this service manual.
 Loading...