

Page 1
SERVICE MANUAL
18/6/2013
World of free manuals
Main Section
I Specifications
I Preparation for Servicing
I Adjustment Procedures
I Schematic Diagrams
I CBA’s
I Exploded views
I Parts List
When servicing the deck
mechanism, refer to MK14 Deck
Mechanism Section.
Deck Mechanism Part No.:
N25E0FL
DVD RECORDER &
VIDEO CASSETTE RECORDER
ADB2737BD
PAL
Page 2

MAIN SECTION
18/6/2013
World of free manuals
DVD RECORDER &
VIDEO CASSETTE RECORDER
ADB2737BD
Main Section
I Specifications
I Preparation for Servicing
I Adjustment Procedures
I Schematic Diagrams
I CBA’s
I Exploded Views
I Par ts L ist
TABLE OF CONTENTS
Specifications . . . . . . . . . . . . . . . . . . . . . . . . . . . . . . . . . . . . . . . . . . . . . . . . . . . . . . . . . . . . . . . . . . . . . . . . . 1-1-1
Laser Beam Safety Precautions . . . . . . . . . . . . . . . . . . . . . . . . . . . . . . . . . . . . . . . . . . . . . . . . . . . . . . . . . . . 1-2-1
Important Safety Precautions . . . . . . . . . . . . . . . . . . . . . . . . . . . . . . . . . . . . . . . . . . . . . . . . . . . . . . . . . . . . . 1-3-1
Standard Notes for Servicing . . . . . . . . . . . . . . . . . . . . . . . . . . . . . . . . . . . . . . . . . . . . . . . . . . . . . . . . . . . . . 1-4-1
Preparation for Servicing . . . . . . . . . . . . . . . . . . . . . . . . . . . . . . . . . . . . . . . . . . . . . . . . . . . . . . . . . . . . . . . . 1-5-1
Cabinet Disassembly Instructions. . . . . . . . . . . . . . . . . . . . . . . . . . . . . . . . . . . . . . . . . . . . . . . . . . . . . . . . . . 1-6-1
Electrical Adjustment Instructions. . . . . . . . . . . . . . . . . . . . . . . . . . . . . . . . . . . . . . . . . . . . . . . . . . . . . . . . . . 1-7-1
How to Initialize the DVD Recorder & VCR. . . . . . . . . . . . . . . . . . . . . . . . . . . . . . . . . . . . . . . . . . . . . . . . . . . 1-8-1
Firmware Renewal Mode . . . . . . . . . . . . . . . . . . . . . . . . . . . . . . . . . . . . . . . . . . . . . . . . . . . . . . . . . . . . . . . . 1-9-1
Function Indicator Symbols. . . . . . . . . . . . . . . . . . . . . . . . . . . . . . . . . . . . . . . . . . . . . . . . . . . . . . . . . . . . . . 1-10-1
Block Diagrams. . . . . . . . . . . . . . . . . . . . . . . . . . . . . . . . . . . . . . . . . . . . . . . . . . . . . . . . . . . . . . . . . . . . . . . 1-11-1
Schematic Diagrams / CBA’s and Test Points. . . . . . . . . . . . . . . . . . . . . . . . . . . . . . . . . . . . . . . . . . . . . . . . 1-12-1
Waveforms . . . . . . . . . . . . . . . . . . . . . . . . . . . . . . . . . . . . . . . . . . . . . . . . . . . . . . . . . . . . . . . . . . . . . . . . . . 1-13-1
Wiring Diagram < VCR Section > . . . . . . . . . . . . . . . . . . . . . . . . . . . . . . . . . . . . . . . . . . . . . . . . . . . . . . . . . 1-14-1
Wiring Diagram < DVD Section > . . . . . . . . . . . . . . . . . . . . . . . . . . . . . . . . . . . . . . . . . . . . . . . . . . . . . . . . . 1-14-2
IC Pin Function Descriptions. . . . . . . . . . . . . . . . . . . . . . . . . . . . . . . . . . . . . . . . . . . . . . . . . . . . . . . . . . . . . 1-15-1
Lead Identifications. . . . . . . . . . . . . . . . . . . . . . . . . . . . . . . . . . . . . . . . . . . . . . . . . . . . . . . . . . . . . . . . . . . . 1-16-1
Exploded Views. . . . . . . . . . . . . . . . . . . . . . . . . . . . . . . . . . . . . . . . . . . . . . . . . . . . . . . . . . . . . . . . . . . . . . . 1-17-1
Mechanical Parts List . . . . . . . . . . . . . . . . . . . . . . . . . . . . . . . . . . . . . . . . . . . . . . . . . . . . . . . . . . . . . . . . . . 1-18-1
Electrical Parts List . . . . . . . . . . . . . . . . . . . . . . . . . . . . . . . . . . . . . . . . . . . . . . . . . . . . . . . . . . . . . . . . . . . . 1-19-1
Manufactured under license from Dolby Laboratories.
"Dolby" and the double-D symbol are trademarks of Dolby Laboratories.
Page 3
SPECIFICATIONS
18/6/2013
World of free manuals
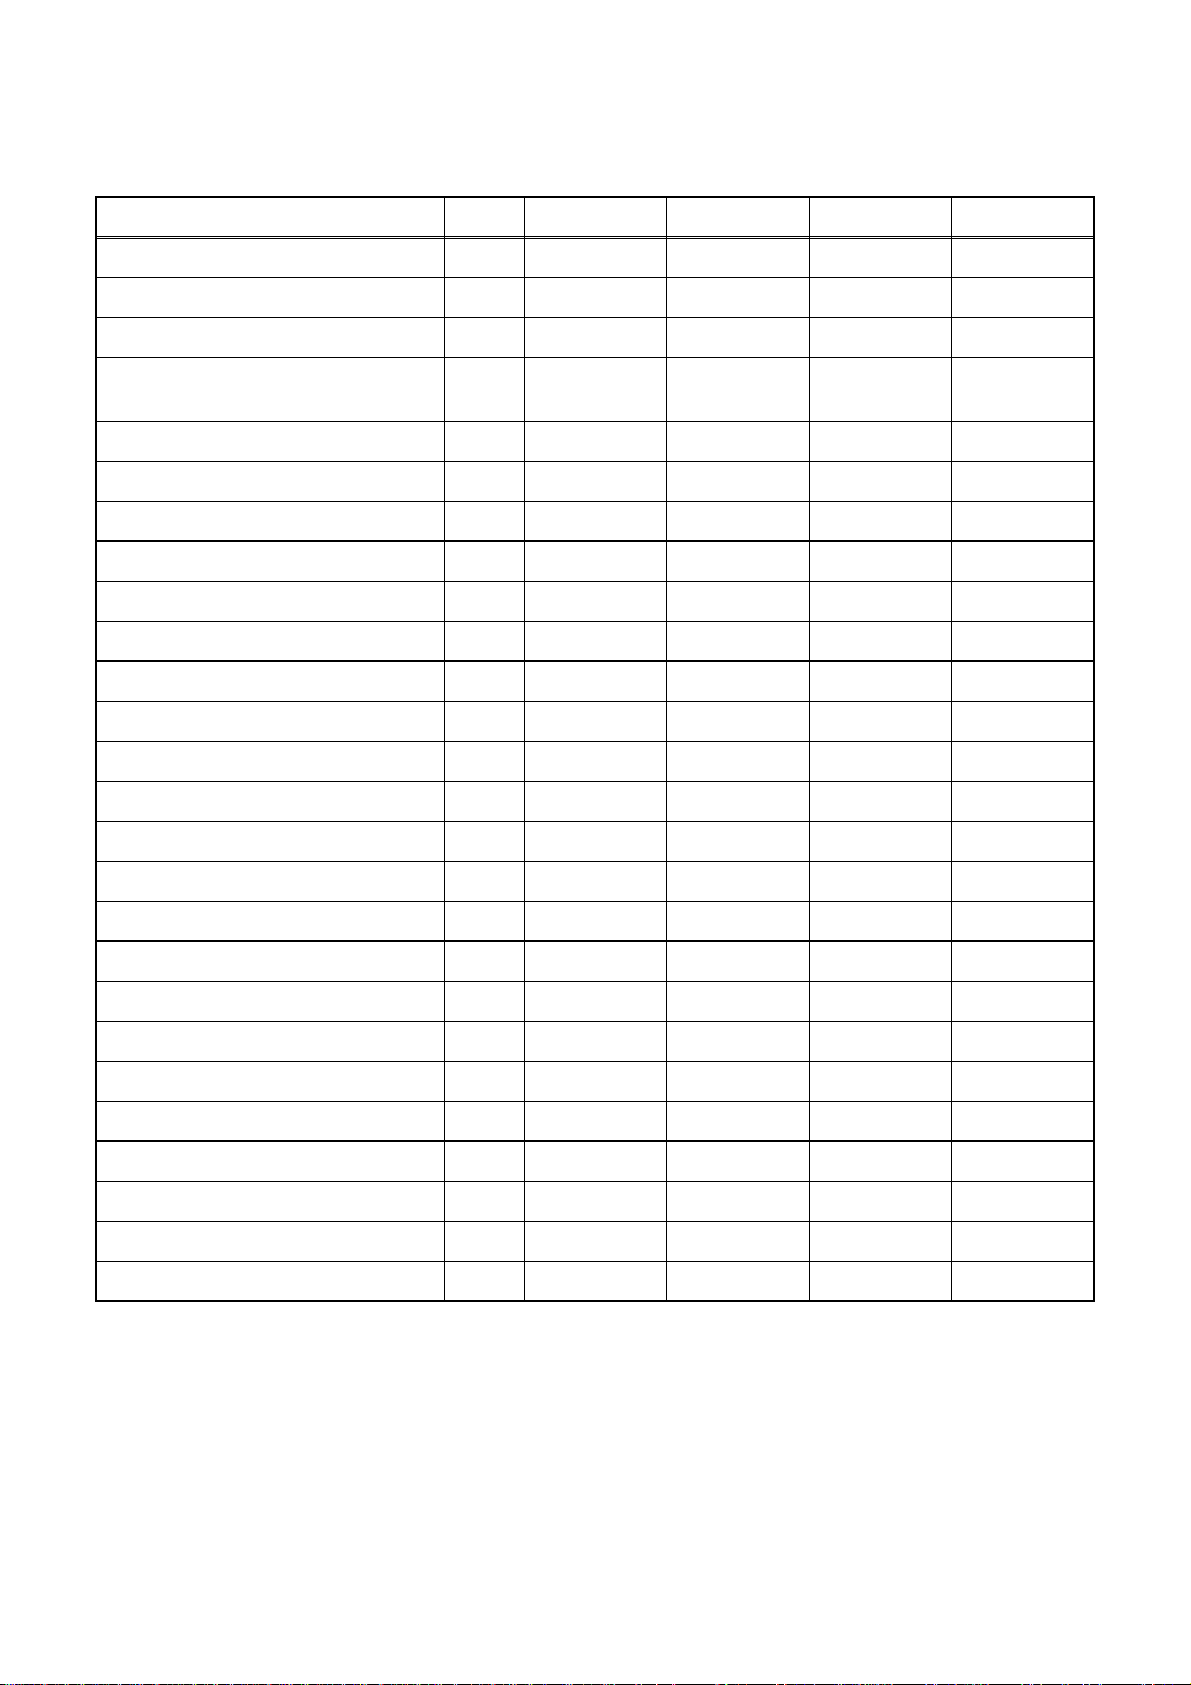
< VCR Section >
Description Unit Minimum Nominal Maximum Remark
1. Video
1-1. Video Output (PB) Vp-p 0.8 1.0 1.2 SP Mode
1-2. Video Output (R/P) Vp-p 0.8 1.0 1.2
1-3. Video S/N Y (R/P) dB 40 45
1-4. Video Color S/N AM (R/P) dB 37 41 SP Mode
1-5. Video Color S/N PM (R/P) dB 30 36 SP Mode
1-6. Resolution (PB) Line 230 245 SP Mode
2. Servo
2-1. Jitter Low µsec 0.07 0.12 SP Mode
2-2. Wow & Flutter % 0.3 0.5 SP Mode
3. Normal Audio
3-1. Output (PB) dBV -9 -4 -3 SP Mode
3-2. Output (R/P) dBV -9 -4 -1.5 SP Mode
3-3. S/N (R/P) dB 36 41 SP Mode
3-4. Distortion (R/P) % 1.0 4.0 SP Mode
3-5. Freq. resp (R/P) at 200Hz dB -6 -2 SP Mode
(-20dB ref. 1kHz) at 8kHz dB -8 -2 SP Mode
SP Mode,
W/O Burst
4. Tuner
4-1. Video output Vp-p 0.8 1.0 1.2 E-E Mode
4-2. Video S/N dB 39 44 E-E Mode
4-3. Audio output dB -10 -6 -2 E-E Mode
4-4. Audio S/N dB 40 46 E-E Mode
5. Hi-Fi Audio
5-1. Output dBV -12 -9 -4 SP Mode
5-2. Dynamic Range dB 70 85 SP Mode
5-3. Freq. resp (6dB B.W) Hz 20 ~ 20K SP Mode
Note: Nominal specs represent the design specs. All units should be able to approximate these – some will
exceed and some may drop slightly below these specs. Limit specs represent the absolute worst condi tion that
still might be considered acceptable; In no case should a unit fail to meet limit specs.
1-1-1 E9710SP
Page 4
< DVD Section >
18/6/2013
World of free manuals
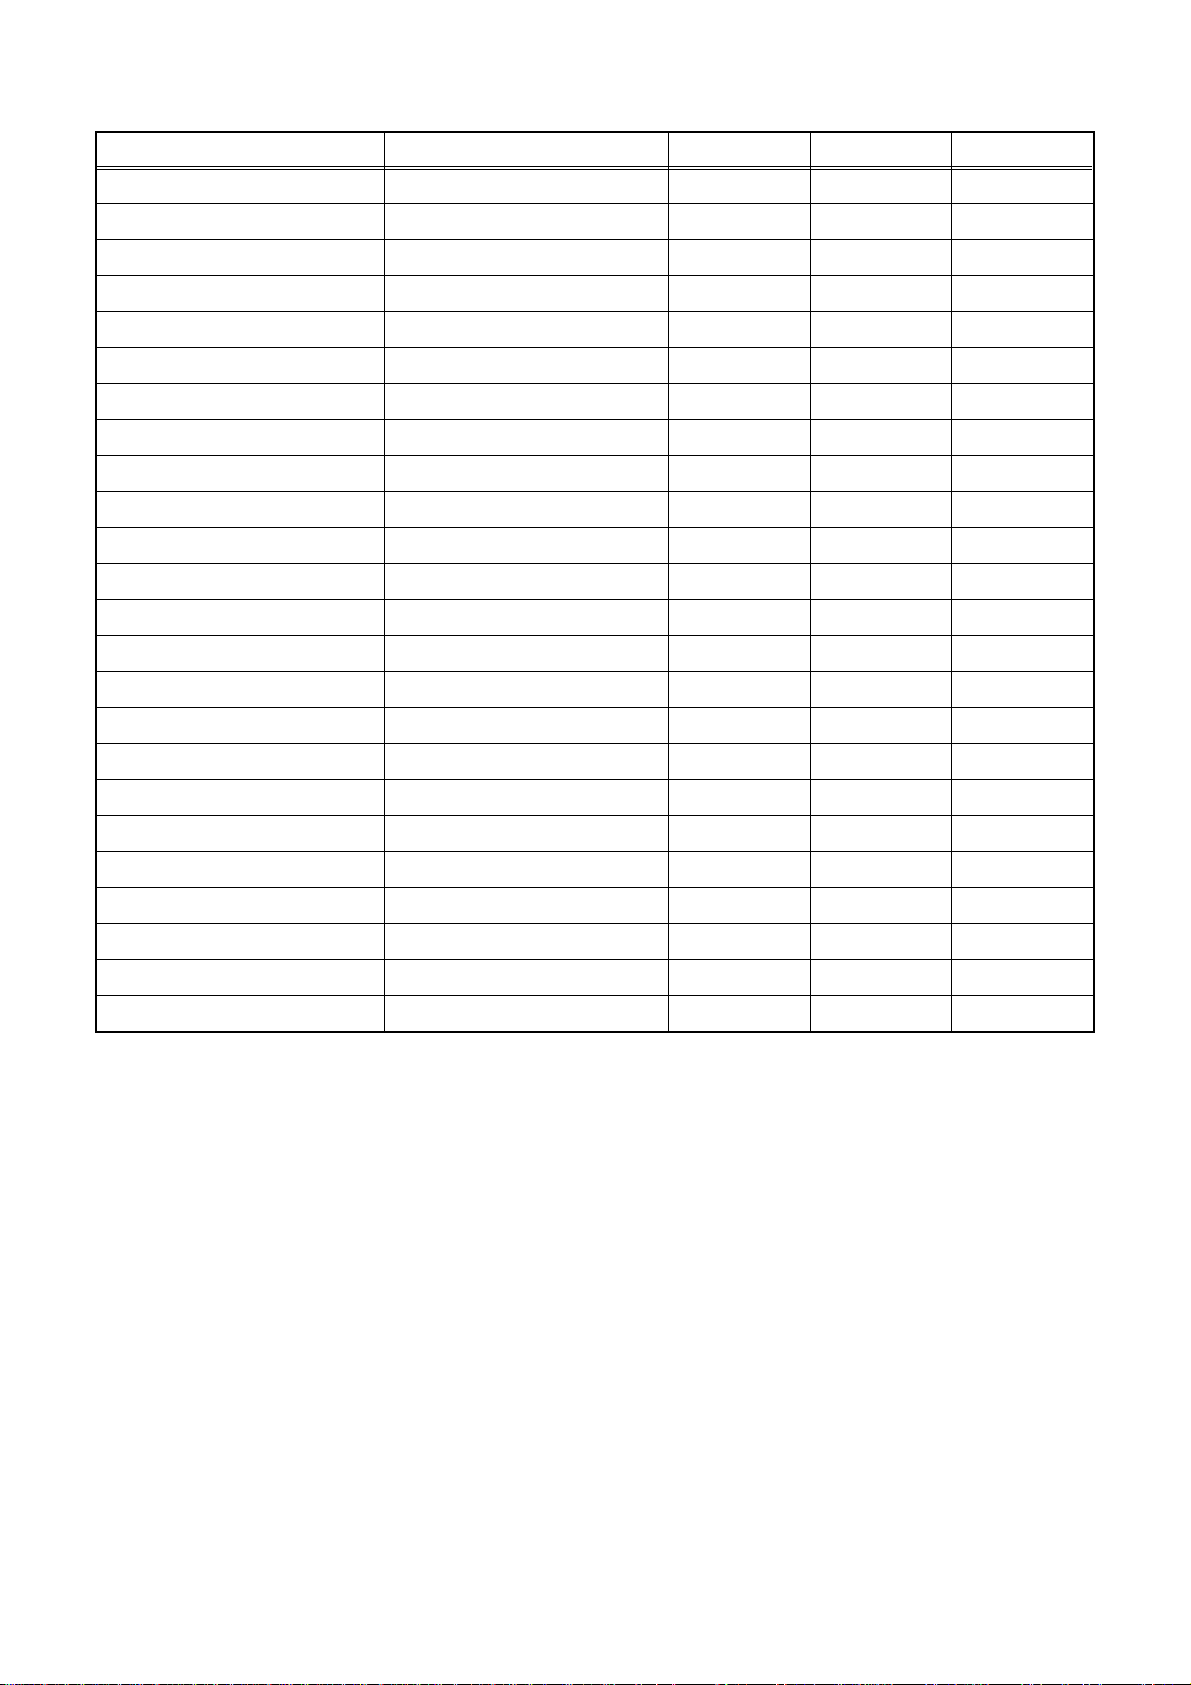
Item Conditions Unit Nominal Limit
1. VIDEO
1-1. Video Output 75 Ω load Vp-p 1.0
1-2. S-Video Output
Y (Luminance) 75 Ω load Vp-p 1.0
C (Chrominance) 75 Ω load Vp-p 0.3
2. AUDIO
2-1. Output Level Vrms 2.0
2-2. Frequency Response
DVD-VIDEO LPCM fs = 96 kHz Hz 20 - 44 k
fs = 48 kHz Hz 20 - 20 k
Audio CD fs = 44.1 kHz Hz 20 - 20 k
2-3. Signal/Noise Ratio
DVD-VIDEO LPCM dB 85
CD dB 85
REC & Playback Input: 2 Vrms, Rec Speed: SP dB 85
2-4. THD+N 1 kHz, 0 dB
DVD-VIDEO LPCM % 0.01
CD % 0.01
REC & Playback Input: 2 Vrms, Rec Speed: SP % 0.01
3. TUNER
3-1. Video Output 75 Ω load Vp-p 1.0
3-2. Video S/N dB 42
3-3. Audio Output dBv -12
3-4. Audio S/N dB 46
Notes:
1. All Items are measured without pre-emphasis unless otherwise specified.
2. Power supply: 220 - 240 V ~ 50 Hz
3. Load imp.: 100 kΩ
4. Room ambient : 5 °C ~ 40 °C
1-1-2 E9710SP
Page 5
LASER BEAM SAFETY PRECAUTIONS
18/6/2013
World of free manuals
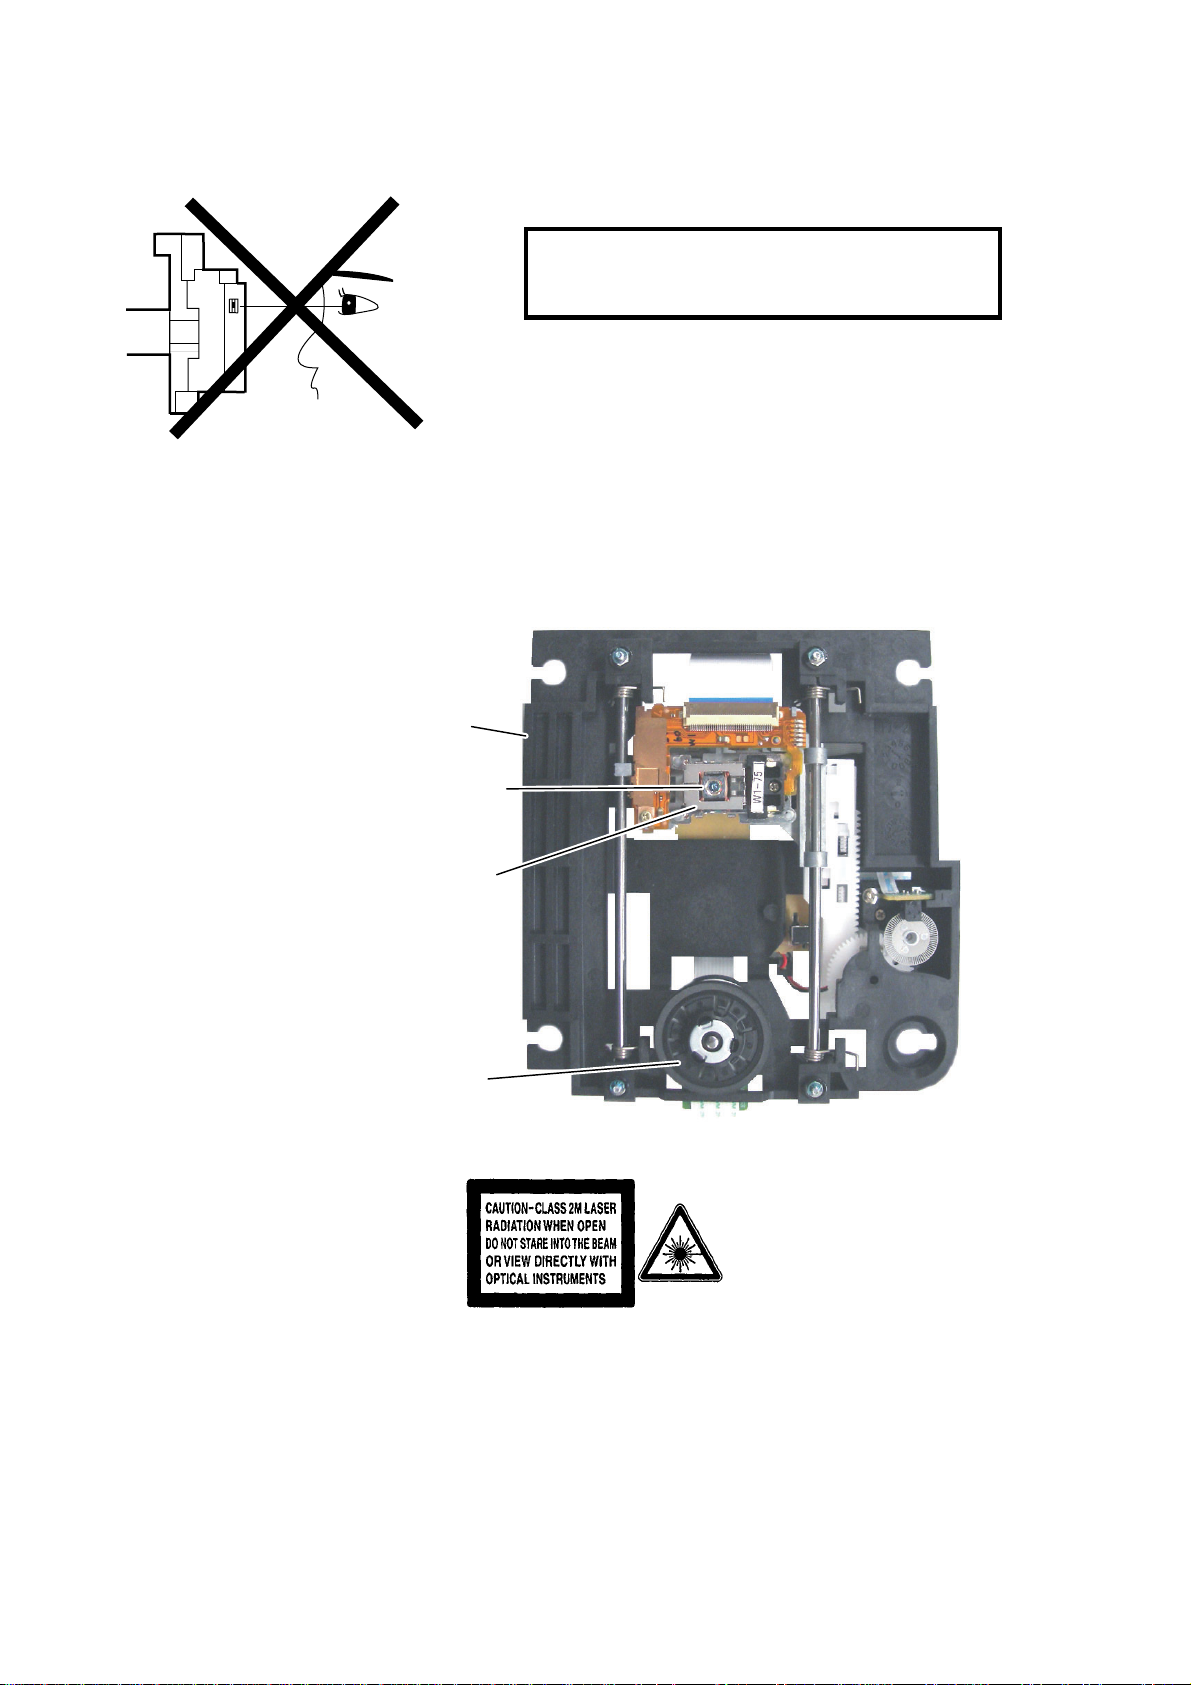
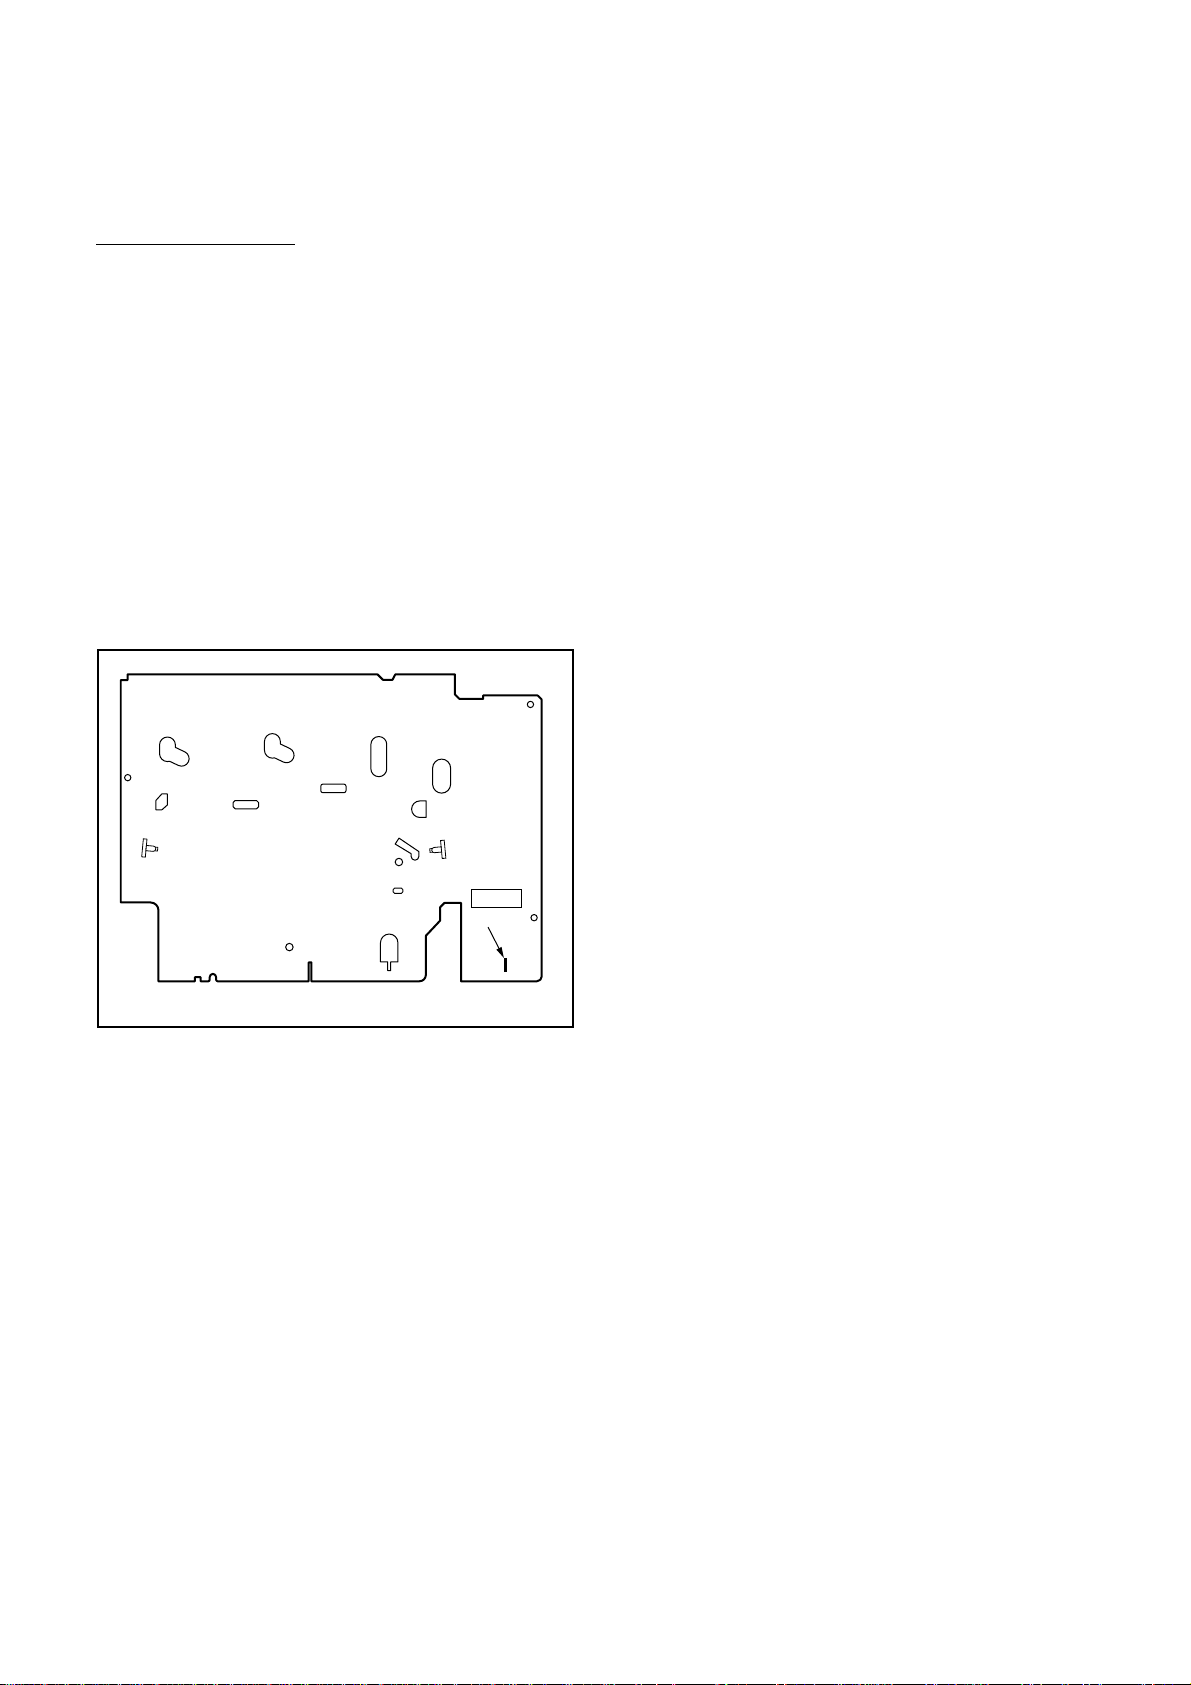
This DVD player uses a pickup that emits a laser beam.
Do not look directly at the laser beam coming
from the pic kup or allo w it to strike a gainst y our
skin.
The laser beam is emitted from the location shown in the figure. When checking the laser diode, be sure to keep
your eyes at least 30 cm away from the pickup lens when the diode is turned on. Do not look directly at the laser
beam.
CAUTION: Use of controls and adjustments, or doing procedures other than those specified herein, may result in
hazardous radiation exposure.
Drive Mechanism Assembly
Laser Beam Radiation
Laser Pickup
Turntable
Location: Inside Top of DVD mechanism.
1-2-1 R3PLSP
Page 6

IMPORTANT SAFETY PRECAUTIONS
18/6/2013
World of free manuals
Product Safety Notice
Some electrical and mechanical parts have special
safety-related characteristic s which are often not evident from visual inspection, nor can the protection
they give necessarily be obtained by replacing them
with components rated for higher voltage, wattage,
etc. Parts that have special s afety characteristics are
identifi ed b y a ! on schematics and in parts lists. Use
of a substitute replacement that does not have the
same safety characteristics as the recommended
replacement part might create shock, fire, and/or other
hazards. The Product’s Safety is under review continuously and new instructions are issued whenever
appropriate. Prior to shipment from the factory, our
products are carefully inspected to confirm with the
recognized product safety and electr ical codes of the
countries in which they are to be sold. However, in
order to maintain such compliance, it is e qual ly imp or tant to implement the following precautions when a set
is being serviced.
Precautions during Servicing
A. Parts identified by the ! symbol are critical for
safety. Replace only with part number specified.
B. In addition to safety, other parts and assemblies
are specified for conformance with regulations
applying to spur ious radi ation. Thes e must also be
replaced only with specified replacements.
Examples: RF conver ters, RF cables, noise blocking capacitors, and noise blocking filters, etc.
C. Use specified internal wiring. Note especially:
1)Wires covered with PVC tubing
2)Double insulated wires
3)High voltage leads
D. Use specified insulating materials for hazardous
live parts. Note especially:
1)Insulation tape
2)PVC tubing
3)Spacers
4)Insulators for transistors
E. When replacing AC primary side components
(transformers, power cord, etc.), wrap ends of
wires securely about the terminals before soldering.
F. Observe that the wires do no t co ntac t he at prod uc -
ing parts (heatsink s, oxide metal film resist ors, fusible resistors, etc.).
G. Check that replaced wires do not contact sharp
edges or pointed parts.
H. When a power cord has b een replac ed, check that
5 - 6 kg of force in any direction will not loosen it.
I. Also check areas surrounding repaired locations.
J. Be careful that foreign objects (screws, solder
droplets, etc.) do not remain inside the set.
K. When connecting or disconnecting the internal
connectors, first, disconne ct the AC plug from the
AC outlet.
1-3-1 DVD_SFNP
Page 7
Safety Check after Servicing
18/6/2013
World of free manuals
Examine the area surrounding the repaired location
for damage or deterioration. Observe that screws,
parts, and wires have been returned to their original
positions. Afterwards, do the following tests and confirm the specified values to verify compliance with
safety standards.
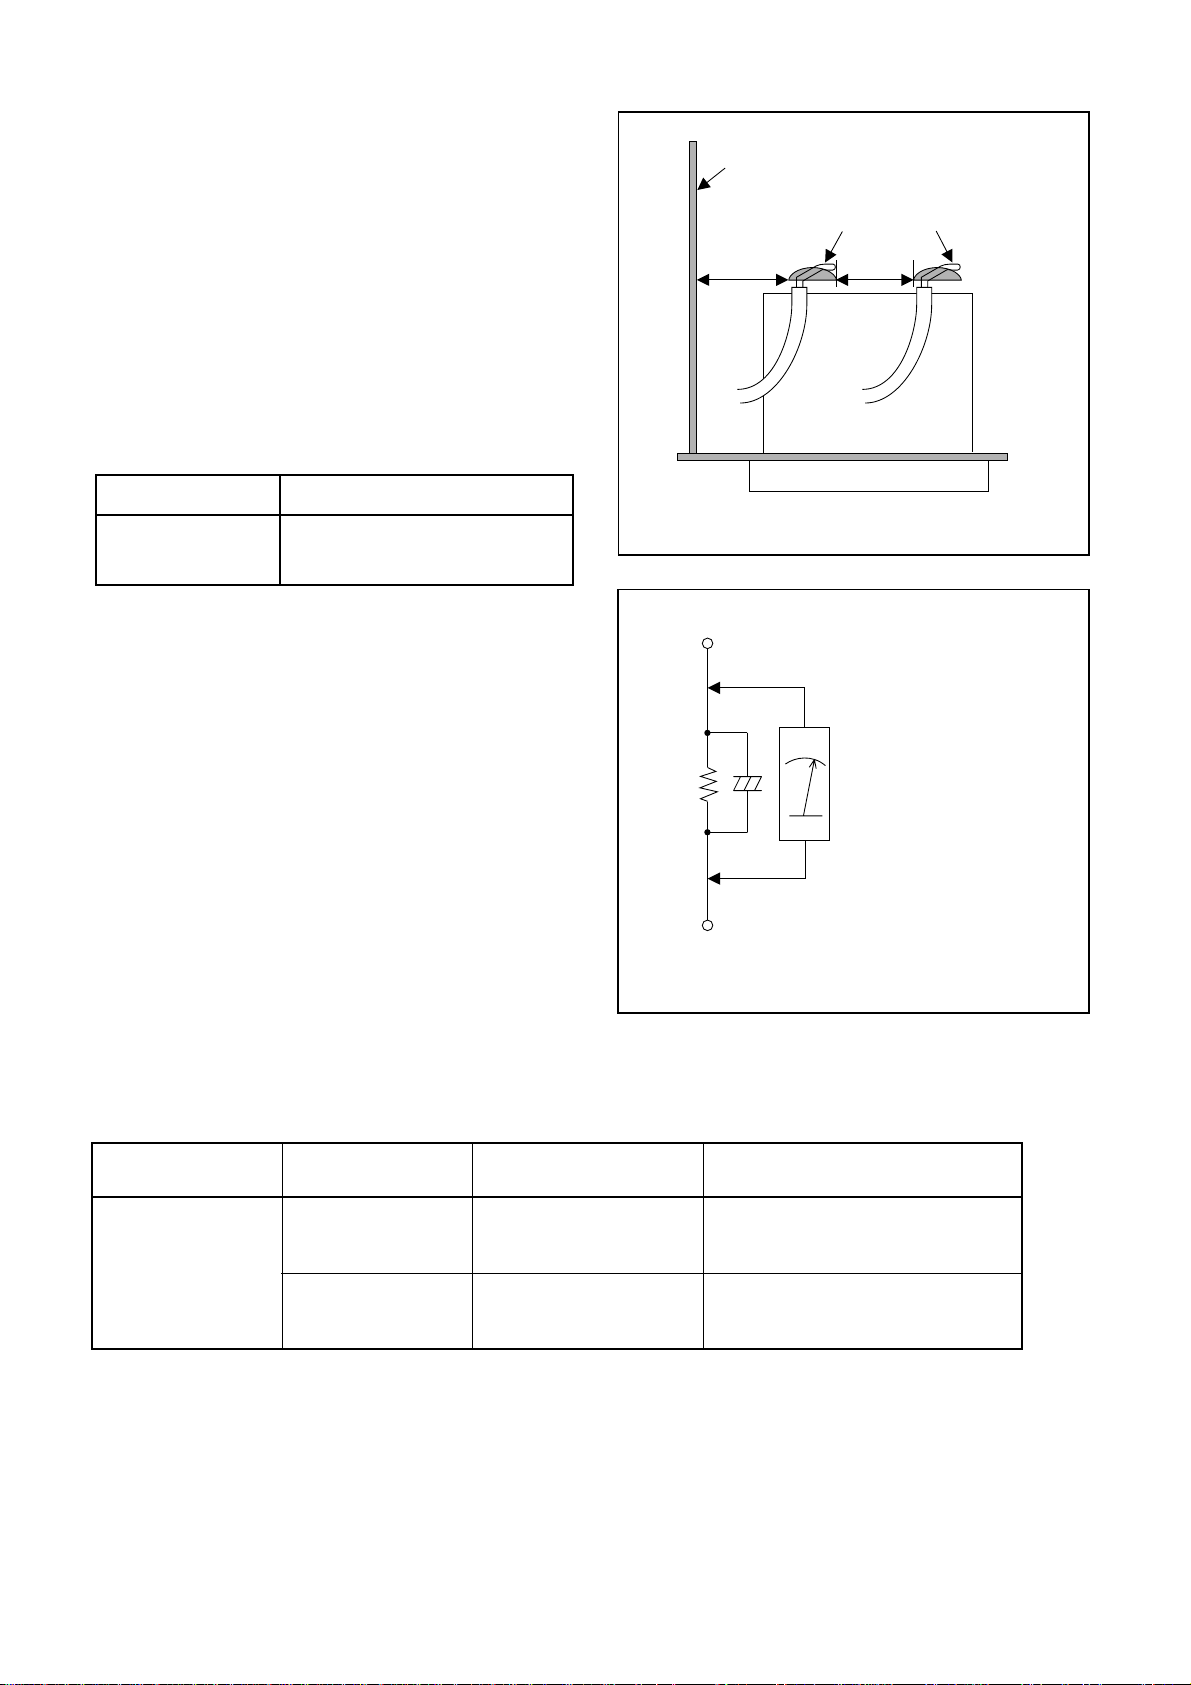
1. Clearance Distan ce
When replacing primary circuit components, confirm
specified clearance dista nce (d) and (d’) between sol dered terminals, and between terminals and surrounding metallic parts. (See Fig. 1)
Table 1 : Ratings for selected area
AC Line Voltage Clearance Distance (d), (d’)
220 to 240 V
Note: This table is unofficial and for reference only.
Be sure to confirm the precise values.
2. Leakage Curre nt Test
≥ 3 mm(d)
≥ 6 mm(d’)
Chassis or Secondary Conductor
Primary Circuit
d' d
Fig. 1
Exposed Accessible Part
Confirm the specified (or lower) leakage current
between B (earth ground, power cord plug prongs)
and externally exposed accessible parts (RF terminals, antenna terminals, video and audio input and
output terminals, microphone jacks, earphone jacks,
etc.) is lower than or equal to the specified value in the
table below.
Measuring Method (Power ON) :
Insert load Z between B (earth ground, power cord
plug prongs) and exposed accessible parts. Use an
AC voltmeter to measure across t he ter minals of l oad
Z. See Fig. 2 and the following table.
Table 2: Leakage current ratings for selected areas
AC Line Voltage Load Z Leakage Current (i)
220 to 240 V
2kΩ RES.
Connected in
parallel
50kΩ RES.
Connected in
parallel
i≤0.7mA AC Peak
i≤2mA DC
i≤0.7mA AC Peak
i≤2mA DC
Z
One side of
B
Power Cord Plug Prongs
One side of power cord plug
AC Voltmeter
(High Impedance)
prongs (B) to:
RF or
Antenna terminals
A/V Input, Output
Fig. 2
Note: This table is unofficial and for reference only. Be sure to confirm the precise values.
1-3-2 DVD_SFNP
Page 8
STANDARD NOTES FOR SERVICING
18/6/2013
World of free manuals
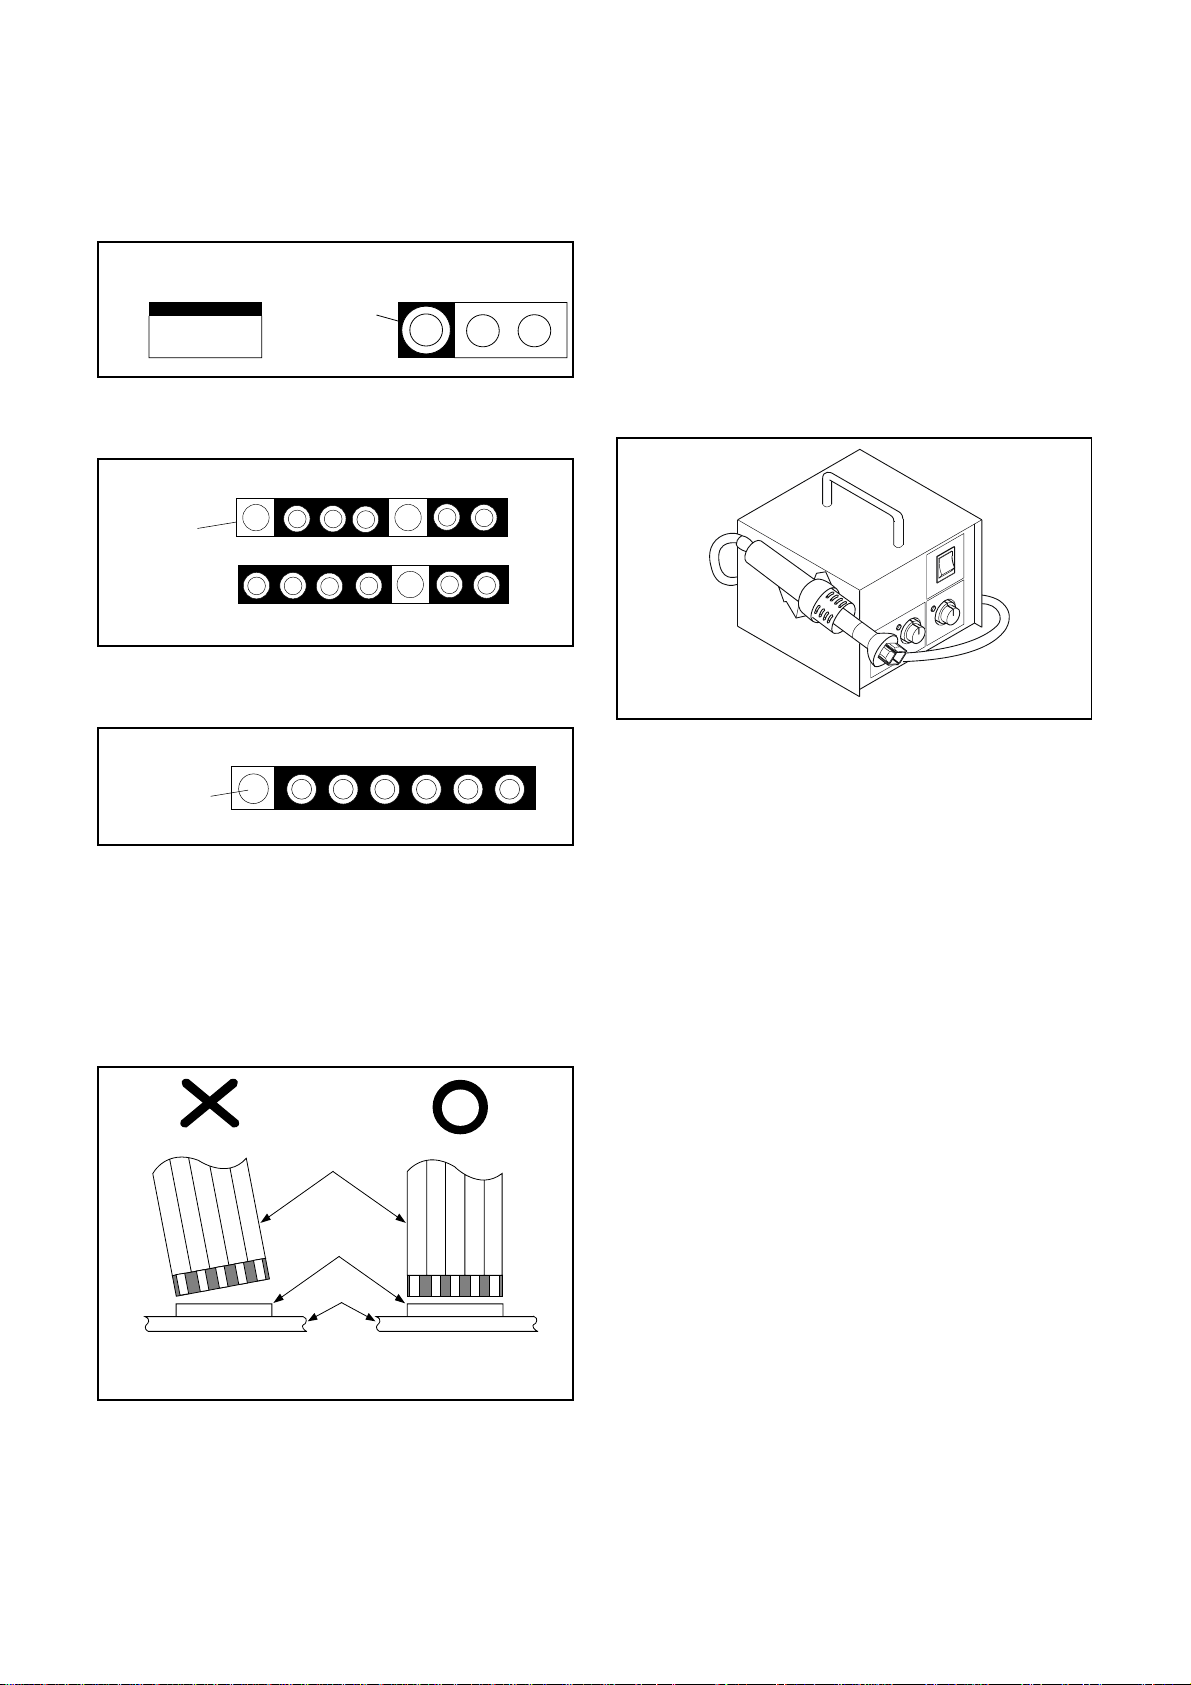
Circuit Board Indications
1. The output pin of the 3 pin Regu lator ICs is indicated as shown.
Top View
Input
Out
2. F or other ICs, pin 1 and every fifth pin are indicated
as shown.
In
Pin 1
3. The 1st pin of every male connec to r is ind ic ate d as
shown.
Bottom View
5
10
Pb (Lead) Free Solder
When soldering, be sure to use the Pb free solder.
How to Remove / Install Flat Pack-IC
1. Removal
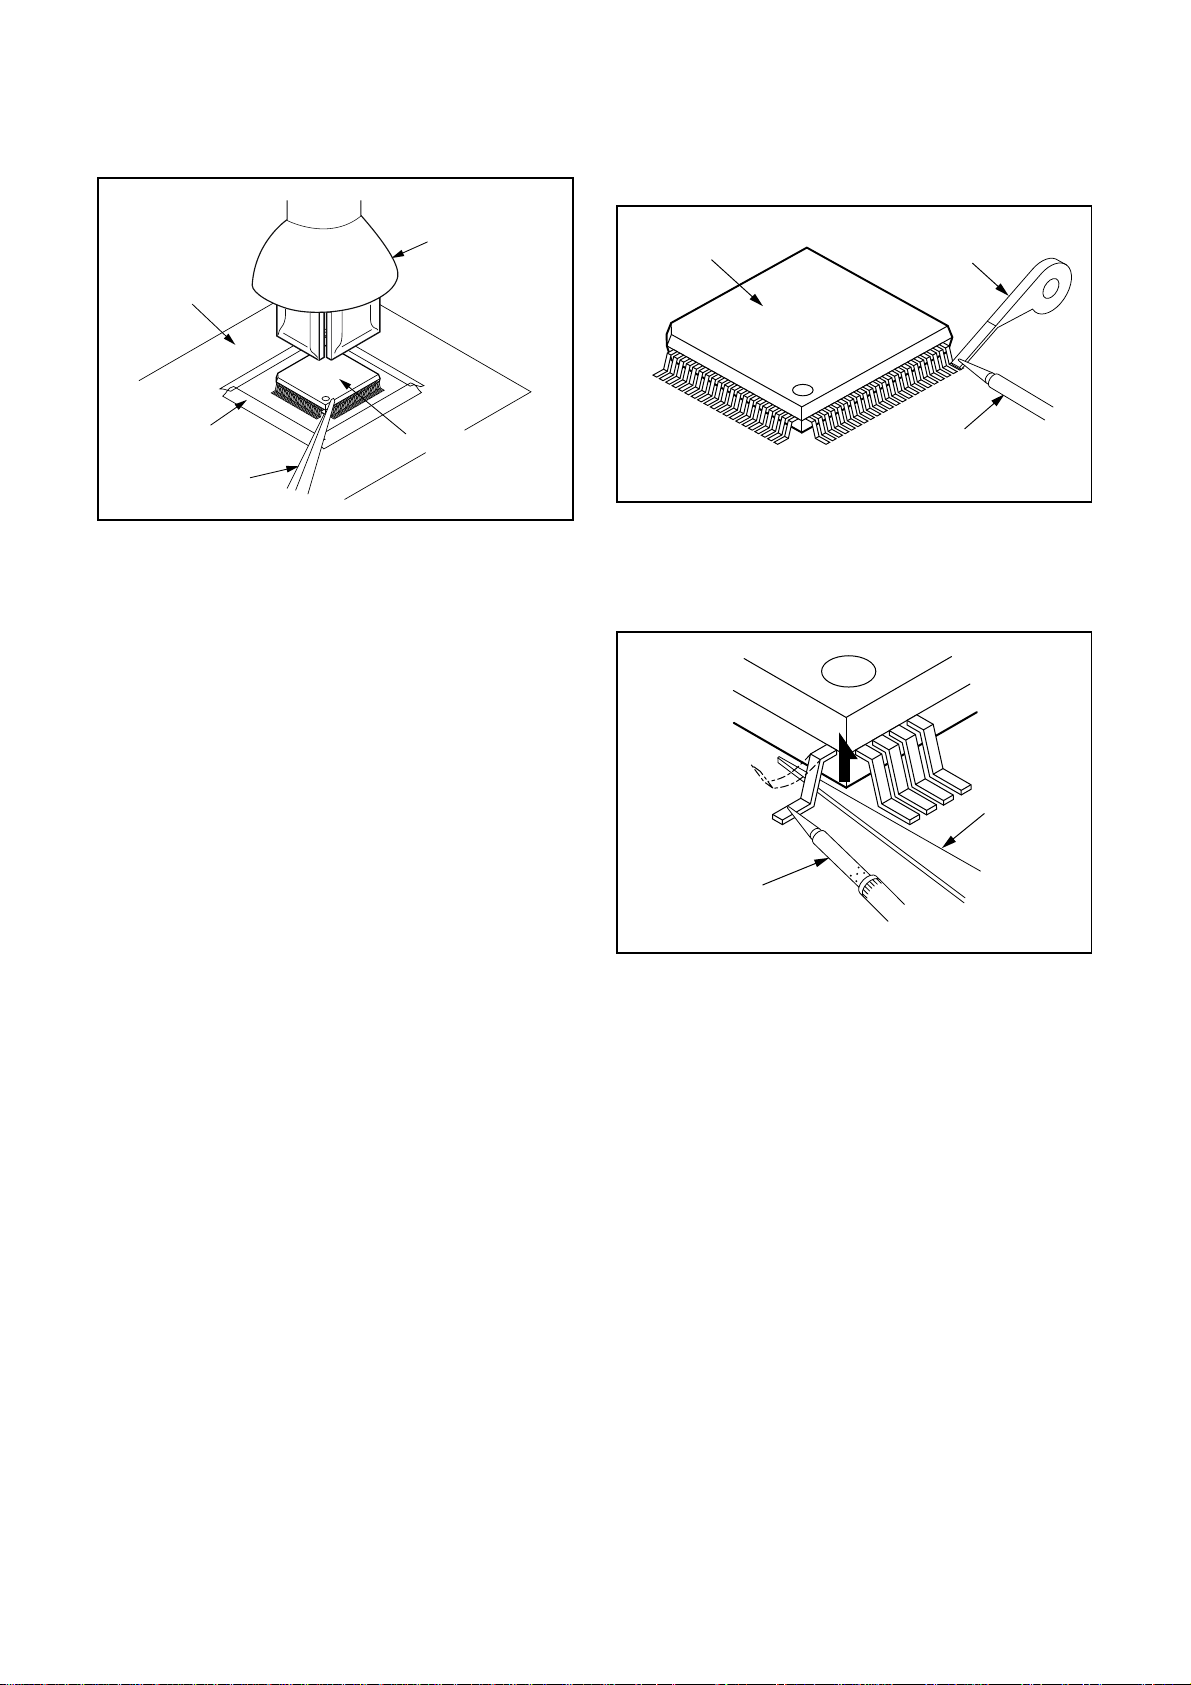
With Hot-Air Flat Pack-IC Desoldering Machine:.
(1)Prepare the hot-air flat pack-IC desoldering
machine, then apply hot air to the Flat Pack-IC
(about 5 to 6 seconds). (Fig. S-1-1)
Fig. S-1-1
Pin 1
Instructions for Connectors
1. When you connect or disconnect the FF C (Flexible
Foil Connector) cable, be sure to first disconnect
the AC cord.
2. FFC (Flexible Foil Connector) cable should be
inserted parallel into the connector, not at an angle.
FFC Cable
Connector
CBA
(2)Remove the flat pack-IC with tweezers while apply-
ing the hot air.
(3)B ottom of the flat pack-IC is fixed with glue to the
CBA; when removing entire flat pack-IC, first apply
soldering iron to c ent er of the flat pack-IC and heat
up. Then remove (glue will be melted). (Fig. S-1-6)
(4)Rel ease the flat pack-IC from the CBA using twee-
zers. (Fig. S-1-6)
Caution:
1. The Flat Pack -IC shape may differ by models. Use
an appropriate hot-air flat pack-IC desoldering
machine, whose shape matches that of the Flat
Pack-IC.
2. Do not supply hot air to the chi p parts aro und the
flat pack-IC for over 6 seconds because damage to
the chip parts may occur. Put masking tape around
the flat pack-IC to protect other parts from damage.
(Fig. S-1-2)
* Be careful to avoid a short circuit.
1-4-1 DVD_NOTE
Page 9
3. The flat pack-IC on the CBA is affixed with glue, so
18/6/2013
World of free manuals
be careful not to break or dama ge the foil of each
pin or the solder lands under the IC when removing
it.
Hot-air
Flat Pack-IC
Desoldering
Machine
CBA
With Soldering Iron:
(1)Using desoldering braid, remove the solder from all
pins of the flat pack-IC. When you use s older flux
which is applied to all pins of the flat pack-IC, you
can remove it easily. (Fig. S-1-3)
Flat Pack-IC
Desoldering Braid
Masking
Tape
Tweezers
Flat Pack-IC
Fig. S-1-2
Soldering Iron
Fig. S-1-3
(2) Lift each lead of the flat pack-IC upward one by
one, using a shar p pin or wire to which solder will
not adhere (iron wire). W hen heating th e pins, use
a fine tip soldering iron or a hot air desoldering
machine. (Fig. S-1-4)
Sharp
Pin
Fine Tip
Soldering Iron
Fig. S-1-4
(3)B ottom of the flat pack-IC is fixed with glue to the
CBA; when removing entire flat pack-IC, first apply
soldering iron to c ent er of the flat pack-IC and heat
up. Then remove (glue will be melted). (Fig. S-1-6)
(4)Rel ease the flat pack-IC from the CBA using twee-
zers. (Fig. S-1-6)
With Iron Wire:
(1)Using desoldering braid, remove the solder from all
pins of the flat pack-IC. When you use s older flux
which is applied to all pins of the flat pack-IC, you
can remove it easily. (Fig. S-1-3)
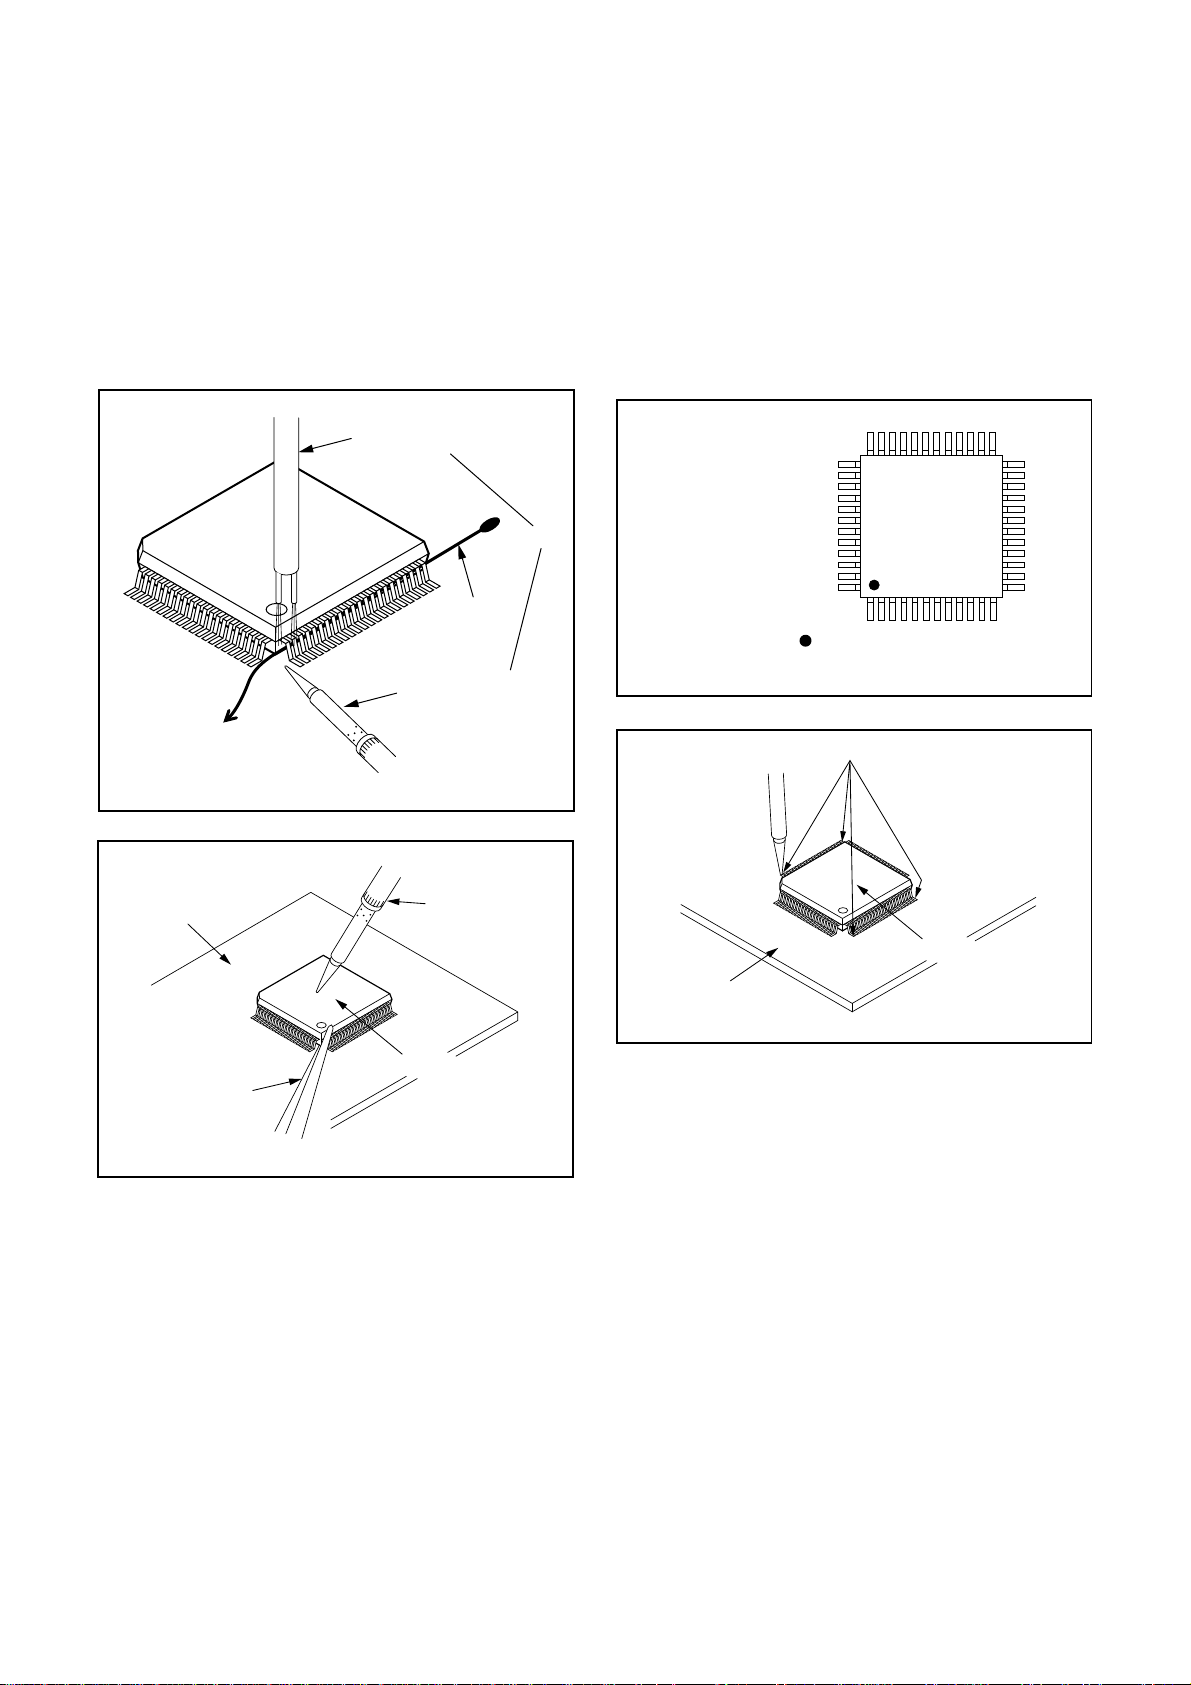
(2) Affix the wire to a workbench or solid mounting
point, as shown in Fig. S-1-5.
(3) While heating the pins using a fine tip soldering
iron or hot air blower, pull up the wire as the solder
melts so as to l ift the IC leads from the CBA contact pads as shown in Fig. S-1-5.
1-4-2 DVD_NOTE
Page 10
(4)Bo ttom of the flat pack-IC is fixed with glue to the
18/6/2013
World of free manuals
CBA; when removing entire flat pack-IC, first apply
soldering iron t o center of the flat pack-IC and heat
up. Then remove (glue will be melted). (Fig. S-1-6)
(5)Rel ease the fla t pack-IC from the C BA us ing twee-
zers. (Fig. S-1-6)
Note:
When using a solder ing iron, care must be taken
to ensure that the fl at pack-IC i s not bein g held by
glue. When the flat pack-IC is removed from the
CBA, handle it gentl y b ecaus e i t m ay be dama ged
if force is applied.
2. Installation
(1) Using desoldering braid, remove the solder from
the foil of each pin of the flat pack-IC on the CBA
so you can install a repla cement flat p ack-IC more
easily.
(2) The “I” mark on the flat pack-IC indicates pin 1.
(See Fig. S-1-7.) Be sure this mar k matches the 1
on the PCB when p ositioning for install ation. Then
presolder the four corn ers of the flat pack-IC. (See
Fig. S-1-8.)
(3)Solder all pins of the flat pack-IC. Be sure that none
of the pins have solder bridges.
To Solid
Mounting Point
CBA
Hot Air Blower
Iron Wire
Soldering Iron
Fig. S-1-5
Fine Tip
Soldering Iron
Example :
or
Pin 1 of the Flat Pack-IC
is indicated by a " " mark.
Fig. S-1-7
Presolder
Flat Pack-IC
CBA
Fig. S-1-8
Tweezers
Flat Pack-IC
Fig. S-1-6
1-4-3 DVD_NOTE
Page 11
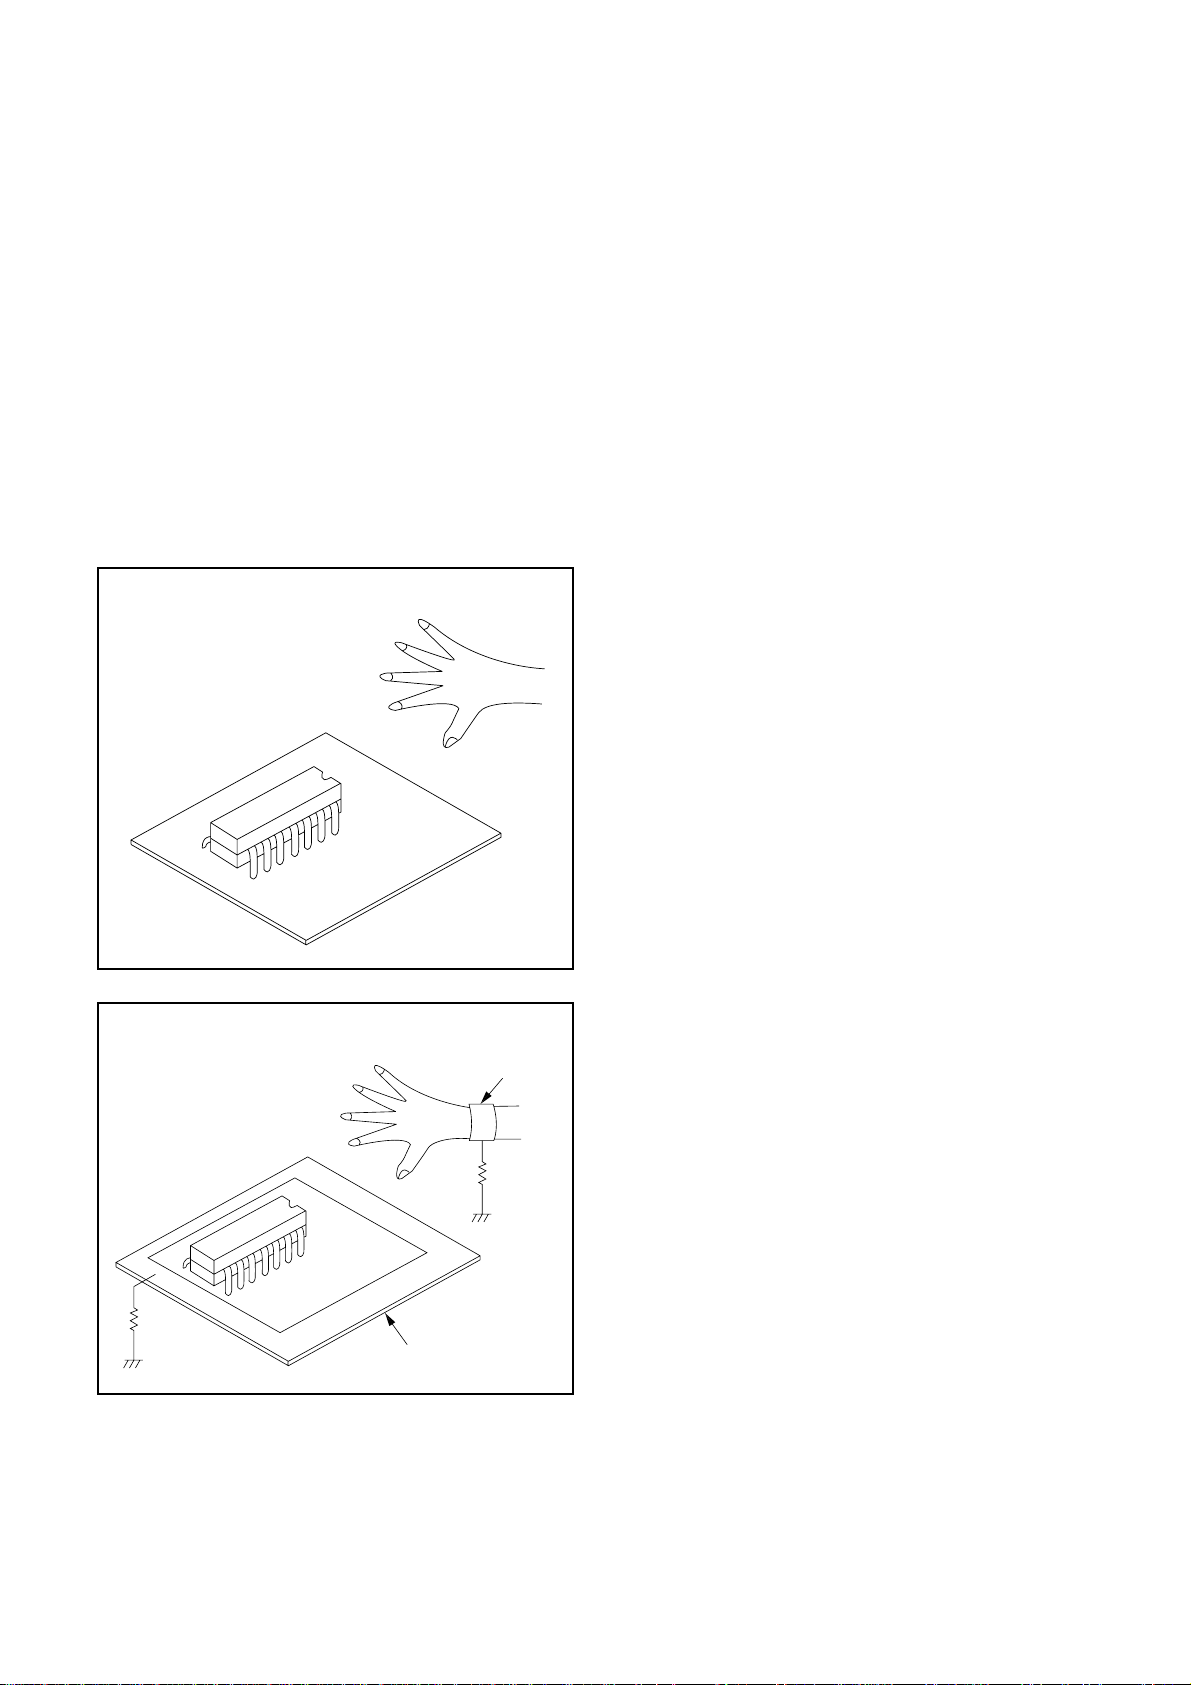
Instructions for Handling
18/6/2013
World of free manuals
Semi-conductors
Electrostatic breakdown of the semi-conductors may
occur due to a potenti al difference caused by electro static charge during unpacking or repair work.
1. Ground for Human Body
Be sure to wear a groundi ng ban d (1M Ω) that is properly grounded to remove any static electr icity that may
be charged on the body.
2. Ground for Workbench
(1)Be sure to place a conductive sheet or copper plate
with proper grounding ( 1MΩ) on the wor kbench or
other surface, where the semi-conductors are to be
placed. Because the static electricity charge on
clothing will not escap e through the body grounding band, be care ful to avoid contacting semi-con ductors with your clothing.
< Incorrect >
< Correct >
1MΩ
CBA
Grounding Band
1MΩ
CBA
Conductive Sheet or
Copper Plate
1-4-4 DVD_NOTE
Page 12
PREPARATION FOR SERVICING
18/6/2013
World of free manuals
How to Enter the Service Mode
About Optical Sensors
Caution:
An optical sensor system is used for the Tape Start
and End Sensors on th is equipment. Carefully read
and follow the instructions below. Otherwise the unit
may operate erratically.
What to do for preparation
Insert a tape into the Deck Mechanism Asse mbly and
press the PLAY button. The tape will be loaded into
the Deck Mechanism Assembly. Make sure the power
is on, connect TP501 (S-INH) to GND. T his will stop
the function of Tape Start Sensor, Tape End Sensor
and Reel Sensors. (If these TPs are c on nec ted before
plugging in the unit, the function of the sensors will
stay valid.) See Fig. 1.
Q503
Q504
S-INH
TP501
Fig. 1
Note: Because the Tape End Sensors are inactive, do
not run a tape al l t he way to the start or the end of the
tape to avoid tape damage.
1-5-1 E9710PFS
Page 13
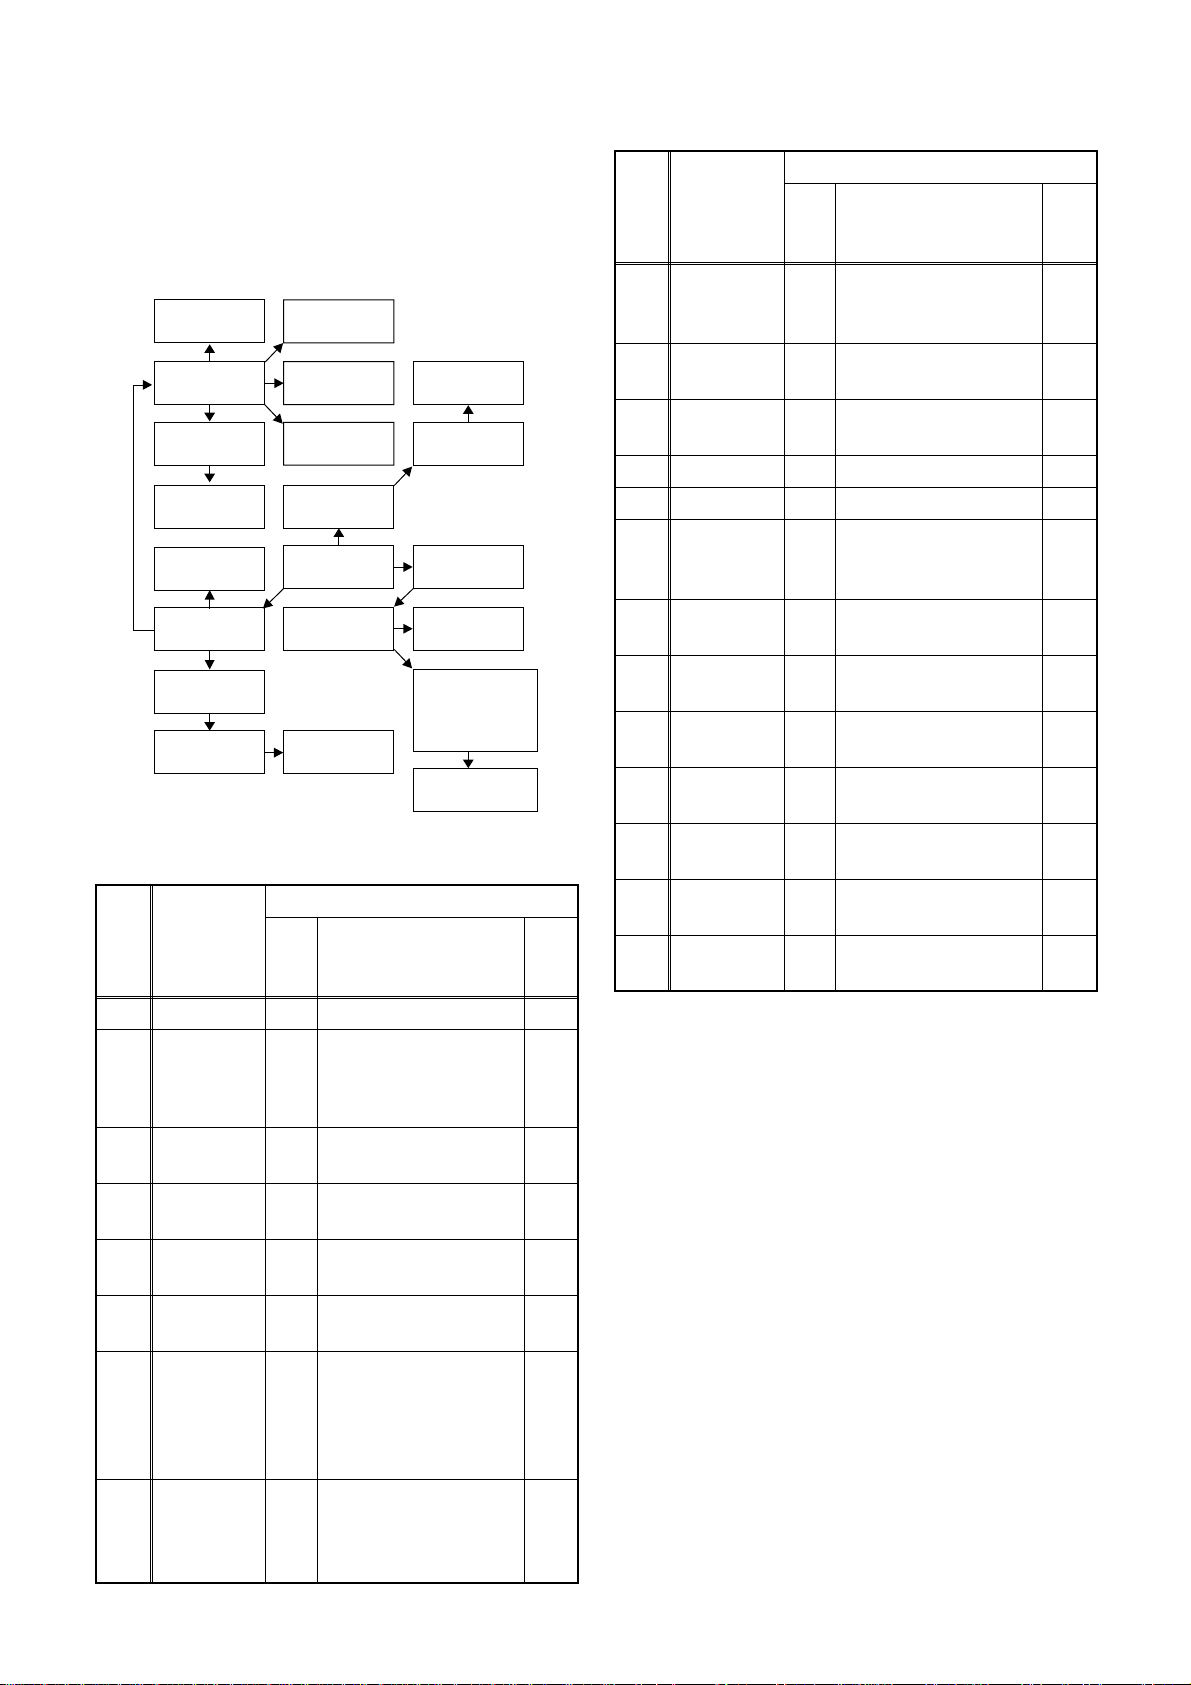
CABINET DISASSEMBLY INSTRUCTIONS
18/6/2013
World of free manuals
1. Disassembly Flowchart
This flowchar t indi cates the di sass embly ste ps to ga in
access to item(s) to be ser v iced. Whe n reassembling,
follow the steps in reverse order. Bend, route, and
dress the cables as they were originally.
[16] Power
SW CBA
[14] VCR
Chassis Unit
[18] Rear
Jack CBA
[19] Main,
AFV CBA
[10] DC
Fan Motor
[8] Rear
Panel Unit
[9] Power
Supply CBA
[11] PCB
Holder
[20] Deck
Pedestal
[15] Deck
Assembly
[17] Function
CBA
[2] Front
Assembly
[1] T op Cover
[4] Radiation
Sheet
[12] Rear
Panel
[6] Front Jack
CBA
[5] Jack
Bracket
[3] Front
Bracket
[21] Front
Bracket R
[7] DVD
Mechanism
& DVD Main
CBA Assembly
[13] Bracket R
2. Disassembl y Method
ID/
LOC.
No.
PART
Fig.
No.
[1] Top Cover D1 6(S-1) ---
Front
[2]
[3]
[4]
[5]
[6]
Assembly
Front
Bracket
Radiation
Sheet
Jack
Bracket
Front Jack
CBA
D2
D2 2(S-2), (S-3), ---
D2 ---------- ---
D3 2(S-4) ---
D3 Jack Earth Plate ---
DVD
Mechanism
[7]
& DVD
D4
Main CBA
Assembly
Rear Panel
[8]
Unit
D5
REMOVAL
REMOVE/*UNHOOK/
UNLOCK/RELEASE/
UNPLUG/DESOLDER
*5(L-1), *3(L-2),
*CN1505
2(S-5A), 2(S-5B),
Dust Cover , *CN101,
*CN701
3(S-6A), 2(S-6B),
3(S-7), (S-8A),
(S-8B), *CN1503,
*CN1504
Note
1
1-1
1-2
1-3
---
---
ID/
LOC.
No.
PART
REMOVE/*UNHOOK/
Fig.
UNLOCK/RELEASE/
No.
UNPLUG/DESOLDER
Note
Power
REMOVAL
[9]
Supply
D6 4(S-9) ---
CBA
DC Fan
[10]
[11]
Motor
PCB
Holder
D6 2(S-10) ---
3(S-11), Earth Plate
D6
---
[12] Rear Panel D6 ---------- --[13] Bracket R D7 2(S-12) ---
[14]
[15]
[16]
[17]
[18]
[19]
[20]
[21]
↓
(1)
VCR
Chassis
Unit
Deck
Assembly
Power SW
CBA
Function
CBA
Rear Jack
CBA
Main, AFV
CBA
Deck
Pedestal
Front
Bracket R
↓
(2)
5(S-13), 5(S-14),
D7
(S-15), (S-16)
(S-17), (S-18),
D8
Desolder
---
2
3
D8 Desolder ---
D8 Desolder ---
D8 Desolder, Earth Plate ---
D8 ---------- ---
D9 8(S-19) ---
D9 (S-20) ---
↓
(3)
↓
(4)
↓
(5)
Note:
(1):Identification (location) No. of parts in the figures
(2):Name of the part
(3):Figure Number for reference
(4): Identification of parts to be removed, unhooked,
unlocked, released, unplugged, unclamped, or
desoldered.
P=Spring, L=Locking Tab, S=Screw,
CN=Connector
*=Unhook, Unlock, Release, Unplug, or Desolder
e.g. 6(S-1) = six Screws (S-1),
5(L-1) = five Locking Tabs (L-1)
(5):Refer to “Reference Notes.”
1-6-1 E9B05DC
Page 14
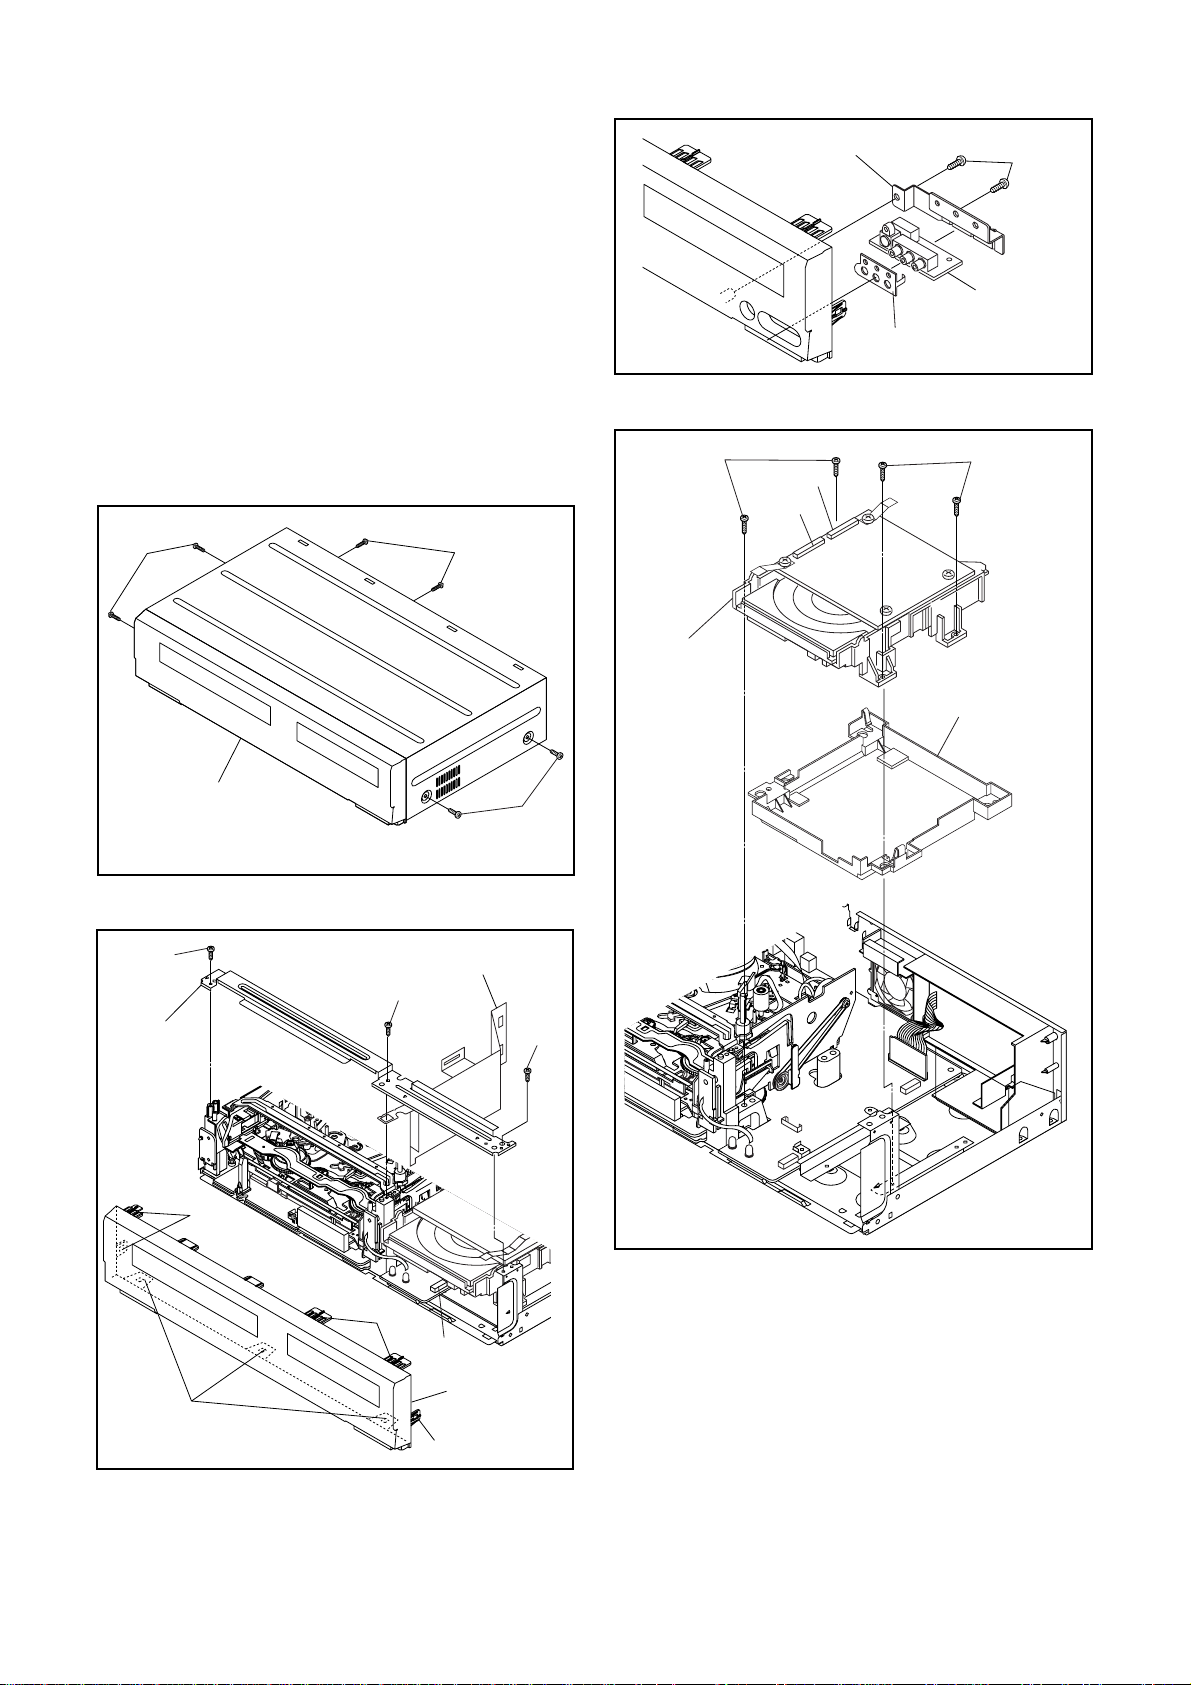
Reference Notes
18/6/2013
World of free manuals
CAUTION 1: Locking Tabs (L-1) and (L-2) are fragile.
Be careful not to break them.
1-1. Release five Locking Tabs (L-1).
1-2. Release three Locking Tabs (L-2)
1-3. Disconnect Connector (CN1505), and remove
the Front Assembly.
2. When reassembling, solder wire jumpers as shown
in Fig. D8.
3. Before installing the Deck Assembly, be sure to
place the pin of LD-SW on Main CB A as shown in
Fig. D8. Then, install the Deck Assembly while
aligning the hole of Cam Gear with the pin of LDSW, the shaft of Cam Gea r with t he ho le of LD -S W
as shown in Fig. D8.
(S-1)
(S-1)
[1] T op Cover
(S-1)
(S-5A)
[7] DVD
Mechanism
&
DVD Main
CBA
Assembly
[5] Jack Bracket
Jack Earth Plate
CN101
CN701
(S-4)
[6] Front
Jack CBA
Fig. D3
(S-5B)
Dust Cover
(S-2)
[3] Front
Bracket
(L-2)
Fig. D1
[4] Radiation Sheet
(S-2)
(S-3)
(L-1)
Fig. D4
(L-1)
CN1505
[2] Front
Assembly
(L-1)
Fig. D2
1-6-2 E9B05DC
Page 15
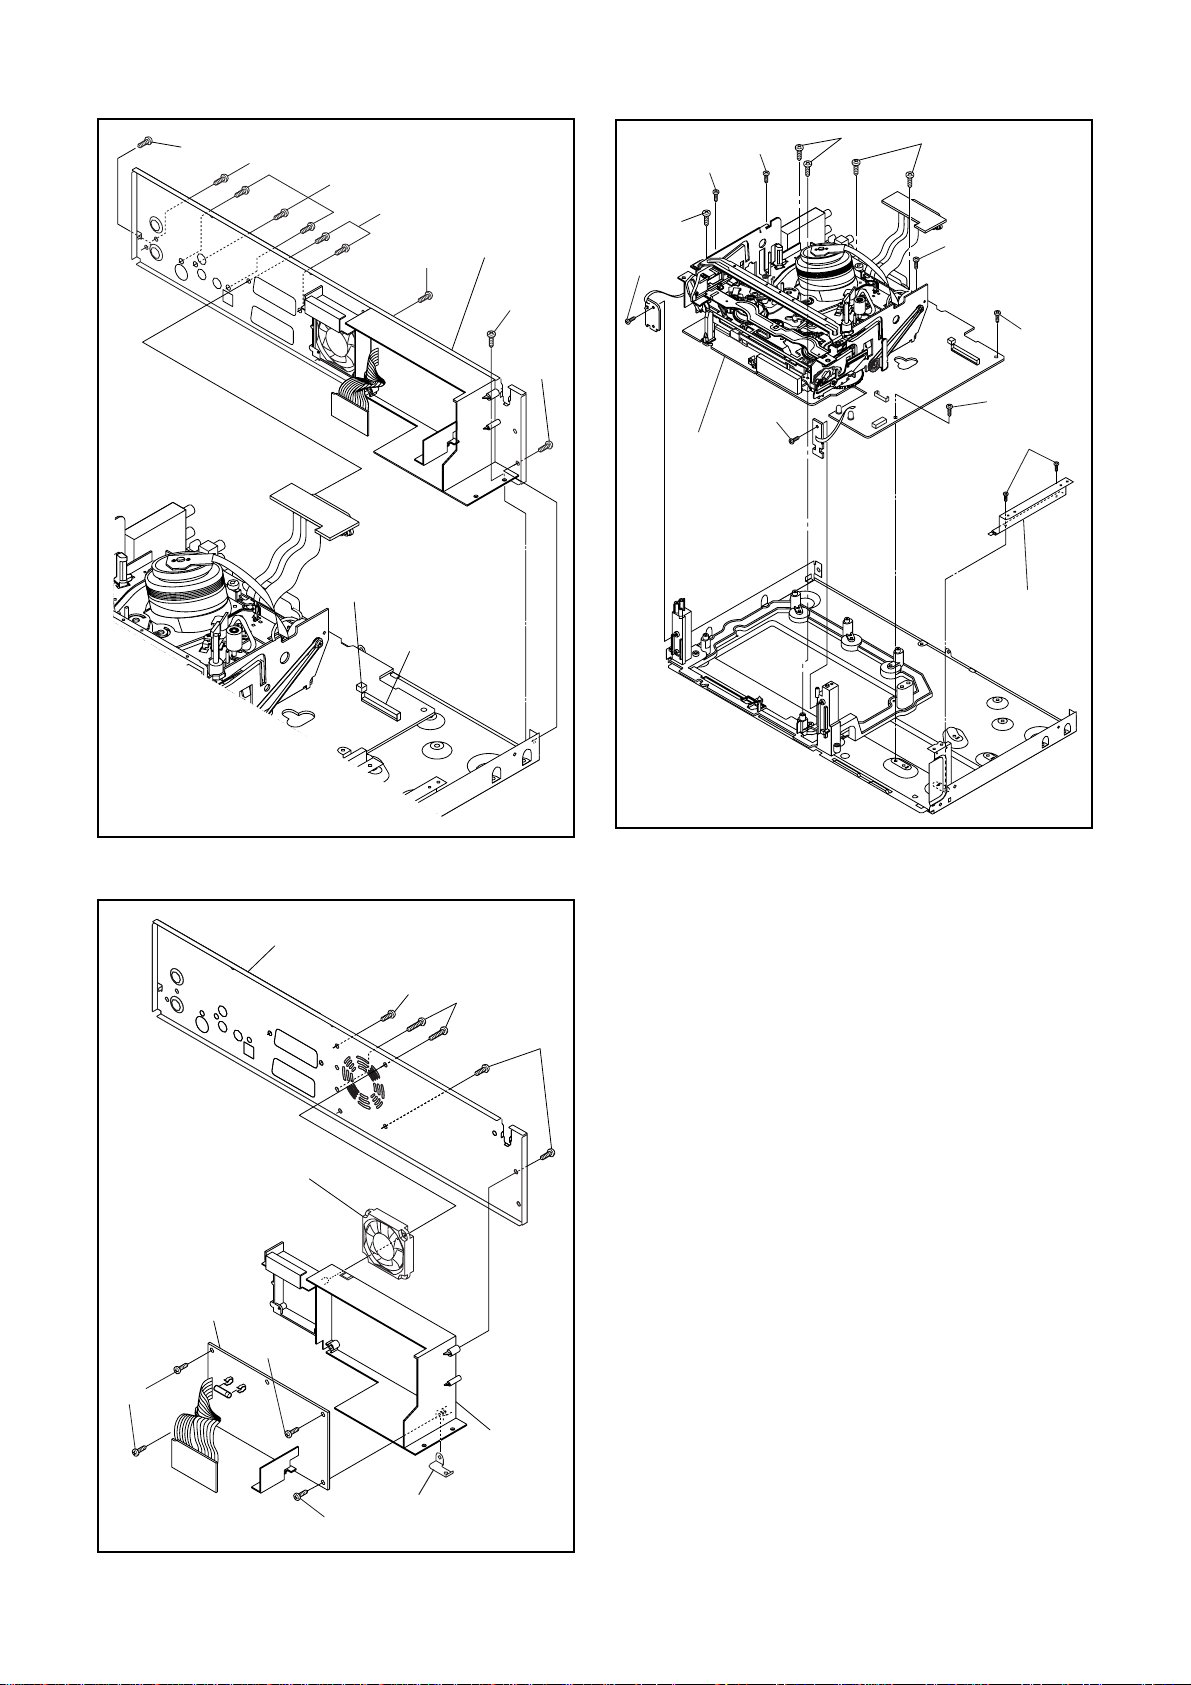
(S-7)
18/6/2013
World of free manuals
(S-8A)
(S-6A)
(S-6B)
(S-7)
[8] Rear
Panel Unit
(S-8B)
(S-7)
(S-13)
(S-15)
(S-14)
(S-14)
(S-16)
[14] VCR
Chassis
Unit
(S-13)
(S-13)
(S-14)
(S-14)
(S-14)
(S-12)
CN1503
[12] Rear Panel
(S-11)
CN1504
(S-10)
Fig. D5
(S-11)
[13] Bracket R
Fig. D7
[10] DC Fan Motor
[9] Power
Supply CBA
(S-9)
(S-9)
(S-9)
Earth
Plate
[11] PCB
Holder
Fig. D6
1-6-3 E9B05DC
Page 16
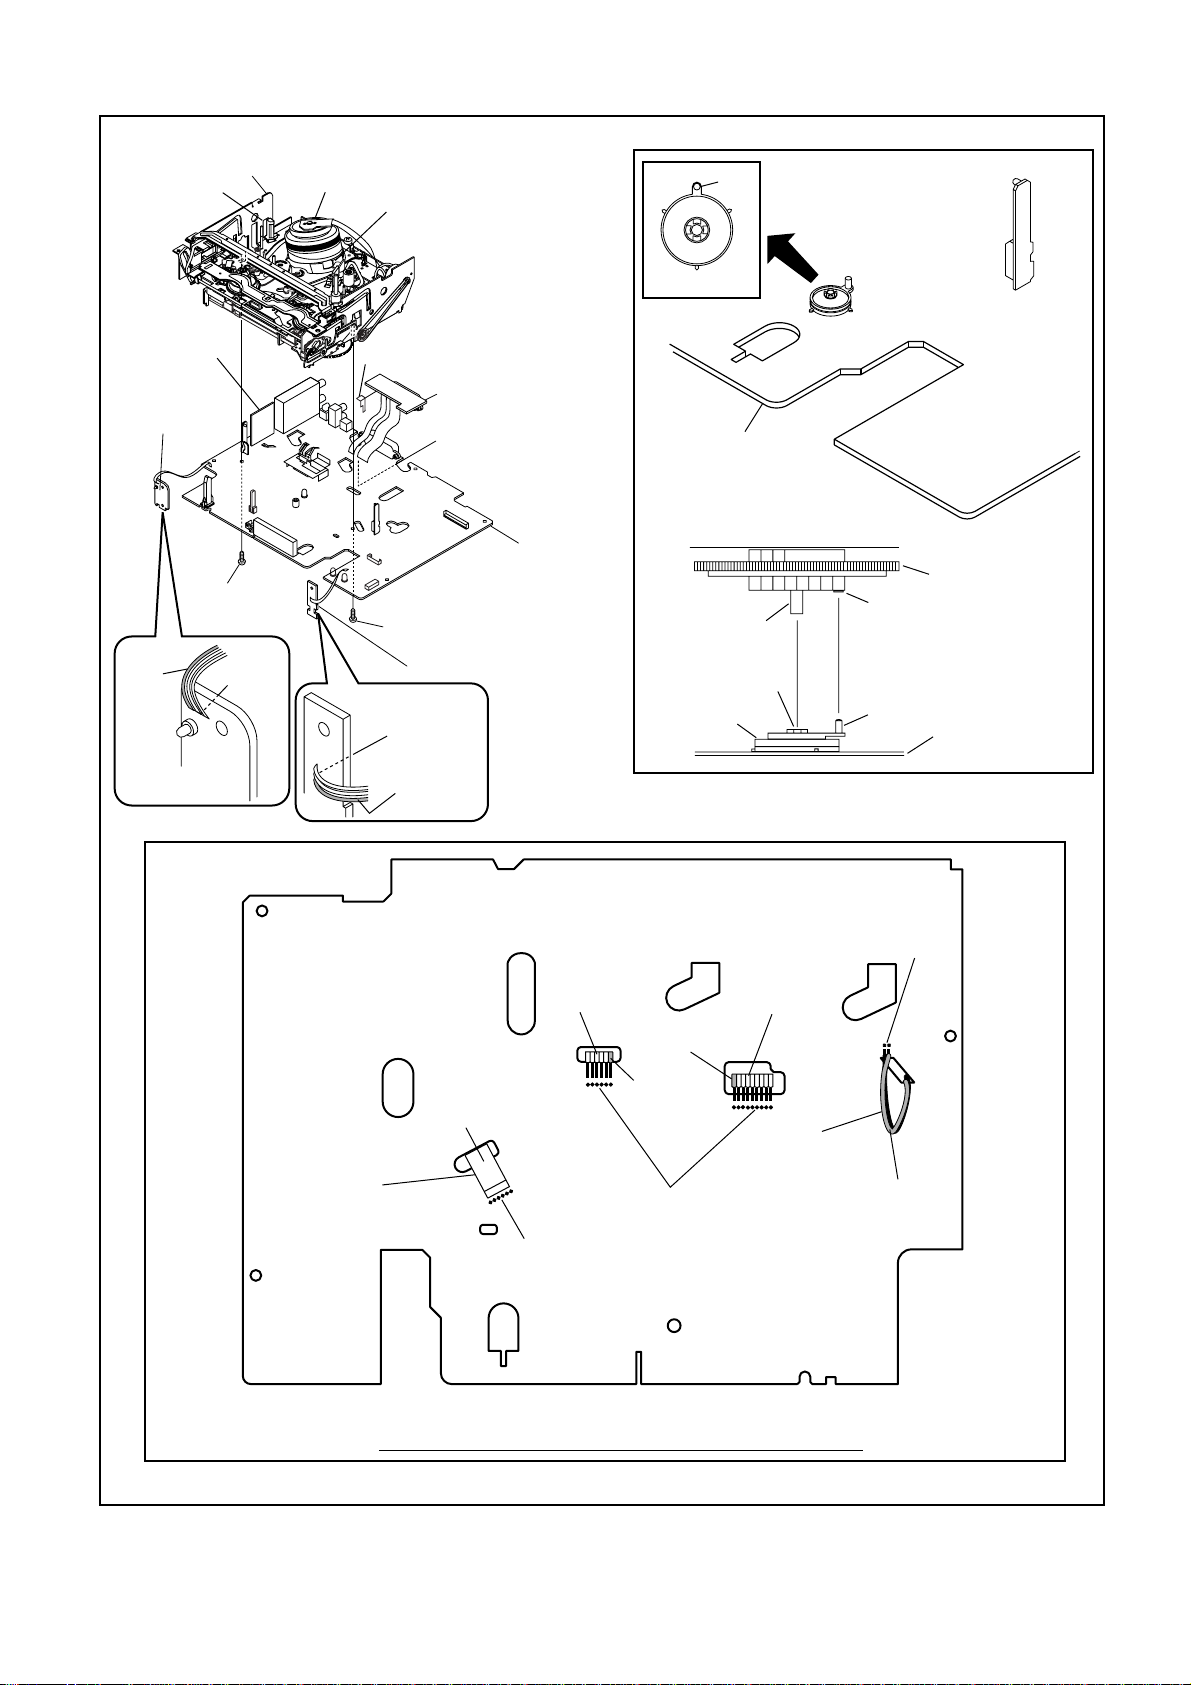
[15] Deck
18/6/2013
World of free manuals
Assembly
FE Head
Cylinder
Assembly
Pin
ACE Head
Assembly
SW507
LD-SW
[19] AFV CBA
[16] Power
SW CBA
(S-17)
Lead
with
blue
stripe
Desolder
Earth Plate
[18] Rear Jack CBA
Desolder from bottom
(S-18)
[17] Function CBA
Desolder
Lead with
blue stripe
[19] Main
CBA
[19] Main CBA
[15] Deck Assembly
Shaft
Hole
LD-SW
Cam Gear
Hole
Pin
[19] Main CBA
From
Capstan
Motor
Assembly
From
Cylinder
Assembly
From
FE Head
Printing side
From
ACE Head
Assembly
Lead with
blue stripe
Lead with
blue stripe
Desolder
Desolder
BOTT OM VIEW
Lead connections of Deck Assembly and Main CBA
Desolder
Lead with
gray stripe
Fig. D8
1-6-4 E9B05DC
Page 17
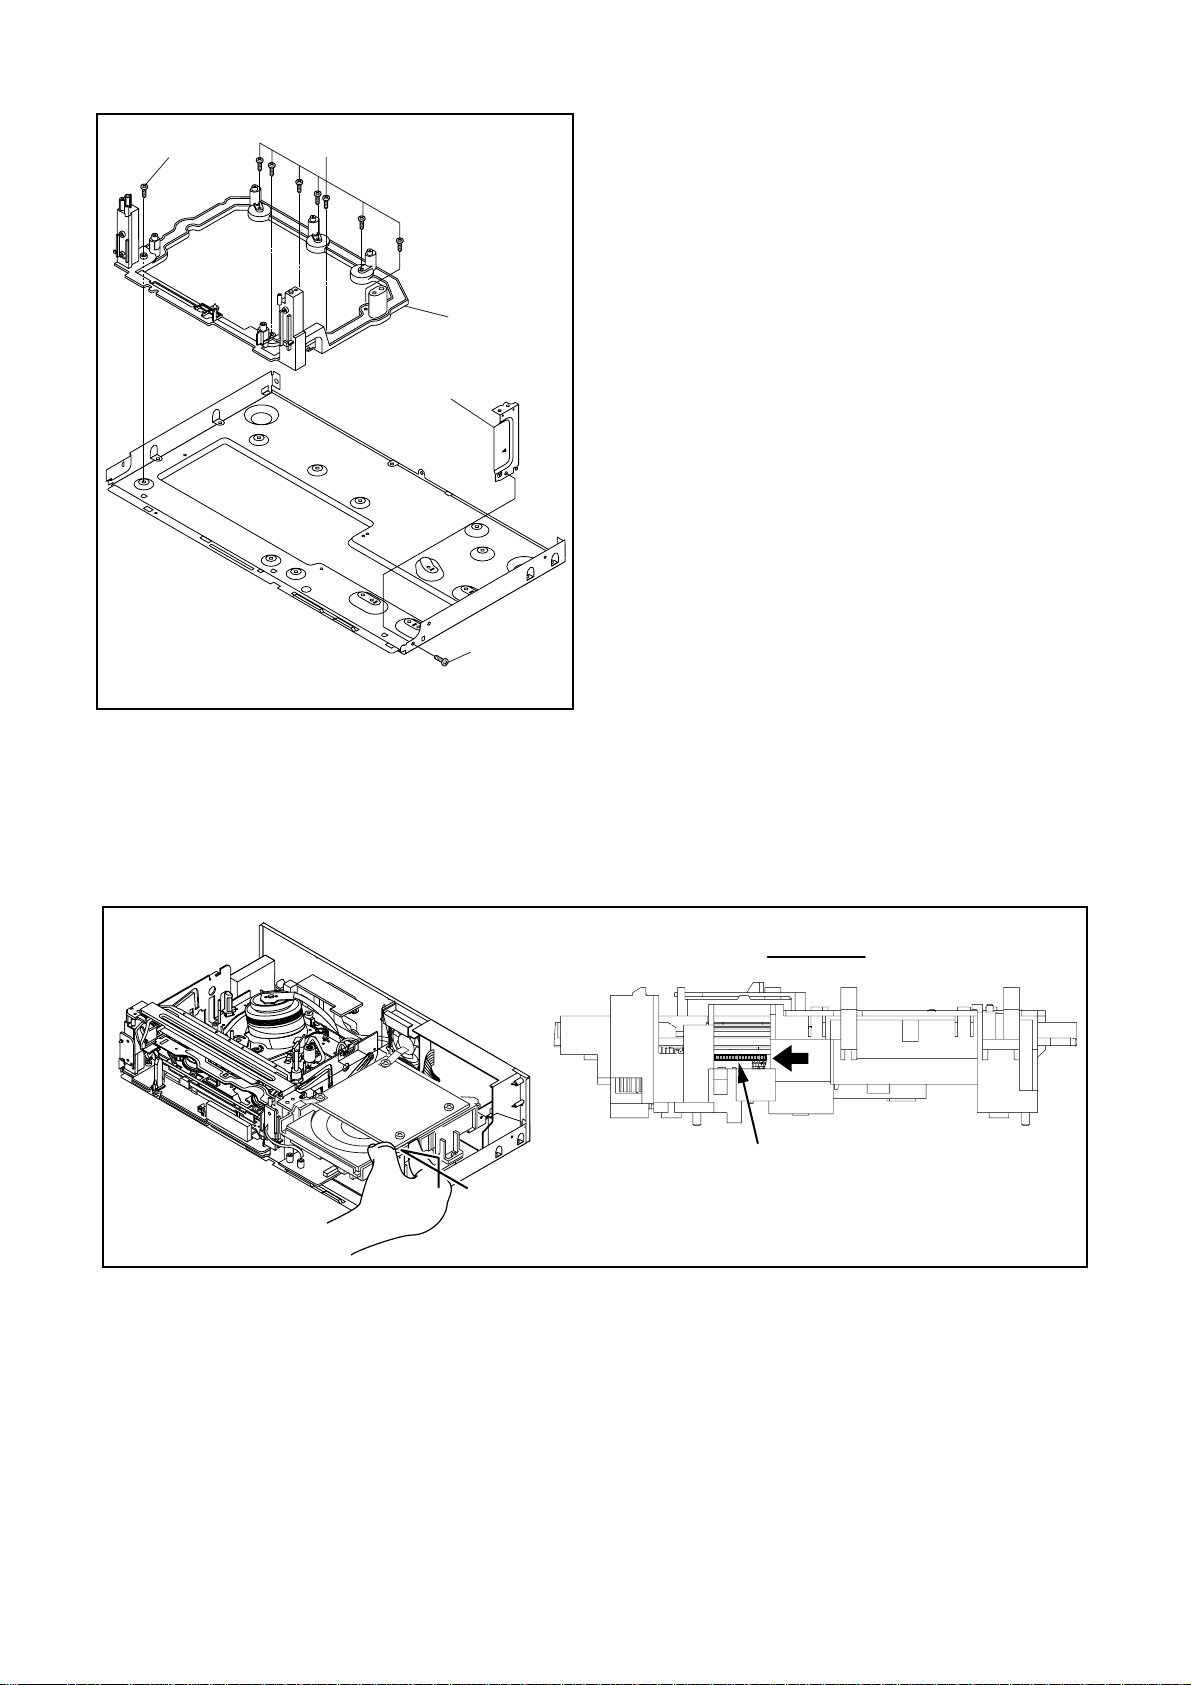
(S-19)
18/6/2013
World of free manuals
(S-19)
[20] Deck
Pedestal
[21] Front
Bracket R
(S-20)
Fig. D9
3. How to Eject Manually
Note: When rotating the gear, be careful not to damage the gear.
1. Remove the Top Cover.
2. Rotate the gear in the direction of the arrow manually as shown below until the tray descends.
3. Pull the tray out manually and remove a disc.
View for A
Rotate this gear in
A
the direction of the arrow
1-6-5 E9B05DC
Page 18
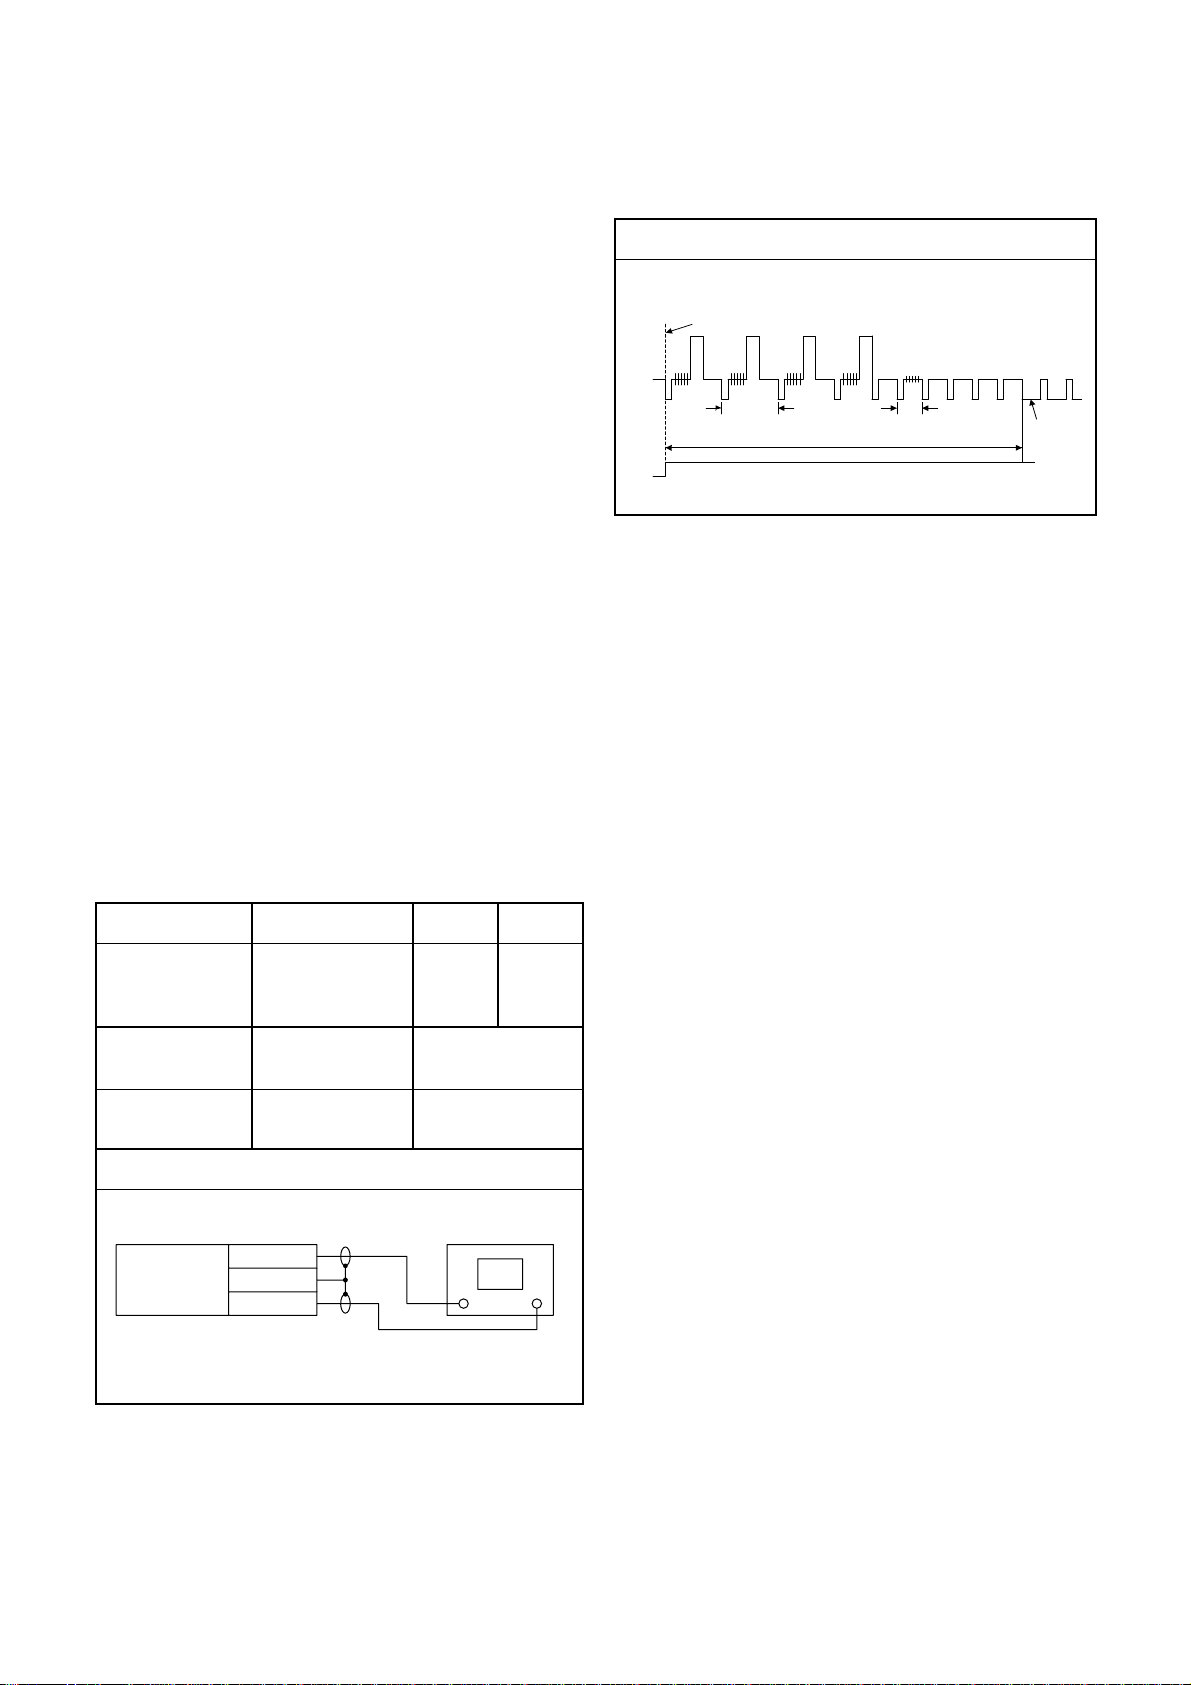
ELECTRICAL ADJUSTMENT INSTRUCTIONS
18/6/2013
World of free manuals
General Note: "CBA" is an abbreviation for
"Circuit Board Assembly."
NOTE:
1.Electri cal adjustm ents are re quired after re placing
circuit components and certain mechanical par ts.
It is impor tant to do these adjustments only after
all repairs and replacements have been completed. Also, do not attempt these adjustments
unless the proper equipment is available.
2.To perfor m these alignment / confirmation procedures, make sure that the tracking control is set in
the center position: Press either [PROG. L5??] or
[PROG. K] button on the front pan el fir st, then the
[VCR PLAY] button on the front panel.
Test Eq uip ment Requi red
1.Oscilloscope: Dual-trace with 10:1 probe,
V-Range: 0.001~50V/Div.,
F-Range: DC~AC-20MHz
2.Alignment Tape (FL6A)
Head Switching Position Adjustment
Figure 1
EXT. Syncronize Trigger Point
CH1
CH2
Reference Notes:
Playback the Alignment tape and adjust VR501 so that
the V-sync front edg e of the CH1 video out put waveform is at the 6.5H±1H (416µs±64µs) delayed position
from the rising edge o f the CH2 head switching pulse
waveform.
1.0H
6.5H±1H (416µs±64µs)
Switching Pulse
0.5H
V-Sync
Purpose:
To deter mine the Head Switching position duri ng
playback.
Symptom of Misadjustment:
May cause Head Switching n oise or vertical jitter
in the picture.
Test point Adj.Point Mode Input
J236(JK1-V-OUT)
TP504(RF-SW)
GND
Tape
FL6A Oscilloscope
Connections of Measurement Equipment
Main CBA
TP504
VR501
(Switching Point)
(MAIN CBA)
Measurement
Equipment
J236
GND
PLAY
(SP)
Spec.
6.5H±1H
(416µs±64µs)
Oscilloscope
-----
CH1 CH2
Trig. (+)
1-7-1 H9710EA
Page 19

HOW TO INITIALIZE THE DVD RECORDER & VCR
18/6/2013
World of free manuals
To put the program back at the factory-default, initialize the DVD recorder & VCR as the following procedure.
< DVD Section >
1. Turn the DVD recorder on.
2. Confirm that no disc is loaded or that the disc tray
is open. To put the DVD recorder into the Version
display mode, press [CM SKIP], [1], [2], and [3]
buttons on the remote control in that order.
Fig. a appears on the screen.
*1: "
*2: Firmware Version differs depending on the
models, and this indication is one example.
" differs depending on the models.
*******
F/W VERSION DISP
MODEL NAME :
FE VERSION :
BE VERSION :
TT VERSION :
LD ADJUSTMENT :
DISC ADJUSTMENT :
DEFAULT SETTING : ENTER
EXIT : RETURN
*******
R30_015_000
W3T34280Z2B
T30014GVP
OK
OK
Fig. a Version Display Mode Screen
3. Press [ENTER] button, then the DVD recorder
starts initializing. When the initializing is
completed, the DVD recorder exits the Version
display mode and turns off the power
automatically.
* To move into the Normal mode from the
V ersion display mode, press [RETURN] button
on the remote control instead of [ENTER]
button.
* When [STANDBY-ON] button is pressed
before [ENTER] button is pressed, the DVD
recorder exits the Version display mode, then
the power turns off.
1-8-1 E9B00INT
Page 20
FIRMWARE RENEWAL MODE
18/6/2013
World of free manuals
1. Turn the power on and remove the disc on the tray.
2. To put the DVD recorder into version up mode,
press [CM SKIP], [6], [5], and [4] buttons on the
remote control unit in the order. Then the tray will
open automatically.
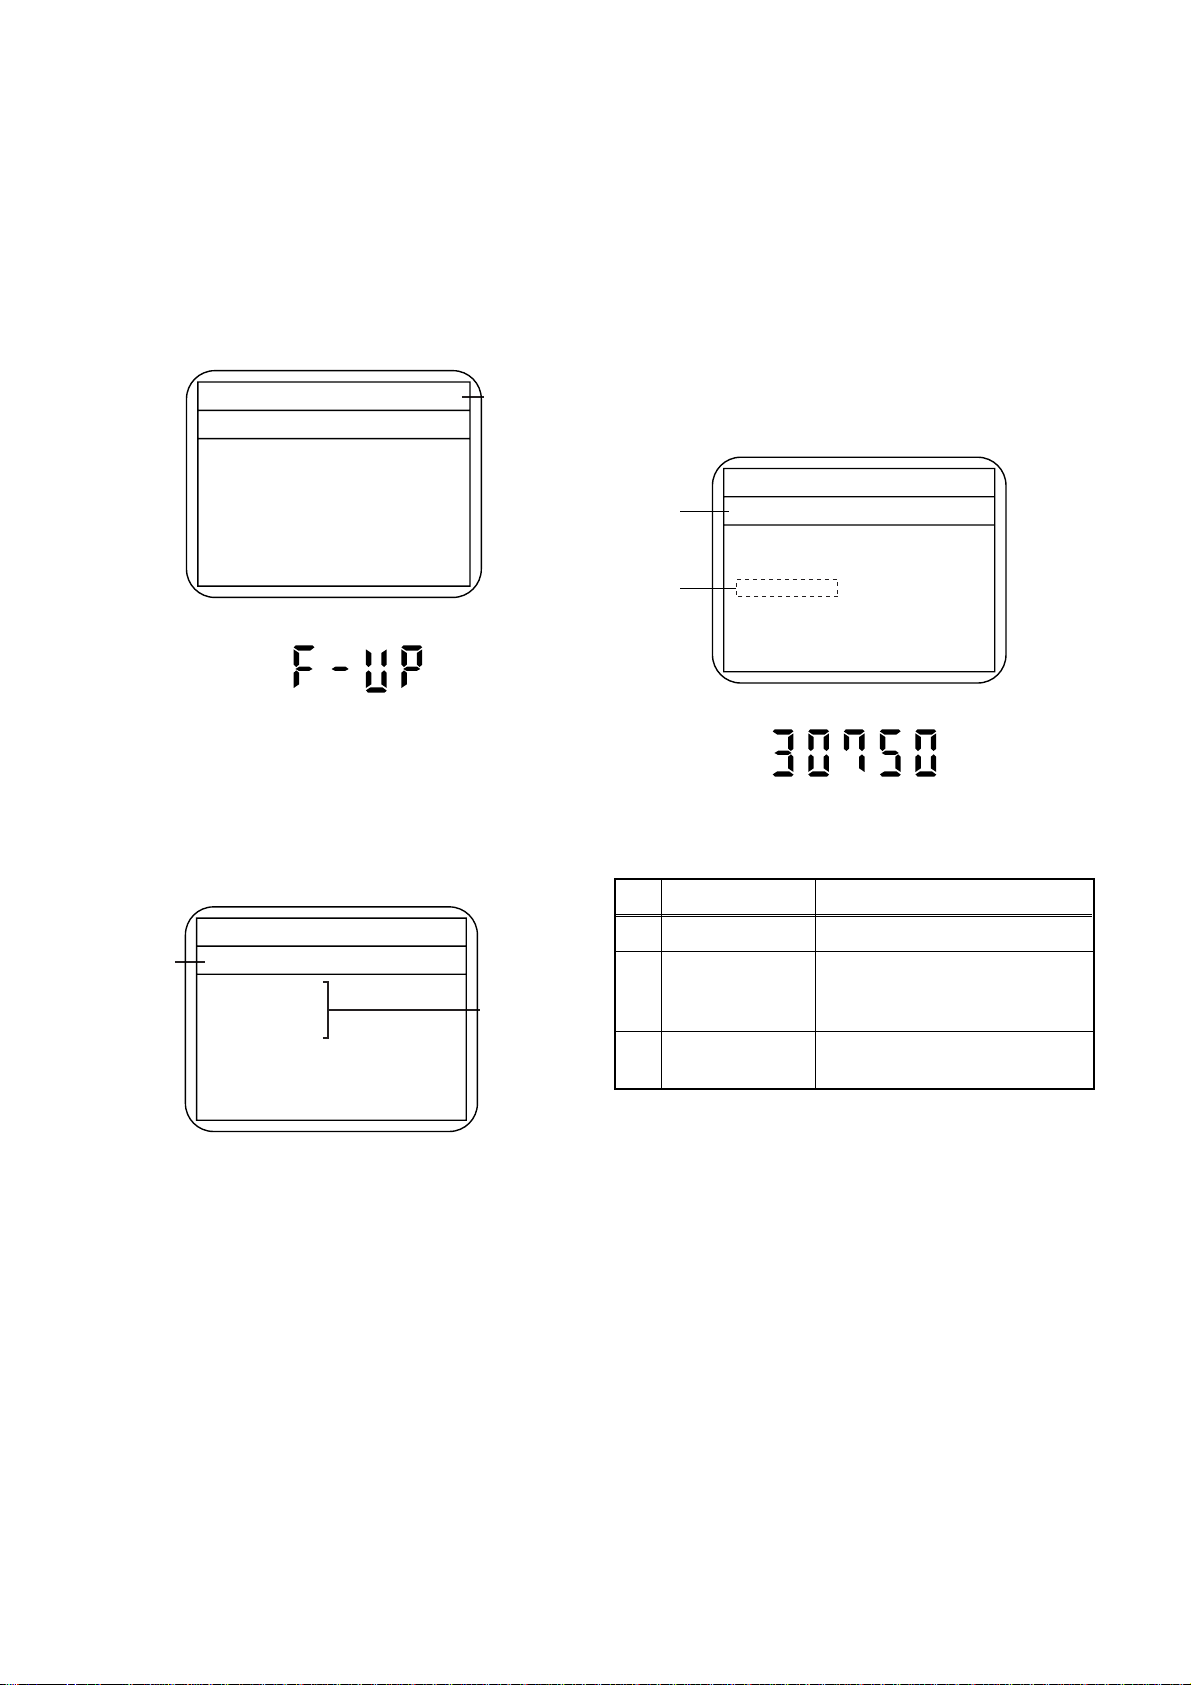
Fig. a appears on the screen and Fig. b appears
on the VFD.
* Firmware Version differs depending on the
models, and this indication is one example.
Firm Update Mode
Please insert a disc.
Fig. a Version Up Mode Screen
Fig. b VFD in Version Up Mode
ver. W3T34280Z2B
Current
F/W version
is displayed.
4. Select the firmware version pressing arrow
buttons, then press [ENTER].
Fig. d appears on the screen and Fig. e appears
on the VFD. The DVD recorder starts updating.
About VFD indication of Fig. e:
1) When Fig. d is displayed on the screen, “F-UP”
is displayed on the VFD.
2) When “Firmware Updating... XX% Complete.”
is displayed on the screen, “30750” is displayed
on the VFD.
* Firmware Version differs depending on the
models, and this indication is one example.
Firm Update Mode ver. W3T34280Z2B
Selected
F/W Version
is displayed.
(*1)
W3T34280Z2B
File Loading...
Fig. d Programming Mode Screen
3. Load the disc for version up.
Fig. c appears on the screen. The file on the top is
highlighted as the default.
When there is only one file to exist, Step 4 will
start automatically.
* Firmware Version differs depending on the
models, and this indication is one example.
Firm Update Mode ver. W3T34280Z2B
Disc name
is displayed.
VOL_200604130934
1 W3T34280Z2B
2 W3T34281Z2B
3 W3T34282Z2B
4 W3T34283Z2B
Fig. c Update Disc Screen
1 / 1
Files included
in the disc are
displayed.
Fig. e VFD in Programming Mode (Example)
The appearance shown in (*1) of Fig. d is
described as follows.
No. Appearance State
1 File Loading... Sending files into the memory
Firmware
2
Updating...
Writing new version data
XX% Complete.
Firmware
---
Update Failure
Failed in updating
5. After updating is finished, the tray opens
automatically.
At this time, no button is available.
6. Pull out the AC code once, then insert it again.
1-9-1 E9B00FW
Page 21
FUNCTION INDICATOR SYMBOLS
18/6/2013
World of free manuals
< VCR Section >
Note:
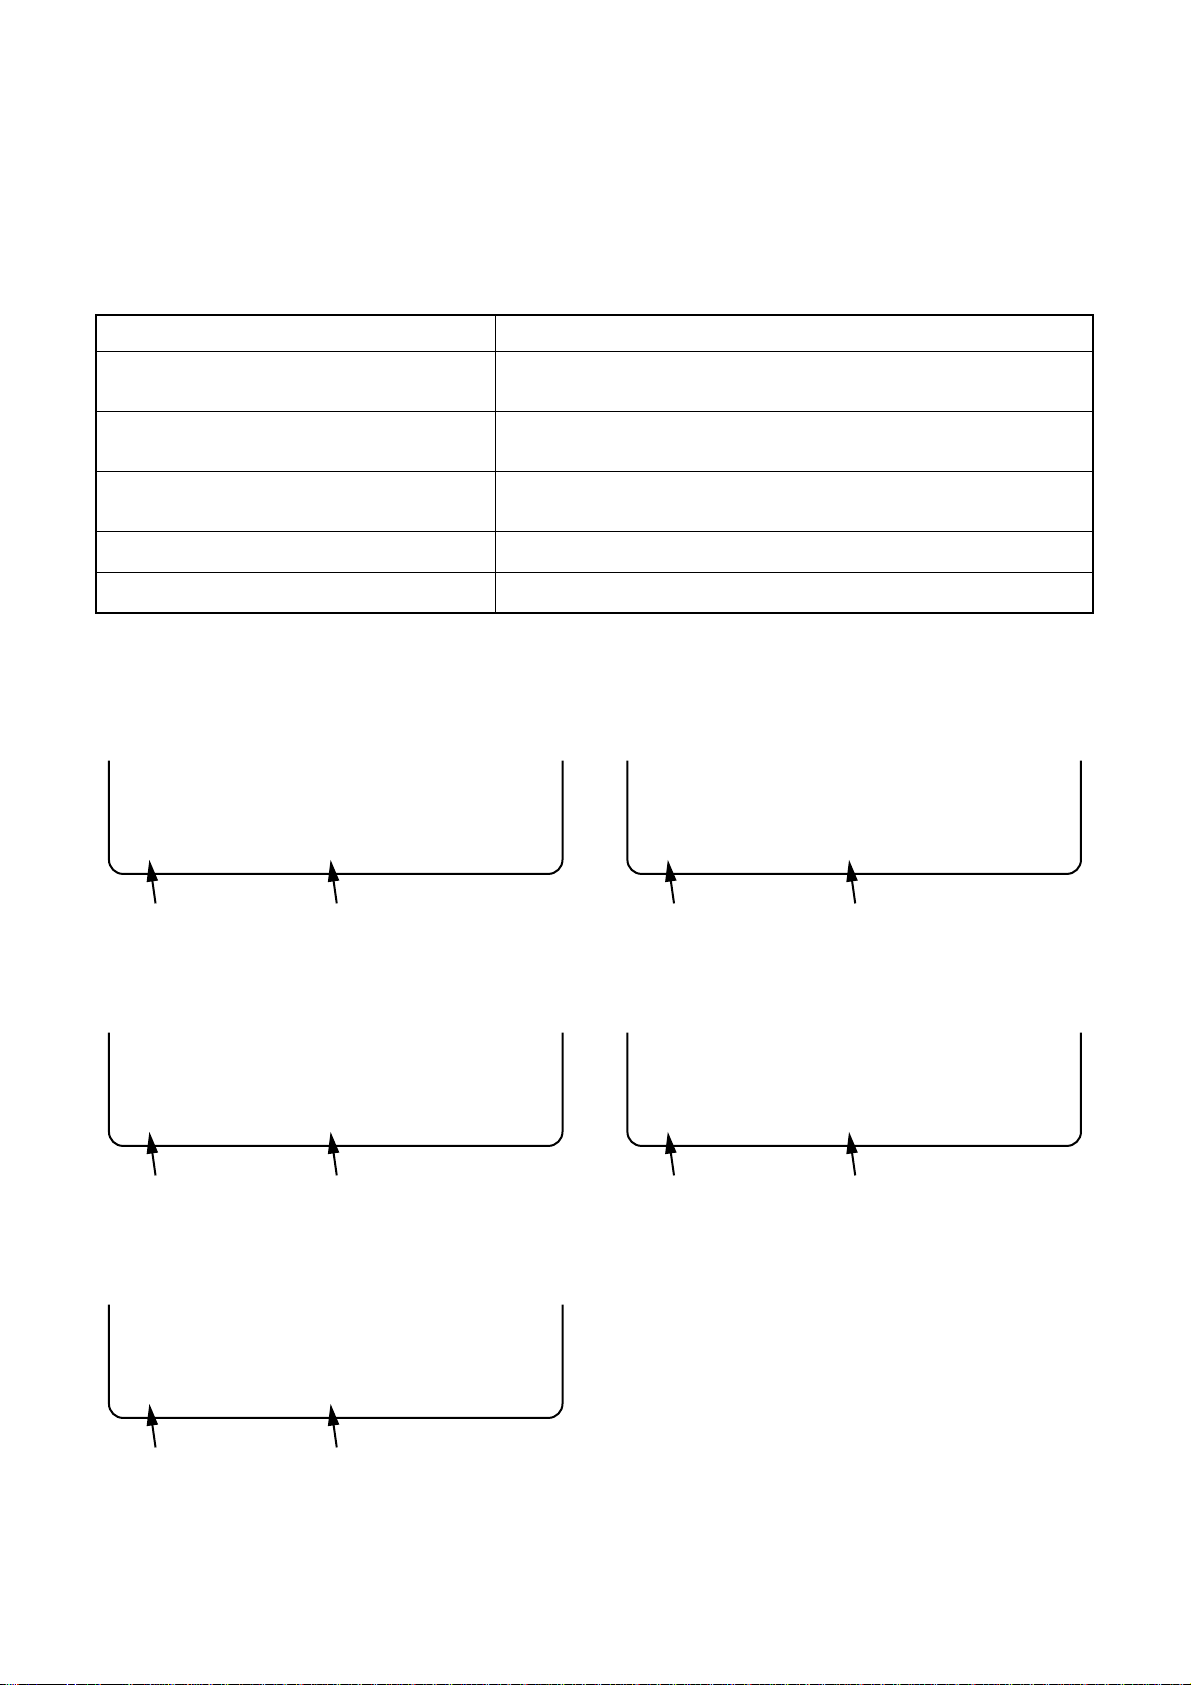
If a mechanical ma lfunction occurs, the power is tur ned off. When the power comes on again a fter that by
pressing [STANDBY-ON] button, an error message is displayed on the TV screen for 5 seconds.
MODE INDICATOR ACTIVE
When reel or capstan mechanism is not
functioning correctly
When tape loading mechanism is not functioning correctly
When cassette loading mechanism is not
functioning correctly
When the drum is not working properly
P-ON Power safety detection
“A R” is displayed on a TV screen. (Refer to Fig. 1.)
“A T” is displayed on a TV screen. (Refer to Fig. 2.)
“A C” is displayed on a TV screen. (Refer to Fig. 3.)
“A D” is displayed on a TV screen. (Refer to Fig. 4.)
“A P” is displayed on a TV screen. (Refer to Fig. 5.)
TV screen
When reel or capstan mechanism is not functioning
correctly
A
R
SP 0 : 00 : 00
Recording mode
Elapsed time
Fig. 1
When the drum is not working properly
A
D
SP 0 : 00 : 00
Recording mode
Elapsed time
Fig. 4
When tape loading mechanism i s not function ing correctly
A
T
SP 0 : 00 : 00
Recording mode
When cassette loadi ng mechanism is not functi oning
correctly
A
C
Elapsed time
Fig. 2
SP 0 : 00 : 00
Recording mode
Elapsed time
Fig. 3
P-ON Power safety detection
A
P
SP 0 : 00 : 00
Recording mode
Elapsed time
Fig. 5
1-10-1 E9B01FIS
Page 22
< DVD Section >
18/6/2013
World of free manuals
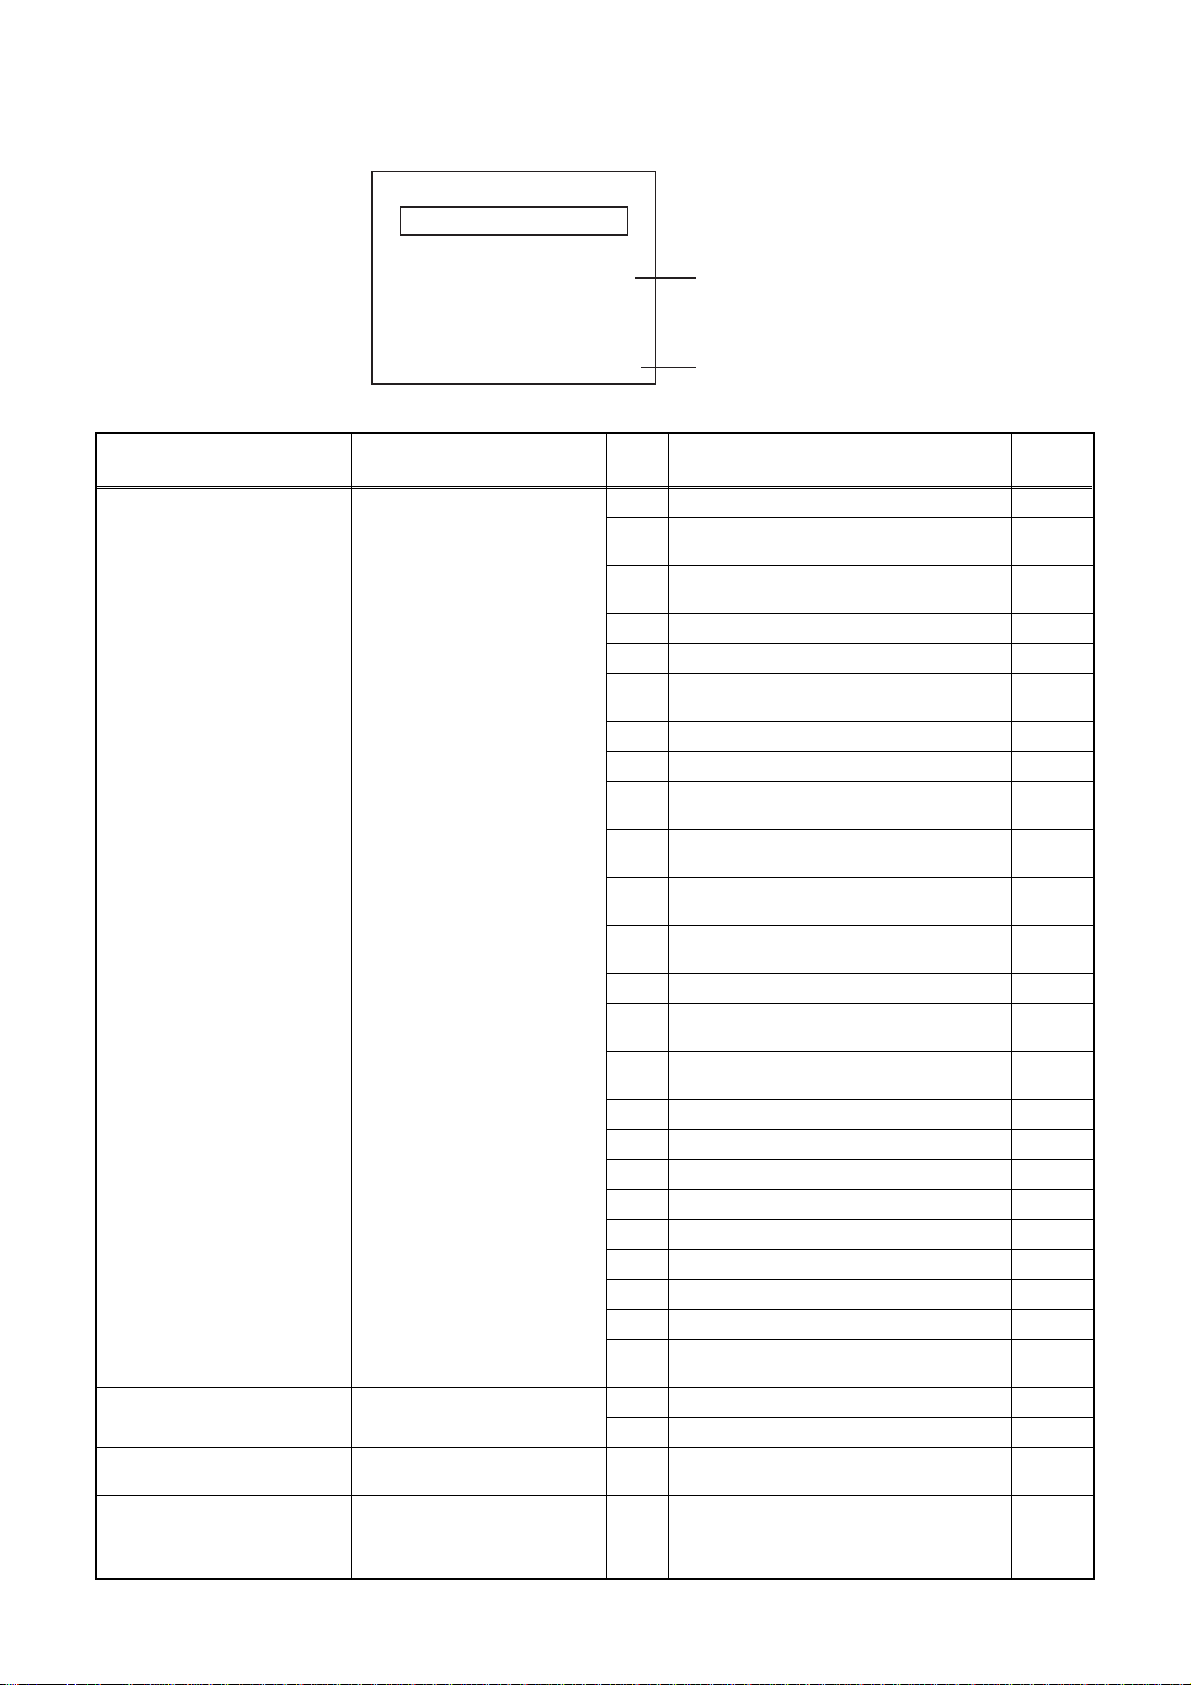
Note: If an error occurs, a message with the error number appears on the screen.
Recording Error
Message Solution
Can not record on this disc.
This program is not allowed to
be recorded.
This program is not recordable
in Video mode.
This program is not allowed to
be recorded on this disc.
You cannot record on this disc as
Power Calibration Area is full.
Insert the recordable disc, and
ensure the disc status satisfies
the recording requiremen ts.
You cannot record copy
prohibited programs.
Set “DVD-RW Recording
Format” to “VR mode”.
Insert a ver.1.1 CPRM
compatible DVD-RW disc.
Error message
E35
Error
No.
1 An error occurs during data reading. 2
3
4 An error occurs with OPC. -
5 During recovery in a record. 6
7 An error occurs in a format. -
8 It cannot start an encode. 9
10
11
12
13 It is a reply that “ATAPI is not readable.” 14
15
16 An error occurs in Finalize Close. -
17 An error occurs in Rec Stop Close. 18 An error occurs in PCA Full (DVD_R). 19 Safety Stop occur s during editing. 20 High Speed Disc. 2
21 The disc is not formatted. 5
22 Disc Error has occurred. 3
23 The -R Disc of VR Mode. 6
24
25 During the Macrovision picture input. 11
26 During the CGMS picture input. 12
27
28
Error No.
Error Description Priority
There is no reply for 15 seconds in Test
Unit Ready.
Cannot write the data after trying three
times.
An error occurs ev en if recov ery has been
tried three times.
NV_PCK/RDI_PCK is not in encoded
data.
Encode Paus e co ndi tio n continued for 1 0
minutes.
Encode Pause condition continued in
normal REC condition for 10 minutes.
Difference in the addres s and ca n not get
StreamID of RDI/VIDEO.
Cannot write the data after recovering
SMALL VMGI.
Cannot write the data after DVD-R
Reverse Track.
The disc except DVD-R/RW or finalized
DVD-R.
During the CGMS picture (possible to
record once) input. (Video Format Disc)
During the CGMS picture (possible to
record once) input. (Disc which is not for
the correspondence to VR Format
CPRM)
-
-
-
-
-
-
-
-
-
1
12
12
1-10-2 E9B01FIS
Page 23
Message Solution
18/6/2013
World of free manuals
This disc is protected and not
recordable.
Disc is full.
(No area for new recording)
You cannot record more than
99 titles on one disc.
(The maximum is 99.)
You cannot record more than
999 chapters on one disc.
(The maximum is 999.)
You cannot record on this dis c
as Control Information is full.
You cannot record on the disc
as Power Calibration Ar ea is
full.
This disc is already finalized.
Can not record on this disc. Repeat the same operation.
Release the disc protect
setting in the Disc Setting
menu.
Insert the recordable disc with
enough recording space.
Delete unnecessary titles.
Delete unnec essary chapter
markers.
Delete unnecessary titles. 34
Insert a new disc. 35 PCA is Full. (in REC start) 4
Release the finalizing for this
disc.
Error
No.
Error Description Priority
29 Disc Protected Disc. 7
30 No available reco rdi ng spa ce. 5
Its recording capacity has been reach ed.
31
(Video Format Disc)
Its recording capacity has been reach ed.
32
(VR Format Disc)
The 999 chapter has been reached. (VR
33
Format Disc)
There is not space to record field of
control i nformation.
36 It is finalized. (Video Format Disc) 6
37 Access to Memory Area range outside. -
38 Sector Address is wrong. 39 BUP writing error of chapter editing. -
7
8
9
10
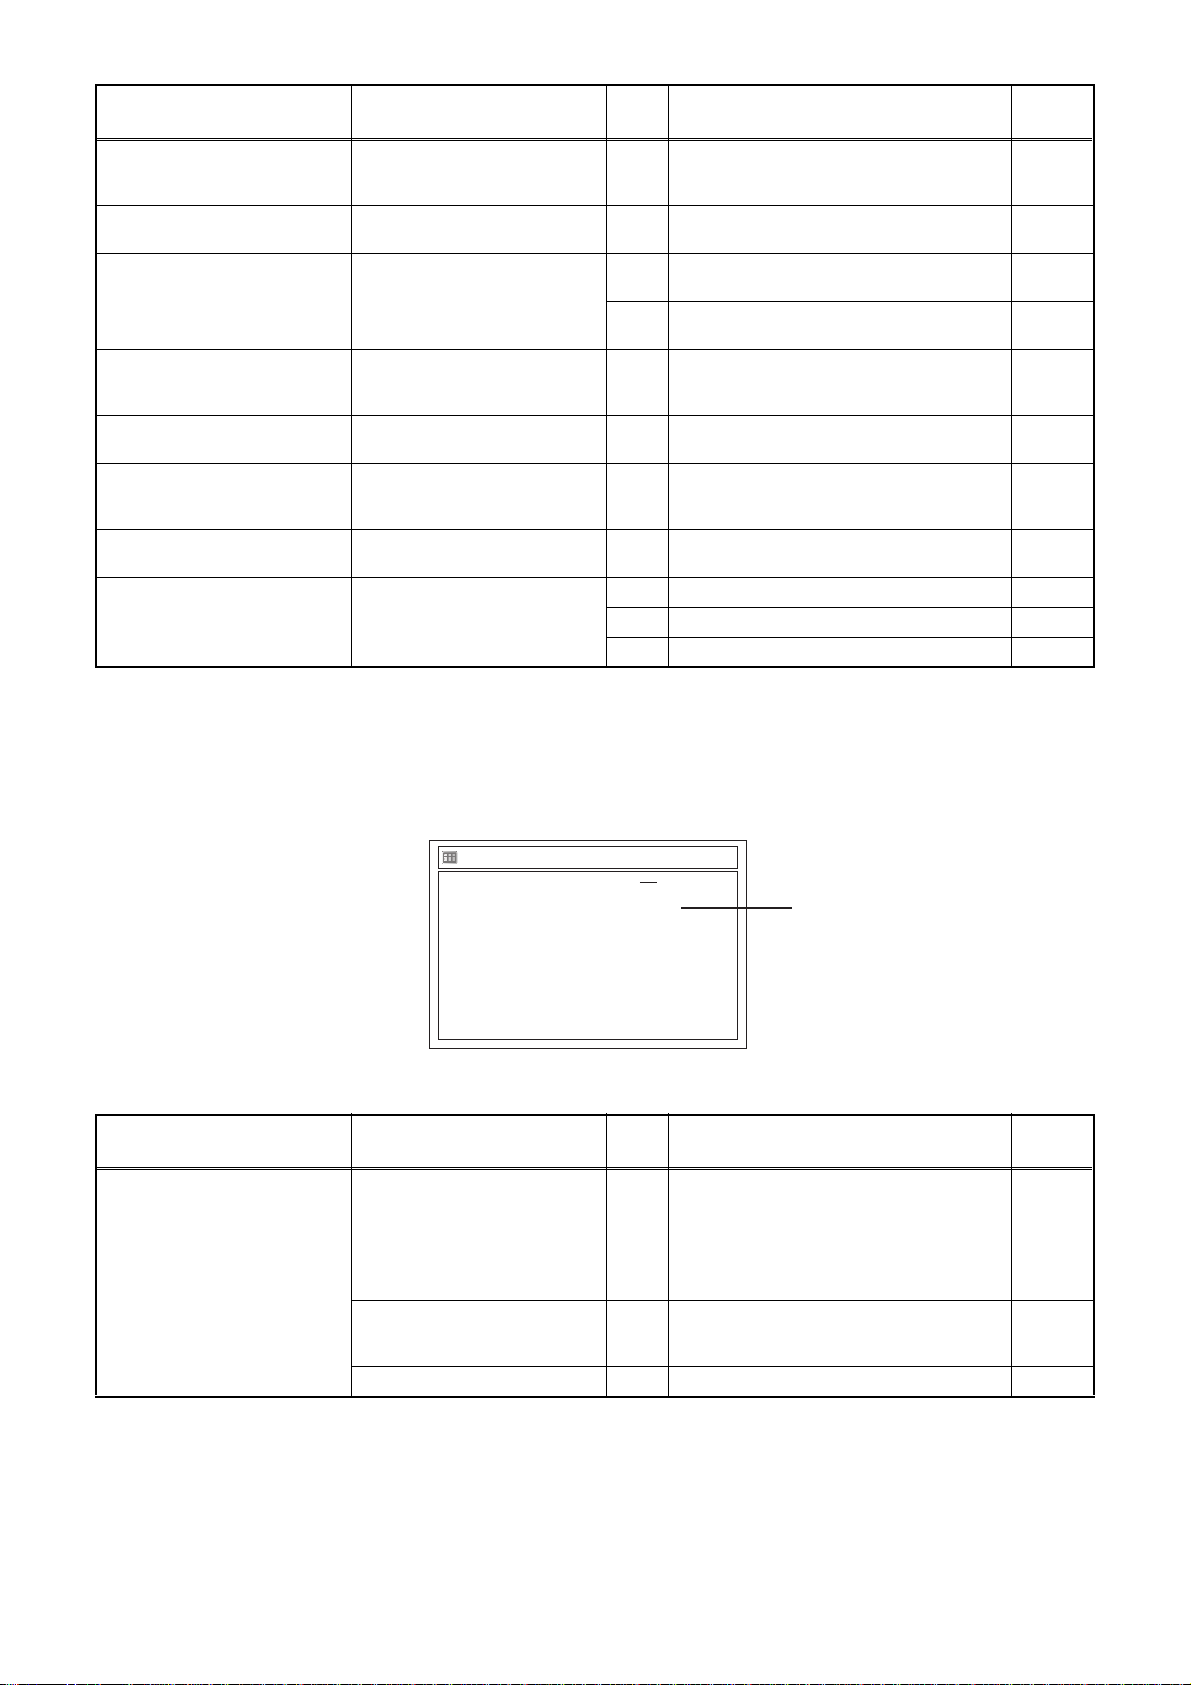
If an error occurs during the timer recording, one of the following error numbers (40 to 42) or the above error
messages (error number: 1 to 39) is displayed on the recording menu after timer recording.
(Once the screen of the program line is exited, the program line for the error will be cleared.)
(No Error Message is displayed for the error No. 40 ~ 42.)
A program with the error number is grayed out and asterisked on the timer programming list.
Message Solution
Error message is not
displayed.
Timer Programming
Date Start End CH Speed PDC
01/01 0:57 1:57 P08 DVD E40 ON
*
2. ---
3. ---
4. ---
5. ---
6. ---
7. ---
8. ---
Error
- Set the timer programming
correctly.
- Set the timer programming
before the start time.
- Insert a recordable videotape
with a record tab.
Turn the power on and set the
clock correctly then set time r
programming again.
Insert the recordable disc. 42 No disc when recording -
VCR DVD
DVD
VCR
The speed mode changes
to the error number.
No.
Error Description Priority
- Some portion has not been recorded
because of program overlapping.
40
- Recording did not start at the s tart time.
- No Videotape is inserted.
Videotape ran out during recording.
41 Power failed -
-
1-10-3 E9B01FIS
Page 24
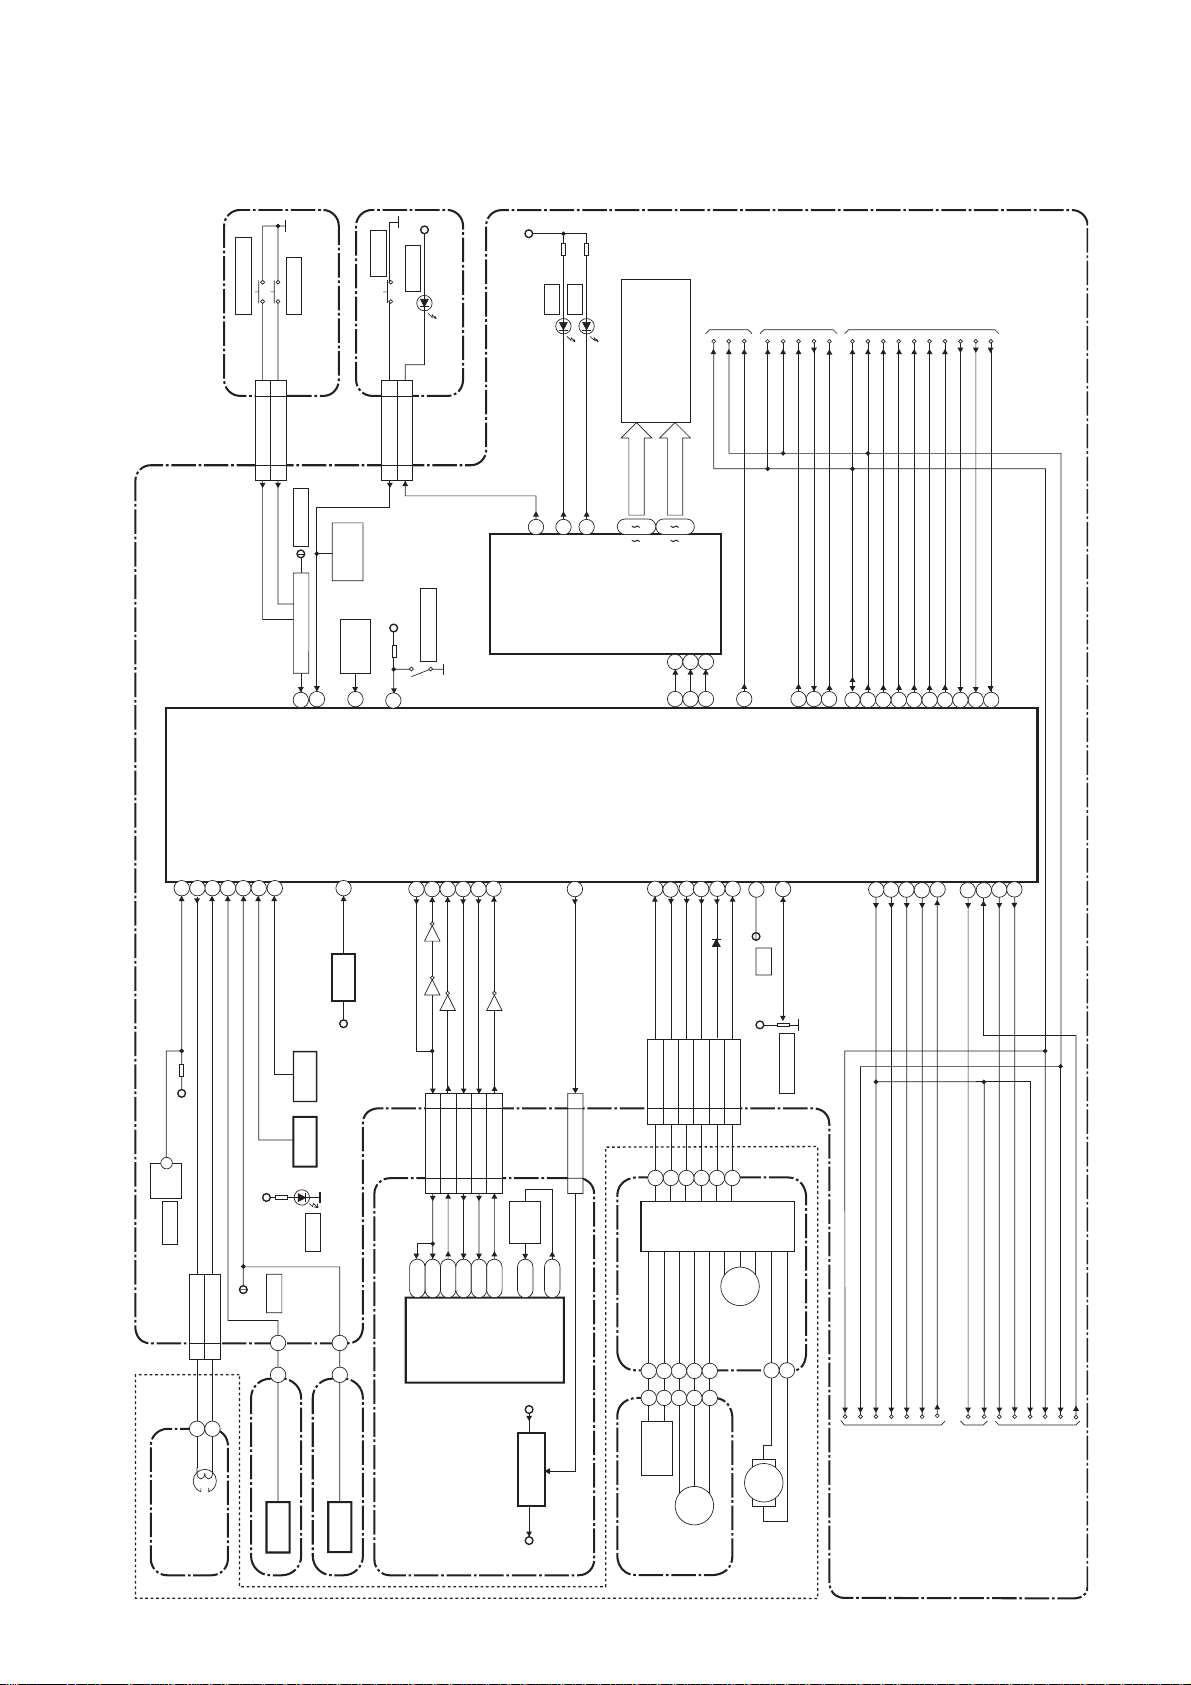
BLOCK DIAGRAMS
18/6/2013
World of free manuals
Servo/System Control Block Diagram
DUBBING
OPEN/CLOSE
SW681
SW682
OPEN/CLOSE-SW
DUBBING-SW
1 1
2 2
CN510 CN681
TP501
FUNCTION CBA
CN671
CN508
SENS-INH
VCR KEY
SWITCH
REMOTE
RM1501
7
KEY- 1
SENSOR
14
REMOCON-IN
DVD KEY SWITCH
8
KEY- 2
POWER
POWER
D671
SW671
POWER-LED
2 2POWER-SW
3 3
AL+5V
SW506
31
REC-SAF-SW
AL+5V
POWER SW CBA
IC612
(FIP DRIVER)
REC-SAFETY
AL+5V
1
POWER-LED
DVD
D502
3
DVD-LED
VCR
D503
2
VCR-LED
FL601
42
1G
GRID
36
FIP
7G
SEGMENT
20
28
i
a
DRV-DIN
7
68
DRV-DATA
TO AUDIO
BLOCK DIAGRAM
IIC-BUS SCL
IIC-BUS SDA
DRV-CLK
DRV-STB
8
9
69
DRV-CLK70DRV-STB
TO Hi-Fi AUDIO
BLOCK DIAGRAM
A-MODE
Hi-Fi-H-SW
IIC-BUS SCL
IIC-BUS SDA
AUDIO-MUTE-H
19
83
Hi-Fi-H-SW
VCR-AUDIO-MUTE
IIC-BUS SCL
IIC-BUS SDA
AUDIO-MUTE-2
86
28
71
72
A-MODE
IIC-BUS SCL
IIC-BUS SDA
AUDIO-MUTE-2
RF-SW
D-REC-H
18
33
RF-SW
D-REC-H
TO VIDEO
BLOCK DIAGRAM
H-A-SW
C-ROTA
D-V-SYNC
H-A-COMP
17
16
13
15
H-A-SW
C-ROTA
D-V-SYNC
H-A-COMP
V-ENV
C-SYNC
6
V-ENV
58
C-SYNC
END-S
CTL(-)
ST-S
CTL(+)
LD-SW9
IC501
(SERVO/SYSTEM CONTROL)
T-REEL
949510480
MAIN CBA
AL+5V
AL+5V
SW507
LD-SW
TP502
CN504
5 CTL(+)
6 CTL(-)
S-REEL79
PS502
Q506
END-S
S-REEL
T-REEL
D555
S-LED
Q515
RESET
34
RESET
TIMER+5V
SYSTEM-RESET
63
CN1502
CN701
T4
SYS-RESET
IC101
(MAIN MICRO CONTROLLER)
DVD-POW-SAFETY
S-DATA-OUT
S-DATA-IN
READY/BUSY
S-CLOCK
64
658966
67
Q519
Q518
Q517
Q516
44SYS-RESET
11SUB-RXD
33SUB-TXD
55SUB-SCLK
22RDY
J25
L25
N23
N24
R24
RDY
SUB-TXD
SUB-RXD
SUB-SCLK
SYS-RESET
27MHz
X802
N2
CLK 27 IN
VI+1.2VP-ON+1.2V
X'TAL
N1
CLK 27 OUT
REG-CONT2
25
30 301V2CONT
CN101 CN1501
LM-FWD/REV
D-CONT77
C-CONT
C-FG
C-F/R
76
87
81
78
C-F/R5C-CONT7LM-FWD/REV
4
MOTOR
DRIVE
D-CONT9D-PFG
8
CIRCUIT
CN502
3 C-FG
CAPSTAN MOTOR
D-PFG
CTL
90
97
CTL
TP503
AL+5V
M
CAPSTAN
MOTOR
PG-DELAY
2
VR501
SW-POINT
OUTPUT-SELECT
82
IIC-BUS SDA
VIDEO-SW1
IIC-BUS SCL
OUTPUT-SELECT
VIDEO-SW1
VIDEO-SW3
22
23 VIDEO-SW2
24
DAVN-L
VIDEO-SW2
VIDEO-SW3
DAVN-L
56
27 RGB-THROUGH
RGB-THROUGH
OUTPUT-SELECT
DVD-SCART
-AUDIO-MUTE
30
29 DVD-AUDIO-MUTE2
26 DVD-AUDIO-MUTE
DVD-SCART-AUDIO-MUTE
DVD-AUDIO-MUTE2
IIC-BUS SDA
DVD-AUDIO-MUTE2
IIC-BUS SCL
OUTPUT-SELECT
CONTROL
HEAD
ACE HEAD ASSEMBLY
(DECK ASSEMBLY)
SENSOR CBA
ST-S
Q504
SENSOR CBA
END-S
Q503
PG
SENSOR
+1.2V
REGULATOR
IC106
DVD MAIN CBA
CYLINDER ASSEMBLY
M
DRUM
MOTOR
1-11-1
MLOADING
MOTOR
TO VIDEO
INPUT SELECT
BLOCK DIAGRAM
TO VIDEO
OUTPUT SELECT
BLOCK DIAGRAM
TO AUDIO
E9B05BLS
INPUT/OUTPUT
SELECT
BLOCK DIAGRAM
Page 25
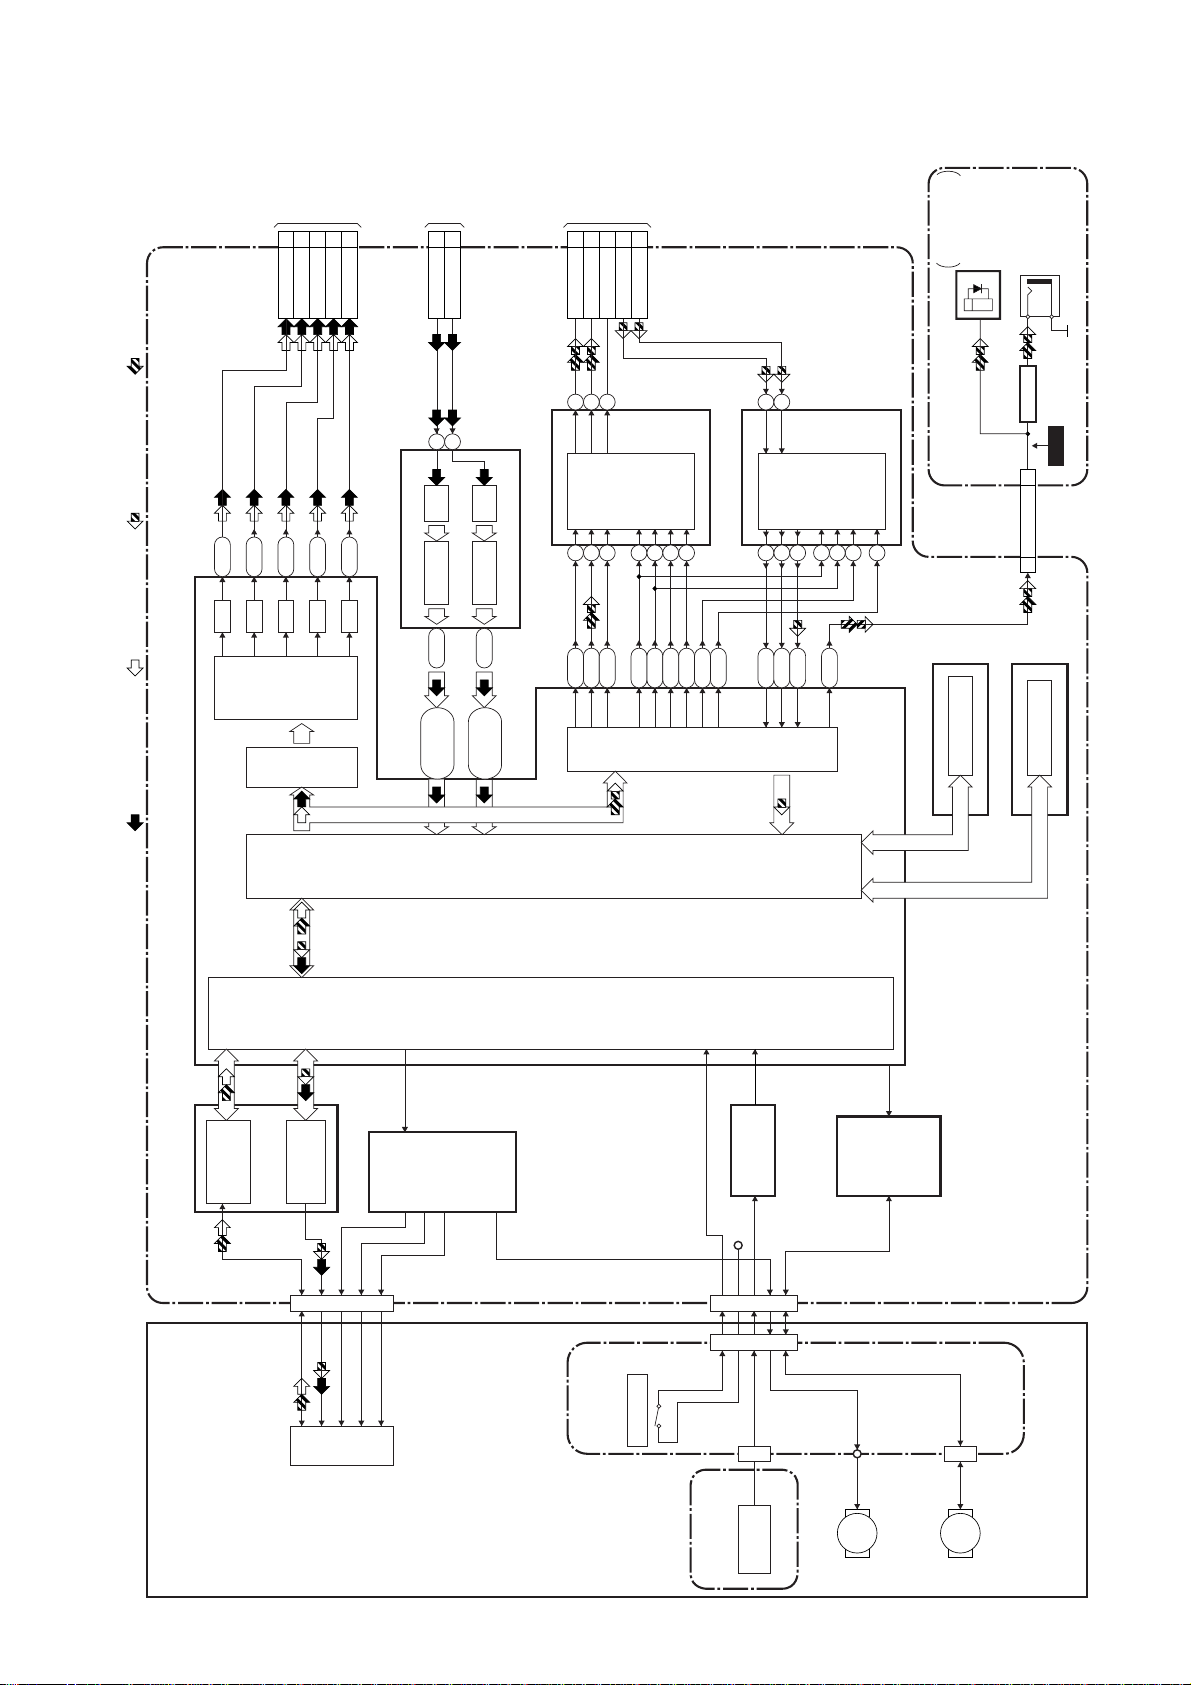
Digital Signal Process Block Diagram
18/6/2013
World of free manuals
TO VIDEO
OUTPUT
SELECT
BLOCK
DIAGRAM
24
30
22
CN701
VIDEO-Y(I/P)-OUT
VIDEO-Y(I)-OUT
VIDEO-C-OUT
(CN1502)
28
VIDEO-Cb/Pb-OUT
VIDEO-Cr/Pr-OUT26VIDEO-Y/CVBS-IN
TO VIDEO
INPUT
SELECT
10
CN701
BLOCK
DIAGRAM
VIDEO-C-IN 8
(CN1502)
TO AUDIO
INPUT
14
16
CN701
AUDIO(L)-OUT
AUDIO(R)-OUT
/OUTPUT
SELECT
BLOCK
12
20
DVD-AUDIO-MUTE
AUDIO(L)-IN
DIAGRAM
(CN1502)
18
AUDIO(R)-IN
FIBER OPTIC
TRANS MODULE
DIGITAL
AUDIO OUT
(OPTICAL)
JK1503
(REAR)
DIGITAL
AUDIO OUT
(COAXIAL)
JK1504 (REAR)
REC VIDEO SIGNAL PB VIDEO SIGNAL REC AUDIO SIGNAL PB AUDIO SIGNAL
G4
D/A
M4
D/A
L4
D/A
VIDEO
ENCODER
VIDEO
I/F
K1
D/A
G3
D/A
10
13
DECODER A/D45-50
IC701 (VIDEO DECODER)
AB1-AB4
Y2, AA4,
DECODER A/D39-44
V3, Y3, W1,
Y4, W2, AA3
IC801
(AUDIO D/A CONVERTER)
BACK-END
DIGITAL
151416
L-CH
R-CH
768
U1R3U2
SIGNAL
PROCESS
MUTE
AUDIO D/A
CONVERTER
4
3
K26
M25
2
P24
5
T3
R26
AUDIO
I/F
IC802
R2
(AUDIO A/D CONVERTER)
13
R-CH
L-CH
789
P2R1P3
14
AUDIO A/D
CONVERTER
101112
T2
BUFFER
Q1534
MAIN CBA
6
FLASH MEMORY
IC104 (FLASH MEMORY)
WF10
28 28SPDIF
CN101 CN1501
DDR SDRAM
IC102 (DDR SDRAM)
IC101
RF/
IC201
DVD MECHANISM
ERROR AMP
CN201
LPC
TILT
PICK
IC301
TRACKING
-UP
FOCUS
MOTOR
DRIVER
FRONT-END
DIGITAL
SIGNAL
PROCESS
TRAY OPEN
IC202
+3.3V
CN301
CN1001
CN1003
ENCODER
CBA
OP AMP
FE
ENCODER
IC302
SLED
MOTOR
M
MOTOR
DRIVER
CN1002
SPINDLE
MOTOR
DVD MAIN CBA
RELAY CBA
M
1-11-2
E9B05BLD
Page 26
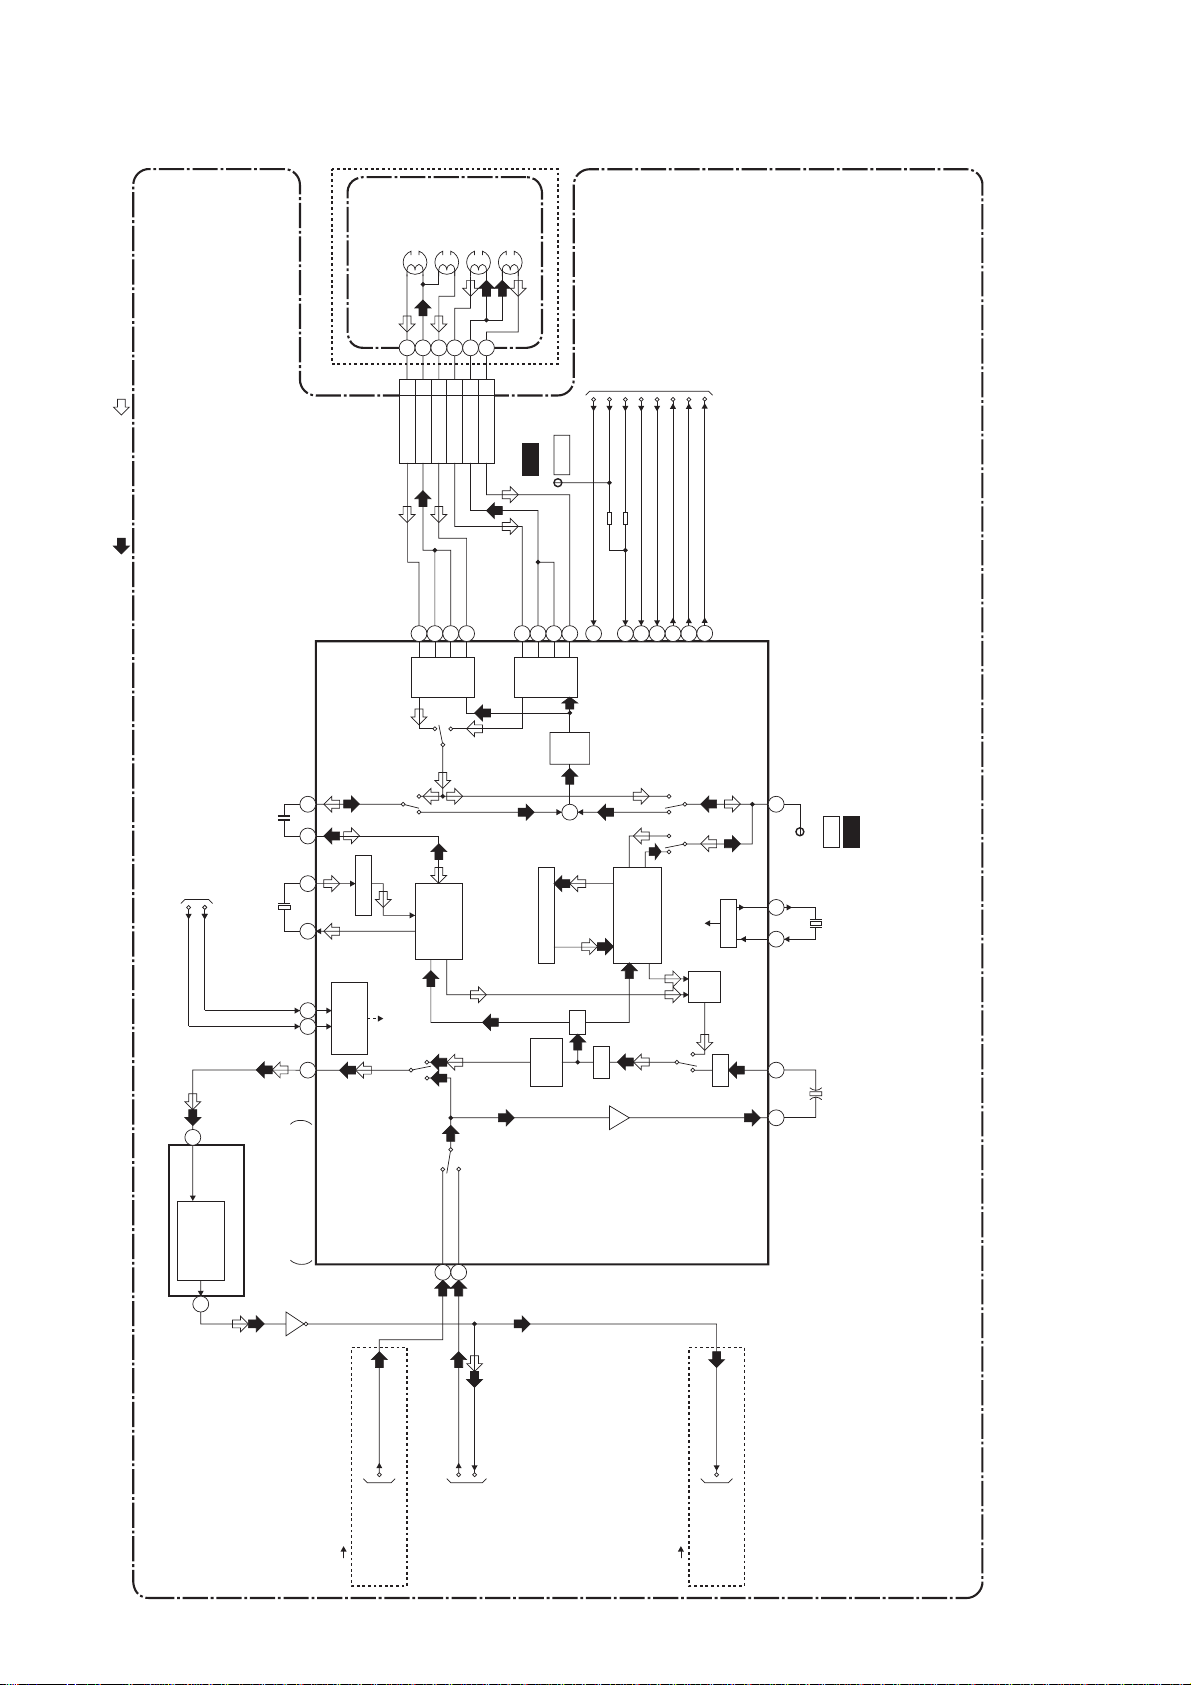
Video Block Diagram
18/6/2013
World of free manuals
MODE: SP/RECPB-VIDEO SIGNAL
CYLINDER ASSEMBLY
VIDEO (L)-1
HEAD
VIDEO (R)-1
HEAD
VIDEO (R)-2
HEAD
VIDEO (L)-2
HEAD
REC-VIDEO SIGNAL
TO SERVO/SYSTEM
CONTROL BLOCK
DIAGRAM
IIC-BUS SCL
IIC-BUS SDA
(DECK ASSEMBLY)
CN251
7978
Y. DELAY
46 43
6968
SERIAL
DECORDER
65
123
VIDEO(L)-1
VIDEO(R)-1
VIDEO-COM
969594
SP
HEAD
SP
P
R
LUMINANCE
SIGNAL
PROCESS
AGC
456
VIDEO(L)-2
VIDEO(R)-2
VIDEO-COM
93
AMP
EP
WF1
RF-SW
TP504
908988
EP
HEAD
AMP
REC FMAGC
Y
CCD 1H DELAY
CHARA.
INS.
87
+
1/2
TO SERVO/SYSTEM
RF-SW
C-ROTA
D-REC-H
D-V-SYNC
70
80
D-REC-H
RF-SW/C-ROTA
C
CHROMINANCE
FBC
CONTROL BLOCK
DIAGRAM
V-ENV
H-A-SW
C-SYNC
H-A-COMP
67
84
83
71
62
V-ENV
H-A-SW
H-A-COMP
RPRP
PROCESS
C-SYNC
Y/C
PR
D-V-SYNC
SIGNAL
MIX
VXO
AGC
21
WF2
C-PB
TP301
2928
X301
4.43MHz
MAIN CBA
50
OSD
CHARACTER
MIX
IC501 (OSD)
52
VIDEO SIGNAL PROCESS
/HEAD AMP
IC301
Q301
DVD-VIDEO(DUB)
TO VIDEO
OUTPUT SELECT
BLOCK DIAGRAM
(DVD VCR DUBBING)
BYPASS
DVD
50
VCR
VCR-VIDEO
TO VIDEO
48
PB/EE-VIDEO
INPUT SELECT
BLOCK DIAGRAM
1-11-3
58 59
VCR-VIDEO(DUB)
TO VIDEO
INPUT SELECT
BLOCK DIAGRAM
(VCR DVD DUBBING)
E9B05BLV
Page 27
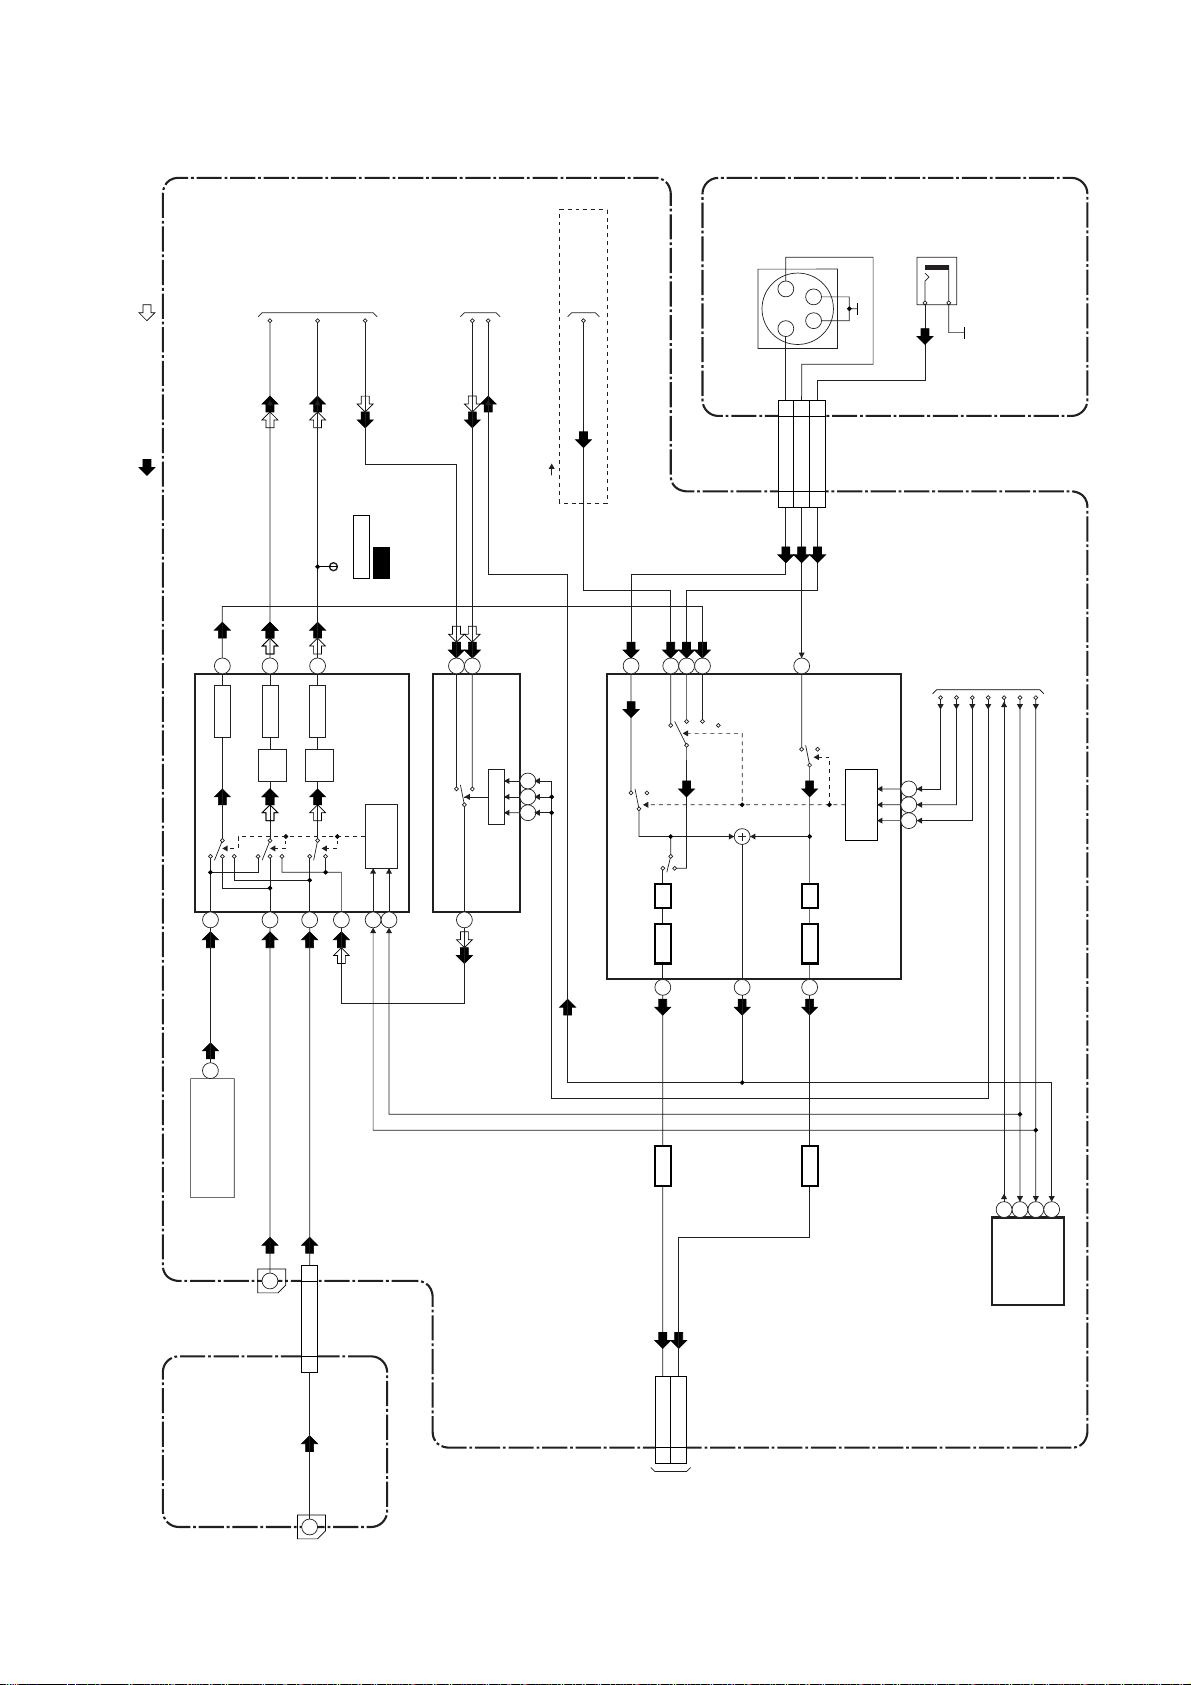
Video Input Select Block Diagram
18/6/2013
World of free manuals
JK1204
S-VIDEO IN(FRONT)
VIDEO-IN
(FRONT)
REC VIDEO SIGNAL PB VIDEO SIGNAL
31
BUFFER
TO VIDEO
VIDEO-OUT2
VIDEO-OUT1
30
DRIVER
6dB
6dB
AMP
OUTPUT SELECT
BLOCK DIAGRAM
DVD-VIDEO
WF3
JK1-V-OUT
J236
29
DRIVER
AMP
CONTROL
LOGIC
TO VIDEO
BLOCK DIAGRAM
PB/EE-VIDEO
VCR-VIDEO
3
5
VCR
DVD
SW CTL
(VCR DVD DUBBING)
109 11
TO VIDEO
BLOCK DIAGRAM
VCR-VIDEO(DUB)
15
MUTE
S-VIDEO-Y
VCR
8
VIDEO
10
12
TU/LINE
MUTE
2
1
3 4
Y C
CN1201
FRONT-VIDEO-IN
22FRONT-Y-IN
11FRONT-C-IN
44
CN1505
4
MUTE
S-VIDEO-C
CONTROL
LOGIC
JK1201
VIDEO-SW1
22 23 24
TO SERVO/SYSTEM CONTROL
BLOCK DIAGRAM
VIDEO-SW3
VIDEO-SW2
OUTPUT-SELECT
DAVN-L
IIC-BUS SDA
FRONT JACK CBA
IIC-BUS SCL
IC1518 (VIDEO INPUT SELECT)
TU1501 (TUNER UNIT)
28
17
VIDEO OUT
JK1502
1
20
VIDEO IN
REAR JACK CBA
3
VIDEO-IN210 10
CL2001 CN1507
JK2001
20
IC1508 (SW)
5
33
32
4
(VIDEO INPUT SELECT)IC1507
LPF
BUFFER
19
BUFFER
Q1521
CN1502
VIDEO-Y/CVBS-IN
VIDEO-C-IN8
10
MAIN CBA
BUFFER LPF
20
21
BUFFER
Q1520
IC1511 (VPS)
DAVN-L
6147
SDA
SCL
16
VPS-V
VIDEO-IN2
1-11-4
TO DIGITAL
SIGNAL PROCESS
BLOCK DIAGRAM
(CN701)
E9B05BLVIS
Page 28
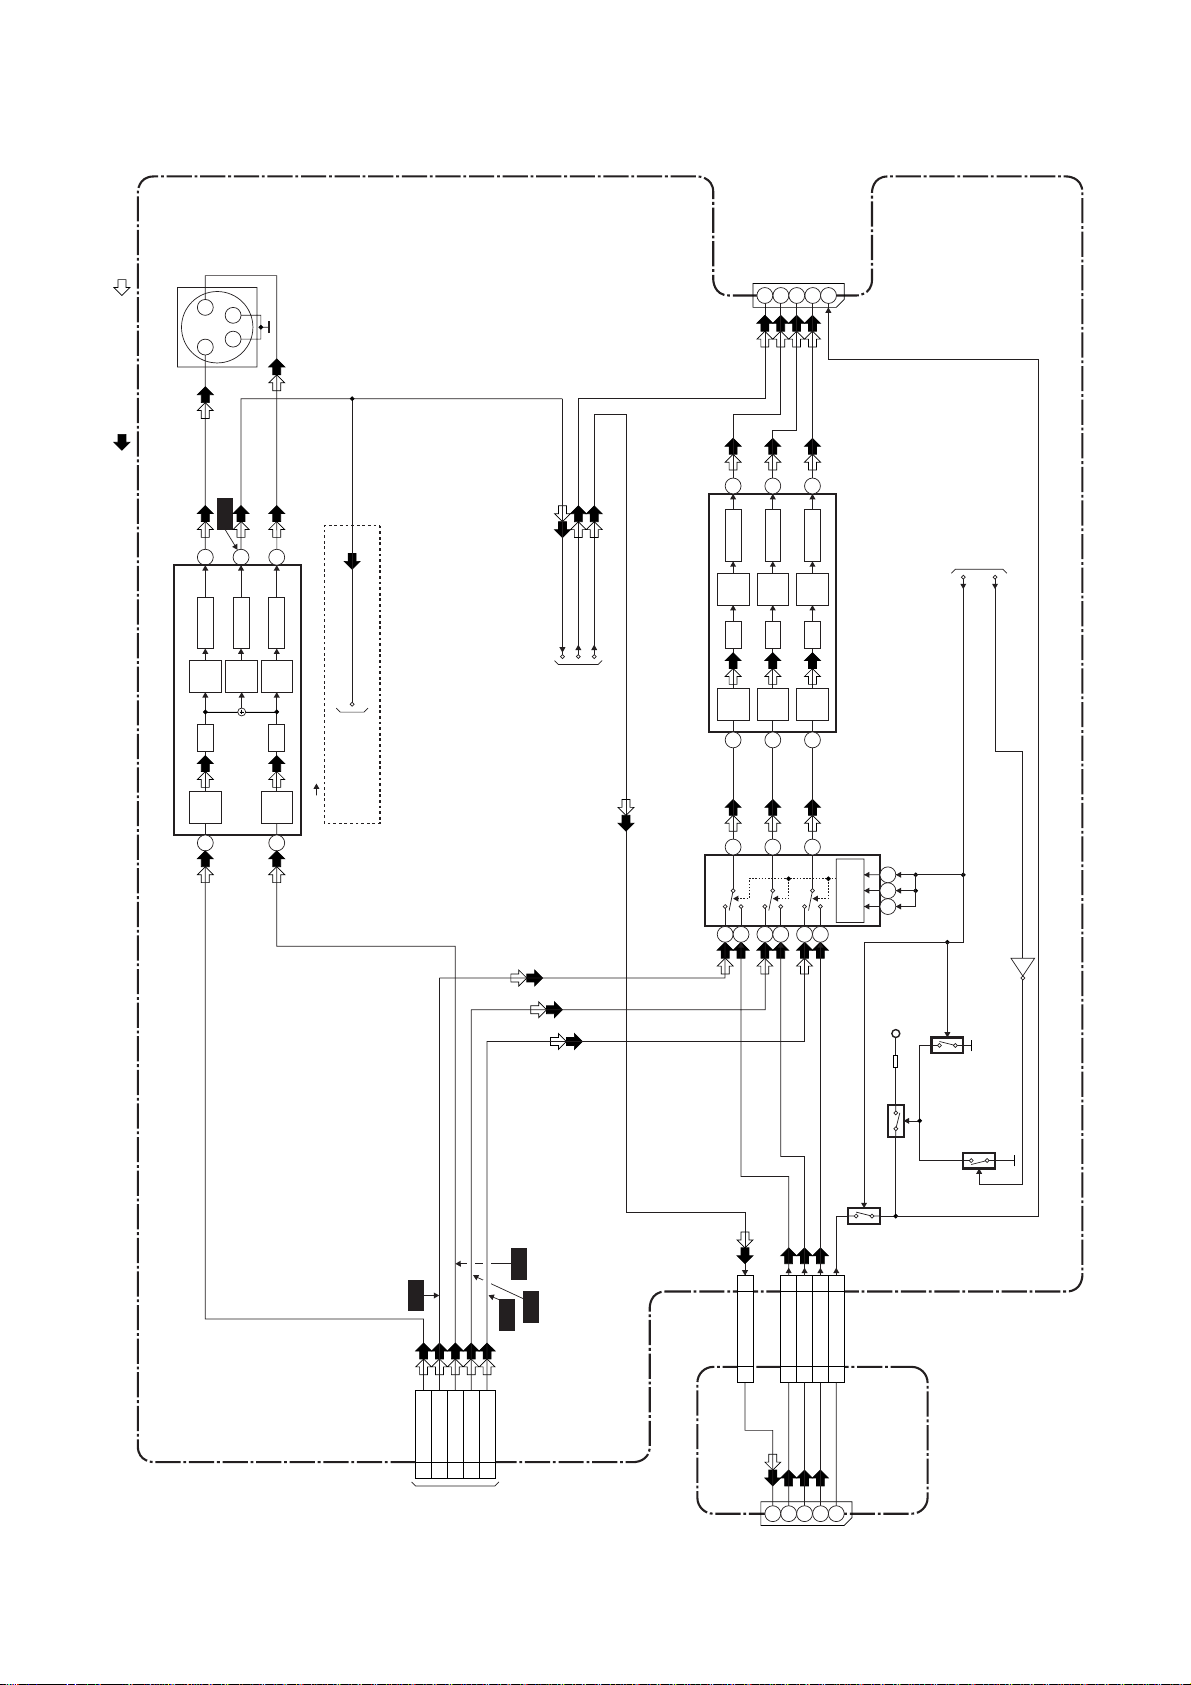
Video Output Select Block Diagram
18/6/2013
World of free manuals
JK1506
S-VIDEO
OUT
2
1
3 4
YC
REC VIDEO SIGNAL PB VIDEO SIGNAL
VIDEO-OUT1
19
JK1502
VIDEO-G OUT
VIDEO-B OUT
VIDEO-R OUT
16P
7
11
15
16
WF9
5
2dB
AMP
8dB
LPF DRIVER
4dB
AMP
IC1515 (VIDEO DRIVER)
3
6
DRIVER
AMP
-6dB
7
2dB
AMP
LPF DRIVER
4dB
AMP
1
DVD-VIDEO(DUB)
TO VIDEO
BLOCK DIAGRAM
(DVD VCR DUBBING)
DVD-VIDEO
VIDEO-OUT2
VIDEO-OUT1
TO VIDEO INPUT SELECT
BLOCK DIAGRAM
11
2dB
AMP
LPF DRIVER
4dB
AMP
IC1514 (VIDEO DRIVER)
6
15
IC1509 (SW)
2
1
15
2dB
AMP
LPF DRIVER
4dB
AMP
1
4
5
10
TO SERVO/SYSTEM CONTROL
BLOCK DIAGRAM
2dB
AMP
LPF DRIVER
RGB-THROUGH
OUTPUT-SELECT
4dB
AMP
8
MAIN CBA
14
9 10 11
SW
3
CONTROL
12
13
Q1527
P-ON+3.3V
Q1529
WF6
CN1502
VIDEO-Y(I/P)-OUT
VIDEO-C-OUT
VIDEO-Y(I)-OUT
30
24
222826
TO DIGITAL
SIGNAL PROCESS
BLOCK DIAGRAM
WF7
WF5
WF4
VIDEO-Cb/Pb-OUT
VIDEO-Cr/Pr-OUT
(CN701)
1-11-5
CN1507
VIDEO-OUT2
8 8
CL2001
JK2001
CN1507
VIDEO-G-IN3 13
VIDEO-B-IN2 12
VIDEO-R-IN414
CL2002
7
111915
VIDEO-B IN
VIDEO-R IN
VIDEO-G IN
VIDEO-OUT2
16P1 11
16
16P
Q1533
Q1530
Q1531
REAR JACK CBA
E9B05BLVOS
Page 29
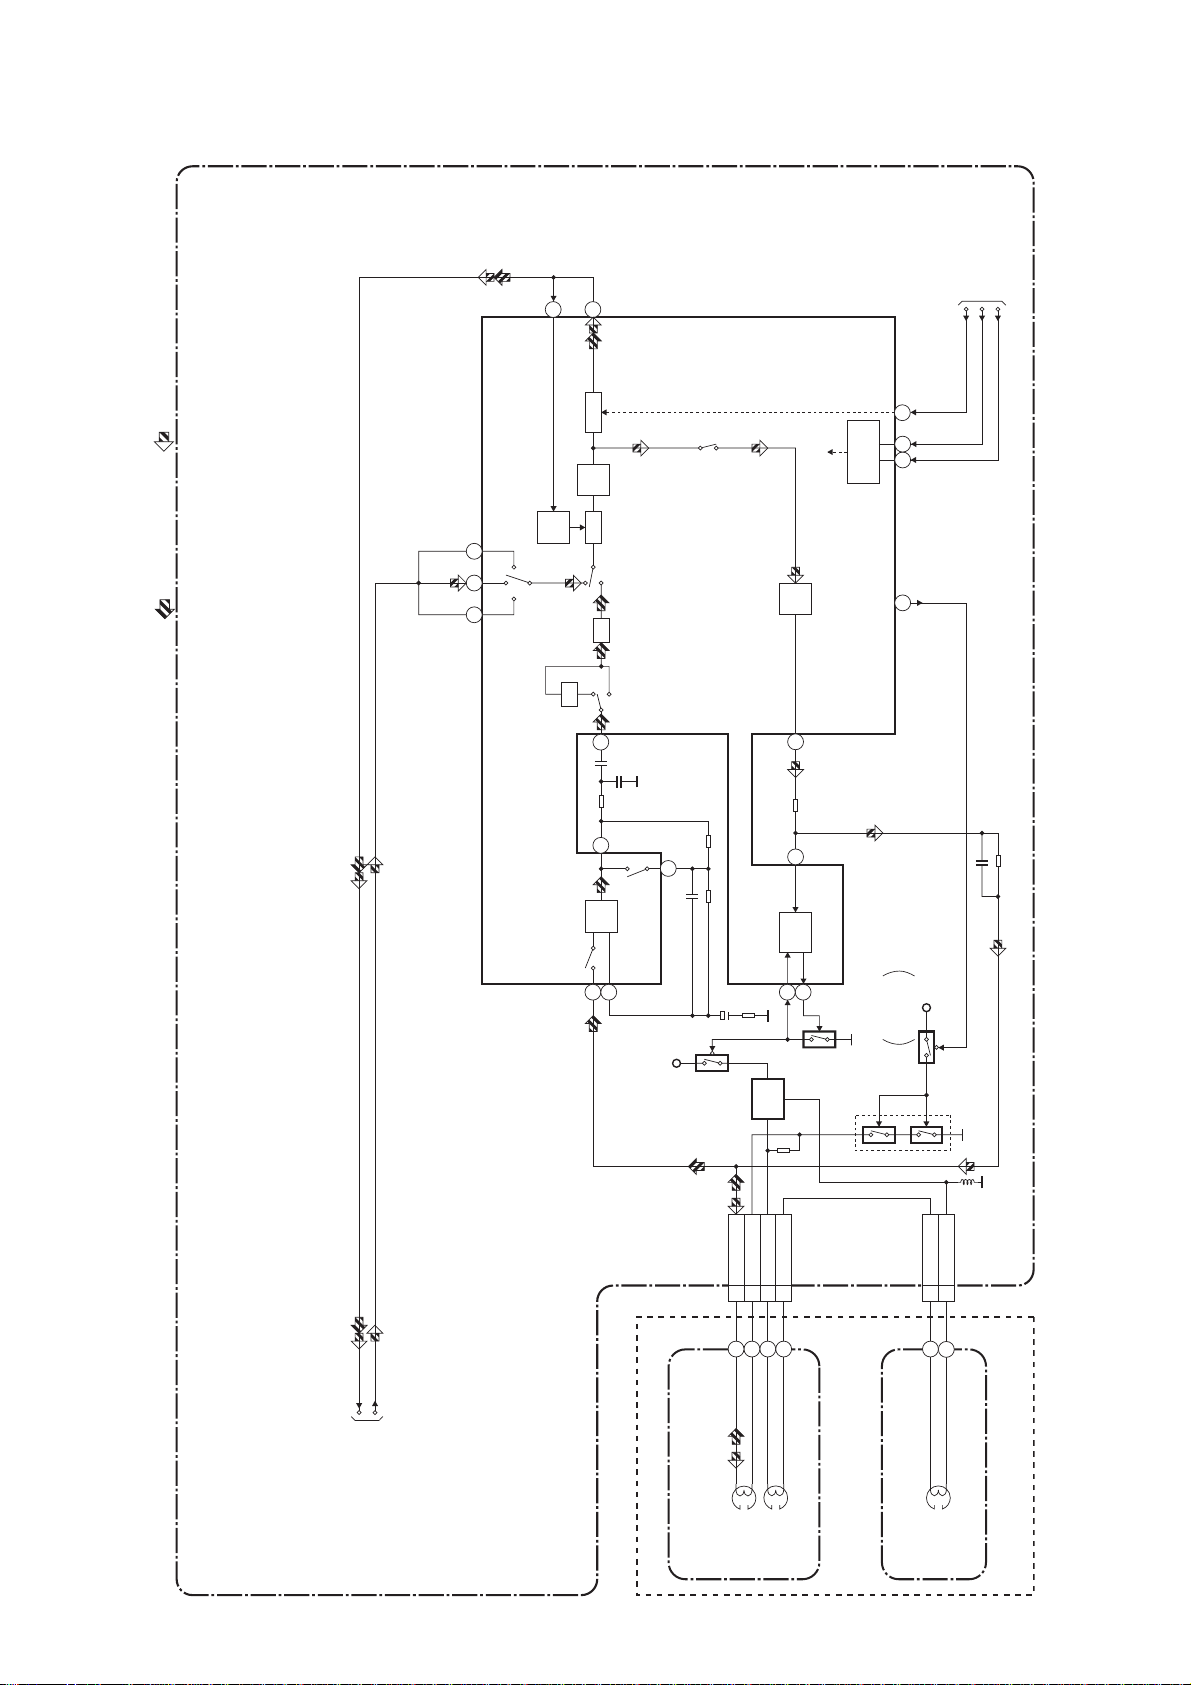
Audio Block Diagram
18/6/2013
World of free manuals
Mode : SP/REC
ALC
12
DET
11
MUTE
LINE
ALC
AMP
REC-ON
SERIAL
DECODER
71
68 69
TO SERVO/SYSTEM
CONTROL BLOCK
DIAGRAM
IIC-BUS SCL
IIC-BUS SDA
AUDIO-MUTE-H
PB-AUDIO SIGNAL REC-AUDIO SIGNAL
MAIN CBA
1513 17
IC301
(AUDIO SIGNAL PROCESS)
IN1
TUNER IN2
INV
PB-ON
P
R
ATT
98
7
EQ
AMP
SP/LP-ON
5
6
+5V
Q404
Q403
BIAS
OSC
REC
100
3
AUTO
1
AMP
BIAS
2
Q406
16
AUDIO HD-SW
CONTROL
+5V
SWITCHING
D-REC-OFF
Q405
Q401
(PB=ON)
N-A-PB
N-A-REC
TO Hi-Fi AUDIO
BLOCK DIGRAM
1-11-6
CN504
ACE HEAD ASSEMBLY
(DECK ASSEMBLY)
AUDIO-PB/REC
4
3 A-COM
1 AE-H
2 AE-H/FE-H
AUDI O
HEAD
AUDI O
ERASE
HEAD
CN501
2 FE-H
FE HEAD
FULL
ERASE
1 FE-H-GND
HEAD
E9B05BLA
Page 30
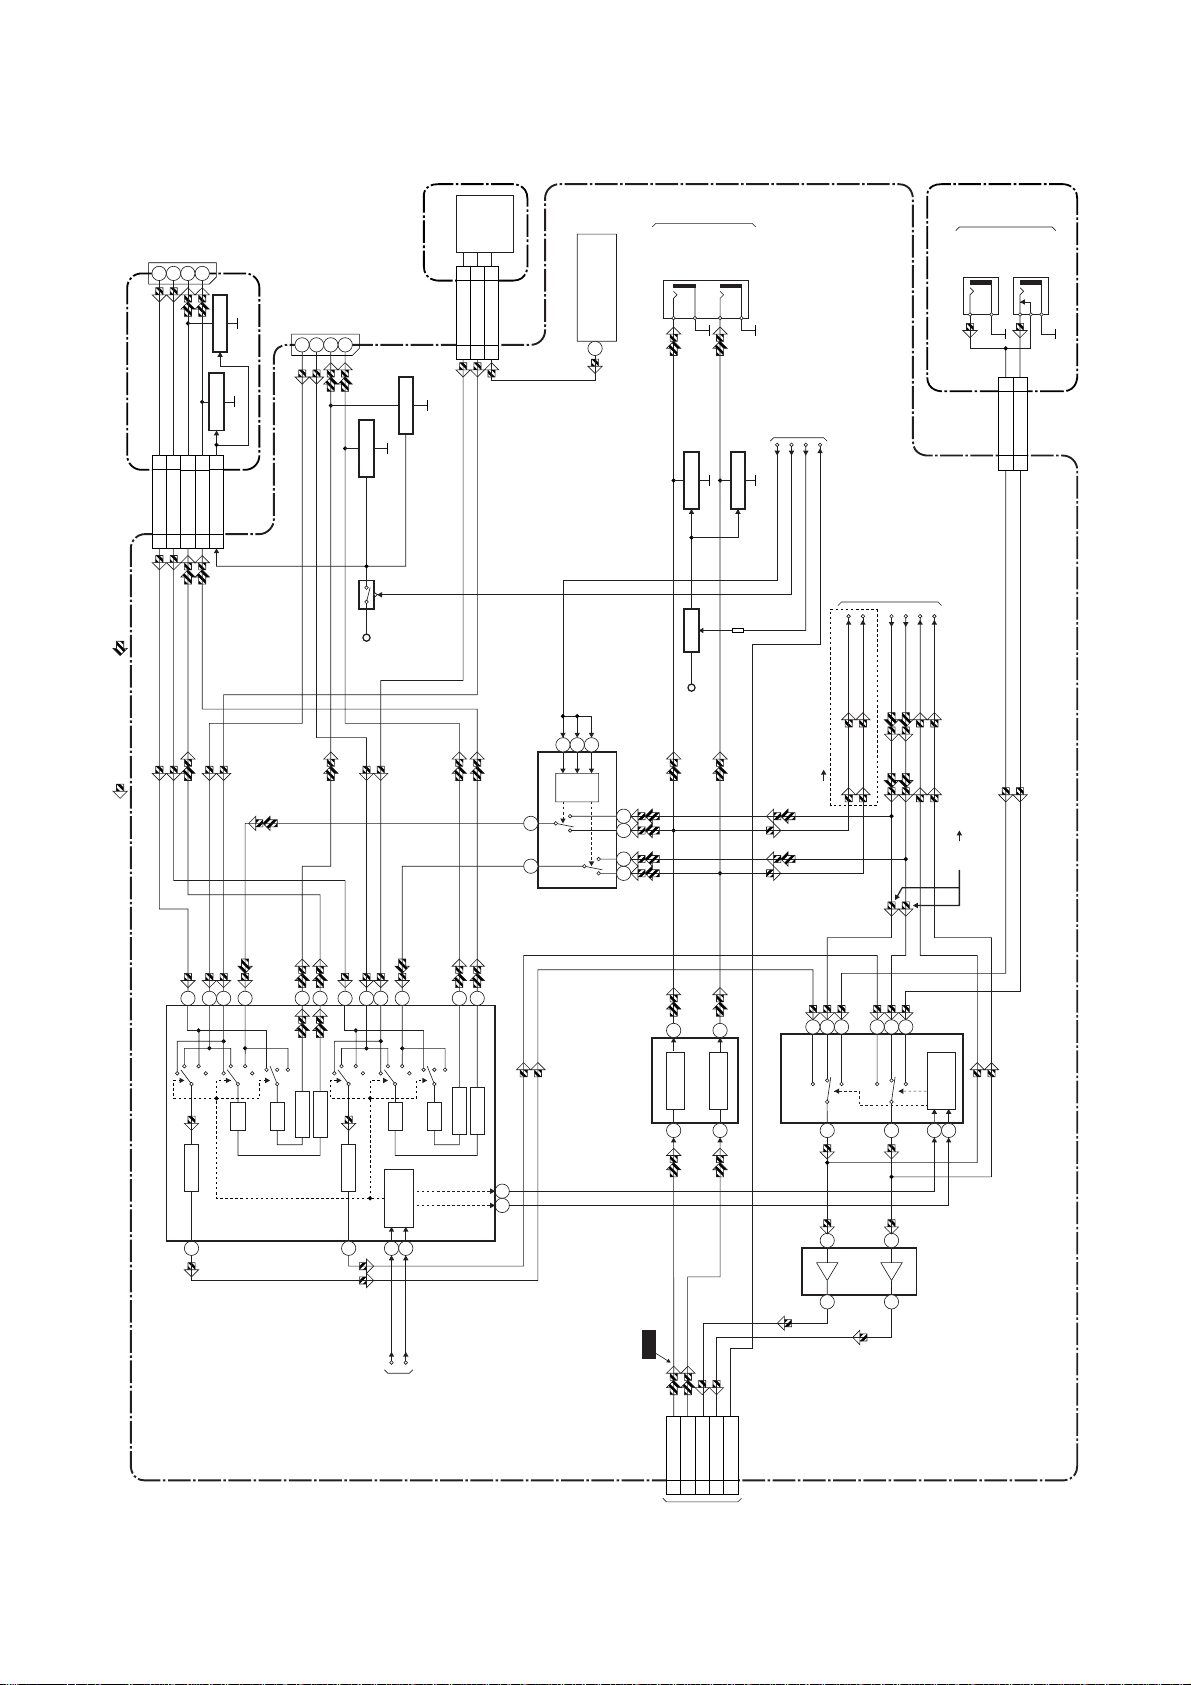
Audio Input/Output Select Block Diagram
18/6/2013
World of free manuals
AUDIO(R)-IN2
AUDIO(L)-OUT2
AUDIO(R)-OUT2
AUDIO(L)-IN26
2
1
3
JK2001
MUTE-ON
REAR JACK CBA
CN1507 CN2001
REC AUDIO SIGNAL PB AUDIO SIGNAL
MUTE-ON
JK2-AUDIO-MUTE
JK2-AUDIO(L)-OUT
JK2-AUDIO(L)-IN
JK2-AUDIO(R)-IN
JK2-AUDIO(R)-OUT
2 2
44
77
66
11
Q2002,
Q2004
Q2003,
Q2005
AUDIO(L)-IN16
JK1502
AUDIO(R)-IN1
AUDIO(L)-OUT1
AUDIO(R)-OUT1
2
1
3
Q1537Q1507
Q1538
MUTE-ON
+5V
IF SINAL
AFV CBA
CN1
TU-AUDIO(R)
TU-AUDIO(L)
44
55
CN1506
MUTE-ON
PROCESS
SIF OUT
SIF
22
TU1501 (TUNER UNIT)
7
9
10
11
SW
CTL
JK1505
AUDIO(L)
-OUT
MUTE-ONDRIVE
+5V
REARQ1532 Q1539
AUDIO(R)
-OUT
MUTE-ON
Q1540
TO SERVO/SYSTEM
OUTPUT-SELECT
DVD-SCART-AUDIO-MUTE
CONTROL
BLOCK DIAGRAM
DVD-AUDIO-MUTE
DVD-AUDIO-MUTE2
DVD-AUDIO(L)
(DVD VCR DUBBING))
DVD-AUDIO(R)
TO Hi-Fi AUDIO
BLOCK DIAGRAM
PB/EE-AUDIO(L)
PB/EE-AUDIO(R)
VCR-AUDIO(L)
VCR-AUDIO(R)
FRONT JACK CBA
JK1202
AUDIO(L)
-IN
CN1505 CN1201
FRONT
AUDIO(R)
-IN
JK1203
88
6
AUDIO(L)-IN-F
AUDIO(R)-IN-F
6
6
6
8
10
24
AMP
BUFFER
IC1518 (INPUT/OUTPUT SELECT)
27
AMP
26
25
DRIVER
DRIVER
14
BUFFER
23
162012
AMP
LOGIC
33
IIC-BUS SCL
IIC-BUS SDA
14
FRONT
(VCR DVD DUBBING))
SW CTL
9
10
MAIN CBA
14 15
22
21
AMP
DRIVER
DRIVER
CONTROL
32
13 15
IC1508
(SW)
13 12 1 2
4
5111
(OP AMP)IC1513
WF8
1
OP AMP
2
7
OP AMP
6
TU/IN1/2
(L-CH)
(AUDIO INPUT SELECT)
IC1501
)
OP AMP
(
IC1506
VCR
3
6
7
FRONT
12
TU/IN1/2
(R-CH)
VCR
13
2
1
TO SERVO/SYSTEM
CONTROLBLOCK
DIAGRAM
1-11-7
CN1502
AUDIO(R)-OUT
AUDIO(L)-OUT
14
16
TO DIGITAL
AUDIO(L)-IN
AUDIO(R)-IN
DVD-AUDIO-MUTE
18
20
12
SIGNAL PROCESS
BLOCK DIAGRAM
(CN701)
E9B05BLAS
Page 31
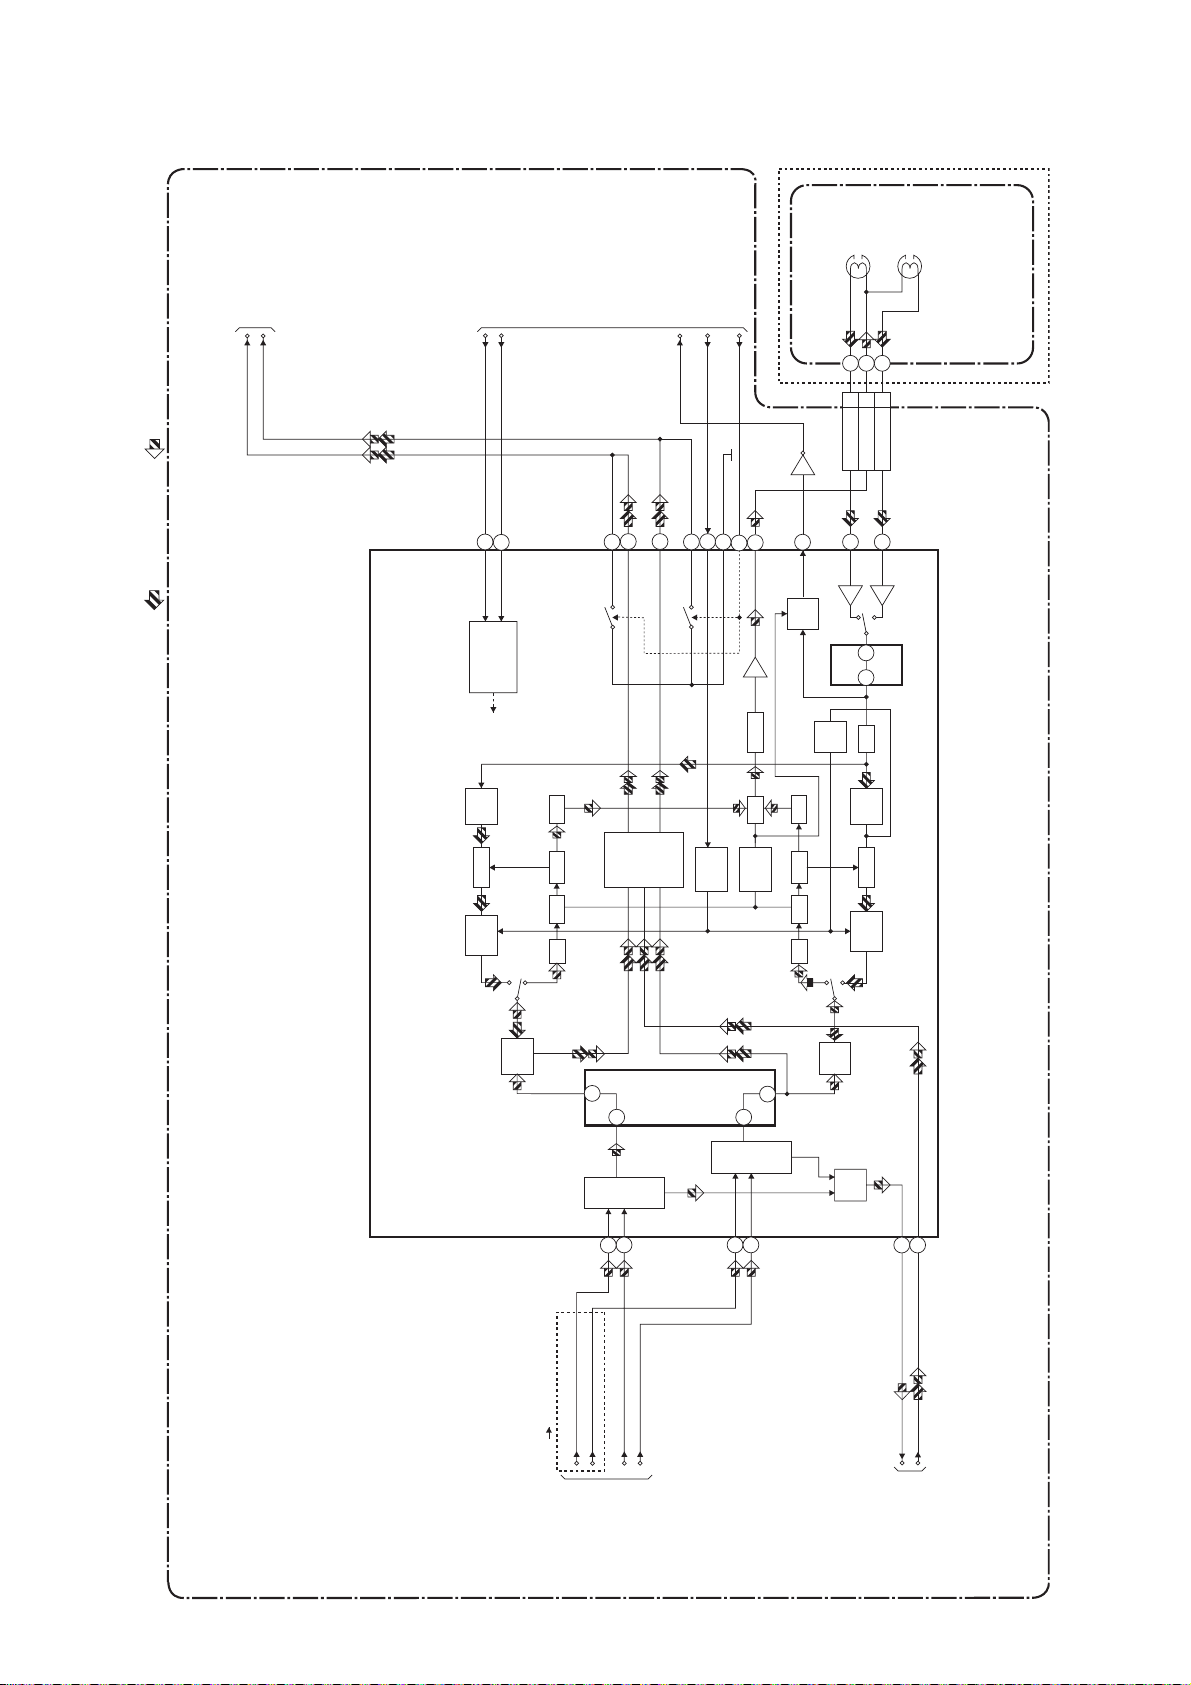
Hi-Fi Audio Block Diagram
18/6/2013
World of free manuals
TO AUDIO
INPUT/OUTPUT
SELECT
BLOCK DIAGRAM
TO
SERVO/ SYSTEM
CONTROL BLOCK
DIAGRAM
Hi-Fi
AUDIO(R)
HEAD
Hi-Fi
AUDIO(L)
HEAD
CYLINDER ASSEMBLY
REC-AUDIO SIGNALPB-AUDIO SIGNAL Mode : SP/REC
PB/EE-AUDIO(L)
PB/EE-AUDIO(R)
IIC-BUS SCL
IIC-BUS SDA
37
38
SERIAL
DATA
DECODER
R-CH
BPF
COMP
SW
NOISE
P
A-MODE
Hi-Fi-H-SW
767774
MUTE-ON
LPF
VCO
LIM DEV
R
OUTPUT
MUTE-ON
SELECT
73
39
HOLD
(DECK ASSEMBLY)
AUDIO-MUTE-2
75
26
53
COMP
MIX
PULSE
NOISE
DET
Q451
21
ENV
LPF
VCO
LIM DEV
DET
R
DO
7
CN251
AUDIO(R)
Hi-Fi-
24
R
DET
P
Hi-Fi-COM 8
34 33
LIM
L-CH
SW
9
AUDIO(L)
Hi-Fi-
27
L
BPF
COMP
NOISE
MAIN CBA
IC451 ( Hi-Fi AUDIO PROCESS)
R-CH
PNR
DVD-AUDIO(R)
(DVD VCR DUBBING)
47
48
R-CH
INSEL
50
52
VCR-AUDIO(R)
DVD-AUDIO(L)
VCR-AUDIO(L)
TO AUDIO
INPUT/OUTPUT
SELECT
BLOCK DIAGRAM
6
14
L-CH
4
15
INSEL
L-CH
PNR
NOR
SW
78
80
N-A-REC
N-A-PB
TO AUDIO
BLOCK DIAGRAM
1-11-8
E9B05BLH
Page 32
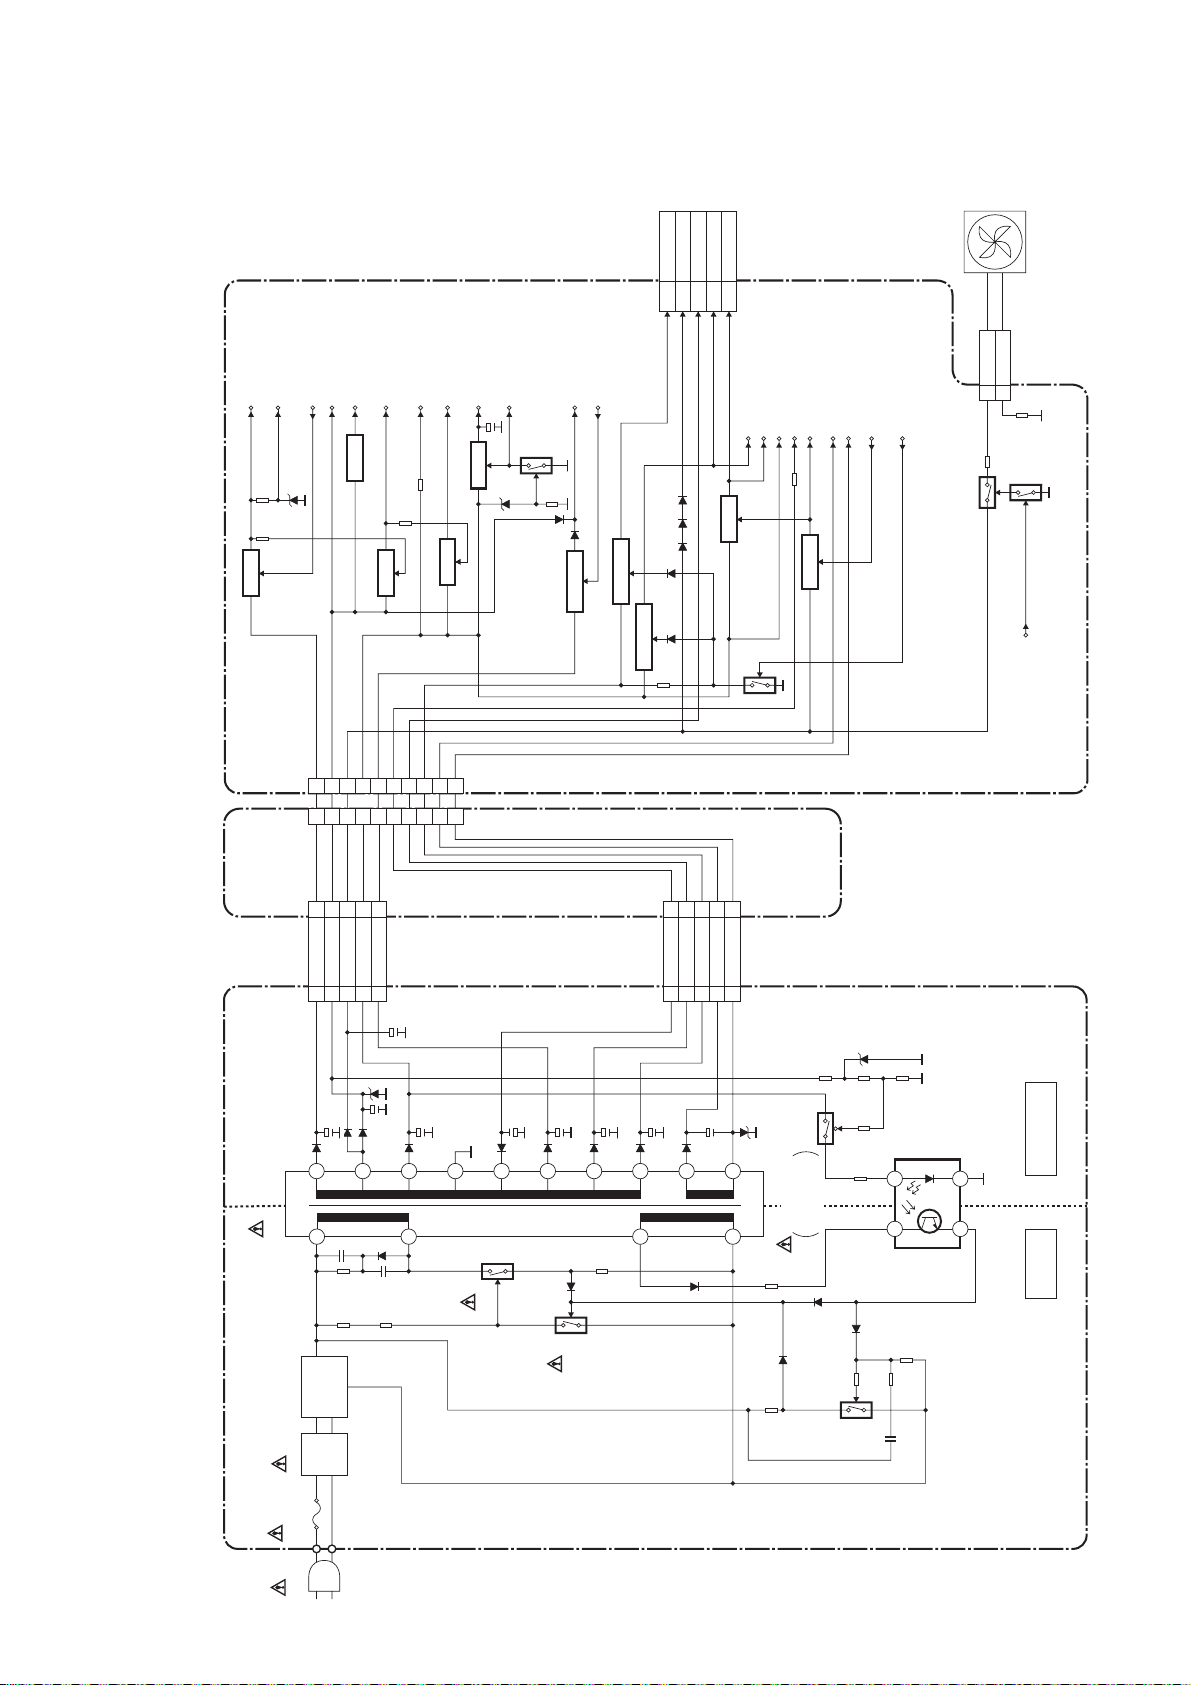
Power Supply Block Diagram
CAUTION !
Fixed voltage (or Auto voltage selectable) power supply circuit is used in this unit.
If Main Fuse (F1001) is blown , check to see that all components in the power supply
circuit are not defective before you connect the AC plug to the AC power supply.
Otherwise it may cause some components in the power supply circuit to fail.
18/6/2013
World of free manuals
P-ON-H
P-ON+44V
SW+44V
Q1516,Q1517
P-ON+15V
<TO PIN 75 OF IC501>
AL+12V
MAIN CBAPOWER SUPPLY CBA
1
3
1
3
CN051A
P-ON+9V
P-ON-DECK+5V
SW+5V
Q1542
SW+9V
Q1515
8
5
10
5
8
10
P-ON+5V
AL+5V
SW+5V
Q1518
19
121416
1214161918
Q1513
18
P-DOWN-H
TIMER+5V
<TO PIN 32 OF IC501>
SW+5V
Q1512
Q1508,Q1509
TO DVD
C-POW-SW
AL+16V/+12V
<TO PIN 84 OF IC501>
IC1504
+2.5V REG.
SW+16V
IC1505
MAIN CBA
(CN101)
P-ON+2.5V
24,25
CN1501
+3.3V REG.
P-ON+3.3V
4-6 EV+10.5V
14-16
19-21 AL+3V
Q1510
P-ON+5V
9-11
DVD-P-ON+5V
DVD P-ON+3.3V
SW+5V
Q1519
EV+5V
-FL
Q1511,Q1514
DVD P-ON+12V
F2
F1
PWR-SW
SW+12V
FAN
<TO PIN 41 OF IC501>
REG-CONT
<TO PIN 42 OF IC501>
1 FAN+12V
CN1503
Q1501
GND
2
FAN-CONT1
Q1502
<TO PIN 11 OF IC501>
JUNCTION
CBA
NOTE:
The voltage for parts in hot circuit is measured using
hot GND as a common terminal.
T0011
5
1 AL+44V13 AL+12V35 FAN AL+12V
CL051A CL051B CN1504
20
2
BRIDGE
RECTIFIER
D1001 - D1004
LINE
FILTER
L1003
8
10
AL+5V
AL+16V
8
10
19
2
469
8
4 AL+3V
12
6 AL+4V
9F18
F2
Q1004
11
IC1001
ERROR
8
VOLTAGE DET
1
4
23
2 AL-30V
CL052A CL052B
18
17
16
15
14
13
4
7
HOT COLD
Q1001
Q1003
Q1008
CAUTION !
For continued protection against fire hazard,
replace only with the same type fuse.
HOT CIRCUIT. BE CAREFUL.
F1001
T1.6A L 250V
AC1001
1-11-9
E9B05BLP
Page 33

SCHEMATIC DIAGRAMS / CBA’S AND TEST POINTS
18/6/2013
World of free manuals
Standard Notes
WARNING
Many electrical and mechanical parts in this chassis
have special characteristics. These characteristi cs
often pass unnoticed and the protection afforded by
them cannot necessarily be obtained by using
replacement components rated for higher voltage,
wattage, etc. Replacement parts that have these
special safety characteristics are identified in this
manual and its supplements; electrical components
having such features are identified by the mark " ! "
in the schematic diagram and the parts list. Before
replacing any of these components, read the parts list
in this manual carefully. The use of substitute
replacement parts that do not have the same safety
characteristics as specified in the parts list may create
shock, fire, or other hazards.
Notes:
1. Do not use the part number shown on these
drawings for ordering. The correct part number is
shown in the parts list, and may be slightly different
or amended since these drawings were prepared.
2. All resistance values are indicated in ohms
3
(K=10
3. Resistor wattages are 1/4W or 1/6W unless
otherwise specified.
4. All capacitance values are indicated in µF
(P=10
5. All voltages are DC voltages unless otherwise
specified.
6. Electrical parts such as capacitors, connectors,
diodes, IC’s, transistors, resistors, switches, and
fuses are identified by four digits. The first two
digits are not shown for each component. In each
block of the diagram, there is a note such as shown
below to indicate these abbreviated two digits.
, M=106).
-6
µF).
1-12-1 W2P_SC
Page 34
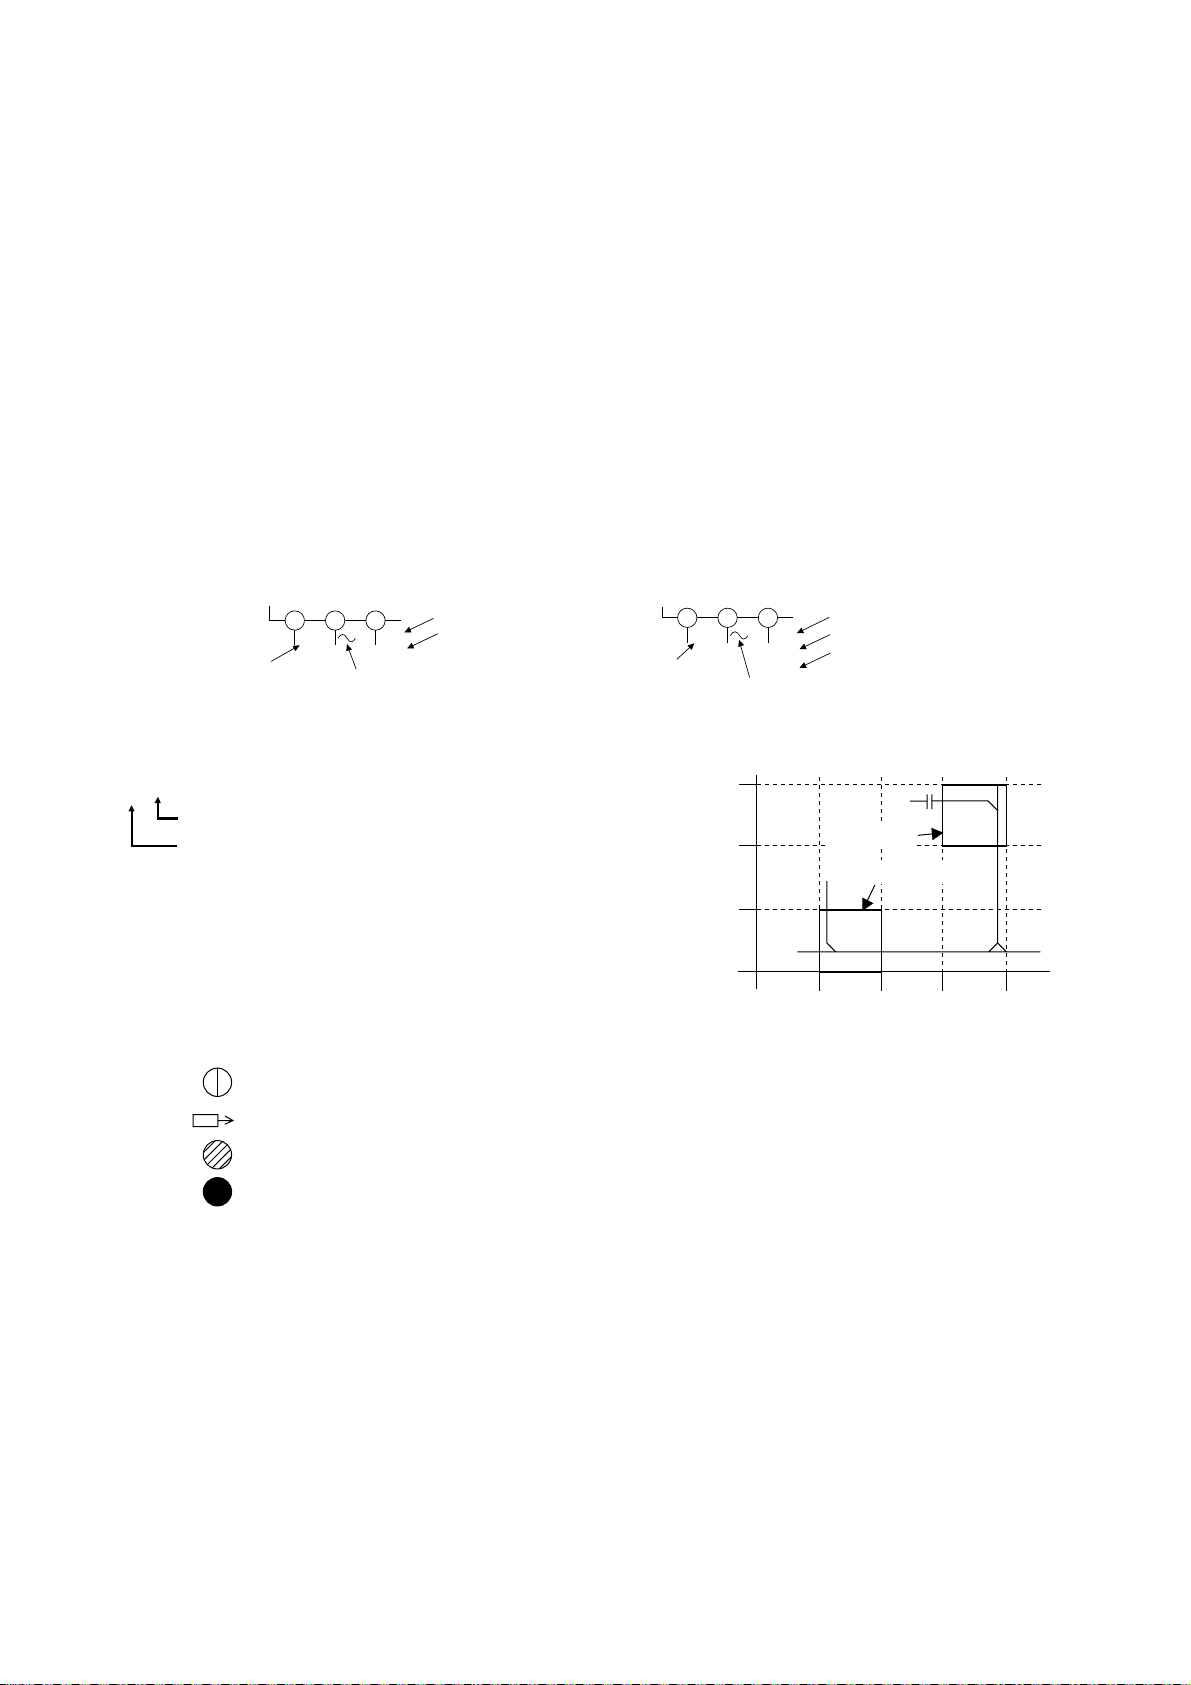
LIST OF CAUTION, NOTES, AND SYMBOLS USED IN THE SCHEMATIC DIAGRAMS ON
18/6/2013
World of free manuals
THE FOLLOWING PAGES:
1. CAUTION:
FOR CONTINUED PROTECTION AGAINST FIRE HAZARD, REPLACE ONLY WITH THE SAME TYPE FUSE.
2. CAUTION:
Fixed Voltage (or Auto voltage selectable) power supply circuit is used in this unit.
If Main Fuse (F1001) is blown, first check to see that all components in the power supply circuit are not
defective before you connect the AC plug to the AC power supply. Otherwise it may cause some components
in the power supply circuit to fail.
3. Note:
1. Do not use the part number shown on the drawings for ordering. The correct part number is shown in the
parts list, and may be slightly different or amended since the drawings were prepared.
2. To maintain original function and reliability of repaired units, use only original replacement parts which are
listed with their part numbers in the parts list section of the service manual.
4. Voltage indications for PLAY and REC modes on the schematics are as shown below:
< DVD Section >
231
5.0
The same voltage for
both PLAY & STOP modes
5.0
(2.5)
Indicates that the voltage
is not consistent here.
5. How to read converged lines
1-D3
Distinction Area
Line Number
(1 to 3 digits)
Examples:
1. "1-D3" means that line number "1" goes to the line number
"1" of the area "D3".
2. "1-B1" means that line number "1" goes to the line number
"1" of the area "B1".
6. Test Point Inform a tion
: Indicates a test point with a jumper wire across a hole in the PCB.
: Used to indicate a test point with a component lead on foil side.
: Used to indicate a test point with no test pin.
PLAY mode
STOP mode
< VCR Section >
5.0
The same voltage for
both PLAY, REC & DVD
modes
5.0
(2.5)
< >
PLAY mode
REC mode
DVD mode
231
Indicates that the voltage
is not consistent here.
3
AREA D3
2
1
AREA B1
1-D3
ABCD
Unit: Volts
1-B1
: Used to indicate a test point with a test pin.
1-12-2 W2P_SC
Page 35
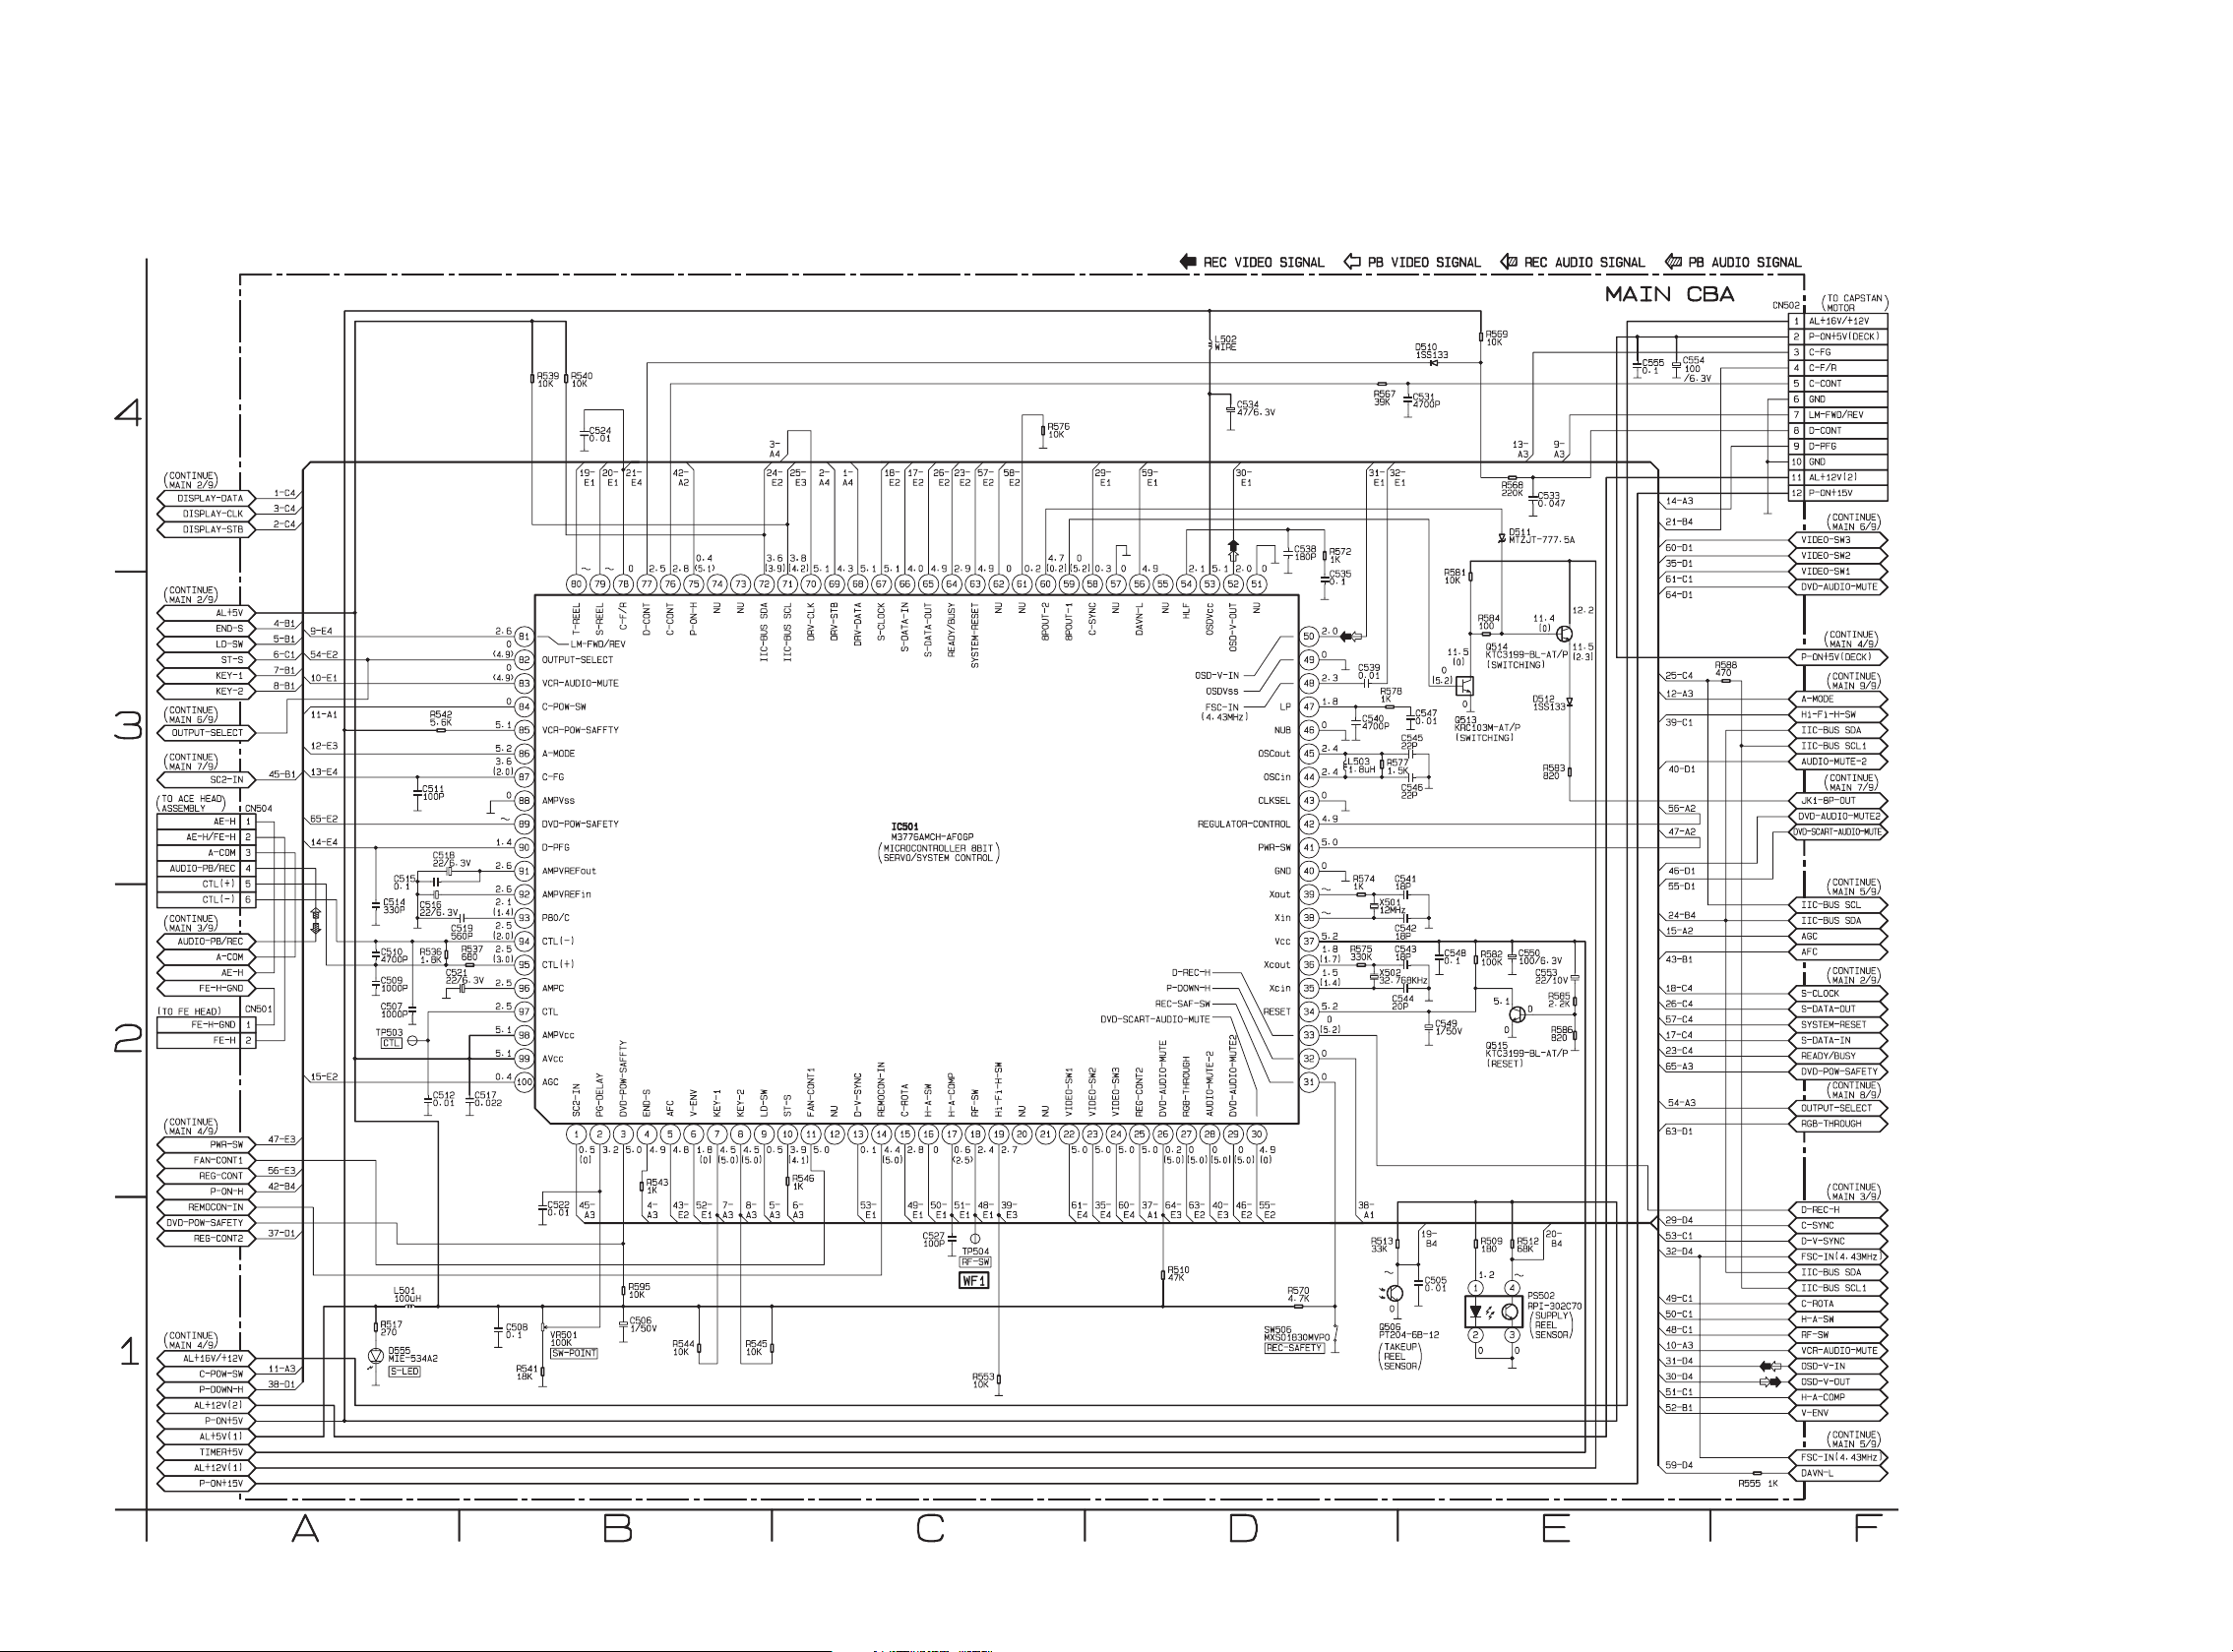
Main 1/9 Schematic Diagram < VCR Section >
18/6/2013
World of free manuals
1-12-3
E9B05SCM1
Page 36
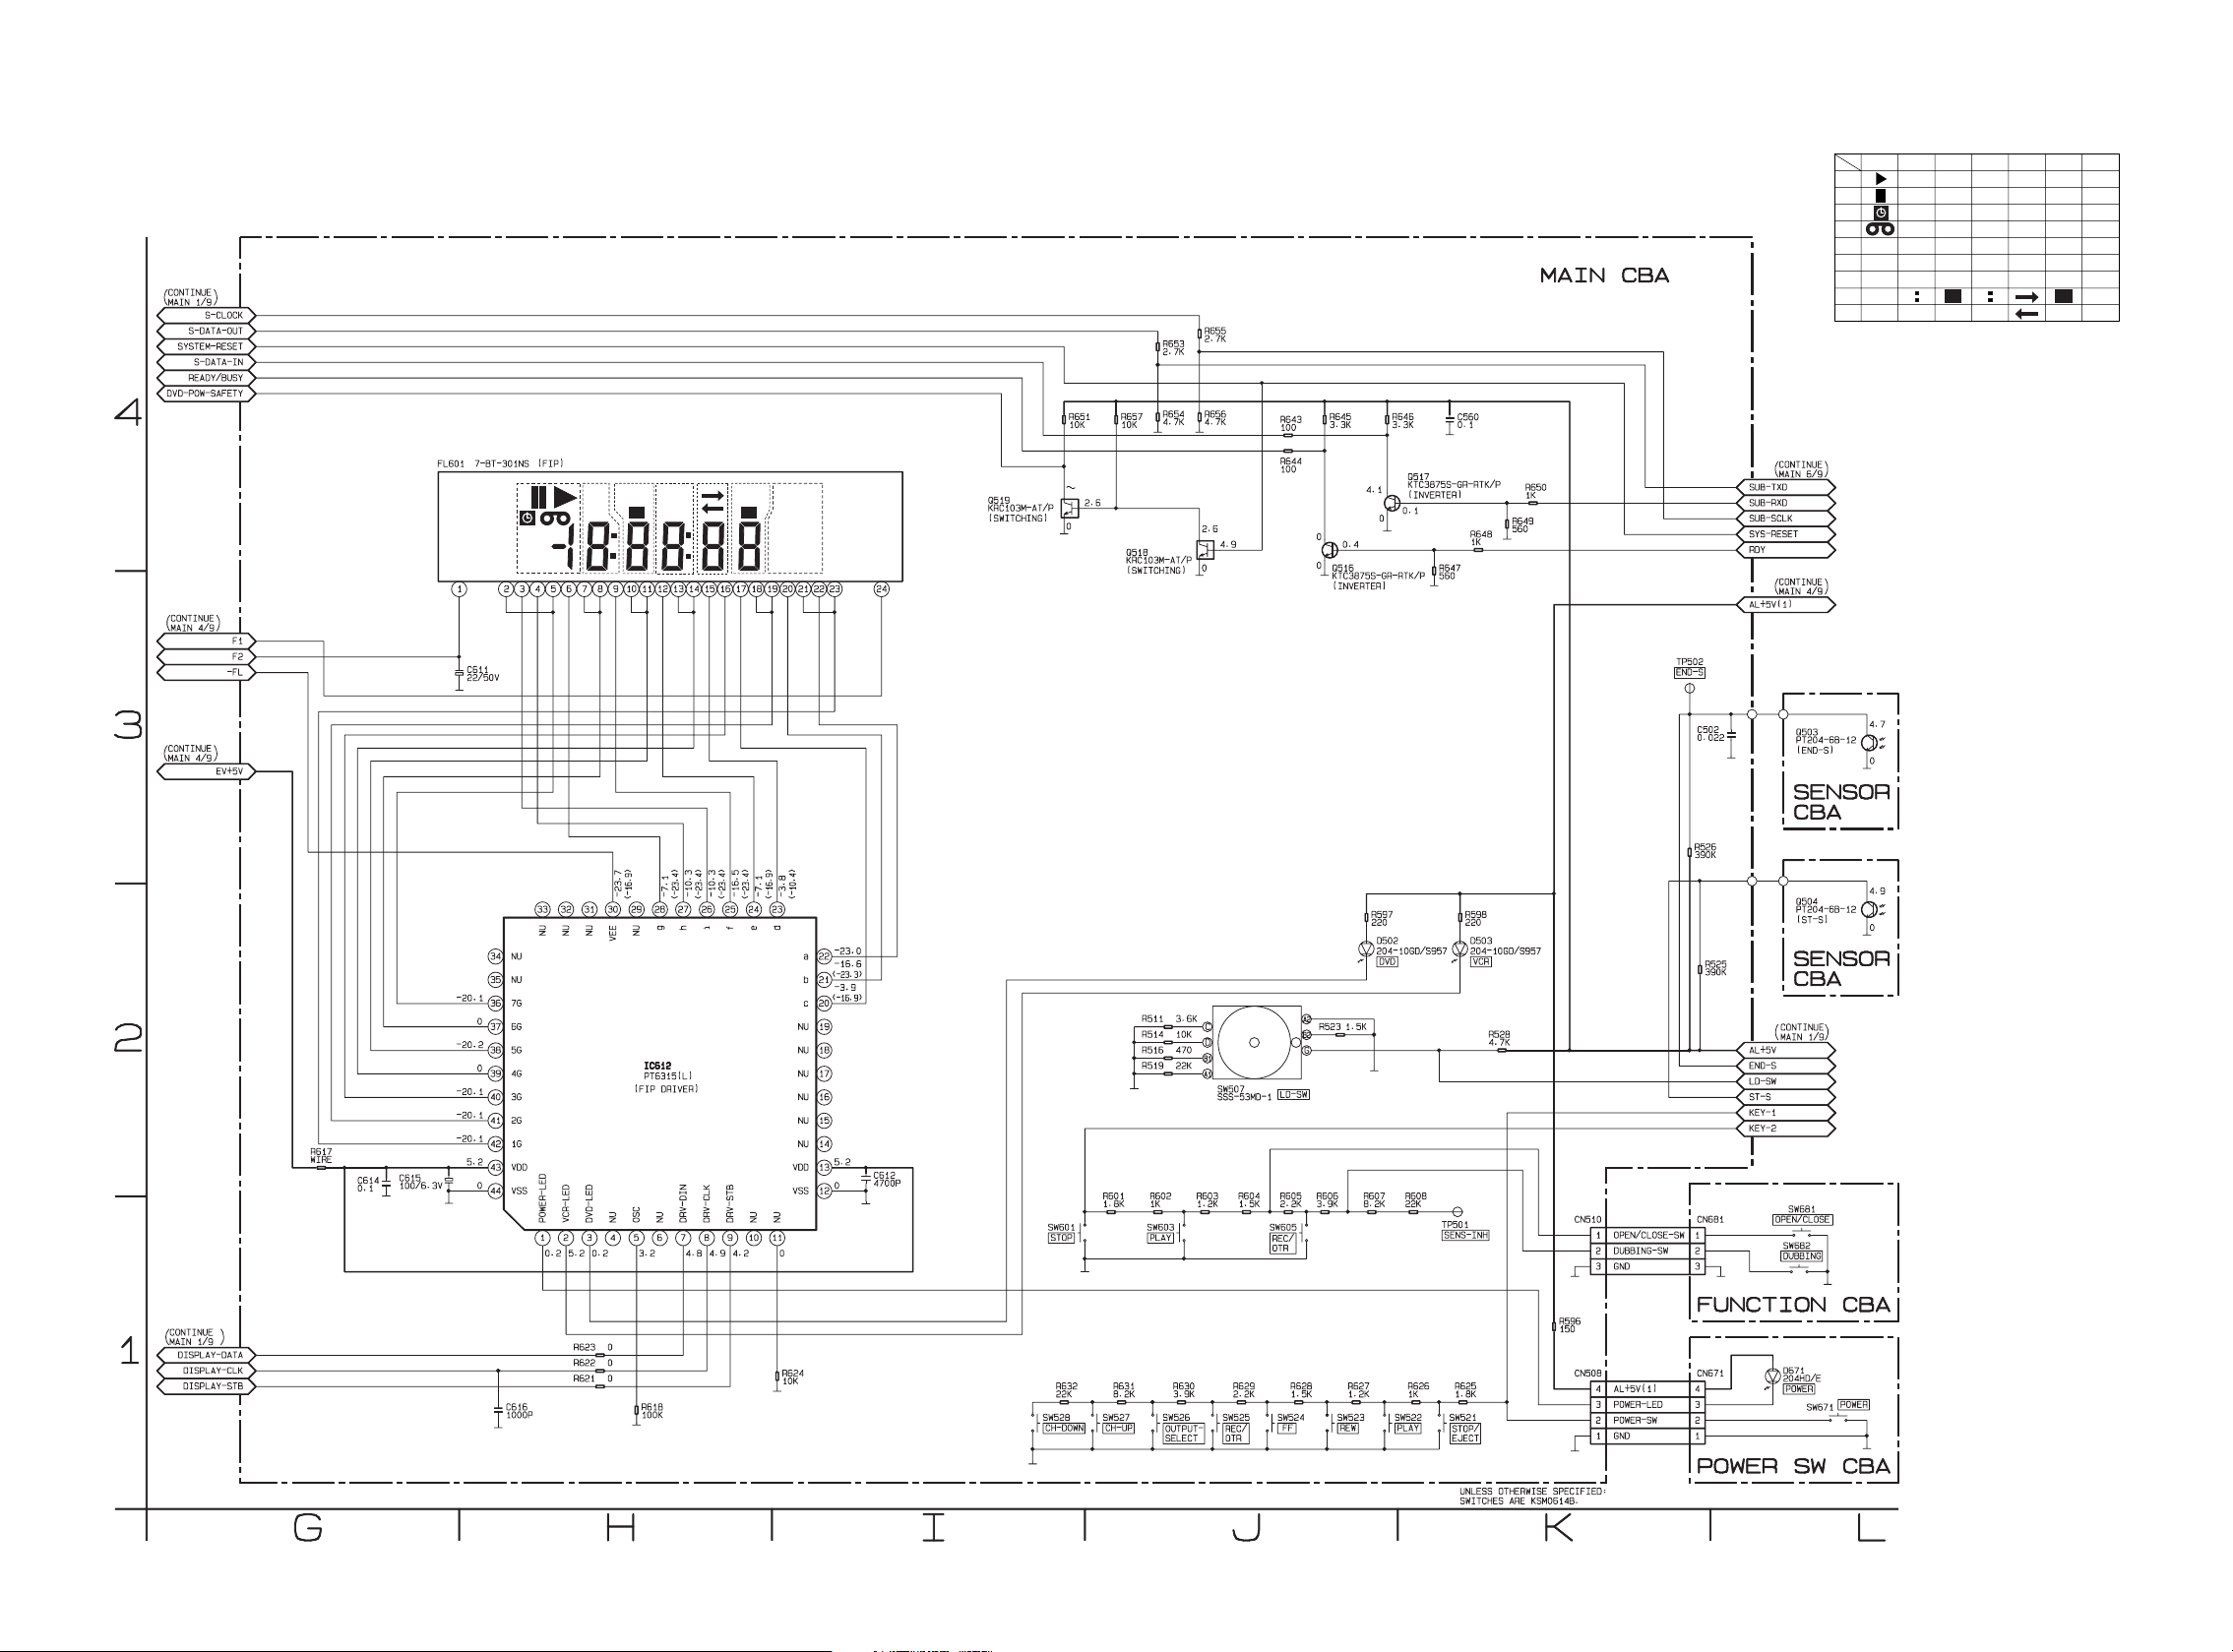
7G 6G 5G 4G 3G 2G 1G
a
b
c
d
e
f
g
c
d
e
f
gg
c
d
e
f
g
c
d
e
f
g
c
d
e
f
g
c
d
e
f
g
hh
i
ababababa
b
FL601 MATRIX CHART
REPEAT
PM
REC
VCD VCR DVD
R
XP
SP
LP
EP
SLP
P.SCAN
SEP
W
CD
T
C
Main 2/9, Power SW, Function & Sensor Schematic Diagram < VCR Section >
18/6/2013
World of free manuals
7G
6G
5G 4G 3G 2G 1G
VCD VCR
REC
PM
REPEAT
CD
T C
h
g
h
c
DVD
a
d
g
R
XP SP
b
LP EP
SLP
ef
P.SCAN
W
SEP
1-12-4
E9B05SCM2
Page 37
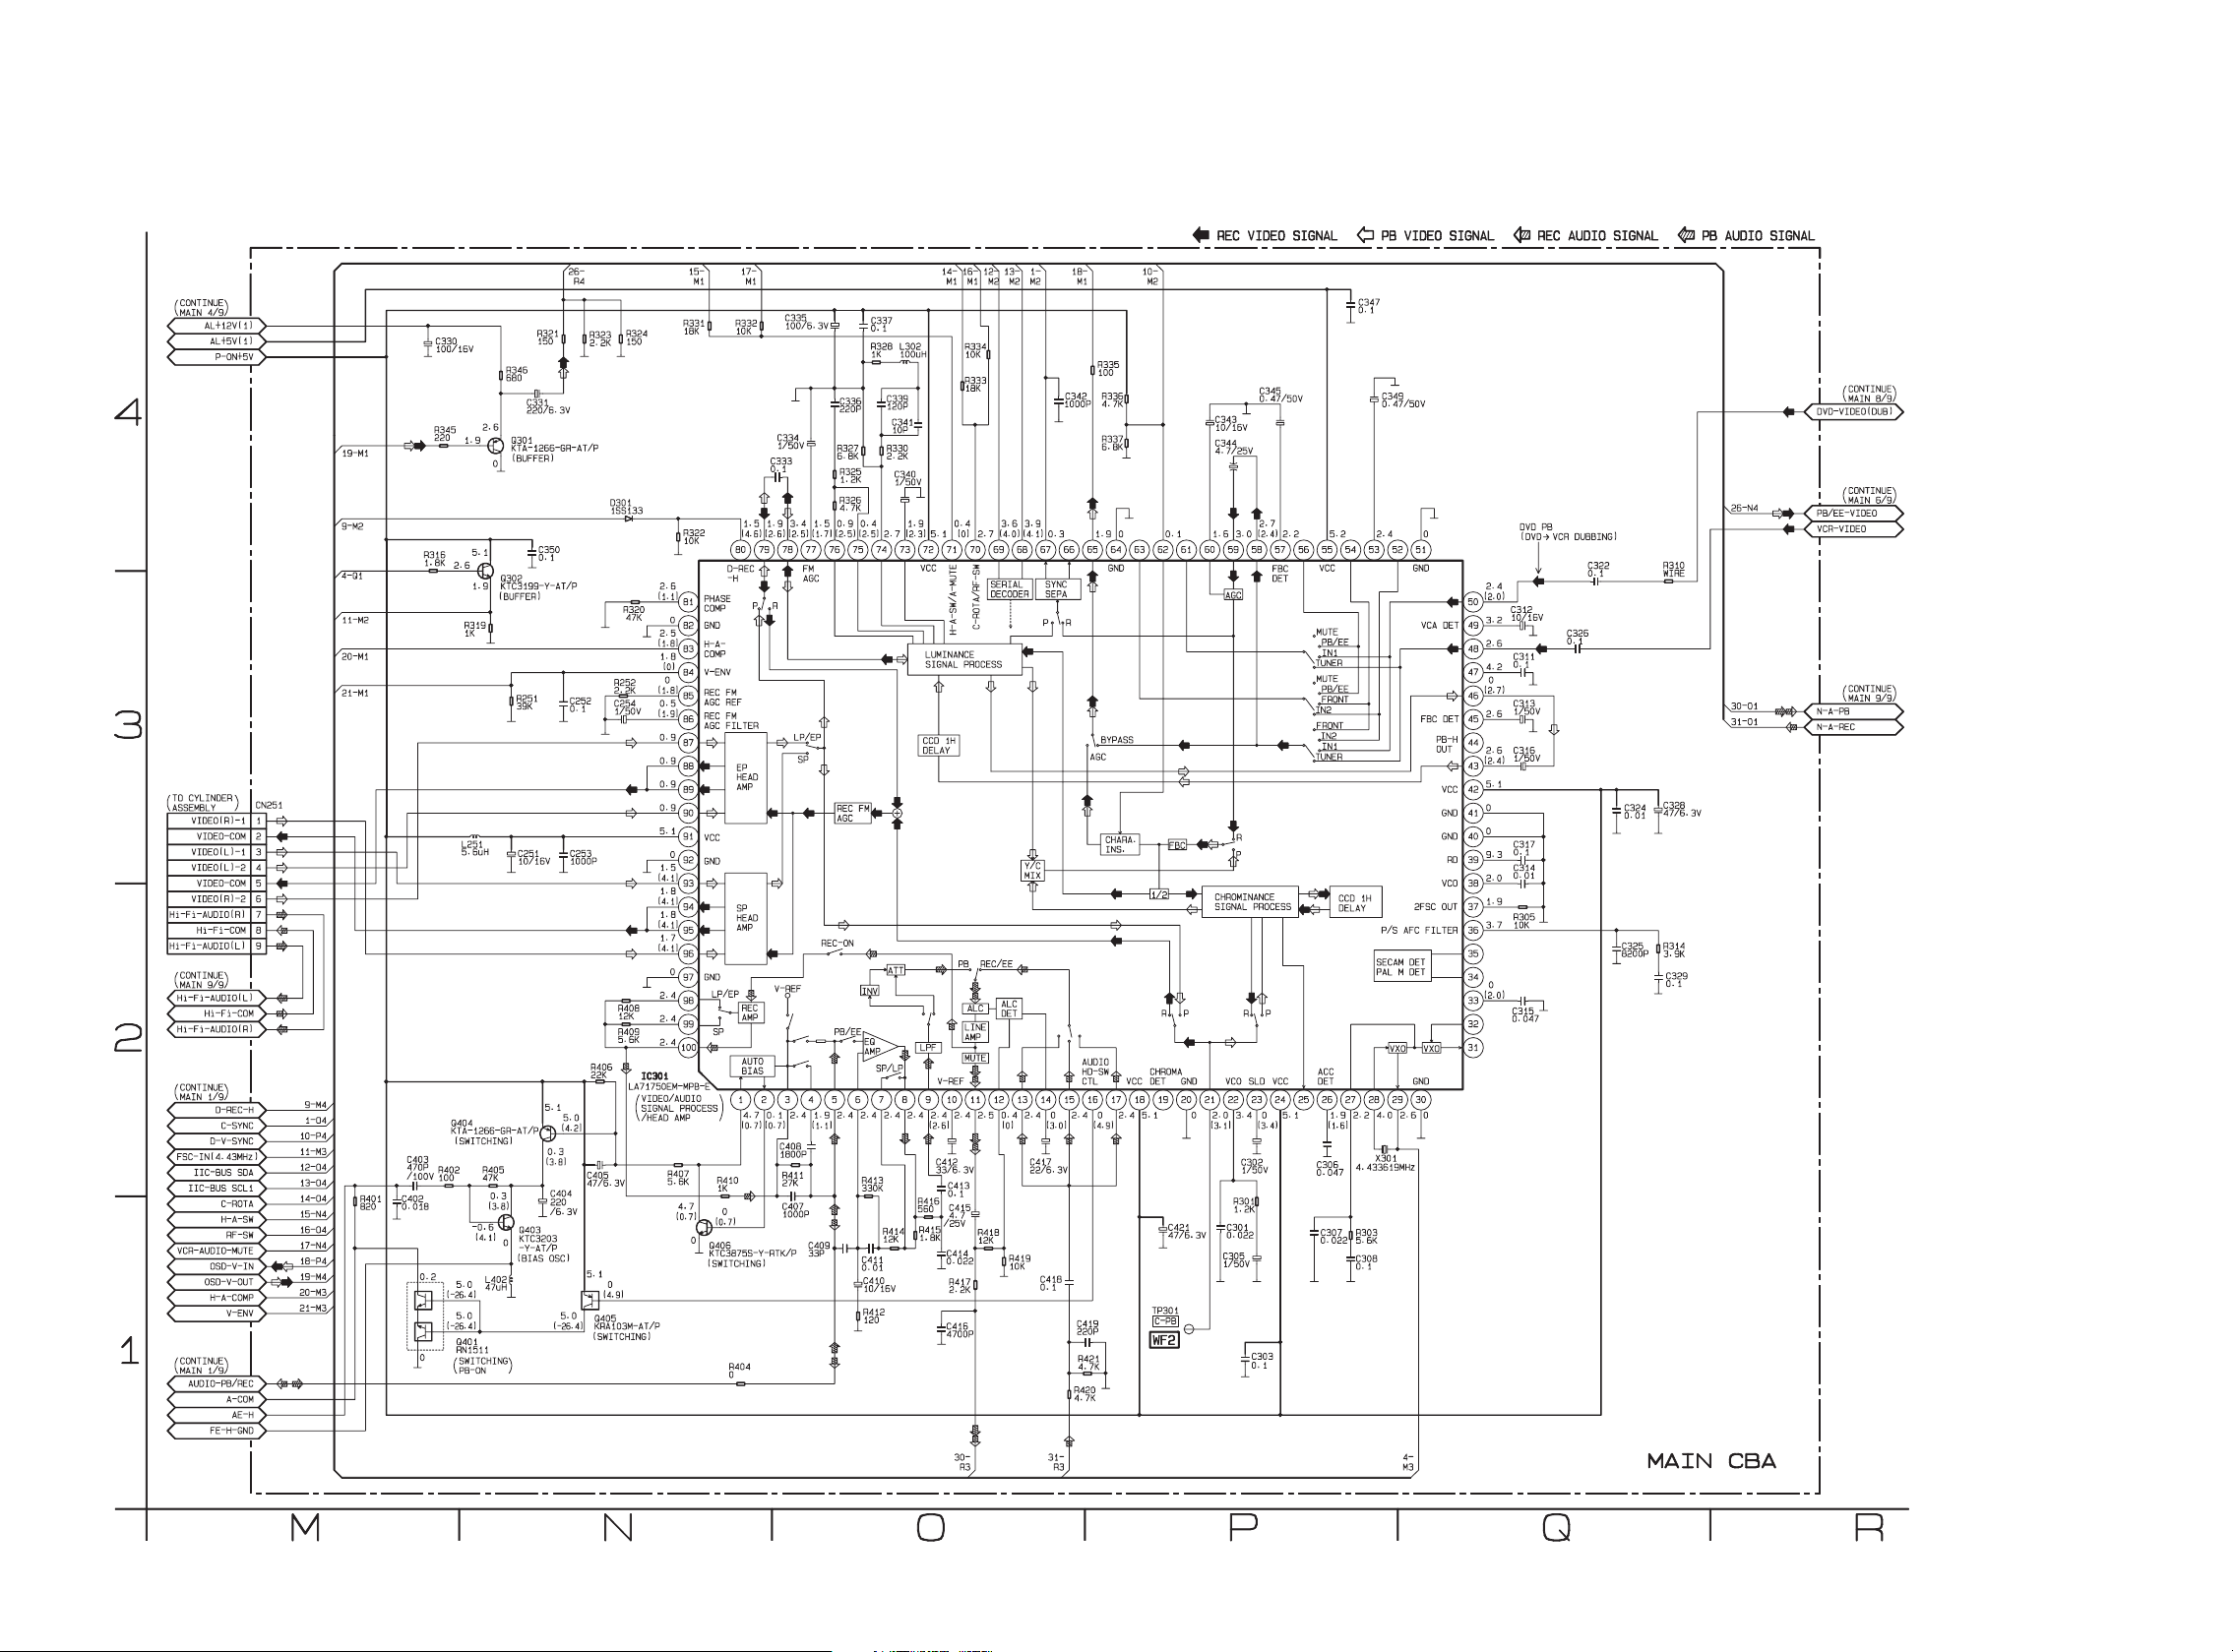
Main 3/9 Schematic Diagram < VCR Section >
18/6/2013
World of free manuals
1-12-5
E9B05SCM3
Page 38
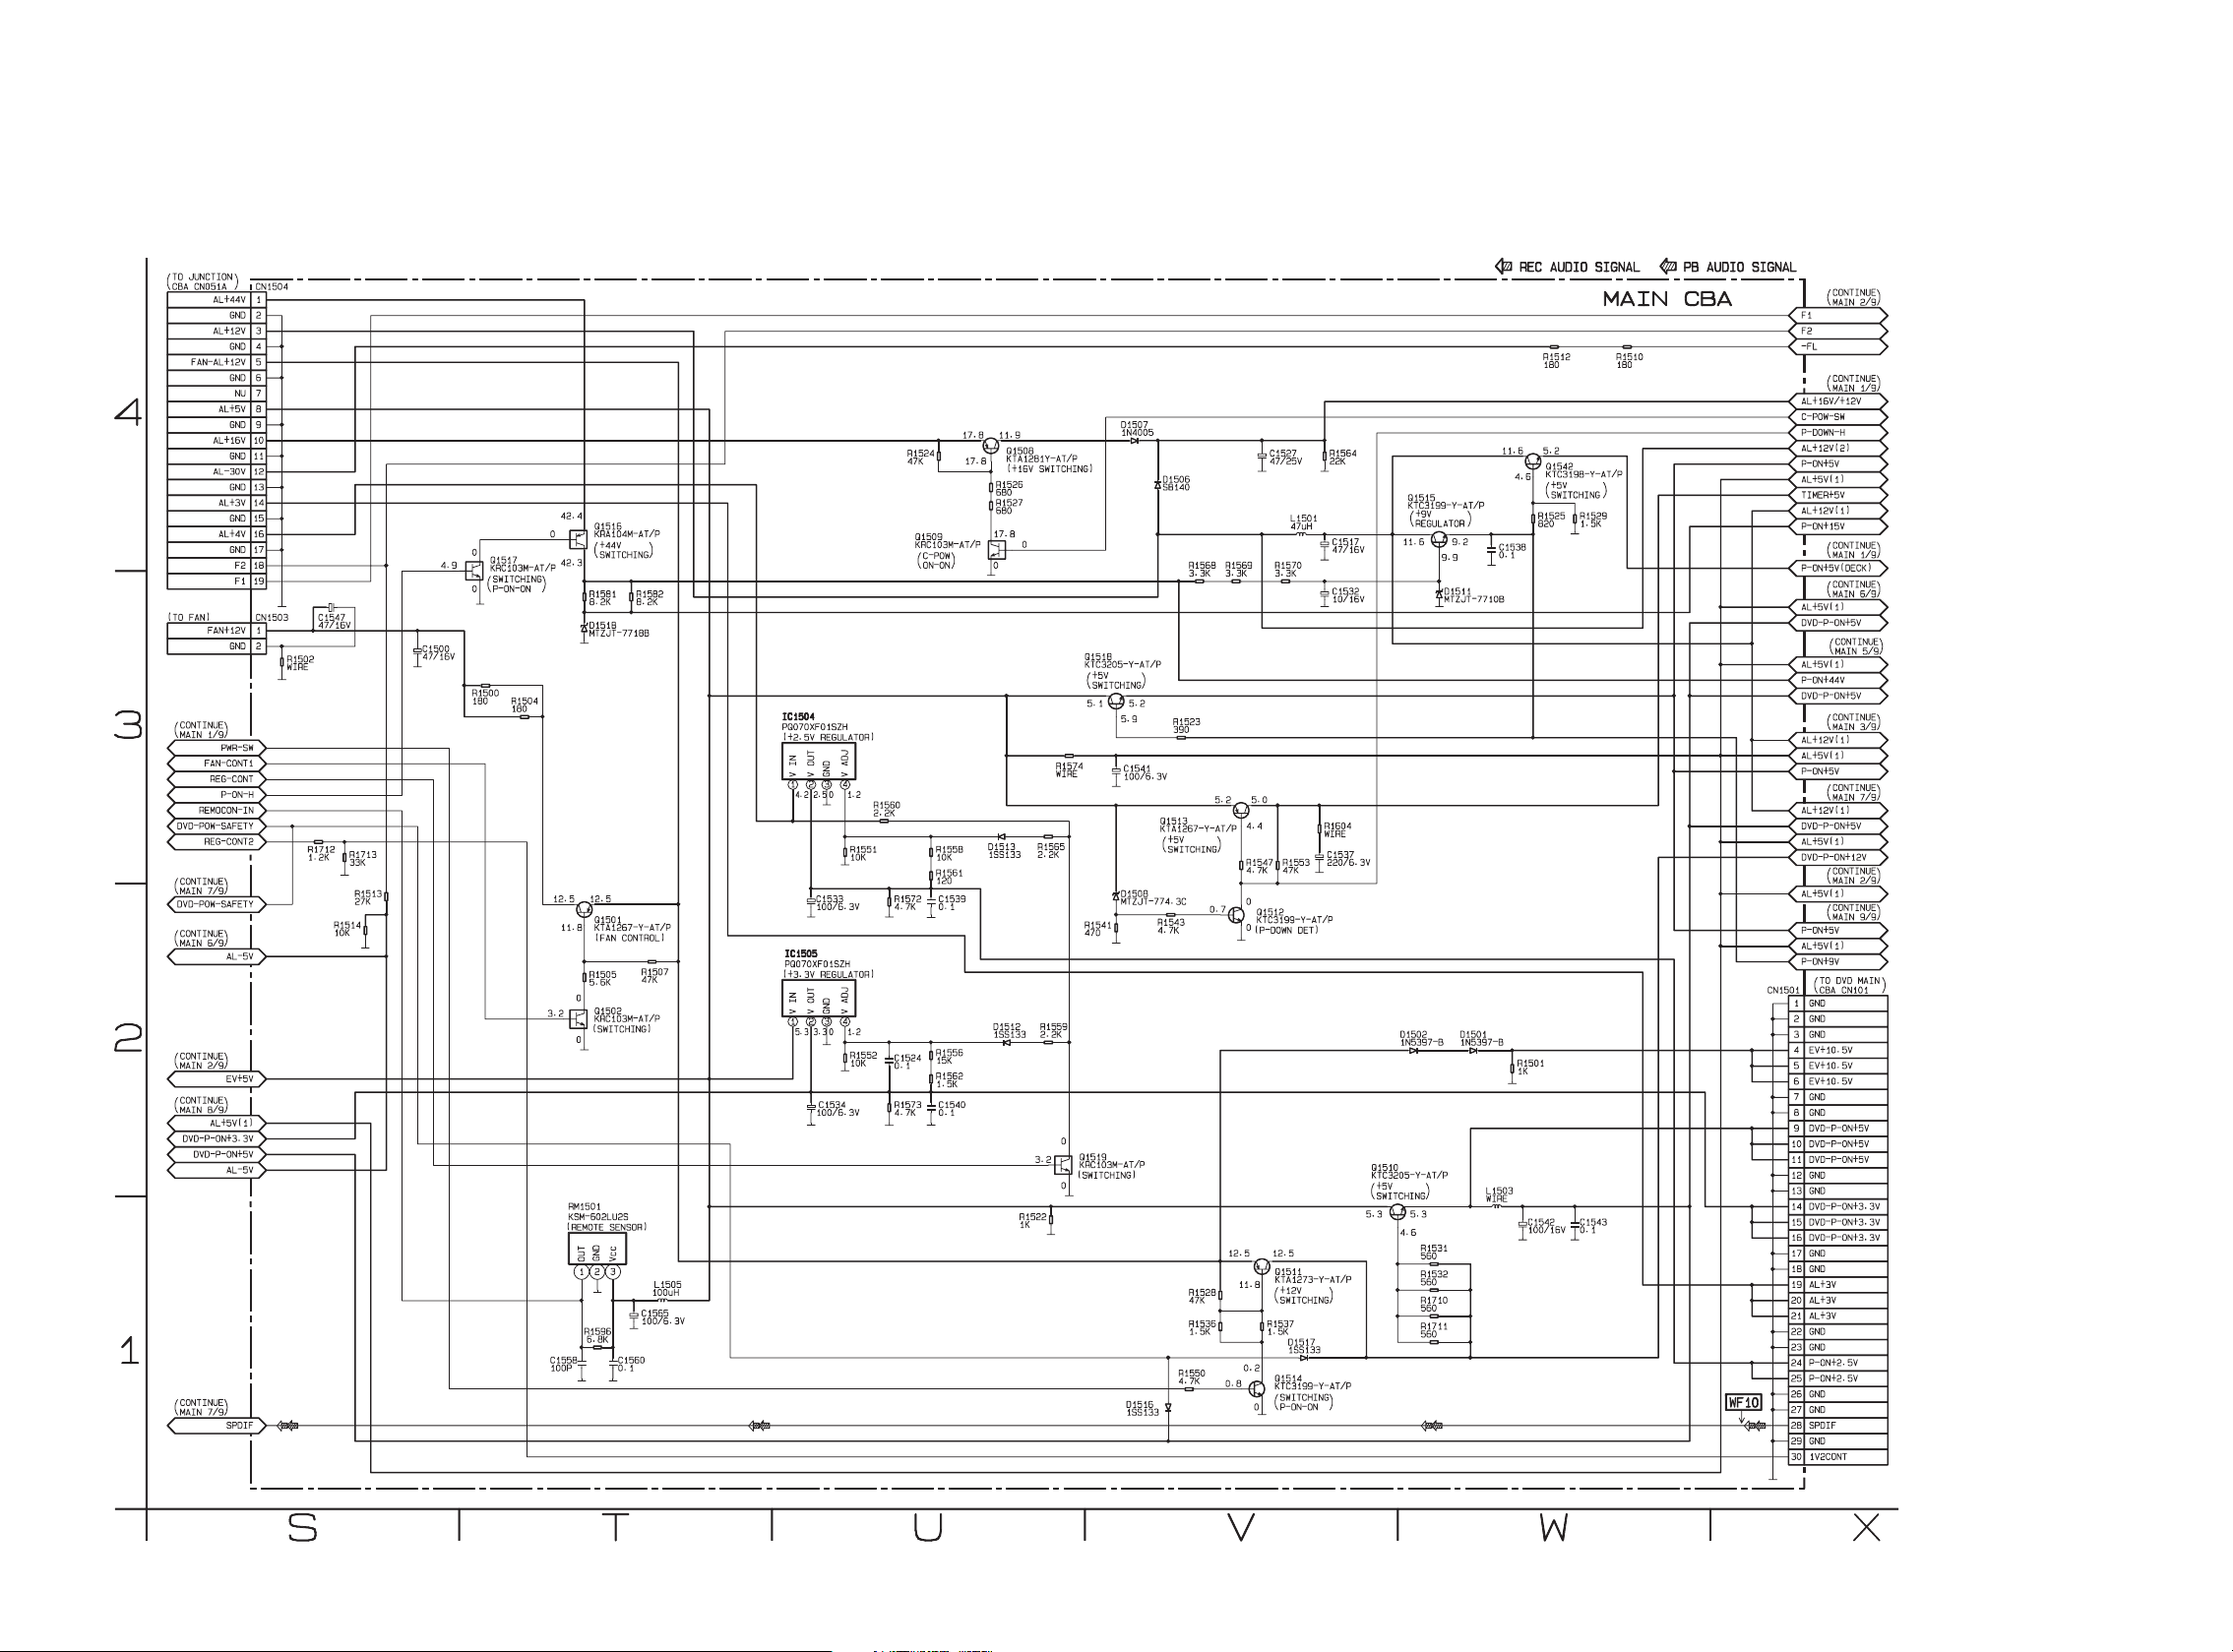
Main 4/9 Schematic Diagram < VCR Section >
18/6/2013
World of free manuals
1-12-6
E9B05SCM4
Page 39
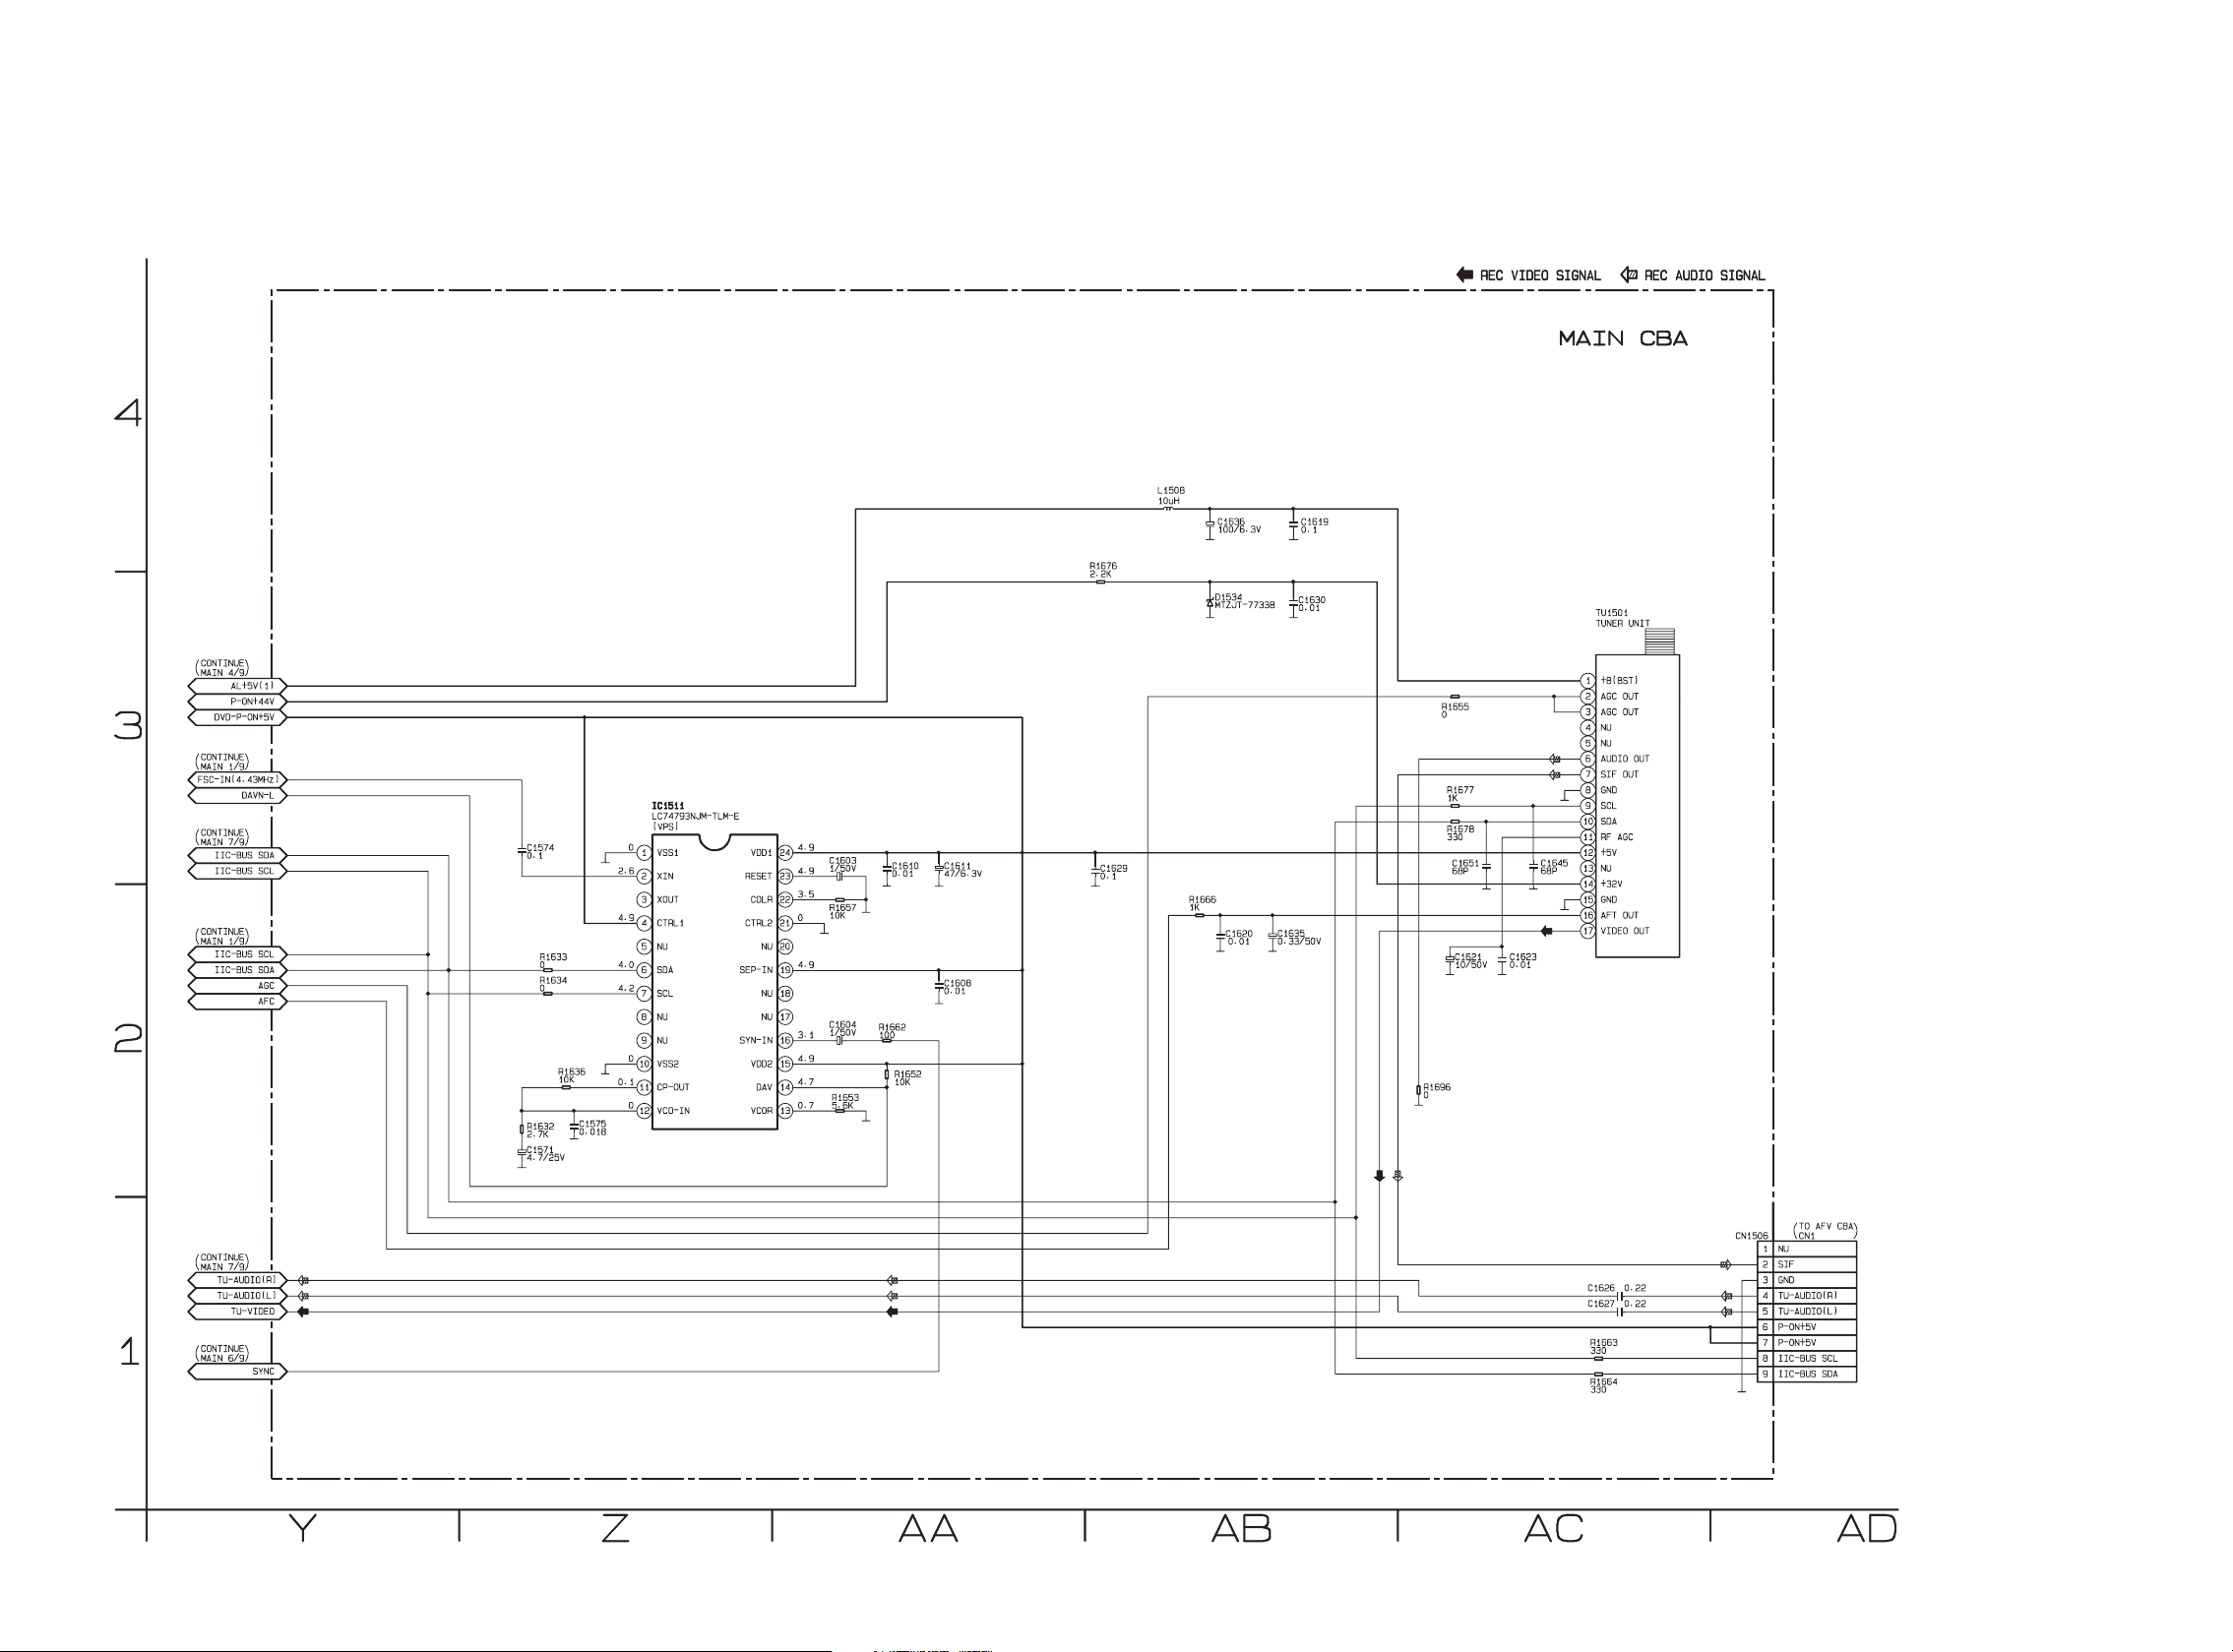
Main 5/9 Schematic Diagram < VCR Section >
18/6/2013
World of free manuals
1-12-7
E9B05SCM5
Page 40
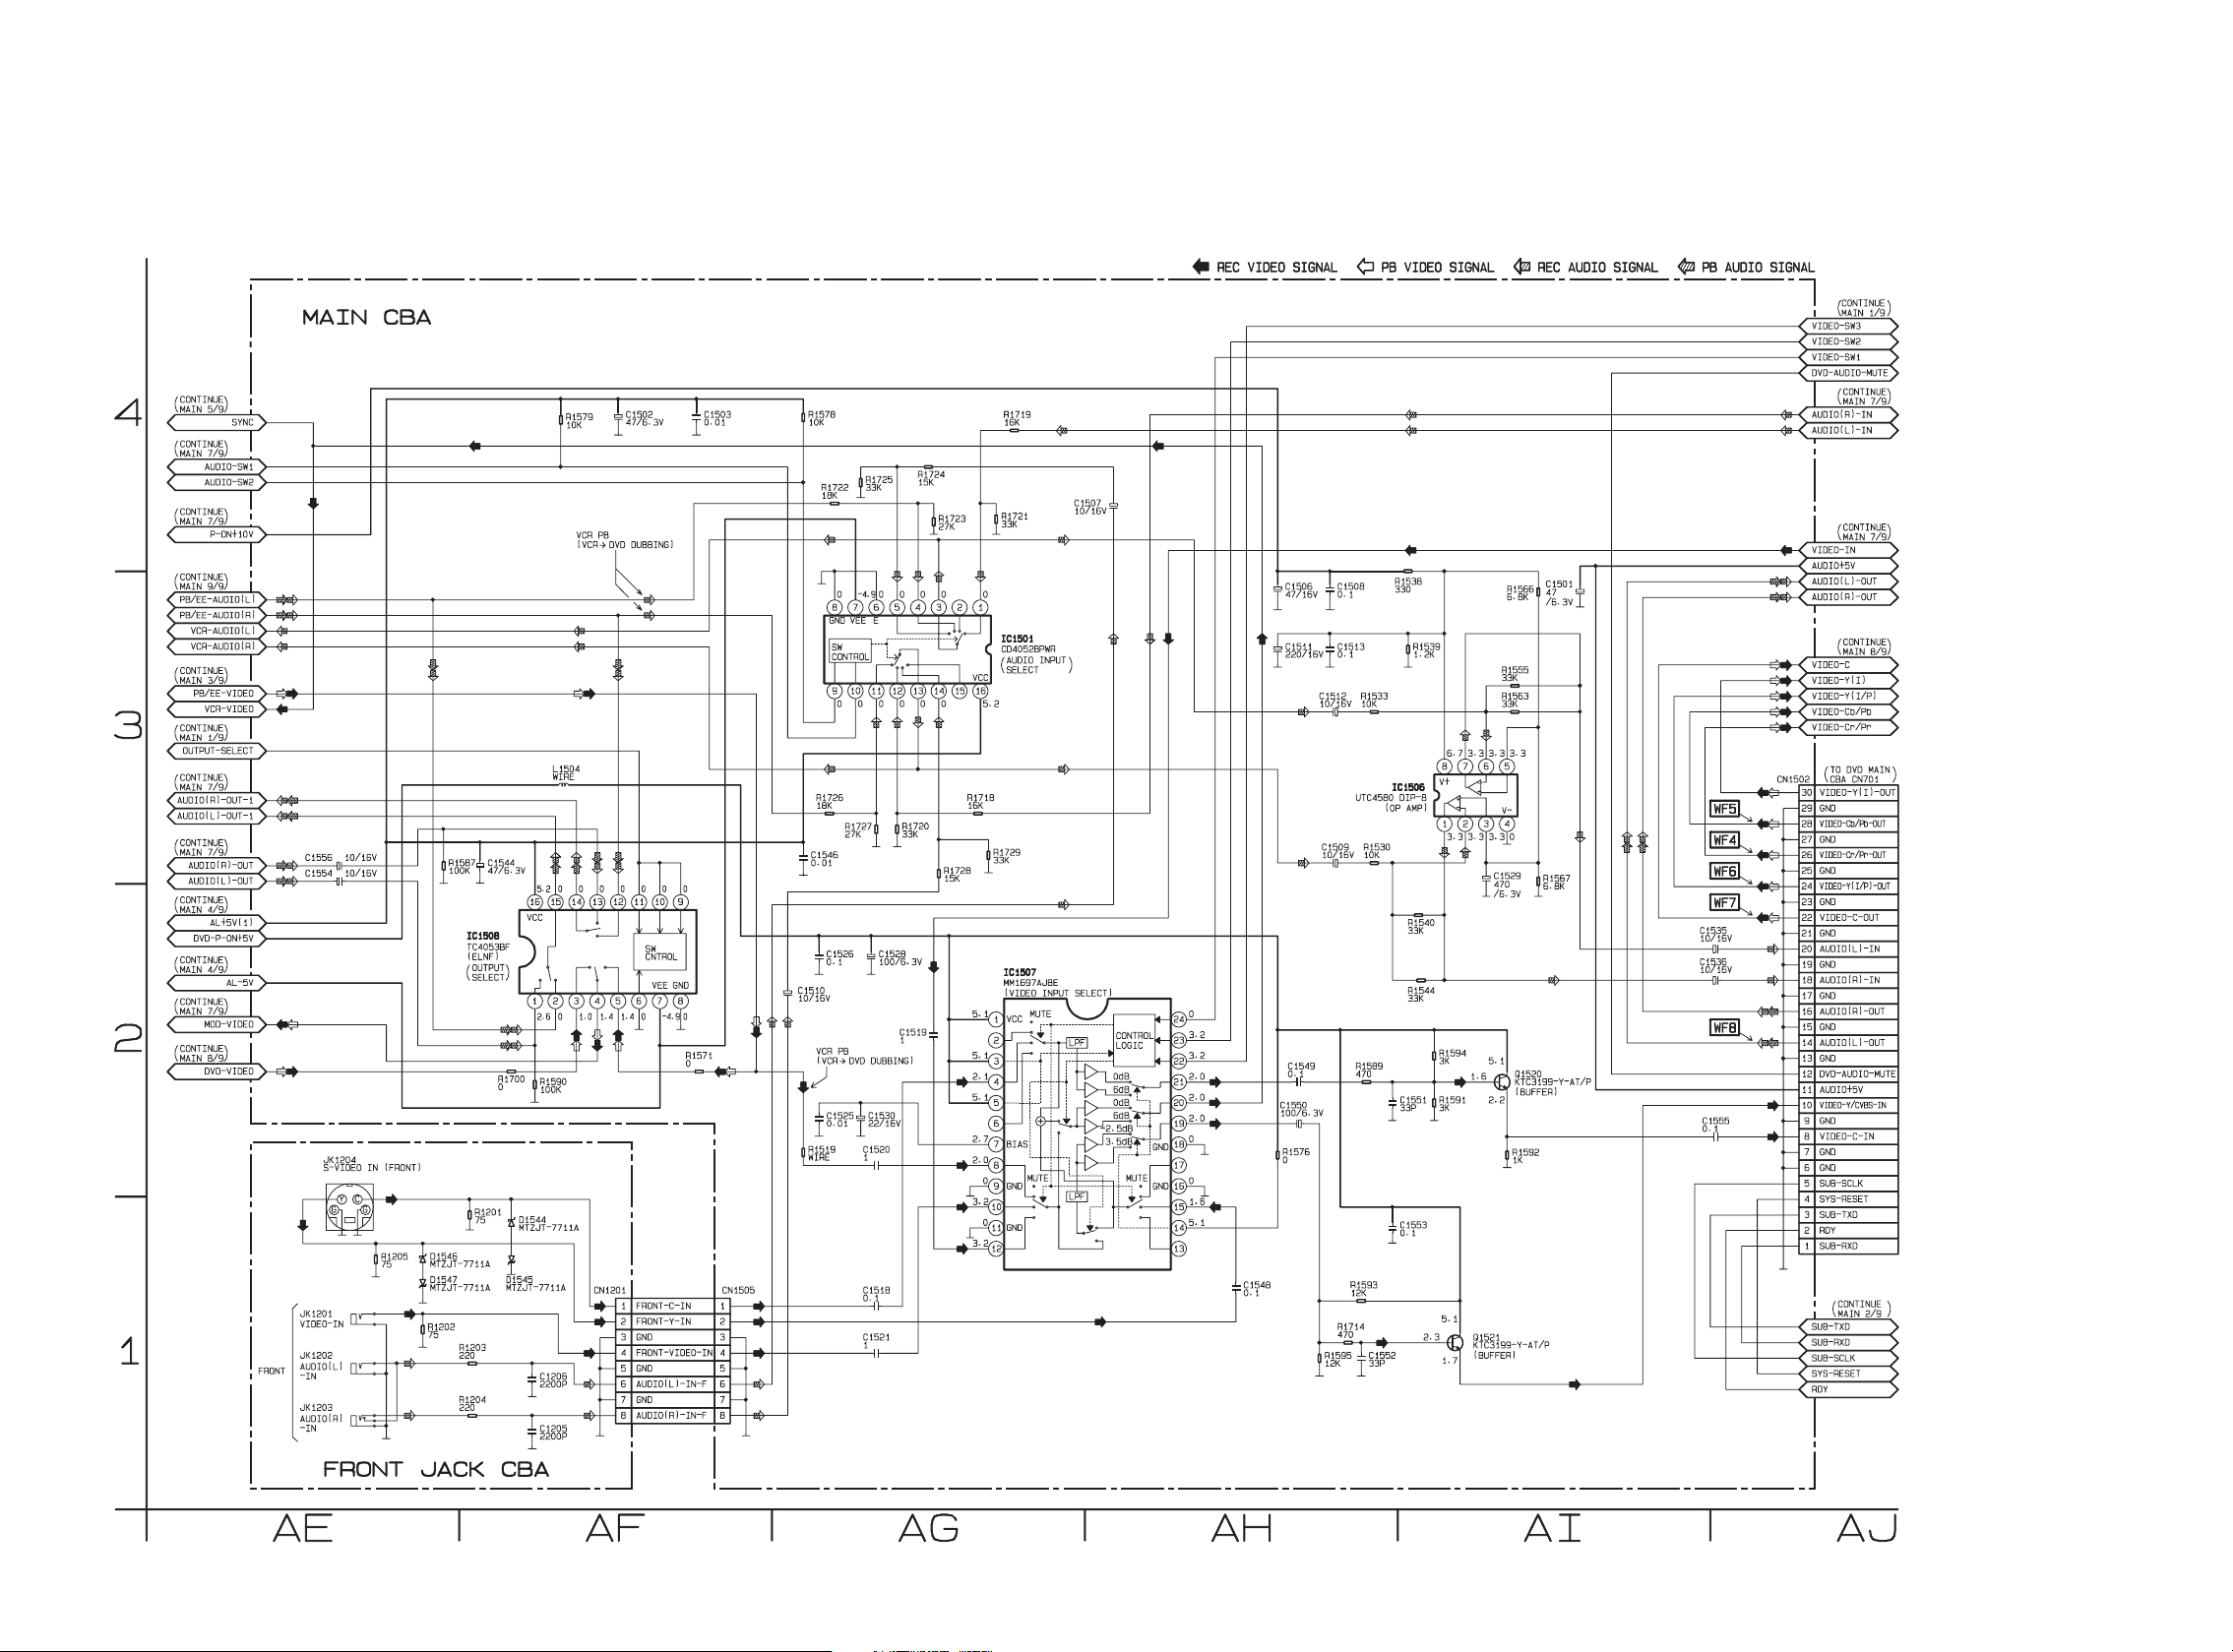
Main 6/9 & Front Jack Schematic Diagram < VCR Section >
18/6/2013
World of free manuals
1-12-8
E9B05SCM6
Page 41
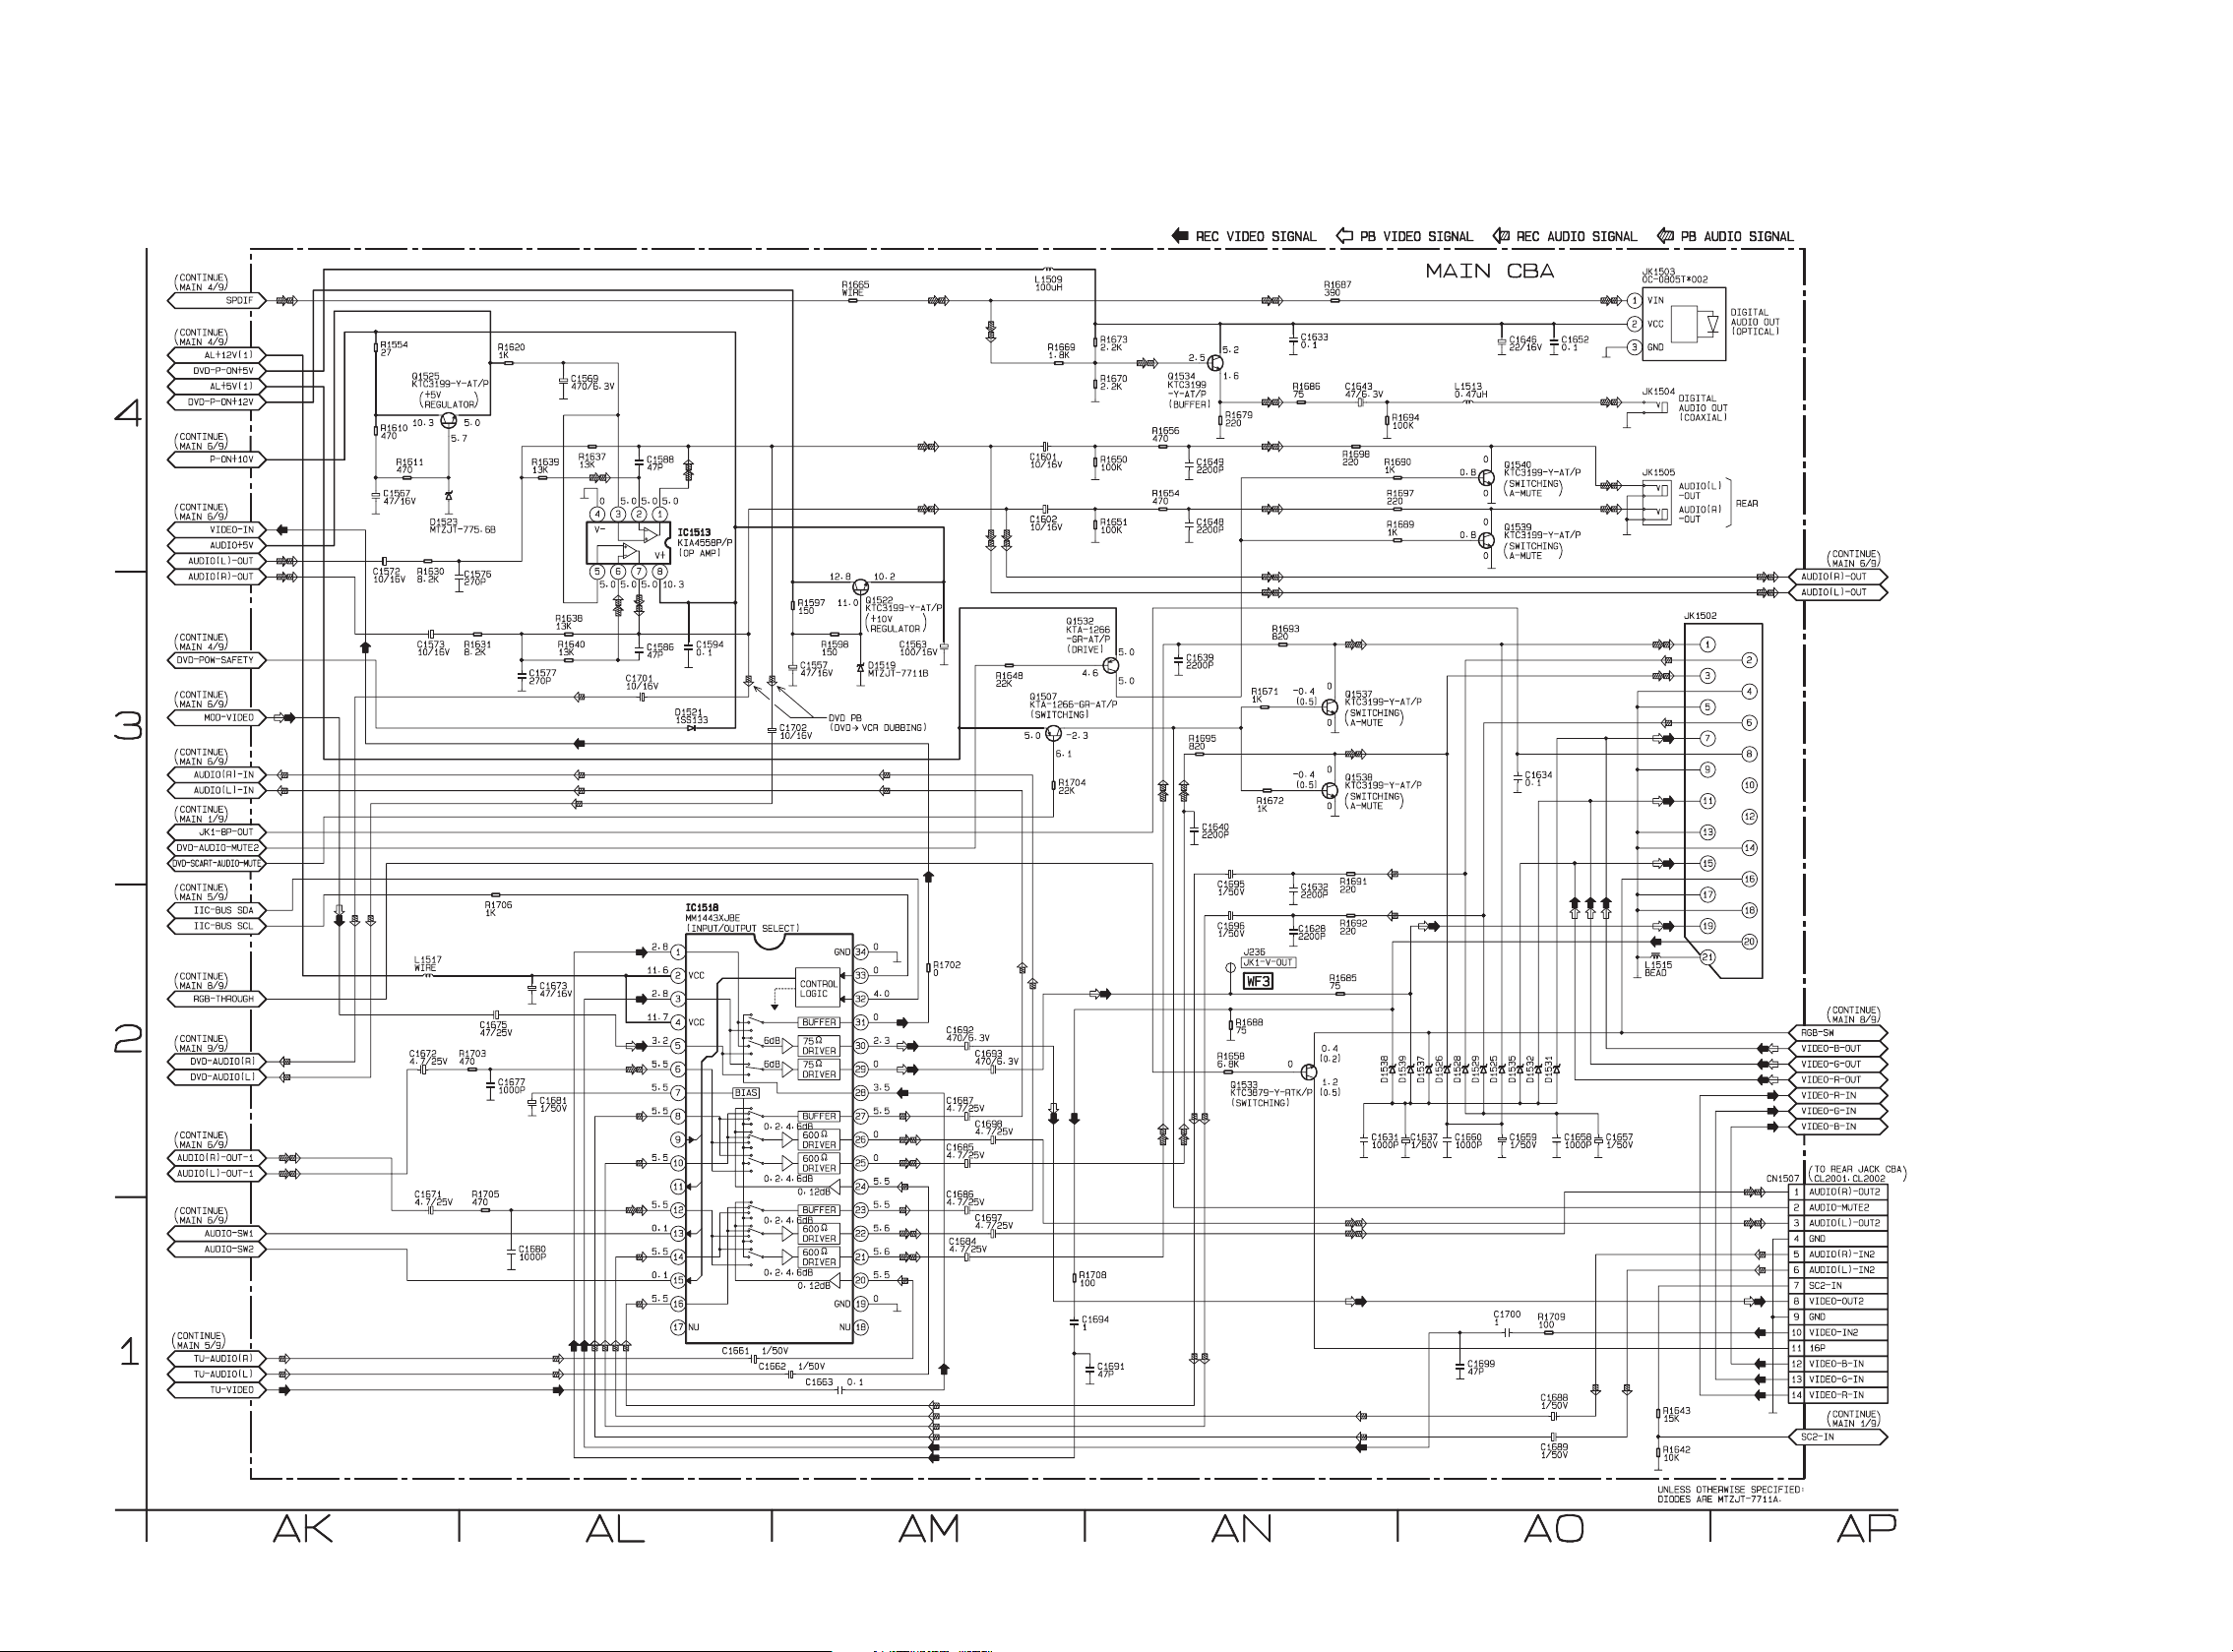
Main 7/9 Schematic Diagram < VCR Section >
18/6/2013
World of free manuals
1-12-9
E9B05SCM7
Page 42
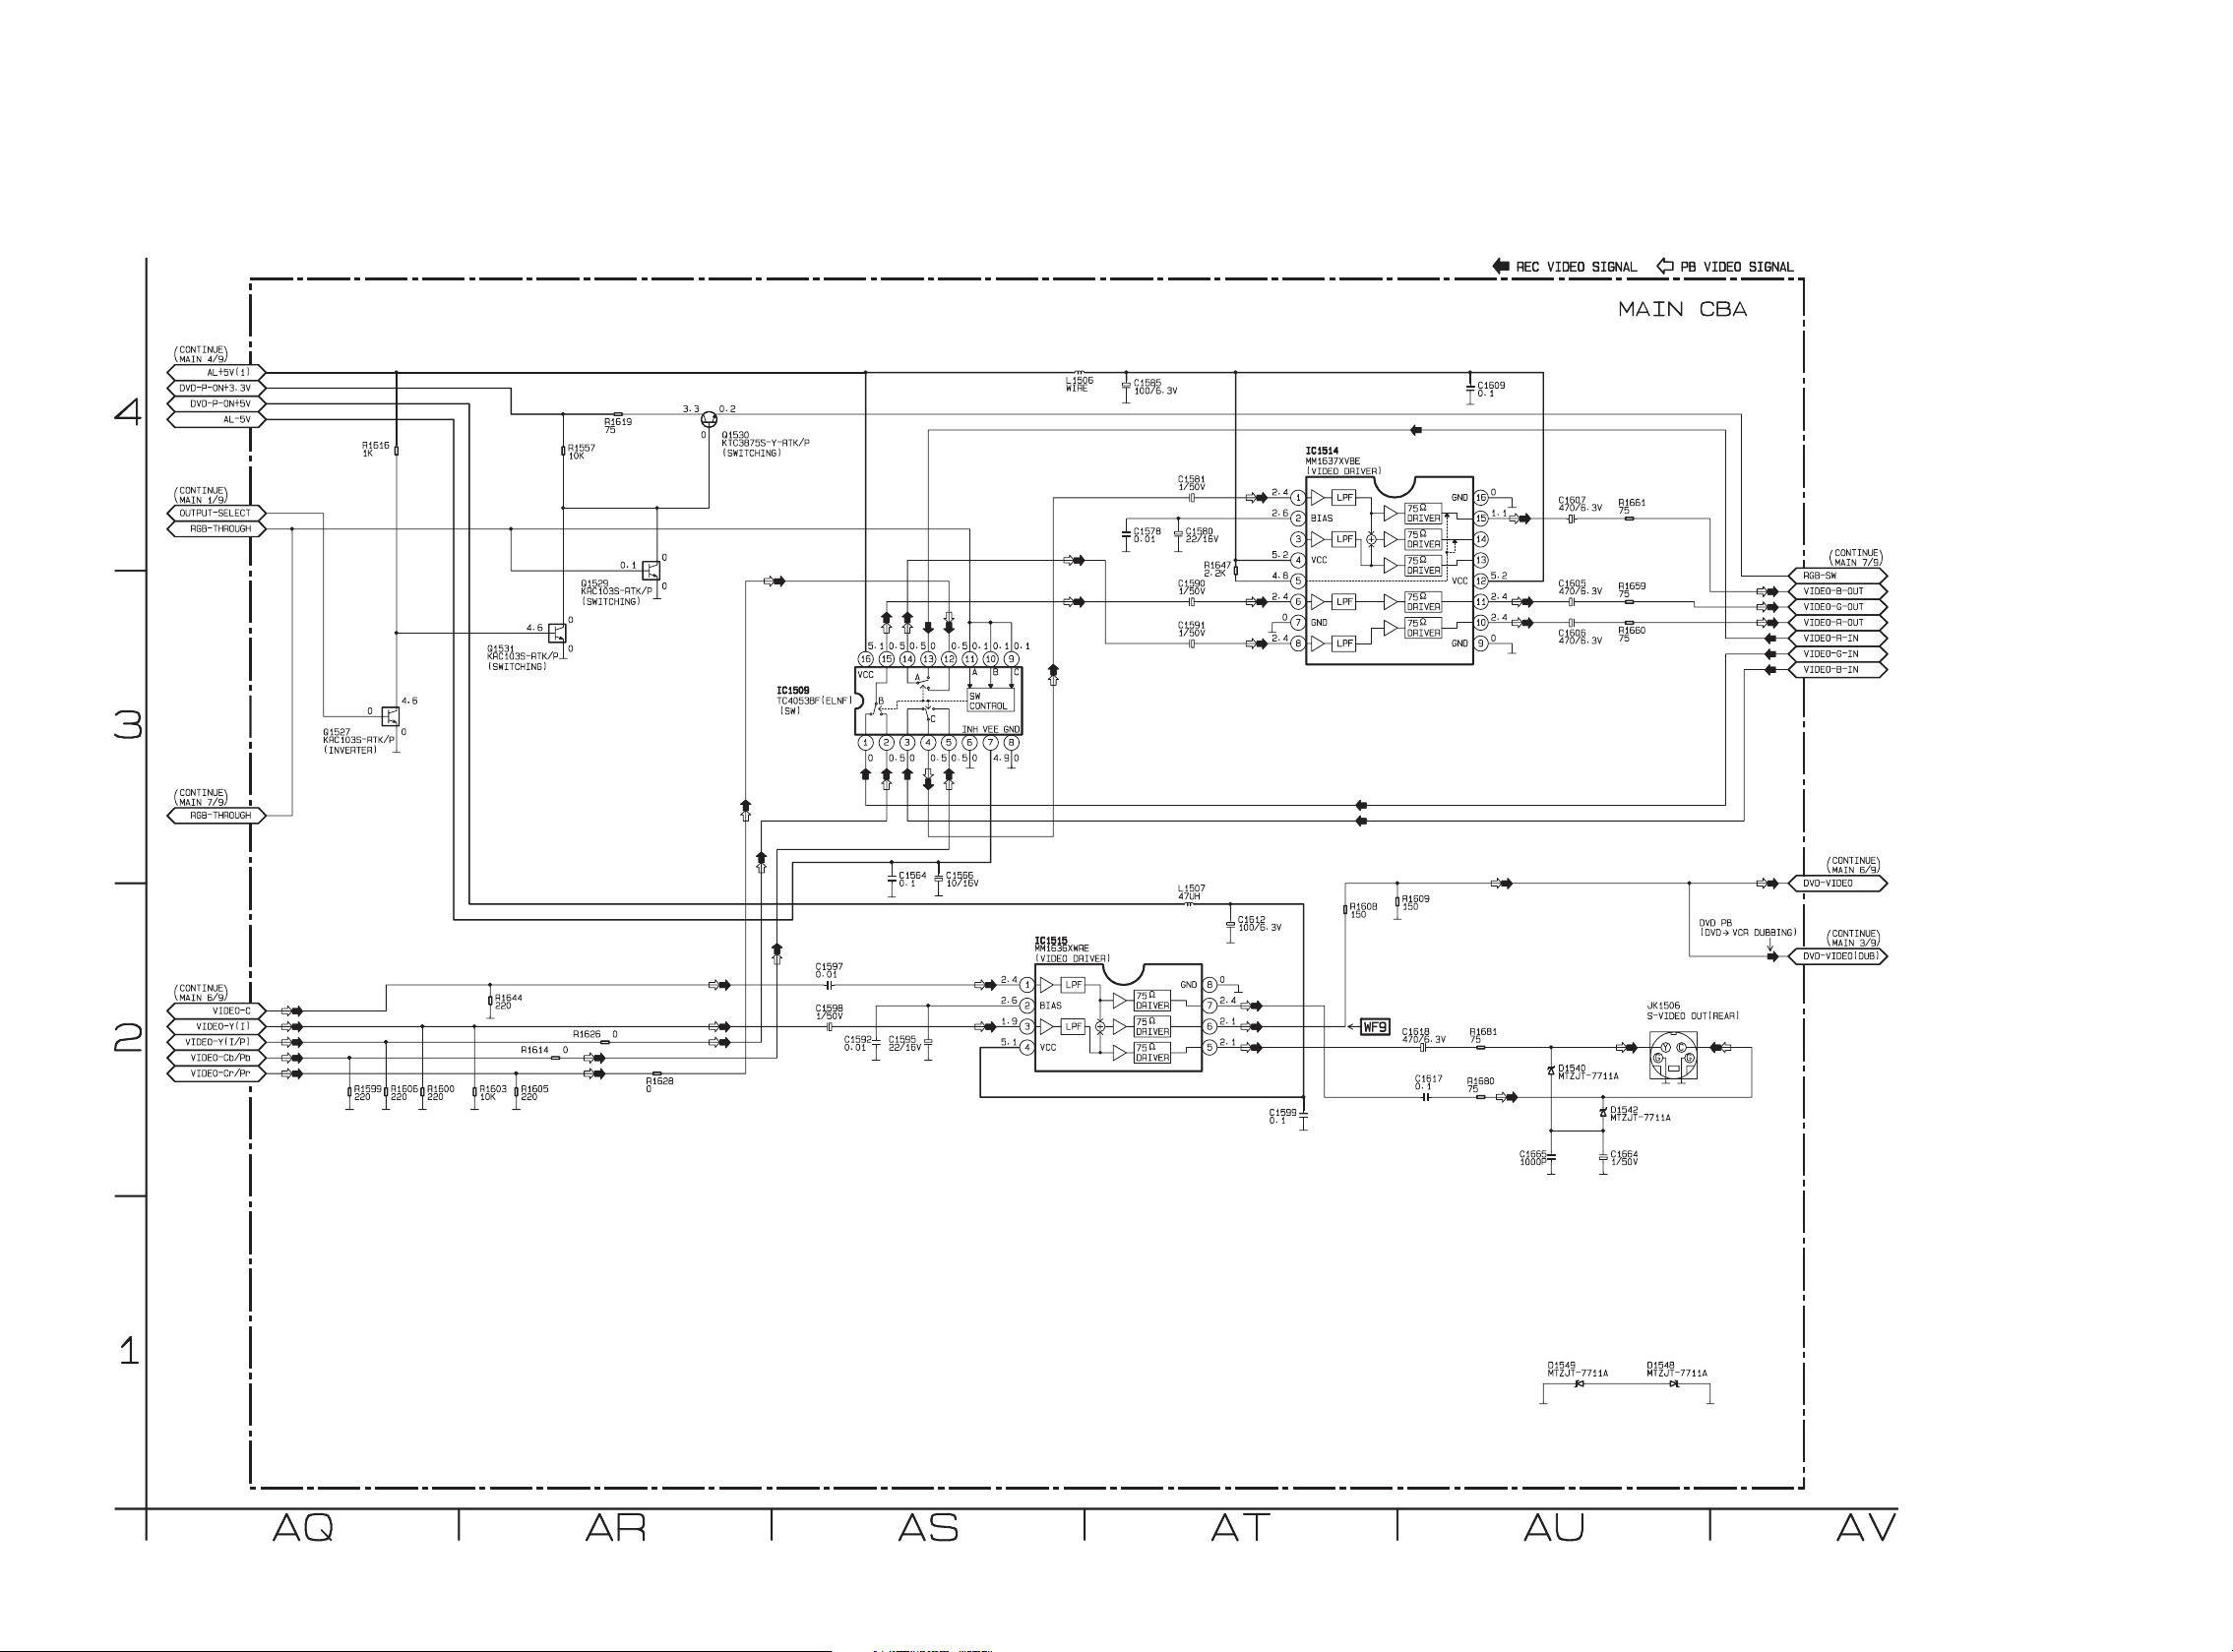
Main 8/9 Schematic Diagram < VCR Section >
18/6/2013
World of free manuals
1-12-10
E9B05SCM8
Page 43
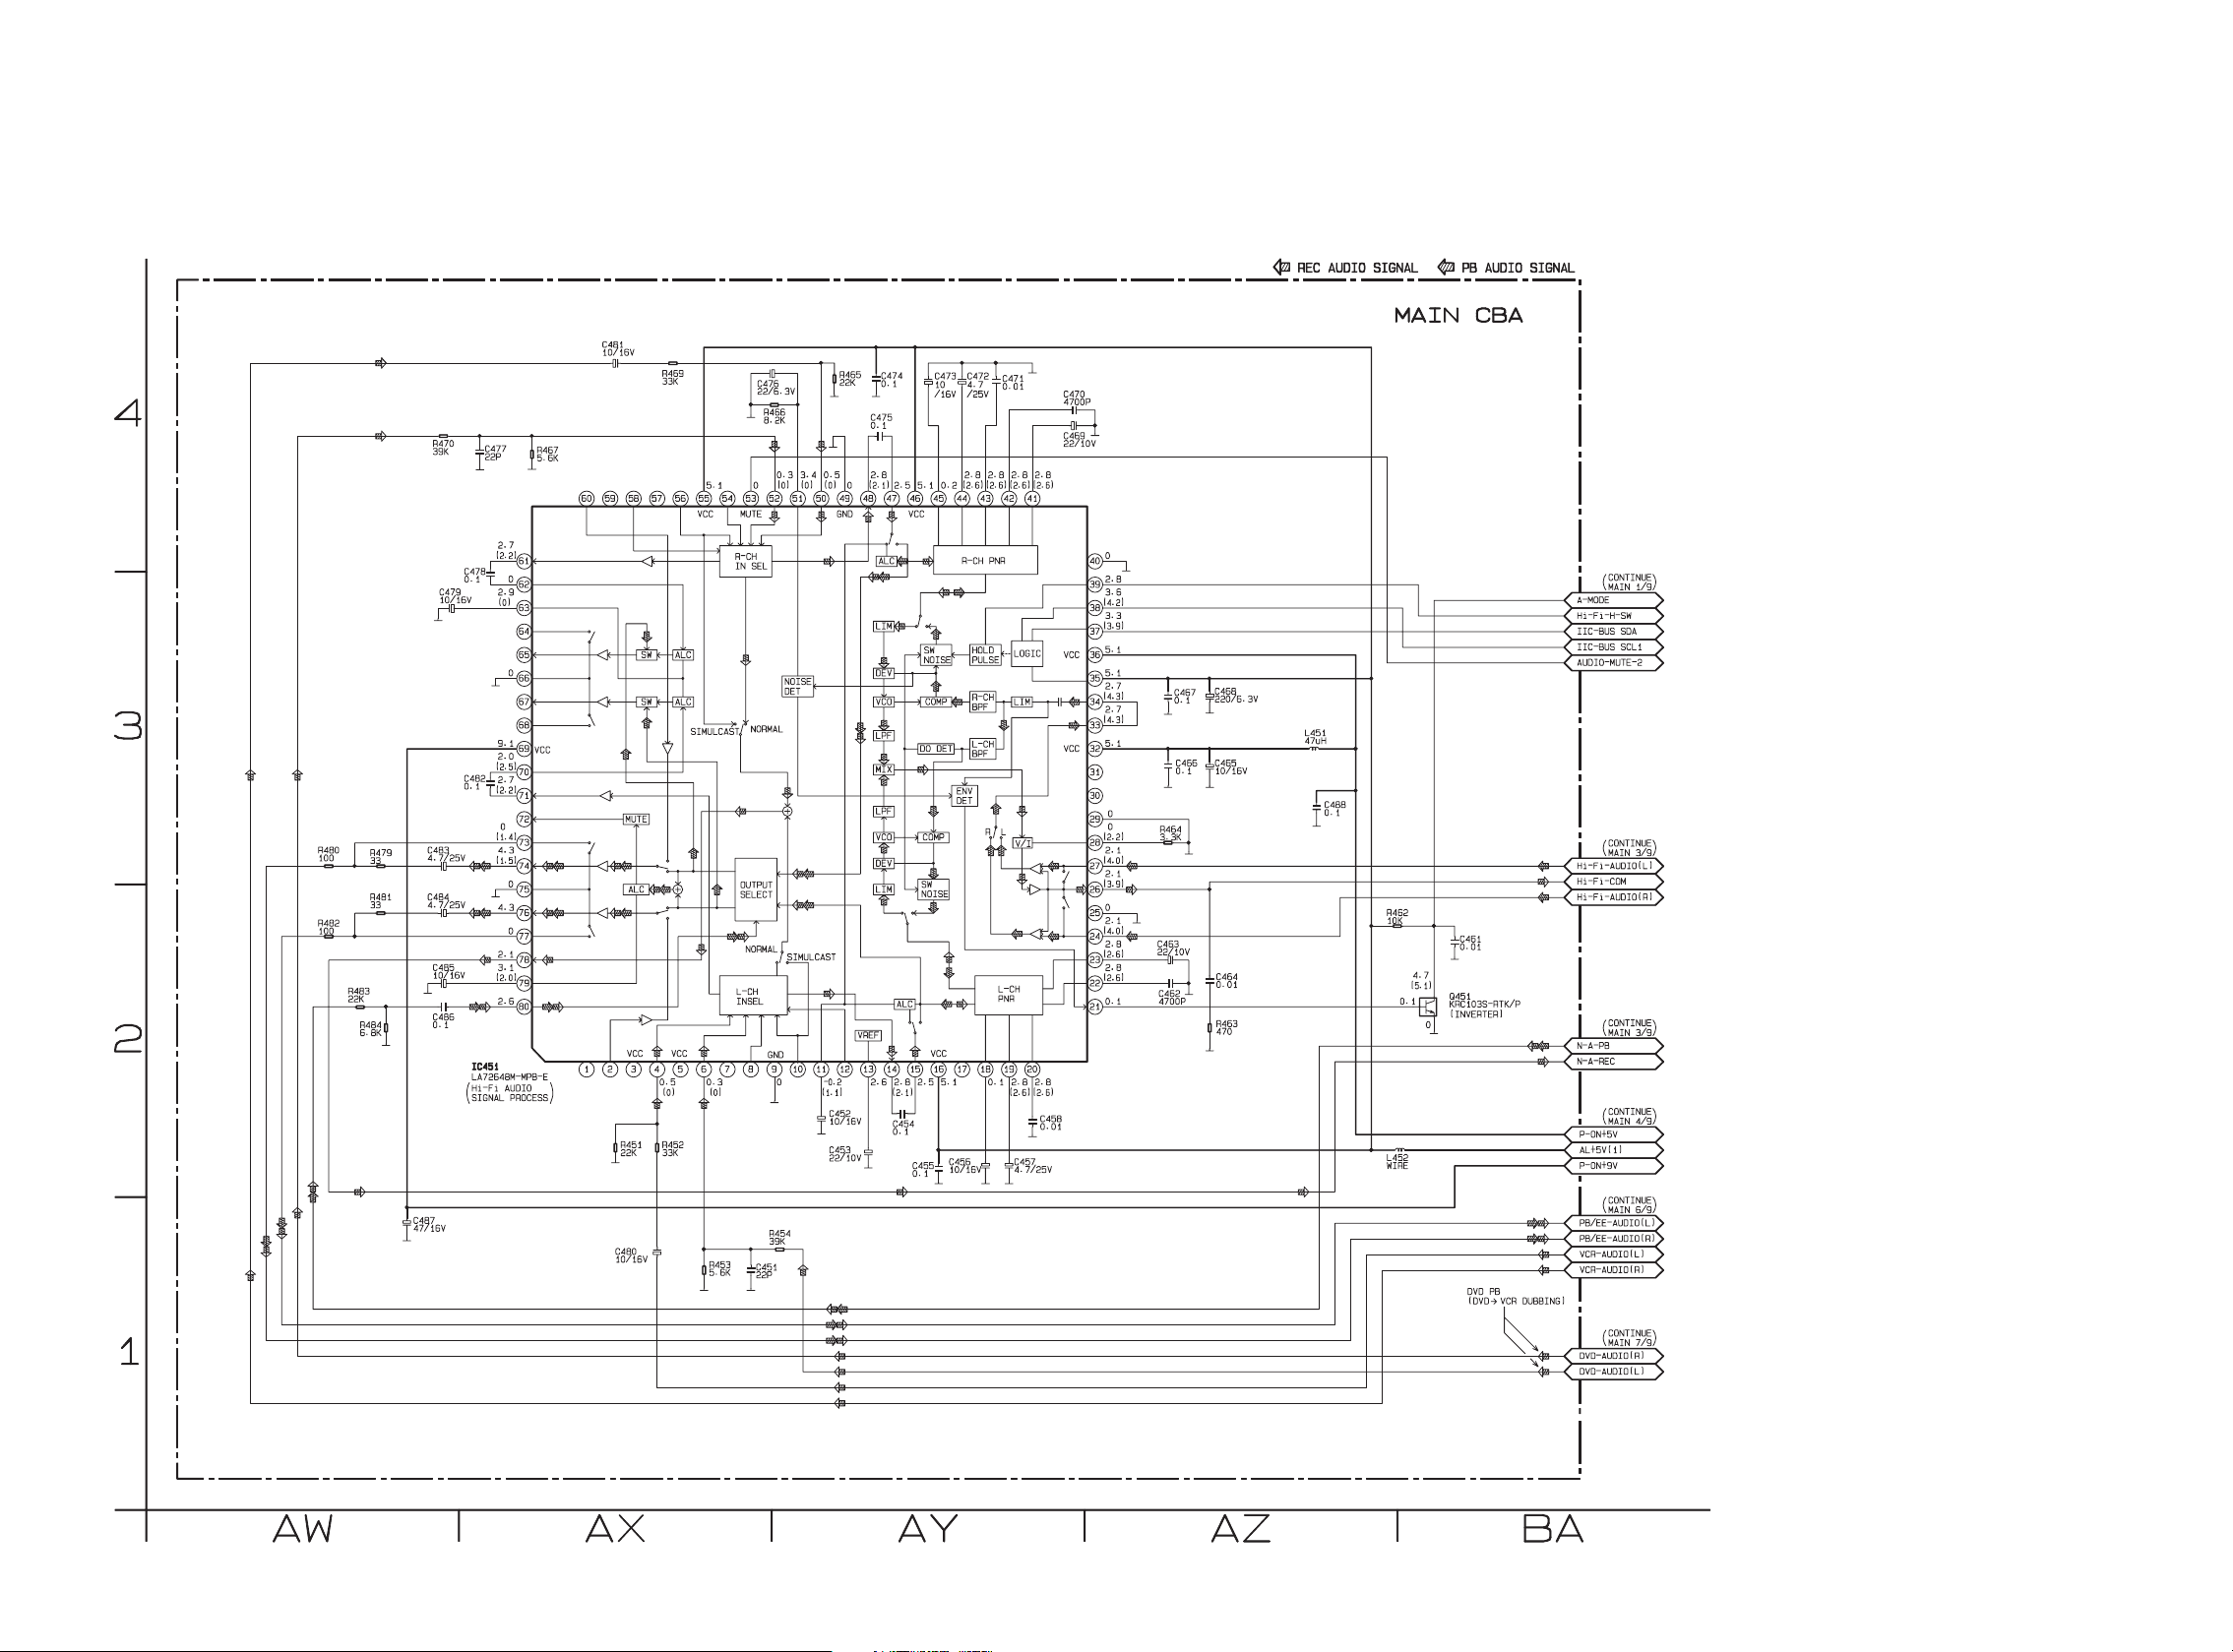
Main 9/9 Schematic Diagram < VCR Section >
18/6/2013
World of free manuals
1-12-11
E9B05SCM9
Page 44
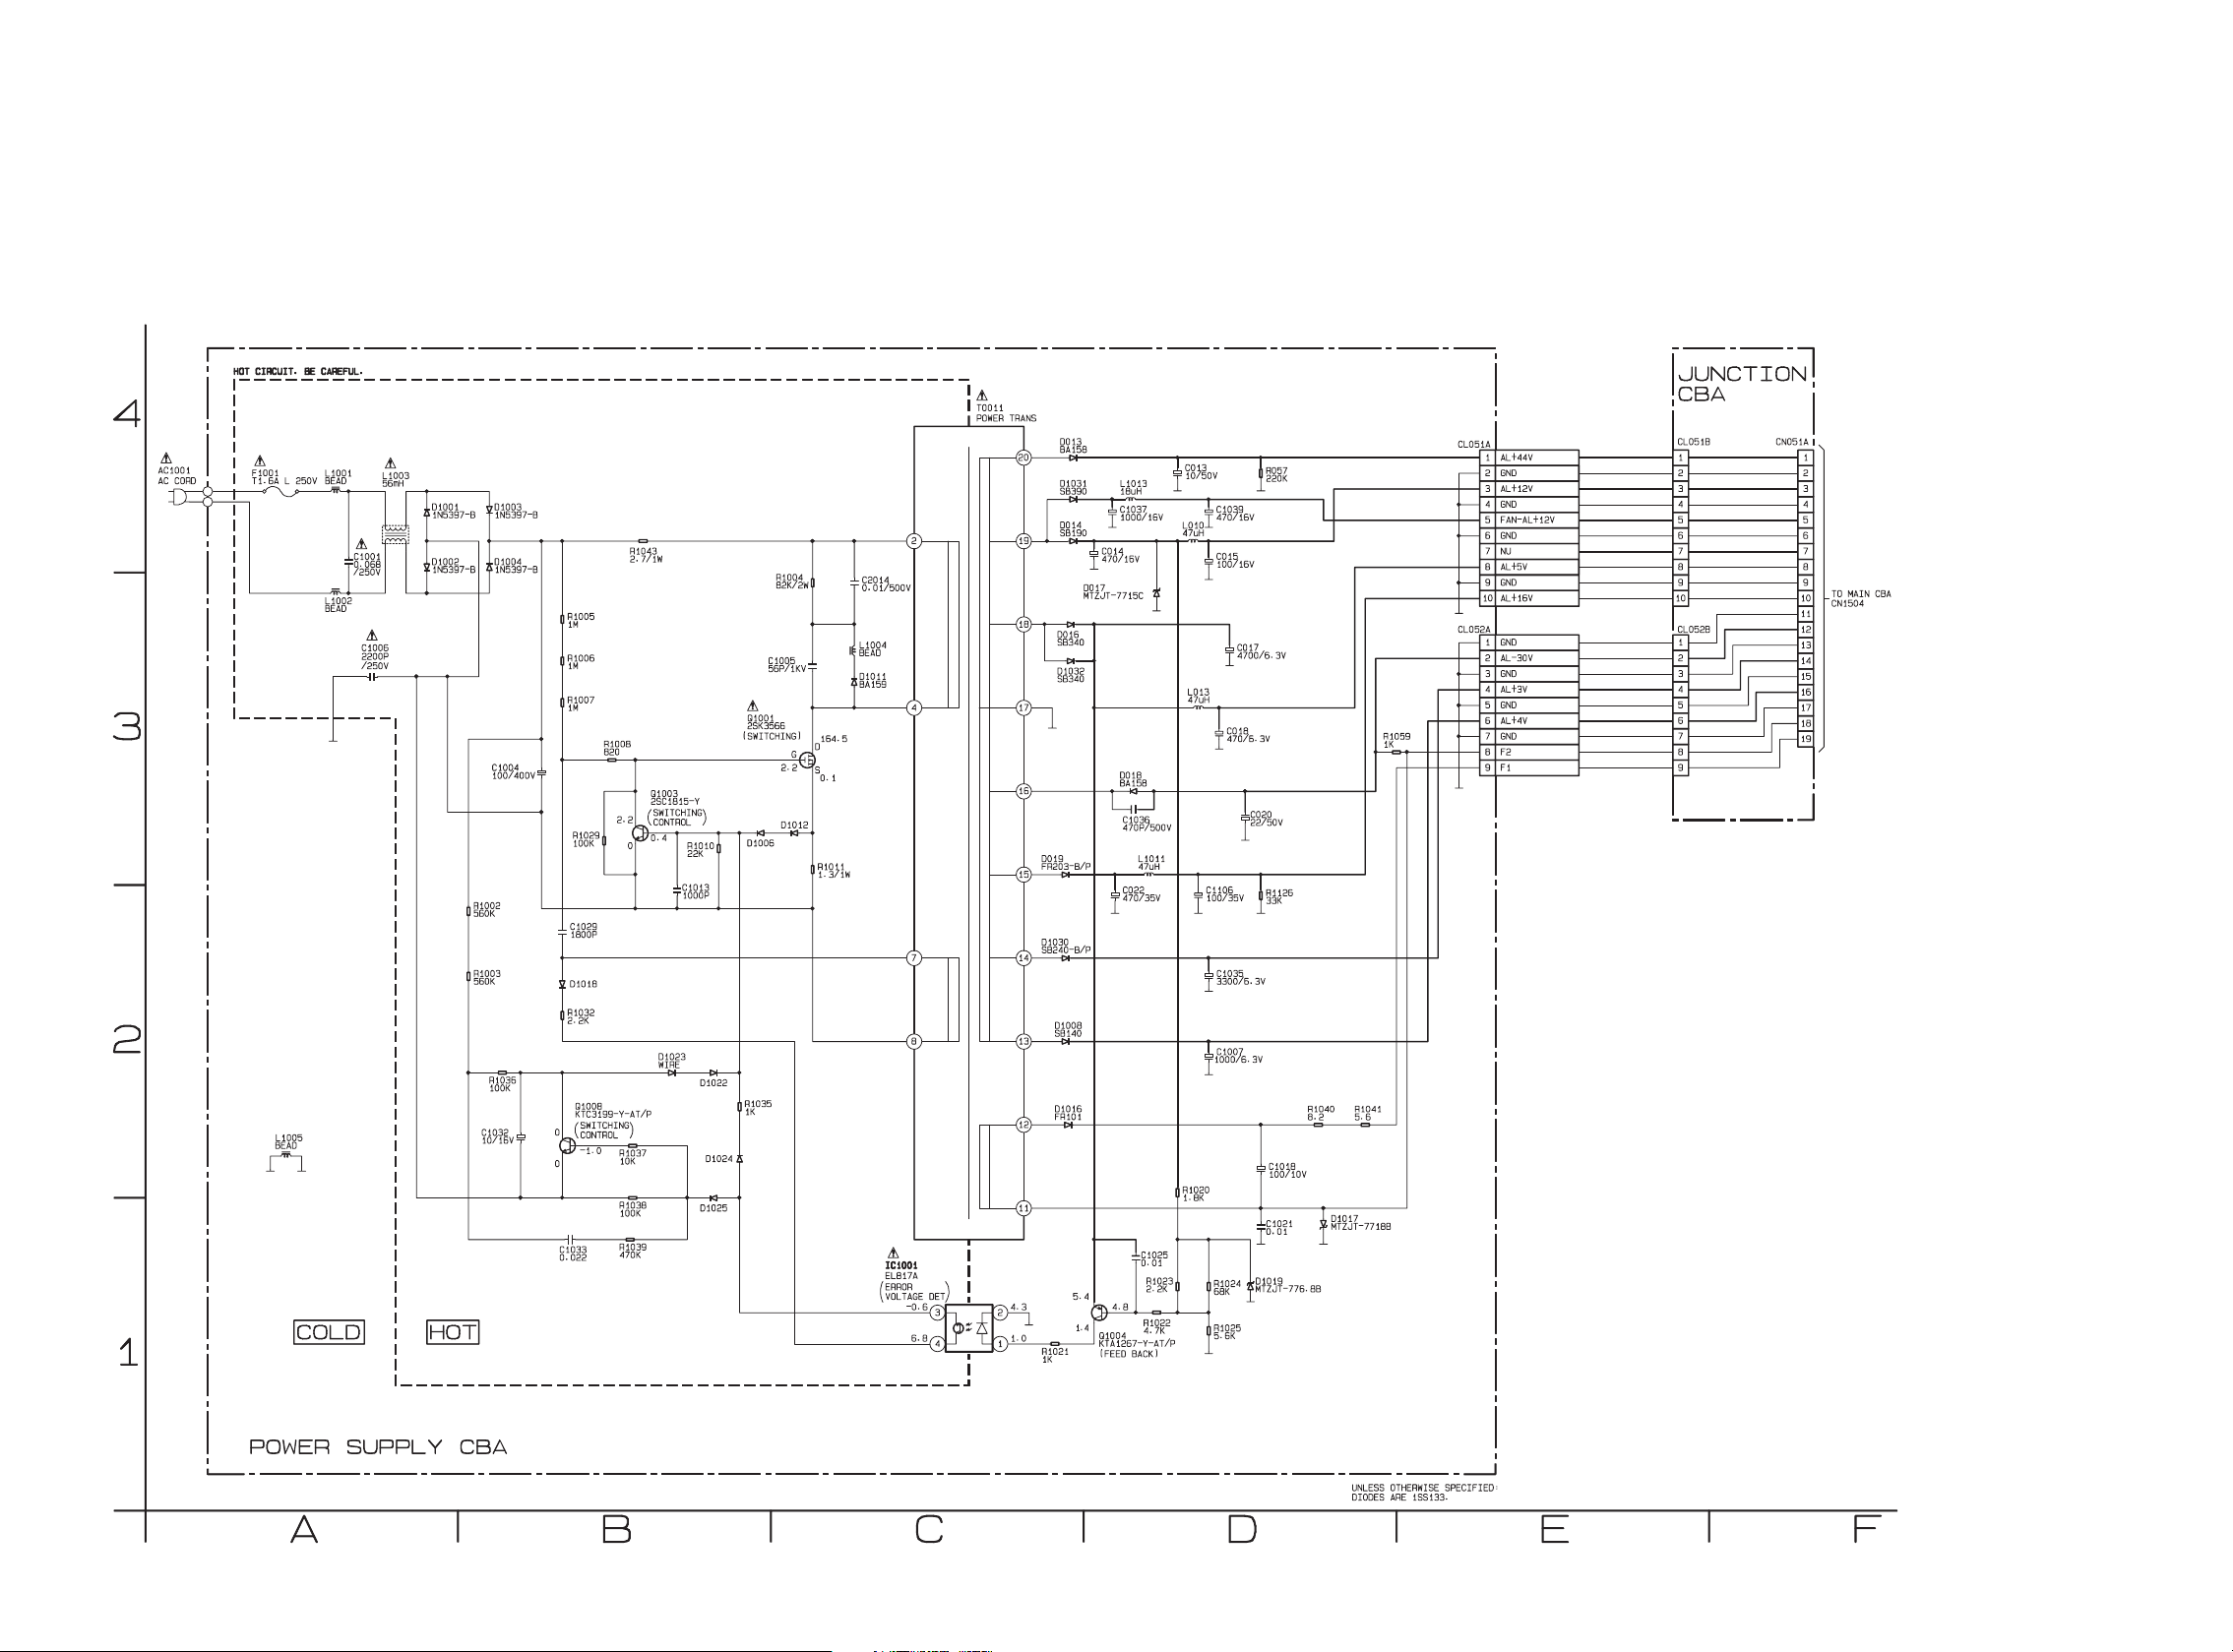
Power Supply & Junction Schematic Diagram < VCR Section >
NOTE:
The voltage for parts in hot circuit is measured using
hot GND as a common terminal.
18/6/2013
World of free manuals
CAUTION !
Fixed voltage (or Auto voltage selectable) power supply circuit is used in this unit.
If Main Fuse (F1001) is blown , check to see that all components in the power supply
circuit are not defective before you connect the AC plug to the AC power supply.
Otherwise it may cause some components in the power supply circuit to fail.
CAUTION !
For continued protection against fire hazard,
replace only with the same type fuse.
1-12-12
E9B05SCP
Page 45
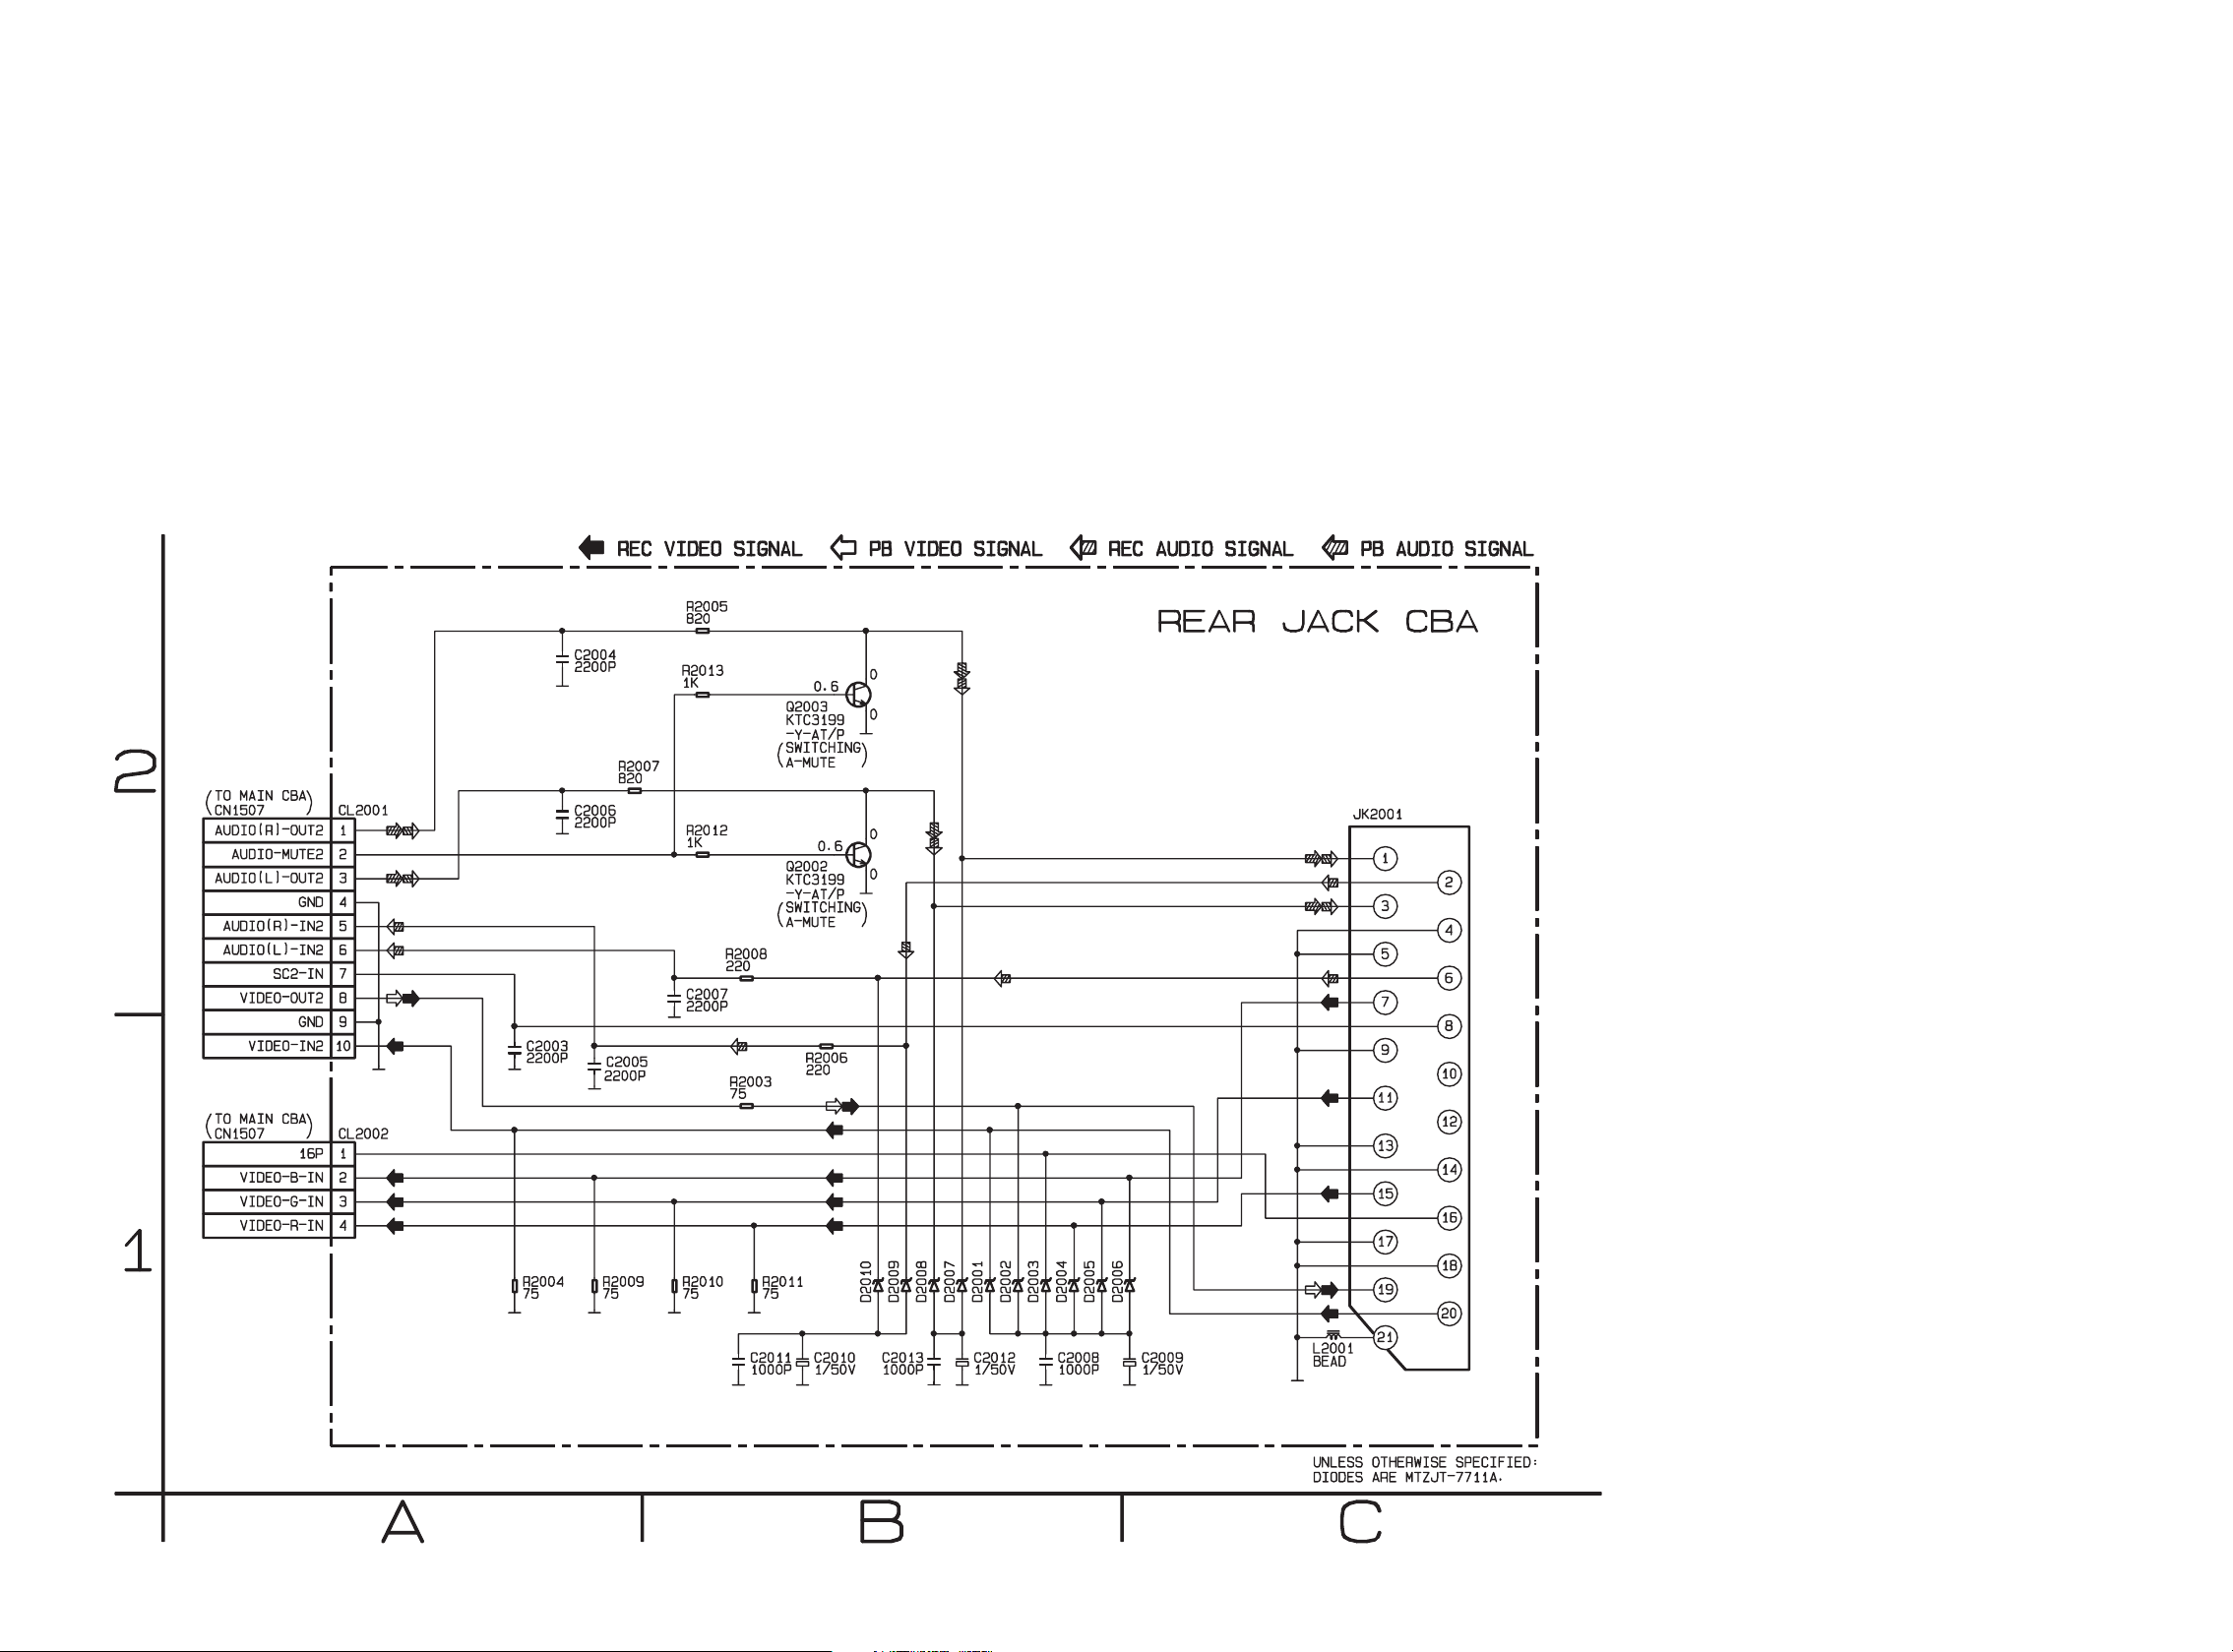
Rear Jack Schematic Diagram < VCR Section >
18/6/2013
World of free manuals
1-12-13
E9B05SCRJ
Page 46
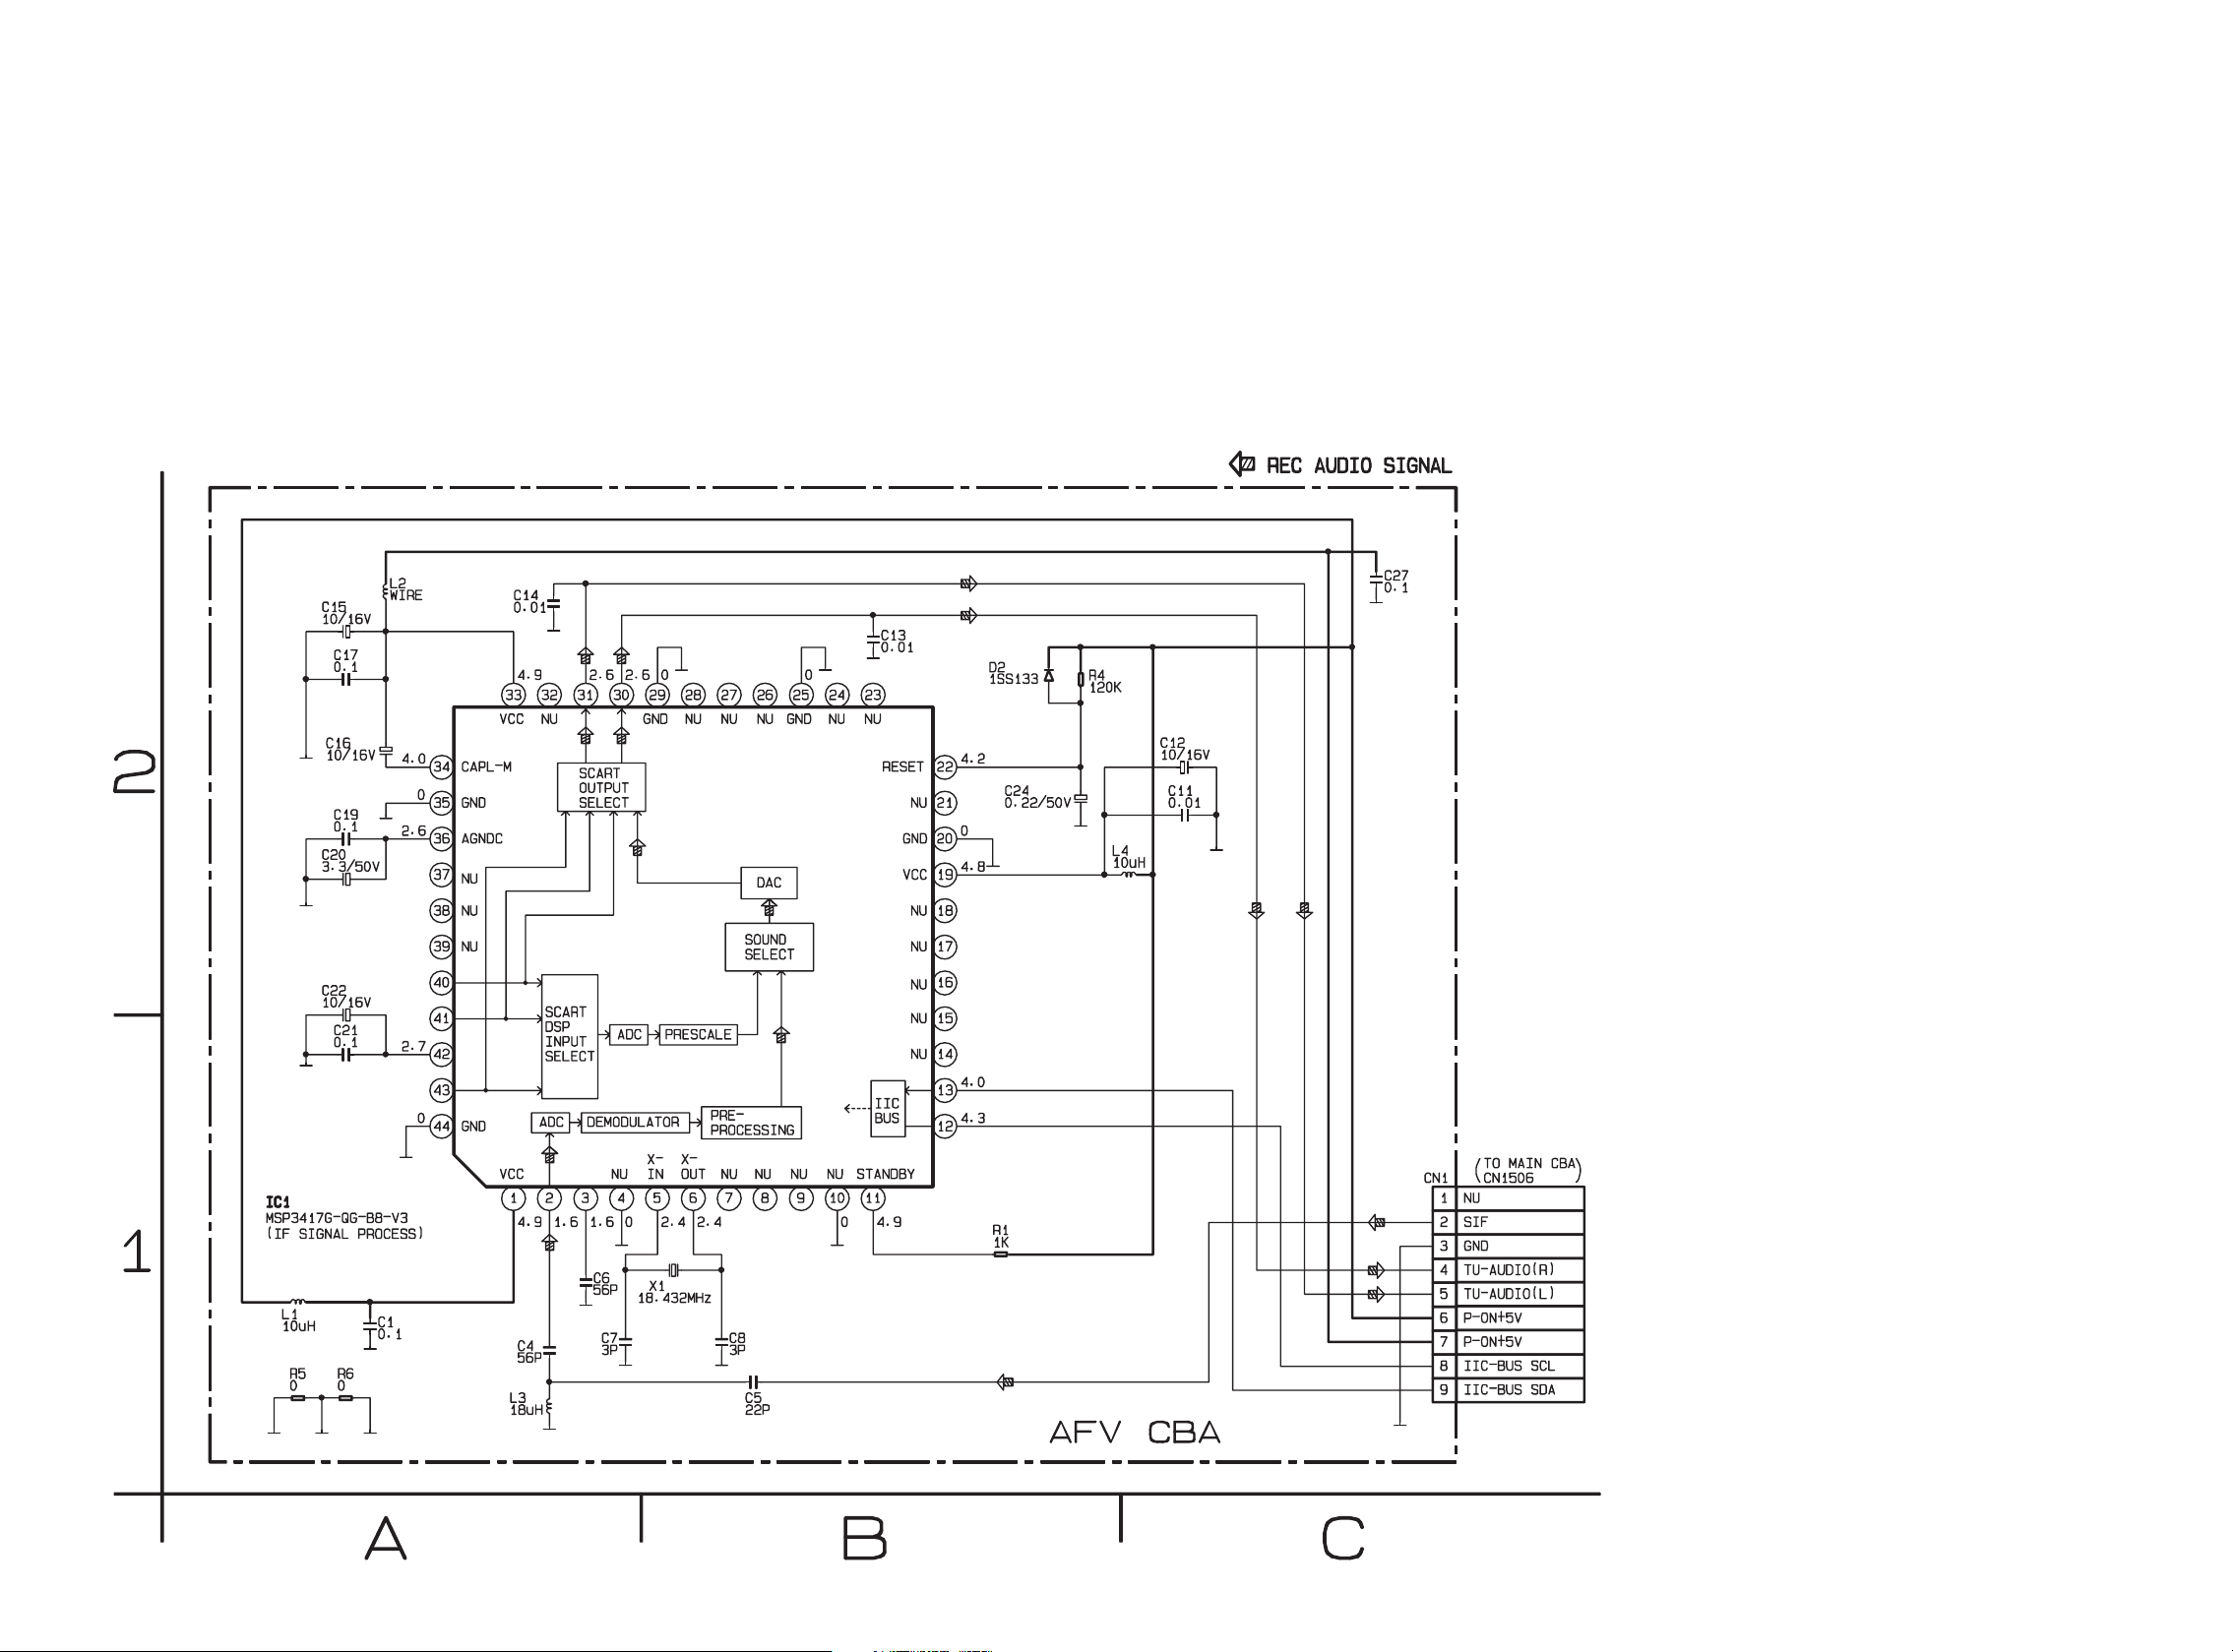
AFV Schematic Diagram < VCR Section >
18/6/2013
World of free manuals
1-12-14
E9B05SCAFV
Page 47
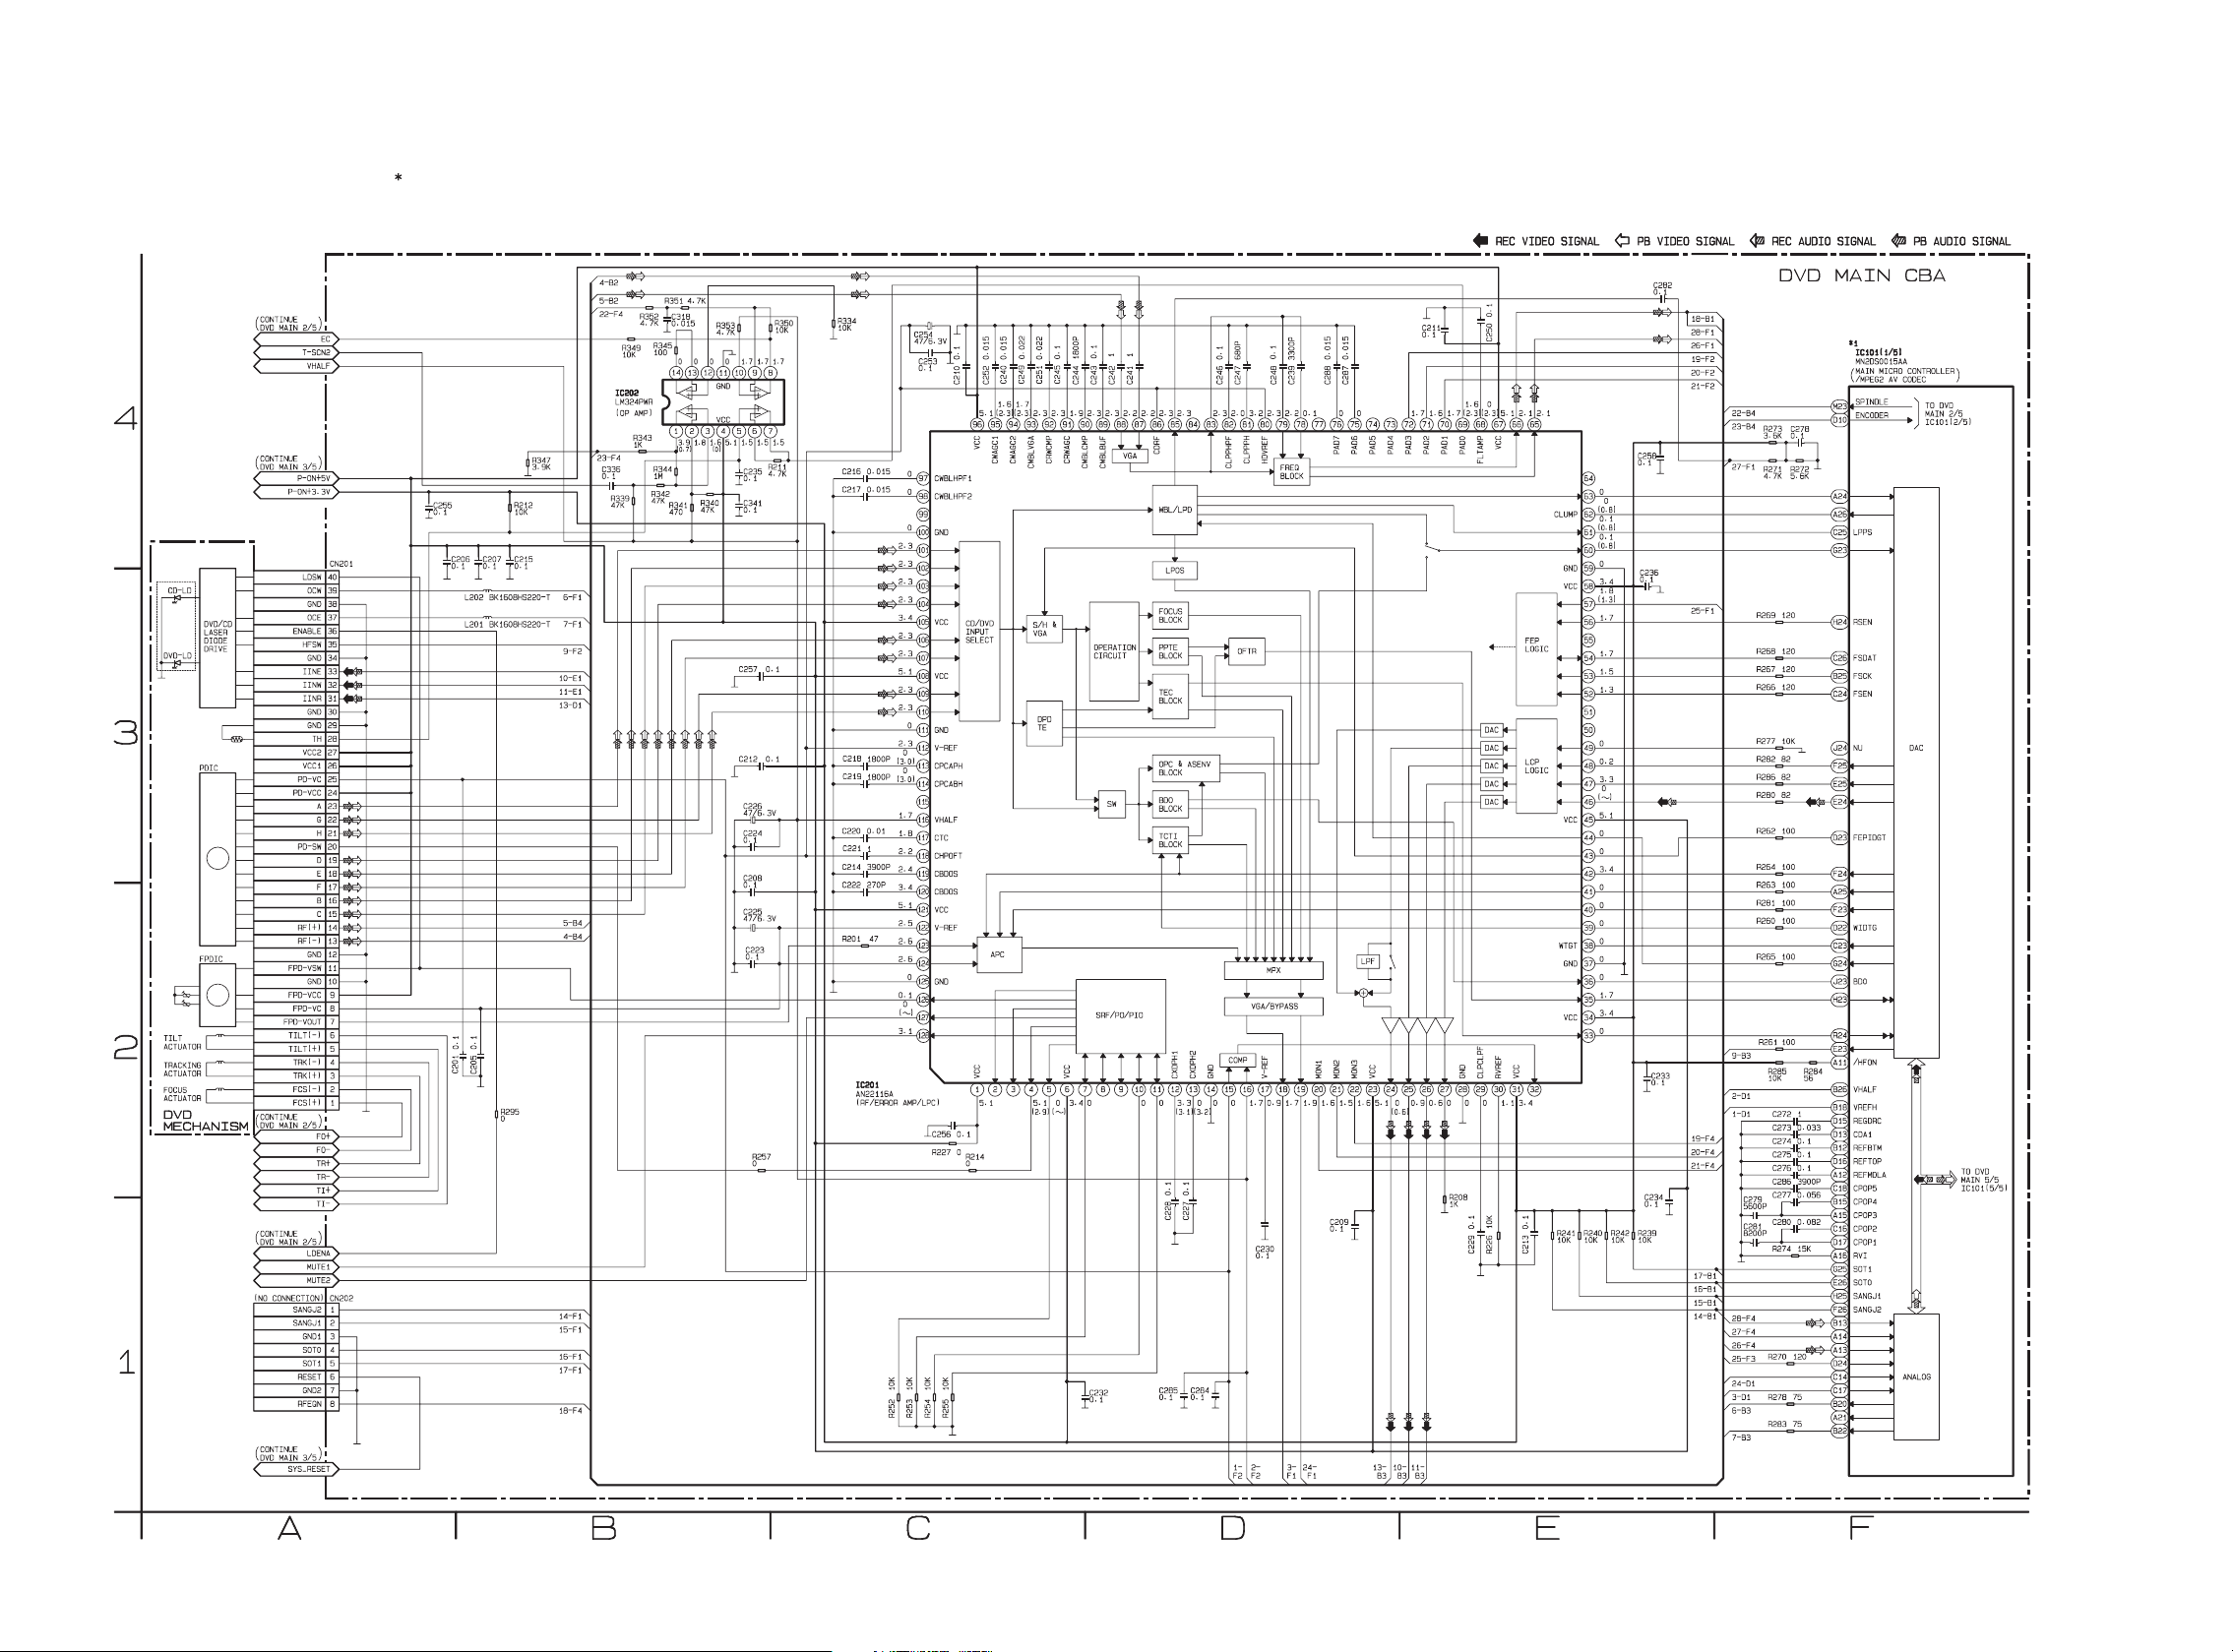
DVD Main 1/5 Schematic Diagram < DVD Section >
18/6/2013
World of free manuals
1 NOTE:
The order of pins shown in this diagram is different from that of actual IC101.
IC101 is divided into five and shown as IC101 (1/5) ~ IC101 (5/5) in this DVD Main Schematic Diagram Section.
1-12-15
E9B05SCD1
Page 48
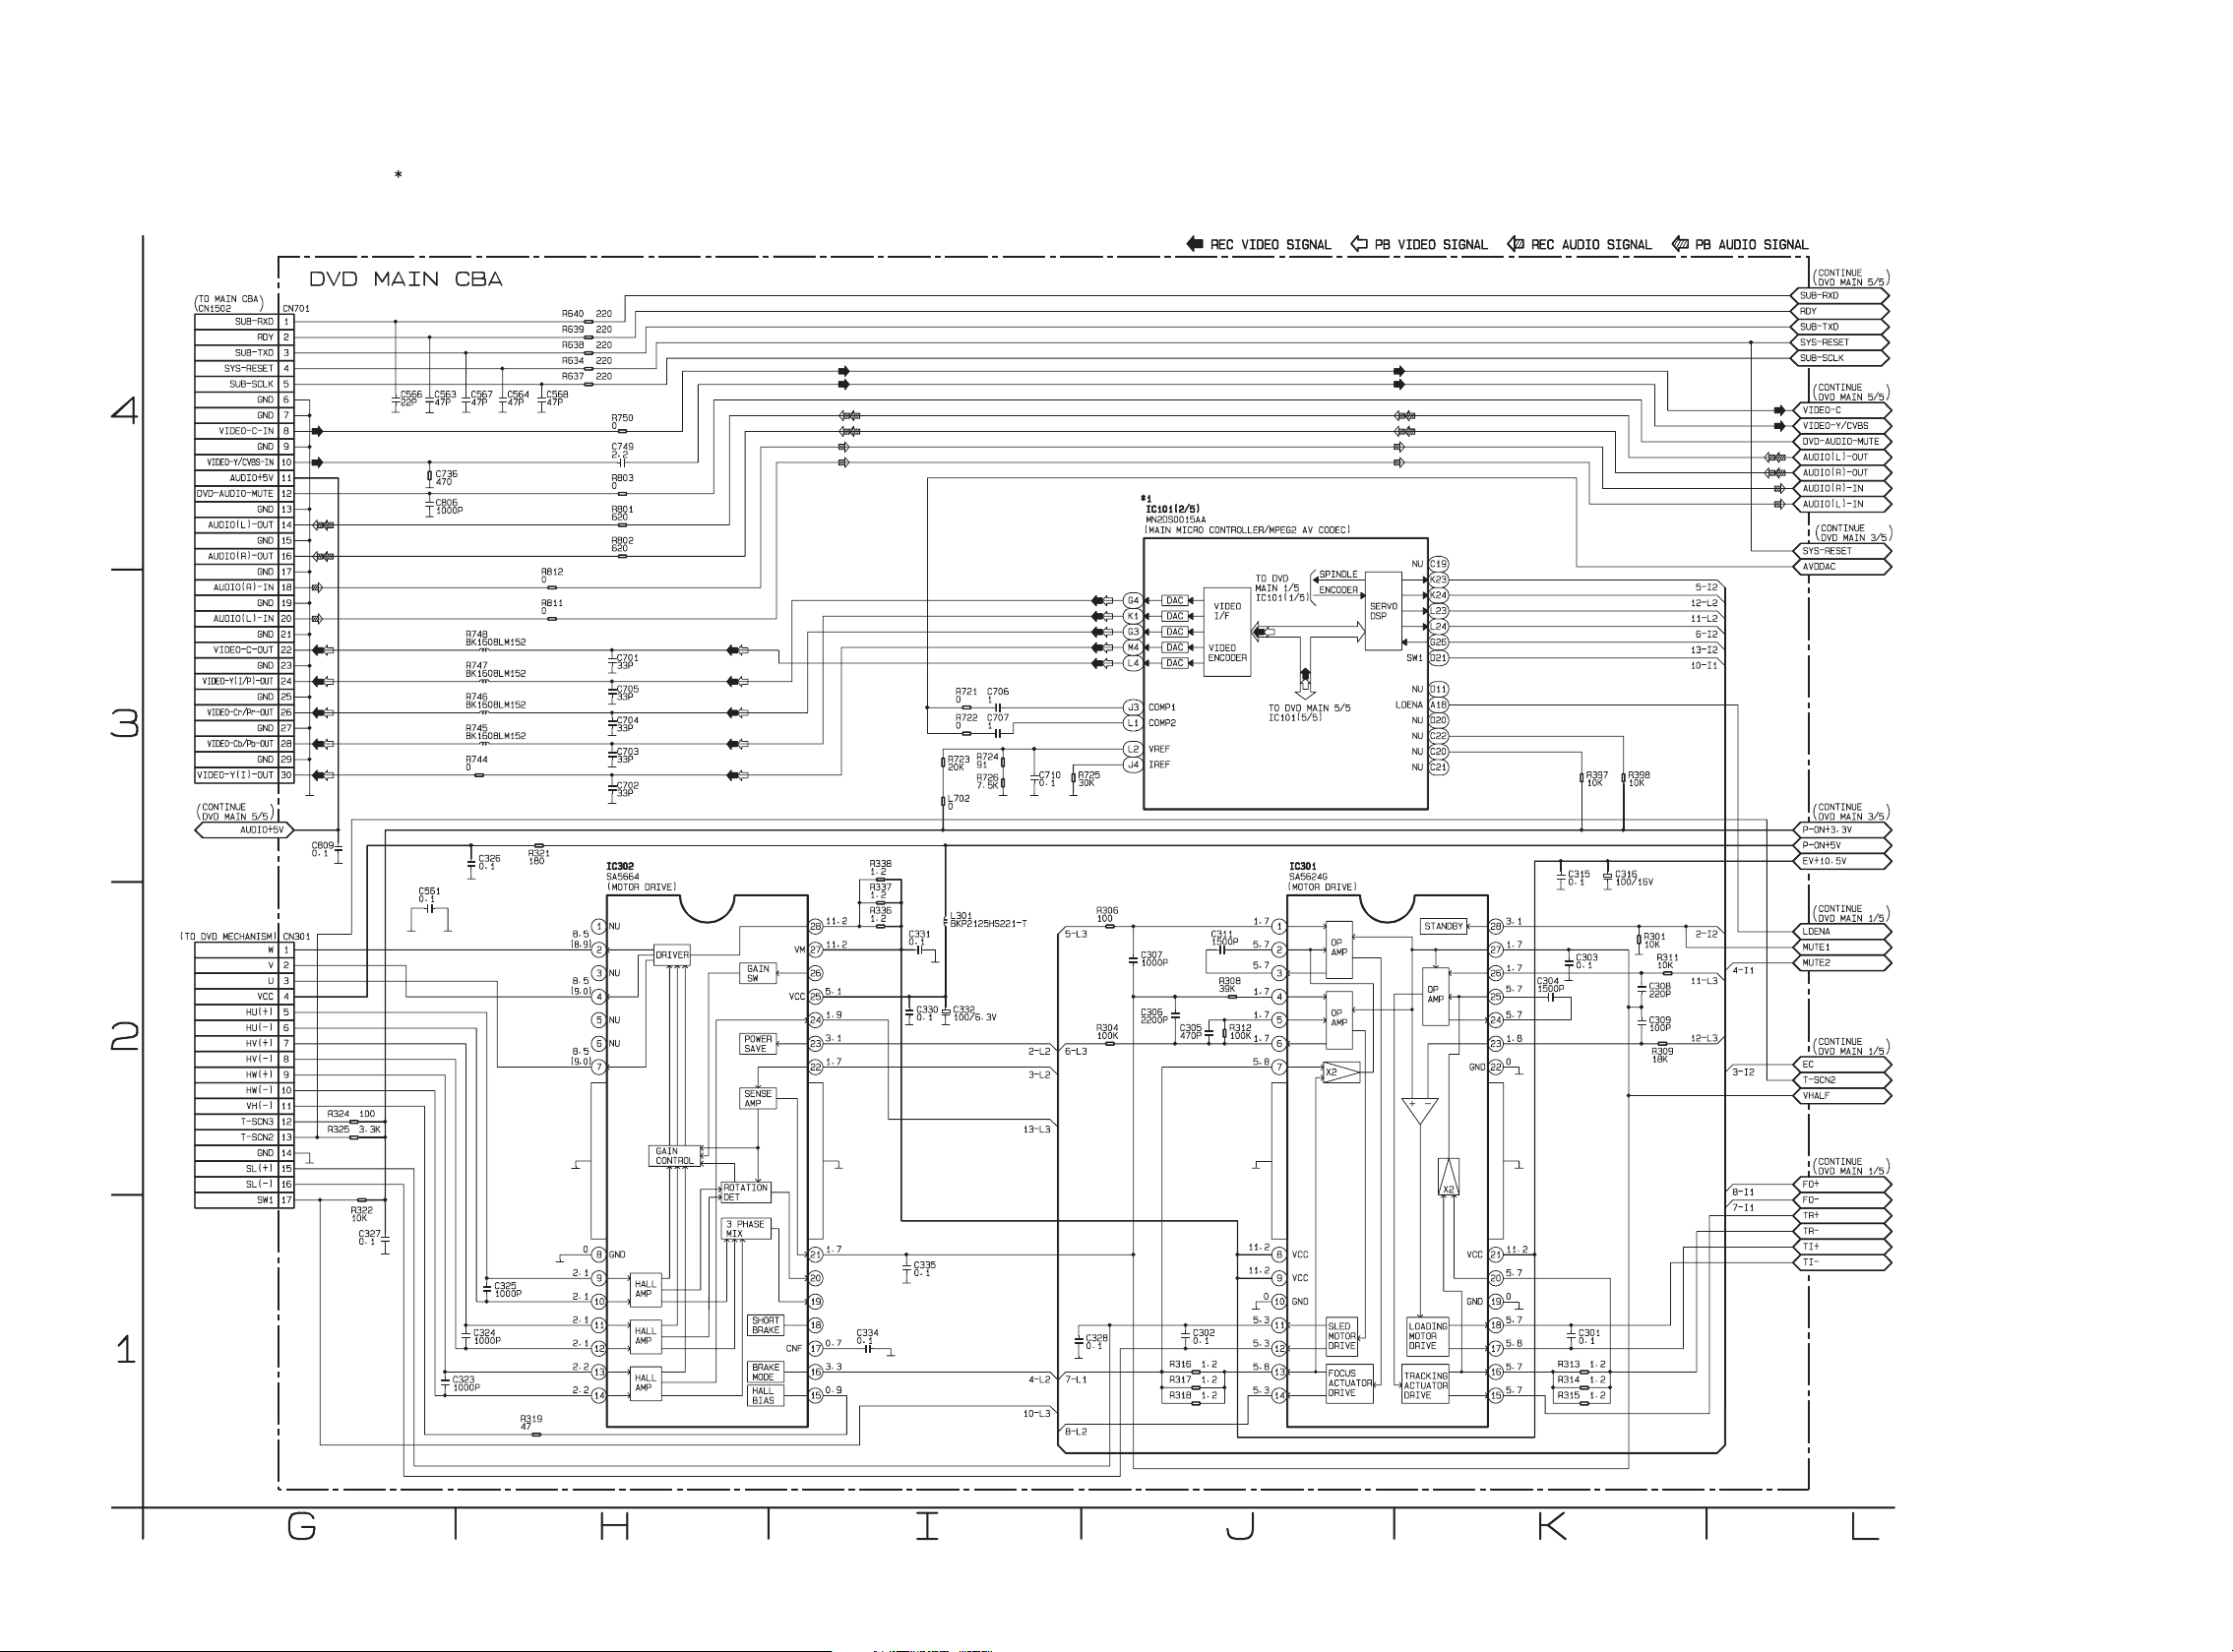
DVD Main 2/5 Schematic Diagram < DVD Section >
18/6/2013
World of free manuals
1 NOTE:
The order of pins shown in this diagram is different from that of actual IC101.
IC101 is divided into five and shown as IC101 (1/5) ~ IC101 (5/5) in this DVD Main Schematic Diagram Section.
1-12-16
E9B05SCD2
Page 49
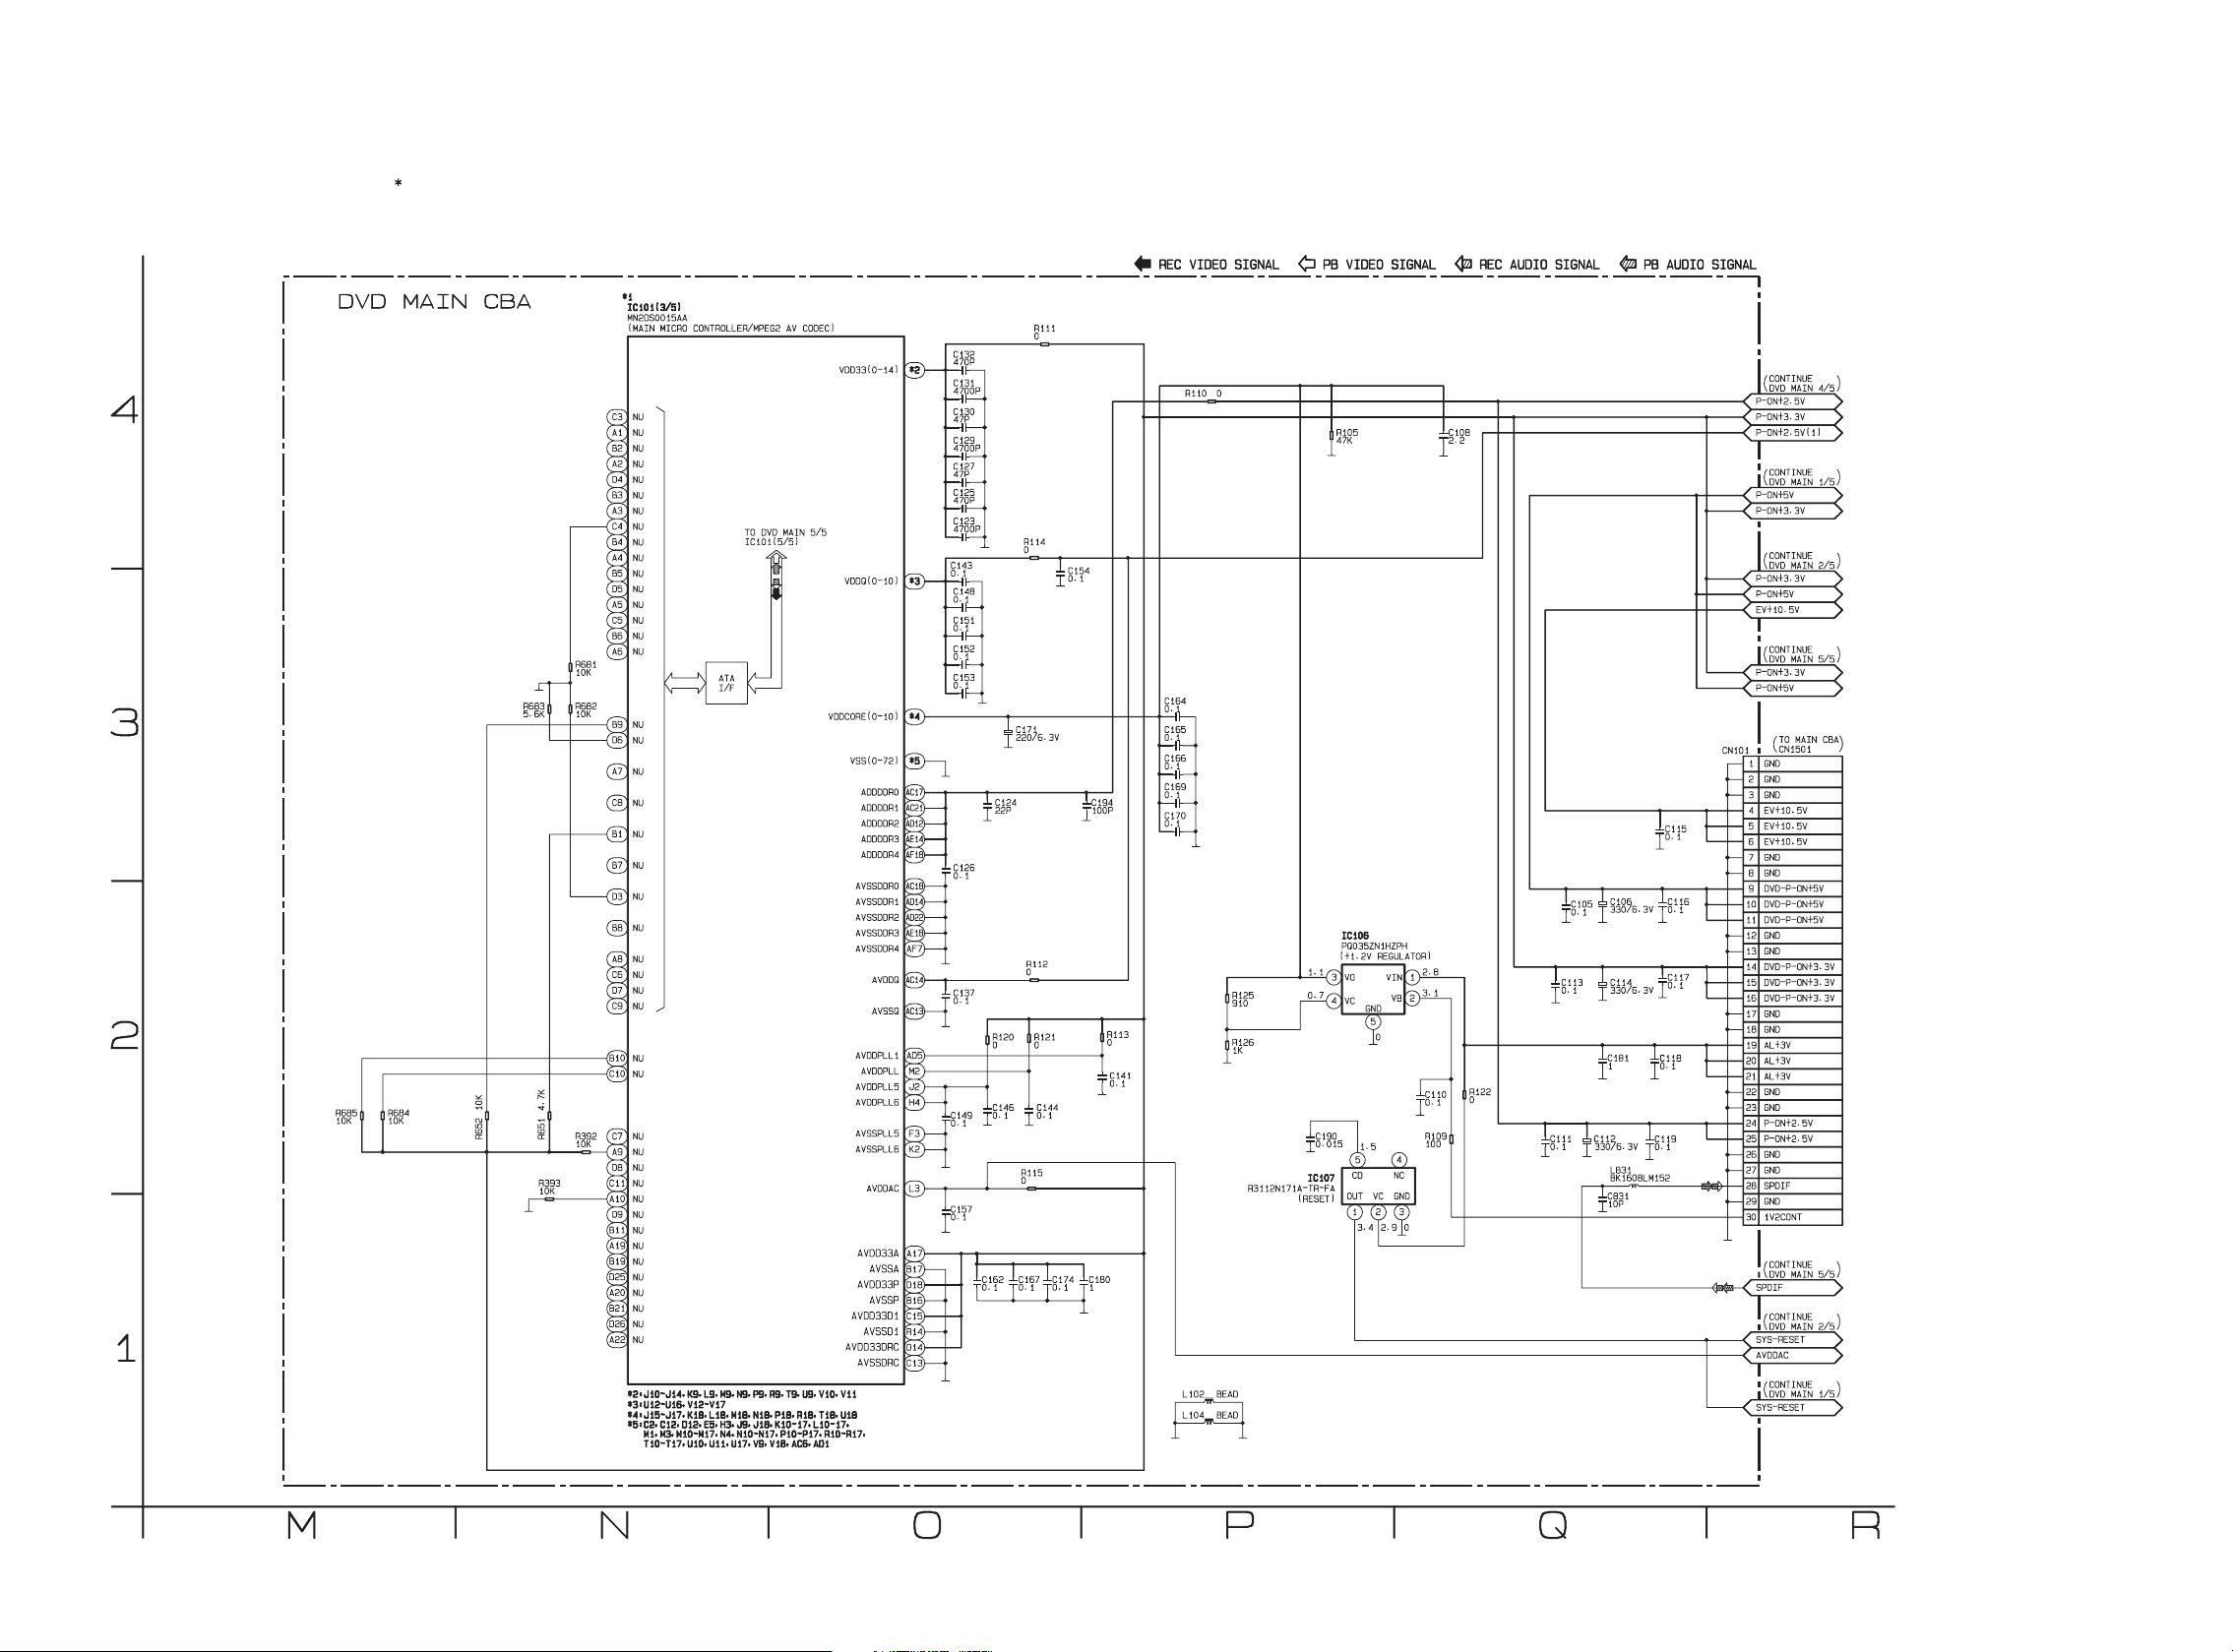
DVD Main 3/5 Schematic Diagram < DVD Section >
18/6/2013
World of free manuals
1 NOTE:
The order of pins shown in this diagram is different from that of actual IC101.
IC101 is divided into five and shown as IC101 (1/5) ~ IC101 (5/5) in this DVD Main Schematic Diagram Section.
1-12-17
E9B05SCD3
Page 50
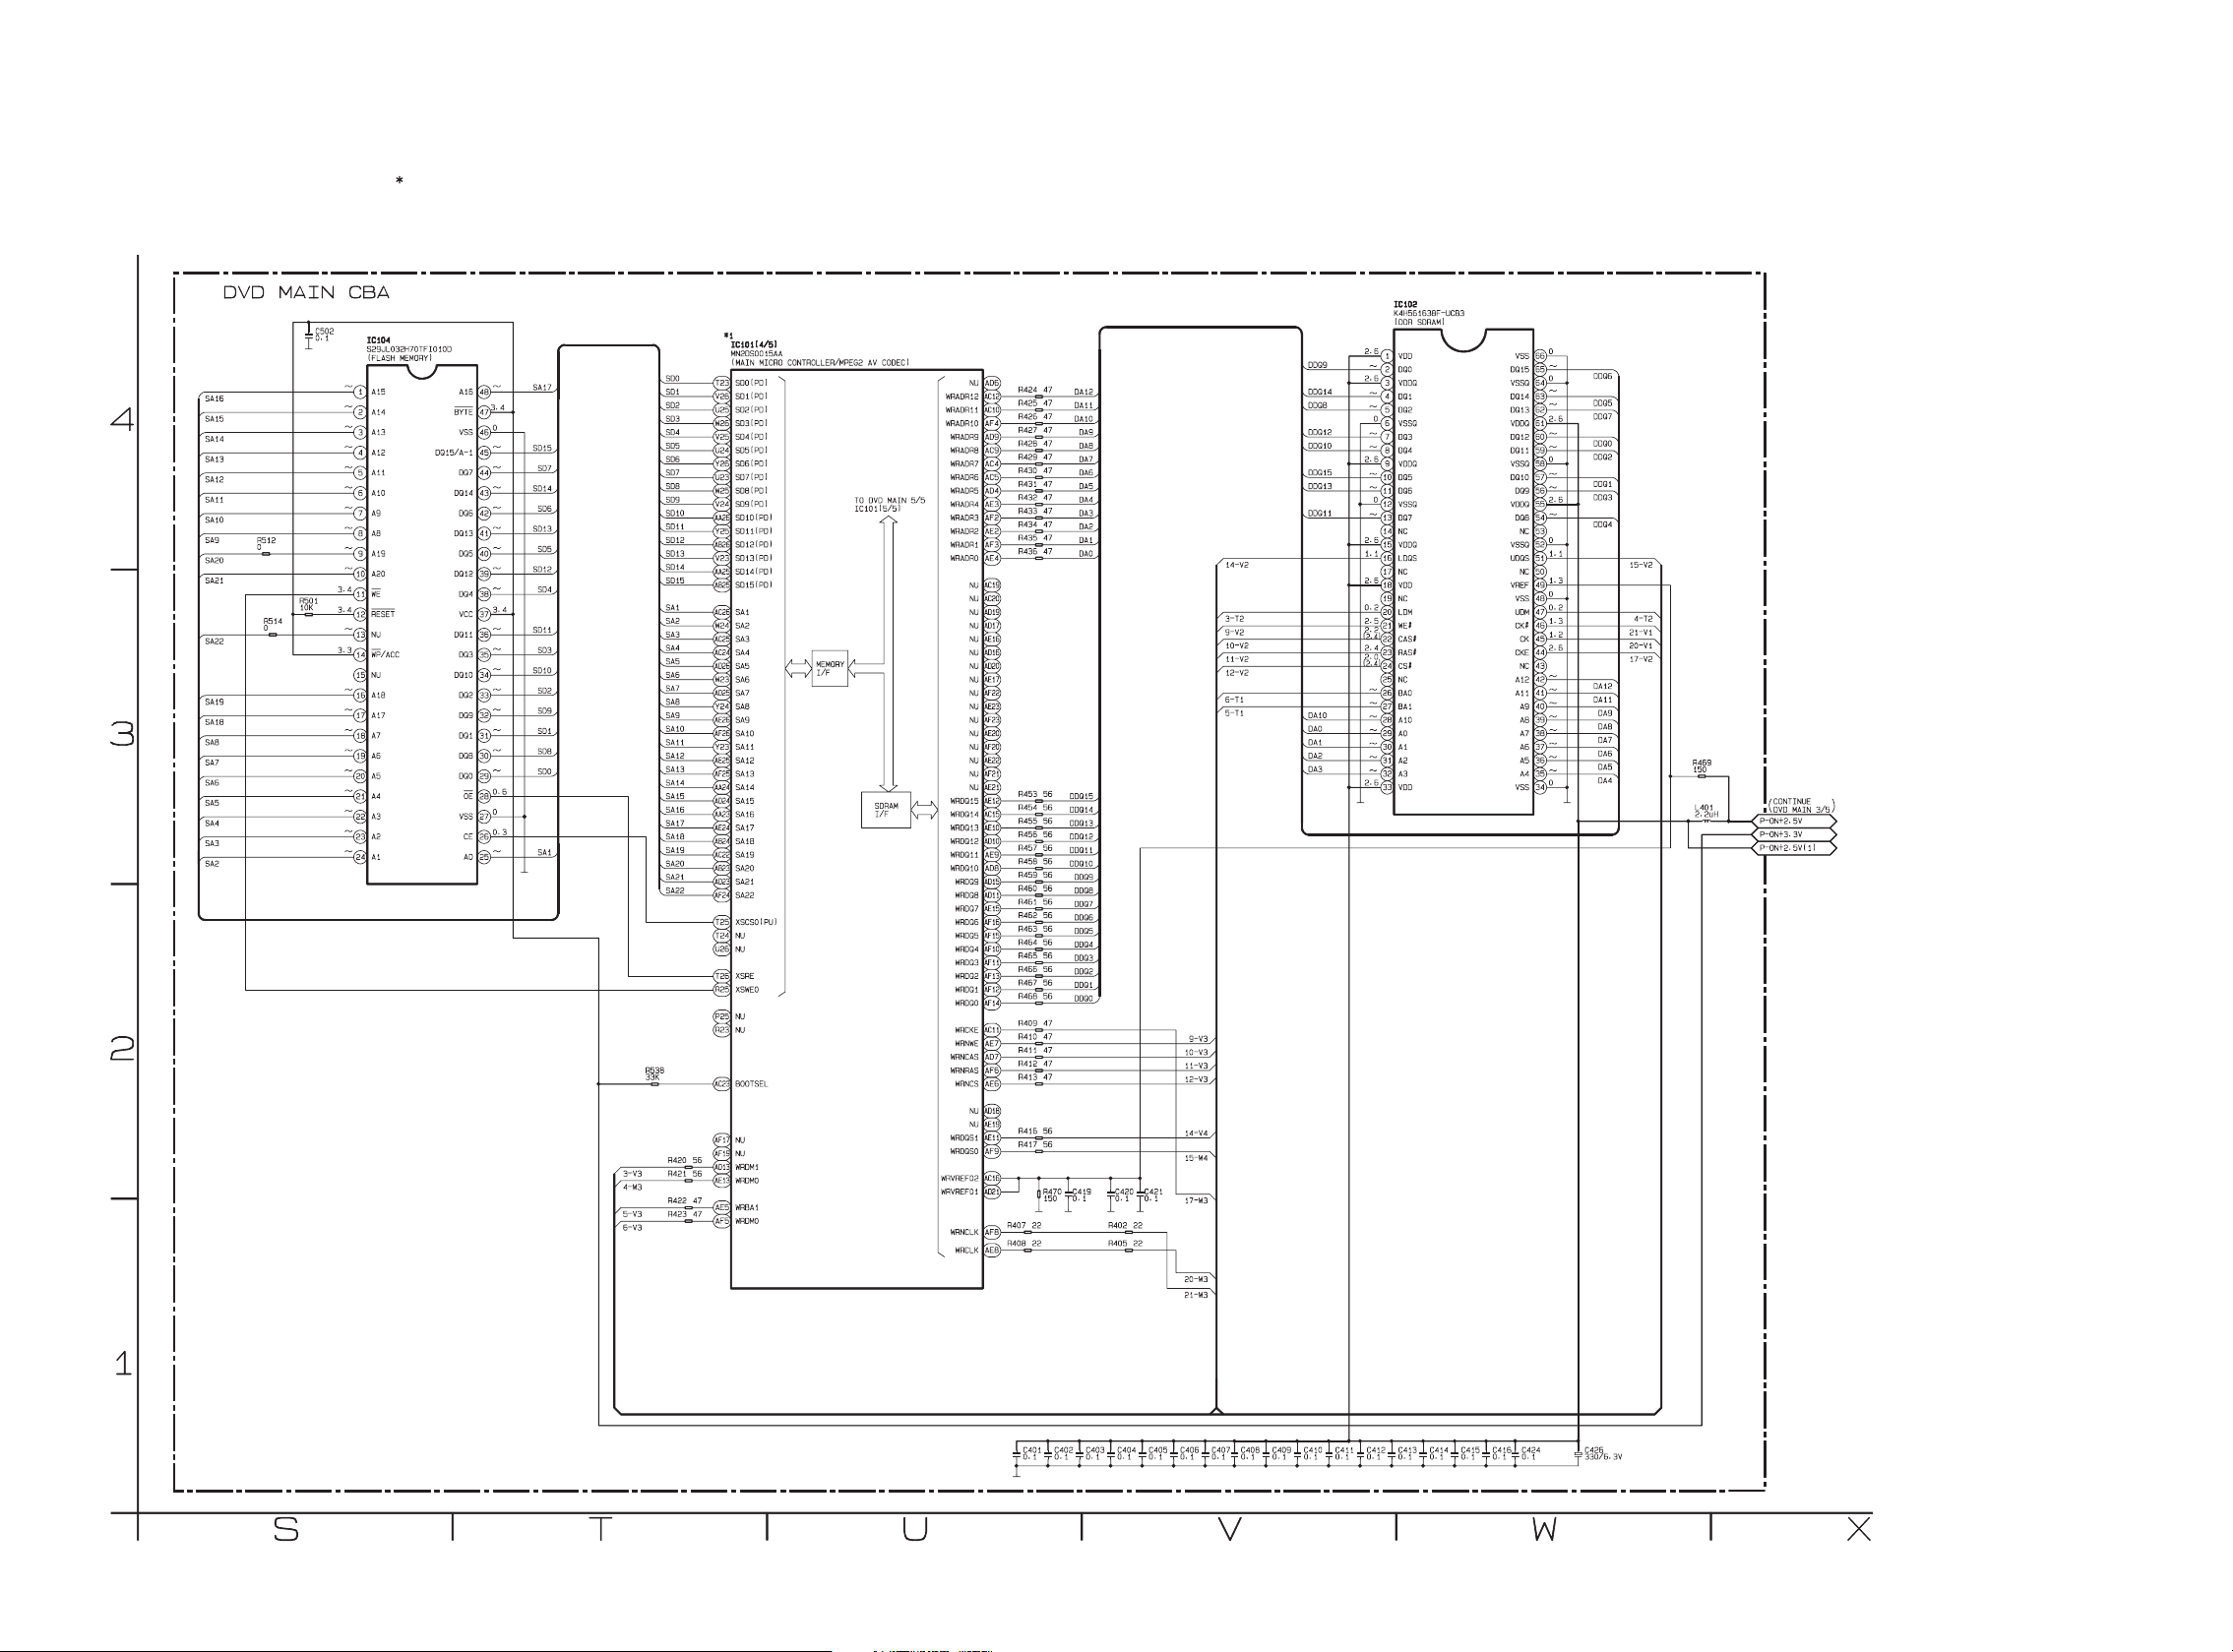
DVD Main 4/5 Schematic Diagram < DVD Section >
18/6/2013
World of free manuals
1 NOTE:
The order of pins shown in this diagram is different from that of actual IC101.
IC101 is divided into five and shown as IC101 (1/5) ~ IC101 (5/5) in this DVD Main Schematic Diagram Section.
1-12-18
E9B05SCD4
Page 51
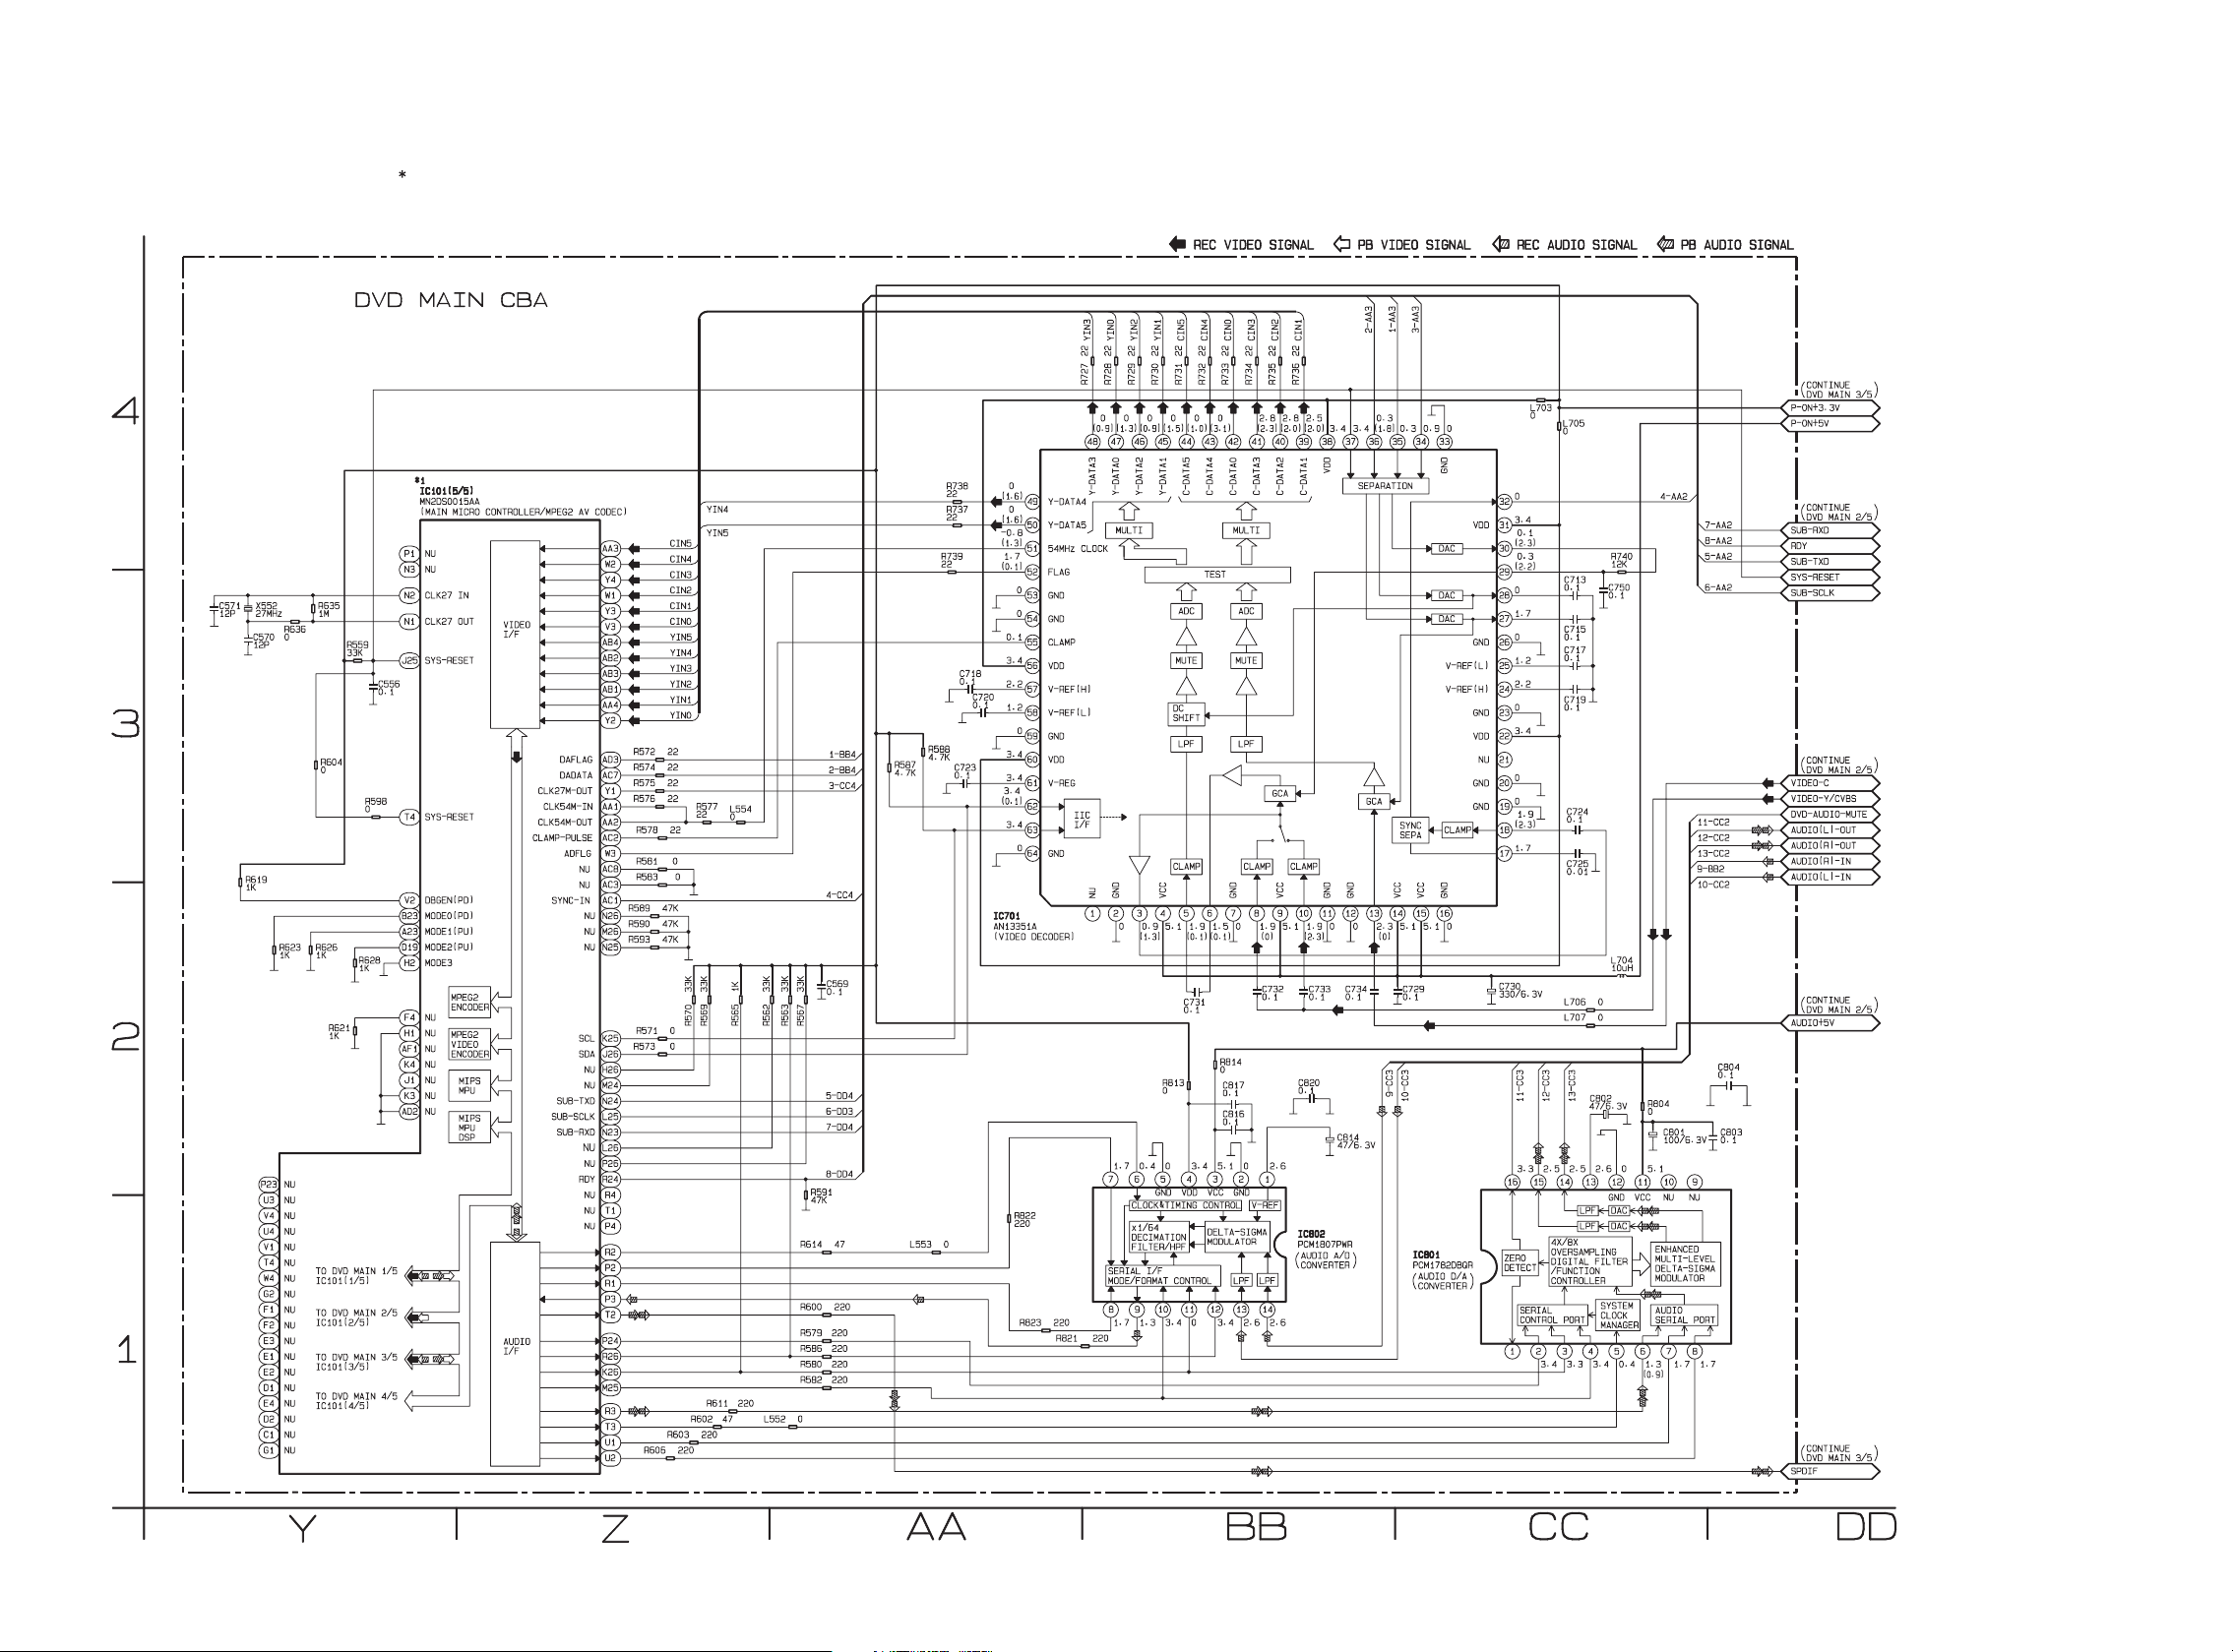
DVD Main 5/5 Schematic Diagram < DVD Section >
18/6/2013
World of free manuals
1 NOTE:
The order of pins shown in this diagram is different from that of actual IC101.
IC101 is divided into five and shown as IC101 (1/5) ~ IC101 (5/5) in this DVD Main Schematic Diagram Section.
1-12-19
E9B05SCD5
Page 52
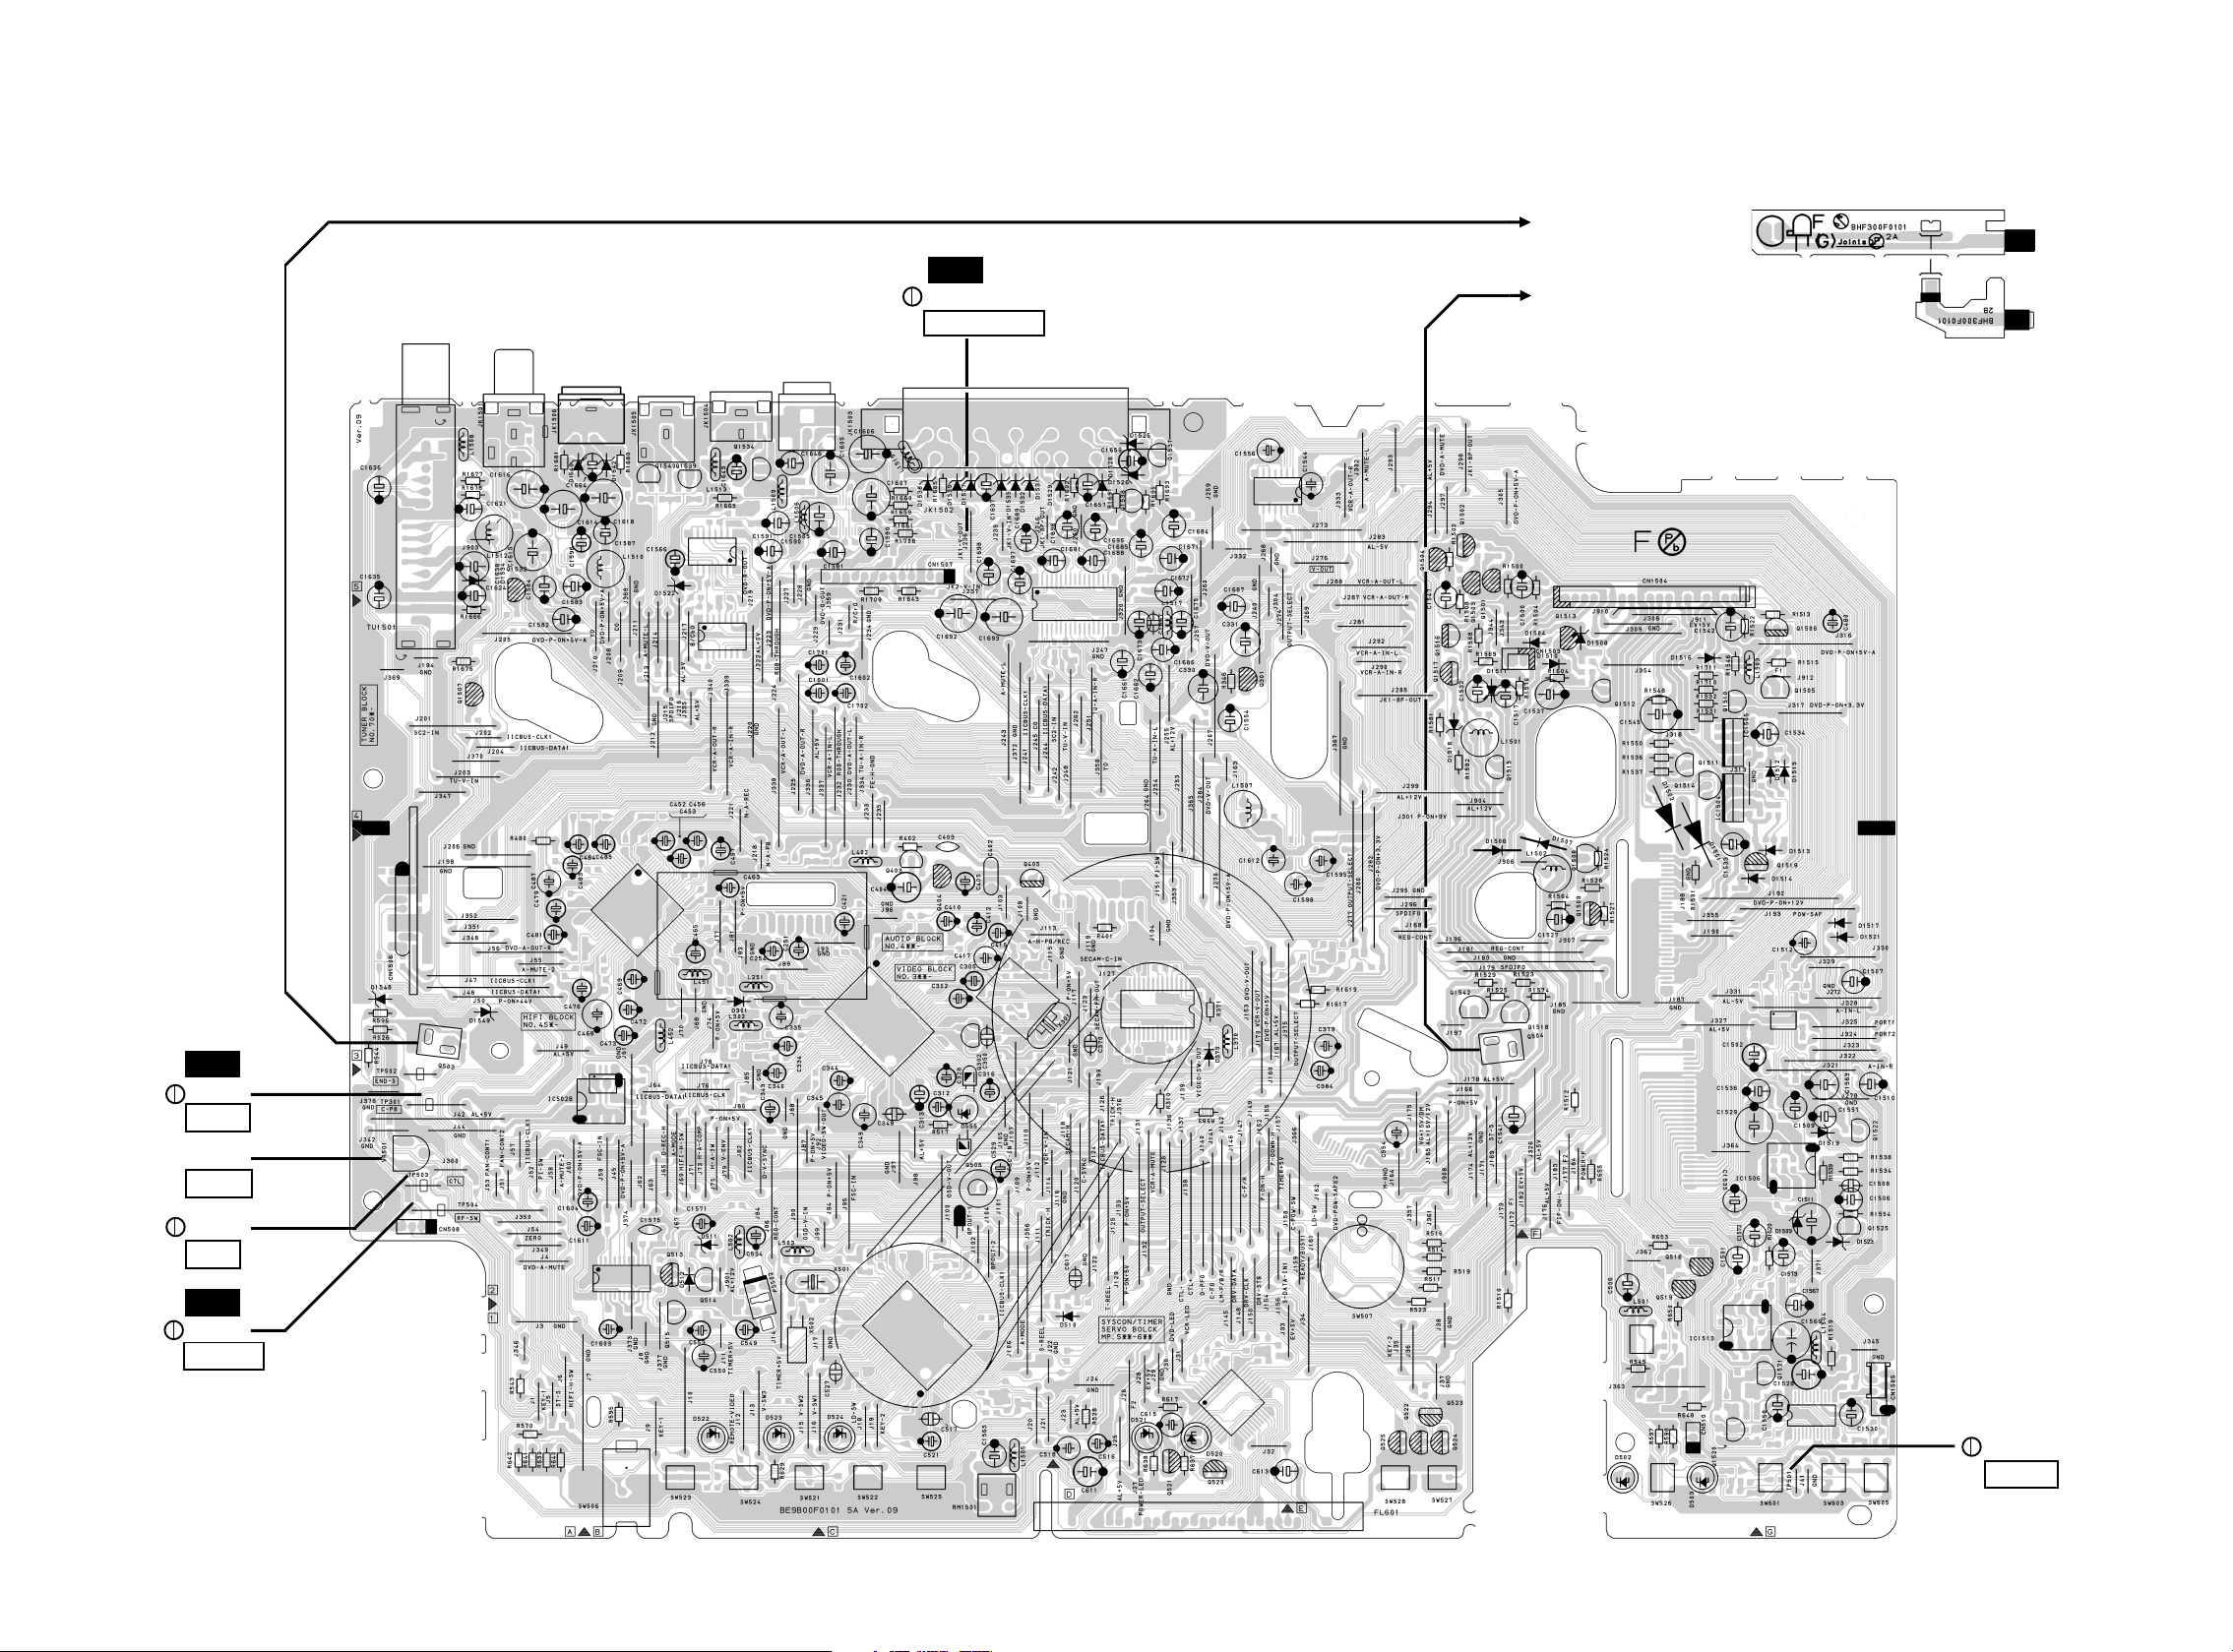
Main CBA Top View
18/6/2013
World of free manuals
WF3
J236
JK1-V-OUT
Sensor CBA Top View
TO BOARD SENSOR
(END-SENSOR)
BHF300F01012A
TO BOARD SENSOR
(START-SENSOR)
BHF300F01012B
WF2
TP301
C-PB
VR501
SW-P
TP503
CTL
WF1
TP504
RF-SW
1-12-20
TP501
S-INH
BE9B00F01015A
Page 53
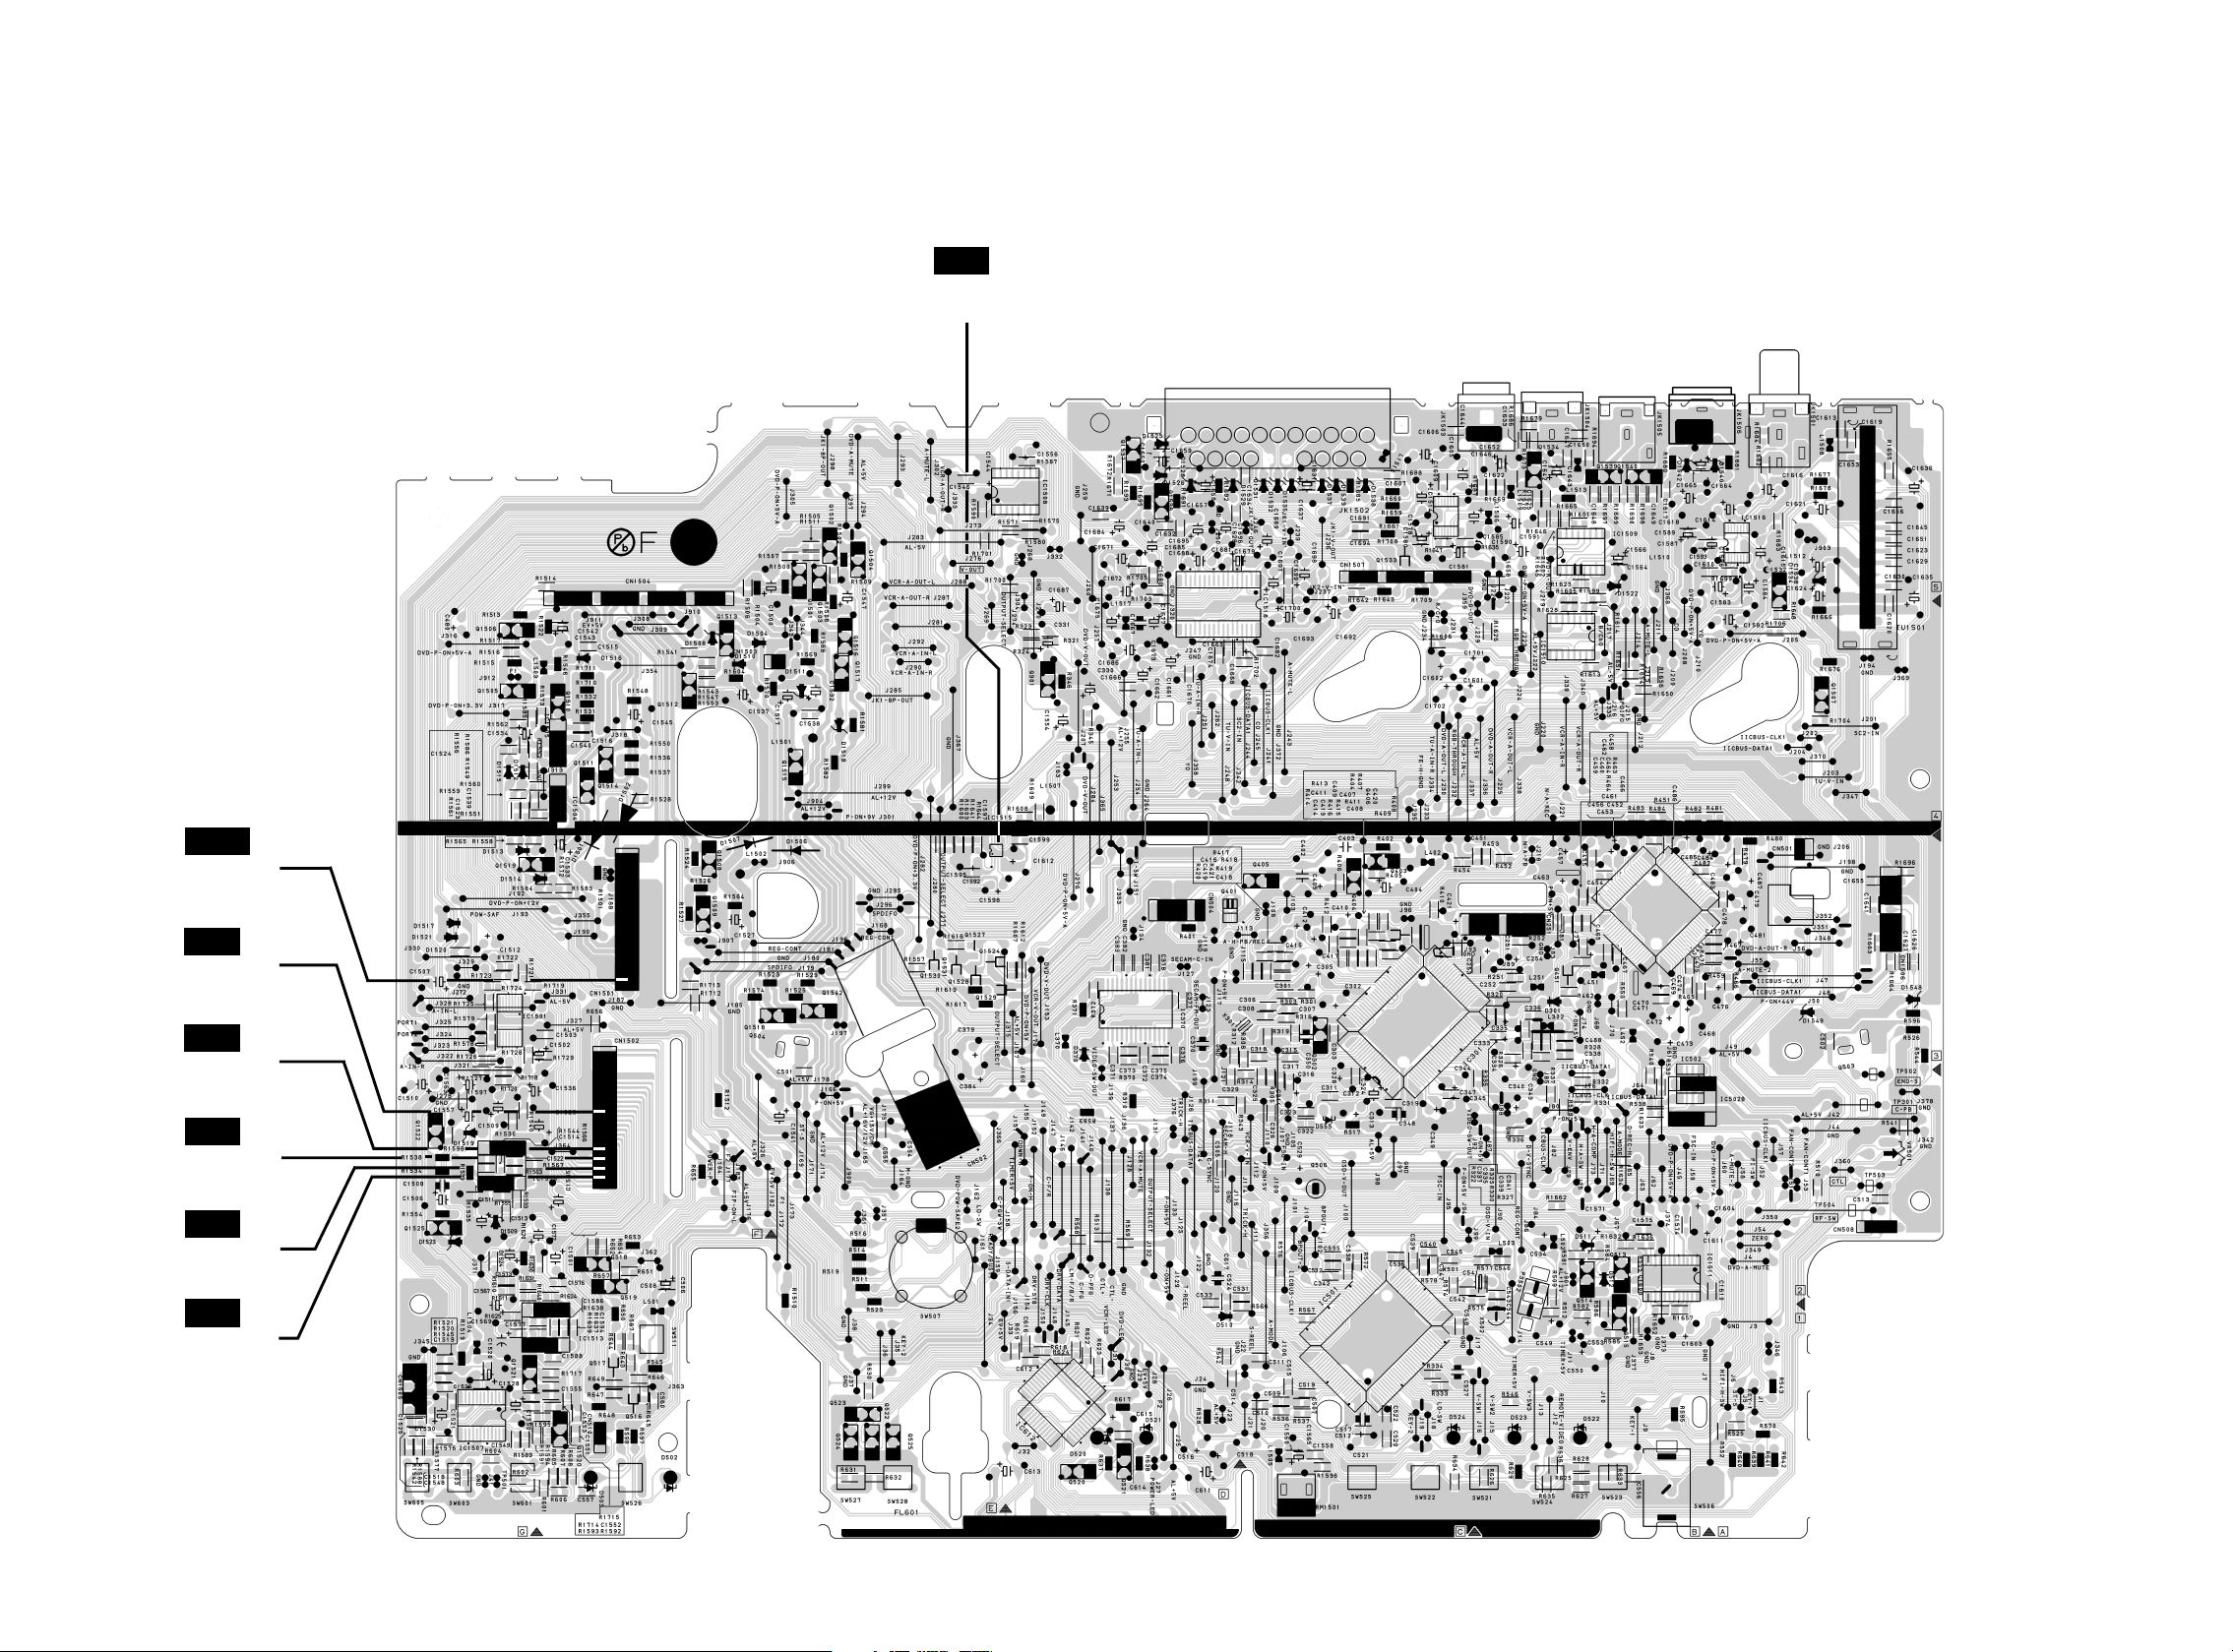
Main CBA Bottom View
18/6/2013
World of free manuals
WF9
PIN 6 OF
IC1515
WF10
PIN 28 OF
CN1501
WF8
PIN 14 OF
CN1502
WF7
PIN 22 OF
CN1502
WF6
PIN 24 OF
CN1502
WF4
PIN 26 OF
CN1502
WF5
PIN 28 OF
CN1502
1-12-21
BE9B00F01015A
Page 54
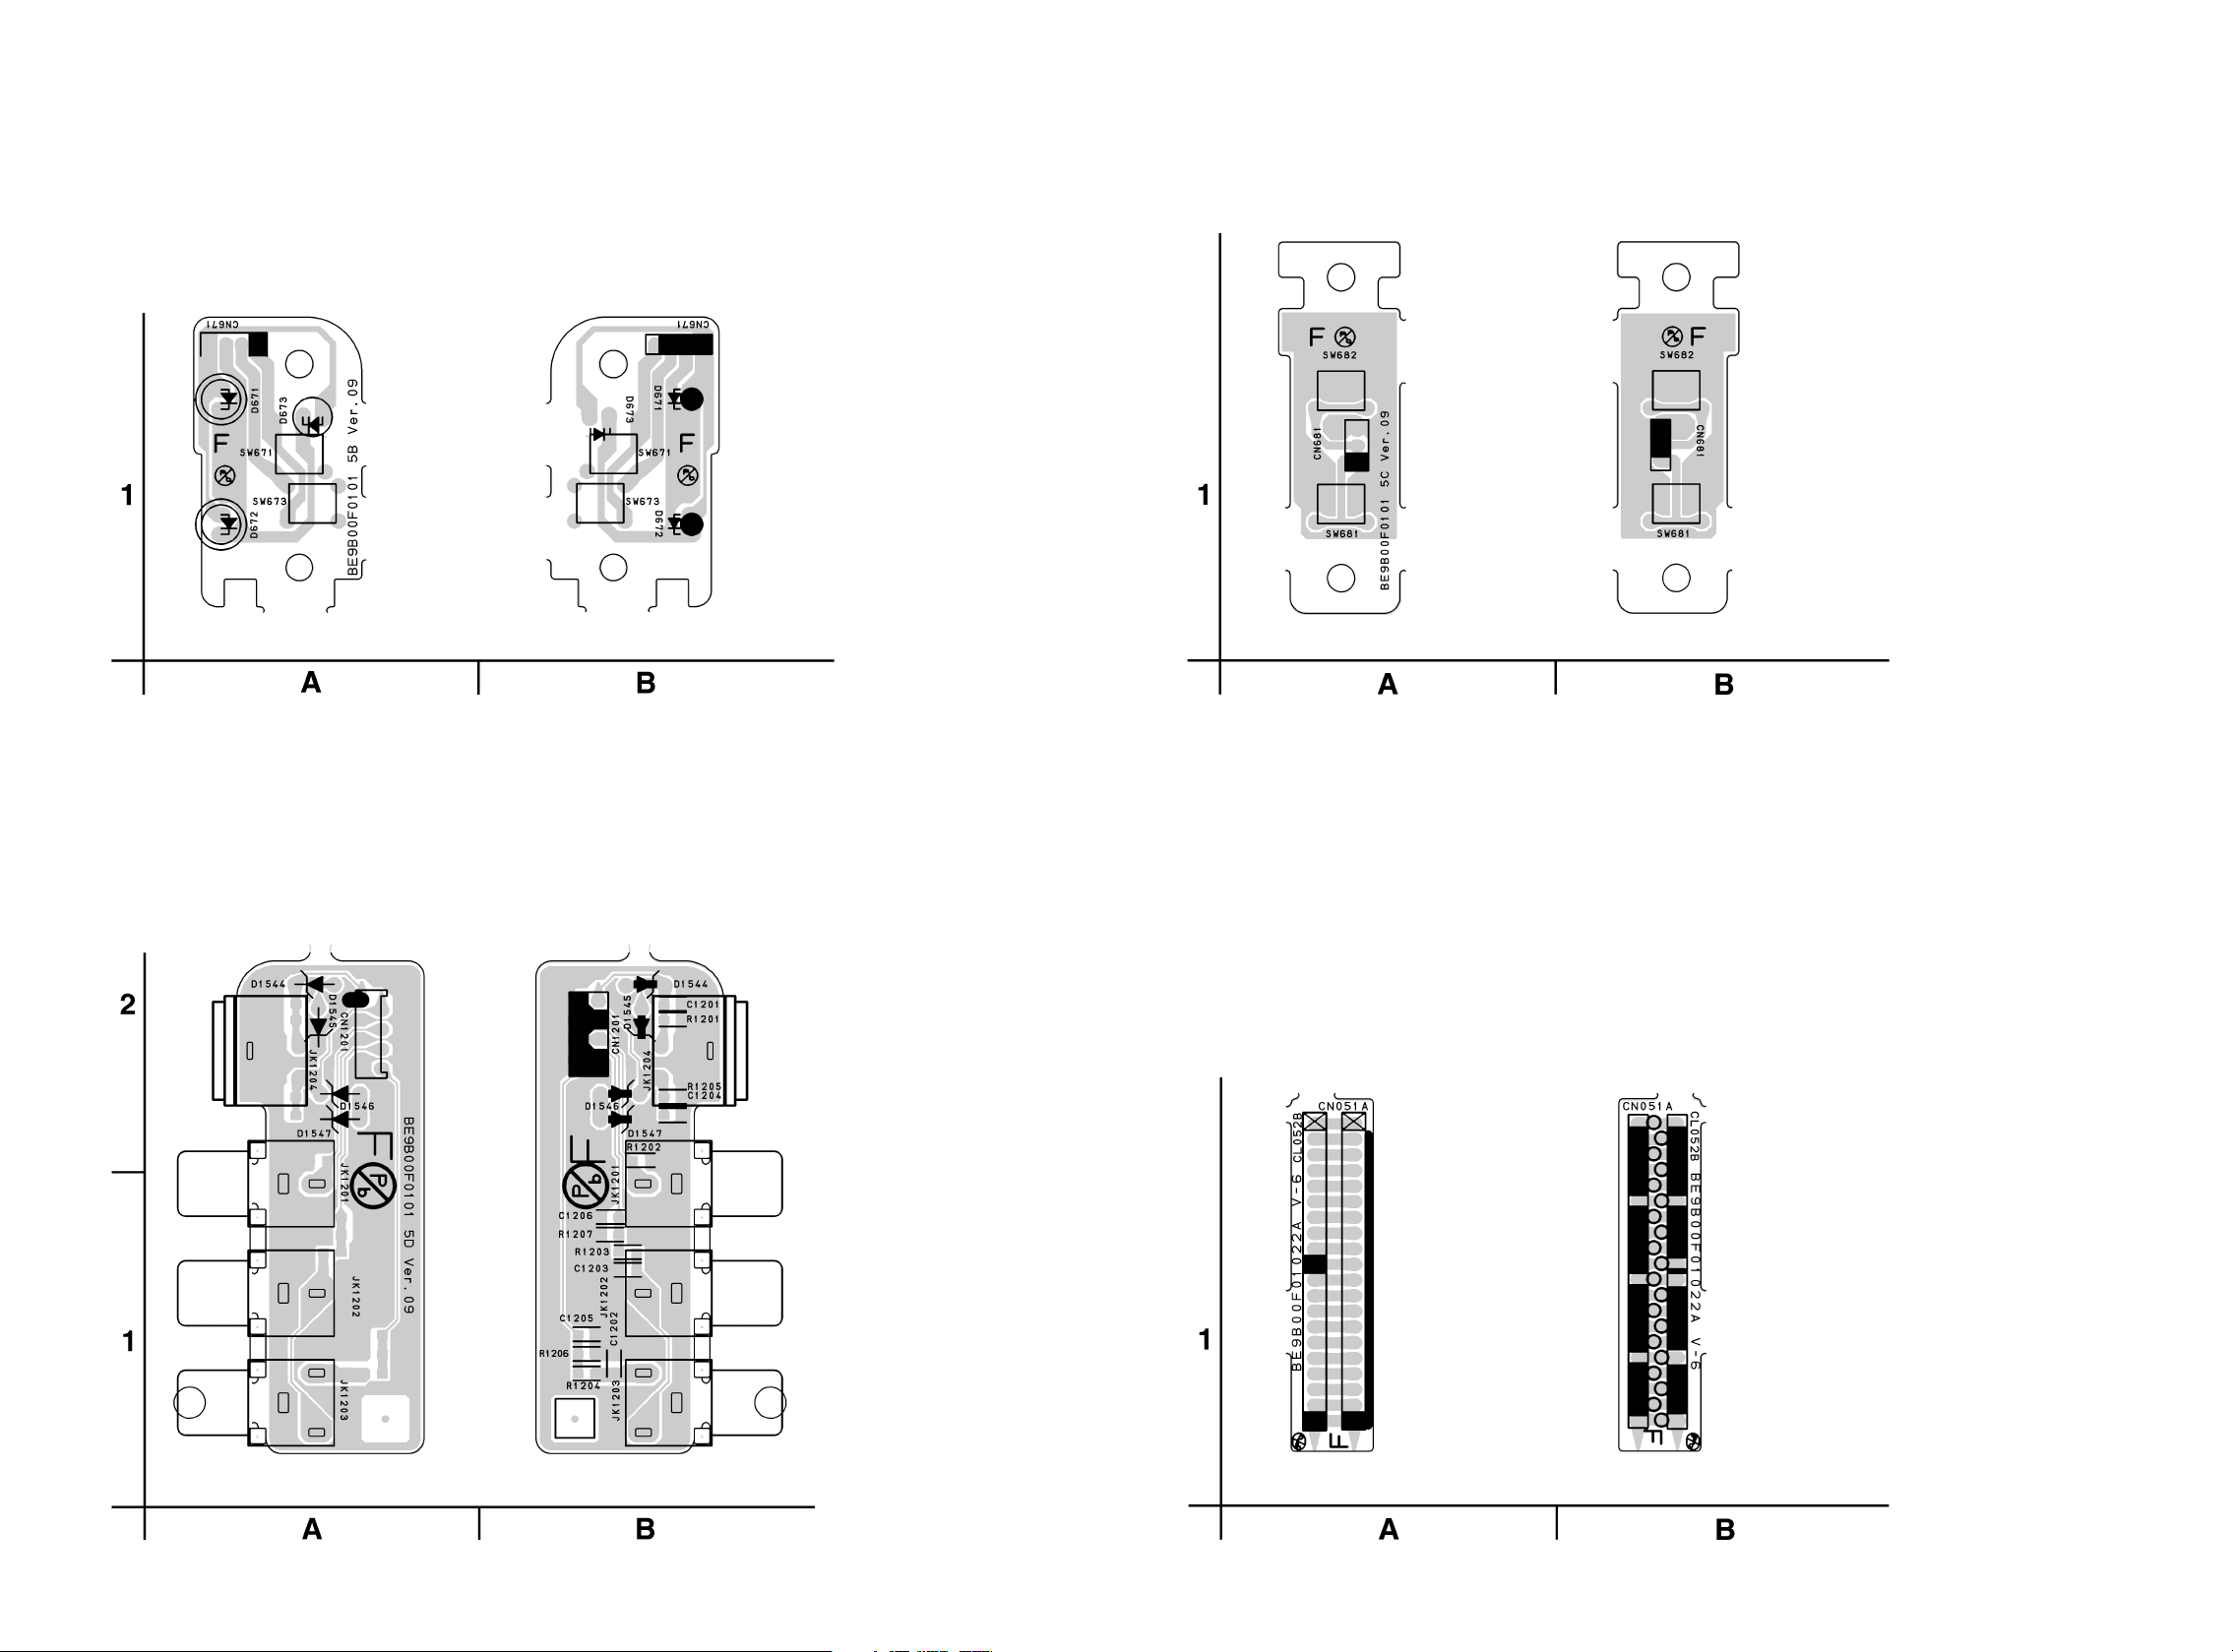
Power SW CBA Top View Power SW CBA Bottom View Function CBA Top View Function CBA Bottom View
18/6/2013
World of free manuals
BE9B00F01015B
Front Jack CBA Top View Front Jack CBA Bottom View
BE9B00F01015C
Junction CBA Top View Junction CBA Bottom View
BE9B00F01015D
BE9B00F01022B
1-12-22
Page 55
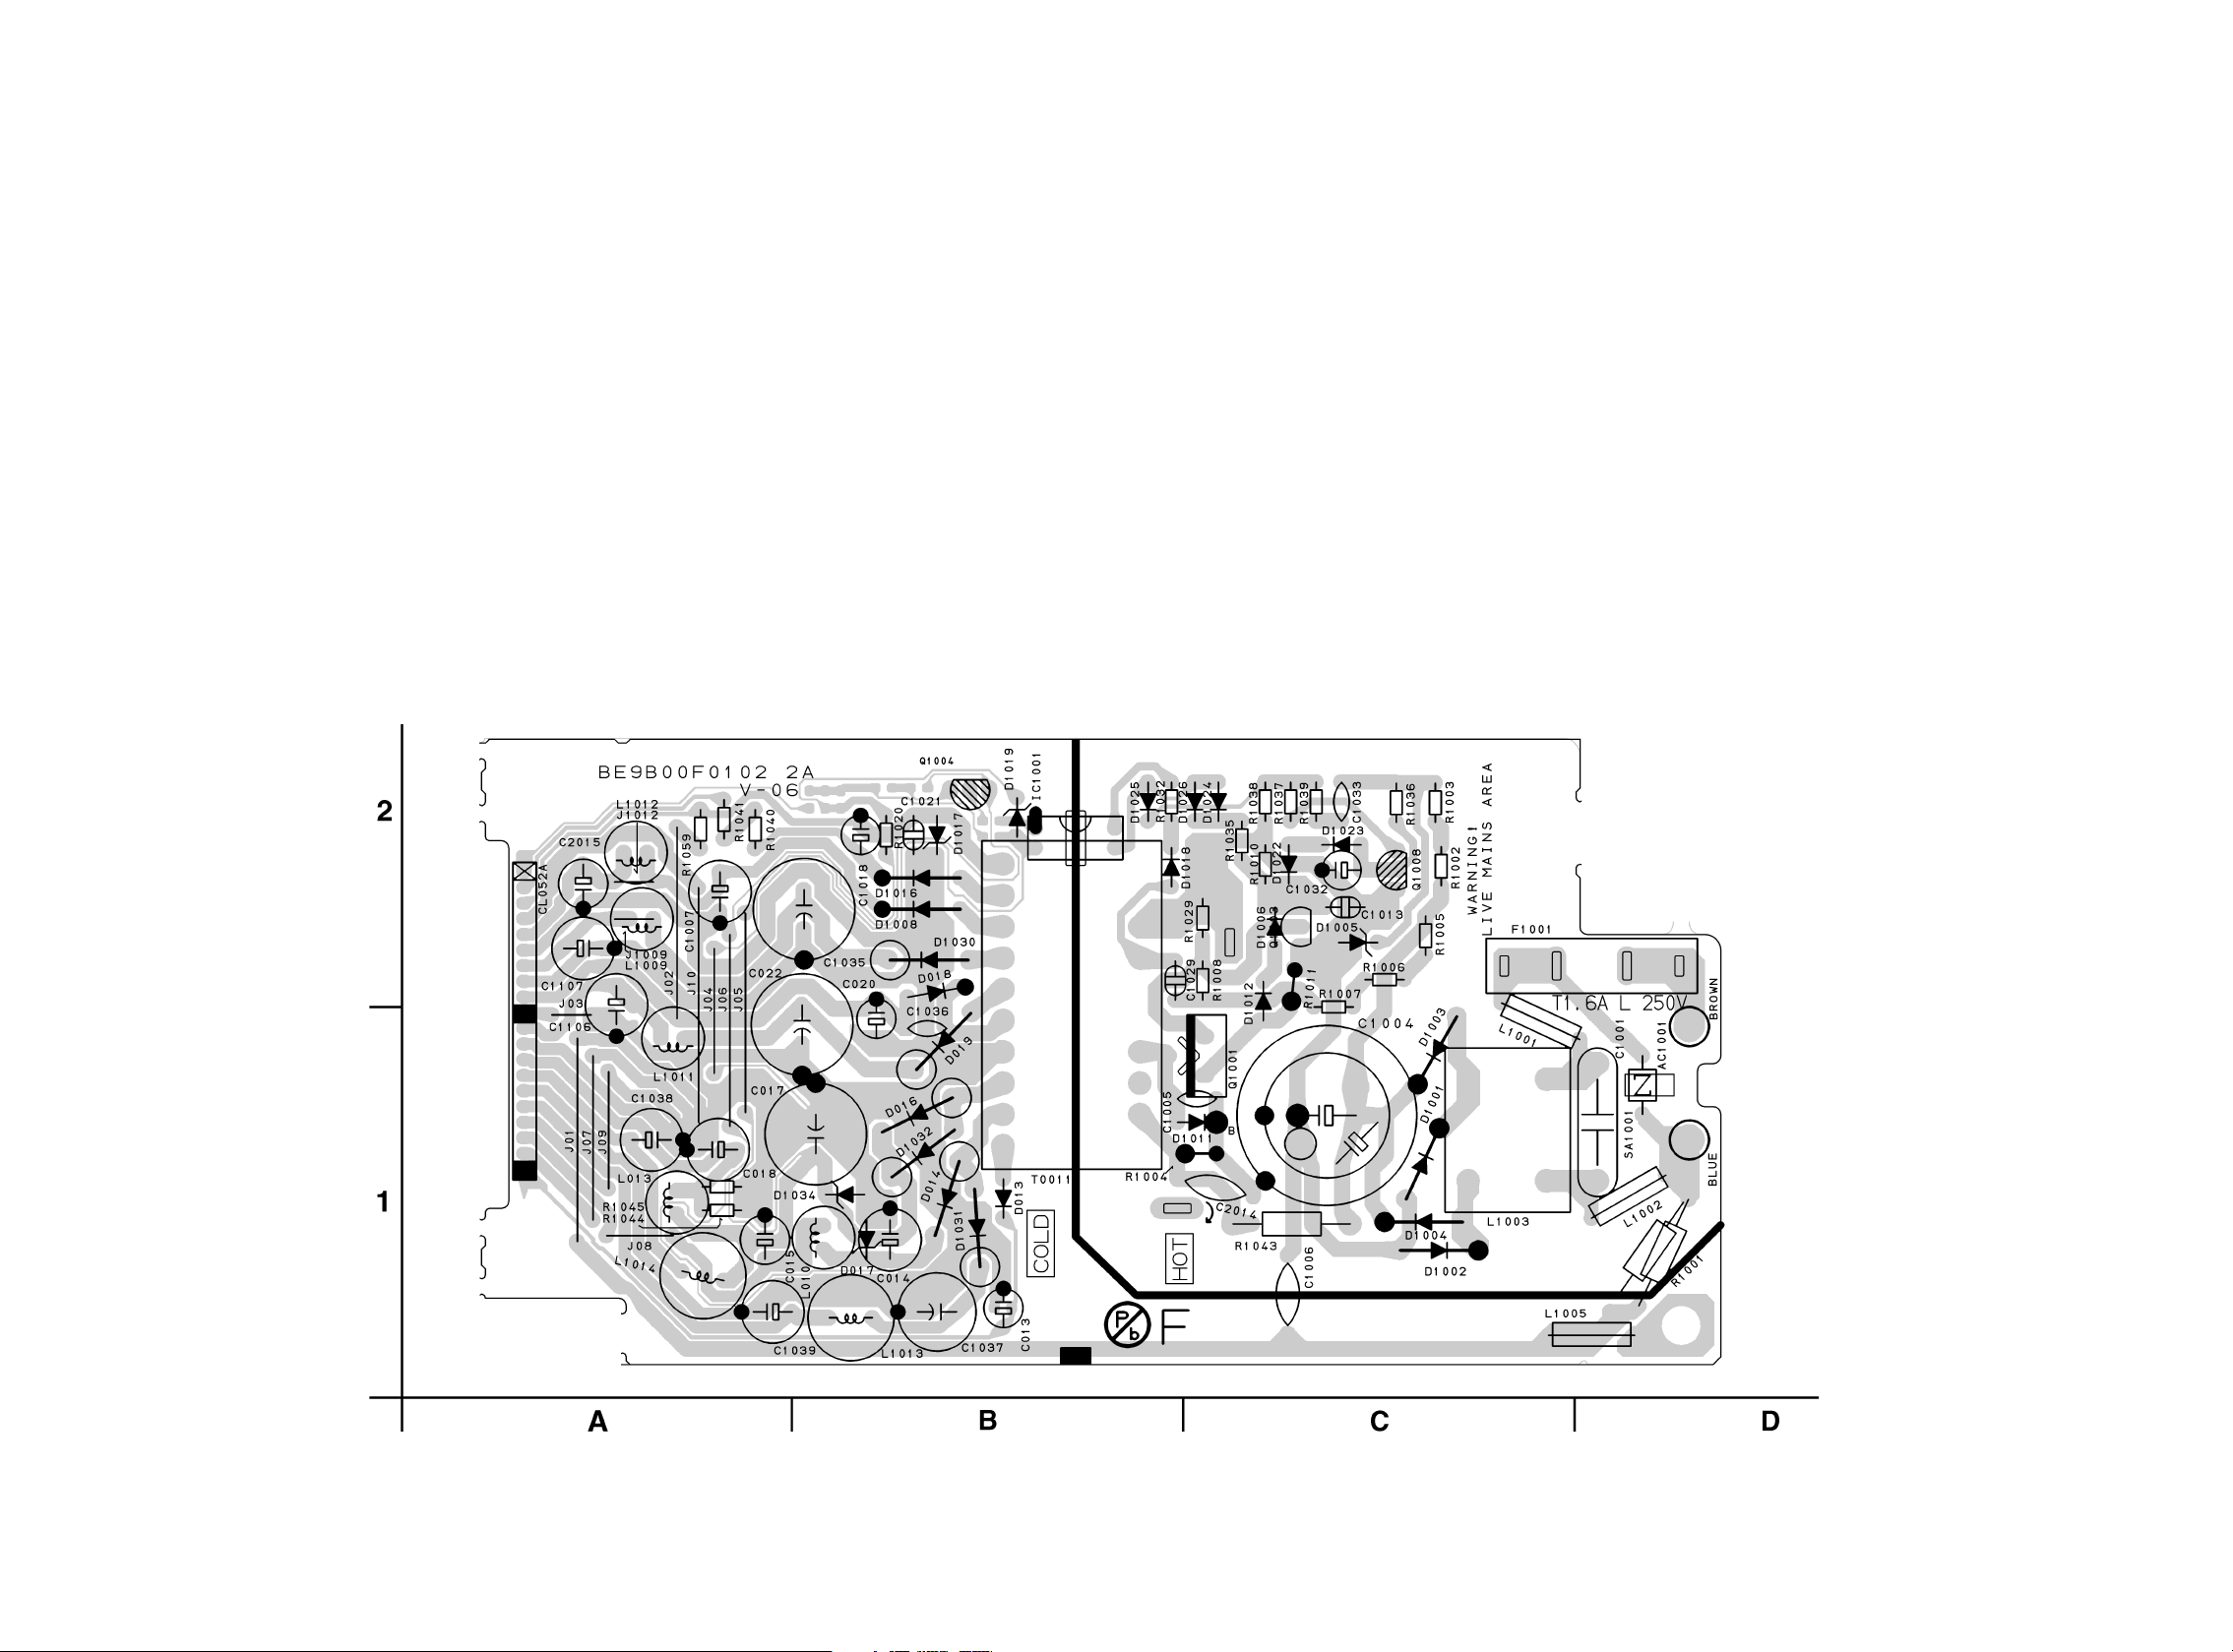
Power Supply CBA Top View
18/6/2013
World of free manuals
CAUTION !
For continued protection against fire hazard,
replace only with the same type fuse.
NOTE:
The voltage for parts in hot circuit is measured using
hot GND as a common terminal.
CAUTION !
Fixed voltage (or Auto voltage selectable) power supply circuit is used in this unit.
If Main Fuse (F1001) is blown , check to see that all components in the power supply
circuit are not defective before you connect the AC plug to the AC power supply.
Otherwise it may cause some components in the power supply circuit to fail.
Because a hot chassis ground is present in the power
supply circut, an isolation transformer must be used.
Also, in order to have the ability to increase the input
slowly, when troubleshooting this type power supply
circuit, a variable isolation transformer is required.
1-12-23
BE9B00F01022A
Page 56
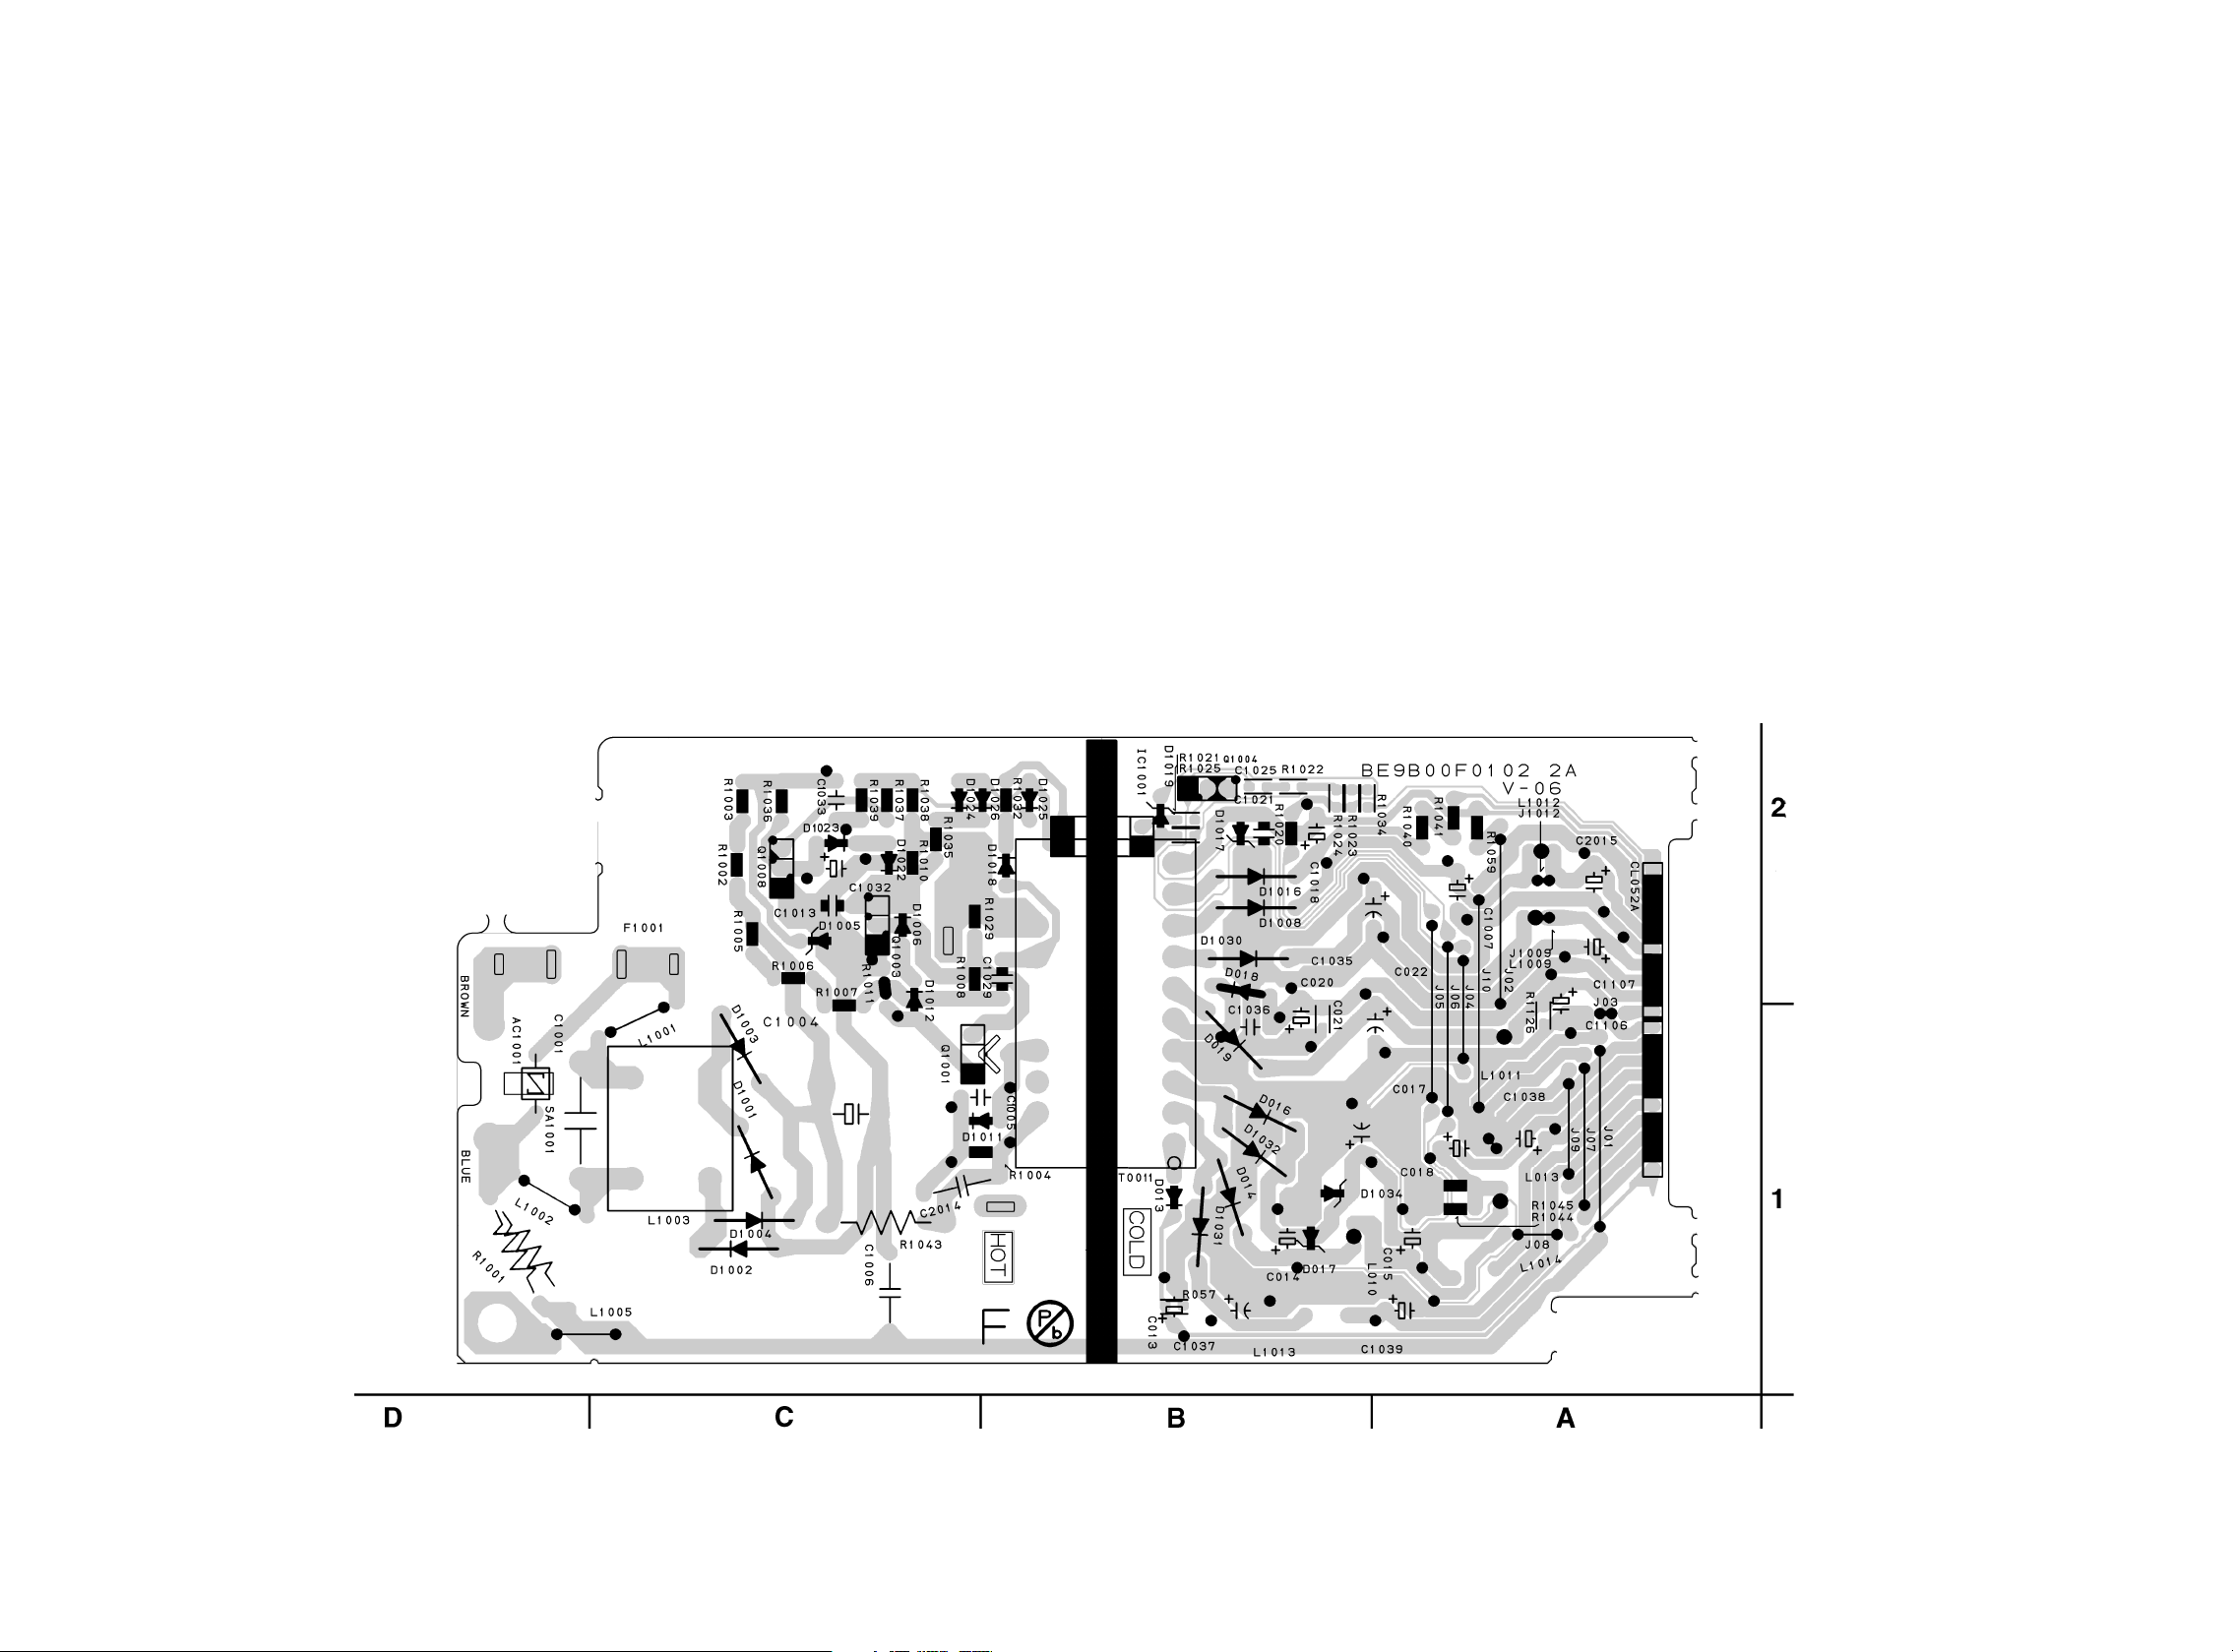
Power Supply CBA Bottom View
18/6/2013
World of free manuals
CAUTION !
For continued protection against fire hazard,
replace only with the same type fuse.
NOTE:
The voltage for parts in hot circuit is measured using
hot GND as a common terminal.
CAUTION !
Fixed voltage (or Auto voltage selectable) power supply circuit is used in this unit.
If Main Fuse (F1001) is blown , check to see that all components in the power supply
circuit are not defective before you connect the AC plug to the AC power supply.
Otherwise it may cause some components in the power supply circuit to fail.
Because a hot chassis ground is present in the power
supply circut, an isolation transformer must be used.
Also, in order to have the ability to increase the input
slowly, when troubleshooting this type power supply
circuit, a variable isolation transformer is required.
1-12-24
BE9B00F01022A
Page 57
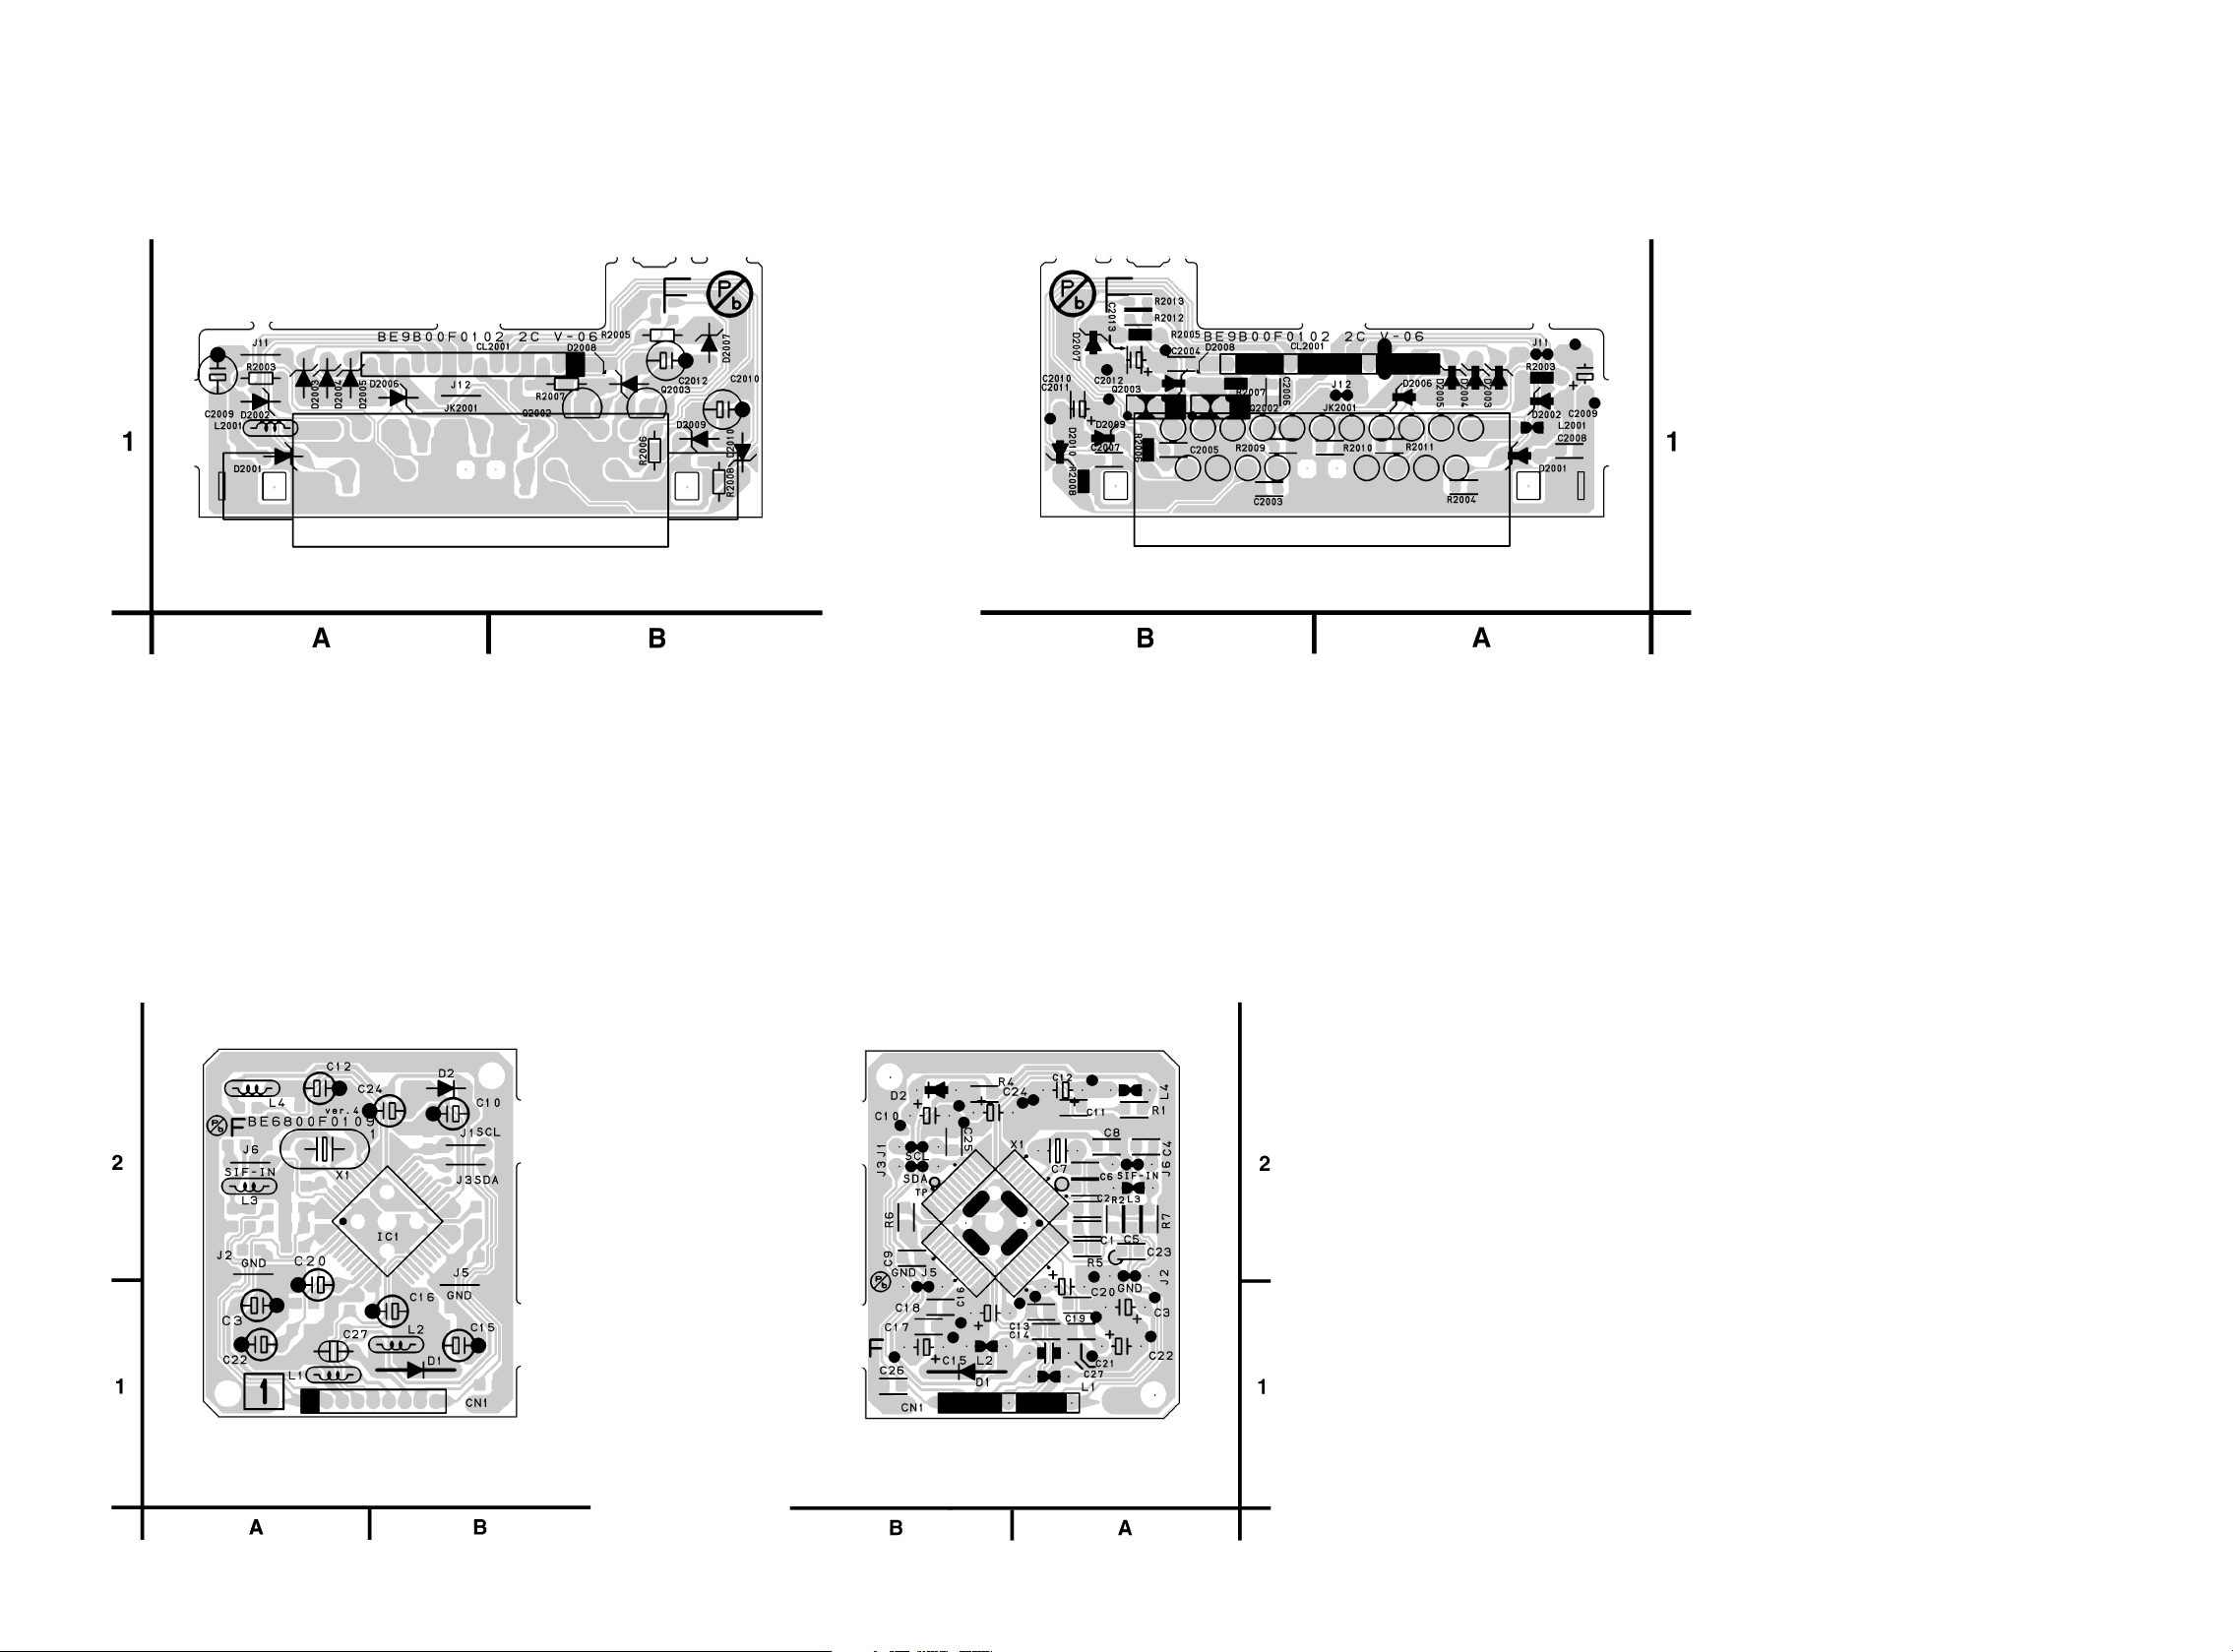
REAR JACK CBA Top View
18/6/2013
World of free manuals
REAR JACK CBA Bottom View
BE9B00F01022C
AFV CBA Top View
AFV CBA Bottom View
BE6800F01091
1-12-25
Page 58
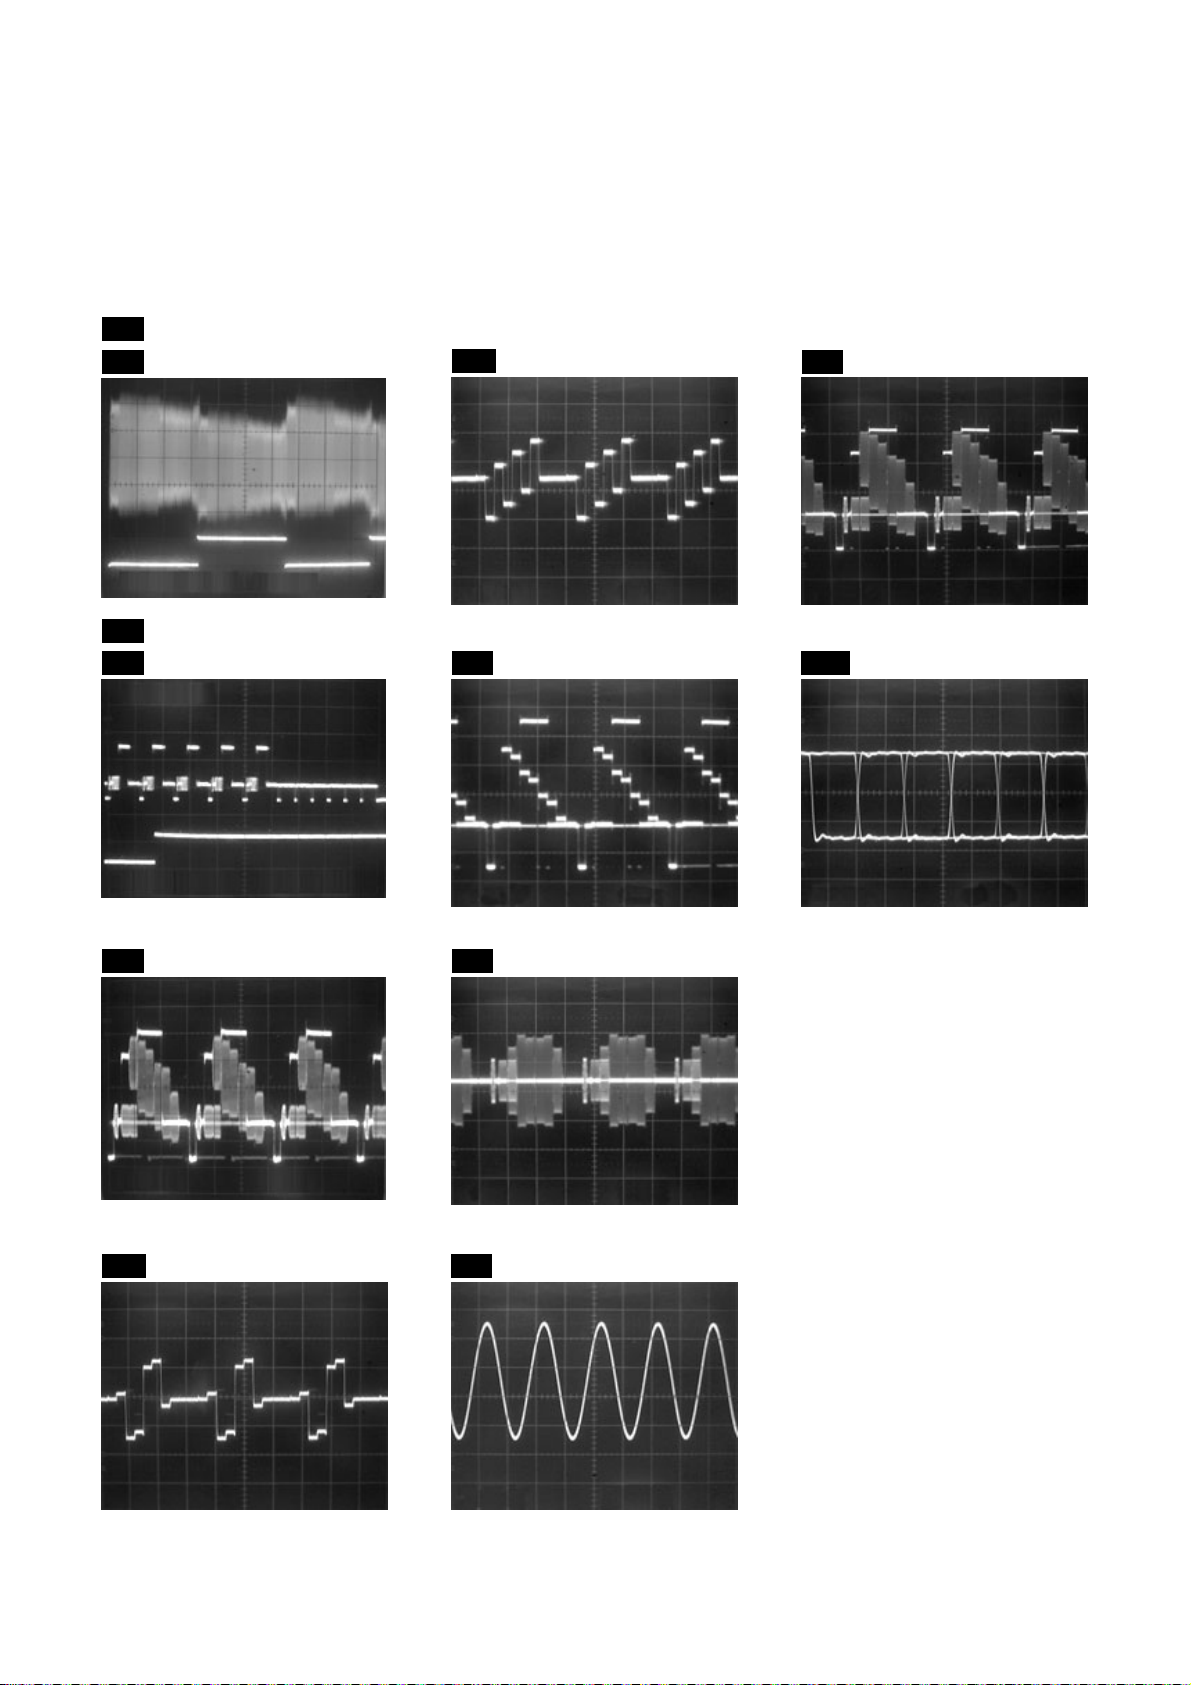
WAVEFORMS
18/6/2013
World of free manuals
NOTE:
Input: COLOR BAR SIGNAL (WITH 1KHz AUDIO SIGNAL)
WF2
UPPER
TP301
WF5
WF1
LOWER
TP504
Pin 28 of CN1502
WF9
Pin 6 of IC1515
C-PB
RF-SW 5V 5m
WF3
UPPER
WF1
LOWER
V-OUT 0.5V
RF-SW 5V
J236
WF3
0.2V
J236
TP504
s
µs
50
VIDEO-Cb
WF6
Pin 24 of CN1502
VIDEO-Y 0.2V 20µs
WF7
Pin 22 of CN1502
0.2V 20µs
VIDEO-CVBS 0.5V 20µs
WF10
Pin 28 of CN1501
SPDIF 1V 0.1µs
V-OUT E-E 0.2V 20
WF4
Pin 26 of CN1502
VIDEO-Cr
0.2V 20µs
µs
VIDEO-C 0.2V 20µs
WF8
Pin 14 of CN1502
AUDIO(L)-OUT
1V 0.5ms
1-13-1 W3PWF
Page 59
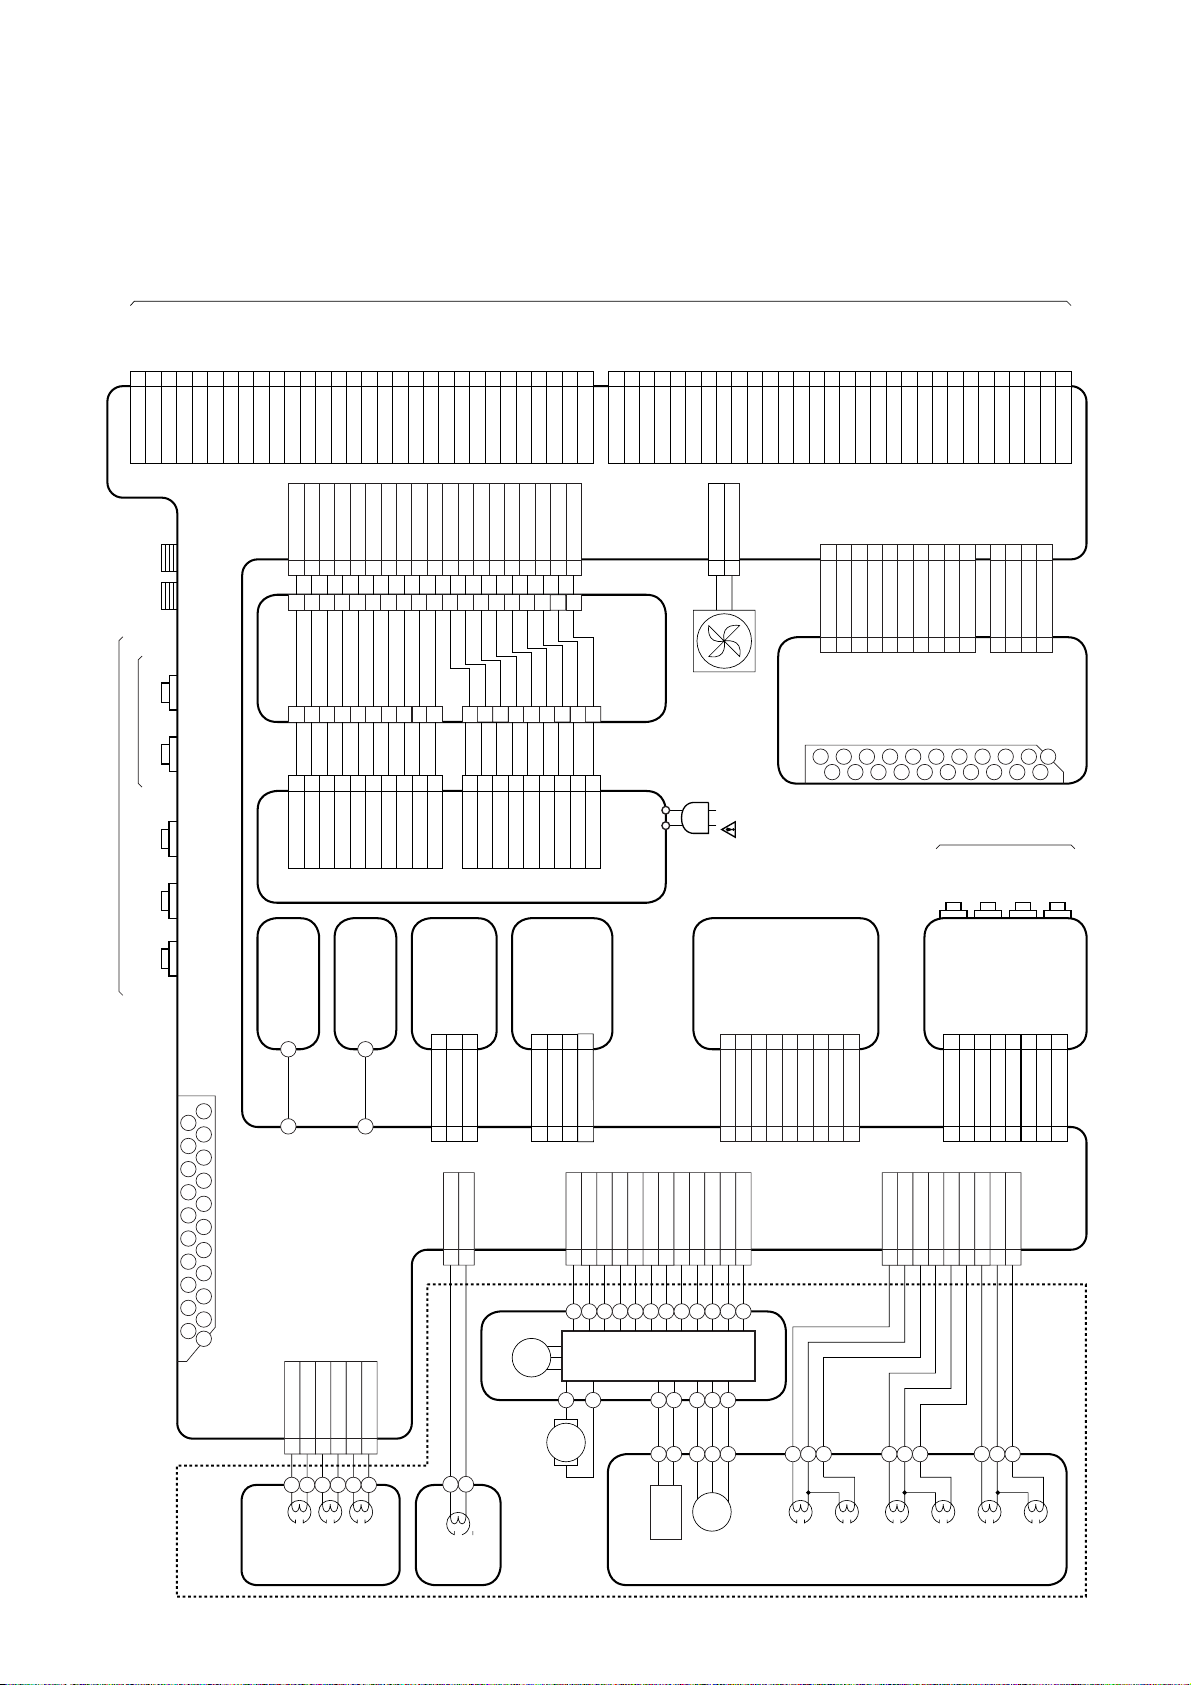
WIRING DIAGRAM < VCR SECTION >
18/6/2013
World of free manuals
TO WIRING
DIAGRAM
<DVD SECTION>
TO DVD
MAIN
CBA
CN101
(JW101)
1
2
4
5
678
9
10111213141516171831920212223242526272829
30
3
1
5
2
4
9
6
7
8
10
TO DVD
1112131415
MAIN
CBA
CN701
(JW102)
16
17181920212223242526272829
30
CN1501
GND
GND
GND
ANT-IN ANT-OUT
(COAXIAL)
DIGITAL AUDIO OUT
(OPTICAL)
REAR
AUDIO(L)
-OUT
AUDIO(R)
-OUT
S-VIDEO
OUT
EV+10.5V
EV+10.5V
EV+10.5V
GND
GND
P-ON+5V
P-ON+5V
P-ON+5V
GND
GND
P-ON+3.3V
GND
AL+44V1
AL+12V3
2
12467
33
CN051ACL051A CN1504
1234567
CL051B
JW1001
234
1
GND
AL+44V
AL+12V
SENSOR CBA
P-ON+3.3V
P-ON+3.3V
GND
GND6
FAN-AL+12V5
GND4
5
6
578
GND
GND
FAN-AL+12V
SENSOR CBA
NU7
NU
GND
AL+3V
AL+3V
AL+3V
GND11
AL+16V10
GND9
AL+5V8
9
8
10
11101314161718
9
8
9
10AL+16V
GND
AL+5V
FUNCTION
CN681
GND
GND
P-ON+2.5V
P-ON+2.5V
GND13
GND15
AL+3V14
AL-30V12
12
15
1234567
CL052B
JW1002
234
1
GND
GND
AL-30V
AL+3V
CL052A
CBA
GND
GND
SPDIF
AL+4V16
GND17
F218
6
5
789
GND
GND
AL+4V
POWER SW CBA
CN671
GND
F119
19
8
F2
CN1502
1V2CONT
SUB-RXD
9
F1
SYS-RESET
SUB-SCLK
GND
RDY
SUB-TXD
GND
CN1503
FAN
JUNCTION CBA
POWER SUPPLY
CBA
GND
VIDEO-C-IN
FAN+12V1
2 GND
AC CORD
1
2
AUDIO+5V
DVD-AUDIO-MUTE
GND
VIDEO-Y/CVBS-IN
AUDIO(L)-OUT
CN1507
JW2001
AUDIO(R)-OUT2
11
CL2001
123456789
JK2001
AFV CBA
4
3
AUDIO(R)-OUT
GND
GND
AUDIO(R)-IN
GND
AUDIO(L)-IN
2
AUDIO(L)-IN2
AUDIO(R)-IN2
AUDIO-MUTE2
AUDIO(L)-OUT2
GND
6 6
5 5
4 4
33
2
98765
VIDEO-Y(I/P)-OUT
GND
VIDEO-C-OUT
GND
VIDEO-IN2
VIDEO-OUT2
SC2-IN
GND
9 9
8 8
7 7
10 10
REAR
JACK
CBA
1011121314151617181920
S-VIDEO
IN
CN1201
1
2
VIDEO-Cb/Pb-OUT
VIDEO-Cr/Pr-OUT
GND
GND
VIDEO-G-IN
VIDEO-B-IN
16P
3 13
2 12
1 11
CL2002
FRONT
AUDIO(L)
-IN
VIDEO
-IN
FRONT JACK
CBA
3
4
6
5
GND
VIDEO-Y(I)-OUT
VIDEO-R-IN
4 14
21
AUDIO(R)
-IN
8
7
JK1502
1
2
3
4
5
6
7
8
9
10
11
12
13
14
15
16
17
18
19
20
21
CN504
ACE HEAD
ASSEMBLY
(DECK ASSEMBLY)
MAIN CBA
AE-H
AE-H/FE-H
1
23456
HEAD
AUDIO
ERASE
A-COM
AUDIO-PB/REC
CTL(+)
CTL(-)
HEAD
HEAD
AUDIO
CONTROL
JW002
DUBBING-SW
OPEN/CLOSE-SW
22
11
CN510
FE-H-GND
CN501
1
FE HEAD
FULL
ERASE
JW001
GND
33
FE-H
2
CAPSTAN
HEAD
POWER-SW
GND
POWER-LED
22
11
3 3
CN508
AL+16V/+12V
CN502
1
M
MOTOR
M
LOADING
MOTOR
1-14-1
SIF
D-CONT
D-PFG
8
9
SENSOR
CN1506 CN1
GND
101112
M
DRUM
MOTOR
NU1
2
P-ON+15V
AL+12V(2)
AL+5V(1)
44
C-F/R
C-FG
C-CONT
LM-FWD/REV
P-ON+5V(DECK)
23456
GND
7
MOTOR
DRIVE
CIRCUIT
PG
CYLINDER
ASSEMBLY
TU-AUDIO(L)5
TU-AUDIO(R)4
GND3
CAPSTAN
MOTOR
VIDEO
(R)1
P-ON+5V6
HEAD
P-ON+5V7
IIC-BUS SDA9
IIC-BUS SCL8
VIDEO
(L)1
HEAD
JW103
CN1505
CN251
VIDEO(L)-2
VIDEO(L)-1
VIDEO(R)-1
VIDEO-COM
1234567
VIDEO
(L)2
HEAD
VIDEO
FRONT-C-IN
FRONT-Y-IN
1
2
VIDEO-COM
VIDEO(R)-2
(R)2
HEAD
GND
GND
FRONT-VIDEO-IN
AUDIO(L)-IN-F
3
4
6
5
Hi-Fi-AUDIO(R)
Hi-Fi-AUDIO(L)
Hi-Fi-COM
8
9
Hi-Fi
AUDIO
(R) HEAD
Hi-Fi
AUDIO
E9B05WI
AUDIO(R)-IN-F
GND
8
7
(L) HEAD
Page 60
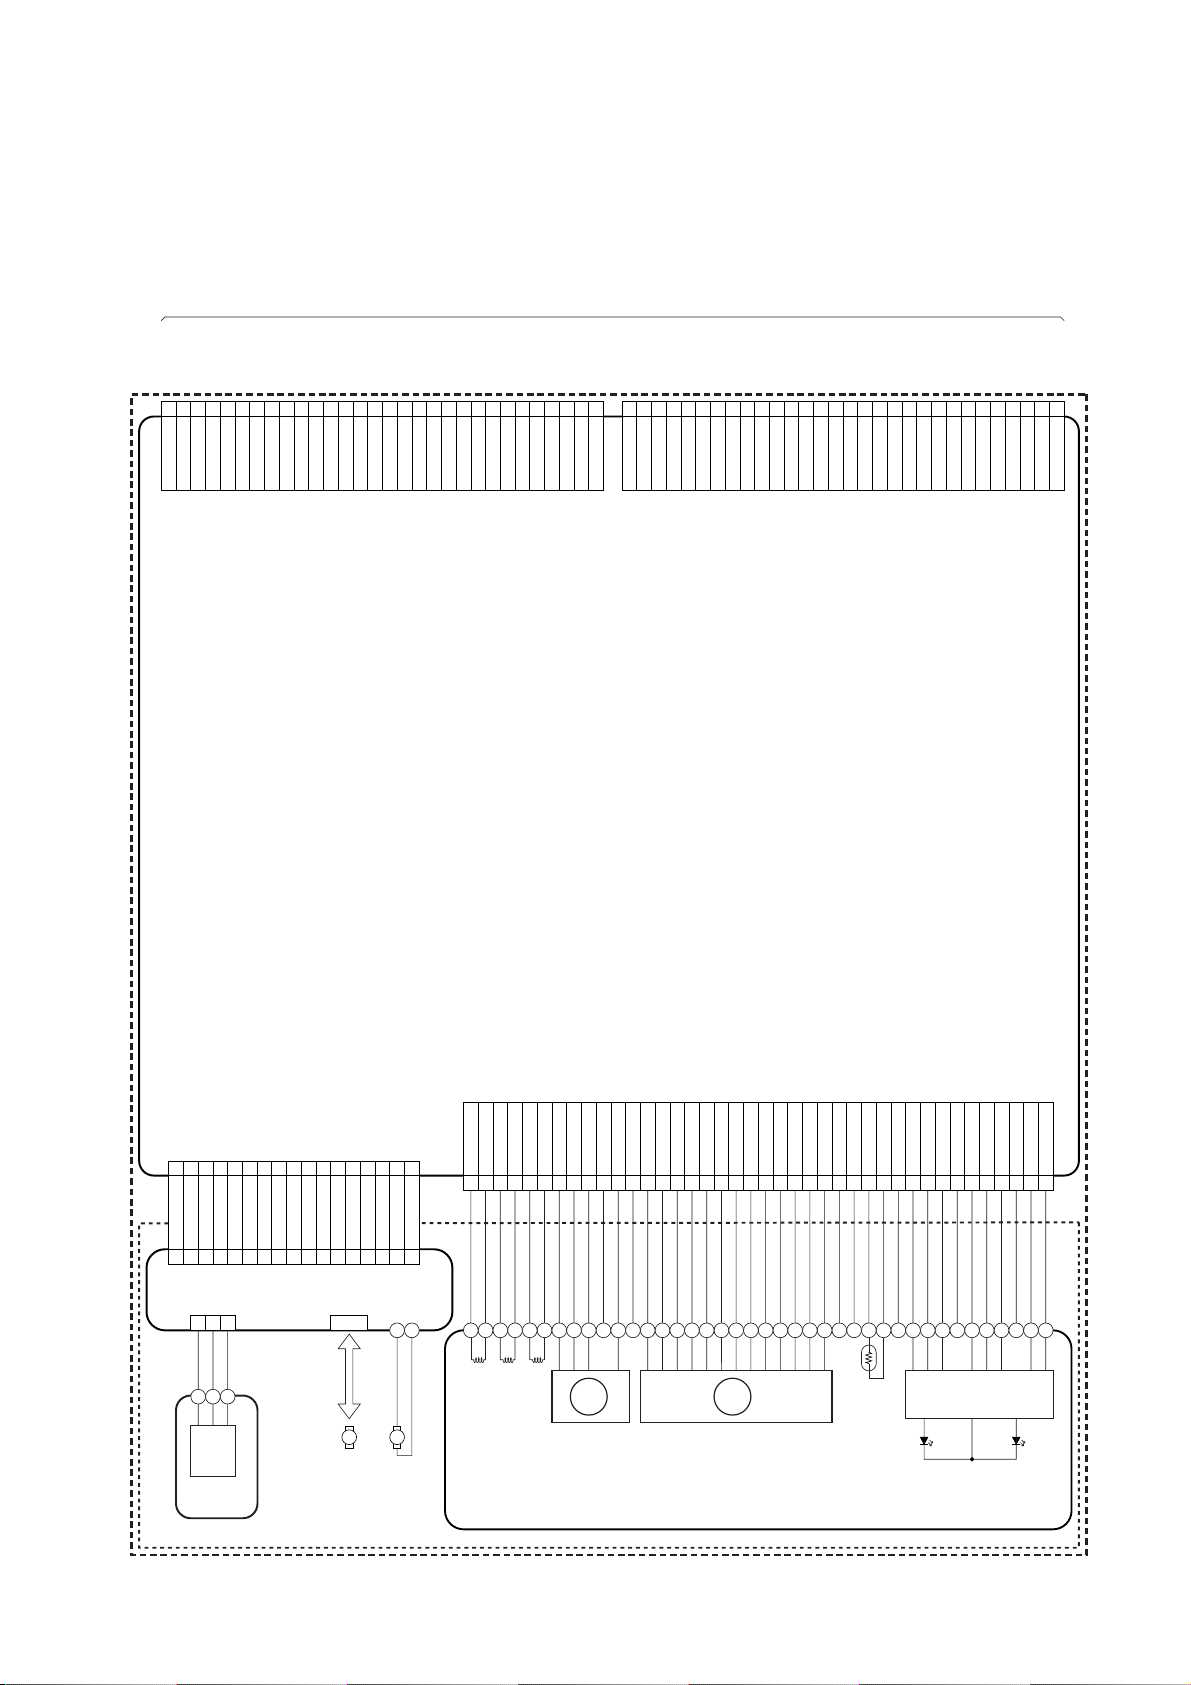
124
18/6/2013
World of free manuals
WIRING DIAGRAM < DVD SECTION >
TO WIRING
DIAGRAM
<VCR SECTION>
TO
MAIN CBA
CN1501
(JW101)
5
678
9
10111213141516171831920212223242526272829
30
3
1
2
4
9
5
6
7
8
1112131415
10
TO
MAIN CBA
CN1502
(JW102)
16
17181920212223242526272829
30
CN101
GND
GND
GND
EV+10.5V
EV+10.5V
EV+10.5V
GND
GND
P-ON+5V
P-ON+5V
P-ON+5V
GND
GND
P-ON+3.3V
P-ON+3.3V
P-ON+3.3V
GND
GND
AL+3V
AL+3V
AL+3V
GND
GND
P-ON+2.5V
P-ON+2.5V
GND
GND
SPDIF
GND
1V2CONT
DVD MAIN CBA
CN701
SUB-RXD
RDY
SYS-RESET
SUB-SCLK
SUB-TXD
GND
GND
VIDEO-C-IN
GND
AUDIO+5V
DVD-AUDIO-MUTE
VIDEO-Y/CVBS-IN
GND
AUDIO(L)-OUT
GND
AUDIO(R)-OUT
GND
AUDIO(R)-IN
GND
AUDIO(L)-IN
GND
VIDEO-C-OUT
VIDEO-Cr/Pr-OUT
VIDEO-Y(I/P)-OUT
GND
GND
VIDEO-Cb/Pb-OUT
GND
GND
VIDEO-Y(I)-OUT
118W217V415
316
CN301
VCC
U
CN1001
123
CN1003
SLED
SENSOR
DVD MECHANISM
DVD MECHANISM & DVD MAIN CBA ASSEMBLY
910 HW+
514
613
712
811
HU+
HU-
HV+
HV-
RELAY
ENCODER CBA
109
HW-
CBA
118
127
T-SCN3
VH-
~
1
CN1002
SPINDLE
136
T-SCN2
11
M
MOTOR
145
GND
154
SL+
163
SL-
M
SLED
MOTOR
172
SW1
CN201
FCS(+) 4TRK(-)
TRK(+)
1
3
2 FCS(-)
FOCUS
ACTUATOR
TRACKING
PICK UP
GND
FPD-VSW
RF(+)15C16B17F18E19D20PD-SW21H22G23A24PD-VCC25PD-VC26VCC127VCC228TH29GND30GND31IINR32IINW33IINE34GND35HFSW36ENABLE37OCE38GND39OCW40LDSW
9 FPD-VCC
10
11
FPDIC
GND
12
RF(-)
13
14
PDIC
DVD-LD
DVD/CD
LASER
DIODE
DRIVE
CD-LD
E9B05WID
FPD-VC
6 TILT(-)
5 TILT(+)
7 FPD-VOUT
8
ACTUATOR
TILT
ACTUATOR
1-14-2
Page 61
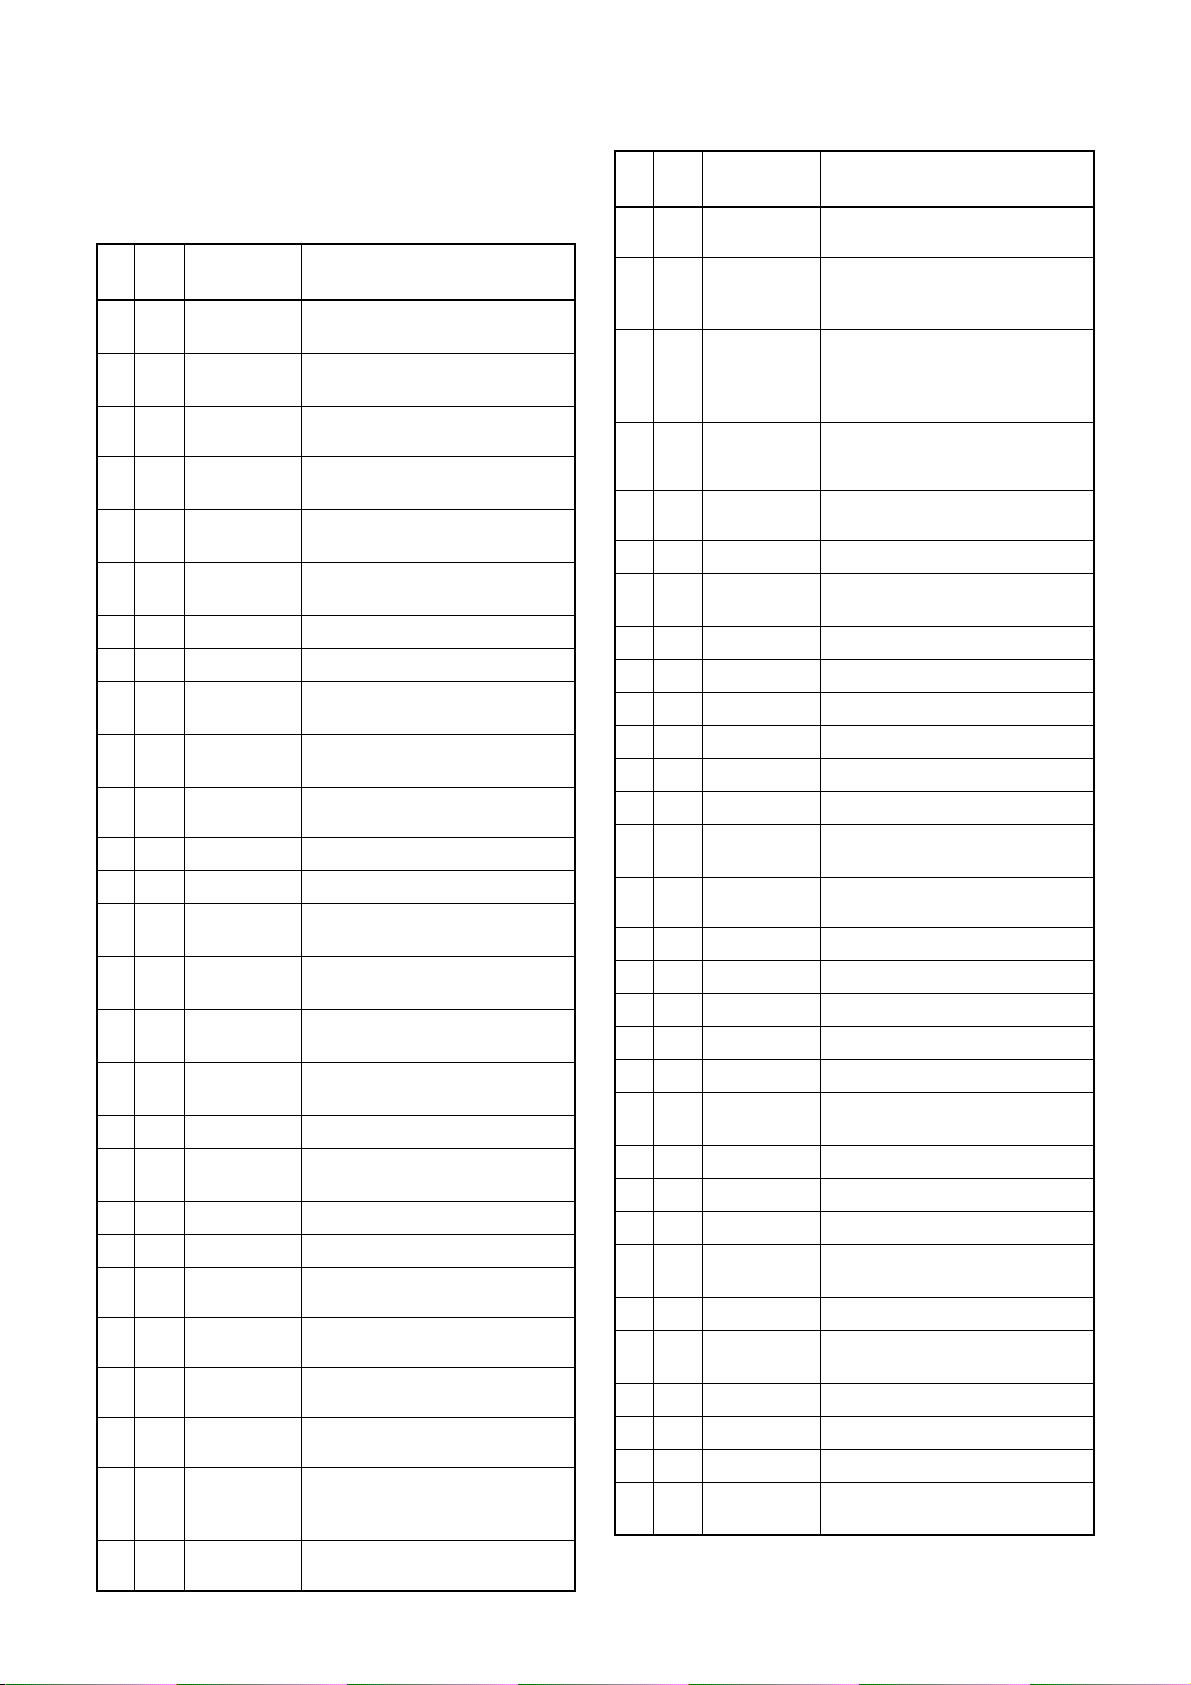
IC PIN FUNCTION DESCRIPTIONS
18/6/2013
World of free manuals
< VCR Section >
IC501( SERVO / SYSTEM CONTROL IC )
Pin
IN/
No.
OUT
1IN
2IN
3IN
4IN
5IN
6IN
7IN
8IN
9IN
10 IN
11 OUT
12 -
13 OUT
14 IN
15 OUT
16 OUT
17 IN
18 OUT
19 OUT
20 -
21 22 OUT
23 OUT
24 OUT
25 OUT
26 OUT
27 OUT
Signal
Name
SC2-IN
PG-DELAY
DVD-POWSAFETY
END-S
AFC
V-ENV
KEY-1 Key Scan Input Signal 1
KEY-2 Key Scan Input Signal 2
LD-SW
ST-S
FANCONT1
NU Not Used
D-V- SYNC Dummy V-s ync Output
REMOCON
-IN
C-ROTA
H-A-SW
H-A-COMP
RF-SW Video Head Switching Pulse
Hi-Fi-H-SW
NU Not Used
NU Not Used
VIDEOSW1
VIDEOSW2
VIDEOSW3
REGCONT2
DVDAUDIOMUTE
RGBTHROUGH
Input Signal from Pin 8 of
SCART2
Video Head Switching Pulse
Signal Adjusted Voltage
Abnormal Voltage Detection
Tape End Position Detect
Signal
Automatic Frequency Control
Signal
Video Envelope Comparator
Signal
Deck Mode Position Detector
Signal
Tape Start Position Detector
Signal
Fan Motor Control Signal
Remote Control Sensor
Color Phase Rotary
Changeover SIgnal
Video Head Amp Switching
Pulse
Head Amp Comparator
Signal
HiFi Audio Head Switching
Pulse
Video Input Select Signal
Video Input Select Signal
Video Input Select Signal
Power Regulator Control
Signal
DVD Audio Mute Control
Signal
SCART 2 RGB Through
Control Signal
Function
Pin
IN/
No.
OUT
28 OUT
29 OUT
30 OUT
31 IN
32 IN P-DOWN -H
33 OUT
34 IN
35 IN
36 OUT
37 38 IN
39 OUT
40 -
41 OUT
42 OUT
43 IN
44 IN
45 OUT
46 47 IN
48 IN
49 -
50 IN
51 -
52 OUT
53 54 55 -
56 IN
57 -
58 IN
Signal
Name
AUDIOMUTE-2
DVDAUDIOMUTE2
DVDSCARTAUDIOMUTE
REC-SAFSW
D-REC-H Delayed Record Signal
RESET
Xcin Sub Clock
Xcout Sub Clock
Vcc Vcc
Xin Main Clock Input
Xout Main Clock Input
GND Vss(GND)
PWR-SW
REGULATOR
-CONTROL
CLKSEL Clock Select (GND)
OSCin Clock Input for letter size
OSCout Clock Output for letter size
NUB Not Used
LP LP
FSC-IN
[4.43MHz]
OSDVss OSDVss
OSD-V-IN OSD Video Signal Input
NU Not Used
OSD-V-
OUT
OSDVcc OSDVcc
HLF
NU Not Used
DAVN-L VPS/PDC Data Receive = "L"
NU Not Used
C-SYNC
Function
Audio Mute Control Signal
DVD Audio Mute Control
Signal
DVD SCART Audio Mute
Control Signal
Recording Safety SW Detect
(With Record tab=”L”/ With out
Record tab=”H”)
Power Voltage Down Detector
Signal
System Reset Signal
(Reset=”L”)
DVD Power Supply Control
Signal
Power Regulator Control
Signal
4.43MHz Clock Input
OSD Video Signal Output
LPF Connected Terminal
(Slicer)
Composite Synchronized
Pulse
1-15-1 E9B01PIN
Page 62
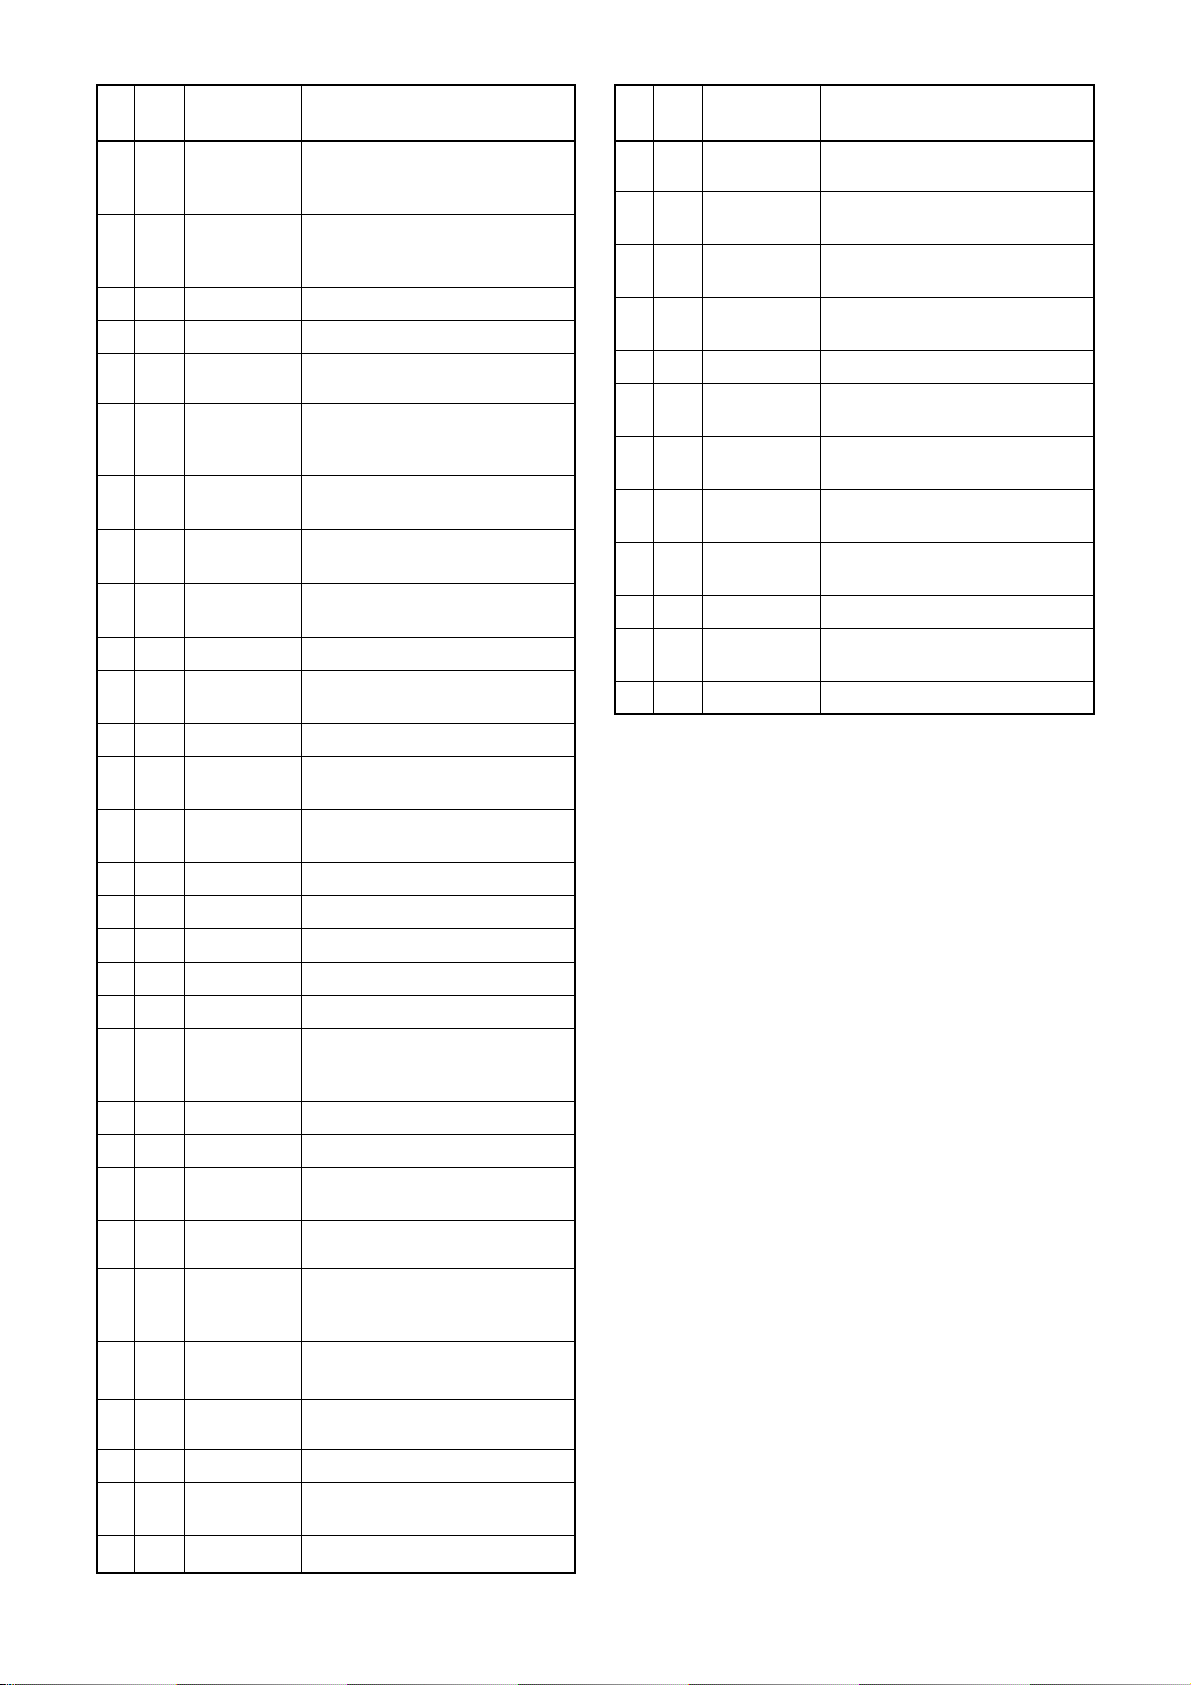
Pin
18/6/2013
World of free manuals
No.
IN/
OUT
Signal
Name
Function
Control SCART 18Pin Level
59 OUT
8POUT-1
by using 8POUT-1 and
8POUT-2
Control SCART 18Pin Level
60 OUT
8POUT-2
by using 8POUT-1 and
8POUT-2
61 62 -
63 OUT
64 IN
65 OUT
66 IN
67 OUT
68 OUT
69 OUT
70 OUT
71 OUT
72
73 -
74 75
76 OUT
77 OUT
NU Not Used
NU Not Used
SYSTEMRESET
READY/
BUSY
S-DATAOUT
S-DATA-IN
S-CLOCK
System Reset Signal
Ready/Busy communication
Control with Main Micro
Controller
Communication of Data from
VCR Micro Controller
Communication of Data to
VCR Micro Controller
Communication of Clock with
VCR Micro Controller
DRV-DATA VFD Driver IC Control Data
DRV-STB
VFD Driver IC Chip Select
Signal
DRV-CLK VFD Driver IC Control Clock
IN/
OUT
IIC-BUSSCL
IIC-BUSSDA
IIC BUS Control Clock
IIC BUS Control Data
NU Not Used
NU Not Used
OUT P-ON-H Power On Signal to High
C-CONT Capstan Motor Control Signal
D-CONT Drum Motor Control Signal
Capstan Motor FWD/REV
78 OUT
C-F/R
Control Signal (FWD=“L”/
REV=“H”)
79 IN
80 IN
81 OUT
82 OUT
83 OUT
S-REEL Supply Reel Rotation Signal
T-REEL Take Up Reel Rotation Signal
LM-FWD/
REV
OUTPUTSELECT
VCRAUDIOMUTE
Loading Motor Control Signal
Output Select
Audio Mute Control Signal
(Mute = “H”)
Pin
No.
OUT
89 IN
90
91 -
92 93 94
OUT
95
OUT
96 -
97 98 99 -
100
IN/
IN
IN/
IN/
IN
Signal
Name
DVD-POWSAFETY
D-PFG
AMPVREF
out
AMPVREF
in
Abnormal Voltage Detection
Drum Motor Phase/
Frequency Generator
V-Ref for CTL AMP
V-Ref for CTL AMP
P80/C P80/C Terminal
CTL (-)
CTL (+)
AMPC
CTL
Playback/Record Control
Signal (-)
Playback/Record Control
Signal (+)
CTL AMP Connected
Terminal
To Monitor for CTL AMP
Output
AMPVcc AMPVcc
AVcc
A/D Converter Power Input/
Standard Voltage Input
AGC IF AGC Comparator Signal
Notes:
Abbreviation for Active Level:
PWM -----Pulse Wide Modulation
A/D--------Analog - Digital Converter
Function
84 OUT
85 IN
86 IN
87 IN
88 -
C-POW-SW
VCR POWSAFETY
A-MODE Hi-Fi Tape Detection Signal
C-FG
AMPVss AMPVss
Capstan Power Switching
Signal
VCR Power Supply Safety
Signal
Capstan Motor Rotation
Detection Pulse
1-15-2 E9B01PIN
Page 63
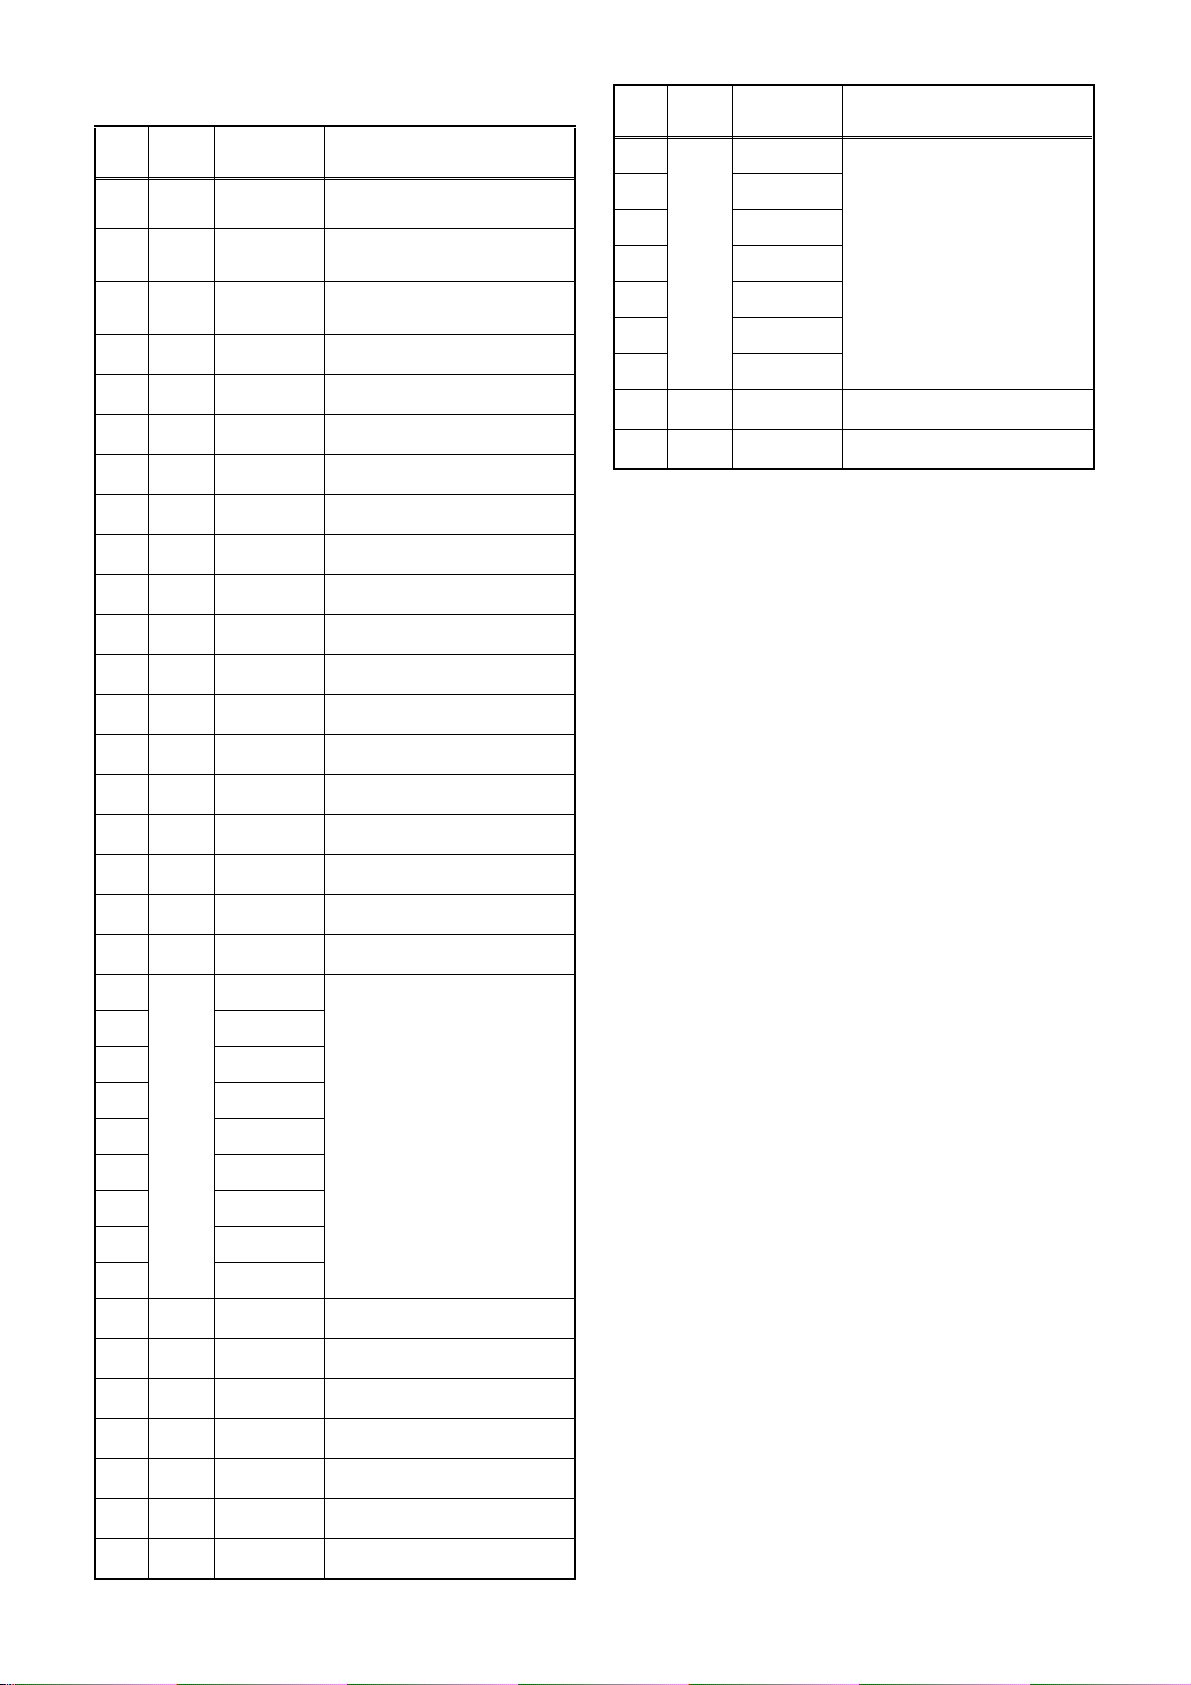
IC612 ( FIP DRIVER )
18/6/2013
World of free manuals
Pin
No.
IN/
OUT
1 OUT
Signal
Name
POWERLED
2 OUT VCR-LED
3 OUT DVD-LED
4 -
NU
5 IN OSC
6 -
NU
7 IN DRV-DIN
Name Function
Power LED Signal Output
VCR Mode LED Signal
Output
DVD Mode LED Signal
Output
Not Used
Oscillator Input
Not Used
Serial Data Input
Pin
No.
36
IN/
OUT
Signal
Name
7G
37 6G
38 5G
39 4G
OUT
40 3G
41 2G
42 1G
43 - VDD
44 - VSS
Name Function
Grid Output
Power Supply
GND
8 IN DRV-CLK
9 IN DRV-STB
10 11 -
NU
NU
12 - VSS
13 - VDD
14 15 16 17 18 19 20
NU
NU
NU
NU
NU
NU
c
Clock Input
Serial Interface Strobe
Not Used
Not Used
GND
Power Supply
Not Used
Not Used
Not Used
Not Used
Not Used
Not Used
21 b
22 a
23 d
24 e
OUT
25 f
26 i
27 h
28 g
29 -
30 - VEE
31 32 33 34 35 -
NU
NU
NU
NU
NU
NU
Segment Output
Not Used
Pull Down Level
Not Used
Not Used
Not Used
Not Used
Not Used
1-15-3 E9B01PIN
Page 64
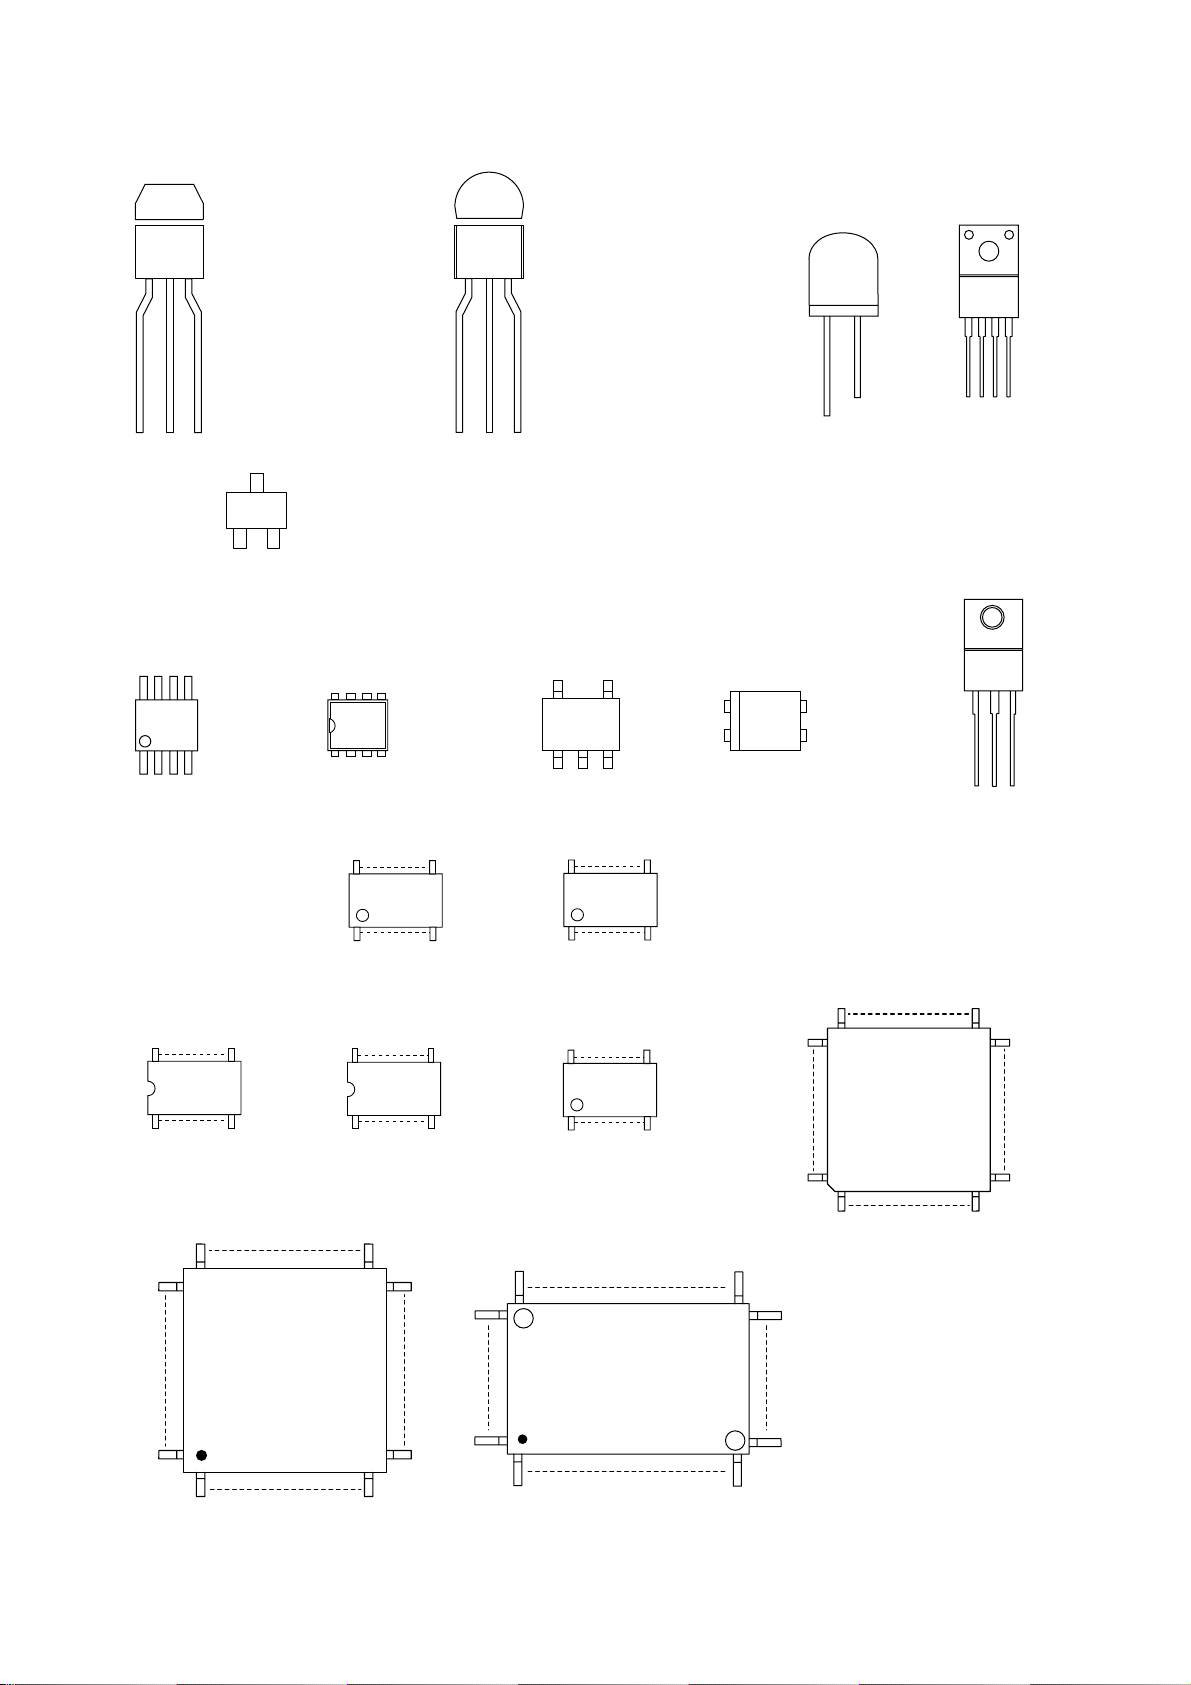
LEAD IDENTIFICATIONS
18/6/2013
World of free manuals
E CB
KIA4558P/P
RC4580IP
8 5
1 4
KRA103M-AT/P
KRC103M-AT/P
KTA1267-(GR,Y)-AT/P
KTC3199-(BL,GR,Y)-AT/P
KRA104M-AT/P
C
KRC103S-RTK/P
KTC3875S-(GR,Y)-RTK/P
KTC3879-Y-RTK/P
BE
UTC4580 DIP-8
8 5
1 4
MM1636XWRE
8
E CB
5
2SA966-Y(TE6 F M)
2SA1015-GR(TE2 F T)
2SA1020-Y(TE6 F M)
2SC1815-(BL,GR,Y)(TE2 F T)
2SC2120-Y(TE2 F T)
2SC3266-Y(TPE2 F)
KTA-1266-GR-AT/P
KTA1273-Y-AT/P
KTA1281Y-AT/P
KTC3198-(GR,Y)-AT/P
KTC3203-Y-AT/P
KTC3205-Y-AT/P
FMG4A T148
RN1511(TE85R.F)
C1 C2
B1 E B2
MM1637XVBE
16
9
MID-32A22F
PT204-6B-12
E
EL817(A,B,C)
LTV-817(B,C)-F
PS2561A-1(Q,W)
1
2
1: Anode
4
2: Cathode
3
3: Emitter
4: Collector
PQ070XF01SZH
C
1234
2SK3566
GDS
CD4053BCSJX_NL
CD4053BNSR
TC4053BF(EL N F)
CD4052BPWR
BU4053BCF-E2
16
1
9
8
MSP3417G-QG-B8-V3
PT6315(L)
33
34
44
1
1
4
MM1697AJBE
LC74793NJM-TLM-E
24
1
13
12
23
22
12
11
81
100
1
MM1443XJBE
34
1
M3776AMCH-AF0GP
LA71750EM-MPB-E
80
1
18
17
8
LA72648M-MPB-E
60
61
80
1
51
50
41
40
21
20
Note:
A: Anode
K: Cathode
E: Emitter
C: Collector
B: Base
31
R: Reference
S: Source
30
G: Gate
D: Drain
1-16-1 E9B05LE
Page 65
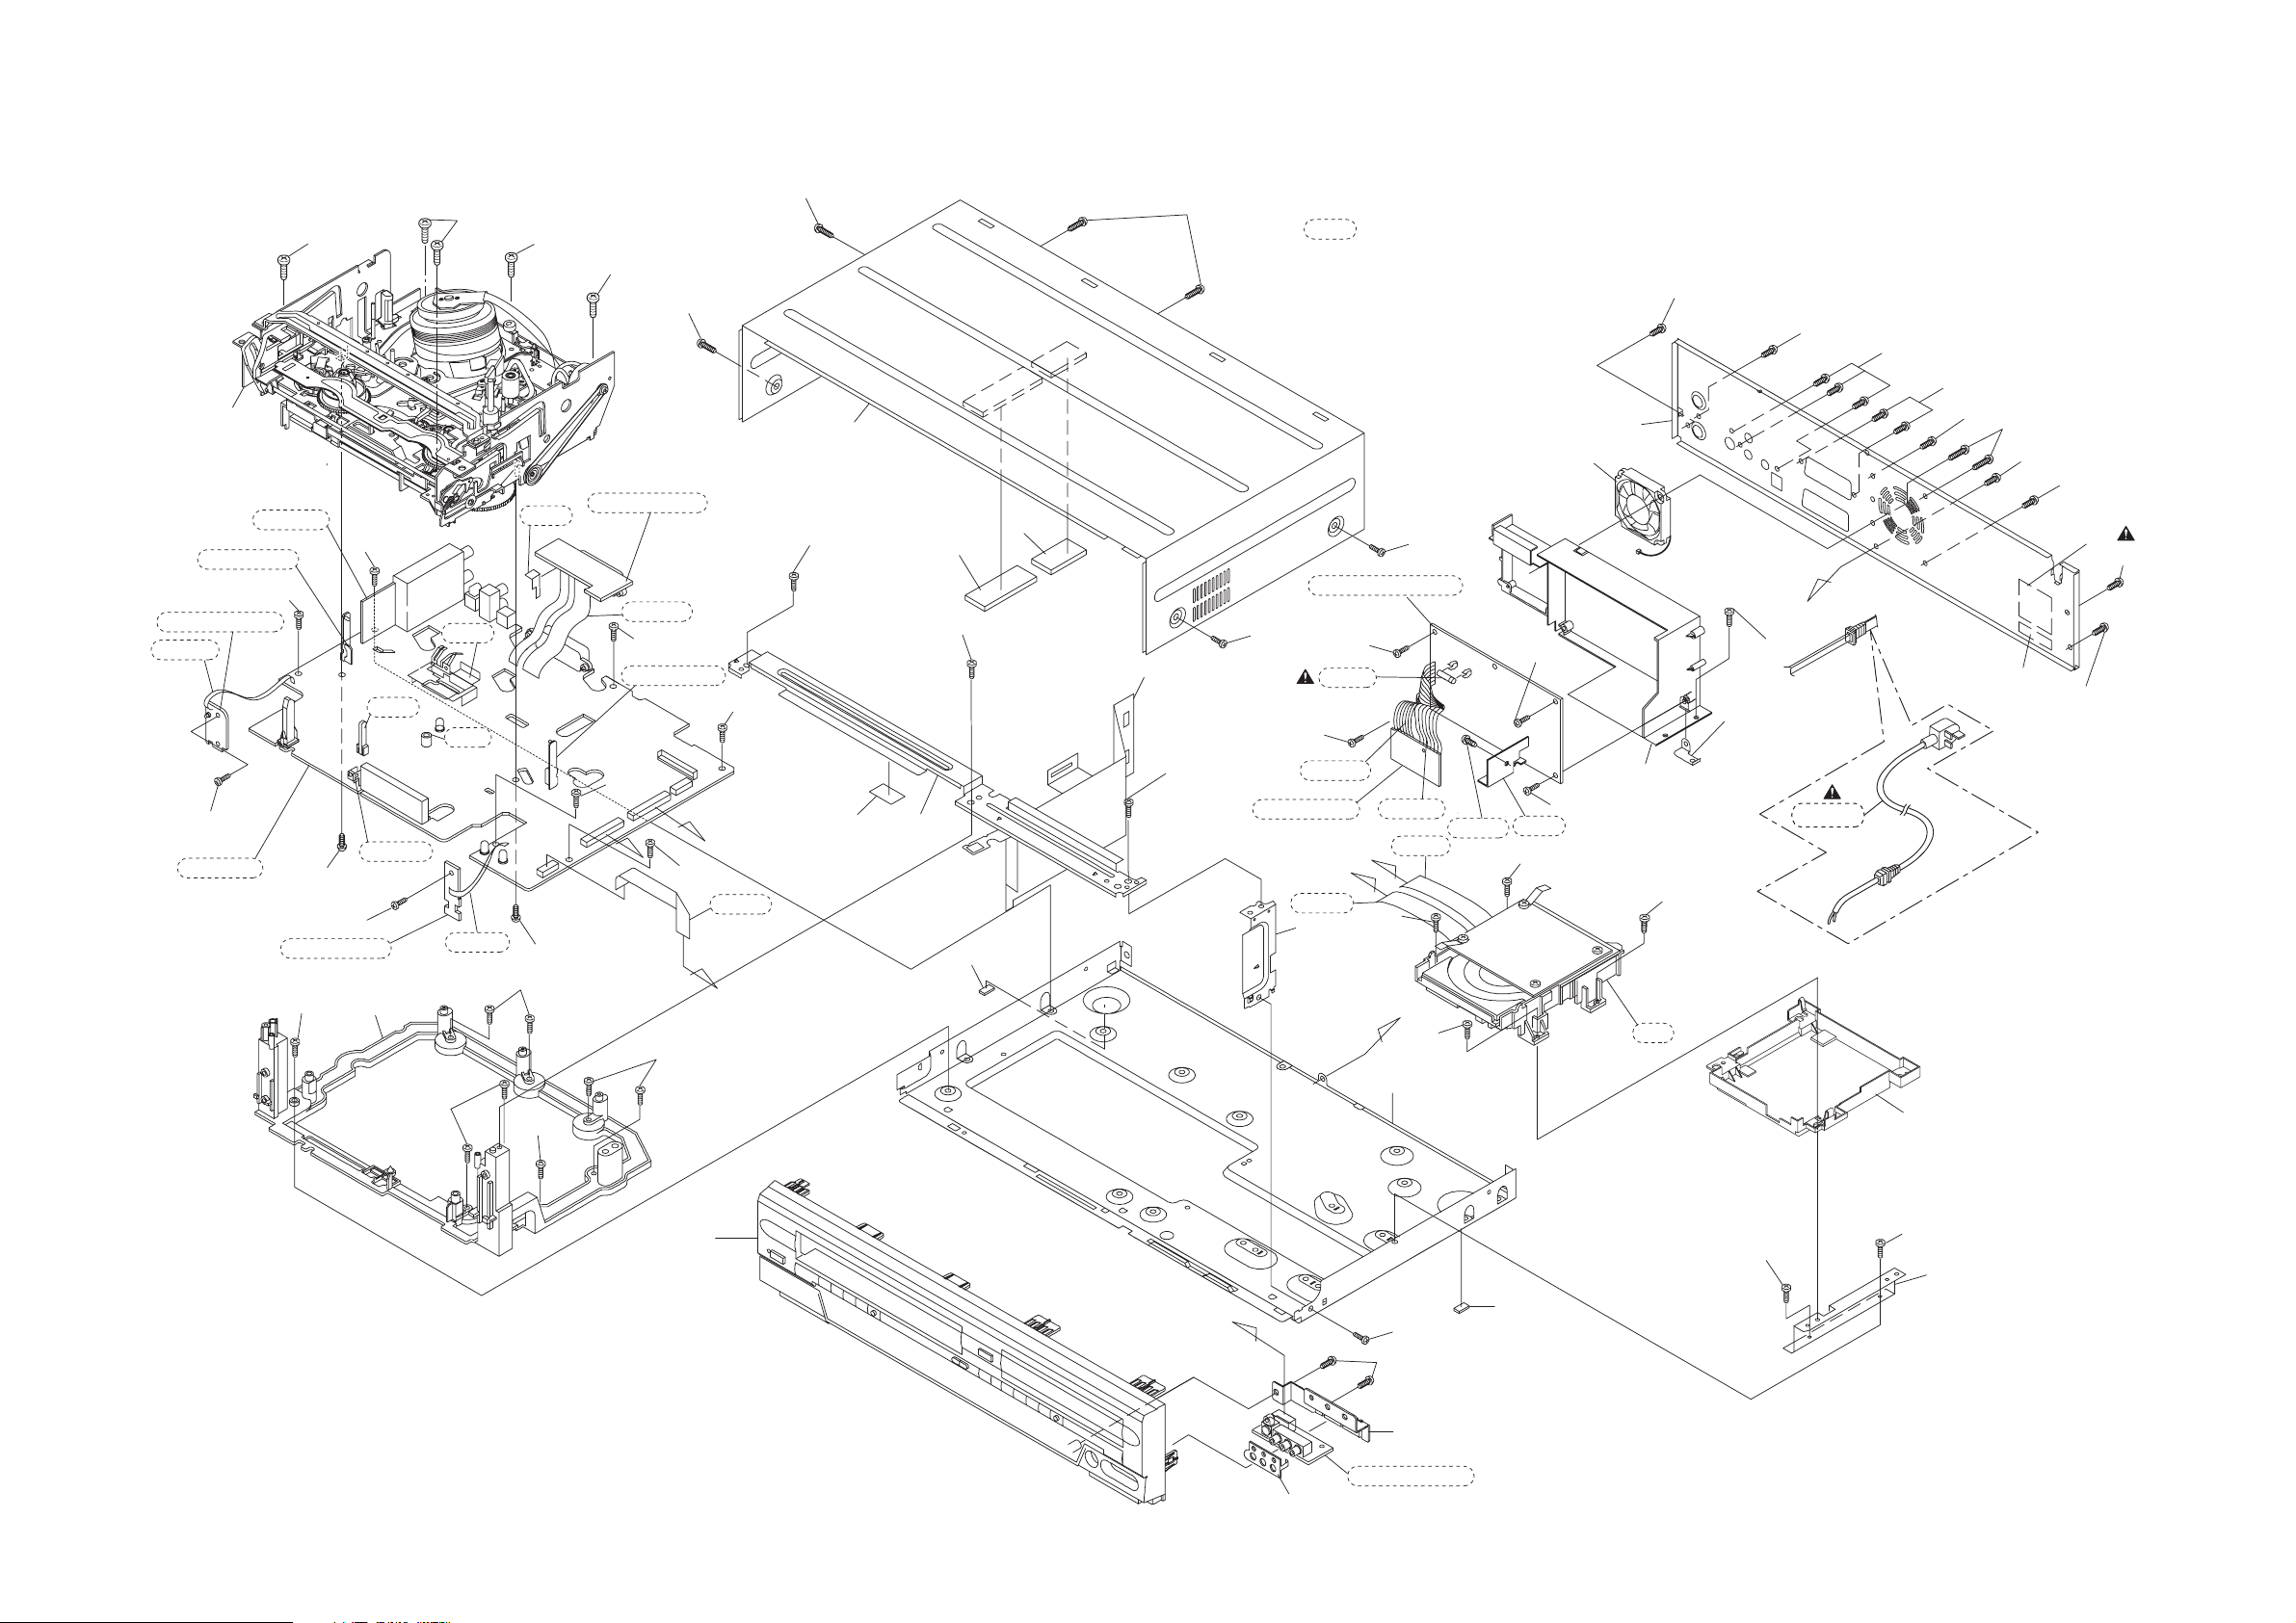
Cabinet
18/6/2013
World of free manuals
EXPLODED VIEWS
1B1
Sensor CBA
2L033
Power SW CBA
JW001
2L052
Main CBA
2L071
AFV CBA
2L022
Function CBA
2L017
2L033
2L054
2B46
RM1501
2B1
2L017
2L071
2B17
2B16
JW002
2B60
2L021
2L017
2L017
2L071
2L071
2L011
Rear Jack CBA
JW2001
2L033
Sensor CBA
2L030
B
2L033
2L017
2L033
A
JW103
C
2L011
2L045
A2
2B31
2B2
2B76
2L045
A34
2B77
2B19
2L011
2L013
Power Supply CBA
2L011
2L043
F1001
2L043
JW1001
Junction CBA
JW102
2B3
See Electrical Parts List
for parts with this mark.
2L011
B'
JW1002
A'
2L111
D'
A3
JW101
2L110
2L019
FM1001
2L043
2B18
2L111
2L043
A4
2B10
1B2
2L081
2L110
2B4
2L082
D
2L018
AC1001
2L062
2B45
2L083
2L044
2L100
2L081
2L044
A10
2L044
A14
2L081
A1X
2L015
2L015
2B11
C'
2B59
2L014
2L061
2B13
Front Jack CBA
A34
1-17-1 E9B05CEX
Page 66
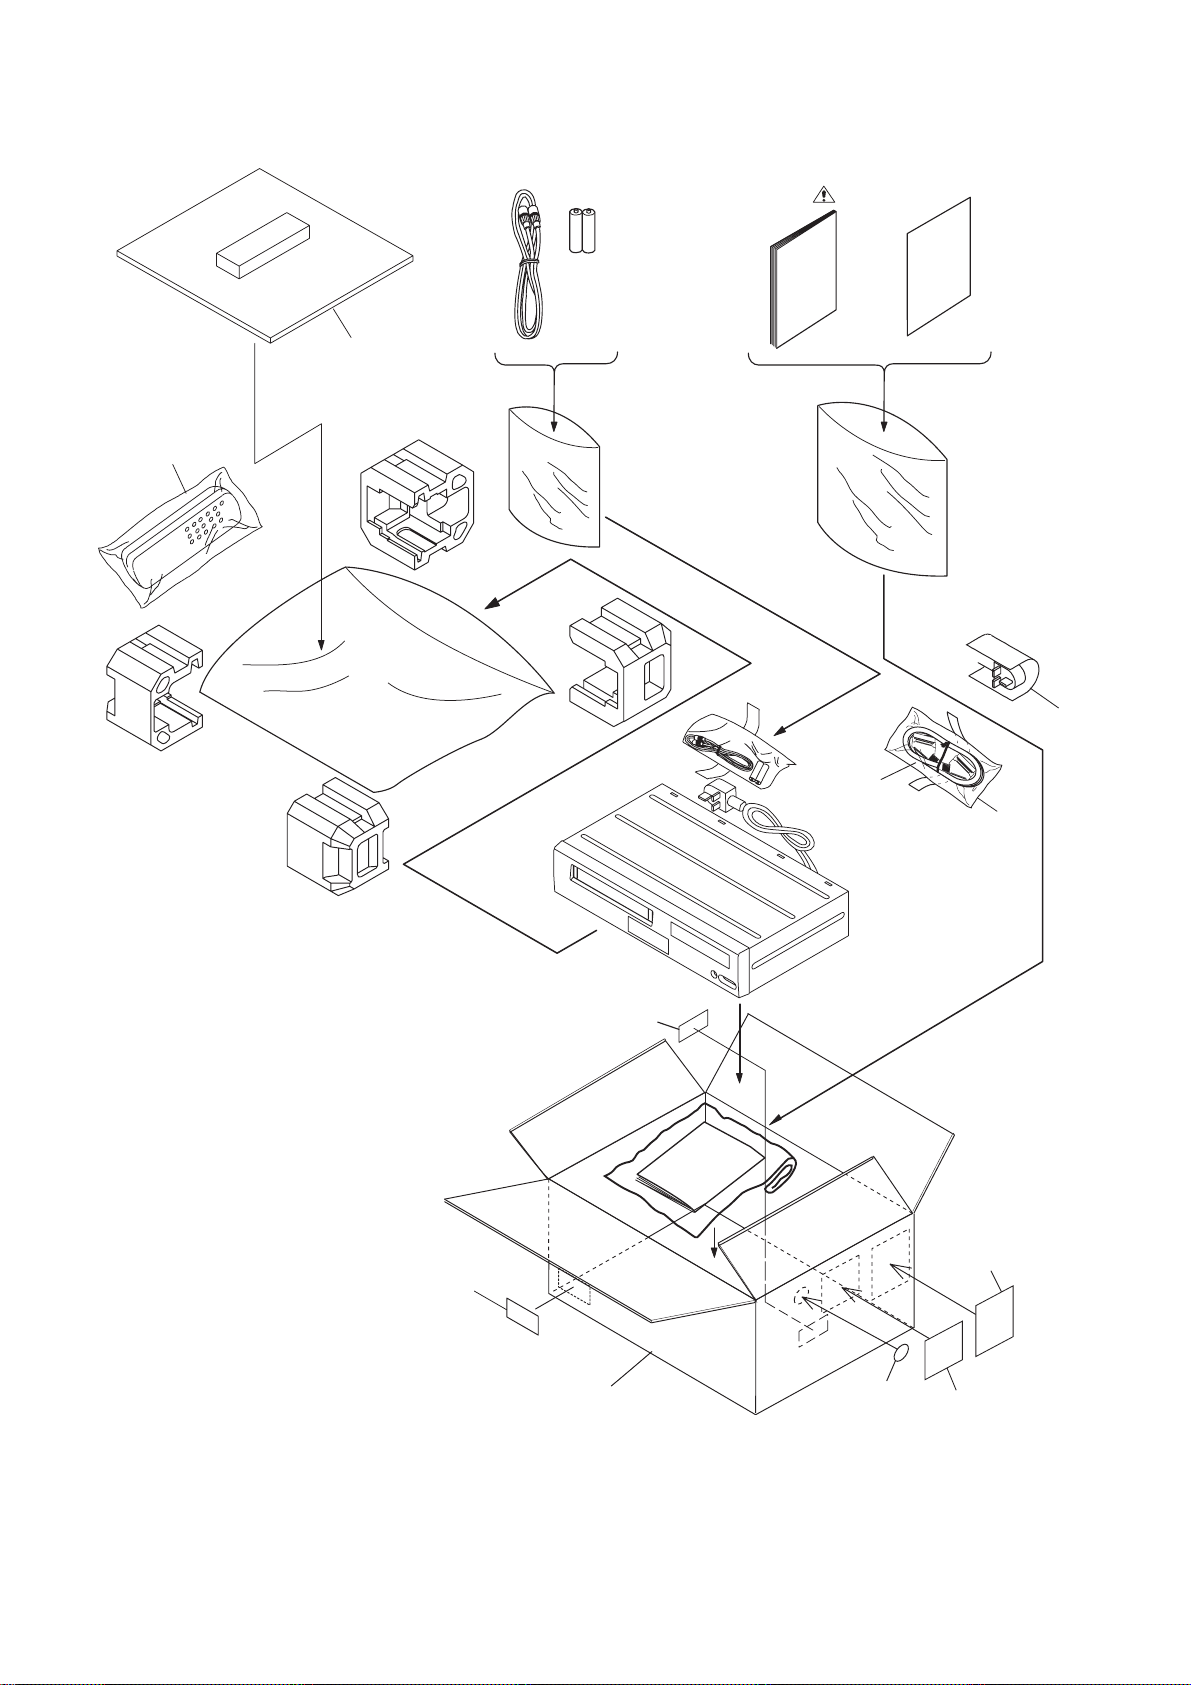
Packing
18/6/2013
World of free manuals
X1
S9
S2
X3
X2
X9
S2
X20
X22
X4
S2
S10
S3
X6
S2
2B64
S-19
A14
S1
S-18
S-17
1-17-2 E9B05PEX
Page 67
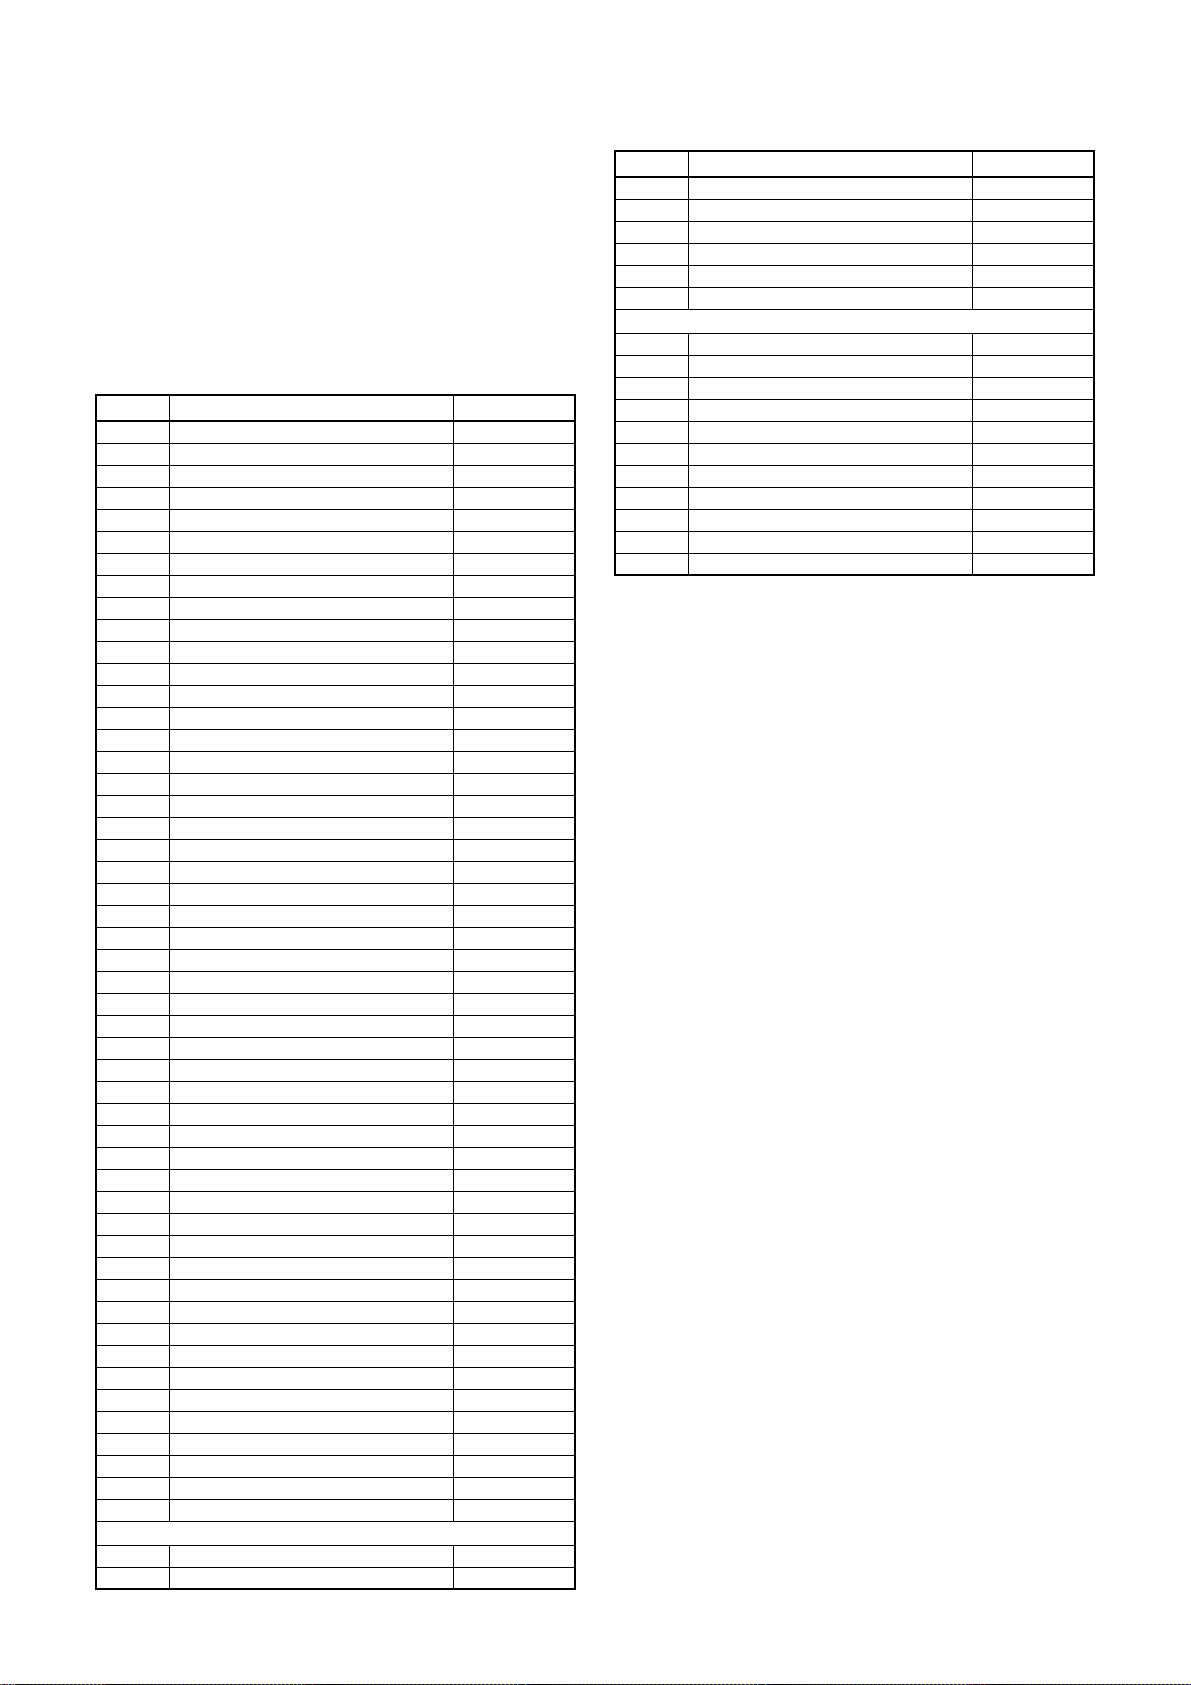
MECHANICAL PARTS LIST
18/6/2013
World of free manuals
PRODUCT SAFETY NOTE: Products marked with a
! have special characteristics important to safety.
Before replacing any of these components, read
carefully the product safety notice in this service
manual. Don't degrade the safety of the product
through improper servicing.
NOTE: Parts that are not assigned part numbers
(---------) are not available.
Ref. No. Description Part No.
A1X FRONT ASSEMBL Y E9B05BD 1VM222908
A2 TOP COVER E9400UD 0VM101356D
A3 MAIN CHASSIS E9400UD 0VM101353H
A4 REAR PANEL E9B05BD 1VM222980
A10! RA TING LABEL E9B05BD ---------A14 BARCODE LABEL UNFIGURE E9704ED ---------A14 BARCODE LABEL E9B05BD ---------A34 FOOT K7010U A 0VM 403657
1B1 DECK ASSEMBLY CZD014/VM25E0 N25E0FL
2B1 DECK PEDESTAL E9600UD 1VM120055G
2B2 FRONT BRACKET E9400UD 0VM204534C
2B3 FRO NT BRA CKET R E 9400UD 0VM4162 69A
2B4 EART H P LATE E9400UD 0VM416272
2B10 PCB HOLDER E 970 0ED 1VM120056B
2B11 BRACKET R E9 600UD 1VM421062C
2B13 JACK BRA CKE T E9400U D 0VM416273
2B19 RADIA T ION SHE ET E9700 ED 1VM320806A
2B31 TAPE HIMELON H9206JD 0VM413956
2B45 DUST COVER(PS) E9B34ED 1VM222682
2B59 JACK EARTH PLATE E9600UD 1VM320623
2B64 LABEL EAS L0951UB ---------2B76 RUBBER CUSHION(B) E9B00ED 1VM424744
2B77 RUBBER CUSHION(C) E9B00ED 1VM424745
2L011 SCREW C-TIGHT M3X5 BIND HEAD + GBCC3050
2L013 SCREW S-TIGHT M3X6 BIND HEAD+ GBJS3060
2L014 SCREW S-TIGHT M3X6 BIND HEAD+ GBJS3060
2L015 SCREW M3X5 HEAD+ BIND S-TIGHT GBJS3050
2L017 SCREW S-TIGHT M3X8 BIND HEAD+ GBJS3080
2L018 SCREW S-TIGHT M3X6 BIND HEAD+ GBJS3060
2L021 SCREW P-TIGHT M3X8 BIND HEAD+ GBCP3080
2L022 SCREW S-TIGHT M3X6 BIND HEAD+ GBJS3060
2L030 SCREW P-TIGHT M3X8 BIND HEAD+ GBJP3080
2L033 SCREW S-TIGHT M3X6 BIND HEAD+ GBJS3060
2L043 SCREW P-TIGHT M3X8 BIND HEAD+ GBJP3080
2L044 SCREW P-TIGHT M3X8 BIND HEAD+ GBJP3080
2L045 SCREW P-TIGHT M3X8 BIND HEAD+ GBJP3080
2L052 SCREW P-TIGHT M3X6 BIND HEAD+ GBJP3060
2L054 SCREW P-TIGHT M3X6 BIND HEAD+ GBJP3060
2L061 SCREW P-TIGHT M3X6 BIND HEAD+ GBJP3060
2L062 SCREW B-TIGHT M3X8 BIND HEAD+ GBHB3080
2L071 SCREW P-TIGHT M3*10 WASHERHEAD+ GCJP3100
2L081 S-TIGHT SCREW M3X6 BIND HEAD+BLACK GBHS3060
2L082 S-TIGHT SCREW M3X6 BIND HEAD+BLACK GBHS3060
2L083 SCREW P-TIGHT M3X8 BIND HEAD+ BLK GBHP3080
2L100 P-TIGHT SCR EW M 3X34 E940 0UD 1VM420034A
2L110 SCREW S-TIGHT M3X10 BIND HEAD+ GBJS3100
2L111 SCREW P-TIGHT 3X14 BIND HEAD + GBJP3140
FM1001 DC FAN MOT OR D06K-12TS7 01(AX) MMEZR12NH003
FM1001 DC FAN MOT OR KD1206PTS3 H.B1229.G MMEZR12SNN05
FM1001 MOT OR D C F AN 2 D65BK10 0100 MMEZR12XNR01
PACKING
S1 GIFT BOX CARTON E9B05BD 1VM323718
S2 SIDE PAD E9701BD 1VM120075
Ref. No. Description Part No.
S3 SET BAG E7708UA 0DM400731D
S9 TOP PAD E9770ED 1VM321492
S10 AC P AD HC461BD 0VM413331
S-17 TUC CODE LABEL E9B05BD ---------S-18 SECURITY LABEL E8D81BD ---------S-19 CASEMARK LABEL E9B05BD ----------
ACCESSORIES
X1 REMOTE CONTROL UNIT NB148ED NB148ED
X2 DRY BA TT ERY R6P/2S XB0M451T0001
X2 DRY BA TTER Y R6UW/2S XB0M311MS001
X2 DRY BA TT ERY ES-GR6M-C XB0M571GLP01
X3 RF CORD PAL 1.2M WPZ0122LG001
X3 RF CABLE CC1001020012010 WPZ0122LW001
X4 ACCESSORY BAG E5700UD 0VM415576
X6 SCART CABLE 1.5M CE1013020085710 WX1E4300-012
X9 REMOCON BAG E9704ED 1VM422101
X20! OWERS MANUAL(ENG) E9B05BD 1VMN23514
X22 QUICK GUIDE(ENG) E9B05BD 1VMN23515
20060629 1-18-1 E9B05CA
Page 68
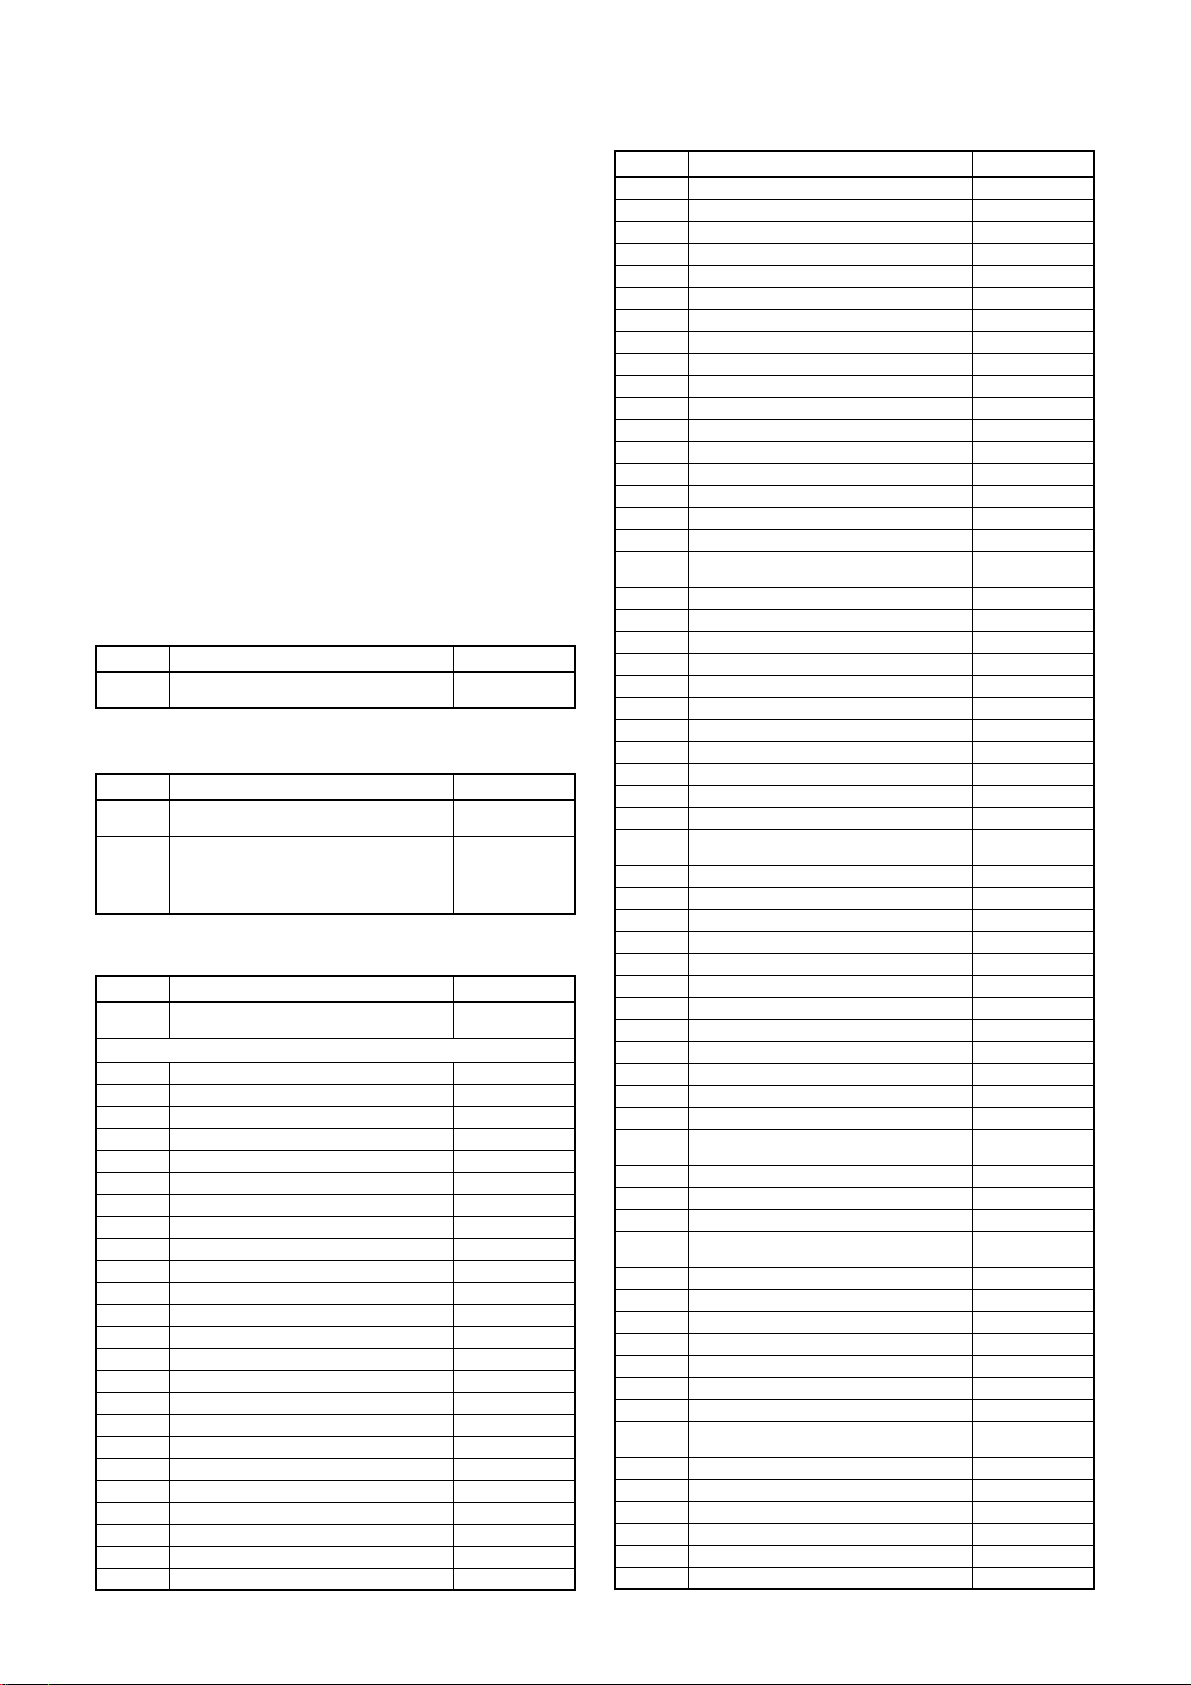
ELECTRICAL PARTS LIST
18/6/2013
World of free manuals
PRODUCT SAFETY NOTE: Products marked with a
! have special characteristics important to safety.
Before replacing any of these components, read
carefully the product safety notice in this service
manual. Don't degrade the safety of the product
through improper servicing.
NOTES:
1. Parts that are not assigned part numbers (---------)
are not available.
2. Tolerance of Capacitors and Resistors are noted
with the following symbols.
C.....±0.25% D.....±0.5% F.....±1%
G.....±2% J......±5% K.....±10%
M.....±20% N.....±30% Z.....+80/-20%
DVD MECHANISM & D VD MAIN CBA
ASSEMBLY
Ref. No. Description Part No.
1B2 DVD MECHANISM & D VD MAIN CBA
ASSEMBL Y
N78GFCBN
MCV CBA
Ref. No. Description Part No.
MCV CBA
Consists of the following
MAIN CBA (MCV-A )
POWER SW CBA (MCV-B)
FUNCTION CBA (MCV-C)
FRONT JACK CBA (MCV -D)
SENSOR CBA
MAIN CBA
Ref. No. Description Part No.
MAIN CBA (MCV-A )
Consists of the following:
CAPACITORS
C251 ELECTROLYTIC CAP . 10µF/16V M H7 CE1CMAVSL100
C251 ALUMINUM ELECTROLYTIC CAP 10µF/16V H7 CE1CMAVSM100
C252 CHIP CERAMIC CAP .(1608) F Z 0.1µF/50V CHD1JZ30F1 04
C252 CHIP CERAMIC CAP .(1608) F Z 0.1µF/25V CHD1EZ30F104
C253 CHIP CERAMIC CAP . (1608) B K 1000pF/50V CHD1JK30B102
C254 ELECTROLYTIC CAP . 1µF/50V M H7 CE1JMA VS L1R0
C254 ALUMINUM ELECTROLYTIC CAP 1µF/50V H7 CE1JMA VSM1R 0
C301 CHIP CERAMIC CAP . (1608) B K 0.022µF/50V CHD1JK30B22 3
C301 CHIP CERAMIC CAP . (1608) B K 0.022µF/25V CHD1EK30B223
C302 ELECTROLYTIC CAP . 1µF/50V M H7 CE1JMA VS L1R0
C302 ALUMINUM ELECTROLYTIC CAP 1µF/50V H7 CE1JMA VSM1R 0
C303 CHIP CERAMIC CAP .(1608) F Z 0.1µF/50V CHD1JZ30F1 04
C303 CHIP CERAMIC CAP .(1608) F Z 0.1µF/25V CHD1EZ30F104
C305 ELECTROLYTIC CAP . 1µF/50V M H7 CE1JMA VS L1R0
C305 ALUMINUM ELECTROLYTIC CAP 1µF/50V H7 CE1JMA VSM1R 0
C306 CHIP CERAMIC CAP . (1608) B K 0.047µF/50V CHD1JK30B47 3
C306 CHIP CERAMIC CAP . (1608) B K 0.047µF/25V CHD1EK30B473
C307 CHIP CERAMIC CAP . (1608) B K 0.022µF/50V CHD1JK30B22 3
C307 CHIP CERAMIC CAP . (1608) B K 0.022µF/25V CHD1EK30B223
C308 CHIP CERAMIC CAP .(1608) F Z 0.1µF/50V CHD1JZ30F1 04
C308 CHIP CERAMIC CAP .(1608) F Z 0.1µF/25V CHD1EZ30F104
C311 CHIP CERAMIC CAP .(1608) F Z 0.1µF/50V CHD1JZ30F1 04
C311 CHIP CERAMIC CAP .(1608) F Z 0.1µF/25V CHD1EZ30F104
C312 ELECTROLYTIC CAP . 10µF/16V M H7 CE1CMAVSL100
1VSA14529
----------
----------
----------
---------1VSA11699
----------
Ref. No. Description Part No.
C312 ALUMINUM ELECTROLYTIC CAP 10µF/16V H7 CE1CMAVSM100
C313 ELECTROLYTIC CAP. 1µF/50V M H7 CE1JMASSL1R0
C313 ELECTROLYTIC CAP. 1µF/50V M H7 CE1JMASSM1R0
C314 CHIP CERAMIC CAP.(1608) B K 0.01µF/50V CHD1JK30B103
C315 CHIP CERAMIC CAP.(1608) B K 0.047µF/50V CHD1JK30B473
C315 CHIP CERAMIC CAP.(1608) B K 0.047µF/25V CHD1EK30B473
C316 ELECTROLYTIC CAP. 1µF/50V M H7 CE1JMAVSL 1R0
C316 ALUMINUM ELECTROLYTIC CAP 1µF/50V H7 CE1JMAVSM1R0
C317 CHIP CERAMIC CAP.(1608) F Z 0.1µF/50V CHD1JZ30F104
C317 CHIP CERAMIC CAP.(1608) F Z 0.1µF/25V CHD1EZ30F104
C322 CHIP CERAMIC CAP.(1608) F Z 0.1µF/50V CHD1JZ30F104
C322 CHIP CERAMIC CAP.(1608) F Z 0.1µF/25V CHD1EZ30F104
C324 CHIP CERAMIC CAP.(1608) B K 0.01µF/50V CHD1JK30B103
C325 CHIP CERAMIC CAP. B K 8200pF/50V CHD1JK30B822
C326 CHIP CERAMIC CAP.(1608) F Z 0.1µF/50V CHD1JZ30F104
C326 CHIP CERAMIC CAP.(1608) F Z 0.1µF/25V CHD1EZ30F104
C328 ELECTROLYTIC CAP. 47µF/6.3V M H7 CE0KMAVSL470
C328 ALUMINUM ELECTROLYTIC CAP 47µF/6.3V H7CE0KMAVSM470
C329 CHIP CERAMIC CAP.(1608) F Z 0.1µF/50V CHD1JZ30F104
C329 CHIP CERAMIC CAP.(1608) F Z 0.1µF/25V CHD1EZ30F104
C330 ELECTROLYTIC CAP. 100µF/16V M CE1CMASDL101
C330 ELECTROLYTIC CAP. 100µF/16V M CE1CMASTM101
C331 ELECTROLYTIC CAP. 220µF/6.3V M CE0KMASDL221
C331 ELECTROLYTIC CAP. 220µF/6.3V M CE0KMASTM221
C333 CHIP CERAMIC CAP.(1608) F Z 0.1µF/50V CHD1JZ30F104
C333 CHIP CERAMIC CAP.(1608) F Z 0.1µF/25V CHD1EZ30F104
C334 ELECTROLYTIC CAP. 1µF/50V M H7 CE1JMAVSL 1R0
C334 ALUMINUM ELECTROLYTIC CAP 1µF/50V H7 CE1JMAVSM1R0
C335 ELECTROLYTIC CAP. 100µF/6.3V H7 CE0KMAVSL101
C335 ALUMINUM ELECTROLYTIC CAP 100µF/6.3V H7CE0KMAVSM101
C336 CHIP CERAMIC CAP. CH J 220pF/50V CHD1JJ3CH221
C337 CHIP CERAMIC CAP.(1608) F Z 0.1µF/50V CHD1JZ30F104
C337 CHIP CERAMIC CAP.(1608) F Z 0.1µF/25V CHD1EZ30F104
C339 CHIP CERAMIC CAP. CH J 120pF/50V CHD1JJ3CH121
C340 ELECTROLYTIC CAP. 1µF/50V M H7 CE1JMAVSL 1R0
C340 ALUMINUM ELECTROLYTIC CAP 1µF/50V H7 CE1JMAVSM1R0
C341 CHIP CERAMIC CAP.(1608) CH D 10pF/50V CHD1JD3CH100
C342 CHIP CERAMIC CAP.(1608) CH J 1000pF/50V CHD1JJ3CH102
C343 ELECTROLYTIC CAP. 10µF/16V M H7 CE1CMAVSL100
C343 ALUMINUM ELECTROLYTIC CAP 10µF/16V H7 CE1CMAVSM100
C344 ELECTROLYTIC CAP. 4.7µF/25V M NP H7 CP1EMAVSB4R7
C345 ELECTROLYTIC CAP. 0.47µF/50V M H7 CE1JMAVSL R47
C345 ALUMINUM ELECTROLYTIC CAP 0.47µF/50V H7CE1JMAVSMR47
C347 CHIP CERAMIC CAP.(1608) B K 0.1µF/25V CHD1EK30B104
C347 CHIP CERAMIC CAP.(1608) B K 0.1µF/16V CHD1CK30B104
C349 ELECTROLYTIC CAP. 0.47µF/50V M H7 CE1JMAVSL R47
C349 ALUMINUM ELECTROLYTIC CAP 0.47µF/50V H7CE1JMAVSMR47
C350 CERAMIC CAP.(AX) F Z 0.1µF/50V CCA1JZTFZ104
C402 FILM CAP .(P) 0.018µF/50V J CMA1JJP00183
C402 FILM CAP .(P) 0.018µF/50V J CA1J183MS029
C403 CERAMIC CAP. B K 470pF/100V CCD2AKS0B471
C404 ELECTROLYTIC CAP. 220µF/6.3V M H7 CE0KMASSL221
C404 ELECTROLYTIC CAP. 220µF/6.3V M H7 CE0KMASSM221
C405 ELECTROLYTIC CAP. 47µF/6.3V M H7 CE0KMAVSL470
C405 ALUMINUM ELECTROLYTIC CAP 47µF/6.3V H7CE0KMAVSM470
C407 CHIP CERAMIC CAP.(1608) B K 1000pF/50V CHD1JK30B102
C408 CHIP CERAMIC CAP. B K 1800pF/50V CHD1JK30B182
C409 CHIP CERAMIC CAP.(1608) CH J 33pF/50V CHD1JJ3CH330
C410 ELECTROLYTIC CAP. 10µF/16V M H7 CE1CMAVSL100
C410 ALUMINUM ELECTROLYTIC CAP 10µF/16V H7 CE1CMAVSM100
C411 CHIP CERAMIC CAP.(1608) B K 0.01µF/50V CHD1JK30B103
20060629 1-19-1 E9B05EL
Page 69
Ref. No. Description Part No.
18/6/2013
World of free manuals
C412 ELECTROLYTIC CAP . 33µF/6.3V M H7 CE0KMAVSL330
C412 ALUMINUM ELECTROLYTIC CAP 33µF/6.3V H7CE0KMAVSM330
C413 CHIP CERAMIC CAP .(1608) F Z 0.1µF/50V CHD1JZ30F1 04
C413 CHIP CERAMIC CAP .(1608) F Z 0.1µF/25V CHD1EZ30F104
C414 CHIP CERAMIC CAP . (1608) B K 0.022µF/50V CHD1JK30B22 3
C414 CHIP CERAMIC CAP . (1608) B K 0.022µF/25V CHD1EK30B223
C415 ELECTROLYTIC CAP . 4.7µF/25V M H7 CE1EMAVSL4R7
C415 ALUMINUM ELECTROLYTIC CAP 4.7µF/25V H7CE1EMAVSM4R7
C416 CHIP CERAMIC CAP . (1608) B K 4700pF/50V CHD1JK30B472
C417 ELECTROLYTIC CAP . 22µF/6.3V M H7 CE0KMAVSL220
C417 ALUMINUM ELECTROLYTIC CAP 22µF/6.3V H7CE0KMAVSM220
C418 CHIP CERAMIC CAP .(1608) F Z 0.1µF/50V CHD1JZ30F1 04
C418 CHIP CERAMIC CAP .(1608) F Z 0.1µF/25V CHD1EZ30F104
C419 CHIP CERAMIC CAP . CH J 220pF/50V CHD1JJ3CH221
C421 ELECTROLYTIC CAP . 47µF/6.3V M H7 CE0KMAVSL470
C421 ALUMINUM ELECTROLYTIC CAP 47µF/6.3V H7CE0KMAVSM470
C451 CHIP CERAMIC CAP .(1608) CH J 22pF/50V CHD1JJ3CH220
C452 ELECTROLYTIC CAP . 10µF/16V M H7 CE1CMAVSL100
C452 ALUMINUM ELECTROLYTIC CAP 10µF/16V H7 CE1CMAVSM100
C453 ELECTROLYTIC CAP . 22µF/10V M H7 CE1AMAVSL220
C453 ALUMINUM ELECTROLYTIC CAP 22µF/10V H7 CE1AMAVSM220
C454 CHIP CERAMIC CAP .(1608) F Z 0.1µF/50V CHD1JZ30F1 04
C454 CHIP CERAMIC CAP .(1608) F Z 0.1µF/25V CHD1EZ30F104
C455 CHIP CERAMIC CAP .(1608) F Z 0.1µF/50V CHD1JZ30F1 04
C455 CHIP CERAMIC CAP .(1608) F Z 0.1µF/25V CHD1EZ30F104
C456 ELECTROLYTIC CAP . 10µF/16V M H7 CE1CMAVSL100
C456 ALUMINUM ELECTROLYTIC CAP 10µF/16V H7 CE1CMAVSM100
C457 ELECTROLYTIC CAP . 4.7µF/25V M H7 CE1EMAVSL4R7
C457 ALUMINUM ELECTROLYTIC CAP 4.7µF/25V H7CE1EMAVSM4R7
C458 CHIP CERAMIC CAP . (1608) B K 0.01µF/50V CHD1JK30B103
C461 CHIP CERAMIC CAP . (1608) B K 0.01µF/50V CHD1JK30B103
C462 CHIP CERAMIC CAP . (1608) B K 4700pF/50V CHD1JK30B472
C463 ELECTROLYTIC CAP . 22µF/10V M H7 CE1AMAVSL220
C463 ALUMINUM ELECTROLYTIC CAP 22µF/10V H7 CE1AMAVSM220
C464 CHIP CERAMIC CAP . (1608) B K 0.01µF/50V CHD1JK30B103
C465 ELECTROLYTIC CAP . 10µF/16V M H7 CE1CMAVSL100
C465 ALUMINUM ELECTROLYTIC CAP 10µF/16V H7 CE1CMAVSM100
C466 CHIP CERAMIC CAP .(1608) F Z 0.1µF/50V CHD1JZ30F1 04
C466 CHIP CERAMIC CAP .(1608) F Z 0.1µF/25V CHD1EZ30F104
C467 CHIP CERAMIC CAP .(1608) F Z 0.1µF/50V CHD1JZ30F1 04
C467 CHIP CERAMIC CAP .(1608) F Z 0.1µF/25V CHD1EZ30F104
C468 ELECTROLYTIC CAP . 220µF/6.3V M H7 CE0KMAVSL2 21
C468 ALUMINUM ELECTROLYTIC CAP 220µF/6.3V H7CE0KMAVSM221
C469 ELECTROLYTIC CAP . 22µF/10V M H7 CE1AMAVSL220
C469 ALUMINUM ELECTROLYTIC CAP 22µF/10V H7 CE1AMAVSM220
C470 CHIP CERAMIC CAP . (1608) B K 4700pF/50V CHD1JK30B472
C471 CHIP CERAMIC CAP . (1608) B K 0.01µF/50V CHD1JK30B103
C472 ELECTROLYTIC CAP . 4.7µF/25V M H7 CE1EMAVSL4R7
C472 ALUMINUM ELECTROLYTIC CAP 4.7µF/25V H7CE1EMAVSM4R7
C473 ELECTROLYTIC CAP . 10µF/16V M H7 CE1CMAVSL100
C473 ALUMINUM ELECTROLYTIC CAP 10µF/16V H7 CE1CMAVSM100
C474 CHIP CERAMIC CAP .(1608) F Z 0.1µF/50V CHD1JZ30F1 04
C474 CHIP CERAMIC CAP .(1608) F Z 0.1µF/25V CHD1EZ30F104
C475 CHIP CERAMIC CAP .(1608) F Z 0.1µF/50V CHD1JZ30F1 04
C475 CHIP CERAMIC CAP .(1608) F Z 0.1µF/25V CHD1EZ30F104
C476 ELECTROLYTIC CAP . 22µF/6.3V M H7 CE0KMAVSL220
C476 ALUMINUM ELECTROLYTIC CAP 22µF/6.3V H7CE0KMAVSM220
C477 CHIP CERAMIC CAP .(1608) CH J 22pF/50V CHD1JJ3CH220
C478 CHIP CERAMIC CAP .(1608) F Z 0.1µF/50V CHD1JZ30F1 04
C478 CHIP CERAMIC CAP .(1608) F Z 0.1µF/25V CHD1EZ30F104
C479 ELECTROLYTIC CAP . 10µF/16V M H7 CE1CMAVSL100
C479 ALUMINUM ELECTROLYTIC CAP 10µF/16V H7 CE1CMAVSM100
Ref. No. Description Part No.
C480 ELECTROLYTIC CAP. 10µF/16V M H7 CE1CMAVSL100
C480 ALUMINUM ELECTROLYTIC CAP 10µF/16V H7 CE1CMAVSM100
C481 ELECTROLYTIC CAP. 10µF/16V M H7 CE1CMAVSL100
C481 ALUMINUM ELECTROLYTIC CAP 10µF/16V H7 CE1CMAVSM100
C482 CHIP CERAMIC CAP.(1608) F Z 0.1µF/50V CHD1JZ30F104
C482 CHIP CERAMIC CAP.(1608) F Z 0.1µF/25V CHD1EZ30F104
C483 ELECTROLYTIC CAP. 4.7µF/25V M H7 CE1EMAVSL4R7
C483 ALUMINUM ELECTROLYTIC CAP 4.7µF/25V H7CE1EMAVSM4R7
C484 ELECTROLYTIC CAP. 4.7µF/25V M H7 CE1EMAVSL4R7
C484 ALUMINUM ELECTROLYTIC CAP 4.7µF/25V H7CE1EMAVSM4R7
C485 ELECTROLYTIC CAP. 10µF/16V M H7 CE1CMAVSL100
C485 ALUMINUM ELECTROLYTIC CAP 10µF/16V H7 CE1CMAVSM100
C486 CHIP CERAMIC CAP.(1608) F Z 0.1µF/50V CHD1JZ30F104
C486 CHIP CERAMIC CAP.(1608) F Z 0.1µF/25V CHD1EZ30F104
C487 ELECTROLYTIC CAP. 47µF/16V M H7 CE1CMAVSL470
C487 ALUMINUM ELECTROLYTIC CAP 47µF/16V H7 CE1CMAVSM470
C488 CHIP CERAMIC CAP.(1608) F Z 0.1µF/50V CHD1JZ30F104
C488 CHIP CERAMIC CAP.(1608) F Z 0.1µF/25V CHD1EZ30F104
C502 CHIP CERAMIC CAP.(1608) B K 0.022µF/50V CHD1JK30B223
C502 CHIP CERAMIC CAP.(1608) B K 0.022µF/25V CHD1EK30B223
C505 CHIP CERAMIC CAP.(1608) B K 0.01µF/50V CHD1JK30B103
C506 ELECTROLYTIC CAP. 1µF/50V M CE1 JMASDL1R0
C506 ELECTROLYTIC CAP 1µF/50V M CE1 JMASTM1R0
C507 CHIP CERAMIC CAP.(1608) B K 1000pF/50V CHD1JK30B102
C508 CHIP CERAMIC CAP.(1608) F Z 0.1µF/50V CHD1JZ30F104
C508 CHIP CERAMIC CAP.(1608) F Z 0.1µF/25V CHD1EZ30F104
C509 CHIP CERAMIC CAP.(1608) B K 1000pF/50V CHD1JK30B102
C510 CHIP CERAMIC CAP.(1608) B K 4700pF/50V CHD1JK30B472
C511 CHIP CERAMIC CAP.(1608) CH J 100pF/50V CHD1JJ3CH101
C512 CHIP CERAMIC CAP.(1608) B K 0.01µF/50V CHD1JK30B103
C514 CHIP CERAMIC CAP. B K 330pF/50V CHD1JK30B331
C515 CHIP CERAMIC CAP.(1608) F Z 0.1µF/50V CHD1JZ30F104
C515 CHIP CERAMIC CAP.(1608) F Z 0.1µF/25V CHD1EZ30F104
C516 ELECTROLYTIC CAP. 22µF/6.3V M H7 CE0KMAVSL220
C516 ALUMINUM ELECTROLYTIC CAP 22µF/6.3V H7CE0KMAVSM220
C517 CERAMIC CAP.(AX) F Z 0.022µF/25V CCA1EZTFZ223
C518 ELECTROLYTIC CAP. 22µF/6.3V M H7 CE0KMAVSL220
C518 ALUMINUM ELECTROLYTIC CAP 22µF/6.3V H7CE0KMAVSM220
C519 CHIP CERAMIC CAP. CH J 560pF/50V CHD1JJ3CH561
C521 ELECTROLYTIC CAP. 22µF/6.3V M H7 CE0KMAVSL220
C521 ALUMINUM ELECTROLYTIC CAP 22µF/6.3V H7CE0KMAVSM220
C522 CHIP CERAMIC CAP.(1608) B K 0.01µF/50V CHD1JK30B103
C524 CHIP CERAMIC CAP.(1608) B K 0.01µF/50V CHD1JK30B103
C527 CERAMIC CAP.(AX) B K 100pF/50V CCA1JKT0B101
C531 CHIP CERAMIC CAP.(1608) B K 4700pF/50V CHD1JK30B472
C533 CHIP CERAMIC CAP.(1608) B K 0.047µF/50V CHD1JK30B473
C533 CHIP CERAMIC CAP.(1608) B K 0.047µF/25V CHD1EK30B473
C534 ELECTROLYTIC CAP. 47µF/6.3V M H7 CE0KMAVSL470
C534 ALUMINUM ELECTROLYTIC CAP 47µF/6.3V H7CE0KMAVSM470
C535 CHIP CERAMIC CAP.(1608) F Z 0.1µF/50V CHD1JZ30F104
C535 CHIP CERAMIC CAP.(1608) F Z 0.1µF/25V CHD1EZ30F104
C538 CHIP CERAMIC CAP. CH J 180pF/50V CHD1JJ3CH181
C539 CHIP CERAMIC CAP.(1608) B K 0.01µF/50V CHD1JK30B103
C540 CHIP CERAMIC CAP.(1608) B K 4700pF/50V CHD1JK30B472
C541 CHIP CERAMIC CAP. CH J 18pF/50V CHD1JJ3CH180
C542 CHIP CERAMIC CAP. CH J 18pF/50V CHD1JJ3CH180
C543 CHIP CERAMIC CAP. CH J 18pF/50V CHD1JJ3CH180
C544 CHIP CERAMIC CAP. CH J 20pF/50V CHD1JJ3CH200
C545 CHIP CERAMIC CAP.(1608) CH J 22pF/50V CHD1JJ3CH220
C546 CHIP CERAMIC CAP.(1608) CH J 22pF/50V CHD1JJ3CH220
C547 CHIP CERAMIC CAP.(1608) B K 0.01µF/50V CHD1JK30B103
C548 CHIP CERAMIC CAP.(1608) F Z 0.1µF/50V CHD1JZ30F104
C548 CHIP CERAMIC CAP.(1608) F Z 0.1µF/25V CHD1EZ30F104
20060629 1-19-2 E9B05EL
Page 70
Ref. No. Description Part No.
18/6/2013
World of free manuals
C549 ELECTROLYTIC CAP . 1µF/50V M H7 CE1JMA VS L1R0
C549 ALUMINUM ELECTROLYTIC CAP 1µF/50V H7 CE1JMA VSM1R 0
C550 ELECTROLYTIC CAP . 100µF/6.3V H 7 CE0KMAVSL101
C550 ALUMINUM ELECTROLYTIC CAP 100µF/6.3V H7CE0KMAVSM101
C553 ELECTROLYTIC CAP . 22µF/10V M H7 CE1AMAVSL220
C553 ALUMINUM ELECTROLYTIC CAP 22µF/10V H7 CE1AMAVSM220
C554 ELECTROLYTIC CAP . 100µF/6.3V H 7 CE0KMAVSL101
C554 ALUMINUM ELECTROLYTIC CAP 100µF/6.3V H7CE0KMAVSM101
C555 CHIP CERAMIC CAP . (1608) B K 0.1µF/25V CHD1EK30B104
C555 CHIP CERAMIC CAP . (1608) B K 0.1µF/16V CHD1CK30B104
C560 CHIP CERAMIC CAP .(1608) F Z 0.1µF/50V CHD1JZ30F1 04
C560 CHIP CERAMIC CAP .(1608) F Z 0.1µF/25V CHD1EZ30F104
C611 ELECTROLYTIC CAP . 22µF/50V M H7 CE1JMASSL220
C611 ALUMINUM ELECTROLYTIC CAP 22µF/50V H7 CE1JMASSM220
C612 CHIP CERAMIC CAP . (1608) B K 4700pF/50V CHD1JK30B472
C614 CHIP CERAMIC CAP .(1608) F Z 0.1µF/50V CHD1JZ30F1 04
C614 CHIP CERAMIC CAP .(1608) F Z 0.1µF/25V CHD1EZ30F104
C615 ELECTROLYTIC CAP . 100µF/6.3V H 7 CE0KMAVSL101
C615 ALUMINUM ELECTROLYTIC CAP 100µF/6.3V H7CE0KMAVSM101
C616 CHIP CERAMIC CAP . (1608) B K 1000pF/50V CHD1JK30B102
C1500 ELECTROLYTIC CAP. 47µF/16V M CE1CMASDL470
C1500 ALUMINUM ELECTROLYT IC CAP 47µF/16V M CE1CMASTM470
C1501 ELECTROLYTIC CAP. 47µF/6.3V M CE0KMASDL470
C1501 ELECTROLYTIC CAP. 47µF/6.3V M CE0KMASTM470
C1502 ELECTROLYTIC CAP. 47µF/6.3V M CE0KMASDL470
C1502 ELECTROLYTIC CAP. 47µF/6.3V M CE0KMASTM470
C1503 CHIP CERAMIC CAP.(1608) B K 0.01µF/50V CHD1JK30B103
C1506 ELECTROLYTIC CAP. 47µF/16V M CE1CMASDL470
C1506 ALUMINUM ELECTROLYT IC CAP 47µF/16V M CE1CMASTM470
C1507 ELECTROLYTIC CAP. 10µF/16V M CE1CMASDL100
C1507 ELECTROLYTIC CAP. 10µF/16V M CE1CMASTM100
C1508 CERAMIC CAP.(AX) B K 0.1µF/25V CCA1EKT0B104
C1509 ELECTROLYTIC CAP. 10µF/16V M CE1CMASDL100
C1509 ELECTROLYTIC CAP. 10µF/16V M CE1CMASTM100
C1510 ELECTROLYTIC CAP. 10µF/16V M CE1CMASDL100
C1510 ELECTROLYTIC CAP. 10µF/16V M CE1CMASTM100
C1511 ELECTROLYTIC CAP. 220µF/16V M CE1CMASDL221
C1511 ELECTROLYTIC CAP. 220µF/16V M CE1CMASTM221
C1512 ELECTROLYTIC CAP. 10µF/16V M H7 CE1CMA VSL100
C1512 ALUMINUM ELECTROLYT IC CAP 10µF/16V H7 CE1CMAVS M100
C1513 CHIP CERAMIC CAP.(1608) F Z 0.1µF/50V CHD1JZ30F104
C1513 CHIP CERAMIC CAP.(1608) F Z 0.1µF/25V CHD1EZ30F104
C1517 ELECTROLYTIC CAP. 47µF/16V M CE1CMASDL470
C1517 ALUMINUM ELECTROLYT IC CAP 47µF/16V M CE1CMASTM470
C1518 CHIP CERAMIC CAP.(1608) F Z 0.1µF/50V CHD1JZ30F104
C1518 CHIP CERAMIC CAP.(1608) F Z 0.1µF/25V CHD1EZ30F104
C1519 CHIP CERAMIC CAP. F Z 1µF/10V CHD1AZ30F105
C1520 CHIP CERAMIC CAP. F Z 1µF/10V CHD1AZ30F105
C1521 CHIP CERAMIC CAP. F Z 1µF/10V CHD1AZ30F105
C1524 CHIP CERAMIC CAP.(1608) B K 0.1µF/25V CHD1EK30B104
C1524 CHIP CERAMIC CAP.(1608) B K 0.1µF/16V CHD1CK30B104
C1525 CHIP CERAMIC CAP.(1608) B K 0.01µF/50V CHD1JK30B103
C1526 CHIP CERAMIC CAP.(1608) F Z 0.1µF/50V CHD1JZ30F104
C1526 CHIP CERAMIC CAP.(1608) F Z 0.1µF/25V CHD1EZ30F104
C1527 ELECTROLYTIC CAP. 47µF/25V M CE1EMASDL470
C1527 ALUMINUM ELECTROLYT IC CAP 47µF/25V M CE1EMASTM470
C1528 ELECTROLYTIC CAP. 100µF/16V M CE1CMASDL101
C1528 ELECTROLYTIC CAP. 100µF/16V M CE1CMASTM101
C1529 ELECTROLYTIC CAP. 470µF/6.3V M CE0KMASDL471
C1529 ELECTROLYTIC CAP. 470µF/6.3V M CE0KMASTM471
C1530 ELECTROLYTIC CAP. 22µF/16V M CE1CMASDL220
C1530 ALUMINUM ELECTROLYT IC CAP 22µF/16V M CE1CMASTM220
C1532 ELECTROLYTIC CAP. 10µF/16V M CE1CMASDL100
C1532 ELECTROLYTIC CAP. 10µF/16V M CE1CMASTM100
C1533 ELECTROLYTIC CAP. 100µF/6.3V M CE0KMASDL101
Ref. No. Description Part No.
C1533 ELECTROLYTIC CAP. 100µF/6.3V M CE0KMASTM101
C1534 ELECTROLYTIC CAP. 100µF/6.3V M CE0KMASDL101
C1534 ELECTROLYTIC CAP. 100µF/6.3V M CE0KMASTM101
C1535 ELECTROLYTIC CAP. 10µF/16V M CE1CMASDL100
C1535 ELECTROLYTIC CAP. 10µF/16V M CE1CMASTM100
C1536 ELECTROLYTIC CAP. 10µF/16V M CE1CMASDL100
C1536 ELECTROLYTIC CAP. 10µF/16V M CE1CMASTM100
C1537 ELECTROLYTIC CAP. 220µF/6.3V M H7 CE0 KMASSL221
C1537 ELECTROLYTIC CAP. 220µF/6.3V M H7 CE0 KMASSM221
C1538 CHIP CERAMIC CAP .(1 608) F Z 0.1µF/50V CHD1JZ30F104
C1538 CHIP CERAMIC CAP .(1 608) F Z 0.1µF/25V CHD1EZ30F104
C1539 CHIP CERAMIC CAP .(1 608) F Z 0.1µF/50V CHD1JZ30F104
C1539 CHIP CERAMIC CAP .(1 608) F Z 0.1µF/25V CHD1EZ30F104
C1540 CHIP CERAMIC CAP .(1 608) F Z 0.1µF/50V CHD1JZ30F104
C1540 CHIP CERAMIC CAP .(1 608) F Z 0.1µF/25V CHD1EZ30F104
C1541 ELECTROLYTIC CAP. 100µF/6.3V M H7 CE0 KMASSL101
C1541 ELECTROLYTIC CAP. 100µF/6.3V M H7 CE0 KMASSM101
C1542 ELECTROLYTIC CAP. 100µF/16V M CE1CMASDL101
C1542 ELECTROLYTIC CAP. 100µF/16V M CE1CMASTM101
C1543 CHIP CERAMIC CAP .(1 608) F Z 0.1µF/50V CHD1JZ30F104
C1543 CHIP CERAMIC CAP .(1 608) F Z 0.1µF/25V CHD1EZ30F104
C1544 ELECTROLYTIC CAP. 47µF/6.3V M H7 CE0KMAVSL470
C1544 ALUMINUM ELECTROLYTI C CAP 47µF/6.3V H7CE0KMAVSM470
C1546 CHIP CERAMIC CAP . F Z 0.01µF/50V CHD1JZ30F103
C1547 ELECTROLYTIC CAP. 47µF/16V M CE1CMASDL470
C1547 ALUMINUM ELECTROLYTI C CAP 47µF/16V M CE1CMASTM470
C1548 CHIP CERAMIC CAP .(1 608) F Z 0.1µF/50V CHD1JZ30F104
C1548 CHIP CERAMIC CAP .(1 608) F Z 0.1µF/25V CHD1EZ30F104
C1549 CHIP CERAMIC CAP .(1 608) F Z 0.1µF/50V CHD1JZ30F104
C1549 CHIP CERAMIC CAP .(1 608) F Z 0.1µF/25V CHD1EZ30F104
C1550 ELECTROLYTIC CAP. 100µF/6.3V M NP CP0KMASNC101
C1551 CHIP CERAMIC CAP .(1608) CH J 3 3pF/50V CHD1JJ3CH330
C1552 CHIP CERAMIC CAP .(1608) CH J 3 3pF/50V CHD1JJ3CH330
C1553 CHIP CERAMIC CAP .(1 608) F Z 0.1µF/50V CHD1JZ30F104
C1553 CHIP CERAMIC CAP .(1 608) F Z 0.1µF/25V CHD1EZ30F104
C1554 ELECTROLYTIC CAP. 10µF/16V M CE1CMASDL100
C1554 ELECTROLYTIC CAP. 10µF/16V M CE1CMASTM100
C1555 CHIP CERAMIC CAP .(1 608) F Z 0.1µF/50V CHD1JZ30F104
C1555 CHIP CERAMIC CAP .(1 608) F Z 0.1µF/25V CHD1EZ30F104
C1556 ELECTROLYTIC CAP. 10µF/16V M H7 CE1CMAVSL100
C1556 ALUMINUM ELECTROLYTI C CAP 10µF/16V H7 CE1CMAVSM100
C1557 ELECTROLYTIC CAP. 47µF/16V M CE1CMASDL470
C1557 ALUMINUM ELECTROLYTI C CAP 47µF/16V M CE1CMASTM470
C1558 CHIP CERAMIC CAP .(1608) CH J 1 00pF/50V CHD1JJ3CH101
C1560 CHIP CERAMIC CAP .(1 608) F Z 0.1µF/50V CHD1JZ30F104
C1560 CHIP CERAMIC CAP .(1 608) F Z 0.1µF/25V CHD1EZ30F104
C1563 ELECTROLYTIC CAP. 100µF/16V M CE1CMASDL101
C1563 ELECTROLYTIC CAP. 100µF/16V M CE1CMASTM101
C1564 CHIP CERAMIC CAP .(1 608) F Z 0.1µF/50V CHD1JZ30F104
C1564 CHIP CERAMIC CAP .(1 608) F Z 0.1µF/25V CHD1EZ30F104
C1565 ELECTROLYTIC CAP. 100µF/6.3V M CE0KMASDL101
C1565 ELECTROLYTIC CAP. 100µF/6.3V M CE0KMASTM101
C1566 ELECTROLYTIC CAP. 10µF/16V M CE1CMASDL100
C1566 ELECTROLYTIC CAP. 10µF/16V M CE1CMASTM100
C1567 ELECTROLYTIC CAP. 47µF/16V M CE1CMASDL470
C1567 ALUMINUM ELECTROLYTI C CAP 47µF/16V M CE1CMASTM470
C1569 ELECTROLYTIC CAP. 470µF/6.3V M CE0KMASDL471
C1569 ELECTROLYTIC CAP. 470µF/6.3V M CE0KMASTM471
C1571 ELECTROLYTIC CAP. 4.7µF/25V M H7 CE1EMAVSL4R7
C1571 ALUMINUM ELECTROLYTI C CAP 4.7µF/25V H7CE1EMAVSM4R7
C1572 ELECTROLYTIC CAP. 10µF/16V M CE1CMASDL100
C1572 ELECTROLYTIC CAP. 10µF/16V M CE1CMASTM100
C1573 ELECTROLYTIC CAP. 10µF/16V M CE1CMASDL100
C1573 ELECTROLYTIC CAP. 10µF/16V M CE1CMASTM100
C1574 CHIP CERAMIC CAP .(1 608) F Z 0.1µF/50V CHD1JZ30F104
C1574 CHIP CERAMIC CAP .(1 608) F Z 0.1µF/25V CHD1EZ30F104
20060629 1-19-3 E9B05EL
Page 71
Ref. No. Description Part No.
18/6/2013
World of free manuals
C1575 SEMICONDUCTOR CAP . SR K 0.018µF/25V CDA1EKP0X183
C1576 CHIP CERAMIC CAP.(1608) CH J 270pF/50V CHD1JJ3CH271
C1577 CHIP CERAMIC CAP.(1608) CH J 270pF/50V CHD1JJ3CH271
C1578 CHIP CERAMIC CAP.(1608) B K 0.01µF/50V CHD1JK30B103
C1580 ELECTROLYTIC CAP. 22µF/16V M CE1CMASDL220
C1580 ALUMINUM ELECTROLYT IC CAP 22µF/16V M CE1CMASTM220
C1581 ELECTROLYTIC CAP. 1µF/50V M CE1JMASDL1R0
C1581 ELECTROLYTIC CAP 1µF/50V M CE1JMASTM1R0
C1585 ELECTROLYTIC CAP. 100µF/6.3V M CE0KMASDL101
C1585 ELECTROLYTIC CAP. 100µF/6.3V M CE0KMASTM101
C1586 CHIP CERAMIC CAP.(1608) CH J 47pF/50V CHD1JJ3CH470
C1588 CHIP CERAMIC CAP.(1608) CH J 47pF/50V CHD1JJ3CH470
C1590 ELECTROLYTIC CAP. 1µF/50V M CE1JMASDL1R0
C1590 ELECTROLYTIC CAP 1µF/50V M CE1JMASTM1R0
C1591 ELECTROLYTIC CAP. 1µF/50V M CE1JMASDL1R0
C1591 ELECTROLYTIC CAP 1µF/50V M CE1JMASTM1R0
C1592 CHIP CERAMIC CAP.(1608) B K 0.01µF/50V CHD1JK30B103
C1594 CHIP CERAMIC CAP.(1608) F Z 0.1µF/50V CHD1JZ30F104
C1594 CHIP CERAMIC CAP.(1608) F Z 0.1µF/25V CHD1EZ30F104
C1595 ELECTROLYTIC CAP. 22µF/16V M H7 CE1CMA VSL220
C1595 CAP ELE H7-85 22µF/16V H7 CE1CMAV SM220
C1597 CHIP CERAMIC CAP.(1608) B K 0.01µF/50V CHD1JK30B103
C1598 ELECTROLYTIC CAP. 1µF/50V M H7 CE1JMAVSL1R0
C1598 ALUMINUM ELECTROLYT IC CAP 1µF/50V H7 CE1JMAVSM1R0
C1599 CHIP CERAMIC CAP.(1608) F Z 0.1µF/50V CHD1JZ30F104
C1599 CHIP CERAMIC CAP.(1608) F Z 0.1µF/25V CHD1EZ30F104
C1601 ELECTROLYTIC CAP. 10µF/16V M H7 CE1CMA VSL100
C1601 ALUMINUM ELECTROLYT IC CAP 10µF/16V H7 CE1CMAVS M100
C1602 ELECTROLYTIC CAP. 10µF/16V M H7 CE1CMA VSL100
C1602 ALUMINUM ELECTROLYT IC CAP 10µF/16V H7 CE1CMAVS M100
C1603 ELECTROLYTIC CAP. 1µF/50V M H7 CE1JMAVSL1R0
C1603 ALUMINUM ELECTROLYT IC CAP 1µF/50V H7 CE1JMAVSM1R0
C1604 ELECTROLYTIC CAP. 1µF/50V M H7 NP CP1JMAVS B1R0
C1605 ELECTROLYTIC CAP. 470µF/6.3V M CE0KMASDL471
C1605 ELECTROLYTIC CAP. 470µF/6.3V M CE0KMASTM471
C1606 ELECTROLYTIC CAP. 470µF/6.3V M CE0KMASDL471
C1606 ELECTROLYTIC CAP. 470µF/6.3V M CE0KMASTM471
C1607 ELECTROLYTIC CAP. 470µF/6.3V M CE0KMASDL471
C1607 ELECTROLYTIC CAP. 470µF/6.3V M CE0KMASTM471
C1608 CHIP CERAMIC CAP.(1608) B K 0.01µF/50V CHD1JK30B103
C1609 CHIP CERAMIC CAP.(1608) F Z 0.1µF/50V CHD1JZ30F104
C1609 CHIP CERAMIC CAP.(1608) F Z 0.1µF/25V CHD1EZ30F104
C1610 CHIP CERAMIC CAP.(1608) B K 0.01µF/50V CHD1JK30B103
C1611 ELECTROLYTIC CAP. 47µF/6.3V M H7 CE0KMAVSL470
C1611 ALUMINUM ELECTROLYT IC CAP 47µF/6.3V H7CE0KMAVSM470
C1612 ELECTROLYTIC CAP. 100µF/6.3V H7 CE0KMAVSL101
C1612 ALUMINUM ELECTROLYT IC CAP 100µF/6.3V H7CE0KMAVSM101
C1617 CHIP CERAMIC CAP.(1608) B K 0.1µF/25V CHD1EK30B104
C1617 CHIP CERAMIC CAP.(1608) B K 0.1µF/16V CHD1CK30B104
C1618 ELECTROLYTIC CAP. 470µF/6.3V M CE0KMASDL471
C1618 ELECTROLYTIC CAP. 470µF/6.3V M CE0KMASTM471
C1619 CHIP CERAMIC CAP.(1608) F Z 0.1µF/50V CHD1JZ30F104
C1619 CHIP CERAMIC CAP.(1608) F Z 0.1µF/25V CHD1EZ30F104
C1620 CHIP CERAMIC CAP.(1608) B K 0.01µF/50V CHD1JK30B103
C1621 ELECTROLYTIC CAP. 10µF/50V M CE1JMASDL100
C1621 ALUMINUM ELECTROLYT IC CAP 10µF/50V M CE1JMASTM100
C1623 CHIP CERAMIC CAP.(1608) B K 0.01µF/50V CHD1JK30B103
C1626 CHIP CERAMIC CAP. F Z 0.22µF/16V CHD1CZ30F224
C1627 CHIP CERAMIC CAP. F Z 0.22µF/16V CHD1CZ30F224
C1628 CHIP CERAMIC CAP. B K 2200pF/50V CHD1JK30B222
C1629 CHIP CERAMIC CAP.(1608) F Z 0.1µF/50V CHD1JZ30F104
C1629 CHIP CERAMIC CAP.(1608) F Z 0.1µF/25V CHD1EZ30F104
C1630 CHIP CERAMIC CAP.(1608) B K 0.01µF/50V CHD1JK30B103
C1631 CHIP CERAMIC CAP.(1608) B K 1000pF/50V CHD1JK30B102
C1632 CHIP CERAMIC CAP. B K 2200pF/50V CHD1JK30B222
C1633 CHIP CERAMIC CAP.(1608) F Z 0.1µF/50V CHD1JZ30F104
Ref. No. Description Part No.
C1633 CHIP CERAMIC CAP .(1 608) F Z 0.1µF/25V CHD1EZ30F104
C1634 CHIP CERAMIC CAP .(1 608) F Z 0.1µF/50V CHD1JZ30F104
C1634 CHIP CERAMIC CAP .(1 608) F Z 0.1µF/25V CHD1EZ30F104
C1635 ELECTROLYTIC CAP. 0.33µF/50V M CE1JMASDLR33
C1635 ALUMINUM ELECTROLYTI C CAP 0.33µF/50V MCE1JMASTMR33
C1636 ELECTROLYTIC CAP. 100µF/6.3V M CE0KMASDL101
C1636 ELECTROLYTIC CAP. 100µF/6.3V M CE0KMASTM101
C1637 ELECTROLYTIC CAP. 1µF/50V M CE1JMASDL1R0
C1637 ELECTROLYTIC CAP 1µF/50V M CE1JMASTM1R0
C1639 CHIP CERAMIC CAP . B K 2200pF/50V CHD1JK30B222
C1640 CHIP CERAMIC CAP . B K 2200pF/50V CHD1JK30B222
C1643 ELECTROLYTIC CAP. 47µF/6.3V M CE0KMASDL470
C1643 ELECTROLYTIC CAP. 47µF/6.3V M CE0KMASTM470
C1645 CHIP CERAMIC CAP .(1608) CH J 6 8pF/50V CHD1JJ3CH680
C1646 ELECTROLYTIC CAP. 22µF/16V M CE1CMASDL220
C1646 ALUMINUM ELECTROLYTI C CAP 22µF/16V M CE1CMASTM220
C1648 CHIP CERAMIC CAP . B K 2200pF/50V CHD1JK30B222
C1649 CHIP CERAMIC CAP . B K 2200pF/50V CHD1JK30B222
C1651 CHIP CERAMIC CAP .(1608) CH J 6 8pF/50V CHD1JJ3CH680
C1652 CHIP CERAMIC CAP .(1 608) F Z 0.1µF/50V CHD1JZ30F104
C1652 CHIP CERAMIC CAP .(1 608) F Z 0.1µF/25V CHD1EZ30F104
C1657 ELECTROLYTIC CAP. 1µF/50V M CE1JMASDL1R0
C1657 ELECTROLYTIC CAP 1µF/50V M CE1JMASTM1R0
C1658 CHIP CERAMIC CAP .(1608) B K 1000pF/50V CHD1JK30B102
C1659 ELECTROLYTIC CAP. 1µF/50V M CE1JMASDL1R0
C1659 ELECTROLYTIC CAP 1µF/50V M CE1JMASTM1R0
C1660 CHIP CERAMIC CAP .(1608) B K 1000pF/50V CHD1JK30B102
C1661 ELECTROLYTIC CAP. 1µF/50V M CE1JMASDL1R0
C1661 ELECTROLYTIC CAP 1µF/50V M CE1JMASTM1R0
C1662 ELECTROLYTIC CAP. 1µF/50V M CE1JMASDL1R0
C1662 ELECTROLYTIC CAP 1µF/50V M CE1JMASTM1R0
C1663 CHIP CERAMIC CAP .(1608) B K 0.1µF/25V CHD1EK30B104
C1663 CHIP CERAMIC CAP .(1608) B K 0.1µF/16V CHD1CK30B104
C1664 ELECTROLYTIC CAP. 1µF/50V M CE1JMASDL1R0
C1664 ELECTROLYTIC CAP 1µF/50V M CE1JMASTM1R0
C1665 CHIP CERAMIC CAP .(1608) B K 1000pF/50V CHD1JK30B102
C1671 ELECTROLYTIC CAP. 4.7µF/25V M CE1EMASDL4R7
C1671 ALUMINUM ELECTROLYTI C CAP 4.7µF/25V M CE1EMASTM4R7
C1672 ELECTROLYTIC CAP. 4.7µF/25V M CE1EMASDL4R7
C1672 ALUMINUM ELECTROLYTI C CAP 4.7µF/25V M CE1EMASTM4R7
C1673 ELECTROLYTIC CAP. 47µF/16V M CE1CMASDL470
C1673 ALUMINUM ELECTROLYTI C CAP 47µF/16V M CE1CMASTM470
C1675 ELECTROLYTIC CAP. 47µF/25V M CE1EMASDL470
C1675 ALUMINUM ELECTROLYTI C CAP 47µF/25V M CE1EMASTM470
C1677 CHIP CERAMIC CAP .(1608) B K 1000pF/50V CHD1JK30B102
C1680 CHIP CERAMIC CAP .(1608) B K 1000pF/50V CHD1JK30B102
C1681 ELECTROLYTIC CAP. 1µF/50V M CE1JMASDL1R0
C1681 ELECTROLYTIC CAP 1µF/50V M CE1JMASTM1R0
C1684 ELECTROLYTIC CAP. 4.7µF/25V M CE1EMASDL4R7
C1684 ALUMINUM ELECTROLYTI C CAP 4.7µF/25V M CE1EMASTM4R7
C1685 ELECTROLYTIC CAP. 4.7µF/25V M CE1EMASDL4R7
C1685 ALUMINUM ELECTROLYTI C CAP 4.7µF/25V M CE1EMASTM4R7
C1686 ELECTROLYTIC CAP. 4.7µF/25V M CE1EMASDL4R7
C1686 ALUMINUM ELECTROLYTI C CAP 4.7µF/25V M CE1EMASTM4R7
C1687 ELECTROLYTIC CAP. 4.7µF/25V M CE1EMASDL4R7
C1687 ALUMINUM ELECTROLYTI C CAP 4.7µF/25V M CE1EMASTM4R7
C1688 ELECTROLYTIC CAP. 1µF/50V M CE1JMASDL1R0
C1688 ELECTROLYTIC CAP 1µF/50V M CE1JMASTM1R0
C1689 ELECTROLYTIC CAP. 1µF/50V M CE1JMASDL1R0
C1689 ELECTROLYTIC CAP 1µF/50V M CE1JMASTM1R0
C1691 CHIP CERAMIC CAP .(1608) CH J 4 7pF/50V CHD1JJ3CH470
C1692 ELECTROLYTIC CAP. 470µF/6.3V M CE0KMASDL471
C1692 ELECTROLYTIC CAP. 470µF/6.3V M CE0KMASTM471
C1693 ELECTROLYTIC CAP. 470µF/6.3V M CE0KMASDL471
C1693 ELECTROLYTIC CAP. 470µF/6.3V M CE0KMASTM471
C1694 CHIP CERAMIC CAP . F Z 1µF/10V CHD1AZ30F105
20060629 1-19-4 E9B05EL
Page 72
Ref. No. Description Part No.
18/6/2013
World of free manuals
C1695 ELECTROLYTIC CAP. 1µF/50V M CE1JMASDL1R0
C1695 ELECTROLYTIC CAP 1µF/50V M CE1JMASTM1R0
C1696 ELECTROLYTIC CAP. 1µF/50V M CE1JMASDL1R0
C1696 ELECTROLYTIC CAP 1µF/50V M CE1JMASTM1R0
C1697 ELECTROLYTIC CAP. 4.7µF/25V M CE1EMASDL4R7
C1697 ALUMINUM ELECTROLYT IC CAP 4.7µF/25V M CE1EMASTM4R7
C1698 ELECTROLYTIC CAP. 4.7µF/25V M CE1EMASDL4R7
C1698 ALUMINUM ELECTROLYT IC CAP 4.7µF/25V M CE1EMASTM4R7
C1699 CHIP CERAMIC CAP.(1608) CH J 47pF/50V CHD1JJ3CH470
C1700 CHIP CERAMIC CAP. F Z 1µF/10V CHD1AZ30F105
C1701 ELECTROLYTIC CAP. 10µF/16V M H7 CE1CMA VSL100
C1701 ALUMINUM ELECTROLYT IC CAP 10µF/16V H7 CE1CMAVS M100
C1702 ELECTROLYTIC CAP. 10µF/16V M H7 CE1CMA VSL100
C1702 ALUMINUM ELECTROLYT IC CAP 10µF/16V H7 CE1CMAVS M100
CONNECTORS
CN1503 PH CONNECTOR (WHITE) TOP 2P B2B-PH-K-
CN1504 242 SERIE S CONNECT OR 224202 119W1 J322C19TG00 1
CN1505 FE CONNECTOR TOP 8P 08FE-BT-VK-N JCFEJ08JG001
CN1506 AFV PCB ASSEMBL Y E9B01AFV E9B01AFV
S(LF)
J3PHC02JG017
DIODES
D301 SWITCHING DIODE 1SS133(T-77) QDTZ001SS133
D301 DIODE SWITCHING 1N4148-F 0021 NDTZ01N4148F
D301 SWITCHING DIODE 1N4148M NDTZ01N4148M
D502 LED(GREEN) 204-10GD/S957 NPQZ10GDS957
D503 LED(GREEN) 204-10GD/S957 NPQZ10GDS957
D510 SWITCHING DIODE 1SS133(T-77) QDTZ001SS133
D510 DIODE SWITCHING 1N4148-F 0021 NDTZ01N4148F
D510 SWITCHING DIODE 1N4148M NDTZ01N4148M
D511 ZENER DIODE MTZJT -777.5A QDTA0MTZJ7R5
D511 DIODE ZENER 7V5BSA-T26 NDTA7R5BST26
D511 ZENER DIODE DZ-7.5BSA T265 NDTA0DZ7R5BS
D512 SWITCHING DIODE 1SS133(T-77) QDTZ001SS133
D512 DIODE SWITCHING 1N4148-F 0021 NDTZ01N4148F
D512 SWITCHING DIODE 1N4148M NDTZ01N4148M
D555 LED MIE-534A2 NPZZM1E534A2
D555 LED SIR-563ST3F P QPQPS1R563ST
D555 LED SIR-563ST3F Q QPQQS1R563ST
D1501 DIODE 1N5397-B NDLZ001N5397
D1502 DIODE 1N5397-B NDLZ001N5397
D1506 SCHOTTKY BARRIER DIODE SB140 NDQZ000SB140
D1506 SCHOTTKY BARRIER DIODE SB140 NDWZ000SB140
D1507 RECTIFIER DIODE 1N4005 NDQZ001N4005
D1507 RECTIFIER DIODE 1N 4005 NDWZ001N4005
D1508 ZENER DIODE MTZJT -774.3C QDTC0MTZJ4R3
D1508 DIODE ZENER 4V3BSC-T26 NDTC4R3BST26
D1508 ZENER DIODE DZ-4.3BSCT265 NDTC0DZ4R3BS
D1511 ZENER DIODE MTZJT -7710B QDTB00MTZJ10
D1511 DIODE ZENER 10BSB-T26 NDTB010BST26
D1511 ZENER DIODE DZ-10BSBT265 NDTB00DZ10BS
D1512 SWITCHING DIODE 1SS133(T-77) QDTZ001SS133
D1512 DIODE SWITCHIN G 1N4148 -F0021 NDTZ01N41 48F
D1512 SWITCHING DIODE 1N4148M NDTZ01N4148M
D1513 SWITCHING DIODE 1SS133(T-77) QDTZ001SS133
D1513 DIODE SWITCHIN G 1N4148 -F0021 NDTZ01N41 48F
D1513 SWITCHING DIODE 1N4148M NDTZ01N4148M
D1516 SWITCHING DIODE 1SS133(T-77) QDTZ001SS133
D1516 DIODE SWITCHIN G 1N4148 -F0021 NDTZ01N41 48F
D1516 SWITCHING DIODE 1N4148M NDTZ01N4148M
D1517 SWITCHING DIODE 1SS133(T-77) QDTZ001SS133
D1517 DIODE SWITCHIN G 1N4148 -F0021 NDTZ01N41 48F
D1517 SWITCHING DIODE 1N4148M NDTZ01N4148M
D1518 ZENER DIODE MTZJT -7718B QDTB00MTZJ18
D1518 DIODE ZENER 18BSB-T26 NDTB018BST26
D1518 ZENER DIODE DZ-18BSBT265 NDTB00DZ18BS
D1519 ZENER DIODE MTZJT -7711B QDTB00MTZJ11
D1519 DIODE ZENER 11BSB-T26 NDTB011BST26
Ref. No. Description Part No.
D1519 ZENER DIODE DZ-11BSBT265 NDTB00DZ11BS
D1521 SWITCHING DIODE 1SS133(T -77) QDTZ001SS133
D1521 DIODE SWITCHING 1N4148-F0021 NDTZ01N4148F
D1521 SWITCHING DIODE 1N4148M NDTZ01N4148M
D1523 ZENER DIODE MTZJT-775.6B QDTB0MTZJ5R6
D1523 DIODE ZENER 5V6BSB-T26 NDTB5R6BST26
D1523 ZENER DIODE DZ-5.6BSBT265 NDTB0DZ5R6BS
D1525 ZENER DIODE MTZJT-7711A QDTA00MTZJ11
D1525 DIODE ZENER 11BSA-T26 NDTA011BST26
D1525 ZENER DIODE DZ-11BSAT2 65 NDTA00DZ 11BS
D1526 ZENER DIODE MTZJT-7711A QDTA00MTZJ11
D1526 DIODE ZENER 11BSA-T26 NDTA011BST26
D1526 ZENER DIODE DZ-11BSAT2 65 NDTA00DZ 11BS
D1528 ZENER DIODE MTZJT-7711A QDTA00MTZJ11
D1528 DIODE ZENER 11BSA-T26 NDTA011BST26
D1528 ZENER DIODE DZ-11BSAT2 65 NDTA00DZ 11BS
D1529 ZENER DIODE MTZJT-7711A QDTA00MTZJ11
D1529 DIODE ZENER 11BSA-T26 NDTA011BST26
D1529 ZENER DIODE DZ-11BSAT2 65 NDTA00DZ 11BS
D1531 ZENER DIODE MTZJT-7711A QDTA00MTZJ11
D1531 DIODE ZENER 11BSA-T26 NDTA011BST26
D1531 ZENER DIODE DZ-11BSAT2 65 NDTA00DZ 11BS
D1532 ZENER DIODE MTZJT-7711A QDTA00MTZJ11
D1532 DIODE ZENER 11BSA-T26 NDTA011BST26
D1532 ZENER DIODE DZ-11BSAT2 65 NDTA00DZ 11BS
D1534 ZENER DIODE MTZJT-7733B QDTB00MTZJ33
D1534 DIODE ZENER 33BSB-T26 NDTB033BST26
D1534 ZENER DIODE DZ-33BSBT265 NDTB00DZ33BS
D1535 ZENER DIODE MTZJT-7711A QDTA00MTZJ11
D1535 DIODE ZENER 11BSA-T26 NDTA011BST26
D1535 ZENER DIODE DZ-11BSAT2 65 NDTA00DZ 11BS
D1537 ZENER DIODE MTZJT-7711A QDTA00MTZJ11
D1537 DIODE ZENER 11BSA-T26 NDTA011BST26
D1537 ZENER DIODE DZ-11BSAT2 65 NDTA00DZ 11BS
D1538 ZENER DIODE MTZJT-7711A QDTA00MTZJ11
D1538 DIODE ZENER 11BSA-T26 NDTA011BST26
D1538 ZENER DIODE DZ-11BSAT2 65 NDTA00DZ 11BS
D1539 ZENER DIODE MTZJT-7711A QDTA00MTZJ11
D1539 DIODE ZENER 11BSA-T26 NDTA011BST26
D1539 ZENER DIODE DZ-11BSAT2 65 NDTA00DZ 11BS
D1540 ZENER DIODE MTZJT-7711A QDTA00MTZJ11
D1540 DIODE ZENER 11BSA-T26 NDTA011BST26
D1540 ZENER DIODE DZ-11BSAT2 65 NDTA00DZ 11BS
D1542 ZENER DIODE MTZJT-7711A QDTA00MTZJ11
D1542 DIODE ZENER 11BSA-T26 NDTA011BST26
D1542 ZENER DIODE DZ-11BSAT2 65 NDTA00DZ 11BS
D1544 ZENER DIODE MTZJT-7711A QDTA00MTZJ11
D1544 DIODE ZENER 11BSA-T26 NDTA011BST26
D1544 ZENER DIODE DZ-11BSAT2 65 NDTA00DZ 11BS
D1545 ZENER DIODE MTZJT-7711A QDTA00MTZJ11
D1545 DIODE ZENER 11BSA-T26 NDTA011BST26
D1545 ZENER DIODE DZ-11BSAT2 65 NDTA00DZ 11BS
D1546 ZENER DIODE MTZJT-7711A QDTA00MTZJ11
D1546 DIODE ZENER 11BSA-T26 NDTA011BST26
D1546 ZENER DIODE DZ-11BSAT2 65 NDTA00DZ 11BS
D1547 ZENER DIODE MTZJT-7711A QDTA00MTZJ11
D1547 DIODE ZENER 11BSA-T26 NDTA011BST26
D1547 ZENER DIODE DZ-11BSAT2 65 NDTA00DZ 11BS
D1548 ZENER DIODE MTZJT-7711A QDTA00MTZJ11
D1548 DIODE ZENER 11BSA-T26 NDTA011BST26
D1548 ZENER DIODE DZ-11BSAT2 65 NDTA00DZ 11BS
D1549 ZENER DIODE MTZJT-7711A QDTA00MTZJ11
D1549 DIODE ZENER 11BSA-T26 NDTA011BST26
D1549 ZENER DIODE DZ-11BSAT2 65 NDTA00DZ 11BS
ICS
IC301 IC Y/C/A LA71750EM-MPB-E QSZBA0RSY020
IC451 IC HIFI LA72648M-MPB-E QSZBA0RSY033
20060629 1-19-5 E9B05EL
Page 73
Ref. No. Description Part No.
18/6/2013
World of free manuals
IC501 SYSCON IC M3776AMCH-AF0GP QSZAC0RHT100
IC612 VFD DRIVER IC PT6315(L) NSZBA0RG2009
IC1501 IC(ANALOG SW) CD4052BPWR NSZBA0TTY142
IC1504 VOL TAGE REGULAT OR PQ070XF01SZH QSZBA0SSH054
IC1505 VOL TAGE REGULAT OR PQ070XF01SZH QSZBA0SSH054
IC1506 IC OP AMP UTC4580 DIP-8 8PIN NSZBA0S2H003
IC1506 IC OP AMP RC4580IP NSZBA0STY173
IC1507 VIDEO SWITCH MM1697AJBE QSZBA0TMM150
IC1508 IC SWITCH TC4053BF(EL N F) QSZBA0TTS163
IC1508 IC SWITCH BU4053BCF-E2 QSMDA0TRM010
IC1508 IC ANALOG MULTIPLEXERS
IC1508 IC ANALOG MULTIPLEXER CD4053BNSR NSZBA0TTY093
IC1509 IC SWITCH TC4053BF(EL N F) QSZBA0TTS163
IC1509 IC SWITCH BU4053BCF-E2 QSMDA0TRM010
IC1509 IC ANALOG MULTIPLEXERS
IC1509 IC ANALOG MULTIPLEXER CD4053BNSR NSZBA0TTY093
IC1511 IC VPS/PDC SLICER LC74793NJM-TLM-E QSZBA0TSY049
IC1513 IC OP AMP KIA4558P/P NSZBA0SJY035
IC1513 IC OP AMP UTC4580 DIP-8 8PIN NSZBA0S2H003
IC1513 IC OP AMP RC4580IP NSZBA0STY173
IC1514 DRIVER FOR DVD MM1637XVBE QSZBA0TMM102
IC1515 DRIVER FOR DVD MM1636XWRE QSZBA0TMM108
IC1518 AV SWITCH MM1443XJBE QSZBA0TMM152
CD4053BCSJX_NL
CD4053BCSJX_NL
NSZBA0TF3138
NSZBA0TF3138
COILS
L251 INDUCTOR 5.6µH-K-26T LLAXKATTU5R6
L302 INDUCTOR(100µH K) LAP02T A101K LLAXKATT U101
L402 INDUCTOR 47µH-K-5FT LLARKBSTU470
L451 INDUCTOR 47µH-K-5FT LLARKBSTU470
L452 PCB JUMPER D0.6-P5.0 JW5.0T
L501 INDUCTOR(100µH K) LAP02T A101K LLAXKATT U101
L502 PCB JUMPER D0.6-P5.0 JW5.0T
L503 INDUCTOR 1.8µH-K-26T LLAXKATTU1R8
L1501 CHOKE COIL 47µH LLBD00PKV022
L1501 RADIAL TYPE CHOKE COIL CW68-470K-
L1501 CHOKE COIL 47µH-K LLBD00PKT001
L1501 FIXED INDUCTORS(PB FREE) LGB0810TLF-
L1503 PCB JUMPER D0.6-P5 .0 JW5.0T
L1504 PCB JUMPER D0.6-P5 .0 JW5.0T
L1505 INDUCTOR(100µH K) LAP02T A101K LLAXKATT U101
L1506 PCB JUMPER D0.6-P5 .0 JW5.0T
L1507 CHOKE COIL 47µH LLBD00PKV022
L1507 RADIAL TYPE CHOKE COIL CW68-470K-
L1507 CHOKE COIL 47µH-K LLBD00PKT001
L1507 FIXED INDUCTORS(PB FREE) LGB0810TLF-
L1508 INDUCTOR 10µH-K-26T LLAXKATTU100
L1509 INDUCTOR(100µH K) LAP02T A101K LLAXKATT U101
L1513 INDUCTOR(0.47µH K) LAP02T AR47K LLAXKATTUR47
L1515 BEAD CORE ASSEMBL Y E9770ED 1VSA12643
L1517 PCB JUMPER D0.6-P5 .0 JW5.0T
841040NP
470K
841040NP
470K
LLBD00PKV023
LLBD00PU6010
LLBD00PKV023
LLBD00PU6010
TRANSISTORS
Q301 TRANSISTOR KT A-1266-GR-AT/P NQS4KTA1266P
Q301 TRANSISTOR 2SA1015-GR(TE2 F T) QQS12SA1015F
Q302 TRANSISTOR KTC3199-Y -AT/P NQSYKTC3199P
Q302 TRANSISTOR KTC3199-GR-AT/P NQS4KTC3199P
Q302 TRANSISTOR 2SC1815-Y(TE2 F T) QQSY2SC1815F
Q302 TRANSISTOR 2SC1815-GR(TE2 F T) QQS12SC1815F
Q401 CHIP TRANSISTOR RN1511(TE85R.F) QQ2Z0RN1511F
Q401 CHIP TRANSIST OR FMG4 A T148 QQ2Z000F MG4A
Q403 TRANSISTOR KTC3203-Y -AT/P NQSYKTC3203P
Q403 TRANSISTOR 2SC2120-Y(TE2 F T) QQSY2SC2120F
Q404 TRANSISTOR KT A-1266-GR-AT/P NQS4KTA1266P
Q404 TRANSISTOR 2SA1015-GR(TE2 F T) QQS12SA1015F
Q405 RES. BUILT-IN TRANSISTOR KRA103M-AT/P NQSZ0KRA103M
Ref. No. Description Part No.
Q406 CHIP TRANSISTOR KTC3875S-Y -R TK/P NQ1YKTC3875S
Q451 TRANSISTOR KRC103S-RTK/P NQ1ZKRC103SP
Q506 PHOTO TRA NSISTOR PT204-6B-12 NPWZT2046B12
Q506 PHOTO TRANSISTOR M ID-32A22F NPWZ1D32A22F
Q513 NPN TRANSISTOR KRC103M-AT/P NQSZKRC103MP
Q514 TRANSISTOR KTC3199-BL-A T /P NQS5KTC3199P
Q514 TRANSISTOR 2SC1815-BL(TE2 F T) QQS22SC1815F
Q515 TRANSISTOR KTC3199-BL-A T /P NQS5KTC3199P
Q515 TRANSISTOR 2SC1815-BL(TE2 F T) QQS22SC1815F
Q516 CHIP TRANSISTOR KTC3875S-GR-RTK/P NQ14KTC3875S
Q517 CHIP TRANSISTOR KTC3875S-GR-RTK/P NQ14KTC3875S
Q518 NPN TRANSISTOR KRC103M-AT/P NQSZKRC103MP
Q519 NPN TRANSISTOR KRC103M-AT/P NQSZKRC103MP
Q1501 TRANSISTOR KTA1267-Y -AT/P NQSYKT A1267P
Q1501 TRANSISTOR KTA1267-GR-AT/P NQS1KTA 1267 P
Q1502 NPN TRANSISTOR KRC103M-A T/P NQSZKRC103MP
Q1507 TRANSISTOR KTA-1266-GR-AT/P NQS4KT A1266P
Q1507 TRANSISTOR 2SA1015-GR(TE2 F T) QQS12SA1015F
Q1508 TRANSISTOR KTA1281Y -AT/P NQVYKTA1 281P
Q1508 TRANSISTOR 2SA1020-Y(TE6 F M) QQSY2SA1020F
Q1509 NPN TRANSISTOR KRC103M-A T/P NQSZKRC103MP
Q1510 TRANSISTOR KTC3205-Y-A T/P NQSYKTC3205P
Q1510 TRANSISTOR 2SC3266-Y(TPE2 F) QQSY2SC3266F
Q1511 TRANSISTOR KTA1273-Y -AT/P NQSYKT A1273P
Q1511 TRANSISTOR 2SA966-Y(TE6 F M ) QQSY02SA966F
Q1512 TRANSISTOR KTC3199-Y-A T/P NQSYKTC3199P
Q1512 TRANSISTOR KTC3199-GR-A T/P NQS4KTC3199P
Q1512 TRANSISTOR 2SC1815-Y(TE2 F T) QQSY2SC1815F
Q1512 TRANSISTOR 2SC1815-GR(TE2 F T) QQS12SC1815F
Q1513 TRANSISTOR KTA1267-Y -AT/P NQSYKT A1267P
Q1513 TRANSISTOR KTA1267-GR-AT/P NQS1KTA 1267 P
Q1514 TRANSISTOR KTC3199-Y-A T/P NQSYKTC3199P
Q1514 TRANSISTOR KTC3199-GR-A T/P NQS4KTC3199P
Q1514 TRANSISTOR 2SC1815-Y(TE2 F T) QQSY2SC1815F
Q1514 TRANSISTOR 2SC1815-GR(TE2 F T) QQS12SC1815F
Q1515 TRANSISTOR KTC3199-Y-A T/P NQSYKTC3199P
Q1515 TRANSISTOR KTC3199-GR-A T/P NQS4KTC3199P
Q1515 TRANSISTOR 2SC1815-Y(TE2 F T) QQSY2SC1815F
Q1515 TRANSISTOR 2SC1815-GR(TE2 F T) QQS12SC1815F
Q1516 RES. BUIL T-IN TRANSISTOR KRA104M-AT/P NQSZ0KRA104M
Q1517 NPN TRANSISTOR KRC103M-A T/P NQSZKRC103MP
Q1518 TRANSISTOR KTC3205-Y-A T/P NQSYKTC3205P
Q1518 TRANSISTOR 2SC3266-Y(TPE2 F) QQSY2SC3266F
Q1519 NPN TRANSISTOR KRC103M-A T/P NQSZKRC103MP
Q1520 TRANSISTOR KTC3199-Y-A T/P NQSYKTC3199P
Q1520 TRANSISTOR KTC3199-GR-A T/P NQS4KTC3199P
Q1520 TRANSISTOR 2SC1815-Y(TE2 F T) QQSY2SC1815F
Q1520 TRANSISTOR 2SC1815-GR(TE2 F T) QQS12SC1815F
Q1521 TRANSISTOR KTC3199-Y-A T/P NQSYKTC3199P
Q1521 TRANSISTOR KTC3199-GR-A T/P NQS4KTC3199P
Q1521 TRANSISTOR 2SC1815-Y(TE2 F T) QQSY2SC1815F
Q1521 TRANSISTOR 2SC1815-GR(TE2 F T) QQS12SC1815F
Q1522 TRANSISTOR KTC3199-Y-A T/P NQSYKTC3199P
Q1522 TRANSISTOR KTC3199-GR-A T/P NQS4KTC3199P
Q1522 TRANSISTOR 2SC1815-Y(TE2 F T) QQSY2SC1815F
Q1522 TRANSISTOR 2SC1815-GR(TE2 F T) QQS12SC1815F
Q1525 TRANSISTOR KTC3199-Y-A T/P NQSYKTC3199P
Q1525 TRANSISTOR KTC3199-GR-A T/P NQS4KTC3199P
Q1525 TRANSISTOR 2SC1815-Y(TE2 F T) QQSY2SC1815F
Q1525 TRANSISTOR 2SC1815-GR(TE2 F T) QQS12SC1815F
Q1527 TRANSISTOR KRC103S-RTK/P NQ1ZKRC103SP
Q1529 TRANSISTOR KRC103S-RTK/P NQ1ZKRC103SP
Q1530 CHIP TRANSISTOR KTC3875S-Y-RTK/P NQ1YKTC3875S
Q1531 TRANSISTOR KRC103S-RTK/P NQ1ZKRC103SP
Q1532 TRANSISTOR KTA-1266-GR-AT/P NQS4KT A1266P
Q1532 TRANSISTOR 2SA1015-GR(TE2 F T) QQS12SA1015F
Q1533 TRANSISTOR KTC3879-Y-RTK/P NQ1YKTC3879P
20060629 1-19-6 E9B05EL
Page 74
Ref. No. Description Part No.
18/6/2013
World of free manuals
Q1534 TRANSISTOR KTC3199-Y-AT/P NQSYKTC3199P
Q1534 TRANSISTOR KTC3199-GR-AT/P NQS4KTC3199P
Q1534 TRANSISTOR 2SC1 815-Y(T E2 F T) QQSY2SC1815F
Q1534 TRANSISTOR 2SC1815-GR(TE2 F T) QQS12SC1815F
Q1537 TRANSISTOR KTC3199-Y-AT/P NQSYKTC3199P
Q1537 TRANSISTOR KTC3199-GR-AT/P NQS4KTC3199P
Q1537 TRANSISTOR 2SC1 815-Y(T E2 F T) QQSY2SC1815F
Q1537 TRANSISTOR 2SC1815-GR(TE2 F T) QQS12SC1815F
Q1538 TRANSISTOR KTC3199-Y-AT/P NQSYKTC3199P
Q1538 TRANSISTOR KTC3199-GR-AT/P NQS4KTC3199P
Q1538 TRANSISTOR 2SC1 815-Y(T E2 F T) QQSY2SC1815F
Q1538 TRANSISTOR 2SC1815-GR(TE2 F T) QQS12SC1815F
Q1539 TRANSISTOR KTC3199-Y-AT/P NQSYKTC3199P
Q1539 TRANSISTOR KTC3199-GR-AT/P NQS4KTC3199P
Q1539 TRANSISTOR 2SC1 815-Y(T E2 F T) QQSY2SC1815F
Q1539 TRANSISTOR 2SC1815-GR(TE2 F T) QQS12SC1815F
Q1540 TRANSISTOR KTC3199-Y-AT/P NQSYKTC3199P
Q1540 TRANSISTOR KTC3199-GR-AT/P NQS4KTC3199P
Q1540 TRANSISTOR 2SC1 815-Y(T E2 F T) QQSY2SC1815F
Q1540 TRANSISTOR 2SC1815-GR(TE2 F T) QQS12SC1815F
Q1542 TRANSISTOR KTC3198-Y-AT/P NQSYKTC3198P
Q1542 TRANSISTOR KTC3198-GR-AT/P NQS4KTC3198P
RESISTORS
R251 CHIP RES. 1/10W J 39k Ω RRXAJR5Z0393
R251 RES CHIP 1608 1/10W J 39k Ω RRXA393YF002
R252 CHIP RES. 1/10W J 2.2k Ω RRXAJR5Z0222
R252 RES CHIP 1608 1/10W J 2.2k Ω RRXA222YF002
R301 CHIP RES. 1/10W J 1.2k Ω RRXAJR5Z0122
R301 RES CHIP 1608 1/10W J 1.2k Ω RRXA122YF002
R303 CHIP RES. 1/10W J 5.6k Ω RRXAJR5Z0562
R303 RES CHIP 1608 1/10W J 5.6k Ω RRXA562YF002
R305 CHIP RES. 1/10W J 10k Ω RRXAJR5Z0103
R305 RES CHIP 1608 1/10W J 10k Ω RRXA103YF002
R310 PCB JUMPER D0.6-P5.0 JW5.0T
R314 CHIP RES. 1/10W J 3.9k Ω RRXAJR5Z0392
R314 RES CHIP 1608 1/10W J 3.9k Ω RRXA392YF002
R316 CHIP RES. 1/10W J 1.8k Ω RRXAJR5Z0182
R316 RES CHIP 1608 1/10W J 1.8k Ω RRXA182YF002
R319 CHIP RES. 1/10W J 1k Ω RRXAJR5Z0102
R319 RES CHIP 1608 1/10W J 1.0k Ω RRXA102YF002
R320 CHIP RES. 1/10W J 47k Ω RRXAJR5Z0473
R320 RES CHIP 1608 1/10W J 47k Ω RRXA473YF002
R321 CHIP RES. 1/10W J 150 Ω RRXAJR5Z0151
R321 RES CHIP 1608 1/10W J 150 Ω RRXA151YF002
R322 CHIP RES. 1/10W J 10k Ω RRXAJR5Z0103
R322 RES CHIP 1608 1/10W J 10k Ω RRXA103YF002
R323 CHIP RES. 1/10W J 2.2k Ω RRXAJR5Z0222
R323 RES CHIP 1608 1/10W J 2.2k Ω RRXA222YF002
R324 CHIP RES. 1/10W J 150 Ω RRXAJR5Z0151
R324 RES CHIP 1608 1/10W J 150 Ω RRXA151YF002
R325 CHIP RES. 1/10W J 1.2k Ω RRXAJR5Z0122
R325 RES CHIP 1608 1/10W J 1.2k Ω RRXA122YF002
R326 CHIP RES. 1/10W J 4.7k Ω RRXAJR5Z0472
R326 RES CHIP 1608 1/10W J 4.7k Ω RRXA472YF002
R327 CHIP RES. 1/10W J 6.8k Ω RRXAJR5Z0682
R327 RES CHIP 1608 1/10W J 6.8k Ω RRXA682YF002
R328 CHIP RES. 1/10W J 1k Ω RRXAJR5Z0102
R328 RES CHIP 1608 1/10W J 1.0k Ω RRXA102YF002
R330 CHIP RES. 1/10W J 2.2k Ω RRXAJR5Z0222
R330 RES CHIP 1608 1/10W J 2.2k Ω RRXA222YF002
R331 CHIP RES. 1/10W J 18k Ω RRXAJR5Z0183
R331 RES CHIP 1608 1/10W J 18k Ω RRXA183YF002
R332 CHIP RES. 1/10W J 10k Ω RRXAJR5Z0103
R332 RES CHIP 1608 1/10W J 10k Ω RRXA103YF002
R333 CHIP RES. 1/10W J 18k Ω RRXAJR5Z0183
R333 RES CHIP 1608 1/10W J 18k Ω RRXA183YF002
R334 CHIP RES. 1/10W J 10k Ω RRXAJR5Z0103
Ref. No. Description Part No.
R334 RES CHIP 1608 1/10W J 10k Ω RRXA103YF002
R335 CHIP RES. 1/10W J 10 0 Ω RRXAJR5Z0101
R335 RES CHIP 1608 1/10W J 100 Ω RRXA101YF002
R336 CHIP RES. 1/10W J 4.7k Ω RRXAJR5Z0472
R336 RES CHIP 1608 1/10W J 4.7k Ω RRXA472YF002
R337 CHIP RES. 1/10W J 6.8k Ω RRXAJR5Z0682
R337 RES CHIP 1608 1/10W J 6.8k Ω RRXA682YF002
R345 CHIP RES. 1/10W J 22 0 Ω RRXAJR5Z0221
R345 RES CHIP 1608 1/10W J 220 Ω RRXA221YF002
R346 CARBON RES. 1/4W J 680 Ω RCX4JA TZ0681
R401 CARBON RES. 1/4W J 820 Ω RCX4JA TZ0821
R402 CARBON RES. 1/6W J 100 Ω RCX6JA TZ0101
R402 CARBON RES. 1/4W J 100 Ω RCX4JA TZ0101
R404 CHIP RES.(1608) 1 /10 W 0 Ω RRXAZR5Z0000
R404 RES CHIP 1608 1/10W J 0 Ω RRXA000YF002
R405 CHIP RES. 1/10W J 47k Ω RRXAJR5Z0473
R405 RES CHIP 1608 1/10W J 47k Ω RRXA473YF002
R406 CHIP RES. 1/10W J 22k Ω RRXAJR5Z0223
R406 RES CHIP 1608 1/10W J 22k Ω RRXA223YF002
R407 CHIP RES. 1/10W J 5.6k Ω RRXAJR5Z0562
R407 RES CHIP 1608 1/10W J 5.6k Ω RRXA562YF002
R408 CHIP RES. 1/10W J 12k Ω RRXAJR5Z0123
R408 RES CHIP 1608 1/10W J 12k Ω RRXA123YF002
R409 CHIP RES. 1/10W J 5.6k Ω RRXAJR5Z0562
R409 RES CHIP 1608 1/10W J 5.6k Ω RRXA562YF002
R410 CHIP RES. 1/10W J 1k Ω RRXAJR5Z0102
R410 RES CHIP 1608 1/10W J 1.0k Ω RRXA102YF002
R411 CHIP RES. 1/10W J 27k Ω RRXAJR5Z0273
R411 RES CHIP 1608 1/10W J 27k Ω RRXA273YF002
R412 CHIP RES. 1/10W J 12 0 Ω RRXAJR5Z0121
R412 RES CHIP 1608 1/10W J 120 Ω RRXA121YF002
R413 CHIP RES. 1/10W J 33 0k Ω RRXAJR5Z0334
R413 RES CHIP 1608 1/10W J 330k Ω RRXA3 34YF002
R414 CHIP RES. 1/10W J 12k Ω RRXAJR5Z0123
R414 RES CHIP 1608 1/10W J 12k Ω RRXA123YF002
R415 CHIP RES. 1/10W J 1.8k Ω RRXAJR5Z0182
R415 RES CHIP 1608 1/10W J 1.8k Ω RRXA182YF002
R416 CHIP RES. 1/10W J 56 0 Ω RRXAJR5Z0561
R416 RES CHIP 1608 1/10W J 560 Ω RRXA561YF002
R417 CHIP RES. 1/10W J 2.2k Ω RRXAJR5Z0222
R417 RES CHIP 1608 1/10W J 2.2k Ω RRXA222YF002
R418 CHIP RES. 1/10W J 12k Ω RRXAJR5Z0123
R418 RES CHIP 1608 1/10W J 12k Ω RRXA123YF002
R419 CHIP RES. 1/10W J 10k Ω RRXAJR5Z0103
R419 RES CHIP 1608 1/10W J 10k Ω RRXA103YF002
R420 CHIP RES. 1/10W J 4.7k Ω RRXAJR5Z0472
R420 RES CHIP 1608 1/10W J 4.7k Ω RRXA472YF002
R421 CHIP RES. 1/10W J 4.7k Ω RRXAJR5Z0472
R421 RES CHIP 1608 1/10W J 4.7k Ω RRXA472YF002
R451 CHIP RES. 1/10W J 22k Ω RRXAJR5Z0223
R451 RES CHIP 1608 1/10W J 22k Ω RRXA223YF002
R452 CHIP RES. 1/10W J 33k Ω RRXAJR5Z0333
R452 RES CHIP 1608 1/10W J 33k Ω RRXA333YF002
R453 CHIP RES. 1/10W J 5.6k Ω RRXAJR5Z0562
R453 RES CHIP 1608 1/10W J 5.6k Ω RRXA562YF002
R454 CHIP RES. 1/10W J 39k Ω RRXAJR5Z0393
R454 RES CHIP 1608 1/10W J 39k Ω RRXA393YF002
R462 CHIP RES. 1/10W J 10k Ω RRXAJR5Z0103
R462 RES CHIP 1608 1/10W J 10k Ω RRXA103YF002
R463 CHIP RES. 1/10W J 47 0 Ω RRXAJR5Z0471
R463 RES CHIP 1608 1/10W J 470 Ω RRXA471YF002
R464 CHIP RES. 1/10W J 3.3k Ω RRXAJR5Z0332
R464 RES CHIP 1608 1/10W J 3.3k Ω RRXA332YF002
R465 CHIP RES. 1/10W J 22k Ω RRXAJR5Z0223
R465 RES CHIP 1608 1/10W J 22k Ω RRXA223YF002
R466 CHIP RES. 1/10W J 8.2k Ω RRXAJR5Z0822
R466 RES CHIP 1608 1/10W J 8.2k Ω RRXA822YF002
20060629 1-19-7 E9B05EL
Page 75
Ref. No. Description Part No.
18/6/2013
World of free manuals
R467 CHIP RES. 1/10W J 5.6k Ω RRXAJR5Z0562
R467 RES CHIP 1608 1/10W J 5.6k Ω RRXA562YF002
R469 CHIP RES. 1/10W J 33k Ω RRXAJR5Z0333
R469 RES CHIP 1608 1/10W J 33k Ω RRXA333YF002
R470 CHIP RES. 1/10W J 39k Ω RRXAJR5Z0393
R470 RES CHIP 1608 1/10W J 39k Ω RRXA393YF002
R479 CHIP RES. 1/10W J 33 Ω RRXAJR5Z0330
R479 RES CHIP 1608 1/10W J 33 Ω RRXA330YF002
R480 CARBON RES. 1/6W J 100 Ω RCX6JATZ0101
R480 CARBON RES. 1/4W J 100 Ω RCX4JATZ0101
R481 CHIP RES. 1/10W J 33 Ω RRXAJR5Z0330
R481 RES CHIP 1608 1/10W J 33 Ω RRXA330YF002
R482 CHIP RES. 1/10W J 100 Ω RRXAJR5Z0101
R482 RES CHIP 1608 1/10W J 100 Ω RRXA101YF002
R483 CHIP RES. 1/10W J 22k Ω RRXAJR5Z0223
R483 RES CHIP 1608 1/10W J 22k Ω RRXA223YF002
R484 CHIP RES. 1/10W J 6.8k Ω RRXAJR5Z0682
R484 RES CHIP 1608 1/10W J 6.8k Ω RRXA682YF002
R509 CHIP RES. 1/10W J 180 Ω RRXAJR5Z0181
R509 RES CHIP 1608 1/10W J 180 Ω RRXA181YF002
R510 CHIP RES. 1/10W J 47k Ω RRXAJR5Z0473
R510 RES CHIP 1608 1/10W J 47k Ω RRXA473YF002
R511 CARBON RES. 1/6W G 3.6k Ω RCX6GATZ0362
R511 CARBON RES. 1/4W G 3.6k Ω RCX4GATZ0362
R512 CHIP RES. 1/10W J 68k Ω RRXAJR5Z0683
R512 RES CHIP 1608 1/10W J 68k Ω RRXA683YF002
R513 CHIP RES. 1/10W J 33k Ω RRXAJR5Z0333
R513 RES CHIP 1608 1/10W J 33k Ω RRXA333YF002
R514 CARBON RES. 1/6W G 10k Ω RCX6GA TZ0103
R514 CARBON RES. 1/4W G 10k Ω RCX4GA TZ0103
R516 CARBON RES. 1/6W G 470 Ω RCX6GATZ0471
R516 CARBON RES. 1/4W G 470 Ω RCX4GATZ0471
R517 CARBON RES. 1/4W J 270 Ω RCX4JATZ0271
R519 CARBON RES. 1/6W G 22k Ω RCX6GA TZ0223
R519 CARBON RES. 1/4W G 22k Ω RCX4GA TZ0223
R523 CARBON RES. 1/6W G 1.5k Ω RCX6GATZ0152
R523 CARBON RES. 1/4W G 1.5k Ω RCX4GATZ0152
R525 CHIP RES. 1/10W J 390k Ω RRXAJR5Z0 394
R525 RES CHIP 1608 1/10W J 390k Ω RRXA394YF002
R526 CARBON RES. 1/6W J 390k Ω RCX6JATZ0394
R526 CARBON RES. 1/4W J 390k Ω RCX4JATZ0394
R528 CARBON RES. 1/6W G 4.7k Ω RCX6GATZ0472
R528 CARBON RES. 1/4W G 4.7k Ω RCX4GATZ0472
R536 CHIP RES. 1/10W J 1.8k Ω RRXAJR5Z0182
R536 RES CHIP 1608 1/10W J 1.8k Ω RRXA182YF002
R537 CHIP RES. 1/10W J 680 Ω RRXAJR5Z0681
R537 RES CHIP 1608 1/10W J 680 Ω RRXA681YF002
R539 CHIP RES. 1/10W J 10k Ω RRXAJR5Z0103
R539 RES CHIP 1608 1/10W J 10k Ω RRXA103YF002
R540 CHIP RES. 1/10W J 10k Ω RRXAJR5Z0103
R540 RES CHIP 1608 1/10W J 10k Ω RRXA103YF002
R541 CHIP RES. 1/10W J 18k Ω RRXAJR5Z0183
R541 RES CHIP 1608 1/10W J 18k Ω RRXA183YF002
R542 CHIP RES. 1/10W J 5.6k Ω RRXAJR5Z0562
R542 RES CHIP 1608 1/10W J 5.6k Ω RRXA562YF002
R543 CARBON RES. 1/4W J 1k Ω RCX4JATZ 0102
R544 CARBON RES. 1/6W J 10k Ω RCX6JA TZ01 03
R544 CARBON RES. 1/4W J 10k Ω RCX4JA TZ01 03
R545 CARBON RES. 1/6W J 10k Ω RCX6JA TZ01 03
R545 CARBON RES. 1/4W J 10k Ω RCX4JA TZ01 03
R546 CHIP RES. 1/10W J 1k Ω RRXAJR5Z0102
R546 RES CHIP 1608 1/10W J 1.0k Ω RRXA102YF002
R553 CHIP RES. 1/10W J 10k Ω RRXAJR5Z0103
R553 RES CHIP 1608 1/10W J 10k Ω RRXA103YF002
R555 CHIP RES. 1/10W J 1k Ω RRXAJR5Z0102
R555 RES CHIP 1608 1/10W J 1.0k Ω RRXA102YF002
R567 CHIP RES. 1/10W J 39k Ω RRXAJR5Z0393
Ref. No. Description Part No.
R567 RES CHIP 1608 1/10W J 39k Ω RRXA393YF002
R568 CHIP RES. 1/10W J 22 0k Ω RRXAJR5Z0224
R568 RES CHIP 1608 1/10W J 220k Ω RRXA2 24YF002
R569 CHIP RES. 1/10W J 10k Ω RRXAJR5Z0103
R569 RES CHIP 1608 1/10W J 10k Ω RRXA103YF002
R570 CARBON RES. 1/6W J 4.7k Ω RCX6JATZ0472
R570 CARBON RES. 1/4W J 4.7k Ω RCX4JATZ0472
R572 CHIP RES. 1/10W J 1k Ω RRXAJR5Z0102
R572 RES CHIP 1608 1/10W J 1.0k Ω RRXA102YF002
R574 CHIP RES. 1/10W J 1k Ω RRXAJR5Z0102
R574 RES CHIP 1608 1/10W J 1.0k Ω RRXA102YF002
R575 CHIP RES. 1/10W J 33 0k Ω RRXAJR5Z0334
R575 RES CHIP 1608 1/10W J 330k Ω RRXA3 34YF002
R576 CHIP RES. 1/10W J 10k Ω RRXAJR5Z0103
R576 RES CHIP 1608 1/10W J 10k Ω RRXA103YF002
R577 CHIP RES. 1/10W J 1.5k Ω RRXAJR5Z0152
R577 RES CHIP 1608 1/10W J 1.5k Ω RRXA152YF002
R578 CHIP RES. 1/10W J 1k Ω RRXAJR5Z0102
R578 RES CHIP 1608 1/10W J 1.0k Ω RRXA102YF002
R581 CHIP RES. 1/10W J 10k Ω RRXAJR5Z0103
R581 RES CHIP 1608 1/10W J 10k Ω RRXA103YF002
R582 CHIP RES. 1/10W J 10 0k Ω RRXAJR5Z0104
R582 RES CHIP 1608 1/10W J 100k Ω RRXA1 04YF002
R583 CARBON RES. 1/4W J 820 Ω RCX4JA TZ0821
R584 CHIP RES. 1/10W J 10 0 Ω RRXAJR5Z0101
R584 RES CHIP 1608 1/10W J 100 Ω RRXA101YF002
R585 CHIP RES. 1/10W J 2.2k Ω RRXAJR5Z0222
R585 RES CHIP 1608 1/10W J 2.2k Ω RRXA222YF002
R586 CHIP RES. 1/10W J 82 0 Ω RRXAJR5Z0821
R586 RES CHIP 1608 1/10W J 820 Ω RRXA821YF002
R588 CHIP RES. 1/10W J 47 0 Ω RRXAJR5Z0471
R588 RES CHIP 1608 1/10W J 470 Ω RRXA471YF002
R595 CARBON RES. 1/6W J 10k Ω RCX6JATZ0103
R595 CARBON RES. 1/4W J 10k Ω RCX4JATZ0103
R596 CARBON RES. 1/6W J 150 Ω RCX6JA TZ0151
R596 CARBON RES. 1/4W J 150 Ω RCX4JA TZ0151
R597 CARBON RES. 1/6W J 220 Ω RCX6JA TZ0221
R597 CARBON RES. 1/4W J 220 Ω RCX4JA TZ0221
R598 CARBON RES. 1/6W J 220 Ω RCX6JA TZ0221
R598 CARBON RES. 1/4W J 220 Ω RCX4JA TZ0221
R601 CHIP RES. 1/10W J 1.8k Ω RRXAJR5Z0182
R601 RES CHIP 1608 1/10W J 1.8k Ω RRXA182YF002
R602 CHIP RES. 1/10W J 1k Ω RRXAJR5Z0102
R602 RES CHIP 1608 1/10W J 1.0k Ω RRXA102YF002
R603 CHIP RES. 1/10W J 1.2k Ω RRXAJR5Z0122
R603 RES CHIP 1608 1/10W J 1.2k Ω RRXA122YF002
R604 CHIP RES. 1/10W J 1.5k Ω RRXAJR5Z0152
R604 RES CHIP 1608 1/10W J 1.5k Ω RRXA152YF002
R605 CHIP RES. 1/10W J 2.2k Ω RRXAJR5Z0222
R605 RES CHIP 1608 1/10W J 2.2k Ω RRXA222YF002
R606 CHIP RES. 1/10W J 3.9k Ω RRXAJR5Z0392
R606 RES CHIP 1608 1/10W J 3.9k Ω RRXA392YF002
R607 CHIP RES. 1/10W J 8.2k Ω RRXAJR5Z0822
R607 RES CHIP 1608 1/10W J 8.2k Ω RRXA822YF002
R608 CHIP RES. 1/10W J 22k Ω RRXAJR5Z0223
R608 RES CHIP 1608 1/10W J 22k Ω RRXA223YF002
R617 PCB JUMPER D0.6-P5.0 JW5.0T
R618 CHIP RES. 1/10W J 10 0k Ω RRXAJR5Z0104
R618 RES CHIP 1608 1/10W J 100k Ω RRXA1 04YF002
R621 CHIP RES.(1608) 1 /10 W 0 Ω RRXAZR5Z0000
R621 RES CHIP 1608 1/10W J 0 Ω RRXA000YF002
R622 CHIP RES.(1608) 1 /10 W 0 Ω RRXAZR5Z0000
R622 RES CHIP 1608 1/10W J 0 Ω RRXA000YF002
R623 CHIP RES.(1608) 1 /10 W 0 Ω RRXAZR5Z0000
R623 RES CHIP 1608 1/10W J 0 Ω RRXA000YF002
R624 CHIP RES. 1/10W J 10k Ω RRXAJR5Z0103
R624 RES CHIP 1608 1/10W J 10k Ω RRXA103YF002
20060629 1-19-8 E9B05EL
Page 76
Ref. No. Description Part No.
18/6/2013
World of free manuals
R625 CHIP RES. 1/10W J 1.8k Ω RRXAJR5Z0182
R625 RES CHIP 1608 1/10W J 1.8k Ω RRXA182YF002
R626 CHIP RES. 1/10W J 1k Ω RRXAJR5Z0102
R626 RES CHIP 1608 1/10W J 1.0k Ω RRXA102YF002
R627 CHIP RES. 1/10W J 1.2k Ω RRXAJR5Z0122
R627 RES CHIP 1608 1/10W J 1.2k Ω RRXA122YF002
R628 CHIP RES. 1/10W J 1.5k Ω RRXAJR5Z0152
R628 RES CHIP 1608 1/10W J 1.5k Ω RRXA152YF002
R629 CARBON RES. 1/4W J 2.2k Ω RCX4JATZ0222
R630 CHIP RES. 1/10W J 3.9k Ω RRXAJR5Z0392
R630 RES CHIP 1608 1/10W J 3.9k Ω RRXA392YF002
R631 CHIP RES. 1/10W J 8.2k Ω RRXAJR5Z0822
R631 RES CHIP 1608 1/10W J 8.2k Ω RRXA822YF002
R632 CHIP RES. 1/10W J 22k Ω RRXAJR5Z0223
R632 RES CHIP 1608 1/10W J 22k Ω RRXA223YF002
R643 CHIP RES. 1/10W J 100 Ω RRXAJR5Z0101
R643 RES CHIP 1608 1/10W J 100 Ω RRXA101YF002
R644 CHIP RES. 1/10W J 100 Ω RRXAJR5Z0101
R644 RES CHIP 1608 1/10W J 100 Ω RRXA101YF002
R645 CHIP RES. 1/10W J 3.3k Ω RRXAJR5Z0332
R645 RES CHIP 1608 1/10W J 3.3k Ω RRXA332YF002
R646 CHIP RES. 1/10W J 3.3k Ω RRXAJR5Z0332
R646 RES CHIP 1608 1/10W J 3.3k Ω RRXA332YF002
R647 CHIP RES. 1/10W J 560 Ω RRXAJR5Z0561
R647 RES CHIP 1608 1/10W J 560 Ω RRXA561YF002
R648 CARBON RES. 1/4W J 1k Ω RCX4JATZ 0102
R649 CHIP RES. 1/10W J 560 Ω RRXAJR5Z0561
R649 RES CHIP 1608 1/10W J 560 Ω RRXA561YF002
R650 CARBON RES. 1/4W J 1k Ω RCX4JATZ 0102
R651 CHIP RES. 1/10W J 10k Ω RRXAJR5Z0103
R651 RES CHIP 1608 1/10W J 10k Ω RRXA103YF002
R653 CARBON RES. 1/6W J 2.7k Ω RCX6JATZ0272
R653 CARBON RES. 1/4W J 2.7k Ω RCX4JATZ0272
R654 CHIP RES. 1/10W J 4.7k Ω RRXAJR5Z0472
R654 RES CHIP 1608 1/10W J 4.7k Ω RRXA472YF002
R655 CARBON RES. 1/6W J 2.7k Ω RCX6JATZ0272
R655 CARBON RES. 1/4W J 2.7k Ω RCX4JATZ0272
R656 CHIP RES. 1/10W J 4.7k Ω RRXAJR5Z0472
R656 RES CHIP 1608 1/10W J 4.7k Ω RRXA472YF002
R657 CHIP RES. 1/10W J 10k Ω RRXAJR5Z0103
R657 RES CHIP 1608 1/10W J 10k Ω RRXA103YF002
R1500 CARBON RES. 1/4W J 180 Ω RCX4JATZ0181
R1501 CARBON RES. 1/4W J 1k Ω RCX4JA TZ 0102
R1502 PCB JUMPER D0.6-P5.0 JW5.0T
R1504 CARBON RES. 1/4W J 180 Ω RCX4JATZ0181
R1505 CHIP RES. 1/10W J 5.6k Ω RRXAJR5Z0562
R1505 RES CHIP 1608 1/ 10W J 5.6 k Ω RRXA562YF002
R1507 CHIP RES. 1/10W J 47k Ω RRXAJR5Z0473
R1507 RES CHIP 1608 1/ 10W J 47k Ω RRXA473YF002
R1510 CARBON RES. 1/4W J 180 Ω RCX4JATZ0181
R1512 CARBON RES. 1/4W J 180 Ω RCX4JATZ0181
R1513 CARBON RES. 1/6W J 27k Ω RCX6JATZ0273
R1513 CARBON RES. 1/4W J 27k Ω RCX4JATZ0273
R1514 CHIP RES. 1/10W J 10k Ω RRXAJR5Z0103
R1514 RES CHIP 1608 1/ 10W J 10k Ω RRXA103YF002
R1519 PCB JUMPER D0.6-P5.0 JW5.0T
R1522 CARBON RES. 1/4W J 1k Ω RCX4JA TZ 0102
R1523 CARBON RES. 1/4W J 390 Ω RCX4JATZ0391
R1524 CARBON RES. 1/6W J 47k Ω RCX6JATZ0473
R1524 CARBON RES. 1/4W J 47k Ω RCX4JATZ0473
R1525 CARBON RES. 1/6W J 820 Ω RCX6JATZ0821
R1525 CARBON RES. 1/4W J 820 Ω RCX4JATZ0821
R1526 CARBON RES. 1/4W J 680 Ω RCX4JATZ0681
R1527 CARBON RES. 1/4W J 680 Ω RCX4JATZ0681
R1528 CHIP RES. 1/10W J 47k Ω RRXAJR5Z0473
R1528 RES CHIP 1608 1/ 10W J 47k Ω RRXA473YF002
R1529 CARBON RES. 1/6W J 1.5k Ω RCX6JA TZ 0152
Ref. No. Description Part No.
R1529 CARBON RES. 1/4W J 1.5k Ω RCX4JATZ0152
R1530 CHIP RES. 1/10W J 10k Ω RRXAJR5Z0103
R1530 RES CHIP 1608 1/10W J 10k Ω RRXA103YF002
R1531 CARBON RES. 1/4W J 560 Ω RCX4JA TZ0561
R1532 CARBON RES. 1/4W J 560 Ω RCX4JA TZ0561
R1533 CHIP RES. 1/10W J 10k Ω RRXAJR5Z0103
R1533 RES CHIP 1608 1/10W J 10k Ω RRXA103YF002
R1536 CARBON RES. 1/4W J 1.5k Ω RCX4JATZ0152
R1537 CARBON RES. 1/4W J 1.5k Ω RCX4JATZ0152
R1538 CARBON RES. 1/4W J 330 Ω RCX4JA TZ0331
R1539 CARBON RES. 1/4W J 1.2k Ω RCX4JATZ0122
R1540 CHIP RES. 1/10W J 33k Ω RRXAJR5Z0333
R1540 RES CHIP 1608 1/10W J 33k Ω RRXA333YF002
R1541 CHIP RES. 1/ 10W J 47 0 Ω RRXAJR5Z0471
R1541 RES CHIP 1608 1/10W J 470 Ω RRXA471YF002
R1543 CHIP RES. 1/10W J 4.7k Ω RRXAJR5Z0472
R1543 RES CHIP 1608 1/10W J 4.7k Ω RRXA472YF002
R1544 CHIP RES. 1/10W J 33k Ω RRXAJR5Z0333
R1544 RES CHIP 1608 1/10W J 33k Ω RRXA333YF002
R1547 CHIP RES. 1/10W J 4.7k Ω RRXAJR5Z0472
R1547 RES CHIP 1608 1/10W J 4.7k Ω RRXA472YF002
R1550 CARBON RES. 1/6W J 4.7k Ω RCX6JATZ0472
R1550 CARBON RES. 1/4W J 4.7k Ω RCX4JATZ0472
R1551 CHIP RES. 1/10W F 10k Ω RRXAFR5H1002
R1551 CHIP RES. 1/10W F 10k Ω RRXAFR5Z1002
R1551 RES CHIP 1608 1/10W F 10.0k Ω RTW1002YF002
R1552 CHIP RES. 1/10W F 10k Ω RRXAFR5H1002
R1552 CHIP RES. 1/10W F 10k Ω RRXAFR5Z1002
R1552 RES CHIP 1608 1/10W F 10.0k Ω RTW1002YF002
R1553 CHIP RES. 1/10W J 47k Ω RRXAJR5Z0473
R1553 RES CHIP 1608 1/10W J 47k Ω RRXA473YF002
R1554 CARBON RES. 1/4W J 27 Ω RCX4JA TZ0270
R1555 CHIP RES. 1/10W J 33k Ω RRXAJR5Z0333
R1555 RES CHIP 1608 1/10W J 33k Ω RRXA333YF002
R1556 CHIP RES. 1/10W F 15k Ω RRXAFR5H1502
R1556 CHIP RES. 1/10W F 15k Ω RRXAFR5Z1502
R1556 RES CHIP 1608 1/10W F 15.0k Ω RTW1502YF002
R1557 CHIP RES. 1/10W J 10k Ω RRXAJR5Z0103
R1557 RES CHIP 1608 1/10W J 10k Ω RRXA103YF002
R1558 CHIP RES. 1/10W F 10k Ω RRXAFR5H1002
R1558 CHIP RES. 1/10W F 10k Ω RRXAFR5Z1002
R1558 RES CHIP 1608 1/10W F 10.0k Ω RTW1002YF002
R1559 CHIP RES. 1/10W J 2.2k Ω RRXAJR5Z0222
R1559 RES CHIP 1608 1/10W J 2.2k Ω RRXA222YF002
R1560 CHIP RES. 1/10W J 2.2k Ω RRXAJR5Z0222
R1560 RES CHIP 1608 1/10W J 2.2k Ω RRXA222YF002
R1561 CHIP RES. 1/10W F 120 Ω RRXAFR5H1200
R1561 CHIP RES. 1/10W F 120 Ω RRXAFR5Z1200
R1561 RES CHIP 1608 1/10W F 120 Ω RTW1200YF002
R1562 CHIP RES. 1/10W F 1.5k Ω RRXAFR5H1501
R1562 CHIP RES. 1/10W F 1.5k Ω RRXAFR5Z1501
R1562 RES CHIP 1608 1/10W F 1.50k Ω RTW1501YF002
R1563 CHIP RES. 1/10W J 33k Ω RRXAJR5Z0333
R1563 RES CHIP 1608 1/10W J 33k Ω RRXA333YF002
R1564 CARBON RES. 1/6W J 22k Ω RCX6JATZ0223
R1564 CARBON RES. 1/4W J 22k Ω RCX4JATZ0223
R1565 CHIP RES. 1/10W J 2.2k Ω RRXAJR5Z0222
R1565 RES CHIP 1608 1/10W J 2.2k Ω RRXA222YF002
R1566 CHIP RES. 1/10W J 6.8k Ω RRXAJR5Z0682
R1566 RES CHIP 1608 1/10W J 6.8k Ω RRXA682YF002
R1567 CHIP RES. 1/10W J 6.8k Ω RRXAJR5Z0682
R1567 RES CHIP 1608 1/10W J 6.8k Ω RRXA682YF002
R1568 CARBON RES. 1/6W J 3.3k Ω RCX6JATZ0332
R1568 CARBON RES. 1/4W J 3.3k Ω RCX4JATZ0332
R1569 CARBON RES. 1/6W J 3.3k Ω RCX6JATZ0332
R1569 CARBON RES. 1/4W J 3.3k Ω RCX4JATZ0332
R1570 CARBON RES. 1/6W J 3.3k Ω RCX6JATZ0332
20060629 1-19-9 E9B05EL
Page 77
Ref. No. Description Part No.
18/6/2013
World of free manuals
R1570 CARBON RES. 1/4W J 3.3k Ω RCX4JA TZ 0332
R1571 CHIP RES.(1608) 1/10W 0 Ω RRXAZR5Z0000
R1571 RES CHIP 1608 1/ 10W J 0 Ω RRXA000YF002
R1572 CHIP RES. 1/10W J 4.7k Ω RRXAJR5Z0472
R1572 RES CHIP 1608 1/ 10W J 4.7 k Ω RRXA472YF002
R1573 CHIP RES. 1/10W J 4.7k Ω RRXAJR5Z0472
R1573 RES CHIP 1608 1/ 10W J 4.7 k Ω RRXA472YF002
R1574 PCB JUMPER D0.6-P5.0 JW5.0T
R1576 CHIP RES.(1608) 1/10W 0 Ω RRXAZR5Z0000
R1576 RES CHIP 1608 1/ 10W J 0 Ω RRXA000YF002
R1578 CHIP RES. 1/10W J 10k Ω RRXAJR5Z0103
R1578 RES CHIP 1608 1/ 10W J 10k Ω RRXA103YF002
R1579 CHIP RES. 1/10W J 10k Ω RRXAJR5Z0103
R1579 RES CHIP 1608 1/ 10W J 10k Ω RRXA103YF002
R1581 CARBON RES. 1/4W J 8.2k Ω RCX4JA TZ 0822
R1582 CARBON RES. 1/4W J 8.2k Ω RCX4JA TZ 0822
R1587 CHIP RES. 1/10W J 100k Ω RRXAJR5Z0 104
R1587 RES CHIP 1608 1/ 10W J 100 k Ω RRXA104YF002
R1589 CHIP RES. 1/10W J 470 Ω RRXAJR5Z0471
R1589 RES CHIP 1608 1/ 10W J 470 Ω RRXA471YF002
R1590 CHIP RES. 1/10W J 100k Ω RRXAJR5Z0 104
R1590 RES CHIP 1608 1/ 10W J 100 k Ω RRXA104YF002
R1591 CHIP RES. 1/10W J 3k Ω RRXAJR5Z0302
R1591 RES CHIP 1608 1/ 10W J 3.0 k Ω RRXA302YF002
R1592 CHIP RES. 1/10W J 1k Ω RRXAJR5Z0102
R1592 RES CHIP 1608 1/ 10W J 1.0 k Ω RRXA102YF002
R1593 CHIP RES. 1/10W J 12k Ω RRXAJR5Z0123
R1593 RES CHIP 1608 1/ 10W J 12k Ω RRXA123YF002
R1594 CHIP RES. 1/10W J 3k Ω RRXAJR5Z0302
R1594 RES CHIP 1608 1/ 10W J 3.0 k Ω RRXA302YF002
R1595 CHIP RES. 1/10W J 12k Ω RRXAJR5Z0123
R1595 RES CHIP 1608 1/ 10W J 12k Ω RRXA123YF002
R1596 CHIP RES. 1/10W J 6.8k Ω RRXAJR5Z0682
R1596 RES CHIP 1608 1/ 10W J 6.8 k Ω RRXA682YF002
R1597 CHIP RES. 1/10W J 150 Ω RRXAJR5Z0151
R1597 RES CHIP 1608 1/ 10W J 150 Ω RRXA151YF002
R1598 CHIP RES. 1/10W J 150 Ω RRXAJR5Z0151
R1598 RES CHIP 1608 1/ 10W J 150 Ω RRXA151YF002
R1599 CHIP RES. 1/10W F 220 Ω RRXAFR5H2200
R1599 CHIP RES.(1608) 1/10W F 220 Ω RRXAFR5Z2200
R1599 RES CHIP 1608 1/10 W F 220 Ω RTW2200YF002
R1600 CHIP RES. 1/10W F 220 Ω RRXAFR5H2200
R1600 CHIP RES.(1608) 1/10W F 220 Ω RRXAFR5Z2200
R1600 RES CHIP 1608 1/10 W F 220 Ω RTW2200YF002
R1603 CHIP RES. 1/10W F 10 k Ω RRXAFR5H1002
R1603 CHIP RES. 1/10W F 10 k Ω RRXAFR5Z1002
R1603 RES CHIP 1608 1/10 W F 10.0k Ω RTW1002YF002
R1604 PCB JUMPER D0.6-P5.0 JW5.0T
R1605 CHIP RES. 1/10W F 220 Ω RRXAFR5H2200
R1605 CHIP RES.(1608) 1/10W F 220 Ω RRXAFR5Z2200
R1605 RES CHIP 1608 1/10 W F 220 Ω RTW2200YF002
R1606 CHIP RES. 1/10W F 220 Ω RRXAFR5H2200
R1606 CHIP RES.(1608) 1/10W F 220 Ω RRXAFR5Z2200
R1606 RES CHIP 1608 1/10 W F 220 Ω RTW2200YF002
R1608 CHIP RES. 1/10W J 150 Ω RRXAJR5Z0151
R1608 RES CHIP 1608 1/ 10W J 150 Ω RRXA151YF002
R1609 CHIP RES. 1/10W J 150 Ω RRXAJR5Z0151
R1609 RES CHIP 1608 1/ 10W J 150 Ω RRXA151YF002
R1610 CHIP RES. 1/10W J 470 Ω RRXAJR5Z0471
R1610 RES CHIP 1608 1/ 10W J 470 Ω RRXA471YF002
R1611 CHIP RES. 1/10W J 470 Ω RRXAJR5Z0471
R1611 RES CHIP 1608 1/ 10W J 470 Ω RRXA471YF002
R1614 CHIP RES.(1608) 1/10W 0 Ω RRXAZR5Z0000
R1614 RES CHIP 1608 1/ 10W J 0 Ω RRXA000YF002
R1616 CHIP RES. 1/10W J 1k Ω RRXAJR5Z0102
R1616 RES CHIP 1608 1/ 10W J 1.0 k Ω RRXA102YF002
R1619 CARBON RES. 1/4W J 75 Ω RCX4JATZ0750
Ref. No. Description Part No.
R1620 CARBON RES. 1/4W J 1k Ω RCX4JATZ0102
R1626 CHIP RES. (160 8) 1 /10W 0 Ω RRXAZR5Z0000
R1626 RES CHIP 1608 1/10W J 0 Ω RRXA000YF002
R1628 CHIP RES. (160 8) 1 /10W 0 Ω RRXAZR5Z0000
R1628 RES CHIP 1608 1/10W J 0 Ω RRXA000YF002
R1630 CHIP RES. 1/10W F 8.2k Ω RRXAFR5H8201
R1630 CHIP RES. (160 8) 1 /10W F 8 .2k Ω RRXAFR5Z8201
R1630 RES CHIP 1608 1/10W F 8.20k Ω RTW8201YF002
R1631 CHIP RES. 1/10W F 8.2k Ω RRXAFR5H8201
R1631 CHIP RES. (160 8) 1 /10W F 8 .2k Ω RRXAFR5Z8201
R1631 RES CHIP 1608 1/10W F 8.20k Ω RTW8201YF002
R1632 CHIP RES. 1/10W J 2.7k Ω RRXAJR5Z0272
R1632 RES CHIP 1608 1/10W J 2.7k Ω RRXA272YF002
R1633 CHIP RES. (160 8) 1 /10W 0 Ω RRXAZR5Z0000
R1633 RES CHIP 1608 1/10W J 0 Ω RRXA000YF002
R1634 CHIP RES. (160 8) 1 /10W 0 Ω RRXAZR5Z0000
R1634 RES CHIP 1608 1/10W J 0 Ω RRXA000YF002
R1636 CHIP RES. 1/10W J 10k Ω RRXAJR5Z0103
R1636 RES CHIP 1608 1/10W J 10k Ω RRXA103YF002
R1637 CHIP RES. 1/10W F 13k Ω RRXAFR5H1302
R1637 CHIP RES. 1/10W F 13k Ω RRXAFR5Z1302
R1637 RES CHIP 1608 1/10W F 13.0k Ω RTW1302YF002
R1638 CHIP RES. 1/10W F 13k Ω RRXAFR5H1302
R1638 CHIP RES. 1/10W F 13k Ω RRXAFR5Z1302
R1638 RES CHIP 1608 1/10W F 13.0k Ω RTW1302YF002
R1639 CHIP RES. 1/10W J 13k Ω RRXAJR5Z0133
R1639 RES CHIP 1608 1/10W J 13k Ω RRXA133YF002
R1640 CHIP RES. 1/10W J 13k Ω RRXAJR5Z0133
R1640 RES CHIP 1608 1/10W J 13k Ω RRXA133YF002
R1642 CHIP RES. 1/10W J 10k Ω RRXAJR5Z0103
R1642 RES CHIP 1608 1/10W J 10k Ω RRXA103YF002
R1643 CARBON RES. 1/6W J 15k Ω RCX6JATZ0153
R1643 CARBON RES. 1/4W J 15k Ω RCX4JATZ0153
R1644 CHIP RES. 1/10W F 220 Ω RRXAFR5H2200
R1644 CHIP RES. (160 8) 1 /10W F 2 20 Ω RRXAFR5Z2200
R1644 RES CHIP 1608 1/10W F 220 Ω RTW2200YF002
R1647 CHIP RES. 1/10W J 2.2k Ω RRXAJR5Z0222
R1647 RES CHIP 1608 1/10W J 2.2k Ω RRXA222YF002
R1648 CHIP RES. 1/10W J 22k Ω RRXAJR5Z0223
R1648 RES CHIP 1608 1/10W J 22k Ω RRXA223YF002
R1650 CHIP RES. 1/ 10W J 10 0k Ω RRXAJR5Z0104
R1650 RES CHIP 1608 1/10W J 100k Ω RRXA104YF002
R1651 CHIP RES. 1/ 10W J 10 0k Ω RRXAJR5Z0104
R1651 RES CHIP 1608 1/10W J 100k Ω RRXA104YF002
R1652 CHIP RES. 1/10W J 10k Ω RRXAJR5Z0103
R1652 RES CHIP 1608 1/10W J 10k Ω RRXA103YF002
R1653 CHIP RES. 1/10W J 5.6k Ω RRXAJR5Z0562
R1653 RES CHIP 1608 1/10W J 5.6k Ω RRXA562YF002
R1654 CHIP RES. 1/ 10W J 47 0 Ω RRXAJR5Z0471
R1654 RES CHIP 1608 1/10W J 470 Ω RRXA471YF002
R1655 CHIP RES. (160 8) 1 /10W 0 Ω RRXAZR5Z0000
R1655 RES CHIP 1608 1/10W J 0 Ω RRXA000YF002
R1656 CHIP RES. 1/ 10W J 47 0 Ω RRXAJR5Z0471
R1656 RES CHIP 1608 1/10W J 470 Ω RRXA471YF002
R1657 CHIP RES. 1/10W J 10k Ω RRXAJR5Z0103
R1657 RES CHIP 1608 1/10W J 10k Ω RRXA103YF002
R1658 CHIP RES. 1/10W J 6.8k Ω RRXAJR5Z0682
R1658 RES CHIP 1608 1/10W J 6.8k Ω RRXA682YF002
R1659 CARBON RES. 1/4W J 75 Ω RCX4JA TZ0750
R1660 CARBON RES. 1/4W J 75 Ω RCX4JA TZ0750
R1661 CARBON RES. 1/4W J 75 Ω RCX4JA TZ0750
R1662 CHIP RES. 1/ 10W J 10 0 Ω RRXAJR5Z0101
R1662 RES CHIP 1608 1/10W J 100 Ω RRXA101YF002
R1663 CHIP RES. 1/ 10W J 33 0 Ω RRXAJR5Z0331
R1663 RES CHIP 1608 1/10W J 330 Ω RRXA331YF002
R1664 CHIP RES. 1/ 10W J 33 0 Ω RRXAJR5Z0331
R1664 RES CHIP 1608 1/10W J 330 Ω RRXA331YF002
20060629 1-19-10 E9B05EL
Page 78
Ref. No. Description Part No.
18/6/2013
World of free manuals
R1665 PCB JUMPER D0.6-P5.0 JW5.0T
R1666 CARBON RES. 1/4W J 1k Ω RCX4JA TZ 0102
R1669 CHIP RES. 1/10W J 1.8k Ω RRXAJR5Z0182
R1669 RES CHIP 1608 1/ 10W J 1.8 k Ω RRXA182YF002
R1670 CHIP RES. 1/10W J 2.2k Ω RRXAJR5Z0222
R1670 RES CHIP 1608 1/ 10W J 2.2 k Ω RRXA222YF002
R1671 CHIP RES. 1/10W J 1k Ω RRXAJR5Z0102
R1671 RES CHIP 1608 1/ 10W J 1.0 k Ω RRXA102YF002
R1672 CHIP RES. 1/10W J 1k Ω RRXAJR5Z0102
R1672 RES CHIP 1608 1/ 10W J 1.0 k Ω RRXA102YF002
R1673 CHIP RES. 1/10W J 2.2k Ω RRXAJR5Z0222
R1673 RES CHIP 1608 1/ 10W J 2.2 k Ω RRXA222YF002
R1676 CARBON RES. 1/4W J 2.2k Ω RCX4JA TZ 0222
R1677 CARBON RES. 1/4W J 1k Ω RCX4JA TZ 0102
R1678 CARBON RES. 1/4W J 330 Ω RCX4JATZ0331
R1679 CHIP RES. 1/10W J 220 Ω RRXAJR5Z0221
R1679 RES CHIP 1608 1/ 10W J 220 Ω RRXA221YF002
R1680 CARBON RES. 1/4W J 75 Ω RCX4JATZ0750
R1681 CARBON RES. 1/4W J 75 Ω RCX4JATZ0750
R1685 CARBON RES. 1/4W J 75 Ω RCX4JATZ0750
R1686 CHIP RES. 1/10W J 75 Ω RRXAJR5Z0750
R1686 RES CHIP 1608 1/ 10W J 75 Ω RRXA750YF002
R1687 CHIP RES. 1/10W J 390 Ω RRXAJR5Z0391
R1687 RES CHIP 1608 1/ 10W J 390 Ω RRXA391YF002
R1688 CHIP RES. 1/10W J 75 Ω RRXAJR5Z0750
R1688 RES CHIP 1608 1/ 10W J 75 Ω RRXA750YF002
R1689 CHIP RES. 1/10W J 1k Ω RRXAJR5Z0102
R1689 RES CHIP 1608 1/ 10W J 1.0 k Ω RRXA102YF002
R1690 CHIP RES. 1/10W J 1k Ω RRXAJR5Z0102
R1690 RES CHIP 1608 1/ 10W J 1.0 k Ω RRXA102YF002
R1691 CARBON RES. 1/6W J 220 Ω RCX6JATZ0221
R1691 CARBON RES. 1/4W J 220 Ω RCX4JATZ0221
R1692 CARBON RES. 1/6W J 220 Ω RCX6JATZ0221
R1692 CARBON RES. 1/4W J 220 Ω RCX4JATZ0221
R1693 CARBON RES. 1/4W J 820 Ω RCX4JATZ0821
R1694 CHIP RES. 1/10W J 100k Ω RRXAJR5Z0 104
R1694 RES CHIP 1608 1/ 10W J 100 k Ω RRXA104YF002
R1695 CARBON RES. 1/4W J 820 Ω RCX4JATZ0821
R1696 CHIP RES.(1608) 1/10W 0 Ω RRXAZR5Z0000
R1696 RES CHIP 1608 1/ 10W J 0 Ω RRXA000YF002
R1697 CHIP RES. 1/10W J 220 Ω RRXAJR5Z0221
R1697 RES CHIP 1608 1/ 10W J 220 Ω RRXA221YF002
R1698 CHIP RES. 1/10W J 220 Ω RRXAJR5Z0221
R1698 RES CHIP 1608 1/ 10W J 220 Ω RRXA221YF002
R1700 CHIP RES.(1608) 1/10W 0 Ω RRXAZR5Z0000
R1700 RES CHIP 1608 1/ 10W J 0 Ω RRXA000YF002
R1702 CHIP RES.(1608) 1/10W 0 Ω RRXAZR5Z0000
R1702 RES CHIP 1608 1/ 10W J 0 Ω RRXA000YF002
R1703 CHIP RES. 1/10W J 470 Ω RRXAJR5Z0471
R1703 RES CHIP 1608 1/ 10W J 470 Ω RRXA471YF002
R1704 CHIP RES. 1/10W J 22k Ω RRXAJR5Z0223
R1704 RES CHIP 1608 1/ 10W J 22k Ω RRXA223YF002
R1705 CHIP RES. 1/10W J 470 Ω RRXAJR5Z0471
R1705 RES CHIP 1608 1/ 10W J 470 Ω RRXA471YF002
R1706 CHIP RES. 1/10W J 1k Ω RRXAJR5Z0102
R1706 RES CHIP 1608 1/ 10W J 1.0 k Ω RRXA102YF002
R1708 CARBON RES. 1/6W J 100 Ω RCX6JATZ0101
R1708 CARBON RES. 1/4W J 100 Ω RCX4JATZ0101
R1709 CARBON RES. 1/6W J 100 Ω RCX6JATZ0101
R1709 CARBON RES. 1/4W J 100 Ω RCX4JATZ0101
R1710 CARBON RES. 1/4W J 560 Ω RCX4JATZ0561
R1711 CARBON RES. 1/4W J 560 Ω RCX4JATZ0561
R1712 CHIP RES. 1/10W J 1.2k Ω RRXAJR5Z0122
R1712 RES CHIP 1608 1/ 10W J 1.2 k Ω RRXA122YF002
R1713 CHIP RES. 1/10W J 33k Ω RRXAJR5Z0333
R1713 RES CHIP 1608 1/ 10W J 33k Ω RRXA333YF002
R1714 CHIP RES. 1/10W J 470 Ω RRXAJR5Z0471
Ref. No. Description Part No.
R1714 RES CHIP 1608 1/10W J 470 Ω RRXA471YF002
R1718 CHIP RES. 1/10W J 16k Ω RRXAJR5Z0163
R1718 RES CHIP 1608 1/10W J 16k Ω RRXA163YF002
R1719 CHIP RES. 1/10W J 16k Ω RRXAJR5Z0163
R1719 RES CHIP 1608 1/10W J 16k Ω RRXA163YF002
R1720 CHIP RES. 1/10W J 33k Ω RRXAJR5Z0333
R1720 RES CHIP 1608 1/10W J 33k Ω RRXA333YF002
R1721 CHIP RES. 1/10W J 33k Ω RRXAJR5Z0333
R1721 RES CHIP 1608 1/10W J 33k Ω RRXA333YF002
R1722 CHIP RES. 1/10W J 18k Ω RRXAJR5Z0183
R1722 RES CHIP 1608 1/10W J 18k Ω RRXA183YF002
R1723 CHIP RES. 1/10W J 27k Ω RRXAJR5Z0273
R1723 RES CHIP 1608 1/10W J 27k Ω RRXA273YF002
R1724 CHIP RES. 1/10W J 15k Ω RRXAJR5Z0153
R1724 RES CHIP 1608 1/10W J 15k Ω RRXA153YF002
R1725 CHIP RES. 1/10W J 33k Ω RRXAJR5Z0333
R1725 RES CHIP 1608 1/10W J 33k Ω RRXA333YF002
R1726 CHIP RES. 1/10W J 18k Ω RRXAJR5Z0183
R1726 RES CHIP 1608 1/10W J 18k Ω RRXA183YF002
R1727 CHIP RES. 1/10W J 27k Ω RRXAJR5Z0273
R1727 RES CHIP 1608 1/10W J 27k Ω RRXA273YF002
R1728 CHIP RES. 1/10W J 15k Ω RRXAJR5Z0153
R1728 RES CHIP 1608 1/10W J 15k Ω RRXA153YF002
R1729 CHIP RES. 1/10W J 33k Ω RRXAJR5Z0333
R1729 RES CHIP 1608 1/10W J 33k Ω RRXA333YF002
SWITCHES
SW506 LEAF SWITCH MXS01830MVP0 SSC0101MCE03
SW507 SWITCH RO TARY SSS-53MD-1 SSR0106KB004
SW521 TA CT S WIT CH KS M06 14B SST0101HH013
SW521 TACT SWITCH SKQSAF001A SST0101AL041
SW521 T A CT SWITCH TC-1104(H=9.5) SST0101DNG01
SW522 TA CT S WIT CH KS M06 14B SST0101HH013
SW522 TACT SWITCH SKQSAF001A SST0101AL041
SW522 T A CT SWITCH TC-1104(H=9.5) SST0101DNG01
SW523 TA CT S WIT CH KS M06 14B SST0101HH013
SW523 TACT SWITCH SKQSAF001A SST0101AL041
SW523 T A CT SWITCH TC-1104(H=9.5) SST0101DNG01
SW524 TA CT S WIT CH KS M06 14B SST0101HH013
SW524 TACT SWITCH SKQSAF001A SST0101AL041
SW524 T A CT SWITCH TC-1104(H=9.5) SST0101DNG01
SW525 TA CT S WIT CH KS M06 14B SST0101HH013
SW525 TACT SWITCH SKQSAF001A SST0101AL041
SW525 T A CT SWITCH TC-1104(H=9.5) SST0101DNG01
SW526 TA CT S WIT CH KS M06 14B SST0101HH013
SW526 TACT SWITCH SKQSAF001A SST0101AL041
SW526 T A CT SWITCH TC-1104(H=9.5) SST0101DNG01
SW527 TA CT S WIT CH KS M06 14B SST0101HH013
SW527 TACT SWITCH SKQSAF001A SST0101AL041
SW527 T A CT SWITCH TC-1104(H=9.5) SST0101DNG01
SW528 TA CT S WIT CH KS M06 14B SST0101HH013
SW528 TACT SWITCH SKQSAF001A SST0101AL041
SW528 T A CT SWITCH TC-1104(H=9.5) SST0101DNG01
SW601 TA CT S WIT CH KS M06 14B SST0101HH013
SW601 TACT SWITCH SKQSAF001A SST0101AL041
SW601 T A CT SWITCH TC-1104(H=9.5) SST0101DNG01
SW603 TA CT S WIT CH KS M06 14B SST0101HH013
SW603 TACT SWITCH SKQSAF001A SST0101AL041
SW603 T A CT SWITCH TC-1104(H=9.5) SST0101DNG01
SW605 TA CT S WIT CH KS M06 14B SST0101HH013
SW605 TACT SWITCH SKQSAF001A SST0101AL041
SW605 T A CT SWITCH TC-1104(H=9.5) SST0101DNG01
MISCELLANEOUS
2B16 BUSH LED(F) H3700UD 0VM409508
2B17 SHIELD ASSEMBLY E9B00ED 1VM424676
2B46 ROHM HOLDER H7770JD 0VM304573
FL601 VACUUM FLUORESCENT DISPLA Y 7-BT-
301NS
TVFD1C0FT049
20060629 1-19-11 E9B05EL
Page 79
Ref. No. Description Part No.
18/6/2013
World of free manuals
JK1502 RGB CONNECTOR MRC-021V-05 ABS(B110 JXGL210LY008
JK1503 FIBER OPTIC TRANS.MODULE 0C-0805T*002 JWHHA00JD002
JK1503 OPTICAL TRANSMITTING MODULE JST1162 JWHHA00SL T01
JK1504 RCA JAC K MS P-28 1V4 1-B( B11 0) JXRL010LY140
JK1505 RCA JAC K MS P-38 2V-12 NILF JXRL020LY120
JK1506 S TYPE JACK MDC-050V-2.4 LF(B11 0 JXEL040L Y003
JK1506 S TYPE JACK DIN-425-01 JXEL040YUQ01
JW101 FFC CABLE 30P FFC/P1.00/140 WX1E9B00-003
JW102 FFC CABLE 30P FFC/P1.00/140 WX1E9B00-003
PS502 PHOTO INTERRUPTER RPI-302C70 QPWZP1302C70
RM1501 SENSOR REMOTE RECEIVER KSM-602LU2S USESJRSKK048
RM1501 REMOTE RECEIVER PIC-37042LU USESJRSKK033
RM1501 REMOTE RECEIVER MIM-93M6DKF USESJRSUNT01
TP301 PCB JUMPER D0.6-P11.5 JW11.5T
TP501 PCB JUMPER D0.6-P5.0 JW5.0T
TP502 PCB JUMPER D0.6-P7.0 JW7.0T
TP503 PCB JUMPER D0.6-P7.5 JW7.5T
TP504 PCB JUMPER D0.6-P28.0 JW28.0T
TU1501 TUNER UNIT TMFE2-303A UTUNPLGAL020
TU1501 TUNER UNIT TMFE2-301A UTUNPLGAL017
VR501 CARBON P .O .T. VZ067TL1 B104 PB(F) VRCB104HH014
X301 XT AL 4. 4336 19MHz FXC445LLN004
X301 XT AL 1K *044 334 EE FXC445LDS002
X501 QUARTS CRYSTAL 12.000000MHz FXD126LCHE01
X501 XTAL 12 MHz 12.000MHz FXD126LDS002
X502 XTAL QTF38-32768K125P20L FXC323LQUA02
X502 XT AL DT 38 3 2.7 68k Hz FX0323LDS001
POWER SW CBA
Ref. No. Description Part No.
POWER SW CBA (MCV-B)
Consists of the following:
----------
DIODE
D671 LED(RED) 204HD/E NPQZ00204HDE
SWITCHES
SW671 TACT SWITCH KSM0614B SST0101HH013
SW671 TACT SWITCH SKQSAF001A SST0101AL041
SW671 TACT S WITCH TC- 1104( H=9.5) SST0101DNG01
MISCELLANEOUS
JW001 FLAT CABLE 4P AWG26#2651/P2.0/100 WX1E9B00-007
FUNCTION CBA
Ref. No. Description Part No.
FUNCTION CBA (MCV-C)
Consists of the following:
----------
SWITCHES
SW681 TACT SWITCH KSM0614B SST0101HH013
SW681 TACT SWITCH SKQSAF001A SST0101AL041
SW681 TACT S WITCH TC- 1104( H=9.5) SST0101DNG01
SW682 TACT SWITCH KSM0614B SST0101HH013
SW682 TACT SWITCH SKQSAF001A SST0101AL041
SW682 TACT S WITCH TC- 1104( H=9.5) SST0101DNG01
MISCELLANEOUS
JW002 FLAT CABLE 3P AWG26#2651/P2.0/80 WX1E9B00-004
FRONT JACK CBA
Ref. No. Description Part No.
FRONT JACK CBA (MCV -D)
Consists of the following:
CAPACITORS
C1205 CHIP CERAMIC CAP. B K 2200pF/50V CHD1JK30B222
C1206 CHIP CERAMIC CAP. B K 2200pF/50V CHD1JK30B222
CONNECTOR
CN1201 FE CONNECTOR TOP 8P 08FE-BT-VK-N JCFEJ08JG001
----------
Ref. No. Description Part No.
RESISTORS
R1201 CHIP RES. 1/10W J 75 Ω RRXAJR5Z0750
R1201 RES CHIP 1608 1/10W J 75 Ω RRXA750YF002
R1202 CHIP RES. 1/10W J 75 Ω RRXAJR5Z0750
R1202 RES CHIP 1608 1/10W J 75 Ω RRXA750YF002
R1203 CHIP RES. 1/ 10W J 22 0 Ω RRXAJR5Z0221
R1203 RES CHIP 1608 1/10W J 220 Ω RRXA221YF002
R1204 CHIP RES. 1/ 10W J 22 0 Ω RRXAJR5Z0221
R1204 RES CHIP 1608 1/10W J 220 Ω RRXA221YF002
R1205 CHIP RES. 1/10W J 75 Ω RRXAJR5Z0750
R1205 RES CHIP 1608 1/10W J 75 Ω RRXA750YF002
MISCELLANEOUS
JK1201 RCA JAC K(YELLO W) MT J-032 -11B- 40 FE01 JXRL010LY101
JK1202 RCA JACK(WHITE) MTJ-032-11B-41 FE01 JXRL010LY102
JK1203 RCA JACK(RED) MTJ-032-11A-31 FE01 JYRL010L Y024
JK1204 S TYPE JACK MDC-050V-2.4 LF(B110 JXEL040L Y003
JK1204 S TYPE JACK DIN-425-01 JXEL040YUQ01
JW103 FFC CABLE 8P FFC/P1.25/120 WX1E9700-002
SENSOR CBA
Ref. No. Description Part No.
SENSOR CBA
Consists of the following:
1VSA11699
TRANSISTORS
Q503 PHOTO TRA NSISTOR PT204-6B-12 NPWZT2046B12
Q503 PHOTO TRANSISTOR M ID-32A22F NPWZ1D32A22F
Q504 PHOTO TRA NSISTOR PT204-6B-12 NPWZT2046B12
Q504 PHOTO TRANSISTOR M ID-32A22F NPWZ1D32A22F
PSV CBA
Ref. No. Description Part No.
PSV CBA
Consists of the following
POWER SUPPLY CBA (PSV-A)
JUNCTION CBA (PSV-B)
REAR JACK CBA (PSV -C)
1VSA14524
----------
----------
----------
POWER SUPPLY CBA
Ref. No. Description Part No.
POWER SUPPLY CBA (PSV-A)
Consists of the following:
CAPACITORS
C013 ELECTROLYTIC CAP. 10µF/50V M CE1JMASDL100
C013 ALUMINUM ELECTROLYTIC CAP 10µF/50V M CE1JMASTM100
C014 ELECTROLYTIC CAP. 470µF/16V M CE1CMASDL471
C014 ELECTROLYTIC CAP. 470µF/16V M CE1CMASTM471
C015 ELECTROLYTIC CAP. 100µF/16V M CE1CMASDL101
C015 ELECTROLYTIC CAP. 100µF/16V M CE1CMASTM101
C017 ELECTROLYTIC CAP. 4700µF/6.3V SL CE0KMZADL472
C017 ELECTROLYTIC CAP. 4700µF/6.3V SM CE0KMZPDL472
C017 ALUMINUM ELECTROLYTIC CAP 4700µF/6.3V MCE0KMZPTM472
C018 ELECTROLYTIC CAP. 470µF/6.3V M CE0KMASDL471
C018 ELECTROLYTIC CAP. 470µF/6.3V M CE0KMASTM471
C020 ELECTROLYTIC CAP. 22µF/50V M CE1JMASDL220
C020 ELECTROLYTIC CAP 22µF/50V M CE1JMASTM220
C022 ELECTROLYTIC CAP. 470µF/35V M CE1GMASDL471
C022 ELECTROLYTIC CAP. 470µF/35V M CE1GMASTM471
C1001! MET ALIZED FILM CAP. 0.068µF/250V K CT2 E683D C011
C1001! MET ALIZED FILM CAP. 0.068µF/250V K CT2 E683D C014
C1001! MET ALIZED FILM CAP. 0.068µF/250V M CT2E683MS037
C1004 ELECTROLYTIC CAP. 100µF/400V M CA2H101S6016
C1005 CERAMIC CAP . SL K 56pF/1KV CCD3AKPSL560
C1005 CERAMIC CAP . SL J 56pF/1KV CCD3AJPSL560
C1006! SAFTY CAP. 2200pF/250V CCN2EMA0E222
C1006! SAFETY CAP. 2200pF/250V CA2E222MR049
----------
20060629 1-19-12 E9B05EL
Page 80
Ref. No. Description Part No.
18/6/2013
World of free manuals
C1007 ELECTROLYTIC CAP. 1000µF/6.3V M CE0KMASDL102
C1007 ELECTROLYTIC CAP. 1000µF/6.3V M CE0KMASTM102
C1013 CERAMIC CAP.(AX) B J 1000pF/50V CCA1JJT0B102
C1018 ELECTROLYTIC CAP. 100µF/10V M CE1AMASDL101
C1018 ELECTROLYTIC CAP. 100µF/10V M CE1AMASTM101
C1021 CERAMIC CAP.(AX) Y M 0.01µF/16V CCA1CMT0Y103
C1025 CHIP CERAMIC CAP.(1608) B K 0.01µF/50V CHD1JK30B103
C1029 CERAMIC CAP.(AX) X K 1800pF/16V CCA1CKT0X182
C1032 ELECTROLYTIC CAP. 10µF/16V M CE1CMASDL100
C1032 ELECTROLYTIC CAP. 10µF/16V M CE1CMASTM100
C1033 CERAMIC CAP. YV Z 0.022µF/50V CCD1JZSYV223
C1035 ELECTROLYTIC CAP. 3300µF/6.3V SL CE0KMZADL332
C1035 ELECTROLYTIC CAP. 3300µF/6.3V SM CE0KMZPDL332
C1035 ALUMINUM ELECTROL YTIC CAP 3300µF/6.3V MCE0KMZPTM332
C1036 CERAMIC CAP. B K 470pF/500V CCD2JKP0B471
C1037 ELECTROLYTIC CAP. 1000µF/16V M CE1CMASDL102
C1037 ALUMINUM ELECTROLYT IC CAP 1000µF/16V MCE1CMASTM102
C1039 ELECTROLYTIC CAP. 470µF/16V M CE1CMASDL471
C1039 ELECTROLYTIC CAP. 470µF/16V M CE1CMASTM471
C1106 ELECTROLYTIC CAP. 100µF/35V M CE1GMASDL101
C1106 ELECTROLYTIC CAP. 100µF/35V M CE1GMASTM101
C2014 CERAMIC CAP . B K 0.01µF/50 0V CCD2JKP0B103
DIODES
D013 RECTIFIER DIODE BA158 NDQZ000BA158
D013 RECTIFIER DIODE BA158 NDWZ000BA158
D014 SCHOTTKY BARRIER DIODE SB190 NDQZ000SB190
D014 SCHOTTKY BARRIER DIODE SB190 NDWZ000SB190
D016 SCHOTTKY BARRIER DIODE SB340 NDQZ000SB340
D016 SCHOTTKY BARRIER DIODE SB340 NDWZ000SB340
D017 ZENER DIODE MTZJT-7715C QDTC00MTZJ15
D017 DIODE ZENER 15BSC-T26 NDTC015BST26
D017 ZENER DIODE DZ-15BSCT265 NDTC00DZ15BS
D018 RECTIFIER DIODE BA158 NDQZ000BA158
D018 RECTIFIER DIODE BA158 NDWZ000BA158
D019 RECTIFIER DIODE FR203-B/P NDQZ000FR203
D1001 DIODE 1N5397-B NDLZ001N5397
D1002 DIODE 1N5397-B NDLZ001N5397
D1003 DIODE 1N5397-B NDLZ001N5397
D1004 DIODE 1N5397-B NDLZ001N5397
D1006 SWITCHING DIODE 1SS133(T-77) QDTZ001SS133
D1006 DIODE SWITCHIN G 1N4148 -F0021 NDTZ01N41 48F
D1006 SWITCHING DIODE 1N4148M NDTZ01N4148M
D1008 SCHOTTKY BARRIER DIODE SB140 NDQZ000SB140
D1008 SCHOTTKY BARRIER DIODE SB140 NDWZ000SB140
D1011 RECTIFIER DIODE BA159 NDQZ000BA159
D1011 RECTIFIER DIODE BA159 NDWZ000BA159
D1012 SWITCHING DIODE 1SS133(T-77) QDTZ001SS133
D1012 DIODE SWITCHIN G 1N4148 -F0021 NDTZ01N41 48F
D1012 SWITCHING DIODE 1N4148M NDTZ01N4148M
D1016 RECTIFIER DIODE FR101 NDWZ000FR101
D1017 ZENER DIODE MTZJT -7718B QDTB00MTZJ18
D1017 DIODE ZENER 18BSB-T26 NDTB018BST26
D1017 ZENER DIODE DZ-18BSBT265 NDTB00DZ18BS
D1018 SWITCHING DIODE 1SS133(T-77) QDTZ001SS133
D1018 DIODE SWITCHIN G 1N4148 -F0021 NDTZ01N41 48F
D1018 SWITCHING DIODE 1N4148M NDTZ01N4148M
D1019 ZENER DIODE MTZJT -776.8B QDTB0MTZJ6R8
D1019 DIODE ZENER 6V8BSB-T26 NDTB6R8BST26
D1019 ZENER DIODE DZ-6.8BSBT265 NDTB0DZ6R8BS
D1022 SWITCHING DIODE 1SS133(T-77) QDTZ001SS133
D1022 DIODE SWITCHIN G 1N4148 -F0021 NDTZ01N41 48F
D1022 SWITCHING DIODE 1N4148M NDTZ01N4148M
D1023 PCB JUMPER D0.6-P5.0 JW5.0T
D1024 SWITCHING DIODE 1SS133(T-77) QDTZ001SS133
D1024 DIODE SWITCHIN G 1N4148 -F0021 NDTZ01N41 48F
D1024 SWITCHING DIODE 1N4148M NDTZ01N4148M
Ref. No. Description Part No.
D1025 SWITCHING DIODE 1SS133(T -77) QDTZ001SS133
D1025 DIODE SWITCHING 1N4148-F0021 NDTZ01N4148F
D1025 SWITCHING DIODE 1N4148M NDTZ01N4148M
D1030 SCHOTTKY BARRIER DIODE SB240-B/P NDWZ000SB240
D1031 SCHOTTKY BARRIER DIODE SB390 NDQZ000SB390
D1031 SCHOTTKY BARRIER DIODE SB390 NDWZ000SB390
D1032 SCHOTTKY BARRIER DIODE SB340 NDQZ000SB340
D1032 SCHOTTKY BARRIER DIODE SB340 NDWZ000SB340
ICS
IC1001! PHO T OCOUPLER EL817A NPEA000EL817
IC1001! PHO T OCOUPLER EL817B NPEB000EL817
IC1001! PHO T OCOUPLER EL817C NPEC000EL817
IC1001! PHO T OCOUPLER LTV-817B-F NPEB0LTV8 17F
IC1001! PHO T OCOUPLER LTV-817C-F NPEC0L TV8 17F
IC1001! PHO T OCOUPLER PS2561A-1 (Q) QPEQPS2561A1
IC1001! PHO T OCOUPLER PS2561A-1 (W) QPEWPS2561A1
COILS
L010 CHOKE COIL 47µH LLBD00PKV02 2
L010 RADIAL TYPE CHOKE COIL CW68-470K-
L010 CHOKE COIL 47µH-K LLBD00PKT001
L010 FIXED INDUCTORS(PB FREE) LGB0810TLF-
L013 CHOKE COIL 47µH LLBD00PKV02 2
L013 RADIAL TYPE CHOKE COIL CW68-470K-
L013 CHOKE COIL 47µH-K LLBD00PKT001
L013 FIXED INDUCTORS(PB FREE) LGB0810TLF-
L1001 BEAD CORE ASSEMBL Y E9770ED 1VSA12652
L1002 BEAD CORE ASSEMBL Y E9770ED 1VSA12652
L1003! LINE FILTER 56MH TLF14CB5630R2 LLBG00ZTU022
L1003! LINE FILT ER 50MH LF- 4D-E503(PB FREE) LLBG00ZKQ014
L1004 BEAD CORE B16 RH 3.5X10X1. 3 XL03010XM001
L1005 BEAD CORE ASSEMBL Y E9770ED 1VSA12652
L1011 CHOKE COIL 47µH LLBD00PKV02 2
L1011 RADIAL TYPE CHOKE COIL CW68-470K-
L1011 CHOKE COIL 47µH-K LLBD00PKT001
L1011 FIXED INDUCTORS(PB FREE) LGB0810TLF-
L1013 POWER INDUCTORS TWKBNP-180K LLC180KKV007
L1013 CHOKE COIL(18µH) LHL10NB180K LLARKGQTU180
L1013 POWER INDUCTORS CWKBNP-180K LLF1800KV002
841040NP
470K
841040NP
470K
841040NP
470K
LLBD00PKV023
LLBD00PU6010
LLBD00PKV023
LLBD00PU6010
LLBD00PKV023
LLBD00PU6010
TRANSISTORS
Q1001! FET 2SK3566 QFWZ02SK3566
Q1003 TRANSISTOR 2SC1815-Y(TE2 F T) QQSY2SC1815F
Q1004 TRANSISTOR KTA1267-Y -AT/P NQSYKT A1267P
Q1004 TRANSISTOR KTA1267-GR-AT/P NQS1KTA 1267 P
Q1008 TRANSISTOR KTC3199-Y-A T/P NQSYKTC3199P
Q1008 TRANSISTOR KTC3199-GR-A T/P NQS4KTC3199P
Q1008 TRANSISTOR 2SC1815-Y(TE2 F T) QQSY2SC1815F
Q1008 TRANSISTOR 2SC1815-GR(TE2 F T) QQS12SC1815F
RESISTORS
R057 CHIP RES. 1/10W J 22 0k Ω RRXAJR5Z0224
R057 RES CHIP 1608 1/10W J 220k Ω RRXA224YF002
R1002 CARBON RES. 1/4W J 560k Ω RCX4JA TZ0564
R1003 CARBON RES. 1/4W J 560k Ω RCX4JA TZ0564
R1004 METAL O XIDE FILM RES . 2W J 82k Ω RN02JZLZ0823
R1004 METAL O XIDE FILM RES . 2W J 82k Ω RN02JZQZ0823
R1004 METAL O XIDE FILM RES . 2W J 82k Ω RN02JZPZ0823
R1005 CARBON RES. 1/4W J 1M Ω RCX4JATZ0105
R1006 CARBON RES. 1/4W J 1M Ω RCX4JATZ0105
R1007 CARBON RES. 1/4W J 1M Ω RCX4JATZ0105
R1008 CARBON RES. 1/4W G 820 Ω RCX4GATZ0821
R1010 CARBON RES. 1/6W J 22k Ω RCX6JATZ0223
R1010 CARBON RES. 1/4W J 22k Ω RCX4JATZ0223
R1011 MET AL OXIDE FILM RES. 1W J 1.3 Ω RN01JZLZ01R3
R1011 MET AL OXIDE FILM RES. 1W J 1.3 Ω RN01JZQZ01R3
20060629 1-19-13 E9B05EL
Page 81
Ref. No. Description Part No.
18/6/2013
World of free manuals
R1011 METAL O XIDE FILM RES. 1W J 1.3 Ω RN01JZPZ01 R 3
R1020 CARBON RES. 1/6W J 1.8k Ω RCX6JA TZ 0182
R1020 CARBON RES. 1/4W J 1.8k Ω RCX4JA TZ 0182
R1021 CHIP RES. 1/10W J 1k Ω RRXAJR5Z0102
R1021 RES CHIP 1608 1/ 10W J 1.0 k Ω RRXA102YF002
R1022 CHIP RES. 1/10W J 4.7k Ω RRXAJR5Z0472
R1022 RES CHIP 1608 1/ 10W J 4.7 k Ω RRXA472YF002
R1023 CHIP RES.(1608) 1/10W F 2.2k Ω RRXAFR5H0222
R1023 CHIP RES. 1/10W F 2.2k Ω RRXAFR5Z0222
R1023 RES CHIP 1608 1/10 W F 2.20k Ω RTW2201YF002
R1024 CHIP RES. 1/10W J 68k Ω RRXAJR5Z0683
R1024 RES CHIP 1608 1/ 10W J 68k Ω RRXA683YF002
R1025 CHIP RES. 1/10W F 5.6k Ω RRXAFR5H0562
R1025 CHIP RES. 1/10W F 5.6k Ω RRXAFR5Z0562
R1025 RES CHIP 1608 1/10 W F 5.60k Ω RTW5601YF002
R1029 CARBON RES. 1/6W J 100k Ω RCX6JA TZ0104
R1029 CARBON RES. 1/4W J 100k Ω RCX4JA TZ0104
R1032 CARBON RES. 1/6W J 2.2k Ω RCX6JA TZ 0222
R1032 CARBON RES. 1/4W J 2.2k Ω RCX4JA TZ 0222
R1035 CARBON RES. 1/6W J 1k Ω RCX6JA TZ 0102
R1035 CARBON RES. 1/4W J 1k Ω RCX4JA TZ 0102
R1036 CARBON RES. 1/6W J 100k Ω RCX6JA TZ0104
R1036 CARBON RES. 1/4W J 100k Ω RCX4JA TZ0104
R1037 CARBON RES. 1/6W J 10k Ω RCX6JATZ0103
R1037 CARBON RES. 1/4W J 10k Ω RCX4JATZ0103
R1038 CARBON RES. 1/6W J 100k Ω RCX6JA TZ0104
R1038 CARBON RES. 1/4W J 100k Ω RCX4JA TZ0104
R1039 CARBON RES. 1/6W J 470k Ω RCX6JA TZ0474
R1039 CARBON RES. 1/4W J 470k Ω RCX4JA TZ0474
R1040 CARBON RES. 1/4W J 8.2 Ω RCX4JATZ08R2
R1041 CARBON RES. 1/4W J 5.6 Ω RCX4JATZ05R6
R1043 METAL O XIDE FILM RES. 1W J 2.7 Ω RN012R7ZU001
R1043 METAL O XIDE FILM RES. 1W J 2.7 Ω RN012R7KE009
R1043 METAL O XIDE FILM RES. 1W J 2.7 Ω RN012R7DP003
R1059 CARBON RES. 1/4W J 1k Ω RCX4JA TZ 0102
R1126 CHIP RES. 1/10W J 33k Ω RRXAJR5Z0333
R1126 RES CHIP 1608 1/ 10W J 33k Ω RRXA333YF002
MISCELLANEOUS
2B18 HEA T SI NK E680 0ED 1VM420987
2L019 SCREW S-TIGHT M3X8 BIND HEAD+ GBJS3080
AC1001! AC CORD PE8G2X91H0AA061 WAB0182LW016
F1001! FUSE T1.6AL/250V P AG C20BW3162
F1001! FUSE 50T016H 1.6A/25 0V PAG H20BH V162
FH1001 FUSE HOLDER MSF-015 LF (B110) XH01Z00LY002
FH1001 FUSE HOLDER DFH-001 XH01Z00RP001
FH1002 FUSE HOLDER MSF-015 LF (B110) XH01Z00LY002
FH1002 FUSE HOLDER DFH-001 XH01Z00RP001
T0011! TRANS POWER 6711 LTTZPE0KT007
T0011! TRANS POWER BCK-28-9985 LTTZPE0XB006
JUNCTION CBA
Ref. No. Description Part No.
JUNCTION CBA (PSV -B)
Consists of the following:
----------
CONNECTOR
CN051A 242 SERIES CONNECTOR TUC-P19X-B1 WHT STJCTUB19TG002
MISCELLANEOUS
JW1001 FLAT CABLE 10P AWG26#2651/P2.0/100 WX1E9700-003
JW1002 FLAT CABLE 9P AWG26#2651/P2.0/100 WX1E9700-004
REAR JACK CBA
Ref. No. Description Part No.
REAR JACK CBA (PSV-C)
Consists of the following:
----------
Ref. No. Description Part No.
CAPACITORS
C2003 CHIP CERAMIC CAP . B K 2200pF/50V CHD1JK30B222
C2004 CHIP CERAMIC CAP . B K 2200pF/50V CHD1JK30B222
C2005 CHIP CERAMIC CAP . B K 2200pF/50V CHD1JK30B222
C2006 CHIP CERAMIC CAP . B K 2200pF/50V CHD1JK30B222
C2007 CHIP CERAMIC CAP . B K 2200pF/50V CHD1JK30B222
C2008 CHIP CERAMIC CAP . B K 1000pF/50V CHD1JKB0B102
C2009 ELECTROLYTIC CAP. 1µF/50V M CE1JMASDL1R0
C2009 ELECTROLYTIC CAP 1µF/50V M CE1JMASTM1R0
C2010 ELECTROLYTIC CAP. 1µF/50V M CE1JMASDL1R0
C2010 ELECTROLYTIC CAP 1µF/50V M CE1JMASTM1R0
C2011 CHIP CERAMIC CAP . B K 1000pF/50V CHD1JKB0B102
C2012 ELECTROLYTIC CAP. 1µF/50V M CE1JMASDL1R0
C2012 ELECTROLYTIC CAP 1µF/50V M CE1JMASTM1R0
C2013 CHIP CERAMIC CAP . B K 1000pF/50V CHD1JKB0B102
DIODES
D2001 ZENER DIODE MTZJT-7711A QDTA00MTZJ11
D2001 DIODE ZENER 11BSA-T26 NDTA011BST26
D2001 ZENER DIODE DZ-11BSAT2 65 NDTA00DZ 11BS
D2002 ZENER DIODE MTZJT-7711A QDTA00MTZJ11
D2002 DIODE ZENER 11BSA-T26 NDTA011BST26
D2002 ZENER DIODE DZ-11BSAT2 65 NDTA00DZ 11BS
D2003 ZENER DIODE MTZJT-7711A QDTA00MTZJ11
D2003 DIODE ZENER 11BSA-T26 NDTA011BST26
D2003 ZENER DIODE DZ-11BSAT2 65 NDTA00DZ 11BS
D2004 ZENER DIODE MTZJT-7711A QDTA00MTZJ11
D2004 DIODE ZENER 11BSA-T26 NDTA011BST26
D2004 ZENER DIODE DZ-11BSAT2 65 NDTA00DZ 11BS
D2005 ZENER DIODE MTZJT-7711A QDTA00MTZJ11
D2005 DIODE ZENER 11BSA-T26 NDTA011BST26
D2005 ZENER DIODE DZ-11BSAT2 65 NDTA00DZ 11BS
D2006 ZENER DIODE MTZJT-7711A QDTA00MTZJ11
D2006 DIODE ZENER 11BSA-T26 NDTA011BST26
D2006 ZENER DIODE DZ-11BSAT2 65 NDTA00DZ 11BS
D2007 ZENER DIODE MTZJT-7711A QDTA00MTZJ11
D2007 DIODE ZENER 11BSA-T26 NDTA011BST26
D2007 ZENER DIODE DZ-11BSAT2 65 NDTA00DZ 11BS
D2008 ZENER DIODE MTZJT-7711A QDTA00MTZJ11
D2008 DIODE ZENER 11BSA-T26 NDTA011BST26
D2008 ZENER DIODE DZ-11BSAT2 65 NDTA00DZ 11BS
D2009 ZENER DIODE MTZJT-7711A QDTA00MTZJ11
D2009 DIODE ZENER 11BSA-T26 NDTA011BST26
D2009 ZENER DIODE DZ-11BSAT2 65 NDTA00DZ 11BS
D2010 ZENER DIODE MTZJT-7711A QDTA00MTZJ11
D2010 DIODE ZENER 11BSA-T26 NDTA011BST26
D2010 ZENER DIODE DZ-11BSAT2 65 NDTA00DZ 11BS
COIL
L2001 BEAD CORE ASSEMBL Y E9770ED 1VSA12643
TRANSISTORS
Q2002 TRANSISTOR KTC3199-Y-A T/P NQSYKTC3199P
Q2002 TRANSISTOR KTC3199-GR-A T/P NQS4KTC3199P
Q2002 TRANSISTOR 2SC1815-Y(TE2 F T) QQSY2SC1815F
Q2002 TRANSISTOR 2SC1815-GR(TE2 F T) QQS12SC1815F
Q2003 TRANSISTOR KTC3199-Y-A T/P NQSYKTC3199P
Q2003 TRANSISTOR KTC3199-GR-A T/P NQS4KTC3199P
Q2003 TRANSISTOR 2SC1815-Y(TE2 F T) QQSY2SC1815F
Q2003 TRANSISTOR 2SC1815-GR(TE2 F T) QQS12SC1815F
RESISTORS
R2003 CARBON RES. 1/4W J 75 Ω RCX4JA TZ0750
R2004 CHIP RES. 1/10W J 75 Ω RRXAJR5Z0750
R2004 RES CHIP 1608 1/10W J 75 Ω RRXA750YF002
R2005 CARBON RES. 1/4W J 820 Ω RCX4JA TZ0821
R2006 CARBON RES. 1/4W J 220 Ω RCX4JA TZ0221
R2007 CARBON RES. 1/4W J 820 Ω RCX4JA TZ0821
R2008 CARBON RES. 1/4W J 220 Ω RCX4JA TZ0221
R2009 CHIP RES. 1/10W J 75 Ω RRXAJR5Z0750
R2009 RES CHIP 1608 1/10W J 75 Ω RRXA750YF002
20060629 1-19-14 E9B05EL
Page 82
Ref. No. Description Part No.
18/6/2013
World of free manuals
R2010 CHIP RES. 1/10W J 75 Ω RRXAJR5Z0750
R2010 RES CHIP 1608 1/ 10W J 75 Ω RRXA750YF002
R2011 CHIP RES. 1/10W J 75 Ω RRXAJR5Z0750
R2011 RES CHIP 1608 1/ 10W J 75 Ω RRXA750YF002
R2012 CHIP RES. 1/10W J 1k Ω RRXAJR5Z0102
R2012 RES CHIP 1608 1/ 10W J 1.0 k Ω RRXA102YF002
R2013 CHIP RES. 1/10W J 1k Ω RRXAJR5Z0102
R2013 RES CHIP 1608 1/ 10W J 1.0 k Ω RRXA102YF002
MISCELLANEOUS
2B60 21P EARTH PLA TE E7B20ED 1VM423185
JK2001 RGB CONNECTOR MRC-021V-03 ABS(B11 JXGL210LY006
JW2001 FLAT CABLE 14P AWG26#2651/P2.0/85 WX1E9B00-005
AFV CBA
Ref. No. Description Part No.
AFV CBA
Consists of the following:
CAPACITORS
C1 CHIP CERAMIC CAP.(1608) F Z 0.1µF/50V CHD1JZ30F104
C1 CHIP CERAMIC CAP.(1608) F Z 0.1µF/25V CHD1EZ30F104
C4 CHIP CERAMIC CAP. CH J 56pF/50V CHD1JJ3CH560
C5 CHIP CERAMIC CAP.(1608) CH J 22pF/50V CHD1JJ3CH220
C6 CHIP CERAMIC CAP. CH J 56pF/50V CHD1JJ3CH560
C7 CHIP CERAMIC CAP. CH C 3pF/50V CHD1JC3CH3R0
C7 CHIP CERAMIC CAP. CJ C 3pF/50V CHD1JC3CJ3R0
C7 CHIP CERAMIC CAP. CH D 3pF/50V CHD1JD3CH3R0
C8 CHIP CERAMIC CAP. CH C 3pF/50V CHD1JC3CH3R0
C8 CHIP CERAMIC CAP. CJ C 3pF/50V CHD1JC3CJ3R0
C8 CHIP CERAMIC CAP. CH D 3pF/50V CHD1JD3CH3R0
C11 CHIP CERAMIC CAP.(1608) B K 0.01µF/50V CHD1JK30B103
C12 ELECTROLYTIC CAP. 10µF/16V M H7 CE1CMASSL100
C12 ELECTROLYTIC CAP. 10µF/16V M H7 CE1CMASSM100
C13 CHIP CERAMIC CAP.(1608) B K 0.01µF/50V CHD1JK30B103
C14 CHIP CERAMIC CAP.(1608) B K 0.01µF/50V CHD1JK30B103
C15 ELECTROLYTIC CAP. 10µF/16V M H7 CE1CMASSL100
C15 ELECTROLYTIC CAP. 10µF/16V M H7 CE1CMASSM100
C16 ELECTROLYTIC CAP. 10µF/16V M H7 CE1CMASSL100
C16 ELECTROLYTIC CAP. 10µF/16V M H7 CE1CMASSM100
C17 CHIP CERAMIC CAP.(1608) F Z 0.1µF/50V CHD1JZ30F104
C17 CHIP CERAMIC CAP.(1608) F Z 0.1µF/25V CHD1EZ30F104
C19 CHIP CERAMIC CAP.(1608) F Z 0.1µF/50V CHD1JZ30F104
C19 CHIP CERAMIC CAP.(1608) F Z 0.1µF/25V CHD1EZ30F104
C20 ELECTROLYTIC CAP. 3.3µF/50V M H7 CE1JMASSL3R3
C20 ALUMINUM ELECTRO LYTIC CAP 3.3µF/50V H7CE1JMASSM3R3
1VSA14515
Ref. No. Description Part No.
RESISTORS
R1 CHIP RES. 1/10W J 1k Ω RRXAJR5Z0102
R1 RES CHIP 1608 1/10W J 1.0k Ω RRXA102YF002
R4 CHIP RES. 1/10W J 120k Ω RRXAJR5Z0124
R4 RES CHIP 1608 1/10W J 120k Ω RRXA124YF002
R5 CHIP RES.(1608) 1/10W 0 Ω RRXAZR5Z0000
R5 RES CHIP 1608 1/10W J 0 Ω RRXA000YF002
R6 CHIP RES.(1608) 1/10W 0 Ω RRXAZR5Z0000
R6 RES CHIP 1608 1/10W J 0 Ω RRXA000YF002
MISCELLANEOUS
X1 XTAL 18.432MHz FXD186LLN001
C21 CHIP CERAMIC CAP.(1608) F Z 0.1µF/50V CHD1JZ30F104
C21 CHIP CERAMIC CAP.(1608) F Z 0.1µF/25V CHD1EZ30F104
C22 ELECTROLYTIC CAP. 10µF/16V M H7 CE1CMASSL100
C22 ELECTROLYTIC CAP. 10µF/16V M H7 CE1CMASSM100
C24 ELECTROLYTIC CAP. 0.22µF/50V M H7 CE1JMASSLR22
C24 ALUMINUM ELECTRO LYTIC CAP 0.22µF/50V H7CE1JMASSMR22
C27 CERAMIC CAP.(AX) F Z 0.1µF/50 V CCA1JZTFZ104
CN1 ANGLE PIN HEADER 9P IMSA-6029B-1-
D2 SWITCHING DIODE 1SS133(T-77) QDTZ001SS133
D2 DIODE SWIT CHING 1N4148 -F0021 NDTZ01N414 8F
D2 SWITCHING DIODE 1N4148M NDTZ01N4148M
IC1 IC AUDIO PROCESSOR MSP3417G-QG-B8-V3 NSZBA0SP3005
L1 INDUCTOR 10µH-K-26T LLAXKATTU100
L2 PCB JUMPER D0.6-P5.0 JW5.0T
L3 INDUCTOR 18µH-K-26T LLAXKATTU180
L4 INDUCTOR 10µH-K-26T LLAXKATTU100
09Z003-
20060629 1-19-15 E9B05EL
CONNECTOR
JTED009ER0 45
DIODES
IC
COILS
Page 83

18/6/2013
World of free manuals
ADB2737BD
E9B05BD
2007-04-03
 Loading...