

Page 1
1
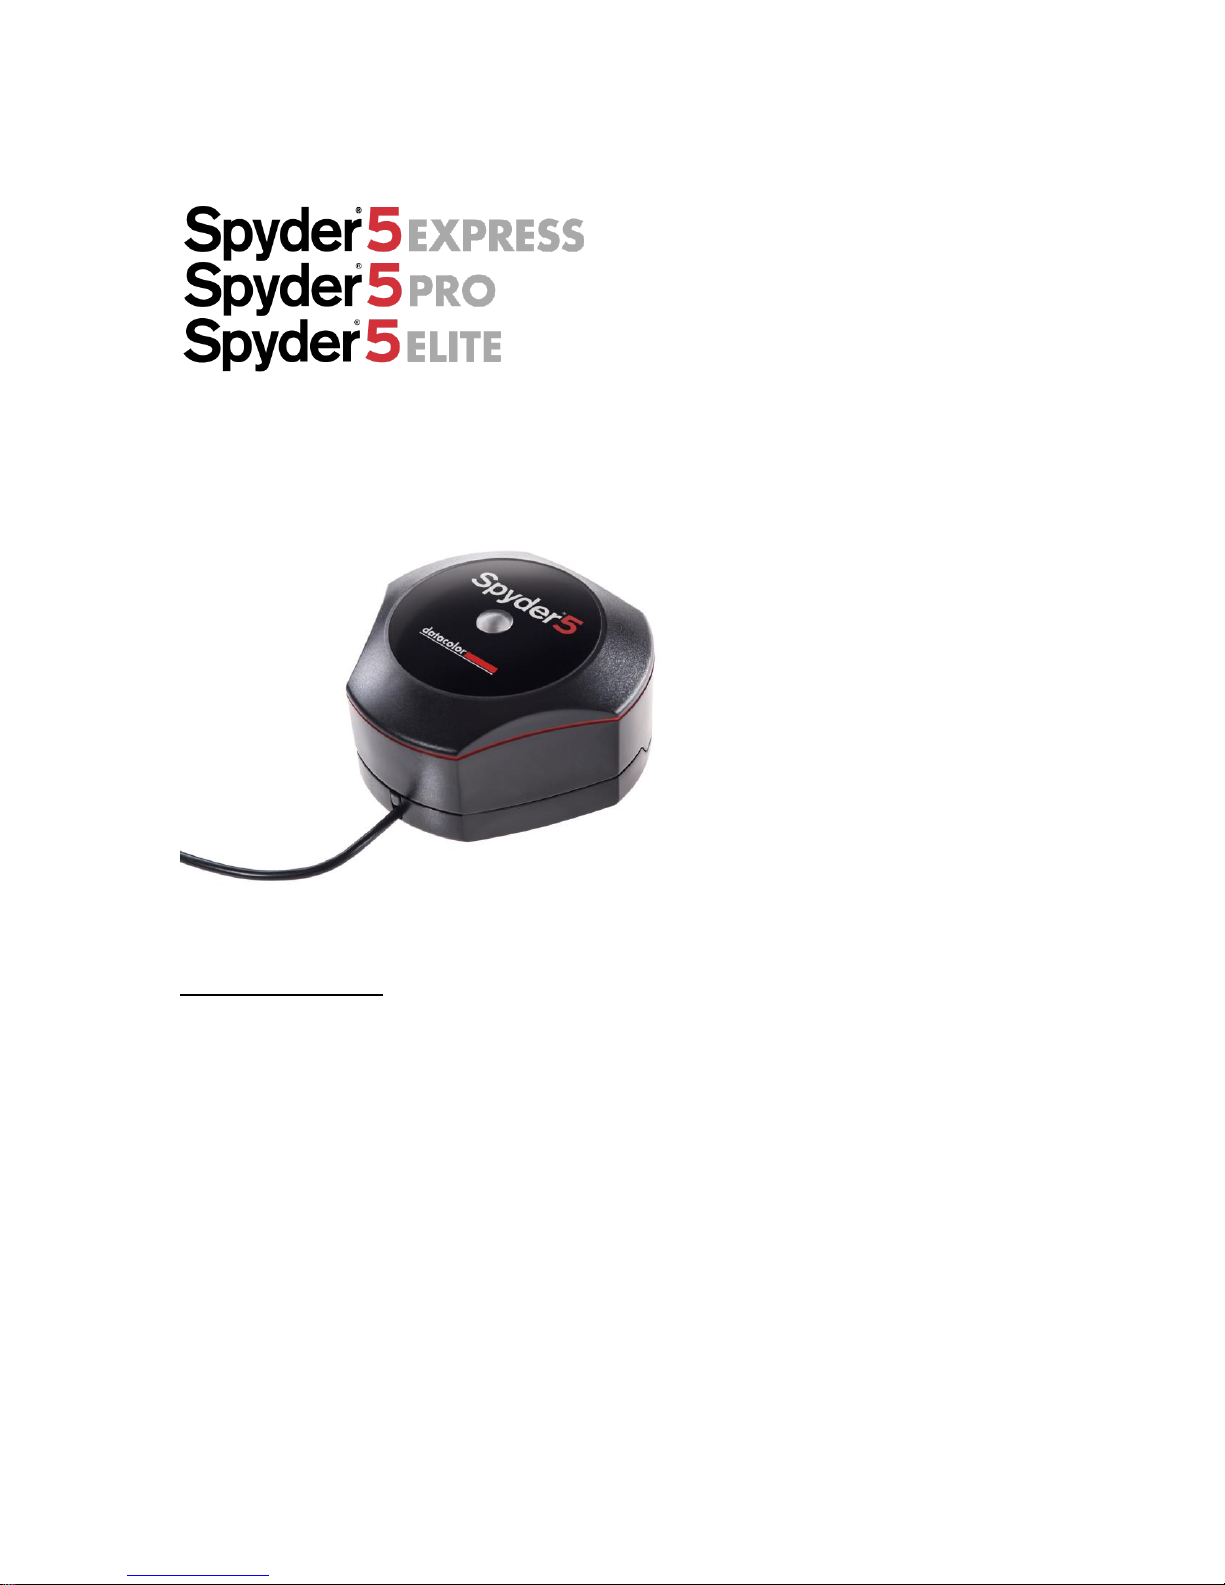
Spyder5 User’s Guide
Spyder®5EXPRESS
Hobbyist photographers seeking a simple monitor color calibration solution.
Next Generation Spyder5 colorimeter with dual purpose lens cap and
counterweight, improved tonal response, and the industry’s only patented 7detector optical engine
See and share your images as you intended with confidence
Simple 4 step process guides you to a precise calibration giving you
exceptional color accuracy for image display and printing
“Before and After” evaluation of your calibration results using a professional
Datacolor composite image
Fast and easy, calibration takes about five minutes to ensure your color
accuracy
Multiple Monitor Support of all your laptop and desktop monitors including
wide gamut, LED and 4k/5k displays
Page 2

2
Spyder®5PRO
Serious photographers and designers seeking a full-featured and advanced color
accuracy solution.
Next Generation Spyder5 colorimeter with dual purpose lens cap and
counterweight, improved tonal response, ambient light sensor, and the
industry’s only patented 7-detector optical engine
See, share, and print your images as you intended with confidence
Software designed for serious photographers with wizard, interactive help,
and advanced calibration options
“Before and After” evaluation of your calibration results using a professional
Datacolor composite image or your own images to examine nuances which
are most important to you
Multiple Monitor Support of all your laptop and desktop monitors including
wide gamut, LED and 4k/5k displays
Ambient light sensor monitors room lighting to ensure consistent viewing
conditions
Fast and easy, full calibration takes only about five minutes to ensure color
accuracy, less than half the time for periodic re-calibrations.
Monitor Quality Analysis module lets you monitor and compare the health of
all your laptop and desktop monitors
Spyder®5ELITE
Professional photographers, studios, and calibration perfectionists seeking ultimate
control of the color workflow.
Next Generation Spyder5 colorimeter with dual purpose lens cap and
counterweight, improved tonal response, ambient light sensor, and the
industry’s only patented 7-detector optical engine
See, share, and print your images as you intended with confidence
Software designed for calibration perfectionists with dual mode operation –
wizard and expert console, unlimited calibration settings, and advanced gray
balance algorithms
“Before and After” evaluation of your calibration results using a professional
Datacolor composite image or your own images in full screen mode to
examine nuances which are most important to you
Multiple Monitor Support of all your laptop and desktop monitors including
wide gamut, LED and 4k/5k displays, and front projectors
Ambient light sensor monitors room lighting to ensure consistent viewing
conditions
Fast and easy, full calibration takes only about five minutes to ensure color
accuracy, less than half the time for periodic re-calibrations
Unlimited control for calibration settings for the pro or calibration
Page 3

3
perfectionist including the better gray balance algorithm for the smoothest
gradients possible
Video standards for the pro crossing over to motion
Advanced Monitor Quality Analysis module lets you monitor and compare
the health of all your laptop and desktop monitors including screen
uniformity
Page 4

4
Table of Contents
INTRODUCTION 6
WHAT’S IN THE BOX 7
SYSTEM REQUIREMENTS 7
SPYDER5 COMPARISON CHART 8
SERIALIZATION AND ACTIVATION 9
SOFTWARE LAYOUT 13
SPYDER5EXPRESS 14
WELCOME SCREEN 14
SELECT DISPLAY 15
DISPLAY TYPE 16
MAKE AND MODEL 17
CALIBRATION 18
SAVE PROFILE 20
SPYDERPROOF 21
SPYDER5PRO 22
WELCOME SCREEN 22
SELECT DISPLAY 23
DISPLAY TYPE 24
IDENTIFY CONTROLS 25
MAKE AND MODEL 26
CALIBRATION SETTINGS 27
MEASURING ROOM LIGHT 28
CALIBRATION 30
SAVE PROFILE 32
RECAL 33
CHECKCAL 34
SPYDERPROOF 35
PROFILE OVERVIEW 36
SHORTCUTS 37
DISPLAY ANALYSIS 38
SPYDER5ELITE 39
WELCOME SCREEN 39
SELECT WORKFLOW 41
STEP-BY-STEP ASSISTANT 42
STUDIOMATCH 44
MEASURING ROOM LIGHT 45
EXPERT CONSOLE 47
CALIBRATION 48
Page 5

5
SAVE PROFILE 50
RECAL 51
CHECKCAL 52
SPYDERPROOF 53
SPYDERTUNE 54
PROFILE OVERVIEW 56
SHORTCUTS 57
DISPLAY ANALYSIS 58
GLOSSARY OF TERMS 60
FAQ’S 62
Page 6

6
Introduction
Thank you for purchasing your new Spyder5 Color Calibrator. This document will
offer a step-by-step guide for using your Spyder5 Calibrator to get the best possible
color from your laptop and/or desktop display(s).
Page 7

7
What’s in the Box
Spyder5 Sensor
Serial Number
Welcome Card with Welcome page details
Link to download the Spyder5 software
System Requirements
Windows 7 32/64, Windows 8.0, 8.1 32/64
Mac OS X 10.7, 10.8, 10.9, 10.10
Monitor resolution 1280x768 or greater, 16-bit video card (24 bit
recommended), 1GB of available RAM, 500 MB of available hard disk
Internet connection for software download
USB port
Page 8

8
Spyder5 Comparison Chart
Feature
Spyder5EXPRESS
Spyder5PRO
Spyder5ELITE
Designed for
Hobbyist
photographers
seeking a simple
monitor color
calibration solution
Serious
photographers and
designers seeking a
full-featured and
advanced color
accuracy solution
Professional
photographers,
studios, and
calibration
perfectionists seeking
ultimate control of the
color workflow
Hardware
Calibration
Device
Spyder5
Colorimeter
Spyder5
Colorimeter
Spyder5
Colorimeter
Software
4 Step Process
Wizard
Wizard
Interactive help
Interactive help
Interactive help
Advanced features
Expert Console
Suite of expert features
Calibration
Settings
Fixed (2)
16 Choices
Unlimited choices,
user-defined, and TV
standards for
videography
Multiple
Monitor
Support
Laptops
Laptops
Laptops
Desktop monitors
Desktop monitors
Desktop monitors
Front projectors
StudioMatch Assistant
Before & After
Calibration
Evaluation
Standard Datacolor
Image
Standard Datacolor
Image
Standard Datacolor
Image
Imported User Images
Imported User Images
(Full Screen Mode)
Room Light
Monitoring
None
3 Ambient Light
Settings
5 Ambient Light
Settings
Fast
Recalibration
Option
None
Yes
Yes
Display Analysis
None
Basic
Advanced including
Screen Uniformity
Page 9
9
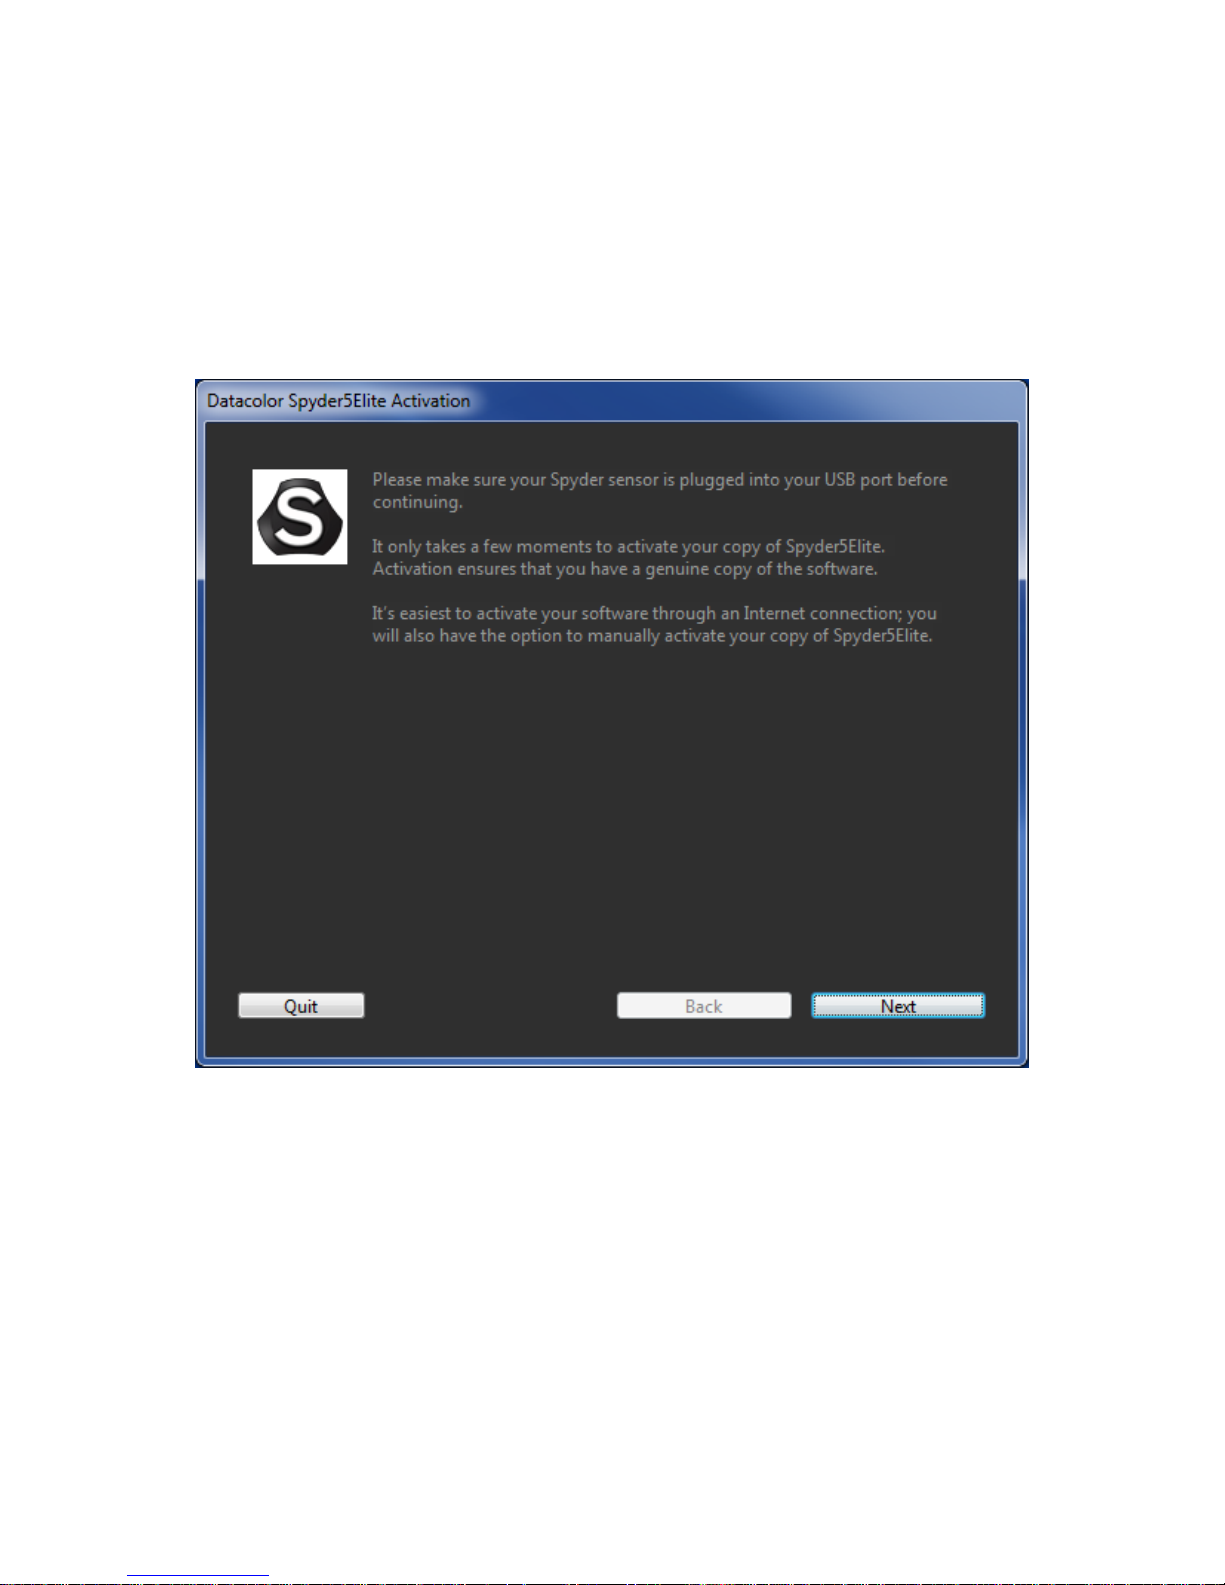
Serialization and Activation
The Spyder5 Activation is the same for all 3 models. The software wizard will walk
you through the activation process step-by-step.
First, make sure that your Spyder5 is plugged into a USB port on your computer;
make sure it is a direct port, not on a keyboard, hub, or extension cable.
Page 10
10
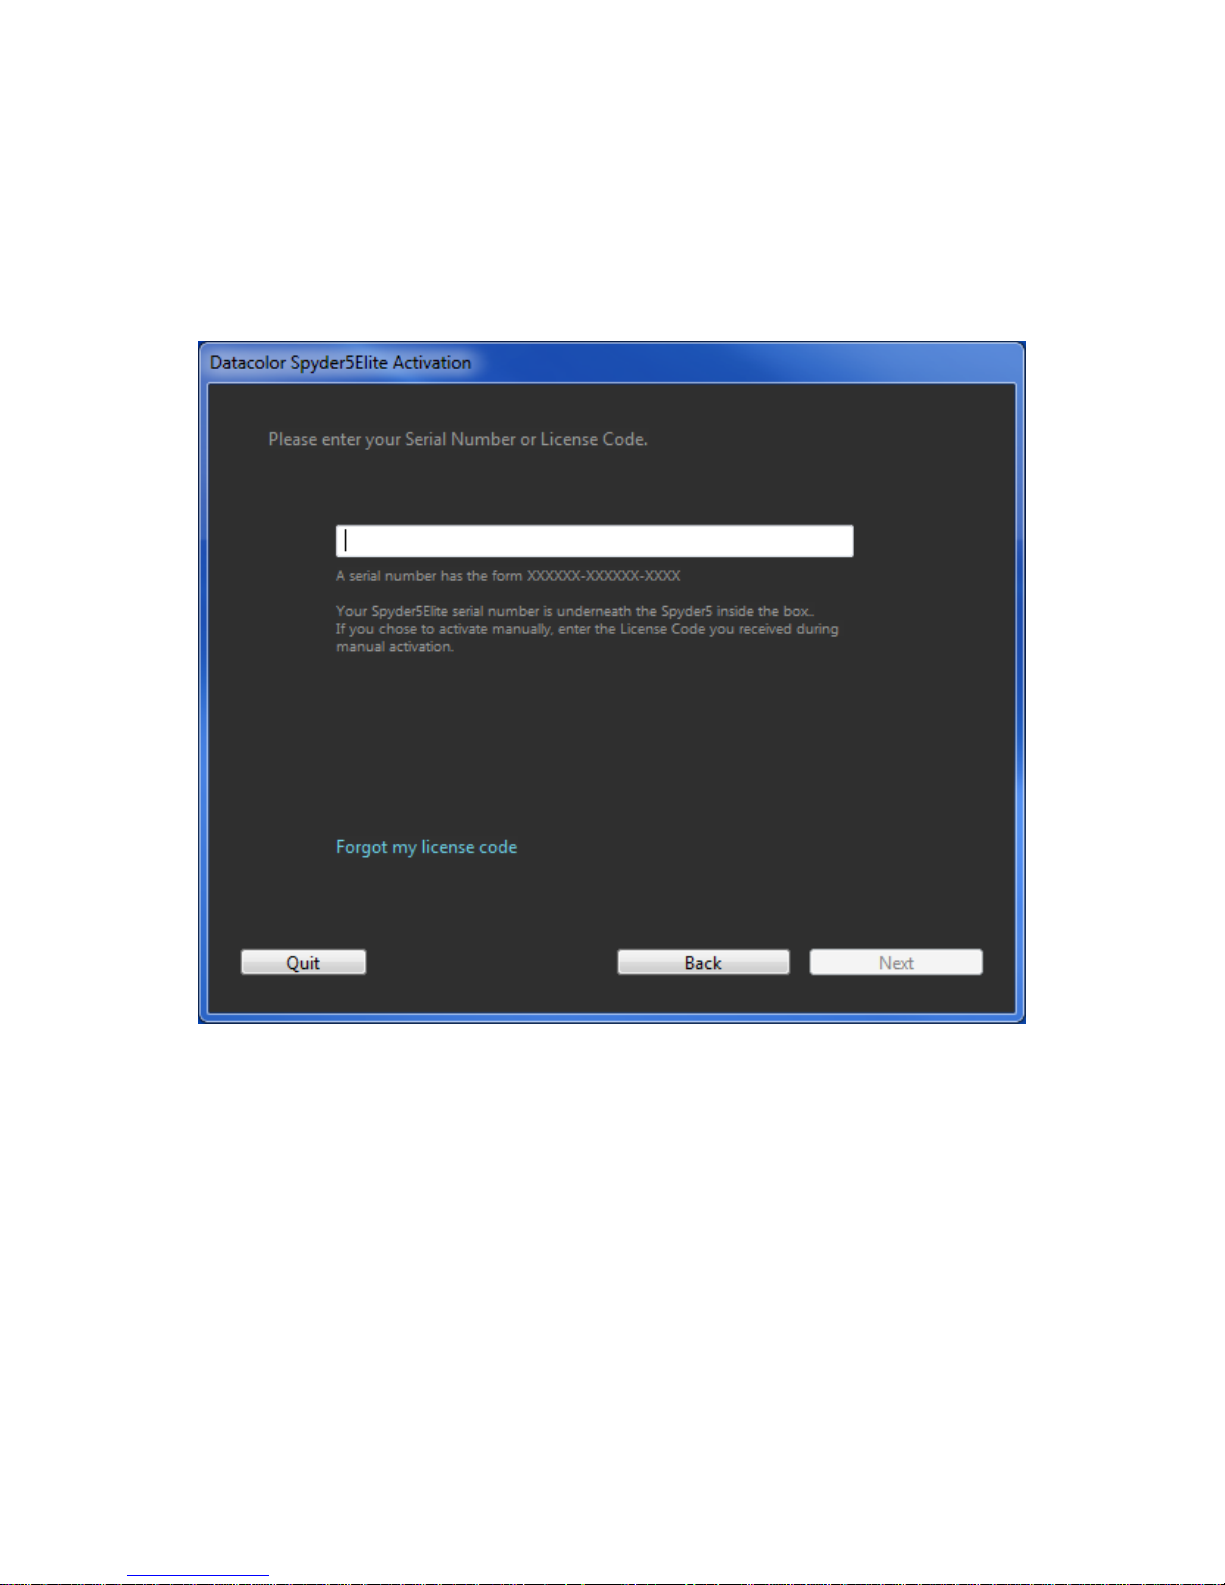
Enter your serial number or license code, the serial number is located in the box,
under the Spyder5 sensor, if you have already registered the software on another
machine, enter the license code you were provided then. With the easy automated
activation, please make sure that your computer is connected to the internet and
that no firewall blocks your Spyder software from communicating with the
Datacolor activation server.
Page 11
11
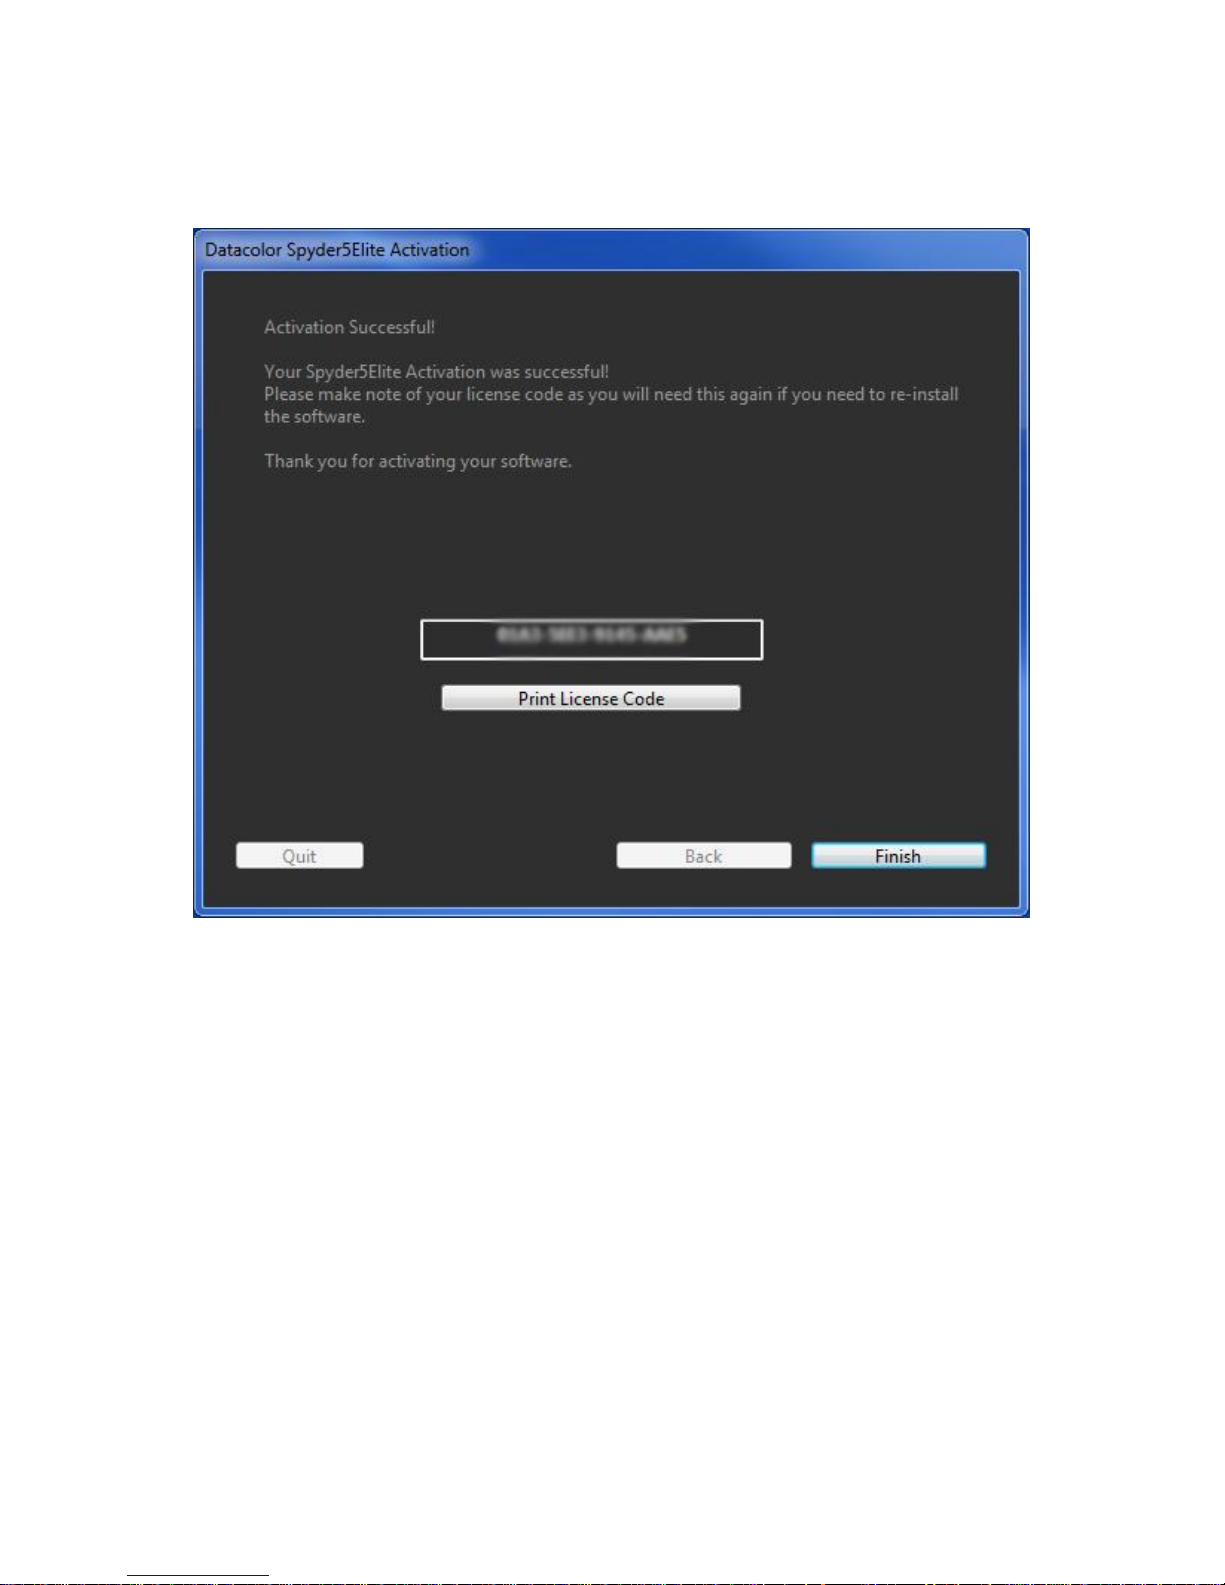
Save the email with the license code, you will need this if you want to use the device
on another computer.
Page 12

12
You will then be presented with two windows, the first asking if you would like to
automatically check for updates, the second if you would like to share your
calibration data with Datacolor. We recommend clicking yes to both of these as new
updates come out frequently which can improve the quality of your calibration. We
collect calibration information from our users to improve our products. No personal
information is collected.
Page 13

13
Software Layout
The software that comes with your Spyder5 is a wizard, which will walk you
through the process step-by-step. We have outlined the steps below based on which
unit you purchased, as each have different controls.
Some of the similarities in the software versions are outlined here:
While you are working with the software, you will see an Interactive Help screen on
the right hand side as you are navigating through the steps, describing the buttons
and windows in this area to explain the functionality of each feature.
In the bottom right corner there is a “Click to learn more” button, clicking on that
text will take you to a help file with more detailed instructions of the options
available on the current screen.
Page 14
14
Spyder5EXPRESS
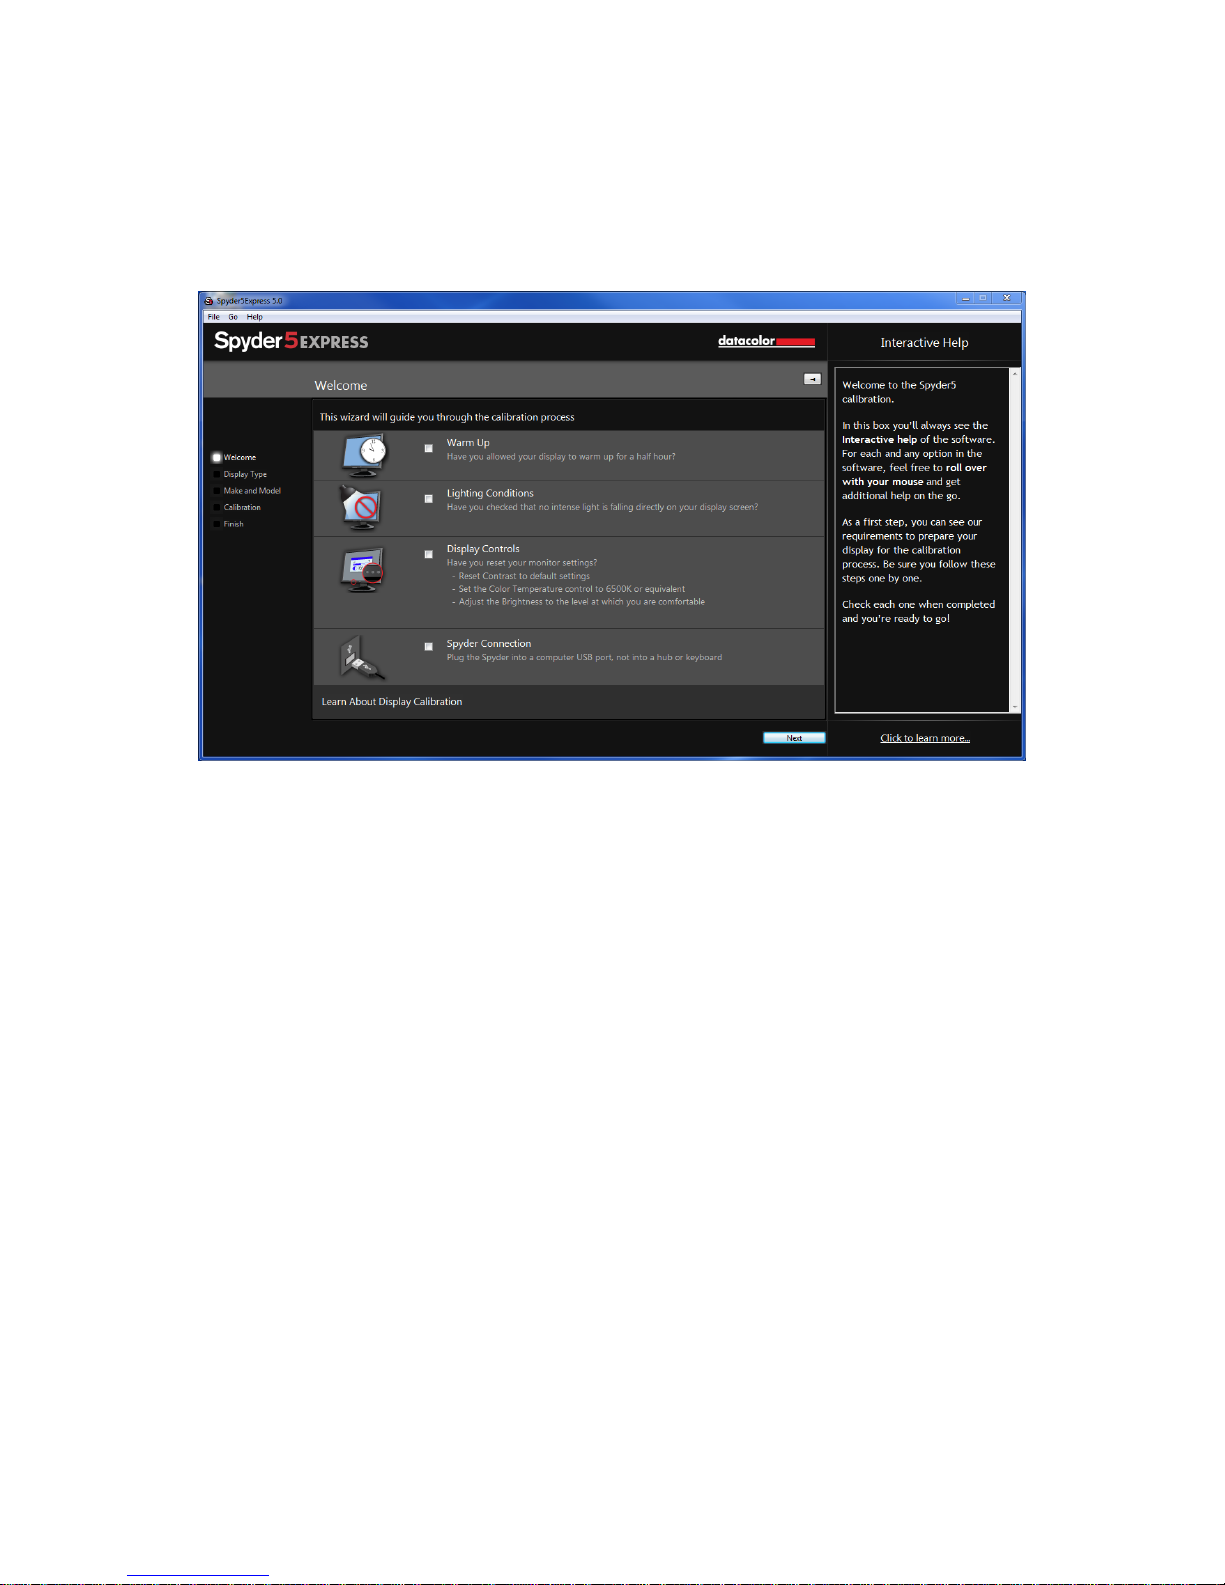
Welcome Screen
The first time you run the Spyder5EXPRESS software, you will be greeted with a
Welcome Screen:
There are 4 Checkboxes on this screen:
1) Warm Up
Please make sure that your display has been powered up for at least 30 minutes
prior to doing a calibration.
2) Lighting Conditions
Please make sure that there is no direct light falling on your display as this
could have an adverse effect on your calibration.
3) Display Controls
If your computer has these controls, make sure to set them to the default
settings or equivalent.
4) Spyder Connection
Please plug your Spyder5EXPRESS into a USB port on your computer. Please
avoid using a hub, extension cable, or a port on a keyboard as this could
prevent the Spyder unit from getting the proper data flow.
These checkboxes will only be activated the first time you run the software, the next
time you run the software the reminders will show up, but you will not need to
check the boxes again.
Once you have completed this step, please click the “Next” button in the lower right
corner.
Page 15
15
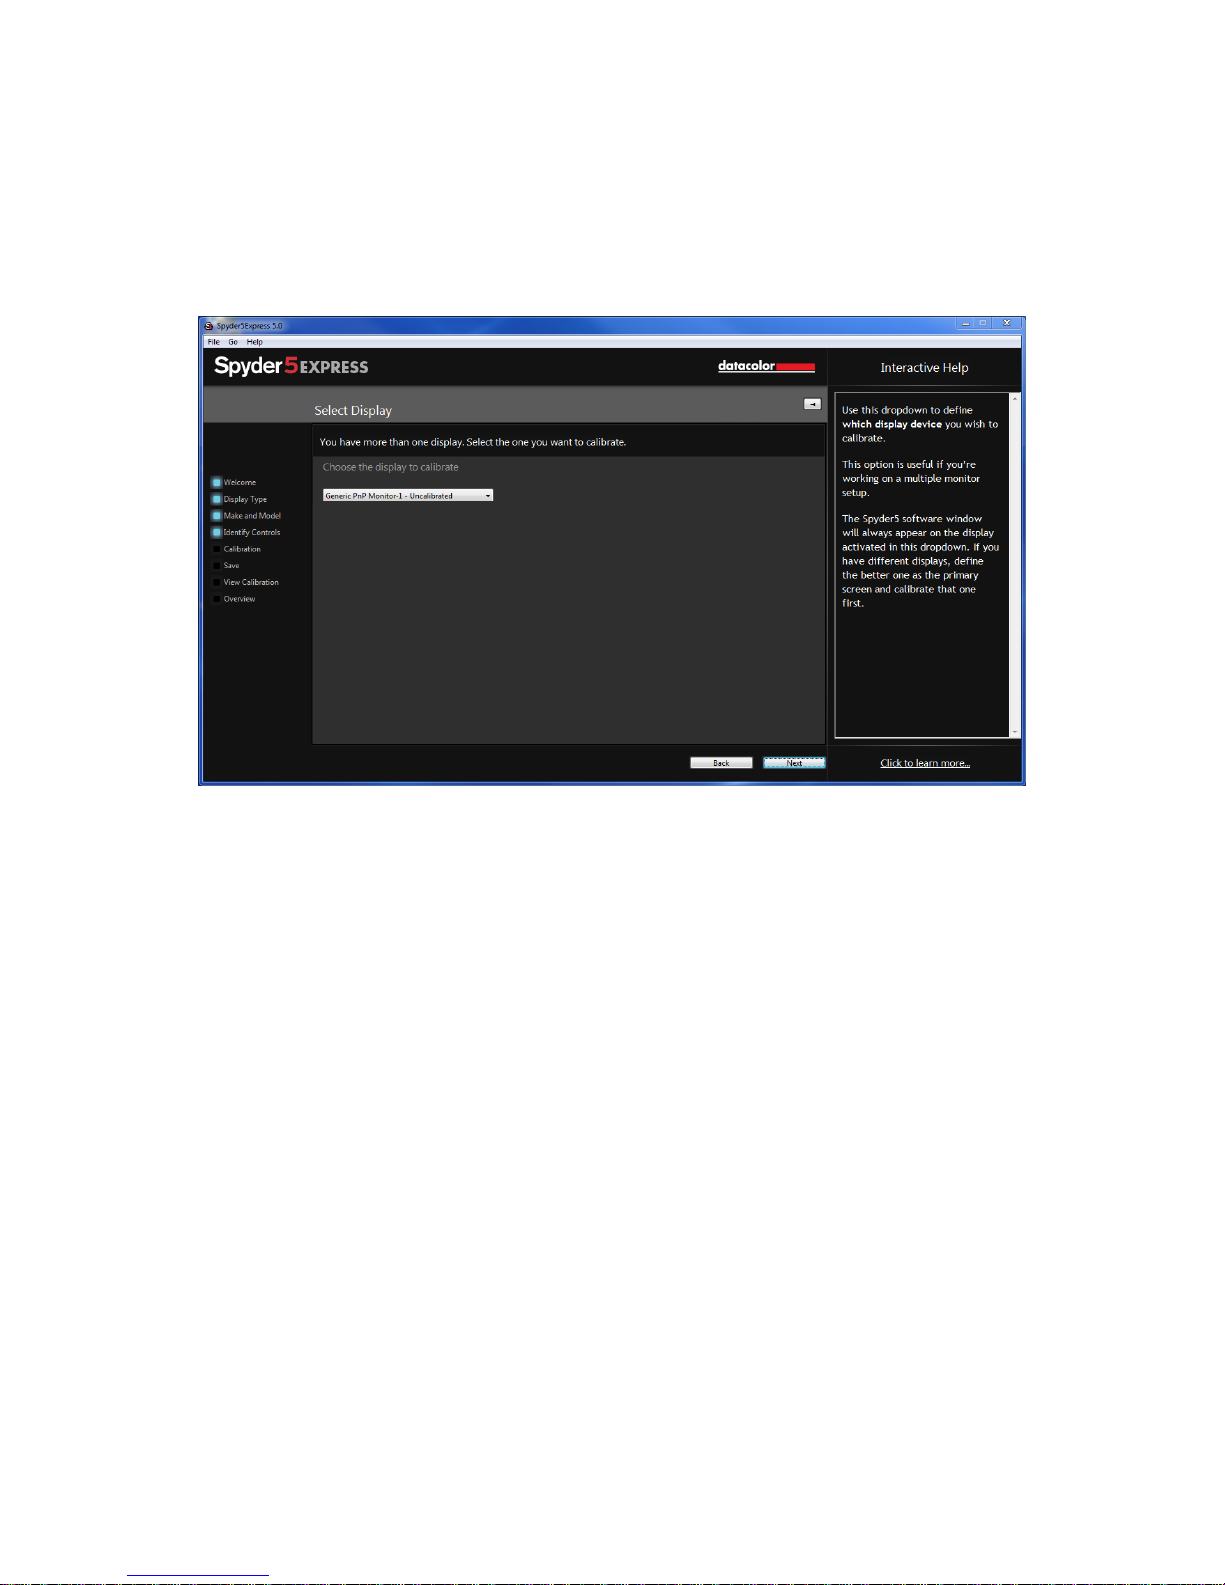
Select Display
If you have more than one display connected to your computer, you can select which
display to calibrate in this drop-down menu. The software will automatically move
to the selected display to run the calibration.
Once you have completed this step, please click the “Next” button in the lower right
corner.
Page 16
16
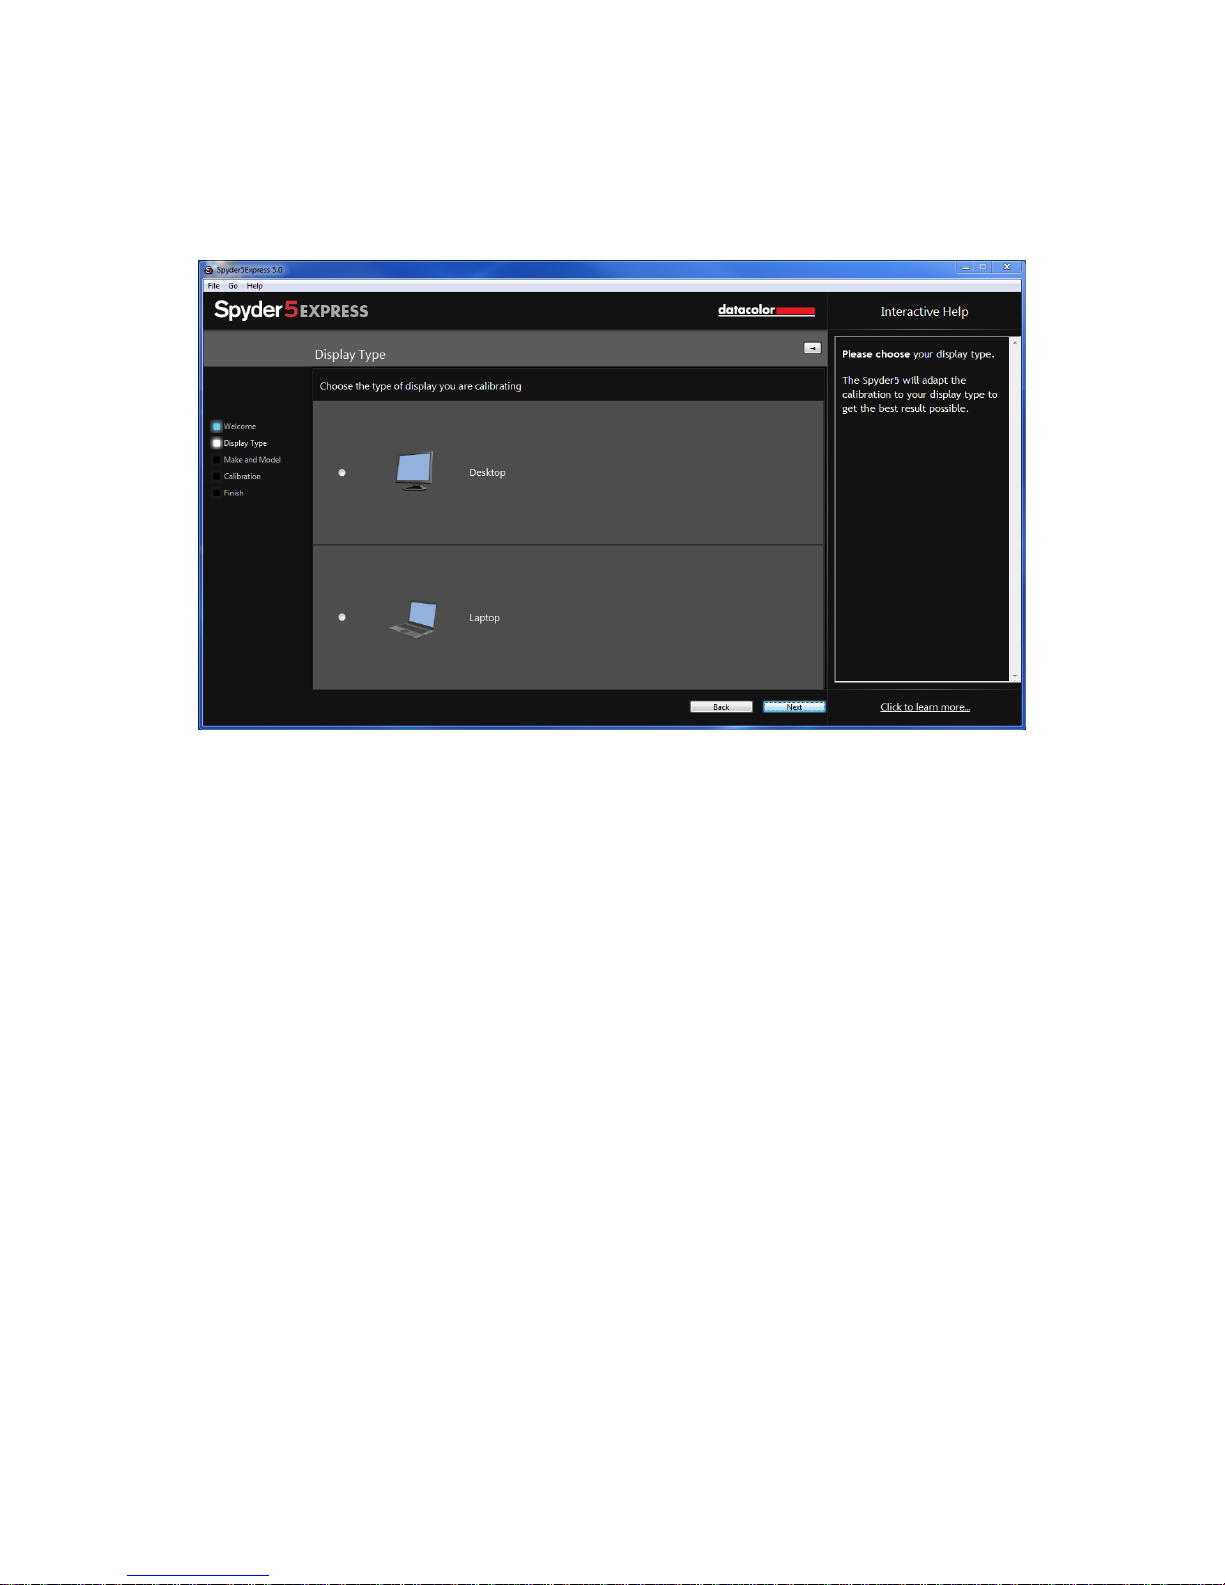
Display Type
Here you will choose whether you are using a Desktop or a Laptop Display.
Once you have completed this step, please click the “Next” button in the lower right
corner.
Page 17
17
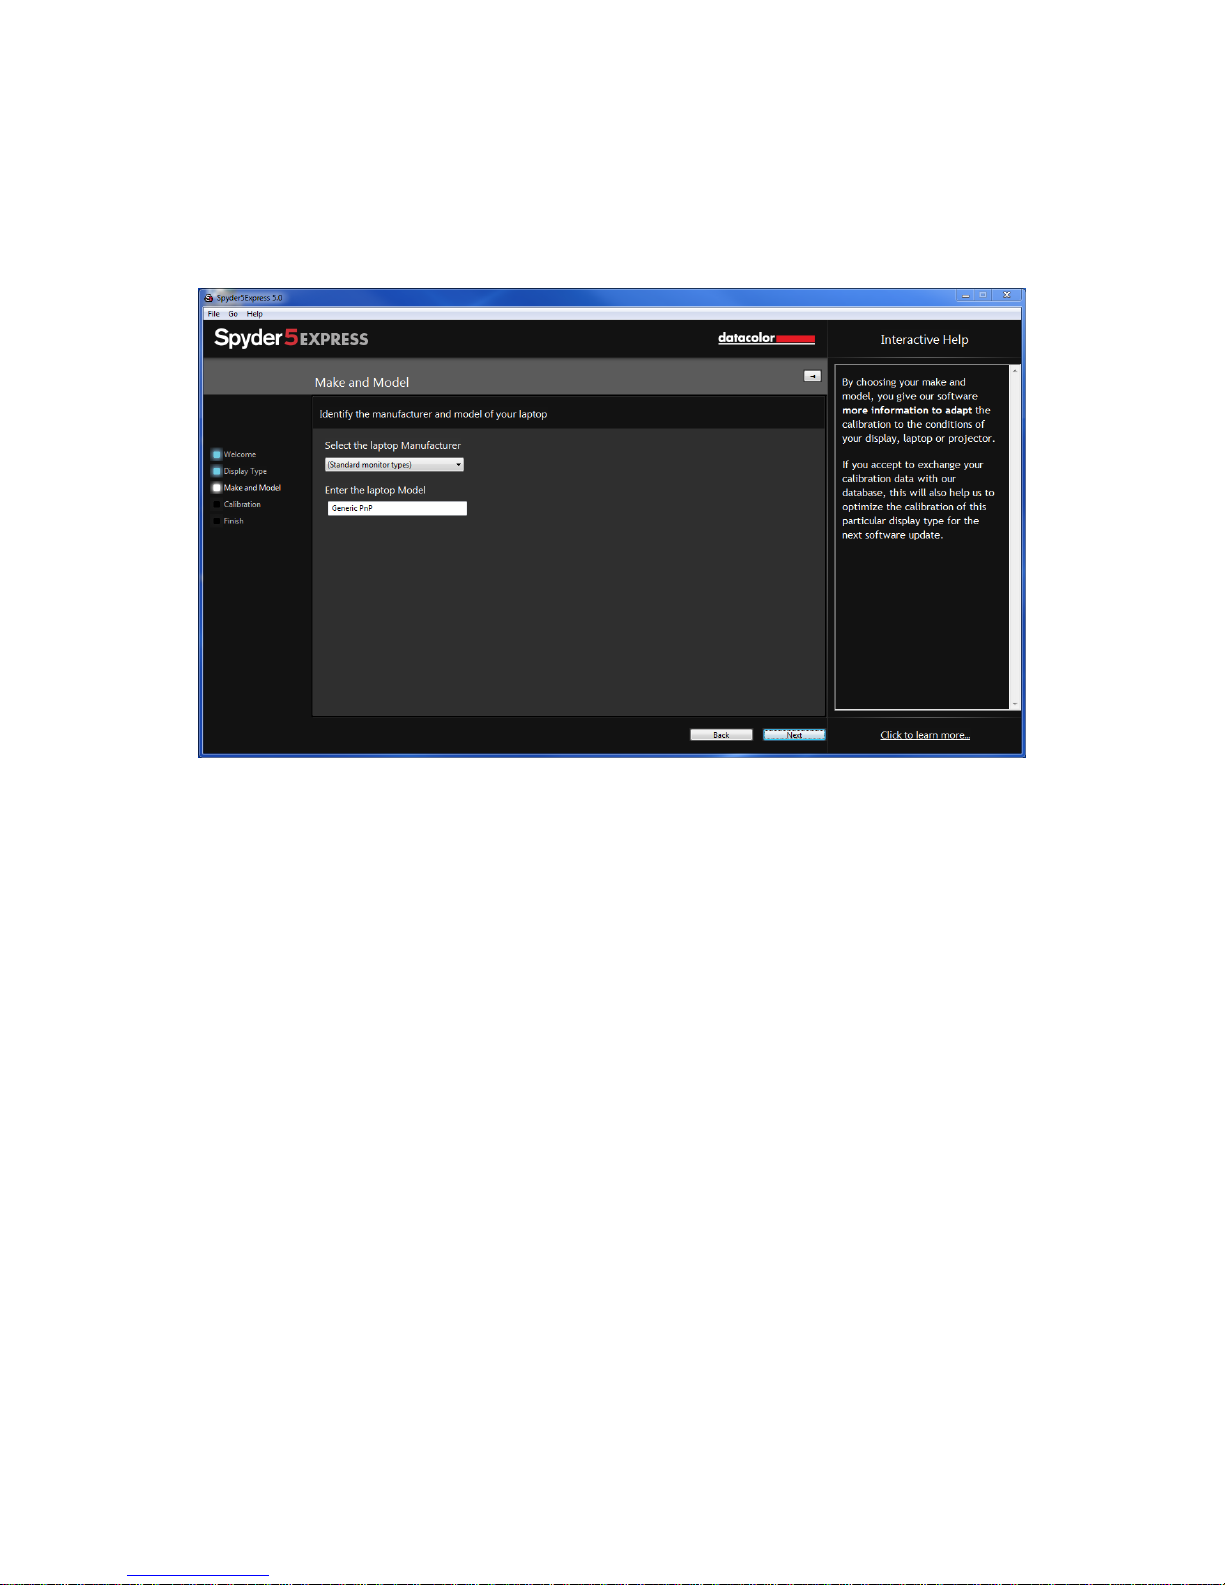
Make and Model
Please choose the Manufacturer of your display in this screen and enter the display
model.
Page 18
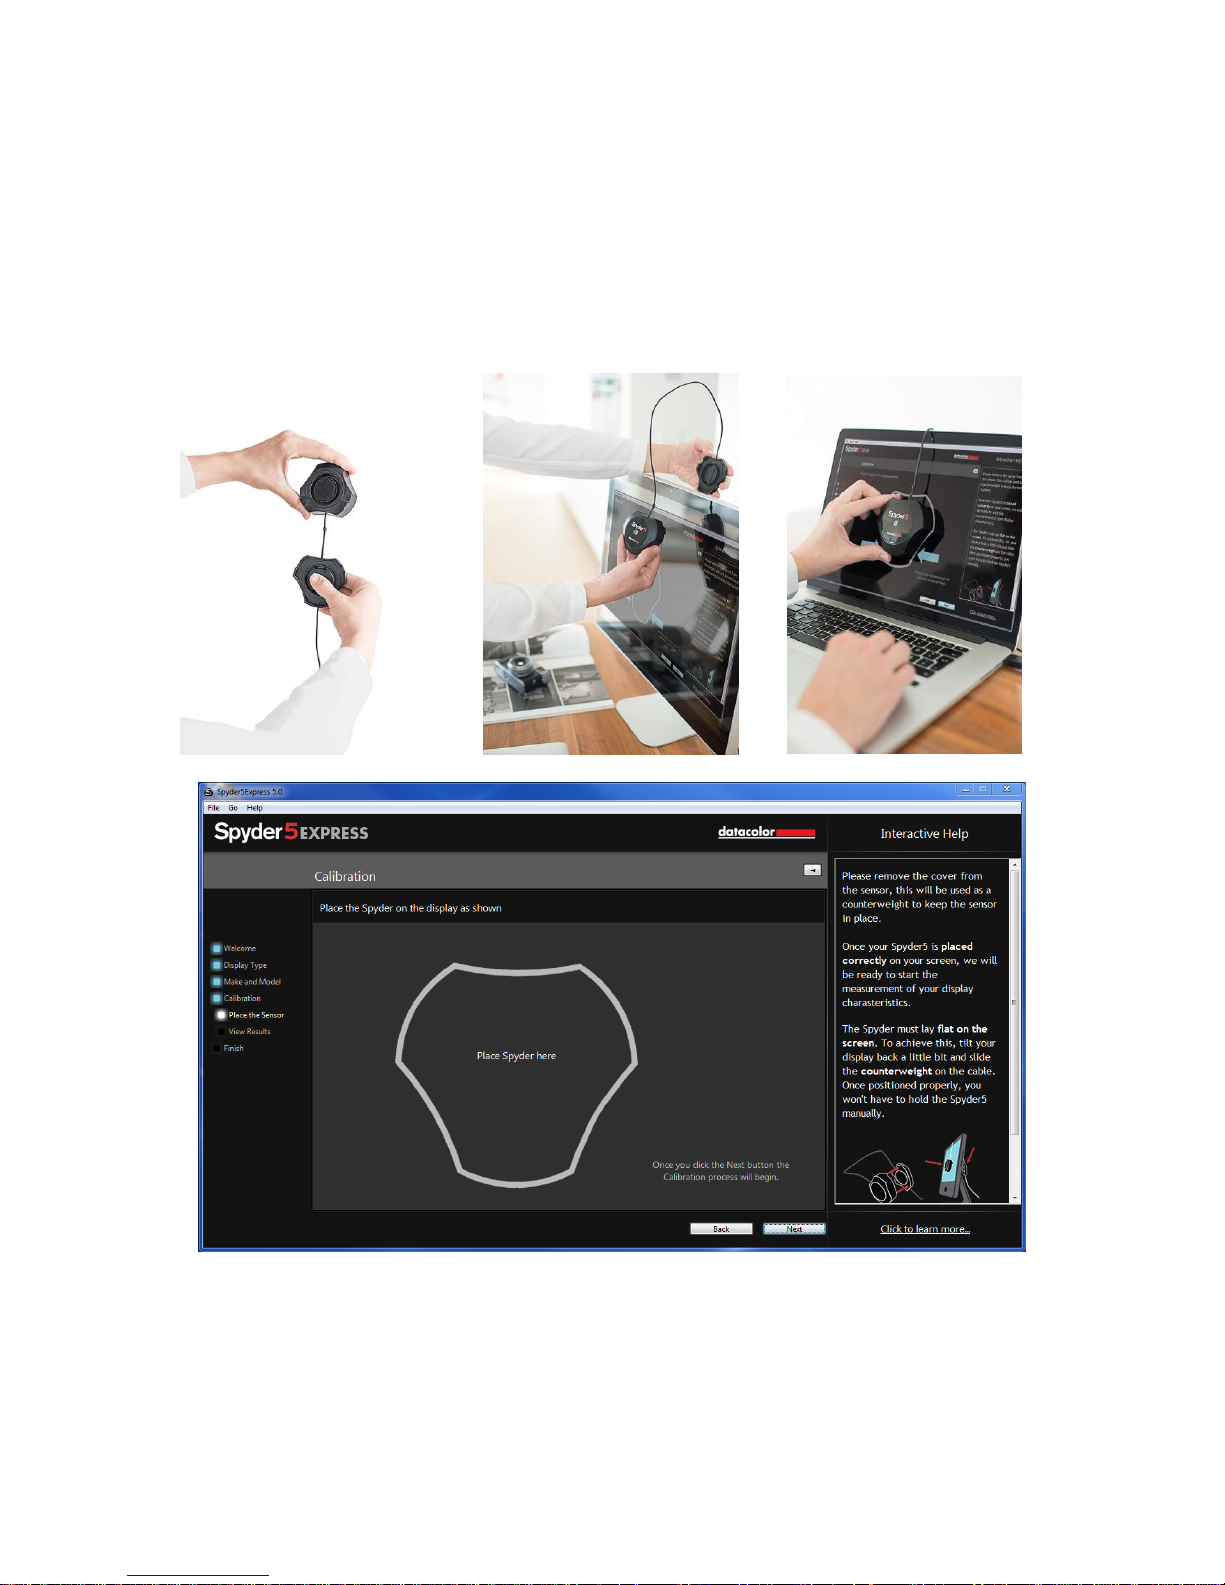
18
Calibration
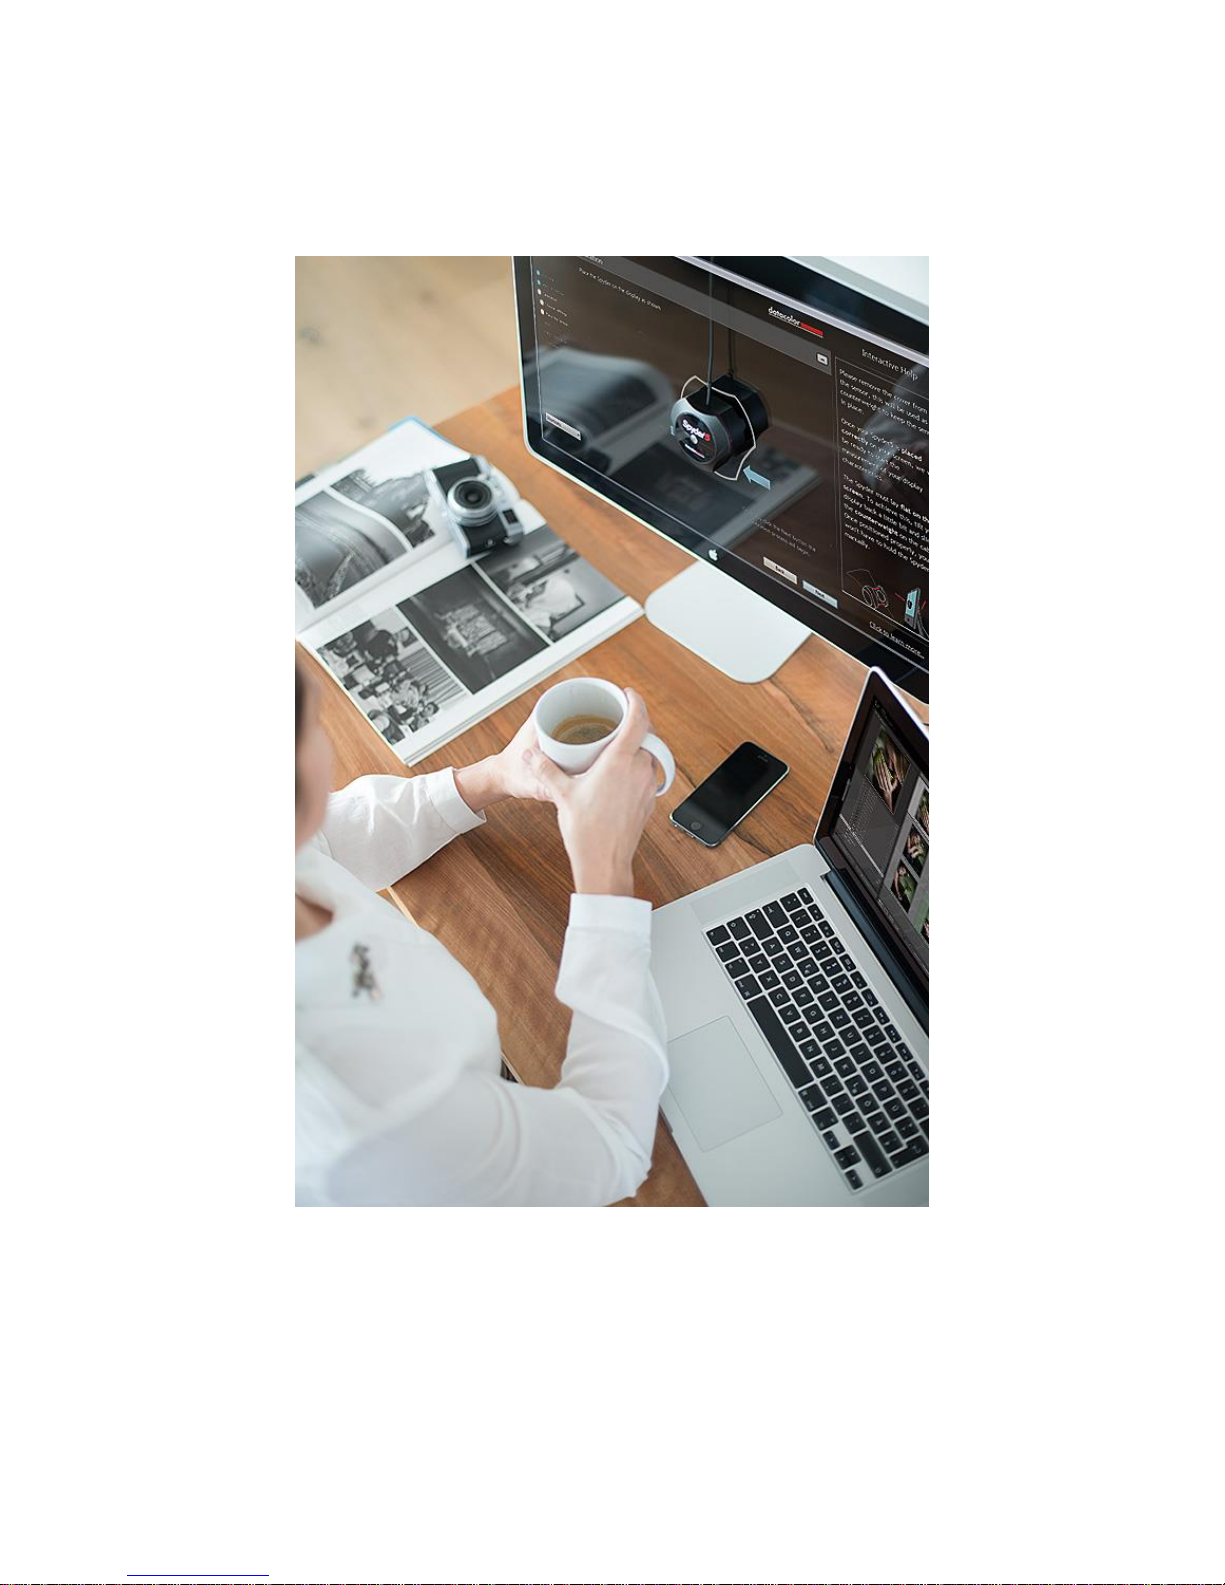
This screen shows you where to place the Spyder5 unit for the calibration process.
Remove the cover of the sensor as it is used as a counter-weight so that the unit
remains in place and flat against the screen. We recommend that you slightly tilt
your display back so the unit rests against the monitor without you having to hold it
in place, as any movement can cause a poor calibration.
Page 19
19
Once the unit is in place, click the next button to proceed with the calibration. A
series of color patches will flash on the screen, this process takes approximately 5-6
minutes.
Once the measuring is completed, click on the “Finish” button to proceed.
Page 20
20
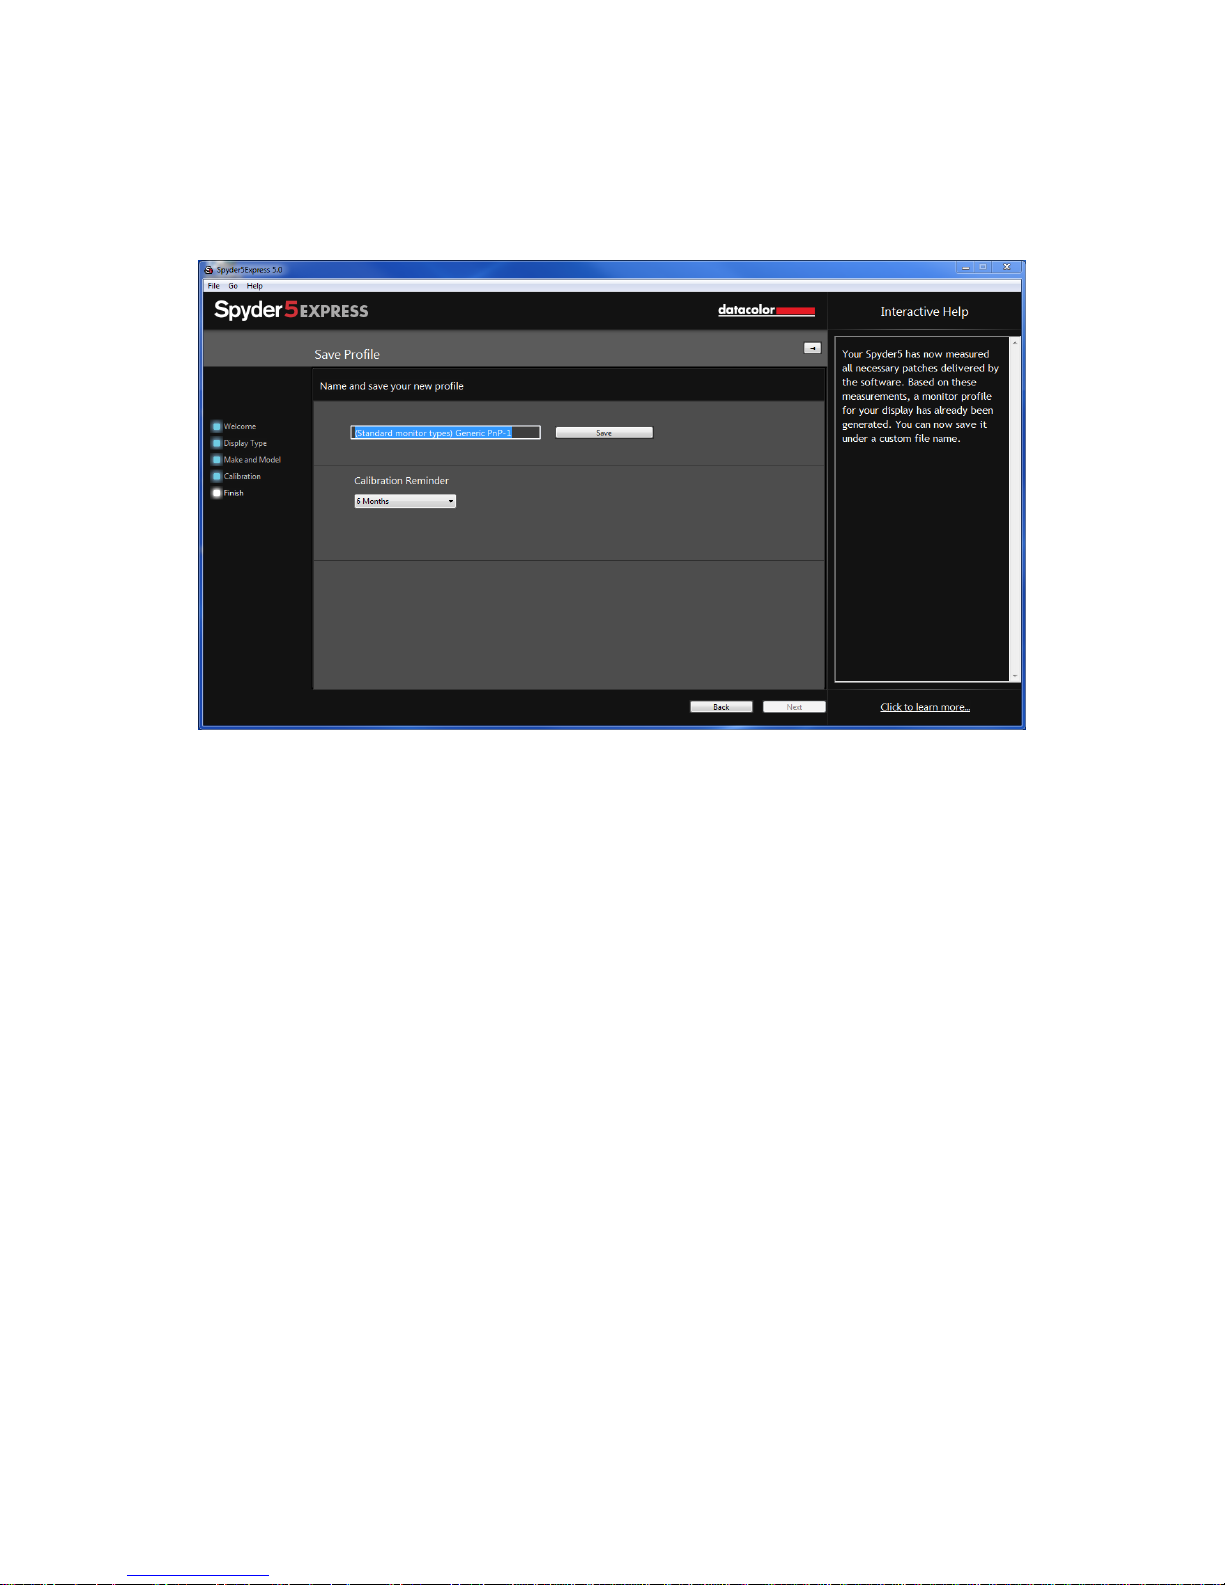
Save profile
After the calibration is complete, the Save Profile window will appear.
Enter the name you would like to save the profile as. Here is a sample file name we
think works best to keep an archive of your monitor profiles:
“Make_Model_yyyymmdd(date)_ver1”
Click “Save” to proceed.
You can also set a reminder of when to recalibrate your display, we recommend a
minimum of once a month.
Page 21

21
SpyderProof
The SpyderProof window allows you to compare between your new calibrated and
old uncalibrated image by clicking on the “Switch” button.
You can click inside an image to zoom into it for more detail in both calibrated and
uncalibrated views.
Once you are done with this screen you can click on “Quit” to exit the software, or
“Calibrate Another Display” if you have another display connected to this computer
that you want to calibrate.
Page 22

22
Spyder5PRO
Welcome Screen
The first time you run the Spyder5PRO software, you will be greeted with a
Welcome Screen:
There are 4 Checkboxes on this screen:
1) Warm Up
Please make sure that your display has been powered up for at least 30
minutes prior to doing a calibration.
2) Lighting Conditions
Please make sure that there is no direct light falling on your display as this
could have an adverse effect on your calibration.
3) Display Controls
If your computer has these controls, make sure to set them to the default
settings or equivalent.
4) Spyder Connection
Please plug your Spyder5PRO into a USB port on your computer. Please
avoid using a hub, extension cable, or a port on a keyboard as this could
prevent the Spyder unit from getting the proper data flow.
These checkboxes will only be activated the first time you run the software, the next
time you run the software the reminders will show up, but you will not need to
check the boxes again.
Once you have completed this step, please click the “Next” button in the lower right
corner.
Page 23

23
Select Display
If you have more than one display connected to your computer, you can select which
display to calibrate in this drop-down menu. The software will automatically move
to the selected display to run the calibration.
Once you have completed this step, please click the “Next” button in the lower right
corner.
Page 24

24
Display Type
Here you will choose whether you are using a Desktop or a Laptop Display.
Once you have completed this step, please click the “Next” button in the lower right
corner.
Page 25

25
Identify Controls
If you are calibrating a desktop monitor, here is where you will let the software
know if you have Brightness and/or Kelvin preset controls on your monitor.
Page 26

26
Make and Model
Please choose the Manufacturer of your display in this screen and enter the display
model.
Page 27

27
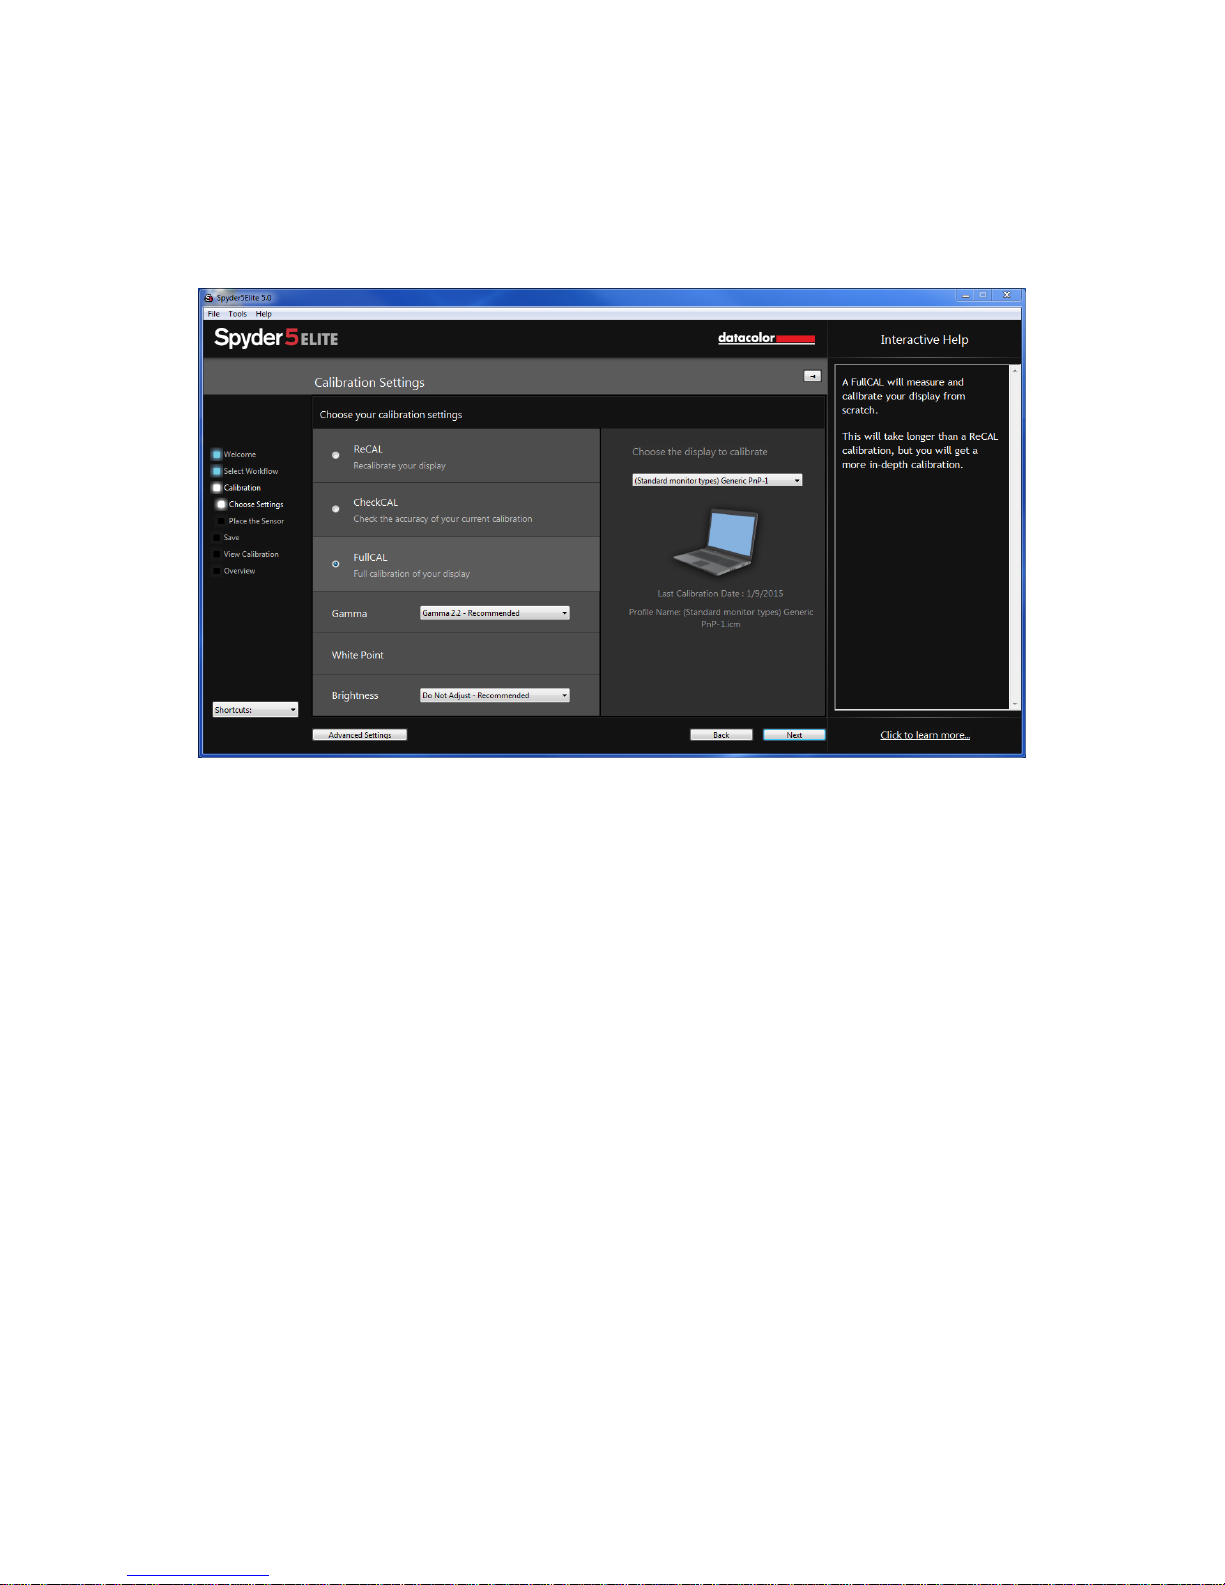
Calibration Settings
If this is your first time calibrating this display, you will automatically have Full
Calibration selected here. On subsequent calibrations you can choose doing a
FullCAL, a ReCAL, or a CheckCAL. A FullCAL will perform a full calibration of your
display. A ReCAL will recalibrate your display and a CheckCAL will check to see if
your display is still accurate.
You will also see your current target settings for Gamma, White Point, and
Brightness here. To make an adjustment to either of these targets, please choose
“Change Settings” in the lower left corner. Here you will also choose whether you
would want the Spyder to read your room light in order to help set the brightness of
your display properly based on the level of lighting in your room. Once you have
made your selections click “Next” to move onto the next screen.
Page 28

28
Measuring Room Light
If you have selected “Room Light On-Recommended” on a desktop machine, or
“Room Light Off-Recommended” on a laptop, the software will now want to take a
reading of your room light. Place the Spyder on your desk and click the next button;
a reading of your room light will be taken. Please be sure that no direct light is
falling on your display or the Spyder at this time.
After the reading is done the software will tell you what the room light
measurement is, it can be:
Moderately Low, Medium, or High
There will be recommendations on the screen based on which reading you have
achieved. We do not recommend calibrating in High or Very High room lighting.
Page 29

29
The software will recommend target settings here as well based on the room
lighting level. You can choose to accept these targets or continue with the targets
you have already chosen.
Please click ”Next” to proceed to the Calibration window.
Page 30

30
Calibration
If you have selected “Room Light On-Recommended” on the previous screen, a
dialogue will pop up asking you to stay at your computer for the beginning of the
calibration process to adjust your brightness level. The calibration process will stop
about a minute into the process and ask you to adjust your display brightness to the
recommended level. Once you have made an adjustment, either up or down, hit the
“Update” button, it will check the brightness level again to see if you are close to the
recommended setting. When you are within the parameters, you can press the
“Continue” button. It may take a couple of times to get your brightness set properly,
please try to get as close as possible to the target, though it may not fall completely
within the range, that is ok, as long as you are as close as you can be.
This screen shows you where to place the Spyder5 unit for the calibration process.
Remove the cover of the sensor as it is used as a counter-weight so that the unit
remains in place and flat against the screen. We recommend that you slightly tilt
your display back so the unit rests against the monitor without you having to hold it
in place, as any movement can cause a poor calibration.
Page 31

31
Once the unit is in place, click the next button to proceed with the calibration. A
series of color patches will flash on the screen, this process takes approximately 5-6
minutes.
Once the measuring is completed, click on the “Finish” button to proceed.
Page 32

32
Save profile
After the calibration is complete, the Save Profile window will appear.
Enter the name you would like to save the profile as. Here is a sample file name we
thinks works best to keep an archive of your monitor profiles:
“Make_Model_yyyymmdd(date)_ver1”
Click “Save” to proceed.
You can also set a reminder of when to recalibrate your display, we recommend
once a month.
Page 33

33
ReCAL
After you have already Fully Calibrated your display, you can do a ReCAL, this will
save time versus doing a FullCAL. Select ReCAL from the Calibration Settings
Window and proceed as in the full calibration.
Page 34

34
CheckCAL
A CheckCAL will quickly see if your display is in need of a calibration:
It will measure a small amount of color patches and either gives you two checks or
one or two X’s, which mean you will need to recalibrate.
Page 35

35
SpyderProof
The SpyderProof window allows you to compare between your new calibrated and
old uncalibrated image by clicking on the “Switch” button.
You can click inside an image to zoom into it for more detail in both calibrated and
uncalibrated views.
At the bottom of this screen you will see “SpyderProof Image: with a drop down
menu. Here you can choose to use the standard set of images, the ones that are
displayed by default, or you can choose custom and select an image on your
computer to use. You can also click on the “custom image” button to select an image,
or even just drag and drop an image onto this window to display it. Either TIFF or
JPEG images will work here.
Page 36

36
Profile Overview
On this screen you will view your current display’s gamut and be able to compare it
to industry standards; sRGB, NTSC, and AdobeRGB. You can also choose profiles you
have made previously to see how they compare.
Once you are done with this screen you can click on “Quit” to exit the software, or
“Calibrate Another Display” if you have another display connected to this computer
that you want to calibrate.
Page 37

37
Shortcuts
In the lower left corner of the software window is the “Shortcuts” drop down menu.
Here you can quickly access: Display Type, Calibration, SpyderProof, and Display
Analysis.
Page 38

38
Display Analysis
This is a series of 4 tests you can perform on your monitor to see its strengths and
weaknesses. These tests can be accessed through “Shortcuts” dropdown or directly
from the Spyder5 program folder at /Support/Spyder5ProMQA. These tests
include:
Gamut
Graphs the display’s color saturation
Tone Response
Graphs the display’s tone response and white point
Brightness and Contrast
Brightness, Contrast and White point at different Brightness settings
White Point at Different OSD Settings
Brightness, Contrast and White Point at Different presets
Select the tests you wish to perform and then click “Begin Tests”. The software will
walk you through where to place the sensor and direct you when to change the
brightness on your display.
When performing the Brightness and Contrast test, the first portion of the test will
have you set your display to 0% brightness. Once you click the measure button it
will take about 10 seconds to perform the test. As your screen will be fully dimmed
it will be impossible to see when the test is complete, please wait about 10 seconds
before turning the brightness up a bit to continue.
Once finished, you can select “View Report” to see the results of all the tests.
Page 39

39
Spyder5ELITE
Welcome Screen
The first time you run the Spyder5ELITE software, you will be greeted with a
Welcome Screen:
There are 4 Checkboxes on this screen:
1) Warm Up
Please make sure that your display has been powered up for at least 30
minutes prior to doing a calibration.
2) Lighting Conditions
Please make sure that there is no direct light falling on your display as this
could have an adverse effect on your calibration.
3) Display Controls
If your computer has these controls, make sure to set them to the default
settings or equivalent.
4) Spyder Connection
Please plug your Spyder5ELITE into a USB port on your computer. Please
avoid using a hub, extension cable, or a port on a keyboard as this could
prevent the Spyder unit from getting the proper data flow.
Page 40

40
These checkboxes will only be activated the first time you run the software, the next
time you run the software the reminders will show up, but you will not need to
check the boxes again.
Once you have completed this step, please click the “Next” button in the lower right
corner.
Page 41

41
Select Workflow
In this window you can select which calibration mode you want to use:
Step-by-step Assistant – the software assistant will walk you through each
step of the process.
StudioMatch – this will match all of your studio displays as closely as
possible.
Expert Console – This will provide all of your controls on one screen.
Page 42
42
Step-by-step Assistant
If this is your first time calibrating this display, you will automatically have Full
Calibration selected here.
On subsequent calibrations you can choose doing a FullCAL, a ReCAL, or a
CheckCAL. A FullCAL will perform a full calibration of your display. A ReCAL will
recalibrate your display. A CheckCAL will check to see if your display is still
accurate.
You will also see your current target settings for Gamma, White Point, and
Brightness here. To make an adjustment to either of these targets, please choose the
drop down next to each setting to make your changes.
In the lower left corner there is an “Advanced Settings” button. Here you can choose
a custom target for Gamma, White Point, and Brightness as well as TV standards to
calibrate a videography workflow.
Page 43

43
The next dropdown is where you will also choose whether or not to read your room
light to help set the brightness of your display properly based on the level of lighting
in your room. Once you have made your selections click next to move onto the next
screen. The final dropdown is the Grey Balance Calibration with Better, Faster
(recommended), and off. Better will do an iterative grey Balance which, though
taking longer, will give a more precise calibration. Choosing faster will do the
minimal Grey Balance required to get a calibration. Off, only use this when
calibrating a DLP front projector.
Once you have made your settings, click “next” to start the calibration process.
Page 44

44
StudioMatch
Choose the displays you would like to match using the StudioMatch feature.
StudioMatch allows you to get a consistent picture on all of the displays, attached to
your workstation.
If you are trying to match displays from another machine, please enter the lowest
Brightness Value on this page as well. If you haven’t calibrated the other machines
yet, leave this blank for now.
Click on “Next” and the software will ask to take a reading of the room light, make
sure no light is falling directly on the Spyder or screen at this point and then click
“Next”.
Page 45

45
Measuring Room Light
If you have selected “Room Light On-Recommended” on a desktop machine, or
“Room Light Off-Recommended” on a laptop, the software will now want to take a
reading of your room light. Place the Spyder on your desk and click the next button;
a reading of your room light will be taken. Please be sure that no direct light is
falling on your display or the Spyder at this time.
Next you will take brightness readings of the displays you are looking to match. The
software will keep track of these displays and when finished, it will recommend
settings based on its readings. It will give you a targeted brightness, keep track of
this number if you are going to try to match monitors connected to another
machine, it will also give you recommended gamma and White Point settings based
on its readings.
Page 46

46
Click “Next” and you will be prompted to save this target.
Once it is saved, the software will show you where the file is. If you are calibrating
monitors connected to another computer, you will copy this file to the other
computers and select this file when calibrating.
Click “Next” to move onto the Calibration process; in Studio Match it will perform
this on both monitors.
Page 47

47
Expert Console
In the Expert Console you have access to all of the settings in one screen.
You will first select the display you wish to calibrate from the drop down menu.
Below that, you can choose a custom target that you created previously, or choose a
standard target from the list, the 2.2-6500 120 is the usual default, but feel free to
change it to what you need for your purposes. The White point and Gamma menus
allow you to select presets or type in the exact value you wish to obtain.
Under the luminance section you can choose “Visual” or “Measured Mode”. In Visual
Mode you will let the Spyder5 measure the room light to define the brightness
target needed for your particular room. In Measured Mode you can enter a custom
value in cd/m
Under “Options” you have a checkbox to view your calibrated monitor vs an
uncalibrated setting by checking or unchecking the box. Turning on Room Light
Compensation will allow the Spyder5 to read the level of lighting in your room to
properly set the brightness and contrast of your display. The final dropdown is the
Grey Balance Calibration with Better, Faster (recommended) and off. Better will do
an iterative Grey Balance which, though taking longer, will give a more precise
calibration. Choosing faster will do the minimal Grey Balance required to get a
calibration.
Once you have made your selections, click “Next” to begin the calibration process.
2
as a calibration target.
Page 48

48
Calibration
If you have selected “Room Light On-Recommended” on the previous screen, a
dialogue will pop up asking you to stay at your computer for the beginning of the
calibration process to adjust your brightness level. The calibration process will stop
about a minute into the process and ask you to adjust your display brightness to the
recommended level, once you have made an adjustment, either up or down, hit the
“Update” button, it will check the brightness level again to see if you are close to the
recommended setting, once you are within the parameters, you can press the
“Continue” button. It may take a couple of times to get your brightness set properly,
please try to get as close as possible to the target, though it may not fall completely
within the range, that is ok, as long as you are as close as you can be.
This screen shows you where to place the Spyder5 unit for the calibration process.
Remove the cover of the sensor as it is used as a counter-weight so that the unit
remains in place and flat against the screen. We recommend that you slightly tilt
your display back so the unit rests against the monitor without you having to hold it
in place, as any movement can cause a poor calibration.
Page 49

49
Once the unit is in place, click the next button to proceed with the calibration. A
series of color patches will flash on the screen; this process takes approximately 5-6
minutes. If you choose Grey Calibration “Better”, this process takes 1-3 minutes
longer.
Once the measuring is completed, click on the “Finish” button to proceed.
Page 50

50
Save profile
After the calibration is complete, the Save Profile window will appear.
Enter the name you would like to save the profile as. Here is a sample file name we
think works best to keep an archive of your monitor profiles:
“Make_Model_yyyymmdd(date)_ver1”
Click “Save” to proceed.
You can also set a reminder of when to recalibrate your display, we recommend
once a month.
Page 51

51
ReCAL
After you have already Fully Calibrated your display, you can do a ReCAL, this will
save time versus doing FullCAL. Select ReCAL from the Calibration Settings Window
and proceed as in the full calibration.
Page 52

52
CheckCAL
A CheckCAL will quickly see if your display is in need of a calibration:
It will measure a small amount of color patches and either give you two checks or
one or two X’s, which mean you will need to recalibrate.
Page 53

53
SpyderProof
The SpyderProof window allows you to compare between your new calibrated and
old uncalibrated image by clicking on the “Switch” button.
You can click inside an image to zoom into it for more detail in both calibrated and
uncalibrated views.
At the bottom of this screen you will see “SpyderProof Image: with a drop down
menu. Here you can choose to use the standard set of images, the ones that are
displayed by default, or you can choose custom and select an image on your
computer to use. You can also click on the “custom image” button to select an image,
or even just drag and drop an image onto this window to display it. Either TIFF or
JPEG images will work here.
Page 54

54
SpyderTune
These settings should only be changed if you want to match multiple monitors with
different backlight technologies, as it will change the precise correction done by the
Spyder5 calibration.
When done properly, a StudioMatch calibration will match multiple displays. If you
are using multiple displays and they work with different backlight technologies and
different panels, it gets complicated to match them together. That's where the
SpyderTune function of Spyder5 comes in.
Only use SpyderTune if absolutely necessary. It will change the sophisticated
monitor calibration of your Spyder5 and is therefore only a compromise to match
screens whose technological differences make it difficult to achieve an alignment.
Metamerism Failure
Our eyes can't adapt to multiple light sources if they have a different spectral
distributions as the receptors in our eyes absorb light at various wavelengths. Even
though the Spyder5 or any other sensor will measure both as having the same value.
This is also known as the "metamerism failure".
SpyderTune Sliders
Inside SpyderTune, you can change the White Point from Red to Blue and from
Purple to Green. Furthermore, you can change the intensity of the Gamma and the
Brightness of your Display.
Page 55

55
Which display should be adjusted?
We recommend you to use your better display as primary one and only change the
secondary display's calibration with SpyderTune to match their view.
Switch
Once you're SpyderTune corrections are done, be sure you compare with the
original Spyder5 calibration by clicking the "Switch" button.
Save
If the result is as expected and you could match your screens together, you can click
the "Save" button to save your calibration with the new SpyderTune adjustments.
Reset
If you made a mistake, you can click the "Reset" button to reset the sliders to the
original state of the Spyder5 calibration.
Page 56

56
Profile Overview
On this screen you will view your current display’s gamut and be able to compare it
to industry standards; sRGB, NTSC, and AdobeRGB. You can also choose profiles you
have made previously to see how they compare.
Once you are done with this screen you can click on “Quit” to exit the software, or
“Calibrate Another Display” if you have another display connected to this computer
that you want to calibrate.
Page 57

57
Shortcuts
In the lower left corner of the software window is the “Shortcuts” drop down menu.
Here you can quickly access: Display Type, Calibration, Expert Console, SpyderTune,
SpyderProof, StudioMatch, and Display Analysis.
Page 58

58
Display Analysis
This is a series of 6 tests you can perform on your monitor to see its strengths and
weaknesses. You can access these tests through the “Shortcuts” dropdown or
directly from the Spyder5 program folder at /Support/Spyder5EliteMQA.
These tests include:
Gamut
Graphs the display’s color saturation
Tone Response
Graphs the display’s tone response and white point
Brightness and Contrast
Brightness, Contrast and White point at different Brightness settings
White Point at Different OSD Settings
Brightness, Contrast and White Point at Different presets
Screen Uniformity
Maps the uniformity of the display’s brightness and color
Color Accuracy
Analyze how accurately the monitor displays various colors
Select the tests you wish to perform and then click “Begin Tests.” The software will
walk you through where to place the sensor and direct you when to change the
brightness on your display.
Page 59

59
When performing the Brightness and Contrast test, the first portion of the test will
have you set your display to 0% brightness. Once you click the measure button it
will take about 10 seconds to perform the test. As your screen will be fully dimmed
it will be impossible to see when the test is complete, please wait about 10 seconds
before turning the brightness up a bit to continue.
Once finished, you can select “view report” to see the results of all the tests.
Page 60

60
Glossary of Terms
AdobeRGB
Default color space for computer displays.
Ambient Light
Light from any source, other than the display, that reaches the screen surface.
Brightness
Amount of light radiating from the screen.
Calibrate
To measure and correct by comparison with a standard, of the correct value or each
reading on a measuring instrument.
Candela
Basic unit of luminous intensity.
Color Temperature
Measurement of the color of white light, expressed in degrees Kelvin. The color
temperature is the color of light a perfect black-body radiator emits when heated to
the temperature. Computer monitors typically have a color temperature of 50009300 Kelvin: 5000 Kelvin is a yellow-white, 9300 Kelvin is a blue-white and 6500
Kelvin is a standard white point that matches daylight at noon.
Contrast
Difference in color and/or brightness of an image and other images within the same
field of view.
Curves
Graph of tonal response characteristics in the display.
Gamma
Non-linear operation used to code and decode brightness values in an image.
Gamut
Refers to the complete set of colors which can be reproduced/captured by a device.
Kelvin
Kelvin scale is a measure of temperature, starting from absolute zero.
Luminance
Amount of light emitted or reflected from a surface.
NTSC
Default color space for television.
OSD
Abbreviation for “On-Screen Display”.
Profile
Data file used to define and match color.
Room Light
(See Ambient Light.)
Saturation
Intensity of a color, expressed as the degree to which it differs from white. Can also
be described as vividness or richness of a color.
sRGB
Default color space for the Internet.
Page 61

61
Tone
Lightness, brightness or value of a patch in an image: dark tones correspond to
shadows, light tones correspond to highlight areas.
White Point
(See Color Temperature.)
Page 62

62
FAQ’s
1. What does calibrate mean?
To measure and correct by comparison with a standard, of the correct value
or each reading on a measuring instrument.
2. What is a profile?
A data file that describes the color behavior of a physical device (such as a
scanner, monitor, or printer) or that defines the color of an abstract color
space (such as Adobe RGG or ColorMatch RGB) in terms of a deviceindependent color model (such as CIE LAB or CIE XYZ). Used by colormanagement systems to define and match color.
3. What is the Curves window?
It provides a graphical display of the tonal response characteristics of the
monitor system. This includes representations of the monitor’s default
behavior, the desired behavior and the actual behavior.
4. What does color temperature mean?
It is a measurement of the color of white light, expressed in degrees Kelvin.
(The Kelvin scale is a measure of temperature, starting from absolute zero.)
The color temperature is the color of light a perfect black-body radiator
emits when heated to the temperature. Computer monitors typically have a
color temperature of 5000-9300 Kelvin: 5000 Kelvin is a yellow-white, 9300
Kelvin is a blue-white and 6500 Kelvin is a standard white point that matches
daylight at noon
5. What is native white point?
The native white point is the color temperature that the monitor hardware
exhibits without any software calibration applied. With some monitors it can
be adjusted with front panel controls, with others, it is fixed, and can only be
corrected with software adjustments.
6. What is ambient light?
Light from any source, other than the projection device, that reaches the
screen surface. The amount of ambient light affects the contrast, and
resolution of the screen.
7. How do I receive software updates?
Datacolor is constantly working to improve and upgrade our software. These
updates are then posted in the ‘Software Upgrades’ section of our website,
where our customers can download them free of charge. The only thing the
customer needs in order to successfully install their Datacolor update is their
serial number.
Page 63

63
8. Where is my software serial number?
Your serial number will be either 17 or 18 digits long; depending on your
application. It is located on the inside of your box under the hardware device.
Please do not confuse this with the hardware serial number for your
hardware device(s).
9. Why don’t my monitors look the same after calibration?
Visual observation of two monitors sitting side-by-side will never appear to
match. Even if they are the same type, make and model, two displays will
have subtle differences that are readily discerned in side-by-side
comparison, but become negligible when each display is viewed separately.
Comparing a CRT monitor to an LCD monitor will be even less rewarding
because of the inherent differences in display technology. In a side-by-side
comparison between a CRT and an LCD, the LCD will always be perceived as
'brighter' and having 'higher contrast'. This is because the peak luminance of
an LCD is typically about twice that of a CRT, even when you calibrate both
monitors to have the same Gamma and White Point.
To compound the effect, the organic eye-brain colorimeter (aka human color
perception) causes one kind of difference to be perceived as if it were
another kind of difference. Even if two samples have the same color but
different luminance, they will be perceived as also different in color. Thus,
when you calibrate a CRT and an LCD to the same Gamma and White Point
and place the monitors next to each other, the fact that the LCD is twice as
bright will cause them to appear different in color even if an instrument
records identical chromaticities.
The human visual system has another powerful feature, referred to as
'adaptation'. For example, if you move from a room with incandescent
lighting to one that is lit with fluorescent tubes, you will initially perceive
white objects as having a bluish cast, and possibly brighter than they were.
However, after a few minutes, your visual system 'adapts' to the new
environment and your 'adapted' perception is that white objects are merely
white.
Visual adaptation allows us to use two different technologies, like CRT and
LCD, to view the same image file with similar perception. However, if you
place two different monitors side-by-side and view them simultaneously, the
visual system cannot adapt to both simultaneously. They will always appear
different (in color, luminance and contrast) due to that very sensitive
'comparison' function of human visual perception.
Therefore, a side-by-side comparison of two monitors is not a reasonable
metric for determining whether you can use each monitor individually and
Page 64

64
achieve similar results. A better test would be to put each monitor in a
separate room, displaying the same image file (using the same software).
Then view the image on monitor 1, allowing time for visual adaptation. Next,
move to monitor 2, again allowing time for visual adaptation.
In such a test it is important to confirm that the image file being viewed has
an embedded ICC profile that accurately defines its color space. Also that
Photoshop's Color Settings are set such that the embedded color profile is
used, and that each monitor is correctly calibrated, profiled and its profile is
set as the current monitor profile.
10. What is Datacolor’s technical support policy?
Datacolor provides technical support at no additional charge. If you have a
question, please visit our support site:
support.datacolor.com
 Loading...