

Page 1

Page 2

Open the printer cover. Remove the protective wrap
from the cleaning roller (b) and install the cleaning
roller in the printer (c).
a Load the ribbon on the ribbon cartridge.
b Load the ribbon cartridge in the printer.
Fan the cards, and then load them
in the input hopper.
a Open the laminator cartridge gate.
b Push the full supply roll onto the
supply spindle.
c Push the empty take-up spool
onto the take-up spindle with
the black gear.
d Close the gate.
a Load the laminator cartridge(s) in the printer.
b Close the printer cover.
a Connect the power cable to
the printer.
b Connect the power cable to
an outlet.
c Power on the printer.
d Wait for the Ready light (on
the LCD panel) to turn green.
Page 2
Page 3

Local connection to a PC using the USB data port
Benefits
• Secure—users print cards from one PC
• Simple—quickest and easiest way to start printing cards
See “Local USB Installation on page 4
Network connection using the Built-in Ethernet port
Benefits
• Connects to Ethernet 10base-T
• Economical—several users can send cards to one printer
• No print server required
See “Built-In Ethernet” on page 5
Network connection using a print server connected to the network (HP
Benefits
• Flexible—print server can support
specialized protocols
• Integrates the printer into your existing
infrastructure
See “Network With Print Server” on page 6
Network connection using a wireless print server (HP 380x)
Benefits
• The latest technology
• Portability
See “Wireless Print Server” on page 7
®
175x rev c)
SP75 Quick Install Guide Page 3
Page 4
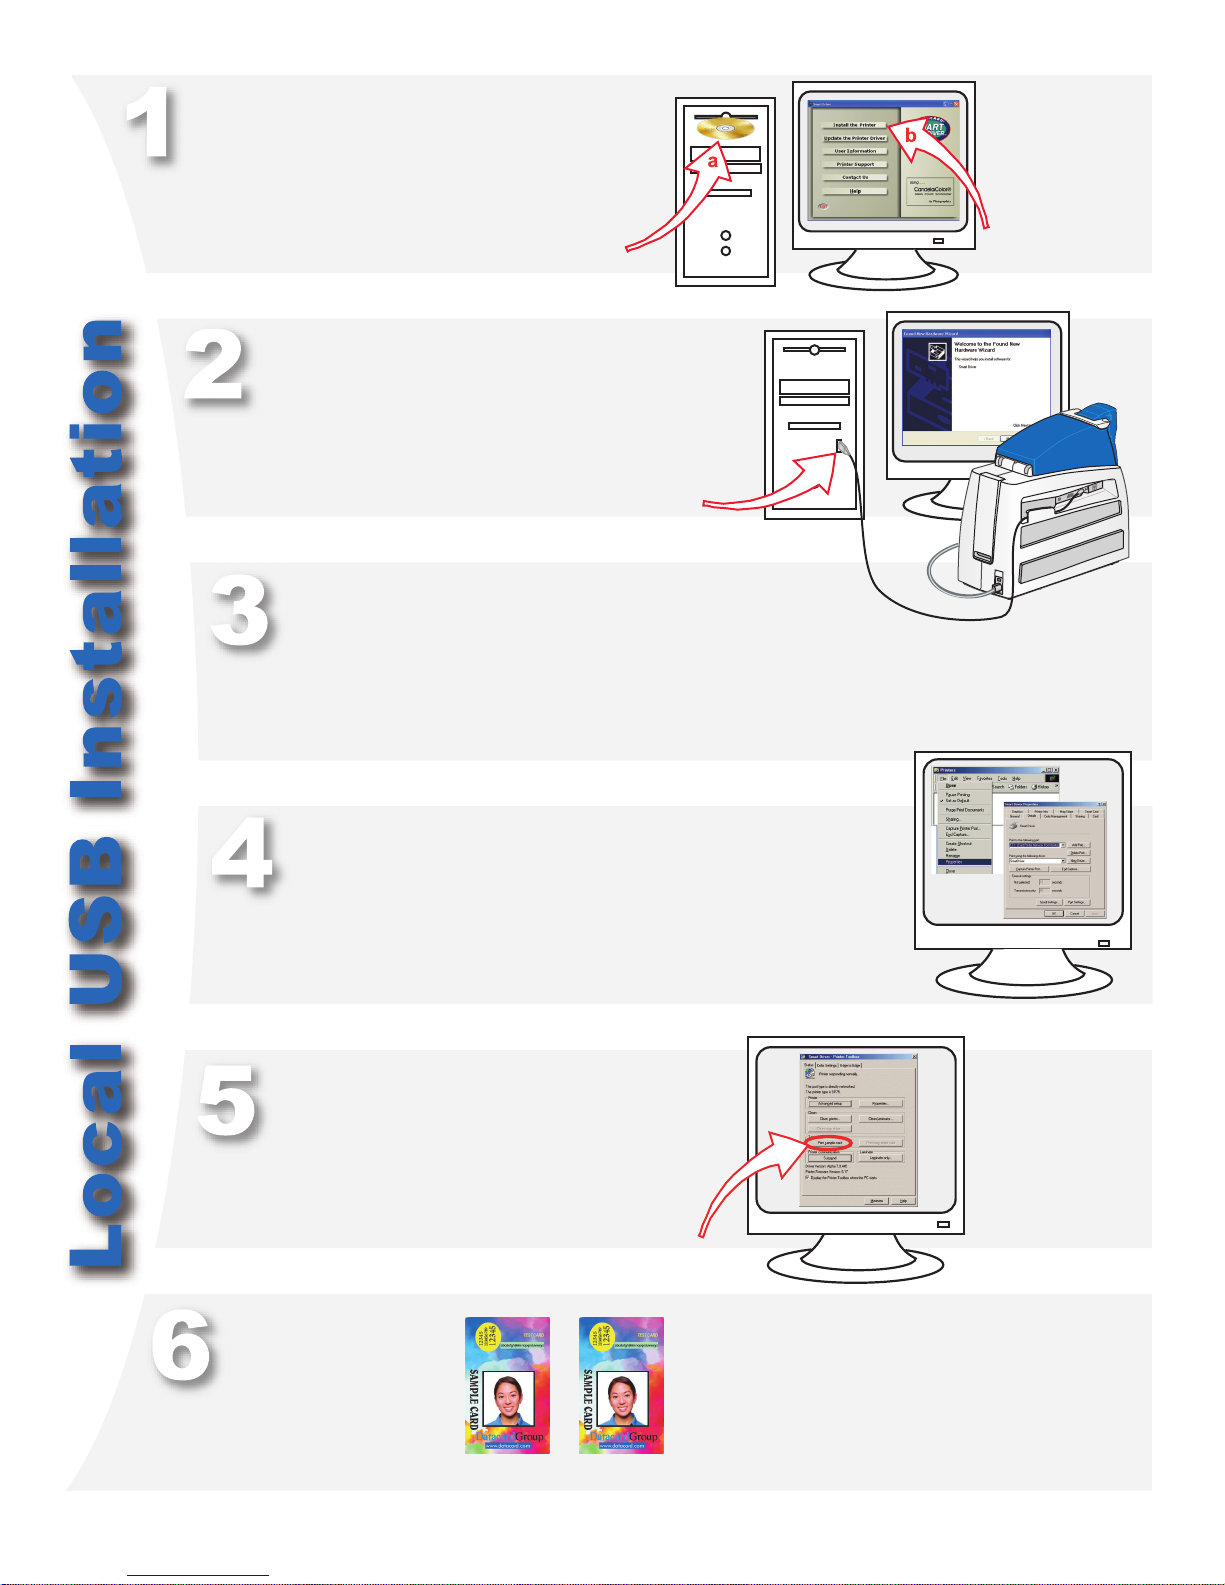
a Insert the Smart Driver CD-ROM in the
PC’s drive.
b Click “Install the Printer” after the
window opens.
Connect the USB data cable to the PC when prompted.
Follow the prompts to install the Smart Driver and Info Central.
Printing Preferences (Windows
and Me), or Default Document Properties (Windows NT®) opens at the
end of installation.
Change the Laminator “Apply Material” settings to match the material
loaded in the printer. Change other settings if needed.
Open the Printer Toolbox when Printing
Preferences, Properties, or Document Default
Properties opens. Click “Print Sample Card” on
the Printer Toolbox.
Compare your card with
the factory card.
®
2000 and XP), Properties (Windows 98
Page 4
Congratulations, you have installed the printer!
Complete the installation report and install your
ID software now.
Page 5
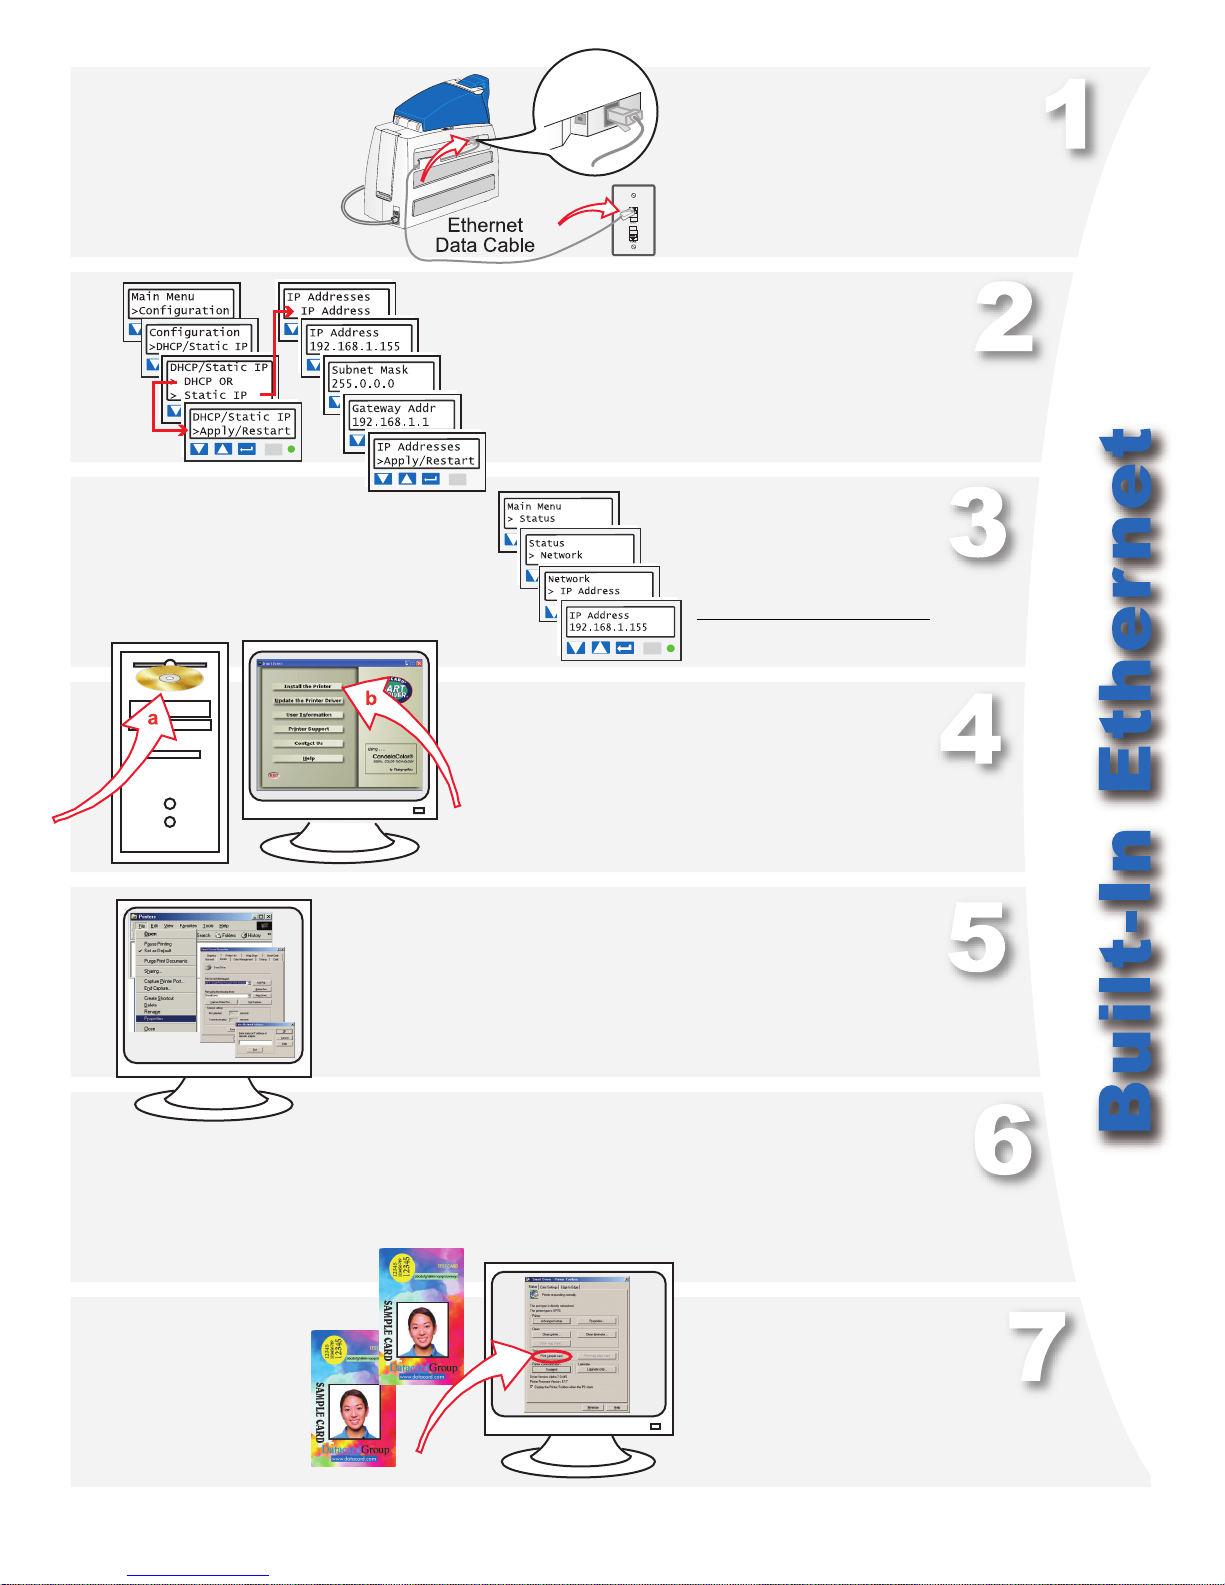
Connect the printer to the network
using an Ethernet cable.
Use the printer LCD panel to set the IP address
mode—DHCP or Static IP. Set the IP address if
needed. The printer restarts if you changed settings.
Retrieve the IP address
and record it.
IP Address:
a Insert the Smart Driver CD-ROM.
b Click “Install the Printer” after the
window opens. Choose “Direct
Network” during installation.
Set the printer IP address in the driver’s Properties\ Ports\
Configure or Properties\ Details\ Port Settings dialog box.
Open the Printing Preferences (Windows 2000 and XP), Properties (Windows
98 and Me), or Default Document Properties (Windows NT) dialog box and
change the laminator “Apply Material” settings to match the supplies loaded in
the printer. Change other settings if needed.
Congratulations,
you have installed the
printer! Complete the
installation report
and install your ID
software now.
SP75 Quick Install Guide Page 5
Open the Printer Toolbox when
Printing Preferences, Properties,
or Document Default Properties
opens. Click “Print Sample Card”
on the Printer Toolbox.
Compare your card with the
factory card.
Page 6
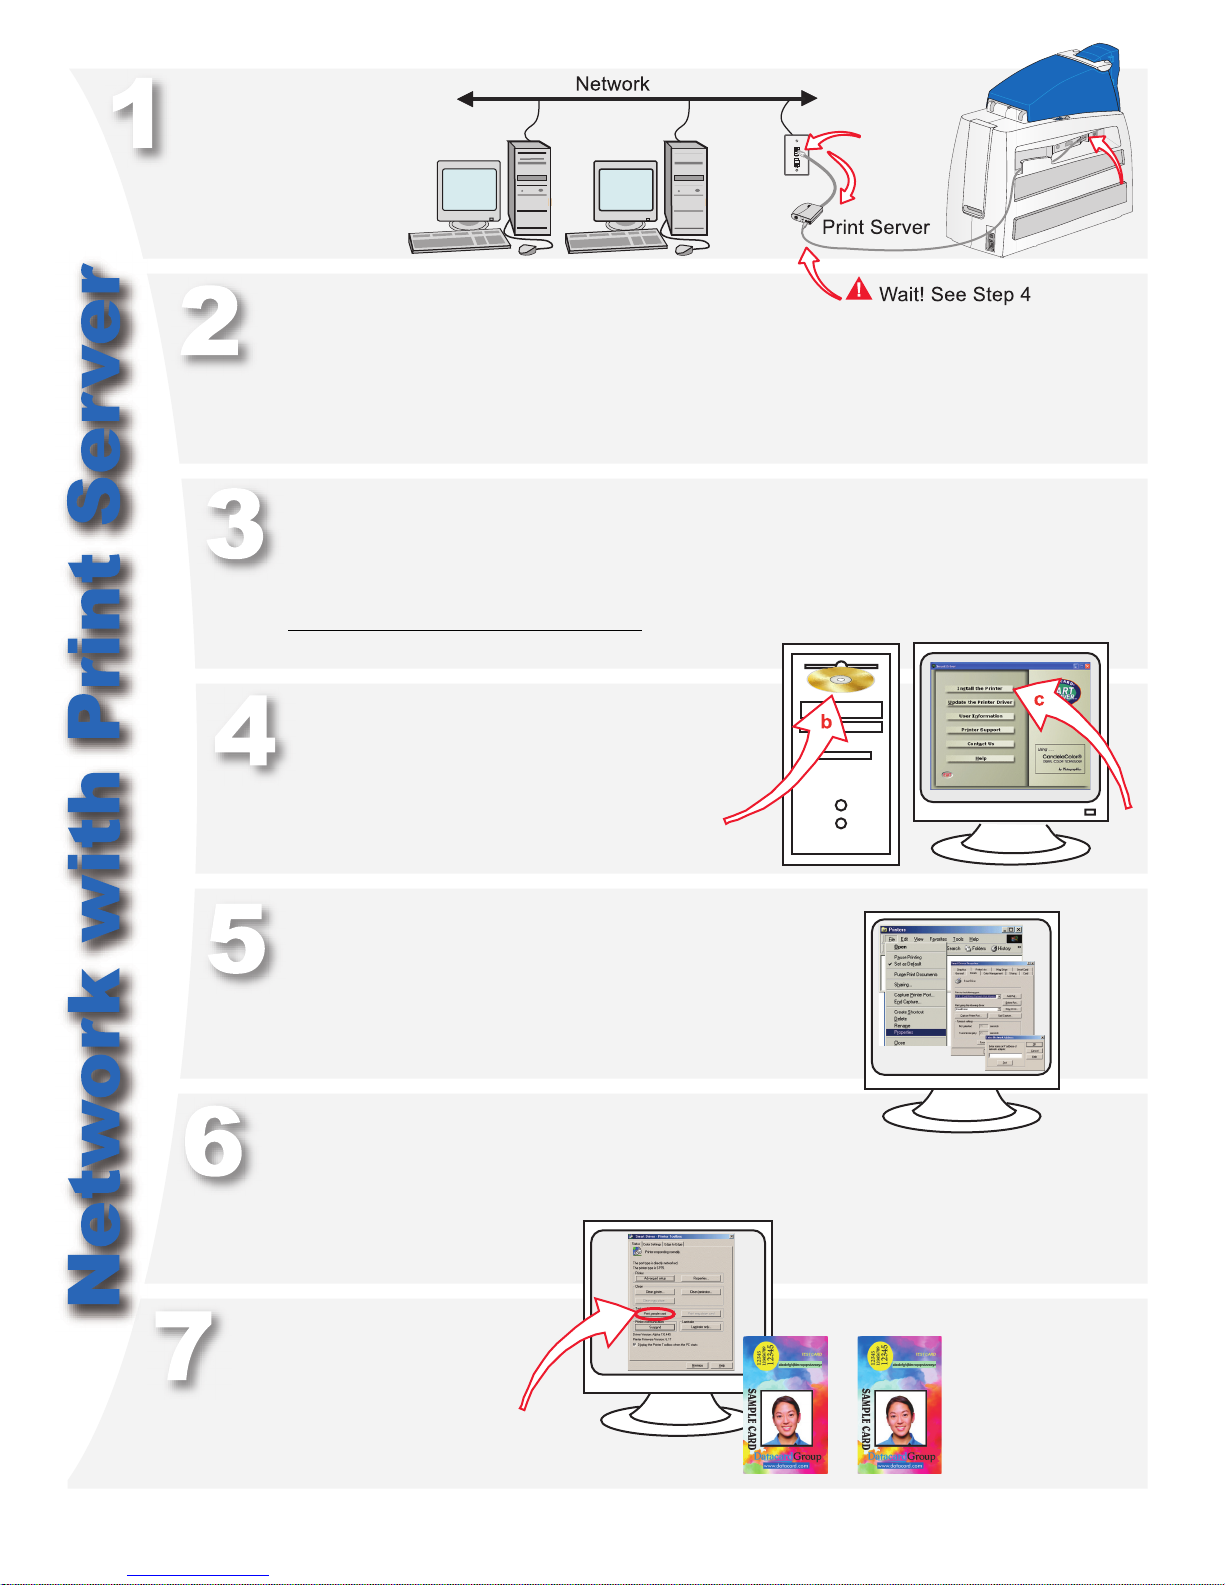
Connect the print server to the
network using an Ethernet cable.
Use HP Web Jetadmin® to set up the print server on the network.
See print server documentation for information. Continue when the
print server is identified to the network (can take up to 20 minutes).
Configure the print server for your network. Obtain the settings,
including the print server IP address or network name, from
your network personnel.
IP Address:
a Connect the printer to the print server using a
USB cable. See Step 1.
b Insert the Smart Driver CD-ROM.
c Click “Install the Printer” after the window opens.
Choose “DIrect Network” during installation.
Set the printer IP address in the driver’s Properties\Ports\
Configure or Properties\Details\Port Settings dialog box.
Open the Printing Preferences (Windows 2000 and XP), Properties
(Windows 98 and Me), or Default Document Properties (Windows NT)
dialog box and change the laminator “Apply Material” settings to match
the supplies loaded in the printer. Change other settings if needed.
Open the Printer Toolbox when
Printing Preferences, Properties,
or Document Default Properties
opens. Click “Print Sample Card”
on the Printer Toolbox.
Compare your card with the
factory card.
Page 6
Congratulations,
you have installed the
printer! Complete the
installation report
and install your ID
software now.
Page 7
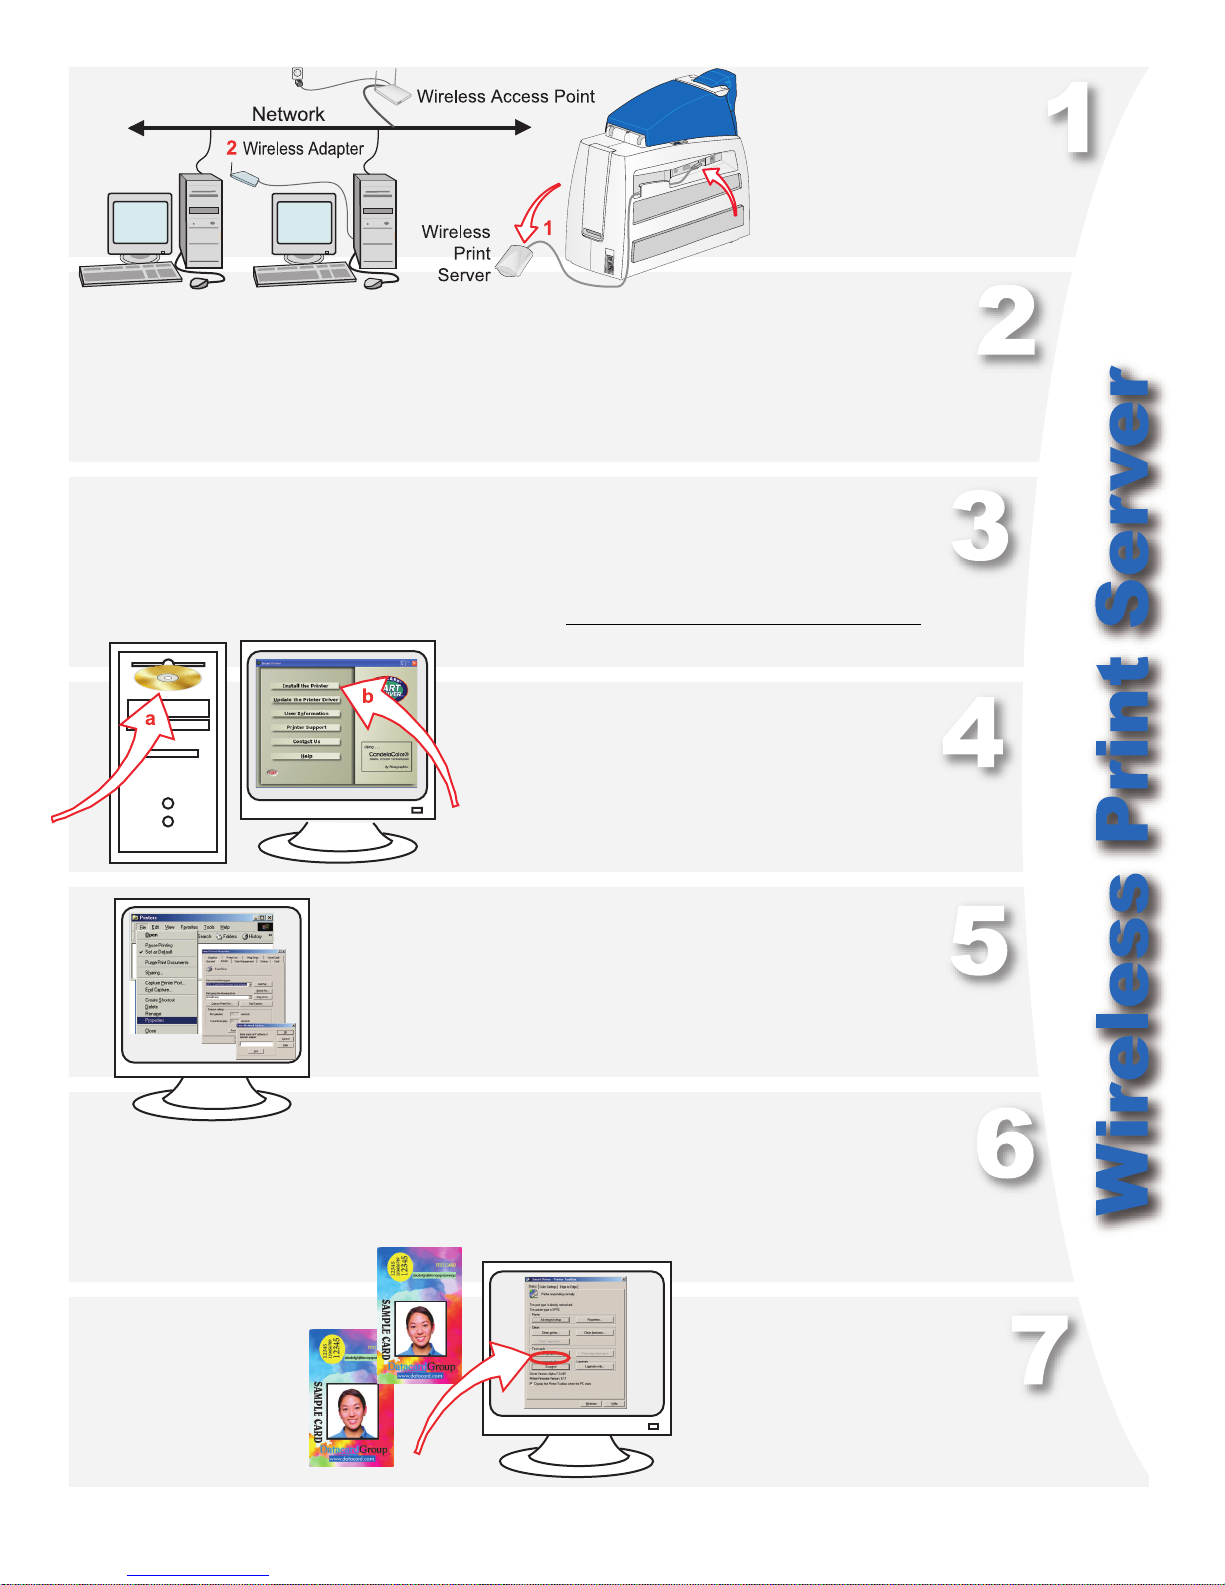
Connect the printer and wireless
print server using a USB cable.
See your organization’s wireless
security policy when setting up a
wireless connection.
Connect a wireless adapter to a computer and set the adapter to the values for the wireless
print server. See the print server documentation for the values to use. Continue when the print
server is identified to the network (can take up to 20 minutes).
Use HP Web Jetadmin to set up and configure the print server for your network.
Obtain the settings, including the print server IP address or network name, from your
network personnel.
IP Address:
a Insert the Smart Driver CD-ROM.
b Click “Install the Printer” after the
window opens. Choose “DIrect
Network” during installation.
Set the print server IP address or network name in the driver’s Properties\
Ports\Configure or Properties\Details\Port Settings dialog box.
Open the Printing Preferences (Windows 2000 and XP), Properties (Windows 98
and Me), or Default Document Properties (Windows NT) dialog box and change
the laminator “Apply Material” settings to match the supplies loaded in the
printer. Change other settings if needed.
Congratulations,
you have installed the
printer! Complete the
installation report
and install your ID
software now.
Open the Printer Toolbox when
Printing Preferences, Properties,
or Document Default Properties
opens. Click “Print Sample Card”
on the Printer Toolbox.
Compare your card with the
factory card.
Page 7
Page 8

11111 Br e n R o a d W est
Minnetonka, MN 55343-9015
952.933.1223
952.933.7971 FAX
www.datacard.com
Datacard is a registered trademark and the Smart Driver logo is a trademark of DataCard Corporation. Windows and Windows
NT are registered trademarks of Microsoft Corporation. HP and Web Jetadmin are registered trademarks of Hewlett-Packard
Development Company.
© 2005 DataCard Corporation. All rights reserved. June 2005 539410-001 Rev. C
 Loading...