


 Loading...
Datacard® SD260L™/SD360™/SD460™ Card Printers
User’s Guide
February 2015
Part No. 527400-001, Rev. B
Notice
Please do not attempt to operate or repair this equipment without adequate training. Any use, operation or repair you perform that is not in accordance with the information contained in this documentation is at your own risk.
Trademark Acknowledgments
Datacard is a registered trademark and service mark of Entrust Datacard Corporation in the United States and other countries.
MasterCard is a registered trademark of MasterCard International Incorporated.
Visa is a registered trademark of Visa International Service Association.
All other product names are the property of their respective owners.
Proprietary Notice
The design and information contained in these materials are protected by US and international copyright laws.
All drawings and information herein are the property of Entrust Datacard Corporation. All unauthorized use and reproduction is prohibited.
Entrust Datacard
1187 Park Place Shakopee, MN 55379 Phone: 952 933 1223 Fax: 952 933 7971
www.entrustdatacard.com
Copyright © 2014, 2015 Entrust Datacard Corporation. All rights reserved.
ii
Compliance Statements
Liability
The WARNING and CAUTION labels have been placed on the equipment for your safety. Please do not attempt to operate or repair this equipment without adequate training. Any use, operation, or repair in contravention of this document is at your own risk.
Safety
All Datacard® products are built to strict safety specifications in accordance with CSA/UL60950 1 requirements and the Low Voltage Directive 2006/95/EC.
Therefore, safety issues pertaining to operation and repair of Datacard® equipment are primarily environmental and human interface.
The following basic safety tips are given to ensure safe installation, operation, and maintenance of Datacard equipment.
•Connect equipment to a grounded power source. Do not defeat or bypass the ground lead.
•Place the equipment on a stable surface (table) and ensure floors in the work area are dry and non slip.
•Know the location of equipment branch circuit interrupters or circuit breakers and how to turn them on and off in case of emergency.
•Know the location of fire extinguishers and how to use them. ABC type extinguishers may be used on electrical fires.
•Know local procedures for first aid and emergency assistance at the customer facility.
•Use adequate lighting at the equipment location.
•Maintain the recommended temperature and humidity range in the equipment area.
iii
Regulatory Compliance
Notice for USA (FCC notice)
This equipment has been tested and found to comply with the limits for Class A computing devices, pursuant to Part 15 of FCC rules. These limits are designed to provide reasonable protection against harmful interference when the equipment is operated in a commercial environment. This equipment generates, uses, and can radiate radio frequency energy. If this equipment is not installed and used in accordance with this instruction manual, it may cause harmful interference to radio communications. Operation of this equipment in a residential area is likely to cause harmful interference in which case the user will be required to correct the interference at their own expense. Changes or modifications not expressly approved by the party responsible for compliance could void the user's authority to operate the equipment.
Notice for Canada
Industry Canada
This digital apparatus does not exceed the Class A limits for radio noise for digital apparatus set out in the Radio Interference Regulations of the Canadian Department of Communications.
Le présent appareil numérique n'émet pas de bruits radioélectriques dépassant les limites applicables aux appareils numériques de la classe A prescrites dans le Règlement sur le brouillage radioélectrique édicté par le ministère des Communications du Canada.
RSS Gen, Issue 3, December 2010, Section 7.1.3 User Manual Notice
This Device complies with Industry Canada License exempt RSS standard(s). Operation is subject to the following two conditions: 1) this device may not cause interference, and 2) this device must accept any interference, including interference that may cause undesired operation of the device.
Cet appareil est conforme avec Industrie Canada RSS standard exemptes de licence(s). Son fonctionnement est soumis aux deux conditions suivantes: 1) ce dispositif ne peut causer des interférences, et 2) cet appareil doit accepter toute interférence, y compris les interférences qui peuvent causer un mauvais fonctionnement du dispositif.
Notice for Europe
The EU Declaration of Conformity can be found on Datacard.com
We hereby certify that this printer complies with EMC Directive 2004/108/EC, R&TTE Directive 1999/5/EC, and the EU RoHS Directive EU Directive 2011/65/EC. This printer conforms to Class A of EN 55022 and to EN 301 489 5. Operation of this equipment in a residential environment may possibly cause interference. In the event of interference, the users, at their own expense, will be required to take whatever measures are necessary to correct the problem.
iv

Notice for Europe and Australia
This is a Class A product. In a domestic environment this product may cause radio interference, in which case the user may be required to take adequate measures.
Notice for China (Simplified Chinese)
A
Notice for Taiwan (Traditional Chinese)
Notice for Japan
Japanese Voluntary Control Council for Interference (VCCI) class A statement
Korea Communications Commission (KCC) statement
v
California Proposition 65 Compliance
WARNING: This product contains chemicals, including lead, known to the State of California to cause cancer, and birth defects or other reproductive harm. Wash hands after handling.
Datacard Group believes that its products are not harmful when used as designed. However, the above warning is made in compliance with the State of California Safe Drinking Water and Toxic Enforcement Act of 1986, which requires warning labels on products that may contain elements that the State of California considers harmful.
vi
Revision Log
SD260L/SD360/SD460 Card Printers User’s Guide
Revision |
Date |
Description of Changes |
|
|
|
A |
March 2014 |
First release of this document (formerly Part No. |
|
|
527248 001). Updated for XPS Card Printer Driver 5.0 and |
|
|
SD460 laminating system. |
|
|
|
B |
February 2015 |
Updated for XPS Card Printer Driver 6.0; added IPv6 |
|
|
information. |
|
|
|
vii
viii
Contents
Chapter 1: Introduction. . . . . . . . . . . . . . . . . . . . . . . . . . . . . . . . . . . . . . . . . . . . . . . . . . . . . 1
About this Manual. . . . . . . . . . . . . . . . . . . . . . . . . . . . . . . . . . . . . . . . . . . . . . . . . . . . . . . . . . . . . . 1
Intended Audience . . . . . . . . . . . . . . . . . . . . . . . . . . . . . . . . . . . . . . . . . . . . . . . . . . . . . . . . . . . . 1
Technical Support . . . . . . . . . . . . . . . . . . . . . . . . . . . . . . . . . . . . . . . . . . . . . . . . . . . . . . . . . . . . . . 1
Chapter 2: About the Printer . . . . . . . . . . . . . . . . . . . . . . . . . . . . . . . . . . . . . . . . . . . . . . . . . 3
About the SD Series Card Printers . . . . . . . . . . . . . . . . . . . . . . . . . . . . . . . . . . . . . . . . . . . . . . . . . 3 Printer Components . . . . . . . . . . . . . . . . . . . . . . . . . . . . . . . . . . . . . . . . . . . . . . . . . . . . . . . . . . . . 3
Printer Top and Front . . . . . . . . . . . . . . . . . . . . . . . . . . . . . . . . . . . . . . . . . . . . . . . . . . . . . . . . . 4 Printer Left Side. . . . . . . . . . . . . . . . . . . . . . . . . . . . . . . . . . . . . . . . . . . . . . . . . . . . . . . . . . . . . . 5 Inside the Printer. . . . . . . . . . . . . . . . . . . . . . . . . . . . . . . . . . . . . . . . . . . . . . . . . . . . . . . . . . . . . 6 Print Ribbon Cartridge. . . . . . . . . . . . . . . . . . . . . . . . . . . . . . . . . . . . . . . . . . . . . . . . . . . . . . . . 7 Printer with Duplex Module. . . . . . . . . . . . . . . . . . . . . . . . . . . . . . . . . . . . . . . . . . . . . . . . . . . . 7 Printer with Laminator (SD460 System Only) . . . . . . . . . . . . . . . . . . . . . . . . . . . . . . . . . . . . . . 8 System Label . . . . . . . . . . . . . . . . . . . . . . . . . . . . . . . . . . . . . . . . . . . . . . . . . . . . . . . . . . . . . . . 9
Chapter 3: Using the System. . . . . . . . . . . . . . . . . . . . . . . . . . . . . . . . . . . . . . . . . . . . . . . . 11
How the Card Travels . . . . . . . . . . . . . . . . . . . . . . . . . . . . . . . . . . . . . . . . . . . . . . . . . . . . . . . . . . 11
Card Printer System Overview . . . . . . . . . . . . . . . . . . . . . . . . . . . . . . . . . . . . . . . . . . . . . . . . . . . 12
Equipment . . . . . . . . . . . . . . . . . . . . . . . . . . . . . . . . . . . . . . . . . . . . . . . . . . . . . . . . . . . . . . . . 12
Tasks and Users. . . . . . . . . . . . . . . . . . . . . . . . . . . . . . . . . . . . . . . . . . . . . . . . . . . . . . . . . . . . . 12
Printer Controls . . . . . . . . . . . . . . . . . . . . . . . . . . . . . . . . . . . . . . . . . . . . . . . . . . . . . . . . . . . . . . . 13
Power Button . . . . . . . . . . . . . . . . . . . . . . . . . . . . . . . . . . . . . . . . . . . . . . . . . . . . . . . . . . . . . . 13
Down Arrow, Up Arrow, and Enter Key . . . . . . . . . . . . . . . . . . . . . . . . . . . . . . . . . . . . . . . . . 13
LCD Panel Menus. . . . . . . . . . . . . . . . . . . . . . . . . . . . . . . . . . . . . . . . . . . . . . . . . . . . . . . . . . . 14
User Button and Light . . . . . . . . . . . . . . . . . . . . . . . . . . . . . . . . . . . . . . . . . . . . . . . . . . . . . . . 16
Ribbon Light . . . . . . . . . . . . . . . . . . . . . . . . . . . . . . . . . . . . . . . . . . . . . . . . . . . . . . . . . . . . . . . 17
Card Light. . . . . . . . . . . . . . . . . . . . . . . . . . . . . . . . . . . . . . . . . . . . . . . . . . . . . . . . . . . . . . . . . 17
Retrieve the Printer’s Network IP Address. . . . . . . . . . . . . . . . . . . . . . . . . . . . . . . . . . . . . . . . . . 18
Retrieve an IPv4 Address . . . . . . . . . . . . . . . . . . . . . . . . . . . . . . . . . . . . . . . . . . . . . . . . . . . . 18
Retrieve an IPv6 Address . . . . . . . . . . . . . . . . . . . . . . . . . . . . . . . . . . . . . . . . . . . . . . . . . . . . 20
Print a Test Card . . . . . . . . . . . . . . . . . . . . . . . . . . . . . . . . . . . . . . . . . . . . . . . . . . . . . . . . . . . . . . 22
Load and Replace Supplies. . . . . . . . . . . . . . . . . . . . . . . . . . . . . . . . . . . . . . . . . . . . . . . . . . . . . 23
Load Cards. . . . . . . . . . . . . . . . . . . . . . . . . . . . . . . . . . . . . . . . . . . . . . . . . . . . . . . . . . . . . . . . 23
Load the Print Ribbon . . . . . . . . . . . . . . . . . . . . . . . . . . . . . . . . . . . . . . . . . . . . . . . . . . . . . . . 23
Load the Cleaning Sleeve . . . . . . . . . . . . . . . . . . . . . . . . . . . . . . . . . . . . . . . . . . . . . . . . . . . 24
Install the Ribbon Cartridge . . . . . . . . . . . . . . . . . . . . . . . . . . . . . . . . . . . . . . . . . . . . . . . . . . 24
Chapter 4: Printing Cards . . . . . . . . . . . . . . . . . . . . . . . . . . . . . . . . . . . . . . . . . . . . . . . . . . 25
Before Starting to Print . . . . . . . . . . . . . . . . . . . . . . . . . . . . . . . . . . . . . . . . . . . . . . . . . . . . . . . . . 25
ix
Print Cards . . . . . . . . . . . . . . . . . . . . . . . . . . . . . . . . . . . . . . . . . . . . . . . . . . . . . . . . . . . . . . . . . . . 26
Print from ID Software . . . . . . . . . . . . . . . . . . . . . . . . . . . . . . . . . . . . . . . . . . . . . . . . . . . . . . . 26 Print from Other Software . . . . . . . . . . . . . . . . . . . . . . . . . . . . . . . . . . . . . . . . . . . . . . . . . . . . 26
Chapter 5: System Maintenance . . . . . . . . . . . . . . . . . . . . . . . . . . . . . . . . . . . . . . . . . . . . 27
Clean the Printer . . . . . . . . . . . . . . . . . . . . . . . . . . . . . . . . . . . . . . . . . . . . . . . . . . . . . . . . . . . . . . 27
Clean the Printhead . . . . . . . . . . . . . . . . . . . . . . . . . . . . . . . . . . . . . . . . . . . . . . . . . . . . . . . . . . . 28
Run a Printer Cleaning Card . . . . . . . . . . . . . . . . . . . . . . . . . . . . . . . . . . . . . . . . . . . . . . . . . . . . 30
Chapter 6: Troubleshooting . . . . . . . . . . . . . . . . . . . . . . . . . . . . . . . . . . . . . . . . . . . . . . . . 33
Locate a Problem Within the Card Production System . . . . . . . . . . . . . . . . . . . . . . . . . . . . . . . 34 Locate a Problem with Basic Printer Functions. . . . . . . . . . . . . . . . . . . . . . . . . . . . . . . . . . . . . . 35 Installation Problems. . . . . . . . . . . . . . . . . . . . . . . . . . . . . . . . . . . . . . . . . . . . . . . . . . . . . . . . . . . 36
USB Installation Troubleshooting. . . . . . . . . . . . . . . . . . . . . . . . . . . . . . . . . . . . . . . . . . . . . . . 37 Network Installation Troubleshooting . . . . . . . . . . . . . . . . . . . . . . . . . . . . . . . . . . . . . . . . . . 38
Card Printer Driver Problems . . . . . . . . . . . . . . . . . . . . . . . . . . . . . . . . . . . . . . . . . . . . . . . . . . . . 38
The Card Printer Driver does not detect the network-connected printer . . . . . . . . . . . . 39 The Card Printer Driver does not detect the USB-connected printer . . . . . . . . . . . . . . . . 39 Driver status or Windows print queue does not provide expected data . . . . . . . . . . . . . 40 Printer Messages do not display on the PC . . . . . . . . . . . . . . . . . . . . . . . . . . . . . . . . . . . . . 41
Card Appearance . . . . . . . . . . . . . . . . . . . . . . . . . . . . . . . . . . . . . . . . . . . . . . . . . . . . . . . . . . . . 41
Something did not print . . . . . . . . . . . . . . . . . . . . . . . . . . . . . . . . . . . . . . . . . . . . . . . . . . . . . 42 Printing includes unexpected data. . . . . . . . . . . . . . . . . . . . . . . . . . . . . . . . . . . . . . . . . . . . 43 The color printing has flaws . . . . . . . . . . . . . . . . . . . . . . . . . . . . . . . . . . . . . . . . . . . . . . . . . . 43 The printing is too light. . . . . . . . . . . . . . . . . . . . . . . . . . . . . . . . . . . . . . . . . . . . . . . . . . . . . . . 45 The printing is too dark . . . . . . . . . . . . . . . . . . . . . . . . . . . . . . . . . . . . . . . . . . . . . . . . . . . . . . 45 The monochrome printing has flaws . . . . . . . . . . . . . . . . . . . . . . . . . . . . . . . . . . . . . . . . . . . 46
Magnetic Stripe Problems . . . . . . . . . . . . . . . . . . . . . . . . . . . . . . . . . . . . . . . . . . . . . . . . . . . . . . 47 Laminator Problems . . . . . . . . . . . . . . . . . . . . . . . . . . . . . . . . . . . . . . . . . . . . . . . . . . . . . . . . . . . 49
Patch Appearance Problems . . . . . . . . . . . . . . . . . . . . . . . . . . . . . . . . . . . . . . . . . . . . . . . . 49 Topcoat Appearance Problems . . . . . . . . . . . . . . . . . . . . . . . . . . . . . . . . . . . . . . . . . . . . . . 51
Use Advanced Troubleshooting Tools. . . . . . . . . . . . . . . . . . . . . . . . . . . . . . . . . . . . . . . . . . . . . 53 Card Jams . . . . . . . . . . . . . . . . . . . . . . . . . . . . . . . . . . . . . . . . . . . . . . . . . . . . . . . . . . . . . . . . . . . 54 Messages and Conditions . . . . . . . . . . . . . . . . . . . . . . . . . . . . . . . . . . . . . . . . . . . . . . . . . . . . . . 55
Messages on the Printer LCD . . . . . . . . . . . . . . . . . . . . . . . . . . . . . . . . . . . . . . . . . . . . . . . . . 55 Messages from the XPS Card Printer Driver on the PC . . . . . . . . . . . . . . . . . . . . . . . . . . . . 59 Messages from Printer Manager . . . . . . . . . . . . . . . . . . . . . . . . . . . . . . . . . . . . . . . . . . . . . . 59 Other Messages . . . . . . . . . . . . . . . . . . . . . . . . . . . . . . . . . . . . . . . . . . . . . . . . . . . . . . . . . . . . 59 Respond to Messages . . . . . . . . . . . . . . . . . . . . . . . . . . . . . . . . . . . . . . . . . . . . . . . . . . . . . . . 60 Printer Messages . . . . . . . . . . . . . . . . . . . . . . . . . . . . . . . . . . . . . . . . . . . . . . . . . . . . . . . . . . . 60
100: Request not supported. . . . . . . . . . . . . . . . . . . . . . . . . . . . . . . . . . . . . . . . . . . . . . . 60 101: Job could not complete . . . . . . . . . . . . . . . . . . . . . . . . . . . . . . . . . . . . . . . . . . . . . 60 102: Card not in position . . . . . . . . . . . . . . . . . . . . . . . . . . . . . . . . . . . . . . . . . . . . . . . . . 60 103: Printer problem . . . . . . . . . . . . . . . . . . . . . . . . . . . . . . . . . . . . . . . . . . . . . . . . . . . . . 61 104: Critical problem. . . . . . . . . . . . . . . . . . . . . . . . . . . . . . . . . . . . . . . . . . . . . . . . . . . . . 61
x
105: Magstripe data error. . . . . . . . . . . . . . . . . . . . . . . . . . . . . . . . . . . . . . . . . . . . . . . . . 61 106: Magstripe data not found . . . . . . . . . . . . . . . . . . . . . . . . . . . . . . . . . . . . . . . . . . . . 62 107: Magstripe read data error . . . . . . . . . . . . . . . . . . . . . . . . . . . . . . . . . . . . . . . . . . . . 62 108: Magstripe read no data. . . . . . . . . . . . . . . . . . . . . . . . . . . . . . . . . . . . . . . . . . . . . . 62 109: Print ribbon problem . . . . . . . . . . . . . . . . . . . . . . . . . . . . . . . . . . . . . . . . . . . . . . . . . 63 110: Print ribbon out or missing . . . . . . . . . . . . . . . . . . . . . . . . . . . . . . . . . . . . . . . . . . . . 63 111: Card not picked . . . . . . . . . . . . . . . . . . . . . . . . . . . . . . . . . . . . . . . . . . . . . . . . . . . . 63 112: Card hopper empty . . . . . . . . . . . . . . . . . . . . . . . . . . . . . . . . . . . . . . . . . . . . . . . . . 63 113: Close cover to continue. . . . . . . . . . . . . . . . . . . . . . . . . . . . . . . . . . . . . . . . . . . . . . 64 114: Cover opened during job . . . . . . . . . . . . . . . . . . . . . . . . . . . . . . . . . . . . . . . . . . . . 64 116: Magstripe not available . . . . . . . . . . . . . . . . . . . . . . . . . . . . . . . . . . . . . . . . . . . . . . 64 117: Reader not available . . . . . . . . . . . . . . . . . . . . . . . . . . . . . . . . . . . . . . . . . . . . . . . . 65 118: Print ribbon type problem . . . . . . . . . . . . . . . . . . . . . . . . . . . . . . . . . . . . . . . . . . . . 65 119: Print ribbon not supported . . . . . . . . . . . . . . . . . . . . . . . . . . . . . . . . . . . . . . . . . . . . 65 120: User paused the printer . . . . . . . . . . . . . . . . . . . . . . . . . . . . . . . . . . . . . . . . . . . . . . 66 121: Print ribbon not identified. . . . . . . . . . . . . . . . . . . . . . . . . . . . . . . . . . . . . . . . . . . . . 66 122: Magstripe format problem. . . . . . . . . . . . . . . . . . . . . . . . . . . . . . . . . . . . . . . . . . . . 66 123: Insert new card side 1 up . . . . . . . . . . . . . . . . . . . . . . . . . . . . . . . . . . . . . . . . . . . . . 66 124: Insert same card side 2 up . . . . . . . . . . . . . . . . . . . . . . . . . . . . . . . . . . . . . . . . . . . . 66 149: Option not installed . . . . . . . . . . . . . . . . . . . . . . . . . . . . . . . . . . . . . . . . . . . . . . . . . 67 152: Insert new card side 2 up . . . . . . . . . . . . . . . . . . . . . . . . . . . . . . . . . . . . . . . . . . . . . 67 153: Insert same card side 2 up . . . . . . . . . . . . . . . . . . . . . . . . . . . . . . . . . . . . . . . . . . . . 67 170: Insert new card side 1 up . . . . . . . . . . . . . . . . . . . . . . . . . . . . . . . . . . . . . . . . . . . . . 67 171: Insert same card side 1 up . . . . . . . . . . . . . . . . . . . . . . . . . . . . . . . . . . . . . . . . . . . . 67 172: Insert cleaning card . . . . . . . . . . . . . . . . . . . . . . . . . . . . . . . . . . . . . . . . . . . . . . . . . 68 173: Improper shutdown. . . . . . . . . . . . . . . . . . . . . . . . . . . . . . . . . . . . . . . . . . . . . . . . . . 68
Laminator Messages . . . . . . . . . . . . . . . . . . . . . . . . . . . . . . . . . . . . . . . . . . . . . . . . . . . . . . . . 68 177: Laminator not available. . . . . . . . . . . . . . . . . . . . . . . . . . . . . . . . . . . . . . . . . . . . . . 68 196: Laminator error critical . . . . . . . . . . . . . . . . . . . . . . . . . . . . . . . . . . . . . . . . . . . . . . . 68 197: Laminator entry card problem . . . . . . . . . . . . . . . . . . . . . . . . . . . . . . . . . . . . . . . . 68 198: L1 area card problem . . . . . . . . . . . . . . . . . . . . . . . . . . . . . . . . . . . . . . . . . . . . . . . 69 199: L2 area card problem . . . . . . . . . . . . . . . . . . . . . . . . . . . . . . . . . . . . . . . . . . . . . . . 69 200: Laminator exit card problem. . . . . . . . . . . . . . . . . . . . . . . . . . . . . . . . . . . . . . . . . . 69 201: L1 supply problem . . . . . . . . . . . . . . . . . . . . . . . . . . . . . . . . . . . . . . . . . . . . . . . . . . . 69 202: L1 supply out or missing . . . . . . . . . . . . . . . . . . . . . . . . . . . . . . . . . . . . . . . . . . . . . . 69 203: L1 supply type problem . . . . . . . . . . . . . . . . . . . . . . . . . . . . . . . . . . . . . . . . . . . . . . 70 204: L1 supply not supported . . . . . . . . . . . . . . . . . . . . . . . . . . . . . . . . . . . . . . . . . . . . . . 70 205: L1 supply not identified. . . . . . . . . . . . . . . . . . . . . . . . . . . . . . . . . . . . . . . . . . . . . . . 70 206: L2 supply problem . . . . . . . . . . . . . . . . . . . . . . . . . . . . . . . . . . . . . . . . . . . . . . . . . . . 70 207: L2 supply out or missing . . . . . . . . . . . . . . . . . . . . . . . . . . . . . . . . . . . . . . . . . . . . . . 70 208: L2 supply type problem . . . . . . . . . . . . . . . . . . . . . . . . . . . . . . . . . . . . . . . . . . . . . . 70 209: L2 supply not supported . . . . . . . . . . . . . . . . . . . . . . . . . . . . . . . . . . . . . . . . . . . . . . 70 210: L2 supply not identified. . . . . . . . . . . . . . . . . . . . . . . . . . . . . . . . . . . . . . . . . . . . . . . 70 211: L1 heater problem . . . . . . . . . . . . . . . . . . . . . . . . . . . . . . . . . . . . . . . . . . . . . . . . . . 71 212: L2 heater problem . . . . . . . . . . . . . . . . . . . . . . . . . . . . . . . . . . . . . . . . . . . . . . . . . . 71
xi
213: L1 heater sensor problem. . . . . . . . . . . . . . . . . . . . . . . . . . . . . . . . . . . . . . . . . . . . . 71 214: L2 heater sensor problem. . . . . . . . . . . . . . . . . . . . . . . . . . . . . . . . . . . . . . . . . . . . . 71 215: L1 heater roller problem . . . . . . . . . . . . . . . . . . . . . . . . . . . . . . . . . . . . . . . . . . . . . . 71 216: L2 heater roller problem . . . . . . . . . . . . . . . . . . . . . . . . . . . . . . . . . . . . . . . . . . . . . . 71 217: Debow problem . . . . . . . . . . . . . . . . . . . . . . . . . . . . . . . . . . . . . . . . . . . . . . . . . . . . 72 218: Impresser problem . . . . . . . . . . . . . . . . . . . . . . . . . . . . . . . . . . . . . . . . . . . . . . . . . . 72 219: Impresser sensor problem. . . . . . . . . . . . . . . . . . . . . . . . . . . . . . . . . . . . . . . . . . . . . 72 220: Impresser heater problem . . . . . . . . . . . . . . . . . . . . . . . . . . . . . . . . . . . . . . . . . . . . 72 221: Bar code scanner problem . . . . . . . . . . . . . . . . . . . . . . . . . . . . . . . . . . . . . . . . . . . 72 222: Firmware version mismatch . . . . . . . . . . . . . . . . . . . . . . . . . . . . . . . . . . . . . . . . . . . 73 223: Laminator system mismatch . . . . . . . . . . . . . . . . . . . . . . . . . . . . . . . . . . . . . . . . . . 73
Driver-Only Messages . . . . . . . . . . . . . . . . . . . . . . . . . . . . . . . . . . . . . . . . . . . . . . . . . . . . . . . 73 500: The printer is not available . . . . . . . . . . . . . . . . . . . . . . . . . . . . . . . . . . . . . . . . . . . . 73 501: The printer connection was lost. . . . . . . . . . . . . . . . . . . . . . . . . . . . . . . . . . . . . . . . 73 502: The card data is missing or is not usable . . . . . . . . . . . . . . . . . . . . . . . . . . . . . . . . 73 504: The card data is missing or is not usable . . . . . . . . . . . . . . . . . . . . . . . . . . . . . . . . 74 505: USB communication issue . . . . . . . . . . . . . . . . . . . . . . . . . . . . . . . . . . . . . . . . . . . . 74 506: A card is currently processing . . . . . . . . . . . . . . . . . . . . . . . . . . . . . . . . . . . . . . . . . 74 508: The printer is shutting down . . . . . . . . . . . . . . . . . . . . . . . . . . . . . . . . . . . . . . . . . . . 74 509: The printer is offline or suspended. . . . . . . . . . . . . . . . . . . . . . . . . . . . . . . . . . . . . . 74
Driver SDK Messages . . . . . . . . . . . . . . . . . . . . . . . . . . . . . . . . . . . . . . . . . . . . . . . . . . . . . . . . 75 511: Cannot lock or unlock the printer. Locks are not installed. . . . . . . . . . . . . . . . . . 75 512: Cannot lock or unlock the printer. The password is incorrect or invalid. . . . . . . 75 513: Cannot lock or unlock the printer. The printer is busy. . . . . . . . . . . . . . . . . . . . . . 75 514: Cannot lock or unlock the printer. The cover is open. . . . . . . . . . . . . . . . . . . . . . 75 515: Failed to lock or unlock the printer. The locks did not function. . . . . . . . . . . . . . 75 516: Timeout expired before bar code could be read. . . . . . . . . . . . . . . . . . . . . . . . . 75 517: Wrong printer job ID.. . . . . . . . . . . . . . . . . . . . . . . . . . . . . . . . . . . . . . . . . . . . . . . . . 75
Appendix A: SD460 Laminating System . . . . . . . . . . . . . . . . . . . . . . . . . . . . . . . . . . . . |
A-1 |
About the SD460 System . . . . . . . . . . . . . . . . . . . . . . . . . . . . . . . . . . . . . . . . . . . . . . . . . . . . . . A-1
Outside the Laminator . . . . . . . . . . . . . . . . . . . . . . . . . . . . . . . . . . . . . . . . . . . . . . . . . . . . . A-2
Laminator Back and Left Side . . . . . . . . . . . . . . . . . . . . . . . . . . . . . . . . . . . . . . . . . . . . A-2
Laminator Status Light . . . . . . . . . . . . . . . . . . . . . . . . . . . . . . . . . . . . . . . . . . . . . . . . . . A-3
Laminator Front and Right Side . . . . . . . . . . . . . . . . . . . . . . . . . . . . . . . . . . . . . . . . . . . A-3
Inside the Laminator . . . . . . . . . . . . . . . . . . . . . . . . . . . . . . . . . . . . . . . . . . . . . . . . . . . . . . . A-4
Laminator Configuration Label . . . . . . . . . . . . . . . . . . . . . . . . . . . . . . . . . . . . . . . . . . . . . . A-5
Laminator Setup . . . . . . . . . . . . . . . . . . . . . . . . . . . . . . . . . . . . . . . . . . . . . . . . . . . . . . . . . . . . . A-6
Laminator Overlay Materials . . . . . . . . . . . . . . . . . . . . . . . . . . . . . . . . . . . . . . . . . . . . . . . . A-6
Load Laminator Overlay Material . . . . . . . . . . . . . . . . . . . . . . . . . . . . . . . . . . . . . . . . . . . . A-8
Card Design . . . . . . . . . . . . . . . . . . . . . . . . . . . . . . . . . . . . . . . . . . . . . . . . . . . . . . . . . . . . . A-10
Verify Setup . . . . . . . . . . . . . . . . . . . . . . . . . . . . . . . . . . . . . . . . . . . . . . . . . . . . . . . . . . . . . A-10
Clear Laminator Card Jam . . . . . . . . . . . . . . . . . . . . . . . . . . . . . . . . . . . . . . . . . . . . . . . . . . . A-11
Clean the Laminator. . . . . . . . . . . . . . . . . . . . . . . . . . . . . . . . . . . . . . . . . . . . . . . . . . . . . . . . . A-12
xii

Chapter 1: Introduction
About this Manual
This manual provides user information for the SD260L, SD360, and SD460 Card Printers. The manual includes:
An overview of printer components and options, and a description of the system label.
How to use the printer, including how to power the printer on and off, how to use the front panel and LCD menus, card processing basics, how to print a test card, and how to load and replace supplies.
How to perform routine maintenance and troubleshooting tasks.
An additional Installation and Administrator’s Guide is available for use by administrators or other professionals responsible for printing cards. Refer to the Owner’s Library CD.
Intended Audience
The manual is intended for the printer operator who prints cards, loads and replaces supplies, maintains the printer, and performs troubleshooting.
Technical Support
Contact Datacard Technical Phone Support at 1 800 328 3996.
SD260L/SD360/SD460 Card Printers User’s Guide |
1 |

2 |
Introduction |

Chapter 2: About the Printer
About the SD Series Card Printers
The card printer applies images, text, and encoded data to plastic cards. It can print full color and monochrome images, depending on the type of print ribbon installed.
A busy issuance site might issue up to 10,000 cards a month. During these busy times, the site might use more than one printer to keep up with demand. The printer issues cards either one at a time or in batches—up to 100 cards at a time. An optional 200 card input hopper is available for some printers.
Options available for the card printer include magnetic stripe, smart card, and automatic duplex modules, and a reject hopper. The configuration label on the printer shows the options installed. Refer to “System Label” on page 9 for more information about recognizing the factory installed options on your card printer.
Printer Components
Refer to the following to view the printer components and the different options:
Printer Top and Front on page 4
Printer Left Side on page 5
Inside the Printer on page 6
Print Ribbon Cartridge on page 7
Printer with Duplex Module on page 7
Printer with Laminator (SD460 System Only) on page 8
System Label on page 9
SD260L/SD360/SD460 Card Printers User’s Guide |
3 |
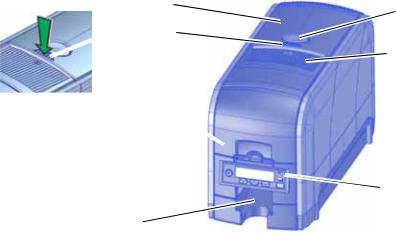
Printer Top and Front
|
Cover |
Latch Button |
|
|
|
|
Cover Ridges |
|
|
|
Ribbon Cartridge Handle |
Card Input |
|
|
Hopper |
|
|
|
|
Front Panel |
|
Output |
|
|
Hopper |
|
Cover |
Open the cover to access the printhead and ribbon. |
|
Latch Button |
Push the latch button to release the cover and open the printer. |
|
Cover Ridges |
Press down on the ridges when closing the cover to make sure |
|
|
that it latches properly on both sides. |
|
Ribbon Cartridge |
Use the handle to remove the print ribbon cartridge from the |
|
Handle |
printer. |
|
Card Input Hopper |
The input hopper loads cards to print. The hopper holds up to |
|
|
100 cards (0.030 in. or 0.762 mm thickness). |
|
Front Panel |
The front panel lets you work with the printer. It includes the |
|
|
USER button, the status lights, the power button, and the LCD |
|
|
panel with navigation keys. |
|
Output Hopper |
The output hopper holds up to 25 completed cards. |
|
4 |
About the Printer |
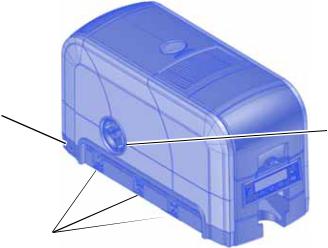
Printer Left Side
Cable Lock
Receptacle
 Manual Advance
Knob
Printer
Connections
Manual Advance Knob |
The knob moves a card in the track to clear a card jam. |
Cable Lock Receptacle |
The receptacle allows you to insert the security plate before |
|
attaching the optional Kensington® lock. |
Printer Connections |
Printer connections include: |
|
Power receptacle |
|
USB connection |
|
Network connection |
SD260L/SD360/SD460 Card Printers User’s Guide |
5 |
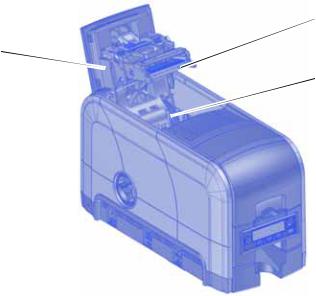
Inside the Printer
 Printhead
Configuration
Label 

 Print Ribbon Cartridge
Configuration Label |
The label shows the location and date of manufacture, the |
|
printer serial number, and lists the options installed. |
Printhead |
The printhead transfers images to cards using the print |
|
ribbon. |
Print Ribbon Cartridge |
The cartridge holds the print ribbon and cleaning sleeve. |
6 |
About the Printer |
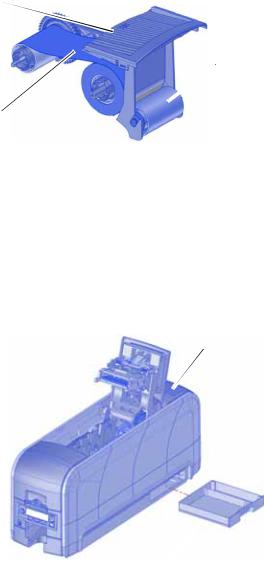
Print Ribbon Cartridge
Print Ribbon
Cartridge
Replaceable Cleaning
 Sleeve
Print Ribbon
Print Ribbon Cartridge |
The cartridge holds the ribbon for printing. |
Print Ribbon |
The ribbon applies images to cards. |
Replaceable Cleaning |
The cleaning sleeve removes dust and other particles from |
Sleeve |
cards to maintain print quality. |
Printer with Duplex Module
 Duplex Module
|
Reject Card |
|
Tray |
Duplex Module |
The duplex module automatically turns the card for two |
|
sided printing. |
Reject Card Tray |
Unfinished cards or cards not processed properly are placed |
|
in the optional reject card tray. |
SD260L/SD360/SD460 Card Printers User’s Guide |
7 |
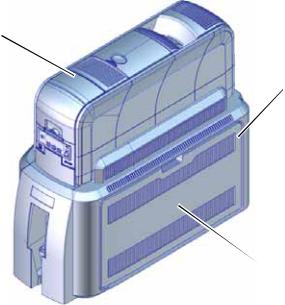
Printer with Laminator (SD460 System Only)
Printer
Laminator
Laminator Access
 Door
Door
Laminator |
The laminator attaches to the printer and applies patch or |
|
topcoat overlay material to the card. |
Laminator Access Door |
Open the door to access the laminator cartridges. |
Refer to Appendix A: "SD460 Laminating System” for complete information.
8 |
About the Printer |
System Label
The printer configuration label on the side of the cover swingarm shows the components installed. It provides information that is useful when requesting service.
The label shows the following information:
Printer model and serial number
Configuration, which includes options installed in the printer
Date and country of assembly
MAC address to use when the printer is connected via an Ethernet network
Information for components installed by the dealer or sales group is handwritten on the label.
SD260L/SD360/SD460 Card Printers User’s Guide |
9 |

10 |
About the Printer |

Chapter 3: Using the System
This section provides information about how a card travels through the printer, printer controls, printing a test card, loading and replacing supplies, and cleaning the printer.
How the Card Travels
When you send a print job from the PC, the card is verified and sent to the printer. The hopper pick mechanism picks a card and moves the card into the printer for processing.
Optionally, the card moves to the magnetic stripe encoding area or to the smart card park station, depending on the type of card selected. Encrypted data is decrypted and written to the card. In an SD460 laminating system, the card then moves into the laminator where the overlay material is applied to the card. The finished card exits the printer through the card output hopper.
SD260L/SD360/SD460 Card Printers User’s Guide |
11 |
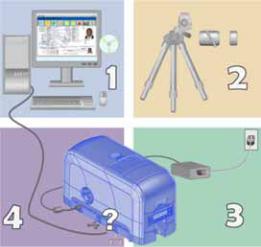
Card Printer System Overview
The card printer is used with other equipment and software to create a card production system. The system produces cards for a specific purpose, and the cards must meet requirements.
Equipment
The system can include:
1.A PC, with software to support the printer, such as:
The XPS Card Printer Driver for Windows.
ID software designed specifically to capture, format, and save the data for cards.
A retail application such as Microsoft® Word or Adobe® Photoshop®.
2.Capture devices, such as:
A digital camera connected to the PC to take photos for ID badges and other cards.
A signature capture pad or fingerprint reader.
3.The printer with supplies and a facility power source.
4.A data connection between the printer and PC, which can be a USB connection or a network
connection. (You cannot use both with one printer.)
Tasks and Users
Typical roles in a card production system include:
The operator, who makes cards, loads supplies, and handles minor problems such as card jams.
The system administrator, who sets up the card printer and other hardware, sets up card designs, configures card production software, and identifies the best use of the card printer in the organization.
12 |
Using the System |

Printer Controls
The front panel of the printer provides the controls for operating the printer. The front panel controls are described in the following sections.
|
|
|
LCD Panel |
|
|
|
Status Lights |
|
|
|
Ribbon |
|
|
|
Cards |
Power |
|
|
|
Button |
|
|
User Light & |
Down |
Up |
Enter |
User Button |
Arrow |
Arrow |
|
|
Power Button
Use the POWER button to power off and power on the printer. All lights show steady amber while the printer powers on.
To power off the printer, press the button for 1 to 2 seconds until the printer begins to shut down.
To power off the printer while it is processing cards, press the button for 2 seconds or more. Card jobs in the printer are not completed.
Down Arrow, Up Arrow, and Enter Key
Use the arrow keys to move through the printer menu system, and the ENTER key to make a selection.
Press the up or down arrow key when the LCD panel displays Ready to display additional information about the printer on line 2, including the firmware version, printer model, serial number, and network IP address or USB IP address. The SD460 laminating system also displays the laminator firmware version and the laminator serial number. If you don’t press a key for 30 seconds, the LCD panel returns to the default Ready message.
When you use the arrow keys to view the printer IP address, only the IPv4 address displays. To see the IPv6 addresses available to the printer, you must use the LCD Status menu. Refer to “Retrieve an IPv6 Address” on page 20.
SD260L/SD360/SD460 Card Printers User’s Guide |
13 |
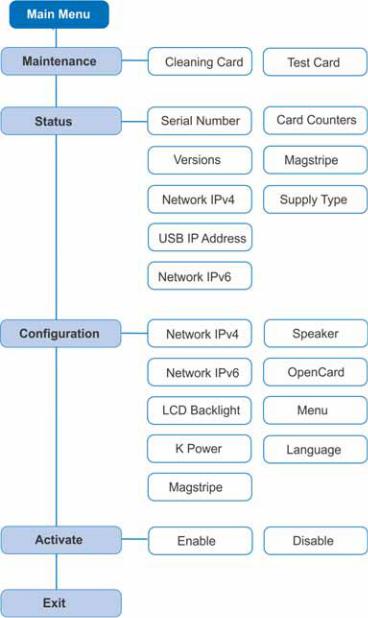
LCD Panel Menus
The LCD panel shows the printer’s menu system and displays printer messages or conditions. When the printer is in the Ready status, the LCD displays the model number of the printer.
For a list of messages and recovery information, refer to “Respond to Messages” on page 60.
14 |
Using the System |

The menu system has four major branches:
Use the Maintenance menu to run a cleaning card or print a test card. Use the Status menu to see settings and data about the printer.
Use the Configuration menu to change settings.
Use the Activate menu to enable or disable the printer for transport.
Use the Activate menu only during installation or removal of systems that require activation.
HINTS & TIPS
You can access the menu system when Ready displays on line 1 of the LCD panel.
The printer returns to the Ready status after 2 minutes of no activity. Changes not applied are lost.
To leave a selection without changing the value, press the up or down arrow key until Exit displays, and then press ENTER.
SD260L/SD360/SD460 Card Printers User’s Guide |
15 |

User Button and Light
The printer’s USER button displays with a border of light that indicates the system status. Use the USER button to:
Suspend printer activity—press the USER button when the LCD panel displays Ready.
Clear a message—press the USER button once.
Clear all messages—press the USER button for 2 seconds or more.
Clear all cards currently printing—press and hold the USER button for 2 seconds or more. (Make sure that this action is allowed in your card system.)
Determine whether the printer is ready, busy printing, or not available. Indicators include the following:
Off |
The printer is off or suspended. |
Green |
The printer is ready. |
Blinking green |
The printer is busy. |
Amber |
The printer is not ready. |
|
The POWER button was pressed |
|
to turn the printer off. |
Blinking amber |
The printer has an error. |
Color Cycle: |
The system is not ready or a |
Amber, Green, |
door on the system is open. The |
Light Green, Off |
colors cycle quickly. |
16 |
Using the System |

Ribbon Light
The ribbon indicates the status of the print ribbon in the printer. Indicators include the following:
Off |
The print ribbon is okay. |
Blinking amber |
A blinking light indicates one of the |
|
following: |
|
The printer problem applies to |
|
the print ribbon. |
|
The print ribbon is low. |
|
The print ribbon is out. |
Card Light
The card light indicates the status of cards in the printer. Indicators include the following:
Off |
Cards are okay. |
Blinking amber |
A blinking light indicates either of |
|
the following: |
|
No card is detected for the print |
|
job. Insert a card to continue |
|
printing. |
|
Scheduled printer cleaning is |
|
due. Insert a cleaning card now, |
|
or set aside time to run a |
|
cleaning card. |
SD260L/SD360/SD460 Card Printers User’s Guide |
17 |
Retrieve the Printer’s Network IP Address
You need to know the printer IP address to perform some tasks. For example, the XPS Card Printer Driver asks you to enter the network IP address during installation. You also use the IP address when launching Printer Manager, the printer’s web interface, from a browser window.
To display the IP address, you can do one of the following:
Press the up or down arrow key while the printer displays Ready. Refer to “Down Arrow, Up Arrow, and Enter Key” on page 13.
Use the LCD menu system Status menu.
The printer supports both IPv4 and IPv6 addressing. Because an IPv6 address is much longer than an IPv4 address, the LCD displays the two types of addresses differently.
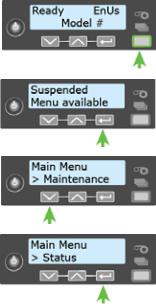
Retrieve an IPv4 Address
To display an IPv4 address using the Status menu, do the following. You also can display the subnet mask, gateway address, and MAC address, if necessary.
Begin with the printer power connected, and the printer connected to the network.
1.Press the POWER button (if needed) to power on the printer.
2.Access the Status menu in the LCD menu:
a.Press the USER button to suspend the printer.
b.Press the ENTER key to enter the menu system.
c.Press the down arrow to display Status on line 2.
d.Press ENTER to enter the Status menu.
18 |
Using the System |
Loading...