

Page 1

User's Manual
DXi series
DX-80I / DX-100I
Antes de utilizar el equipo, lea la sección
“Precauciones de seguridad” de este manual.
Conserve este manual para futuras consultas.
Before operating the device, please read the
“Safety precautions” section of this manual.
Retain this manual for future reference.
Page 2

CONTENTS
SAFETY PRECAUTIONS
WARRANTY
DECLARATION OF CONFORMITY
INTRODUCTION
Installation: Electrical Considerations
Installation: Mechanical Considerations
RF Emissions
Dynamic Amplifier Performance Measurements
Initial Set-up and Switching On
FRONT PANEL
REAR PANEL
Maintenance
Line Inputs and Outputs
Speaker Outputs
Bridged (Mono) Operation
DSP LAYOUT, CONFIGURATIONS AND ROUTING
Source Choices and Selection
Input Processing Channels
Mix Matrix Section
Power Amplifier and Auxiliary Output Processing Channels
Independent Network Audio Outputs
DIRECTLY EDITING AUDIO PARAMETERS
Overview
Input Gain
Input Delay
Input Parametric EQ Bands 1 through 8
Output Gain
Output Polarity
Output Delay
Output High Pass Filter
Output Low Pass Filter
Output Parametric EQ Bands 1 through 9
Output Limiters: Program Limiter
Output Limiters: Peak Limiter
Output Matrix Gains
ADVANCED EDITING FEATURES
Overview
Selecting Available Sources (Analogue, AES, Network Audio)
Switching from Analogue to AES Sources
Choosing Sources to Route to Input Processing Channels
Changing Network Output Source
Changing Crossover Configuration
Using Free Assign Mode
Bridged Mode for Output Pairs
Resetting Audio Parameters
Ganging Channels for Editing
STORING AND RECALLING SETTINGS
Memory Overview
Storing a Memory…
Recalling a Memory…
SYSTEM ADJUSTMENTS
Overview
REMOTE CONTROL
Overview
Remote Control Software Choices
Configuration of the Remote Interface
Wireless Connection with DeltaDirect iPad App
RESETTING BACK TO DEFAULTS AND CLEARING SECURITY
Default Settings
Entering Start-up Control Codes
Clearing Security – Forgotten Unlock Code
SPECIFICATIONS
ANNEX I: Limiters and How to Set Them Correctly
ANNEX II: Upgrading Firmware and Loading Presets
3
4
5
6
6
7
7
7
7
8
10
10
11
11
12
13
14
14
15
15
16
17
17
17
17
18
18
18
18
19
19
20
21
21
22
23
23
23
24
25
26
27
28
29
30
30
32
32
33
34
35
35
36
36
36
36
41
42
42
42
42
43
46
52
Manual del Usuario / DXI series / User’s Manual
Page 3
Precauciones de Seguridad
D seriesXi
Amplificadores profesionales / Professional power amplifiers
Safety Precautions
Conserve y lea estas instrucciones.
Respete y siga todas las advertencias.
El signo de exclamación en un triángulo equilátero pretende
alertar al usuario de instrucciones operativas y de mantenimiento
(reparación) en la literatura que acompaña al aparato.
ADVERTENCIA: Los aparatos de CLASE I se deben conectar a
una toma de corriente eléctrica con conexión a tierra.
El rayo con punta de flecha dentro de un triángulo equiláter o
pretende alertar al usuario de la presencia de voltajes peligrosos
no aislados dentro de la envolvente del producto, que puede ser
de magnitud suficiente para constituir un riesgo de descarga
eléctrica para las personas.
ADVERTENCIA: Para evitar lesiones, este aparato debe estar
firmemente sujeto al bastidor, de conformidad con las
instrucciones de instalación.
El cableado exterior conectado a estos terminales requiere de su
instalación por una persona instruida y el uso de cables flexibles
preparados.
No exponga este equipo a la lluvia o humedad. No use este
aparato cerca del agua (piscinas y fuentes, por ejemplo). No
exponga el equipo a salpicaduras ni coloque sobre él objetos
que contengan líquidos, tales como vasos y botellas. Equipo IP-
20. Limpie con un paño seco. No use limpiadores con
disolventes.
No instale el aparato cerca de fuentes de calor tales como
radiadores, calefactores, estufas u otros aparatos que produzcan
calor. No bloquee las aberturas de ventilación, e instalar de
acuerdo con las instrucciones del fabricante. Los ventiladores de
refrigeración succionan aire fresco del frontal y sale caliente por
la parte trasera de la unidad a través de las rejillas de ventilación.
La parte delantera y trasera del amplificador debe tener una
exposición al aire libre (por ejemplo, en un rack las puertas
delanteras y traseras abiertas), con cámara de aire de 2 cm a los
lados y la parte superior. SI AL AIRE NO SE LE PERMITE
ESCAPAR POR ATRÁS, SE SOBRECALENTARÁ LA UNIDAD.
Tenga cuidado al montar otro equipo en el mismo rack.
Diseñado para funcionar entre 15ºC y 35ºC, con el 75% de
humedad relativa máxima.
Desconecte este aparato durante tormentas eléctricas,
terremotos o cuando no se vaya a emplear durante largos
periodos.
Tenga en cuenta que la tensión nominal de alimentación es el
valor indicado en la etiqueta, con un rango ±10% de ese valor
(según IEC 60065:2001).
Proteja el cable de alimentación de ser pisado o aplastado,
especialmente en los enchufes, receptáculos y en el punto en el
que salen del aparato. Confíe las reparaciones a personal
cualificado. Se requiere servicio cuando el aparato ha sido
dañado de alguna manera, como por ejemplo si el cable de
alimentación o el enchufe está dañado, se ha derramado líquido
o han caído objetos dentro del aparato, el aparato ha sido
expuesto a la lluvia o la humedad, no funciona con normalidad o
se ha caído. El interruptor de alimentación deberá permanecer
fácilmente accesible. Para desconectar completamente este
aparato de la red eléctrica, desconecte el cable de alimentación
del interruptor de corriente principal. Esta unidad está equipada
con un cable de alimentación de 3 hilos. Por razones de
seg u rida d , L A C O N E X IÓN A T I E RRA N O D E B E
DESCONECTARSE EN NINGUNA CIRCUNSTANCIA.
Cuando la unidad esté montada en un rack y permanentemente
conectada a red debe ser instalada con un conector de fácil
acceso o con un dispositivo de desconexión omnipolar con al
menos 3 mm de distancia entre sus contactos. El interruptor de
los amplificadores sólo afecta a uno de los polos de la red
eléctrica, por tanto, en las unidades con un cable desmontable
el dispositivo de desconexión de red (por ejemplo, el enchufe o
la conexión a red), debe ser fácilmente accesible para poder
estar completamente desconectado de la red. Sin embargo, en
unidades con cable fijo deberá usar un dispositivo de
desconexión externo (antes descrito). La instalación deberá
seguir todas las normas de instalación vigentes.
Utilice sólo accesorios (por ejemplo, soportes o racks)
recomendados por el fabricante. Cuando se utiliza un rack o un
carro de transporte, tenga cuidado al mover la combinación
carro / aparato para evitar lesiones causadas por un vuelco.
Este símbolo indica que el presente producto no puede ser
tratado como residuo doméstico normal, sino que debe
entregarse en el correspondiente punto de recogida de equipos
eléctricos y electrónicos.
Manual del Usuario / DXI series / User’s Manual
Keep these instructions. Read these instructions.
Heed all warnings. Follow all instructions.
The exclamation point within an equilateral triangle is intended to
alert the user of important operating and maintenance (servicing)
instructions in the literature accompanying the appliance.
WARNING: Apparatus with CLASS I construction shall be
connected to a MAINS socket outlet with a protective earthing
connection.
The lightning flash with arrowhead symbol within an equilateral
triangle is intended to alert the user to the presence if
uninsulated “dangerous voltage” within the product's enclosure
that may be of sufficient magnitude to constitute a risk of electric
shock to persons.
WARNING: To prevent injury, this apparatus must be securely
attached to the rack in accordance with the installation
instructions.
The connected outer wiring to these terminals requires of its
installation by an instructed person and the use of a flexible the
cable already prepared.
Do not expose this device to rain or moisture. Do not use this
apparatus near water (for example, swimming pools and
fountains). Do not place any objects containing liquids, such as
bottles or glasses, on the top of the unit. Do not splash liquids
on the unit. IP-20 equipment. Clean only with a dry cloth. Do not
use any solvent based cleaners.
Do not install near any heat sources such as radiators, heat
registers, stoves or other apparatus that produce heat.
Do not block any ventilation openings, install in accordance with
the manufacturer's instructions.
The cooling fans suck cool air in through the front and blow hot
air out at the rear of the unit through the ventilating grills. The
front and rear of the amplifier should have free exposure to the
air (i.e. in a rack leave the front and rear doors off), with 2cm air
gap at the sides and top. IF AIR IS NOT ALLOWED TO ESCAPE
FROM THE REAR, OVER-HEATING WILL OCCUR. Take care
when mounting other equipment in the same rack.
Working temperature ranges from 15ºC to 35ºC with a relative
humidity of 75%.
Unplug this apparatus during ligtning storms, earthquakes or
when unused for long periods of time.
Take into account that the nominal AC voltage is the value
shown in the equipment ±10% (according to IEC 60065:2001).
Protect the power cord from being walked on or pinched
particularly at plugs, convenience receptacles and the point
where they exit from the apparatus.
Refer all servicing to qualified service personnel. Servicing is
required when the apparatus has been damaged in any way,
such as if the power-supply cord or plug is damaged, liquid has
been spilled or objects have fallen into the apparatus, the
apparatus has been exposed to rain or moisture, does not
operate normally, or has been dropped.
The mains circuit breaker shall remain readily accessible.
To completely disconnect this equipment from the AC mains,
disconnect the power cord from the mains circuit breaker.
This unit is fitted with a 3-wire power cord. For safety reasons,
THE EARTH LEAD SHOULD NOT BE DISCONNECTED IN ANY
CIRCUMSTANCE.
Where the amplifier is mounted in a rack and permanently
connected to the mains, then the rack should be installed with a
readily accessible connector or an ALL POLE circuit breaker with
3mm breaking distances.
The mains switch on the amplifiers only switches one pole of the
mains supply, therefore for units with a detachable cord to be
fully disconnected from the mains, the mains disconnect device
(ie mains plug or mains coupler) should remain readily operable.
For units with a fixed mains lead the external all pole circuit
breaker with 3mm breaking distances is the disconnect device
and therefore the installation of the amplifier shall be carried out
in accordance with all the applicable installation rules.
Only use attachments/accessories specified by the manufacturer.
Use only with the cart, tripod, bracket or table specified by the
manufacturer, or sold with the apparatus. When a cart is used,
use caution when moving the cart/apparatus combination to
avoid injury from a tip over.
This symbol on the product indicates that this product should
not be treated as household waste. Instead it shall be handed
over to the appicable collection point for the recycling of
electrical and electronic equipment.
3
Page 4

GARANTÍA
Todos nuestros productos están garantizados por un periodo de 24
meses desde la fecha de compra.
Las garantías sólo serán válidas si son por un defecto de
fabricación y en ningún caso por un uso incorrecto del producto.
Las reparaciones en garantía pueden ser realizadas,
exclusivamente, por el fabricante o el servicio de asistencia técnica
autorizado.
Otros cargos como portes y seguros, son a cargo del comprador
en todos los casos.
Para solicitar reparación en garantía es imprescindible que el
producto no haya sido previamente manipulado e incluir una
fotocopia de la factura de compra.
WARRANTY
All our products are warrantied against any manufacturing defect
for a period of 2 years from date of purchase.
The warranty excludes damage from incorrect use of the product.
All warranty repairs must be exclusively undertaken by the factory
or any of its authorised service centers.
To claim a warranty repair, do not open or intend to repair the
product.
Return the damaged unit, at shippers risk and freight prepaid, to
the nearest service center with a copy of the purchase invoice.
4
Manual del Usuario / DXI series / User’s Manual
Page 5

DECLARACIÓN DE CONFORMIDAD
DECLARATION OF CONFORMITY
DAS Audio Group, S.L.
C/ Islas Baleares, 24 - 46988 - Pol. Fuente del Jarro - Valencia. España
(Spain).
Declara que los amplificadores de la serie DXi
Declares that DXi amplifier series
cumplen con los objetivos esenciales de las Directivas:
abide by essential objectives relating Directives:
l de Baja Tensión (Low Voltage Directive) 2014/35/UE
l de Compatibilidad Electromagnética (EMC) 2014/30/UE
l RoHS 2011/65/UE
l RAEE (WEEE) 2012/19/UE
Y es conforme a las siguientes Normas Armonizadas Europeas:
In accordance with Harmonized European Norms:
l EN 60065:2014.- Audio, video and similar electronic apparatus. Safety
requirements.
l EN 55032:2012.- Electromagnetic compatibility of multimedia equipment.
Emission requirements.
l EN 55103-2:2009.- Electromagnetic compatibility. Product family
standard for audio, video, audio-visual and entertainment lighting control
apparatus for professional use. Part 2:Immunity.
l EN 50581:2012.- Technical documentation for the assessment of
electrical and electronic products with respect to the restriction of
hazardous substances.
Manual del Usuario / DXI series / User’s Manual
5
Page 6

INTRODUCTION
Thank you for choosing a DXi series amplifier for your application.
Please spend a little time reading through this manual, so that you obtain the best possible
performance from the unit and become familiar with its operating requirements.
All DAS Audio Group products are carefully designed and engineered for cutting-edge performance
and world-class reliability. If you would like further information about this or any other DAS Audio
product, please contact us.
We wish you many years of service from this amplifier and look forward to hearing from you in the
near future.
The DXi amplifier series has been designed to combine incredible audio power and performance with
ultra-flexible connectivity for both remote control and audio. Exemplary audio processing is assured
through the use of a DSP platform, and power amplifier capabilities are taken care of with high efficiency
output stages and a generous power supply.
All units named with an “i” include a DSP in the amplifier. DX-100I and DX-80I include a 4 in 8 out
DSP platform.
Accepting analogue, AES3 digital and optional Dante networked audio, the DXi amplifiers can
connect to any source and make it available over the network, as well as processing four additional
channels with local analogue outputs to connect to DX amplifiers. These auxiliary processed outputs
can also be fed onto the network, and used by DX amplifiers that have Dante cards fitted, or by any
other Dante enabled device.
Connectivity for remote control is covered by USB, Ethernet and RS485, with relay of either USB or
Ethernet control via RS485 to work with legacy products. Configuration of the amplifier's processing is
through the industry standard DASnet application, with tuning and monitoring of a network of DXi
amplifiers.
With a range of power levels available in the DX Series, the amplifiers can be networked to a single DXi
model, creating a powerful, efficient system that's easy to expand and adapt for use in live, install and
everything in between.
INSTALLATION: ELECTRICAL CONSIDERATIONS
The amplifier has been manufactured to comply with your local power supply requirements, but before
connecting the unit to the supply, ensure that the voltage (printed on the rear panel) is correct.
The amplifier is fitted with either a 100/120V or 220/240V tapped transformer according to customer
requirements.
Make sure power outlets conform to the power requirements listed on the back of the unit. Damage
caused by connecting to improper AC voltage is not covered by the warranty.
Safety Warning
Apparatus with CLASS I construction shall be connected to a MAINS socket outlet with a protective
earthing connection.
Where a MAINS plug or appliance coupler is used as the disconnect device, it should remain readily
operable.
Where the amplifier is mounted in a rack and permanently connected to the mains, then the rack should
be installed with a readily accessible connector or an ALL POLE circuit breaker with 3mm breaking
distances.
This unit is fitted with a 3-wire power connector. For safety reasons, THE EARTH LEAD SHOULD NOT
BE DISCONNECTED IN ANY CIRCUMSTANCE. If ground loops are encountered consult the section on Line
Inputs and Outputs on page 11.
WHERE A FIXED MAINS LEAD IS FITTED, THE WIRING COLOURS ARE:
230V AREAS: 120V AREAS:
EARTH = GREEN AND YELLOW GREEN
NEUTRAL = BLUE WHITE
LIVE = BROWN BLACK
TO PREVENT THE LIKELIHOOD OF SHOCK OR FIRE HAZARD, DO NOT EXPOSE THE UNIT TO RAIN
OR MOISTURE. DO NOT PLACE OBJECTS CONTAINING LIQUID ON TOP OF THE APPARATUS.
TO AVOID ELECTRICAL SHOCK DO NOT REMOVE COVERS. REFER ALL SERVICING TO QUALIFIED
PERSONNEL.
DO NOT USE THE UNIT OF THE ELECTRICAL POWER CORD IS FRAYED OR BROKEN. The power
supply cords should be routed so that they are not likely to be walked on or pinched by items placed upon
or against them, paying particular attention to cords and plugs and the point where they exit from the
appliance.
ALWAYS OPERATE THE UNIT WITH THE AC GROUND WIRE CONNECTED TO THE ELECTRICAL
SYSTEM GROUND. Precautions should be taken so that the means of grounding of a piece of equipment is
not defeated.
DO NOT REMOVE THE LID. Removing the lid will expose you to potentially dangerous voltages. There
are no user serviceable parts inside.
ESD strikes to the unit's front panel that are in excess of 4000 volts may cause disturbance to the status
LEDs on the unit. This will not affect audio performance and will be corrected on the next power up cycle.
6
Manual del Usuario / DXI series / User’s Manual
Page 7

INTRODUCTION (cont'd)
INSTALLATION: MECHANICAL CONSIDERATIONS
To ensure that this equipment performs to specification, it should be mounted in a suitable rack or
enclosure as described below. Like all high power amplifiers, it should be kept away from other equipment
which is sensitive to magnetic fields. Also, this amplifier may suffer a substantial reduction in performance if it
is subjected to, or mounted close to equipment which radiates high RF fields.
Warning: To prevent injury, this apparatus must be securely attached to the rack in accordance with the
installation instructions.
When mounting the amplifier in a rack or enclosure:
Be aware that ...
THE FRONT PANEL IS NOT CAPABLE OF SUPPORTING THE UNIT ON ITS OWN.
Make sure that the rear of the unit is adequately supported. The brackets which are supplied fit standard 19
inch (483mm) rack mounting systems.
ENSURE THERE IS ADEQUATE VENTILATION.
The cooling fans suck cool air in through the front and blow hot air out at the rear of the unit through the
ventilating grills. The front and rear of the amplifier should have free exposure to the air (i.e. in a rack leave
the front & rear doors off), with 2cm air gap at the sides.
IF AIR IS NOT ALLOWED TO ESCAPE FROM THE REAR, OVER-HEATING WILL OCCUR.
Take care when mounting other equipment in the same rack.
Make sure that the rack unit has a separate earth connection (technical earth).
Please also see the notes regarding maintenance on page 10.
RF EMISSIONS
The high frequency resonant converters in the DXi series amplifiers have been designed to have very low
radio frequency (RF) emissions; however even these low level emissions can cause interference with other
equipment.
In order for this to be minimised, the amplifier should be mounted in a metal rack enclosure, which
should have a separate (technical) Earth. Alternatively a separate earth should be attached to the amplifier at
the rear rack mounting bracket.
DYNAMIC AMPLIFIER PERFORMANCE MEASUREMENTS
The DXi series is the very latest example of a 'dynamic amplifier'. This new 'breed' of power amplifiers
provide very high peak power levels in a much smaller, and lighter, package than previously possible with
conventional amplifiers.
They are designed specifically for today's high power audio installations, which use multiple speakers
with electronic crossovers or speaker controllers. These systems can handle very high transient signals that
far exceed their RMS power rating. The DXi series amplifiers have been designed to match this requirement
and can deliver huge levels of power for short durations.
In order to protect themselves and the loudspeakers that they are driving, continuous signals such as
sine waves, are automatically detected and reduced (ramped down) to a safe level.
When trying to measure the power output however, continuous signals will give totally incorrect results. A
dynamic signal, such as a tone burst, should be used and the levels measured by monitoring the waveform
on an oscilloscope. The power envelope can then be accurately measured.
Our power output figures are measured using signals with known Crest Factors and are quoted at the
rear of this manual on page 43 and on our website.
Please refer to the technical area of our website for further information.
INITIAL SET-UP AND SWITCHING ON
Please read all documentation before operating your equipment and retain all documentation for future
reference.
Do not spill water or other liquids into or on the unit and do not operate the unit while standing in liquid.
Do not block fan intake or rear ventilation outlets or operate the unit in an environment that could impede
the free flow of air around the unit.
If the unit is used in an extremely dusty or smoky environment, it should be cleaned of any collected
debris at regular intervals. Please also see the notes regarding maintenance on page 10.
It is important that the power output of your amplifier is matched to the power handling capacity of your
loudspeaker. If not, damage to the loudspeaker could occur.
Switching On…
At 'switch-on' the protection circuit will initially activate whilst the circuits stabilise, indicated by the red
A/P LED illuminating, in addition to various other LEDs. After a few seconds the red A/P LED will extinguish
indicating a satisfactory working condition. Other LEDs may remain illuminated depending upon rear panel
switch settings and input connections. If the A/P LED does not extinguish after 5 seconds the unit may be
faulty or some external connections may be incorrect or inappropriate. If this occurs you should power down
the unit and remove all external connections (except for the mains power supply) and repeat the power up
sequence. If the problem persists please contact us.
Manual del Usuario / DXI series / User’s Manual
7
Page 8

FRONT PANEL
1
3
4
5
2
6
8
7
Note: The front panel is common for all models.
1: USB Type “B”: Connect to a computer for remote control – a driver will be required. Please see the
section on remote control starting on page 36.
2: MUTE keys: This will mute the respective input or output channel according to the current setting of the
bank control selection (#14).
3: 2 x 24 LCD: By default this will display preset names and is used to show all parameter information. The
LCD contrast and backlight brightness can be adjusted in the System Sub-Menu - see page 32 for details. If
the LCD backlight is flashing, it is being remotely identified by software.
4: PROTECTION LED: If a condition exists, either internally or externally, that could cause damage to either
the amplifier or the speakers, the protection circuit will disengage the outputs and this LED will
illuminate/flash.
Typical conditions that could cause the protection to be triggered include very high frequency or
subsonic input signals, DC in the inputs, short-circuited outputs, or internal high temperatures.
The protection circuit can affect all channels or a 'channel pair' depending on the type of fault. This is
indicated by the combination of Protection LED illuminating and a corresponding message on the LCD. In
this way, it is possible for two channels (a channel pair) to remain functioning even though a fault has caused
the other channel pair to mute. A channel pair would be 1+2 or 3+4.
Temperature related faults will reset automatically if the unit has cooled sufficiently. Output short circuits
will require manual reset after clearing the fault (switching off at the mains switch and then on again after a
few seconds). Short circuits on either channel of a channel pair will only affect that channel pair.
5: BRIDGE pair LEDs: The channel pair LED will illuminate if these channels have been switched into bridged
(mono) mode. See page 11 for details of how to connect your speaker to a bridged channel pair, and page
12 for how to enable bridge mode.
6: Power Switch: This double pole switch turns the amplifier fully off and isolates it from the mains supply.
7: STBY LED: The DXi amplifiers can be powered down leaving just the DSP active. Apart from the obvious
power savings to be made, there may be circumstances when only the DSP is required, such as utilizing it
for braking analogue audio channels onto a Dante network. This LED illuminates when the power amplifier
sections are turned OFF.
HINT: The amplifier can be brought out of standby by holding ENTER and QUIT at power-up.
8: REMOTE LED: This will flash when the unit is being addressed under remote control.
8
Manual del Usuario / DXI series / User’s Manual
Page 9

FRONT PANEL (cont'd)
12
13
15
14
9: DIGITAL IN LED: This illuminates if either AES input is switched in (replacing the respective analogue input
channel) and will flash if there is a loss of lock on either input. Note that this does not mean AES is actually
routed to the amplifier's DSP, only that a rear panel socket is set to receive an AES stereo signal.
10: NETWORK AUDIO LED: This will illuminate when an audio network connection is correctly made to the
amplifier. Note that this does not mean that any network audio channels are actually routed to the amplifier's
DSP, only that the connection is available.
11/12: Rotary encoder and navigation keys: MENU is always the way under the bonnet of the amplifier, and
then BACK and NEXT to choose the Sub-Menu and ENTER to select the choice. These controls are also
used when editing DSP audio parameters, accessed via the EDIT keys.
13: Signal meters: Depending on the current bank selected (#14), these will be showing input levels preDSP, output levels for the power amp channels, or output levels of the auxiliary channels.
14: EDIT keys: First press on an EDIT key will show the gain for the selected channel within its respective
BANK. Second press will display the last edited parameter - see pages 17 to 18 for more info on full realtime editing of input and output parameters.
15: BANK Select key and LEDs: This key will cycle through three banks: inputs A-D, power amp outputs 1-4
or auxiliary outputs 5-8, for both meter displays, mute functions and during editing. Bank select will default
to showing power amp outputs on meters and mutes after 20 seconds of inactivity.
11
9
10
Manual del Usuario / DXI series / User’s Manual
9
Page 10
REAR PANEL
Note: Designed and manufactured in England by XTA Electronic Ltd. and MC Audio for DAS Audio
2
Group, S.L. The rear panel is common for all models.
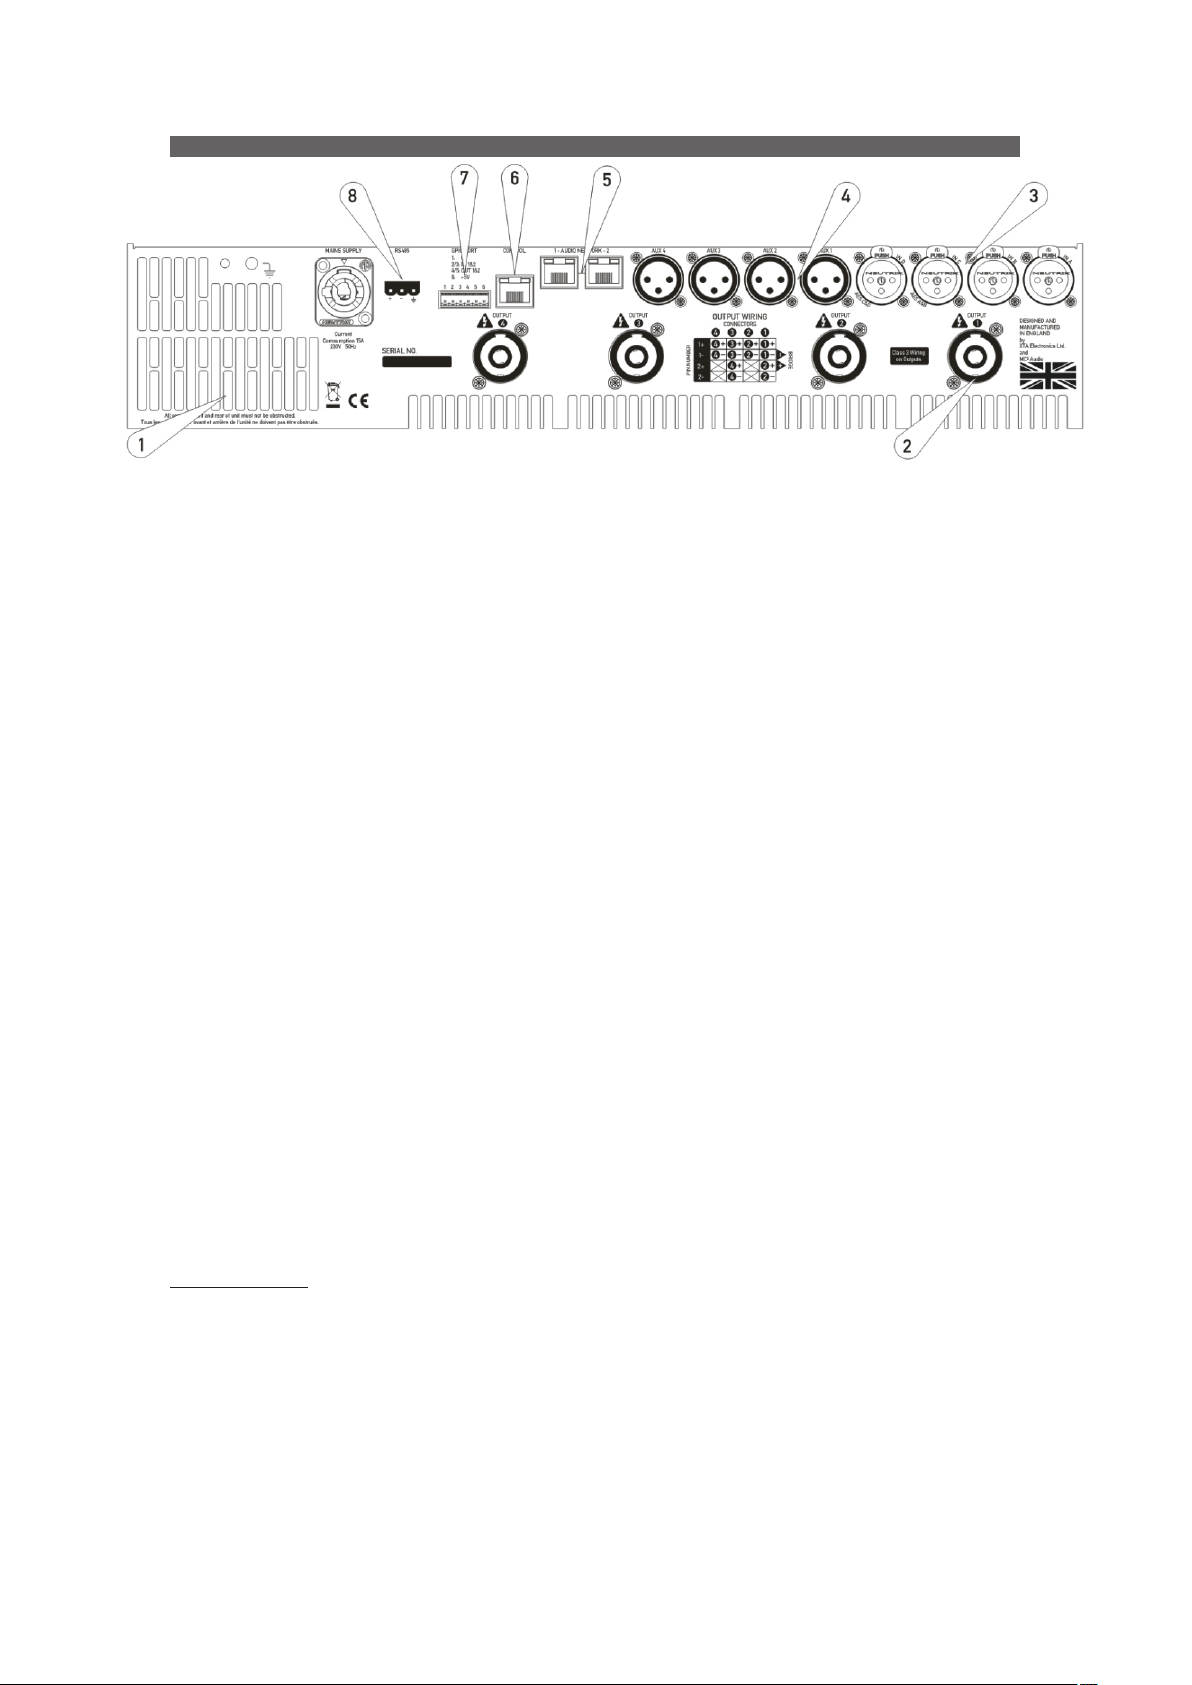
1: Fan outlet: The variable speed fans suck air in through the front vents and out through the back of the
amplifier. Please see maintenance for recommendations on how to clean this and the front foam sections.
2: Channel A output Speakon socket: Normal output is on pins 1+ hot, 1- cold. Channel B's output is also
wired to this socket to enable a single NL4 to provide both channels and to facilitate easier wiring in bridged
mode. Channel B is wired pins 2+ hot, 2- cold. Similarly channel C's output Speakon socket carries Channel
D's output. Check the table on the rear panel for details.
3: Input XLR sockets: Connect signal inputs to these sockets, wired pin 2 hot, 3 cold, 1 ground. For
sensitivity and impedance of these inputs, please see the specifications on page 43. Inputs C & D may also
be switched to AES digital inputs, each carrying a stereo AES stream – channels A&B on socket C, channels
C & D on socket D. This arrangement allows an analogue stereo source to remain connected to sockets A &
B for fallback purposes. To select AES inputs please see the section on page 24.
4: Auxiliary output XLR sockets: These carry the four additional channels of separate DSP processing – they
are NOT just link outputs or a copy of the power amplifier channel's processed audio – they are fully
independent.
5: Audio network connections: Four additional inputs are available via the Dante network card included. This
will also add four network audio outputs, which can be chosen (in banks of four) from a variety of processing
points within the amplifier's DSP structure. For more on this feature see the block diagram on page 13 and
set-up information from page 27.
6: Ethernet control port: Your amplifier may be remotely controlled by connecting it to a computer via this
standard Ethernet port connection. Please see the section starting on page 35 for how to use this feature.
HINT: You can quickly check the amplifier's IP address by pressing ENTER + NEXT.
7: GPIO Port: Your amplifier has a pair of general purpose logic level input and outputs that can be
configured to recall memories, put the amplifier in standby, mute and control levels, and also provide
feedback about status. Please see the section on page 36 for more details.
8: RS485 Port: Your amplifier may also be controlled via an RS485 connection, and this port may also be
used to relay control data from the Ethernet port or the front panel USB port to connect to further devices.
Please see the remote control section on page 36 for more information.
MAINTENANCE
These maintenance instructions are for use by qualified personnel only. Before any routine maintenance,
please ensure that your amplifier is disconnected from the mains supply!
The filter behind the air intake apertures on the front of your amplifier should be cleaned or replaced
periodically, e.g. 12-24 months. (Filters in amplifiers located in more 'dirty' atmospheres may require more
frequent maintenance).
The filter should be 'dry' cleaned, using a vacuum cleaner preferably. Running the unit without a filter is
not recommended unless it is within a 'clean room'. Replacement filter material is available.
If the fan vents on the rear of the amplifier develop a build-up of dust/debris on the finger guards, they
can be cleaned with a dry paintbrush and a vacuum cleaner.
The casework of the amplifier may be cleaned with a lightly dampened cloth – do not use any solvents
as they will damage the paint finish and could remove printing.
If you have any doubts about carrying out maintenance, please refer to a service engineer or contact
your local dealer.
10
Manual del Usuario / DXI series / User’s Manual
Page 11

REAR PANEL (cont'd)
VLR
MALE
VLR
FEMALE
QPEAKON
NL2 & NL4
LINE INPUTS AND OUTPUTS
The inputs are made via 3-pin XLR connectors, which
are electronically balanced and should be connected via a
high grade twin core screened cable, as follows:
Pin 1: Screen (see note below)
Pin 2: Hot (signal +)
Pin 3: Cold (signal -)
The amplifier is designed to operate with fully balanced equipment and ground loops or loss of
performance may be experienced if connected to unbalanced sources. If it is unavoidable however, the
following wiring should be used. The cable should still be twin core plus screen.
Pin 1: Screen - connected to the chassis of the unbalanced equipment - or left disconnected at the
unbalanced end.
Pin 2: Hot (signal +)
Pin 3: Cold (ground 0V)
NOTE: This amplifier is wired to the latest industry recommendations. Pin 1 is connected directly to the
chassis/mains earth. If ground loops (mains hum) are encountered remove the screen connection from the
other end of the cable and leave it open circuit. If problems persist, consult your dealer/supplier.
DO NOT TAMPER WITH OR ALTER ANY GROUND (EARTH) CONNECTIONS INSIDE THE AMPLIFIER.
For bridged operation input should be made to channel A (or C) only and the channels set for bridged
mode for the appropriate pair of channels.
Outputs are also made via 3-pin XLR connectors
wired as follows:
Pin 1: Screen (see note above)
Pin 2: Hot (signal +)
Pin 3: Cold (signal -)
Note that the rear panel outputs are electronically
balanced and so are not galvanically (electrically) isolated.
Front panel outputs are transformer balanced and so are
isolated.
SPEAKER OUTPUTS
The speaker outputs are via Neutrik Speakon connectors. 2 pole (NL2FC) or 4 pole (NL4FC) connectors
can be used.
Pin 1+: Hot
Pin 1-: Cold
Additionally, Channel 1 Speakon connector carries Channel 2 output on Pins +2 & -2 to allow easy biamping or bridged operation using a single NL4 connector. Similarly, Channel 3's Speakon connector also
carries Channel 4 output.
Output Connector 1
Pin 2+: Hot Ch. 2
Pin 2-: Cold Ch. 2
Output Connector 3
Pin 2+: Hot Ch. 4
Pin 2-: Cold Ch. 4
Manual del Usuario / DXI series / User’s Manual
11
Page 12

REAR PANEL (cont'd)
For bi-amped operation, connect as above.
There must be no shared connections between channels.
Negative output terminals must not be joined together as they are not both at ground potential.
Connecting them together will damage the amplifier and void the warranty!
As the currents involved are very high, and to ensure best performance, the speaker cables should be
kept as short as possible and conform to the following minimum requirements:
DX-80I, 14A into 4 Ohm speaker loads
DX-100I, 20A into 4 Ohm speaker loads
When operating the amplifier into loads of less than 4 Ohms, be aware that the current capacity of the
speaker cables will need to be increased above the values quoted here.
Do not connect the inputs/outputs to any other voltage source such as a battery, mains source or power
supply, regardless of whether the amplifier is turned on or off.
Do not run the output of any amplifier channel back into another channel's input and do not parallel or
series-connect an amplifier output with any other amplifier output.
BRIDGED (MONO) OPERATION
Pairs of channels may be independently bridged – channel pair 1+2, and/or channel pair 3+4.
The method is the same for both channel pairs:
Select the required bridged mode through the front panel MENU system (see page 29 for more
information).
Use Channel 1 or 3's Output Speakon connector and connect as follows:
Pin 2+: Hot
Pin 1-: Cold
When operating in bridged mode, the minimum impedances are doubled.
The minimum load in bridged mode is 4 ohms.
12
Manual del Usuario / DXI series / User’s Manual
Page 13
DSP LAYOUT, CONFIGURATIONS AND ROUTING
Manual del Usuario / DXI series / User’s Manual
13
Page 14

DSP LAYOUT, CONFIGURATIONS AND ROUTING (cont'd)
ANALOGUE IN CALIBRATION
NEUTRIK
NEUTRIK
NEUTRIK
NEUTRIK
*Network audio input and output (Dante)
A
B
ANALOGUE C OR AES A+B
C
OR
ANALOGUE D OR AES C+D
D
OR
NETWORK
INPUTS ABCD*
The rules are as follows:
2
SOURCE SWITCH 12-4
2
4
Source Choices and Selection
Your amplifier can source audio from analogue, AES digital,
or network locations (DANTE).
Analogue and AES digital audio are standard, and arranged
so that AES digital audio can be chosen in pairs of channels to
replace either analogue inputs A&B together or analogue
inputs C&D together, or all four channels.
Physical input of AES for channels A&B is swapped to the
input XLR for channel C and the AES input for channels C&D is
on the XLR socket for channel D.
In this way, a pair of analogue inputs can remain connected
to channels A&B and a digital stream of the same audio can be
connected to input C, with fallback from one to the other
possible without repatching.
With the DANTE card, four additional digital sources will be
available.
In total, 8 sources can be made available at any one time –
four analogue and four digital. This affects the choices that
can be made for routing to the inputs of the DSP channels.
Analogue A and B is available at all times;
If AES A&B is selected, Analogue C cannot be used (shares XLR C);
If AES C&D is selected, Analogue D cannot be used (shares XLR D);
If AES A&B is chosen, Dante A&B cannot be used (shares SRC One);
If AES C&D is chosen, Dante C&D cannot be used (shares SRC Two);
Source selection is therefore affected by the selection of AES inputs, which then controls the choice
of input source selections on offer to any input processing channel.
Please see page 23 for further info on using the AES and Input source selection menu options.
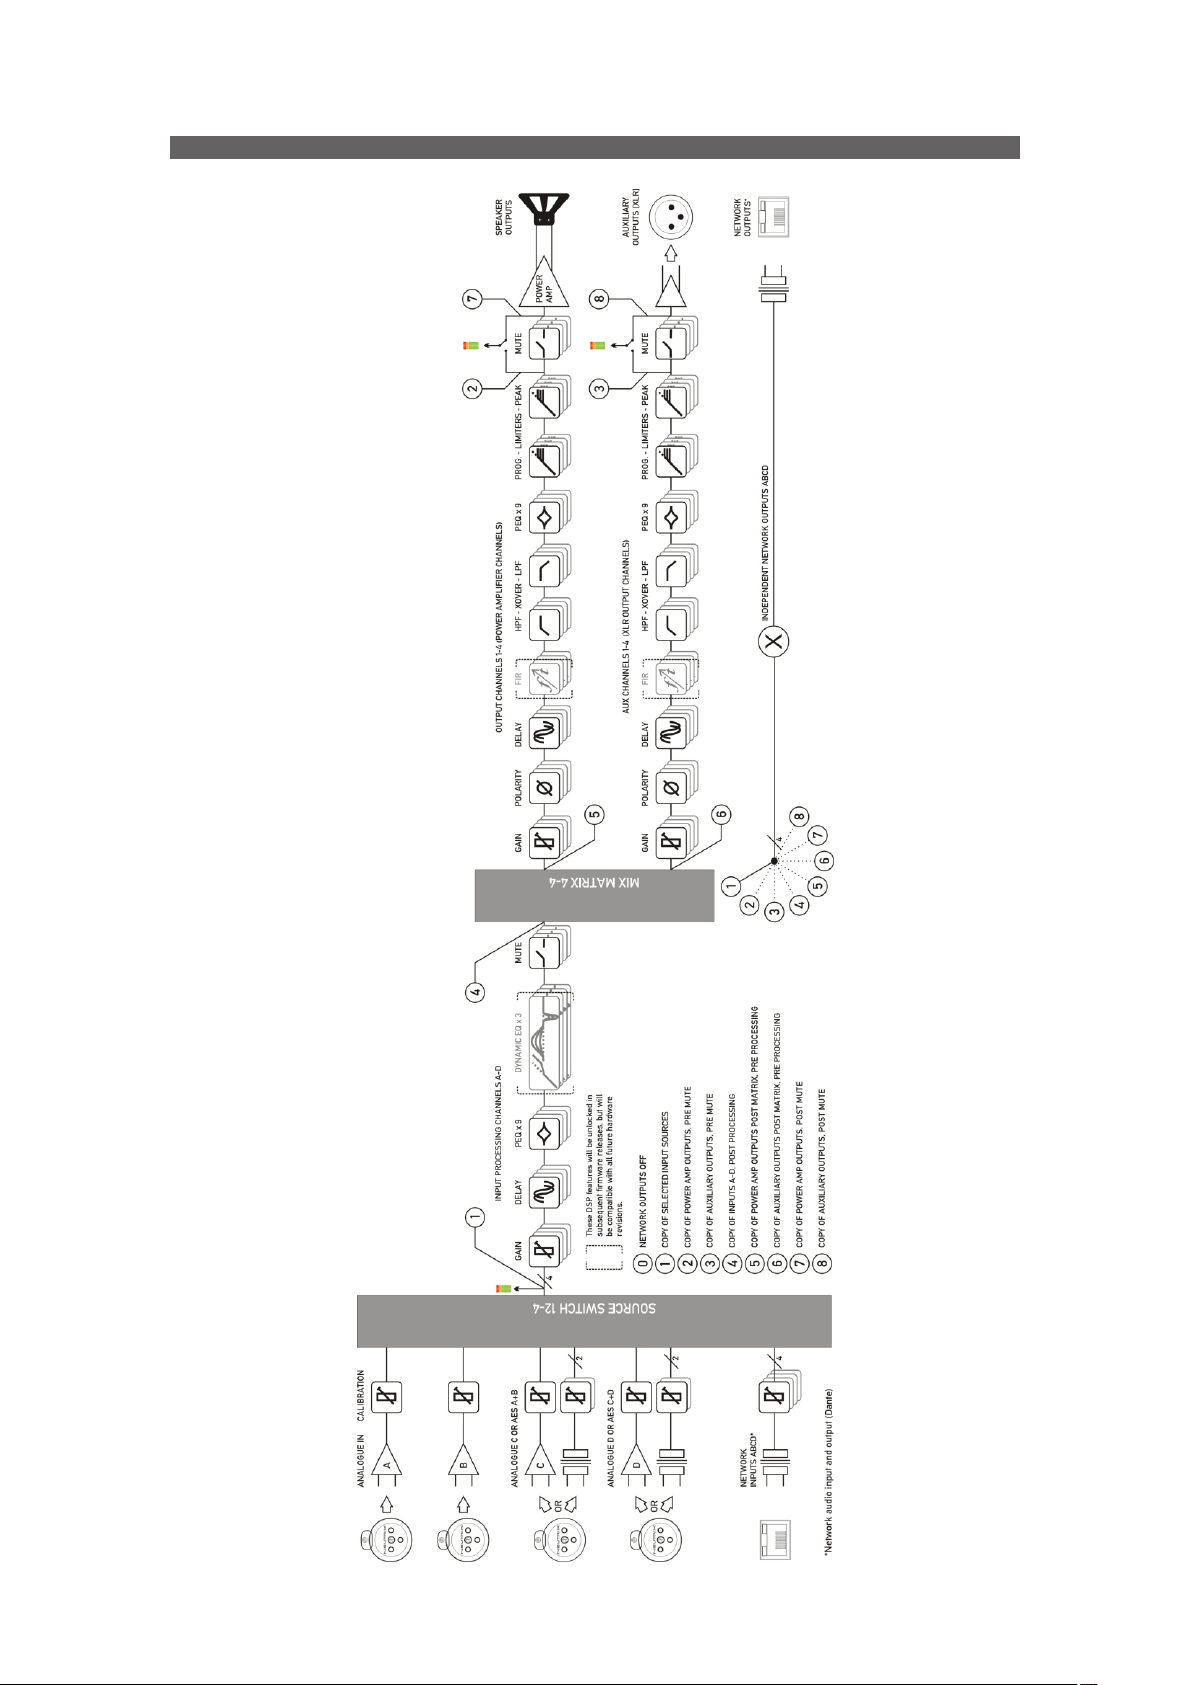
Input Processing Channels
Your amplifier has four input channels
of processing that can be fed from a
variety of sources.
These four channels in turn, feed a
mix matrix for routing to the power
amplifier processing channels and the
auxiliary output processing channels.
Each input processing channel consists of the following sections:
Input gain control
Input delay time
Input parametric EQ bands 1 through 9
The dynamic EQ sections will be added in a future firmware update. For more information on
adjusting input processing parameters, please see the section beginning on page 17.
14
Manual del Usuario / DXI series / User’s Manual
Page 15

DSP LAYOUT, CONFIGURATIONS AND ROUTING (cont'd)
Mix Matrix Section
The mix matrix allows four independent mixes to
be set up for the power amplifier channels and the
auxiliary output channels.
These can be either “Boolean” in design (so just
A+B+C etc.) or a full mix matrix mode can be used
to allow four continuously variable “sends” from the
four input processing channels to be combined.
There are also a variety of templates to act as starting points for crossover duties, where useful
crossover (high and low pass) frequencies are automatically assigned to groups of outputs, dependant
on the format used. For more information on adjusting the mix matrix, please see the output editing
section on page 22. Note that the mix matrix will only be available if it has been selected as part of the
output/auxiliary configurations – see page 27 to change this.
Power Amplifier and Auxiliary Output Processing Channels
There are eight identical channels of output processing in your amplifier: four dedicated to the power
amplifier channels, and a further four that are connected to the auxiliary XLR outputs on the amplifier,
providing analogue feeds to other equipment.
Each output processing channel consists of the following sections:
Output delay time
High and low pass crossover filters (up to 48dB/Oct.)
Output parametric EQ bands 1 through 9
Output gain control
Program (RMS) limiter
Peak limiter
FIR filtering capabilities will be added in a future firmware update. For more information on adjusting
output processing parameters, please see the section beginning on page 18.
Manual del Usuario / DXI series / User’s Manual
15
Page 16

DSP LAYOUT, CONFIGURATIONS AND ROUTING (cont'd)
Independent Network Audio Outputs
All DXi models have a network audio card fitted (Dante), this means being able to route four channels
of audio from the network and, as well, being able to route four channels of audio back onto the
network.
This feature is primarily intended for use with the DX series models, which may also be fitted with a
network audio interface (optional), allowing them to utilise the additional processing channels in your DXi
models via connection with a single Ethernet cable.
Working like this, the network audio outputs would be routed directly from end of the auxiliary output
processing, so that they are just a copy of the signals available at the Aux XLR outputs 1-4 (choice #1 in
the above diagram).
However, there are other circumstances where it might be more useful to route these outputs from
elsewhere within the DSP processing. For example, if the network outputs are being used to also “breakin” analogue or AES channels, for use with other amplifiers, it might be more applicable to route the
audio from the outputs of input processing channels (choice #5).
If it's required for the network outputs to break in channels that are not being used by the local
processing, this can also be achieved by using the outputs of the mix matrix which feed the auxiliary
output processing (choice #3).
Alternately, the mixes being used by the power amp processing can be selected (choice #4) and
finally, the pre-mute final output of the auxiliary channels' processing may be selected (choice 2) to
prevent muting the local aux outputs from muting the network feeds.
Note that these routing selections work on a “x4” basis – all four network output feeds are
selected from one of the above choices as a group – they cannot be individually assigned to
different points.
For more information on selecting the network audio output routing, please see the section on page
26.
16
Manual del Usuario / DXI series / User’s Manual
Page 17

DIRECTLY EDITING AUDIO PARAMETERS
Overview
Editing all audio parameters is available from the front panel of your amplifier using a combination of
the select BANK key, reassignable EDIT keys, and the BACK/NEXT/ENTER navigation controls.
First, make sure the correct bank of channels is selected – either inputs A-D, amplifier outputs 1-4 or
auxiliary outputs 5-8 by pressing the BANK key.
Next, press the EDIT key that corresponds to the channel to be adjusted. The EDIT key will
illuminate, and the gain will always be displayed as the first parameter.
To choose another parameter, use BACK and NEXT to scroll through the available choices.
If there are multiple parameters grouped on a single screen (such as parametric EQ frequency, 'Q'
and gain) move between these using the ENTER key.
Inp A DeskLeft PEQ:1
102Hz Q=3.0 +10.9dB
Press
ENTER
Finally, use the rotary encoder to adjust the value of the parameter.
You can swap bank at any time by pressing the BANK key, and to quickly access the same
parameter on another channel (within a bank) double press on the required channel's EDIT key. If
the same parameter doesn't exist in a bank (such as no limiters on the input bank), the gain
screen will be shown.
A third press on the same EDIT key will exit editing and return to the current bank's default
screen.
Hint: You can quickly check the same setting of any parameter on a bank of channels by
double pressing each EDIT key in turn – so to check each output's polarity setting, just press
EDIT, press NEXT until Polarity is displayed, then press the next channel's EDIT twice, and so on.
Input Gain
Variable between -40dB and +6dB in 0.1dB steps.
Press
ENTER
Press
ENTER
Inp A
Input Delay
Max delay time is 650.000mS in 10uS steps. Swap to 1mS steps by pressing ENTER.
Units can be changed to read distance instead of time though the system sub-menu – see page 32
for details.
Inp A
Manual del Usuario / DXI series / User’s Manual
Input Gain= 6.0dB
Delay= 500.00mS
Gain
Delay
17
Page 18

Page 19

DIRECTLY EDITING AUDIO PARAMETERS (cont'd)
Output High Pass Filter
Set the high pass filter frequency – a setting of “<10Hz” bypasses the filter. To change the filter slope
and type, press ENTER and then adjust with the encoder. Note that 48dB/Octave filters will only be
available if PEQ 6 & 7 are bypassed.
Out 1 Output 1 HPF
25.8Hz Linkw - Riley 24dB
Parametric bands will remember their settings if bypassed and used in 48dB/Octave crossover filters
and these settings will be reinstated if a lower order filter type is subsequently chosen (24dB/Octave or
lower).
The message
Bypass PEQ’s 6 & 7
To Access 48dB Slopes
will be shown if the bands aren't already in bypass (or set to 0dB).
Output Low Pass Filter
Set the low pass filter frequency – a setting of “>32kHz” bypasses the filter. To change the filter slope
and type, press ENTER and then adjust with the encoder. Note that 48dB/Octave filters will only be
available if PEQ 8 & 9 are bypassed.
Out 1 Output 1 LPF
9k70Hz Linkw - Riley 24dB
Parametric bands will remember their settings if bypassed and used in 48dB/Octave crossover filters
and these settings will be reinstated if a lower order filter type is subsequently chosen (24dB/Octave or
lower).
The message
Bypass PEQ’s 8 & 9
To Access 48dB Slopes
will be shown if the bands aren't already in bypass (or set to 0dB).
Manual del Usuario / DXI series / User’s Manual
19
Page 20

Page 21

DIRECTLY EDITING AUDIO PARAMETERS (cont'd)
Output Limiters: Program Limiter
Note that the output limiters are calibrated differently for the amplifier output channels and the
auxiliary output channels. They cover the same range, but the scaling on the threshold is different as the
auxiliary outputs are calibrated to the maximum line output level, whilst the amplifier outputs are
calibrated to include the gain of the power amplifier.
Out 1 Output 1 Limiter
Ak=2.0mS Rl=x16 +38.5dB
Move between the attack time, the release time and the threshold by pressing the ENTER key.
If the message “Automatic T/C” appears on the limiter edit screen, this means that the limiters time
constants have been set to be configured automatically, based on the frequency of this channel's high
pass crossover filter.
To turn this feature off, and use manual attack and release times, please see the section on page 27
describing amplifier and auxiliary routing.
Release time is set as a multiplier of the attack time, so is represented as a “time N” readout. The
minimum release time is twice the attack time, to minimise audible artefacts of inappropriate limiter time
constants. We recommend using the automatic feature unless there is a good reason not to – a badly
set up limiter will not only function incorrectly, and not provide the protection you expect, it can also
sound pretty terrible!
Setting up limiters has perhaps been seen as a “black art” by some engineers – it is actually a simple
process, as long as you have a few basic pieces of information to hand. Please read through the section
on limiters and how to set them correctly, starting on page 46 of this manual.
Output Limiters: Peak Limiter
The peak limiter immediately follows the program limiter in an output (both power amplifier and
auxiliary) signal path. It is designed to control the peaks that pass through the program limiter, due to
the attack time set on the program limiter. A slow attack time will allow the program limiter to exceed its
threshold for a short period, and this may cause over excursion on LF drivers. This may be controlled by
imposing an absolute maximum level, set in dB above the program limiter threshold. This limiter has a
zero overshoot characteristic and so only has a release parameter (with no attack time).
Out 1 Output 1 PeakLim
Rel.=Medium +3.5dB Abv
Toggle between release time (Slow/Medium/Fast) and the threshold above the Program limiter by
pressing the ENTER key. If the release time is replaced with “Rel.=Auto”, this means that the limiters time
constants have been set to be configured automatically, based on the frequency of this channel's high
pass crossover filter. Please see the section on page 27 describing amplifier and auxiliary routing, if you
want to revert to manual release time.
Manual del Usuario / DXI series / User’s Manual
21
Page 22

DIRECTLY EDITING AUDIO PARAMETERS (cont'd)
Output Matrix Gains
Note that this feature will only be displayed if the configuration for the amplifier or auxiliary outputs
has been set to operate in “Full Matrix” mode, as opposed to “Free Assign” or a standard routing
configuration (1 x 4 way, 2 x 2 way etc.)
To use “Full Matrix” mode, please see the section about adjusting the configuration on page 27.
Out 1 Matrix Gain In A
0.0 Off -40.0 +15.0
Initially, the “send” level from Input A will be selected – press ENTER to jump to the next “send” level
for this output. Range is from -40dB to +15.0dB, with Mute one step below -40.0dB, whereupon the
display will show “Off” as for Input B's send level in the above example.
22
Manual del Usuario / DXI series / User’s Manual
Page 23

ADVANCED EDITING FEATURES
Overview
In addition to being able to control all the EQ and limiter functions via the front panel, it is also
possible to completely reconfigure the source selections and routing, turn on matrix mixing, and
configure ganging options to speed up editing.
The routing and ganging options are independent for the amplifier outputs and auxiliary outputs, but
source selection is global across the entire device.
Selecting Available Sources (Analogue, AES, Network Audio)
Your amplifier can source audio from
analogue, AES digital, or network locations
(DANTE).
Analogue and AES digital audio are standard,
and arranged so that AES digital audio can be
chosen in pairs of channels to replace either
analogue inputs A&B together or analogue
inputs C&D together, or all four channels.
Physical input of AES for channels A&B is
swapped to the input XLR for channel C and the
AES input for channels C&D is on the XLR
socket for channel D.
In this way, a pair of analogue inputs can
remain connected to channels A&B and a digital
stream of the same audio can be connected to
input C, with fallback from one to the other
possible without repatching.
With the DANTE card, four additional digital
sources will then be available.
In total, 8 sources can be made available at
any one time – four analogue and four digital.
This affects the choices that can be made for
routing to the inputs of the DSP channels.
The rules are as follows:
Analogue A and B is available at all times;
If AES A&B is selected, Analogue C cannot be used (shares XLR C);
If AES C&D is selected, Analogue D cannot be used (shares XLR D);
If AES A&B is chosen, Dante A&B cannot be used (shares SRC One);
If AES C&D is chosen, Dante C&D cannot be used (shares SRC Two);
Source selection is therefore affected by the selection of AES inputs, which then controls the choice
of input source selections on offer to any input processing channel. Switch any required AES sources
first, then select the required source combination.
Manual del Usuario / DXI series / User’s Manual
23
Page 24

ADVANCED EDITING FEATURES (cont'd)
Switching from Analogue to AES Sources
To select inputs, from the home screen, press MENU, choose the CONFIGURATION Sub-Menu and
press ENTER.
CONFIGURATION Sub - Menu
Input AES Selection
Use the encoder or BACK and NEXT keys to find the Input AES Selection option and press ENTER.
The screen will now show the current choice for the physical XLR inputs on channels C&D:
Input AES Selection
XLR C= Ana: XLR D= Ana *
Use the encoder or BACK and NEXT keys to cycle between the four combinations, of analogue (Ana)
or Digital (AES). Press ENTER to confirm the choice, and again to confirm if changes have been made.
=== Selection Changed === Press
[ENTER] to CONFIRM
If a digital source is chosen for either XLR, the AES IN LED on the front panel will begin to flash until
a valid lock is seen for the selected inputs.
If the AES input(s) have valid stable signals and there are no other issues, the LED will not be
flashing.
Note that the AES LED being illuminated does NOT mean that an AES source is being used or
routed anywhere within the amplifier. It is an indication that valid AES is connected.
24
Manual del Usuario / DXI series / User’s Manual
Page 25

ADVANCED EDITING FEATURES (cont'd)
Choosing Sources to Route to Input Processing Channels
To choose sources, from the home screen, press MENU, choose the CONFIGURATION Sub-Menu
and press ENTER.
CONFIGURATION Sub -Menu
Input Source Selection
Use the encoder or BACK and NEXT keys to find the Input Source Selection option and press
ENTER.
The screen will now show the current choice for the first input processing channel (A):
Input Source Selection
Input A = Analogue A
Use the encoder or BACK and NEXT keys to scroll through the eight choices for this input. These will
be:
Four analogue sources:
Analogue A
Analogue B
{Analogue C}
Analogue D
And four digital sources, depending on the AES selection:
AES A
AES B
{Dante C}
{Dante D}
The choices shown above would be shown if AES has been selected on XLR C. Analogue C is
shown in brackets to indicate that this selection will result in no audio, either because the input is
currently unavailable (due to input selection choices in the case of Analogue C) or because the input
does not exist (due to the network audio card not being fitted in the case of the Dante C and Dante D).
Press ENTER when the required input source is shown, and the next processing channel will be
selected, running through input channels A-D. Finally, if anything has been changed, the confirmation
screen will show:
=== Selection Changed === Press
[ENTER] to CONFIRM
Press ENTER to confirm the changes and exit to the home screens.
Manual del Usuario / DXI series / User’s Manual
25
Page 26

ADVANCED EDITING FEATURES (cont'd)
Changing Network Output Source
As your amplifier has a network audio card fitted (Dante) then, as well as being able to route four
channels of audio from the network, it is possible to route four channels of audio back onto the network.
The possible sources for the network outputs are always selected as a group of four, and there are eight
points within your amplifier's DSP than can be chosen.
To choose sources, from the home screen, press MENU, choose the CONFIGURATION Sub-Menu
and press ENTER.
CONFIGURATION Sub -Menu
Digital Output Source
Use the encoder or BACK and NEXT keys to find the Digital Output Source option and press ENTER.
Digital Output Source
Source = Aux Outputs *
Use the encoder or BACK and NEXT keys to choose between one of the following 5 sources:
Digital Outputs Muted
The network outputs source is disconnected and no audio is transmitted. The Dante
connection is maintained and visible on the network
Amp Outputs pre Mute
Source : audio is sourced just after all amplifier output's processing but pre-mute so the
network copies will not be affected by local (or remote) mutes.
Aux Outputs pre Mute
Source : audio is sourced just after all auxiliary output's processing but pre-mute so the
network copies will not be affected by local (or remote) mutes.
Amp Outputs+M
Source : audio is sourced just after all amplifier output's processing post-mute so the network
copies will be affected by local (or remote) mutes.
Aux Outputs+M
Source : audio is sourced just after all auxiliary output's processing post-mute so the network
copies will be affected by local (or remote) mutes.
Press ENTER to confirm the changes and exit to the home screens.
26
Manual del Usuario / DXI series / User’s Manual
Page 27

ADVANCED EDITING FEATURES (cont'd)
Changing Crossover Configuration
As the amplifier output's configuration setup is identical to the auxiliary output's configuration, this
section will just explain the former. The configuration of the amplifier outputs 1-4, and auxiliary outputs
1-4 have separate entries in the Configuration sub-menu, but operate identically. Once the input
sources and AES selections have been set up, the last part of the process is to determine what actual
routing configuration is required from the “outputs” of the four input processing channels.
This is the mix matrix. The mix matrix can function either in a “Boolean” operation mode, where input
signals still have the capability to be mixed together to feed an output channel's processing, but at fixed
standard levels, or as a fully variable mixer.
There is also a selection of useful templates if used in the “Boolean” mode, which will pre-configure
not only the routing, but also useful starting points for each outputs' crossover filters.
To change configuration, from the home screen, press MENU, choose the CONFIGURATION SubMenu and press ENTER.
CONFIGURATION Sub -Menu
Output Routing
Use the encoder or BACK and NEXT keys to find the Output Routing option and press ENTER.
Output Routing
Routing = 2 x 2 WAY *
Use the encoder or BACK and NEXT keys to choose from the following routing options:
Full Matrix
This mode offers continuously variable send levels from the four input processing channels
and the adjustment of the levels is then through individual output editing as explained on page
22.
Free Assign
This mode allows the input sends to be selected as ON or OFF and intelligently adjusts the
send levels to maintain 0dB on the output – this is further explained on the next page.
1 x 4 WAY
All four outputs are fed from input processing channel A's output and assigned default
crossover points, which may then be adjusted if required.
2 x 2 WAY
Outputs 1 & 2 (or Aux 5 & 6) are fed from input processing channel A's output, and outputs 3
& 4 (or Aux 7 & 8) from channel B. Default crossover points are assigned.
4 x 1 WAY
Input processing channel A feeds output channel 1, B to 2, C to 3 and D to 4. Crossover
points are not assigned and will be set to full range – this can be changed manually if
required.
Manual del Usuario / DXI series / User’s Manual
27
Page 28

ADVANCED EDITING FEATURES (cont'd)
Using Free Assign Mode
Free assign mode allows any combination of inputs to be routed to an output, with the send levels
being intelligently adjusted to ensure that the output levels sum to 0dB.
So, if two inputs are summed to a particular output, their gains will be dropped by 6dB so that if both
input levels are 0dB they will sum to produce a 0dB level at the output (assuming the output gain as not
been adjusted by the user).
If three inputs are summed, their gains will be reduced by 9.5dB so if all three inputs are 0dB, so the
output will be 0dB.
Lastly, if all four inputs are summed to an output channel, the gains will be reduced by 12dB.
If this method of operation is not desired, the same summing can be achieved without the automatic
gains adjustments by switching to Full Matrix mode and manually setting the send levels as required.
Select Free Assign mode when changing the output routing (separately for power amp outputs and
auxiliary outputs).
To change configuration, from the home screen, press MENU, choose the CONFIGURATION SubMenu and press ENTER.
CONFIGURATION Sub -Menu
Output Routing
Use the encoder or BACK and NEXT keys to find the Output Routing option and press ENTER.
Output Routing
Routing = Free Assign *
Use the encoder or BACK and NEXT keys to choose Free Assign and press ENTER.
The first MUTE key will begin to flash and the EDIT keys will illuminate to show which input
processing channels are being routed to this output as well as being show on-screen. In the example
below, output 1 is being fed from A+D:
Output Routing
Routing Out1 = A+D *
Use the encoder or BACK and NEXT keys to
choose the required routing combination. The
EDIT key LEDs will change in sympathy with the
input selection.
28
Manual del Usuario / DXI series / User’s Manual
Page 29

ADVANCED EDITING FEATURES (cont'd)
Press ENTER to move on to the next output channel or press the channel's MUTE key to select it.
When all channels have been routed, press ENTER – the unit will run through any remaining channels (if
output 3 had been manually selected, for example, then ENTER would run through channel 4 before
moving on to the final set-up selections).
The next set-up selections are concerned with using automatic time constants for the limiters and
selecting bridged configurations.
The screen will first show:
Output Routing
AutoLimiter TimeCst:Yes*
DAS Audio advise setting the limiter time constants automatically. They are based on the frequency
of this channel's high pass crossover filter. Unless you have a particular reason to not use the auto
setting, set this to YES and press ENTER.
Bridged Mode for Output Pairs
Output pairs can be selected to run in a bridged configuration to realise higher output powers.
When operating in bridged mode, the minimum impedances are doubled.
The minimum load in bridged mode is 4 ohms.
For details of how to connect to the amplifier when running in bridged mode, please see page 12.
Selecting bridged mode is available through the CONFIGURATION > Output Routing menu and
as part of the set-up wizard. Bridged mode is not available for auxiliary output configuration and should
instead be selected on the externally driven “slave “ amplifier.
The screen will show:
Output Routing
Bridging = None *
Use the encoder to select which channel pairs are to be bridged:
1<>2 - bridge outputs 1 & 2 only
3<>4 - bridge outputs 3 & 4 only
1<>2 & 3<>4 – bridge both output pairs
Confirm selection with ENTER – final section of the configuration wizard will then ask about
resetting/clearing parameters as explained in the next section. If a bridged mode has been selected there
are some changes apparent in the interface to confirm this.
Depending on what bridged mode are active the appropriate LED will illuminate above the power
switch:
There are some changes operationally when
a pair of channels are bridged.
Channel MUTE keys will be automatically
ganged;
Meters for the bridge pair will read
identically; and lastly
Manual del Usuario / DXI series / User’s Manual
29
Page 30

ADVANCED EDITING FEATURES (cont'd)
Channel EDIT keys will be automatically ganged, and the display reflects the bridged mode by
changing to show the following when a bridged pair are edited:
1<B>2 Output 1 Gain
Output Gain = 0.0dB
In this example, the bridged pair are outputs 1 & 2 and this will be displayed if EDIT is pressed on
either output channel.
Bridged status is stored in an output memory, and ignored if this memory is recalled into the auxiliary
channels.
Resetting Audio Parameters
Resetting parameters is available through the CONFIGURATION > Output Routing menu and
CONFIGURATION > Auxiliary Routing menu as part of the set-up wizard.
The final set-up query is about resetting the current parameters. If you have already edited the
outputs' DSP settings and are setting up routing last, make sure you select “No” when asked about
resetting, or all your filter, delay limiter and crossover parameters will be cleared!
Output Routing
Clear Out Settings:Yes*
If “Yes” is selected, then, depending on format chosen, all outputs will be set to full range (no
crossover), limiters at max threshold (so minimum protection), delays and gains at zero, polarity
normal and all bands of EQ to PEQ mode, 1kHz, Q of 3.0 and 0dB. All output/auxiliary
channels will also be muted for safety!
Certain formats will preset the crossover frequencies to give a useful starting point:
Selecting a 2 x 2 way configuration will preset the output crossovers as
Outputs 1 + 3: <10Hz – 1.62kHz, 24dB/Oct. Link-Riley
Outputs 2 + 4: 1.62kHz - >32kHz, 24dB/Oct. Link-Riley
Selecting a 1 x 4way configuration will preset the output crossovers as
Output 1: <10Hz – 149Hz, 24dB/Oct. Link-Riley
Output 2: 149Hz – 1.31kHz, 24dB/Oct. Link-Riley
Output 3: 1.31kHz – 8.00kHz, 24dB/Oct. Link-Riley
Outputs 4: 8.00kHz – >32kHz, 24dB/Oct. Link-Riley
In both cases, all other DSP functions are reset as in bold above.
Hint: This procedure can be used to quickly clear all EQ – simply run through all the steps of
either output or auxiliary routing as appropriate without changing anything and select “Yes” when
asked about clearing output settings.
Ganging Channels for Editing
To make editing of multiple channels simpler (for example, stereo input sources or two-way
output editing), it's possible to gang channels together so that any edits applied to one will
automatically be applied to the other (or others).
Ganging is separated for inputs, outputs and auxiliary channels, but the method of setting
them up is identical so only the output ganging option will be covered here.
To change output ganging, from the home screen, press MENU, choose the CONFIGURATION
Sub-Menu and press ENTER.
30
CONFIGURATION Sub -Menu
Output Ganging
Manual del Usuario / DXI series / User’s Manual
Page 31

ADVANCED EDITING FEATURES (cont'd)
Use the encoder or BACK and NEXT keys to find the Output Ganging option and press ENTER.
Output Routing
Ganging = 1+3 2+4 *
Use the encoder or BACK and NEXT keys to choose the required ganging option and press ENTER.
If the ganging mode has changed, confirm this with a final press of ENTER and the ganging is complete.
Note that ganging assumes the settings of the lowest numbered channel in the gang is the initial
master channel and so any changes to ganging will immediately copy the settings from the lowest
member in the gang to all other ganged channels.
For example – adding channel 3 to a gang of 1+3 will instantly make channel 3's settings identical to
channel 1.
Mutes remain unganged at all times (except in bridge mode – see page 29), as does polarity.
Ganged channels are indicated by the EDIT keys illuminating together and the display showing the
member numbers of the gang:
Aux1&3 Extern 1 Gain
Output Gain = +12.5dB
The label shown (“Extern 1”) is always the lowest gang member, no matter which EDIT button has
been pressed in the gang.
Labels can only be changed through remote control software or the DeltaDirect iPad app.
Ganging states are stored in output memories and will be recalled when an output memory is recalled
to either amplifier outputs or auxiliary outputs.
Manual del Usuario / DXI series / User’s Manual
31
Page 32

STORING AND RECALLING SETTINGS
Memory Overview
The memory in your amplifier is organised into three different types – input memories, output
memories and source memories. Input and output memories are formatted in banks of four channels at a
time – be that four input channels or four output channels (amplifier or auxes).
Source memories are a different type and are global to the entire amplifier. It is also possible to store
and recall a complete copy of all current settings (so, input, source, amplifier and aux outputs) in a
memory location – “Everything”.
Input memories contain all the EQ, gains, delays, mutes and names for the four input channels.
INPUT MEMORY
Output memories contain all the EQ, crossover filters, FIR data (if applicable), polarities, gains,
delays, mutes, limiters (including auto time constants setting), names, bridge modes, and routing from
the mix matrix (including free assign and full matrix gains if applicable). This is for the bank of four
amplifier channels, or the bank of four auxiliary output channels.
OUTPUT MEMORY
Source memories contain the all data concerned with additional choices of source selection
encompassing AES/Analogue switching, Network Audio Output Source and the source switching
(choosing which inputs feed the input DSP channels).
SOURCE MEMORY
Memories all exist in a numbered list and depending on the type of memory to be recalled, the list will
be filtered to only show the applicable memory type.
32
Manual del Usuario / DXI series / User’s Manual
Page 33

STORING AND RECALLING SETTINGS (cont'd)
Storing a Memory…
When a memory is to be stored, the type is first selected (Input, Output, Source or Everything) and
then in the case of an Output memory, this must be further qualified to determine if the stored data is to
originate from the amplifier outputs or the auxiliary outputs.
To store a memory, from the home screen, press MENU, choose the GLOBAL MEMORY Sub-Menu
and press ENTER.
MEMORY Sub -Menu
Recall an Output Memory
Use the encoder or BACK and NEXT keys to choose either Input or Output memory type as
appropriate and press ENTER.
STORE an Output Memory Store from
Amp Outputs *
In the previous example, the extra step is to choose whether to store the four amplifier outputs' data,
or the four auxiliary outputs' data. Choose with encoder and press ENTER.
STORE an Output Memory
103:
Use the encoder to choose the memory number to use – memories that are already used will show
the current name and a question mark on the bottom line and ask for confirmation if chosen:
STORE an Output Memory
94:LEFT SIDE 6 SUBS ?
The name may now be edited/entered using a combination of the encoder and the BACK/NEXT keys
to move along the name. Press ENTER when complete, or QUIT to exit.
Enter Memory Name
94:LEFT SIDE 6 SUBS ?
Memory is then stored, with a confirmation message and the amplifier will return to the default screen
on the selected bank.
Manual del Usuario / DXI series / User’s Manual
33
Page 34

STORING AND RECALLING SETTINGS (cont'd)
Recalling a Memory…
When a memory is recalled, after choosing the type (Input, Output, Source or Everything), recall of
Output memories is further qualified by what bank of outputs the recalled data is to affect – amplifier or
auxiliaries.
To recall a memory, from the home screen, press MENU, choose the GLOBAL MEMORY Sub-Menu
and press ENTER.
MEMORY Sub -Menu
Recall an Output Memory
Use the encoder or BACK and NEXT keys to choose either Input or Output memory type as
appropriate and press ENTER.
RECALL an Output Memory Recall to
Aux Outputs *
Use the encoder to choose the memory required, remembering that the list will only contain
memories of the chosen type, and so the numbers may not be contiguous (so there may be gaps!)
Press ENTER and confirm. If the routing configuration of the memory just recalled is different to the
current configuration, the outputs will be muted for safety.
RECALL an Output Memory 94:LEFT SIDE
6 SUBS
Dependant on the bank selected, the display will by default show the name of the last input, amp
output or aux output memory recalled, or the same on all three if an “Everything” memory was recalled.
34
Manual del Usuario / DXI series / User’s Manual
Page 35

Page 36

REMOTE CONTROL
Overview
Your amplifier is equipped with multiple options for remote control. It can operate as a single device
via a USB connection to the front panel, and this can also be used as a converter to an RS485 network,
where other DX series amplifiers or DAS system units may be connected.
It may also be controlled via an Ethernet connection and again will relay data onto an RS485 network
if required.
The Ethernet and USB connections can be used in an intelligent switchover mode, where the
Ethernet connection is active, but will be overridden by a USB connection, allowing quick connection to
a system via the front panel without needing to reconfigure the current remote interface setup.
The RS485 network can be used on its own as third means of communication, if the amplifier is part
of a bigger system and an Ethernet connection is not available.
Using an Ethernet connection, multiple amplifiers can be connected directly to a standard Ethernet
switch, or WiFi router, allowing for wireless communication.
Finally, the GPIO port on your amplifier can be configured to feed back a variety of alarm signals
(such as over temperature threshold, or protection triggered) and offer simple closed contact control of
standby mode, mutes or memory recalls. It also accepts variable voltages which allow direct level
control of selected channels' gains.
Remote Control Software Choices
Your amplifier is designed to be fully configured via AudioCore.
Main configuration is performed via AudioCore, either with a wired connection via Ethernet, USB or
RS485. Connection to amplifiers is also possible wirelessly using the Ethernet connection if this is via a
wireless router.
Tuning of a system can then be performed wirelessly (via a WiFi connection) using just the iPad or
tablet.
Configuration of the Remote Interface
To configure the remote interface, from the home screen, press MENU, choose the INTERFACE SubMenu and press ENTER.
INTERFACE Sub -Menu
External Interface
Use the encoder or BACK and NEXT keys to select External Interface and press ENTER.
External Interface
Mode= Ethernet or USB
Use the encoder or BACK and NEXT keys to choose the required interface and press ENTER. This
will invoke a series of further options depending on the interface chosen – these are explained below:
Mode = OFF: Interface is disabled and no external comms are active. This is useful if you need to
fully secure your amplifier as well as locking the front panel (for more information on security and locking
see page 42.)
36
Manual del Usuario / DXI series / User’s Manual
Page 37

REMOTE CONTROL (cont'd)
Mode = Ethernet Only: The Ethernet control port on the rear panel is active. Selecting this choice will
then ask for the following further information to be confirmed:
RS485 Relay: Choose ON to relay all remote control data onto the RS485 network for
connection to further devices (other DAS Audio units)
RS485 Speed: Only shown if RS485 Relay = ON: set RS485 baud rate (recommended to use
57600)
Remote ID Number: Set a device ID (still required even on Ethernet connections). This must
be unique to the connected unit – setting the same ID on multiple units may cause comms
problems for all devices.
IP Mode: Choose either Static or Auto IP. Auto IP will generate an IP address based on
unique hardware features such as MAC address. Choose Static if you need to select the IP
address to lie within a specific range, for instance when working within a larger infrastructure.
GtWay: The gateway address is used for external access to the Internet and should be left at
the default setting.
SubNt: The subnet mask is used to subdivide IP addresses into groups that allow further sub-
groups addressing to be defined, so further extending the address range.
Leave at default 255.255.255.0 unless specifically required.
IP: The IP address specifies the amplifier's unique identifier on the Ethernet network. It is
used in conjunction with the amplifier's Remote ID number to identify individual devices on
the network. Make sure this is not set to the same value as any other devices or comms
problems will occur.
Manual del Usuario / DXI series / User’s Manual
37
Page 38

REMOTE CONTROL (cont'd)
Mode = USB Only: The USB socket on the front panel is active. Selecting this choice will then ask
for the following further information to be confirmed:
USB Speed: As the USB connection appears as a virtual COM port in remote software, it still
has an associated serial speed. Leave at the default of 57600. This is not the actual USB
serial data rate – it's the virtual COM port data rate!
RS485 Relay: Choose ON to relay all remote control data onto the RS485 network for
connection to further devices (other Delta DSP amplifiers or XTA processors)
RS485 Speed: Only shown if RS485 Relay = ON: set RS485 baud rate (recommended to use
57600)
Remote ID Number: Set a device ID (still required even on Ethernet connections). This must
be unique to the connected unit – setting the same ID on multiple units may cause comms
problems for all devices.
38
Manual del Usuario / DXI series / User’s Manual
Page 39

REMOTE CONTROL (cont'd)
Mode = Ethernet Or USB: The Ethernet control port on the rear panel is active, so long as the
amplifier is not connected via USB, whereupon it automatically takes priority. Selecting this choice will
then ask for the following further information to be confirmed:
RS485 Relay: Choose ON to relay all remote control data onto the RS485 network for
connection to further devices (other Delta DSP amplifiers or XTA processors)
USB Speed: As the USB connection appears as a virtual comm port in remote software, it still
has an associated serial speed. Leave at the default of 57600. This is not the actual USB
serial data rate – it's the virtual COM port data rate!
RS485 Speed: Only shown if RS485 Relay = ON: set RS485 baud rate (recommended to use
57600)
Remote ID Number: Set a device ID (still required even on Ethernet connections). This must
be unique to the connected unit – setting the same ID on multiple units may cause comms
problems for all devices.
IP Mode: Choose either Static or Auto IP. Auto IP will generate an IP address based on
unique hardware features such as MAC address. Choose Static if you need to select the IP
address to lie within a specific range, for instance when working within a larger infrastructure.
GtWay: The gateway address is used for external access to the Internet and should be left at
the default setting.
SubNt: The subnet mask is used to subdivide IP addresses into groups that allow further sub-
groups addressing to be defined, so further extending the address range.
Leave at default 255.255.255.0 unless specifically required.
IP: The IP address specifies the amplifier's unique identifier on the Ethernet network. It is used
in conjunction with the amplifier's Remote ID number to identify individual devices on the
network. Make sure this is not set to the same value as any other devices or comms
problems will occur.
Remember that this mode is purely an automatic priority switching version of an Ethernet or
USB connection – it is not possible to interconnect amplifiers via the Ethernet cables either
directly or via a router – use the RS485 bus for device interconnection.
All three connection methods will relay data either explicitly (RS485 using the hardware bus
connection) or electronically (USB or Ethernet through the processor) if required.
Manual del Usuario / DXI series / User’s Manual
39
Page 40

REMOTE CONTROL (cont'd)
Mode = RS485 Only: The RS485 port on the rear panel is active. Selecting this choice will then ask
for the following further information to be confirmed:
RS485 Speed: Set RS485 baud rate (recommended to use 57600)
Remote ID Number: Set a device ID (still required even on Ethernet connections). This must be
unique to the connected unit – setting the same ID on multiple units may cause comms problems for all
devices.
40
Manual del Usuario / DXI series / User’s Manual
Page 41

REMOTE CONTROL (cont'd)
Wireless Connection with Wifi Router
Free yourself of cables and go wireless! Plug the Ethernet connection from your amplifier(s) into a
wireless router and you are good to go!
Main remote configuration of a single amplifier, or a network of amplifiers is performed through
AudioCore, with system tuning using either AudioCore.
Manual del Usuario / DXI series / User’s Manual
41
Page 42

RESETTING BACK TO DEFAULTS AND CLEARING SECURITY
If you need to quickly clear all current settings and memories, there are a variety of setup control
codes that can do this for you.
Default Settings
Your amplifier will start-up as a “four analogue inputs to four output system”, with no EQ or limiting
(apart from self-protective limiters) in place. The aux outputs will “mirror” the analogue inputs (and so
initially act just like “link” outputs, again with no EQ or limiting in place).
Entering Start-up Control Codes
Turn the amplifier on with the BACK and ENTER keys held. The display will show:
Enter Setup Code:
[ ]
Use the EDIT and MUTE keys to represent the characters A, B, C D for EDITs and 1, 2, 3, 4 for
MUTEs.
Type in one of the following codes to initiate a setup function:
D4B13D – clear all user memories and reset to defaults, keeping security and factory alignment
settings
A2341B – clear current settings to default (leaves memories, alignments and security)
AA2121 – clear security via the XTA/MC2 supplied crack code
Clearing Security – Forgotten Unlock Code
Note that if you see the message “Parameters Locked!” during editing, or parameters can be viewed
but not adjusted, then this is due to preset data locking or hiding and is specific to the currently running
preset – this is not device security, and we cannot override it – it is specified by the speaker
manufacturer.
If you have forgotten the pass-code and your amplifier is locked, you will need to contact us to
unlock it after performing the following procedure. There is no master unlock code for all amplifiers –
the code is generated based on an algorithm using amplifier internal settings for greater security.
Turn the amplifier on with the BACK and ENTER keys held. The display will show:
Enter Setup Code:
[ ]
Use the EDIT and MUTE keys to represent the characters A, B, C D for EDITs and 1, 2, 3, 4 for
MUTEs.
Type in AA2121.
The display will now show:
Enter XTA Supplied Code:
Break No.=64223 [ ]
Make a note of the “Break Number” shown (64223 in this example) and contact us with this – we can
then supply the code to unlock your amplifier.
Do not enter any menus or make any further adjustments to the amplifier or this code may “roll over”
and you will need to go through this procedure again. Either switch the amplifier off or press QUIT to
exit without entering a code.
Resetting security leaves does not delete any settings – it just clears the locking passcode.
42
Manual del Usuario / DXI series / User’s Manual
Page 43

Page 44

Page 45

Page 46

Page 47

ANNEX I: LIMITERS AND HOW TO SET THEM CORRECTLY (cont'd)
Peak Limiter
The main limitation with traditional dynamics control is the inability of the processing to react truly
instantaneously to the signal. One of the most significant advantages of digital signal processing over
analogue is the ability to delay the audio signal precisely and without extensive complex hardware. The entire
domain of digital signal processing is based around the combination of delaying, multiplying, and
accumulating numbers (representing samples of audio) to implement all the filters and dynamics processing
we have come to expect today.
In the case of dynamics processing, being able to delay a signal allows the processor module to delay the
main signal in relation to the sidechain (the signal being monitored relative to the threshold), so that it can
compensate for peaks prior to the arrival of the main signal.
Consider the situation of a monitor engineer listening to a band perform. Having no access to dynamics
processors, he has had to resort to manually 'riding the faders' in an attempt to keep control of the levels.
Should the level of one of the channels on his desk reach an unacceptably high level, he will turn it down
appropriately.
There is a hidden sidechain in
operation even in this case. The
main signal path is fed through
the monitor desk and the gain
controlled by adjusting the fader.
The sidechain is formed by the
feedback path between the
engineer's ears checking the level
and his brain instructing his hand
to turn the fader down if the
volume goes over the threshold
he has chosen.
In this case, the delay between the signal actually going over the threshold, the engineer registering the
situation, and then turning the signal down will be in the order of several hundred milliseconds at best. This
will only be true if he is not distracted – in reality, it may be several seconds before any gain reduction is
imposed on the signal to bring it under control.
For an analogue dynamics processor, the situation is
much better. Controlling the gain electronically, and not
relying on a human sidechain feedback mechanism, it
can react much more quickly.
The red waveform represents the input to the
dynamics module, with the dotted line showing the
threshold for gain control to occur. There are several
peaks towards the start of this signal that are above the
threshold, and so the dynamics processing should react
to these as appropriate. (In this case reduce the gain).
The blue waveform shows the output of the
dynamics module. The circled peak demonstrates that
the processor has missed the first peak above the
threshold (as it is very fast and short), but has 'caught
up' shortly afterwards, keeping all other peaks under
control. As it is unable to predict what is coming, this
will always be a failing with analogue dynamics
processing.
Manual del Usuario / DXI series / User’s Manual
47
Page 48

ANNEX I: LIMITERS AND HOW TO SET THEM CORRECTLY (cont'd)
The peak limiter predelays the sidechain signal,
resulting in a “zero overshoot” limiter, which is able to
catch all peaks and provide a reliable absolute
maximum setting for the output of any channel.
The predelayed sidechain is shown in green, with
the main signal in red. As the main signal arrives slightly
after the sidechain, the output from the unit does not
suffer from the overshoot problem.
Remember that this delay is only in the order of tens
of microseconds, and is a pre-delay – the sidechain is
moved back in time in relation to the main signal.
Inserting a delay into the main signal path of an
analogue dynamics processor will achieve similar
results, but with the penalty of delaying the main signal
by the amount of look ahead delay introduced.
The peak limiter follows the RMS limiter, has only two parameters to adjust – the release time and the
threshold. Note that the threshold is set to be a minimum of 2dB above the threshold of the program limiter –
setting the threshold to “10dB above” means that no more than 10dB of overshoot above the threshold of
the program limiter will ever be allowed.
The release time can also be automatically set if the RMS limiter has automatic time constants enabled
and so are set by the high pass filter frequency for that channel.
Setting Accurate Limiter Thresholds – Program Limiter
The limiters built into your amplifier are intended to be used for loudspeaker driver protection, as opposed
to amplifier protection. The amplifier has additional limiters which can adapt automatically to both temperature
and incoming mains conditions to stay operational and playing music for as long as possible. The following
section describes how to set up the units' limiters to provide exceptional protection against driver overheating
and cone over-excursion. Most speaker systems are given a power rating in Watts RMS. This is the maximum
continuous power that the system will handle and often appears very conservative. In reality, as music
program is far from continuous in nature, the peak power of the system is much higher – up to ten times the
continuous figure. Any limiter, which is to protect the driver from damage, must be able to fulfil the following
tasks:
- Have an attack time which is calculated to allow transients through but keep the RMS level below the
speaker manufacturers specification;
- Have a release time which is sufficiently long to avoid the limiter itself modulating the program;
- Be intelligent enough to adjust the envelope of the limiter according to the frequency content of the
program material.
The RMS limiters are capable of performing all these tasks. The only parameter that the user must set
manually is the threshold, and it is crucial that this is done correctly.
48
Manual del Usuario / DXI series / User’s Manual
Page 49

Page 50

Page 51

Page 52

ANNEX II: UPGRADING FIRMWARE AND LOADING PRESETS
Loading new firmware or presets uses the same “Flash Loader” utility that is bundled with the
firmware or presets “bin” (binary) file. Firmware (or Program) files have the prefix “LTAM”, and preset files
have the prefix “LTAR”.
Amplifier Communications Set-up
Updates can be performed through an Ethernet, US or RS485 connection. Choose the correct port
on the amplifier and configure it accordingly though the Interface Sub-menu. See page 35 for more info
on choosing the interface.
Download the Files
Go to DX-80I / DX-100I related downloads to find the latest firmware or presets and software:
http://www.dasaudio.com/en/p/dx-80i-3/
Unzip the files – you will have the loader application, and the firmware or preset file as appropriate.
52
Manual del Usuario / DXI series / User’s Manual
Page 53

ANNEX II: UPGRADING FIRMWARE AND LOADING PRESETS (cont'd)
Connect To The Amplifier
Plug in the appropriate cable according to your chosen connection method. Remember – if you are
connecting via an USB or RS485, you will need to make sure your amplifier is set to ID1 for the loader to
f i n d i t .
Start the loader application:
Press the “Connect Serial” button if using USB or RS485, or “Connect IP” if using an Ethernet
connection. We recommend you choose either a USB or wired Ethernet connection.
After a few seconds, the unit should be located and its status and type should be displayed, along
with the current firmware and some other information.
Choose What To Load
From the drop-down list under “Load” choose either “presets” or “program” (firmware), and then
locate the correct file by pressing the “…” button.
The file type will have been filtered for you – LTAM*.bin for firmware (program) files or LTAR*.bin for
preset files.
Manual del Usuario / DXI series / User’s Manual
53
Page 54

ANNEX II: UPGRADING FIRMWARE AND LOADING PRESETS (cont'd)
Start The Update!
Just before you press the “Load” button – please close any other applications running on the
PC – interruptions in the process could render your amplifier inoperable. Do not disconnect the
cable, turn off the power or attempt to close the loader app once loading has begun!
Now that you have been warned (!) – press the “Load” button. Confirm the load, and the amplifier
will switch to Standby and begin to load the new firmware. A message detailing progress will accompany
the bar on the loader app:
Remote Load 374B
Block 0 of 4096
Upon completion, the app will close and your amplifier will restart – that's it!
What If It All Goes Wrong…
Don't panic! Your amplifier can be recovered, but please be aware that…
THE AMPLIFIER OPERATES AT VOLTAGES IN EXCESS OF THE INCOMING MAINS VOLTAGE,
AND THESE VOLTAGES REMAIN PRESENT FOR AN EXTENDED PERIOD AFTER MAINS POWER IS
REMOVED!
READ THESE INSTRUCTIONS CAREFULLY AND HEED ALL WARNINGS!
Disconnect your amplifier completely from the incoming mains supply.
Ensure that the HT present LEDs visible here through the front left vent with the foam removed…
…are fully extinguished before continuing. This will take at least five minutes so please be patient for
your own safety.
54
Manual del Usuario / DXI series / User’s Manual
Page 55

ANNEX II: UPGRADING FIRMWARE AND LOADING PRESETS (cont'd)
It is now safe to remove the top cover of your amplifier – there are four screws (Torx) along each side
and eight on the top of the cover. Be careful not to drop any screws inside!
Locate the “Rescue Recovery” link CN11 – between ICs U24 and U28 on the top circuit board - and
remove it. This will make your amplifier run in recovery mode – the original firmware version loaded at the
factory will now be active.
Replace the top cover temporarily, reapply mains power and switch on. Once booted, check the
interface is set as required and perform a program update again using the Flash Loader application.
The display will show an additional “R” next to the Remote Load message to show rescue mode is
active:
Remote Load R374B
Block 0 of 4096
Upon completion, the app will close. Disconnect the power and wait for at least five minutes until
the HT Present LEDs have fully extinguished again.
Remove top cover and replace the “Rescue Recovery” link once more.
Replace top cover and screw down, and replace the filter foam in the left hand front vent.
Your amplifier should now be fully operational again – no settings will have been lost in the process.
Manual del Usuario / DXI series / User’s Manual
55
Page 56

www.dasaudio.com
UM_DXI_01_EN
DAS Audio Group, S.L.
C/. Islas Baleares, 24
46988 Fuente del Jarro
Valencia, SPAIN
Tel. +34 96 134 0860
DAS Audio of America, INC.
6900 NW 52th Street
Miami, FL. 33166 - U.S.A.
TOLL FREE: 1 888 DAS 4 USA
DAS Audio Asia PTE. LTD.
3 Temasek Avenue, Centennial
Tower #34-36
Singapore 039190
Tel. +65 6549 7760
DAS do Brasil LTDA.
Rua Dos Andradas, 382 SL
Santa Efigênia, São Paulo
Brasil. CEP: 01208-000
Tel. +551133330764
 Loading...