

Danze DC026018BC Installation manual
CALL 1-888-328-2383 OR VISIT WWW.DANZE.COM
© 2009 DANZE, INC. ALL RIGHTS RESERVED.
Español, página “Español - 1”
Français, page “Français - 1”
Installation Instructions
Cirtangular® Collection
24” Pedestal Lavatory
DC026018-DC028110
Pub No. IM-DC026018-DC028110/08-09.03

IntroductIon to danze
Thank you for choosing Danze. We believe that elements in your bathroom should
awaken your senses like a splash of cool water. That’s what you will experience
with Danze.
Danze is a manufacturer of high quality decorative plumbing products for your
powder room, kitchen and bath. We offer a broad variety of products, designs &
finishes to suit your own particular needs. You can feel confident that our products will provide years of beauty and trouble-free performance.
danze VItreous chIna Products
Danze vitreous china products include toilets, bidets and lavatories. Our fixtures
reflect state-of-the-art design and engineering, and meet or exceed the most
rigorous plumbing codes throughout North America. Operating fixtures are
equipped with first quality valves and accessories to give you years of troublefree service.
Should you have questions about your Danze purchase, contact us at our website
www.danze.com, or call our technical service center during business hours at
888-328-2383.
Danze, Inc. reserves the right to make product specification changes and to
change or discontinue models without notice or obligation in North America.
Assure that sufficient support is behind the finished wall to allow for a secure
installation of the anchoring hardware. The Cirtangular® Pedestal Basin can not
be used without the supporting Cirtangular® Pedestal Column or Cirtangular®
Bathroom Vanities. Local Plumbing and Building Codes should be followed for
all installations.
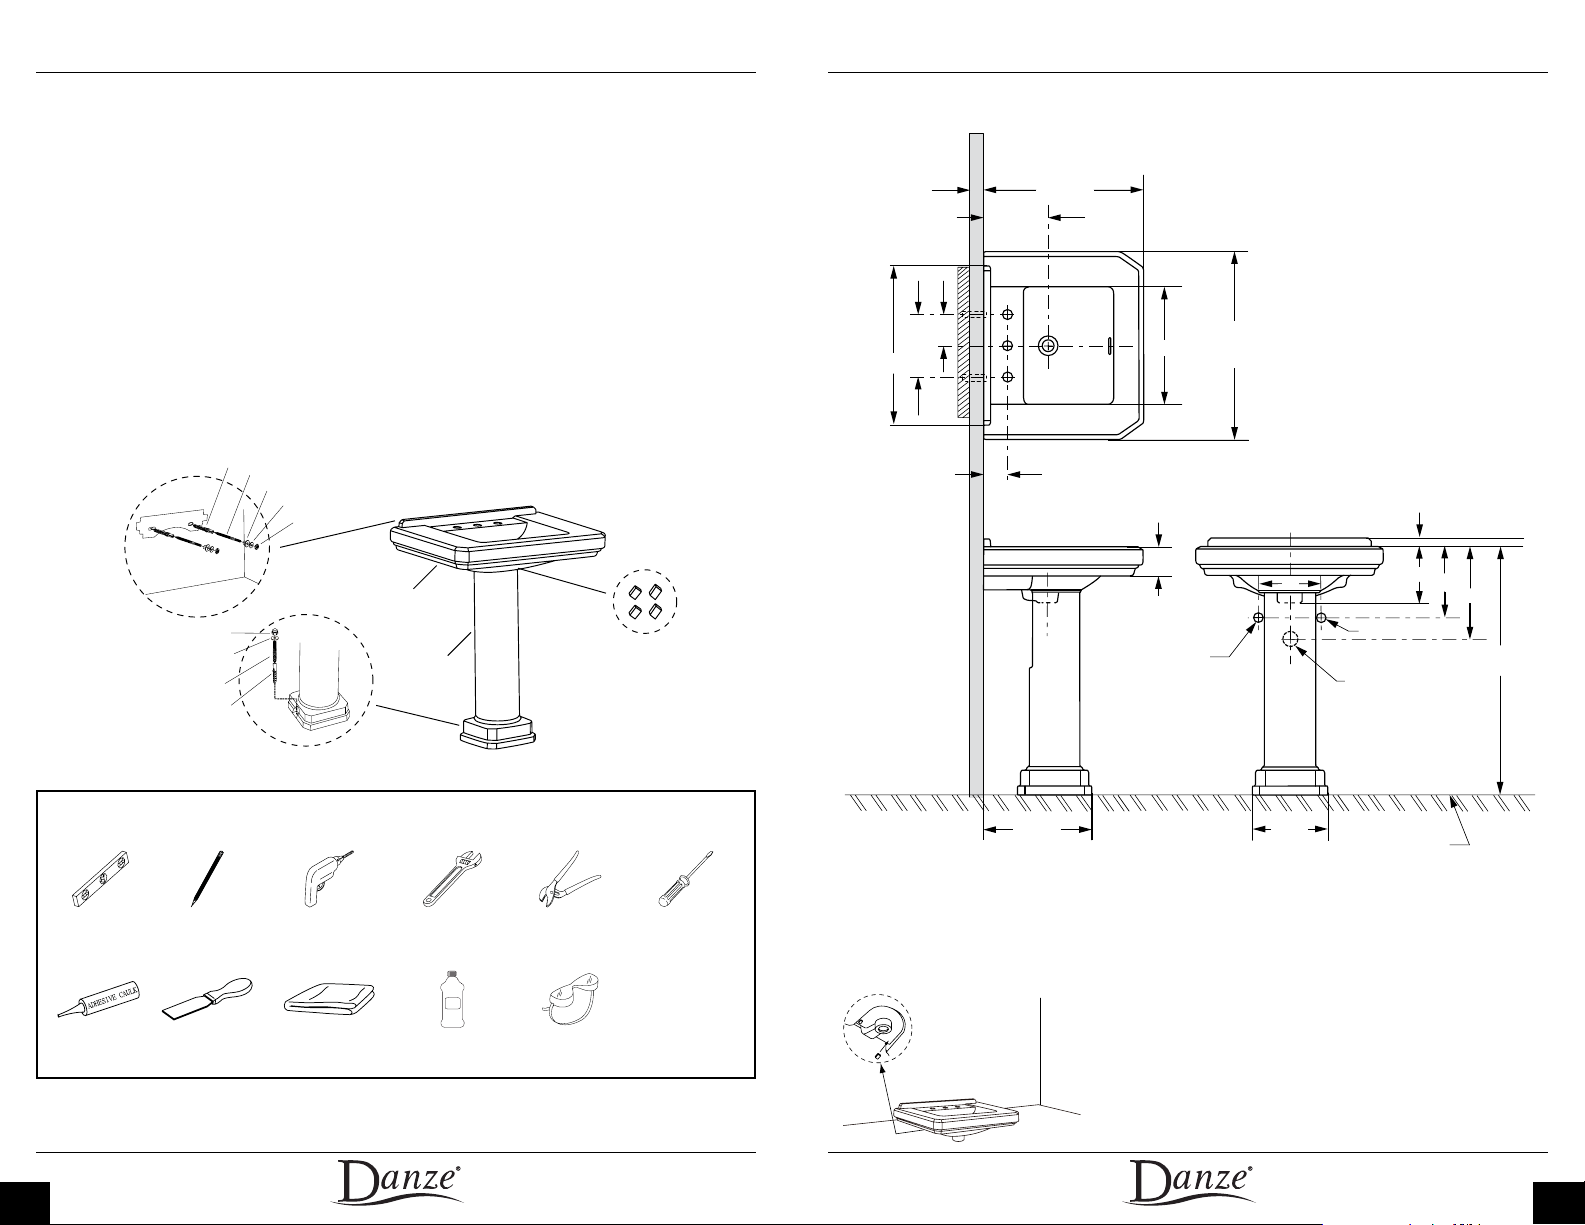
BeFore InstaLLatIon
Check to make sure you have the following parts included in the pedestal basin
package:
( A ) 24” Pedestal Basin for Pedestal Column Model DC028110 only
( D ) Wall Anchor Hardware
( C ) Expansion Anchors (2 each)
( E ) Wall Anchor Bolts (2 each)
( F ) Plastic Wall Anchor Washers (2 each)
( H ) Wall Anchor Nuts (2 each)
( N ) Metal Wall Anchor Washers (2 each)
( G ) Cork Pads (4 each)
( V ) Welcome to Danze Kit
(W) Installation Instructions
( X ) Homeowner Care Manual
2
FINISHED
WALL
FINISHED
FLOOR
3/8” HOT
3/8
” COLD
1 1/4” WASTE
8”
24 1/2
”
20 1/2
”
8 3/8
”
4
”
8
”
20 3/4
”
15
1/8
”
2 7/8
”
3 7/8
”
1 3/8
”
7 5/8
”
10
”
12 3/4
”
35
”
9 3/4
”
13 1/8
”
G
D
E
C
L
I
K
J
M
H
N
F
A
B
( Y ) Warranty Parts Guide
Rubbing
Alcohol
Check to make sure you have the following parts included in the pedestal column
package:
( B ) Pedestal Column for 24” Pedestal Basin Model DC026018
( I ) Pedestal Column Anchor Hardware
( J ) Pedestal Column Anchor Bolt (1 each)
( K ) Pedestal Column Anchor Washer (1 each)
( L ) Pedestal Column Anchor Cap Nut (1 each)
( M ) Pedestal Column Expansion Anchor (1 each)
( V ) Welcome to Danze Kit
(W) Installation Instructions
( X ) Homeowner Care Manual
( Y ) Warranty Parts Guide
Product dImensIons
tooLs requIred
Carpenter’s Level Pencil Adjustable
Drill Channel
Putty Knife
Cloth Rubbing AlcoholAdhesive Caulk Safety Glasses
3
Wrench
Lock Pliers
Regular Screwdriver
InstaLLatIon InstructIons
For installation with the Cirtangular® pedestal column
1. Apply two cork pads (G) onto the bottom of
the pedestal basin (A) in the pedestal column recess as indicated.
4
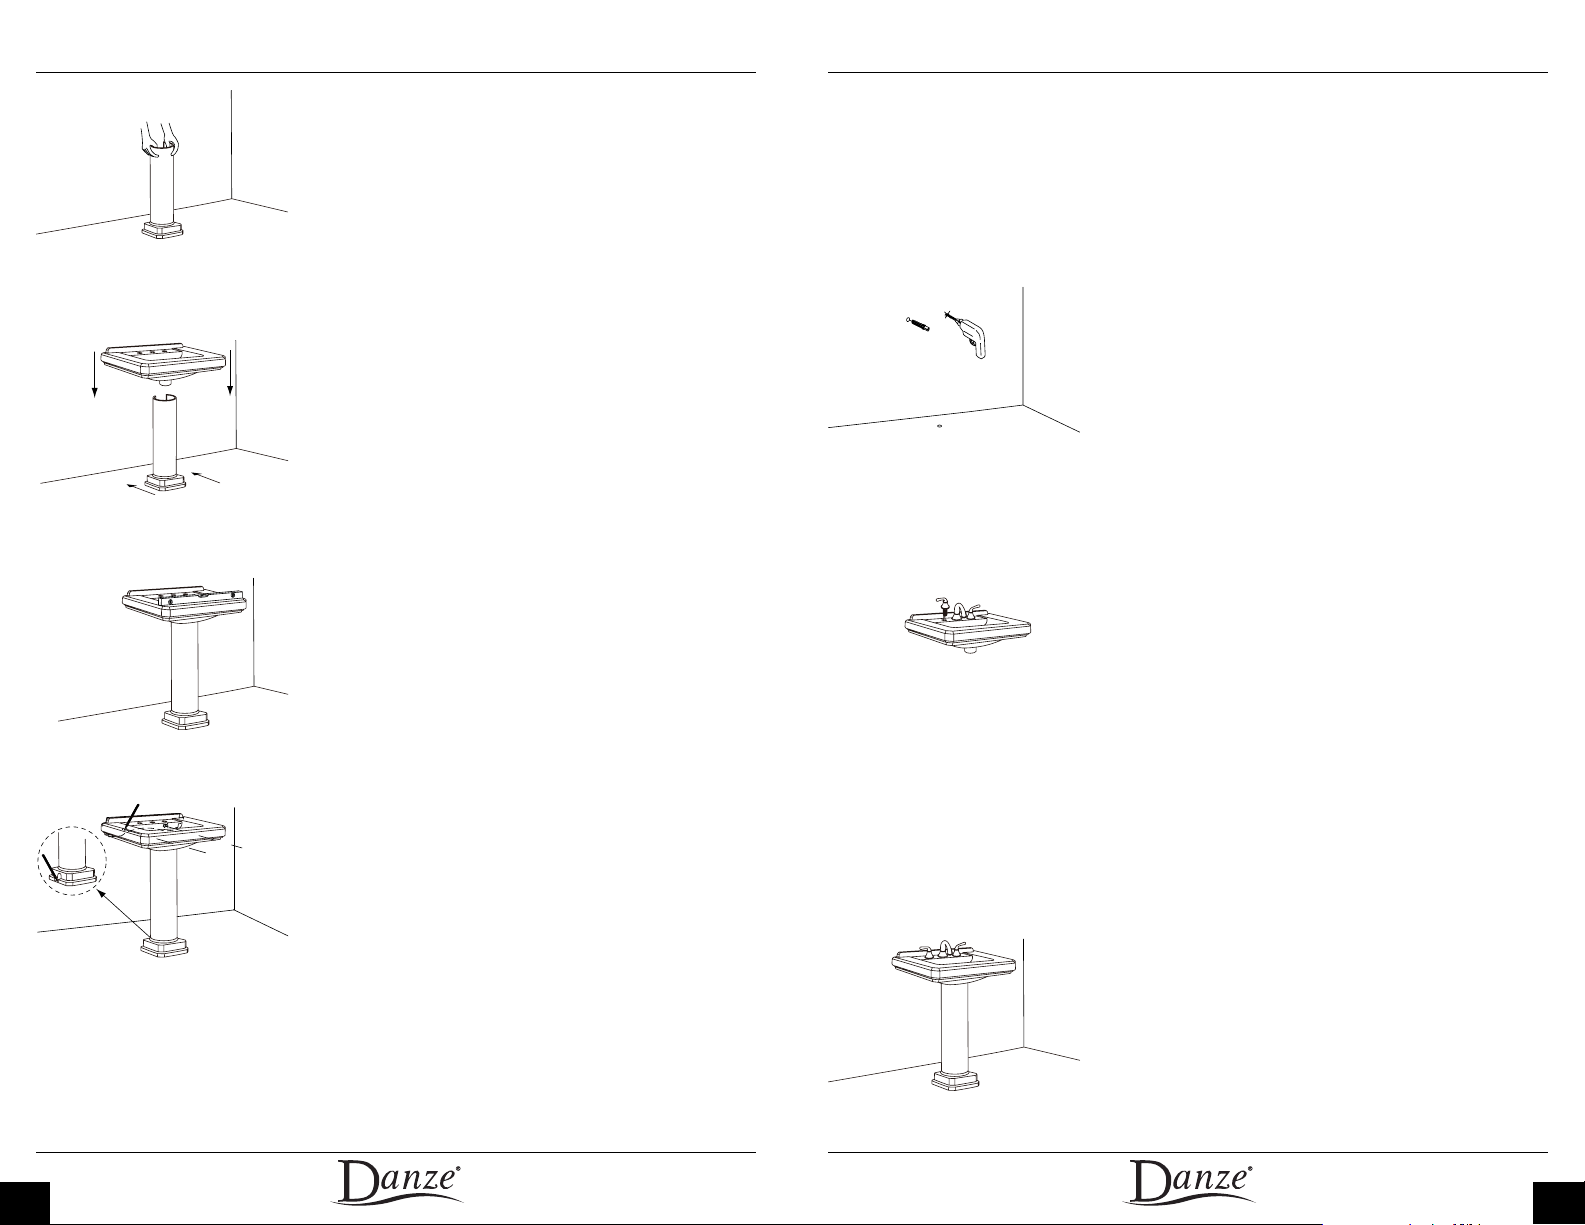
2. Place the pedestal column (B) close to the finished wall in the intended installation location.
3. Place the pedestal basin (A) onto the pedestal
column (B). Adjust the pedestal basin (A) position so that it sits evenly on the pedestal column
(B).
8. Remove the pedestal basin (A) from the pedestal column (B) and set both pieces aside while
installing the anchoring hardware.
9. Drill ¼” holes in the finished wall on the pencil
marks indicating the wall anchor hole location.
Install the wall anchor bolts (E) in the finished
wall leaving approximately 1½” of the wall anchor bolts (E) exposed.
4. Carefully slide the assembled pedestal lavatory up against the finished wall. Make sure the
back wall of the pedestal basin (A) is flush with
the finished wall.
5. Check the top of the pedestal basin (A) for
level front to back and side to side. Additional
cork pads (G) are provided to aid in leveling the
pedestal basin (A) if necessary.
6. Use a pencil to lightly mark the location of
the wall anchor holes in the back of the pedestal
basin (A) onto the finished wall.
7. Use a pencil to lightly mark the location of the
pedestal column base and the pedestal column
floor anchor hole onto the floor.
10. Drill ³/16” hole in the floor on the pencil marks
indicating the pedestal column floor anchor hole
location.
11. Assemble the faucet and drain (not included)
in the pedestal basin (A) according to the manufacturer’s recommendations.
12. Move the pedestal column (B) back into position aligning the base with the pencil mark on
the floor.
13. Set the pedestal basin (A) into the proper
position on the pedestal column (B). Align the
holes in the back wall of the pedestal basin (A)
with the wall anchor bolts (E).
5
6
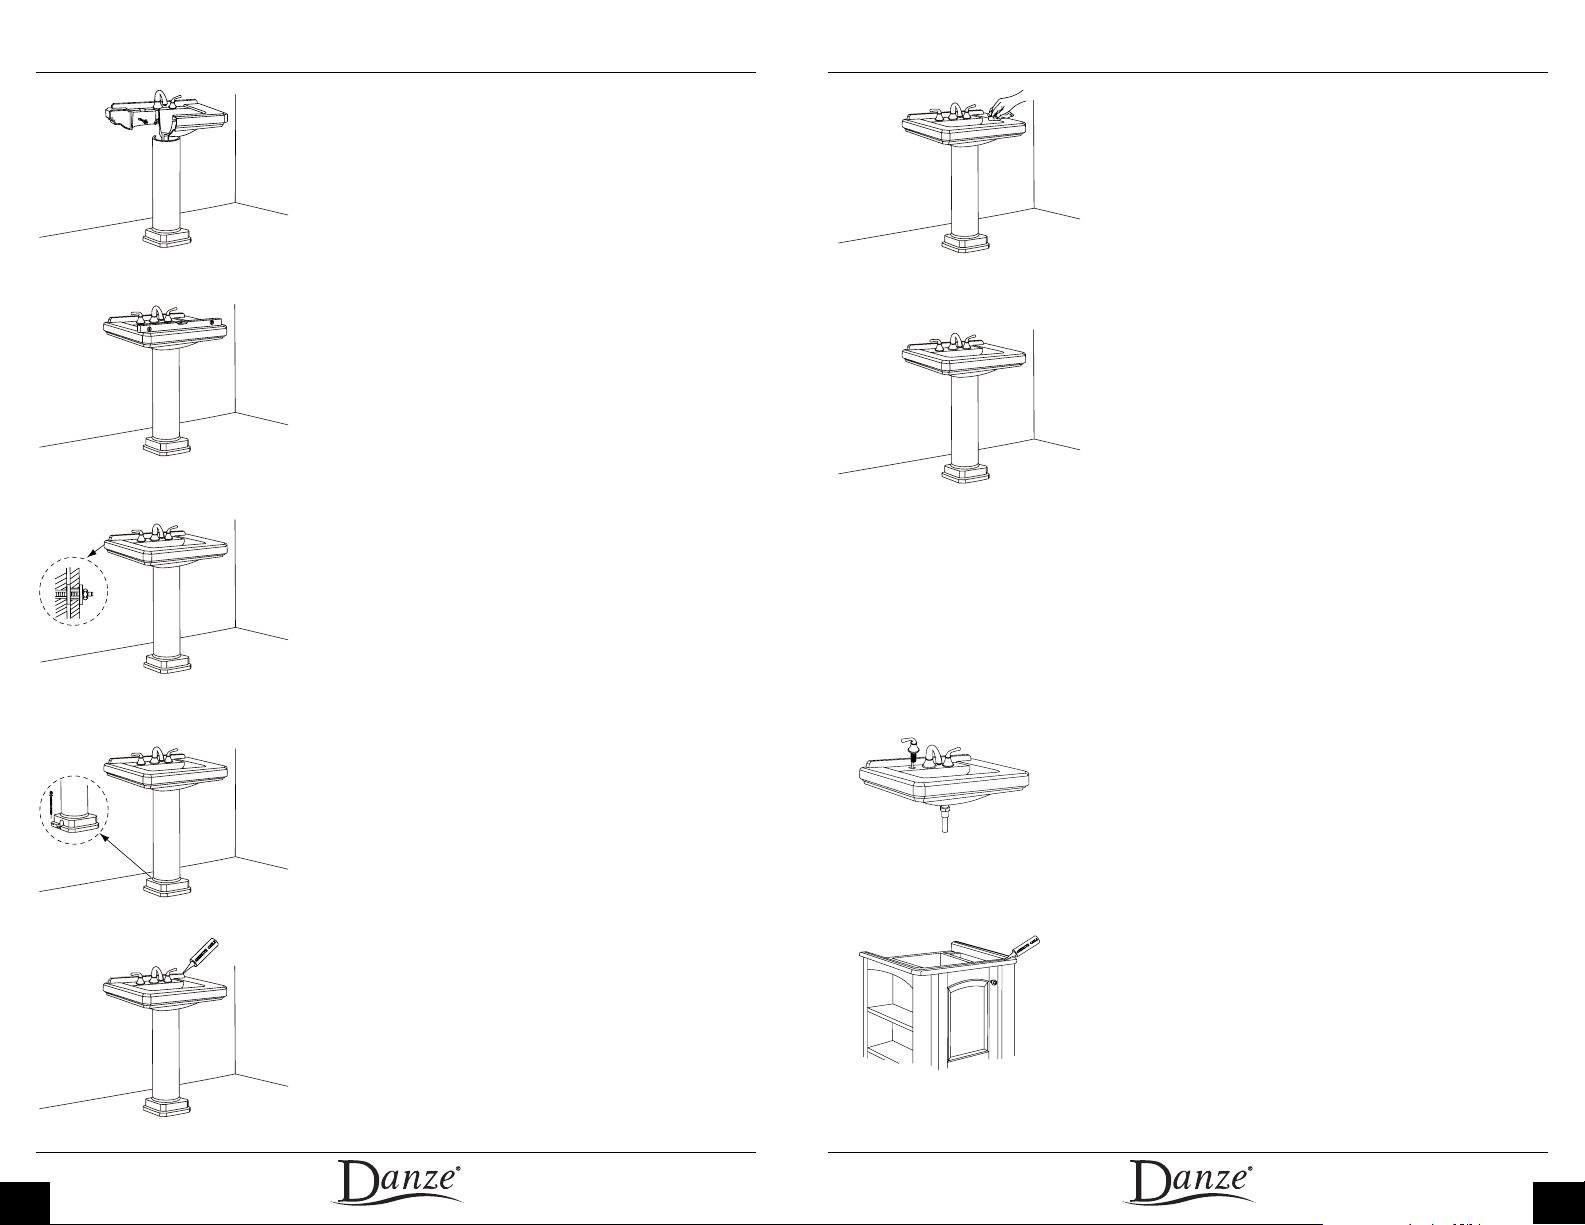
14. Assemble the plastic wall anchor washers (F)
onto the wall anchor bolts (E). The plastic wall
anchor washers (F) should slide over the wall anchor bolts (E) and into the hole in the back wall
of the pedestal basin (A).
15. Check the top of the pedestal basin (A) for
level front to back and side to side. Make final
adjustments before assembling the wall anchor
nuts (H) onto the wall anchor bolts (E).
19. Remove excess adhesive caulk with a dry
cloth.
20. Dampen a cloth with rubbing alcohol and
clean any unwanted adhesive caulk from the
lavatory surface as soon as the wall anchor hardware (D) and pedestal column anchor hardware
(I) has been secured.
21. Complete the faucet and drain connections
per the manufacturer’s recommendations.
16. Assemble the wall anchor nuts (H) onto the
wall anchor bolts (E) and carefully tighten to secure the pedestal basin (A). Be careful not to
over tighten the wall anchor nuts (H).
17. Install the pedestal column anchor bolt (J)
into the base of the pedestal column (B). Place
the pedestal column anchor washer (K) over the
pedestal column anchor bolt (J). Assemble the
pedestal column anchor cap nut (L) onto pedestal column anchor bolt (J) and carefully tighten
to secure the pedestal column (B).
18. Apply a continuous bead of adhesive caulk
(not included) around the pedestal basin (A) and
wall intersection. Smooth the bead of adhesive
caulk per the adhesive caulk manufacturer’s instructions. This will assure a water tight seal between the lavatory and wall.
For installation on the Cirtangular® 24” bathroom vanities
1. Install the Cirtangular® bathroom vanity according to the Installation Instructions provided
with the bathroom vanity.
2. Assemble faucet and drain (not included) in
pedestal basin (A) according to the manufacturer’s recommendations.
3. Apply a continuous bead of adhesive caulk
(not included) in the groove on the top surface
of the Cirtangular® bathroom vanity to assure a
water tight seal between the pedestal basin (A)
and vanity.
7
8
 Loading...