

Danze DC011223 Installation Manual [en, es, fr]
CALL 1-888-328-2383 OR VISIT WWW.DANZE.COM
© 2007 DANZE, INC. ALL RIGHTS RESERVED.
Español, página “Español - 1”
Français, page “Français - 1”
Installation Instructions
Orrington™ Collection
One Piece Toilet
DC011223
Pub No. IM-DC011223/08-07.01

IntroductIon to danze
Thank you for choosing Danze. We believe that elements in your bathroom should
awaken your senses like a splash of cool water. That’s what you will experience
with Danze.
Danze is a manufacturer of high quality decorative plumbing products for your
powder room, kitchen and bath. We offer a broad variety of products, designs &
finishes to suit your own particular needs. You can feel confident that our products will provide years of beauty and trouble-free performance.
danze VItreouS cHIna ProductS
Danze vitreous china products include toilets, bidets and lavatories. Our fixtures
reflect state-of-the-art design and engineering, and meet or exceed the most
rigorous plumbing codes throughout North America. Operating fixtures are
equipped with first quality valves and accessories to give you years of troublefree service.
Should you have questions about your Danze purchase, contact us at our website
www.danze.com, or call our technical service center during business hours at
888-328-2383.
Danze, Inc. reserves the right to make product specification changes and to
change or discontinue models without notice or obligation in North America.
This toilet has been designed for easy installation. Conventional fittings have
been used throughout so that the working parts and operation of this assembly
may be easily understood. Local Plumbing and Building Codes should be followed for all installations.
Do not expose plastic trim parts to strong oxidizing agents, chlorine, or acid levels of lower than 5.0 pH. Most bowl/ tile cleaners contain such agents.
Tank type bowl cleaners can cause tank component failure and damage. Our warranty excludes such failures.
BeFore InStaLLatIon
Check to make sure you have the following parts included in the toilet package:
( A ) One-piece Toilet Model DC011223
( M ) Toilet Tank Cover
( H ) Coupling Nut and Cone Washer (1 each)
( N ) Toilet Seat
( O ) Ceramic Floor Bolt Cover Plates (2 each)
( V ) Welcome to Danze Kit
( P ) Hook and Loop Tape (6 strips)
( W ) Installation Instructions
2
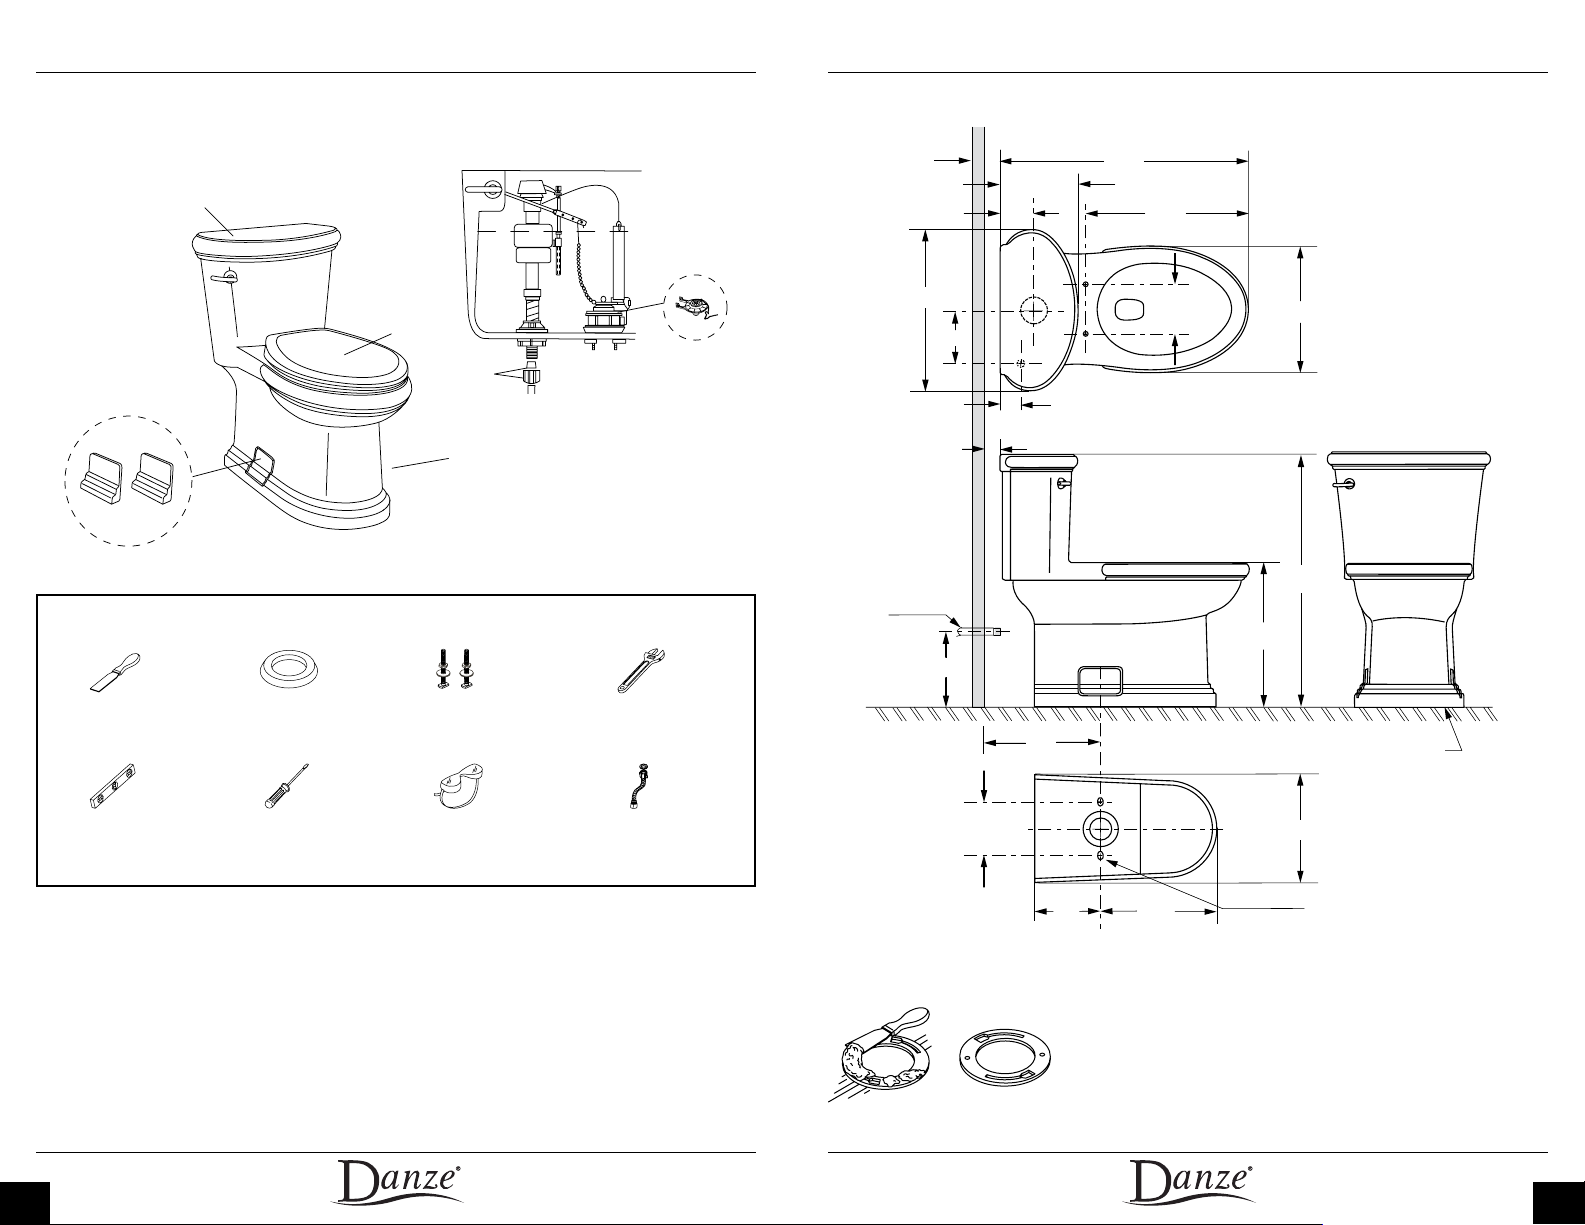
( X ) Homeowner Care Manual
3/8“
dz
S.P.S. SUPPLY
14 3/8”
12 3/4”
16 1/2”
1”
4”
29
1/8
”
2
1/4
”
18
3/4
”
3 7/8”
9
1/8
”
19
1/8
”
28
7/8
”
5
1/2
” 15”
6”
12”
8”
FINISHED
WALL
FINISHED
FLOOR
SLOT
dz
(1/2”x1”)
8 1/4”
O
M
N
H
A
( Y ) Warranty Parts Guide
Product dImenSIonS
tooLS requIred
* optional, only required if not already in place or the existing supply line needs to be replaced
Putty Knife Wax Ring (1 required) Floor Mounting Bolts,
Washers and Nuts (2
each required)
Regular Screwdriver Safety GlassesCarpenter’s Level
Adjustable wrench
Flexible Water Supply Line*
InStaLLatIon InStructIonS
3
1. Turn off and disconnect water supply. Unbolt
and remove old toilet. Remove old wax ring and
clean floor flange area with putty knife.
4
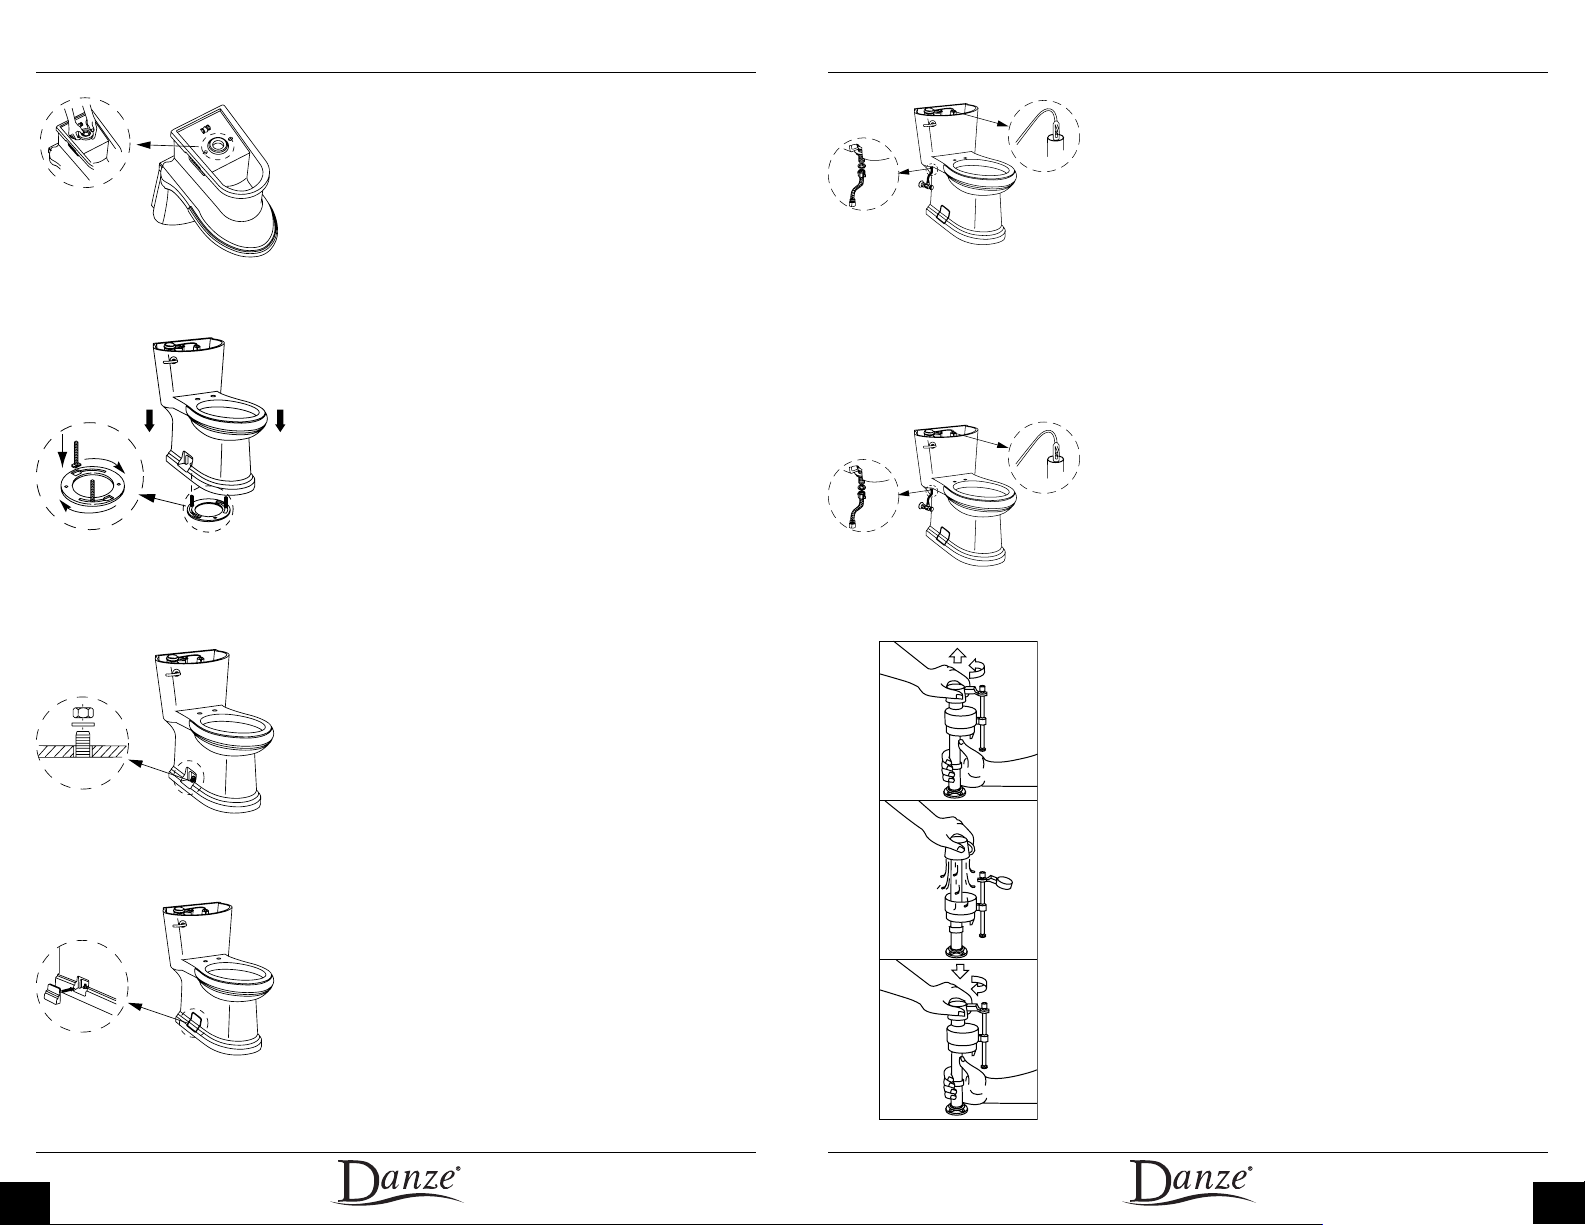
2. Install new wax ring (not included) on the bot-
tom of the toilet (A) making sure not to cover
the toilet outlet. (Alternate Method: The wax
ring may also be placed onto the floor flange.)
6. The fill valve coupling nut (H) is provided to
connect the water supply line to the fill valve.
Do not use pipe dope! Hand tighten only!
Overtightening may split the fill valve and will
void the warranty.
3. Install the new floor mounting bolts (not included) upright in the slots of the floor flange.
Place the toilet (A) over the floor flange/ waste
line opening by aligning the floor mounting
bolts in the toilet floor bolt holes. Press down
firmly and twist toilet slightly to compress wax
ring and assure a seal between the toilet (A) and
floor.
4. Place one floor mounting bolt washer (not
included) over each floor mounting bolt and as-
semble the floor mounting bolt nut to the floor
mounting bolt. Tighten floor mounting bolt nut
carefully until the floor mounting bolt nut is just
snug.
5. Install the ceramic floor bolt cover plates (O)
by firmly pressing the ceramic floor bolt cover
plates (O) into the recesses in the side wall of
the toilet (A). (Six additional strips of hook and
loop tape (P) are provided should replacements
be needed in the future.)
7. If using flexible water supply line (not includ-
ed), assemble the flexible water supply line to
the threads of the tank fill valve. Do not use Teflon tape or pipe dope on the fill valve threads.
This could result in over-tightening and breakage.
8. Make sure refill tube adaptor (I) is attached to
the top of the flush valve overflow tube. Note:
Flow from the refill tube must be positioned directly over the overflow tube.
9. IMPORTANT: Always clear sand and rust
from system.
Remove valve top by lifting arm and rotat-
•
ing top 1/8 turn counterclockwise.
While holding a container over the un-
•
capped valve to prevent splashing, turn
water supply on and off a few times. Leave
water supply off.
Replace top by engaging lugs and rotating
•
1/8 turn clockwise. Make certain top is
turned to the locked position. Valve may
not turn on if the top is not fully turned
to the locked position.
5
6
 Loading...