

Page 1

FC 100/ 200/ 300 DeviceNet Contents
Contents
1. Introduction
Safety Note 6
Assumptions 9
Hardware 9
Background Knowledge 9
Abbreviations 11
2. How to Install
Cabling 13
Installation of Option in the Frequency 17
3. How to Configure the System
Configure the Master 21
Configure the Frequency Converter 21
4. How to Control the Frequency Converter
DeviceNet Process Control Modes 23
I/O Assembly Instances 25
Process Data 25
5
13
19
23
ODVA Control Profile 27
Danfoss FC Control Profile 32
5. How to Access the Parameters
Explicit Messages 39
Object Classes 39
DeviceNet Object Classes 39
Danfoss Object Classes 50
Reading/Writing to Parameters with Index 51
6. Parameters
Parameter List 66
Data Types Supported 67
7. Application Examples
Example: Working with Instance 101/151 Process 69
8. Troubleshooting
Troubleshooting 73
39
53
69
73
Index
81
MG.33.D3.02 - VLT® is a registered Danfoss trademark
1
Page 2

Contents FC 100/ 200/ 300 DeviceNet
Contents | Illustration
Illustration 1.1: 9
Illustration 2.1: 13
2
MG.33.D3.02 - VLT® is a registered Danfoss trademark
Page 3

FC 100/ 200/ 300 DeviceNet Contents
Contents | Table
Table 8.1: LED: Module Status (MS) 73
Table 8.2: LED: Network Status (NS) 74
MG.33.D3.02 - VLT® is a registered Danfoss trademark
3
Page 4

1
1. Introduction FC 100/ 200/ 300 DeviceNet
4
MG.33.D3.02 - VLT® is a registered Danfoss trademark
Page 5

FC 100/ 200/ 300 DeviceNet 1. Introduction
1. Introduction
1.1.1. Copyright, Limitation of Liability and Revision Rights
This publication contains information proprietary to Danfoss A/S. By accepting and using this
manual the user agrees that the information contained herein will be used solely for operating
equipment from Danfoss A/S or equipment from other vendors provided that such equipment is
intended for communication with Danfoss equipment over a PROFIBUS serial communication link.
This publication is protected under the Copyright laws of Denmark and most other countries.
Danfoss A/S does not warrant that a software program produced according to the guidelines provided in this manual will function properly in every physical, hardware or software environment.
Although Danfoss A/S has tested and reviewed the documentation within this manual, Danfoss A/
S makes no warranty or representation, either express or implied, with respect to this documentation, including its quality, performance, or fitness for a particular purpose.
In no event shall Danfoss A/S be liable for direct, indirect, special, incidental, or consequential
damages arising out of the use, or the inability to use information contained in this manual, even
if advised of the possibility of such damages. In particular, Danfoss A/S is not responsible for any
costs including but not limited to those incurred as a result of lost profits or revenue, loss or
damage of equipment, loss of computer programs, loss of data, the costs to substitute these, or
any claims by third parties.
1
Danfoss A/S reserves the right to revise this publication at any time and to make changes in its
contents without prior notice or any obligation to notify previous users of such revisions or
changes.
MG.33.D3.02 - VLT® is a registered Danfoss trademark
5
Page 6
1
1. Introduction FC 100/ 200/ 300 DeviceNet
1.2.1. Safety Note
The voltage of the frequency converter is dangerous whenever connected to mains.
Incorrect installation of the motor, frequency converter or fieldbus may cause damage to the equipment, serious personal injury or death. Consequently, the instructions in this manual, as well as national and local rules and safety regulations, must
be complied with.
1.2.2. Safety Regulations
1. The frequency converter must be disconnected from mains if repair work is to be carried
out. Check that the mains supply has been disconnected and that the necessary time has
passed before removing motor and mains plugs.
2. The [STOP/RESET] key on the control panel of the frequency converter does not disconnect the equipment from mains and is thus not to be used as a safety switch. 3.
Correct protective earthing of the equipment must be established, the user must be protected against supply voltage, and the motor must be protected against overload in
accordance with applicable national and local regulations.
3. Correct protective earthing of the equipment must be established, the user must be protected against supply voltage, and the motor must be protected against overload in
accordance with applicable national and local regulations.
4. The earth leakage currents are higher than 3.5 mA.
5. Protection against motor overload is not included in the factory setting. If this function
is desired, set par. 1-90
ETR warning
motor frequency. For the North American market: The ETR functions provide class 20
motor overload protection in accordance with NEC.
6. Do not remove the plugs for the motor and mains supply while the frequency converter
is connected to mains. Check that the mains supply has been disconnected and that the
necessary time has passed before removing motor and mains plugs.
7. Please note that the frequency converter has more voltage inputs than L1, L2 and L3,
when load sharing (linking of DC intermediate circuit) and external 24 V DC have been
installed. Check that all voltage inputs have been disconnected and that the necessary
time has passed before commencing repair work.
. Note: The function is initialised at 1.16 x rated motor current and rated
Motor Thermal Protection
to data value
ETR trip
or data value
1.2.3. Warning Against Unintended Start
1. The motor can be brought to a stop by means of digital commands, bus commands,
references or a local stop, while the frequency converter is connected to mains. If personal safety considerations make it necessary to ensure that no unintended start occurs,
these stop functions are not sufficient.
2. While parameters are being changed, the motor may start. Consequently, the stop key
[STOP/RESET] must always be activated; following which data can be modified.
3. A motor that has been stopped may start if faults occur in the electronics of the frequency
converter, or if a temporary overload or a fault in the supply mains or the motor connection ceases.
1.2.4. Warning
Touching the electrical parts may be fatal - even after the equipment has been disconnected from mains.
6
MG.33.D3.02 - VLT® is a registered Danfoss trademark
Page 7

FC 100/ 200/ 300 DeviceNet 1. Introduction
Also make sure that other voltage inputs have been disconnected, such as external 24 V DC, load
sharing (linkage of DC intermediate circuit), as well as the motor connection for kinetic back up.
Please refer to the relevant Operating Instructions for further safety guidelines.
1
MG.33.D3.02 - VLT® is a registered Danfoss trademark
7
Page 8

1
1. Introduction FC 100/ 200/ 300 DeviceNet
1.3. About this Manual
First time users can obtain the most essential information for quick installation and set-up in these
chapters:
Introduction
How to Install
How to Configure the System
Application Examples
For more detailed information including the full range of set-up options and diagnosis tools please
refer to the chapters:
How to Control the Frequency Converter
How to Access the Parameters
Parameters
Troubleshooting
1.4. Technical Overview
DeviceNet is a low-level network that standardizes communications between industrial devices
(sensors, limit switches, motor controls) and high-level devices (controllers). DeviceNet follows
the Open Systems Interconnection (OSI) model and is based on CAN technology for Media Access
Control and Physical Signalling.
DeviceNet systems can be configured to operate in a master-slave or a distributed control architecture using peer-to-peer communication. Up to 63 nodes in a multi-drop network topology are
supported, and communication options can be powered directly from the bus, using the same
cable for communication. Nodes can be removed or inserted without powering down the network.
Each node on the network has its own unique Media Access Control IDentifier (MAC ID) to distinguish it on the network. The access control is based on the CSMA/CA (Carrier Sense Multiple
Access / Collision Avoidance) principle, meaning that all nodes may have access to the network
at the same time. If two nodes attempt to get control of the network bus simultaneously, the CAN
protocol resolves the issue by arbitration. In this way collisions on the network are avoided.
DeviceNet defines device profiles for devices belonging to specific classes. For other devices, a
custom class must be defined in order to make it DeviceNet compatible. This further enhances
the interchangeability and interoperability of the network.
8
MG.33.D3.02 - VLT® is a registered Danfoss trademark
Page 9
FC 100/ 200/ 300 DeviceNet 1. Introduction
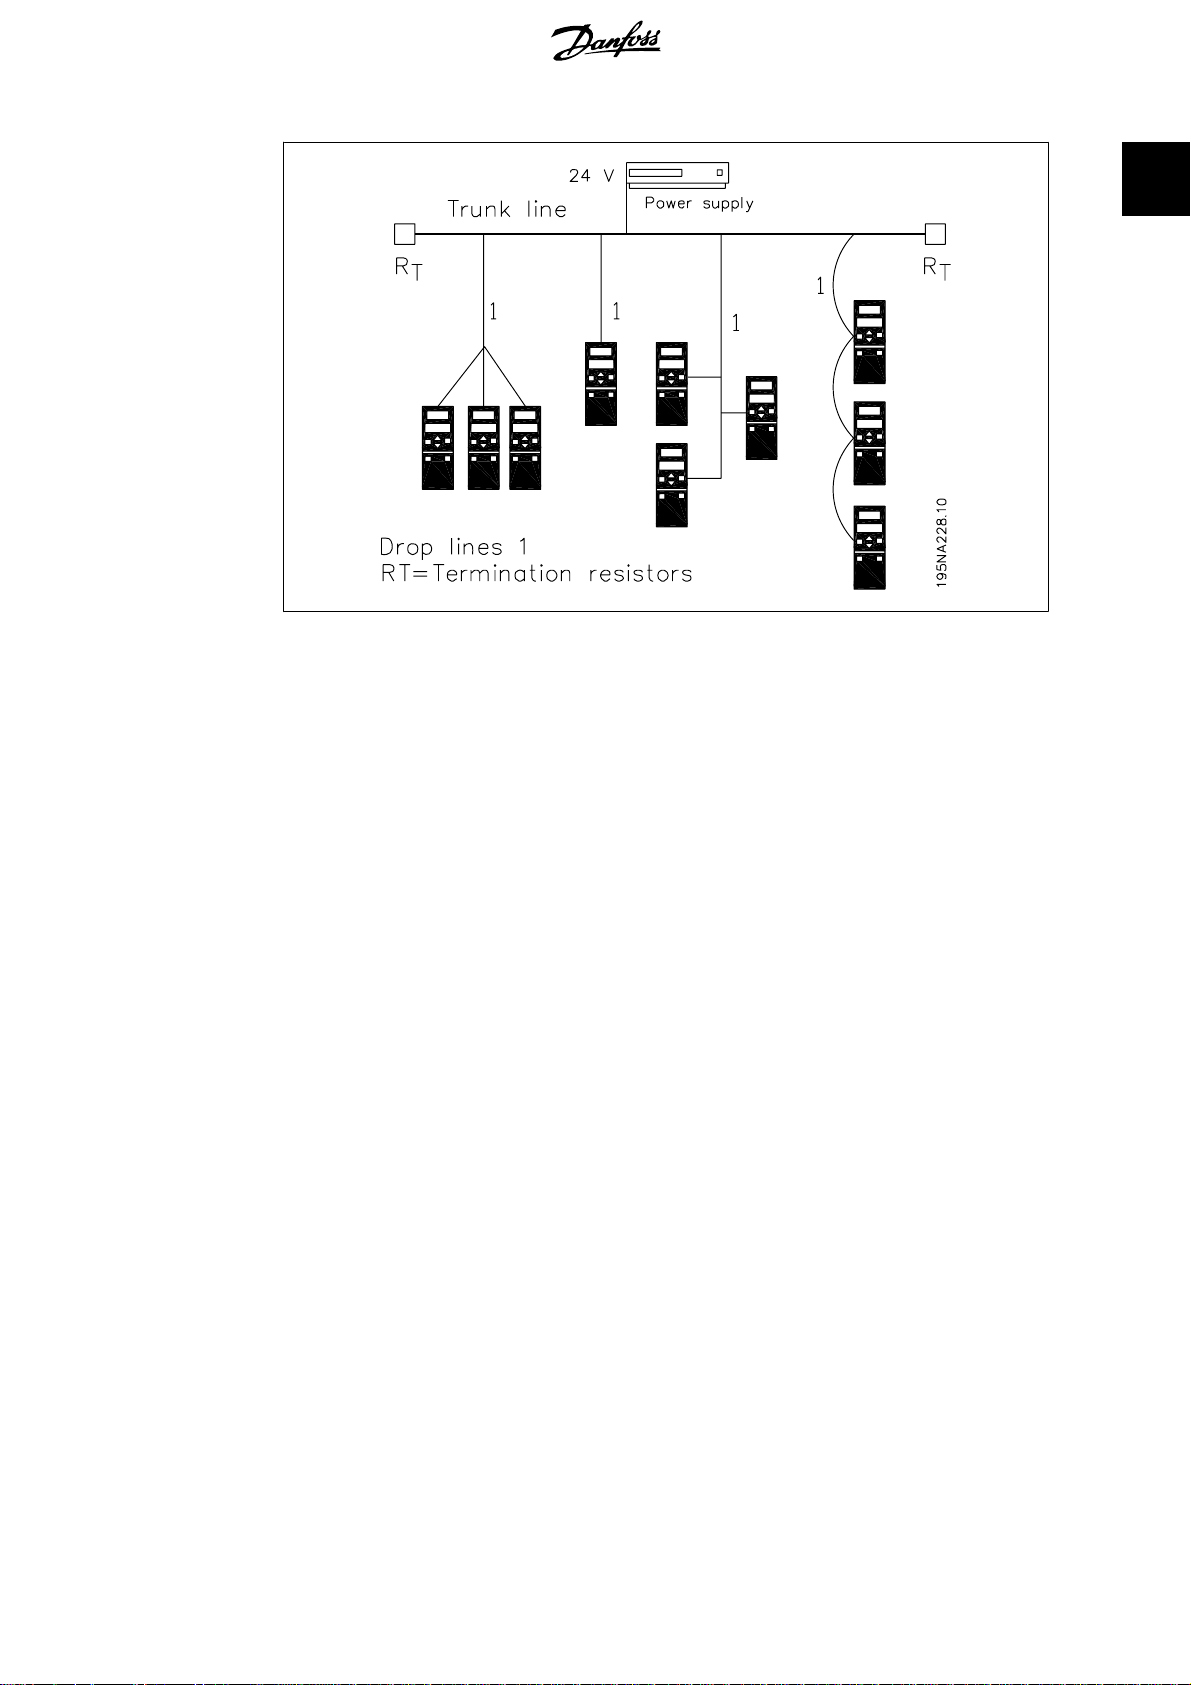
Illustration 1.1: Topology
1
1.5. Assumptions
These operating instructions assume that you are using a Danfoss FC 100, 200 or 300 frequency
converter with DeviceNet. It is also assumed that as master you are using a PLC or PC equipped
with a serial communication card supporting all the DeviceNet communication services required
by your application. Furthermore, it is assumed that all requirements stipulated in the DeviceNet
standard as well as those set up in the AC Drive Profile and those pertaining to the VLT frequency
converter are strictly observed as well as all limitations therein fully respected.
1.6. Hardware
These operating instructions relate to the DeviceNet option type no. 130B1102 and 130B1201.
1.7. Background Knowledge
The Danfoss DeviceNet is designed to communicate with any master abiding by the DeviceNet
standard. It is therefore assumed that you have full knowledge of the PC or PLC you intend to use
as a master in your system. Any questions pertaining to hardware or software produced by any
other manufacturer is beyond the scope of these operating instructions and is of no concern to
Danfoss. If you have questions about how to set up master - master communication or communication to a non-Danfoss slave, please consult the appropriate documentation.
MG.33.D3.02 - VLT® is a registered Danfoss trademark
9
Page 10
1
1. Introduction FC 100/ 200/ 300 DeviceNet
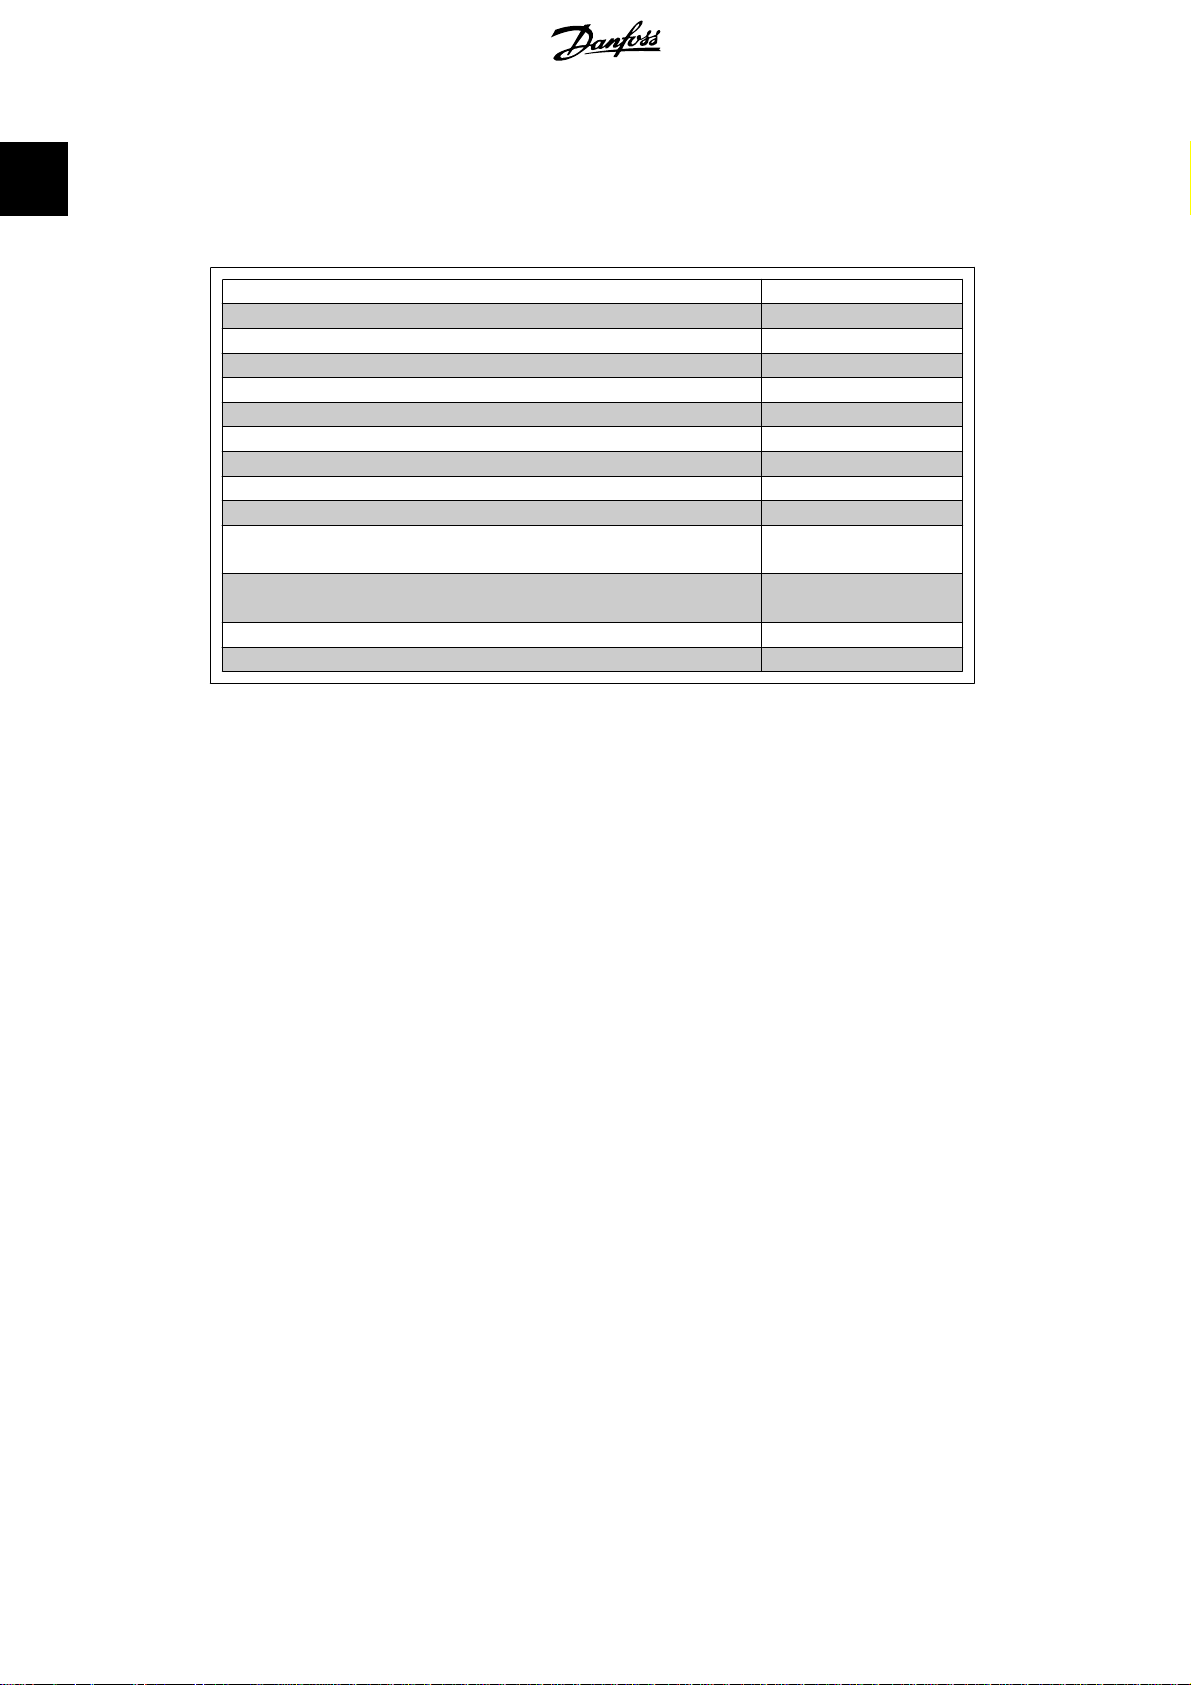
1.8. Available Literature
The following literature is available for the FC 100, 200 and 300 series.
Title
VLT HVAC Drive FC 100 Operating Instructions MG.11.AX.YY
VLT HVAC Drive FC 100 Design Guide MG.11.BX.YY
VLT HVAC Drive FC 100 Programming Guide MG.11.CX.YY
VLT AQUA Drive FC 200 Operating Instructions MG.20.NX.YY
VLT AQUA Drive FC 200 Design Guide MG.20.MX.YY
VLT AQUA Drive FC 200 Programming Guide MG.20.OX.YY
VLT AutomationDrive FC 300 Operating Instructions MG.33.AX.YY
VLT AutomationDrive FC 300 Design Guide MG.33.BX.YY
VLT AutomationDrive FC 300 Programming Guide MG.33.MX.YY
VLT AutomationDrive FC 100, 200 and 300 PROFIBUS Operating
Instructions
VLT AutomationDrive FC 100, 200 and 300 DeviceNet Operating Instructions
VLT AutomationDrive FC 300 MCT 10 Software Dialogue MG.33.EX.YY
PROFIBUS DP V1 Design Guide MG.90.EX.YY
X = Revision number
Y = Language code
Please also refer to
mation.
www.danfoss.com/drives
for frequently asked questions and additional infor-
Literature no.
MG.33.CX.YY
MG.33.DX.YY
10
MG.33.D3.02 - VLT® is a registered Danfoss trademark
Page 11

FC 100/ 200/ 300 DeviceNet 1. Introduction
1.9. Abbreviations
ACK ACKnowledge
BOC Bus Off Counter
BOOL BOOLean expression
CAN Controller Area Network
CSMA/CA Carrier Sense Multiple Access/Collision Avoidance
COS Change of State
CTW Control Word
EDS Electronic Data Sheet
EMC Electromagnetic Compatibility
ETR Electronic Thermal Relay
FIFO First In First Out
HF High Frequency
HPFB High Performance Field Bus
I/O Input/Output
ISO International Standards Organization
LCD Liquid Crystal Display
LCP Local Control Panel
LED Light Emitting Diode
LSB Least Significant Bit
MAC ID Media Access Control IDentifier
MAV Main Actual Value
MRV Main Reference Value
MSB Most Significant Bit
N/A Not Applicable
ODVA Open DeviceNet Vendor Association
OSI Open Systems Interconnection
PC Personal Computer
PCD Process Data
PIW Peripheral Input Word
PLC Programmable Logic Control
PNU Parameter Number
PPO Parameter-Process Data Object
QW Peripheral Output Word
SINT Signed Integer
STW Status Word
VSD Variable Speed Drive
UDINT Unsigned Double Integer
UNIT Unsigned Integer
USINT Unsigned Short Integer
1
MG.33.D3.02 - VLT® is a registered Danfoss trademark
11
Page 12

2
2. How to Install FC 100/ 200/ 300 DeviceNet
12
MG.33.D3.02 - VLT® is a registered Danfoss trademark
Page 13
FC 100/ 200/ 300 DeviceNet 2. How to Install
2. How to Install
2.1. Cabling
2.1.1. Cable Lengths
Baud rate Max total cable
length
125k baud 500 meters (1640 ft.) 6 meters (20 ft.) for one drop 156 meters (512 ft.)
250k baud 250 meters (820 ft.) 78 meters (256 ft.)
500k baud 100 meters (328 ft.) 39 meters (128 ft.)
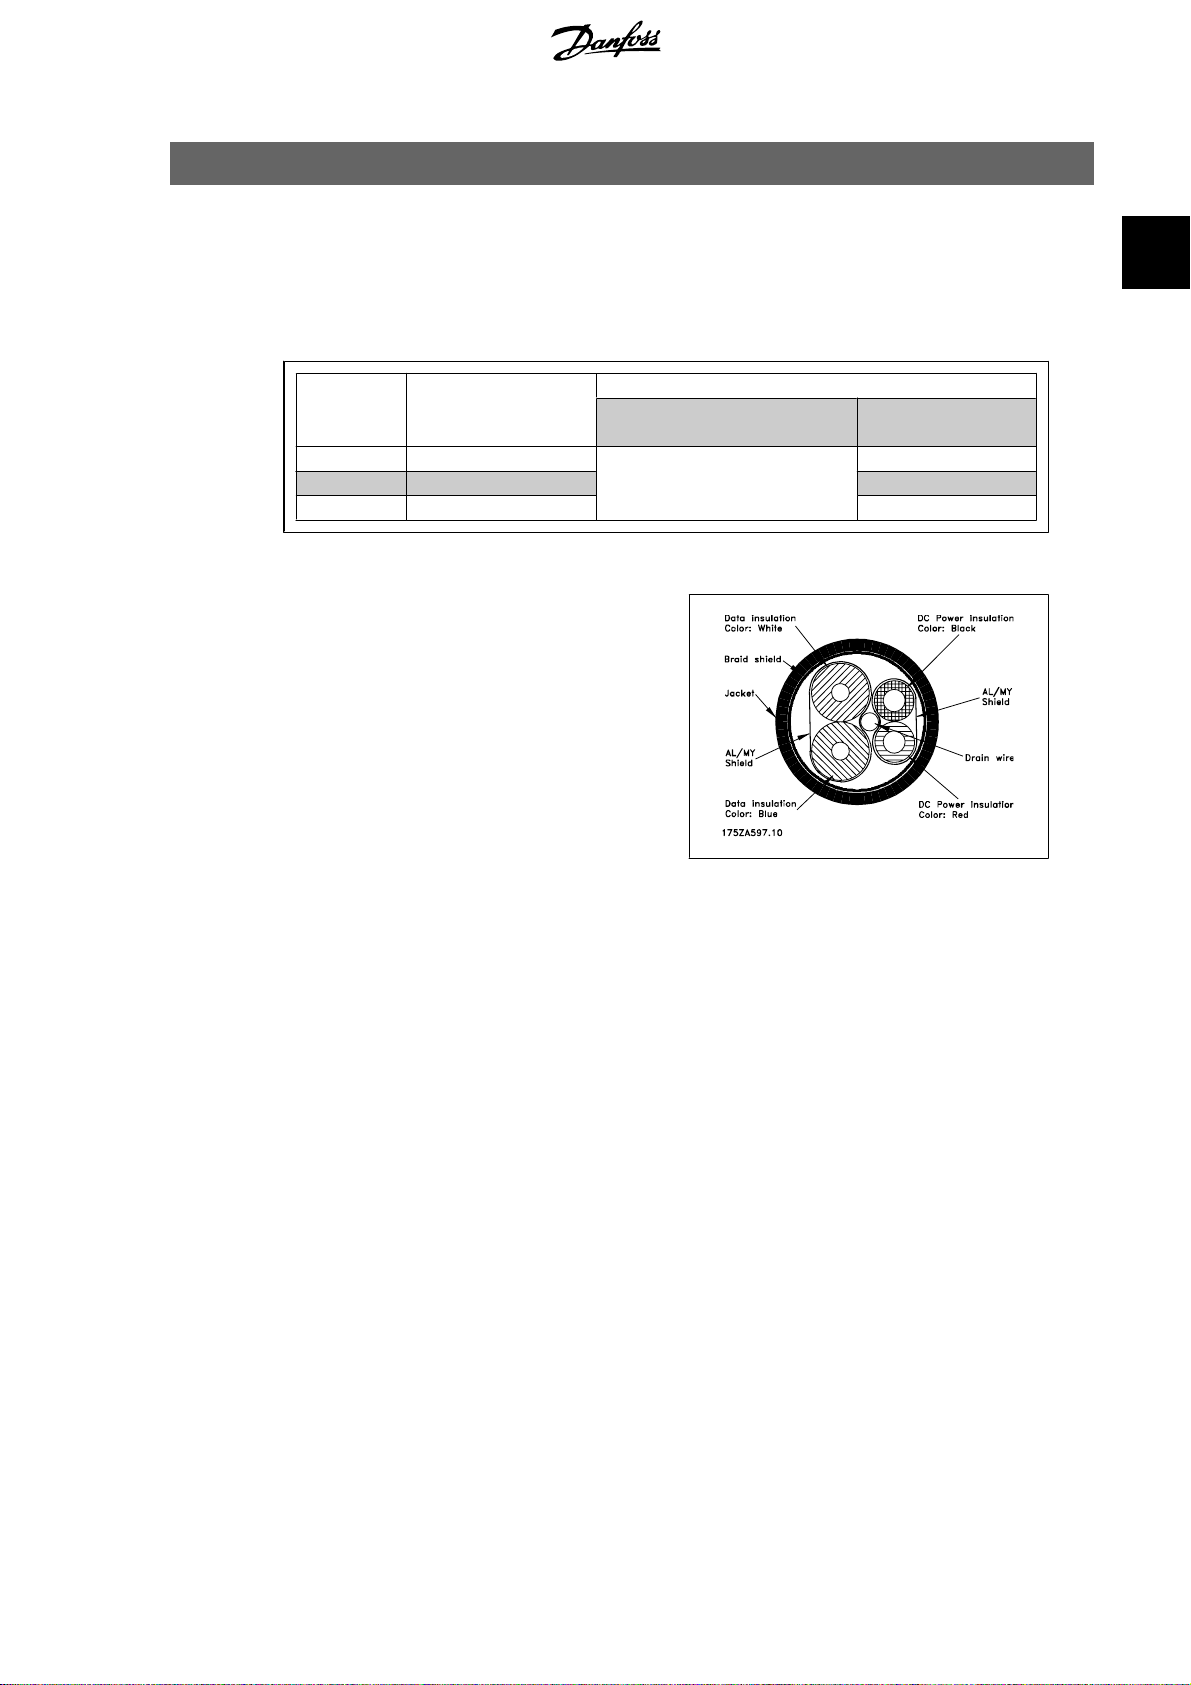
2.1.2. Cable Specifications
The cable used should be according to ODVA
specifications.
Be aware that the ODVA “Flat Cable” is an
unscreened cable type, and is not suited for
use with frequency converters.
2
Drop length
Maximum per drop Cumulative maxi-
mum
Illustration 2.1: ODVA “Thin Cable” cross section
MG.33.D3.02 - VLT® is a registered Danfoss trademark
13
Page 14
2
2. How to Install FC 100/ 200/ 300 DeviceNet
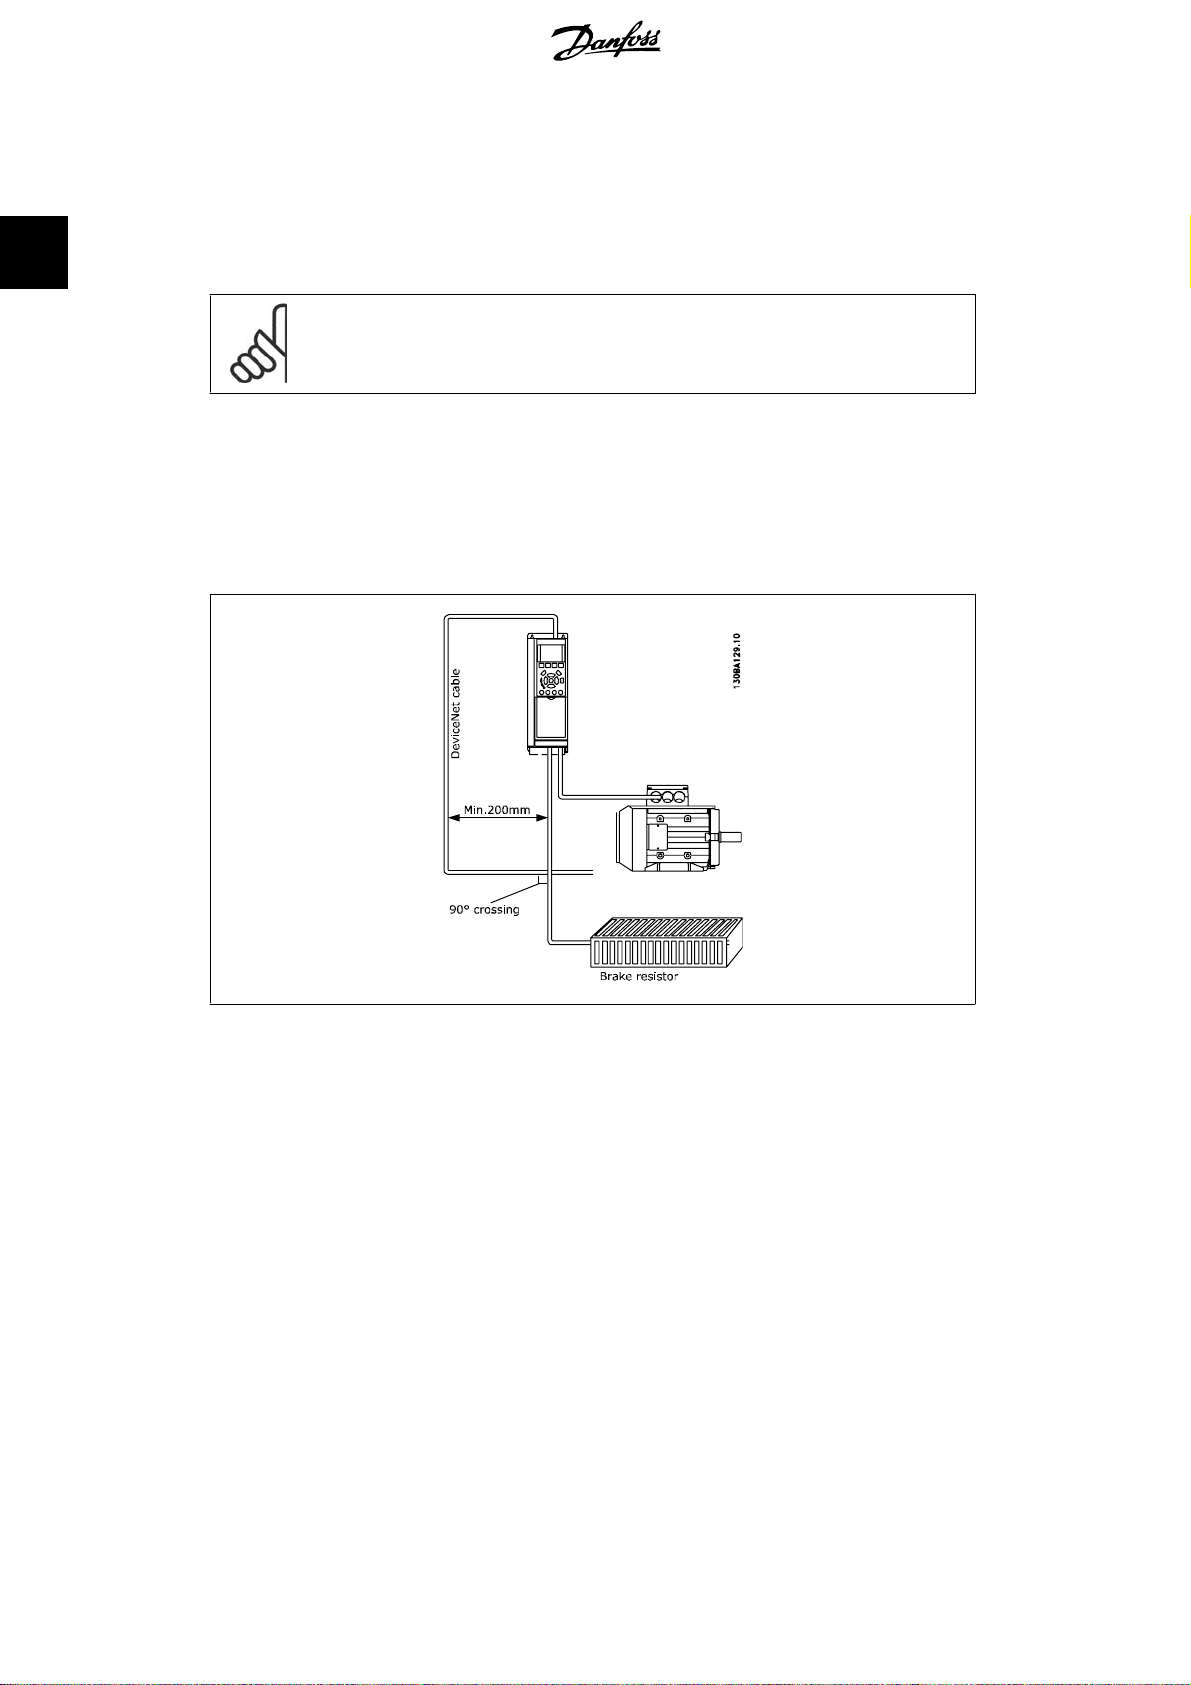
2.1.3. EMC Precautions
The following EMC precautions are recommended in order to achieve interference-free operation
of the DeviceNet network. Additional EMC information is available in the relevant FC 100, 200 or
300 Operating Instructions and Design Guides.
NB!
Relevant national and local regulations, for example regarding protective earth connection, must be observed.
The DeviceNet communication cable must be kept away from motor and brake resistor cables to
avoid coupling of high frequency noise from one cable to the other. Normally a distance of 200
mm (8 inches) is sufficient, but it is generally recommended to keep the greatest possible distance
between the cables, especially where cables run in parallel over long distances. If the DeviceNet
cable has to cross a motor and brake resistor cable they must cross each other at an angle of 90
degrees.
14
MG.33.D3.02 - VLT® is a registered Danfoss trademark
Page 15
FC 100/ 200/ 300 DeviceNet 2. How to Install
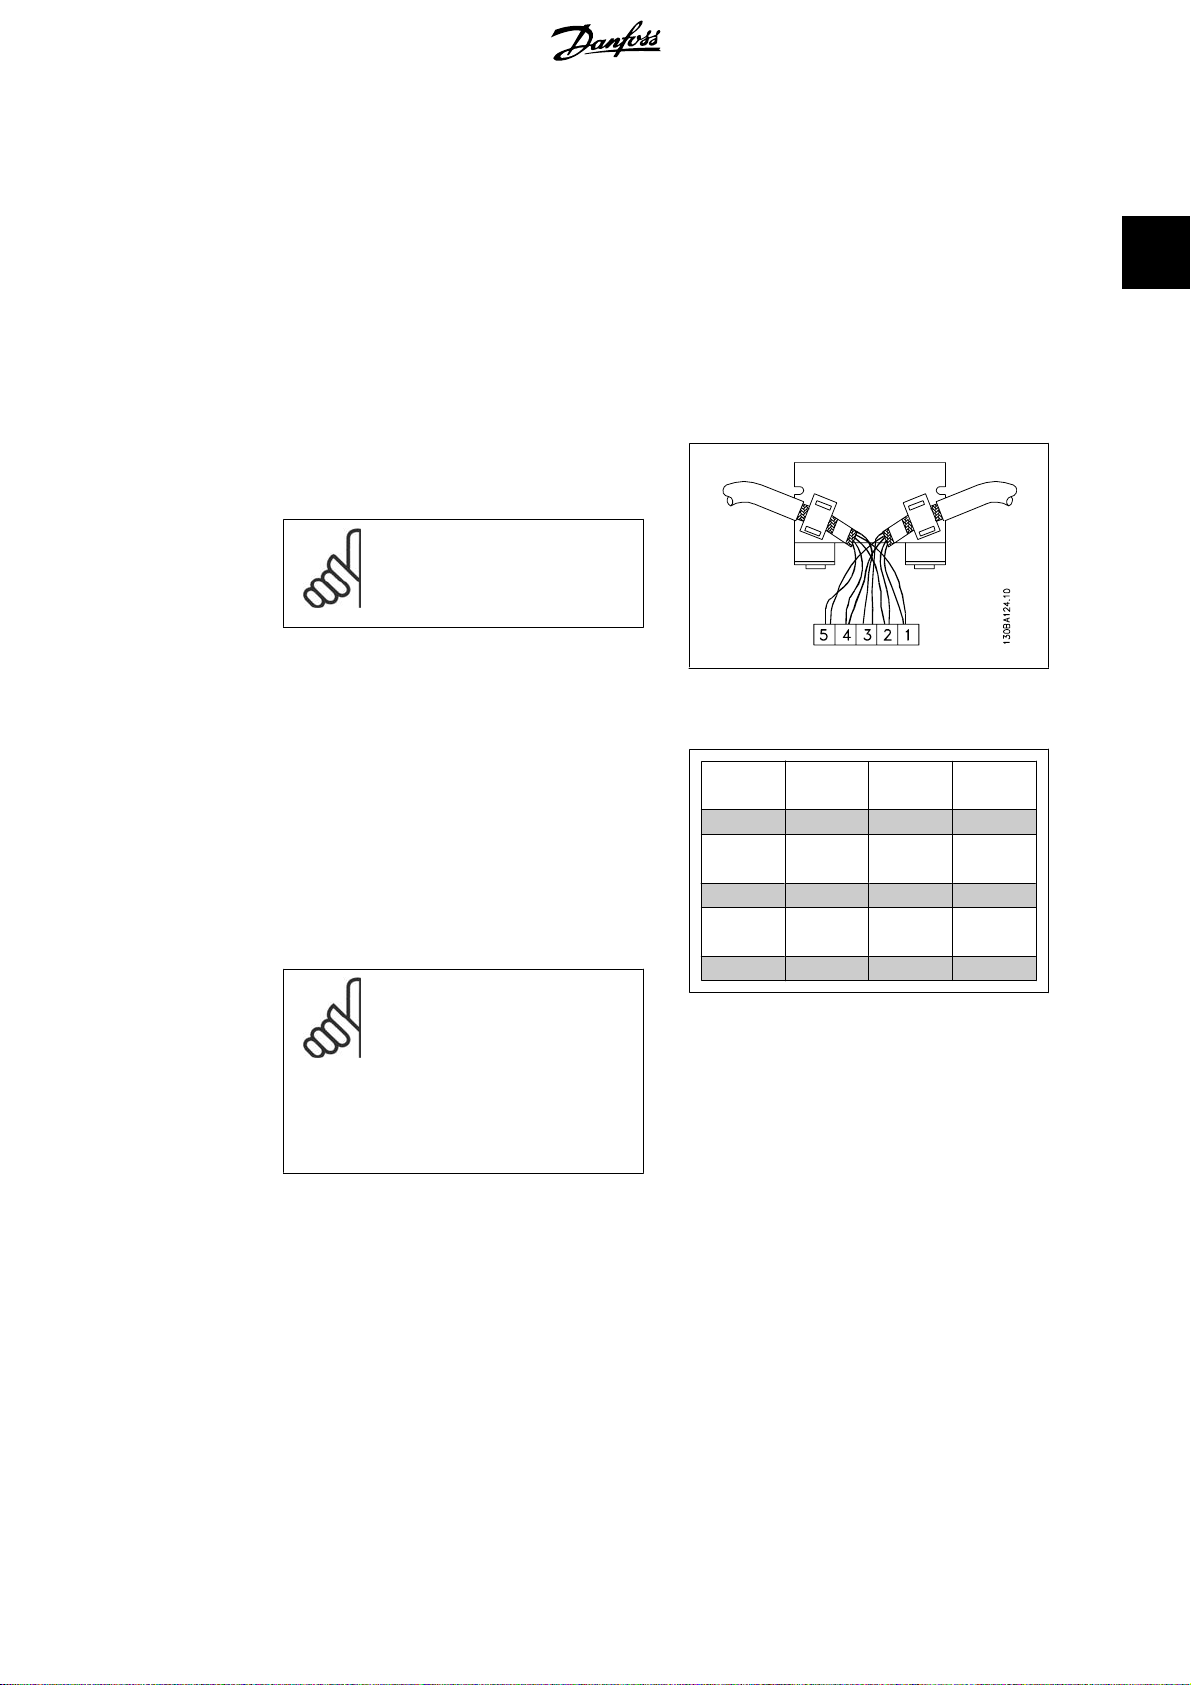
2.1.4. Connection of the Cable Screen
Danfoss recommends connection of the screen of the DeviceNet cable to ground at both ends of
the cable at every DeviceNet station (see Danfoss recommendation for further details). Low impedance ground connection of the screen is very important, also at high frequencies. Achieve this
by connecting the surface of the screen to ground, for example by means of a cable clamp or a
conductive cable gland. The frequency converter package includes various clamps and brackets
to enable a proper ground connection of the DeviceNet cable screen. The screen connection required for CE and EMC compliance is shown in the following drawing.
2.1.5. ODVA Recommendation
The Screen must be connected to ground at
only one point on the network.
NB!
Please note that this recommendation conflicts with the correct
EMC installation.
2
2.1.6. Earth Connection
It is important that all stations connected to
the DeviceNet network are connected to the
same earth potential. The earth connection
must have a low HF (high frequency) impedance. This can be achieved by connecting a
large surface area of the cabinet to ground,
for example by mounting the frequency converter on a conductive rear plate.
NB!
Particularly when there are long
distances between the stations
in a DeviceNet network, it may
be necessary to use additional
potential equalizing cables, connecting the individual stations to
the same earth potential.
Pin no. Termi-
nal
1 V- Black GND
2 CAN_L Blue CAN
3 Drain (bare) Screen
4 CAN_H White CAN
5 V+ Red +24 V
Colour Name
LOW
HIGH
MG.33.D3.02 - VLT® is a registered Danfoss trademark
15
Page 16
2
2. How to Install FC 100/ 200/ 300 DeviceNet
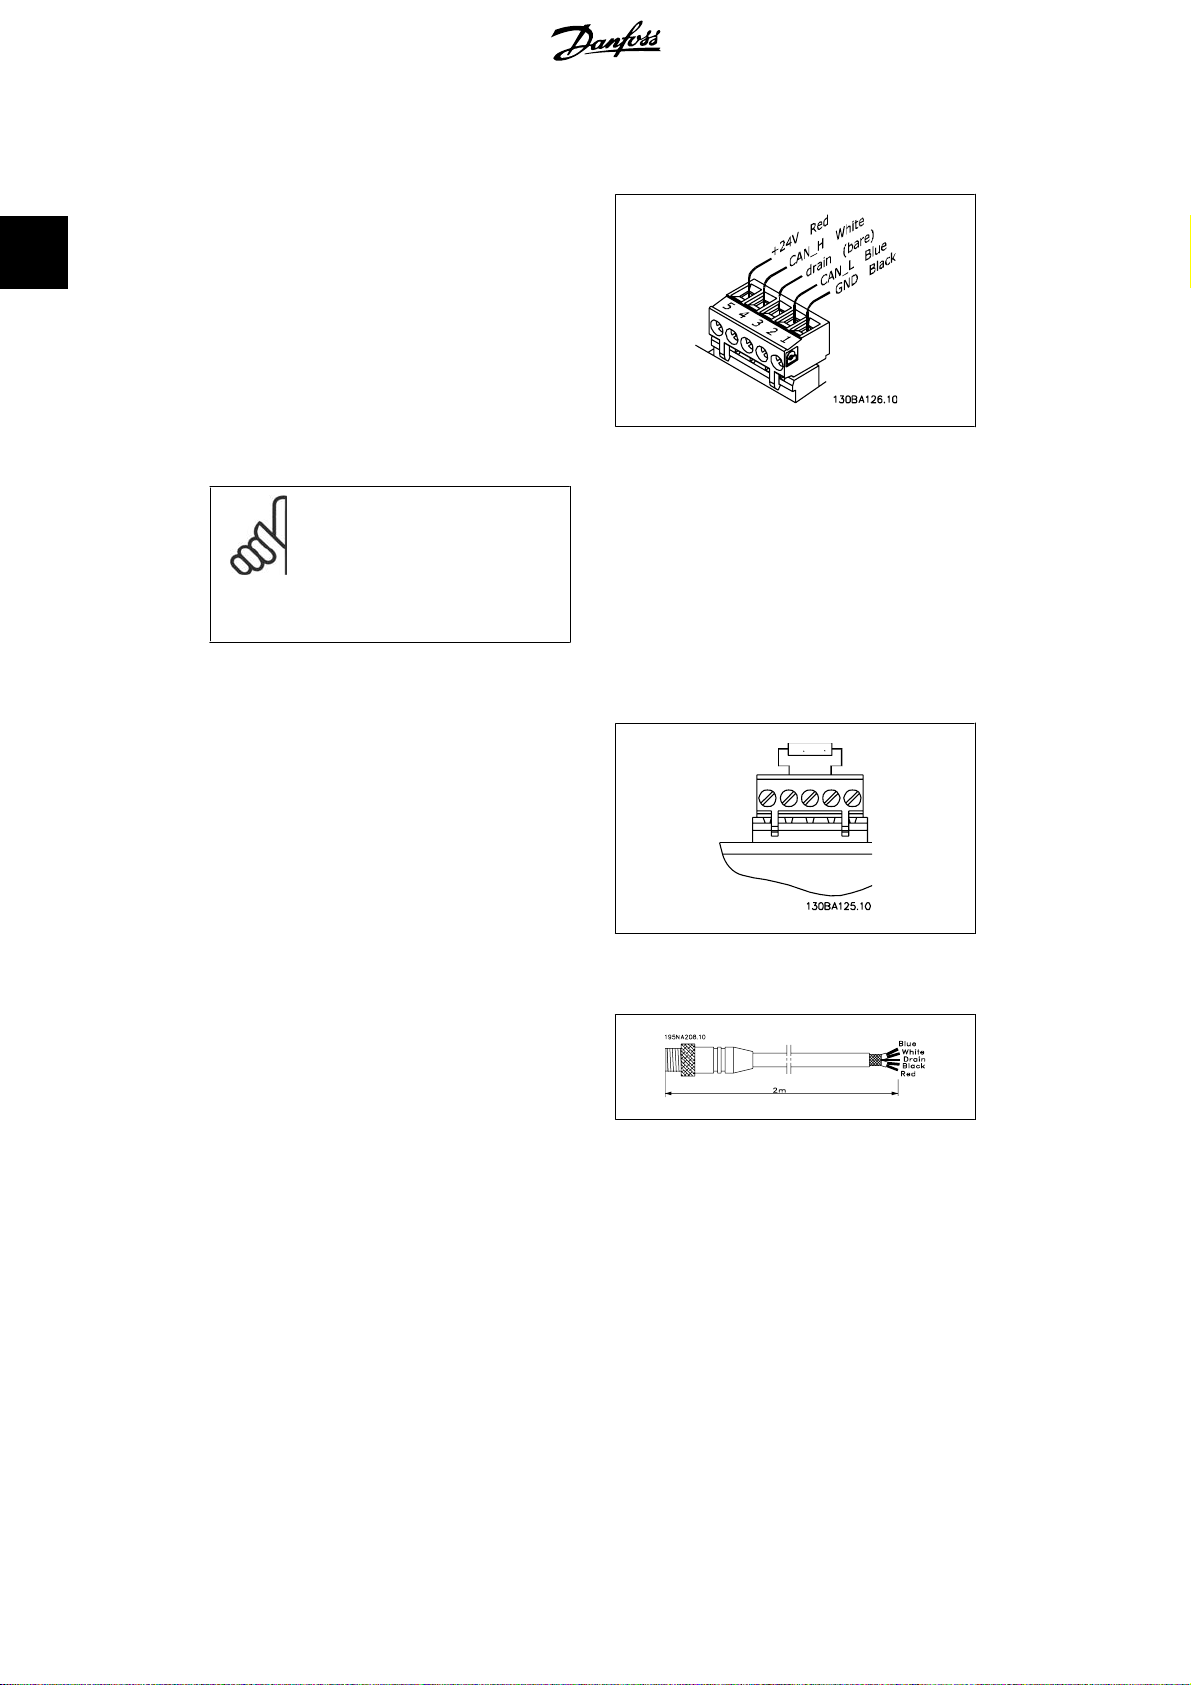
2.1.7. DeviceNet Connection
It is essential to terminate the bus line properly. A mismatch of impedance may result in
reflections on the line that will corrupt data
transmission. The DeviceNet control card is
provided with a plug-cable connector. When a
plug connector is used as a splice between
two trunk lines, the removal of devices will not
sever the network. If required, strain relief
must be provided by the developer. In current
installations of this type of connector, the
strain relief is attached to the product.
NB!
Install wires only when the network is inactive. This will prevent problems such as shorting
the network supply or disrupting
communications.
2.1.8. DeviceNet Termination
Termination resistors should be installed at
each end of the bus line. The resistors must
be mounted between terminal 2 (CAN_L) and
terminal 4 (CAN_H) and should have the following specification:
121 Ohm, 1 % Metal film, 1/4 Watt
2.1.9. Drop Cable
An alternative to splicing two trunk lines in the
connector on the control card is to use a DeviceNet connection box or a T-connector. For
this kind of installation a drop cable is available as an option.
Drop cable order number: 195N3113
The connector is a micro-style, male, with rotating coupling nut, and fits into a Micro Device port.
2.1.10. Network Power Consumption
The DeviceNet option is powered via the internal power supply in the drive. The network voltage
(+24 V) is detected only to determine if the bus is energized or not, thus the current draw from
the network is negligible.
16
MG.33.D3.02 - VLT® is a registered Danfoss trademark
Page 17
FC 100/ 200/ 300 DeviceNet 2. How to Install
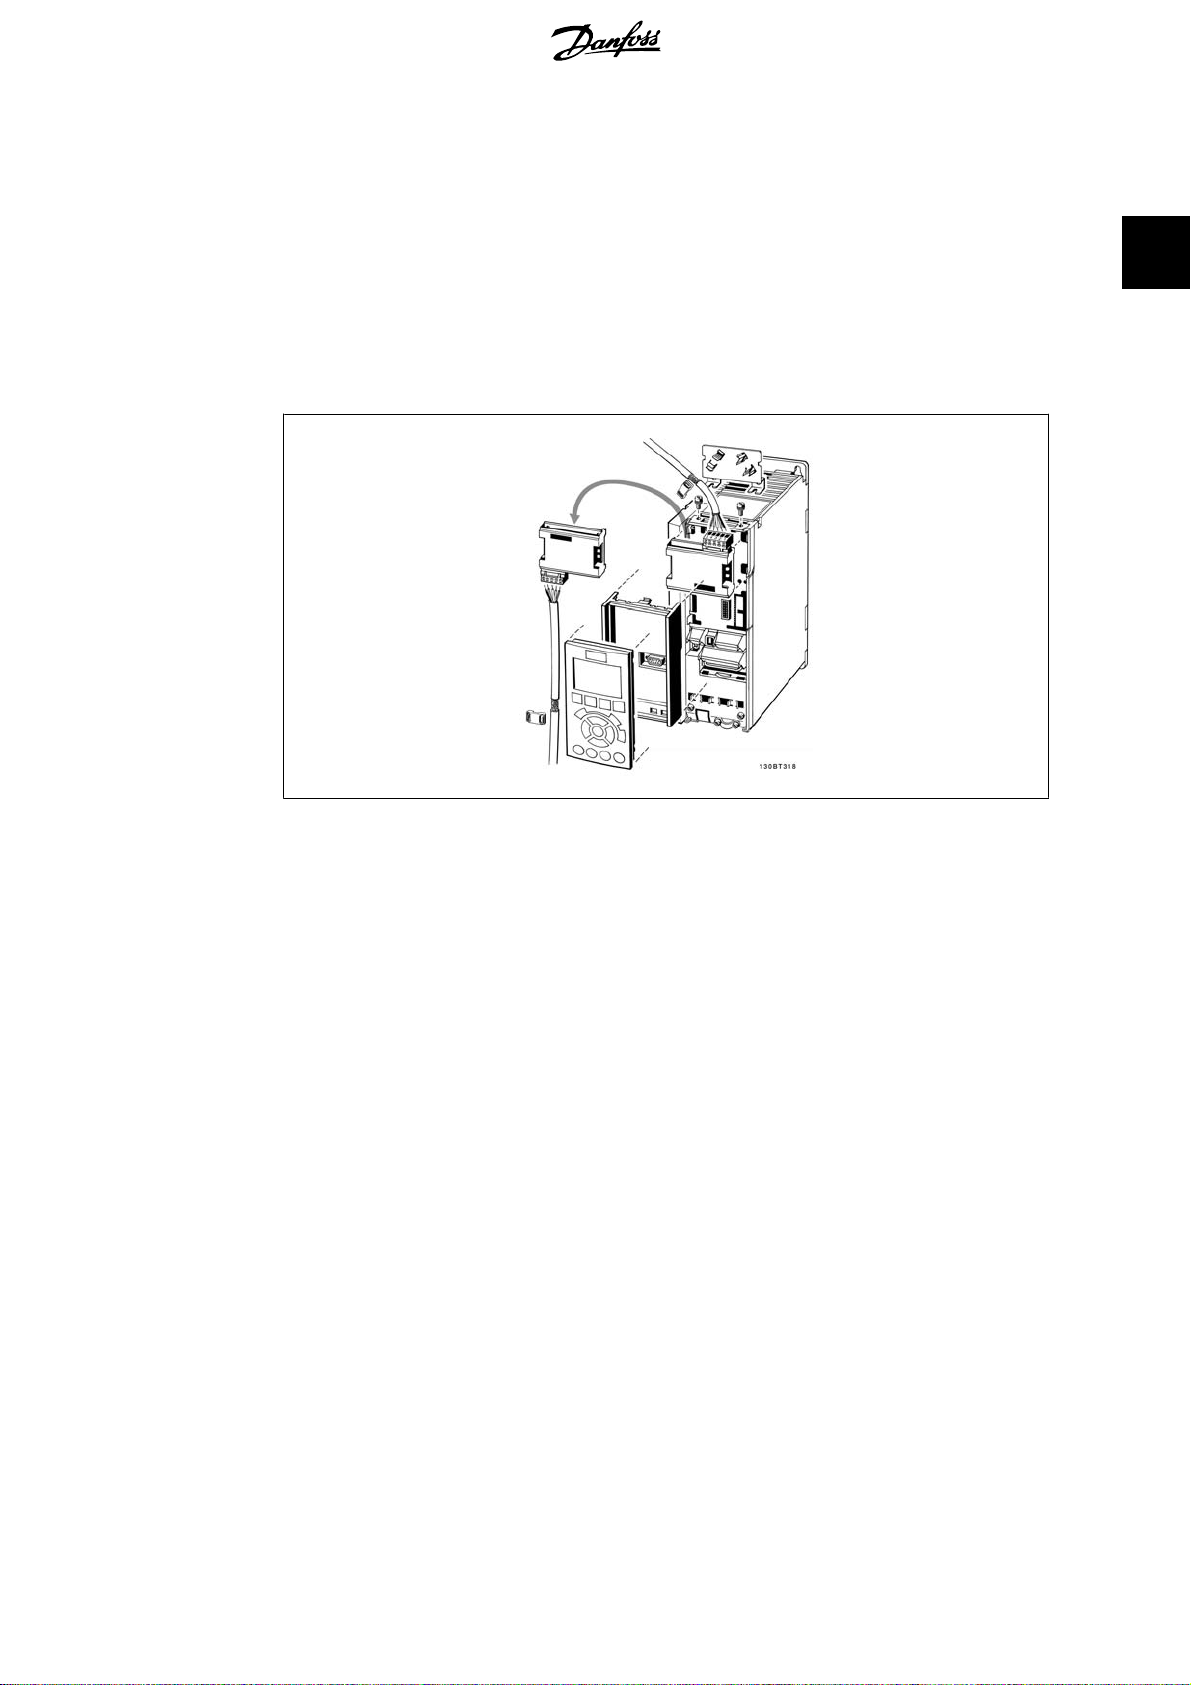
2.2. Installation of Option in the Frequency
To install a fieldbus option in the frequency converter you will need:
- The fieldbus option
- Fieldbus option adaptor frame for the frequency converter. This frame is deeper than the
standard frame, to allow space for the fieldbus option beneath.
- Cable holders
2
Instructions:
- Remove the LCD panel from the frequency converter.
- Remove the frame located beneath and discard.
- Push the option into place. Two positions are possible, with cable terminal facing either
up or down. The cable up position is often most suitable when several frequency converters are installed side by side in a rack, as this position permits shorter cable lengths.
- Push the fieldbus option adaptor frame for the frequency converter into place.
- Replace the LCD panel.
- Attach cable.
- Fasten the cable in place using cable holders. The top surface of the frequency converter
has pre-drilled threaded holes for attaching the cable holders to the unit.
- If an option is installed after initial power-up the frequency converter will be tripped and
display: Alarm 67
Option Change
.
MG.33.D3.02 - VLT® is a registered Danfoss trademark
17
Page 18

3
3. How to Configure the System FC 100/ 200/ 300 DeviceNet
18
MG.33.D3.02 - VLT® is a registered Danfoss trademark
Page 19
FC 100/ 200/ 300 DeviceNet 3. How to Configure the System
3. How to Configure the System
3.1. Configure the DeviceNet Network
All DeviceNet stations that are connected to
the same bus network must have a unique
station address. The DeviceNet address of the
frequency converter can be selected via:
- Hardware switches (default 63)
- Parameter 10-02
63)
- Class code 0X03, Instance 1, Attrib-
ute 1
MAC ID
(default
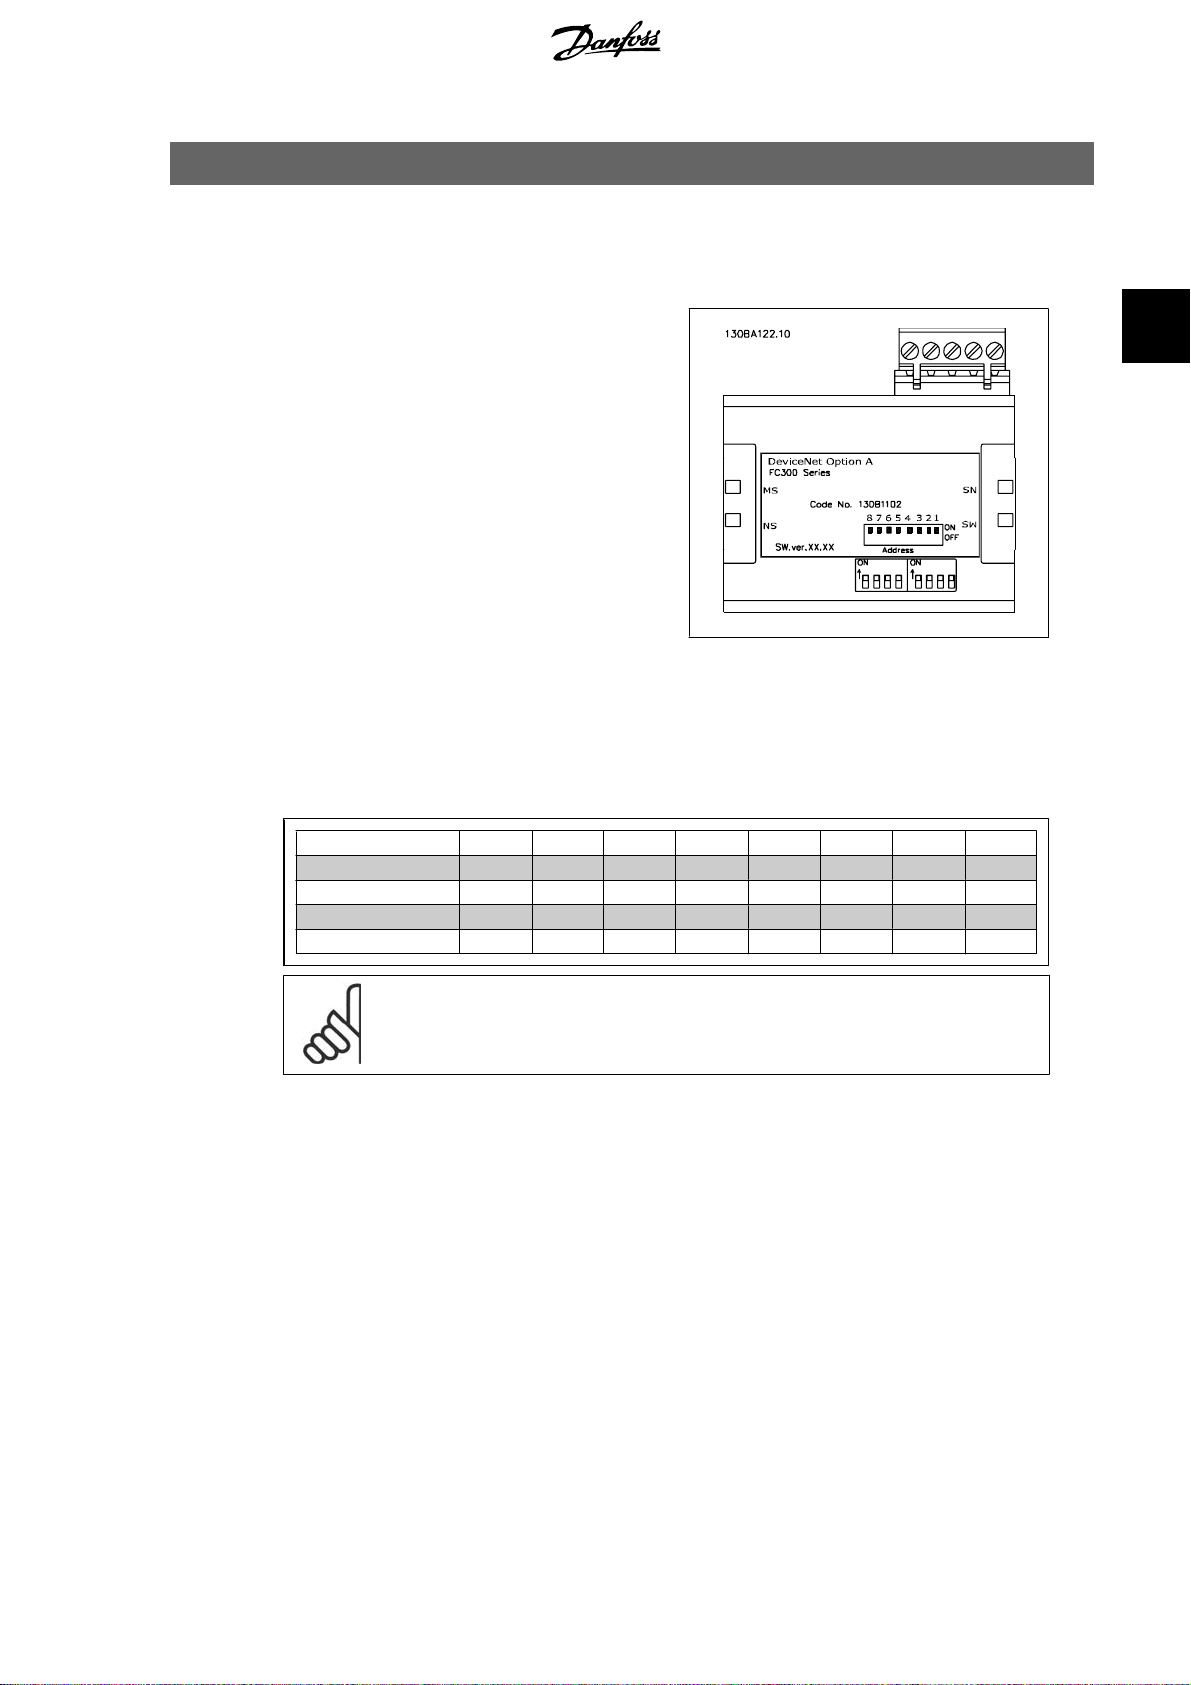
3.1.1. Setting the DeviceNet Address using the Hardware Switches
Setting the DeviceNet Address using the Hardware Switches: Using the hardware switches it is
possible to select an address range from 0-63 (factory setting 63) according to the table below:
Switch
Address value - - +32 +16 +8 +4 +2 +1
Ex. address 5 - - OFF OFF OFF ON OFF ON
Ex. address 20 - - OFF ON OFF ON OFF OFF
Ex. address 35 - - ON OFF OFF OFF ON ON
8 7 6 5 4 3 2 1
3
NB!
Switch off the power supply before changing the hardware switches.
The address change will come into effect at the next power-up, and can be read in par. 10-02
MAC ID
.
3.1.2. Setting the DeviceNet Address via Par. 10-02
The address can be set via par. 10-02
setting). The address change will come into effect at the next power-up.
MAC ID
if the hardware switches are set to 63 (factory
MAC ID
3.1.3. Setting the DeviceNet Address with the Object Class Code
0x03, Attribute 1, Instance 1
The address can be set via the DeviceNet object class code 0x03 attribute 1 command if the
hardware switch is set to 63 (factory setting). A new address becomes effective immediately after
the class code 0x03, Instance 1, Attribute 1 command.
MG.33.D3.02 - VLT® is a registered Danfoss trademark
19
Page 20
3
3. How to Configure the System FC 100/ 200/ 300 DeviceNet
3.1.4. Baud Rate Setting
All DeviceNet stations connected to the same bus network must have the same Baud rate. The
baud rate of the frequency converter can be selected via:
- Hardware switches
- Par. 10-01
- Object Class code 0x03, Instance 1, Attribute 2.
Baudrate Select
(default 125k Baud)
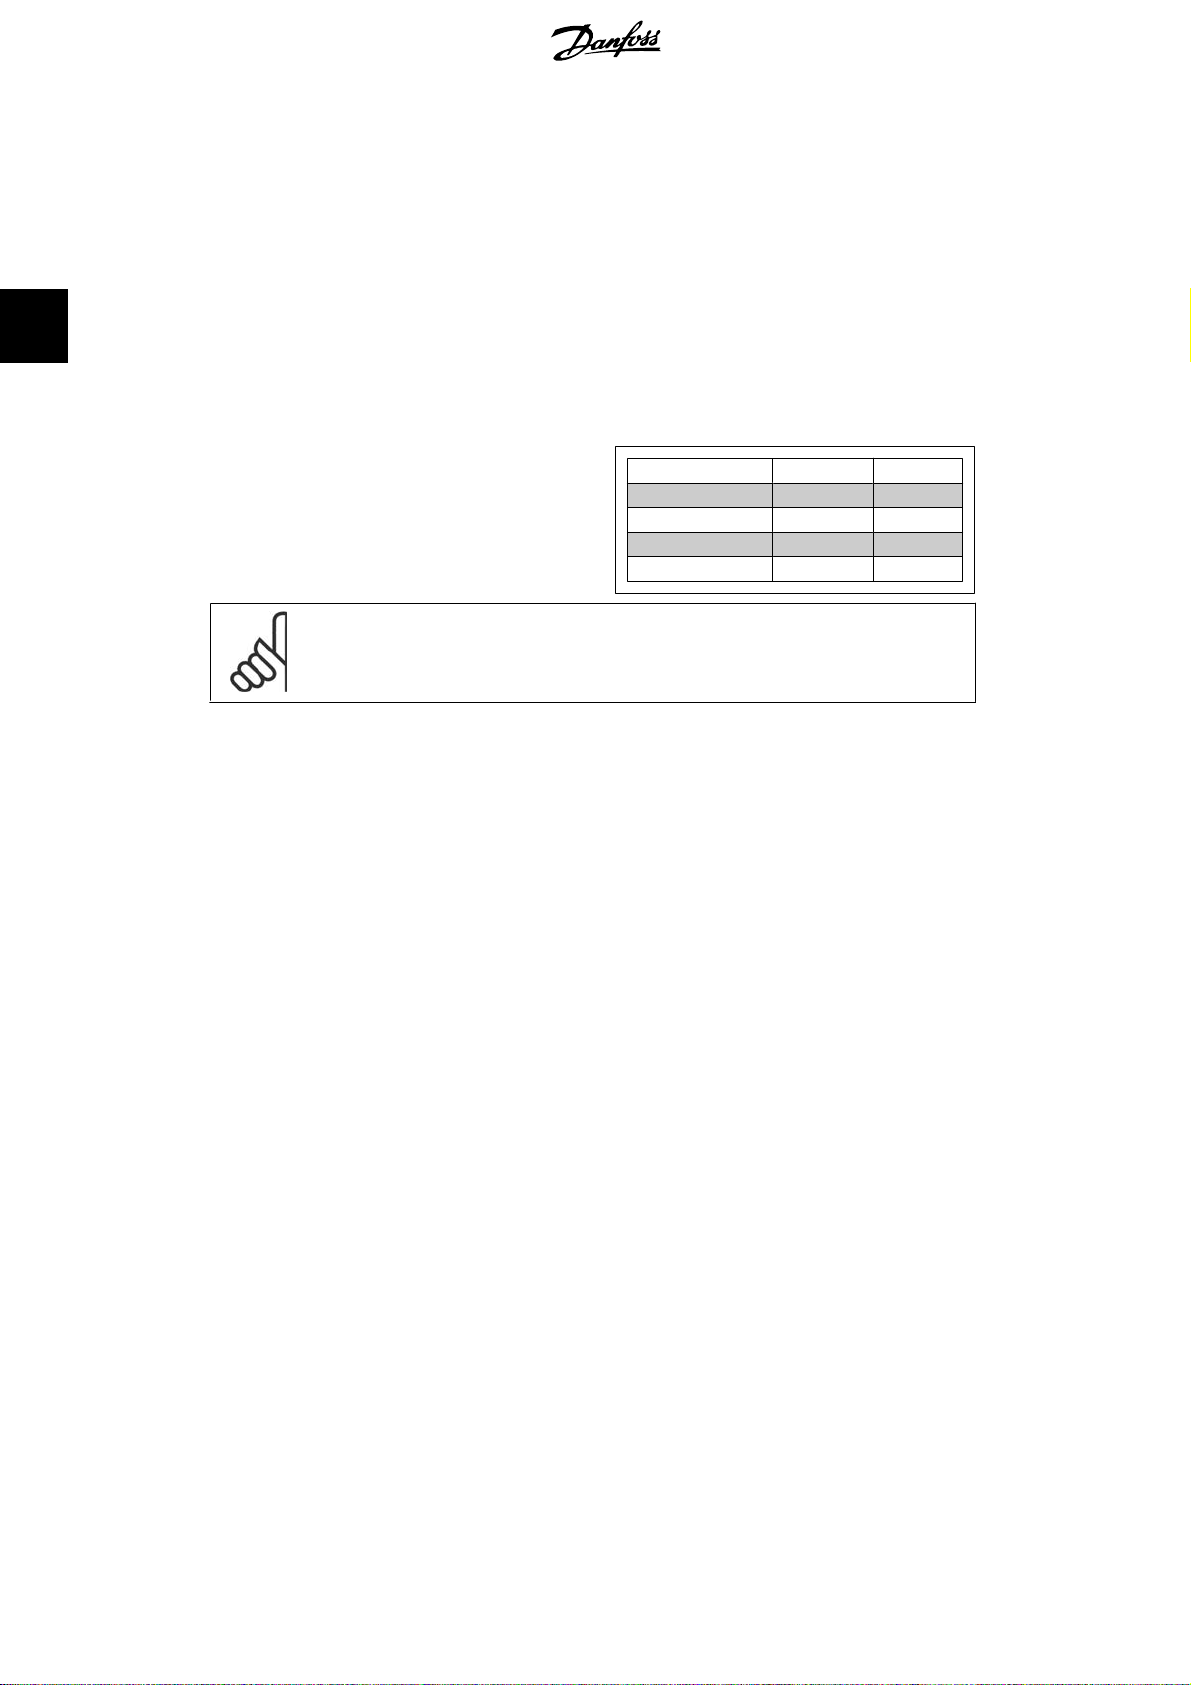
3.1.5. Setting the DeviceNet Baud Rate using the H ardware Switches
Using the hardware switches it is possible to
select a baud rate of 125k baud (factory setting), 250k baud or 500 k baud according to
the following table:
NB!
Switch off the power supply before changing the hardware switches.
The baud rate change will come into effect at the next power-up, and can be read in par. 10-01
Baudrate select
.
3.1.6. Setting the DeviceNet Baud Rate via Par. 10-01
lect
The baud rate can be set via par. 10-01
to ON (factory setting). The baud rate change will come into effect at the next power-up.
Baudrate select
Baud rate switch
Par. 10-01 1 1
125 k Baud 0 0
250 k Baud 0 1
500 k Baud 1 0
8 7
Baudrate se-
if the hardware switches 1 and 2 are set
3.1.7. Setting the DeviceNet Baud Rate with the Object Class Code
0x03 Attribute 2
The baud rate can be set via the DeviceNet object class code 0x03 attribute 2 command, if the
hardware switches 1 and 2 are set to ON (factory setting). A new baud rate becomes effective
immediately after the class code 0x03 attribute 2 command.
20
MG.33.D3.02 - VLT® is a registered Danfoss trademark
Page 21

FC 100/ 200/ 300 DeviceNet 3. How to Configure the System
3.2. Configure the Master
3.2.1. EDS File
A large part area of the system configuration is the setting of application related parameters. EDS
(Electronic Data Sheet) files simplify the setting up of most of the DeviceNet configurable parameters. Danfoss provides a generic English EDS file covering all voltage and power sizes, for offline configuration. The EDS file can be downloaded from http://www.danfoss.com/drives.
NB!
The EDS-file does not contain all parameters but a selected, limited number of parameters with generic minimum, maximum and default values.
3.3. Configure the Frequency Converter
3.3.1. VLT Parameters
3
Pay particular attention to the following parameters when configuring the frequency converter
with a DeviceNet interface. Please refer to the Parameters chapter for more details of each parameter.
• Par. 0-40
•Par. 8-10
• Par. 8-50 to 8-56 (see section
• Par. 8-03 to 8-05. The reaction in the event of a bus time out is set via these parameters
• Par.. 10-01
• Par. 10-02
3.3.2. LEDs
The DeviceNet control card contains two bi-colour (green/red) LEDs for each connector hook-up
port, to indicate the state of the device and the network respectively. For details of the range of
communications status indicated by the LEDs, please refer to the Troubleshooting chapter.
[Hand on] key on LCP
If the Hand button on the frequency converter is activated, control of the drive via the
DeviceNet interface is disabled. After initial power-up the frequency converter will automatically detect whether a fieldbus option is installed in slot A, and set par. 8-02
Word Source
already commissioned drive, it will not change par. 8-02 but will enter Trip Mode, and
the frequency converterwill display an error.
Choose between the Danfoss FC Profile and the ODVA profile. Select the desired DeviceNet instance in par. 10-10
trol commands with digital input command of the control card.
to [Option A]. If an option is added to, changed in or removed from an
Control Word Profile
Baud rate
MAC ID
. Default is 125 kbps.
. Default is 63.
.
(see section
Process Data Type Selection
Parameters
How to Control the Frequency Converter
). Selection of how to gate the DeviceNet con-
Control
.
).
MG.33.D3.02 - VLT® is a registered Danfoss trademark
21
Page 22

4
4. How to Control the Frequency Converter FC 100/ 200/ 300 DeviceNet
22
MG.33.D3.02 - VLT® is a registered Danfoss trademark
Page 23
FC 100/ 200/ 300 DeviceNet 4. How to Control the Frequency Converter
4. How to Control the Frequency Converter
4.1. DeviceNet Process Control Modes
This section describes two of three possible process control modes: Polling and Change of State
(COS).
The third FC control mode uses the acyclical mode Explicit Messaging via the Standard DeviceNet
Control Supervisory object CLASS 29H. The Control Supervisory object is described within the
DeviceNet Object Classes
4.1.1. Polling
section,
How to Access the Parameters
chapter.
4
This is a classical Master-Slave connection and
the standard DeviceNet operation mode. The
master controls the data exchange by sending
cyclical poll-requests to the connected slaves,
and the slaves answers by sending a poll-response to the master. The master can control
and monitor the frequency converter by polling the DeviceNet or Danfoss objects (I/O Instances).
4.1.2. Change of State, COS
This an event-controlled operation mode used to minimize network traffic. Messages are transmitted only if a defined state or value has changed. The condition for triggering a COS message
is determined by the insertion of COS-filters (parameters 10-20 to 10-23), for each bit in the
different PCD-words. The filter acts like a logical AND-function: If a bit in the filter is set to “1”,
the COS-function triggers upon a change to the corresponding bit for the PCD-word.
POLLED I/O
Master → slave
Slave → master
CTW MRV
STW MAV
MG.33.D3.02 - VLT® is a registered Danfoss trademark
23
Page 24
4
4. How to Control the Frequency Converter FC 100/ 200/ 300 DeviceNet
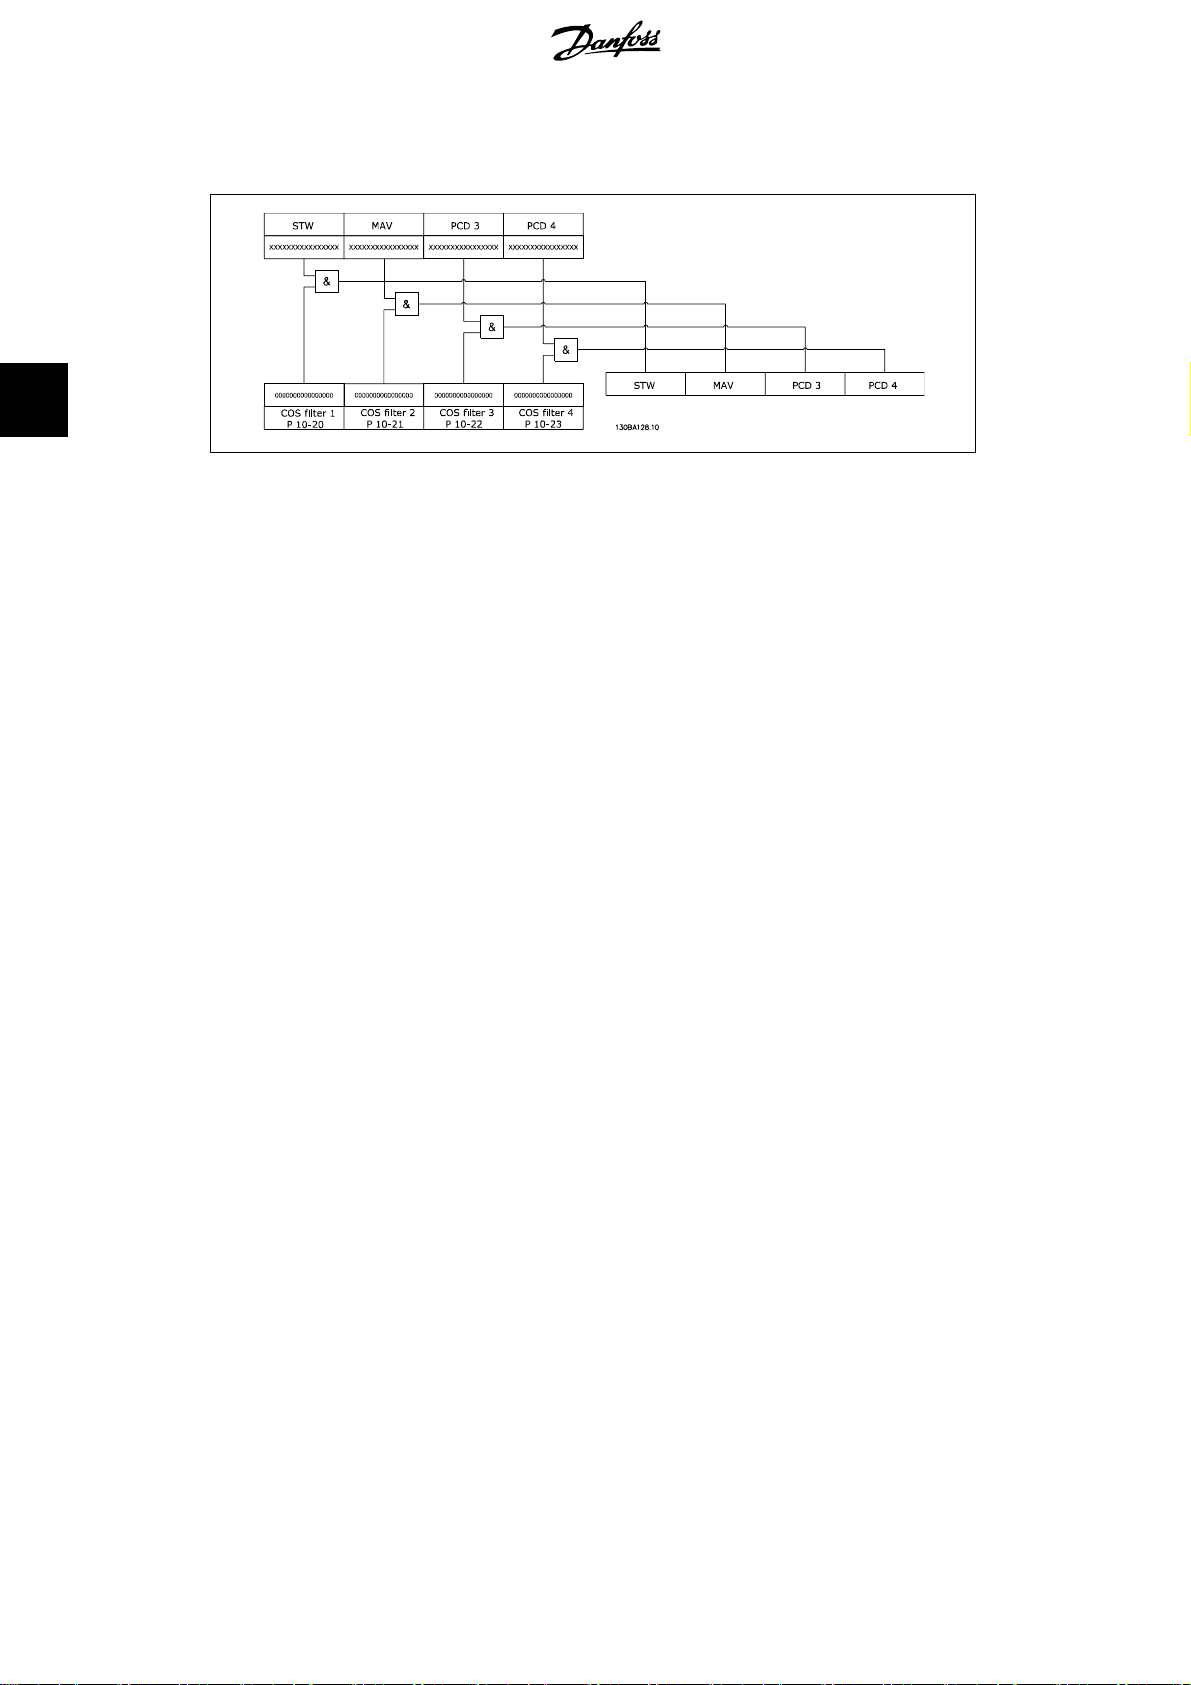
The figure below shows the different PCDs and their corresponding filter parameters.
Par. 10-20 to 10-23 can be used to filter out undesired events for COS. If a filter bit is set to 0,
the corresponding I/0 Instance bit will be unable to produce a COS message. By default, all bits
in the COS filters are set to 0.
In order to signal that the connection has not been interrupted, or the device is not powered off,
a Heartbeat Message is transmitted within a specified time interval (Heartbeat Interval). This interval is defined in Attribute Heartbeat Time of the connection object, Class Code 0x05.
To prevent the device from producing heavy network traffic if a value changes frequently, the
Production Inhibit Time (an attribute of the connection object) is defined. This parameter defines
the minimum time between two COS messages.
The Attribute Expected Package Rate defines the maximum time between two COS messages even
when the value is unchanged. In the event of COS connection, the Explicit Package Rate is identical
with the Heartbeat Interval mentioned above. This timer is used both as transmission trigger and
inactivity watchdog, depending upon whether the connection is producer or consumer.
24
MG.33.D3.02 - VLT® is a registered Danfoss trademark
Page 25
FC 100/ 200/ 300 DeviceNet 4. How to Control the Frequency Converter
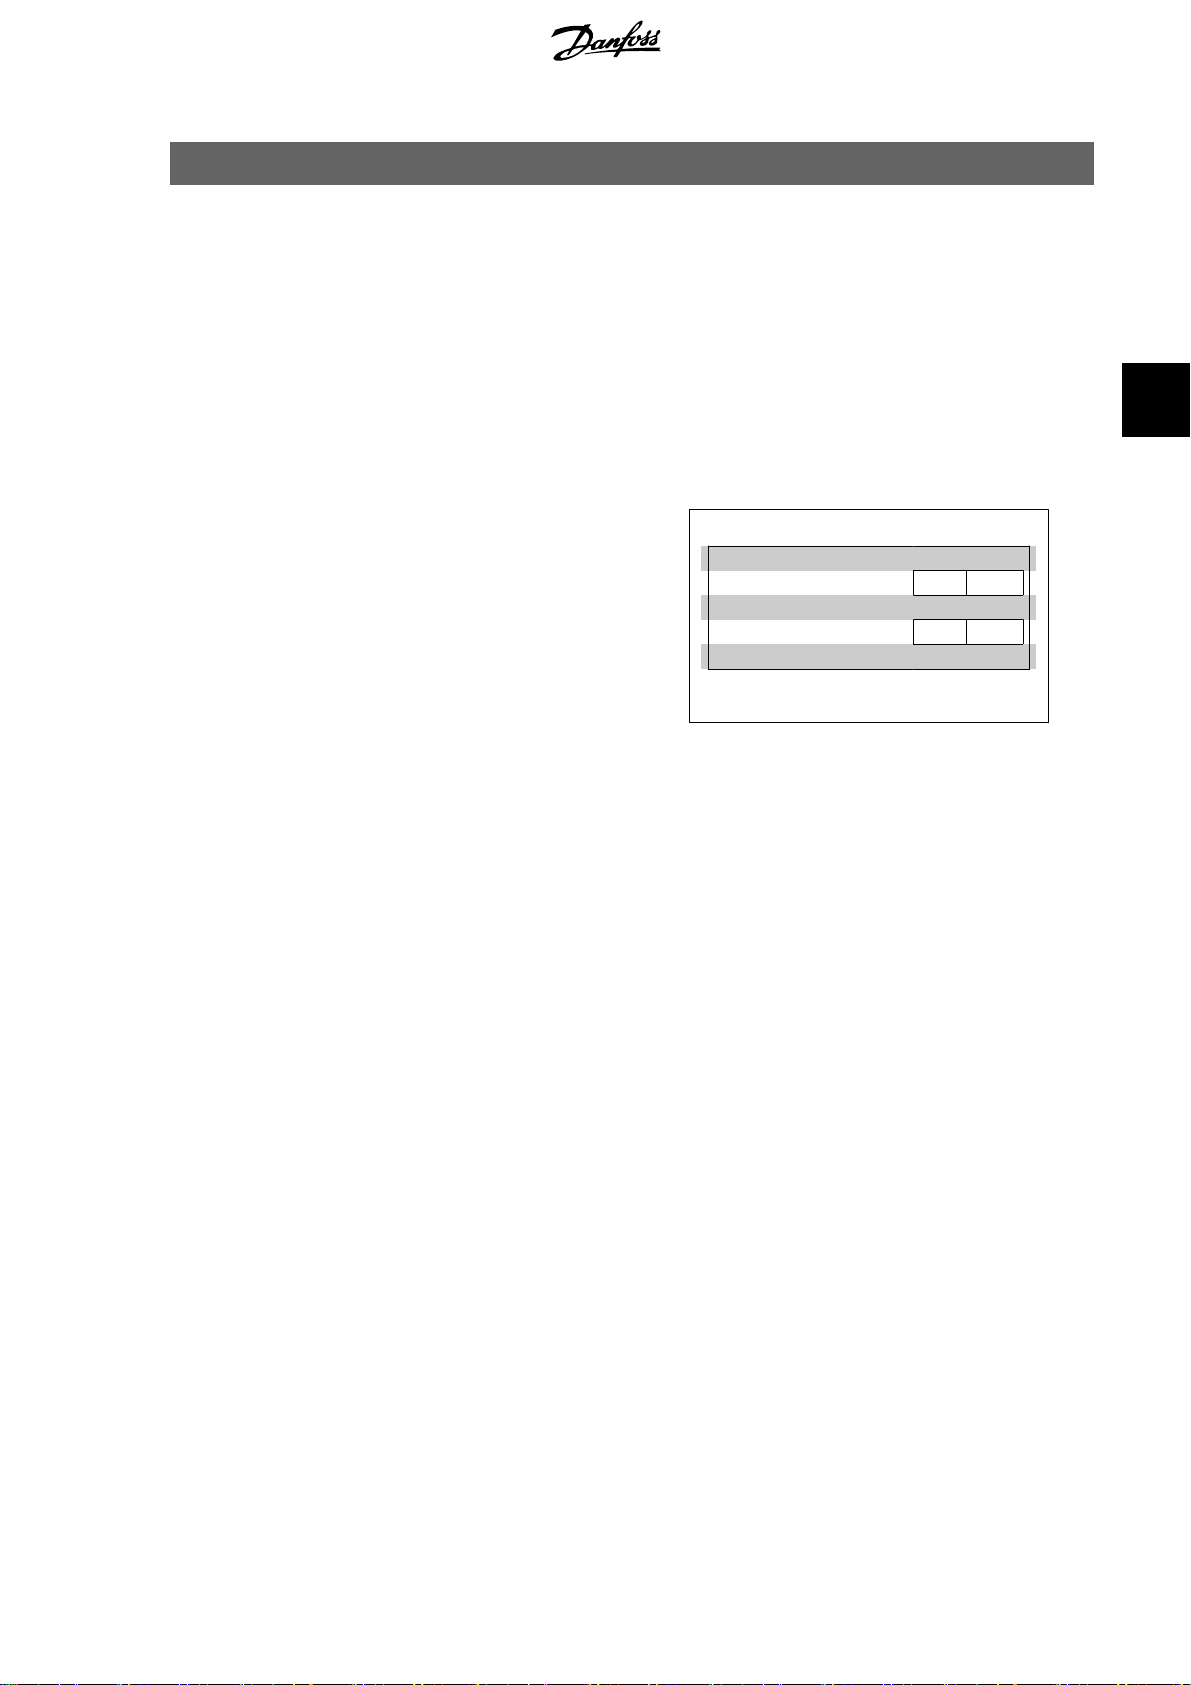
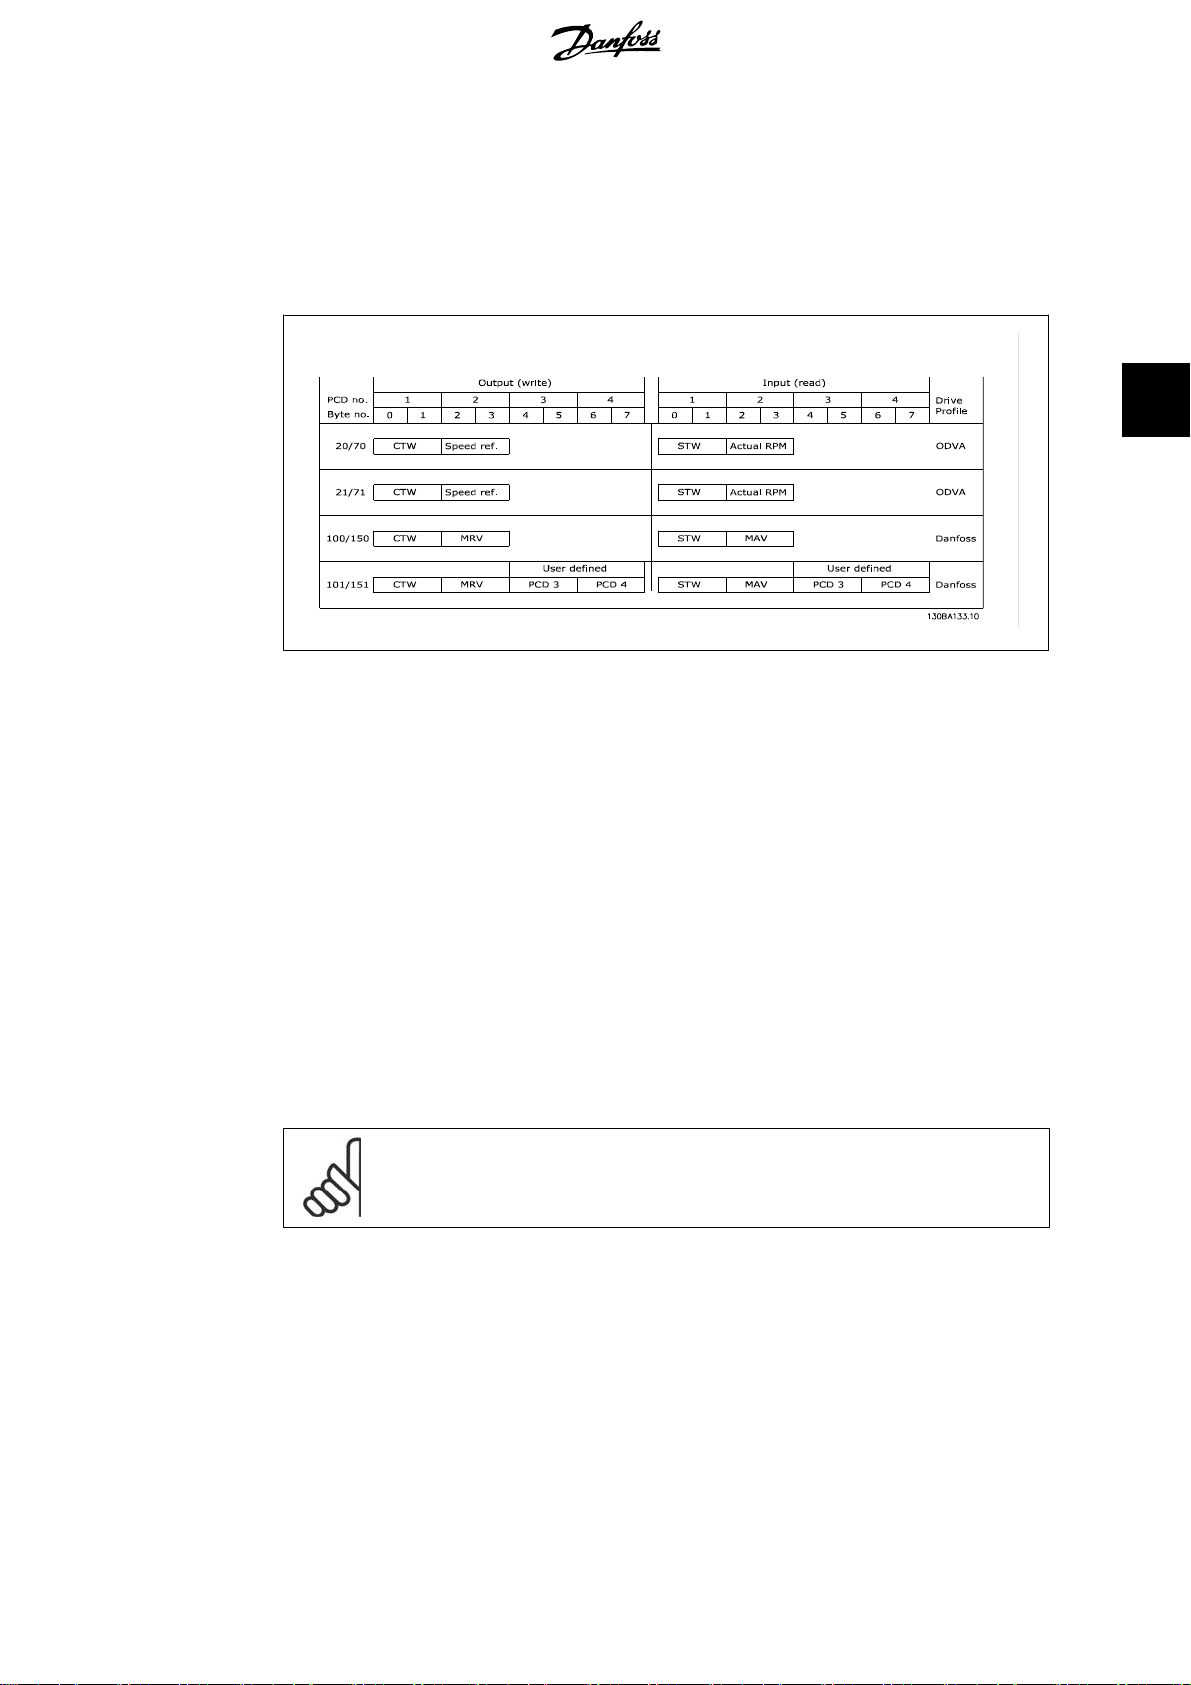
4.2. I/O Assembly Instances
I/O Assembly Instances are a number of defined process control objects with defined content
comprising control and status information. The figure below shows the I/O Assembly Instance
options for controlling and monitoring the frequency converter.
4
4.3. Process Data
Process data comprises the control and status data in the I/O Assembly Instances.
The CTW, MRV and STW and MAV have defined formats and functions, depending upon the I/O
Instance chosen. PCD1 and PCD2 are freely configurable for instance 101/151 via par. 10-11 and
10-12.
The VLT DeviceNet provides a flexible way for the user to customize the number of Process Data
(I/O words) and the functionality of each word. To activate the user definable process data, select
the I/O Instance 101/151 in par. 10-10
to four words in the input and output area. This selection uses the Danfoss-specific profile for the
Control word and Status word as well for the Main Reference Value/Main Actual Value.
The first two words are fixed on the VLT DeviceNet, whereas the user can select the input and
output, PCD 3 and PCD 4. The number of PCDs active in a system is fixed to 2 words.
NB!
Selection of Instance 101/151 under par. 10-10 is only possible if FC Profile has been
selected in par. 8-10
To enable use of PCD data from the VLT DeviceNet, configure the contents of each single PCD
word in par. 10-11
to par. 10-11 and 10-12 are effected immediately in the PCD data.
Process Data Config Write
Process Data Type Selection
Control Word Profile
and par. 10-12
.
. This will change the I/O size
Process Data Config Read
. Changes
MG.33.D3.02 - VLT® is a registered Danfoss trademark
25
Page 26

4
4. How to Control the Frequency Converter FC 100/ 200/ 300 DeviceNet
26
MG.33.D3.02 - VLT® is a registered Danfoss trademark
Page 27

FC 100/ 200/ 300 DeviceNet 4. How to Control the Frequency Converter
4.4. ODVA Control Profile
4.4.1. Control Word under Instances 20/70 and 21/71
Control Word under Instances 20/70 and
21/71 Set par. 8-10
Control Word Profile
ODVA, and select the instance in par. 10-10
Process Data Type Selection
.
to
The control word in Instances 20 and 21 is
defined in the overview to the right:
NB!
Note that the bits 00 and 02 in Instance 20 are identical with bits 00 and 02 in the
more extensive Instance 21.
Bit In st anc e 20 Instance 21
00 Stop Run Fwd Stop Run Fwd
01 - - Stop Run Rev
02 No func-
03 - - - 04 - - - 05 - - - Net Ctrl
06 - - - Net Ref
07-15 - - - -
Bit = 0 Bit = 1 Bit = 0 Bit = 1
tion
Fault reset
No function
Fault reset
Explanation of the Bits:
Bit 0, Run Fwd:
Bit 0 = "0" means that the VLT frequency converter has a stop command.
Bit 0 = "1" leads to a start command and the VLT frequency converter will start to run the motor
clockwise.
4
Bit 1, Run Rev:
Bit 1 = "0" leads to a stop of the motor.
Bit 1 = "1" leads to a start of the motor.
Bit 2, Fault Reset:
Bit 2 = "0" means that there is no reset of a trip.
Bit 2 = "1" means that a trip is reset.
Bit 3, No function:
Bit 3 has no function.
Bit 4, No function:
Bit 4 has no function.
Bit 5, Net Control:
Bit 5 = "0" means that the drive is controlled from the standard inputs.
Bit 5 = "1" means that DeviceNet controls the drive.
MG.33.D3.02 - VLT® is a registered Danfoss trademark
27
Page 28

4. How to Control the Frequency Converter FC 100/ 200/ 300 DeviceNet
NB!
Please note that changes will affect par. 8-50 to 8-56.
Bit 6, Net Reference:
Bit 6 = "0" Reference is from the standard inputs.
Bit 6 = "1" Reference is from DeviceNet.
4
NB!
Please note that changes will affect parameters 3-15 to 3-17 Reference source X.
For the Speed reference, see section
.
21/71
Bus Speed Reference Value under Instances 20/70 and
28
MG.33.D3.02 - VLT® is a registered Danfoss trademark
Page 29

FC 100/ 200/ 300 DeviceNet 4. How to Control the Frequency Converter
4.4.2. Status Word under Instances 20/70 and 21/71
The status word in Instances 70 and 71 is defined in the overview to the right:
NB!
Note that the bits 00 and 02 in Instance 70 are identical with bits 00 and 02 in the
more extensive Instance 71.
4
Bit In st anc e 70 Instance 71
00 - Fault - Fault
01 - - - Warning
02 - Running
03 - - - Running
04 - - - Ready
05 - - - Ctrl from
06 - - - Ref. from
07 - - - At ref.
08-15 - - State Attribute
Bit = 0 Bit = 1 Bit = 0 Bit = 1
1 Fwd
- Running
1 Fwd
2 Rev.
Net
Net
Explanation of the Bits:
Bit 0, Fault:
Bit 0 = "0" means that there is no fault in the frequency converter.
Bit 0 = "1" means that there is a fault in the frequency converter.
Bit 1, Warning:
Bit 0 = "0" means that there is no unusual situation.
Bit 0 = "1" means that an abnormal condition has arisen.
Bit 2, Running 1:
Bit 2 = "0" means that the drive is not in one of these states or that Run 1 is not set.
Bit 2 = "1" means that the drive state attribute is enabled or stopping, or that Fault-Stop and bit
0 (Run 1) of the control word are set at the same time.
Bit 3, Running 2:
Bit 3 = "0" means that the drive is in neither of these states or that Run 2 is not set.
Bit 3 = "1" means that the drive state attribute is enabled or stopping, or that fault-stop and bit
0 (Run 2) of the control word are set at the same time.
Bit 4, Ready:
Bit 4 = "0" means that the state attribute is in another state.
Bit 4 = "1" means that the state attribute is ready, enabled or stopping.
Bit 5, Control from net:
Bit 5 = "0" means that the drive is controlled from the standard inputs.
Bit 5 = "1" means that DeviceNet has control (start, stop, reverse) of the drive.
MG.33.D3.02 - VLT® is a registered Danfoss trademark
29
Page 30

4. How to Control the Frequency Converter FC 100/ 200/ 300 DeviceNet
Bit 6, Ref from net:
Bit 6 = "0" means that the reference comes from inputs to the drive.
Bit 6 = "1" means that the reference comes from DeviceNet.
Bit 7, At reference:
Bit 7 = "0" means that the motor is running, but that the present speed is different from the preset
speed reference, i.e. the speed is being ramped up/down during start/stop.
Bit 7 = "1" means that the drive and reference speeds are equal.
4
Bit 8 - 15, State attribute:
(Instance 71 only)
Represents the state attribute of the drive, as
indicated in the table to the right:
For more detail of the actual output speed, see the section
20/70 and 21/71
.
Bit Number
8 (Vendor specific)
9 Start up
10 Not ready
11 Ready
12 Enabled
13 Stopping
14 Fault stop
15 Faulted
Meaning
Actual Output Speed under Instances
30
MG.33.D3.02 - VLT® is a registered Danfoss trademark
Page 31

FC 100/ 200/ 300 DeviceNet 4. How to Control the Frequency Converter
4.4.3. Bus Speed Reference Value under Instances 20/70 and 21/71
The speed reference value is transmitted to
the frequency converter in the form of a 16bit word. The value is transmitted as a whole
number. Negative figures are formatted by
means of 2’s complement.
The bus speed reference has the following format:
Par. 3-00 = "0" [ref
MIN
-> ref
] 0 (0000 Hex) [RPM] =>+ 32767 (7FFF Hex) [RPM]
MAX
4
Par. 3-00 = "1" [-ref
The actual reference [Ref. %] in the frequency converter depends on the settings in the following
parameters:
Par. 1-23
Par. 1-25
Par. 3-03
Note that if the bus speed reference is negative, and the control word contains a run reverse
signal, the drive will run clockwise (- - is +).
Example:
Par. 1-25
Par. 1-23
Par. 3-03
In order to run the motor at 25%, the reference transmitted must be: (1420*0,25) = 355 =
163hex
163hex => 25% => Fout = 12,5Hz
Motor Frequency
Motor Nominal Speed
Maximum Reference
Motor Nominal Speed
Motor Frequency
Maximum Reference
-> +ref
MAX
= 50 Hz
] -32767 (8001 Hex ) =>+32767 [RPM] (7FFF Hex)
MAX
= 1420 RPM
= 1420 RPM
4.4.4. Actual Output Speed under Instances 20/70 and 21/71
The value of the actual speed of the motor is transmitted in the form of a 16-bit word. The value
is transmitted as a whole number. Negative figures are formed by means of 2’s complement.
The actual speed value has the following format:
-32767 (8000 Hex) [RPM] -> +32767 [RPM] (7FFF Hex) [RPM]
MG.33.D3.02 - VLT® is a registered Danfoss trademark
31
Page 32

4
4. How to Control the Frequency Converter FC 100/ 200/ 300 DeviceNet
4.5. Danfoss FC Control Profile
4.5.1. Control Word under Instances 100/150 and 101/151
To select FC protocol in the control word, par.
Control Word Profile
8-10
protocol [0]. The control word is used to send
commands from a master (PLC or PC) to a
slave (frequency converter).
The control word in Instances 100/101 is defined as follows to the right:
must be set to FC
Bit Bit value = 0 Bit value = 1
00 Reference value External selection lsb
01 Reference value External selection msb
02 DC brake Ramp
03 Coasting No coasting
04 Quick stop Ramp
05 Hold output frequency Use ramp
06 Ramp stop Start
07 No function Reset
08 No function Jog
09 Ramp 1 Ramp 2
10 Data invalid Data valid
11 No function Relay 01 active
12 No function Relay 04 active
13 Parameter set-up Selection lsb
14 Parameter set-up Selection msb
15 No function Reverse
Explanation of the Control Bits:
Bits 00/01
Bits 00 and 01 are used to choose between the four reference values, which are pre-programmed
in par. 3-10
Preset Reference
according to the table to the right:
Program-
Parameter
Bit 01 Bit 00
med ref.
value
1 3-10 [0] 0 0
2 3-10 [1] 0 1
3 3-10 [2] 1 0
4 3-10 [3] 1 1
NB!
In par. 8-56
Preset Reference Select
a selection is made to define how Bit 00/01
gates with the corresponding function on the digital inputs.
32
MG.33.D3.02 - VLT® is a registered Danfoss trademark
Page 33

FC 100/ 200/ 300 DeviceNet 4. How to Control the Frequency Converter
Bit 02, DC brake:
Bit 02 = ’0’ leads to DC braking and stop. Braking current and duration are set in par. 2-01
Brake Current
Bit 02 = ’1’ leads to ramping.
Bit 03, Coasting:
Bit 03 = ’0’ causes the frequency converter to immediately "let go" of the motor (the output
transistors are "shut off"), so that it coasts to a standstill.
Bit 03 = ’1’ enables the frequency converter to start the motor if the other starting conditions have
been fulfilled.
Bit 04, Quick stop:
Bit 04 = ’0’ causes a stop, in which the motor speed is ramped down to stop via par. 3-81
and 2-02
NB!
In par. 8-50
corresponding function on a digital input.
Stop Ramp Time
.
DC Braking Time
Coasting Select
.
a selection is made to define how Bit 03 gates with the
DC
Quick
4
Bit 05, Hold output frequency:
Bit 05 = ’0’ causes the present output frequency (in Hz) to freeze. The frozen output frequency
can then be changed only by means of the digital inputs (parameters 5-10 to 5-15) programmed
to Speed up and Speed down.
NB!
If Hold output is active, only the following can stop the frequency converter:
• Bit 03 Coasting stop
•Bit 02 DC braking
• Digital input (parameters 5-10 to 5-15) programmed to DC braking, Coasting stop or Reset and coasting stop.
Bit 06, Ramp stop/start:
Bit 06 = ’0’ causes a stop, in which the motor
speed is ramped down to stop via the selected
ramp down
parameter.
NB!
In par. 8-53
gates with the corresponding function on a digital input.
Start Select
a selection is made to define how Bit 06 Ramp stop/start
Bit 06 = ’1’ permits the frequency converter to
start the motor, if the other starting conditions
have been fulfilled.
Bit 07, Reset:
Bit 07 = ’0’ does not cause a reset.
Bit 07 = ’1’ causes the reset of a trip. Reset is activated on the leading edge of the signal, i.e.
when changing from logic ’0’ to logic ’1’.
Bit 08, Jog:
Bit 08 = ’1’ causes the output frequency to be determined by par. 3-19
MG.33.D3.02 - VLT® is a registered Danfoss trademark
Jog Speed
.
33
Page 34

4. How to Control the Frequency Converter FC 100/ 200/ 300 DeviceNet
Bit 09, Selection of ramp 1/2:
Bit 09 = "0" means that ramp 1 is active (parameters 3-40 to 3-47).
Bit 09 = "1" means that ramp 2 (parameters 3-50 to 3-57) is active.
4
Bit 10, Data not valid/Data valid:
Is used to tell the frequency converter whether the control word is to be used or ignored.
Bit 10 = ’0’ causes the control word to be ignored, Bit 10 = ’1’ causes the control word to
be used. This function is relevant, because the
control word is always contained in the telegram, regardless of which type of telegram is
used, i.e. it is possible to turn off the control
word if you do not wish to use it in connection
with updating or reading parameters.
Bit 11, Relay 01:
Bit 11 = "0" Relay not activated.
Bit 11 = "1" Relay 01 activated, provided Control word bit 11 has been chosen in par. 5-40
Function Relay
Bit 12, Relay 04:
Bit 12 = "0" Relay 04 has not been activated.
Bit 12 = "1" Relay 04 has been activated, provided Control word bit 12 has been chosen in
par. 5-40
.
Function Relay
.
Set-up
1 0 0
2 0 1
3 1 0
4 1 1
Bit 14 Bit 13
Bit 13/14, Selection of set-up:
Bits 13 and 14 are used to choose from the
four menu set-ups according to the table to
the right:
The function is only possible when Multi-Set-ups is selected in par. 0-10
NB!
In par. 8-55
the corresponding function on the digital inputs.
Bit 15 Reverse:
Bit 15 = ’0’ causes no reversing.
Bit 15 = ’1’ causes reversing.
Set-up Select
a selection is made to define how Bits 13/14 gate with
Active Set-up
.
34
MG.33.D3.02 - VLT® is a registered Danfoss trademark
Page 35

FC 100/ 200/ 300 DeviceNet 4. How to Control the Frequency Converter
4.5.2. Status Word under Instances 100/150 and 101/151
The status word in Instance 150/151 is defined as follows to the right:
Bit Bit = 0 Bit = 1
00 Control not ready Control ready
01 Drive not ready Drive ready
02 Coasting Enable
03 No error Trip
04 No error Error (no trip)
05 Reserved 06 No error Trip lock
07 No warning Warning
08 Speed ≠ reference Speed = reference
09 Local operation Bus control
10 Out of frequency limit Frequency limit ok
11 No operation In operation
12 Drive ok Stopped, auto start
13 Voltage ok Voltage exceeded
14 Torque ok Torque exceeded
15 Timer ok Timer exceeded
4
Explanation of the Statur Bits:
Bit 00, Control not ready/ready:
Bit 00 = ’0’ means that the frequency converter has tripped.
Bit 00 = ’1’ means that the frequency converter controls are ready, but that the power component
is not necessarily receiving any power supply (in case of external 24 V supply to controls).
Bit 01, Drive ready:
Bit 01 = ’1’. The frequency converter is ready for operation, but there is an active coasting command via the digital inputs or via serial communication.
Bit 02, Coasting stop:
Bit 02 = ’0’. The frequency converter has released the motor.
Bit 02 = ’1’. The frequency converter can start the motor when a start command is given.
Bit 03, No error/trip:
Bit 03 = ’0’ means that the frequency converter is not in fault mode.
Bit 03 = ’1’ means that the frequency converter is tripped, and that a reset signal is required to
re-establish operation.
Bit 04, No error/error (no trip):
Bit 04 = ’0’ means that the frequency converter is not in fault mode.
Bit 04 = “1” means that there is a frequency converter error but no trip.
Bit 05, Not used:
Bit 05 is not used in the status word.
Bit 06, No error / trip lock:
Bit 06 = ’0’ means that the frequency converter is not in fault mode.
Bit 06 = “1” means that the frequency converter is tripped, and locked.
Bit 07, No warning/warning:
Bit 07 = ’0’ means that there are no warnings.
MG.33.D3.02 - VLT® is a registered Danfoss trademark
35
Page 36

4
4. How to Control the Frequency Converter FC 100/ 200/ 300 DeviceNet
Bit 07 = ’1’ means that a warning has occurred.
Bit 08, Speed ≠ reference/speed = reference:
Bit 08 = ’0’ means that the motor is running, but that the present speed is different from the
preset speed reference. It might, for example, be the case while the speed is being ramped up/
down during start/stop.
Bit 08 = ’1’ means that the present motor present speed matches the preset speed reference.
Bit 09, Local operation/bus control:
Bit 09 = ’0’ means that [STOP/RESET] is activated on the control unit, or that Local control in par.
3-13
Reference site
communication.
Bit 09 = ’1’ means that it is possible to control the frequency converter via the fieldbus/ serial
communication.
Bit 10, Out of frequency limit:
Bit 10 = ’0’, if the output frequency has reached the value in par. 4-11
par. 4-13
Bit 10 = "1" means that the output frequency is within the defined limits.
Motor Speed High Limit
is selected. It is not possible to control the frequency converter via serial
Motor Speed Low Limit
.
or
Bit 11, No operation/in operation:
Bit 11 = ’0’ means that the motor is not running.
Bit 11 = ’1’ means that the frequency converter has a start signal or that the output frequency is
greater than 0 Hz.
Bit 12, Drive OK/stopped, auto start:
Bit 12 = ’0’ means that there is no temporary over temperature on the inverter.
Bit 12 = ’1’ means that the inverter has stopped because of over temperature, but that the unit
has not tripped and will resume operation once the over temperature stops.
Bit 13, Voltage OK/limit exceeded:
Bit 13 = ’0’ means that there are no voltage warnings.
Bit 13 = ’1’ means that the DC voltage in the frequency converter’s intermediate circuit is too low
or too high.
Bit 14, Torque OK/limit exceeded:
Bit 14 = ’0’ means that the motor current is lower than the torque limit selected in par. 4-16
Torque Limit Motor Mode
Bit 14 = ’1’ means that the torque limit in par. 4-16 and 4-17 has been exceeded.
Bit 15, Timer OK/limit exceeded:
Bit 15 = ’0’ means that the timers for motor thermal protection and VLT thermal protection, respectively, have not exceeded 100%.
Bit 15 = ’1’ means that one of the timers has exceeded 100%.
or par. 4-17
Torque Limit Generator Mode
.
36
MG.33.D3.02 - VLT® is a registered Danfoss trademark
Page 37

FC 100/ 200/ 300 DeviceNet 4. How to Control the Frequency Converter
4.5.3. Bus Reference Value under Instances 100/150 and 101/151
The frequency reference value is transmitted
to the frequency converter in the form of a 16bit word. The value is transmitted as a whole
number (-32767 to 32767). Negative figures
are formatted by means of 2’s complement.
The bus reference has the following format:
100% = 4000 Hex
Par. 3-00 = "0" ["ref
Par. 3-00 = "1" [- ref
+100%
MIN
MAX
-> ref
-> + ref
"] 0 -> 16384 (4000 Hex) ~ 0 -> 100%
MAX
] -16384 (C000 Hex) -> +16384 (4000 Hex) ~ -100% ->
MAX
Master slave→ 16 bit
CTW Speed ref. RPM
4.5.4. Actual Output Frequency under Instances 100/150 and
101/151
The value of the actual output frequency of
the frequency converter is transmitted in the
form of a 16-bit word. The value is transmitted
as a whole number (-32767 -> 32767) Negative figures are formed by means of 2’s complement.
Slave master→ 16 bit
STW Actual ref. RPM
4
The actual output frequency has the following format:
-32767 ->+32767.
-16384 (C000 Hex) corresponds to -100%, and 16384 (4000 Hex) corresponds to 100%.
MG.33.D3.02 - VLT® is a registered Danfoss trademark
37
Page 38

5
5. How to Access the Parameters FC 100/ 200/ 300 DeviceNet
38
MG.33.D3.02 - VLT® is a registered Danfoss trademark
Page 39

FC 100/ 200/ 300 DeviceNet 5. How to Access the Parameters
5. How to Access the Parameters
5.1. Explicit Messages
DeviceNet is based on the CAN protocol. This means that every message contains an 11-bit CAN
identifier field to define the connection ID. These CAN identifiers are also used to determine access
priority.
The MAC ID is stored in the header of the message, which is split into four different message
groups.
10
9 8 7 6 5 4 3 2 1 0 Identifier bits
0 Group 1 ID Source MAC ID Message Group 1
1 0 MAC ID Group 2 ID Message Group 2
1 1 Group 3 iD Source MAC ID Message Group 3
1 1 1 1 1 Group 4 ID Message Group 4
1 1 1 1 1 1 1 X X X X Invalid Can Identifiers
5
FC 100, 200 and 300 parameters can be accessed by the Standard DeviceNet service Explicit
Message. Two classes of explicit messages are supported: Message group 2: Explicit messages
take place via pre-defined master/slave connections. Message group 3: Explicit messages take
place via dynamically established lower prioritized connections.
5.2. Object Classes
The following Standard DeviceNet objects can be accessed:
Class ID 01h Identity Object Class ID 10h Parameter Group Object
Class ID 03h DeviceNet Object Class ID 28h Motor Data Object
Class ID 04h Assembly Object Class ID 29h Control Supervisory Object
Class ID 05h Connection Object Class ID 2Ah AC/DC Drive Object
Class ID 0Fh Parameter Object Class ID 2Bh Acknowledge Handler Object
The following DeviceNet Vendor Specific Objects are also available:
Class ID 100d to 119d Danfoss Classes.
The above Object classes are described in the following sections:
Danfoss Object Classes
.
5.3. DeviceNet Object Classes
DeviceNet Object Classes
and
5.3.1. Class ID 01h Identity Object
This is a standard DeviceNet Object for identification of the device (frequency converter). The
Heartbeat Interval can be set in this Object. The attributes supported for this class are listed below.
MG.33.D3.02 - VLT® is a registered Danfoss trademark
39
Page 40

5. How to Access the Parameters FC 100/ 200/ 300 DeviceNet
5.3.2. Class ID 0x01
5
Attribute
1 Get Vendor USINT 97 Danfoss Drives
2 Get Device
3 Get Product
4 Get Revision UNIT Software version
5 Get Status UNIT
6 Get Serial
7 Get Product
10 Get/Set Heartbeat
Access Name Data
type
UNIT 2 AD/DC Motor
Type
UNIT 100 See EDS File Sec-
Code
UDINT From frequency
Number
String FC 100, 200 or
Name
USINT 0-255 sec 0 Off
Interval
Min/
Max
5.3.3. Class ID 03h DeviceNet Object
This is a standard DeviceNet Object for configuration and status of the DeviceNet connection.
The attributes supported for this class are listed below.
Units Default Description
Vendor Code
tion
on FC 100, 200
or 300
converter
300
5.3.4. Class ID 0x03
Attribute
1 Get/Set MAC ID USINT 0-63 63 Node address
2 Get/Set Baud Rate USINT 0-2 0 0=125
4 Get BOC Bus-Off Counter
5 Get Allocate
6 Get MAC ID
7 Get Baud rate
Access Name Data
information
Switch
changed
switched
from last
power up
Min/
type
BOOL 0-1 0 The node ad-
BOOL 0-1 0 The baud rate
Max
Units Default Description
1=250
2=500
Only required if
predefined Master/Slave is implemented
dress switch has
changed since
the last powerup/reset
switch has
changed since
the last powerup
40
MG.33.D3.02 - VLT® is a registered Danfoss trademark
Page 41

FC 100/ 200/ 300 DeviceNet 5. How to Access the Parameters
5.3.5. Class ID 04h Assembly Object
This is a standard DeviceNet Object for transfer of the I/O Instances (Process Data) described in
the section “How to control the Frequency Converter”. Using this it is possible to send or read any
of the defined Instances, either by polling or explicit messaging.
The attributes supported for this class are listed below.
5.3.6. Class ID 0x04
Attribute
3 Set Data ARRAY
Instance
20 Set 2 Words DeviceNet AC/DC Profile Instance 20/70
21 Set 2 Words DeviceNet AC/DC Profile Instance 21/71
70 Get 2 Words DeviceNet AC/DC Profile Instance 20/70
71 Get 2 Words DeviceNet AC/DC Profile Instance 21/71
100 Set 2 Words Danfoss specific, no PCD
101 Set 4 Words Danfoss specific, 2 PCD Words Instance 101/151
150 Get 2 Words Danfoss specific, no PCD
151 Get 4 Words Danfoss specific, 2 PCD Words Instance 101/151
Access Name Data
type
Access Size Description Parameters 10-10 selec-
Words
Words
Min/
Max
5.3.7. Class ID 05h Connection Object
This is a standard DeviceNet Object for allocation and managing I/O and explicit messaging connections. For this class three Instances are supported: Explicit Messages, Polled I/O and Change
of State connections.
Units Default Description
5
tion:
Instance 100/150
Instance 100/150
The attributes supported for the different instances are listed below.
MG.33.D3.02 - VLT® is a registered Danfoss trademark
41
Page 42

5. How to Access the Parameters FC 100/ 200/ 300 DeviceNet
5.3.8. Instance 1 Attributes: Explicit Message Instance
5
Attribute
1 Get State USINT State of the object
2 Get Instance
3 Get Transport
4 Get Produced
5 Get Consumed
6 Get Initial
7 Get Produced
8 Get Consumed
9 Get/Set Expected
12 Get Watchdog
13 Get Produced
14 Get Produced
15 Get Consumd
16 Get Consumed
17 Get Production
Access Name Data
type
USINT Indicates either I/O or Explicit Message
Type
USINT Defines behaviour of the connection
Class Trigger
UINT CAN Identifier Field when the connection transConnection ID
UINT CAN Identifier Field value that denotes message
Connection ID
USINT Defines the message group(s) across which proCommunication
Characteristics
UINT Maximum number of bytes transmitted across
Connectin
size
UINT Maximum number of bytes received across this
Connection size
UINT Defines value used in Transmission Trigger TimPackage
Rate
USINT Defines how to handle Inactivity/Watchdog
timeout
action
UINT Number of Bytes in the produced connection
Connection Path
Length
Array of
Connectino Path
Connection Path
Length
Connection Path
Inhibit
Time
USINT
UINT Number of bytes in the consumed connection
Array of
USINT
UINT Defines minimum time between new data pro-
Description
mits
to be received
ductions and consumptions associated with this
connection occur
this connection
connection
er and Inactivity/Watchdog timer
timeout
path attribute
Specifies the Application object(s) whose data is
to be produced by these Connection Objects
path attribute
Specifies the Application object(s) that are to receive the data consumed by this Connection object
ductin. This attribute is required for I/O Client
connection.
42
MG.33.D3.02 - VLT® is a registered Danfoss trademark
Page 43

FC 100/ 200/ 300 DeviceNet 5. How to Access the Parameters
5.3.9. Instance 2 Attributes: Polled I/O
Attribute
1 Get State USINT State of the object
2 Get Instance
3 Get Transport
4 Get Produced
5 Get Consumed
6 Get Initial
7 Get Produced
8 Get Consumed
9 Get/Set Expected
12 Get Watchdog
13 Get Produced
14 Get Produced
15 Get Consumd
16 Get Consumed
17 Get Production
Access Name Data
type
USINT Indicates either I/O or Explicit Message
Type
USINT Defines behaviour of the connection
Class Trigger
UINT CAN Identifier Field when the connection transConnection ID
UINT CAN Identifier Field value that denotes message
Connection ID
USINT Defines the message group(s) across which proCommunication
Characteristics
UINT Maximum number of bytes transmitted across
Connectin
size
UINT Maximum number of bytes received across this
Connection size
UINT Defines value used in Transmission Trigger TimPackage
Rate
USINT Defines how to handle Inactivity/Watchdog
timeout
action
UINT Number of Bytes in the produced connection
Connection Path
Length
Array of
Connectino Path
Connection Path
Length
Connection Path
Inhibit
Time
USINT
UINT Number of bytes in the consumed connection
Array of
USINT
UINT Defines minimum time between new data pro-
Description
mits
to be received
ductions and consumptions associated with this
connection occur
this connection
connection
er and Inactivity/Watchdog timer
timeout
path attribute
Specifies the Application object(s) whose data is
to be produced by these Connection Objects
path attribute
Specifies the Application object(s) that are to receive the data consumed by this Connection object
ductin. This attribute is required for I/O Client
connection.
5
MG.33.D3.02 - VLT® is a registered Danfoss trademark
43
Page 44

5. How to Access the Parameters FC 100/ 200/ 300 DeviceNet
5.3.10. Instance 4: Change of State/Cycle
5
Attribute
1 Get State USINT State of the object
2 Get Instance
3 Get Transport
4 Get Produced
5 Get Consumed
6 Get Initial
7 Get Produced
8 Get Consumed
9 Get/Set Expected
12 Get Watchdog
13 Get Produced
14 Get Produced
15 Get Consumd
16 Get Consumed
17 Get Production
Access Name Data
type
USINT Indicates either I/O or Explicit Message
Type
USINT Defines behaviour of the connection
Class Trigger
UINT CAN Identifier Field when the connection transConnection ID
UINT CAN Identifier Field value that denotes message
Connection ID
USINT Defines the message group(s) across which proCommunication
Characteristics
UINT Maximum number of bytes transmitted across
Connectin
size
UINT Maximum number of bytes received across this
Connection size
UINT Defines value used in Transmission Trigger TimPackage
Rate
USINT Defines how to handle Inactivity/Watchdog
timeout
action
UINT Number of Bytes in the produced connection
Connection Path
Length
Array of
Connectino Path
Connection Path
Length
Connection Path
Inhibit
Time
USINT
UINT Number of bytes in the consumed connection
Array of
USINT
UINT Defines minimum time between new data pro-
Description
mits
to be received
ductions and consumptions associated with this
connection occur
this connection
connection
er and Inactivity/Watchdog timer
timeout
path attribute
Specifies the Application object(s) whose data is
to be produced by these Connection Objects
path attribute
Specifies the Application object(s) that are to receive the data consumed by this Connection object
ductin. This attribute is required for I/O Client
connection.
5.3.11. Class ID 0F4 Parameter Object
This object is an interface to the parameters of the drive. It identifies configurable parameters
and supplies their description, including min. and max. values and a descriptive text.
44
MG.33.D3.02 - VLT® is a registered Danfoss trademark
Page 45

FC 100/ 200/ 300 DeviceNet 5. How to Access the Parameters
The attributes supported are listed below.
Attribute Access Stub/
1 Set/Get Stub Parameter value
2 Get Stub Link path size USINT Size of link path
3 Get Stub Link path ARRAY DeviceNet's path to parameter's origin
4 Get Stub Descriptor WORD Description of parameter
5 Get Stub Data type EPATH Data type code
6 Get Stub Data size USINT Number of bytes in parameter value
7 Get Full Parameter name
8 Get Full Units string SHORT
9 Get/Set Full Help string SHORT
10 Get Full Min value
11 Get Full Max value
12 Get Full Default value
13 Get Full Scaling multiplier UINT Multiplier for scaling factor
14 Get Full Scaling divisor UINT Divisor for scaling factor
15 Get Full Scaling base UINT Base for scaling formula
16 Get Full Scaling offset INT Offset for scaling formula
17 Get Full Multiplier link UINT Parameter instance of multiplier source
18 Get Full Divisor link UINT Parameter instance of divisor source
19 Get Full Base link UINT Parameter instance of base source
20 Get Full Offset link UINT Parameter instance of offset source
21 Get Full Decimal preci-
1
= Same data type as the parameter.
Full
Name Data type Description
1
Actual value of parameter
Human readable text string representing parameter name
Human readable text string representing parameter name
Human readable text string representing parameter name
1
Min valid value
1
Max valid value
1
Parameters default value
Segment type/
port
Segment Address
string
sion
Data type
BYTE
Path
SHORT
STRING
STRING
STRING
Data type
Data type
Data type
USINT Specifies parameter value format
5
MG.33.D3.02 - VLT® is a registered Danfoss trademark
45
Page 46

5. How to Access the Parameters FC 100/ 200/ 300 DeviceNet
5.3.12. Class ID 10h Parameter Group Object
This Object defines 14 parameter groups for all FC 100, 200 and 300 parameters. One Class
instance exists for each parameter group. A read out of an instance will contain the name of the
current parameter group.
5
In-
Group
stance
0 1 O P E R A T I O N D I S P L .
1 2 L O A D M O T O R
2 3 B R A K E S
3 4 R E F E R E N C E R A M P S
4 5 L I M I T S W A R N I N G S
5 6 D I G I T A L I N O U T
6 7 A N A L O G I N O U T
7 8 C O N T R O L L E R S
8 9 C O M M . A N D O P T I O N
9 10 C A N F I E L D B U S
10 11 S P E C I A L F U N C T I O N
Name (max. 16 characters)
46
MG.33.D3.02 - VLT® is a registered Danfoss trademark
Page 47

FC 100/ 200/ 300 DeviceNet 5. How to Access the Parameters
5.3.13. Class ID 28 Motor Data Object
In this object, the current motor data can be configured and read out. The Instances, attributes
and services supported for this class are listed below.
5.3.14. Class ID 0/28 Motor Data Object
Attrib-
Access Name Data
ute
3 Get/set Motor
6 Get/set Rated
7 Get/set Rated
8 Get/set Rated
9 Get/set Rated
12 Get/set Pole
15 Get/set Base
type
current
voltage
power
frequency
count
speed
Generic
type
maximum
values
USINT 7 7 7 = Squirrel Cage Induction Motor 1-11
UNIT 0-100.00 100mA Drive dependent Stator Current rating (from motor
UNIT 200-500 volt Drive dependent Base Voltage rating (from motor
UDINT 0-18500 Watt Drive dependent Power rating at rated frequency
UNIT 1-1000 Hz Drive dependent Elec. frequency rating (from motor
UINT Drive dependent Number of poles in the motor 1-39
UNIT 100-60000 RPM Drive dependent Nominal motor speed (from motor
Units Default Description Parameter
nameplate)
nameplate)
(from motor nameplate)
nameplate)
nameplate)
reference
1-24
1-22
1-20
1-23
1-25
5
MG.33.D3.02 - VLT® is a registered Danfoss trademark
47
Page 48

5. How to Access the Parameters FC 100/ 200/ 300 DeviceNet
5.3.15. Class ID 29h Control Supervisory Object
The Control Supervisory Object can be used for process control and monitoring of the frequency
converter, as an alternative to the I/O Instances defined in the section “How to control the Frequency Converter”.
The attributes supported for this class are listed below.
5.3.16. Class ID 0x29
5
Attribute Access Name Data type Min/
3 Get/Set Run 1 Bool 0-1 Run Fwd, see note below
4 Get/Set Run 2 Bool 0-1 Run rev, see note below
5 Get/Set NetCtrl Bool 0-1 1 0 = Local Control
6 Get State USINT 0-7 0 = Vendor specific
7 Get Running 1 Bool 0-1 0 0 = Other state
8 Get Running 2 Bool 0-1 0 0 = Other state
9 Get Ready Bool 0-1 0 = Other state
10 Get Fault Bool 0-1 0 0 = No Faults Present
12 Get/Set Fault Rst Bool 0-1 0 = No Action
13 Get Fault Code UINT
15 Get Ctrl From Net Bool 0-1 1 0 = Control is local
16 Get/Set DN Fault Mode UINT 0-2 1 Action on loss of DeviceNet
Max
Default Description
1 = Control from Network
1 = Start up
2 = Not ready
3 = Ready
4 = Enabled
5 = Stopping
6 = Fault stop
7 = Fault
1 = (Enable and Run 1)
or (Stopping and Running 1)
or (Fault Stop and Running 1)
1 = (Enable and Run 2)
or (Stopping and Running 2)
or (Fault Stop and Running 2)
1 = Ready or Enabled or Stopping
1 = Fault Occured (latched)
1 ->1 = Reset Fault
1 = Control is from Network
0 = Fault + Stop
1 = Ignore (Warning Optional)
2 = Danfoss specific
NB!
The ODVA drive profile selected in par. 10-10
Process Data Type Selection
able only when Instances 20/70 or 21/71 are selected.
is avail-
48
MG.33.D3.02 - VLT® is a registered Danfoss trademark
Page 49

FC 100/ 200/ 300 DeviceNet 5. How to Access the Parameters
The State – Transition diagram below shows how the frequency converter will respond to the
various command attributes associated with Class ID 0x29.
5
5.3.17. Class ID 2Ah AC/DC Drive Object
Use this object to set and read out a range of FC 100, 200 or 300 drive control and status information. The attributes supported for this class are listed below.
5.3.18. Class ID 0x2A
Attribute Access Name Data
3 Get At Reference Bool 0-1 0 = Drive not at reference
4 Get/Set Net REf Bool 0-1 1 0 = Set reference at non-DeviceNet refer-
6 Get/Set Drive Mode USINT 0-1 1 0 = Vendor specific mode
7 Get Speed Actual INT
8 Get/Set Speed Ref INT
22 Get/Set Speed Scale SINT -128-127 Speed scaling factor
29 Get Ref from Net Bool 0-1 0 = Local speed reference
type
Min/
Max
Default Description
1 = Drive at reference
ence
1 = Set reference at DeviceNet reference
1 = Open loop speed (Frequency)
RPM/2
RPM/2
Speed Scale
Speed Scale
2 = Closed loop speed control
Actual drive speed
(best approximation)
Speed reference
1 = DeviceNet speed reference
MG.33.D3.02 - VLT® is a registered Danfoss trademark
49
Page 50

5. How to Access the Parameters FC 100/ 200/ 300 DeviceNet
5.3.19. Class ID 2Bh (Acknowledge Handler Object)
Use this object to manage message reception acknowledgements, necessary for Change-Of-State
support.
The attributes supported for this class are listed below.
5.3.20. Class ID 0x2B
5
Attribute Access Name Data
1 Set ACK Timer UINT 0-65535 16 Time top wait for ACK before resending
2 Get/Set Retry Timer USINT 0-255 1 Number of ACK-timeouts to wait before
3 Get/Set COS UINT Connection instance ID
type
5.4. Danfoss Object Classes
Use the Danfoss classes for read and write of
all FC 100, 200 or 300 parameter values. For
each parameter group a corresponding object
Class is defined. The following table shows the
classes supported, and their relationship to
the FC 100, 200 and 300 parameters.
Instance Description
The Danfoss VLT DeviceNet uses Instance 1
only; so always leave this at the value of 1.
Attribute Description
The attributes for the FC 100, 200 or 300 parameter are the last 2 (two) digits of the parameter + 100.
Min/
Max
Default Description
producing.
RetryLimit_Reache event.
Danfoss Classes
Parameter range Class
Parameter 0-00 - 0-99 Class 100
Parameter 1-00 - 1-99 Class 101
Parameter 2-00 - 2-99 Class 102
Parameter 3-00 - 3-99 Class 103
Parameter 4-00 - 4-99 Class 104
Parameter 5-00 - 5-99 Class 105
Parameter 6-00 - 6-99 Class 106
Parameter 7-00 - 7-99 Class 107
Parameter 8-00 - 8-99 Class 108
Parameter 10-00 - 10-99 Class 110
Parameter 11-00 - 11-99 Class 111
Parameter 13-00 - 13-99 Class 113
Parameter 14-00 - 14-99 Class 114
Parameter 15-00 - 15-99 Class 115
Parameter 16-00 - 16-99 Class 116
5.4.1. Example
To read from par. 16-62
the class, instance and attribute must be set
as shown in the table to the right:
50
MG.33.D3.02 - VLT® is a registered Danfoss trademark
Analogue Input 53
,
Class
116 1 162
Instance Attribute
Page 51

FC 100/ 200/ 300 DeviceNet 5. How to Access the Parameters
5.5. Reading/Writing to Parameters with Index
Indexed parameters such as 10-11 or 10-12 need special handling since DeviceNet does not support indexed addressing. The way to handle this in the frequency converter is to use par. 10-30
Parameter Data Types
write of an indexed parameter.
NB!
If two masters access this feature at the same time, incorrect data may be generated.
, which serves as an index pointer. Set up the pointer before each read/
5.5.1. Example
Write 16-10 in index 2 in par. 10-12
First, set up the index pointer in par. 10-30
Array Index
The next step is to write the data (in this example 16-10) to par. 10-12.
. In this example index 2:
Process Data Config Read
Class Instance Attribute Value
110 Dec 1 Dec 130 Dec 2 Dec
6E Hex 1 Hex 82 Hex 2 Hex
Class Instance Attribute Value
110 Dec 1 Dec 112 Dec 1610 Dec
6E Hex 1 Hex 70 Hex 64A Hex
5
.
MG.33.D3.02 - VLT® is a registered Danfoss trademark
51
Page 52

6
6. Parameters FC 100/ 200/ 300 DeviceNet
52
MG.33.D3.02 - VLT® is a registered Danfoss trademark
Page 53

FC 100/ 200/ 300 DeviceNet 6. Parameters
6. Parameters
8-01 Control Site
Option: Function:
[0]
[1] Digital only Control by using digital inputs only.
[2] Control word only Control by using control word only.
The setting in this parameter overrides the settings in par. 8-50 to 8-56.
8-02 Control Word Source
Option: Function:
[0] None
[1] FC RS485
[2] FC USB
[3] Option A
[4] Option B
[5] Option C0
[6] Option C1
[30] External Can Select the source of the control word: one of two serial interfa-
Digital and ctrl. word Control by using both digital input and control word.
*
ces or four installed options. During initial power-up, the frequency converter automatically sets this parameter to
A
[3] if it detects a valid fieldbus option installed in slot A. If the
option is removed, the frequency converter detects a change in
the configuration, sets par. 8-02 back to default setting
RS485
, and the frequency converter then trips. If an option is
installed after initial power-up, the setting of par. 8-02 will not
change but the frequency converter will trip and display: Alarm
Option Changed
67
This parameter cannot be adjusted while the motor is running.
.
Option
FC
6
8-03 Control Word Timeout Time
Range: Function:
1.0s
8-04 Control Word Timeout Function
Option: Function:
[0]
[1] Freeze Output
[2] Stop
[0.1 - 18000.0 s] Enter the maximum time expected to pass between the recep-
*
tion of two consecutive telegrams. If this time is exceeded, it
indicates that the serial communication has stopped. The function selected in par. 8-04
then be carried out. The time-out counter is triggered by a valid
control word.
Off
*
MG.33.D3.02 - VLT® is a registered Danfoss trademark
Control Word Time-out Function
will
53
Page 54

6
6. Parameters FC 100/ 200/ 300 DeviceNet
[3] Jogging
[4] Max. Speed
[5] Stop and trip
[7] Select set-up 1
[8] Select set-up 2
[9] Select set-up 3
[10] Select set-up 4 Select the time-out function. The time-out function activates
when the control word fails to be updated within the time period
specified in par. 8-03
Off
-
-
-
-
-
-
-
[0]: Resume control via serial bus (Fieldbus or
standard) using the most recent control word.
Freeze output
munication resumes.
Stop
[2]: Stop with auto restart when communication
resumes.
Jogging
communication resumes.
Max. freq.
until communication resumes.
[3]: Run the motor at JOG frequency until
[4]: Run the motor at maximum frequency
Stop and trip
quency converter in order to restart: via the fieldbus,
via the reset button on the LCP or via a digital input.
Select set-up 1-4
set-up upon reestablishment of communication following a control word time-out. If communication resumes
causing the time-out situation to disappear, par. 8-05
End-of-time-out Function
the set-up used before the time-out or to retain the
set-up endorsed by the time-out function. Note the
following configuration required in order to change the
set-up after a time-out: Set Par. 0-10
Multi set-up
This Set-up Linked To
0-12
Control Word Time-out Time
[1]: Freeze output frequency until com-
[5]: Stop the motor, then reset the fre-
[7] - [10]: This option changes the
defines whether to resume
[9], and select the relevant link in par.
.
.
Active set-up to
8-05 End-of-Timeout Function
Option: Function:
Select the action after receiving a valid control word following a
time-out. This parameter is active only when par. 8-04 is set to
[Set-up 1-4].
[0] Hold set-up Retains the set-up selected in par. 8-04 and displays a warning,
until par. 8-06 toggles. Then the frequency converter resumes
its original set-up.
Resume set-up Resumes the set-up active prior to the time-out.
*
[1]
8-06 Reset Control Word Timeout
Option: Function:
*
Do not reset
[0]
54
MG.33.D3.02 - VLT® is a registered Danfoss trademark
Page 55

FC 100/ 200/ 300 DeviceNet 6. Parameters
[1] Do reset Select
8-07 Diagnosis Trigger
Option: Function:
*
*
Disable
FC profile
[0]
[1] Trigger on alarms
[2] Trigger alarms/warn. This parameter has no function for DeviceNet.
8-10 Control Word Profile
Option: Function:
[0]
[5] ODVA When this parameter is set to [0] FC profile, Instances 100/150
Do reset
original set-up following a control word time-out. When the value is set to
reset and then immediately reverts to the
ting.
Select
Do not reset
Select setup 1-4
This parameter is active only when
selected in par. 8-05
and 101/151 are selectable in par. 10-10.
When [3] ODVA profile is selected, Instances 20/70 and 21/71
are selectable in par. 10-10.
[1] to return the frequency converter to the
Do reset
[1], the frequency converter performs the
Do not reset
[0] to retain the set-up specified in par. 8-04,
following a control word time-out.
Hold set-up
End-of-Time-out Function
[0] has been
.
[0] set-
6
8-50 Coasting Select
Option: Function:
Select control of the coasting function via the terminals (digital
input) and/or via the bus.
[0] Digital input
[1] Bus
[2] Logic AND
Logic OR
*
[3]
NB!
This parameter is active only when par. 8-01
control word
8-51 Quick Stop Select
Option: Function:
[0] Digital input
[1] Bus
[2] Logic AND
Logic OR Select control of the Quick Stop function via the terminals (dig-
*
[3]
.
ital input) and/or via the bus.
Control Site
is set to [0]
Digital and
MG.33.D3.02 - VLT® is a registered Danfoss trademark
55
Page 56

6
6. Parameters FC 100/ 200/ 300 DeviceNet
NB!
Con-
.
Digital and
8-52 DC Brake Select
Option: Function:
Select control of the DC brake via the terminals (digital input)
and/or via the fieldbus.
[0] Digital input
[1] Bus
[2] Logic AND
Logic OR
*
[3]
NB!
This parameter is active only when par. 8-01
control word
.
This parameter is active only when par. 8-01
trol Site
is set to [0]
Control Site
Digital and control word
is set to [0]
8-53 Start Select
Option: Function:
Select control of the frequency converter start function via the
terminals (digital input) and/or via the fieldbus.
[0] Digital input
[1] Bus Activates Start command via the serial communication port or
fieldbus option.
[2] Logic AND Activates Start command via the fieldbus/serial communication
port, AND additionally via one of the digital inputs.
Logic OR Activates Start command via the fieldbus/serial communication
*
[3]
port OR via one of the digital inputs.
NB!
This parameter is active only when par. 8-01
control word
8-54 Reversing Select
Option: Function:
[0] Digital input
[1] Bus
[2] Logic AND
Logic OR Select control of the frequency converter reverse function via
*
[3]
.
the terminals (digital input) and/or via the fieldbus.
Bus
Select
communication port or fieldbus option.
Control Site
[1], to activate the Reverse command via the serial
is set to [0]
Digital and
56
MG.33.D3.02 - VLT® is a registered Danfoss trademark
Page 57

FC 100/ 200/ 300 DeviceNet 6. Parameters
Select
Logic AND
fieldbus/serial communication port, AND additionally via one of
the digital inputs.
Logic OR
Select
fieldbus/serial communication port OR via one of the digital inputs.
8-55 Set-up Select
Option: Function:
Select control of the frequency converter set-up selection via
the terminals (digital input) and/or via the fieldbus.
[0] Digital input
[1] Bus Activates the set-up selection via the serial communication port
or fieldbus option.
[2] to activate the Reverse command via the
[3] to activate the Reverse command via the
NB!
This parameter is active only when par. 8-01
trol Site
is set to [0]
Digital and control word
Con-
.
6
[2] Logic AND Activates the set-up selection via the fieldbus/serial communi-
cation port, AND additionally via one of the digital inputs.
Logic OR Activate the set-up selection via the fieldbus/serial communica-
*
[3]
tion port OR via one of the digital inputs.
NB!
This parameter is active only when par. 8-01
control word
8-56 Preset Reference Select
Option: Function:
[0] Digital input
[1] Bus Activates Preset Reference selection via the serial communica-
[2] Logic AND Activates Preset Reference selection via the fieldbus/serial com-
.
Select control of the frequency converter Preset Reference selection via the terminals (digital input) and/or via the fieldbus.
tion port or fieldbus option.
munication port, AND additionally via one of the digital inputs.
Control Site
is set to [0]
Digital and
[3]
Logic OR Activates the Preset Reference selection via the fieldbus/serial
*
communication port OR via one of the digital inputs.
NB!
This parameter is active only when par. 8-01
control word
MG.33.D3.02 - VLT® is a registered Danfoss trademark
.
Control Site
is set to [0]
Digital and
57
Page 58

6
6. Parameters FC 100/ 200/ 300 DeviceNet
8-90 Bus Jog 1 Speed
Range: Function:
100
RPM
8-91 Bus Jog 2 Speed
Range: Function:
200
RPM
10-00 CAN Protocol
Option: Function:
[0] CANopen
[1]
[0 - par. 4-13 RPM] Enter the jog speed. This is a fixed jog speed activated via the
*
[0 - par. 4-13 RPM] Enter the jog speed. This is a fixed jog speed activated via the
*
DeviceNet View the active CAN protocol.
*
serial port or fieldbus option.
serial port or fieldbus option.
NB!
The options depend on installed option.
10-01 Baud Rate Select
Option: Function:
[16] 10 Kbps
[17] 20 Kbps
[18]
[19]
[20]
[21] 250 Kbps
[22] 500 Kbps Select the fieldbus transmission speed. The selection must cor-
10-02 MAC ID
Range: Function:
63
10-05 Readout Transmit Error Counter
Range: Function:
0
*
50 Kbps
100 Kbps
125 Kbps
*
respond to the transmission speed of the master and the other
fieldbus nodes.
[0 - 127 ] Selection of station address. Every station connected to the
*
same DeviceNet network must have an unambiguous address.
[0 - 255] View the number of CAN control transmission errors since the
last power-up.
58
MG.33.D3.02 - VLT® is a registered Danfoss trademark
Page 59

FC 100/ 200/ 300 DeviceNet 6. Parameters
10-06 Readout Receive Error Counter
Option: Function:
[0] 0 - 255 View the number of CAN control receipt errors since the last
power-up.
10-07 Readout Bus Off Counter
Range: Function:
0
*
10-10 Process Data Type Selection
Option: Function:
[0 - 255] View the number of Bus Off events since the last power-up.
Select the Instance (telegram) for data transmission. The Instances available are dependent upon the setting of par. 8-10
Control Word Profile
When par. 8-10 is set to [0]
and [1] are available.
When par. 8-10 is set to [5]
[3] are available.
Instances 100/150 and 101/151 are Danfoss-specific. Instances
20/70 and 21/71 are ODVA-specific AC Drive profiles.
For guidelines in telegram selection, please refer to the DeviceNet Operating Instructions.
Note that a change to this parameter will be executed immediately.
.
FC profile
ODVA
, par. 10-10 options [0]
, par. 10-10 options [2] and
6
[0] Instance 100/150
[1] Instance 101/151
[2] Instance 20/70
[3] Instance 21/71
10-11 Process Data Config Write
Option: Function:
[0 ]
None
*
3-02 Minimum reference
3-03 Maximum reference
3-12 Catch up/slow
down value
3-41 Ramp 1 ramp up
time
3-42 Ramp 1 ramp
down time
3-51 Ramp 2 ramp up
time
3-52 Ramp 2 ramp
down time
3-80 Jog ramp time
3-81 Quick stop ramp
time
MG.33.D3.02 - VLT® is a registered Danfoss trademark
59
Page 60

6
6. Parameters FC 100/ 200/ 300 DeviceNet
4-11 Motor speed low
limit (RPM)
4-13 Motor speed
high limit (RPM)
4-16 Torque limit motor mode
4-17 Torque limit
generator mode
7-28 Minimum Feedback
7-29 Maximum Feedback
8-90 Bus Jog 1 Speed
8-91 Bus Jog 2 Speed
16-80 Fieldbus CTW 1
(Fixed)
16-82 Fieldbus REF 1
(Fixed)
34-01 PCD 1 Write to
MCO
34-02 PCD 2 Write to
MCO
34-03 PCD 3 Write to
MCO
34-04 PCD 4 Write to
MCO
34-05 PCD 5 Write to
MCO
34-06 PCD 6 Write to
MCO
34-07 PCD 7 Write to
MCO
34-08 PCD 8 Write to
MCO
34-09 PCD 9 Write to
MCO
34-10 PCD 10 Write to
MCO
Select the process write data for I/O Assembly Instances
101/151. Elements [2] and [3] of this array can be selected.
Elements [0] and [1] of the array are fixed.
10-12 Process Data Config Read
Option: Function:
None
16-00 Control Word
16-01 Reference
[Unit]
16-02 Reference %
16-03 Status Word
(Fixed)
60
MG.33.D3.02 - VLT® is a registered Danfoss trademark
Page 61

FC 100/ 200/ 300 DeviceNet 6. Parameters
16-04 Main Actual
Value [Unit]
16-05 Main Actual
Value (%) (Fixed)
16-10 Power [kW]
16-11 Power [hp]
16-12 Motor Voltage
16-13 Frequency
16-14 Motor Current
16-16 Torque
16-17 Speed [RPM]
16-18 Motor Thermal
16-19 KTY Sensor
Temperature
16-21 Phase Angle
16-30 DC Link Voltage
16-32 BrakeEnergy/s
16-33 BrakeEnergy/2
min
16-34 Heatsink Temp.
16-35 Inverter Thermal
16-38 SL Control
State
16-39 Controlcard
Temp.
16-50 External Reference
16-51 Pulse Reference
16-52 Feedback
[Unit]
16-53 Digi Pot Reference
16-60 Digital Input
16-61 Terminal 53
Switch Setting
16-62 Analog Input
53
16-63 Terminal 54
Switch Setting
16-64 Analog Input
54
16-65 Analog Output
42 [mA]
16-66 Digital Output
[bin]
16-67 Freq. Input
#29 [Hz]
6
MG.33.D3.02 - VLT® is a registered Danfoss trademark
61
Page 62

6
6. Parameters FC 100/ 200/ 300 DeviceNet
16-68 Freq. Input
#33 [Hz]
16-69 Pulse Output
#27 [Hz]
16-70 Pulse Output
#29 [Hz]
16-71 Relay Output
[bin]
16-84 Comm Option
STW
16-85 FC Port CTW 1
16-90 Alarm Word
16-91 Alarm Word 2
16-92 Warning Word
16-93 Warning Word
2
16-94 Extended Status Word
16-95 Extended Status Word 2
34-21 PCD 1 Read
from MCO
34-22 PCD 2 Read
from MCO
34-23 PCD 3 Read
from MCO
34-24 PCD 4 Read
from MCO
34-25 PCD 5 Read
from MCO
34-26 PCD 6 Read
from MCO
34-27 PCD 7 Read
from MCO
34-28 PCD 8 Read
from MCO
34-29 PCD 9 Read
from MCO
34-30 PCD 10 Read
from MCO
34-40 Digital Inputs
34-41 Digital Outputs
34-50 Actual Position
34-51 Commanded
Position
34-52 Actual Master
Position
34-53 Slave Index Position
62
MG.33.D3.02 - VLT® is a registered Danfoss trademark
Page 63

FC 100/ 200/ 300 DeviceNet 6. Parameters
34-54 Master Index
Position
34-55 Curve Position
34-56 Track Error
34-57 Synchronizing
Error
34-58 Actual Velocity
34-59 Actual Master
Velocity
34-60 Synchronizing
Status
34-61 Axis Status
34-62 Program Status Select the process read data for I/O Assembly Instances
101/151. Elements [2] and [3] of this array can be selected.
Elements [0] and [1] of the array are fixed.
10-13 Warning Parameter
Range: Function:
0
*
[0 - 65535] View a DeviceNet-specific Warning word. One bit is assigned to
every warning. Please refer to the DeviceNet Operating Instructions (MG.33.DX.YY) for further information.
6
Bit: Meaning:
0 Bus not active
1 Explicit connection timeout
2 I/O connection
3 Retry limit reached
4 Actual is not updated
5CAN bus off
6 I/O send error
7 Initialization error
8 No bus supply
9Bus off
10 Error passive
11 Error warning
12 Duplicate MAC ID Error
13 RX queue overrun
14 TX queue overrun
15 CAN overrun
10-14 Net Reference
Read only from LCP.
Select the reference source in Instance 21/71 and 20/70.
[0]
Off Enables reference via analog/digital inputs.
*
[1] On Enables reference via the fieldbus.
10-15 Net Control
Read only from LCP.
MG.33.D3.02 - VLT® is a registered Danfoss trademark
63
Page 64

6. Parameters FC 100/ 200/ 300 DeviceNet
Select the control source in Instance 21/71 and 20-70.
6
[0]
[1] On enable control via the fieldbus.
10-20 COS Filter 1
Range: Function:
0
*
10-21 COS Filter 2
Range: Function:
65535
10-22 COS Filter 3
Range: Function:
65535
Off Enables control via analog/digital inputs.
*
[0 - FFFF] Sets up the filter mask for the status word. When operating in
COS (Change-Of-State), it is possible to filter out bits in the status word that should not be sent if they change.
[0 - 65535] Sets up the filter mask for the Main Actual Value. When oper-
*
ating in COS (Change-Of-State), it is possible to filter out bits in
the Main actual value that should not be sent if they change.
[0 - 65535] Sets up the filter mask for PCD 3. When operating in COS
*
(Change-Of-State), it is possible to filter out bits in PCD 3 that
should not be sent if they change.
10-23 COS Filter 4
Range: Function:
65535
10-30 Array Index
Range: Function:
0
*
10-31 Store Data Values
Option: Function:
[0]
[1] Store edit set-up
[2] Store all set-ups This parameter is used to activate a function that stores all pa-
[0 - 65535] Sets up the filter mask for PCD 4. When operating in COS
*
(Change-Of-State), it is possible to filter out bits in PCD 4 that
should not be sent if they change.
[0 - 255] View array parameters. This parameter is valid only when a De-
viceNet fieldbus is installed.
Off
*
rameter values in the non-volatile memory thus retaining
changed parameter values at power down.
'*Off:
The store function is inactive.
-
Store edit set-up:
will be stored in the non-volatile memory.
The value returns to
All parameter values in the set-up selected
Off
when all values have been stored.
64
MG.33.D3.02 - VLT® is a registered Danfoss trademark
Page 65

FC 100/ 200/ 300 DeviceNet 6. Parameters
-
Store all set-ups:
volatile memory. The value returns to
values have been stored.
10-33 Store Always
Option: Function:
[0]
[1] On This parameter is used to select whether parameter data re-
16-90 Alarm Word
Range: Function:
0
*
Off
*
ceived via the DeviceNet option should always be stored in nonvolatile memory.
[0 - FFFFFFFF] View the alarm word sent via the serial communication port in
hex code.
All parameter values will be stored in the non-
Off
when all parameter
6
16-92 Warning Word
Range: Function:
0
*
[0 - FFFFFFFF] View the warning word sent via the serial communication port
in hex code.
MG.33.D3.02 - VLT® is a registered Danfoss trademark
65
Page 66

6
6. Parameters FC 100/ 200/ 300 DeviceNet
6.2. Parameter List
Par.
Parameter description Default value Range Conversion
No. #
8-00 Enabled Options All [1] [0 - 7] - 5
8-01 Control Site Dig. & ctrl. word [0] [0 - 2] - 5
8-02 Control Word Source FC RS485 [0] [0 - 4] - 5
8-03 Control Word Timeout Time 1s 0.1-18000 -1 7
8-04 Control Word Timeout Function Off [0] [0 - 10] -1 5
8-05 End ofTimeout Function Hold set-up [0] [0 - 1] - 5
8-06 Reset Control Word Timeout Do not reset [0] [0 - 1] - 5
8-07 Diagnosis Trigger Disable [0] [0 - 3] - 5
8-10 Control Word Profile FC profile [0] [0 - x] - 5
8-50 Coasting Select Logic OR [3] [0 - 3] - 5
8-51 Quick Stop Select Logic OR [3] [0 - 3] - 5
8-52 DC Brake Select Logic OR [3] [0 - 3] - 5
8-53 Start Select Logic OR [3] [0 - 3] - 5
8-54 Reversing Select Logic OR [3] [0 - 3] - 5
8-55 Set-up Select Logic OR [3] [0 - 3] - 5
8-56 Preset Reference Select Logic OR [3] [0 - 3] - 5
8-90 Bus Jog 1 Speed 100 rpm 0 - par. 4-13 67 6
8-91 Bus Jog 2 Speed 200 rpm 0 par. 4-13 67 6
10-00 CAN Protocol DeviceNet [1] [0 - 1] - 5
10-01 Baud Rate Select 125 Kbps [20] [20 - 22] - 5
10-02 MAC ID 63 0 - 63 0 5
10-05 Readout Transmit Error Counter 0 0 - 255 0 5
10-06 Readout Receive Error Counter 0 0 - 255 0 6
10-07 Readout Bus Off Counter 0 0 - 1000 0
10-10 Process Data Type Selection [0]/[2] [0 - 3] 0 5
10-11 Process Data Config Write 0 list 0 5
10-12 Process Data Config Read 0 list 0 5
10-13 Warning Parameter 0 0 - FFFF 0 5
10-14 Net Reference Off [0] [0 - 1] - 5
10-15 Net Control Off [0] [0 - 1] - 5
10-20 COS Filter 1 0 0 - FFFF 0 6
10-21 COS Filter 2 0 0 - FFFF 0 6
10-22 COS Filter 3 0 0 - FFFF 0 6
10-23 COS Filter 4 0 0 - FFFF 0 6
10-30 Array Index 0 0 - 255 0 6
10-31 Store Data Values Off [0] [0 - 2] - 5
10-32 DeviceNet Revision - - - 6
10-33 Store Always Off [0] [0 - 1] - 5
16-90 Alarm Word 0 0 - FFFF 0 7
16-92 Warning Word 0 0 - FFFF 0 7
index
Data type
66
MG.33.D3.02 - VLT® is a registered Danfoss trademark
Page 67

FC 100/ 200/ 300 DeviceNet 6. Parameters
6.3. Data Types Supported
6.3.1. Object and Data Types Supported
Data types supported
6.3.2. Conversion Index
This number refers to a conversion figure used
when writing or reading to parameters.
Data
type
3 Integer 16
4 Integer 32
5 Unsigned 8
6 Unsigned 16
7 Unsigned 32
9 Visible string
10 Byte string
33 Standardized value (16 bit)
35 Bit sequence
41 Byte
42 Word
Description
Conversion
index
100 1
67 1/60
6 1000000
5 100000
4 10000
3 1000
2 100
1 10
0 1
-1 0.1
-2 0.01
-3 0.001
-4 0.0001
-5 0.00001
-6 0.000001
Conversion
factor
6
MG.33.D3.02 - VLT® is a registered Danfoss trademark
67
Page 68

7
7. Application Examples FC 100/ 200/ 300 DeviceNet
68
MG.33.D3.02 - VLT® is a registered Danfoss trademark
Page 69

FC 100/ 200/ 300 DeviceNet 7. Application Examples
7. Application Examples
7.1. Example: Working with Instance 101/151 Process
This example shows how to work with I/O Instance 101/151, which consists of Control
Word/Status Word and Reference/Main Actual
Value. The Instance 101/151 also has two additional words, which can be programmed to
monitor process signals, as shown in the figure.
The application requires monitoring of the
motor torque and digital input, so PCD 3 is set
up to read the actual motor torque. PCD 4 is
set up to monitor the state of an external sensor via the process signal digital input. The
sensor is connected to digital input 18.
7
An external device is also controlled via control word bit 11 and the built-in relay of the
frequency converter.
Reversing is permitted only when the reversing bit 15 in the control word and the digital
input 19 are set to high.
For safety reasons the frequency converter
will stop the motor if the DeviceNet cable is
broken, the master has a system failure, or
the PLC is in stop mode.
MG.33.D3.02 - VLT® is a registered Danfoss trademark
69
Page 70

7. Application Examples FC 100/ 200/ 300 DeviceNet
7
Parameter
Function Setting
No.
4-10 Motor speed range/direction Both directions [2]
5-10 Digital input 18 No operation [0]
5-11 Digital input 19 Reversing [10]
5-40 Function relay Control word bit 11 [36]
8-03 Control word timeout time 1.0 sec
8-04 Control word timeout function Stop [2]
8-10 Control word profile FC Profile
8-50 Coasting select Bus [1]
8-51 Quick-stop select Bus [1]
8-52 DC-brake select Bus [1]
8-53 Start select Bus [1]
8-54 Reversing select Logic AND [2]
8-55 Set-up select Bus [1]
8-56 Preset reference select Bus [1]
10-01 Baud rate select - set to match other DeviceNet stations
10-02 MAC ID - set desired station address
10-10 Process data type selection Instance 101/151 [1]
10-12 Process Data Config Read PCD 3: Torque
7.1.1. Example of PLC Programming
Control word bit 12 [37]
PCD 4: Digital input
In this example Instance 101/151 is placed in the following Input/Output address:
Input address
0.0-0.15 0.16-0.31 1.0-1.15 1.16-1.31
Set-up Status
word
MAV Motor tor-
que
Digital in-
put
70
MG.33.D3.02 - VLT® is a registered Danfoss trademark
Page 71

FC 100/ 200/ 300 DeviceNet 7. Application Examples
Output address
0.0-0.15 0.16-0.31 1.0-1.15 1.16-1.31
Set-up Control
Reference Not used Not used
word
7
MG.33.D3.02 - VLT® is a registered Danfoss trademark
71
Page 72

8. Troubleshooting FC 100/ 200/ 300 DeviceNet
8
72
MG.33.D3.02 - VLT® is a registered Danfoss trademark
Page 73

FC 100/ 200/ 300 DeviceNet 8. Troubleshooting
8. Troubleshooting
8.1. Troubleshooting
8.1.1. LED Status
First, check the LEDs.
The DeviceNet control card contains two bi-colour (green/red) LEDs to indicate the state of the
device and the network respectively.
The upper LED indicates module status (MS).
The lower LED indicates network status (NS).
State Bi-colour LED Status
No Power Off There is no power applied to the option
Device operational
Standby
Minor fault
Unrecoverable
fault
Self test
Table 8.1: LED: Module Status (MS)
Green
Green
Red
Red
Green
Red
The DeviceNet option is operating in normal condition.
The DeviceNet option needs commissioning due to configuration missing, incomplete or incorrect.
Recoverable fault.
Unrecoverable fault, may need replacing.
The DeviceNet option is in Self-test
mode.
8
MG.33.D3.02 - VLT® is a registered Danfoss trademark
73
Page 74

8. Troubleshooting FC 100/ 200/ 300 DeviceNet
State Bi-colour LED Status
No Power/Not
on-line
On-line, not connected
On-line and connected
Connection timeout
Critical link failure
Table 8.2: LED: Network Status (NS)
Off The option has not completed “Duplicate
MAC ID” test yet or may not be powered.
Green
Green
Red
Red
The option is on-line, but not allocated to
a master.
The DeviceNet option is on-line and connected to a master.
One or more I/O connections are in timeout state.
8
74
MG.33.D3.02 - VLT® is a registered Danfoss trademark
Page 75

FC 100/ 200/ 300 DeviceNet 8. Troubleshooting
8.1.2. No Communication with the Drive
If there is no communication with the drive,
proceed with the following checks:
Check 1: Is the cabling correct?
Check that the cables are connected to the
correct terminals as shown in the diagram.
Pin no.
1 V- Black GND
2 CAN_L Blue CAN
3 Drain (bare) Screen
4 CAN_H White CAN
5 V+ Red +24 V
Check 2: Is the 24V network voltage applied?
Check 3: Is the correct EDS file installed?
Download the correct EDS file from http://www.danfoss.com/drives.
Check 4: Is the bus connection terminated at both ends?
If not, terminate the bus connection with termination resistors at the initial and final nodes, as
shown in the following diagram. Termination is performed between terminal 2 (CAN_L) and 4
(CAN_H) with a resistor: 121 Ohm, 1% metal film, ¼ Watt.
Terminal
Colour Name
LOW
HIGH
8
MG.33.D3.02 - VLT® is a registered Danfoss trademark
75
Page 76

8. Troubleshooting FC 100/ 200/ 300 DeviceNet
8.1.3. Drive Will Not Respond to Control Signals
- Danfoss Control Word profile (instances 100/150 and 101/151)
Check 1: Is the Control word valid?
If bit 10=0 in the Control word, then the frequency converter will not accept the Control word,
because the default setting is bit 10=1. Set bit 10=1 via the PLC.
Check 2: Is the relationship between bits in the Control word and the terminal I/Os correct?
Check the logical relationship in the frequency converter.
Set the logic to bit 3=1 AND digital input=1 in order to achieve a successful start.
Define the desired logical relationship in par. 8-50 to 8-56 according to the following range of
options. Select the FC control mode, digital input and/or bus communication, using par. 8-50 to
8-56.
The tables below show the effect upon the frequency converter of a coast command for the full
range of par. 8-50 settings.
8
The effect of control mode upon the function of par. 8-50
and 8-52
lect
Digital input
If
will control the Coast and DC Brake functions.
If Bus [1] is selected, commands will be activated only when given via the control word.
If Logic AND [2] is selected, both signals must
be activated to perform the function.
If Logic OR [3] is selected, activation of one
signal will activate the function.
DC Brake Select
is as follows:
[0] is selected, the terminals
Par. 8-50/51/52 setting:
Terminal Bit 02/03/04 Function
0 0 Coast/DC brake/Q-Stop
0 1 Coast/DC brake/Q-Stop
1 0 No Coast/DC brake/Q-Stop
1 1 No Coast/DC brake/Q-Stop
Par. 8-50/51/52 setting:
Terminal Bit 02/03/04 Function
0 0 Coast/DC brake/Q-Stop
0 1 No Coast/DC brake/Q-Stop
1 0 Coast/DC brake/Q-Stop
1 1 No Coast/DC brake/Q-Stop
Par. 8-50/51/52 setting:
Terminal Bit 02/03/04 Function
0 0 Coast/DC brake/Q-Stop
0 1 No Coast/DC brake/Q-Stop
1 0 No Coast/DC brake/Q-Stop
1 1 No Coast/DC brake/Q-Stop
Par. 8-50/51/52 setting:
Terminal Bit 02/03/04 Function
0 0 Coast/DC brake/Q-Stop
0 1 Coast/DC brake/Q-Stop
1 0 Coast/DC brake/Q-Stop
1 1 No Coast/DC brake/Q-Stop
Coasting Select
Digital Input [0]
Bus [1]
Logic AND [2]
Logic OR [3]
, 8-51
Quick Stop Se-
NB!
Please note that Coasting, Quick Stop and DC brake functions are active for logic
“0’’.
76
MG.33.D3.02 - VLT® is a registered Danfoss trademark
Page 77

FC 100/ 200/ 300 DeviceNet 8. Troubleshooting
The effect of control mode upon the function of par. 8-53
lect
:
Digital Input
If
will control the start and reversing functions
If
Bus
[1] is selected, commands will be acti-
vated only when given via the control word.
If
Logic AND
be activated to perform the function.
If
Logic OR
signal will activate the function.
[0] is selected, the terminals
[2] is selected, both signals must
[3] is selected, activation of one
Par. 8-53/54 setting:
Terminal Bit 06/15 Function
0 0 Stop/Anti-clockwise
0 1 Stop/Anti-clockwise
1 0 Start/Clockwise
1 1 Start/Clockwise
Par. 8-53/54 setting:
Terminal Bit 02/03/04 Function
0 0 Stop/Anti-clockwise
0 1 Start/Clockwise
1 0 Stop/Anti-clockwise
1 1 Start/Clockwise
Par. 8-53/54 setting:
Terminal Bit 02/03/04 Function
0 0 Stop/Anti-clockwise
0 1 Stop/Anti-clockwise
1 0 Stop/Anti-clockwise
1 1 Start/Clockwise
Par. 8-53/54 setting:
Terminal Bit 02/03/04 Function
0 0 Stop/Anti-clockwise
0 1 Start/Clockwise
1 0 Start/Clockwise
1 1 Start/Clockwise
Start Select
and 8-54
Digital input [0]
Bus [1]
Logic AND [2]
Logic OR [3]
Reversing Se-
8
The effect of control mode upon the function of par. 8-55
:
Select
Digital input
If
will control the set-up and preset reference
functions.
[0] is selected, the terminals
Par. 8-55/56 setting:
Terminal Bit 00/01,
Msb Lsb Msb Lsb Preset ref., Set-up no.
0 0 0 0 1
0 0 0 1 1
0 0 1 0 1
0 0 1 1 1
0 1 0 0 2
0 1 0 1 2
0 1 1 0 2
0 1 1 1 2
1 0 0 0 3
1 0 0 1 3
1 0 1 0 3
1 0 1 1 3
1 1 0 0 4
1 1 0 1 4
1 1 1 0 4
1 1 1 1 4
Set-up Select
13/14
and 8-56
Digital input [0]
Preset Reference
Function
MG.33.D3.02 - VLT® is a registered Danfoss trademark
77
Page 78

8
8. Troubleshooting FC 100/ 200/ 300 DeviceNet
If
Bus
[1] is selected, commands will be acti-
vated only when given via the control word.
If
Logic AND
[2] is selected, both signals must
be activated to perform the function.
Par. 8-55/56 setting:
Terminal Bit 00/01,
Msb Lsb Msb Lsb Preset ref., Set-up no.
0 0 0 0 1
0 0 0 1 2
0 0 1 0 3
0 0 1 1 4
0 1 0 0 1
0 1 0 1 2
0 1 1 0 3
0 1 1 1 4
1 0 0 0 1
1 0 0 1 2
1 0 1 0 3
1 0 1 1 4
1 1 0 0 1
1 1 0 1 2
1 1 1 0 3
1 1 1 1 4
Par. 8-55/56 setting:
Terminal Bit 00/01,
Msb Lsb Msb Lsb Preset ref., Set-up no.
0 0 0 0 1
0 0 0 1 1
0 0 1 0 1
0 0 1 1 1
0 1 0 0 1
0 1 0 1 2
0 1 1 0 1
0 1 1 1 2
1 0 0 0 1
1 0 0 1 1
1 0 1 0 3
1 0 1 1 3
1 1 0 0 1
1 1 0 1 2
1 1 1 0 3
1 1 1 1 4
Bus [1]
Function
13/14
Logic AND [2]
Function
13/14
If
Logic OR
[3] is selected, activation of one
signal will activate the function.
Par. 8-55/56 setting:
Terminal Bit 00/01,
Msb Lsb Msb Lsb Preset ref., Set-up no.
0 0 0 0 1
0 0 0 1 2
0 0 1 0 3
0 0 1 1 4
0 1 0 0 2
0 1 0 1 2
0 1 1 0 4
0 1 1 1 4
1 0 0 0 3
1 0 0 1 4
1 0 1 0 3
1 0 1 1 4
1 1 0 0 4
1 1 0 1 4
1 1 1 0 4
Logic OR [3]
Function
13/14
78
MG.33.D3.02 - VLT® is a registered Danfoss trademark
Page 79

FC 100/ 200/ 300 DeviceNet 8. Troubleshooting
8.1.4. Alarm Word and Warning Word
Alarm word and Warning word are shown on the display in Hex format. If there is more than one
warning or alarm, a sum of all warnings or alarms will be shown. Alarm word and warning word
can also be displayed using the field bus in par. 16-05, 16-06 and 16-04.
Bit (Hex) Alarm word
(Par. 16-90)
00000001 Unused - - 00000002 Drive over temperature 29 Major Recoverable
00000004 Earth fault 14 Major Unrecoverable
00000008 Unused - - 00000010 Control word timeout 18 Minor Recoverable
00000020 Over current 13 Major Unrecoverable
00000040 Torque limit 12 Major Recoverable
00000080 Motor thermistor over
temp.
00000100 Motor ETR over tempera-
ture
00000200 Inverter overloaded 9 Major Recoverable
00000400 DC link under voltage 8 Major Recoverable
00000800 DC link over voltage 7 Major Recoverable
00001000 Short circuit 16 Major Unrecoverable
00002000 Inrush fault 33 Major Recoverable
00004000 Mains phase loss 4 Major Unrecoverable
00008000 AMA not OK 50 Major Recoverable
00010000 Live zero error 2 Major Recoverable
00020000 Internal fault 38 Major Unrecoverable
00040000 Brake resistor power limit 26 Major Unrecoverable
00080000 Motor phase U is missing 30 Major Unrecoverable
00100000 Motor phase V is missing 31 Major Unrecoverable
00200000 Motor phase W is missing 32 Major Unrecoverable
00400000 Fieldbus comm. fault 34 Major Recoverable
00800000 24 V supply fault 47 Major Unrecoverable
01000000 Mains failure 36 Major Recoverable
02000000 1.8 V supply fault 48 Major Unrecoverable
04000000 Brake resistor short circuit 25 Major Recoverable
08000000 Brake chopper fault 27 Major Recoverable
10000000 Unused - - 20000000 Unused - - 40000000 Unused - - 80000000 Unused - - -
FC 100/ 200/ 300
Alarm no. Major /
minor alarm
11 Major Recoverable
10 Major Recoverable
Recoverable /
unrecoverable alarm
8
MG.33.D3.02 - VLT® is a registered Danfoss trademark
79
Page 80

8. Troubleshooting FC 100/ 200/ 300 DeviceNet
8
Bit (Hex) Warning word (Par. 16-92) Warning no.
FC 100/ 200/ 300
00000001 Unused 00000002 Drive over temperature 29
00000004 Earth fault 14
00000008 Unused 00000010 Control word timeout 18
00000020 Over current 13
00000040 Torque limit 12
00000080 Motor thermistor over temp. 11
00000100 Motor ETR over temperature 10
00000200 Inverter overloaded 9
00000400 DC link under voltage 8
00000800 DC link over voltage 7
00001000 DC link voltage low 6
00002000 DC link voltage high 5
00004000 Mains phase loss 4
00008000 No motor 3
00010000 Live zero error 2
00020000 10 V low 1
00040000 Brake resistor power limit 26
00080000 Brake resistor short circuit 25
00100000 Brake chopper fault 27
00200000 Speed limit 49
00400000 Fieldbus comm. fault 34
00800000 24 V supply fault 47
01000000 Mains failure 36
02000000 Current limit 59
04000000 Unused 08000000 Unused 10000000 Unused 20000000 Unused 40000000 Unused 80000000 Warning word 2 (ext. stat. word) -
8.2. Alarm/Warning Limits
8.2.1. Warnings and Alarm Messages
There is a clear distinction between alarms and warnings. In the event of an alarm, The frequency
converter will enter a fault condition. After the cause for the alarm has been cleared, the master
will have to acknowledge the alarm message for the frequency converter to start operating again.
A warning on the other hand may come when a warning condition appears, and disappear when
conditions return to normal without interfering with the process.
8.2.2. Warnings
All warnings within the frequency converter are represented by a single bit within a warning word.
A warning word is always an action parameter. Bit status FALSE [0] means no warning, while bit
status TRUE [1] means warning. To each bit and each bit status there is a corresponding text
string. In addition to the warning word message the master will also be notified through a change
of bit 7 in the Status Word.
8.2.3. Alarms
Following an Alarm message, the frequency converter will enter Fault condition. Only after the
fault has been alleviated and the master has acknowledged the alarm message by setting bit 3 in
the Control Word, can the frequency converter resume operation. All alarms within the frequency
converter are represented by a single bit within an alarm word. An alarm word is always an action
parameter. Bit status FALSE [0] means no alarm, while bit status TRUE [1] means alarm.
80
MG.33.D3.02 - VLT® is a registered Danfoss trademark
Page 81

FC 100/ 200/ 300 DeviceNet Index
Index
A
Abbreviations 11
Alarm Word 79
Alarm Word, 16-90 65
Alarms 80
Array Index 10-30 64
B
Bus Jog 2 Speed 58
C
Cable Lengths 13
Cable Specifications 13
Change Of State, Cos 23
Coasting Select, 8-50 55
Connection Of The Cable Screen 15
Control Site, 8-01 53
Control Word Timeout Function 53
Conversion Index 67
D
Danfoss Fc Control Profile 32
Danfoss Object Classes 50
Dc Brake Select, 8-52 56
Devicenet Connection 16
Devicenet Object Classes 39
Devicenet Termination 16
Drive Will Not Respond To Control Signals 76
Drop Cable 16
E
Earth Connection 15
Eds File 21
Emc Precautions 14
I
I/o Assembly Instances 25
Installation Of Option In The Frequency Converter 17
L
Led Status 73
Leds 21
M
Mac Id, 10-02 58
N
Net Control 10-15 63
Net Reference 10-14 63
Network Power Consumption 16
No Communication With The Drive 75
O
Object And Data Types Supported 67
Odva Control Profile 27
Odva Recommendation 15
MG.33.D3.02 - VLT® is a registered Danfoss trademark
81
Page 82

Index FC 100/ 200/ 300 DeviceNet
P
Polling 23
Preset Reference Select, 8-56 57
Q
Quick Stop Select 55
R
Reset Control Word Timeout 54
S
Safety Note 6
Setting The Devicenet Address 19
Setting The Devicenet Baud Rate 20
Start Select, 8-53 56
T
Topology 9
V
Vlt Parameters 21
W
Warning Parameter 10-13 63
Warning Word 79
Warning Word, 16-92 65
Warnings 80
82
MG.33.D3.02 - VLT® is a registered Danfoss trademark
 Loading...