

Page 1

vacon® nx
ac drives
optcq
ethernet ip option board
user manual
Page 2

Page 3

1
Local contacts: http://drives.danfoss.com/danfoss-drives/local-contacts/
Table of contents
Document: DPD00893C
Version release date: 24.8.2017
1. Introduction ...................................................................................................................... 3
2. EtherNet/IP board technical data ..................................................................................... 4
2.1 Overview ..........................................................................................................................................................4
2.2 LED indications................................................................................................................................................5
2.3 EtherNet/IP ......................................................................................................................................................5
2.4 Connections and wiring ..................................................................................................................................7
3. Installation ....................................................................................................................... 8
3.1 Installing the EtherNet/IP option board in a VACON® NX unit ......................................................................8
3.2 NCDrive .......................................................................................................................................................... 10
3.3 IP tool NCIPConfig......................................................................................................................................... 10
3.3.1 Updating the OPTCQ option board program with the NCIPConfig tool ...................................................... 12
3.4 Configuring the option board parameters ................................................................................................... 13
4. Commissioning ............................................................................................................... 14
4.1 Speed and duplex .......................................................................................................................................... 15
4.2 IP address ...................................................................................................................................................... 16
4.3 Communication timeout ............................................................................................................................... 16
4.4 Input/Output assemblies .............................................................................................................................. 16
5. EtherNet/IP .................................................................................................................... 18
5.1 Overview ........................................................................................................................................................ 18
5.2 AC/DC drive profile ....................................................................................................................................... 18
5.3 EDS file .......................................................................................................................................................... 18
5.4 Explicit messaging ........................................................................................................................................ 19
5.4.1 List of object classes ..................................................................................................................................... 19
5.4.2 List of services .............................................................................................................................................. 19
5.4.3 List of data types ........................................................................................................................................... 20
5.4.4 Reset service ................................................................................................................................................. 20
6. Common industrial objects implemented by the option board ....................................... 21
6.1 Common required objects of the CIP ........................................................................................................... 21
6.1.1 Identity object, class 0x01 ............................................................................................................................. 21
6.1.2 Connection manager object, class 0x06 ...................................................................................................... 22
6.1.3 TCP/IP interface object, class 0xF5 ............................................................................................................. 23
6.1.4 Ethernet link object, class 0xF6 ................................................................................................................... 24
6.2 Objects present in an AC/DC drive ............................................................................................................... 25
6.2.1 Assembly object, class 0x04 ......................................................................................................................... 25
6.2.2 Motor data object, class 0x28 ....................................................................................................................... 25
6.2.3 Control supervisor object, class 0x29 .......................................................................................................... 26
6.2.4 AC/DC drive object, class 0x2A ..................................................................................................................... 27
6.3 Vendor-specific objects ................................................................................................................................ 28
6.3.1 Vendor parameter object, class 0xA0 .......................................................................................................... 28
6.3.2 Assembly instance selector object, class 0xBE .......................................................................................... 28
7. Assembly instances implemented by the option board .................................................. 29
7.1 Output instances ........................................................................................................................................... 29
7.1.1 Assembly instance 20 ................................................................................................................................... 29
7.1.2 Assembly instance 21 (default) .................................................................................................................... 29
7.1.3 Assembly instance 23 ................................................................................................................................... 29
7.1.4 Assembly instance 25 ................................................................................................................................... 30
7.1.5 Assembly instance 101 ................................................................................................................................. 30
7.1.6 Assembly instance 111 ................................................................................................................................. 31
7.1.7 Assembly instance 128 ................................................................................................................................. 31
7.2 Input instances .............................................................................................................................................. 33
7.2.1 Assembly instance 70 ................................................................................................................................... 33
7.2.2 Assembly instance 71 (default) .................................................................................................................... 33
Page 4

2
Local contacts: http://drives.danfoss.com/danfoss-drives/local-contacts/
7.2.3 Assembly instance 73 ................................................................................................................................... 33
7.2.4 Assembly instance 75 ................................................................................................................................... 34
7.2.5 Assembly instance 107 ................................................................................................................................. 34
7.2.6 Drive state...................................................................................................................................................... 34
7.2.7 Assembly instance 117 ................................................................................................................................. 35
7.2.8 Assembly instance 127 ................................................................................................................................. 36
8. Data mapping ................................................................................................................. 37
8.1 Control word .................................................................................................................................................. 37
8.2 Status word .................................................................................................................................................... 37
8.3 Process Data OUT (Slave Master) ............................................................................................................ 37
8.4 Process Data IN (Master Slave) ............................................................................................................... 38
8.5 Additional information .................................................................................................................................. 39
8.5.1 Handling of the NetCtrl bit (Network Control) ............................................................................................ 39
8.5.2 Handling of the NetRef bit (Network Reference) ........................................................................................ 39
8.5.3 Handling of the NetProc bit in assembly instance 25 (Net Process) ......................................................... 39
8.5.4 Handling of RefFromNet and CtrlFromNet bits .......................................................................................... 39
Page 5
Introduction 3
Local contacts: http://drives.danfoss.com/danfoss-drives/local-contacts/
1
1. INTRODUCTION
The VACON
®
NX AC drive can be connected to Ethernet by using an EtherNet/IP fieldbus board
OPTCQ. The OPTCQ is installed in the card slot D or E.
Every appliance connected to an Ethernet network has two identifiers; a MAC address and an IP
address. The MAC address (Address format: 00:21:99:xx:yy:zz) is unique to the appliance and cannot
be changed. The EtherNet/IP board's MAC address is found on the sticker attached to the board or
by using the VACON
®
IP tool software NCIPConfig. VACON® PC software can be downloaded from
http://drives.danfoss.com website.
In a local network, IP addresses can be defined by the user as long as all units connected to the
network are given the same network portion of the address. For more information about IP
addresses, contact your Network Administrator. Overlapping IP addresses cause conflicts between
appliances. For more information about setting IP addresses, see Chapter 3.
9000.emf
DANGER! When the AC drive is connected to the power source, the internal
components and circuit boards are at high potential. Coming into contact with
this voltage can cause death or severe injury.
If you need further information related to EtherNet/IP, contact your local support. See local
contacts: http://drives.danfoss.com/danfossdrives/local-contacts/.
NOTE! You can download the English and French product manuals with applicable safety, warning and caution
information from http://drives.danfoss.com/knowledge-center/technical-documentation/.
REMARQUE Vous pouvez télécharger les versions anglaise et française des manuels produit contenant
sements et mises en garde applicables sur le site
http://drives.danfoss.com/knowledge-center/technical-documentation/.
Page 6
4 EtherNet/IP board technical data
Local contacts: http://drives.danfoss.com/danfoss-drives/local-contacts/
2
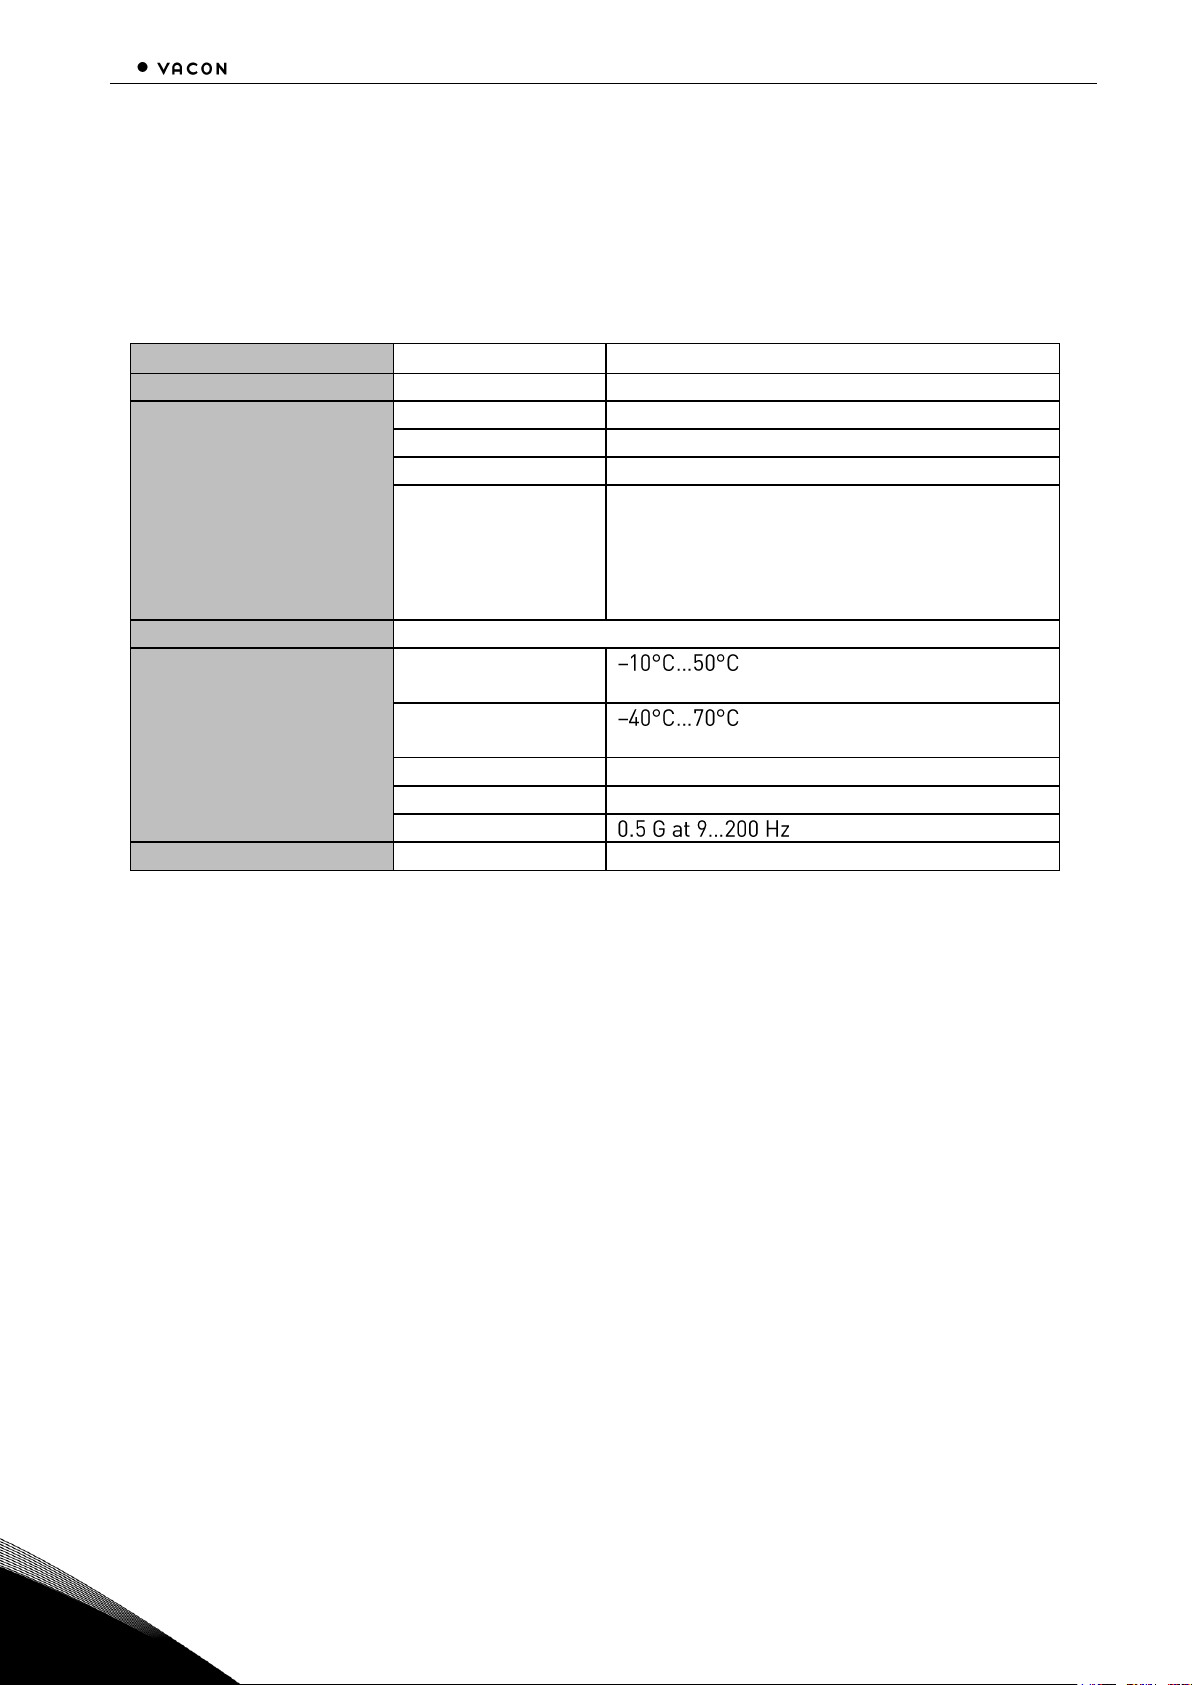
2. ETHERNET/IP BOARD TECHNICAL DATA
2.1 Overview
Table 1. EtherNet/IP board technical data
General
Card Name
OPTCQ
Ethernet connections
Interface
RJ-45 connector
Communications
Transfer cable
Shielded Twisted Pair
Speed
10 / 100 Mb
Duplex
half / full
IP address
Static IP or DHCP (firmware version
dependent)
V004 and newer: Default is DHCP
V003 and older: Default is static IP
192.168.0.10
Protocols
EtherNet/IP
Environment
Ambient operating
temperature
Storing
temperature
Humidity
<95%, no condensation allowed
Altitude
Max. 1000 m
Vibration
Safety
Fulfils EN50178 standard
Page 7
EtherNet/IP board technical data 5
Local contacts: http://drives.danfoss.com/danfoss-drives/local-contacts/
2
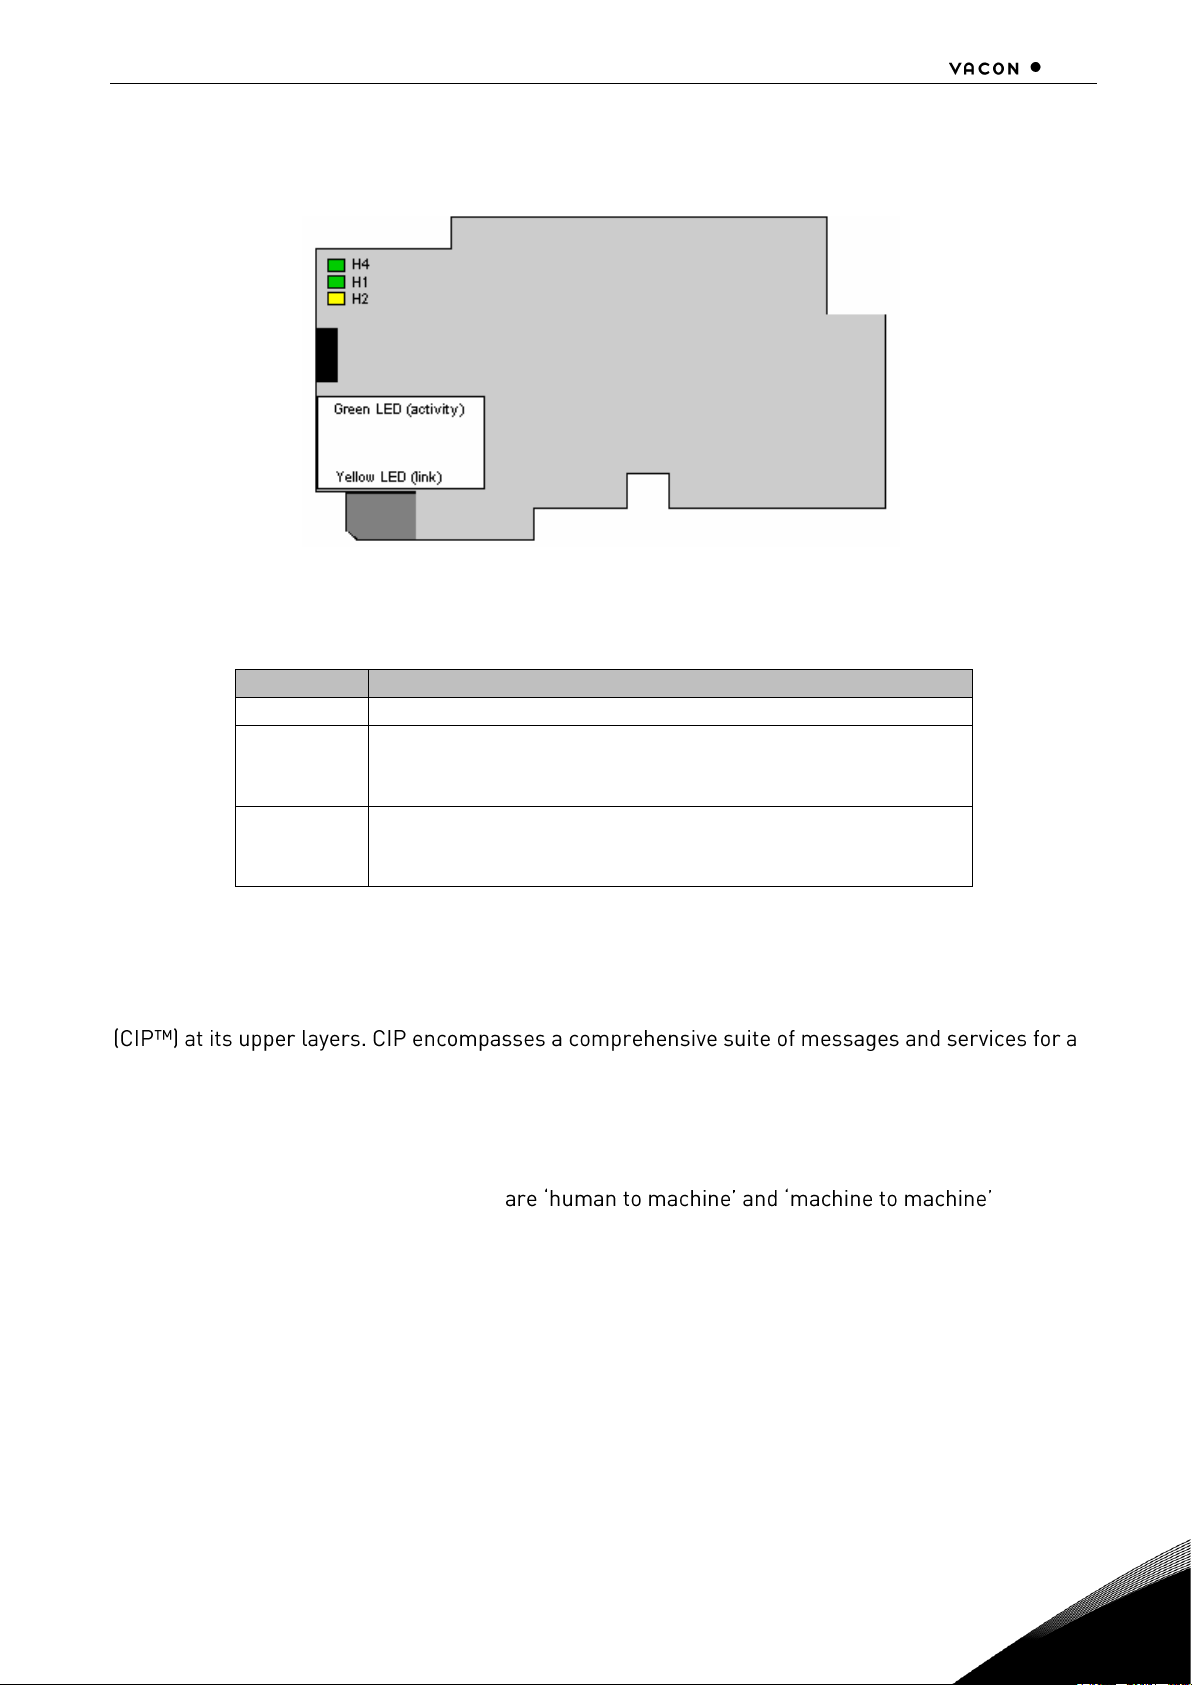
2.2 LED indications
Figure 1.
Table 2. Meaning of the LED indications
LED
Meaning
H4
LED is ON when board is powered.
H1
Blinking 0.25s ON / 0.25s OFF when board firmware is
corrupted (see Chapter 3.2).
OFF when board is operational.
H2
Blinking 2.5s ON / 2.5s OFF when board is ready for
external communication.
OFF when board is not operational.
2.3 EtherNet/IP
EtherNet/IP is a member of a family of networks that implements the Common Industrial Protocol
variety of manufacturing automation applications, including control, safety, synchronization, motion,
configuration and information. As a truly media-independent protocol that is supported by hundreds
of vendors around the world, CIP provides users with a unified communication architecture
throughout the manufacturing enterprise.
Common use-cases of Ethernet devices . Basic
features of these two use-cases are presented in Figures 2 and 3 below.
More information on EtherNet/IP can be found at www.odva.org.
Page 8
6 EtherNet/IP board technical data
Local contacts: http://drives.danfoss.com/danfoss-drives/local-contacts/
2
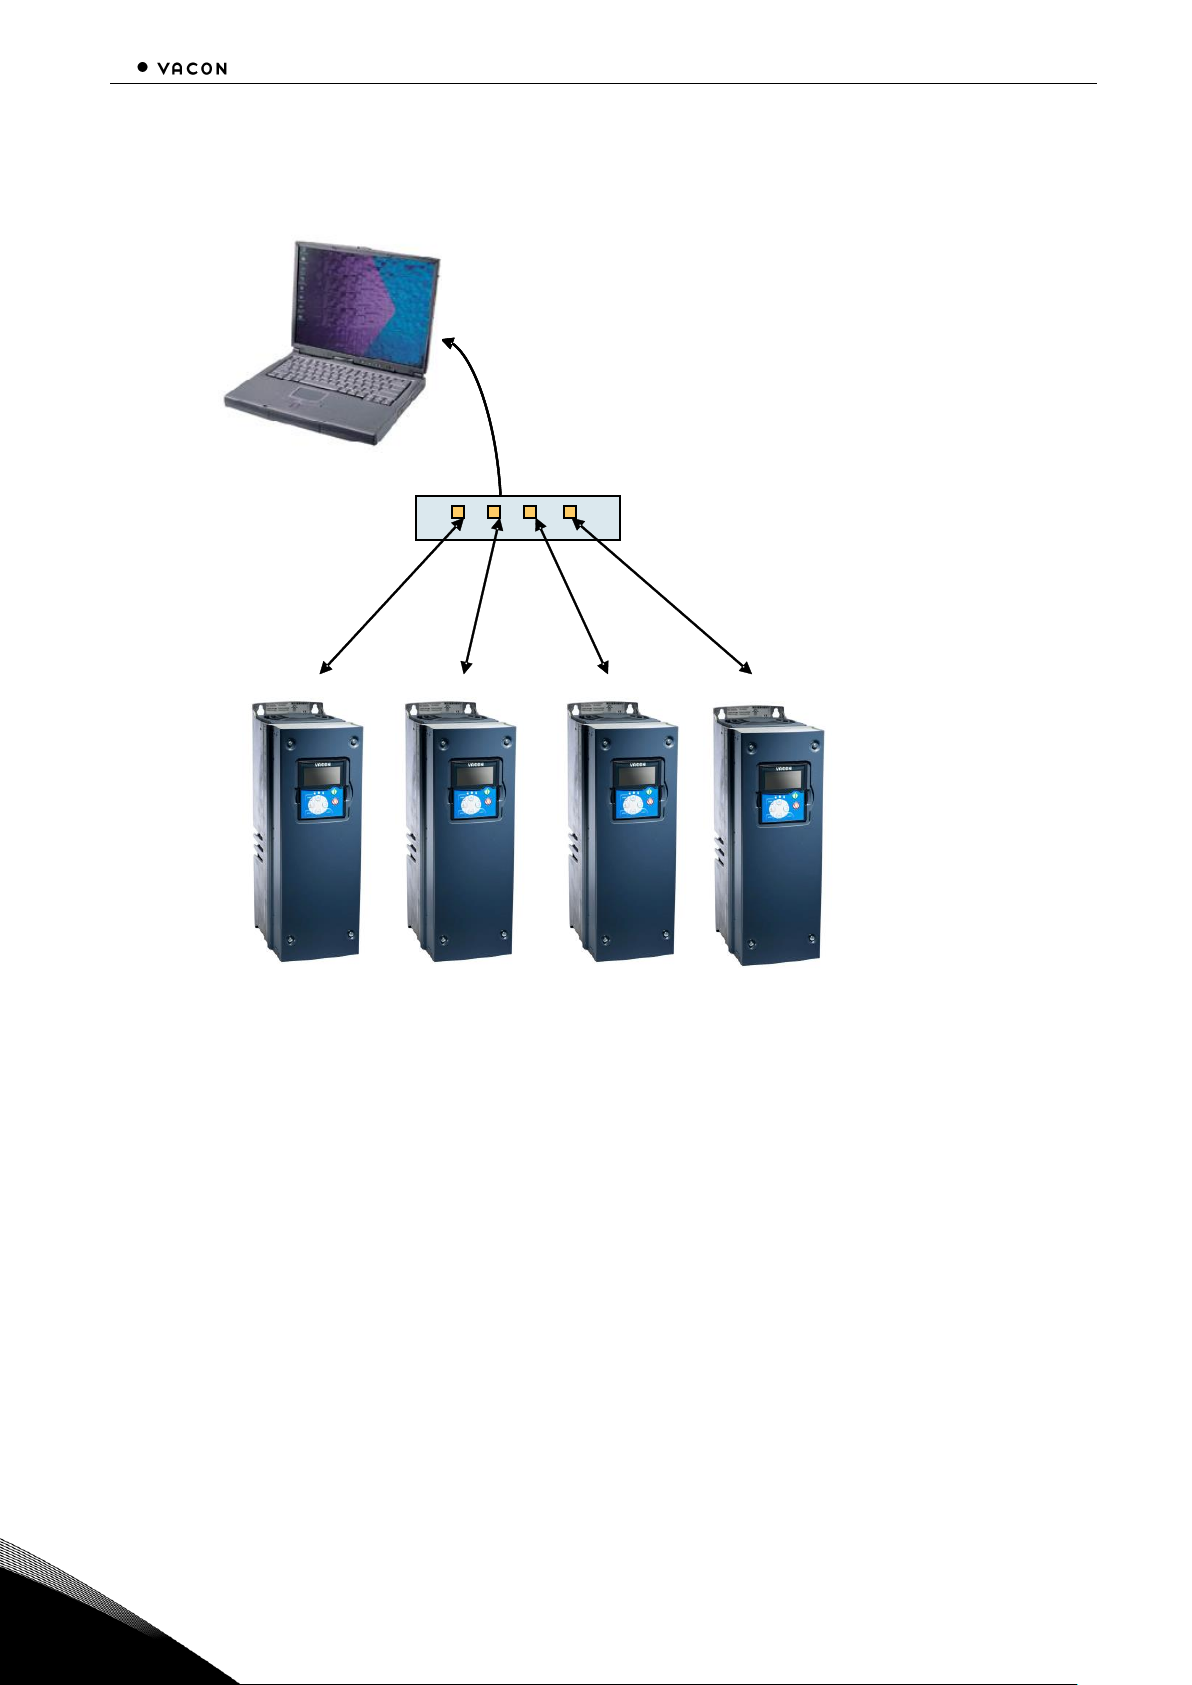
Figure 2. Human to machine (graphical user interface, relatively slow communication)
NOTE! The VACON® NCDrive can be used in VACON® NXS and NXP drives via Ethernet. In VACON
®
NXL drives this is not possible.
Ethernet switch
Values
• Trends
• Fault history
NCDrive / NCIPConfig interface
• Parameter
• Slow rate actual
Page 9

EtherNet/IP board technical data 7
Local contacts: http://drives.danfoss.com/danfoss-drives/local-contacts/
2
Figure 3. Machine to machine (industrial environment, fast communication)
2.4 Connections and wiring
The EtherNet/IP board supports 10 and 100Mb speeds in both Full and Half-duplex modes. The
boards must be connected to the Ethernet network with a shielded CAT-5e cable. Use a so-called
crossover cable (at least CAT-5e cable with STP, Shielded Twisted Pair) if you want to connect the
EtherNet/IP option board directly to the master appliance. Use only industrial standard components
in the network and avoid complex structures to minimize the length of response time and the
amount of incorrect dispatches.
PLC or Programmable Controller
PLC or Programmable Controller PLC or Programmable Controller
Master
Ethernet switch
Real-Time Control
• Start/Stop, Direction, etc.
• Reference
• Feedback
Page 10
8 Installation
Local contacts: http://drives.danfoss.com/danfoss-drives/local-contacts/
3
3. INSTALLATION
3.1 Installing the EtherNet/IP option board in a VACON
®
NX unit
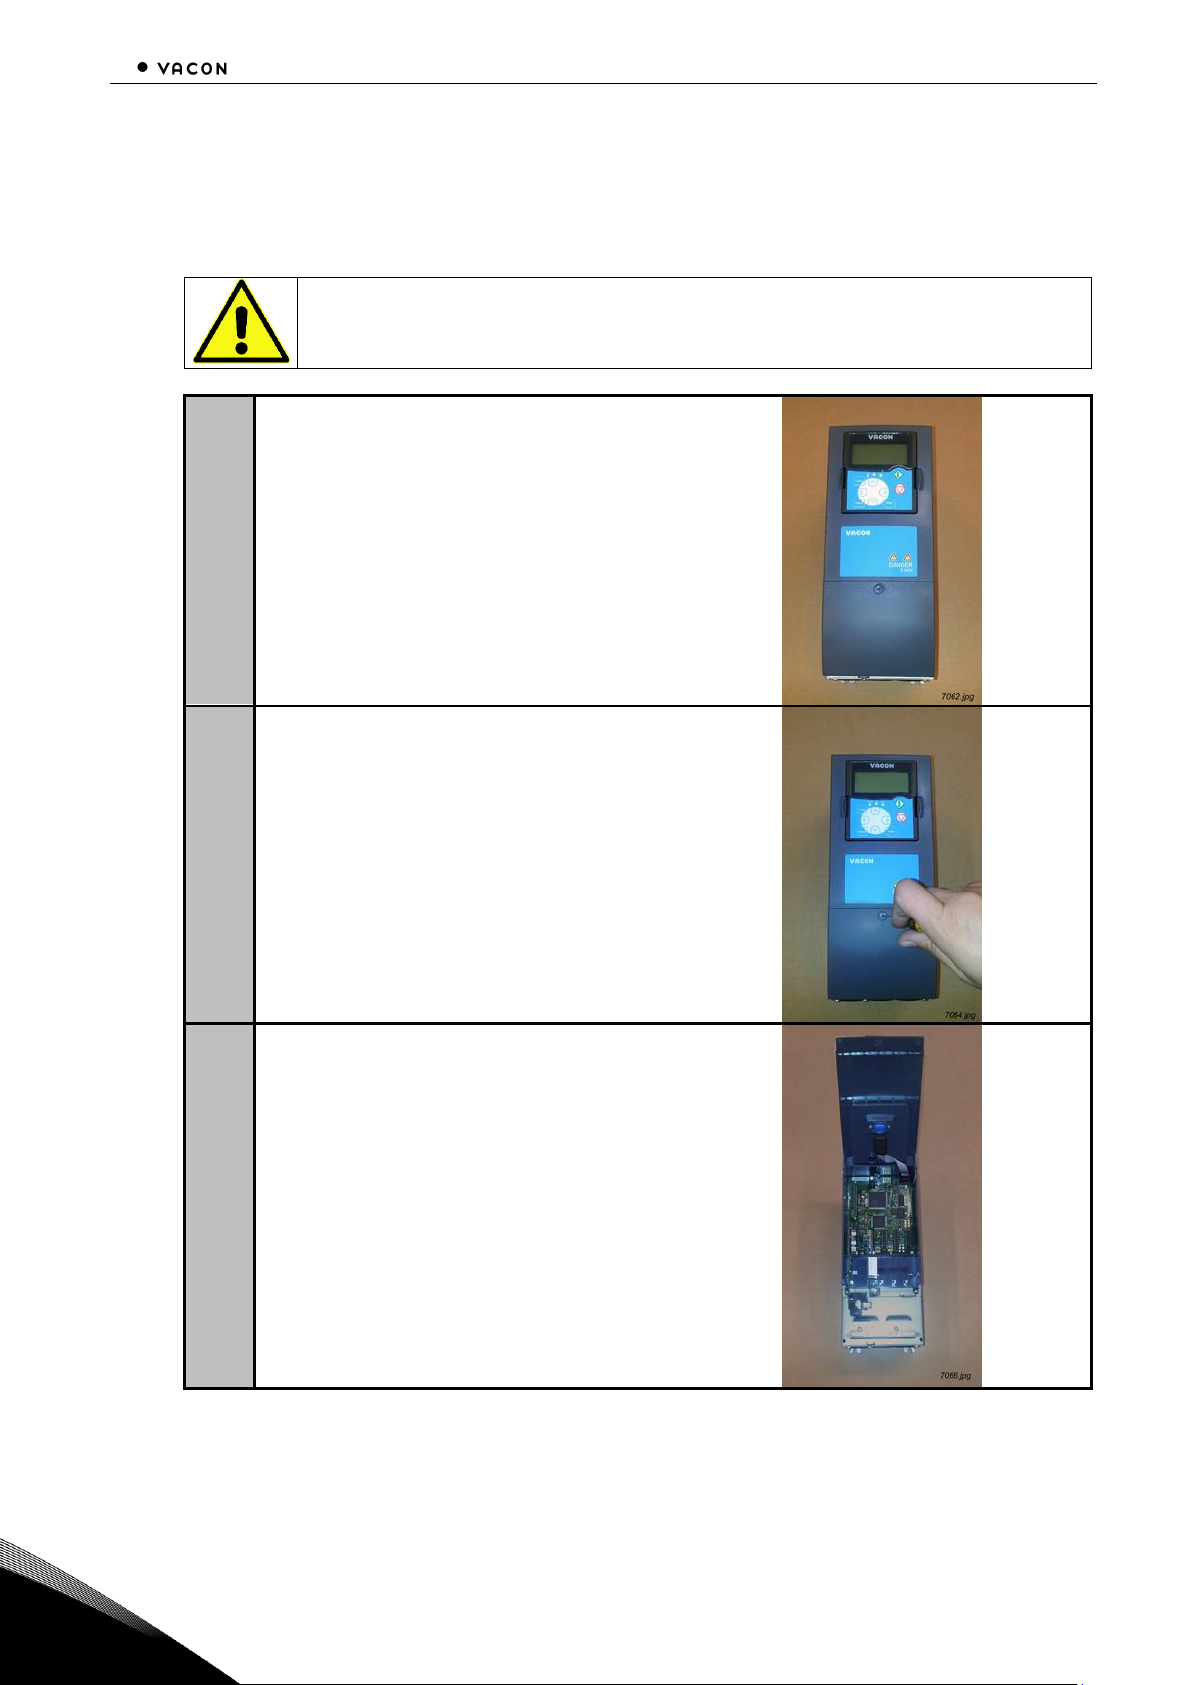
13006.emf
CAUTION! Before an option or fieldbus board is changed or added, make sure
that the AC drive is switched off.
1
The VACON® NX AC drive.
2
Remove the cable cover.
3
Open the cover of the control unit.
Page 11
Installation 9
Local contacts: http://drives.danfoss.com/danfoss-drives/local-contacts/
3
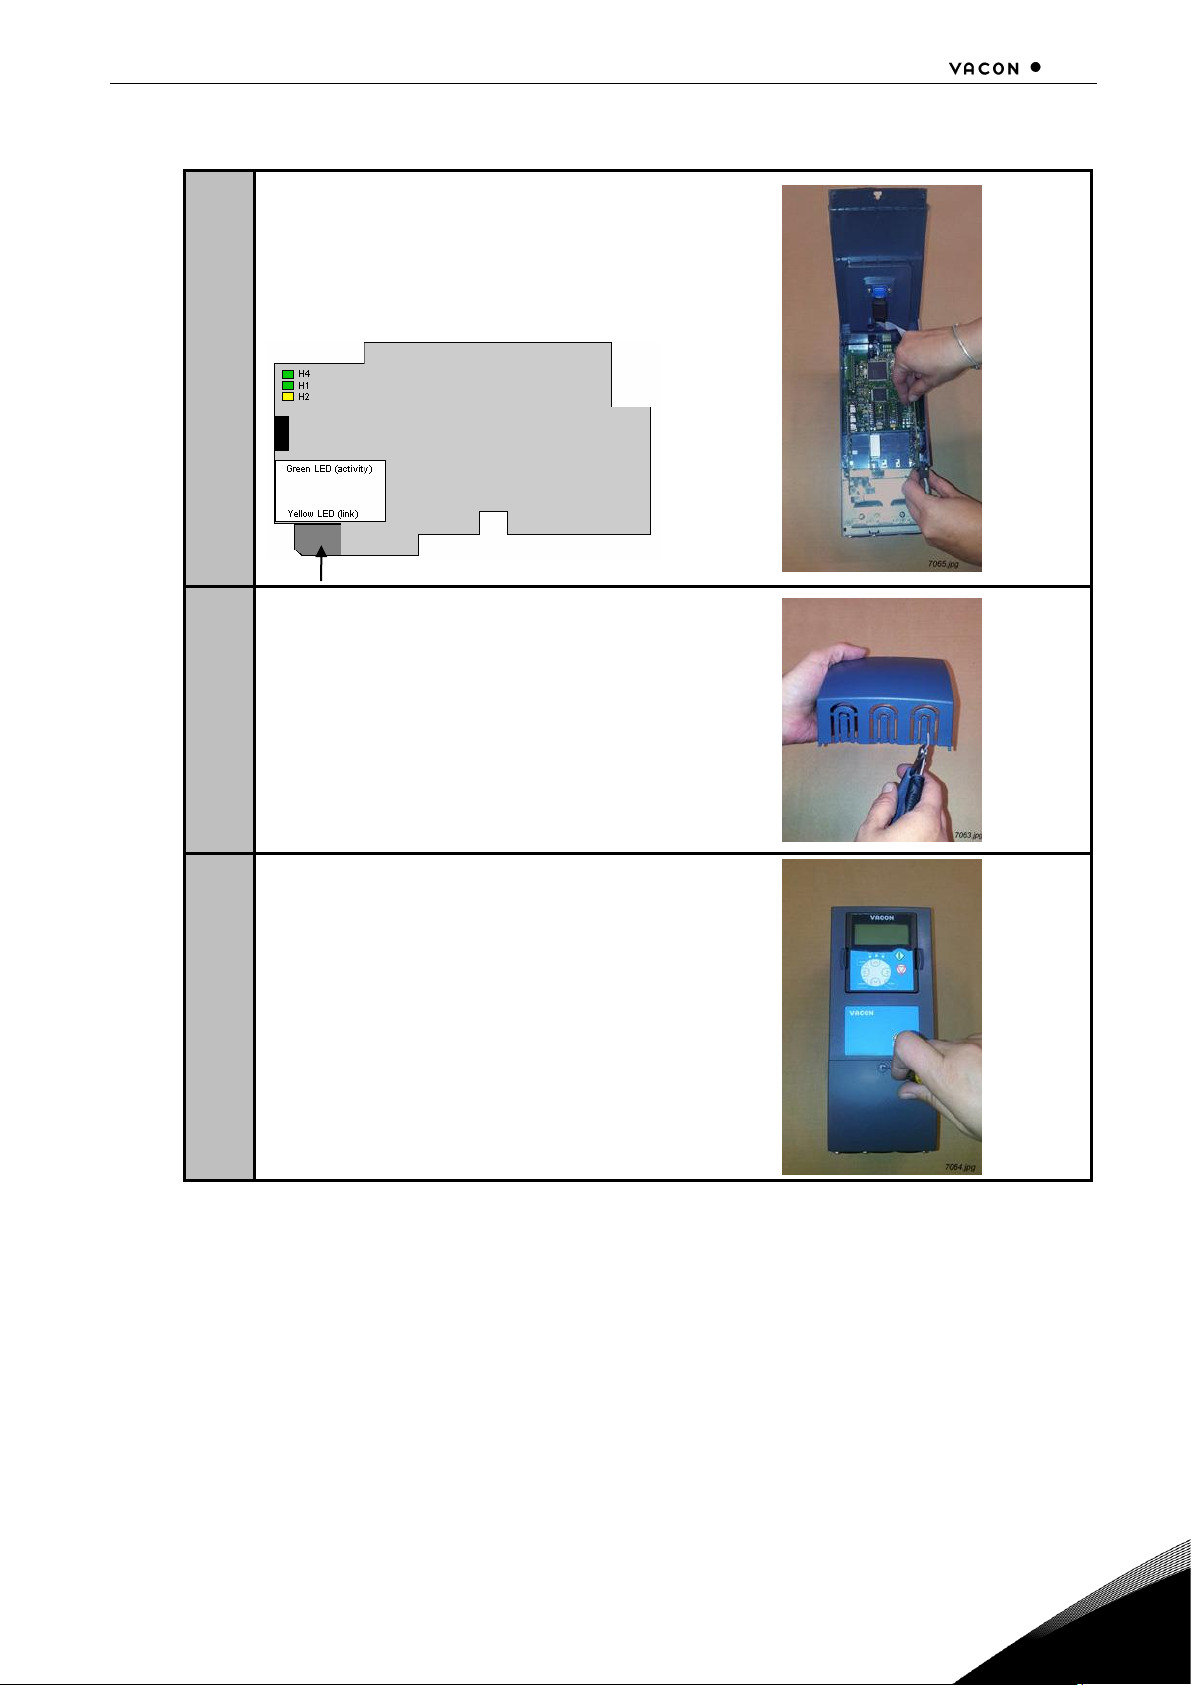
4
Install EtherNet/IP option board in slot
D or E on the control board of the AC
drive. Make sure that the grounding
plate (see below) fits tightly in the
clamp.
5
Make an opening for your cable by
cutting the grid as wide as necessary.
6
Close the cover of the control unit and
the cable cover.
Page 12
10 Installation
Local contacts: http://drives.danfoss.com/danfoss-drives/local-contacts/
3
3.2 NCDrive
The VACON® NCDrive software can be used with the EtherNet/IP board in VACON® NXS and NXP
drives. However, it does not work with with NXL drives.
It is recommended that you use the VACON® NCDrive software only in LAN (Local Area Network).
NOTE! If an OPTCQ Ethernet option board is used for an NC Tools connection, like VACON® NCDrive,
the OPT-D3 board cannot be used.
NCLoad does not work via Ethernet. See VACON® NCDrive Help for further information.
3.3 IP tool NCIPConfig
To start using the VACON® EtherNet/IP board, the IP address must be correctly configured. The
OPTCQ board has static IP as default (firmware V003 and older) or DHCP as default (firmware V004
or newer).
If static IP is used, the correct IP address must be set before connecting the board to the network. If
DHCP is used, the board can be connected to the network, and when there is a DHCP server in the
network, the OPTCQ board will obtain its IP address from the DHCP server.
You need a PC with an Ethernet connection and the NCIPConfig tool installed to set the EtherNet/IP
board's IP addresses. To install the NCIPConfig tool, start the installation program from CD or
download it from the http://drives.danfoss.com website. After starting the installation program,
follow the on-screen instructions.
When the program is installed successfully, launch it by selecting it in the Windows Start menu.
Follow these instructions to set the IP addresses. Select
Help
-->
Manual
if you want more
information about the software features.
1
Connect your PC to the Ethernet network with an Ethernet cable.
You can also connect the PC directly to the device using a crossover cable. This option
may be needed if your PC does not support the Automatic crossover function.
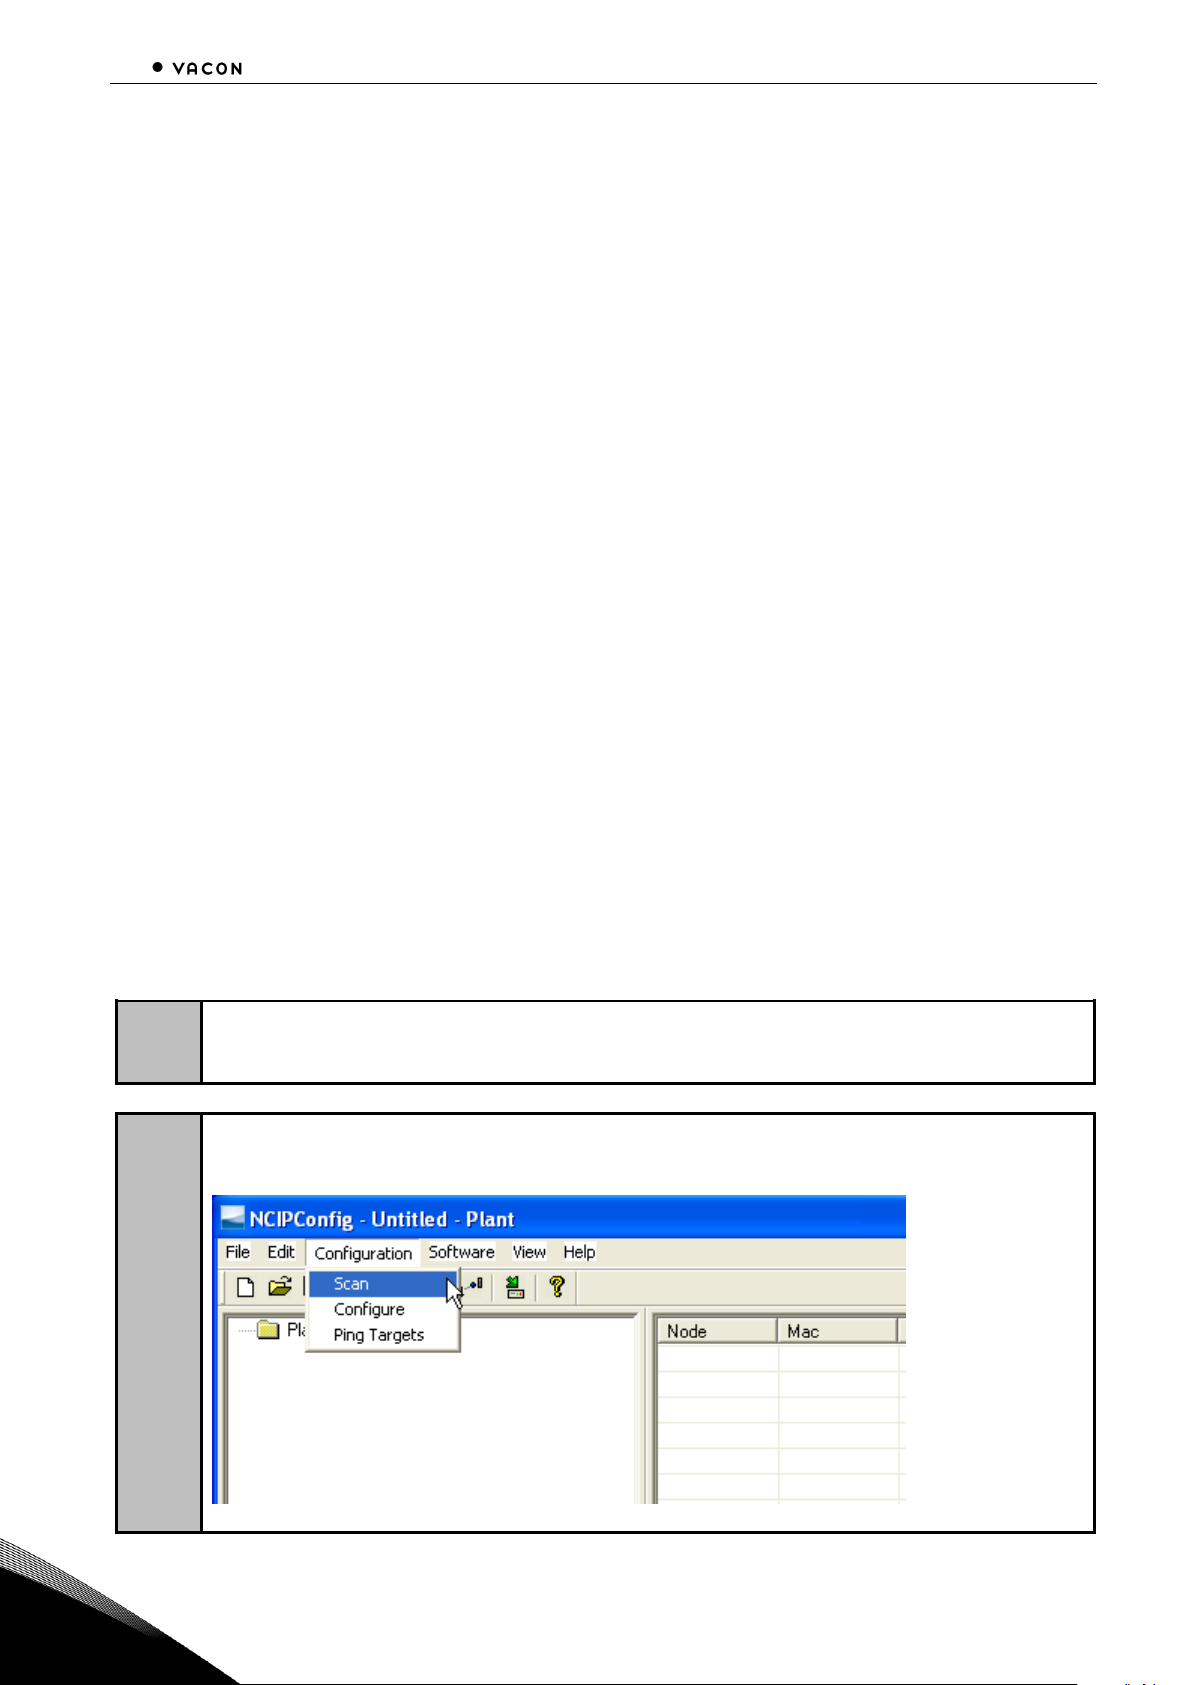
2
Scan the network nodes. Select
Configuration
-->
Scan
and wait until the devices
connected to the bus in the tree structure are displayed to the left of the screen.
Page 13
Installation 11
Local contacts: http://drives.danfoss.com/danfoss-drives/local-contacts/
3
NOTE! Some switches block broadcast messages. In this case, each network node must be scanned
separately. Read the manual under Help menu.
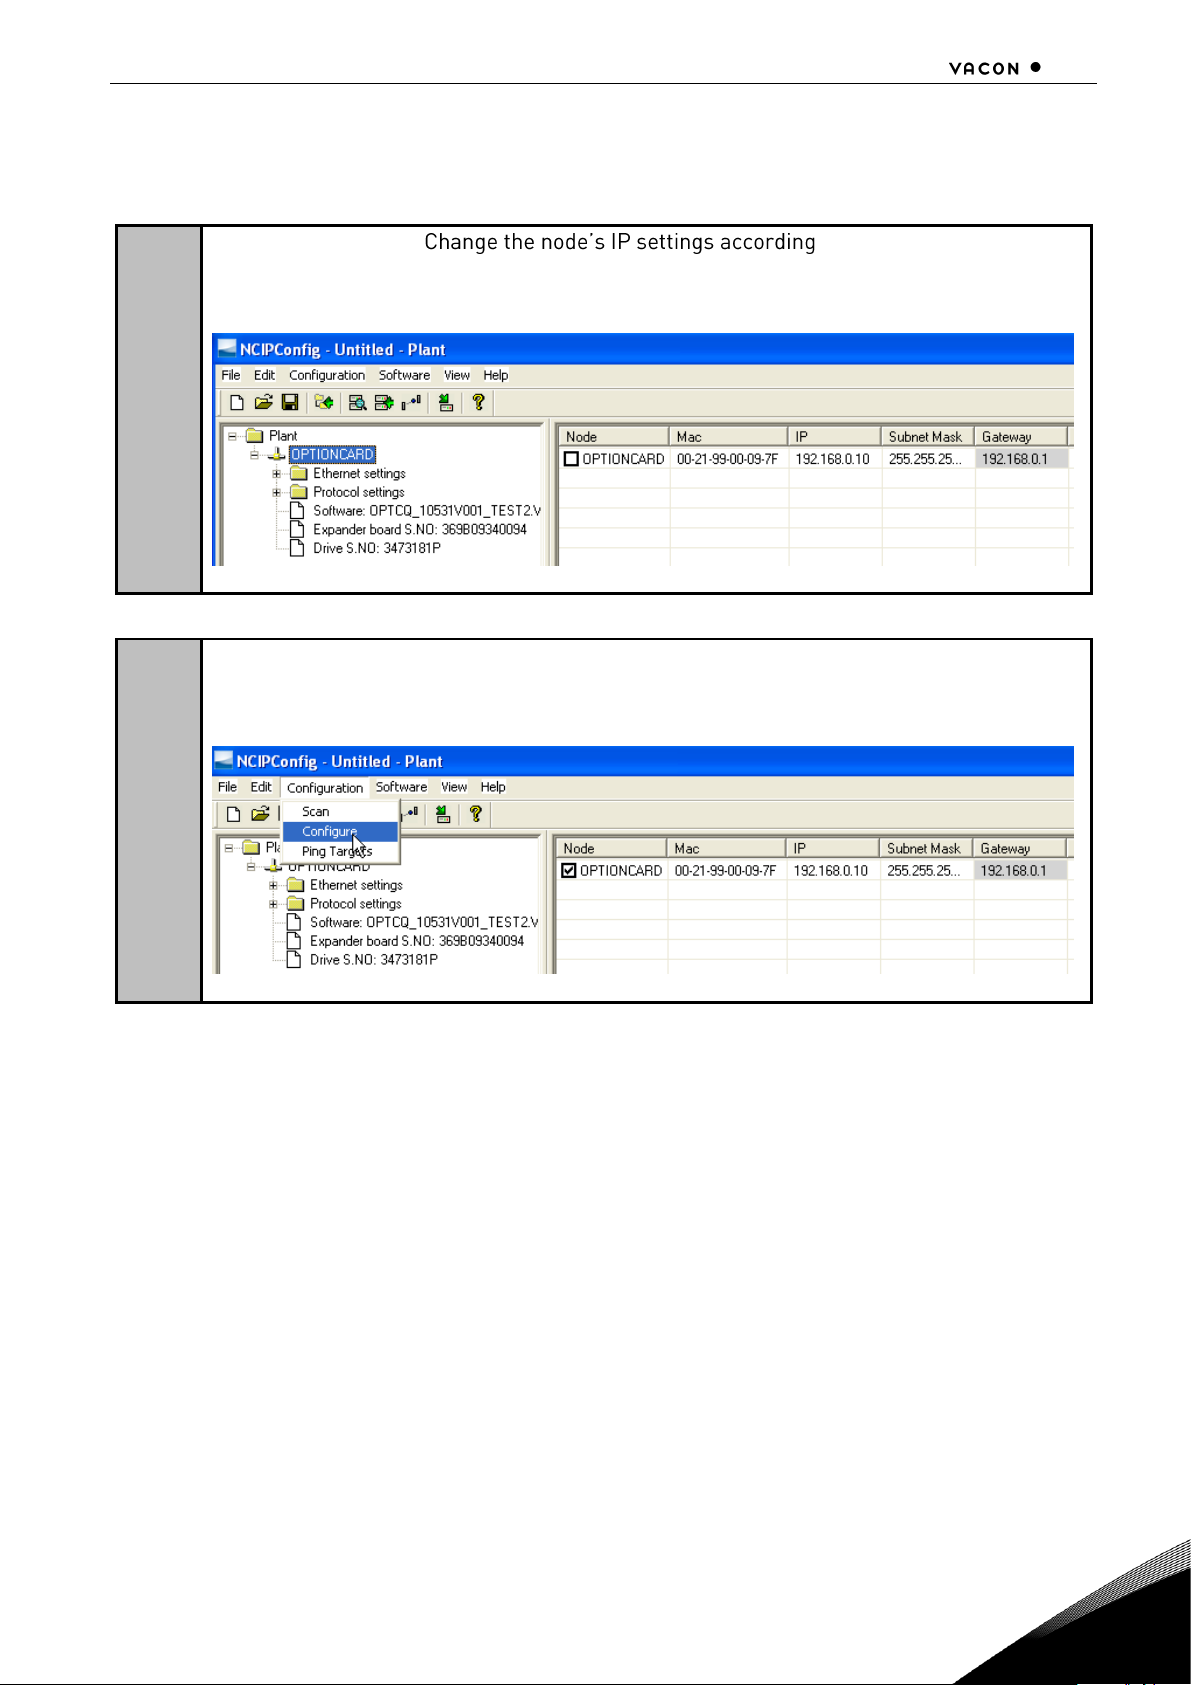
3
Set the IP addresses. to the network IP settings.
The program reports conflicts with a red colour in a table cell. Read the manual under
Help
menu.
4
Send configuration to boards. In the table view, tick the boxes for boards whose
configuration you want to send. Select
Configuration
, then
Configure
. Your changes are
sent to the network and will be valid immediately.
NOTE! Only the symbols A-Z, a-z and 0-9 can be used in the drive name. Do not use special
characters or Scandinavian letters (ä, ö, etc.). The drive name can be freely formed using the
allowed characters.
Page 14

12 Installation
Local contacts: http://drives.danfoss.com/danfoss-drives/local-contacts/
3
3.3.1 Updating the OPTCQ option board program with the NCIPConfig tool
In some cases it may be necessary to update the option board's firmware. Differing from other
VACON® option boards, the EtherNet/IP option board's firmware is updated with the VACON®
NCIPConfig tool. The IP addresses of the PC and the option board must be in the same area when
the software is loaded.
1
To start the firmware update, scan the nodes in the network according to the instructions
in Chapter 7. When you can see all nodes in the view, update the new firmware by clicking
the VCN packet field on the right in the table view of VACON® NCIPConfig.
2
Choose a new firmware packet in the window that opens.
3
Tick the new s box in the VCN Packet field at the right corner of the
table view. Select all nodes to be updated by ticking the boxes. Send the new firmware to
the board by selecting
Software
-->
Download
.
1.
2.
Page 15

Installation 13
Local contacts: http://drives.danfoss.com/danfoss-drives/local-contacts/
3
NOTE! Do not do a power up cycle within 1 minute after downloading the option board software. This
can cause the option board to go to Safe Mode. This situation can only be solved by re-downloading
the software. The Safe Mode triggers a fault code (F54). The Board slot error F54 can also appear
due to a faulty board, a temporary malfunction of the board or a disturbance in the environment.
NOTE! If the OPTCQ board firmware is updated from V003 (or older) to V004 (or newer), the static IP
address assigned to the board will remain after the update. To activate the DHCP mode manually,
see Chapter 4.
3.4 Configuring the option board parameters
These features are available in the VACON® NCIPConfig tool version 1.6.
1
In the tree-view, expand the folders until you reach the board parameters.
2
Slowly double-click the parameter (
Comm. Time-out
in the figure below) and enter a new
value. When the modification is complete, the new parameter values are automatically
sent to the option board.
NOTE! If the fieldbus cable is broken or removed, a fieldbus error is generated. Reset the fault by
checking the installation. If the installation is correct, contact your local contacts. See VACON® NX
All in One Application Manual for resetting faults.
Page 16

14 Commissioning
Local contacts: http://drives.danfoss.com/danfoss-drives/local-contacts/
4
4. COMMISSIONING
The VACON® EtherNet/IP board is commissioned with the control keypad by giving values to
appropriate parameters in menu M7 (or with the VACON® NCIPConfig tool, see Chapter 3.3). Keypad
commissioning is only possible with the VACON® NXP and NXS type AC drives. The VACON® NXL AC
drives require the VACON® NCIPConfig tool.
In the Expander board menu (M7) you can see which expander boards are connected to the control
board. You can also edit the parameters associated with the expander board.
1
Enter the following menu level (G#) with the arrow button right. Browse through slots A
to E with the arrow buttons up/down to see which expander boards are connected.
2
On the last line of the display, you see the number of parameter groups associated with
the board. Press the arrow button right once more to reach the parameter group level
where there is only one group in the EtherNet/IP board case: Parameters.
3
To go to Parameter group, press the arrow button right again.
Table 1. EtherNet/IP monitoring values
No
Name
Description
1
Speed/duplex
See chapter 4.1 for details.
Table 2. EtherNet/IP parameters
No
Name
Default
Range
Description
1
Comm. Timeout
0
255 s
0 = RPI (Requested Packet
Interval) x CTM (Connection
Timeout Multiplier)
2
IP Part 1
192
1 223
IP Address Part 1
3
IP Part 2
168
IP Address Part 2
4
IP Part 3 0
IP Address Part 3
5
IP Part 4
10
IP Address Part 4
6
SubNet Part 1
255
55
Subnet Mask Part 1
7
SubNet Part 2
255
Subnet Mask Part 2
8
SubNet Part 3
0
Subnet Mask Part 3
9
SubNet Part 4
0
Subnet Mask Part 4
10
DefGW Part 1
192
55
Default Gateway Part 1
11
DefGW Part 2
168
Default Gateway Part 2
12
DefGW Part 3
0
Default Gateway Part 3
13
DefGW Part 4
1
Default Gateway Part 4
14
OutputAssembly
21
See Chapter 7
15
InputAssembly
71
See Chapter 7
16
Speed/duplex
Autoneg.
-
Speed and duplex of the
Ethernet port. See chapter 4.1
for details.
Page 17

Commissioning 15
Local contacts: http://drives.danfoss.com/danfoss-drives/local-contacts/
4
NOTE! The default value of parameter 1 is 0 in firmware versions V004 and newer. In earlier
versions the default value is 10 seconds.
NOTE! The default value of parameters 2-13 is 0 in firmware versions V004 and newer, because
DHCP is enabled by default.
4.1 Speed and duplex
Speed and duplex parameter can be used to set Ethernet port to use specific value, but it is
recommended that auto-negotiation is always used. Possible values are listed in table below.
No
Name
Description
1
autoneg.
Ethernet port speed and duplex
is detected automatically
2
10M HD
10 Mb half duplex
3
10M FD
10 Mb full duplex
4
100M HD
100 Mb half duplex
5
100M FD
100 Mb full duplex
Monitoring view shows current speed and duplex of the Ethernet port. If there is no connection then
value is "undefined". Possible values are listed in table below.
No
Name
Description
1
undefined
Ethernet port is not up. Speed
and duplex have not been
detected.
2
10M HD
10 Mb half duplex
3
10M FD
10 Mb full duplex
4
100M HD
100 Mb half duplex
5
100M FD
100 Mb full duplex
Page 18

16 Commissioning
Local contacts: http://drives.danfoss.com/danfoss-drives/local-contacts/
4
4.2 IP address
The IP address is divided into four octets. The value is 0.0.0.0 when DHCP is used until the board has
been assigned an IP address. A static IP address is entered by editing the parameters from the
keypad or using NCIPConfig. This disables DHCP mode.
When the board has static IP, and the IP address is changed to *.0.0.0 through VACON® NCIPConfig
or the keypad, then DHCP mode will be re-enabled after the next power-up.
Changing the IP address to *.255.255.255 causes the board to change to static IP address
192.168.0.10 after the next power-up.
4.3 Communication timeout
With firmware version V004 or newer, when this parameter is assigned the value 0, the
communication timeout is the value of the Requested Packet Interval (RPI) multiplied with the
Connection Timeout Multiplier (CTM) as defined in the EtherNet/IP master. RPI for the OPTCQ board
is at minimum 16 milliseconds. If a value other than 0 is used as the communication timeout, this
means the total time (in seconds) including the RPI x CTM timeout. If communication with the
EtherNet/IP master device is inactive for a period longer than the defined communication timeout,
the drive generates a fieldbus fault.
With firmware version V003 or older, when this parameter is assigned the value 0, the
communication timeout is disabled. In this case a fieldbus fault is generated only if the Ethernet link
is lost (for example, if the cable is disconnected). You can change the Communication timeout value
from the keypad or with the VACON® NCIPConfig tool. See Chapter 3.3.
NOTE! If the fieldbus cable is broken or removed, a fieldbus error is generated. Reset the fault by
checking the installation. If the installation is correct, contact your local contacts. See VACON® NX
All in One Application Manual for resetting faults.
4.4 Input/Output assemblies
The I/O assemblies are changed in the keypad, through VACON® NCIPConfig, or in the EtherNet/IP
master. The same assembly must be selected in both the drive and the EtherNet/IP master. The
configuration assembly for the OPTCQ board must be set to 1 in the EtherNet/IP master.
All EtherNet/IP parameters are saved to the EtherNet/IP board (not to the control board). If the new
EtherNet/IP board is changed into the control board, you must configure the new EtherNet/IP board.
The option board parameters can be saved to the keypad, with the VACON® NCIPConfig tool or with
VACON® NCDrive.
Page 19

Commissioning 17
Local contacts: http://drives.danfoss.com/danfoss-drives/local-contacts/
4
Figure 4. Configuration example from Rockwell PLC.
Figure 5. Configuration example from EIPScan tool.
Page 20

18 EtherNet/IP
Local contacts: http://drives.danfoss.com/danfoss-drives/local-contacts/
5
5. ETHERNET/IP
5.1 Overview
EtherNet/IP (EtherNet/Industrial Protocol) is a communication system suitable for use in industrial
environments. EtherNet/IP allows industrial devices to exchange time-critical application
information. These devices include simple I/O devices such as sensors and actuators, as well as
complex control devices such as robots, programmable logic controllers, welders, and process
controllers.
EtherNet/IP uses CIP (Control and Information Protocol), the common network, transport and
application layers also shared by ControlNet and EtherNet/IP. EtherNet/IP then makes use of the
standard Ethernet and TCP/IP technology to transport CIP communications packets. The result is a
common, open application layer on top of the open and popular Ethernet and TCP/IP protocols.
EtherNet/IP Messaging Forms:
• Unconnected Messaging is used for connection establishment and for infrequent, low-
priority messages.
• Connected Messaging uses resources that are dedicated in advance to a particular purpose,
such as real-time I/O data transfer.
• EtherNet/IP Messaging Connections:
• Explicit Messaging Connections are general-purpose point-to-point connections. Messages
are sent through TCP protocol.
• Implicit (I/O Data) Connections are established to transfer application-specific I/O Data at
regular intervals. They are often set up as one-to-many relationships to take full advantage
of the producer-consumer multicast model. Implicit messages are sent through UDP
protocol.
5.2 AC/DC drive profile
To provide interoperability between devices from different manufacturers, a "standard" must be
defined so that:
• The devices behave in the same way.
• They produce and/or consume the same basic set of I/O data.
• They contain the same basic set of configurable attributes.
This information is called the device profile.
5.3 EDS file
The Electronic Data Sheet (EDS) is a specially formatted ASCII text file that contains configuration
data for specific device types. The EDS provides information about the context, content and format of
the device configuration data.
The information in the EDS allows configuration tools to provide informative screens that guide you
through the steps that are needed to configure a device.
The EDS provides all of the information necessary to access and alter the configurable parameters
of a device. This information matches the information provided by instances of the Parameter Object
Class. The CIP Object Library describes the Parameter Object Class in detail.
Page 21

EtherNet/IP 19
Local contacts: http://drives.danfoss.com/danfoss-drives/local-contacts/
5
5.4 Explicit messaging
Explicit Messaging is used in commissioning and parametrising of the EtherNet/IP board. Explicit
messages provide multipurpose, point-to-point communication paths between two devices. They
provide the typical request/response-oriented network communication used to perform node
configuration and problem diagnosis. Explicit messages typically use low priority identifiers and
contain the specific meaning of the message right in the data field. This includes the service to be
performed and the specific object attribute address.
NOTE! If Class 1 connection (cyclic data) has been established, Explicit Messages cannot be used to
control Output Data. However, this restriction does not apply for I/O Data reading.
5.4.1 List of object classes
The Communication Interface supports the following object classes:
Table 3.
Class
Object
0x01
Identity Objects
0x04
Assembly Object
0x06
Connection Manager Object
0x28
Motor Data Object
0x29
Control Supervisor Object
0x2A
AC/DC Drive Object
0xA0
Vendor Parameters Object
0xBE
Assembly Instance Selector Object
0xF5
TCP/IP Interface Object
0xF6
Ethernet Link Object
5.4.2 List of services
The services supported by the object classes in Table 4 are shown below.
Table 4.
Service
Code
(in hex)
Service Name
Identity objec
t
Connection manager
TCP/IP interface
Ethernet link
Assembly
Motor Data
Control S
upervisor
AC/DC Drive
Vendor parameter
Assemly instance
selector
Class
Inst
Class
Inst
Class
Inst
Class
Inst
Class
Inst
Class
Inst
Class
Inst
Class
Inst
Class
Inst
Class Inst
01
Get_Attributes_All
Y Y Y Y Y Y 05
Reset (Type 0)
Y Y 0E
Get_Attribute_Single
Y Y Y Y Y Y Y Y Y Y Y Y Y Y 10
Set_Attribute_Single
Y Y Y Y Y Y
Y
4E
Forward Close
Y 52
Unconnected_Send
Y 54
Forward_Open
Y
See Chapter 6 for the Interface Object profiles.
Page 22

20 EtherNet/IP
Local contacts: http://drives.danfoss.com/danfoss-drives/local-contacts/
5
5.4.3 List of data types
The attribute list that follows includes information on the Data Type of each attribute. The following
tables explain the Data, Structure, and Array Type codes used in the Data Type column.
Table 5. Elementary Data Types
Data Type Name
Data Type
Code (in hex)
Data Type Description
BOOL
C1
Logical Boolean with values
TRUE and FALSE
SINT
C2
Signed 8-bit integer value
INT
C3
Signed 16-bit integer value
USINT
C6
Unsigned 8-bit integer value
UINT
C7
Unsigned 16-bit integer value
UDINT
C8
Unsigned 32-bit integer value
BYTE
D1
Bit string - 8 bits
WORD
D2
Bit string - 16 bits
SHORT_STRING
DA
Character string (1 byte per
character, 1 byte length
indicator)
Table 6. Constructed Data Types
Type Code
Description
A1
Abbreviated array type encoding
A2
Formal structure type encoding
5.4.4 Reset service
The following table lists the different types of resets supported by the Identity Object. Resetting the
OPTCQ interface to its out-of-box configuration sets all the attributes to their default values. It also
changes the response of the drive to a loss of communications with the OPTCQ. The device has to be
re-configured for your application before resuming normal operation.
Table 7.
Value
Type of Reset
0
Emulate as closely as possible the cycling of power to
the OPTCQ EtherNet/IP Interface. This value is the
default if this parameter is omitted. The VACON® AC
drive stops if it is running.
Page 23

Common industrial objects implemented by the option board 21
Local contacts: http://drives.danfoss.com/danfoss-drives/local-contacts/
6
6. COMMON INDUSTRIAL OBJECTS IMPLEMENTED BY THE OPTION BOARD
6.1 Common required objects of the CIP
6.1.1 Identity object, class 0x01
Table 8.
Class Attributes
Id
Description
Data Type
Access Rule
01h
Revision
Get 02h
Max Instances
UINT
Get Class Services
Id
Service
0Eh
Get_Attribute_Single
Instance Attributes
Id
Description
Data Type
Access Rule
01h
Vendor ID
UINT
Get 02h
Device Type
UINT
Get 03h
Product Code
UINT
Get
04h
Revision
STRUCT
of:
Get
Major Revision
USINT
Minor Revision
USINT
05h
Status
WORD
Get
Byte struct:
Bit0 = Owned
Bit2 = Configured
Bit8 = Minor Revocerable fault
Bit9 = Minor Unrecovable fault
Bit10 = Major Recoverable fault
Bit11 = Major Unrecoverable fault
Bit4 7:
0011 = No I/O connection
established
0110 = At least one I/O
connection in run mode
06h
Serial Number
UDINT
Get
07h
Product Name
SHORT_
STRING
Get
Instance Services
Id
Service
01h
Get_Attributes_All
05h
Reset*
0Eh
Get_Attribute_Single
*Only reset type 0 reset of the Option Board
Page 24

22 Common industrial objects implemented by the option board
Local contacts: http://drives.danfoss.com/danfoss-drives/local-contacts/
6
6.1.2 Connection manager object, class 0x06
Table 9.
Class Attributes
Id
Description
Data
Type
Access Rule
01h
Revision
Get 02h
Max Instance
Get Class Services
Id
Service
01h
Get_Attributes_All
0Eh
Get_Attribute_Single
Instance Attributes
Id
Description
Data
Type
Access Rule
01h
Open Requests
UINT
Get 02h
Open Format Rejects
UINT
Get
03h
Open Resource
Rejects
UINT
Get
04h
Open Other Rejects
UINT
Get 05h
Close Requests
UINT
Get
06h
Close Format
Requests
UINT
Get
07h
Close Other Requests
UINT
Get 08h
Connection Timeouts
UINT
Get Instance Services
Id
Service
01h
Get_Attributes_All
0Eh
Get_Attribute_Single
4Eh
Forward Close
52h
Unconnected_Send
54h
Forward_Open
RPI = Requested Packet Intervall, minimum
time is 16ms
Page 25

Common industrial objects implemented by the option board 23
Local contacts: http://drives.danfoss.com/danfoss-drives/local-contacts/
6
6.1.3 TCP/IP interface object, class 0xF5
Table 10.
Class Attributes
Id
Description
Data
Type
Access Rule
01h
Revision
Get 02h
Max Instance
UINT
Get Class Services
Id
Service
01h
Get_Attributes_All
0Eh
Get_Attribute_Single
Instance Attributes
Id
Description
Data
Type
Access Rule
01h
Status
DWORD
Get
02h
Configuration
Capability
DWORD
Get
03h
Configuration Control
DWORD
Get / Set
04h
Physical Link
STRUCT
of:
Get
Path Size
UINT
Path
Padded
EPATH
05h
Interface
Configuration
STRUCT
of:
Get / Set
IP Address
UDINT
Network Mask
UDINT
Gateway Address
UDINT
Name Server
UDINT
Name Server 2
UDINT
Domain Name
STRING
06h
Host Name
STRING
Get / Set
Instance Services
Id
Service
01h
Get_Attributes_All
0Eh
Get_Attribute_Single
10h
Set_Attribute_Single
Attribute Configuration Control supports only the value 0 (device is using configuration values that
are stored in non-volatile memory).
Attribute Host Name is used only for information purposes.
Page 26

24 Common industrial objects implemented by the option board
Local contacts: http://drives.danfoss.com/danfoss-drives/local-contacts/
6
6.1.4 Ethernet link object, class 0xF6
Table 11.
Class Attributes
Id
Description
Data Type
Access Rule
01h
Revision
UINT
Get 02h
Max Instance
UINT
Get
03h
Number of
Instances
UINT
Get
Class Services
Id
Service
01h
Get_Attributes_All
0Eh
Get_Attribute_Single
Instance Attributes
Id
Description
Data Type
Access Rule
01h
Interface Speed
UDINT
Get 02h
Interface Flags
DWORD
Get
03h
Physical
Address
ARRAY of
6 USINTs
Get
Instance Services
Id
Service
0Eh
Get_Attribute_Single
Page 27

Common industrial objects implemented by the option board 25
Local contacts: http://drives.danfoss.com/danfoss-drives/local-contacts/
6
6.2 Objects present in an AC/DC drive
6.2.1 Assembly object, class 0x04
Table 12.
Class Attributes
Id
Description
Access Rule
NOT SUPPORTED
Class Services
Id
Service
NOT SUPPORTED
Instance Attributes
Id
Description
Data Type
Access Rule
03h
Data
ARRAY of
BYTE
Get / Set
Instance Services
Id
Service
0Eh
Get_Attribute_Single
10h
Set_Attribute_Single
6.2.2 Motor data object, class 0x28
Table 13.
Class Attributes
Id
Description
Access Rule
NOT SUPPORTED
Class Services
Id
Service
Requirements
NOT SUPPORTED
Instance Attributes
Id
Description
Data
Type
Access
Rule
03h
Motor Type
USINT
Get 06h
Rated Current
UINT
Get / Set
07h
Rated Voltage
UINT
Get / Set
09h
Rated
Frequency
UINT
Get / Set
0Ch
Pole Count
UINT
Get
0Fh
Base Speed
UINT
Get / Set
Instance Services
Id
Service
0Eh
Get_Attribute_Single
10h
Set_Attribute_Single
Page 28

26 Common industrial objects implemented by the option board
Local contacts: http://drives.danfoss.com/danfoss-drives/local-contacts/
6
6.2.3 Control supervisor object, class 0x29
Table 14.
Class Attributes
Id
Description
Access Rule
NOT SUPPORTED
Class Services
Id
Service
Requirements
NOT SUPPORTED
Instance Attributes
Id
Description
Data Type
Access Rule
03h
Run1
BOOL
Get / Set
04h
Run2
BOOL
Get / Set
05h
NetCtrl *
BOOL
Get / Set
06h
State
USINT
Get 07h
Running1
BOOL
Get 08h
Running2
BOOL
Get 09h
Ready
BOOL
Get 0Ah
Faulted
BOOL
Get 0Bh
Warning
BOOL
Get 0Ch
FaultRst
BOOL
Get / Set
0Fh
CtrlFromNet**
BOOL
Get Instance Services
Id
Service
0Eh
Get_Attribute_Single
10h
Set_Attribute_Single
05h
Reset
* Network Control (When Bit is set to 1 and control place is fieldbus, the drive gets control from the network).
NOTE! Does not force the drive to fieldbus control.
** Indicates the status of NetCtrl.
Figure 6. When both Run attributes (Run1 & Run2) are set, no action is taken.
Page 29

Common industrial objects implemented by the option board 27
Local contacts: http://drives.danfoss.com/danfoss-drives/local-contacts/
6
6.2.4 AC/DC drive object, class 0x2A
Table 15.
Class Attributes
Id
Description
Access Rule
NOT SUPPORTED
Class Services
Id
Service
NOT SUPPORTED
Instance Attributes
Id
Description
Data Type
Access Rule
03h
AtReference
BOOL
Get 04h
NetRef*
BOOL
Get / Set
05h
NetProc**
BOOL
Get / Set
06h
DriveMode
USINT
Get / Set
07h
SpeedActual
INT
Get 08h
SpeedRef
INT
Get / Set
0Bh
TorqueActual
INT
Get 0Ch
TorqueRef
INT
Get / Set
0Dh
ProcessActual
INT
Get 0Eh
ProcessRef
INT
Get / Set
1Dh
RefFromNet***
BOOL
Get Instance Services
Id
Service
0Eh
Get_Attribute_Single
10h
Set_Attribute_Single
* Network Reference (When Bit is 1 and control place is fieldbus, the drive gets reference from the network).
** Network Process (used to write process reference)
• When Netproc = 1 & Drive mode = 0 (Vendor-specific), Process Reference is sent to the Drive
as Process Data 1
• When Netproc = 1 & Drive mode = 4 (Process Control), Process Reference is sent to the Drive
as Process Data 2
• When NetProc = 0, Process Reference must fail.
*** Indicates the status of NetRef.
Page 30

28 Common industrial objects implemented by the option board
Local contacts: http://drives.danfoss.com/danfoss-drives/local-contacts/
6
6.3 Vendor-specific objects
6.3.1 Vendor parameter object, class 0xA0
Vendor Parameter Object is used to get access to the drive parameters. Because drive parameters
are identified by a 16-bit ID number, it is impossible to use only an Attribute ID, which is 8 bits in
length. To overcome this issue the following method is used to calculate the requested Drive
Parameter ID:
Drive Parameter ID = Instance ID (Higher Byte) + Attribute ID (Lower Byte).
Table 16.
Class Attributes
Id
Description
Access Rule
NOT SUPPORTED
Class Services
Id
Service
NOT SUPPORTED
Instance Attributes
Id
Description
Access Rule
LOWER BYTE OF THE PARAMETER ID
Instance Services
Id
Service
0Eh
Get_Attribute_Single
10h
Set_Attribute_Single
6.3.2 Assembly instance selector object, class 0xBE
Table 17.
Class Attributes
Id
Description
Access Rule
NOT SUPPORTED
Class Services
Id
Service
NOT SUPPORTED
Instance Attributes
Id
Description
Data Type
Access Rule
03h
InputInstance
USINT
Get / Set
04h
OutputInstance
USINT
Get / Set
Instance Services
Id
Service
0Eh
Get_Attribute_Single
10h
Set_Attribute_Single
Page 31

Assembly instances implemented by the option board 29
Local contacts: http://drives.danfoss.com/danfoss-drives/local-contacts/
7
7. ASSEMBLY INSTANCES IMPLEMENTED BY THE OPTION BOARD
7.1 Output instances
The output instances of the drive are the following:
• Assemblys 20-25 ODVA AC/DC Profile
• Assemblys 71-75 ODVA AC/DC Profile
• Assemblys 100-> Vacon Profile.
7.1.1 Assembly instance 20
Table 18.
Instance 20 (Output)
Length = 4 Bytes
Byte
Bit 7
Bit 6
Bit 5
Bit 4
Bit 3
Bit 2
Bit 1
Bit 0 0
FaultReset
RunFwd
1
2
Speed Reference (Low Byte), rpm
3
Speed Reference (High Byte), rpm
7.1.2 Assembly instance 21 (default)
Table 19.
Instance 21 (Output)
Length = 4 Bytes
Byte
Bit 7
Bit 6
Bit .5
Bit 4
Bit 3
Bit 2
Bit 1
Bit 0 0
NetRef
NetCtrl
FaultReset
RunRev
RunFwd
1
2
Speed Reference (Low Byte), rpm
3
Speed Reference (High Byte), rpm
7.1.3 Assembly instance 23
Table 20.
Instance 23 (Output)
Length = 6 Bytes
Byte
Bit 7
Bit 6
Bit .5
Bit 4
Bit 3
Bit 2
Bit 1
Bit 0
0 NetRef
NetCtrl
FaultReset
RunRev
RunFwd
1
2
Speed Reference (Low Byte), rpm
3
Speed Reference (High Byte), rpm
4
Torque Reference (Low Byte), Nm
5
Torque Reference (High Byte), Nm
Page 32

30 Assembly instances implemented by the option board
Local contacts: http://drives.danfoss.com/danfoss-drives/local-contacts/
7
Torque Reference is not sent to the drive if Motor Control Mode (Parameter ID 600) is set to values
other than:
• 2 Torque Control
• 4 Closed Loop Torque Control.
Torque Reference is sent to the drive as a Process Data 1.
NOTE! Torque reference is not functional in NXL.
7.1.4 Assembly instance 25
Table 21.
Instance 25 (Output)
Length = 6 Bytes
Byte
Bit 7
Bit 6
Bit .5
Bit 4
Bit 3
Bit 2
Bit 1
Bit 0
0
NetProc
NetRef
NetCtrl
FaultReset
RunRev
RunFwd
1
Drive Mode
2
Speed Reference (Low Byte), rpm
3
Speed Reference (High Byte, rpm
4
Process Reference (Low Byte)
5
Process Reference (High Byte)
The following drive modes are supported:
• 0 (Vendor-specific) Process Reference is sent to the drive as Process Data 1.
• 4 (Process Control) Process Reference is sent to the drive as Process Data 2 (see Chapter
8.5.3).
Other drive modes are not supported. If they are used, the Process Reference is not handled.
7.1.5 Assembly instance 101
Table 22.
Process Data is sent to the drive independently of the NetRef bit and the NetCtrl bit settings.
Instance 101 (Output)
Length = 8 Bytes
Byte
Bit 7
Bit 6
Bit .5
Bit 4
Bit 3
Bit 2
Bit 1
Bit 0 0
NetRef
NetCtrl
FaultReset
RunRev
RunFwd
1
2
FBSpeed Reference (Low Byte), %
3
FBSpeed Reference (High Byte), %
4
FBProcessDataIn1(Low Byte)
5
FBProcessDataIn1(High Byte)
6
FBProcessDataIn2(Low Byte)
7
FBProcessDataIn2(High Byte)
Page 33

Assembly instances implemented by the option board 31
Local contacts: http://drives.danfoss.com/danfoss-drives/local-contacts/
7
7.1.6 Assembly instance 111
Table 23.
* Reference 1 to the AC drive. Used normally as Speed reference. The allowed scaling is 0...10000. In the
application, the value is scaled in percentage of the frequency area between set minimum and maximum
frequency.
0 = 0.00 %, 10000 = 100.00 %
7.1.7 Assembly instance 128
Table 24.
Instance 128
Length = 20 Bytes
Byte
Bit 7
Bit 6
Bit 5
Bit 4
Bit 3
Bit 2
Bit 1
Bit 0
0
FBFixedControlWord (Low Octet)
1
FBGeneralControlWord (High Octet)
2
FBSpeedReference (Low Octet) in %
3
FBSpeedReference (High Octet) in %
4
FBProcessDataIn1 (Low Octet)
5
FBProcessDataIn1 (High Octet)
6
FBProcessDataIn2 (Low Octet)
7
FBProcessDataIn2 (High Octet)
8
FBProcessDataIn3 (Low Octet)
9
FBProcessDataIn3 (High Octet)
10
FBProcessDataIn4 (Low Octet)
11
FBProcessDataIn4 (High Octet)
Instance 111 (Output)
Length = 20 Bytes
Byte
Bit 7
Bit 6
Bit .5
Bit 4
Bit 3
Bit 2
Bit 1
Bit 0
0
FBFixedControlWord (Low Byte)
1
FBFixedControlWord (High Byte)
2
FBSpeedReference (Low Byte) *
3
FBSpeedReference (High Byte) *
4
ProcessDataIn1 (LowByte)
5
ProcessDataIn1 (HighByte)
6
ProcessDataIn2 (LowByte)
7
ProcessDataIn2 (HighByte)
8
ProcessDataIn3 (LowByte)
9
ProcessDataIn3 (HighByte)
10
ProcessDataIn4 (LowByte)
11
ProcessDataIn4 (HighByte)
12
ProcessDataIn5 (LowByte)
13
ProcessDataIn5 (HighByte)
14
ProcessDataIn6 (LowByte)
15
ProcessDataIn6 (HighByte)
16
ProcessDataIn7 (LowByte)
17
ProcessDataIn7 (HighByte)
18
ProcessDataIn8 (LowByte)
19
ProcessDataIn8 (HighByte)
Page 34

32 Assembly instances implemented by the option board
Local contacts: http://drives.danfoss.com/danfoss-drives/local-contacts/
7
12
FBProcessDataIn5 (Low Octet)
13
FBProcessDataIn5 (High Octet)
14
FBProcessDataIn6 (Low Octet)
15
FBProcessDataIn6 (High Octet)
16
FBProcessDataIn7 (Low Octet)
17
FBProcessDataIn7 (High Octet)
18
FBProcessDataIn8 (Low Octet)
19
FBProcessDataIn8 (High Octet)
7.1.7.1 Control word
Table 25.
Bit
Description
0
1
0
Start/Stop
Stop request from fieldbus
Run request from fieldbus
1
Direction
Requested direction is
"FORWARD"
Requested direction is
"REVERSE"
2
Fault Reset
No action
No action. Rising edge (0->1) =
Active faults, alarms and infos
are reset
3
Not in use
4
Not in use
5
Not in use
6
Not in use
7
Not in use
8
Request Fieldbus Control
Control Place is as
parameterised in the drive
(unchanged)
Control Place shall be
overridden to Fieldbus Control
9
Request Fieldbus
Reference
Source of setpoint value shall be
as parameterised in the drive
(unchanged)
Source of setpoint value shall
be overridden to Fieldbus
10
Not in use
11
Not in use
12
Not in use
13
Not in use
14
Not in use
15
Master connection state
Offline
Active
Page 35

Assembly instances implemented by the option board 33
Local contacts: http://drives.danfoss.com/danfoss-drives/local-contacts/
7
7.2 Input instances
7.2.1 Assembly instance 70
Table 26.
Instance 70 (Input)
Length = 4 Bytes
Byte
Bit 7
Bit 6
Bit .5
Bit 4
Bit 3
Bit 2
Bit 1
Bit 0 0
Running1
Faulted 1
2
Speed Actual (Low Byte), rpm
3
Speed Actual (High Byte), rpm
7.2.2 Assembly instance 71 (default)
Table 27.
7.2.3 Assembly instance 73
Table 28.
NOTE! Torque reference is not functional in VACON® NXL.
Instance 71 (Input)
Length = 4 Bytes
Byte
Bit 7
Bit 6
Bit .5
Bit 4
Bit 3
Bit 2
Bit 1
Bit 0
0
AtReference
RefFromNet
CtrlFromNet
Ready
Running2
Running1
Warning
Faulted
1
Drive State, see Chapter 7.2.6
2
Speed Actual (Low Byte), rpm
3
Speed Actual (High Byte), rpm
Instance 73 (Input)
Length = 6 Bytes
Byte
Bit 7
Bit 6
Bit .5
Bit 4
Bit 3
Bit 2
Bit 1
Bit 0
0
AtReference
RefFromNet
CtrlFromNet
Ready
Running2
Running1
Warning
Faulted
1
Drive State, see Chapter 7.2.6
2
Speed Actual (Low Byte), rpm
3
Speed Actual (High Byte), rpm
4
Torque Actual (Low Byte), Nm
5
Torque Actual (High Byte), Nm
Page 36

34 Assembly instances implemented by the option board
Local contacts: http://drives.danfoss.com/danfoss-drives/local-contacts/
7
7.2.4 Assembly instance 75
Table 29.
7.2.5 Assembly instance 107
Table 30.
7.2.6 Drive state
0x00 DN_NON_EXISTANT
0x01 DN_STARTUP
0x02 DN_NOT_READY
0x03 DN_READY
0x04 DN_ENABLED
0x05 DN_STOPPING
0x06 DN_FAULT_STOP
0x07 DN_FAULTED
Instance 75 (Input)
Length = 6 Bytes
Byte
Bit 7
Bit 6
Bit .5
Bit 4
Bit 3
Bit 2
Bit 1
Bit 0
0
AtReference
RefFromNet
CtrlFromNet
Ready
Running2
Running1
Warning
Faulted
1
Drive State, see Chapter 7.2.6
2
Speed Actual (Low Byte), rpm
3
Speed Actual (High Byte), rpm
4
Process Actual (Low Byte)
5
Process Actual (High Byte)
Instance 107 (Input)
Length = 8 Bytes
Byte
Bit 7
Bit 6
Bit .5
Bit 4
Bit 3
Bit 2
Bit 1
Bit 0
0
AtReference
RefFromNet
CtrlFromNet
Ready
Running2
Running1
Warning
Faulted
1
Drive State, see Chapter 7.2.6
2
% Speed Actual (Low Byte) *
3
% Speed Actual (High Byte) *
4
Process DataOut1 (Low Byte)
5
Process DataOut1 (High Byte)
6
Process DataOut2 (Low Byte)
7
Process DataOut2 (High Byte)
Page 37

Assembly instances implemented by the option board 35
Local contacts: http://drives.danfoss.com/danfoss-drives/local-contacts/
7
7.2.7 Assembly instance 117
Table 31.
* The actual value from the AC drive. The value is between 0...10000. In the application, the value is scaled in
percentage of frequency area between set minimum and maximum frequency.
0 = 0.00 %, 10000 = 100.00 %
** The actual speed of the motor. The unit is RPM.
*** The actual speed of the motor with slip speed. The unit is RPM.
Instance 117 (Input): EIP Drive Status
Length = 34 bytes
Byte
Bit 7
Bit 6
Bit .5
Bit 4
Bit 3
Bit 2
Bit 1
Bit 0
0
FBStatusWord (Low Byte)
1
FBStatusWord (High Byte)
2
% Speed Actual (Low Byte) *
3
% Speed Actual (High Byte) *
4
RPM Speed Actual (Low Byte) **
5
RPM Speed Actual (High Byte) **
6
RPM with Slip Speed Actual (Low Byte)***
7
RPM with Slip Speed Actual (High Byte) ***
8
Reserved
9
Reserved
10
Reserved
11
Reserved
12
Reserved
13
Reserved
14
Reserved
15
Reserved
16
Reserved
17
Reserved
18
ProcessDataOut1 (LowByte)
19
ProcessDataOut1 (HighByte)
20
ProcessDataOut2 (LowByte)
21
ProcessDataOut2 (HighByte)
22
ProcessDataOut3 (LowByte)
23
ProcessDataOut3 (HighByte)
24
ProcessDataOut4 (LowByte)
25
ProcessDataOut4 (HighByte)
26
ProcessDataOut5 (LowByte)
27
ProcessDataOut5 (HighByte)
28
ProcessDataOut6 (LowByte)
29
ProcessDataOut6 (HighByte)
30
ProcessDataOut7 (LowByte)
31
ProcessDataOut7 (HighByte)
32
ProcessDataOut8 (LowByte)
33
ProcessDataOut8 (HighByte)
Page 38

36 Assembly instances implemented by the option board
Local contacts: http://drives.danfoss.com/danfoss-drives/local-contacts/
7
7.2.8 Assembly instance 127
Table 32.
Instance 127
Length = 20 Bytes
Byte
Bit 7
Bit 6
Bit 5
Bit 4
Bit 3
Bit 2
Bit 1
Bit 0
0
FBFixedStatusWord (Low Octet)
1
FBGeneralStatusWord (High Octet)
2
FBSpeedActual (Low Octet) in %
3
FBSpeedActual (High Octet) in %
4
FBProcessDataOut1 (Low Octet)
5
FBProcessDataOut1 (High Octet)
6
FBProcessDataOut2 (Low Octet)
7
FBProcessDataOut2 (High Octet)
8
FBProcessDataOut3 (Low Octet)
9
FBProcessDataOut3 (High Octet)
10
FBProcessDataOut4 (Low Octet)
11
FBProcessDataOut4 (High Octet)
12
FBProcessDataOut5 (Low Octet)
13
FBProcessDataOut5 (High Octet)
14
FBProcessDataOut6 (Low Octet)
15
FBProcessDataOut6 (High Octet)
16
FBProcessDataOut7 (Low Octet)
17
FBProcessDataOut7 (High Octet)
18
FBProcessDataOut8 (Low Octet)
19
FBProcessDataOut8 (High Octet)
Page 39

Data mapping 37
Local contacts: http://drives.danfoss.com/danfoss-drives/local-contacts/
8
8. DATA MAPPING
8.1 Control word
Table 33.
Bit
0
1
0
STOP
RUN
1
Clockwise
Counterclockwise
2
Rising edge of this bit will reset active fault
3-15
Not in use
8.2 Status word
Table 34.
Bit
0
1
0
Ready status
Drive is not ready for
operation
Drive is ready for operation
1
Run/Stop status
Drive is stopped
Drive is running
2
Direction status
Drive is running clockwise
Drive is running
counterclockwise
3
Fault status
No fault is active
Drive is in fault state
4
Alarm status
No alarm is active
An alarm is active
5
Reference reached
Reference is not reached
Reference is reached
6
Zero speed
Motor is not running at zero
speed
Motor is running at zero speed
7
Motor magnetisation
Motor is not magnetised
Motor is magnetised
8-15
Not in use
8.3 Process Data OUT (Slave Master)
The fieldbus master can read the actual values of the AC drive by using process data variables. The
applications
Basic, Standard, Local/Remote, Multi-Step, PID control and Pump and fan control
use
process data as follows:
Table 35.
Data
Value
Unit
Scale
Process data OUT 1
Output Frequency
Hz
0.01 Hz
Process data OUT 2
Motor Speed
rpm
1 rpm
Process data OUT 3
Motor Current
A
0.1 A
Process data OUT 4
Motor Torque
%
0.1%
Process data OUT 5
Motor Power
%
0.1%
Process data OUT 6
Motor Voltage
V
0.1 V
Process data OUT 7
DC link voltage
V
1 V
Process data OUT 8
Active Fault Code
-
-
The
Multipurpose
application has a selector parameter for every Process Data. The monitoring
values and drive parameters are selected using the ID number (see VACON® NX All in One
Application Manual, Tables for monitoring values and parameters). Default selections are as in the
table above.
Page 40

38 Data mapping
Local contacts: http://drives.danfoss.com/danfoss-drives/local-contacts/
8
8.4 Process Data IN (Master Slave)
ControlWord, Reference and Process Data are used with All-in One applications as explained in the
three following tables.
Table 36. Basic, Standard, Local/Remote, Multi-Step applications
Data
Value
Unit
Scale
Reference
Speed Reference
%
0.01%
ControlWord
Start/Stop
Command
Fault reset
Command
-
-
PD1 PD8
Not used
-
-
Table 37. Multipurpose control application
Data
Value
Unit
Scale
Reference
Speed Reference
%
0.01%
ControlWord
Start/Stop Command
Fault reset Command
-
Process Data IN1
Torque Reference
%
0.1%
Process Data IN2
Free Analogue INPUT
%
0.01%
Process Data IN3
Adjust Input
%
0.01%
PD3 PD8
Not Used
-
-
Table 38. PID control and Pump and fan control applications
Data
Value
Unit
Scale
Reference
Speed Reference
%
0.01%
ControlWord
Start/Stop Command
Fault reset Command
- - Process Data IN1
Reference for PID
controller
%
0.01%
Process Data IN2
Actual Value 1 to PID
controller
%
0.01%
Process Data IN3
Actual Value 2 to PID
controller
%
0.01%
PD4 PD8
Not Used
-
-
Page 41

Data mapping 39
Local contacts: http://drives.danfoss.com/danfoss-drives/local-contacts/
8
8.5 Additional information
8.5.1 Handling of the NetCtrl bit (Network Control)
If NetCtrl bit is set, Output Instance to the drive. Additionally, BusCtrl bit of
the FBFixedControlWord is set.
8.5.2 Handling of the NetRef bit (Network Reference)
If NetRef bit is set, Torque Reference and Speed Reference are sent to the drive. Additionally,
BusRef bit of the FBFixedControlWord is set.
8.5.3 Handling of the NetProc bit in assembly instance 25 (Net Process)
If NetProc bit is set, Process Reference is sent to the drive.
8.5.4 Handling of RefFromNet and CtrlFromNet bits
RefFromNet and CtrlFromNet bits are set if value of REMOTEIndication is more than 0, and NetRef
and NetCtrl bits are set. See Chapters 6.2.3 and 6.2.4.
NOTE! When you contact a distributor or a factory because of a fault condition, always write down all
the texts and codes on the keypad display. Then send the problem description together with the
Drive Info File to the local distributor. See local contacts: http://drives.danfoss.com/danfoss-
drives/local-contacts/ . If possible, also send a "Wireshark" log from the situation if applicable.
Page 42

40 Data mapping
Local contacts: http://drives.danfoss.com/danfoss-drives/local-contacts/
8
License for LWIP
Copyright (c) 2001, 2002 Swedish Institute of Computer Science.
All rights reserved.
Redistribution and use in source and binary forms, with or without modification, are permitted
provided that the following conditions are met:
1. Redistributions of source code must retain the above copyright notice, this list of conditions and
the following disclaimer.
2. Redistributions in binary form must reproduce the above copyright notice, this list of conditions
and the following disclaimer in the documentation and/or other materials provided with the
distribution.
3. The name of the author may not be used to endorse or promote products derived from this
software without specific prior written permission.
THIS SOFTWARE IS PROVIDED BY THE AUTHOR "AS IS" AND ANY EXPRESS OR IMPLIED
WARRANTIES, INCLUDING, BUT NOT LIMITED TO, THE IMPLIED WARRANTIES OF
MERCHANTABILITY AND FITNESS FOR A PARTICULAR PURPOSE ARE DISCLAIMED. IN NO EVENT
SHALL THE AUTHOR BE LIABLE FOR ANY DIRECT, INDIRECT, INCIDENTAL, SPECIAL, EXEMPLARY,
OR CONSEQUENTIAL DAMAGES (INCLUDING, BUT NOT LIMITED TO, PROCUREMENT OF
SUBSTITUTE GOODS OR SERVICES; LOSS OF USE, DATA, OR PROFITS; OR BUSINESS
INTERRUPTION) HOWEVER CAUSED AND ON ANY THEORY OF LIABILITY, WHETHER IN CONTRACT,
STRICT LIABILITY, OR TORT (INCLUDING NEGLIGENCE OR OTHERWISE) ARISING IN ANY WAY OUT
OF THE USE OF THIS SOFTWARE, EVEN IF ADVISED OF THE POSSIBILITY OF SUCH DAMAGE.
Page 43

www.danfoss.com
Vacon Ltd
Member of the Danfoss Group
Runsorintie 7
65380 Vaasa
Finland
Document ID:
DPD00893C
Rev. C
 Loading...