

Page 1

VACON CX/CXL/CXS
FREQUENCY CONVERTERS
Profibus DP
Fieldbus
Option Board
USER'S MANUAL
Subject to changes without notice
F O R S M O O T H C O N T R O L
Page 2

VACON CX Profibus user’s manual Page 2
________________________________________________________________________________________
INDEX
1. GENERAL.......................................................................................................................................................3
2. SPECIFICATIONS ..........................................................................................................................................4
2.1 General.......................................................................................................................................................4
2.2 Profibus cable.............................................................................................................................................4
3. PROFIBUS DP................................................................................................................................................6
3.1 General.......................................................................................................................................................6
3.2 Profiles........................................................................................................................................................6
4. INSTALLATION..............................................................................................................................................7
5. CONNECTIONS..............................................................................................................................................9
5.1 Board layout................................................................................................................................................9
5.2 Profibus connections..................................................................................................................................9
5.3 I/O-control connections.............................................................................................................................10
6. COMMISSIONING.........................................................................................................................................11
7. PROFIBUS-VACON CX INTERFACE..........................................................................................................12
7.1 General.....................................................................................................................................................12
7.2 PPO-types ................................................................................................................................................12
7.3 Process Data............................................................................................................................................15
7.3.1 Control Word....................................................................................................................................15
7.3.2 Status Word.....................................................................................................................................16
7.3.3 State Machine..................................................................................................................................16
7.3.4 Speed Reference.............................................................................................................................17
7.3.5 Actual Value.....................................................................................................................................18
7.3.6 PD1-PD4..........................................................................................................................................18
7.4 Parameter Data ........................................................................................................................................19
7.4.1 Actual Values...................................................................................................................................19
7.4.2 Parameter Read and Write.................................................................................................
.............20
7.4.3 Fault Code .......................................................................................................................................20
8. FAULT TRACKING......................................................................................................................................21
9. TYPE FILES..................................................................................................................................................22
9.1 GSD-file....................................................................................................................................................22
APPENDIX A.........................................................................................................................................................23
Board layout........................................................................................................................................................23
Profibus connections..........................................................................................................................................23
APPENDIX B.........................................................................................................................................................24
APPENDIX C: INSTALLATION............................................................................................................................26
Installation of Profibus DP in Vacon CXS drives................................................................................................26
________________________________________________________________________________________
Vacon Oyj Phone +358-201-2121 Fax: +358-201-212 205
Page 3
VACON CX Profibus user’s manual Page 3
________________________________________________________________________________________
1. GENERAL
Vacon frequency converters can be connected to the Profibus DP by using a Fieldbus board. The
converter can then be controlled, monitored and programmed from the Host system.
The used I/O can also be extended with the Fieldbus board:
• 4 digital inputs (standard signals)
• 4 digital outputs (2 standard signal)
• 1 relay output (standard signal)
• Thermistor input (can be directly connected to the motor thermistors for overtemperature trip)
• Encoder input
The Profibus fieldbus board can be installed inside the frequency converter as instructed in this manual.
Note that the installation procedure is different for CX/CXL (board CX202OPT) and CXS frequency
converters (CX210OPT).
The control connections are isolated from the mains potential and the I/O ground is connected to the
frame of the device via a 1 MΩ resistor and 4.7 nF capacitor*. The control I/O ground can also be
connected directly to the frame by changing the position of the jumper X9 (GND ON/OFF) to ONposition. Digital inputs are also isolated from the I/O ground.
NOTE !
Internal components and circuit boards (except for the isolated I/O terminals) are at mains
potential when the frequency converter is connected to the mains. This voltage is extremely
dangerous and may cause death or severe injury if you come into contact with it.
The control I/O terminals are isolated from the mains potential, but the I/O:s (if jumper X9 is in
OFF-position) may have dangerous voltage connected even if the power is off on the
frequency converter.
* Default value = X9 is GND OFF- position)
________________________________________________________________________________________
Vacon Oyj Phone +358-201-2121 Fax: +358-201-212 205
Page 4
VACON CX Profibus user’s manual Page 4
________________________________________________________________________________________
2. SPECIFICATIONS
2.1 General
Profibus DP connections
I/O -control
connections
Safety
Interface 9-pin DSUB connector (female)
Transfer method RS-485, Half duplex
Transfer cable Twisted pair (1 pair and shield)
Electrical isolation 500 V DC
Digital input (4 pcs)
24 V: “0” ≤10 V, “1” ≥18 V, R
= 5 kΩ
i
Digital output (4 pcs) Open collector output, 50 mA/48 V
Relay output (1 pcs) Max.switching voltage: 300 V DC, 250 V AC
Max.switching load: 8 A / 24 V DC
0,4 A / 300 V AV
2 kVA / 250 V DC
Max.continuous load: 2 A rms
Thermistor input (1 pcs)
Encoder input (3 pcs)
Aux. voltage
R
= 4.7 kΩ
trip
24 V: “0” ≤10 V, “1” ≥18 V, R
5 V : “0” ≤2 V, “1” ≥3 V, R
= 330 Ω
i
24 V (±20%), max 50 mA
= 3.3 kΩ
i
Fulfils EN50178 standard
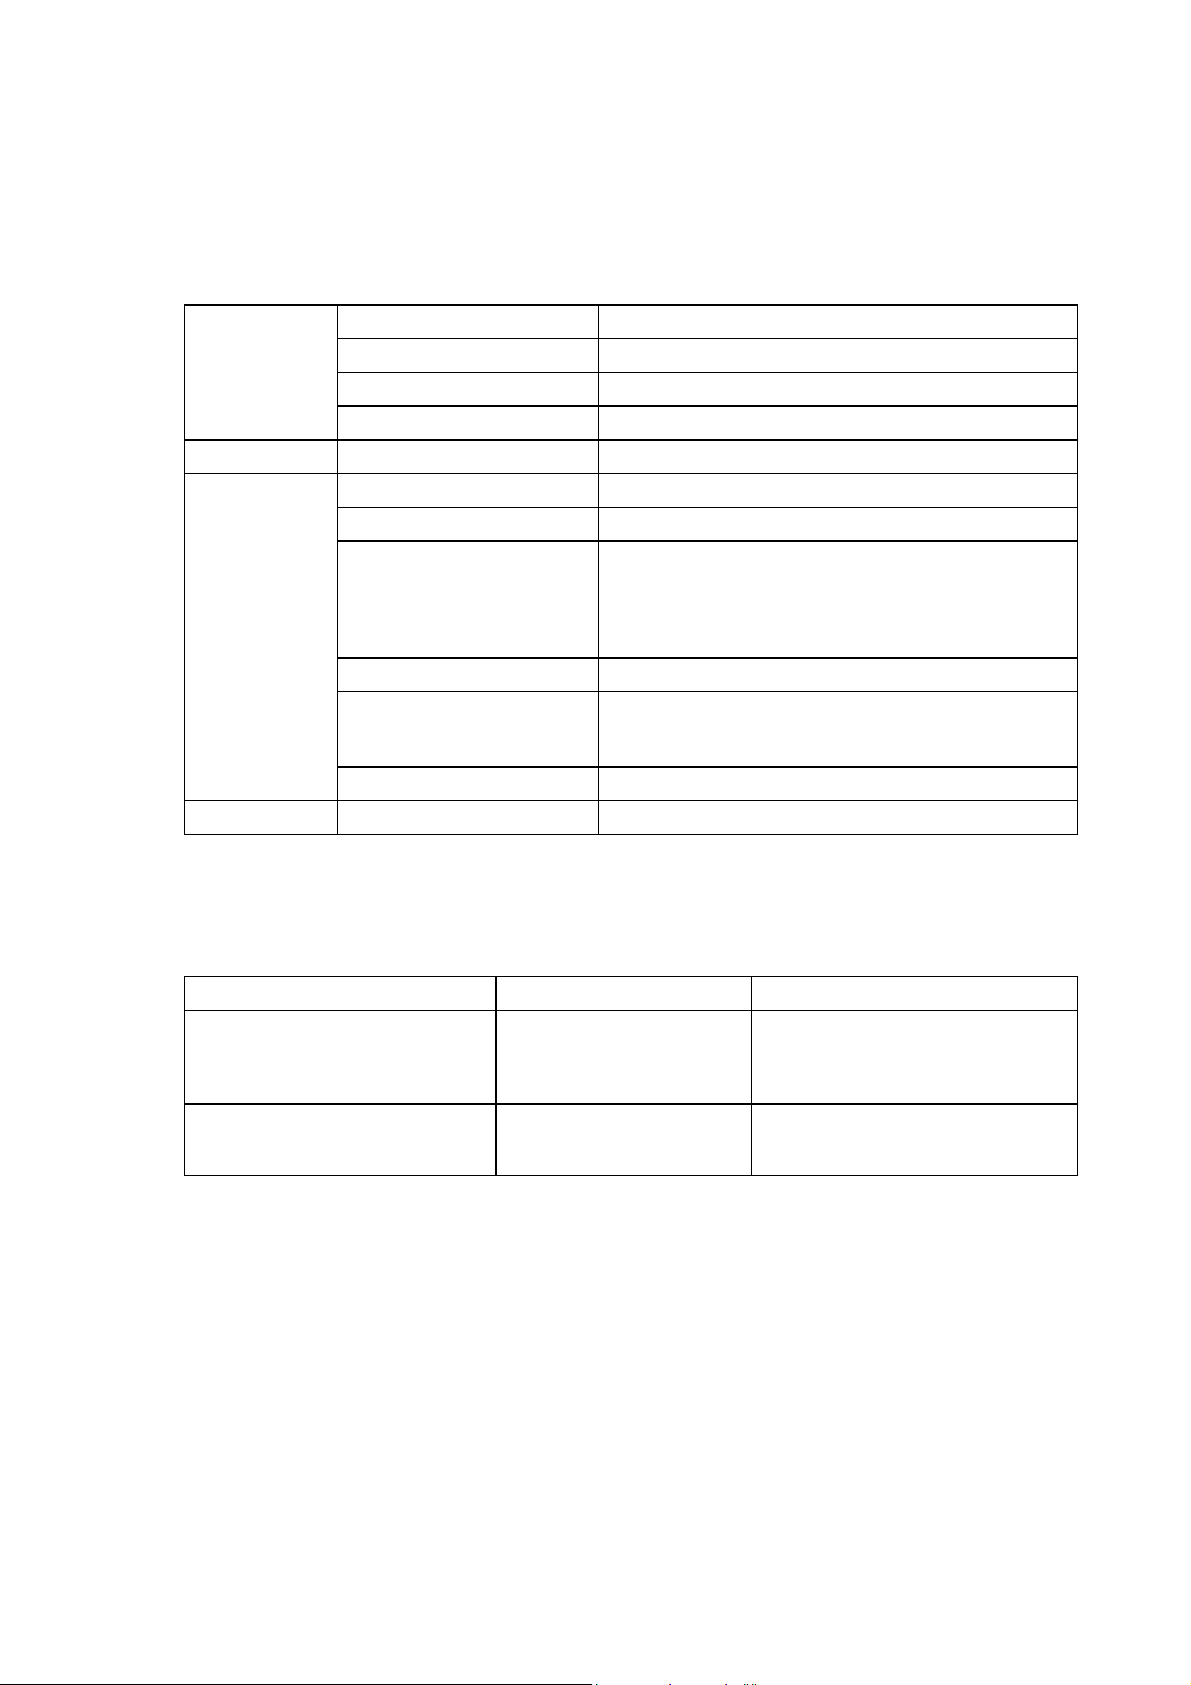
Communication mode
PPO types
Communication parameters
- Address
- Baud Rate
Table 2-1. Profibus communication data
2.2 Profibus cable
Profibus devices are connected in a bus structure. Up to 32 stations (master or slaves) can be
connected in one segment. The bus is terminated by an active bus terminator at the beginning and end
of each segment (see figure 2-1). To ensure error-free operation, both bus terminations must always be
powered. When more than 32 stations are used, repeaters (line amplifiers) must be used to connect the
individual bus segments.
The maximum cable length depends on the transmission speed and cable type (see table 2-4). The
specified cable length can be increased by the use of repeaters. The use of more than 3 repeaters in
series is not recommended.
Profibus DP
1 to 127
9.6 kBaud to 12 MBaud
1
2
3
4
________________________________________________________________________________________
Vacon Oyj Phone +358-201-2121 Fax: +358-201-212 205
Page 5
VACON CX Profibus user’s manual Page 5
)
)
)
)
(3)
(5)
(8)
(6)
)
)
)
)
________________________________________________________________________________________
Parameter Line A Line B
Impedance
Capacity
Resistance
Wire gauge
Conductor area
135 ... 165 Ω
(3 to 20 Mhz)
< 30 pF/m
< 110 Ω / km
> 0,64 mm
> 0,34 mm
2
100 ... 130 Ω
( f > 100kHz)
< 60 pF/m
> 0,53 mm
> 0,22 mm
2
Table 2-2 Line Parameter
Baud rate (kbit/s) 9.6 19.2 93.75 187.5 500 1500 3000-12000
Length line A (m)
Length line B (m)
1200 1200 1200 1000 400 200 100
1200 1200 1200 600 200 - -
Table 2-3 Line length for different transmission speeds
Following cables can be used (e.g):
Belden Profibus Data Cable 3079A
Olflex Profibus Cable 21702xx
Siemens SINEC L2 LAN cable for profibus 6XV1 830-0AH10
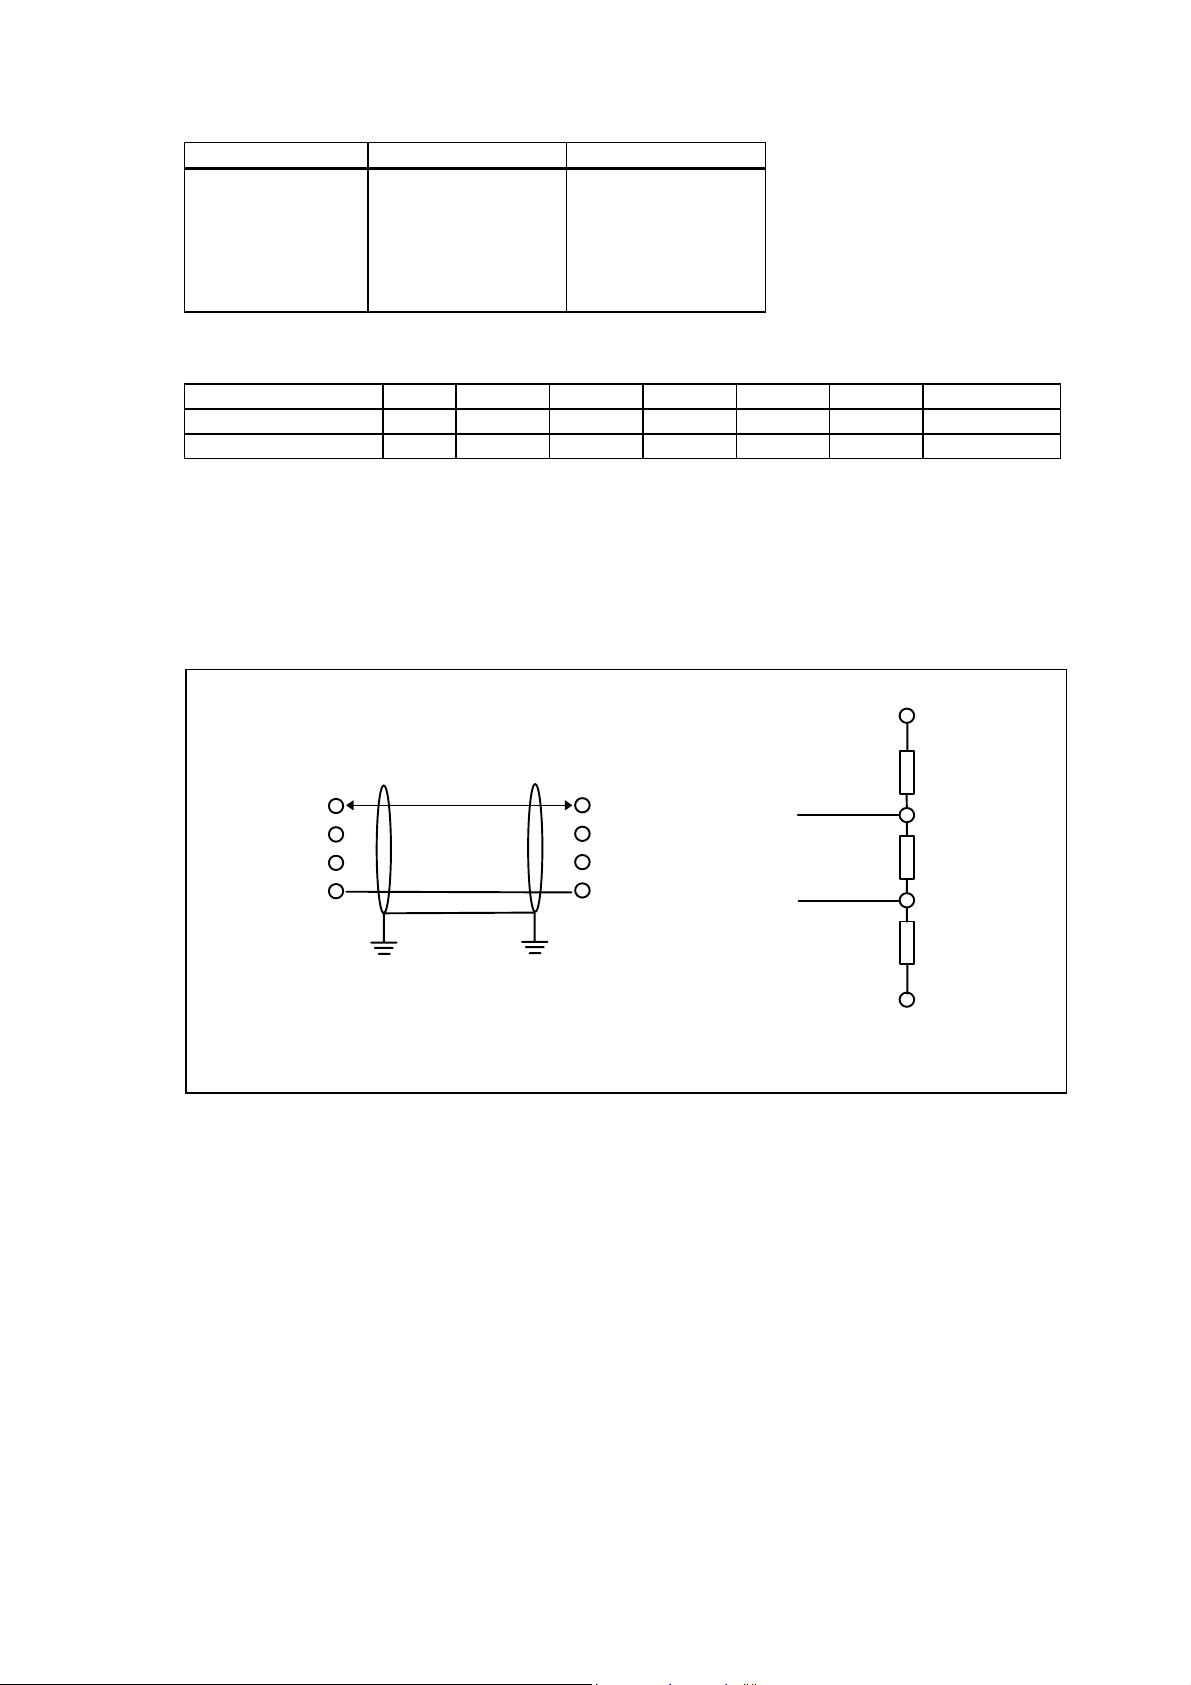
Station 1
RxD/TxD-P (3
DGND (5
VP (6
RxD/TxD-N (8
Shielding
Protective
ground
Protective
ground
Cabling
Figure 2-1 Cabling and bus termination
Station 2
RxD/TxD-P
DGND
VP
RxD/TxD-N
Data Line
Data Line
Bus Termination
VP (6
390
Ω
RxD/TxD-P (3
220
Ω
RxD/TxD-N (8
390
Ω
DGND (5
________________________________________________________________________________________
Vacon Oyj Phone +358-201-2121 Fax: +358-201-212 205
Page 6

VACON CX Profibus user’s manual Page 6
________________________________________________________________________________________
3. PROFIBUS DP
3.1 General
PROFIBUS is a vendor-independent, open fieldbus standard for a wide range of applications in
manufacturing, process and building automation. Vendor independence and openness are guaranteed
by the PROFIBUS standard EN 50 170. With PROFIBUS, devices of different manufacturers can
communicate without special interface adjustments. PROFIBUS can be used for both high-speed time
critical data transmission and extensive complex communication tasks. The PROFIBUS family consists
of three compatible versions.
PROFIBUS-DP
Optimized for high speed and inexpensive hookup, this PROFIBUS version is designed
especially for communication between automation control systems and distributed I/O at the
device level. PROFIBUS-DP can be used to replace parallel signal transmission with 24 V or 0
to 20 mA.
PROFIBUS-PA
PROFIBUS-PA is designed especially for process automation. It permits sensors and actuators
to be connected on one common bus line even in intrinsically-safe areas. PROFIBUS-PA
permits data communication and power over the bus using a 2-wire technology according to the
international standard IEC 1158-2.
PROFIBUS-FMS
PROFIBUS-FMS is the general-purpose solution for communication tasks at the cell level.
Powerful FMS services open up a wide range of applications and provide great flexibility.
PROFIBUS-FMS can also be used for extensive and complex communication tasks.
PROFIBUS specifies the technical and functional characteristics of a serial fieldbus system with which
decentralized digital controllers can be networked together from the field level to the cell level.
PROFIBUS distinguishes between master devices and slave devices.
Master devices determine the data communication on the bus. A master can send messages without an
external request when it holds the bus access rights (the token). Masters are also called active stations
in the PROFIBUS protocol.
Slave devices are peripheral devices. Typical slave devices include input/output devices, valves, drives
and measuring transmitters. They do not have bus access rights and they can only acknowledge
received messages or send messages to the master when requested to do so. Slaves are also called
passive stations.
3.2 Profiles
The PROFIBUS-DP protocol defines how user data are to be transmitted between the stations over the
bus. User data are not evaluated by the PROFIBUS-DP transmission protocol. The meaning is
specified in the profiles. In addition, the profiles specify how PROFIBUS-DP is to be used in the
application area. The following PROFIBUS-DP profile is used in VACON CX Profibus fieldbus board.
Variable-Speed Drive Profile (3.071)
Leading manufacturers of drive technology have jointly defined the PROFIDRIVE profile. The profile
specifies how the drives are to be parameterized and how the setpoints and actual values are to be
transmitted. This enables drives from different vendors to be exchanged. The profile contains necessary
specifications for speed control and positioning. It specifies the basic drive functions while leaving
sufficient freedom for application-specific expansions and further developments. The profile describes
the mapping of the application functions for DP or FMS.
________________________________________________________________________________________
Vacon Oyj Phone +358-201-2121 Fax: +358-201-212 205
Page 7
VACON CX Profibus user’s manual Page 7
________________________________________________________________________________________
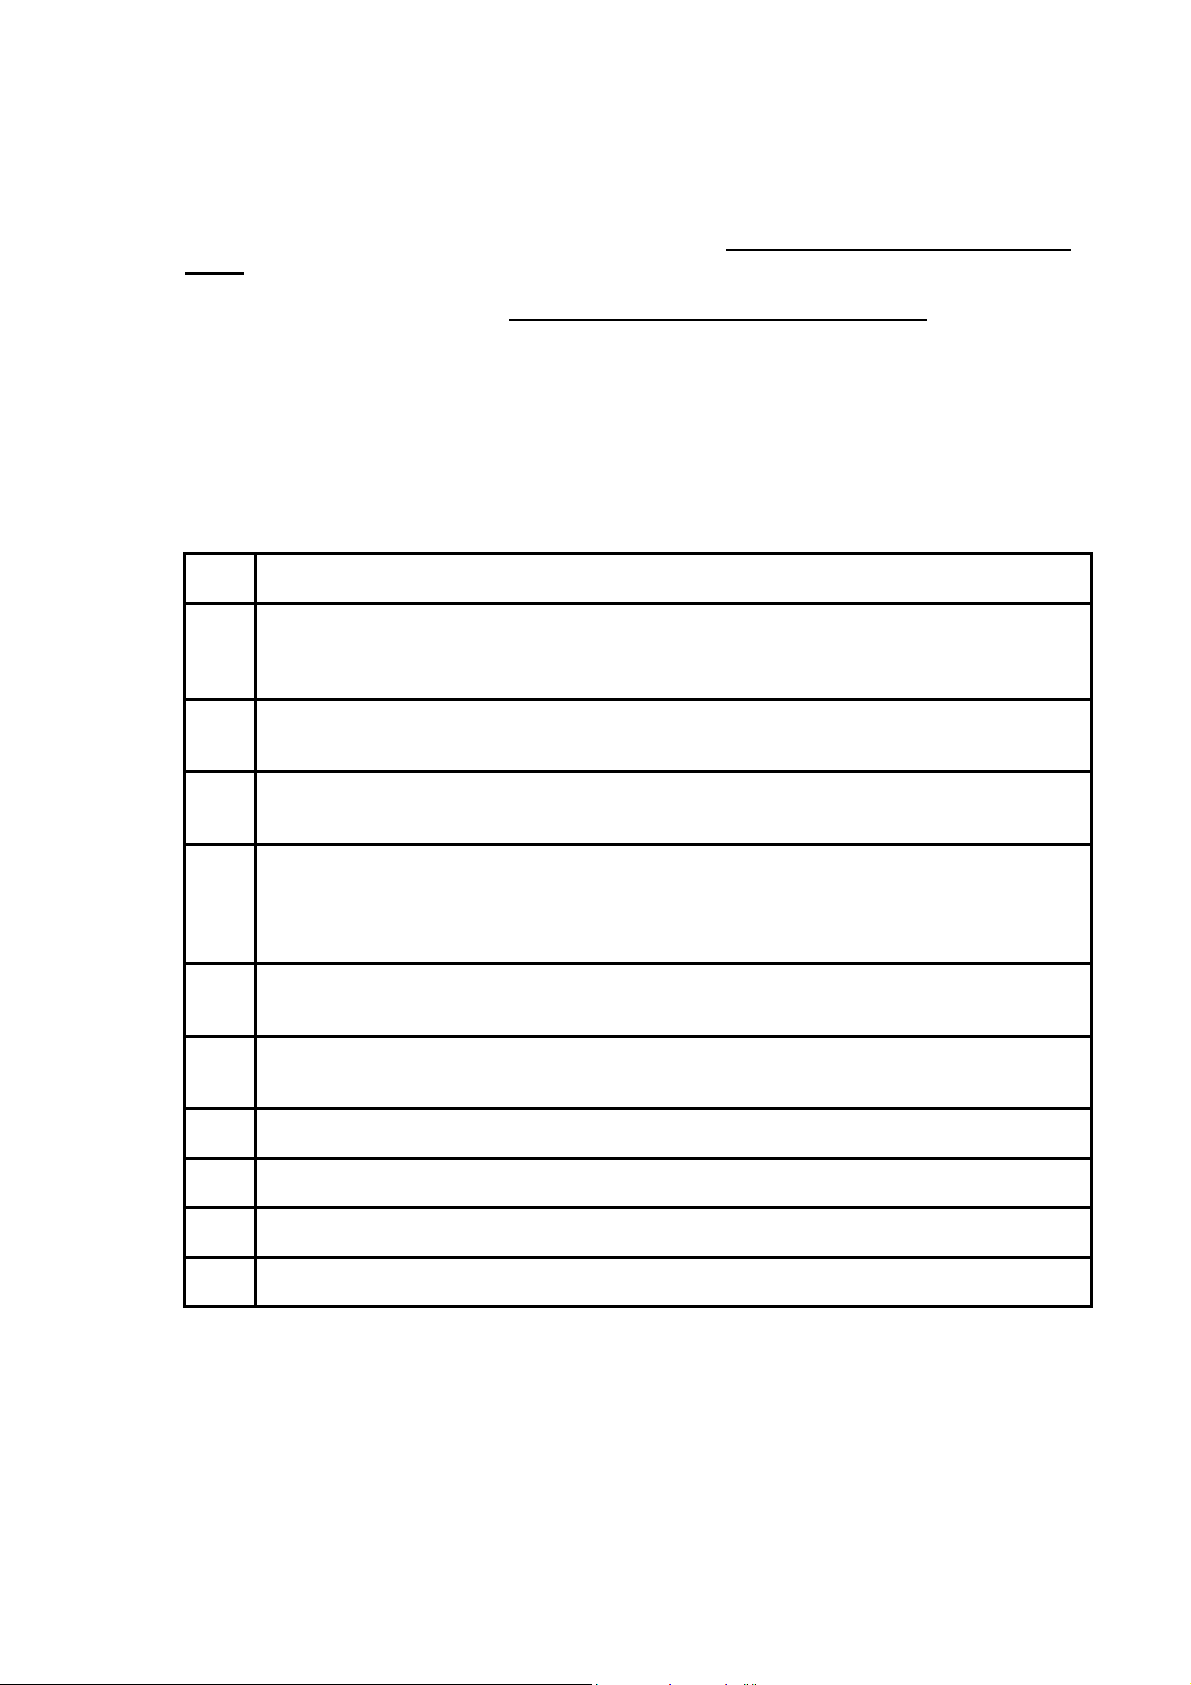
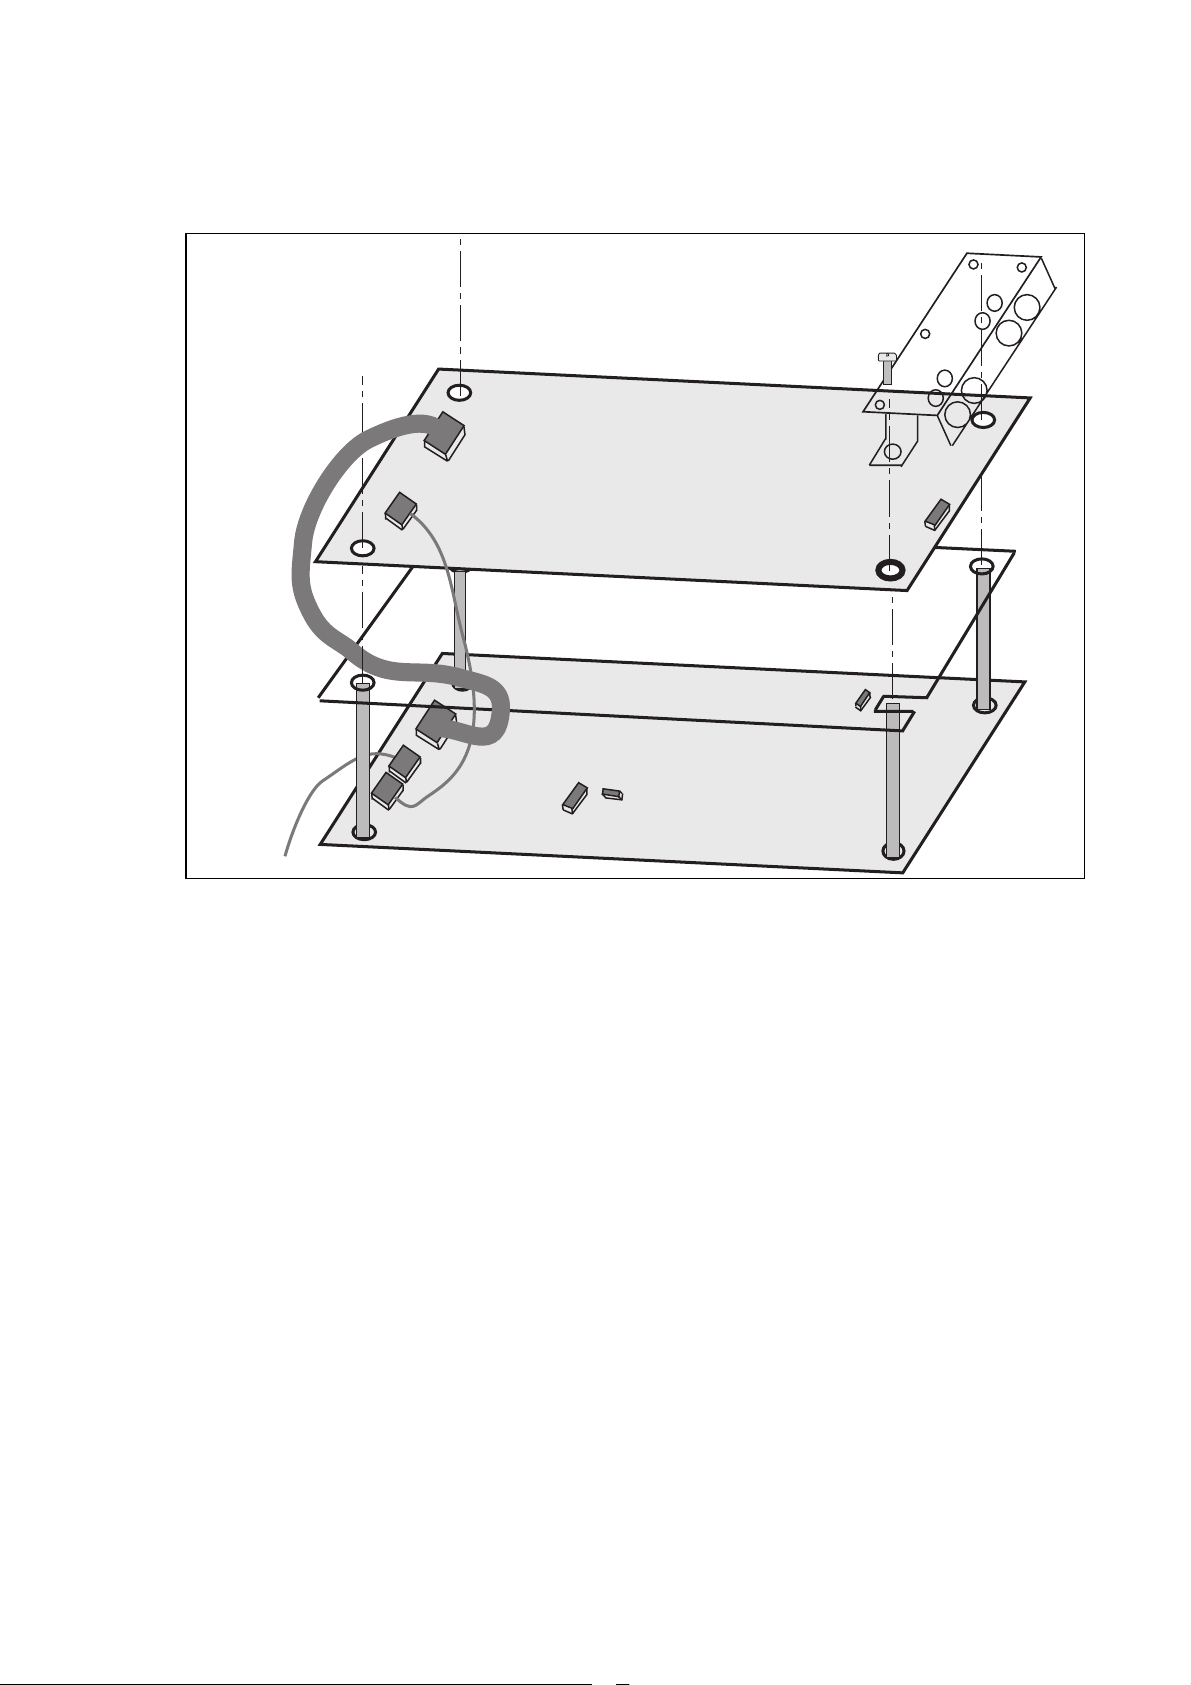
4. INSTALLATION
NOTE! These instructions apply if you have received the Profibus board for Vacon CX or CXL
drives (CX202OPT) as an accessory. Otherwise the board has already been installed for you at
the factory.
Instructions for the installation of Profibus option board for Vacon CXS drives
will find in Appendix C.
Before doing any commissioning, carefully read the safety instructions in the "Vacon CX/CXL/CXS
frequency converter, User's manual" chapter “SAFETY”. Check that you have received all the Fieldbus
board parts: Fieldbus board, plastic board, power cable (black terminal), data cable (blue terminal) and
earthing screw.
Fieldbus board can be installed in the place reserved for an option board inside the frequency converter
(see figure 4-1).
Remove the control panel and jumper X4 from the control board (1).
A
Connect the power cable to control board terminal X5 (2) and the data cable to terminal X14
B
(3). The power cable can also be connected to terminal X6, if the power cable from the
power board is connected to terminal X5.
Bend the data cable into an "S-curve" as far as possible from the power board transformer
C
(4) before you place the plastic board above the control board.
Remove the protection foil of the plastic board and place the plastic board on the control
D
board, remember the right position of the plastic board (5).
Install the Fieldbus board above the plastic board by the larger holes and push it downward
E
so that the narrow part of the hole in the board fits the cut on the sleeve. Check that the
installation is stable. If you have difficulties placing the plastic board and the Fieldbus board,
slightly bend the regulator A4 (6) and capacitor C59 (7) of the control board.
Connect the power cable to terminal X6 of the Fieldbus board (8) and the data cable to the
F
terminal X14 (9).
Install the jumper which you removed from the terminal X4 of the control board, on the
G
terminal X9 of the Fieldbus board (10) in ON or OFF position.
If the package includes the cable cover (11), fasten it into position as shown in figure 4-1.
H
Install the earthing screw (12).
I
After this install the control panel and connect the needed control signals.
J
If you use a 5 V encoder input, install the jumpers on terminal X15 (see figure 5-1) of the
K
Fieldbus board (one jumper on the two upper pins and the other on the two lower).
(CX210OPT) you
________________________________________________________________________________________
Vacon Oyj Phone +358-201-2121 Fax: +358-201-212 205
Page 8
VACON CX Profibus user’s manual Page 8
________________________________________________________________________________________
11
12
9
Fieldbus board
8
10
4
Plastic board
5
3
2
Figure 4-1. Fieldbus board installed onto the control board
Control board
7
1
6
________________________________________________________________________________________
Vacon Oyj Phone +358-201-2121 Fax: +358-201-212 205
Page 9
VACON CX Profibus user’s manual Page 9
________________________________________________________________________________________
5. CONNECTIONS (CX202OPT)
(For the board layout and connections of the small Profibus DP board, Vacon CX210OPT, see
Appendix A)
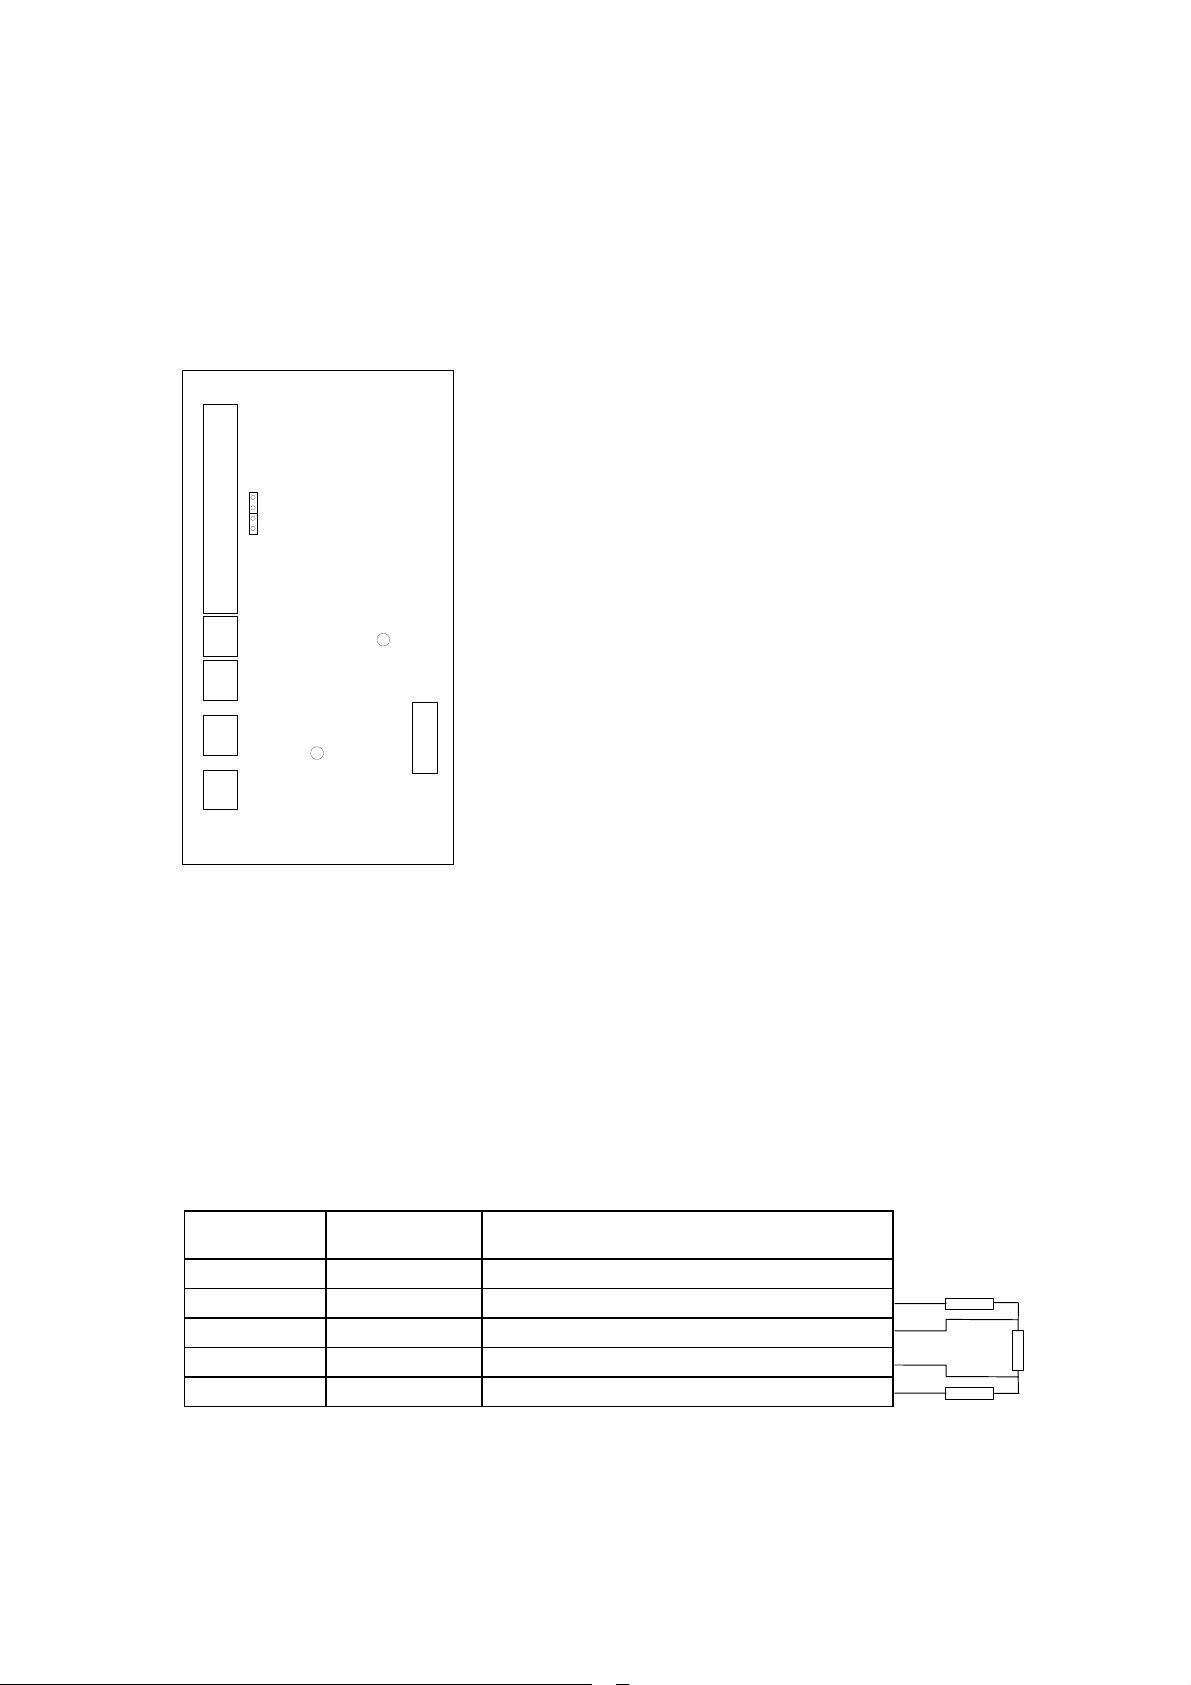
5.1 Board layout
Terminals:
X1 I/O - terminals
X10 Digital Output terminal
X1
X15
X10
X3
X7
H3
X4
H1
X5
Figure 5-1. Fieldbus board
Diagnostic LED:
H1 Data Exchange state for Profibus DP, Red. The red LED goes out when
communication is established
H1 led is active when Fieldbus board is not ready to exchange data
H3 Supply Voltage, Green.
H3 led is active if the Fieldbus board has supply voltage.
X3 Digital Output terminal
X7 Relay Output terminal
X4 Thermistor input
X15 Encoder input selection
X5 Screw terminal to Profibus DP
X9 Connection of control I/O ground:
ON - Directly to the frame of the
device
OFF- To the frame of the
device via RC filter
X17 Connection of control Fieldbus
cable shield:
ON - Directly to the frame of the
device
OFF- To the frame of the
device via RC filter
5.2 Profibus connections
Screw Connector connector X5: (Terminal resistors not included in the package)
Signal Connector X5
Shield X5-241 Cable shield
Description
Termination for
the last node
390 Ω
VP X5-242 Supply voltage of the terminating resistance
RxD/TxD-P X5-243 Receive/Transmission data positive (B)
RxD/TxD-N X5-244 Receive/Transmission data negative (A)
220 Ω
DGND X5-245 Data Ground
390 Ω
Table 5-1. X5 screw connector terminals
Note! If Vacon is the last device then the bus termination must be set. Install the resistors to the screw
terminal (see table 5-1)
________________________________________________________________________________________
Vacon Oyj Phone +358-201-2121 Fax: +358-201-212 205
Page 10

VACON CX Profibus user’s manual Page 10
________________________________________________________________________________________
5.3 I/O-control connections
Terminal Signal Description
201…205 Not used
206 +24 V Control voltage output Voltage for switches, etc. max. 0.05 A
207 GND I/O ground Ground for reference and controls
208 COME Common for DIE1-DIE4 Connect to GND or +24 V
209 DIE1 Programmable:
External fault
OR
Selection of active control
source
Contact open = no fault
Contact closed = fault
Contact open = VACON IO-terminal
Contact closed = Fieldbus
210 DIE2 Run disable Contact open = start of motor enabled
Contact closed = start of motor disabled
211 DIE3 Acceler. / Decel. time
selection
Contact open = time 1 selected
Contact closed = time 2 selected
212 DIE4 Jogging speed selection Contact open = no action
Contact closed = jogging speed
213 Not Used
214 DIE6A+
215 DIE6A-
Enco-
216 DIE7B+
der
217 DIE7B-
Pulse input A
(differential input)
Pulse input B
(differential input)
90 degrees phase shift compared
to pulse input A
218 DOE1 Encoder direction output
219 DOE2 Encoder divider 1/64 output
220 Not Used
Signal from
motor thermistor
222 TI 225 RO4/1
221 TI+
Thermistor input
Relay output 4, FAULT
226 RO4/2
231 DOE3 Open collector output 3 READY
232 GND I/O ground Ground for reference and controls
233 DOE4 Open collector output 4 RUN
234 GND I/O ground Ground for reference and controls
Figure 5-2. Control connections
NOTE! Thermistor input (Terminals 221 and 222) must be shorted if not used
READY = ON, when mains voltage has been applied and VACON CX is ready to operate
RUN = ON, when the motor is running
FAULT = ON, if a fault occurs
________________________________________________________________________________________
Vacon Oyj Phone +358-201-2121 Fax: +358-201-212 205
Page 11

VACON CX Profibus user’s manual Page 11
________________________________________________________________________________________
6. COMMISSIONING
READ FIRST THE COMMISSIONING OF THE FREQUENCY CONVERTER IN VACON CX/CXL/CXS
FREQUENCY CONVERTER USER'S MANUAL (CHAPTER 8.)
Commissioning of the Fieldbus board:
Check that Multi-purpose Control Application II (or e.g. Fieldbus Application) is selected.
- Parameter P0.1 = 0
For further information about use of parameters, see Vacon CX/CXL/CXS User's Manual, Chapter 7.
Start-up test:
FREQUENCY CONVERTER APPLICATION
1. Check that the control panel is not the active control source.
(See Vacon CX/CXL/CXS frequency converter User's manual, Chapter 7.)
2. Set parameter “Fieldbus control select” to value 1(On).
MASTER SOFTWARE
1. Set Control Word value to 0hex.
2. Set Control Word value to 47Fhex.
3. Frequency converter status is RUN
4. Set Reference value to 5000 (=50,00%).
5. The Actual value is 5000 and the frequency converter output frequency is 25,00 Hz
6. Set Control Word value to 7Dhex.
7. Frequency converter status is STOP
If Status Word bit 3 = 1 Status of frequency converter is FAULT.
________________________________________________________________________________________
Vacon Oyj Phone +358-201-2121 Fax: +358-201-212 205
Page 12

VACON CX Profibus user’s manual Page 12
________________________________________________________________________________________
7. PROFIBUS-VACON CX INTERFACE
Features of the Profibus-Vacon CX interface:
• Direct control of Vacon CX ( e.g. Run, Stop, Direction, Speed reference, Fault reset)
• Full access to all Vacon CX parameters
• Monitor Vacon CX status (e.g. Output frequency, Output current, Fault code ..)
7.1 General
Data transfer between Profibus DP master and slave takes place via the Input/Output data field. The
master writes to slave’s Output data and the slave answers by sending the contents of its Input data to
the master. The contents of Input /Output data is defined in a device profile, PROFIDRIVE is the device
profile for frequency converters.
The Vacon CX frequency converter can be controlled by Profibus DP master using PPO-types defined
in PROFIDRIVE (see next chapter). When fieldbus has been selected as the frequency converter’s
active control place, the frequency converter’s operation can be controlled from the Profibus DP master.
Whether or not the active control place is fieldbus, the frequency converter can be monitored and its
parameters can be set by the Profibus DP master.
7.2 PPO-types
PPOs (Parameter/Process Data Object)are communication objects in PROFIBUS DP. PPOs in VACON
CX:
PPO1
PPO2
PPO3
PPO4
Parameter Field Process Data Field
ID IND VALUE CW
Byte
ID Parameter type and number
IND Parameter subindex
SW
REF
ACT
PD1 PD2 PD3 PD4
VALUE Parameter value
CW Control Word
SW Status Word
REF Reference Value
ACT Actual Value
PD Process Data
________________________________________________________________________________________
Vacon Oyj Phone +358-201-2121 Fax: +358-201-212 205
Page 13

VACON CX Profibus user’s manual Page 13
________________________________________________________________________________________
ID
ID byte1 ID byte2
15 14 13 12 11 10 9 8 7 6 5 4 3 2 1 0
Request/Response type SM Parameter Number
SM: Spontaneous bit (not used)
Request/Response types
Request Function Response Function
0 No request 0 No response
1 Read parameter value (word) 1 Parameter value ready (word)
2 Write parameter value (word) 7 Request rejected (+fault code)
Fault Number (if response = 7)
Fault Number Description
0 Illegal Parameter
1 Parameter is read only ( e.g. actual values)
2 Parameter value is out of limits
17 Request temporarily rejected (e.g. can be changed only for STOP state)
18 Other fault
101 Unknown request type
Example1, (PPO1 mode):
Read parameter number 102 (Par 1.2).
Start frequency converter and set speed reference 50,00%.
Command Master - Slave:
ID 1066 hex 1 - Read parameter value
066 - Parameter 102 (= Maximum frequency )
IND 0000 hex 0000 - No meaning
VALUE 0000 0000 hex 0000 0000 - No meaning
CW 047F hex 04 7F- Start command (see chapter control word and state machine)
REF 1388 hex Speed ref. 50,00% (= 25,00 Hz if parameter min. frequency 0 Hz and
max. frequency 50 Hz)
PPO1 frame:
10 66 00 00 00 00 00 00 04 7F 13 88
________________________________________________________________________________________
Vacon Oyj Phone +358-201-2121 Fax: +358-201-212 205
Page 14

VACON CX Profibus user’s manual Page 14
________________________________________________________________________________________
Answer Slave - Master:
ID 1066 hex 1 - Parameter value ready
066 - Parameter 102 (= Maximum frequency )
IND 0000 hex 0000 - No meaning
VALUE 0000 0032 hex 0000 0032 - Parameter value = 32hex ( 50 Hz)
SW 0000 hex 0000 - frequency converter status (see chapter status word and state
machine)
ACT 0000 hex Current speed 0,00% (= 0,00 Hz if parameter min. frequency 0 Hz
and max. frequency 50 Hz)
PPO1 frame:
10 66 00 00 00 00 00 32 00 00 00 00
Example 2, (PPO1 mode):
Write to parameter number 701 (Par 7.1) value 2.
Keep Run mode on and Send speed reference 75,00%.
Command Master - Slave:
ID 22BD hex 2 - Write parameter value
2BD - Parameter 701 (= Response to reference fault )
IND 0000 hex 0000 - No meaning
VALUE 0000 0002 hex 0000 0002 - Parameter value
CW 047F hex 04 7F- Start command (see chapter control word and state machine)
REF 1D4C hex Speed ref. 75,00% (= 37,50 Hz if parameter min. frequency 0 Hz and
max. frequency 50 Hz)
PPO1 frame:
22 BD 00 00 00 00 00 02 04 7F 1D 4C
Answer Slave - Master:
ID 12BD hex 1 - Parameter value ready
2BD - Parameter 701 (= Response to reference fault )
IND 0000 hex 0000 - No meaning
VALUE 0000 0032 hex 0000 0032 - Parameter value = 32HEX ( 50 Hz)
SW 0337 hex 0337- frequency converter status (see chapter status word and state
machine)
ACT 09C4 hex Current speed 25,00% (= 12,50 Hz if parameter min. frequency 0 Hz
and max. frequency 50 Hz)
PPO1 frame:
12 BD 00 00 00 00 00 00 03 37 09 C4
________________________________________________________________________________________
Vacon Oyj Phone +358-201-2121 Fax: +358-201-212 205
Page 15

VACON CX Profibus user’s manual Page 15
A
p
________________________________________________________________________________________
7.3 Process Data
Direct control of Vacon CX ( e.g. Run, Stop, Direction, Speed reference, Fault reset) and frequency
converter status (e.g. Output frequency, Output current, Fault code ..) can be handled by using PPO
types 1 to 4.
Fieldbus Board
P PROCESS DATA
R
O
F
I
B
U
S
D
P
M
A
S
T
E
R
Output
Control Word
Reference
PD1 Variables
RUN/STOP
DIRECTION
FAULT RESET
PD2 FAULT STATE
PD3
PD4 Output Frequency
In
PD2
PD3
PD4
Frequency Reference
(Frequency Reference 2)
ut CONTROL SOURCE
Status Word READY STATE
Actual Value RUN STATE
PD1 DIRECTION STATE
VACON CX
Parameters
ctive Fault Code
7.3.1 Control Word
The Control command for the state machine (see figure 7.1). The state machine describes the device
status and the possible control sequence of the frequency converter.
The control word is composed of 16 bits that have the following meanings:
Bit Description
Value = 0 Value = 1
0 STOP 1 (by ramp) ON 1
1 STOP 2 (by coast) ON 2
2 STOP 3 (by ramp) ON 3
3 RUN DISABLE ENABLE
4 No Action START
5 No Action START
6 No Action START
7 No Action FAULT RESET (0 -> 1)
8 No Action No Action
9 No Action No Action
________________________________________________________________________________________
Vacon Oyj Phone +358-201-2121 Fax: +358-201-212 205
Page 16

VACON CX Profibus user’s manual Page 16
________________________________________________________________________________________
10 Disable Profibus control Enable Profibus control
11 Not used Not used
12 Not used Not used
13 Not used Not used
14 Not used Not used
15 Not used Not used
7.3.2 Status Word
Information about the status of the device and messages is indicated in the status word.
The status word is composed of 16 bits that have the following meanings:
Bit Description
Value = 0 Value = 1
0 Not Ready (initial) READY
1 Not Ready READY
2 DISABLE ENABLE
3 NO FAULT FAULT ACTIVE
4 STOP 2 OFF STOP 2 ON
5 STOP 3 OFF STOP 3 ON
6 START ENABLE START DISABLE
7 No Warning Warning
8
Reference ≠ Actual value
Reference = Actual value
9 Fieldbus control OFF Fieldbus control ON
10 Not used Not used
11 Not used Not used
12 FC stopped Running
13 Not used Not used
14 Not used Not used
15 Not used Not used
7.3.3 State Machine
The state machine describes the device status and the possible control sequence of the frequency
converter. The state transitions can be generated by using “control word” parameter. The “status word”
parameter indicates the current status of the state machine. The modes INIT, STOP, RUN and FAULT
(see figure 7-1) correspond to the actual mode of the Frequency converter.
DISABLE (Bit6=1
) is one value of the “status word”.
Bit0=0 is one value of the “control word”.
________________________________________________________________________________________
Vacon Oyj Phone +358-201-2121 Fax: +358-201-212 205
Page 17

VACON CX Profibus user’s manual Page 17
________________________________________________________________________________________
Power ON
Fault
Bit0=0
STOP 1
STOP by ramp
Bit1=0
Bit3=0
RUN DISABLE
STOP Bit2=0
DISABLE
INIT Bit6=1
Bit0=0
NOT READY
STOP Bit6=0
Bit0=0
xxxx x1xx xxxx x110
READY 1
STOP Bit0=1
Bit0=1
READY 2
STOP Bit1=1
Bit3=1
FAULT ACTIVE
FAULT Bit3=1
Reset fault
Bit7=0
Bit7=1
Bit1=0
STOP 2
STOP by coast
Bit4=0
Bit2=0
STOP 3
STOP by ramp
Bit5=0
Figure 7-1. States of the device control
7.3.4 Speed Reference
Speed reference of the frequency converter. The range is -10000... 10000, percentage of frequency
area between set minimum and maximum frequency.
-10000 = 100,00 % (Direction reverse)
0 = 0,00 % (Direction forward)
10000 = 100,00 % (Direction forward)
ENABLE
STOP Bit2=1
Bit4=1, Bit5=1, Bit6=1
RUNNING
RUN
________________________________________________________________________________________
Vacon Oyj Phone +358-201-2121 Fax: +358-201-212 205
Page 18

VACON CX Profibus user’s manual Page 18
________________________________________________________________________________________
7.3.5 Actual Value
Actual value of the motor. The range is -10000... 10000, percentage of frequency area between set
minimum and maximum frequency.
-10000 = 100,00 % (Direction reverse)
0 = 0,00 % (Direction forward)
10000 = 100,00 % (Direction forward)
7.3.6 PD1-PD4
The master can read the frequency converter’s actual values using process data variables. There are
four process data variables and each of them can be selected to show one of the monitoring page
variables or active fault code. Selection can be done in two different ways:
By master: Parameter 916.1 PD1
916.2 PD2
916.3 PD3
916.4 PD4
By control panel: Parameter Process Data 1 PD1
Process Data 2 PD2
Process Data 3 PD3
Process Data 4 PD4
Set the number of the variable to be monitored (see table 7-1) or number 99 for the active fault code to
the value of the parameter.
Profibus DP master
PD1 PD2 PD3 PD4
Figure 7-2. Control of Process Data
Selector
Parameter
VACON CX
1 Output Frequency
2 Motor Speed
.
.
.
22 Fieldbus status
99 Active fault code
________________________________________________________________________________________
Vacon Oyj Phone +358-201-2121 Fax: +358-201-212 205
Page 19

VACON CX Profibus user’s manual Page 19
p
A
________________________________________________________________________________________
7.4 Parameter Data
Fieldbus Board
P PARAMETERS
R
O
F
I
B
U
S
D
P
M
A
S
T
E
R
The Vacon variables and fault codes can be read and parameters can be read and written using PPO
types 1 and 2.
Output
Parameter ID
Parameter Index
Parameter Value Variables
In
Parameter Value
ut
Parameter ID
Parameter Index
VACON CX
Parameters
ctive Fault Code
7.4.1 Actual Values
Actual Values can be read by using the parameter read function.
Profibus parameter numbers according to monitored item numbers are as follows.
Parameter number Vacon variable
1 n1
2 n2
. .
. .
98 n98
Number Data name Step Unit Description
V1 Output frequency 0,01 Hz Frequency to the motor
V2 Motor speed 1 rpm Calculated motor speed
V3 Motor current 0,1 A Measured motor current
V4 Motor torque 1 % Calculated actual torque/nominal torque of the unit
V5 Motor power 1 % Calculated actual power/nominal power of the unit
V6 Motor voltage 1 V Calculated motor voltage
V7 DC-link voltage 1 V Measured DC-link voltage
V8 Temperature 1 °C Temperature of the heat sink
________________________________________________________________________________________
Vacon Oyj Phone +358-201-2121 Fax: +358-201-212 205
Page 20

VACON CX Profibus user’s manual Page 20
________________________________________________________________________________________
V9 Operating day counter DD.dd
V10 Operating hours, "trip
HH.hh
counter”
Operating days 1), not resetable
Operating hours 2), can be reset with program-button
#3
V11 MW-hours 0,001 MWh Total amount of MW-hours, not resettable
V12 MW-hours, "trip counter" 0,001 MWh MW-hours, can be reset with programmable button
#4
V13 Voltage/analogue input 0,01 V Voltage of the terminal Uin+ (control board)
V14 Current/analogue input 0,01 mA Current of terminals Iin+ and Iin- (control board)
V15 Digital input status, gr. A 0 = Open Input, 1 = Closed Input (Active)
V16 Digital input status, gr. B 0 = Open Input, 1 = Closed Input (Active)
V17 Digital and relay output
0 = Open Input, 1 = Closed Input (Active)
status
V18 Control program Version number of the control software
V19 Unit nominal power 0,1 kW Shows the power size of the unit
V20 Motor temperature rise 1 % 100% = temperature of motor has risen to nominal
value
Table 7-1 Monitored Items
1)
DD = full days, dd = decimal part of a day
2)
HH = full hours, hh = decimal part of an hour
For Special Actual Values see Appendix B.
7.4.2 Parameter Read and Write
The Vacon variables and parameters can be read and written using the Parameter Read/Write function.
Profibus parameters according to parameter numbers are as follows.
Parameter
Vacon parameter group Vacon parameter number
Number
101 - 199 Group 1 1 - 99
201 - 299 Group 2 1 - 99
. .
. .
801 - 899 Group 8 1 - 99
901 - 999 Profibus DP parameter
1001 - 1099 Group 9 1 - 99
. .
. .
1901 - 1999 Group 18 1 - 99
Numbering of the parameter as well as parameter ranges and steps can be found in the application
manual in question. The parameter value should be given without decimals. The Profibus DP
parameter group can be set by the Profibus DP master only, not on the VACON CX control panel.
7.4.3 Fault Code
When a fault is active, fault codes can be read using the Parameter Read function. Profibus parameter
number according to the fault code is as follows.
Parameter number Vacon variable
99 Active fault code
List and description of the fault codes are in VACON CX/CXL/CXS USER’S MANUAL
________________________________________________________________________________________
Vacon Oyj Phone +358-201-2121 Fax: +358-201-212 205
Page 21

VACON CX Profibus user’s manual Page 21
________________________________________________________________________________________
8. FAULT TRACKING
Fault Type
Fault 19 is active in Vacon CX The data cable connection
Fault 27 is active in Vacon CX Profibus DP Master is not active
UL led is not active (Supply Voltage,
Green).
DE led is active (Data Exchange not
Ready) and actual value n22 = 0
DE led is active (Data Exchange not
Ready) and actual value n 22 = 1
Possible cause Checking
Check the installation
between control board and
fieldbus board is not working
and the control source is fieldbus
The power cable connection
between control board and
fieldbus board is not working
Fieldbus board has not received a
parameterization telegram or the
telegram is incorrect.
Bus wire break
Fieldbus board has not received a
configuration telegram or the
telegram is incorrect.
- if installation is correct contact the
nearest Vacon distributor
Check the system Master device
Check the installation
- if installation is correct contact the
nearest Vacon distributor
Check the configuration in the
Profibus DP master.
Check the bus cables
Check the type files (GSD)
________________________________________________________________________________________
Vacon Oyj Phone +358-201-2121 Fax: +358-201-212 205
Page 22

VACON CX Profibus user’s manual Page 22
________________________________________________________________________________________
9. Type Files
9.1 GSD-file
#Profibus_DP
GSD_Revision = 1
Vendor_Name = "Vaasa Control"
Model_Name = "Vacon CX202OPT"
Revision = "1.0"
Ident_Number = 0x9500
Protocol_Ident = 0
Station_Type = 0
FMS_supp = 1
Hardware_Release = "HW1.0"
Software_Release = "SW1.0"
9.6_supp = 1
19.2_supp = 1
93.75_supp = 1
187.5_supp = 1
500_supp = 1
1.5M_supp = 1
3M_supp = 1
6M_supp = 1
12M_supp = 1
MaxTsdr_9.6 = 60
MaxTsdr_19.2 = 60
MaxTsdr_93.75 = 60
MaxTsdr_187.5 = 60
MaxTsdr_500 = 100
MaxTsdr_1.5M = 150
MaxTsdr_3M = 250
MaxTsdr_6M = 450
MaxTsdr_12M = 800
Redundancy = 0
Repeater_Ctrl_Sig = 0
24V_Pins = 0
Implementation_Type = "Profibus for Vacon CX "
Freeze_Mode_supp = 1
Sync_Mode_supp = 1
Auto_Baud_supp = 1
Set_Slave_Add_supp = 0
Min_Slave_Intervall = 20
Modular_Station = 1
Max_Module = 4
Max_Input_Len = 20
Max_Output_Len = 20
Max_Data_Len = 40
Modul_Offset = 0
Fail_Safe = 1
Max_Diag_Data_Len = 6
Module = "VACON PPO 1" 0xF3, 0xF1
EndModule;
Module = "VACON PPO 2" 0xF3, 0xF5
EndModule;
Module = "VACON PPO 3" 0xF1
EndModule;
Module = "VACON PPO 4" 0xF5
EndModule;
________________________________________________________________________________________
Vacon Oyj Phone +358-201-2121 Fax: +358-201-212 205
Page 23

VACON CX Profibus user’s manual Page 23
________________________________________________________________________________________
APPENDIX A
CONNECTIONS (small Profibus DP Board, Vacon CX210OPT)
Board layout
H1
X5
H3
1 2 3 4 5
Figure 1. Profibus board
Terminals:
X5 Screw terminal to Profibus DP
Diagnostic LED:
H1 Data Exchange state for Profibus DP, Red.
H1 led is active when Fieldbus board is not ready to exchange data
H3 Supply Voltage, Red.
H3 led is active if the Fieldbus board has supply voltage.
Profibus connections
Screw Connector connector X5: (Terminal resistors not included in the package)
Signal Connector X5
Shield X5-1 Cable shield
VP X5-2 Supply voltage of the terminating resistance
RxD/TxD-P X5-3 Receive/Transmission data positive (B)
RxD/TxD-N X5-4 Receive/Transmission data negative (A)
DGND X5-5 Data Ground
Table 1. D-sub connector
Note! If Vacon is the last device then the bus termination must be set. Install the resistors to the screw
terminal (see table 5-1)
________________________________________________________________________________________
Vacon Oyj Phone +358-201-2121 Fax: +358-201-212 205
Description
Termination for
the last node
390 Ω
220 Ω
390 Ω
Page 24

VACON CX Profibus user’s manual Page 24
________________________________________________________________________________________
APPENDIX B
Special Actual Values
By default, the Actual Value corresponds to the motor rotation speed in percentage.
Actual Value can be attached some other monitored variable. Meaning of Actual Value can be selected
by resetting a Control Word bits 15...11. The user can choose to show one of the monitoring page
variables or the active fault code.
Control Word (bits 15...11) is binary coded as follows:
Control Word Description
bit 15 bit 14 bit 13 bit 12 bit 11
0 0 0 0 0 Default, Actual Speed (%)
0 0 0 0 1 V1 (see table 0-1)
0 0 0 1 0 V2 (see table 0-1)
0 0 0 1 1 V3 (see table 0-1)
.
.
1 1 1 0 1 V29 (see table 0-1)
1 1 1 1 0 Active Fault Code
1 1 1 1 1 Default, Actual Speed (%)
NOTE: The minimum interval allowed to change the bits above is 500ms!
# Data name Step Unit Description
V1 Output frequency 0,01 Hz Frequency to the motor
V2 Motor speed 1 rpm Calculated motor speed
V3 Motor current 0,1 A Measured motor current
V4 Motor torque 1 % Calculated actual torque/nominal torque of the
unit
V5 Motor power 1 % Calculated actual power/nominal power of the
unit
V6 Motor voltage 1 V Calculated motor voltage
V7 DC-link voltage 1 V Measured DC-link voltage
V8 Temperature 1 °C Temperature of the heat sink
V9 Operating day count DD.dd
V10 Operating hours, "trip
HH.hh
counter”
V11 MW-hours 0,001 MWh Total MW-hours, not resetable
V12 MW-hours, "trip
0,001 MWh MW-hours, can be reset with programmable
counter"
V13 Voltage/analogue
0,01 V Voltage of the terminal Uin+ (control board)
input
V14 Current/analogue
0,01 mA Current of terminals Iin+ and Iin- (control board)
input
V15 Digital input status,
0 = Open Input, 1 = Closed Input (Active)
gr. A
V16 Digital input status,
0 = Open Input, 1 = Closed Input (Active)
gr. B
V17 Digital and relay
0 = Open Input, 1 = Closed Input (Active)
output status
V18 Control program Version number of the control software
V19 Unit nominal power 0,1 kW Shows the power size of the unit
V20 Motor temperature
1 % 100%= temperature of motor has risen to nominal
rise
________________________________________________________________________________________
Vacon Oyj Phone +358-201-2121 Fax: +358-201-212 205
Operating days 1), not resetable
Operating hours 2), can be reset with program-
button #3
button #4
value
1)
DD = full days, dd = decimal part of a day
2)
HH = full hours, hh = decimal part of an hour
Page 25

APPENDIX C: INSTALLATION
Installation of Profibus DP in Vacon CXS drives
NOTE: The option boards on the pictures may not look exactly the same as the one you have
purchased. These instructions are, still, applicable.
Remove the control panel and the panel base.
A
Remove the fixing screw from the control
B
board and replace it with a stand sleeve (4).
Connect the power cable (5) to terminal X5
C
of the control board. The power cable can
also be connected to terminal X6 if terminal
X5 is already reserved by the power cable
from the power board.
4
5
Remove the protective foil of the plastic
D
board and place the plastic board above the
control board. Be sure to place the plastic
board correctly so that the stand sleeve (4)
comes out through the hole on the board.
E
Place the board on the protective plastic
board (6) and connect the data cable (2) to
terminal X14 of the control board. The stand
sleeve should come out through the metaledged hole.
F
Secure the board on the stand sleeve with
the screw (3) attached.
4
3
6
2
X14
Page 26

VACON CX Profibus user’s manual Page 26
________________________________________________________________________________________
Connect the power cable (5) to terminal X9
G
on the option board.
Attach the control panel base with four
H
screws.
Check the connections. Remove all foreign objects from inside the frequency drive. Put the
I
control panel and the frequency drive cover back to their places.
________________________________________________________________________________________
Vacon Oyj Phone +358-201-2121 Fax: +358-201-212 205
Page 27

V
ax:+358-20
ud188g.doc
13.5.2002
acon Oyj
P.O. Box 25
Runsorintie 7
FIN-65381 VAASA
FINLAND
Phone: +358-201-2121
F
1-212 205
 Loading...