

Page 1

Operating Guide
SonoRead Tool Software
Table of Contents
1. Introduction ............................................................................................................................................... 2
1.1 Main characteristics ................................................................................................................................................................2
1.2 References ..................................................................................................................................................................................2
2. Installation procedure .............................................................................................................................. 2
2.1 Minimum requirements ........................................................................................................................................................2
2.2 Installation of the SonoRead Tool software ..................................................................................................................3
2.3 SonoRead Tool update...........................................................................................................................................................4
3. Software structure .................................................................................................................................... 4
3.1 Main screen ................................................................................................................................................................................4
3.2 Settings tool ...............................................................................................................................................................................5
3.2.1 SonoRead 868 wM-Bus .................................................................................................................................................5
3.2.2 General ................................................................................................................................................................................5
3.2.3 AES Key ................................................................................................................................................................................6
3.2.4 License .................................................................................................................................................................................7
3.3 Roads tool ...................................................................................................................................................................................7
3.3.1 Roads overview (start page) ........................................................................................................................................7
3.3.2 Managing a chosen Road .............................................................................................................................................8
3.3.3 Searching and filtering tasks in the road navigator ...........................................................................................9
3.3.4 Selecting multiple items ...............................................................................................................................................10
3.3.5 Create a new Road...........................................................................................................................................................10
3.3.6 Add a group or a task (device) to the road .............................................................................................................11
3.3.7 Display the state of a task .............................................................................................................................................11
3.3.8 Change an existing road file .......................................................................................................................................13
3.3.9 Execute a task ....................................................................................................................................................................14
3.3.10 Warnings .............................................................................................................................................................................14
3.3.11 List of error messages ....................................................................................................................................................15
3.4 Export tool .................................................................................................................................................................................15
3.4.1 Export characteristics ....................................................................................................................................................15
3.4.2 Exporting a road file .......................................................................................................................................................15
3.5 About tool ..................................................................................................................................................................................16
3.6 Feedback assistant ..................................................................................................................................................................16
4. Best Practice ............................................................................................................................................... 17
4.1 How to organize a road .........................................................................................................................................................17
4.1.1 Organizing Groups ..........................................................................................................................................................17
4.2 Recommended ways to edit the road .............................................................................................................................18
4.2.1 Copy content of a road to another road .................................................................................................................18
4.2.2 Combine two roads into a new road ........................................................................................................................18
4.2.3 Move part of a road to another road ........................................................................................................................18
5. Troubleshooting procedure ..................................................................................................................... 19
5.1 Procedure to follow ................................................................................................................................................................19
© Danfoss | 2019.05 VU.SH.D1.02 | 1
Page 2

Operating Guide SonoRead Tool
1. Introduction
1.1 Main characteristics
SonoRead Tool software permits remote
reading of the data from Danfoss SonoHCA radio
devices. For this purpose, the SonoRead Tool
software works with the SonoRead 868 radio
modems.
The list of devices to read is saved in a road file
in XML format. The road files can be created
or modified directly using the SonoRead Tool
software.
A road file contains a list of tasks organized
in groups of subgroups. The SonoRead Tool
software can only work on a single road file
at a time, but several can be stored with easy
transition from one road file to another.
The data produced by performing the task (read)
are inserted in the road file. The file is updated
when the task is completed. The road file is
automatically saved whenever its content is
changed.
Tasks can be performed individually or in groups.
The road files – in xml format – can be read
and changed using a simple text editor. Most
databases include export and import functions
in xml format.
This software runs on computer or tablet with
Windows OS.
This document gives important information
about the installation and use of the SonoRead
Too l softwa re.
In addition, a road can be created or changed
using the SonoRead Tool software. A task or
a group can be added, changed, deleted or
reinitialised.
The SonoRead Tool software can be translated
into other languages. For further information
about the translation tools, please contact
Danfoss directly.
The SonoRead Tool software works with the
radio modem SonoRead 868.
SonoRead Tool software connects to the
modems using Bluetooth.
1.2 References
2. Installation procedure
2.1 Minimum
requirements
[1]Open Metering System Technical Report
03, XML-Key Exchange, Issue 1.0.2 / 2015-10,
available at:
http://oms-group.org/en/download4all/technicalreports/
The SonoRead Tool software can be obtained
by contacting your local representative.
The following equipment is needed to run the
SonoRead Tool software:
• PC computer or tactile tablet with: Windows 7
32/64 bits operating system
• 2 GB memory
• Screen resolution: 1024x768 pixels
• Bluetooth connection if used with
SonoRead 868
It is advisable to have:
• A SonoRead 868 radio modem to perform
tests
• Internet access to update the software
Remark fo r Windows 10 users:
The generic COM ports provided by the integrated driver
of Windows 10 aren’t always working.
It can be necessary to install the manufacturer Bluetooth
drivers to create a COM port which work with the
SonoRead Tool!
2 | VU.SH.D1.02 © Danfoss | 2019.05
Page 3

Operating Guide SonoRead Tool
2.2 Installation of the
SonoRead Tool
software
The SonoRead Tool_<version>.exe file
launches the installation of the SonoRead Tool
software.
Procedure to install the application:
• Double click on the Setup.exe icon to launch
the installation program.
• The installation help window
“Setup – SonoRead Tool” will now appear.
• Installation of a shortcut on the desktop.
• Define the installation path and validate with
the Next button.
• If the installation directory does not exist,
press the Yes button to create it.
• Press the Install button to start the program
installation procedure.
• The files are now being installed on the PC
computer or tactile tablet.
When you click on the Finish button, the
SonoRead Tool software will be launched
automatically.
• A window will show you when the installation
has been completed.
VU.SH.D1.02 | 3© Danfoss | 2019.05
Page 4

Operating Guide SonoRead Tool
2.3 SonoRead Tool update
3. Software structure
3.1 Main screen
An automatic check for updates done at
the start-up can be configured using the
Settings tool.
You can also check for updates manually in:
About Check for updates.
Launch the software with the SonoRead Tool
shortcut created during installation.
The main menu of the SonoRead Tool software
enables one of the available tools to be chosen.
Select the tool by clicking on the appropriate
button in the main window.
When the installation file for a new release has
been downloaded, simply follow the installation
procedure described above. There is no need to
uninstall the old release. When the SonoRead
Tool software is uninstalled, the data (roads,
user preference) will be kept in the respective
directories.
Main functions of the Export button:
4 | VU.SH.D1.02 © Danfoss | 2019.05
Page 5

Operating Guide SonoRead Tool
3.2 Settings tool
The Settings tool defines the SonoRead Tool
user parameters. Settings are grouped into the
following sections:
1. SonoRead 868 settings
2. General settings
3. AES key settings
4. License settings
To save the changes please use the Save [1]
button.
To return to the main software menu, click on the
Back [2] button.
3.2.1 SonoRead 868
wM-Bus
3.2.2 General
• COM port
Define the communication port to which
the SonoRead 868 radio modem will be
connected. Select the COM port to be used
and press the Try connection button.
If successful: “Connection succeeded !”, if the
connection failed: “Unable to connect !”
• Maximum listening time
Defines the maximum time in minutes the
SonoRead Tool waits messages from the
wM-Bus devices that are scheduled to be
read. The time must be between 1 and
30 minutes.
• Language
Enables the display language to be chosen.
A restart of the SonoRead Tool is mandatory
for full support of the selected language.
• Check for update at start-up
• Show virtual keyboard
Check/uncheck the box.
• Ensure radio address uniqueness
When adding or editing a task, the SonoRead
Tool will check that the entered radio
address and task type (read/parametrization)
combination is not already present in the
current road.
VU.SH.D1.02 | 5© Danfoss | 2019.05
Page 6

Operating Guide SonoRead Tool
3.2.3 AES Key
C:\Users\username\Documents\SonoRead Tool\SonoReadToolDb
This section configures the encryption key
settings. There are two main ways to handle the
encryption keys:
1. Global encryption keys
With global encryption keys, groups of
installed devices share the same encryption
key (e.g. different key based on the device
type). SonoRead Tool supports three global
keys and if defined, they are all tried when
encrypted data is received from a device.
2. Individual encryption keys
With individual keys each device can have
its own. This mode is activated when the
encryption key database is enabled in
settings. When a device is read out, the
possible individual keys are tried first before
the global AES keys. Each parametrize task
which programs the encryption key to the
device will also add the key’s information
into the database. In addition, SonoRead Tool
supports import and export of the individual
encryption keys using the OMS Key Exchange
format [1]. It is possible to import new
encryption keys into the database with a OMS
Key Exchange format file. You can also export
all the keys from the database into an OMS
Key Exchange file.
With AES key settings you can define the default
encryption keys that will be used to decrypt any
data received from a device. In addition, you can
enable the encryption key database to allow
individual keys for each device as well as import
and export of these files.
• AES Key 1 (default)
• AES Key 2
• AES Key 3
AES 128 encryption key values. If a Danfoss
product (e.g. SonoHCA) uses an AES
encryption key, fill up one of the fields with
the value of the key to visualize data. All the
keys will be tried to decrypt the encrypted
data.
AES Key 1 will be used as the default key when
a new parametrization task is added to a road.
• Use Encryption key database
Check/uncheck the box to enable/disable
internal encryption key database. Each device
has its own individual encryption key when
the database is enabled.
• Database location
Shows the location of the internal encryption
key database. You can select another location
with the Browse button. If the selected
location is a directory with an existing
database, it will be opened. If the selected
directory is empty then a new database will
be created. If multiple users share a common
database then, all users need to be able to
write to the selected location.
• Status
Displays the status of the encryption key
database. When in use it should read
“Database opened normally”.
• Default import/export key encryption key
In the export and import files all encryption
keys are wrapped together, this field defines
the default value of the key encryption key.
• Import
Pressing this button starts the import of a
OMS Key Exchange file into the database, see
chapter 3.2.4.1 for details.
• Export
Pressing this button starts the export of
all keys in the database into an OMS Key
Exchange file, see chapter 3.2.4.2 for details.
3.2.3.1 Importing an OMS Key Exchange file
• Press the Import button
• A file selection dialog will open; select the
OMS Key Exchange file you would like to
import. If the signature validation fails for
the selected file a confirmation dialog will
be shown.
• A new dialog will open; give the key
encryption key that was used to create the file
and press Import button on the dialog.
• Once the import is complete, a message
dialog is opened with information about how
many devices and keys have been imported.
Pressing OK on the dialog completes the
import process.
3.2.3.2 Exporting to an OMS Key Exchange
file
• Press the Export button
• A file selection dialog will open; select the
directory and file name for the OMS Key
Exchange file.
• A new dialog will open; give the key
encryption key to be used and press the
Export button.
• Once the export is complete a message dialog
will be opened with information about how
many devices and keys have been exported.
Pressing OK on the dialog completes the
export process.
6 | VU.SH.D1.02 © Danfoss | 2019.05
Page 7

Operating Guide SonoRead Tool
3.2.4 License
3.3 Roads tool
3.3.1 Roads overview (start
page)
This section shows information about the
installed license and allows installation of new
license key.
• Product
Displays product, edition and version
information contained in the currently
installed license.
• Status
Status of the installed license, it should
normally be VALID.
• Expire date
Expire date of the current license and count of
the remaining days from the current date.
SonoRead Tool can manage several roads at the
same time. When starting the tool “Roads”, an
• License no.
License number of the installed license.
• License hw ID
Unique hardware ID stored in the license.
• Hardware ID
Unique hardware ID of the PC/Tablet running
the application.
• New license key
Pressing this button starts the activation
process for a new license key.
overview of all roads available under a specified
folder is given.
There are different functions for managing the
roads:
1. One level up
Navigates one level up in the folder structure.
2. Present location
Shows the path to the actual position.
3. Last locations
Shows the last used folder locations.
4. Browse button
To navigate through the folder structure.
5. Search Field
For searching a road within the actual folder.
6. Sorting Field
Classifies the Roads after changing the name
or date.
7. Roads and subfolders in Folder
This area shows subfolders [7a] and all or
filtered roads [7b] in the actual folder.
8. Add a new Road
This button allows to add a road in the actual
folder [2].
See also chapter 4.1 for best practices how to
organize the road files.
VU.SH.D1.02 | 7© Danfoss | 2019.05
Page 8
Operating Guide SonoRead Tool
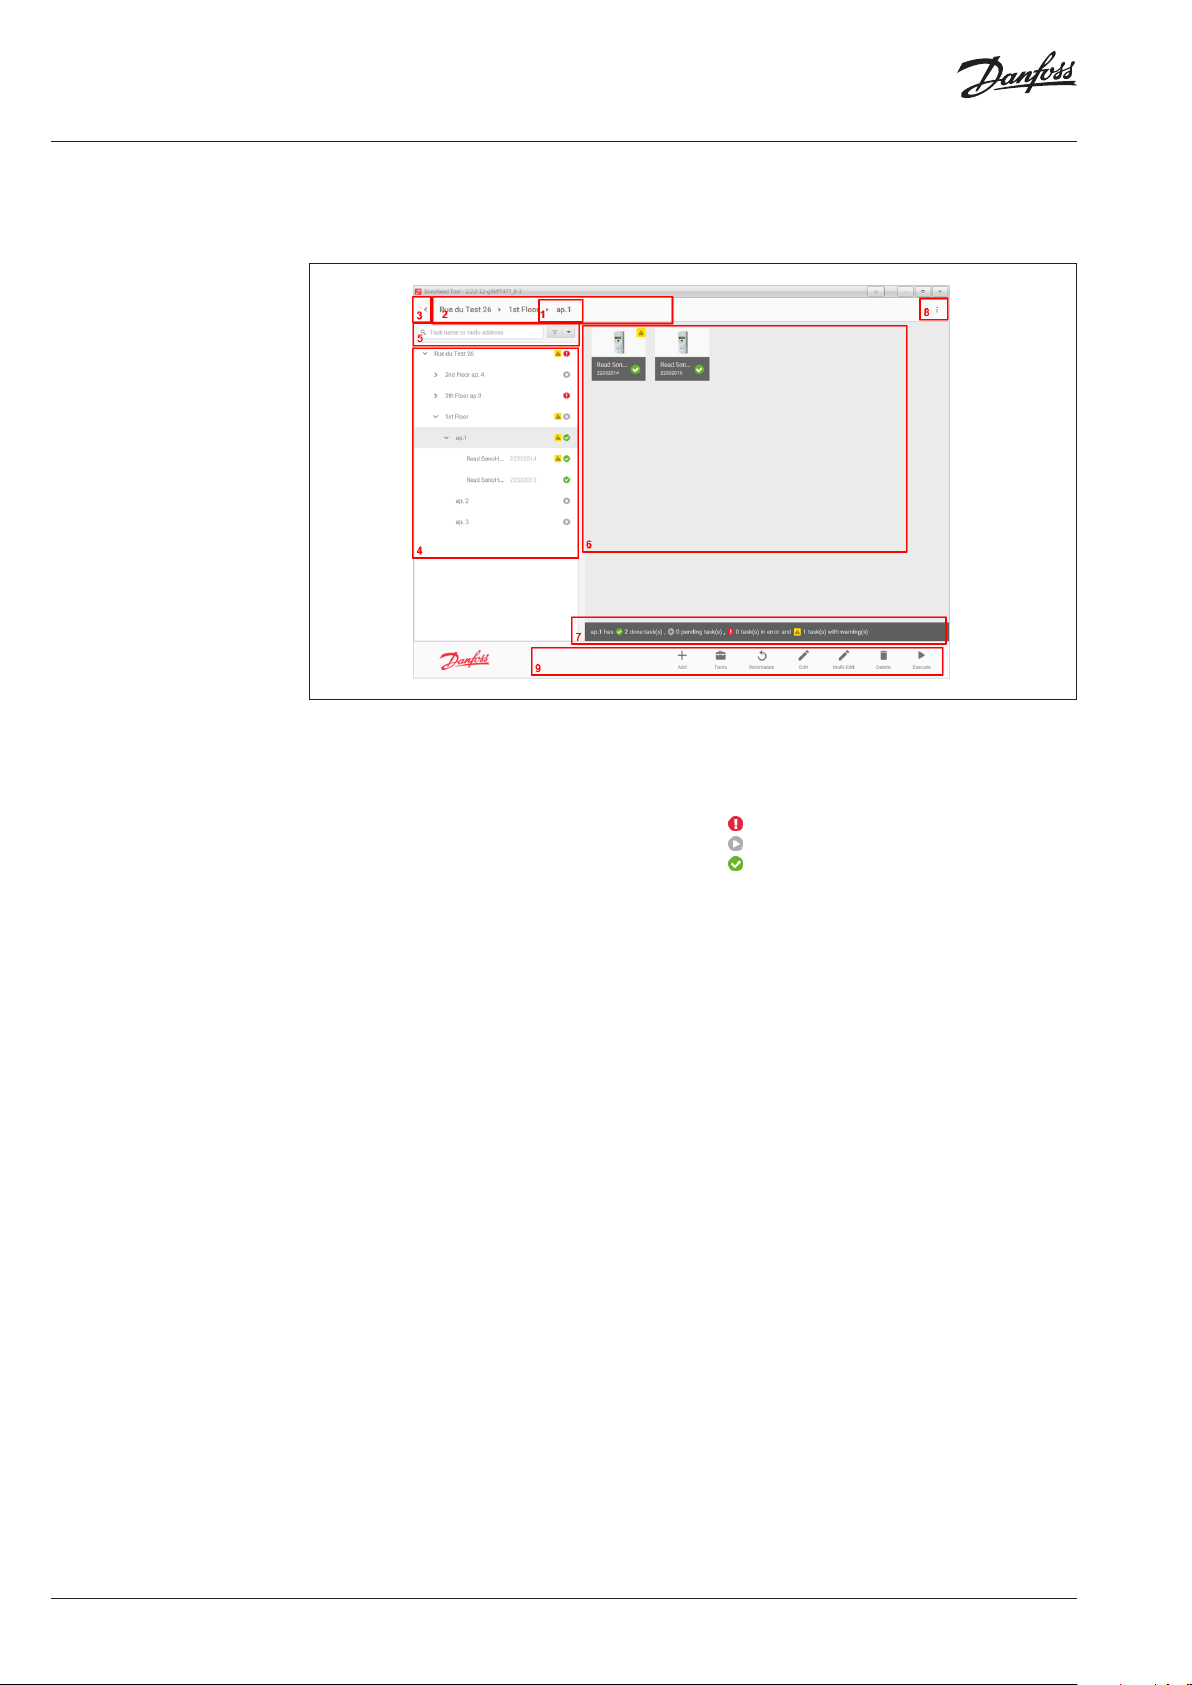
3.3.2 Managing a chosen
Road
When a road is chosen in the Roads overview,
a new view opens and shows the different
possibilities for managing a Road.
1. Present location
Indicate the name of the element which
is currently being displayed (known as
“context”).
2. Full location
Shows the parent elements of the context.
3. Back button
Return to the road selection page.
4. Tree V iew
Represents the road structure in tree form.
5. Search Field
Input a search string to find one or more
elements in the Road.
6. “Tile” view
Displays the content of the context (tasks and/
or groups)
Colour/icon symbols:
: element error
: element not performed
: element performed
7. Group summary
Provide information about the state of the
tasks in the selected group.
8. View Options
Selects which information and warning
should displayed.
9. Control bar
Contain the actions available in the context.
8 | VU.SH.D1.02 © Danfoss | 2019.05
Page 9

Operating Guide SonoRead Tool
3.3.3 Searching and
filtering tasks in the
road navigator
Tasks in a Road can be searched and filtered by
DONE, PENDING, ERROR and Warnings.
Optionally, the Radio Address, Group Summary
and Warning icon can be displayed. For changing
the view, use the menu View Options [1] in the
top right corner of the road navigator.
View Options: In this pop-up window (button
is placed at the top right corner [1]) you can
choose which information and warnings should
be displayed in the tree view and in the group
summary.
VU.SH.D1.02 | 9© Danfoss | 2019.05
Page 10

Operating Guide SonoRead Tool
3.3.4 Selecting multiple
items
In the Tile view, you can enter a multiselection
mode by pressing Ctrl and clicking one of the
tiles or by holding the left mouse button down
on top of a tile for more than one second. On
touch screens, multiselection mode is activated
by touching one tile for more than one second.
Once multiselection mode is activated, you
can add or remove tiles to/from the selection
by clicking/tapping them. Selected tiles are
marked with a bold border and a check mark
on upper right corner. When the multiselection
mode is active the control bar has an additional
“Cancel” button, pressing this button ends the
multiselection mode.
3.3.5 Create a new Road
Remark:
We advise you to create two
separate road files in every
case (one file containing the
parameterization tasks and the
other with the reading tasks). See
also chapter 6.1 for best practices on
how to organize the road files.
Road storage location:
• Click the Browse button to select a new
location for the road files.
Select the Road tool and click on the Add
button.
Define the name of the new Road file and press
OK to validate:
10 | VU.SH.D1.02 © Danfoss | 2019.05
Page 11

Operating Guide SonoRead Tool
3.3.6 Add a group or a task
(device) to the road
Remark:
Each device has its o wn tasks which can
be chosen from t he available tasks list.
To add a task (read a device) to a road file, you
must select the road file and go to the desired
location in the road file.
The new group/task will be added to the
selected group. To add a task to a group, just
select it before adding a new task.
Click on the Add button to create:
• A new group, click on the Group button.
• A new task, click on the Task button.
The list of products as a function of the selected
task (reading) will be displayed in the available
tasks list window on the left-hand side.
3.3.7 Display the state of a
task
Select a device from the list. A new window will
appear. This window will enable certain values of
the selected device to be initialised.
Here is an example for the SonoHCA device:
• Name
The title of the task can be changed.
• Radio address
Enter the radio address corresponding to the
device. The radio address is the same as the
serial number of the device.
By scanning the QR code of the product or its
bar code with a bar code reader, the scanned
serial number will immediately be copied into
the “Radio Address” field.
A reading task may be in 3 different states:
: Task successfully performed.
Symbolised by a green check mark.
: Task performed with an error.
Symbolised by a red exclamation mark.
: Task not yet performed. Symbolised by
a grey play symbol.
To display the properties of a task just click
on the desired task.
• Device number
If the number is 1, one task will be added.
If the number is incremented, the amount
of tasks will be added (for instance Read
SonoHCA), the radio address will also be
incremented consecutively in the road
structure.
From now on, the device will be present in the
road structure.
VU.SH.D1.02 | 11© Danfoss | 2019.05
Page 12

Operating Guide SonoRead Tool
3.3.7 Display the state of a
task (continuous)
The task properties are displayed in a new
screen.
Task successfully performed with a warning.
Data available for the device which has been
read. A warning for the device is shown in the
top.
Task performed with an error.
Data not available for the device read.
Remark:
The type of error is displayed in red.
See Chapter 3.3.11 List of error messages
12 | VU.SH.D1.02 © Danfoss | 2019.05
Page 13

Operating Guide SonoRead Tool
3.3.7 Display the state of a
task (continuous)
Remark:
The tree view of the road structure
shows the state of the tasks:
Groups containing at least one
task performed with an error
have an exclamation mark.
Groups which only contain
tasks successfully performed
have a green check mark.
Groups which have not yet
been performed have a grey
play symbol.
Task not yet performed.
The data for the device read are not yet available.
3.3.8 Change an existing
road file
Go to the desired location and select the desired
road file.
The following control bar enables the road file to
be changed:
• Add
Enables a new group or task to be added.
• Tools
This contains a menu with copy/paste.
Copying of a task or a group is possible. You
can also paste the copied element(s) either
into the same road or to another road.
Hint: Copy/paste function depends on
the setting of “Ensure radio addresses
uniqueness” in the General Settings (see
chapter 3.2.3). If it’s enabled, it will prevent
pasting a copied element within the same
road.
• Reinitialize
A task successfully performed cannot be
performed again.
To perform this task again, it must first be
reinitialized by clicking on the Reinitialize
button. That action erases the data from the
previously read XML file.
• Edit
If the task to be edited contains data from a
reading, the data will be erased.
Editing a group enables the group name and
the information field to be changed.
Editing a task enables the task name,
radio address, the data to be read and the
information field to be changed, depending
on the device type.
• Delete
Delete the selected group/task.
• Execute
Select a group or a task and click on the
Execute button.
To execute all tasks not yet completed in a
particular group, just select the desired group
before pressing the Execute key.
VU.SH.D1.02 | 13© Danfoss | 2019.05
Page 14

Operating Guide SonoRead Tool
3.3.9 Execute a task
Remark:
To stop the reading process, press
the Cancel button.
A pop-up window indicates the progress of the
current execution.
This window disappears as soon as the current
execution has been completed.
The window of the SonoRead Tool software
contains the following information:
• Done: X / Y error(s): Z
X: tasks performed successfully.
Y: total tasks to be performed.
Z: tasks performed with an error.
The LED in the SonoRead 868 radio modems
indicates the state of the reading task.
Remaining listening time: time remaining to
receive messages from wM-Bus devices.
3.3.10 Warnings 3.3.10.1 Select or deselect warnings to be
The warnings inform the user of problems
experienced with the radio devices during a
radio reading.
If an error has occurred and this corresponds to
the type of warning chosen, a warning message
will be automatically displayed on the road
navigator or in the radio device properties.
verified
Several types of warnings can be activated or
deactivated for every Read task.
To define the warnings activated, please use the
Device Settings tool and check or uncheck the
available warning items for every Read task.
Only the checked warnings will be displayed on
the road navigator in the event of an error.
The warning messages of all the devices are
verified after each reading.
The type of warning is displayed when the
property of a task is shown.
The warnings correspond to an interpretation of
the Error states of the devices read.
14 | VU.SH.D1.02 © Danfoss | 2019.05
Page 15

Operating Guide SonoRead Tool
3.3.11 List of error messages
3.4 Export tool
List of error messages which may appear when a
task is displayed:
• Codec error: value of an M-bus field could
not be decoded.
• Radio communication error: contact
between the device and radio modem cannot
be established.
• Cannot contact radio modem
SonoRead 868:
- SonoRead 868 is not switched on.
The Export tool enables to convert a xml road
file into a CSV type file.
- Wrong COM port.
- The Bluetooth communication is disturbed
by a WIFI signal, switch off the WIFI function
of the PC computer or tactile tablet.
• Operation not supported: parameter writing
is not supported on the device.
• Internal error: indicates any other internal
error of the application (consult the log for
further in-formation).
3.4.1 Export characteristics
Remark:
A new pattern can only be saved
if it contains either {TIME} or
{DATETIME} tag in it. Default pattern
is {ROAD}-{DATETIME}.
3.4.2 Exporting a road file
The Export tool extracts from the xml file
(road file) the values of each device read by the
SonoRead Tool software. The Export tool will
generate various files with the extension “.csv”
which can then be used by clients to establish a
billing or verification system.
For each column, a heading will be added
automatically to obtain a more detailed
description of the displayed value.
The language of the column heading will
correspond to the language used by the
SonoRead Tool software.
The generated CSV file will be opened
automatically by the “Microsoft Office Excel”
software.
During the exportation process, the
• Select the road file to be exported in the list
on the left side.
• Choose the checkbox “Open/Do not open the
csv file after exporting”.
• Choose the Export destination.
The csv file will be saved in a sub-file
timestamped at the indicated location.
SonoRead Tool will create a new folder with
the corresponding name pattern defined in
Directory name pattern. You can only enter
standard authorised directory characters, plus
the following special tags:
{ROAD} Name of the exported road.
{DATETIME} Current date and time in
format yyyymmddHHMMSS.
{DATE} Current date in format
yyyymmdd.
{TIME} Current time in format
HHMMSS.
For example the export of a road named
“TestRoad” on 15th June 2017 at 12:45:22
with pattern “{ROAD}-{DATE}-{TIME}
test” will create new directory with name
“TestRoad-20170615-124522 test”.
• To start exporting, press the Export button
and wait a few seconds
VU.SH.D1.02 | 15© Danfoss | 2019.05
Page 16

Operating Guide SonoRead Tool
3.5 About tool
The About tool enables:
• Need help?
The user guide document can be opened.
The user guide is available in the « \doc »
subfolder of the application folder.
• What’s new
The software change log will be displayed.
• Visit us
The Danfoss IT website will be opened.
• Check for updates
A check for updates will be done. It is
necessary to be connected to the Internet.
3.6 Feedback assistant
The feedback assistant helps us to get feedback
regarding the SonoRead Tool software. It will
generate a preformatted e-mail message with
that needed technical data that will be sent to
your local distributor. To use the assistant, press
the Feedback assistant button in the SonoRead
Tool window title bar.
This will open the “Feedback assistant” dialog
where you can select if a screenshot should be
included with the technical data.
Remark:
You can use the feedback assistant
even if the SonoRead Tool device
does not have e-mail or internet
access. In this case, please copy the
generated zip file e.g. to a USB-stick
and send it to your local distributor.
Some Screenshots are also ver y
helpful.
By pressing Open as e-mail… button, your
default Mail application will be opened with a
preformatted e-mail message. A File Explorer
window will popup, please fill in the required
fields and attach the generated zip file with the
to your e-mail.
16 | VU.SH.D1.02 © Danfoss | 2019.05
Page 17

Operating Guide SonoRead Tool
4. Best Practice
4.1 How to organize a
road
For walk by applications, it makes sense to create
a road for one or more buildings when doing
repeated readouts. If there are bigger buildings
with a lot of apartments and devices, it can
make sense to create a readout road only for one
building. Typical application: there’s one or more
heat cost allocators in each flat.
4.1.1 Organizing Groups
With the SonoRead Tool, it is possible to create
multiple groups under one road. You can
structure a road in groups and subgroups to
have a better overview. For example, you create
a group for each floor of a building. If there is
more than one device per apartment, you can
also create a subgroup for each flat. If you have
bad reception of the radio signal, you could
execute every group separately. For example,
each floor of a high home when walking up or
down the floors.
VU.SH.D1.02 | 17© Danfoss | 2019.05
Page 18

Operating Guide SonoRead Tool
4.2 Recommended ways
to edit the road
4.2.1 Copy content of a road
to another road
4.2.2 Combine two roads
into a new road
If you need to copy all the groups and tasks in
one road (Road-A) into another road (Road-B)
use the following steps:
• Open Road-A in the SonoRead Tool
• Make sure the top level of the road is selected
• Press Tools in the command bar and select
copy from the opened menu
• Close the road Road-A
If you need to combine the content of two roads
(Road-A and Road-B) into a new road (Road-C)
use the following steps:
• Open Road-A in the SonoRead Tool
• Make sure the top level of the road is selected
• Press Tools in the command bar and select
copy from the opened menu
• Close the road Road-A
• Create Road-C in the SonoRead Tool with the
structure you need
• Select the group into where you want to put
the content of Road-A
• Press Tools in the command bar and select
paste from the opened menu
• Open Road-B in the SonoRead Tool
• Select the group where you want to put the
content of Road-A
• Press Tools in the command bar and select
paste from the opened menu
Content of the Road-A is now part of Road-B
• Close the road Road-C
• Open Road-B in the SonoRead Tool
• Make sure the top level of the road is selected
• Press Tools in the command bar and select
copy from the opened menu
• Close the road Road-B
• Open Road-C in the SonoRead Tool
• Select the group into where you want to put
the content of Road-B
• Press Tools in the command bar and select
paste from the opened menu
Content of the Road-A and Road-B are now part
of Road-B
4.2.3 Move part of a road to
another road
If you need to move parts of groups and tasks
from a road (Road-A), into another one (Road-B),
use the following steps:
• Open Road-A in the SonoRead Tool
• Select the groups and tasks you need to
move, you can use the multi-select function
• Press Tools in the command bar and select
copy from the opened menu
• Close the road Road-A
• Open Road-B in the SonoRead Tool
• Select the group into where you want to put
the content copied from Road-A
• Press Tools in the command bar and select
paste from the opened menu
• Close the road Road-B
• Open Road-A in the SonoRead Tool
• Select the same groups and tasks that were
selected in the second step
• Press Delete in the command bar
• Press Yes in the opened confirmation dialog
• Close the road Road-A
Content from the Road-A is now moved to
Road-B
18 | VU.SH.D1.02 © Danfoss | 2019.05
Page 19

Operating Guide SonoRead Tool
5. Troubleshooting
procedure
5.1 Procedure to follow
This procedure describes the troubleshooting
method and sequence to perform when
there are communication problems with the
SonoRead Tool.
Please proceed as follows:
General Check:
1. Check that the radio modem SonoRead 868 is switched on.
2. Check that the radio address of the device is introduced correctly.
3. Check that the radio modem SonoRead 868 is charged and that accumulators are
working properly.
Replace with new batteries if necessary.
4. Read another device or another device type.
Check Bluetooth connection:
5. Check that the Bluetooth interface of your PC or tactile tablet is switched on.
6. Check that the COM port number defined for Bluetooth connection is correct (“Options”
tool).
7. Check the windows configuration panel to know which COM port is assigned to the
Bluetooth inter-face.
8. Check communication between SonoRead Tool and radio modem SonoRead 868 using
“Try connection” in “Options” tool.
If successful: “Connection successful!”, if failure: “Unable to connect!”
If the problem could not be resolved, please write the SN (________________), SW
version (_____________) and HW version (_____________) and provide them to your
local distributor.
Please refer to chapter List of error messages.
During the troubleshooting procedure, please
use the last software version of SonoRead Tool.
Other checks:
9. The Bluetooth communication is disturbed by a WIFI signal, switch off the WIFI function
of the PC computer or tactile tablet.
Try a new readout to check if it is working correctly
10. Switch off all of your equipment (PC / tactile tablet and radio modem) and switch them
on again.
11. Use another radio modem SonoRead 868 if available.
Technical support:
For technical support, please contact your local Danfoss agent.
VU.SH.D1.02 | 19© Danfoss | 2019.05
Page 20

Danfos
produc
Al
Danfoss A/S
Heating Segment • heating
Operating Guide SonoRead Tool
s can accept no responsibility for possible errors in catalogues, brochures and o ther printed material. Danfoss reserves the right to alter its products w ithout notice. This also applies to
ts already on order provided that such alterations can be m ade without subsequential changes being necessary in specications already agreed.
l trademarks in this material are p roperty of the respective companies. Danfoss and all Danfoss logot ypes are trademarks of Danfoss A/S. All rights reserve d.
.danfoss.com • +45 7488 2222 • E-Mail: heating@danfoss.com
© Danfoss | DHS-SRMT/SI | 2019.0520 | VU.SH.D1.02
 Loading...