


CAUTION: Read all instructions carefully before installation.
Save this Installation and Operation Manual for future reference.
RX1200
ROOF AND GUTTER DEICING CONTROLLER
INSTALLATION AND OPERATION MANUAL
POWER
HEATING
Danfoss Electric Heating, North America

RX1200 - ROOF AND GUTTER DE-ICING CONTROLLER
Table of Contents
General Safety Instructions . . . . . . . . . . . . . . . . . . . . . . . . . . . . . . . . . . . . . . .2
Introduction. . . . . . . . . . . . . . . . . . . . . . . . . . . . . . . . . . . . . . . . . . . . . . . . .3
RX1200 Kit Description . . . . . . . . . . . . . . . . . . . . . . . . . . . . . . . . . . . . . . . . . .3
RX1200 Specications . . . . . . . . . . . . . . . . . . . . . . . . . . . . . . . . . . . . . . . . . .4
Installation Instructions . . . . . . . . . . . . . . . . . . . . . . . . . . . . . . . . . . . . . . . . .5
Operation Modes and Signal Lights . . . . . . . . . . . . . . . . . . . . . . . . . . . . . . . . . .8
Commissioning. . . . . . . . . . . . . . . . . . . . . . . . . . . . . . . . . . . . . . . . . . . . . . .9
Testing . . . . . . . . . . . . . . . . . . . . . . . . . . . . . . . . . . . . . . . . . . . . . . . . . . . .9
Warranty . . . . . . . . . . . . . . . . . . . . . . . . . . . . . . . . . . . . . . . . . . . . . . . . . .11
General Safety Instructions
1. THIS UNIT SHOULD BE INSTALLED, OPENED, AND
REPAIRED BY QUALIFIED PERSONNEL ONLY!
CETTE UNITÉ DEVRAIT ÊTRE INSTALLÉE, OUVERTE, ET
RÉPARÉE PAR LE PERSONNEL QUALIFIÉ SEULEMENT!
2. To avoid shock hazard do not open the front cover with power
connected to the RX1200 or any controlled equipment.
Pour éviter la décharge électrique déconnectez toute la
puissance avant d’ouvrir la couverture du RX1200.
07/2017 VIEXE202 ©Danfoss
2
RX1200 - ROOF AND GUTTER DE-ICING CONTROLLER
Introduction
The RX1200 controller is designed to use in conjunction with Danfoss roof and gutter de-icing cable for roof, gutter and snow melting applications, such as Danfoss RX
cables. The RX1200 sense both moisture and temperature conditions in the gutter or
downspouts and turns the roof de-icing cable on and o based upon these readings.
By combining the moisture and temperature readings, the controller is able to save up
to 75% on energy consumption compared to a controller which only measure temperature.
Danfoss RX products – cables and controls are designed to produce an eective and
constant solution to protect your roof from ice dam or related hazards. The quality
engineered RX heating cables provide a safe, exible and economical solution of you
snow and ice protection needs.
The RX1200 is rated at a maximum of 10.2 Amps at 120 Volts, which means the maximum cable wattage the can be connected to the controller is 1225 Watts. Only one roof
and gutter de-icing cable can be connected to the RX1200 by a grounded plug.
Remember that self-regulating cables can get higher eect when turned on in cold weather.
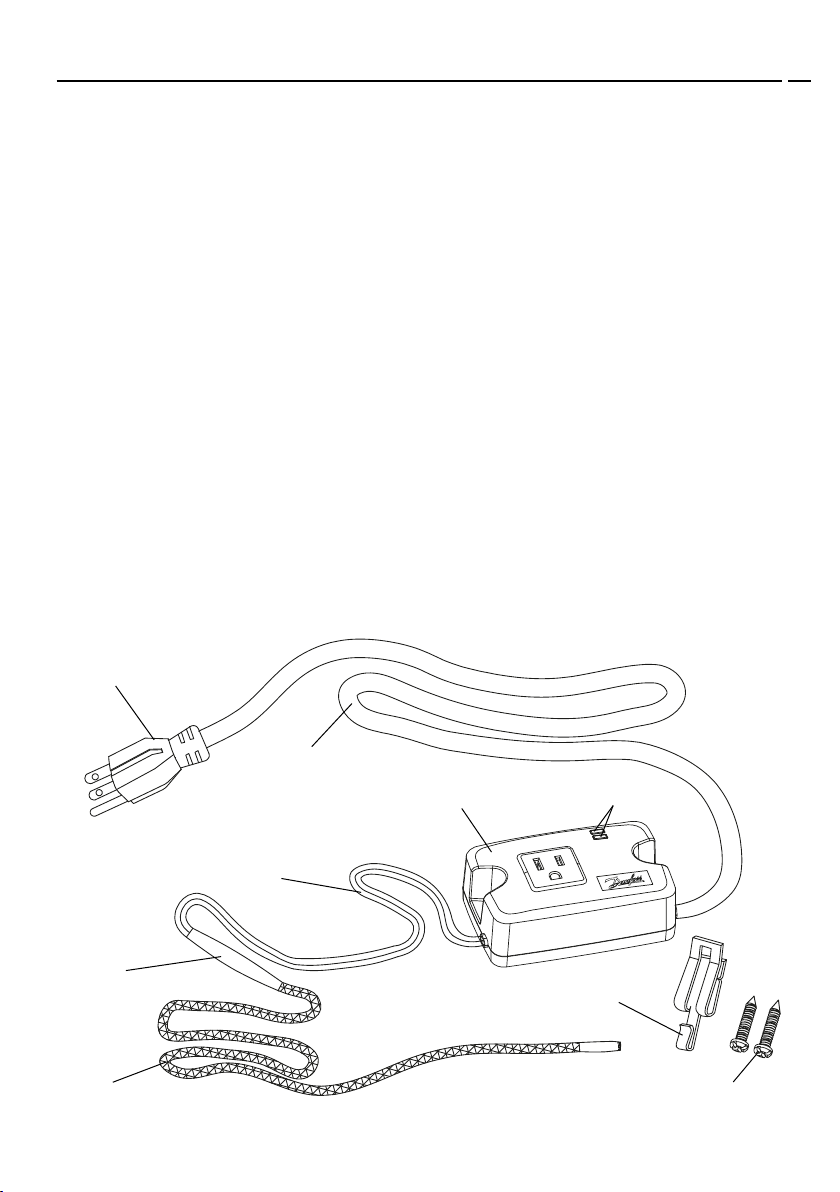
RX1200 Kit Description
Grounded Plug
Power Cord
Main Housing Indicators
POWER
HEATING
Probe Leads
Splice Connection
Sensor Shingle Clips,
6 pcs.
Sensor Wire
07/2017 VIEXE202 ©Danfoss
Screws, 2 pcs.
3

RX1200 - ROOF AND GUTTER DE-ICING CONTROLLER
RX1200 Specications
Technical Data RX1200
Power Supply: 120VAC 50/60Hz
Resistive Load (Output) max.: 10.2A @ 120V (1225W)
Enclosure Type: Outdoor, under sot/eave
Turn On/O Temperatures: On at 39.2°F, o at 44.6°F (on at 4°C, o at 7°C)
Indicators: Power and Heating
Mounting: Under sot/eave or on wall protected against rain
and direct sunlight
Dimensions (H x W x D): 1.73” x 4.57” x 2.84” (44mm x 116mm x 72mm)
Mounting Holes: Center to Center distance 3.82” (97mm)
Power Cord: 4.9ft (1.5m), 16AWGx3C, with grounded plug, black
Probe Lead: 2.3ft (0.7m), black
Sensor Wire: 9.84ft (3m), moisture sensor, black
Sensor Shingle Clips: 6 pcs., aluminum alloy
Screws: 2 pcs., M4x25
WARNING
1. It is required the circuit supplying power to the RX1200 and heating cable have
ground fault protection. This is mandatory by National/Canadian Electric Code.
a. If the ground fault trips and cannot be reset, then there is a fault in either the
RX1200 or the heating cable.
b. Do not attempt to bypass the ground fault device. Doing so may result in risk of
re or electrical shock.
2. The RX1200 must be kept dry. The RX1200 is not water resistance and will fail if the
device gets in contact with water, snow or ice.
3. Roof and Gutter cables must be installed in compliance with either National or Canadian Electric Code and Local or Provincial Code
4. Only one roof and gutter cable per RX1200. Do not exceed 1225W on the RX1200;
risk of electric shock, re or the formation of ice dams can result if more than 1225W
or more than one cable is connected to the RX1200.
5. The RX1200 must be installed according to the manufacturer’s instructions. By not
doing so may void your warranty.
6. Make sure to save this manual in case assistance is needed in the future.
07/2017 VIEXE202 ©Danfoss
4
RX1200 - ROOF AND GUTTER DE-ICING CONTROLLER
Installation Instructions
Roof with Gutter
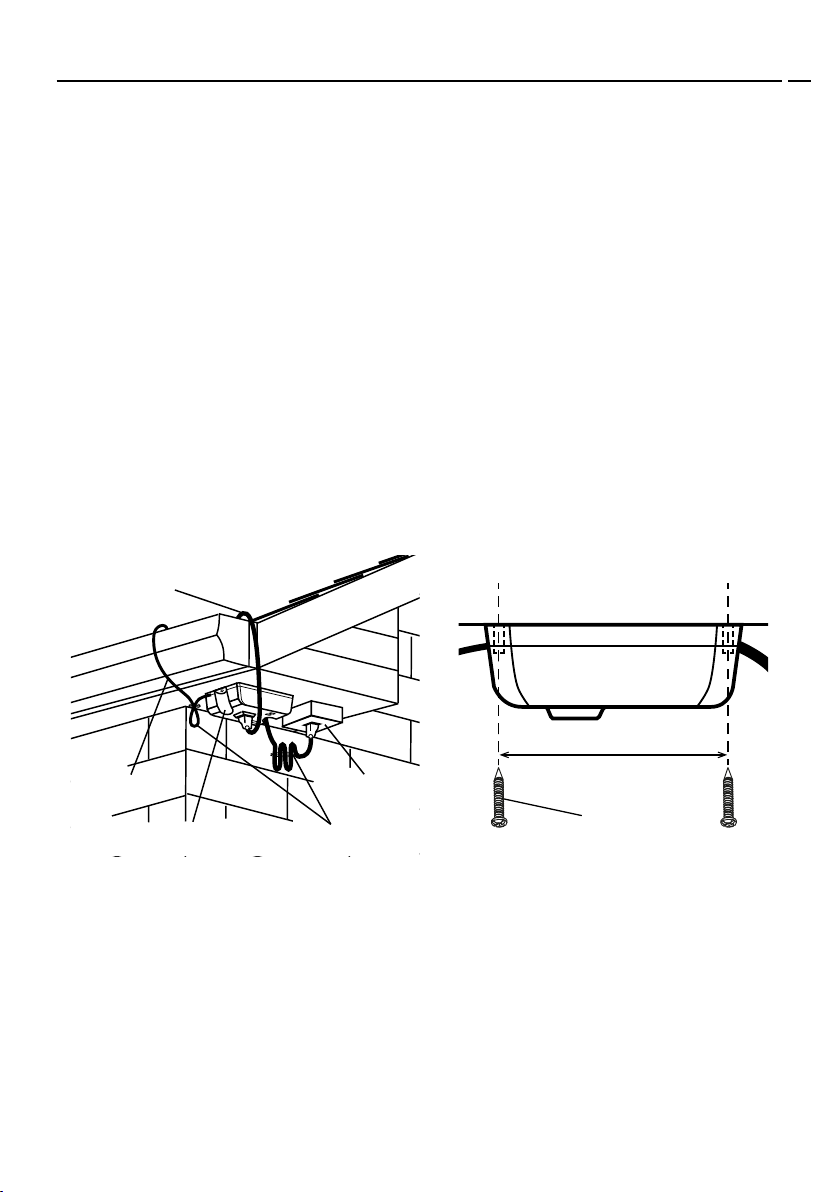
1. The RX1200 main housing should be mounted under the eave or sot, or equivalent
location protected from the weather. See Fig. 1.
a. Make sure the mounting location is close enough to the receptacle, which is supplying power to the RX1200.
i. Location of the receptacle should be protected from rain, snow and direct
sunlight.
b. Make sure power leads, probe leads and power connection to the heating cables
have drip loops for maximum water protection. See Fig. 1.
Note: The RX1200 should be mounted where you can see the indicator lights. This will
allow you to determine if the RX1200 is powered and heating.
i. Receptacle can be controlled by switch with pilot light, (located indoors.)
Mount RX1200 main housing using the two (2) screws provided. See Fig 2.
Heating Cable
2.7” (68mm)
ReceptacleProbe Leads
M4x25
RX1200 Housing Drip Loops
Fig. 1 Fig. 2
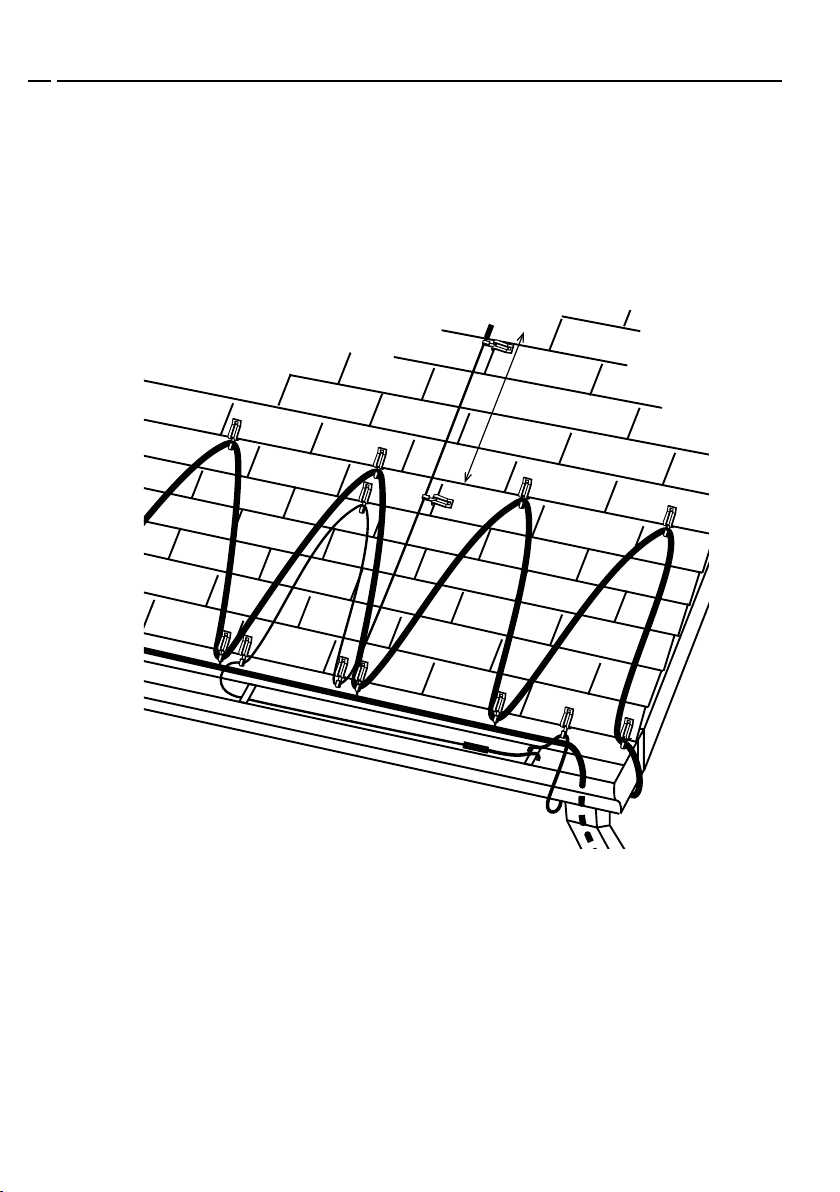
2. Place splice connection and sensor wire along the bottom of the gutter approxi-
mately two inches within the roof and gutter cable. See Fig.3.
a. Attach probe lead near splice connection to the edge of the roof by sensor shingle
clip.
b. Wrap the probe lead around at least one gutter support strap or nail.
c. Run the sensor wire along one zig-zag of the roof and gutter heating cable on the
roof as shown on Fig. 3.
07/2017 VIEXE202 ©Danfoss
5
RX1200 - ROOF AND GUTTER DE-ICING CONTROLLER
d. Run the sensor wire up the roof, at least 2 feet (60cm) beyond the roof and gutter
heating cable as shown on Fig. 3.
i. Secure the senor wire to the roof with the Sensor Shingles Clips provided.
Gently squeeze the coated end of the clip around the sensor wire.
Note: Sensor wire cannot be extended.
min. 24” (60cm)
Fig. 3
Roof without Gutter
1. The RX1200 main housing should be mounted under the eave or sot, or equiva-
lent location protected from the weather. See Fig. 5.
2. Splice connection and probe lead should be looped and xed near controller box.
See Fig. 5.
3. Run the sensor wire along one zig-zag of the roof heating cable on the roof as
shown on Fig. 3.
4. Run the sensor wire up the roof, at least 2 feet (60cm) beyond the roof heating
cable shown on Fig. 3.
07/2017 VIEXE202 ©Danfoss
6

RX1200 - ROOF AND GUTTER DE-ICING CONTROLLER
Fig. 4
Sensor Wire installation with gutter
Sensor Wire installation without gutter
Fig. 5
Metal and Membrane Roof
1. To install the shingle clips on metal or membrane roof, adhesive must be used
to bond the shingle clip to the roof. Note: Danfoss sells Roof Clip Glue. Contact
your local representative for more information.
2. Precautions must be taken on metal roof installation to protect the sensor wire
from getting damaged. Damage can occur to the sensor wire from sliding snow
or ice which can cause the controller to stop working.
3. Make sure the sensor wire will be long enough to reach the melting area on a
membrane roof.
Connection
1. Connect the power cord of the roof and gutter de-icing cable into the RX1200
main housing. Do not exceed maximum load of 10.2A @ 120V or maximum
output of 1225W.
2. Connect the grounded plug of the RX1200 into the receptacle. Make certain
that this connection remains dry and that the power cord has drip loops.
3. If using a plot light switch, turn the switch to the “ON” position. This will light
the “Power” indicator on the RX1200.
07/2017 VIEXE202 ©Danfoss
7

RX1200 - ROOF AND GUTTER DE-ICING CONTROLLER
Operation Modes and Signal Lights
Power On
The “Power” indicator will light up green, when the RX1200 is connected to power.
Energizing Roof De-icing Heating Cable
The RX1200 requires both the proper temperature AND the presence of moisture to
energize the roof de-icing heating cable.
Temperature Measurement
The temperature sensor is placed in the RX1200 main housing, therefore the RX1200
should be installed outdoors. The sensor will measure the ambient temperature. Note:
Sunlight on the main housing will result in incorrect ambient temperature.
Moisture Sensor
The sensor wire will determine if water is present. The sensor wire needs to be covered
with at least 10 inches (25.40cm) of water for the system to turn on. Note: The moisture
sensor will only measure the water on the wire, NOT snow and ice.
Temperature Above 39.2°F (4°C)
If the ambient temperature is above 39.2°F (4°C) and the sensor wire is wet, then the
“Heating” indicator on the main housing will turn on and turn o after two minutes.
Temperature Below 39.2°F (4°C)
If the ambient temperature is below 39.2°F (4°C) and the sensor wire is wet, then the
“Heating” indicator on the main housing will turn on. This means the RX1200 is energizing the roof de-icing heating cable.
Temperature Above 44.6°F (7°C)
If the ambient temperature is above 44.6°F (7°C), the “Heating” indicator will turn o
and the RX1200 will stop energizing the roof de-icing heating cable.
Heating Cable Failure Monitoring
If the outer jacket and insulation of the roof de-icing heating cable is damaged, the
RX1200 controller will stop supplying power to the heating cable. The “Heating” indicator will start to blink indicating the heating cable needs to be replaced. Do not solely
rely on this function to monitor the heating cable, as minor damage and other abnormal conditions may not be detected.
07/2017 VIEXE202 ©Danfoss
8

RX1200 - ROOF AND GUTTER DE-ICING CONTROLLER
Commissioning
The RX1200, power connection to the receptacle and the roof de-icing heating cable
should be inspected at the beginning of the winter season and then monthly during
operations of the unit.
Stop using and replace the RX1200 that has been damaged, cut or deteriorated for
any reason. Look for any signs of animal bite marks or physical abuse to the RX1200.
Remember to remove leaves and other debris from gutter, downspouts and roof.
Disconnect the power to the RX1200 during summer months.
There are no serviceable parts for the RX1200.
Testing
The RX1200 can be tested for functionality by submerging the sensor wire in 10 inches
(25.40cm) water. The “Heating” indicator on the main housing will turn on for two minutes and then turn o (when the ambient temperature is above 39.2°F (4°C)).
07/2017 VIEXE202 ©Danfoss
9

RX1200 - ROOF AND GUTTER DE-ICING CONTROLLER
LIMITED WARRANTY
The RX1200 is warranted against defects in workmanship and materials
for one year from date of sale. This warranty does not apply to damage
resulting from accident, misuse, or alteration nor where connected voltage
is more than 5% above the congured operating voltage, nor to equipment
improperly installed or wired or maintained in violation of this Owner’s Manual.
No other written or oral warranty applies. No employee, agent, dealer or
other person is authorized to give any warranties on behalf of DANFOSS.
Units returned for warranty repair cannot be modied from shipped
condition and leads must protrude a minimum of 6 inches from the base
conduit hub. Repair costs of a modied unit will be quoted as the unit must
be returned to the original, unmodied condition prior to return shipping.
The customer shall be responsible for all costs incurred in the removal or
reinstallation and shipping of the product for repairs. Within the limitations
of this warranty, inoperative units should be returned, freight prepaid,
to DANFOSS, and we will repair or replace, at our option, at no charge to
you with return freight paid by DANFOSS. It is agreed that such repair or
replacement is the exclusive remedy available from DANFOSS and that
DANFOSS IS NOT RESPONSIBLE FOR DAMAGES OF ANY KIND, INCLUDING
INCIDENTAL AND CONSEQUENTIAL DAMAGE. Some states do not allow the
exclusion or limitation of incidental or consequential damages so the above
exclusion may not apply to you. The warranty gives you specic legal rights,
and you may also have other rights which vary from state to state.
07/2017 VIEXE202 ©Danfoss
10

RX1200 - ROOF AND GUTTER DE-ICING CONTROLLER
07/2017 VIEXE202 ©Danfoss
11

Danfoss can accept no responsibility for possible errors in catalogues, brochures, other printed materials, and website information. Danfoss reserves the right to alter its products without notice. This also applies to products already on order provided that such alteration can be made without subsequent changes being necessary in specications
already agreed upon. All trademarks in this material are property of the respective companies. Danfoss and the Danfoss logotype are registered trademarks of Danfoss A/S. All
rights reserved.
DANFOSS ELECTRIC HEATING
North America
TOLL FREE: 1-888-DANFOSS (option 3)
FAX: 416-352-5981
Visit us online: www.LX.Danfoss.com
VIEXE202
Produced by Danfoss A/S © 07/2017
 Loading...