

Page 1
RT51/52 + RF
Electronic room thermostat with
manual or automatic Day/Night set-back
®
Certification Mark
Installation Instructions
GB
User Instructions
Instructions d’installation
F
Instructions d’utilisateur
Installationsanweisungen
D
Inbetriebnahme-Instruktion
Instrucciones de instalación
ES
Instrucciones del usuario
Installatie handleiding
NL
Instructiesevoor Gebruik
ПдзгЯет егкбфЬуфбузт
GR
ПдзгЯет чсЮузт
Instrukcja instalacji
PL
Instrukcja Użytkownika
Montavimo instrukcijos
LT
Informacija Vartotojui
DK
Instruktions vejledning
Brugervejleding
Istruzioni per l’uso
I
Istruzioni per l’utente
Page 2

Index
GB
Installation Instructions 3-7
User Instructions 8-12
Instructions d’installation 13-17
F
Instructions d’utilisateur 18-21
Installationsanweisungen 22-26
D
Inbetriebnahme-Instruktion 27-30
Instrucciones de instalación 31-35
ES
Instrucciones del usuario 36-39
DK
NL
GR
PL
Instruktions vejledning 40-44
Brugervejleding 45-48
Installatie handleiding 49-53
Instructiesevoor Gebruik 54-57
ПдзгЯет егкбфЬуфбузт 58-62
ПдзгЯет чсЮузт 63-66
Instrukcja instalacji 67-71
Instrukcja Użytkownika 72-75
Montavimo instrukcijos 76-80
LT
Informacija Vartotojui 81-84
Istruzioni per l’uso 85-89
I
Istruzioni per l’utente 90-93
2
Page 3
Installation Instructions
Please Note:
This product should only be installed by a quali ed
electrician or competent heating installer and should
be in accordance with the current edition of the IEEE
wiring regulations.
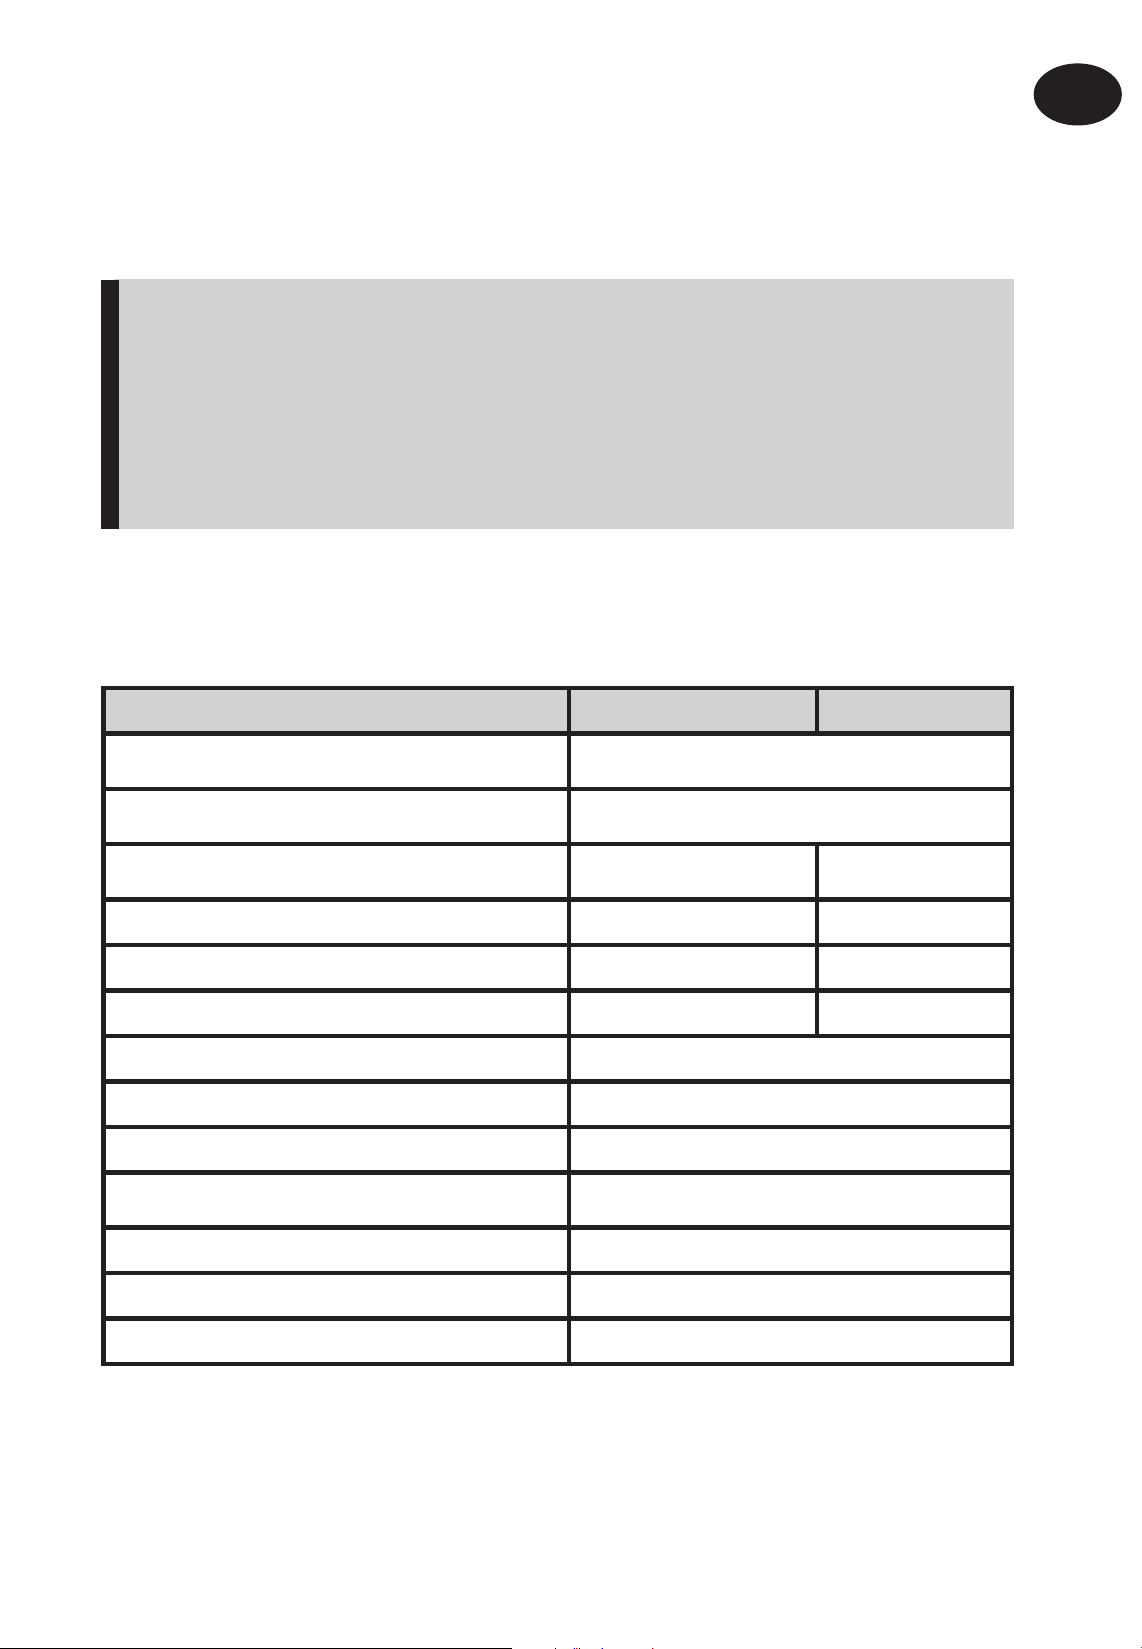
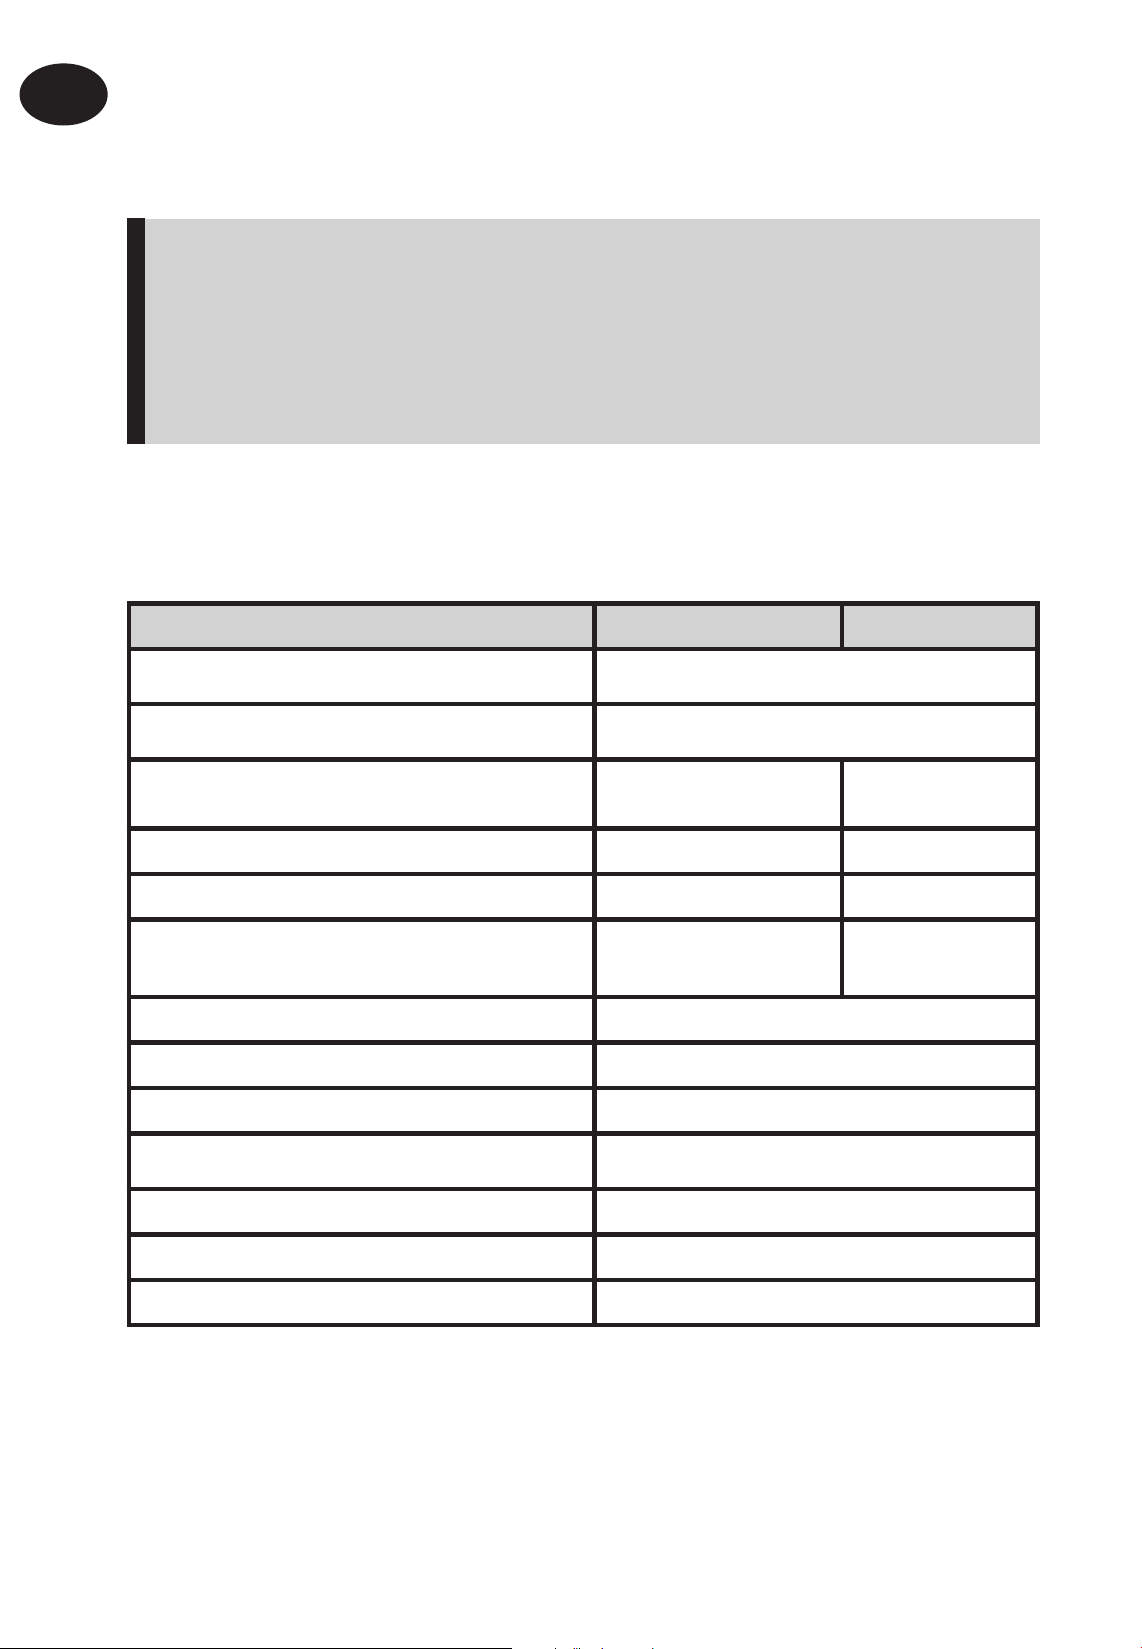
Product Speci cation
Thermostat features RT51/52 RT51/52-RF
GB
Installation Instructions
Power supply 2 x AA/MN1500/LR alkaline cells
Memory back-up 1 min. for battery change
Switching action of output relay 1 x SPDT, Type 1B N/A
Switch rating of relay contact 3(1)A, 10-230Vac N/A
Transmission frequency (RF model) N/A 433.92MHz
Transmitter range (RF model) N/A 30m max
Temperature range 5-30°C
Dimensions, mm 110 wide, 88 high, 28 deep
Design standard EN60730-2-9 (EN300220 for RF)
Rated impulse voltage 2.5Kv
Ball hardness test 75°C
Control pollution situation Degree 2
Temperature accuracy ±1°C
Important note RF products: Ensure that there are no large metal objects, such as boiler cases
or other large appliances, in line of sight between the transmitter and receiver as these will
prevent communication between thermostat and receiver.
3
Page 4
GB
Installation Instructions
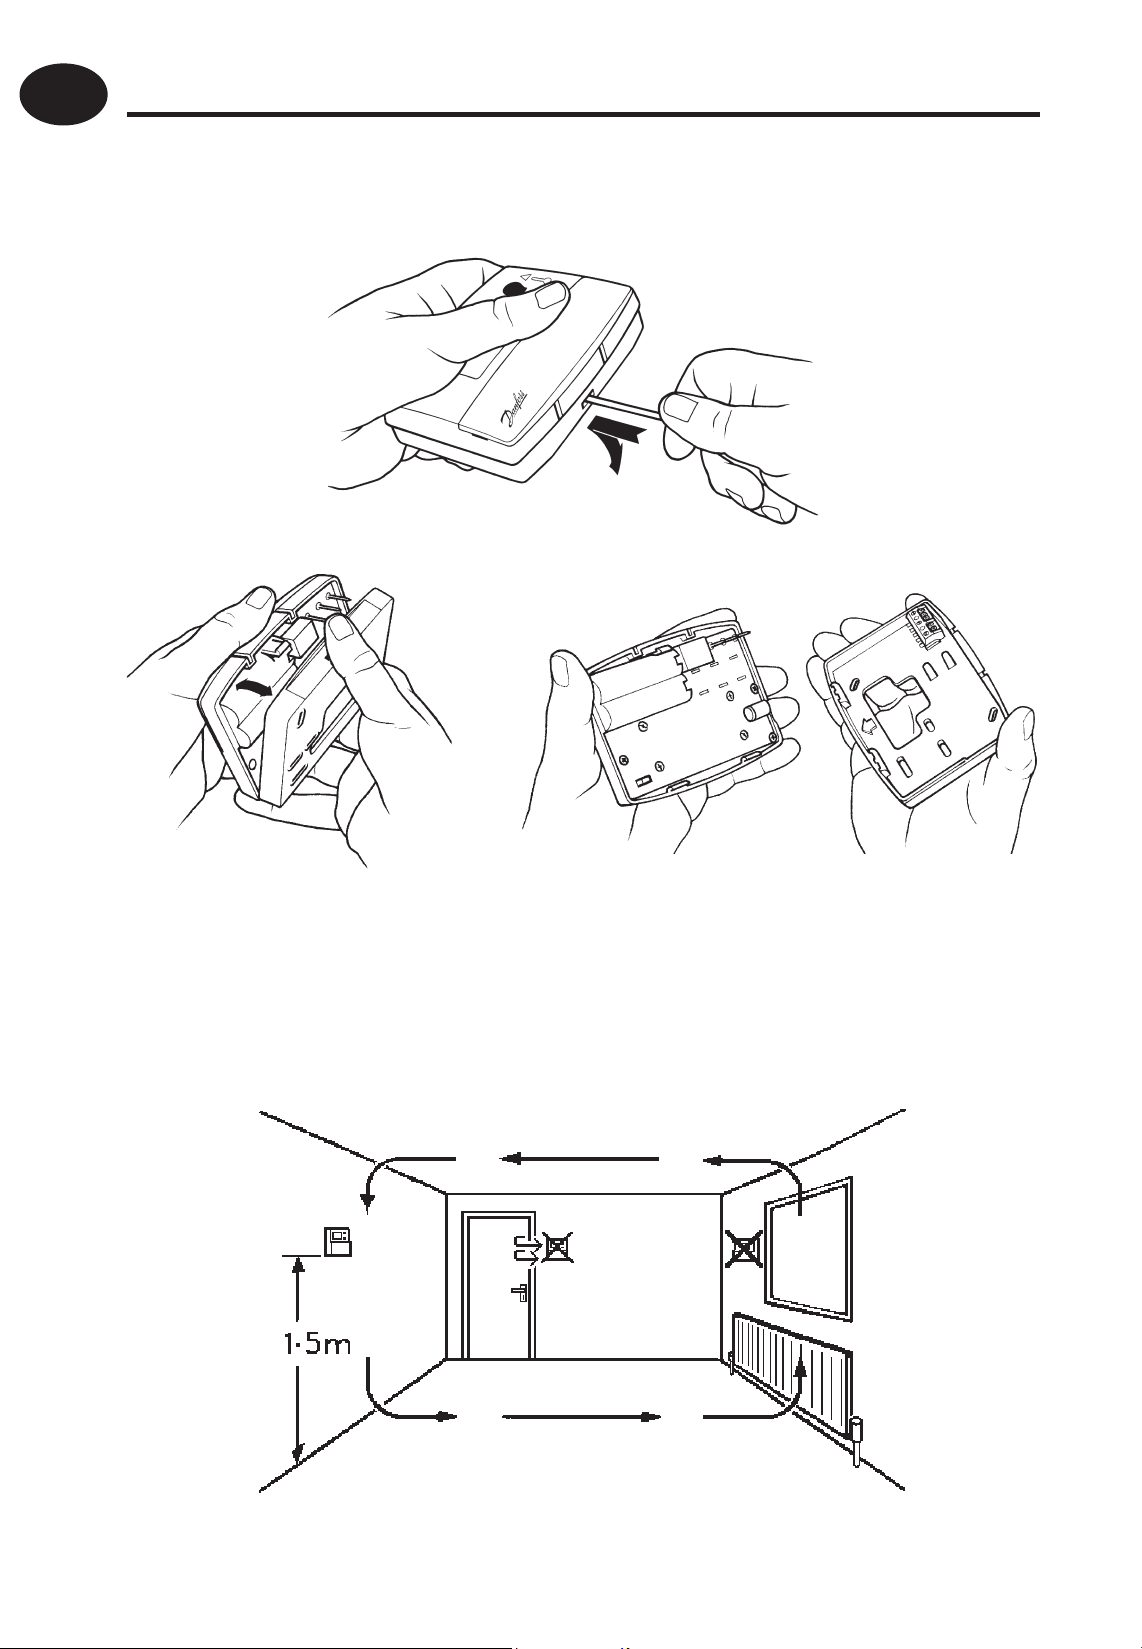
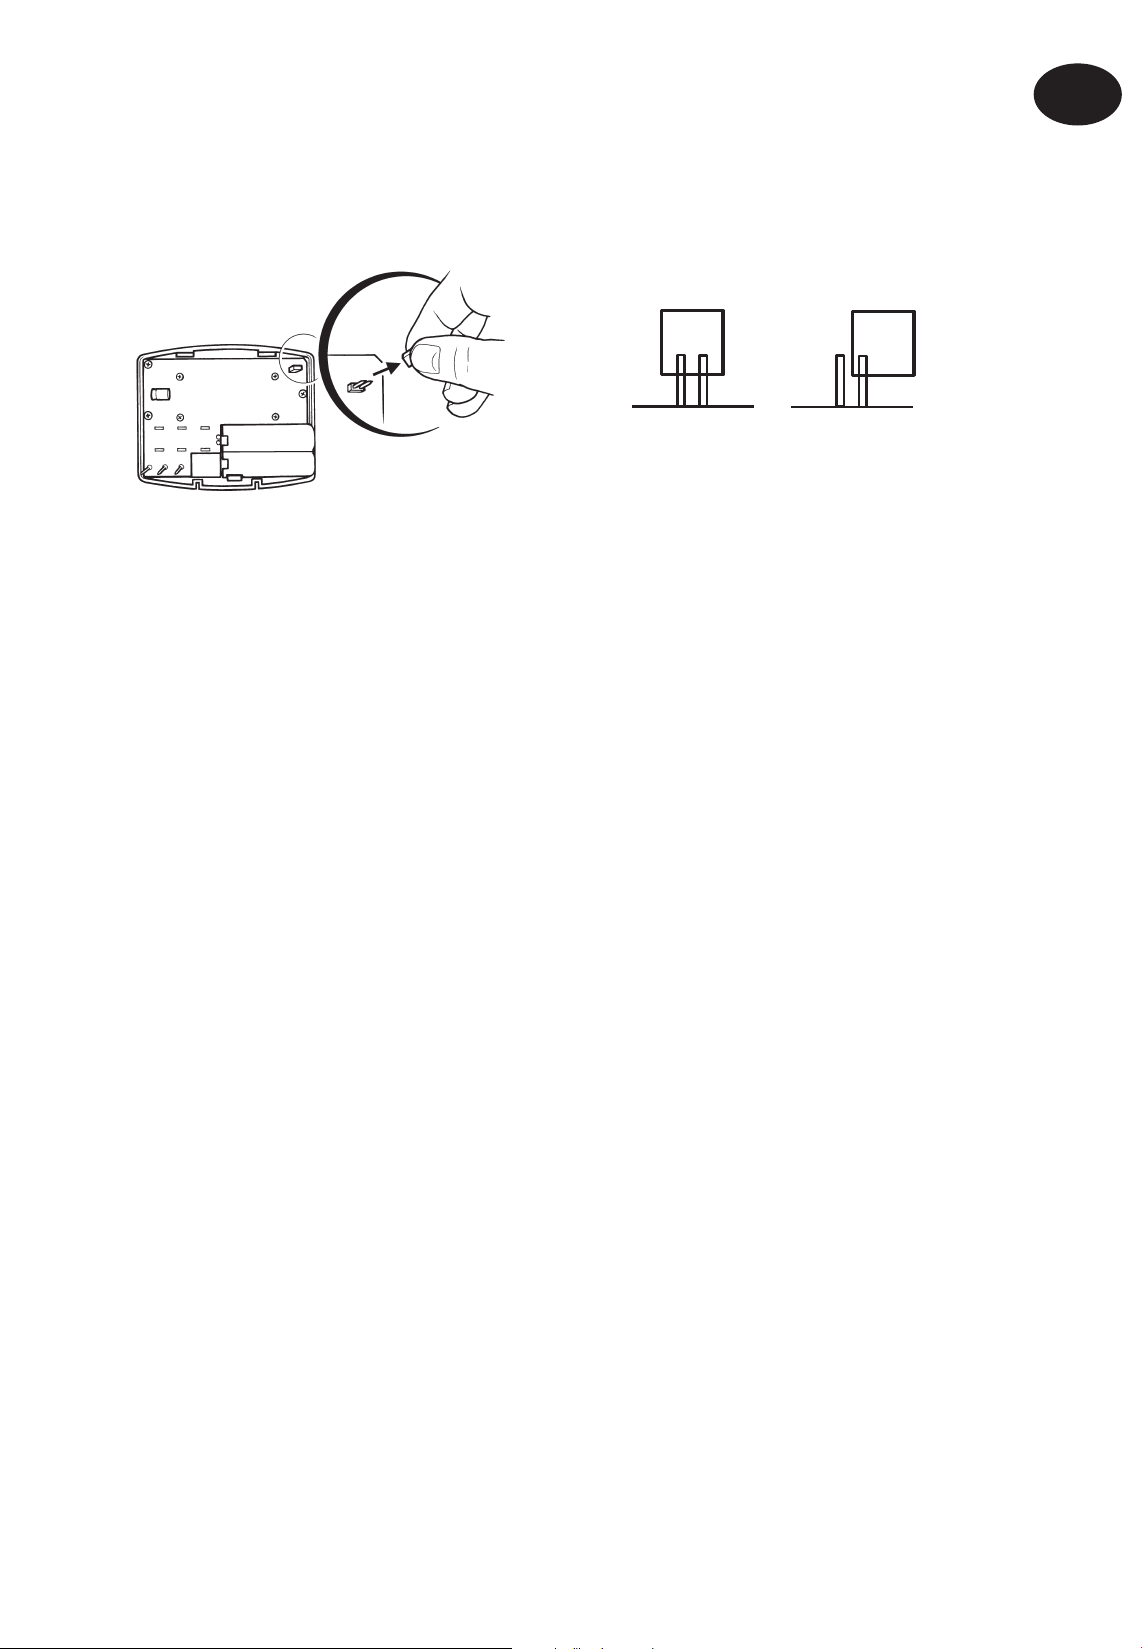
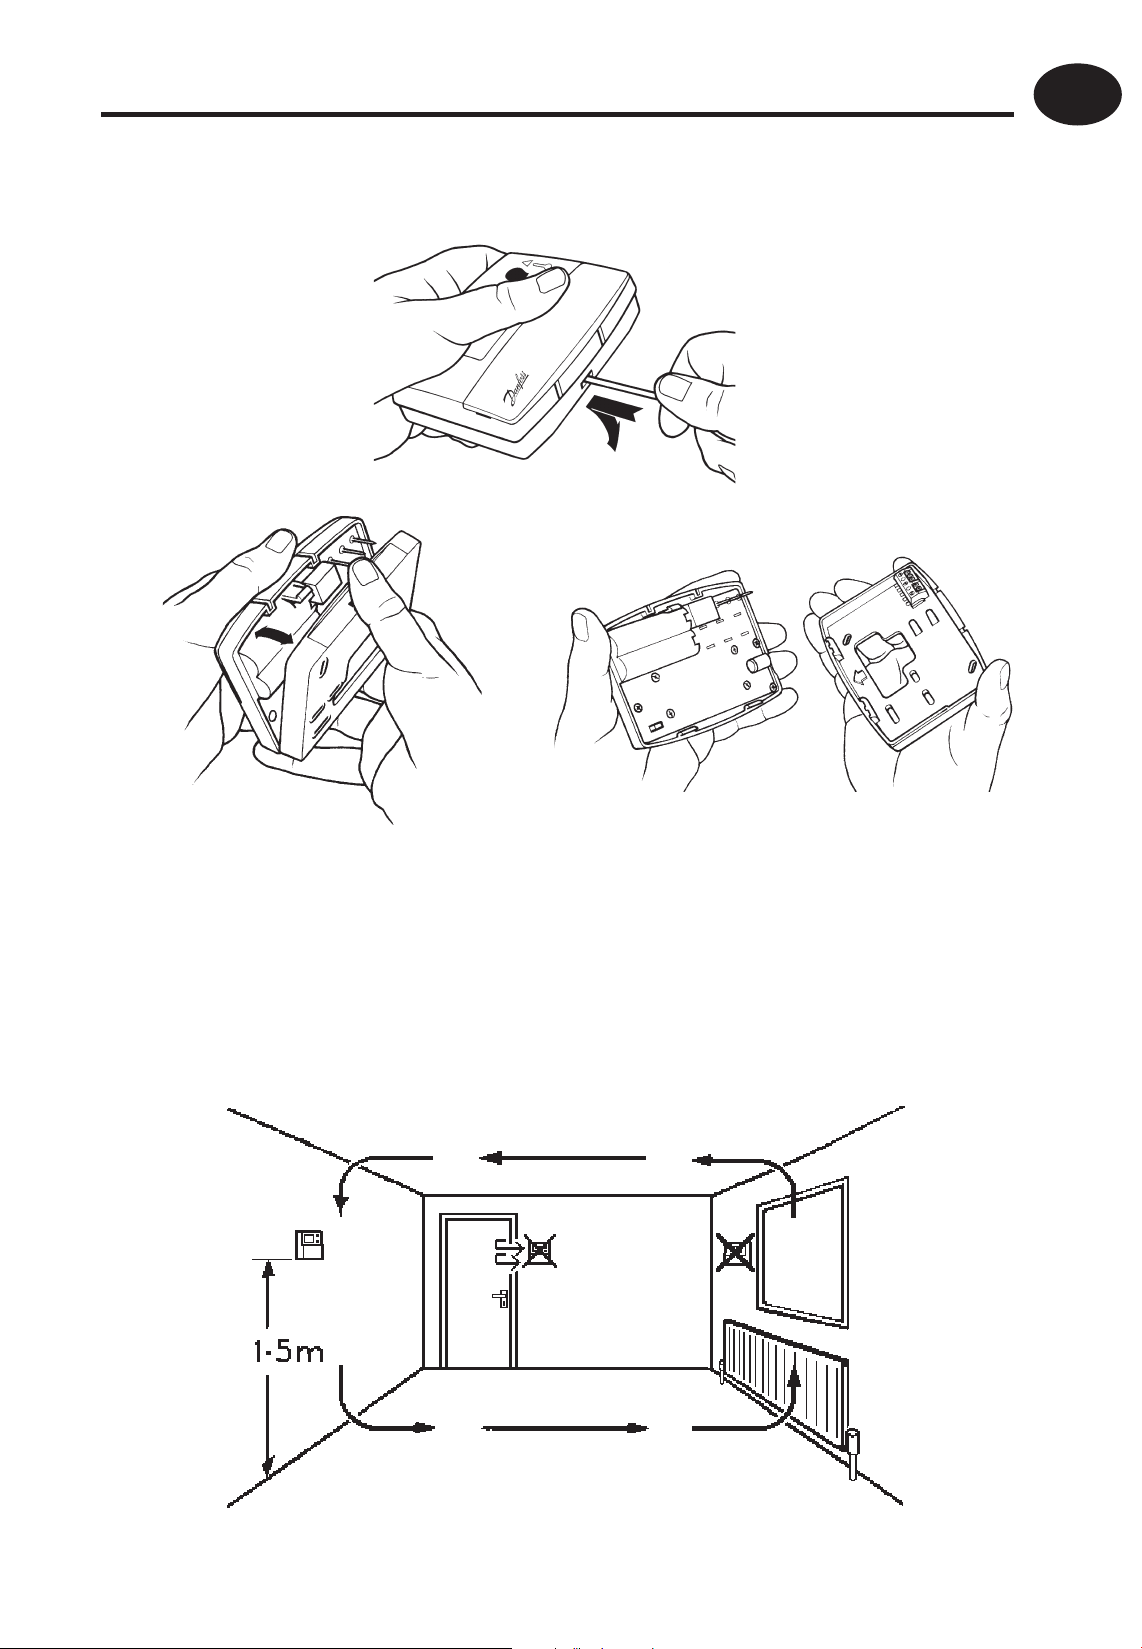
Installation
First, remove the wallplate from the back of the unit.
From the top left hand corner of the wallplate, there must be
clearances of at least 140mm to the right, 15mm to the left,
30mm above and 100mm below in order to mount the plugin module.
4
Page 5
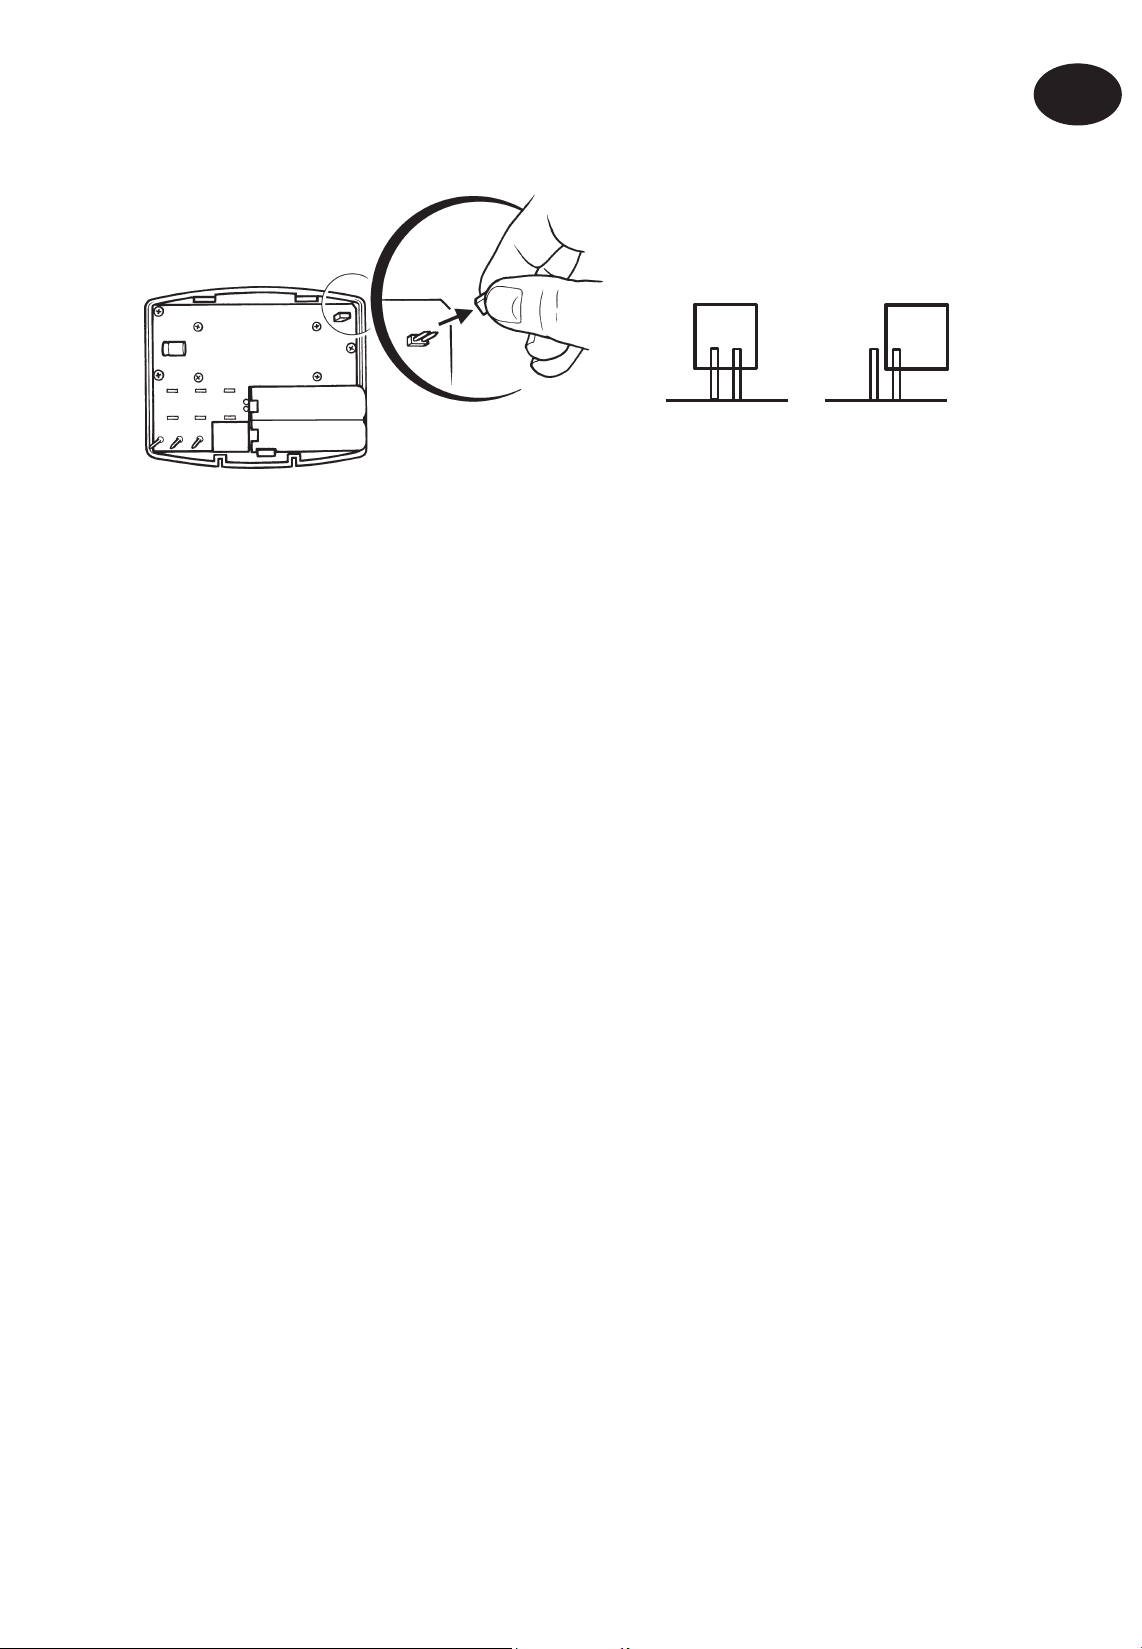
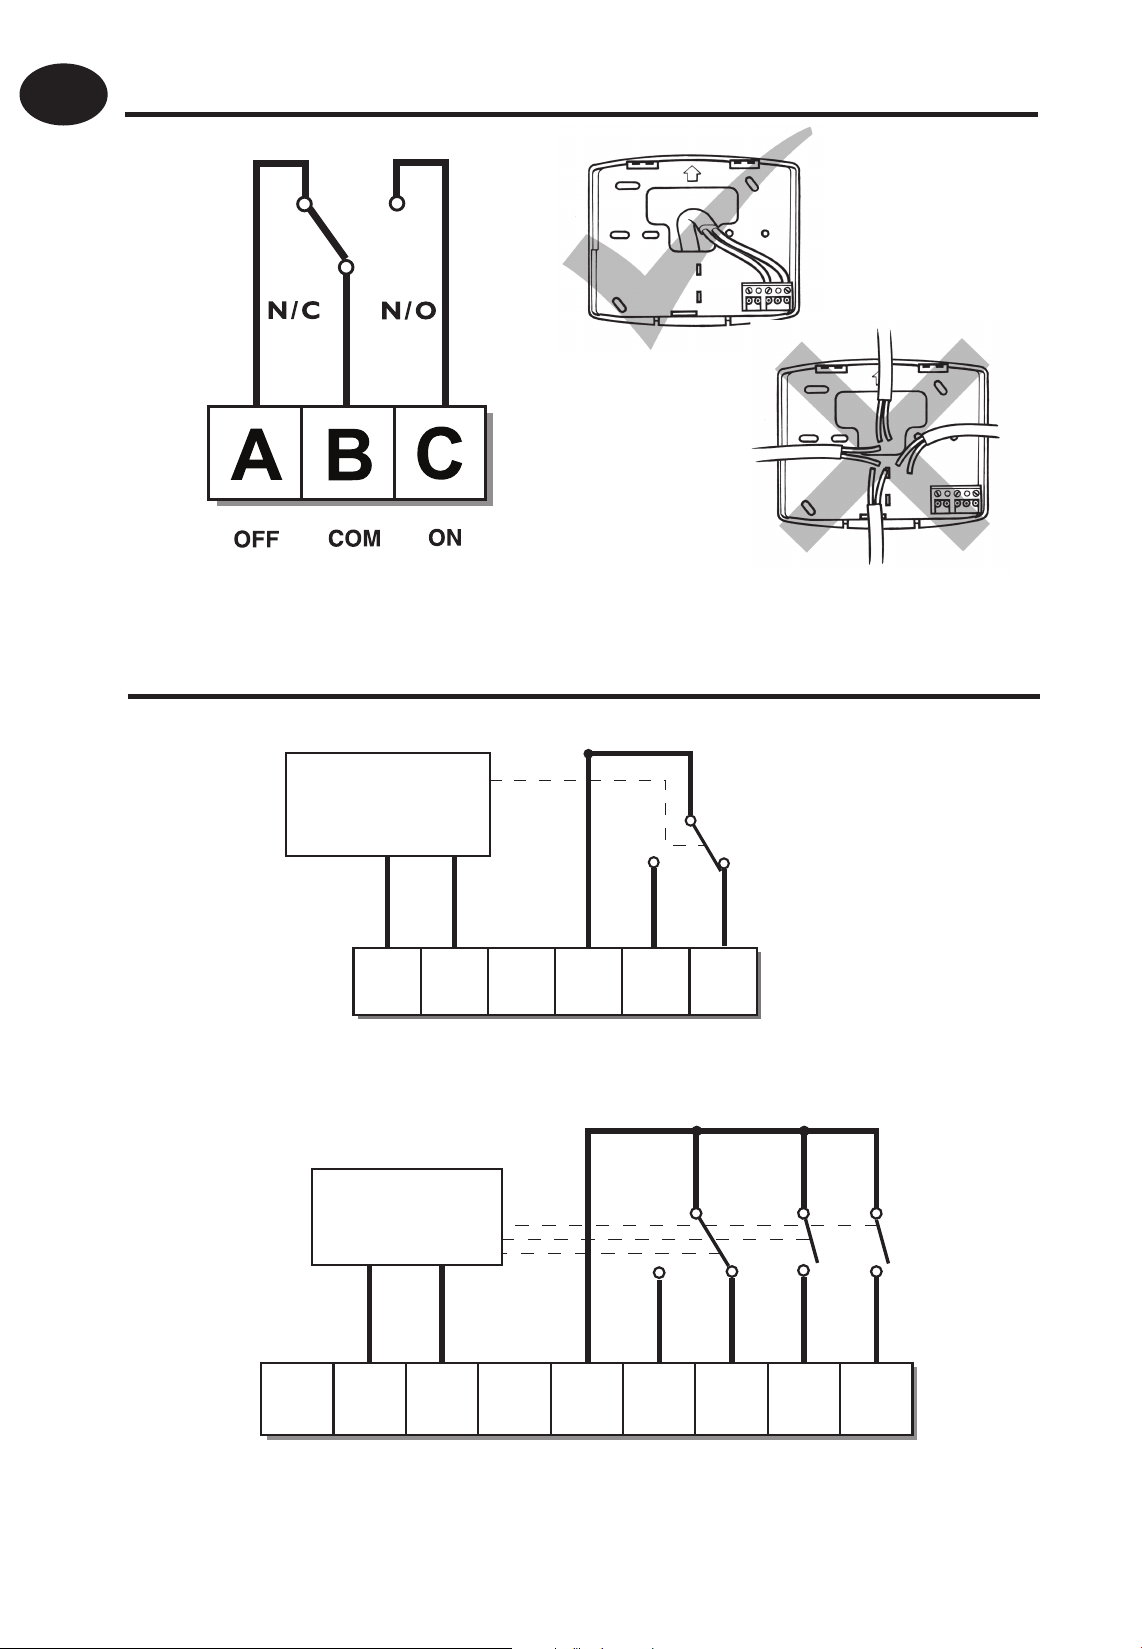
Prior to mounting the unit should be set in either ON/OFF or
chrono-proportional control mode (see below).
ON/OFF CHRONO
ON/OFF - boilers switches ON when below set temperature
and OFF when above.
GB
Installation Instructions
Chrono-Proportional - energy saving feature which res
the boiler at regular intervals to maintain a set temperature,
achieving a constant ambient environment for the user.
Some existing thermostats will have a Neutral wire and/or
Earth wire connected. These are not required by the RT51/52
and must NOT be connected to any RT51/52 terminals. Instead
!
they should be made electrically safe and coiled in the recess at
the back of the RT51/52.
5
Page 6
GB
Installation Instructions
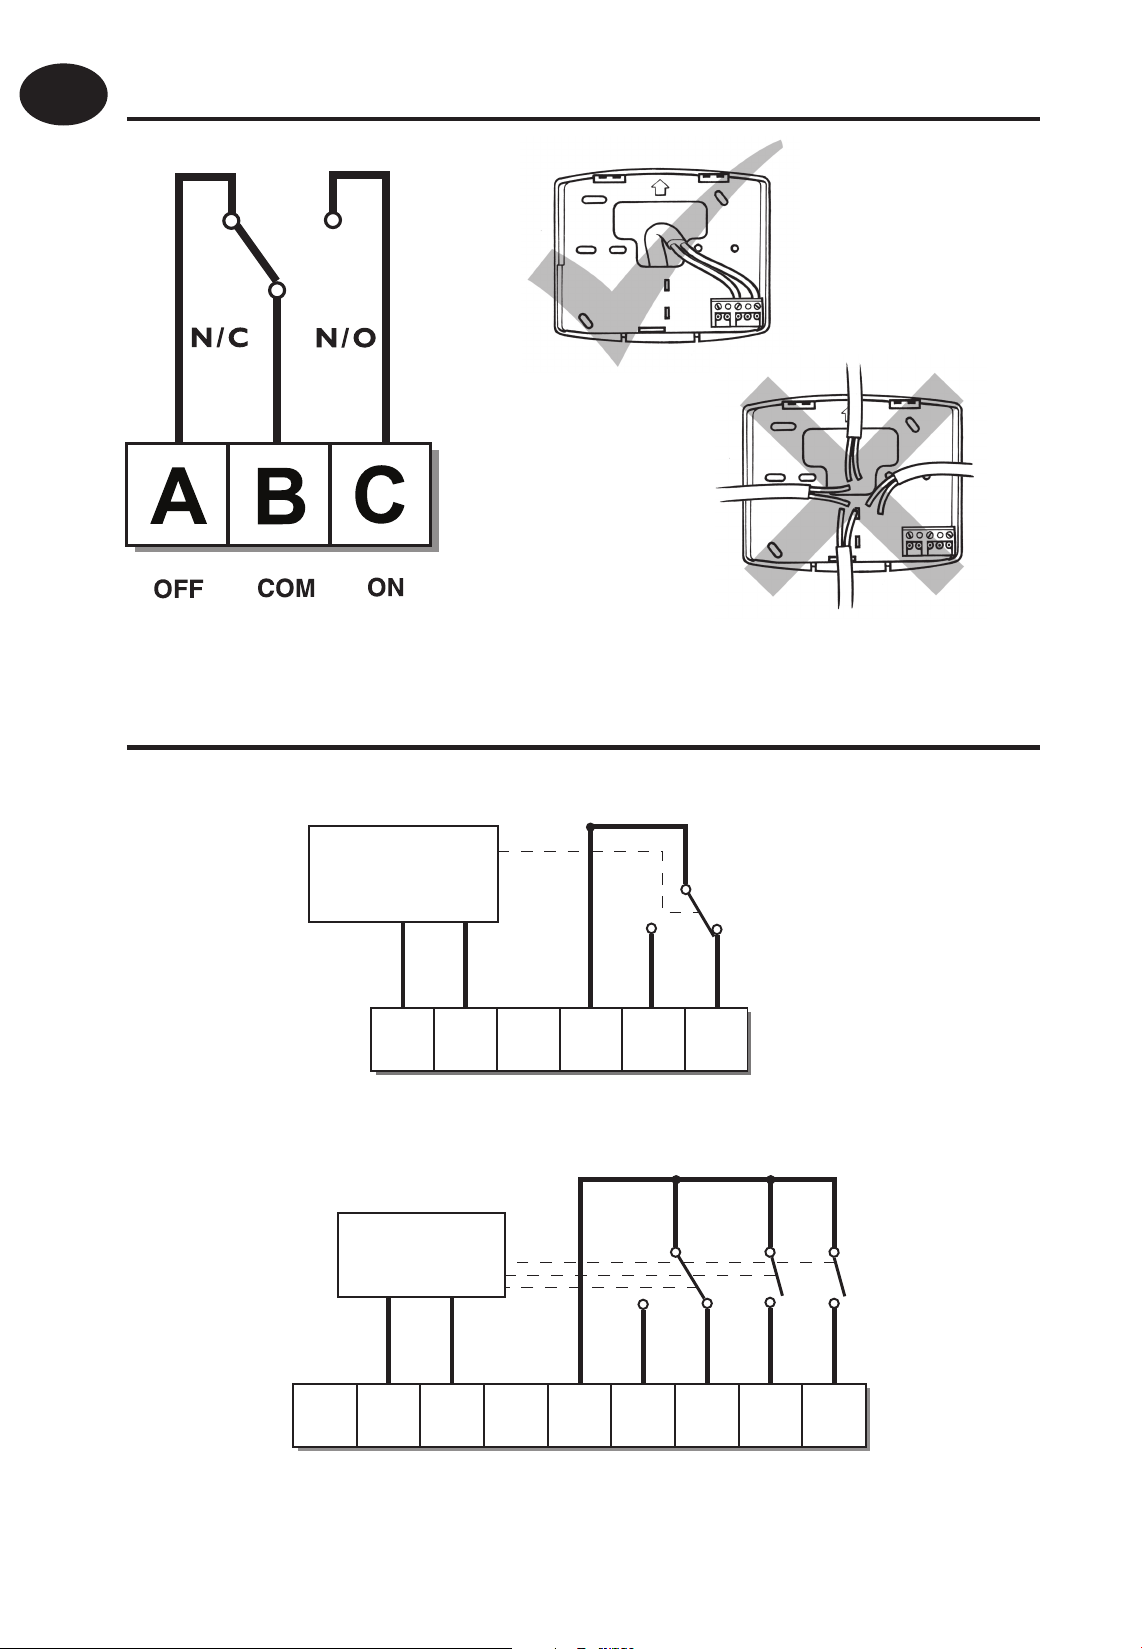
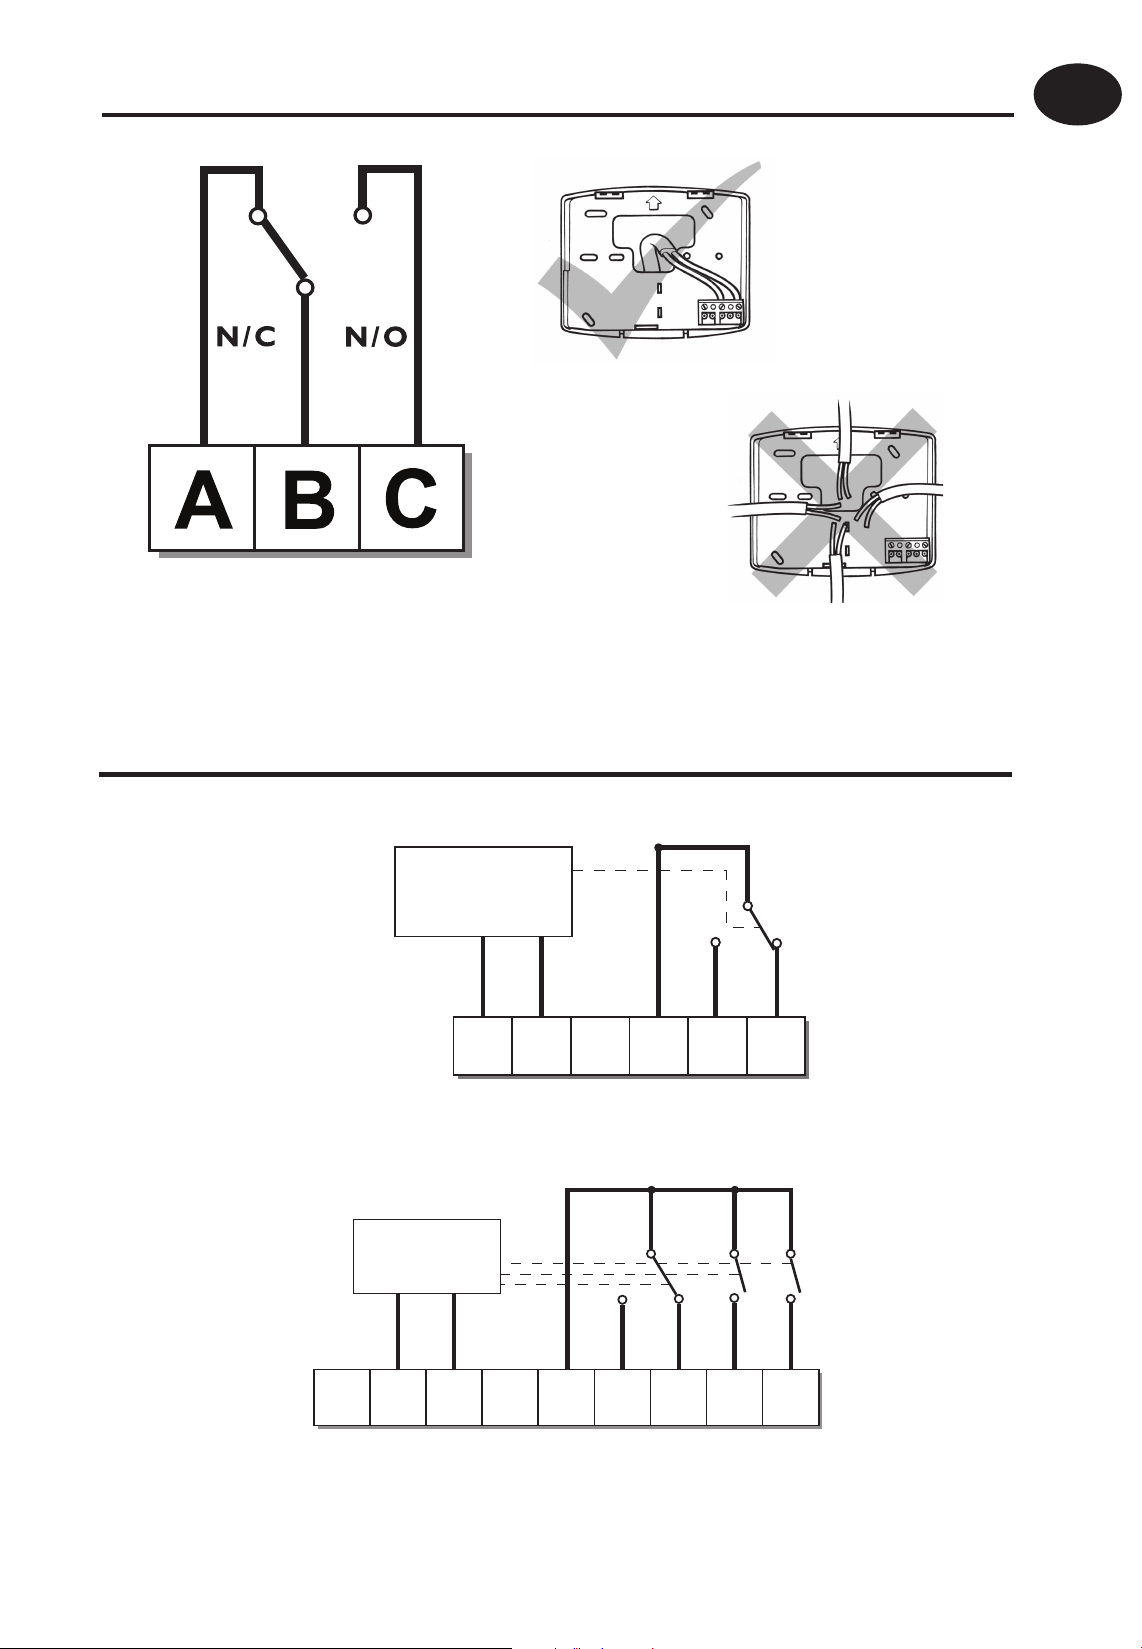
Thermostat Wiring (not RF models)
TP5000, RT51, RT52 (3061 12/01)
RX Receiver Wiring (RF models only)
RX1
ELECTRONICS
3
ZONE
1 ON
4
ZONE
1 OFF
RX2 & RX3
N
ELECTRONICS
L
12
COM
N
C1
L
2
COM
A
B
N L
NB. For mains voltage operated systems link terminal 2 to mains live supply.
6
345
ZONE
1 ON
ZONE
1 OFF
ZONE
2 ON
TERMINAL 6
RX3 ONLY
6
ZONE
3 ON
Page 7
Commissioning (RF models only)
If the thermostat and the receiver have been supplied together
in a combined pack, the units have been paired in the factory
and no commissioning is required (RX1 only).
To tune the RX receiver to the frequency of the thermostat signal,
follow steps 1-5 below.
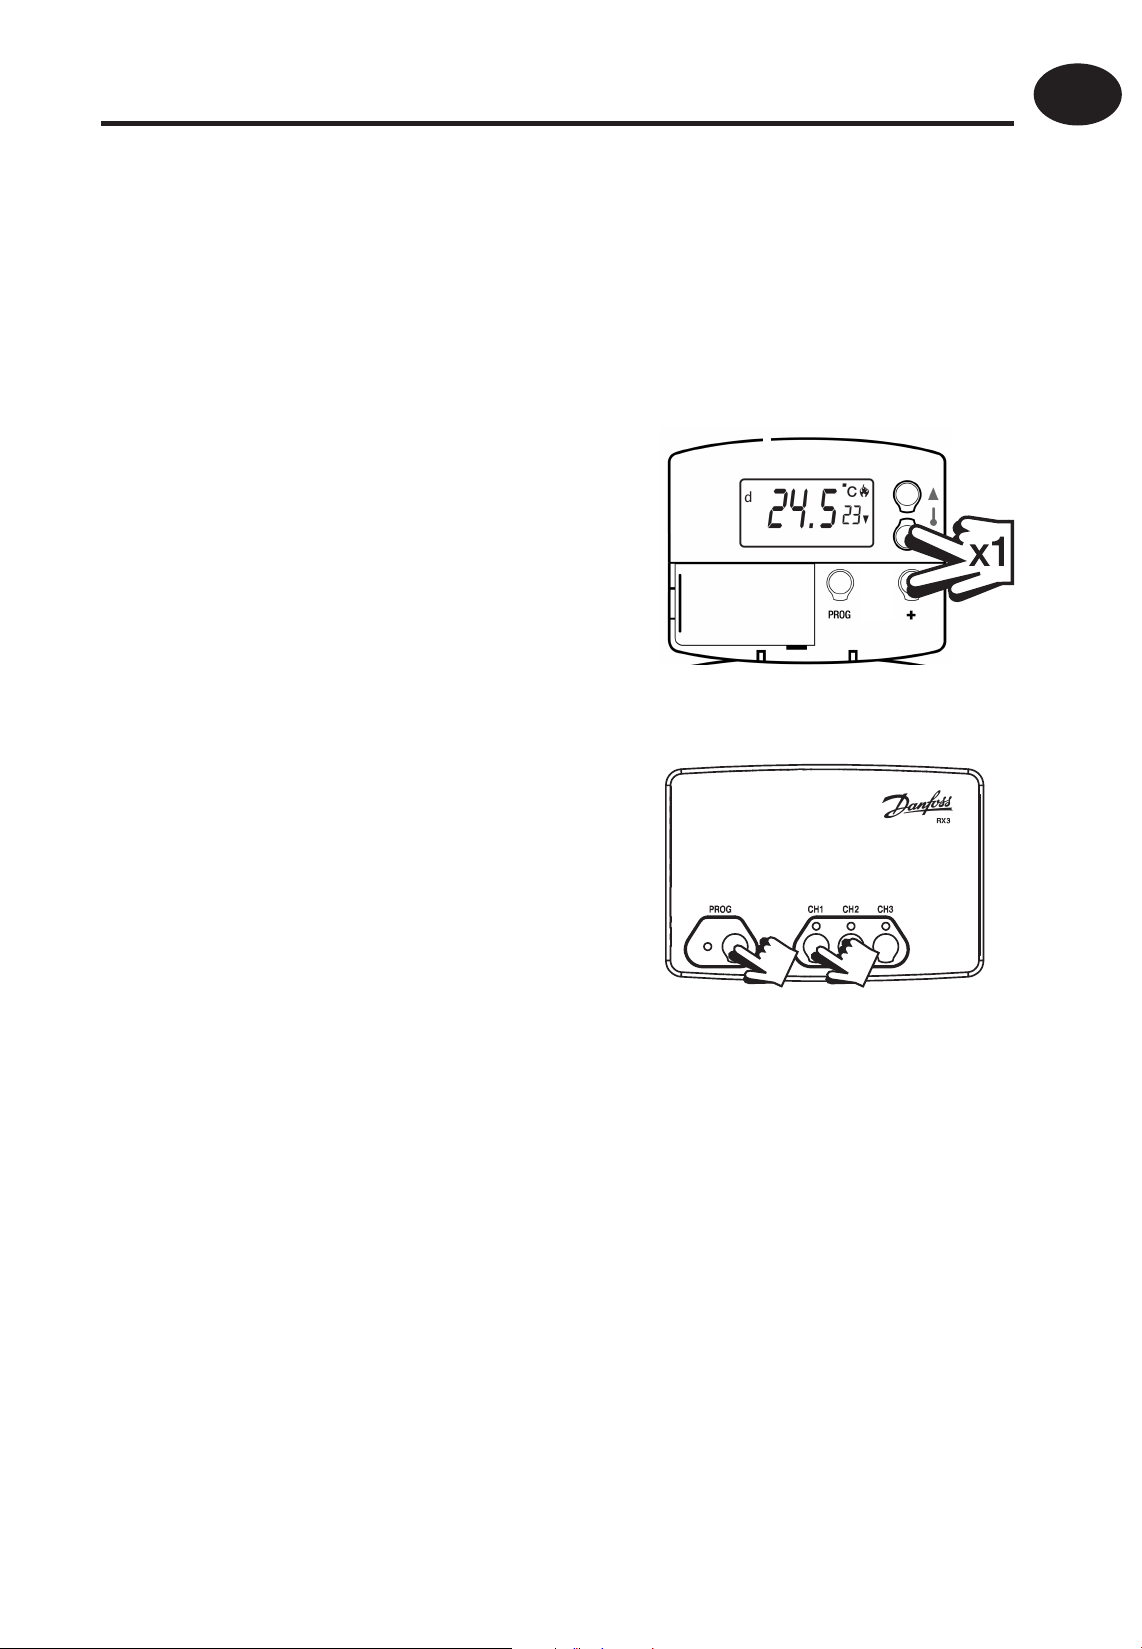
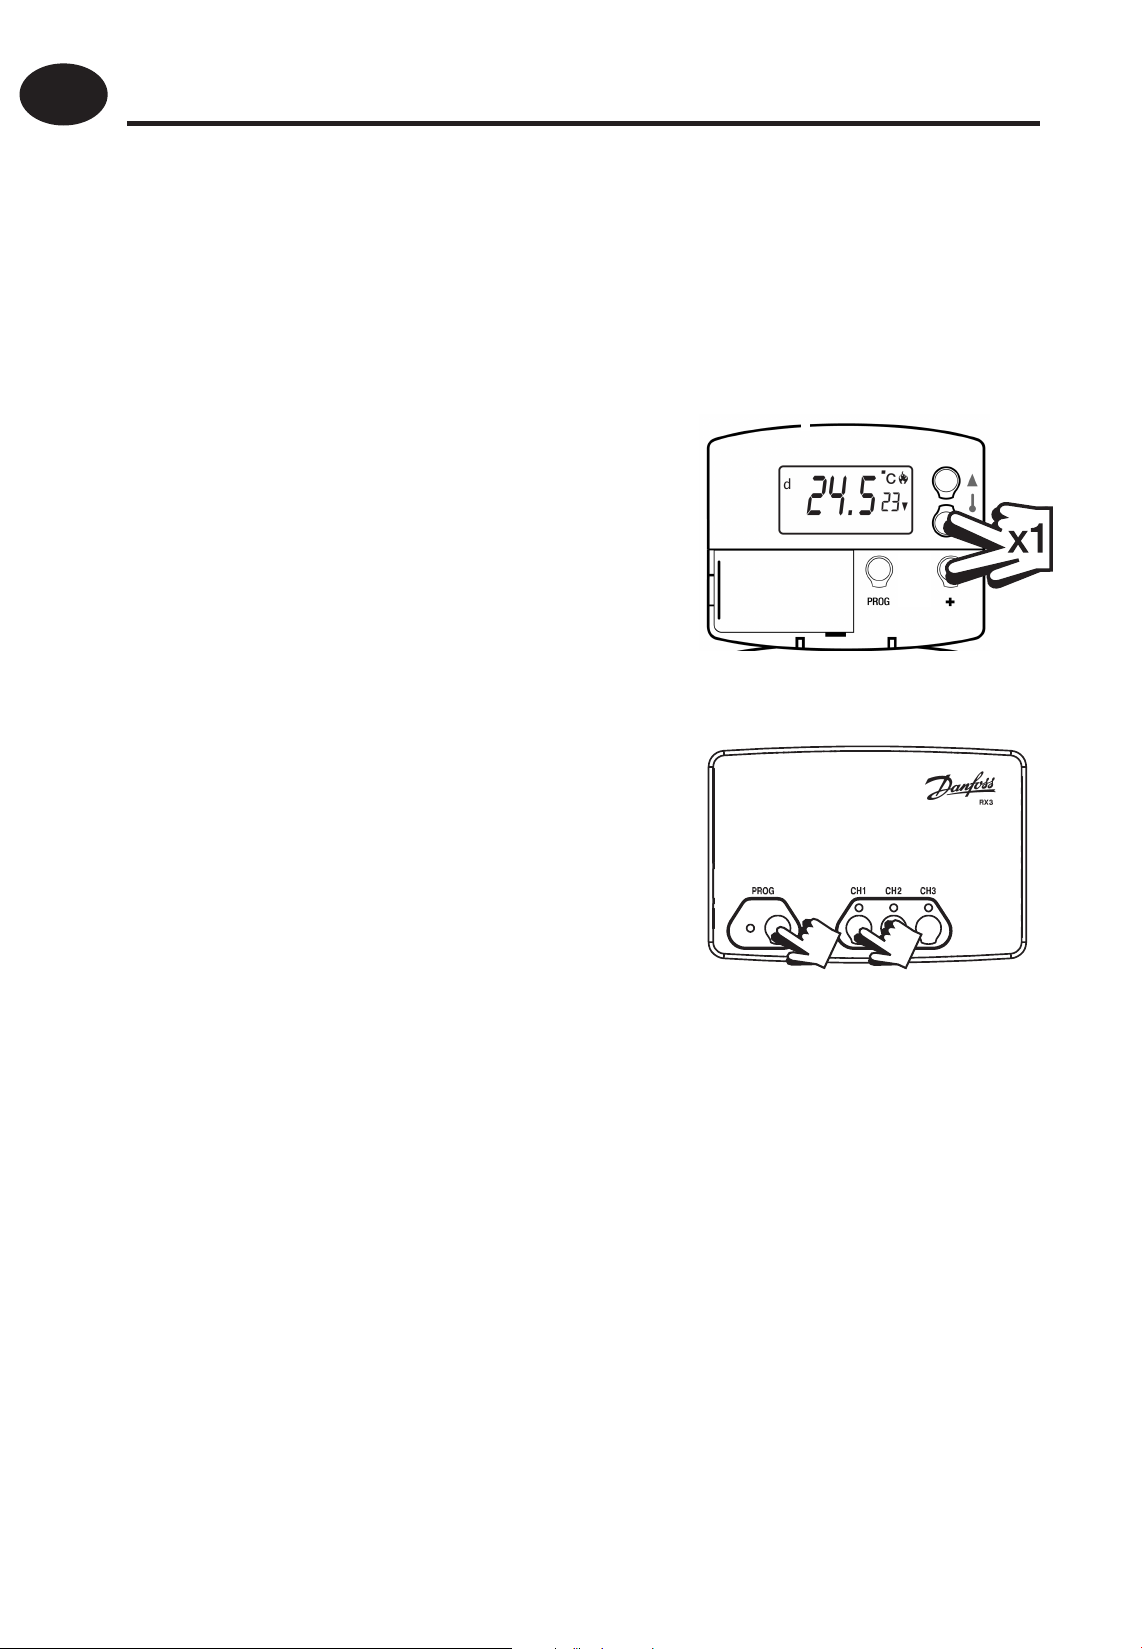
Step 1 RT51/52-RF
Reset the unit by removing the
batteries for 2 minutes, then replace.
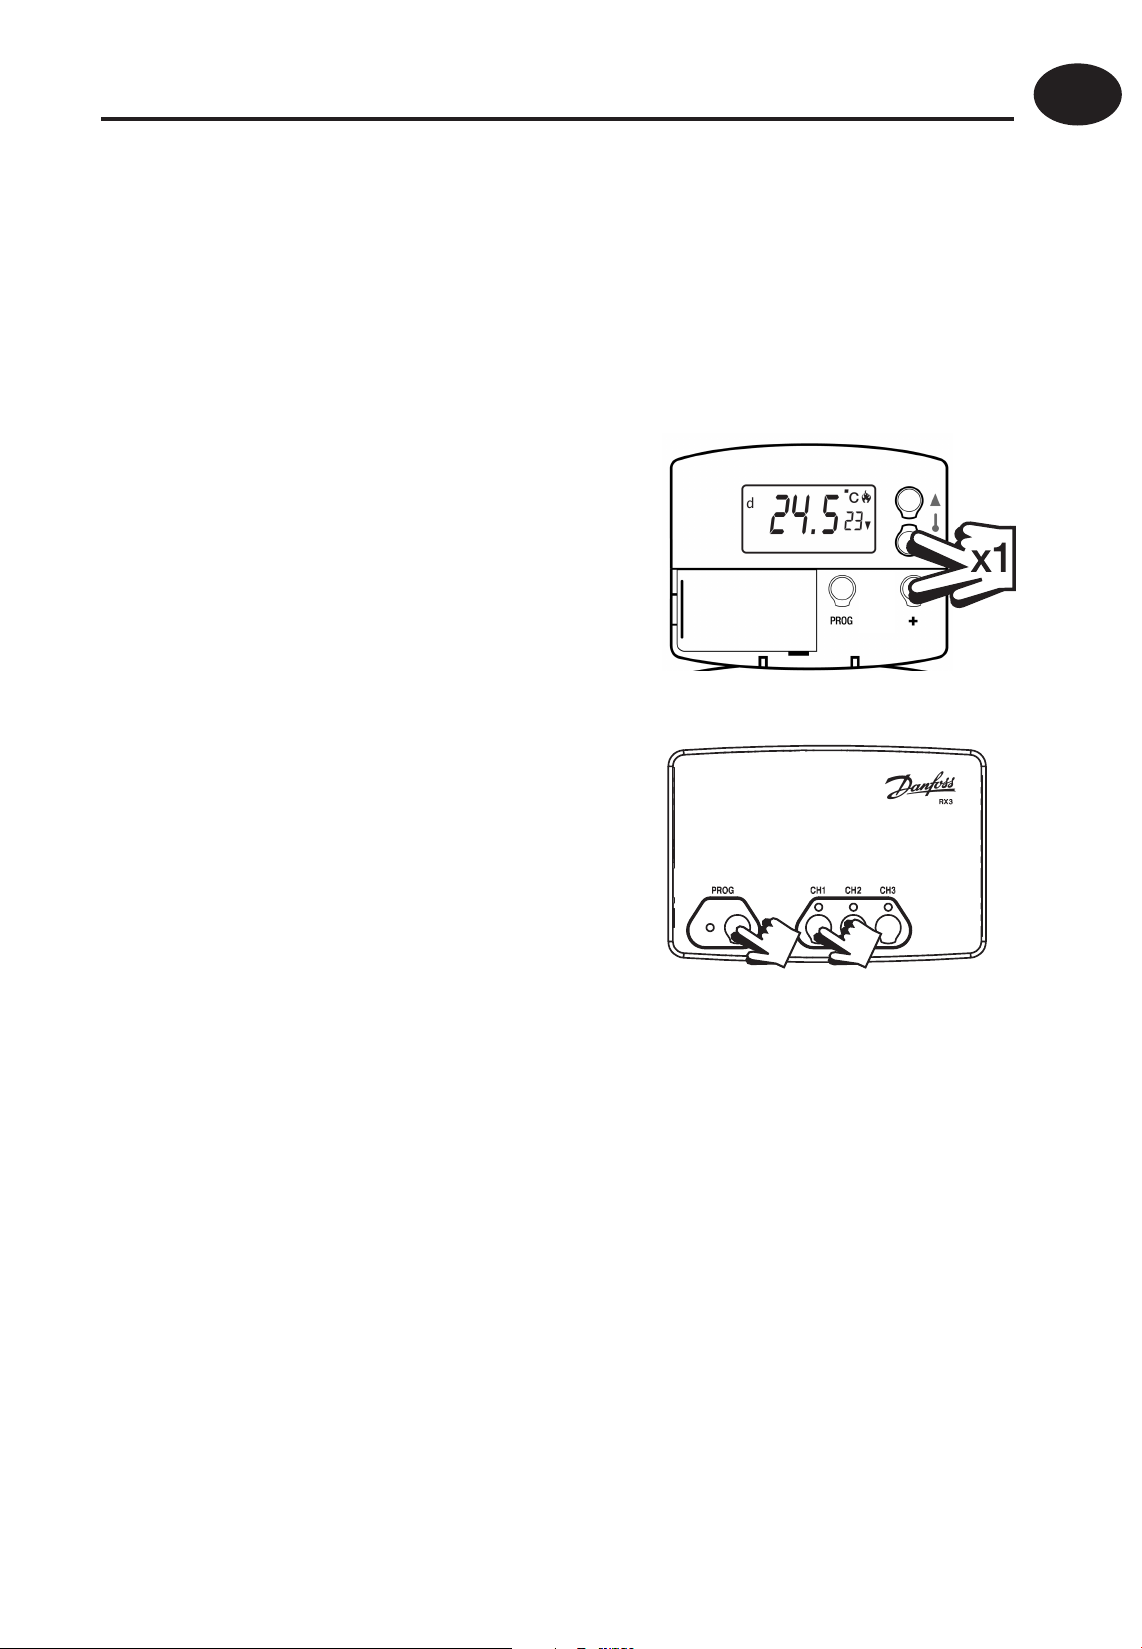
Step 2 Press and hold V and +
GB
buttons for 3 seconds (Thermostat now
transmits unique signal continuously
for 5 minutes).
Step 3 RX1
Press and hold buttons PROG and CH1
for 3 seconds until green light ashes
once.
Step 4 RX2 (if applicable)
Stat 1 - perform steps 1-3.
Stat 2 - wait 5 mins, perform steps 1-2 and
then press PROG and CH2 on RX2.
RX3 (if applicable)
Stat 1 - perform steps 1-3.
Installation Instructions
Stat 2 - wait 5 mins, perform steps 1-2 and then press PROG and
CH2 on RX3.
Stat 3 - wait 5 mins, perform steps 1-2 and then press PROG and
CH3 on RX3.
Step 5 RT51/52-RF
Press Λ or V to select temperature - unit will revert back to operating
mode.
7
Page 8

GB
User Instructions
What is a programmable room thermostat?
... an explanation for householders
A room thermostat simply switches the heating system on and o as
necessary. It works by sensing the air temperature, switching on the
heating when the air temperature falls below the thermostat setting,
and switching it o once this set temperature has been reached.
Turning a room thermostat to a higher setting will not make the
room heat up any faster. How quickly the room heats up depends on
the design of the heating system, for example, the size of boiler and
radiators.
Neither does the setting a ect how quickly the room cools down.
Turning a room thermostat to a lower setting will result in the room
being controlled at a lower temperature, and saves energy.
The heating system will not work if a time switch or programmer has
switched it o .
The way to set and use your room thermostat is to nd the lowest
temperature setting that you are comfortable with, and then leave it
alone to do its job. The best way to do this is to set the room thermostat
to a low temperature – say 18°C – and then turn it up by one degree
each day until you are comfortable with the temperature. You won’t
have to adjust the thermostat further. Any adjustment above this
setting will waste energy and cost yo u more money.
If your heating system is a boiler with radiators, there will usually be
only one room thermostat to control the whole house. But you can have
di erent temperatures in individual rooms by installing thermostatic
radiator valves (TRVs) on individual radiators. If you don’t have TRVs,
you should choose a temperature that is reasonable for the whole
house. If you do have TRVs, you can choose a slightly higher setting to
make sure that even the coldest room is comfortable, then prevent any
overheating in other rooms by adjusting the TRVs.
Room thermostats need a free ow of air to sense the temperature, so
they must not be covered by curtains or blocked by furniture. Nearby
electric res, televisions, wall or table lamps may prevent the thermostat
from working properly.
8
Page 9

User Instructions
Your room thermostat
RT51
The RT51 is a simple to use room thermostat which allows you
to programme a Day and a Night temperature, and to switch
between the two settings simply by pressing 2 buttons.
RT52
The RT52 has the same functionality as the RT51 with the added
GB
User Instructions
bene t of a built-in timer, which will return the thermostat to Day
temperature at a time chosen by you.
Wireless RF versions
Both models are available in wireless versions - RT51-RF and RT52RF - which o er exactly the same functions as the hard-wired
models.
Each thermostat communicates with an RX receiver, which can be
located up to 30m away.
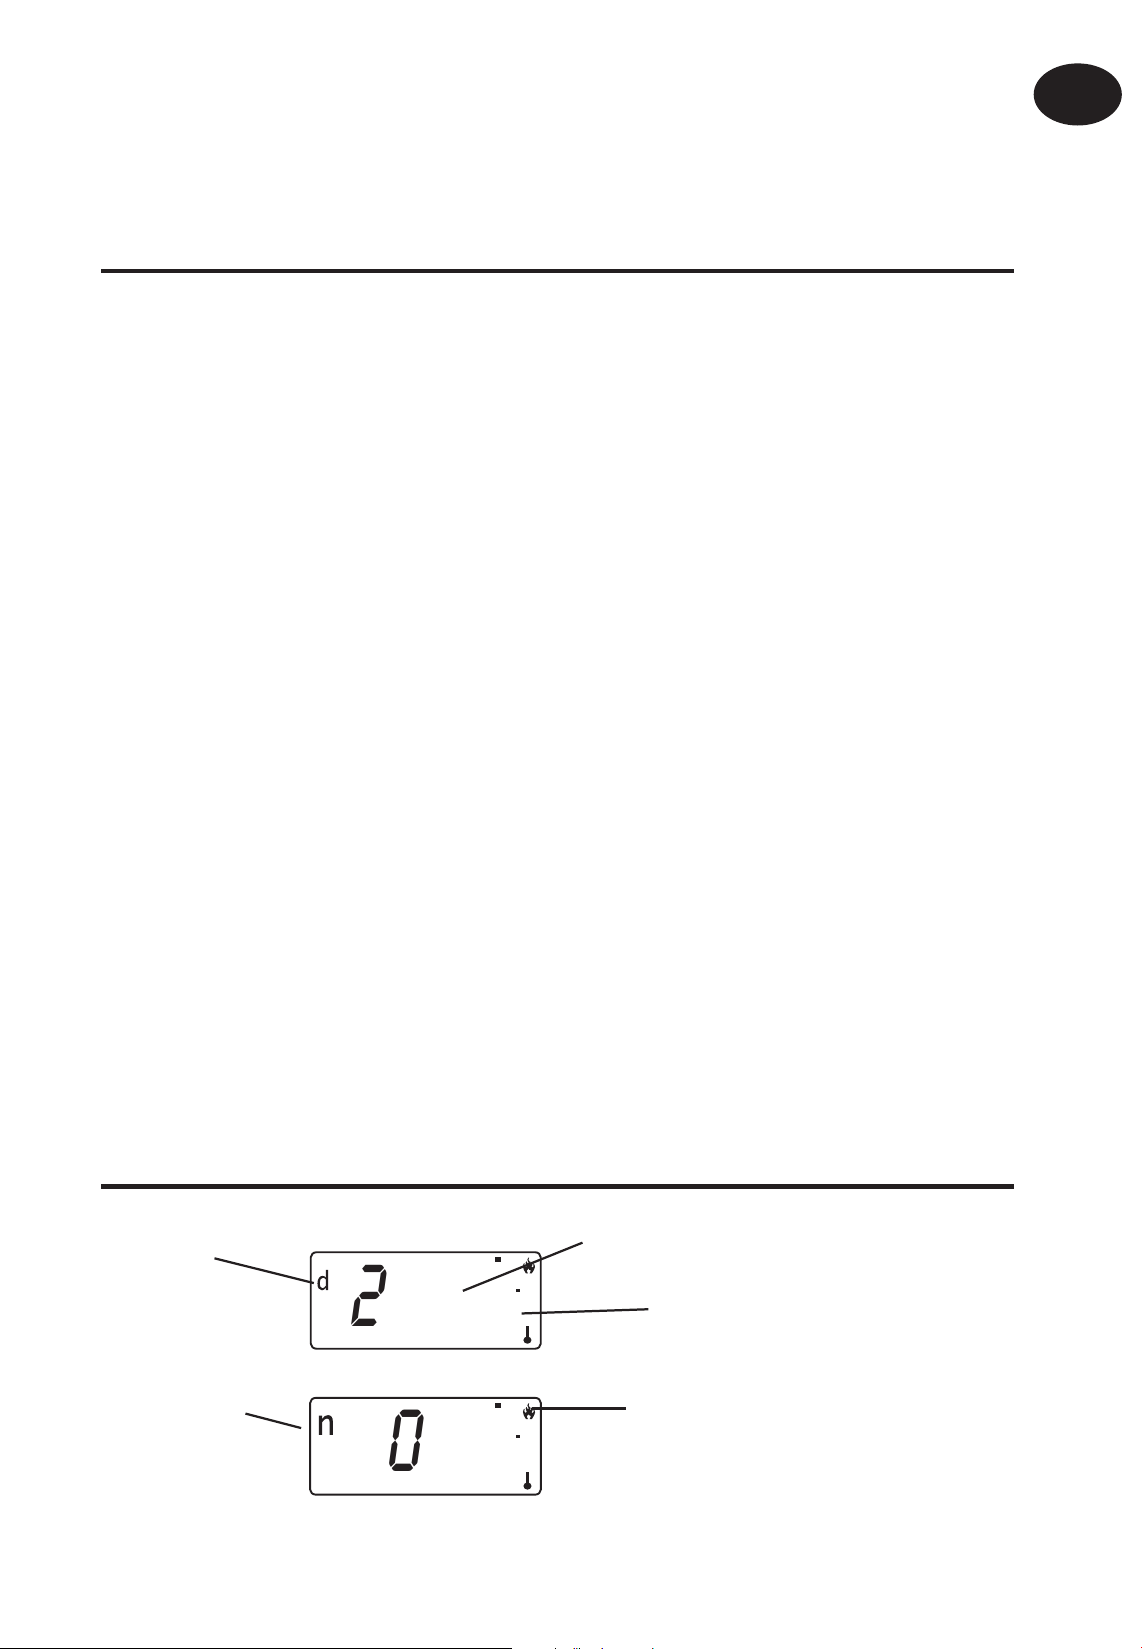
Reading your display
DAY mode
NIGHT mode
@
20.0
n
20.0
22
22
C
C
Actual room temperature
Required room temperature
Room temperature is lower than
required temperature, therefore
thermostat has switched on and
is calling for heat
9
Page 10

GB
User Instructions
All models
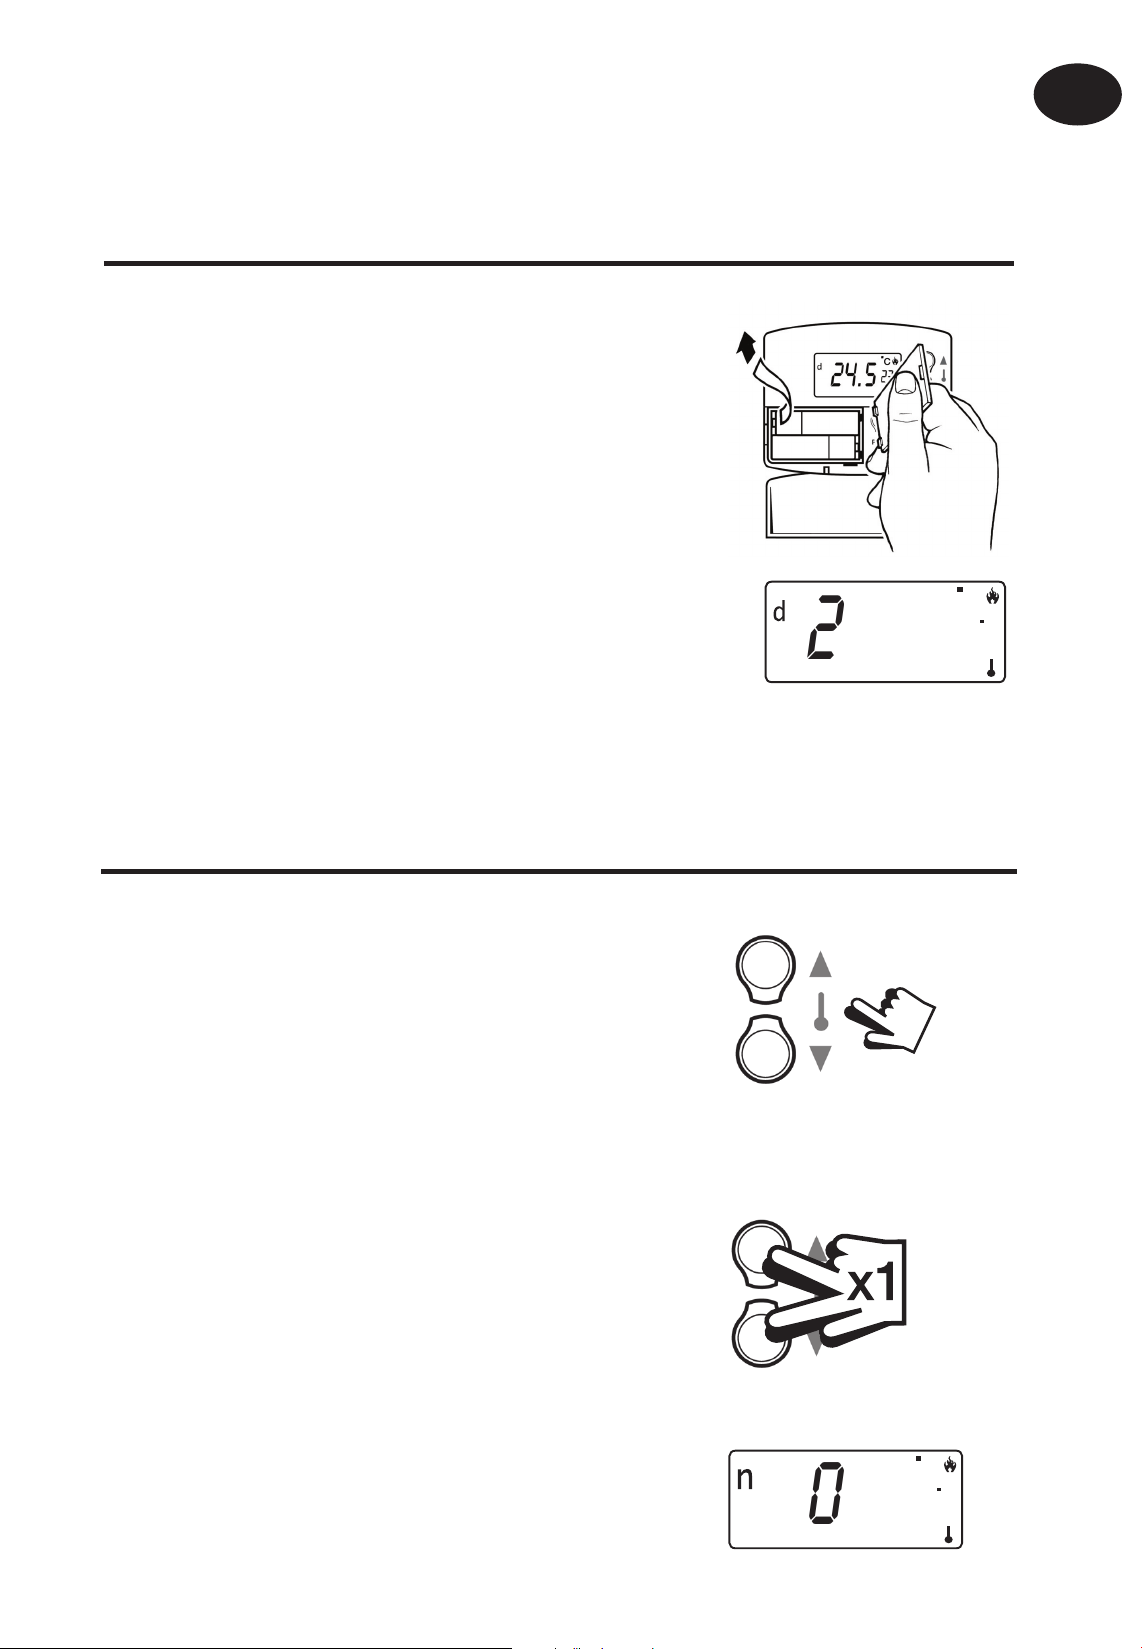
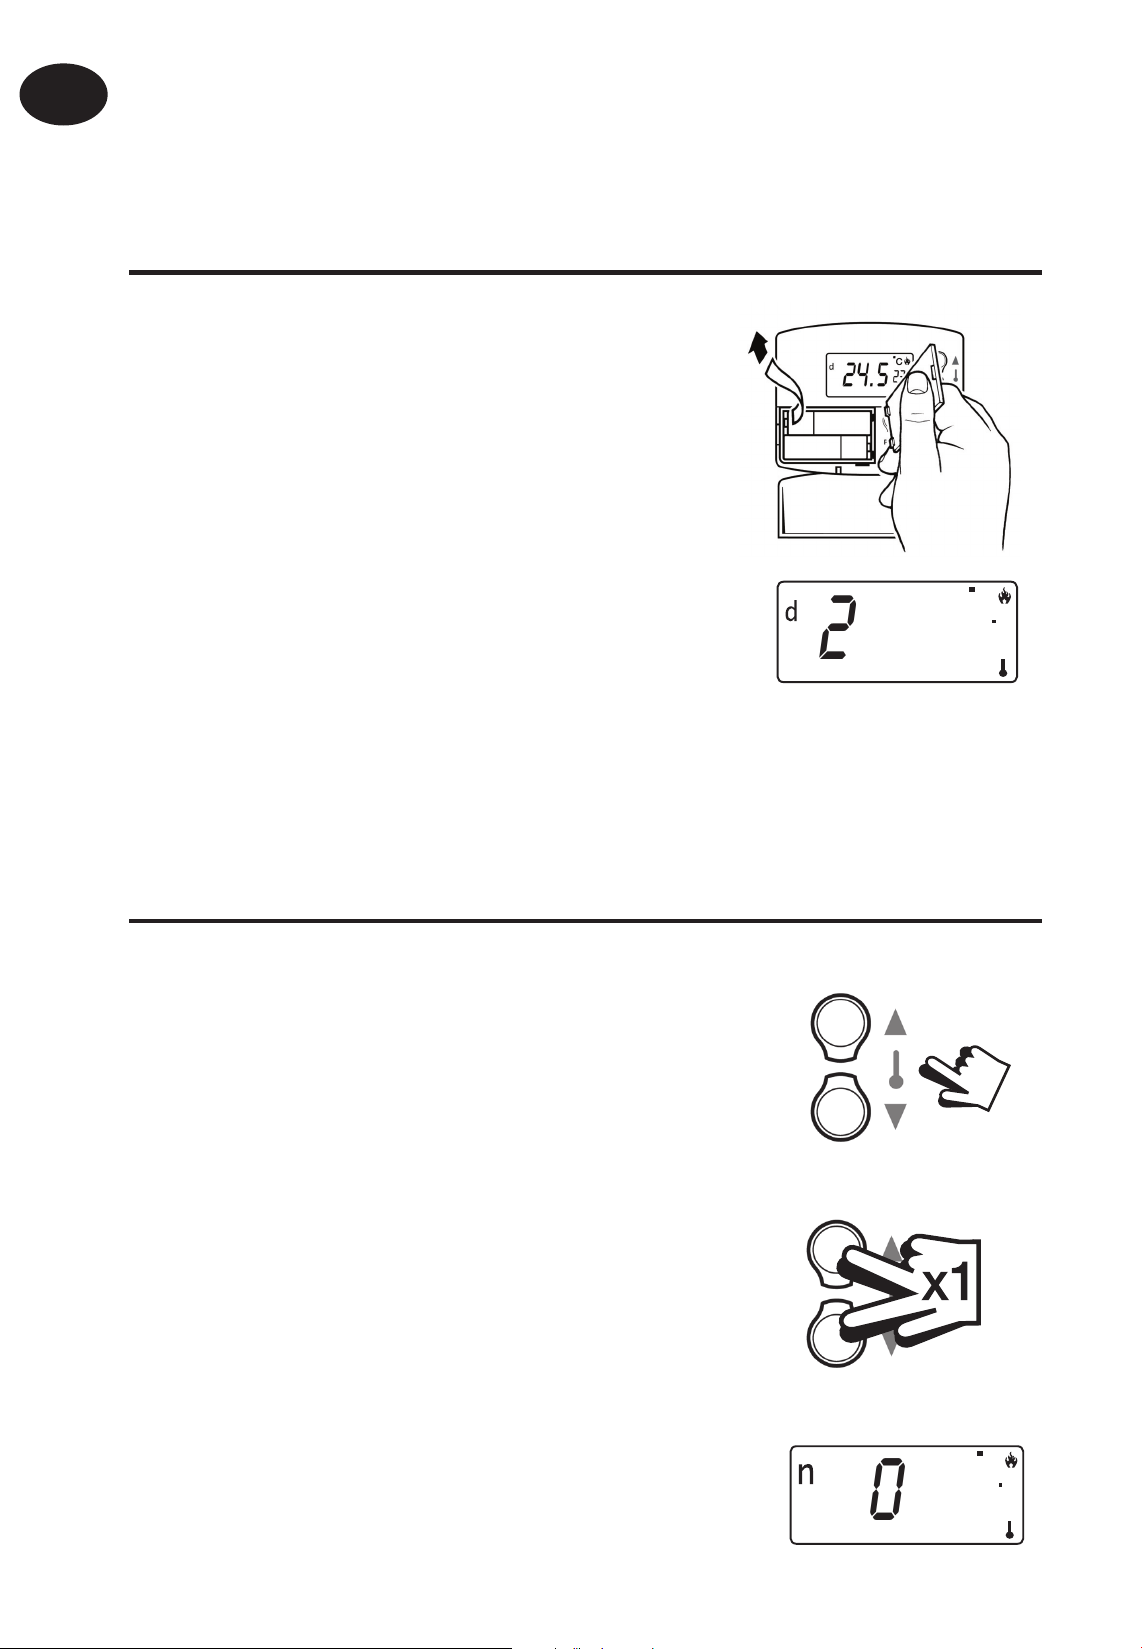
Before you start
To reset the unit, open the ap on the
front of the programmer. Remove the
batteries for 2 minutes, then replace.
The display will automatically default to
DAY mode (d shown top left of display)
and show actual temperature in the large
@
characters and required temperature in
20.0
the smaller characters.
Setting the DAY & NIGHT temperatures
DAY temperature
Use the and buttons until the
required DAY temperature is shown.
NIGHT (set-back) temperature
C
22
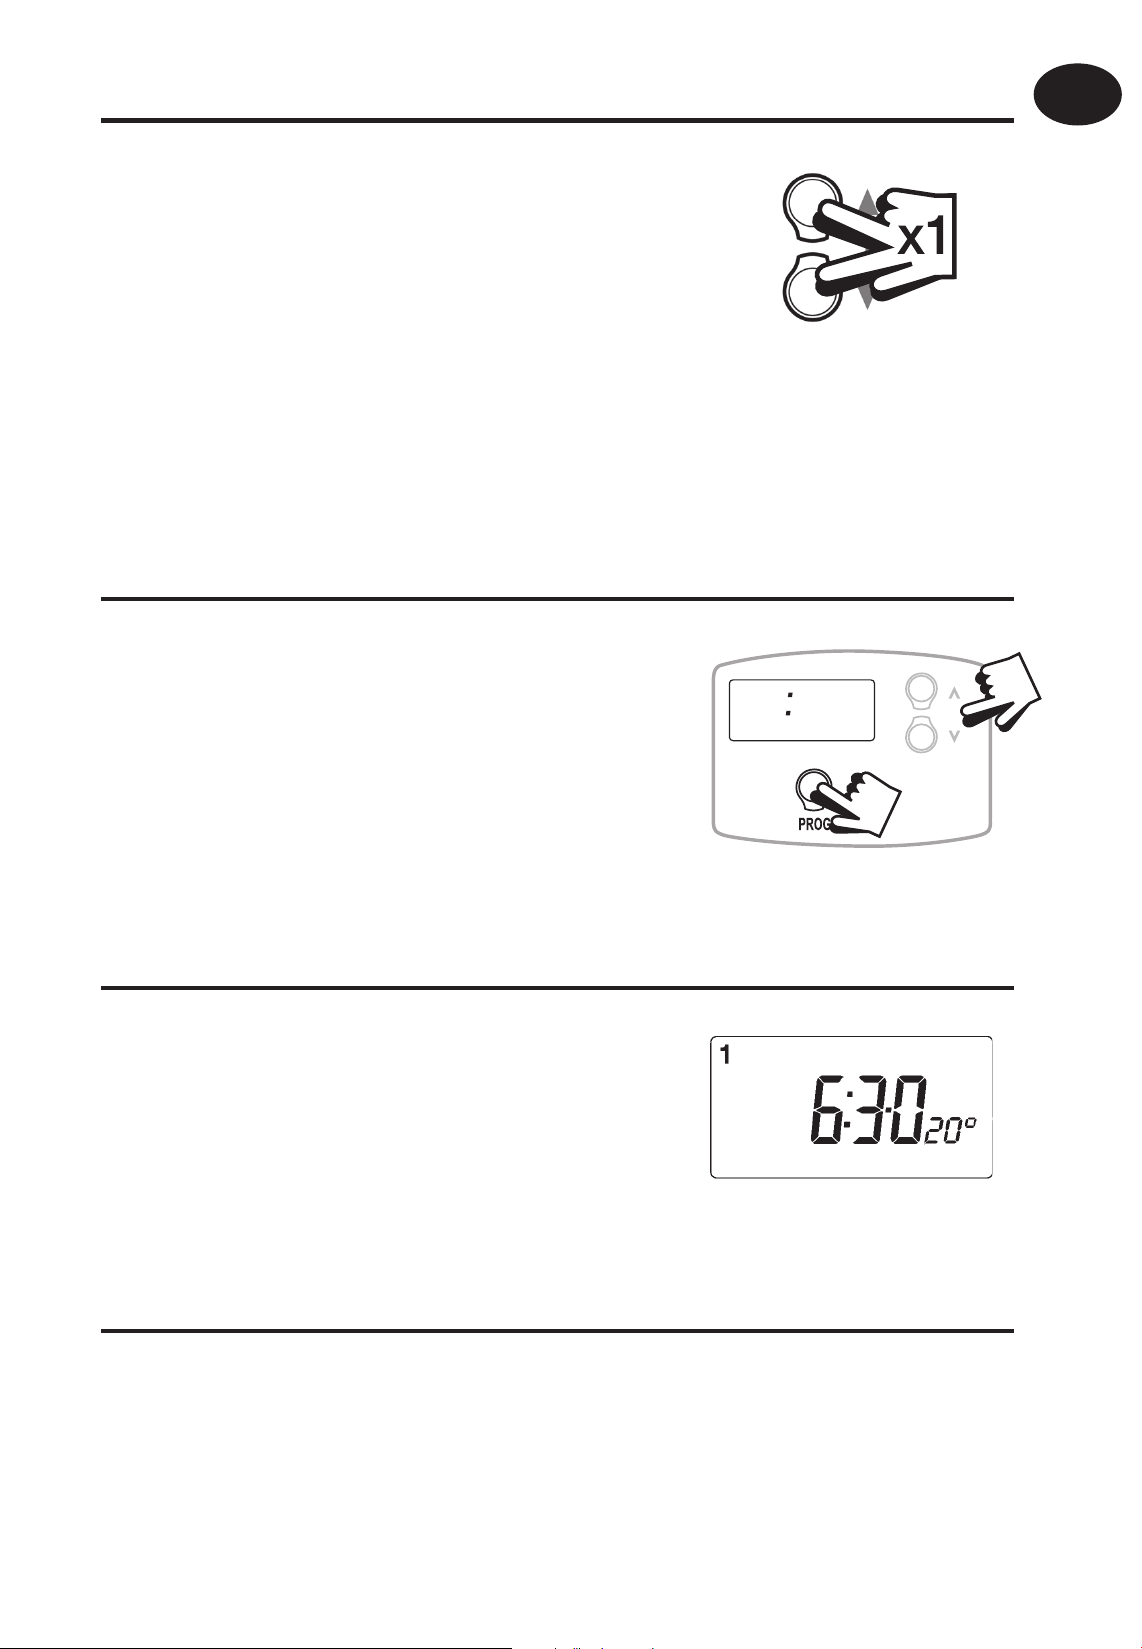
Press and buttons together once to
select NIGHT mode (n shown top left of
display).
Use the and buttons until the
required NIGHT (set-back) temperature
is shown (between 5-30°C or O ).
10
n
20.0
C
22
Page 11
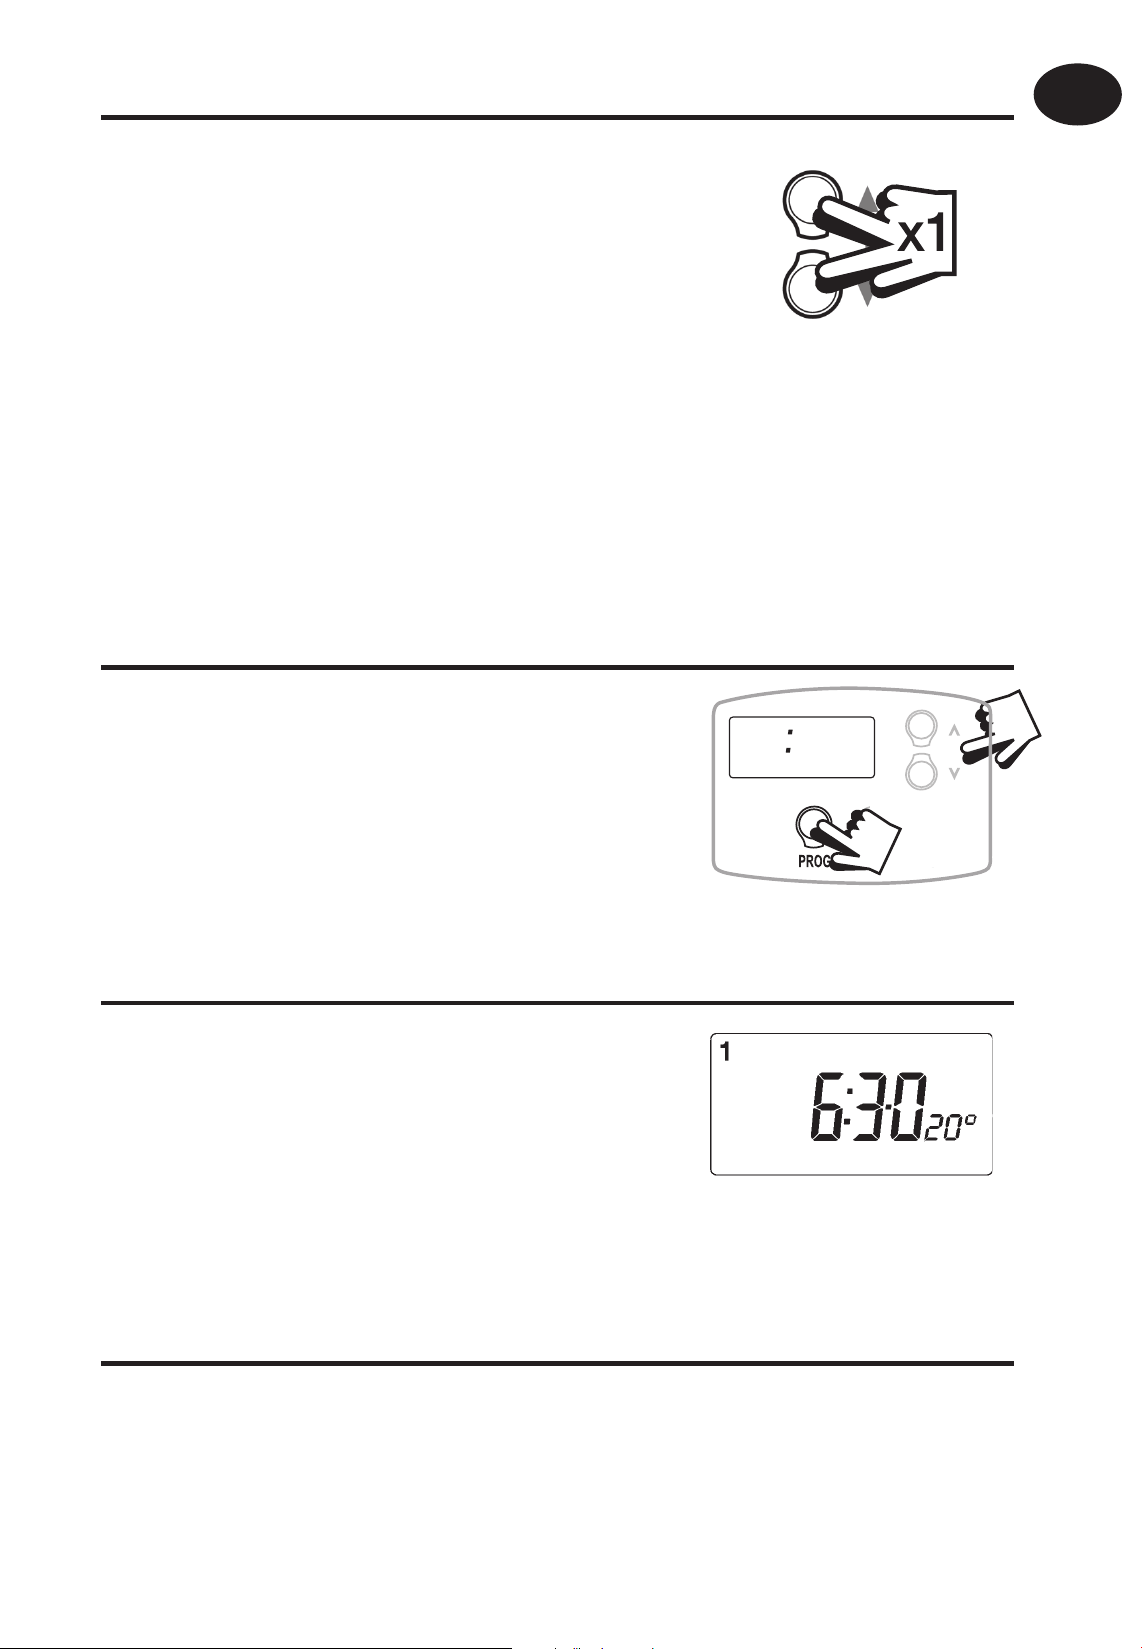
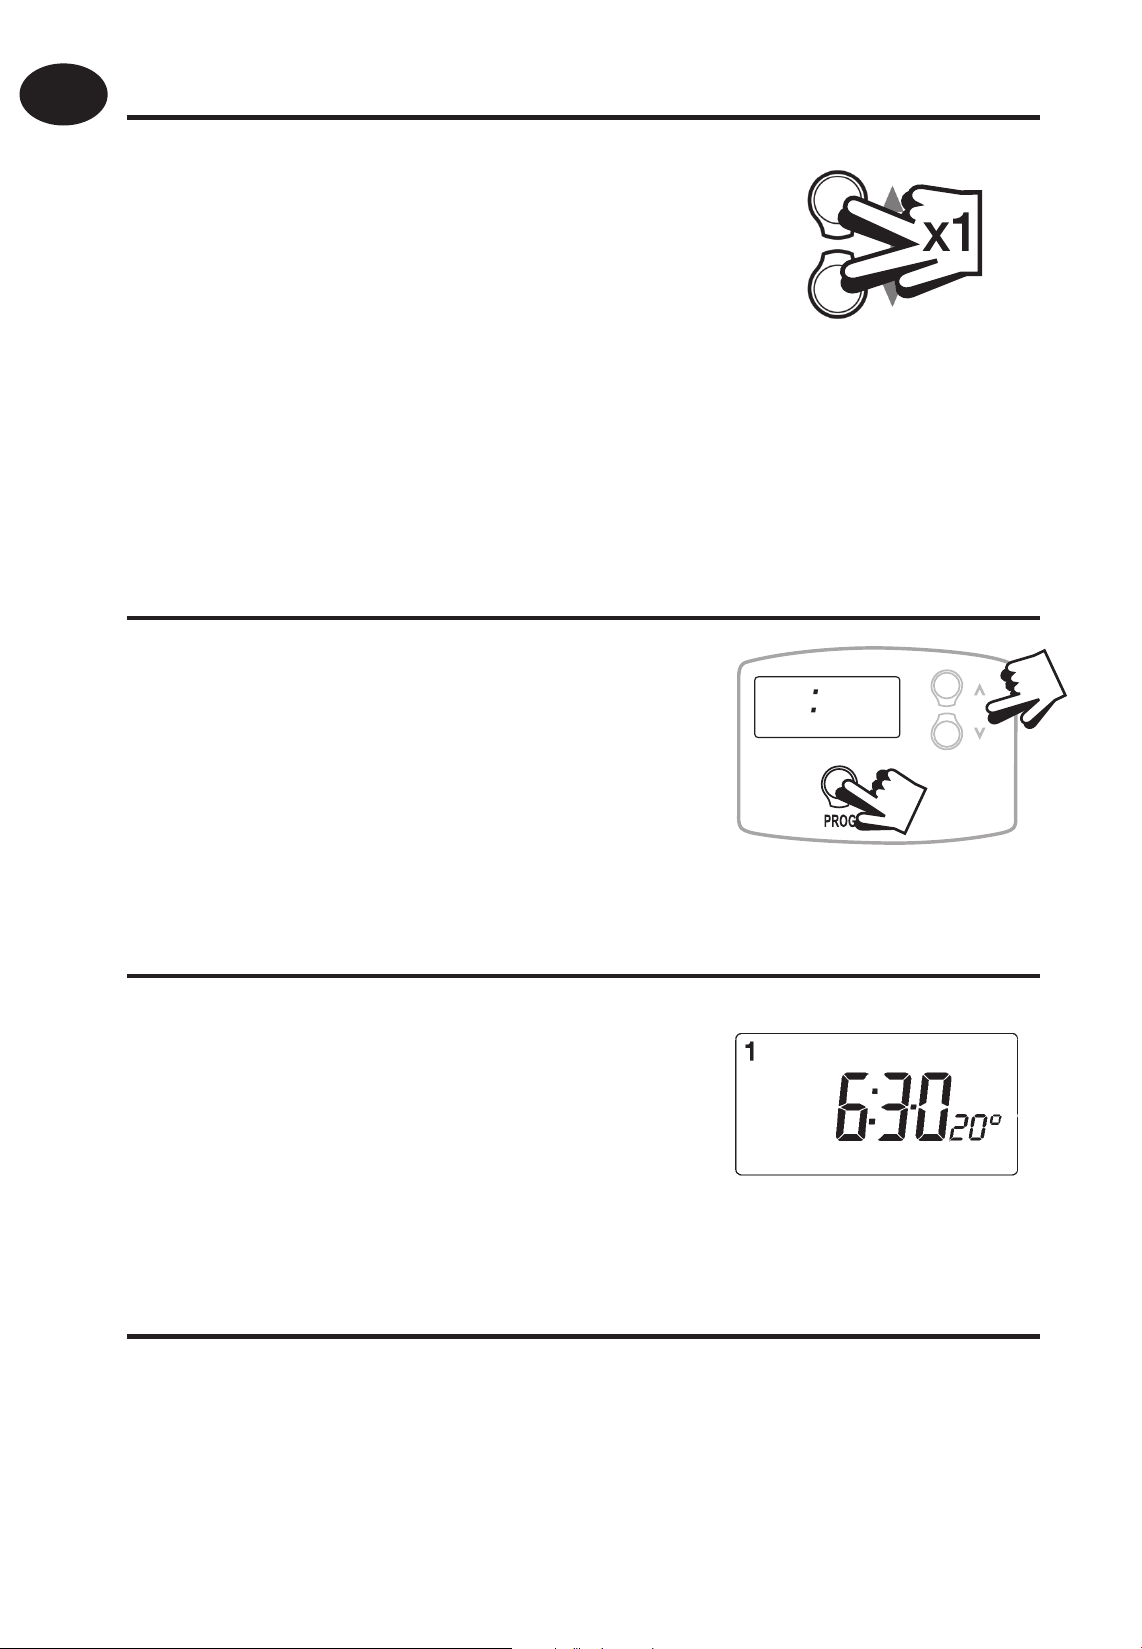
Moving between DAY and NIGHT mode
Pressing the and buttons
together once allows you to toggle
between DAY and NIGHT mode as
required.
RT52 / RT52-RF only
Setting the clock
GB
User Instructions
Press PROG button once.
Use and buttons until the correct
TIME is shown.
Setting the Return to Day Time
Press PROG button again.
Use and buttons to select the
time you wish the unit to return to
DAY mode.
i2 00
RUN Mode
Press PROG again to return to RUN mode.
The unit will now control your heating at the temperatures you
have set.
11
Page 12

GB
All models
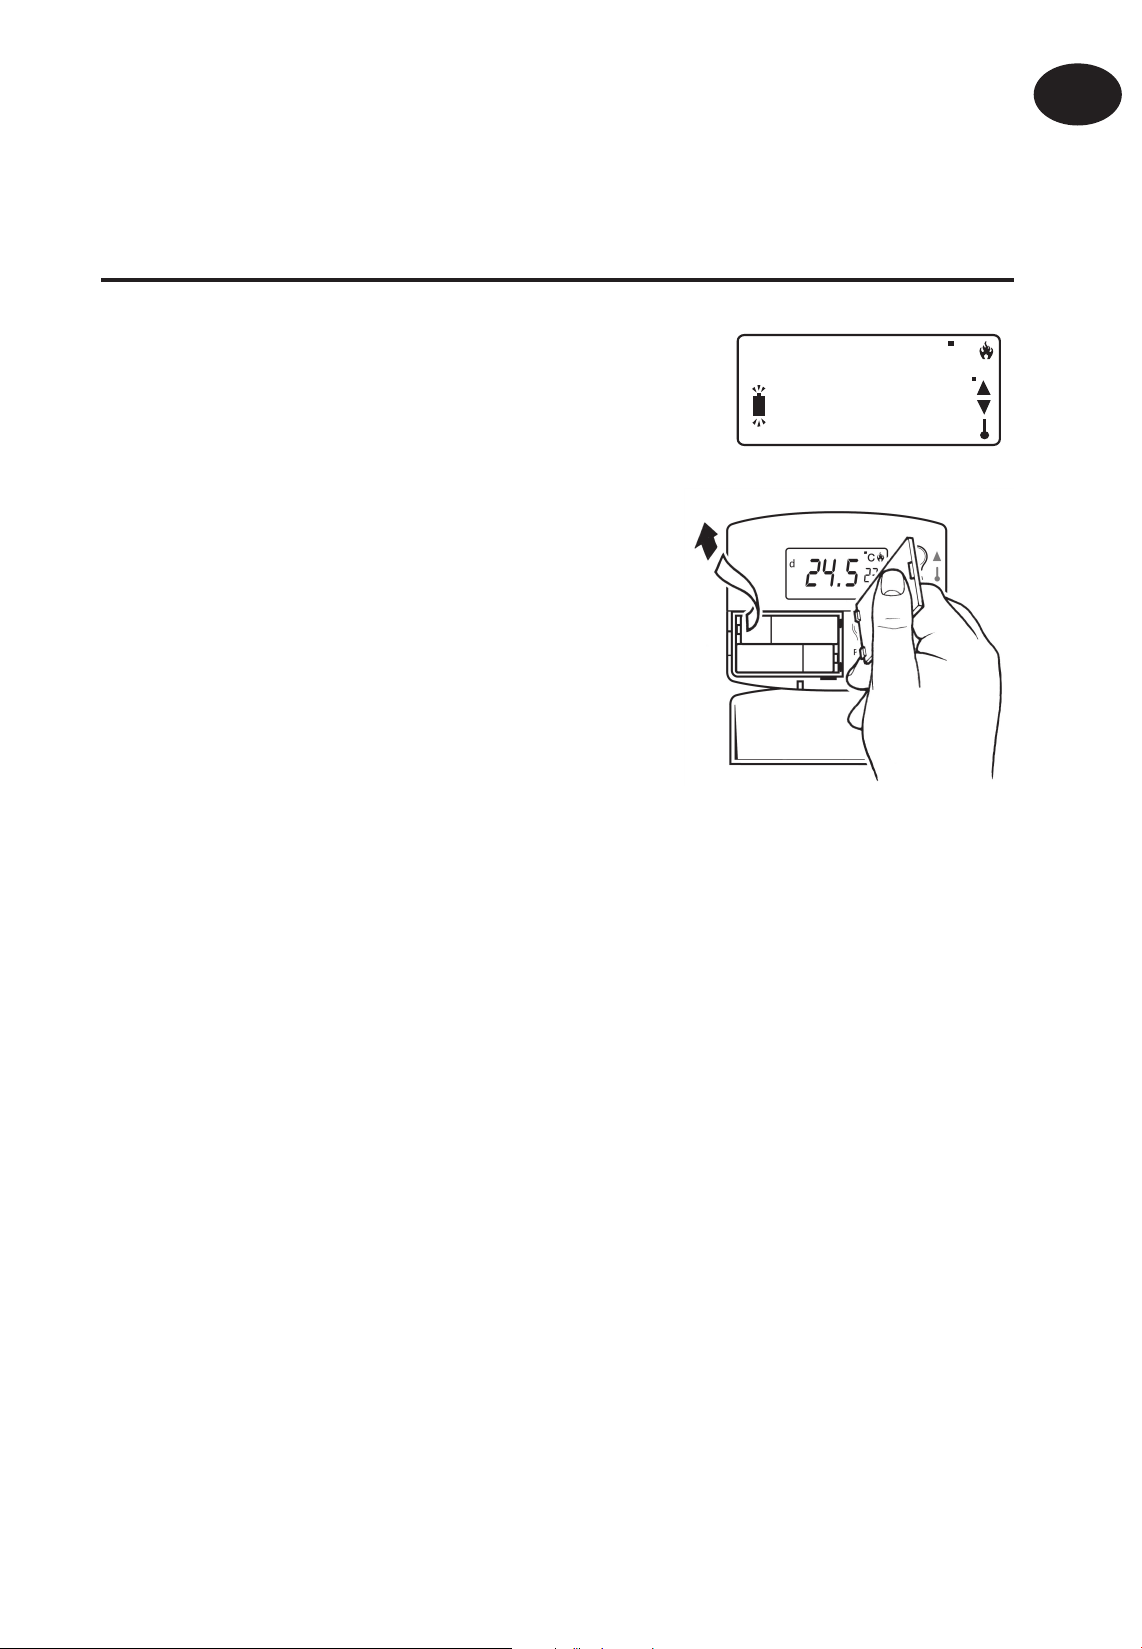
Battery Replacement
When batteries are low a battery
symbol will ash in the LCD display.
C
You have 15 days to replace the
User Instructions
battery before the unit will switch
o .
When changing batteries, remove
old batteries and insert new
ones within ONE MINUTE and
programming will not be lost.
IMPORTANT: always use high quality alkaline batteries.
NB. If the display ever goes blank during normal operation, the
20.0
22
!
batteries will need to be renewed, the unit reset and the time and
programmes reset.
12
Page 13
Instructions d’installation
Remarque:
Ce produit doit être installé exclusivement par un électricien
quali é ou un installateur de chau age compétent et doit
être conforme à la version en vigueur des réglementations de
câblage IEEE.
F
Speci cations
Caractéristiques RT51/52 RT51/52-RF
Alimentation 2 piles alcalines x AA/MN1500
Précision Horloge 1 minute, pour changer les piles
Type de contact
Caractéristique de contact 3(1)A, 10-230Vac N/A
Fréquence de fonctionnement N/A 433.92MHz
Portée émetteur
Plage de températures 5-30°C
Dimensions, mm 110 largeur, 88 hauteur, 28 épaisseur
Normes de fabrication EN60730-2-9 (EN300220 for RF)
(voir remarque ci-dessous) N/A 30 mètres max
1 x SPDT, Type 1B
N/A
Instructions d’installation
Tension de choc nominale 2.5Kv
Essai à la bille 75°C
Niveau de recyclage Degré 2
Précision de la température ±1°C
Remarque importante RF: Veiller à ce qu’aucun gros objet métallique (caisson de chaudière
ou autres gros appareils domestiques) ne fasse obstacle aux communications entre le
thermostat et le récepteur.
13
Page 14

F
Instructions d’installation
Installation
Retirez tout d’abord la plaque murale de l’arrière de l’appareil.
Par rapport au coin gauche supérieur de la plaque murale, vous
devez disposer d’espacements d’au moins 140 mm à droite, 15
mm à gauche, 30 mm au-dessus et 100 mm en-dessous a n de
pouvoir monter le module en chable.
14
Page 15
Avant de monter l’appareil, ce dernier doit être en mode ON/
OFF (Marche/Arrêt) ou réglage chrono-proportionnel (voir cidessous).
1) ON/OFF 2) CHRONO
ON/OFF (Marche/Arrêt) – la chaudière se met en marche
lorsque la température est inférieure à la température dé nie
et s’arrête lorsque la température est supérieure.
F
Instructions d’installation
Chrono-proportionnel – fonction d’économie d’énergie qui
déclenche la chaudière à intervalles réguliers pour maintenir
une température dé nie, o rant un environnement ambiant
constant à l’utilisateur.
Certains thermostats existants compteront un câble Neutre et/ou
Terre connecté. Ces derniers ne sont pas nécessaires au modèle
RT51/52 et NE doivent PAS être connectés à l’une des bornes du
!
RT51/52. Ils doivent en revanche être isolés et enroulés dans le
renfoncement à l’arrière du RT51/52.
15
Page 16
F
Instructions d’installation
Câblage (versions câblées seulement)
Câblage du Récepteur RX (modèles RF uniquement)
RX1
ELECTRONICS
RX2 & RX3
N
ELECTRONICS
L
12
COM
3
ZONE
1 ON
4
ZONE
1 OFF
A
NB. Pour les systèmes alimentés sur secteur, reliez la borne 2 à la phase du secteur.
16
B
N
C1
L
2
COM
345
ZONE
1 ON
ZONE
1 OFF
ZONE
2 ON
6
ZONE
3 ON
TERMINAL 6
RX3 ONLY
Page 17
Instructions (versions câblées)
Si le thermostat émetteur et le récepteur ont été fournis ensemble
dans un kit, ces deux éléments peuvent communiquer directement
sans manipulation particulière (Modèles RX1 uniquement).
Pour ajuster le récepteur RX à la fréquence du signal du thermostat, suivez
les points 1-5 ci-dessous.
Etape 1 RT52/52-RF
Réinitialisez l’appareil en retirant les
piles pendant 2 minutes, puis replacez
ces dernières.
Etape 2 Appuyez sur les touches
F
V et + en les maintenant enfoncées
pendant 3 secondes. (Le thermostat
transmet alors un signal unique en
continu pendant 5 minutes).
Etape 3 RX1
Appuyez sur les touches PROG et CH1
en les maintenant enfoncées pendant
3 secondes jusqu’à ce que le voyant
vert clignote une fois.
Etape 4 RX2 (si applicable)
Etat 1 – exécutez les points 1-3 .
Etat 2 - patientez 5 min, exécutez les points 1-2 puis appuyez sur
les touches PROG et CH2 du RX2.
Instructions d’installation
RX3 (si applicable)
Etat 1 – exécutez les points 1-3.
Etat 2 - patientez 5 min, exécutez les points 1-2 puis appuyez sur
les touches PROG et CH2 du RX3.
Etat 3 - patientez 5 min, exécutez les points 1-2 puis appuyez sur
les touches PROG et CH3 du RX3.
Etape 5 RT51/52-RF
Appuyez sur V ou Λ pour sélectionner la température – l’appareil
repassera en mode de fonctionnement.
17
Page 18

F
Instructions d’utilisateur
Instructions d’utilisateur
Votre thermostat d’ambiance
RT51
Le RT51 est un thermostat d’ambiance simple d’emploi qui vous
permet de programmer une température Jour et une température
Nuit, et de basculer entre les deux réglages en appuyant simplement
sur 2 touches.
RT52
Le RT52 a la même fonctionnalité que le RT51, mais intègre également
une minuterie, qui fera repasser le thermostat à la température Jour à
l’heure que vous avez choisie.
Modèles RF sans l
Les deux modèles sont disponibles en versions sans l - RT51-RF et
RT52-RF – qui o rent exactement les mêmes fonctions que les modèles
câblés.
Chaque thermostat communique avec un récepteur RX, qui peut être
placé jusqu’à 30 m du thermostat.
Lecture de l’écran
Mode JOUR
18
Mode NUIT
@
20.0
n
20.0
22
22
C
C
Température ambiante e ective
Température ambiante désirée
La température ambiante étant
inférieure à la température désirée,
le thermostat s’est allumé et met le
chau age en marche
Page 19
Tous les modèles
Avant de commencer
Pour réinitialiser l’appareil, ouvrez le
couvercle à l’avant du programmateur.
Retirez les piles pendant 2 minutes, puis
replacez ces dernières.
L’écran a chera automatiquement par
défaut le mode JOUR (lettre d a chée en
F
haut et à gauche de l’écran) et indiquera la
@
température e ective en gros caractères
et la température désirée en petits
caractères.
Réglage des températures JOUR & NUIT
La Température de la Journée
Appuyer sur les boutons ou jusqu’à
ce que la TEMPERATURE DE LA JOURNEE
requise s’a che.
La Température de la Nuit
20.0
22
C
Instructions d’utilisateur
Appuyer une fois simultanément sur
les boutons et pour sélectionner
le mode NUIT (n s’a che en haut et à
gauche de l’écran).
Appuyer sur les boutons ou jusqu’à
ce que la TEMPERATURE DE LA NUIT (mise
en réduit) requise s’a che (entre 5-30°C
ou Arrêt).
n
20.0
C
22
19
Page 20
F
Instructions d’utilisateur
Réglage de l’heure du retour au mode jour
Appuyer une fois simultanément sur
les boutons et pour basculer entre
les modes JOURNEE (d) et NUIT (n) selon
les besoins.
RT52/52-RF uniquement
Régler l’horloge
Appuyer une fois sur le bouton PROG.
i2 00
Appuyer sur les boutons ou jusqu’à
ce que l’HEURE correcte s’a che.
Régler l’Heure de Retour à la Température de la Journée
Appuyer une nouvelle fois sur le bouton
PROG.
Appuyer sur les boutons ou jusqu’à
ce que l’HEURE correcte s’a che.
Mode RUN (Fonctionnement)
Appuyer une nouvelle fois sur PROG pour repasser en mode
FONCTIONNEMENT.
L’appareil régulera désormais votre chau age aux températures que
vous avez dé nies.
20
Page 21
Tous les modèles
Remplacement des Piles
F
Lorsque les piles sont usagées, un
symbole de pile clignotera sur l’écran
LCD.
Vous disposez de 15 jours pour
remplacer la pile avant que l’appareil
ne s’éteigne.
Lorsque vous remplacez les piles,
retirez les piles usées et insérez
les piles neuves dans LA MINUTE
qui suit pour préserver vos
programmations.
20.0
22
C
Instructions d’utilisateur
IMPORTANT: toujours utiliser des piles alcalines de qualité.
NB. Si rien ne s’a che à l’écran pendant le fonctionnement
normal de l’appareil, les piles doivent être remplacées, l’appareil
réinitialisé, et l’heure et les programmes redé nis.
!
21
Page 22
D
Installationsanweisungen
Bitte beachten:
Dieses Produkt darf nur von einem quali zierten
Elektriker oder Heizungsinstallateur und gemäß den
aktuellen IEEE-Bestimmungen installiert werden.
Technische Daten
Installationsanweisungen
Technische Daten RT51/52 RT51/52-RF
Stromversorgung 2 x AA / MN1500 Batterien alkaline
Zeitgenauigkeit 1 Minute, für Batteriewechsel
Schaltkontakt
Schaltleistung 3(1)A, 10-230Vac nicht zutre end
Übertragungsfrequenz nicht zutre end 433.92 MHz
Reichweite des Senders (siehe
nachfolgenden Hinweis)
Temperaturbereich 5-30°C
Abmessungen (B x H x T) 110 x 88 x 28 mm
Bauart EN60730-2-9 (EN300220 : RF)
Nennimpulsspannung 2.5Kv
Umschaltkontakt,
potentialfrei, SPDT Type 1B
nicht zutre end 30m max
nicht zutre end
Verformbarkeit unter Druck 75°C
Emissionswerte Grad 2
Temperaturgenauigkeit ±1°C
Wichtiger Hinweis RF: Achten Sie darauf, dass sich keine größeren Metallobjekte wie
Boilergehäuse oder andere große Geräte zwischen Thermostat und Empfänger be nden, da
ansonsten die Kommunikation zwischen dem Thermostat und dem Empfänger der Signale
gestört werden kann.
22
Page 23
Installation
Entfernen Sie zuerst die Wandplatte auf der Geräterückseite.
D
Installationsanweisungen
Es müssen folgende Abstände eingehalten werden: Von der
linken oberen Ecke der Wandplatte mindestens 140mm nach
rechts, 15 mm nach links, 30 mm nach oben und 100 mm nach
unten, um das Einsteckmodul einzubauen.
23
Page 24

D
Vor dem Anbringen muss das Gerät auf EIN/AUS oder
Installationsanweisungen
zeitproportionalen Regelmodus eingestellt sein (siehe unten).
1) ON/OFF 2) CHRONO
1) EIN/AUS - Heizgerät schaltet ein, wenn die tatsächliche
Temperatur unter der eingestellten Temperatur liegt und AUS,
wenn sie darüber liegt.
2) Zeitproportional (Chrono) – Energiesparfunktion, bei der das
Heizgerät in regelmäßigen Intervallen anspricht, um eine eingestellte
Temperatur zu halten und eine konstante Umgebungstemperatur
für den Benutzer zu erreichen.
Verschiedene bereits vorhandene Thermostate haben einen
angeschlossenen Nullleiter oder Masseleiter. Diese werden vom RT51/52
nicht benötigt und dürfen NICHT an eine der Anschlussklemmen des
RT51/52 angeschlossen werden. Diese sollten vielmehr abisoliert
!
und in der Aussparung auf der Rückseite des RT51/52 untergebracht
werden.
24
Page 25
Verdrahtung (nur bei Kabelversion)
D
AUS COM EIN
Verdrahtung der Empfangseinheit RX (nur RF-Modelle)
RX1
ELEKTRONIK
N
L
12
COM
3
ZONE
1 EIN
4
ZONE
1 AUS
Installationsanweisungen
RX2 und RX3
ELEKTRONIK
KLEMME 6
NUR BEI RX3
B
N
C1
L
A
Hinweis: Bei Systemen, die per Netzspannung betrieben werden, Anschlussklemme (2)
an stromführende Leitung (L) anschließen (brücken).
345
2
COM
ZONE
1 EIN
ZONE
1 AUS
ZONE
2 EIN
6
ZONE
3 EIN
25
Page 26
D
Inbetriebnahme- Instruktion (nur RF-Modelle)
Wurde das Thermostat zusammen mit dem Receiver in einem
kombinierten Paket geliefert ist dieses eine Einheit und die
Einstellung/Programmierung erfolgte bereits im Werk (Nur RX1Modelle).
Befolgen Sie zur Frequenzabgleichung des RX-Empfängers auf das
Thermostatsignal unten aufgeführte Schritte 1 bis 5.
1. RT51/52-RF
Das Gerät wird durch eine 2-minütige
Entnahme der Batterien zurückgesetzt.
Anschließend Batterien wieder einsetzen.
Installationsanweisungen
2. Die Tasten V und + für 3 Sekunden
gedrückt halten (RT51/52 sendet jetzt
eigenes Signal für die Dauer von 5 Minuten
ohne Unterbrechung).
3. RX1 - Die Tasten PROG und CH1 3
Sekunden gedrückt halten, bis das grüne
Licht einmal au euchtet.
4. RX2 (falls zutre end)
Stat 1 – Schritte 1-3 ausführen.
Stat 2 - 5 Minuten warten, dann Schritte 1-2 für einen weiteren
Thermostaten ausführen und PROG und CH2 auf RX2 drücken.
RX3 (falls zutre end)
Stat 1 - Schritte 1-3 ausführen.
Stat 2 - 5 Minuten warten, dann Schritte 1-2 für einen weiteren
Thermostaten ausführen und PROG und CH2 auf RX3 drücken.
Stat 3 - 5 Minuten warten, dann Schritte 1-2 für einen weiteren
Thermostaten für einen weiteren Thermostaten ausführen und PROG
und CH3 auf RX3 drücken.
5. RT51/52-RF
Zur Auswahl der Temperatur V oder Λ drücken. Das Gerät schaltet auf
Betriebsmodus um.
26
Page 27
Benutzeranweisungen
Der Raumthermostat
RT51
Der RT51 ist ein einfach zu bedienender Thermostat, bei dem
Temperaturen für jeweils tagsüber und nachts programmmiert
werden können. Durch Drücken von 2 Tasten kann zwischen den
beiden Einstellungen gewählt werden.
RT52
Der RT52 verfügt zusätzlich zu den Funktionen des RT51 über eine
eingebaute Zeitschaltuhr, die den Thermostat zu einer von Ihnen
D
Benutzeranweisungen
vorgegebenen Zeit auf Tagestemperatur umschaltet.
Drahtlose RF-Versionen
Beide Modelle werden auch als drahtlose Versionen unter den
Bezeichnungen RT51-RF und RT52-RF angeboten und verfügen
über die selben Funktionen wie die Modelle mit Kabelführung.
Jeder Thermostat kommuniziert mit einem RX-Empfänger, der in
einer Entfernung von bis zu 30 m positioniert werden kann.
Ablesen des Displays
TAG-Modus
@
20.0
22
Tatsächliche Raumtemperatur
C
Erforderliche Raumtemperatur
NACHT-Modus
n
20.0
22
C
Die Raumtemperatur ist niedriger
als die gewünschte Temperatur. Der
Thermostat schaltet deshalb ein und
veranlasst den Heizmodus.
27
Page 28
D
Alle Modelle
Bevor Sie beginnen
Für ein Zurücksetzen des Geräts ist
die Klappe auf der Vorderseite des
Programmiermoduls zu ö nen. Entnehmen
Sie die Batterien und setzen Sie diese nach
ca. 2 Minuten wieder ein.
Das Display schaltet automatisch auf TAG-
Benutzeranweisungen
Modus um (d wird oben links auf dem
@
Display angezeigt) und zeigt die tatsächliche
Temperatur in grossen Zeichen und die
gewünschte Temperatur in kleineren
Zeichen an.
Einstellen der TAG- und NACHT-Temperaturen
Tagestemperatur
Verwenden Sie die Tasten und , bis die
gewünschte TAGESTEMPERATUR angezeigt
wird.
Nacht- (Absenk-) Temperatur
20.0
22
C
Wählen Sie durch gleichzeitiges einmaliges
Drücken der Tasten und den NACHT-
Modus (n wird auf dem Display oben links
angezeigt).
Verwenden Sie die Tasten oder bis
die erforderliche NACHT- (Absenk-)
Temperatur angezeigt wird (zwischen 530°C oder AUS).
28
n
20.0
C
22
Page 29
Zwischen Tag- und Nacht-Modus wechseln
Durch gleichzeitiges einmaliges Drücken
der Tasten und kann je nach Bedarf
zwischen TAG- (d) und NACHT- (n)
Modus gewechselt werden.
Nur RT52/52-RF
D
Einstellen der Uhr
Drücken Sie einmal die Taste PROG.
Verwenden Sie die Tasten oder , bis
die korrekte UHRZEIT angezeigt wird.
Einstellen der Uhrzeit für den Wechsel auf Tagbetrieb
Drücken Sie wieder die Taste PROG.
Verwenden Sie die Tasten und , bis
i2 00
Benutzeranweisungen
die korrekte UHRZEIT angezeigt wird.
RUN-Modus
Drücken Sie erneut PROG, um zum RUN-Modus zurückzukehren.
Das Gerät steuert jetzt Ihre Heizung zu den von Ihnen eingestellten
Temperaturen.
29
Page 30

D
Alle Modelle
Batteriewechsel
Bei niedrigem Ladezustand der
Batterie erscheint ein entprechendes
Symbol auf der LCD-Anzeige.
Sie haben für den Batteriewechsel
Benutzeranweisungen
15 Tage Zeit, bevor das Gerät
abschaltet.
Beim Batteriewechsel müssen
die verbrauchten Batterien und
die neuen Batterien innerhalb
von 1 MINUTE entnommen und
eingesetzt werden, da ansonsten der
Programmspeicher gelöscht wird.
20.0
22
C
WICHTIG: Verwenden Sie immer hochwertige Alkalibatterien
Typ AA LR6.
Hinweis: Falls die Anzeige bei normalem Betrieb ausfällt müssen
die Batterien gewechselt, das Gerät zurückgesetzt und Zeit und
Programme neu eingestellt werden.
!
30
Page 31

Instrucciones de instalación
Observe que:
Este producto deberá ser instalado solamente por un electricista
cuali cado o por un instalador de calefacción competente
y deberá instalarse de acuerdo con la edición vigente de las
normas de cableado de la IEEE.
Especi caciones
ES
Instrucciones de instalación
Especi caciones RT51/52 RT51/52-RF
Fuente de alimentación 2 pilas AA / MIN 1500 / LR 6
Respaldo de batería 1 minuto, para cambio de batería
Tipo de contacto
Carga de los contactos 3(1)A, 10-230Vac N/A
Frecuencia de funcionamiento N/A 433.92MHz
Campo de acción del transmisor (véase
nota abajo)
Rango de temperatura 5-30°C
Dimensiones generales (mm) 110 An, 88 Al, 29 Pr
Norma de fabricación EN60730-2-9 (EN300220 : RF)
Tensión nominal del impulso 2.5Kv
Ensayo de presión con bola 75°C
1 x SPDT
N/A
N/A
30 metros
máximos
Control antipolución Grado 2
Precisión de temperatura ±1°C
Nota importante RF: Asegurar que la línea de visión entre el transmisor y el termostato no
haya quedado obstaculizada por objetos grandes metálicos tales como calderas u otros
aparatos grandes ya que estos impedirían la comunicación entre el termostato y el receptor.
31
Page 32

ES
Instalación
En primer lugar, quitar la placa mural de la parte trasera de la
unidad.
Instrucciones de instalación
Desde la esquina superior izquierda de la placa mural, debe
haber un espacio libre de al menos 140mm a la derecha, de
15mm a la izquierda, de 30mm arriba y de 100mm abajo con el
n de montar el módulo enchufable.
32
Page 33

Antes de proceder a su montaje la unidad deberá ponerse en modo
ON/OFF o en modo de control crono-proporcional (ver abajo).
1) ON/OFF 2) CHRONO
1) ON/OFF : la caldera cambia a ON cuando está a una temperatura
inferior a la establecida y a OFF cuando está a una temperatura
superior.
ES
2) Crono-proporcional : con guración de ahorro de energía en la
cual la caldera se enciende a intervalos periódicos para mantener
una temperatura establecida, obteniéndose una temperatura
ambiente constante para el usuario.
Algunos termostatos existentes tendrán un cable Neutro y/o un cable
de conexión a Tierra. Estos cables no son necesarios para el RT51/52 y
NO deben conectarse a ningún terminal del RT51/52. En lugar de eso
los cables deberán aislarse eléctricamente de modo seguro y enrollarse
!
dentro de un hueco en la parte trasera del RT51/52.
Instrucciones de instalación
33
Page 34

ES
Cableado (solo versiones de conexión permanente)
Instrucciones de instalación
Cableado del Receptor RX (solo para modelos RF)
RX1
ELECTRONICS
RX2 & RX3
N
ELECTRONICS
L
12
COM
3
ZONE
1 ON
4
ZONE
1 OFF
TERMINAL 6
TERMINAL 6
RX3 SOLO
RX3 ONLY
A
N.B. Para sistemas que funcionen con la tensión de la red unir el terminal 2 con la
alimentación de la red
34
B
C1
N
2
L
COM
345
ZONE
1 ON
ZONE
1 OFF
ZONE
2 ON
6
ZONE
3 ON
Page 35

Instrucciones de puesta en marcha
Si el termoestato y el receptor se han suministrado juntos en un
paquete combinado, las unidades han sido emparejadas en la
fábrica y no será necesaria ninguna operación (solo modelos
RX1).
Para sintonizar el receptor RX en la frecuencia de la señal del termostato,
seguir los pasos 1-5 indicados a continuación.
Paso 1 RT51/52-RF
Restablecer la unidad retirando
las baterías durante 2 minutos y a
continuación volver a colocarlas.
Paso 2 Oprimir los botones V y + y
ES
Instrucciones de instalación
mantenerlos oprimidos durante 3
segundos (La RT51/52-RF transmite ahora
una señal única continuamente durante 5
minutos).
Paso 3 RX1
Oprimir los botones PROG y CH1 y
mantenerlos oprimidos durante 3
segundos hasta que la luz verde dé un
destello.
Paso 4 RX2 (si es aplicable)
Stat 1 – ejecutar los pasos 1-3.
Stat 2 - esperar 5 mins., ejecutar los pasos 1-2 y a continuación oprimir
PROG y CH2 en el RX2.
RX3 (si es aplicable)
Stat 1 - ejecutar los pasos 1-3.
Stat 2 - esperar 5 mins., ejecutar los pasos 1-2 y a continuación oprimir
PROG y CH2 en el RX3.
Stat 3 - esperar 5 mins., ejecutar los pasos 1-2 y a continuación oprimir
PROG y CH3 en el RX3.
Paso 5 RT51/52-RF Oprimir V o Λ para seleccionar temperatura; la
unidad volverá al modo operativo.
35
Page 36

ES
Instrucciones del usuario
Su termostato de ambiente
RT51
El RT51 es un termostato de ambiente de fácil utilización que permite la
programación de una temperatura de día y otra de noche, y el cambio
entre los dos ajustes simplemente pulsando dos botones.
RT52
Instrucciones del usuario
El RT52 tiene la misma funcionalidad que el RT51 con la ventaja
adicional de un temporizador integrado, que cambiará el termostato
a temperatura de día a una hora elegida por usted.
Versiones RF sin hilos
Ambos modelos están disponibles en versiones sin hilos: RT51-RF y
RT52-RF, que tienen exactamente las mismas funciones que los modelos
con conexión alámbrica.
Cada termostato está comunicado con un receptor RX, que puede
situarse hasta a 30m de distancia.
Leyendo la pantalla
Temperatura ambiente interior real
Modo de DÍA
22
C
Temperatura ambiente interior
requerida
@
20.0
Modo de NOCHE
36
n
20.0
22
La temperatura ambiente interior
C
es inferior a la temperatura
requerida, por lo cual el termostato
ha conectado y está demandando
calor
Page 37

Todos los modelos
Antes de comenzar
Para restablecer la unidad, abrir la tapa
frontal del programador. Retirar las baterías
durante 2 minutos, y a continuación volver a
colocarlas.
La pantalla mostrará automáticamente por
omisión el modo de DÍA (aparece “d” en la
ES
parte superior izquierda de la pantalla) e
indicará la temperatura actual en caracteres
de gran tamaño y la temperatura requerida
en caracteres de menor tamaño.
@
20.0
Ajuste de las temperaturas de DÍA y de NOCHE
La Temperatura diurna
Utilice los botones y hasta que se
muestre la TEMPERATURA DIURNA deseada.
22
C
Instrucciones del usuario
La Temperatura nocturna
Pulse los botones y a la vez una vez para
seleccionar el modo NOCHE (aparece n en la
parte superior izquierda de la pantalla).
Utilizar los botones y hasta que
la temperatura de NOCHE requerida
(reajustada) aparezca en pantalla (entre 530°C o “O ” ).
n
20.0
C
22
37
Page 38

ES
Cambiar entre el modo DÍA y NOCHE
Si desea cambiar entre el modo DÍA
(d) y NOCHE (n), pulse los botones
y a la vez una vez.
RT52/52-RF sólo
Poner en hora el reloj
Instrucciones del usuario
Pulse el botón PROG una vez.
Utilice los botones y hasta que se
muestre la HORA correcta.
Fijar Volver a la Temperatura diurna
Pulse el botón PROG otra vez.
Utilice los botones y hasta que
se muestre la HORA correcta.
i2 00
Modo en FUNCIONAMIENTO ( “RUN” )
Pulse de nuevo PROG para volver al modo RUN.
La unidad controlará ahora su calefacción a las temperaturas que
usted haya jado.
38
Page 39

Todos los modelos
Cambio de pilas
ES
Cuando las baterías están bajas
aparece destelleando un símbolo de
batería en la pantalla LCD.
Dispone de 15 días para cambiar
las pilas antes de que la unidad se
apague.
Durante el cambio de pilas, quite
las pilas antiguas e introduzca
las nuevas en UN MINUTO y no se
perderá la programación.
20.0
22
C
Instrucciones del usuario
IMPORTANTE: utilice siempre pilas alcalinas de alta calidad.
NB. Si la pantalla se queda en blanco alguna vez
durante el funcionamiento normal, se deberán
volver a cambiar las pilas y reajustar la unidad, los
!
programas y la hora.
39
Page 40

DK
Instruktions vejledning
Speci cations
Instruktions vejledning
Speci cations RT51/52 RT51/52-RF
Bemærk:
Dette produkt må kun installeres af en uddannet elektriker
eller kompetent varmeinstallatør, og installation skal ske
i henhold til de gældende IEEE-standarder for trådføring.
Batterier 2 x AA/MN1500/LR alkaline cells
Tidsnøjagtighed Ét minut til batteriskift
Kontakt type
Kontaktbelastning 3(1)A, 10-230Vac N/A
Sendefrekvens (RF) N/A 433.92MHz
Rækkevidde (RF) N/A Max. 30 meter
Temperaturområde 5-30°C
Mål (mm) 110 bred, 88 høj og 29 dyb
Konstruktionsnorm EN60730-2-9 (EN300220 : RF)
Nominel Impuls Spænding 2.5Kv
Kugle tryk test 75°C
1 x SPDT
N/A
Omgivelser Grad 2
Temperaturnøjagtighed ±1°C
Vigtig note ved RF produkter: Vær opmærksom på at større metal genstande, som kedler eller
andre store elektriske maskiner, placeret mellem sender og modtager kan formindske modtage
og sende forholdene og evt. forhindre kommunikationen mellen termostat og modtager.
40
Page 41

Vejledning
Fjern først vægpladen bag på enheden.
DK
Instruktions vejledning
For at kunne montere indstiksmodulet skal der i øverste
venstre hjørne af vægpladen være en afstand på mindst 140
mm til højre for vægpladen, 15 mm til venstre for vægpladen,
30 mm over vægpladen og 100 mm under vægpladen.
41
Page 42

DK
Før montering påbegyndes, skal enheden indstilles i enten ON/
OFF-tilstand eller tidsmæssigt proportionel kontroltilstand (se
nedenfor).
1) ON/OFF 2) CHRONO
Instruktions vejledning
1) ON/OFF - kedlen er ON, når temperaturen er under den
indstillede temperatur, og OFF, når temperaturen er over den
indstillede temperatur.
2) Tidsmæssig proportionalitet - energibesparelsesfunktion,
som opvarmer kedlen med jævne mellemrum for at bevare den
indstillede temperatur, hvorved brugeren opnår en konstant
omgivende temperatur.
Der er sluttet en nulleder og/eller jordledning til nogle af
termostaterne. Disse skal ikke bruges til RT51/52, og må IKKE
forbindes til klemmerne på RT51/52. De skal i stedet gøres elektrisk
sikre, og skal oprulles i fordybningen bag på RT51/52.
!
42
Page 43

Ledningsføring (ledningstrukne versioner)
DK
Instruktions vejledning
Trådføring af RX-modtager (kun RF-modeller)
RX1
ELECTRONICS
RX2 & RX3
N
ELECTRONICS
L
12
COM
3
ZONE
1 ON
4
ZONE
1 OFF
TERMINAL 6
RX3 ONLY
A
B
N
C1
L
345
2
COM
ZONE
1 ON
ZONE
1 OFF
ZONE
2 ON
6
ZONE
3 ON
PS. I relation til systemer, der modtager netspænding, skal klemme 2 tilkobles
forsyningsnettet.
43
Page 44

DK
Aktiveringsinstruktioner (kun RF-modeller)
Hvis termostat og modtager er leveret i sampak, er enhederne
indstillet fra fabrik, og trin 1-5 kan derfor springes over (Kun
RX1 modeller).
Trin 1-5 nedenfor skal følges for justering af RX-modtageren i forhold
til frekvensen af termostatens signal.
Trin 1 RT51/52-RF
Nulstil enheden ved at erne batterierne
i to minutter og herefter sætte dem på
plads igen.
Instruktions vejledning
Trin 2 Tryk på og hold - og +-
knapperne nede i tre sekunder (RT51/52
sender nu et entydigt, vedvarende signal
i fem minutter).
Trin 3 RX1
Tryk på og hold knapperne PROG og
CH1 nede i tre sekunder, indtil den
grønne lampe blinker én gang.
Trin 4 RX2 (hvis anvendelig)
Termostat 1 - udfør trin 1-3.
Termostat 2 - vent fem minutter, udfør
trin 1-2, og tryk herefter på PROG og CH2 på RX2.
RX3 (hvis anvendelig)
Termostat 1 - udfør trin 1-3.
Termostat 2 - vent fem minutter, udfør trin 1-2, og tryk herefter på
PROG og CH2 på RX3.
Termostat 3 - vent fem minutter, udfør trin 1-2, og tryk herefter på
PROG og CH2 på RX3.
Trin 5 RT51/52-RF
Tryk på Λ eller V for at vælge temperatur – enheden vender herefter
tilbage til driftstilstand.
44
Page 45

Brugervejleding
Din rumtermostat
RT51
RT51 er en rumtermostat, der er nem at bruge, og som giver
dig mulighed for at programmere en dag- og en nattemperatur.
Du skifter mellem de to indstillinger blot ved at trykke på de to
knapper.
RT52
RT52 har den samme funktionalitet som RT51, men har en yderligere
DK
Brugervejleding
fordel i form af en indbygget timer, som sætter termostaten til en
dagtemperatur på et tidspunkt, som du har valgt.
Trådløse RF-udgaver
Begge modeller fås i trådløse udgaver – RT51-RF og RT52-RF – som
har nøjagtig de samme funktioner som modellerne med tråd.
Termostaterne kommunikerer med en RX-modtager, som kan
placeres op til 30 m væk fra enheden.
A æsning af displayet
DAG-tilstand
@
20.0
C
22
Aktuel rumtemperatur
Ønsket rumtemperatur
NATTE-tilstand
n
20.0
22
C
Rumtemperaturen er lavere end
den ønskede temperatur, og
termostaten er derfor slået til,
hvilket sætter varmen i gang
45
Page 46

DK
Brugervejleding
Alle modeller
Før du starter
Åbn klappen på forsiden af den
programmerbare enhed for at nulstille
enheden. Fjern batterierne i to minutter,
og sæt dem herefter på plads igen.
Displayet viser automatisk DAG-tilstand
som standard (“d” i displayets øverste
venstre side), den aktuelle temperatur
@
med store tal og den ønskede temperatur
20.0
med mindre tal.
Indstilling af DAG- og NAT-temperaturer
DAG-temperatur
Brug - og -knappen, indtil DAGtemperaturen vises.
NATTE (tilbagestilling)-temperatur
C
22
Tryk på - og -knappen samtidigt én
gang for at vælge NATTE-tilstand (n vises i
øverste, venstre side af displayet).
Brug - og -knapperne, indtil den
ønskede nattemperatur (tilbagestilling)
vises (mellem 5-30° C eller O ).
46
n
20.0
C
22
Page 47

Skiftning mellem DAG- og NATTE-tilstand
Ved at trykke på - og -knappen
samtidigt én gang har du mulighed
for at skifte mellem DAG- og NATTEtilstand efter behov.
Gælder kun for RT52 / RT52-RF
Indstilling af ur
DK
Brugervejleding
Tryk på PROG.
Brug knapperne eller for at
justere TIDSPUNKTET.
Ændring fra dag- til nattemperatur
Tryk på PROG igen.
Brug - og -knappen til at vælge
det tidspunkt, hvor du ønsker, at
enheden skal vende tilbage til DAGtilstand.
i2 00
DRIFTS-tilstand
Tryk på PROG igen for at vende tilbage til DRIFTS-tilstand.
Enheden kontrollerer nu din opvarmning ved de temperaturer, du
har indstillet.
47
Page 48

DK
Alle modeller
Udskiftning af batterier
Når batteriniveauet er lavt, blinker
et batterisymbol i LCD-displayet.
Brugervejleding
Du har 15 dage til at udskifte
batteriet, før elektronikken slås fra.
Ved udskiftning af batterier skal
de nye batterier indsættes inden
for et minut efter udtagningen af
de gamle batterier for at bevare
programmeringen.
20.0
22
C
VIGTIGT: brug altid alkaliske batterier af høj kvalitet.
NB: Hvis displayet skulle blive blankt under normal drift, skal
batterierne udskiftes, og elektronikken, tidspunkterne samt
programmerne skal genindstilles.
!
48
Page 49

Installatie handleiding
N.B.:
Dit product dient alleen te worden geïnstalleerd
door een erkend elektrotechnicus of een vakkundige
verwarmingsinstallateur conform de thans geldende IEEEvoorschriften voor bedrading.
Technische speci caties
Omschrijving RT51/52 RT51/52-RF
NL
Installatie handleiding
Voeding 2 x AA/MN1500 Alkaline batterijen
Programma backup 1 minuut, voor wisselen batterijen
Relaiscontact
Maximum contactbelasting 10-230Vac, 3(1)A n.v.t
Bedrijfsfrequentie n.v.t 433,92MHz
Zendbereik (zie onderstaande
opmerking)
Temperatuurbereik 5-30°C
Afmetingen (bxhxd) 110 x 88 x 29mm
Constructienorm EN60730-2-9 (EN300220 : RF)
Nominale piekspanning 2,5Kv
SPDT Type 1B
n.v.t
potentiaalvrij
n.v.t 30m max
Kogeldruktest 75°C
Stralingsniveau Graad 2
Nauwkeurigheid ±1°C
Belangrijk voor RF modellen: Let er op dat zich geen grote metalen voorwerpen, zoals ketels
of andere grote apparaten, in de gezichtslijn tussen thermostaat en ontvanger bevinden,
aangezien hierdoor de communicatie tussen thermostaat en ontvanger wordt verhinderd.
49
Page 50

NL
Montage
Verwijder eerst de wandplaat van de achterkant van de
thermostaat.
Installatie handleiding
Monteer de wandplaat op een hoogte van ca. 1,5 m vanaf de
vloer, niet op de tocht en uit de buurt van warmtebronnen
zoals radiatoren, open haard of direct zonlicht. Rondom de
wandplaat dient een vrije ruimte van minimaal 140 mm te
worden aangehouden.
50
Page 51

Voorafgaand aan de plaatsing dient de thermostaat te worden
ingesteld op ON/OFF of CHRONO-proportionele regeling (zie
hieronder).
NL
1) ON/OFF – de ketel schakelt AAN wanneer de temperatuur
daalt tot onder de ingestelde waarde en weer UIT bij hogere
temperaturen.
2) CHRONO-proportioneel - energiebesparende
comfortabele functie die de ketel met regelmatige
tussenpozen inschakelt waardoor een constante
ruimtetemperatuur voor de gebruiker wordt bereikt.
1) ON/OFF 2) CHRONO
Installatie handleiding
!
Op sommige bestaande thermostaten kan een Nul- en/of
Aardedraad zijn aangesloten. Deze zijn niet nodig op de
RT51/52 en mogen NIET op de klemmen van de RT51/52 worden
aangesloten. Zij moeten worden geïsoleerd en worden opgerold
in de uitsparing van de RT51/52.
51
Page 52

NL
Aansluiting (niet voor RF-modellen)
Sluit de klemmen B en C aan op de
thermostaatklemmen van de ketel
(bij modulerende ketels de klemmen
Installatie handleiding
voor schakelende thermostaten,
indien aanwezig).
Aansluiting van de RX-ontvanger
(alleen bij RF-modellen)
RX1
ELECTRONICS
N
L
12
COM
3
ZONE
1 ON
4
ZONE
1 OFF
RX2 & RX3
ELECTRONICS
TERMINAL 6
RX3 ONLY
B
N
C1
L
COM
A
N.B. Bij netspanning gevoede systemen dient klem 2 te worden aangesloten op
de fase van de netvoeding.
52
2
34
ZONE
ZONE
1 OFF
1 ON
5
ZONE
2 ON
6
ZONE
3 ON
Page 53

Inbedrijfstelling van RF-modellen
Als de thermostaat en de ontvanger in een setverpakking zijn
geleverd is de aanmeldprocedure al in de fabriek uitgevoerd
(enkel model RX1).
Verwijder de isolatiestrip uit het batterijcompartiment en volg
onderstaande stappen om de thermostaat bij de ontvanger aan te
melden.
Stap 1 RT51/52-RF
Druk 3 seconden gelijktijdig op de en
+ toetsen.
N.B. De thermostaat zendt nu gedurende 5
minuten een aanmeldsignaal uit.
NL
Installatie handleiding
Stap 2 RX ontvanger
Druk binnen 5 minuten na stap 1
gedurende 3 seconden gelijktijdig op
PROG en CH1. De groene LED knippert
één keer: aanmelding in orde.
Stap 3 Druk op of van de zojuist aangemelde thermostaat.
Het aanmeldsignaal stopt en de thermostaat gaat naar normaal bedrijf.
Verhoog of verlaag de gewenste temperatuur d.m.v. de of toets
om te controleren of de thermostaat op de juiste wijze schakelt.
Stap 4 RX2../RX3..(indien van toepassing)
Herhaal voor de overige thermostaten de stappen 1,2 en 3, nu echter
met de knoppen CH2 en CH3 van de RX ontvanger.
53
Page 54

NL
Instructies voor Gebruik
Instructies voor Gebruik
Uw kamerthermostaat
RT51
De RT51 is een gemakkelijk te bedienen kamerthermostaat waarmee
u een Dag- en Nacht-temperatuur kunt instellen en heen en weer kunt
schakelen tussen de twee instellingen door simpelweg op 2 toetsen
te drukken.
RT52
De RT52 heeft dezelfde functionaliteit als de RT51 met het extra
voordeel van een ingebouwde tijdschakelaar, die de thermostaat op
een door u gekozen tijdstip terugzet op Dag-temperatuur.
Draadloze RF-versies
Beide modellen zijn verkrijgbaar in draadloze versies - RT51-RF en RT52RF – die exact dezelfde functies bieden als de vast bedrade modellen.
Elke thermostaat communiceert met een RX-ontvanger, die tot een
afstand van 30 m geplaatst kan zijn.
Display weergave
54
DAG-stand
NACHT-stand
@
20.0
n
20.0
22
22
C
C
Actuele kamertemperatuur
Gewenste kamertemperatuur
De kamertemperatuur is lager dan
de gewenste temperatuur, daarom
is de thermostaat ingeschakeld en
vraagt om warmte
Page 55

Alle modellen
Alvorens te beginnen
Verwijder de isolatiestrip uit het
batterijcompartiment.
De display zal automatisch naar de DAGstand gaan (de d wordt getoond in de
linker bovenhoek van de display) en de
actuele (gemeten) temperatuur wordt in
grote cijfers en de gewenste temperatuur
in kleinere cijfers weergegeven.
@
20.0
NL
Instructies voor Gebruik
C
22
Instellen van DAG- & NACHT-temperaturen
DAGTEMPERATUUR
Gebruik de of toets tot de gewenste
DAGTEMPERATUUR wordt aangegeven
(tussen 5-30ºC of O /uit).
NACHTTEMPERATUUR
Druk één keer gelijktijdig op de en
toetsen om de NACHT-stand te aktiveren
(de n wordt getoond in de linker
bovenhoek van de display).
Gebruik de of toets tot de
gewenste NACHTTEMPERATUUR wordt
aangegeven.
n
20.0
C
22
55
Page 56

NL
Instructies voor Gebruik
Schakelen tussen DAG- en NACHT-stand
Door gelijktijdig kort op de en
toetsen te drukken wordt gewisseld
tussen DAG- en NACHT-stand.
Alleen RT52/52-RF
De klok instellen
Druk één keer op de PROG-toets.
Gebruik en toetsen tot de
correcte TIJD wordt aangegeven.
Instellen van Terug naar DAG-stand
Druk weer op de PROG-toets.
Gebruik de en toetsen om de
gewenste TIJD in te stellen.
Normaal bedrijf
i2 00
Druk nogmaals op PROG om terug te keren naar normaal bedrijf.
De thermostaat zal uw verwarming nu regelen op de door u
ingestelde temperaturen.
56
Page 57

Alle modellen
Vervangen van batterij
NL
Wanneer de batterijen bijna leeg zijn
knippert er een batterijsymbool in de
LCD-display.
U hebt 15 dagen om de batterij te
vervangen alvorens de unit wordt
uitgeschakeld.
Verwijder de oude batterijen en zet er
binnen een minuut nieuwe in, dan gaat
de programmering niet verloren.
BELANGRIJK:
Gebruik hoogwaardige alkaline batterijen!
N.B. Wanneer de display tijdens normaal bedrijf ooit blanco wordt,
20.0
22
C
Instructies voor Gebruik
!
dan moeten de batterijen worden vervangen, de unit gereset naar
fabrieksinstelling en de tijd en programma’s opnieuw worden
ingesteld.
57
Page 58

GR
ПдзгЯет егкбфЬуфбузт
Рбсбкблпэме узмейюуфе:
Бхфь фп рспъьн иб рсЭрей нб егкбиЯуфбфбй брь ейдйкехмЭнп
злекфспльгп Ю бсмьдйп иесмйкь егкбфбуфЬфз кбй иб
рсЭрей нб еЯнбй уэмцщнб ме фзн йучэпхуб Экдпуз фщн
кбнпнйумюн злекфсйкюн егкбфбуфЬуещн фпх ЙЕЕЕ.
ПдзгЯет егкбфЬуфбузт
ЧбсбкфзсйуфйкЬ
ЧбсбкфзсйуфйкЬ RT51/52 RT51/52-RF
MрбфбсЯет лейфпхсгЯбт 2 x AA / MN 1500 блкблйкЭт
БксЯвейб юсбт
Фэрпт ербцЮт селЭ
ÔÜóç ñåëÝ 3(1)A, 10-230 Vac N/A
Ухчньфзфб рпмрпэ N/A 433.92MHz
ЕмвЭлейб рпмрпэ N/A Max 30 мЭфсб
РесйпчЮ иесмпксбуйюн 5-30°C
ДйбуфЬуейт (мЮкпт x эшпт x вЬипт) 110 mm x 88 mm x 29 mm
РспдйбгсбцЭт учедйбумпэ EN60730-2-9 (EN300220 : RF)
ПнпмбуфйкЮ фЬузт юизузт 2.5Kv
ДпкймЮ уцбйсйкЮт рЯеузт 75°C
КбфЬуфбуз елЭгчпх сэрбнузт Degree 2
1 лерфь, гйб бллбгЮ мрбфбсЯбт
SPDT фэрпт 1В
N/A
БксЯвейб иесмпксбуЯбт ±1°C
УзмбнфйкЮ рбсбфЮсзуз гйб фпхт RF фэрпхт: ВевбйщиеЯфе ьфй ден хрЬсчей кЬрпйп
мегЬлп мефбллйкь бнфйкеЯменп ьрщт егкбфЬуфбуз лЭвзфб Ю Ьллет фечнйкЭт ухукехЭт
рпх рбсемвЬллпнфбй ендйЬмеуб мефбоэ фпх иесмпуфЬфз чюспх кбй фзт мпнЬдбт фпх
дЭкфз Эфуй юуфе нб рбсемрпдЯжефбй з ерйкпйнщнЯб мефбоэ фпхт.
58
Page 59

ЕгкбфЬуфбуз
Рсюфб, бцбйсЭуфе фп рЬнел брь фп рЯущ мЭспт фзт
мпнЬдбт.
GR
ПдзгЯет егкбфЬуфбузт
Брь фзн рЬнщ бсйуфесЮ гщнЯб фпх рЬнел рсЭрей нб
хрЬсчпхн елеэиесет брпуфЬуейт фпхлЬчйуфпн 140 mm
рспт фб деойЬ, 15 mm рспт фб бсйуфесЬ, 30 mm рспт
фб ерЬнщ кбй 100 mm рспт фб кЬфщ гйб фзн егкбфЬуфбуз
фпх излхкщфпэ дпмпуфпйчеЯпх.
59
Page 60

GR
Рсйн брь фзн егкбфЬуфбуз з мпнЬдб иб рсЭрей нб
фпрпиефеЯфбй уфз иЭуз ON/OFF Ю чспнп-бнблпгйкпэ
елЭгчпх (влЭре рбсбкЬфщ).
1) ON/OFF – фп мрьйлес фЯиефбй ON (енфьт) ьфбн з
иесмпксбуЯб еЯнбй кЬфщ брь фз иесмпксбуЯб сэимйузт
ПдзгЯет егкбфЬуфбузт
кбй OFF (екфьт) ьфбн еЯнбй рЬнщ.
2) Чспнп-бнблпгйкьт Элегчпт – чбсбкфзсйуфйкь
еопйкпньмзузт енЭсгейбт рпх бнЬвей фп мрьйлес кбфЬ
фбкфйкЬ дйбуфЮмбфб гйб нб дйбфзсеЯ фз иесмпксбуЯб
сэимйузт, ерйфхгчЬнпнфбт уфбиесь ресйвЬллпн гйб фпн
чсЮуфз.
1) ON/OFF 2) CHRONO
60
!
МесйкпЯ хрЬсчпнфет иесмпуфЬфет Эчпхн ухндедемЭнп
фпн пхдЭфесп бгщгь кбй/Ю фпн бгщгь геЯщузт. БхфпЯ пй
бгщгпЯ ден брбйфпэнфбй брь фп RT51/52 кбй ДЕН рсЭрей
нб ухндЭпнфбй уе бкспдЭкфет RT51/52, бллЬ иб рсЭрей
нб кбиЯуфбнфбй злекфсйкЬ буцблеЯт кбй нб ухуфсЭцпнфбй
уфзн еупчЮ уфп рЯущ мЭспт фпх RT51/52.
Page 61

ЗлекфсйкЮ уэндеуз (мьнп гйб фйт екдьуейт
кблщдйбкЮт уэндеузт)
GR
ПдзгЯет егкбфЬуфбузт
ЗлекфсйкЮ уэндеуз ДЭкфз RX (мьнп мпнфЭлб RF)
RX1
ELECTRONICS
RX2 & RX3
N
ELECTRONICS
L
12
COM
3
ZONE
1 ON
4
ZONE
1 OFF
TERMINAL 6
RX3 ONLY
A
Узм. Гйб ухуфЮмбфб рпх лейфпхсгпэн ме фзн фЬуз дйкфэпх, ухндЭуфе фпн
бкспдЭкфз 2 уфпн бгщгь цЬузт фпх дйкфэпх рбспчЮт.
B
N
C1
L
2
COM
345
ZONE
1 ON
ZONE
1 OFF
ZONE
2 ON
6
ZONE
3 ON
61
Page 62

GR
ПдзгЯб (Мьнп гйб екдьуейт RF)
Гйб нб ухнфпнЯуефе фпн деЯкфз RX уфз ухчньфзфб фпх уЮмбфпт фпх
иесмпуфЬфз, бкплпхиЮуфе фб рбсбкЬфщ вЮмбфб 1-5.
ÂÞìá 1 RT51/52-RF
ЕрбнбцЭсефе фз мпнЬдб, бцбйсюнфбт фйт мрбфбсЯет гйб
2 лерфЬ, кбй кбфьрйн ербнбфпрпиефЮуфе фйт.
ÂÞìá 2 РйЭуфе кбй ксбфЮуфе рйеумЭнб
фб рлЮкфсб êáé + гйб 3
дехфесьлерфб.
(П RT51/52 екрЭмрей фюсб Энб
кбй мпнбдйкь уЮмб ухнечют гйб
ПдзгЯет егкбфЬуфбузт
5 лерфЬ).
ÂÞìá 3 RX1
РйЭуфе кбй ксбфЮуфе рйеумЭнб
фб рлЮкфсб PROG êáé CH1
гйб 3 дехфесьлерфб Эщт ьфпх
фп рсЬуйнп цщт нб еклЬмшей
мЯб цпсЬ.
ÂÞìá 4 RX2 (еЬн Эчей ецбсмпгЮ)
УфЬдйп 1 – рсбгмбфпрпйЮуфе фб 1-3.
УфЬдйп 2 – ресймЭнефе 5 лерфЬ, рсбгмбфпрпйЮуфе фб
вЮмбфб 1-2 кбй кбфьрйн рйЭуфе PROG êáé CH2 óôïí
RX2.
RX3 (еЬн Эчей ецбсмпгЮ)
УфЬдйп 1 – рсбгмбфпрпйЮуфе фб вЮмбфб 1-3.
УфЬдйп 2 – ресймЭнефе 5 лерфЬ, рсбгмбфпрпйЮуфе фб
вЮмбфб 1-2 кбй кбфьрйн рйЭуфе PROG êáé CH2 óôïí
RX3.
УфЬдйп 3 – ресймЭнефе 5 лерфЬ, рсбгмбфпрпйЮуфе фб
вЮмбфб 1-2 кбй кбфьрйн рйЭуфе PROG êáé CH3 óôïí
RX3.
ÂÞìá 5 RT51/52-RF
РйЭуфе Þ гйб нб ерйлЭоефе иесмпксбуЯб – з мпнЬдб
62
иб ерйуфсЭшей уфпн фсьрп лейфпхсгЯбт..
Page 63

ПдзгЯет чсЮузт
П иесмпуфЬфзт убт чюспх
RT51
П RT51 еЯнбй еэкплпт уфз чсЮуз иесмпуфЬфзт чюспх рпх
убт ерйфсЭрей нб рспгсбммбфЯжефе иесмпксбуЯб ЗмЭсбт кбй
иесмпксбуЯб Нэчфбт, кбй нб кЬнефе мефбгщгЮ мефбоэ фщн дэп
схимЯуещн рйЭжпнфбт брлют 2 рлЮкфсб.
RT52
П RT52 Эчей фзн Ядйб лейфпхсгйкьфзфб ьрщт п RT51 ме фп рсьуиефп
рлепнЭкфзмб енущмбфщмЭнпх чспнпмефсзфЮ, п прпЯпт иб
GR
ПдзгЯет чсЮузт
ербнбцЭсей фп иесмпуфЬфз уфз иесмпксбуЯб ЗмЭсбт уфз уфйгмЮ
рпх иб ерйлЭоефе.
Буэсмбфет екдьуейт RF
Кбй фб дэп мпнфЭлб дйбфЯиенфбй уе буэсмбфет екдьуейт - RT51-
RF кбй RT52-RF – рпх рспуцЭспхн бксйвют фйт Ядйет лейфпхсгЯет
ьрщт фб енуэсмбфб мпнфЭлб.
КЬие иесмпуфЬфзт ерйкпйнщнеЯ ме дЭкфз RX, рпх мрпсеЯ нб
всЯукефбй Эщт кбй 30 m мбксйЬ.
БнЬгнщуз фзт пиьнзт убт
Фсьрпт DAY
(змЭсбт)
Фсьрпт NIGHT
(нэчфбт)
@
20.0
n
20.0
22
22
C
C
ХцйуфЬменз иесмпксбуЯб чюспх
Брбйфпэменз иесмпксбуЯб
чюспх
З иесмпксбуЯб чюспх еЯнбй
чбмзльфесз брь фзн брбйфпэменз,
гй’ бхфь п иесмпуфЬфзт фЭизке
енфьт кбй жзфЬ иесмьфзфб.
63
Page 64

GR
¼лб фб мпнфЭлб
Рспфпэ оекйнЮуефе
Гйб нб ербнбцЭсефе фз мпнЬдб, бнпЯофе
фп кбрЬкй уфп емрсьт мЭспт фпх
рспгсбммбфйуфЮ. БцбйсЭуфе фйт мрбфбсЯет
гйб 2 лерфЬ кбй кбфьрйн ербнбфпрпиефЮуфе
фйт.
ПдзгЯет чсЮузт
З пиьнз иб рспфеспфеиеЯ бхфпмЬфщт уфпн
фсьрп DAY (змЭсб рпх рбспхуйЬжефбй
уфп бсйуфесь рЬнщ мЭспт фзт пиьнзт) кбй
иб деЯоей фзн хрЬсчпхуб иесмпксбуЯб ме
мегЬлпхт чбсбкфЮсет кбй фзн брбйфпэменз
@
20.0
C
22
иесмпксбуЯб ме мйксьфеспхт чбсбкфЮсет.
Сэимйуз фщн иесмпксбуйюн ЗМЕСБУ & НХЧФБУ
Сэимйуз фзт иесмпксбуЯбт змЭсбт
ЧсзуймпрпйЮуфе фб рлЮкфсб s кбй t
Эщт ьфпх емцбнйуфеЯ з брбйфпэменз
ИЕСМПКСБУЙБ ЗМЕСБт.
Сэимйуз фзт иесмпксбуЯбт нэчфбт
РбфЮуфе мбжЯ фб рлЮкфсб s кбй t мЯб цпсЬ
гйб нб ерйлЭоефе фпн фсьрп лейфпхсгЯбт
НХЧФБУ (n емцбнЯжефбй уфп рЬнщ
бсйуфесЬ мЭспт фзт пиьнзт).
ЧсзуймпрпйЮуфе фб рлЮкфсб s кбй t Эщт
ьфпх цбнеЯ (ербнбцесиеЯ) з брбйфпэменз
иесмпксбуЯб НХЧФБУ (мефбоэ 5-30°C Ю
Off).
64
n
20.0
C
22
Page 65

МефбкЯнзуз мефбоэ фсьрпх лейфпхсгЯбт
ЗМЕСБУ кбй НХЧФБУ
Фп фбхфьчспнп рЬфзмб фщн рлЮкфсщн
êáé мЯб цпсЬ убт дЯней фзн дхнбфьфзфб
нб мефбкйнзиеЯфе мефбоэ фсьрпх
лейфпхсгЯбт ЗМЕСБУ (d) кбй НХЧФБУ
(n) ьрщт чсейЬжефбй.
Ìüíï ãéá ôï RT52/52-RF
Сэимйуз фпх сплпгйпэ
GR
ПдзгЯет чсЮузт
РбфЮуфе фп рлЮкфсп PROG ìßá öïñÜ.
ЧсзуймпрпйЮуфе фб рлЮкфсб êáé
Эщт ьфпх емцбнйуфеЯ п ущуфьт
ЧСПНПУ.
i2 00
Сэимйуз фзт ерйуфспцЮт уе иЭуз ЗмЭсбт
РбфЮуфе рЬлй фп рлЮкфсп PROG.
ЧсзуймпрпйЮуфе фб рлЮкфсб êáé
Эщт ьфпх емцбнйуфеЯ п ущуфьт
ЧСПНПУ.
Фсьрпт RUN (лейфпхсгЯб)
РбфЮуфе фп PROG рЬлй гйб нб ерйуфсЭшефе уфзн кбфЬуфбуз
ЛЕЙФПХСГЙБУ.
З мпнЬдб иб елЭгчей фюсб фз иЭсмбнуЮ убт уфйт иесмпксбуЯет
рпх Эчефе схимЯуей.
65
Page 66

GR
¼лб фб мпнфЭлб
БнфйкбфЬуфбуз мрбфбсЯбт
¼фбн рЭупхн пй мрбфбсЯет, уфзн пиьнз
LCD иб бнбвпувЮней фп уэмвплп фзт
мрбфбсЯбт.
ПдзгЯет чсЮузт
¸чефе 15 мЭсет нб бнфйкбфбуфЮуефе фз
мрбфбсЯб рспфпэ увЮуей з мпнЬдб.
¼фбн бллЬжефе мрбфбсЯет, бцбйсЭуфе
фйт рблйЭт мрбфбсЯет кбй вЬлфе
кбйнпэсгйет мЭуб уе Энб лерфь гйб нб
мз чбиеЯ п рспгсбммбфйумьт.
УЗМБНФЙКП: чсзуймпрпйеЯфе рЬнфпфе блкблйкЭт мрбфбсЯет
хшзлЮт рпйьфзфбт
20.0
C
22
!
Узм. ЕЬн кЬрпфе з пиьнз увЮуей кбфЬ фзн кбнпнйкЮ
лейфпхсгЯб, рсЭрей нб бнбнещипэн пй мрбфбсЯет, нб
ербнбсхимйуфеЯ з мпнЬдб кбй нб ербнбсхимйуфеЯ п чсьнпт
кбй фб рспгсЬммбфб.
66
Page 67

Instrukcja instalacji
Prosimy pamiętać:
Produkt ten powinien być instalowany wyłącznie przez
wykwalifi kowanego elektryka lub instalatora ogrzewania.
Montaż należy przeprowadzać zgodnie z aktualnymi
przepisami dotyczącymi przewodów elektrycznych
PL
IEEE.
Specyfi kacja
Specyfi kacja RT51/52 RT51/52-RF
Zasilanie 2 x AA / MN 1500 / LR 6 Baterie
Podtrzymanie pamięci
Typy wbudowanych przekaźników
Obciążalność styków 3(1)A, 10-230Vac N/A
Częstotliwość komunikacji N/A 433.92MHz
Zasięg nadajnika (zob. uwagę niżej)
1 minuta, dla wymiany baterii
1 x SPDT, Type 1B
N/A
Maksymalnie 30
metrów, prosta
N/A
linia
Instrukcja instalacji
Zakres temperatury 5-30°C
Wymiary (mm) 110 dł., 88wys., 29 szer.
Zgodno
Napięcie znamionowe 2.5Kv
Test twardości 75°C
Dokładność regulacji ±1°C
Ważna uwaga RF: Należy sprawdzić, czy w prostej linii między termostatem i
nadajnikiem nie znajdują się duże metalowe przedmioty, takie jak bojlery lub inne
duże urządzenia, gdyż mogą one uniemożliwić łączność między termostatem i
nadajnikiem.
ść z normą EN60730-2-9 (EN300220 : RF)
67
Page 68

PL
Instalacja
Najpierw usuń pokrywę z tylnej części urządzenia.
Instrukcja instalacji
Aby zamontować przewód, w lewym górnym rogu
pokrywy musi znajdować się wolny obszar o wymiarach
przynajmniej 140 mm z prawej strony, 15 mm z lewej, 30
mm powyżej i 100 mm poniżej pokrywy.
68
Page 69

Przed montażem urządzenie powinno zostać
PL
nastawione na tryb sterowania ON/OFF (WŁ./WYŁ.) lub
chronoproporcjonalny tryb sterowania (patrz poniżej).
1) Tryb ON/OFF (WŁ./WYŁ.) – kocioł włącza się, gdy
temperatura spada poniżej ustawionej, zaś wyłącza się, gdy
temperatura wzrasta powyżej ustawionej wartości.
2) Tryb chronoproporcjonalny – tryb oszczędzający
energię, w którym kocioł włącza się w regularnych odstępach
czasu w celu utrzymania wyznaczonej temperatury, tworząc
ciągłe przyjazne środowisko dla użytkownika.
1) ON/OFF 2) CHRONO
Instrukcja instalacji
!
Niektóre termostaty mają podłączony przewód zerowy oraz/
lub przewód uziomowy. Przewody te nie są wymagane dla
modelu RT51/52 i NIE NALEŻY ich podłączać do żadnych
złączy RT51/52. Należy je natomiast zaizolować, zwinąć i
umieścić we wnęce z tyłu urządzenia.
69
Page 70

PL
Podłączanie przewodów (tylko dla wersji
podłączanych na stałe)
Instrukcja instalacji
Przewody instalacji elektrycznej odbiornika RX
(tylko w modelach RF)
RX1
RX2 & RX3
ELECTRONICS
N
ELECTRONICS
L
12
COM
3
ZONE
1 ON
4
ZONE
1 OFF
TERMINAL 6
RX3 ONLY
345
2
ZONE
1 ON
ZONE
1 OFF
ZONE
2 ON
6
ZONE
3 ON
N
C1
L
COM
A
UWAGA: Dla systemów zasilanych z głównego systemu zasilania podłączyć
złącze 2 do żyły prądowej.
70
B
Page 71

Instrukcja
Jeżeli termostat i odbiornik dostarczone są w jednym,
wspólnym opakowaniu, nie ma potrzeby rejestracji termostatu
- zostało to wykonane fabrycznie (tylko w model RX1).
Aby nastawić odbiornik RX na częstotliwość sygnału termostatu,
należy wykonać czynności opisane w krokach 1-5 poniżej.
Krok 1 RT51/52-RF
Zresetuj urządzenie, usuwając z niego
baterie na 2 minuty, a następnie załóż
je z powrotem.
Krok 2 Naciśnij i przytrzymaj przez
3 sekundy przyciski oraz + (RT
zacznie przesyłać charakterystyczny
PL
Instrukcja instalacji
sygnał ciągły, trwający 5 minut).
Krok 3 RX1
Naciśnij i przytrzymaj przyciski PROG
oraz CH1 przez 3 sekundy, aż jeden
raz zabłyśnie zielona lampka.
Krok 4 RX2 (jeżeli dotyczy)
Czynność 1 - wykonaj czynności
opisane w krokach 1-3.
Czynność 2 - odczekaj 5 min., wykonaj
czynności opisane w krokach 1-2, a następnie naciśnij przyciski
PROG oraz CH2 na RX2.
RX3 (jeżeli dotyczy)
Czynność 1 - wykonaj czynności opisane w krokach 1-3.
Czynność 2 - odczekaj 5 min., wykonaj czynności opisane w krokach
1-2, a następnie naciśnij przyciski PROG oraz CH2 na RX3.
Czynność 3 - odczekaj 5 min., wykonaj czynności opisane w krokach
1-2, a następnie naciśnij przyciski PROG oraz CH3 na RX3.
Krok 5 RT51/52-RF
Naciśnij lub , aby wybrać temperaturę – urządzenie powróci
do trybu pracy.
71
Page 72

PL
Instrukcja Użytkownika
Twój termostat pokojowy
RT51
Urządzenie RT51 jest prostym w obsłudze termostatem
pokojowym, który pozwala na zaprogramowanie temperatury na
dzień i na noc oraz na łatwe przełączanie z jednego ustawienia
na drugie poprzez naciśnięcie 2 przycisków.
RT52
Instrukcja Użytkownika
Termostat RT52 jest tak samo funkcjonalny jak model RT51,
dodatkowo zaś posiada wbudowany regulator czasowy, który
przywraca ustawienia termostatu na temperaturę dzienną w
momencie wybranym przez Ciebie.
Bezprzewodowe wersje RF
Oba modele dostępne są w wersjach bezprzewodowych - RT51RF oraz RT52-RF, posiadających takie same funkcje, jak modele
przewodowe.
Każdy termostat współpracuje z odbiornikiem RX, który może
znajdować się w odległości do 30 m.
Odczytywanie z wyświetlacza
Rzeczywista temperatura w
Tryb DAY
(dzienny)
@
20.0
C
22
pomieszczeniu
Wymagana temperatura w
pomieszczeniu
Tryb NIGHT
(nocny)
72
n
20.0
22
C
Temperatura w pomieszczeniu
jest niższa niż zadana, dlatego
termostat się włączył i sygnalizuje
potrzebę włączenia ogrzewania
Page 73

Wszystkie modele
Przed rozpoczęciem
Aby zresetować urządzenie, otwórz klapę
znajdująca się z przodu programatora.
Wyjmij baterie na 2 minuty, a następnie
ponownie je załóż.
Wyświetlacz automatycznie przestawi się
na tryb DAY (dzienny – w lewym górnym
rogu wyświetlacza pojawia się litera d) i za
pomocą dużych cyfr pokaże temperaturę
rzeczywistą, a za pomocą małych cyfr
@
20.0
PL
Instrukcja Użytkownika
C
22
temperaturę zadaną.
Nastawianie temperatury na dzień i na noc
Temperatura dzienna
Manipulować przyciskami i , aż do
wyświetlenia żądanej TEMPERATURY
DZIENNEJ.
Temperatura nocna
Jednocześnie przycisnąć jeden raz
przyciski i , aby przejść w tryb
NIGHT (NOC) (w lewym górnym rogu
wyświetlacza pojawi się n).
Naciskaj przyciski oraz , aż pokaże
się żądana obniżona temperatura nocna
(pomiędzy 5-30°C lub wyłączone).
n
20.0
C
22
73
Page 74

PL
Przełączanie pomiędzy trybem DZIENNYM i
NOCNYM
Poprzez jednoczesne naciśnięcie
przycisków i , można
przechodzić pomiędzy trybami
DZIEŃ (d) i NOC (n).
Tylko RT52/52-RF
Instrukcja Użytkownika
Ustawianie czasu
Wcisnąć jeden raz przycisk
PROG.
Manipulować przyciskami i ,
aż do wyświetlenia poprawnego
czasu.
Nastawianie powrotu do ustawień dziennych
Wcisnąć ponownie przycisk
PROG.
Manipulować przyciskami i , aż
do wyświetlenia się poprawnego
czasu.
i2 00
Tryb RUN (praca)
Wcisnąć ponownie przycisk PROG, aby powrócić do trybu
RUN (PRACA).
Urządzenie będzie teraz utrzymywało za pomocą ogrzewania
temperaturę, którą ustawiłeś
74
Page 75

Wszystkie modele
Wymiana baterii
PL
Jeżeli baterie są słabe, symbol baterii
na wyświetlaczu LCD będzie błyskać.
20.0
Masz 15 dni na wymianę baterii – po
tym czasie termostat wyłączy się
samoczynnie.
Podczas wymiany baterii, wyjmij stare
baterie i włóż nowe w ciągu jednej
minuty, a ustawienia programów
zostaną zachowane.
WAŻNE: zawsze używaj wysokiej jakości baterii
alkalicznych.
C
22
Instrukcja Użytkownika
!
UWAGA. Jeśli zdarzy się, że wyświetlacz wyłączy się podczas
pracy, to należy wymienić baterie, wyzerować ustawienia
urządzenia i ponownie wprowadzić czas i ustawienia
programów.
75
Page 76

LT
Montavimo instrukcijos
Montavimo instrukcijos
Įsidėmėkite:
Šį gaminį prijungti gali tik kvalifi kuotas elektrikas arba
kompetentingas šildymo sistemos instaliuotojas, o
prijungimas turi būti suderintas su IEEE elektros laidų
montavimo reglamento dabartine redakcija.
Speci kacija
Specifikacija RT51/52 RT51/52-RF
Maitinimas
Laiko nustatymo tikslumas
Kontakto tipas
Pajungimo įtampa, galia
Siųstuvo daþnis
Siøstuvo ribos (þiûrëkite pastabà
apaèioje)
Temperatūros diapazonas
Matmenys (mm) 110 plotis, 88 aukðtis, 28 gylis
Atitinka standartus EN60730-2-9 (EN300220 : RF)
Nominali impulso átampa 2.5Kv
Rutulinio slëgio bandymas 75°C
2xAA/MN:500 šarminės baterijos
1 min. baterijos įkrovimui
SPDT tipas 1B
3(1)A, 10-230Vac N/A
N/A 433.92MHz
N/A
5-30°C
N/A
30 metrø maks.,
matomumo linija
Kontroliuojama tarša Laipsnis 2
Tiksli temperatūra
Svarbu paþymëti: Uþtikrinkite, kad nebûtø dideliø metaliniø daliø, kaip, pavyzdþiui,
boileriai arba kiti dideli árenginiai,(matomumo linijoje) tarp termostato ir imtuvo,
kadangi jie trukdys ryðiui tarp termostato ir imtuvo.
76
±1°C
Page 77

Montavimo instrukcijos
Iš pradžių nuimkite sienos plokštelę nuo prietaiso galo.
LT
Montavimo instrukcijos
Nuo viršutinio kairiojo sienos plokštelės kampo iki
dešiniojo krašto turi būti mažiausiai 140 mm, iki kairiojo
krašto – 15 mm, 30 mm viršuje ir 100 mm apačioje tarpas,
kad būtų galima sumontuoti jungiamą kištuku modulį.
77
Page 78

LT
Prieš montuodami prietaisą, nustatykite jį į ON/OFF arba
reguliavimo pagal laiką režimą (žr. toliau).
1) ON/OFF 2) CHRONO
1) ON/OFF – boileris įsijungia (ON), jei temperatūra
Montavimo instrukcijos
!
nukrenta žemiau už nustatytąją, ir išsijungia (OFF), jei
temperatūra pakyla aukščiau už nustatytąją.
2) Reguliavimo pagal laiką režimas – tai taupantis
energiją režimas, kai boileris kaitinamas reguliariais
intervalais, kad būtų išlaikyta nustatyta temperatūra, taip
užtikrinant reikiamas aplinkos sąlygas.
Prie kai kurių termostatų gali būti prijungtas neutralus ir/
arba įžeminimo laidas. Jų nereikia RT51/52 prietaisams
ir jų NEREIKIA prijungti prie RT51/52 gnybtų. Juos galite
atjungti nuo elektros tinklo ir susukę įdėti į angą RT51/52
gale.
78
Page 79

Laidai - (tiktai laidiniam jungimui)
LT
Montavimo instrukcijos
RX imtuvo laidai (tik RF modeliams)
RX1
ELECTRONICS
RX2 & RX3
N
ELECTRONICS
L
12
COM
3
ZONE
1 ON
4
ZONE
1 OFF
TERMINAL 6
RX3 ONLY
A
Dėmesio! Jei naudojate su maitinimo šaltiniais veikiančias sistemas, prijunkite 2
gnybtą prie maitinimo šaltinio.
B
C1
N
2
L
COM
345
ZONE
1 ON
ZONE
1 OFF
ZONE
2 ON
6
ZONE
3 ON
79
Page 80

LT
Montavimo instrukcijos
Paleidimas (tiktai RF versijoms)
Jeigu termostatas ir imtuvas tiekiami kartu vienoje pakuotėje,
jie parenkami gamykloje, todėl derinimas nereikalingas (tik
RX1 modeliams).
Norėdami suderinti RX imtuvą su termostato signalo dažniu, atlikite
toliau nurodytus 1-5 veiksmus.
1 RT51/52-RF
Iš naujo paleiskite prietaisą: 2
minutėms ištraukite baterijas, o paskui
jas pakeiskite.
2 Paspauskite ir + klavišus
ir palaikykite juos nuspaudę 3
sekundes. (RT51/52 dabar 5 minutes
nepertraukiamai siunčia unikalius
signalus).
3 RX1
Paspauskite kartu PROG ir CH1
klavišus ir palaikykite 3 sekundes juos
nuspaudę, kol vieną kartą blykstelės
žalia šviesa.
4 RX2 (jei taikoma)
Stat 1 – atlikite 1-3 veiksmus;
Stat 2 – palaukite 5 minutes, atlikite 1-2 veiksmus ir tada
paspauskite klavišus PROG ir CH2, esančius RX2.
RX3 (jei taikoma)
Stat 1 – atlikite 1-3 veiksmus;
Stat 2 – palaukite 5 minutes, atlikite 1-2 veiksmus ir tada
paspauskite klavišus PROG ir CH2, esančius RX3;
Stat 3 – palaukite 5 minutes, atlikite 1-2 veiksmus ir tada
paspauskite klavišus PROG ir CH3, esančius RX3.
5 RT51/52-RF
Norėdami pasirinkti temperatūrą, paspauskite ar – prietaisas
persijungs į darbo režimą.
80
Page 81

Informacija Vartotojui
Jūsų kambario termostatas
RT51
RT51 yra nesudėtingas kambario termostatas, leidžiantis
užprogramuoti dienos ir nakties temperatūrą bei perjungti iš vieno
nustatymo į kitą tiesiog paspaudžiant 2 klavišus.
RT52
RT52 būdingos tos pačios funkcijos kaip ir RT51, tačiau jame
LT
Informacija Vartotojui
papildomai įmontuotas laikmatis, jūsų pasirinktu laiku perjungiantis
termostatą į dienos temperatūrą.
Bevieliai RF modeliai
Abu modelius galima įsigyti kaip bevieles versijas (RT51-RF ir
RT52-RF), kurioms būdingos visiškai tos pačios funkcijos kaip ir
modeliams su laidais.
Visi termostatai palaiko ryšį su RX imtuvu, kuris gali būti
sumontuotas iki 30 m atstumu.
Jūsų rodmenų nuskaitymas
DIENOS
režimas
@
20.0
C
22
Dabartinė kambario temperatūra
Pageidaujama kambario
temperatūra
NAKTIES
režimas
n
20.0
22
C
Kambario temperatūra yra
žemesnė už pageidaujamą, todėl
termostatas įsijungia ir padidina
temperatūrą.
81
Page 82

LT
Informacija Vartotojui
Visi modeliai
Prieš pradedant naudoti
Jei norite iš naujo paleisti prietaisą,
atidarykite skydelį programavimo prietaiso
priekinėje dalyje. 2 minutėms išimkite
baterijas, tada pakeiskite jas.
Ekranas automatiškai persijungs į dienos
režimą (kairėje ekrano pusėje pasirodo
raidė „d“) ir jame pasirodys dabartinė
temperatūra dideliais skaitmenimis, o
@
pageidaujama temperatūra – mažesniais
20.0
skaitmenimis.
Dienos ir nakties temperatūros nustatymas
Dienos temperatûros nustatymas
Spauskite ir mygtukus,
kol pasirodys reikiama DIENOS
TEMPERATÛRA.
Nakties temperatûros nustatymas
C
22
Norëdami pasirinkti NAKTIES režimą
(n parodyta ekrano virðuje kairëje
pusëje), vienu metu nuspauskite abu
ir mygtukus.
Spauskite ir klavišus tol, kol
pasirodys pageidaujama nakties
(mažesnė) temperatūra (nuo 5 iki 30°C
arba šildymas išjungiamas).
82
n
20.0
C
22
Page 83

DIENOS ir NAKTIES režimų nustatymas
Norëdami perjungti ið DIENOS
(d) á NAKTIES (n) režimą arba
atvirkðèiai, vienu metu nuspauskite
abu ir mygtukus.
Tik RT52/52-RF
Laikrodžio nustatymas
Vieną kartą paspauskite PROG
LT
Informacija Vartotojui
mygtuką.
Spauskite ir mygtukus, kol
pasirodys tinkamas LAIKAS.
Grįžimo prie dienos laiko nustatymas
Vël paspauskite PROG mygtuką.
Spauskite ir mygtukus, kol
pasirodys tinkamas LAIKAS.
i2 00
RUN režimas
Norëdami sugráþti á RUN reþimà, vël spauskite PROG.
Dabar prietaisas reguliuos šildymą pagal jūsų nustatytą
temperatūrą.
83
Page 84

LT
Visi modeliai
Baterijø pakeitimas
Jei išsikrauna baterijos, LCD ekrane
ima mirksėti baterijos simbolis.
Baterijas galësite pakeisti per 15
dienø, po to prietaisas iðsijungs.
Keisdami baterijas, per vienà minutæ
Informacija Vartotojui
iðimkite senàsias ir ádëkite naujàsias
baterijas – tuomet nustatyta programa
iðliks.
SVARBU! Naudokite tik aukðtos kokybës ðarmines baterijas.
Ásidëmëkite! Jei normalaus veikimo metu ekranas iðsijungia,
20.0
C
22
!
reikia pakeisti baterijas, perkrauti prietaisà bei vël nustatyti
laikà bei programas.
84
Page 85

Istruzioni per l’uso
Nota:
L’installazione di questo prodotto deve essere e ettuata
esclusivamente da elettricisti quali cati o da installatori
specializzati in impianti di riscaldamento, in conformità con le
ultime prescrizioni della normativa IEEE.
Speci cazioni
Caratteristiche del termostato RT51/52 RT51/52-RF
Alimentazione 2 x AA/MN1500 LR batterie alcaline
I
Istruzioni per l’uso
Supporto memoria
Funzione di commutazione del relè
di uscita
Taratura del contatto relè 3(1)A, 10-230Vac N/A
Frequenza del trasmettitore (solo RF) N/A 433.92MHz
Campo di funzionamento del
trasmettitore
Intervallo temperatura 5-30°C
Dimensioni (mm) 110 larghezza, 88 altezza, 28 profondità
Standard di progetto EN60730-2-9 (EN300220 : RF)
Tensione nominale impulsi 2.5Kv
Prova di pressione con sfere 75°C
Livello antinquinamento Degree 2
1 minuto, per la sostituzione della
batteria
1 x SPDT type 1B
N/A
N/A
30 metri max.
Precisione temperatura ±1°C
Nota importante per i prodotti RF: Accertarsi che tra il trasmettitore e il ricevitore
non vi siano oggetti metallici di grandi dimensioni, quali ad esempio i rivestimenti
esterni della caldaia o altri dispositivi di una certa dimensione che impediscano le
comunicazioni tra termostato e ricevitore.
85
Page 86

I
Installazione
Rimuovere innanzitutto la piastra a parete dal retro
dell’unità.
Istruzioni per l’uso
Per il montaggio del modulo plug-in, è necessario che in
corrispondenza dell’angolo superiore sinistro della piastra sia
disponibile uno spazio libero di almeno 140 mm verso destra,
15 mm verso sinistra, 30 mm verso l’alto e 100 mm verso il
basso.
86
Page 87

Prima del montaggio impostare l’unità in modalità di controllo
ON/OFF o di regolazione crono-proporzionale (vedere sotto).
1) ON/OFF 2) CHRONO
1) ON/OFF: la caldaia si inserisce (ON) quando la temperatura
scende al di sotto del valore impostato e si disinserisce (OFF)
quando lo supera.
I
Istruzioni per l’uso
!
2) CHRONO (Regolazione crono-proporzionale): funzione
a risparmio energetico che inserisce la caldaia ad intervalli
regolari per mantenere una temperatura preimpostata,
consentendo così all’utente di avere una temperatura
ambiente costante.
Alcuni termostati sono dotati di conduttore di collegamento di
neutro e/o di terra. Questi conduttori non sono necessari per il
RT51/52 e NON devono essere collegati a nessun morsetto del
RT51/52. Occorre invece isolarli elettricamente e avvolgerli nel
vano sul retro del RT51/52.
87
Page 88

I
Cablaggio (esclusi i modelli RF)
Istruzioni per l’uso
Cablaggio del ricevitore (solo modelli RF)
RX1
ELECTRONICS
RX2 & RX3
N
ELECTRONICS
L
12
COM
3
ZONE
1 ON
4
ZONE
1 OFF
TERMINAL 6
RX3 ONLY
A
Importante: Sui sistemi alimentati con tensione di rete collegare il terminale 2 al
circuito di alimentazione di rete.
88
B
N
C1
L
2
COM
345
ZONE
1 ON
ZONE
1 OFF
ZONE
2 ON
6
ZONE
3 ON
Page 89

Messa in servizio (solo versioni RF)
Se il termostato ed il ricevitore sono stati forniti assieme in un’unica
confezione, gli stessi sono già stati sintonizzati in fabbrica.
Nessuna ulteriore operazione è richiesta (solo modello RX1).
Per la sintonizzazione del ricevitore RX sulla frequenza del segnale del
termostato, seguire le istruzioni di cui ai punti 1-5 seguenti.
Punto 1 RT51/52-RF
I
Resettare l’unità togliendo le
batterie per 2 minuti e quindi
reinserirle.
Punto 2 Premere i pulsanti e + per 3
secondi.
(Il TP5000 trasmette ora un unico segnale continuativamente
per 5 minuti).
Punto 3 RX1
Premere i pulsanti PROG
e CH1 per 3 secondi no a
quando l’indicatore verde non
lampeggia una volta.
Punto 4 RX2 (se previsto)
Istruzioni per l’uso
Termostato 1: seguire le istruzioni di cui ai punti 1-3.
Termostato 2: attendere 5 minuti, eseguire le operazioni di cui ai
punti 1-2 e quindi premere PROG e CH2 su RX2.
RX3 (se previsto)
Termostato 1: seguire le istruzioni di cui ai punti 1-3.
Termostato 2: attendere 5 minuti, eseguire le operazioni
di cui ai punti 1-2 e quindi premere PROG e CH2 su RX3.
Termostato 3: attendere 5 minuti, eseguire le operazioni di cui ai
punti 1-2 e quindi premere PROG e CH3 su RX3.
Punto 5 RT51/52-RF
Premere il pulsante o per selezionare la temperatura;
l’unità torna in modalità di funzionamento.
89
Page 90

I
Istruzioni per l’utente
Il vostro termostato ambiente
RT51
L’RT51 è un termostato ambiente di facile impiego che consente di
programmare una temperatura notturna ed una diurna, e di commutare
tra le due impostazioni premendo semplicemente due pulsanti.
Istruzioni per l’utente
RT52
Il modello RT52 ha le stesse funzioni dell’RT51 con l’aggiunta di un
timer incorporato, che riporta il termostato alla temperatura diurna
all’ora selezionata.
Versioni RF senza li
Entrambi i modelli sono disponibili nelle versioni senza li, RT51-RF e RT52RF, che presentano le stesse funzioni dei modelli con li.
Ciascun termostato comunica con un ricevitore RX, che può essere
posto no a 30 metri di distanza.
Lettura del display
Modalità
DAY
(diurna)
@
20.0
C
22
Temperatura ambiente e ettiva
Temperatura ambiente
programmata
90
Modalità
NIGHT
(notturna)
n
20.0
22
La temperatura ambiente è inferiore
C
a quella programmata e quindi il
termostato si è inserito comandando
l’attivazione del riscaldamento
Page 91

Tutti i modelli
Operazioni preliminari
Per resettare l’unità, aprire lo sportello sulla
parte anteriore del programmatore. Togliere
le batterie per 2 minuti e quindi reinserirle.
Il display commuta automaticamente in
modalità DAY (sul lato superiore sinistro del
display) e visualizza la temperatura e ettiva
con caratteri più grandi e quella programmata
con caratteri più piccoli.
@
20.0
I
Istruzioni per l’utente
C
22
Impostazione delle temperature DIURNA e NOTTURNA
Temperature diurna
Utilizzare i pulsanti e
la temperatura DIURNA desiderata.
Temperature notturna
Premere contemporaneamente una volta i
pulsanti e per selezionare la modalità
NIGHT (notturna) (indicazione “n” sulla parte
no a visualizzare
superiore sinistra del display).
Agire sui pulsanti i no a quando non
viene visualizzata la temperatura NOTTURNA
richiesta (tra 5 e 30°C o O ).
n
20.0
C
22
91
Page 92

I
Commutazione tra modalità DAY (diurna) e NIGHT
(notturna)
Premendo contemporaneamente
una volta i pulsanti e è possibile
commutare tra le modalità DAY e NIGHT
come desiderato.
Istruzioni per l’utente
Solo RT52/52-RF
Impostazione dell’ora
Premere una volta il pulsante PROG.
i2 00
Utilizzare i pulsanti e no a
visualizzare l’ora esatta.
Impostazione del ritorno all’ora del giorno
Premere nuovamente PROG.
Utilizzare i pulsanti e per
selezionare l’ora alla quale si desidera
che l’unità ritorni in modalità DAY.
Modalità RUN
Premere nuovamente PROG per tornare in modalità RUN.
L’unità regolerà ora il riscaldamento alle temperature impostate.
92
Page 93

Tutti i modelli
Sostituzione delle batterie
I
Il simbolo della batteria lampeggia sullo
schermo LCD per indicare che le batterie
sono scariche.
L’utente dispone di 15 giorni
per sostituire la batteria prima
che l’apparecchio si spenga
definitivamente.
All’atto della sostituzione, togliere
le vecchie batterie ed inserire quelle
nuove entro un minuto per non perdere
i parametri di programmazione.
IMPORTANTE: utilizzare sempre batterie alcaline di buona qualità.
20.0
C
22
Istruzioni per l’utente
!
N.B.: Se il display si spegne durante il normale funzionamento, è
necessario sostituire le batterie, resettare l’apparecchio e azzerare i
parametri.
93
Page 94

949596
Page 95

Page 96

www.danfoss.com/BusinessAreas/Heating
Part No 61076v07 07/07
 Loading...