

User Guide
PFM 1000 Balancing Measuring Device
User Guide for Mobile Devices with iOS
© Danfoss | 2020.03 BC309062448253en-000301 | 1

User Guide PFM 1000
Content
Introduction ........................................................................................................................................ 3
PFM 1000 Instrument Features ......................................................................................................... 3
PFM 1000 Pressure Measuring Unit .................................................................................................. 3
PFM 1000 application installation & Main Display ......................................................................... 4
Application Setup ............................................................................................................................... 4
Pressure Unit Turn-on ........................................................................................................................ 5
Warning! Very important! .................................................................................................................. 5
Measuring ........................................................................................................................................... 5
Measuring Window......................................................................................................................................................... 5
Measuring Context Menu Tabs .................................................................................................................................. 6
Select Valve ....................................................................................................................................................................... 6
Valve Preset ....................................................................................................................................................................... 6
Medium ............................................................................................................................................................................. 6
Kv Direct Setup ................................................................................................................................................................ 6
Set Requested Flow ....................................................................................................................................................... 7
Medium Temperature ................................................................................................................................................... 7
Pressure Measuring Zero, Deaeration of Measuring Hoses ............................................................................ 8
Quick Record .................................................................................................................................................................... 8
Projects ................................................................................................................................................ 9
Project Management ..................................................................................................................................................... 9
Project Window, Project Tab ....................................................................................................................................... 9
Project Context Menu ................................................................................................................................................... 10
New .......................................................................................................................................................................................................10
Open .....................................................................................................................................................................................................10
Save .......................................................................................................................................................................................................10
Save as ..................................................................................................................................................................................................10
Send Project via Mail ......................................................................................................................................................................10
Project renaming .............................................................................................................................................................................10
Project Window, Branches Tab................................................................................................................................... 10
Branch Context Menu ................................................................................................................................................... 11
Add Branch .........................................................................................................................................................................................11
Rename Branch ................................................................................................................................................................................11
Move Branch up ...............................................................................................................................................................................11
Delete Branch ....................................................................................................................................................................................11
Move Branch Down ........................................................................................................................................................................11
Recording ............................................................................................................................................ 12
Record Info Tab ................................................................................................................................................................ 12
Record info Context Menu .......................................................................................................................................... 12
New Record ........................................................................................................................................................................................12
Open Record ......................................................................................................................................................................................13
Read Record .......................................................................................................................................................................................13
Send Record via Mail ......................................................................................................................................................................13
Delete Record ....................................................................................................................................................................................13
Record Items Tab ............................................................................................................................................................. 13
Heating Engineering Calculations ................................................................................................... 14
Preset Calculation ........................................................................................................................................................... 14
Pressure Loss Calculation ............................................................................................................................................. 15
Available Pressure Calculation ................................................................................................................................... 15
Valve Authority Calculation ........................................................................................................................................16
Quick Records Database .................................................................................................................... 16
Maintenance ....................................................................................................................................... 17
Sintered Filters Replacement ..................................................................................................................................... 17
Battery Replacement ..................................................................................................................................................... 17
Troubleshooting ................................................................................................................................. 18
Safety and Device Disposal Instructions ......................................................................................... 18
Batteries ............................................................................................................................................................................. 18
Information for Users on Collection and Disposal of Used Devices and Batteries ................................. 18
Specifications ...................................................................................................................................... 19
2 | BC309062448253en-000301 © Danfoss | 2020.03
User Guide PFM 1000
Introduction
PFM 1000 Instrument
Features
The PFM 1000 instrument is designed for hydraulic balancing of heating and cooling systems. It allows
measuring static pressure, differential pressures and flow in the said systems. Using the differential
pressure measured by the measuring component in the system, PFM 1000 calculates the flow that
runs through the component (balancing valve or measuring orifice). The application corrects the
calculated flow also for anti-freeze mixes in cooling systems. The flow can be measured in all branches
of the whole hydraulic system and the whole system can be balanced.
The core of the instrument consists of the pressure measuring unit that measures pressure in
balancing components of hydronic systems and sends the measured values to the Bluetooth Low
Energy (hereinafter just BLE) technology in a mobile device with the Android or iOS operating
systems. The PFM 1000 measuring unit is very robust with a massive heavy-duty frame that can
withstand a fall from 2 meters. Inside the measuring unit, there is a hydraulic section with a builtin symmetrical differential sensor for accurate digital processing of measured data. The PFM 1000
measuring instrument is very accurate and this accuracy is based on:
• Very accurate measuring of the pressure with a fully differential pressure sensor and 24-bit
processing of data from the pressure sensor
• Possibility of resetting the differential pressure for pressure measuring of very low differential
pressures. The resetting of measuring is done at the hydraulic bypass of pressure inputs.
The PFM 1000 instrument uses advanced digital technologies that compensate inaccuracies usually
occurring in pressure measuring, such as temperature dependencies and measuring non-linearity.
Another feature of the PFM 1000 instrument consists in recording measurements. Data from
measuring can be recorded independently and directly in the pressure measuring unit. The
measuring unit is equipped with a time circuit that allows programming a periodical recording of
measurement independently on the application in the mobile device. Once the recording is complete,
the measuring unit turns off and the record remains stored in the measuring unit until the application
reads it out. Another method of recording consists in recording of current values directly into the
mobile device.
Using the BLE transmission, the PFM 1000 application communicates with the measuring unit; a
user-friendly interface can be handled via the user mobile device. The application processes pressure
values and allows displaying the flows in the measured system based on features of balancing
components stored in the mobile device’s storage. The application stores in the mobile device’s
storage balancing valves of most leading European producers. If, incidentally, a valve in not contained
in the application, you can enter the valve’s Kv and the application will calculate the flow from this
value.
You can handle the software by direct touching required fields, or you can use the menu in the upper
section of the screen.
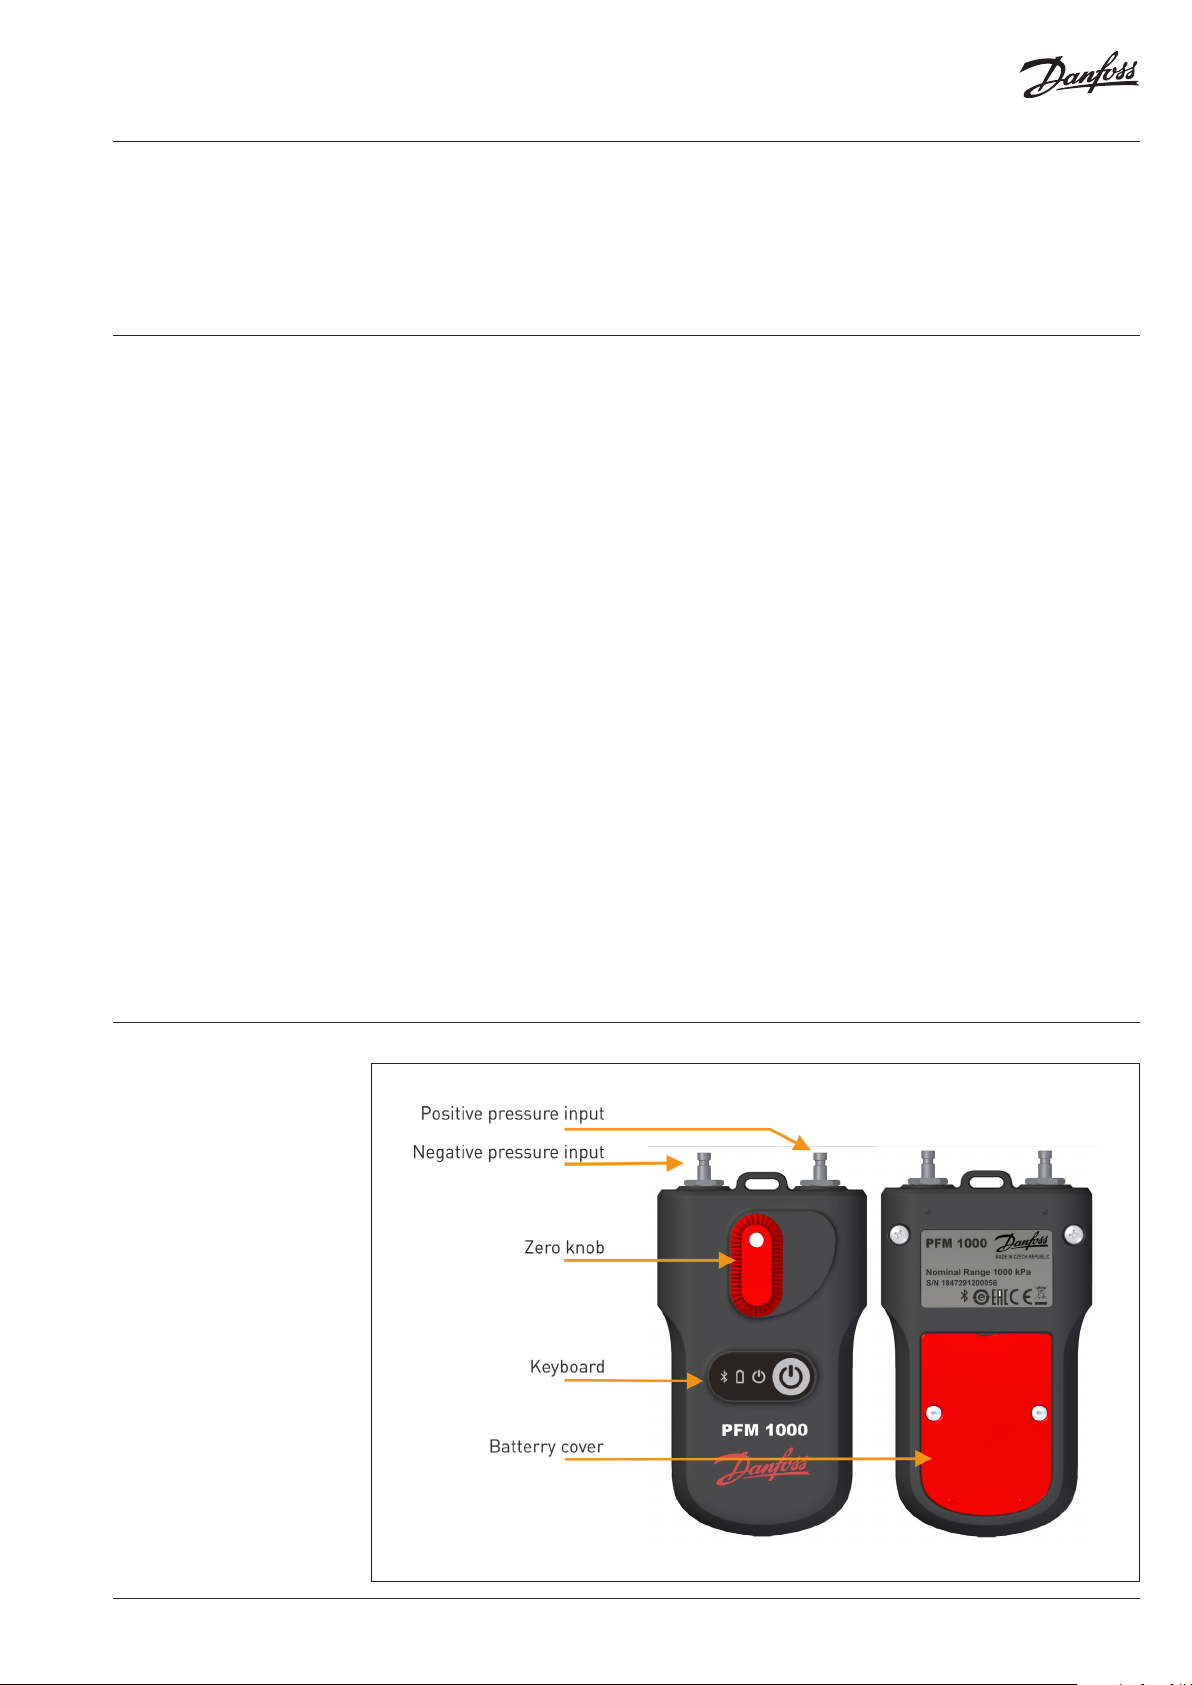
PFM 1000 Pressure
Measuring Unit
BC309062448253en-000301 | 3© Danfoss | 2020.03
User Guide PFM 1000
PFM 1000 application
installation & Main Display
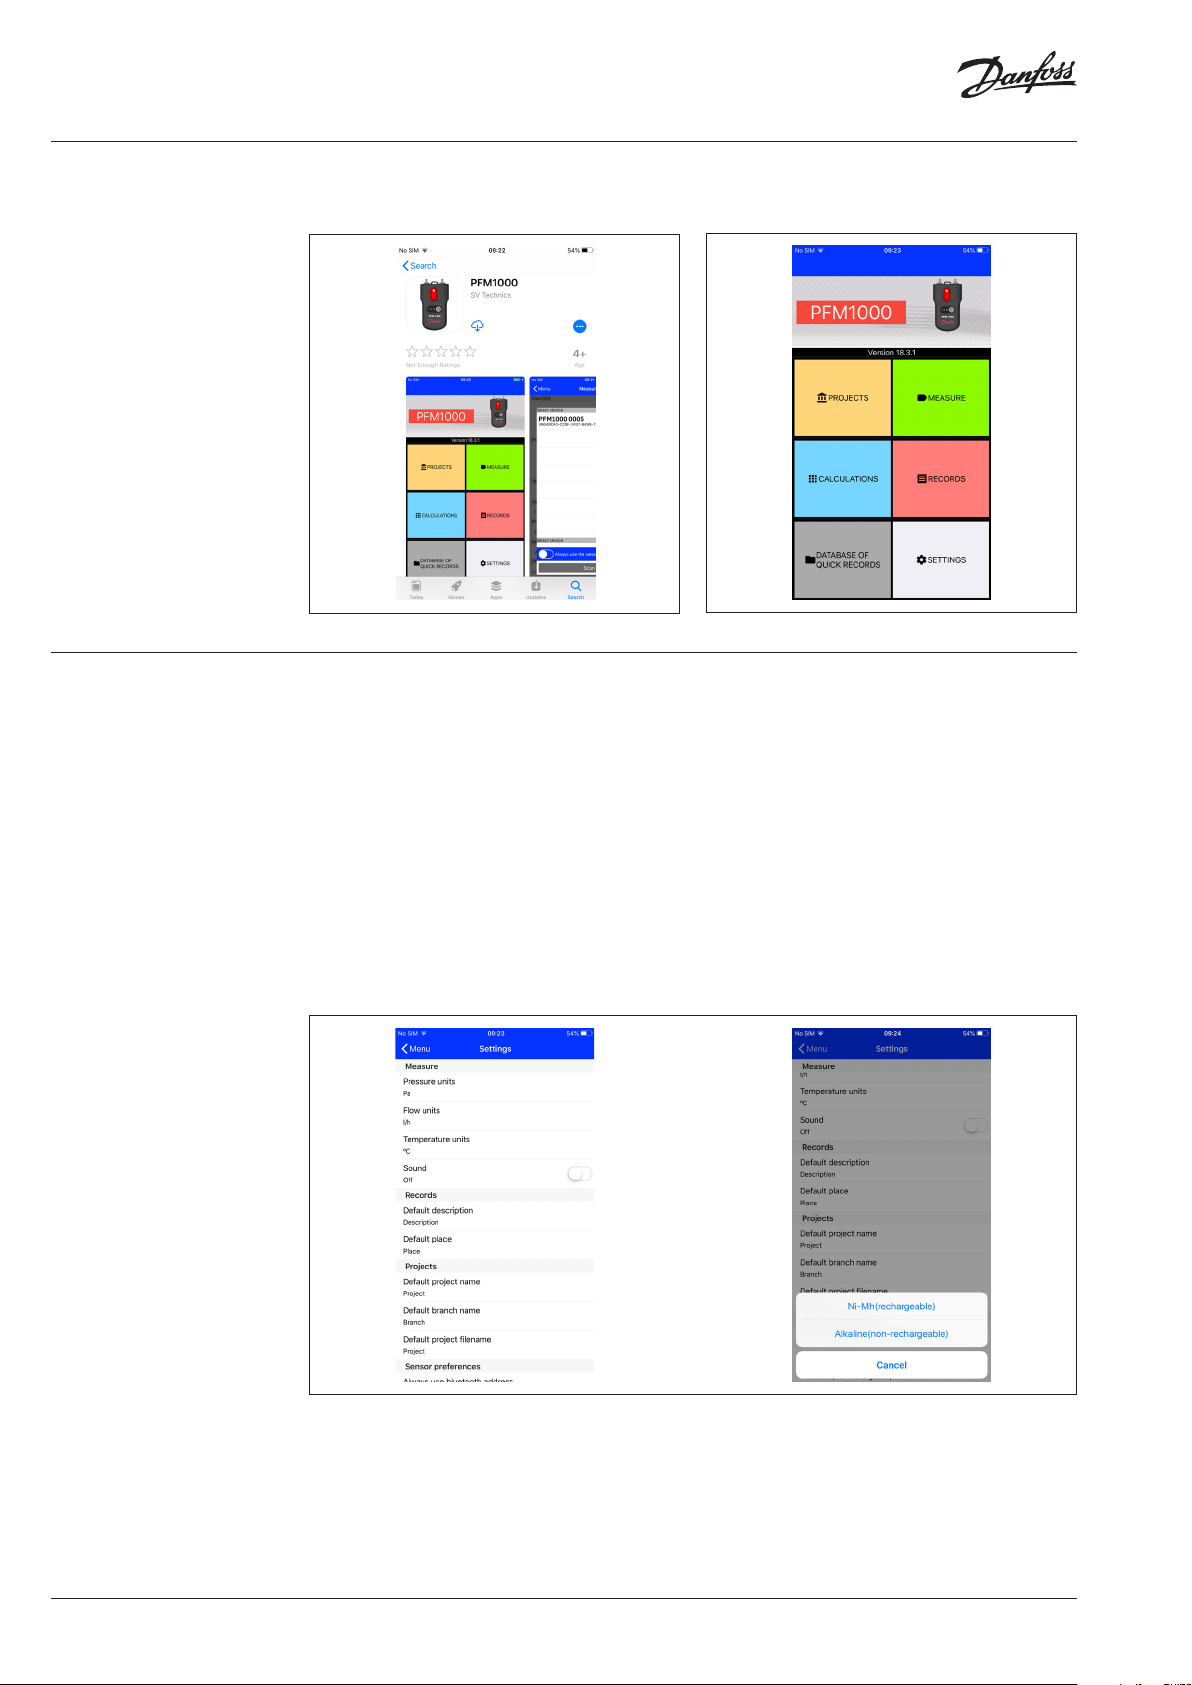
Application Setup Press the Setup button in the introductory window where you can set up the initial features of the
Find in App Store the PFM 1000 application and
install it in your mobile device.
application.
In the Measuring section, these are units for measuring the pressure, flow and temperature. Further,
you can turn on/off here the sound for the whole PFM 1000 application.
Turn on/off the sound in the PFM 1000 application by pressing the Sound button.
In the Records section, you can enter Initial description, Initial record location.
In the Projects section, you can enter Initial project name, Initial branch name, Initial project file name.
In the Sensor preferences, the Bluetooth address of the pressure unit is stored after activating the
Always use the selected device option in Measuring. After the application installation is complete,
this item remains empty. When you will be measuring with the automatic connection of one unit
without searching and you will want to connect another pressure unit, you must delete this field.
Once the Battery type is selected, enter the used AAA battery type in the pressure unit. This setup is
very important for the correct calculation a display of the battery condition indication. You can find
the battery type on the battery. Almost all rechargeable batteries sized AAA are of the NiMH type.
Well-known and of high quality are Eneloop batteries from Panasonic.
Start the PFM 1000 application.
4 | BC309062448253en-000301 © Danfoss | 2020.03
User Guide PFM 1000
Pressure Unit Turn-on
Measuring
When switched on, the instrument initialises itself. This take several seconds and the
green light indicator on the instrument is flashing quickly period 200ms during the
initialisation. Do not establish the Bluetooth connection with the measuring instrument
until this light indicator stops flashing and is on steadily. If the green light indicator fleshes
with 1 second period, there is an error in the BLE module initialisation. Try to switch off the
instrument, wait for several seconds and turn it on again.
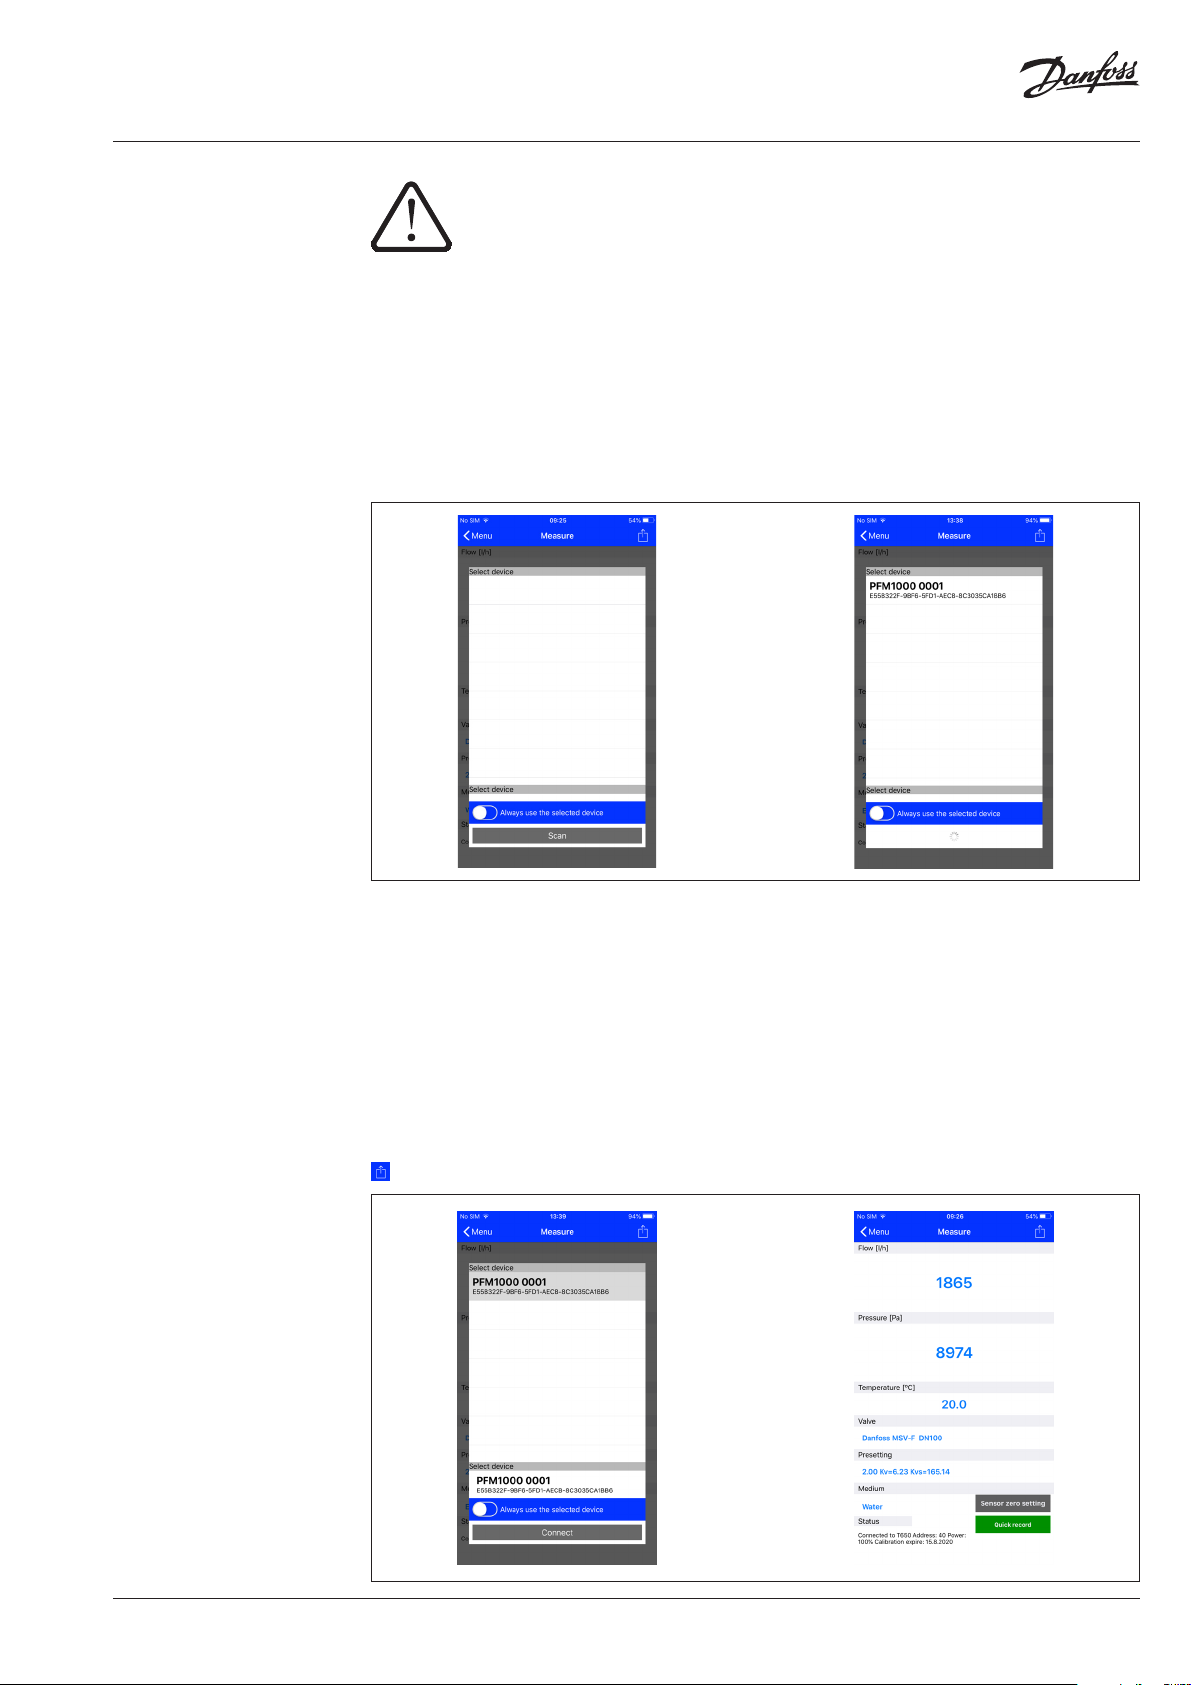
Once the Measuring button is selected, a window is displayed on the introductory screen for
searching and connecting with the measuring unit. After the Scan button is pressed, the PFM 1000
application will search for and display available PFM 1000 devices. Select your PFM 1000 unit from
the displayed list using the last four digits of the serial number and confirm the option by pressing
the Connect button. This function occurs in many other places in the PFM 1000 application. If you
check the Always use the selected device option, the PFM 1000 application will connect with this unit
automatically and will not search for any other. Once the Measuring button is pressed, the Measuring
screen will appear straight away.
You can cancel the Always use the selected device from the Application Setup, the Sensor Preferences /
Always use Bluetooth Address option. Here, delete the Bluetooth address of your pressure unit module.
Measuring Window
Based on the differential pressure measured, type of measured medium, its temperature, valve and
its preset, the application displays the differential pressure in measuring points of the attached fitting
and compute the flow through this fitting.
The status line in the screen’s bottom displays several important pieces of information:
1. The last four digits of the serial number of the pressure unit connected.
2. The percentage status of the battery of the pressure unit connected.
3. The validity of calibration of the pressure unit connected.
4. The firmware version of the pressure unit connected.
You can find settings available in the Measuring window in the context menu after pressing a button.
You can find the button in the upper right corner of the screen.
BC309062448253en-000301 | 5© Danfoss | 2020.03
User Guide PFM 1000
Measuring (continuous)
Measuring Context Menu Tabs
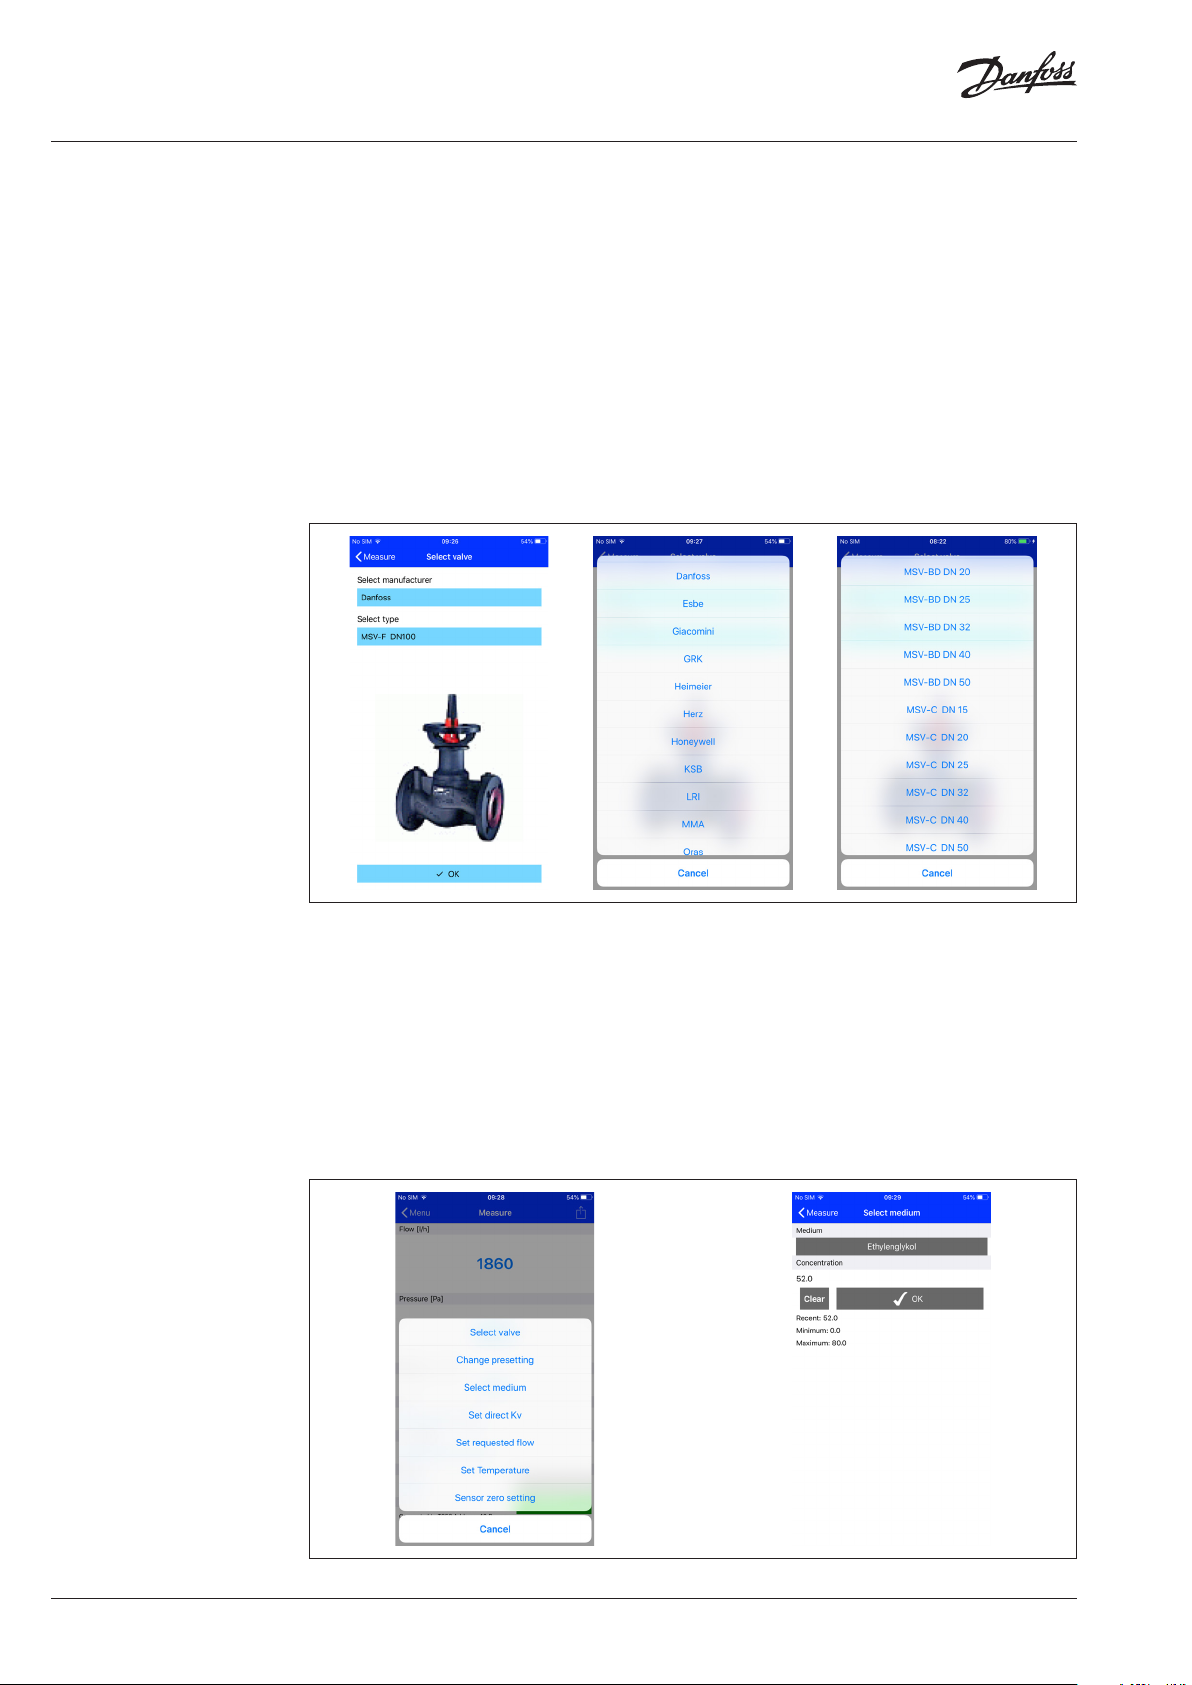
Select Valve
You can select the required valve by pressing the Select valve selection list.
After clicking on the blue Manufacturer line, the list of valve manufacturers contained in the PFM 1000
instrument database will open from which you select the manufacturer required by you. The database
of valves in the instrument contains valves the world’s leading manufacturers. When selecting the
valve and its preset, the Kv values provided by the manufacturer will be used for the flow calculation.
The Kv values are recalculated by the mathematical function from manufacturers’ tables.
After clicking on the blue Se lect Type line, the list of valves of the given manufacturer will open from
which you can select the required valve type. For simpler orientation and selection, also the photo for
each valve type will be displayed for you.
Valve Preset
You can change the valve preset from the Change presetting selection list.
For every valve, the preset field displays the interval in which you can enter the preset.
Medium
You can select the heat-transfer medium of the measured system by pressing the Select Medium
selection list.
If you select as the medium the Ethylenglycol or Propylenglycol ant-freeze mix, you will have to
enter the given anti-freeze mix concentration in the Concentration field. Then, the application will
recalculate the flow calculation using this value. Also, you can find under the Concentration field data
on the extent in which the concentration can be specified and entered.
Kv Direct Setup
In case the database of valves does not contain the valve you require you can measure the flow using
the Kv direct specification.
You can obtain the table with preset values and Kv values from the documentation of the respective
valve manufacturer.
6 | BC309062448253en-000301 © Danfoss | 2020.03

User Guide PFM 1000
Measuring (continuous)
Set Requested Flow
This function is used for displaying the actual/requested flow ratio at the measured valve (the lambda
quantity in the proportional balancing method). This way you can easily and quickly set up the
requested flow through the valve.
Once the value of requested flow is entered, the flow value in absolute units / the percentage ratio
from the previous paragraph will be displayed in the Flow field in the Measuring screen.
If you set up the requested flow value back to zero,the Flow field in the Measuring window will show
just the flow value in absolute units.
Medium Temperature
Specify the temperature of the medium in the measured system by pressing the Set
Temperatureselection list.
Fill in the temperature data manually in the Temperature field.
For water medium, the effect of the temperature on the flow calculation is negligible. If an anti-freeze is
selected as the medium, the temperature specification is necessary for the flow calculation!!!
BC309062448253en-000301 | 7© Danfoss | 2020.03

User Guide PFM 1000
Measuring (continuous)
Measure
position
Zero setting
position
Pressure Measuring Zero, Deaeration of Measuring Hoses
For measuring low differential pressures (under 500 Pa), it is necessary to reset the pressure measuring
of the measuring unit.
The reset function will be activated from the Sensor zero setting selection list. You will be led
through the reset procedure by gradually emerging pictures. By rotating the pressure reset knob to
the left, the pressure inlets are hydraulically connected and physically there is zero pressure difference
between them. In the pressure measuring unit, the zero pressure value is set. Then, turn the reset
button to its default position.
The connection of the pressure inlets can also be used to bleed the connection hoses of the
measuring unit. For media temperatures above
50 ° C, venting of less than 10 seconds is recommended to avoid unnecessary heating of the pressure
unit measuring circuits.
Quick Record
Selecting the Quick Record button navigates to a new window where additional details of the
recording such as the name or value of the required flow through can be added in the relevant fields.
The initial pressure value on the measured valve prior to recording can also be added. The last field in
the Quick Recording window can be populated with the name of the folder where the recording will
be saved, if left empty the record will be saved in a default location.
8 | BC309062448253en-000301 © Danfoss | 2020.03

User Guide PFM 1000
Projects Project Management
The project management in the PFM 1000 measuring instrument makes the work in the real
technology easier. You can prepare the project you need to measure directly in the PFM 1000
measuring instrument. You can then store two values for each branch of the project - the initial status
of the branch before balancing and its status after balancing. From the data of the whole project you
can then print a report on the project status before balancing and the report on balancing.
For the project measurement you select the respective project and branch. The PFM 1000 measuring
instrument will set the valve and its preset automatically and you are ready for measuring. The
measured data will be again stored automatically in the project’s correct fields.
You can find in the Projects introductory screen two tabs - Projects a Branches.
Project Window, Project Tab
In the Project tab, the input data of the project is entered or measured, such as Project name, File
name for storing projects, Project input pressure. If the Common valve is used in the project, change
the position of the sliding button. Then, you have to specify and enter the Valve type and Initial
preset. Once the system is balanced, you can also specify and enter the Balanced status preset.
BC309062448253en-000301 | 9© Danfoss | 2020.03

User Guide PFM 1000
Projects (continuous) Project Context Menu
After clicking on the button in the Project tab, a
selection list is displayed in which you can work
with projects - New, Open, Save, Mail, Save as,
Delete, Rename Project.
New
Once the New button is selected from the
selection list, a screen is opened in which
you specify and enter the new project name.
Confirm it with the OK button.
After that, the introductory Projects screen is
reopened which already shows the new file
name for storing the new project.
Open
Select from the selection list an already existing
project which you want to open.
Save
The selection list, Save - stores the existing
project with the existing name.
Save as
The Save as selection list, enter the new name
for storing the existing project, confirm with the
OK button.
Send Project via Mail
The Mail selection list. The existing project will
be exported in the .xml format and send via Mail.
In order to have this function available, you have
to have the Email client application set up in
your mobile device. Once this tab is selected, the
Send Mail Email client form is displayed where
the project file is already appended. Fill in the
recipient’s address, the Mail subject, text, and, if
appropriate, the signature. The Mail message will
be sent off after pressing the Send button.
Project renaming
The Rename Project selection list, specify and
enter the new project name for renaming,
confirm with the OK button.
Project Window, Branches Tab
Once the Branches tab is selected, a screen is
displayed where you can set up or measure
parameters of individual branches.
In the first field in this screen, you can specify
and enter the branch name, or, using an arrow
key, you can select the branch you want to be
displayed from the existing branches.
In other fields, you can enter the Valve used in
the given branch and specify and enter the Flow
requested. The other three fields contain the
measured quantities - Disposition pressure, Initial
flow, Actual flow. The other two fields are used
for specifying and entering two values - Initial
preset and Preset. The remaining fields are filled
in automatically.
10 | BC309062448253en-000301 © Danfoss | 2020.03

User Guide PFM 1000
Projects (continuous) Branch Context Menu
After clicking on the button in the Branches
tab, the Branch context menu selection list is
displayed. Here, you can work with branches:
Add branch, Rename branch, Relocate branch
up, Delete branch, Relocate branch down
Add Branch
The Add branch selection list: A screen is opened
in which you specify and enter the new branch
name and confirm with the OK button.
Rename Branch
The Rename branch selection list: A screen
is opened in which you specify and enter the
branch new name and confirm with the OK
button.
Move Branch up
The Move branch up selection list: You can
relocate the existing branch one place up in the
list of branches. You can verify this in the list of
branches by selecting the arrow at the branch
name.
Delete Branch
The Delete branch selection list: You can delete
the branch which is currently being edited.
Move Branch Down
The Move branch down selection list: You can
relocate the existing branch one place down in
the list of branches. You can verify this in the list
of branches by selecting the arrow at the branch
name.
BC309062448253en-000301 | 11© Danfoss | 2020.03

User Guide PFM 1000
Recording The PFM 1000 pressure unit is equipped with the function of independent periodical data recording.
This function may make the project diagnostics easier especially for irregular or long-time processes.
The recorded data contains the record description, date, time, selected valve, valve preset, medium,
temperature of the medium while recording, pressure and flow. Recordings can be read into the
mobile device and further exported and analysed in tables or diagrams. Last but not least, tables
and diagrams can be printed from the data exported like this and reports compiled on the hydraulic
system balancing.
You can find two tabs in the introductory Recordings screen - Record info and Record items.
Record Info Tab
After clicking on the button, the Record Info context menu is displayed where you can work with
records using respective tabs - Add new record, Open record, Save record as, Read record, Send
record via Mail, Delete record.
Record info Context Menu
New Record
From the New selection list, a screen is open where you can select what quantities you want to record.
The pressure recording is always mandatory and cannot be deactivated. Once the quantities to be
stored are selected, you select the medium and its initial temperature in the two subsequent fields.
The last two fields of this screen are designed for specifying and entering the valve on which you
are measuring and its preset. Confirm the entry by the Continue to record options button. Another
screen opens in which you specify and enter the text of the record location and description. The last
two fields are used for entering the interval in which the selected quantities should be measured
and saved, and how many times the record should be repeated. You can activate new recording by
clicking on the Start recording button. During the recording green indicator light is flashing with the
period 2 seconds.
During the data recording you can stop the recording with the following procedure:
1)
In the menu you will choose the option Read out the recorded
2)
After several seconds will appear the window and will ask you for the confirmation, that you want to
stop this
12 | BC309062448253en-000301 © Danfoss | 2020.03

User Guide PFM 1000
Recording (continuous) Open Record
From the Open record selection list, a new screen opens in which the list of records stored by the PFM
1000 application in the mobile device is shown. Once a record is selected in the list, the screen with
data of this record opens, and the data is available for further processing, e.g. to be sent off via Mail.
You can see on the Record Info tab the data from the previous paragraph; the recorded data can be
seen on the Record items tab.
Read Record
From the Read record selection menu, you can read a record from the pressure measuring unit. After
reading, a line opens into which you have to enter the name under which the record will be stored.
The file name extension is added automatically.
Send Record via Mail
In order to have this function available you have to have the Email client application set up in your
mobile device.
Once this tab is selected from the Send record via Mail selection list, the Send Mail Email client form
is displayed where the recordings file is already appended. The recording file format is .xml. Fill in the
recipient’s address, the Mail subject, text, and, if appropriate, the signature. The Mail message will be
sent off after pressing the Send button.
Delete Record
From the Delete selection list, a window is displayed asking whether or not you really want this record
deleted. The record is not deleted before the confirmation.
Record Items Tab
You can read a record from the measuring unit or open a record from the mobile device.
Once the Record items tab is selected, a screen appears where you can see the measured values
along with the time of recording.
BC309062448253en-000301 | 13© Danfoss | 2020.03

User Guide PFM 1000
Heating Engineering
Calculations
Heating engineering calculations allow and make easier solutions of partial tasks and calculations in
balancing hydraulic systems.
There are the following four calculations in the PFM 1000 application:
1. Preset calculation - calculates the valve preset for the flow requested in the current branch.
2. Pressure loss calculation - calculates the pressure loss on the valve for the requested flow and
preset.
3. Available pressure calculation - The “available pressure” is understood to be the minimum pressure
in the branch after the requested flow is attained for the given preset.
4. Valve authority calculation - The valve authority is the ratio between the pressure drop on the
fully opened control valve and the pressure in the whole branch in percent. This quantity helps in
dimensioning the valve and evaluating whether the given valve is suitable for the branch. For the
optimal use of the system regulation, this should be in the range of 50 up to 100%. When this value is
less than 50%, the valve is not dimensioned properly.
Press the Calculations in the application’s main menu. Select the requested valve and its preset in the
respective selection fields of the Calculations introductory screen.
Preset Calculation
It calculates the valve preset in the current branch for the requested flow.
Enter the requested flow in the first Preset calculation screen and confirm the entry with the OK
button. Confirm with the actual flow with Save current measured flow button in the next screen.
Close fully the control valve in the next screen. Confirm the measured pressure value with the Save
current disposal pressure button. Based on the measured values and the requested flow, the PFM
1000 application calculates the needed valve preset and displays the result in the Calculations
window in the Results section of the screen.
14 | BC309062448253en-000301 © Danfoss | 2020.03

User Guide PFM 1000
Heating Engineering
Calculations
Pressure Loss Calculation
Enter the requested flow in the first Pressure loss calculation screen and confirm the entry with
the OK button. The application calculates the pressure loss on the valve with the given preset and
requested flow and displays the result in the Calculations / Results section of the screen.
Available Pressure Calculation
Enter the requested flow in the first Available pressure calculation screen and confirm the entry
with the OK button. Confirm saving of the current measured flow with the Save button. Confirm
saving of the measured disposal pressure with the fully closed valve with the Save button in the next
screen. The result will be displayed in the Calculations / Results section of the screen.
BC309062448253en-000301 | 15© Danfoss | 2020.03

User Guide PFM 1000
Heating Engineering
Calculations (continuous)
Quick Records Database Selecting the Quick Record Database button navigates to a new window where previously saved
Valve Authority Calculation
Measure the disposal pressure in the first Valve authority calculation screen with the valve closed,
and confirm with the Save button. Measure the pressure in the next screen with the valve fully open,
and confirm with the Save button. The result will be displayed in the Calculations / Results section
of the screen.
recordings from the Quick Recording window can be browsed. Recordings are saved sequentially into
one file, unless previously specified to be saved elsewhere. The default file is saved in the Internal
Memory/ PFM 1000/Quick Records folder. An empty form is displayed upon opening of the Quick
Record Database. The required file can then be opened from the Quick Record Database menu using
the Open command. The rest of the Quick Record Database menu options are the same as in the
menu for standard recordings, which is described under the Recording section.
16 | BC309062448253en-000301 © Danfoss | 2020.03

User Guide PFM 1000
Maintenance Sintered Filters Replacement
For the correct function of the instrument, replace regularly the sintered filters in the pressure inputs.
Unscrew the pressure input using the 13 mm wrench, replace the clogged filters with a new set, screw
the pressure inputs back and tighten.
Battery Replacement
Unscrew the screws on the battery cover.
Remove the cover and insert new batteries following the technical parameters.
If you insert batteries of a different type, do not forget to change the battery type in the PFM 1000
application.
BC309062448253en-000301 | 17© Danfoss | 2020.03

User Guide PFM 1000
Troubleshooting
Safety and Device Disposal
Instructions
Fault Repair
The instrument cannot be turned on Check batteries, replace batteries
The green light indicator is fleshing with 1 second period
(0.5 of a second is on + 0.5 of a second is of f)
A slow response to the pressure change in inputs, the
measured value when the pressure inputs are free is higher
than 1 kPa
The pressure unit Bluetooth search is not functional, or the
PFM 1000 application is unable to connect with the pressure
unit after pressing Connect, refer to the picture on page 9
The application does not connect with the pressure unit in the
measuring window, the last picture on page 9, or the start or
record reading stops
I have entered the Always use selected device option and
want to measure with a different pressure unit.
The Bluetooth module initialisation is faulty. Turn the
instrument off and on.
The replacement of filters in the pressure inputs. Reset
pressure measuring.
Check the Mobile device setup. If you have the PFM 1000
pressure unit paired with the mobile device, unpair it. BLE
does not pairing of the Bluetooth device as the previous
version required; quite contrary, the pairing impedes the
connection making..
Turn off the pressure unit and on again, repeat the requested
application’s function.
Turn off the Bluetooth in the mobile device, turn it on again,
and repeat the requested application’s function.
In the PFM 1000 application setup go to the Se nsor setup
/ Always use B luetooth address. Here, you will see the BT
module address recorded by your option. Delete the address,
and the application will again search through all pressure
units.
Batteries
• Incorrect handling with batteries may cause spillage of the electrolyte and fire.
• When disposing of batteries, contact local authorities or dealers and get information on the
correct way of disposal.
• Do not expose batteries to heat and fire.
• Do not leave batteries in the car exposed to direct sunshine with windows and doors closed.
• Do not dismantle batteries and short-circuit them.
• Do not use batteries with the packing damaged.
• In case of incorrect replacement of batteries there is the threat of explosion.
• Only use the battery type recommended by the manufacturer for replacement.
Information for Users on Collection and Disposal of Used Devices and Batteries
This symbol on the device, packing or in appended documents means that the used electric and
electronic devices cannot be disposed of in the common communal waste.
For correct disposal, recovery and recycling of used products and batteries, please give them over to
respective collection locations in compliance with the national legislation and directions 2002/96/EC,
2006/66/EC and 2012/19/EC.
By ensuring the correct disposal of the product you can help prevent from occurring potential
dangerous impacts on the environment and human health that would threaten when the product is
not disposed of properly.
Commercial users in European Union may contact their dealers or suppliers.
18 | BC309062448253en-000301 © Danfoss | 2020.03

User Guide PFM 1000
Specifications
Nominal pressure range
1)
1,000kPa or 2,000 kPa Power supply
AAA Alkaline batteries or
NiMH rechargeable batteries
Max. Overpressure 120% of nominal pressure Power Consumption 20mA Bluetooth use
Linearit y and hysteresis error
Error for the pressure range
0 till 5 kPa after pressure zero
setting
Temperature error
Medium temperature
2)
0.15% from nominal pressure
range
± 50 Pa for nominal pressure
range 1 MPa
± 100 Pa for nominal pressure
range 2 MPa
0.25% from nominal pressure
range
Operating time
Zeroing of the pressure
measurement
Max. Aufzeichnung record
quantity
Max. valve and valve producer
quantity in database
-5 to 90°C Water Resistance IP65
According the used battery
type 40h Max.
Mechanical with hydraulic
bypass
2000
Unlimited
Ambient temperature -5 to 50°C Calibration Validity 24 months
Storage temperature -5 to 50°C Dimensions (l x w x d) 140 x75x47 mm
Wireless data transfer Bluetooth Low Energy 5.0 Weight 440 g
1)
Optional
2)
Measured at the e nd of measuring hoses, lengt h 1.5m, Hot wate r flows through PFM 1000 hydraulic pa rts during Pressure zero
procedure. Ma ximum time duration of zero ing when temperature of the m edium exceeds 50°C is 10 seconds.
BC309062448253en-000301 | 19© Danfoss | 2020.03

Danfos
produc
Al
Danfoss A/S
Heating Segment • heating
User Guide PFM 1000
Part Name
部件名称
Pressure un it case
测量仪器套 装
Hydrauli c part of the press ure unit
测量仪器的液压件
Electr onic component s of the pressure uni t
测量仪器的电子元器件
Batteries
电池
Measuring needles
测量探针
Hoses
软管
Quick coup lings for the hose s
测量接头
Ada ptor R 21
转换器R21
Suitcase
套装盒
O: Indica tes that this hazar dous substance con tained in all of the h omogeneous ma terial for this par t is below the limi t requirement in GB /T 26572;
O: 表示该有害物质在该部件所有均质材料中的含量均在GB/T 26572规定的限量要求以下。
X: Indica tes that this hazar dous substance co ntained in at least o ne of the homogen eous material fo r this part is above th e limit requirem entw in GB/T 26572;
X: 表示该有害物质至少在该部件的某一均质材料中的含量超出GB/ T 26572规定的限量要求。
Pb/铅 Hg/汞 Cd/镉
O O O O O O
X O O O O O
O O O O O O
O O O O O O
X O O O O O
O O O O O O
X O O O O O
X O O O O O
O O O O O O
Hazardous Substances Table/有害物质含量表
Cr(VI)/
六价铬
PBB/
多溴联苯
PBDE/
多溴二苯醚
s can accept no responsibility for possible errors in catalogues, brochures and o ther printed material. Danfoss reserves the right to alter its products w ithout notice. This also applies to
ts already on order provided that such alterations can be m ade without subsequential changes being necessary in specications already agreed.
l trademarks in this material are p roperty of the respective companies. Danfoss an d all Danfoss logotypes are trademarks of Danfoss A/S. All rights r eserved.
.danfoss.com • +45 7488 2222 • E-Mail: heating@danfoss.com
© Danfoss | DHS-SRMT/SI | 2020.0320 | BC309062448253en-000301
 Loading...