

Quick Guide
RA
K
living connect® Z,
Electronic Radiator Thermostat
Preparation
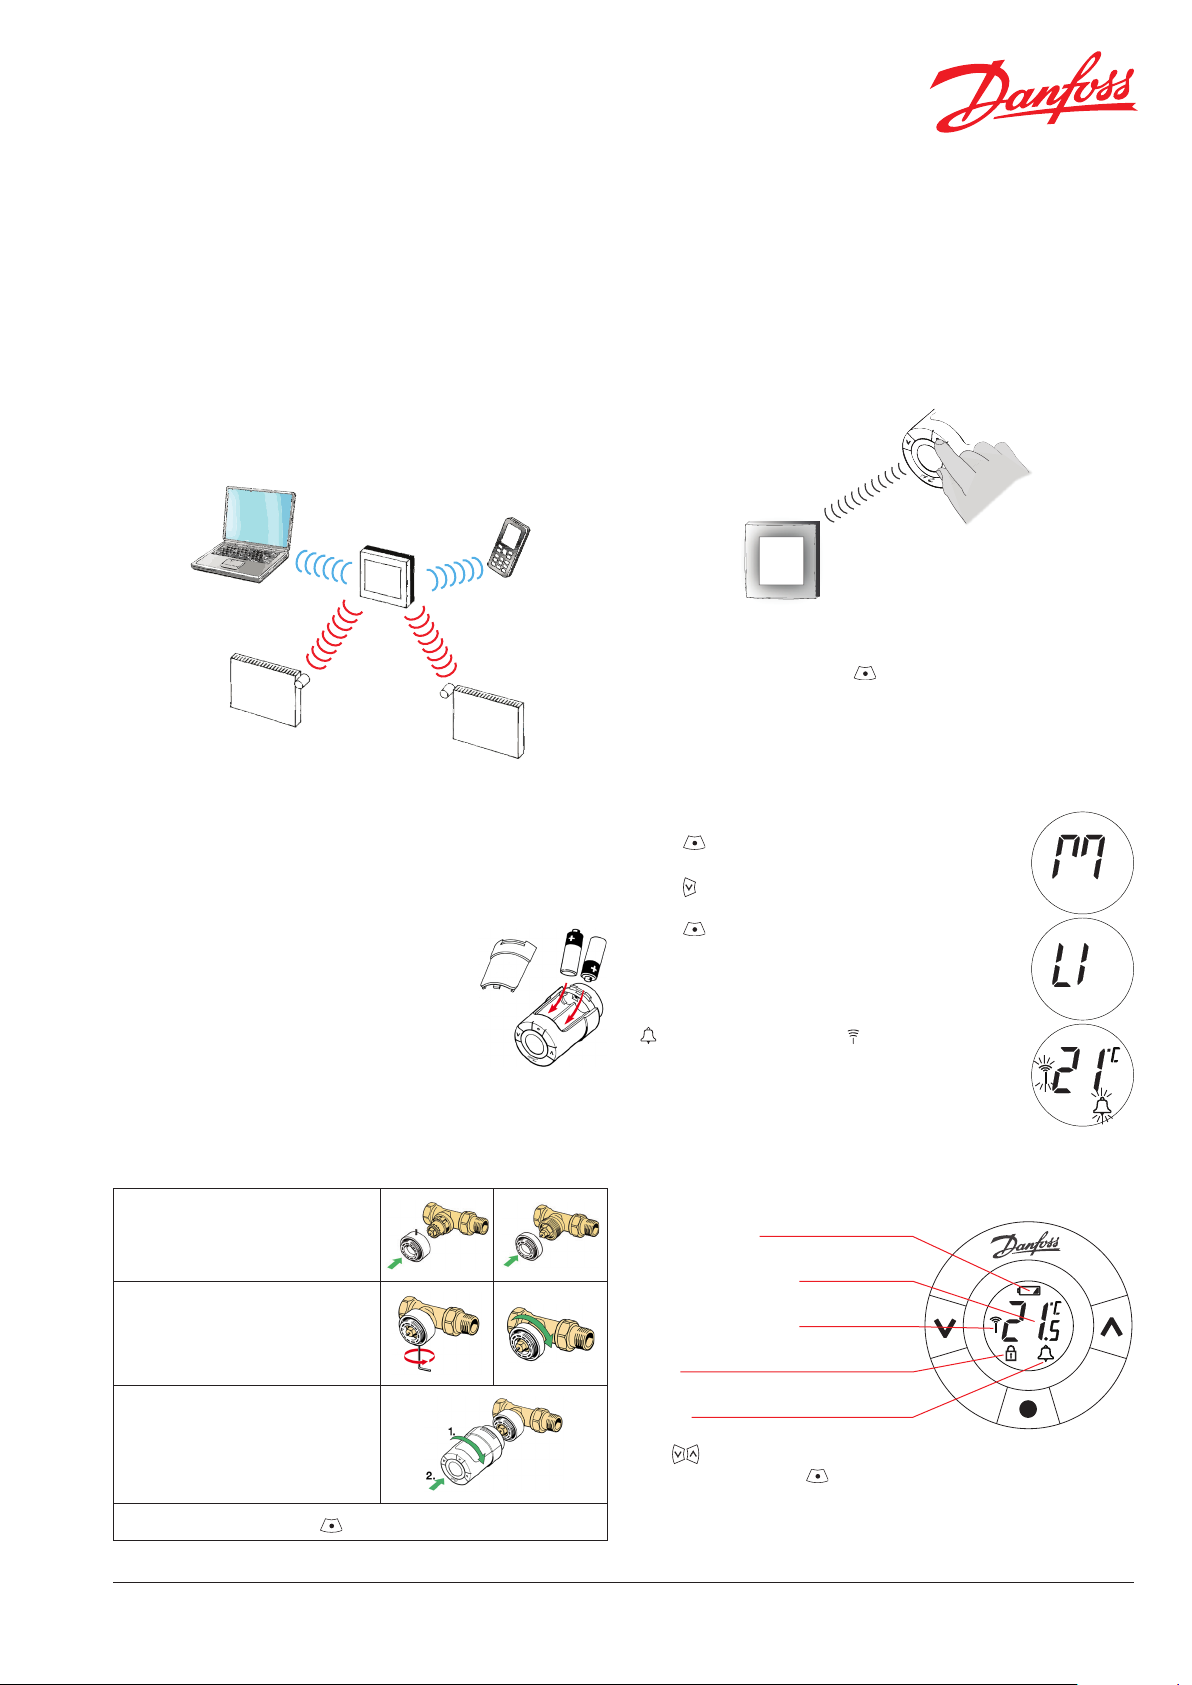
living connect® Z is an electronic radiator thermostat, intended
for use with water based room radiators. It can be controlled by
a Z-Wave certied controller, which supports the appropriate
command classes.
Z-Wave
controller
living connect® Z
sensor
living connect® Z is supplied with adapters for Danfoss RA valves
and valves with M30 x 1.5 (K) connections, two alkaline AA batteries and a 2 mm Allen key.
Inserting the batteries
Remove the battery cover and insert two AA
batteries. Make sure the batteries are correctly
oriented.
Rechargeable batteries must not be used.
When replacing batteries the programme settings will be preserved, but after two minutes
the settings for time and date are reset.
Including the device to a network
Z-wave
controller
• Ensure living connect® Z is factory reset.
• Activate “Inclusion” on the Z-Wave controller.
• Quickly press and release on living connect® Z.
• Observe both controller and living connect® Z for status of the
process.
Testing the connection
Press for at least 3 seconds until M is displayed.
Press until LI is displayed.
Press to test the connection.
LI disappears when the connection is made.
If no connection can be made, the alarm symbol
and the antenna symbol ashes.
Installing living connect® Z
M must be ashing on the display prior to installing.
1. Start by mounting the appropriate adapter.
2. Tighten RA adapter using the
Allen key, hand-tighten the K
adapter (max. 5 Nm).
3. Screw the thermostat onto
the adapter and tighten by
hand (max. 5 Nm).
4. A large M ashes, press to x the thermostat.
VQIDC202 © Danfoss 12/2014
Display and buttons
Battery symbol
The set temperature
Network connection
Lock
Alarm
Use to navigate the display and the menus and to set the
temperature, and use to select and conrm.
1
Quick Guide living connect® Z, Electronic Radiator Thermostat
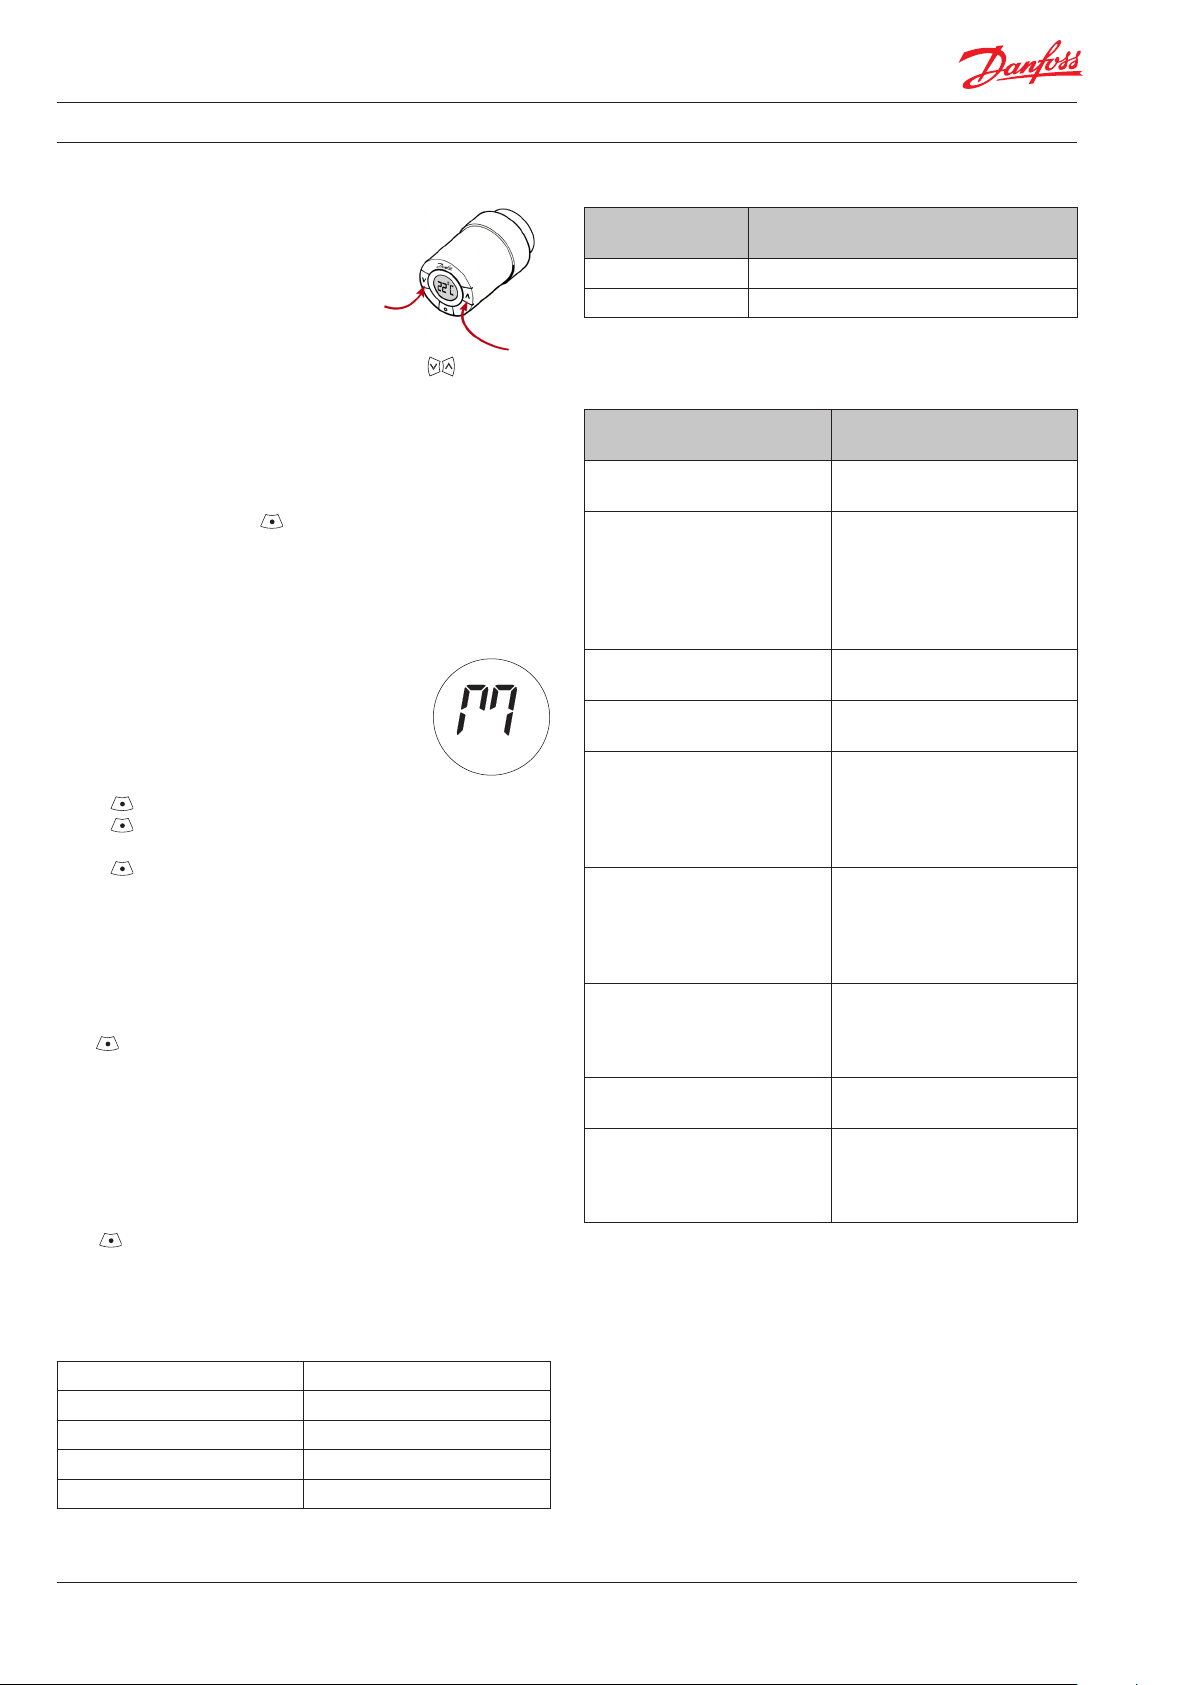
Temperature control and adjustment
The temperature is usually con-trolled via
the controller, but may be changed at any
time using the thermostat’s buttons.
If this is done, the thermostat sends a
message to the controller, which then
syncronises other thermostats in the
same room.
18
19
20
21
26
25
24
23
Press to change
the temperature.
Excluding the device from the network
• Activate “Exclusion” on the Z-Wave controller.
• Quickly press and release on living connect® Z.
• Observe both controller and living connect® Z for status of the
process.
Re-installation mode
If the thermostat has been removed from
the radiator and needs to be reinstalled
(after being used), it is necessary to activate
installation mode to prevent damage to the
thermostat.
To enter installation mode:
• Press until M is displayed.
• Press to withdraw the spindle. M ashes.
• Reinstall the thermostat on the valve.
• Press for approx. 3 seconds to x the thermostat.
If the thermostat is moved to another room, make sure to make
the necessary changes in the controller.
Factory reset
Remove the battery cover and take out one battery. Press and
hold for approx. 5 seconds, while re-inserting the battery.
living connect® Z is now factory reset and in mounting mode.
Wake up
A controller can only communicate with living connect® Z, when
the device is awake. The intervals when the thermostat is awake
can be set using the “wake up command class”.
Press to manually wake up the device. It will stay awake for 10
seconds and send out a node info.
Implemented Z-Wave device classes
Z-Wave
Device Classes
Generic device GENERIC_TYPE_THERMOSTAT
Specic device SPECIFIC_TYPE_SETPOINT_THERMOSTAT
Device Class
Implemented
Supported and controlled Z-Wave command classes
Z-Wave Command
Classes Supported
COMMAND_CLASS_BATTERY
COMMAND_CLASS_CLIMATE_
CONTROL_SCHEDULE
COMMAND_CLASS_CLOCK
COMMAND_CLASS_
MANUFACTURER_SPECIFIC
COMMAND_CLASS_MULTI_
CMD
COMMAND_CLASS_
PROTECTION
COMMAND_CLASS_
THERMOSTAT_SETPOINT
COMMAND_CLASS_VERSION
COMMAND_CLASS_WAKE_UP
Get current battery status of
living connect®.
Control a temperature oset
to the thermostat setpoint of
living connect®. The temperature oset is dened
by schedules and schedule
overrides.
Set or get the current living
connect® clock.
Get manufacturer ID of
system.
A special Z-Wave command
used by living connect® to encapsulate multiple commands
in one command and thereby
conserve battery life.
Set or get living connect® local
protection mode. Possible local protection values are:
0 = no protection
2 = fully locked (tamperproof)
Set or get current thermostat
setpoint of living connect®.
Heating setpoint is the only
supported setpoint type.
Get version of product and
command classes.
A special Z-Wave command
used by living connect® to
synchronize communication
with its controller.
Description
Z-wave info
Device type Slave
SDK 4.55
Software version 1.01
ProduktID 4
Explorer frames YES
2
VQIDC202 © Danfoss 12/2014

Quick Guide living connect® Z, Electronic Radiator Thermostat
Technical requirements and info
• After a succesful inclusion the controller must send a WAKE_
UP_INTERVAL_SET command to living connect® Z in order to
specify where and when living connect® Z should communicate
wirelessly. If not, the thermostat cannot perform wake ups and
the alarm and antenna symbols will ash.
• The nodeID set in the WAKE_UP_INTERVAL_SET command
must be for a permanently listening device which reponds to
the commands sent from living connect® Z. This means PC’s with
USB sticks will only work if the PC is never turned o.
• If living connect® Z does not get correct and timely replies (e.g.
if the controller is turned of ) it will automatically switch to 30 minutes wake up intervals. If at next wake up the controller replies
as expected, living connect® Z will switch back to the original
wake up interval.
• After sending the WAKE_UP_INTERVAL_SET command, the
controller must assign return routes, so living connect® Z can
reach its destination, i.e. the no-deID set in the WAKE_UP_INTERVAL_SET command.
• living connect® Z will not commence its periodic communications
if it is in “Mounting mode”. “Mounting mode” is for physical
installation and should not be confused with “Inclusion”. Please
see section “Installing living connect® Z, item 4” for instructions
on how to leave “Mounting mode”.
• Although living connect® Z supports single commands, multi
commands must always be used to ensure two years battery
lifetime.
• If multiple thermostats are installed in the same room, it is
important that the controller ensures they all have the same
schedule and the same setpoint.
Troubleshooting
Error code Action
E1, E2, E3, E4 Contact your local Service Technician.
The thermostat is not receiving the expected
replies from the control system.
E5
Check that you have a Z-wave certied
controller running and it has the necessary
functionality to control the thermostat (see
“Technical requirements”).
Technical specications
Thermostat type
Recommended use Residential (pollution degree 2)
Actuator Electro-mechanical
Display Grey with back-light
Software classication A
Control PID
Transmission frequency 868.42 MHz
Transmission range up to 30 m
Power supply 2 x 1.5V AA alkaline, class III
Power consumption
Battery life 2 years
Low battery signal
Ambient temperature 0 to 40°C
Transportation temperature -20 to 65°C
Max. water temperature 90°C
Temperature setting range 4 to 28°C
Measurement interval
Clock accuracy +/- 10 min./year
Spindle movement
Noise level <30 dBA
Safety classication Type 1
Weight 177 g incl. RA adapter
IP class* 20
Tested for safety and EMC requirements as specied in EN 60730-1,
EN 60730-2-9 and EN 60730-2-14.
Programmable electronic radiator valve controller
3 µW in standby,
1.2 W when active
Battery icon will ash in display.
If battery level is critical, the
display will ash.
Measures temperature every
minute
Linear, up to 4.5 mm, max. 2 mm
on valve (1 mm/s)
Safety precautions
The thermostat is not intended for children and must not be
used as a toy.
Do not leave packaging materials where children may be
tempted to play with them, as this is extremely dangerous.
Do not attempt to dismantle the thermostat as it contains no
user-serviceable parts. If error code E1, E2 etc. is shown in the
display or other defects appear, please return the thermostat
to the distributor.
VQIDC202 © Danfoss 12/2014
3

Quick Guide living connect® Z, Electronic Radiator Thermostat
4
VQIDC202 © Danfoss 12/2014
 Loading...