

Page 1

MAKING MODERN LIVING POSSIBLE
Operating Instructions
VLT® Lift Drive LD 302
www.danfoss.com/drives
Page 2

Page 3

Page 4

Page 5

Contents
Contents
VLT® Lift Drive LD 302
1 Introduction
1.1 Purpose of the Manual
1.2 Additional Resources
1.3 Document and Software Version
1.4 Intended Use
1.5 Certifications
1.6 Disposal Instruction
2 Safety
2.1 Qualified Personnel
2.2 Safety Precautions
3 Mechanical Installation
3.1 Equipment Pre-installation Check List
3.2 Unpacking
3.3 Installation Environment
3.3.1 Installation Site Check List 6
3.4 Mounting
4
4
4
4
4
4
4
5
5
5
6
6
6
6
6
3.4.1 Cooling 6
3.4.2 Lifting 7
3.4.3 Mounting 7
4 Electrical Installation
4.1 Safety instructions
4.1.1 Requirements 8
4.1.2 Cable Entries 8
4.2 EMC Compliant Installation
4.2.1 General Aspects of EMC Emissions 11
4.2.2 EMC Immunity 12
4.3 Harmonics
4.4 Grounding
4.4.1 Grounding Requirements 15
4.4.1.1 Ground Leakage Current 15
4.4.1.2 Grounding Using Screened Cable 16
4.5 PELV - Protective Extra Low Voltage
4.6 Wiring Schematic
8
8
11
14
15
16
18
4.6.1 Operation with Motor Contactors 18
4.6.2 Operation without Motor Contactors 19
4.7 Motor Connection
4.8 AC Mains Connection
MG34X102 - Rev. 2013-12-04 1
20
20
Page 6

Contents
VLT® Lift Drive LD 302
4.9 Control Wiring
4.9.1.1 Removing the Cover 20
4.9.1.2 Control Terminal Types 21
4.9.1.3 Relay Connection 22
4.9.1.4 Wiring to Control Terminals 23
4.9.1.5 Lift Controller MCO 361 Control Terminals 23
4.9.1.6 Using Screened Control Cables 24
4.9.1.7 Terminal 37, Safe Torque Off 25
4.9.1.8 Lift Control without Motor Contactors 26
4.10 Installation Check List
5 Commissioning
5.1 Safety Instructions
5.1.1 Safety Inspection 28
5.2 Applying Power to the Frequency Converter
5.2.1 Applying Power Procedure 28
5.3 Local Control Panel
5.3.1 LCP Layout 29
20
27
28
28
28
28
5.3.2 Setting LCP Display Values 29
5.3.3 Display Menu Keys 30
5.3.4 Navigation Keys 30
5.3.5 Operation Keys 31
5.3.6 Back-up and Copying Parameter Settings 31
5.3.7 Recommended Initialisation 31
5.3.8 Manual Initialisation 32
6 Programming
6.1 Basic Operational Programming
6.2 Automatic Motor Adaptation
6.3 Programming the Lift Application
6.3.1 Start and Stop Sequences 35
7 Functions
7.1 Brake Functions
7.1.1 Introduction 37
7.1.1.1 Mechanical Holding Brake 37
33
33
33
33
37
37
7.1.1.2 Dynamic Brake 37
7.1.2 Brake Resistor Requirements 37
7.1.2.1 Mechanical Brake Control 38
7.1.3 Brake Resistor Cabling 39
7.2 DCP Communication
2 MG34X102 - Rev. 2013-12-04
39
Page 7

Contents
VLT® Lift Drive LD 302
8 Diagnostics and Troubleshooting
8.1 Status Messages
8.2 Warnings and Alarms
8.3 Basic Troubleshooting
9 Application Examples
9.1 Main Contactors
9.2 Operation with Absolute Encoder (SSI/EnDat)
9.3 Check Encoder Rotation
9.4 Emergency Operation UPS
10 Special Conditions
10.1 Special Conditions
10.1.1 Extreme Running Conditions 50
10.1.2 Motor Thermal Protection 50
10.1.3 Derating 51
11 Parameter Overview
40
40
40
47
48
48
48
48
49
50
50
52
11.1 xx-** Active Parameters
11.2 Parameters 0-** Operation and Display
11.3 Parameters 1-** Load and Motor
11.4 Parameters 4-** Limits/Warnings
11.5 Parameters 14-** Special Functions
11.6 Parameters 19-** Application Parameters
11.7 Parameters 32-** Encoder
12 Specifications
12.1 Electrical Data
12.2 Ambient Conditions
12.3 Power Ratings, Weight and Dimensions
12.4 Connection Tightening Torques
12.5 Lift Controller MCO 361 Specifications
12.6 Motor Type and Associated Motor Number
12.6.1 Motor Type and Associated Motor Number Stored in Motor Database 76
12.6.2 Motor Type and Associated Motor Number not Stored in Motor Database 78
52
53
54
55
56
56
66
67
67
70
70
73
74
76
Index
80
MG34X102 - Rev. 2013-12-04 3
Page 8

Introduction
VLT® Lift Drive LD 302
1
1 Introduction
1.1 Purpose of the Manual
This manual targets
system designers
•
installers
•
service technicians
•
It provides detailed information for the installation and
start-up of the frequency converter. Chapter 3 Mechanical
Installation provides requirements for mechanical and
electrical installation, including
input
•
motor
•
control and serial communications wiring
•
control terminal functions
•
chapter 5 Commissioning provides detailed procedures for
start-up
•
basic operational programming
•
functional testing
•
The remaining chapters provide information about
user interface
•
programming
•
applications
•
start-up troubleshooting
•
specifications
•
1.2
Additional Resources
1.4
Intended Use
The frequency converter is an electronic motor controller
intended for
regulation of motor speed in response to system
•
feedback or to remote commands from external
controllers. A power drive system consists of the
frequency converter, the motor and equipment
driven by the motor.
system and motor status surveillance.
•
The frequency converter can also be used for motor
protection.
Depending on configuration, the frequency converter can
be used in standalone applications or form part of a larger
appliance or installation.
The frequency converter is allowed for use in residential,
industrial and commercial environments in accordance
with local laws and standards.
NOTICE
In a residential environment this product can cause radio
interference, in which case supplementary mitigation
measures can be required.
Foreseeable misuse
Do not use the frequency converter in applications which
are non-compliant with specified operating conditions and
environments. Ensure compliance with the conditions
specified in chapter 12 Specifications.
1.5
Certifications
Supplemental publications and manuals are available from
Danfoss.
See www.danfoss.com/BusinessAreas/DrivesSolutions/
Documentations/Technical+Documentation.htm for listings.
1.3
Document and Software Version
This manual is regularly reviewed and updated. All
suggestions for improvement are welcome. Table 1.1 shows
the document version and the corresponding software
version.
Edition Remarks Software
version
MG34X1 This is the first edition of this manual 6.72
Table 1.1 Document and Software Versions
4 MG34X102 - Rev. 2013-12-04
1.6 Disposal Instruction
Table 1.2 Disposal Instruction
Do not dispose of equipment containing
electrical components together with
domestic waste.
Collect it separately in accordance with
local and currently valid legislation.
Page 9

Safety
2 Safety
VLT® Lift Drive LD 302
The following symbols are used in this document:
WARNING
Indicates a potentially hazardous situation which could
result in death or serious injury.
CAUTION
Indicates a potentially hazardous situation which could
result in minor or moderate injury. It may also be used
to alert against unsafe practices.
NOTICE
Indicates important information, including situations that
may result in damage to equipment or property.
2.1 Qualified Personnel
Correct and reliable transport, storage, installation,
operation and maintenance are required for the troublefree and safe operation of the frequency converter. Only
qualified personnel is allowed to install or operate this
equipment.
Qualified personnel is defined as trained staff, who are
authorised to install, commission, and maintain equipment,
systems and circuits in accordance with pertinent laws and
regulations. Additionally, the personnel must be familiar
with the instructions and safety measures described in this
document.
2.2
Safety Precautions
WARNING
UNINTENDED START
When the frequency converter is connected to AC mains,
the motor may start at any time. The frequency
converter, motor, and any driven equipment must be in
operational readiness. Failure to be in operational
readiness when the frequency converter is connected to
AC mains could result in death, serious injury,
equipment, or property damage.
WARNING
DISCHARGE TIME
Frequency converters contain DC-link capacitors that can
remain charged even when the frequency converter is
not powered. To avoid electrical hazards, disconnect AC
mains, any permanent magnet type motors, and any
remote DC-link power supplies, including battery backups, UPS, and DC-link connections to other frequency
converters. Wait for the capacitors to fully discharge
before performing any service or repair work. The
amount of wait time is listed in the Discharge Time table.
Failure to wait the specified time after power has been
removed before doing service or repair could result in
death or serious injury.
Voltage [V] Minimum waiting time (minutes)
4 15
380-400 0.25-7.5 kW
[0.34-10 hp]
High voltage may be present even when the warning LEDs are
off!
11-75 kW
[15-100 hp]
2 2
WARNING
HIGH VOLTAGE
Frequency converters contain high voltage when
connected to AC mains input power. Qualified personnel
only should perform installation, start up, and
maintenance. Failure to perform installation, start up,
and maintenance by qualified personnel could result in
death or serious injury.
MG34X102 - Rev. 2013-12-04 5
Table 2.1 Discharge Time
Page 10

Mechanical Installation
3 Mechanical Installation
VLT® Lift Drive LD 302
3.1 Equipment Pre-installation Check List
Compare the model number of the unit on the
33
•
nameplate to what was ordered to verify the
proper equipment
Ensure each of the following are rated for same
•
voltage:
Mains (power)
Frequency converter
Motor
Ensure that the frequency converter output
•
current rating is equal to or greater than motor
full load current for peak motor performance
Motor size and frequency converter
power must match for proper overload
protection
If frequency converter rating is less than
motor, full motor output cannot be
achieved
3.2 Unpacking
3.3
Installation Environment
3.3.1 Installation Site Check List
The frequency converter relies on the ambient air
•
for cooling. Observe the limitations on ambient
temperature for optimal operation.
Before mounting the frequency converter, ensure
•
that the installation location has sufficient
support strength
Keep the frequency converter interior free from
•
dust and dirt. Ensure that the components stay as
clean as possible. In construction areas, provide a
protective covering. Optional IP54 (NEMA 12) or
IP66 (NEMA 4) enclosures may be necessary.
Keep the manual, drawings, and diagrams
•
accessible for detailed installation and operating
instructions. It is important that the manual is
available for equipment operators.
Locate equipment as near to the motor as
•
possible. Keep motor cables as short as possible.
Check the motor characteristics for actual
tolerances. Do not exceed
3.2.1 Items Supplied
300 m [1,000 ft] for unshielded motor
•
Items supplied may vary according to product configuration.
Make sure the items supplied and the
•
information on the nameplate correspond to the
order confirmation.
Check the packaging and the frequency converter
•
visually for damage caused by inappropriate
handling during shipment. File any claim for
damage with the carrier. Retain damaged parts
for clarification.
NOTICE
Do not remove the nameplate from the frequency
converter (loss of warranty).
Consider derating for temperatures between 40
•
°C [104 °F] and 50 °C [122 °F] and elevation
1,000 m [3,300 ft] above sea level. See the
equipment Design Guide for detailed information.
3.4
Mounting
3.4.1 Cooling
Ensure that top and bottom clearance for air cooling is
provided. See Illustration 3.1 for clearance requirements.
cables
150 m [500 ft] for screened cable.
•
3.2.2 Storage
Ensure that requirements for storage are fulfilled. Refer to
chapter 12.2 Ambient Conditions for further details.
6 MG34X102 - Rev. 2013-12-04
Page 11

a
b
130BA419.10
130BA219.11
1
130BA228.11
1
Mechanical Installation
Illustration 3.1 Top and Bottom Cooling Clearance
VLT® Lift Drive LD 302
3 3
Item Description
1 Back plate
Illustration 3.2 Proper Mounting with Back Plate
Install the back plate properly for required airflow to cool
the unit.
Enclosure type A1-A5 B1-B4 C1, C3 C2, C4
a/b [mm] 100 200 200 225
Table 3.1 Minimum Airflow Clearance Requirements
Lifting
3.4.2
To determine a safe lifting method, check the
•
weight of the unit
Ensure that the lifting device is suitable for the
•
task
If necessary, plan for a hoist, crane, or forklift with
•
the appropriate rating to move the unit
For lifting, use hoist rings on the unit, when
•
provided
Mounting
3.4.3
1. Ensure that the strength of the mounting location
supports the unit weight. The frequency
converter allows side-by-side installation.
2. Mount the unit vertically to a solid flat surface or
to the optional back plate (see Illustration 3.2 and
Illustration 3.3).
3. Use the slotted mounting holes on the unit for
wall mount, when provided.
Item Description
1 Back plate
Illustration 3.3 Proper Mounting with Railings
NOTICE
Back plate is needed when mounted on railings.
NOTICE
Improper mounting can result in overheating and
reduced performance.
MG34X102 - Rev. 2013-12-04 7
Page 12

L1
L1L2L2L3L3
2
91 92 93
1
130BB460.11
Electrical Installation
VLT® Lift Drive LD 302
4 Electrical Installation
4.1 Safety instructions
4.1.1 Requirements
WARNING
44
EQUIPMENT HAZARD!
Rotating shafts and electrical equipment can be
hazardous. All electrical work must conform to national
and local electrical codes. Only trained and qualified
personnel should install, start up, and maintain the
equipment. Failure to follow these guidelines could
result in death or serious injury.
NOTICE
WIRING ISOLATION!
Run input power, motor wiring and control wiring in 3
separate metallic conduits or use separated screened
cable for high frequency noise isolation. Failure to isolate
power, motor and control wiring could result in less than
optimum frequency converter and associated equipment
performance.
For safety, comply with the following requirements.
Electronic controls equipment is connected to
•
hazardous mains voltage. Take extreme care to
protect against electrical hazards when applying
power to the unit.
Run motor cables from multiple frequency
•
converters separately. Induced voltage from
output motor cables that are run together can
charge equipment capacitors even with the
equipment turned off and locked out.
Overload and equipment protection
The frequency converter provides overload
•
protection for the motor (Class 20 motor
protection). See chapter 10 Special Conditions for
details.
All frequency converters must be provided with
•
short circuit and overcurrent protection. Input
fusing is required to provide this protection, see
Illustration 4.1. If not factory supplied, the installer
must provide fuses as part of installation.
Item Description
1 Fuses
2 Ground
Illustration 4.1 Frequency Converter Fuses
Wire Type and Ratings
All wiring must comply with local and national
•
regulations regarding cross section and ambient
temperature requirements.
Danfoss recommends that all power connections
•
are made with a minimum 75 °C [167 °F] rated
copper wire.
See chapter 12.3 Power Ratings, Weight and
•
Dimensions for recommended wire sizes.
Cable Entries
4.1.2
NOTICE
Other solutions are possible. Unused cable entries can be
sealed with rubber grommets (for IP21).
8 MG34X102 - Rev. 2013-12-04
Page 13

[3]
[4]
[5]
[6]
[2]
[1]
130BB664.10
[4]
[5]
[3]
[6]
[2]
[1]
130BB666.10
[1]
[4]
[5]
[3]
[2]
130BB659.10
[5]
[4]
[3]
[6]
[2]
[1]
130BB667.10
Electrical Installation
VLT® Lift Drive LD 302
Item
Recommended
use
Dimensions
UL [in] [mm]
1)
Nearest
metric
1 Mains 3/4 28.4 M25
2 Motor 3/4 28.4 M25
3 Brake/load
3/4 28.4 M25
sharing
4 Control cable 3/4 28.4 M25
5
6
1)
2)
Control cable
Control cable
Tolerance ±0.2 mm
Knockout hole
2)
3/4 28.4 M25
2)
3/4 28.4 M25
Illustration 4.2 A5 (IP55)
Item Recommended use Dimensions
1 Mains M25
2 Motor M25
3 Brake/load sharing
28.4 mm
1)
4 Control cable M25
5 Control cable M25
6 Control cable M25
1)
Knock-out hole
Illustration 4.3 A5 (IP55) Threaded Gland Holes
Item
Recommended
use
Dimensions
UL [in] [mm]
1)
Nearest
metric
1 Mains 1 34.7 M32
2 Motor 1 34.7 M32
3 Brake/load
1 34.7 M32
sharing
4 Control cable 1 34.7 M32
5 Control cable 1/2 22.5 M20
1)
Tolerance ±0.2 mm
Illustration 4.4 B1 (IP21)
Item Recommended use
Dimensions
UL [in] [mm]
1)
Nearest metric
1 Mains 1 34.7 M32
2 Motor 1 34.7 M32
3 Brake/load sharing 1 34.7 M32
4 Control cable 3/4 28.4 M25
5 Control cable 1/2 22.5 M20
6
Control cable
1)
Tolerance ±0.2 mm
2)
Knockout hole
2)
1/2 22.5 M20
4 4
Illustration 4.5 B1 (IP55)
MG34X102 - Rev. 2013-12-04 9
Page 14

[6]
[5]
[3]
[2]
[4]
[1]
130BB669.10
[4]
[3]
[5]
[2]
[1]
130BB668.10
[4]
[3]
[2]
[5]
[1]
130BB670.10
Electrical Installation
VLT® Lift Drive LD 302
Item Recommended use Dimensions
1 Mains M32
44
2 Motor M32
3 Brake/load sharing M32
4 Control cable M25
5 Control cable M25
6 Control cable
1)
Knockout
22.5 mm
1)
Item Recommended use Dimensions
1 Mains M40
2 Motor M40
3 Brake/Load Sharing M32
4 Control cable M25
5 Control cable M20
Illustration 4.8 B2 (IP55) Threaded Gland Holes
Illustration 4.6 B1 (IP55) Threaded Gland Holes
Item
Recommended
use
Dimensions
UL [in] [mm]
1)
Nearest
metric
1 Mains 1 1/4 44.2 M40
2 Motor 1 1/4 44.2 M40
3 Brake/load sharing 1 34.7 M32
4 Control cable 3/4 28.4 M25
5
1)
Tolerance ±0.2 mm
2)
Knockout hole
Control cable
2)
1/2 22.5 M20
Illustration 4.7 B2 (IP55)
10 MG34X102 - Rev. 2013-12-04
Page 15

1
2
z
z
z
L1
L2
L3
PE
U
V
W
C
S
I
2
I
1
I
3
I
4
C
S
C
S
C
S
C
S
I
4
C
S
z
PE
3
4
5
6
175ZA062.12
Electrical Installation
VLT® Lift Drive LD 302
4.2 EMC Compliant Installation
4.2.1 General Aspects of EMC Emissions
The frequency converter, motor cable and the motor generate airborne interference in the range 30 MHz to 1 GHz.
Capacitive currents in the motor cable coupled with a high dU/dt from the motor voltage generate leakage currents.
Use screened motor cable to reduce radiated interference. Connect the motor cable screen to the frequency converter
enclosure as well as to the motor enclosure. Use integrated screen clamps to avoid twisted screen ends (pigtails).
To reduce the interference level from the entire system (unit + installation), make motor and brake cables as short as
possible. Avoid placing cables with a sensitive signal level alongside motor and brake cables. Especially control electronics
generate radio interference higher than 50 MHz (airborne).
4 4
1 Ground wire
2 Screen
3 AC mains supply
4 Frequency converter
5 Screened motor cable
6 Motor
Table 4.1
Illustration 4.9 Situation that Generates Leakage Currents
Ensure that screen currents can be conveyed back to the frequency converter. Also, ensure good electrical contact from the
mounting plate through the mounting screws to the frequency converter chassis.
NOTICE
When unscreened cables are used, some emission requirements are not complied with, although the immunity
requirements are observed.
MG34X102 - Rev. 2013-12-04 11
Page 16

Electrical Installation
VLT® Lift Drive LD 302
4.2.2 EMC Immunity
All Danfoss frequency converters comply with the requirements for the industrial environment as well as home and office
environments.
Immunity tests were performed in accordance with the following standards:
EN 61000-4-2 (IEC 61000-4-2): Electrostatic discharges (ESD): Simulation of electrostatic discharges from human
•
44
Voltage range: 380-400 V
Basic standard Burst
Acceptance criterion B B B A A
Line
Motor
Brake 4 kV CM
Load sharing 4 kV CM
Control wires
Standard bus 2 kV CM
Relay wires 2 kV CM
Application and fieldbus
options
LCP cable
External 24 V DC
Enclosure
beings.
EN 61000-4-3 (IEC 61000-4-3): Incoming electromagnetic field radiation, amplitude modulated simulation of the
•
effects of radar and radio communication equipment as well as mobile communications equipment.
EN 61000-4-4 (IEC 61000-4-4): Burst transients: Simulation of interference brought about by switching a contactor,
•
relay, or similar devices.
EN 61000-4-5 (IEC 61000-4-5): Surge transients: Simulation of transients brought about for example, by lightning
•
that strikes near installations.
EN 61000-4-6 (IEC 61000-4-6): RF common mode: Simulation of the effect from radio-transmission equipment
•
joined by connection cables.
IEC 61000-4-4
4 kV CM
4 kV CM
2 kV CM
2 kV CM
2 kV CM
2 V CM
— —
Surge
IEC 61000-4-5
2 kV/2 Ω DM
4 kV/12 Ω CM
4 kV/2 Ω
4 kV/2 Ω
4 kV/2 Ω
2 kV/2 Ω
2 kV/2 Ω
2 kV/2 Ω
2 kV/2 Ω
2 kV/2 Ω
0.5 kV/2 Ω DM
1 kV/12 Ω CM
1)
1)
1)
1)
1)
1)
1)
1)
ESD
Radiated electromagnetic
IEC
61000-4-2
— —
— —
— —
— —
— —
— —
— —
— —
— —
— —
8 kV AD
6 kV CD
field
IEC 61000-4-3
10 V/m —
RF common
mode voltage
IEC 61000-4-6
10 V
10 V
10 V
10 V
10 V
10 V
10 V
10 V
10 V
10 V
RMS
RMS
RMS
RMS
RMS
RMS
RMS
RMS
RMS
RMS
Table 4.2 EMC Immunity
1) Injection on cable screen
AD: Air discharge
CD: Contact discharge
CM: Common mode
DM: Differential mode
EMC Test Results
The following test results have been obtained using a system with
a frequency converter
•
a screened cable
•
a control box with potentiometer
•
a motor
•
12 MG34X102 - Rev. 2013-12-04
Page 17

Electrical Installation
a screened motor cable
•
VLT® Lift Drive LD 302
RFI filter type Conducted emission Radiated emission
Standards
and
requirements
H1: RFI Class A1/B, Category 1/2
LD 302 0-75 kW
H2: RFI Class A2, Category 3
LD 302 0-7.5 kW
H3: RFI Class A1/B, Category 1/2
LD 302 11-55 kW
EN 55011 Class B
Housing,
trades and
light
industries
EN/IEC 61800-3 Category C1
First
environment,
home and
office
IP20 50 m [164 ft] 150 m [492 ft] 150 m [492 ft] No Yes
[0-100 hp]
380-480 V
0-7.5 kW
[0-10 hp]
380-480 V
[0-10 hp]
380-480 V
11-75 kW
[15-100 hp]
380-480 V
0-7.5 kW
[0-10 hp]
380-480 V
[15-75 hp]
380-480 V
IP55 50 m [164 ft] 150 m [492 ft] 150 m [492 ft] No Yes
IP20 No No 5 m [16 ft] No No
IP20 No No 25 m [82 ft] No No
IP55 No No 5 m [16 ft] No No
IP55 50 m [164 ft] 150 m [492 ft] 150 m [492 ft] No Yes
Class A
Group 1
Industrial
environment
Category C2
First
environment,
home and
office
Class A
Group 2
Industrial
environment
Category C3
Second
environment,
industrial
Class B
Housing,
trades and
light
industries
Category C1
First
environment,
home and
office
Class A
Group 1
Industrial
environment
Category C2
First
environment,
home and
office
4 4
Table 4.3 EMC Test Results (Emission, Immunity)
H1, H2 or H3 is defined in the type code position 16-17 for EMC filters
H1 - Integrated EMC filter. Fulfils EN 55011 Class A1/B and EN/IEN 61800-3 Category 1/2
H2 - No additional EMC filter. Fulfils EN 55011 Class A2 and EN/IEC 61800-2 Category 3
H3 - Integrated EMC filter. Fulfils EN 55011 Class A1/B and EN/IEC 61800-3 Category 1/2.
MG34X102 - Rev. 2013-12-04 13
Page 18

175HA034.10
Electrical Installation
4.3 Harmonics
VLT® Lift Drive LD 302
4.3.2
Harmonics Emission Requirements
4.3.1 General Aspects of Harmonics
Equipment connected to the public supply network
Emission
Options Definition
A frequency converter takes up a non-sinusoidal current
from mains, which increases the input current I
. A non-
RMS
sinusoidal current is transformed with a Fourier analysis
and split into sine-wave currents with different frequencies,
44
that is, different harmonic currents In with 50 Hz basic
frequency:
Hz 50 250 350
Table 4.4 Harmonic Currents
I
1
I
5
I
7
The harmonics do not affect the power consumption
directly, but increase the heat losses in the installation
(transformer, cables). So, in plants with a high percentage
of rectifier load, maintain harmonic currents at a low level
to avoid overload of the transformer and high temperature
in the cables.
Illustration 4.10 Harmonic Currents
NOTICE
Some of the harmonic currents might disturb communication equipment connected to the same transformer or
cause resonance with power-factor correction batteries.
To ensure low harmonic currents, the frequency converter
is equipped with intermediate circuit coils as standard. This
normally reduces the input current I
by 40%.
RMS
1 IEC/EN 61000-3-2 Class A for 3-phase balanced
equipment (for professional equipment only up to 1
kW total power).
2 IEC/EN 61000-3-12 Equipment 16-75 A and profes-
sional equipment as from 1 kW up to 16 A phase
current.
Table 4.5 Connected Equipment
Harmonics Test Results (Emission)
4.3.3
Power sizes up to PK75 in T2 and T4 comply with IEC/EN
61000-3-2 Class A. Power sizes from P1K1 and up to P18K
in T2 and up to P90K in T4 comply with IEC/EN
61000-3-12, Table 4. Power sizes P110 - P450 in T4 also
comply with IEC/EN 61000-3-12 even though not required
because currents are above 75 A.
Actual
(typical)
Limit for
R
≥120
sce
Actual
(typical)
Limit for
R
≥120
sce
Table 4.6 Harmonics Test Results (Emission)
Individual harmonic current In/I1 (%)
I
5
I
7
I
11
I
40 20 10 8
40 25 15 10
Harmonic current distortion factor (%)
THD PWHD
46 45
48 46
13
If the short-circuit power of the supply Ssc is greater than
or equal to:
S
= 3 ×
R
The voltage distortion on the mains supply voltage
depends on the size of the harmonic currents multiplied
by the mains impedance for the frequency in question.
SC
at the interface point between the user’s supply and the
public system (R
The total voltage distortion THD is calculated based on the
individual voltage harmonics using this formula:
It is the responsibility of the installer or user of the
equipment to ensure that the equipment is connected
2
2
THD
% =
U
+
5
(UN% of U)
U
+ ... +
7
2
U
N
only to a supply with a short-circuit power Ssc greater than
or equal to what is specified above. If necessary, consult
the distribution network operator.
Other power sizes can be connected to the public supply
network by consultation with the distribution network
operator.
Compliance with various system level guidelines:
The harmonic current data in Table 4.6 are given in
accordance with IEC/EN61000-3-12 with reference to the
14 MG34X102 - Rev. 2013-12-04
SCE
×
U
mains
sce
×
I
= 3 × 120 × 400 ×
equ
I
equ
).
Page 19

130BB955.12
a
b
Leakage current
Motor cable length
130BB956.12
THVD=0%
THVD=5%
Leakage current
Electrical Installation
Power Drive Systems product standard. The data may be
used to calculate the harmonic currents' influence on the
power supply system and to document compliance with
relevant regional guidelines: IEEE 519 -1992; G5/4.
VLT® Lift Drive LD 302
4.4 Grounding
4.4.1 Grounding Requirements
WARNING
GROUNDING HAZARD!
Ground the frequency converter in accordance with
national and local electrical codes as well as instructions
contained within these instructions. Ground currents are
higher than 3.5 mA. Failure to ground frequency
converter properly could result in death or serious injury.
To ground electrical equipment properly, follow
•
all local and national electrical codes
Proper protective earthing for equipment with
•
ground currents higher than 3.5 mA must be
established, see chapter 4.4.1.1 Ground Leakage
Current
A dedicated ground wire is required for input
•
power, motor power and control wiring
Use the clamps provided with the equipment for
•
proper ground connections
Do not ground one frequency converter to
•
another in a “daisy chain” fashion
Keep the ground wire connections as short as
•
possible
Use of high-strand wire to reduce electrical noise
•
is recommended
Follow motor manufacturer wiring requirements
•
4.4.1.1
Ground Leakage Current
4 4
Illustration 4.11 Cable Length and Power Size Influence on
Leakage Current. Pa > Pb.
Follow national and local codes regarding protective
earthing of equipment with a leakage current > 3.5 mA.
Frequency converters generate a leakage current in the
ground connection. A fault current in the frequency
converter at the output power terminals might charge the
filter capacitors and cause a transient ground current.
The ground leakage current depends on various system
configurations including RFI filtering, screened motor
cables, and frequency converter power.
MG34X102 - Rev. 2013-12-04 15
Illustration 4.12 Line Distortion Influences Leakage Current
According to EN/IEC 61800 5 1, ground wire must be
reinforced, if the leakage current exceeds 3.5 mA:
Ground wire (terminal 95) of at least 10 mm2 [8
•
AWG]
2 separate ground wires both complying with the
•
dimensioning rules
See EN/IEC61800-5-1 and EN50178 for further information.
Page 20

130BB958.12
f
sw
Cable
150 Hz
3rd harmonics
50 Hz
Mains
RCD with low f
cut-
RCD with high f
cut-
Leakage current
Frequency
130BB957.11
Leakage current [mA]
100 Hz
2 kHz
100 kHz
130BA266.10
+DC
BR-
B
MAINS
L1 L2 L3
91 92 93
RELAY 1 RELAY 2
99
- LC -
UVW
MOTOR
Electrical Installation
VLT® Lift Drive LD 302
Using RCDs
4.4.1.2
Grounding Using Screened Cable
Where residual current devices (RCDs), also known as earth
leakage circuit breakers (ELCBs), are used, comply with the
following:
Grounding clamps are provided for motor wiring (see
Illustration 4.15).
Only use RCDs of type B, capable of detecting AC
and DC currents
To prevent faults due to transient ground
currents, use RCDs with an inrush delay
44
Dimension RCDs according to the system configuration and environmental considerations
Illustration 4.15 Grounding with Screened Cable
Illustration 4.13 Main Contributions to Leakage Current
4.5 PELV - Protective Extra Low Voltage
Illustration 4.14 Influence of the Cut-off Frequency of the RCD
WARNING
ELECTRICAL SHOCK HAZARD!
Protect against electrical shock by using electrical supply
of the PELV type and the setting up the installation as
described in local/national regulations on PELV supplies.
Failure to protect against electrical shock can cause
personal injury or death.
All control terminals and relay terminals 01-03/04-06
comply with PELV, except for grounded Delta leg above
400 V.
The electrical isolation complies with the requirements for
higher isolation according to EN 61800-5-1.
To maintain PELV all connections made to the control
terminals must be PELV, e.g. thermistor must be
reinforced/double insulated.
16 MG34X102 - Rev. 2013-12-04
Page 21

130BC968.11
1325 4
6
9
8
M
7
Electrical Installation
Item Description
1 Power supply (SMPS) incl. signal isolation of UDC,
indicating the voltage of intermediate DC link circuit
2 Gate drive that runs the IGBTs (trigger transformers/opto-
couplers)
3 Current transducers
4 Opto-coupler, brake module
5 Internal inrush, RFI, and temperature measurement
circuits
6 Custom relays
7 Mechanical brake
8 Functional galvanic isolation for 24 V back-up option
9 Functional galvanic isolation for RS-485 standard bus
interface
VLT® Lift Drive LD 302
4 4
Illustration 4.16 Galvanic Isolation
WARNING
Installation at high altitude:
380-400 V, enclosure types A, B and C: At altitudes
above 2,000 m [6,600 ft], contact Danfoss regarding
PELV.
MG34X102 - Rev. 2013-12-04 17
Page 22

130BD154.10
Parameter
19 - 50
Drive
enable
K10.1
K10
K10.1
K10
K2
K1
K12
K1 K2
K12
Safety
Chain
K2
K1
N
Speed
select
Motor
Thermistor
L1
L2
L3
PE
Direction
up down
91 92 93 95
81 82 PE 96 97 98 99
50 53 55
20
20 29
37 12 1332
33
27
1
2 3 4 5 6 7 8
MCO 361
18
Brake
Resistor
Motor
Brake Relay
(max. 29 mA)
1 2 3 4 5 6 7 8 9 10 1112
1 2 3 4 5 6 7 8 21
X58
K1
K2
U V W PE
M
3~
X57 - Input
X55 - Encoder
Encoder
Interface
X59 - Output
Frequency Converter
Brake
Contractor
Brake
Motor
Electrical Installation
VLT® Lift Drive LD 302
4.6 Wiring Schematic
4.6.1 Operation with Motor Contactors
Illustration 4.17 is valid when 19-86 Enable SC is set to [1] Simple control.
44
Illustration 4.17 Wiring Schematic with Contactors
18 MG34X102 - Rev. 2013-12-04
Page 23

130BD155.10
Parameter
19 - 50
Drive
enable
K10.1
K10
K10.1
K10
K2
K1
K12
K1 K2
K12
Safety
Chain
K2
K1
N
Speed
select
Motor
Thermistor
L1
L2
L3
PE
Direction
up down
91 92 93 95
81 82 PE 96 97 98 99
505355
20
20 29
37 12 1332 33 27
1
2 3 4 5 6 7 8
MCO 361
18
Brake
Resistor
Motor
Brake Relay
(max. 29 mA)
1 2 3 4 5 6 7 8 9 10 1112
1 2 3 4 5 6 7 8 21
X58
U V W PE
M
3~
X57 - Input
X55 - Encoder
Encoder
Interface
X59 - Output
Frequency Converter
Brake
Contractor
Brake
Motor
K2
K1
Electrical Installation
VLT® Lift Drive LD 302
4.6.2 Operation without Motor Contactors
Illustration 4.18 is valid when 19-86 Enable SC is set to [1] Simple control.
4 4
Illustration 4.18 Wiring Schematic without Contactors
MG34X102 - Rev. 2013-12-04 19
Page 24

130BT248.10
Electrical Installation
VLT® Lift Drive LD 302
4.7 Motor Connection
WARNING
INDUCED VOLTAGE!
Run output motor cables from multiple frequency
converters separately. Induced voltage from output
motor cables that are run together can charge
equipment capacitors even with the equipment turned
44
off and locked out. Failure to run output motor cables
separately could result in death or serious injury.
For maximum cable sizes and length, see
•
chapter 12.3 Power Ratings, Weight and Dimensions
Comply with local and national electrical codes
•
for cable sizes
Do not install power factor correction capacitors
•
between the frequency converter and the motor
Do not wire a starting or pole-changing device
•
between the frequency converter and the motor
1. Connect the 3-phase motor wiring to terminals
96 (U), 97 (V), and 98 (W).
2. Ground the cable in accordance with grounding
instructions provided.
3. Torque terminals in accordance with the
information provided in chapter 12.4 Connection
Tightening Torques.
4. Follow motor manufacturer wiring requirements.
Illustration 4.15 represents mains input, motor, and
grounding for basic frequency converters. Actual configurations vary with unit types and optional equipment.
4.9 Control Wiring
4.9.1.1
or TT/TN-S mains with a grounded leg (grounded
delta), set 14-50 RFI Filter to OFF. When off, the
internal RFI filter capacitors between the chassis
and the intermediate circuit are isolated. This
isolation prevents damage to the intermediate
circuit and reduces ground capacity currents in
accordance with IEC 61800-3.
Isolate control wiring from high-power
•
components in the frequency converter.
If the frequency converter is connected to a
•
thermistor, for PELV isolation, optional thermistor
control wiring must be reinforced/double
insulated. A 24 V DC supply voltage is
recommended.
Removing the Cover
Remove cover plate with a screw driver. See
•
Illustration 4.19.
Or remove front cover by loosening attaching
•
screws. See Illustration 4.20.
4.8
AC Mains Connection
Size wiring based on the input current of the
•
frequency converter. For maximum wire sizes, see
chapter 12.3 Power Ratings, Weight and
Dimensions.
Comply with local and national electrical codes
•
for cable sizes.
Connect 3-phase AC input power wiring to
•
terminals L1, L2, and L3 (see Illustration 4.15).
Depending on the configuration of the
•
equipment, input power is connected to the
mains input terminals or the input disconnect.
Ground the cable in accordance with grounding
•
•
instructions provided in chapter 4.4.1 Grounding
Requirements
All frequency converters may be used with an
isolated input source as well as with ground
reference power lines. When supplied from an
isolated mains source (IT mains or floating delta)
Illustration 4.19 Control Wiring Access for Enclosure Types A2,
A3, B3, B4, C3 and C4
20 MG34X102 - Rev. 2013-12-04
Page 25

130BT334.10
130BA248.11
2
3
4
1
130BB921.11
12 13 18 19 27 29 32 33 20 37
39 42 50 53 54 55
61 68 69
130BB931.10
1
2 3
Electrical Installation
Illustration 4.20 Control Wiring Access for Enclosure Types A4,
A5, B1, B2, C1 and C2
VLT® Lift Drive LD 302
Enclosure types A2 and A3
Encoder and I/O terminal are located behind the C option
terminal cover, see Illustration 4.21.
The lift controller bus terminals and debug terminals
(RS-485) are on the top of the C-option cover. If these
connections are used, cut out the plastic parts above the
connectors and mount the cable relief.
Table 4.7 before tightening the covers.
See
Enclosure type IP20 IP55
A4/A5 -
B1 B2 C1 C2 -
- Does not exist
Table 4.7 Tightening Torques for Covers [Nm]/[lb-ft]
2/1.5
2.2/1.6
2.2/1.6
2.2/1.6
2.2/1.6
4.9.1.2 Control Terminal Types
Illustration 4.22 shows the removable frequency converter
connectors.
4 4
Illustration 4.21 Location of Encoder and I/O Terminals
Illustration 4.22 Control Terminal Locations
Illustration 4.23 Terminal Numbers
Connector 1, terminals 12-37
•
Connector 2, terminals 61, 68, 69
•
Connector 3, terminals 39-55
•
Connector 4, USB port for use with the MCT 10
•
Set-up Software
Also provided are 2 Form C relay outputs.
•
Location depends upon the frequency converter
configuration and size.
Enclosure types A5, B1 and B2
All MCO 361 terminals are located next to the control card.
To get access, remove the front cover, see Illustration 4.20.
MG34X102 - Rev. 2013-12-04 21
Page 26

130BA029.12
Relay2
Relay1
35 36
311
130BA215.10
RELAY 1
RELAY 2
9
9
6
03 02 01
90 05 04
130BA391.12
RELAY 1 RELAY 2
06 05 04 03 02 01
DC+
Electrical Installation
VLT® Lift Drive LD 302
4.9.1.3 Relay Connection
To set relay output, see parameter group 5-4* Relays.
No.
01-02 make (normally open)
01-03 break (normally closed)
04-05 make (normally open)
04-06 break (normally closed)
44
Table 4.8 Relay Connections
Location of relays
Illustration 4.25 Terminals for Relay Connection
(Enclosure Types A5, B1 and B2).
Illustration 4.24 Terminals for Relay Connection
(Enclosure Types A1, A2 and A3).
Illustration 4.26 Terminals for Relay Connection
(Enclosure Types C1 and C2).
22 MG34X102 - Rev. 2013-12-04
Page 27

2
1
10 mm
130BA310.10
12 13
18
19
27
29
32
33
X62
X55
X56
X57
X58
X59
2
X60
130BB794.10
1
Electrical Installation
VLT® Lift Drive LD 302
4.9.1.4 Wiring to Control Terminals
Control terminal connectors can be unplugged from the
frequency converter for ease of installation, as shown in
Illustration 4.22.
1. Open the contact by inserting a small screwdriver
into the slot above or below the contact, as
shown in Illustration 4.27.
2. Insert the bared control wire into the contact.
3. To fasten the control wire into the contact,
remove the screwdriver.
4. Ensure that the contact is not loose. Loose
control wiring can cause equipment faults or less
than optimal operation.
4 4
Illustration 4.27 Connecting Control Wiring
See chapter 12.3 Power Ratings, Weight and Dimensions for
control terminal wiring sizes.
See chapter 4.7 Motor Connection for typical control wiring
connections.
4.9.1.5
Lift Controller MCO 361 Control
Item Description Item Description
1 Terminal block 1 X58 24 V DC supply
2 Terminal block 2 X59 Digital outputs
X55 Encoder 2 X62 Not used
X56 Not used X60 DCP connector
X57 Digital inputs
Terminals
Illustration 4.28 Location of Terminal Blocks on MCO 361
MCO control terminals are plug connectors with screw
terminals.
X55 = Encoder
X56 = Not used
X57 = Digital inputs
X58 = 24 V DC supply
X59 = Digital outputs
X62 = Not used
X60 = DCP connector
Terminal block 1 is used with bookstyle and terminal block
2 with compact enclosure types.
MG34X102 - Rev. 2013-12-04 23
Page 28

1
2
PE
FC
PE
PLC
130BB922.12
PE PE
<10 mm
100nF
FC
PE
PE
PLC
<10 mm
130BB609.12
Electrical Installation
VLT® Lift Drive LD 302
Terminal
Block No
TTL
1 +24 V supply - - 2 +8 V supply - - 3 +5 V supply 5 V 5 V 5 V
4 GND 0 V 0 V 0 V
44
X55
X56 1-12 Not used No function
X57
X58
X59
5 A A A A
6 A not A not A not A not
7 B B B B
8 B not B not B not B not
9 Z/Clock H N Clock
10 Z not/Clock not H not N not Clock not
11 DATA - - DATA
12 DATA not - - DATA not
1 Digital Input Drv. enable
2 Digital Input
3 Digital Input
4 Digital Input
5 Digital Input
6 Digital Input
7 Digital Input
8 Digital Input
9 Digital Input not used
10 Digital Input not used
1 +24 V supply not used
2 GND not used
1 Digital Output
2 Digital Output
3 Digital Output
4 Digital Output Output contactor K12
5 Digital Output CTR - Ready/fault
6 Digital Output
7 Digital Output
8 Digital Output Connected to terminal 18
Terminal
description
Lift controller function
SinCos
(1 Vpp)
Defined by 19-50 Run-in
mode
Defined by 19-50 Run-in
mode
Defined by 19-50 Run-in
mode
Defined by 19-50 Run-in
mode
Defined by 19-50 Run-in
mode
Defined by 19-50 Run-in
mode
Defined by 19-50 Run-in
mode
Defined by 19-84 Function
output 1
Speed level 1, < 0.8 m/s or
depending on 19-71 Set-up
counter
Speed level 2, < 0.3 m/s or
depending on 19-71 Set-up
counter
Over temperature. Depends
on 19-70 Temp. monitor
In position or Stand-still for
setting 19-50 Run-in mode
to 6 or 7.
SSI/Endat
Terminal
Block No
X60
*CS is high when transmissions are active
X62 1-5 Not used N/A
Table 4.9 Terminal Blocks
Terminal
description
CS* Control Select Can DCP3 DCP4
1 RxD/TxD - P
2 RxD/TxD - N
3 0 V
4 5 V
Lift controller function
4.9.1.6 Using Screened Control Cables
Correct screening
Provide screening clamps at both ends of cable to ensure
best possible cable contact.
If the ground potential between the frequency converter
and the PLC differs, electric noise may occur. Solve this
problem by fitting an equalising cable next to the control
cable. Minimum cable cross section: 16 mm2 [6 AWG].
Item Description
1
2 Equalising cable
Long control cables
With long control cables, ground loops may occur. To
eliminate ground loops, connect one end of the screen-toground with a 100 nF capacitor (keep leads short).
Min. 16 mm2 [6 AWG]
Illustration 4.29 Correct Screening
Illustration 4.30 Long Control Cables
24 MG34X102 - Rev. 2013-12-04
Page 29

PE
FC
PE
FC
130BB923.12
PE PE
69
68
61
69
68
61
1
2
<10 mm
37
12
130BT314.10
Electrical Installation
Avoid EMC noise on serial communication
To reduce interference between conductors, use twistedpair cables, see Illustration 4.31. Connect the terminal the
ground via an internal RC-link. The recommended method
is shown in Illustration 4.31.
Illustration 4.31 Twisted-pair Cables
VLT® Lift Drive LD 302
4.9.1.7 Terminal 37, Safe Torque Off
Preparation
Remove the bridge (jumper) between terminals 37 and 12
(24 V DC). Cutting or breaking the jumper is not sufficient.
4 4
Illustration 4.32 Bridge Jumper Between Terminal 37 and
Terminal 12, 24 V DC.
MG34X102 - Rev. 2013-12-04 25
Page 30

130BD343.10
Mains supply
Rectier
Control
Card
Inverter
M
V LT
COM
(T20)
24V (T12)
37
K1 K2
K1
K2
K1 K2
Mechanical brake control
Switching element
monitor
Control system
K1
K2
Switching element
Safety circuit with
switching elements
Digital
controls
Electrical Installation
VLT® Lift Drive LD 302
44
Illustration 4.33 Wiring in Lift Applications
System component requirements
All components used with the Safe Torque Off function
must comply with the general requirements of EN 81-1.
Switching device requirements
The monitoring of the switching device is as defined in
EN81-1 § 12.7.1: "The supply at terminal 37 must be
interrupted by 2 independent contacts (see block diagram).
If one contactor does not open, prevent a new start at the
latest with the next direction change”.
Design of the switching elements:
According to EN81 § 13..2.1.2 b) category DC -13, § 13.2.1.3
(in forced contacts) and § 13.2.2.
§ 14.1.1 error consideration for electrical safety devices
Electrical requirement of the switching elements:
Air and leakage paths
•
Rated shock capability 4 kV
•
IEC 60 664-1 over voltage category III
•
Degree of contamination 3
•
Rated insulation voltage 250 V AC
•
The wire between terminal 12 and the first contact
element is identical to the wire from contact element 2 to
terminal 37. This wire must be protected and the screen
must be connected to terminal 20 (GND). The 2 switching
elements must be installed next to each other. Electrical
requirements of the cable must comply with the
requirements of EN 81-1 § 13,5. The cables must be
flexible and protected Rated voltage Uo/U 300/500 V.
NOTICE
The function of the 2 independent switching elements
can also be activated with an emergency stop relay in
accordance with EN954-1 category 4 and EN81 appendix
H. Perform a function test according to the elevator
control system documentation.
4.9.1.8 Lift Control without Motor
Contactors
The Safe Torque Off function can be used as replacement
for the 2 independent contractors between frequency
converter and motor.
26 MG34X102 - Rev. 2013-12-04
Page 31

Electrical Installation
VLT® Lift Drive LD 302
4.10 Installation Check List
Before completing installation of the unit, inspect the entire installation as detailed in Table 4.10. Check and mark the items
when completed.
Inspect for Description
Auxiliary equipment•Look for auxiliary equipment, switches, disconnects, or input fuses/circuit breakers that may reside on the
input power side of the frequency converter or output side to the motor. Ensure that they are ready for
full-speed operation
Check function and installation of any sensors used for feedback to the frequency converter
•
Remove any power factor correction caps on motor(s)
•
Adjust any power factor correction caps on the mains side and ensure that they are dampened
•
Cable routing
Control wiring
Cooling clearance
Ambient conditions•Check that requirements for ambient conditions are met
Fusing and circuit
breakers
Grounding
Input and output
power wiring
Panel interior
Switches
Vibration
Ensure that motor wiring and control wiring are separated or screened or in 3 separate metallic conduits
•
for high-frequency interference isolation
Check for broken or damaged wires and loose connections
•
Check that control wiring is isolated from power and motor wiring for noise immunity
•
Check the voltage source of the signals, if necessary
•
The use of screened cable or twisted pair is recommended. Ensure that the shield is terminated correctly
•
Measure that top and bottom clearance is adequate to ensure proper air flow for cooling, see
•
Check for proper fusing or circuit breakers
•
Check that all fuses are inserted firmly and are in operational condition and that all circuit breakers are in
•
the open position
Check for sufficient ground connections that are tight and free of oxidation
•
Grounding to conduit, or mounting the back panel to a metal surface, is not a suitable grounding
•
Check for loose connections
•
Check that motor and mains are in separate conduit or separated screened cables
•
Inspect that the unit interior is free of dirt, metal chips, moisture, and corrosion
•
Check that the unit is mounted on an unpainted, metal surface
•
Ensure that all switch and disconnect settings are in the proper positions
•
Check that the unit is mounted solidly, or that shock mounts are used, as necessary
•
Check for an unusual amount of vibration
•
☑
4 4
Table 4.10 Installation Check List
CAUTION
POTENTIAL HAZARD IN THE EVENT OF INTERNAL FAILURE
Risk of personal injury when the frequency converter is not properly closed.
Before applying power, ensure all safety covers are in place and securely fastened.
•
MG34X102 - Rev. 2013-12-04 27
Page 32

Commissioning
5 Commissioning
VLT® Lift Drive LD 302
5.1 Safety Instructions
5.1.1 Safety Inspection
5.2 Applying Power to the Frequency
Converter
5.2.1 Applying Power Procedure
CAUTION
HIGH VOLTAGE!
If input and output connections have been connected
55
improperly, there is potential for high voltage on these
terminals. Power cables for multiple motors run
improperly in same conduit cause a risk of leakage
current charging capacitors within the frequency
converter. The risk is also present even when the
frequency converter is disconnected from mains input.
For initial start-up, make no assumptions about power
components. Follow pre-start procedures. Failure to
follow pre-start procedures could result in personal
injury or damage to equipment.
1. Input power to the unit must be OFF and locked
out. Do not rely on the frequency converter
disconnect switches for input power isolation.
2. Verify that there is no voltage on input terminals
L1 (91), L2 (92), and L3 (93), phase-to-phase, and
phase-to-ground,
3. Verify that there is no voltage on output
terminals 96 (U), 97 (V), and 98 (W), phase-tophase, and phase-to-ground.
4. Confirm continuity of the motor by measuring
ohm values on U-V (96-97), V-W (97-98), and W-U
(98-96).
5. Check for proper grounding of the frequency
converter as well as the motor.
6. Inspect the frequency converter for loose
connections on terminals.
7. Confirm that the supply voltage matches voltage
of frequency converter and motor.
WARNING
HIGH VOLTAGE!
Frequency converters contain high voltage when
connected to the energised DC bus. Only qualified
personnel should install, start up and maintain the
freqeuncy converters. Failure to let qualified personnel
install, start up and maintain the frequency converters
could result in death or serious injury.
WARNING
UNINTENDED START!
When the frequency converter is connected to the
energised DC bus, the motor may start at any time. The
frequency converter, motor, and any driven equipment
must be in operational readiness. Failure to be in
operational readiness when the frequency converter is
connected to the energised DC bus could result in death,
serious injury, equipment, or property damage.
1. Confirm that input voltage is balanced within 3%.
If not, correct input voltage imbalance before
proceeding. Repeat procedure after voltage
correction.
2. Ensure optional equipment wiring, if present,
matches installation application.
3. Ensure that all operator devices are in the OFF
position. Panel doors closed, or a cover mounted.
4. Apply power to the unit. DO NOT start the
frequency converter now. For units with a
disconnect switch, turn to the ON position to
apply power to the frequency converter.
NOTICE
Before applying power to the unit, inspect the entire
installation, see chapter 4.10.1 Installation Check List
NOTICE
If the status line in the LCP reads AUTO REMOTE
COAST,it indicates that the unit is ready to operate, but
is missing an input signal on terminal 27.
5.3 Local Control Panel
The local control panel (LCP) is the combined display and
keypad on the front of the unit and has several user
functions.
28 MG34X102 - Rev. 2013-12-04
Page 33

Auto
on
Reset
Hand
on
O
Status
Quick
Menu
Main
Menu
Alarm
Log
Cancel
Info
Status
1(1)
1234rpm
Back
OK
43,5Hz
Run OK
43,5Hz
On
Alarm
Warn.
130BC362.10
a
b
c
d
1.0 A
1.1
2
3
1.3
1.2
130BP041.10
799 RPM
Auto Remote Ramping
1 (1)
36.4 kw7.83 A
0.000
53.2 %
Status
Commissioning
VLT® Lift Drive LD 302
Start, stop, and control speed when in local
•
control
Display operational data, status, warnings, and
•
cautions
Programming frequency converter functions
•
Manually Reset the frequency converter after a
•
fault when auto-reset is inactive
NOTICE
Adjust the display contrast by pressing [Status] and [▲]/
[▼].
5.3.1 LCP Layout
The graphical LCP is divided into 4 functional groups (see
Illustration 5.1).
local operation. Also included are the status
indicator lights.
d. Operational keys and reset.
5.3.2 Setting LCP Display Values
The display area is activated when the frequency converter
receives power from
mains voltage
•
a DC bus terminal
•
a 24 V external supply
•
The information displayed on the LCP can be customised
for user application.
Each display readout has a parameter associated
•
with it
Options are selected in main menu 0-2*
•
The frequency converter status at the bottom line
•
of the display is generated automatically and is
not selectable. See chapter 9 Application Examples
for definitions and details.
5 5
Display Parameter number Default setting
1.1 0-20 Speed [RPM]
1.2 0-21 Motor current
1.3 0-22 Power [kW]
2 0-23 Frequency
3 0-24 Reference [%]
Table 5.1 Parameter Numbers and Default Settings for Display
Lines
Illustration 5.1 LCP
a. Display area.
b. Display menu keys for changing the display to
Illustration 5.2 Example Showing all Display Lines
show status options, programming, or error
message history.
c. Navigation keys for programming functions,
moving the display cursor, and speed control in
MG34X102 - Rev. 2013-12-04 29
Page 34

1.1
1.2
2
1.3
130BP062.10
207RPM
Auto Remote Running
1 (1)
24.4 kW5.25A
6.9
Hz
Status
130BP045.10
Status
Quick
Menu
Main
Menu
Alarm
Log
130BT117.10
OK
Back
Info
Warn
Alarm
On
Cancel
Commissioning
Illustration 5.3 Example Showing a Reduced Number of
Display Lines
VLT® Lift Drive LD 302
Key Function
Alarm log
Table 5.2 Menu Key Functions
Displays a list of current warnings, the last 5
alarms, and the maintenance log.
For details about the frequency converter
•
before it entered the alarm mode, select the
alarm number using the navigation keys
and press [OK].
5.3.4 Navigation Keys
55
5.3.3 Display Menu Keys
Navigation keys are used for programming functions and
moving the display cursor. The navigation keys also
provide speed control in local (hand) operation. 3 indicator
Menu keys are used for menu access for parameter set-up,
lights are also located in this area.
toggling through status display modes during normal
operation, and viewing fault log data.
Illustration 5.4 Menu Keys
Key Function
Status
Quick Menu
Main Menu
Press to show operational information.
In Auto mode, press and hold to toggle
•
between status readout displays
Press repeatedly to scroll through each
•
status display
•
Press and hold [Status] plus [▲] or [▼] to
adjust the display brightness
The symbol in the upper right corner of the
•
display shows the motor rotation direction
and the active set-up. This is not
programmable.
Allows access to programming parameters for
initial set-up instructions and many detailed
application instructions.
Press to access Q2 Quick Set-up for
•
sequenced instructions to program the basic
frequency converter set-up
Follow the sequence of parameters as
•
presented for the function set-up
Allows access to all programming parameters.
Press twice to access top-level index
•
Press once to return to the last location
•
accessed
Press and hold to enter a parameter
•
number for direct access to that parameter
Illustration 5.5 Navigation Keys
Key Function
Back
Cancel
Info
Navigation
keys
OK
Table 5.3 Navigation Key Functions
Reverts to the previous step or list in the menu
structure.
Cancels the last change or command as long as
the display mode has not changed.
Press for a definition of the function being
displayed.
Use the 4 navigation keys to move between items
in the menu.
Use to access parameter groups or to enable an
option.
30 MG34X102 - Rev. 2013-12-04
Page 35

130BP046.10
Hand
on
O
Auto
on
Reset
Commissioning
VLT® Lift Drive LD 302
Indicator
light
Green On The On indicator light activates
Yellow Warn When warning conditions are met,
Red Alarm A fault condition causes the red
Table 5.4 Indicator Light Functions
5.3.5
Operation keys are found at the bottom of the LCP.
Indicator Function
when the frequency converter
receives power from mains
voltage, a DC bus terminal, or a 24
V external supply.
the yellow Warn indicator light
comes on and text appears in the
display area identifying the
problem.
alarm indicator light to flash and
an alarm text is displayed.
Operation Keys
Data can be uploaded into the LCP memory as a
•
storage back-up
Once stored in the LCP, the data can be
•
downloaded back into the frequency converter
Data can also be downloaded into other
•
frequency converters by connecting the LCP into
those units and downloading the stored settings.
(This procedure is a quick way to program
multiple units with the same settings).
Initialisation of the frequency converter to restore
•
factory default settings does not change data
stored in the LCP memory
WARNING
UNINTENDED START!
When the frequency converter is connected to AC mains,
the motor may start at any time. The frequency
converter, motor, and any driven equipment must be in
operational readiness. Failure to be in operational
readiness when the frequency converter is connected to
AC mains could result in death, serious injury, or
equipment or property damage.
5 5
Illustration 5.6 Operation Keys
Key Function
Hand on
Off
Auto On
Reset
Table 5.5 Operation Key Functions
5.3.6
Starts the frequency converter in local control.
To control frequency converter speed, use the
•
navigation keys
An external stop signal by control input or
•
serial communication overrides the local hand
on
Stops the motor but does not remove power to
the frequency converter.
Puts the system in remote operational mode.
Responds to an external start command by
•
control terminals or serial communication
Speed reference is from an external source
•
Resets the frequency converter manually after a
fault has been cleared.
Back-up and Copying Parameter
Settings
Programming data is stored internally in the frequency
converter.
CAUTION
Initialisation restores the unit to factory default settings.
Any programming, motor data, localisation, and
monitoring records are lost. Uploading data to the LCP
provides a back-up before initialisation.
Restoring the frequency converter parameter settings back
to default values is done by initialisation of the frequency
converter. Initialisation can be carried out through
14-22 Operation Mode or manually.
Initialisation using 14-22 Operation Mode does not
•
change frequency converter data such as
operating hours, serial communication selections,
personal menu settings, fault log, alarm log, and
other monitoring functions
Using 14-22 Operation Mode is generally
•
recommended
Manual initialisation erases all motor,
•
programming, localisation, and monitoring data
and restores factory default settings
5.3.7
Recommended Initialisation
1. Press [Main Menu] twice to access parameters.
2.
Scroll to 14-22 Operation Mode.
3. Press [OK].
4.
Scroll to Initialisation.
MG34X102 - Rev. 2013-12-04 31
Page 36

130BD644.10
Auto
on
Reset
Hand
on
O
Status
Quick
Menu
Main
Menu
Alarm
Log
Back
Cancel
Info
OK
Status
1(1)
0.00A
Operating Mode
On
Alarm
Warn.
000000000000bin
X57.1
X57.2
X57.3
X57.4
X57.5
X57.6
X57.7
X57.8
X57.9
X57.10
00 00000000000 bin
130BD352.10
Commissioning
VLT® Lift Drive LD 302
5. Press [OK].
6. Remove power to the unit and wait for the
display to turn off.
7. Apply power to the unit.
Default parameter settings are restored during start up.
This may take slightly longer than normal.
8. Alarm 80 is displayed.
9. Press [Reset] to return to operation mode.
55
5.3.8 Manual Initialisation
1. Disconnect power to the unit and wait for the
Illustration 5.8 LCP Display, Status Terminal X.57
display to turn off.
2. Press and hold [Status], [Main Menu] and [OK] at
the same time and apply power to the unit.
Factory default parameter settings are restored during
start-up.
After powering-up the frequency converter, the LCP
displays Operation Mode.
The LCP displays the input status terminal X.57 (0 bin=0 V
DC, 1 bin=24 V DC) and the actual motor current in
Ampere.
32 MG34X102 - Rev. 2013-12-04
Illustration 5.7 LCP Display
Page 37

Programming
6 Programming
VLT® Lift Drive LD 302
6.1 Basic Operational Programming
The frequency converter requires basic operational
programming before running the best performance.
1. To enable motor operation, enter motor
nameplate data.
2.
Set up the parameters in parameter group 19-**
Application Parameters for the lift application.
6.2 Automatic Motor Adaptation
Automatic Motor Adaptation (AMA) is a procedure that
measures the electrical characteristics of the motor to
optimise compatibility between the frequency converter
and the motor.
The frequency converter builds a mathematical
•
model of the motor for regulating output motor
current. The procedure also tests the input phase
balance of electrical power. It compares the
motor characteristics with the data entered in
parameters 1-20 Motor Power [kW] to 1-25 Motor
Nominal Speed.
It does not cause the motor to run and it does
•
not harm the motor
Some motors may be unable to run the complete
•
version of the test. In that case, select Enable
reduced AMA
If an output filter is connected to the motor,
•
select Enable reduced AMA
If warnings or alarms occur, see chapter 10 Special
•
Conditions
Run this procedure on a cold motor for best
•
results
To run AMA
1. Press [Main Menu] to access parameters.
2.
Scroll to parameter group 19-** Application
Parameters.
3. Press [OK].
4.
Scroll to 19-63 Motor Adaptation (AMA).
5. Press [OK].
6.
Select [1] Enable complete AMA.
7. Press [OK].
8. Follow on-screen instructions.
9. The AMA runs automatically and indicates when
it is complete.
10. Press [OK] and [Cancel] to save measured values.
6.3
Programming the Lift Application
Press [Main Menu] or [Quick Menu] to set up the lift
application parameters.
NOTICE
Press [OK] and [Cancel] simultaneously to save changed
parameter settings.
The following procedures describe which parameters to set
and in which order.
Setting motor data for asynchronous motors
1. 19-01 Motor number.
2. 1-10 Motor Construction.
3. 1-20 Motor Power [kW].
4. parameter 1-22 Motor Voltage.
5. parameter 1-23 Motor Frequency.
6. parameter 1-24 Motor Current.
7. parameter 1-25 Motor Nominal Speed.
8. 19-02 Motor cosphi.
Setting motor data for permanent magnet motors
1. 19-01 Motor number.
2. 1-10 Motor Construction.
3. parameter 1-24 Motor Current.
4. parameter 1-25 Motor Nominal Speed.
5. parameter 1-26 Motor Cont. Rated Torque.
6. parameter 1-30 Stator Resistance (Rs).
7. parameter 1-37 d-axis Inductance (Ld).
8. parameter 1-39 Motor Poles.
9. parameter 1-40 Back EMF at 1000 RPM.
Setting the incremental encoder data
1. parameter 32-00 Incremental Signal Type.
2. parameter 32-01 Incremental Resolution.
Motor adaptation for asynchronous motors
1. 19-63 Motor adaptation (asynchron motor).
Setting the lift-construction data
1. 19-10 Traction sheave [mm].
2. 19-11 Ration 100.
3. 19-12 Suspension.
6 6
MG34X102 - Rev. 2013-12-04 33
Page 38

Programming
VLT® Lift Drive LD 302
Setting the control type
1. 19-86 Enable simple control.
2. 19-50 Run-in mode.
Save data and calculate internal settings
1. 19-64 Store parameter.
Pre-start check
The 2 LEDs at terminal block X55 show the status of
channels A and B of the incremental encoder.
Check that the LEDs are on. If the LEDs are off, there is a
broken wire or a short circuit.
Starting the frequency converter in inspection mode
1. Set the speed signal (vi) and the direction signal
66
The motor is now magnetised, the brake is released, and
the frequency converter starts. If the motor does not start,
see chapter 8.3.1 Basic Troubleshooting.
The motor runs controlled in both directions and the
frequency converter can control the lift motor.
Start speed controller - asynchronous motor
Start speed controller - permanent magnet motor
Operation speed controller - asynchronous motor
(32/33).
2. Set the enable signal (X57.1 and 27).
1.
Set 19-13 Brake lift delay to a value between 300
and 800 ms.
2.
Set 19-14 Brake delay to a value between 30 and
500 ms.
3.
Set 19-40 KP-gain at start to 100.
4.
Set 19-42 I-time at start to 200 ms.
5.
Set 19-44 Filtertime at start to 10 ms.
6.
Set 19-46 Pos gain start to 0.1.
1.
Set 19-13 Brake lift delay to 0 ms.
2.
Set 19-14 Brake delay to a value between 300 and
500 ms.
3.
Set 19-40 KP-gain at start to a value between 500
and 100.
4.
Set 19-42 I-time at start to a value between 12
and -50 ms.
5.
Set 19-44 Filtertime at start to 1 ms.
6.
Set 19-46 Pos gain start to a value between 0.2
and 0.5.
1.
Set 19-41 KP-gain at operation to 100.
2.
Set 19-43 I-time operation to 200 ms.
3.
Set 19-45 Filtertime operation to 10 ms.
Operation speed controller - permanent magnet motor
1.
Set 19-41 KP-gain at operation to a value between
10 and 70.
2.
Set 19-43 I-time operation to 200 ms.
3.
Set 19-45 Filtertime operation to 10 ms.
Stop behaviour
1. 19-15 Brake close delay.
2. 19-58 Delay after stop.
3. 19-59 Torque down time.
Setting of speeds
1. 19-20 Max. speed [m/s].
2. 19-21 V4 [m/s], Nominal speed.
3. 19-22 V0 [m/s], Levelling speed.
4. 19-23 Vi [m/s], Inspection speed.
5. 19-24 V3 [m/s], Intermediate speed 1.
6. 19-25 V2 [m/s], Intermediate speed 2.
7. 19-26 Vn [m/s], Relevelling speed.
8. 19-28 V1 [m/s], Intermediate speed 3.
Adjusting the motion profile
1. 19-19 Run in distance [mm].
2. 19-21 V4 [mm/s].
3. 19-22 V0 [mm/s].
4.
19-30 Acceleration [mm/s2].
5.
19-31 Deceleration [mm/s2].
6.
19-32 Start at jerk [mm(s3].
7.
19-33 Accel. jerk [mm/s3].
8.
19-34 Decel. jerk [mm/s3].
9.
19-35 Run in jerk [mm/s3].
10.
19-55 L-start acc [mm/s2].
11. 19-56 L-start speed [mm/s].
12. 19-57 L-start time [ms].
34 MG34X102 - Rev. 2013-12-04
Page 39

130BD353.10
Release
I1+27+37
Start
Brake
release
Speed
I2...I8
Direction
selected
Motor
on
Motor current
on
Release time
expired
Release
I1+27+37
Speed
I2...I8
Set speed
Direction
UP and Down
Direction
Down
Direction
change?
Decelerate
to 0 mm/s
Motor
off
Error
message
Brake
close
Motor off
No direction
Decelerate
to 0 mm/s
Execute travel
command
Y
N
N
NN
N
N
N
N
N
Y
Y
Y
Y
YYY
Y
Programming
VLT® Lift Drive LD 302
6.3.1 Start and Stop Sequences
NOTICE
Start and stop sequences in lift operating mode.
6 6
Illustration 6.1 Lift Control Start Sequence
MG34X102 - Rev. 2013-12-04 35
Page 40

130BD354.10
Falling edge
run-in signal
Target position
=pos + run - in pos
Positioning
mode
Release
I1+27+37
Position
reached
Brake
close
Closing time
expired?
Motor not
energized
Signal position
reached
Release
I1+27+37
Position reached
delete
End
Lift drive
Motor
de-energized
Brake
close
Y
N
Y
Y
Y
N N
N
Programming
VLT® Lift Drive LD 302
66
Illustration 6.2 Lift Control Stop Sequence
36 MG34X102 - Rev. 2013-12-04
Page 41

T
tb tat0
tc
ta
Hz
[s]
50
8
3
0
0.5 2.5 1.3
1
2
3
4
51
2.5 2 0.5 30
Im
143%
123%
112%
83%
0
130BD342.10
Functions
VLT® Lift Drive LD 302
7 Functions
7.1 Brake Functions
7.1.1 Introduction
Brake function is applied for braking the load on the
motor shaft, either as dynamic brake or static brake.
7.1.1.1 Mechanical Holding Brake
A mechanical holding brake mounted directly on the
motor shaft normally performs static braking. In some
applications, the static holding torque works as static
holding of the motor shaft (synchronous permanent
motors). A PLC or a digital output from the frequency
converter (relay or solid state) controls the holding brake.
NOTICE
When the holding brake is included in a safety chain:
A frequency converter cannot provide a safe control of a
mechanical brake. A redundancy circuitry for the brake
control must be included in the total installation.
7.1.1.2 Dynamic Brake
1
Load cycle
2 Motor current
3 Motor operation
4 Generator operation
7 7
Establish a dynamic brake by using a brake resistor. A
brake IGBT keeps the overvoltage below a certain
threshold by directing the brake energy from the motor to
the connected brake resistor.
Brake Resistor Requirements
7.1.2
A brake resistor can handle regenerative braking and
ensure that energy is absorbed in the brake resistor and
not in the frequency converter. For more information, see
Brake Resistor Design Guide.
The amount of kinetic energy transferred to the resistor in
each braking period can be calculated based on the cycle
time and braking time (intermittent duty cycle).
Calculate the intermittent duty cycle for the resistor as
follows:
Duty cycle = tb/T
T = cycle time in s
tb is the braking time in s (of the cycle time)
Illustration 7.1 Intermittent Duty Cycle
Cycle time (s) 120
Braking duty cycle at 100% torque Continuous
Braking duty cycle at over torque (150/160%) 40%
Table 7.1 Braking at High Overload Torque Level
380-400 V
PK37-P75K
If a 10% duty cycle is applied, the brake resistors are able
to absorb brake power for 10% of the cycle time. The
remaining 90% of the cycle time is used on dissipating
excess heat. Danfoss offers brake resistors with duty cycle
of 5%, 10% and 40%.
NOTICE
Make sure that the resistor is designed to handle the
required braking time.
The max. permissible load on the brake resistor is stated as
a peak power at a given intermittent duty cycle and can
be calculated as:
2
U
Ω =
P
peak
dc
R
br
where
MG34X102 - Rev. 2013-12-04 37
Page 42

t0 t1 t2 t3 t4 t5 t6 t7t8t9 t10 t11 Time
par. 19-13
par. 19-14
par. 19-19
par. 19-58
par. 19-15
1
2
3
4
5
6
7
130BD351.11
par. 19-59
Functions
P
= P
peak
x Mbr [%] x η
motor
motor
x η
VLT
VLT® Lift Drive LD 302
[W]
As can be seen, the brake resistance depends on the
intermediate circuit voltage (Udc).
Size Brake
active
LD 302
3x380-400V*650 V 840 V/828 V 850 V/855 V
Warning before
cut out
Cut out (trip)
CAUTION
FIRE HAZARD!
Do not touch the brake resistor as it can get hot while/
after braking. To avoid fire, place the brake resistor in a
secure environment. Failure to follow these guidelines
can cause personal injury and property/equipment
damage.
7.1.2.1 Mechanical Brake Control
Table 7.2 Intermediate Circuit Voltage
* Power size dependent
The VLT Lift Drive LD 302 features a mechanical brake
control specifically designed for lift applications. Output 29
is used for controlling the brake.
NOTICE
Ensure that the brake resistor is rated for 850 V.
77
Danfoss recommends that the brake resistance R
enables the frequency converter to brake at the highest
braking torque (M
) of 160%. The formula can be
br(%)
rec
that
The LD 302 automatically implements control of the
mechanical brake and setting of controller parameters.
WARNING
Risk of mechanical brake malfunction. Do not alter the
settings of mechanical brake function parameters.
written as:
Interrupt the power supply by 2 from each other
independent electrical devices. These devices could be the
same as the devices for switching terminal 37 (Safe Torque
Off). If the switching elements did not open one of the 2
contacts at stop of the elevator, prevent renewed starting
R
Ω =
rec
P
motor
η
is typically at 0.90
motor
η
is typically at 0.98
VLT
2
U
x 100
dc
x
M
xη
br
%
VLT
x η
motor
at the latest with the next direction change.
For 480 V frequency converters, R
at 160% braking
rec
torque is written as:
480V :
480V :
375300
R
=
rec
P
motor
428914
R
=
rec
P
motor
Ω
Ω
1
2
1) For frequency converters ≤ 7.5 kW [10 hp] shaft output
2) For frequency converters 11-75 kW [15-100 hp] shaft
output
NOTICE
Do not apply resistor brake circuit resistances higher
than recommended by Danfoss. If a brake resistor with a
higher ohmic value is selected, the 160% braking torque
may not be achieved as the frequency converter may cut
out for safety reasons.
NOTICE
If there is a short circuit in the brake transistor, prevent
power dissipation in the brake resistor by using a mains
switch or contactor to disconnect the mains for the
frequency converter. (The frequency converter can
control the contactor).
38 MG34X102 - Rev. 2013-12-04
Motor speed
1
2 Motor current
3 Drive enable X57.1
4 Brake close/open
5 Control active X59.4
6 In position X59.7
7 Low speed V0
Illustration 7.2 Brake Release Sequence for Mechanical Brake
Control
Page 43

Functions
VLT® Lift Drive LD 302
Time Description
t0 In- Position
t1 Motor control on
t2 Delay and open brake
t3 Speed reference
t4 Max. speed
t5 Deceleration command
t6 Low speed V0
t7 Stop command
t8 Positioning
t9 Brake close
t10 Motor off
t11 In- Position
Parameter Description
19-13 Brake Lift delay
19-14 Brake delay
19-19 Run in distance
19-58 Delay after Stop
19-15 Brake close delay
Table 7.3 Brake Release Sequence for Mechanical Brake Control
Brake Resistor Cabling
7.1.3
NOTICE
EMC (twisted cables/screening)
To reduce the electrical noise from the wires between
the brake resistor and the frequency converter, the wires
must be twisted.
For enhanced EMC performance, use a metal screen.
DCP4
For lift controllers with absolute encoder system
As DCP3, plus:
•
Time-optimised direct levelling depending on
•
remaining distance
Millimetre accurate adjustment depending on
•
distance
Supervising the deceleration at the shaft ends
•
Physical
Point-to-Point link
•
Frequency converter and lift controller are linked,
•
based on RS-485 interface (semi-duplex mode).
Baud rate: 38.400 Baud
-
Parity: none
-
Data bits: 8
-
Stop bits: 1
-
Master/follower
The lift controller is the master
•
The frequency converter is the follower
•
The messages are transferred in a 15 ms cycle
•
The LD 302 supports DCP 3 and DCP 4 protocol. Terminal
60 is used as communication interface to the master.
DCP-Manufacturer Codes for VLT Lift Drive LD 302
Frequency converter manufacturer: Danfoss
•
GmbH
DCP-Identification: DA
•
7 7
7.2
DCP Communication
The Drive Control and Position protocol (DCP) is used for
the serial link between a lift controller and frequency
converter, based on an RS-485 interface.
The DCP protocol distinguishes between 3 modes:
DCPComChan
This mode provides only the DCP communication channel
without actuating the travel commands.
DCP3
For lift controllers without absolute encoder system:
Control via the serial DCP link instead of the
•
terminal board.
Status messages, such as fault and over
•
temperature, are transmitted via the DCP link
instead of by relay.
Monitoring speed (such as relevelling-,
•
deceleration- and overspeed)
MG34X102 - Rev. 2013-12-04 39
Page 44

130BD645.10
Status
1(1)
0.00A
Operating Mode
000000000000bin
Diagnostics and Troubleshoo...
VLT® Lift Drive LD 302
8 Diagnostics and Troubleshooting
8.1 Status Messages
The frequency converter automatically generates status
messages that appear in the middle of the display.
Act. inspection mode! Control mode is active
AMA active AMA, Automatic Motor Adaptation is
Auto on!! Frequency converter is not in automatic
Counter expired!!! Direction change counter expired
Counter low Direction change counter low/call
Operating Mode Lift Drive ready
Set parameter Internal parameter calculation and
88
MCO track error Monitor tracking error
MCO encoder error Encoder - fault, - short circuit, - wire
No motor data!! Motor data not assigned
Overspeed Shutdown due to overspeed
Overtemp heatsink Overtemperature on heatsink
Overtemp motor Overtemperature on motor
Please wait Wait until frequency converter is ready
Positioning n compl. Positioning not completed
VLT alarm There is a fault in the frequency
Lift application
message
active
mode
service
adjustment
breakage
converter
Table 8.1 Lift Application Messages and Descriptions
Illustration 8.1 Status Display
Description
8.2 Warnings and Alarms
The frequency converter monitors the condition of
input power
•
output
•
motor factors
•
other system performance indicators
•
A warning or alarm either indicates a problem internal to
the frequency converter or external failure conditions such
as
input voltage
•
motor load or temperature
•
external signals
•
other areas monitored by the frequency converter
•
Warnings
A warning is issued when an alarm condition is impending
or when an abnormal operating condition makes the
frequency converter issue an alarm. A warning clears itself,
when the abnormal condition has ended.
Alarms
Trip
The frequency converter suspends operation to prevent
frequency converter or system damage. The motor coasts
to a stop. The frequency converter continues to monitor
the frequency converter status. Remedy the fault condition
and reset the frequency converter.
Resetting the frequency converter after trip/trip lock
A trip can be reset in any of 4 ways:
Press [Reset] on the LCP
•
Digital reset input command
•
Serial communication reset input command
•
Auto reset
•
Trip-lock
Input power is cycled. The motor coasts to a stop. The
frequency converter continues to monitor the frequency
converter status.
1. Remove input power to the frequency converter.
2. Correct the cause of the fault.
3. Reset the frequency converter.
A warning is displayed in the LCP along with the warning
number.
An alarm flashes on display along with the alarm number.
40 MG34X102 - Rev. 2013-12-04
Page 45

130BP086.11
Status
0.0Hz 0.000kW 0.00A
0.0Hz
0
Earth Fault [A14]
Auto Remote Trip
1(1)
Diagnostics and Troubleshoo...
Illustration 8.2 Display Example of an Alarm
VLT® Lift Drive LD 302
See chapter 5.3.4 Navigation Keys for explanation of the
indicator lights.
The following warning/alarm information defines each
warning/alarm condition, provides the probable cause for
the condition, and details a remedy or troubleshooting
procedure.
WARNING 1, 10 Volts low
The control card voltage is below 10 V from terminal 50.
Remove some of the load from terminal 50, as the 10 V
supply is overloaded. Max. 15 mA or minimum 590 Ω.
A short circuit in a connected potentiometer or improper
wiring of the potentiometer can cause this condition.
Troubleshooting
Remove the wiring from terminal 50. If the
warning clears, the problem is with the wiring. If
the warning does not clear, replace the control
card.
WARNING/ALARM 2, Live zero error
This warning or alarm only appears if programmed in
6-01 Live Zero Timeout Function. The signal on one of the
analog inputs is less than 50% of the minimum value
programmed for that input. Broken wiring or faulty device
sending the signal can cause this condition.
Troubleshooting
Check connections on all the analog input
terminals. Control card terminals 53 and 54 for
signals, terminal 55 common. MCB 101 terminals
11 and 12 for signals, terminal 10 common. MCB
109 terminals 1, 3, 5 for signals, terminals 2, 4, 6
common).
Check that the frequency converter programming
and switch settings match the analog signal type.
Perform input terminal signal test.
WARNING/ALARM 3, No motor
No motor has been connected to the output of the
frequency converter.
WARNING/ALARM 4, Mains phase loss
A phase is missing on the supply side, or the mains
voltage imbalance is too high. This message also appears
for a fault in the input rectifier on the frequency converter.
Options are programmed at 14-12 Function at Mains
Imbalance.
Troubleshooting
Check the supply voltage and supply currents to
the frequency converter.
WARNING 5, DC link voltage high
The intermediate circuit voltage (DC) is higher than the
high-voltage warning limit. The limit is dependent on the
frequency converter voltage rating. The unit is still active.
WARNING 6, DC link voltage low
The intermediate circuit voltage (DC) is lower than the lowvoltage warning limit. The limit is dependent on the
frequency converter voltage rating. The unit is still active.
WARNING/ALARM 7, DC overvoltage
If the intermediate circuit voltage exceeds the limit, the
frequency converter trips after a time.
Troubleshooting
Connect a brake resistor
Extend the ramp time
Change the ramp type
Activate the functions in 2-10 Brake Function
Increase 14-26 Trip Delay at Inverter Fault
If the alarm/warning occurs during a power sag,
use kinetic back-up (14-10 Mains Failure)
WARNING/ALARM 8, DC under voltage
If the DC-link voltage drops below the undervoltage limit,
the frequency converter checks if a 24 V DC backup supply
is connected. If no 24 V DC backup supply is connected,
the frequency converter trips after a fixed time delay. The
time delay varies with unit size.
Troubleshooting
Check that the supply voltage matches the
frequency converter voltage.
Perform input voltage test.
Perform soft charge circuit test.
WARNING/ALARM 9, Inverter overload
The frequency converter is about to cut out because of an
overload (too high current for too long). The counter for
electronic, thermal inverter protection issues a warning at
98% and trips at 100%, while giving an alarm. The
frequency converter cannot be reset until the counter is
below 90%.
The fault is that the frequency converter has run with
more than 100% overload for too long.
Troubleshooting
Compare the output current shown on the LCP
with the frequency converter rated current.
Compare the output current shown on the LCP
with measured motor current.
Display the thermal drive load on the LCP and
monitor the value. When running above the
frequency converter continuous current rating,
the counter increases. When running below the
8 8
MG34X102 - Rev. 2013-12-04 41
Page 46

Diagnostics and Troubleshoo...
VLT® Lift Drive LD 302
frequency converter continuous current rating,
the counter decreases.
WARNING/ALARM 10, Motor overload temperature
According to the electronic thermal protection (ETR), the
motor is too hot. Select whether the frequency converter
issues a warning or an alarm when the counter reaches
100% in 1-90 Motor Thermal Protection. The fault occurs
when the motor runs with more than 100% overload for
too long.
Troubleshooting
Check for motor overheating.
Check if the motor is mechanically overloaded
Check that the motor current set in 1-24 Motor
Current is correct.
Ensure that Motor data in parameters 1-20 to
1-25 are set correctly.
If an external fan is in use, check in 1-91 Motor
External Fan that it is selected.
88
WARNING/ALARM 11, Motor thermistor over temp
The thermistor might be disconnected. Select whether the
frequency converter issues a warning or an alarm in
1-90 Motor Thermal Protection.
Troubleshooting
WARNING/ALARM 12, Torque limit
The torque has exceeded the value in 4-16 Torque Limit
Motor Mode or the value in 4-17 Torque Limit Generator
Mode. 14-25 Trip Delay at Torque Limit can change this
Running AMA in 19-63 Automatic Motor
Adaptation tunes the frequency converter to the
motor more accurately and reduces thermal
loading.
Check for motor overheating.
Check if the motor is mechanically overloaded.
Check that the thermistor is connected correctly
between either terminal 53 or 54 (analog voltage
input) and terminal 50 (+10 V supply). Also check
that the terminal switch for 53 or 54 is set for
voltage. Check that 1-93 Thermistor Source
selects terminal 53 or 54.
When using digital inputs 18 or 19, check that
the thermistor is connected correctly between
either terminal 18 or 19 (digital input PNP only)
and terminal 50.
If a KTY sensor is used, check for correct
connection between terminals 54 and 55
If using a thermal switch or thermistor, check that
the programming of 1-93 Thermistor Resource
matches sensor wiring.
If using a KTY Sensor, check the programming of
1-95 KTY Sensor Type, 1-96 KTY Thermistor Resource
and 1-97 KTY Threshold level match sensor wiring.
warning from a warning-only condition to a warning
followed by an alarm.
Troubleshooting
If the motor torque limit is exceeded during ramp
up, extend the ramp up time.
If the generator torque limit is exceeded during
ramp down, extend the ramp down time.
If torque limit occurs while running, possibly
increase the torque limit. Make sure that the
system can operate safely at a higher torque.
Check the application for excessive current draw
on the motor.
WARNING/ALARM 13, Over current
The inverter peak current limit (approximately 200% of the
rated current) is exceeded. The warning lasts about 1.5 s,
then the frequency converter trips and issues an alarm.
Shock loading or quick acceleration with high inertia loads
can cause this fault. If the acceleration during ramp up is
quick, the fault can also appear after kinetic back-up. If
extended mechanical brake control is selected, trip can be
reset externally.
Troubleshooting
Remove power and check if the motor shaft can
be turned.
Check that the motor size matches the frequency
converter.
Check parameters 1-20 to 1-25 for correct motor
data.
ALARM 14, Earth (ground) fault
There are current from the output phases to ground, either
in the cable between the frequency converter and the
motor or in the motor itself.
Troubleshooting
Remove power to the frequency converter and
repair the ground fault.
Check for ground faults in the motor by
measuring the resistance to the ground of the
motor cables and the motor with a
megohmmeter.
Perform current sensor test.
ALARM 15, Hardware mismatch
A fitted option is not operational with the present control
board hardware or software.
Record the value of the following parameters and contact
Danfoss:
15-40 FC Type
15-41 Power Section
15-42 Voltage
15-43 Software Version
15-45 Actual Typecode String
42 MG34X102 - Rev. 2013-12-04
Page 47

Diagnostics and Troubleshoo...
VLT® Lift Drive LD 302
15-49 SW ID Control Card
15-50 SW ID Power Card
15-60 Option Mounted
15-61 Option SW Version (for each option slot)
ALARM 16, Short circuit
There is short-circuiting in the motor or motor wiring.
Remove power to the frequency converter and repair the
short circuit.
WARNING/ALARM 22, Hoist mechanical brake
Report value shows what kind it is.
0 = The torque ref. was not reached before time out.
1 = Expected brake feedback not received before time out.
WARNING 23, Internal fan fault
The fan warning function is an extra protective function
that checks if the fan is running/mounted.
Troubleshooting
Check fan resistance.
Check soft charge fuses.
WARNING 24, External fan fault
The fan warning function is an extra protective function
that checks if the fan is running/mounted.
Troubleshooting
Check fan resistance.
Check soft charge fuses.
WARNING 25, Brake resistor short circuit
The brake resistor is monitored during operation. If a short
circuit occurs, the brake function is disabled and the
warning appears. The frequency converter is still
operational, but without the brake function. Remove
power to the frequency converter and replace the brake
resistor.
WARNING/ALARM 26, Brake resistor power limit
The power transmitted to the brake resistor is calculated as
a mean value over the last 120 s of run time. The
calculation is based on the intermediate circuit voltage and
the brake resistance value. The warning is active when the
dissipated braking is higher than 90% of the brake
resistance power.
WARNING
If the brake transistor is short-circuited, there is a risk of
substantial power being transmitted to the brake
resistor.
WARNING/ALARM 27, Brake chopper fault
The brake transistor is monitored during operation and if a
short circuit occurs, the brake function is disabled and a
warning is issued. The frequency converter is still
operational but, since the brake transistor has shortcircuited, substantial power is transmitted to the brake
resistor, even if it is inactive.
Remove power to the frequency converter and remove the
brake resistor.
This alarm/warning could also occur if the brake resistor
overheats.
WARNING/ALARM 28, Brake check failed
The brake resistor is not connected or not working.
ALARM 29, Heat Sink temp
The maximum temperature of the heat sink has been
exceeded. The temperature fault resets when the
temperature falls below a defined heat sink temperature.
The trip and reset points are different based on the
frequency converter power size.
Troubleshooting
Check for the following conditions.
Ambient temperature too high.
Motor cables too long.
Incorrect airflow clearance above and below the
frequency converter
Blocked airflow around the frequency converter.
Damaged heat sink fan.
Dirty heat sink.
Troubleshooting
Check fan resistance.
Check soft charge fuses.
IGBT thermal sensor.
ALARM 30, Motor phase U missing
Motor phase U between the frequency converter and the
motor is missing.
Remove power from the frequency converter and check
motor phase U.
ALARM 31, Motor phase V missing
Motor phase V between the frequency converter and the
motor is missing.
Remove power from the frequency converter and check
motor phase V.
ALARM 32, Motor phase W missing
Motor phase W between the frequency converter and the
motor is missing.
Remove power from the frequency converter and check
motor phase W.
ALARM 33, Inrush fault
Too many power-ups have occurred within a short time
period. Let the unit cool to operating temperature.
WARNING/ALARM 36, Mains failure
This warning/alarm is only active if the supply voltage to
the frequency converter is lost and 14-10 Mains Failure is
not set to [0] No Function. Check the fuses to the
frequency converter and mains supply to the unit.
8 8
MG34X102 - Rev. 2013-12-04 43
Page 48

Diagnostics and Troubleshoo...
VLT® Lift Drive LD 302
ALARM 38, Internal fault
When an internal fault occurs, a code number defined in
Table 8.2 is displayed.
Troubleshooting
Cycle power
Check that the option is properly installed
Check for loose or missing wiring
It may be necessary to contact Danfoss service or the
supplier. Note the code number for further troubleshooting directions.
No. Text
0 Serial port cannot be initialised. Contact your
Danfoss supplier or Danfoss Service Department.
256–258 Power EEPROM data is defective or too old
512 Control board EEPROM data is defective or too
old.
513 Communication time-out reading EEPROM data
514 Communication time-out reading EEPROM data
515 Application-oriented control cannot recognise the
88
516 Cannot write to the EEPROM because a write
517 Write command is under time-out
518 Failure in the EEPROM
519 Missing or invalid barcode data in EEPROM
783 Parameter value outside of min/max limits
1024–1279 A CAN telegram that has to be sent could not be
1281 Digital signal processor flash time-out
1282 Power micro software version mismatch
1283 Power EEPROM data version mismatch
1284 Cannot read digital signal processor software
1299 Option SW in slot A is too old
1300 Option SW in slot B is too old
1301 Option SW in slot C0 is too old
1302 Option SW in slot C1 is too old
1315 Option SW in slot A is not supported (not allowed)
1316 Option SW in slot B is not supported (not allowed)
1317 Option SW in slot C0 is not supported (not
1318 Option SW in slot C1 is not supported (not
1379 Option A did not respond when calculating
1380 Option B did not respond when calculating
1381 Option C0 did not respond when calculating
1382 Option C1 did not respond when calculating
1536 An exception in the application-oriented control is
EEPROM data.
command is on progress.
sent.
version
allowed)
allowed)
platform version
platform version
platform version.
platform version.
registered. Debug information written in LCP.
No. Text
1792 DSP Watch Dog is active. Debugging of power
part data, motor-oriented control data not
transferred correctly.
2049 Power data restarted
2064–2072 H081x: Option in slot x has restarted
2080–2088 H082x: Option in slot x has issued a powerup-wait
2096–2104 H983x: Option in slot x has issued a legal
powerup-wait
2304 Could not read any data from power EEPROM
2305 Missing SW version from power unit
2314 Missing power unit data from power unit
2315 Missing SW version from power unit
2316 Missing lo_statepage from power unit
2324 Power card configuration is determined to be
incorrect at power-up
2325 A power card has stopped communicating while
main power is applied
2326 Power card configuration is determined to be
incorrect after the delay for power cards to
register.
2327 Too many power card locations have been
registered as present.
2330 Power size information between the power cards
does not match.
2561 No communication from DSP to ATACD
2562 No communication from ATACD to DSP (state
running)
2816 Stack overflow control board module
2817 Scheduler slow tasks
2818 Fast tasks
2819 Parameter thread
2820 LCP stack overflow
2821 Serial port overflow
2822 USB port overflow
2836 cfListMempool too small
3072–5122 Parameter value is outside its limits
5123 Option in slot A: Hardware incompatible with
control board hardware
5124 Option in slot B: Hardware incompatible with
control board hardware.
5125 Option in slot C0: Hardware incompatible with
control board hardware.
5126 Option in slot C1: Hardware incompatible with
control board hardware.
5376–6231 Out of memory
Table 8.2 Internal Fault, Code Numbers
ALARM 39, Heat Sink sensor
No feedback from the heat sink temperature sensor.
The signal from the IGBT thermal sensor is not available on
the power card. The problem could be on the power card,
on the gate drive card, or the ribbon cable between the
power card and gate drive card.
44 MG34X102 - Rev. 2013-12-04
Page 49

Diagnostics and Troubleshoo...
VLT® Lift Drive LD 302
WARNING 40, Overload of digital output terminal 27
Check the load connected to terminal 27 or remove shortcircuit connection. Check 5-00 Digital I/O Mode and
5-01 Terminal 27 Mode.
WARNING 41, Overload of digital output terminal 29
Check the load connected to terminal 29 or remove shortcircuit connection. Check 5-00 Digital I/O Mode and
5-02 Terminal 29 Mode.
WARNING 47, 24 V supply low
The 24 V DC is measured on the control card. The external
24 V DC back-up power supply may be overloaded,
otherwise contact the Danfoss supplier.
WARNING 48, 1.8 V supply low
The 1.8 V DC supply used on the control card is outside of
allowable limits. The power supply is measured on the
control card. Check for a defective control card. If an
option card is present, check for an overvoltage condition.
WARNING 49, Speed limit
When the speed is not within the specified range in
4-11 Motor Speed Low Limit [RPM] and 4-13 Motor Speed
High Limit [RPM], the frequency converter shows a warning.
When the speed is below the specified limit in 1-86 Trip
Speed Low [RPM] (except when starting or stopping), the
frequency converter trips.
ALARM 50, AMA calibration failed
Contact Danfoss supplier or Danfoss service department.
ALARM 51, AMA check U
The settings for motor voltage, motor current and motor
power are wrong. Check the settings in parameters 1-20 to
1-25.
ALARM 52, AMA low I
The motor current is too low. Check the settings.
ALARM 53, AMA motor too big
The motor is too big for the AMA to operate.
ALARM 54, AMA motor too small
The motor is too small for the AMA to operate.
ALARM 55, AMA parameter out of range
The parameter values of the motor are outside of the
acceptable range. AMA cannot run.
ALARM 56, AMA interrupted by user
The user has interrupted the AMA.
ALARM 57, AMA internal fault
Try to restart AMA again a number of times, until the AMA
is carried out.
nom
nom
and I
nom
NOTICE
Repeated runs may heat the motor to a level where the
resistance Rs and Rr are increased. In most cases,
however, this behaviour is not critical.
ALARM 58, AMA Internal fault
Contact the Danfoss supplier.
WARNING 59, Current limit
The current is higher than the value in 4-18 Current Limit.
Ensure that motor data in parameters 1–20 to 1–25 are set
correctly. Possibly increase the current limit. Be sure that
the system can operate safely at a higher limit.
ALARM 64, Voltage Limit
The load and speed combination demands a motor
voltage higher than the actual DC-link voltage.
WARNING/ALARM 65, Control card over temperature
The cut-out temperature of the control card is 80 °C.
Troubleshooting
Check that the ambient operating temperature is
•
within limits
Check for clogged filters
•
Check fan operation
•
Check the control card
•
WARNING 66, Heat sink temperature low
The frequency converter is too cold to operate. This
warning is based on the temperature sensor in the IGBT
module.
Troubleshooting
The heat sink temperature measured as 0 °C could indicate
that the temperature sensor is defective, causing the fan
speed to increase to the maximum. If the sensor wire
between the IGBT and the gate drive card is disconnected,
this warning would result. Also, check the IGBT thermal
sensor.
ALARM 67, Option module configuration has changed
One or more options have either been added or removed
since the last power-down. Check that the configuration
change is intentional and reset the unit.
ALARM 68, Safe Stop activated
Safe Torque Off has been activated. To resume normal
operation, apply 24 V DC to terminal 37, then send a reset
signal (via bus, digital I/O, or by pressing [Reset].
ALARM 69, Power card temperature
The temperature sensor on the power card is either too
hot or too cold.
Troubleshooting
Check that the filters for the door fans are not
blocked.
ALARM 70, Illegal FC configuration
The control card and power card are incompatible. To
check compatibility, contact the Danfoss supplier with the
type code of the unit from the nameplate and the part
numbers of the cards.
WARNING 76, Power unit setup
The required number of power units does not match the
detected number of active power units.
8 8
MG34X102 - Rev. 2013-12-04 45
Page 50

Diagnostics and Troubleshoo...
VLT® Lift Drive LD 302
WARNING 77, Reduced power mode
The frequency converter is operating in reduced power
mode (less than the allowed number of inverter sections).
This warning is generated on power cycle when the
frequency converter is set to run with fewer inverters, and
remains on.
ALARM 79, Illegal power section configuration
The scaling card has an incorrect part number or is not
installed. The MK102 connector on the power card could
not be installed.
ALARM 80, Drive initialised to default value
Parameter settings are initialised to default settings after a
ALARM 82, CSIV parameter error
CSIV failed to init a parameter.
ALARM 85, Dang fail PB
Profibus/Profisafe error.
WARNING/ALARM 104, Mixing fan fault
The fan is not operating. The fan monitor checks that the
fan is spinning at power-up or whenever the mixing fan is
turned on.
Troubleshooting
Cycle power to the frequency converter to
determine if the warning/alarm returns.
manual reset. To clear the alarm, reset the unit.
ALARM 81, CSIV corrupt
CSIV file has syntax errors.
All lift controller messages are shown in the LCP in short text.
See Table 8.3 for more information.
Error no. LCP display Error text
88
102 Too many CAN objects There are no more CAN objects available (CANINI).
103 Illegal axis num. Axis not in system.
105 Error not reset Error not cleared.
106 Home not done Failed to move to HOME position.
107 Home vel. zero Home velocity 0
108 Position error Position error.
109 Index not found Index pulse (encoder) not found.
110 Unknown com. Unknown command.
111 SW end limit Software end limit activated.
112 Unknown param. Illegal parameter number.
113 FC not enabled VLT Error Status
114 Too many loops. Too many nested loops.
115 Par. save failed INLONG command got an illegal string
116 Param. memory Parameters in memory are corrupted.
117 Progr. Memory Programs in memory are corrupted.
118 Reset by CPU Reset by CPU.
119 User abort User abort.
121 No more SDO chn Number of SDO channels exceeded.
125 HW end limit Limit switch activated.
149 Too many inter. Too many interrupt functions.
150 No ext. 24 V External supply is missing.
151 Too many gosub Too many nested GOSUB commands
152 Too many returns Too many RETURN commands.
154 D. out overload Digital output overloaded.
155 LINK failed LINKGPAR failed.
156 Illegal double arg. A floating point function was called with an invalid argument.
160 Internal Intr. error Interrupt happened, but interrupt address is no longer valid.
162 Memory error Error in verifying
170 Too many DIM arrays Too many DIM arrays defined.
171 Array too small Array too small
175 Out of array mem. No more memory space for the new array defined by DIM.
176 Array size wrong Array size does not correspond to the size of the existing array.
179 Waitndx time-out Time-out while waiting for index.
184 Too many ontime Too many ONTIME or ONPERIODS interrupts.
46 MG34X102 - Rev. 2013-12-04
Page 51

Diagnostics and Troubleshoo...
VLT® Lift Drive LD 302
Error no. LCP display Error text
187 Out of memory Not enough memory for variables
188 CAN guarding error A guarding error happened.
189 CAN send-receive error CAN send or receive error.
190 Memory locked Memory locked
191 Illegal cam array Illegal curve array in SETCURVE.
192 Encoder error Encoder error
193 Stack overflow Stack overflow: Too many local variables or nested function calls.
194 Out of dyn. mem Out of dynamic memory.
195 Too many testindices Too many test indices in data logging command.
196 Code too old Code is too old for the current firmware.
198 Limit sw. violation Wrong direction after limit switch tripped and error reset.
199 Internal MCO fault Internal MCO fault
Table 8.3 Overview of Error Messages
8.3 Basic Troubleshooting
NOTICE
Press [OK] and [Cancel] simultaneously to save changed parameter settings.
Symptom Possible Cause Test Solution
Motor is stopped with MCO
Track-error or accelerates
unexpectedly
Motor runs controlled, but
in wrong direction.
Motor makes noise or
vibrations
Motor needs too much
current.
Table 8.4 Troubleshooting
The encoder direction is different
from the motor direction
Direction of movement depends
on the mechanical construction.
Wrong motor data may be
entered.
Check that motor data is correct. If using an asynchronous motor,
Change 19-05 Encoder direction.
If the problem still occurs, check
34-50 Actual Position if encoder
pulses are counted correctly. If not,
check encoder wiring or replace
the encoder.
Change 19-04 Car direction.
Reduce the value in 19-41 KP-gain
at operation.
perform AMA.
8 8
MG34X102 - Rev. 2013-12-04 47
Page 52

Start
Main contactors
switch on
Release + travel
command enabled
contractors
enabled
Main
N
130BD364.10
Position reached
Main contactors
switch o
Release + travel
command disabled
130BD365.10
= ”1”
End
Position reached
= ”0”
130BA119.10
B
A
A
B
A
B
B
A
Application Examples
9 Application Examples
VLT® Lift Drive LD 302
9.1 Main Contactors
Prolong the life time of the main contactors by only
switching off the main contactors if the lift motor is
deenergised (no current load). For load-free switching of
the main contactors, control of the lift should proceed as
illustrated in Illustration 9.1 and Illustration 9.2.
9.2 Operation with Absolute Encoder (SSI/
EnDat)
For running PM-motors with frequency converters, it is
necessary to know the exact rotor position. Usually, the
rotor position is determined by using a single-turn
absolute encoder mounted on the rotor shaft. The LD 302
does not need an absolute encoder for operating PMmotors. It detects the rotor position by creating a test
signal before the first motor start. However, it is possible
to use a single-turn absolute encoder for rotor position
detection. Switch to absolute encoder type after normal
commissioning is finished.
1. 19-08 Abs. encoder type.
2. 19-09 Abs. encoder offs.
3. 19-98 Abs. enc. position.
9.3 Check Encoder Rotation
99
If encoder feedback is used, check the encoder rotation.
The encoder is connected on the MCO 361 terminal block
X55.
Illustration 9.1 Main Contactors Power-on
Illustration 9.2 Main Contactors Power-off
The pulse input to the frequency converter determines the
encoder direction. Clockwise direction of the shaft end
means that channel A is 90 electrical degrees before
channel B. Counter clockwise direction means that channel
B is 90 electrical degrees before A.
Illustration 9.3 Encoder Direction
48 MG34X102 - Rev. 2013-12-04
Page 53
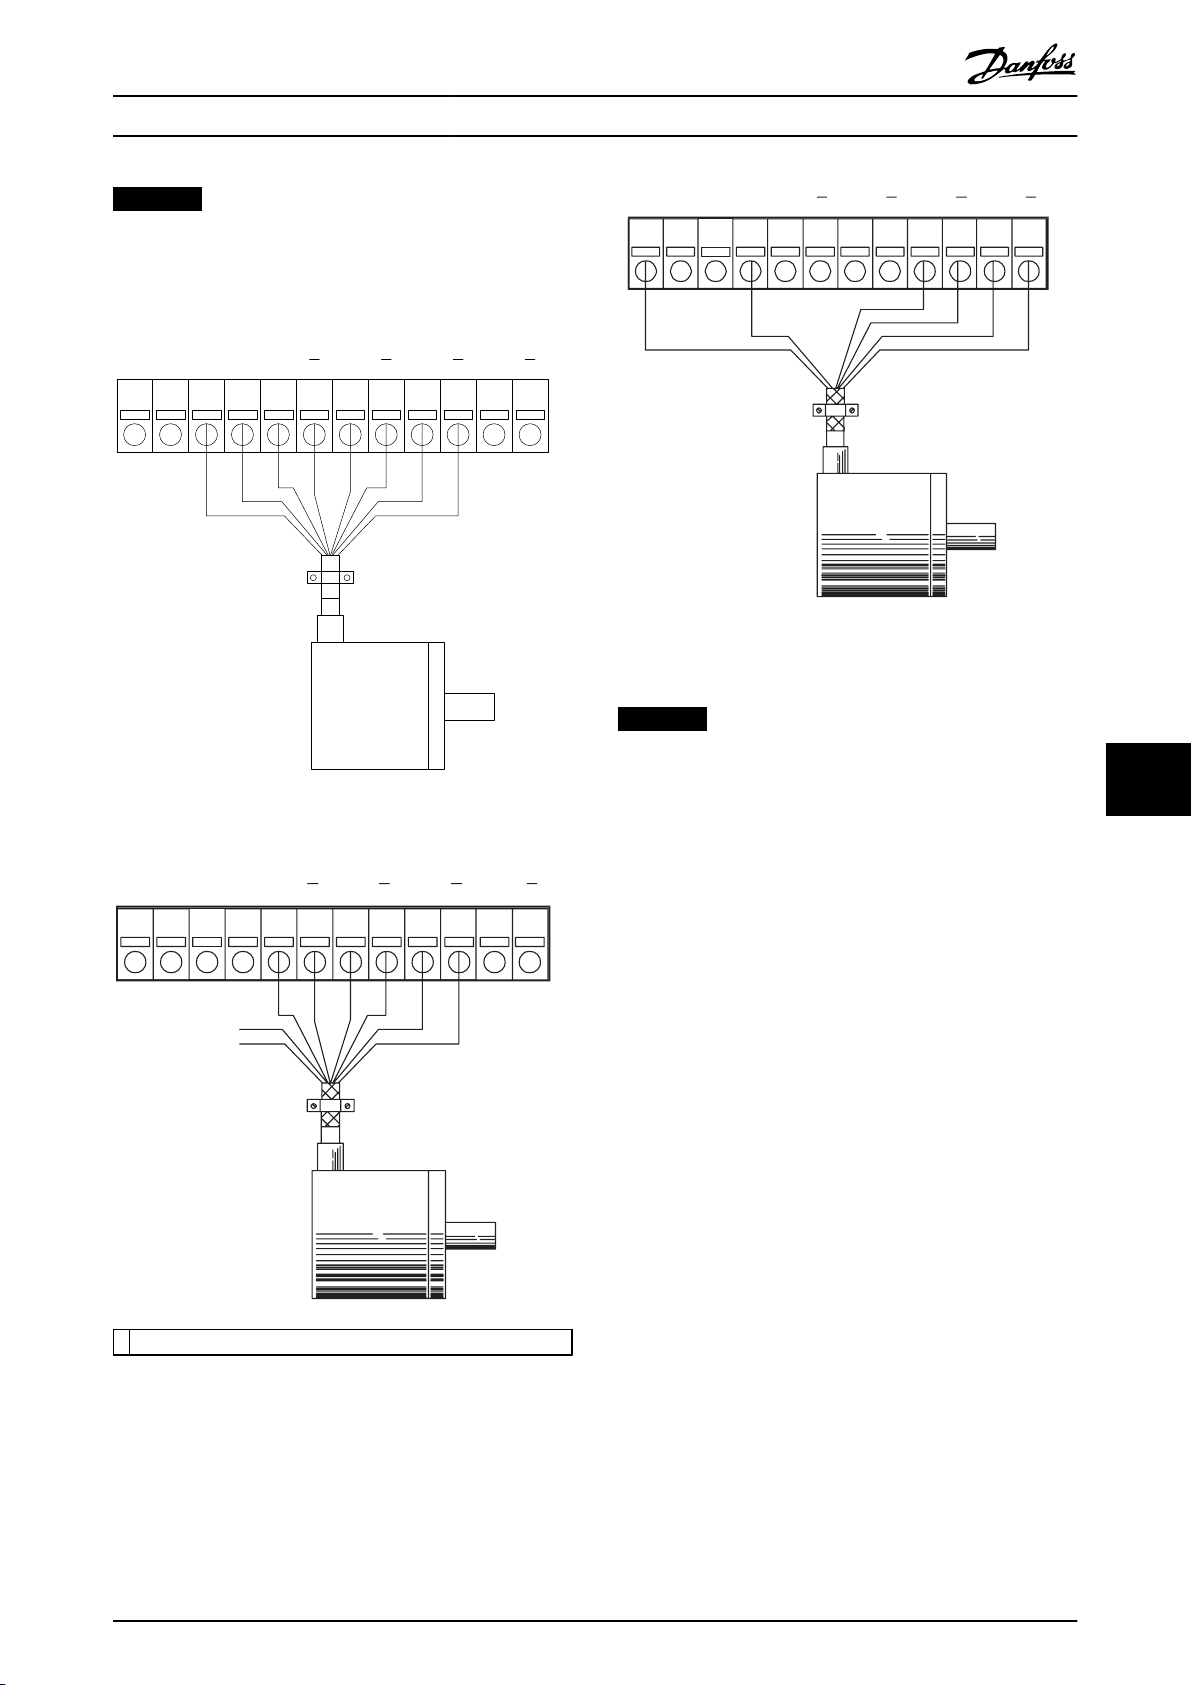
1
2 3 12
130BA163.11
754 6 8 9 10 11
24 V
8 V 5 V GND A A B B Z Z D D
24 V 8 V 5 V GND A A B B Z Z D D
1 2 3 4 5 6 7 8 9 10 11 12
1
1
130BA232.11
24 V
8 V 5 V
GND A A
B B
Z Z D
D
1 2 3 4 5 6 7 8 9 10 11 12
130BA233.11
Application Examples
VLT® Lift Drive LD 302
NOTICE
If the feedback is negative, the encoder connection is
wrong!
9.3.1 Encoder Connections Examples
Illustration 9.6 24 V Absolute Encoder (SSI) Supplied by an
External Power Source
Illustration 9.4 5 V Incremental Encoder (RS-422) Supplied by
MCO 361
1 External 5 V supply
NOTICE
Common mode disturbances. When external power
supply is used, ensure the same potential between GND
on external supply and encoder connections (4) to avoid
common mode disturbance.
9.4 Emergency Operation UPS
For emergency operation in case of mains power failure, it
is possible to use a 230 V UPS. Operation with a UPS
requires a UPS control card connected on the frequency
converter. For each lift ride, the frequency converter
determines and stores the direction of the load.
If a mains power failure occurs during a lift ride and after
applying the UPS voltage, the lift controller starts the lift
with reduced speed (Evacuation Speed Veva) in the correct
direction to the next floor level.
For more detailed information, contact Danfoss.
9 9
Illustration 9.5 5 V Incremental Encoder (RS-422) Supplied by
an External Power Source
MG34X102 - Rev. 2013-12-04 49
Page 54

555039 42 53 54
+10 V
130BD356.10
PTC/Thermistor
Special Conditions
10 Special Conditions
VLT® Lift Drive LD 302
10.1 Special Conditions
10.1.1 Extreme Running Conditions
Short circuit (motor phase – phase)
The frequency converter is protected against short circuits.
A short circuit between 2 output phases causes an
overcurrent in the converter. If the short circuit current
exceeds the permitted value, the frequency converter is
turned off (Alarm 16 trip lock).
See the relevant Design Guide for protection against a
short circuit at the load sharing and brake outputs.
Switching on the output
Switching on the output between the motor and the
frequency converter may cause an error, but does not
damage the frequency converter.
Motor-generated overvoltage
The voltage in the intermediate circuit is increased when
the motor acts as a generator. The increase in voltage
occurs in following cases:
The load drives the motor (at constant output
•
frequency from the frequency converter), that is
1010
the load generates energy.
During ramp-down with high moment of inertia,
•
low friction, and too short ramp-down time for
the energy to be dissipated as a loss in the
frequency converter, the motor, and the installation.
Incorrect slip compensation setting may cause
•
higher DC-link voltage.
Back-EMF from PM motor operation. If coasted at
•
high RPM, the PM motor back-EMF may
potentially exceed the maximum voltage
tolerance of the frequency converter and cause
damage.
10.1.2
The frequency converter supports thermal motor
protection (motor overheating) by using a motor
thermistor in motor windings (PTC sensor) or a mechanical
thermal switch (Klixon type). The thermistor input, terminal
50 and 53, is used to connect the PTC or Klixon.
In operating mode, the lift operates as long as the
thermistor input is below 3 kΩ. If the thermistor input is
above 3 kΩ, an “Over Temperature”-warning is generated.
When this warning is generated, the lift cannot be started,
or it is put to a hold after completion of the ride. Further
operation is only possible if the motor temperature is
below the critical motor temperature.
Motor Thermal Protection
Illustration 10.1 Motor Thermistor
WARNING
The frequency converter must be equipped with a break
chopper and a connected brake resistor.
Mains drop-out
During a mains drop-out, the frequency converter keeps
running until the intermediate circuit voltage drops below
the minimum stop level. The minimum stop level is
typically 15% below the frequency converter's lowest rated
supply voltage. The mains voltage before the drop-out and
the motor load determines how long it takes for the
inverter to coast.
50 MG34X102 - Rev. 2013-12-04
Page 55

1330
550
250
-20°C
175HA183.10
4000
3000
R
(Ω)
nominel
nominel -5°C
nominel +5°C
[°C]
Special Conditions
Illustration 10.2 Thermistor Input
VLT® Lift Drive LD 302
10.1.3
In some applications, manual and/or automatic derating is
necessary.
Manual Derating
Manual derating must be considered for:
Automatic Derating
The frequency converter constantly checks for critical
levels:
As a response to a critical level, the frequency converter
adjusts the switching frequency. For critical high internal
temperatures and low motor speed, the frequency
converter can also force the PWM pattern to SFAVM.
Derating
Installation at altitudes above 1,000 m [3,300 ft]
•
Continuous operation at low RPM in constant
•
torque applications
Ambient temperatures above 45 °C [113 °F]
•
Critical high temperature on the control card or
•
heat sink
High motor load
•
High DC-link voltage
•
Low motor speed
•
10 10
MG34X102 - Rev. 2013-12-04 51
Page 56

Parameter Overview
11 Parameter Overview
11.1 xx-** Active Parameters
VLT® Lift Drive LD 302
Table 11.1 contains active parameters for the VLT Lift Drive
LD 302.
NOTICE
The Graphical LCP (LCP 102) displays all available
parameters in the Quick Menu and the Main Menu.
Changes to deactivated parameters have no impact.
Press [OK] and [Cancel] simultaneously to save changed
parameter settings.
ID Name Default value Unit
0-** Operation/Display
0-01 Language [0] English
0-03 Regional settings [0] International
Display line 1.1
0-20
small [3440] Digital Inputs bin
Display line 1.2
0-21
small [1614] Motor Current A
Display line 1.3
0-22
small [1614] Motor Current A
0-23 Display line 2 large [1660] Digital Inputs bin
0-24 Display line 3 large [3450] Actual Position
1111
1-** Load and Motor
1-10 Motor construction [0] Asynchron
1-20 Motor power Size related kW
1-22 Motor voltage Size related V
1-23 Motor frequency 50 Hz
1-24 Motor current Size related A
Motor nominal
1-25
speed 1500 RPM
Motor Cont. Rated
1-26
Torque Size related
1-30 Stator resistance (Rs) Size related Ohm
1-31 Rotor resistance (Rr) Size related Ohm
Stator leakage
1-33
reactance (X1) Size related Ohm
Rotor leakage
1-34
reactance (X2) Size related Ohm
1-35 Main reactance (Xh) Size related Ohm
Iron loss resistance
1-36
(Rfe) Size related Ohm
1-39 Motor poles 4
4-** Limits/Warnings
Torque limit motor
4-16
mode 200 %
Torque limit
4-17
generator mode 200 %
4-18 Current limit 160 %
ID Name Default value Unit
14-** Special Functions
14-01 Switching frequency Size related kHz
19-** Lift Application Parameter
19-01 Motor Number 0
19-02 Motor cos Phi Size related
19-03 Encoder Auto
tuning
19-04 Car direction 0
19-05 Encoder direction 0
19-06 Encoder monitor 0
19-07 Encoder resolution 2
19-08 Absolute encoder
type
19-09 Absolute encoder
offset
19-10 Traction sheave 650 mm
19-11 Ratio 100 36.85
19-12 Suspension 1
19-13 Brake Lift delay 300 ms
19-14 Brake delay 300 ms
19-15 Brake close delay 600 ms
19-16 Max. Torque 0.00 %
19-19 Run in Distance 60.0 mm
19-20 Max. Speed 1.000 m/s
19-21 V4 1.000 m/s
19-22 V0 0.100 m/s
19-23 Vi 0.300 m/s
19-24 V3 0.800 m/s
19-25 V2 0.300 m/s
19-26 Vn 0.010 m/s
19-27 Floor level distance 5.0 mm
19-28 V1 0.200 m/s
19-30 Acceleration mm/s² 0.700 mm/s²
19-31 Deceleration mm/s² 1.000 mm/s²
19-32 Start jerk 0.600 mm/s³
19-33 Acceleration jerk 0.600 mm/s³
19-34 Deceleration jerk 1.000 mm/s³
19-35 Run in jerk 0.400 mm/s³
19-38 Comfort 0
19-40 KP – gain at start 100
19-41 KP – gain at
operation
19-42 I time at start 200.0 ms
19-43 I time operation 200.0 ms
19-44 Filtertime start 1.0 ms
19-45 Filtertime operation 10.0 ms
19-46 Position gain start 0.0000
19-50 Run – in Mode 0
0
0
0
100
52 MG34X102 - Rev. 2013-12-04
Page 57

Parameter Overview
VLT® Lift Drive LD 302
ID Name Default value Unit
19-55 L- start acceleration 0.020 m/s²
19-56 L- start speed 0.050 m/s
19-57 L- start time 200 ms
19-58 Delay after stop 100 ms
19-59 Torque down time 200 ms
19-60 Test – Run Mode 0
19-62 Open loop 0
19-63 Motor adaption 0
19-64 Store Parameter 0
19-65 Brake monitor not active
19-66 Digital Serial 0
19-67 Function Relay 1 1
19-68 Time delay coast 5 ms
19-69 Sync Position 0
19-70 Temp monitor 0
19-71 Set up counter 0
19-72 DCP4 corr. factor 1.000
19-73 DCP4 slip compen-
sation
19-80 Log No 1
19-81 Error code 0
19-82 Error Time 0 h
19-83 Reset Error log 0
19-84 Function output 1 0
19-86 Enable SC 0
19-90 Software Version Version No.
19-92 Status
19-93 Dir change cnt 1 -1
19-94 Dir change cnt 2 0
19-98 Abs enc position 0
19-99 Distance during dec. 0
32-** Lift Controller Basic Settings
Incremental Signal
32-00
Type [1] RS422 (5 V TTL)
Incremental
32-01
Resolution 1024
Table 11.1 Lift Application Parameters
11.2
Parameters 0-** Operation and Display
0 %
0-01 Language
Option: Function:
[0] * English Defines the display language. When setting
the language to [0] English or [1] Deutsch,
status display messages and parameter
descriptions are shown in the selected
language.
When setting the language to one of the
other options, status display messages and
parameters in parameter group 19-**
Application Parameters are shown in English.
[1] * Deutsch
[2] * Français
0-01 Language
Option: Function:
[3] * Dansk
[4] * Española
[5] * Italiano
[6] * Svenska
[7] * Nederlands
[20] * Suomi
0-03 Regional Settings
Option: Function:
NOTICE
This parameter cannot be adjusted while
the motor is running.
[0] * Interna-
tional
[1] US
0-20 Display Line 1.1 Small
Option: Function:
[3440] * Digital Inputs
0-21 Display Line 1.2 Small
Option: Function:
[1614] * Motor Current
0-22 Display Line 1.3 Small
Option: Function:
[1614] * Motor Current
0-23 Display Line 2 Large
Option: Function:
[1660] * Digital Inputs
0-24 Display Line 3 Large
Option: Function:
[3450] * Actual Position
Activates 1-20 Motor Power [kW] for setting the
motor power in kW and sets the default value of
parameter 1-23 Motor Frequency to 50 Hz.
Activates 1-20 Motor Power [kW] for setting the
motor power in hp and sets the default value of
parameter 1-23 Motor Frequency to 60 Hz.
Select a variable for display in line 1, left
position.
Select a variable for display in line 1,
middle position.
Select a variable for display in line 1,
right position.
Select a variable for display in line 2.
Select a variable for display in line 3.
11 11
MG34X102 - Rev. 2013-12-04 53
Page 58

Parameter Overview
VLT® Lift Drive LD 302
11.3 Parameters 1-** Load and Motor
1-10 Motor Construction
Option: Function:
Select the motor design type.
[0] Asynchron For asynchronous motors.
[1] PM, non-salient
SPM
1-20 Motor Power [kW]
Range: Function:
Size
related*
[Application
dependant]
1-21 Motor Power [hp]
Range: Function:
Sizerelated*
1111
1-22 Motor Voltage
[Application
dependant]
For salient or non-salient PM motors.
PM motors are divided into 2 groups, with
either surface-mounted (non-salient) or
interior (salient) magnets.
Enter the nominal motor power in kW
according to the motor nameplate
data. The default value corresponds to
the nominal rated output of the unit.
This parameter is visible in LCP if
parameter 0-03 Regional Settings is [0]
International.
Enter the nominal motor power in hp
according to the motor nameplate
data. The default value corresponds to
the nominal rated output of the unit.
This parameter is visible in LCP if
parameter 0-03 Regional Settings is [1]
US
1-24 Motor Current
Range: Function:
data. The data are used for
calculating torque, motor
protection etc.
1-25 Motor Nominal Speed
Range: Function:
Size
related*
[10 - 60000
RPM]
Enter the nominal motor speed
value from the motor nameplate
data. The data are used for
calculating motor compensations.
n
= ns - n
m,n
1-26 Motor Cont. Rated Torque
Range: Function:
Size
related*
[0.1 10000 Nm]
Enter the value from the motor
nameplate data. The default value
corresponds to the nominal rated
output. This parameter is available when
1-10 Motor Construction is set to [1] PM,
non-salient SPM, i.e. the parameter is
valid for PM and non-salient SPM
motors only.
1-30 Stator Resistance (Rs)
Range: Function:
Size
related*
[ 0.0140 -
140.0000 Ohm]
Set the line to common stator
resistance value. Enter the value
from a motor datasheet or
perform an AMA on a cold motor.
slip
.
Range: Function:
Size
related*
[ 10 1000 V]
Enter the nominal motor voltage
according to the motor nameplate
data. The default value corresponds to
the nominal rated output of the unit.
NOTICE
Parameters 1-31 to 1-35 do not have effect when 1-10
Motor Construction is set to [1] PM, non-salient SPM.
1-23 Motor Frequency
Range: Function:
Size
related*
[20 1000
Hz]
Min - Max motor frequency: 20-1000 Hz.
Select the motor frequency value from the
motor nameplate data. If a value different
from 50 Hz or 60 Hz is selected, adapt the
load independent settings in 1-50 Motor
Magnetisation at Zero Speed to 1-53 Model
Shift Frequency. For 87 Hz operation with
230/400 V motors, set the nameplate data
for 230 V/50 Hz. To run at 87 Hz, adapt
4-13 Motor Speed High Limit [RPM] and
3-03 Maximum Reference.
1-24 Motor Current
1-31 Rotor Resistance (Rr)
Range: Function:
Size related* [ 0.0100 -
1-33 Stator Leakage Reactance (X1)
Range: Function:
Size related* [ 0.0400 - 400.0000
1-34 Rotor Leakage Reactance (X2)
Range: Function:
Size related* [ 0.0400 - 400.0000
Range: Function:
Size
related*
54 MG34X102 - Rev. 2013-12-04
[ 0.10 -
10000.00 A]
Enter the nominal motor current
value from the motor nameplate
100.0000 Ohm]
Ohm]
Ohm]
Set the rotor resistance value
Rr to improve shaft
performance.
Set the stator leakage
reactance of the motor.
Set the rotor leakage
reactance of the motor.
Page 59

Parameter Overview
VLT® Lift Drive LD 302
1-35 Main Reactance (Xh)
Range: Function:
Size related* [ 1.0000 - 10000.0000
Ohm]
Set the main reactance of
the motor.
NOTICE
1. Run an AMA on a cold motor. The frequency
converter measures the value from the motor.
2. Enter the X1, X2 and Xh values manually. Obtain
the value from the motor supplier.
3. Use the X1, X2 and Xh default setting. The
frequency converter establishes the setting
based on the motor nameplate data.
1-36 Iron Loss Resistance (Rfe)
Range: Function:
Size
related*
1-37 d-axis Inductance (Ld)
Range: Function:
Size
related*
1-39 Motor Poles
Range: Function:
Size related* [2 - 128 ] Enter the number of motor poles.
[ 0 -
10000.000
Ohm]
[0.0 -
1000.0
mH]
To compensate for iron loss in the
motor, enter the equivalent iron loss
resistance (RFe) value.
The RFe value cannot be found by
performing an AMA.
The RFe value is especially important in
torque control applications. If RFe is
unknown, leave parameter 1-36 Iron
Loss Resistance (Rfe) on default setting.
Enter line to common direct axis
inductance of the PM motor. Obtain the
value from the permanent magnet motor
datasheet.
If only line-line data are available, divide
the line-line value by 2 to achieve the
line-common (star point) value. Alternatively measure the value with an
inductance meter, this also takes the
inductance of the cable into account.
Divide the measured value by 2 and enter
the result.
This parameter is only active when
1-10 Motor Construction has the value [1]
PM, non-salient SPM (Permanent Magnet
Motor).
For a selection with one decimal, use this
parameter. For a selection with three
decimals, use 30-80 d-axis Inductance (Ld).
Poles ~nn@ 50 Hz ~nn@ 60 Hz
2 2700-2880 3250-3460
4 1350-1450 1625-1730
6 700-960 840-1153
Table 11.2 Number of Motor Poles
Table 11.2 shows the number of poles for normal speed
ranges of various motor types. Define motors designed for
other frequencies separately. The motor pole value is
always an even number and refers to the total number of
poles. The frequency converter bases the initial setting of
parameter 1-39 Motor Poles on parameter 1-23 Motor
Frequency and parameter 1-25 Motor Nominal Speed.
1-40 Back EMF at 1000 RPM
Range: Function:
Size
related*
[0 9000 V]
Set the nominal back EMF for the motor
when running at 1,000 RPM.
Back EMF is the voltage generated by a PM
motor when no frequency converter is
connected and the shaft is turned
externally. Back EMF is normally specified
for nominal motor speed or for 1,000 RPM
measured between 2 lines. If the value is
not available for a motor speed of 1,000
RPM, calculate the correct value as follows.
If back EMF is for example. 320 V at 1,800
RPM, it can be calculated at 1,000 RPM as
follows:
Example
Back EMF 320 V at 1,800 RPM. Back EMF=
(Voltage/RPM)*1,000 = (320/1800)*1,000 =
178.
This parameter is only active when
1-10 Motor Construction is set to [1] PM
motor (Permanent Magnet Motor).
11.4 Parameters 4-** Limits/Warnings
4-16 Torque Limit Motor Mode
Range: Function:
200%* [Application
dependant]
4-17 Torque Limit Generator Mode
Range: Function:
200%* [Application
dependant]
The function limits the torque on
the shaft to protect the
mechanical installation.
The function limits the torque on
the shaft to protect the
mechanical installation.
11 11
MG34X102 - Rev. 2013-12-04 55
Page 60

Parameter Overview
VLT® Lift Drive LD 302
4-18 Current Limit
Range: Function:
200%* [Application
dependant]
This function is a true current limit
function that continues in the over
synchronous range. However, due to
field weakening, the motor torque at
current limit drops accordingly, when the
voltage increase stops above the
synchronised motor speed.
11.5 Parameters 14-** Special Functions
14-01 Switching Frequency
Select the converter switching frequency. Changing the switching
frequency can reduce acoustic noise from the motor. Default
values depend on power size.
Option: Function:
[0] 1.0 kHz
[1] 1.5 kHz Default switching frequency for
355-1200 kW [500-1600 hp], 690
V
[2] 2.0 kHz Default switching frequency for
250-800 kW [350-1075 hp], 400 V
and 37-315 kW [50-450 hp], 690
V
[3] 2.5 kHz
[4] 3.0 kHz Default switching frequency for
18.5-37 kW [25-50 hp], 200 V and
37-200 kW [50-300 hp], 400 V
1111
[5] 3.5 kHz
[6] 4.0 kHz Default switching frequency for
5.5–15 kW [7.5-20 hp], 200 V and
11-30 kW [15-40], 400 V
[7] 5.0 kHz Default switching frequency for
0.25–3,7 kW [0.34-5 hp], 200 V
and 0.37-7.5 kW [0.5-10 hp], 400
V
[8] 6.0 kHz
[9] 7.0 kHz
[10] 8.0 kHz
[11] 10.0 kHz
[12] 12.0kHz
[13] 14.0 kHz
[14] 16.0kHz
NOTICE
The output frequency value of the frequency converter
NOTICE
To avoid a trip, the frequency converter can adapt the
switching frequency automatically.
11.6 Parameters 19-** Application
Parameters
19-01 Motor Number
Option: Function:
Select the ASM or PM motor type stored in LD 302
motor type database. By selecting a certain motor
type, all required motor data are set automatically
within the LD 302. See Table 12.21 and Table 12.22
for motor type and associated motor number.
1. Enter motor type number.
2. Save the selected motor type.
3. Press [OK] and [Cancel] to save the
settings.
If selecting [0], enter the following parameter for
ASM or PM motors.
ASM motors
1-10 Motor Construction
•
1-20 Motor Power [kW]
•
parameter 1-22 Motor Voltage
•
parameter 1-23 Motor Frequency
•
parameter 1-24 Motor Current
•
parameter 1-25 Motor Nominal Speed
•
19-02 Motor Cos Phi
•
19-63 Motor Adaptation
•
PM motors
1-10 Motor Construction
•
parameter 1-23 Motor Frequency
•
parameter 1-24 Motor Current
•
parameter 1-26 Motor Cont. Rated Torque
•
parameter 1-30 Stator Resistance (Rs)
•
parameter 1-37 d-axis Inductance (Ld)
•
parameter 1-39 Motor Poles
•
parameter 1-40 Back EMF at 1000 RPM
•
* No standard ASM or PM motor within LD 302
[0]
motor database.
[XXX] [1 –
The entered value enables a certain ASM or PM
120]
motor type within the LD 302 motor database.
must never exceed 1/10 of the switching frequency.
When the motor is running, adjust the switching
frequency in parameter 14-01 Switching Frequency to
minimise motor noise.
19-02 Motor Cos Phi
Range: Function:
Size
related*
[65-95] Set the motor cos phi value, multiplied by
100. The input of the cos phi value causes
automatically a new calculation of the
advanced motor data, parameter 1-30 Stator
56 MG34X102 - Rev. 2013-12-04
Page 61

Parameter Overview
VLT® Lift Drive LD 302
19-02 Motor Cos Phi
Range: Function:
Resistance (Rs) to parameter 1-35 Main
Reactance (Xh).
19-03 Encoder Autotuning
Option: Function:
Detect the direction of the encoder
rotation.
[0] * No function Not active
[1] Encoder
Autotuning
Determine encoder rotation direction.
The detected encoder direction is
automatically stored in 19-06 Encoder
Monitor.
19-04 Car Direction
Option: Function:
Change the travel direction of the elevator
car.
[0] * No function The car direction is not changed.
[1] Car direction The car direction is changed.
19-05 Encoder Direction
Option: Function:
Change the travel direction of the encoder
without swapping 2 phases in the motor
cable.
Before switching to operating mode, set
19-62 Open Loop to [0] Closed loop control.
[0] * No function The encoder direction is not changed.
[1] Encoder
direction
The encoder direction is changed.
NOTICE
To start the car in upwards direction, motor shaft
rotation must be clockwise.
19-06 Encoder Monitor
Option: Function:
Enables the encoder monitoring for
encoder voltage
•
wire break
•
encoder error
•
[0] * No function The encoder monitoring is not active.
[1] Encoder monitor The encoder monitoring is active.
19-07 Encoder Resolution
Range: Function:
2* [2-8] Set the factor n to calculate the encoder resolution.
Encoder resolution=resolution x 2
For TTL encoder, set fixed n=2.
For SinCos encoder, set 22 or 23.
n
19-08 Absolute Encoder Type
Select the absolute encoder type for 13-bit single turn encoder.
Option: Function:
[0] * None
[1] SSI
[2] EnDat
19-09 Absolute Encoder Offset
Select the absolute encoder type offset.
Range: Function:
0* [8192-0002]
NOTICE
Before setting up parameters 19-10 to 19-12:
1. Enter motor data.
2. Set the parameters.
3. Press [OK] + [Cancel] to save the parameter
settings.
The frequency converter uses the values for calculating
maximum speed.
19-10 Traction sheave
Range: Function:
650 mm* [100-2500 mm ] Set the traction sheave diameter in
mm.
19-11 Ratio 100
Range: Function:
36.85* [99.99-1.00 ] Set the gear ratio value, multiplied by 100.
19-12 Suspension
Range: Function:
1* [2-8] Specifies the number of suspensions.
19-13 Brake Lift Delay
Range: Function:
300
[6000-20
ms*
ms]
19-14 Brake Delay
Range: Function:
300
[3000-50
ms*
ms]
Set the delay time in ms for the lift brake.
Ensure that the motor is 100% premagnetised
to take over the maximum load after brake
release. For asynchronous motors (ASM), the
frequency converter assigns a delay time of
300 ms to 1,500 ms, depending on motor
size. See also chapter 7.1.2.1 Mechanical Brake
Control.
Set the time delay in ms for the brake
release after the 24 V output signal on
terminal 29. See also
chapter 7.1.2.1 Mechanical Brake Control.
11 11
MG34X102 - Rev. 2013-12-04 57
Page 62

Parameter Overview
VLT® Lift Drive LD 302
19-15 Brake Close Delay
Range: Function:
600
ms*
[6000-50
ms]
Set the time delay in ms for closing the brake
after switching the output signal from 24 V
to 0 V on terminal 29. The time delay ensures
that the motor remains energised long
enough to close the brake. See also
chapter 7.1.2.1 Mechanical Brake Control.
19-23 Inspection Speed, Vi
Range: Function:
0.300 m/s* [0.630-0.01 m/s] Set the inspection speed Vi in m/s.
19-24 Intermediate Speed, V3
Range: Function:
0.800 m/s* [20-0.01 m/s] Set the intermediate speed V3 in m/s.
19-25 Intermediate Speed, V2
19-16 Max. Torque
Range: Function:
0.00%
ms*
[200 to
-200%]
Set the time delay in ms for closing the brake
after switching the output signal from 24 V to
0 V, on terminal 29. This time delay ensures
that the motor is energised long enough to
close the brake. See also
chapter 7.1.2.1 Mechanical Brake Control.
When set to 0, there is no function. When set
above or below 0, the function is active.
19-19 Run in Distance
Range: Function:
60.0
mm*
[50000-0
mm]
Set the run-in distance in mm. See also
chapter 7.1.2.1 Mechanical Brake
Control.
Range: Function:
0.300 m/s* [20-0.01 m/s] Set the intermediate speed V2, in
m/s.
19-26 Relevelling Speed, Vn
Range: Function:
0.010 m/s* [20-0.01 m/s] Set the relevelling speed Vn, in m/s.
19-27 Floor level distance
Range: Function:
5.0 mm* [2000-10 mm] Set the floor level distance, in mm.
19-28 Intermediate Speed, V1
Range: Function:
0.200 m/s* [20-0.01 m/s] Set the intermediate speed V1 in m/s.
NOTICE
Parameter Symbol
19-20 Max. sSpeed
19-21 Nominal Speed V4
19-22 Levelling Speed V0
1111
19-23 Inspection Speed Vi
19-24 Intermediate Speed 1 V3
19-25 Intermediate Speed 2 V2
19-26 Relevelling Speed Vn
19-28 Intermediate Speed V1
Evacuation Speed, Fixed (V0) Veva
Changing parameter setting of 19-38 Comfort causes
changes to the parameter settings in 19-30 Acceleration
mm/s2, 19-31 Deceleration mm/s2, 19-32 Start Jerk, 19-33,
19-34 Deceleration Jerk and 19-35 Run in Jerk.
NOTICE
A change of the parameter settings for 19-31
Deceleration mm/s2, 19-34 Deceleration Jerk and 19-35
Run in Jerk, changes the braking distance.
Table 11.3 Lift Speed Parameters
19-30 Acceleration mm/s
Range: Function:
19-20 Max. Speed
0.700 m/s
Range: Function:
1.000
m/s*
19-21 V4, Nominal Speed
Range: Function:
1.000 m/s* [20-0.01 m/s] Set the nominal speed V4, in m/s.
19-22 Levelling Speed, V0
[20-0.01
m/s]
Set the max. speed in m/s for the lift.
Depending on the nominal motor speed
and the settings in parameters 19-10 to
19-12, the maximum speed is limited to
125% of the rated motor speed.
19-31 Deceleration mm/s
Range: Function:
1.000 m/s
19-32 Start Jerk
Range: Function:
0.600
3
m/s
*
Range: Function:
0.100 m/s* [20-0.01 m/s] Set the levelling speed V0, in m/s.
58 MG34X102 - Rev. 2013-12-04
2
* [2-0.1 m/s
2
* [2-0.1 m/s
[9.990-0.1
m/s3]
2
2
Set the maximum acceleration for the
]
selected speed in m/s
2
2
Set the maximum deceleration in
]
2
mm/s
Set the start jerk in mm/s3. The start-up
jerk is an essential comfort feature.
Suggestion for start jerk setting:
gentle: < 0.3 m/s
•
normal: 0.6 m/s
•
dynamic: > 1.0 m/s
•
2
3
3
3
Page 63

0
1
2
3
4
5
6
7
8
9
t0 t1 t2 t3 t4 t5 t6 t7 t8 t9 t10
v
[m/s]
t [s]
130BD345.10
1
2
3
Par.
19-40
19-42
19-44
19-46
Par.
19-41
19-43
19-45
Par.
19-14
t0 t1 t2 t3 t/s
130BD344.10
Parameter Overview
VLT® Lift Drive LD 302
19-33 Acceleration Jerk
Range: Function:
0.600 m/s
3
* [9.990-0.1 m/s
3
] Sets the acceleration jerk in m/s3.
19-34 Deceleration Jerk
Range: Function:
1.000
m/s
3
*
[9.990-0.1
m/s3]
Set the deceleration jerk in mm/s3. The
run-jerk is activated, when the levelling
speed is reached. Suggestions for
deceleration jerk setting:
gentle: < 0.6 m/s
•
normal: 1.0 m/s
•
dynamic: > 1.4 m/s
•
19-35 Run in Jerk
Range: Function:
0.400
m/s
3
*
[9.990-0.1
m/s3]
Set the run-in jerk in mm/s3. The run-in
jerk is activated when the levelling
speed is reached. Suggestions for run-in
jerk setting:
gentle: < 0.2 m/s
•
normal: 0.4 m/s
•
dynamic: > 0.6 m/s
•
Identifier Time period Parameter Description
0 t0-t2 19-55 to 19-57 Line start
1 t1-t2 19-32 Start jerk
2 t2-t3 19-30 Acceleration
3 t3-t4 19-33 Accel. jerk
4 t4-t5 19-21 V4
5 t5-t6 19-34 Decel. jerk
6 t6-t7 19-31 Deceleration
7 t7-t8 19-35 Run in jerk
8 t8-t9 Low Speed V0
3
3
3
3
3
3
9 t9-t10 19-19 Run in Distance
Table 11.4 Legend to Illustration 11.1
Ramp Parameter Description
NOTICE
Changing the settings of 19-38 Comfort, changes the
settings in 19-30 Acceleration mm/s2, 19-31 Deceleration
mm/s2, 19-32 Start Jerk, 19-33 Acceleration Jerk, 19-34
Deceleration Jerk and 19-35 Run in Jerk.
19-38 Comfort
Option: Function:
Set the travelling comfort.
[0] * Normal Normal comfort
[1] Gentle Gentle comfort
[2] Dynamic Dynamic comfort
[3] No function
Illustration 11.1 Ramp Parameter for Acceleration,
Deceleration and Jerk
11 11
Illustration 11.2 Control Parameter Start/Operations
1 Actual speed
2 Mechanical brake
3 Motor active
Table 11.5 Legend to Illustration 11.2
19-40 KP Gain at Start
Range: Function:
100* [5000-1] Set the PID proportional gain at start. Increase
the KP-start value if the motor rotates
backwards after start.
19-41 KP Gain at Operation
Range: Function:
100* [5000-1] Set the PID proportional gain for operation,
travel. Decrease the KP- operating value in case
of motor noise during travelling. Increase the
KP- operating value in case of motor oscillations
during travelling.
MG34X102 - Rev. 2013-12-04 59
Page 64

0.6
0.6
f
g
= 10 Hz
175ZA293.11
Feedback
Disturbed feedback signal
t (Sec.)
t (Sec.)
Filtered feedback signal
Lowpass lter
Feedback
1111
Parameter Overview
VLT® Lift Drive LD 302
19-42 TI Time at Start
Range: Function:
200* [500-2 ms] Set the PID integral time in ms at start.
Increase the time value if after start the motor
rotates backwards.
19-43 TI Time Operation
Range: Function:
200* [500-2 ms] Set the PID integral time in ms for operation,
travel.
19-44 Filtertime Start
Range: Function:
1.0
ms* [500-1
ms]
NOTICE
Severe filtering can cause bad dynamic
performance.
Set a time constant for the speed control lowpass filter. The low-pass filter improves steadystate performance and dampens oscillations on
the feedback signal. This is an advantage if there
is a great amount on noise in the system, see
Illustration 11.3. For example, if a time constant (τ)
of 100 ms is programmed, the cut-off frequency
for the low-pass filter is 1/0.1= 10 RAD/s. This
value corresponds to (10/2 x π) = 1.6 Hz. The PID
regulator only regulates a feedback signal that
varies by a frequency of less than 1.6 Hz. If the
feedback signal varies by a higher frequency than
1.6 Hz, the PID regulator does not react.
Illustration 11.3 Filtering Feedback through Lowpass Filter
19-45 Filtertime Operation
Range: Function:
10.0 ms* [500-1 ms] Set the speed controller filter time for
19-46 Position Gain Start
Range: Function:
0.0000* [500-1 ms] Select the position gain start.
60 MG34X102 - Rev. 2013-12-04
operation mode.
Page 65
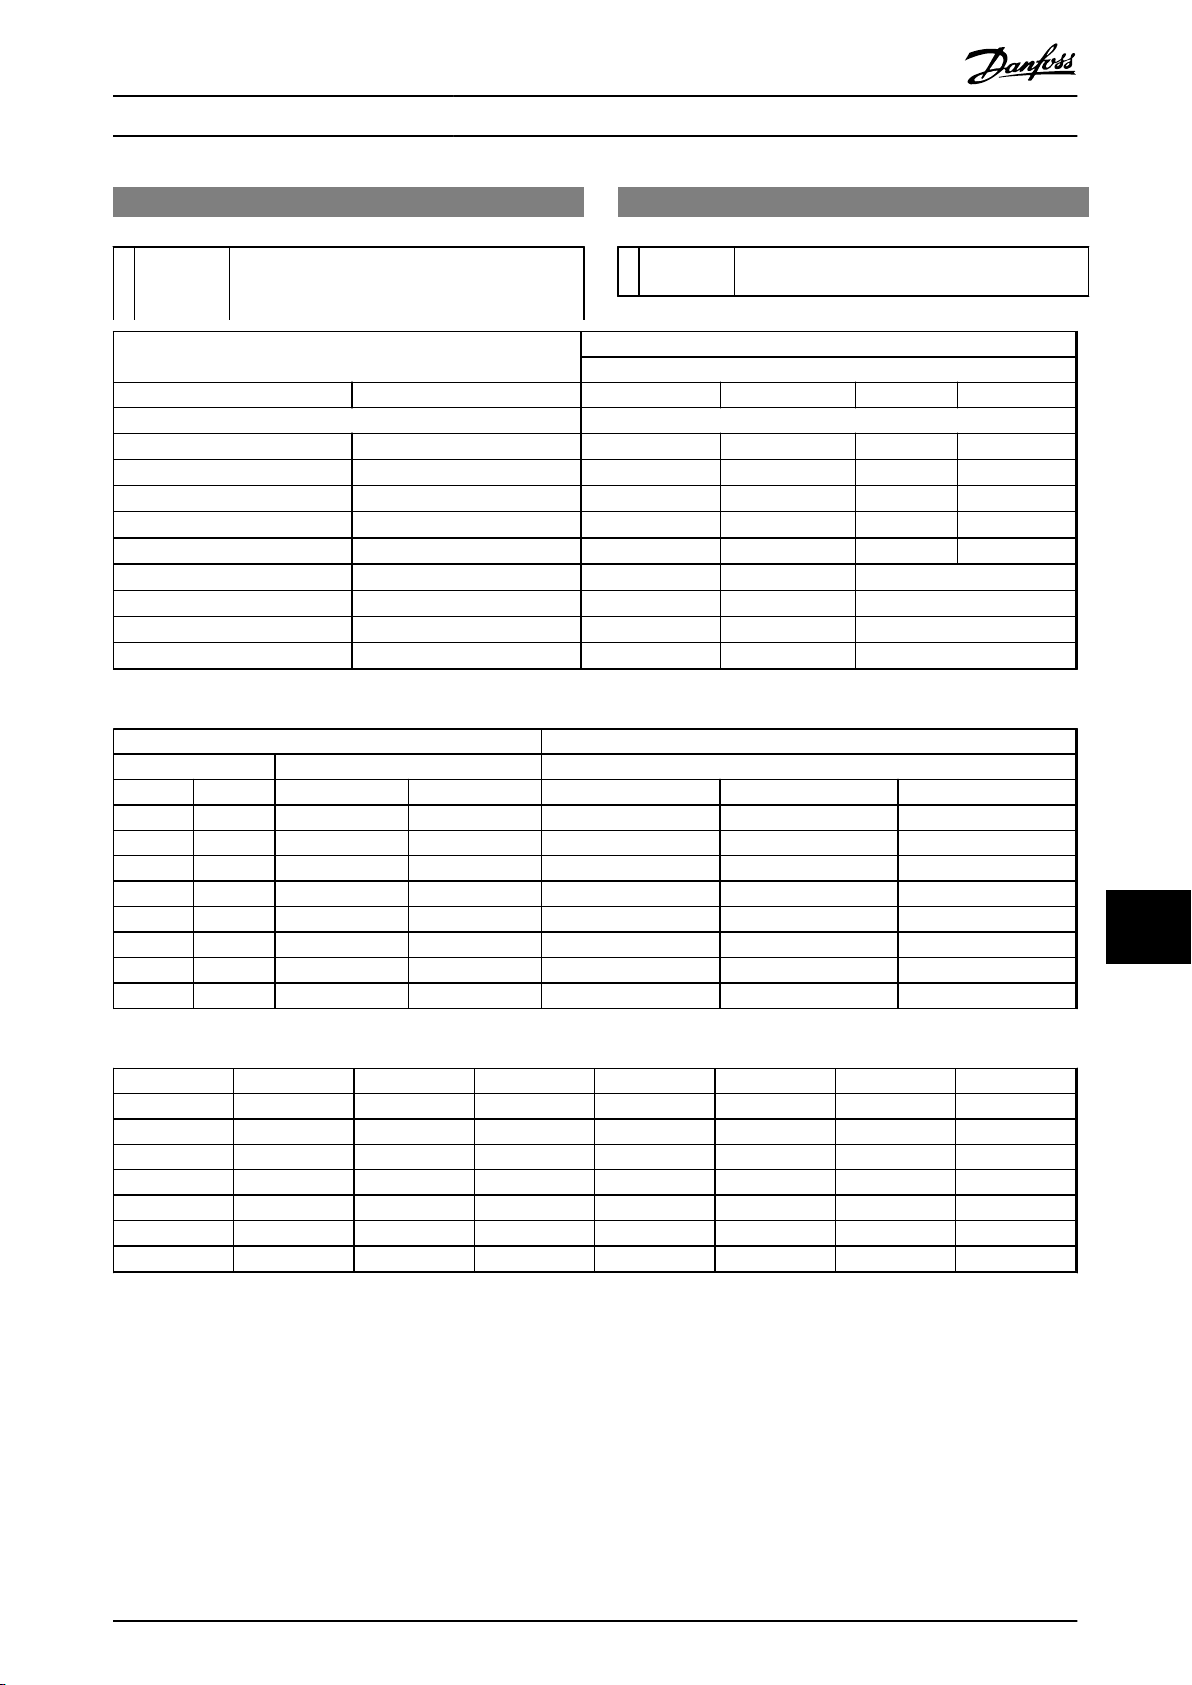
Parameter Overview
VLT® Lift Drive LD 302
19-50 Run-in Mode
Range: Function:
0 [255 to
-255]
Table 11.6 Control Travel Profile
LD 302 Lift controller 19-50 Run-in Mode
32 33 X57.7 X57.8 0, 1, 4 6, 7 8, 9
0 0 x x no move no move x
0 1 x x Down Down x
1 0 x x Up Up x
1 1 x x Up Down x
x x 0 0 x x no move
x x 0 1 x x Down
x x 1 0 x x Up
x x 1 1 x x Up
Set the Run-in mode function for the control
travel profile and resulting speed. See also
Table 11.6 to Table 11.11 for function depending
Input select
Drv. enable + Terminal 0, 1, 7 4, 6 8 9
Selected input terminal
X57.1⇒T27
X57.1⇒T27
X57.1⇒T27
X57.1⇒T27
X57.1⇒T27
X57.1⇒T27
X57.1⇒T27
X57.1⇒T27
X57.1⇒T27
Digital input terminal Parameter setting
X57.2 V0 SL1 V0 SL1
X57.3 V4 SL2 V4 SL2
X57.4 V3 SL3 V3 SL3
X57.5 V2 Vi
X57.6 Vn
X57.7 Vi Up
X57.8 Veva Down
T32 Up Up Encoder A
T33 Down Down Encoder B
19-50 Run-in Mode
Range: Function:
on the entered parameter value for the Run-in
mode.
19-50 Run-in Mode
Possible value settings
Resulting speed
11 11
Table 11.7 Direction of Travel
V0 1* X X X X X X
Veva 0 1 X X X X X
Vi 0 0 1 X X X X
Vn 0 0 0 1 X X X
V2 0 0 0 0 1 X X
V3 0 0 0 0 0 1 X
V4 0 0 0 0 0 0 1**
Table 11.8 Priority of Resulting Speeds in Relation to Digital Input Setting on Terminal X57 for 19-50 Run-in mode, Value Setting 0
* highest priority
** lowest priority
1 - high signal
0 - low signal
x - any state
X57.2 X57.8 X57.7 X576 X57.5 X57.4 X57.3
MG34X102 - Rev. 2013-12-04 61
Page 66

Parameter Overview
VLT® Lift Drive LD 302
When selecting 19-50 Run-in Mode 0 or 1, the falling edge on input X57.2 Run-in Speed, determines the positioning to the
floor level (19-19 Run in Distance), independent of the selected speed.
Veva
Vi 0 1 X X X X X
Vn 0 0 1 X X X X
V2 0 0 0 1 X X X
V3 0 0 0 0 1 X X
V4 0 0 0 0 0 1 X
V0 0 0 0 0 0 0
Table 11.9 Priority of Resulting Speeds in Relation to Digital Input Setting on Terminal X57 for 19-50 Run-in mode, Value Setting 1
* highest priority
** lowest priority
1 - high signal
0 - low signal
x - any state
V0, Run in Speed (19-22) 0 0 1
Vi, Inspection Speed (19-23) 0 1 0
V3, Intermediate Speed 1 (19-24) 1 0 0
Vn, Relevelling Speed (19-26) 1 0 1
V2, Intermediate Speed 2 (19-25) 1 1 0
V4, Max. Speed (19-21) 0 1 1
X57.8 X57.7 X57.6 X57.5 X57.4 X57.3 X57.2
*
1
X X X X X X
1
Speed select 3 (X57.4) Speed select 2 (X57.3) Speed select 1 (X57.2)
**
Table 11.10 Resulting Speeds in Relation to Digital Input Setting on Terminal X57 for 19-50 Run-in mode, Value Setting 4
1111
Vn, Relevelling Speed (19-26) 0 0 1
V0, Run in Speed (19-22) 0 1 0
Vi, Inspection Speed (19-23) 0 1 1
V1, Intermediate Speed 3 (19-28) 1 0 0
V2, Intermediate Speed 2 (19-25) 1 0 1
V3, Intermediate Speed 1 (19-24) 1 1 0
V4, Max. Speed (19-21) 1 1 1
Table 11.11 Resulting Speeds in Relation to Digital Input Setting on Terminal X57 for 19-50 Run-in mode, Value Setting 6
Vi 1* x x x
V3 0 1 x x
V4 0 0 1 x
V0 0 0 0 1**
Table 11.12 Resulting Speeds in Relation with Digital Input Setting on Terminal X57 for 19-50 Run-in mode, Value Setting 8
X57.5 X57.4 X57.3 X57.2
Speed select 3 (X57.4) Speed select 2 (X57.3) Speed select 1 (X57.2)
62 MG34X102 - Rev. 2013-12-04
Page 67

Par. 19-55
Par. 19-56
Par. 19-57
Par. 19-32
Par. 19-30
Par. 19-33
Par. 19-21
Time
10 11 12
13
Speed
130BD350.10
Parameter Overview
VLT® Lift Drive LD 302
19-55 L- start Acc
Range: Function:
0.020 m/s
2
* [2-0.01 ms
2
Set the start acceleration for linear
]
ramp in m/s2.
19-56 L- start Speed
Range: Function:
0.050 m/s* [0.5-0.01 ms] Set the start speed for linear ramp in
m/s.
19-57 L- start time
Range: Function:
200 ms* [2000-0 ms] Set the time for the linear start time in
ms. Entering a start time of 0 ms,
disables the linear ramp function.
19-62 Open Loop
Option: Function:
[1] Open loop Emergency control without encoder, open loop
using input X57.2 or X57.7 for control.
Decrease the KP- operating value, 19-41 KP
Gain at Operation, in case of motor noise
during travelling.
19-63 Motor Adaptation
Option: Function:
The AMA function optimises dynamic motor
performance.
[0] * No Function
[1] Complete
Adaptation
[2] Reduced
Adaptation
[3] Calculation Calculates the data values for the motor
[4]
Performs AMA of the stator resistance RS,
the rotor resistance Rr, the stator leakage
reactance X1, the rotor leakage reactance X2,
and the main reactance Xh. (1-30 Stator
Resistance (Rs) to 1-35 main reactance (Xh)).
Do not select this option if an LC filter is
used between the frequency converter and
the motor.
Performs a reduced AMA of the stator
resistance Rs in the system only.
model equivalent diagram and in writes the
calculated values automatically to 1-30 Stator
Resistance (Rs) to 1-35 main reactance (Xh).
Illustration 11.4 Linear Start Time
19-58 Delay After Stop
Range: Function:
100 ms* [1000-1ms] Set the delay for mechanical brake in ms.
See also chapter 7.1.2.1 Mechanical Brake
Control.
19-59 Torque Down Time
Range: Function:
200 ms* [5000-50
ms]
Set the torque down time in ms. See
also chapter 7.1.2.1 Mechanical Brake
Control.
19-60 Test – Run Mode
Option: Function:
Run mode test.
[0] * Test not enabled.
[1] Enable test.
19-62 Open Loop
Option: Function:
Open loop control.
[0] * Closed
loop
Control with encoder, closed loop.
19-64 Store Parameter
Option: Function:
Store all parameter settings.
[0] * No Function
[1] Store Parameter Activate store
19-66 Digital Serial
Option: Function:
Activate digital input access or DCP protocol.
[0] * Digital input Enable digital input - access
[1] DCP 3 Enable DCP 3- protocol
[2] DCP 4 Enable DCP 4- protocol
19-67 Function Relay 1
Option: Function:
Select function for relay 1.
[0]
[1] * Open relay contact at voltage “Off”
[2] Open relay contact at emergency shutdown, move not
finished properly.
11 11
MG34X102 - Rev. 2013-12-04 63
Page 68

Parameter Overview
VLT® Lift Drive LD 302
19-68 Time Delay Coast
Range: Function:
5 ms* [0-500
ms]
Set a delay time for all inputs of the
frequency converter. The delay time is the
time passing until the frequency converter
accepts the input status, and secures the
inputs against signal bouncing.
19-69 Sync Position
Range: Function:
0* [0-214783634] Used for DCP4 communication to determine
the position deviation of the controller
encoder and motor encoder. Enter the
determined value in 19-72 DCP4 Corr. Factor.
19-70 Temp Monitor
Option: Function:
Selects the temperature monitoring.
[0] * Only heat sinks monitoring.
[1] Activate motor thermistor (PTC sensor) monitoring on
terminal A 53 and heat sinks monitoring.
[-1] No function
19-71 Set-up Counter
Range: Function:
0* [2147483646
– 0]
1111
This function is used for plastic-coated ropes
to determine the number of cycle changes.
The number of the cycle changes is an
indication of the condition of the plasticcoated ropes used for the lift. The number
of cycle changes tells if the plastic-coated
ropes must be replaced or not. The number
of the cycle changes is contained in the
direction Counter 1 and 2, 19-93 Dir Change
Cnt 1 or 19-94 Dir Change Cnt 2. The coded
parameter value for 19-71 Set-up Counter
defines the use of direction Counter 1,
direction Counter 2, or warning threshold
direction Counter 1. The application checks
the parameter input value. After setting
correct parameter input value, 19-71 Set-up
Counter is set to 0. If the input data not
plausible, 19-71 Set-up Counter is set to
“-1”.The data are accepted after pressing
[OK] + [CANCEL].
19-80 Log No
Option: Function:
Parameters in this group are array parameters where
up to 10 fault logs can be viewed. [1] is the most
recent logged data, [10] is the oldest.
[1] * Error log no. 1
[2] Error log no. 2
[3] Error log no. 3
[4] Error log no. 4
[5] Error log no. 5
[6] Error log no. 6
[7] Error log no. 7
[8] Error log no. 8
[9] Error log no. 9
[10] Error log no. 10
19-81 Error Code
Range: Function:
0* [0000000000] Displays the error code.
19-82 Error Time
Range: Function:
0h* [0000000000h] Displays the error time in h.
19-83 Reset Error log
Option: Function:
Reset of the error log in parameters 19-80 to
19-82.
[0] * No Function
[1] Reset Reset data log
19-84 Function Output 1
Option: Function:
Specifies the output function
for output X59.1.
[0] * Overspeed
[1] Direction evacuation
[2] Direction evacuation
inverse
19-86 Enable SC
Option: Function:
Enable Simple control
[0] * Standard Standard speed control
[1] Signal Start with “Up” and “Down” signal
19-72 DCP4 Corr. Factor
Range: Function:
1.000* [1.200–0.800] Set the DCP4 correction factor. Refer to
19-69 Sync Position.
19-73 DCP4 slip comp.
Range: Function:
0%* [1.50%–0%] Set the DCP4 slip compensation in %.
64 MG34X102 - Rev. 2013-12-04
Page 69

130BD346.11
LD 302
12
27
X57.1
32 Direction- Up
33 Direction- Down
PLC
K1
K2
X59.4
K12 K1 K2
K12
N
Drv. enable
Safety
chain
130BD347.11
1
2
3
4
5
t
130BD348.11
LD 302
12
27
X57.1
32 Direction- Up
33 Direction- Down
PLC
K1
K2
X59.4
K12
K1 K2
K12
N
Safety
chain
Drive enable
t
1
2
3
4
5
130BD349.11
Parameter Overview
VLT® Lift Drive LD 302
Illustration 11.5 19-86 Enable Simple Control=[0]
Illustration 11.7 19-86 Enable Simple Control=[1]
11 11
Illustration 11.6 19-86 Enable Simple Control=[0]
1
Direction
2 Selected speed
3 Output X59.4
4 Operation
5 Drv. enable
Table 11.13 Legend to Illustration 11.6
Illustration 11.8 19-86 Enable Simple Control=[1]
Direction
1
2 Selected speed
3 Output X59.4
4 Operation
5 Drv. enable
Table 11.14 Legend to Illustration 11.8
19-90 Software Version
Range: Function:
0000000000 * [Build X.XX] Displays the software version as
build number.
MG34X102 - Rev. 2013-12-04 65
Page 70

Parameter Overview
VLT® Lift Drive LD 302
19-92 Status
Range: Function:
[2147483646– 0] Indicates internal status information.
19-93 Dir Change Cnt 1
Range: Function:
-1 * [2147483646–
-1]
Indicates the counter value for cycle
changes. 19-71 Set-up counter activates the
counter function. Activating 19-93 Dir
Change Cnt 1 changes the function for
output X59.2 from default Speed level 1
tocounter warning. Device failure or
setting to factory default causes the
counter readings to be lost. To avoid
losing the counter readings, provide an
extra external direction-counter. After
each travel, with changed direction, the
counter value is reduced by one (countdown).
19-94 Dir Change Cnt 2
Range: Function:
0* [2147483646–0]Indicates the counter value for cycle
changes. 19-71 Set-up counter activates the
counter function. Device failure or setting
to factory default causes the counter
readings to be lost. To avoid losing the
counter readings, provide an extra external
direction-counter. After each travel, with
changed direction, the counter value
1111
counts up by one. After reaching the
maximum value, the counter starts again at
zero. The direction change counter 2 is
always active.
32-00 Incremental Signal Type
Option: Function:
[2] Sinusoidal
1Vpp
[3] CAN encoder If an MCO CAN encoder is used, select [3].
If an analog incremental encoder with 1 V
peak-peak signal is connected, select [2].
32-01 Incremental Resolution
Range: Function:
1024* [1 -
1073741823 ]
Calculate velocity in RPM (rounds per
minute) as well as time-out for detection
of the zero pulse with HOME and INDEX.
Set the resolution of the incremental
encoder connected to Encoder 2 interface
(X55). Encoder resolution can be found on
encoder nameplate or datasheet.
Digital incremental encoder
•
(32-00 = [1]): The resolution must
be set in pulses per revolution
Analog incremental encoder
•
(32-00 = [2]): The resolution must
be set in sinusoidal signal
periods per revolution
CAN encoder (32-00 = [3]):
•
Incremental encoder: Pulses per
revolution absolute encoder:
(pulses per revolution)/4
19-98 Abs Enc Position
Range: Function:
0* [2147483646– -1] Absolute encoder position.
19-99 Distance During Dec
Range: Function:
0* [1000000 to -1000000] Distance during deceleration.
11.7 Parameters 32-** Encoder
32-00 Incremental Signal Type
Option: Function:
Specify type of incremental encoder
connected to Encoder 2 interface (X55 and
X62, if CAN encoder is used).
[0] None If no incremental encoder is connected,
select [0].
[1] * RS422 (5V
TTL)
If a digital incremental encoder with an
interface according to RS422 is connected,
select [1].
66 MG34X102 - Rev. 2013-12-04
Page 71

Specifications
VLT® Lift Drive LD 302
12 Specifications
12.1 Electrical Data
P4K0 P5K5 P7K5
Typical shaft output [kW]/[hp] 4/5 5.5/7.5 7.5/10
Enclosure IP20 A2 A3 A3
Enclosure IP55 A4/A5 A5 A5
Output current
High overload 160% for 1 min.
Shaft output [kW]/[hp] 4/5 5.5/7.5 7.5/10
Continuous
(3x380-440 V) [A]
Intermittent
(3x380-440 V) [A]
Continuous
(3x441-500 V) [A]
Intermittent
(3x441-500 V) [A]
Continuous kVA
(400 V AC) [kVA]
Continuous kVA
(460 V AC) [kVA]
Max. input current
Continuous
(3x380-440 V) [A]
Intermittent
(3x380-440 V) [A]
Continuous
(3x441-500 V) [A]
Intermittent
(3x441-500 V) [A]
Additional specifications
IP20 max. cable cross section5) (mains, motor, brake, and load sharing) [mm
(AWG)]2)
IP55 max. cable cross section5) (mains, motor, brake, and load sharing) [mm
(AWG)]
Max. cable cross section5) with disconnect
Estimated power loss
at rated max. load [W]
Weight, enclosure IP20 [kg]/[lbs] 4.9/10.8 6.6/14.6 6.6/14.6
Weight, enclosure IP55 [kg]/[lbs] 13.5/29.8 14.2/31.3 14.2/31.3
Efficiency
0.37-7.5 kW [0.5-10 hp] only available as 160% high overload.
4)
4)
2
2
10 13 16
16 20.8 25.6
8.2 11 14.5
13.1 17.6 23.2
6.9 9.0 11.0
6.5 8.8 11.6
9.0 11.7 14.4
14.4 18.7 23.0
7.4 9.9 13.0
11.8 15.8 20.8
4,4,4 (12,12,12)
(min. 0.2(24))
4,4,4 (12,12,12)
6,4,4 (10,12,12)
124 187 255
0.97 0.97 0.97
12 12
Table 12.1 Mains Supply 3x380-400 V AC
MG34X102 - Rev. 2013-12-04 67
Page 72

Specifications
VLT® Lift Drive LD 302
P11K P15K P18K P22K
High/Normal Load
1)
HO NO HO NO HO NO HO NO
Typical shaft output [kW]/[hp] 11/15 15/20 15/20 18.5/25 18.5/25 22/30 22/30 30/40
Enclosure IP20 B3 B4 B4 B4
Enclosure IP55 B1 B1 B2 B2
Output current
Continuous (3 x 380-440 V) [A] 24 32 32 37.5 37.5 44 44 61
Intermittent (60 s overload)
(3 x 380-440 V) [A]
Continuous
(3 x 441-500 V) [A]
Intermittent (60 s overload)
(3 x 441-500 V) [A]
Continuous kVA
(400 V AC) [kVA]
Continuous kVA
(460 V AC) [kVA]
38.4 35.2 51.2 41.3 60 48.4 70.4 67.1
21 27 27 34 34 40 40 52
33.6 29.7 43.2 37.4 54.4 44 64 57.2
16.6 22.2 22.2 26 26 30.5 30.5 42.3
21.5 27.1 31.9 41.4
Max. input current
Continuous
(3 x 380-440 V) [A]
Intermittent (60 s overload)
(3 x 380-440 V) [A]
Continuous
(3 x 441-500 V) [A]
Intermittent (60 s overload)
(3 x 441-500 V) [A]
22 29 29 34 34 40 40 55
35.2 31.9 46.4 37.4 54.4 44 64 60.5
19 25 25 31 31 36 36 47
30.4 27.5 40 34.1 49.6 39.6 57.6 51.7
Additional specifications
IP55 max. cable cross-section5) (mains,
brake, load sharing) [mm2 (AWG)]
2)
IP55 max. cable cross-section5) (motor)
[mm2 (AWG)]
2)
IP20 max. cable cross-section5) (mains,
1212
brake, motor and load sharing)
Max. cable cross-section with
Disconnect [mm2 (AWG)]
2)
Estimated power loss
at rated max. load [W]
4)
16, 10, 16 (6, 8, 6) 16, 10, 16 (6, 8, 6) 35,-,-(2,-,-) 35,-,-(2,-,-)
10, 10,- (8, 8,-) 10, 10,- (8, 8,-) 35, 25, 25 (2, 4, 4) 35, 25, 25 (2, 4, 4)
10, 10,- (8, 8,-) 10, 10,- (8, 8,-) 35,-,-(2,-,-) 35,-,-(2,-,-)
16, 10, 10 (6, 8, 8)
291 392 379 465 444 525 547 739
Weight, enclosure IP20 [kg]/[lbs] 12/26.5 12/26.5 23.5/51.8 23.5/51.8
Weight,
enclosure IP55 [kg]/[lbs]
Efficiency
4)
23/50.7 23/50.7 27/59.5 27/59.5
0.98 0.98 0.98 0.98
Table 12.2 Mains Supply 3x380-400 V AC
68 MG34X102 - Rev. 2013-12-04
Page 73

Specifications
High/Normal Load
Typical shaft output [kW]/[hp] 30/40 37/50 55/75 75/100
Enclosure IP20 B4 C4
Enclosure IP55 C1 C2
Output current
Continuous ( 3x380-440 V) [A] 61 73 106 147
Intermittent (60 s overload)
(3x380-440 V) [A]
Continuous
(3x441-500 V) [A]
Intermittent (60 s overload)
(3x441-500 V) [A]
Continuous kVA (400 V AC) [kVA] 42.3 50.6 73.4 102
Continuous kVA (460 V AC) [kVA] 51.8 104
Max. input current
Continuous (3x380-440 V) [A] 55 66 96 133
Intermittent (60 s overload)
(3x380-440 V) [A]
Continuous
(3x441-500 V) [A]
Intermittent (60 s overload)
(3x441-500 V) [A]
Additional specifications
IP20 max. cable cross-section5) (mains and motor)
IP20 max. cable cross-section5) (brake and load sharing)
IP55max. cable cross-section5) (mains, motor) [mm2 (AWG)]
IP55 max. cable cross-section5) (brake, load sharing) [mm
2)
(AWG)]
Max. cable size with mains disconnects [mm2 (AWG)] 2)
Estimated power loss
at rated max. load [W]
Weight,
enclosure IP55 [kg]/[lbs]
Efficiency
4)
1)
4)
VLT® Lift Drive LD 302
2)
2
P30K P55K
HO NO HO NO
91.5 80.3 159 162
52 65 105 130
78 71.5 158 143
82.5 72.6 144 146
47 59 95 118
70.5 64.9 143 130
35 (2) 150 (300mcm)
35 (2) 95 (4/0)
50 (1) 150 (300MCM)
50 (1) 95 (3/0)
50, 35, 35
(1, 2, 2)
570 698 1022 1384
45/99.2 65/143.3
0.98 0.98
95, 70, 70
(3/0, 2/0, 2/0)
12 12
Table 12.3 Mains Supply 3x380-400 V AC
1) High overload = 160% torque during 60 s, Normal overload = 110% torque during 60 s
2) American Wire Gauge.
3) Measured using 5 m [16.4 ft] screened motor cables at rated load and rated frequency.
4) The typical power loss is at nominal load conditions and expected to be within
cable conditions).
Values are based on a typical motor efficiency (eff2/eff3 border line). Motors with lower efficiency also add to the power loss in the
frequency converter and opposite.
If the switching frequency is increased compared to the default setting, the power losses may rise significantly.
LCP and typical control card power consumptions are included. Further options and customer load may add up to 30 W to the losses.
(Though typical only 4 W extra for a fully loaded control card, or options for slot A or slot B, each).
MG34X102 - Rev. 2013-12-04 69
±
15% (tolerance relates to variety in voltage and
Page 74

Specifications
Although measurements are made with state of the art equipment, some measurement inaccuracy must be allowed for (±5%).
5) The 3 values for the max. cable cross section are for single core, flexible wire and flexible wire with sleeve, respectively.
VLT® Lift Drive LD 302
12.2 Ambient Conditions
Environment
Enclosure IP20, IP55
Vibration test 1.0 g
Max. THVD 10%
Max. relative humidity 5% - 93% (IEC 721-3-3; Class 3K3 (non-condensing) during operation
Aggressive environment (IEC 60068-2-43) H2S test
Ambient temperature Max. 50 °C (24-hour average maximum 45 °C)
Minimum ambient temperature during full-scale operation 0 °C
Minimum ambient temperature at reduced performance - 10 °C
Temperature during storage/transport -25 to +65/70 °C
Maximum altitude above sea level without derating 1000 m
Derating for high altitude, see special conditions in the Design Guide.
EMC standards, Emission EN 61800-3
EMC standards, Immunity EN 61800-3
class Kd
12.3 Power Ratings, Weight and
Dimensions
Enclosure A2 A3 A5 B1 B2 B3 B4
Power rating
[kW]/[hp]
IP Class IP20 IP20 IP55 IP55 IP55 IP20 IP20 IP20 IP20
Voltage [V] 400 400 400 400 400 400 400 400 400
Continuous
Output current
(100%) [A]
1212
Overload 6 s/60 s
[A]
Current at 16 kHz
[A]
Current at 14 kHz
[A]
Current at 12 kHz
[A]
Current at 10 kHz
[A]
Current at 8 kHz
[A]
Ambient
temperature [°C ]
Load cycles:
design point pr.
year
Duty cycle [%] 50 50 50 50 50 50 50 50 50
4/5
10 13-16 13-16 21 35 26 35 44 51
16/16 20.8-25.6 20.8-25.6 33.6 56 46.8/41.6 59.9/56 70.4/70.4 91.3/81.6
10 13-16 13-16 - 35 - 32 35 44
10 13-16 13-16 - 35 - 32 35 44
10 13-16 13-16 21 35 21 35 44 51
10 13-16 13-16 21 35 26 35 44 51
10 13-16 13-16 21 35 26 35 44 51
45 45 45 45 45 45 45 45 45
2.1 mio. 2.1 mio 2.1 mio 2.1 mio 2.1 mio 2.1 mio 2.1 mio 2.1 mio 2.1 mio
5.5-7.5/7.
5-10
5.5-7.5/7.5
-10
11/15 18/25 11/15 15/20 18/25 22/30
Table 12.4 Enclosure Types and Power Ratings, A2-A5, B1-B4
70 MG34X102 - Rev. 2013-12-04
Page 75

C
a
b
130BA648.12
f
e
B
A
a
d
e
b
c
a
e
f
130BA715.12
Specifications
VLT® Lift Drive LD 302
Enclosure C1 C2 C3 C4
Power rating
[kW]/[hp]
IP Class IP55 IP55 IP20 IP20 IP20 IP20
Voltage [V] 400 400 400 400 400 400
Continuous Output
current (100%) [A]
Overload 6 s/60 s [A] 75 147 108/90 135/112.5 162/135 198/165
Current at 16 kHz [A] 50 - - - - Current at 14 kHz [A] 50 - - - - Current at 12 kHz [A] 50 98 60 75 83 98
Current at 10 kHz [A] 50 98 60 75 90 98
Current at 8 kHz [A] 50 98 60 75 90 110
Ambient
temperature [°C ]
Load cycles: design
point pr. year
Duty cycle [%] 50 50 50 50 50 50
Table 12.5 Enclosure Types and Power Ratings, C1-C4
Included upon delivery are accessory bags containing necessary
brackets
•
screws
•
connectors
•
30/40 55/75 30/40 37/50 45/60 55/75
50 98 60 75 90 110
45 45 45 45 45 45
2.1 mio 2.1 mio 2.1 mio 2.1 mio 2.1 mio 2.1 mio
12 12
Illustration 12.1 Top and Bottom Mounting Holes
Illustration 12.2 Top and Bottom Mounting Holes (B4 only)
MG34X102 - Rev. 2013-12-04 71
Page 76

Specifications
Enclosure type A1 A2 A3 A4 A5 B1 B2 B3 B4
Rated power [kW]/[hp] 480 V 0.37-1.5/
IP
NEMA
Height [mm]/[in]
Height of back plate A
Height with decoupling plate for
fieldbus cables
Distance between mounting holes a
Width [mm]/[in]
Width of back plate B
Width of back plate with one C option B
Width of back plate with 2 C options B
Distance between mounting holes b
Depth [mm]/[in]
Depth without option A/B C 207/8.15 205/8.07 205/8.07 175/6.89 200/7.87 260/10.24
With option A/B C 222/8.74 220/8.66 220/8.66 175/6.89 200/7.87 260/10.24
Screw holes [mm]/[in]
Max. weight [kg]/[lbs]
Front cover tightening torque
Plastic cover (low IP) Click Click Click - - Click Click Click Click
Metal cover (IP55/66) [Nm]/[lb-ft]
1212
Table 12.6 Dimensions and Power Ratings, Enclosure Types A1-A5 and B1-B4
VLT® Lift Drive LD 302
0.37-4.0/
0.5-2.0
20
Chassis20Chassis20Chassis55Type 1255Type 1255Type 1255Type 1220Chassis20Chassis
200/7.87 268/10.55 268/10.55 390/15.35 420/16.54 480/18.9 650/25.6
A
316/12.44 374/14.72 374/14.72
190/7.48 257/10.12 257/10.12 401/15.79 402/15.83 454/17.87
75/2.95 90/3.54 130/5.12 200/7.87 242/9.53 242/9.53 242/9.53 165/6.5 230/9.06
60/2.36 70/2.76 110/4.33 171/6.73 215/8.46 210/8.27 210/8.27 140/5.51 200/7.87
c
6.0/0.24 8.0/0.31 8.0/0.31 8.25/0.32 8.25/0.32 12/0.47 12/0.47 8/0.31
d ø8 ø11 ø11 ø12 ø12 ø19 ø19
e ø5 ø5.5 ø5.5 ø6.5 ø6.5 ø9 ø9
f
5/0.2 9/0.35 6.5/0.26 6/0.24 9/0.35 9/0.35 9/0.35 7.9/0.31 15/0.59
2.7/6.0 4.9/11 6.6/14.6 9.7/21.4
0.5-5.0
130/5.12 170/6.69 242/9.53 242/9.53 242/9.53 205/8.07 230/9.06
150/5.91 190/7.48 242/9.53 242/9.53 242/9.53 225/8.86 230/9.06
- - -
5.5-7.5/7.
5-10
0.37-4.0/
0.5-5.0
1.5/1.1 1.5/1.1 2.2/1.6 2.2/1.6
0.37-7.5/
0.5-10
- - - -
13.5/14.2
29.8/31.3
11-15/15-2018.5-22/
25-30
624/24.57380/14.96495/19.4
260/10.2
260/10.24262/10.
23/50.7 27/59.5 12/26.5
11-15/1
5-20
399/15.71520/20.4
420/16.54595/23.4
249/9.8 242/9.53
4
12/0.47
6.8/0.27 8.5/0.33
31
- -
18.5-30/
25-40
7
3
9
242/9.53
23.5/51.
8
72 MG34X102 - Rev. 2013-12-04
Page 77

Specifications
Enclosure type C1 C2 C3 C4
Rated power [kW]/[hp] 480 V 30-45/40-60 55-75/75-100 37-45/50-60 55-75/75-100
IP
NEMA
Height [mm]/[in]
Height of back plate A
Height with decoupling plate for fieldbus cables A 630 800
Distance between mounting holes a
Width [mm]/[in]
Width of back plate B
Width of back plate with one C option B
Width of back plate with 2 C options B
Distance between mounting holes b
Depth [mm]/[in]
Depth without option A/B C
With option A/B C
Screw holes [mm]/[in]
Max. weight [kg][lbs]
Front cover tightening torque
Plastic cover (low IP) [Nm]/[lb-ft]
Metal cover (IP55/66) [Nm]/[lb-ft] 2.2/1.6 2.2/1.6 2.0/1.48 2.0/1.48
VLT® Lift Drive LD 302
c
d ø19 ø19
e ø9 ø9
f
55
Type 1/Type 1255Type 1/Type 12
680/26.77 770/30.31 550/21.65 660/25.98
648/25.51 739/29.09 521/20.51 631/24.84
308/12.13 370/14.57 308/12.13 370/14.57
308/12.13 370/14.57 308/12.13 370/14.57
308/12.13 370/14.57 308/12.13 370/14.57
272/10.71 334/13.15 270/10.63 330/12.99
310/12.2 335/13.19 333/13.11 333/13.11
310/12.2 335/13.19 333/13.11 333/13.11
12.5/0.49 12.5/0.49
9.8/0.39 9.8/0.39 35/1.38 50/1.97
45/99 65/143
Click Click
20
Chassis
8.5/0.33 8.5/0.33
17/0.67 17/0.67
2.0/1.48 2.0/1.48
Chassis
20
Table 12.7 Dimensions and Power Ratings, Enclosure Types C1-C4
12.4
Connection Tightening Torques
Enclo-
sure
A2
A3
A4
A5
B1
B2
B3
B4
C1
C2
C3
C4
Table 12.8 Tightening of Terminals
Power [kW]/[hp] Torque [Nm]/[lb-ft]
380-480/500 V Mains Motor
0.37-4.0/0.5-5.0 1.8/1.3 1.8/1.3 1.8/1.3 1.8/1.3 3/2.2 0.6/0.44
5.5-7.5/7.5-10 1.8/1.3 1.8/1.3 1.8/1.3 1.8/1.3 3/2.2 0.6/0.44
0.37-4.0/0.5-5.0 1.8/1.3 1.8/1.3 1.8/1.3 1.8/1.3 3/2.2 0.6/0.44
0.37-7.5/0.5-10 1.8/1.3 1.8/1.3 1.8/1.3 1.8/1.3 3/2.2 0.6/0.44
11-15/15-20 1.8/1.3 1.8/1.3 1.5/1.1 1.5/1.1 3/2.2 0.6/0.44
18-22/25-30 4.5/3.3 4.5/3.3 3.7/2.7 3.7/2.7 3/2.2 0.6/0.44
11-15/15-20 1.8/1.3 1.8/1.3 1.8/1.3 1.8/1.3 3/2.2 0.6/0.44
18-30/25-40 4.5/3.3 4.5/3.3 4.5/3.3 4.5/3.3 3/2.2 0.6/0.44
30-45/40-60 10/7.4 10/7.4 10/7.4 10/7.4 3/2.2 0.6/0.44
1)
55-75/75-100
37-45/50-60 10/7.4 10/7.4 10/7.4 10/7.4 3/2.2 0.6/0.44
55-75/75-100
14/24
10.3/17.7
14/24
10.3/17.7
1)
1)
1)
14/24
10.3/17.7
14/24
10.3/17.7
DC
connection
1)
1)
1)
1)
14/10.3 14/10.3 3/2.2 0.6/0.44
14/10.3 14/10.3 3/2.2 0.6/0.44
Brake Ground Relay
12 12
1)
For different cable dimensions x/y, where x ≤ 95 mm2 [3/0 AWG] and y ≥ 95 mm2 [3/0 AWG] .
MG34X102 - Rev. 2013-12-04 73
Page 78

Specifications
VLT® Lift Drive LD 302
12.5 Lift Controller MCO 361 Specifications
12.5.1 Protection and Features
All inputs, outputs and supply voltages are
•
protected against short circuit.
All inputs, outputs and supply voltages are
•
isolated galvanically from high voltages such as
mains supply and motor voltage (PELV).
Encoder signals are monitored during operation
•
and standstill.
Customer-specific application programs can be
•
copy-protected.
All MCO 361 parameters including user-defined
•
Number of programmable digital outputs
Terminal block X59
Terminal number
Driver type Push-pull
Logic
Voltage level 0-24 V DC
Max. output current (sink or source) with
internal power supply (total)
Max. output current (sink or source) with
external power supply (per output)
Table 12.11 Digital Outputs
1)
Terminals X59-1 and X59-2 can be programmed as input,
33-60 Terminal X59/1 and X59/2 Mode.
2)
Selected in 5-00 Digital I/O Mode.
1
8 (6)
11), 21), 3, 4, 5, 6, 7, 8
PNP or NPN
40 mA
100 mA
2)
application parameters are accessible via the LCP.
X58
1)
2
PNP or NPN
1)
2)
All digital inputs and outputs are isolated galvan-
•
ically from the internal electronics and can be
sourced from an external 24 V power supply.
12.5.2
Control Input/Output and Control
Data
Type Plug connectors with screw
terminals
Maximum cross section, rigid
wire
Maximum cross section, flexible
wire
Maximum cross section, wire
with enclosed core
Minimum cross section
1212
Table 12.9 Connection Terminals
Number of programmable digital
inputs
Terminal block X57
Terminal number 1, 2, 3, 4, 5, 6, 7, 8, 9, 10
Logic
Voltage level 0-24 V DC
Voltage level, logic.0. PNP < 5 V DC
Voltage level, logic.1. PNP > 10 V DC
Voltage level, logic.0. NPN > 19 V DC
Voltage level, logic.1. NPN < 14 V DC
Maximum voltage on input 28 V DC
Table 12.10 Digital Inputs
1)
Selected in parameter 5-00 Digital I/O mode. The digital inputs are
isolated galvanically from the internal electronics and can be sourced
by an external 24 V power supply.
1.5 mm2/AWG 16
1.5 mm2/AWG 16
1.5 mm2/AWG 16
0.08 mm2/AWG 28
10
PNP or NPN ¹)
Number of digital outputs which can be used as
digital inputs
Terminal block X59
Terminal number 1, 2
Logic
Voltage level 0-24 V DC
Voltage level, logic.0. PNP < 10 V DC
Voltage level, logic.1. PNP > 17 V DC
Voltage level, logic.0. NPN > 13 V DC
Voltage level, logic.1. NPN < 6 V DC
Maximum voltage on input 28 V DC
Table 12.12 Combined Digital Inputs/Outputs
1)
Terminals X59-1 and X59-2 can be programmed as input,
33-60 Terminal X59/1 and X59/2 Mode.
2)
Selected in 5-00 Digital I/O Mode.
Terminal block
Terminal number 1, 2
Maximum load 65 mA
Table 12.13 24 V DC Supply Output
The internal 24 V power supply can be disconnected via
parameter 33-85, an 24 V external supply must then be
connected to X58-1 and X58-2.
General specifications
Number of encoder
inputs
Terminal block X55 and X56
Terminal number 5, 6, 7, 8, 9, 10, 11, 12
Input impedance
Maximum voltage on
inputs
Cable type Screened cable with a twisted pair of
2
120Ω
5 V DC
wires for each encoder channel
Table 12.14 Encoder Inputs
74 MG34X102 - Rev. 2013-12-04
Page 79

Specifications
VLT® Lift Drive LD 302
Incremental encoder type RS422/TTL
Maximum frequency 410 kHz
Phase displacement between A and B
Maximum cable length
90° ±30°
2
300 m
Table 12.15 Incremental Encoder Specifications
Absolute encoder type SSI
Data coding Gray
Data length 12–32 bit
Clock frequency
Maximum cable length
78 kHz – 2 MHz
2
150 m
1)
Table 12.16 Absolute Encoder Specifications
1)
Always observe specifications/limitations prescribed by the encoder
supplier.
2)
150 m [492 ft] cable is possible up to 500 kHz clock frequency,
above 500 kHz cable length must be limited further.
Number of encoder outputs 1
Terminal block X56
Terminal number 5, 6, 7, 8, 9, 10, 11, 12
Signal type RS422
Maximum frequency 410 kHz
Maximum number of followers 31 (more with repeater)
Maximum cable length 400 m
Program memory size
100 Kb
Maximum number of application programs 90
Average command execution time 0.3 ms
Maximum reaction time on interrupt input ms
Table 12.20 Application Program
12.5.3 Supply Voltage Overview
Table 12.17 Encoder Output
Max. number of voltage supplies
3
Terminal block X55 and X56
Terminal number 1, 2, 3, 4
24 V, max. load
8 V, max. load
5 V, max. load
250 mA
250 mA1),
400 mA
1)
2)
1)
Table 12.18 Encoder Voltage Supply
1)
By one voltage supply. By more voltage supplies, reduce load
according to following principle: 6 W: Load 24 V + 8 V + 5 V and 2
W: 8 V + 5 V.
2)
8 V is only available at terminal block X55.
Sample time of position PID loop
Positioning accuracy
Synchronising accuracy
1 ms
± 1 increment
± 1 increment
¹)
¹)
Table 12.19 Control Characteristics
1)
This is the static accuracy; dynamic accuracy depends on many
“external” factors such as encoder resolution, moment of inertia,
mechanical backlash and elasticity.
12 12
Illustration 12.3 Wiring Diagram - Supply Voltage
MG34X102 - Rev. 2013-12-04 75
Page 80

Specifications
VLT® Lift Drive LD 302
12.6 Motor Type and Associated Motor Number
12.6.1 Motor Type and Associated Motor Number Stored in Motor Database
Parameter Motor Power Current Revolution Torque Resistor Inductance Poles Back EMF
19-01 Type
[No.
39-116]
39 160.20
40 160.20
41 160.30
42 160.30
43 160.30
44 160.30
45 160.40A
46 160.40A
47 160.40A
48 160.40A
49 200.15C-20
50 200.15C-20
51 200.15C-20
52 200.15C-20
53 200.15C-20
54 200.15C-20
55 200.20C-20
56 200.20C-20
57 200.20C-20
58 200.20C-20
59 200.20C-20
60 200.20C-20
61 200.30C-20
1212
62 200.30C-20
63 200.30C-20
64 200.30C-20
65 200.30C-20
66 200.30C-20
67 200.30C-20
68 200.40C-20
69 200.40C-20
70 200.40C-20
71 200.40C-20
72 200.40C-20
73 200.40C-20
74 225.30-20
75 225.30-20
76 225.30-20
77 225.30-20
78 225.30-20
79 225.40-20
80 225.40-20
81 225.40-20
82 225.40-20
83 225.40-20
Ziehl
Abegg
P [kW]/
[hp]
I [A] N [1/min]
Par. 1-21 Par. 1-24 Par. 1-25 Par. 1-26 Par. 1-30 Par. 1-37 Par. 1-39 Par. 1-40
3.3/4.4
5.2/7
2.8/3.7
3.5/4.7
4.4/5.9
5.6/7.5
5.2/7
6.5/8.7
8.2/11
10.5/14.1
2.5/3.4
4.4/5.9
4.3/5.8
5/6.7
6.8/9.1
7.9/10.6
3.3/4.4
4.1/5.5
5.8/7.8
6.6/8.8
8.9/11.9
10.4/13.9
4.8/6.4
6/8
6.7/9
8.4/11.3
9.6/12.9
12.8/17.2
14.1/18.9
6/8
7.5/10.1
10.6/14.2
12.1/16.2
16.2/21.7
18.8/25.2
3.2/4.3
5/6.7
6.3/8.4
8.2/11
10/13.4
4.5/6
7/9.4
8/10.7
9/12.1
11.5/15.4
9 240
13 384
10.5 192
13 240
16 300
19.5 384
14 192
16.5 240
20 300
25 384
9 96
11.3 168
11.5 186
14.5 192
18.5 258
20.5 300
11 96
12.5 120
16 168
18 192
24 258
27.5 300
14 96
16.5 120
17 168
21.5 168
24.5 192
31 258
35 300
17.5 96
20 120
27 168
32 192
39 258
44 300
11 60
15.5 96
17.5 120
23 156
25 192
16 60
22.5 96
22.5 108
25 120
33.5 156
T [Nm]/[lbft]
130/96
130/96
195/144
195/144
195/144
195/144
260/192
260/192
260/192
260/192
250/184
250/184
220/162
250/184
250/184
250/184
330/243
330/243
330/243
330/243
330/243
330/243
475/350
475/350
380/280
475/350
475/350
475/350
450/332
600/443
600/443
600/443
600/443
600/443
600/443
500/369
500/369
500/369
500/369
500/369
710/524
710/524
710/524
710/524
710/524
R1 [Ohm] Ld [mH] number
3.36 16.7 20 908
1.58 7.6 20 626
2.98 16.7 20 1126
2.07 11.6 20 937
1.39 7.8 20 796
0.91 5.1 20 626
2.21 13.3 20 1162
1.56 9.3 20 973
1.05 6.4 20 807
0.67 4 20 640
6.22 37.1 20 1766
2.79 17.4 20 1267
2.7 16.8 20 1060
2.29 13.3 20 1063
1.37 8.1 20 818
1.13 6.6 20 744
4.66 30.8 20 1874
3.46 22.7 20 1629
2.08 13.7 20 1256
1.58 10.5 20 1099
0.92 6.1 20 831
0.71 4.7 20 732
3.09 23.4 20 2054
2.25 17 20 1730
1.58 12.2 20 1318
1.35 10.1 20 1328
1.05 7.9 20 1180
0.67 5.1 20 945
0.461 3.5 20 784
2.21 18.4 20 2108
1.63 13.4 20 1788
0.94 7.9 20 1359
0.67 5.6 20 1153
0.448 3.8 20 945
0.352 3 20 830
2.86 28.9 20 2855
1.43 14.7 20 1964
1.2 11.9 20 1716
0.66 6.6 20 1320
0.54 5.5 20 1216
2.86 28.9 20 2855
1.43 14.7 20 1964
1.43 14.9 20 1954
1.2 9 20 1644
0.66 6.6 20 1320
V/1000
RPM
76 MG34X102 - Rev. 2013-12-04
Page 81

Specifications
VLT® Lift Drive LD 302
Parameter Motor Power Current Revolution Torque Resistor Inductance Poles Back EMF
19-01 Type
[No.
39-116]
84 225.40-20
85 225.40-20
86 225.60B-20
87 225.60B-20
88 225.60B-20
89 225.60B-20
90 225.60B-20
91 225.60B-20
92 225.60B-20
93 225.60B-20
94 225.60B-20
95 250.60B-20
96 250.60B-20
97 250.60B-20
98 250.60B-20
99 250.60B-20
100 250.60B-20
101 250.60B-20
102 250.60B-20
103 250.80C-20
104 250.80C-20
105 250.80C-20
106 250.80C-20
107 250.80C-20
108 250.80C-20
109 250.80C-20
110 250.100C-20
111 250.100C-20
112 250.100C-20
113 250.100C-20
114 250.100C-20
115 250.100C-20
116 250.100C-20
Ziehl
Abegg
P [kW]/
[hp]
I [A] N [1/min]
Par. 1-21 Par. 1-24 Par. 1-25 Par. 1-26 Par. 1-30 Par. 1-37 Par. 1-39 Par. 1-40
12.5/16.8
13/17.4
7/9.4
11/14.7
12.5/16.8
14/18.8
18/24.1
20/26.8
20/26.8
25/33.5
31.5/42.2
10/13.4
16/21.4
20/26.8
26/34.9
32/42.9
38/51
37/49.6
42/56.3
19/25.5
25/33.5
30/40.2
27/36.2
33/44.2
42/56.3
54/72.4
22/29.4
30/40.2
37/49.6
33/44.2
42/56.3
58/77.7
69/92.5
33.5 168
33 192
23 60
35 96
35 108
42 120
53.5 156
53.5 168
53.5 192
65 240
70 336
30 60
43 96
52.5 120
68 156
80 192
92 240
85 252
94 336
58 84
70 114
80 138
64 156
81 192
102 240
137 312
62 78
82 108
98 132
77 150
98 192
139 264
167 312
T [Nm]/[lbft]
710/524
650/479
1120/826
1120/826
1120/826
1120/826
1120/826
1120/826
1000/738
1000/738
900/664
1600/1180
1600/1180
1600/1180
1600/1180
1600/1180
1500/1106
1400/1033
1200/885
2100/1549
2100/1549
2100/1549
1650/1217
1650/1217
1650/1217
1650/1217
2650/1955
2650/1955
2650/1955
2100/1549
2100/1549
2100/1549
2100/1549
R1 [Ohm] Ld [mH] number
0.66 6.6 20 1318
0.539 5.5 20 1216
1.92 22 20 2999
0.86 9.8 20 1982
0.86 9.8 20 1986
0.563 6.7 20 1629
0.37 4.3 20 1309
0.37 4.3 20 1308
0.29 3.3 20 1144
0.214 2.4 20 973
0.147 1.7 20 819
1.36 20.9 20 3258
0.645 9.9 20 2235
0.431 6.6 20 1831
0.263 4 20 1419
0.193 2.9 20 1216
0.132 2 20 1009
0.132 2 20 1009
0.086 1.3 20 819
0.533 8.4 20 2286
0.325 5.1 20 1776
0.239 3.7 20 1529
0.239 3.7 20 1519
0.164 2.4 20 1270
0.106 1.7 20 1009
0.06 0.9 20 771
0.503 8.3 20 2551
0.285 4.7 20 1906
0.196 3.2 20 1586
0.196 3.3 20 1592
0.127 2.1 20 1270
0.071 1.2 20 963
0.05 0.8 20 793
V/1000
RPM
12 12
Table 12.21 PM Motor, Ziehl Abegg Stored in Motor Database
MG34X102 - Rev. 2013-12-04 77
Page 82
Specifications
VLT® Lift Drive LD 302
12.6.2 Motor Type and Associated Motor Number not Stored in Motor Database
NOTICE
Danfoss can accept no responsibility and liability for the accuracy of the manufacturer motor data.
Motor Power Current Revolution Torque Resistor Inductance Poles Back EMF
PM-Type P [kW]/[hp] I [A] N [1/min]
Ziehl Abegg Par 1-20 Par. 1-24 Par. 1-25 Par. 1-26 Par. 1-30 Par. 1-37 Par. 1-39 Par. 1-40
SM160.20
SM160.20
SM160.30
SM160.30
SM160.30
SM160.30
SM160.40
SM160.40
SM160.40
SM160.40
200.15B-20
200.15B-20
200.15B-20
200.15B-20
200.15B-20
200.15B-20
200.20B-20
200.20B-20
200.20B-20
200.20B-20
200.20B-20
200.30B-20
1212
200.30B-20
200.30B-20
200.30B-20
200.30B-20
200.30B-20
700.09AL-30
700.09AL-30
700.12AL-30
700.12AL-30
700.12AL-30
700.12AL-30
700.14AL-30
700.14AL-30
700.14AL-30
700.14AL-30
700.14AL-30
700.14AL-30
700.16AL-30
700.16AL-30
700.16AL-30
700.16AL-30
700.16AL-30
2.6/3.5
4.2/5.6
2.8/3.7
3.5/4.7
4.4/5.9
5.6/7.5
3.7/5
4.6/6.2
5.8/7.8
7.4/9.9
1.6/2.1
3.2/4.3
3.5/4.7
4.3/5.8
4.9/6.6
5.7/7.6
2.1/2.8
4.2/5.6
4.7/6.3
6.5/
7.5/10.1
3.3/4.4
4.8/6.4
6.7/9
7.6/10.2
10.3/13.8
10.7/14.3
3/4
5/6.7
4.5/6
7.5/10.1
12/16.1
13/17.4
5.5/7.4
8.5/11.4
14/18.8
15/20.1
17/22.8
17.5/23.5
6.5/8.7
10/13.4
16/21.4
17.5/23.5
18/24.1
6.6 240
10 384
7 192
8.3 240
10 300
12.5 384
8.7 192
10.5 240
13 300
16.5 384
5.3 84
9.5 168
9.5 186
11.5 186
13 258
14 300
6.7 84
10.8 168
11.7 186
16 258
17.5 300
10.5 84
13 120
17 168
19 192
25 258
25 258
7.6 60
11.5 96
11.5 60
18 96
29 156
32.5 168
13 60
20.5 96
33.5 156
36.5 168
40.5 192
43 240
16.5 60
25 96
41.5 156
49 168
50 192
T [Nm]/[lbft]
105/77
105/77
140/103
140/103
140/103
140/103
185/136
185/136
185/136
185/136
180/133
180/133
180/133
220/162
180/133
180/133
240/177
240/177
240/177
240/177
240/177
380/280
380/280
380/280
380/280
380/280
340/251
500/369
500/369
750/553
750/553
750/553
750/553
850/627
850/627
850/627
850/627
850/627
700/516
1000/738
1000/738
1000/738
1000/738
900/664
R1 [Ohm] Ld [mH] number V/1000 RPM
3,751 17.2 20 894
1,588 7.5 20 590
3,401 21.4 20 1144
2.38 12.7 20 952
1,645 8.9 20 796
1,082 5.6 20 626
2,581 14.9 20 1180
1,719 10.1 20 973
1,147 6.6 20 796
0.733 4.2 20 626
9.51 58.2 20 1977
2.7 16.8 20 1061
2.7 16.8 20 1060
2.7 16.8 20 1060
1,776 10.6 20 845
1,329 6.9 20 732
7.04 45.5 20 2060
2.79 17.4 20 1267
2,267 14.9 20 1181
1.31 8.3 20 885
0.992 6.6 20 784
4.09 31.8 20 2121
2.54 20 20 1687
1.58 12.1 20 1318
1.24 9.7 20 1180
0.71 5.4 20 885
0.551 4.2 20 952
4.616 73.7 30 3996
2.09 33.4 30 2691
1.833 33.8 30 3921
0.779 14 30 2518
0.288 5.2 30 1537
0.238 4.3 30 1403
1,833 33.8 30 3921
0.779 14 30 2518
0.288 5.2 30 1537
0.238 4.3 30 1403
0.189 3.5 30 1269
0.115 2.2 30 980
1,333 25.9 30 3691
0.555 11 30 2402
0.201 4 30 1442
0.159 3.1 30 1287
0.121 2.4 30 1115
78 MG34X102 - Rev. 2013-12-04
Page 83

Specifications
VLT® Lift Drive LD 302
Motor Power Current Revolution Torque Resistor Inductance Poles Back EMF
PM-Type P [kW]/[hp] I [A] N [1/min]
T [Nm]/[lb-
ft]
R1 [Ohm] Ld [mH] number V/1000 RPM
Ziehl Abegg Par 1-20 Par. 1-24 Par. 1-25 Par. 1-26 Par. 1-30 Par. 1-37 Par. 1-39 Par. 1-40
700.16AL-30
700.16AL3-30
700.16AL3-30
700.16AL3-30
700.16AL3-30
860.28AL-30
860.28AL-30
860.28AL-30
860.28AL-30
860.28AL-30
860.28AL-30
860.28AL-30
Table 12.22 PM Motor, Ziehl Abegg not Stored in Motor Database
20/26.8
7.2/9.7
11.6/15.5
18.8/25.2
20/26.8
9.2/12.3
17/22.8
22/29.5
30/40.2
37/49.6
36/48.3
39/52.3
50 240
19 60
29 96
48 156
55 168
25.5 40
43 75
53.5 96
68.5 132
80.5 160
80 180
80 196
800/590
1150/848
1150/848
1150/848
1150/848
2200/1623
2200/1623
2200/1623
2200/1623
2200/1623
1900/1401
1900/1401
0.093 1.8 30 961
1,333 25.9 30 3691
0.555 11 30 2402
0.201 4 30 1442
0.159 3.1 30 1287
1,244 30.3 30 5091
0.418 10 30 2980
0.28 6.8 30 2402
0.168 4.1 30 1883
0.124 3 30 1614
0.085 2.1 30 1346
0.085 1.9 30 1345
12 12
MG34X102 - Rev. 2013-12-04 79
Page 84

Index
VLT® Lift Drive LD 302
Index
A
Absolute Encoder Specifications.................................................. 75
AC
input..................................................................................................... 20
Mains.................................................................................. 5, 11, 20, 31
Alarm log................................................................................................ 30
Alarms...................................................................................................... 40
AMA.................................................................................................... 42, 45
Ambient
Conditions.......................................................................................... 70
temperature......................................................... 6, 8, 43, 51, 70, 71
Analog
input..................................................................................................... 41
signal.................................................................................................... 41
Application
Examples............................................................................................. 48
instructions........................................................................................ 30
Program............................................................................................... 75
Auto
Auto...................................................................................................... 31
mode.................................................................................................... 30
on........................................................................................................... 31
On.......................................................................................................... 31
Automatic Motor Adaptation........................................................ 33
Auto-reset............................................................................................... 29
Auxiliary equipment.......................................................................... 27
B
Back
Back....................................................................................................... 30
plate........................................................................................................ 7
Basic Operational Programming.................................................. 33
Brake
chopper........................................................................................ 43, 50
control........................................................................................... 37, 42
IGBT....................................................................................................... 37
release sequence.............................................................................. 38
resistor............................................................... 37, 38, 39, 41, 43, 50
Resistor Cabling................................................................................ 39
Bus terminal............................................................................. 21, 29, 31
C
Cable
cross section........................................................................ 24, 67, 70
entries..................................................................................................... 8
lengths................................................................................... 15, 20, 75
routing................................................................................................. 27
sizes................................................................................................ 20, 69
Cancel....................................................................................................... 30
Certifications........................................................................................... 4
Circuit breakers.................................................................................... 27
Clearance
Clearance........................................................................................ 7, 43
requirements........................................................................................ 6
Combined Digital Inputs/Outputs............................................... 74
Communication interface................................................................ 39
Conduit.................................................................................................... 27
Connection Terminals....................................................................... 74
Connector.......................................................................... 21, 23, 71, 74
Control
cables................................................................................................... 24
card....................................................................................................... 41
Characteristics................................................................................... 75
terminal functions.............................................................................. 4
terminals............................................................................... 16, 21, 31
Terminals............................................................................................. 23
wire........................................................................................................ 23
wiring............................................................................ 4, 8, 15, 23, 27
Wiring................................................................................................... 20
Cooling
Cooling................................................................................................... 6
clearance............................................................................................. 27
Correct screening................................................................................ 24
Current rating................................................................................... 6, 42
D
Damage...................................................................................................... 6
DC-link..................................................................................................... 41
DCP protocol......................................................................................... 39
DCP3......................................................................................................... 39
DCP4......................................................................................................... 39
DCPComChan....................................................................................... 39
Debug terminal.................................................................................... 21
Degree of contamination................................................................ 26
Derating....................................................................................... 51, 6, 51
Digital
input..................................................................................................... 42
Inputs................................................................................................... 74
Outputs................................................................................................ 74
Dimensions............................................................................................ 70
Discharge time........................................................................................ 5
Disconnect
switch................................................................................................... 28
switches............................................................................................... 28
Display area.................................................................................... 29, 31
Disposal Instruction.............................................................................. 4
Dissipated braking............................................................................. 43
Dynamic brake..................................................................................... 37
E
Earth leakage circuit breakers....................................................... 16
ELCB.......................................................................................................... 16
80 MG34X102 - Rev. 2013-12-04
Page 85

Index
VLT® Lift Drive LD 302
Electrical
Data....................................................................................................... 67
installation............................................................................................ 4
noise.............................................................................................. 15, 39
EMC
EMC.................................................................... 11, 12, 13, 25, 39, 70
Immunity............................................................................................. 12
Emergency operation........................................................................ 49
Encoder
Encoder............ 21, 23, 34, 39, 40, 46, 47, 48, 57, 61, 63, 66, 74
Connections Examples................................................................... 49
feedback.............................................................................................. 48
Inputs................................................................................................... 74
Output.................................................................................................. 75
Rotation............................................................................................... 48
Voltage Supply.................................................................................. 75
Environment.......................................................................................... 70
External controllers.............................................................................. 4
Extreme Running Conditions......................................................... 50
F
Fault log.................................................................................................. 30
Feedback.......................................................................................... 27, 44
Floating delta........................................................................................ 20
For more detailed information...................................................... 28
Front cover tightening torque............................................... 72, 73
Full load current..................................................................................... 6
Functional
testing..................................................................................................... 4
Testing................................................................................................. 28
Fuses.................................................................................................. 27, 43
Fusing......................................................................................................... 8
Harmonics
Emission Requirements................................................................. 14
Test Results (Emission)................................................................... 14
Heat sink..................................................................... 43, 44, 45, 51, 64
Holding brake....................................................................................... 37
I
I/O terminal............................................................................................ 21
IEC 61800-3............................................................................................ 20
Immunity tests...................................................................................... 12
Incremental Encoder Specifications........................................... 75
Induced voltage.............................................................................. 8, 20
Info............................................................................................................ 30
Initialisation........................................................................................... 32
Input
current.................................................................................................. 20
disconnect.......................................................................................... 20
power.............................................................. 5, 8, 15, 20, 27, 40, 28
power wiring.............................................................................. 20, 27
terminal............................................................................................... 41
terminals............................................................................... 20, 28, 61
voltage.......................................................................................... 28, 40
Installation.................................................................. 4, 6, 8, 23, 27, 28
Intended Use........................................................................................... 4
Interference isolation........................................................................ 27
Intermediate circuit................................................ 20, 38, 41, 43, 50
Isolated mains...................................................................................... 20
Items supplied........................................................................................ 6
K
Kinetic energy....................................................................................... 37
G
General
Aspects of EMC Emissions............................................................. 11
Aspects of Harmonics Emission.................................................. 14
Ground
connections................................................................................ 15, 27
Leakage Current............................................................................... 15
loops..................................................................................................... 24
potential.............................................................................................. 24
wire................................................................................................. 11, 15
Grounded delta.................................................................................... 20
Grounding
Grounding............................................................................ 20, 28, 27
Using Screened Cable.................................................................... 16
H
Hand
Hand..................................................................................................... 31
on........................................................................................................... 31
On.......................................................................................................... 31
Harmonic currents.............................................................................. 14
MG34X102 - Rev. 2013-12-04 81
L
LCP layout............................................................................................... 29
Leakage current..................................................................... 11, 15, 28
Lift
Control Start Sequence.................................................................. 35
Control Stop Sequence.................................................................. 36
Lifting.......................................................................................................... 7
Load-free switching........................................................................... 48
Local
control........................................................................................... 29, 31
control panel..................................................................................... 28
operation............................................................................................ 29
Location of relays................................................................................ 22
M
Main
contactors........................................................................................... 48
menu.................................................................................................... 29
Menu................................................................................ 30, 32, 33, 52
Page 86

Index
VLT® Lift Drive LD 302
Mains
drop-out.............................................................................................. 50
power failure...................................................................................... 49
voltage.......................................................................................... 29, 30
Manual Initialisation.......................................................................... 32
Master/follower................................................................................... 39
Maximum wire size............................................................................. 20
Mechanical
Brake Control..................................................................................... 38
installation............................................................................................ 4
Menu
access................................................................................................... 30
keys................................................................................................ 29, 30
structure.............................................................................................. 30
Moment of inertia............................................................................... 50
Motor
cables................................................. 6, 8, 11, 13, 15, 20, 43, 57, 69
characteristics............................................................................... 6, 33
connection......................................................................................... 20
current.................................................................................... 33, 45, 29
data................................................................................................ 42, 45
phases.................................................................................................. 50
power............................................................................................ 15, 45
protection......................................................................................... 4, 8
rotation................................................................................................ 30
status....................................................................................................... 4
Thermal Protection.......................................................................... 50
wiring........................................................................................ 8, 16, 27
Motor-generated overvoltage...................................................... 50
Mounting
Mounting..................................................................... 6, 7, 11, 27, 71
holes.............................................................................................. 72, 73
Multiple
frequency converters................................................................. 8, 20
motors.................................................................................................. 28
N
Nameplate................................................................................................ 6
Navigation
keys......................................................................................... 29, 30, 31
Keys....................................................................................................... 30
Noise isolation........................................................................................ 8
O
Off.............................................................................................................. 31
OK............................................................................................................... 30
Operation
keys................................................................................................ 29, 31
Keys....................................................................................................... 31
Operational information.................................................................. 30
Optional equipment................................................................... 20, 28
Output
current.................................................................................................. 41
power wiring..................................................................................... 27
terminals............................................................................................. 28
Overcurrent protection....................................................................... 8
Overload protection........................................................................ 6, 8
P
PELV
PELV...................................................................................................... 20
- Protective Extra Low Voltage.................................................... 16
Phase loss............................................................................................... 41
Point-to-point link.............................................................................. 39
Power
connections.......................................................................................... 8
factor............................................................................................. 20, 27
ratings.................................................................................................. 70
Pre-installation....................................................................................... 6
Programming
Programming.................................................... 4, 30, 41, 29, 31, 52
functions............................................................................................. 30
Protection
Protection........................................................................................... 16
and Features...................................................................................... 74
Protective
covering................................................................................................. 6
earthing............................................................................................... 15
Public supply network...................................................................... 14
Q
Qualified personnel.............................................................................. 5
Quick Menu..................................................................................... 30, 52
R
Rated
insulation voltage............................................................................ 26
shock capability................................................................................ 26
RCD............................................................................................................ 16
RC-link...................................................................................................... 25
Redundancy circuitry........................................................................ 37
Reference................................................................................................ 29
Relay
outputs................................................................................................ 21
terminals............................................................................................. 16
Remote commands............................................................................... 4
Reset.......................................... 31, 32, 40, 41, 42, 43, 45, 46, 29, 31
Residual current device.................................................................... 16
Restore..................................................................................................... 31
RFI filter..................................................................................... 13, 15, 20
Rotor position....................................................................................... 48
S
Safe Torque Off...................................................................... 25, 26, 38
82 MG34X102 - Rev. 2013-12-04
Page 87

Index
Safety
chain..................................................................................................... 37
Inspection........................................................................................... 28
Instructions........................................................................................ 28
Screened
cable............................................................................................ 6, 8, 27
Control Cables................................................................................... 24
Serial
communication.................................................................. 24, 31, 40
communications wiring................................................................... 4
Set-up....................................................................................................... 30
Short
circuit.................................................................................................... 43
circuit (motor phase – phase)...................................................... 50
circuit protection................................................................................ 8
Slip compensation....................................................................... 50, 64
Specifications................................................................................... 4, 67
Start up.................................................................................................... 32
Start-up...................................................................................................... 4
Static brake............................................................................................ 37
Status.............................................................. 28, 29, 30, 32, 53, 64, 66
Storage....................................................................................................... 6
Supply
voltage................................................................................... 20, 28, 43
Voltage Overview............................................................................. 75
Switching on the output.................................................................. 50
System
feedback................................................................................................ 4
Monitoring.......................................................................................... 40
VLT® Lift Drive LD 302
V
Voltage
distortion............................................................................................. 14
imbalance........................................................................................... 41
W
Warning................................................................................................... 40
Warnings and Alarms........................................................................ 40
Weight...................................................................................................... 70
Wire
ratings..................................................................................................... 8
sizes......................................................................................................... 8
type.......................................................................................................... 8
Wiring schematic................................................................................. 18
T
THD............................................................................................................ 14
Thermal motor protection....................................................... 42, 50
Thermistor
Thermistor................................................................................... 20, 42
control wiring.................................................................................... 20
Tightening of Terminals................................................................... 73
Torque........... 20, 37, 38, 42, 43, 51, 54, 55, 56, 58, 69, 73, 76, 78
Total voltage distortion.................................................................... 14
Transient ground current................................................................ 16
Travel commands................................................................................ 39
Trip
Trip........................................................................................................ 40
function.................................................................................................. 8
lock........................................................................................................ 40
Troubleshooting...................................................................... 4, 41, 40
U
User functions....................................................................................... 28
MG34X102 - Rev. 2013-12-04 83
Page 88

www.danfoss.com/drives
Danfoss can accept no responsibility for possible errors in catalogues, brochures and other printed material. Danfoss reserves the right to alter its products without notice. This also applies to
products already on order provided that such alterations can be made without subsequential changes being necessary in specifications already agreed. All trademarks in this material are property
of the respective companies. Danfoss and the Danfoss logotype are trademarks of Danfoss A/S. All rights reserved.
130R0514 MG34X102 Rev. 2013-12-04
*MG34X102*
 Loading...