

Instruction
FH-CWT Thermostat

Instruction FH-CWT Thermostat
Instruction FH-CWT Thermostat 5
Инструкция для термостата FH-CWT 11
FH-CWT-Thermostat - Gebrauchsanweisung 19
Instructions thermostat FH-CWT 27
FH-CWT 温控器使用说明
Produced by Danfoss Floor Heating Hydronics 05.2011
VI.CU.A2.2D
33
3

Instruction FH-CWT Thermostat
Produced by Danfoss Floor Heating Hydronics 05.2011
VI.CU.A2.2D
4
Produced by Danfoss Floor Heating Hydronics 05.2011

Instruction FH-CWT Thermostat
Index
1. Functional Overview . . . . . . . . . . . . . . . . . . . . . . . 6
2. Mounting . . . . . . . . . . . . . . . . . . . . . . . . . . . . . . . . . . 6
3. Installation. . . . . . . . . . . . . . . . . . . . . . . . . . . . . . . . . 6
4. General usage . . . . . . . . . . . . . . . . . . . . . . . . . . . . . 7
5. Frost Protection Mode. . . . . . . . . . . . . . . . . . . . . . 8
6. Technical Specifications . . . . . . . . . . . . . . . . . . . . 9
7. Figures and illustrations . . . . . . . . . . . . . . . . . . . . 39
IMPORTANT!
Protect the thermostat from dirt, fluids, concrete and do NOT
insert any objects into it.
Do not cover the thermostat, for instance by hanging towels
directly in front of it.
Installation must be done by an authorized electrician.
Produced by Danfoss Floor Heating Hydronics 05.2011
VI.CU.A2.2D
5

Instruction FH-CWT Thermostat
Produced by Danfoss Floor Heating Hydronics 05.2011
1. Functional Overview
Front - fig. 1
Dial knob.
Red/Green LED (behind the cover).
LED modes
• Green light ON - Thermostat is ON but not heating.
• Red light ON - Thermostat is ON and heating.
Back - fig. 2
Screw hole for wall mounting.
Terminals for cable mounting.
2. Mounting
Placing the Room Thermostat - fig. 4
! Wherever possible, the room thermostat should
be installed where the effects of sunlight, draught,
or other heaters (eg. TV’s), etc. are avoided.
3. Installation
Installing the Room Thermostat - fig. 5 and fig.6
• Carefully remove the back plate. Do NOT enter
any objects deeply into the thermostat.
• Mount the back plate to the wall box using the
enclosed screws.
• Connect the thermostat correctly in accordance
with the Wiring Diagram.
VI.CU.A2.2D
6
Produced by Danfoss Floor Heating Hydronics 05.2011

Instruction FH-CWT Thermostat
• Mount the cover to the back plate, and finally
mount the dial knob.
Wiring Diagram
The product must be connected to the following
leads:
• Terminal L: Phase (L) 230 V ± 10%, 50/60 Hz
• Terminal NO: Valve (NO)
• Terminal NC: Valve (NC)
• Terminal N: Neutral (N)
4. General usage
Turning the Room Thermostat ON/OFF
• Turn the thermostat OFF by turning the knob
counterclockwise to • on the scale - Fig. 3 .
• Turn the thermostat ON by turning the knob
clockwise to your desired temperature.
Setting the Room Temperature
• Turn the knob to set the desired room temperature according to the scale - Fig. 3.
Produced by Danfoss Floor Heating Hydronics 05.2011
VI.CU.A2.2D
7
Instruction FH-CWT Thermostat
Produced by Danfoss Floor Heating Hydronics 05.2011
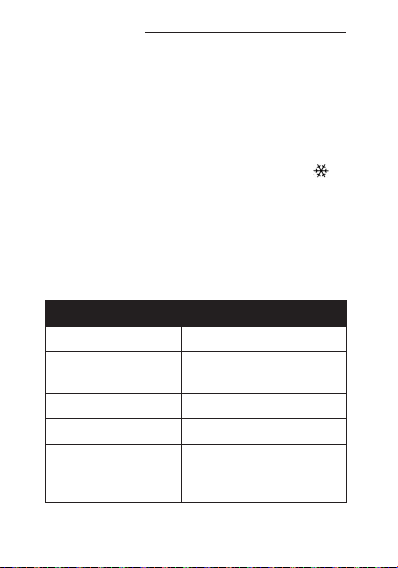
5. Frost Protection Mode
Set the thermostat to Frost Protection Mode by
turning the knob to the position on the scale Fig. 3 .
• When the room temperature drops below 5 °C
the heating will be turned ON.
• When the room temperature raises above 6 °C
the heating will be turned OFF.
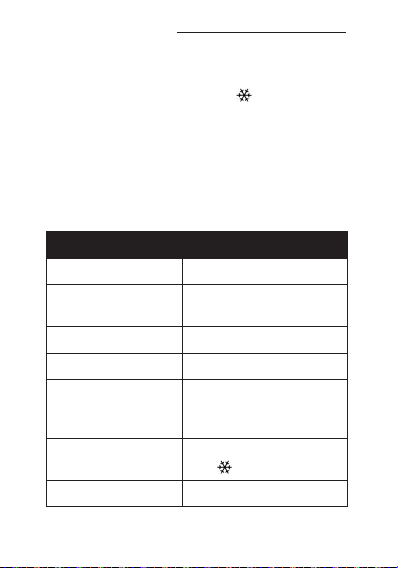
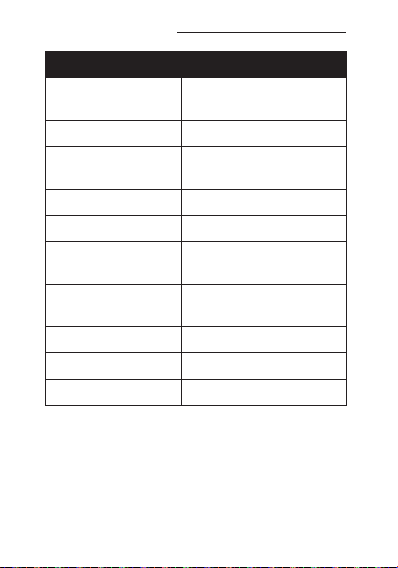
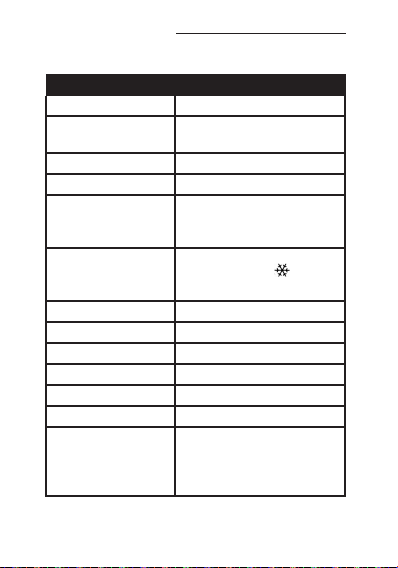
6. Technical Specifications
Feature Description
Approval CE Marking, EN 60730
Colour White RAL 9016/ Grey
Dimensions 86 Χ 99 Χ 29mm
Adjustment mode Dial
Fault indication/
failure mode
Frost protection Yes, put the dial to posi-
Ambient temperature - 10 °C – 60 °C
RAL 7011
If sensor failure, thermostat will turn off all
output of relays
tion (5 °C)
VI.CU.A2.2D
8
Produced by Danfoss Floor Heating Hydronics 05.2011
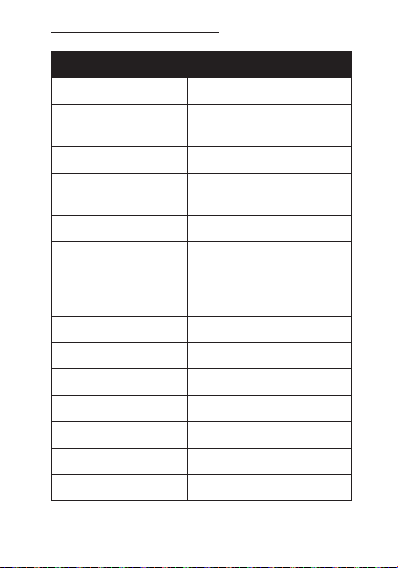
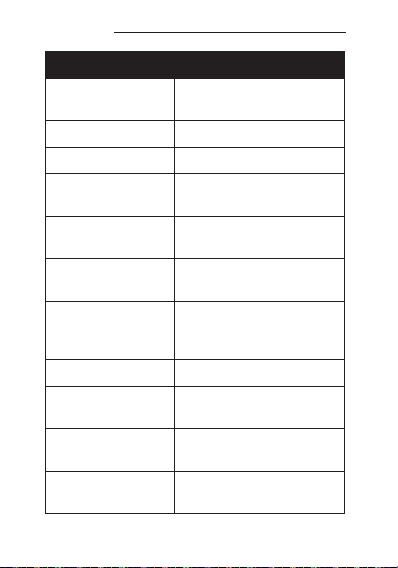
Instruction FH-CWT Thermostat
Feature Description
Precision ±1.5 °C
Hysteresis 1 °C, below the setpoint
temperature
IP class 30
LCD backlight/
No
nightlight
LCD display No
LED indicator Green light: Thermostat
ON and no heat demand
Red light: Thermostat ON
and heat demand
Max. load, inductive <1A
Max. load, resistive <3A
Mounting Wall mounting
Network, wire No
Network, wireless No
Off-set function No
Power consumption 7 W
Produced by Danfoss Floor Heating Hydronics 05.2011
VI.CU.A2.2D
9
Instruction FH-CWT Thermostat
Feature Description
Power supply,
No
battery
Power supply, net 230Vac±10% 50/60Hz
Power backup
Not applicable
settings
Sensor, floor No
Sensor, room NTC 10K accuracy: ±1%
Sensor, room
5-30 °C
- set range
Shell material/ non
94V0/ Yes
inflammable
Shell material, type ABS+PC
Static protection Yes
Programmable No
10
VI.CU.A2.2D
Produced by Danfoss Floor Heating Hydronics 05.2011
Инструкция для термостата FH-CWT
Со держание
1. Обзор функций................................................................ 10
2. Монтаж ............................................................................... 10
3. Установка ........................................................................... 11
4. Эксплуатация ................................................................... 11
5. Режим защиты от мороза ........................................... 12
6. Технические характеристики ................................... 13
7. Рисунки и иллюстрации .............................................. 39
ВАЖНАЯ ИНФОРМАЦИЯ!
Защищайте термостат от попадания загрязнений,
жидкостей и цемента и НЕ вставляйте в него посторонние предметы.
Не закрывайте термостат, например, повесив перед
ним полотенце.
Установку должны производить только квалифицированные электрики.
Изготовлено 05.2011 компанией Danfoss FHH
VI.CU.A2.2D
11

Инструкция для термостата FH-CWT
1. Обзор функций
Вид спереди - рис. 1
Круглый регулятор.
Красный/зеленый светодиод (под крышкой).
Режимы светодиода
• Горит зеленый свет - Термостат включен, но нагрев
отключен.
• Горит красный свет - Термос тат включен, нагрев
включен.
Вид сзади - рис. 2
Резьбовое отверстие для монтажа на стене.
Контакты для подключения кабеля.
2. Монтаж
Размещение комнатного термостата - рис. 4
! Если возможно, комнатный термостат должен устанавливаться в местах, исключающих воздействие на
него солнечных лучей, сквозняков и иных источников тепла (напр. телевизора) и т.п.
12
VI.CU.A2.2D
Изготовлено 05.2011 компанией Danfoss FHH

Инструкция для термостата FH-CWT
3. Установка
Установка комнатного термостата - рис. 5 и рис. 6
• Аккуратно снимите заднюю пластину. Не вставляйте
в термостат посторонние предметы.
• Прикрутите заднюю платину к распределительному
шкафу при помощи приложенных болтов.
• Подключите термостат в соответствии с монтажной
схемой.
• Прикрепите крышку к задней пластине, а затем
установите круглый регулятор.
Монтажная схема
Изделие необходимо подключить к следующим
проводам:
• Выход L: Фаза (L) переменный ток 230 В, 50/60 Гц
• Выход NO: Клапан (NO)
• Выход NC: Клапан (NC)
• Выход N: Нулевой (N)
4. Эксплуатация
Включение/выключение комнатного термостата
• Выключение термостата осуществляется поворотом круглого регулятора против часовой стрелки
до • на шкале - Рис. 3 .
• Включение термостата и задание желаемой
температуры осуществляется поворотом круглого
регулятора по часовой стрелке.
Изготовлено 05.2011 компанией Danfoss FHH
VI.CU.A2.2D
13
Инструкция для термостата FH-CWT
Установка температуры в помещении
• Поверните круглый регулятор для установки
температуры в помещении в соответствии со
шкалой - Рис. 3.
5. Режим защиты от мороза
Включение режима защиты от мороза осуществляется
поворотом круглого регулятора до положения на
шкале - Рис.3 .
• Когда температура в помещении опускается ниже
5 °C включается обогрев.
• Когда температура в помещении поднимается
выше 6 °C обогрев отключается.
6. Технические характеристики
Функция Описание
Одобрение Маркировка СЕ, EN 60730
Цвет Белый RAL 9016/ Серый
Размеры 86 Χ 99 Χ 29мм
Режим регулировки Круглый регулятор
Индикация сбоя/
аварийный режим
RAL 7011
В случае неисправности
датчика будут отключены
все выходы реле.
14
VI.CU.A2.2D
Изготовлено 05.2011 компанией Danfoss FHH

Инструкция для термостата FH-CWT
Функция Описание
Защита от мороза Да, установите регулятор
в положение (5 °C)
Температура окру-
- 10 °C - 60 °C
жающей среды
Точность регулировки ±1,5 °C
Гистерезис 1 °C, ниже установленной
температуры
Класс по IP 30
Подсветка ЖК-
Нет
экрана/ночная
подсветка
ЖК-экран Нет
Светодиодный
индикатор
Зеленый свет: Термостат
включен, но обогрев
выключен
Красный свет: Термо-
стат включен, обогрев
включен
Максимальная на-
<1A
грузка, индукционная
Изготовлено 05.2011 компанией Danfoss FHH
VI.CU.A2.2D
15

Инструкция для термостата FH-CWT
Функция Описание
Максимальная на-
<3A
грузка, резистивная
Монтаж Монтаж на стене
Сеть, кабельная Нет
Сеть, беспроводная Нет
Функция компен-
Нет
сации
Потребляемая мощ-
7 Вт
ность
Источник питания,
Нет
батарея
Источник питания,
сеть
Резервное сохране-
230 В, переменный ток
50/60 Гц
Не используется
ние настроек
Датчик, напольный Нет
Датчик, комнатный NTC 10K точность: ±1%
Датчик, комнатный
5-30 °C
- диапазон регулировки
16
VI.CU.A2.2D
Изготовлено 05.2011 компанией Danfoss FHH

Инструкция для термостата FH-CWT
Функция Описание
Материал корпуса/
94V0/ Да
негорючий
Материал корпуса,
ABS+PC
тип
Антистатическая
Да
защита
Управление про-
Нет
граммой
Изготовлено 05.2011 компанией Danfoss FHH
VI.CU.A2.2D
17

Инструкция для термостата FH-CWT
18
VI.CU.A2.2D
Изготовлено 05.2011 компанией Danfoss FHH

FH-CWT-Thermostat - Gebrauchsanweisung
Stichwortverzeichnis
1. Funktionsübersicht ................................................. 20
2. Anbringung ............................................................... 20
3. Installation ................................................................. 20
4. Betriebsgrundlagen ................................................ 21
5. Frostschutzbetrieb .................................................. 22
6. Technische Spezifikationen ................................. 22
7. Abbildungen und Illustrationen ........................ 39
WICHTIG!
Achten Sie darauf, dass das Thermostat nicht mit Schmutz,
Flüssigkeiten oder Beton in Kontakt kommt, und schieben Sie
keine Gegenstände in das Thermostat ein.
Decken Sie das Thermostat nicht ab (hängen Sie beispielsweise
keine Handtücher direkt vor das Gerät).
Die Installation ist von einem befugten Elektriker durchzuführen.
Hergestellt von Danfoss FHH 05/2011
VI.CU.A2.2D
19

FH-CWT-Thermostat - Gebrauchsanweisung
1. Funktionsübersicht
Vorderseite - Abb. 1
Wählknopf.
Rote/Grüne LED (hinter der Abdeckung).
LED-Modi
• Grüne LED EIN - Thermostat ist eingeschaltet,
heizt jedoch nicht.
• Rote LED EIN - Thermostat ist eingeschaltet und
heizt.
Rückseite - Abb. 2
Schraubloch für Wandanbringung.
Anschlüsse für Verkabelung.
2. Anbringung
Platzieren des Raumthermostats - Abb. 4
! Wenn möglich ist das Raumthermostat so anzubringen, dass es weder Sonnenlicht, noch Zugluft
oder sonstigen Wärmequellen (z. B. Fernseher)
ausgesetzt ist.
3. Installation
Installation des Raumthermostats (siehe Abb. 5 u. 6)
• Nehmen Sie vorsichtig die Wandplatte ab.
Schieben Sie keine Gegenstände weit in das
Thermostat ein.
20
VI.CU.A2.2D
Hergestellt von Danfoss FHH 05/2011

FH-CWT-Thermostat - Gebrauchsanweisung
• Befestigen Sie die Wandplatte mit den mitgelieferten Schrauben an der Wanddose.
• Schließen Sie das Thermostat ordnungsgemäß an
(siehe Schaltbild).
• Bringen Sie die Abdeckung der Wandplatte an
und montieren Sie abschließend den Wählknopf.
Schaltbild
Das Gerät ist wie folgt anzuschließen:
• Anschluss L: Phase (L) 230 V ± 10%, 50/60 Hz
• Anschluss NO: Ventil (Schließer)
• Anschluss NC: Ventil (Öffner)
• Anschluss N: Neutralleiter (N)
4. Betriebsgrundlagen
Ein-/Ausschalten des Raumthermostats
• Schalten Sie das Thermostat aus, indem Sie den
Knopf gegen den Uhrzeigersinn auf • auf der
Skala drehen - Abb. 3 .
• Schalten Sie das Thermostat ein, indem Sie den
Knopf im Uhrzeigersinn auf die gewünschte
Temperatur drehen.
Einstellen Der Raumtemperatur
• Drehen Sie den Knopf, um die gewünschte
Raumtemperatur entsprechend der Skala (Abb.
3) einzustellen.
Hergestellt von Danfoss FHH 05/2011
VI.CU.A2.2D
21

FH-CWT-Thermostat - Gebrauchsanweisung
5. Frostschutzbetrieb
Stellen Sie das Thermostat auf Frostschutzbetrieb,
indem Sie den Knopf in die Position auf der
Skala stellen - Abb. 3 .
• Wenn die Raumtemperatur unter 5 °C fällt, wird
die Heizung eingeschaltet.
• Wenn die Raumtemperatur über 6 °C steigt, wird
die Heizung ausgeschaltet.
6. Technische Spezifikationen
Merkmal Beschreibung
Zulassung CE-Kennzeichnung, EN
Farbe Verkehrsweiß RAL 9016/
Abmessungen 86 Χ 99 Χ 29 mm
Einstellung Betriebsart
Fehleranzeige/
Fehlerbetrieb
Frostschutz Ja, Wählknopf auf Position
VI.CU.A2.2D
22
60730
Eisengrau RAL 7011
Wählknopf
Bei einer Fühlerstörung
schaltet das Thermostat
alle Relaisausgänge aus.
stellen (5 °C)
Hergestellt von Danfoss FHH 05/2011

FH-CWT-Thermostat - Gebrauchsanweisung
Merkmal Beschreibung
Umgebungstem-
- 10 °C -60 °C
peratur
Genauigkeit ±1,5 °C
Hysterese 1 °C, unter Sollwerttem-
peratur
IP-Schutzart 30
LCD-Hintergrund-
Nein
beleuchtung/
Nachtlicht
LCD-Anzeige Nein
LED-Anzeige Grünes Licht: Thermo-
stat eingeschaltet, kein
Heizbedarf
Rotes Licht: Thermostat
eingeschaltet und Heiz-
bedarf
Max. induktive
<1A
Belastung
Max. ohmsche
<3A
Belastung
Anbringung Wandanbringung
Hergestellt von Danfoss FHH 05/2011
VI.CU.A2.2D
23
FH-CWT-Thermostat - Gebrauchsanweisung
Merkmal Beschreibung
Netzwerk, drahtge-
Nein
bunden
Netzwerk, drahtlos Nein
Offset-Funktion Nein
Leistungsauf-
7 W
nahme
Stromversorgung,
Nein
Akku
Stromversorgung,
230 V AC, ±10%, 50/60 Hz
Netz
Sicherungsfunktio-
Nicht zutreffend
nen bei Trennung
der Versorgung
Fühler, Boden Nein
Fühler, Raum NTC, 10K, Genauigkeit:
±1%
Fühler, Raum
5-30 °C
- Einstellbereich
Gehäusematerial/
94V0/Ja
Nichtbrennbar
24
VI.CU.A2.2D
Hergestellt von Danfoss FHH 05/2011

FH-CWT-Thermostat - Gebrauchsanweisung
Merkmal Beschreibung
Gehäusematerial,
ABS+PC
Typ
Statikschutz Ja
Programmierbar Nein
Hergestellt von Danfoss FHH 05/2011
VI.CU.A2.2D
25

FH-CWT-Thermostat - Gebrauchsanweisung
26
VI.CU.A2.2D
Hergestellt von Danfoss FHH 05/2011

Instructions thermostat FH-CWT
Sommaire
1. Présentation fonctionnelle ................................... 28
2. Montage ...................................................................... 28
3. Installation .................................................................. 28
4. Utilisation générale.................................................. 29
5. Mode hors gel ............................................................ 30
6. Spécifications techniques ..................................... 30
7. Chiffres et illustrations ............................................ 39
IMPORTANT!
Protéger le thermostat contre la saleté, les fluides, le béton et ne
PAS insérer d’objet.
Ne pas couvrir le thermostat, en plaçant des serviettes devant
par exemple.
L’installation doit être réalisée par un électricien agréé.
Produit par Danfoss Floor Heating Hydronics 05.2011
VI.CU.A2.2D
27

Instructions thermostat FH-CWT
1. Présentation fonctionnelle
Avant - fig. 1
Bouton du cadran.
Voyant rouge/vert (derrière le couvercle).
Modes DEL
• Voyant vert actif - Le thermostat est actif mais ne
chauffe pas.
• Voyant rouge actif - Le thermostat est actif et
chauffe.
Dos - fig. 2
Trou de vis pour montage mural.
Bornes pour montage de câbles.
2. Montage
Mise en place du thermostat d’ambiance - fig. 4
! Lorsque c’est possible, le thermostat d’ambiance
doit être installé à l’abri des effets de la lumière du
soleil, des appels d’air et des autres résistances (de
la télévision par exemple), etc.
3. Installation
Installation du thermostat d’ambiance - fig. 5 et 6
• Retirer doucement la platine arrière. Ne PAS
insérer d’objet profondément dans le thermostat.
28
VI.CU.A2.2D
Produit par Danfoss Floor Heating Hydronics 05.2011

Instructions thermostat FH-CWT
• Monter la platine arrière sur la boîte murale en
utilisant les vis fournies.
• Raccorder correctement le thermostat selon le
schéma de câblage.
• Monter le couvercle sur la platine arrière puis le
bouton du cadran.
Schéma de câblage
Le produit doit être relié aux fils suivants :
• Borne L : Phase (L) 230 V ± 10 %, 50/60 Hz
• Borne NO Vanne (NON)
• Borne NC Vanne (NC)
• Borne N: Neutre (N)
4. Utilisation générale
Activer/Désactiver le thermostat d’ambiance
• Désactiver le thermostat en tournant le bouton
dans le sens antihoraire et en le plaçant sur • sur
l’échelle - Fig. 3 .
• Activer le thermostat en faisant tourner le bouton
dans le sens horaire et en le plaçant sur la température choisie.
Régler la température ambiante
• Tourner le bouton pour régler la température
ambiante choisie selon l’échelle - Fig. 3.
Produit par Danfoss Floor Heating Hydronics 05.2011
VI.CU.A2.2D
29

Instructions thermostat FH-CWT
5. Mode hors gel
Régler le thermostat sur Mode hors gel en tournant
le bouton sur la position de l’échelle - Fig. 3 .
• Lorsque la température ambiante descend audessous de 5 °C, le chauffage est activé.
• Lorsque la température ambiante descend audessous de 6 °C, le chauffage est désactivé.
6. Spécifications techniques
Fonction Description
Approbation Marquage CE, EN 60730
Couleur Blanc RAL 9016/Gris
Dimensions 86 Χ 99 Χ 29 mm
Mode de réglage Cadran
Indication de défaut/
Mode de défaillance
Hors gel Oui, placer le cadran sur
Température ambiante - 10 °C - 60 °C
RAL 7011
En cas de panne du
capteur, le thermostat
désactivera toutes les
sorties de relais.
la position (5 °C)
30
VI.CU.A2.2D
Produit par Danfoss Floor Heating Hydronics 05.2011

Instructions thermostat FH-CWT
Fonction Description
Précision ±1,5 °C
Hystérésis 1 °C au-dessous de
la température de
référence
Classe IP 30
Rétroéclairage LCD/
Non
veilleuse
Écran LCD Non
Indicateur DEL Voyant vert : Ther-
mostat actif et aucune
demande en chaleur
Voyant rouge :
Thermostat actif et
demande en chaleur
Charge max. inductive <1A
Charge max. résistive <3A
Montage Montage mural
Réseau, câble Non
Réseau, sans fil Non
Fonction de décalage Non
Produit par Danfoss Floor Heating Hydronics 05.2011
VI.CU.A2.2D
31

Instructions thermostat FH-CWT
Fonction Description
Puissance consommée 7 W
Alimentation, batterie Non
Alimentation, nette 230 V CA ±10 % 50/60
Hz
Paramètres de l’ali-
Non applicable
mentation de secours
Capteur, sol Non
Capteur, pièce Précision NTC 10K : ±1%
Capteur, pièce
5-30 °C
- gamme définie
Matériau du boîtier/
94V0/ Oui
ininflammable
Matériau du boîtier,
ABS+PC
type
Protection statique Oui
Programmable Non
32
VI.CU.A2.2D
Produit par Danfoss Floor Heating Hydronics 05.2011

FH-CWT温控器使用说明
索引
1. 功能概述 .............................................................. 34
2. 安装位置 .............................................................. 34
3. 安装 ...................................................................... 34
4. 常规操作 .............................................................. 35
5. 低温保护 .............................................................. 35
6. 技术指标 .............................................................. 36
7. 安装及电气接线图 ............................................. 39
敬告!
切勿将泥土、水、混凝土等杂质进入温控器内。
不要在温控器上覆盖东西,比如直接在它上面悬
挂毛巾。
安装必需由专业的电工操作。
丹佛斯水地暖产品 05.2011
VI.CU.A2.2D
33

FH-CWT温控器使用说明
1.功能概述
前视图-图1
①拨盘旋钮
②红/绿色LED(上壳后)
LED模式
• 绿灯亮-温控器开启但不供热
• 红灯亮-温控器开启且供热
后视图-图2
①安装用螺钉孔
②接线端子
2.安装位置
房间温控器的位置-图4①
安装位置的选择应避免阳光、气流以及其它发热
体(如电视机)对温控器的影响。
3.安装
房间温控器的安装-图5、图6
• 仔细地拆开温控器底板。不要让任何杂质掉进
温控器内。
• 用包装盒中的螺丝钉将底板固定在墙上。
• 按接线图正确接线。
• 将温控器上壳和底板安装好,最后装上拨盘旋
钮。
34
VI.CU.A2.2D
丹佛斯水地暖产品 05.2011

FH-CWT温控器使用说明
接线图
本产品的接线必须按照以下指导来进行:
• 端子L: 火线(L)230V±10%,50/60Hz
• 端子NO:阀(常开)
• 端子NC:阀(常闭)
• 端子N: 零线(N)
4.常规操作
开/关房间温控器
• 逆时针旋转旋钮到刻度“•”(图3①),关闭
温控器。
• 顺时针旋转旋钮,开启温控器,并调到所需温
度。
房间温度的设定
• 旋转旋钮,依照刻度显示设定所需房间温度-
图3。
5.低温保护
·旋转旋钮到“ ”位置,温控器启动低温保护
模式-图3②。
当房间温度低于5℃时,供热开启;
当房间温度高于6℃时,供热关闭。
丹佛斯水地暖产品 05.2011
VI.CU.A2.2D
35
FH-CWT温控器使用说明
6.技术指标
特征 描述
认证 CE 认证,EN 60730
颜色 白色RAL 9016/灰RAL
尺寸 86×99×29mm
调节方式 旋钮
故 障 指 示 / 故 障模式如果 传感器 故障, 温控
低温保护 是,可启用,
存储环境温度 -10℃~60℃
精度 ±1.5℃
回差 1℃,低于设定值
IP等级 30
LCD背光 否
LCD显示 否
LED指示 绿灯亮 :温控 器开启 但
7011
器将 关闭所 有的继 电输
出。
旋转 旋钮到 “ ”位 置
(5℃)
不供热
红灯 亮:温 控器开 启且
供热
36
VI.CU.A2.2D
丹佛斯水地暖产品 05.2011

FH-CWT温控器使用说明
特征 描述
最大电流 负载 (
感性)
最大电流 负载 (
阻性)
安装 墙面安装
网络,有线 否
网络,无线 否
温度校准功能 否
功耗 7W
电池供电 否
外接供电 230Vac±10%
数据备份 不可用
地面温度传感器 否
房间温度传感器 NTC 10K 精度:±1%
房间温度 传感 器
设定范围
外壳材料/阻燃 94V0/是
外壳材料类型 ABS+PC
静电保护 是
可编程性 否
<1A
<3A
50/60Hz
5-30℃
丹佛斯水地暖产品 05.2011
VI.CU.A2.2D
37

Instruction FH-CWT Thermostat
Produced by Danfoss Floor Heating Hydronics 05.2011
VI.CU.A2.2D
38
Produced by Danfoss Floor Heating Hydronics 05.2011

Instruction FH-CWT Thermostat
7. Figures and illustrations
7. Рисунки и иллюстрации
7. Abbildungen und Illustrationen
7. Chiffres et illustrations
7. 安装及电气接线图
Produced by Danfoss Floor Heating Hydronics 05.2011
VI.CU.A2.2D
39

Produced by Danfoss Floor Heating Hydronics 05.2011
Fig. 1
Fig. 2
Instruction FH-CWT Thermostat
VI.CU.A2.2D
40
Produced by Danfoss Floor Heating Hydronics 05.2011

Instruction FH-CWT Thermostat
20
15
25
Fig. 3
Fig. 4
Produced by Danfoss Floor Heating Hydronics 05.2011
VI.CU.A2.2D
41

Produced by Danfoss Floor Heating Hydronics 05.2011
Fig. 5
Fig. 6
FH-CWT
Instruction FH-CWT Thermostat
L
NO
NC
~230V ± 10%
50/60 Hz
N
VI.CU.A2.2D
42
Produced by Danfoss Floor Heating Hydronics 05.2011

Instruction FH-CWT Thermostat
Produced by Danfoss Floor Heating Hydronics 05.2011
VI.CU.A2.2D
43

www.heating.danfoss.com
 Loading...