

Page 1
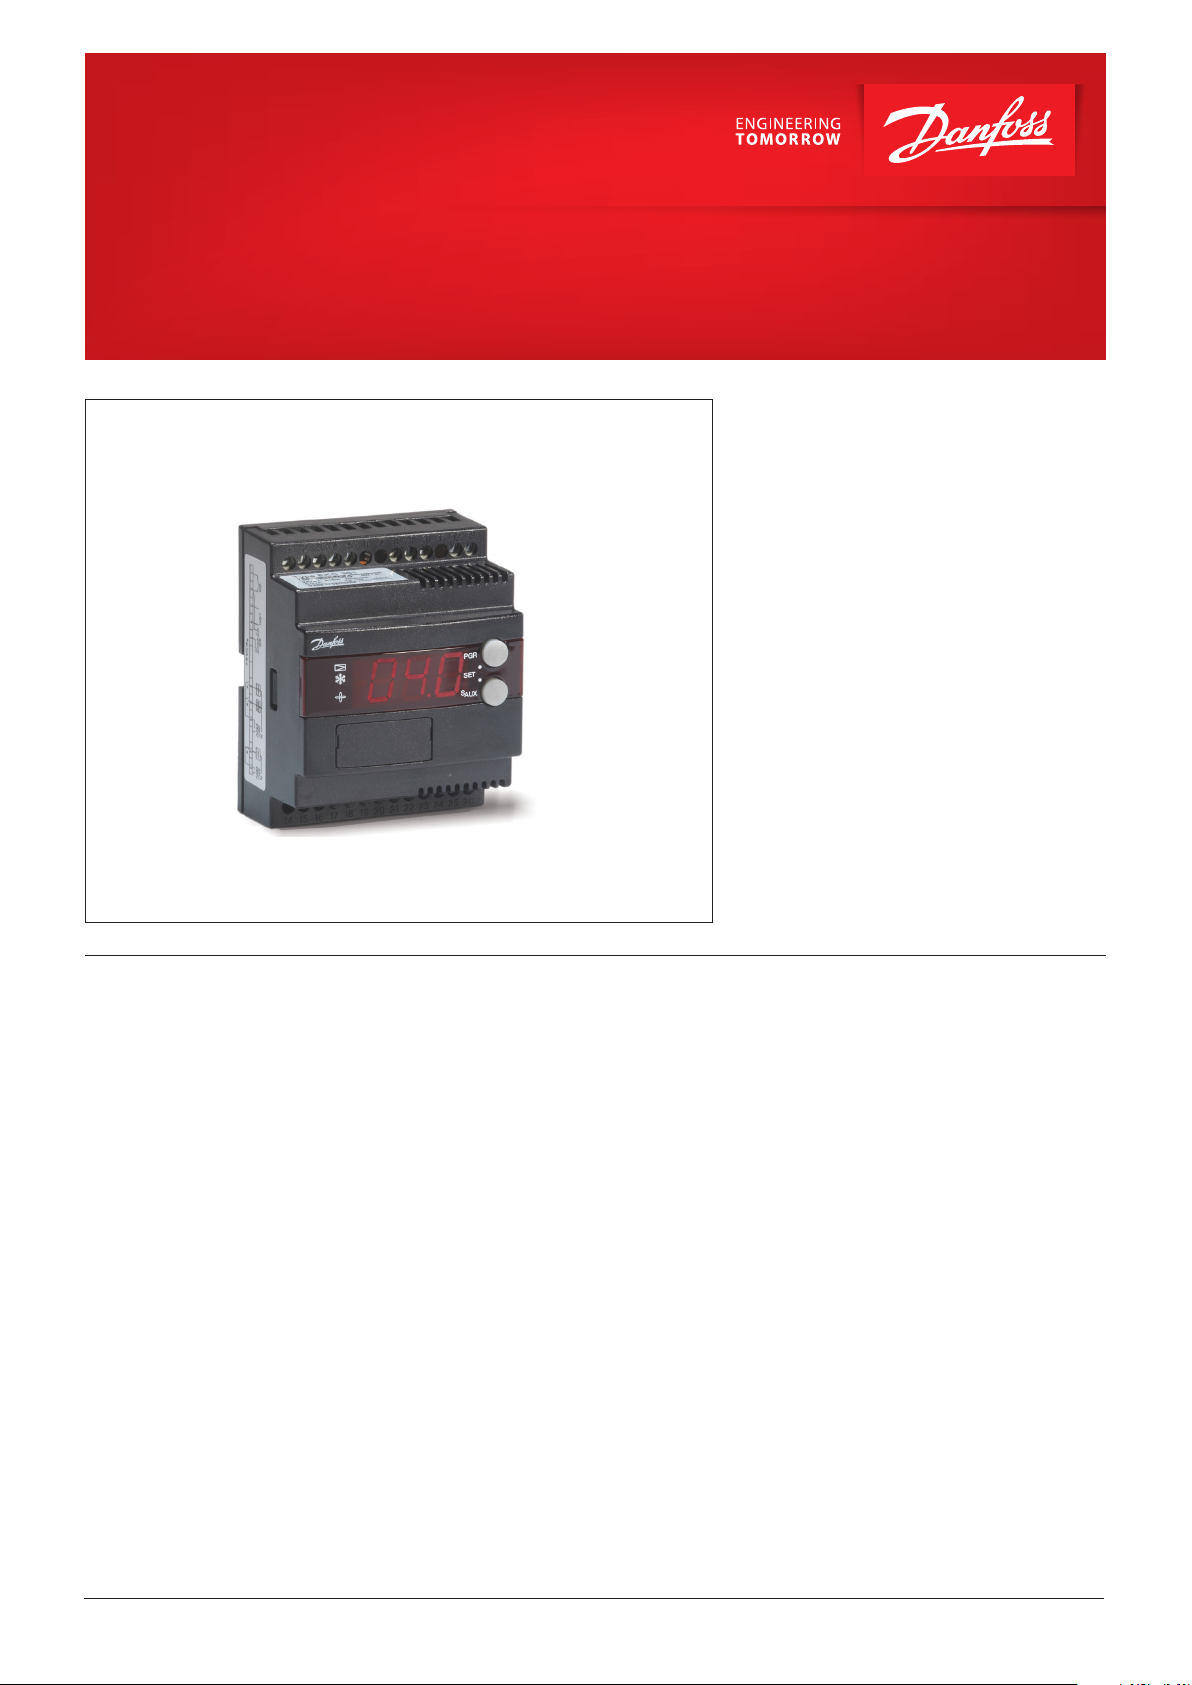
User Guide
Media temperature controller
EKC 361
The controller and valve can be used where
there are stringent requirements to accurate
temperature control in connection with refrigeration.
E.g.:
• Cold room for fruits and food products
• Refrigerating systems
• Work premises in the food industry
• Process cooling of liquids
Features • The temperature is kept within an accuracy of
±0.25°C or better after a transient
phenomenon.
• The evaporator's temperature is kept as high
as possible, so that the air humidity is kept
high and waste is limited.
• A transient phenomenon can be controlled
with the adaptive function. Select either:
- Fast build-up where underswings are
allowed
- Not quite so fast build-up where under
swings are less pronounced
- Build-up without underswings
• PID regulation
• p0 limitation
© Danfoss | DCS (ADAP-KOOL®) |2015-11
DKRCI.PS.RP0.B2.02 | 1
Page 2
User Guide | Media temperature controller, EKC 361
Introduction
Functions
• Modulating temperature control
• Digital ON/OFF input for start/stop of regulation ICS/PM or
forced closing of ICM
• Alarm if the set alarm limits are exceeded
• Relay output for fan
• Relay output for solenoid valves
• Analog input signal that can displace the temperature reference
• Analog Output signal corresponding to selecting temperature
as running display value. Please observe : Not possible if ICM is
selected as valve
ICS or PM
© Danfoss | DCS (ADAP-KOOL®) | 2015-11
Start/
stop
DKRCI.PS.RP0.B2.02 | 2
Page 3
User Guide | Media temperature controller, EKC 361
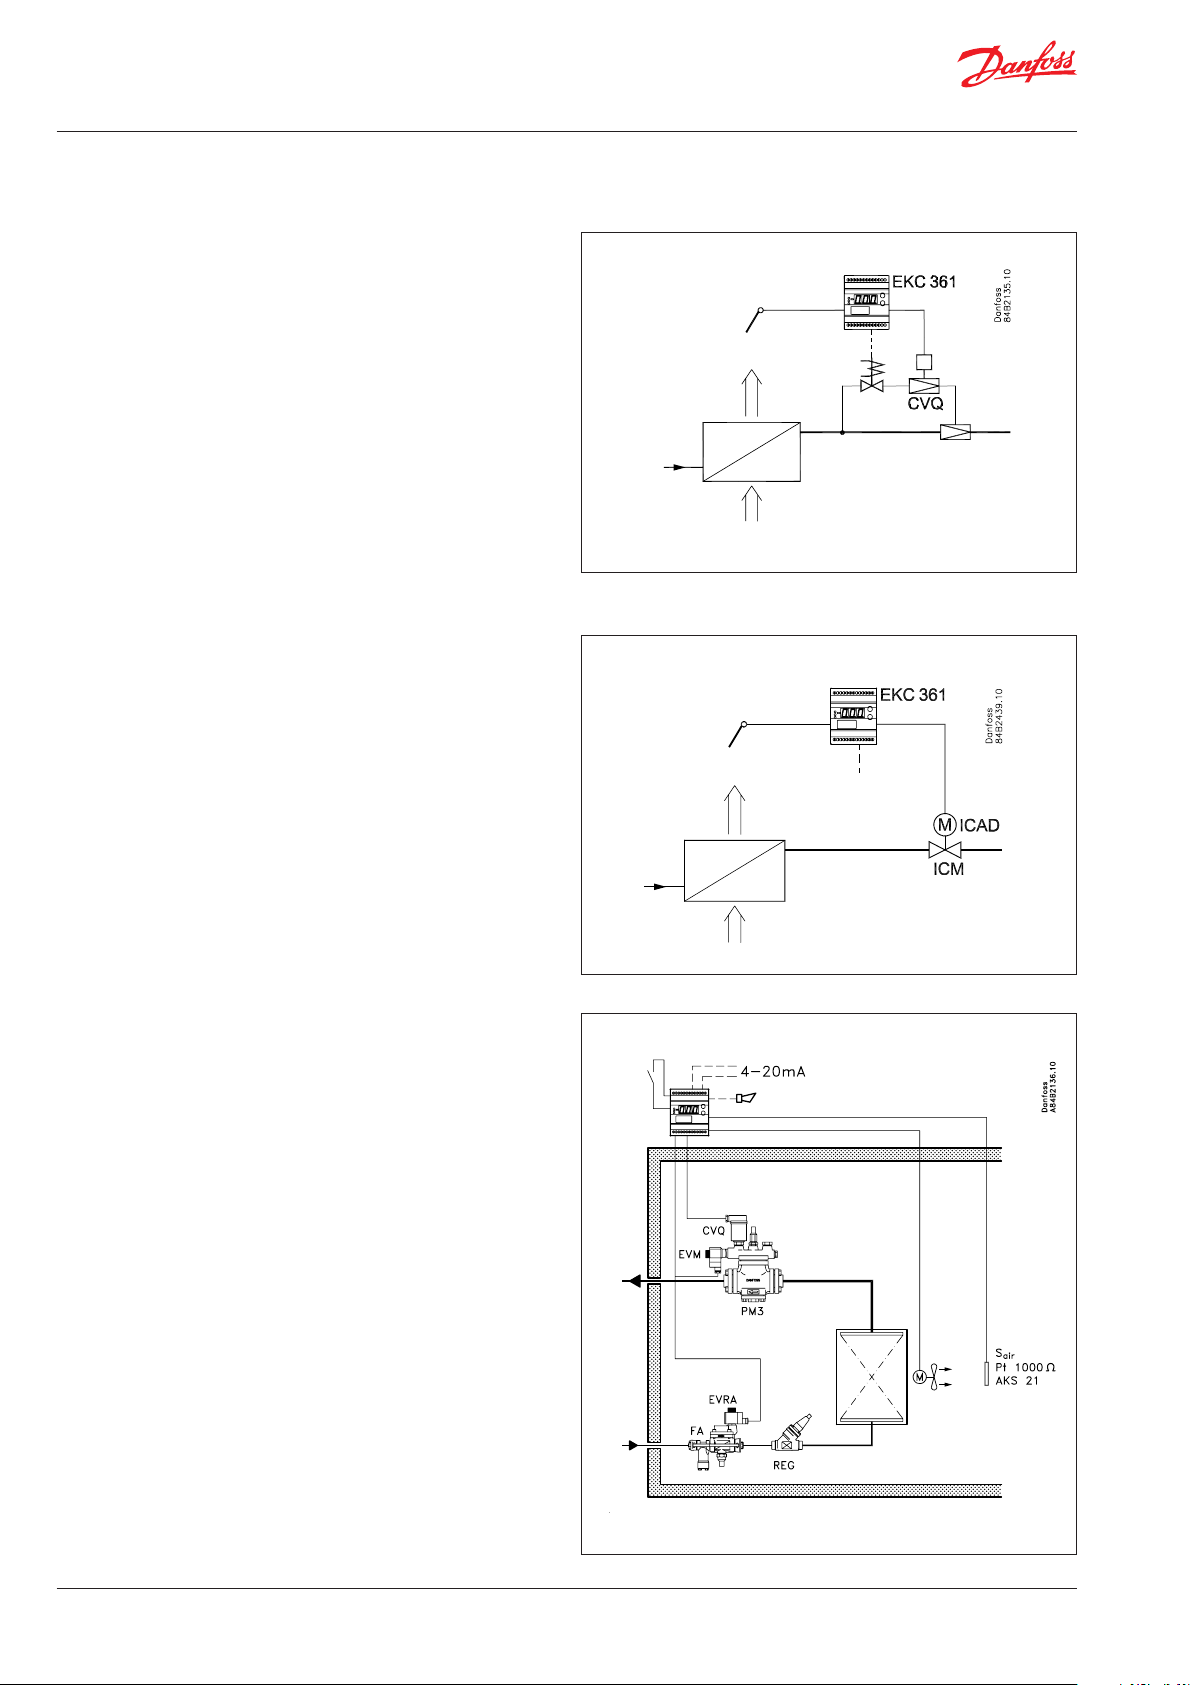
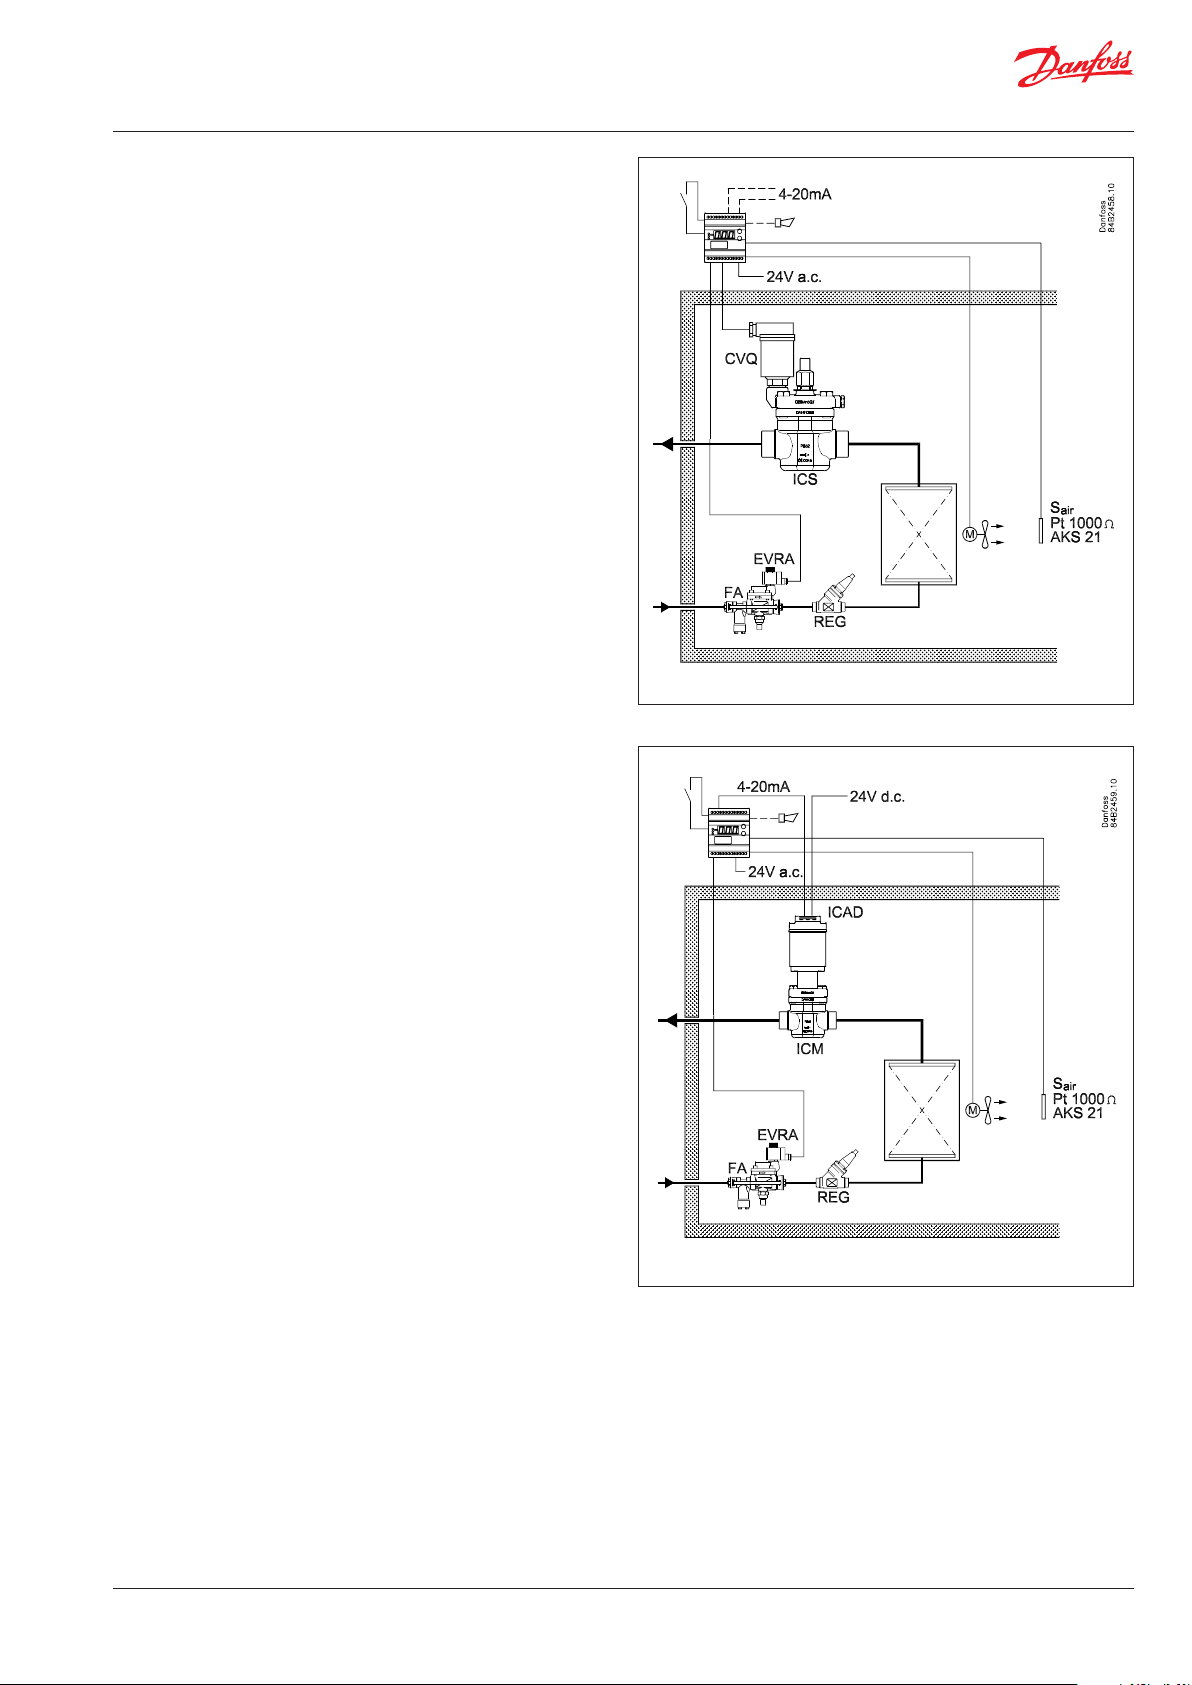
Application examples
ICS/PM
ISC/PM with CVQ is a pilot-operated and pressure-dependent
valve for controlling media temperature.
The ICS or PM must be equipped with a CVQ pilot valve in order
to position ICS or PM. The CVQ valve is operated by the EKC 361
controller.
Please notice that a power failure will cause the CVQ pilot valve to
fully open ICS/PM. If it is required that ICS/PM must close at power
failure, the pilot valve type EVM-NC can be installed.
If the Digital Input is ON, it releases the ICS/PM for controlling
temperature. If the Digital Input is OFF, if stops controlling PM/ICS,
but EKC 361 will maintain a CVQ minimum temperature. (Parameter n02)
Please see separate literature for ICS/PM
ICS : DKRCI.PD.HS0.APM : DKRCI.PD.HL0.A-
ICM
ICM is a direct activating and pressure independent valve for controlling media temperature.
When ICM is selected, the ICM is positioned directly via the analog
output 0/4-20mA output from the EKC 361.
If the Digital Input is ON, it releases the ICM for controlling temperature. If the Digital Input is OFF, the ICM is forced to close.
The opening degree OD 0-100 % can be limited by parameter n32
and n33.
Please see separate literature for ICM
ICM : DKRCI.PD.HT0.A-
General for ICS/PM and ICM
The EKC 361 can also operate a solenoid valve in the liquid line
(Digital output on terminal 9 and 10). It will follow the status of
Digital Input, however if a low temperature alarm is detected (A2
alarm) the solenoid valve in the liquid line will be closed.
The EKC 361 can also operate a fan (Digital output on terminal 8
and 10). It will follow the status of Digital Input.
The Parameter (r12) must be ON in order to ensure general operation. If Parameter (r12) is OFF, EKC 361 will operate corresponding
to if Digital Input is OFF
As media temperature sensor is S
can also be used to control liquid.
is used. Please observe that S
air
air
As option an auxiliary temperature sensor Saux can be installed
but only for monitoring.
S
can both be shown as running display value selected by
air/Saux
parameter o17. The selected sensor (S
out on the Analog Output as 0/4-20 mA.
air
or S
) will be sent
aux
Temperature scaling with parameter o27 and o28. Please observe
by ICM the Analog Output is not available for sending temperature
signals (S
It is normally recommended, on a aircooler, to install S
evaporator air outlet side.
air
or S
).
aux
, at the
air
Extra options
• PC operation
The controller can be provided with data communication, so
that it may be hooked up with other products in the ADAPKOOL® range of refrigeration controls. Operation, moni toring
and data collection can then be performed from a PC - either in
situ or at a service company.
© Danfoss | DCS (ADAP-KOOL®) | 2015-11
DKRCI.PS.RP0.B2.02 | 3
Page 4
User Guide | Media temperature controller, EKC 361
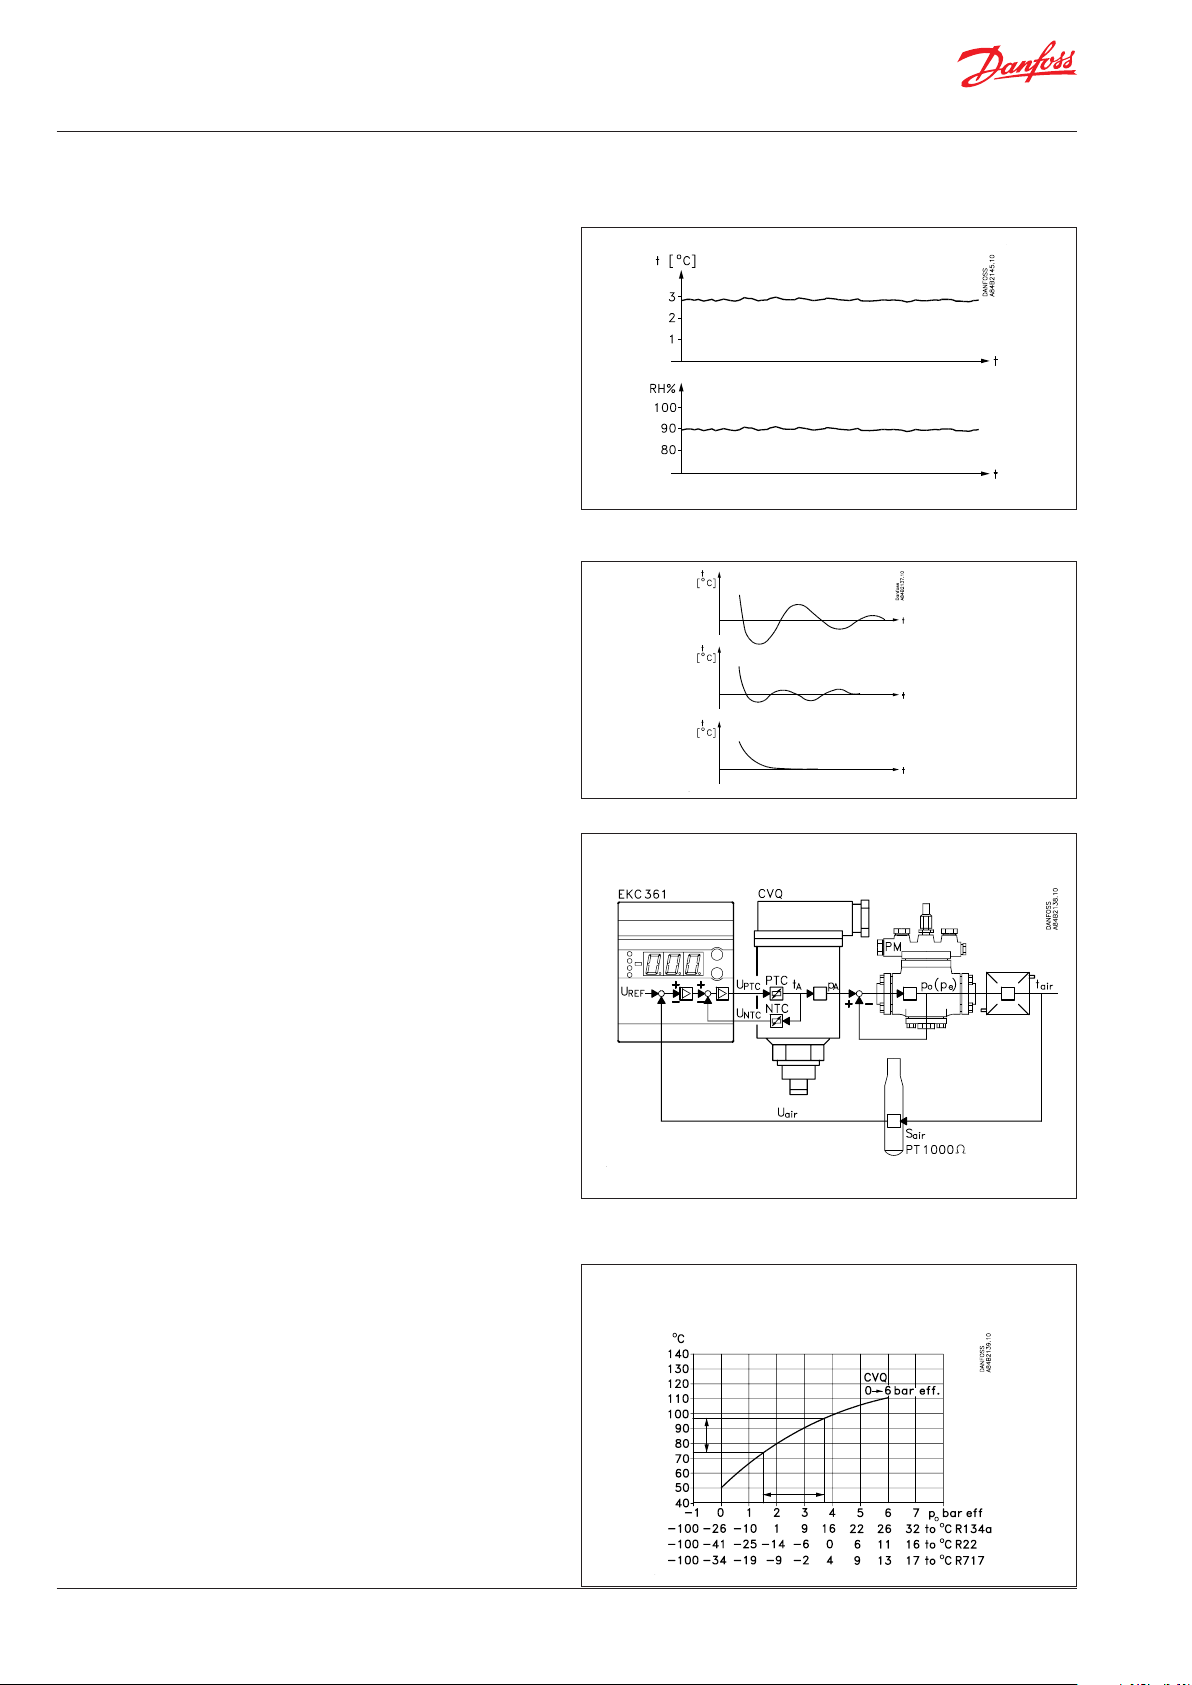
Function
Very accurate temperature control
With this system where controller, pilot valve and main valve have
been adapted for optimum use in the refrigerating plant, the refrigerated products may be stored with temperature uctuations
of less than ±0.25°C.
High air humidity
As the evaporating temperature is constantly adapted to the
refrigeration needs and will always be as high as possible with a
very small temperature uctuation, the relative air humidity in the
room will be kept at a maximum.
Drying-out of the products will in this way be reduced to a mini-
mum.
Temperature is quickly attained
With the built-in PID control and the possibility of choosing between three transient phenomena, the controller can be adapted
to a kind of temperature performance that is optimum for this
particular refrigerating plant. See parameter (n07).
• Fastest possible cooling
• Cooling with less underswing
• Cooling where underswing is unwanted.
Regulation ICS/PM with CVQ
The controller receives signals from room sensor S
sensor must be placed at the air outlet from the evaporator to
. This room
air
obtain the best possible regulation. The controller sees to it that
the required room temperature is maintained.
Built-in between the controller and the actuator is a so-called
inner control loop which constantly checks the temperature (pressure) in the actuator’s pressure vessel. In this way a very stable
control system is obtained.
If there is a deviation between the required and the registered
temperature the controller will immediately send more or fewer
pulses to the actuator to counteract the error. A change of the
number of pulses will act on the temperature and hence the
pressure in the pressure vessel. As the charging pressure and the
evaporating pressure p0 follow each other, a changed charging
pressure will produce the eect that the valve’s opening degree is
also changed. The ICS/PM with CVQ system maintains the pressure
in the evaporator whatever pressure changes there may be on the
suction side (on the ICS/PM valve’s outlet).
Evaporating pressure limitation (p0 limitation)
The inner control loop mentioned above also causes the evaporating pressure to stay within a xed limit. In this way the system is
safeguarded against a too low supply air temperature.
It oers the following advantages:
- High-temperature systems can be connected to low-tempera ture
compressor units
- Protection against icing on evaporator
- Frost protection of liquid coolers
The allowed temperature in the actuator determines the evapora ting pressure
Actuator temperature
Regulation with ICM
When using ICM as selected valve the system will still control ICM
in order to maintain S
This system does not include any inner control loop.
according to entered setpoint.
air
It is a direct operating and pressure independent valve for controlling media temperature. (S
).
air
© Danfoss | DCS (ADAP-KOOL®) | 2015-11
DKRCI.PS.RP0.B2.02 | 4
Page 5

User Guide | Media temperature controller, EKC 361
Survey of functions
Function Para-
meter
Normal display
Parameter by operation via data communication
Normally S
S
aux
(017=Air) will be shown as running display value. If lower button is activated
air
will be displayed for 5 sec, and then return to S
air
If (017=Au) Saux will be shown as running display value. If lower button is activated
Sair will be displayed for 5 sec, and then return to Saux
If ICM has been selected (n03=6)
If (017=Air) S
(u24) will be displayed for 5 sec, and then return to S
If (017=Au) OD (u24) will be shown as running display value. If lower button is activated S
be displayed for 5 sec, and then return to OD (u24)
(017=Air) will be shown as running display value. If lower button is activated OD
air
.
air
air
will
Reference
Setpoint
Regulation is performed based on the set value provided that there is no external contribution
(o10).
(Push both buttons simultaneously to set the setpoint).
Temperature unit
Here you select whether the controller is to indicate the temperature values in °C or in °F. If indication in °F is selected, other temperature settings will also change over to Fahrenheit, either as
absolute values or as delta values.
External contribution to the setpoint
This setting determines how large a contribution (in °C/°F) is to be added to the set setpoint
when the input signal is max. (20 mA).
Correction of signal from S
(Compensation possibility through long sensor cable).
Correction of signal from S
(Compensation possibility through long sensor cable).
air
aux
Start/stop of refrigeration
With this setting refrigeration can be started and stopped. Start/stop of refrigeration can also be
accomplished with the external switch function. See also appendix 1.
Alarm
The controller can give alarm in dierent situations. When there is an alarm all the light-emitting
diodes (LED) will ash on the controller front panel, and the alarm relay will cut in.
Alarm for upper deviation
The alarm for too high S
active when the S
+ r06) can be seen in u02).
temperature is set here. The value is set in Kelvin. The alarm becomes
air
temperature exceeds the actual reference plus A01. (The actual reference (SP
air
Alarm for lower deviation
The alarm for too low S
active when the S
ture alarm is detected (A2 alarm) the solenoid valve in the liquid line (Digital output on terminal
temperature is set here. The value is set in Kelvin. The alarm becomes
air
temperature drops below the actual reference minus A02. If a low tempera-
air
9 and 10) will be closed
Alarm delay
If one of the two limit values is exceeded, a timer function will commence. The alarm will not
become active until the set time delay has been passed. The time delay is set in minutes.
Control parameters
Actuator’s max. temperature
Set the temperature (°C) the actuator is to have at the limit of the regulating range. The setting
ensures that the actuator will not become superheated and work itself away from the regulating
range. Due to tolerances in the actuator the value must be set 10K higher than indicated in the
curves on page 11.
Actuator’s min. temperature
Set the temperature (°C) the actuator will have at the limit of the regulating range. The setting
ensures that the actuator will not become too cold and work itself away from the regulating
range. Due to tolerances in the actuator the value must be set 10K lower than indicated in the
curves on page 11.
Air temp.
- SP Temp.
r05 Temp unit
°C=0,
°F=1
(In AKM only °C is displayed whatever the
setting)
r06 Ext. Ref.o set (°C/°F)
r09 Adjust S
r10 Adjust S
(°C/°F)
Air
(°C/°F)
Aux
r12 Main Switch
A01 Upper deviation
A02 Lower deviation
A03 Temp alarm delay
With data communication the importance
of the individual alarms can be dened.
Setting is carried out in the “Alarm destinations” menu. See also page 10.
n01 Q-max. temp.
n02 Q-min. temp.
© Danfoss | DCS (ADAP-KOOL®) | 2015-11
DKRCI.PS.RP0.B2.02 | 5
Page 6

User Guide | Media temperature controller, EKC 361
Actuator type
Here you dene the actuator mounted in the system:
1: CVQ -1-5 bar
2: CVQ 0-6 bar
3: CVQ 1.7-8 bar
4: CVMQ
5: KVQ
6: ICM
P: Amplication factor Kp
If the Kp value is reduced the regulation becomes slower.
I: Integration time Tn
The I-setting can be cancelled by setting the value to max. (600s). If it is set to 600s, parameter
n07 must be set to “0”. (If the Tn value is increased the regulation becomes slower).
D: Dierentiation time Td
The D-setting can be cancelled by setting the value to min. (0).
Transient phenomenon
If the refrigeration requires a very fast transient phenomenon or must not have an underswing or
temperature shift, this function can be used. (see page 4)
0: Ordinary regulating technique
1: Fast building-up where a minor underswing is allowed
2: Not quite so fast building-up, but without underswing
OD - Opening degree Max. Limitation - ICM only
When ICM has been selected (n03=6) the Maximum OD can be entered. ICM will never go above
this value. (If n32=n33, ICM is forced to this value)
OD - Opening degree Min. Limitation - ICM only
When ICM has been selected (n03=6) the Minimum OD can be entered. ICM will never go below
this value. (If n32=n33, ICM is forced to this value)
Miscellaneous
Output signal
The controller can transmit a current signal via the analog output (terminal 2 and 5). Range of
current signal can be selected below:
If (017=Air) Sair will send out to the analog output.
If (017=Au) Saux will send out to the analog output
S
min. value (0 or 4 mA) will correspond to the setting in "o27"
air/Saux
S
max. value (20 mA) will correspond to the setting in "o28"
air/Saux
If ICM has been selected (n03=6)
OD (u24) to control ICM, is send out to the analog output
(o27) and (o28) is not active
Range for current signal:
0: No output signal
1: 4-20 mA
2: 0-20 mA
Input signal
If you wish to connect a signal that is to displace the controller’s control reference, the signal
must be dened in this menu.
0: No signal
1: 4-20 mA
2: 0-20 mA
(4 or 0 mA will not give a displacement. 20 mA will displace the reference by the value set in
menu r06).
Data communication
If the controller is built into a network with data communication, it must have an address, and
the master gateway of the data communication must then know this address.
These settings can only be made when a data communication module has been mounted in the
controller and the installation of the data communication cable has been completed.
This installation is mentioned in a separate document “RC8AC”.
The address is set between 1 and 60
The address is sent to the gateway when the menu is set in pos. ON
(The setting will automatically change back to O after a few seconds.)
Language
This setting is only required if data communication is connected to the controller.
Settings: 0=English, 1=German, 2=French, 3=Danish, 4=Spanish and 6=Swedish
When the controller is operated via data communication, the texts in the right-hand column will
be shown in the selected language.
When you change the setting to an other language you must activate o04 before "the new
language" can be visible from the AKM program.
Frequency
Set the net frequency.
Valve type
n03
Kp factor
n04
Tn sec.
n05
Td sec.
n06
Q-ctrl. mode
n07
ICM OD Max.
n32
ICM OD Min.
n33
AO type
o09
AI type
o10
Following installation of a data communication module, the controller can be operated
on a par with the other controllers in ADAPKOOL® refrigeration controls.
-
o03
-
o04
Language
o11
50 / 60 Hz
o12
(50=0, 60=1)
© Danfoss | DCS (ADAP-KOOL®) | 2015-11
DKRCI.PS.RP0.B2.02 | 6
Page 7

User Guide | Media temperature controller, EKC 361
Selection of running display value
If S
(017=Air) will be shown as running display value. If lower button is activated S
air
be displayed for 5 sec, and then return to S
S
will send out to the analog output. See also (o09),(o27),(o28)
air
If (017=Au) S
be displayed for 5 sec, and then return to S
S
will send out to the analog output. See also (o09),(o27),(o28)
aux
will be shown as running display value. If lower button is activated S
aux
air
aux
will
aux
will
air
o17
Display Aux/Air
Aux =0
Air = 1
If ICM has been selected (n03=6)
If (017=Air) S
OD (u24) will be displayed for 5 sec, and then return to S
(017=Air) will be shown as running display value. If lower button is activated
air
air
If (017=Au) OD (u24) will be shown as running display value. If lower button is activated
S
will be displayed for 5 sec, and then return to OD (u24)
air
(Setting for the function o09)
o27 Temp. at AO min.
Set the temperature value where the output signal must be minimum
(0 or 4 mA)
(Setting for the function o09)
o28 Temp. at AO max.
Set the temperature value where the output signal must be maximum (20 mA). (With a temperature range of 50°C (dierential between the settings in o27 and o28) the dissolution will be
better than 0.1 °C. With 100°C the dissolution wil be better than 0.2°C.)
Service
A number of controller values can be printed for use in a service situation
Read the temperature at the S
Read the control reference
sensor (calibrated value) u01 Air temp.
air
u02 Air reference
(Setpoint + any contribution from external signal)
Read temperature at the S
(This showing can also be uploaded from the normal display, if you push the lowermost button
sensor (calibrated value)
aux
u03 Aux. temp.
for almost a second)
Read valve’s actuator temperature u04 Actuator temp.
Read reference for valve’s actuator temperature u05 Actuator Ref.
Read value of external current signal u06 AI mA
Read value of transmitted current signal u08 AO mA
Read status of input DI (start/stop input) u10 DI
ICM opening degree.
u24 OD%
Only active if (n03)=6
-- DO1 Alarm
Read status of alarm relay
-- DO2 Cooling
Read status of relay for solenoid valve
-- DO3 Fan
Read status of relay for fan
Operating status
Operating status of the controller can be called forth in the display. Push briey (1s) the upper
button. If there is a status code, it will be shown on the display. (Status codes have lower priority
EKC State
(0 = regulation)
than alarm codes. In other words, you cannot see a status code, if there is an active alarm).
The individual status codes have the following meanings:
S10: Refrigeration stopped by the internal or external start/ stop 10
S12: Refrigeration stopped due to low S
air
12
© Danfoss | DCS (ADAP-KOOL®) | 2015-11
DKRCI.PS.RP0.B2.02 | 7
Page 8

User Guide | Media temperature controller, EKC 361
Operation
Display
The values will be shown with three digits, and with a setting you
can determine whether the temperature is to be shown in °C or in
°F.
Light-emitting diodes (LED) on front panel
There are LED’s on the front panel which will light up when the
corresponding relay is activated.
The three lowest LED’s will ash, if there is an error in the regulation.
In this situation you can upload the error code on the display and
cancel the alarm by giving the uppermost button a brief push.
The controller can give the following messages:
E1
E7 Cut-out S
Error message
E8 Short circuited S
E11 Valve’s actuator temperature outside its range
E12 Analog input signal is outside the range
A1
Alarm message
A2 Low-temperature alarm
The buttons
When you want to change a setting, the two buttons will give you
a higher or lower value depending on the button you are pushing. But before you change the value, you must have access to the
menu. You obtain this by pushing the upper button for a couple
of seconds - you will then enter the column with parameter codes.
Find the parameter code you want to change and push the two
buttons simultaneously. When you have changed the value, save
the new value by once more pushing the two buttons simultaneously.
Gives access to the menu
Gives access to changes
Saves a change
Examples of operations
Set set-point
1. Push the two buttons simultaneously
2. Push one of the buttons and select the new value
3. Push both buttons again to conclude the setting
Set one of the other menus
1. Push the upper button until a parameter is shown
2. Push one of the buttons and nd the parameter you want to
change
3. Push both buttons simultaneously until the parameter value is
shown
4. Push one of the buttons and select the new value
5. Push both buttons again to conclude the setting
© Danfoss | DCS (ADAP-KOOL®) | 2015-11
Errors in the controller
air
air
High-temperature alarm
(or cutout an alarm)
Menu survey
Function
Normal display
Shows the temperature at the selected sensor
At ICM valve OD also can be selected
Reference
Set the required room temperature - -70°C 160°C 10°C
Temperature unit r05 °C °F °C
Input signal’s temperature inuence r06 -50°C 50°C 0.0
Correction of the signal from S
Correction of the signal from S
Start/stop of refrigeration r12 OFF/0 On/1 On/1
Alarm
Upper deviation (above the temperature setting) A01 0 50 K 5.0
Lower deviation (below the temperature setting) A02 0 50 K 5.0
Alarm’s time delay A03 0
Regulating parameters
Actuator max. temperature n01 41°C 140°C 140
Actuator min. temperature n02 40°C 139°C 40
Actuator type (1=CVQ-1 to 5 bar, 2=CVQ 0 to 6
bar, 3=CVQ 1.7 to 8 bar, 4= CVMQ, 5=KVQ, 6= ICM)
P: Amplication factor Kp n04 0,5 50 3
I: Integration time Tn (600 = o) n05 60 s 600 s 240
D: Dierentiation time Td (0 = o) n06 0 s 60 s 10
Transient phenomenon
0: Ordinary control
1: Underswing minimised
2: No underswing
OD - Opening degree - max. limit - ICM only n32 0% 100% 100
OD - Opening degree min limit - ICM only n33 0% 100% 0
Miscellaneous
Controller's address (0-120) o03* 0 990 0
ON/OFF switch (service-pin message) o04* - -
Dene output signal of analog output:
0: no signal, 1: 4 - 20 mA, 2: 0 - 20 mA
Dene input signal of analog input
0: no signal, 1: 4 - 20 mA, 2: 0 - 20 mA
Language (0=english, 1=German, 2=French,
3=Danish, 4=Spanish and 6=Swedish.)When you
change the setting to an other language you must
activate o04 before "the new language" can be
visible from the AKM program.
Set supply voltage frequency o12
Select of running display value o17 Au/0 Air/1 Air/1
(Setting for the function o09)
Set the temperature value where the output signal
must be minimum (0 or 4 mA)
(Setting for the function o09)
Set the temperature value where the output signal
must be maximum (20 mA)
Service
Read temperature at the S
Read regulation reference u02
Read temperature at the S
Read valve's actuator temperature u04
Read reference of the valve's actuator temperature u05
Read value of external current signal u06
Read value of transmitted current signal u08
Read status of input DI u10
ICM opening degree. (only at ICM) u24
*) This setting will only be possible if a data communication module has been
installed in the controller.
Factory setting
If you need to return to the factory-set values, it can be done in this way:
- Cut out the supply voltage to the controller
- Keep both buttons depressed at the same time as you recon nect the supply voltage
air
aux
sensor u01
air
sensor u03
aux
Para-
Min. Max.
meter
-
r09 -10,0°C 10,0°C 0.0
r10 -10,0°C 10,0°C 0.0
n03 1 6 2
n07 0 2 2
o09 0 2 0
o10 0 2 0
011* 0 6 0
50
Hz/0
o27 -70°C 160°C -35
o28 -70°C 160°C 15
SW =1.5x
180
min
60
Hz/1
mA
mA
on/o
Fac.
setting
°C
30
0
°C
°C
°C
°C
°C
%
DKRCI.PS.RP0.B2.02 | 8
Page 9

User Guide | Media temperature controller, EKC 361
Data
Supply voltage
Power consumption
Input signal
Sensor input 2 pcs. Pt 1000 ohm
Output signal Current signal
Relay output 2 pcs. SPST
Alarm relay 1 pcs. SPST
Actuator
Data communication
Ambient
temperature
Enclosure IP 20
Weight 300 g
Mounting DIN rail
Display LED, 3 digits
Terminals max. 2.5 mm2 multicore
Approvals
24 V a.c. +/-15% 50/60 Hz, 80 VA
(the supply voltage is galvanically separated
from the input and output signals)
Controller
Actuator
Current signal 4-20 mA or 0-20 mA
Digital input from external contact function
Input
Output
Possible to connect a data communication
module
During operation
During transport
EU Low Voltage Directive and EMC demands re
CE-marking complied with.
LVD-tested acc. to EN 60730-1 and EN 607302-9
EMC-tested acc. to EN50081-1 and EN 50082-2
5 VA
75 VA
4-20 mA or 0-20 mA
Max. load: 200 ohm
AC-1: 4 A (ohmic)
AC-15: 3 A (inductive)
Temperature signal from
sensor in the actuator
Pulsating 24 V a.c. to
actuator
-10 - 55°C
-40 - 70°C
Capacitive load
The relays cannot be used for the direct connection of capacitive loads such
as LEDs and on/o control of EC motors.
All loads with a switch mode power supply must be connected with a suitable contactor or similar.
Ordering
Type Function Code No.
EKC 361 Evaporating pressure controller 084B7060
EKA 174
Temperature sensor Pt 1000 ohm: ..........Kindly refer to catalogue RK0YG...
Valves: .............................................................DKRCI.PD.HT0.A
Data communication module
(accessories), (RS 485 module)
with galvanic separation
084B7124
Connections
Necessary connections
Terminals:
25-26 Supply voltage 24 V a.c.
17-18 Signal from actuator (from NTC)
23-24 Supply to actuator (to PTC)
20-21 Pt 1000 sensor at evaporator outlet
1-2 Switch function for start/stop of regulation. If a switch is
not connected, terminals 1 and 2 must be short circuited.
Application dependent connections
Terminal:
12-13 Alarm relay
There is connection between 12 and 13 in alarm situa tions
and when the controller is dead
8-10 Relay switch for start/stop of fan
9-10 Relay switch for start/stop of solenoid valves
18-19 Current signal from other regulation (Ext.Ref.)
21-22 Pt 1000 sensor for monitoring
2-5 Current output for Sair/Saux temperature or ICAD actuator
for ICM valve
3-4 Data communication
Mount only, if a data communication module has been
mounted.
It is important that the installation of the data communication cable be done correctly. Cf. separate literature No.
RC8AC..
Data communication
CVQ/
CVMQ/
KVQ
Wire length: See appendix 2
© Danfoss | DCS (ADAP-KOOL®) | 2015-11
DKRCI.PS.RP0.B2.02 | 9
Page 10

User Guide | Media temperature controller, EKC 361
Data communication
This page contains a description of a few of the possibilities you
will have when the controller is provided with data communication.
Examples
If you want to know more about operation of controllers via PC,
you may order additional literature.
Each controller is provided
with a plug-in module.
The controllers are then connected to a two-core cable.
The cable can be connected
to a gateway type AKA 245.
Example of menu display
• Measurements are shown at
one side and settings at the
other.
• You will also be able to see
the parameter names of the
functions on page 5-7.
This gateway will now control
the communication to and
from the controllers.
It will collect temperature values and it will receive alarms.
When there is an alarm the
alarm relay will be activated for
two minutes
• With a simple change-over
the values can also be
shown in a trend diagram.
• If you wish to check earlier
temperature measurements,
you can see them in the log
collection.
The gateway can now be connected to a modem.
When an alarm occurs from
one of the controllers, the
gateway will - via the modem
- make a phone call to the
service company.
Alarms
If the controller is extended
with data communication, it
will be possible to dene the
importance of the transmitted
alarms.
The importance is dened with
the setting: 1, 2, 3 or 0. When
the alarm then arises at some
time, it will result in one of the
following activities:
1 = Alarm
The alarm message is sent o
with alarm status 1. This means
that the gateway that is the
master in the system will have
its alarm relay output activated
for two minutes. Later, when
the alarm ceases, the alarm
text will be retransmitted, but
now with status value 0.
At the service company a
modem, gateway and PC with
system software type AKM
have been installed.
All the controllers’ functions
can now be operated from the
various menu displays.
The programme will for example upload all the collected
tempera ture values once a day.
2 = Message
The alarm text is transmitted
with status value 2. Later, when
the “message” lapses, the alarm
text is retransmitted, but now
with status value 0.
3 = Alarm
As “1”, but the master gateway’s
relay output is not activated.
0 = Suppressed information
The alarm text is stopped at
the controller. It is transmitted
nowhere.
© Danfoss | DCS (ADAP-KOOL®) | 2015-11
DKRCI.PS.RP0.B2.02 | 10
Page 11

User Guide | Media temperature controller, EKC 361
Appendix 1
Interaction between internal and external start/stop functions
and active functions.
Internal Start/stop O O On On
External Start/stop O On O On
Refrigeration O On
Actuator Stand-by Regulating
Actuator temperature "n02" "n02" to "n01"
Fan relay O On
Expansion valve relay O On
Temperature monitoring No Yes
Sensor monitoring Yes Ye s
Appendix 3
Appendix 2
Cable length for the CVQ actuator
The actuator must be supplied with 24 V a.c. ± 10%.
To avoid excessive voltage loss in the cable to the actuator, use a
thicker cable for large distances.
Wire cross section
Cable length
Connection between the evaporating temperature and the
CVMQ
actuator’s temperature (the values are approximate).
n01: The highest regulated room temperature will have a be longing to value which
in turn indicates the value of the n01 setting. Due to tolerances in the actuator, the setting value must be 10 K higher than shown in the curve.
n02: The lowest occurring suction pressure will have a belonging to value which in
turn indicates the value of the n02 setting. Due to tolerances in the actuator,
the setting value must be 10 K lower than shown in the curve.
CVQ KVQ
© Danfoss | DCS (ADAP-KOOL®) | 2015-11
DKRCI.PS.RP0.B2.02 | 11
Page 12

User Guide | Media temperature controller, EKC 361
Start of controller
When the electric wires have been connected to the controller,
the following points have to be attended to before the regulation
starts:
1. Switch o the external ON/OFF switch that starts and stops the
regulation.
2. Follow the menu survey on page 7, and set the various para-
meters to the required values.
3. Switch on the external ON/OFF switch, and regulation will start.
If the temperature uctuates
When the refrigerating system has been made to work steadily,
the controller’s factory-set control parameters should in most
cases provide a stable and relatively fast regulating system.
If the system on the other hand oscillates, you must register the
periods of oscillation and compare them with the set integration
time Tn, and then make a couple of adjustments in the indicated
parameters.
4. If the system has been tted with a thermostatic expansion
valve, it must be set to minimum stable superheating. (If a
specic T0 is required for the adjustment of the ex pansion valve,
the two setting values for the actuator temperature (n01 and
n02) can be set to the belonging value while the adjustment
of the expansion valve is carried out. Remember to reset the
values).
5. Follow the actual room temperature on the display. (On
terminals 2 and 5 a current signal can be transmitted which
represents the room temperature. Connect a data collection
unit, if applicable, so that the temperature performance can be
followed).
If the time of oscillation is longer than the integration time:
(Tp > Tn , (Tn is, say, 4 minutes))
1. Increase Tn to 1.2 times T
2. Wait until the system is in balance again
p
3. If there is still oscillation, reduce Kp by, say, 20%
4. Wait until the system is in balance
5. If it continues to oscillate, repeat 3 and 4
If the time of oscillation is shorter than the integration time:
(Tp < Tn , (Tn is, say, 4 minutes))
1. Reduce Kp by, say, 20% of the scale reading
2. Wait until the system is in balance
3. If it continues to oscillate, repeat 1 and 2
Trouble shooting - ICS/PM with CVQ
In addition to the error messages transmitted by the controller,
the table below may help identifying errors and defects.
Symptom Defect Conrmation of defect
Media temperature too low.
Actuator feels cold.
Media temperature too low.
Actuator fells warm.
Media temperature too high.
Actuator feels cold.
Media temperature too high.
Actuator feels warm.
© Danfoss | DCS (ADAP-KOOL®) | 2015-11
Short-circuited NTC resistor in
actuator.
Defective PTC resistor (heating
element) in actuator.
Undersized cable to CVQ. Measure voltage across terminals 77 and 78 (min. 18 V a.c.).
Undersized 24 V transformer. Measure voltage across transformer output terminals (24 V a.c. +10/ -15%) under all
Loss of charge in actuator. Replace actuator.
Fault in refrigerant plant. Examine plant for ther defects.
Cut out NTC resistor in actuator. If more than 200 kohm is measured across terminals 17 and 18 (disassemble the
If less than 100 ohm is measured across terminals 17 and 18 (disassemble the lead),
the NTC or the leads are short-circuited. Check the leads.
If more than 30 ohm or 0 ohm is measured across terminal 23 and 24 (disassemble
the lead), either the PTC or the leads are defective.
Check the leads.
Measure resistance in power cables to CVQ (max. 2 ohm)
working conditions.
If voltage drops under some working conditions the transformer is undersized.
lead), either the NTC or leads are disconnected.
Check the leads.
DKRCI.PS.RP0.B2.02 | 12
Page 13

User Guide | Media temperature controller, EKC 361
Fine adjustments
When the system has been operating for a while, it may be
required for some systems to optimise some of the adjustments.
Below we have a look at settings having an inuence on the speed
and accuracy of the regulation.
Adjustment of the actuator’s min. and max. temperatures
At the rst setting these values were set to 10 K outside of the
expected temperature in order to eliminate the tolerances in the
actuator. By adjusting the two values to the values where the
valve is exactly in mesh, the valve will all the time remain active in
its regulation.
If the actuator is replaced at a later date, this procedure must be
repeated for the new actuator.
Min.
By adjusting the actuator’s min. temperature you obtain a limit
for how low a pressure can occur in the evaporator (the point is
where the valve starts a limitation of the refrigerant ow).
The system must be put in an operating situation where max.
capacity is called for (large refrigeration need).
The min. temperature must now be changed upwards step by
step, at the same time as the evaporating pressure is read on the
system’s manometer.
When a change of the evaporating pressure is registered, this is
the point where the valve is exactly in mesh. (If frost protec tion is
required for the system, the value can be raised to the belonging
value).
Max.
By adjusting the actuator’s max. temperature you obtain a limit for
how high a pressure can occur in the evaporator (the refrigerant
ow is blocked completely).
The system is put in an operating situation where there is no call
for refrigeration capacity (no refrigerant ow).
The max. temperature is now changed downwards step by step, at
the same time as the evaporating pressure is read on the system’s
manometer.
When a change of the evaporating pressure is registered, this
is the point where the valve opens. Adjust the setting a little
upwards, so that the valve will again close completely for the
refrigerant ow. (If the actual application has a requirement regarding max. evaporating pressure, a lower setting may of course
be selected, so that the pressure is limited).
Method for xing Kp, Tn and Td
Described below is a method (Ziegler-Nichols) for xing Kp, Tn
and Td.
1. The system is made to regulate the temperature at the required
reference with a typical load. It is important that the valve regulates, and that it is not fully open.
2. Parameter u05 is read. The actuator’s min. and max. setting is
adjusted, so that the average of the min. and max. values is
equal to the read u05.
3. The controller is set, so that it will regulate as a P-controller. (Td is
set to 0, Tn in pos. OFF (600), and Q-Ctrl.mode is set at 0).
4. The stability of the system is examined by stopping the system
for, say, one minute (using the start/stop setting or the switch).
Now check how the building-up of the temperature proceeds.
If the building-up peters out, raise Kp a little and repeat the
start/stop operation. Continue with this until you obtain a building-up which does not peter out.
5. Kp is in this case the critical amplication (Kp
ing-up time for the continued oscillation is the critical buildingup time (T
6. Based on these values, the regulating parameters can now be
critical
).
) and the build-
critical
calculated and subsequently set:
• If PID regulation is required:
Kp < 0.6x Kp
Tn > 0.5x T
Td < 0.12x T
• If PI regulation is required:
Kp < 0.45x Kp
Tn > 0.85x T
7. Reset the values for the controller’s min. and max. tem peratures
critical
critical
critical
critical
critical
and Q-Ctrl.mode.
© Danfoss | DCS (ADAP-KOOL®) | 2015-11
DKRCI.PS.RP0.B2.02 | 13
Page 14

User Guide | Media temperature controller, EKC 361
© Danfoss | DCS (ADAP-KOOL®) | 2015-11
DKRCI.PS.RP0.B2.02 | 14
Page 15

User Guide | Media temperature controller, EKC 361
© Danfoss | DCS (ADAP-KOOL®) | 2015-11
DKRCI.PS.RP0.B2.02 | 15
Page 16

User Guide | Media temperature controller, EKC 361
Danfoss can accept no responsibility for possible errors in catalogues, brochures and other printed material. Danfoss reserves the right to alter its products without notice. This also applies to products
already on order provided that such alternations can be made without subsequential changes being necessary in specications already agreed.
All trademarks in this material are property of the respecitve companies. Danfoss and Danfoss logotype are trademarks of Danfoss A/S. All rights reserved.
© Danfoss | DCS (ADAP-KOOL®) | 2015-11
DKRCI.PS.RP0.B2.02 | 16
 Loading...