

Installation Guide
Danfoss ECdry Touch Kit


Installation Guide Danfoss ECdry Touch Kit
Table of Contents
1 ECdry � � � � � � � � � � � � � � � � � � � � � � � � � � � � � � � � � � � � � � � � � � � � � � � 4
2 General information � � � � � � � � � � � � � � � � � � � � � � � � � � � � � � � � � � � � � � 5
3 Product overview� � � � � � � � � � � � � � � � � � � � � � � � � � � � � � � � � � � � � � � � 7
4 Technical Details � � � � � � � � � � � � � � � � � � � � � � � � � � � � � � � � � � � � � � � � 9
5 Designing the layout � � � � � � � � � � � � � � � � � � � � � � � � � � � � � � � � � � � � 11
1.1 Preparing the base . . . . . . . . . . . . . . . . . . . . . . . . . . . . . . 13
1.1 Calculating current limitations. . . . . . . . . . . . . . . . . . . . . . . 14
1.1 Connecting the ECdry elements . . . . . . . . . . . . . . . . . . . . . 15
1.1 Cutting the ECdry oor heating element to size. . . . . . . . . . . . 16
1.1 Filling up the remaining space. . . . . . . . . . . . . . . . . . . . . . . 17
1.1 Mounting the ECtemp Thermostat . . . . . . . . . . . . . . . . . . . . 18
1.1 Checking the ECdry oor heating system. . . . . . . . . . . . . . . . 18
1.1 Laying the top oor . . . . . . . . . . . . . . . . . . . . . . . . . . . . . 19
1.1 Warning label . . . . . . . . . . . . . . . . . . . . . . . . . . . . . . . . . 19
6 Layout paper� � � � � � � � � � � � � � � � � � � � � � � � � � � � � � � � � � � � � � � � � � 20
7 Safety Precautions � � � � � � � � � � � � � � � � � � � � � � � � � � � � � � � � � � � � � � 22
8 The 5 Year Danfoss Warranty: � � � � � � � � � � � � � � � � � � � � � � � � � � � � � � � 24
AN324050550815en-000201 | 3Danfoss © | 2020.07

Installation Guide Danfoss ECdry Touch Kit
1 ECdry
Congratulations with your new Danfoss oor heating system.
We are condent that you will be satised with your new system. Danfoss brings you optimum
comfort with the luxury and comfort of a warm oor as well as a pleasant room temperature.
Floor heating is the most comfortable type of heating because it is based on the fact that
warmth travels upwards; pleasant warmth for your feet, body and head.
4 | Danfoss © | 2020.07 AN324050550815en-000201
Installation Guide Danfoss ECdry Touch Kit
2 General information
The ECdry oor heating system consists of a
foam/carpet heating element with heating
mats inside. The system must al ways be controlled with a ECtemp, as it is an important
part of the safety and overheating protec tions
system.
The ECdry oor heating system can be used
under wooden oors such as parquet and
laminate. Please check the specications
ECdry has been tested and approved with
ooring materials with insulation values
from 0,07 to 0,18 m² K/W.
For best performance of the oor heating system, keep the insulation value from the ECdry
heating unit to oor surface as low as possible.
The ECdry oor heating system has been
developed to the dry application area for
underoor heating.
with your supplier of these products.
It is applicable for wooden and concrete
oor constructions with the two output
ranges 55 W/m² and 100 W/m².
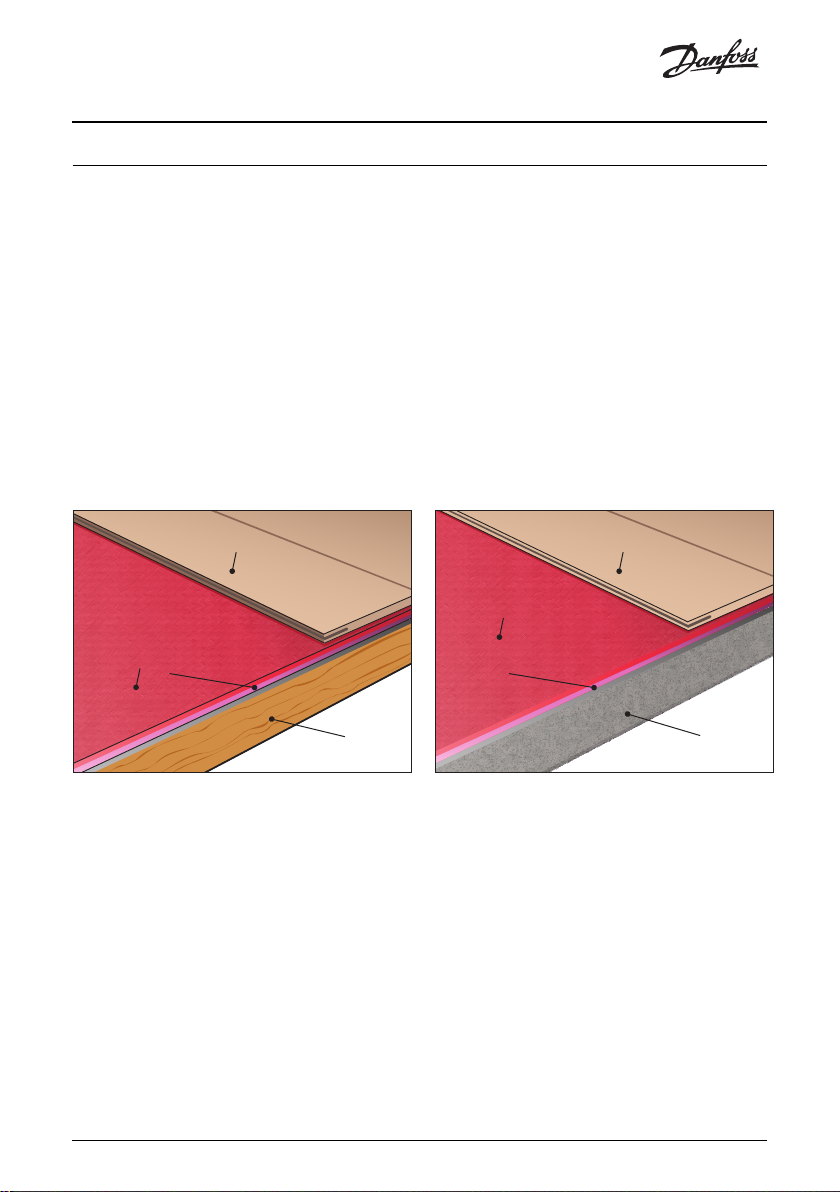
Parquet/laminate
ECdry
Vapour barrier Vapour barrier
wooden suboor
Flooring
ECdry 55
Wooden oor construction
Existing
Flooring
ECdry 55 or 100
Concrete oor construction
Parquet/laminate
ECdry
Existing
concrete suboor
AN324050550815en-000201 | 5Danfoss © | 2020.07
Installation Guide Danfoss ECdry Touch Kit
The maximum thermal resistance between the ECdry element and the room is
0,18 m² K/W as shown in the table below.
The ECdry oor heating system is for indoor applications in dry rooms only. As with any other
underoor heating system, it will be most
eective if the underoor is well insulated.
The following directions will guide you stepby-step through the installation process. Please
read the directions and the safety precautions
before you start the installation process.
Thermal
resistance
Examples of Flooring Density
0,07 m² K/W 11 mm HDF based laminate >800 kg/m³
0,10 m² K/W 14 mm beech parquet 650-800 kg/m³
0,13 m² K/W 22 mm solid oak plank >800 kg/m³
0,18 m² K/W 22 mm solid r planks 450-650 kg/m³
6 | Danfoss © | 2020.07 AN324050550815en-000201
Installation Guide Danfoss ECdry Touch Kit
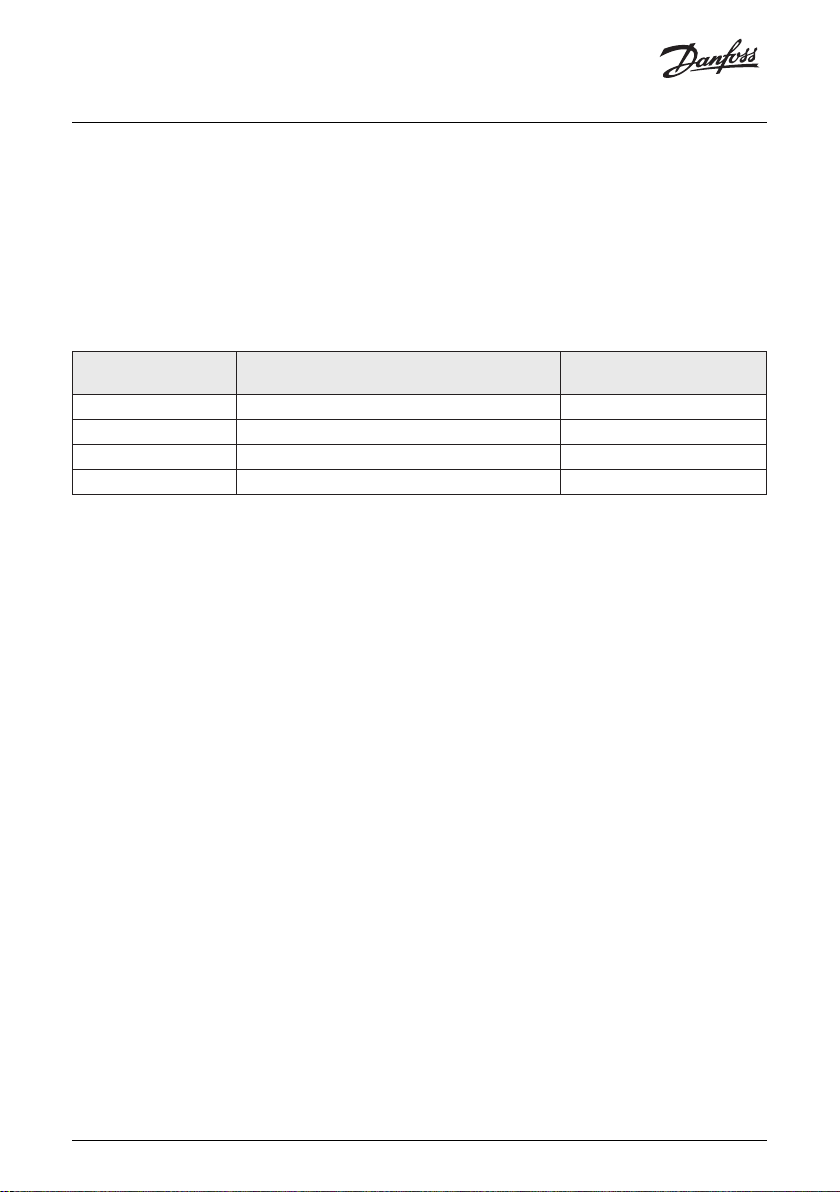
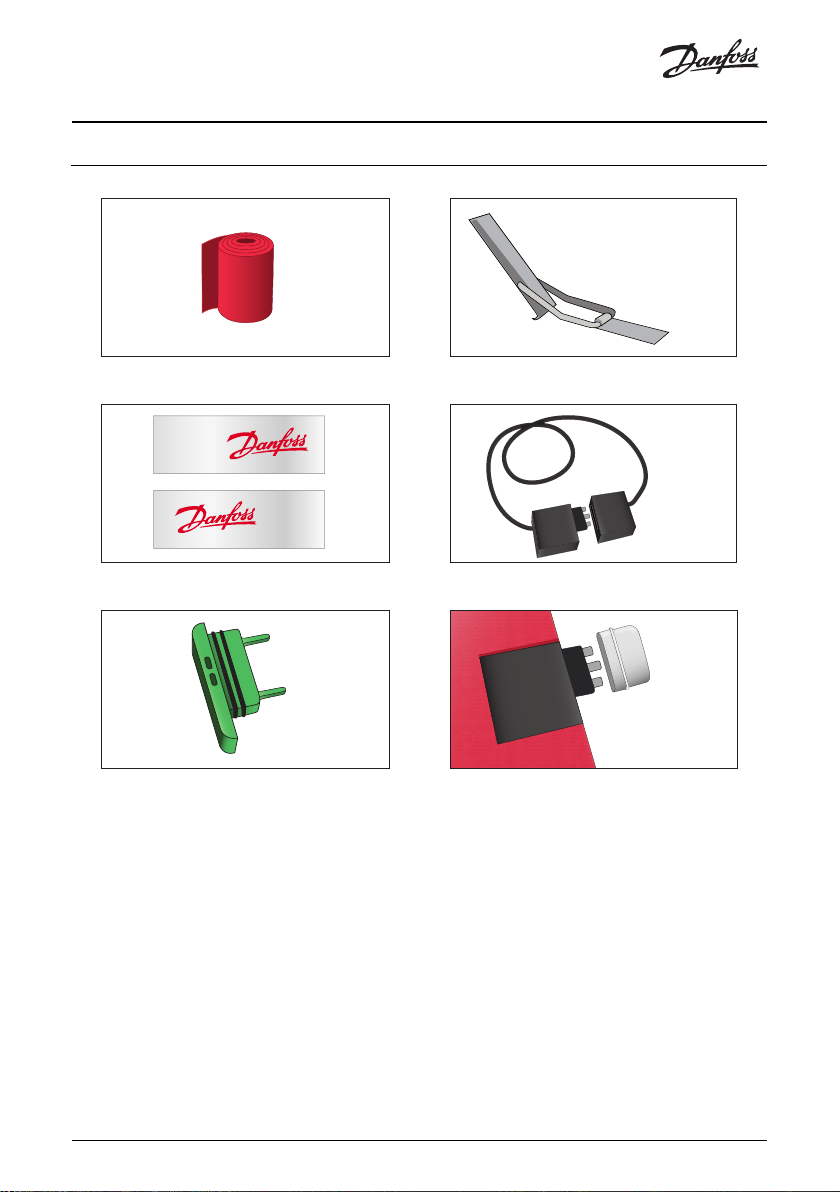
3 Product overview
ECdry FM ECdry Connection Tool
ECdry Tape ECdry X
ECdry End Stop ECdry Protection Cap
AN324050550815en-000201 | 7Danfoss © | 2020.07
Installation Guide Danfoss ECdry Touch Kit
Products supplied for wooden oor constructions
ECdry Name Description
ECdry 55 ECdry Element, 1-5 m²
Products supplied for concrete oor constructions
ECdry Name Description
ECdry 55 ECdry Element, 1-5 m²
Or:
ECdry 100 ECdry Element, 1-5 m²
Accessories
ECdry Name Description
ECdry Touch Kit:
• ECtemp Touch Electronic Intelligent
Timer Thermostat
ECdry Touch Kit
ECdry X-25 ECdry Extension Cord, 25 cm
ECdry X-100 ECdry Extension Cord, 100 cm
ECdry X-200 ECdry Extension Cord, 200 cm
ECdry FM-1 ECdry Filler Material, 1 m²
ECdry FM-2 ECdry Filler Material, 2 m²
ECdry FM-4 ECdry Filler Material, 4 m²
• ECtemp NTC Floor Sensor
• ECdry Connection Tool
• ECdry Supply cord 3 m
• ECdry and ECtemp Instructions
• ECdry Warning Label
8 | Danfoss © | 2020.07 AN324050550815en-000201
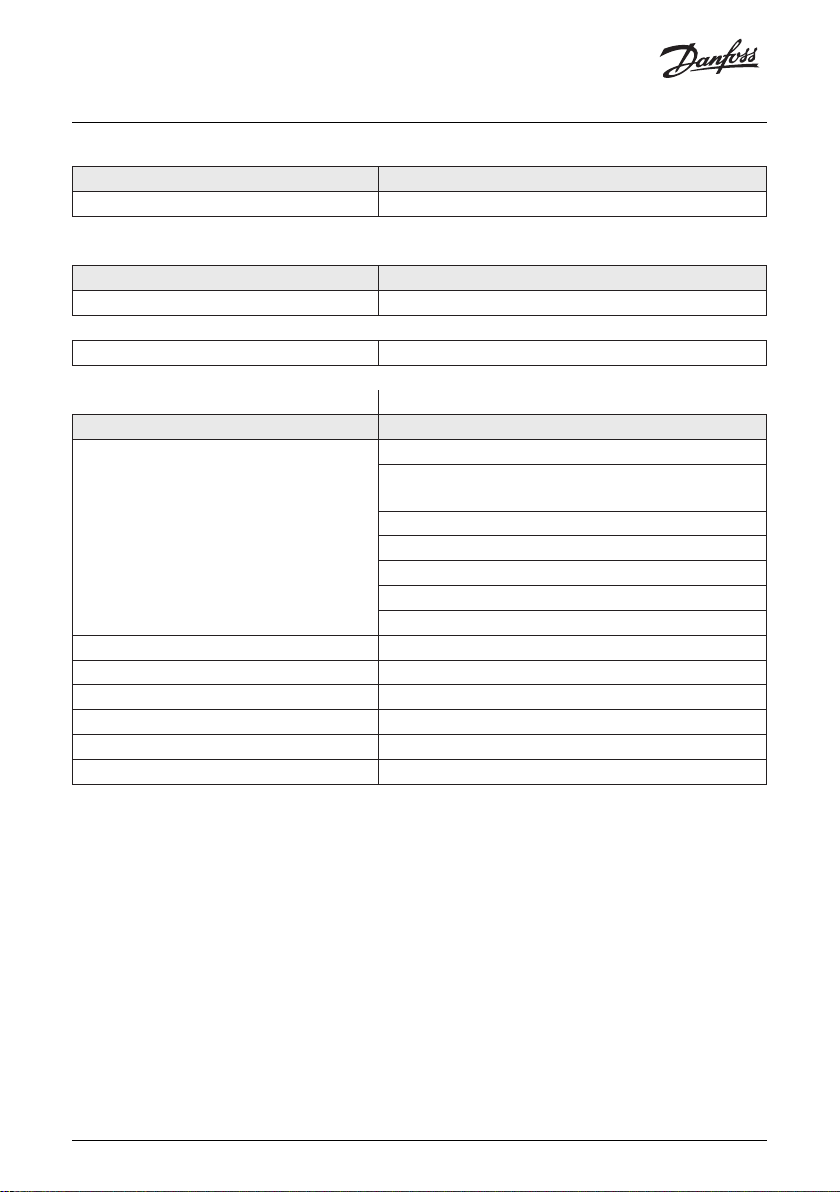
Installation Guide Danfoss ECdry Touch Kit
4 Technical Details
Installation must be carried out in accordance with the national regulation and
wiring rules for installation
Technical details of ECdry
Height 8 mm
Mains voltage 230 V (50 Hz)
Maximum Ampere per ECdry System 10 A
IP rating for ECdry Element IP X7
Output 55 W/m² or 100 W/m²
Sound reduction value 17 dB
Insulation value μ 8 W/m²K
Maximum heated surface per ECdry Touch Kit
(Maximum current limit is 10 Ampere)
Product Max heated surface
ECdry 55 42 m²
ECdry 100 23 m²
For ECdry 55
Floor area Heated surface Total power output Ampere
1 m² 0,4 m² 22 Watt 0,10 A
2 m² 1,4 m² 77 Watt 0,33 A
3 m² 2,4 m² 132 Watt 0,57 A
4 m² 3,4 m² 187 Watt 0,81 A
5 m² 4,4 m² 242 Watt 1,05 A
For ECdry 100
Floor area Heated surface Total power output Ampere
1 m² 0,4 m² 40 Watt 0,17 A
2 m² 1,4 m² 140 Watt 0,61 A
3 m² 2,4 m² 240 Watt 1,04 A
4 m² 3,4 m² 340 Watt 1,48 A
5 m² 4,4 m² 440 Watt 1,91 A
AN324050550815en-000201 | 9Danfoss © | 2020.07

Installation Guide Danfoss ECdry Touch Kit
EM
A
K
EM
A
K
EM
A
K
EM
A
K
EM
A
K
EM
A
K
EM
A
K
EM
A
K
This side up
Heating element must only be installed on top of concrete oor constructions (never on wooden oor construction), never inbedded in concrete.
Direct oor heating
The ECdry element may be cut here to t the actual area, as there are no
electrical parts in this area
The ECdry element can NOT be cut here as there are electrical parts in this
area
For indoor use only
Read the instruction manual before installation
Double insulated
This symbol indicates that this product must not be disposed of with your
other household waste.
Danfoss declares that ECdry is tested according to the standard
EN/IEC 60335-2-96. Household and similar electrical appliances. Safety. Part 2-96.
Particular requirements for exible sheet heating mats for room heating.
10 | Danfoss © | 2020.07 AN324050550815en-000201
Installation Guide Danfoss ECdry Touch Kit
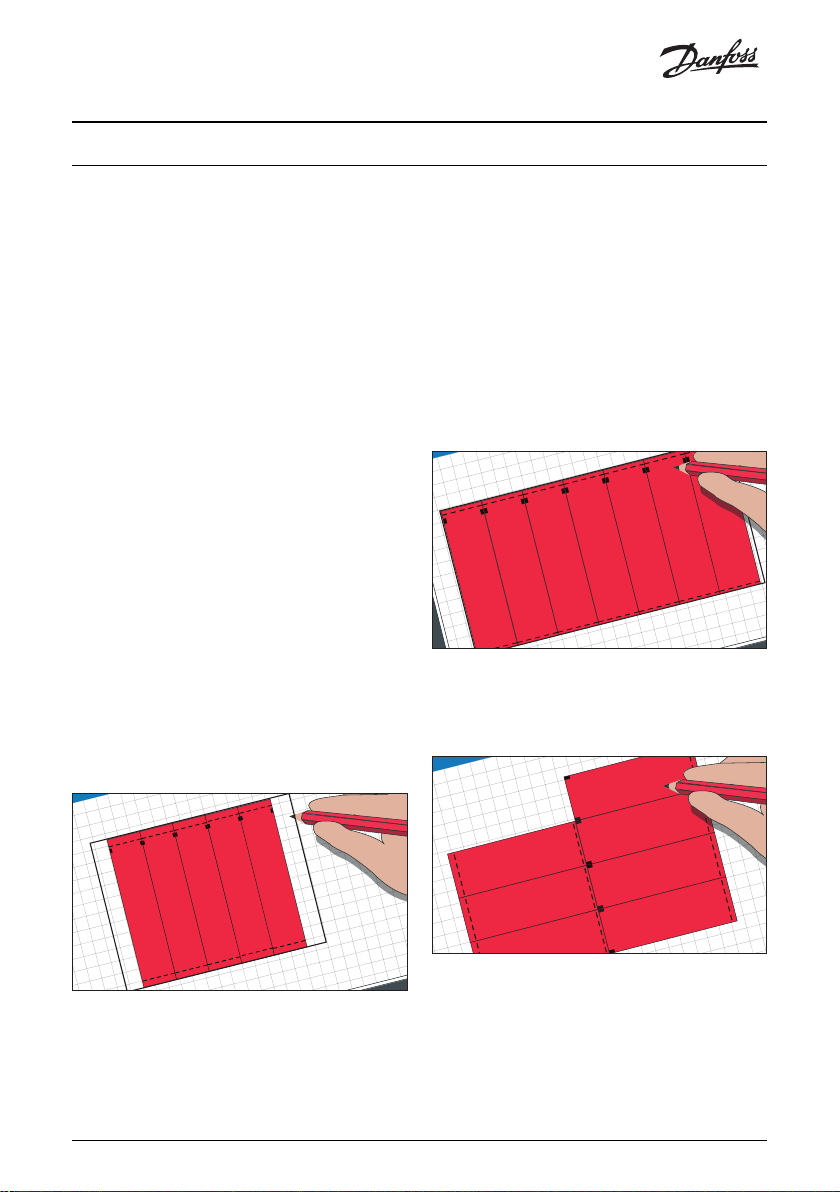
5 Designing the layout
Draw a oor plan of the room and determine
the most logical location for the control system and the position of the oor heating mats.
Consider the placement of the thermostat to
get the most convenient access and make sure
the necessary power supply is available.
The output cord from the control system will
go into the right side of the heating element,
so you should start laying the rst heat element on the right side of the oor and work
towards the left side. Remember to keep
at least 70 mm of free space between the
skirting/wall and the rst heating element
for the plug-in connection between the oor
heating element and the control system. Use
the ller material to ll this space afterwards.
Examples of calculations are provided below
to help you work out how many ECdry oor
heating mats are required. All ECdry oor
heating mats are one metre wide and the
standard length varies from one to ve metres. Reduce the length of the elements to
the required size as shown in the table.
Example 1: When the area is 5 m wide and 6 m
long, you will need 5 × 5 m ECdry oor heating
mats, plus 5 square metres of ller material.
ller material. A ECdry oor heating extension cord is available as an accessory. Use
the cord in the event that you are unable
to make a direct connection between two
adjacent oor heating elements or between
the 1st mat and thermostat kit. The extension cords must only be placed in the ller
material and not on top of the heating element. The extension cords can be extended
with each other if necessary (if you need
3 m extension cords you can use 2 m + 1 m
extension cords).
Example 3: When placing the elements after
each other you should always cut away the
cold end (25 cm) of the element to avoid
cold zones.
Example 2: When the area is 3.75 m wide
and 7.10 m long, you will need 6 × 4 m
ECdry oor heating mats. Cut the 4 m long
elements down to 3.75 m. You will also need
0.38 square metres (buy 1 square metre) of
AN324050550815en-000201 | 11Danfoss © | 2020.07

Installation Guide Danfoss ECdry Touch Kit
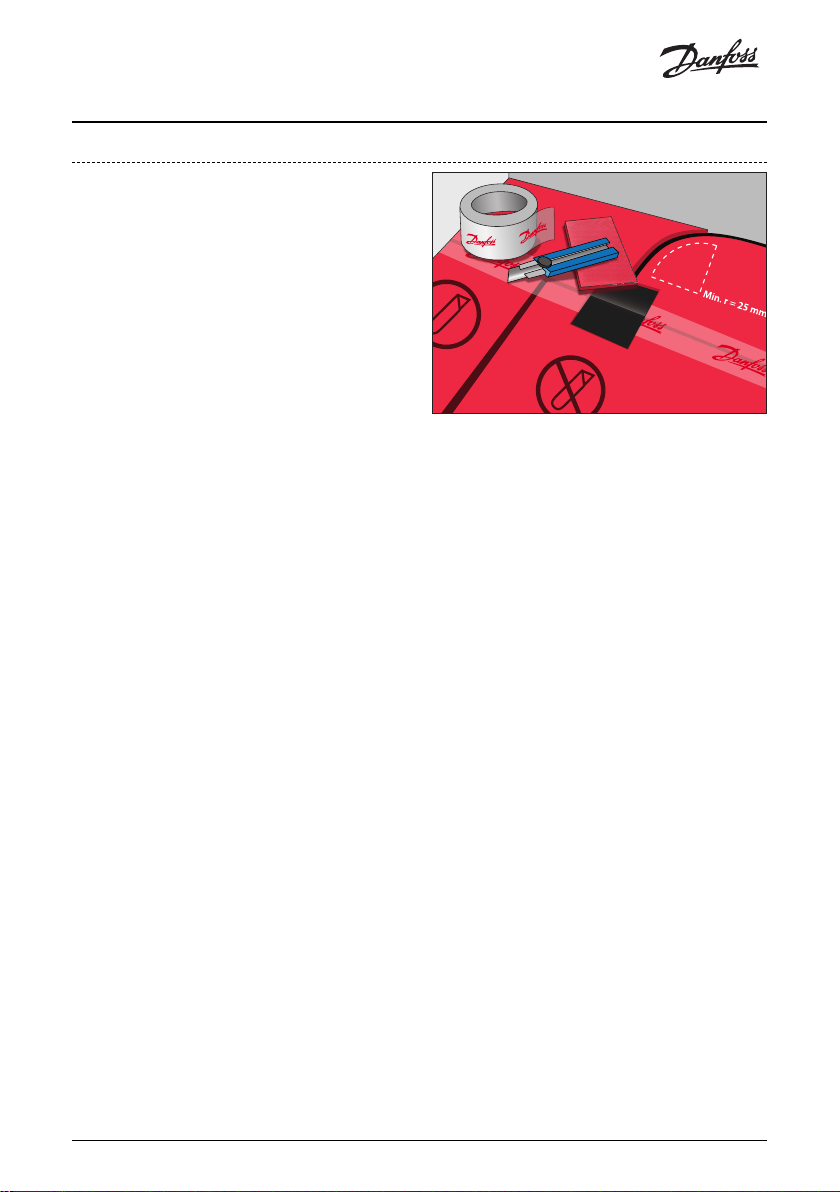
Installing Supply Cord or Extension Cords:
The cords must only be placed in the ller
material and not over/in the heating element.
The ller material shall be cut so it envelopes
the cords. The ECdry X can withstand maximum 10 A.
Element size Standard length Minimum length
1 m² 1 m 0,5 m
2 m² 2 m 1,5 m
3 m² 3 m 2,5 m
4 m² 4 m 3,5 m
5 m² 5 m 4,5 m
1 m wide ller materials without heating (1, 2 and 4 m)
Make sure that no hot spots develop when
using the oor heating system. Avoid hot
spots by ensuring that the heat from the oor
heating is homogeneously released to the
area you wish to heat and that there is free
space (ventilation) under the furniture.
12 | Danfoss © | 2020.07 AN324050550815en-000201
When designing the layout, make sure not
to install ECdry heating element under permanent or built-in cupboards or re places/
ovens. ECdry have to be separated from
other heat sources such as chimneys. Instead
ECdry ller material should be used.

Installation Guide Danfoss ECdry Touch Kit
1�1 Preparing the base
Before you start installing the product,
please ensure that the oor is:
• Permanently inexible
• Dry
• Flat and regular
• Dust- and fat-free
• Free from any sharp objects
Use a powerful vacuum cleaner to remove
all dust from the oor.
Remember to install a 0,20 mm vapour barrier on the suboor
before rolling out the heating mats.
AN324050550815en-000201 | 13Danfoss © | 2020.07

Installation Guide Danfoss ECdry Touch Kit
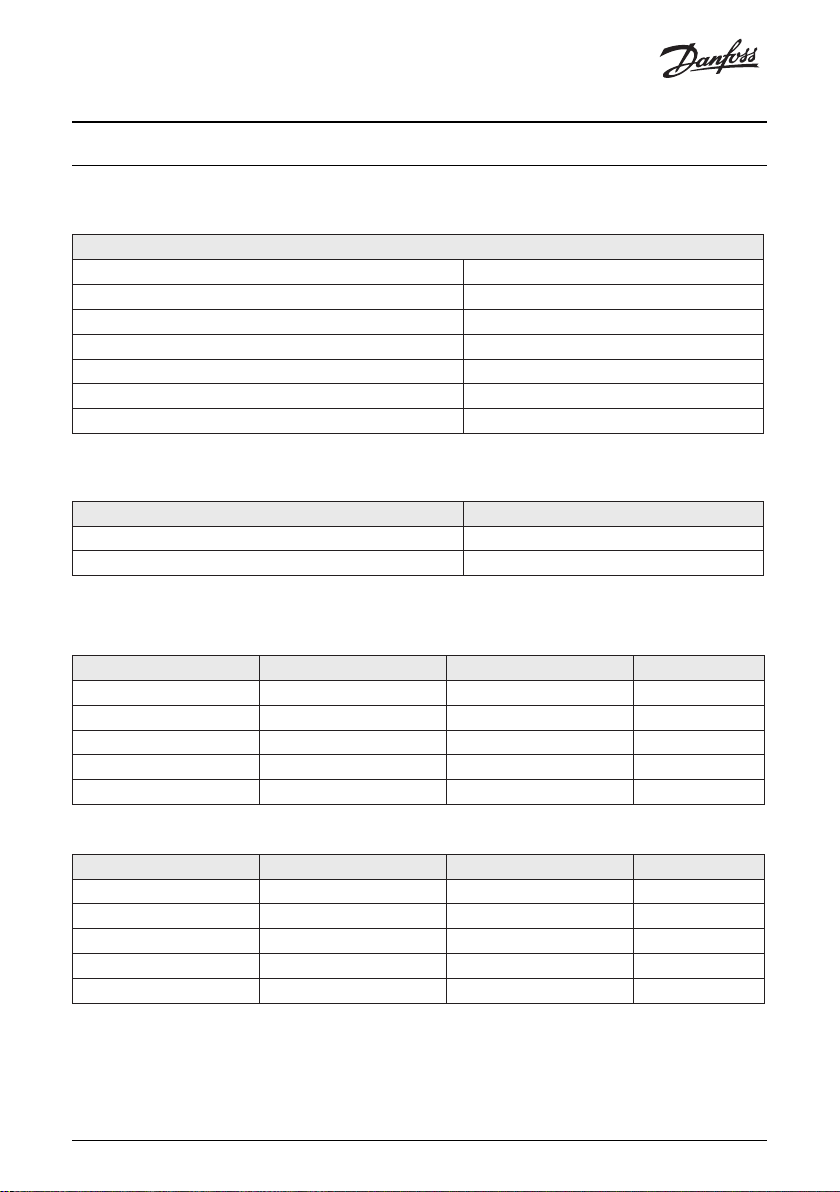
1�1 Calculating current limitations
The ECdry oor heating system should be
connected in accordance with national standards and wiring rules.
Maximum current per ECdry system is 10
Ampere.
Maximum heated surface per ECdry Touch Kit (10 A limit per system)
Product Max heated surface
ECdry 55 42 m²
ECdry 100 23 m²
For ECdry 55 (Mains voltage 230 Volt and 50 Hz)
Floor area Heated surface Total power output Ampere
1 m² 0,4 m² 22 Watt 0,10 A
2 m² 1,4 m² 77 Watt 0,33 A
3 m² 2,4 m² 132 Watt 0,57 A
4 m² 3,4 m² 187 Watt 0,81 A
5 m² 4,4 m² 242 Watt 1,05 A
For ECdry 100
Floor area Heated surface Total power output Ampere
1 m² 0,4 m² 40 Watt 0,17 A
2 m² 1,4 m² 140 Watt 0,61 A
3 m² 2,4 m² 240 Watt 1,04 A
4 m² 3,4 m² 340 Watt 1,48 A
5 m² 4,4 m² 440 Watt 1,91 A
In the following tables you will nd maximum heated surface per ECdry Touch Kit
and an overview of the total power output
of the systems.
14 | Danfoss © | 2020.07 AN324050550815en-000201

Installation Guide Danfoss ECdry Touch Kit
1
2
21
1�1 Connecting the ECdry elements
Bulges on the element may occur, but will
disappear when the ECdry system is heated.
All elements are equipped with an end stop
to insulate the connector and protect the
connection against moisture. Remove the
end stops with the special tool, just before
making the connection with the next heating mats. If all end stops are taken out at
once, remember to leave the end stop in the
last element.
Connect the plug-in connection of the second
element into the plug-in connection of the rst
element. Put the male and female connector
together by hand before using the connector tool to push the elements tight together.
Check that the plug-in connection ts correctly
and permanently. Continue with the subsequent elements in the same manner.
Make sure that all plug-in connections t
straight and without any mechanical stress.
Discontinue the oor heating installation
process in the event of damage to one or
more components. Incorrect installation may
cause problems and/or defects to the oor
heating mats. Please take precautions not to
drop sharp objects on the heating mats.
Use the enclosed aluminum tape to x mats
to each other in order to secure connections and to avoid movement of mats. Place
aluminum tape in two positions: directly on
connections (between mat connections and
in the opposite end of the mat). In addition
x 1st mat connection and output cord from
ECdry Touch Kit.
Make sure that the end stop in the last element
is in place before the oor covering is laid. Keep
the end stops if you intend to remove/reposition your oor heating system later.
20 cm 10 cm
20 cm 20 cm
20 cm
AN324050550815en-000201 | 15Danfoss © | 2020.07
Installation Guide Danfoss ECdry Touch Kit
EM
A
K
EM
A
K
1�1 Cutting the ECdry oor heating element to size
Each end of the ECdry heating element consists of 25 cm without electrical parts inside.
The ECdry heating element may only be cut
at the far ends where there are no electrical
parts inside as marked on the product below.
Markings and symbols have been printed on
the ECdry heating mats:
Cutting area
Do not cut area. Electrical parts
inside. If cut, element will be destroyed.
To cut the element to size:
Carefully measure the piece you wish to cut
o and simply cut with a sharp knife.
10
20
30
16 | Danfoss © | 2020.07 AN324050550815en-000201
Installation Guide Danfoss ECdry Touch Kit
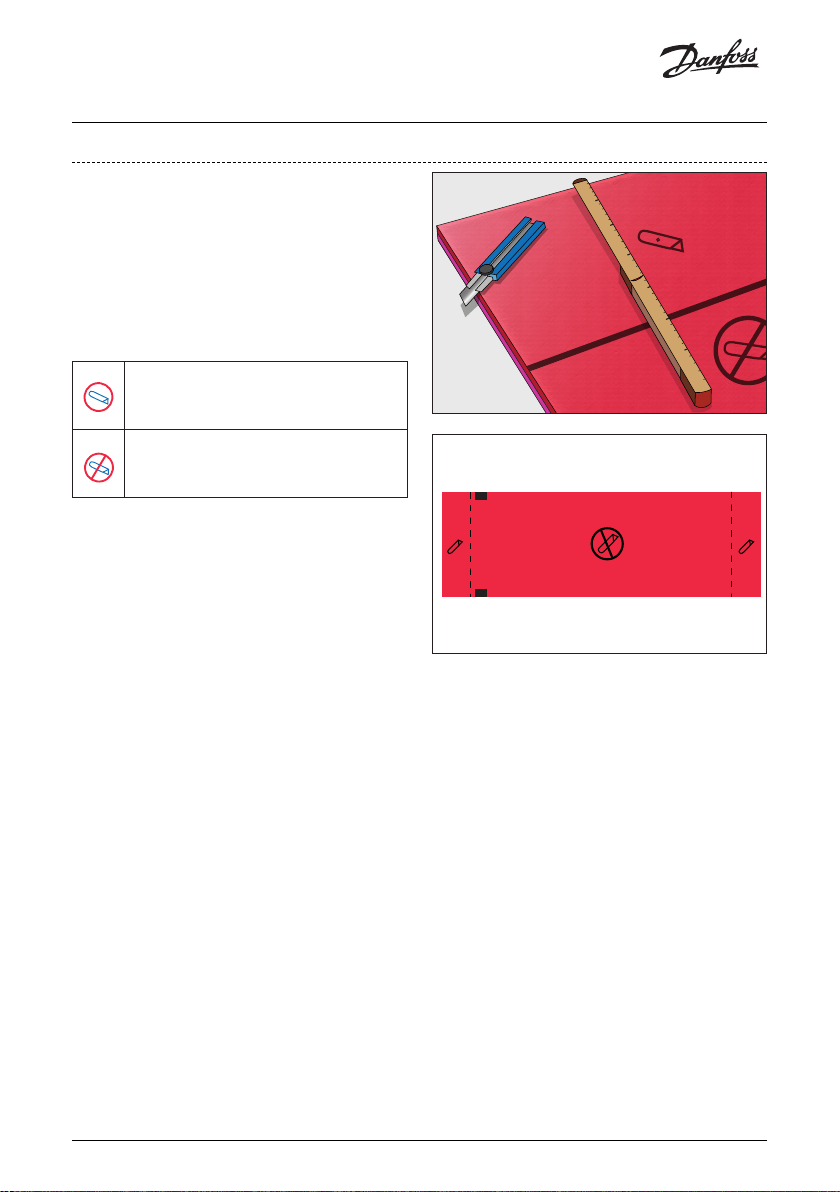
1�1 Filling up the remaining space
At this point all connections between the
elements should be aligned and connected
and as much of the oor as possible should
be covered with ECdry elements. The space
without ECdry heating mats should be covered with the ECdry Filler Material to ensure
an even and homogenous oor surface.
A knife, a lineal (to cut along) and a wooden
plate (behind the ECdry element) can be
used when cutting the ECdry Filler Material
to avoid cutting into the electrical parts and
ensuring a straight cut.
To be certain that the distribution of the
oor heating mats in your room is correct,
we suggest you make everything t before
you secure the elements permanently. It is
most important to make sure that all plug-in
connections are perfectly aligned to allow
the ow of electricity from one element to
the next. Put the oor heating mats plus any
ller materials down as shown in the lay-out.
Once you have correctly positioned all oor
heating mats and you have cut the ller
material to size, you can proceed with the
permanent installation as explained in the
following steps.
Fit the output cord
Cut a piece of material from the ller material to embed the output cord between the
ECdry Controller and the ECdry heating mat.
AN324050550815en-000201 | 17Danfoss © | 2020.07

Installation Guide Danfoss ECdry Touch Kit
1�1 Mounting the ECtemp Thermostat
The electrical installation must be done by
an authorised electrician. Mount the ECtemp
thermostat to the wall. The ECtemp should be
installed in accordance with the instruction
manual supplied with the thermostat and the
ECdry Touch Kit.
Cut a piece of material from the ller material to make room for the ECdry Supply Cord
between the ECtemp thermostat and the
ECdry Touch element.
Make sure not to fold and/or squeeze the
cord between the thermostat and the oor
heating element but make room for the cord
in the ller material. Minimum bending
diameter is 5 cm.
To place the sensor in the right spot, remove
the cut-away area in the ECdry Touch
heating element and place the sensor
down into the groove.
Fix the sensor to the heating mat with the
enclosed aluminium tape.
1�1 Checking the ECdry oor heating system
Check that all work has been carried out in
accordance with directions before testing
the ECdry oor heating system. Testing
may commence when everything has been
correctly connected. Read the directions for
the control system before you proceed. Set
the temperature at maximum 35 °C. After a
short while you will notice the ECdry oor
heating mats are warming up.
If the oor heating mats are not warming
up to the same temperature, the plug-in
connections should be checked once again.
Remember to switch o the ECdry system
before checking.
18 | Danfoss © | 2020.07 AN324050550815en-000201
Installation Guide Danfoss ECdry Touch Kit
1�1 Laying the top oor
Please consult the oor manufacturer to
ensure that the oor covering is suitable for
oor heating. The nal oor covering (laminate or parquet) can be laid when the ECdry
heating system has been tested.
According to ISO 13732-2,
the comfortable oor surface temperature depends
on the ooring material.
Soft wood (pine)
22.5 - 28°C
Hard wood (oak)
24.5 - 28°C
However, observe the maximum oor
surface temperature according to the ooring manufacturer. For most wooden oor
products, the temperature is usually around
27 °C. All temperature settings must be set
some degrees higher to compensate for the
heat resistance in the top ooring.
Thermal
resistance
Examples of Flooring Details
Approximate setting
[m²K/W]
0,07
11 mm HDF based laminate
> 800 kg/m³ 28°C
0,10 14 mm beech parquet 650 - 800 kg/m³ 31°C
0,13 22 mm solid oak plank > 800 kg/m³ 32°C
0.18 22 mm solid r planks 450 - 650 kg/m³ 35°C
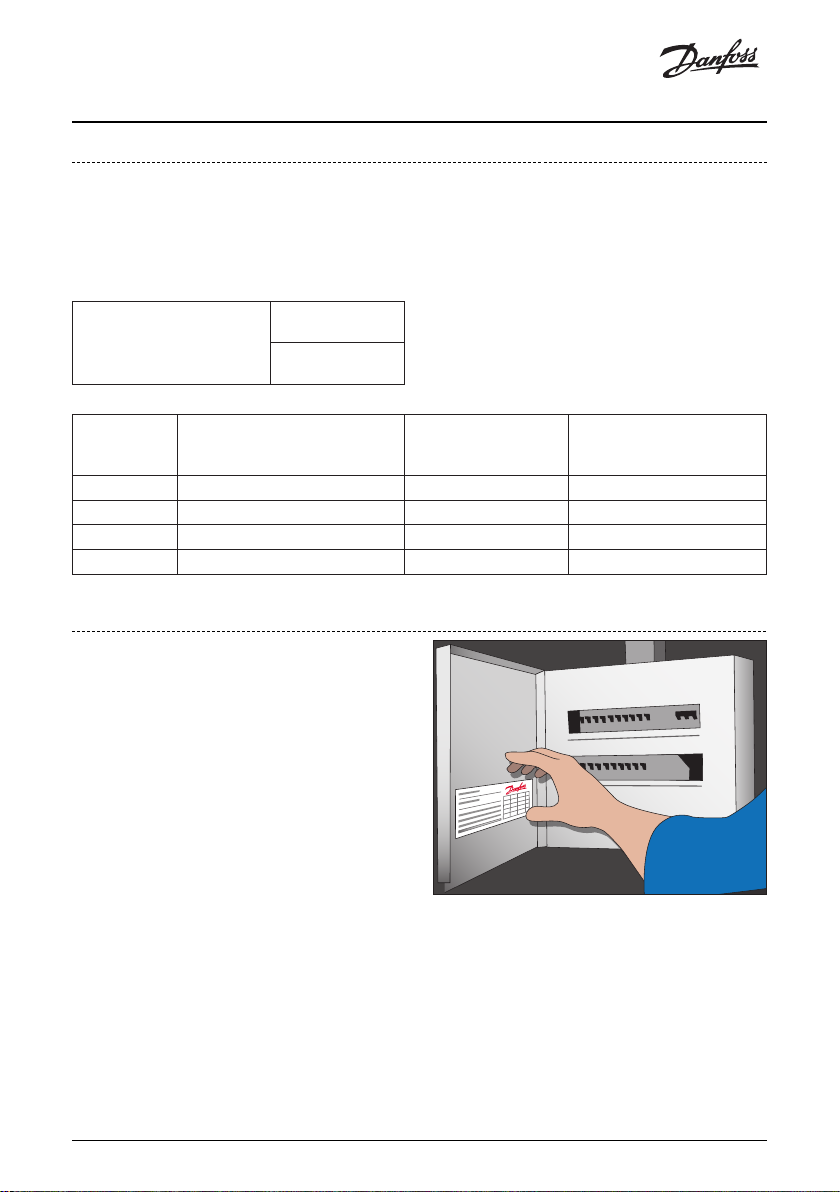
1�1 Warning label
The warning label that is included in the
ECdry Touch Kit must be lled out and
placed in the distribution board. For future
reference it is important to ll in, which
room and how many ECdry elements that
have been installed, by whom and the
installation date. Furthermore, the room
should be drawn in the manual so it is easy
to see how the elements have been positioned in the room in the future. See layout
paper on next page.
for 25°C
oor temperature
AN324050550815en-000201 | 19Danfoss © | 2020.07
Installation Guide Danfoss ECdry Touch Kit
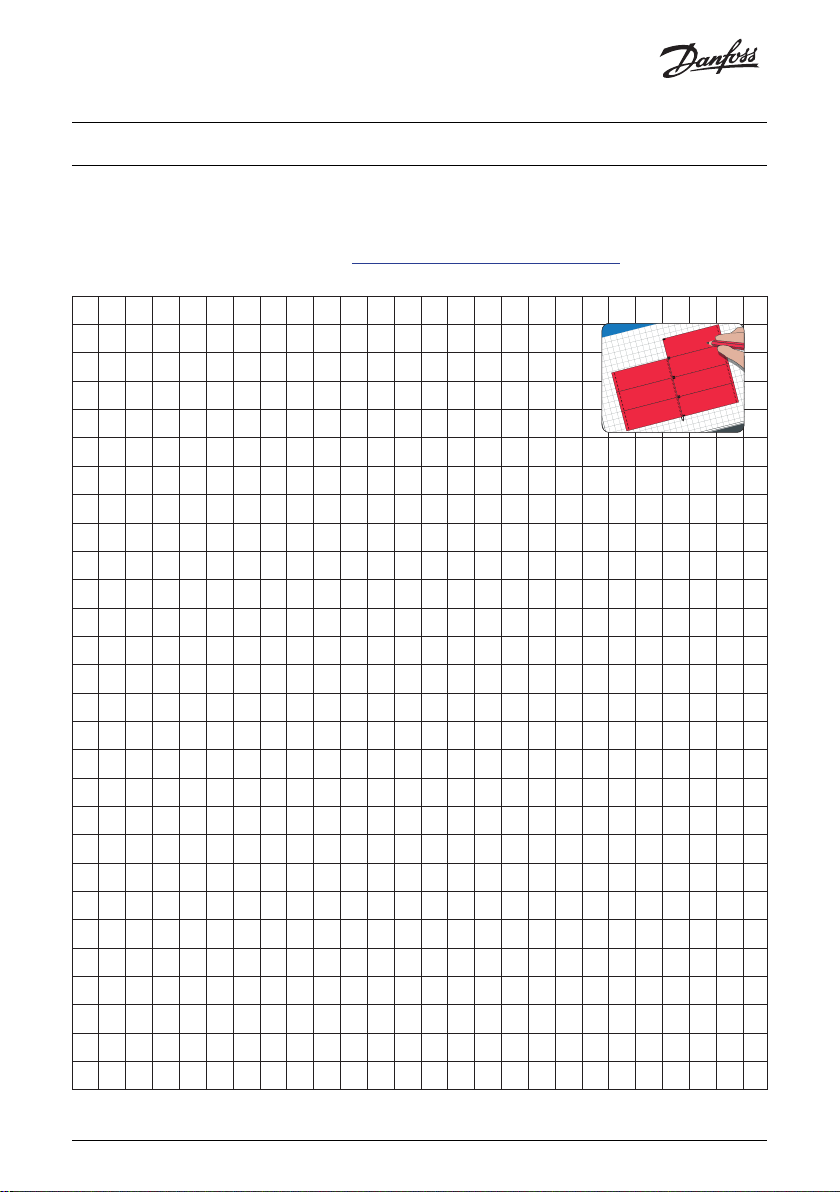
6 Layout paper
Please draw the room on the page below and position the heating mats that you are installing
(for future reference)
These products are installed in Room
20 | Danfoss © | 2020.07 AN324050550815en-000201
Installation Guide Danfoss ECdry Touch Kit
List of ECtemp thermostats
Use ECtemp with a maximum set point of 35 °C.
Use of other thermostat/setting will make
the warranty void!
ECtemp Touch
Item no. Product name Type Language
088L0122*
ECtemp Touch Pure white, RAL 9010 1
088L0128 ECtemp Touch Pure white, RAL 9010 2
* Included into the ECdry Touch Kit
1 - Contains languages: Bulgarian, Czech, Danish, English, Estonian, Finnish, French, German, Latvian, Lithuanian,
Norwegian, Polish, Romanian, Russian, Slovenian, Slovak, Swedish, Ukranian.
2 - Contains languages: Chinese, Croatian, Dutch, English, Hungarian, Italian, Portuguese, Serbian, Spanish, Turkish.
ECtemp Smart
Item no. Product name Type
088L1140 ECtemp Smart Polar White (RAL 9016)
088L1141 ECtemp Smart Pure White (RAL 9010)
088L1143 ECtemp Smart Pure Black (RAL 9005)
For more detail information, please visit - danfoss�com
AN324050550815en-000201 | 21Danfoss © | 2020.07

Installation Guide Danfoss ECdry Touch Kit
7 Safety Precautions
• Use the oor heating element for the
purposes described in the installation
manual only.
• ECdry must always be installed with the
ECdry Touch Kit.
• The ECdry oor heating system is to be
supplied through a residual current device
having a rated residual operating current
not exceeding 30 mA.
• Means for disconnection must be
incorporated in the xed wiring in
accordance with the wiring rules.
• All the used ECdry elements must have
the same area output.
• The ECdry elements are not to be installed
on irregular surfaces.
• Bending diameter of the oor heating
mats is 100 mm.
• ECdry heating element must be separated
from other heat sources.
• Be careful not to separate or move the
heating mats during installation.
• The ECdry heating element must not be
installed at ambient temperatures below 5 °C.
• The ECdry oor heating system is only for
indoor use.
• Do not install or use the oor heating
system after one or more components
have been damaged.
• Do not allow home repairs under any
circumstances. Repairs must be carried
out by qualied electricians. Faulty repairs
may cause personal injury or damage to
property.
• Do not use the oor heating in combination
with parts that are not recommended,
installed or supplied by Danfoss.
• Use original parts of the ECdry oor
heating system only. The warranty for the
entire system and for the separate parts
becomes null and void if parts from other
manufactures have been used.
• Make sure that no hot spots develop
when using the oor heating system.
Avoid hot spots by ensuring that the heat
from the oor heating is homogeneously
released to the area you wish to heat.
Do not install the oor heating element
under permanent or built-in cupboards
(min. 6 cm air).
• Do not use the ECdry oor heating system
if the system is wet.
• Warning label should be lled out
and placed next to the distribution
switchboard.
• When storing the ECdry oor heating
element keep it rolled as from factory or
laying at, never standing unrolled up
against a wall/ in vertical position
22 | Danfoss © | 2020.07 AN324050550815en-000201
• The ECdry oor heating system is only to be
used with the ECdry extension cords (The
ECdry X). Do never cut the extension cords.
• Do not buckle the supply cord and the
extension cords; do not have them run
across hot and/or sharp objects.

Installation Guide Danfoss ECdry Touch Kit
EM
A
K
• Unroll the extension cords entirely to
prevent the cords from overheating.
• Do not pull the cord or the oor heating
element to undo a plug-in connection.
Always use the connection tool.
• If the extension or supply cord is
damaged, it must be replaced by the
manufacturer, its service agent or similar
persons in order to avoid a hazard.
• Connect the oor heating to 230 Volt and
50 Hz only.
• Do not allow needles, sharp objects,
liquids and/or other electricity-conducting
objects/uids to make contact with the
oor heating system.
• The printed side of the heating element
must be visible when placing the element
showing the symbol:
THIS SIDE UP
• Save the manual together with the
warranty papers for further use.
AN324050550815en-000201 | 23Danfoss © | 2020.07

Installation Guide Danfoss ECdry Touch Kit
8 The 5 Year Danfoss Warranty:
You have purchased a Danfoss heating system
which we are sure will serve to improve the
comfort and economy of your application.
Danfoss provides superior electrical heating
solutions for total climate control in and around
homes and buildings. Danfoss oers a complete
product program with ECex heating cables
or ECmat heating mats, ECtemp thermostats,
ECdry and ECdry heating systems, ECfast xing
strips and Danfoss Self-limiting heating cables
combined with additional products completing
the product program.
This 5 year warranty applies to ECdry heating mats and Danfoss Self-limiting heating
cables, connection units and Danfoss crimp
set for self-limiting heating cables.
Should you, against all expectations, experience a problem with your Danfoss product,
you will nd that Danfoss oers a 5 year
warranty from the date of purchase on the
following conditions:
During the warranty period Danfoss shall
oer a new comparable product or repair
the product in case the product is found
to be faulty by reason of defective design,
materials or workmanship. Repair or replacement shall be carried out solely at Danfoss’s
discretion. Danfoss shall not be liable for any
consequential or incidental damages including, but not limited to, damages to property
or extra utility expenses.
note that the WARRANTY CERTIFICATE must
be completed in English or local language.
An extension of the warranty period following repairs undertaken under warranty
cannot be granted.
The Danfoss Warranty shall not cover any
damage caused by incorrect conditions of
use, incorrect installation or if installation
has been carried out by non-authorised
electricians. All work will be invoiced in full
if Danfoss is required to inspect or repair
faults that have arisen as a result of any of
the above.
The Danfoss Warranty shall not extend to
equipment which has not been paid in full.
Danfoss will, at all times, provide a rapid
and eective response to all complaints and
inquiries from our customers.
The warranty explicitly excludes all claims
exceeding the above conditions.
The warranty shall be valid only if the
WARRANTY CERTIFICATE is completed correctly and in accordance with the instructions, and provided the fault is submitted to
the installer or the seller without undue delay and proof of purchase is provided. Please
24 | Danfoss © | 2020.07 AN324050550815en-000201
Installation Guide Danfoss ECdry Touch Kit
5 YEAR WARRANTY
Warranty Certicate
The Danfoss Warranty certicate is granted to
Name:
Address:
City:
Country:
Telephone:
Attention:
The Warranty Certicate must be completed correctly for the Warranty to be valid.
Please read the Warranty conditions on the previous page.
Type product:
Material number:
Installed by:
Date:
Supplier Stamp
Date: / -
AN324050550815en-000201 | 25Danfoss © | 2020.07

Installation Guide Danfoss ECdry Touch Kit
26 | Danfoss © | 2020.07 AN324050550815en-000201

Installation Guide Danfoss ECdry Touch Kit
AN324050550815en-000201 | 27Danfoss © | 2020.07

Danfoss A/S
Nordborgvej 81
6430 Nordborg, Syddanmark
Denmark
Danfoss © | 2020.07 08091477 & AN324050550815en-000201
 Loading...