


MAKING MODERN LIVING POSSIBLE
Service Instructions
DHP-AQ
www.heating.danfoss.com

Danfoss A/S is not liable or bound by warranty if these
instructions are not adhered to during installation or service.
The English language is used for the original instructions.
Other languages are a translation of the original instructions.
(Directive 2006/42/EC)
© Copyright Danfoss A/S

Service Instructions DHP-AQ
Table of Contents
1 About documents and decals ........................................................ 4
1.1 Introduction ................................................................ 4
1.2 Symbols in documents .......................................................... 4
1.3 Symbols on decals ............................................................ 4
2 Important information/Safety regulation ................................................ 6
2.1 General safety precautions ....................................................... 6
2.2 Refrigerant ................................................................. 7
2.3 Electrical connection ........................................................... 8
2.4 Water quality ................................................................ 8
2.5 Commissioning .............................................................. 9
3 Troubleshooting ................................................................. 10
3.1 Alarm ..................................................................... 10
3.2 Components ................................................................ 11
3.3 Measurement points ........................................................... 12
3.4 Check points ................................................................ 14
3.5 Operational problems .......................................................... 15
Danfoss Heating Solutions VMGFJ202
3
N
Service Instructions
DHP-AQ
1 About documents and decals
1.1 Introduction
The following documents are available for this product:
Installation quick guide containing information to install a heat pump. Supplied with the heat pump on delivery.
▪
The Service instructions contain information about the heat pump’s function, accessories, fault tracing and technical data. The in-
▪
structions also contain tips and advice that should be followed before a heat pump installation. It is therefore recommended that
the instructions are read before installation. The Service instructions are available for download as below.
The Wiring diagrams that contain the wiring diagram for the heat pump intended for fault tracing and service. The Wiring diagrams
▪
are available for download as below.
The User manual must handed over and gone through with the end customer. Supplied with the heat pump on delivery.
▪
Country specific instructions and forms are available where relevant. Supplied with the heat pump on delivery.
▪
Self-adhesive decals with translation text. Must be placed on the manufacturing plate in conjunction with installation. Supplied
▪
with the heat pump on delivery.
The Service instructions and Wiring diagrams are available for download here:
www.documentation.heatpump.danfoss.com
1.2
The instructions contain different warning symbols, which, together with text, indicate to the user that there are risks involved with actions to be taken.
The symbols are displayed to the left of the text and three different symbols are used to indicate the degree of danger:
A fourth symbol is used to give practical information or tips on how to perform a procedure.
Symbols in documents
Danger Indicates an immediate danger that leads to fatal or serious injury if necessary measures are not taken.
Warning Risk of personal injury!
Indicates a possible danger that can lead to fatal or serious injury if necessary measures are not taken.
Caution Risk of installation damage.
Indicates a possible hazard that can lead to item damage if necessary measures are not taken.
Information regarding making the handling of the installation easier or a possible operational technical disadvantage.
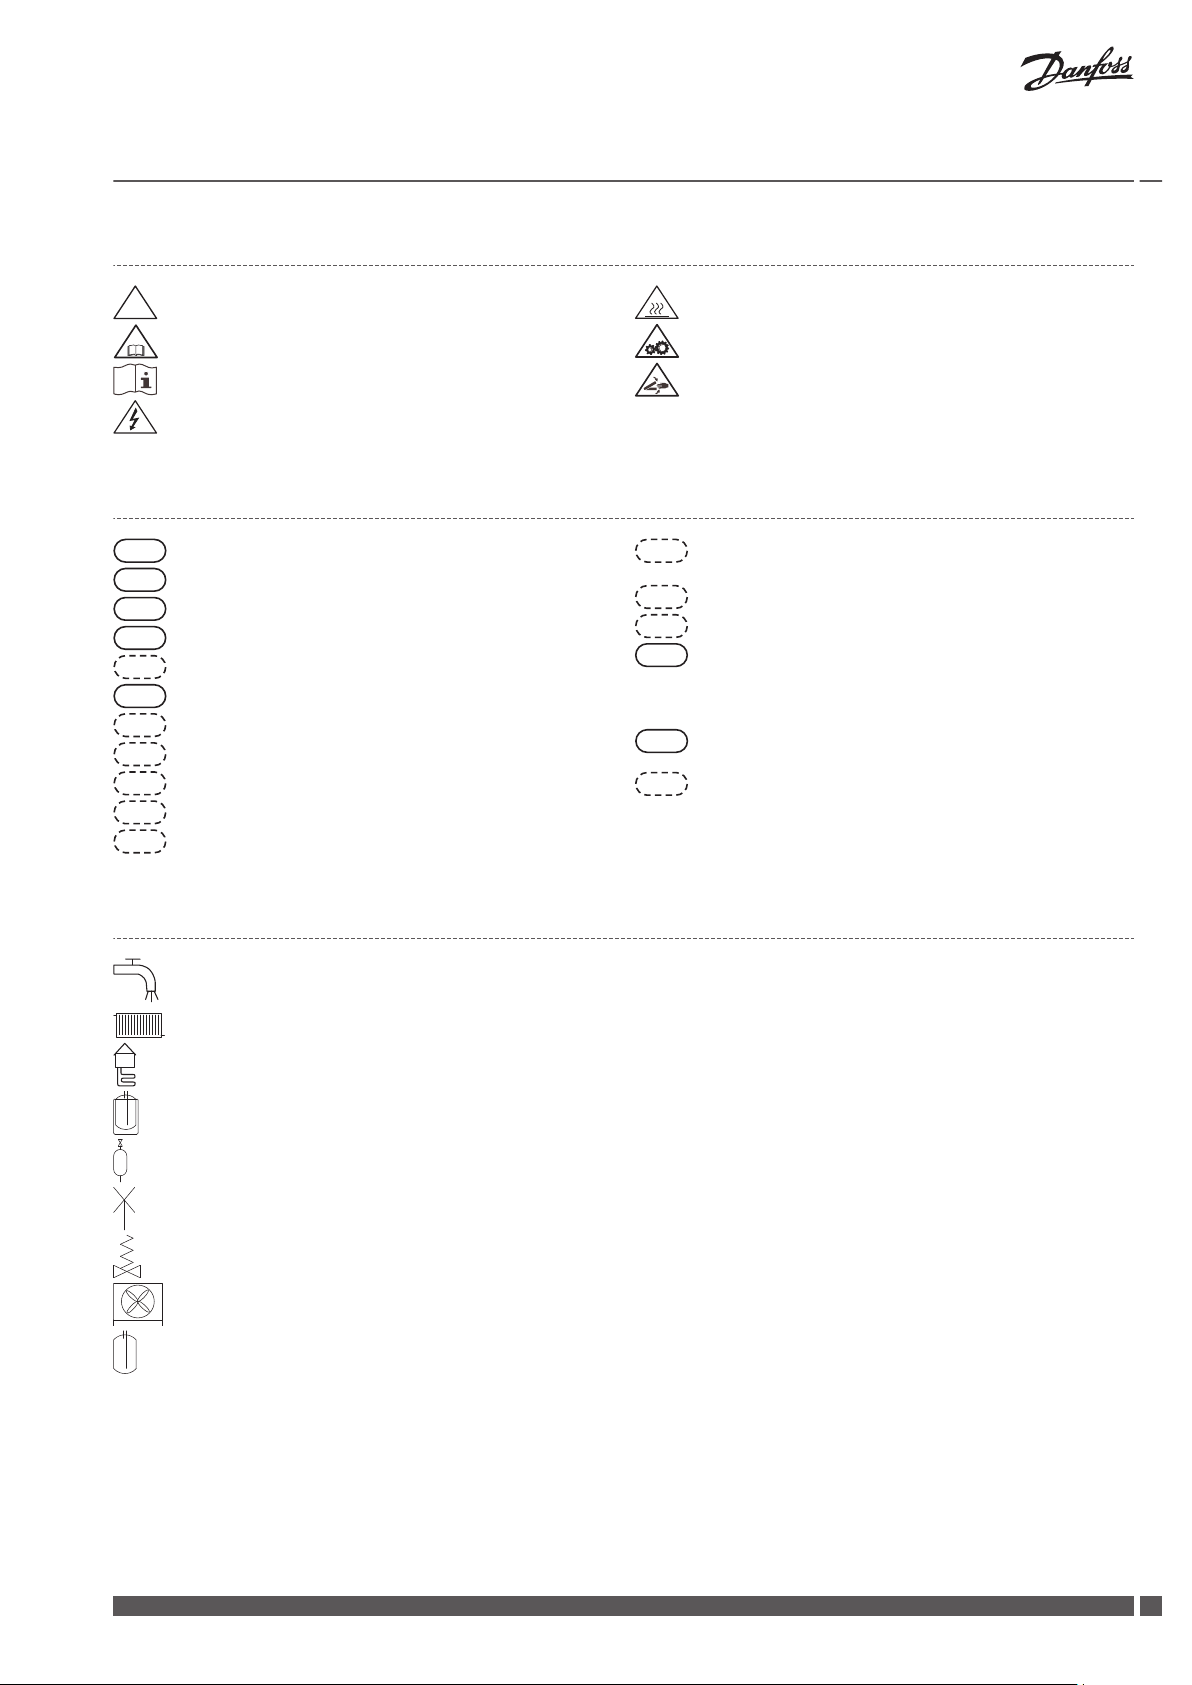
1.3 Symbols on decals
The following symbols can occur on decals on the different parts of the heat pump. Which symbols are used depends on the heat pump
model.
4
VMGFJ202 Danfoss Heating Solutions
!
!
3
50
54
55
71
353
362
304
363
365
366
406
62
408
417
Service Instructions
1.3.1 General
DHP-AQ
Warning, danger!
Read the documentation provided.
Read the documentation provided.
Warning, hazardous electrical voltage!
1.3.2 Electrical components
Outdoor unit
Outdoor sensor
Hot water sensor
Hot water top sensor
Flow guard
Drip tray
Shunt valve
Circulation pump
Exchange valve hot water
Supply line sensor
Return line sensor
Warning, hot surfaces!
Warning, moving parts!
Warning, risk of crushing injury!
Room sensor
or
EVU
Defrost sensor
Explanation
Component, ordinary delivery according to proposed system solutions
Component, accessorie according to proposed system solutions
1.3.3 Pipe connections
Tap water
Heating system
Brine system
Defrosting tank
Expansion tank with safety valve, brine
Air bleeding
Temperature and pressure relief valve
Outdoor unit
Water heater
Danfoss Heating Solutions VMGFJ202
5
Service Instructions DHP-AQ
2 Important information/Safety regulation
2.1 General safety precautions
Warning Risk of personal injury! Children are not permitted to play with the product.
Caution The heat pump must be installed by authorised installation engineers and the installation must follow the
applicable local rules and regulations as well as these installation instructions.
Caution This product is not intended for persons (including children) with reduced physical, sensory or psychological
capacity, or who do not have knowledge or experience, unless supervised or they have received instructions
on how the apparatus functions from a safety qualified person.
Caution The heat pump must be located in a frost-free environment!
Caution The heat pump must be placed in an area with a floor drain.
Caution The heat pump must be located on a stable base. The floor must be able to support the gross weight of the
heat pump with filled hot water tank (see Technical data).
Caution To prevent leaks, ensure that there are no stresses in the connecting pipes!
Caution It is important that the heating system is bled after installation.
Caution Bleed valves must be installed where necessary.
Caution The hot water tank must be equipped with an approved safety valve.
Caution Heating systems with closed expansion tanks must also be supplied with approved pressure gauges and safe-
ty valves.
6
VMGFJ202 Danfoss Heating Solutions
N
N
Service Instructions DHP-AQ
Caution Cold and hot water pipes and overflow pipes from safety valves must be made of heat resistant and corro-
sion-resistant material, for example copper. The safety valve overflow pipes must have an open connection to
the drain and visibly flow into this in a frost-free environment.
Caution The connecting pipe between the expansion tank and the safety valve must slope continuously upwards. A
continuous upwards slope means that the pipe must not slope downwards from the horizontal at any point.
Caution When cooling it is important to limit the lowest flow line temperature to prevent condensation.
If there is any risk of groundwater infiltration at wall lead-ins for brine pipes, watertight grommets must be
used.
In addition to applicable local rules and regulations the installation should be carried out in a manner that
prevents vibrations from the heat pump being transmitted into the house causing noise.
2.2 Refrigerant
2.2.1 Refrigerant
Caution Work on the refrigerant circuit must only be carried out by a certified engineer!
Although the heat pump cooling system (refrigerant circuit) is filled with a chlorine-free and environmentally-approved refrigerant that
will not affect the ozone layer, work on this system may only be carried out by authorized persons.
2.2.2
Fire risk
The refrigerant is not combustible or explosive in normal conditions.
2.2.3
Toxicity
In normal use and normal conditions the refrigerant has low toxicity. However, although the toxicity of the refrigerant is low, it can cause
injury (or be highly dangerous) in abnormal circumstances or where deliberately abused.
Warning Risk of personal injury! Spaces in which heavy vapour can collect below the level of the air must be well venti-
lated.
Refrigerant vapour is heavier than air and, in enclosed spaces below the level of a door for example, and in the event of leakage, concentrations can arise with a resultant risk of suffocation due to a lack of oxygen.
Warning Risk of personal injury! Refrigerant exposed to a naked flame creates a poisonous irritating gas. This gas can
be detected by its odour even at concentrations below its permitted levels. Evacuate the area until it has been
sufficiently ventilated.
Danfoss Heating Solutions VMGFJ202
7
Service Instructions DHP-AQ
2.2.4 Work on the refrigerant circuit
Caution When repairing the refrigerant circuit, the refrigerant must not be released from the heat pump, it must trea-
ted in the appropriate way.
Draining and refilling must only be carried out using new refrigerant (for the amount and type of refrigerant see manufacturer’s plate)
through the service valves.
Caution All warranties from Danfoss are void if, when filling with refrigerant other than Danfoss A/S specified refriger-
ant, if there has not been written notification that the new refrigerant is an approved replacement refrigerant
together with other remedies.
2.2.5 Scrapping
Caution When the heat pump is to be scrapped the refrigerant must be extracted for disposal. Local rules and regula-
tions related to the disposal of refrigerant must be followed.
2.3 Electrical connection
Warning Hazardous electrical voltage! The terminal blocks are live and can be highly dangerous due to the risk of elec-
tric shock. All power supplies must be isolated before electrical installation is started. The heat pump is connected internally at the factory, for this reason electrical installation consists mainly of the connection of the
power supply.
Caution Electrical installation may only be carried out by an authorized electrician and must follow applicable local
and national regulations.
Caution The electrical installation must be carried out using permanently routed cables. It must be possible to isolate
the power supply using an all-pole circuit breaker with a minimum contact gap of 3 mm. (The maximum load
for externally connected units is 2A).
2.4 Water quality
Caution A normal heating system always contains a certain amount of corrosion particulates (rust) and sludge prod-
ucts from calcium oxide. This comes from acid that is naturally occurring in the fresh water that the system is
filled with. It is not good practice to have to fill the heating system regularly which is why any leakage in the
heating system should be repaired immediately. Normal filling should occur only once or twice a year. The
water in the heating system should be as clean as possible, always position the dirt filter on the return line
from the heating system to the heat pump, as close to the heat pump as possible.
Caution Hard water; Normally it is not a problem installing a heat pump in areas with hard water because the normal
operating temperature for the hot water does not exceed 60°C. In areas where there are exceptional prevailing conditions with the water one can install a softening filter, which softens the water, cleans any impurities
and prevents the build up of calcification.
8
VMGFJ202 Danfoss Heating Solutions

Service Instructions DHP-AQ
2.5 Commissioning
Caution The installation may only be commissioned if the heating system and brine system have been filled and bled.
Otherwise the circulation pumps can be damaged.
Caution If the installation is only to be driven by the immersion heater during the installation, ensure that the heating
system is filled and the brine pump and compressor cannot be started. This is carried out by setting the operating mode to AUX. HEATER.
Danfoss Heating Solutions VMGFJ202
9

Service Instructions DHP-AQ
3 Troubleshooting
3.1 Alarm
In event of alarm this is indicated in the display with the text ALARM and an alarm message, see following table. For alarms that are not
reset automatically acknowledgement is required. Acknowledge the alarm by setting the heat pump to operating mode OFF and then
back to the desired operating mode.
Message Meaning
MOTOR P COMP.ERROR The compressor motor protection has deployed.
MOTOR P FAN ERROR The fan motor protection has deployed.
EL. HEATER ERROR The electrical heater overheating protection has deployed.
HEAT / PRESSURE ERROR The expected pressure and temperature change in the refrigerant circuit has not happened in the
correct way at compressor start.
LOW PRESSURE ERROR Evaporation pressure has fallen too low.
LOW PRESSURE TRANSDUCER Fault in low pressure transmitter alternatively cable fault.
HIGH PRESSURE ERROR High pressure switch has deployed.
LOW HEAT CIR. FLOW The flow sensor has registered too low a flow.
MAX TEMP ELEC. HW Too high temperature in heat pump junction box/electrical cabinet.
NO. OF TRIES X/5(where X=1…5) Circulation pump is jammed. Start attempt made.
HEATING CIRC. PUMP Circulation pump is jammed.
HEATING SYSTEM PUMP Circulation pump is jammed.
OUTDOOR SENSOR Sensor fault alternatively cable fault.
DEFROST SENSOR Sensor fault alternatively cable fault. Defrost sensor.
SUPPLY LINE SENSOR Sensor fault alternatively cable fault. Supply line sensor.
SYSTEM SUPPLY LINE SENSOR Sensor fault alternatively cable fault. System supply line sensor.
RETURN LINE SENSOR Sensor fault alternatively cable fault. Return line sensor.
HIGH RETURN LINE TEMP Return line temperature too high
BUFFER TANK SENSOR Sensor fault alternatively cable fault.
HGW SENSOR Sensor fault alternatively cable fault.
HOT WATER SENSOR Sensor fault alternatively cable fault (the lower sensor, Start sensor).
HOT WATER TOP Sensor fault alternatively cable fault.
FAILSAFE MODE Sensor fault alternatively cable fault on one of the refrigerant sensors. The heat pump goes to fail-
safe mode and defrosts on time.
REFR.1 SENSOR Sensor fault alternatively cable fault. Refrigerant sensor 1
REFR.2 SENSOR Sensor fault alternatively cable fault. Refrigerant sensor 2
LOW RETURN TEMP 1 The return line temperature is too low to start a defrosting.
LOW RETURN TEMP 2 The return line has fallen too low during defrosting.
LOW EVAP. TEMP 1 Evaporation temperature too low.
LOW EVAP. TEMP 2 Too great a deviation in evaporation temperature average value.
SUCTION TEMP SENSOR Sensor fault alternatively cable fault.
ROOM SENSOR Sensor fault alternatively cable fault.
DISCHARGE PIPE SENSOR Sensor fault alternatively cable fault.
DISTR. CIR. 1 SENSOR Sensor fault alternatively cable fault.
DISTR. CIR. 2 SENSOR Sensor fault alternatively cable fault.
POOL SENSOR Sensor fault alternatively cable fault.
COM. ERROR HP-CARD Communication broken between display card and heat pump card (outdoor).
COM. ERROR HUB-CARD Communication broken between display card and hub card (indoor).
10
VMGFJ202 Danfoss Heating Solutions
N
11
10
12
13
14
16
15
17
1
2
3
4
5
6
7
8
9
19
18
Service Instructions DHP-AQ
Message Meaning
COM. ERROR EXV-CARD Communication broken between display card and expansion valve control card (outdoor).
COM. ERROR EXPANSION CARD Communication broken between display card and expansion card (indoor).
In event of alarm the heat pump will if possible supply heating to the house, primarily with the compressor,
secondarily with the auxiliary heater. Hot water will stop to indicate that something noteworthy has occurred.
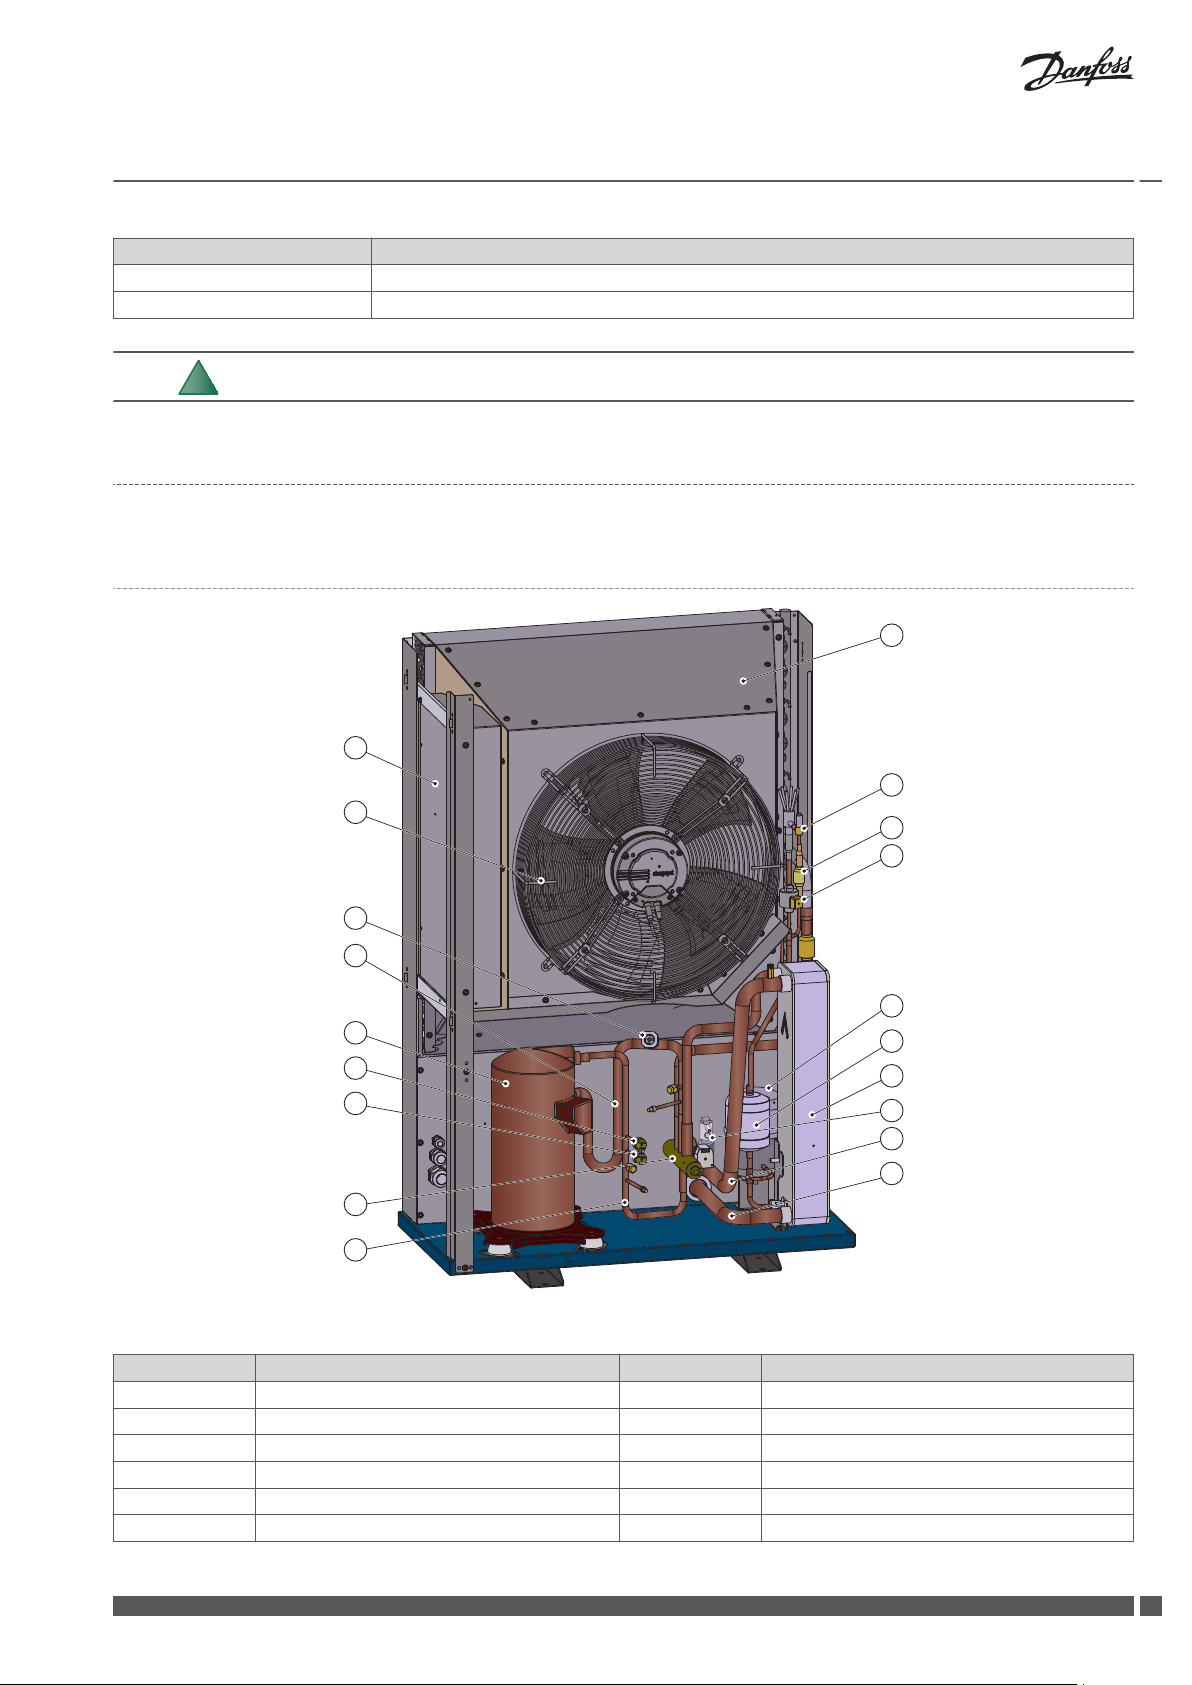
3.2 Components
3.2.1 Outdoor unit
Fig. 1: Components
Position
Name Position Name
1 Electrical cabinet 11 Electronic expansion valve
2 Fan 12 Receiver
3 Pressure transmitter 13 Drying filter
4 Suction line 14 Heat exchanger
5 Compressor 15 Flow sensor
6 High pressure switch 16 Heating system supply line
Danfoss Heating Solutions VMGFJ202
11

1
1
2
3
4
1
2
4
3
5
Service Instructions DHP-AQ
Position Name Position Name
7 Operating pressure switch 17 Return line heating system
8 Four-way valve 18 Solenoid
9 Discharge pipe 19 Non-return valve
10 Air heat exchanger
3.2.2 Indoor unit
DHP-AQ Mini
DHP-AQ Maxi
1. Control module (transparent in image)
2. Immersion heater
DHP-AQ Midi
3.3
Measurement points
Caution When reading the resistance of the sensors, the sensor leads must first be disconnected from the control
equipment.
3. Reversing valve
4. Circulation pump
5. Water heater
°C Outdoor / Defrost sensor
-30 1884 – –
-25 1443 – –
12
150 ohm, Ω
VMGFJ202 Danfoss Heating Solutions
PT1000 sensor
1000 ohm, Ω
Other sensors
22 kilo ohm, kΩ

N
Service Instructions DHP-AQ
°C Outdoor / Defrost sensor
150 ohm, Ω
PT1000 sensor
1000 ohm, Ω
Other sensors
22 kilo ohm, kΩ
-20 1115 – –
-15 868 – –
-10 681 – –
-5 538 – –
0 428 1000 66,3
5 343 – 52,4
10 276 1039 41,8
15 224 – 33,5
20 183 1078 27,1
25 150 – 22,0
30 124 1117 18,0
35 103 – 14,8
40 86 1155 12,2
45 – – 10,1
50 – 1194 8,5
55 – – 7,1
60 – 1232 6,0
65 – – 5,0
70 – 1271 4,2
75 – – 3,7
80 – – 3,1
85 – – 2,7
3.3.1 Measurement checking sensors during fault tracing
1. Disconnect the relevant sensor from I/O-card/terminal block.
2. Measure the resistance for the sensor and any extension cables.
3. Then measure the sensor only.
To ensure the sensor value the actual temperature must be checked against the measured resistance.
Danfoss Heating Solutions VMGFJ202
13

7
8
9
7
Service Instructions DHP-AQ
3.3.2 Positioning sensors
DHP-AQ Maxi
Heat pump
1. DISCHARGE PIPE SENSOR
2. SUCTION TEMP SENSOR
3. REFR.1 SENSOR
4. REFR.2 SENSOR
5. DEFROST SENSOR (located to rear beside air intake)
6. OUTDOOR SENSOR (positioned on wall to north)
7. SUPPLY LINE SENSOR
8. HOT WATER TOP
9. HOT WATER SENSOR
RETURN LINE SENSOR - Located on return pipe that runs to heat pump. See system solution in the Installation instructions.
DHP-AQ Midi
3.4 Check points
Temperatures
Condensing temperature: 0.5 – 1.5 °C above supply line temperature
Evaporation temperature: 7 - 8 °C
Radiator circuit: 8°K temperature difference
Overheating R407C: 4K ±1 K
14
VMGFJ202 Danfoss Heating Solutions

Service Instructions DHP-AQ
Pressure switch/pressure transmitter
Refrigerant R407C
OP (operating pressure switch) 2.85 MPa
High pressure switch 3,10 MPa
Pressure transmitter low pressure 0.04 MPa
Following parameters can be read off in the display:
Suction gas temperature
▪
Evaporation pressure
▪
Evaporation temperature (calculated from ”Dew point”)
▪
Opening percent EXV
▪
Superheating
▪
This means new opportunities to diagnose the heat pump, without having to remove the covers when working on the cooling circuit.
In normal operation the heat pump operates with superheating of 5.5°C – 7°C, the expansion valve's degree of opening will vary
▪
depending on operating situation.
At outdoor temperatures of -5°C or lower the opening degree is below 20%
▪
At outdoor temperatures of +5C to +13°C the opening degree is around 40-50%
▪
When cooling (A35W18) the degree of opening is 100%
▪
Caution If superheating is >9°C and the degree of opening of the expansion valve lies steady at 100% this can indicate
that a significant part of the refrigerant has leaked from the heat pump.
If this is the case, the heat pump must be checked by service technicians with personal refrigeration
certificates!
Break pressure
3.5 Operational problems
The tables list the most probable and common causes of the problem first. When troubleshooting the cause of a problem start with the
first cause and go down the list.
There may be more than one way of troubleshooting a cause where the most probable is given first.
3.5.1
Problem – Alarm LP (lower pressure transmitter)
Cause
1. Cable break or loose cable
to lower pressure transmitter.
2. The pressure transmitter
opens too soon.
3. Lack of refrigerant, not
enough refrigerant in the
system.
Alarm
Troubleshooting Remedy
Check that both cables are connected to the lower
▪
pressure transmitter.
Using the buzzer, check that there are no cable
▪
breaks. In order to do this, disconnect the cables from
the lower pressure transmitter and circuit board.
Pressure transmitter fault, opens at a higher pressure than
indicated. Check break pressure using the manometer apparatus.
Using manometer apparatus and thermometer, check that
the unit’s overheating is correct for the specific refrigerant.
If a cable has come loose, reconnect it.
If there is a cable break, replace the cable.
If the pressure transmitter breaks too early,
replace it.
Follow the correct procedure (depending
on type of refrigerant) to add the correct
amount of refrigerant.
If there appears to be a leak in the refrigerant circuit, carry out leak tracing and any
necessary corrective action.
Danfoss Heating Solutions VMGFJ202
15

Service Instructions DHP-AQ
Cause Troubleshooting Remedy
4. Drying filter blockage. Check the temperature difference above the drying filter.
A difference of max 1°C is permissible. If the difference is
greater, the filter is blocked. Take a reading during operation.
5. Blocked evaporator on
the refrigerant side.
Problem – Alarm HP (high pressure switch)
Cause Troubleshooting Remedy
1. Air in the heating system. Listen for air in the heat pump and heating system. Bleed the heating system according to the
2. Blocked strainer in the
heating system.
3. Closed or partially closed
thermostats/valves in the
heating system.
4. The circulation pump that
is defective or has jammed.
Using manometer apparatus and thermometer, check that
the unit’s overheating is correct for the specific refrigerant.
Check that the strainer is not blocked. Clean the strainer if necessary.
Check that the thermostats/valves in the heating system
are open.
Is there voltage and 0 – 10V signal (applies to A classed circulation pumps) up to the circulation pump?
If the drying filter is sealed, replace it.
If the evaporator is thought to be blocked
by oil for example, try blowing nitrogen
through it to release the oil. If this does not
work, it must be replaced
installation instructions.
Open closed thermostats/valves.
Check that the circulation pump is active in
the control system’s manual test menu.
Check if there is voltage to the circulation
pump, if there is, and it does not run, the
circulation pump is jammed. If this is the
case, open the bleed screw and try to release the paddle wheel using a screwdriver
for example (Does not apply to heat pumps
in not valid ).
5. Shut-off main tap in heat-
ing system.
6. Cable break or loose cable
to high pressure switch.
7. The high pressure switch
does not open.
If there is no voltage to the circulation
pump, check if there is voltage from the I/O
card, see wiring diagram. If there is voltage
from the I/O card, check the components
between the I/O card and the circulation
pump.
If a component is defective, replace it.
Check that the main tap is open. Open closed main tap.
Check that both cables are connected to the pressure
▪
switch.
Using the buzzer, check that there are no cable
▪
breaks. In order to do this, disconnect the cables from
the pressure switch and circuit board.
Incorrect pressure switch installed. Same or higher
▪
break pressure than the high pressure switch. See
marking.
Pressure switch fault, opens at a higher pressure than
▪
indicated (mark pressure). Check using the manometer apparatus.
Defective pressure switch, never opens.
▪
If a cable has come loose, reconnect it.
If there is a cable break, replace the cable.
If the high pressure switch does not open,
replace it.
16
VMGFJ202 Danfoss Heating Solutions

Service Instructions DHP-AQ
Cause Troubleshooting Remedy
8. The high pressure switch
opens too soon.
Incorrect pressure switch installed. As low or lower
▪
break pressure than operating pressure switch. See
marking.
Pressure switch fault, opens at a lower pressure than
▪
indicated (mark pressure). Check using the manometer apparatus.
Defective pressure switch, always open.
▪
If the high pressure switch opens too soon
or is always open, replace it.
9. External system shunt
that closes on time setting.
10. Incorrectly facing nonreturn valve with too high
opening pressure.
11. Large pressure drop in
the heating system.
12. Blocked condenser on
the water side.
Check for shunts or valves in the system, which are timercontrolled, that close down the entire or too large a part of
the heating system.
Check the system’s direction of flow and that the non-
▪
return valve is turned the correct way.
Check that the heat pump’s external available pres-
▪
sure exceeds the non-return valve’s opening pressure.
Dirt in the heating system.
▪
Closed or partially closed thermostats/valves in the
▪
heating system.
Under dimensioned pipe system. Check that the HP’s
▪
external available pressure exceeds the system pressure drop.
If there is no strainer in the heating system, there is a risk
of dirt sticking in the condenser and blocking it. Unfortunately there is no easy way of checking if the condenser is
blocked.
You can carry out a test by allowing the compressor and
circulation pumps to remain in operation and after a while,
check that the pressure pipe becomes hot and that the circulation pumps work (for circ.pumps with a bleed screw,
unscrew it and feel if the pump rotor rotates using a screwdriver).
Always ensure that there is a sufficiently
large water volume for the heat pump to
work against, i.e. for the heat to give off its
heat to.
If the non-return valve is facing the wrong
way, turn it.
If the non-return valve has too great an
opening pressure, replace it.
If necessary, clean/flush the heating system.
Open closed thermostats/valves.
If there is not sufficient pressure equipment, the heating system can be adjusted
according to the system solution for large
pressure drop.
If the condenser is thought to be blocked,
try flushing it. If this does not work, it must
be replaced
Then read the temperature on both connection pipes to
the condenser:
If the temperature difference is <3°C, the condenser is
probably blocked.
If the temperature difference is 3-13°C, it is probably not
blocked.
If the temperature difference is >13°C, the condenser is
probably blocked.
13. Blocked condenser on
the refrigerant side.
14. Overfilled refrigerant circuit.
Danfoss Heating Solutions VMGFJ202
Using manometer apparatus and thermometer, check that
the unit’s overheating is correct for the specific refrigerant.
Using manometer apparatus and thermometer, check that
the unit’s overheating is correct for the specific refrigerant.
If the condenser is thought to be blocked
by oil for example, try blowing nitrogen
through it to release the oil. If this does not
work, it must be replaced
Follow the correct procedure (depending
on type of refrigerant) to add the correct
amount of refrigerant.
If there appears to be a leak in the refrigerant circuit, carry out leak tracing and any
necessary corrective action.
17

Service Instructions DHP-AQ
Problem – Alarm (motor protection)
Cause Troubleshooting Remedy
1. Phase drop or blown fuse. Check the fuses in the fuse box. Check that all phases are
present on the terminal block for incoming supply. Also
check that all wiring is secure, if screw terminals are used
they must be properly tightened, if phoenix flat spring terminals are used, the cables must be secure in the correct
hole with load on the cable.
2. Cable break. Check the supply to the motor protection, soft-starter or
compressor.
3. Defective soft-starter
(three-phase heat pump).
4. Defective soft-starter (sin-
gle phase heat pump).
5. Defective or incorrectly
set motor protection.
6. Defective compressor. Measurement check the voltage on the phase(s) (each to
7. Alarm from single phase
soft starter.
Measurement check and establish that when the Heat
pump card gives a signal (there must be voltage between
A1 & A2 on the soft-starter), the soft-starter releases all
three phases down to the compressor.
Check measure and establish that when the Heat pump
card gives a signal (there must be voltage between ON
and N on the soft-starter), the soft-starter releases the phases to the compressor.
Use a hook-on meter to establish when the motor protection deploys, check what the motor protection is set
to.Compare with the table. For three phase heat pumps all
three phases must be supplied.
zero) at the compressor. There must not be any large deviation between the phases. If measurement checking the
winding’s resistance the same value must be on one to
three windings.
Check the fault cause using the soft start LEDs.
If any of the phases are missing, check
backwards towards the building’s main
electrical cabinet. If there are no phases
there, contact the network supplier.
If a cable is damaged, replace it.
If the soft-starter does not release the phases when it receives signals from the heat
pump card, replace it.
If the soft-starter does not release the phases when it receives signals from the heat
pump card and does not alarm as below,
replace it.
If the motor protection is defective, replace
it.
If incorrectly set, adjust to the correct value.
If the compressor is defective, replace it.
Problem – Alarm sensor (all)
Cause
Sensor fault alternatively ca-
ble fault.
Problem – Error phase sequence
Cause
The incoming phases have
the incorrect sequence (only
applies to 3-phase heat
pumps), appears after a minute when the compressor
is started.
Troubleshooting Remedy
Troubleshooting Remedy
When reading the resistance of the sensors, the sen-
▪
sor leads must first be disconnected from the control
equipment or terminal block.
First take a reading from the sensor including cable
▪
and check against the ohm table in Measurement
points .
If the read off value does not correspond with the ta-
▪
ble, only measure the sensor and check the ohm table
in Measurement points .
If the text HEAT / PRESSURE ERROR is displayed it can
▪
mean that the phases are in the incorrect order.
When the compressor is running, check the pressure
▪
pipe temperature by feeling the pressure pipe. If the
phases are correctly sequenced it should be hot (not
just warm) even a distance from the compressor.
When the compressor runs with the phases incorrect-
▪
ly sequenced a strange noise may be heard (loud, rattling) when the compressor runs backwards.
If the sensor gives a correct value, the cable
is defective.
If the sensor does not give a correct value,
the sensor is defective.
If the phases are in the incorrect order,
switch two incoming phases at the main
terminal block and recheck according to
the troubleshooting window.
18
VMGFJ202 Danfoss Heating Solutions

Service Instructions
Problem – Alarm electric heater error
Cause Troubleshooting Remedy
1. The overheating protection has tripped.
2. Phase drop.
The alarm occurs when 230
V is not registered between
L2 on the circuit board and
N. Does not apply if MAX
STEP = P.
3. Overheating protection
fault, cannot be reset.
4. Flow sensor fault. Check what the flow sensor shows. Is it a plausible/actual
5. No or insufficient circulation in the heating system.
Check if the overheating protection has tripped. If the overheating protection has tripped,
Check if the overheating protection has tripped.
▪
Check if any cables at the circuit board or overheating
▪
protection are loose or damaged.
Press the reset button, measurement check for 230 V on
the incoming and outgoing connections.
value?
Measure the resistance of the sensor, check against the
ohm table in Measurement points .
Check:
That the circulation pump spins
▪
That the shut-off valves are open.
▪
That the strainer is not blocked.
▪
That there is no air in the heating system.
▪
DHP-AQ
reset it.
If the overheating protection has tripped,
reset it.
If the cables are loose or damaged, secure
or replace them.
If the overheating protection is defective,
replace it.
If the sensor is defective, replace it.
The circulation pump may have jammed. If
so, open the bleed screw and try to release
the paddle wheel using a screwdriver for
example.
Open closed valves or taps.
Check, and, if necessary, clean the strainer.
Problem – Alarm circulation pump
Cause
The circulation pump’s inte-
grated alarm has deployed.
(Only applies to not valid )
Troubleshooting Remedy
▪
▪
Air in the heating system.
Has the circulation pump jammed?
If necessary, bleed the heating system according to the installation instructions
Vent the heating system and TWS coil.
If the circulation pump has jammed, there
is an integrated shake function that attempts to shake itself loose up to a maximum of 5 times, if it does not succeed, an
alarm will occur.
Try cutting the voltage to the heat pump to
stop the alarm and then manually run the
circulation pump.If the alarm recurs, repeat
the procedure several times. If this does not
help, replace the circulation pump.
Danfoss Heating Solutions VMGFJ202
19

Service Instructions DHP-AQ
Problem – Operating pressure switch open alternatively high hot gas temperature
Cause Troubleshooting Remedy
1. Operating pressure
switch, function.
2. Fault in the discharge
pipe sensor.
3. Hot gas temperature too
high.
4. Lack of refrigerant, not
enough refrigerant in the
system.
1. Switch off the main switch for the heat pump, wait
until the compressor has been stationary for at least
15 minutes.
2. Disconnect the two cables on the pressure switch, using a buzzer check if the pressure switch is closed.
Check what the discharge pipe sensor shows. Is it a plausible/actual value?
Measure the resistance of the discharge pipe sensor, check
against the ohm table in Measurement points .
The discharge pipe sensor displays more than 140°C. See
operating data.
Using manometer apparatus and thermometer, check that
the unit’s overheating is correct for the specific refrigerant.
If the pressure switch is closed, bridge the
pressure switch cables temporarily and
switch on the voltage to the heat pump
again. If there is an indication 0 (zero) in the
display this means that the pressure switch
is fault-free and the problem is in the wiring
or in the circuit board.
If the pressure switch is open, try carefully
tapping the head of the pressure switch
with a screwdriver and use a buzzer test to
see if it has closed again.
Replace the pressure switch if it appears to
jam repeatedly.
If the discharge pipe sensor is defective, replace it.
The square symbol appears when the delivery pipe temperature is as high or greater
than the maximum temperature of the discharge pipe 140°C.
Follow the correct procedure (depending
on type of refrigerant) to add the correct
amount of refrigerant.
If there appears to be a leak in the refrigerant circuit, carry out leak tracing and any
necessary corrective action. If leak tracer is
not available, brush soap water on the suspected leak and look for bubbles. Also
check for oil as this can come out from the
refrigerant circuit.
3.5.2 Leakage
Problem – Leak fluid side
Cause
1. Insufficiently tightened
connections.
2. Defective gasket or Oring.
3. Cracked nut or connection.
4. There is no overflow pipe
connected to the safety
valve(s).
5. Filler valve between incoming cold water and
heating system not closed
or leaking.
20
Troubleshooting Remedy
Locate the leak.
Locate the leak. Replace the gasket or O-ring.
Locate the leak. Replace nut or connection.
Establish which safety valve does not have an overflow
pipe.
Check whether water continuously leaks from the safety
valve on the expansion vessel on the hot side.
VMGFJ202 Danfoss Heating Solutions
Tighten the connection and check that
▪
it is sealed.
If it is still not sealed, replace the entire
▪
connection and support sleeve (only
at soft pipes).
Install an overflow pipe according to the
applicable norms.
Try closing the filler valve and see if water
stops dripping from the safety valve. If not,
replace the filler valve.

Service Instructions DHP-AQ
Cause Troubleshooting Remedy
6. Leak at soldered joints. Locate the leak. Drain the system of fluid, repair the leak.If
the leak is on the connection pipe to the
heat exchanger, also drain the refrigerant
side.
7. Associated leakage in the
condenser.
Check for lack of refrigerant in the unit.
▪
Check by smelling at the safety valve on the hot side,
▪
open the valve and check.
If the condenser has a leak, replace it.
8. Leak at soldered joint on
water heater (only applies to
DHP-AQ Maxi DHP-AQ Maxi)
9. Associated leakage on
plate heat exchanger (only
applies to DHP-AQ Maxi
DHP-AQ Maxi)
3.5.3 Noise
Problem – Noise problem in the radiator system
Cause
1. Flexible hoses missing. Flexible hoses must be installed according to the instruc-
2. Incorrectly installed flexi-
ble hoses.
3. Installing/suspending
pipes.
4. Circulation noise (whis-
tling noise in the heating
system).
5. Clicking.
Locate the leak. If there is a leak at the soldered joint, re-
Check for lack of refrigerant in the unit
▪
Check by smelling at the safety valve on the hot side,
▪
open the valve and check.
Troubleshooting Remedy
tions.
Flexible hoses must be installed according to the instruc-
tions.
Check if vibrations are transmitted via one of the pipe
mountings in the installation.
Check the heating system.
Closed valves, choke valves, adjuster valves or other
▪
restrictions in the radiator system can cause circulation noise.
Is the heating system correctly adjusted for flow?
▪
Too great a flow in the heating system can cause cir-
▪
culation noise.
Check that the volume tank is installed and has the
▪
correct dimensions for the relevant system. See the
installation instructions.
Establish when clicking occurs, during heating and/or
▪
in connection with completed hot water production?
Locate the clicking noises.
▪
place the water heater.
If there is leakage, replace plate heat exchanger.
Install flexible hoses according to the instructions.
Install flexible hoses according to the instructions.
Remove or move the mounting point or install vibration isolating mounting parts.
If the incorrect type of valve is used to
choke the flow, replace with the correct
type.
If the heating system is not correctly adjusted, make adjustments.
Can the heating system be run at a lower
flow?
A surge tank can be installed on the supply
line to mix the hot water with the existing,
slightly cooler, water, before it goes out to
the radiators.
Try lubricating lead-ins in walls, ceilings
and floors with silicone spray.
Danfoss Heating Solutions VMGFJ202
21

Service Instructions DHP-AQ
Problem – Loud compressor noise
Cause Troubleshooting Remedy
1. Phase drop.
The compressor attempts to
start or operates on two
phases (only applies to 3
phase heat pumps) .
1. Check that there is 400 V between incoming phases
on the heat pump.
2. If there is supply to the heat pump, measure the voltage for all electrical components all the way to the
compressor, see wiring diagram.
Check where the phase drop is and rectify.
2. Touching pipes – vibrations.
3. Compressor fault Determine whether the compressor is unusually loud.
Problem – Shrieking, whistling noise
Cause
1. Noise from the soft-starter.
2. The compressor’s safety
valve opens.
Problem – Noise – miscellaneous
Cause
1. Vibrating protective
sleeves on the pressure
switches.
2. Vibration noise from the
electrical installation.
Establish which pipe(s) is/are causing the problem. Try to remove the contact:
Check with a voltmeter at a point before and after the
▪
soft starter. The measurement values should not differ.
Troubleshooting Remedy
Measurement check the input and output phases for the
soft-starter as well as the control signals from the heat
pump card, see wiring diagram.
The compressor has an integrated safety valve that opens
when the pressure difference between high and low pressure sides is too large. A whistling sound can be heard during pressure equalisation. Use a manometer to check at
which pressure differential pressure equalisation occurs.
Troubleshooting Remedy
Establish where the vibration noise is coming from. Prevent the protection sleeve vibrating by
Check for electrical steps or similar devices screwed to the
heat pump and wall. These can cause vibrations and noise.
If the compressor is defective, replace it.
If the soft-starter is defective, replace it.
Replace the compressor if the valve opens
at too low pressure or when the compressor is stationary.
using insulation tape for example.
Carry out according to the installation instructions.
3.5.4 Hot-water
Problem – Temperature and/or quantity
Cause
1. Defective 3-way valve motor.
2. Jammed reversing valve.
The valve is not secure and
releases hot water to the radiators during hot water
production.
3. Air in TWS coil or water
outer jacket.
4. Start temperature set too
high for hot water production.
22
Troubleshooting Remedy
Check the function of the reversing valve by test running it
manually.
Detach the motor and test closing and opening the valve
by turning the shaft by hand.
During hot water production:
▪
▪
Check that the start temperature is correctly set. Should
not be set above the factory set value.
Listen for air.
Check the temperature difference between supply
and return line.
VMGFJ202 Danfoss Heating Solutions
If the motor is defective, replace it.
If it jams, replace with a new one.
Bleed the system.
A Large temperature difference can indicate air in the system.
If the start value is set too high, reduce
▪
it to the factory set value.

Service Instructions
Cause Troubleshooting Remedy
5. Sensor fault, hot water
sensor.
Hot water production is started by the hot water sensor.
6. Large drain flow (>12 l/
min).
Check what the hot water sensor (the start sensor) shows.
Is it a plausible/actual value?
Measure the resistance of the sensor, check against the
ohm table in Measurement points .
Check how many litres of hot water (approx. 40°C) per minute drains from the tap.Use a clock and bucket to measure the drain flow.
DHP-AQ
If the sensor is defective, replace it.
If the drain water flow is greater than 12 l/
min, stratification in the water heater is affected, which reduces the hot water capacity.
Suggested corrective actions:
▪
▪
▪
Install a pressure reduction valve on
the incoming cold water pipe.
Change to a mixer with lower flow.
Adjust the drain flow on the existing
mixer, do not open the tap fully.
7. Water heater too small in
relation to requirement.
8. The operating pressure
switch opens too soon (at
too low a pressure).
Hot water production ends
when the operating pressure switch opens.
9. Insufficient exchange surface to transfer the heat
pump’s output to the heater.(Only applies to heat
pumps with a separate heater.)
10. Heat loss in the hot water pipe.
How large is the requirement and what is the capacity of
the heater?
Check the break pressure using manometer apparatus. If the pressure switch opens at the incorrect
Is the exchange surface too small?
Can the heater cope with the heat pump’s output?
Open the hot water tap, read off the temperature on the
outgoing hot water pipe from the heat pump and the temperature of the hot water. The temperature difference
measured between the heat pump and hot water indicates
the temperature loss.
Examples of temperature loss causes:
Long water pipes.
▪
Uninsulated hot water pipes.
▪
Hot water pipes routed through cold areas.
▪
Other causes that can affect the hot water temperature:
Is a mixer valve installed in the system? Temperature
▪
set too low on the mixer valve? Leaking mixer valve?
Water tap fault? Leaking thermostat mixer?
▪
VVC loss.
▪
Replace with a larger heater or supplement
with an extra heater.
E.g. supplement with an DWH DWH or an
electric heater.
pressure, replace it.
The replacement pressure switch can be installed on the service output (Schrader
valve).
Replace with a heater with a larger exchange surface.
If any problems occur during troubleshooting as per the points, carry out corrective
actions.
To quickly check that the heat pump’s hot
water production works as it should, drain
the hot water so that the heat pump starts
to produce the hot water. When done, read
off the temperature on the top sensor and
on the start sensor. The top sensor should
show a temperature of around 50 - 55°C
and the start sensor around 45 - 48°C. If, after completed hot water production, these
temperatures are obtained, this means that
you have the correct temperature and volume of hot water in the water heater.
Danfoss Heating Solutions VMGFJ202
23

Service Instructions DHP-AQ
3.5.5 Heating comfort
Problem – Too cold
Cause Troubleshooting Remedy
1. The heat pump’s control
computer is not set/adjusted to the customer’s requirements/wishes.
2. Incorrect operating mode
set in the heat pump’s control computer.
3. Sensor fault, OUTDOOR/
ROOM/SUPPLY LINE/
RETURN LINE.
4. The 3-way valve has jammed in hot water mode.
Check the ROOM and CURVE and MAX settings. Adjust incorrect values in the heat pump’s
control computer.
ROOM = Desired indoor temperature
CURVE = Should be set so that the desired
indoor temperature (ROOM) is maintained
regardless of the outdoor temperature.
MAX = Highest set-point value on the supply line regardless of the outdoor temperature.
Check which operating mode is set. If the incorrect operating mode is set,
change to the desired operating mode.
Check what the relevant sensor shows. Is it a plausible/
actual value?
Measure the resistance of the sensor, check against the
ohm table in Measurement points .
1. Check the function of the 3-way valve motor by test
running it manually. If the motor does not shift mode
during manual test operation, check that there is voltage to the motor, see wiring diagram.
2. Detach the motor and test closing and opening the
valve by turning the shaft by hand.
If the sensor is defective, replace it.
Is the motor being supplied with voltage
according to the wiring diagram in both
operating instances?MANUAL TEST – REV.V.
HOT WATER 0=Radiator mode1=Hot water
modeIf there is voltage to the motor but it
does not shift mode, replace it.
5. Defective electric heating
element.
6. The heat pump has stopped on HIGH RETURN.
7. Heat production is stopped by the HYSTERESIS
function.
Use a buzzer and check if all coils in the electric heating element are intact.
Check what the MAX RETURN value is set at in the
▪
heat pump’s control computer. It must be adjusted to
the unit’s maximum supply temperature and the system’s delta temperature so that it does not cut at too
high a return temperature when the highest supply
temperature is transmitted.
Check what the return line sensor shows. Is it a plausi-
▪
ble/actual value? If not, take a resistance reading from
the sensors and check against the ohm table in Measurement points .
If the flow temperature rises as soon as heat production is
stopped by HYSTERESIS before INTEGRAL reaches 0, there
may be heating deficit in the house.
Check if heat production stops because the hysteresis
▪
value is set too low? (See the installation instructions
for factory setting.)
Check if heat production stops because thermostats/
▪
valves in the heating system are closed or partially
closed?
Check if heat production stops because the heating
▪
system is under dimensioned?
If the electric heating element is defective,
replace it.
If the MAX RETURN value is not adjusted for
the system according to the troubleshooting window, adjust it.
If the sensor is defective, replace it.
Try increasing the hysteresis value un-
▪
til the heat pump stops on INTEGRAL
instead.
Open thermostats/valves in the heat-
▪
ing system and check that the heat
pump stops on INTEGRAL.
If the heating system is deemed to be
▪
under dimensioned, the system must
be extended (the heat emitting surface increased).
24
VMGFJ202 Danfoss Heating Solutions

Service Instructions DHP-AQ
Cause Troubleshooting Remedy
8. The auxiliary heater is not
permitted to cut in with sufficient output.
Value set too low on MAXSTEP.
MAXSTEP 1 = 3 kW
MAXSTEP 2 = 6 kW
MAXSTEP 3 = 9 kW
Check the set value on MAXSTEP in the heat pump’s control computer.
If necessary, adjust the MAXSTEP value in
the heat pump’s control computer.230V 1N MAXSTEP 1 – 3400 V 3-N: MAXSTEP 1 – 5
MAXSTEP 1 = 3 kW
MAXSTEP 2 = 6 kW
MAXSTEP 3 = 9 kW
MAX STEP 4 = 12 kW (cannot cut in when
the compressor is running.)
MAXSTEP 4 = 12 kW
MAXSTEP 5 = 15 kW
9. The external auxiliary
heater does not start when
the heat pump’s control
computer requests it.
10. Closed or partially closed
thermostats/valves in the
heating system.
11. The total output of the
heat pump and auxiliary
heater is too low in relation
to the building’s power demand.
12. Under dimensioned
heating system.
13. Changed conditions
Have you increased your
heating and/or hot water
demand?
If an external auxiliary heater is used, check that it is correctly installed by test running it in MANUAL TEST –
EXT.AUX.HEATER - 1.
If it does not start at manual test operation, check that the
start signal/voltage comes from the heat pump. See wiring
diagram.
Check that the thermostats/valves in the heating system
are open.
What is the building’s power demand?
What is the output of the heat pump?
What is the output of the auxiliary heater, what is it set to?
Check existing heating system.
What output is it dimensioned for to produce at what supply temperature?
What output is required to keep the room warm?
If the heat pump has been dimensioned for a certain
▪
demand and this demand is increased, the heat pump
might not be able to maintain the desired room temperature.
If hot water consumption increases, a larger propor-
▪
tion of time is used to produce hot water, which
means less time for heat production (only applies to
system solution 1).
MAX STEP 5 = 15 kW (cannot cut in when
the compressor is running.)
Connect the external auxiliary heater according to the instructions.
Measure the voltage on the I/O card’s
probe L2 Oil/Electricity.
Open closed thermostats/valves.
Ensure that available power is at least as
great as the building’s power demand.
If the heating system is dimensioned for
greater supply temperatures than the heat
pump can provide, it must be adjusted by
increasing the heat emitting surface for example.
If the room requires a higher output than
the heating system can provide, extend the
heating system.
If the heat pump cannot cope with the demand, replace it with one with a higher
output or supplement it with a higher output auxiliary heater.
Danfoss Heating Solutions VMGFJ202
25

Service Instructions DHP-AQ
Problem – Too hot
Cause Troubleshooting Remedy
1. The heat pump’s control
computer is not set/adjusted to the customer’s requirements/wishes.
2. Sensor fault, OUTDOOR/
ROOM/SUPPLY LINE.
3. Defective 3-way valve motor.
The motor should set the
valve to the relevant position depending on operating conditions. If it does not,
hot water from the water
heater will mix with the radiator water.
Check the ROOM and CURVE and MIN settings. Adjust incorrect values in the heat pump’s
control computer.
ROOM = Desired indoor temperature.
CURVE = Should be set so that the desired
indoor temperature (ROOM) is maintained
regardless of the outdoor temperature.
MIN = Lowest set-point value on the supply
line regardless of the outdoor temperature.
Check what the relevant sensor shows. Is it a plausible/
actual value?
Measure the resistance of the sensor, check against the
ohm table in Measurement points .
Check the function of the 3-way valve motor by test running it manually. If the motor does not shift mode during
manual test operation, check that there is voltage to the
motor, see wiring diagram.
If the sensor is defective, replace it.
Is the motor being supplied with voltage
according to the wiring diagram in both
operating instances?
MANUAL TEST – REV.V. HOT WATER
0=Radiator mode
1=Hot water mode
4. Jammed reversing valve.
If the valve is not sealed, hot
water from the water heater
will mix with the radiator
water.
Detach the motor and test closing and opening the valve
by turning the shaft by hand.
If there is voltage to the motor but it does
not shift mode, replace it.
If it is sluggish or jams, replace with a new
one.
26
VMGFJ202 Danfoss Heating Solutions

Service Instructions DHP-AQ
Problem – Irregular indoor temperature
Cause Troubleshooting Remedy
1. The heat pump’s control
computer is not set/adjusted to the customer’s requirements/wishes.
Check the ROOM and CURVE, MIN, MAX CURVE5, CURVE0,
CURVE-5 and HEAT STOP settings.
Adjust incorrect values in the heat pump’s
control computer.
ROOM = Desired indoor temperature
CURVE = Should be set so that the desired
indoor temperature (ROOM) is maintained
regardless of the outdoor temperature.
MIN = Lowest set-point value on the supply
line regardless of the outdoor temperature
(on the condition that heat stop does not
apply).
MAX = Highest set-point value on the supply line regardless of the outdoor temperature.
CURVE5,0,-5 =The supply temperature can
be adjusted up or down 5°C at these outdoor temperatures.
2. Incorrectly positioned/
installed sensors.
Check that outdoor sensors and any room sensors are installed according to the instructions and that they are calibrated.
HEAT STOP = Stops all production of heat
when the outdoor temperature is the same
as or greater than the set value. To exit heat
stop the outdoor temperature must drop to
3°C below the set value.
Check that the room sensor is posi-
▪
tioned in a suitable place that is representative of the building and calibrate
it if necessary. Avoid placing near external doors, windows and heat sources.
Install the outdoor sensor according to
▪
the instructions and calibrate it, if necessary.
Danfoss Heating Solutions VMGFJ202
27

Service Instructions DHP-AQ
3.5.6 Other
Problem – The heat pump runs and runs but never stops
Cause Troubleshooting Remedy
1. Air in the heating system. Listen for air in the heat pump and heating system. Bleed the heating system according to the
installation instructions.
2. Changed conditions Have
you increased your heating
and/or hot water demand?
If the heat pump has been dimensioned for a certain
▪
demand and this demand is increased, the heat pump
might not be able to maintain the desired room temperature.
If hot water consumption increases, a larger propor-
▪
tion of time is used to produce hot water, which
means less time for heat production.
If the heat pump cannot cope with the demand, replace it with one with a higher
output or supplement it with a higher output auxiliary heater.
3. Lack of refrigerant, not
enough refrigerant in the
system.
Problem – Runs on electric heating element
Cause
1. Operating mode AUX.
HEATER is selected.
2. The compressor cannot
run due to an alarm.
3. The integral value has
reached the start level for
the auxiliary heater.
4. Peak heat operation (anti-
legionella function) is running.
5. The heat pump has stop-
ped on HIGH RETURN.
Using manometer apparatus and thermometer, check that
the unit’s overheating is correct for the specific refrigerant.
Troubleshooting Remedy
If this operating mode is selected, the auxiliary heater is
used for heating and hot water production, not the compressor.
Check the alarm that is indicated in the display. Rectify the problem and rest the alarm. See
Check what the integral value is in the control system. If the auxiliary heater is in operation be-
Check if the heat pump runs peak heat. Peak heat operation occurs in connection
Check what the MAX RETURN value is set at in the
▪
heat pump’s control computer. It must be adjusted to
the unit’s maximum supply temperature and the system’s delta temperature so that it does not cut at too
high a return temperature when the highest supply
temperature is transmitted.
Check what the return line sensor shows. Is it a plausi-
▪
ble/actual value? If not, take a resistance reading from
the sensors and check against the ohm table in Measurement points .
Follow the correct procedure (depending
on type of refrigerant) to add the correct
amount of refrigerant.
If there appears to be a leak in the refrigerant circuit, carry out leak tracing and any
necessary corrective action. If leak tracer is
not available, brush soap water on the suspected leak and look for bubbles. Also
check for oil as this can come out from the
refrigerant circuit.
If AUX. HEATER mode is selected and you
no longer want it, change to AUTO, the
heat pump then controls both the compressor and auxiliary heater.
Alarm .
cause the integral value has counted down
to the start value, the computer reacts as it
should, see the Installation instructions for
further information.
with hot water production with the set interval. The compressor should then start to
produce hot water and 2 minutes later the
auxiliary heater starts. The compressor
must then stop and the stop temperature
be reached with only the auxiliary heater
connected. Take no corrective action.
If the MAX RETURN value is not adjusted for
the system according to the troubleshooting window, adjust it.
If the sensor is defective, replace it.
28
VMGFJ202 Danfoss Heating Solutions

Service Instructions DHP-AQ
Cause Troubleshooting Remedy
6. The compressor runs
backwards.The incoming
phases have the incorrect
sequence (only applies to 3phase heat pumps).
If the compressor runs backwards, it will not cope with
compressing the refrigerant
and therefore does not produce the correct power,
which leads to the control
system requesting auxiliary
heating.
7. Changed conditions Have
you increased your heating
and/or hot water demand?
If the text ERR PHASE SEQ. appears in the display
▪
when the heat pump is powered, (only appears in the
first 10 minutes) this means that the phases have the
incorrect sequence.
When the compressor is running, check the pressure
▪
pipe temperature by feeling the pressure pipe. If the
phases are correctly sequenced it should be hot (not
just warm) even a distance from the compressor.
When the compressor runs with the phases incorrect-
▪
ly sequenced a strange noise may be heard (loud, rattling) when the compressor runs backwards.
If the heat pump has been dimensioned for a certain
▪
demand and this demand is increased, the heat pump
might not be able to maintain the desired room temperature.
If hot water consumption increases, a larger propor-
▪
tion of time is used to produce hot water, which
means less time for heat production.
If the phases are in the incorrect order,
switch two incoming phases at the main
terminal block and recheck according to
the troubleshooting window.
If the heat pump cannot cope with the demand, replace it with one with a higher
output or supplement it with a higher output auxiliary heater.
Problem – The auxiliary heater is in operation but not the compressor
Cause
1. Operating mode AUX.
HEATER is selected.
2. Peak heat operation (antilegionella function) is running.
3. The compressor cannot
run due to an alarm.
4. The heat pump has stopped on high return.
Troubleshooting Remedy
If this operating mode is selected, the auxiliary heater is
used for heating and hot water production, not the compressor.
Check if the heat pump runs peak heat. Peak heat operation occurs in connection
Check the alarm that is indicated in the display. Rectify the problem and rest the alarm.
Check what the MAX value is set at in the heat pump’s
▪
control computer. It must be adjusted to the unit’s
maximum supply temperature and the system’s delta
temperature so that it does not cut at too high a return temperature when the highest supply temperature is transmitted.
Check what the return line sensor shows. Is it a plausi-
▪
ble/actual value? If not, take a resistance reading from
the sensors and check against the ohm table in Measurement points .
If AUX. HEATER mode is selected and you
no longer want it, change to AUTO, the
heat pump then controls both the compressor and auxiliary heater.
with hot water production with the set interval. The compressor should then start to
produce hot water and 2 minutes later the
auxiliary heater starts. The compressor
must then stop and the stop temperature
be reached with only the auxiliary heater
connected. Take no corrective action, this is
normal.
If the MAX RETURN value is not adjus-
▪
ted for the system according to the
troubleshooting window, adjust it.
If the sensor is defective, replace it.
▪
Danfoss Heating Solutions VMGFJ202
29

Service Instructions DHP-AQ
Cause Troubleshooting Remedy
5. The compressor has been
stopped by the operating
pressure switch or delivery
line sensor.
Check if a square appears in the display’s lower left corner.
If so, the operating pressure switch is open or the delivery
pipe sensor triggers an alarm for too high temperature.
The operating pressure switch is most easily checked
▪
by using a buzzer to see if it is connected.
The pressure pipe sensor value is read off from the
▪
control system in the HEAT PUMP menu. Is it a plausible/actual value? If not, take a resistance reading from
the sensor and check against the ohm table in Measurement points .
The compressor has been stopped by the delivery line
▪
sensor and you have established that it shows the
correct temperature. This may have been caused by a
leak in the refrigerant circuit.
If the operating pressure switch has stuck in
the open position, try gently tapping on
the pressure switch head. If this does not
help, or it sticks in the open position repeatedly, replace the pressure switch. If the
delivery line sensor is defective, replace it. If
the delivery line temperature gets so hot
that the compressor stops, start by leaktracing the unit. Rectify the leak, if a leak is
found. If no leak is found, try draining and
refilling the unit and then restarting the
heat pump and seeing what the delivery
line temperature is. If the problem persists,
replace the compressor.
6. The compressor runs
backwards. The incoming
phases have the incorrect
sequence (only applies to 3phase heat pumps). If the
compressor runs backwards,
it will not cope with compressing the refrigerant and
therefore does not produce
the correct power, which
leads to the control system
requesting auxiliary heating.
7. The built-in overheating
protection (bi-metal protection) in the compressor has
tripped.
Problem – The heat pump consumes too much energy
Cause
1. Blocked strainer in the
heating system.
2. The compressor cannot
run due to an alarm.
3. Incorrect flow over hot
side of the heat pump.
4. The heat pump’s control
computer is not set/adjusted to the customer’s requirements/wishes.
If the text ERR PHASE SEQ. appears in the display
▪
when the heat pump is powered, (only appears in the
first 10 minutes) this means that the phases have the
incorrect sequence.
When the compressor is running, check the pressure
▪
pipe temperature by feeling the pressure pipe. If the
phases are correctly sequenced it should be hot (not
just warm) even a distance from the compressor.
When the compressor runs with the phases incorrect-
▪
ly sequenced a strange noise may be heard (loud, rattling) when the compressor runs backwards.
Check if the heat pump’s control computer indicates that
the compressor is in operation, and if there is voltage in
the soft-starter control inputs. Then read off and check
that there is voltage on the compressor’s electrical connection(s).
Troubleshooting Remedy
Check that the strainer is not blocked. Clean the strainer if necessary.
Check the alarm that is indicated in the display. Rectify the problem and rest the alarm. See
Measurement check what the difference between the supply and return line is using a thermometer (∆t). The difference should be about 8°C (can vary depending on refrigerant). A lower ∆t results in reduced efficiency in the heat
pump.
Check the ROOM and CURVE and MIN settings. Adjust incorrect values in the heat pump’s
If the phases are in the incorrect order,
switch two incoming phases at the main
terminal block and recheck according to
the troubleshooting window.
If there is voltage on the compressor’s electrical connection(s) and the overheating
protection does not close when the compressor has not run and has cooled down
for at least 1 hour, replace the compressor.
section Alarm .
Adjust the system to obtain the correct ∆t.
control computer. ROOM = Desired indoor
temperature CURVE = Should be set so that
the desired indoor temperature (ROOM) is
maintained regardless of the outdoor temperature. MIN = Lowest set-point value on
the supply line regardless of the outdoor
temperature.
30
VMGFJ202 Danfoss Heating Solutions

Service Instructions DHP-AQ
Cause Troubleshooting Remedy
5. The interval for peak heat
operation has changed to a
lower value than the factory
set value. This results in the
heat pump going into peak
heat operation more often
than calculated.
6. The heat pump has stopped on HIGH RETURN.
Check the specified interval for peak heat operation in the
control computer.
Check what the MAX RETURN value is set at in the
▪
heat pump’s control computer. It must be adjusted to
the unit’s maximum supply temperature and the system’s delta temperature so that it does not cut at too
high a return temperature when the highest supply
temperature is transmitted.
Check what the return line sensor shows. Is it a plausi-
▪
ble/actual value? If not, take a resistance reading from
the sensors and check against the ohm table in Measurement points .
If there is a shorter interval between the
peak heat productions, this explains why
the unit consumes more current than calculated, but this does not mean for sure that
it should be increased, there might be a
reason why the interval has been changed.
If the MAX RETURN value is not adjusted for
the system according to the troubleshooting window, adjust it. If the sensor is defective, replace it.
7. The compressor runs
backwards. The incoming
phases have the incorrect
sequence (only applies to 3phase heat pumps). If the
compressor runs backwards,
it will not cope with compressing the refrigerant and
therefore does not produce
the correct power, which
leads to the control computer requesting auxiliary heating.
8. The compressor has been
stopped by the operating
pressure switch or delivery
line sensor.
If the text ERR PHASE SEQ. appears in the display
▪
when the heat pump is powered, (only appears in the
first 10 minutes) this means that the phases have the
incorrect sequence.
When the compressor is running, check the pressure
▪
pipe temperature by feeling the pressure pipe. If the
phases are correctly sequenced it should be hot (not
just warm) even a distance from the compressor.
When the compressor runs with the phases incorrect-
▪
ly sequenced a strange noise may be heard (loud, rattling) when the compressor runs backwards.
Check if a square appears in the display’s lower left corner.
If so, the operating pressure switch is open or the delivery
pipe sensor triggers an alarm for too high temperature.
The operating pressure switch is most easily checked
▪
by using a buzzer to see if it is connected.
The delivery line sensor value is read off from the con-
▪
trol computer in the HEAT PUMP menu. Is it a plausible/actual value? If not, take a resistance reading from
the sensor and check against the ohm table in the installation instructions.
The compressor has been stopped by the delivery line
▪
sensor and you have established that it shows the
correct temperature. This may have been caused by a
leak in the refrigerant circuit.
If the phases are in the incorrect order,
switch two incoming phases at the main
terminal block and recheck according to
the troubleshooting window.
If the operating pressure switch has stuck in
the open position, try gently tapping on
the pressure switch head. If this does not
help, or it sticks in the open position repeatedly, replace the pressure switch. If the
delivery line sensor is defective, replace it. If
the delivery line temperature gets so hot
that the compressor stops, start by leaktracing the unit. Rectify the leak, if a leak is
found. If no leak is found, try draining and
refilling the unit and then restarting the
heat pump and seeing what the delivery
line temperature is. If the problem persists,
replace the compressor.
9. Expansion valve defective
or incorrectly set.
10. Lack of refrigerant, not
enough refrigerant in the
system.
Danfoss Heating Solutions VMGFJ202
Using manometer apparatus and thermometer check what
the overheating reading of the unit is.
Using manometer apparatus and thermometer, check that
the unit’s overheating is correct for the specific refrigerant.
If the expansion valve is defective, replace
it.
If there appears to be a leak in the refrigerant circuit, carry out leak tracing and any
necessary corrective action. If leak tracer is
not available, brush soap water on the suspected leak and look for bubbles. Also
check for oil as this can come out from the
refrigerant circuit.
31

Service Instructions DHP-AQ
Cause Troubleshooting Remedy
11. Overfilled refrigerant cir-
cuit.
12. Changed conditions
Have you increased your
heating and/or hot water
demand?
Problem – Auxiliary heater cuts in too soon
Cause
1. The heat pump’s control
computer is not set/adjusted to the customer’s requirements/wishes.
2. Changed conditions Have
you increased your heating
and/or hot water demand?
Using manometer apparatus and thermometer, check that
the unit’s overheating is correct for the specific refrigerant.
If the heat pump has been dimensioned for a certain
▪
demand and this demand is increased, the heat pump
might not be able to maintain the desired room temperature.
If hot water consumption increases, a larger propor-
▪
tion of time is used to produce hot water, which
means less time for heat production.
Troubleshooting Remedy
Check the ROOM, CURVE, INTEGRAL A1 and INTEGRAL A2
settings
If the heat pump has been dimensioned for a certain
▪
demand and this demand is increased, the heat pump
might not be able to maintain the desired room temperature.
If hot water consumption increases, a larger propor-
▪
tion of time is used to produce hot water, which
means less time for heat production.
Follow the correct procedure (depending
on type of refrigerant) to add the correct
amount of refrigerant.
If the heat pump cannot cope with the demand, replace it with one with a higher
output or supplement it with a higher output auxiliary heater.
Adjust incorrect values in the heat pump’s
control computer. ROOM = Desired indoor
temperature CURVE = Should be set so that
the desired indoor temperature (ROOM) is
maintained regardless of the outdoor temperature. INTEGRAL A1 = Start value for the
compressor. INTEGRAL A2 = Start value
(calculated from A1) for the auxiliary heater.
If the heat pump cannot cope with the demand, replace it with one with a higher
output or supplement it with a higher output auxiliary heater.
3. Lack of refrigerant, not
enough refrigerant in the
system.
Problem – Short operating times despite heating demand
Cause
ROOM and/or CURVE set too
high in combination with a
heating system with poor
circulation due to closed radiator valves, too small elements or insufficient water
volume. A tight fitting system with poor pipe dimensions may produce the same
phenomena.
Problem – Connection of external AH
Cause
Incorrectly connected auxili-
ary heater. Does not start
when the control computer
gives the signal.
Using manometer apparatus and thermometer, check that
the unit’s overheating is correct for the specific refrigerant.
Troubleshooting Remedy
Check if the heat pumps starts, if the supply temperature
rises quickly whilst nothing happens to the return temperature. If this happens and the heat pump is stopped by the
hysteresis function to later quickly drop in temperature
(supply) in order to start again, but cannot due to time
conditions in regulation, this means that the heat pump
cannot transport the heat away from the condenser as it
should. In such a case, hysteresis starts and stops the heat
pump often.
Troubleshooting Remedy
Check the connection against the instructions/wiring dia-
gram. Test the function in manual mode.
If there appears to be a leak in the refrigerant circuit, carry out leak tracing and any
necessary corrective action. If leak tracer is
not available, brush soap water on the suspected leak and look for bubbles. Also
check for oil as this can come out from the
refrigerant circuit.
Adjust ROOM and CURVE if necessary. Ensure that there is sufficient flow over the
condenser and the heating circuit.
If the auxiliary heater is incorrectly connected, reconnect according to the instructions.
32
VMGFJ202 Danfoss Heating Solutions

Service Instructions DHP-AQ
3.5.7 Heat pump
Problem – Noise/loud noise
Cause Troubleshooting Remedy
1. Positioning the heat
pump.
2. Connection/wall lead-ins. Check that the unit is installed according to the instruc-
Problem – Defrosting problems
Cause Troubleshooting Remedy
Location/calibration of the
outdoor sensor.
Defrost sensor calibration Check that the defrost sensor is installed according to the
Problem – Build-up of ice under and around the outdoor unit
Cause
Insufficient drainage. Does a lot of ice accumulate under and around the out-
Determine whether the heat pump can be moved to a
more suitable location.
tions.
Check that the outdoor sensor is installed according to the
installation instructions and that it is correctly calibrated.
installation instructions and that it is correctly calibrated.
Troubleshooting Remedy
door unit because the melted water has nowhere to run?
Move the heat pump if possible.
Rigid mountings can generate noise from
the heat pump via walls in the house.
Install according to the instructions and calibrate, if necessary.
Calibrate if necessary.
Drain the ground under and around the
outdoor section or install a drainpipe routed to an indoor drain or gully. NOTE! Install
a heating cable in the drainpipe.
Problem – Water run-off by the outdoor unit, risk of moisture problems in house foundations
Cause
Insufficient drainage. During some periods when the outdoor unit is being de-
Troubleshooting Remedy
Drain the ground under and around the
frosted, large amounts of water can run off.
outdoor unit so that it can cope with the
extra amount of water produced because
of defrosting or install a drainpipe routed to
an indoor drain or gully. NOTE! Install a
heating cable in the drainpipe.
Danfoss Heating Solutions VMGFJ202
33

Service Instructions DHP-AQ
34
VMGFJ202 Danfoss Heating Solutions

Service Instructions DHP-AQ
Danfoss Heating Solutions VMGFJ202
35

Service Instructions DHP-AQ
Danfoss Heat Pumps
Box 950
671 29 ARVIKA
Phone +46 570 81300
E-mail: dhpinfo@danfoss.com
Internet: www.heating.danfoss.com
Danfoss can accept no responsibility for possible errors in catalogues, brochures and other printed material. Danfoss reserves the right to alter its products without notice. This also applies to products
already on order provided that such alterations can be made without subsequential changes being necessary in specifications already agreed. All trademarks in this material are property of the respective
companies. Danfoss Heating Solutions and the Danfoss Heating Solutions logotype are trademarks of Danfoss A/S. All rights reserved.
VMGFJ202 Produced by Danfoss Heating Solutions © Aug 2013
 Loading...