

Page 1
Installation and user manual
Devireg™ 850 sensor
GB-DAS
1
Page 2

2
Table of content
1 Sensors and control zones. . . . . . . . . . . . . . . . . . . . . . . . . . . . . . . . . . . . . . . . . 3
1.1 Sensor types and function . . . . . . . . . . . . . . . . . . . . . . . . . . . . . . . . . . . . . 3
1.2 Control zones . . . . . . . . . . . . . . . . . . . . . . . . . . . . . . . . . . . . . . . . . . . . . 4
1.3 Assign sensors to control zones . . . . . . . . . . . . . . . . . . . . . . . . . . . . . . . . . . 5
2 Placing and installation of sensors . . . . . . . . . . . . . . . . . . . . . . . . . . . . . . . . . . . 6
2.1 Placing ground sensors . . . . . . . . . . . . . . . . . . . . . . . . . . . . . . . . . . . . . . . 6
2.1.1 Placing the first ground sensor in a zone . . . . . . . . . . . . . . . . . . . . . . . . . . . . 6
2.1.2 Placing the following ground sensors in a zone . . . . . . . . . . . . . . . . . . . . . . . . 6
2.1.3 Example with ground sensors . . . . . . . . . . . . . . . . . . . . . . . . . . . . . . . . . . . 7
2.1.4 Extending the ground sensor cable . . . . . . . . . . . . . . . . . . . . . . . . . . . . . . . 7
2.2 Installing ground sensors . . . . . . . . . . . . . . . . . . . . . . . . . . . . . . . . . . . . . . 8
2.3 Placing roof sensors . . . . . . . . . . . . . . . . . . . . . . . . . . . . . . . . . . . . . . . . 10
2.3.1 Placing the first roof sensor in a zone . . . . . . . . . . . . . . . . . . . . . . . . . . . . . 10
2.3.2 Placing the following roof sensors in a zone . . . . . . . . . . . . . . . . . . . . . . . . . 10
2.3.3 Guiding plates . . . . . . . . . . . . . . . . . . . . . . . . . . . . . . . . . . . . . . . . . . . . 10
2.3.4 Example with roof sensors . . . . . . . . . . . . . . . . . . . . . . . . . . . . . . . . . . . . 11
2.3.5 Extending the roof sensor cable. . . . . . . . . . . . . . . . . . . . . . . . . . . . . . . . . 11
2.4 Installing roof sensors . . . . . . . . . . . . . . . . . . . . . . . . . . . . . . . . . . . . . . . 12
3 Technical specification . . . . . . . . . . . . . . . . . . . . . . . . . . . . . . . . . . . . . . . . . . 13
4 Appendix A – PSU & feeder cable . . . . . . . . . . . . . . . . . . . . . . . . . . . . . . . . . . 14
Page 3
3
1 Sensors and control zones
S
N
E
W
3
4
2
1
This section guides you through a short introduction to the terms used in the manual
- Area type
- Sensor type
- Controller
- Control Zones
Finally you will be able to assign a number of sensors to the chosen control zones.
1.1 Sensor types and function
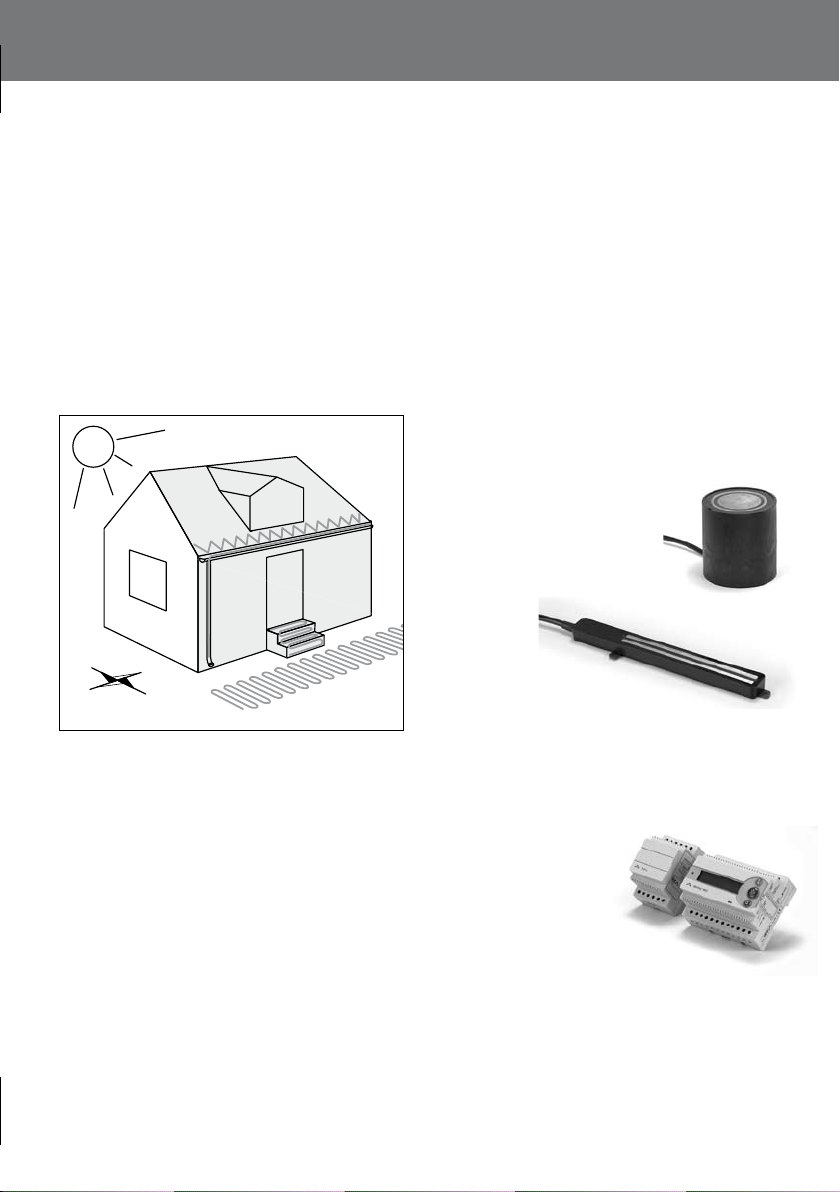
Identify the type(s) of area prepared for the DEVI ice and snow melting system, by looking
fig. below:
1. Walkways and parking areas
2. Steps and stairs
3. Roofs and roof edges
4. Gutters and down pipes
For ground areas like 1 and 2
you have one or more ground
sensors.
For roof areas
like 3 and 4
you have one
or more roof
sensors.
The ground and roof sensors both measure two things on the sensor surface
- temperature
- moisture from ice, snow, hail or rain
These measurements are input to the Devireg 850, and it decides how the
ice and snow melting system should control the heated areas.
Details about the setup of the controller can be found in the Devireg 850
installation manual.
Page 4
4
1 Sensors and control zones
1.2 Control zones
A Devireg 850 and up to 4 sensors are able to control an area as a single zone, but can also control more areas as 2 separated control zones.
2 control zones consits of minimum 2 heating elements + 2-4 sensors and can be:
Combi zones = when you have both a roof and a ground area
Dual zones = e.g. if steps should have a better performance than a walkway
If the power supply is limited, both combi and dual zones gives you the possibility to prioritize
which zone to operate first.
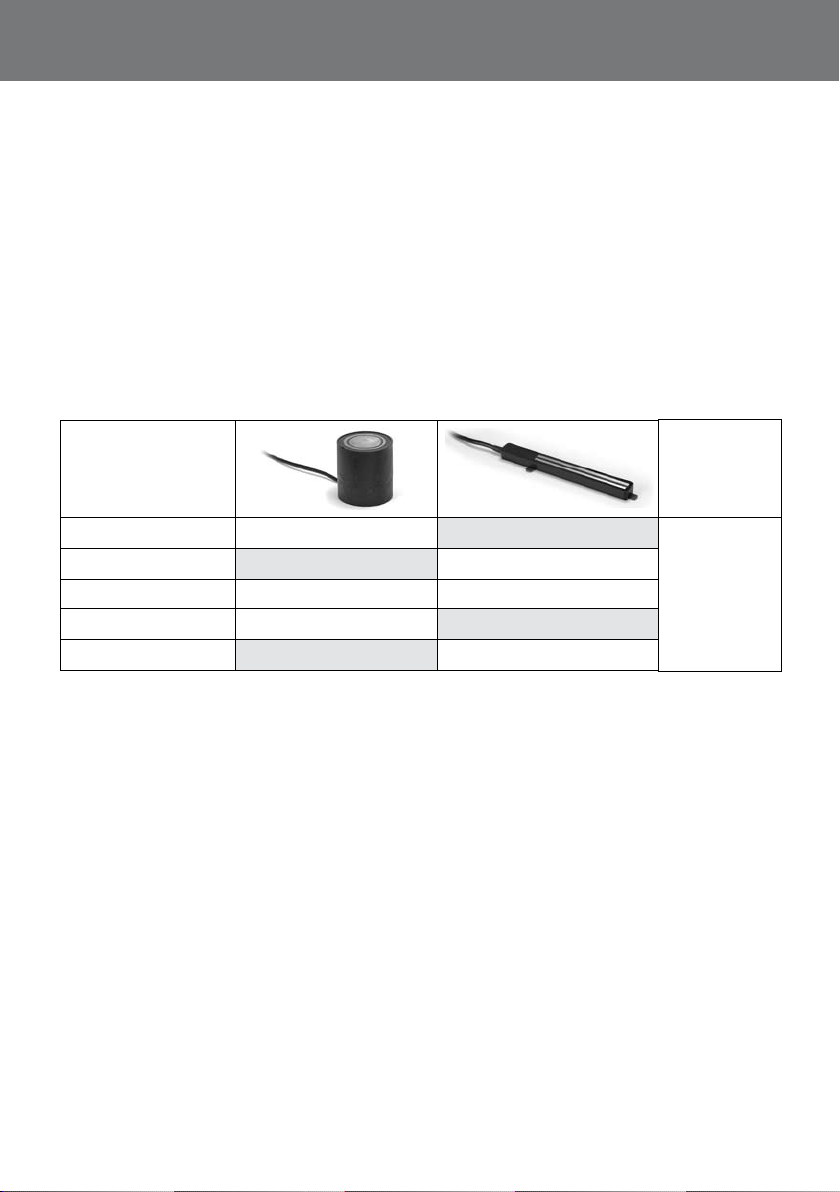
A Devireg 850 and up to 4 sensors give the following 5 control options:
Zone type
Single zone ground 1-4 in one zone
Single zone roof 1-4 in one zone
Combi zones 1-3 in one ground zone 1-3 in one roof zone
Dual zones ground 2-4 split in two zones
Dual zones roof 2-4 split in two zones
Maximum 4
sensors in all
Page 5

5
1 Sensors and control zones
1.3 Assign sensors to control zones
There are some good reasons to have 2 or more sensors in one control zone.
- Higher degree of detection safety, which is relevant for larger, complex or busy roof and
ground areas.
- Approx. 1 hour faster ground system, as one sensor measures the ground temperature
and other sensors measure the moisture whereas a single sensor must switch between
temperature and moisture measurements.
Now decide how the ice and snow melting system should be operated and assign the sensors to
the control zones. In case of questions the system designer must be consulted.
Draw circles around
Zone type and
1-4 Sensors
Single zone ground x 1 2 3 4
Single zone roof x 1 2 3 4
Combi zones x 1 2 3 1 2 3
Dual zones ground x 2 3 4
Dual zones roof x 2 3 4
Maximum 4
sensors in all
Page 6

6
2 Placing and installation of sensors
At this point you must have identified and assigned sensors to the control zones as prescribed in
section 1.
In this section 2 you will be guided through a correct placing and installation of the sensors.
For placing and installation of ground sensors see section 2.1.
For placing and installation of roof sensors see section 2.2.
2.1 Placing ground sensors
Placing ground sensors in appropriate spots is very important for the performance of the ice and
snow melting system. The appropriate spot must fulfill some characteristics, where the below 2
are the most important:
The sensors must be placed minimum 1 meter within the boundaries of the heated zone
The sensors must not be covered or prevented from being exposed to snow or rain.
This includes dirt, leaves and pebbles.
2.1.1 Placing the first ground sensor in a zone
Find one who knows the area and make him describe the area function and weather conditions.
The first ground sensor in a zone must now be placed where the first snow appears. The appropriate spot can be found by following below steps.
a) Where the heated area is in shade all day. Look e.g. for algae.
b) Where e.g. a wind shield make the snow drift
c) Where the most traffic from shoes or car wheels happens
If you have a dual zone system, the first sensor for the other zone must be placed by following
the same steps above.
2.1.2 Placing the following ground sensors in a zone
The following ground sensors in a zone must be placed where the surface dries up last.
The appropriate spot can be found by following below steps.
d) Where the heated area is in shade all day
e) Where the melting water accumulates e.g. due to hollows in the area
f) So the whole zone is covered, but min. 1 meter from other sensors
If there is doubt about the appropriate spot, prepare a second spot for later use.
Page 7

7
2 Placing and installation of sensors
1 2 3
2.1.3 Example with ground sensors
In this example a lower step section (1), a walkway
platform (2) and an upper step section (3) is heated.
Depending on number of zones and detection
safety, 2-3 ground sensors is installed.
Sensor no. 1 is the most important as this is placed
where snow is likely to appear first due to shade
and snow drift also because the spot is stepped on
by pedestrians.
Sensor no. 2 is also important as the platform is
object to water puddles. Here the shaded spot
will dry up last. If the power supply is limited, the
platform could be a low priority zone in a dual zone
system.
Sensor no. 3 is relevant if more detection safety
is required, as additional to sensor no. 1. Can be
prepared for later installation.
2.1.4 Extending the ground sensor cable
The ground sensor consists of two parts, a sensor part with a sensor
cable and a sensor tube.
A 15-meter cable is supplied with the sensor part. Approx. 0.5 m of
this cable should be coiled inside the bottom of the sensor tube,
leaving 14.5 meter to be connected with the Devireg 850 controller.
If the appropriate spot is located out of this range, a feeder cable
extension for the sensor may be needed. This sensor cable extension must be a 4-wired cable
with a diameter in accordance with the table in Appendix A – Sensor cable extension.
Note each new colour of the 4 wire cable feeder extensions (white, white, red and black)
Dual zone sensors: Do NOT join feeder cable extensions from separate zones
Page 8

8
2 Placing and installation of sensors
illustration_a_b_c
2.2 Installing ground sensors
At this point you must have located the appropriate spots for the ground sensors and extended
the feeder cable if necessary as prescribed in section 2.1.
The sensor part and the sensor tube may now be installed in connection with the actual construction work and connected at a later date. The following applies for all types of installations.
a) The base below the sensor tube must be hard, e.g. a concrete plate or similar, in order to
ensure that the sensor is not pushed into the ground if e.g. a lorry runs over it. The tube is
designed to be mounted on a plate using the two screw holes inside the tube.
b) Place the sensor tube in between the heating cables with a minimum distance of 1 cm.
min. 1 m
min. 1 cm
Assembly box
Feeder cable
c) The sensor tube must be positioned so that it is flush with the surrounding
terrain and so that the sensor part must be placed so that the upper brass
surface is horizontal.
d) Lay a conduit for the sensor cable between the
sensor tube and the Devireg 850 controller.
installation pipe
Page 9

9
2 Placing and installation of sensors
Installation in asphalt:
The temperature around the sensor part and sensor tube must not exceed 80°C.
A wooden dummy or similar must replace the sensor while asphalt is poured and cooled down.
The conduit must be a metal tube that can withstand the high temperatures.
Not OK! OK!
e) Ensure that the sensor tube is closed with the supplied cap before the
concrete is poured or the bricks are laid. Make sure that air gaps are filled
with cement.
f) Coil approx. 0.5 m of the sensor cable
inside the tube. If the sensor cable needs
extension, see section 2.1.4.
g) Place the sensor part inside the sensor
tube until it is horizontally flush with the
edge of the sensor tube and rests on the
collar inside the tube.
h) The sensor part may be inspected using the two holes around the edge of the sensor tube.
The grooves on the outside of the sensor part correspond with the holes in the sensor tube.
installation pipe with sensor cable
Page 10

10
2 Placing and installation of sensors
2.3 Placing roof sensors
Placing roof sensors in appropriate spots is very important to the performance of the Ice & Snow
melting system. The appropriate spot must fulfil some requirements, where the below 2 are the
most important:
The sensors must be placed minimum 1 meter within the boundaries of the heated zone
The sensors must not be covered and prevented from being exposed to snow or rain.
This includes dirt and especially leaves in the gutters.
2.3.1 Placing the first roof sensor in a zone
Find one who knows the area and make him describe the area function and weather conditions.
The first roof sensor in a zone must now be placed where ice and snow cause most problems.
The appropriate spot can be found by following below steps.
a) Where the heated area is in shade or oriented to the north/west
b) In the main gutter close to the main down pipe
If you have a dual zone system, the first sensor for the other zone must be placed by following
the same steps above.
2.3.2 Placing the following roof sensors in a zone
The following roof sensors in a zone must be placed where the surface dries up latest .
The appropriate spot can be found by following below steps.
c) Where the snow slides e.g. due to roof joints or gutter valleys
d) In other gutters, close to other down pipes
e) So the whole zone is covered, but min. 1 meter from other sensors
If there is doubt about the appropriate spot, prepare a second spot for later use.
2.3.3 Guiding plates
If a roof area is oriented to the south and the roof slope is
steep it can be exposed to strong sun radiation.
In that case it can be necessary to install guiding plates
above the sensor, so the slowly dripping melting water from
the roof hit the roof sensor.
If there is doubt about the appropriate spot, prepare a
second spot for later use.
guiding plate
Page 11

11
2 Placing and installation of sensors
1 2 3
2.3.4 Example with roof sensors
In this example a roof with several dormers is heated. Depending on the number of zones and
required safety it is relevant to install 2-3 roof sensors.
Sensor no. 1 is placed in shady side of the
front. It is the most important as all melting
water passes the sensor until the gutter is dry.
As snow is likely to slide down here, the spot is
one of the last to dry up.
Sensor no. 2 is also important as the shaded
dormer roof is more flat, which might cause
sudden snow slides on a dry roof. The dormers
could be the lower prioritized zone in a dual
zone system.
Sensor no. 3 is relevant if a higher detection safety is required. It could both be placed near
another down pipe or in the gutter valley. Thus it can be an additional sensor to both no. 1 and 2
and can be prepared for later installation.
2.3.5 Extending the roof sensor cable
The roof sensor is a sensor part with a sensor cable built in one.
A 15-meter cable is supplied with the roof sensor to be connected with the Devireg 850 controller.
If the appropriate spot is located out of this range, a feeder cable extension for the sensor may be
needed. This sensor cable extension must be a 4-wired cable with a diameter in accordance with
the table in Appendix A – Sensor cable extension.
Note each new colour of the 4 wire cable feeder extensions (white, white, red and black)
Dual zone sensors: Do NOT join feeder cable extensions from separate zones
Page 12

12
2 Placing and installation of sensors
2.4 Installing roof sensors
At this point you must have selected the appropriate spots for the roof sensors and extended the
feeder cable if necessary as prescribed in section 2.3.
The roof sensor may now be installed in connection with the actual construction work and connected at a later date. The following applies for all types of installations.
a) The sensor must be placed between or next to the heating cables,
with a distance of minimum 1 cm between sensor and heating cable.
b) The sensor must be placed so that the upper brass surface is
horizontal. If the sensor is placed on an angled roof, the sensor must
be levelled until the surface is horizontal.
c) Fasten the sensor by using the attachments on the sensor or glue it to the surface.
min. 1 cm
Page 13

13
4 Technical specification
Technical data
Type number:
- Ground
- Roof
Voltage: 24VDC +10%/-20% (18-26VDC)
Power consumption:
• Ground
• Roof
IP class:
Ambient temperature:
• Ground
• Roof
Sensor type:
Sensor lead:
Indication:
Measurements
• Ground sensor
• Sensor tube (ground)
• Roof sensor
D850 G1 Sensor
D850 R1 Sensor
Max. 13W
Max. 8W
IP 67
-30˚C to +70˚C
-50˚C to +70˚C
Devibus connected moisture sensor(s)
15 m of 4x1 mm2 (may be extended in accordance
with the table in appendix A)
2 x 16-character illuminated display.
Depth = 87 mm; Heigth = 74 mm
Depth = 93 mm; Height = 98 mm
Depth = 15 mm; Height = 23,5 mm; Width 216 mm
Page 14

14
3 Appendix A – Sensor cable extension
Ground system
Number of sensors: 1 or 2 3 4
Cable type
2
1 mm
2
1,5 mm
2
2,5 mm
2
4 mm
Max length (m)
300
450
750
1200
Max. length (m)
150
225
380
600
Max length (m)
Roof system
Number of sensors: 1 2 3 4
Cable type
2
1 mm
2
1,5 mm
2
2,5 mm
2
4 mm
Max length (m)
400
600
1000
1600
Max length (m)
100
150
250
400
Max length (m)
130
200
330
525
Max length (m)
80
120
200
310
75
110
190
300
Page 15

15
zone A
sensor I
sensor II
sensor III
zone B
Note each new colour of the 4
wire cable sensor extensions
(white, white, red and black).
Sensor cable extension
according to above table
is led to Devireg™ 850.
Dual zone sensors:
Do not join sensor cables extensions
from separate zones
1
2
3
4
5
6
7
8
II
III
“Red”
“White”
“White”
“Black”
Red
White
White
Black
Red
White
White
Black
Page 16

16
The DEVITM Guarantee
You have purchased a DEVI heating system which we are sure will serve to improve the
comfort and economy of your home.
DEVI provides a complete heating solution with DeviexTM heating cables or DevimatTM
heating mats, DeviregTM thermostats and DevifastTM xing strips. Should you, against all
expectations, experience a problem with your DEVI heating system, you will nd that
DEVI, whose products are manufactured in Denmark and sold throughout the European
Union, is subject to the standard regulations pertaining to product liability as specied in
EU directive 85/374/CEE as well as all applicable legislation in the individual countries on
the following conditions:
DEVI oers a 10-year guarantee on all DeviexTM heating cables and DevimatTM heating
mats, and a 2-year guarantee against material defects and production defects in connection
with any other DEVI products.
e guarantee shall be valid only if the GUARANTEE CERTIFICATE is completed
correctly and in accordance with the instructions, and provided the fault is inspected by or
submitted to DEVI or an authorised DEVI dealer.
Please note that the GUARANTEE CERTIFICATE must be completed in English or local
language.
DEVI shall undertake any repair free of charge or supply the customer with a new unit.
Repairs shall be carried out at no further cost to the customer. In the case of faulty
DeviregTM thermostats, DEVI reserves the right to repair the unit free of charge and
without any unreasonable delays for the customer.
e DEVI Guarantee shall not cover installations that have been carried out by non-authorised electricians, faults which arise as a result of misuse by other suppliers, damage caused
by third parties, incorrect installations or consequential damage. All work will be invoiced
in full if DEVI
is required to inspect or repair faults that have arisen as a result of any of the above.
e DEVI Guarantee shall not extend to equipment which has not been paid in full.
DEVI will, at all times, provide a rapid, eective and honest response to all queries and
reasonable demands from our customers.
e above guarantee covers product liability only, while purchases are subject to national
legislation.
Page 17

17
The DEVITM Guarantee
Guarantee Certificate
The DEVITM Guarantee is granted to:
Name:
Address:
Postal code:
In order to obtain the DEVI
carefully filled in. See other conditions on previous page.
Electrical Installation by:
Type of thermostat:
Suppliers Stamp:
Phone:
Please observe!
TM
Guarantee, the following must be
Installation date:
Production code:
DEVI A/S
DK • 7100 Vejle
Phone +45 76 42 47 00
Fax +45 76 42 47 03
Page 18

18
Page 19

19
Page 20

˚C
Article: 08095360
Version: 01.02
 Loading...