

Instructions
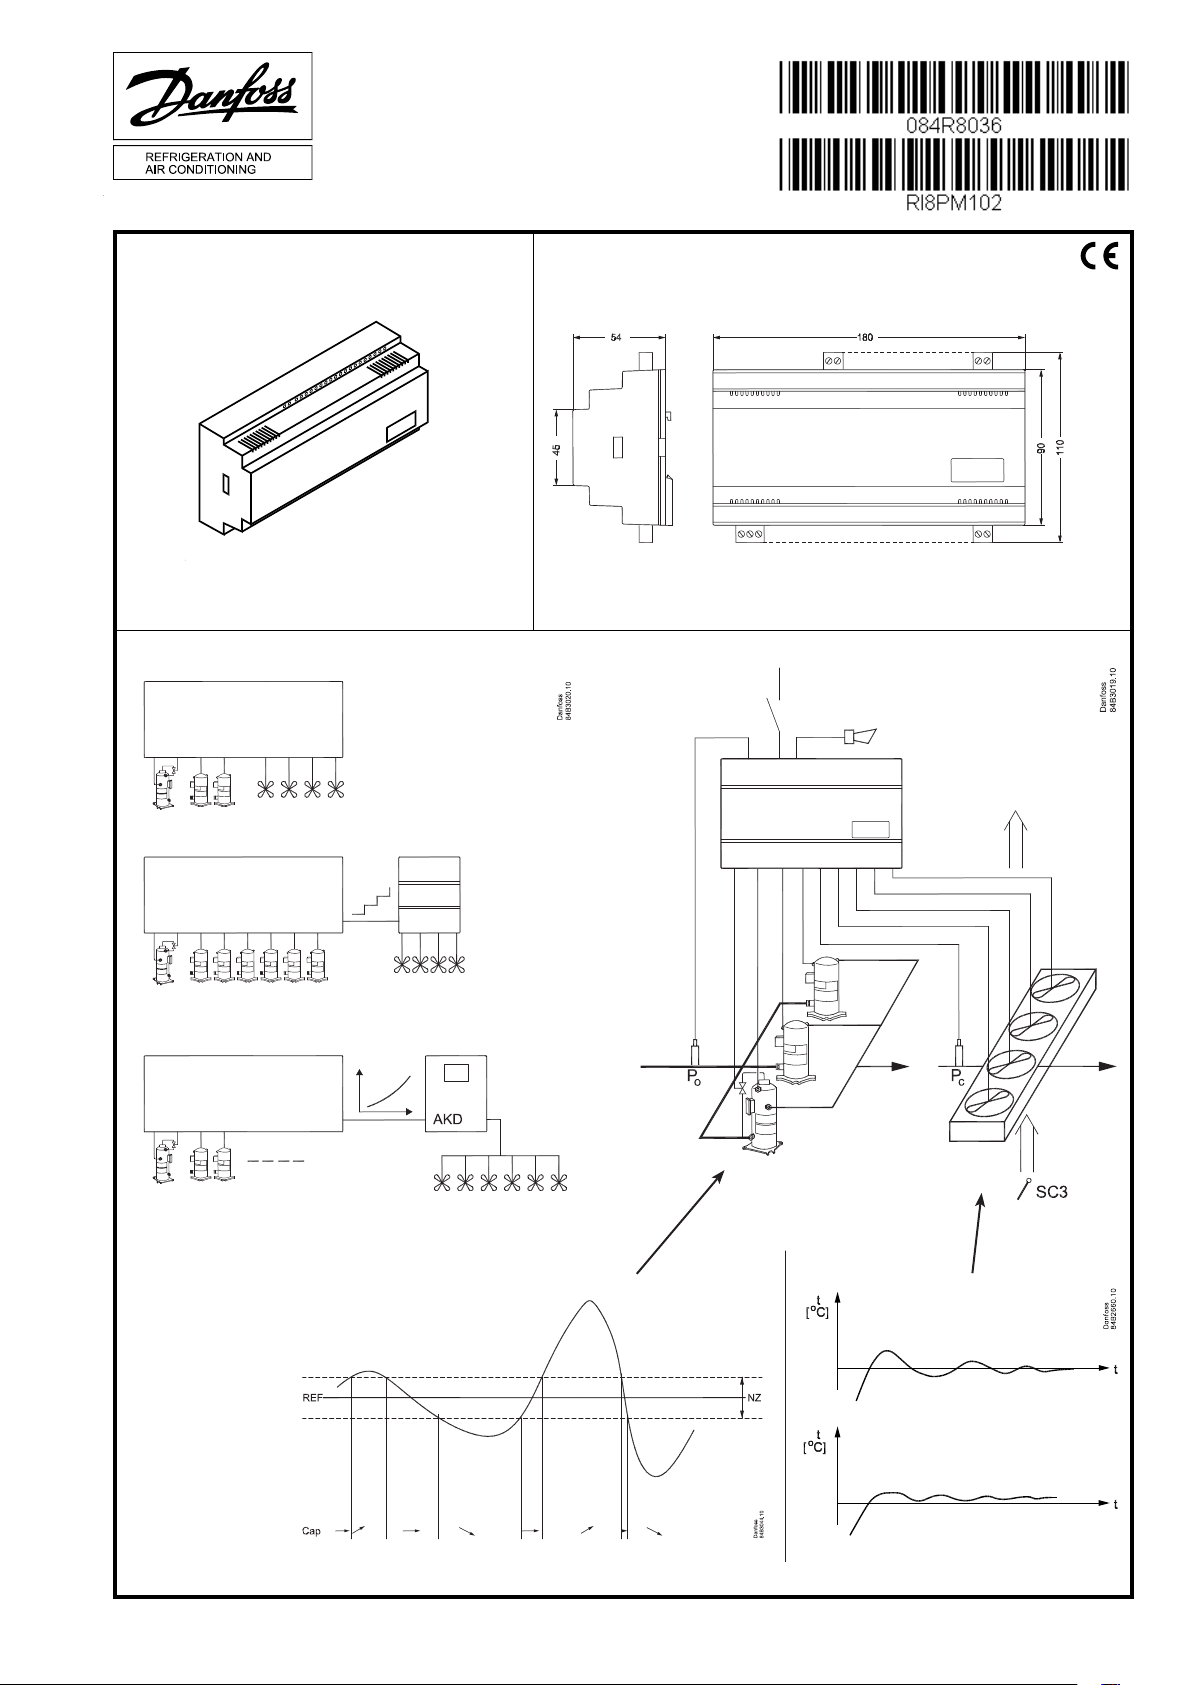
AK-PC 560
Identification
Principle
084B8013
Dimensions
Danfoss
84B2330.11
RI8PM102 09-2011
NZ control PI or P control
ENGLISH
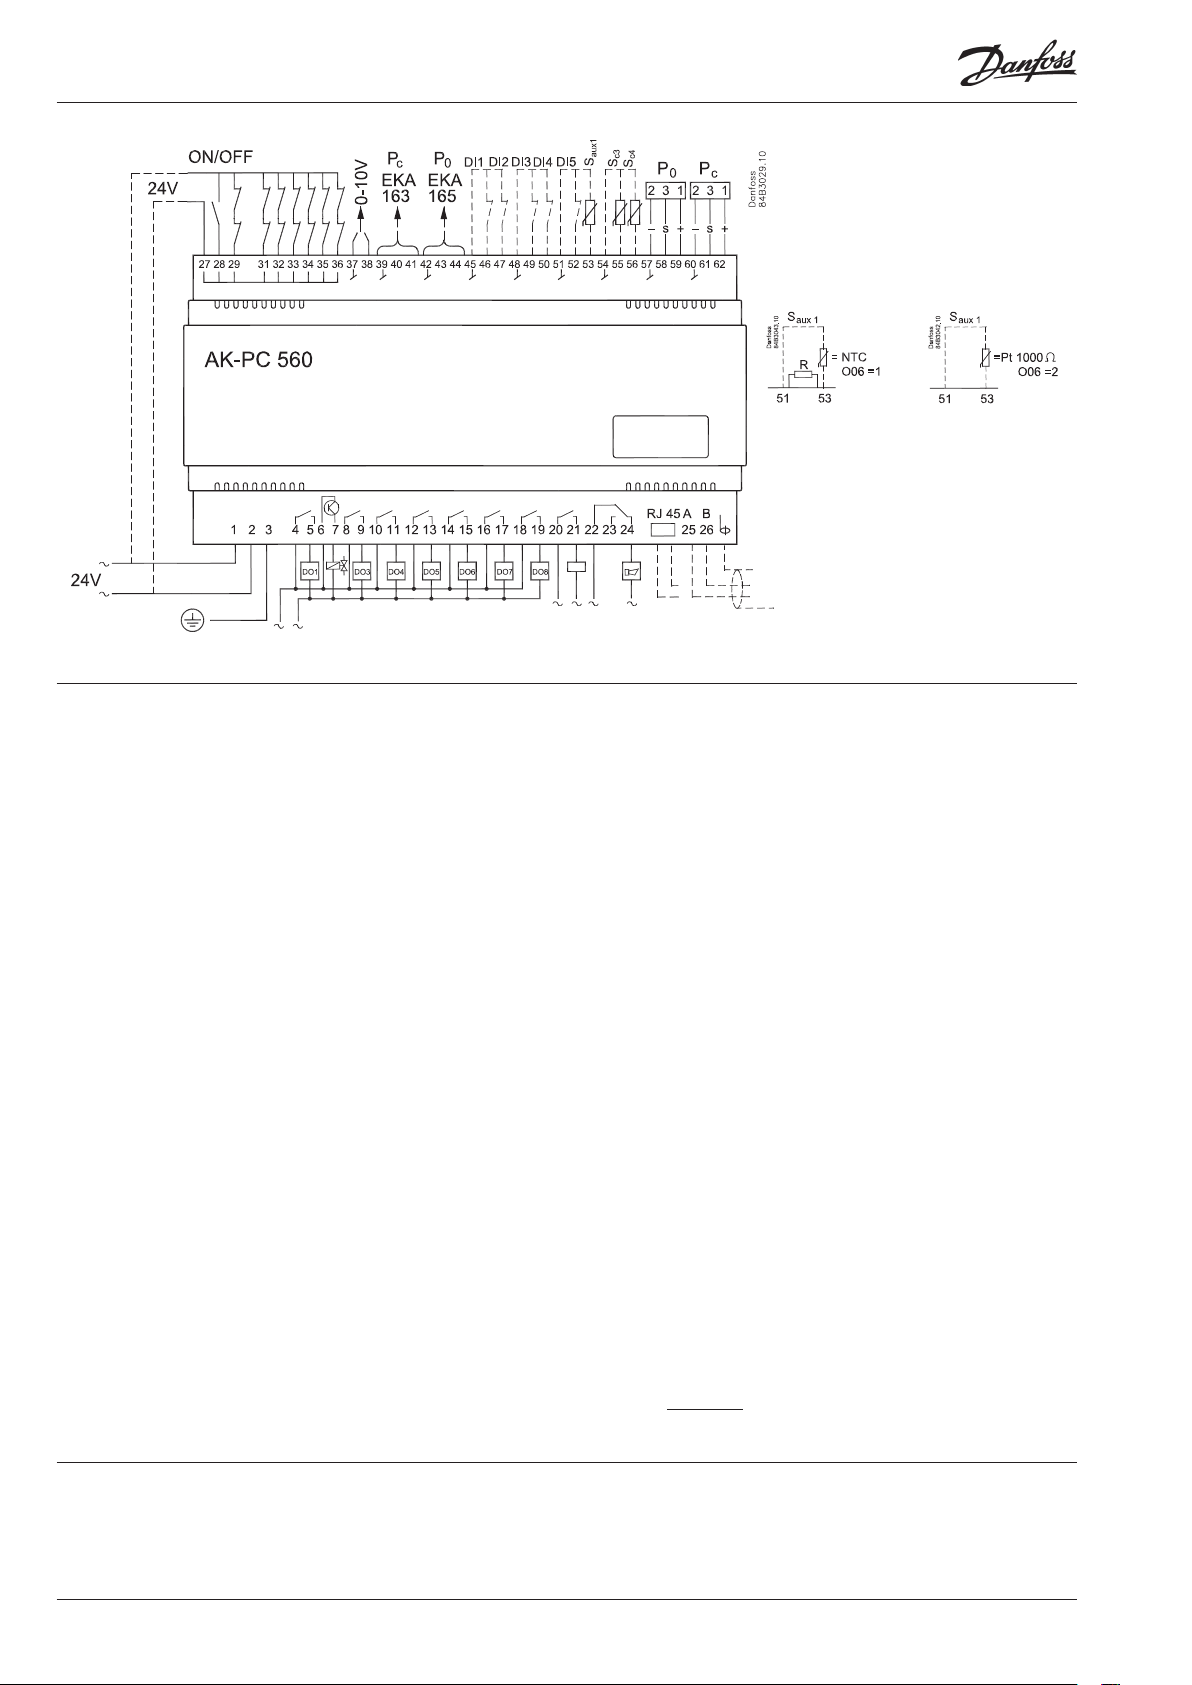
Connections
Necessary connections
Terminals:
1-2 Supply voltage 24 V a.c.
4-5 Relay outputs for digital scroll compressor
6-7 Solid state relay for digital scroll compressor's unloader
8- 19 Relay outputs for either compressors or fan motors
22-24 Alarm relay *
There is connection between 22 and 24 in alarm situa tions
and when the controller is dead
27-28 4 V signal to start / stop of regulation
27-29 24 V signal from the safety circuit Digital scroll
30 No function
27-31 24 V signal from the safety circuit DO 3
27-32 24 V signal from the safety circuit DO 4
27-33 24 V signal from the safety circuit DO 5
27-34 24 V signal from the safety circuit DO 6
27-35 24 V signal from the safety circuit DO 7
27-36 24 V signal from the safety circuit DO 8
57-59 Suction pressure. Voltage signal from AKS 32R **
60-62 Condenser pressure. Voltage signal from AKS 32R **
P0/Pc: AKS 32R:
1 = Black = +
2 = Blue = 3 = Brown = s
(R=1680 ohm)
All inputs are low-voltage.
Relay output 1-8 are low voltage.
Relay output 9 and 10 may be
high voltage.
Data communication
Application dependent connections
20-21 AKD start/stop *
The relay cutin when the frequency converter have to
start.
37-38 Voltage signal to external condenser control
(see settings page 12)
39-41 Possibility of connecting an external display type EKA 163
or display of Pc
42-44 Possibility of connecting an external display type EKA 163
for display of P0, or EKA 165 for operation and display of
P0
45-46 DI1 - Contact function for alarm signal
45-47 DI2 - Contact function for alarm signal
48-49 DI3 - Contact function for alarm signal
48-50 DI4 - Contact function for displacement of the suction
pressure reference or for alarm signal.
51-52 DI5 - Contact function for displacement of the condenser
pressure reference or for alarm signal.
51-53 Separate sensor Saux. Discharge gas temperature.
Sensor signal from Pt 1000 (AKS 21) or Copeland-NTC and
with supplied resistor mounted.
54-55 Outdoor ambient temperature (Sc3). Sensor signal from Pt
1000, AKS 11 or AKS 21 (mounted if r33 = 2 or 4).
54-56 Air temperature at condenser outlet. Sensor signal from a
Pt 1000, AKS 11 or AKS 21.
Data communication
25-26 Mount only, if a data communication module has been
fitted.
For ethernet communication the plug connection RJ45
must be used. (LON FTT10 can also be connected in this
way.
It is important that the installation of the data communication cable be done correctly. Cf. separate literature No.
RC8AC.
*)
Relays DO9 and DO10 may in special cases be reconfigurated so that they can be
used as fan relays.
**)
If the controller has to control only the compressor or the fans, respectively Pc and P0
sensor can be dispensed
2 Instructions RI8PM102 © Danfoss 09/2011 AK-PC 560
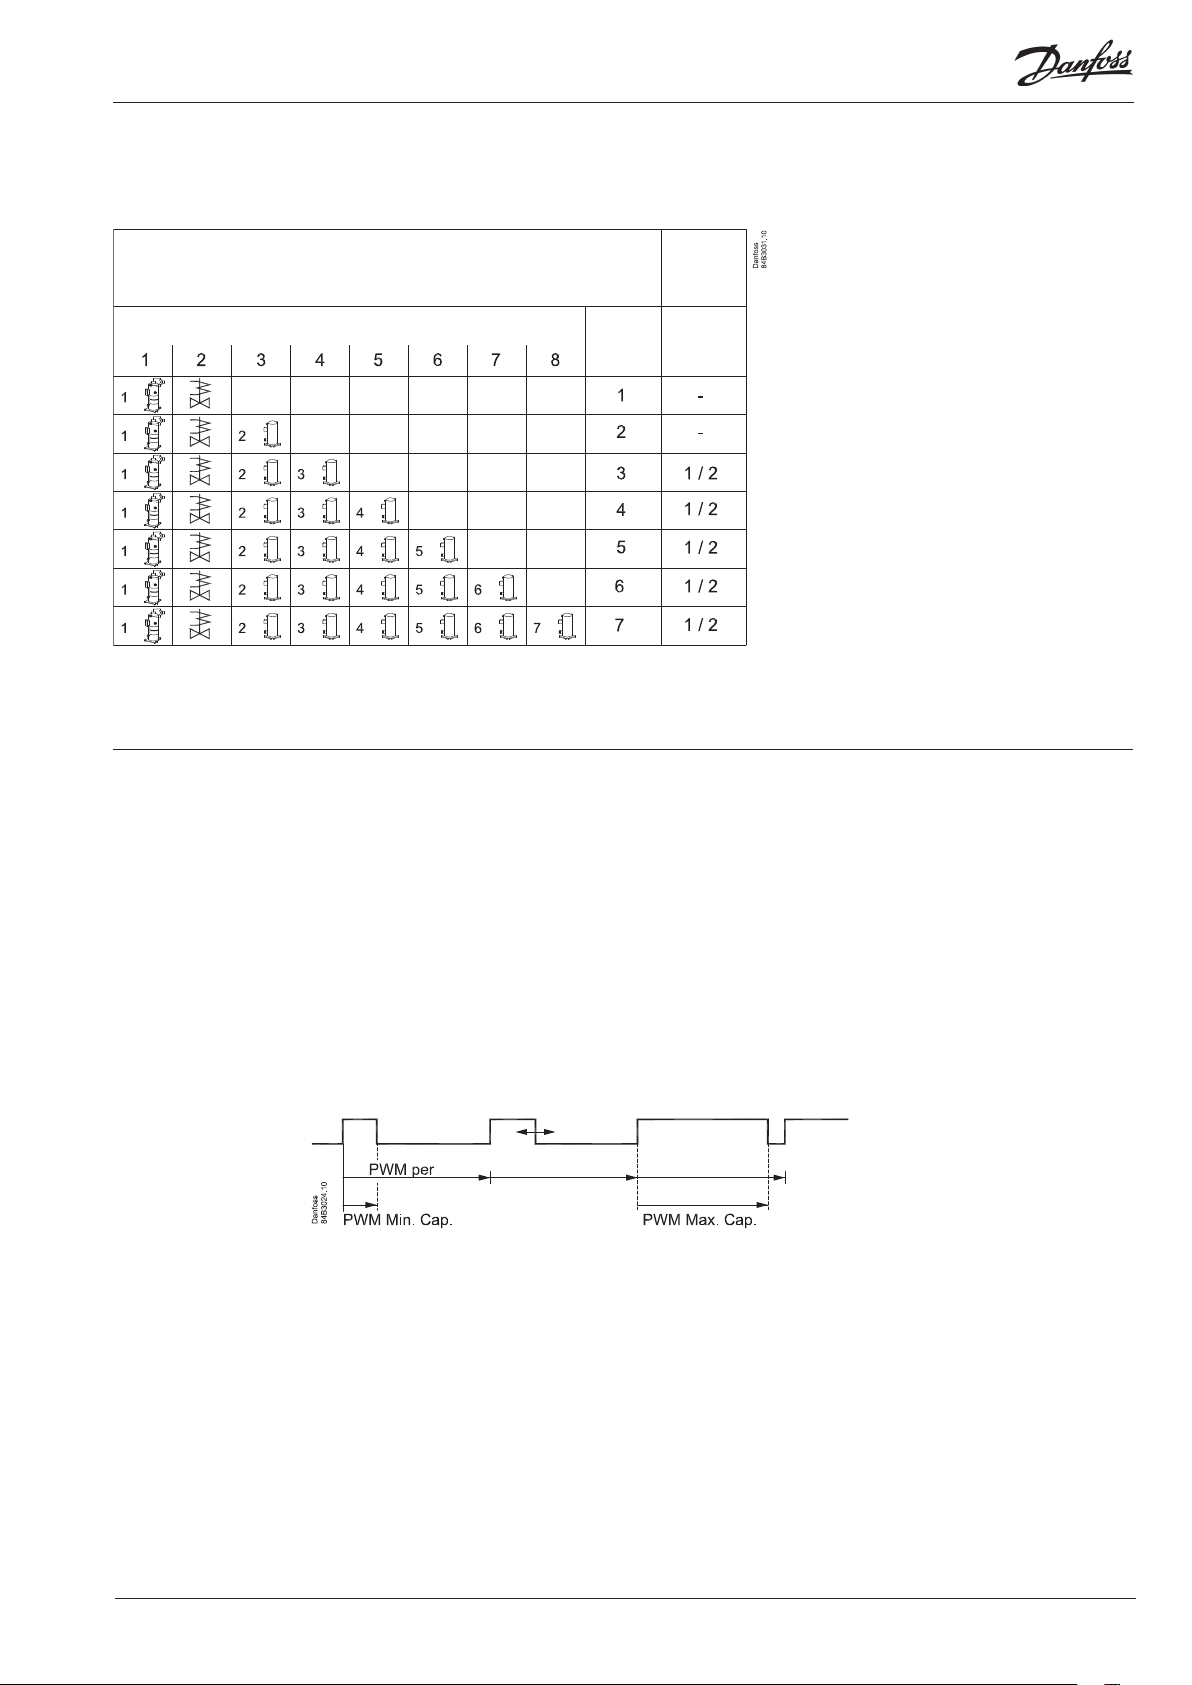
Compressor configuration when o61 =1 or 2 (This is where you can choose between the options
shown.)
Setting "c16" will define the configuration.
Setting "c08" will define coupling mode.
Compressor connections
Coupling
mode
Capacity step
All capacity steps are presumed to be identi-
cal.
Relay no.
Set
"c16"
to
Set
"c08"
to
Coupling mode
Coupling mode 1 = sequential operation.
Compressor 1 will be the first to start. Then
compressor 2 and so on.
Coupling mode 2 = cyclic operation.
Compressor 1 will always be in operation
when cooling is required. After this the compressor with the lowest number of operating
hours will be started.
The capacity from the digital scroll compressor
The capacity is divided into period times as "PWM per". 100% capacity is delivered when cooling takes place for the whole period.
An off time is required by the by-pass valve within the period and an on time is also permitted. There is "no cooling" when the
valve is on.
The controller itself calculates the capacity needed and will then vary it according to the cut-in time of the by-pass valve.
A limit is introduced if low capacity is needed so that the cooling does not go below 10%. This is because the compressor can
cool itself. This value can be increased if necessary.
The capacity can similarly be limited so that the compressor cannot deliver 100% capacity. It is not normally necessary to limit
this max. capacity.
Refrigeration
No refrigeration
AK-PC 560 Instructions RI8PM102 © Danfoss 09/2011 3

Condenser couplings
When the compressor relays have been established the turn
comes to the fan relays.
The first vacant relay (DO3-DO8) will become the first fan relay.
It will be followed by the subsequent relays. If more relays are
required than the vacant DO relays, a relay module can be
connected to the analog output. The function is, as follows:
If there are up to four external fans on an EKC 331:
If there are more than four external fans on two EKC 331 units:
1.
2.
Output signal from AK-PC 560
In EKC 331 the voltage range must be set to 0-5 V (“o10” = 6).
In EKC 331 the number of steps must be set to 4 (“o19” = 4) (also when
fewer fans are connected).
Connection
Alternating start-up of fans (only if c29 is 11 to 18)
The fans can be defined to start alternately when they have all been
stopped.
The first time regulation is started, fan 1 will be started first – the regulation
determines whether additional fans will be started.
After the next time all fans are stopped, fan 2 will be the first to be started,
and so on.
Fan 1 will again be the first fan to be started when the rotation has been
through the total number of fans.
If there is more than one fan on an EKC 331, it will not be possible to start
the other fans first. Here, the fan with the lowest voltage step will always be
the one which is started first.
If the entire condenser capacity is to be controlled by a
frequency converter, AK-PC 560 must send an analog signal
about the required capacity (“c29” = 9).
The signal varies from 0 to 10 V. Signal and capacity have the
following context.
Output signal from AK-PC 560
In the first EKC 331, set 0-5 V (“o10” = 6).
In the second EKC 331, set 5-10 V (“o10” = 7).
In both EKC’s the number of steps must be set to 4 (“o19” = 4) (also when
fewer fans are connected to the second EKC).
Connection
4 Instructions RI8PM102 © Danfoss 09/2011 AK-PC 560

Operation
Data communication
If the controller is extended with data communication, the operation can be performed from a system unit.
The importance of the alarms that are sent can be defined with
the setting: 1 (High), 2 (Medium), 3 (Low) or 0 (No alarm).
Operation via external display
The values will be shown with three digits, and with a setting you
can determine whether the pressures are to be shown in SI units
(°C / bar) or US units (°F / psig.).
There are three options for the display.
P0 is over the neutral zone
P0 is under the neutral zone
1: Relay digital scroll
2: Relay comp. 2
3: Relay comp. 3
.
.
.
10: Capacity form the
digital scroll
EKA 165
EKA 165
To operate the controller and view the evaporation pressure.
If the lowermost key is pressed, the condensation pressure will
be shown briefly in the display. (If regulation is based only on the
condensation pressure, the display will always show Pc).
During normal operation the light-emitting diodes in the display
will indicate where regulation is taking place.
Second highest : Over neutral zone
"None" : Neutral zone
Second lowest : Under neutral zone
The other LEDs on the display will show the functions that are
active:
• Relays for compressors
• The capacity can be read from the digital scroll compressor
• Relays for fans
• Input signals for the digital inputs
• The optimization LED will light up when the reference is 2 K or
more over the set point.
EKA 163
EKA 164
The buttons on the display
When you want to change a setting, the upper and the lower
buttons will give you a higher or lower value depending on the
button you are pushing. But before you change the value, you
must have access to the menu. You obtain this by pushing the
upper button for a couple of seconds - you will then enter the
column with parameter codes. Find the parameter code you want
to change and push the middle button. When you have changed
the value, save the new value by once more pushing the middle
button.
EKA 163
If the condensation pressure is to be shown constantly, a display
without operating keys can be connected.
EKA 164
To operate the controller and view the evaporation pressure.
If the lowermost key is pressed, the condensation pressure will be
shown briefly in the display.
Like the EKA 165, the LEDs in the display will show where the
regulation is located.
Or short:
1. Push the upper button (long push) until a parameter is shown
2. Push one of the buttons and find the parameter you want to
change
3. Push the middle button until the setting value is shown
4. Push one of the buttons and select the new value
5. Push the middle button again to conclude the setting
( A brief pushing will show the active alarm codes.)
AK-PC 560 Instructions RI8PM102 © Danfoss 09/2011 5

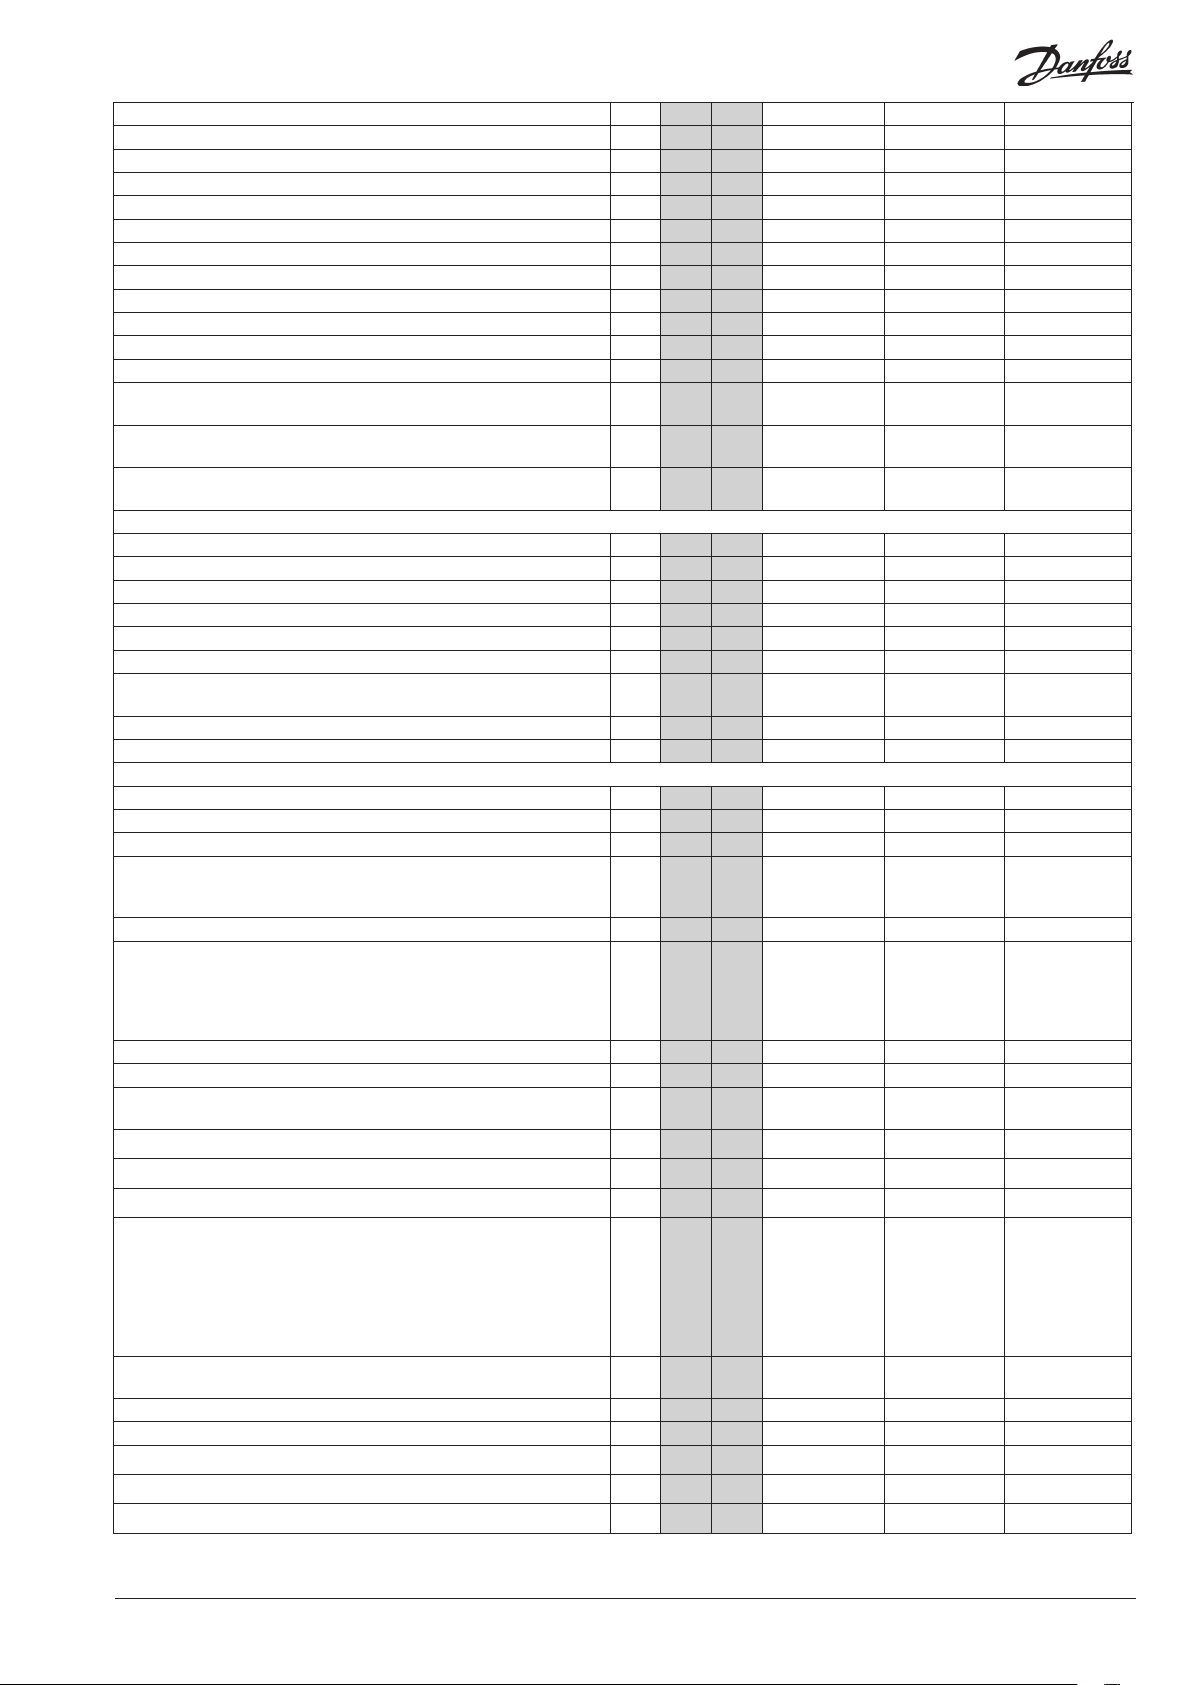
Menu survey
Sequence
1. o61 must be set as the first parameter. This parameter determines which of the four operating interfaces (application mode) are
activated. This must be set via the display keys. It cannot be set via data communication. (Active functions are shown below in shaded
fields.)
2. Quick- start
To get the system up and running quickly so that cooling can be commenced, start it by setting the following parameters (these parameters can only be set when the regulation is stopped, r12=0): r23, r28, c08, c16, c29, o06, o30, o75, o76 and finally r12=1.
3. Once the regulation is under way, you can go through the other parameters and adjust them in situ.
SW: 1.0x
Function
Normal display
Shows P0 in EKA 165 (display with buttons) - °C P °C / bar
Shows Pc in EKA 163 - °C P °C / bar
P0 reference
Neutral zone r01 0.1°C / 0.1 bar 20°C /5.0 bar 4.0°C / 0.4 bar
Correction of signal from P0 sensor r04 -50°C /-5.0 bar 50°C / 5.0 bar 0.0
Select view; SI or US. 0=SI (bar /°C), 1=US (Psig /°F)
Start/Stop of regulation r12 OFF ON OFF
Reference offset for P0 (see also r27) r13 -50°C / -5.0 bar 50°C / 5.0 bar 0.0
Set regulation set point for P0 r23 -99°C / -1 bar 30°C / 60.0 bar 0.0°C / 3.5 bar
Shows total P0 reference
( r23 + various displacements)
Limitation: P0 reference max. value
(also applies to regulation with reference displacement)
Limitation: P0 reference min. value
(also applies to regulation with reference displacement)
Displacement of P0 (ON=active “r13”) r27 OFF ON OFF
Pc reference
Set regulation set point for Pc r28 -25°C / 0.0 bar 75°C / 110.0 bar 35°C / 15.0 bar
Shows total Pc reference r29 °C / bar
Limitation: Pc reference max. value r30 -99.9°C / -0.0 bar 99.9°C/ 130.0bar 55.0°C / 60.0 bar
Limitation: Pc reference min. value r31 -99.9°C / 0.0 bar 99.9°C / 60.0 bar -99.9°C / 0.0 bar
Correction of signal from Pc sensor r32 -50°C / -5.0 bar 50°C / 5.0 bar 0.0
Pc reference variation. 1 and 2 are PI-regulation
1: Fixed reference. “r28” is used
2: Variable reference. Outdoor temperature (Sc3) included in the reference
3: As 1, but with P-regulation (Xp-band)
4: As 2, but with P-regulation (Xp-band)
Reference offset for Pc r34 -50°C / -5.0 bar 50°C / 5.0 bar 0.0
The mean temperature difference across the condenser at maximum
load (dim tm K)
The mean temperature difference across the condenser at the lowest
relevant compressor capacity (min tm K)
Capacity
Min. ON time for relays c01 0 min 30 min. 0
Min. time period between cutins of same relay c07 2 min. 60 min 2
Definition of regulation mode
1: Sequential (step mode / FILO)
2: Cyclic (step mode / FIFO)
Definition of compressor connections.
See options on page 3.
Definition of condenser:
1-8: Total number of fan relays or voltage step on the voltage output
9: Only via analog output and start of frequency converter
10: Not used
11- 18: Total number of fan relays which are to be connected with alter-
nating start-up.
Cut in compressor capacity with manual control. See also “c32” c31 0% 100% 0
Manual control of compressor capacity (when ON, the value in “c31” will
be used)
Parameter
r05 0 1 0
r24 °C / bar
r25 -99°C / -1.0 bar 30°C / 60.0 bar 30.0°C / 40.0 bar
r26 -99°C / -1.0 bar 30°C / 40.0 bar -99.9°C / -1.0 bar
r33 1 4 1
r35 3.0 50.0 10.0
r56 3.0 50.0 8.0
c08 1 2 1
c16 1 7 1
c29 0/OFF 18 0
c32 OFF (0) ON (1) OFF (0)
o61 =
1 2
Min. Max. Factory
setting
To be continued
6 Instructions RI8PM102 © Danfoss 09/2011 AK-PC 560
Pump down limit. Limit value where the last compressor is cut out. c33 -99.9°C / -1.0 bar 100°C / 60 bar 100°C / 60 bar
Time delay for incorrect cut-out, compressor 1 c77 0 s 240 s 60 s
Time delay for incorrect cut-out, compressor x; x=2, 3 and so on. c78 0 s 240 s 60 s
Pulse width period for the digital scroll modulation c79 10 s 30 s 20 s
Max. capacity in the pulse width period c80 50 % 100 % 100 %
Min. capacity in the pulse width period c81 10 % 50 % 10 %
Kp factor for PI regulation of the digital scroll c82 2 20 5
Tn factor for PI regulation of the digital scroll c83 40 s 300 s 50 s
The digital scroll's capacity compared to one of the other compressors c84 100% 200% 100%
Proportional band Xp for (P= 100/Xp) condenser regulation n04 0.2 K / 0.2 bar 40.0 K / 10.0 bar 10.0 K / 3.0 bar
I: Integration time Tn for condenser regulation
Cutin condenser capacity with manual control. See also “n53” n52 0% 100% 0
Manual control of condenser capacity (when ON, the value in “n52” will
be used)
Start speed The voltage for the speed regulation is kept at 0V until the
regulation requires a higher value than the value set here.
Min. speed. The voltage for the speed regulation switches to 0V when
the regulation requires a lower value than the value set here.
Alarm
Delay time for a A32 alarm A03 0 min. 90 min. 0 min.
Low alarm and safety limit for P0 A11 -99°C / -1.0 bar 30°C / 40 bar -40°C / 0.5 bar
Delay time for a DI1 alarm A27 0 min. (-1=OFF) 480 min. OFF
Delay time for a DI2 alarm
Delay time for a DI3 alarm
Upper alarm and safety limit for Pc
Upper alarm limit for sensor "Saux1" If a higher value is measured then
the digital scroll stops.
Delay time for a P0 alarm A44 0 min. (-1=OFF) 480 min. 0 min.
Delay time for a Pc alarm A45 0 min. (-1=OFF) 480 min. 0 min.
Miscellaneous
Controllers address o03* 1 240
On/off switch (service-pin message) o04* - -
Access code o05 1 (0=OFF) 100 OFF
Used sensor type for Saux
1=Internal Copeland NTC. (A fixed resistor must also be fitted.)
2=Pt 1000
Set supply voltage frequency o12 50 Hz (0) 60 H (1) 50Hz (0)
Manual control of outputs:
0: No override
1-10: 1 will cut in relay 1, 2 relay 2, etc.
11-18: Gives voltage signal on the analog output. (11 gives 1.25 V, and so
on in steps of 1.25 V
P0 pressure transmitter’s working range - min. value o20 -1 bar 5 bar -1.0
P0 pressure transmitter’s working range - max. value o21 6 bar 199 bar 12.0
Use of DI4-input
0=not used. 1=P0 displacement. 2=alarm function. Alarm="A31"
Operating hours of relay 1 (value time 1000) o23 0.0 h 99.9 h 0.0
Operating hours of relay 3 (value time 1000) o25 0.0 h 99.9 h 0.0
Operating hours of relay 4 (value time 1000 o26 0.0 h 99.9 h 0.0
Setting of refrigerant
1=R12. 2=R22. 3=R134a. 4=R502. 5=R717. 6=R13. 7=R13b1. 8=R23.
9=R500. 10=R503. 11=R114. 12=R142b. 13=User defined 14=R32.
15=R227. 16=R401A. 17=R507. 18=R402A. 19=R404A. 20=R407C.
21=R407A. 22=R407B. 23=R410A. 24=R170. 25=R290. 26=R600.
27=R600a. 28=R744. 29=R1270. 30=R417A. 31=R422A. 32=R413A.
33=R422D. 34=R427A. 35=R438A. 36=XP10. 37=R407F
Use of DI5-input
0=not used. 1=Pc displacement. 2=alarm function. Alarm="A32"
Pc pressure transmitter’s working range - min. value o47 -1 bar 5 bar -1.0
Pc pressure transmitter’s working range - max. value o48 6 bar 199 bar 34.0
Operating hours of relay 5 (value time 1000)
Operating hours of relay 6 (value time 1000)
Operating hours of relay 7 (value time 1000)
* this setting is only possible if data communication module is mounted in the controller
n05 30 s 600 s 150
n53 OFF (0) ON (1) OFF (0)
n54 0% 75% 20%
n55 0% 50% 10%
A28 0 min. (-1=OFF) 480 min. OFF
A29 0 min. (-1=OFF) 480 min. OFF
A30 -10 °C / 0.0 bar 200°C/200 bar 60.0°C / 60.0 bar
A32 1°C (0=OFF) 150°C 130°C
o06 1 2 1
o18 0 18 0
o22 0 2 0
o30 0 37 0
o37 0 2 0
o50 0.0 h 99.9 h 0.0
o51 0.0 h 99.9 h 0.0
o52 0.0 h 99.9 h 0.0
AK-PC 560 Instructions RI8PM102 © Danfoss 09/2011 7

Operating hours of relay 8 (value time 1000) o53 0.0 h 99.9 h 0.0
Selection of application
1. Show temperature and "c16" mode
2: Show pressure and "c16" mode
Function for relay output DO9:
0. Start / stop of speed regulation
1. Inject on signal for evaporator control
2. Boost ready (at least one compressor is on)
3. Start /stop of condenser fan
Function for relay output DO10:
0. Alarm relay
1. Start / stop of condenser fan
Definition of alarm message at DI1 signal:
0. Not used
1. Fan failure (A34)
2. DI1 alarm (A28)
Display connection
Off: EKA 164
On: EKA 165 (extended display with light-emitting diodes)
Service
Temperature at Saux (discharge gas temperature) u03
Status on DI1 input u10
Status on DI2 input u37
Read temperature at sensor "Sc3" u44 °C
Read temperature at sensor "Sc4" u45 °C
Status on DI3 input u87
Status on DI4 input u88
Status on DI5 input u89
Read regulation capacity in % of the digital scroll U28
o61 1 2 1 2 1
o75 0 3 0
o76 0 1 0
o78 0 2 0
o82 Off On Off
8 Instructions RI8PM102 © Danfoss 09/2011 AK-PC 560

The controller can give the following messages
E1 Error
message
E2
Alarm
A2
message
A11 Refrigerant not selected
A17
Fault in controller
Regulation is outside the range, or the control
signal is defective
Low P0
High Pc
A19 Compressor 1 error (29)
A20 Compressor 2 error (31)
A21 Compressor 3 error (32)
A22 Compressor 4 error (33)
A23 Compressor 5 error (34)
A24 Compressor 6 error (35)
The actual compressors
safety circuit is
interrupted.
That is to say the signal
is missing on one of the
terminals 29-36
A25 Compressor 7 error (36)
A27
Saux discharge gas temperature to high . Digital
scroll is stopped
A28 DI 1 alarm. Terminal 46 interrupted
A29 DI 2 alarm. Terminal 47 interrupted
A30 DI 3 alarm. Terminal 49 interrupted
A31 DI 4 alarm. Terminal 50 interrupted
A32 DI 5 alarm. Terminal 52 interrupted
A34 Fan alarm. There is no signal on DI1 input
A45 Regulation stopped
S0 Status
message
S2 Wait for “c01”
Regulation
S5 Wait for “c07”
S10
Refrigeration stopped by the internal or external
start/stop function
S25 Manual control of outputs
Safety cutout.
S34
Setting A30 is exceeded or all safety inputs (29-
36) are open
PS Info
Access code is required before you have access to
the settings
Messages can be brought up on the display by briefly pressing
the uppermost key. If there is more than one alarm, they can be
scrolled through
Factory setting
If you need to return to the factory-set values, it can be done in
this way:
- Cut out the supply voltage to the controller
- Keep the middle button pressed at the same time as you reconnect the supply voltage
AK-PC 560 Instructions RI8PM102 © Danfoss 09/2011 9
The Product contains electrical components
And may not be disposed together with domestic waste.
Equipment must be separate collected with Electrical and Electronic waste. According to Local and currently valid legislation.
FC-SPMC
 Loading...