

Page 1
User Guide
Capacity controller
AK-PC 520
ADAP-KOOL® Refrigeration control systems
Page 2
Introduction
Application
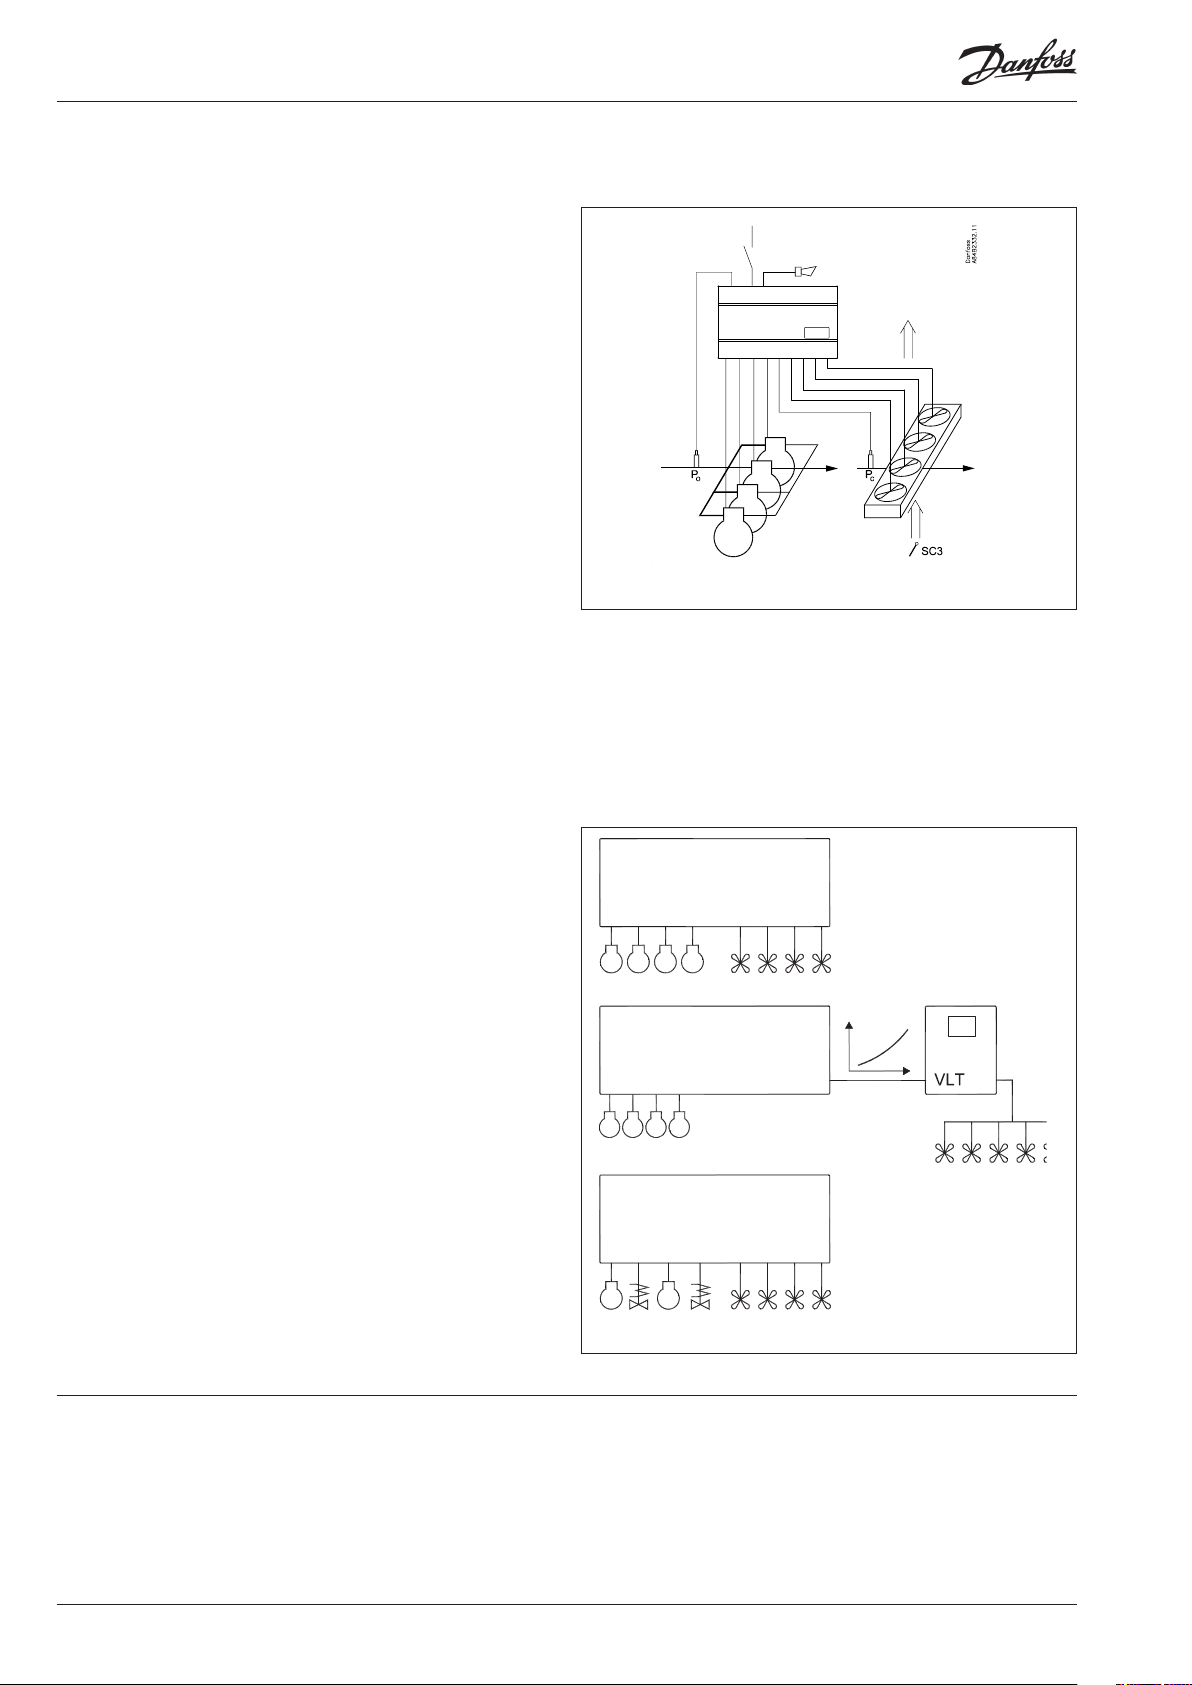
The controller is used for capacity regulation of compressors or
condensers in small refrigerating systems.
There are eight outputs and up to 4 compressors and 4 fans can
be coupled.
Advantages
• Energy conservation during:
- Suction pressure optimisation (P0)
- Variable condensing pressure (Pc)
• Patented neutral zone regulation
• Many possible combinations for compressor constellations
• Sequential or cyclic operation
• Possibility of suction pressure optimisation via the data communication
Regulation
Regulation is based on signals from one pressure transmitter for
the compressor regulation and one pressure transmitter for the
condenser regulation plus one temperature sensor for the air
temperature before the condenser.
The two pressure transmitters can be replaced by two
temperature sensors when regulation has to be carried out on
brine systems.
• Pressure regulation P0 (pack)
• Temperature regulation Sx (chiller)
• Pressure regulation Pc (pack / chiller)
• Pressure regulation with variable reference Pc (Sc3)
Functions
• Relays for compressor and condenser regulation
• Voltage output for capacity regulation of condenser
• Status inputs. An interrupted signal indicates that the safety
circuit has been activated and the respective circuit stopped
• Contact inputs for indication of alarms
• Contact inputs for displacement of references or for indication of
alarms
• Alarm relay
• External start/stop of regulation
• Possibility of data communication
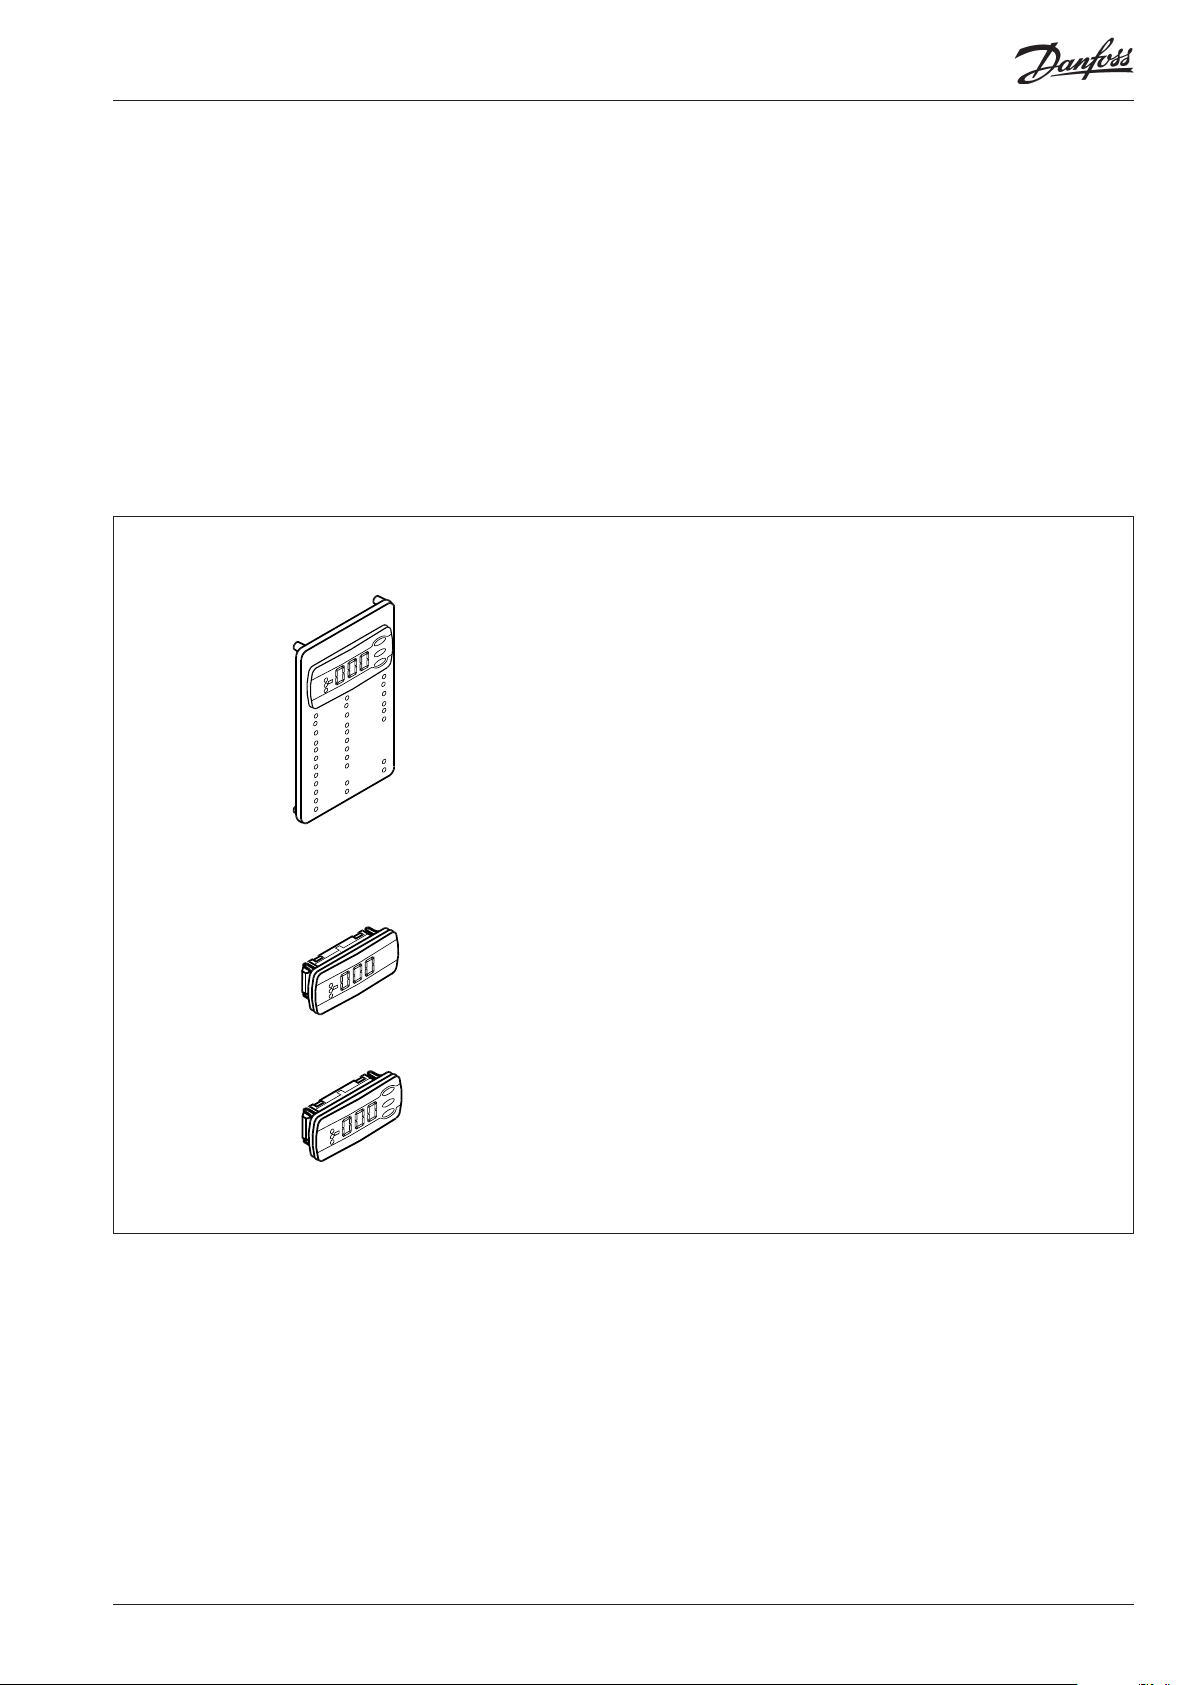
Operation
All operation takes place either via data communication or via
connection of a display type EKA 164 or EKA 165.
Combinations
The controller has ten relay outputs two of which have been
reserved for the alarm function and for the ”VLT start/stop”
function.
For a start relays are reserved for compressor capacities starting
from DO1, DO2, etc.
The next relay and the following will be for fans (max. 4 fans).
Another solution could be that the fan speed is controlled via the
analog output and a frequency converter.
Compressors and unloaders can
be combined in various ways. Cf.
survey on page 11.
Contents
Introduction ....................................................................................................... 2
Function ............................................................................................................... 3
Survey of functions .......................................................................................... 4
Operation .......................................................................................................... 13
Menu survey .....................................................................................................14
Connections ..................................................................................................... 18
2 Manual RS8FK202 © Danfoss 12-2009 AK-PC 520
Data ..................................................................................................................... 19
Ordering ............................................................................................................19
Montage ............................................................................................................ 19
Safety function ................................................................................................ 20
Override ............................................................................................................. 21
Appendix ........................................................................................................... 22
Page 3
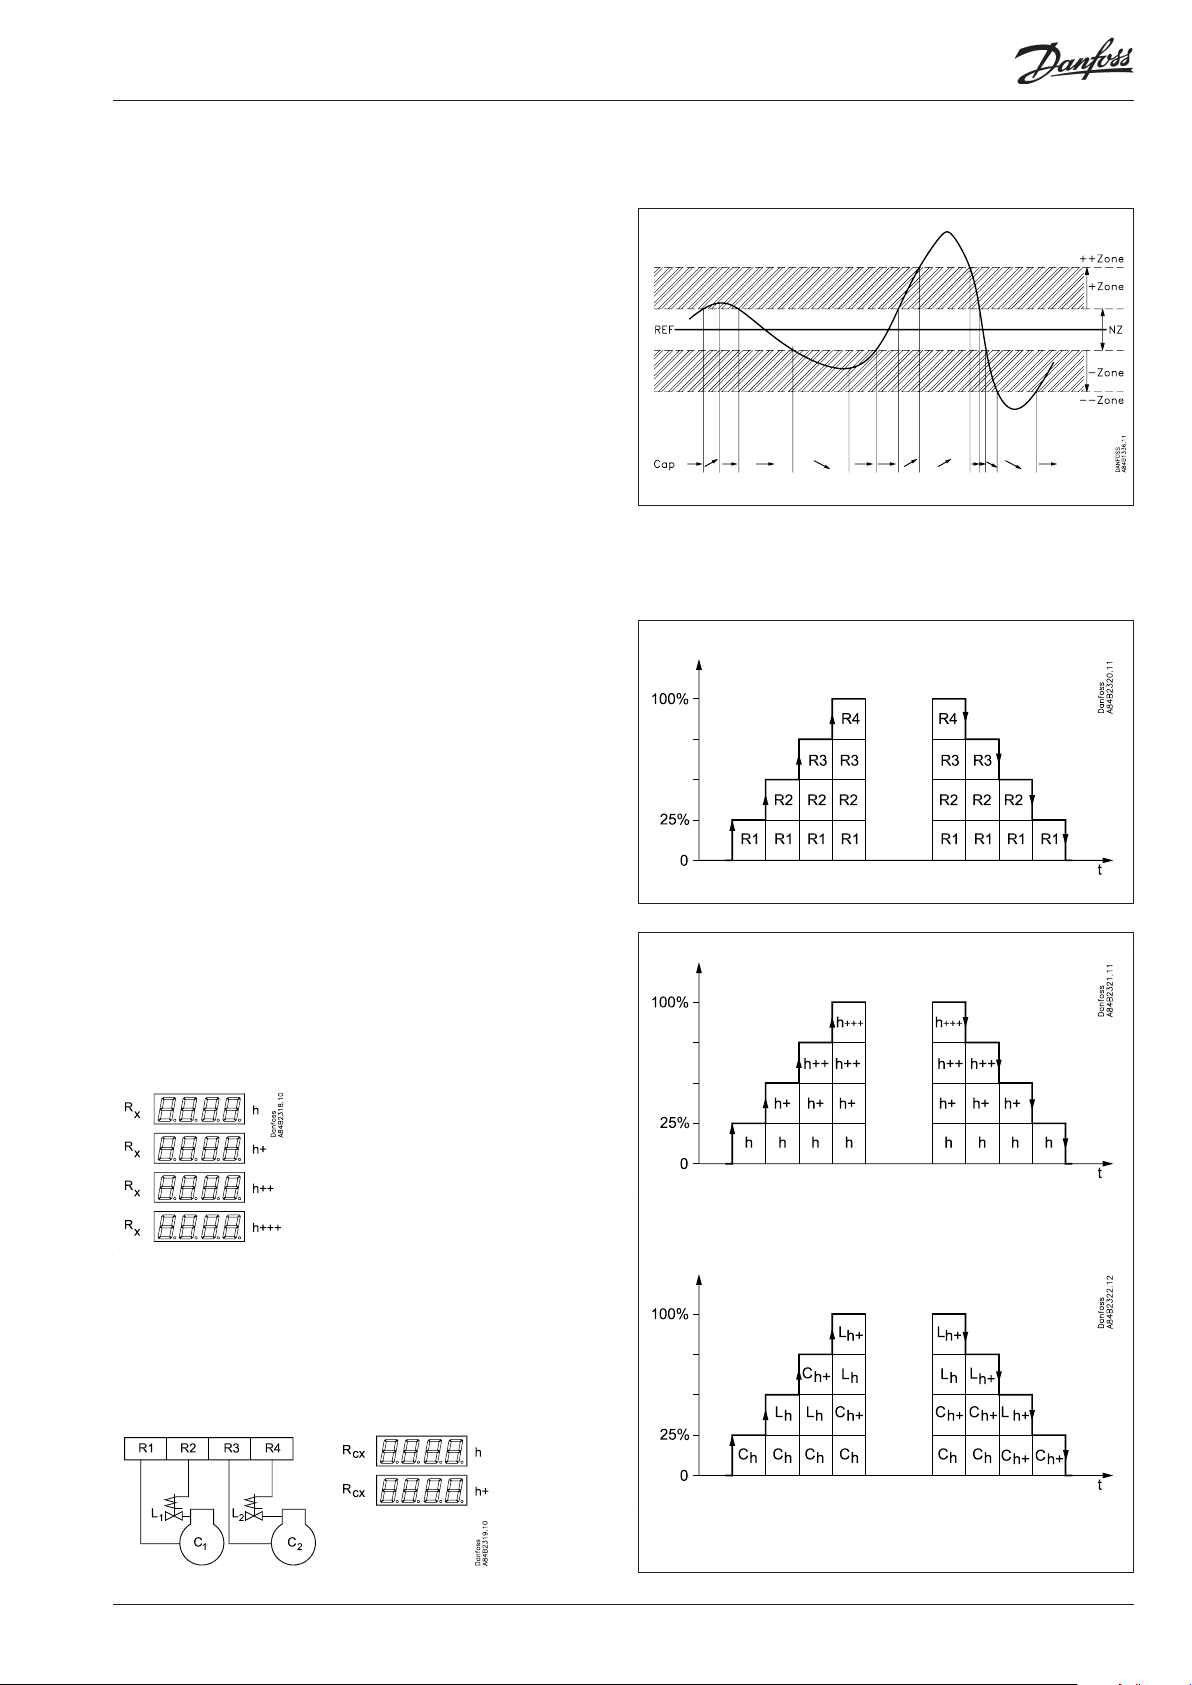
Function
Capacity regulation
The cut-in capacity is controlled by signals from the connected
pressure transmitter/temperature sensor and the set reference.
Outside the reference a neutral zone is set where the capacity will
neither be cut in nor out.
Outside the neutral zone (in the hatched areas named +zone and
-zone) the capacity will be cut in or out if the regulation registers a
change of pressure “away” from the neutral zone. Cutin and cutout
will take place with the set time delays.
If the pressure however “approaches” the neutral zone, the controller will make no changes of the cut-in capacity.
If regulation takes place outside the hatched area (named ++zone
and --zone), changes of the cut-in capacity will occur somewhat
faster than if it were in the hatched area.
Cutin of steps can be dened for either sequential or cyclic operation.
Sequential (rst in - last out)
The relays are here cut in in sequence – rst relay number 1, then
2, etc.
Cutout takes place in the opposite sequence, i.e. the last cut-in
relay will be cut out rst.
Cyclic (rst in - rst out)
The relays are coupled here so that the operating time of the
individual relays will become equalised.
At each cutin the regulation scans the individual relays’ timer,
cutting in the relay with least time on it.
At each cutout a similar thing happens. Here the relay is cut out
that has most hours on the timer.
Rx = random relay
h = number of hours
If capacity regulation is carried out on two compressors with one
unloader each, the following function can be used:
Relays 1 and 3 are connected to the compressor motor.
Relays 2 and 4 are connected to the unloaders.
Relays 1 and 3 will operate in such a way that the operating time
for the two relays will become equalised.
C = compressor, L = Unloader
AK-PC 520 Manual RS8FK202 © Danfoss 12-2009 3
Page 4
Survey of functions
The total function content is shown below – not all functions are present at the same
time. The setting of o61 determines which functions are present.
The menu overview on page 14 shows the various functions and settings.
Para-
Function
Normal display
If the two displays are mounted:
P0 will be shown on EKA 165 (the one with buttons)
Pc will be shown on EKA 163. Both readouts will be in temperature or in bar.
Compressor regulation reference Compressor control
P0 setpoint
Regulation is based on the set value plus an oset, if applicable. An oset can be created from night setback r13 and/or from a system units override function.
Oset
The set reference may be displaced with a xed value when a signal is received at the
DI4 input or from the function "Night setback" (r27).
(Cf. also Denition of DI4 input).
Night setback (Displacement of P0)
OFF: No change of the reference
ON: Oset value forms part of the reference
Reference
The regulation reference is shown here
Set point limitation
With these settings the setpoint can only be set between the two values.
(This also apply if regulation with displacements of the reference).
Max. permissible setpoint value. r25 P0RefMax °C / P0RefMax b
Min. permissible setpoint value. r26 P0RefMin °C / P0RefMin b
Neutral zone
There is a neutral zone around the reference. See also page 3.
Correction of pressure measurement
An oset adjustment of the registered pressure can be made.
Unit
Here you can select whether the display is to indicate in SI units or US units.
0: SI (°C / bar)
1: US (°F / psig)
Start/stop of refrigeration
With this setting the refrigeration can be started and stopped. Start/stop of refrigeration may also be performed with an external contact function connected to the input
named “ON input”. (The input must be wired).
Condenser regulation reference Condenser control
Pc setpoint
Regulation is based on the set value plus an oset, if applicable. An oset can be created via the “r34” function and/or from a system units override function.
Oset
The set reference may be displaced with a xed value when a signal is received at the
DI5 input. (Cf. also Denition of DI5 input).
Pc reference variation. See also page 22
Regulation with setting 1 (or 2 if the reference is to vary with the outdoor temperature) will give the best regulation if the system is in balance. But if a lot of condenser
steps are cut in and out and the compressor capacity often becomes low, it will be
necessary to select setting 3 instead (or 4, if there is regulation with the outdoor temperature). (Settings 3 and 4 will generally be preferable if a Pc-oset at max. compressor capacity can be accepted).
1: No change of the reference. Regulation based on set setpoint. And oset with the
DI5 function is allowed.
2: Outdoor temperature forms part of the reference. The outdoor temperature is
measured with Sc3. When the outdoor temperature drops one degree, the reference
is lowered one degree.
Here is oset with the DI5 function not allowed. At DI5 signal the reference will
change to the set setpoint.
Setting 1 and 2 operate with a PI regulation, but if the system is unstable and the PI
regulation not satisfactory the I element may be left out, so that the controller will be
with P regulation only.
3: As 1, but with P regulation (xp-band)
4: As 2, but with P regulation (xp-band)
meter
Parameter by operation via
data communication
P0 °C or P0 b
Pc °C or Pc b
r23 P0Set Point °C / P0Set Point b
r13 Night oset
r27 NightSetBack
r24 P0 ref. °C / P0 ref. b
r01 Neutral zone
r04 AdjustSensor
r05
(In AKM onlySI (bar and °C) is used,
whatever the setting)
r12 Main Switch
r28 PcSet Point °C / PcSet Point b
r34 PcRefOset
r33 Pc mode
4 Manual RS8FK202 © Danfoss 12-2009 AK-PC 520
Page 5
Condenser reference
The regulation reference is shown here.
Set point limitation
With these settings the setpoint can only be set between the two values.
(This also applies to regulations where the Xp band lies above the reference).
Max. permissible setpoint value. r30 PcRefMax °C / PcRefMax b
Min. permissible setpoint value. r31 PcRefMin °C / PcRefMin b
Correction of pressure measurement
An oset adjustment of the registered pressure can be made.
Dimensioning temperature Dim tm
The mean temperature dierence across the condenser at maximum load (tm dierence at max. load). This is the temperature dierence between the air and condensing
temperature.
Dimensioning temperature Min tm
The mean temperature dierence across the condenser at the lowest relevant
compressor capacity (tm dierence at min. load). This is the temperature dierence
between the air and condensing temperature.
Reading your P0
This is where you can see the actual pressure that is being measured by the pressure
transmitter.
The value is part of the regulation, since the regulation signal for capacity regulation
originates from the pressure transmitter.
The value is part of the frost protection regulation, since the regulation signal for
capacity regulation originates from the temperature sensor.
Reading your T0
This is where you can see the actual pressure being measured by the sensor chosen
for capacity regulation (the sensor is dened in o81). The value is displayed in °C.
Compressor capacity Compressor pack cong.
Running time
To prevent frequent start/stop, values have to be set for how the relays are to cut in
and out.
Min. ON time for relays.
(The time is not used if the relay cuts an unloader in or out).
Min. time period between cutin of same relay.
(The time is not used if the relay cuts an unloader in or out).
Setting for neutral zone regulation
Regulation band over the neutral zone c10 + Zone k / + Zone b
Time delay between step cut-ins in the regulation band over the neutral zone c11 + Zone m
Time delay between step cut-ins in the regulation band over the "+Zone band". c12 + + Zone m
Regulation band under the neutral zone c13 - Zone k / - Zone b
Time delay between step cut-outs in the regulation band under the neutral zone c14 - Zone m
Time delay between step cut-outs in the regulation band under the "-Zone band" c15 - - Zone m
Pump down limit
The factory setting for this function is OFF.
Activate by setting a value corresponding to pressure under the zone and over the P0
min. limit.
The function keeps the last capacity step going until the pressure comes down to the
pump down limit. When this value is reached the last compressor will cut out.
Do not reconnect capacity until the pressure is once more above the neutral zone.
Compressor conguration
Here you set the predened combination of number of compressors and any unloaders.
1 = One compressor, 2 = two compressors, 3 = three, 4 = four.
5 = One compressor + one unloader. 6 = One compressor + two unloaders.
For 7 to 8: See survey on page 11
Selection of coupling mode
1. Sequential: First relay 1 cuts in, then relay 2, etc. Cutout takes place in the opposite
sequence. (”First in, last out”).
2. Cyclic: An automatic operating time equalisation is arranged here, so that all steps
with motor connection will have the same operating time
Unloaders’ cutin and cutout mode
The relays for unloaders can be set to switch on when more capacity is required (setting = 0), or they can switch o when more capacity is called for (setting = 1).
Manual control of compressor capacity
This sets the capacity that is to be cut in when switching to manual control.
(c01 and c07 will still apply)
Manual control
Manual control of the compressor capacity is enabled here.
When set to ON, the capacity that is set in “c31” is cut in.
r29 Pc ref. °C / Pc ref. b
r32 AdjustSensor
r35 Dim tm K
r56 Min tm K
r57 P0°C / P0 b
r58 Cmp.CtrlSens
c01 Min.ON time
c07 MinRecyTime
c33 PumpDownLim.
c16 Compr mode
c08 Step mode
c09 Unloader
(switch on = 0)
(switch o = 1)
c31 CmpManCap%
c32 CmpManCap
AK-PC 520 Manual RS8FK202 © Danfoss 12-2009 5
Page 6
- - - - Comp. Cap %
Read cut-in compressor capacity
Actuel zone state:
0=o. 1= --zone. 2=-zone. 3=Neutralzone. 4=+zone. 5=++zone
Condenser capacity
Denition of condenser and number of fans
Here you set the number of fan steps with which regulation has to be carried out (but
max. four).
1-4: All fans are cut in and out with relays. The rst vacant relay number is assigned to
fan 1, the next to number 2, etc.
5-8: Not used
9: All fans controlled via the analog output and a frequency converter.
10: Not used
11-14: Total number of fan relays (as 1-4), but here the starting sequence is altered
after each time all fans are stopped.
Read temperature at sensor Sc3 u44 Sc3 temp
Read temperature at sensor Sc4 (sensor is only used for monitoring) u45 Sc4 temp
Regulation parameters for the condenser regulation
Proportional band xp (P = 100/Xp)
If the Xp value is increased, the regulation becomes steadier
I: Integration time Tn
If the Tn value is increased, the regulation becomes steadier
Manual control of condenser capacity
This sets the capacity that is to be cut in when switching to manual control.
Manual control
Manual control of the condenser capacity is enabled here.
When set to ON, the capacity that is specied in “n52” is cut in.
Speed control start value
Speed control will only be activated when the capacity requirement reaches this
value.
Speed control stop value
Speed control will be stopped when the capacity requirement falls below this value.
Alarm Alarm settings
The controller can give alarm in dierent situations. When there is an alarm the lightemitting diodes (LED) will ash on the display and the alarm relay will cut in.
P0 min. (Alarm and safety function, see also page 20.)
Here you set when the alarm at too low suction pressure is to enter into eect. The
value is set as an absolute value.
Alarm delay P0 alarm
The time delay is set in minutes. At min. setting the alarm is cancelled.
Pc max. (Alarm and safety function, see also page 20.)
Here you set when the alarm at too high condensing pressure is to enter into eect.
The value is set as an absolute value.
Alarm delay Pc alarm
The time delay is set in minutes. At min. setting the alarm is cancelled.
Alarm delay DI1 (an interrupted input will give alarm).
The time delay is set in minutes. At max. setting the alarm is cancelled.
Alarm delay DI2 (an interrupted input will give alarm).
The time delay is set in minutes. At max. setting the alarm is cancelled.
Alarm delay DI3 (an interrupted input will give alarm).
The time delay is set in minutes. At max. setting the alarm is cancelled.
Alarm limit for high temperature of the “Saux1” sensor
With setting = O the alarm has been opted out.
Alarm delay from "Saux1" (A32)
If the limit value is exceeded, a timer function will commence. The alarm will not become active until the set time delay has been passed. The time delay is set in minutes.
Give the top button a brief push to zeroset the alarm and to have the message shown
on the display.
c29 Fan mode
- - - - Fan Cap %
Read cut-in condenser capacity
n04 Xp K
n05 Tn s
n52 FanManCap%
n53 FanManCap
n54 StartSpeed
n55 MinSpeed
A11 Min. P0. b
A44 P0AlrmDelay
A30 Max. Pc. b
A45 PcAlrmDelay
A27 DI1AlrmDelay
A28 DI2AlrmDelay
A29 DI3AlrmDelay
A32 Saux1 high
A03 Alarm delay
Reset alarm
The function zerosets all alarms when
set in pos. ON.
With data communication the importance of the individual alarms can be
dened. Setting is carried out in the
“Alarm destinations” menu.
6 Manual RS8FK202 © Danfoss 12-2009 AK-PC 520
Page 7
Miscellaneous Miscellaneous
Choice of application
The regulator can be congured in various ways. The use that is required out of the
two uses available is set here. The functions for the two uses can be viewed on page
14. This menu must be set as the rst of all menus, as it enables the associated settings to
be set.
1. Show temperature
2: Show pressure
Sensor type (Sc3, Sc4 and "Saux1") (see also overview page 21)
Normally a Pt1000 sensor with great signal accuracy is used for temperature measurement and AKS 32R for pressure measurement. But a PTC sensor may also be used (r25
= 1000) in special situations.
All temperature sensors must be of the same kind.
In brine cooling the pressure measurements are replaced by temperature measurements.
The following settings are possible:
0=PT1000. 1=PTC1000. 2=PT1000 on sensors and on Po. 3=PTC1000 on sensors and
on Po. 4=PT1000 on sensors and on Pc. 5=PTC1000 on sensors and on Pc. 6=PT1000
on sensors, on Po and on Pc. 7=PTC1000 on sensors, on Po and on Pc.
(If a temperature sensor is mounted on P0 or Pc, the respective settings in o20, 21, 47
and 48 will not be required).
Settings at water cooler application
Denition of the signal inlet when compressor regulation is controlled with signal
from a temperature sensor:
0. Temperature signal on terminal 57-58 (P0 inlet)
1. Temperature signal on Saux inlet
2. Temperature signal on Sc4 inlet
(P0 min. function (A11) will not be aected by the denition)
If frost protection is required, you must connect a pressure transmitter on P0 and the
temperature sensor must be connected to the Saux or Sc4 input.
Display connection
This is where you dene the type of display that is connected to the controller
O: EKA 164
On: EKA 165. The extended display with LEDs.
Read temperature at sensor "Saux1" o49 Saux1 temp
Pressure transmitter’s working range
Depending on the pressure, a pressure transmitter with a given working range is
used. This working range must be set in the controller (e.g.: -1 to 12 bar
The values must be set in bar if display in °C has been selected. And in psig, if °F has
been selected.
P0-Min. value o20 P0MinTrsPres
P0-Max. value o21 P0MaxTrsPres
Pc-Min. value o47 PcMinTrsPres
Pc-Max. value o48 PcMaxTrsPres
Use of DI1 input
The digital input can be connected to a contact function, and the contact can now be
used for one of the following functions:
Setting / function:
0: DI input not used
1: Fan alarm when contact cuts out. Alarm "A34" is given.
2: Alarm function when the contact cuts out. Alarm “A28” is given.
There is time delay for the alarm. Setting in "A27".
Use of DI4 input
The digital input can be connected to a contact function, and the contact can now be
used for one of the following functions:
Setting / function:
0: DI input not used
1: Regulation reference P0 displaced when contact is cut in
2: Alarm function when the contact cuts out. Alarm “A31” is given. There is no time
delay.
Use of DI5 input
The digital input can be connected to a contact function, and the contact can now be
used for one of the following functions:
Setting / function:
0: DI input not used
1: Regulation reference Pc displaced when contact is cut in
2: Alarm function when the contact cuts out. Alarm “A32” is given. There is no time
delay
o61 This setting cannot be made via data
communication. It must be set directly
on the controller.
o06 Sensor type
o81 Ctrl.Sensor
o82
If the values are to be set from the
AKM programme, they must be set in
bar.
o78 Di1 control
o22 Di4 control
o37 Di5 control
AK-PC 520 Manual RS8FK202 © Danfoss 12-2009 7
Page 8
Operating hours
The operating hours for the compressor relays can be read and set in the following menus. The read value is multiplied by 1000 to obtain the number of hours (f.ex.
shows 2.1 for 2100 hours). On reaching 99.9 hours the counter stops and must now be
reset to, say, 0. There will be no alarm or error message for counter overow.
Value for relay number 1 to 4 o23-
o26
Refrigerant setting
o30 Refrigerant
Before refrigeration is started, the refrigeration must be dened. You may choose
between the following refrigerants:
1=R12. 2=R22. 3=R134a. 4=R502. 5=R717. 6=R13. 7=R13b1. 8=R23. 9=R500.
10=R503. 11=R114. 12=R142b. 13=User dened. 14=R32. 15=R227. 16=R401A.
17=R507. 18=R402A. 19=R404A. 20=R407C. 21=R407A. 22=R407B. 23=R410A.
24=R170. 25=R290. 26=R600. 27=R600a. 28=R744. 29=R1270. 30=R417A.
31=R422A.
Warning: Wrong selection of refrigerant may cause damage to the compressor.
Other refrigerants: Select setting 13 here, and subsequently three factors have to be
set – fac1, fac2 and fac3 – via AKM.
Manual control (stopped regulation only)
o18 - - From this menu the relays can be cut in and out manually. 0 gives no override, but a
number between 1 and 10 will cut in a belonging relay. 1 will cut in relay number 1, 2
relay 2, etc.
11-18 will produce voltage on the analog output. Setting 11 will give a voltage of
1.25 V, setting 12 will give 2.5 V, etc.
(In the AKM display the hour number
has not been multiplied)
DO1 run hour.....
DO4 run hour
Frequency
o12 50 / 60 Hz
Set the net frequency.
Address
If the controller is built into a network with data communication, it must have an
address, and the master gateway of the data communication must then know this
address.
These settings can only be made when a data communication module has been
mounted in the controller and the installation of the data communication cable has
been completed.
This installation is mentioned in a separate document “RC8AC”.
The address is set between 1 and 240 (gateway determined) o03
The address is sent to the gateway when the menu is set in pos. ON o04
Access code
o05
If the settings in the controller are to be protected by a numerical code, you can set a
numerical value between 0 and 100. If not, you can cancel the function with setting
OFF.
Special settings
Outputs DO9 and DO10 are normally used for the ”AKD start/stop” function and for the alarm
function, but they may be redened in special cases.
DO9 function:
o75 DO9 function
0: AKD Start/stop
1: Inject-on function (see drawing below)
2: Boost ready function (see drawing below)
3: Not used
DO10 function:
o76 DO10 function
0: Alarm relay
1: Not used
Status on the digital inputs
The signal on the DI inputs can be read in the following menus:
Status on DI 1 u10
Status on DI 2 u37
Status on DI 3 u87
Status on DI 4 u88
Status on DI 5 u89
(50=0, 60=1)
Following installation of a data communication module, the controller can
be operated on a par with the other
controllers in ADAP-KOOL® refrigeration controls.
DI 1 Status
DI 2 Status
DI 3 Status
DI 4 Status
DI 5 Status
8 Manual RS8FK202 © Danfoss 12-2009 AK-PC 520
Page 9

Conguration settings (compressor and fan denitions, coupling mode and refrigerant) can only take place when regulation is stopped.
Warning ! Direct start of compressors *
To prevent compressor breakdown parameter c01 and c07 should be set according to suppliers requirements or in general :
Hermetic Compressors c07 min. 5 minutes
Semihermetic Compressors c07 min. 8 minutes and c01 min. 2 to 5 minutes ( Motor from 5 to 15 KW )
* ) Direct activating of solenoid valves does not require settings dierent from factory (0)
DO9 function:
Inject-on function
DO9 is here used for the Inject ON function. Here all the electronic expansion valves are closed when all the compressors are stopped
and P0 > +Zone.
Wiring is carried out as shown below.
The function may however also be generated via data communication. In this way the relay output is made available for other
applications.
Boost ready function
If two controllers are to capacity regulate the high-temperature part and the low-temperature part, respectively, they must be
connected in such a way that low-temperature regulation cannot be started until the high-temperature part is operating. The signal
can be taken from DO9 of one controller and received on the ON input of the other controller.
Example:
AK-PC 520 Manual RS8FK202 © Danfoss 12-2009 9
Page 10

Operating status
The controller goes through some regulating situations where it is just waiting for the next
point of the regulation. To make these “why is nothing happening” situations visible, you can
see an operating status on the display. Push briey (1s) the upper button. If there is a status
code, it will be shown on the display. The individual status codes have the following meanings
S0: Regulation 0
S2: When the relay is operated, it must be activated for min. x minutes (cf. c01) 2
S5: Renewed cutin of the same relay must not take place more often than every x minutes (cf.
c07)
S8: The next relay must not cut in until x minutes have elapsed (cf.c11-c12) 8
S9: The next relay must not cut out until x minutes have elapsed (cf. c14-c15) 9
S10: Regulation stopped with the internal og external start/stop 10
S25: Manual regulation of outputs 25
S34: Safety cutout. Setting A30 is exceeded 34
Alarm messages Alarms "Destinations"
A2: Low P0 A02 Low P0 alarm
A11: No refrigerant has been selected (cf. o30) A11 No RFG Sel
A17: High Pc A17 Hi Pc alarm
A19 ....A22: Compr. fault. Interupted signal on actual input (terminal 29-32) A19..... A22 Comp._fault
A27: High temperature alarm for sensor "Saux1" A27 Saux1 high
A28 .... A32: External alarm. Interrupted signal on input "DI1" /2/3/4/5 A28..... A32 DI_ Alarm
A34: Fan alarm. There is signal on DI1 input A34 Fan fault
A45: Regulation stopped with setting or with external switch A45 Stand by
E1: Error in the controller E1 Ctrl. fault
E2: Control signal outside the range (short-circuited/interrupted) E2 Out of range
EKC state
(0 = regulation)
5
10 Manual RS8FK202 © Danfoss 12-2009 AK-PC 520
Page 11

Compressor conguration when o61 =1 or 2 (This is where you can choose between the options shown.)
Setting "c16" will dene the conguration.
Setting "c08" will dene coupling mode.
Compressor connections
Relay no.
Set
"c16"
to
Coupling
mode
Set
"c08"
to
Capacity step
All capacity steps are presumed to be identical.
Coupling mode
Coupling mode 1 = sequential operation.
Coupling mode 2 = cyclic operation.
Couplings
When there is cyclic operation and connections with unloaders there
will in some capacity cutins and cutouts be overlappings where the
unloaders from either one compressor or another may be active.
In such cases the unloaders on the compressor with the lowest number
of hours will be cut in, and the others cut out.
The changeover will take place at 6-second intervals.
AK-PC 520 Manual RS8FK202 © Danfoss 12-2009 11
Page 12

Condenser couplings
84B2870.10
When the compressor relays have been established the turn
comes to the fan relays.
The rst vacant relay (DO1-DO5) will become the rst fan relay. It
will be followed by the subsequent relays.
If the entire condenser capacity is to be controlled by
a frequency converter, AK-PC 520 must send an analog
signal about the required capacity (“c29” = 9).
The signal varies from 0 to 10 V. Signal and capacity
have the following context.
Danfoss
1. 2.
12 Manual RS8FK202 © Danfoss 12-2009 AK-PC 520
Page 13
Operation
Data communication
If the controller is extended with data communication, the operation can be performed from a system unit. The parameter names
for the functions can be viewed in the right-hand column on
pages 4–10.
The importance of the alarms that are sent can be dened with
the setting: 1 (High), 2 (Medium), 3 (Low) or 0 (No alarm).
Operation via external display
The values will be shown with three digits, and with a setting you
can determine whether the pressures are to be shown in SI units
(°C / bar) or US units (°F / psig.).
There are three options for the display.
EKA 165
To operate the controller and view the evaporation pressure.
If the lowermost key is pressed, the condensation pressure will
be shown briey in the display. (If regulation is based only on the
condensation pressure, the display will always show Pc).
During normal operation the light-emitting diodes in the display
will indicate where regulation is taking place.
Highest + second highest : ++Zone
Second highest : +Zone
"None" : Neutral zone
Second lowest : -Zone
Lowest+ second lowest : - - Zone
EKA 165
EKA 163
EKA 164
The buttons on the display
When you want to change a setting, the upper and the lower
buttons will give you a higher or lower value depending on the
button you are pushing. But before you change the value, you
must have access to the menu. You obtain this by pushing the
upper button for a couple of seconds - you will then enter the
column with parameter codes. Find the parameter code you want
to change and push the middle button. When you have changed
the value, save the new value by once more pushing the middle
button.
The other LEDs on the display will show the functions that are
active:
• Relays for compressors
• Relays for fans
• Input signals for the digital inputs
• The optimisation LED will light up when the reference is 2 K or
more over the set point.
EKA 163
If the condensation pressure is to be shown constantly, a display
without operating keys can be connected.
EKA 164
To operate the controller and view the evaporation pressure.
If the lowermost key is pressed, the condensation pressure will be
shown briey in the display.
Like the EKA 165, the LEDs in the display will show where the
regulation is located.
Or short:
1. Push the upper button (long push) until a parameter is shown
2. Push one of the buttons and nd the parameter you want to
change
3. Push the middle button until the setting value is shown
4. Push one of the buttons and select the new value
5. Push the middle button again to conclude the setting
( A brief pushing wil show the active alarm codes. See page 17.)
AK-PC 520 Manual RS8FK202 © Danfoss 12-2009 13
Page 14

Menu survey
Sequence
1. o61 must be set as the rst parameter. This parameter determines which of the two operating interfaces (application mode) are
activated. This must be set via the display keys. It cannot be set via data communication. (Active functions are shown below in shaded
elds.)
2. Quick- start
To get the system up and running quickly so that cooling can be commenced, start it by setting the following parameters (these parameters can only be set when the regulation is stopped, r12=0):
r23, r28 c08, c09, c16, c29, o06, o30, o75, o76, o81 and nally r12=1.
3. Once the regulation is under way, you can go through the other parameters and adjust them in situ.
SW: 1.0x
Function
Normal display
Shows P0 in EKA 165 (display with buttons) - °C P °C / bar
Shows Pc in EKA 163 - °C P °C / bar
P0 reference
Neutral zone r01 0.1°C / 0.1 bar 20°C /5.0 bar 4.0°C / 0.4 bar
Correction of signal from P0 sensor r04 -50°C /-5.0 bar 50°C / 5.0 bar 0.0
Select view; SI or US. 0=SI (bar /°C), 1=US (Psig /°F)
Start/Stop of regulation
Reference oset for P0 (see also r27) r13 -50°C / -5.0 bar 50°C / 5.0 bar 0.0
Set regulation setpoint for P0 r23 -99°C / -1 bar 30°C / 60.0 bar 0.0°C / 3.5 bar
Shows total P0 reference
( r23 + various displacements)
Limitation: P0 reference max. value
(also applies to regulation with reference displacement)
Limitation: P0 reference min. value
(also applies to regulation with reference displacement)
Displacement of P0 (ON=active “r13”) r27 OFF ON OFF
Pc reference
Set regulation setpoint for Pc r28 -25°C / 0.0 bar 75°C / 110.0 bar 35°C / 15.0 bar
Shows total Pc reference r29 °C / bar
Limitation: Pc reference max. value r30 -99.9°C / -0.0 bar 99.9°C/130.0bar 55.0°C / 60.0 bar
Limitation: Pc reference min. value r31 -99.9°C / 0.0 bar 99.9°C / 60.0 bar -99.9°C / 0.0 bar
Correction of signal from Pc sensor r32 -50°C / -5.0 bar 50°C / 5.0 bar 0.0
Pc reference variation.1 and 2 are PI-regulation
1: Fixed reference. “r28” is used
2: Variable reference. Outdoor temperature (Sc3) included in the reference
3: As 1, but with P-regulation (Xp-band)
4: As 2, but with P-regulation (Xp-band)
Reference oset for Pc r34 -50°C / -5.0 bar 50°C / 5.0 bar 0.0
The mean temperature dierence across the condenser at maximum load
(dim tm K)
The mean temperature dierence across the condenser at the lowest
relevant compressor capacity (min tm K)
This is where you can see the actual pressure (P0) that is being measured
by the pressure transmitter.
This is where you can see the actual pressure (T0) that is part of the regulation. From the sensor which is dened in “o81”
Capacity
Min. ON time for relays c01 0 min 30 min. 0
Min. time period between cutins of same relay c07 0 min. 60 min 4
Denition of regulation mode
1: Sequential (step mode / FILO)
2: Cyclic (step mode / FIFO)
If a regulation mode with unloaders is selected, the relay must be dened
to:
0: Cut in when more capacity is required
1: Cut out when more capacity is required
Regulation parameter for + Zone
Regulation parameter for + Zone c11 0.1 min 60 min 4.0
Regulation parameter for ++ Zone
Parameter
r05 0 1 0
r12 OFF ON OFF
r24 °C / bar
r25 -99°C / -1.0 bar 30°C / 60.0 bar 30.0°C / 40.0 bar
r26 -99°C / -1.0 bar 30°C / 40.0 bar -99.9°C / -1.0 bar
r33 1 4 1
r35 3.0 50.0 10.0
r56 3.0 50.0 8.0
r57 °C / bar
r58 °C
c08 1 2 1
c09 0 1 0
c10 0.1 K / 0.1 bar 20 K / 2.0 bar 4.0 / 0.4 bar
c12 0.1 min. 20 min 2.0
o61 =
1 2
Min. Max. Factory
setting
To be continued
14 Manual RS8FK202 © Danfoss 12-2009 AK-PC 520
Page 15
Regulation parameter for - Zone c13 0.1 K / 0.1 bar 20 K / 2.0 bar 4.0 / 0.3 bar
Regulation parameter for - Zone c14 0.1 min. 60 min 1.0
Regulation parameter for - - Zone c15 0.02 min. 20 min 0.5
Denition of compressor connections.
See options on page 11.
c16 1 8 0
Denition of condenser:
1-4: Total number of fan relay
5-8: Not used
9: Only via analog output and start of frequency converter
c29 0/OFF 14 0
10: Not used
11- 14: Total number of fan relays (1-4) which are to be connected with
alternating start-up.
Cut in compressor capacity with manual control. See also “c32” c31 0% 100% 0
Manual control of compressor capacity (when ON, the value in “c31” will
be used)
c32 OFF ON OFF
Pump down limit. Limit value where the last compressor is cut out. c33 -99.9°C / -1.0 bar 100°C / 60 bar 100°C / 60 bar
Proportional band Xp for (P= 100/Xp) condenser regulation n04 0.2 K / 0.2 bar 40.0 K / 10.0 bar 10.0 K / 3.0 bar
I: Integration time Tn for condenser regulation n05 30 s 600 s 150
Cutin condenser capacity with manual control. See also “n53” n52 0% 100% 0
Manual control of condenser capacity (when ON, the value in “n52” will
be used)
Start speed The voltage for the speed regulation is kept at 0V until the
regulation requires a higher value than the value set here.
Min. speed. The voltage for the speed regulation switches to 0V when the
regulation requires a lower value than the value set here.
n53 OFF ON OFF
n54 0% 75% 20%
n55 0% 50% 10%
Alarm
Delay time for a A32 alarm A03 0 min. 90 min. 0 min.
Low alarm and safety limit for P0
A11 -99°C / -1.0 bar 30°C / 40 bar -40°C / 0.5 bar
Delay time for a DI1 alarm A27 0 min. (-1=OFF) 999 min. OFF
Delay time for a DI2 alarm A28 0 min. (-1=OFF) 999 min. OFF
Delay time for a DI3 alarm A29 0 min. (-1=OFF) 999 min. OFF
Upper alarm and safety limit for Pc A30 -10 °C / 0.0 bar 200°C/200.0 bar 60.0°C / 60.0 bar
Upper alarm limit for sensor "Saux1" A32 1°C (0=OFF) 140°C OFF
Delay time for a P0 alarm A44 0 min. (-1=OFF) 999 min. 0 min.
Delay time for a Pc alarm A45 0 min. (-1=OFF) 999 min. 0 min.
Miscellaneous
Controllers address o03* 1 990
On/o switch (service-pin message) o04* - -
Access code o05 1 (0=OFF) 100 OFF
Used sensor type for Sc3, Sc4 and "Saux1"
0=PT1000, 1=PTC1000
2-7=variations with temperature sensor on P0 and Pc. See earlier in the
o06 0 7 (1) 0
manual and page 21.
Set supply voltage frequency o12 50 Hz 60 H 0
Manual control of outputs:
0: No override
1-10: 1 will cut in relay 1, 2 relay 2, etc.
o18 0 18 0
11-18: Gives voltage signal on the analog output. (11 gives 1.25 V, and so
on in steps of 1.25 V
P0 pressure transmitter’s working range - min. value o20 -1 bar 0 bar -1.0
P0 pressure transmitter’s working range - max. value o21 1 bar 200 bar 12.0
Use of DI4-input
0=not used. 1=P0 displacement. 2=alarm function. Alarm="A31"
o22 0 2 0
Operating hours of relay 1 (value time 1000) o23 0.0 h 99.9 h 0.0
Operating hours of relay 2 (value time 1000) o24 0.0 h 99.9 h 0.0
Operating hours of relay 3 (value time 1000 o25 0.0 h 99.9 h 0.0
Operating hours of relay 4 (value time 1000) o26 0.0 h 99.9 h 0.0
Setting of refrigerant
1=R12. 2=R22. 3=R134a. 4=R502. 5=R717. 6=R13. 7=R13b1. 8=R23.
9=R500. 10=R503. 11=R114. 12=R142b. 13=User dened. 14=R32.
15=R227. 16=R401A. 17=R507. 18=R402A. 19=R404A. 20=R407C.
o30 0 31 0
21=R407A. 22=R407B. 23=R410A. 24=R170. 25=R290. 26=R600.
27=R600a. 28=R744. 29=R1270. 30=R417A. 31=R422A.
* this setting is only possible if data communication module is mounted in the controller
To be continued
AK-PC 520 Manual RS8FK202 © Danfoss 12-2009 15
Page 16

Use of DI5-input
0=not used. 1=Pc displacment. 2=alarm function. Alarm="A32"
Pc pressure transmitter’s working range - min. value
Pc pressure transmitter’s working range - max. value o48 1 bar 200 bar 34.0
Read temperature at sensor "Saux1" o49 °C
Operating hours of relay 5 (value time 1000)
Operating hours of relay 6 (value time 1000) o51 0.0 h 99.9 h 0.0
Operating hours of relay 7 (value time 1000) o52 0.0 h 99.9 h 0.0
Operating hours of relay 8 (value time 1000) o53 0.0 h 99.9 h 0.0
Selection of application
1. Show temperature in display
2: Show pressure in display
Function for relay output DO9:
0. Start / stop of speed regulation
1. Inject on signal for evaporator control
2. Boost ready (at least one compressor is on)
3. Start /stop of condenser fan
Function for relay output DO10:
0. Alarm relay
1. Start / stop of condenser fan
Denition of alarm message at DI1 signal:
0. Not used
1. Fan failure (A34)
2. DI1 alarm (A28)
Settings at water cooler application
Denition of signal input to the compressor regulation when regulation
with temperature signal:
0. Temperature sensor on 57-58
1. Temperature sensor on Saux
2. Temperature sensor on Sc4
If frost protection is required, the setting must be 1 or 2.
Display connection
O: EKA 164
On: EKA 165 (extended display with light-emitting diodes)
Service
Status on DI1 input u10
Status on DI2 input u37
Read temperature at sensor "Sc3" u44 °C
Read temperature at sensor "Sc4" u45 °C
Status on DI3 input u87
Status on DI4 input u88
Status on DI5 input u89
o37 0 2 0
o47 -1 bar 0 bar -1.0
o50 0.0 h 99.9 h 0.0
o61 1 2 1 2 1
o75 0 3 0
o76 0 1 0
o78 0 2 0
o81 0 2 0
o82 O On O
16 Manual RS8FK202 © Danfoss 12-2009 AK-PC 520
Page 17

The controller can give the following messages
E1 Error
message
E2 Regulation is outside the range, or the control
A2 Alarm
message
A11 Refrigerant not selected
A17 High Pc
A19
A20 Compressor 2 error
A21 Compressor 3 error
A22
A27 Room temperature alarm (Saux1 temp.)
A28 DI 1 alarm. Terminal 46 interrupted
A29 DI 2 alarm. Terminal 47 interrupted
A30 DI 3 alarm. Terminal 49 interrupted
A31 DI 4 alarm. Terminal 50 interrupted
A32 DI 5 alarm. Terminal 52 interrupted
A34 Fan alarm. There is no signal on DI1 input
A45 Regulation stopped
S0 Status
message
S2 Wait for “c01”
S5 Wait for “c07”
S8 Wait for “c11” or “c12”
S9 Wait for “c14” or “c15”
S10 Refrigeration stopped by the internal or external
S25 Manual control of outputs
S34 Safety cutout. Setting A30 is exceeded or all
PS Info Access code is required before you have access to
Fault in controller
signal is defective
Low P0
Compressor 1 error
Compressor 4 error
Regulation
start/stop function
safety inputs (29-32) are open
the settings
The actual compressors
safety circuit is
interrupted.
That is to say the signal
is missing on one of the
terminals 29-32
Messages can be brought up on the display by briey pressing
the uppermost key. If there is more than one alarm, they can be
scrolled through
Factory setting
If you need to return to the factory-set values, it can be done in
this way:
- Cut out the supply voltage to the controller
- Keep the upper and the lower button depressed at the same
time as you recon nect the supply voltage
AK-PC 520 Manual RS8FK202 © Danfoss 12-2009 17
Page 18

Connections
Danfoss
84B2869.10
Compressor control
with temperature
o06 = 0
o81 = 1
Other combinations: see page 21
All inputs are low-voltage.
All relay outputs may be
high-voltage.
P0/Pc: AKS 32R:
1 = Black = +
2 = Blue = 3 = Brown = s
Necessary connections
Terminals:
1-2 Supply voltage 24 V a.c.
4- 19 Relay outputs for either compressors, unloaders or fan mo-
tors
22-24 Alarm relay
There is connection between 22 and 24 in alarm situa tions
and when the controller is dead
27-28 24 V signal to start / stop of regulation
27-29 24 V signal from the safety circuit DO 1
27-30 24 V signal from the safety circuit DO 2
27-31 24 V signal from the safety circuit DO 3
27-32 24 V signal from the safety circuit DO 4
57-59 Suction pressure. Voltage signal from AKS 32R **
60-62 Condenser pressure. Voltage signal from AKS 32R **
Unloader
If an output is used for an unloader it
is not necessary to wire the belonging
safety circuit.
Ex. with an unloader on DO2 a connection on terminal 30 can be left out
Application dependent connections
20-21 AKD start/stop *
The relay cutin when the frequency converter have to
start.
37-38 Voltage signal to external condenser control
(see settings page 12)
39-41 Possibility of connecting an external display type EKA 163
or display of Pc
42-44 Possibility of connecting an external display type EKA 163
for display of P0, or EKA 165 for operation and display of
P0
45-46 DI1 - Contact function for alarm signal
45-47 DI2 - Contact function for alarm signal
48-49 DI3 - Contact function for alarm signal
48-50 DI4 - Contact function for displacement of the suction
pressure reference or for alarm signal.
51-52 DI5 - Contact function for displacement of the condenser
pressure reference or for alarm signal.
51-53 Separate sensor Saux1. Sensor signal fra AKS 11, AKS 12 or
EKS 111
54-55 Out temperature (Sc3). Sensor signal from AKS 11, AKS 12
or EKS 111 (mounted if r33 =2 or 4)
54-56 Air temperature at condenser outlet. Sensor signal from
AKS 11, AKS 12 or EKS 111
Data communication
25-26 Mount only, if a data communication module has been
mounted.
For ethernet communication the plug connection RJ45
must be used. (LON FTT10 can also be connected in this
way.
It is important that the installation of the data communication cable be done correctly. Cf. separate literature No.
RC8AC.
*)
Relay DO9 may in special cases be recongurated. See also page 9.
**)
• If the controller has to control only the compressor or the fans, respectively Pc and P0
sensor can be dispensed
• In brine systems temperature measurement at terminals 57-58 and 60-61 may be
used instead of pressure measurement with AKS 32R. See also o06.
18 Manual RS8FK202 © Danfoss 12-2009 AK-PC 520
Page 19

Data Ordering
Danfoss
84B2330.11
Supply voltage 24 V a.c. +/-15% 50/60 Hz, 5 VA
2 pcs. Pressure transmitters type AKS 32R
Input signal
Digitale input from
contact function.
Relay output for
capacity regulation
"AKD start/stop" relay 1 pcs. SPST
Alarm relay 1 pcs. SPDT
Voltage output 0-10 V d.c. Max. 5 mA, Ri min. 2.2 kohm
Display outputs
Data communication
Environments
Enclosure IP 20
Weight 0.4 kg
Mounting DIN rail or on wall
Terminals max. 2.5 mm2 multicore
Approvals
(temperature sensor in brine systems)
3 pcs. temperature sensor input for PT 1000
ohm/0°C or PTC 1000 ohm/25°C
1 pcs. for Start/stop of regulation
4 pcs. for monitoring of safety circuits
3 pcs. for alarm function
2 pcs. for alarm function or for displacement of
references
8 pcs. SPST
EKA 163 Pc display
EKA 165(164)
Possible to connect a data communication
module
0 - 55°C, during operation
-40 - 70°C, during transport
20 - 80% Rh, not condensing
No shock inuence / vibrations
EU Low voltage Directive and EMC demands re
CE-marking complied with.
LVD-tested acc. to EN 60730-1 and EN 60730-2-9
EMC-tested acc. to EN61000-6-2 and 3
AC-1: 3 A (ohmic)
AC-15: 2 A (inductive)
AC-1: 6 A (ohmic)
AC-15: 3 (inductive)
Operation, P0 display and
LED
Type Function Code no.
AK-PC 520 Capacity controller 084B8012
EKA 163B Display unit 084B8574
EKA 164B Display unit with operation buttons 084B8575
EKA 165
EKA 175 Data communication module, RS 485 084B8579
EKA 178B Data communication module, MOD-bus 084B8571
EKA 174
Display unit with operation buttons
and light-emitting diodes for input and
output
Cable for display unit 2 m, 1 pcs. 084B7298
Cable for display unit 6 m, 1 pcs. 084B7299
Data communication module, LON RS
485, with galvanic separation (recommended when output 0-10 V is used)
084B8573
084B7124
Montage
AK-PC 520
Pressure transmitter / temperature sensor
Please refer to catalogue RK0YG...
Installation considerations
Accidental damage, poor installation, or site conditions, can give
rise to malfunctions of the control system, and ultimately lead to a
plant breakdown.
Every possible safeguard is incorporated into our products to
prevent this. However, a wrong installation, for example, could still
present problems. Electronic controls are no substitute for normal,
good engineering practice.
Danfoss will not be responsible for any goods, or plant components, damaged as a result of the above defects. It is the installer's
responsibility to check the installation thoroughly, and to t the
necessary safety devices.
Special reference is made to the necessity of signals to the
controller when the compressor is stopped and to the need of
liquid receivers before the compressors.
Only for front mounting (IP 40)
Only connection via plugs
Display type EKA 163 / EKA 164
Your local Danfoss agent will be pleased to assist with further
advice, etc.
Display type EKA 165
AK-PC 520 Manual RS8FK202 © Danfoss 12-2009 19
Page 20

Safety function
Criterion Compressor control Condenser control
P0 < P0 min (A11) 0% capacity. (Min ON time (c01) overrid-
den)
P0 signal failure (P0 reading < 5%) Calculated average capacity No change.
Pc > Pc max. minus 3 K
(The "HP" LED on EKA 165 lights up)
Pc > Pc max. (A30) 0% capacity 100% capacity
Pc signal failure (Pc reading < 5%) No change 100% capacity
Sc3 signal failure (Variable reference (r33) is
set to 2 or 4)
Signal failure on the regulation sensor
(Saux or S4. (o81))
Exercising fans
On the setting c29 = 1-4 the last fans will hardly be activated during the winter.
To ensure that the fans are ‘exercised’ a test will be carried out every 24 hours to check whether all relays have been in operation.
The relays that have not been used will now be activated for 30 seconds, but with a pause of one hour between individual relays.
The capacity changes to 2/3 of the actual
capacity. After 30 seconds it changes to
half capacity.
After a further 30 seconds there is a full
cut-out.
No change The variable part is omitted.
The P0 reference lowers by 5 K. At the same
time, the P0 signal becomes the regulation
sensor
No change
100% capacity
Reference (r29) = Setting (r28)
No change
20 Manual RS8FK202 © Danfoss 12-2009 AK-PC 520
Page 21

Override
The controller contains a number of functions that can be used
together with the override function in the master gateway.
They can therefore only be used in combination with data
communication.
Function via data communication Functions to be used in the system units
override function
Selection of parameter in AK-PC 520
Stop of injection when the compressor is
stopped
Night setback Day/night control and time schedule r27 NightSetback
Suction pressure optimisation P0 optimisation
The system unit registers the refrigeration point which handles the largest capacity (requires the
lowest suction pressure). The parameter may be logged for use in a service situation.
AKC ON - - - MC Inject ON
Select controller address
(The parameters are found automatically and
do not become visible).
- - - MLC
Selecting sensor type and where the signal must be connected
Overview for setting o06
Regulation P0-input Pc-input Sc3** Sc4 Saux Setting in o06
Pack/chiller
with frost protection
+ condenser
AKS 32R* AKS 32R
Pt1000 Pt1000*** Pt1000*** 0
PTC1000 PTC1000*** PTC1000*** 1
Chiller
without frost protection
+ condenser
Pack/chiller
with frost protection
+ dry cooler
Chiller
without frost protection
+ dry cooler
*) Supplies signal to frost protection.
**) Will supply signal to oating condenser regulation if it is dened in r33 (r33 = 2 or 4).
***) With brine cooling where there should also be frost protection, connect the regulation sensor to either Sc4 or Saux (dened in o81).
Pt1000
AKS 32R
PTC1000 PTC1000 PTC1000 PTC1000 3
Pt1000 Pt1000 Pt1000*** Pt1000*** 4
AKS 32R*
PTC1000 PTC1000 PTC1000*** PTC1000*** 5
Pt1000 Pt1000 Pt1000 Pt1000 Pt1000 6
PTC1000 PTC1000 PTC1000 PTC1000 PTC1000 7
Pt1000 Pt1000 Pt1000 2
AK-PC 520 Manual RS8FK202 © Danfoss 12-2009 21
Page 22

Appendix
The regulation functions are explained in more detail below.
The PC reference
You may choose between four dierent regulation modes.
Basically 1 or 2 are recommended. But if the plant is unstable it
may become necessary to change over to 3 or 4.
1. PI regulation. Fixed reference i.e. constant condensing pressure.
2. PI regulation. Floating reference with outdoor temperature i.e.
variable condensing pressure.
3. As ”1”, but with P regulation. A somewhat higher condensing
pressure than indicated by the reference must be accepted here.
4. As ”2”, but with P regulation. A somewhat higher condensing
pressure than indicated by the reference must be accepted here.
1. PI regulation with xed reference
Ref
To limit the variation in the reference, if oating reference is
chosen (mode 2 & 4), two limit values will have to be set. A max.
limit (r30) and a min. limit (r31). The total regulation reference (r29)
will not be able to go beyond these limits.
As a safeguard against too high condenser temperature a Pc max.
value (A30) also has to be set. If the temperature approaches this
value a cutout of the compressor will be started.
The dierent regulation modes are as follows:
Setpoint
The reference at any time, on the basis of which the controller
regulates, can be seen in ”r29”.
A reference (r28) is set here which with certainty can cope with all
kinds of loads.
2. PI regulation with oating reference
Ref
The reference follows the outdoor temperature Sc3. If the outdoor
temperature drops one degree the reference will also drop one
degree. The reference is adjusted according to the compressor
capacity with max. Xp value.
If you need to raise the condensing temperature for, say, heat
recovery, the setpoint (r28) must be set to this temperature.
If you need to raise the condensing temperature for, say, heat
recovery, an oset value (r34) has to be set.
The DI5 function must be dened to 1.
When a signal is subsequently received on the DI5 input the
reference will be raised.
The DI5 function must be dened to 1.
When a signal is subsequently received on the DI5 input the
reference will be changed to the r28 setting.
The reference at any time, on the basis of which the controller
regulates, can be seen in ”r29”.
If there is sensor failure on the outdoor temperature sensor the
reference will change over to the r28 setting.
22 Manual RS8FK202 © Danfoss 12-2009 AK-PC 520
Page 23
3. P regulation with xed setting
Ref
As ”1”, but an increasing deviation from the reference must be
accepted as the controller uses the dierence between the actual
condenser temperature and the set reference for indicating the
number of fans that has to be cut in.
4. P regulation with oating reference
Ref
The number of fan steps is divided up based on the Xp value.
Recommended setting for Xp is the DT of the condenser, typically
10 to 15 K.
The cutin and cutout of fans are shown in the drawing.
If the entire condenser capacity is controlled by speed regulation,
the capacity will be indicated on the broken line.
As ”2”, but an increasing deviation from the reference must be
accepted as the controller uses the dierence between the actual
condenser temperature and the actual outdoor temperature for
indicating the number of fans that has to be cut in. (The rst "r56degrees" are left out, as there must be a possibility of cooling via
the condenser).
The number of fan steps is divided up based on the Xp value.
Recommended setting for Xp is the DT of the condenser, typically
10 to 15 K.
The cutin and cutout of fans are shown in the drawing.
If the entire condenser capacity is controlled by speed regulation,
the capacity will be indicated on the broken line.
Important settings for avoiding unwanted alarms
When r33 = 1 or 2:
Set Pc ref max. to at least 5 K under Pc max. (A30).
When r33 = 3 or 4:
Set Pc ref max. to at least (Xp value +5) K under Pc max. (A30).
AK-PC 520 Manual RS8FK202 © Danfoss 12-2009 23
Page 24

List of literature
Installation guide for extended operation RC8AC-Here you can see how a data communication connection to ADAP-KOOL® Refrigeration controls can be established.
Danfoss can accept no responsibility for possible errors in catalogues, brochures and other printed material. Danfoss reserves the right to alter its products without notice. This also applies to products
already on order provided that such alternations can be made without subsequential changes being necessary in specications already agreed.
All trademarks in this material are property of the respecitve companies. Danfoss and Danfoss logotype are trademarks of Danfoss A/S. All rights reserved.
24 Manual RS8FK202 © Danfoss 12-2009 AK-PC 520
DE-BD
 Loading...