

Page 1
OWNER’S MANUAL
MANUEL DU PROPRIÉTAIRE
MANUAL DEL PROPIETARIO
*
*
*
UPRIGHT FREEZER
Owner’s Manual...............................1 - 8
CONGÉLATEUR VERTICAL
Manuel du propriétaire...................9 - 16
CONGELADOR VERTICAL
Manual del propietario.................17 - 24
MODEL * MODÈLE * MODELO
DUF167A4WDD
DUF167A4BSLDD
www.Danby.com
DANBY PRODUCTS LIMITED, ONTARIO, CANADA N1H 6Z9
DANBY PRODUCTS INC., FINDLAY, OHIO, USA 45840
PRÊT POUR
LE GARAGE
2020.10.08
Page 2

Welcome to the Danby family.
We are proud of our quality products and we believe in dependable service. We suggest
that you read this owner’s manual before plugging in your new appliance as it contains
important operation information, safety information, troubleshooting, and maintenance tips
to ensure the reliability and longevity of your appliance.
You are entitled to the warranty coverage as described in the owner’s manual provided with
your new appliance.
1. Please write down your appliance information below. You must keep the original proof
of purchase receipt to validate and receive warranty services.
2. Register your product online and receive a FREE 2 MONTH WARRANTY EXTENSION
after fi lling out a product survey, at www.danby.com/support/product-registration/
Model Number: ____________________________________________________
Serial Number: ____________________________________________________
Date of Purchase: __________________________________________________
Need Help?
1. Read your Owner’s Manual for installation help, troubleshooting, and maintenance
assistance.
2. Visit www.Danby.com to access self-service tools, FAQs and much more by searching
your model number in the search bar.
3. For the Quickest Customer Service, please fi ll out the web form at www.danby.com/
support. Your submission will go directly to an expert on your particular appliance.
Our average response times are between 20 minutes and 2 hours, during EST business
hours.
4. Call 1-800-263-2629 - please note that during peak hours, hold times can exceed one
hour.
1
Page 3
Important Safety Information
READ AND FOLLOW ALL SAFETY INSTRUCTIONS
SAFETY REQUIREMENTS
DANGER: Risk of fi re or explosion. Flammable
refrigerant used. Do not puncture refrigerant tubing.
• Do not use mechanical devices to defrost
refrigerator.
• Ensure that servicing is done by factory
authorized service personnel, to minimize
product damage or safety issues.
• If the power supply cord is damaged, it must be
replaced by the manufacturer, its service agent
or similar qualifi ed person in order to avoid
hazard.
• Consult repair manual or owner’s guide before
attempting to service this product. All safety
precautions must be followed.
• Dispose of properly in accordance with federal
or local regulations.
• Follow handling instructions carefully.
• Do not store explosive substances such as
aerosol cans with a fl ammable propellant in this
appliance.
WARNING: Keep ventilation openings, in the
appliance enclosure or in the built-in structure, clear
of obstruction.
WARNING: Do not use mechanical devices or other
means to accelerate the defrosting process, other
than those recommended by the manufacturer.
WARNING: Do not damage the refrigerant circuit.
WARNING: Do not use electrical appliances inside
the food storage compartments of the appliance,
unless they are of the type recommended by the
manufacturer.
CAUTION: Children should be supervised to ensure
that they do not play with the appliance.
SAFETY REQUIREMENTS
This appliance is not intended for use by persons
(including children) whose physical, sensory or
mental capabilities may be different or reduced,
or who lack experience or knowledge, unless such
persons receive supervision or training to operate
the appliance by a person responsible for their
safety.
This appliance is intended to be used in household
and similar applications such as:
• Staff kitchen areas in shops, offi ces and other
working environments;
• Farm houses and by clients in hotels, motels and
other residential type environments;
• Bed and breakfast type environments;
• Catering and similar non-retail applications.
GROUNDING INSTRUCTIONS
This appliance must be grounded. Grounding
reduces the risk of electrical shock by providing an
escape wire for the electrical current.
This appliance has a cord that has a grounding
wire with a 3-prong plug. The power cord must be
plugged into an outlet that is properly grounded.
If the outlet is a 2-prong wall outlet, it must be
replaced with a properly grounded 3-prong wall
outlet. The serial rating plate indicates the voltage
and frequency the appliance is designed for.
WARNING - Improper use of the grounding
plug can result in a risk of electric shock.
Consult a qualifi ed electrician or service agent
if the grounding instructions are not completely
understood, or if doubt exists as to whether the
appliance is properly grounded.
DANGER: Risk of child entrapment. Before throwing
away an old appliance:
• Remove the door or lid.
• Leave shelves in place so that children may not
easily climb inside.
DANGER: Do not add a lock to the door or lid. This
can cause child entrapment and harm.
SAVE THESE INSTRUCTIONS!
Do not connect your appliance to extension
cords or together with another appliance in the
same wall outlet. Do not splice the power cord.
Do not under any circumstances cut or remove the
third ground prong from the power cord. Do not
use extension cords or ungrounded (two prongs)
adapters.
2
Page 4
INSTALLATION INSTRUCTIONS OPERATING INSTRUCTIONS
LOCATION
• Two people should be used when moving the
appliance.
• Remove interior and exterior packaging prior to
installation. Wipe the outside of the appliance
with a soft, dry cloth and the inside with a
lukewarm wet cloth.
• Place the appliance on a fl oor that is strong
enough to support it when it is fully loaded.
• Do not place the appliance in direct sunlight or
near sources of heat, such as a stove or heater,
as this can increase electrical consumption.
Extreme cold ambient temperatures may also
cause the appliance to perform improperly.
• Do not use the appliance near water, for
example in a wet basement or near a sink.
• This appliance is intended for indoor household
and garage use only. Freezers are tested to
perform in temperatures ranging from 0°F to
110°F (-17°C to 43°C). It is not designed for
outside installation, including anywhere that
is not temperature controlled such as porches,
vehicles, etc.
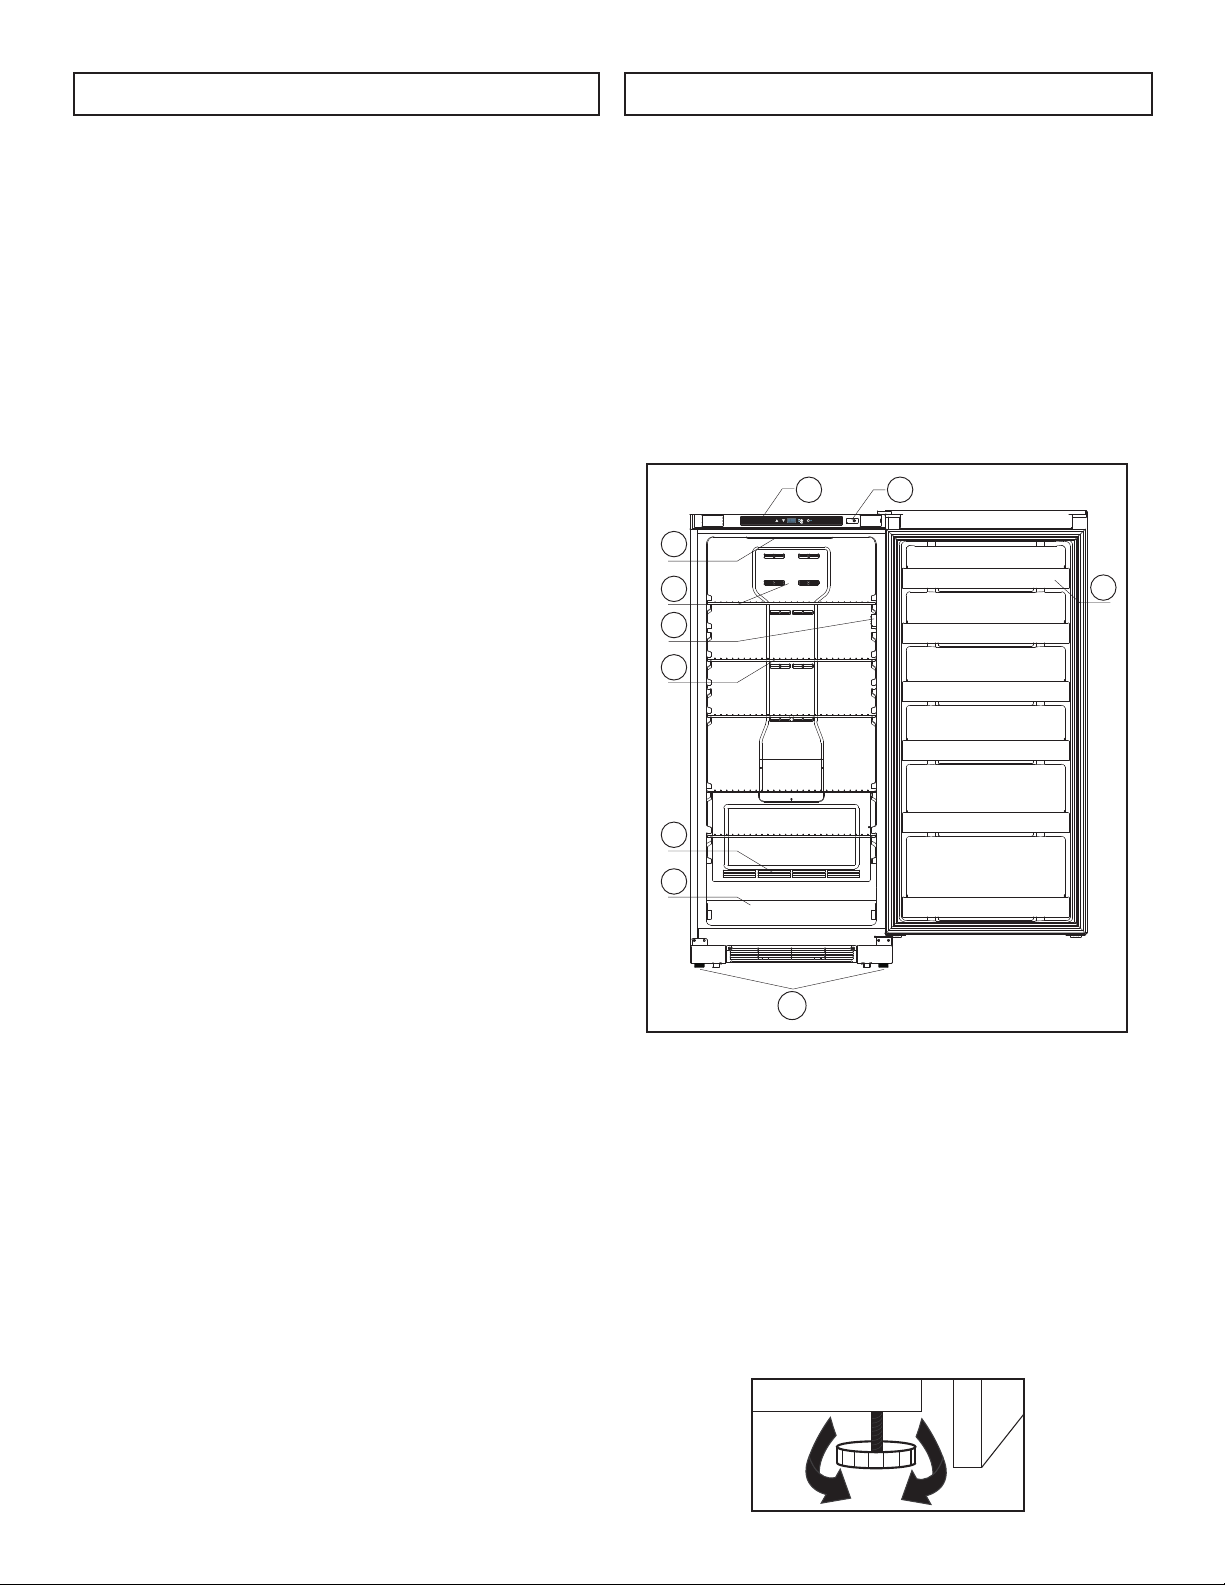
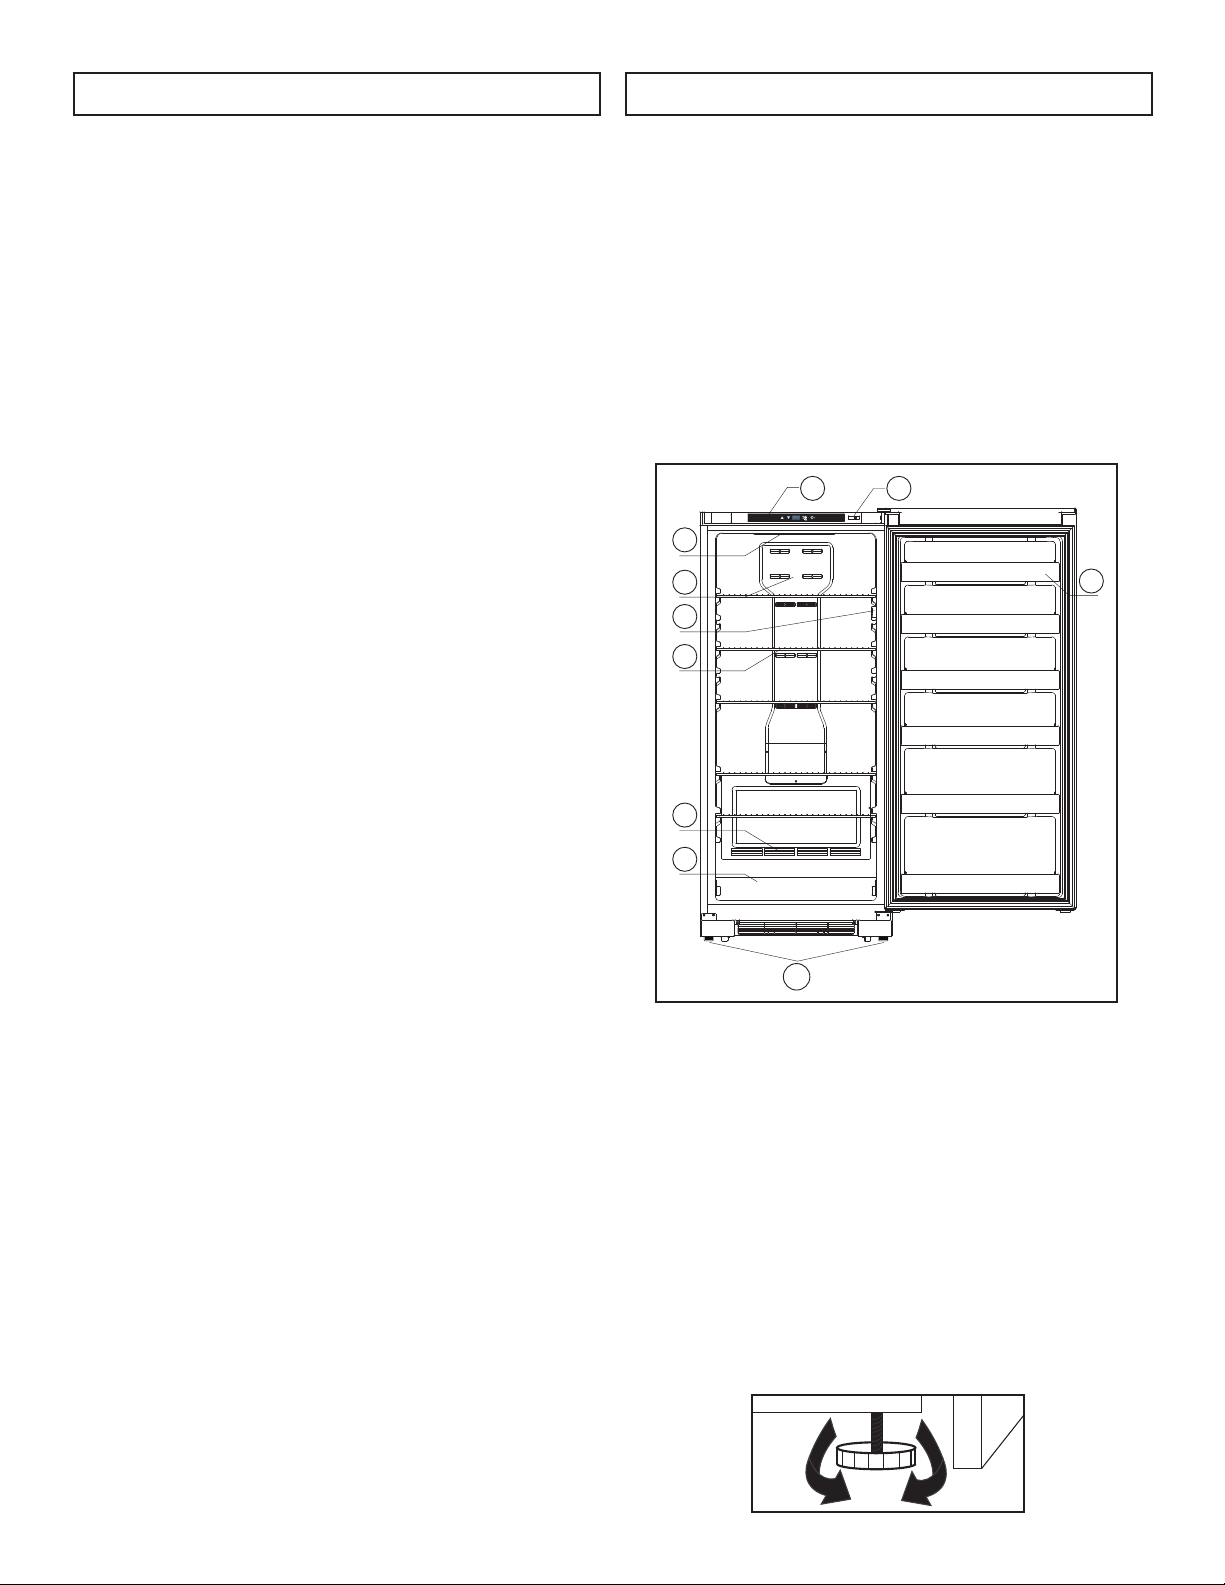
FEATURES
1. Light Switch
2. Control Panel
3. LED Light
4. Airfl ow Outlet
5. Temperature Sensor
6. Freezer Shelf
7. Airfl ow Inlet
8. Shelf Front
9. Door Shelf
10. Adjustable Feet
3
4
5
6
7
12
9
• Before connecting the appliance to a power
source, let it stand upright for approximately
6 hours. This will reduce the possibility of a
malfunction in the cooling system from handling
during transportation.
• This appliance is 76.1 cm (29.9 inches) wide by
170.9 cm (67.3 inches) high by 72.4 cm (28.5
inches) deep.
• Allow 12.7 cm (5 inches) of space between the
back, sides and top of the appliance and all
adjacent walls.
• This appliance is intended for free-standing
installation only and is not intended to be
built into a cabinet or counter. Building in this
appliance can cause it to malfunction.
8
10
LEVELING INSTRUCTIONS
There are two adjustable legs on the bottom of the
appliance that can be turned up or down to ensure
that the appliance is level.
1. Turn the leveling leg counter-clockwise as far as
it will go, until the top of the foot is touching the
bottom of the chassis.
2. Slowly turn the leveling leg clockwise until the
appliance is level.
3
Page 5
OPERATING INSTRUCTIONS
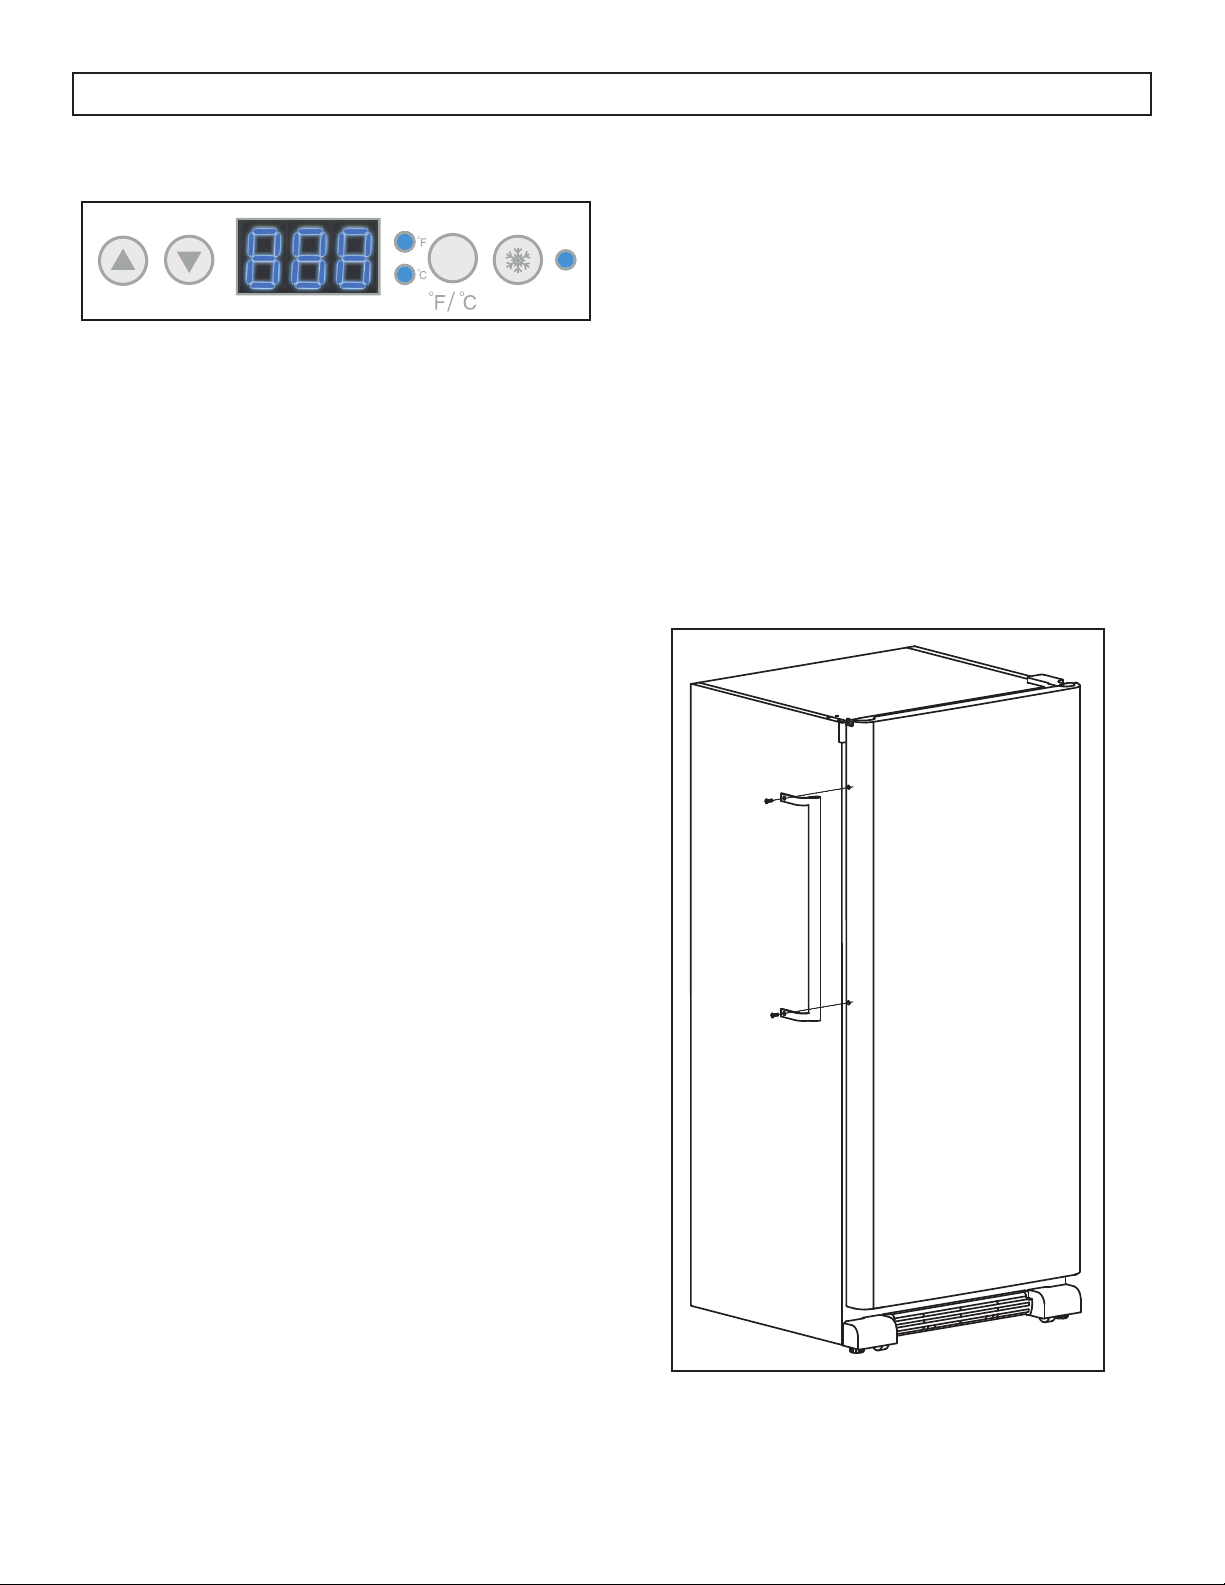
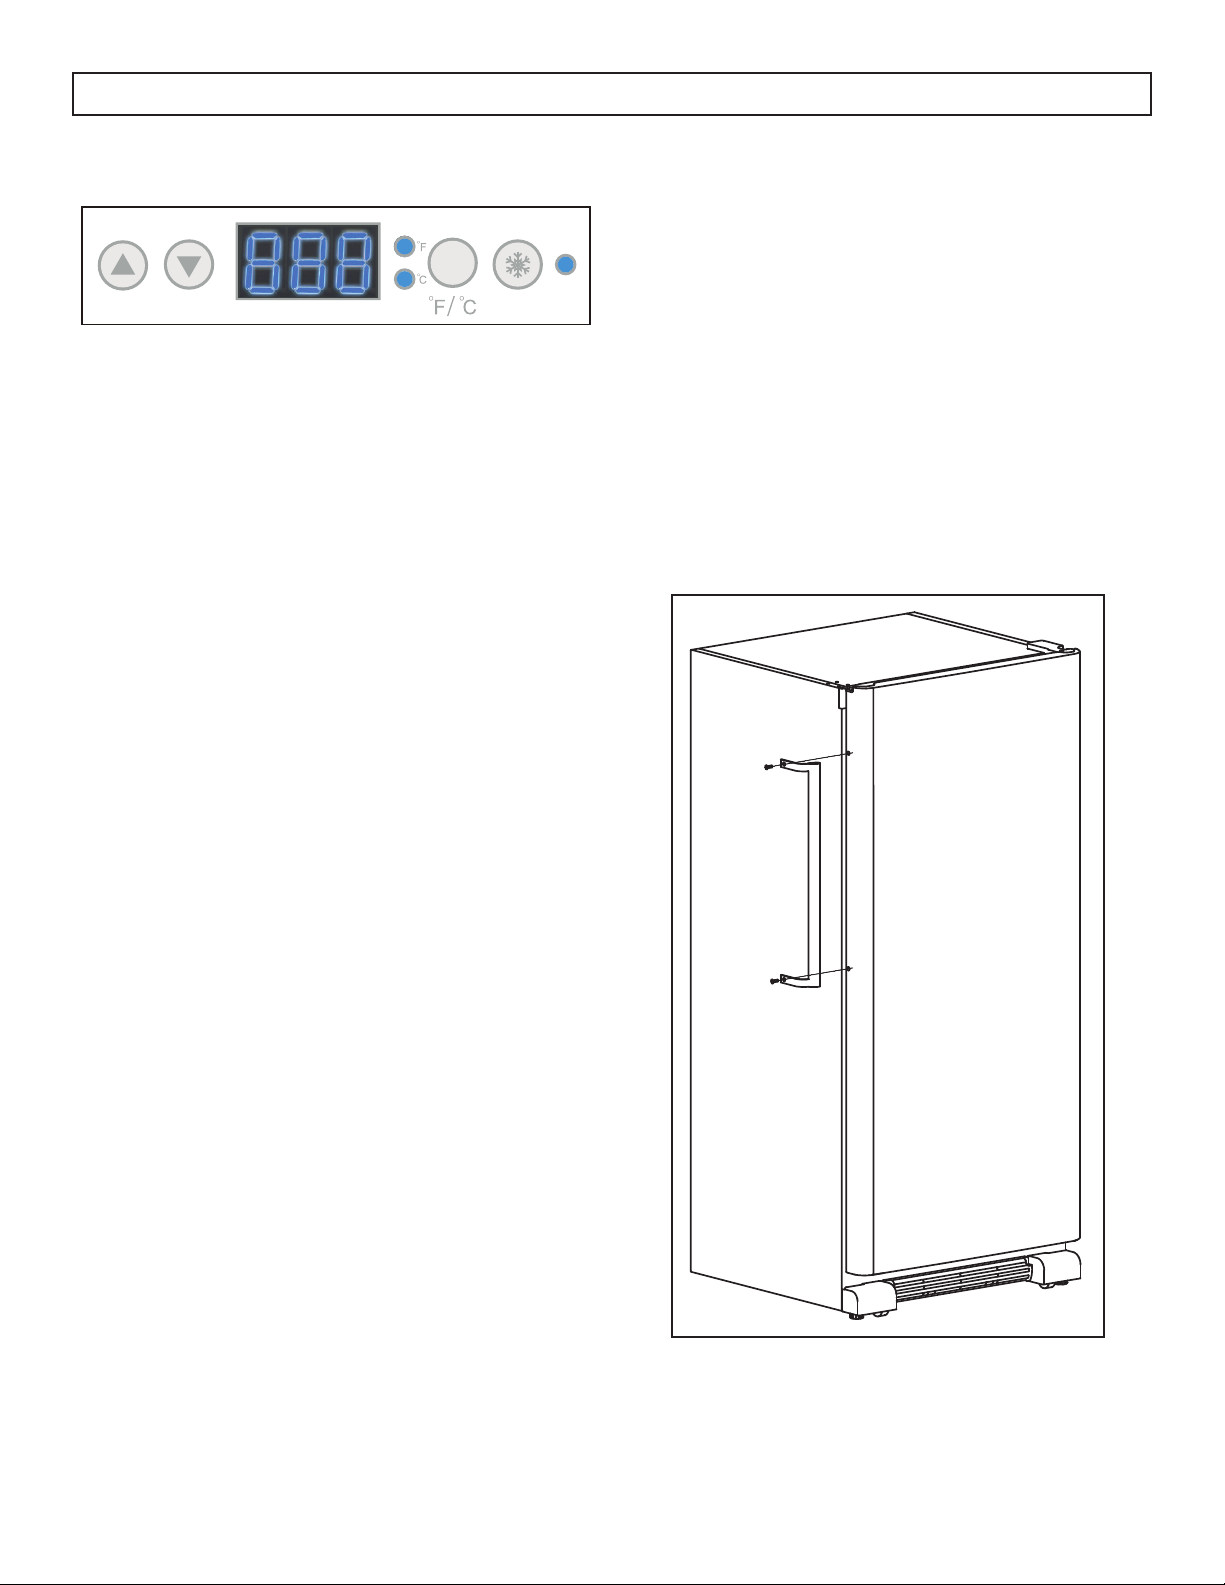
CONTROL PANEL
TEMPERATURE SETTING
Press the arrow buttons to set or adjust the
temperature.
The temperature can be set between -14°C to -24°C
(7°F to -11°F).
The recommended temperature setting is -18°C
(0°F).
FAST FREEZE FUNCTION
This function should be used when the appliance is
fi rst turned on, when it has been fi lled with groceries
or if the door has been open for an extended
period. This function will run the compressor
constantly to reach the coldest temperature as
quickly as possible.
HANDLE INSTALLATION
The appliance ships with the handle inside the
cabinet to protect it from damage. It must be
installed by the end user. The appliance should be
unplugged before installing the handle.
1. Position the handle over the exposed door
handle posts.
2. Remove the two screws from the side of door
with a screwdriver, insert screws into the handle
bracket, fi x it to the side of door and tighten it
until snug.
Note: The handle may look slightly different based
on the colour of the appliance.
Press and hold the fast freeze button for three
seconds to activate the fast freeze. The LED indicator
will illuminate.
To cancel the fast freeze function press and hold the
fast freeze button until the LED indicator turns off.
When the fast freeze cycle has fi nished or is
canceled the appliance will revert back to the last
set temperature.
TEMPERATURE SCALE
To switch between °C and °F, press the °C/°F
button, the corresponding indicator light will
illuminate.
OPEN DOOR ALARM
This appliance is equipped with a door alarm that
will sound if the door is left open for more than 3
minutes. The alarm will beep and the display will
fl ash continuously until the door is closed.
4
Page 6
OPERATING INSTRUCTIONS
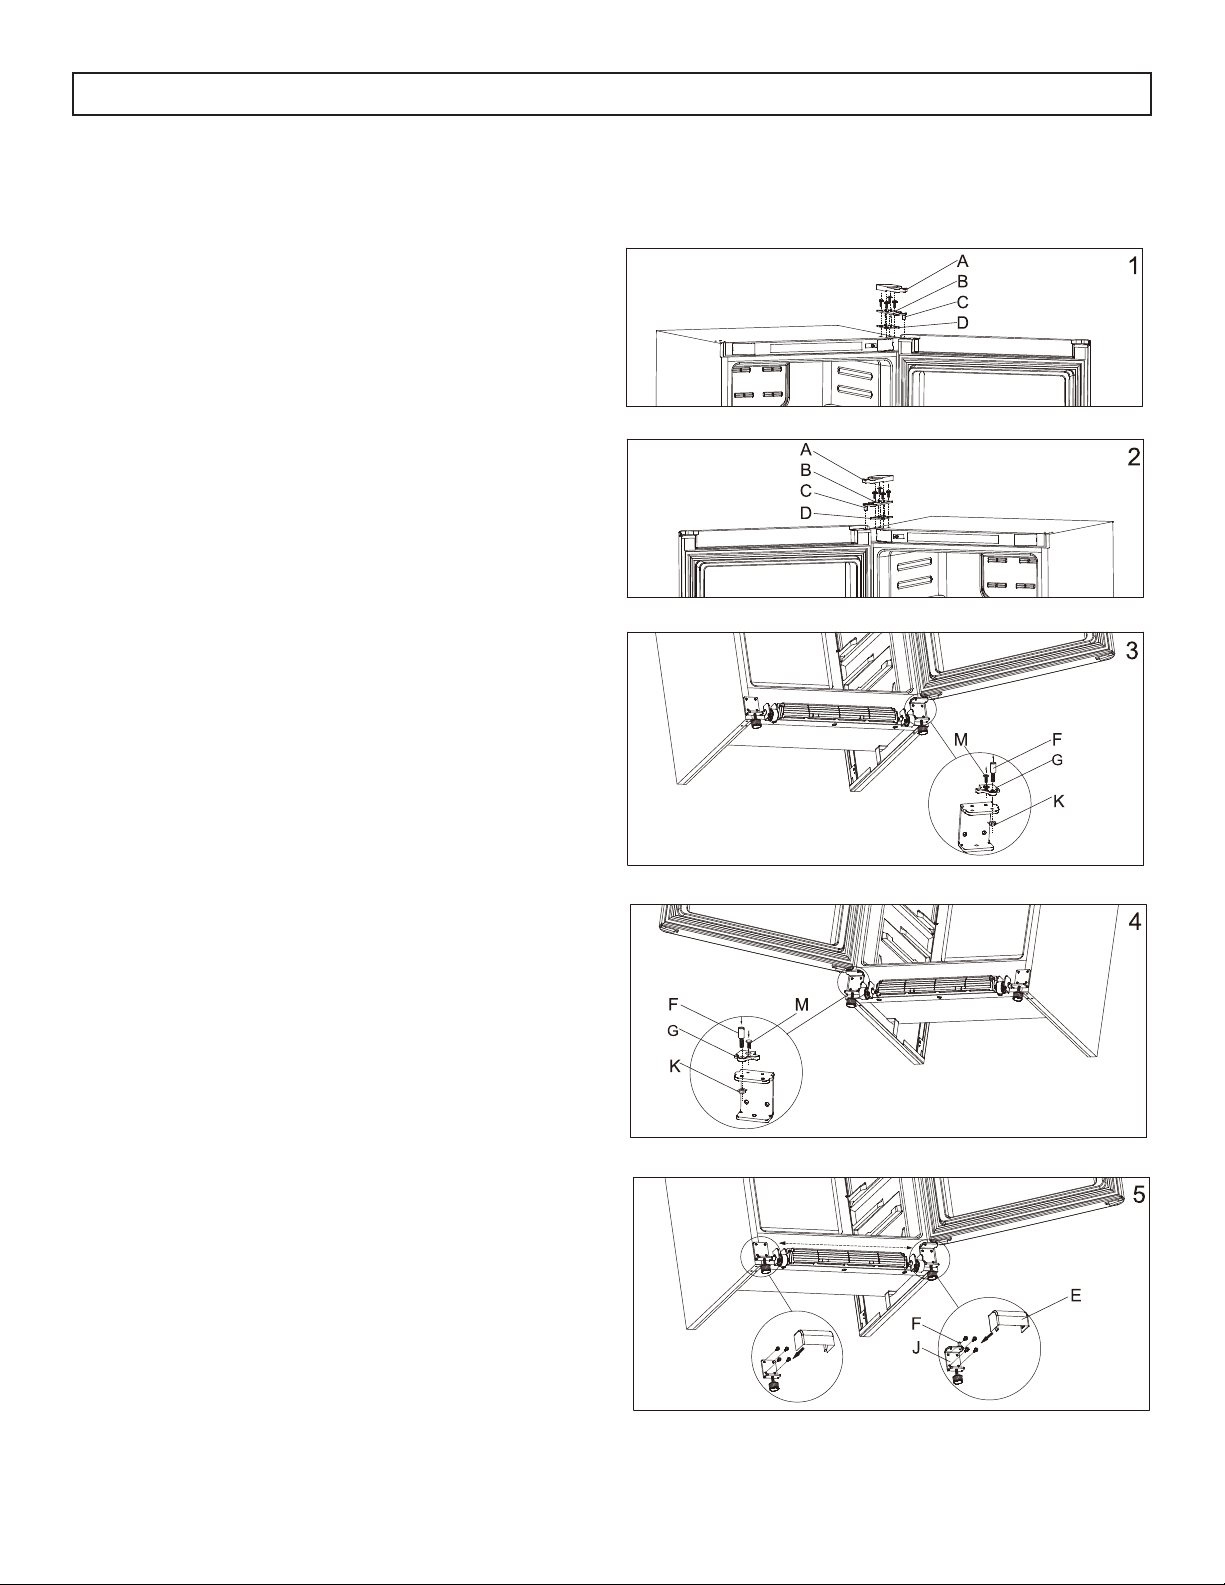
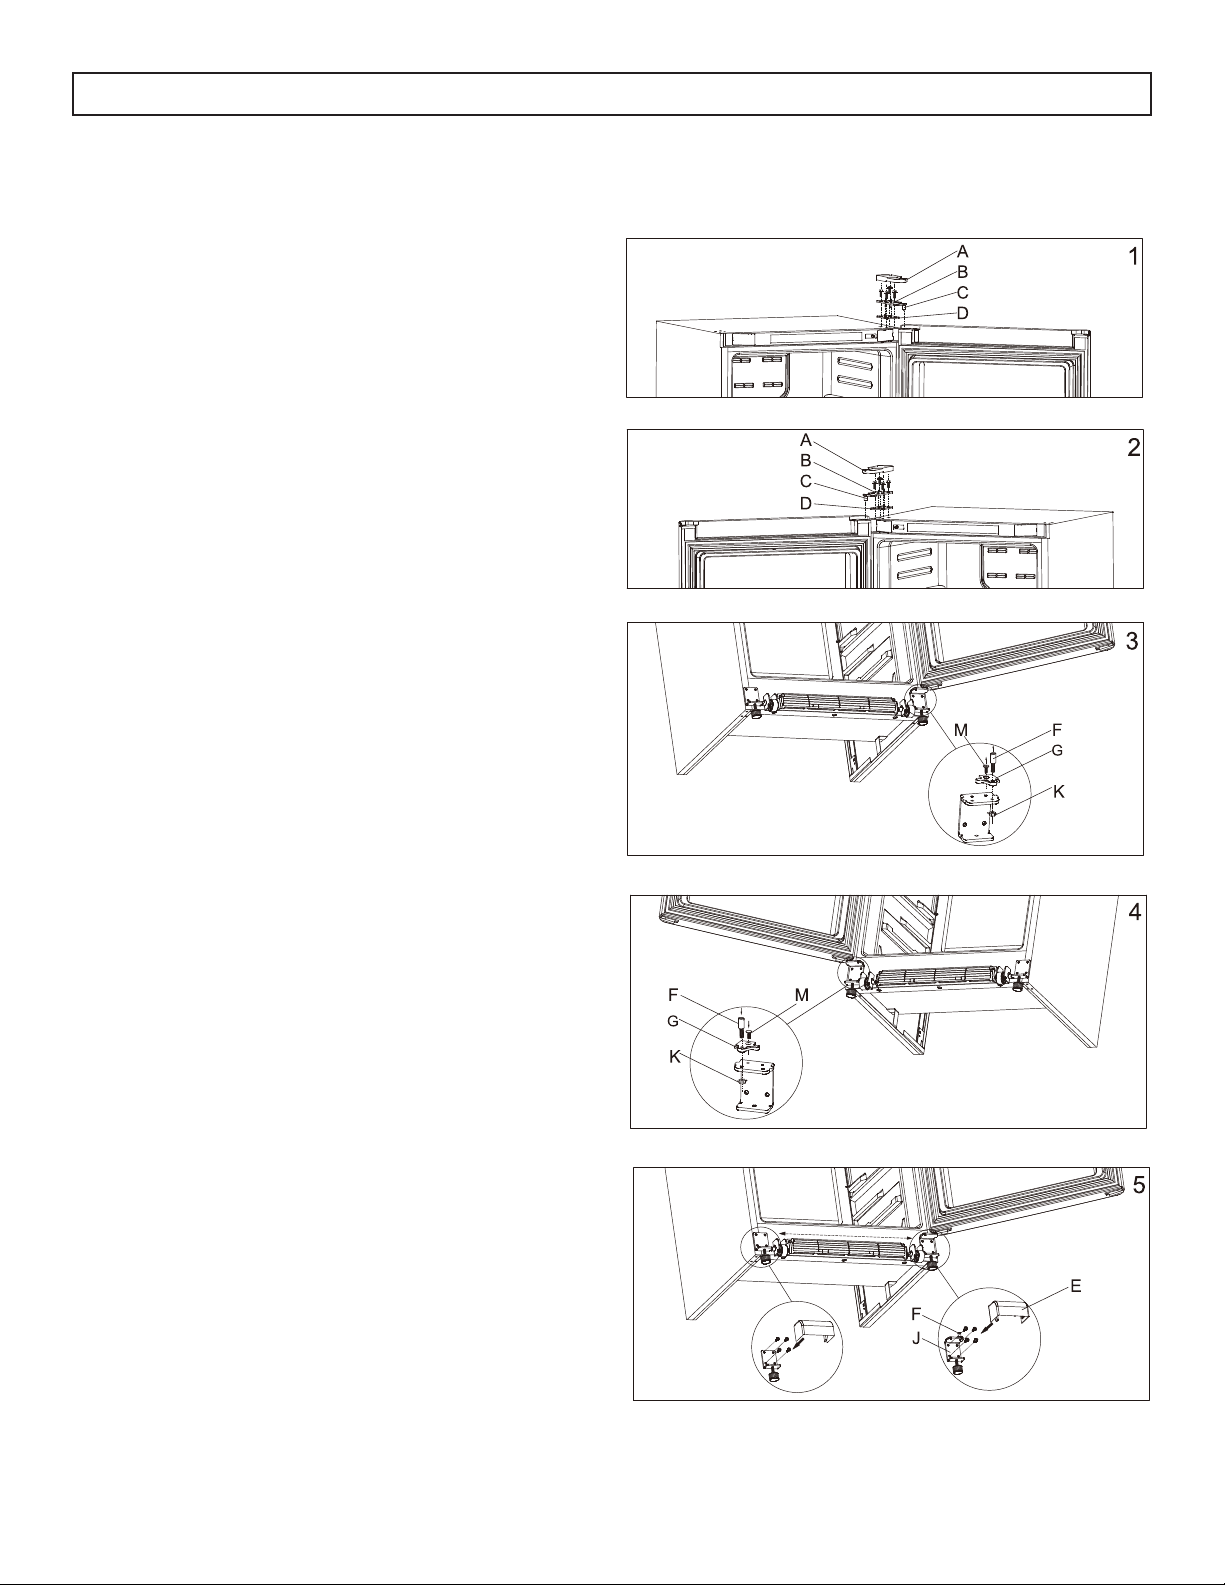
DOOR REVERSAL INSTRUCTIONS
If the appliance is placed on its back or side for any
length of time during this process, it must be allowed
to remain upright for 6 hours before plugging it in
to avoid damage to the internal components.
1. Remove one screw from top hinge cover (A) and
then remove top hinge cover.
2. Remove four screws from top hinge (B) and then
remove top hinge, top door spindle (C) and top
hinge spacer (D).
3. Remove door from unit and set aside. Ensure
that you do not damage the bottom door
spindles (F).
4. Remove roller caps at bottom of unit (E).
5. Remove four screws each from both bottom
hinges and then swap the bottom hinges (J).
Ensure that the C-shaped hinge is on the side of
the unit opposite the handle.
6. Reinstall four screws each in both bottom hinges
(F).
7. Reinstall the bottom door spindles (F and G).
8. Reinstall the roller caps at the bottom of the unit
(E).
9. Reinstall the door and ensure that the bottom
door spindle (F) is placed in the hole in bottom
hinge that is closest to the outside of the unit.
10. Replace hinge spacer (D), replace top door
spindle (C), reinstall top hinge with four screws
(B). Ensure that you fl ip the top hinge to its
opposite side so that the top door spindle is in
the correct position.
11. Reinstall the top hinge cover (A) with one screw.
A top hinge cover for the opposite side of the
unit can be found in the accessory bag inside
the unit.
Note: When installing the door, ensure that the top
of the door is level with the top of the cabinet. If the
door is not level, the rubber gasket will not make
a good seal with the cabinet which can cause the
appliance to malfunction.
5
Page 7

CARE & MAINTENANCE
CLEANING
Ensure the appliance is unplugged before cleaning.
• To clean the inside of the appliance, use a soft
cloth and a solution of a tablespoon of baking
soda to one quart of water or a mild soap
solution or some mild detergent.
• Wash removable shelves in a mild detergent
solution, then dry and wipe with a soft cloth.
• Clean the outside with a soft, damp cloth and
some mild detergent.
• It is important to keep the area clean where the
door seals against the cabinet. Clean this area
with a soapy cloth. Rinse with a damp cloth and
let dry.
Note: Do not use cleaners containing ammonia or
alcohol on the appliance. Ammonia or alcohol can
damage the appearance of the appliance. Never
use any commercial or abrasive cleaners or sharp
objects on any part of the appliance.
POWER FAILURE
Most power failures are corrected within a few
hours and should not affect the temperature of your
appliance if you minimize the number of times the
door is opened. If the power is going to be off for
a longer period of time, take the proper steps to
protect your contents.
Note: Wait 3 to 5 minutes before attempting
to restart the refrigerator if operation has been
interrupted.
VACATION
• Short vacations: Leave the appliance operating
during vacations of less than three weeks.
• Long vacations: If the appliance will not be used
for several months, remove all items and turn
off the appliance. Clean and dry the interior
thoroughly. To prevent odor and mold growth,
leave the door open slightly, blocking it open if
necessary.
ENERGY SAVING TIP
The appliance should be located in the coolest area
of the room, away from heat producing appliances,
and out of direct sunlight. Do not overload the unit
or block any ventilation openings.
MOVING
• Remove all items.
• Tape the door shut.
• Be sure the appliance stays secure in the upright
position during transportation. Also protect the
outside of the appliance with a blanket or similar
item.
• If the appliance is placed on its back or side
during transportation, upon reaching the
destination, allow it to remain in its operating
position for 6 hours to avoid damage to internal
components.
DISPOSAL
DEFROST
This unit is equipped with an automatic defrost
function and does not require manual defrosting.
Defrost water from the appliance is channeled into
a drip tray located above the compressor. Heat
transfer from the compressor causes the defrost
water to evaporate.
ERROR CODES
• E1: Sensor failure.
• E2: Defrosting sensor failure.
• E3: Sensor failure and defrosting sensor failure.
• H: High temperature.
This appliance may not be treated as regular
household waste, it should be taken to the
appropriate waste collection point for recycling
of electrical components. For information on local
waste collection points, contact your local waste
removal agency or government offi ce.
6
Page 8
FREQUENTLY ASKED QUESTIONS
What are the standard wattage and amps used?
This information can be found on the rating plate located on the back of the cabinet.
How much does it cost to run the freezer?
Please refer to the energy guide.
Can I use an extension cord?
No, an extension cord may not be used.
I am having trouble opening the door or lid; why?
The freezer door or lid may be diffi cult to open immediately after closing it. This is normal and is due to
the pressure difference between the cold interior of the freezer and the warm air that has just entered the
freezer when it was opened. The pressure will equalize within a few minutes.
TROUBLESHOOTING
No power
• A fuse may be blown or the circuit breaker tripped
• Plug not fully inserted into the wall outlet
Internal temperature not cold enough
• Temperature setting is too warm
• The door or lid is not shut properly or opened excessively
• Recently added a large quantity of warm food to the cabinet
• Close proximity to heat source or direct sunlight
• Ambient temperature or humidity is very high
Freezer runs continuously
• Temperature setting is too cold
• The door or lid is not shut properly or opened excessively
• Recently added a large quantity of warm food to the cabinet
• Close proximity to heat source or direct sunlight
• Ambient temperature or humidity is very high
Freezer makes a gurgling noise when operating
• This noise is completely normal. The refrigerant inside the appliance will make a gurgling noise as it
changes from a liquid to a gas and back again.
7
Page 9
LIMITED “IN HOME” WARRANTY
LIMITED IN-HOME APPLIANCE WARRANTY
This quality product is warranted to be free from manufacturer’s defects in material and workmanship, provided that the unit is used under the normal operating
This quality product is warranted to be free from manufacturer’s defects in material and workmanship, provided that the unit is used
conditions intended by the manufacturer.
under the normal operating conditions intended by the manufacturer.
This warranty is available only to the person to whom the unit was originally sold by Danby Products Limited (Canada) or Danby Products Inc. (U.S.A.) (hereafter
This warranty is available only to the person to whom the unit was originally sold by Danby Products Limited (Canada) or Danby
“Danby”) or by an authorized distributor of Danby, and is non-transferable.
Products Inc. (U.S.A.) (hereafter “Danby”) or by an authorized distributor of Danby, and is non-transferable.
TERMS OF WARRANTY
Plastic parts are warranted for thirty (30) days from the date of purchase, with no extensions provided.
Plastic parts, are warranted for thirty (30) days only from purchase date, with no extensions provided.
First 5 years
First Year
To obtain service
To obtain
Service
Boundaries of
in-home service
During the first five (5) years, any functional parts of this product found to be defective, will be repaired or
replaced, at warrantor’s option, at no charge to the original purchaser.
During the rst twelve (12) months, any functional parts of this product found to be defective, will be repaired or replaced, at warrantor’s
option, at no charge to the ORIGINAL purchaser.
Contact the dealer where the unit was purchased, or contact the nearest authorized Danby service depot, where
service must be performed by a qualified service technician. If service is performed on the unit by anyone other
Danby reserves the right to limit the boundaries of “In Home Service” to the proximity of an Authorized Service Depot. Any app liance
than an authorized service depot, all obligations of Danby under this warranty shall be void.
requiring service outside the limited boundaries of “In Home Service” , it will be the consumer’s responsibility to transport the appliance (at
their own expense) to the original retailer (point of purchase) or a service depot for repair. See “Boundaries of In Home Serv ice” below.
Danby reserves the right to limit the boundaries of “In Home Service” to the proximity of an authorized service
Contact your dealer from whom your unit was purchased, or contact your nearest authorized Danby service depot, where service
depot. Any appliance requiring service outside the limited boundaries of “In Home Service”, will be the consumer’s
must be performed by a qualied service technician.
responsibility to transport at their own expense to the original point of purchase or a service depot for repair. If the
If service is performed on the units by anyone other than an authorized service depot, or the unit is used for commercial appli cation, all
appliance is installed in a location that is 100 kilometers (62 miles) or more from the nearest service center, it must
obligations of Danby under this warranty shall be void.
be delivered to the nearest authorized Danby Service Depot by the purchaser.
TERMS OF WARRANTY
Boundaries of
In Home Service
If the appliance is installed in a location that is 100 kilometers (62 miles) or more from the nearest service center your unit must be
Transportation charges to and from the service location are not protected by this warranty and are the
delivered to the nearest authorized Danby Service Depot, as service must only be performed by a technician qualied and certif ied for
responsibility of the purchaser.
warranty service by Danby. Transportation charges to and from the service location are not protected by this warranty and are t he
Nothing within this warranty shall imply that Danby will be responsible or liable for any spoilage or damage to food or other
contents of this appliance, whether due to any defect of the appliance, or its use, whether proper or improper.
responsibility of the purchaser.
Nothing within this warranty shall imply that Danby will be responsible or liable for any spoilage or damage to food or other c ontents of this appliance, whether due
to any defect of the appliance, or its use, whether proper or improper.
Save as herein provided, by Danby, there are no other warranties, conditions, representations or guarantees, express or implied, made
or intended by Danby or its authorized distributors and all other warranties, conditions, representations or guarantees, including any
warranties, conditions, representations or guarantees under any Sale of Goods Act or like legislation or statute is hereby expressly
Save as herein provided, Danby, there are no other warranties, conditions, representations or guarantees, express or implied, m ade or intended by Danby or its
excluded. Save as herein provided, Danby shall not be responsible for any damages to persons or property, including the unit itself,
authorized distributors and all other warranties, conditions, representations or guarantees, including any warranties, conditio ns, representations or guarantees
howsoever caused or any consequential damages arising from the malfunction of the unit and by the purchase of the unit, the
under any Sale of Goods Act or like legislation or statue is hereby expressly excluded. Save as herein provided, Danby shall no t be responsible for any damages
purchaser does hereby agree to indemnify and hold harmless Danby from any claim for damages to persons or property caused by
to persons or property, including the unit itself, howsoever caused or any consequential damages arising from the malfunction o f the unit and by the purchase of
the unit.
the unit, the purchaser does hereby agree to indemnify and hold harmless Danby from any claim for damages to persons or propert y caused by the unit.
No warranty or insurance herein contained or set out shall apply when damage or repair is caused by any of the following:
No warranty or insurance herein contained or set out shall apply when damage or repair is caused by any of the following:
1) Power failure.
2) Damage in transit or when moving the appliance.
1) Power failure.
3) Improper power supply such as low voltage, defective house wiring or inadequate fuses.
2) Damage in transit or when moving the appliance.
4) Accident, alteration, abuse or misuse of the appliance such as inadequate air circulation in the room or abnormal operating
3) Improper power supply such as low voltage, defective house wiring or inadequate fuses.
conditions (ie. extremely high or low room temperature).
4) Accident, alteration, abuse or misuse of the appliance such as inadequate air circulation in the room or abnormal operating con ditions
5) Use for commercial or industrial purposes (ie. If the appliance is not installed in a domestic residence).
6) Fire, water damage, theft, war, riot, hostility, acts of God such as hurricanes, floods etc.
7) Service calls resulting in customer education.
8) Improper Installation (ie. Building-in of a free standing appliance or using an appliance outdoors that is not approved for outdoor
application, including but not limited to: patios, porches or anywhere that is not properly insulated or climate controlled).
Proof of purchase date will be required for warranty claims; retain bills of sale. In the event that warranty service is required, present
Proof of purchase date will be required for warranty claims; so, please retain bills of sale. In the event warranty service is required, present this document to our
the proof of purchase to our authorized service depot.
AUTHORIZED SERVICE DEPOT.
(extremely high or low room temperature).
5) Use for commercial or industrial purposes (ie. If the appliance is not installed in a domestic residence).
6) Fire, water damage, theft, war, riot, hostility, acts of God such as hurricanes, oods etc.
7) Service calls resulting in customer education.
8) Improper Installation (ie. Building-in of a free standing appliance or using an appliance outdoors that is not approved for out door application).
EXCLUSIONS
EXCLUSIONS
GENERAL PROVISIONS
GENERAL PROVISIONS
Danby Products Limited
Danby Products Limited
PO Box 1778, Guelph, Ontario, Canada N1H 6Z9
PO Box 1778, Guelph, Ontario, Canada N1H 6Z9
Telephone: (519) 837-0920 FAX: (519) 837-0449
Telephone: (519) 837-0920 FAX: (519) 837-0449
Warranty Service
Warranty Service
In-home
In Home
1-800-263-2629
1-800-263-2629
09/20
04/09
Danby Products Inc.
PO Box 669, Findlay, Ohio, U.S.A. 45840
Telephone: (419) 425-8627 FAX: (419) 425-8629
PO Box 669, Findlay, Ohio, U.S.A. 45840
Telephone: (419) 425-8627 FAX: (419) 425-8629
Danby Products Inc.
Page 10

Bienvenue dans la famille Danby.
Nous sommes fi ers de nos produits de qualité et nous croyons en un service fi able. Nous
vous suggérons de lire ce manuel du propriétaire avant de brancher votre nouvel appareil
car il contient des informations de fonctionnement importantes, des informations de
sécurité, des conseils de dépannage et d’entretien pour assurer la fi abilité et la longévité de
votre appareil.
Vous avez droit à la couverture de la garantie décrite dans le manuel du propriétaire fourni
avec votre nouvel appareil.
1. Veuillez noter ci-dessous les informations relatives à votre appareil. Vous devez
conserver la preuve d’achat originale pour valider et bénéfi cier des services de garantie.
2. Enregistrez votre produit en ligne et recevez une PROLONGATION DE GARANTIE
GRATUITE DE 2 MOIS après avoir rempli une enquête sur les produits, à l’adresse
www.danby.com/support/product-registration/
Numéro de modèle : _______________________________________________
Numéro de serie : _________________________________________________
Date d’achat : _____________________________________________________
Besoin d’assistance?
1. Lisez votre manuel du propriétaire pour obtenir de l’aide à l’installation, au dépannage
et à la maintenance.
2. Visitez www.Danby.com pour accéder aux outils en libre-service, aux FAQ et bien plus
encore en recherchant votre numéro de modèle dans la barre de recherche.
3. Pour bénéfi cier du service client le plus rapide, veuillez remplir le formulaire Web à
l’adresse www.danby.com/support. Votre soumission ira directement à un expert de
votre appareil particulier. Nos temps de réponse moyens sont compris entre 20 minutes
et 2 heures, pendant les heures ouvrables EST.
4. Composez le 1-800-263-2629 - veuillez noter que pendant les heures de pointe, les
temps d’attente peuvent dépasser une heure.
9
Page 11
Consignes de sécurité importantes
LIRE ET SUIVRE TOUTES LES INSTRUCTIONS DE SÉCURITÉ
EXIGENCES DE SÉCURITÉ
DANGER : Risque d’incendie ou d’explosion.
Liquide frigorigène infl ammable utilisé. Ne pas
percer les tubes de réfrigérant.
• N’utilisez pas de dispositifs mécaniques pour
dégivrer le réfrigérateur.
• Assurez-vous que l’entretien est effectué par le
personnel de service autorisé en usine, afi n de
minimiser les dommages sur les produits ou les
questions de sécurité.
• Consultez le manuel de réparation ou le guide
du propriétaire avant d’essayer de réparer
ce produit. Toutes les précautions de sécurité
doivent être respectées.
• Éliminer conformément aux règlements fédéraux
ou locaux.
• Suivez attentivement les instructions de
manutention.
• Ne pas stocker des substances explosives
comme les bombes aérosol avec un propulseur
infl ammable dans cet appareil.
AVERTISSEMENT : Garder les ouvertures de
ventilation, dans l’enceinte de l’appareil ou dans la
structure intégrée, sans obstruction.
AVERTISSEMENT : N’utilisez pas de dispositifs
mécaniques ou d’autres moyens pour accélérer
le processus de dégivrage, autres que ceux
recommandés par le fabricant.
AVERTISSEMENT : Ne pas endommager le circuit de
réfrigérant.
AVERTISSEMENT : N’utilisez pas d’appareils
électriques à l’intérieur des compartiments de
stockage d’aliments de l’appareil, à moins qu’ils ne
soient du type recommandé par le fabricant.
ATTENTION : Les enfants devraient être surveillés
pour s’assurer qu’ils ne jouent pas avec l’appareil.
DANGER : Risque de piégeage des enfants. Avant
de jeter un ancien appareil :
• Retirez la porte ou le couvercle.
• Laissez les étagères en place afi n que les enfants
ne puissent pas facilement monter à l’intérieur.
EXIGENCES DE SÉCURITÉ
Cet appareil n’est pas destiné à être utilisé par
des personnes (y compris des enfants) dont les
capacités physiques, sensorielles ou mentales
peuvent être différentes ou réduites, ou qui n’ont
pas d’expérience ou de connaissances, à moins que
ces personnes ne reçoivent de supervision ou de
formation pour faire fonctionner l’appareil par une
personne responsable de leur sécurité.
Cet appareil est destiné à être utilisé dans des
applications domestiques et similaires telles que:
• Cuisines du personnel dans les magasins, les
bureaux et autres environnements de travail;
• Les maisons de ferme et par les clients dans les
hôtels, motels et autres environnements de type
résidentiel;
• Chambres d’hôtes;
• Restauration et applications similaires non
commerciales.
INSTRUCTIONS DE MISE À LA TERRE
Cet appareil doit être mis à la terre. La mise à
la terre réduit le risque de choc électrique en
fournissant un fi l d’échappement pour le courant
électrique.
Cet appareil possède un cordon doté d’un fi l de
mise à la terre avec une fi che à 3 broches. Le
cordon d’alimentation doit être branché sur une
prise correctement mise à la terre. Si la sortie
est une prise murale à 2 broches, elle doit être
remplacée par une prise murale à 3 broches
correctement mise à la terre. La plaque signalétique
en série indique la tension et la fréquence
auxquelles l’appareil est conçu.
AVERTISSEMENT - Une utilisation incorrecte de la
fi che de mise à la terre peut entraîner un risque
d’électrocution. Consultez un électricien qualifi é
ou un agent de service si les instructions de mise
à la terre ne sont pas complètement comprises ou
s’il existe un doute quant à savoir si l’appareil est
correctement mis à la terre.
Ne branchez pas votre appareil à des rallonges
ou avec un autre appareil dans la même prise
murale. Ne pas épisser le cordon d’alimentation.
Ne coupez ou retirez en aucun cas la troisième
broche du cordon d’alimentation. N’utilisez pas de
cordons de prolongement ou d’adaptateurs sans
mise à la terre (deux broches).
DANGER : N’ajoutez pas de verrou à la porte ou
au couvercle. Cela peut entraîner le piégeage et le
préjudice des enfants.
GARDEZ CES INSTRUCTIONS!
Si le cordon d’alimentation est endommagé, il doit
être remplacé par le fabricant, son agent de service
ou une personne qualifi ée similaire afi n d’éviter tout
risque.
10
Page 12
CONSIGNES D’UTILISATIONINSTRUCTIONS D’INSTALLATION
EMPLACEMENT
• Deux personnes doivent être utilisées pour
déplacer l’appareil.
• Retirer l‘emballage intérieur et extérieur avant
l’installation. Essuyez l’extérieur de l’appareil
avec un chiffon doux et sec et à l’intérieur avec
un chiffon humide tiède.
• Placez votre appareil sur un plancher qui
est assez fort pour le soutenir quand il est
complètement chargé.
• Ne placez pas l’appareil directement dans la
lumière du soleil ou à proximité de sources de
chaleur, comme un poêle ou un réchauffeur,
car cela peut augmenter la consommation
électrique. Des températures ambiantes extrêmes
et froides peuvent également provoquer
dysfonctionnement de l’appareil.
• Ne pas utiliser ce produit près de l’eau, par
exemple, dans un sous-sol humide ou près d’un
évier.
CARACTÉRISTIQUES
1. Interrupteur d’éclairage
2. Panneau de commande
3. Lumière à LED
4. Évent d’évacuation d’air
5. Senseur de température
6. Tablette du congélateur
7. Évent d’entrée d’air
8. Avant de la tablette
9. Tablette de porte
10. Patte ajustable
12
3
4
5
6
9
• Cet appareil est destiné à un usage domestique
et garage uniquement. Les congélateurs sont
testés pour fonctionner à des températures
allant de 0°F à 110°F (-17°C à 43°C). Il n’est
pas conçu pour une installation à l’extérieur,
y compris partout où la température n’est pas
contrôlée comme les porches, les véhicules, etc.
• Avant de brancher l‘appareil à une source
d’alimentation, laissez - le debout pendant
environ 6 heures; Ceci réduira la possibilité
d’un dysfonctionnement dans le système de
refroidissement de la manipulation pendant le
transport.
• Cet appareil est 76,1 cm (29,9 pouces) de large
par 170,9 cm (67,3 pouces) de haut par 72,4
cm (28,5 pouces) de profondeur.
• Laisser 12,7 cm (5 pouces) d’espace entre le
dos, les côtés et le dessus de l’appareil et les
parois adjacentes.
• Cet appareil est destiné uniquement à une
installation autonome et ne doit pas être
intégré dans une armoire ou un compteur. La
construction de cet appareil peut provoquer un
dysfonctionnement.
7
8
10
INSTRUCTIONS DE NIVEAU
Il y a deux pattes réglables sur le bas de l’appareil
qui peuvent être montés ou bas pour s’assurer que
l’appareil est au niveau.
1. Tournez la jambe de nivellement dans le sens
inverse des aiguilles d’une montre aussi loin que
possible, jusqu’à ce que le haut du pied touche
le bas du châssis.
2. Tournez lentement la jambe de nivellement dans
le sens des aiguilles d’une montre jusqu’à ce que
l’appareil soit à niveau.
11
Page 13
CONSIGNES D’UTILISATION
PANNEAU DE CONTRÔLE INSTALLATION DE LA POIGNÉE
L’appareil est expédié avec la poignée à l’intérieur
du meuble pour le protéger des dommages. Il doit
être installé par l’utilisateur fi nal. L’appareil doit être
débranché avant d’installer la poignée.
1. Placez la poignée sur les poteaux de la poignée
RÉGLAGE DE LA TEMPÉRATURE
de porte exposés.
Appuyez sur les boutons fl échés pour régler ou
régler la température.
La température peut être réglée entre -14°C et
-24°C (7°F et -11°F).
Le réglage de température recommandé est de
-18°C (0°F).
FONCTION DE CONGÉLATION RAPIDE
Cette fonction doit être utilisée lorsque l’appareil est
allumé pour la première fois, lorsqu’il a été rempli
d’épicerie ou si la porte a été ouverte pendant une
période prolongée. Cette fonction fera fonctionner
le compresseur en permanence pour atteindre la
température la plus froide aussi rapidement que
possible.
Appuyez sur le bouton de congélation rapide et
maintenez-le enfoncé pendant trois secondes pour
activer la congélation rapide. L’indicateur LED
s’allume.
2. Retirez les deux vis du côté de la porte avec
un tournevis, insérez les vis dans le support de
la poignée, fi xez-le sur le côté de la porte et
serrez-le jusqu’à ce qu’il soit bien ajusté.
Remarque: La poignée peut être légèrement
différente en fonction de la couleur de l’appareil.
Pour annuler la fonction de congélation rapide,
maintenez enfoncé le bouton de congélation rapide
jusqu’à ce que le voyant LED s’éteigne.
Lorsque le cycle de congélation rapide est terminé
ou est annulé, l’appareil revient à la dernière
température réglée.
ÉCHELLE DE TEMPÉRATURE
Pour basculer entre °C et °F, appuyez sur le bouton
°C/°F, le voyant correspondant s’allumera.
ALARME PORTE OUVERTE
Cet appareil est équipé d’une alarme de porte qui
retentit si la porte reste ouverte pendant plus de 3
minutes. L’alarme retentit et l’affi chage clignote en
continu jusqu’à ce que la porte soit fermée.
12
Page 14
CONSIGNES D’UTILISATION
INSTRUCTIONS D’INVERSION DE PORTE
Si l’appareil est placé à l’arrière ou au côté pendant
un certain temps pendant ce processus, il doit être
autorisé à rester debout pendant 6 heures avant
de le brancher pour éviter d’endommager les
composants internes.
1. Enlevez une vis du couvre-charnière supérieur
(A) et enlevez le couvre-charnière supérieur.
2. Enlevez quatre vis de la charnière supérieure
(B) et enlevez la charnière supérieure, l’axe de
porte supérieur (C) et l’entretoise de la charnière
supérieure (D).
3. Enlevez la porte de l’appareil et mettez-la de
côté. Attention de ne pas endommager les axes
de porte inférieurs (F).
4. Enlevez les capuchons pour roulement au bas de
l’appareil (E).
5. Enlevez les quatre vis des deux charnières
inférieures et échangez les charnières inférieures
(J). Assurez-vous que la charnière en forme de
C soit sur le côté opposé de la poignée.
6. Réinstallez quatre vis dans chacune des
charnières inférieures (H).
7. Réinstallez les axes de porte inférieurs (F et G).
8. Réinstallez la porte et assurez-vous que l’axe de
porte inférieur (F) soit inséré dans le trou de la
charnière inférieure la plus proche de l’extérieur
de l’appareil.
9. Réinstallez l’entretoise de charnière (D),
réinstallez l’axe de porte supérieur (C), et
réinstallez la charnière supérieure avec quatre
vis (B). Assurez-vous d’inverser la charnière
supérieure de sorte que l’axe de porte supérieur
soit dans la bonne position.
10. Réinstallez le couvre-charnière supérieur
(A) avec une vis. Vous trouverez un couvrecharnière supérieur pour le côté opposé de
l’appareil dans le sac d’accessoires à l’intérieur
de l’appareil.
11. Réinstallez les capuchons pour roulement au bas
de l’appareil (E).
Remarque: Lors de l’installation de la porte,
assurez-vous que le haut de la porte est au niveau
du haut de l’armoire. Si la porte n’est pas au
niveau, le joint d’étanchéité en caoutchouc ne
fera pas une bonne étanchéité avec l’armoire
qui pourrait provoquer un dysfonctionnement de
l’appareil.
13
Page 15

SOINS ET ENTRETIEN
NETTOYAGE
Assurez-vous que l’appareil est débranché avant de
nettoyer une partie de l’appareil.
• Pour nettoyer l’intérieur de l’appareil, utilisez
un chiffon doux et une solution d’une cuillère
à soupe de bicarbonate de soude à un quart
d’eau ou une solution de savon doux ou un
détergent doux.
• Lavez les tablettes amovibles dans une solution
détergente douce, puis séchez et essuyez avec
un chiffon doux.
• Nettoyez l’extérieur avec un chiffon doux et
humide et un peu de détergent doux.
• Il est important de garder la région de scellement de la porte sur l’armoire propre. Nettoyez
avec un tissu savonneux, rincez le région et puis
séchez.
Remarque: N’utilisez pas de produits nettoyants
comprenant de l’ammoniaque ou de l’alcool sur
l’appareil. L’ammoniaque ou l’alcool peuvent altérer
le fi ni de l’appareil. N’utilisez jamais de nettoyant
industriels sur aucune partie de votre appareil.
VACANCES
• Courtes vacances: Laissez le unité fonctionner
pendant les vacances durant moins de trois
semaines.
• Longues vacances: Si l’unité ne doit pas être
utilisé pendant plusieurs mois, retirez tout ce
qu’il contient et mettez-le hors tension. Nettoyez
et asséchez à fond l’intérieur. Pour éviter les
odeurs et le développement de moisissures,
laissez la porte entrouverte, la coincer au
besoin.
CONSEIL RELATIF AUX ÉCONOMIES
D’ÉNERGIE
L’appareil doit être situé dans la zone la plus fraiche
de la pièce, loin des appareils de production de
chaleur et hors de la lumière directe du soleil. Ne
pas surcharger l’appareil ou bloquer les ouvertures
de ventilation.
PANNE DE COURANT
La plupart des pannes de courant ne durent que
quelques heures et ne devraient pas modifi er la
température de votre l’appareil si vous réduisez au
maximum le nombre de fois où la porte est ouverte.
Si le courant reste coupé pendant une longue
période. il faut prendre des mesures de protection
du contenu de l’appareil.
Remarque: Attendez 3 à 5 minutes avant d’essayer
de redémarrer le réfrigérateur si l’opération a été
interrompue.
DÉGIVRER
Cet appareil est équipé d’une fonction de dégivrage
automatique et ne nécessite pas de dégivrage
manuel. Le dégivrage de l’eau de l’appareil
est canalisé dans un tiroir situé au-dessus du
compresseur. Le transfert de chaleur du compresseur
provoque l’évaporation de l’eau de dégivrage.
CODES D’ERREUR
• E1: défaillance du capteur du réfrigérateur.
• E1: défaillance du capteur.
• E2: défaillance du capteur de dégivrage.
• E3: panne du capteur du réfrigérateur et
défaillance du capteur de dégivrage.
• H: température élevée.
DÉMÉNAGER
• Supprimez tous les éléments.
• Fermez la porte.
• Assurez-vous que l’appareil reste en position
verticale pendant le transport. Protégez
également l’extérieur de l’appareil avec une
couverture ou un objet similaire.
• Si l’appareil est placé sur le dos ou le
côté pendant le transport, en arrivant à la
destination, lui permettre de rester en position
de travail pendant 6 heures pour éviter
d’endommager les composants internes.
ÉLIMINATION DES DÉCHETS
Ce produit ne doit pas être traité comme un déchet
domestique ordinaire, il doit être transporté au
point de collecte approprié pour le recyclage
des composants électriques. Pour obtenir des
renseignements sur les points de collecte des déchets
locaux, communiquez avec votre agence locale
de traitement des déchets ou avec le bureau du
gouvernement.
14
Page 16
QUESTIONS FRÉQUEMMENT POSÉES
Quels sont la puissance et les amplis standard utilisés?
Ces informations se trouvent sur la plaque signalétique située à l’arrière de l’armoire.
Combien cela coûte-t-il de faire fonctionner le congélateur?
Veuillez vous référer au guide énergétique.
Puis-je utiliser une rallonge?
Non, une rallonge ne peut pas être utilisée.
J’ai du mal à ouvrir la porte ou le couvercle; Pourquoi?
La porte ou le couvercle du congélateur peut être diffi cile à ouvrir immédiatement après sa fermeture. Ceci
est normal et est dû à la différence de pression entre l’intérieur froid du congélateur et l’air chaud qui vient
d’entrer dans le congélateur lors de son ouverture. La pression s’égalisera en quelques minutes.
DÉPANNAGE
Aucune puissance
• Un fusible est peut-être grillé ou le disjoncteur s’est déclenché
• La fi che n’est pas complètement insérée dans la prise murale
Température interne pas assez froide
• Le réglage de la température est trop chaud
• La porte ou le couvercle n’est pas correctement fermé ou trop ouvert
• Récemment ajouté une grande quantité d’aliments chauds dans l’armoire
• Proche d’une source de chaleur ou de la lumière directe du soleil
• La température ambiante ou l’humidité est très élevée
Le congélateur fonctionne en continu
• Le réglage de la température est trop froid
• La porte ou le couvercle n’est pas correctement fermé ou trop ouvert
• Récemment ajouté une grande quantité d’aliments chauds dans l’armoire
• Proche d’une source de chaleur ou de la lumière directe du soleil
• La température ambiante ou l’humidité est très élevée
Le congélateur fait un gargouillis lors de son fonctionnement
• Ce bruit est tout à fait normal. Le réfrigérant à l’intérieur de l’appareil émettra un gargouillis lorsqu’il
passe d’un liquide à un gaz et vice-versa.
15
Page 17
GARANTIE LIMITÉE POUR APPAREIL ÉLECTROMÉNAGER RÉSIDENTIEL
This quality product is warranted to be free from manufacturer’s defects in material and workmanship, provided that the unit is used under the normal operating
Le fabricant garantit ce produit contre les défauts de matériaux et de fabrication, à condition que celui-ci soit utilisé dans des conditions
conditions intended by the manufacturer.
normales telles que prévues par le fabricant.
This warranty is available only to the person to whom the unit was originally sold by Danby Products Limited (Canada) or Danby Products Inc. (U.S.A.) (hereafter
La garantie est non transférable et offerte seulement au premier acheteur du produit auprès de Danby Products Limited (Canada) ou
“Danby”) or by an authorized distributor of Danby, and is non-transferable.
Danby Products Inc. (États-Unis) (ci-après « Danby ») ou d’un distributeur autorisé de Danby.
Les pièces de plastique sont garanties pendant trente (30) jours à compter de la date d’achat; aucune prolongation.
Plastic parts, are warranted for thirty (30) days only from purchase date, with no extensions provided.
Cinq premières
années
First Year
Demande de
service
To obtain
Service
Territoire du
service à
domicile
Durant les cinq (5) premières années, toute pièce fonctionnelle reconnue défectueuse sera réparée ou remplacée, à
la discrétion du fabricant, sans frais pour l’acheteur original.
During the rst twelve (12) months, any functional parts of this product found to be defective, will be repaired or replaced, at warrantor’s
option, at no charge to the ORIGINAL purchaser.
Communiquer avec le distributeur à qui le produit a été acheté ou le centre de service autorisé Danby le plus
proche; le service doit être fait par un technicien qualifié du centre, sans quoi Danby ne sera tenue de respecter
Danby reserves the right to limit the boundaries of “In Home Service” to the proximity of an Authorized Service Depot. Any app liance
aucune des obligations de la présente garantie.
requiring service outside the limited boundaries of “In Home Service” , it will be the consumer’s responsibility to transport the appliance (at
their own expense) to the original retailer (point of purchase) or a service depot for repair. See “Boundaries of In Home Serv ice” below.
Danby se réserve le droit de fixer des limites géographiques au « service à domicile » selon la proximité d’un centre
Contact your dealer from whom your unit was purchased, or contact your nearest authorized Danby service depot, where service
de service autorisé. Pour tout service sur un appareil situé hors du territoire établi, il reviendra à l’acheteur
must be performed by a qualied service technician.
d’apporter à ses frais l’appareil au point de vente original ou au centre de service pour réparation. Si l’appareil se
If service is performed on the units by anyone other than an authorized service depot, or the unit is used for commercial appli cation, all
trouve à 100 km (62 miles) ou plus d’un centre de service, l’acheteur doit le faire expédier au centre autorisé
obligations of Danby under this warranty shall be void.
Danby le plus proche.
LIMITED IN-HOME APPLIANCE WARRANTY
MODALITÉS DE LA GARANTIE
TERMS OF WARRANTY
Boundaries of
In Home Service
Aucun élément de la présente garantie ne sous-entend que Danby est d’une quelconque façon responsable de nourriture
gaspillée ou de tout autre contenu endommagé en raison d’une défectuosité de l’appareil ou de son utilisation (adéquate ou
inadéquate).
If the appliance is installed in a location that is 100 kilometers (62 miles) or more from the nearest service center your unit must be
Les frais de transport (aller et retour) au centre de service ne sont pas couverts par la garantie et incombent à
delivered to the nearest authorized Danby Service Depot, as service must only be performed by a technician qualied and certif ied for
l’acheteur.
warranty service by Danby. Transportation charges to and from the service location are not protected by this warranty and are t he
responsibility of the purchaser.
Nothing within this warranty shall imply that Danby will be responsible or liable for any spoilage or damage to food or other c ontents of this appliance, whether due
to any defect of the appliance, or its use, whether proper or improper.
À moins d’indications contraires données aux présentes par Danby, le produit n’est l’objet d’aucune autre garantie, condition,
déclaration ou assertion, expresse ou tacite, de la part de Danby ou de ses distributeurs autorisés. Est donc expressément exclue toute
autre garantie, condition, déclaration ou assertion, notamment celles prévues par une loi sur la vente de biens ou une autre disposition
Save as herein provided, Danby, there are no other warranties, conditions, representations or guarantees, express or implied, m ade or intended by Danby or its
législative semblable. Sauf indications contraires aux présentes, Danby n’est pas responsable des dommages personnels ou
authorized distributors and all other warranties, conditions, representations or guarantees, including any warranties, conditio ns, representations or guarantees
matériels, y compris ceux au produit lui-même, quelle qu’en soit la cause, ni des dommages découlant d'une défaillance de
under any Sale of Goods Act or like legislation or statue is hereby expressly excluded. Save as herein provided, Danby shall no t be responsible for any damages
l’appareil. Par l’achat du produit, l’acheteur accepte d’indemniser et de dégager de toute responsabilité Danby pour toute
to persons or property, including the unit itself, howsoever caused or any consequential damages arising from the malfunction o f the unit and by the purchase of
réclamation relative aux dommages personnels ou matériels imputables à l’appareil.
the unit, the purchaser does hereby agree to indemnify and hold harmless Danby from any claim for damages to persons or propert y caused by the unit.
Toute garantie ou assurance incluse ou décrite aux présentes ne s’applique pas si les dommages ou les bris à réparer découlent
No warranty or insurance herein contained or set out shall apply when damage or repair is caused by any of the following:
d’une des situations suivantes :
1) Power failure.
1) Panne de courant
2) Damage in transit or when moving the appliance.
2) Dommage pendant le transport ou le déplacement de l’appareil
3) Source d’alimentation inadéquate (p. ex. tension faible, câblage résidentiel défectueux ou fusibles inadéquats)
3) Improper power supply such as low voltage, defective house wiring or inadequate fuses.
4) Accident impliquant l’appareil ou altération ou utilisation abusive ou inadéquate de celui-ci, notamment une mauvaise circulation
4) Accident, alteration, abuse or misuse of the appliance such as inadequate air circulation in the room or abnormal operating con ditions
d’air dans la pièce ou des conditions d’utilisation anormales (p. ex. température ambiante extrême)
5) Usage commercial ou industriel (installation de l’appareil autre que dans une résidence)
6) Feu, dégât d’eau, vol, guerre, émeute, actes hostiles et catastrophes naturelles (p. ex. tornades, inondations, etc.)
7) Appels de service se résolvant par une formation de l’utilisateur
8) Mauvaise installation (appareil autoportant encastré ou utilisation extérieure d’un appareil non prévu à cette fin, sur un patio ou un
porche, ou à tout autre endroit non adéquatement isolé ou où la température n’est pas contrôlée)
(extremely high or low room temperature).
5) Use for commercial or industrial purposes (ie. If the appliance is not installed in a domestic residence).
6) Fire, water damage, theft, war, riot, hostility, acts of God such as hurricanes, oods etc.
7) Service calls resulting in customer education.
8) Improper Installation (ie. Building-in of a free standing appliance or using an appliance outdoors that is not approved for out door application).
EXCLUSIONS
EXCLUSIONS
DISPOSITIONS GÉNÉRALES
GENERAL PROVISIONS
Proof of purchase date will be required for warranty claims; so, please retain bills of sale. In the event warranty service is required, present this document to our
Une preuve d’achat avec date est requise pour toute réclamation en vertu de la garantie; conserver la facture de vente. En cas de
AUTHORIZED SERVICE DEPOT.
service couvert par la garantie, présenter la preuve d’achat au centre de service autorisé.
Danby Products Limited
Danby Products Limited
C.P. 1778, Guelph (Ontario) N1H 6Z9, CANADA
PO Box 1778, Guelph, Ontario, Canada N1H 6Z9
Tél. : 519 837-0920 Téléc. : 519 837-0449
Telephone: (519) 837-0920 FAX: (519) 837-0449
Warranty Service
Service sous garantie
In-home
À domicile
1-800-263-2629
1 800 263-2629
09/20
04/09
Danby Products Inc.
PO Box 669, Findlay, Ohio, 45840, ÉTATS-UNIS
Tél. : 419 425-8627 Téléc. : 419 425-8629
PO Box 669, Findlay, Ohio, U.S.A. 45840
Telephone: (419) 425-8627 FAX: (419) 425-8629
Danby Products Inc.
Page 18

Bienvenido a la familia Danby.
Estamos orgullosos de nuestros productos de calidad y creemos en un servicio
confi able. Le sugerimos que lea este manual del propietario antes de enchufar su nuevo
electrodoméstico, ya que contiene información importante de funcionamiento, información
de seguridad, solución de problemas y consejos de mantenimiento para garantizar la
confi abilidad y longevidad de su electrodoméstico.
Tiene derecho a la cobertura de la garantía como se describe en el manual del propietario
que se proporciona con su nuevo electrodoméstico.
1. Escriba la información de su aparato a continuación. Debe conservar el comprobante
de compra original para validar y recibir los servicios de garantía.
2. Registre su producto en línea y reciba una EXTENSIÓN DE GARANTÍA GRATUITA DE 2
MESES después de completar una encuesta sobre el producto, en
www.danby.com/support/product-registration/
Número de modelo: _______________________________________________
Número de serie: _________________________________________________
Fecha de compra: _________________________________________________
Necesitas ayuda?
1. Lea el manual del propietario para obtener ayuda con la instalación, resolución de
problemas y asistencia de mantenimiento.
2. Visite www.Danby.com para acceder a herramientas de autoservicio, preguntas
frecuentes y mucho más buscando su número de modelo en la barra de búsqueda.
3. Para obtener el servicio al cliente más rápido, complete el formulario web en www.
danby.com/support. Su envío irá directamente a un experto en su dispositivo en
particular. Nuestros tiempos de respuesta promedio son entre 20 minutos y 2 horas,
durante el horario comercial EST.
4. Llame al 1-800-263-2629; tenga en cuenta que durante las horas pico, los tiempos de
espera pueden exceder una hora.
17
Page 19
Importantes Instrucciones de Seguridad
LEA Y SIGA TODAS LAS INSTRUCCIONES DE SEGURIDAD
REQUERIMIENTOS DE SEGURIDAD
PELIGRO: Riesgo de incendio o explosión.
Refrigerante infl amable usado. No perforar la
tubería del refrigerante.
• No utilice dispositivos mecánicos para
descongelar el refrigerador.
• Asegúrese de que el personal de mantenimiento
autorizado por la fábrica haga el
mantenimiento para minimizar los daños o
problemas de seguridad del producto.
• Consulte el manual de reparación o la guía
del propietario antes de intentar reparar este
producto. Todas las precauciones de seguridad
deben ser seguidas.
• Deseche adecuadamente de acuerdo con las
regulaciones federales o locales.
• Siga cuidadosamente las instrucciones de
manipulación.
• No almacene sustancias explosivas como
aerosoles con propelente infl amable en este
electrodoméstico.
ADVERTENCIA: Mantenga las aberturas de
ventilación, en la caja del aparato o en la estructura
incorporada, sin obstrucción.
ADVERTENCIA: No utilice dispositivos mecánicos
u otros medios para acelerar el proceso de
descongelación, distintos de los recomendados por
el fabricante.
ADVERTENCIA: No dañar el circuito refrigerante.
ADVERTENCIA: No utilice electrodomésticos dentro
de los compartimentos de almacenamiento de
alimentos del aparato, a menos que sean del tipo
recomendado por el fabricante.
PRECAUCIÓN: Los niños deben ser supervisados
para asegurarse de que no juegan con el aparato.
PELIGRO: Riesgo de atrapamiento de niños. Antes
de tirar un electrodoméstico viejo:
• Retire la puerta o la tapa.
• Deje los estantes en su lugar para que los niños
no puedan subir fácilmente dentro.
PELIGRO: No agregue un candado a la puerta o
tapa. Esto puede causar atrapamiento y daño al
niño.
REQUERIMIENTOS DE SEGURIDAD
Este aparato no está diseñado para ser usado por
personas (incluyendo niños) cuyas capacidades
físicas, sensoriales o mentales pueden ser
diferentes o reducir, o que carecen de experiencia
o conocimiento, a menos que dichas personas
reciban supervisión o entrenamiento para operar
el aparato por una persona responsable de su la
seguridad.
Este dispositivo está destinado a ser utilizado en
aplicaciones domésticas y similares, tales como:
• Cocinas de personal en tiendas, ofi cinas y otros
entornos de trabajo;
• Casas rurales y clientes en hoteles, moteles y
otros entornos de tipo residencial;
• Cama y desayuno;
• Catering y aplicaciones similares no minoristas.
INSTRUCCIONES DE CONEXION A TIERRA
Este aparato debe estar conectado a tierra. La
puesta a tierra reduce el riesgo de descarga
eléctrica proporcionando un cable de escape para
la corriente eléctrica.
Este aparato tiene un cable que tiene un cable de
conexión a tierra con un enchufe de 3 clavijas. El
cable de alimentación debe estar enchufado en un
tomacorriente que esté debidamente conectado a
tierra. Si el tomacorriente es un enchufe de pared
de 2 terminales, debe ser reemplazado por un
tomacorriente de pared de 3 clavijas debidamente
conectado a tierra. La placa de características en
serie indica el voltaje y la frecuencia que el aparato
está diseñado para.
ADVERTENCIA - El uso incorrecto del enchufe
de conexión a tierra puede resultar en un riesgo
de descarga eléctrica. Consulte a un electricista
califi cado o agente de servicio si las instrucciones
de conexión a tierra no se entienden completamente
o si existe duda sobre si el aparato está
debidamente conectado a tierra.
No conecte el aparato a los cables de extensión ni
con otro aparato en la misma toma de corriente.
No empalme el cable de alimentación. No corte ni
extraiga en ningún caso la tercera clavija de tierra
del cable de alimentación. No utilice cables de
extensión ni adaptadores sin conexión a tierra (dos
clavijas).
Si el cable de alimentación está dañado, debe
ser reemplazado por el fabricante, su agente de
servicio o persona califi cada similar para evitar
riesgos.
¡GUARDE ESTAS INSTRUCCIONES!
18
Page 20
INSTRUCCIONES DE INSTALACIÓN INSTRUCCIONES DE OPERACIÓN
UBICACIÓN
• Se deben utilizar dos personas al mover el
aparato.
• Retire el embalaje interior y exterior antes de la
instalación. Limpie el exterior del aparato con
un paño suave y seco y el interior con un paño
húmedo tibio.
• Coloque el aparato en un piso que sea lo
sufi cientemente fuerte como para soportarlo
cuando esté completamente cargado.
• Ubique el aparato lejos de la luz directa del sol
y fuentes de calor (estufa, calentador, radiador,
etc.). La luz solar directa y las fuentes de calor
pueden aumentar el consumo eléctrico. Las
temperaturas ambientales extremadamente frías
también pueden causar que la unidad funcione
incorrectamente.
• No utilice este producto cerca del agua, por
ejemplo, en un sótano húmedo o cerca de un
fregadero.
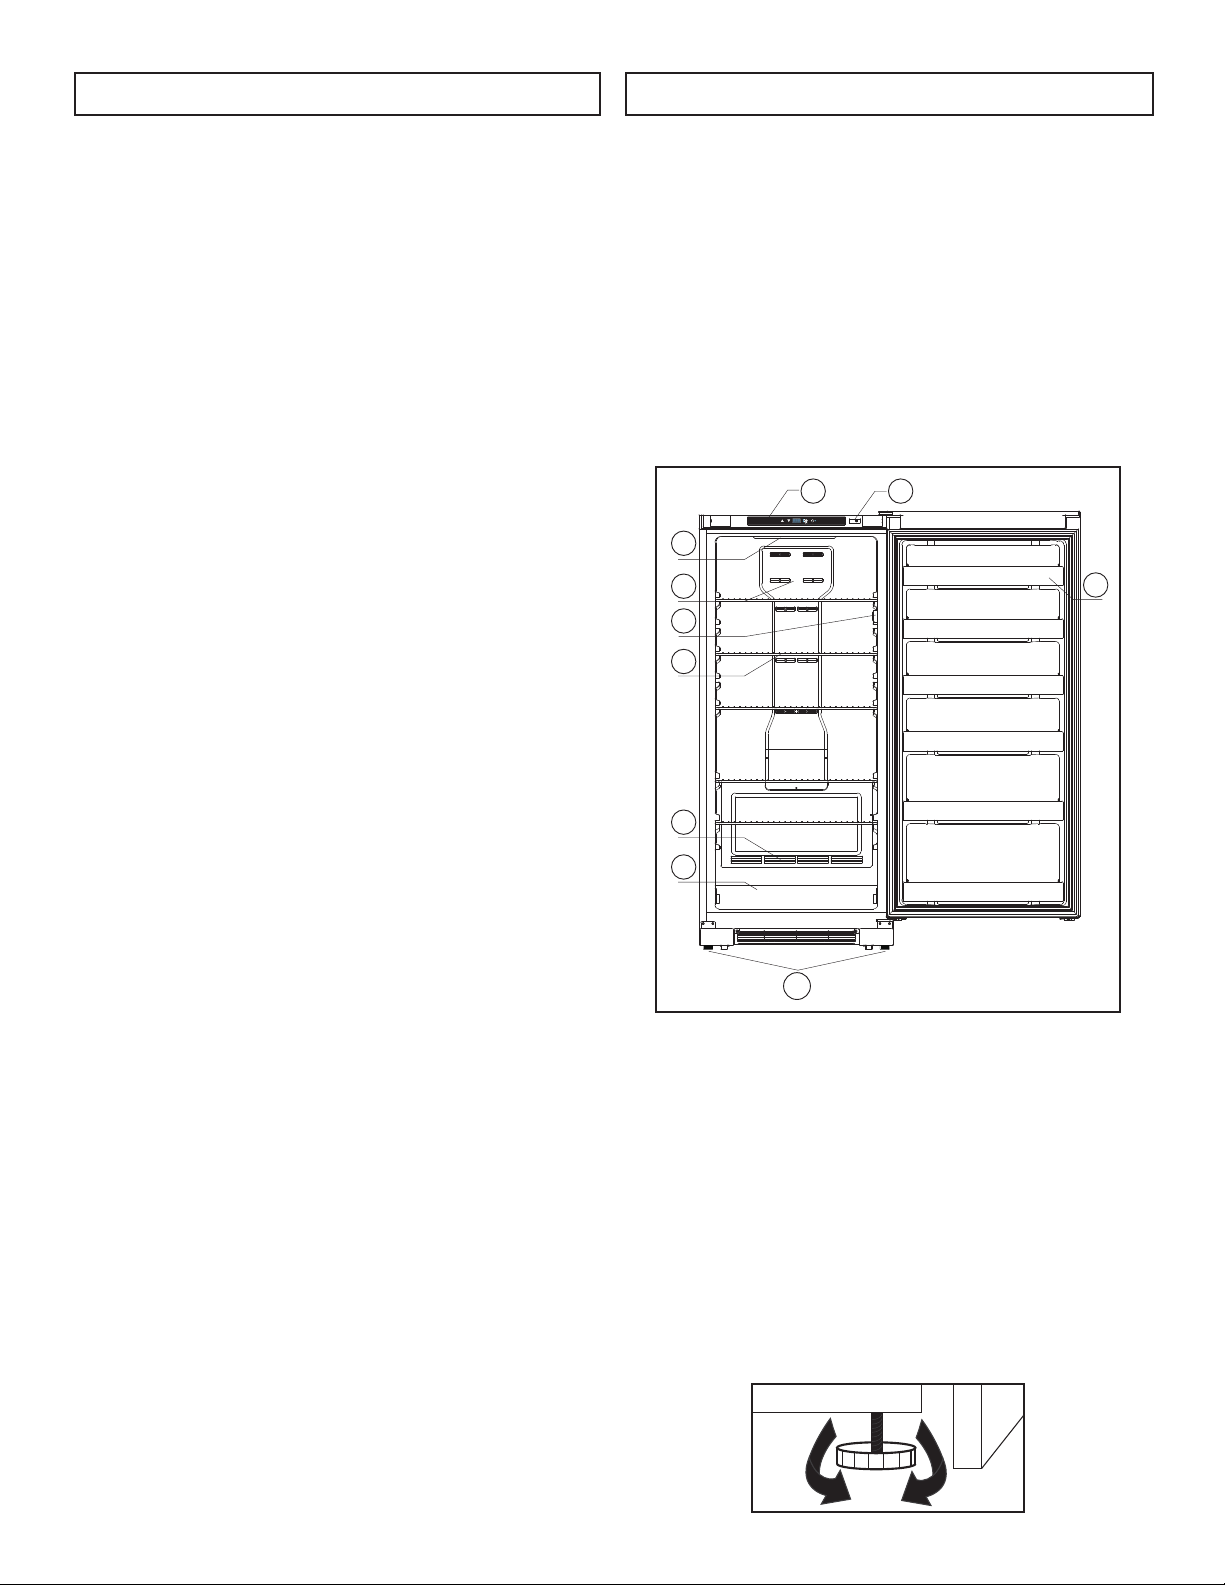
CARACTERISTICAS
1. Interruptor de la luz
2. Panel de control
3. Luz LED
4. Salida de aire
5. Sensor de temperatura
6. Estante del congelador
7. Entrada de aire
8. Estante de la puerta
9. Frente del estante
10. Patas ajustables
3
4
5
6
12
9
• Este aparato está diseñado para uso doméstico
y en garaje en interiores únicamente. Los
congeladores se prueban para funcionar en
temperaturas que varían de 0°F a 110°F (-17°C
a 43°C). No está diseñado para instalación en
exteriores, incluso en cualquier lugar que no
tenga temperatura controlada, como porches,
vehículos, etc.
• Antes de conectar el aparato a una fuente de
alimentación, deje que se mantenga erguido
durante aproximadamente 6 horas; Esto
reducirá la posibilidad de un malfuncionamiento
en el sistema de enfriamiento debido a la
manipulación durante el transporte.
• Esta aparato tiene 76.1 cm (29.9 pulgadas) de
ancho por 170.9 cm (67.3 pulgadas) de alto
por 72.4 cm (28.5 pulgadas) de profundidad.
• Espere 12.7 cm (5 pulgadas) de espacio entre la
parte posterior, los lados y la parte superior del
aparato y todas las paredes adyacentes.
• Este aparato está diseñado para instalación
independiente y no está diseñado para ser
instalado en un gabinete o mostrador. La
construcción en este aparato puede causar un
mal funcionamiento.
7
8
10
INSTRUCCIONES DE NIVELACIÓN
Hay dos patas ajustables en la parte inferior
del aparato que se pueden subir o bajar para
asegurarse de que el aparato esté nivelado.
1. Gire la pierna de nivelación en el sentido de
las agujas del reloj hasta el tope, hasta que la
parte superior del pie toque la parte inferior del
chasis.
2. Gire lentamente la pierna de nivelación en el
sentido de las agujas del reloj hasta que el
aparato esté nivelado.
19
Page 21
INSTRUCCIONES DE OPERACIÓN
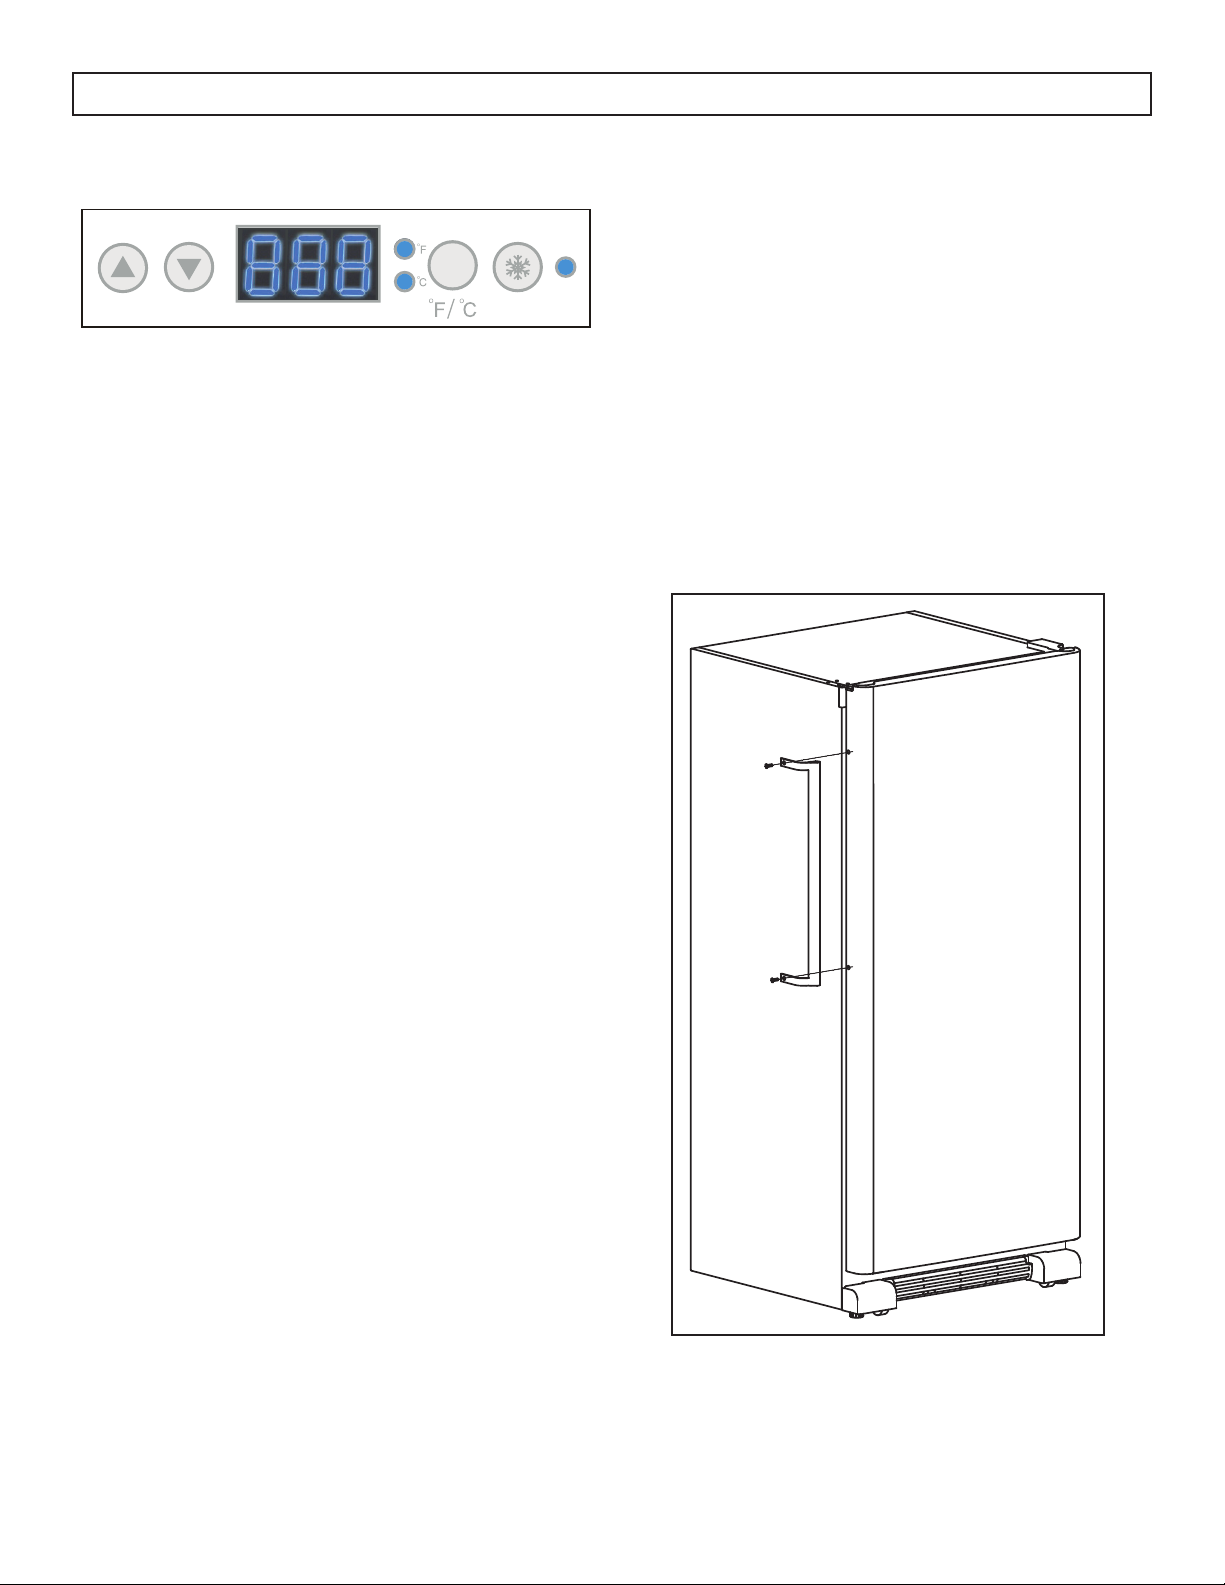
PANEL DE CONTROL INSTALACIÓN DE MANIJA
El electrodoméstico se envía con la manija dentro
del gabinete para protegerlo de daños. Debe ser
instalado por el usuario fi nal. El electrodoméstico
debe desconectarse antes de instalar el mango.
1. Coloque el mango sobre los postes expuestos de
AJUSTE DE TEMPERATURA
la manija de la puerta.
Presione los botones de fl echa para confi gurar o
ajustar la temperatura.
La temperatura se puede establecer entre -14°C a
-24°C (7°F a -11°F).
El ajuste de temperatura recomendado es -18°C
(0°F).
FUNCIÓN DE CONGELACIÓN RÁPIDA
Esta función debe usarse cuando el aparato se
enciende por primera vez, cuando se ha llenado de
comestibles o si la puerta ha estado abierta durante
un período prolongado. Esta función hará funcionar
el compresor constantemente para alcanzar la
temperatura más fría lo más rápido posible.
Mantenga presionado el botón de congelación
rápida durante tres segundos para activar la
congelación rápida. El indicador LED se iluminará.
Para cancelar la función de congelación rápida,
mantenga presionado el botón de congelación
rápida hasta que el indicador LED se apague.
2. Retire los dos tornillos del lado de la puerta
con un destornillador, inserte los tornillos en el
soporte de la manija, fíjelo al lado de la puerta
y apriételo hasta que quede ajustado.
Nota: El manija puede parecer ligeramente
diferente según el color del aparato.
Cuando el ciclo de congelación rápida ha
fi nalizado o se cancela, el aparato volverá a la
última temperatura establecida.
LA ESCALA DE TEMPERATURA
Para cambiar entre °C y °F, presione el botón °C/°F,
la luz indicadora correspondiente se iluminará.
ALARMA DE PUERTA ABIERTA
Este aparato está equipado con una alarma de
puerta que sonará si la puerta se deja abierta
durante más de 3 minutos. La alarma sonará y la
pantalla parpadeará continuamente hasta que se
cierre la puerta.
20
Page 22
INSTRUCCIONES DE OPERACIÓN
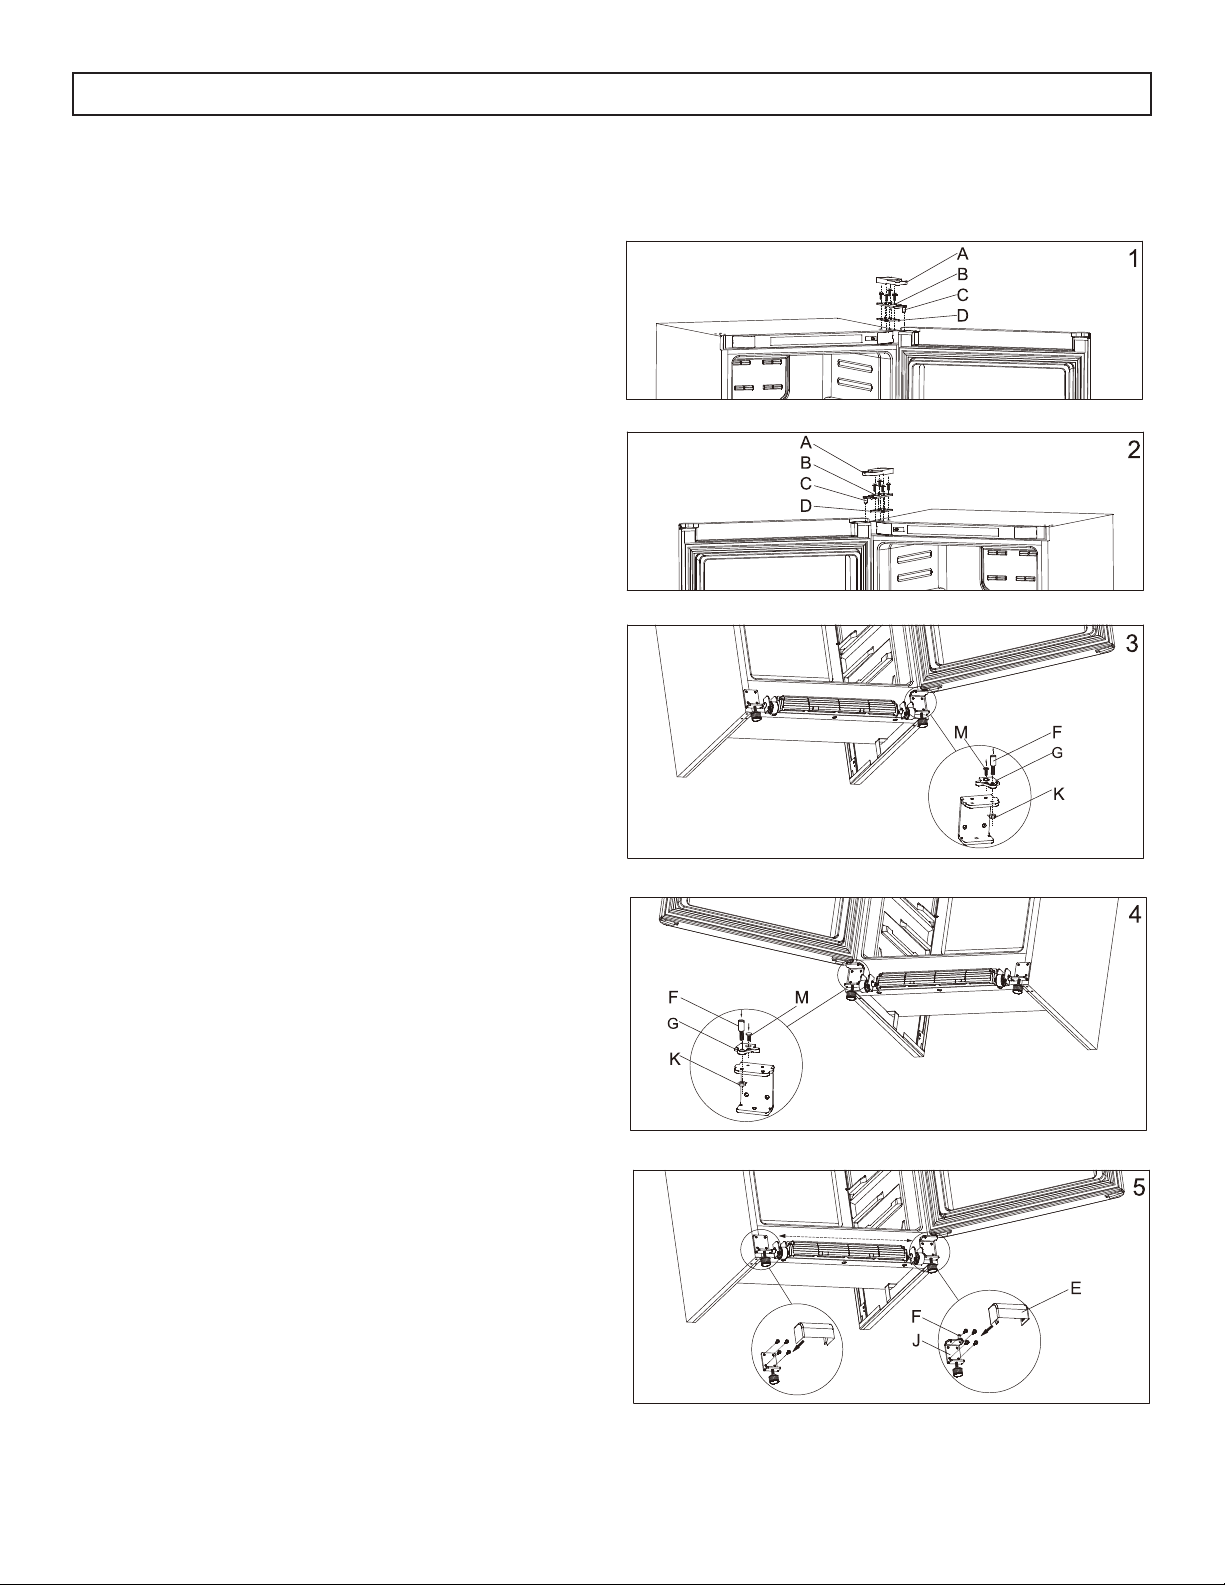
INSTRUCCIONES DE REVERSIÓN DE PUERTA
Si el aparato se coloca en su parte posterior o
lateral durante un período de tiempo prolongado
durante este proceso, se debe permitir que
permanezca erguido durante 6 horas antes de
enchufarlo para evitar daños a los componentes
internos.
1. Saque un tornillo de la cubierta de la bisagra
superior (A) y luego remueva la tapa de bisagra
superior.
2. Saque cuatro tornillos de la bisagra superior
(B) y remueva la bisagra superior, el vástago
superior de la puerta (C) y el espaciador de la
bisagra superior (D).
3. Saque la puerta de la unidad y déjela a un
lado. Asegúrese de no dañar los vástagos
inferiores de la puerta (F).
4. Remueva las tapas de los rodillos de la parte de
abajo de la unidad (E).
5. Remueva cuatro tornillos de cada una de las
bisagras inferiores e invierta las bisagras
inferiores (J). Verifi que que la bisagra en forma
de C quede del lado de la unidad opuesto a la
manija.
6. Vuelva a instalar los cuatro tornillos de cada
bisagra inferior (F).
7. Vuelva a instalar los vástagos inferiores de la
puerta (G).
8. Vuelva a instalar la puerta verifi cando que el
vástago inferior (F) quede dentro del orifi cio de
la bisagra inferior más cercano al exterior de la
unidad.
9. Vuelva a colocar el espaciador de la bisagra
(D), el vástago superior de la puerta (C) y la
bisagra superior con los cuatro tornillos (B).
Asegúrese de cambiar la bisagra superior al
lado opuesto de modo que el vástago superior
de la puerta quede en la posición correcta.
10. Vuelva a instalar la tapa de la bisagra superior
(A) con un tornillo. Puede encontrar una tapa
de bisagra superior para el lado opuesto de la
unidad en la bolsa de accesorios dentro de la
unidad.
11. Vuelva a instalar las tapas de los rodillos en la
parte de abajo de la unidad (E).
Nota: Al instalar la puerta, asegúrese de que
la parte superior de la puerta esté nivelada con
la parte superior del gabinete. Si la puerta no
está nivelada, la junta de goma no hará un buen
sellado con el armario, lo que puede causar un mal
funcionamiento del aparato.
21
Page 23

CUIDADO Y MANTENIMIENTO
LIMPIEZA
Asegúrese de que la unidad esté desenchufada
antes de limpiar cualquier parte del aparato.
• Para limpiar el interior del aparato, utilice un
paño suave y una solución de una cucharada
de bicarbonato de sodio a un litro de agua o
una solución de jabón suave o algún detergente
suave.
• Lave los estantes removibles en una solución de
detergente suave, luego seque y limpie con un
paño suave.
• Limpie el exterior con un paño suave y húmedo
y un poco de detergente suave.
• Es importante mantener el área limpia donde la
puerta sella contra el gabinete. Limpie este área
con un paño jabonoso. Enjuague con un paño
húmedo y deje secar.
Nota: No utilice limpiadores que contengan
amoníaco o alcohol en el aparato. El amoniaco o
el alcohol pueden dañar el aspecto del aparato.
Nunca utilice limpiadores comerciales o abrasivos
ni objetos afi lados en ninguna parte del aparato.
FALLO DE ALIMENTACIÓN
La mayoría de las fallas de alimentación se corrigen
en pocas horas y no deben afectar la temperatura
de su aparato si minimiza el número de veces que
se abre la puerta. Si la alimentación va a estar
apagada por un período de tiempo más largo,
tome las medidas apropiadas para proteger su
contenido.
Nota: Espere de 3 a 5 minutos antes de intentar
reiniciar el refrigerador si se ha interrumpido la
operación.
VACACIONES
• Vacaciones cortas: Deje el aparato en
funcionamiento durante las vacaciones de
menos de tres semanas.
• Largas vacaciones: Si el aparato no se va
a utilizar durante varios meses, retire todos
los artículos y apague el aparato. Limpie y
seque el interior a fondo. Para evitar el olor y
el moho, deje la puerta ligeramente abierta,
bloqueándola si es necesario.
TIP DE AHORRO DE ENERGÍA
El aparato debe estar ubicado en la zona más
fresca de la habitación, lejos de los aparatos que
producen calor y fuera de la luz directa del sol. No
sobrecargue la unidad ni bloquee las aberturas de
ventilación.
MUDARSE
• Eliminar todos los elementos.
• Tape la puerta cerrada.
• Asegúrese de que el aparato permanezca
seguro en posición vertical durante el
transporte. Proteja también el exterior del
aparato con una manta o un artículo similar.
• Si el aparato se coloca en su parte posterior o
lateral durante el transporte, al llegar al destino,
permita que permanezca en su posición de
funcionamiento durante 6 horas para evitar
daños a los componentes internos.
DISPOSICIÓN
DESCONGELAR
Esta unidad está equipada con una función
de descongelación automática y no requiere
descongelación manual. El agua de descongelación
del aparato se canaliza en una bandeja de goteo
situada por encima del compresor. La transferencia
de calor desde el compresor hace que el agua de
descongelación se evapore.
CÓDIGOS DE ERROR
• E1: Fallo del sensor.
• E2: Fallo del sensor de descongelación.
• E3: fallo del sensor del refrigerador y fallo del
sensor de descongelación.
• H: Temperatura alta.
Este aparato no puede ser tratado como un residuo
doméstico normal, sino que debe ser llevado al
punto de recogida de residuos apropiado para
el reciclaje de componentes eléctricos. Para
obtener información sobre los puntos de recogida
de residuos locales, póngase en contacto con la
agencia local de eliminación de residuos o con la
ofi cina gubernamental.
22
Page 24
PREGUNTAS FRECUENTES
¿Cuáles son las potencias y amperios estándar que se utilizan?
Esta información se puede encontrar en la placa de clasifi cación ubicada en la parte posterior del
gabinete.
¿Cuánto cuesta hacer funcionar el congelador?
Consulte la guía de energía.
¿Puedo usar un cable de extensión?
No, no se puede usar un cable de extensión.
Tengo problemas para abrir la puerta o la tapa; ¿por qué?
Es posible que sea difícil abrir la puerta o la tapa del congelador inmediatamente después de cerrarla.
Esto es normal y se debe a la diferencia de presión entre el interior frío del congelador y el aire caliente
que acaba de entrar en el congelador cuando se abrió. La presión se igualará en unos minutos.
SOLUCIÓN SUGERIDA
No funciona
• Un fusible en su casa puede soplarse o el interruptor de circuito disparado
• El enchufe no está completamente insertado en la toma de corriente
La temperatura interna no es lo sufi cientemente fría
• El ajuste de temperatura es demasiado frío
• La puerta o la tapa no se cierra correctamente o se abre en exceso
• Recientemente se agregó una gran cantidad de comida caliente al gabinete
• Muy cerca de una fuente de calor o luz solar directa
• La temperatura ambiente o la humedad es muy alta
El congelador funciona continuamente
• El ajuste de temperatura es demasiado frío
• La puerta o la tapa no se cierra correctamente o se abre en exceso
• Recientemente se agregó una gran cantidad de comida caliente al gabinete.
• Muy cerca de una fuente de calor o luz solar directa.
• La temperatura ambiente o la humedad es muy alta
El congelador hace un gorgoteo cuando está en funcionamiento
• Este ruido es completamente normal. El refrigerante dentro del aparato emitirá un gorgoteo cuando
cambie de líquido a gas y viceversa.
23
Page 25
GARANTÍA LIMITADA “A DOMICILIO”
LIMITED IN-HOME APPLIANCE WARRANTY
Este producto de calidad está garantizado contra defectos de fabricación, incluyendo partes y mano de obra, siempre y
This quality product is warranted to be free from manufacturer’s defects in material and workmanship, provided that the unit is used under the normal operating
cuando la unidad se utilice bajo las condiciones normales de funcionamiento para las que fue diseñado.
conditions intended by the manufacturer.
Esta garantía está solamente disponible para la persona que haya comprado originalmente esta unidad directamente de Danby
This warranty is available only to the person to whom the unit was originally sold by Danby Products Limited (Canada) or Danby Products Inc. (U.S.A.) (hereafter
Products Limited (Canada) o Danby Products Inc. (U.S.A.) (en adelante “Danby”) o uno de sus distribuidores
“Danby”) or by an authorized distributor of Danby, and is non-transferable.
autorizados, y no es transferible.
CONDICIONES DE LA GARANTÍA
Las piezas plásticas, se autorizan por treinta (30) días solamente a partir de la fecha de la compra, sin las extensiones
proporcionadas.
Plastic parts, are warranted for thirty (30) days only from purchase date, with no extensions provided.
Primeros 5 años
First Year
Para obtener
servicio
To obtain
Service
Límites del servicio
técnico a domicilio
Boundaries of
In Home Service
Durante los primeros cinco (5) años, cualquier parte en buen estado de este producto que resulte defectuosa,
During the rst twelve (12) months, any functional parts of this product found to be defective, will be repaired or replaced, at warrantor’s
incluyendo cualquier sistema sellado, será reparado o reemplazado, a opción del
option, at no charge to the ORIGINAL purchaser.
fabricante, sin cargo para el comprador ORIGINAL.
Comuníquese con el distribuidor donde haya comprado la unidad, o llame al Taller de Servicio Autorizado más
cercano, donde debe ser reparada por un técnico calificado. Si esta unidad es reparada en otro lugar que no
Danby reserves the right to limit the boundaries of “In Home Service” to the proximity of an Authorized Service Depot. Any app liance
sea un Taller de Servicio Autorizado, o si la unidad se utiliza para aplicaciones comerciales, Danby no se hará
requiring service outside the limited boundaries of “In Home Service” , it will be the consumer’s responsibility to transport the appliance (at
responsable de ninguna forma y la garantía será anulada.
their own expense) to the original retailer (point of purchase) or a service depot for repair. See “Boundaries of In Home Serv ice” below.
Contact your dealer from whom your unit was purchased, or contact your nearest authorized Danby service depot, where service
Danby se reserva el derecho de limitar la cobertura de "Servicio en Domicilio" sujeto a la proximidad de un
must be performed by a qualied service technician.
Taller de Servicio Autorizado. Para todo artefacto que requiera servicio fuera del área limitada de "Servicio en
If service is performed on the units by anyone other than an authorized service depot, or the unit is used for commercial appli cation, all
Domicilio", el cliente será responsable por transportar dicho artefacto hasta el Taller de Servicio Autorizado
obligations of Danby under this warranty shall be void.
mas cercano. Si el electrodoméstico está instalado en un lugar que se encuentra a 100 kilómetros (62 millas)
o más del centro de servicios más cercano, se debe llevar la unidad al Centro de servicios Danby autorizado
If the appliance is installed in a location that is 100 kilometers (62 miles) or more from the nearest service center your unit must be
más cercano, ya que dicho servicio sólo puede realizarlo un técnico calificado y certificado por Danby para
delivered to the nearest authorized Danby Service Depot, as service must only be performed by a technician qualied and certif ied for
prestar servicios de garantía.
warranty service by Danby. Transportation charges to and from the service location are not protected by this warranty and are t he
responsibility of the purchaser.
Los cargos por transporte desde y hacia el lugar en que se efectúe el servicio técnico no están cubiertos por
esta garantía y son de responsabilidad del comprador.
TERMS OF WARRANTY
Nothing within this warranty shall imply that Danby will be responsible or liable for any spoilage or damage to food or other c ontents of this appliance, whether due
Nada dentro de esta garantía implica que Danby será responsable por cualquier daño que hayan sufrido los alimentos u otros
to any defect of the appliance, or its use, whether proper or improper.
contenidos de este aparato, ya sea debido a un defecto del aparato, o su uso, adecuado o inadecuado.
EXCLUSIONS
Save as herein provided, Danby, there are no other warranties, conditions, representations or guarantees, express or implied, m ade or intended by Danby or its
Salvo lo aquí indicado por Danby, no existen otras garantías, condiciones o representaciones, explícitas o implícitas, concretas o
authorized distributors and all other warranties, conditions, representations or guarantees, including any warranties, conditio ns, representations or guarantees
intencionales por parte de Danby o sus distribuidores autorizados y todas las demás garantías, condiciones o representaciones,
under any Sale of Goods Act or like legislation or statue is hereby expressly excluded. Save as herein provided, Danby shall no t be responsible for any damages
incluyendo cualquier garantía, condiciones o representaciones bajo cualquier Acta de Venta de Productos o legislación o estatuto
to persons or property, including the unit itself, howsoever caused or any consequential damages arising from the malfunction o f the unit and by the purchase of
similar, quedan de esta forma expresamente excluidas. Salvo lo aquí indicado, Danby no serán responsables por ningún daño a
the unit, the purchaser does hereby agree to indemnify and hold harmless Danby from any claim for damages to persons or propert y caused by the unit.
personas o bienes, incluyendo la propia unidad, sin importar su causa, o de ningún daño indirecto causado por el desperfecto de la
unidad, y al comprar esta unidad, el comprador acepta por la presente, indemnizar y proteger a Danby contra cualquier reclamo
por daños a personas o bienes causados por la unidad.
EXCLUSIONES
GENERAL PROVISIONS
No warranty or insurance herein contained or set out shall apply when damage or repair is caused by any of the following:
1) Power failure.
No se considerará ninguna de estas garantías o seguros cuando el daño o la necesidad de reparación sea el producto de los
2) Damage in transit or when moving the appliance.
siguientes casos:
3) Improper power supply such as low voltage, defective house wiring or inadequate fuses.
1) Falla del suministro eléctrico.
2) Daños en tránsito o durante el transporte de la unidad.
4) Accident, alteration, abuse or misuse of the appliance such as inadequate air circulation in the room or abnormal operating con ditions
3) Alimentación incorrecta, como bajo voltaje, instalación eléctrica defectuosa o fusibles inadecuados.
4) Accidente, modificación, abuso o uso incorrecto del artefacto, tal como insuficiente ventilación del ambiente o condiciones de
operación anormales (temperatura ambiente extremadamente alta o baja).
5) Utilización comercial o industrial (v.g., si el electrodoméstico no está instalado en una vivienda particular).
6) Incendio, daños por agua, robo, guerra, disturbios, hostilidades, actos de fuerza mayor como huracanes, inundaciones, etc.
7) Pedidos de servicio debido a desinformación del usuario.
8) Instalación inadecuada (v.g., instalación empotrada de un electrodoméstico diseñado como unidad independiente o uso de un
Proof of purchase date will be required for warranty claims; so, please retain bills of sale. In the event warranty service is required, present this document to our
electrodoméstico al aire libre que no esté aprobado para dicho fin, incluyendo pero no limitado a: patios, porches o en cualquier
AUTHORIZED SERVICE DEPOT.
lugar que no esté bien aislado o controlado por el clima).
(extremely high or low room temperature).
5) Use for commercial or industrial purposes (ie. If the appliance is not installed in a domestic residence).
6) Fire, water damage, theft, war, riot, hostility, acts of God such as hurricanes, oods etc.
7) Service calls resulting in customer education.
8) Improper Installation (ie. Building-in of a free standing appliance or using an appliance outdoors that is not approved for out door application).
CONDICIONES GENERALES
Se requerirá una prueba de la fecha de compra para reclamaciones de garantía; Retener las facturas de venta. En el caso de que se
requiera servicio de garantía, presente el comprobante de compra a nuestro depósito de servicio autorizado.
Warranty Service
In-home
Servicio de Garantía
Danby Products Limited
PO Box 1778, Guelph, Ontario, Canada N1H 6Z9
Danby Products Limited
Telephone: (519) 837-0920 FAX: (519) 837-0449
PO Box 1778, Guelph, Ontario, Canada N1H 6Z9
Telephone: (519) 837-0920 FAX: (519) 837-0449
Servicio en Domicilio
1-800-263-2629
1-800-263-2629
09/20
04/09
PO Box 669, Findlay, Ohio, U.S.A. 45840
Telephone: (419) 425-8627 FAX: (419) 425-8629
Telephone: (419) 425-8627 FAX: (419) 425-8629
PO Box 669, Findlay, Ohio, U.S.A. 45840
Danby Products Inc.
Danby Products Inc.
Page 26

NOTES / REMARQUES / NOTAS :
__________________________________________________________________________________________
__________________________________________________________________________________________
__________________________________________________________________________________________
__________________________________________________________________________________________
__________________________________________________________________________________________
__________________________________________________________________________________________
__________________________________________________________________________________________
__________________________________________________________________________________________
__________________________________________________________________________________________
__________________________________________________________________________________________
__________________________________________________________________________________________
__________________________________________________________________________________________
__________________________________________________________________________________________
__________________________________________________________________________________________
__________________________________________________________________________________________
__________________________________________________________________________________________
__________________________________________________________________________________________
__________________________________________________________________________________________
__________________________________________________________________________________________
__________________________________________________________________________________________
__________________________________________________________________________________________
__________________________________________________________________________________________
Page 27

NOTES / REMARQUES / NOTAS :
__________________________________________________________________________________________
__________________________________________________________________________________________
__________________________________________________________________________________________
__________________________________________________________________________________________
__________________________________________________________________________________________
__________________________________________________________________________________________
__________________________________________________________________________________________
__________________________________________________________________________________________
__________________________________________________________________________________________
__________________________________________________________________________________________
__________________________________________________________________________________________
__________________________________________________________________________________________
__________________________________________________________________________________________
__________________________________________________________________________________________
__________________________________________________________________________________________
__________________________________________________________________________________________
__________________________________________________________________________________________
__________________________________________________________________________________________
__________________________________________________________________________________________
__________________________________________________________________________________________
__________________________________________________________________________________________
__________________________________________________________________________________________
Page 28

DANBY PRODUCTS LIMITED, ONTARIO, CANADA N1H 6Z9
DANBY PRODUCTS INC., FINDLAY, OHIO, USA 45840
*Trademarks of Danby Products Limited and/or its subsidiaries
* Marques de commerce de Danby Products Limited et / ou de ses filiales
* Marcas comerciales de Danby Products Limited y / o sus subsidiarias
Printed in China
Imprimé en Chine
Impreso en China
 Loading...