

Page 1

PORTABLE DRYER
Owner’s Manual............................1 - 12
SÉCHE-LINGE PORTATIF
Manuel du propriétaire.................13 - 24
GUÍA DEL USUARIO
OWNER’S MANUAL
MODELO • MODEL
DDY060WDB
2017.06.13
Page 2

Welcome
Welcome to the Danby family. We are proud of our quality products and we beleive in
dependable service. We suggest that you read this owner’s manual before plugging in your new
appliance as it contains important operation information, safety information, troubleshooting and
maintenance tips to ensure the reliability and longevity of your appliance.
Visit www.Danby.com to access self service tools, FAQs and much more. For additional assistance
call 1-800-263-2629.
Note the information below; you will need this information to obtain service under warranty.
You must provide the original purchase receipt to validate your warranty and receive service.
Model Number:
Serial Number:
Date of Purchase:
Need Help?
Before you call for service, here are a few things you can do to help us serve you better.
Read this owner’s manual:
It contains instructions to help you use and maintain your appliance properly.
If you receive a damaged appliance:
Immediately contact the retailer or builder that sold you the appliance.
Save time and money:
Check the troubleshooting section at the end of this manual before calling. This section
will help you solve common problems that may occur.
1-800-26- Danby
(1-800-263-2629)
1
Page 3
Important Safety Information
READ AND FOLLOW ALL SAFETY INSTRUCTIONS
IMPORTANT WARNING
DANGER: Risk of child entrapment. Before
thowing away an old appliance:
• Remove the door or lid.
• Leave the shelves in place so that children
cannot easily climb into the appliance.
GROUNDING INSTRUCTIONS
This appliance must be grounded. In the event of an
electrical short circuit, grounding reduces the risk of
electrical shock by providing an escape wire for the
electrical current.
This appliance is equipped with a cord that has a
grounding wire with a grounding plug. The power
cord must be plugged into an outlet that is properly
grounded. If the outlet is a standard 2-prong wall
outlet, it is your responsibility to have it replaced
with a properly grounded 3-prong wall outlet.
The serial rating plate indicates the voltage and
frequency the appliance is designed for.
WARNING - Improper use of the grounding
plug can result in a risk of electric shock.
Consult a qualifi ed electrician or service agent
if the grounding instructions are not completely
understood, or if doubt exists as to whether the
appliance is properly grounded.
SAFETY REQUIREMENTS
Ensure that component parts are replaced with like
components and that servicing is done by factory
authorized service personnel, to minimize the risk of
possible ignition due to incorrect parts or improper
service.
This appliance is not intended for use by persons
(including children) whose physical, sensory or
mental capabilities may be different or reduced,
or who lack experience or knowledge, unless such
persons receive supervision or training to operate
the appliance by a person responsible for their
safety.
Children should be supervised to ensure that they
do not play with the appliance.
Do not place items exposed to cooking oils in the
dryer. Items contaminated with cooking oils may
contribute to a chemical reaction that could cause
a load to catch fi re. To reduce the risk of fi re due
to contaminated loads, the fi nal part of a tumble
dry cycle occurs without heat as a cool down
period. Avoid stopping the dryer before the end of
the drying cycle unless items can be immediately
removed and spread out to allow the accumulated
heat to dissipate.
DO NOT USE AN EXTENSION CORD
Do not connect your appliance to extension cords
or together with another appliance in the same wall
outlet. Do not splice the power cord. Do not under
any circumstances cut or remove the third ground
prong from the power cord.
If the power supply cord is damaged, it must be
replaced by the manufacturer, its service agent or
similar qualifi ed person in order to avoid hazard.
Items that have been soiled with oil products can ignite spontaneously,
especially when exposed to heat sources such as in a tumble dryer. The
items become warm, causing an oxidation reaction in the oil. Oxidation
creates heat. If the heat cannot escape, the items can become hot enough
to catch fi re. Piling, stacking or storing items that have been soiled with
oil can prevent heat from escaping and create a fi re hazard.
SAVE THESE INSTRUCTIONS!
2
Page 4

Important Safety Information
READ AND FOLLOW ALL SAFETY INSTRUCTIONS
• Do not dry articles that have been previously
cleaned in, washed in, soaked in or spotted
with gasoline, dry-cleaning solvents, or other
fl ammable or explosive substances, as they give
off vapours that could ignite or explode.
• Do not reach into the appliance if the drum is
moving.
• Do not install or store this appliance where it will
be exposed to the weather. This appliance is not
intended for use outdoors.
• Do not tamper with the controls.
• Do not use heat to dry articles containing
foam rubber or similarly textured rubber-like
materials.
• Clean the lint screen before and after each load.
• Keep area around the exhaust opening and
adjacent surrounding areas free from the
accumulation of lint, dust and dirt.
• The interior of the appliance and exhaust duct
should be cleaned periodically by qualifi ed
service personnel.
• Do not operate the appliance if it has a
damaged power cord or plug. If the power
cord is damaged, it must be replaced by the
manufacturer, its service agent or similarly
qualifi ed persons in order to avoid hazard.
• Do not attempt to repair, disassemble or modify
the appliance. The warranty becomes void if
the unit is not serviced or repaired by qualifi ed
personnel. There are no user-serviceable parts
inside.
• Do not over load the appliance.
• Ensure foreign objects do not fi nd their way into
the appliance. Remove all objects from pockets
such as lighters, matches, hairpins, coins, etc.
• The door window may be hot after a long
drying cycle. Ensure that children are kept away
from the appliance.
• If the dryer is not wall mounted, ensure that it
is placed on a fl at, fi rm surface in a dry, wellventilated place. Use the adjustable front legs
to assist in leveling the appliance if necessary.
Do not place the appliance on any soft material
such as foam, plastic or carpeting.
• Do not place the appliance or power cord near
heat sources such as radiators, heaters, air ducts
or direct sunlight. Do not place open fl ames such
as candles on or near the appliance.
• Do not block any ventilation openings. Ensure
that vents are not covered by newspapers,
tablecloths, curtains, carpeting, etc.
• Do not run the power cord under fl oor
coverings. Keep the power cord away from high
traffi c areas where it can become a tripping
hazard.
• Do not misuse the power cord. Never carry or
pull the appliance by the power cord. Never
pull the power cord to unplug it from the outlet,
instead, grasp the plug and pull to remove from
outlet.
• After turning the power off, wait 2 minutes
before attempting to turn the unit back on.
• Remove the transport packaging from the back
of the unit before fi rst use.
• This unit must be exhausted to the outside. The
exhaust air must not be discharged into a fl ue
which is used for exhausting fumes from other
appliances that are burning gasoline or other
fuels.
• Do not install this appliance behind a lockable
door, a sliding door or in such a way that
opening the dryer door is restricted. Do not
install in a tight fi tting cabinet.
SAVE THESE INSTRUCTIONS!
3
Page 5

INSTALLATION INSTRUCTIONS
FEATURES
Front
Air Filter
Door
Window
Control Panel
Door Gasket
Drum
Air Intake
Back
Casing
Exhaust Vent
Back Cover
4
Page 6

INSTALLATION INSTRUCTIONS
LOCATION
Before you install the dryer, select a location with
the following characteristics:
• A hard, level surface. Do not place the dryer on
carpeted fl oor.
• Away from direct sunlight. Direct sunlight may
affect the acrylic coating, plastic and electrical
components.
• Adequate ventilation. Ventilation openings must
not be obstructed.
• Away from sources of heat such as fi replaces or
stoves.
• Make sure that the dryer does not stand on its
power cord.
• There must be at least 10 cm (4 inches) of space
between the the dryer and any adjacent wall.
WALL MOUNTING KIT
A wall mounting kit is included with the unit so that
the unit can be secured to the wall if necessary.
We recommend using two people to complete the
installation as the dryer can be heavy.
The wall mounting kit includes:
Description Image Quantity
Hanging brackets
Plastic spacers
Exhaust connector 1
12 mm long screws 4
25 mm long screws 4
2
2
Tools required:
• one drill and 3 mm bit
• one Phillips head screwdriver
• four ɸ12 x 50 mm timber screws
Note:
• A minimum of 50 mm (2 inches) is required
between the top of the dryer and the ceiling.
• If mounting above a washing machine, ensure
there is enough space above the washing
machine to fully open the lid and load or unload
the appliance.
• This dryer is not designed to be placed directly
on top of a washing machine or any other
appliance.
Important: If you wish to install the dryer with a
stacking kit, we strongly recommend only using
the Danby Dryer with the Danby Laundry Stacking
Kit and ensure that you follow all installation
instructions that come with the Laundry Stacking Kit.
5
Page 7

INSTALLATION INSTRUCTIONS
WALL MOUNTING INSTRUCTIONS
1. Determine where you would like the dryer
positioned and mark the required bracket
position on the wall.
2. Securely affi x the hanging brackets to the
wall.
• The hanging brackets must be screwed into
wall studs to ensure the installation is secure.
• The hanging brackets must be placed no
more than 56.3 cm (22.2 inches) apart.
• If the wall studs are further apart than 56.3 cm
(22.2 inches), you must install two braces on
the wall, one to hold the hanging brackets and
one to brace the plastic spacers.
Brace
• Ensure the braces are screwed directly into
the wall studs and then screw the hanging
brackets to the brace.
Important note: If the hanging brackets do not
align with the wall studs we strongly recommend
using a wood or metal brace that will allow at
least two screws to be secured into wall studs.
7OODºORºMETALºB
6
Page 8

INSTALLATION INSTRUCTIONS
WALL MOUNTING INSTRUCTIONS
1. Install the exhaust connector on the back of the
unit. The exhaust connector can be aimed in any
direction that is convenient for your installation.
2. Using four 12mm screws, attach the plastic
spacers to the rear of the unit. These spacers will
minimize vibration and noise during operation.
Exhaust connector
3. With assistance, mount the dryer on the wall
bracket.
Spacers
12 mm screws
Wall bracket mounting points
7
Page 9
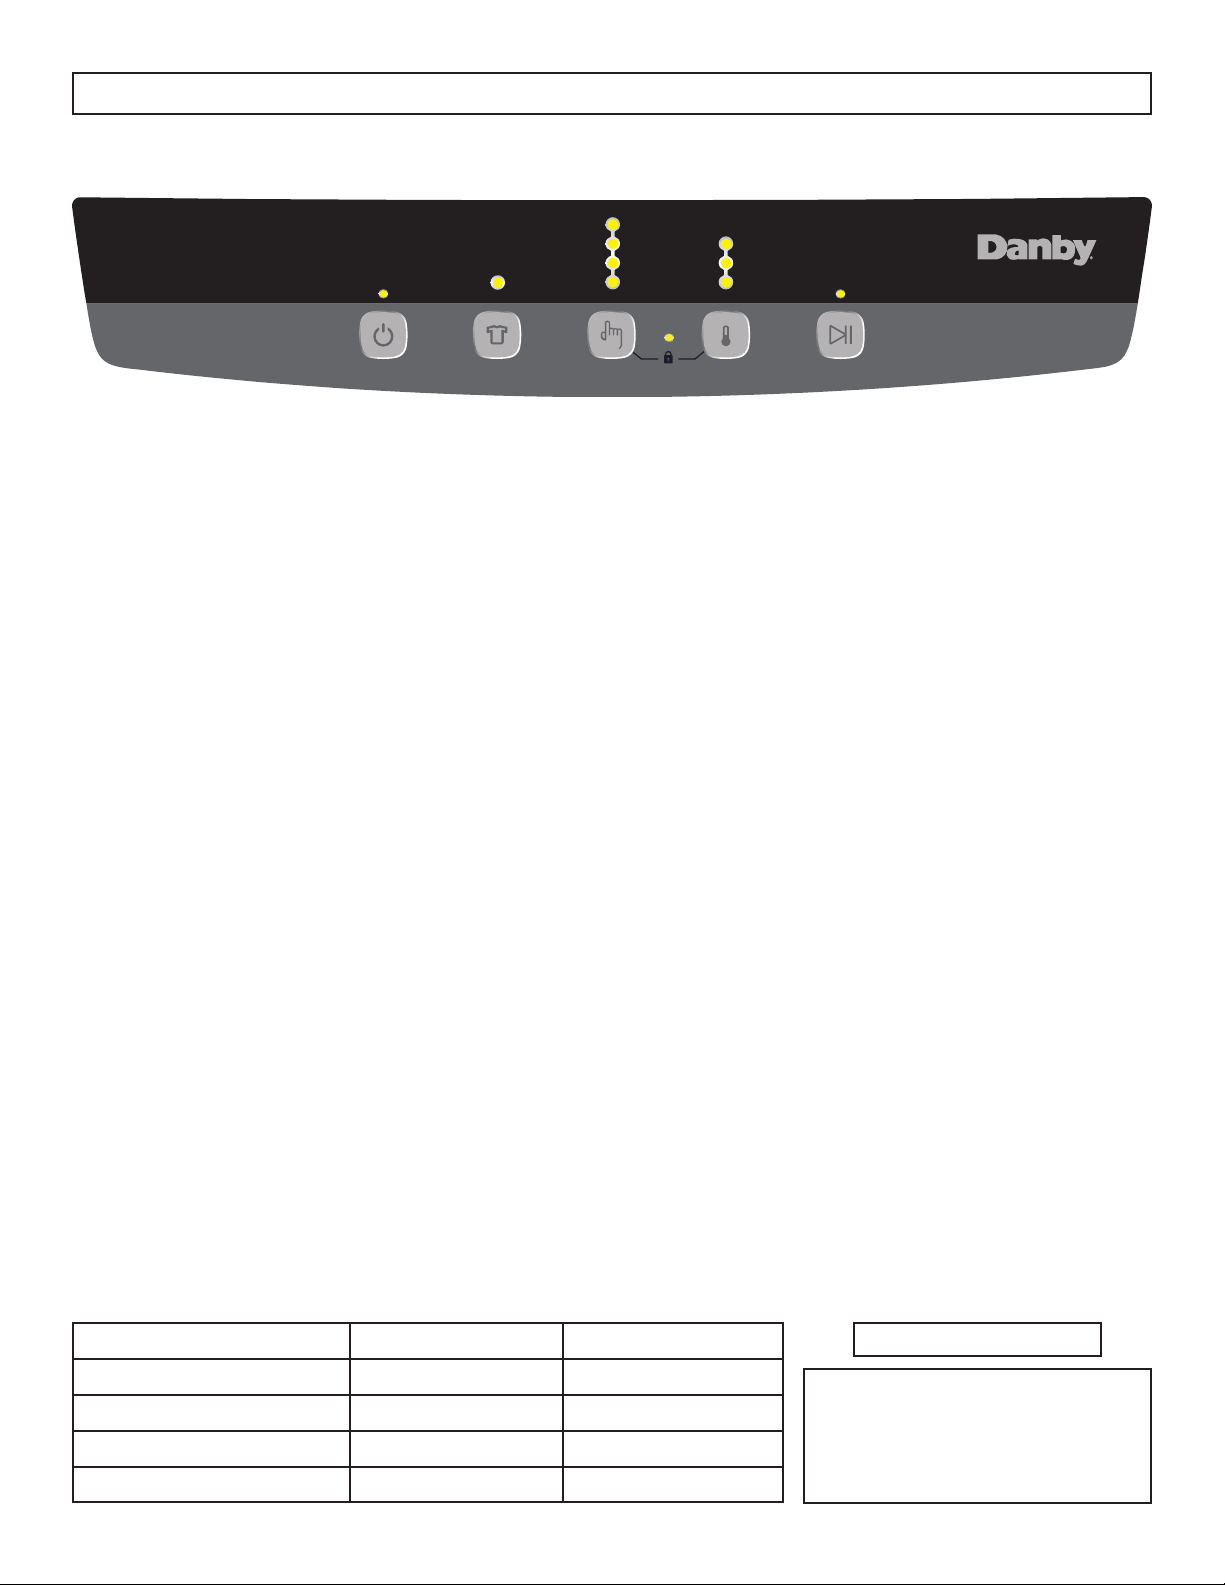
OPERATING INSTRUCTIONS
CONTROL PANEL
AIR DRY
POWER AIR DRY PROGRAM TEMPERATURE
Power: Press the Power button to turn the unit on
or off. When the unit is turned on it will beep and
the light above the Power button will illuminate.
The default program setting is “Heavy Dry” and the
defaut temperature is “High”.
Air Dry: The dryer will circulate room temperature
air for the fi rst 150 minutes and then circulate hot
air for the remaining 22 minutes of the cycle. This is
an energy effi cient cycle that is intended for delicate
clothes or materials that cannot be exposed to
excessive heat when cleaned.
Program: Press the program button to scroll through
available program settings.
• Heavy Dry: The unit will run until the humidity
level inside the drum has reached ≤ 35%.
Maximum running time is 200 minutes.
HEAVY DRY
NORMAL DRY
QUICK DRY
1 HOUR TIMED DRY
LOCK
SETTING
HIGH
MEDIUM
LOW
START/PAUSE
Temperature: Press the Temperature button to scroll
through available temperature settings.
• High: Dryer uses two sets of heating elements
running simultaneously.
• Medium: Dryer uses two sets of heating elements
for 10 minutes, then uses one set of elements for
another 10 minutes, alternating back and forth
for the duration of the program.
• Low: Dryer uses one set of heating elements.
Start/Pause: Press the Start/Pause button to start
the drying program. The light above the Start/Pause
button will illuminate to indicate that the program
has started. While the unit is running, press the
Start/Pause button to pause the drying program.
Press the Start/Pause button again to resume the
selected program.
• Normal Dry: The unit will run until the humidity
level inside the drum has reached ≤ 40%.
Maximum running time is 150 minutes.
Lock: When the dryer is running, press and hold
the Program and Temperature buttons at the same
time for 3 seconds to lock the control panel. The
• Quick Dry: The unit will run until the humidity
level inside the drum has reached ≤ 45%.
Maximum running time is 90 minutes.
light above the lock icon will illuminate to indicate
that the control panel is locked. While locked,
the buttons will not work if pressed. To unlock the
control panel, press and hold the Program and
• 1 hour: The unit will run for 60 minutes, 50
Temperature buttons at the same time for 3 seconds.
minutes on full power heating and 10 minutes
of air cooling. For this program, temperature
selection is disabled.
Drying Capacity Dry Time - High Dry Time - Low
Approx. 2 Kg (4.4 Lbs) Approx. 60 min. Approx. 90 min.
Approx. 3 Kg (6.6 Lbs) Approx. 90 min. Approx. 150 min.
Approx. 4 Kg (8.8 Lbs) Approx. 150 min. Approx. 200 min.
Approx. 6 Kg (13.2 Lbs) Approx. 200 min. -
8
Note: 1 Kg = 2.2 Lbs
Note: Drying times can be
affected by many factors such as
type of material, bulkiness, how
full the dryer is, etc. The chart is
meant as a guide only.
Page 10

OPERATING INSTRUCTIONS
OPERATING INSTRUCTIONS
• The maximum capacity of the unit is 6 Kgs (13.2
Lbs) of dry textile material. Do not over load.
• It is recommended that items be added to the
dryer one at a time to avoid tangling which can
result in uneven drying.
• Check the pockets of all items to be dried,
ensure that foreign objects do not enter the unit
such as lighters, hair pins, coins, etc.
• Turn items with zippers inside out and fasten all
buckles.
• Dryer heat may permanently set stains, ensure
all stains are removed prior to putting items in
the dryer.
• Separate light and dark coloured items to ensure
the colours do not bleed.
• For best results load the dryer with similar
fabrics.
Prior to loading the dryer check that the items you
are drying do not have the following symbols on
them as items marked with these symbols should
not be placed in a dryer:
• Delicate items should be placed into a nylon net
bag prior to drying. Do not place underwire
bras in a dryer.
• Do not add items to the dryer when it is in
operation.
• If drying large items such as blankets or heavy
loads of laundry, it is recommended that you
periodically pause the program, open the dryer
door, shake the large item or turn over the heavy
load and then restart the drying cycle. This will
ensure even drying.
• If the door is opened during operation and not
correctly closed, an alarm will sound for 10
seconds. The alarm will pause for 6 minutes
and then sound again for 10 seconds every 6
minutes until the door is closed. The appliance
cannot function while the door is open. Once the
door is closed, press the Start/Pause button to
resume operation.
CAUTION! HOT SURFACE
Do not touch the air intake during
the drying cycle due to high
temperatures.
WARNING!
To reduce the risk of fi re, this
unit must be exhausted to the
outdoors.
9
Page 11

CARE & MAINTENANCE
Cleaning the lint fi lter
Unplug the power cord prior to any cleaning. The
lint fi lter must be in place when the unit is running
and should be cleaned before and after every load.
1. Removing the lint fi lter.
• Remove the fi lter by gently pulling outwards on
the center of the exhaust vent shroud.
• The fi lter has three parts: exhaust vent shroud,
lint fi lter and exhaust fi lter.
2. Cleaning the lint fi lter.
• Separate the three pieces of the fi lter.
• Remove lint with a soft brush or vacuum cleaner.
3. Replacing the lint fi lter.
• After cleaning, reassemble the exhaust vent
shroud, the lint fi lter and the exhaust fi lter.
• Ensure the fi lter assembly is fi rmly installed in the
unit.
Cleaning the air intake fi lter
The air intake fi lter should be cleaned once a
month. Remove the air intake fi lter by holding the
upper and lower ends and pulling outward. Remove
the fi lter and clean it with a soft brush. Reassemble
and install in the unit.
Cleaning the interior and exterior
• Do not immerse any part of the unit in water.
• Do not use thinner, gasoline or alcohol on or
near the unit as the residue and fumes can cause
a fi re.
• Do not use any type of spray cleaner on the
interior of the unit. If the drum becomes stained,
clean with a damp cloth.
• Remove any residue before drying the next load.
• Clean cabinet with mild soap and water. Do not
use harsh or abrasive cleaners.
10
Page 12

TROUBLESHOOTING
Danby Consumer Care: 1-800-263-2629
Hours of operation:
Monday to Thursday 8:30 am - 6:00 pm Eastern Standard Time
Friday 8:30 am - 4:00 pm Eastern Standard Time
Information in this manual is subject to change without notice.
PROBLEM POSSIBLE CAUSE
Dryer does not operate • The appliance is not plugged in.
• The circuit breaker tripped or a blown fuse.
Dryer drum does not turn. • The door is not fully closed.
• The power plug is unplugged.
• The outlet does not have power.
The laundry is not thoroughly dried. • The lint fi lter or air intake fi lter are clogged.
• There is too much laundry in the dryer.
• Wet items were added during the drying cycle.
• The laundry has become twisted while drying.
• The dryer has been placed in a small or badly
ventilated area.
• Dryer vent is blocked.
11
Page 13

LIMITED “IN HOME” WARRANTY
LIMITED IN-HOME APPLIANCE WARRANTY
This quality product is warranted to be free from manufacturer’s defects in material and workmanship, provided that the unit is used under the normal operating
This quality product is warranted to be free from manufacturer’s defects in material and workmanship, provided that the unit is used
conditions intended by the manufacturer.
under the normal operating conditions intended by the manufacturer.
This warranty is available only to the person to whom the unit was originally sold by Danby Products Limited (Canada) or Danby Products Inc. (U.S.A.) (hereafter
This warranty is available only to the person to whom the unit was originally sold by Danby Products Limited (Canada) or Danby
“Danby”) or by an authorized distributor of Danby, and is non-transferable.
Products Inc. (U.S.A.) (hereafter “Danby”) or by an authorized distributor of Danby, and is non-transferable.
TERMS OF WARRANTY
Plastic parts are warranted for thirty (30) days from the date of purchase, with no extensions provided.
Plastic parts, are warranted for thirty (30) days only from purchase date, with no extensions provided.
First 12 months
First Year
To obtain service
To obtain
Service
Boundaries of
in-home service
During the first twelve (12) months, any functional parts of this product found to be defective, will be repaired or
replaced, at warrantor’s option, at no charge to the original purchaser.
During the rst twelve (12) months, any functional parts of this product found to be defective, will be repaired or replaced, at warrantor’s
option, at no charge to the ORIGINAL purchaser.
Contact the dealer where the unit was purchased, or contact the nearest authorized Danby service depot, where
service must be performed by a qualified service technician. If service is performed on the unit by anyone other
Danby reserves the right to limit the boundaries of “In Home Service” to the proximity of an Authorized Service Depot. Any app liance
than an authorized service depot, all obligations of Danby under this warranty shall be void.
requiring service outside the limited boundaries of “In Home Service” , it will be the consumer’s responsibility to transport the appliance (at
their own expense) to the original retailer (point of purchase) or a service depot for repair. See “Boundaries of In Home Serv ice” below.
Danby reserves the right to limit the boundaries of “In Home Service” to the proximity of an authorized service
Contact your dealer from whom your unit was purchased, or contact your nearest authorized Danby service depot, where service
depot. Any appliance requiring service outside the limited boundaries of “In Home Service”, will be the consumer’s
must be performed by a qualied service technician.
responsibility to transport at their own expense to the original point of purchase or a service depot for repair. If the
If service is performed on the units by anyone other than an authorized service depot, or the unit is used for commercial appli cation, all
appliance is installed in a location that is 100 kilometers (62 miles) or more from the nearest service center, it must
obligations of Danby under this warranty shall be void.
be delivered to the nearest authorized Danby Service Depot by the purchaser.
TERMS OF WARRANTY
Boundaries of
In Home Service
If the appliance is installed in a location that is 100 kilometers (62 miles) or more from the nearest service center your unit must be
Transportation charges to and from the service location are not protected by this warranty and are the
delivered to the nearest authorized Danby Service Depot, as service must only be performed by a technician qualied and certif ied for
responsibility of the purchaser.
warranty service by Danby. Transportation charges to and from the service location are not protected by this warranty and are t he
Nothing within this warranty shall imply that Danby will be responsible or liable for any spoilage or damage to food or other
contents of this appliance, whether due to any defect of the appliance, or its use, whether proper or improper.
responsibility of the purchaser.
Nothing within this warranty shall imply that Danby will be responsible or liable for any spoilage or damage to food or other c ontents of this appliance, whether due
to any defect of the appliance, or its use, whether proper or improper.
Save as herein provided, by Danby, there are no other warranties, conditions, representations or guarantees, express or implied, made
or intended by Danby or its authorized distributors and all other warranties, conditions, representations or guarantees, including any
warranties, conditions, representations or guarantees under any Sale of Goods Act or like legislation or statute is hereby expressly
Save as herein provided, Danby, there are no other warranties, conditions, representations or guarantees, express or implied, m ade or intended by Danby or its
excluded. Save as herein provided, Danby shall not be responsible for any damages to persons or property, including the unit itself,
authorized distributors and all other warranties, conditions, representations or guarantees, including any warranties, conditio ns, representations or guarantees
howsoever caused or any consequential damages arising from the malfunction of the unit and by the purchase of the unit, the
under any Sale of Goods Act or like legislation or statue is hereby expressly excluded. Save as herein provided, Danby shall no t be responsible for any damages
purchaser does hereby agree to indemnify and hold harmless Danby from any claim for damages to persons or property caused by
to persons or property, including the unit itself, howsoever caused or any consequential damages arising from the malfunction o f the unit and by the purchase of
the unit.
the unit, the purchaser does hereby agree to indemnify and hold harmless Danby from any claim for damages to persons or propert y caused by the unit.
No warranty or insurance herein contained or set out shall apply when damage or repair is caused by any of the following:
No warranty or insurance herein contained or set out shall apply when damage or repair is caused by any of the following:
1) Power failure.
2) Damage in transit or when moving the appliance.
1) Power failure.
3) Improper power supply such as low voltage, defective house wiring or inadequate fuses.
2) Damage in transit or when moving the appliance.
4) Accident, alteration, abuse or misuse of the appliance such as inadequate air circulation in the room or abnormal operating
3) Improper power supply such as low voltage, defective house wiring or inadequate fuses.
conditions (ie. extremely high or low room temperature).
4) Accident, alteration, abuse or misuse of the appliance such as inadequate air circulation in the room or abnormal operating con ditions
5) Use for commercial or industrial purposes (ie. If the appliance is not installed in a domestic residence).
6) Fire, water damage, theft, war, riot, hostility, acts of God such as hurricanes, floods etc.
7) Service calls resulting in customer education.
8) Improper Installation (ie. Building-in of a free standing appliance or using an appliance outdoors that is not approved for outdoor
application, including but not limited to: garages, patios, porches or anywhere that is not properly insulated or climate controlled).
Proof of purchase date will be required for warranty claims; retain bills of sale. In the event that warranty service is required, present
Proof of purchase date will be required for warranty claims; so, please retain bills of sale. In the event warranty service is required, present this document to our
the proof of purchase to our authorized service depot.
AUTHORIZED SERVICE DEPOT.
(extremely high or low room temperature).
5) Use for commercial or industrial purposes (ie. If the appliance is not installed in a domestic residence).
6) Fire, water damage, theft, war, riot, hostility, acts of God such as hurricanes, oods etc.
7) Service calls resulting in customer education.
8) Improper Installation (ie. Building-in of a free standing appliance or using an appliance outdoors that is not approved for out door application).
EXCLUSIONS
EXCLUSIONS
GENERAL PROVISIONS
GENERAL PROVISIONS
Danby Products Limited
Danby Products Limited
PO Box 1778, Guelph, Ontario, Canada N1H 6Z9
PO Box 1778, Guelph, Ontario, Canada N1H 6Z9
Telephone: (519) 837-0920 FAX: (519) 837-0449
Telephone: (519) 837-0920 FAX: (519) 837-0449
Warranty Service
Warranty Service
In-home
In Home
1-800-263-2629
1-800-263-2629
04/17
04/09
Danby Products Inc.
PO Box 669, Findlay, Ohio, U.S.A. 45840
Telephone: (419) 425-8627 FAX: (419) 425-8629
PO Box 669, Findlay, Ohio, U.S.A. 45840
Telephone: (419) 425-8627 FAX: (419) 425-8629
Danby Products Inc.
Page 14

Bienvenue
Bienvenue à la famille Danby. Nous sommes fi ers de la qualité de nos produits et nous croyons
en le service fi able. Nous vous suggérons de lire ce manual d’utilisation avant de brancher
votre nouvel appareil car il contient des informations inportantes sur l’utilisation, la sécurité, le
dépannage et la maintenance, afi n d’assurer la fi abilité et la longévité de votre appareil.
Visitez www.Danby.com pour accéder aux outils d’autoservice, aux FAQ et bien plus encore. Pour
obtenir de l’aide supplémentaire, composez 1-800-263-2629.
Notez les informations ci-dessous; Vous aurez besoin de cette information pour obtenir un
service sous garantie.
Vous devez fournir le reçu d’achat original pour valider votre garantie et recevoir le service.
Numéro de modèle:
Numéro de serie:
Date d’achat:
Besoin d’assistance?
Avant d’appeler pour service, voici quelques choses que vous pouvez faire pour nous
aider à mieux vous servir.
Lire ce manuel du propriétaire:
Il contient des instructions pour vous aider à utiliser et à maintenir votre appareil
correctement.
Si vous recevez un appareil endommagé:
Contactez immédiatement le revendeur ou l’entrepreneur qui vous a vendu l’appareil.
Gagnez du temps et de l’argent:
Avant d’appeler pour service, consultez la section de dépannage à la fi n de ce manuel.
Cette section vous aidera à résoudre les problèmes courants pouvant survenir.
1-800-26- Danby
(1-800-263-2629)
13
Page 15

Consignes de sécurité importantes
LIRE ET SUIVRE TOUTES LES INSTRUCTIONS DE SÉCURITÉ
AVERTISSEMENT IMPORTANT
DANGER : Risque de piéger un enfant. Avant
de jeter votre ancien appareil:
• Enlever la porte ou le couvercle.
• Laisser les tablettes en place afi n que les
enfants ne puissent pas facilement y entrer.
INSTRUCTIONS DE MISE À LA TERRE
Cet appareil doit être mis à la terre. En cas de
courtcircuit, la mise à la terre réduit les risques de
décharge électrique en fournissant un échappatoire
au courant électrique.
Cet appareil est équipé d’un cordon doté d’un fi l
de mise à la terre avec une fi che de mise à la terre.
Le cordon d’alimentation doit être branché sur une
prise correctement mise à la terre. Si la sortie est
une prise murale à 2 broches standard, il est de
votre responsabilité de la remplacer par une prise
murale à 3 broches correctement mise à la terre. La
tension et la fréquence requises pour cet appareil
sont indiquées sur la plaque d’identifi cation.
AVERTISSEMENT - Une fi che de mise à la terre mal
branchée peut entraîner un risque d’incendie, de
choc électrique ou de blessures aux personnes qui
utilisent l’appareil. Si vous n’êtes pas certain que
l’appareil est correctement mis à la terre, consultez
un préposé du service qualifi é.
N’UTILISER JAMAIS DE FIL DE RALLONGE
Ne connectez pas votre appareil aux rallonges ou
avec un autre appareil dans la même prise murale.
Ne pas épisser le cordon d’alimentation. Ne coupez
ou retirez en aucun cas la troisième broche du
cordon d’alimentation.
EXIGENCES DE SÉCURITÉ
Assurez-vous que les composants sont remplacés
par des composants similaires et que l’entretien
est effectué par le personnel de service autorisé en
usine, afi n de minimiser le risque d’allumage possible en raison de pièces incorrectes ou d’un mauvais
service.
Ce dispositif n’est pas désigné d’être utilisé
par des personnes (y compris enfants) dont le
développement et capacité physique, sensoriel
ou mental est différente ou réduite, ou par
les personnes qui manquent expérience ou
connaissance sauf si ces personnes sont surveillés
ou formés par une personne responsable de leur
sécurité.
Les enfants doivent être surveillés pour s’assurer
qu’ils ne jouent pas avec l’appareil.
Ne placez pas les objets exposés aux huiles de
cuisson dans la sécheuse. Les articles contaminés
avec des huiles de cuisson peuvent contribuer à une
réaction chimique qui pourrait provoquer l’incendie
d’une charge. Pour réduire le risque d’incendie dû
à des charges contaminées, la partie fi nale d’un
cycle de séchage par culbutage se produit sans
chaleur pendant une période de refroidissement.
Évitez d’arrêter la sécheuse avant la fi n du cycle de
séchage, à moins que les articles ne puissent être
immédiatement enlevés et étalés pour permettre à la
chaleur accumulée de se dissiper.
Si le cordon d’alimentation est endommagé, il doit
être remplacé par le fabricant, son agent de service
ou une personne qualifi ée similaire afi n d’éviter tout
risque.
Les articles qui ont été souillés avec des produits pétroliers peuvent s’enfl ammer
spontanément, surtout lorsqu’ils sont exposés à des sources de chaleur comme
dans un séchoir à tambour. Les articles deviennent chauds, provoquant une
réaction d’oxydation dans l’huile. L’oxydation crée de la chaleur. Si la chaleur
ne peut pas s’échapper, les articles peuvent devenir assez chaud pour prendre
feu. Empiler, empiler ou entreposer des objets souillés d’huile peut empêcher la
chaleur de s’échapper et créer un risque d’incendie.
GARDER CES INSTRUCTIONS!
14
Page 16

Consignes de sécurité importantes
LIRE ET SUIVRE TOUTES LES INSTRUCTIONS DE SÉCURITÉ
• Ne pas sécher les articles qui ont été
préalablement nettoyés, lavés, trempés ou tachés
à l’aide d’essence, de solvants de nettoyage
à sec ou d’autres substances infl ammables ou
explosives, car ils dégagent des vapeurs qui
pourraient s’enfl ammer ou exploser.
• Ne pas mettre la main dans l’appareil si le
tambour est en mouvement.
• N’installez pas et ne rangez pas cet appareil
dans un endroit exposé aux intempéries. Cet
appareil n’est pas destiné à être utilisé à l
‘extérieur.
• Ne pas trafi quer les commandes.
• Ne pas utiliser de chaleur pour sécher des
articles contenant du caoutchouc mousse ou
des matériaux semblables à du caoutchouc de
texture similaire.
• Nettoyez le fi ltre à peluche avant et après
chaque charge.
• Gardez la zone autour de l’ouverture
d’échappement et les zones environnantes
adjacentes exemptes d’accumulation de
peluches, de poussières et de saletés.
• L‘intérieur de l’appareil et le conduit
d‘évacuation doivent être nettoyés
périodiquement par un personnel qualifi é.
• Ne placez pas l’appareil ou le cordon
d’alimentation près de sources de chaleur telles
que des radiateurs, des chauffages, des conduits
d’air ou la lumière directe du soleil. Ne placez
pas de fl ammes nues telles que des bougies sur
ou près de l’appareil.
• Ne pas obstruer les ouvertures de ventilation.
Assurez-vous que les évents ne sont pas couverts
par les journaux, les nappes, les rideaux, les
tapis, etc.
• N’utilisez pas le cordon d’alimentation sous
les revêtements de sol. Gardez le cordon
d’alimentation à l’écart des zones à forte
circulation où il peut devenir un risque de
déclenchement.
• N’utilisez pas l‘appareil s’il présente un cordon
d’alimentation ou une prise endommagés. Si le
cordon d’alimentation est endommagé, il doit
être remplacé par le fabricant, son agent de
service ou des personnes qualifi ées de manière
similaire afi n d’éviter tout risque.
• N’essayez pas de réparer, de démonter ou de
modifi er l’appareil. La garantie devient nulle
si l’appareil n’est pas réparé ou réparé par
du personnel qualifi é. Il n’y a pas de pièces
réparables par l’utilisateur.
• Ne surchargez pas l’appareil.
• S’assurer que les objets étrangers ne se trouvent
pas dans l’appareil. Retirez tous les objets des
poches telles que briquets, allumettes, épingles à
cheveux, pièces de monnaie, etc.
• La fenêtre de porte peut être chaude après un
long cycle de séchage. Veillez à ce que les
enfants soient éloignés de l’appareil.
• Si le séchoir n’est pas fi xé au mur, assurezvous qu’il est placé sur une surface plane et
ferme dans un endroit sec et couvert de gaz.
Utilisez les pieds avant réglables pour faciliter
le nivellement de l‘appareil si nécessaire. Ne
placez pas l‘appareil sur une matière molle telle
que de la mousse, du plastique ou du tapis.
• Après avoir mis l’appareil hors tension, attendez
2 minutes avant de remettre l’appareil sous
tension.
• Retirez l’emballage de transport de l’arrière de
l’appareil avant la première utilisation.
• Cet appareil doit être épuisé vers l’extérieur.
L’air évacué ne doit pas être évacué dans une
cheminée qui sert à évacuer les fumées d’autres
appareils qui brûlent de l’essence ou d’autres
carburants.
• N’installez pas cet appareil derrière une porte
verrouillable, une porte coulissante ou de façon
à ce que l’ouverture de la porte de la sécheuse
soit limitée. Ne pas installer dans un meuble.
• N’utilisez pas le cordon d’alimentation de
façon incorrecte. Ne jamais transporter ou tirer
l‘appareil par le cordon d’alimentation. Ne
tirez jamais sur le cordon d’alimentation pour le
débrancher de la prise, mais saisissez la fi che et
tirez pour la retirer de la prise.
GARDER CES INSTRUCTIONS!
15
Page 17

INSTRUCTIONS D’INSTALLATION
CARACTÉRISTIQUES
Avant
Filtre à air
Porte
Fenêtre
Panneau de contrôle
Joint de porte
Tambour
Prise d’air
Arrière
Enveloppe Évacuation d’air
Couverture arrière
16
Page 18

INSTRUCTIONS D’INSTALLATION
EMPLACEMENT
Avant d’installer la sécheuse, sélectionnez un
emplacement avec les caractéristiques suivantes:
• Une surface dure et plane. Ne placez pas la
sécheuse sur un sol moquette.
• Loin de la lumière directe du soleil. La lumière
directe du soleil peut affecter le revêtement
acrylique, plastique et composants électriques.
• Ventilation adéquate. Les ouvertures de
ventilation ne doivent pas être obstruées.
• Loin des sources de chaleur comme les
cheminées ou les poêles.
• Assurez-vous que le séchoir ne se trouve pas sur
son cordon d’alimentation.
• Il doit y avoir au moins 10 cm (4 pouces)
d’espace entre le sécheur et tout mur adjacent.
KIT DE MONTAGE MUR
Un kit de montage mural est fourni avec l’appareil
afi n que l’unité puisse être fi xée au mur si
nécessaire. Nous recommandons d’utiliser deux
personnes pour terminer l’installation car le séchoir
peut être lourd.
Le kit de montage mural comprend:
Description Image Quantité
Supports de suspension
Entretoises en plastique
Connecteur
d’échappement
12 mm vis 4
25 mm vis
2
2
1
4
Outils nécessaires:
• un foret et un bit de 3 mm
• un tournevis Phillips
• quatre ɸ12 x 50 mm vis à bois
Remarque:
• Un minimum de 50 mm (2 pouces) est
nécessaire entre le haut de la sécheuse et le
plafond.
• Si vous placez au-dessus d’une machine à laver,
assurez-vous qu’il y a assez d’espace au-dessus
de la machine à laver pour ouvrir complètement
le couvercle et charger ou décharger l’appareil.
• Ce séchoir n’est pas conçu pour être placé
directement sur le dessus d’une machine à laver
ou tout autre appareil.
Important: Si vous désirez installer la sécheuse
avec un kit d’empilage, nous vous recommandons
vivement d’utiliser le dessiccateur Danby avec le
kit d’empilage Danby et de vous assurer que vous
suivez toutes les instructions d’installation fournies
avec le kit d’empilage de linge.
17
Page 19

INSTRUCTIONS D’INSTALLATION
INSTRUCTIONS DE MONTAGE PAR MUR
1. Déterminer où vous souhaitez que le sécheur
positionné et de marquer la position du support
requis sur le mur.
2. Fixer solidement les supports de suspension au
mur.
• Les supports de suspension doivent être vissés
dans des montants de paroi pour assurer
l’installation est sécurisé.
• Les supports de suspension ne peuvent pas être
séparés par plus de 56,3 cm (22,2 pouces).
• Si les poteaux du mur sont plus éloignés que
56,3 cm (22,2 pouces), vous devez installer
deux accolades sur le mur, une pour tenir les
supports de suspension et une pour attacher les
entretoises en plastique.
• Assurez-vous que les accolades sont vissées
directement dans les goujons du mur, puis visser
les supports de suspension à l’accolade.
Remarque importante: Si les supports de
suspension ne sont pas alignés avec les goujons du
mur, nous vous recommandons fortement d’utiliser
un étrier en bois ou en métal qui permettra au
moins deux vis d’être fi xées dans des montants.
Plafond
Entretoise
Goujon
Supports de suspension
Goujon
Goujon
Entretoise en bois ou en métal (non inclus)
7OODºORºMETALºB
25 mm vis
Goujon
18
Page 20

INSTRUCTIONS D’INSTALLATION
INSTRUCTIONS DE MONTAGE PAR MUR
1. Installez le connecteur d’échappement à l’arrière
de l’appareil. Le connecteur d’échappement peut
être orienté dans n’importe quelle direction qui
convient à votre installation.
2. À l‘aide de quatre vis de 12 mm, fi xez les
entretoises en plastique à l’arrière de l‘appareil.
Ces entretoises minimisent les vibrations et le
bruit pendant le fonctionnement.
Connecteur
d’échappement
3. Avec l’aide, montez la sécheuse sur le support
mural.
Entretoises
12 mm vis
Points de montage du support de mur
19
Page 21

CONSIGNES D’UTILISATION
PANNEAU DE COMMANDE
SÉCHER À L’AIR
DÉMARRAGE SÉCHER À L’AIR PROGRAMMES RÉGLAGE DE
Démarrage: Appuyez sur le bouton démarrage
pour allumer ou éteindre l’appareil. Lorsque
l’appareil est allumé, il émet un bip et la lumière audessus du bouton démarrage s’allume. Le paramètre
de programme par défaut est “Séchage intensif” et
la température par défaut est “Haute”.
Séchage à l’air: Le sécheur fait circuler de l’air à
température ambiante pendant les 150 premières
minutes, puis fait circuler de l’air chaud pendant
les 22 minutes restantes du cycle. Il s’agit d’un
cycle éconergétique qui est destiné à des vêtements
délicats ou des matériaux qui ne peuvent pas être
exposés à une chaleur excessive lors du nettoyage.
Programme: Appuyez sur la touche de
programmation pour faire défi ler les paramètres de
programme disponibles.
• Séchage intensif: L’appareil fonctionnera
jusqu’à ce que le niveau d’humidité à l’intérieur
du tambour ait atteint ≤ 35%. Le temps de
fonctionnement maximum est de 200 minutes.
• Séchage normal: L’unité fonctionnera jusqu’à
ce que le niveau d’humidité à l’intérieur
du tambour ait atteint ≤ 40%. Le temps de
fonctionnement maximum est de 150 minutes.
• Séchage rapide: L’unité fonctionnera jusqu’à
ce que le niveau d’humidité à l’intérieur
du tambour ait atteint ≤ 45%. Le temps de
fonctionnement maximum est de 90 minutes.
• Séchage chronomètre une heure: L’appareil
fonctionnera pendant 60 minutes, 50 minutes en
pleine puissance de chauffage et 10 minutes de
refroidissement par air. Pour ce programme, la
sélection de la température est désactivée.
SÉCHAGE INTENSIF
SÉCHAGE NORMAL
SÉCHAGE RAPIDE
SÉCHAGE CHRONOMÉTRÉ
UNE HEURE
SERRURE
HAUT
MÉDIUM
BAS
TEMPÉRATURES
DÉMARRAGE/PAUSE
Réglage de température: Appuyez sur le bouton
réglage de température pour faire défi ler les
paramètres de température disponibles.
• Haute: La sécheuse utilise deux jeux d’éléments
chauffants fonctionnant simultanément.
• Médium: La sécheuse utilise deux ensembles
d’éléments chauffants pendant 10 minutes,
puis utilise un ensemble d’éléments pendant 10
minutes supplémentaires, alternant en va-et-vient
pour la durée du programme.
• Bas: La sécheuse utilise un ensemble d’éléments
chauffants.
Démarrage/Pause: Appuyez sur le bouton
Démarrer/Pause pour lancer le programme de
séchage. Le voyant au-dessus du bouton Démarrer/
Pause s’allume pour indiquer que le programme
a démarré. Pendant que l’appareil est en marche,
appuyez sur le bouton Démarrer/Pause pour
interrompre le programme de séchage. Appuyez
de nouveau sur le bouton Démarrer/Pause pour
reprendre le programme sélectionné.
Verrou: Lorsque le séchoir est en marche, maintenez
enfoncées les touches de programmation et de
température en même temps pendant 3 secondes
pour verrouiller le panneau de commande. Le
voyant au-dessus de l’icône de verrouillage s’allume
pour indiquer que le panneau de commande est
verrouillé. Lorsqu’ils sont verrouillés, les boutons
ne fonctionnent pas s’ils sont enfoncés. Pour
déverrouiller le panneau de commande, appuyez
et maintenez enfoncés les boutons de programme
et de température en même temps pendant 3
secondes.
Capacité de séchage Temps de séchage
- intensif
Temps de séchage -
rapide
Environ 2 Kg (4.4 Lbs) Environ 60 min. Environ 90 min.
Environ 3 Kg (6.6 Lbs) Environ 90 min. Environ 150 min.
Environ 4 Kg (8.8 Lbs) Environ 150 min. Environ 200 min.
Environ 6 Kg (13.2 Lbs) Environ 200 min. -
20
Remarque: 1 kg = 2,2 Lbs
Remarque: Le temps de séchage
peut être infl uencé par de
nombreux facteurs, tels que le type
de matériau, la masse volumique,
le degré de séchage, etc.
Page 22

CONSIGNES D’UTILISATION
CONSIGNES D’UTILISATION
• La capacité maximale de l’appareil est de 6
Kgs (13,2 Lbs) de matière textile sèche. Ne pas
surcharger.
• Il est recommandé que les articles soient
ajoutés à la sécheuse une à la fois pour éviter
l’enchevêtrement qui peut entraîner un séchage
inégal.
• Vérifi ez les poches de tous les articles à
sécher, veillez à ce que des objets étrangers ne
pénètrent pas dans l’appareil tels que briquets,
épingles à cheveux, pièces de monnaie, etc.
• Tourner les articles avec des fermetures à
glissière à l’envers et attacher toutes les boucles.
• La chaleur de la sécheuse peut fi xer
défi nitivement les taches, s’assurer que toutes les
taches sont enlevées avant de mettre des articles
dans la sécheuse.
• Séparer les éléments clairs et foncés afi n
d’assurer que les couleurs ne saignent pas.
Avant de charger le sécheur, vérifi ez que les articles
que vous séchez ne portent pas les symboles
suivants car les articles marqués avec ces symboles
ne doivent pas être placés dans un séchoir:
• Pour de meilleurs résultats, chargez la sécheuse
avec des tissus similaires.
• Les articles délicats doivent être placés dans un
sac en nylon avant de sécher. Ne placez pas de
soutiens-gorge à armature dans un sèche-linge.
• N’ajoutez pas d’articles à la sécheuse quand
elle est en marche.
• Si vous essuyez des articles de grande taille
tels que des couvertures ou de lourdes charges
de linge, il est recommandé de suspendre
périodiquement le programme, d’ouvrir la porte
de la sécheuse, de secouer le gros article ou de
retourner la charge lourde, puis de redémarrer
le cycle de séchage. Cela assurera un séchage
uniforme.
• Si la porte est ouverte pendant le fonctionnement
et qu’elle n’est pas correctement fermée, une
alarme sonnera pendant 10 secondes. L’alarme
se met en pause pendant 6 minutes, puis sonne
à nouveau pendant 10 secondes toutes les 6
minutes jusqu’à ce que la porte soit fermée.
L’appareil ne peut pas fonctionner lorsque la
porte est ouverte. Une fois la porte fermée,
appuyez sur le bouton Démarrer/Pause pour
reprendre le fonctionnement.
MISE EN GARDE!
SURFACE CHAUDE
Ne pas toucher la prise d’air
pendant le cycle de séchage
en raison des températures
élevées.
ATTENTION!
Pour réduire le risque
d’incendie, cet appareil doit
être évacué vers l’extérieur.
21
Page 23

SOINS ET ENTRETIEN
Nettoyage du fi ltre à peluche
Débranchez le cordon d’alimentation avant tout
nettoyage. Le fi ltre à peluche doit être en place
lorsque l’appareil fonctionne et doit être nettoyé
avant et après chaque charge.
1. Retrait du fi ltre à peluche.
• Retirez le fi ltre en tirant doucement vers
l’extérieur sur le centre de l’enveloppe de
ventilation.
• Le fi ltre comporte trois parties: capot
de ventilation, fi ltre à peluche et fi ltre
d’échappement.
2. Nettoyage du fi ltre à peluche.
• Séparez les trois morceaux du fi ltre.
• Enlever la peluche avec une brosse douce ou un
aspirateur.
3. Remplacement du fi ltre à peluche.
• Après le nettoyage, remonter le capot du
conduit d’évacuation, le fi ltre à peluche et le
fi ltre d’échappement.
• Assurez-vous que l’ensemble fi ltre est solidement
installé dans l’appareil.
Linceul
d’échappement
de ventilation
Filtre à
peluche
Le fi ltre est fi xé à
l’arrière du tambour
Filtre à
peluche
Peluche
Filtre
d’échappement
Filtre
d’échappement
Brosse ou aspirateur
Nettoyage du fi ltre d’admission d’air
Le fi ltre d’admission d’air doit être nettoyé une
fois par mois. Retirez le fi ltre d’admission d’air en
tenant les extrémités supérieure et inférieure et en
tirant vers l’extérieur. Retirez le fi ltre et nettoyez-le
avec une brosse douce. Remonter et installer dans
l’appareil.
Nettoyage de l’intérieur et de l’extérieur de
la sécheuse
• N’immergez aucune partie de l ‘appareil dans
l’eau.
• N’utilisez pas de diluant, d’essence ou d’alcool
sur ou près de l’appareil, car le résidu et les
vapeurs peuvent provoquer un incendie.
• N’utilisez aucun produit de nettoyage à
l’intérieur de l’appareil. Si le tambour devient
taché, nettoyer avec un chiffon humide.
• Retirez tout résidu avant de sécher la charge
suivante.
• Nettoyez l’armoire avec du savon doux et de
l’eau. N’utilisez pas de nettoyants abrasifs ou
durs.
Enveloppe d’admission d’air
Filtre d’admission d’air
22
Page 24

DÉPANNAGE
Danby soins du consommateur: 1-800-263-2629
Heures d’ouverture:
Lundi à Jeudi 8 h 30 à 18 h, heure normale de l’Est
Vendredi de 8 h 30 à 16 h, heure normale de l’Est
Les informations contenues dans ce manuel sont sujettes à modifi cation sans préavis.
PROBLÈME CAUSE POSSIBLE
La sécheuse ne fonctionne pas • L’appareil n’est pas branché.
• Le disjoncteur a déclenché ou un fusible grillé.
Le tambour du séchoir ne tourne pas. • La porte n’est pas complètement fermée.
• La fi che d’alimentation est débranchée.
• La prise de courant n’est pas alimentée.
Le linge n’est pas complètement séché. • Le fi ltre à peluche ou le fi ltre d’admission d’air sont
obstrués.
• Il ya trop de linge dans la sécheuse.
• Des articles humides ont été ajoutés pendant le cycle de
séchage.
• Le linge est devenu tordu pendant le séchage.
• Le séchoir a été placé dans un endroit peu ou mal
ventilé.
• L’évent du sécheur est bloqué.
23
Page 25

GARANTIE LIMITÉE “À DOMICILE”
LIMITED IN-HOME APPLIANCE WARRANTY
Cet appareil de qualité est garanti exempt de tout vice de matière première et de fabrication, s’il est utilisé dans les conditions
This quality product is warranted to be free from manufacturer’s defects in material and workmanship, provided that the unit is used under the normal operating
normales recommandées par le fabricant.
conditions intended by the manufacturer.
Cette garantie n’est offerte qu’à l’acheteur initial de l’appareil vendu par Danby Products Limited (Canada) ou Danby Products Inc.
This warranty is available only to the person to whom the unit was originally sold by Danby Products Limited (Canada) or Danby Products Inc. (U.S.A.) (hereafter
(E.- U.A.) (ci-après « Danby ») ou par l’un des ses distributeurs agréés et elle ne peut être transférée.
“Danby”) or by an authorized distributor of Danby, and is non-transferable.
CONDITIONS
Les pièces en plastique sont garanties pendant trente (30) jours seulement à partir de la date de l’achat, sans aucune prolongation
prévue.
Plastic parts, are warranted for thirty (30) days only from purchase date, with no extensions provided.
Premiers 12 mois
First Year
Pendant les premiers douze (12) mois, toutes les pièces fonctionnelles de ce produit qui s’avèrent défectueuses
seront réparées ou remplacées, selon le choix du garant, sans frais à l’acheteur initial.
During the rst twelve (12) months, any functional parts of this product found to be defective, will be repaired or replaced, at warrantor’s
TERMS OF WARRANTY
option, at no charge to the ORIGINAL purchaser.
Pour bénéficier
du service
To obtain
Service
Limites de l’entretien
à domicile
Boundaries of
In Home Service
Nothing within this warranty shall imply that Danby will be responsible or liable for any spoilage or damage to food or other c ontents of this appliance, whether due
Aucune partie de la garantie ne prévoit implicitement que le fabricant sera tenu responsable des dommages subis par les aliments ou
to any defect of the appliance, or its use, whether proper or improper.
d’autres types de contenu, qu’ils soient causés par la défectuosité de l’appareil ou par son usage adéquat ou inadéquat.
Save as herein provided, Danby, there are no other warranties, conditions, representations or guarantees, express or implied, m ade or intended by Danby or its
En vertu de la présente, il n’existe aucune autre garantie, condition ou représentation, qu’elle soit exprimée ou tacite, de façon
authorized distributors and all other warranties, conditions, representations or guarantees, including any warranties, conditio ns, representations or guarantees
manifeste ou intentionnelle, par Danby ou ses distributeurs agréés. De même, sont exclues toutes les autres garanties, conditions ou
under any Sale of Goods Act or like legislation or statue is hereby expressly excluded. Save as herein provided, Danby shall no t be responsible for any damages
représentations, y compris les garanties, conditions ou représentations en vertu de toute loi régissant la vente de produits ou de toute
to persons or property, including the unit itself, howsoever caused or any consequential damages arising from the malfunction o f the unit and by the purchase of
autre législation ou règlement semblables. En vertu de la présente, Danby ne peut être tenue responsable en cas de blessures
the unit, the purchaser does hereby agree to indemnify and hold harmless Danby from any claim for damages to persons or propert y caused by the unit.
corporelles ou des dégâts matériels, y compris à l’appareil, quelle qu’en soit les causes. Danby ne peut pas être tenue responsable
des dommages indirects dus au fonctionnement défectueux de l’appareil. En achetant l’appareil, l’acheteur accepte de mettre à
couvert et de dégager Danby de toute responsabilité en cas de réclamation pour toute blessure corporelle ou tout dégât matériel
causé par cet appareil.
No warranty or insurance herein contained or set out shall apply when damage or repair is caused by any of the following:
1) Power failure.
La garantie ou assurance ci-dessus ne s’applique pas si les dégâts ou réparations sont dus aux cas suivants:
2) Damage in transit or when moving the appliance.
1) Panne de courant.
3) Improper power supply such as low voltage, defective house wiring or inadequate fuses.
2) Dommage subis pendant le transport ou le déplacement de l’appareil.
4) Accident, alteration, abuse or misuse of the appliance such as inadequate air circulation in the room or abnormal operating con ditions
3) Alimentation électrique incorrecte (tension faible, câblage défectueux, fusibles incorrects).
4) Accident, modification, emploi abusif ou incorrect de l’appareil tel qu'une circulation d'air inadéquate dans la pièce ou des
conditions de fonctionnement anormales (température extrêmement élevée ou basse).
5) Utilisation dans un but commercial ou industriel (à savoir, si l'appareil n'est pas installé dans un domicile résidentiel).
6) Incendie, dommages causés par l’eau, vol, guerre, émeute, hostilités, cas de force majeure (ouragan, inondation, etc.).
7) Visites d’un technicien pour expliquer le fonctionnement de l’appareil au propriétaire.
8) Installation inappropriée (par exemple, encastrement d'un appareil autoportant, ou utilisation extérieure d'un appareil non conçu à
Proof of purchase date will be required for warranty claims; so, please retain bills of sale. In the event warranty service is required, present this document to our
cet effet, y compris, mais sans s'y limiter: les garages, les patios, les porches ou ailleurs qui ne sont pas correctement isolés ou
AUTHORIZED SERVICE DEPOT.
climatisés).
(extremely high or low room temperature).
5) Use for commercial or industrial purposes (ie. If the appliance is not installed in a domestic residence).
6) Fire, water damage, theft, war, riot, hostility, acts of God such as hurricanes, oods etc.
7) Service calls resulting in customer education.
8) Improper Installation (ie. Building-in of a free standing appliance or using an appliance outdoors that is not approved for out door application).
S’adresser au détaillant qui a vendu l’appareil, ou à la station technique agréée de service la plus proche, où
les réparations doivent être effectuées par un technicien qualifié. Si les réparations sont effectuées par
Danby reserves the right to limit the boundaries of “In Home Service” to the proximity of an Authorized Service Depot. Any app liance
quiconque autre que la station de service agréée où à des fins commerciales, toutes les obligations de Danby
requiring service outside the limited boundaries of “In Home Service” , it will be the consumer’s responsibility to transport the appliance (at
en vertu de cette garantie seront annulées.
their own expense) to the original retailer (point of purchase) or a service depot for repair. See “Boundaries of In Home Serv ice” below.
Contact your dealer from whom your unit was purchased, or contact your nearest authorized Danby service depot, where service
Danby se réserve le droit de limiter les limites de "Service au domicile" à proximité d'un dépôt de service
must be performed by a qualied service technician.
agréé. Tout appareil nécessitant un service en dehors des limites de "Service à domicile" sera la responsabilité
If service is performed on the units by anyone other than an authorized service depot, or the unit is used for commercial appli cation, all
du consommateur de transporter l'appareil à laur propres frais le point d'achat original ou un dépôt de service
obligations of Danby under this warranty shall be void.
pour réparation. Si l'appareil est installé à plus de 100 kilomètres (62 milles) du centre de service le plus
proche, il doit être livré à l'atelier de réparation autorisé par Danby le plus proche, car l'entretien doit
If the appliance is installed in a location that is 100 kilometers (62 miles) or more from the nearest service center your unit must be
uniquement être réalisé par un technicien qualifié et certifié pour effectuer un entretien couvert par la garantie
delivered to the nearest authorized Danby Service Depot, as service must only be performed by a technician qualied and certif ied for
de Danby.
warranty service by Danby. Transportation charges to and from the service location are not protected by this warranty and are t he
responsibility of the purchaser.
Les frais de transport entre votre domicile et le lieu de l'entretien ne sont pas couverts par la présente garantie
et doivent être acquittés par l'acheteur.
EXCLUSIONS
EXCLUSIONS
GENERAL PROVISIONS
CONDITIONS GÉNÉRALES
La preuve de la date d'achat sera requise pour les réclamations de garantie; Conserver les factures de vente. Dans le cas où un
service de garantie est requis, présentez la preuve d'achat à notre dépôt de service agréé.
Warranty Service
In-home
Service sous garantie
Danby Products Limited
Danby Products Limited
PO Box 1778, Guelph, Ontario, Canada N1H 6Z9
PO Box 1778, Guelph, Ontario, Canada N1H 6Z9
Telephone: (519) 837-0920 FAX: (519) 837-0449
Téléphone : (519) 837-0920 Télécopieur: (519) 837-0449
Service au domicile
1-800-263-2629
1-800-263-2629
04/17
04/09
Danby Products Inc.
PO Box 669, Findlay, Ohio, U.S.A. 45840
PO Box 669, Findlay, Ohio, U.S.A. 45840
Téléphone: (419) 425-8627 Télécopieur: (419) 425-8629
Telephone: (419) 425-8627 FAX: (419) 425-8629
Danby Products Inc.
Page 26

NOTES / REMARQUES:
__________________________________________________________________________________________
__________________________________________________________________________________________
__________________________________________________________________________________________
__________________________________________________________________________________________
__________________________________________________________________________________________
__________________________________________________________________________________________
__________________________________________________________________________________________
__________________________________________________________________________________________
__________________________________________________________________________________________
__________________________________________________________________________________________
__________________________________________________________________________________________
__________________________________________________________________________________________
__________________________________________________________________________________________
__________________________________________________________________________________________
__________________________________________________________________________________________
__________________________________________________________________________________________
__________________________________________________________________________________________
__________________________________________________________________________________________
__________________________________________________________________________________________
__________________________________________________________________________________________
__________________________________________________________________________________________
__________________________________________________________________________________________
Page 27

NOTES / REMARQUES:
__________________________________________________________________________________________
__________________________________________________________________________________________
__________________________________________________________________________________________
__________________________________________________________________________________________
__________________________________________________________________________________________
__________________________________________________________________________________________
__________________________________________________________________________________________
__________________________________________________________________________________________
__________________________________________________________________________________________
__________________________________________________________________________________________
__________________________________________________________________________________________
__________________________________________________________________________________________
__________________________________________________________________________________________
__________________________________________________________________________________________
__________________________________________________________________________________________
__________________________________________________________________________________________
__________________________________________________________________________________________
__________________________________________________________________________________________
__________________________________________________________________________________________
__________________________________________________________________________________________
__________________________________________________________________________________________
__________________________________________________________________________________________
Page 28

MODELO • MODEL
DDY060WDB
Printed in China
Impreso en China
Danby Products Limited, Guelph, ON, Canada N1H 6Z9
Danby Products Inc., Findlay, Ohio, USA 45840
 Loading...