

Page 1
OWNER’S MANUAL
GUIDE D’UTILISATION
Model •
Modèle
DBD5L
CAUTION:
Read
and follow all safety rules
and
operating instructions
be
fore first use of this product.
PRÉC
AUTION :
Veuillez lire attentivement les
consignes
de sécurité et les
instructions
d'utilisation avant
l'utilisation
initiale de ce
produit.
Danby Products Limited, Guelph, Ontario Canada N1H 6Z9
Dan
by Products Inc., Findlay, Ohio USA 45839-0669
1.08.08
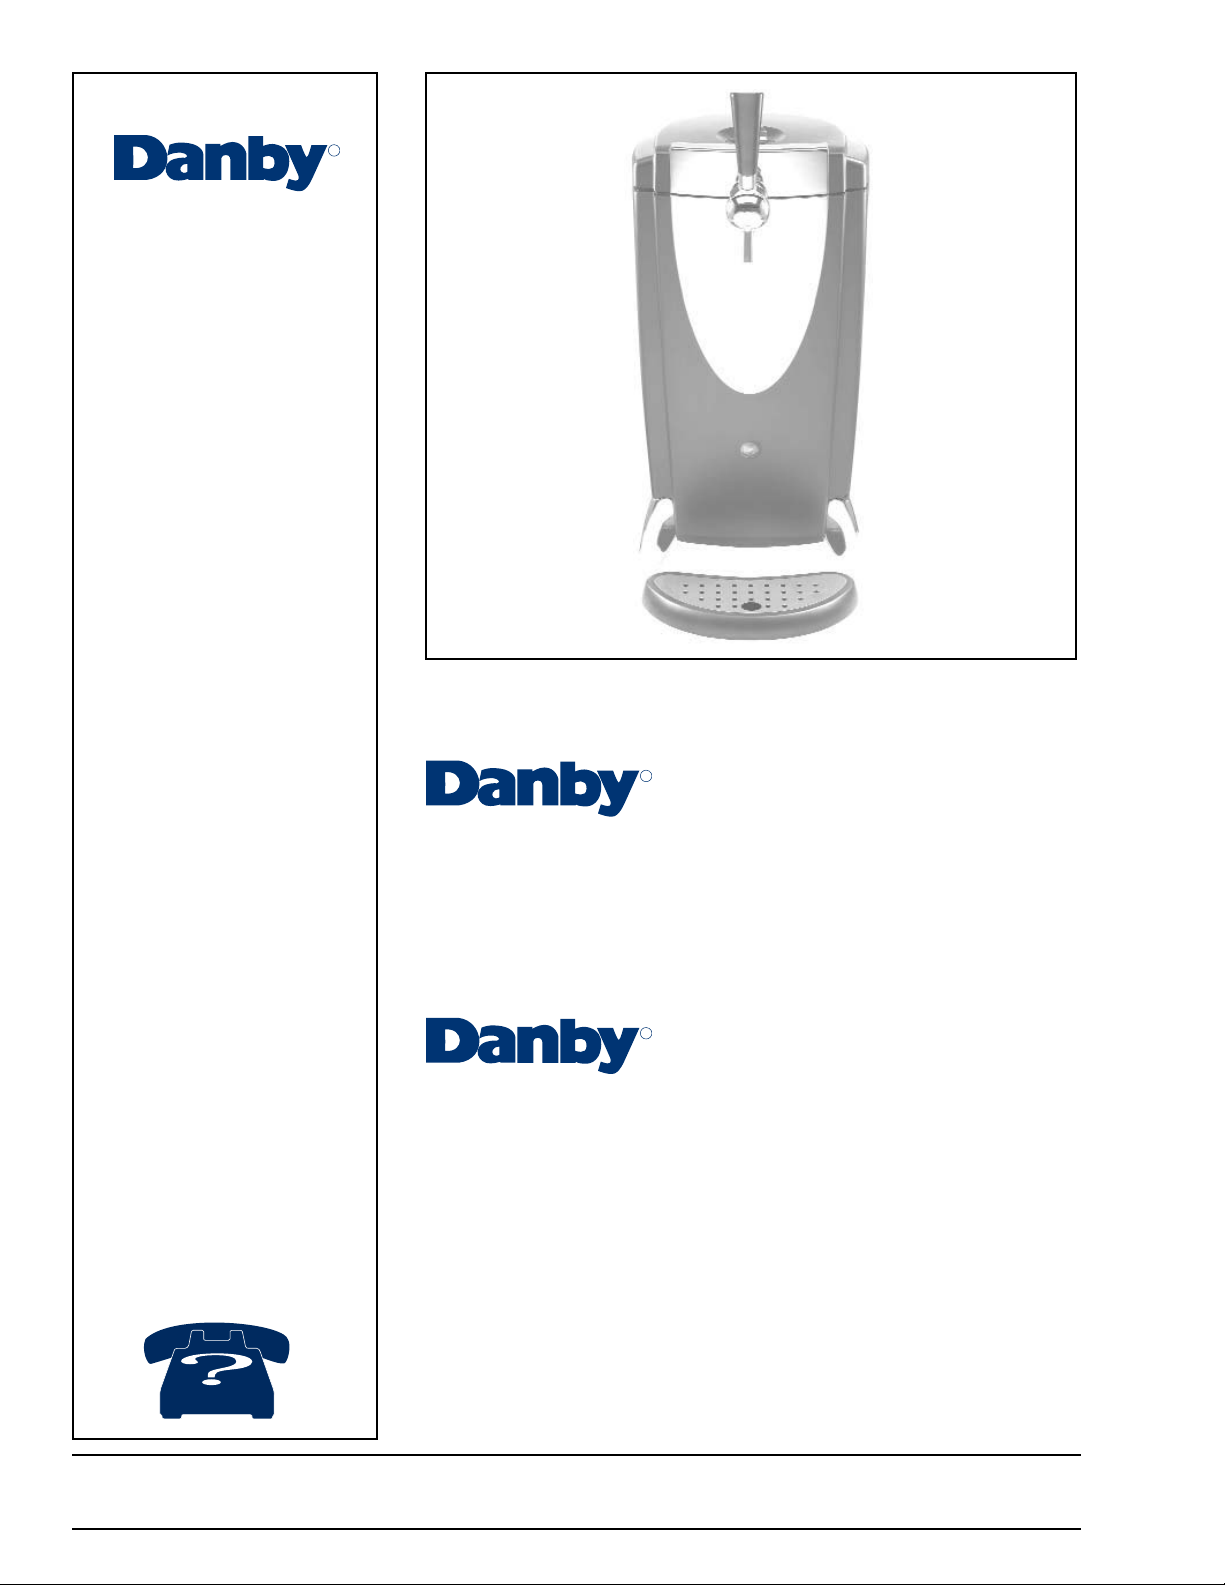
Beverage Dispenser
Owner’s Manual
Table of Contents . . . . . . . . . . . . . . . . . . . . . . . . 3
Distributeur de Breuvage
Guide d'utilisation
Table des matières . . . . . . . . . . . . . . . . . . . . . ..22
R
1 800 26 DANBY
R
R
Page 2
WELCOME
Welcome to the
Danby family. We’re
proud of our quality
products and we
believe in dependable
service.
You’ll see it in this
easy-to-use manual
and you’ll hear it in
the friendly voices of
our consumer service
department.
Tel: 1-800-26(1-800-263-2629)
Best of all, you’ll
experience these
values each time you
use your Beverage
Dispenser. That’s
important, because
your new Beverage
Dispenser will be part
of your family for a
long
time.
Start Here!…Before using your Beverage Dispenser
Write down the model and serial
numbers here. They are on a label
located on the back of the cabinet.
Model number
DBD5L
Serial number
Date purchased
Staple your receipt to this page.
You will need it to obtain service
under warranty.
NEED HELP?
Before you call for service,
there are a few things you
can do to help us serve
you better...
Read this manual
It contains instructions to
help you use and maintain
your beverage dispenser
properly.
If you received a
damaged appliance
Immediately contact the
dealer (or builder) that sold
you the appliance.
Save time and money
Check the section titled
“Before you call for
Service” before calling.
This section helps you
solve common problems
that might occur.
If you do need service, you
can relax knowing help is
only a phone call away.
Tel: 1-800-26-
(1-800-263-2629)
R
R
Page 3
Important Safety Information
Grounding Instructions
Handling Beer Kegs
Safety Precautions
Important Notice
Features
Product Features & Accessories
Parts & Accessories
Setting Up Your Beverage Dispenser
How the Beverage Dispenser Works
Disposal of Packaging
Location
Installation Instructions
Connecting the Beverage Dispenser
Preparing a Standard 5 Liter Mini Keg
Getting the Dispenser Ready
Turning on the Air Pressure
Preparing the Beverage Container
Connecting Container to Dispenser
Operating the Beverage Dispenser
Switching On the Power
Cooling the Beverage Dispenser
Using Dispensing Tap, Shelf Life of Mini Kegs
Depressurize & Disconnect Keg or Container
Care and Cleaning
Cleaning Outside, Inside, Parts & Accessories
Defrosting & Maintaining Dispenser
Before You Call For Service
Troubleshooting
Warranty
4
6
8
10
TABLE OF
CONTENTS
15
18
20
4
4
5
5
6
7
8
8
9
9
10
11
12
15
14
15
16
17
18
19
20
21
13
3
Page 4

IMPORTANT SAFETY INFORMATION
SAFETY
PRECAUTIONS
READ ALL SAFETY INFORMATION BEFORE USING
GROUNDING
INSTRUCTIONS
• This appliance must be grounded. In the event of a
malfunction or breakdown, grounding will reduce the risk
of electric shock by providing a path of least resistance
for electric current.
• This appliance is equipped with a power cord having an
equipment grounding conductor and grounding plug. The
plug must be plugged into an appropriate wall outlet that
is installed and grounded in accordance with all existing
local codes and ordinances.
• Consult a qualified electrician or serviceman if the
grounding instructions are not clearly understood, or if
doubt exist as to whether your electrical wall outlets are
properly grounded.
FOR YOUR
SAFETY...
Pertaining to the risk
of Fire, Electric
Shock or Injury to
Persons.
1) Please observe the instructions and safety information located on the keg
2) Never shake the keg
3) Once opened, leave the keg in the dispenser or refrigerator so it remains cold
4) Do not freeze the keg or place in the freezer. The beer will be damaged if the keg is frozen
5) Do not expose the keg to direct sunlight or temperatures above 86°F (30°C), as there is a
risk of high pressure build-up
6) As with all beer purchases, always check the best-before date.
NOTE: Keeping the beer keg cold does not mean the beer keeps longer!
7) New and unopened kegs keep best when stored at a steady temperature of 37°F (3°C)46°F (8°C)
4
• This appliance should be serviced only by a qualified electrical technician. Do not operate if the
power cord or plug has been damaged, or if the appliance has been damaged or dropped.
• Do not store or use this appliance outdoors. Do not use this product near water. Do not immerse
cord or plug in water. Keep appliance away from heated surfaces and open flames.
• Unplug this appliance before cleaning
When Handling Beer Kegs
Please Save These Instructions!
Page 5

IMPORTANT SAFETY INFORMATION
SAFETY
PRECAUTIONS
• Do not defrost this appliance using other
electric appliances (i.e. hair dryer) and never
attempt to scrape or remove ice/frost
with sharp objects.
• Always disconnect the appliance from the
power supply before cleaning and/or
attempting repairs/servicing.
WARNING:
Repairs should be
performed by qualified service
personnel only.
Alcohol is easily available with Danby's new Beverage Dispenser, however, it is not intended to be
available to people under the legal age to consume alcohol.
Danby does not assume liability for the
unlawful use or consumption of alcohol.
PLEASE DRINK RESPONSIBLY AND PLEASE DON'T DRINK AND DRIVE!
IMPORTANT
NOTICE
• This appliance must be connected
to a properly grounded electrical
outlet (see “
Grounding Instructions”
on page 4)
• Do not operate this appliance if it
has a damaged power cord or plug.
• Do not use this product near water,
for example: in a wet basement, near
a swimming pool or sink.
5
Page 6
6
3
5
7
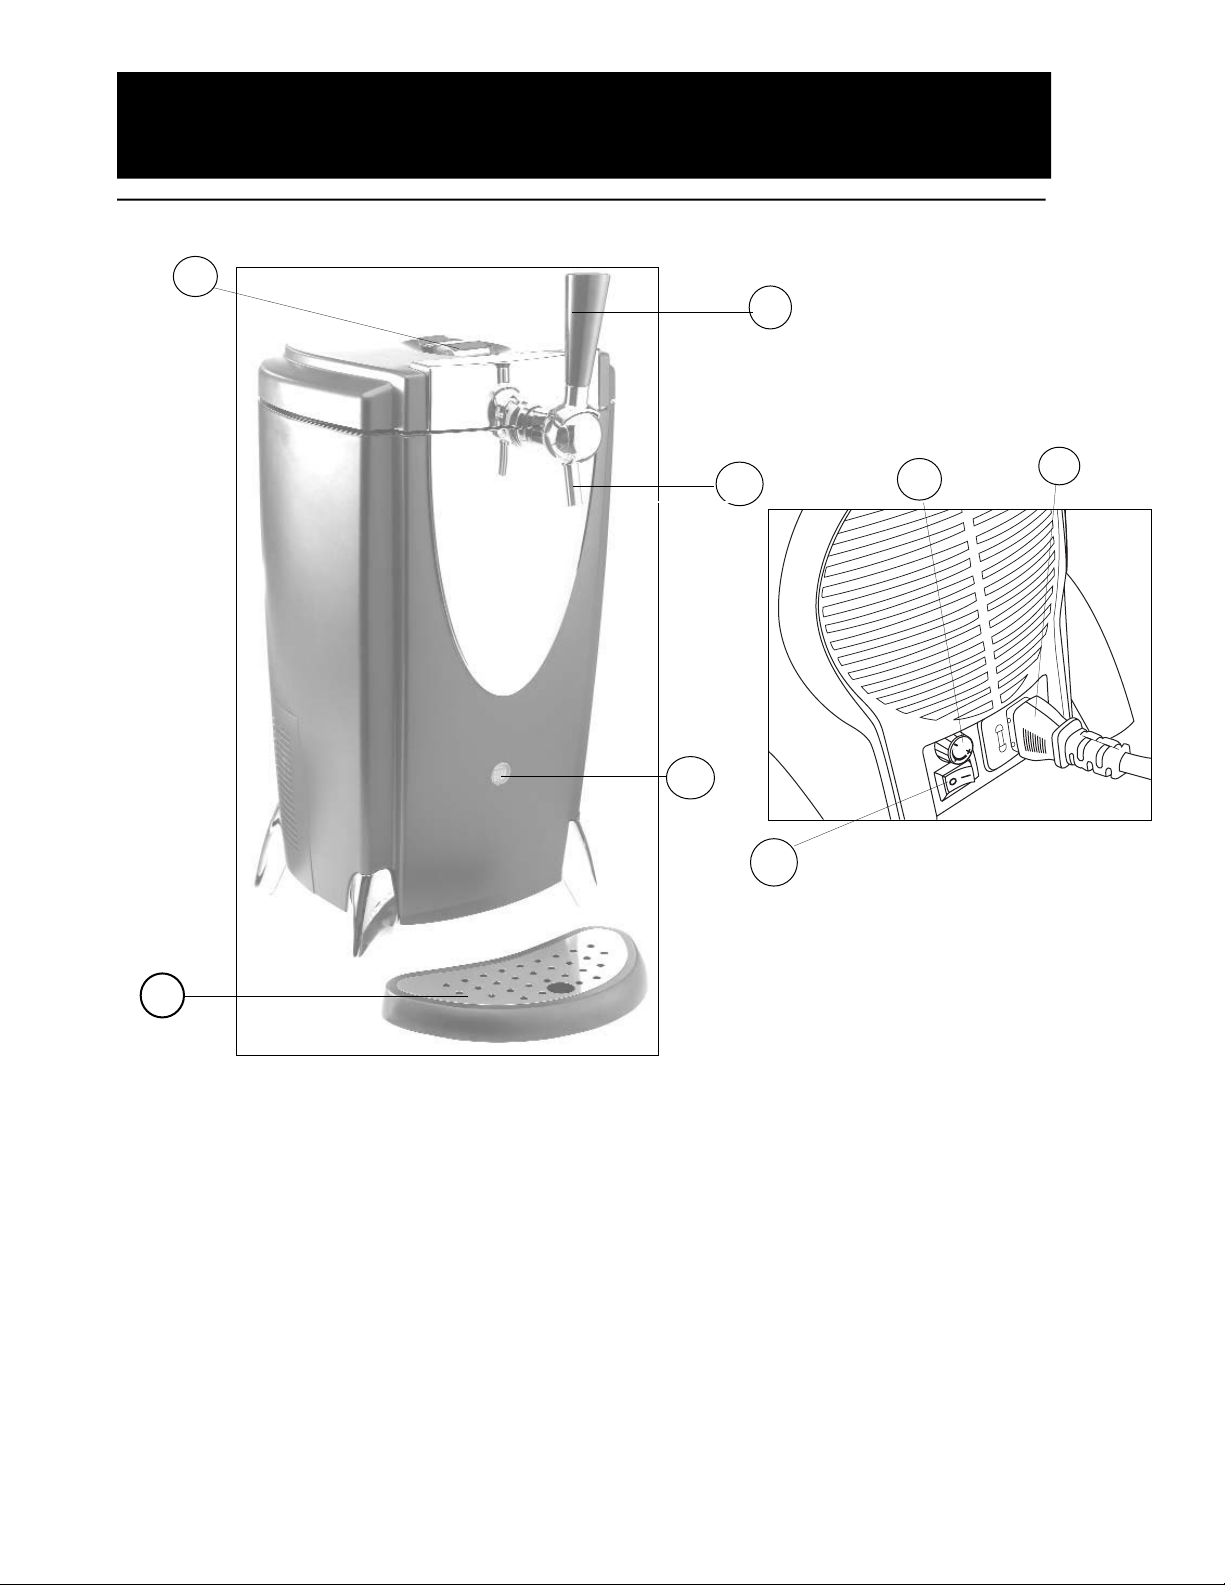
PRODUCT FEATURES AND ACCESSORIES
4
2
6
1. DRIP TRAY
2. TAP
3. TAP HANDLE
4. HANDLE TO OPEN DISPENSER LID
5. TEMPERATURE DISPLAY
6. ON /OFF SWITCH
7. TEMPERATURE CONTROL
8. POWER SUPPLY CORD
8
1
Page 7
For more details on purchasing any of the above listed accessories, please contact our customer
service department at (1-800-263-2629)
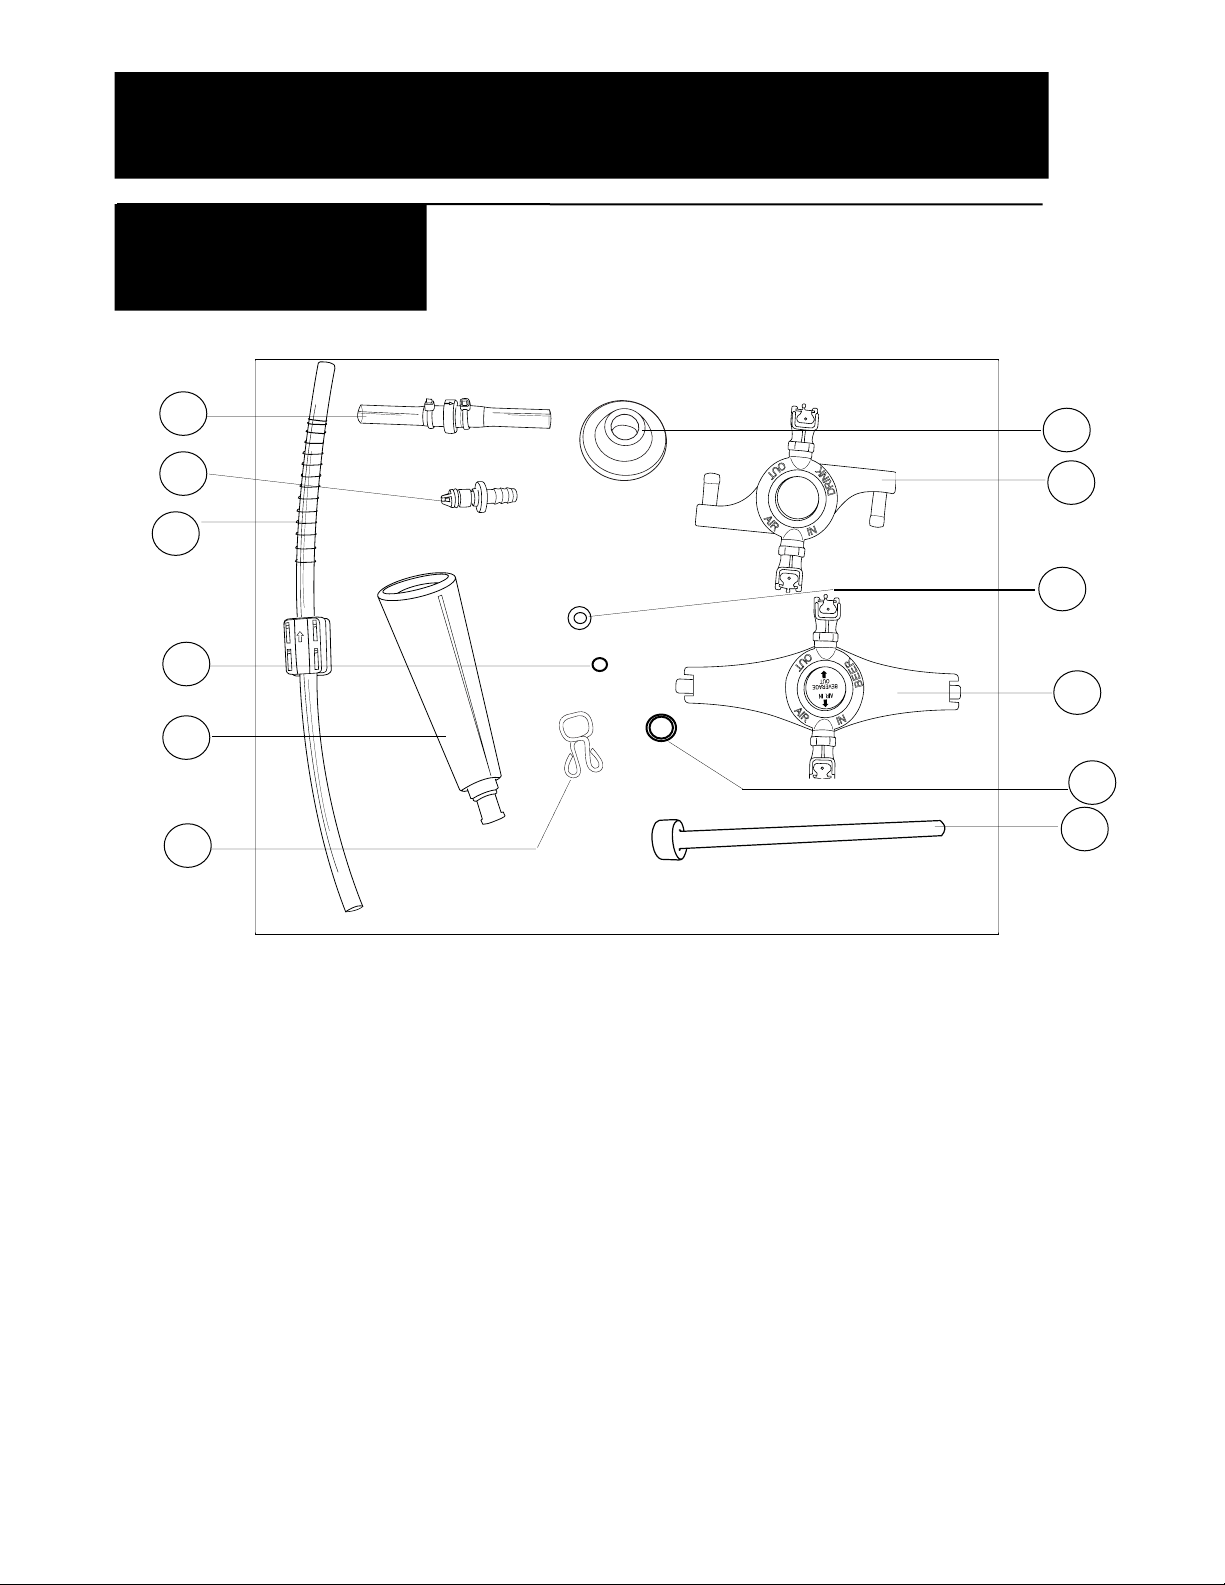
PARTS AND ACCESSORIES
INCLUDED
ACCESSORIES
7
1. 1 YELLOW RISING TUBE
2. 2 AIR CONNECT TUBES
3. 3 DISPENSING TUBES with Black Stoppers
4. YELLOW ADAPTER for Standard 5 Liter Mini Keg
5. WHITE ADAPTER for Beverage Container
6. 2 YELLOW and 2 WHITE MALE CONNECTORS
7. 1 BLACK RUBBER SEAL
8. Clear “O-rings” for YELLOW and WHITE MALE CONNECTORS
9. Black “O-rings” for TAP HANDLE
10. METAL CLIPS
11. Spare “O-rings” for YELLOW RISING TUBE
12. TAP HANDLE
13. 5 Liter Polycarbonate Beverage Container (not shown)
Remove and inspect that all accessories supplied with this unit
are
present and in good condition. In the event any of the
accessories are missing and/or not in good condition, please
call
Danby TOLL FREE at the number listed below to speak
with
one of our Customer Service Representatives.
2
6
3
9
12
10
7
5
8
4
11
1
N
E
P
O
Page 8

SETTING UP YOUR BEVERAGE DISPENSER
DISPOSAL OF
PACKAGING
WE CARE ABOUT THE
ENVIRONMENT
How the Beverage Dispenser Works.
This appliance is a beverage cooler and dispenser. Standard
5 liter mini kegs, and the Beverage Container are cooled
to the desired temperature in the cooling compartment
of
the appliance.
8
• Ensure that all included
accesso
ries are present and in
good
condition (see
‘Parts &
Accesso
ries”
on page 7).
• Make sure you have read and
understood
all important safety
in
formation on pages 4-5.
With Standard 5 Liter Mini Kegs & 5L Beverage Container
The beverage dispenser is compatible with different adapters that work with standard 5
liter mini kegs and the provided beverage container. These adapters ensure that the
kegs and container as specified in this manual can be used with the unit.
This appliance uses compressed air to control the pressure of the standard mini kegs
or the beverage container which allows it to dispense the beverage. Air is pumped into
the standard mini keg or the container to force the beverage out and into your glass.
Important Notice: Sanitation
Handling mini kegs, containers, tubes, adapters, and pipes which come in contact with beverages
requires
special care and attention to sanitation. It is important to clean the tubes, adapters, pipes,
and
the beverage dispenser itself thoroughly before and after each use.
Please comply with the following principles:
• Clean all parts of the appliance that come in contact with beverages thoroughly after
each use (refer to
“Care and Cleaning”
on page 18).
• If in doubt, clean all parts before using.
• Clean all parts when changing a mini keg or the container.
IMPORTANT
• Please dispose of all old and unused appliances in
accordance with your local ordinances.
Page 9

SETTING UP YOUR BEVERAGE DISPENSER
9
Find a suitable area for the dispenser. Do not place the dispenser outside, in direct sunlight, or in
any other location where the dispenser will be exposed to water or other harsh conditions. The
dispenser
should not be placed in environments where the ambient temperature drops below 65°F
(18°C)
or goes above 85°F (29°C). The ideal ambient temperature is 72° (22°C).
Affer the dispenser is in a suitable location, it is time to insert the
tap
handle into the dispensing tap and prepare the drip tray.
1. Insert the tap handle by lining up the metal tabs on the handle
with
the grooves in the dispensing tap. Pressing down firmly, turn
the
handle clockwise until the handle locks into place
(See
Figure 1
).
2. Remove the protective foil from the drip plate tray, and position
the
tray in front of the dispenser (See
Figure 1
)
POWER
CAUTION: DO NOT PLUG THE DISPENSER INTO AN OUTLET
UNTIL
A 5 LITER MINI KEG OR THE CONTAINER IS
PROPERLY CONNECTED.
After
connecting a keg or the container to the unit, please refer to
“
Switching on the Power
” on page 15 for further instructions.
Figure 1
PRESS DOWN &
TURN CLOCKWISE
POSITION
DRIP
TRAY
LOCATION OF THE BEVERAGE DISPENSER
The beverage dispenser is a free standing appliance, but can be installed next to counters and
walls- but do not place under a counter. For the dispenser to function properly, it is important to
have a clearance of at least 4” inches (101.6 mm) from the back of the dispenser to any surface
next to it. Also, there must be a clearance of at least 2” inches (50.8 mm) from the sides of the
dispenser
to any surface next to it.
INSTALLATION INSTRUCTIONS
INSERTING THE TAP HANDLE AND DRIP TRAY
Page 10

CONNECTING THE BEVERAGE DISPENSER
Preparing A Standard 5 Liter Mini Keg
10
USING THE YELLOW ADAPTOR
To connect the Yellow Adapter to a standard 5 liter mini
keg, follow these instructions.
NOTE: MAKE SURE ALL COMPONENTS ARE
PROPERLY SANITIZED PRIOR TO EACH USE.
PREPARING THE STANDARD 5 LITER MINI KEG
1. Screw the YELLOW RISING PIPE into the YELLOW
ADAPTER. Make sure there is an o-ring inside the RISING
PIPE. (See
Figure 2
)
2. Remove the plug from the top of the keg tap to ventilate
the keg. This releases the pressure build-up in the top of the
keg. The ventilation openings are designed differently per keg
type. Check the top ventilation opening to make sure the
opening is wide enough for the YELLOW RISING PIPE. If
there are parts in the way, such as a plastic edging, make
sure it is removed. It may be necessary to use a screwdriver
or pliers to do so.
3. Insert the YELLOW RISING PIPE (attached to the
YELLOW ADAPTER) into the top ventilation opening of the
mini keg. (See
Figure 3
)
4. If the YELLOW RISING PIPE does not fit into the tap, you
may be required to remove the plastic seal completely from
the ventilation tap using pliers. If this is required, insert the
provided BLACK RUBBER SEAL (See “
Parts & Accessories”
on page 7) into the keg before inserting the RISING PIPE.
This will create a tight seal between the keg and the RISING
PIPE. Keep a cloth or towel on hand, as the beverage could
spill.
5. Make sure the YELLOW ADAPTER fits completely down on
top of the mini keg and the sides of the ADAPTER snap and
lock into place around the edges of the mini keg. (See
Figure
3
)
Figure 2
Figure 3
SIdes Snap &
Lock into
place around
edges
FASTEN
RISING PIPE
INTO WHITE
ADAPTER
(turn in
clockwise
Direction)
BEVERAGE
OUT
AIR IN
Page 11

CONNECTING THE BEVERAGE DISPENSER
Preparing A Standard 5 Liter Mini Keg (cont’d)
USING THE YELLOW ADAPTER (continued)
DISPENSING TUBE FOR YELLOW ADAPTER
The DISPENSING TUBE will be pre-assembled, but if
assembling is required please follow these instructions:
DISPENSING TUBE WITH BLACK STOPPER
YELLOW MALE CONNECTOR
METAL CLIP
8. Place the CLIP over the end of the DISPENSING TUBE
9. Insert the YELLOW MALE CONNECTOR into the
opening of the end with the CLIP. Attach the CLIP so it
seals the MALE CONNECTOR into place under the TUBE.
(See
Figure 4
)
10. When finished, take the other end of the DISPENSING
TUBE (the side with nothing attached) and insert it into the
opening of the tap. (See
Figure 5
)
11. Pull the TAP HANDLE down so the DISPENSING TUBE
fits through the tap. To do this, you may have to push and
thread it through. Make sure the BLACK STOPPER fits
securely in the inlet just before entering the tap.
(See
Figure 5
)
12. The DISPENSING TUBE needs to go all the way
through the spout. The TUBE should be slightly exposed
below the bottom of the tap. (See
Figure 5
)
11
Figure 4
Figure 5
BLACK STOPPER
TUBE IS
EXPOSED
YELLOW MALE CONNECTOR
DISPENSING TUBE
Attach METAL CLIP so it seals
MALE CONNECTOR in place
OPEN
Page 12

CONNECTING THE BEVERAGE DISPENSER
12
Preparing A Standard 5 Liter Mini Keg (cont’d)
USING THE YELLOW ADAPTER (continued)
CONNECTING THE MINI KEG TO THE
DISPENSER
13. Insert the 5 liter mini keg (with the ADAPTER
connected)
into the dispenser. Insert the YELLOW MALE
CONNEC
TOR attached to the AIR-CONNECT TUBE into
the
AIR IN opening of the YELLOW ADAPTER
(See
Figure 6
). Make sure you hear a “locking click”
14
. Take the YELLOW MALE CONNECTOR attached to the
DISPENSING
TUBE and insert that end into the
BEVERAGE OUT opening of the YELLOW ADAPTER
(See
Figure 6
). Make sure you hear a “locking click”
15
. Make sure there are no kinks in the TUBES. There
needs
to be an even air flow from the unit to the keg and
even liquid flow from the keg to the tap. Also make sure the
keg is centered in the cooling compartment of the unit. This
ensures
even cooling throughout.
TURNING ON THE AIR PRESSURE
16. Before closing the lid of the dispenser, you need to turn
on
the air pressure which will generate the power to
dispense
the beverage.
17
. In the upper left hand corner of the under side of the
lid,
there is a black switch, labeled AIR ON or AIR OFF,
which
can be moved up or down. Move the switch to the
AIR ON position (See
Figure 7
). Once you close the lid the
power will be activated to turn the air pressure on.
18
. When the dispenser is not being used, make sure the
switch is in the AIR OFF position.
CLOSE THE LID
To turn on the power, please refer to “
Switching on the
Power
” on page 15
Figure 6
Figure
7
To connect dispensing tube to
Yellow adapter
PUSH
UNTIL
LOCKING
CLICK
AIR ON/OFF
SWITCH
r
i
A
r
i
A
n
Page 13

CONNECTING THE BEVERAGE DISPENSER
13
Preparing the Beverage Container
USING THE WHITE BEVERAGE CONTAINER ADAPTER
To connect the WHITE ADAPTER to the 5L Beverage
Containe
r, follow these instructions.
NOTE: MAKE SURE ALL COMPONENTS ARE
PROPERLY SANITIZED PRIOR TO EACH USE.
PREPARING THE BEVERAGE CONTAINER
To prepare the Beverage Container, please follow these
inst
ructions:
BEVERAGE CONTAINER
WHIT
E ADAPTER
YELL
OW RISING PIPE
AIR-CONNECT
TUBE
DISPENSIN
G TUBE WITH BLACK STOPPER
1. Fill the beverage container with a beverage of your
choice. Make sure to fill only to the lower edge of the
handles. Fasten the RISING PIPE securely into the WHITE
ADAPTER (See
Figure 12
).
GETTING THE CONTAINER READY
2. Insert the RISING PIPE and the WHITE ADAPTER into
the container. Position the inlet grooves on the ADAPTER
over the handles. Make sure it is securely fastened (See
Figure 13
).
SETTING UP THE DISPENSING TUBE
3. Pull the tap handle completely down and push the
DISPENSING TUBE into the tap. Make sure the BLACK
STOPPER fits securely in the inlet just before the tap (See
Figure 14
)
4. Make sure the DISPENSING TUBE is slightly exposed
below the tap (See
Figure 14
).
SETTING UP THE AIR CONNECT TUBE
5. Connect the AIR-CONNECT TUBE to the AIR OUT valve
located in the back of the unit. Place the CLIP over the
valve to ensure an air-tight seal.
Figure 13
Figure
14
Figure
12
FASTEN UNDER
GROOVES
FASTEN
RISING
PIPE
INTO
WHITE
ADAPTER
(tu
rn in
clo
ckwise
Direction)
BL
ACK STOPPER
TUBE IS
EXPOSED
Page 14

CONNECTING THE BEVERAGE DISPENSER
14
Preparing The Container
USING THE WHITE ADAPTER (continued)
CONNECTING THE CONTAINER TO THE
BEVERAGE DISPENSER
6. Insert the container into the center of the unit.
7. Attach the AIR-CONNECT TUBE to the “AIR IN”
valve in the WHITE ADAPTER (See
Figure 15
).
8. Attach the DISPENSING TUBE to the “DRINK
OUT
” valve in the WHITE ADAPTER
(See
Figure 15
).
9. Make sure there are no kinks in the TUBES. There
needs
to be an even flow from the unit to the
container
and an even liquid flow from the container
to
the tap.
Als
o, make sure the container is centered in the
cooling
compartment of the unit. This ensures even
cooling
throughout.
TURN ON THE AIR PRESSURE
10. Turn on the air pressure by moving the switch to
the
ON position (See
Figure 16
).
CLOSE THE LID
To turn on the power, please refer to “
Switching on
the
Power
” on page 15.
Figure 15
Figure
16
AIR IN
DRINK OUT
AIR ON/OFF
SWITCH
B
E
A
V
I
O
R
E
U
R
I
T
N
A
G
E
r
i
A
r
i
A
n
Page 15

OPERATING THE BEVERAGE DISPENSER
Switching On The Power
CAUTION:Switch on the beverage dispenser only when the mini keg or the
container
is properly connected (See “
Connecting the Beverage Disenser
” on
pages 10-14).
Ma
ke sure to clean up any liquids that have spilled in and around the
beverage dispenser.
1. Make sure the beverage dispenser is properly connected to a mini keg or
to
the container.
2. Close the lid.
3. Insert the Power cable into a properly grounded 3 prong outlet
(See
“
Important Safety Information
” on page 4).
4. Press the ON /OFF switch located on the bottom panel in the back of the
unit
(See
Figure 17
).
5. Make sure the air pressure switch is in its proper setting. If necessary, refer
to
the AIR PRESSURE sections in “
Connecting the Beverage Dispenser
” on
pages 10-14.
+ = WARMER
= COOLER
15
Cooling the Beverage Dispenser
It takes approximately 15 hours for the beverage dispenser to chill a standard
5 liter mini keg from normal room temperature of 72°F (22°C) to a desired
drinking temperature of 41°F (5°C).
1. To cool the beverage dispenser, use the temperature regulator located in
back of the unit and next to the power switch.
2. To make the beverage dispenser warmer, turn the temperature adjustor to
the
+ direction. To make the dispenser cooler, turn the temperature adjustor to
the
- direction (See
Figure 18
).
Adjusting
the internal temperature with the temperature adjustor will have a
gradual effect on the temperature of the beverage. It should take at least 2-3
hours
for the beverage dispenser temperature to reach the desired
tempe
rature when a change is being made.
The internal temperature of the dispenser is displayed on the front of the unit.
NOTE: The temperature displayed on the front of the dispenser is measured
by the temperature on the outside of the keg or container. Consequently, the
displ
ayed temperature may sometimes vary from the actual temperature of the
beverage. This depends on the length of time and temperature at which the
keg and container were chilled.
Figure 17
Figure 18
= OFF
= ON
Temperature Conversion Chart
+
1 2 3 4 5 6 7 8 9 10 11 12 13 14 15 16 17 18
c
34 36 37 39 41 43 44 46 48 50 52 54 55 57 59 61 63 64
F
Page 16

OPERATING THE BEVERAGE DISPENSER
Using The Dispensing Tap
You can begin dispensing your beverage immediately after the 5 liter mini keg or the
container has been connected to the dispenser. However, it is recommended that you
wait until the beverage has reached the desired set temperature.
Beer, in particular, can foam excessively if the temperature is too high.
NOTE: Do not place glasses on top of the dispenser. It is an uneven surface, so
glasses may fall.
1. Take a clean glass and hold it at a slight 45° degree angle directly under the tap
NOTE: To ensure proper cleanliness, make sure the tap is not immersed in the
beverage being dispensed into the glass. Beer residue on the tap can impair foam
formation.
2. Pull the tap handle all the way down and fill the glass. Dispensing with the tap
partially open can cause excessive foam.
3. Gently release the tap handle to stop dispensing.
Shelf Life Of 5 Liter Mini Kegs and Container
Opened 5 liter mini kegs have a shelf life of 24 hours unless otherwise stated by your
beverage manufacturer on the keg. Read all instructions on the keg carefully, or if in
doubt, contact the manufacturer directly. Do not keep an opened 5 liter mini keg in the
dispenser (even when switched ON) longer than 24 hours , for which you are to follow
their noted shelf life instructions. After that length of
time, the beverage will go flat.
Do not store beverages in the beverage container longer than 24 hours.
Always leave the dispenser switched ON when storing a mini keg or the beverage
container inside the appliance. This ensures proper cooling.
16
Page 17

17
OPERATING THE BEVERAGE DISPENSER
Depressurize To Disconnect the Mini Keg & the Container
YELLOW ADAPTER - First, pull out the MALE CONNECTOR
attached
to the AIR-CONNECT TUBE from the ADAPTER, then pull
out
the MALE CONNECTOR attached to the DISPENSING TUBE
from
the ADAPTER. Then, push down on the metal press tabs (See
Figure 19
).
WHITE BEVERAGE CONTAINER ADAPTER- Pull the DISPENSING TUBE off of the DRINK OUT
pipe
of the ADAPTER. Then, pull off the AIR-CONNECT TUBE from the AIR IN pipe of the
ADAPTER. It may be necessary to pull hard.
5. Once the TUBES have been disconnected from the ADAPTERS, pull the tap handle toward you.
Dispense
any unnecessary liquid from the DISPENSING TUBE, then pull the TUBE out of the tap.
6. Gently release the tap handle back to its resting position.
7. Remove the mini keg or container from the beverage dispenser.
8. To disconnect the ADAPTERS:
YELL
OW ADAPTER: unclip the sides of the ADAPTER which cover the keg edges. Pull the
ADAPTER and the RISING TUBE out of the keg. Unscrew the RISING PIPE and the ADAPER.
WHIT
E BEVERAGE CONTAINER ADAPTER- push in the locking mechanisms on either side of the
ADAPTER and pull it off of the container. It may be necessary to pull firmly due to air pressure
build-up. Pull out the RISING PIPE from the ADAPTER.
9. Thoroughly wash and clean the dispenser and all parts used.
NOTE: If you want to store the mini keg or container, see “
Shelf Life of Mini Kegs
” on page 16
Figure 19
To disconnect
dispensing
tubes
PUSH
DOWN ON
ME
TAL
TAB
It is very important to depressurize the mini keg or container when you are finished using them. If the
pressure is not released, remaining high pressure could lead to spraying or spilling. Follow these
directions to ensure proper depressurization.
NOTE: 5 liter mini kegs are empty when only foam is being dispensed from the beverage dispenser. If
necessary you can also disconnect partially full mini kegs.
1. Switch OFF the dispenser.
2. To depressurize the keg or container, pull down the tap handle to dispense all additional beverage
which may be in the unit due to the pressure (ie. beverage that is in the RISING PIPE and ADAPTER).
When the dispensing beverage stops, gently release the tap back to its resting position.
3. Open the lid of the dispenser. If not already done, turn the air pressure switch to the AIR OFF position.
4. Disconnect the tubes while holding the adapter in place:
Page 18

18
CARE AND CLEANING
CAUTION: DO NOT USE A DISHWASHER TO CLEAN THE BEVERAGE
DISPENSER, SPARE PARTS OR ACCESORIES.
NOTE: Handling beverages requires very special attention to cleanliness and
hygiene. Clean the beverage dispenser, spare parts, and accesories thoroughly
after each use.
CLEANING THE OUTSIDE OF THE BEVERAGE DISPENSER
Always unplug the beverage dispenser before cleaning. Do not use a hard brush or
sponge. Use a small amount of soap in water with a soft cloth. To dry, use a dry soft
cloth or towel.
Never immerse the beverage dispenser in water or other liquids. Do not let water or
liquid get into the casing of the unit. Never use very hot water.
Remember to rinse out the drip tray if it should be filled during use, and clean
thouroughly after each use.
CLEANING THE INSIDE OF THE BEVERAGE DISPENSER
Soak up all beverage or liquids that have spilled in the cooling compartment; Clean the
cooling compartment with soapy water and a soft cloth.
Clean and rinse the tap with a soft cloth and water
CLEANING THE SPARE PARTS AND ACCESORIES
Thoroughly clean all TUBES, ADAPTERS, and CONNECTORS with light soap and
warm water. For the ADAPTERS to be properly washed and rinsed, the
CONNECTORS and TUBES need to be attached. This will provide access to
inaccessible areas within the ADAPTERS. Make sure to remove the “O-rings” in the
ADAPTERS and CONNECTORS to clean inaccessible areas. Rinse thoroughly under
warm flowing water to remove any residual soap and beverage residue.
Repeat if necessary.
Air dry all washed parts and accessories for 24 hours.
NOTE: Do not pre-install the accessories. Store the accessories in a separate box or
bag outside of the beverage dispenser.
Page 19

CARE AND CLEANING
19
DEFROSTING THE BEVERAGE DISPENSER
If frost builds up in and around the beverage dispenser, that means there is too much
humidity near the unit. Move the unit to a less humid location.
NOTE: DO NOT USE A HEATER OR ANY SHARP UTENSILS TO REMOVE FROST
OR CLEAN THE BEVERAGE DISPENSER
Unplug the beverage dispenser and, once the frost melts, carefully wipe down the
outside or inside of the unit. When dry, plug the unit back in.
MAINTAINING THE UNIT
Empty the drip tray when necessary and clean it with a damp cloth
Occasionally wipe the outside of the beverage dispenser with a damp cloth to ensure
cleanliness
IN THE EVENT OF A POWER FAILURE
In the event of a power failure, do not remove the cover of the beverage dispenser too
frequently to ensure the internal temperature remains the same. A slight and gradual
increase in temperature could have an effect on the temperature of the beverage.
If the ambient temperature is very hot, place the beverage dispenser in a cool
environment.
Page 20

Problem Possible Causes What To Do
1)The beverage
dispenser
is not
cooling
2)
Beer or beverage
is
not being
dispensed
3)The
dispenser
tempe
ratre display
is
not illuminated
4)
Excessive foam,
spilling,
or spraying
occurs
5)
The dispenser is
1) No power supply
1a) Low voltage
1b) Blown fuse
2) The mini keg or
container is empty.
2a) The DISPENSING or
AIR-CONNECT TUBE is
pinched.
2b)The air pressure switch
is in the AIR OFF position.
2c) Air is leaking.
3) No power
3a) The power switch
remains in the OFF (O)
position.
4) First glass
4a) The mini keg is not
cold enough, or has been
shaken.
4b) The DISPENSING
TUBE or AIR-CONNECT
TUBE is leaking, or the
ADAPTOR is not properly sealed.
4c) Dispensing tap is not
open enough
5) The air pressure is
1) Make sure the dispenser is plugged into a 3 prong
outlet
1a) Make sure the dispenser is plugged into a proper
120V outlet
1b) Change fuse. It is recommended that a qualified
electrician change the fuse on the dispenser
2) Change the keg or container.
2a) Make sure the TUBES are not kinked when
connected. If necessary, turn the keg in the dispenser
to even out the TUBES.
2b) Switch the air pressure to the AIR ON position
2c) Make sure there is an air-tight seal between the
keg and the RISING PIPE. Also, make sure the
CONNECTORS and TUBES are properly attached and
secured. If necessary, change the TUBES.
3) Make sure the dispenser is plugged into a 3 prong
outlet.
3a) Push the power switch to the ON (
l ) position.
4) The first glass from a keg can have too much foam.
This is normal.
4a)
Always pre-chill the mini keg before tapping, and
store keg where there is little or no movement for at
least 24 hours before using to allow for chilling and
rest.
4b)
Make sure the TUBES are properly connected. If
necessary, change the TUBES. Make sure the
ADAPTER is securely fastened to the mini keg. If
necessary, re-connect.
4c) Pull the tap handle completely down to ensure the
tap opens up.
5) The air pressure switch is turned to the ON
position.This is normal. If not in use, turn to the OFF
position.
BEFORE YOU CALL FOR SERVICE
TROUBLE SHOOTING
making a humming
noise
turned off
20
Page 21

LIMITED PRODUCT WARRANTY
This quality product is warranted to be free from manufacturer’s defects in material and workmanship, provided that the unit is used under the normal operating
conditions intended by the manufacturer.
This warranty is available only to the person to whom the unit was originally sold by Danby or by an authorized distributor of Danby, and is non-transferable.
TERMS OF WARRANTY
Plastic parts (ie. evaporator door, door rails, covers and trays are warranted for thirty (30) days only from purchase date, with no extensions provided.
Limited One (1) Year
During the first year (1), any electrical parts of this product found to be defective, including any sealed system units, will be repaired or
replaced, at warrantor’s option, at no charge to the ORIGINAL purchaser. Consumable parts (ie. light bulbs) are not warranted
or guaranteed for any length of time.
To obtain
Contact your dealer from whom your unit was purchased, or contact your nearest authorized Danby service depot, where service
Service
must be performed by a qualified service technician. If service is performed on the unit by anyone other than an authorized service
depot, or the unit is used for commercial application, all obligations of Danby under this warranty shall be at an end.
Nothing within this warranty shall imply that Danby will be responsible or liable for any spoilage or damage to food or other contents of this appliance, whether
due to any defect of the appliance, or its use, whether proper or improper.
EXCLUSIONS
Save as herein provided, Danby Products Limited (Canada) or Danby Products Inc. (U.S.A.), there are no other warranties, conditions, representations or
guarantees, express or implied, made or intended by Danby Products Limited or its authorized distributors and all other warranties, conditions, representations or
guarantees, including any warranties, conditions, representations or guarantees under any Sale of Goods Act or like legislation or statute is hereby expressly
excluded. Save as herein provided, Danby Products Limited (Canada) or Danby Products Inc. (U.S.A), shall not be responsible for any damages to persons or
property, including the unit itself, howsoever caused or any consequential damages arising from the malfunction of the unit and by the purchase of the unit, the
purchaser does hereby agree to indemnify and save harmless Danby Products Limited from any claim for damages to persons or property caused by the unit.
GENERAL PROVISIONS
No warranty or insurance herein contained or set out shall apply when damage or repair is caused by any of the following:
1) Power Failure.
2) Damage in transit or when moving the appliance.
3) Improper power supply such as low voltage, defective house wiring or inadequate fuses.
4) Accident, alteration, abuse or misuse of the appliance such as inadequate air circulation in the room or abnormal operating conditions,
(extremely high or low room temperature).
5) Use for commercial or industrial purposes.
6) Fire, water damage, theft, war, riot, hostility, acts of God such as hurricanes, floods etc.
7) Service calls resulting in customer education.
Proof of purchase date will be required for warranty claims; so, please retain bills of sale. In the event warranty service is required, present this document to our
AUTHORIZED SERVICE DEPOT.
Warranty Service
R
Danby Products Limited
PO Box 1778, 5070 Whitelaw RD, Guelph, Ontario, Canada N1H 6Z9
Telephone: (519) 837-0920 FAX: (519) 837-0449
Danby Products Inc.
PO Box 669, 101 Bentley Court, Findlay, Ohio, U.S.A. 45839-0669
Telephone: (419) 425-8627 FAX: (419) 425-8629
07/08
Carry In
21
Page 22

Model • Modèle
DBD5L
For service, contact your nearest
service depot or call:
1-800-261-800-263-2629)
to recommend a depot in
your area.
En cas de réparation, veuillez
contacter votre service
après-vente le plus près ou
communiquez au:
1-800-26-
1-800-263-2629)
pour connaître le service
après-vente le plus proche.
Beverage Dispenser
The model number can be found on the serial plate located on the
back panel of the unit.
All repair parts available for purchase or special order when you visit
your nearest service depot. To request service and/or the
location of the service depot nearest you, call the TOLL FREE
NUMBER.
When requesting service or ordering parts, always provide the
following information:
• Product Type
• Model Number
• Part Description
Distributeur de Breuvage
Le numéro du modèle se trouve sur la plaque d'identification située
sur
le panneau arrière de l'appareil.
Il
est possible d'acheter les pièces de rechange ou de les obtenir par
commande
spéciale en vous rendant à votre service après-vente le
plus
proche. Pour effectuer des réparations ou obtenir l'adresse du
se
rvice après-vente le plus proche, veuillez composer le NUMÉRO
SANS
FRAIS.
Pour effectuer des réparations ou commander des pièces de
rechang
e, veuillez donner les renseignements suivants :
• Type de modèle
• Numéro du modèle
• Description des pièces
Danby Products Limited, Guelph, Ontario Canada N1H 6Z9
Dan
by Products Inc., Findlay, Ohio USA 45839-0669
Printed in China (P.R.C.) Imprimé en Chine (R.P.C.) Impresso en China (R.P.C.)
R
R
R
 Loading...