

Page 1

QUICK START MANUAL
AUTOMATED RIGGING SOLUTIONS
7200 Rawson Road Victor, New York 14564 USA
tel 866-486-7835 585-924-5000 fax 585-924-0545
www.daktronics.com/rigging email sales@daktronics.com
Copyright © 2008–2011 Daktronics ED-17172 REV5 20 September 2011
Page 2
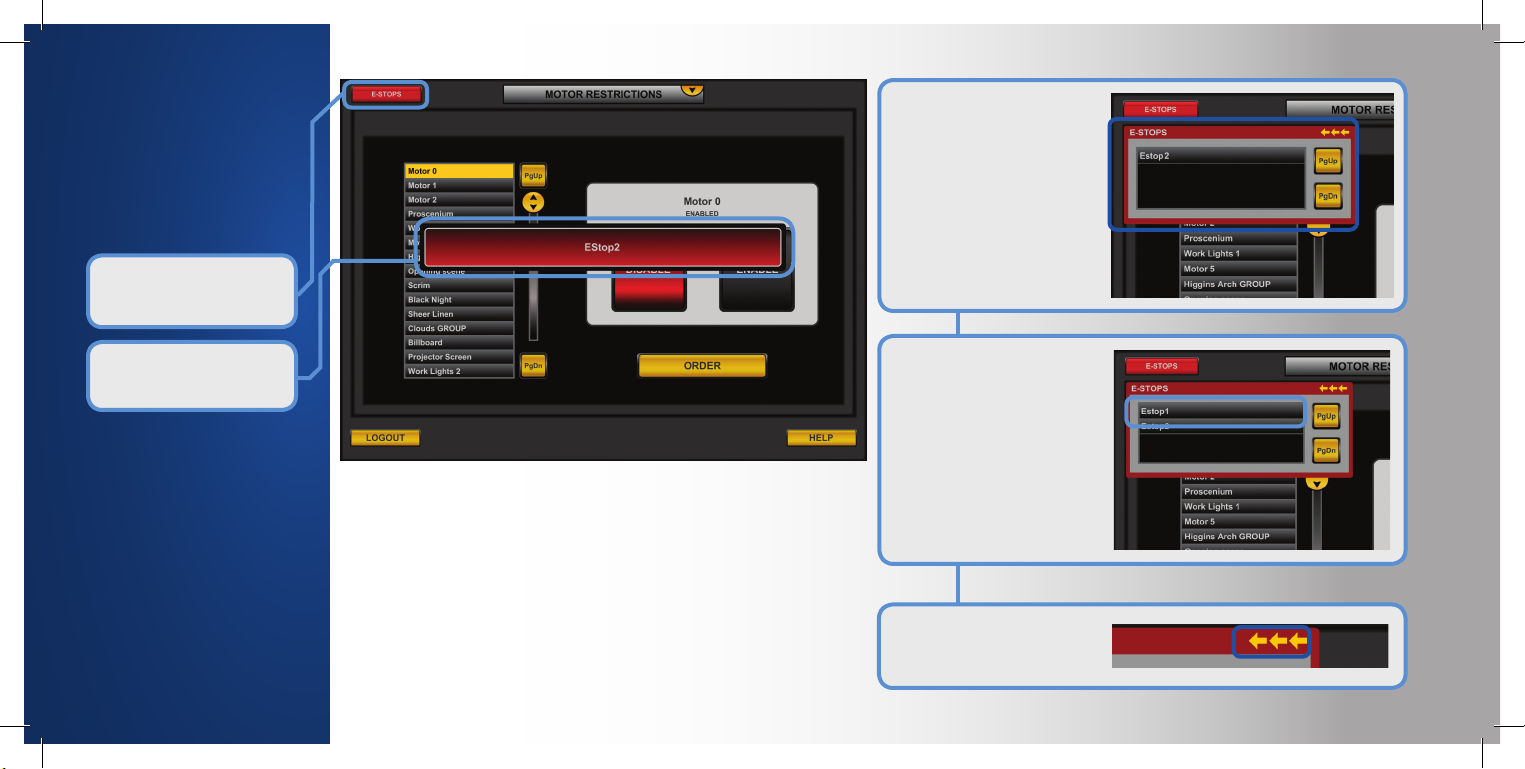
E-STOP RECOGNITION
Emergency Stop (E-Stop)
recognition is done in
every module. When the
VAC senses an E-Stop
button is engaged...
The E-STOPS button
activates and begins
flashing.
Display
Touch the E-STOPS button
and the E-Stop Alert panel
will display.
Note: In Manual or Setup,
the VAC interface will be
frozen while the E-Stop Alert
panel is displayed.
A window with the location
of the E-Stop appears for
two seconds.
If another E-Stop is engaged
while the panel is open, then
its name will appear at the
top of the list. When an EStop is disengaged, its name
is removed from the list.
The panel will close when
all of the E-Stops are
disengaged.
Touch the gold arrows that
appear in the upper right corner of an E-Stop Alert panel
to hide it.
E-STOP RECOGNITION
Page 3
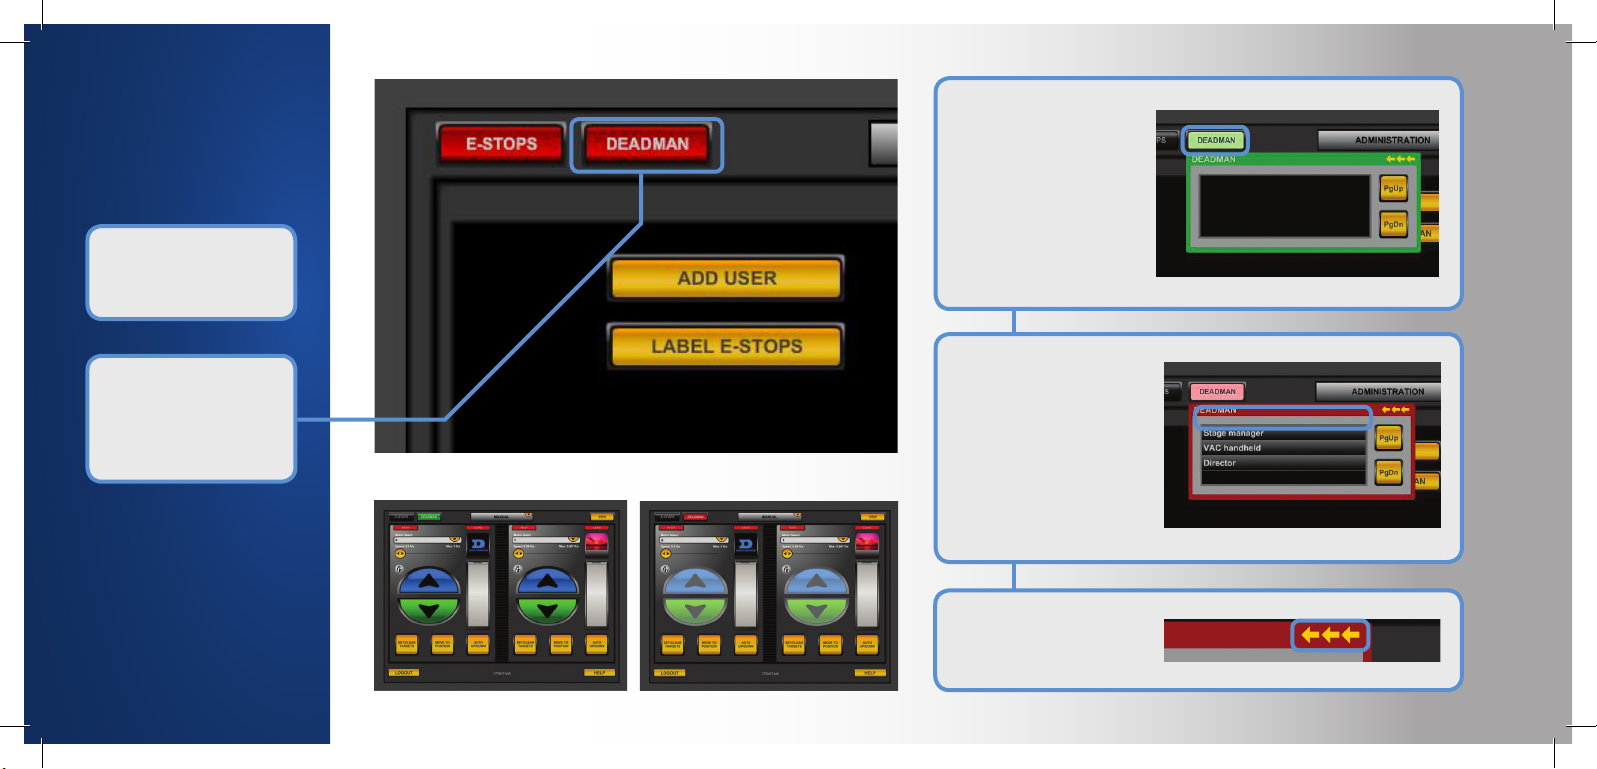
DEADMAN RECOGNITION
Deadman recognition
is also done in every
module.
Under normal operation,
the Deadman button will
display green and allow
hoist operations.
When tripped, the
Deadman button will
change to red and disable
hoist control, which is
shown visually by graying
out the interface controls.
Display
Touch the Deadman button
and the Deadman Alert
panel will display.
Note: Hoist Control will be
frozen while a Deadman is
tripped, you will however still
be able to setup cue sheets,
presets and groupings.
If another Deadman is
tripped while the Alert panel
is open, then its name will
appear at the top of the
list. When re-engaged, the
Deadman in question will
be removed from that list.
The panel will close when
all of the E-Stops are
disengaged.
Touch the gold arrows that
appear in the upper right
corner of the Deadman alert
panel to hide it from view.
DEADMAN RECOGNITION
Page 4

Batten Position Indicator
MANUAL
The Manual module
allows all users the
ability to control
motors and to
work with targets.
Targets are the upper
and lower positions
that the motor will
be moving to most
of the time.
This module allows
the setting and
clearing of targets.
Set Targets
Touch SET TARGETS. From the menu, pick which target (upper,
lower or one of three alternates) to change. The keypad will display
the boundaries. Enter the target numerically or use current batten
position. To change multiple targets, select them from the menu and
make the changes before touching CONTINUE.
Clear Targets
Touch the yellow buttons to clear
an alternate target, blue to clear
the upper target or green to clear
the lower target. The button will
change to read CONFIRM. Touch
again to clear the target.
Shows Upper, Lower and Alternate Targets
Change Motor
Touch the button
under Motor Select
to display the list
of motors. Touch a
motor name to select.
Touch CONFIRM.
Motor Info
Touch this button to see detailed information
screens (above) about the selected motor.
Move Motor To
Position
Touch MOVE TO
POSITION. Enter target
in keypad, set speed and
touch MOVE. The motor
will then
move to
its target.
Move Motor Auto
Touch AUTO UP/DOWN.
Select a target (upper,
lower or one of three
alternates) by touching
and holding its button
for three seconds. The
motor will then move to
its target.
i-Batten Safety Feature
When enabled, if a change in batten weight
is detected, the motor will stop until weight is
returned to normal. If disaled, this icon has
a red slash over it.
Change Icon
Touch the icon button twice to
display the Icon Selection
panel. Touch category to
display icons. Touch icon to
select. Touch DONE to confirm.
Change
Speed
Drag the
button left or right. Touch
the button twice to manually
enter the speed.
Move Motor Manually
Touch and hold the arrow
buttons. Slide your finger
to minus (-) to slow the
speed or plus (+) to
increase it. The motor will
stop when the button is
released or when the
motor has reached
its limit.
MANUAL
Page 5

GROUPING
Create
To add a motor, touch its
name in the motor list. The
name appears in the group
motor list.
To remove a motor, touch its
name in the group motor list.
The motor name appears in
the motor list.
Touch DONE to continue.
The group motor list is only
for display. Type the new
group name. Touch DONE
to create the group or
CANCEL to exit.
Delete
Select a group by touching
its name. Review the motors
displayed on the right to be
sure you have chosen the
correct one. Touch DELETE
to remove or CANCEL
to exit.
Edit
This works like editing in
the Create screen.
Rename
This works like naming in
the Create screen.
Modify
Touch a group
in the list to
select it. Touch
CONTINUE
to edit.
Touch EDIT to
change the
motors, TRIM to
change the
positions,
RENAME to
change the
name.
Trim
Touch a motor name and the trim
controls will activate. Use the
arrow buttons or touch JOYSTICK
to move the motor. After using
the joystick touch FINISHED.
This module
works with
groups.
A group is two or
more motors that
will act in unison.
Groups are for
hanging objects
across multiple
battens or when
two or more
battens must
move together.
All groups must
have more than
one motor.
GROUPING
Page 6

PRESETS
Name
Name your new preset by using the
VAC keyboard or the virtual keyboard.
Create
Select a motor and
move it using the
controls. This is the
motor’s target for the
preset. Repeat for all
motors.
Touch OMIT MOTOR
to ignore it in the list.
Touch ALL to add all
omitted motors back.
The motors will move
in the order of the
list. To change the
order, select a motor
and touch MOVE IN
LIST, and select a new
position.
When all motors are
in the correct position,
touch DONE.
Touch and hold the arrow
buttons to move the batten. Slide
your finger left or right to change
the speed.
Touch UPR for the upper limit, or
LWR for the lower.
Touch JOYSTICK for joystick
control. Touch the FINISHED
button to stop using the joystick.
Keypad
Touch this
button
to enter
the target
numerically.
Modify
Select a preset from
the list by touching
its name. Touch
ACCEPT to change
the preset or touch
EXIT to leave this
function.
After selection, this works like Create.
Delete
Select a preset by touching
its name. Touch ACCEPT to
remove the preset or touch
EXIT to leave this function.
Run
Select a preset by touching
its name. Touch ACCEPT
to choose the preset and
CONTINUE to confirm or
touch EXIT to leave this function.
After preset selection there are three options: START,
PAUSE and EXIT. Touch EXIT to return to the main menu.
Touch START to run the preset. The PAUSE and STOP/
CANCEL buttons activate. Touch PAUSE while running
to halt.
Touch STOP/CANCEL to
stop running the preset and
return to the main menu.
While the preset is paused,
touch START to continue
running the preset.
This module
works with
presets.
Presets are
single cues
that move
every selected
motor to a
set position
sequentially.
PRESETS
Page 7

CUEING
Cues are commands
to move motors
during a show. A
series of cues for
a show is called
a cue sheet. Each
cue sheet can have
3 cute lists, A, B
and C.
Touch CREATE CUE
SHEET to create a
new one, or touch
LOAD CUE SHEET
to work with an
existing one.
Touch DELETE CUE
SHEET to remove a
cue sheet entirely.
Load
Choose a cue sheet
to work with by
touching its name.
After selecting, touch
ACCEPT to load.
Delete
Choose a cue sheet
to work with by
touching its name.
After selecting, touch
DELETE to remove.
Create
Name your new cue sheet. Touch ACCEPT.
Set Cue Zero
Touch MANUAL SCREEN to
change targets. Touch CLOSE to
return to this screen. Touch SET
CUE 00.00 when the targets
are correct.
Cue Sheet
This is the cue sheet. The cues appear in
order from top to bottom. Use the PgUp,
PgDn or scroll button to move through the
list. Touch the ADD, DELETE or MODIFY
buttons to work with individual cues. Touch
RUN to execute a cue.
Add
Each cue has seven pieces of data that must be entered. The number and title are the same throughout a cue, so if
you decide to add more actions, you do not have to enter the first two values again.
NUMBER TITLE MOTOR TARGET TIME/SPEED NOTE NEXT
A WAIT command pauses for a
period of time before the next
action is executed.
A NOTE command only holds a
description for the action.
A FOLLOW command triggers the next cue to run after its cue is
completed or the next action to run immediately.
Touch YES to add
another action,
NO to finish or
CANCEL to go back.
Touch ADD to keep adding cues.
Touch EXIT to stop.
Modify
You can modify cues by changing the cue actions they contain. Touch ADD ACTION to add a new action to the cue.
Touch DELETE ACTION to remove an action from the cue. Touch MODIFY VALUES to change the data in an action.
Add Action
Touch an
arrow to
choose a
position.
Delete Action
Touch one
of the
actions to
delete.
Modify Values
Touch the
value you
wish to
change.
CUEING
Page 8

Delete
Select a cue to delete by
touching its name in the
cue sheet. If you make
a mistake, just touch the
correct one to change it.
Touch EXIT to return to the
main menu.
After the cue is selected,
touch DELETE to
permanently erase it.
Touch CANCEL CHOICE
to clear your selection.
Run
Select a
cue by
touching
its name
in the
list.
Touch SETUP to move the motors into
the starting position for the cue.
While the cue is running you may
stop it by touching PAUSE.
Touch ACCEPT to run.
Touch RUN CUE to start the cue.
Touch DIFF. CUE to change cues.
Touch RESUME to continue,
RESTART to set up the cue again.
i-BATTEN RECOVERY
When the i-Batten fault screen
appears, don’t panic. The fault
screen displays when a motor
has an i-Batten fault while
running a cue or preset.
If you need to run a different
cue, hide the alert box and
then choose DIFF. CUE.
Display the alert screen when
you are able to clear the fault.
Hide/Show Alert
Touch the ALERT button or the three gold
arrows to hide or display the alert screen.
Clear Fault
Select a faulted motor. Touch CLEAR
FAULT. Adjust the sensitivity if necessary
or touch FINISH MOVE. This will clear
the current fault leaving i-Batten active.
Bypass
Select a motor. Touch BYPASS, CONFIRM and FINISH MOVE.
This will display an i-Batten Safety Off icon on actions
containing this motor and disable the i-Batten safety feature for
this m otor.
NOTE: Once the i-Batten is bypassed it can only be enabled by
an Administrator using Batten Setup.
Disable
Select a faulted motor, then touch CONFIRM.
Cues with disable motors are displayed in red
text.
NOTE: Once a motor is disabled, it will not
move again and can only be enabled by an
Administrator using the Motor Restrict module.
CUEING / i-BATTEN RECOVERY
Page 9

SETUP
The Setup
module allows
Administrators the
ability to control
motors, to work
with limits and
calibrate i-batten
safety feature.
Limits are the
upper and lower
boundaries for
motor movement.
This module allows
the setting and
clearing of limits.
Change Motor
Touch the button
under Motor Select
to display the list
of motors. Touch a
motor name
to select.
Touch CONFIRM
or BATTEN SETUP
(see below).
Batten Position Indicator
Indicates Upper & Lower Limit, as
well as current position of the batten.
Change
Speed
Drag the
button left
or right, or
touch the
button twice
to enter the
speed.
Add Category
Type a new name for the
category and touch ACCEPT.
Change Icon
Touch the icon button twice to display the Icon
Selection panel. Touch a category to display icons.
Touch an icon to select. Touch DONE to confirm.
Manage Icons
Select a category. To add an
icon to it, touch ADD. To delete
an icon, select one and touch
DELETE. Touch EDIT to display
category edit functions.
Edit Category
Touch CHANGE NAME
or CHANGE ICONS.
Change Name
Type a new name and
touch ACCEPT.
Change Icons
Select icons and touch
MOVE or DELETE.
Set Limits
Touch SET/CLEAR
LIMITS. Pick which
limit to change.
The keypad
will display the
boundaries. Enter the
target numerically
or use current batten
position.
Move Motor To Position
Touch MOVE TO
POSITION. Enter
target in keypad,
set speed and
touch MOVE.
The motor will
automatically move
to its target.
Move Motor Auto
Touch AUTO UP/
DOWN. Select a
location by touching
and holding its
button for three
seconds. The motor
will automatically
move to the location.
Move Motor Manually
Touch and hold the arrow
buttons. Slide your finger
to minus (-) to slow the
speed or plus (+) to
increase it. The
motor will stop
when the button
is released or
when the motor
has reached
its limit.
Delete Category
Touch MOVE ICONS
or DELETE ICONS.
Delete Icons
Icons are deleted permanently from the system.
Move Icons
Select category and
touch ACCEPT.
SETUP
Page 10

BATTEN SETUP
Follow the instructions to
display Batten Setup screen.
Expand
the
motor
list.
Touch a
mo tor.
Touch
CONFIRM.
Touch
BATTEN
SE T U P.
MOTOR RESTRICT
The Motor Restrict module displays the restricted motors in red and the
enabled motors normally. Select a motor by touching its name in the list.
The options for the motor are dependent on its current status.
1. Lower the batten until it is at a
comfortable height. Tie curtain or
scenery to batten.
2. Move the batten up until the
attachment is just off the floor.
Touch SET LOWER LIMIT.
3. Move the batten up until it is at
the highest point. Touch SET UPPER
LIMIT.
4. Set the maximum speed of the
batten using the slider.
5. Touch SET SENSITIVITY and
enter a number from 0 to 100
using the keypad. You are ready to
teach the i-Batten safety system.
6. Touch the ENABLE button to
activate the i-Batten feature on the
Batten Setup screen.
7. Touch TEACH DOWN.
8. On the search screen, touch
TEACH DOWN, batten will move
to the lower limit.
9. When the batten stops,
touch CONTINUE.
10. On the Batten Setup
screen, touch TEACH UP.
11. On the teach screen, touch
TEACH UP. The batten will
move to the upper limit.
12. When the batten stops,
touch CONTINUE.
13. Touch CONFIRM to
complete.
14. Rename motor (if
necessary) and confirm.
15. Continue to main screen.
Warning:
The i-Batten logo flashes
to show it is bypassed
during setup.
10
TEACH DOWN SCREEN
8
If the motor is enabled...
9
...the only option will be to disable it.
If the motor is disabled...
...the only option will be to enable it.
1
3
2
TEACH UP SCREEN
Order Motors
Touch ORDER to change
the sequence in which the
4
5
7
6
13
11
12
motors are displayed.
Two lists are shown: the
Old Order list and the New
Order list (which is blank at
the opening).
Touch the motor name in the Old Order
that will be first in the New Order.
To return an item to the Old Order list,
touch its name in the New Order list.
BATTEN SETUP / MOTOR RESTRICT
Page 11

VIEW
An overview of motors is displayed
when the VIEW button is touched.
When VIEW is touched, up to
sixty motors are displayed.
If your VAC has more than
60 motors, use the “Previous”
and “Next” buttons to change
the display.
Individual Display
All of the available information
for the motor is displayed using
the Hoist Info panel and Digital
I/O panel. These are the same
as in Manual Motor Info.
Touch a batten
display to see the
View Numerical
panel.
Each motor displayed shows the
upper/lower limits bars, current
position and name. A blue name
means the motor is grouped.
A red name means the batten
is disabled. A red background
means the motor is faulted.
The “Previous” and “Next” buttons
move the display backward and
forward one batten at a time.
The “Up” button will return to the
Numerical Information panel.
Numerical Information
“Previous” and “Next” move the display five battens.
“Up” returns to the opening display. LIMITS or
TARGETS button will display numerical information
for limits or targets. Touch a motor to view details.
CURTAIN
Your VAC might have a bi-part
curtain motor. If so, when you
select this motor in Manual or
Setup mode, the display will
look like above.
Instead of Up/Down
buttons, you will see Open/
Close buttons. Although the
buttons look different, they
work the same.
Curtain Display
The dark blue button shows
the value for the upper
target. The blue vertical
line shows the upper target
curtain position.
The light blue bar shows the
value of the curtain’s current
position. When the curtain
moves, the curtain graphic
moves.
Alternate target positions
are shown with gold vertical
bars.
The green button shows the
value for the lower target.
Green vertical lines show the
lower target curtain position.
Auto Open/Close
To move the motor to its upper, lower or
alternate targets, touch AUTO OPEN/CLOSE.
To move to a target, set the speed using the
speed button, then touch either of the target
buttons. The motor will move instantly.
When the motor begins moving, the CANCEL
button will change to STOP. Touch STOP to
halt the motor’s movement.
VIEW / CURTAIN
 Loading...