

Page 1

Page 2
Instruction
Bedienungsanleitung
Mode d'emploi
Libretto d'istruzioni
Instrucciones
Booklet
DAKOTA
35-70mm Zoorn Lens By
Quantaray
Page 3

Congratulations on
www.orphancameras.com
is
This
a compact and lightweight
metering. Enjoying
your
good photography
releasing the shutter on
With carefully reading this
years
for the
Herzlichen
Kamera arbeitet mit
leichter
drtlcken konnen, und
ahead.
Gltickwunsch zu lhrer DAKOTA RZ-200O.
Offenblendenmessung. Das Fotografieren
geworden.
Ein
die Aufnahme
aufmerksam durch und
denn
Aufnahmersesultate
die
Nous tenons
produits:
le DAKOTA RZ-2000.
pleine
TTL d
tout d vous remercier
avant
ouverture,
rendront son utilisation
d6clencheur au moment
de
La lecture attentive
qualit6 pendant
couleur
verte.
de ce
une
p6riode prolong6e.
selecting of DAKOTA RZ-2000.
SLR camera
with
becomes far
your
focused
subject at the setting which
you
booklet,
grune
LED-Anzeige
Sie haben lange Zeit
werden
can enjoy
easy-to-take highest
verrdt lhnen zum Beispiel,
gelingt.
Lesen Sie diese Bedienungsanleitung
SpaB am
gut
stets
sein.
avoir
oour
Compact et l6ger,
cet appareil
plus
pr6cis
mode
renferme
que
facile
ou la mise
d'emploi vous
jamais.
au
aussi
ll suffira,
point
permettra
full open aperture TTL
with
easier
Diese kompakte
this camera. lt
LED
the
:::,:,tt]U:a:.'::at.,,:....'.:.t:,:t
und
ist mit dieser Kamera
daB Sie den Ausloser
Fotografieren
port6
votre choix
caract6ris6
quelques
par
du sujet
mit dieser Kamera,
sur
par
une
caract6ristiques nouvelles
exemple,
provoque
d'appuyer sur
I'allumage de la LED
d'obtenir des
exposure
just
requires
green.
displays
quality photography
,
"""!.;
.,:1;
leichte
ESR-
r,r'.r.l
viel
bitte
un de nos
mesure
d'exposition
qui
le
prises
de
vues
de
::;q; ::
:
,.
l,::::l
"
l
l
i
ritit:i:l::
'tril"1;:il
:.)t."..1.
r.:.:,:iil
":r;llil!:
rii'.,.t:ii
ir,,,l:i'll
:'lii.t',,
tltll;1i.,
English
P3-P38
Deutsch
L
P3-P39
ltl
Page 4

I
12
1
13
3
2
I
10
11
14
17
5
7
6
3
15
16
Page 5
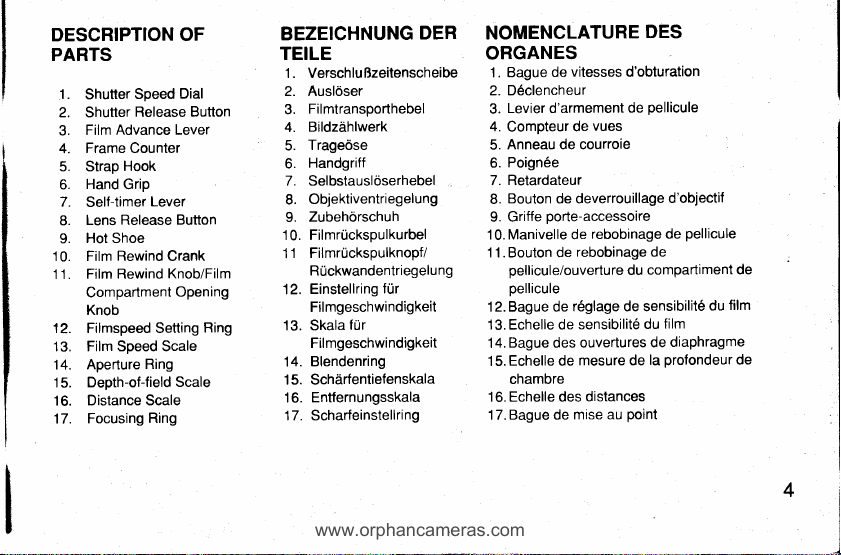
DESCRIPTION
www.orphancameras.com
OF
PARTS
1.
Shutter
2. Shutter
Advance Lever
Film
3.
Frame Counter
4.
5. Strap
Hand
6.
7.
Self-timer
Lens
8.
HotShoe
9.
10. Film
1 1. Film
12. Filmspeed Setting
13. Film Speed Scale
14.
15.
16.
17.
Rewind
Rewind
Compartment
Knob
Aperture
Depth-of-field
Distance Scale
Focusing
Dial
Speed
Release Button
Hook
Grip
Lever
Release Button
Crank
Knob/Film
Opening
Ring
Scale
Ring
Ring
BEZEICHNUNG
DER NOMENCLATURE
TEILE
1. VerschluBzeitenscheibe
2. Ausloser
Filmtransporthebel 3.
3.
Bildzdhlwerk
4.
Trageose
5.
Handgriff 6.
6.
7. selbstausloserhebel
Objektiventriegelung 8.
8.
Zubeh6rschuh 9. Griffe
9.
'10.
Filmrrickspulkurbel
Filmruckspulknopf/
11
Ruckwandentriegelung
Einstellring
12.
Filmgeschwindigkeit
13. Skala
Filmgeschwindigkeit 14.
Blendenring
14.
15. Schdrfentiefenskala
Entfernungsskala
16.
17. Scharfeinstellring
ftlr
fur l3.Echelle de
DES
ORGANES
vitesses
1 . Bague
2. D6clencheur
4.
5.
7.
l0.Manivellederebobinagedepellicule
1 1. Bouton de
12. Bague de
15.
16. Echelle des
17. Bague de
de
Levier d'armement
Compteur
Anneau de courroie
Poign6e
Retardateur
Bouton
de
porte-accessoire
pellicule/ouverture
pellicule
Bague des ouvertures
Echelle de
chambre
d'obturation
pellicule
de
vues
de
deverrouillage
rebobinage de
r6glage de sensibilit6
sensibilit6
mesure de
distances
mise au
d'objectif
compartiment
du
film
du
diaphragme
de
profondeur
la
point
du
de
film
de
Page 6
23
18
29
19
25
26
27
20
21
28
24
22
5
Page 7
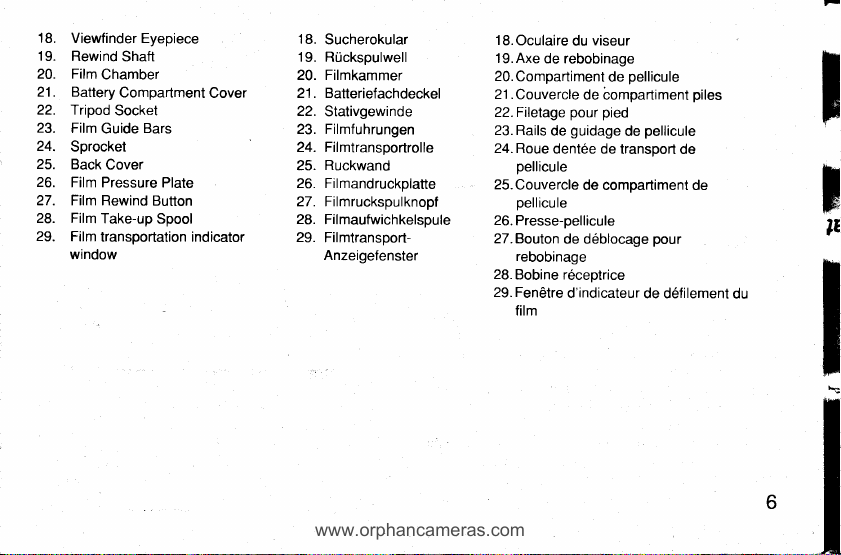
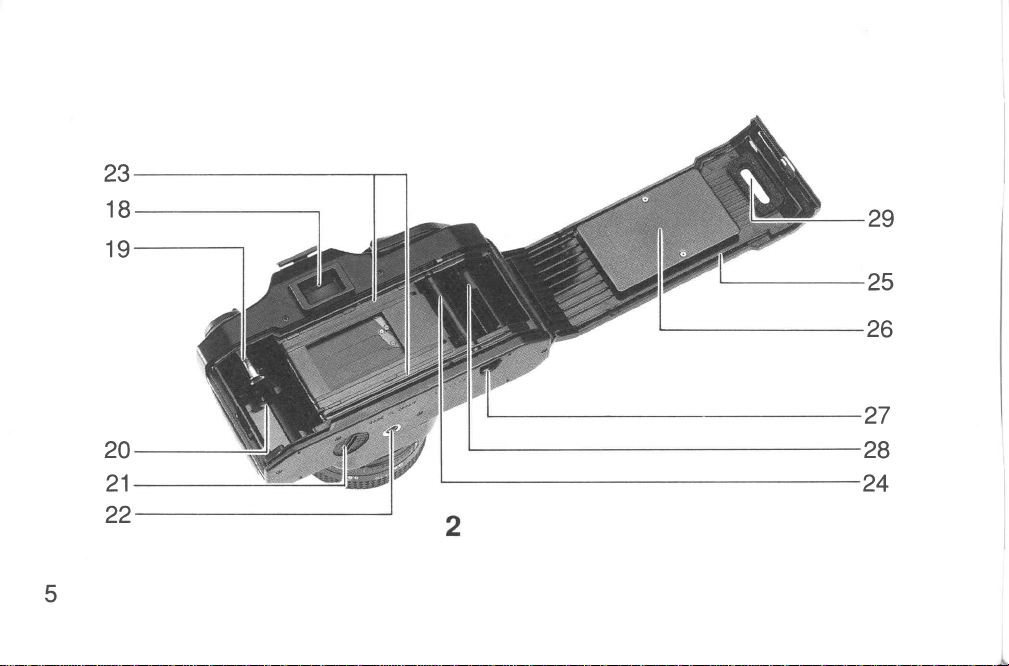
18.
www.orphancameras.com
ViewfinderEyepiece
19.
Rewind
20. Film
21 . Battery
22. Tripod
23.
24.
25.
26.
27. Film Rewind
28. Film
29.
Shaft
Chamber
Compartment
Socket
Film
Sprocket
Back
Film Pressure
Film
window
Bars
Guide
Cover
Plate
Button
Take-up
Spool
transportation indicator
Cover
18.
Sucherokular
19.
RUckspulwell
20. Filmkammer
21. Batteriefachdeckel
22.
Stativgewinde
23. Filmfuhrungen
24. Filmtransportrolle
Ruckwand
25.
26. Filmandruckolatte
27. Filmruckspulknopf
28.
Filmaufwichkelspule
29.
FilmtransoortAnzeigefenster
18.
Oculaire
19.Axe
20.
21 .
22.Filelage
23. Rails
24. Roue
25.
26.
27. Bouton
28.
29. Fendtre
du
de rebobinage
Compartiment
Couvercle
pour pied
guidage
de
dentee de
pellicule
Couvercle
oellicule
Presse-pellicule
de deblocage
rebobinage
Bobine receotrice
d'indicateur
film
viseur
pellicule
de
de bompartiment
de
transport de
de compartiment de
piles
pellicule
pour
de d6filement
;
;
lE
du
I
Page 8
the battery
batteries
the batteries
the
it
closes
Batteries
are used
the bottom
battery
firmly.
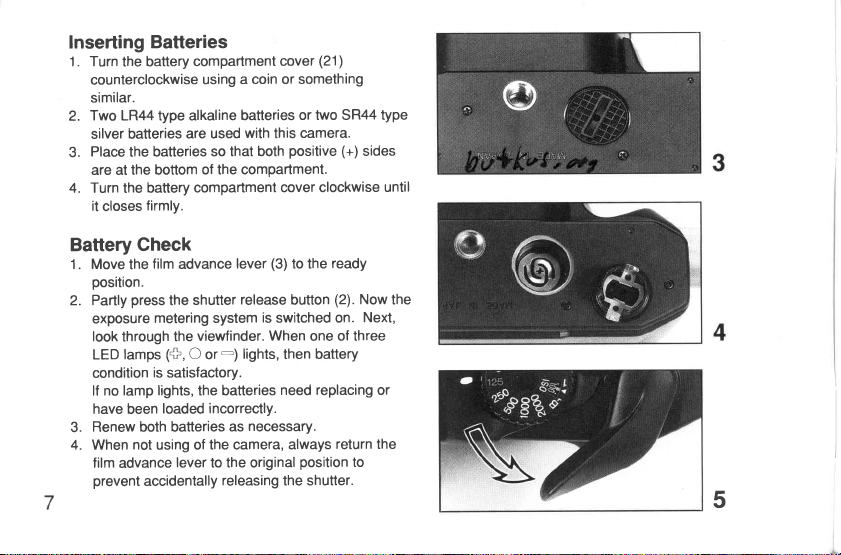
Inserting
. Turn
1
counterclockwise
similar.
Two LR44 type alkaline
2.
silver
Place
3.
are at
4. Turn
compartment
using a
so
of the compartment.
compartment
cover
coin or something
or two SR44
batteries
with
camera.
this
positive
that both
cover clockwise
(21)
(+)
type
sides
until
Battery Gheck
Move
1 .
position.
2. Partly
exposure
look
LED
condition
lf no
have
Renew both batteries
3.
4. When
film
film
advance
the
press
the
metering system
the
through
(+,
lamps
is
satisfactory.
lamp lights, the batteries
loaded
been
not
using of
lever
advance
prevent
accidentally
(3)
lever
release
shutter
viewfinder.
O
is
switched on.
When
-)
lights,
necessary.
as
then battery
need
the shutter.
or
incorrectly.
the camera, always
to the original
releasing
to the
button
one
replacing
position
ready
(2).
Now
Next,
of three
return the
to
the
or
5
Page 9

Loading
www.orphancameras.com
1.
2. Insert the
3.
4. Return
5.
6. Check that the
film
To
the
back
automatically
that the
downward.
sunlight.
Fold
rotate
lightly
(1
e).
Insert
spool
engage
with
smoothly along
operating
advance the
film
the
open
film rewind
cover opens,
resets
film
cassette
projecting
Do
lift
out and
the crank
until the
film rewind
the
film leader
the
(28)
and
with
the spool teeth.
the teeth of sprockel
lightly
film.
knob
this
film locks
place
film
9
chamber back
(1
1),
then
frame
the
"S".
to
into
the
of the
end
place
in
a
rewind crank
film
up the
while
carefully
the
the
the
on
knob
to
into
the
it
so that
perforations
(24)
guide
film
film
advance
cover
pull
it
counter
film
chamber
film
cassette
from direct
away
push
rewind
film
its original
groove
film
the
engage
the
and
(23)
bars
lever
(25),
fold
out
When the
out.
(4)
so
is
(10).
Then
in it
down
shaft
position.
of the take-up
perforations
properly
film
slides
by
(3)
to
Page 10

7. Turn the
8.
9.
11
film
the arrow
turning
the
Close
heard.
Advance the
shutter
counter
(ln
the
position).
The film
advanced
to
the crank
to
crank
the back
release
indicates
this case,
position,
ready
interlocked
rewind
properly.
meaning that
rewind crank
properly
tension
it
when
its
film a couple
the
when
position.
original
and
cover
each
button
"1"
.
film
advance
because
lever
the
knob rotates each
gently
the
becomes
push
it
frames,
of
time, until
lever
the shutter
is in
the
film is
the
in
direction
the
film.
loaded
stiff, and
a click
until
pressing
the
should
release
stored
the
time
advancing
Stop
return
is
frame
be
film is
of
the
at
is
Page 11

Filmspeed Setting
www.orphancameras.com
1 . Filmspeed
package
2. To
setting
inner ring
(ISO/ASA)
filmspeed
is indicated
or
filmspeed: while
set the
ring
points
value which
scale's
film instructions.
in
the
it
until the arrow
turn
the corresponding
window.
on the outside
raising
the
indictor
seen
filmspeed
through the
is
film
of the
filmspeed
on the
Filmspeed
Fi I mgeschwi
Sensibilit6
(ISO/ASA)
nd igkeit
de
25
looloolooloolooo
13
(ISO/ASA)
litm
50
Filmspeed
on the
(ISO/ASA)
sur
100
der
auf
l'6chelle
scale
Fi I mgeschwi
de sensibilit6
200
gkeits-Skala
ndi
film
de
400
1600
1000
I,;l;,;,
3200
I
12
Page 12

Exposure
(shutter
1 . Place
the
position
indicator white line
speed
intermediate
will
be
position
desired
With
setting
monitoring is impossible.
With
2.
brighter
higher value film
the
recommended
photography
In
3.
highest
movement
than the
focal length
the
1/250s
telephoto
1/500s for
15
Setting
priority)
speed
film
and turn the shutter
value. Then if
positions
incorrect. Be
where
value.
at
subjects,
shutter speed
affecting
same
shutter
lens
300mm
lever
advance
aligns
the
of the
sure that the
white line
the
"B"
(bulb)
fast
speed of
higher
to
use
using, telephoto lenses,
possible
your pictures.
value
of the shutter
lens is recommended,
of the
is recommended
speed
with 135mm focal length,
focal length.
(3)
in
the
speed dial so
with
the desired shutter
is
dial
set at
index,
shutter speed
dial clicks at the
with
aligns
position,
exposure
moving
subjects or
film
the
shutter
to avoid camera
Generally
speed as that of
ready
that
the
the
used,
speeds.
use the
for
a
and
the
with
it is
higher
i.e.
14
Page 13

4. Recommended shutter speed
www.orphancameras.com
film
and standard
typicalsituation
lndoors
To monitor
5.
release
until the
When the
exposure
the direction
lights, it means the exposure
necessary, so turn the
smaller
green
lf the
simultaneously,
settings
take the
17
is
in normal
exposure,
(2)
button
green
O mark lights
red # mark
great
is too
greater
of
f/value.
LED
are slightly over
picture.
ISO 100/21"
with
focal length
50mm
follows:
as
1 to
in
the
turn the
is
below
ring
-)
(or
the exposure
that
(or
under) but
1/30
11125lo
1/500 to
the shutter
viewfinder.
aperture
mark light
conditions
partly press
and turn the aperture
lights, it means
.So
f/value. lf the
aperture
red #
and
it means
lens
under
1/15
1/60
to
1/250
112000
(14)
ring
the
that
ring in
red - mark
than
(14)
to a
you
can
good
Overexposure
Uberbelichtung
surexposition
lll
rll
rlz rlz
;+3+.+
-rY.- -r?r-
.\--^.---.\.---r-\--r)
-.\J_- --\-/_-
\_i
Slightly over
leicht ilberbelichtet
l6gdrement
su rexpos6
exposure under
Belichtung Unterbelichtung
Gute
bonne exposition
J-' -Jl-'
li
L
tlz tlz
-_\_/_-
/r\ /r\
il) rrz
\/\Z
/\/\
I
I
/l\
I
I
Slightly under
leicht
l6gdrement
sousexpos6
exposure
sous-exposition
'u-
\-/
/l\
unterbelichtet
I
Page 14

Exposure
1. Place
position
index on the
f/value.
2. The
the brightness of the subject, the
desired or
settings of the aperture
(ASA100/DlN21)
lndoors
Mountain areas
To
3.
release button
untilthe
the
the
mark lights,
19
setting
film
advance lever
the
and turn the aperture
lens
suitable aperlure
filmspeed
narrow
o
depth-of-field
in normal
monitor
the exposure,
green
red # mark lights,
higher
shutter speed setting and
then turn the
(Aperture
indicates
barrel
value
of the
with ISO
film
are as
condition
with
snow
(2)
and turn the shutter speed
C mark lights in the
turn the shutter
priority)
(3)
in
the
(14)
ring
the desired
changes according to
depth-of-field
film in
use, and typical
100/21"
follows:
F11.4 ro
F14lo F18
F/8
F/1 1 to
partly press
viewfinder. lf
shutter speed dial to the
if
ready
untilthe
F12
F/1 1
to
F/16
shutter
the
dial
speed dial
-
red
the
0verexposure
0berbelichtung
surexposition
--+----{b'-
-rft-
to
good
exposure under exposure
Gute Belichtung Unterbelichtung
bonne exposition sotlus-exposition
rlz rlz
-r?t-
O;O.;O-;O.
Slightly
leicht ilberbelichtet
l6gdrement
rexpos6
su
++
tlu tll
/l\ /t\
I
I
over
/l\
tlz
/l\
I
I
Slightly under
leicht unterbelichtet
l6gdrement
sousexpos6
t-
1J-
/t\
I
I
n
-1
I
Page 15

lower
www.orphancameras.com
setting.
intermediate
the dial at
fine control by
afterwards.
either a
When the
positions
click either
operating
green
O mark
between click,
side and
the aperture
lights
once
make
ring
at
set
Holding Gamera
1 . Hold
2.
3.
4.
camera
the
turn the
as to
fingers.
Hold
camera
the
your
place
and
release button.
shutter
your
Press
and
steady
your
With
is
shutter
left
look
through
the camera
right
arm
telephoto
recommended to use a
release
21
palm
in
the
lens focusing
lightly
body
finger
right fore
lightly
Blbow
viewfinder eyepiece
the
against
holding the
lenses or
control
grip.
lower
tripod and/or
cable.
of the
(17)
ring
holding
by
lightly
against
your
face.
shutter
left hand so
with
easily
grip
on the
your
body
(18)
relax
Then
speeds,
remote
(6)
to
it
Page 16

Focusing
1. Focusing
circled
screen. Within
prism
and
microprism
In
2.
focusing
image
the
_
t
alignment
the upper-and lower-half
is
out-of-focus.
To focus
3.
center spot,
when it
the
setting
and
sharp.
4. Focusing
viewfinder
setting
precise
5. Choose
the above
such
as the
For
6.
viewfinder
accessories,
diopter lenses,
23
magnifiers
is
done by
observing
in
area
the
center
the circle is
around
collar.
through
divided
focusing,
by
through the microprism
a broken
is
out-of-focus
in
which
through
is
also
where
the sharpest image
focusing
the most
according
lens
adjustment,
such
optional
can
be used.
of the viewfinder
the
the circle
the
possible.
is
effective focusing
used,
there is
the
image
split
horizontally
focus
images
shimmering
and
correct
image
the
entire matte
In
secured.
to the
shooting
the
subject,
optionally
rubber
as a
angle
through
image
split
the
spot, when
is
brought into
in
correct. When
not
do
collar
outside
image
focus
becomes
surface
this
case,
is
obtained,
method
situation,
etc.
available
piece,
eyecup
finders
or
the
spot
align, it
is
seen
is
at
clear
of the
at the
from
'ffi,
In
focus
18 Not
17
in focus
1
I
Page 17

Rewinding
www.orphancameras.com
1. When the
smoothly,
the
the
film.
Press the
2.
base.
Fold
3.
the
4.
Once
wound
Lift
5.
open
can
Do
6.
..8"
1 . With
position,
as the
the
film
advance
check
frame counter
film
loaded
film
film
the
out
of
direction
pressure
the
into the cassette.
film rewind
the
up
back
the
out.
taken
be
place
in
a
this
(bulb)
Setting
shutter
the
shutter
the
shutter
rewind button
25
film
lever
frame
the
have been
rewind crank
the arrow.
cover
speed
release button
counter
that the
shows
exposed,
the
eases,
(1
knob
(25).
Now
from
away
(1)
dial
will remain open
no Ionger operates
(4)
display.
frames of
all
replace the
(27)
(10)
film is
1)
direct
(2)
on the
and
completely
pull
and
film cassette
the
sunlight.
"B"
set at
pressed.
is
camera
turn
it
for
as
it in
out to
long
lf
Page 18

This
than
landscape
used
employing
i nsufficient
Be
3.
release
setting.
setting
one
for
sure
second
the special
to use
control
when
is
useful
required,
is
photography
the
light conditions.
at
effect
flash test button
and/or
a tripod
when
using
exposure
an
night.
photography
this
in
as
such
it
can be
Or
together
remote shutter
shutter
longer
by
with
speed
Self-Timer
1. Wind the
self-timer
self-timer
Press the shutter
2.
timer
approximately
Once
3.
impossible to
only
4. The self-timer
include
order
releasing
release
27
film
advance
lever
is ready to set.
operates
self-timer
the
return
you
when
yourself
prevent
to
instead of using
control.
(3)
lever
(7)
counterclockwise.
release button
release the shutter
to
10
really
very useful
is
in
camera
seconds
becomes
it manually.
need
picture,
a
movement
the
later.
it.
when
or,
fully
and
(2)
and the
ready it
So operate
you
you
can use
in
remote
turn
Now
in
is
wish
shutter
shutter
the
self-
to
it
the
it
in
Page 19

Photography
www.orphancameras.com
Flash
1. You
and direct
2.
Set the shutter
3. Set
operating
For
given
have
only
hot-shoe
lower.
the corresponding aperture
Guide
details on
aperture
to directly set the
(9)
with
synchronization
speed dial
(G.N.)
Number
the aperture
how
value
to use,
in
manual
the
flash
flash
the
unit
features.
(1)
your
of
(14).
ring
to determine the correct
follow
your
flash
of
having
1
1125 second or
at
value with
flash
unit by
instructions
the
unit.
unit
no
in
the
cable
the
Depth-of-field
1 . When
2.
29
you
are
foreground
in
objects
appear
The range in which
acceptably sharp
of-f
To
aperture
used.
between the
(14),
pairs
the
acceptably sharp
ield."
the depth-of-field scale at
obtain
settings, the depth-of-field
The
depth-of-field scale
focusing ring
the distance
and
the same
of
focusing
on a
and background
in
all objects appear
picture
in
the
within the
f/stops
on
given
subject,
picture.
the
"depth-
is
called
different
scale
positioned
is
(17)
and aperture
range
the depth-of-field
between
will
(15)
is
ring
Page 20

31
scale as the
To
depth-of-field,
off the
For instance,
3.
subject
f/8,
at
using
values
the
are approximately 2.4m
This
between 2.4m
reproduced
the aperture
obtain
the actual
focusing
at a distance
the
depth-of-field
the
depth-of-field
on the
f/values
means
used
read
when
distance
shown
that all
and
acceptably
set
f/value
is
the depth-of-field.
distance values
the values
scale.
lens
is focused
the
of 3m with
can be
scale
as
scale
corresponding with
on the
depth-of-field
and 4.5m respectively.
objects within
4.5m
distance
sharp in
attl8.
of
within
the
the
aperture
obtained
follows:
the
can be
picture
the
the
range
on
by
the
scale
range
a
set
with
Page 21

Infrared
www.orphancameras.com
1-. The
2.
3.
4.
Photography
mark
engraved
dot
field
This
infrared
First,
read
distance
infrared
For instance,
in
the
until
Use the
infrared
concerning
instructions of the
(15)
scale
for reading
is
used
photography
focus in
secure
subject distance
off the
scale
distance
normal manner,
the
focusing
scale
infrared distance
the
red filter
photography.
infrared
when
33
infrared
is
the
using
the
(16),
then
indicator.
you
and
always
For
photography,
infrared film
read
in red
the distance scale
normal manner.
align
focus
move
indicator
when
other details
depth-of-
on the
distance
infrared film.
normal
on the
it with
the
a subject at 3m
on
value
off the
focusing
the
points
attempting
follow
used.
indicator.
in
Then,
"3"
ring
to
the
on
"3".
Page 22

Mounting/Removing the
1 . The lens
2.
To mount
To remove
3.
WARNING:
Shutterspeed
mounting
mount. All
mounted
on the camera body
lens
and turn
the
keeping
then
Synchronization
in Autoexposure
According
filmspeed
you
shutterspeed
synchronizes
autoexposure
as
barrel,
the
lens
all the
the
lift it
the
set,
follows:
other
this camera.
on
lens,
the
insert
lens
lens from
the
way
lens
straight
the
to
(ISO/ASA)
range
which
with
changes
35
of this camera
lenses with a
after
with
the
clockwise until
counterclockwise
release
out of the
Range
of
the
"K"
matching
red mark
the
lens in
the camera
the camera
button
mount.
rso/AsA
100 1 1t2
200
400 1t4
800
1600
3200
Lens
"K"
is
the
mount
can be
red mark
the
the
of
body
it
clicks.
body, turn
while
pressed,
(8)
speed VercchluRgeschwindigkeit
Shutter
25 1 1t2
50
Synchronizes
Synchronisiert
Synchronis6
1t4
1 1t2 1t4 1t8 1t151/30 1/601t125
1t4 1t8
1t2 1t4 1t8 1t151/301/601t125
1t151/30
1t8
1t15
1t8
1/1 5
1t8
1t151/30
1t151/301/601t125
Vitesse d'obluraleur
1/601t1251t250
1/30 1/601t1251t250
1/30 1/601t1251t250
1/601t125
1/601t125
1/30
tffit
1t2501/500
1t2501/500
1t2501/500
1t250
1t250
Not
synchronizes
Nicht synchronisiert
non synchronise
1/500
1/1
000
1/1
1/500
000
1/1
000
1/10001t2000
1/500
1/10001t2000
1/10001t2000
1/500
1/5001/1000
1t2000
1t2000
1t2000
Page 23

SPECIFICATIONS
www.orphancameras.com
Type:
35mm SLR camera
TTL metering with 3 LED display, exposure
and
obtained by
setting
Film format: 24mmx 36mm
Mount type: Bayonet
release: Metalfocal
Shutter
operating
B,
Flash Synchronization:
synchronized
Viewfinder:
image magnification
(with
Field-of-view 93%
the
Focusing method; Matching the divided
through
Focusing through microprism collar
matte surface
Displays
red # mark LED
Both red #
exposure
green
Both
37
vertically
1 - 1/2000s
al
Eye-level finder with
standard 50mm
picture
actual
horizontal
in viewfinder:
and
O mark
-
red
and
focal
with
matching O mark.
"K"
mount
plane
Hot-shoe, X contact,
11125
lower
or
ratio
on the
focal length length at
horizontally
area.
image
split
possible.
is
also
overexposure
green
C marks slightly over-
good
LED
exposure
green
O marks slightly under-
plane
shutter
shutter
shutter speed.
pentaprism
use of
finder
0.86x.
vertically to
and
prism
image
center spot.
or entire
warning
indication
exposure
-
mark LED
red.
Exposure
Filmspeed setting:
Film advancing: One
-)
Film rewinding:
Frame
Self-timer:
metering: Full aperture
system. Center
Display
overexposure,
good
and
Desired
(zero
Measurement
Ev2
steps.
action
Safety
or
interlocked
unused oosition.
and
automatically
completion
opening
duration
exposure
setting
method)
(F2,
1
with 135"
mechanism
double exposure, shutter
film rewind crank, the button
counter:
the back cover.
Mechanical
underexposure
weighted area
underexposure
indication.
is
obtained by
range: ISO 100/21"
-
(F16,
EV19
s)
ISO 25115' - 3200/36", by
frame
advance
and 30" stand-off
throw
prevents
with
the advance
By
operating the
to the original
film winding.
of
Progressive
self-timer,
warning
TTL metering
measurement.
matching O mark.
1/2000s)
by single-lever
double-frame
release button
lever stored at
film rewind
returns
position
at the
with
autoreset by
type
approx.
warnings
1/3
.
advance
is
knob
10
sec.
i
I
I
I
{
j
t
i
I
l
*
I
l
j
I
I
Page 24

Power
source: Two 1.5V
silver batteries
Size and
'
Technische
Typ:35mm
Bifdformat:
Fassung : Bayonett-"K"-Anschlu
VerschluB:
Blitzsynchronisation
weight:
body only)
These
specifications
subjected to change
Daten
ESR-Kamera
Lichtmessung
Belichtungseinstellung
24mm x
Vertikal
Schlitzverschlu
B: 1- 1/2000
Synchronisation
Verschlu Bzeit
Sucher:
Einblick Bildvergro
Blickwinkel horizontal
tatsdchl
s
Penta-Prismensucher
ichen
alkaline
(SR44)
138 x
x
88
58mm,3709
and
external
for improvement
mit
durch
ablaufender
B
bei 11125
Bildfelds
SchlitzverschluB
das
Objektiv;
durch Ausrichten
36mm
: Aufsteckschuh,
und
Berungsverhdltnis
und vertikal
batteries
appearance
without
3LED
B
Metall-
X-Kontakt,
ldngerer
mit
waagerechtem
0,86 fach
93%
(LR44)
(camera
are
prior
noiice.
und
-Anzeige;
des
or
Lichtmessung
MeRbereich:
Filmempf
Filmtransport:
Scharfeinstellung:
bei Horizontal-Schnittbildindikator,
Mikroprismenring
Mattfldchenscheibe
Anzeige im
Rote
*,-Marken-LED
Uberbelichtungswarnung
Die rote
#
tiberbelichtet
Grtine C-Marken-LED
Die rote.unterbelichtet
--Marken-LED
Rote
Offenblendenmessung
Anzeigen
normale
Belichtung
Gewunschte
Ausrichten (Null-Methode)
(Blende
LW 19
indlichkeitseinstellung
3200/36" in 1
Hebelbetdtigung
Spiel
Sicherheitsvorrichtung gegen
;
Ausrichtung
gesamter
und
Sucher:
grune
und
die
und
die
:
Mittenbetonte
frir
Uber-
Einstellung
ISO
1
16,
/3-Schritten
Einzelbildschaltung
C
Gute Belichtung
grtine
C
Unterbelichtungswarnung
Unterbelichung
,
erhdlt man
00121", LW2
1/2000s)
mit
135"
Markierung
Markierung
(Btende
Einrricken
Halbbilder
der
ferner
: ISO
durch
-
-
und
durch
2, 1
2511
eine
und 30"
durch
leicht
leicht
s)
-
5.
il
I
I
-
38
r'ri
MI
ffii
W
 Loading...