

Page 1
Dako Autostainer | English Handbook
Page 2

ii Autostainer Handbook
Page 3
Dako Autostainer Handbook
Document Number 0000620
Revision A
July 2006
Autostainer Handbook
iii
Page 4

iv Autostainer Handbook
Page 5

Copyright © 2006 Dako, Inc. All rights reserved.
This document may not be copied in whole or in part or reproduced in any other media
without the express written permission of Dako, Inc. Please note that under copyright
law, copying includes translation into another language.
User Resources
For the latest information on Dako products and services, please visit the Dako Web site
at:
http://www.dako.com
Installation Procedure
Dako employees will perform the initial installation and setup of all new System
instruments.
Relocation Procedure
Contact Dako’s Technical Service Group before relocating your system.
Scope
This handbook contains basic information on the use and operation of the Autostainer
and assumes you have received basic training on the instrument. Please contact our
Technical Service Group or refer to the Autostainer User Guide for information not
provided in this manual. This manual does not provide instructions for the installation or
upgrade of hardware.
Disclaimers
This manual is not a substitute for the detailed operator training provided by Dako, Inc.,
or for other advanced instruction. Dako Technical Service Group should be contacted
immediately for assistance in the event of any instrument malfunction. Installation of
hardware or software on your Autostainer should be performed only by a certified Dako
Field Service Representative.
Contact Information
U.S. Customers
Dako, Inc
6392 Via Real
Carpinteria, CA 93013 USA
Tel 805-566-6655
Fax 805-566-6688
Technical Support 800-424-0021
Customer Service 800-235-5763
Outside U.S.
Dako Denmark A/S
Produktionsvej 42
DK-2600 Glostrup Denmark
Tel +45 4485 9500
Fax +45 4485 9595
Autostainer Handbook
v
Page 6

vi Autostainer Handbook
Page 7

Table of Contents
Warnings, Precautions and Limitations............................................................................. 1
System Overview .............................................................................................................. 5
Software Overview ............................................................................................................7
Sign In Screen............................................................................................................... 7
Main Menu ....................................................................................................................7
Initialize ......................................................................................................................... 8
Label Printing Initialization ........................................................................................8
Communication Port.................................................................................................. 9
Printer Selection...................................................................................................... 10
The Options Screen ................................................................................................ 10
Format Program Grid ..............................................................................................10
IHC Report ..............................................................................................................10
Custom Options ......................................................................................................10
Reagent Volume and Drop Zone Default ................................................................11
Clean........................................................................................................................... 11
Sign Off and Help........................................................................................................ 11
Reagent Tracking........................................................................................................ 11
Prime Pump ................................................................................................................12
Programming Grid Overview....................................................................................... 12
Entering Slide Information............................................................................................... 13
Adding Slides .............................................................................................................. 13
The Slide Info Button................................................................................................... 13
Deleting Slides ............................................................................................................ 14
Deleting Slides With the Slides Function.................................................................14
Deleting Slide ID Information Using the Slide Info Button....................................... 14
Rearranging slide positions on the Programming Grid ...............................................14
Designing a Protocol....................................................................................................... 15
Standard Protocol Elements .......................................................................................15
Additional Protocol Elements ...................................................................................... 16
Rinse Buffer ............................................................................................................16
Rinse Water ............................................................................................................16
Standard Rinse Replacement ................................................................................. 16
Substrate-Batch ......................................................................................................16
Switch...................................................................................................................... 16
Creating and Editing a Protocol Template ..................................................................16
Deleting a Protocol Template...................................................................................... 17
Using a New Protocol Template Without Saving ........................................................17
Using a Saved Protocol Template............................................................................... 17
Using a Saved Protocol Template for a Specific Auto Program.................................. 18
Selecting Reagent Dispense Volume for All Steps in a Protocol ................................ 18
Selecting Reagent Dispense Volume for a Specific Step in a Protocol ......................18
Programming a Staining Run .......................................................................................... 19
Defining Detection Reagents ......................................................................................19
Defining Primary Antibodies........................................................................................ 20
Assigning Positive and Negative Control Reagents.................................................... 20
Adding Positive and Negative Control Reagents ....................................................21
Autostainer Handbook
vii
Page 8

Negative Controls.................................................................................................... 21
Defining Specific Rinses .............................................................................................22
Auto Programming ...................................................................................................... 22
Deleting an Auto Programming Item .......................................................................23
Using an Auto Programming Item ...........................................................................23
Copy/Paste.............................................................................................................. 23
Editing a Protocol Step................................................................................................ 24
Printing Options........................................................................................................... 24
Slide Labels............................................................................................................. 24
Reagent Labels .......................................................................................................25
Reports.................................................................................................................... 25
Viewing Programmed Slides .......................................................................................25
Assigning Reagent Dispense Locations.................................................................. 26
Printing a Slide Layout Map ....................................................................................26
Selecting a new reagent-dispense location for all slides:........................................ 26
Reagent Management..................................................................................................... 27
Adding Detection Reagents (Secondary, Tertiary, Substrate, etc.) ............................27
Adding Primary Antibodies.......................................................................................... 28
Editing and Deleting Reagent Lists .............................................................................28
Updating a Reagent Lot Number and Expiration Date................................................ 28
Compatibility Check ....................................................................................................29
Loading Reagents........................................................................................................... 31
Reagent Layout Map Screen ......................................................................................31
Missing Reagent Notice .............................................................................................. 32
Loading Slides.................................................................................................................33
Load Slides .................................................................................................................33
Starting a Staining Run ...................................................................................................35
Preparing the System for a Staining Run.................................................................... 35
Quick Start ..................................................................................................................35
Run Log Screen ...................................................................................................... 36
Shutting Down the Autostainer.................................................................................... 36
Maintenance and Troubleshooting.................................................................................. 37
Troubleshooting ..........................................................................................................37
System Specifications ..................................................................................................... 43
Hardware Specifications .............................................................................................43
Software Specifications............................................................................................... 43
Standard Configuration ...................................................................................................45
viii Autostainer Handbook
Page 9
Section 1
Warnings, Precautions and Limitations
Keep the cover closed during operation. The robotic arm will move unexpectedly
during the operation - stay clear. Do not impair the movement of the Autostainer robotic
arm in any way.
Do not pour liquid down the Autostainer sink. The system is not equipped to
drain large liquid volumes poured at high speed. Hazardous reagent wastes must be
disposed of according to local, state, and federal regulations. Wear appropriate personal
protective equipment to prevent exposure.
Do not use bleach in the Autostainer. Bleach may react with other chemicals and
create toxic fumes.
Do not attempt to service the Autostainer unless instructed to do so by an
authorized Dako representative. Doing so will void the warranty or service contract. Do
not relocate the Autostainer System within your facility before contacting your local Dako
representative for vital information that may affect your warranty.
Contact your local Dako representative prior to using non-Dako reagents or
solutions on your Autostainer. Some solvents, acids, and other solutions may cause
damage to internal components of the Autostainer and affect your instrument's
performance and warranty.
Remove caps from reagent vials before starting a run on the system. Place the reagent
racks firmly in their seated position before starting a run.
Place the slide racks in the down position before starting a run on the system.
Do not use the scroll bars to select reagents from the reagent lists when setting up
subsequent runs while the Autostainer is processing. Using the scroll bars during
operation will cause the Autostainer to pause temporarily.
Do not use symbols when programming reagents or protocols. Doing so may cause
errors during the run.
Do not run more than one software application during operation (this includes the CD
player and screen savers). Do not install third-party software or hardware products.
Installing third-party products may lock up the Autostainer and may void the warranty.
Autostainer Handbook
1
Page 10

Do not print slide labels while the Autostainer is running.
Immunohistochemistry is a multi-step diagnostic process that requires specialized
training in the selection of the appropriate reagents, tissue selection, fixation, and
processing, preparation of the IHC slide, and interpretation of the staining results.
Tissue staining is dependent on the proper handling and processing of tissues prior to
staining. Improper fixation, freezing, thawing, washing, drying, heating, sectioning or
contamination with other tissues or fluids may produce artifacts, antibody trapping, or
false-negative results. Inconsistent results may be due to variations in fixation and
embedding methods, or to inherent irregularities within the tissue. Excessive or
incomplete counterstaining may compromise proper results.
Use of old or unbuffered fixatives, or exposure of tissues to excessive heat (greater than
60°C) during processing may result in decreased staining sensitivity.
Normal/non-immune sera from the same animal source as the secondary antisera used
in blocking steps may cause false-negative or false-positive results due to autoantibodies or natural antibodies. False-positive results may be seen due to nonimmunologic binding of reagents to tissue sections. In some case the application of an
alternate blocking reagent prior to incubation with the primary antibody may be useful for
reducing background. A recommended blocking reagent is Dako Protein Block SerumFree (Code No. X0909).
Unexpected negative reactions in poorly differentiated neoplasms may be due to loss or
marked decrease of antigen expression or nonsense mutation in the gene(s) coding for
the antigen. Unexpected positive staining in tumors may be from expression of an
antigen not usually expressed in morphologically similar normal cells, or from
persistence or acquisition of an antigen in a neoplasm that develops morphologic and
immunohistochemical features associated with another cell lineage (divergent
differentiation). Histopathologic classification of tumors is not an exact science and some
literature reports of unexpected staining may be controversial.
The clinical interpretation of any positive staining or its absence should be
complemented by morphological and histological studies with proper controls.
Evaluations should be made within the context of the patient’s clinical history and other
diagnostic tests. It is the responsibility of a qualified pathologist who is familiar with the
antibodies, reagents and methods used to interpret the stained preparation. Staining
must be performed in a certified licensed laboratory under the supervision of a
pathologist who is responsible for reviewing the stained slides and assuring the
adequacy of positive and negative controls.
Reagents may demonstrate unexpected reactions in previously untested tissues. The
possibility of unexpected reactions in tested tissue groups cannot be completely
eliminated due to biological variability of antigen expression in neoplasms, or other
pathological tissues. Contact your local Dako representative with documented
unexpected reactions. Tissues from people infected with hepatitis B virus and containing
hepatitis B surface antigen (HBsAg) may exhibit nonspecific staining with horseradish
peroxidase.
2 Autostainer Handbook
Page 11

Correct Disposal of this Product
(according to Directive 2002/96/EC on Waste Electrical and
Electronic Equipment [WEEE] applicable in the European Union
and other European countries with separate collection systems).
Contact a Dako representative for disposal of the equipment at
the end of its working life. This product should not be mixed with
other commercial waste for disposal.
Autostainer Handbook
3
Page 12

4 Autostainer Handbook
Page 13

Section 2
System Overview
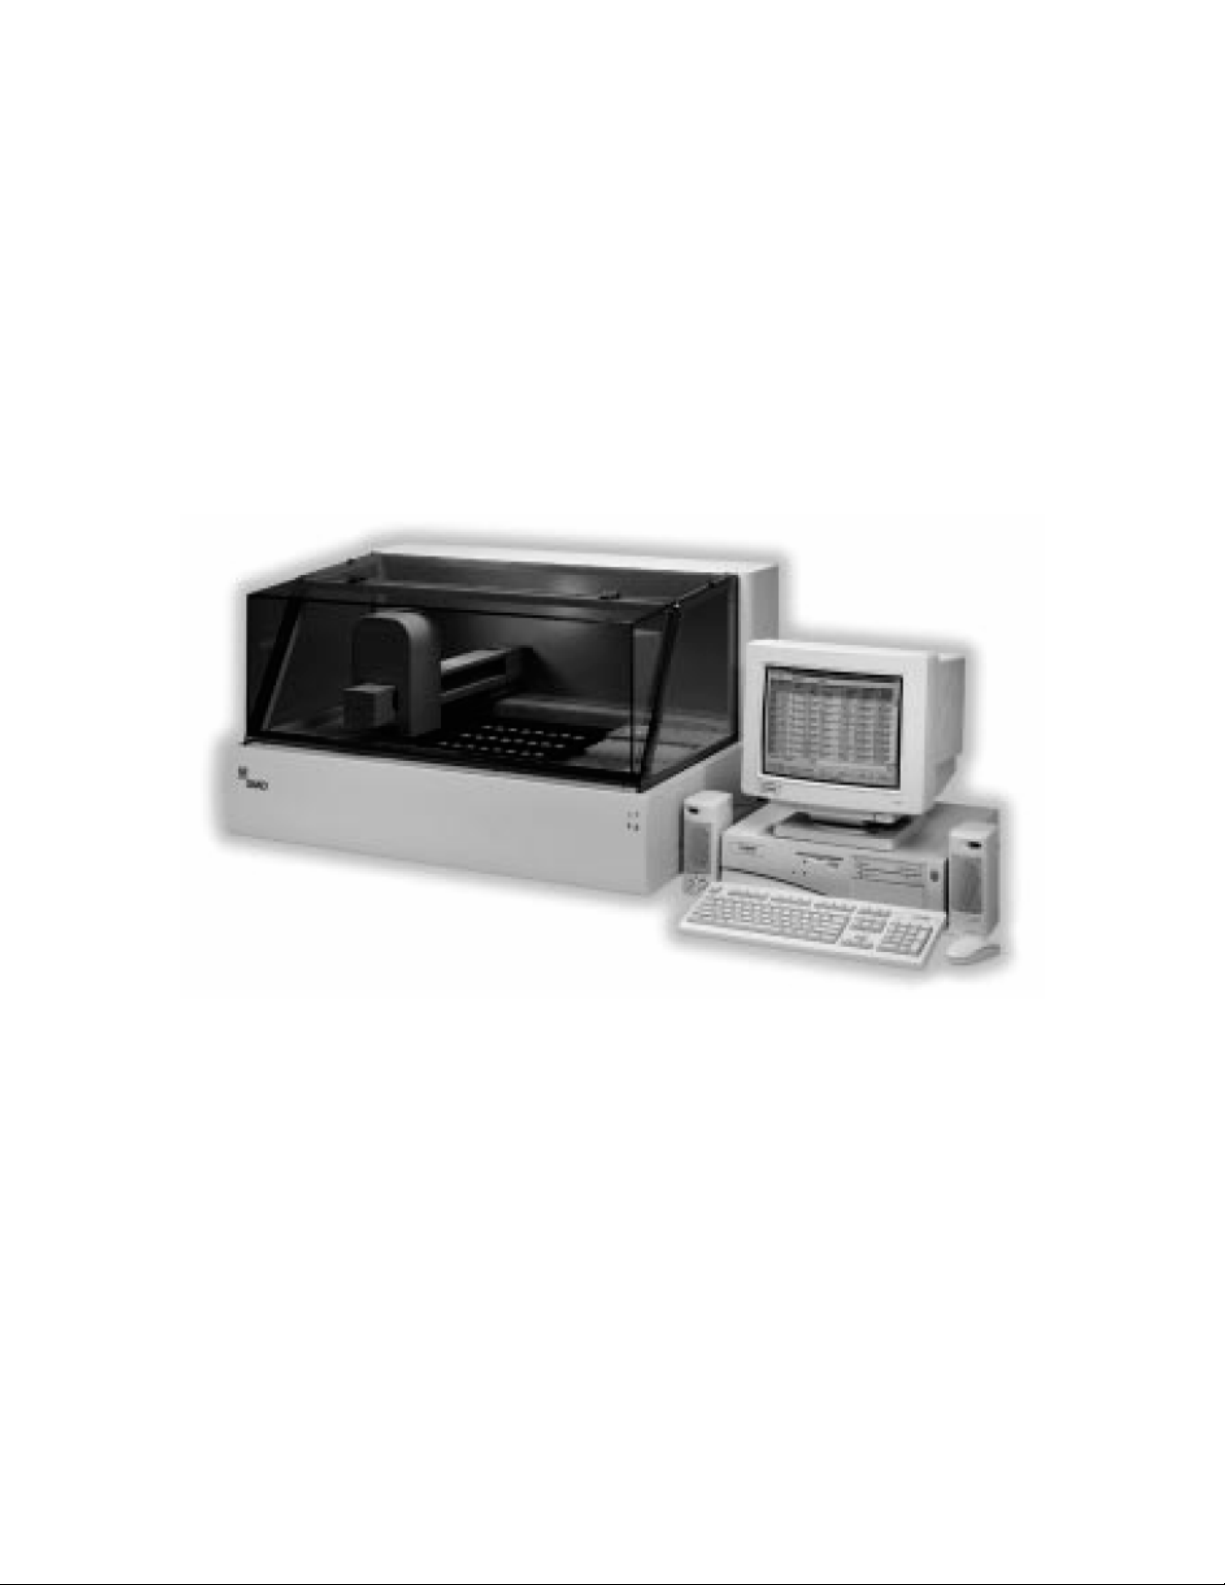
The Autostainer System is an automated slide processing system compatible with
currently available reagents for staining paraffin-embedded and frozen tissue sections,
cytospins, cell smears, and fine-needle aspirates. This system is designed to automate
manual staining methods routinely used in immunohistochemistry and cytochemistry,
enabling the transfer of established protocols from the bench to the Autostainer.
Flexible programming allows for an unlimited number of protocols containing up to 35
steps (including rinse and blow steps between reagent incubations) and 64 different
reagents. A staining run can process from 1 to 48 microscope slides. Individual slides
can be programmed to receive different reagents, of specified volume, during any step in
a staining protocol, and waste is segregated into hazardous and non-hazardous
collection containers, reducing disposal costs.
The Autostainer is designed to track a variety of data. It can generate patient, reagent,
and real-time operation data reports, as well as track reagent usage and log instrument
maintenance.
Autostainer Handbook
5
Page 14

6 Autostainer Handbook
Page 15
Section 3
Software Overview
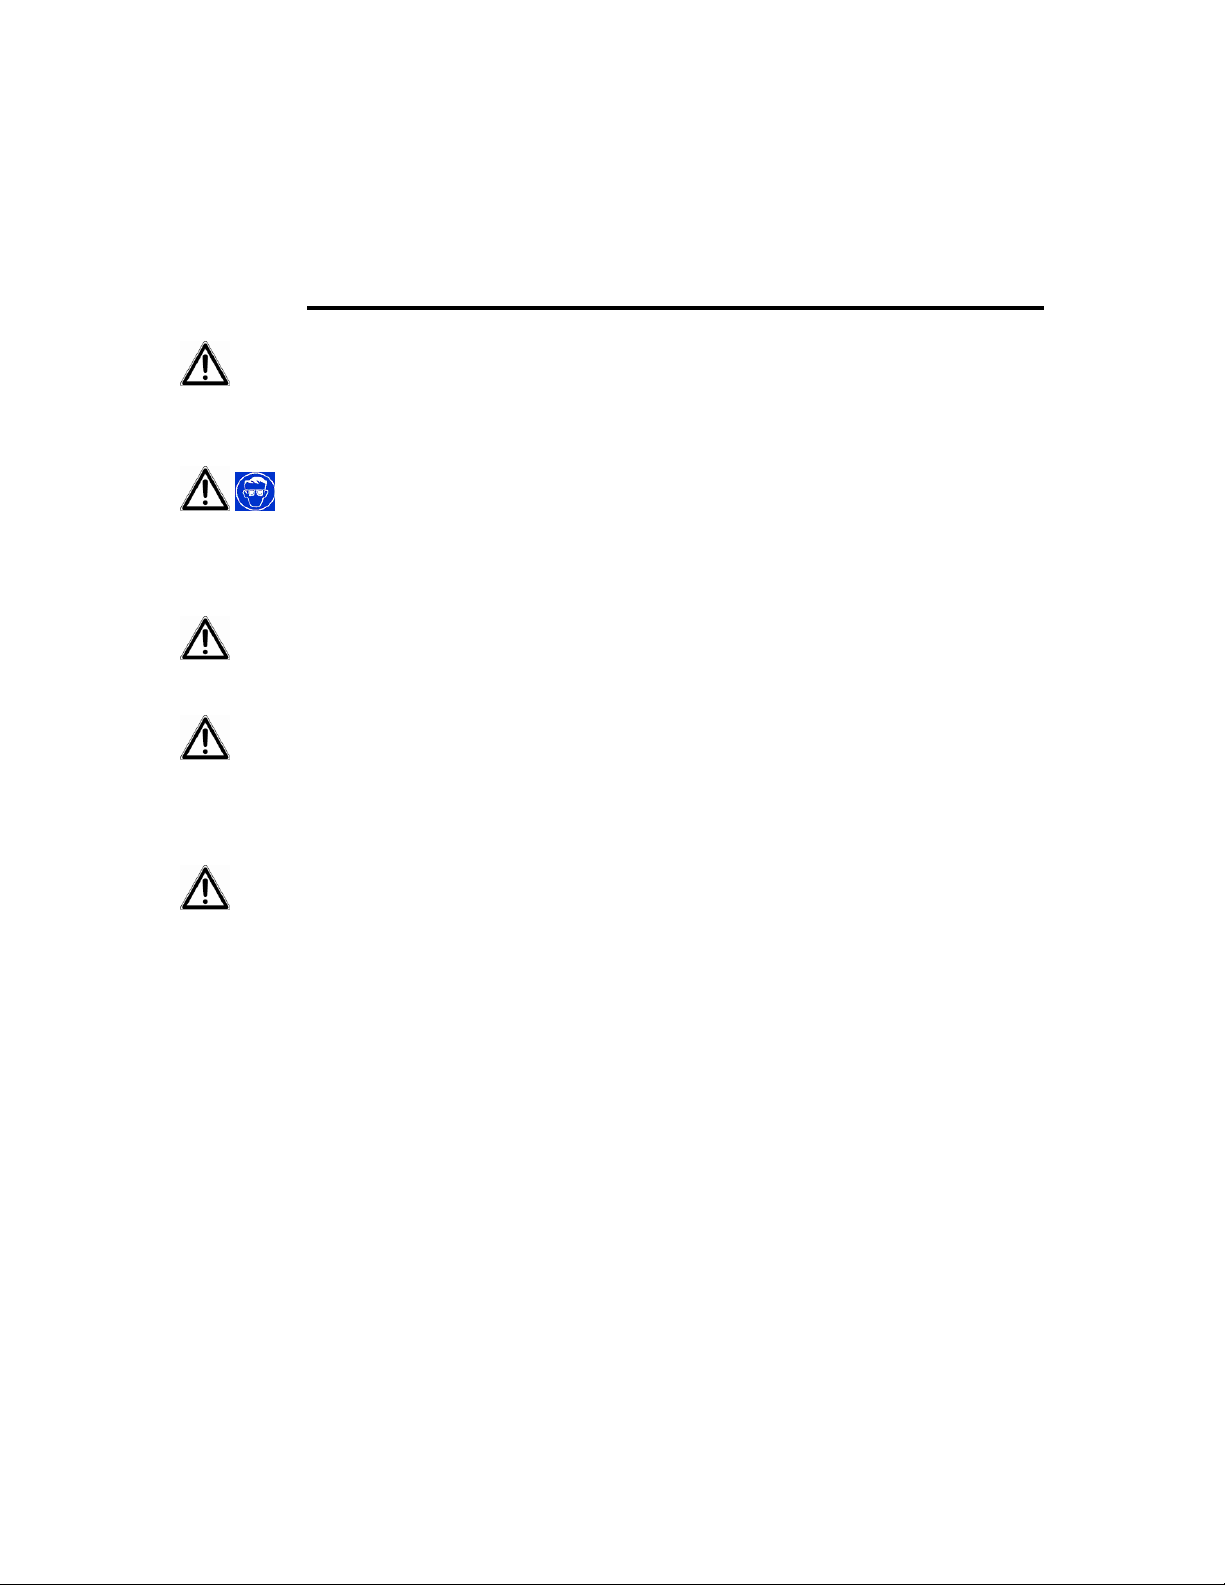
Sign In Screen
The Sign In screen appears when you double-click the Autostainer icon on the desktop.
After your name and password have been validated, the Main Menu appears.
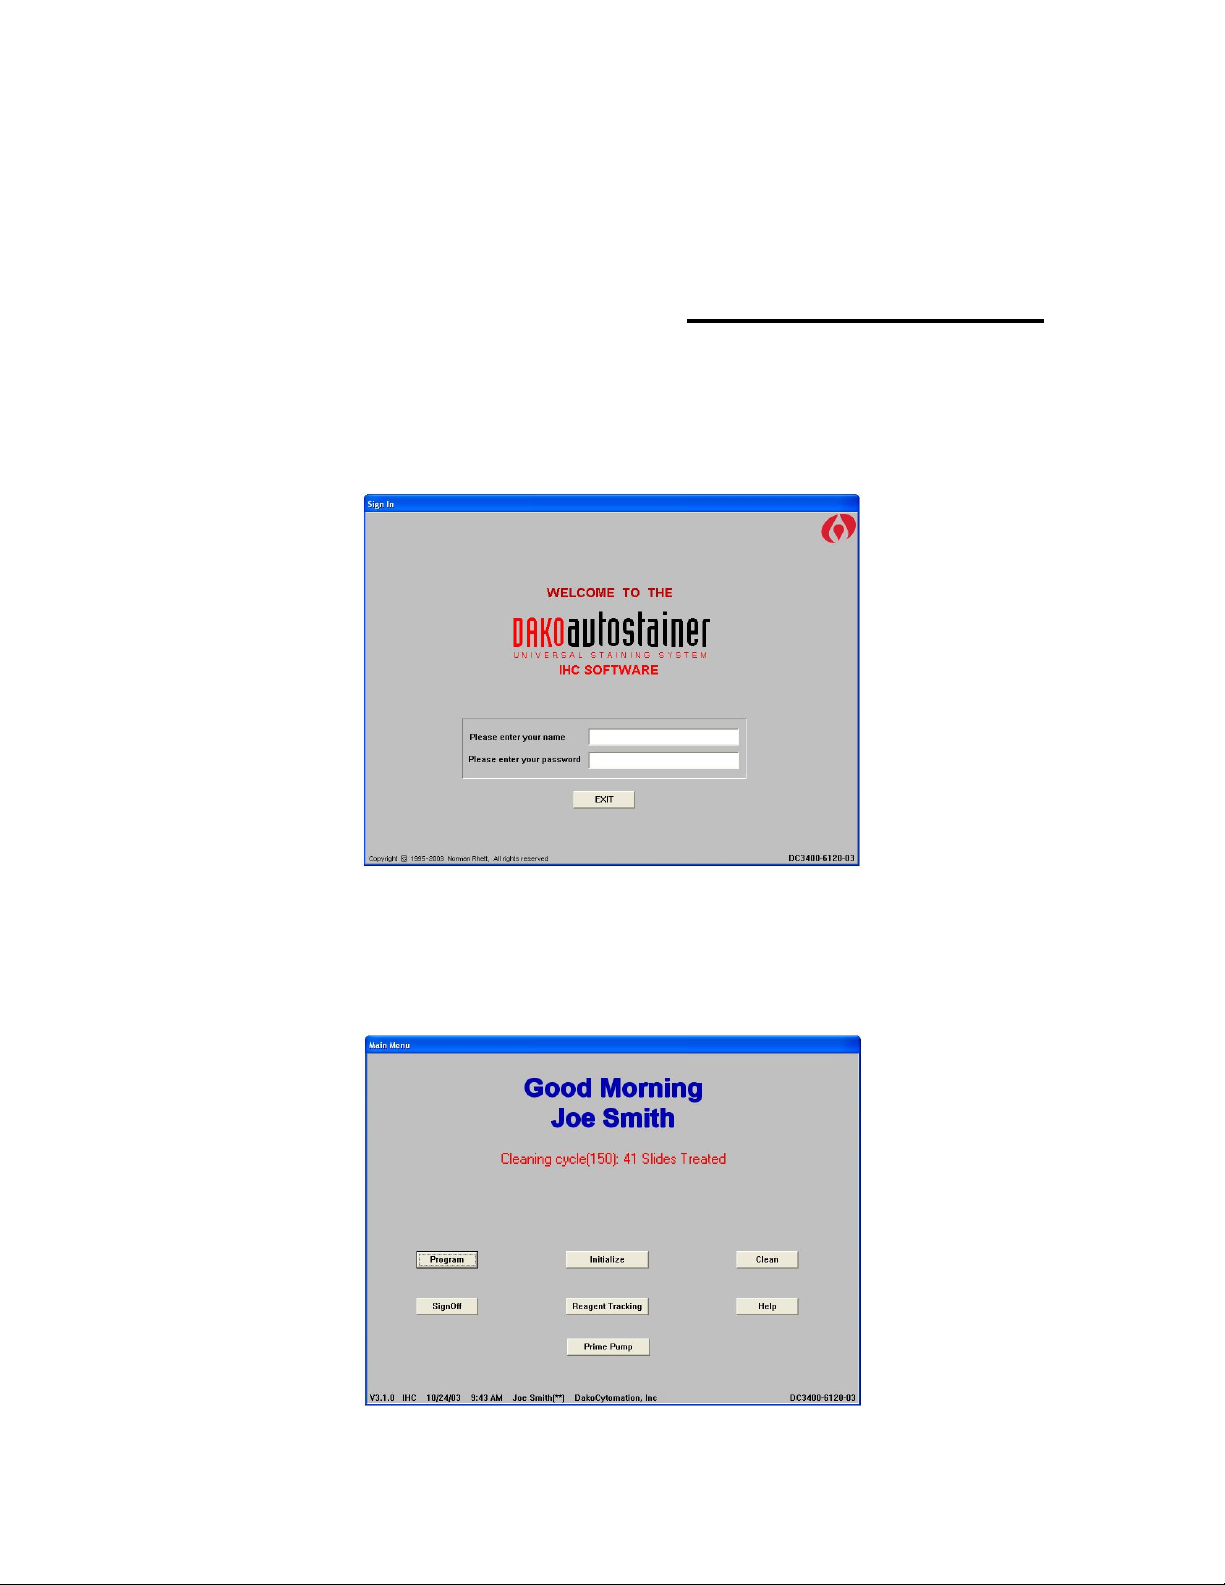
Main Menu
The buttons on the Main Menu allow you to access the other Autostainer screens.
Note: Change Password replaces the Initialize button for users with middle and low
security access.
Autostainer Handbook
7
Page 16
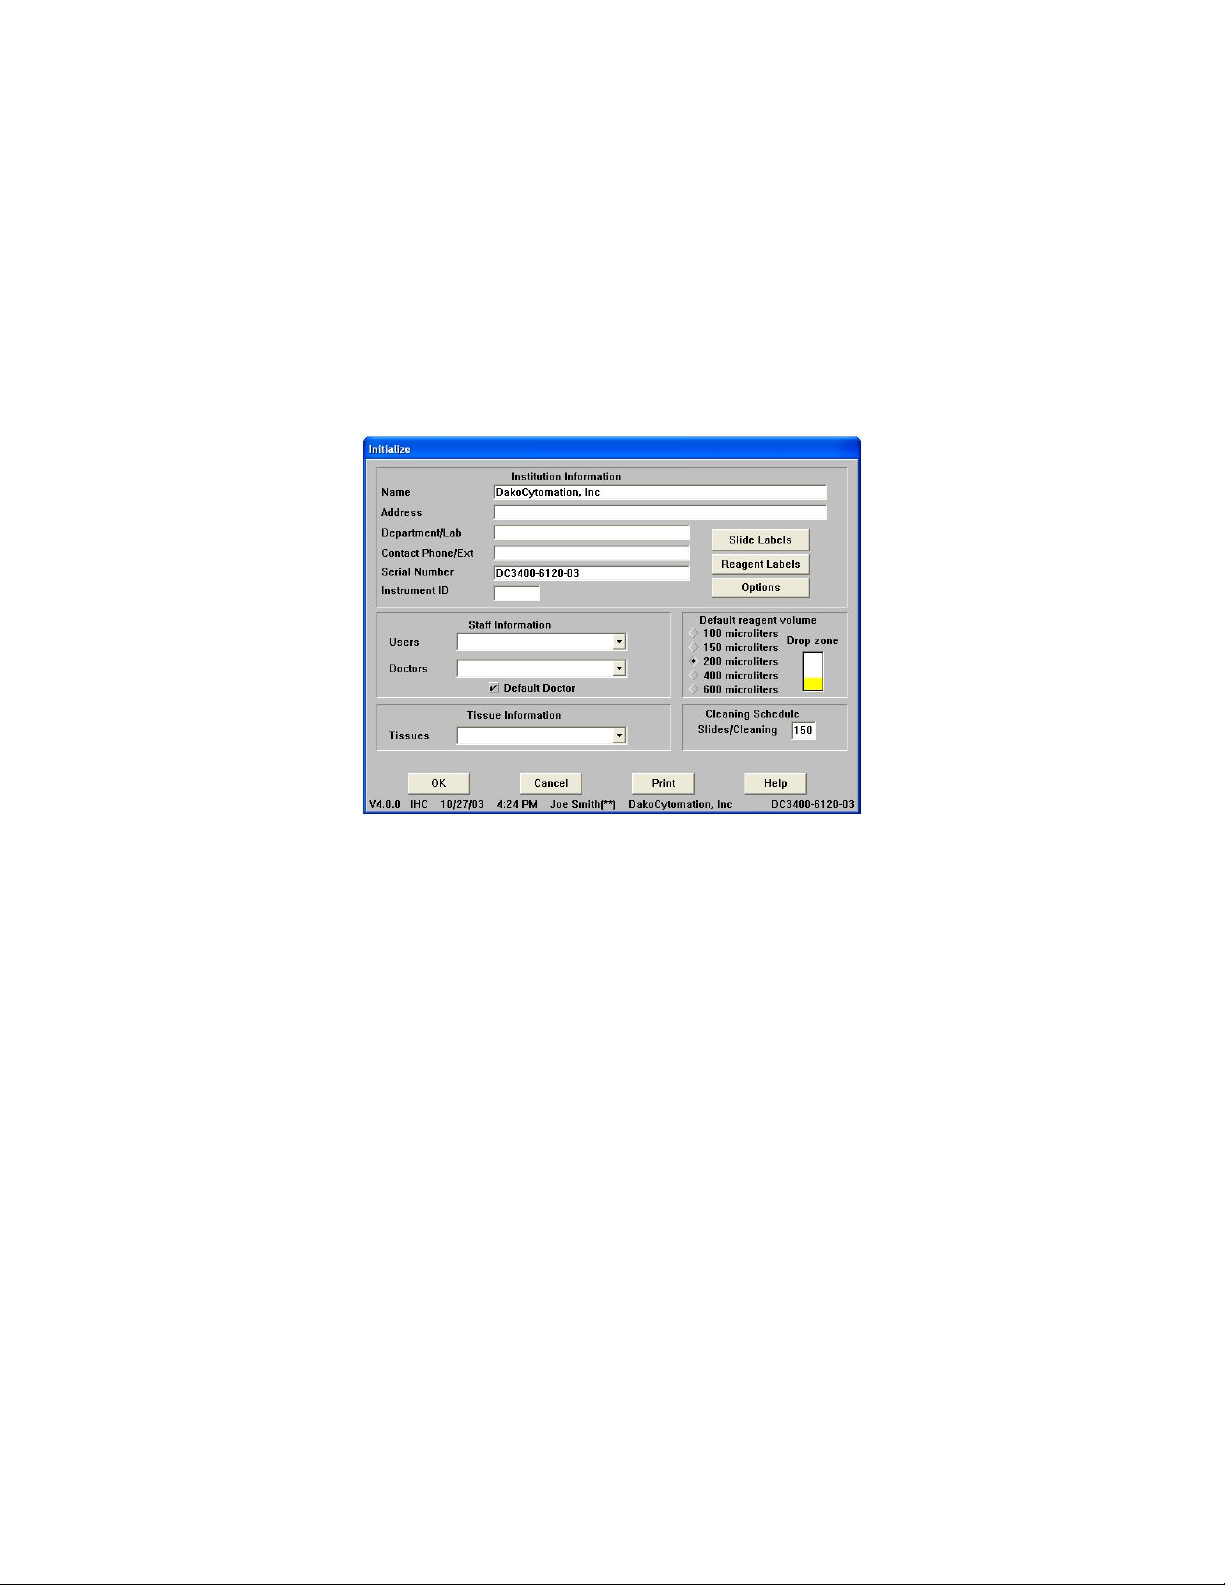
Initialize
The Initialize screen is used to establish and update default information for the system.
This includes the institution information, Autostainer serial number, user names, the
doctors requesting IHC tests, a library of tissues that may be used during staining, the
default volume and the drop zone for reagent dispensation, and the number of slides
allowed between routine cleaning runs. Slide and reagent label formatting, user-defined
printing formats for the Programming Grid, and IHC Reports can also be configured
from this screen.
Label Printing Initialization
The Slide Labels and Reagent Labels buttons are displayed on the Initialize screen
and are used to access the Design Label screens for configuring and adjusting slide
and reagent label printing.
Slide Labels
The Slide Labels button is displayed on the Initialize screen and it is used to access
the Design Slide Label screen for configuring and adjusting slide label printing. Slide
labels are printed from the Print button on the Programming Grid. Do not print labels
while the Autostainer is operating.
1. Select the Slide Labels button.
Note: If Slide ID, Doctor, or Tissue is selected to print on the label, then these items
must be selected from the Options button in the Initialize screen. If these
Programming Grid items are not selected by using the Options button in the
Initialize screen, then these fields will not be present in the Slide Information
screen.
8 Autostainer Handbook
Page 17

2. Select the desired option for each field.
Note: Static information, such as the institution name, can be entered into the field.
This information is printed on every label. To enter static information, highlight the
text in the desired field and type the text in the text box. Press ENTER.
3. Select the number of characters for each line (10, 12, 14, or 16) by selecting a
number from the Length list (Selecting 10 characters will display bold text).
Reagent Labels
Access the Reagent Labels button through the Initialize screen.
1. Select the Reagent Labels button. Reagent Name 1/2 and Reagent Name 2/2 are
used together on adjacent lines to split a long reagent name into 2 separate lines.
Reagent Name 1/2 will contain the first half of the reagent name, and Reagent Name
2/2 will contain the second half of the reagent name. The length of each line is set up
using the Length tool.
2. Select the desired option for each field.
Note: Static information, such as the institution name, can be entered into the field.
This information is printed on every label. To enter static information, highlight the
text in the desired field and type the text in the text box. Press ENTER.
3. Select the number of characters for each line (10, 12, 14, or 16) by selecting a
number from the Length list (Selecting 10 characters will display bold text).
Label Adjustment
1. To check the position of the text on the slide or reagent label and to generate a
test label, select the Adjust Label button from the Design Slide Label or
Design Reagent Label screen.
2. Select the Test Print button. A label is generated by the label printer.
Note: The horizontal adjustment is automatically positioned by the printer. If the
text does not begin along the left edge of the label, the printer may need to be
reset. Turn off the printer. Hold down the green label feed button on top of the
printer and turn the printer on again. When the LED begins to flash red, release
the label reed button and then quickly press the button twice. The labels advance
forward and printer will print. Release the feed button. Press and release the feed
button one more time to advance one label. Perform a test print.
Communication Port
The communication port for the printer is assigned using the Port box on the Design
Slide Label screen. The number displayed in the box must correspond to the
communication serial port where the label printer is connected (e.g., 1 for A and 2 for B).
Autostainer Handbook
9
Page 18

Printer Selection
To select the proper Seymour printer type on the Design Slide Label screen, scroll
though the printer list using the keyboard arrows or the scroll bar.
Note: If the incorrect printer is selected, error messages display on the screen when
slide or reagent labels are printed. To find the model number of your Seymour Glass
Label printer, check the cover of the printer for a number (e.g.,TPL2642). The last four
digits represent the model number (e.g., 2642).
The Options Screen
The Options button is displayed on the Initialize screen. The Options screen enables
you to select format options for the Programming Grid and IHC Report, in addition to
options for rinsing, and slide layout maps.
Format Program Grid
This function enables you to select format options for the Programming Grid.
Selected items are displayed on the Slide Info screen and the Programming Grid.
Note: Selecting the Comment item creates a column for data entry on the
Programming Grid printout. This column is not displayed on the Programming Grid
screen.
IHC Report
Printing options for the IHC Report include:
• One slide ID/page – prints each Slide ID on a separate page
• One case/page – prints one case per page
• No page break – prints continuously all slides for a run
Custom Options
This function enables you to select rinse and blow options and modify the Slide Layout
Map. To activate an option click the corresponding check box.
Delayed Start Water Rinse:
For a delayed start, idle rinses may be performed with water or buffer. If this option is not
selected, buffer will be used for the idle rinse. Note: This option cannot be selected
when the No Pre-Rinse option is selected.
10 Autostainer Handbook
Page 19

Add Rinse to Protocol Steps:
When creating a new protocol template, a buffer rinse can be added automatically,
following each step. Select the Add Rinse to Protocol Steps option to automatically
add buffer rinses. If this option is not checked, the rinse step must be manually selected.
No Pre-Rinse:
When creating a new protocol template, the default pre-rinse step may be removed. If
this option is not checked, the protocol template will include a buffer rinse step.
Flex-time Blow:
When a blow instead of a rinse is required, this option enables Autostainer to perform
the blow without interrupting other functions.
Show Only Programmed Slides:
This option displays only the programmed slides on the Slide Layout Map.
Reagent Volume and Drop Zone Default
From the Initialize screen you can set the default reagent volume by clicking a raised
diamond next to the appropriate volume. Select the default drop zone by clicking the
desired area of the slide image. Select multiple drop zones by holding the CTRL key
while clicking drop-zone areas.
Clean
The Clean screen allows you to initiate a cleaning run. It gives a status report on the
number of slides processed since the last cleaning cycle and the total number of runs. It
also generates a cleaning log.
A cleaning run is recommended after 150 slides have been processed or after one week,
whichever comes first. Once the instrument has processed 150 slides, a message
prompts the user to clean the instrument. The software allows up to 200 slides to be run
between cleaning cycles to allow for flexibility in workflow. If more than 200 slides have
been run, the Program button becomes unavailable and the system does not allow
additional processing until the instrument is cleaned.
Sign Off and Help
Sign Off exits the program and Help displays information regarding Main Menu
features.
Reagent Tracking
The Reagent Tracking screen allows you to monitor the total volume of each reagent
used by the instrument, and generate reports that include all or specific reagents.
Autostainer Handbook
11
Page 20

Prime Pump
u
The Prime Pump screen is used to flush the intake tubing with buffer or DI water without
initiating an actual run. Frequently running fluid through the instrument keeps the
Autostainer running properly. Dako recommends priming the pumps weekly.
Programming Grid Overview
The Programming Grid is the main screen used to define slide information, primary
antibodies, staining reagents, and staining protocols.
Programming Grid
rows represent
individual slides
including complete
identification and all
reagents applied.
The grid can
accommodate 48
slides per staining
n.
r
Software
Version
Menu Bar
Slides – enter the number of slides for a run
File – general information such as opening, saving, and printing slide runs
Edit lists – establish lists of reagents for programming a staining protocol
Copy and Auto – items used during programming
Date/Time
User Name
** high security
* medium security
low security
Institution
Name
Serial
Number
Grid Header
lists the steps and
dispense volumes of
the selected protocol
template for the
current staining run.
Each column
represents one step
of the protocol
template.
Command Buttons:
Slide Info – enter or
edit individual slide
information.
Protocol Template –
select or create a
template to apply to the
current staining run.
Next – displays the
Slide Layout Map:
Program Slides screen.
Print – prints slide and
reagent labels, main
grid, IHC report,
reagent list, or Run
logs.
Exit – returns to Main
Menu without saving.
Help – information on
grid features.
12 Autostainer Handbook
Page 21

Section 4
Entering Slide Information
Slides can be programmed from the Programming Grid either through
menu bar for quick programming of total slide count, or through the Slide Info button for
entering specific slide identification information.
Adding Slides
The Slides option expedites programming by reducing the amount of information
required to program a staining run.
1. Select Slides on the menu bar. This function is used to bypass the Slide Information
screen when programming a staining run.
2. Enter the desired number of slides in the text box or use the scroll bar to select the
desired number of slides and click OK.
Note: Once a run has been set up using this function, slide, tissue, or doctor
information cannot be added to the run. Slide Identification, Case #, Block ID, Tissue,
or Doctor Name will not be associated/displayed in the Programming Grid when the
Slides function is used. If the Slide Info button is selected the Slide Count text box
appears rather than the Slide Information screen.
Slides on the
The Slide Info Button
The Slide Info button allows you to enter specific information for individual slides. The
fields displayed are determined during initialization.
1. Select the Program button on the Main Menu screen.
2. Select the Slide Info button on the Programming Grid and enter slide information.
Note: An entry is required to proceed from one field to the next. Each field requires
at least one key stroke. Type the specified information or press the SPACE BAR
before moving to the next field. The Slide/case field requires entry of the actual
number of slides.
3. Select the Finish Entry button or press ENTER until the Finish Entry button is
highlighted to complete the slide identification entry process. The Programming
Grid appears.
Autostainer Handbook
13
Page 22

Deleting Slides
Deleting Slides With the Slides Function
When using the
deleted if there is at least one entirely blank (unprogrammed) row. Select the
menu item, adjust the number of slides, and click OK.
Note: If all rows are programmed, the slide must be deleted from the Programming
Grid (see Deleting a Specific Slide, later in this section).
Deleting Slide ID Information Using the Slide Info Button
Deleting Slide Identification – deletes all slides associated with the selected slide
identification.
Deleting a Case Number – deletes all slides associated with the selected slide
identification’s case.
Deleting a Block ID – deletes all Block IDs associated with the selected case number.
1. Select the Slide Info button from the Programming Grid.
2. Press the DOWN ARROW key until the desired slide identification is highlighted in
the Slide ID field and press ENTER. The cursor moves to the Case # field. Select
additional criteria if needed.
3. Select the Delete button. A dialog box asks if you want to delete the selected slide
identification.
4. Select the Yes button. Select the Finish Entry button to save changes.
Deleting a Specific Slide
This method deletes one slide at a time.
1. On the Programming Grid left-click the slide number on the row representing the
slide. A dialog box asks if you want to delete the selected slide.
2. Select the Yes button and the selected slide is deleted from the current program.
Note: If slide labels have been printed, the reagent names are replaced with blank
tiles in the deleted slide row.
Slides option on the menu bar to program a staining run, a slide can be
Slides
Rearranging slide positions on the Programming Grid
1. On the Programming Grid right-click the slide number on the row representing the
slide.
2. Move the mouse pointer to the position where the slide is to be inserted and left-
click. The slide information is inserted in the new position.
14 Autostainer Handbook
Page 23

Section 5
Designing a Protocol
Protocol templates allow you to enter the series of steps required to stain a slide and
save the protocol for future use. Low level security does not allow creating or editing
protocol templates.
Standard Protocol Elements
Protocol elements are categories of reagents used to build the protocol outline in the
Protocol Template Design screen. Reagents can be added, deleted and edited by
choosing protocol element categories from the Edit Lists menu item on the
Programming Grid.
Endogenous Enzyme Block
Protein Block
Primary Antibody
Pretreatment
Secondary Reagent (e.g., biotinylated secondary antibodies or link)
Tertiary Reagent (e.g., enzyme-labeled streptavidin or label)
Labeled Polymer (e.g., used in the EnVision visualization systems)
Substrate-Batch
Substrate
Auxiliary (e.g., counterstain)
Autostainer Handbook
15
Page 24

Additional Protocol Elements
Rinse Buffer
A buffer rinse step consists of a buffer wash and air blow cycle and should be
programmed between each protocol template step. Each buffer rinse is displayed as
a blue droplet in the programming grid with a droplet icon in each programmed row.
The buffer icon appears on the Programming Grid printout as a filled-in droplet.
Rinse Water
A water rinse step consists of a water wash and air blow cycle. Each water rinse is
displayed as a white droplet in the programming grid with a droplet icon in each
programmed row. The water icon appears on the Programming Grid printout as a
white droplet.
Standard Rinse Replacement
The standard rinse cycle can be replaced by a blow only step (reagent is blown off
the slide but no buffer is applied) by right-clicking on the droplet icon in the
programming grid. The droplet icon is replaced by a wind symbol.
Substrate-Batch
This step splits the staining run into two distinct operations. The first includes all
steps prior to the application of the substrate, and the second groups all steps
starting with the substrate application. This feature allows you to use unstable
substrates that need to be prepared immediately prior to application. The Autostainer
stops after the steps in the first operation (non-substrate) are completed. An audible
signal indicates when the substrate should be loaded and the screen displays where
it should be placed (typically in position D8 of reagent rack a).
Note: The Substrate-batch step can only be used once in a Protocol Template.
Switch (*Switch)
This step programs the switching of waste disposal from one container to another for
the separation of hazardous from non-hazardous waste. The Switch step is
displayed in the Programming Grid as a skull-and-crossbones icon in each
programmed row. The Switch step can be used multiple times in any Protocol
Template. When programming successive switch steps, the skull-and-crossbones
icon alternates with a flower icon to indicate switching from hazardous to nonhazardous waste.
Note: The switch step must be preceded by a rinse step in the protocol template.
The first switch step in any protocol template is a switch to hazardous waste.
Creating and Editing a Protocol Template
Note: Template names must contain eight or fewer alpha-numeric characters, and no
symbols or spaces should be used.
1. Select the Protocol Template button on the Programming Grid. The Protocol
Template Design screen appears with the default protocol template displayed in the
Protocol Outline column.
2. Select the New Template button. The default protocol template is replaced by the
default first step (rinse buffer) of the new template.
16 Autostainer Handbook
Page 25

Note: If No Pre-rinse is selected at the Options screen, the first rinse buffer is not
displayed (See Initializing, Section 3).
3. Build the new protocol template from the Protocol Elements list. Click on a reagent
in the list, the item is copied to the Protocol Outline list and sequentially numbered.
Note: If Add Rinse to Protocol Steps is selected at the Options screen, rinses are
automatically added after each step, except following a substrate step.
4. To delete a step, select it in the Protocol Outline list. The name is outlined. Select
the Delete Step button.
5. Additional steps can be inserted in the Protocol Outline by highlighting a step and
clicking on the desired step from Protocol Elements. The selected step will be
inserted above the highlighted area in the Protocol Outline.
Note: The Autostainer can accommodate protocol templates containing as many as
35 steps (including rinse steps between reagent incubations).
6. Protocol templates can be used with or without saving. To save a newly created
template select the Save button on the Protocol Template Design screen. The
Save Template window appears with the cursor in the File Name box.
Deleting a Protocol Template
1. Select the Protocol Template button on the Programming Grid.
2. Select the Get Template button and click on the file name of the desired template.
3. Click the Delete Template button. A message asks if you want to delete the selected
protocol template. Click the Yes button.
Note: If the default template is deleted, a new template must be selected from the
Get Template window and saved as the default template.
Using a New Protocol Template Without Saving
1. After a Protocol Template has been created or modified, click the Use Template
button in the Protocol Template Design screen. A dialog box asking “Save on disk
now?” is displayed.
2. Select No and the Programming Grid appears with the new protocol template in the
header row.
Note: If a staining run had already been programmed and the new protocol template
omits previously programmed steps, a warning message is displayed stating that
programmed steps will be discarded if the new protocol template is applied.
Using a Saved Protocol Template
1. Select the Protocol Template button in the Programming Grid.
2. Select the Get Template button, select the template from the choices in the list, and
click OK.
Autostainer Handbook
17
Page 26

3. Click the Use Template button. The Programming Grid appears with the selected
protocol template displayed in the grid header.
Using a Saved Protocol Template for a Specific Auto Program
Auto Programming is a feature for making slide programming more efficient (see
Programming a Staining Run, Section 6).
1. Select the Protocol Template button in the Programming Grid.
2. Select the Get Template button.
3. Select the Auto File check box.
4. Select the desired Auto Program by clicking on it and click OK.
5. Click the Use Template button in the Protocol Template Design screen. The
Programming Grid appears with the selected protocol template displayed in the grid
header.
Selecting Reagent Dispense Volume for All Steps in a Protocol
1. Select the Reagent Volume button in the upper-right corner of the Protocol
Template Design screen. A dialog box with the dispense volume choices for the
selected reagent step appears.
2. Select the raised diamond next to the appropriate volume and click OK. The selected
volume is applied to all steps in the protocol template.
3. Click the Use Template button. A message asks “Save on Disk now”. Select the Yes
button, enter a template name and click OK. Select the No button to use the
template without saving the change. The newly selected dispense volume is
displayed in the grid header of the Programming Grid.
Selecting Reagent Dispense Volume for a Specific Step in a
Protocol
1. Select a protocol template step in the Protocol Outline list to assign a new reagent
dispense volume.
2. Select the Reagent Volume button in the upper-right corner of the Protocol
Template Design screen. A dialog box with the dispense volume choices for the
selected reagent step appears.
3. Select the desired reagent dispense volume by clicking on the raised diamond next
to the appropriate volume and click OK. The selected volume is applied to the
specific step in the Protocol Template.
4. Click the Use Template button. A message asks “Save on Disk now”. Select the Yes
button, enter a template name and click OK. Select the No button to use the
template without saving the change. The newly selected dispense volume is
displayed in the grid header of the Programming Grid.
18 Autostainer Handbook
Page 27

Section 6
Programming a Staining Run
The Autostainer can process a maximum of 48 microscope slides in a single staining
run. Each slide can be stained using an independently designed protocol. After the slide
information is entered and protocol template is selected, specific reagents are assigned
to each slide. This is accomplished from the Programming Grid. The following section
describes how to program specific reagents for a staining run.
Each row
represents one
slide and its
information.
Reagents that
are available for
the highlighted
step.
Defining Detection Reagents
Before you can program specific reagents for slides, you must enter slide information
and select a protocol template as described in Section 4 and Section 5. The
Programming Grid is displayed listing the slides identified during Slide Count or Slide
Information entry. The first programmable field is highlighted and a list of available
reagents for the step is displayed.
1. Select a reagent using the UP and DOWN arrow keys and insert the reagent by
pressing ENTER. A message asks, “Assign to the following unprogrammed slides?”
2. Select Yes to assign the selected reagent to the remaining slides in the grid and the
next programmable step is highlighted. Select No and the reagent is assigned to only
the highlighted step.
3. After all reagents are programmed, click the Next button. The system checks the grid
for missing rinses. If a rinse is missing between two reagents, a message asks if you
want to continue.
Autostainer Handbook
19
Page 28

4. Select Yes and, if the program is new, a dialog box prompts “Save program on
disk?” Otherwise, the Slide Layout Map screen appears. Select Back to Grid to
return to the Programming Grid and the missing rinse appears in the grid.
Defining Primary Antibodies
Each primary antibody reagent is programmed individually and will appear in the
Programming Grid with its programmed pretreatment (see Reagent Management,
Section 7). Primary antibodies and/or pretreatments can be manual steps and are noted
on the Programming Grid and printouts. If a reagent is a manual step (i.e., overnight
incubation, target retrieval, etc.), then it is performed before the slides are loaded.
Note: A primary antibody’s pretreatment automatically appears with the primary antibody
only if the protocol template contains a pretreatment protocol element (see Designing a
Protocol, Section 5).
1. Enter slide information, select a protocol template, and add necessary detection
reagents. When the first programmable Primary Antibody is highlighted, a list of
available Primary Antibodies for the step is displayed.
2. Select the desired antibody from the list using the UP and DOWN arrow keys on the
keyboard and press ENTER.
Note: To make a pretreatment a manual step, right-click on a pretreatment. The list
of available pretreatments is displayed. Select the desired pretreatment from the list.
3. Universal negative controls and previously assigned and saved matched negative
controls are listed at the end of the primary antibody list and are accessed on the
keyboard by pressing the SHIFT key and typing “_”. Once the correct negative
control is selected, press ENTER and the selected negative reagent and
pretreatment will appear in the Programming Grid.
4. Select the Next button, the system checks the grid for missing rinses. If a rinse is
missing between two reagents, a message asks if you want to continue.
5. Select Yes and, if the program is new, a dialog box prompts “Save program on
disk?” Otherwise, the Slide Layout Map screen appears. Select No to return to the
Programming Grid and the missing rinse appears on the screen.
Assigning Positive and Negative Control Reagents
Positive and negative control reagents can be automatically added for each primary
antibody that is added to the Programming Grid. The controls are added as new slides
and contain the matching detection reagents of the test specimen.
20 Autostainer Handbook
Page 29

Adding Positive and Negative Control Reagents
1. Enter Slide Information and select a protocol template. A minimum of one slide must
be programmed through Slide Count or the Slide Information screen. Click OK or
the Finish Entry button.
2. Fill in Programming Grid columns with specific reagents for one slide. After the
primary antibody is applied, Neg.Ctl and Pos.Ctl buttons display in the menu bar.
Continue entering the detection reagents.
3. To insert a matching positive control, click the Pos.Ctl button. One slide will be
added to the Programming Grid with reagents that match the last programmed
slide. In the slide number column, PC appears signifying a positive control reagent.
Negative Controls
Two options are available for Negative Controls:
Unique negative controls for each primary antibody.
Universal Negative Controls that use a generic negative control for all antibodies of a
certain species. The Autostainer uses two different types of negative control, N series
(mouse and rabbit) and NP series (mouse and rabbit). The Neg.Ctl button automatically
assigns the appropriate universal negative control such as, UNC for N series antibodies
or UNC+ for NP series antibodies. The NP series is used with higher sensitivity kits like
EnVision+, LSAB+.
Dako Universal Negative Controls (UNC) are available for ready-to-use antibodies. If the
Universal Negative Control option is chosen, all matching negative controls designated
as “_NC” (i.e., NCVimentin) on the primary antibody list must be deleted from the
reagent list.
Note: If you require assistance deleting the matched negative controls, please contact
your Dako representative.
Assigning Negative Control Type to Antibodies
1. From the Programming Grid select Edit Lists from the menu bar.
2. Select the Primary Antibody category from the reagents list.
3. Select a previously defined antibody or add a new antibody to the list.
4. Enter the correct compatibility code for the antibody (see Compatibility Check in
Section 7).
5. Select UNC or UNC plus from the Neg.Ctl Type field to assign a Universal Negative
Control.
Using the Negative Control Tool
To insert a Universal Negative control, click the Neg.Ctl button in the Programming
Grid.
Note: The Neg.Ctl tool selects one of the four Universal Negative Controls based on the
compatibility and negative control type defined for the primary antibody. If the primary
Autostainer Handbook
21
Page 30

antibody does not have either a compatibility or negative control type defined, an error
appears stating that there is no matching negative control reagent.
Note: If you do not wish to use this feature noted above, then continue programming as
usual. This feature is not active when using Auto Program.
Defining Specific Rinses
A rinse is automatically added following every programmed reagent (except for Protein
Block, where a blow step is added) when assigned as described above. The type of
rinse is selected in the Protocol Template screen (see Designing a Protocol, Section 5).
The type of rinse can also be changed from the Programming Grid.
Click an activated tile in a rinse column. Click again to change the rinse to a different
selection: rinse buffer, rinse (DI) water, blow, or none.
Note: Rinses that precede a switch cannot be changed from the Programming Grid.
The rinse at the end of a run cannot be changed into a blow step.
Auto Programming
Auto Programming is a feature to make slide programming more efficient. This function
is used to save all or any portion, of a protocol to be used in future programming. An
Auto Program can consist of one or more rows of programming. Low level security does
not allow access to creating and saving Auto Programs.
1. Enter Slide Information and select a protocol template. A minimum of one slide must
be programmed through Slide Count or the Slide Information screen. Click OK or
the Finish Entry button.
2. Fill in the Programming Grid columns with specific reagents, except primary
antibody, for one of the programmed slides.
Note: This creates an Auto Program for the detection reagents only. To create an
Auto Program for a protocol that includes the primary antibody, enter specific primary
antibody and detection reagents in the programming grid columns.
3. Select Auto from the menu bar on the Programming Grid.
4. Select Setup from the Auto menu. Auto changes to Setup on the menu bar.
5. Select one or more rows of programmed tiles by clicking on the first row. Click and
drag to select additional rows. Each selected row is highlighted. Release the mouse
button and the Save Auto Program window appears.
6. Enter a file name for the saved protocol. The Auto Program file name must contain
eight or fewer alpha-numeric characters, and no symbols or spaces can be used.
Select the OK button.
7. Select Setup from the menu bar. Setup changes to Auto and exits the Auto
Program function.
Note: To use a saved Auto Program, the template you are programming must
contain the same protocol elements, listed in the same order, as the saved Auto
Program. To find the correct protocol template, use the Auto file function. The
dispense volumes do not have to be the same.
22 Autostainer Handbook
Page 31

Deleting an Auto Programming Item
1. Select Auto from the menu bar on the Programming Grid.
2. Select Setup from the Auto menu. The word Auto changes to Setup.
3. Select any activated tile in the Programming Grid to display the Save Auto
Program window.
4. Click the Auto Program to be deleted.
5. Click the Delete Program button.
6. Click the Yes button to delete the program.
Using an Auto Programming Item
1. Select Auto from the menu bar in the Programming Grid.
2. Select Program from the Auto menu.
3. Select a tile in the row where the Auto Program is to be inserted. A list displays the
saved Auto Program files that can be assigned for this slide.
4. Select the desired Auto Program file name to insert the program.
5. If the Auto Program does not contain a primary antibody, a message prompts
“Assign to all following slides.”
6. Click Yes to assign the Auto Program to all unprogrammed slides. Click No to assign
the Auto Program to only this slide.
Note: Skip is the first item in the Auto Program list. Select this option when you
want to leave a slide unprogrammed.
7. Select Program.
8. Click the Next button. The system checks the grid for missing rinses. If a rinse is
missing between two reagents, a message asks if you want to continue.
9. Select Yes and, if the program is new, a dialog box prompts “Save program on
disk?” Otherwise, the Slide Layout Map screen appears. Select No to return to the
Programming Grid and the missing rinse appears in the grid.
Copy/Paste
1. The Copy/Paste feature copies reagents from one slide to another during slide
programming.
2. Select Copy from the menu bar on the Programming Grid. The word Copy
changes to Select.
3. Use the mouse pointer to select the steps to be copied by clicking and dragging
across the desired tiles. Once the tiles or rows have been highlighted, the word
Select will change to Paste.
4. Click in the area where you wish to insert the copied selection.
Note: Copied rows can only be pasted under the same heading and cannot be
pasted over areas that are currently highlighted.
5. Select Paste on the menu bar to deactivate the Copy function.
Autostainer Handbook
23
Page 32

Editing a Protocol Step
The Autostainer software provides multiple methods for editing the reagents in a defined
staining run from the Programming Grid.
Changing a reagent for a step:
1. Click the reagent step you wish to change.
2. Select the desired reagent from the list. The new reagent is displayed for the step.
Replacing a reagent with skip step (no reagent added to slide):
1. Click the reagent step you wish to change.
2. Select the word None.
Editing a reagent in a staining step for one run only:
1. To edit a reagent in a staining step, or to use a reagent not listed in the reagent list,
click the appropriate step.
2. Select Edit Slide from the reagent list. The Edit Individual Slide Reagent window
displays the information associated with the reagent.
Note: Lot and date cannot be edited here and are grayed out. The reagent long
name, short name, compatibility, and incubation time can be edited.
3. Add a new reagent by entering the appropriate information.
4. Select the OK button. The new reagent is added for the current staining run only and
will not be added to the available list of reagents for this step.
Note: Do not use symbols when entering reagent information. Doing so may cause
errors during the run.
Printing Options
Autostainer allows you to print slide and reagent labels as well as reports that include
information regarding programs, runs, and stored reagents.
Slide Labels
1. Select the Print button at the bottom of the Programming Grid screen. The Which
Report screen displays seven options.
2. Select the Slide Labels button.
3. To print all slide labels for the program, select the All Labels button. The slide label
format is determined by the Design Slide Label screen that is accessed from the
Initialize screen (see Initializing, Section 3).
4. To print a range of labels, type the range of labels with a hyphen between the
starting and ending numbers in the range (i.e., 5-12). To print individual labels, type
the label number with commas between each number (i.e., 1,14,22). Both formats
can be used to print a combination of a range of labels with individual labels (i.e., 512,14,22). Do not use a space between numbers.
24 Autostainer Handbook
Page 33

Reagent Labels
Printing reagent labels from a programmed run:
1. Program or retrieve a previously saved run on the Programming Grid, and select
the Print button.
2. The Which Report screen appears, click the Reagent Labels button.
3. To print all reagent labels, select the Print All button.
4. To print specific reagents, click the desired reagents and select the OK button.
Printing reagent labels not associated with a specific program:
1. From the Programming Grid select the Print button.
2. The Which Report screen appears, click the Reagent Labels button.
3. The Print Reagent Labels screen appears.
4. Select the Other Reagents button.
5. To print all reagent labels, select the Print All button.
6. To print specific reagents, click the desired reagents and select the OK button.
Reports
Program
Grid Report
IHC Report Groups all slides by case number and includes slide numbers, primary
Run Log
Report
1. From the Programming Grid, select the Print button.
2. Select the Program Grid, IHC, or Run Log button.
Prints the Programming Grid including all slide information, protocol
headings, specific reagents, institution information, user, date printed,
number of slide ID’s, number of case numbers, and the Autostainer serial
number.
antibody information, and name and incubation time for all reagents used.
Prints each step performed during a run.
Viewing Programmed Slides
When reagent programming is complete, the first Slide Layout Map appears. The Slide
Layout Map screen is a representation of all 48 slides as they would be viewed facing
the front of the Autostainer. The dispense volume and drop zone(s) for each slide can be
changed on this screen. The location for reagent dispense is displayed by a yellow
highlight.
Autostainer Handbook
25
Page 34

Assigning Reagent Dispense Locations
The non-frosted area of each slide is equally divided into three horizontal sections – or
dispense locations. Each slide can have one to three dispense locations, and the
maximum dispense volume of a slide cannot exceed 800 µL. The default dispense
location is programmed during initialization. Modifications to the dispense volume or
dispense location of a slide in the Slide Layout Map: Program Slides will change the
text color of that slide from black to red in the Slide Layout Map.
Printing a Slide Layout Map
The Slide Layout Map provides a record of reagent dispense volume and dispense
location. It is useful for ensuring that slides are loaded correctly.
1. Select the Next button on the Reagent Layout Map (see Section 8).
2. Select the Print button.
Selecting a new reagent-dispense location for all slides:
1. Select the All Slides tool in the upper left corner of the Slide Layout Map: Program
Slides.
2. Click the desired location on the slide to select a new reagent dispense location.
3. To assign multiple dispense locations on the All Slides tool, press and hold the
CTRL key while clicking on the desired dispense locations.
4. Click the dispense volume. A message displays the dispense volume choices.
5. Select the diamond next to the desired dispense volume.
6. Select the OK button or press ENTER.
7. The Slide Dispense Tool enables the user to make these changes for a specific
slide. The Slide Dispense Tool button tool functions identically to the All Slides tool
except the user is able to manipulate drop zone and reagent application amounts to
only the selected slide.
26 Autostainer Handbook
Page 35

Section 7
Reagent Management
Reagent lists are created and modified using the commands on the Edit Lists menu on
the Programming Grid.
Adding Detection Reagents (Secondary, Tertiary, Substrate, etc.)
1. From the Programming Grid select Edit Lists from the menu bar.
2. Select the reagent category from the list.
3. Enter the full name of the reagent you want to add to the current list and press
ENTER. The software allows the entry of 33 alpha-numeric characters for detection
reagents. No symbols can be used in the reagent Long Name field.
4. Enter an abbreviated name for the reagent in the Short Name field and press
ENTER. The abbreviated name cannot exceed 10 alpha-numeric characters and
should be unique to distinguish it from other reagents. No symbols can be used in
the reagent short name. The cursor moves to the Compatibility field.
5. Enter the correct compatibility code and press ENTER. Assigning compatibility
information to reagents is optional (See Compatibility Check at the end of this
section).
6. Enter the reagent lot number and press ENTER. The lot number cannot exceed 8
alpha-numeric characters. Lot number information is optional.
7. Enter the reagent expiration date and press ENTER. The reagent expiration date is
optional. Use MM/YY format.
Note: All expiration dates are limited to a maximum of 10 years from the date of
entry.
8. Enter the reagent incubation time and press ENTER. Follow steps 3-8 until all
reagents have been added.
Note: A minimum of two minutes incubation time is required for proper operating
conditions.
9. Select the OK button to add the new reagent(s) to the Reagent List.
Autostainer Handbook
27
Page 36

Adding Primary Antibodies
A primary antibody can be added to the reagent list with a related pretreatment reagent.
This facilitates automatic selection of the pretreatment whenever a primary antibody is
selected from the Programming Grid.
1. Follow the same steps as in the Adding Detection Reagents section.
Note: To add a matching negative control use exactly the same name as the positive
control and add the prefix “_NC” to the beginning of the reagent name.
2. If the primary antibody is a step that is preformed off the Autostainer (i.e., overnight
incubation) or requires heating, check the Manual Step check box by pressing the
SPACE BAR.
3. Enter the correct compatibility code and press ENTER. Assigning compatibility
information to reagents is optional (see Compatibility Check at the end of this
section).
4. Select the pretreatment from the box by using the UP and DOWN arrows, or type a
new pretreatment name, and press ENTER
Note: If Manual Step is selected, the incubation time will be “0”. Do not change this
time.
Editing and Deleting Reagent Lists
1. From the Programming Grid select Edit Lists on the menu bar.
2. Select the reagent category from the list.
3. Edit fields by highlighting the information and typing over it. When changing the
reagent name, the software saves the change as a new reagent.
4. To delete, click the Delete button.
5. Select the OK button.
Updating a Reagent Lot Number and Expiration Date
1. From the Programming Grid select Edit Lists on the menu bar.
2. Select the reagent category from the list, and choose a specific reagent.
3. Highlight the current lot number displayed in the lot box. Type the new lot number
and the Change button appears.
4. Highlight the date displayed in the box and enter the new expiration date.
5. Click the Change button – all fields clear.
6. Select the OK button until a dialog box prompts “Save changes on disk?”
7. Select Yes to save the new lot number and expiration date. Select the No button and
the reagent is not edited.
28 Autostainer Handbook
Page 37

Compatibility Check
A compatibility check is included to minimize programming errors resulting from
assigning incompatible reagents (such as alkaline phosphatase-labeled streptavidin and
DAB substrate) to a slide protocol. This feature has two check levels. The first check is
for the species reactivity compatibility of the primary antibody and the secondary
reagent. The second addresses the compatibility rules dictated by the enzyme used in
the detection system. The following tables summarize the compatibility rules and codes
assigned to each reagent type.
Every reagent in the reagent categories list (or Protocol Element) can be programmed
with an appropriate compatibility code or combination of codes. For example, a linking
reagent that reacts with mouse and rabbit antibodies can be marked with compatibility
code AB. The software verifies that these compatibility rules are not violated during the
programming of a staining run. If an incompatible reagent is assigned to a tile in the
programming grid, a message displays the two reagents that are incompatible.
Species Reactivity
Reagent Type
(Protocol Element)
Primary Antibody Monoclonal primary antibodies raised in
mouse (e.g., mouse anti-human)
Primary Antibody Polyclonal primary antibodies raised in
rabbit (e.g., rabbit anti-human)
Secondary Reagent Secondary reagents (antibodies)
compatible with monoclonal antibodies
raised in mouse (e.g., biotinylated antimouse IgG)
Secondary Reagent Secondary reagents (antibodies) reacting
with polyclonal antibodies raised in rabbit
(e.g., biotinylated anti-rabbit IgG)
Secondary Reagent Secondary reagents (antibodies) reacting
with both monoclonal and polyclonal
antibodies raised in mouse or rabbit,
respectively
Enzyme System Compatibility
Reagent Type
(Protocol Element)
Endogenous Enzyme Block, HRP-compatible X
Endogenous Enzyme Block, AP-compatible Y
Tertiary Reagent HRP-labeled streptavidin X
Tertiary Reagent AP-labeled streptavidin Y
Substrate HRP-compatible substrates (e.g., DAB, AEC) X
Substrate AP-compatible substrates (e.g., Fast Red,
New Fuchsin)
Description Compatibility
Code
A
B
A
B
AB
Description Compatibility
Code
Y
Autostainer Handbook
29
Page 38

30 Autostainer Handbook
Page 39

Section 8
Loading Reagents
After programming is complete, the Autostainer calculates the time required for the
staining run, the amount of wash buffer or deionized water required, and the most
efficient placement for the reagent vials.
Reagent Layout Map Screen
The Reagent Layout Map documents the rack positions of the reagents including the fill
volume needed for completing the staining run. It displays a maximum of 32 reagent
vials per rack. The abbreviations for the reagents are displayed in their appropriate
alpha-numeric rack positions.
Each reagent position is color coded to correspond to Dako reagent colors and the
colors from the Programming Grid. If more than 32 reagent vials are required, a
Second Rack button becomes available.
1. Select the Next button in the Slide Layout Map: Program Slides, a message asks,
“Save program on disk?”
2. Select No and the Reagent Layout Map appears.
3. Load the reagent vials according to the reagent map. The reagent volume displayed
includes a dead volume of at least 200 µL.
4. Make sure that enough reagent is in the vials to complete the programmed run and
that the reagent rack is properly seated in its correct location.
Autostainer Handbook
31
Page 40

5. Check that the reagent vials have no bubbles on top of the solution. Remove any
bubbles.
Missing Reagent Notice
The Autostainer displays a prompt when an insufficient volume of reagent is detected.
You can pause the system to add more reagent to the specified vial. If sufficient volume
of a reagent is not available, and you do not respond to the alarm, the Autostainer
continues the run and provides a list of skipped or partially applied slides on the Run
Log.
To program the system to check for sufficient volumes at the start of the run, select the
Check Volumes option on the Set Start Time screen (see Starting a Run, Section 9).
32 Autostainer Handbook
Page 41

Section 9
Loading Slides
After programming is complete and the reagents are loaded, you are ready to load the
slides on the slide racks. Print the Slide Layout Map: Load Slides screen by selecting
the Print button at the bottom of the screen. This map provides a guide for loading slides
and can be saved as part of your staining record.
Note: Soak slides in a buffer solution containing 0.05% Tween-20 for a minimum of five
minutes prior to loading the Autostainer.
Load Slides
Autostainer has four slide racks that hold up to twelve slides each. Slide racks 1-4 have
slide positions 1-12, 13-24, 25-36, and 37-48, respectively. The first rack is located
toward the front of the instrument. Racks two, three, and four are located behind the first.
1. Load slides into the racks by inserting the label end of the slide (with the specimen
facing up) into a slide clip. The rack may be positioned in the angular setting to
facilitate slide loading.
2. Load each slide, in numerical order from left to right, into the slide rack according to
the Slide Layout Map: Load Slides printout.
3. Once all of the slides have been loaded into their correct slide positions and the slide
racks are properly positioned on their locating pins, gently pour buffer over the slides
to keep them from drying out. For best results, pour buffer over the slide label
instead of directly over the specimen. The buffer will then flow over the specimen
without washing it off.
Note: When the slides have been loaded, put the rack back to its horizontal position.
Autostainer Handbook
33
Page 42

34 Autostainer Handbook
Page 43

Section 10
Starting a Staining Run
Preparing the System for a Staining Run
After the specimen-containing slides and reagent vials are loaded, perform the following
checklist:
Slides
• Deparaffinized and rehydrated, soaking in buffer containing 0.05% Tween 20
using a squirt bottle to prevent slides from drying while loading additional slides.
• Seated securely in slide rack.
Racks
• Properly seated in the Autostainer.
Reagents
• At room temperature.
• Placed at proper locations in the reagent racks.
• Contain no air bubbles.
• Contain at least the reagent volume in each vial as specified in the Reagent
Layout Map.
Buffer
• Contains at least the volume of buffer indicated in the Reagent Layout Map plus
any additional volume listed for the completion of a delayed run.
Water
• Contains at least the volume of water indicated in the Reagent Layout Map.
Waste Containers
• Have enough room to accommodate the volume of buffer and water used during
the staining run.
Quick Start
1. Turn on the computer system. Double-click the Autostainer icon.
2. Enter User Name and password and press ENTER.
3. Select the Program button on the main menu.
4. Select Slides from the menu bar. (To enter information for a specific slide see
Section 4.)
5. Enter the slide count for the staining run and click OK.
Note: Skip steps six and seven if you are using the default template.
Autostainer Handbook
35
Page 44

6. Select the Protocol Template button and select a protocol template for the run.
7. Select the Use Template button. The Programming Grid appears with the selected
protocol.
8. Select the desired volume and drop zones for either all slides, or on an individual
side basis.
9. Assign specific antibodies and reagents to all slides and select the Next button. The
Slide Layout Map: Program Slides screen appears.
10. Select the Next button and the Reagent Layout Map appears.
11. Load reagents using the Reagent Layout Map. Check water and buffer volume, and
make sure you have enough space for waste.
12. Select the Next button. The Slide Layout Map: Load Slides screen appears.
13. Load slides using the Slide Layout Map: Load Slides screen.
14. Click the Next button.
15. The Set Start Time screen appears. The system calculates the run time and amount
of buffer and DI water needed to complete the run.
16. Select the Prime Pump (Water) button, and click OK.
17. Select the Prime Pump (Buffer) button.
18. Set reagent levels to Check Volumes or Do Not Check Volumes.
19. Select the Start Run button.
Run Log Screen
During a staining run the Run Log screen is updated with each step performed.
• The New Program button is used to program a new run while the current run is
in process.
• The Review Program button is used to return to the Programming Grid to view
the run in progress.
• The Emergency Stop button can be used to stop a run at any time.
Shutting Down the Autostainer
1. Select the Sign Off button on the Main Menu.
2. A message prompts, “Quit using Autostainer?” Select the Yes button.
3. Shut down the computer.
36 Autostainer Handbook
Page 45

Section 11
Maintenance and Troubleshooting
The Autostainer should be cleaned after 150 slides have been processed or after one
week, whichever comes first. The instrument keeps track of the number of staining runs
performed and displays a maintenance message listing the number of slides since the
last cleaning cycle.
Note: Please contact your Dako representative regarding maintenance details.
Troubleshooting
Problem Possible Cause Course of Action
Autostainer will not turn on (top
green LED not on). Message
displays “Instrument Not On” when
a run is started.
The Autostainer does not respond
when you initiate a prime pump or
a run (bottom LED not on).
Message displays “Instrument Not
On” when a run is started.
Autostainer suddenly stops during
a run.
Buffer or DI Water does not flow
out during a run or a prime.
Not enough buffer or DI
Bent or pinched tubing.
The Autostainer is
unplugged at the power
source.
The cable between the
Autostainer and the
computer is not connected
properly.
The Autostainer will stop
frequently during the run.
This is due to set
incubation times. Check
the run log to verify.
Autostainer was not primed
properly.
water in the appropriate
reservoir.
Check the power cord
connections and verify the
surge protector is plugged in
and turned on.
Shut down the system and
turn the power off. Disconnect
and reconnect the cable
between the Autostainer and
the computer.
Please use caution. Pins
can be bent and cause
damage to the instrument
during operation.
No action is needed. The
Autostainer will resume
movement. Check Run Log
screen.
Prime pump. Pump may need
to be activated several times.
Fill the reservoir with the
proper level of fluid. Then
prime the pump.
Straighten out the tubing and
prime the pump.
Autostainer Handbook
37
Page 46

Problem Possible Cause Course of Action
Buffer or DI Water does not flow
out during a run or a prime. (Cont.)
Inlet filters are clogged and
Tubing not completely
Faulty buffer / DI water
All waste collects into one waste
container.
Waste tubing not placed in
Faulty waste pump.
Waste backs up in the sink. Clogged sink filter. Clean the filter when the
Reagent probe is not dispensing
reagent.
Clogged reagent probe. Contact a Dako
Bubbles on the surface of
The yellow three-way
Z-head assembly is hitting slide
racks during priming or during run.
Blow head/wash head is
Tubing is disconnected at
the inlet fitting(s).
Check the tubing to verify
that the fittings are secure.
Check the inlet filter at the
are restricting fluid flow.
end of the tubing in the
carboy - clean if necessary.
Dako recommends using a
tube and cap assembly
(S3472) to prevent foreign
objects from entering the
carboys and possibly
clogging the filter.
Ensure that buffer and DI
inserted into carboy.
water tubing is fully inserted
into the proper carboys.
Contact a Dako
pump.
“Switch” is not programmed
in the Protocol Template.
representative.
Program a “Switch” in the
Protocol Template.
Insure that all waste tubes
the proper waste carboy.
lead to proper carboy.
Contact a Dako
representative.
instrument is not in use.
Using a small brush and
some water, remove the
material causing the
blockage.
Insufficient reagent in vial. If the system detects
insufficient reagent to
complete the current step,
you have one minute to add
reagent, after which some
slides may be skipped.
representative.
Remove bubbles.
the reagent in the vial.
Verify that the OFF position
stopcock valve on the
syringe has been moved.
of the valve is in the down
direction. The valve should
be in a “T” configuration.
Arm is out of alignment. Emergency stop the run and
restart the run. Remove
steps already performed.
Recheck Reagent Layout
Map as this may cause vials
to be reassigned to new
locations.
Contact a Dako
bent.
representative.
38 Autostainer Handbook
Page 47

Problem Possible Cause Course of Action
The probe and
wash/blow head
are not going to the
correct locations.
Bent probe tip. Verify that all reagent vial caps have been removed
No Staining Insufficient reagent
Reagents vials were
Slides were not
Slides were loaded
Programming error. Check the Programming Grid to ensure that the
Slides drying out. Make sure adequate dispense volume that is
The text of the label
does not begin
along the left edge
of the label and the
text is getting cut
off.
Error occurs during
printing.
Incorrect COM port
Incorrect printer is
The arm has been
knocked out of
calibration.
in vial.
not loaded in the
correct locations in
the reagent racks.
loaded in the
correct locations.
with tissue side
down.
The Seymour
printer may need to
be reset.
Labels or ribbon
have run out.
selected.
selected.
Abort run and save run log. Reprogram the run and
delete the steps from the Protocol Design screen
that have already been completed. Restart run.
and slide racks are firmly locked in place in the
down position. Contact a Dako representative.
If the system detects insufficient reagent to
complete the current step, you have one minute to
add reagent, after which some slides may be
skipped.
Check the Reagent Map to verify proper locations.
Check Run Log for “Unable to Locate Reagent”
Skipped Slides message.
Check the Load Slide printout to verify proper
locations.
Orient slides properly.
staining run was programmed correctly.
suitable for desired incubation times is programmed.
Insure that no extreme environmental conditions are
contributing to the drying of the slides (i.e. direct
sunlight, heating/air conditioning vents, hoods, etc.)
To reset the Seymour Label Printer, turn off the
printer. Hold down the green label feed button on
the top of the printer. Turn on the printer while
holding down the green button and continue holding
the button for three seconds. The labels advance
and the printer will print. Release the feed button.
Press and release the feed button one more time to
advance one label. Perform a test print.
Replace ribbon in the printer and the printer will
restart.
Select the correct COM port from the Slide Label
Design screen, see the Initializing section.
Select the correct printer model from Slide Label
Design screen, see the Initializing section.
Autostainer Handbook
39
Page 48

Problem Possible Cause Course of Action
Slide number is
not listed on
label.
Computer
functions lock up
during a run, but
the Autostainer is
still performing
the run.
User is unable to
access many of
the functions in
the Initialize
section of the
program.
Illegal or fatal
exception errors.
EWP/DWP
messages on
Run Log.
EWL/PFR
messages on
Run Log.
The computer
turns on but
“Safe Mode” is
displayed on all
four corners of
the screen.
Monitor screen
went blank
(power LED is
green).
Monitor screen
went blank
(power LED is
orange).
Label is not
centered correctly
on label.
Windows error. Allow the Autostainer to finish the run. Reboot system
User has been set
up as a “NonAuthorized” user.
Windows error. Shut down the system and turn the power off at the
Enable waste
pump/disable
waste pump.
Faulty waste
removal/probe
failed to retract.
The computer has
been improperly
shut down.
Screen saver utility
installed.
The cable between
the monitor and the
computer is not
connected
properly.
Reprint label if necessary and place the label 1/2 cm
from the top and 1/8 cm from the side of the slide.
before the next run.
Contact a Dako representative.
surge protector. Wait 30 seconds and then power up
the system. If this problem persists, contact a Dako
representative.
Waste is not being pumped out of the system within
the expected time frame. If waste is still separating,
contact a Dako Technical support for additional
cleaning instructions. If waste is no longer separating,
contact Dako for service.
Contact a Dako representative.
Shut down the computer by using the Windows Start
button located at the bottom left corner of the screen
and selecting Shut Down. This button may be hidden
requiring you to drag the mouse pointer off the bottom
of the screen for it to appear. Always shut down the
computer using this method. Perform Scan Disk
through Windows Explorer/Accessories/System
Tools/Scan Disk. For assistance, contact a Dako
representative.
Move the mouse. Current screen will reappear.
Remove screen saver as this may interfere with the
Autostainer operation.
Disconnect and reconnect the cable between the
monitor and the computer.
40 Autostainer Handbook
Page 49

Problem Possible Cause Course of Action
Words on your
monitor screen
are too dim.
Image on the
desktop is
grainy and the
color is
incorrect.
Color depth has
The printer
does not
respond to
print
command.
The parallel
The parallel
The brightness
control is not set
properly.
Windows started
in “Safe Mode.”
been adjusted
too low.
The printer may
be in Manual
Feed mode.
cable between
the printer and
the computer is
not connected
properly.
cable is
defective.
Adjust the brightness control.
Shut down the computer by using the Windows “Start”
button located at the bottom left corner of the screen and
selecting Shut Down. This button may be hidden requiring
you to drag the mouse pointer off the bottom of the screen
for it to appear. Always shut down the computer using this
method. Perform Scan Disk through Windows
Explorer/Accessories/System Tools/Scan Disk.
For assistance, contact a Dako representative.
At the Windows Desktop, use the mouse to right-click
anywhere other than an icon, a drop-down menu displays.
Select Properties. The Windows Display Properties window
should appear. Select the Settings tab. In the Colors box
verify that “High Color (16 bit)” is displayed. If it is not,
select it and save changes.
Briefly press and release the Front Panel Button on the
printer.
Disconnect and reconnect the parallel cable between the
printer and the computer.
Check the cable on another system with a print job that you
know works, or connect another parallel cable.
Autostainer Handbook
41
Page 50

42 Autostainer Handbook
Page 51

Section 12
System Specifications
Hardware Specifications
Dako Autostainer
Dimensions 1.02m W x 0.69m D x 0.61m H
40" W x 27" D x 24" H
Weight 140 lb. (63.5 kg)
Electrical Requirements 120V 110/120V (±10%) 60Hz (±2Hz)
220V 220/240V (±10%) 50Hz (±2Hz)
Normal Operating Temperature 18°C – 26°C (64°F – 79°F)
Slide Rack Capacity 1 – 12 glass slides
Total Slide Capacity 1 – 48 glass slides
Reagent capacity 64 different reagents (15 mL/reagent vial)
Reagent dispense volumes 100, 150, 200, 400 and 600 µL
Reagent probe volume capacity 100 µL minimum, 1200 µL maximum
Computer Controller
Dako reserves the right to change the computer controller specifications at any time.
Computer specifications may vary.
Monitor 15” color
Printer Color InkJet printer
Surge Protector 120 VAC, 15 Amps, 50/60 Hz
Software Specifications
Operating
System
Operating Logic Designed to calculate the most time-efficient sequence to complete a
Protocol Logic Flexible selection of steps including rinses. Maximum 35 protocol
Idle Rinse Buffer is applied to slides during a staining run to keep specimens
Rinse Default
Settings
Incubation Time Recommended minimum time is two minutes.
Autostainer Handbook
Windows® 98, XP or equivalent.
programmed staining run.
steps (including rinse steps).
wet when no reaction is occurring.
Buffer rinse every 30 minutes prior to the start of a run, when delayed
start is selected.
Buffer rinse every 30 minutes during a staining run.
Water rinse every 60 minutes after completion of run.
Default settings for time and the amount of buffer dispensed can be
changed by a Dako representative upon request.
43
Page 52

44 Autostainer Handbook
Page 53

Surface
Size
Environment
Power
Source
Section 13
Standard Configuration
Ensure that the area for the instrument is a solid, level surface that can
support the weight of the system (approximately 240 lbs.)
Minimum work area dimensions: 2.0 m W x 0.8 m D x 1.0 m. H
The work area must have an ambient temperature between 18°C –
26°C (64°F – 79°F), not facing direct sunlight and not effected by a
hood or vent.
Dako recommends a dedicated power source to prevent interference
from other instruments or equipment.
Z Head
Assembly
Back
X Axis
Mechanism
Reagent Probe Wash
Station
Left
Right
Reagent Rack b
Reagent Rack a
Y Axis
Mechanism
Front
Slide Rack
Glass Slide
Sink
(Beneath slide racks)
Slide Rack
Handle
Autostainer Handbook
45
 Loading...