

Page 1
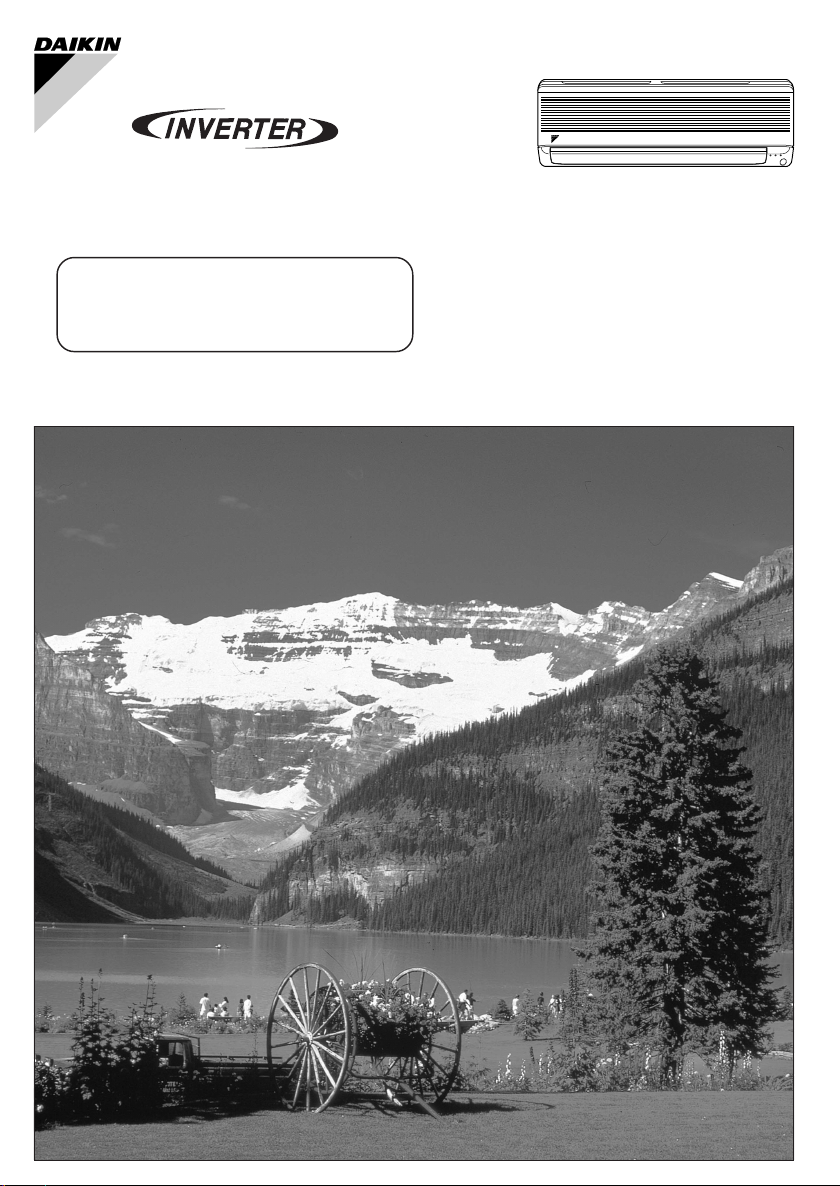
DAIKIN ROOM AIR CONDITIONER
Operation Manual
MODELS
FTKD50BSG
FTKD60BSG
FTKD71BSG
Page 2

CONTENTS
READ BEFORE OPERATION
■ Safety Precautions ................................................. 2
■ Not for multi System ............................................... 4
■ Names of Parts
● Indoor unit, Opening the front grille .............. 5
● Remote controller ......................................... 6
● Outdoor unit .................................................. 7
■ Preparation Before Operation
● Remote controller ......................................... 8
● Indoor unit ..................................................... 9
OPERATION
■ DRY • COOL • FAN Operation ............................. 10
■ Adjusting the Air Flow Direction
● Adjusting the horizontal blade (flap) ........... 11
● Adjusting the vertical blade (louvre) ........... 11
● 3-D air flow.................................................. 11
■ POWERFUL Operation ........................................ 12
■ OUTDOOR UNIT SILENT Operation ................... 12
■ HOME LEAVE Operation ..................................... 13
■ Timer Operation
● OFF TIMER operation ................................ 15
● ON TIMER operation .................................. 15
CARE
■ Care and Cleaning
● Cleaning the air filters ................................. 16
● Cleaning the indoor and outdoor units
and the remote controller ............................ 16
● Replacing photo-catalytic deodorizing &
air cleaning filter ......................................... 16
● Cleaning the front grille ............................... 17
● Check.......................................................... 17
● Before a long idle period ............................. 17
TROUBLE SHOOTING
■ Trouble Shooting
● These cases are not troubles ..................... 18
● Check again ................................................ 19
● Call the service shop immediately .............. 20
1
Page 3
Safety Precautions
■ Read the following warnings and cautions
carefully before operating the system and
use it correctly.
■ This manual classifies the precautions to
the user into two categories on the right.
Be sure to follow all as they are all
important to ensure safety.
■ After reading this manual, keep it in a place
easily accessible to the user for future
reference.
WARNING
Failure to follow a warning is very likely to
result in such grave consequences as death or
serious injury.
CAUTION
Failure to follow a caution may result in
serious injury or property damage, and in
certain conditions, may result in a grave
consequence.
WARNING
● ●
● Do not expose your body to the cool air for a long time, do not cool the room too much.
● ●
It will affect your physical conditions and cause health problems.
● ●
● Do not put a finger, a rod or other objects into the air outlet or inlet.
● ●
As the fan is rotating at a high speed, it will cause injury.
● ●
● Do not attempt to repair, relocate, modify or reinstall the air conditioner by yourself.
● ●
Incorrect work will cause electric shocks, fire etc. For repairs and reinstallation, consult the shop
where you bought the air conditioner.
● ●
● If anything abnormal such as a burning smell occurs, stop the operation immediately and
● ●
turn the breaker OFF.
Continued abnormal operation will cause troubles, electric shocks, fire etc. If anything is
abnormal, consult the shop where you bought the air conditioner.
● ●
● If the air conditioner is not cooling properly, the refrigerant may be leaking, so see the
● ●
dealer where the unit was purchased. Check with a qualified repairman before attempting
any repairs, which might accompany addition of refrigerant.
The refrigerant used in the air conditioner is safe. Although leaks should not occur, if for some
reason any refrigerant happens to leak into the room, make sure it does not come in contact with
any flame, such as fan heaters, kerosene heaters, or gas ranges, as this may result noxious
substances being generated.
CAUTION
● ●
● Do not use the air conditioner for preservation purposes.
● ●
Do not use it for preserving precision instruments, foods, plants, animals, works of fine arts etc.
Performance or quality may deteriorate and animal or plant life may be shorter.
● ●
● Do not operate the air conditioner with a wet hand.
● ●
It may cause an electric shock.
● ●
● Ventilate the room from time to time.
● ●
Be careful especially when using a burning appliance in the same room. Insufficient
ventilation may cause shortage of oxygen.
● ●
● Before cleaning, be sure to stop the operation and turn the breaker OFF.
● ●
As a fan is rotating at a high speed, cleaning during operation may cause injury.
● ●
● After a long use, check the unit stand and fittings for damage.
● ●
The unit may drop and cause injury if damage is left unrepaired.
2
Page 4
● ●
● Do not stand or sit on the outdoor unit. Do not place any object on the unit.
● ●
The object or the person may fall down or drop, causing injury.
● ●
●
Do not place under the indoor or outdoor unit anything which must be kept away from moisture.
● ●
Indoor unit : moisture in the air may condense and drip in certain conditions.
outdoor unit : during cooling operation, condensation may drip from the piping connections.
● ●
● Do not wash the unit with water.
● ●
It may cause an electric shock.
● ●
● Do not place a burning appliance in places exposed to the air flow from the unit or under
● ●
the indoor unit.
It may cause incomplete combustion or deformation of the unit from heat.
● ●
● Do not place a vessel containing water on the unit.
● ●
Water may penetrate into the unit and degrade electrical insulations, resulting in an electric
shock.
● ●
● Do not expose plants or animals directly to the air flow.
● ●
It may cause adverse effects on the plant or the animal.
● ●
● Do not block air inlets nor outlets.
● ●
Impaired air flow may result in insufficient performance or troubles.
● ●
● Do not allow children to mount on the outdoor unit or avoid placing any object on it.
● ●
Falling or tumbling may result in injury.
Installation
WARNING
● ●
● Do not attempt to install the air conditioner by yourself.
● ●
Consult the service shop or a qualified technician.
Incorrect work will result in water leakage, electric shocks or fire. For installation, consult the
service shop where you bought the unit or a qualified technician.
● ●
● The air conditioner must be earthed.
● ●
Incomplete earthing may result in electric shocks. Do not connect the earth line to a gas pipe,
water pipe, lightening rod, or a telephone earth line.
CAUTION
● ●
● Depending on the environment, an earth leakage breaker must be installed.
● ●
Lack of an earth leakage breaker may result in electric shocks.
● ●
● Do not install the air conditioner in places where flammable gas may leak.
● ●
If leaked gas should accumulate near the unit, fire may occur.
● ●
● Arrange the drain hose to ensure smooth drainage.
● ●
Incomplete drainage may cause wetting of the building, furniture etc.
● ●
● Do not connect the air conditioner to a power supply different from the specification.
● ●
It may cause trouble or fire.
3
Page 5
Note for Multi
Installation site
■ To install the air conditioner in the
following types of environments, consult
the shop.
● Places with an oily ambient or where
steam or soot occurs.
● Salty environment such as coastal
areas.
● Places where sulfide gas occurs such
as hot springs.
● Places where snow may block the
outdoor unit.
The drain from the outdoor unit must be
discharged to a place of good drainage.
Consider nuisance to your
neighbours from noises
■ For installation, choose a place as
described below.
● A place solid enough to bear the
weight of the unit which does not
amplify the operation noise or
vibration.
● A place from where the air
discharged from the outdoor unit or
the operation noise will not annoy
your neighbours.
System
● Priority-room setting
When setting the priority-room during
installation, the indoor unit’s operation
mode always takes priority.
When the priority-setting room unit is
operated in POWERFUL mode, there
are times that air conditioners in other
rooms will temporarily stop in order to
centralize power to the unit in the room.
Please adjust the priority-room setting
to match your life style. Moreover, for
priority-room settings, please consult
the service shop where you bought the
unit.
∗ Priority-room setting is applied to only,
4MK90.
Electrical work
● For power supply, be sure to use a
separate power circuit dedicated to the
air conditioner.
System relocation
● Relocating the air conditioner requires
specialized knowledge and skills.
Please consult the shop where you
bought the air conditioner if relocation is
necessary for moving or remodeling.
4
Page 6
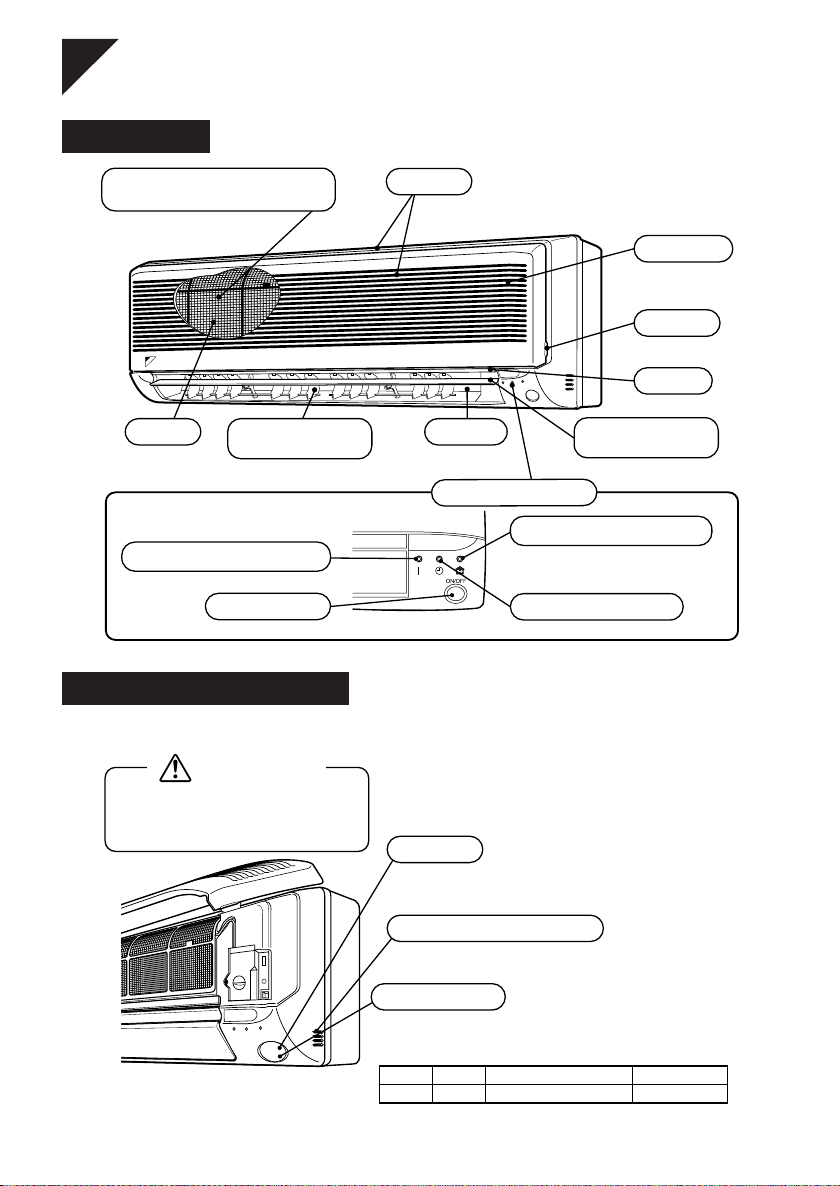
Names of Parts
Indoor unit
Photo-catalytic deodorizing &
air cleaning filter
Photo-catalytic deodorizing & air
cleaning filters are attached to the
inside of the air filters.
DAIKIN
Air filter
Louvre
(vertical blades)
The louvre is inside of the air outlet.
(See page 11.)
OPERATION lamp (green)
ON/OFF switch
Opening the front grille
How to open the front grille : (See page 9.)
Air inlet
Air outlet
Indicator lamps
Front grille
Grille tab
Diffuser
Flap
(Horizontal blade)
(See page 11.)
HOME LEAVE lamp (red)
• Lights up when you use HOME
LEAVE Operation.
(See page 13.)
TIMER lamp (yellow)
(See page 15.)
CAUTION
Before opening the front grille, be sure to
stop the operation and turn the breaker
OFF. If the power is on, the fan may rotate
inside and may cause injury.
Receiver:
• It receives signals from the remote controller.
• When the unit receives a signal, you will hear
a short beep.
Room temperature sensor:
• It senses the air temperature around
the unit.
ON/OFF switch
• Push this switch once to start operation. Push once again
to stop it.
• The operation mode refer to the following table.
Mode
FTKD COOL
• This switch is useful when the remote controller is missing.
Temperature setting
22˚C
Air flow rate
AUTO
5
Page 7
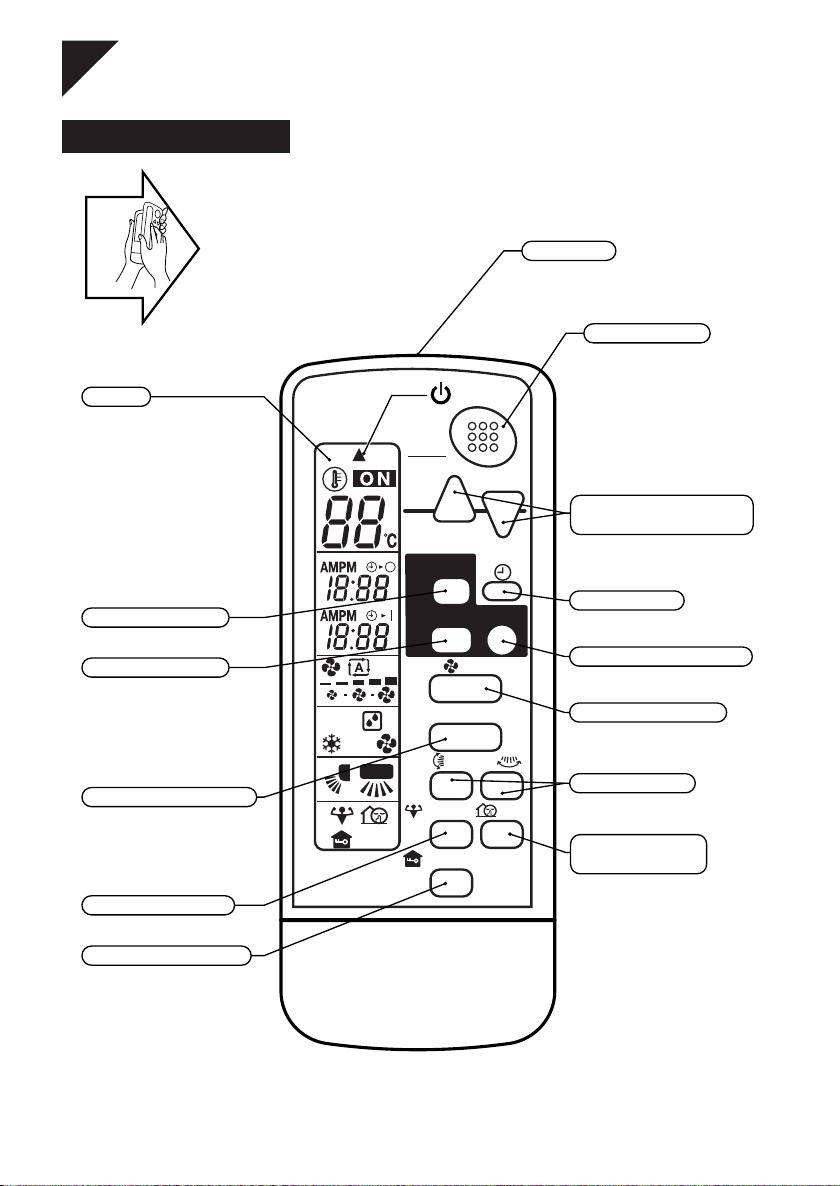
Names of Parts
Remote controller
Open
the
cover.
Display
It displays the current settings.
(In this illustration, each
section is shown with all its
displays ON for the purpose of
explanation.)
OFF TIMER button
(See page 15.)
ON TIMER button
(See page 15.)
MODE selector button
It selects the operation mode.
(DRY / COOL / FAN)
(See page 10.)
POWERFUL button
(See page 12.)
HOME LEAVE button
(See page 13.)
ON/OFF
TEMP
TIME
UP
OFF
TIMER
ON
TIMER
FAN
MODE
SWING
POWERFUL
HOME LEAVE
Transmitter
It sends signals to the indoor unit.
ON/OFF button
Press it once to start
operation. To stop it,
press it once again.
DOWN
TEMPERATURE / TIME
adjustment buttons
It changes the temperature
or time setting.
CANCEL
SILENT
CLOCK button
(See page 9.)
TIMER CANCEL button
It cancels the timer setting.
FAN setting button
It selects the air flow
rate setting.
SWING buttons
(See page 11.)
OUTDOOR UNIT
SILENT button
(See page 12.)
<ARC417 A15 >
6
Page 8

Names of Parts
Outdoor unit
Air inlet
(Back and side)
Air outlet
Appearance of the outdoor unit may differ with some models.
<RKD>
Refrigerant piping
and inter-unit cable
Drain hose
Earth terminal
It is inside of this part.
Refrigerant piping
and inter-unit cable
Air inlet
(Back and side)
Drain hose
Earth terminal
It is inside of this part.
Air outlet
Appearance of the outdoor unit may differ with some models.
<2MK, 3MK, 4MK> <RMK>
Refrigerant piping
and inter-unit cable
Earth terminal
It is inside of this
part.
Air inlet
Air outlet
Drain hose
7
Page 9

Receiver
Preparation Before Operation
Remote controller
holder
Set.
Push.
1
2
■■
■ Operating the remote controller
Remote controller
■■
■ Setting the batteries
■■
Position + and
– correctly!
Address switch
2
■■
●
To use the remote controller, aim the transmitter at
the indoor unit. If there is anything to block signals
between the unit and the remote controller, such as
a curtain, the unit will not operate.
●
Do not drop the remote controller. Do not get it wet.
●
The maximum distance for communication is about
7 m.
3
■■
■ To fix the remote controller
■■
holder on the wall
1
Press with a finger and slide the back
1
cover to take it off.
Set two alkaline dry batteries (AAA).
2
Set the back cover as before.
3
● This will cause the figures on the display
to flash. Set the clock at this point.
Choose a place from where the signals reach
1
the unit.
Fix the holder to a wall, a pillar, etc. with the
2
screws supplied with the holder.
Fit the claw of the holder into the bottom of
3
the remote controller, and push the remote
controller onto the wall.
ATTENTION
About batteries
● Always replace two batteries at the same
time. Replace them with new ones of an
identical type.
● Do not use manganese dry batteries since
their use may cause a malfunction.
● If you are not going to use the air
conditioner for a long period, take out all
the batteries.
● Batteries should last for about a year
under normal conditions. When you find
the displays unclear and signal communication often failing, replace them with new
ones.
● Batteries may be exhausted even before
the recommended date of consumption
printed on them, if the air conditioner was
manufactured many months ago.
● Never try to recharge the batteries.
8
●
To remove, pull it upwards.
ATTENTION
About the remote controller
● Never expose the remote controller to
direct sunlight.
● Dust on the signal transmitter or receiver
will reduce the sensitivity. Wipe off dust
with soft cloth.
● Signal communication may be disabled if
an electronic-starter-type fluorescent lamp
(such as inverter-type lamps) is in the
room. Consult the shop if that is the case.
● If the remote control signals happen to
operate another appliance, move that
appliance to somewhere else, or consult
the shop.
Page 10

Preparation Before Operation
Indoor unit
■■
■ Setting the clock
■■
■ Setting the photo-catalytic
■■
deodorizing & air cleaning filter
Open the front grille.
1
● Hold the grille by the tabs on the two sides
and lift it until it stops with a click.
(about 60°)
■■
Press .
1
is displayed.
blinks.
Pull out the air filters.
2
● Push upwards the
tab at the center of
each air filter, then
pull it down.
Set the photo-catalytic deodorizing &
3
air cleaning filter.
● Attach an photo-catalytic deodorizing &
air cleaning filter to each air filter.
(See page 16 “Care and cleaning”)
Set the air filters in their original
4
positions and close the front grille.
● Operation without air filters may result in
troubles as dust will accumulate inside the
indoor unit.
NOTE
Tips for saving energy
● Be careful not to cool the room too much.
Keeping the temperature setting at a
moderate level helps save energy.
Recommended temperature setting
For cooling: 26°C – 28°C
● Cover windows with a blind or a curtain.
Blocking sunlight and air from outdoors
increases the cooling effect.
● Clogged air filters cause inefficient
operation and waste energy. Clean them
once in about every two weeks.
2
Press
to set the clock to the
present time.
● Holding down ( ) or ( ) button
rapidly increases or decreases the time display.
Press .
3
blinks.
(Now the clock is set.)
■■
■ Turn the breaker ON
■■
● Turning ON the breaker opens the flap, then
closes it again. (This is a normal procedure.)
Please note
● The air conditioner always consumes 15 – 35
watts of electricity even while it is not operating.
● If you are not going to use the air conditioner for a
long period, for example in spring or autumn, turn
the breaker OFF.
● Use the air conditioner in the following conditions.
Mode
Operating conditions
Outdoor temperature : –5 to 46 °C
(In 2-4MK 10 to 46 °C)
COOL
Indoor temperature : 18 to 32 °C
Indoor humidity : 80% max. (*1)
Outdoor temperature : –5 to 46 °C
DRY
Indoor temperature : 18 to 32 °C
Indoor humidity : 80% max.
(*1) Use in humidity 60 % or lower when using the
unit at an outdoor temperature of 10°C or lower.
If operation is continued out of this range
• A safety device may work to stop the operation.
(In multi system, it may work to stop
the operation of the outdoor unit only.)
• Condensation may occur on the indoor unit and drip.
• A safety device may work to stop the operation.
• Condensation may occur on the indoor unit and drip.
9
Page 11

DRY • COOL • FAN Operation
The air conditioner operates with the settings of
your choice.
From the next time on, the air conditioner will
operate with the same settings.
Press and select a mode.
1
Display
● Each pressing of the button advances the
mode setting in sequence.
Press .
2
Then OPERATION
lamp lights up.
■■
■ To stop:
■■
■■
■
To change the air flow rate setting:
■■
Press
DRY mode
The air flow rate
setting is not
variable.
● At smaller air flow rates, the cooling effect is
also smaller.
■■
■ To change the air flow direction:
■■
(See page 11.)
FAN
.
COOL or FAN mode
Five levels of air flow rate setting
” to “ ”plus “ ” are
from “
available.
Display
Press once again.
Then OPERATION lamp goes off.
■■
■
To change the temperature setting:
■■
DRY or FAN mode
The temperature
setting is not
variable.
COOL mode
Press to raise the temperature and
to lower the temperature.
press
Set to the temperature you like.
Display
10
Page 12

Adjusting the Air Flow Direction
You can adjust the air flow direction to increase
your comfort.
Adjusting the
horizontal blade (flap)
Press .
● Every time the button is pressed, “ ”
appears or disappears.
....... The flap automatically
swings up and down.
....... To stop the flap at an
angle you like, press .
Adjusting the
vertical blade (louvre)
Notes on flap angles
● When [SWING] is
selected, the flap
swinging range depends
on the operation mode.
(See the figure.)
● The diffuser is
kept open in DRY
or COOL mode.
DRY⋅COOL
3-D air flow
The 3-D air flow function controls the air flow by
alternating the horizontal swing (up and down)
and vertical swing (left and right).
This provides good air circulation throughout
the room and reduces temperature fluctuations.
Press and during the air
conditioner is operating.
The up/down and left/right
swing displays on the remote
controller will move.
■■
■ To cancel 3-D air flow:
■■
Press .
● Every time the button is pressed, “ ”
appears or disappears.
....... The louvre automatically
swings right and left.
....... To stop the flap at an
angle you like, press .
Press or .
NOTE
Unless [SWING] is selected, you should set
the flap at a nearhorizontal angle in COOL
or DRY mode to obtain the best
performance.
ATTENTION
● Always use a remote controller to adjust
the flap angle. If you attempt to move it
forcibly with hand when it is swinging, the
mechanism may be broken.
11
Page 13

POWERFUL
OUTDOOR UNIT
Operation
POWERFUL operation quickly maximizes the
cooling effect in any operation mode. You can get
the maximum capacity with a touch of a button.
● Pressing the (POWERFUL) button during
operation starts POWERFUL operation.
● POWERFUL operation ends in 20 minutes.
Then the system automatically operates again
with the settings which were used before
POWERFUL operation.
● During you use “POWERFUL operation”, the
other functions will not go on.
Press .
1
Display
■■
■ To cancel POWERFUL operation:
■■
Press .
Notes on POWERFUL operation
● In COOL mode
To maximize the cooling effect, the capacity of
outdoor unit must be increased and the air flow
rate be fixed to the maximum setting.
The temperature and air flow settings are not
variable.
● In DRY mode
The temperature setting is lowered by 3°C and
the air flow rate is slightly increased.
● In FAN mode
The air flow rate is fixed to the maximum setting.
SILENT Operation
OUTDOOR UNIT SILENT operation lowers the
noise-level of the outdoor unit by changing the
frequency and fan rpm on the outdoor unit.
This function is convenient when sleeping, etc.
How to use OUTDOOR UNIT SILENT operation
■■
■ To use the “OUTDOOR UNIT
■■
SILENT operation”
Press .
■■
■ To cancel the “OUTDOOR UNIT
■■
SILENT operation”
Press again.
Note on OUTDOOR UNIT SILENT operation
● This function is not available when it is
connected to Multi system.
● This function is available in COOL modes.
(This is not available in FAN and DRY
modes.)
● Using POWERFUL operation (P12) during
OUTDOOR UNIT SILENT operation will
disengage OUTDOOR UNIT SILENT
operation.
● Turning the unit off either with the remote
controller or by flipping the switch on the unit
during OUTDOOR UNIT SILENT operation
will shut the unit off. The unit will continue in
OUTDOOR UNIT SILENT operation when
turned back on.
12
Page 14

HOME LEAVE Operation
■■
■ How to set the temperature and
HOMR LEAVE operation function is useful when
you leave the house or the room.
How to use HOME LEAVE operation
■■
air flow rate.
Press .
1
∗ This function is only available in COOL
modes.
■■
■ To use the “HOME LEAVE
■■
operation”
Press while the air conditioner
is operating.
(The HOME LEAVE lamp lights up.
■■
■ To cancel the “HOME LEAVE
■■
operation”
Press again.
(The HOME LEAVE lamp goes off.
Before using HOME LEAVE operation...
● When using HOME LEAVE operation for the
first time, set the temperature and air flow
rate for HOME LEAVE operation.
The initial settings are:
Cooling ... Temperature 25°C Air flow rate AUTO
Adjust the set temperature with
2
as you like.
Adjust the air flow rate setting with
3
FAN
as you like.
∗ The temperature and air flow rate will be the
same as the previous settings starting with
the second use.
∗ If you want to change the settings from the
previous use, repeat steps 1 through 3.
)
What’s the HOME LEAVE operation
● What is HOME LEAVE operation?
Using HOME LEAVE operation
It prevents the temperature in the room from
rising too high on hot summer days by using
weak cooling operation (*1). Disengaging home
)
leave operation will return the room to the set
temperature right away.
(*1)... You can change the set temperature and air
flow rate as you wish. Refer to the “Before
using home leave operation” section above on
how to change the settings.
13
Page 15

HOME LEAVE Operation
■■
■ Useful at times like these!
■■
1 Every day before you leave the house...
When you go out, push the
“HOME LEAVE operation”
button, and the air
conditioner will adjust
capacity to reach the
preset temperature for
HOME LEAVE operation.
2 Before bed...
Set the unit to HOME
LEAVE operation before
leaving the living room
when going to bed.
When you return, you will
be welcomed by a
comfortably air conditioned
room.
The unit will maintain the
temperature in the room at
a comfortable level while
you sleep.
Push the “HOME LEAVE
operation” button again,
and the air conditioner will
adjust capacity to the set
temperature for normal
operation.
When you enter the living room in
the morning, the temperature will
be just right.
Disengaging HOME LEAVE
operation will return the
temperature to that set for normal
operation. Even the hottest
summers will pose no problem!
NOTE
<Note on HOME LEAVE operation>
● HOME LEAVE operation is only available in COOL mode. (Cannot be used in AUTO, DRY, and FAN modes.)
● HOME LEAVE operation can be set within the ranges shown below.
Temperature: (During cooling) 18°C to 32°C
Air flow rate: 5 steps from weak to strong, or automatic.
● Using POWERFUL operation (P12) during HOME LEAVE operation will disengage HOME LEAVE operation.
● Turning the unit off by flipping the switch on the unit during HOME LEAVE operation will shut the unit off. The unit
will continue in HOME LEAVE operation when turned back on.
● Turning the unit off with the remote controller during HOME LEAVE operation will shut the unit off.
HOME LEAVE operation will continue when the unit is turned back on.
14
Page 16

Timer Operation
Display
Timer functions are useful for automatically
switching the air conditioner on or off at night or in
the morning. You can also use OFF TIMER and
ON TIMER in combination.
OFF TIMER operation
● Check that the clock is correct.
If not, set the clock to the present time. (See page 9.)
OFF
Press
1
is operating.
2
Press
reaches the point you like.
●
Press
3
TIMER
while the air conditioner
is displayed.
Display
blinks.
Every pressing of either button increases or
decreases the time setting by ten minutes.
Holding down either button changes the
setting rapidly.
OFF
until the time setting
TIMER
once again.
ON TIMER operation
● Check that the clock is correct. If not, set the
clock to the present time. (See page 9.)
ON
Press
1
not operating.
Press
2
reaches the point you like.
● Every pressing of either button increases or
Press
3
Combining ON TIMER and OFF TIMER
● A sample setting for combining the two timers is shown below.
TIMER
while the air conditioner is
is displayed.
Display
decreases the time setting by 10 minutes.
Holding down either button changes the
setting rapidly.
ON
TIMER
blinks.
until the time setting
once again.
Display
Then the TIMER lamp
lights up.
Display
Then the TIMER lamp
lights up.
■■
■ To cancel the timer:
■■
Press
CANCEL
.
Then the TIMER lamp goes off.
Notes on OFF TIMER
●
NIGHT SET MODE
When the OFF TIMER is set, the air conditioner
automatically adjusts the temperature setting
(0.5°C up in COOL) to prevent excessive
cooling for your pleasant sleep.
(Example)
Present time: 11:00 PM
(The unit operating)
OFF TIMER at 0:00 a.m.
ON TIMER at 7:00 a.m.
Combined
Notes on ON,OFF TIMER
● When TIMER is set, the present time is not displayed.
● Once you set ON,OFF TIMER, the time setting is kept in
the memory. (The memory is canceled when remote
controller batteries are replaced.)
● When operating the unit via the ON/OFF Timer, the actual
length of operation may vary from the time entered by the
user.(Maximum approx. 10 minutes.)
ATTENTION
■ In the following cases, set the timer again.
● After a breaker has turned OFF.
● After a power failure.
● After replacing batteries in the remote controller.
15
Page 17

Care and Cleaning
Air filter
• Hold the recessed parts of the
frame and unhook the four claws.
Photo-catalytic
deodorizing &
air cleaning
filter frame
CAUTION
Before cleaning, be sure to stop the
operation and turn the breaker OFF.
Cleaning the air filters
(It is recommended to clean them every two weeks.)
Open the front grille.
1
●
Hold the grille by the tabs on the two sides
and lift it unitl it stops with a click. (about 60°)
Pull out the air filters.
2
● Push a little upwards the
tab at the center of each
air filter, then pull it down.
Take off the photo-catalytic
3
deodorizing & air cleaning filter and
clean them.
●
Wash them with
water, or clean
them with a
vacuum cleaner.
● If the dust does
not come off
easily, wash them
with neutral
detergent thinned with lukewarm water,
then dry them up in the shade.
Set the photo-catalytic deodorizing
4
& air cleaning filter and the air filters
as they were and close the front
grille.
16
Push
●
Insert claws of the filters into slots of the front
panel. The front grille should lock at both sides
and at the point in the middle. Push the grille
at the 4 points indicated by
NOTE
● In a dusty environment, clean the air
filters at least once in every two weeks.
● Operation with dusty air filters lowers the
cooling capacity and wastes energy.
.
Cleaning the indoor and outdoor
units and the remote controller
● Wipe them with dry soft cloth.
For cleaning, do not use water hotter than 40°C,
benzine, gasoline, thinner, nor other volatile
oils, polishing compound, scrubbing brushes
nor other hard stuff.
Replacing photo-catalytic
deodorizing & air cleaning filter
(It is recommended to replace them every
three months.)
● Photo-catalytic deodorizing & air cleaning
filter need to be replaced regularly.
Open the front grille and pull out the
1
air filters.
Take off the photocatalytic deodorizing
& air cleaning filter.
32
Detach
the filter
element
and attach
a new
one.
Attach the photo-
4
catalytic
deodorizing & air
cleaning filter.
Set the air
5
filters as they
were and
close the front
grille.
(Push the grille
at the 4 points,
two at both sides
and in the
middle.)
NOTE
●
To order photo-catalytic deodorizing & air
cleaning filter, contact the service shop where
you bought the air conditioner.
●
Once the photo-catalytic deodorizing & air
cleaning filter element gets dirty, it is not
reusable but must be thrown away.
●
Operation with dirty photo-catalytic deodorizing
& air cleaning filter :
• cannot clean the air.
• results in poor cooling.
• may cause odour.
Photo-catalytic deodorizing & air
cleaning filter (with frame)
Photo-catalytic deodorizing & air
cleaning filter (without frame)
Item
Part No.
KAF918A43
KAF918A44
Page 18

Care and Cleaning
Cleaning the front grille
You may remove the front grille for cleaning.
●
When removing or attaching the front grille, use a robust
and stable stool and watch your steps carefully.
●
When removing or attaching the front grille, support the
grille securely with hand to prevent it from falling.
●
For cleaning, do not use water hotter than 40°C, benzine,
gasoline, thinner, nor other volatile oils, polishing
compound, scrubbing brushes nor other hard stuff.
●
After cleaning, make sure that the front grille is securely
fixed.
Open the front grille.
1
● Hold the grille by the tabs on the two sides
Remove the front grille.
2
●
●
CAUTION
and lift it until it stops with a click.
Supporting the front grille with one hand,
release the lock by sliding down the lever with
the other hand.
To remove the front grille, pull it toward yourself
with both hands.
Check
Check that the base, stand and other
fittings of the outdoor unit are not
decayed or corroded.
Check that nothing blocks the air
inlets and the outlets of the indoor unit
and the outdoor unit.
Check that the earth wire is not
disconnected or broken.
Check that the drain comes smoothly
out of the drain hose during COOL or
DRY operation.
● If no drain water is seen, water may be
leaking from the indoor unit. Stop
operation and consult the service shop if
this is the case.
Before a long idle period
1 Operate the fan alone for several
hours on a fine day to dry out the
inside.
Press and select “ ”.
1
Clean the front grille.
3
●
You may wipe it with a soft cloth soaked in water.
●
Only neutral detergent may be used.
●
You may wash the grille with water. After washing,
dry it with cloth, then dry it up in the shade.
Attach the front grille.
4
●
Set the 3 keys of the front grille into the slots
and push them in all the way.
●
Supporting the front grille with one hand, fit the
lock by sliding up the lever with the other hand.
●
Close the front grille slowly in this state. (Push
the grille at the 3 points, two at both sides and
in the middle.)
Fit the key
into the slot.
Slide up the lerver.
Press .
2
2 Clean the air filters and set them
again.
3 Take out batteries from the remote
controller.
4 Turn OFF the breaker for the room
air conditioner.
17
Page 19

Trouble Shooting
●●
● These cases are not troubles.
●●
The following cases are not air conditioner troubles but have some reasons. You may just continue
using it.
Case
Operation does not start soon.
● When ON/OFF button was
pressed soon after operation
was stopped.
● When the mode was reselected.
The outdoor unit emits water or
steam.
Mists come out of the indoor unit.
The indoor unit gives out odour.
The outdoor fan rotates while the
air conditioner is not in operation.
Explanation
● This is to protect the air conditioner.
You should wait for about 3 minutes.
● Moisture in the air condenses into water on the cool surface of outdoor
unit piping and drips.
■ This happens when the air in the room is cooled into mist by the cold
air flow during cooling operation.
■ This happens when smells of the room, furniture, or cigarettes are
absorbed into the unit and discharged with the air flow.
(If this happens, we recommend you to have the indoor unit washed
by a technician. Consult the service shop where you bought the air
conditioner.)
■ After operation is stopped:
• The outdoor fan continues rotating for another 60 seconds for system
protection.
■ While the air conditioner is not in operation:
• When the outdoor temperature is very high, the out door fan starts
rotating for system protection.
The operation stopped suddenly.
(OPERATION lamp is on)
18
■ For system protection, the air conditioner may stop operating on a
sudden large voltage fluctuation.
It automatically resumes operation in about 3 minutes.
Page 20

Trouble Shooting
●●
● Check again
●●
Please check again before calling a repair person.
Case
The air conditioner does not
operate.
(OPERATION lamp is off)
Cooling effect is poor.
Operation stops suddenly.
(OPERATION lamp blinks.)
Check
● Hasn’t a breaker turned OFF or a fuse blown?
● Isn’t it a power failure?
● Are batteries set in the remote controller?
● Is the timer setting correct?
● Are the air filters clean?
● Is there anything to block the air inlet or the outlet of the indoor and the
outdoor units?
● Is the temperature setting appropriate?
● Are the windows and doors closed?
● Are the air flow rate and the air direction set appropriately?
● Are the air filters clean?
● Is there anything to block the air inlet or the outlet of the indoor and the
outdoor units?
Clean the air filters or take all obstacles away and turn the breaker OFF.
Then turn it ON again and try operating the air conditioner with the remote
controller. If the lamp still blinks, call the service shop where you bought the
air conditioner.
● Are operation modes all the same for indoor units connected to outdoor
units in the multi system?
If not, set all indoor units to the same operation mode and confirm that the
lamps blink.
If the lamps stop blinking after the above steps, there is no malfunction.
An abnormal functioning
happens during operation.
● The air conditioner may malfunction with lightening or radio waves. Turn the
breaker OFF, turn it ON again and try operating the air conditioner with the
remote controller.
19
Page 21

Trouble Shooting
●●
● Call the service shop immediately.
●●
WARNING
■ When an abnormality (such as a burning smell) occurs, stop operation
and turn the breaker OFF.
Continued operation in an abnormal condition may result in troubles,
electric shocks or fire.
Consult the service shop where you bought the air conditioner.
■ Do not attempt to repair or modify the air conditioner by yourself.
Incorrect work may result in electric shocks or fire.
Consult the service shop where you bought the air conditioner.
If one of the following symptoms takes place, call the service shop immediately.
■
The power cord is abnormally hot or damaged
■
An abnormal sound is heard during operation.
■
The safety breaker, a fuse, or the earth leakage
breaker cuts off the operation frequently.
■
A switch or a button often fails to work properly.
■
There is a burning smell.
■
Water leaks from the indoor unit.
.
Turn the breaker
OFF and call the
service shop.
■ After a power failure
The air conditioner automatically
resumes operation in about three
minutes. You should just wait for
a while.
■ Lightning
If lightning may strike the
neighbouring area, stop operation
and turn the breaker OFF for
system protection.
We recommend periodical maintenance
In certain operating conditions, the inside of the air conditioner may get foul
after several seasons of use, resulting in poor performance. It is recommended
to have periodical maintenance by a specialist aside from regular cleaning by
the user. For specialist maintenance, contact the service shop where you
bought the air conditioner.
The maintenance cost must be born by the user.
20
Page 22

3P111151-4 M02B248 (0303)
HT
 Loading...