

Page 1
Instruction manual
UK
English
Video recorder
For model number, see the front display of your video
This manual covers the ‘VQ’ range.
The following standard functions are available on this set.
NTSC playback See page 14
MESECAM tape playback See page 14
Index scan See page 15
Wide-screen pictures See page 16
Commercial skip See page 16
High-speed rewind
See back cover for quick-start guide
Helpline number: 0118 925 2605
With queries, please quote the page number, reference number and model number.
Clarity
approved by
Plain English Campaign
Crystal
Mark
4156
Page 2
Precautions
WORTH
knowing
Please keep the video's guarantee sheet (pages 29 and 30) and receipt for your video
in a safe place.
◆ Read this booklet carefully.
◆ Make sure the rating of your household electricity supply matches
that shown on the back of the video recorder.
◆ Read this chapter and the "Setting up your video" chapter to help
you set up and adjust your video recorder.
◆ Do not put the video recorder in a hot or humid place (to avoid the
risk of fire and electric shock).
◆ Do not open the video recorder. Get a qualified technician to carry
out any repairs.
◆ Do not connect the video recorder to the power supply if you have
just moved it from a cold environment to a warm room. This can
lead to condensation inside the video which can seriously damage
the video and cassettes. Wait around two hours to allow it to reach
room temperature.
◆ Put the video on a steady, flat surface.
◆ Make sure there is good ventilation all around the video.
◆ Only clean the video with a soft, lint-free cloth. Do not use harsh or
alcohol-based cleaning agents.
For your own safety!
◆ There are no components in this video recorder you can
service or repair yourself.
◆ Do not open the case of the video recorder. Only allow a
qualified engineer to repair or service your video.
◆ This video recorder is designed to work continuously.
Switching it off (onto stand-by) does not disconnect it
from the mains. To disconnect it from the mains, you
have to unplug it.
The power cable must be fitted with a fused plug
approved by ASTA or BSI to BS 1362 and provided with a
5A fuse.
The fuse cover must always be securely replaced. If the
video recorder is not working, the fuse may need
replacing (see also “Electrical connection” on page 26).
5A
5A
Chrissie Maher OBE, MA
Founder and Director, Plain English Campaign
Clarity
approved by
Plain English Campaign
Crystal
Mark
“People are always telling me that instructions for using electrical goods are the most difficult to understand. We have
worked closely with Daewoo to make these instructions crystal clear. I hope this instruction book helps you to use your new
video. We would be interested to hear your views.
Please write to us at PO Box 3, New Mills, High Park, England. SK22 4QP”.
AUTO SET
OP EJECT
CH.
Page 3

3
Contents
Before you do anything with the video, please read
the chapter "Setting up the video".
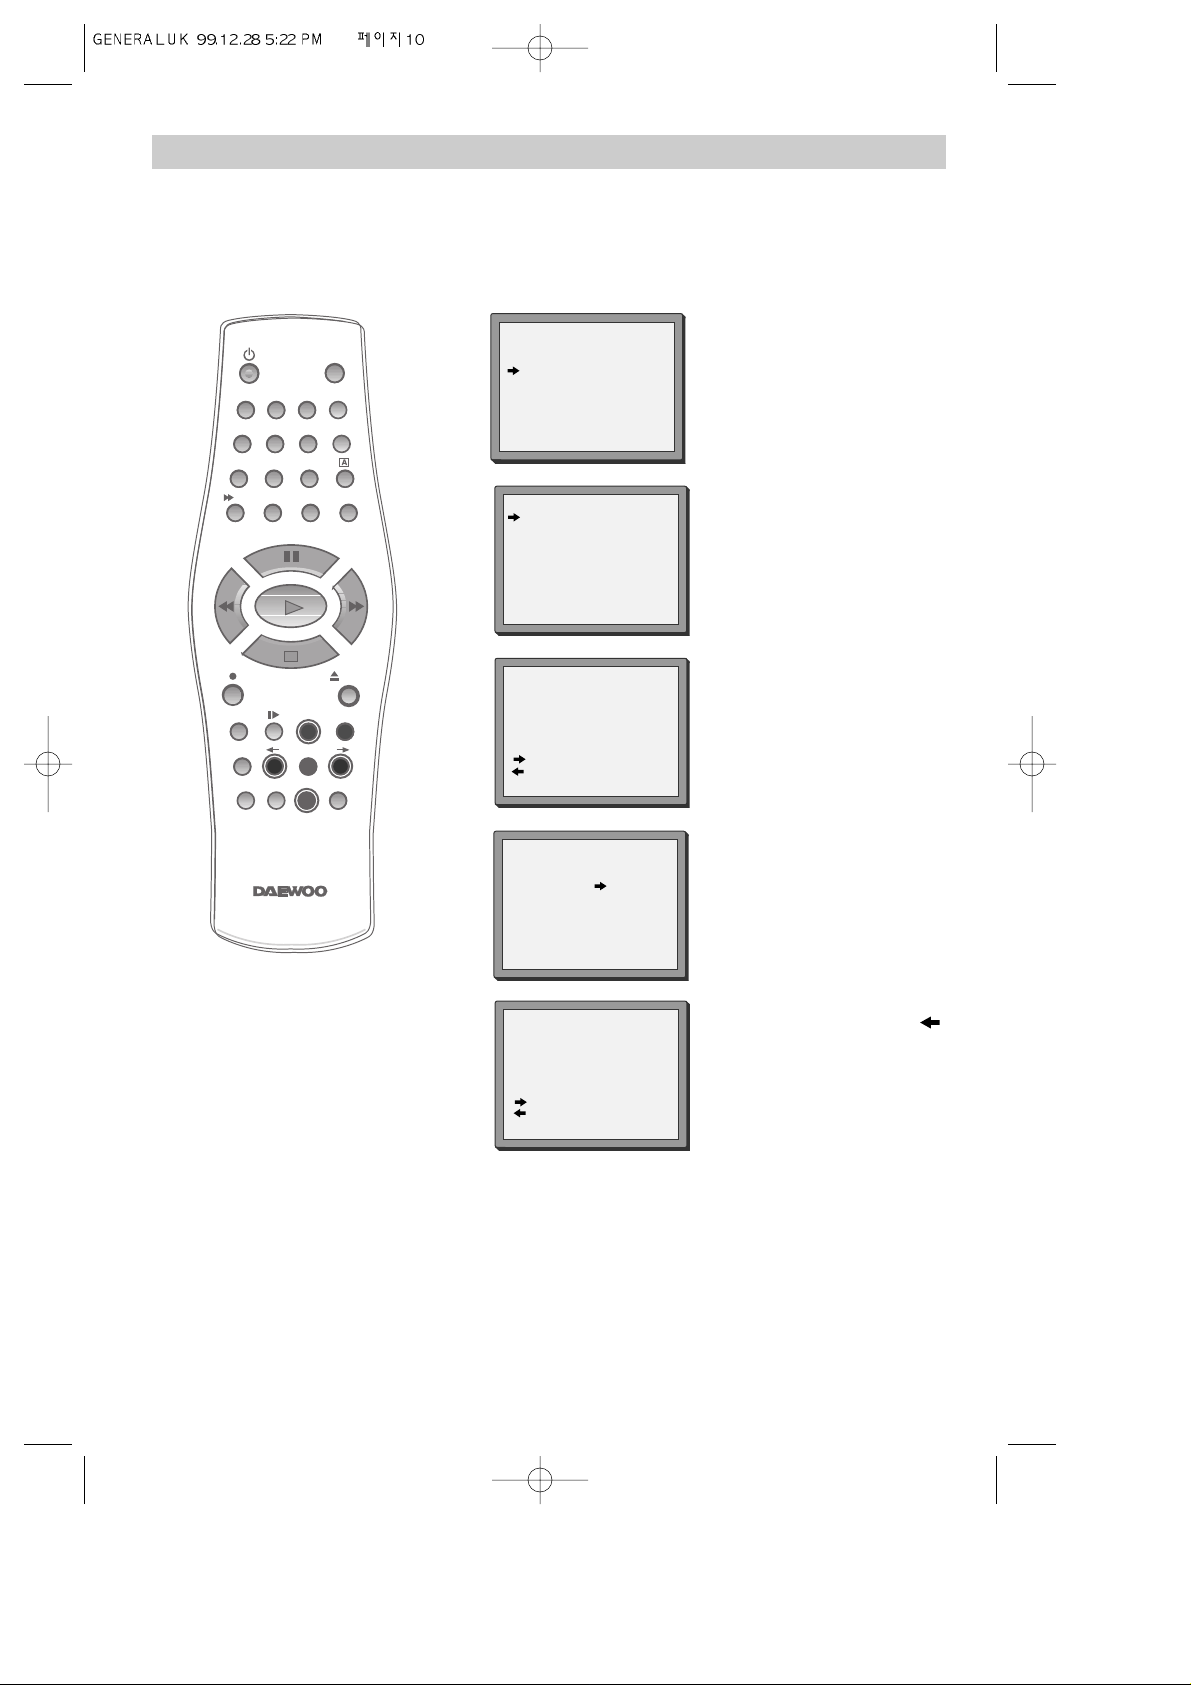
◆ On the following pages, the pictures show the buttons you need to press on the remote
control and what you should see on the television screen or video display.
Setting up the video
Connecting your video through RF lead, Connecting your video through a scart lead ............... 4
Connecting your video to the satellite system, Connecting your video
to the hi-fi system (Option 1),
Connecting your video to the hi-fi system (Option 2) .................................................................. 5
How to connect your video to another video, How to connect your video
to a camcorder .............................................................................................................................. 6
Tuning to the TV using an antenna cable (RF cable), What to do if you
get picture interference ................................................................................................................ 7
Tuning your video recorder to the television, setting time and date .......................................... 8
Decoder or 2nd scart socket ........................................................................................................ 9
Tuning in new stations
Manual tuning..............................................................................................................................10
Station names...............................................................................................................................11
Sorting programme locations, Clearing programme locations................................................... 12
Front panel controls, Digital Shuttle ...........................................................................................13
Playing cassettes
Play ..............................................................................................................................................14
Still, Variable picture search, Variable slow motion,
Finding new recordings (index scan) .......................................................................................... 15
16:9 Wide Screen format, CM skip (commercial skip)...............................................................16
Remote lock................................................................................................................................. 17
Recording cassettes
Simple recording, One touch recording-OTR ............................................................................. 18
Recording cassettes, Timer recording using VideoPlus+ ........................................................... 19
Normal timer recording .............................................................................................................. 20
Timer review – changing and erasing record settings ............................................................... 21
More functions
Clock and counter display, Remaining time and cassette length,
Finding the counter zero position, Resetting the counter to zero ............................................ 22
Cassettes, Power-saving features ............................................................................................. 23
Choice of sound output................................................................................................................24
The hi-fi system, What you can listen to.....................................................................................25
Connections and copying
Electrical connection .................................................................................................................. 26
Moulded Plugs............................................................................................................................. 27
Appendix
Index, Technical information ....................................................................................................... 28
warranty card .............................................................................................................................. 29
Problem-solving guide ................................................................................................................ 31
Quick-start guide ............................................................................................................back cover
Page 4
4
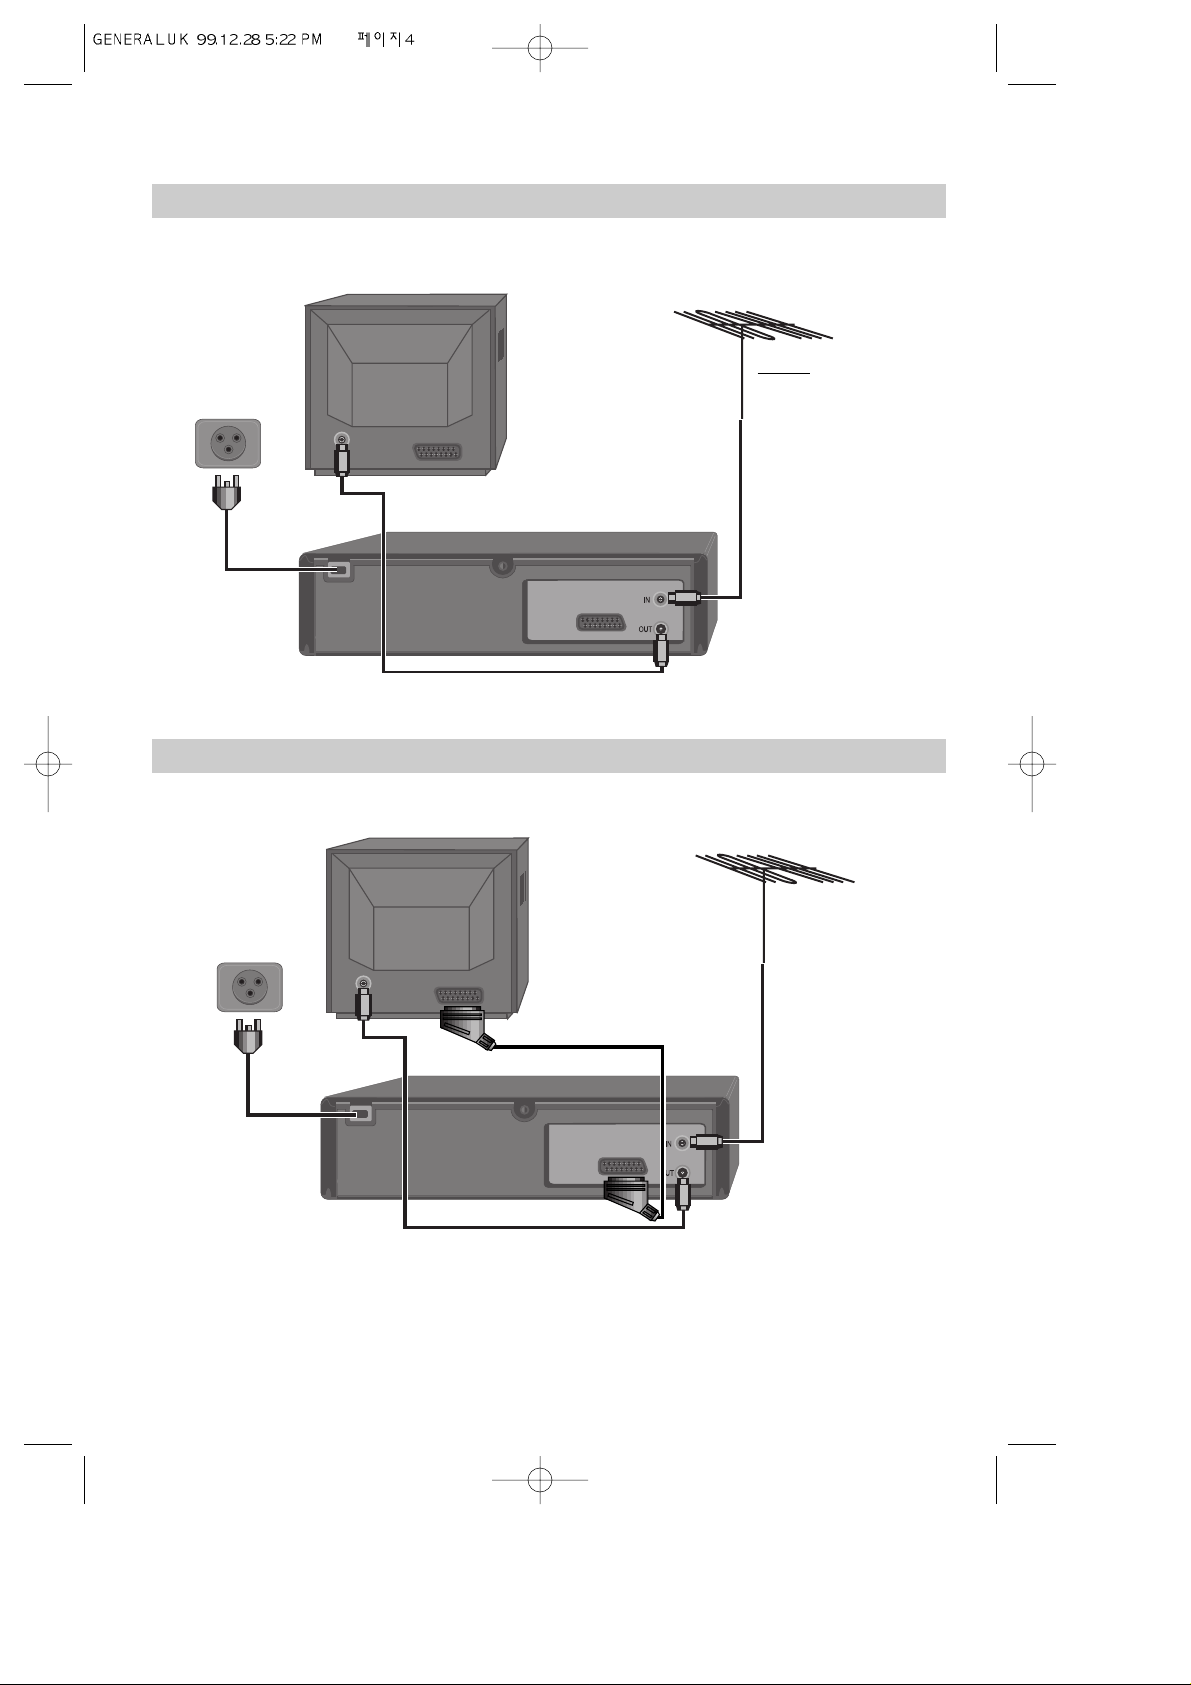
Setting up your video (Option 1) - Connecting your video through RF lead
Before you start, unplug all the equipment from the mains supply.
Television
Aerial
The type of aerial
depends on local
interference and how far
you are from the
transmitter. You should
contact a local electrical
if you have any questions
about your aerial.
Back view of your VCR
This lead is supplied in your accessory kit.
Setting up your video (Option 2) - Connecting your video through a scart lead
Television
Aerial
Scart lead (If supplied)
With this connection, if your VCR is receiving BBC1 and your TV is showing CH4, when you press the TV/VCR button on
the remote control, your TV will automatically display BBC1.
In most cases you will not be able to change channels using the controls on your TV until you turn this
feature off by pressing TV/VCR on your remote control.
You will get better picture and sound quality if you connect your video with a scart lead.
AC 230V
50 Hz
AC 230V
50 Hz
Put the batteries into the remote control. Make sure the (+) and (-) signs on the batteries agree with the (+)
and (-) signs in the battery compartment.
If you have connected your video as shown in option 1, turn to page 7.
1
2
Before you start, unplug all the equipment from the mains supply.
If you have connected your video as shown in option 2, turn to page 8.
Page 5
5
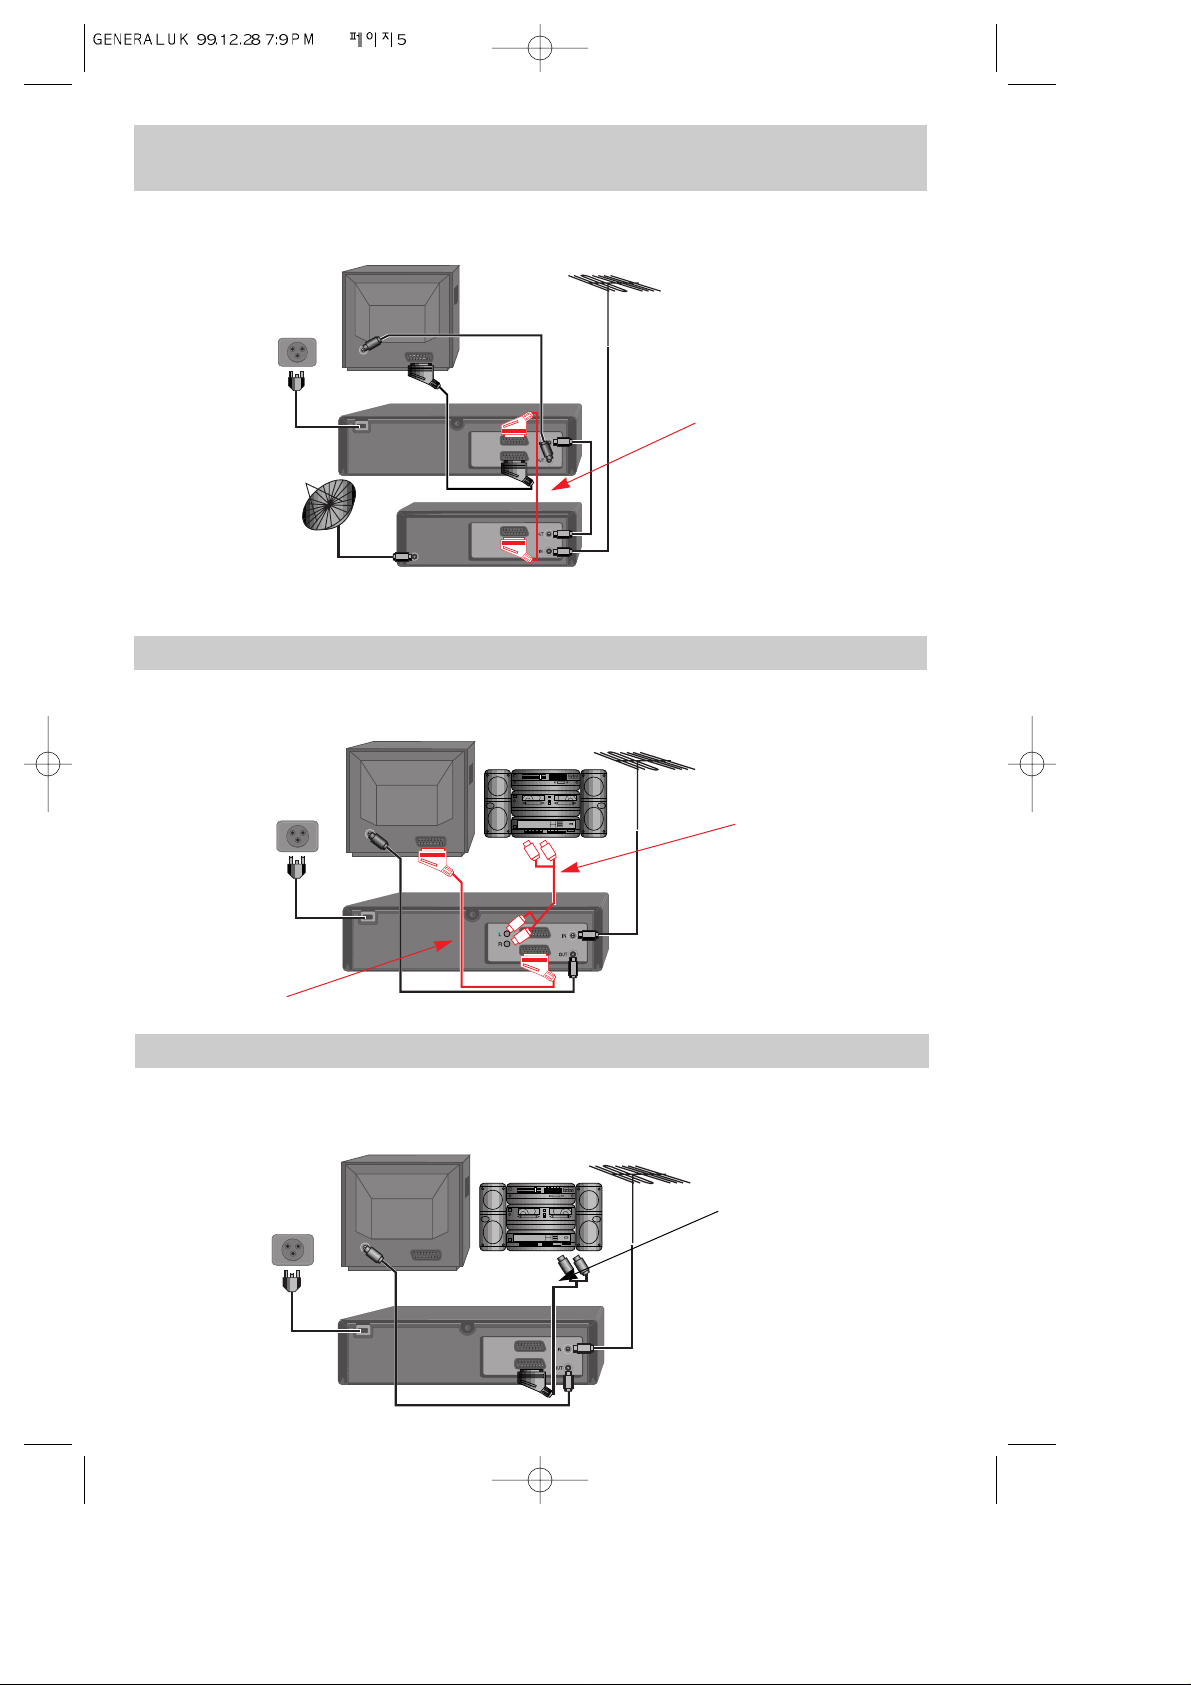
Connecting your video through extra equipment
Connecting your video to the satellite system
Before you start, unplug all the equipment from the mains supply.
Television
You can use this connection
if your video has two scart
sockets. This will improve
sound and picture quality
when you are recording from
satellite.
To use this function, see
page 9.
Video
AC 230V
50 Hz
Make sure the satellite receiver is switched to Sky One.
3
Satellite
Connecting your video to the hi-fi system - Option 1
Before you start, unplug all the equipment from the mains supply.
Television
Plug a phone cable into
‘Audio L/R’ socket on the
back panel and into the
audio socket on any
audio amplifier, if
needed. If your video
does not have this
connection, see below
(Option 2).
Video
AC 230V
50 Hz
You can also use a scart lead to improve picture and sound quality from your video.
4
Hi-Fi
Aerial
Aerial
Connecting your video to the hi-fi system - Option 2
Before you start, unplug all the equipment from the mains supply.
Television
Plug a scart to phone
cable into the ‘AV1’
socket on the back panel
and into the audio socket
on any audio amplifier, if
needed.
Video
AC 230V
50 Hz
5
Hi-Fi
Aerial
Page 6
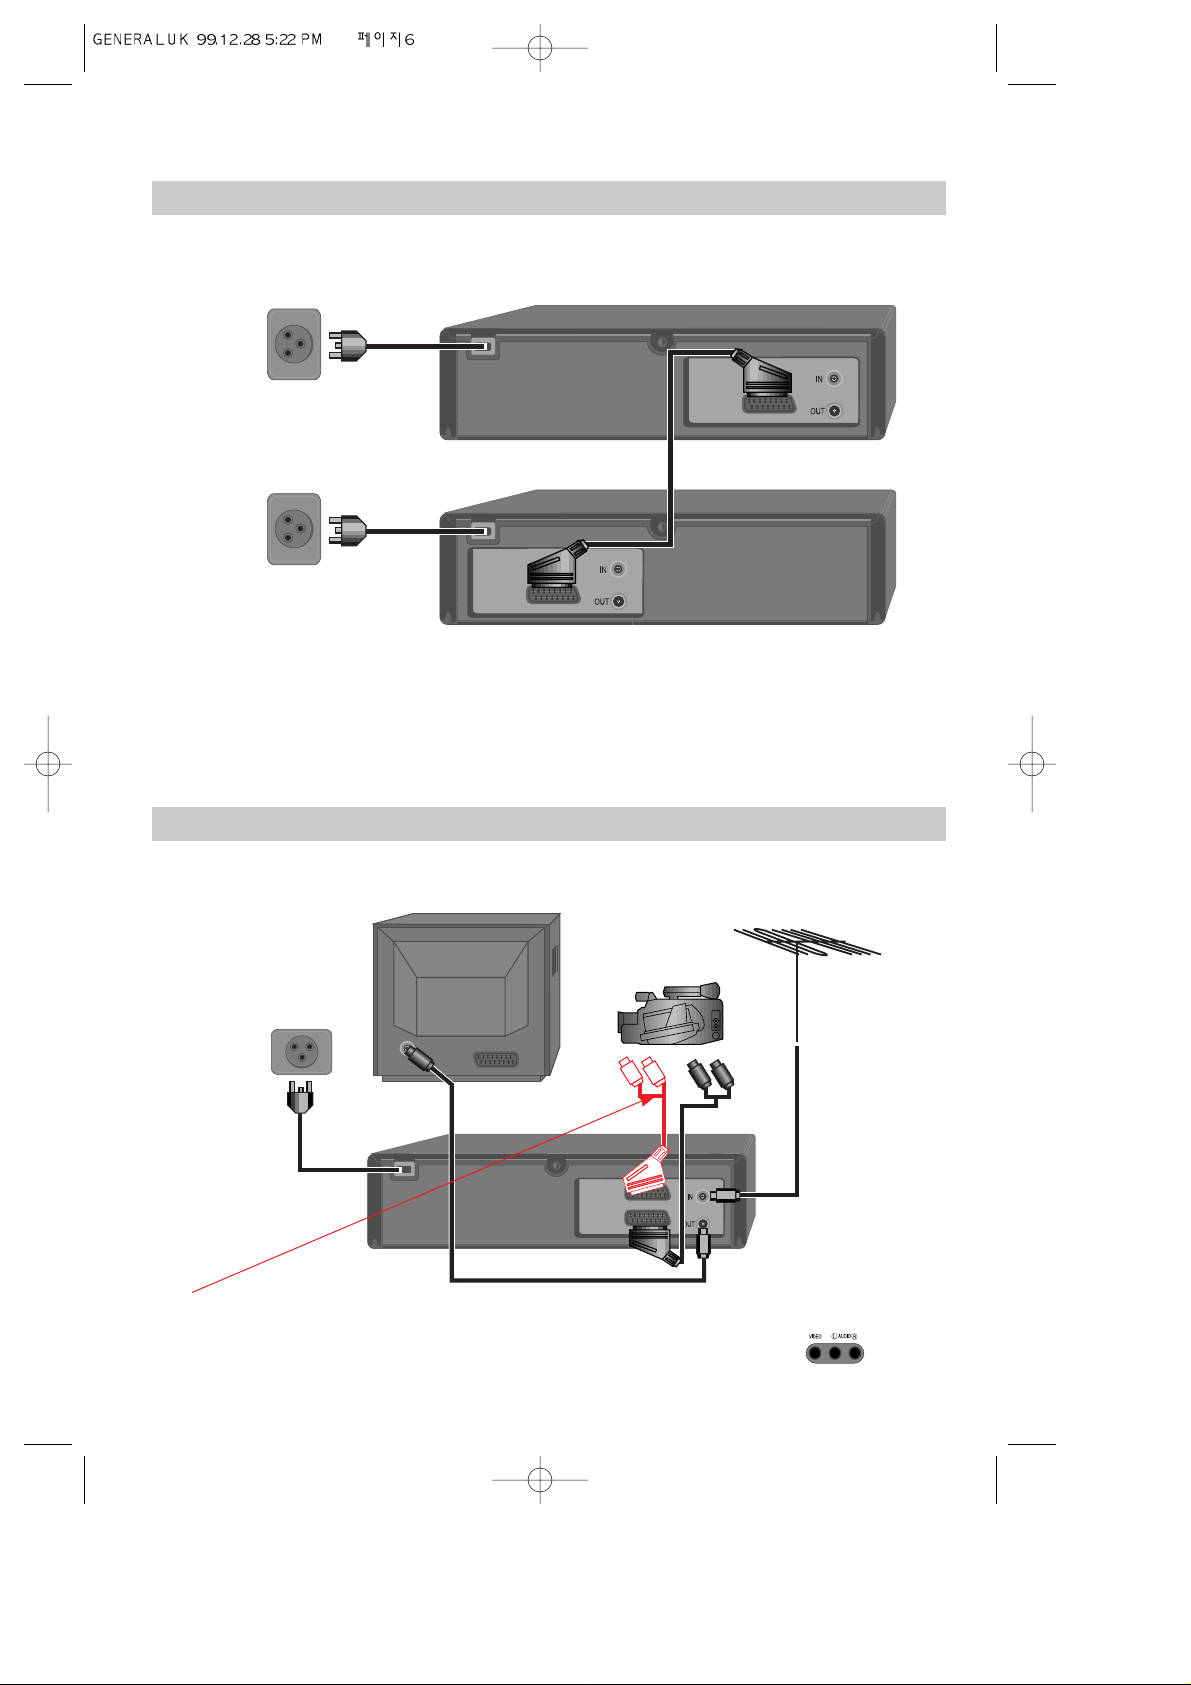
6
How to connect your video to another video
Before you start, unplug all the equipment from the mains supply.
First video
Second video
AC 230V
50 Hz
1) Insert the tape you wish to record on into the first video and press AV until ‘AV1’ appears on the front display.
2) Insert the tape you wish to record from into the second video. Press the play button on the second video.
3) Press the record button on the first video
The video will start recording.
If your video has two scart sockets, you can use the other socket ‘AV2’ to connect other equipment. To use
this function, see page 9.
6
AC 230V
50 Hz
How to connect your video to a camcorder
Before you start, unplug all the equipment from the mains supply.
Camcorder
Aerial
AC 230V
50 Hz
If you have connected your video in this way, you can also connect a scart lead from ‘AV2’ on the back panel of the
video to the television. To use this function, see page 9.
You can also connect the camcorder by using a phone cable if your video has front input sockets. Check
the front of your video for this connection.
7
Television
Video
or
Page 7
7
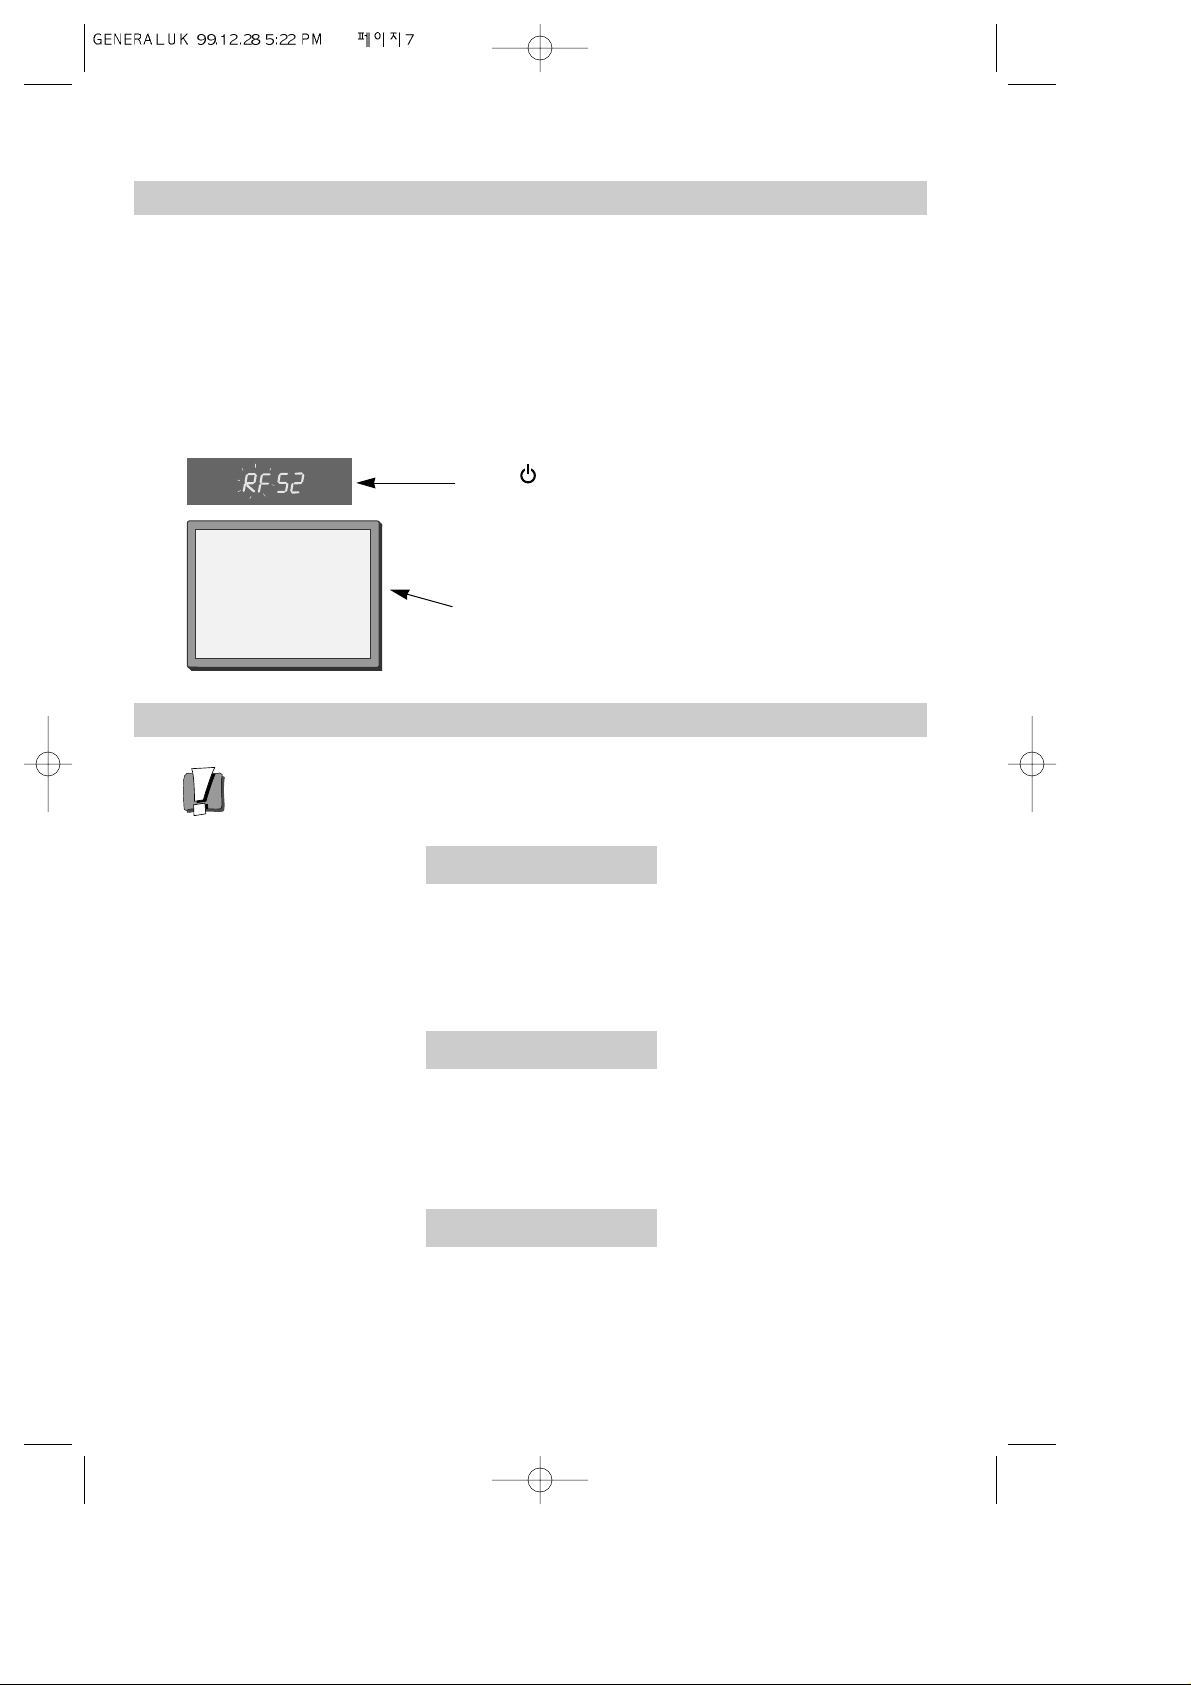
Tuning your video to the TV using an antenna cable (RF cable)
If you have connected your video through the scart connection (diagram 2 on page 4), go to page
8.
Use the following method to tune your video in if you have connected it through RF cable (as
shown in diagram 1 on page 4)
Once you have carried out the steps in ‘Setting up your video’ (diagram 1 on page 4), switch on
your TV.
Press on the remote control and RF52 will be
displayed on the front of your video.
Tune the TV, using the pre-set functions on your TV as
described in its manual, until you see a blue ‘Auto Set’ or
‘Auto Search’ screen. Store this setting on the TV and go
to page 8.
1
2
Auto Set or Auto Search!
OK:confirm MENU:end
What to do if you get picture interference
Option 1
a You can use the number buttons on the remote control to change RF52 to 21, and re-tune the
unused channel station on your TV for video input.
b If you still get interference, adjust the number in steps of 2 (for example, 21 to 23, 23 to 25).
c You can change the RF output from 21 to 69. If you still get interference, try option 2.
The RF output can be adjusted from 21 to 69. If other broadcasts are causing
picture interference, you can change the RF output until your television has a
noise-free channel for your video.
Option 2
a Contact your local broadcaster to find the correct RF output. Change this by pressing the
number buttons on the remote control.
b Re-tune the unused channel station on your TV for video input. If you still get interference, try
option 3.
Option 3
Buy a scart lead from your local electrical shop. Connect the scart lead as shown on page 4,
diagram 2.
If you want to change the RF output in the future due to new broadcasting stations or equipment and so on, press and
hold the OK button on the remote control until RF 52 is displayed on the front of the video. Then go to option 1 above.
Page 8
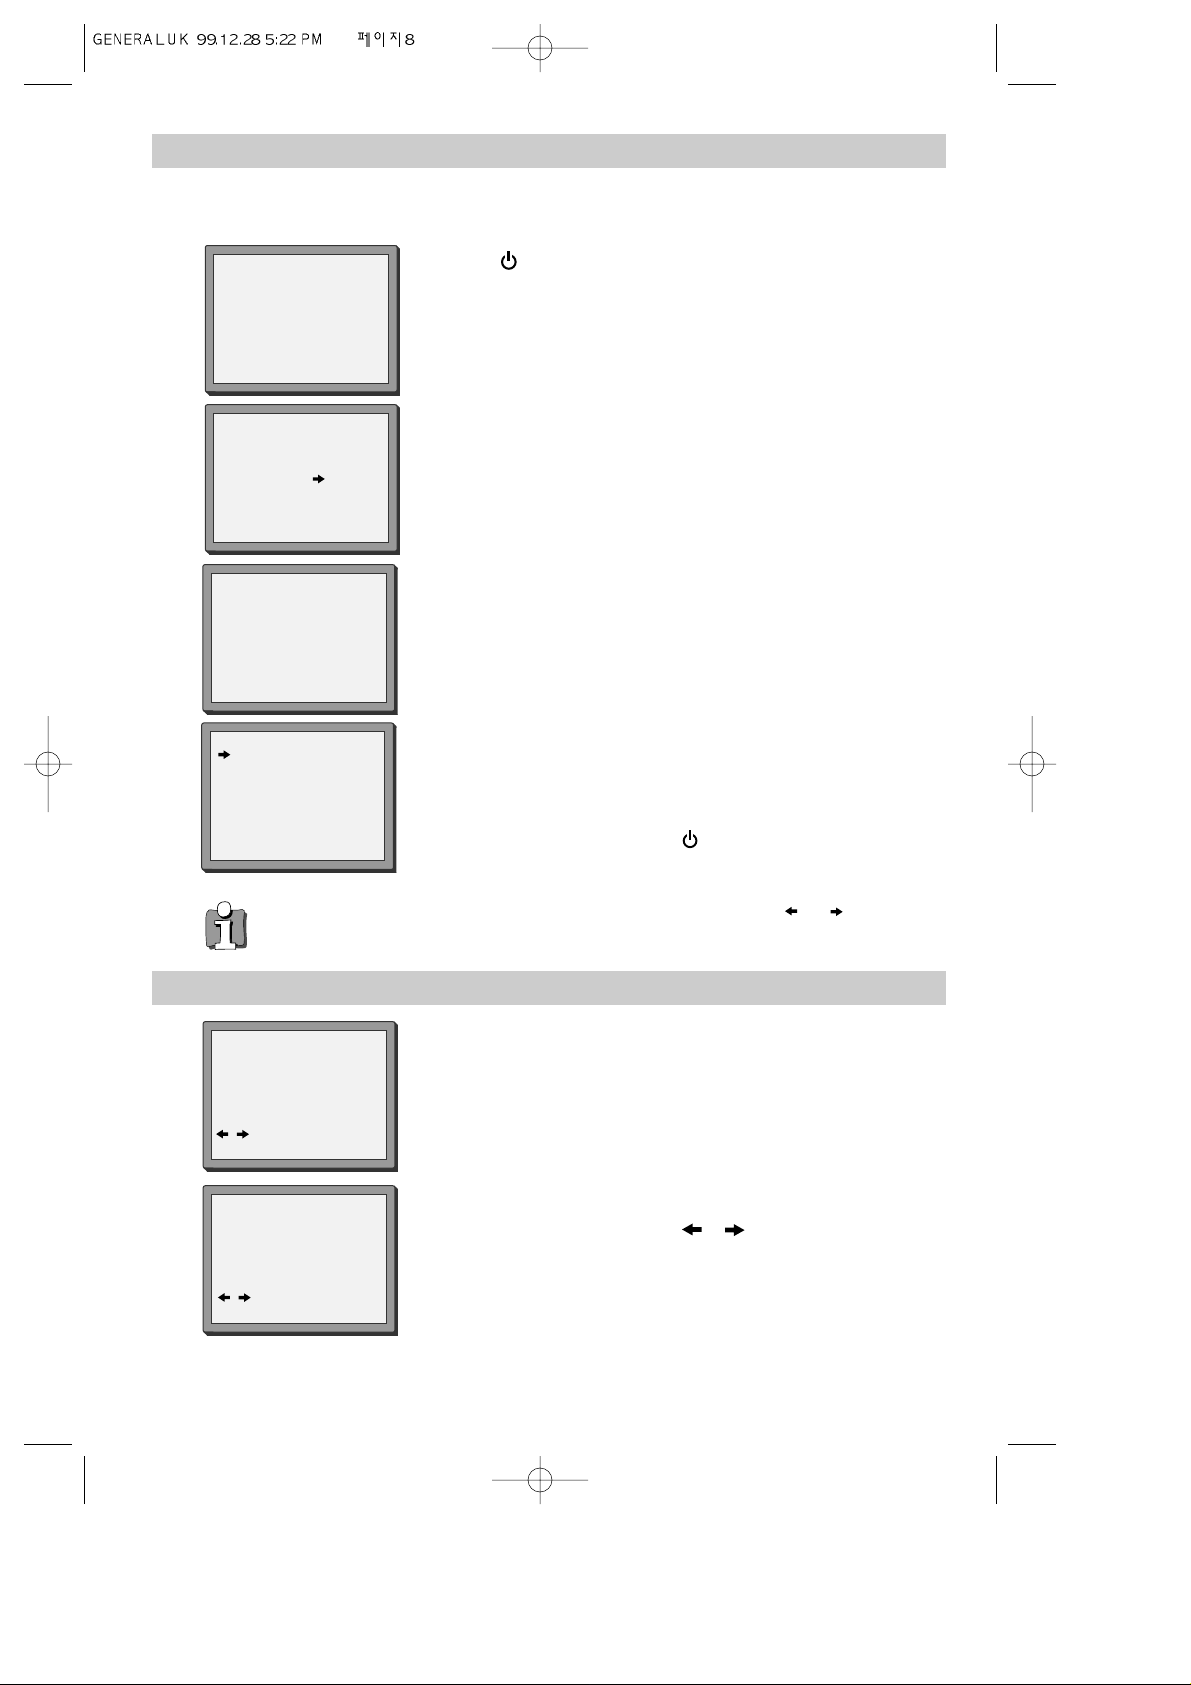
8
Tuning your video recorder to the television
‘Auto set’ only will appear on your screen if your video has this function.
‘Auto search’ only will appear on your screen if your video has this function.
1
Auto Set or Auto Search!
OK:confirm MENU:end
Press on your remote control.
If you do not see this picture, check that the video is
connected properly.
Press OK for ‘Auto Set’ or ‘Auto Search’.
Unless you are living in an area with poor reception, ‘Auto Set’ or ‘ Auto
Search’ tunes in all the stations you can receive in your country and sorts
them in a common order, for example, BBC1 on programme 1, BBC2 on
programme 2 and so on.
See page 11 and page 12 if you need to change any of the automatic
settings. You should finish stage 4 before you go to page 11 or page 12.
The clock is also set automatically. If the clock has not been set, the clock
setting screen will appear.
Please see “ Setting time and date” below.
If you want to change the station names, see page 11.
If you want to change the programme locations see page 12. You need to
change programme locations if the stations are not in order, for example,
BBC1 on programme 1, BBC2 on programme 2 and so on.
Press MENU to end.
• The video’s automatic tuning system usually gets the best results. In poor reception areas, fine
tuning may improve reception. Choose the station and tune it using the and buttons. Use
the number buttons on the remote control to enter the programme number you want to store the
station on.
AUTO SET or AUTO SEARCH
MENU:end
PR03
UHF - - - - - - - - - - - - - -
76%
Setting
Please wait...
AUTO SET or AUTO SEARCH
MANUAL SET
PR01 P-01 PR08 P-08
PR02 P-02 PR09 P-09
PR03 P-03 PR10 P-10
PR04 P-04 PR11 P-11
PR05 P-05 PR12 P-12
PR06 P-06 PR13 P-13
PR07 P-07 PR14 ----
PR+/-:select
OK:confirm MENU:end
2
Important : If you switch the video off at the mains supply overnight, you do not
have to retune the video. Simply press and then MENU on the remote control
to restore all the programme settings See below to set the time and date.
3
4
If the ‘CLOCK SET’ display is not already on the screen press MENU.
Choose ‘VCR SET UP’ by pressing PR- twice, then press OK.
Choose ‘CLOCK SET’ by pressing OK.
CLOCK SET
0-9:setup(hour)
/ :correct
OK:confirm MENU:end
CLOCK SET
0-9:setup(minute)
/ :correct
OK:confirm MENU:end
Time 11:41
Date 20/09/1999(MON)
Time 11:41
Date 20/09/1999(MON)
Setting time and date
1
2
Once the ‘CLOCK SET’ display is on the screen, move to the position
you want to change by pressing or .
Use the number buttons 0 to 9 on the remote control to enter the
correct time and date.
3
Press OK to confirm the settings, and press MENU to end.
Page 9
9
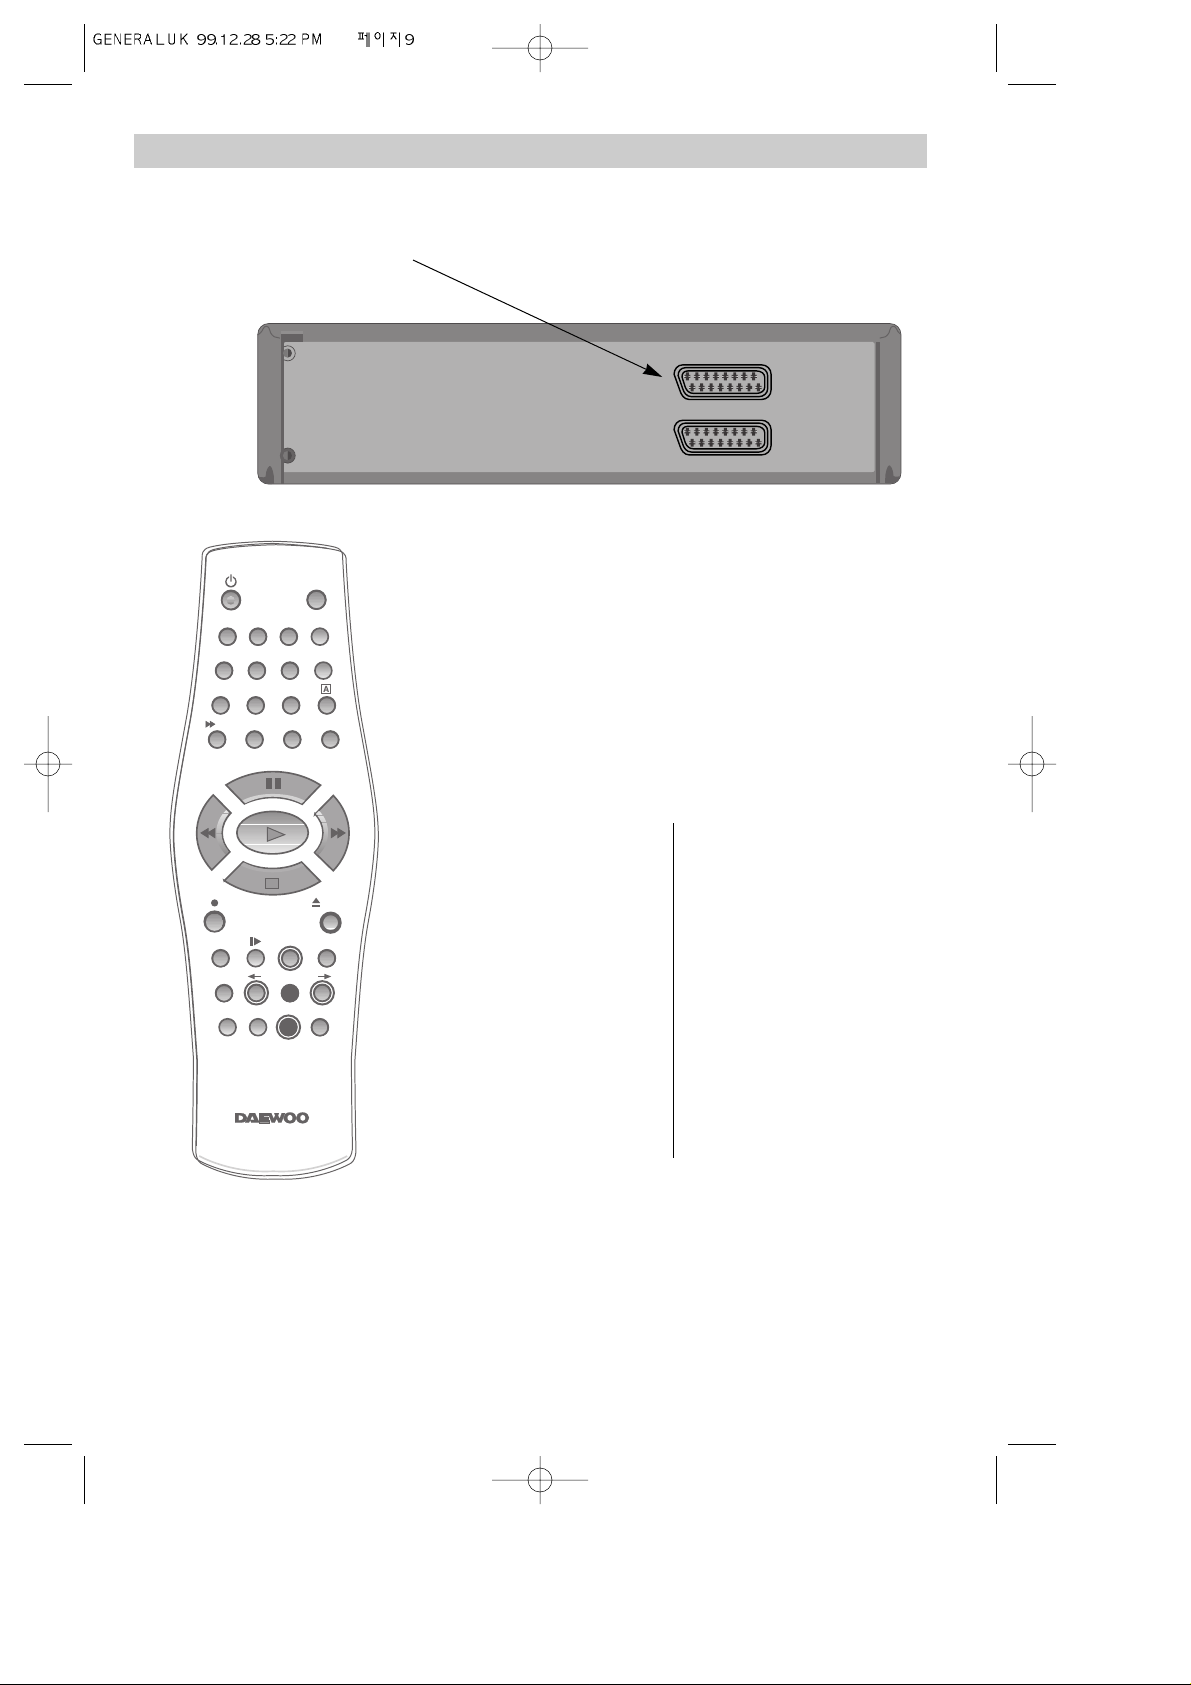
Decoder or 2nd scart socket
If your video has the output, shown in the diagram below, you can connect other equipment as
seen on pages 5 and 6.
2nd scart
SV/V+
PAL/SEC
Tuning equipment to the video.
Press MENU and choose ‘VCR Setup’ by pressing PR- twice
then OK.
Choose ‘2nd SCART Set’ by pressing PR- twice then OK.
Extra equipment
AV2
For example, camcorder,
another video or a satellite
system.
Choose ‘AV2’ by pressing OK.
Press MENU to end.
Press the AV button until
‘AV2’ appears on the front
display.
Pay TV equipment
Decoder
For example a satellite or
cable system.
Choose ‘Decoder’ by pressing
PR- then OK.
Press MENU to end.
Decoder mode : In this mode when your satellite or cable system is
switched on, it controls your video. Satellite and cable systems can also
work in AV2 mode. In this case put your video into AV2 to watch or record
satellite or cable television.
Read your satellite decoder and TV instruction manuals to get the
best connections for your home entertainment system.
1
2
TV/VCR
3
4
5
6
A
V
7
8
9
00
3
QSA.D
SP/LP
–
INDEX
EJECT
PR
+
MENU
OK
+
PR
–
A.SEL
Page 10
10
SV/V+
PAL/SEC
Manual tuning
Manual tuning allows you to tune in new stations or equipment such as a satellite receiver and so on.
When your video is in certain AV modes you cannot use ‘PR Preset’. Press AV until P-_ _ is displayed on
the front of the video.
1
Press MENU.
Choose ‘PR Preset’ by
pressing PR- then OK.
Choose ‘Manual Set’ by
pressing PR- then OK.
Press PR+ or PR- to select
any programme number that
is not being used, for example
‘----’ or ‘P-xx’.
Press OK to confirm.
Press PR+ or PR- to tune in
the station you want.
When ‘Manual Set’ comes back
on the screen, press and hold
button to see the picture.
If it isn’t the station you want, or the
picture is of poor quality, carry on
tuning by pressing PR+ or PR-.
Press OK to store the picture you want.
Tune in other stations (by following step 3
onwards) or press MENU to leave the tuning
mode.
PR PRESET
Auto Set
Manual Set
PR Erase
PR Align
PR+/-:select
OK:confirm MENU:end
MANUAL SET
PR01 BBC1 PR08 SKYS
PR02 BBC2 PR09 MTVE
PR03 ITV PR10 P-10
PR04 CHA4 PR11 P-11
PR05 SKY1 PR12 ---PR06 SKYN PR13 ---PR07 SKYM PR14 ----
PR+/-:select
OK:confirm MENU:end
MANUAL SET
PR29 P-29
PR+/-:search up/down
: name correct
: PR view
OK:confirm MENU:end
MANUAL SET
PR+/-:search up/down
MENU :end
PR29
UHF ----------- -----
68%
MANUAL SET
PR+/-:search up/down
:name correct
:PR view
OK:confirm MENU:end
PR29 P-29
2
3
4
5
6
These buttons are used
on the following two
pages.
Your video has 99 available channel slots. IT will only store programmes that are available in
your area. You can tune in other stations in any channel slot that is not already being used.
SP/LP
1
2
TV/VCR
3
4
5
6
A
V
7
8
9
00
3
QSA.D
EJECT
PR
+
MENU
OK
+
PR
–
INDEX
–
A.SEL
Page 11

11
Station names
If your video is showing no station name or is showing a station name incorrectly, you can change this.
When your video is in certain AV modes you cannot use ‘PR Preset’. Press AV until P-_ _ is displayed on
the front of the video.
1
Press MENU.
Choose ‘PR Preset’ by pressing PR- then OK.
Choose ‘Manual Set’ by pressing PR- then OK.
Move to the details you want to correct by pressing PR+ or PR-
then OK.
Select ‘name correct’ by pressing .
Use PR+ or PR- to select the name from the stored list or
select ‘name create’ again and enter a four-digit name.
To enter a four-digit name, change the letters with the PR+ or
PR- buttons, or move to the next letter with the or
buttons.
Press OK to confirm and
MENU to end.
MANUAL SET
PR29 P-29
PR+/-:search up/down
: name correct
: PR view
OK:confirm MENU:end
2
3
4
MANUAL SET
PR+/-:name change
:name correct
OK:confirm MENU:end
PR01 E-01
MANUAL SET
PR01 BBC1 PR08 SKYS
PR02 BBC2 PR09 MTVE
PR03 ITV PR10 P-10
PR04 CHA4 PR11 P-11
PR05 SKY1 PR12 ---PR06 SKYN PR13 ---PR07 SKYM PR14 ----
PR+/-:select
OK:confirm MENU:end
The video’s automatic tuning system usually gets the best results. In poor reception
areas, fine tuning may improve reception. Choose the station and tune it in using
the and buttons. Use the number buttons on the remote control to enter the
programme number you want to store the station on.
Page 12

12
SV/V+
PAL/SEC
Sorting programme locations
Sorting programme locations allows you to put the video programme in the same order as your TV.
When your video is in certain AV modes you cannot use ‘PR Preset’. Press AV until P-_ _ is displayed on the
front of the video.
1
Press MENU.
Choose ‘PR Preset’ by pressing PR- then OK.
Choose ‘PR Align’ by pressing PR+ then OK.
Press PR+ or PR- to select the
programme you want to swap.
Confirm by pressing the OK
button.
Press PR+ or PR- to move the
station to the program number
you want to store it on.
Confirm with the OK button.
Press MENU to end.
2
3
PR ALIGN
PR+/-:align
:PR view
OK:confirm MENU:end
PR01 BBC1 PR08 SKYS
PR02 BBC2 PR09 MTVE
PR03 ITV PR10 P-10
PR04 CHA4 PR11 P-11
PR05 SKY1 PR12 ---PR06 SKYN PR13 ---PR07 SKYM PR14 ----
Clearing programme locations
Clearing programme locations allows you to erase any stored programmes you
no longer want.
When your video is in certain AV modes you cannot use ‘PR Preset’.
Press AV until P-_ _ is displayed on the front of the video.
1
Press MENU.
Choose ‘PR Preset’ by pressing PR- then OK.
Choose ‘PR Erase’ by pressing PR+ twice and
then OK.
Press PR+ or PR- to select the
station you want to clear.
Press OK to confirm.
Press and hold to watch
the picture.
2
3
PR ERASE
PR+/-:select
:PR view
OK:erase MENU:end
PR03 P-03
IMPORTANT!
The ‘OK’ button will
erase this PR.
PR01 BBC1 PR08 SKYS
PR02 BBC2 PR09 MTVE
PR03 ITV PR10 P-10
PR04 CHA4 PR11 P-11
PR05 SKY1 PR12 ---PR06 SKYN PR13 ---PR07 SKYM PR14 ----
:PR view
OK:confirm MENU:end
If you want to erase the
station, press OK.
Press MENU to end.
If you don’t want to erase the
station, press MENU.
These buttons are used
on the following two
pages.
SP/LP
1
2
TV/VCR
3
4
5
6
A
V
7
8
9
00
3
QSA.D
EJECT
PR
+
MENU
OK
+
PR
–
INDEX
–
A.SEL
Page 13

13
Front panel controls
The following buttons are on the front of your video.
Play
stand-by/ power on
Stop and eject
front input sockets for connecting a stereo camcorder (left and right
channels)
This is only available on some models. Check the front of your video to see if
this connection is available.
Change the station
Recording or one-touch record
Every time you press the button the recording time is increased by 30
minutes.
Rewind or fast forward a cassette from stop, or picture search
backwards or forwards if the video is playing a cassette.
Digital shuttle
Digital shuttle is available on models with the ‘power-drive shuttle’ knob, see picture above.
It allows controlled picture search for editing.
In stop mode
Turn the power-drive shuttle knob to make the cassette fast forward or rewind.
In play mode
Turn the power-drive shuttle knob to fast forward or rewind the cassette with pictures but no
sound.
Turn the power-drive shuttle knob by different amounts to speed up or slow down the picture
movement.
Page 14

14
Play
Push the cassette smoothly and squarely into the cassette bay, with its windows pointing up.
Playing cassettes
SV/V+
PAL/SEC
PLAY SP Hi-Fi
L+R
VCR
VCR
VCR
VCR
VCR
L R
L R
L R
L
R
L R
Start playback.
If you hear an unclear,
mixed sound output in
different languages, select
one of the sound options.
A.Sel is only available on some models. If this screen does not appear
when you press the button, A.Sel is not available on your video.
The screen will only appear if you use a hi-fi tape or play a hi-fi or
NICAM recording.
Stop playback.
Fast forward or rewind the
cassette from stop.
Eject the cassette.
These buttons are used
on the following two
pages.
• When you load a protected cassette such as pre-recorded film (see page 23) playback will start
automatically.
• When you are playing tapes of poor quality or tapes which have been recorded on another machine, you
can use the PR+ or PR- buttons while the cassette is playing to reduce horizontal interferences stripes.
• Playing NTSC tapes on PAL TV: If you play cassettes which have been recorded on the NTSC colour
system (as used in the USA), you can watch the pictures on most PAL TVs.
On older TVs, some black lines may appear at the top and bottom of the screen. The picture may also roll
up or down. To prevent these problems adjust the V-HOLD knob on your television.
NTSC : National Television Systems Committee.
• This video can also play MESECAM cassettes.
SP/LP
1
2
TV/VCR
3
4
5
6
A
7
8
9
00
3
V
QSA.D
A.SEL
EJECT
PR
+
MENU
OK
+
PR
–
INDEX
–
A.SEL
EJECT
Page 15

15
Still
PLAYING cassettes
There must be a cassette in the video.
VCR
Still picture from playback.
Each press of the button moves the picture on one frame.
The play display will blink during still mode.
Press the play button to switch back to normal playback.
After approximately five minutes on still, the cassette will automatically
switch to normal playback.
If the still picture is jumping, you can steady it by using the PR+ and PR-
button.
Variable picture search
VCR
+
VCR
-
Keep pressing to vary the forward search speed.
Keep pressing to vary the rewind search speed.
Press to switch back to normal playback.
Variable slow motion
VCR
Starting from playback you can keep pressing to control
slow motion speed in six steps.
Press to switch back to normal playback.
Finding new recordings (index scan)
The video index search system allows you to find the beginning of any recording you have made
on your video. Your video automatically records index marks on the tape whenever a recording is
started.
Press INDEX + or INDEX – to search forwards or
backwards.
The video will now wind to the beginning of a recording, play
it for about 6 seconds, then wind on to the next one.
When you see the recording you want to watch, press
PLAY.
FF SP
INDEX 01
0:11:09
+
INDEX
–
Page 16

16
16:9 Wide-screen format
16:9 Wide-screen format is only available through wide-screen broadcasts. Your TV must have
16:9 wide-screen function and you must connect your TV and video using an A/V scart lead. (See
page 4, diagram 2.)
SV/V+
PAL/SEC
1
Choose ‘16:9 set’ by pressing MENU. Press PR- twice then OK. Press PR+ then OK.
-ON : For recording and playing the programme
with 16:9 wide-screen format
-OFF : For recording and playing the programme with
4:3 normal TV format
2
3
VCR SETUP
Clock Set
RF Output Set
2nd Scart Set
16:9 set
PR+/-:select
OK:confirm MENU:end
16:9 SET
AUTO
OFF
ON
PR+/-:select
OK:confirm MENU:end
Press PR- to choose the setting you want, for example,
-AUTO, -ON or -OFF. Confirm the setting with OK.
•
16:9 Set
-Auto : This video will check whether the cassette is
recorded in wide screen format (16:9) or normal
TV format (4:3), and will play the cassette with
the appropriate format.
CM skip (commercial skip)
If you press ‘ 30 ‘ button on the remote control, the video will picture search
forward for 30 seconds.
SP/LP
1
2
TV/VCR
3
4
5
6
A
V
7
8
9
00
3
QSA.D
EJECT
PR
+
MENU
OK
+
PR
–
INDEX
–
A.SEL
Page 17

17
Remote lock
Press and hold the button until is displayed on
the front of your video.
Your video cannot be used, only timer recordings will
work.
Keep your remote control in a safe place. To release the
remote lock, press and hold until disappears
from the front display.
You can only set the remote lock with your remote control.
You can prevent anyone from using the controls on the remote control or the front display.
Page 18

18
Simple recording
SV/V+
PAL/SEC
Load a cassette with its safety tab
in place (see page 23).
Press to start your recording.
Press if you want to stop the
recording for a short while.
‘REC’ on the front display will blink.
Press to continue recording.
Press to stop your recording.
Press PR+ or PR- to choose the
station you want to record.
Press SP/LP if you wish to double
the length of the cassette’s
recording time.
For example, on an E-240 cassette you can
record for up to four hours when SL is
displayed, or up to eight hours when LP is
displayed.
STOP SP PR01 BBC1
STEREO ON
VCR
VCR
VCR
L R
L R
L R
L R
These buttons are used
on the following two
pages.
One-touch recording-OTR
VCR
TMR
L R
Press PR+ or PR- to choose the station you want to record.
Every time you press , the recording time will increase by 30
minutes. It is possible to record for up to 10 hours if there is
enough room on the cassette.
• To cancel OTR press and hold the STOP button for about five seconds until the video stops
recording.
• If you want to record from other equipment that is connected to your video, see pages 5, 6 and
9.
2
1
4
7
3
TV/VCR
3
5
6
8
9
00
A
V
EJECT
QSA.D
PR
+
OK
+
PR
–
SP/LP
INDEX
–
MENU
A.SEL
Page 19

19
Recording cassettes
◆ If you want to use the video’s timer to record a programme, the clock, date and stations must be set correctly.
◆ Load a cassette with its safety tab in place (see page 23) and with enough free tape for the recording.
Timer recording using VideoPlus+
VideoPlus is an automatic system which makes it easier to set the timer.
Press SV/V+ to select the VideoPlus screen. (If this button is not
on your remote control, the function is not available on your
video. Go to page 20).
Videoplus numbers are shown in TV guides.
From your current TV guide, type in the number next to the
programme you want to record using the number buttons 0-9.
Press OK to confirm.
1
VideoPlus
0-9:VideoPlus number
:correct
OK:confirm MENU:end
VideoPlus Number
83077----
TIMER PROGRAM (Once)
PR 03
Start Time 21:20
End Time 22:20
Start Date 20/09(MON)
Tape Speed LP
PDC ON
/ :correct
OK:confirm MENU:end
How often do you want
to record this program?
PR+/-:select
OK:confirm MENU:end
Once
Weekly(Once a Week)
Daily(Mon-Fri)
Daily(Mon-Sat)
Daily(Mon-Sun)
TMR
2
Press PR+ or PR- to select how often you want to make the
recording, for example, once, weekly and so on.
Press OK to confirm.
If you wish to changes any details:
Move to the details you want to change using the / buttons.
Change the setting using the PR+ or PR- or number buttons 0-9.
If all the settings are correct, press or until you see
‘OK:confirm’ on the button line of the screen. Press OK to
confirm.
3
4
Press to switch your video off. Your video will not record
unless you do this.
You can switch the video on again if you want to set the timer to record
another programme. Remember to switch the video off when you have finished
setting the timer.
If PDC does not appear on the screen, it is not available on your video. PDC= Programme Delivery Control.
• PDC sets your video to adjust the start and end times of your timed recording. This happens even if a
programme starts earlier or later than advertised.
PDC works when the broadcaster sends a signal, but the signal is not always sent.
If you are not sure the signal will be sent, it is best to switch PDC off.
•
If there is no programme number displayed under ‘PR’ in the change menu, the video doesn’t yet know
the number for the programme you want. Type it in and this will be stored for later recordings.
•
If you wish to record from a satellite receiver, select under ‘PR’ the satellite programme or AV
(depending whether the video is connected with the antenna cable or the scart-cable). Leave the satellite
tuner switched on and set the programme you want to record.
• The video will warn you if you have set the timer to start to recording a second programme before the first
recording has finished.
• To stop the recording after it has already started, press and hold the STOPbutton for about five seconds
until the video stops recording.
• VideoPlus + and Plus code are trademarks of Gemstar Development Corporation.
VideoPlus + system is manufactured under license from Gemstar Development Corporation.
Page 20

20
Normal timer recording
◆ For timer recordings, clock, date, and stations must be set correctly.
◆ Load a cassette with its safety tab in place (see page 23) and with enough free tape for the recording.
SV/V+
PAL/SEC
1
Press MENU.
Choose "Timer Program" by
pressing OK.
Press PR+ or PR- to select an
unused channel, for example ‘- - - -’
then press OK to confirm.
There are positions for eight timer
programs.
Press PR+ or PR- to select how
often you want to make the
recording, for example, once, weekly
and so on. Press OK to confirm.
2
3
PR+/-:select (AV1/AV2)
0-9 :setup(PR)
/ :correct MENU:end
PR -Start Time --:-End Time --:-Start Date --/-Tape Speed SP
PDC OFF
TIMER PROGRAM (Once)
PR 03
Start Time 21:20
End Time 22:20
Start Date 20/09(MON)
Tape Speed LP
PDC OFF
/ :correct
OK:confirm MENU:end
TIMER PROGRAM (Once)
How often do you want
to record this program?
PR+/-:select
OK:confirm MENU:end
Once
Weekly(Once a Week)
Daily(Mon-Fri)
Daily(Mon-Sat)
Daily(Mon-Sun)
TMR
◆ PR : Use PR+if you want to choose
the AV channel or 0 to 9 for other
channels.
◆ Start time : Use buttons 0to 9 to
enter the start time.
◆ End time : Use buttons 0to 9 to enter
the end time.
◆ Start date : Use buttons 0to 9 to
enter the date.
◆ Tape Speed : Use PR+ if you want to
choose LP (see page 18).
◆ PDC : Use PR+if you want to switch
PDC on (see page 19). If PDC does
not appear on the screen, it is not
available on your video.
If you want to change any of the
details. Move to the details you
want to change using the and
buttons.
Change the setting using the PR+ or
PR- or number buttons 0 to 9.
4
5
If all the settings are correct, press until you
see ‘OK:confirm’ on the bottom line of the screen.
Press OK to confirm.
Switch your video off by pressing
the
button.
These buttons are used
on the following two
pages.
You can switch your video on again if you want to set the timer to record another programme. Remember to switch the
video off when you have finished.
• The video will warn you if you have set the timer to start recording a second programme before the first
programme has finished. If you don’t adjust the times, the video will record the first programme completely,
then start to record the second one.
• If there is not enough free space for the recording on the cassette the video will automatically switch to
‘LP’ to double the recording time left on the cassette.
• The recorder will eject cassettes which have the safety tab removed (page23)
• To stop a recording which has already started, press and hold theSTOP button for about five seconds until
the video stops recording.
SP/LP
1
2
TV/VCR
3
4
5
6
A
V
7
8
9
00
3
QSA.D
EJECT
PR
+
MENU
OK
+
PR
–
INDEX
–
A.SEL
Page 21

21
Timer review - changing and erasing record settings
Press MENU.
Choose "Timer Program" by pressing OK.
1
2
Select the program you want to change or erase by pressing
PR+ or PR-.
Press OK to confirm.
Changing a setting
Select the details you want to change by pressing or .
Use the number buttons 0 to 9 to change the settings. Use
PR+ to select the AV channel, to change the tape speed and
to switch PDC on and off.
When you have made all the changes, press or until
you see ‘OK : confirm’ on the bottom line of the screen.
Press OK.
Remember to load a cassette and switch the video off by
pressing .
TIMER PROGRAM
PR STARTEND DATE
01 12:30 15:15 22/09
03 21:20 22:20 20/09
PR+/-:select
OK:confirm MENU:end
TIMER PROGRAM (Once)
PR 03
Start Time 21:20
End Time 22:20
Start Date 20/09(MON)
Tape Speed SP
PDC OFF
0 :erase
/ :correct MENU:end
TIMER PROGRAM
PR STARTEND DATE
01 12:30 15:15 22/09
03 21:20 22:20 20/09
PR+/-:select
OK:confirm MENU:end
3a
Erasing a setting
Press the number 0.
Press OK to confirm.
Press MENU twice to end.
3b
Page 22

22
Clock and counter display
◆ The counter counts in real time from when you load the cassette. This does not have to be at the beginning of the
cassette. The counter does not count unrecorded parts of the cassette.
◆ If you rewind the cassette, the counter will count backwards, if you rewind beyond the zero position, the counter
counts in negative values for example, – 0:01:15.
This display will only appear when there is a cassette in the video.
STOP SP PR01 BBC1
14:00 20/09 E-240 01:24
STEREO ON
Press once to display the time and date.
Press twice to display the counter time and how long is left to the
end of the cassette.
Press three times to clear the screen.
A
A
A
Remaining time and cassette length
Choose ‘Tape Remain’ by pressing OK.
Press PR+ or PR- to select the length of your current cassette.
Press OK to confirm. The display will show how long is left to the
end of the cassette.
Resetting the counter to zero
Finding the counter zero position
Press MENU and choose ‘Tape Control’ by
pressing PR+ and then OK.
Choose ‘Counter Reset’ by pressing PR-
twice and then OK.
The video will reset the counter to zero.
Press MENU and choose ‘Tape Control’ by
pressing PR+ and then OK.
Choose ‘Go to Zero’ by pressing PR- and
then OK.
The video will wind to the position 0:00:00
and stop.
COUNTER RESET
0:00:00
REW SP
GO TO ZERO
0:02:13
TAPE CONTROL
TAPE REMAIN
E-240 01:27
Tape Remain
Go To Zero
Counter Reset
E-180
E-240
E-300
PR+/-:select
OK:confirm MENU:end
PR+/-:select
OK:confirm MENU:end
This display will only appear when there is a cassette in the video.
Press MENU and choose ‘Tape Control’ by pressing PR+ and then OK
This display will only appear when there is a cassette in the video.
This display will only appear when there is a cassette in the video.
These buttons are used
on the following two
pages.
1
4
7
3
SP/LP
PAL/SEC
–
2
5
8
00
+
INDEX
SV/V+
TV/VCR
3
6
9
PR
+
OK
PR
–
A.SEL
A
V
QSA.D
EJECT
MENU
Page 23

23
Cassettes
Power - saving features
Dimmer
Your video recorder’s display will go dim when the video is on stand-by.
Auto power off
If your video is connected through RF, it will switch to stand-by when no
station is received for more than five minutes.
Use only good-quality cassettes with the VHS logo.
•Keep cassettes away from moisture or dust, magnetic and electrical fields
(for example, loudspeakers and computer monitors).
•Always rewind cassettes to the beginning when you have finished using
them. Stand cassettes up with the full spool at the bottom. Always keep
cassettes in their cases.
You can protect your precious recordings from being recorded over by
breaking off the safety tab on the side of the cassette (some cassettes have
a slide). When you have removed the tab your video will eject the cassette if
ever you try to record onto it.
If you want to record onto the cassette after removing the tab, cover the hole
with sticky tape.
We advisable you to use a head - cleaning cassette every six months to keep
your video in perfect working order.
PAL
Page 24

24
Choice of sound output
PLAY SP Hi-Fi
L+R
HI-Fi
LEFT
Hi-Fi
RIGHT
Hi-Fi
OFF
While you are watching a stereo broadcast or playing back a hi-fi recording
The first time you press the A.SEL button while you are playing a recording, ‘Hi-Fi’ will be
shown on the screen. If you are watching a broadcast, ‘STEREO’ will be shown on screen. If you
keep pressing the button, the sound output will change in the following order.
STOP SP PR10 MTVE
BIL
BIL I
II
BIL
I+II
BIL
OFF
First press: the on-screen display of sound output appears and the main language (original sound
track) is selected.
Second press: the video selects the sub-language.
Third press: the video selects both main language and the sub-language.
Fourth press: the video returns to the original soundtrack.
For mono sound performance there is no choice available.
First press: the on-screen display of sound output appears.
Second press: the video selects the left audio channel only.
Third press: the video selects the right audio channel only.
Fourth press: the video selects the normal mono soundtrack of a hi-fi cassette.
While a bilingual performance is being broadcast
If this screen does not appear when you press the A.SEL button, this function is not available on your video
Page 25

25
The hi-fi system
As well as the normal mono sound track of VHS video recorders, your
video has a high-quality hi-fi sound system.
This means you can enjoy the following.
• Films with excellent stereo sound
• Films of full-length concerts in high quality stereo
• Films with impressive surround sound using extra surround-sound
equipment
• Films with two dialogue modes (dual, bilingual), usually the
original sound track and dubbed sound track.
• VHS cassettes with hi-fi stereo sound and also VHS cassette with
normal sound.
What you can listen to
STOP SP PR10 P-10
STEREO ON
PLAY SP Hi-Fi
L+R
During stop, the video displays what the
current station is broadcasting.
When you switch to another station or the
new station may change the sound mode,
your video will display the programme and
sound mode on the screen (if not, press
A.SEL).
• ‘STEREO’ = stereo
‘BIL L’/ ‘BIL R’=bilingual
Nothing= mono sound
During playback, the video will display what is
recorded on the cassette (if not, press A.SEL).
• ‘hi-fi’ = stereo/bilingual
Nothing = mono sound
If this screen does not appear when you press the A.SEL button, this function is not available on your video.
SV/V+
PAL/SEC
PLAY SP Hi-Fi
L+R
HI-Fi
LEFT
Hi-Fi
RIGHT
Hi-Fi
OFF
If this screen does not appear when you press the A.SEL button, this function is not
available on your video.
PLAY SP Hi-Fi
L+R
HI-Fi
LEFT
Hi-Fi
RIGHT
Hi-Fi
OFF
1-4X
1-4X
3
SP/LP
A.SEL
1
2
TV/VCR
3
4
5
6
7
8
9
00
A
V
QSA.D
–
INDEX
EJECT
PR
+
MENU
OK
+
PR
–
A.SEL
A.SEL
Page 26

26
Electrical connection
◆ For your own safety read the following instructions carefully before you try to plug this video into the mains.
◆
Check that the voltage on the rating plate matches the voltage in your home. The rating plate
is on the back panel of the video.
If the mains plug fitted to this appliance is not suitable for your mains sockets, remove the plug
and replace it following instructions below.
(See over the page for how to get rid of the original plug).
The wires of the mains lead fitted to this appliance are coloured as follows.
Blue = Neutral (black)
Brown = Live (red)
The colours of wires in the mains lead fitted to this video may not correspond with the coloured
markings of the terminals in the plug.
◆ The wire which is coloured blue must be connected to the terminal which is marked with the
letter ‘N’ or coloured black.
◆ The wire which is coloured brown must be connected to the terminal which is marked with the
letter ‘L’ or coloured red.
◆ Do not connect any wire to the earth terminal of a three-pin plug.
If the terminals in the plug are not marked or you are in any doubt about the correct connections,
consult a qualified electrician.
Page 27

27
Moulded plugs
◆ If it is necessary to remove a moulded plug from the mains cable, you should cut it off and
replace it with a suitable replacement.
◆ You cannot use the moulded plug for any other appliance, so remove the fuse and throw it
away immediately and safely to prevent anyone, especially children, from plugging it into a
wall socket which would be very dangerous.
◆ If the mains lead ever needs replacing, a qualified electrician should replace it with a flexible
cord from the manufacturer.
◆ After you have replaced a fuse in the plug, you must put the fuse cover back on. If you have
lost the fuse cover, you must get a replacement cover. The replacement fuse cover should be
the same colour as the coloured insert in the base of the plug or the colour that is embossed in
words in the base of the plug, or anywhere else on the plug. Always mention this colour when
you order a replacement fuse cover.
◆ Only 5-amp replacement fuses which are ASTA approved to BS 1362 should be fitted.
Caution:
When you are using this video on AC 230V ~ mains supply, please remember
that when the video is on stand-by, it is not disconnected from the mains
supply. However, it is perfectly safe to leave the video connected to the mains
supply.
This symbol means that this unit is double insulated, an earth connection
is not necessary.
Caution :
To prevent electric shock, do not remove any covers.
Caution:
There are no parts inside which you can repair yourself. Always get a
qualified service engineer to carry out any repairs.
Page 28

28
Index
Technical information
Aerial ........................................................ 4, 7
Bilingual ...........................................14, 24, 25
Cassette length .......................................... 22
Channel .......................................... 7-8, 10-12
CM Skip ...................................................... 16
Condensation .............................. Precautions
Counter ....................................................... 22
Euro AV ........................................................ 9
Fine-tuning ................................................. 11
Location number ................................. 7-8, 12
LP (long play) ........................................ 18, 20
Mains .................................................. 4-6, 26
Mesecam .................................................... 14
NTSC .......................................................... 14
OTR ............................................................. 18
PDC ............................................................ 19
Protected cassette ..................................... 23
Remaining time .......................................... 22
Remote lock ................................................ 17
RF out ........................................................ 7-8
Satellite .................................................... 5, 9
Scart socket .......................................... 4-6, 9
SP (standard play) ................................. 18-20
Stand-by ...................................... Precautions
Station ..................................................7-8, 12
Still-frame adjustment ............................... 15
Test picture .................................................. 7
TV/VCR button .............................................. 4
Tracking ...................................................... 14
VideoPlus+ ................................................. 19
16:9 Set........................................................16
Dimensions
Width x height x depth
360 x 90 x 288 mm
Weight 3.85 kg
Power supply
Voltage AC 230 V ~, 50 Hz
Power consumption Mono 15 Watts
Hi-Fi 17 Watts
System
Video PAL-I
Channel range UHF 21 - 69,
Channel locations 99 + AUX
RF Out UHF CH 21 - 69 (52)
Video
System VHS
Speeds
Short play and long play
Hi-Fi (Available on some models. See pages
24 and 25)
Frequency response 20 Hz to 20 KHz
Dynamic range > 80dB
Signal-to-Noise-Ratio > 60dB
General
Temperature range 5° C to 35° C
Humidity range < 80 %
Timer 8 events,
1 month
These technical details may change.
Page 29

CERTIFICATE OF REGISTRATION
IMPORTANT
TEAR
OFF HERE
AND RETURN
TODAY
REGISTERING YOUR NEW DAEWOO PRODUCT
To register you product for its 12 month guarantee please complete and return the section below.
MR
MRS
MS
SURNAME
NUMBER/HOUSE NAME/STREET
COUNTRY
MODEL No.
PRODUCT DESCRIPTION
NAME OF RETAILER
SERIAL No.
TOWN
INITIALS
POSTCODE
DATE OF PURCHASE
PRODUCT VALUE MODEL No.
SERIAL No.
DATE OF PURCHASE
PRODUCT DETAILS
Y
OUR1STYEAR
M
ANUFACTURER’S
G
UARANTEE
Please keep this with your purchase receipt, which will
be required if service is needed on this product during
the guarantee period.
KEEP THIS SECTION FOR FUTURE REFERENCE
On the expiry date of the manufacturer’s guarantee you will be sent details of our annual insurance plan but if you have already bought an extended warranty
for this product from your retailer please tick box
The information provided will be held on computer by the DAEWOO Registration Department of Domestic & General Insurance Co. Limited for the provision
of warranty insurance or product related purposes.
The information will not be disclosed to third parties, should you prefer not to receive product related details writes to Domestic & General Insurance Co.
Limited, on the address overleaf.
DAE REG / 295
Page 30

DAEWOO GUARANTEE CONDITIONS
This product is guaranteed for 12 months from the date of original
purchase. Any defect that arises due to faulty materials or
workmanship will be repaired free of charge during this period by
the dealer from whom you purchased the unit. The guarantee is
subject to the following provisions.
The guarantee does not cover accidental damage, misuse, cabinet
parts, knobs or consumable items such as batteries, drive belts or
bulbs.
The product must be correctly installed and operated in
accordance with the instructions contained in the manual. It must
be used solely for domestic purposes. For further information
regarding your guarantee please see the section at the rear of your
user manual.
The guarantee will be rendered invalid if the product is resold or
has been damaged by inexpert repair.
DAEWOO disclaims any liability for incidental or consequential
damages.
The guarantee is in addition to and does not diminish your
statutory or legal rights.
In the event of a breakdown please refer to your instruction
manual and check all plugs, fuses and electricity supply.
In the event of there being no breakdown you will be charged for
the repair.
Insert into envelope and send to :
DAEWOO GUARANTEE DEPARTMENT
Leicester House
17, Leicester Street
Bedworth
Nuneaton
Warwickshire CV12 8JP
30
Page 31

Problem-solving guide
The video has the time or - -.- - on the display
If while you are setting up the video, the timer or - -.- - is in the display, the video is switched off
or has already gone through the autoset procedure (OK has already been pressed). In this case,
please turn to page 7 and carry out step 2 until you see the manual tuning screen.
The arrow will not go to preset in the menu
If the arrow will not go to preset, come out of the menu completely by following the on-screen
instructions and press AV on the video remote control until P-_ _ is displayed. P-_ _ will be
displayed on the front of the video where the time normally is displayed.
A blue screen is displayed when you switch the video on
If a blue screen appears when you switch the video on, the AV button has been pressed. Press AV
on the remote control until P-_ _ appears on the display of the video, or until a TV picture is
displayed.
The video has lost programmed channels
If the video has lost the programmed channels, check whether the video has been switched off. If
the video is left with no power for up to eight hours, you can press the MENU button when the
autoset screen appears to bring back the original settings. See page 8 for how to set time and
date.
The timer light stays on the display, even though the recording has finished
If the timer light stays on even though the recording has finished, this is because PDC takes into
account a delay in recording for up to 24 hours.
The TV/VCR button on the video remote control will not work
This button will only work if the TV has the appropriate internal switch.
The television will not change channel when the video is turned on
If the television will not change channel while the video is on, check whether a scart lead has
been connected. (See page 4 option 2)
If a scart lead has been connected, you need to press the TV/VCR button on the video remote
control. When the small VCR symbol appears on the display, you can only change channel by using
the video remote control.
If the TV/VCR button on the video remote control does not work, read the instruction book for the
TV to find out about an audio video button.
The video has a number other than 52 when RF appears
A number other than 52 might be displayed on the video when RF is flashing in the display. This
means that the number has been adjusted in the past.
The TV needs to be tuned in to get the blue auto set or auto search screen.
31
Page 32

Quick-start guide
Please follow the guide from the beginning to the end. Before you connect the video
equipment make sure all equipment is switched off at the plug.
Stage 1. Connecting the video to your TV
A Fit the batteries we have provided into the remote
control. Make sure that the (+) and (-) marks on the
batteries agree with the (+) and (-) marks inside the
battery compartment.
B Plug your aerial into the ANT IN socket of the video.
C Connect the black aerial lead provided from the ANT
OUT socket of the video to your TV aerial socket.
D Plug the video into the mains and turn it on by
pressing the POWER button. RF 52 will now be displayed
on the front of your video.
AC 230V
50Hz
Back view of your video
There are more details, including how to connect extra equipment, on pages 4 to 6.
Stage 2. Tuning in your TV
A Tune a spare channel of your TV until you see the blue ‘AutoSet’
or ‘AutoSearch’ screen. Store this setting on your TV.
B If there is any distortion (lines, flickering and so on) use the
number buttons on the remote control to change RF 52 to 21.
Repeat step 2A. If there is still distortion, you should see page 7.
Auto Set or Auto Search!
OK:confirm MENU:end
Stage 3. Auto Set! or Auto Search! (When you have got a clear picture)
A Point the remote control at the video and
press OK.
B The video is now tuning all the television
stations available in your area.
C If ‘Clock Set’ appears on the TV screen,
please enter the time and date. Use the
number buttons 0 to 9 on the remote control.
Press OK to confirm.
D When ‘Manual Set’ appears on the TV
screen, press MENU to end.
F Your video is now set up. If you want to
change station names or the programmes
they are stored on see pages 11 and 12.
Auto Set or Auto Search!
OK:confirm MENU:end
AUTO SET or AUTO SEARCH
MENU:end
PR03
UHF - - - - - - - - - - - - - -
76%
MANUAL SET
PR01 P-01 PR08 P-08
PR02 P-02 PR09 P-09
PR03 P-03 PR10 P-10
PR04 P-04 PR11 P-11
PR05 P-05 PR12 P-12
PR06 P-06 PR13 P-13
PR07 P-07 PR14 ----
PR+/-:select
OK:confirm MENU:end
Important : If you switch your video off at the mains overnight you do not have to retune the settings. Press and
then MENUto restore all the settings. See page 8 to set the time and date. If you have had any problems setting up your
video , please read the problem-solving guide on page 31.
1
4
7
3
SV/V+
2
TV/VCR
3
5
6
V
A
8
9
00
QSA.D
SP/LP
PAL/SEC
EJECT
+
PR
MENU
OK
+
INDEX
–
PR
–
A.SEL
 Loading...