

Page 1

Service Manual
Microwave Oven
Model: KOT-150S0A
KOT-151S0A
KOT-152U0A
KOT-152C0A
KOT-155S0A
DAEWOO ELECTRONICS CO., LTD.
S/M No. : T150S0A003
http : //svc.dwe.co .kr Feb. 2002
Page 2

1
PRECA UTIONS T O BE OBSERVED BEFORE AND
DURING SER VICING T O AVOID POSSIBLE
EXPOSURE T O EXCESSIVE MICROW AVE ENERGY
(a)Do not operate or allow the oven to be operated with the door open.
(b)Make the following safety checks on all ovens to be serviced before activating the magnetron or other micro-
wave source, and make repairs if necessary: (1) Interlock operation, (2) Proper door closing, (3) Seal and
sealing surfaces (arcing, wear, and other damage), (4) Damage to or loosening of hinges and latches, (5)
Evidence of dropping or abuse.
(c) Before turning on power to the microwave oven for any service test or inspection within the microwave gen-
erating compartments, check the magnetron, wave guide or transmission line, and cavity for proper alignment, integrity, and connections.
(d)Any defective or misadjusted components in the interlock, monitor, door seal and microwave generation and
transmission systems shall be repaired, replaced, or adjusted by procedures described in this manual before
the oven is released to the owner.
(e) A microwave leakage check to verify compliance with the Federal performance standard should be per-
formed on each oven prior to release to the owner.
TABLE OF CONTENTS
PROPER USE AND SERVICE PRECAUTIONS.................................................................................................................2
SPECIFICATIONS...............................................................................................................................................................3
EXTERNAL VIEW................................................................................................................................................................4
INSTALLATION...................................................................................................................................................................4
OPERATIONS AND FUNCTIONS.......................................................................................................................................4
DISASSEMBLY AND ASSEMBLY......................................................................................................................................5
TROUBLE SHOOTING GUIDE .........................................................................................................................................33
MEASUREMENT AND TEST............................................................................................................................................34
WIRING DIAGRAM............................................................................................................................................................42
PRINTED CIRCUIT BOARD..............................................................................................................................................46
EXPLODED VIEW AND PARTS LIST...............................................................................................................................61
Page 3

2
PROPER USE AND SERVICE PRECA UTIONS
CAUTION :
This Device is to be Serviced Only by Properly Qualified Service Personnel.
Consult the Service Manual for Proper Service Procedures to Assure Cotinued Safey Operation and for
Precautions to be Taken to Avoid Possible Exposure to Excessive Microwave Energy.
CAUTION :
Microwave Radiation
Personnel Should not Be Exposed to the Microwave Energy Which May Radiate from the Magnetron or Other
Microwave Generating device if it is Improperly Used or Connected. All Input and Output Microwave
Connections. Wave-Guides, Flanges and Gaskets Must be Secured. Never Operate the Device Without a
Microwave Energy Absorbing Load Attached. Never Look Into an Open waveguide or Antenna While the Device
is Energized.
1. FOR SAFE OPERATION
Damage that allows the microwave energy (that cooks or heats the food) to escape will result in poor cooking and may
cause serious bodily injury to the operator. IF ANY OF THE FOLLOWING CONDITIONS EXIST, OPERATOR MUST
NOT USE THE APPLIANCE.(Only a trained service personnel should make repairs.)
1) A broken door hinge.
2) A broken door viewing screen.
3) A broken front panel, oven cavity.
4) A loosened door lock.
5) A broken door lock.
The door gasket plate and oven cavity surface should be kept clean.
No grease, soil or spatter should be allowed to build up on these surfaces or inside the oven.
DO NOT ATTEMPT TO OPERATE THIS APPLIANCE WITH THE DOOR OPEN. The microwave oven has concealed
switches to make sure the power is turned off when the door is opened. Do not attempt to defeat them. DO NOT
ATTEMPT TO SERVICE THIS APPLIANCE UNTIL YOU HAVE READ THIS SERVICE MANUAL.
2. FOR SAFE SERVICE PROCEDURES
1) If the oven is operative prior to servicing, a microwave emission check should be performed prior to servicing the
oven.
2) If any certified oven unit is found to have excessive emission level 5mW/cm
2
, the service person should:
(a) inform the manufacturer, importer or assembler,
(b) repair the unit at no cost to the owner,
(c) attempt to ascertain the cause of the excessive leakage,
(d) tell the owner of the unit not to use the unit until the oven has been brought into compliance.
3) If the oven operates with the door open, the service person should tell the user not to operate the oven and contact
the manufacturer and CDRH immediately.
Page 4
3
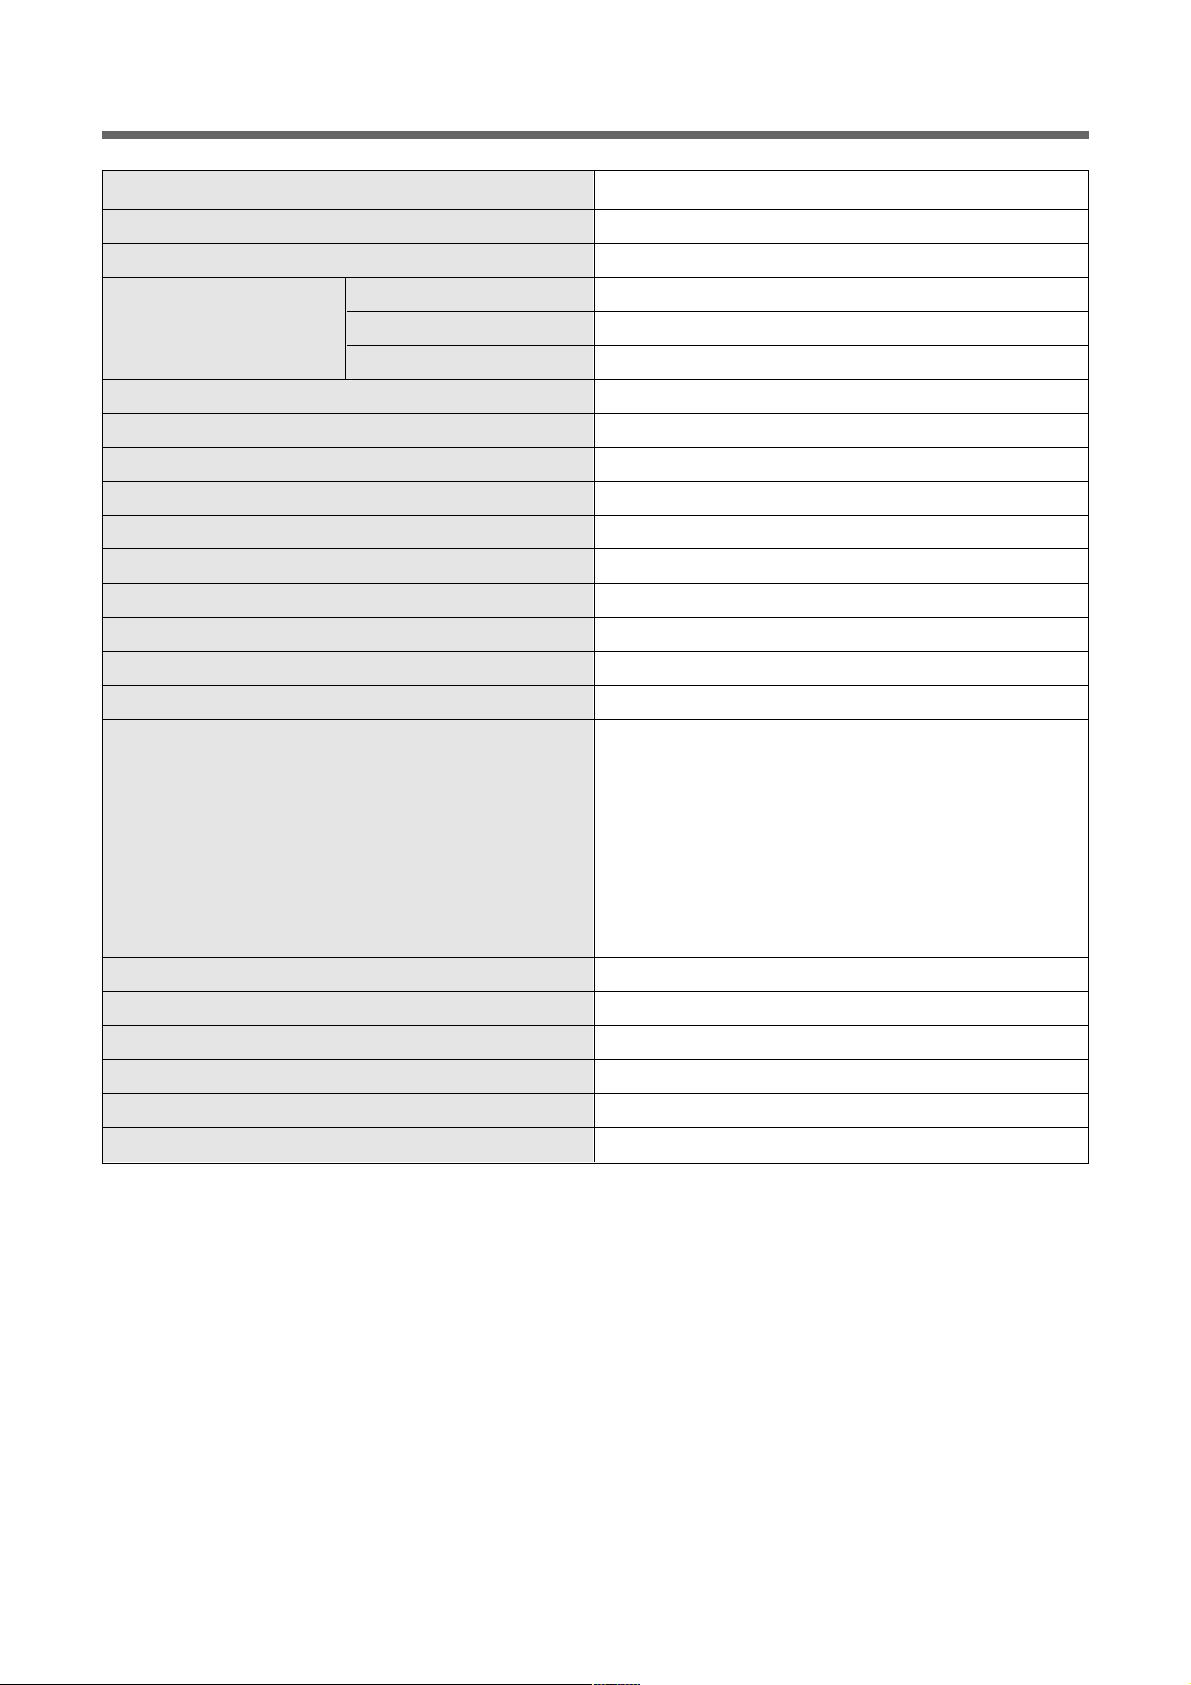
Model
KOT-150S, KOT-151S, KOT-152U, KOT-152C, KOT-155S
Power Supply 120V ~ 60 Hz
Rated Current 14.0 A (microwave oven only).
Power Consumption 1600W, Max.
Microwave Output Power (IEC 705) 1000W
Frequency 2450 MHz ±50 MHz
Outside Dimensions (WxHxD) 760x427x375 mm
Cavity Dimensions (WxHxD) 492x240x340 mm
Net Weight 24.5Kg
Timer Digital, 99 min 99sec
Power Selections 10 Levels
Cavity Volume 1.5 ft
3
Magnetron cooling Forced air
Microwave Distribution Stirring fan disk and turntable
Rectification voltage doubler, half-wave.
Door Sealing Choke System
Safety Device Cavity Thermostat open : 194/90, reset : 32/0
Bottom Thermostat open : 194/90, reset : 32/0
Hood Thermostat open : 104/40, reset : 132.8/56
Line Fuse 20 A
Door Interlock Switches Primary Interlock Switch.
Secondary Interlock Switch.
Interlock Monitor.
Magnetron type 2M218
High Voltage Capacitor 0.98 2.1KV AC
High Voltage Diode 350 mA, 9.0 KV
Cook-top Lamp 125V, 30W
Cavity Lamp 125V, 30W
Tray Glass
* SPECIFICATIONS ARE SUBJECT TO CHANGE WITHOUT NOTICE.
SPECIFICATIONS
Page 5

4
EXTERNAL VIEW
; REFER TO THE INSTALLATION GUIDE
INSTALLATION
; REFER TO THE INSTALLATION GUIDE
OPERATIONS AND FUNCTIONS
; REFER TO THE USE AND CARE MANUAL
Page 6
5
DISASSEMBLY AND ASSEMBLY
Caution to be observed when trouble shooting
Unlike many ther applicances, the microvave oven is high-voltage, high-current equipment.
It is completely safe during normal operation. However, carelessness is servicing the oven can result in an electronic shock
or possible danger from a short circuit. You are asked to observe the following precautions carefully.
1. Always remove the power plug from the outlet before servicing.
2. Use an insulated screwdriver and wear rubber gloves when servicing the high voltage side.
3. Discharge the high voltage capacitor before touching any oven components or wiring.
1) Check the grounding.
Do not operate on a two-wire extension cord.
It is imperative, therefore, make sure it is grounded properly before
beginning repair work.
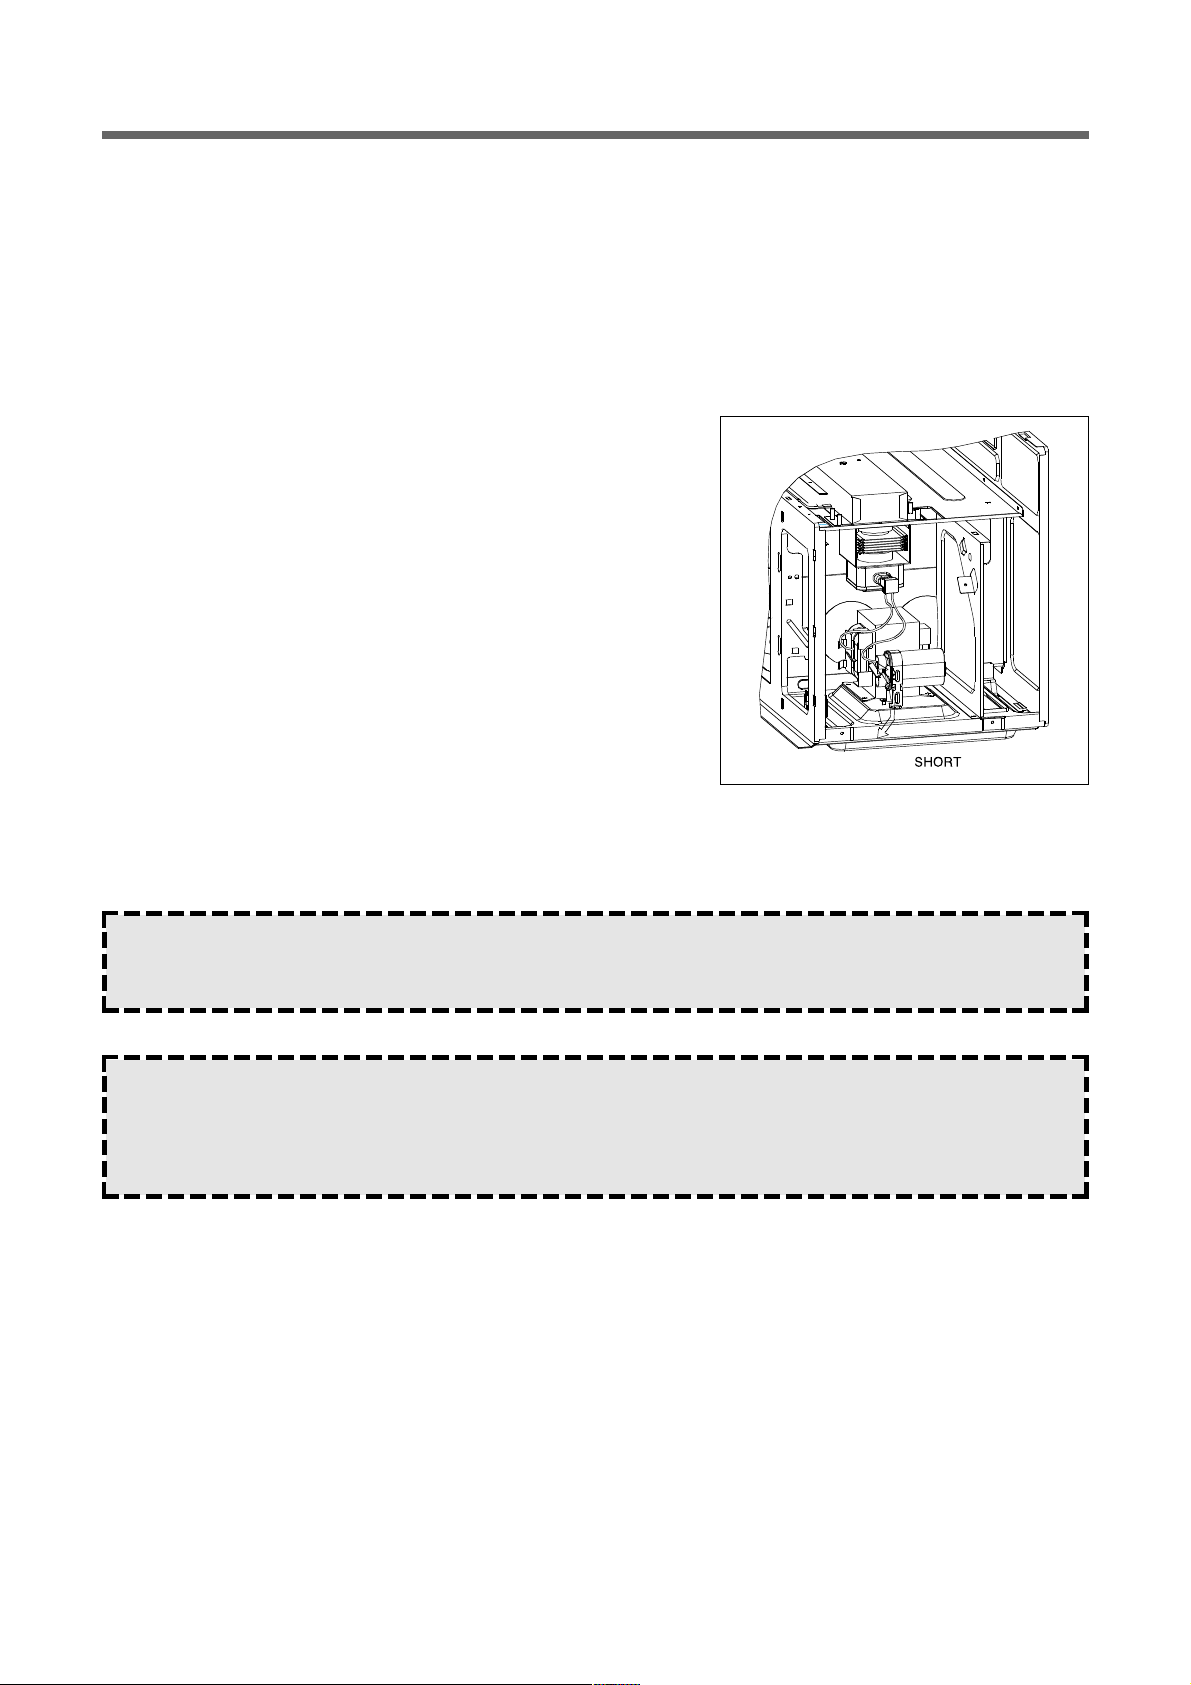
2) Warning about the electric charge in the high voltage capacitor.
For about 30 seconds after the operation has stopped an electric
charge remains in the high voltage capacitor.
When replacing or checking parts, short between oven chassis
and the negative high terminal of the high voltage capacitor by
using a properly insulated screwdrive to discharge.
4. When the 20A fuse is blown due to the operation for the monitor
switch; replace primary interlock switch, secondary interlock switch
and interlock monitor switch.
5. After repair or replacement of parts, make sure theat the screws are
properly tightened, and all electrical connections art tightened.
6. Do not operate without cabinet.
CAUTION :
Service personnel should remove their watches whenever working close to or replacing the magnetron.
CAUTION :
When servicing the appliance, take a care when touching or replacing high potential parts because of electrical
shock or exposing microwave. These parts are as follows-HV Transformer, Magnetron, HV Capacitor, HV
Diode.
Page 7

6
1. GENERAL
-REMOVING/REINSTALLING
-CABINET
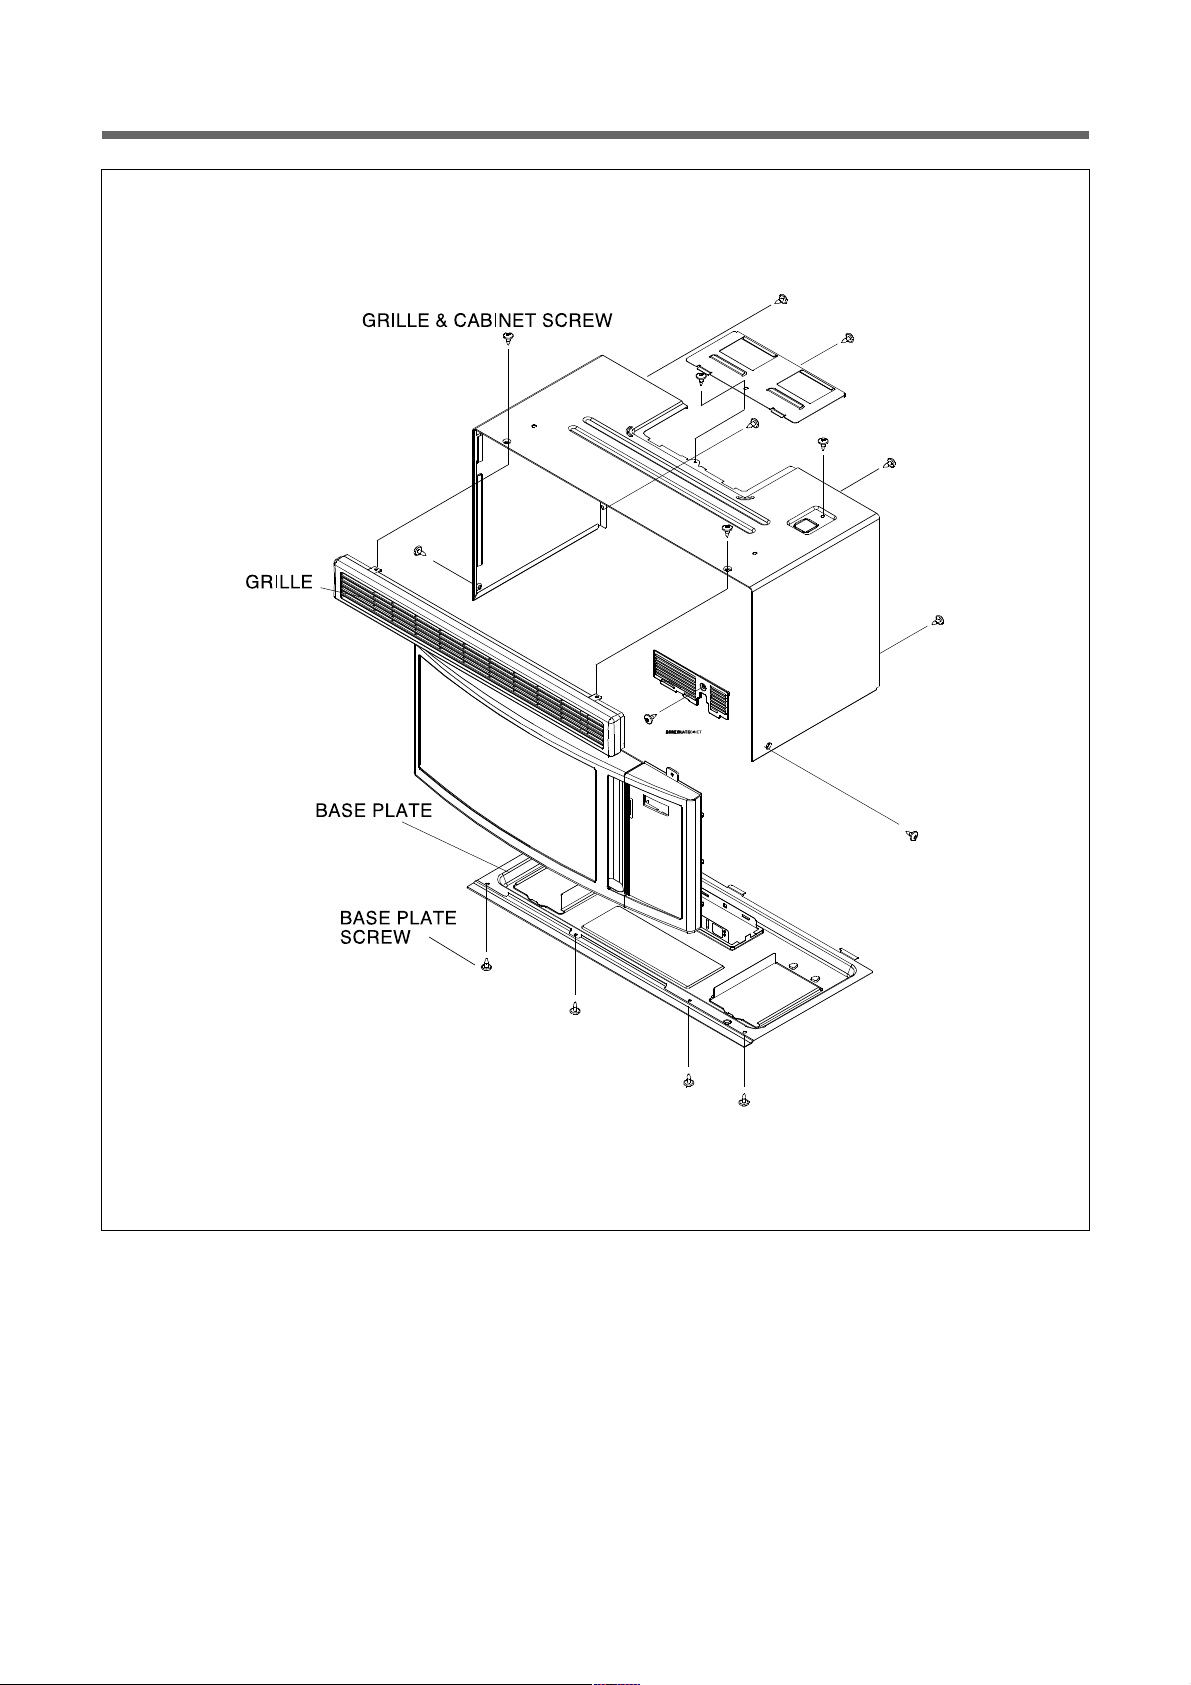
CABINET REMOVAL
Refer to FIG. 1 for the following steps:
1. Remove the microwave oven from its mounting location and set it on a protected (padded) work surface.
2. Remove the two screws from the top of the microwave oven that secure the vent grille to the oven, and pull the top of
the vent grille out so the tabs are from their slots, and remove it.
3. Remove 2 screw from the vent motor cover.
4. Remove the remaining 9screws from the top side and rear of the cabinet. Slide the cabinet back and unhook it from
the side tabs, then slide the power cord into the cabinet, and lift the cabinet off the oven.
Proceed to the section for the component you wish to service.
CABINET INSTALLATION
Refer to FIG. 1 for the following steps:
1. Position the cabinet over the top of the microwave oven and slide the power cord all the way through the top opening.
2. Slide the cabinet forward so that the tabs along the sides of the microwave fit into the corresponding slots in the cabinet.
3. Loosely mount the screws to the top and sides of the cabinet. When all of the screws are installed, tighten them
securely.
4. Install the vent grille on the oven with the two long screws.
5. Install the oven in its mounting location.
W ARNING :
Personal Injury Hazard
Disconnect from the electrical supply before servicing the unit. Failure to do so could result in electrical shock or
other personal injury.
CAUTION :
Personal Injury Hazard
Because of the weight and size of the microwave oven, two people are required to safely move and install it.
Failure to do so could result in personal injury.
Page 8
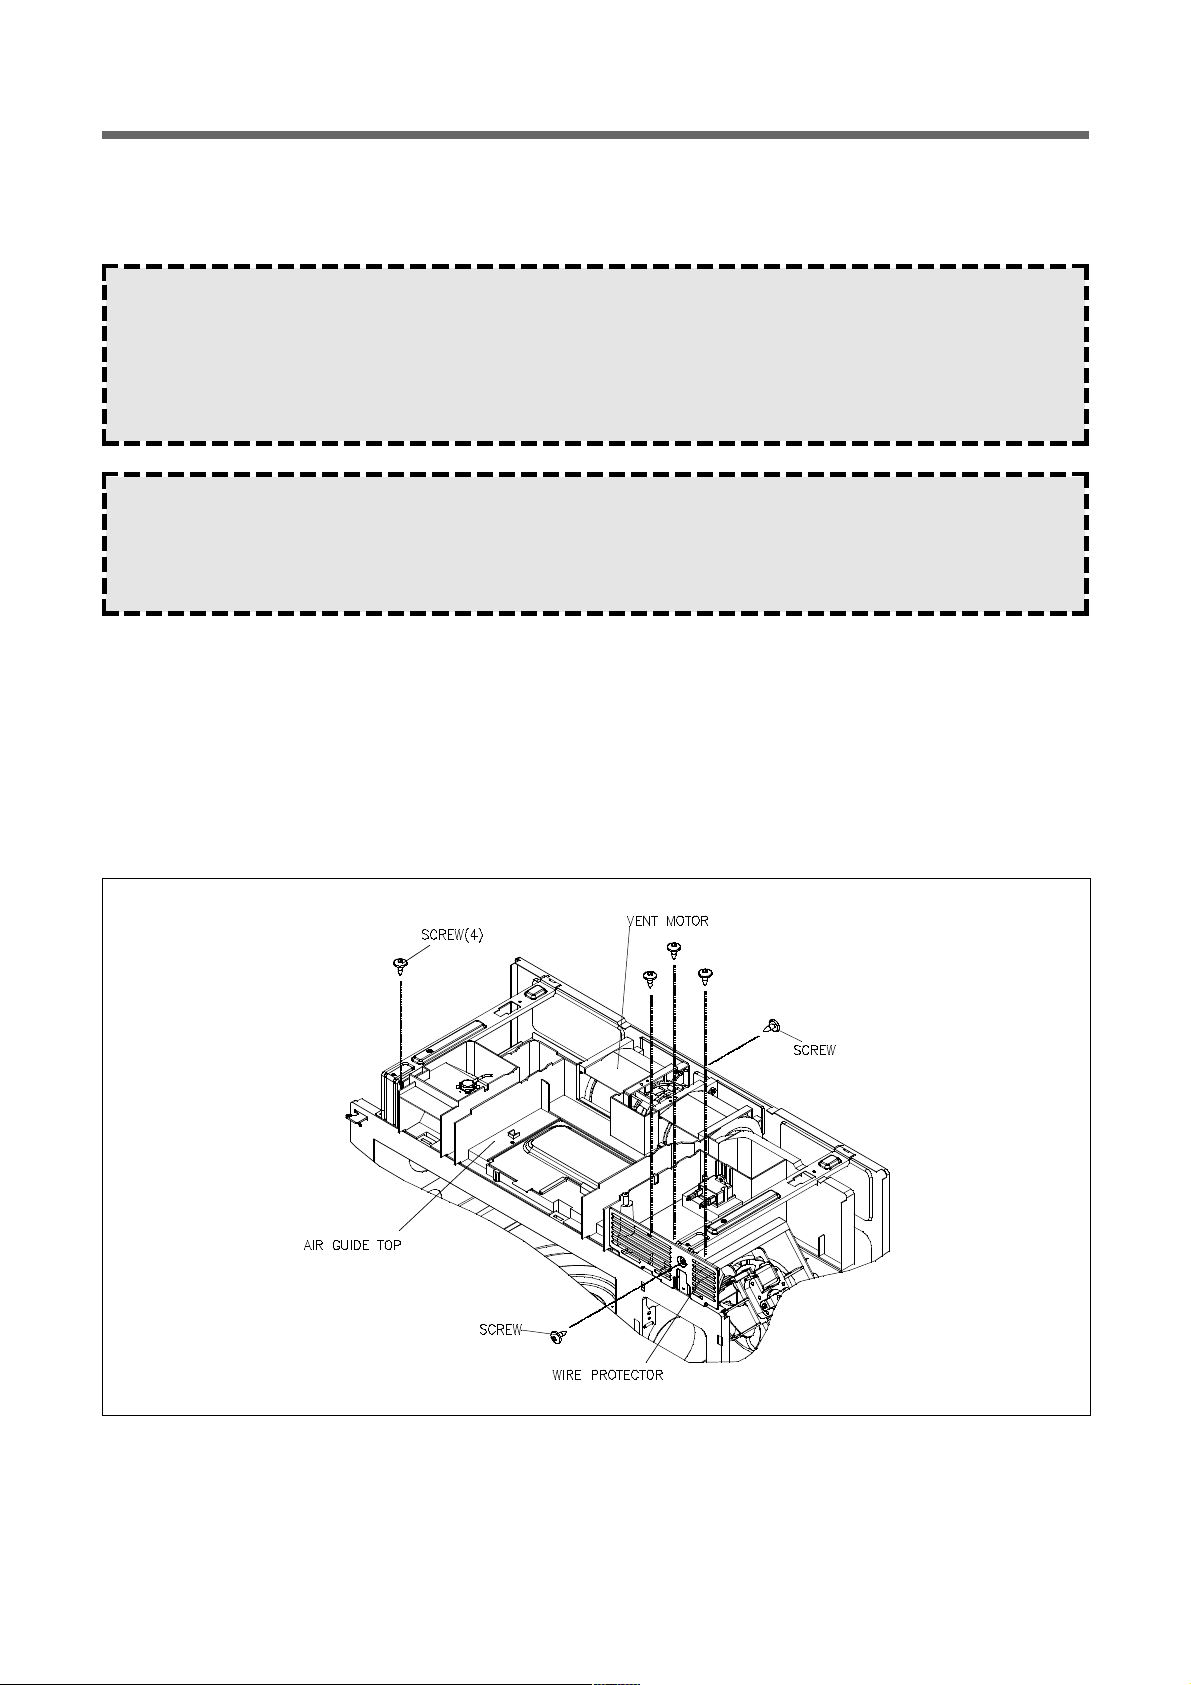
7
FIG. 1
Page 9
8
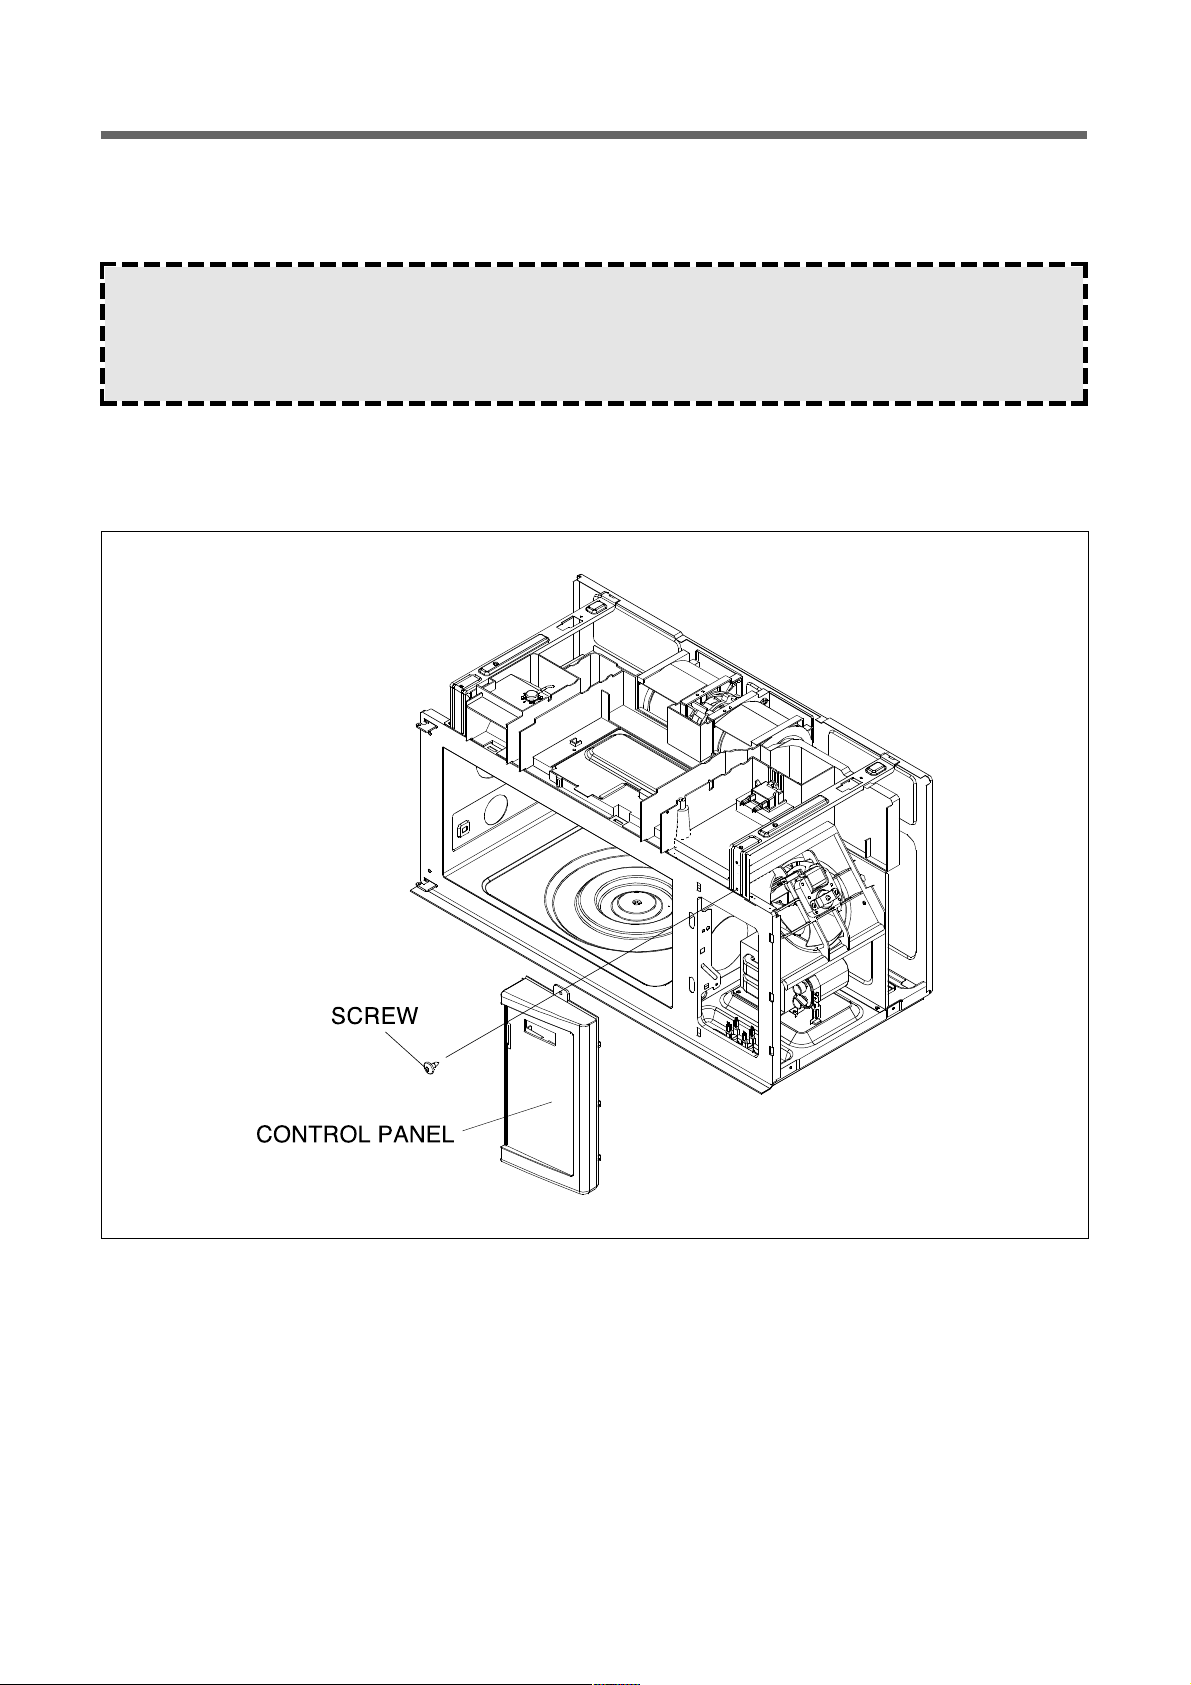
2.THE OPERATING CONTROL SYSTEMS
-REPLACING THE CONTROL CIRCUIT BOARD
1. Remove the two screws from the top of the microwave oven for the vent grille and remove the grille(See FIG. 1).
Refer to FIG. 2, FIG. 2-1 for the following steps:
2. Remove the screw from the front of the microwave oven for wire protector and remove the wire protector(see FIG. 1).
3. Remove the screw from the top center tab of the control panel.
4. From the top and back of the control panel, lift the top locking tab and pull the top of the panel out slightly, then lift the
bottom tabs of the panel out of the slots and pull it forward.
W ARNING :
This Device is to be Serviced Only by Properly Qualified Service Personnel.
Consult the Service Manual for Proper Service Procedures to Assure Continued Safety Operation and for
Precautions to be Taken to Avoid Possible Exposure to Excessive Microwave Energy.
FIG. 2
Page 10
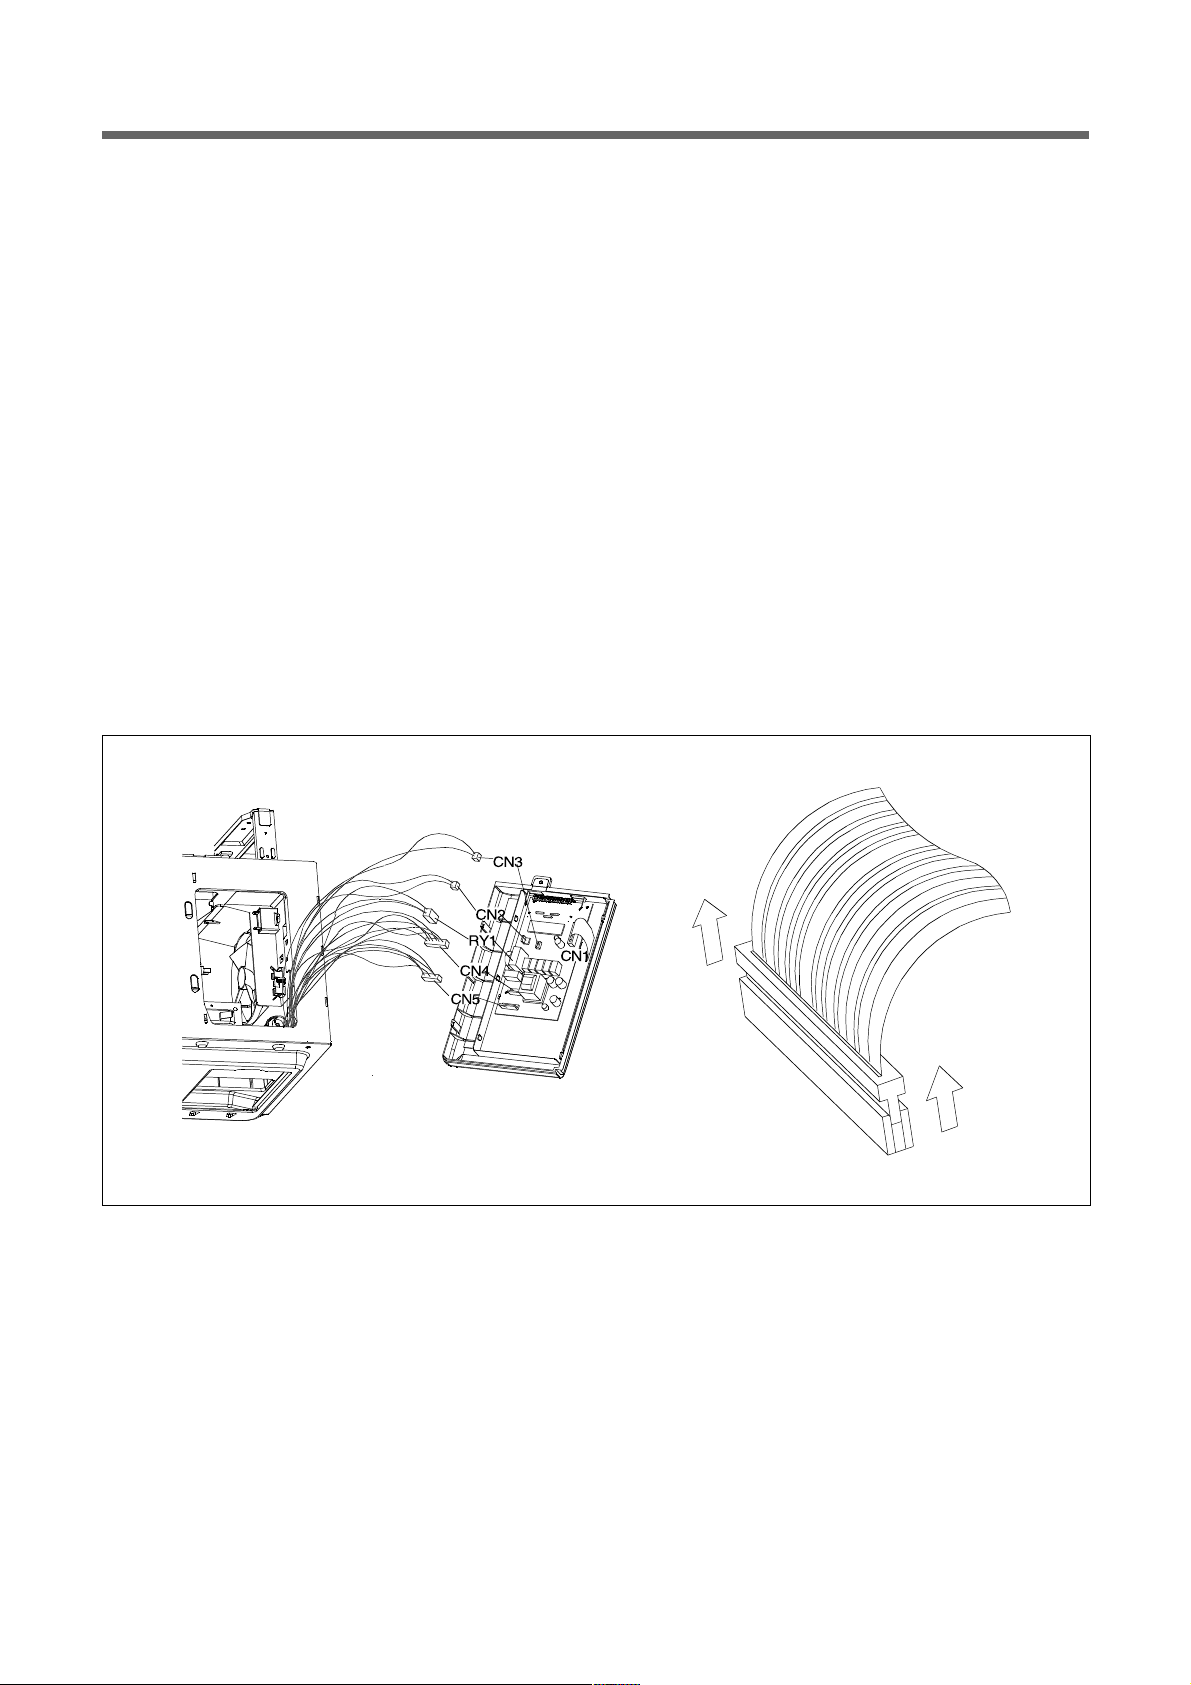
9
4. Unplug the following connectors from the control circuit board:
a) 2-Pin connector at CN2.
b) 2-Pin connector on relay RY1.
c) 3-Pin connector at CN5.
d) 6-Pin connector at CN4.
e) 6-Pin connector at CN3 (Only sensor type model).
f) Lift the end of the locking arm on the ribbon cable at CN1, then lift the ribbon cable out of the socket.
5. Remove 4 screws from the control circuit board and lift the board off the mounting bracket.
6. Clean the surface of the new display and the inside of the control panel window with a soft, damp cloth to remove any
dirt, smudges, or lint.
7. Mount the new control circuit board to the mounting bracket with 4 screws.
8. Plug the following connectors over their control circuit board plugs so that they lock into place:
a) 2-Pin connector at CN2.
b) 2-Pin connectors on relay RY1.
c) 3-Pin connector at CN5.
d) 6-Pin connector at CN4.
e) 6-Pin connector at CN3 (Only sensor type model).
f) Insert the end of the ribbon cable into the narrow slot of connector CN1 as far as it will go(See FIG. 2-2).
Lower the locking arm so that the two small tabs fit into the cutouts of the ribbon cable, then press down so that it
locks into place.
9. Mount the control panel to the oven and secure it with its mounting screw.
10. Mount the vent grille to the microwave oven and check out the operation.
FIG. 2-1 FIG. 2-2
Page 11
10
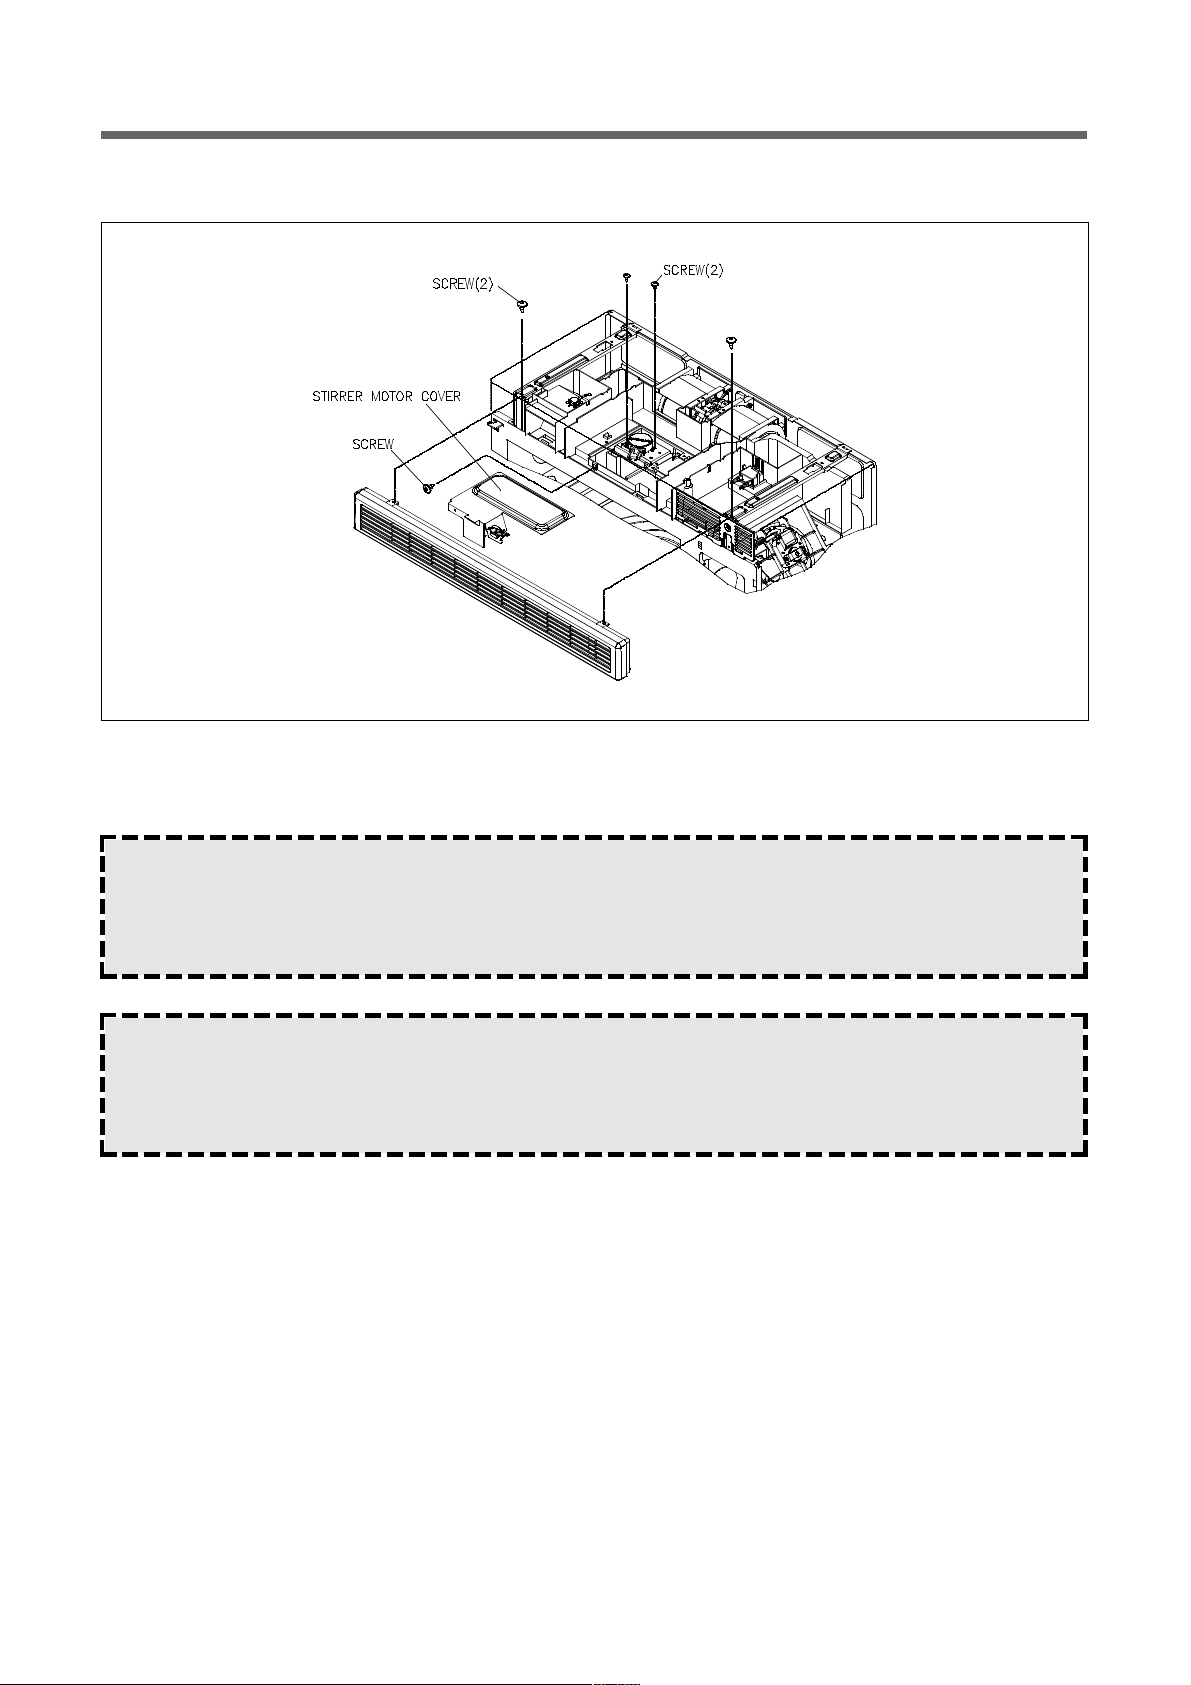
3. REPLACING STIRRER MOTOR
1. Remove the vent grille from the microwave oven (See Cabinet Removal for this procedure).
Refer to FIG. 3 and the insets for the following steps:
2. Remove the screw from the lamp bracket(stirrer motor cover).
3. Pull the connectors off the stirrer motor terminals.
4. Remove 2 mounting screws from the stirrer motor and remove the motor.
5. Mount the new stirrer motor to the oven with its two mounting screws.
6. Connect the wires to the stirrer motor terminals.
7. Reinstall stirrer motor cover.
8. Refer to Cabinet Installations and reinstall the vent grille on the microwave oven.
W ARNING :
Personal Injury Hazard
Disconnect from the electrical supply before servicing the unit. Failure to do so could result in electrical shock or
other personal injury.
CAUTION :
Personal Injury Hazard
Because of the weight and size of the microwave oven, two people are required to safely move and install it.
Failure to do so could result in personal injury.
FIG. 3
Page 12
11
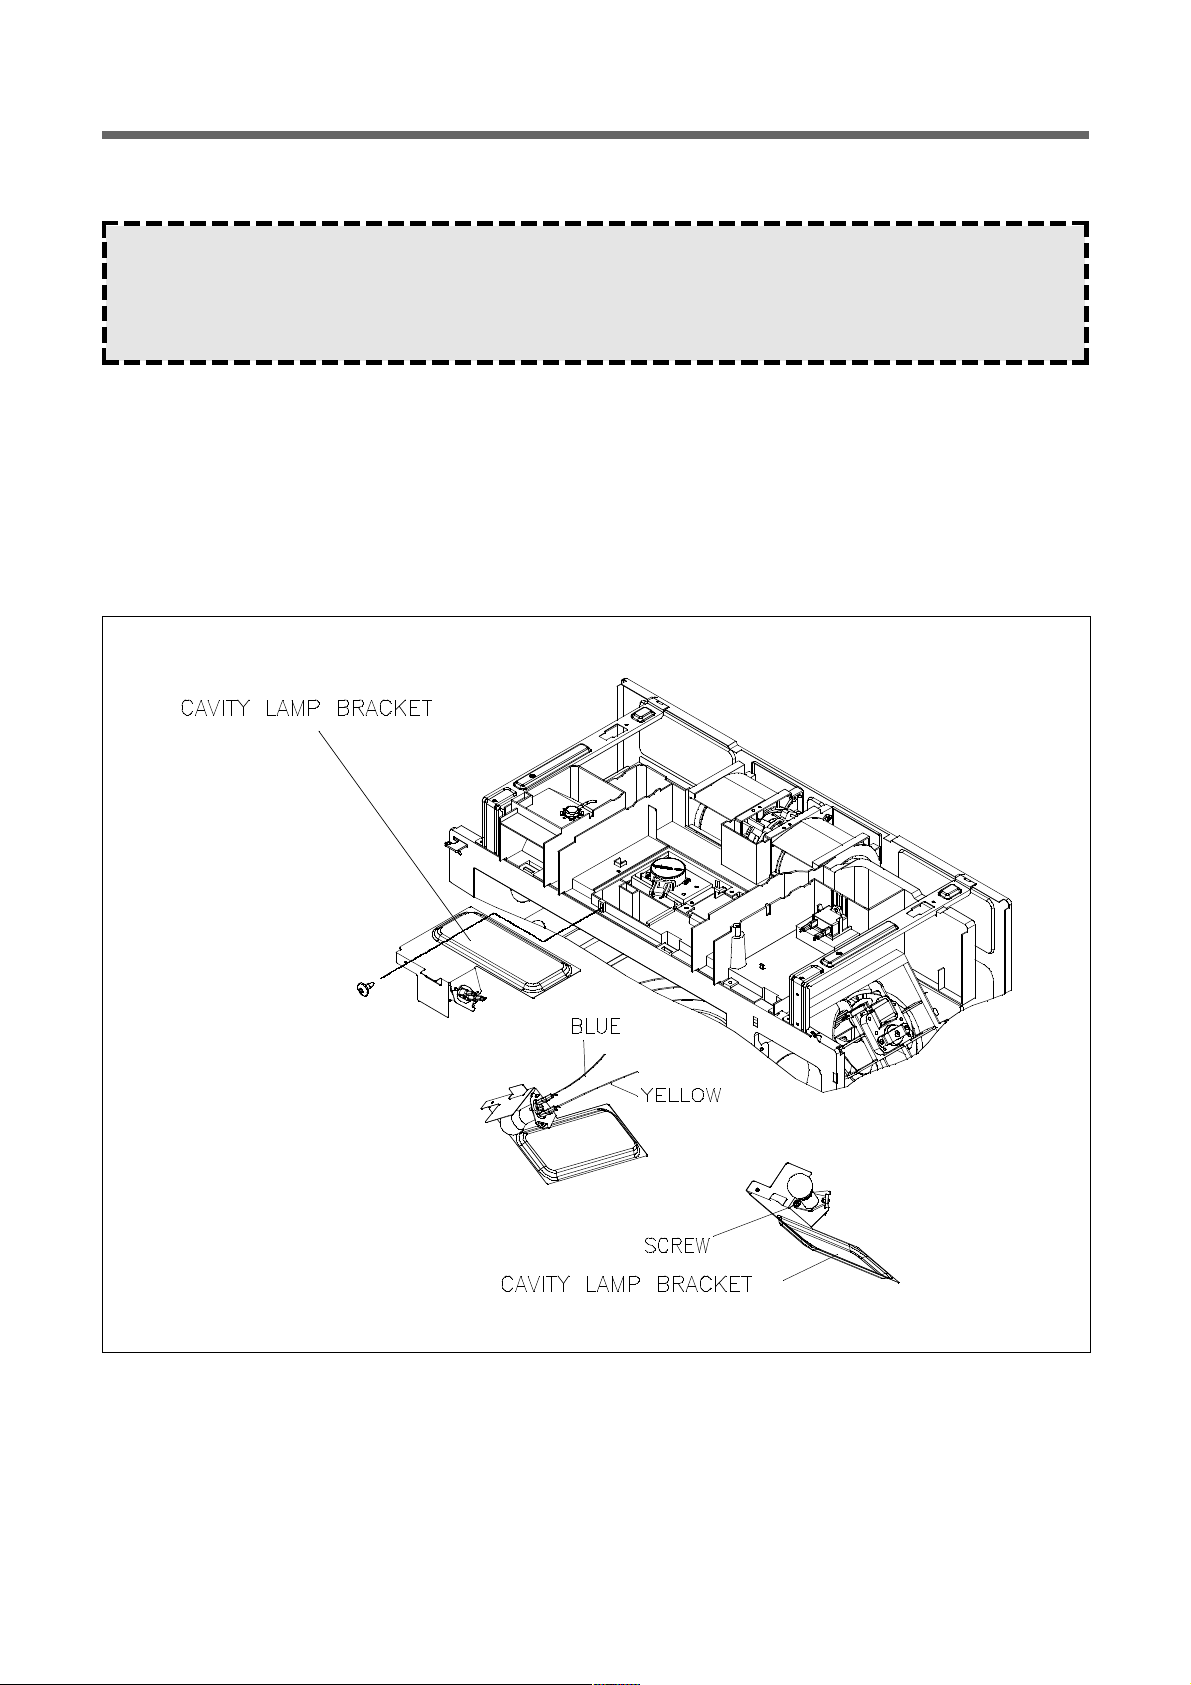
4. REPLACING AN OVEN LIGHT SOCKET
1. Remove the screws for the vent grille and remove the grille.(See FIG. 1 on page)
2. Remove the screw from cavity lamp bracket and pull out.
3. Remove the socket mounting screw from the cavity lamp bracket.
4. Remove the old light socket, and mount the new socket in its place with its mounting screw.
5. Reattach the wire connectors over the light socket terminals.
6. Reinstall the cavity lamp bracket into its air guide top and secure the cavity lamp bracket with its mounting screw.
7. Mount the vent grille to the microwave oven and check out the operation.
W ARNING :
Personal Injury Hazard
Disconnect from the electrical supply before servicing the unit. Failure to do so could result in electrical shock or
other personal injury.
FIG. 4
Page 13
12
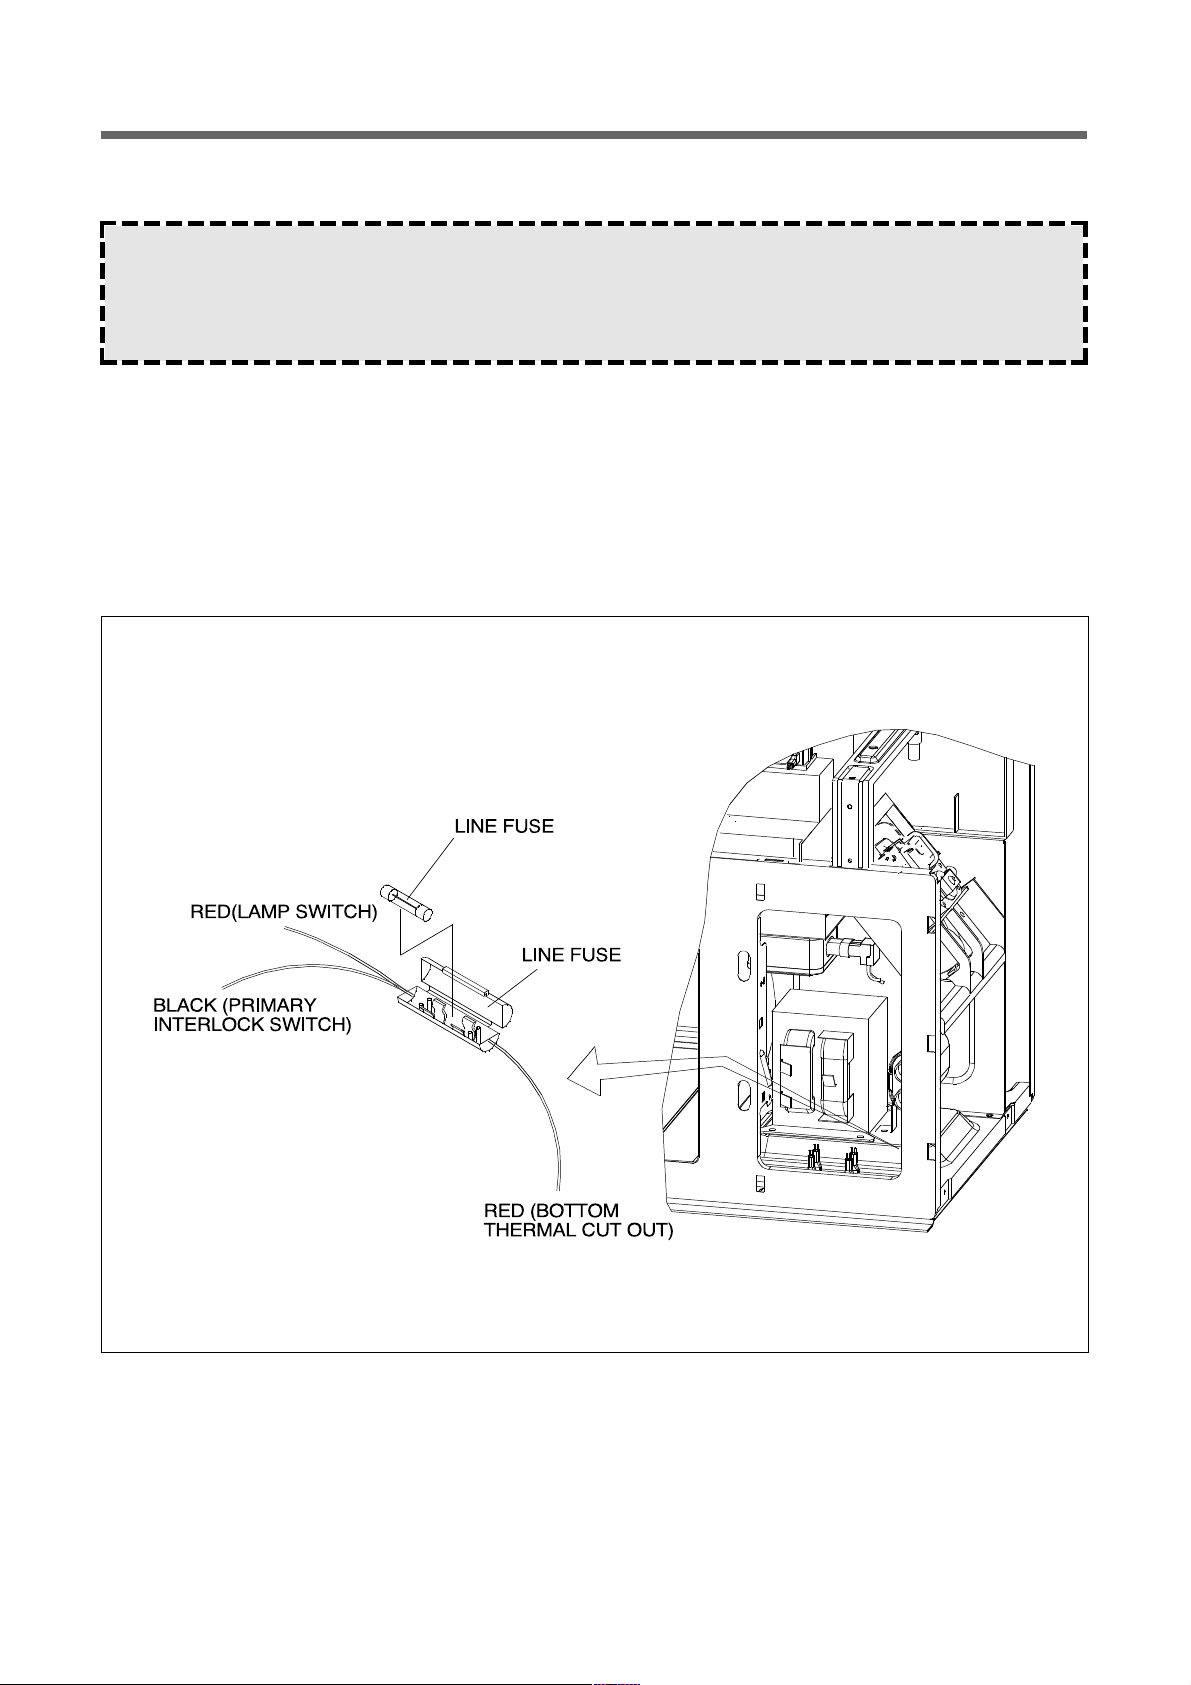
5. REPLACING THE LINE FUSE
1. Remove 2 screws from the vent grille and remove the grille (See FIG. 1).
2. Remove the screw from the front of the microwave oven for wire protector and remove the wire protector(see Fig. 1).
3. Remove the screw from the top center tab of the control panel (See FIG. 2).
4. From the top and back of the control panel, pull out the Fuse Holder.
5. Without touching the metal ends, remove the defective line fuse from its holder and install a new one in its place.
6. Mount the control panel to the oven and secure it with its mounting screw.
7. Mount the vent grille to the microwave oven and check out the operation.
W ARNING :
Personal Injury Hazard
Disconnect from the electrical supply before srvicing the unit. Failure to do so could result shock or other personal injury.
FIG. 5
Page 14
13
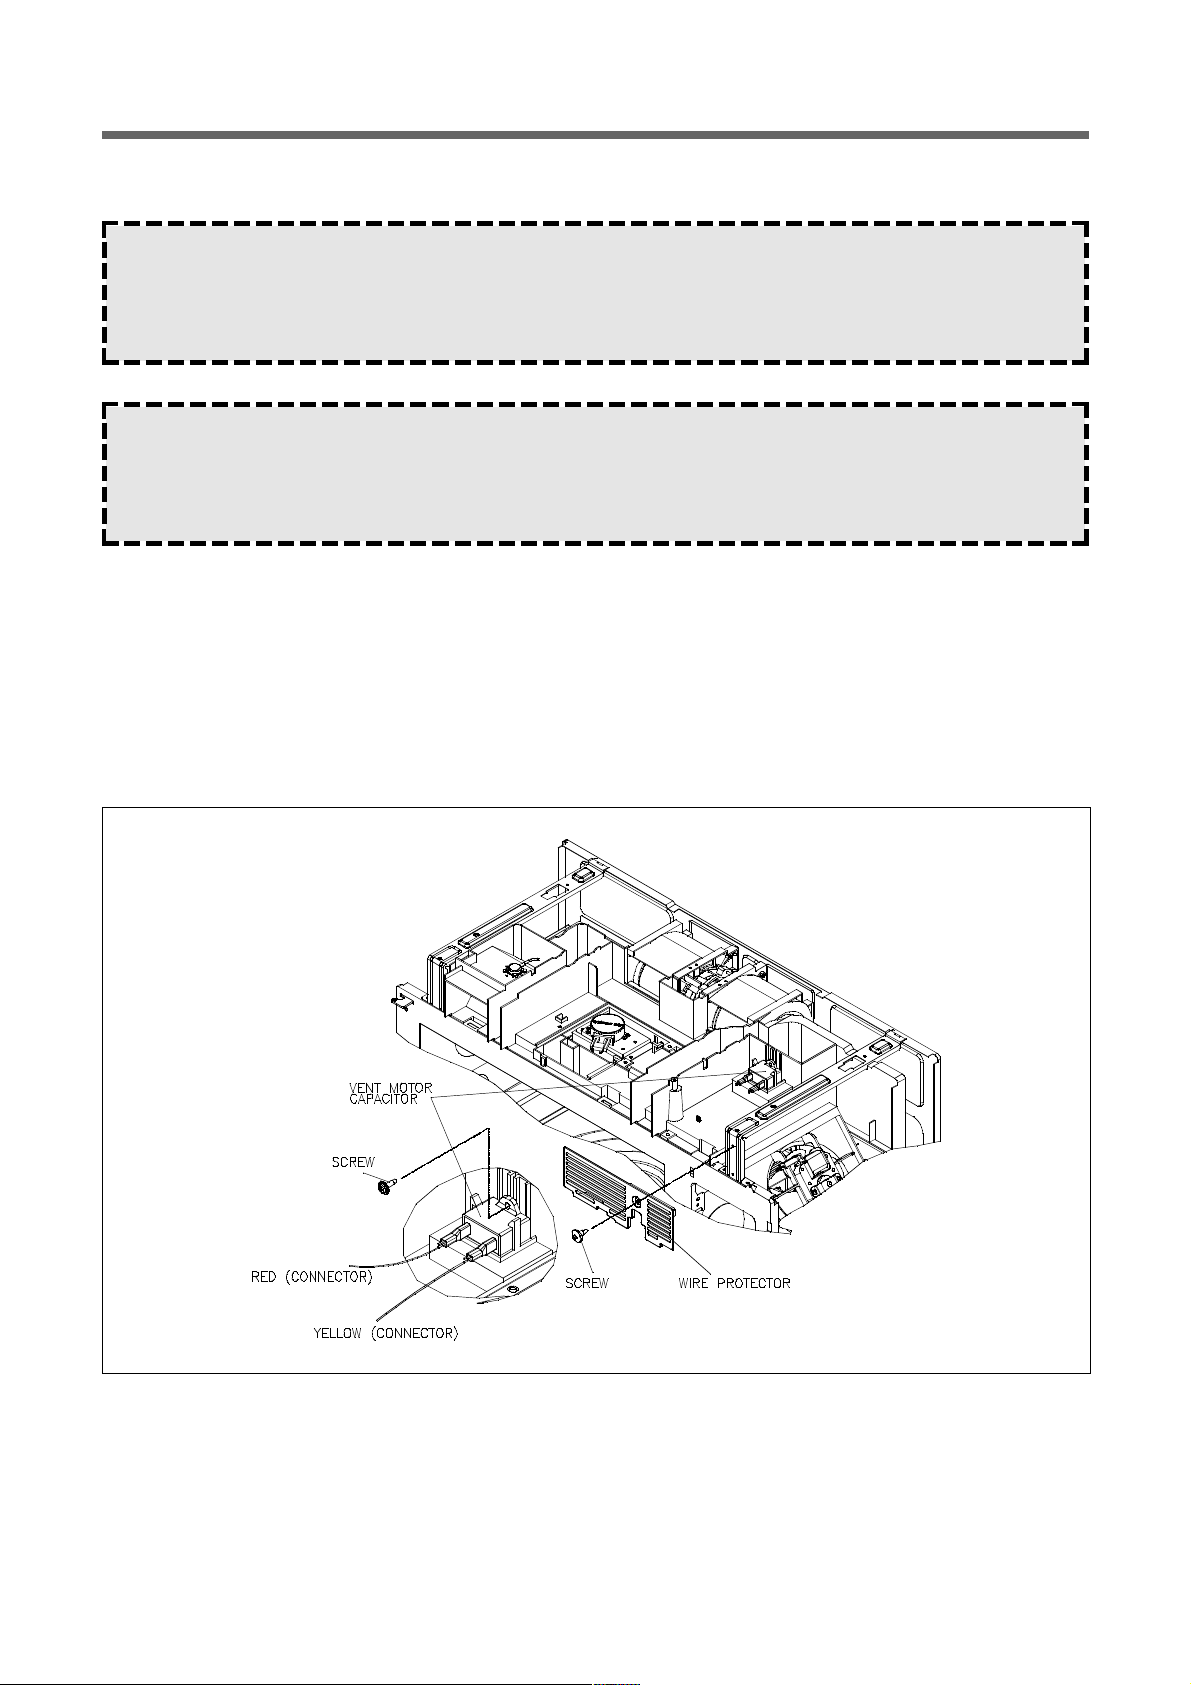
6. REPLACING THE VENT MOTOR CAPACITOR
1. Remove the vent grille from the microwave oven (See Cabinet Removal).
2. Remove the screw from the top center tab of the control panel.(See FIG. 2)
3. Remove the screw from the top center tab of wire protector.
4. Disconnect the two wire connectors from the vent motor capacitor terminals.
5. Remove the screw for vent motor capacitor and remove it, then install a new capacitor in its place.
6. Reconnect the wires to the new vent motor capacitor terminals, as shown in the FIG. 6.
7. Reinstall the control panel and the vent grille on the microwave oven.
W ARNING :
Persona Injury Hazard
Disconnect from the electrical supply before servicing the unit. Failure to do so could result in electrical shock or
other personal injury.
CAUTION :
Persona Injury Hazard
Because of the weight and size of the microwave oven, two people are required to safely move and install it.
Failure to do so could result in personal injury.
FIG. 6
Page 15
14
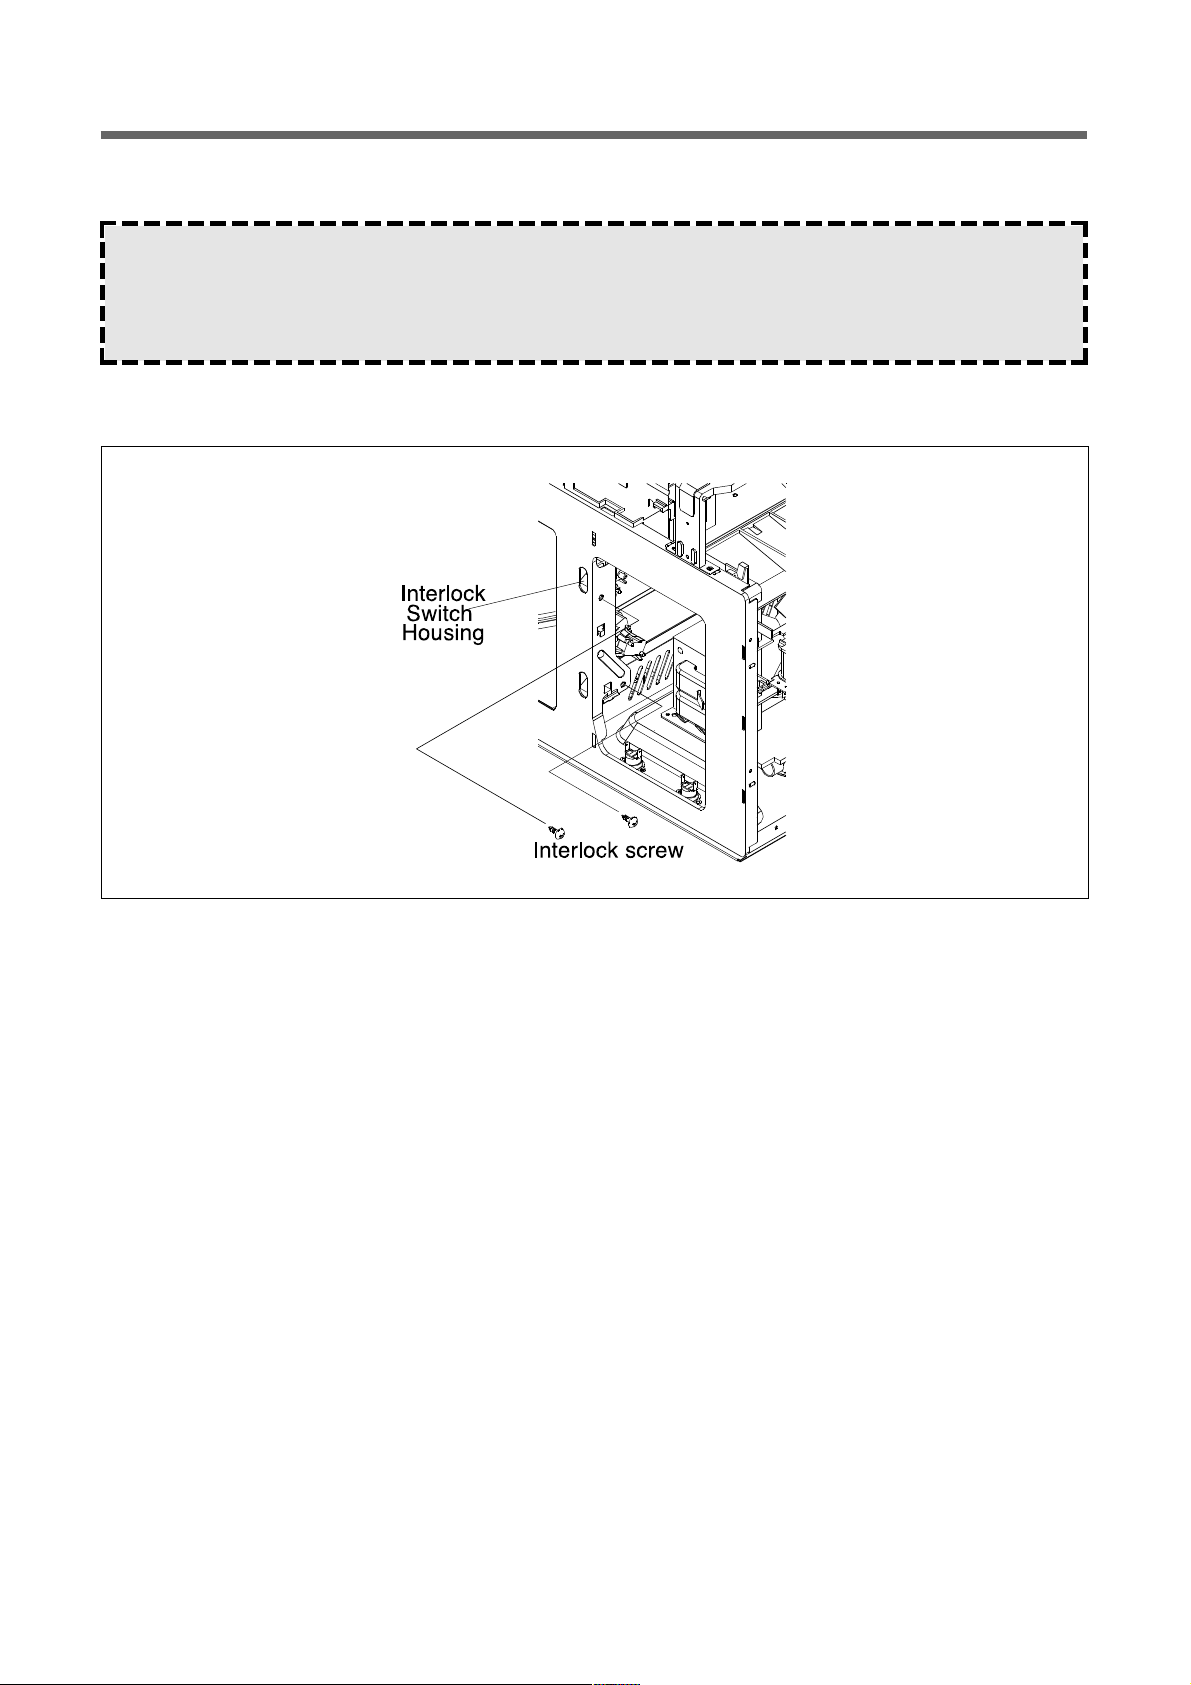
7. REPLACING/ADJUSTING - INTERLOCK SWITCHES
-REPLACING A SWITCH
1. Disconnect the electrical supply to the microwave oven.
2. Remove the vent grille and the cabinet from the microwave oven (See cabinet removal on FIG. 1).
3. Remove the screw from the center of wire protector.
4. Remove the screw from the top center tab of the control panel (See FIG. 2).
5. From the top and back of the control panel, lift the top locking tab and Pull the top of the panel out slightly, then lift the
bottom tabs of the panel out of the slots and pull it forward. Set the panel inside the oven cavity while you work.
Refer to FIG. 7 for the following steps:
6. Remove the two mounting screws from the interlock switch assembly, and position the assembly so you can easily
access the switches and wiring.
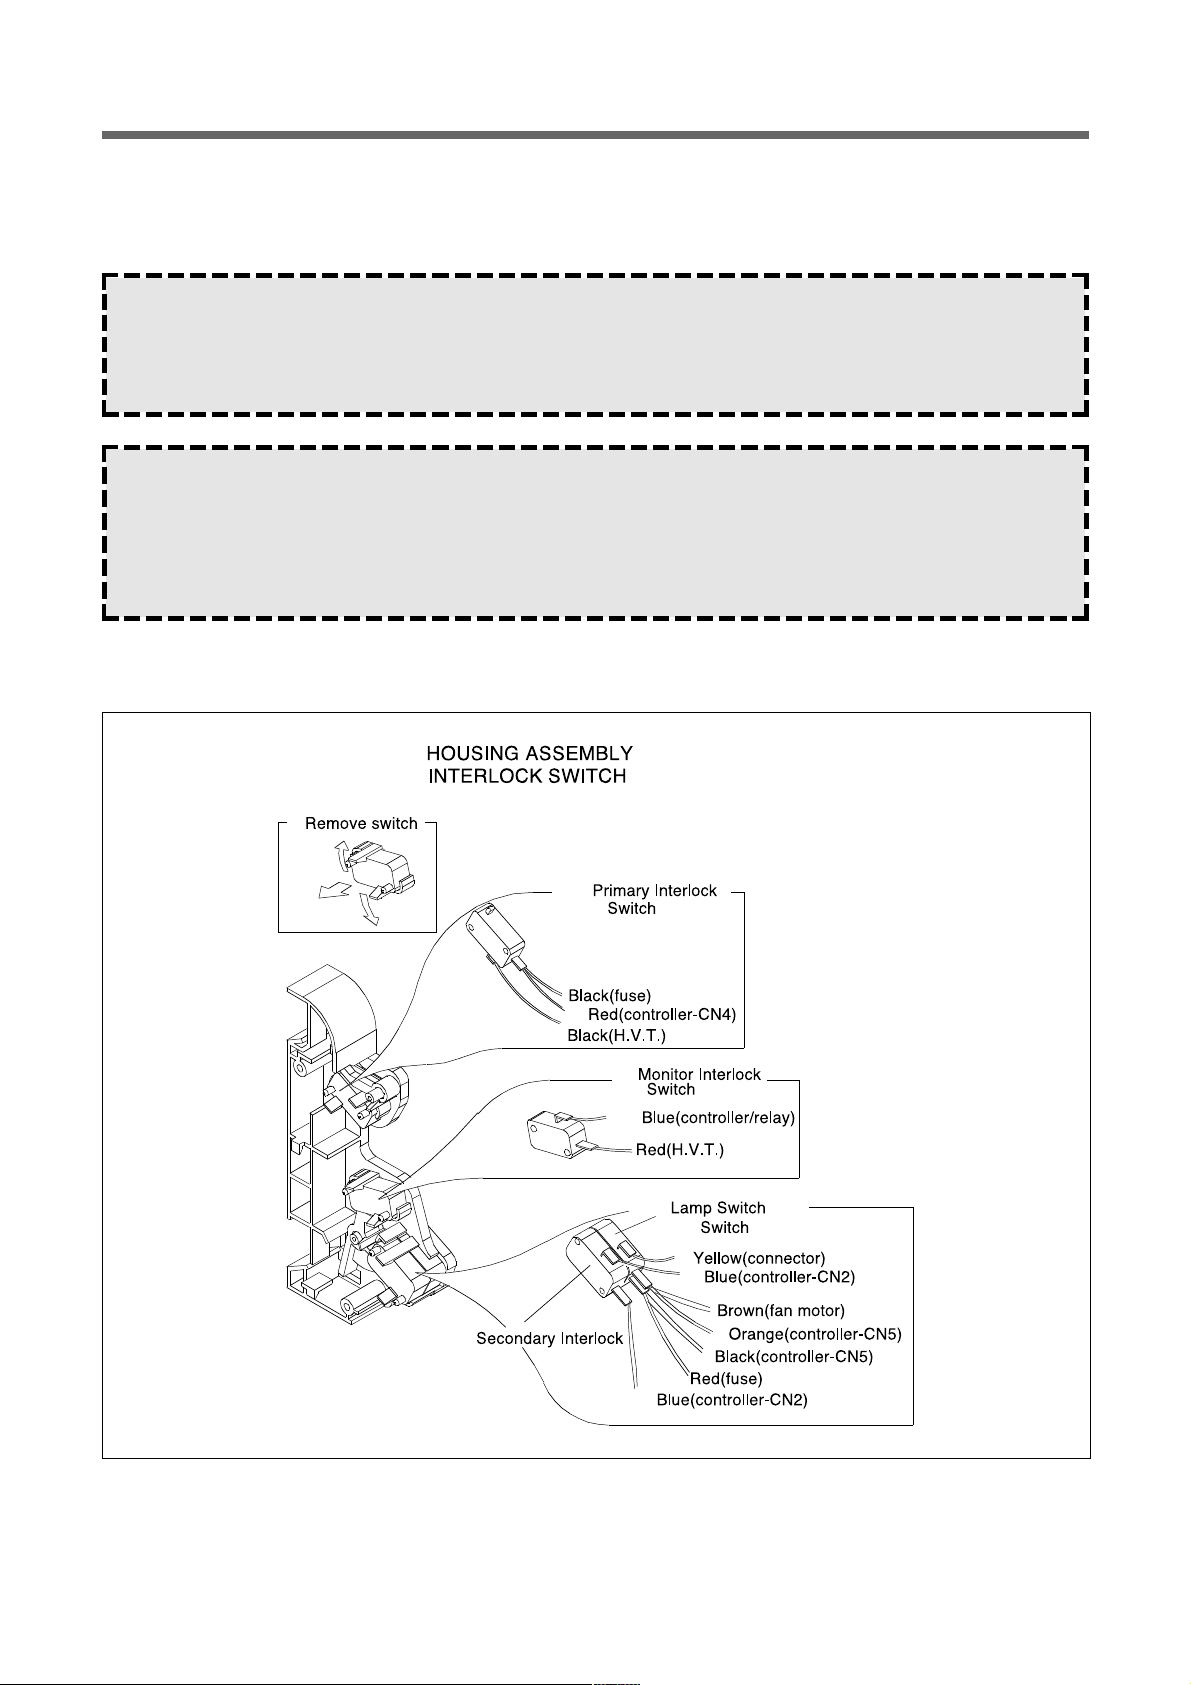
7. Refer to REMOVE SWITCH in FIG. 7-1 for the interlock switches the interlock switch housing assembly, and remove
the switch from the housing as shown.
8. One at a time, pull the wire connectors off the defective switch, and reconnect them to the same terminals on the
replacement switch (See FIG. 7-1).
9. Sanp the new switch into place on the switch housing.
10. Mount the interlock switch assembly to the chassis flange with two screws (See FIG. 7).
W ARNING :
Personal Injury Hazard
Disconnect from the electrical supply before servicing the unit. Failure to do so coud result in electrical shock or
other personal injury.
FIG. 7
Page 16
15
-MAKING ADJUSTMENTS
Refer to FIG. 7-1 for the following steps:
1. If necessary, adjust the interlock switch housing so that the switches operate properly.
2. Mount the control panel to the oven with the screw you removed earlier.
3. Mount the vent grille to the microwave oven and check out the operation of the switches.
W ARNING :
The interlock Monitor Switch provides an added safety check on the Primary and Secondary Interlock Switches.
If the Primary and Secondary Interlock Switches allow the oven to operate with the door open, the Monitor
Interlock Switch will blow the line fuse.
NOTE :
Interlock switch replacement
Whenever safty interlock switches are replaced:
Refer to the following diagram.
Check the connection of monitor switch after replacement.
Perform the electrical continuity check of interlock switches and microwave emission test mentioned in this manual.
FIG. 7-1
Page 17
16
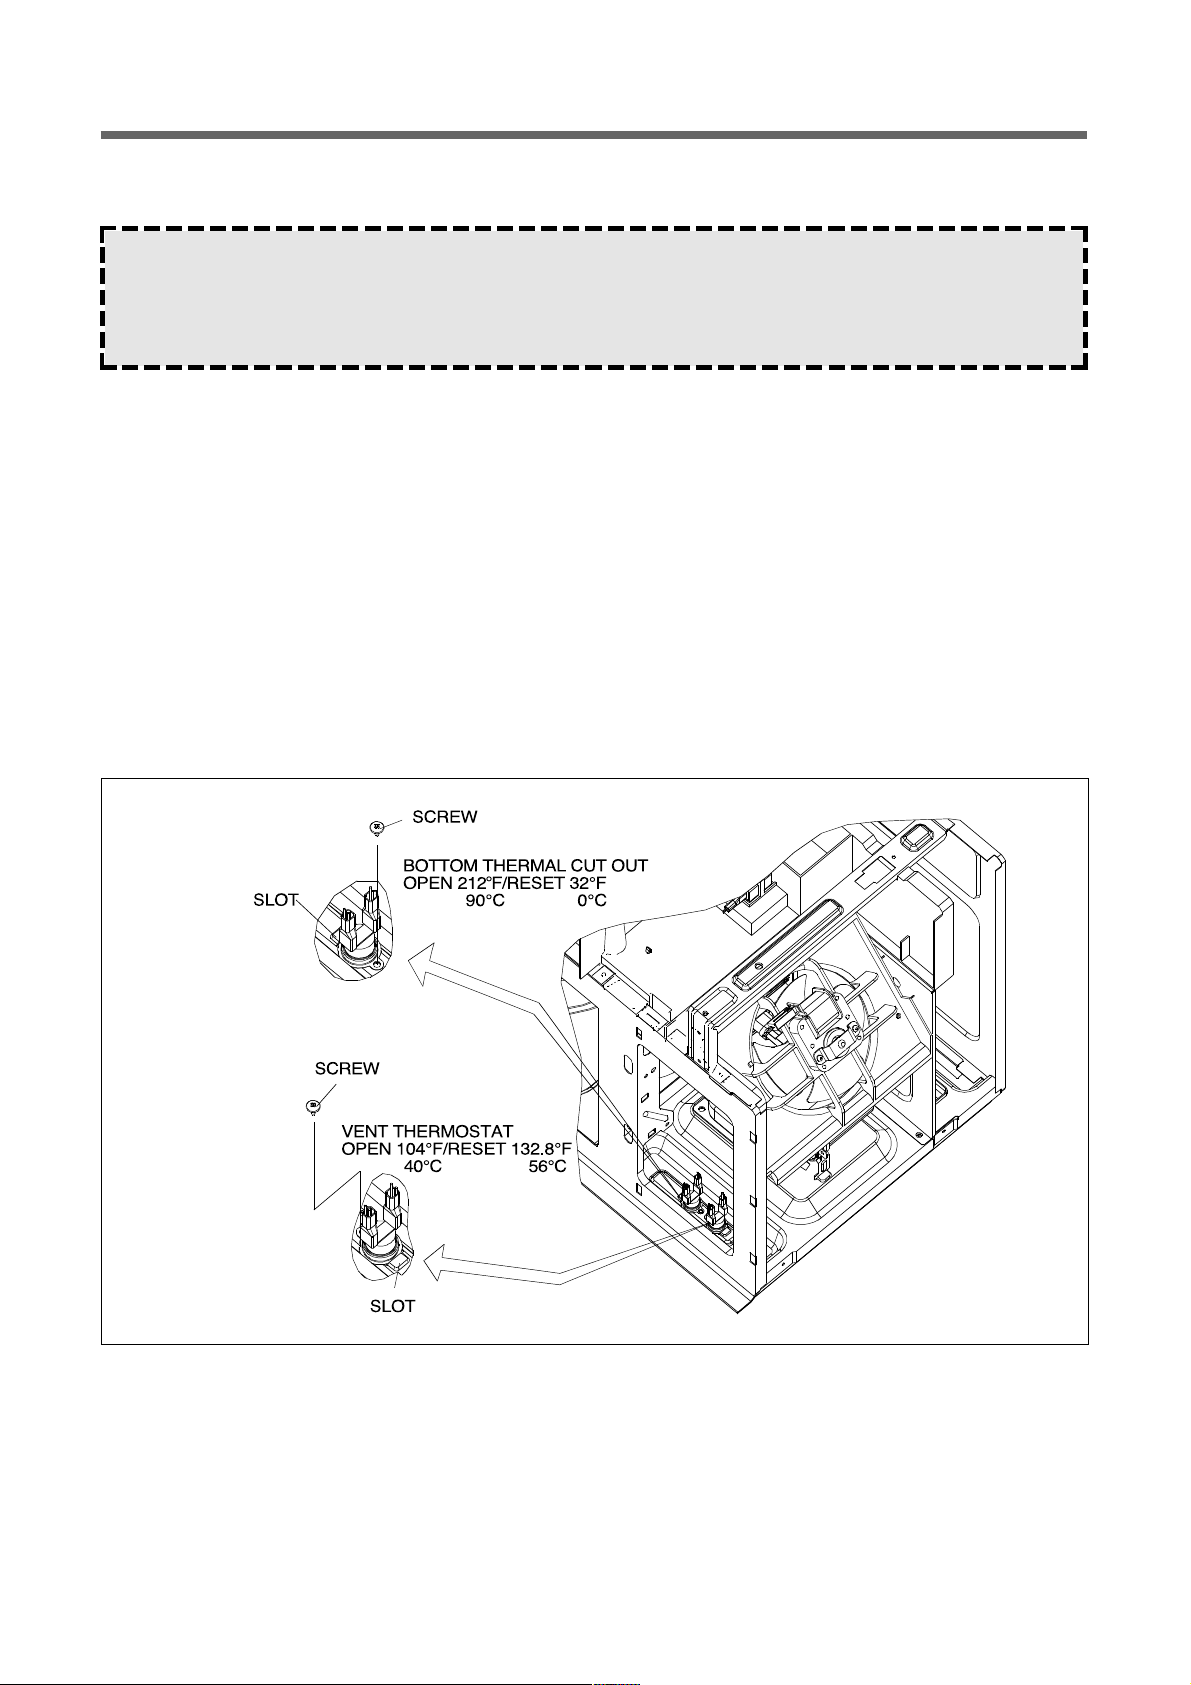
8. REPLACING THE THERMOSTAT (BOTTOM/VENT)
1. Disconnect the electric supply to the microwave oven.
2. Remove the vent grille and the cabinet from the microwave oven (See cabinet removal on FIG. 1).
3. Remove the wire protector(see Fig. 4).
4. Remove the screw from the top center tab of the control panel. (See FIG. 2).
5. From the top and back of the control panel, lift the top locking tab and pull the top of the panel out slightly, then lift bottom tabs of the panel out of the slots and pull it forward. Set the panel inside the oven cavity while you work.
Refer to FIG. 8 and the inset for the following steps:
6. Remove the mounting screw from the bottom thermostat and lift the bottom flange out at slot in the chassis (See FIG. 8)
7. Unplug the two wire connectors from the bottom thermostat.
8. Connect the two wires to the new bottom thermostat.
9. Insert the bottom tab of the bottom thermostat into the chassis slot, and secure the thermostat with its mounting screw.
10. Mount the Control panel to the oven and screw it with its mounting screw.
11. Mount the vent grille to the microwave oven and check out the operation.
* Vent thermostat is same as bottom thermostat method. (See FIG. 8-2)
W ARNING :
Personal Injury Hazard
Disconnect from the electrical supply before servicing the unit. Failure to do so could result in electrical shock or
other personal injury.
FIG. 8
Page 18
17
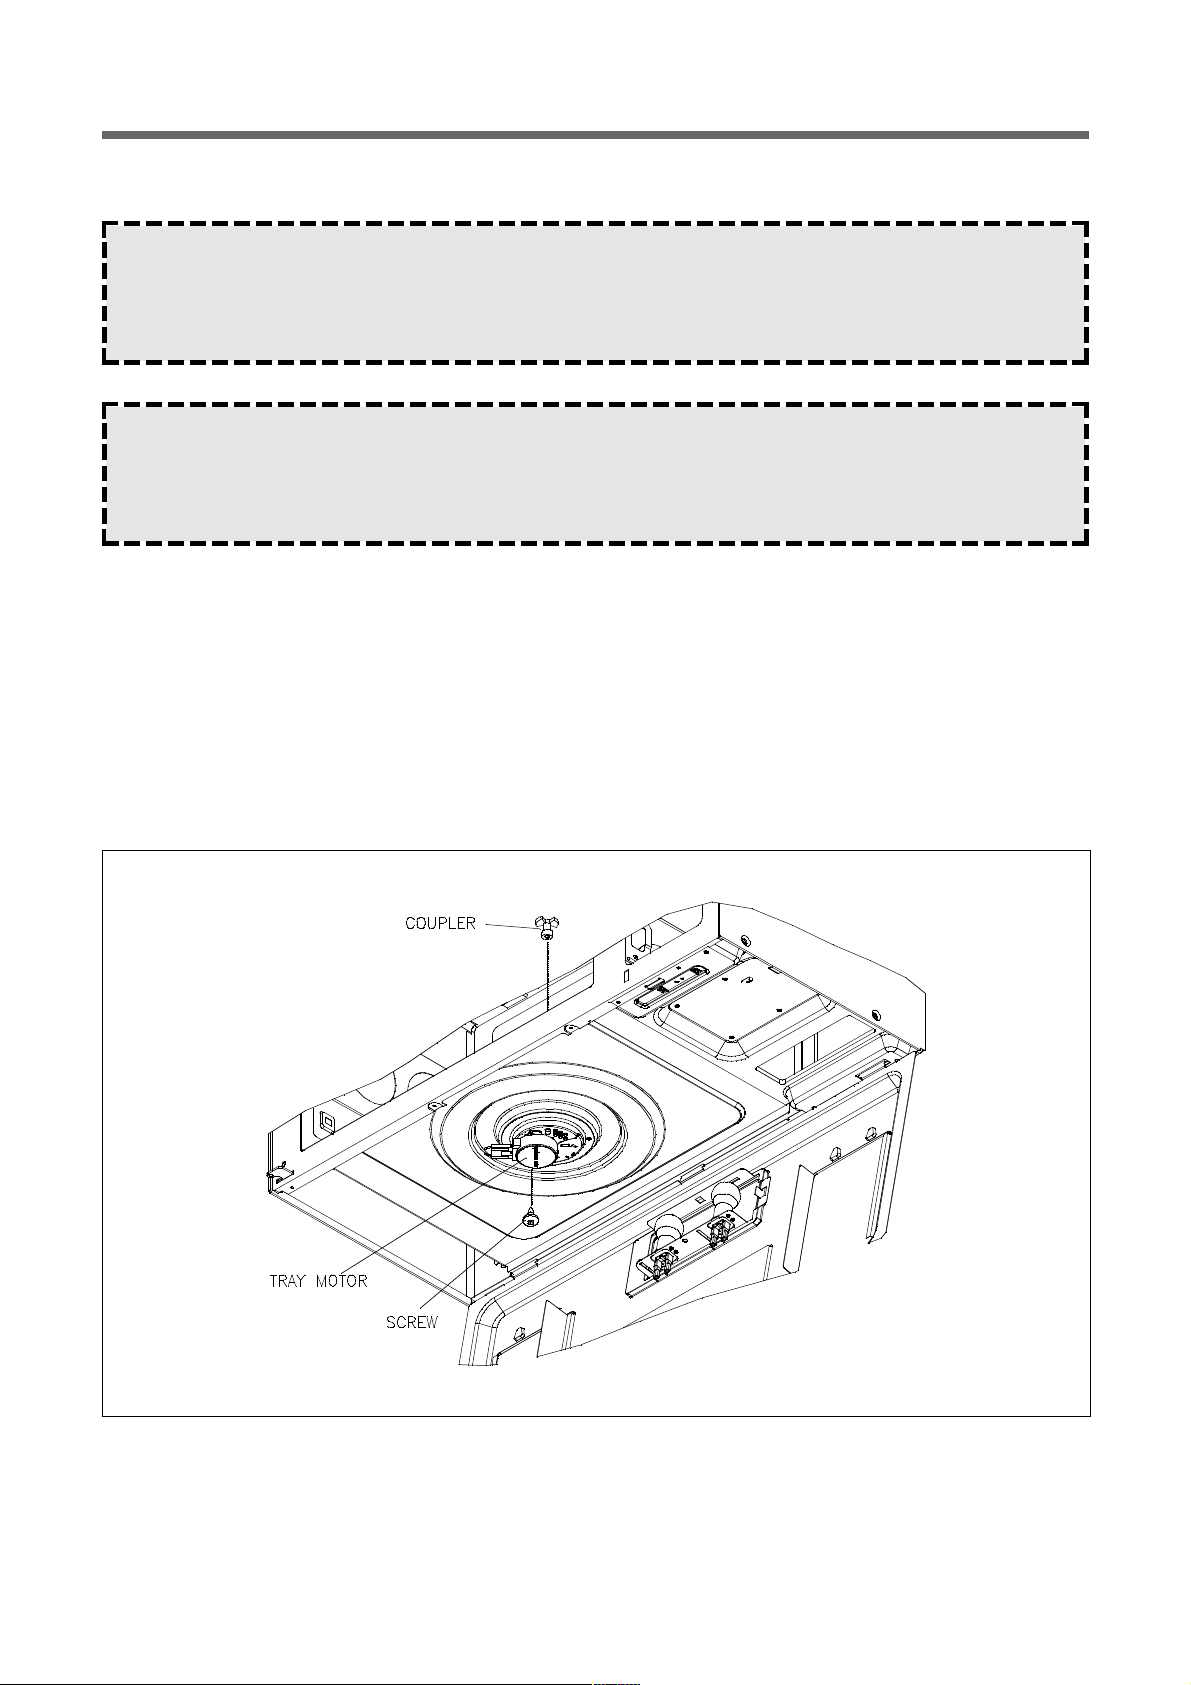
9. REPLACING THE TRAY MOTOR
1. Remove 4 screws from the base plate and remove it.
Refer to the FIG. 9 for the following steps:
2. Pull the connectors off the tray motor terminal.
3. Remove the screws from the tray motor and remove the motor.
4. Install the coupler onto the new tray motor shaft.
5. Mount the new motor to the oven with its the screws.
6. Connect the wires to the tray motor terminal.
7. Reinstall the base plate in the oven.
8. Secure its 4 screws.
W ARNING :
Personal Injury Hazard
Disconnect from the electrical supply before servicing the unit. Failure to do so could result in electrical shock or
other personal injury.
CAUTION :
Personal Injury Hazard
Because of the weight and size of the microwave oven, two people are required to safely move and install it.
Failure to do so could result in personal injury.
FIG. 9
Page 19
18
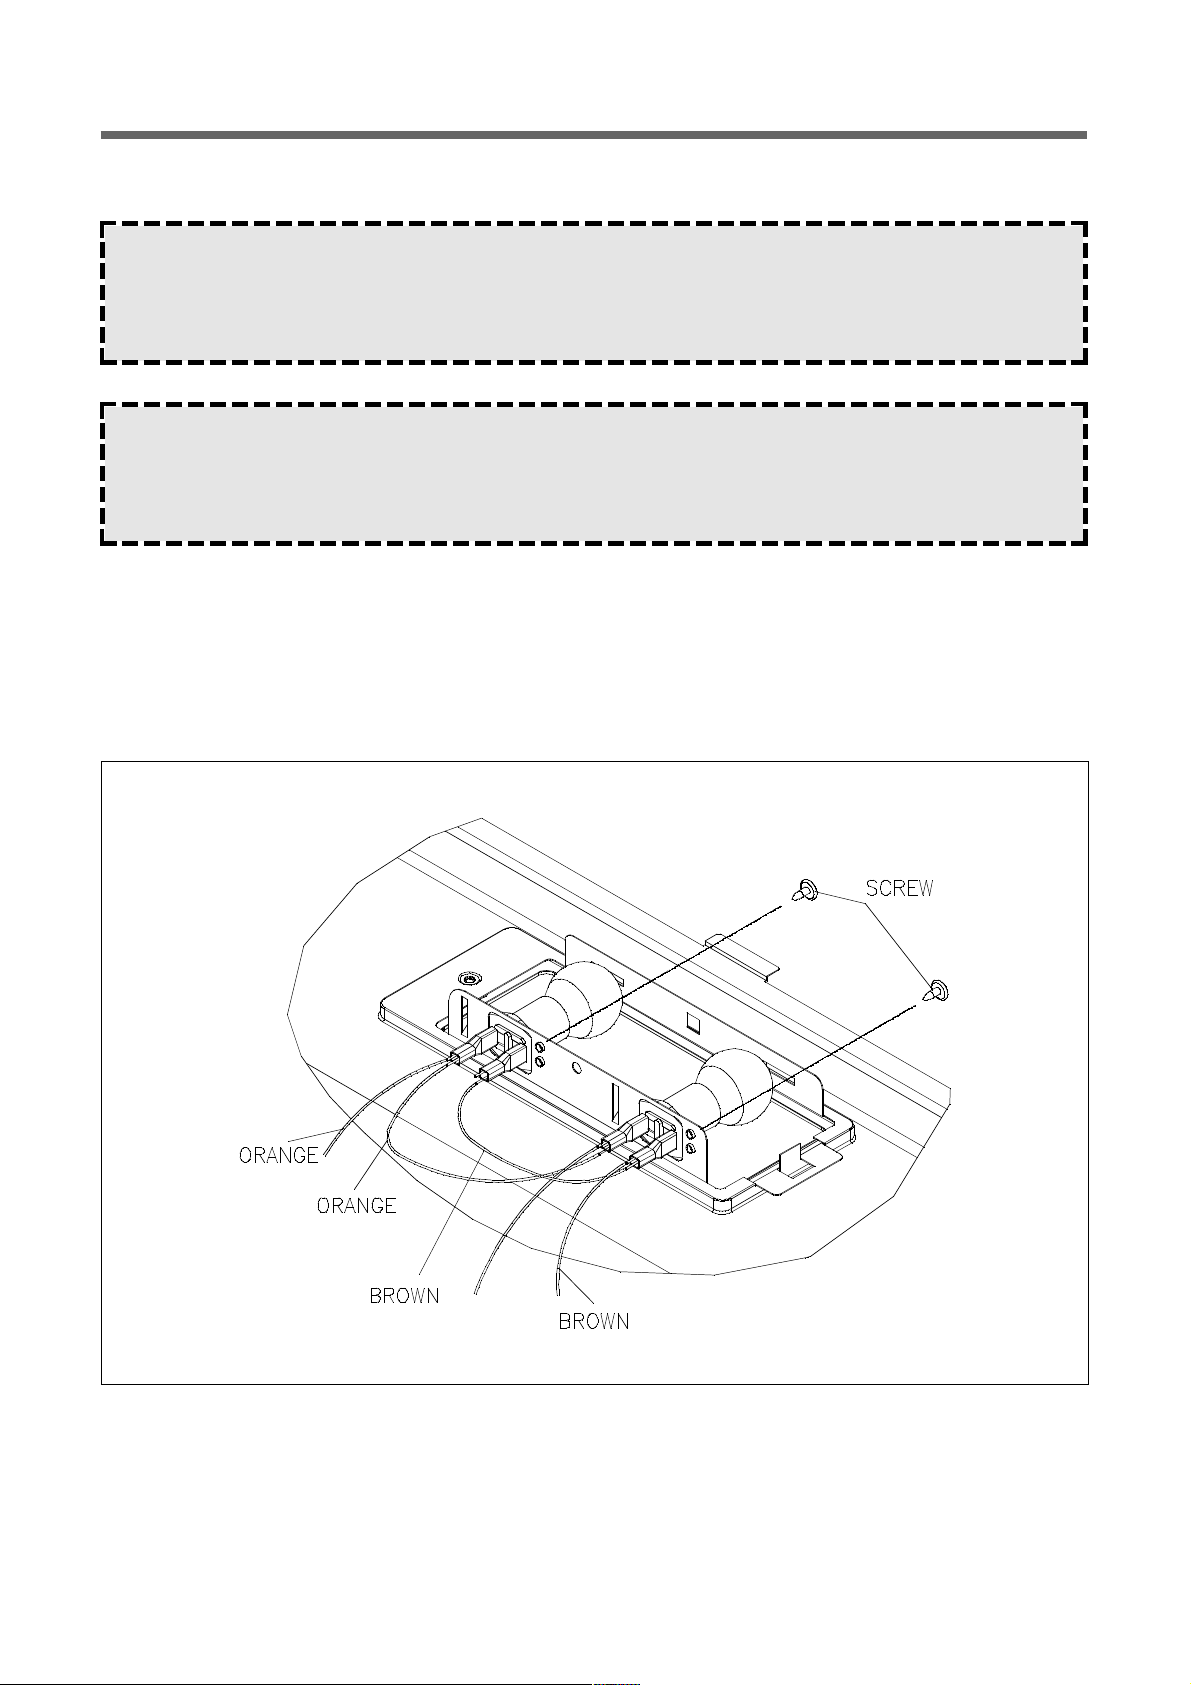
10. REPLACING A COOKTOP LIGHT SOCKET
1. Pull the connectors off the cook-top light socket terminals set the base plate aside.
2. Remove the screw for the cook-top light socket and remove it.
3. Mount the new light socket into the holder.
4. Reattatch the connectors with the orange and brown wires over the light socket terminals.
5. Mount the base plate to the microwave oven.
W ARNING :
Personal Injury Hazard
Disconnect from the electrical supply before servicing the unit. Failure to do so could result in electrical shock or
other personal injury.
CAUTION :
Personal Injury Hazard
Because of the weight and size of the microwave oven, two people are required to safely move and install it.
Failure to do so could result in personal injury.
FIG. 10
Page 20
19
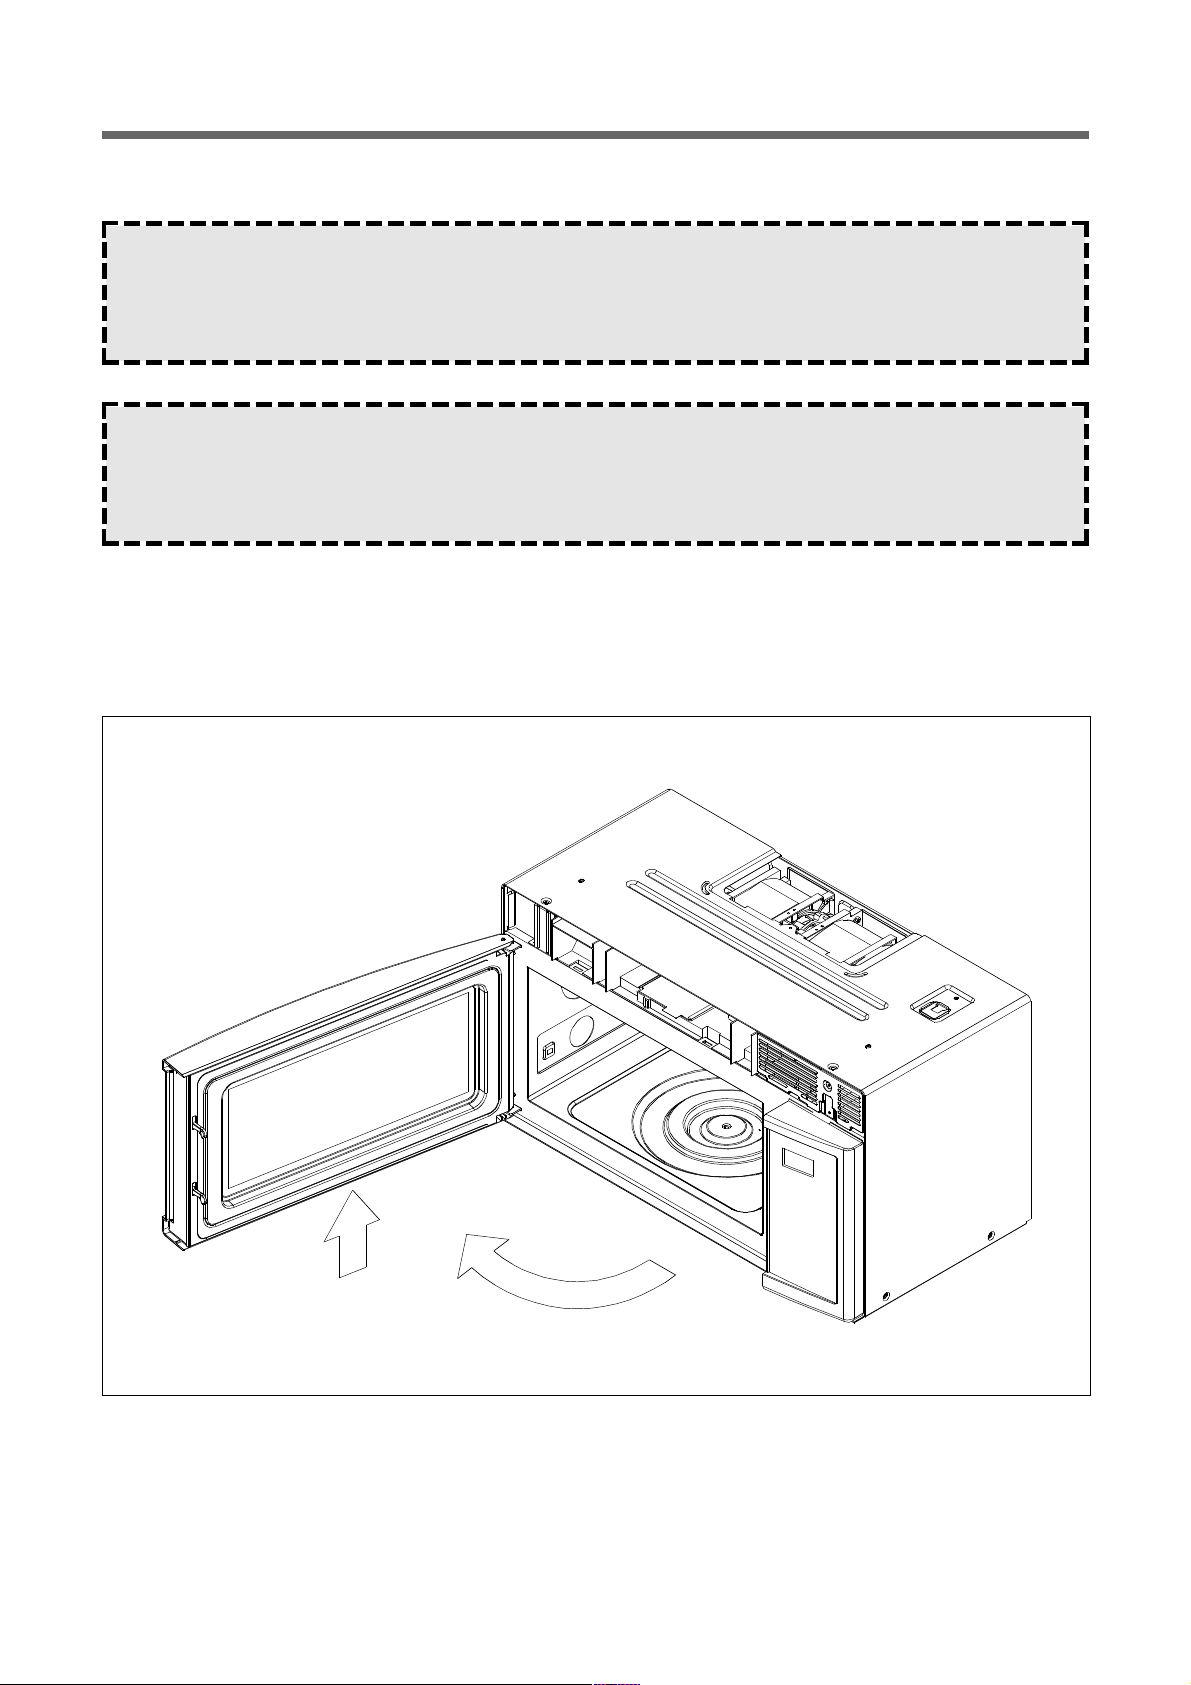
11. REPLACING THE DOOR ASSEMBLY
Refer to FIG. 11 for the following steps:
1. Remove the Grille.
2. Open the door and lift the door.
W ARNING :
Personal Injury Hazard
Disconnect from the electrical supply before servicing the unit. Failure to do so could result in electrical shock or
other personal injury.
CAUTION :
Personal Injury Hazard
Because of the weight and size of the microwave oven, two people are required to safely move and install it.
Failure to do so could result in personal injury.
FIG. 11
Page 21
20
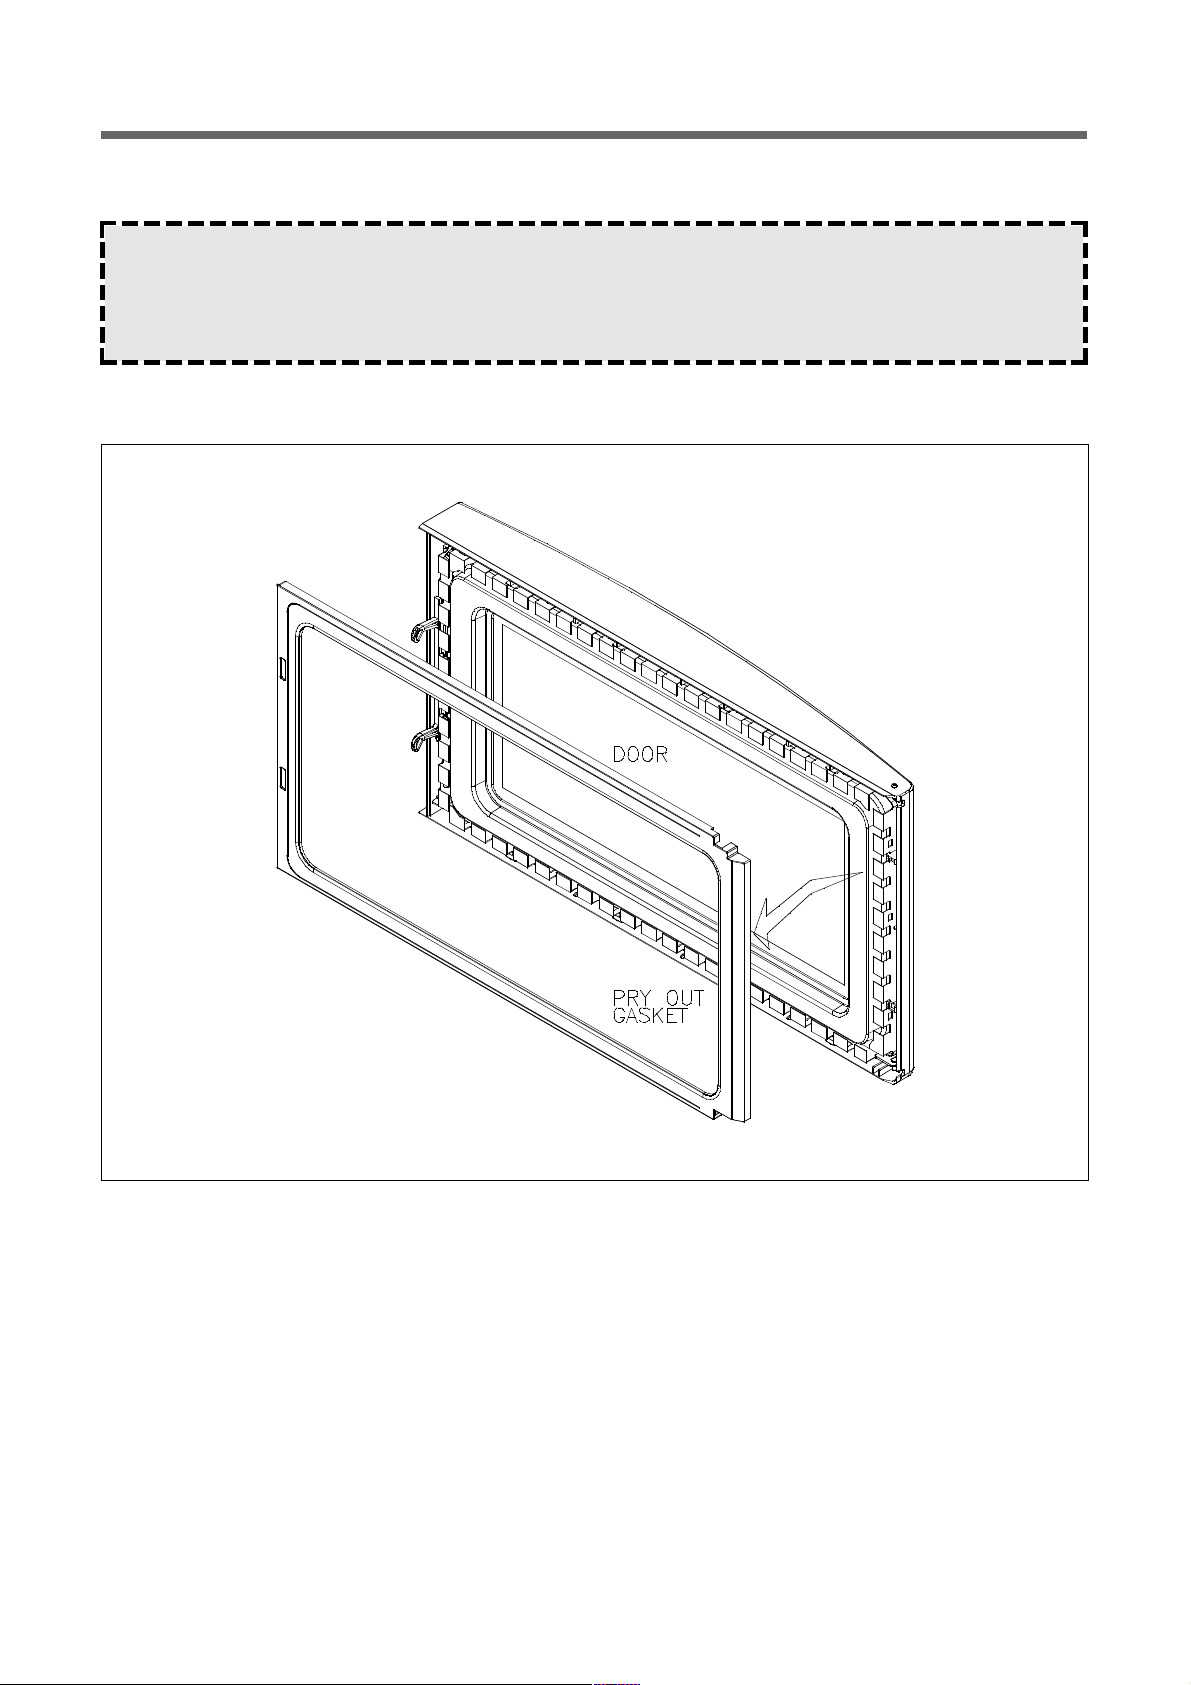
12. REPLACING THE GASKET
Refer to FIG. 12 for the following steps:
1. Open the oven door.
2. Pry out the gasket along the edges of the door with a putty knife.
3. Install the new gasket so that it fits tightly into place inside the door.
W ARNING :
Personal Injury Hazard
Disconnect from the electrical supply before servicing the unit. Failure to do so could result in electrical shock or
other personal injury.
FIG. 12
Page 22
21
13. REPLACING
-THE CAVITY THERMOSTAT
1. Remove the microwave oven from the microwave oven location.
2. Remove the vent grille and cabinet from the microwave oven. (See the cabinet removal)
3. Remove the 2 screws for supporter from the microwave oven.
4. Remove the power cord (see the replacing the powercord, Fig. 16)
5. Remove 4 screws for the vent motor and air guide top.
6. Remove the vent motor and lift the air guide top. (See FIG. 13-1)
7. Unplug and replace the two wire connectors from the cavity thermostat. (See FIG. 13-2)
8. Install the new cavity thermostat and reinstall the air guide top, vent motor, cabinet and vent grille on the microwave
oven.
W ARNING :
Personal Injury Hazard
Disconnect from the electrical supply before servicing the unit. Failure to do so could result in electrical shock or
other personal injury.
Discharge the high voltage capacitor before working inside the oven. Failure to do so could result in electrical
shock.
CAUTION :
Personal Injury Hazard
Because of the weight and size of the microwave oven, two people are required to safely move and install it.
Failure to do so could result personal injury.
FIG. 13
Page 23

22
FIG. 13-1
FIG. 13-2
Page 24

23
14. REPLACING THE VENTILATION MOTOR
1. Remove the microwave oven from the microwave oven location.
2. Remove 2 screws for the vent motor cover and remove it. (See cabinet removal).
3. Remove the screws for the vent motor and lift the vent motor. (See FIG. 14).
4. Unplug the wire connectors for vent motor.
5. Install the new vent motor and secure the vent motor.
6. Connect the wire connector and secure the vent motor.
7. Mount the control panel to the oven and secure it with its mounting screw.
8. Refer to Cabinet Installation and reinstall the base plate and the vent grille on the micrewave oven.
CAUTION :
Personal Injury Hazard
Because of the weight and size of the microwave oven, two people are required to safely move and install it.
Failure to do so could result in personal injury.
FIG. 14
Page 25

24
15. REPLACING THE FAN MOT OR
1. Remove the microwave oven from its mounting location.
2. Remove the vent grille, the wire protector and the cabinet from the microwave oven (See Cabinet Removal).
3. Remove the screw from the top center tab of the control panel.
Refer to the inset and perform the following steps:
4. Unplug the fan motor wire connectors from the motor terminals, and remove the fan motor assembly.
5. Pull the fan blade and compression washer off the shaft of the defective fan motor.
6. Remove the two motor mounting screws from the fan motor and remove it.
7. Mount the new fan motor to the fan motor housing with the two mounting screws.
8. Slide the fan blade.
9. Connect the fan motor wires to the fan motor terminals.
– Reassembly
1. Connect the wiring to the control panel circuit board, and then mount the control panel to the oven with its mounting
screw.
2. Refer to Cabinet Installation, and reinstall the cabinet and the vent grille on the microwave oven with its mounting
screw.
3. Reinstall the microwave oven in its mounting location.
FIG. 15
W ARNING :
Personal Injury Hazard
Disconnect from the electrical supply before servicing the unit. Failure to do so could result in electrical shock or
other personal injury.
CAUTION :
Personal Injury Hazard
Because of the weight and size of the microwave oven, two people are required to safely move and install it.
Failure to do so could result in personal injury.
Page 26

25
16. REPLACING THE POWER CORD
1. Remove the microwave oven from its mounting location.
2. Remove the vent grille, the wire protector and the cabinet from the microwave oven (See “Cabinet Removal).
Refer to FIG. 16 and the inset for the following steps:
3. Unplug the black and white power cord leads.
4. Remove the ground screw from the green power cord lead.
5. Remove the old power cord.
6. Raise the cover just enough to slide the new power cord strain relief block into the chassis slot.
7. Connect the power cord lead to the wiring harness connector so the sections lock together.
8. Route the green wire under the cover, and mount the eyelet to the chassis with the screw you removed earlier.
9. Refer to “Cabinet Installation” and reinstall the cabinet and the vent grille on the microwave oven.
10. Reinstall the microwave oven in its mounting location.
FIG. 16
W ARNING :
Personal Injury Hazard
Disconnect from the electrical supply before servicing the unit. Failure to do so could result in electrical shock or
other personal injury.
CAUTION :
Personal Injury Heazard
Because of the weight and size of the microwave oven, two people are required to safely move and install it.
Failure to do so could result in personal injury.
NOTE :
Disconnect the black lead by pressing in on the locking arm of the connector and pulling it loose.
Page 27

26
17. REPLACING THE HIGH-VOLTAGE TRANSFORMER
1. Remove the vent grille, the wire protector and the base plate from the microwave oven (See FIG. 1,2).
2. Remove the control panel so that you can access the high-voltage section in the microwave oven(See FIG.1).
FIG. 17
W ARNING :
Personal Injury Hazard
Disconect from the electrical supply before servicing the unit. Failure to do so could result in electrical shock or
other personal injury.
CAUTION :
Personal Injury Hazard
Because of the weight and and size of the microwave oven, two people are required to safely move and install it.
Failure to do so could result in personal injury.
NOTE :
Personal Injury Hazard
Disconnect from the power supply, before servicing. Discharge the capacitor using a 20,000 W discharge resistor, or an insulated plastic-handle screwdriver to short across the capacitor terminals.
Page 28

27
3. Discharge the high-voltage capacitor.
4. Remove 4 screws from the H.V. Transformer and save the screws.
Refer to FIG. 17-1 for the following steps:
5. Unplug the five high-voltage transformer wire connectors and remove high voltage transformer.
6. Mount the new high-voltage transformer to the plate with 4 mounting screws you removed earlier.
7. Connect 5 wire connectors going to the high-voltage capacitor, the high-voltage transformer, and the magentron as
shown in FIG.17-1.
FIG. 17-1
Page 29

28
18. REPLACING THE HIGH VOLTAGE RECTIFIER
1. Remove the vent grille, the wire protector and the control panel from the microwave oven (See FIG.1, FIG.2).
2. You can access the high-voltage section in the microwave oven.
3. Discharge the high-voltage capacitor.
4. Unplug one end of the high-voltage rectifier from the high-voltage capacitor terminal.
5. Remove a screw from the end of the high-voltage rectifier, and remove the high voltage rectifier.
6. Mount the eyelet on the end of the high-voltage rectifier lead to the bracket with its mounting screw.
FIG. 18
W ARNING :
Personal Injury Hazard
Disconnect from the electrical supply before servicing the unit. Failure to do so could result in electrical shock or
other personal injury.
CAUTION :
Personal Injury Hazard
Because of the weight and size of the microwave oven, two people are required to safely move and install it.
Failure to do so could result in personal injury.
W ARNING :
Personal Injury Hazard
Disconnect from the power supply, before servicing. Discharge the capacitor using a 20,000 W discharge resistor, or an insulated plastic-handle screwdriver to short across the capacitor terminals.
Page 30

29
19. REPLACING THE HIGH VOLTAGE CAPACITOR
1. Remove the vent grille(See FIG.1, FIG2).
2. Remove the wire protector.
3. Remove the control panel so that you can access the high-voltage section in the microwave oven. (See FIG. 1)
4. Discharge the high-voltage capacitor.
5. Unplug the wire connector going to high voltage transformer and one end of high voltage rectifier.
6. Remove the capacitor mounting strap screw, the remove the old capacitor.
W ARNING :
Personal Injury Hazard
Disconnect from the electrical supply before servicing the unit. Failure to do so could result in electrical shock or
other personal injury.
CAUTION :
Personal Injury Hazard
Because of the weight and size of the microwave oven, two people are required to safely move and install it.
Failure to do so could result in personal injury.
W ARNING :
Personal lnjury Hazard
Disconnect from the power supply, before servicing. Discharge the capacitor using a 20,000 W discharge resistor, or an insulated plastic-handle screwdriver to short across the capacitor terminals.
Page 31

30
7. Position the new high-voltage capacitor with the round blister (between the leads). Make sure that the flange on the
strap is against the front end of the capacitor, and tighten the screw just enough to hold the capacitor in place.
8. Connect the end of the high-voltage rectifier and red wire coming from the high voltage transformer to the indicated
capacitor terminal.
9. Connect the remaining red lead coming from the magnetron to the indicated capacitor terminal.
FIG. 19
Page 32

31
20. REPLACING THE MAGNETRON
1. Remove the microwave oven from its mounting location.
2. Remove the vent grille, the wire protector and the cabinet from the microwave oven (See “Cabinet Removal).
3. Remove the control panel so that you can access the high-voltage section in the microwave oven.
4. Remove the supporter and powercord(See Fig.13).
5. Remove the air guide top.
6. Discharge the high-voltage capacitor.
7. Unplug the red wire connectors from the high voltage transformer.
8. Remove the four mounting hex nuts from the magnetron. Support the magnetron with one hand while you remove the
screws with the other so that the magnetron does not fall as you remove it.
FIG. 20
W ARNING :
Personal Injury Hazard
Disconnect from the electrical supply before servicing the unit. Failure to do so could result in electrical shock or
other personal injury.
CAUTION :
Personal Injury Hazard
Because of the weight and size of the microwave oven, two people are required to safely move and install it.
Failure to do so could result in personal injury.
W ARNING :
Personal Injury Hazard
Disconnect from the power supply, before servicing. Discharge the capacitor using a 20,000 W discharge resistor, or an insulated plastic-handle screwdriver to short across the capacitor terminals.
Page 33

32
9. Mount the magnetron cover lamp to the new magnetron with its 1 mounting screw.
10. Position the new magnetron so that the magnetron the cover lamp the front of the oven, and mount the magnetron to
the top of the chassis with its four mounting hex unts. Make sure that you tighten the nuts securely.
11. Connect the red high voltage leads to the magnetron terminals.
12. Refer to “Cabinet Installation” and reinstall the Air guide top, supporter, powercord, wire protector, the cabinet, control
panel and the vent grille on the microwave.
13. Reinstall the micowave oven in its mounting location.
FIG. 20-1
Page 34

33
TROUBLE SHOO TING GUIDE
Following the procedures below to check if the oven is defective or not.
1. Check grounding before checking trouble.
2. Be careful of the high voltage circuit.
3. Discharge the high voltage capacitor.
4. When checking the continuity of the switches, fuse or high voltage transformer, disconnect one lead wire from these parts
and the check continuity with the AC plug removed. To do otherwise may result in a false reading or damage to your
meter.
5. Do not touch any part of the circuit on the touch control circuit since static electric discharge may damage this control
panel. Always touch yourself to ground while working on this panel to discharge any static charge built up in your body.
First of all, operate the microwave oven following the correct operation described in users guide manual (instruction
manual) by time cooking in order to find the exact cause of any trouble.
(TROUBLE 1) Oven does not operate at all; an y input can not be accepted.
CONDITION CHECK
Check continuity of
interlock monitor
switch with door
closed (COM NC)
Check continuity of
primary interlock
switch contact with
door partially open
until interlock
monitor switch
contact close
(COM NC close)
Malfunction of
interlock monitor
switch
RESULT
continuity
No Continuity
CAUSE REMEDY
Replace(NOTE1)
Fuse blows
Shorted contacts
of primary
interlock switch
continuity Replace(NOTE1)
Check continuity of
primary winding of
low voltage
transformer
Disconnect one
side of the lead
wire connected
from high voltage
to high voltage
Capacitor and
operate the unit
Shorted or open
winding
0 or infinite
Approx.90~110
Replace low
Voltge transformer
Defective low
voltage capacitor
Defective high
voltage capacitor
Normal
Fuse again blows
Replace
Replace
NOTE1 All these switches must be replaced at the same time, plese refer to page 14 and 15 for adjustment
instructions.
Page 35

34
MEASUREMENT AND TEST
CAUTION :
1. Wather load should be measured exactly to 1 liter.
2. Input ower voltage should be exactly 120V as specified.
3. Ambient temperature should be 20 2˚C(68 ±3.6˚F)
1. MEASUREMENT OF THE MICROW AVE POWER OUTPUT
Microwave output power can be checked by indirectly measuring the temperature rise of a certain amount of water
exposed to the microwave as directed below.
PROCEDURE
1. Microwave power output measurement is made with the microwave oven supplied at rated voltage and operated at its
maximum microwave power setting with a load 1000± 5cc of potable water.
2. The water is contained in a cylindrical borosilicate glass vessel having a maximum material thickness of 3 mm and an
outside diameter of approximately 190 mm.
3. The oven and the empty vessel are at ambient temperature prior to the start of the test. The initial temperature of the
water is 10± 2˚C (50 ± 3.6˚F). It is measured immediately before the water is added to the vessel. After addition of the
water to the vessel, the load is immediately placed on the center of the shelf which is in the lowest normal position.
4. Microwave power is switched on.
Heating time should be exactly 41 sec.
Heating time is measured while the microwave Generator is
operating at full power. The filament Heat-up time for
magnetron is not included.
5. The initial and final water temperature are selected so that the
maximum difference between the ambient and final water
temperature is 5˚C.
6. The microwave power output P in watts is calculated from the
following formula:
• ▲▲T is actual temperature rise.
• t is the heating time.
The power measured should be 1000W 10.0 %.
P=4187 X ▲▲T/t
Page 36

35
2. MICRO WA VE RADIATION TEST
On every service call, checks for microwave energy emission must be made according to the following manner.
1. Remove the cooking rack from the oven cavity, if the microwave oven is, so equipped.
2. Place 275mL(9. oz.) glass of water in the center of the oven bottom.
3. Select “HIGH” cook power, turn the microwave oven on, and test for R.F leakage using the following pattern:
a) Check around the cabinet at the front
b) Check around the door
c) Check around the console panel
d) Check horizontally across the door
e) Check vertically across the door
f) Check diagonally across the door
g) Check across the air vents
h) Check across the rear air vent
EQUIPMENT
• Electromagnetic energy leakage monitor(NARDA 8100B,HOLADAYH1501).
* 600 cc glass beaker with an inside diameter of approx. 8.5cm (3.5in).
* Glass thermometer 100˚C or 212˚F
When checking for R.F leakage, use an approved R.F measuring device to assure less than 4mW/cm
2
emission at
5cm distance with a maximum scan rate of 2.5cm/second, in compliance with U.S. Government Department of
Health, Education and Welfare 21 CFR1030, performance Standard for Microwave Ovens.
A proper operating door and seal assembly will normally register small emission, but they must be no greater than
4mW/cm
2
to allow for measurement uncertainty.
All microwave ovens exceeding the emission level of 4mW/cm
2
must be reported to Department of Service for
microwave ovens immediately and the owner should be told not to use the microwave oven until it has been repaired
completely.
W ARNING :
The scan speed is 1 in./sec.
Page 37

36
If a microwave oven is found to operate with the door open, report to Department of Service, the manufacturer and
CDRH* immediately. Also tell the owner not to use the oven.
The interlock monitor switch acts as the final safety switch protecting the customer from microwave radiation.
If the interlock monitor switch operates and opens the line fuse, the interlock switches have failed, and you must replace
all of them(primary and secondary interlock switches, and the monitor switch), because their contact may be melted and
welded together.
All repairs must be performed so that microwave energy emissions are minimal.
CDRH.-Center for Device and Radiological Health, Food, and Drug Administration.
MAKING THE MEASUREMENTS
MEASURING THE OVEN WITH THE CABINET INSTALLED MEASUREMENT NOTES:
• When measuring for leakage, use the 2”(5cm) spacer that is provided with the probe.
• Leakage with the outer panels removed should be less than 5mW/cm
2
• Leakage for a fully assembled oven (before the lamp switch primary is interrupted) with the door opened slightly, should
be less than 2mW/cm
2
• Do not exceed the meter’s full-scale deflection.
• Do not move the test probe along the measuring surfaces faster than 1-inch-per-second (2.5 cm/sec), otherwise a
false reading will occur.
• When testing near a corner of the door, keep the probe perpendicular to the surface, and move it horizontally with out
touching the surfaces, otherwise a false reading will occur.
• Hold the test probe by its gripping surface only, otherwise a false reading will occur.
To measure for oven leakage:
1. Pour 275cc(±25cc) of water into a 600 cc glass beaker.
2. Place the beaker into the center of the microwave oven.
3. Set the energy leakage monitor to 2,450 MHz, and use it according to the manufacturer’s recommended test
procedure to obtain the correct results.
4. Measure the microwave radiation with an electromagnetic radiation monitor. Hold the probe perpendicular to the
surface being measured and measure around the door viewing window, the exhaust opening, and air inlet openings.
5. Operate the oven at its maximum energy output, and take the measurements.
MEASURING THE OVEN WITH THE CABINET REMOVED
When the magnetron has been replaced, use the previous procedure, and measure for microwave energy leakage after
all of the necessary components are replaced or adjusted, and before the cabinet is installed.
Take special care to measure around the magnetron and the waveguide.
W ARNING :
Be careful not to contact any of the high Voltage components when making measurements with the cabinet
removed.
Page 38

37
3. COMPONENT TEST PROCEDURE
THE THERMOSTAT AND THERMAL CUT OUT
There are One thermostats and Two Thermal Cut Out in the OTR Microwave Oven. They are the cavity thermal cut out
and the bottom thermal cut out. The cavity thermal cut out is located air guide top. This thermal cut out is “normallyclosed”, and will open at a set temperature to disable the oven.
The bottom thermal cut out is located directly behind the control panel. It is a “normally-closed”, and will open at a set
temperature to disable the oven.
The vent thermostat is located directly behind the control panel. It is a “normally-open”, that when closed, the Vent motor
activates a low speed. This thermostat is automatically resettable.
POSSIBLE CUSTOMER COMPLAINT:
The unit turns on by itself.
Cavity Thermal Cut Out
Bottom Thermal Cut Out
Vent Thermostat
Magnetron Thermostat
Open
194 / 90
194 / 90
104 / 40
302 / 150
Reset
32 / 0
32 / 0
132.8 / 56
140 / 60
3. COMPONENT TEST PROCEDURE
THE THERMOSTAT AND THERMAL CUT OUT
There are One thermostats and Two Thermal Cut Out in the OTR Microwave Oven. They are the cavity thermal cut out
and the bottom thermal cut out. The cavity thermal cut out is located air guide top. This thermal cut out is “normallyclosed”, and will open at a set temperature to disable the oven.
The bottom thermal cut out is located directly behind the control panel. It is a “normally-closed”, and will open at a set
temperature to disable the oven.
The vent thermostat is located directly behind the control panel. It is a “normally-open”, that when closed, the Vent motor
activates a low speed. This thermostat is automatically resettable.
POSSIBLE CUSTOMER COMPLAINT:
The unit turns on by itself.
Page 39

38
VENT MOTOR CAPACITOR
The Vent motor capacitor is located directly behind the control panel.
It is in use any time the Vent motor is on. The capacitor helps to maintain a constant voltage to the Vent motor so that it
runs more efficiently.
TEST CHARTS
COMPONET TEST PROCEDURE RESULT
High Voltage Transformer(With wire leads unplugged)
Magnetron(with wire leads unplugged)
NOTE
A microwave energy leakage test must always
be performed when the oven is serviced for
any reason.
NOTE
Replace the magnetron if the checks and all of
the high voltage component tests are good,
but the unit still does not heat a load
1. Set the ohmmeter to the Rx1
scale, and measure the:
a) Primary winding
b) Secondary winding
c) Filament winding
2. Set the ohmmeter to its Rx1000
scale, and measure the:
a) Primary to ground
b) Filament to ground
1. Set the ohmmeter to its Rx1000
scale, and measure the:
a) Filament terminal
2. Set the ohmmeter to its Rx1000
scale, and measure the:
a) Filament winding to chassis
a) 0.4 to 0.6 ohms
b) 70 to 130 ohms
c) 0 ohms
a) Normal = infinity
b) Normal = infinity
a) Normal readings
less than 1
a) Normal = infinity
Page 40

39
COMPONET TEST PROCEDURE RESULT
Switches (with wire leads removed). All of the switches
are measured in the same manner.
Fan Motor (with leads disconnected)
Blower Motor (with leads disconnected)
Stirrer Motor (with leads disconnected)
Turn Table Motor (with leads disconnected)
N. O. and C Terminals
Set the ohmmeter to the R X 1
scale, and measure the resistance
between the normally-open (N.O.)
and the common (C) terminals of the
switch.
N. O. and C Terminals
Set the ohmmeter to the R X 1
scale, and measure the resistance
between the normally-close (N.C.)
and the common (C) terminals of the
switch.
Set the ohmmeter to the R x 1 scale,
and measure across the terminals.
Set the ohmmeter to the R x 1 scale,
and measure the:
a) High speed windings
(blue and black wires)
b) Low speed windings
(blue and white wires)
Set the ohmmeter to the R x 1000
scale, and measure the resistance
between the motor terminals.
Set the ohmmeter to the R x 1000
Scale, and measure the resistance
between the motor terminals.
a) Normal - The meter
indicates infinity.
b) Abnormal
- The
meter indicates zero
ohms (a short).
a) Abnormal
- The
meter indicates
infinity.
b) Normal
- The meter
indicates zero ohms
(a short).
a) Fan Motor
- Normal
= 30 to 50 ohms
a) Normal
- High speed
: 25 to 45 ohms
b) Normal
- Low speed
: 45 to 65 ohms
a) Normal
- 3k to 4k
ohms
b) Abnormal
- infinite or
zero ohms
a) Normal
- 3k to 4k
ohms
b) Abnormal
- infinite or
zero ohms
Page 41

40
COMPONET TEST PROCEDURE RESULT
High Voltage Capacitor
Vent Motor Capacitor
High Voltage Diode
Terminal-To-Terminal
Set the ohmmeter to the Rx10k
scale, and measure the resistance
across the capacitor terminals.
Terminal-To-Case
Set the ohmmeter to the Rx1
scale, and measure the resistance
between each terminal and the
case.
Terminal-To-Terminal
Set the ohmmeter to the Rx10k
scale, and measure the resistance
across the capacitor terminals.
Forward Continuity
Set the ohmmeter to the Rx1
scale, and measure forward
resistance across the rectifier
terminals with the (+) lead touching
the anode and the (–) lead touching
the cathode.
a) Normal - The meter
indicates several
ohms, then gradually
returns to infinity.
b) Abnormal - The
meter indicates
infinity, or zero ohms
(a short) immediately.
a) Normal - The meter
indicates infinity.
b) Abnormal - The
meter indicates zero
ohms, or a short.
a) Normal - The meter
indicates several
ohms, then
gradually returns to
infinity
b) Abnormal - The
meter indicates
infinity, or zero ohms
(a short)
immediately.
a) Normal - The meter
indicates several
ohms.
b) Abnormal - The
meter indicates
continuity, or zero
ohms (a short).
Page 42

41
4. SAFETY INTERLOCK CONTINUITY TEST
• You can test continuity of safety interlock and monitor switch by using ohmmeter.
• The switch operation is checked by zero/untimited.
The meter should indicate zero resistance.
• The sequence of check is interlock monitor switch, primary and secondary interlock switches check.
1. In case of interlock monitor switch check.
2. In case of primary interlock switch check.
Condition
1) Door is opened.
2) Common terminal of the monitor switch is
connected.
Condition
1) Door is closed.
POWER
SUPPLY
CORD
PRIMARY
INTERLOCK SWITCH
INTERLOCK
MONITOR
SWITCH
OHHMETER
POWER
SUPPLY
CORD
PRIMARY
INTERLOCK SWITCH
OHHMETER
INTERLOCK
MONITOR
SWITCH
Page 43

42
WIRING DIA GRAM
1. WIRING DIAGRAM
Page 44

43
2. CIRCUIT DESCRIPTION
MICROWAVE COOKING
- TIME COOKING
1. When the food is placed inside the oven and door is closed.
1) The low voltage transformer supplies the necessary voltage to the touch control circuit when the power cord is
plugged in.
2) The contacts of the interlock monitor switch open.
This switch creates short circuit to blow 20A fuse and stop magnetron oscillation when door is opened during operation under abnormal condition (i.e. the contacts of primary interlock switch do not open the circuit).
3) The contacts of primary interlock switch close the primary circuit.
2. When cooking cycle, power and time are set by touching the function pads and the desined mumerical pads.
1) The function indicating bars are located on the digitron light to indicate that function have been set.
2) The time you set appears in the display window.
3) The touch control circuit memorizes the cooking program you set.
3. When the start pad is touched.
The RELAY 1,5 and 6 are controlled by the touch control circuit.
1) 120VAC is applied to the high voltage transformer through the contacts of RELAY 1
2) Fan motor starts rotating and cools the magnetron by blowing the air coming from the intake on the rear plate hole.
3) The oven lamp lights the inside of the oven.
4) Indicator light turns on to indicate function operation. Cooking time starts count down.
5) 3.3 Volts AC is generated from filament winding of the voltage transformer. This filament voltage is applied to the
magnetron to heat the magnetron filament through two noise preventing choke coils.
6) A high voltage of 2000 Volts AC is generated in the secondary of high voltage transformer and this secondary
voltage is increased by the action of the diode and the charging of the high voltage capacitor. This resultant DC
voltage is then applied to the anode of the magnetron. As shown in Figure the first half cycle of the high voltage
produced in the voltage transformer secondary charges the high voltage capacitor. Current flow is in the direction of
the dotted-line during the second half cycle, the voltage produced by the transformer secondary, and the charge of
the high voltage capacitor are combined and applied to the magnetron as shown by the solid line so that oscillations
begin. The disturbance wave generated by the magnetron is prevented by the choke coils of 3.2mH, filter capacitors
of 16pF and the magnetron’s shielded case so that TV and radio programs are not impaired by noise.
Page 45

44
The Touch control circuit controls the ON-OFF time of RELAY 1 in order to vary the output power of the microwave oven
from power level 1 to HI (100%) power.
One complete ON and OFF cycle of the RELAY 1 is 29 seconds. The relation between indications on the control panel
and the output of the microwave oven is as shown.
AUTO DEFROST CYCLE
When auto defrost is selected and the desired defrosting time is chosen, the automatic cycle divides the defrosting time
into 5 periods of alternating defrost and stand times, by cycling on and off.
4. When the door is opened during cooking.
1) The primary interlock switch is opened to cut off primary voltage to the high voltage transformer to stop microwave
oscillation.
2) The secondary interlock switch is opened to give the door open information to touch control circuit. The contacts of
the RELAY 1,5 and 6 open, the display stops counting down.
Page 46

45
3) Fan motor and turn table stop rotating
4) The oven lamp turns off.
5) As soon as the door is opened, the interlock monitor switch contacts close and creates the short circuit.
6) If the contacts of primary interlock switch malfunction the 20A fuse blows open due to the large current surge
caused by the short circuit activation, and this in turn stops magnetron oscillation.
5. When the CANCEL/OFF pad is touched during cooking.
1) The touch control circuit the voltage supplied to the RELAY 1 coil and causes the magnetron to stop oscillating.
2) RELAY 5 and 6 turns off.
3) The display will show the time of day. If you don’t set the clock, the display will show a colon.
4) The oven lamp turns off.
5) Fan motor and turn table motor stop rotating.
POWER LEVEL
OUTPUT POWER
RELAY 1 TURN ON, OFF TIME
AGAINST FULL POWER
P-0 0/29(0%)
P-10 3/29(10%)
P-20 5/29(17%)
P-30 8/29(28%)
P-40 11/29(38%)
P-50 14/29(48%)
P-60 17/29(59%)
P-70 20/29(69%)
P-80 23/29(79%)
P-90 26/29(90%)
P-HI 29/29(100%)
Page 47

46
1. CIRCUIT CHECK PROCEDURE
1) Low voltage transformer (DMR-210P) check
The low voltage transformer is located on the PCB
Measuring condition : Input voltage : 120 V
Frequency : 60Hz
2. Voltage Check
- KEY CHECK POINT
- CHECK METHOD
PRINTED CIRCUIT BO ARD
Terminal
Voltage
6 - 7
8 - 10
LOAD
AC 17V
AC 2.6V
NO LOAD
AC 20V
AC 3.1V
NOTE :
Secondary side voltage of the low votage transformer changes in proportion to fluctuation of power source
voltage.
NOTE :
The allowable tolerance of the secondary voltage is within 5% of normal voltage.
NOTE :
Each measure point must be measured with GND points.
NO CHECK POINT REMARK
1 IC1 PIN 63, 64 +5VDC
2 IC1 PIN 25 –24VDC
3 IC1 PIN 38
4 IC1 PIN 33 OR 34
5 DP1 PIN 1, 2 & 32, 33 2.6 VAC (DISPLAY FILAMENT VOLTAGE)
NO MEASURE POINT (FIG.21) WAVE FORM REMEDY REMARK
1 MP1 DC +5V±0.25 REPLACE Q5, EC1, C8, ZD4 NO LOAD
2 MP2 DC +24V±1.0 REPLACE EC6, R28, D21~D24 NO LOAD
3 MP3 DC -24V±1.0 REPLACE ZD3, ZD6, C7, EC4 NO LOAD
T : 16.67ms (60Hz)
T : 250 ns
Page 48

47
3) Display problems
- THE DISPLAY TROUBLE SHOOTING DATA
NO CAUSE MEASUREMENT RESULT REMEDY
1 Poor contact between PCB Check the voltage of PIN 1, 2 2.6 VAC FIX the PIN 1,2 &
and display filament & PIN 32, 33 32, 33 on the PCB
2 Defective display Refer to the display trouble Replace PCB
shooting data below. assembly
3 Loss of vacuum in the White spot is Replace PCB
display generated on assembly
the display
TROUBLE
DISPLAY NAME & PIN NO. MICOM OUTPUT IN PIN NO.
MEMO doesn’t come on.
A.STSART doesn’t come on.
AM, PM doesn’t come on.
, MUTE don’t come on.
TT OFF doesn’t come on.
, TIMER don’t come on.
SENSOR don’t come on.
SEGMENT “a” doesn’t come on from G1 to G7
SEGMENT “b” doesn’t come on from G1 to G7
SEGMENT “c” doesn’t come on from G1 to G7
SEGMENT “d” doesn’t come on from G1 to G7
SEGMENT “e” doesn’t come on from G1 to G7
SEGMENT “f” doesn’t come on from G1 to G7
SEGMENT “g” doesn’t come on from G1 to G7
SEGMENT “h” doesn’t come on from G1 to G7
SEGMENT “i” doesn’t come on from G1 to G7
SEGMENT “j” doesn’t come on from G1 to G7
SEGMENT “k” doesn’t come on from G1 to G7
SEGMENT “l”doesn’t come on from G1 to G7
SEGMENT “m” doesn’t come on from G1 to G7
SEGMENT “n” doesn’t come on from G1 to G7
, , AM don’t come on.
SENSOR, TIMER, TTOFF, MUTE, PM, A.START, MEMO don’t come on.
GRID1 (1G), 24
GRID2 (2G), 25
GRID3 (3G), 26
GRID4 (4G), 27
GRID5 (5G), 28
GRID6 (6G), 29
GRID7 (7G), 30
SEGMENT a, 11
SEGMENT b, 7
SEGMENT c, 16
SEGMENT d, 14
SEGMENT e, 17
SEGMENT f, 4
SEGMENT g, 5
SEGMENT h, 6
SEGMENT i, 8
SEGMENT j, 18
SEGMENT k, 9
SEGMENT l, 10
SEGMENT m, 13
SEGMENT n, 19
UPPER BAR p15, 15
LOWER BAR p16. 12
7
6
5
4
3
2
1
17
21
12
14
11
24
23
22
20
10
19
18
15
9
13
16
Page 49

48
MEASURE POINT
4) When there is no microwave oscillation
When touching START pad, oven lamp does not turn on.
Fan motor does not rotate, but cook indicator in display comes on.
*Cause: RELAY 6 does not operate.
- CHECK METHOD
When touching START pad, oven lamp turns on.
Fan motor and turntable rotate and cook indicator in display comes on.
*Cause: RELAY 1 does not operate.
- CHECK METHOD
STAGE POINT
RELAY 6 ON
RELAY 6 OFF
A
+5VDC
GND
B
GND
+24VDC
STAGE POINT
RELAY 1 ON
RELAY 1 OFF
A
+5VDC
GND
B
GND
+24VDC
C
+24VDC
+24VDC
Page 50

49
5)When the door is opened during operation, the Count down timer does not stop.
- CHECK METHOD
6) When the digital clock does not operate properly.
- CHECK METHOD
If clock does not keep exact time, you must check resistor R20, transistor Q6
STAGE POINT
1) DOOR OPEN
2) DOOR CLOSED
A
OPEN
CLOSED
B
+5VDC
GND
CHECK NO. METHOD REMEDY
1
Check the stage (ON, OFF) of the secondary interlock Replace secondary interlock switch.
switch by resistance measurement.
POINT WAVE FORM
A
B
T: 16.67 ms
T: 16.67 ms (60 Hz)
Page 51

50
6) When Er01 & Er03 come on display.
-CHECK METHOD
When AUTO REHEATING is just operating, check the point A, B, C, & D after 1~2 minutes.
R 6~10 & connecting status of humidity sensor must be checked before checking point A, B, C & D.
NO
1
2
3
4
CHECK POINT
A
B
C
D
REMARK
0.5V≤VALUE≤3.5V
11.3Vdc
4.4Vdc
2.2Vdc
Tolerance
–
±5%
±5%
±5%
* The Method of connecting humidity sensor * IC2(LM358)
Page 52

51
TROUBLE SHOO TING
Following the procedures below to check if the oven is defective or not.
1. Check grounding before checking trouble.
2. Be careful of the high voltage circuit.
3. Discharge the high voltage capacitor.
4. When checking the continuity of switches of of the high voltage transformer, disconnect one lead wire from these parts
and then check conitnuity with the AC plug removed. To do otherwise may result in false reading of damage to your
meter.
5. Do not touch and part of the circuitry on the touch control circuit since static electric discharge may damage this control
panel.
Always touch yourself to ground while working on this panel to discharge any static charge built up in your body.
First of all operate the microwave oven following the correct operation described on pages 6~19 by time cooking, in order
to find the exact cause of any trouble.
(TROUBLE 1) The following visual conditions indicate a probable defective touch control circuit or membrane switch
assembly.
1. Incomplete segments.
(A) Segments missing.
(B) Partial segments missing.
(C) Digit flickering other than normal fluorescent slight flickering.
(D) "TOUCH CLOCK PAD TO ENTER TIME OF DAY" does not disply when power is on.
2. A distinct change in the brightness of one or more numbers in the display.
3. One of more digits in the display are not on when they should be.
4. Display indicates a number different from one touched.
5. For example, touch 5 and 3 appears in the display.
6. Specific numbers (for example 5 and 3) will not display when the panel is touched.
7. Display does not count down or up with time cooking or clock operation.
8. Oven is programmable and cooks normally but no display shows.
9. Display obviously jumps in time while counting down.
10. Display counts down noticeably too fast while cooking.
11. Display can not shift from the first stage cooking to the third stage cooking while 3 phase cooking (including defrost).
12. Display does not show the time of day when dear pad is touched (in clock mode).
13. Oven lamp and fan motor and tum table motor do not stop although cooking is finished.
Check if the RELAY 5 and 6 contacts close if they are close, replace touch control circuit.
Page 53

52
(TROUBLE 2) Digital readout display does not show programming, even if the membrane keyboard is programmed by
touching proper pads.
MEMBRANE KEYBOARD CHECK PROCEDURE
1. Check the pad termination order and nomenclature
NOTE :
Before following the particular steps listed above in the trouble shooting guide for the membrane keyboard,
failure, please check for the continuity of each wire-harness between the membrane keyboard and control box
assembly.
LEVEL
POWER
0
8
5
TABLE
CANCEL
HI LO OFF ON
TIMER
WARM
TURN
7
4
CLOCK
OFFNIGHT
START
9
6
2
DEFROST
AUTO
FROZEN
PIZZA
FAVORITE CHOICE
COOK
AUTO
POTATO
BAKED
TIME
1
DINNER
COOK
PLATE
POPCORN
BEVERAGE
3
MINUTE
ADD
FROZEN
VEGETABLE
OFF
vent fan light
----
2
POPCORN FAVORITE CHOICEBEVERAGE
BAKED
POTATO PLATE
DINNER
PIZZA
FROZEN
VEGETABLE
FROZEN
COOK
SENSOR
TIME
COOK AUTO
DEFROST MINUTE
ADD
POWER
WARM
TIMER
TABLE
TURN
CLOCK
31
456
789
0
OFFNIGHTONHI LO OFF
CANCEL/OFF START
VENT FAN LIGHT
KOT-152U0A KOT-152C0A
KOT-151S0A
KOT-150S0A
LightVent fan
Vegetable
Frozen
Add
Minute
3
BeveragePopcorn
Plate
Cook
Dinner
1
Time
Baked
Potato
Sensor
Cook
Favorite Choice
Pizza
Frozen
Auto
Defrost
2
6
9
Start
Night Off
Clock
4
7
Turn
Power
Warm
Kitchen
Timer
OnOffLow
High
Stop/Clear
Table
5
8
0
POPCORN BEVERAGE FAVORITE CHOICE
OVER THE RANGE KOT-152UW
BAKED
POTATO
DINNER
PLATE
FROZEN
PIZZA
FROZEN
VEGETABLE
AUTO
COOK
CANCEL/OFF START
POWER
LEVEL
1
WARM
TIMER
Turn
Table
Clock
High
Low
Vent Fan
Off
COOK
TIME
AUTO
DEFROST
ADD
MINUTE
On Night
Light
Off
23
456
789
0
KOT-155S0A
L
K
J
H
G
F
E
D
C
B
A
12
11
10
I
9
8
7
6
5
4
3
2
1
Page 54

53
2. Type of encoding and pad names
The membrane keyboard consists of 35 keys whose configurations are described above and provide 12 pad termintions
to be connected to the touch control circuit.
3. Key check procedure
To determine if the membrane keyboard is defective or not, check the continuity of each pad(key) contacts with a
multimeter.
1) 0 pad : Between A and H
2) 1 pad : Between B and H
3) 2 pad : Between C and H
4) 3 pad : Between D and H
5) 4 pad : Between E and H
6) 5 pad : Between F and H
7) 6 pad : Between G and H
8) 7 pad : Between A and I
9) 8 pad : Between B and I
10) 9 pad : Between C and I
11) TIMER pad : Between D and I
12) WARM pad : Between E and I
13) SENSOR COOK pad : Between F and I
14) AUTO COOK pad : Between G and I
15) ADD MINUTE pad : Between A and J
16) FROZEN PIZZA pad : Between B and J
17) FROZEN VEGETABLE pad : Between C and J
18) DINNER PLATE pad : Between D and J
19) BAKED POTATO pad : Between E and J
Page 55

54
20) POPCORN pad : Between F and J
21) BEVERAGE pad : Between G and J
22) START pad : Between A and K
23) FAVORITE CHOICE pad : Between B and K
24) TURNTABLE ON/OFF pad : Between C and K
25) CLOCK/AUTO START pad : Between D and K
26) AUTO DEFROST pad : Between E and K
27) COOK TIME pad : Between F and K
28) POWER LEVEL/MORE/LESS pad : Between G and K
29) LIGHT OFF pad : Between A and L
30) LIGHT NIGHT pad : Between B and L
31) LIGHT ON pad : Between C and L
32) FAN OFF pad : Between D and L
33) FAN LOW pad : Between E and L
34) FAN HIGH pad : Between F and L
35) CANCEL/OFF pad : Between G and L
Page 56

55
2. COMPONENT INFORMATION
1) TRANSISTOR
2) DIODE AND ZENER DIODE
2. COMPONENT INFORMATION
1) TRANSISTOR
Page 57

56
3. PRINTED CIRCUIT BO ARD FILM
Page 58

57
Page 59

58
4. PCB CIRCUIT DIA GRAM
Page 60

59
5. PCB LOCATION NO
NO NAME SYMBOL SPECIFCATION PART CODE Q’TY REMARK
1 BUZZER BZ1 BM-20K 3515600100 1
2 CAPACITOR ARRAY CA1 6P(5) 102 M 50V CN5XB-102M 1
3 CAPACITOR CERAMIC
C1, C2, C7, C8,
104 50V Z AXIAL CCZF1H104Z 8
C10~13
KOT-150S
4 CAPACITOR CERAMIC C3 102 50V Z AXIAL CCZB1H102K 1 KOT-151S
KOT-155S
KOT-150S
5 CAPACITOR CERAMIC C4, C5, C6, C9 104 50V Z AXIAL CCZF1H104Z 4 KOT-151S
KOT-155S
6 CAPACITOR ELECTRO EC1 50V RS 10µF CEXE1H100A 1
7 CAPACITOR ELECTRO EC2, EC3 35V RSS 200µF CEXF1V221V 2
8 CAPACITOR ELECTRO EC4 50V RSS 100µF CEXF1H101V 1
9 CAPACITOR ELECTRO EC5 50V RSS 220µF CEXF1H221V 1
10 CAPACITOR ELECTRO EC6 35V RSS 1000µF CEXF1V102V 1
11 CONNECTOR FILM CN1 FCZ 254-12 441M367170 1
12 CONNECTOR WAFER CN2 35313-0210 30166M7020 1
KOT-150S
13 CONNECTOR WAFER CN3 35312-031R 30166M503R 1 KOT-151S
KOT-155S
14 CONNECTOR WAFER CN4 35328-0610 4CW3061MXO 1
15 CONNECTOR WAFER CN5 YM396-05VA 3519150510 1
16 DIODE SWITCHING D1~D15, D17, D18 1N4148 AUTO 52mm DZN4148--- 17
17 DIODE RECTIFYING D16, D19~D24 1N4004A AUTO 52mm DZD4004A-- 7
18 DIODE ZENER ZD1 UZ-3.3BSB DZUZ3R3BSB 1
KOT-150S
19 DIODE ZENER ZD2 UZ-4.7BSB DZUZ4R7BSB 1 KOT-151S
KOT-155S
20 DIODE ZENER ZD3 UZ-24BSB DZUZ24BSB- 1
21 DIODE ZENER ZD4 UZ-5.6BSB DZUZ5R6BSB 1
22 DIODE ZENER ZD5 UZ-13BSA DZUZ13BSA- 1
23 DIODE ZENER ZD6 UZ-3.9BSB DZUZ3R9BSB 1
24 DIGITRON DP1 HNM-07MS11 DHNM07MS11 1
25 HOLDER VFD DPH PP 3513001400 1
26 IC MICOM IC1 TMP87CH14N 13GS150S01 1
KOT-150S
27 IC Ic2 LM358(OP AMP) 1lM385---- 1 KOT-151S
KOT-155S
28 PCB MAIN M165 M165 3514321130 1
29 RESISTOR R1, R5, R21, R24 1/6W 1K 0hm 5% RD-AZ102J 4
30 RESISTOR R2 1/6W 1M Ohm 5% RD-AZ105J- 1
31 RESISTOR R3, R18, R20 1/6W 10K Ol m 5% RD-AZ103J- 3
32 RESISTOR R4 1/6W 200 Ohm 5% RD-AZ201J- 1
KOT-150S
33 RESISTOR R6 1/6 1M Ohm 5% RD-AZ105J- 1 KOT-151S
KOT-155S
KOT-150S
34 RESISTOR R7 1/6W 604K Ohm 1% RN-AZ6043F 1 KOT-151S
KOT-155S
Page 61

60
NO NAME SYMBOL SPECIFCATION PART CODE Q’TY REMARK
KOT-150S
35 RESISTOR R8 1/6W 301K OHM 1% RN-AZ3013F 1 KOT-151S
KOT-155S
KOT-150S
36 RESISTOR R9 1/6W 150K Ohm 1% RN-AZ1503F 1 KOT-151S
KOT-155S
KOT-150S
37 RESISTOR R10 1/6W 75K Ohm 1% RN-AZ7502F 1 KOT-151S
KOT-155S
KOT-150S
38 RESISTOR R11, R12 1/6W 3.32K Ohm 1% RN-AZ3321F 1 KOT-151S
KOT-155S
KOT-150S
39 RESISTOR R13 1/2W 200 Ohm 5% RD-2Z201JS 2 KOT-151S
KOT-155S
KOT-150S
40 RESISTOR R14 1/6W 1.82K Ohm 1% RN-AZ1821F 1 KOT-151S
KOT-155S
KOT-150S
41 RESISTOR R15, R16 1/6W 200 Ohm 5% RD-AZ201J- 2 KOT-151S
KOT-155S
KOT-150S
42 RESISTOR R17 1/6W 357K OHM 1% RN-AZ3573F 1 KOT-151S
KOT-155S
43 RESISTOR R19 1/6W 100K Ohm 5% RD-AZ104J- 1
44 RESISTOR R22 1/6W 4.7K Ohm 5% RD-AZ472J- 1
45 RESISTOR R23 1/2W 270 Ohm 5% RD-2Z271JS 1
46 RESISTOR R25 1/4W 1K Ohm 5% RD-4Z102J- 1
1/2W 200 Ohm 5% RD-2Z201JS 2
47 RESISTOR R26, R27
KOT-150S
1/2W 150 Ohm 5% RD-2Z151JS 2 KOT-151S
KOT-155S
48 RESISTOR FUSIBLE R28 1/4W 1 Ohm 5% RF-AZ109J- 1
49 RESISTOR R29 1/2W 27 Ohm 5% RD-2Z270JS 1
50 RESISTOR R30 1/6W 47K Ohm 5% RD-AZ473J- 1
51 RESISTOR ARRAY RA1 6P(5) 1/8 100K 5% RA-86X104J 1 O.T.P
52 RESISTOR ARRAY RA2 5P(4) 1/8 100K 5% RA-85X104J 1
53 RESONATOR CERAMIC CR1 KBR-4.0MKSTF 5PKBR40MKS 1
54 SW RELAY RY1 G5G-1ADT 24V 5SC0101124 1
55 SW RELAY RY2~RY6 OJ-SS-124LM 5SC0101405 5
56 SW RELAY RY7 KM1-M24V 1C-2P 5SC0102115 1
57 TRANSISTOR Q1,Q3,Q6,Q8~Q12 KRC106M AUTO TZRC106M-- 8
58 TRANSISTOR Q2 KTA1270T AUTO TZTA1270Y- 1
59 TRANSISTOR Q4, Q5 KTC3198GR AUTO TZTC3198GR 2
60 TRANSISTOR Q7 KTC-1027Y AUTO TZTC1027Y- 1
61 TRANS POWER LVT DMR-210P 5EPU041351 1
62 VARISTOR VR1 TNR15G271K DTNR15G271 1
63 WIRE COPPER 7.5mm J1, J3, J6, J7 1/0.52 TIN COATING 85801052GY 4
64 WIRE COPPER 15mm J2, J5, J15 1/0.52 TIN COATING 85801052GY 3
65 WIRE COPPER 12.5mm J4 1/0.52 TIN COATING 85801052GY 1
66 WIRE COPPER 10mm J8~J12 1/0.52 TIN COATING 85801052GY 5
KOT-150S
67 WIRE COPPER 7.5mm SJ1 1/0.52 TIN COATING 85801052GY 1 KOT-151S
KOT-155S
Page 62

61
EXPLODED VIEW AND PARTS LIST
1. DOOR ASSEMBLY
1) KOT-150S0A
REF. NO. PART NAME DESCRIPTION PART CODE Q’TY REMARK
BLACK
A00 FRAME DOOR PC 3512204400 1 BISQUE
WHITE
BLACK
A01 HANDLE DOOR *I PC 3512602900 1 BISQUE
WHITE
BLACK
A02 BARRIER SCREEN *O TEMP GLASS T3.2 3517006200 1 BISQUE
WHITE
BLACK
A03 SUPPORTER BARR-S *O ABS XR-401 H-2938 3515307000 1 BISQUE
WHITE
BLACK
A04 DOOR PAINTING AS KOT-150S0A 3511712300 1 BISQUE
WHITE
A05 HOOK POM 3513101200 1
A06 SPRING HOOK PW1 3515101800 1
A07 SCREW TAPPING T2S TRS 4X12 MFZN 7122401211 2
A08 BARRIER SCREEN *I PE T0.1 3517006300 1
A09 GASKET DOOR PP 5113MF6 A353B BK 3512302100 1
Page 63

62
2) KOT-151S0A
REF. NO. PART NAME DESCRIPTION PART CODE Q’TY REMARK
BLACK
A00 FRAME DOOR PC 3512204410 1 BISQUE
WHITE
BLACK
A01 HANDLE DOOR *I PC 3512602910 1 BISQUE
WHITE
BLACK
A02 BARRIER SCREEN *O TEMP GLASS T3.2 3517006210 1 BISQUE
WHITE
A03 FRAME DOOR HANDLE SILICON RUBBER 3517304100 1
BLACK
A04 DOOR PAINTING AS KOT-150S0A 3511712300 1 BISQUE
WHITE
A05 HOOK POM 3513101200 1
A06 SPRING HOOK PW1 3515101800 1
A07 SCREW TAPPING 4TS8 7122400811 2
A08 BARRIER SCREEN *I PE T0.1 3517006300 1
A09 GASKET DOOR PP 5113MF6 A353B BK 3512302100 1
Page 64

63
3) KOT-152U0A, KOT-152C0A
REF. NO. PART NAME DESCRIPTION PART CODE Q’TY REMARK
BLACK
A00 FRAME DOOR PC 3512204420 1 BISQUE
WHITE
BLACK
A01 HANDLE DOOR *I PC 3512603000 1 BISQUE
WHITE
BLACK
A02 BARRIER SCREEN *O TEMP GLASS T3.2 3517006220 1 BISQUE
WHITE
BLACK
A03 HANDLE DOOR *I PC 3512602920 1 BISQUE
WHITE
BLACK
A04 DOOR PAINTING AS KOT-150S0A 3511712300 1 BISQUE
WHITE
A05 HOOK POM 3513101200 1
A06 SPRING HOOK PW1 3515101800 1
A07 SCREW TAPPING T2S TRS 4X12 MFZN 7122401211 2
A08 BARRIER SCREEN *I PE T0.1 3517006300 1
A09 GASKET DOOR PP 5113MF6 A353B BK 3512302100 1
A10 SCREW TAPPING T2S PAN 3X6 MFZN 7121300611 1
Page 65

64
4) KOT-155S0A
A00
A13
A01
A03
A10
A11
A12
A02 A05 A06 A09
A08
A04
A07
REF. NO. PART NAME DESCRIPTION PART CODE Q’TY REMARK
BLACK
A00 FRAME DOOR PC 3512204430 1 BISQUE
WHITE
BLACK
A01 HANDLE DOOR PC 3512604400 1 BISQUE
WHITE
BLACK
A02 BARRIER SCREEN *O TEMP GLASS T3.2 3517006280 1 BISQUE
WHITE
BLACK
A03 SUPPORTER HANDLE PC 3515307910 1 BISQUE
WHITE
BLACK
A04 DOOR PAINTING AS KOT-150S0A 3511712300 1 BISQUE
WHITE
A05 HOOK POM 3513101200 1
A06 SPRING HOOK PW1 3515101800 1
A07 SCREW TAPPING T2S TRS 4X16 MFZN 7122401611 2
A08 BARRIER SCREEN *I PE T0.1 3517006300 1
A09 GASKET DOOR PP 5113MF6 A353B BK 3512302100 1
A10 DECORATOR DOOR*U SUS 430 T0.5 H/L 3511609100 1
A11 DECORATOR DOOR*L SUS 304 T0.5 H/L 3511608800 1
A12 DECORATOR DOOR*T SUS 430 T0.5 H/L 3511609000 1
A13 DECORATOR DOOR*R SUS 430 T0.5 H/L 3511608900 1
Page 66

65
2. CONTROL PANEL ASSEMBLY
1) KOT-150S0A, KOT-151SOA, KOT-152U0A, KOT-152C0A
REF. NO. PART NAME DESCRIPTION PART CODE Q’TY REMARK
BLACK
KOT-150S0A 3518522300 1 BISQUE
WHITE
BLACK
KOT-151S0A 351822310 1 BISQUE
WHITE
B00 SWITCH MEMBRANE
BLACK
KOT-152U0A 351822320 1 BISQUE
WHITE
BLACK
KOT-152C0A 3518522330 1 BISQUE
WHITE
BLACK
PC 3516722700 1 BISQUE
WHITE
BLACK
B01 CONTROL PANEL PC 3516722710 1 BISQUE
WHITE
BLACK
PC 3516722720 1 BISQUE
WHITE
B02 BACK PLATE
SECC T0.6 3516802100 1 KOT-150S0A
SECC T0.6 3516802110 1 KOT-151S0A, 152U0A
B03 PCB AS
KOT-150S0A, KOT-151S0A
3514324410 1
KOT-152U0A 3514324400 1
B04 SCREW TAPPING T2S TRS 4X12 MFZN 7122401211 4
KOT-
150S0A
KOT-
151S0A
KOT152U0A
152C0A
Page 67

66
2) KOT-155S0A
B00
B01 B02
B03
B04 B05
REF. NO. PART NAME DESCRIPTION PART CODE Q’TY REMARK
BLACK
B00 SWITCH MEMBRANE KOT-155S0A 3518522340 1 BISQUE
WHITE
B01 DECORATOR C-PANEL STS430 T0.5 3511609200 1
BLACK
B02 CONTROL PANEL PC 3516722730 1 BISQUE
WHITE
B03 BACK PLATE SECC T0.6 3516802110 1 KOT-155S0A
B04 PCB AS KOT-155S0A 3514324410 1
B05 SCREW TAPPING T2S TRS 4X12 MFZN 7122401211 4
Page 68

67
3. TOTAL ASSEMBLY
Page 69

68
REF. NO. PART NAME DESCRIPTION PART CODE Q’TY REMARK
BLACK
KOT-150S0A 3511712200 1 BISQU
WHITE
BLACK
KOT-151S0A 3511712210 1 BISQUE
A00 DOOR AS
WHITE
BLACK
KOT-152U0A, KOT-152C0A 3511712220 1 BISQUE
WHITE
BLACK
KOT-155S0A 3511712250 1 BISQUE
WHITE
BLACK
KOT-150S0A PKCPSWLA00 1 BISQUE
WHITE
BLACK
KOT-151S0A PKCPSWLD00 1 BISQUE
WHITE
BLACK
B00 CONTROL PANEL AS KOT-152U0A PKCPSWLF00 1 BISQUE
WHITE
BLACK
KOT-152C0A PKCPSWLF10 1 BISQUE
WHITE
BLACK
KOT-155S0A PKCPSWLD10 1 BISQUE
WHITE
F00 SCREW TAPPIMG TI TRS 4X10 MFZN 7112401011 1
F01 HARNESS LAMP KOT-150S0A 3512766700 1
F02 SCREW TAPPING TI TRS 4X10 MFZN 7112401011 1
F03 FILTER AIR AL 3511900200 2
F04 SCREW TAPPING TI TRS 4X10 MFZN BK 7112401012 1
F05 BRACKET LAMP COVER SECC T0.5 M/GY 3510605000 1
F06 FOAM UR 5TX10X60 3517303300 1
F07 COVER LAMP GLASS T3.0 3511405500 1
BLACK
F08 PALTE *B PAINTING AS KOT-150S0A 3514501500 1 BISQUE
WHITE
F09 HOLDER LAMP PENOL 250V 75W 3513003000 2
F10 SCREW TAPPING TI TRS 4X10 MFZN 7112401011 2
F11 LAMP BL 125V 30W T25 C7A #187 3513602400 2
Page 70

69
REF. NO. PART NAME DESCRIPTION PART CODE Q’TY REMARK
F12 HARNESS MAIN KOT150S0A 3512717100 1
F13 CORD POWER AS 3X14AWG 80X80 250-RTML 35113UDNY8 1
F14 FUSE CERA UL/CSA 65TS 125V 20A 5F1CD2031S 1
F15 THERMOSTAT OFF:40 ON:56 V#250 3518905500 1
F16 SCREW TAPPING T2S PAN 4X6 MFZN 7121400611 1
F17 THERMOSTAT OFF:90 ON:0 V#187 3518904800 1
F18 SCREW TAPPING T2S PAN 4X6 MFZN 7121400611 1
F19 BASE*R SBHG T0.8 3510312900 1
F20 TRANS HV DY-N10A0-15T 3518116300 1
F21 SCREW TAPPING TI TRS 4X10 MFZN 7112401011 3
F22 SPECIAL SCREW TT2 HEX 4X8 FLG MFZN 3516003700 4
F23 SCREW TAPTITE TT3 TRS 4X8 MFZN 7272400811 1
F24 DIODE HV SANKEN HVR-1X-32B(D5.3) 4416V24000 1
F25 HOLDER HV CAPACITOR SECC T0.8 3513001900 1
F26 SCREW TAPPING TI TRS 4X10 MFZN 7112401011 1
F27 CAPACITOR HV 2100VAC 0.98UF #250 +3-0% 3518302800 1
F28 SCREW TAPPING TI TRS 4X10 MFZN 7112401011 1
F29 GUIDE AIR OUTLET SECC T0.5 3512519000 1
F30 SCREW TAPPING TI TRS 4X10 MFZN 7112401011 1
F31 PROTECTOR WIRE SECC T0.6 3515703700 1
F32 LOCK POM 3513804700 1
F33 LEVER LOCK POM 3513700800 1
F34 SW MICRO VP531A-OF/SZM-V16-FA-61 4415A66910 1 SECONDARY
F35 SW MICRO VP533A-OF SPNO #187 200G 4415A17352 1 LAMP
F36 SW MICRO VP532A-OF SPNC #187 200G 4415A66600 1 MONITOR
F37 SW MICRO VP533A-OF SPNO #187 200G 4415A17352 1 PRIMARY
F38 LEVER SW MICRO POM 3513702100 1
F39 SCREW TAPPING T2S TRS 4X12 MFZN 7122401211 1
F40 SCREW TAPPING T2S PAN 3X6 MFZN 7121300611 2
F41 THERMOSTAT OFF:150 ON:60 V#187 3518903400 1
F42 MAGNETRON 2M218H(KP) 3518003100 1
F43 SCREW SPECIAL TI TRS 4X16 SE MFZN 7S312X40D1 1
F44 SUPPORTER RANGE MT SBHG T0.8 3515306900 2
F45 SCREW SPECIAL T1 TRS 4X16 SE MFZN 7S312X40D1 3
F46 NUT HEX NUT FLANGE M5X0.8P MFZN 7S627W50X1 4
F47 SCREW TAPPING TI TRS 4X10 MFZN 7112401011 1
F48 MOTOR CONDENSOR 120-127V 60HZ W1D46JA002 3964821200 1
F49 CAVITY AS KOT-150S0A 3516110600 1
F50 GUIDE TRAY RACK POLYSULFONE 3512515900 4
F51 BUTTON LOCKING PP HONAM A353B 4078502031 1
F52 COVER STIRRER PP 5113MF6 A353B 3511406800 1
Page 71

70
REF. NO. PART NAME DESCRIPTION PART CODE Q’TY REMARK
F53 COUPLER STIRRER PPS 3517401800 1
F54 STIRRER BLADE AL050-H18 T0.7 3517100900 1
F55 MOTOR SYNCRO 120V 2.4W ST-16 KX63MRAA 3966820710 1
F56 SCREW TAPPING T2S PAN 4X6 MFZN 7121400611 2
F57 SCREW TAPPING T2S PAN 4X6 MFZN 7121400611 1
F58 MOTOR SYNCRO 120V 2.4W ST-16 KX63XOAD 3966820810 1
F59 COUPLER PPS 3517400600 1
F60 ROLLER TELON D:14.5 3514701501 3
F61 GUIDE ROLLER PP 3512519300 1
F62 TRAY BORO-S1 GLASS (NEG) 441X335A10 1
F63 TRAY RACK MSWR-3 3517207100 1
BLACK
F64 GRILLE AIR PC 3512400300 1 BISQUE
WHITE
F65 FILTER CHARCOAL AL 3511900300 1
F66 SCREW TAPPING TI TRS 4X10 MFZN 7112401011 1
F67 LAMP BL 125V 30W T25 C7 #187 3513602400 1
F68 HOLDER LAMP PENOL 250V 75W 3513003000 1
F69 COVER MOTOR SYNCRO SECC T0.5 3511406700 1
F70 SCREW SPECIAL T1 TRS 4X16 SE MFZN 7S312X40D1 1
F71 SCREW SPECIAL T1 TRS 4X16 SE MFZN 7S312X40D1 3
F72 SENSOR HUMIDITY DH-1-D2 35148101200 1
F73 SCREW TAPPING T2S PAN 3X6 MFZN 7121300611 2
F74 THERMOSTAT OFF:90 ON:0 V#187 3518904800 1
F75 SCREW SPECIAL T1 TRS 4X16 SE MFZN 7S312X40D1 1
F76 FAN PP GF20 3511800100 1
F77 CAPACITOR RUNNING 250VAC 6.0UF 3518301100 1
F78 GUIDE AIR *T PP 5101SW BK 3512519100 1
F79 MOTOR SHADED POLE 120V 60HZ MW15XA-P02 3963822400 1
F80 SCREW TAPPING T2S PAN 4X30 MFZN 7121403011 2
F81 HARNESS THERMOSTAT KOT-150S0A 3512766600 1
BLACK
F82 CABINET PCM OR PAINTED STEEL 3510802900 1 BISQUE
WHITE
F83 SCREW TAPPING TI TRS 4X10 MFZN BK 7112401012 7
F84
COVER MOTOR CONDENSOR
SBHG T0.6 3511405200 1
F85 GUIDE DAMPER SECC T0.5 3512516500 1
F86 VALVE DAMPER ET T0.21 3515400400 1
F87 SCREW TAPPING TI TRS 4X10 MFZN 7112401011 2
Page 72

S/M NO. : T150S0A003
DAEW OO ELECTRONICS CO., LTD .
686, AHYEON-DONG MAPO-GU SEOUL, KOREA
C.P.O. BOX 8003 SEOUL, KOREA
TELEX: DWELEC K28177-8
CABLE: “DAEWOOELEC”
PRINTED DATE: Feb, 2002
 Loading...