

Page 1
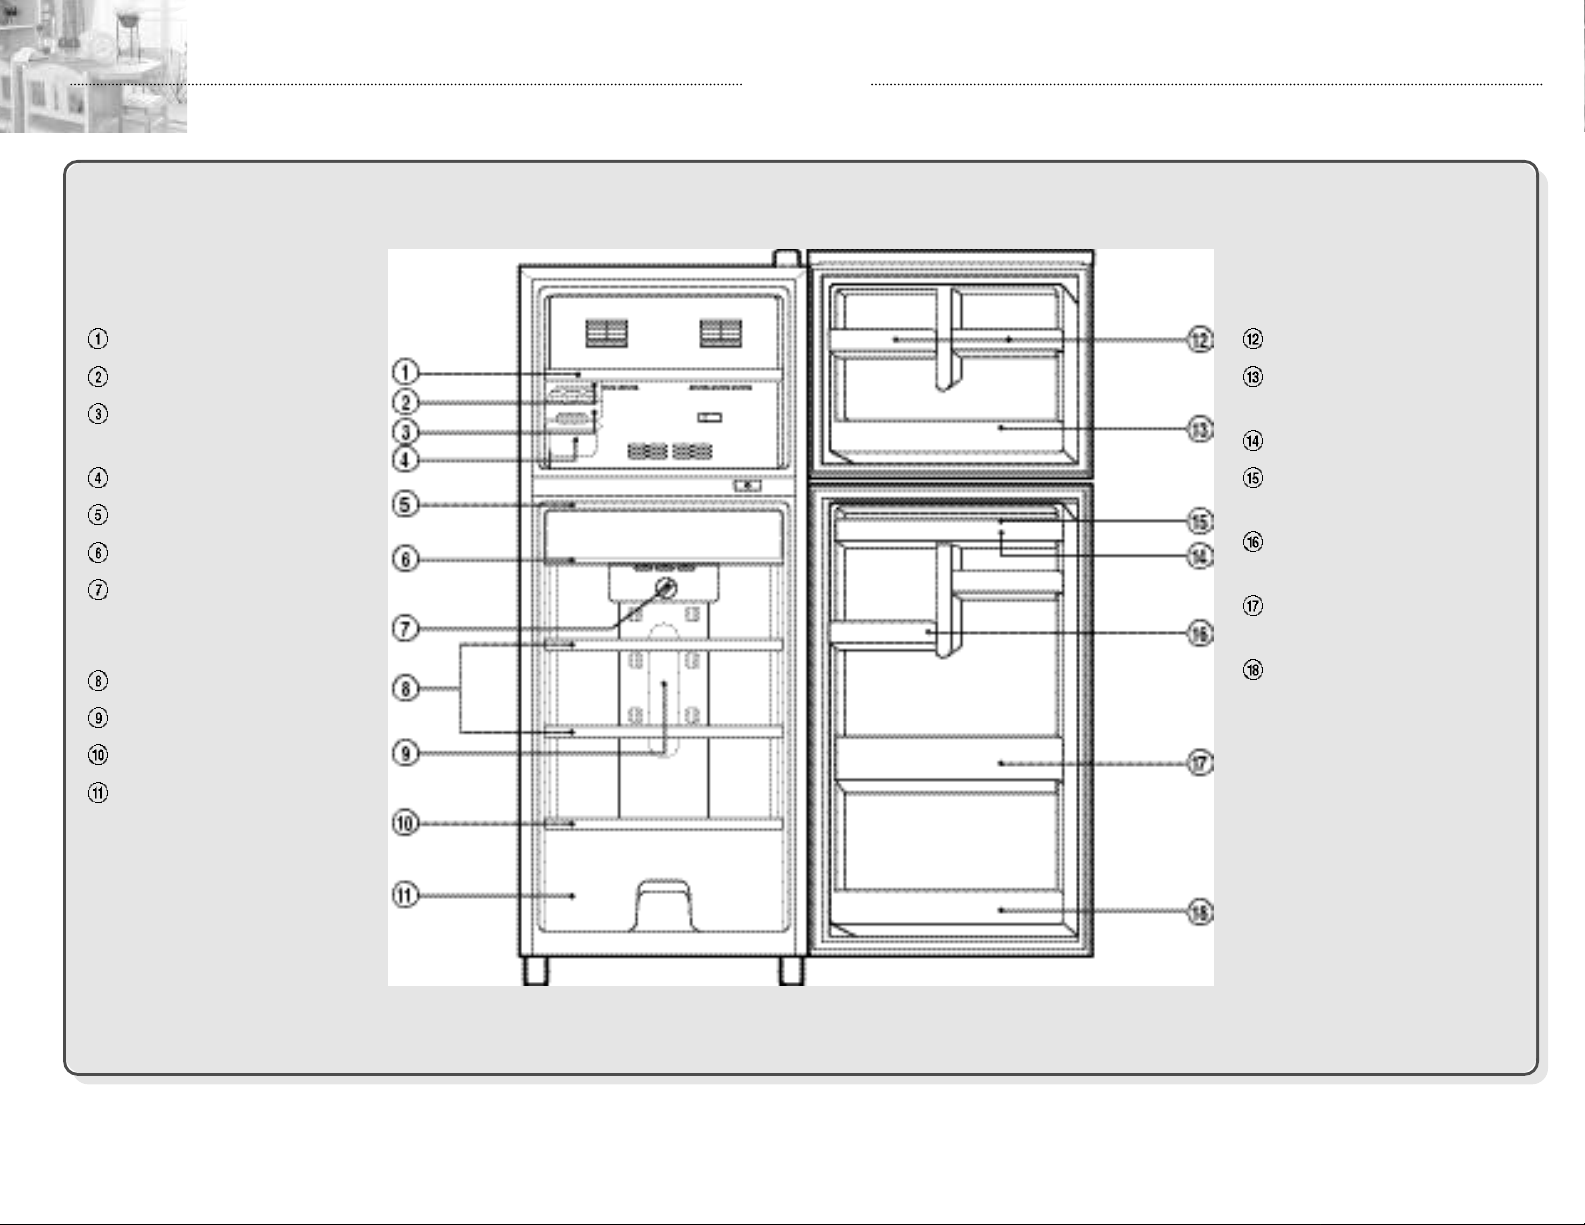
FEATURE CHART
SHELF F (MOVA B L E )
ICE HOLDER ASSEMBY
ICE CASE FRAME
A S S E M B LY
ICE BOX
CHILLED CASE DOOR
CHILLED CASE
R E F R I G E R ATO R
T E M P E R AT U R E
C O N T ROL SWITCH
R SHELF (MOV A B L E )
LAMP COV E R
V E G E TABLE CASE COV E R
V E G E TABLE CASE
FREEZER POCKET(SMALL)
F R E E Z E R
P O C K E T ( M I D D L E )
EGG CASE
U T I L I T Y
P O C K E T ( S M A L L / S M A L L )
U T I L I T Y
P O C K E T ( S M A L L / M I D D L E )
B OT T L E
P O C K E T ( L A R G E / L A R G E )
B OT T L E
P O C K E T ( M I D D L E / L A R G E )
21
Page 2

Here are the features of your new refrige r a t o r.
Take a moment to know all the features designed for the convenience of
the user.
■ M ova ble refrigerator and freezer shelves
S t o rage shelves should be adjusted depending on the height of the fo o d
stored. To do this, pull the shelves slightly fo r wa r d .
■ D e f rost-drain Ve s s e l
Since dust accumulated on the drain case decreases the eva p o ra t i o n
e f f i c i e n c y, you should clean the drain case at regular interva l s.
■ Ice Case Frame Assembly
1) Fill the ice case with water upto the water level line and insert it into the
designated space in the ice holder.
2) After the water is completely frozen, twist the ice case handle clock w i s e
and let the ice fall into the ice box below. When all ice has been cleared
from the ice case, let go of the handle which will return to its ori g i n a l
position by a return spring installed.
AT A RTING POINT OF TWISTING
■ Lamp cov e r
To remove the lamp cove r
1. Push up the bottom end of lamp cover gently,
then pull out.
2. R everse procedure to join together.
■ Ve ge t a ble case
M ay be used for fruit and v e g e t a ble stora g e. Both
the ve g e t a ble case and its cover shelf are
r e m ova ble for easy cleaning. Simply slide fo r ward to
r e m ove.
■ Utility Po cket (To p )
The Egg Case in this pocket can be turned upside down for the storage of
small size goods.
■ For lock installed refrige r a t o rs only.
When you put or take out food from the refrige r a t o r, be careful not to
hit your head on the lock as there is a protrusion on the door of yo u r
r e f r i ge r a t o r.
1. C h e ck your voltage before inserting the power supply cord into the socke t .
2. Contact the earthing conductor to this unit with an attachment eart h i n g
s c r ew.
3. Do not spill liquid on this unit.
4. Do not use flammable spray, such as painting, near this unit.
5. Do not place ignitable material, such as benzine, L.P. gas, alcohol etc., into
this unit.
6. Ta ke precautions against leakage of any gas equipment near this unit.
7. Keep children from hanging on the door of this unit.
8. Do not reinsert the power supply cord within 5 minutes after releasing it from
the socket. If not, there may be problems with the compressor.
43
Page 3
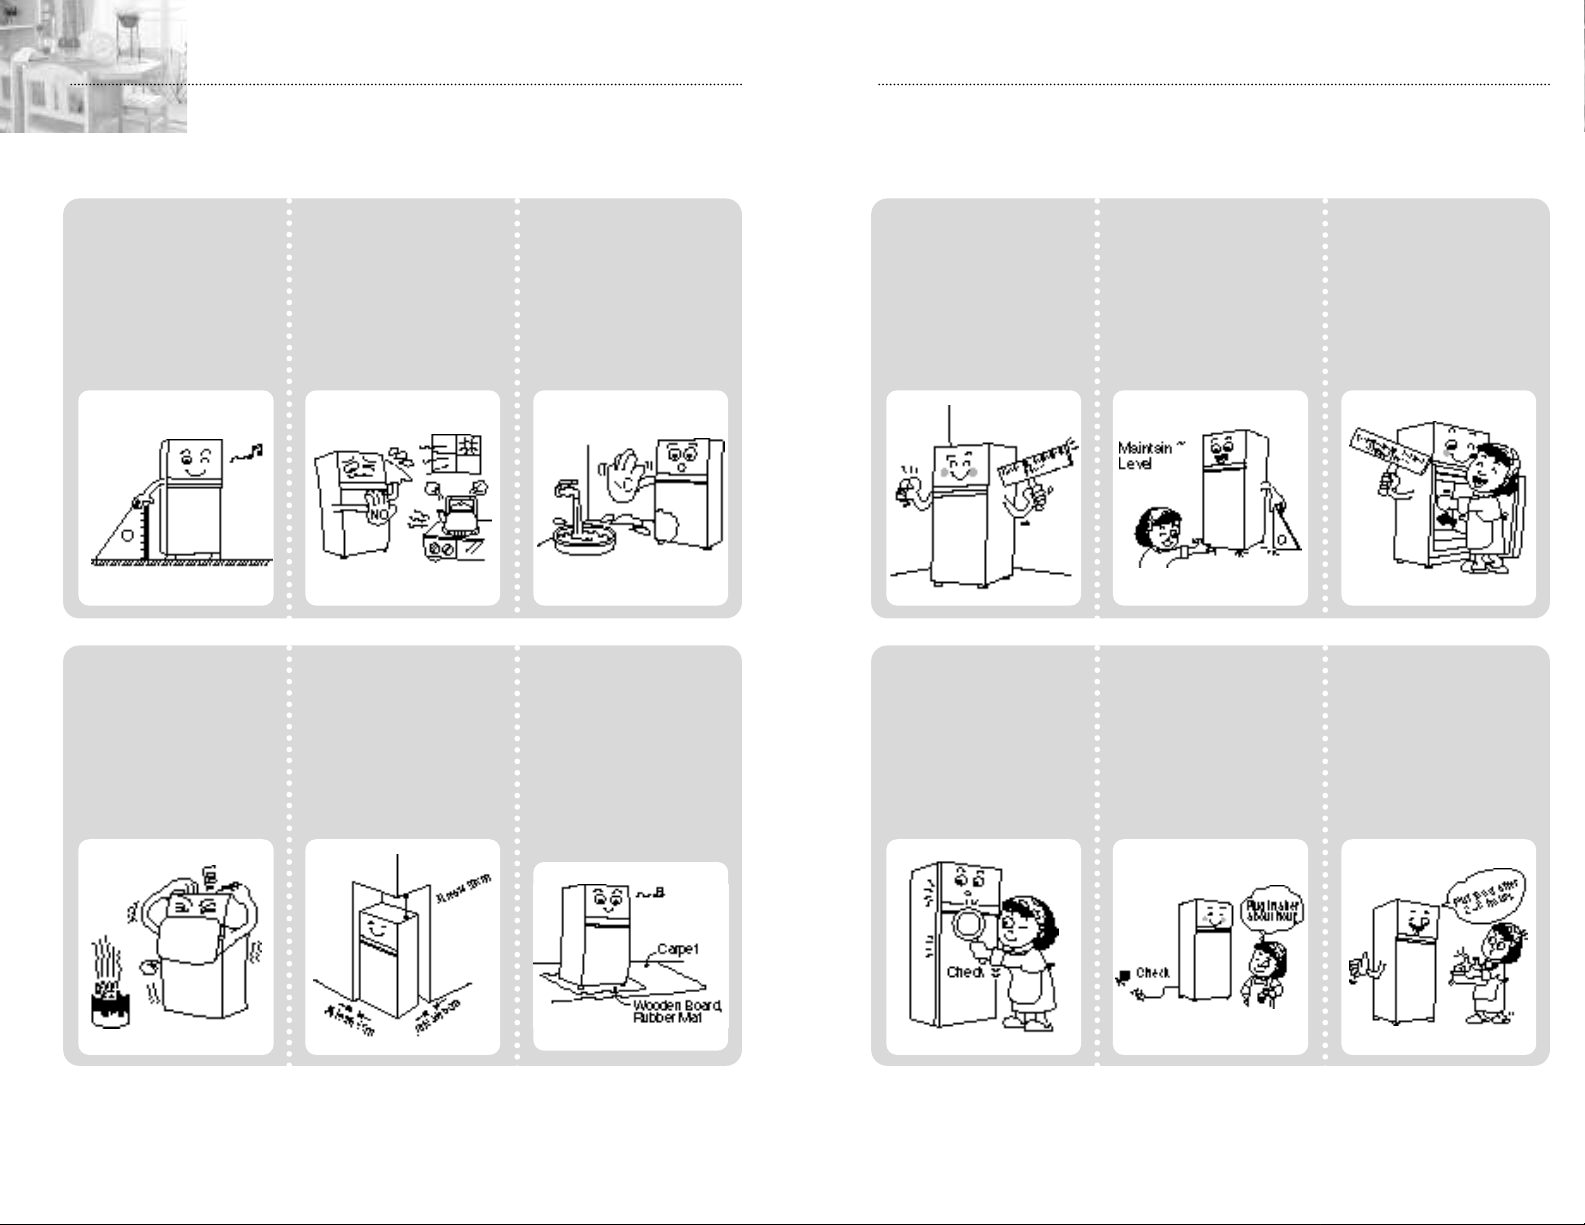
METHODS OF SAFE INSTA L L AT I O N
1.
SAFE INSTA L L ATION PLACE FOR YOUR REFRIGERATO R
2. INSTA L L ATION STEPS
•Place the refrigerator on
a strong and level floor.
Unstable installation can
produce noise and
v i b r a t i o n .
• Avoid places that are
exposed to coal gas or
smoke, or discoloring
may occur on the
r e f r i g e r a t o r .
•Place your refrigerator
where there is no heat
source nearby.
High atmosphere
temperature will lower
cooling efficiency and
increase your electricity
b i l l .
•For good ventilation,
keep enough space
between the sidewalls
and your.
This helps to cool
efficiently and lowers the
electricity bill.
•Place the refrigerator in
an area where the
humidity level is low.
Splashing water on the
refrigerator or installing
the unit in a humid area
may cause short circuit
and rust.
• Putting the refrigerator
on the carpet may cause
temperature rise and
result in the discoloring
of the carpet due to the
compressor heat.
In such a case, place a
hard wooden board or a
rubber mat between the
carpet and the unit.
• Select a safe place to
install your refrigerator.
• Check if the doors are
completely closed.
• Level the refrigerator by
using the adjustable feet.
• Check the voltage.
Then wait about an hour
before plugging the
power cord into the
o u t l e t .
• Install the parts in their
own place.
•Put food in the
refrigerator after running
the refrigerator for 2~3
h o u r s .
65
Page 4

3. WHAT YOU NEED TO KNOW BEFORE MOVING
OR RELOCATING THE REFRIGERATOR!
4. CLEANING YOUR REFRIGERATOR
•Unplung the power cord. • Detach the grille and the
defrost-drain vessel from
the refrigerator with ⊕
driver and then remove
water from the defrostdrain vessel located at
the rear of the
r e f r i g e r a t o r .
•Fasten the interior
components with
adhesive tape.
• Have two people carry
the refrigerator to move
s a f e l y .
•Fasten the doors with
adhesive tape to prevent
from opening while
m o v i n g .
•Take food out of the
r e f r i g e r a t o r .
• Before you clean the
refrigerator, unplug the
power cord. To clean,
use a soft piece of cloth.
Wash with warm, soapy
water rinse and dry.
•Do not sprinkle water
directly on the
refrigerator itself.
• The refrigerator may
smell during the initial
operation, but the odour
will fade away when the
refrigerator is cooled
s u f f i c i e n t l y .
• Put the parts back in
their original positions
after cleaning.
•Use a soft cloth for
cleaning the interior and
exterior of the
r e f r i g e r a t o r .
87
Page 5

HOW TO INSTA L L
HOW TO OPERAT E
Location
Install the refrigerator in a convenient location a w ay from extreme heat and
cold. Allow at least 6cm clearance between the refrigerator and side wall so
that the door may open for a fully usable interior and the refrigerator may
h ave good air circulation. The refrigerator is not designed for recessed
i n s t a l l a t i o n .
■ Select a strong and level floor.
■ Keep 6cm of space betwe e n
the refri g e rator and the wa l l s.
Leveling
L evel the refrigerator so that it rests solidly on the floor without ro ck i n g .
There are two leveling feet at each front corner. Turn to the left to raise a
c o r n e r, to the right to lower it. Use shims under the rear corners, if
n e c e s s a ry.
■If you want the refri g e rator door to close natura l l y, adjust the leveling feet so
that the front of the refri g e rator is raised by 5mm.
1. TEMPERATURE CONTROL
Temperature is controlled by thermostat automatically.
The Temperature Control inside the refrigerator controls the degree of
cooling for each compart m e n t .
F r e e zer Temperature Contro l
The control has four settings fo rm
MIN to WINTER. The WINTER
mode is av a i l a ble only if atmosphere
t e m p e rature is below 10°C.
R e f r i gerator Temperature Contr o l
The control has the four settings from
MIN to WINTER. The WINTER mode
is ava i l a ble only if atmosphere
t e m p e rature is below 10°C.
Starting your new refrigerator
1. Clean the refri g e rator thoroughly. Wipe the outside with a dry cloth, and the inside
with a damp cloth.
2. Set the temperature control knob at normal position.
3. Connect the power supply cord.
■If you want the refri g e rator to remain motionless when open, adjust the leve l i n g
feet so that all four corners are leveled with each other.
All packing materials used to ensure safety during tra n s p o rt should be
r e m oved. You must remove the tr a n s p o rt safty packing and wipe off any
p o s s i ble adhesive tape residues with a petroleum-based cleaner or similar
s o l ve n t .
9
10
Page 6

To control temperature
2. DEFROSTING THE REFRIGERATOR
M a ny factors may influence the internal temperature of the refrige r a t o r
and freezer compart m e n t s .
■The temperature and humidity of the surrounding env i r o n m e n t .
■The opening frequency of the doors and the amount of wa rm food placed in
the refri g e ra t o r.
■The combination of food and containers stored in the refr i g e ra t o r.
For these reasons, you may want to adjust the control to suit the season and
your needs.
■Tu rn the temperature control in the refri g e rator and freezer compart m e n t s
t oward WINTER for colder temperature and toward MIN for wa rm e r
t e m p e ra t u r e.
■A l l ow approximately 12 hours or ove rnight for the temperature to stabilize.
Then check to see if further adjustments are necessary.
To turn off the refrigerator
Disconnect the power supply cord. Remove icing case and food. Leav e
d o o rs ajar for ventilation and dehumidification of both compar t m e n t s .
You will never have to defrost your refrigerator as it is designed to
d e f rost itself completely and automatically.
T o avoid the risk of electric shock or death, unplug the power cord
b e fore replacing a bu rned out light bulb or cleaning the inner
parts.
3. RADIANT HEAT
With the Refri g e rating System in operation, it is likely that the cabinet will fe e l
wa rm at the front edges and sides. This does not indicate troubl e.
It is due to the hot-line used in this type of Refri g e rating System which consists of
piping hot gas from the (motor-dri ven) compressor along the front edges, the
sides of the cabinet and the center partition to prevent dewing. This has nothing
to do with the storage temperature inside.
During spells of hot, humid weather and in rainy season,
moisture may develop on the cabinet, just as water
condenses around a cold glass of water. It is not an
abnormal condition; wipe off the moisture with a dry cloth.
This can also happen when the refrigerator is not installed
in an appropriate place.
1211
Page 7

W H AT TO DO...
When not operating for a long time
■R e m ove the power supply cord.
■D ry your refri g e rator by opening the door for 2-3 day s.
When you get ready to mo v e
■Securely fasten mova ble interior parts (or remove and pack them separ a t e l y )
■D O N OT lay down your refri g e rator hori zo n t a l l y, or the compressor may be
d a m a g e d .
B e fore you call for serv i c e, please ch e ck the fo l l owing points firs t .
If the refrigerator is not operating:
■Is the power supply cord unplugged?
■Is the home fuse or circuit out of order?
If the refrigerator is warmer than usual:
■Has the door been opened frequently or for a long peri o d ?
■Are there any hot food or anything that has been stored without cooling?
■Is the clearance between the refri g e rator and the wall given sufficiently?
If there are unusual sounds:
■Is the refri g e rator placed on a levelled floor?
■Are there any foreign objects behind the refri g e ra t o r ?
■Are dishes on refri g e rator shelves vibra t i n g ?
R E F R I G E R A T O R
WARRANTY
Daewoo warrants the purchaser of this Daewoo
Refrigerator that for a period of 12 months,
commencing from the date of purchase, the
company will repair or replace, free of charge, any
part or parts of the refrigerator including the
compress or and the evaporator, should the
company be fully satisfied, in its sole discretion,
that the defect/s is/are due to faulty material or
workmanship only. Daewoo further warrants the
purchaser that for this refrigerator, the sealed
system, is covered under warranty for the total
period of 5 years, starting from the date of
p u r c h a s e .
The warranty will be governed by the following
c l a u s e s :
1. The company or their authorised service
agent/dealer will repair/replace all parts failing due
to faulty material or defective workman-ship
pertaining to the above refrigerator.
2. Only the company or its authorised service
agent/dealer can service/repair/attend to/rein-stall
the refrigerator.
3. For units installed beyond the municipal limits of
the jurisdiction of the authorised service agent/dealer
of Daewoo, all expenses incurred in collecting the
unit or parts thereof from the company’s authorised
service station or the dealers of Daewoo as well as
POSTCARD
expenses incurred in connection with deputing of
service personnel/technicians towards to and fro
travel conveyance and other incidentals, etc., will be
borne by the customer.
4. Any change of the location of the unit and/or any
change of ownership has to be done in consultation
with Daewoo or its authorised service agent so that
the warranty obligation for the remaining part of
the warranty could be transferred to the new
owners or the original purchaser but at the new
location. The unit so transferred will be inspected
by Daewoo or its service agent at the cost
applicable from time to time. Any damage caused
will be repaired on chargeable b a s i s .
5. The warranty extended herein is in lieu of all
implied conditions and warranties under the law
and is confirmed to the repair and replacement of
the defective parts and does not cover any
consequential or resulting liability, damage, or loss
arising from such defects. Furthermore the
warranty in no case, shall extend to the payment of
any monetary consideration whatsoever of the
replacement or return of the refrigerator as a whole.
6. This warranty does not cover sheet metal
components, corrosion, plastic and glass
components adding decorative value to the
r e f r i g e r a t o r .
Affix
stamp
here
Improper use of the grounding plug can result in electric shock. If a
grounding adapter is used, make sure the receptacle box is fully
grounded.
If the supply cord is damaged, it must be replaced by the
manufacturer or its service agent or a simmilary qualified person
in order to avoid a hazard.
13
To.
Customer Cell,
Daewoo Anchor Electronics Limited,
FB Center, Bake House,
22, Maharashtra Chamber of Commerce Lane,
Fort, Mumbai-400 023.
Page 8

REFRIGERATOR
This warranty is not valid in case of any of the
following events:
• The machine is not used according to the
instructions given in the owners guide.
• If the electrical power supply voltages are not in
the stipulated norms (180V - 250V).
• Any repair work/installation is carried out by a
person other than by the Daewoo Service
certer/Agent.
R E F R I G E R A T O R
• The serial number is delected, defaced or altered.
• Unles this guarantee card is completed on
delivery of the mchine.
Mail service center copy of the Warranty card
fully completed in all respects. Please note that the
warranty is issued at Mumbai and is valid subject
to the jurisdiction of the civil courts at Mumbai.
WARRANTY
Model No:
Name of the purchaser:
Address:
City: Pin Code:
Phone Number:
Date of purchase: Invoice Number:
Customer’s Signature Dealer’s Signature and Stamp
Serial No:
INSTRUCTION MANUAL
CFC-FREE
FR-410DX
CUSTOMER
COPY
R E F R I G E R A T O R
WARRANTY
Model No:
Name of the purchaser:
Address:
City: Pin Code:
Phone Number:
Date of purchase: Invoice Number:
Customer’s Signature Dealer’s Signature and Stamp
Serial No:
SERIOCE CENTER
COPY
■Thank you for selecting this refrigerator.
■ Before using the refrigerator, please read this manual carefully.
Code: 318-5
 Loading...