

Page 1
INSTRUCTION MANUAL
DWD-1210S/1210W
Washing Machine Instruction Manual
CONTENTS Page
A NOTE TO YOU
Thank you for buying a DAEWOO appliance.
DAEWOO washing machines are easy to use, save time, and help you manage your home better.
This manual contains valuable information about how to operate and maintain your machine properly and safely.
Please read it carefully.
Economic wash system
Using artificial intelligence, the washer uses minimum energy and
water by selecting optimal water level and washing time.
Low noise system
The washing machine minimises the washing and spinning noises
by sensing the amount of laundry.
Child-Lock
The Child-Lock system has been used to prevent children from pressing any buttons to change
the programme during operation.
PARTS AND FEATURES.................................................................................................................2
WASHING MACHINE SAFETY........................................................................................................3
INSTALLATION INSTRUCTIONS....................................................................................................4
INLET HOSE CONNECTION...........................................................................................................5
ELECTRICAL REQUIREMENTS .....................................................................................................6
OPERATING YOUR WASHING MACHINE.....................................................................................7
THE FUNCTIONS OF THE CONTROL PANEL...............................................................................9
WASHING PROCEDURE AND PROGRAME SELECTION ..........................................................10
MAINTENANCE .............................................................................................................................19
HOW TO CLEAN THE FILTER......................................................................................................20
REMOVING STAINS......................................................................................................................21
TROUBLE SHOOTING ..................................................................................................................22
SPECIFICATION............................................................................................................................23
Page 2
2
PARTS AND FEATURES
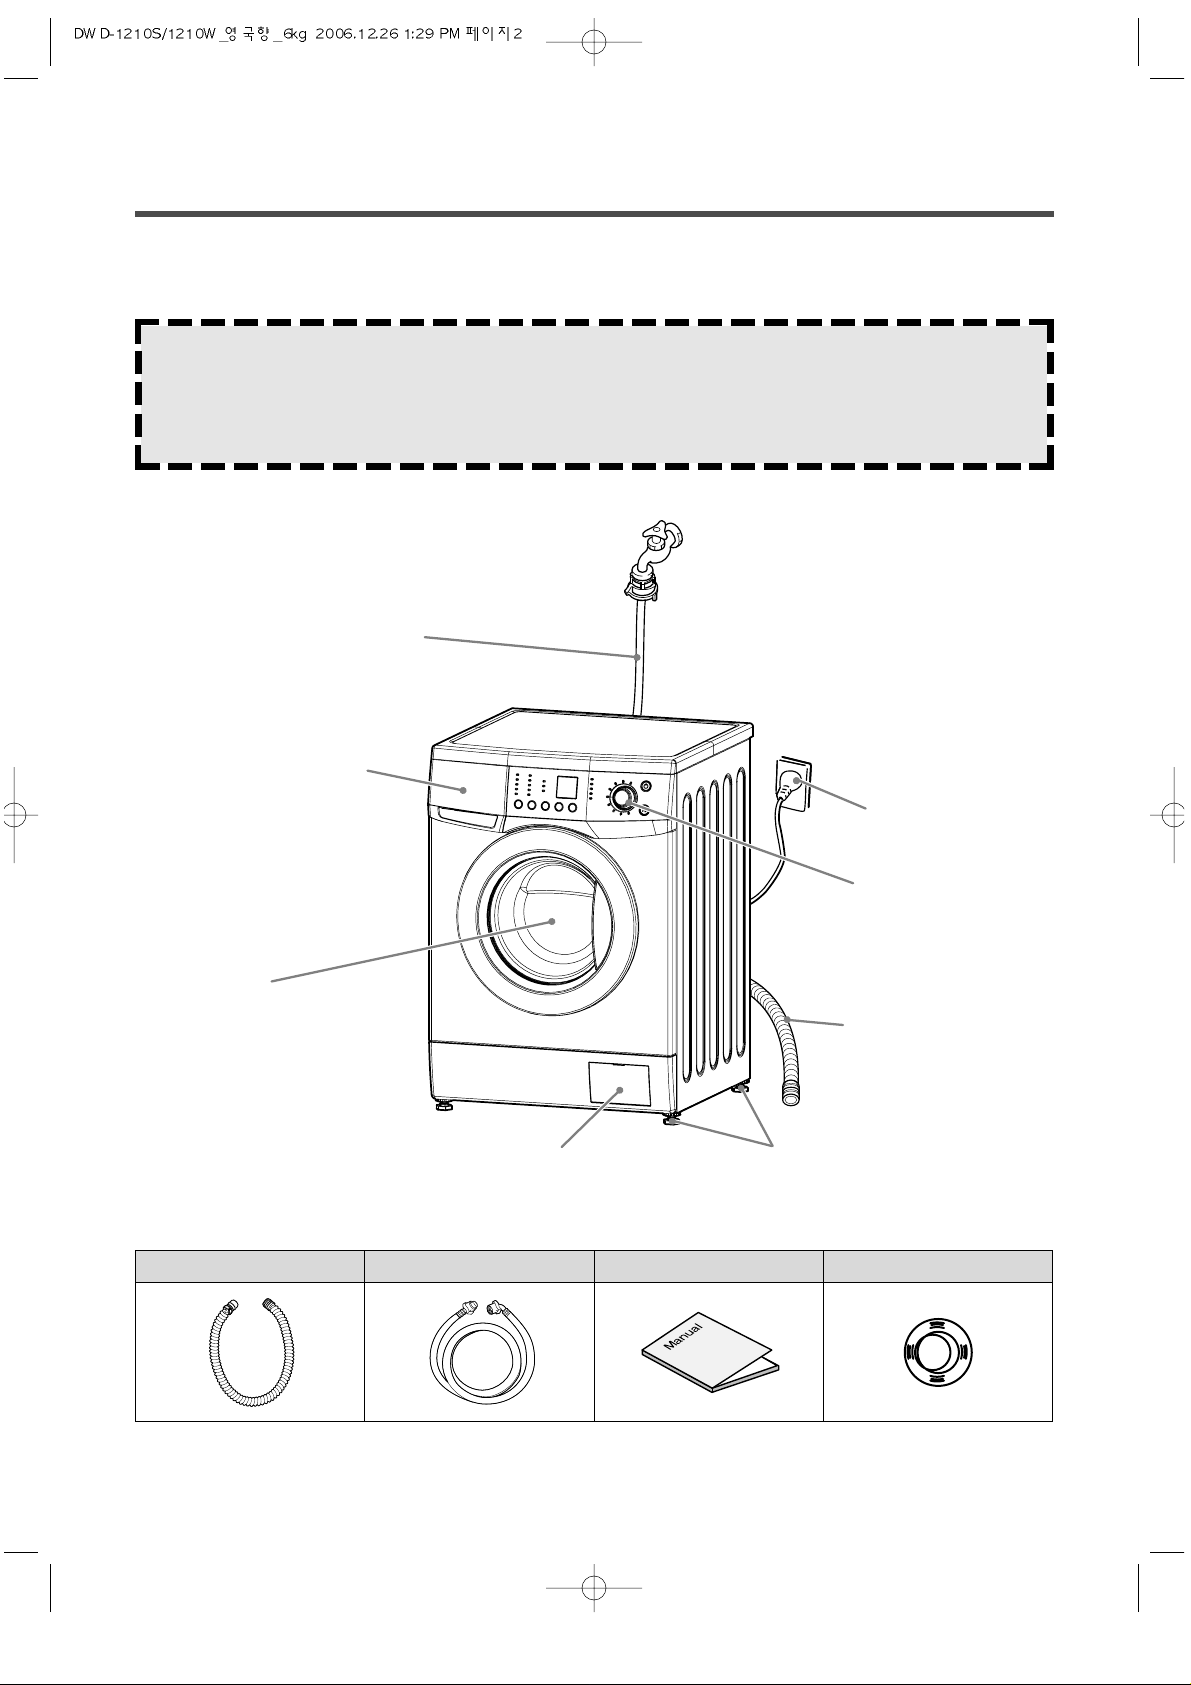
The parts and features of your washer are illustrated on the page.
Become familiar with all parts and features before using your washer .
Accessories
NOTE
The drawings in the book may vary from your model model.
They are designed to show the different features of all models covered by this book,
therefore your model may not include all the features that are available.
Hose drain Inlet hose Manual Cap holder(3EA)
ADJUSTABLE LEGS
CONTROL PANEL
DOOR
DETERGENT COMPARTMENT
INLET HOSE
PUMP COVER
POWER CORD
HOSE DRAIN
Page 3
3
Save these instructions
Your safety is important to us.
To reduce the risk of fire, electrical shock, or injury when using your machine adhere to the
following basic precautions.
Understanding your responsibilities
• Do not use chlorine bleach and ammonia or acid(such as vinegar or rust remover) in the same
wash. Hazardous fumes can form.
• Unplug power supply cord before attempting to service your machine.
• Do not wash fibreglass material.
Small particles can stick to fabrics washed in subsequent loads and cause skin irritation.
• Do not spray water on the control panel of the washer .
It could cause fire or an electric shock.
• In case of the dual valve model, with only the cold water inlet valve, connected and the water
temperature selected as hot or warm, there may be water leakage from unconnected water inlet
valve.
• This appliance must be earthed.
• Flammable fluids (dry-cleaning solvents, etc)
should not be used or stored in or near your
machine.
Do not add flammable fluids to your wash.
These substances give off vapours that can
create a fire hazard or explosion.
• Do not attempt to open the machine door
after a cycle has started.
• Do not tamper with the controls.
• The appliance is not intended for use by
young children or without supervision.
• If the supply cord is damaged, it must be
replaced by the manufacturer , or its service
agent or a similarly qualified person in order
to avoid a hazard.
• If the appliance is connected to the power
supply via an extension lead, it should not
be positioned where it could be splashed by,
or susceptible to, water .
Please ...
• Have only a qualified person install, repair ,
or replace parts on washer .
• Ensure your washing machine is regularly
maintained/serviced.
• Position your washing machine where it will
be protected from the weather and keep
it where the temperature will not fall below
freezing.
• Do not install your machine at a place of
extremely high humidity. It could cause an
electric shock or a short circuit.
• Your washing machine must be connected to
the correct outlet, electrical supply, water
supply , and drain supply.
WASHING MACHINE SAFETY
Read all instructions before using your machine
Page 4
4
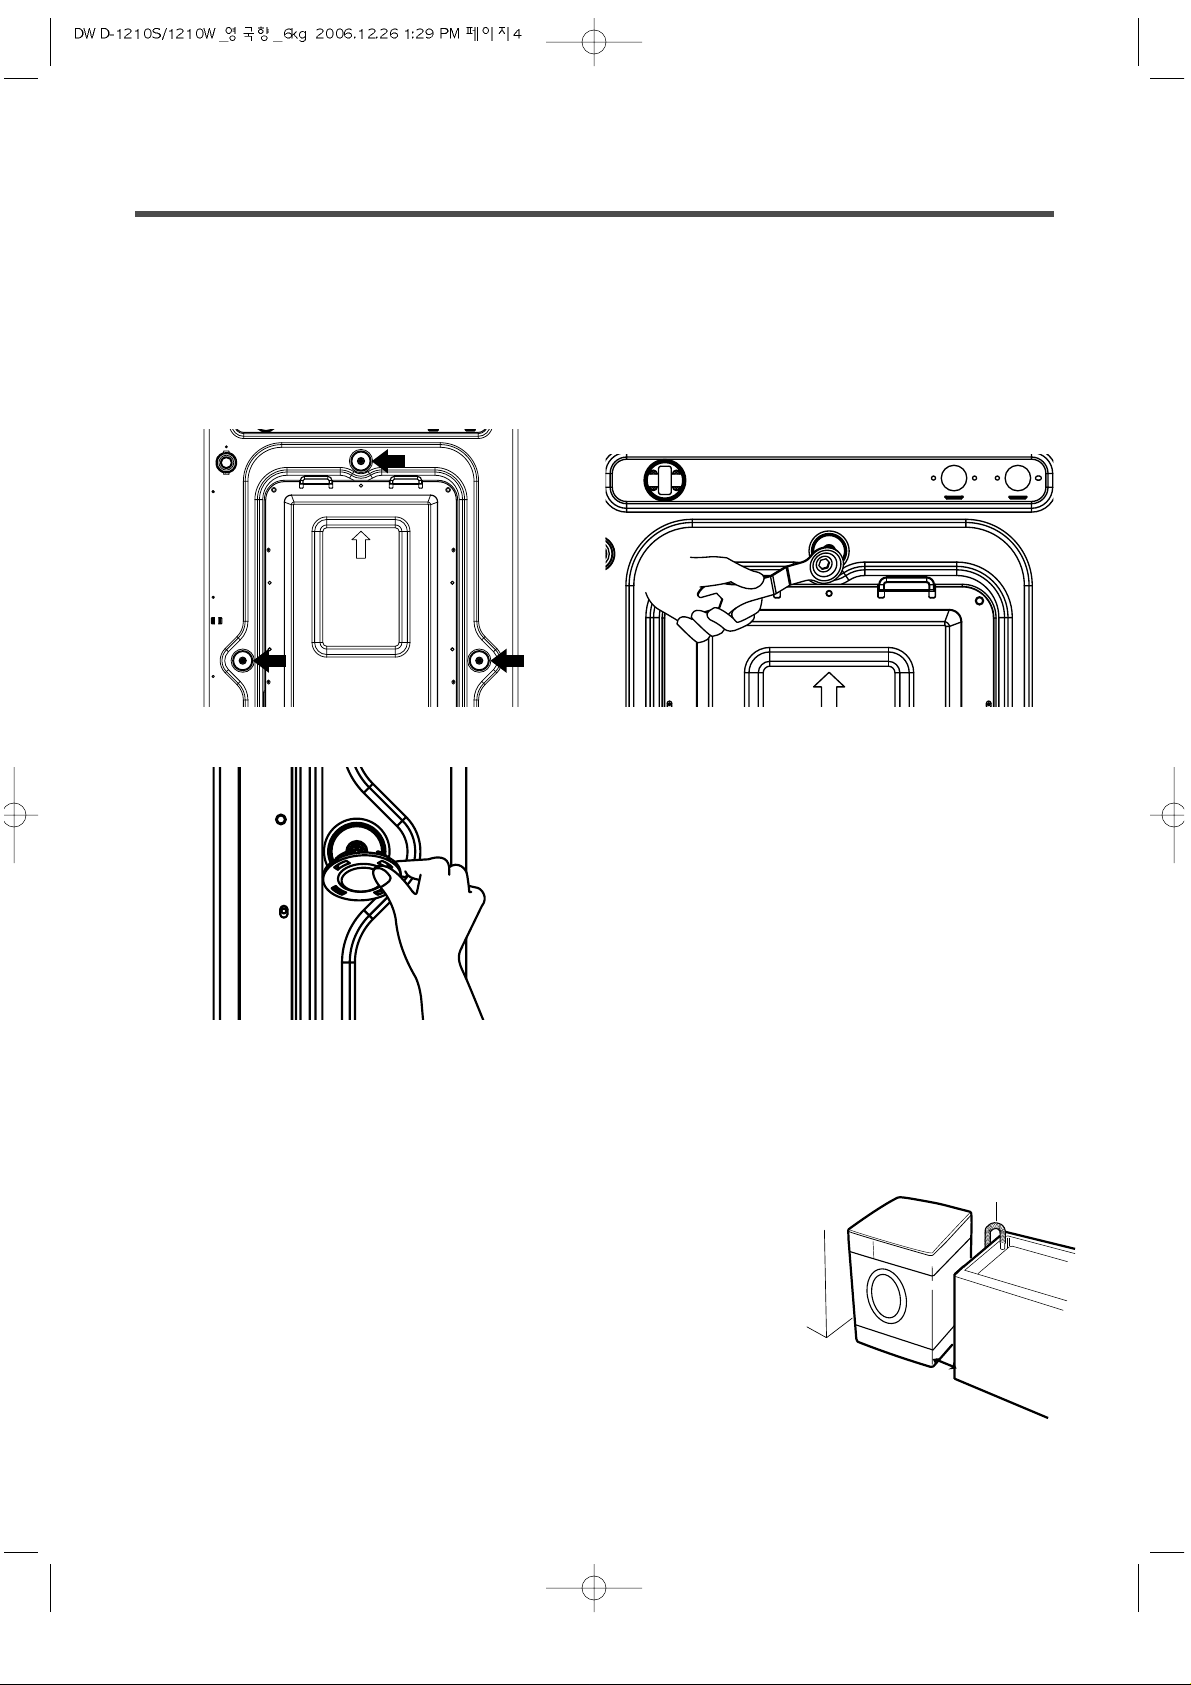
Removing transit bolts
1. Before operating the washer , remove the
transit bolts(3ea) along with the rubber .
• If the bolts are not removed, it may cause
heavy vibration, noise and malfunction.
2. Unscrew the 3 bolts with the 10mm hex
wrench or spanner or cross-tip screwdriver .
Keep the 3 bolts for a later time.
• When the appliance is transported, transit
bolts will be re-used.
3. Close the holes with the cap holders supplied.
Location of washer
• Check location where the machine will be installed. Make sure you have everything necessary
for correct installation.
• Do not place or store your washing machine below 0°C (32°F) to avoid any damage from
freezing.
• Never place/store laundry products on top of the machine.
• Install the washer on the horizontal solid floor .
If the washer is installed on an uneven floor , it could make
considerable noise, vibrate severely and cause a malfunction. If the
machine is not level, adjust the legs up or down for horizontal
installation.
• Ventilation openings must not be obstructed by carpeting when the
machine is installed on a carpeted floor .
• Leave some space (right & left : 2cm, rear : 10cm).
• In case of built-in installation, the distance between top of the washer and bottom of upper plate
should be at least 3mm.
INSTALLATION INSTRUCTIONS
Laundry
Tub
Washer
approx.
2cm
Drain Hose
Page 5
5
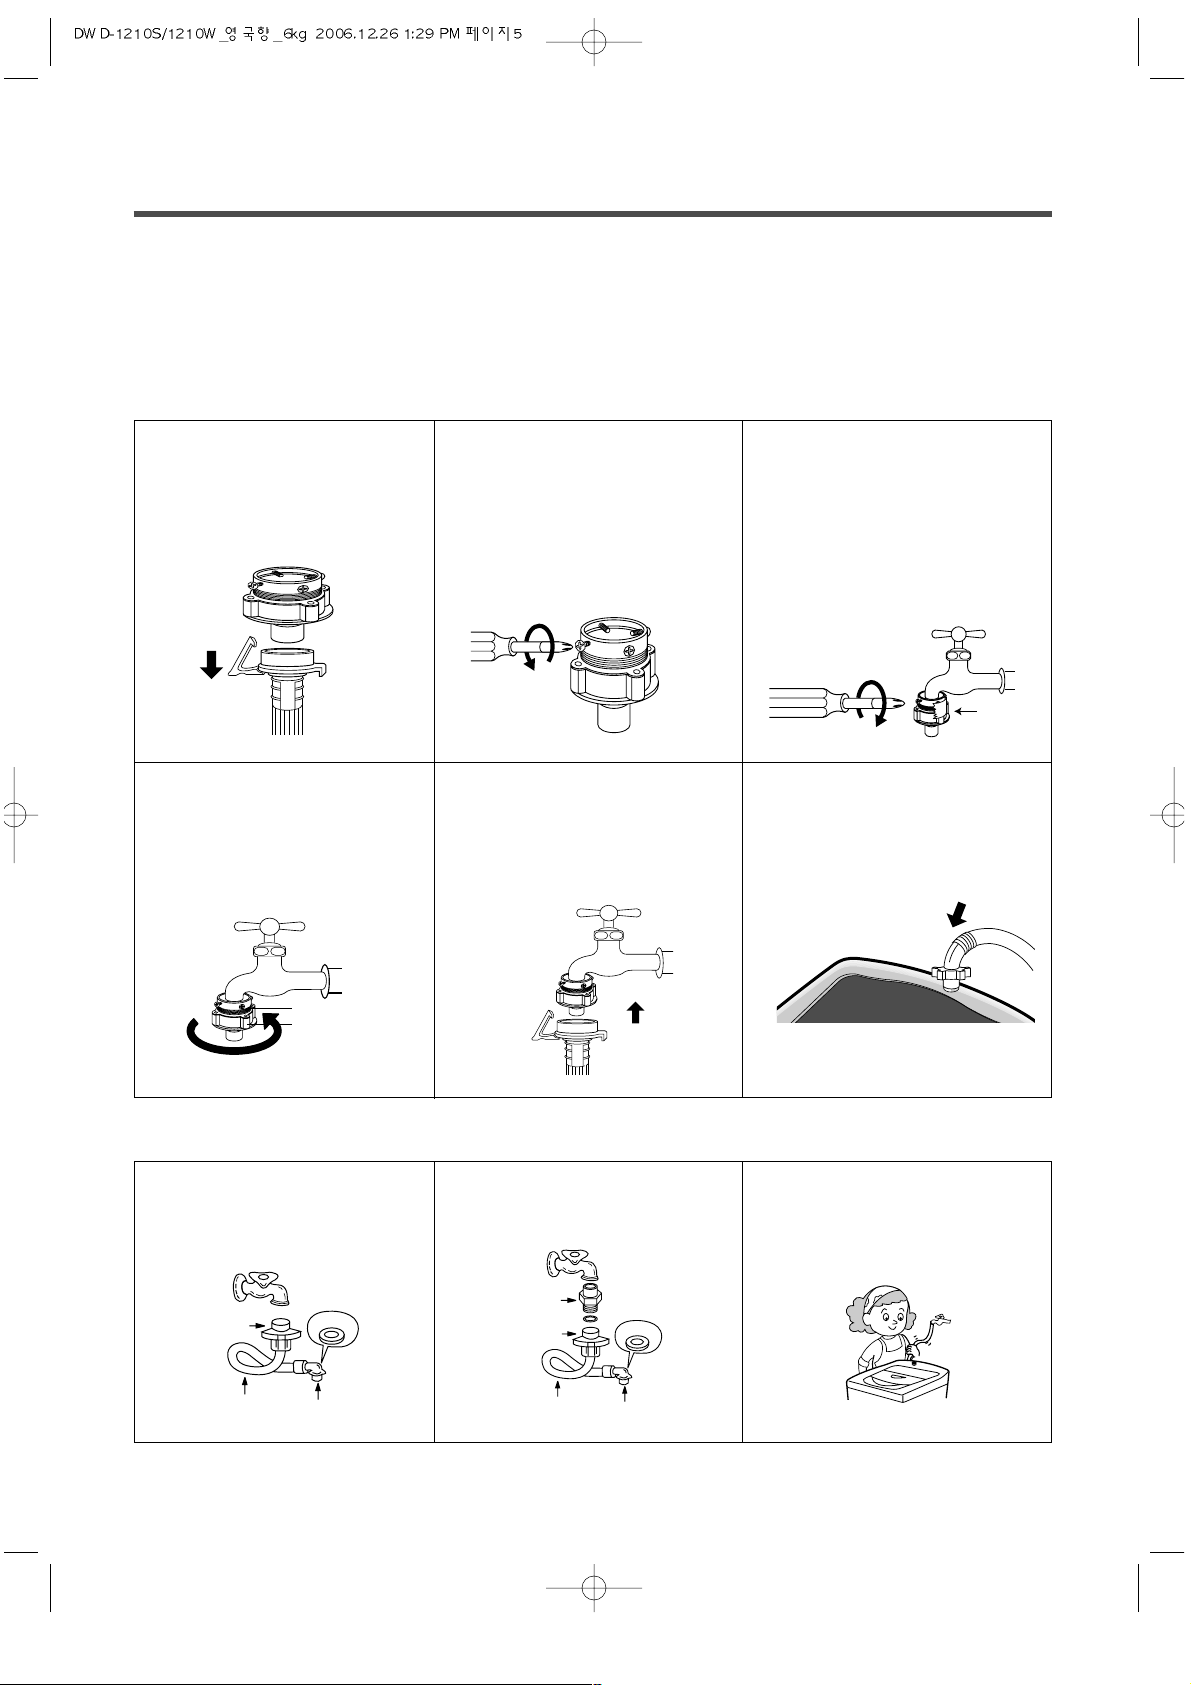
The machine should be connected to the water mains using the the new hose sets supplied.
NEVER reuse old hoses.
If using only one water tap or if there is only one water inlet valve, connect the inlet hose to the
cold water inlet valve.
Caution: Be careful not to confuse hot water inlet and cold water inlet.
For Ordinary Tap
For Screw-Shaped Tap
INLET HOSE CONNECTION
1 Pull down the collar of the
inlet hose to separate it
from the water tap
adapter.
2 Loosen the four screws
properly in order to fit into
water tap.
3 Fit the water tap adapter
into the water tap and
tighten the four screws
evenly while pushing up
the adapter so that the
rubber packing can stick
to the water tap tightly.
4 Remove the tape, and
screw tightly connector B
into connector A.
5 Connect the inlet hose to
the water tap adapter by
pulling down the collar of
the hose end.
6 Connect the inlet hose
adapter of the hose to the
water inlet of the washer
by turning it clockwise
until it is tight.
• Please check the rubber
packing is present inside the
inlet hose adapter of the hose.
1 Connect the inlet hose to
the water tap by screwing
the connector tightly.
2 Connect the connector-
inlet supplied if necessary.
3Connect the inlet hose
adapter to the water inlet
of the machine and turn it
until tight.
*Check the packing in the inlet
TAPE
Connector B
Connector A
Connector
Connector
Rubber
Packing
Hose
Connector
Rubber
Packing
Hose
Connector
inlet
Connector
Page 6
6
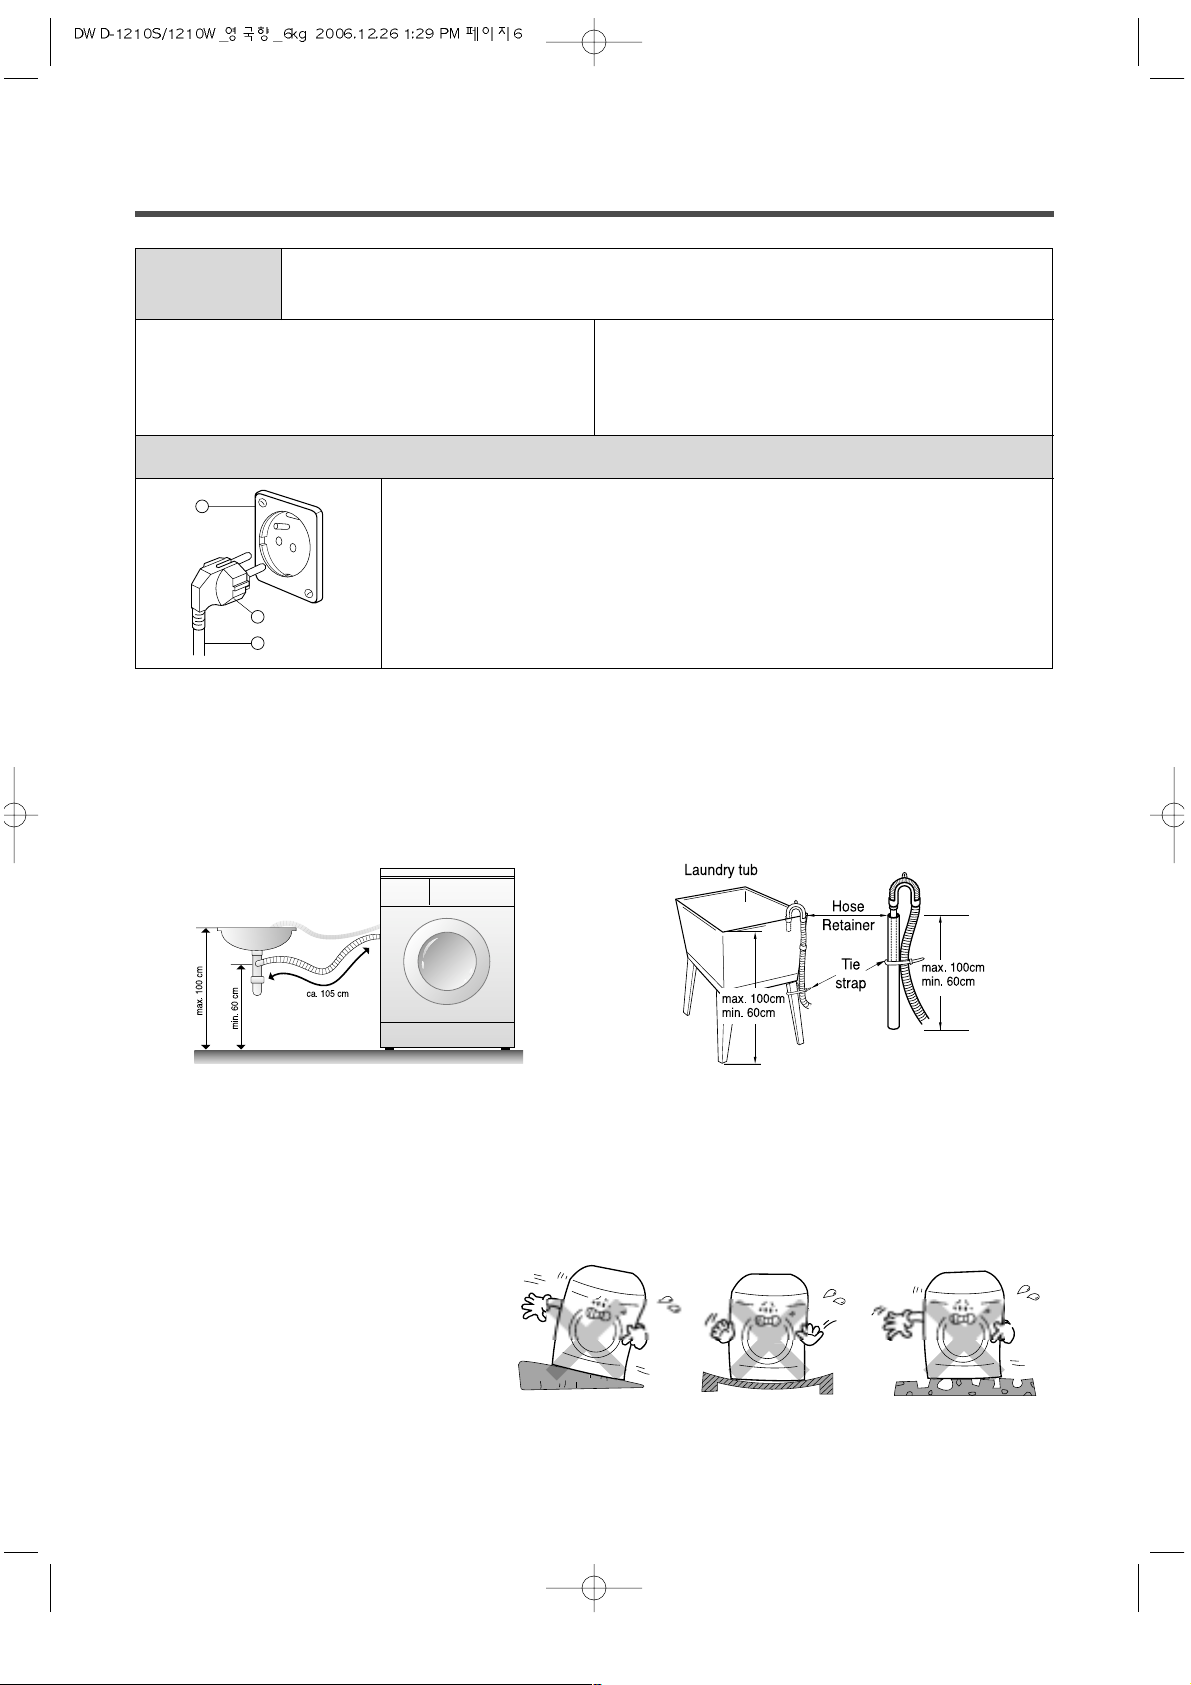
ELECTRICAL REQUIREMENTS
• An electrical earth is required on this machine
• If it does not fit the outlet, have a proper outlet
installed by a qualified electrician.
• Don’t earth to a gas pipe.
• Don’t change the power supply cord plug.
• Check with a qualified electrician if you are not
sure the machine is properly earthed.
WARNING
Recommended earthing method
Electrical shock hazard : Failure to follow these instructions could result in
death or serious injury.
For your personal safety, this machine must be earthed.
It is fitted with a supply lead (A) attached to an earthed plug (B). T o prevent
electric shock occurring, this machine must be plugged into the relevant
earthed power socket (C). It is the personal responsibility and obligation of
the customer to ensure that this is in place before the washing machine is
installed.
C
B
A
Drain system
• Never forget to install drain hose before operating your machine.
• Open the packing box, and there is a drain hose inside the drum.
• Connect the drain hose to the drain outlet at the back side of the machine.
•
The top of the washing machine must be at least 60cm high but no higher than 100cm from floor
level.
• When installing the drain hose to tub(sink), secure it tightly with string or a plastic strap.
• Proper securing of the drain hose will protect the floor from flooding.
• When the drain hose is too long, do not force it back into the machine as this will cause
excessive noise.
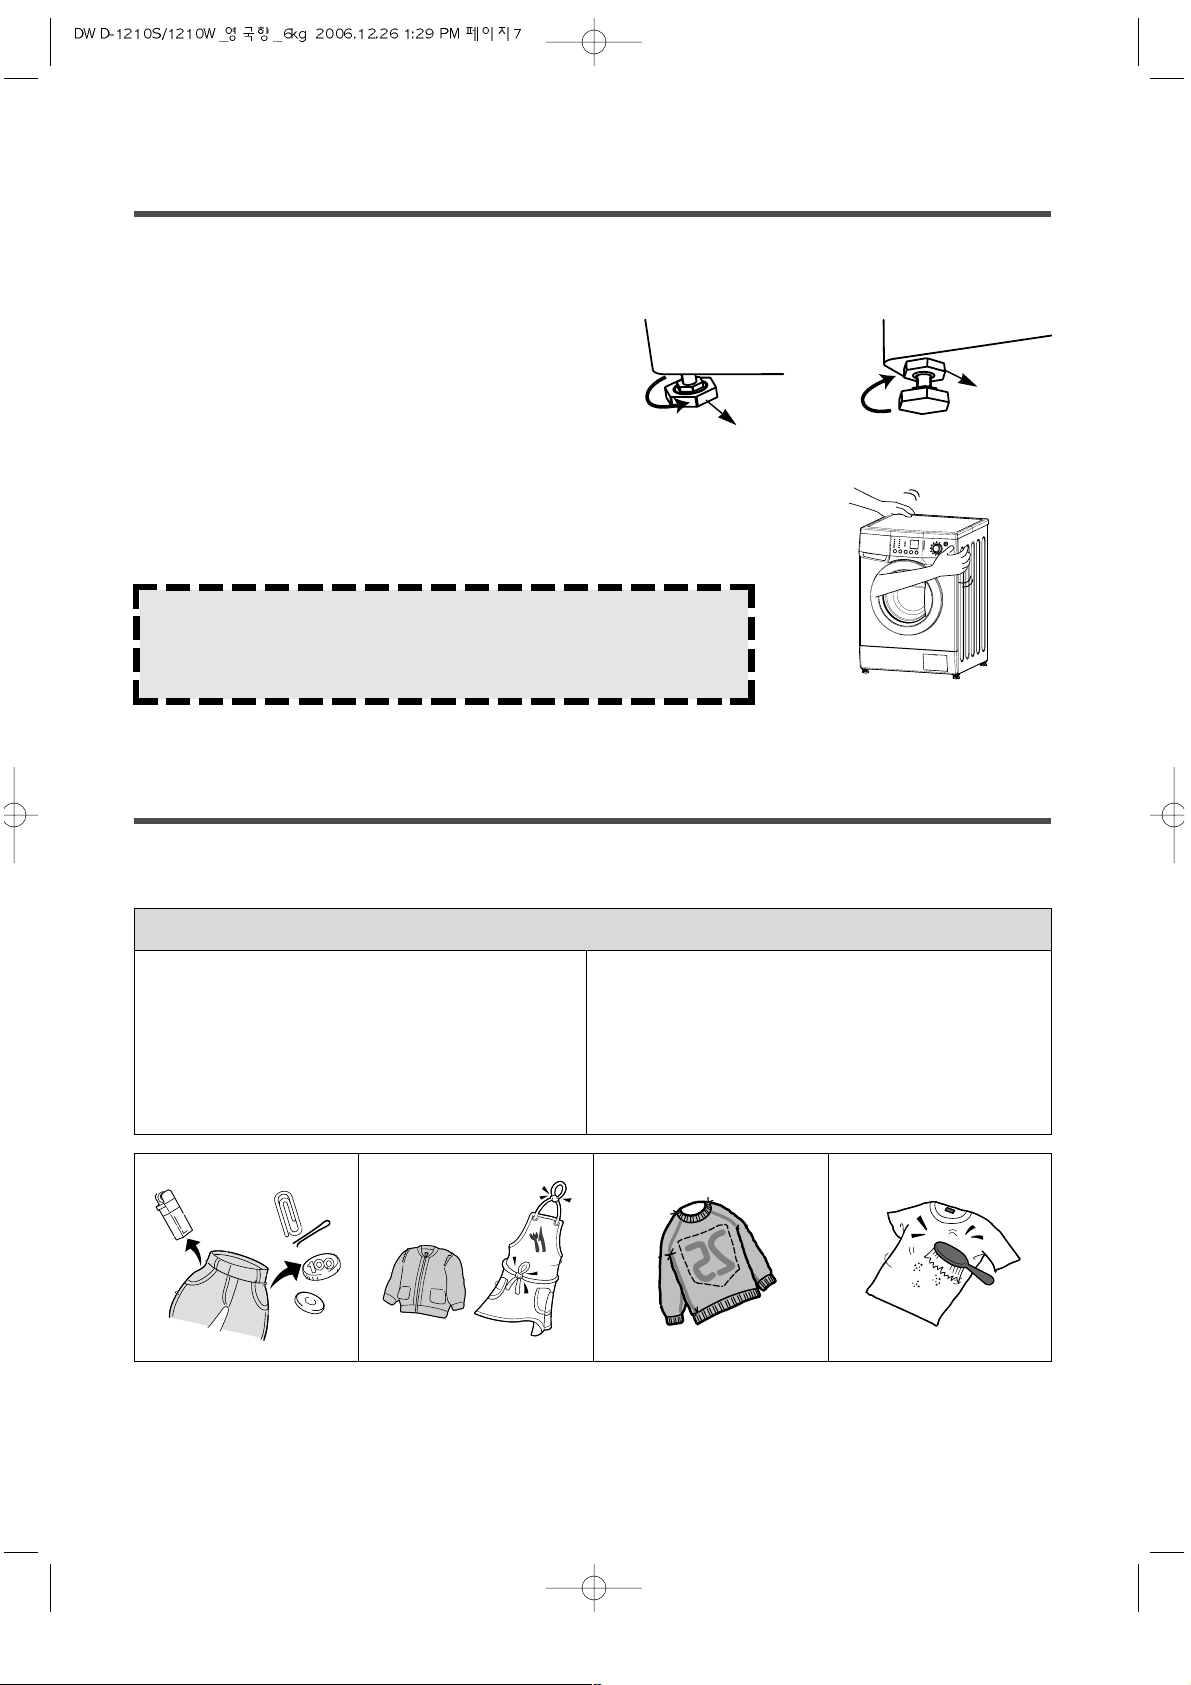
Level adjustment
1 If the washer is installed on an
unsuitable floor, it could make
considerable noise, vibrate and
cause a malfunction.
Page 7
7
OPERATING YOUR WASHING MACHINE
2 Adjust the level of the washing machine using the adjustable legs.
• Please check if there is any gap between the
four adjustable legs and the floor .
• Adjust the level of washer by turning
adjustable legs. And make it sure that there is
no swaying of washer .
• Adjust the fixing nuts tightly so that the washer
maintains the adjustment.
3 Make it sure that the washing machine does not move when
you press down the four corners of the washer's top plate.
adjustable leg
Fixing Nut
NOTE
There should be no instability of the machine when
all the adjustable legs have been correctly balanced.
To obtain the best washing results, you must operate your machine properly.
This section gives you this important information.
• Close zippers, snaps, and hooks to avoid
snagging other items.
Remove pin, buckles, and other hard
objects to avoid scratching the machine
interior.
• Empty pockets and pull them inside out.
• Turn down cuf fs and turn synthetic garments
inside out to avoid damaging the fibres.
• Tie strings and sashes to avoid tangling.
• Treat spots and stains.
(See “Removing stains” on page 21)
Preparing clothes for washing
Page 8
8
• For best cleaning and wrinkle-free results, put clothes
into the machine loosely so that they move easily in
the water.
• Load machine properly and select correct load size
setting.
Overloading and selecting a setting too small for the
wash load can :
- Cause poor cleaning
- Increase wrinkling
- Create excessive lint
- Wear out items faster (because of damage to fibres)
• Mix large and small items in each load. Load evenly to
maintain washer balance.
An unbalanced load can make the washer vibrate
during spin.
• Reduce wash time when using a small load size
setting. Loads with only a few small items needs less
wash time.
• Use a large load size setting to reduce wrinkling with
permanent press clothes and some synthetic
garments. These items should have more room to
move in the water than heavy items. (towels, jeans)
Loading
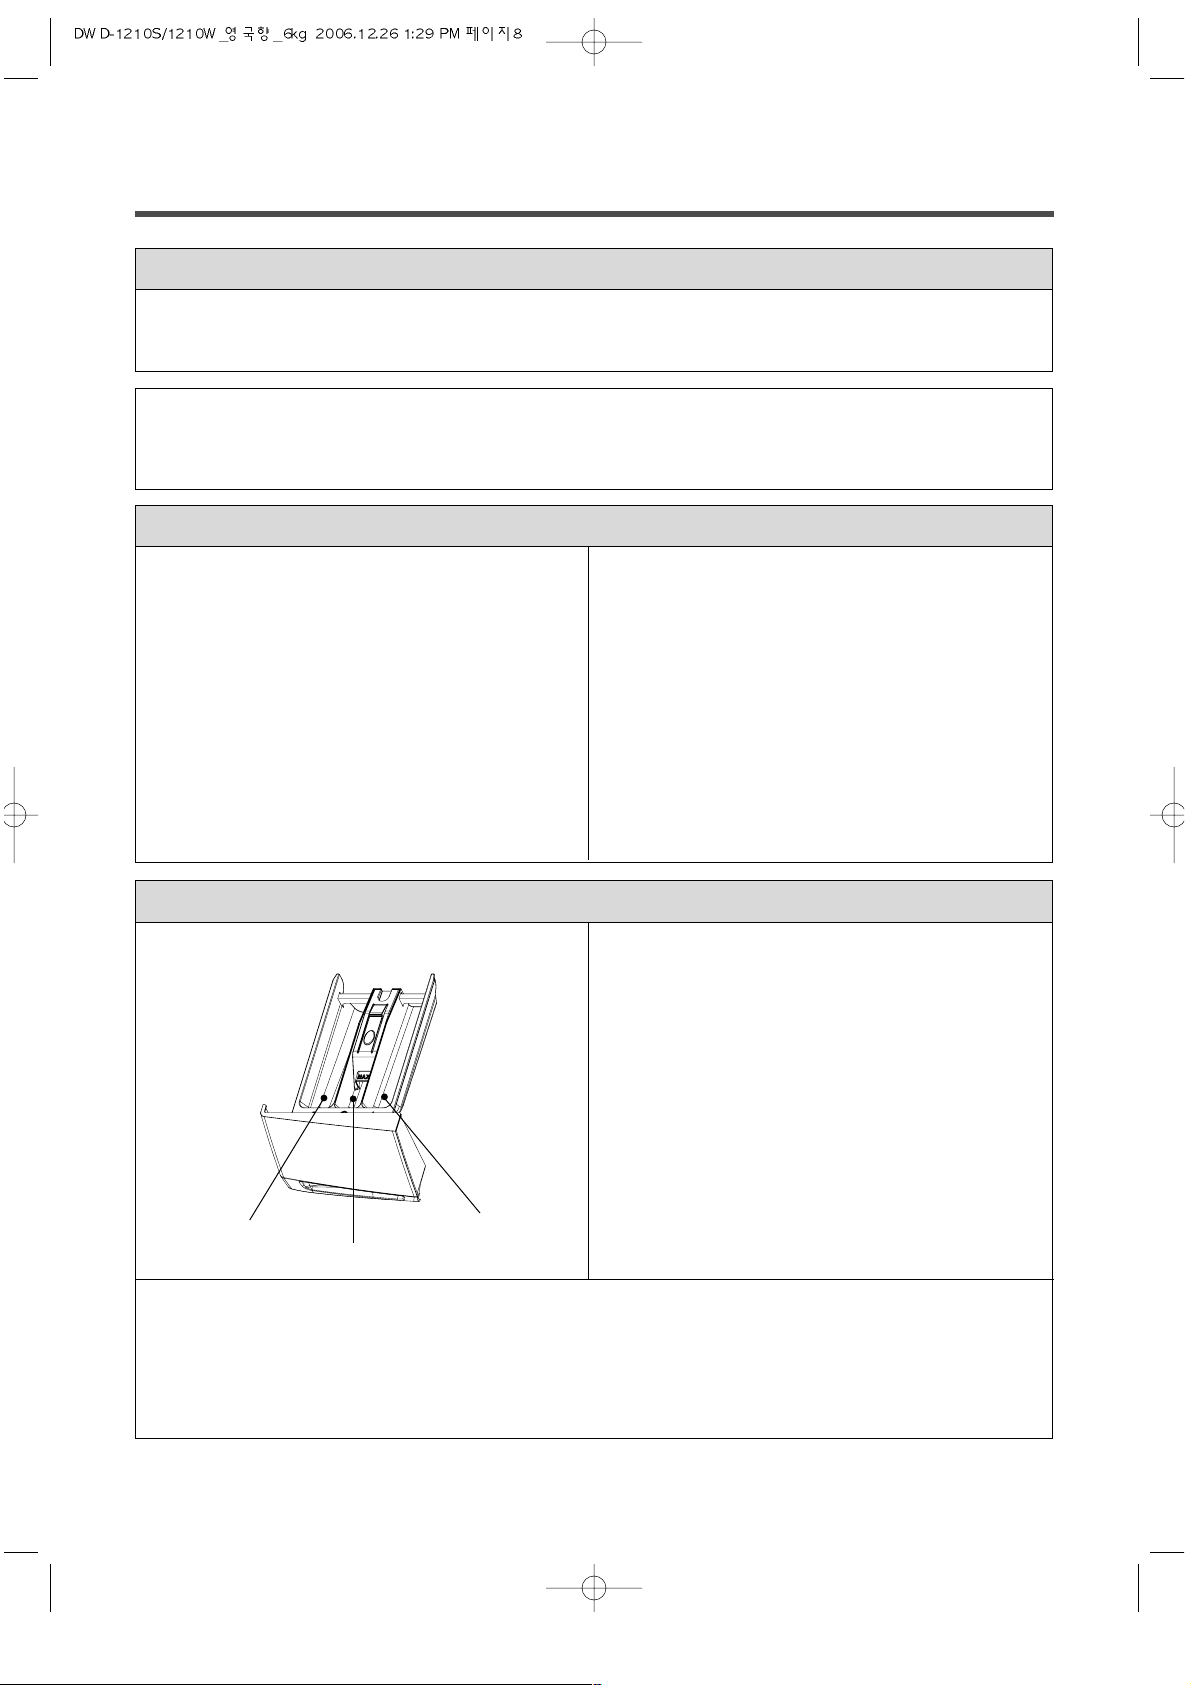
1 Detergent compartment 2 Adding fabric softener
• If desired, pour liquid fabric softener into the
dispenser using the amount recommended by
the manufacturers.
• Do not exceed the maximum fill line. Overfilling
can cause early dispensing of the fabric
softener which could stain clothes.
• Do not open the detergent case when water is
supplied.
• Avoid pouring fabric softener directly on the
clothes.
3 Please use only the powder detergent for the front loader washing machine.
• Please use the proper amount of detergent in conformity with the instruction of the detergent
manufacturer.
• A use of a large amount of fetergent more than the recommended amount can cause many soapsuds
and the overload to the motor. In addition to, this will deteriorate the washing and rinse performmance.
Adding detergent
• Separate heavily soiled items from lightly soiled ones, even if they would normally be washed together.
• Separate dark colours from light colours, colourfast items from non-colourfast items.
Sorting
Soil (Heavy, Normal, Light) Separate clothes according to amount of soil.
Colour (White, Lights, Darks) Separate white clothes from coloured clothes.
Lint (Lint producers, Collectors) Wash lint producers and lint collectors separately.
Main wash
Pre wash
Fabric softener
Page 9
9
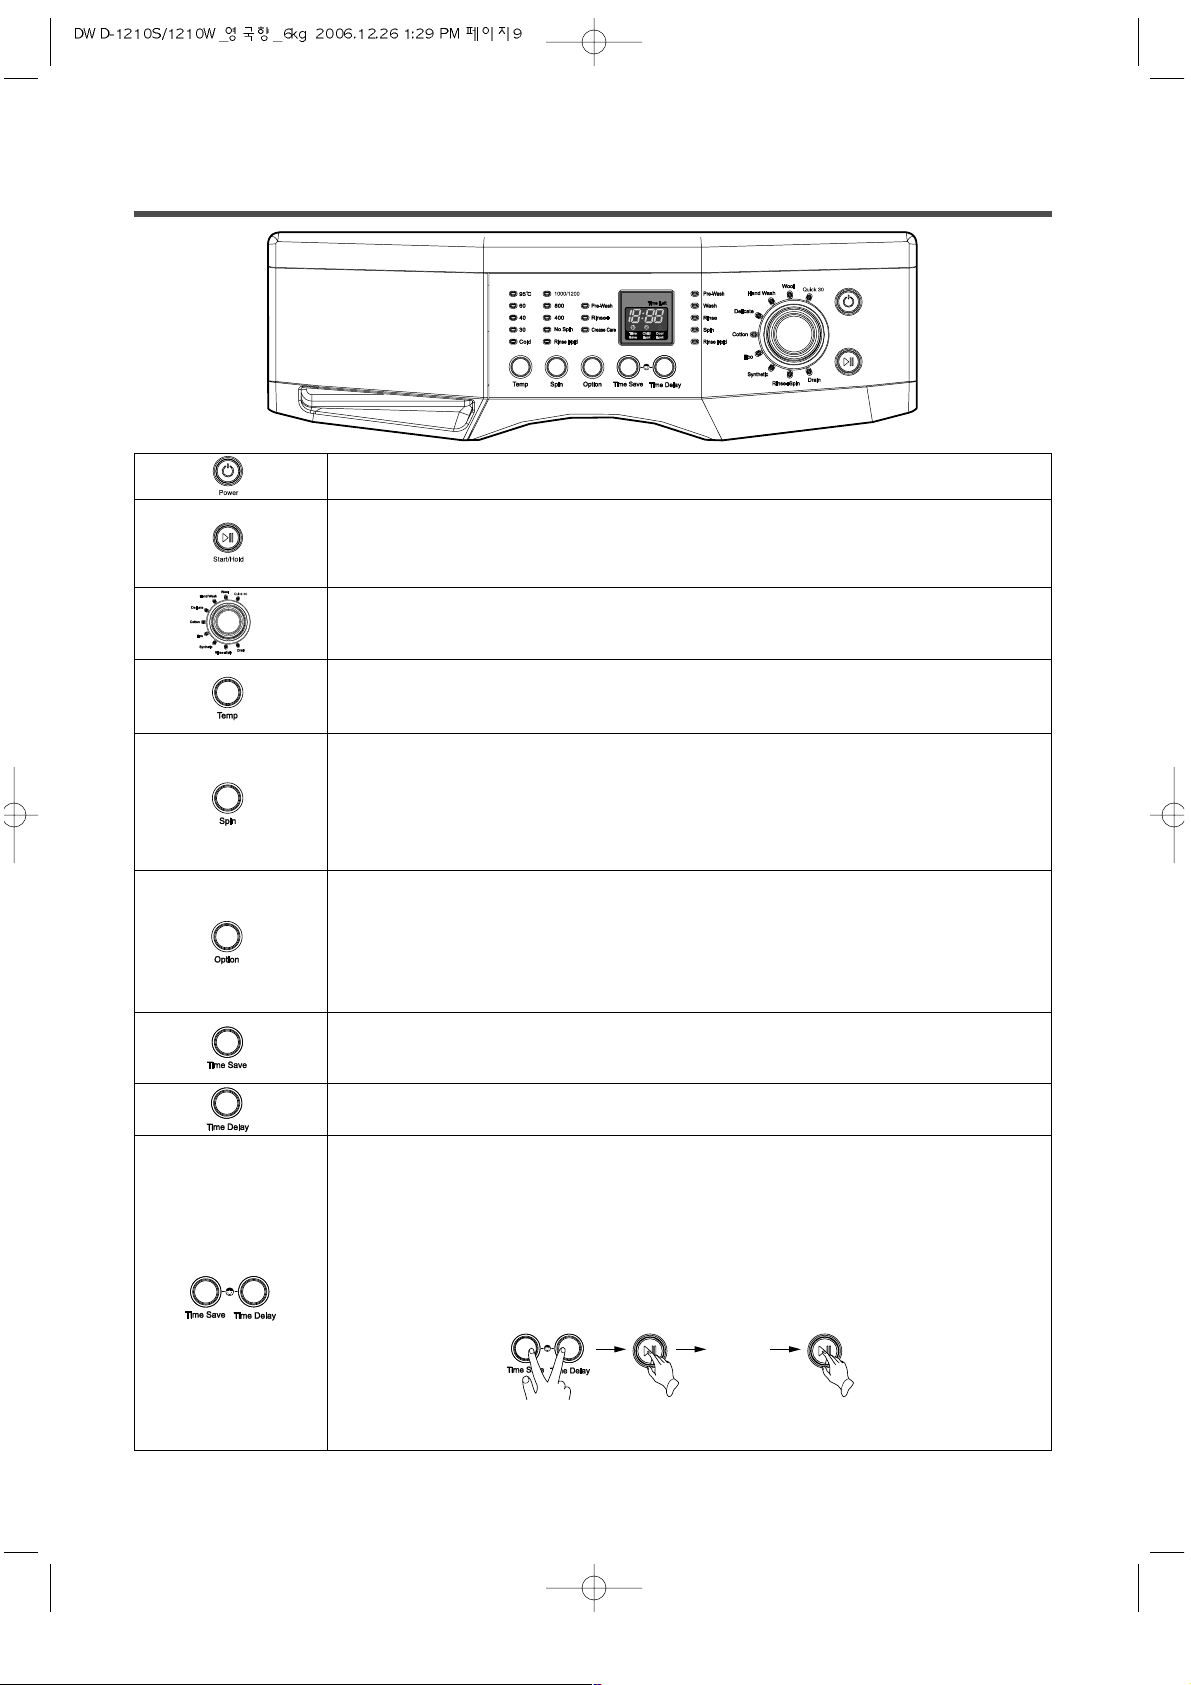
Press this switch to turn the power on or off.
Operation and temporary stop is repeated as it is pressed.
When you want to change the programme while the machine is in operation.
press the “Start/Hold” button →Select the programme that you want to change →press
the “Start/Hold” button again.
An indicator light will come on once a cycle has been chosen.
For the more detailed information, please refer to the page 11~18.
This can be used to monitor the water temperature to reflect the types of clothes being washed.
As the button is pressed, temperature of water is selected by
Cold → 30˚C → 40˚C → 60˚C → 95˚C
By pressing the spin button, the spin speed can be chosen.
Rinse Hold •
Is selected by pressing the spin button repeatedly. This function leaves clothes
in the machine; suspended in the water after a rinse without entering into spin.
• To proceed through to a drain or spin, after the Rinse Hold function is
completed, use spin button.
No spin • If no spin is selected, the washer stops after draining water.
Crease Care • If you want to prevent creasing, select this button with spin speed.
Rinse+ • Is used to add a rinse, which may assist in removing traces of detergent residue.
• By selecting Rinse+ function, the rinse time and the rinse water are increased.
Pre-Wash • The washing machine operates one additional wash and spin before the main wash.
• If the laundry is heavily soiled, Pre-Wash cycle is effective.
• Pre-Wash is available in Cotton and Synthetic programmes.
All cycles have pre-set washing times, but Time Save decreases it to 10 minutes.
Each time this button is pressed the clock icon is repeated on and off. When it is on, the Time
Save function is set. Time Save is available in Cotton, Eco and Synthetic programmes.
It can be used to pre-engage time for wash.
Use this function when you want to prevent any accident occurringby a child touching the washing machine.
During an operation of the machine, press ‘Time Save’ and ‘Time Delay’ buttons simultaneously.
In Child Lock mode, no button functions except Power button.
In Child Lock mode, press ‘Time Save’ and ‘Time Delay’ buttons simultaneously like setting Child Lock
and Child Lock is cancelled.
To change to the programme required, while in Child Lock mode:
1. Press both the Time save and Time delay buttons simultaneously again.
2. Press the Start/Hold button.
3. Select the desired program and press the Start/Pause button again.
THE FUNCTIONS OF THE CONTROL PANEL
* The Child Lock will be cancelled when power is off.
Change to
the desired
programme
Page 10
10
1. COTTON IS AUTOMATICALLY SELECTED WHEN THE POWER BUTTON IS PRESSED.
• Press the Power button to start.
• Press the Start/Hold button
• Initial cycle:
- Programme : Cotton
- Wash : main wash
- Rinse : 3 times
- Spin : 800 rpm
- Water temperature : 40˚C
W ASHING PROCEDURE AND PROGRAMME SELECTION
2. MANUAL SELECTION
• Press the Power button to start
• Select the cycle you want by turning the programme dial and pressing each button.
• Press the Start/Hold button.
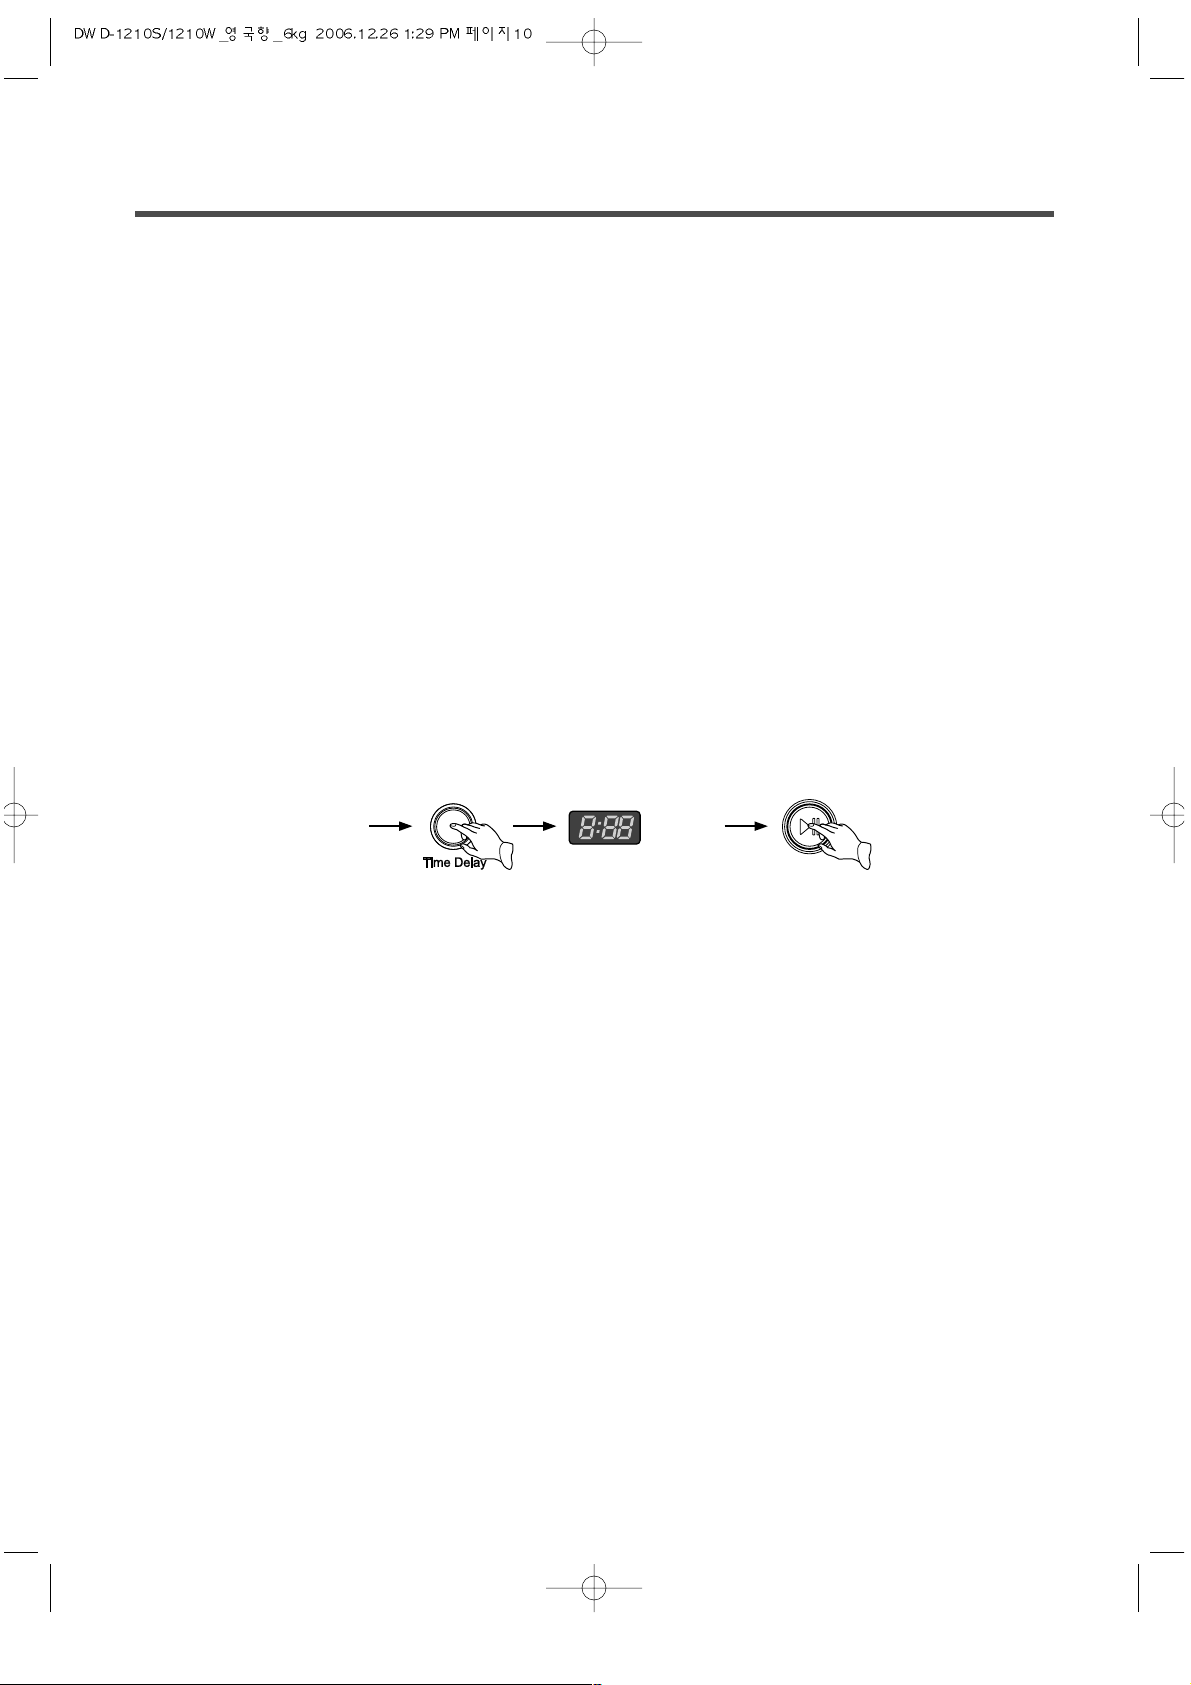
3. TIME DELAYED WASHING
• A washing cycle may be programmed to finish up to 12 hours later.
For example, should you wish to delay the wash so that it will finish in eight hours' time:
- Press the Time Delay Button
* Each pressing of the button advances time delay by one hour.
• Now the timer is set.
• If you want to check the selected programme, press the “Start/Hold” button again.
• Preparing washing before starting “Time Delay”;
- Load laundry and close the door
- Place the detergent and fabric softener in the detergent compartment.
• To cancel the time delay, press the Power button.
ajust to "8"
select the
program
or manual
Page 11
11
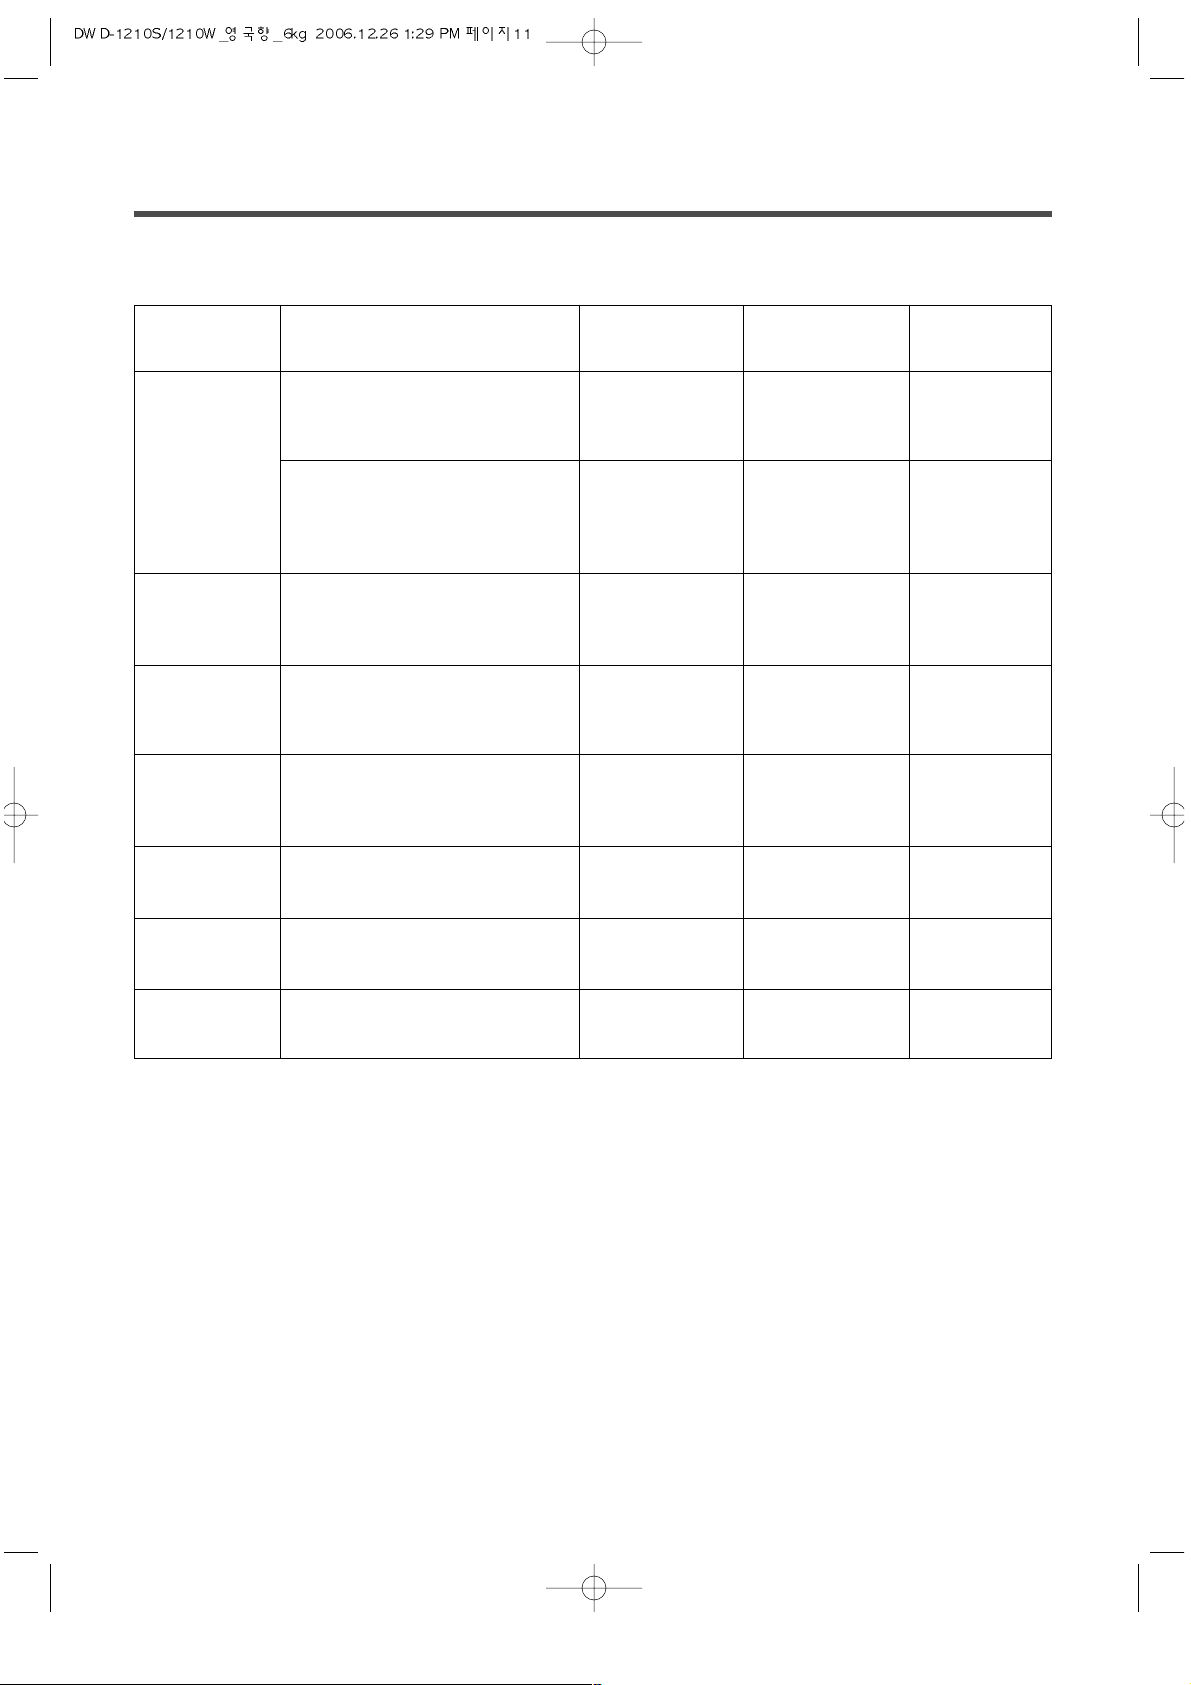
4. FUNCTION
• Recommended programmes according to the laundry type
• Pre Wash : If the laundry is heavily soiled, “Pre Wash” program is recommended.
Pre Wash is available in Cotton and Synthetic programmes.
• Rinse+ : Used to introduce an additional rinse, which may assist in removing traces of detergent residue.
• Eco : By selecting Eco function, the water temperature is lowered and washing time is increased.
So you can economise your consumption of heating energy.
Fabric
Type
First check if laundry is machine
washable.(white cotton, linen
towel and sheets..)
Colourfast garments
(shirts, night dresses, pyjamas..)
and lightly soiled white cottons
(underwear..)
60˚C
(95˚C)
Pre Wash
Rinse+
Crease Care
Rating
40˚C
(60˚C, 30˚C)
Pre Wash
Rinse+
Crease Care
Rating
Laundry type is the same as
Cotton.
60˚C
Pre Wash
Rinse+
Crease Care
Rating
Proper
Temp.
Option
Maximum
Load
Programme
Cotton
Eco
Polyamide, Acrylic, Polyester
40˚C
(60˚C, 30˚C)
Pre Wash
Rinse+
Crease Care
Less than
1.5kg
Synthetic
Delicate laundry easily
damaged
(silk, curtains..)
Cold
Rinse+
Crease Care
Less than
1.0kg
Delicate
Machine washable woollens
with pure new wool only.
Cold
Rinse+
Crease Care
Less than
1.0kg
Wool
“Hand wash” marked delicate
and wool laundry
Cold
(30˚C)
Rinse+
Crease Care
Less than
1.0kg
Hand Wash
Coloured laundry which
is lightly soiled.
30˚C
(Cold, 40˚C)
Rinse+
Crease Care
Less than
1.0kg
Quick
Page 12
12
* COTTON PROGRAMME
Note
• If you want to change the setting during operation, press the Start/Hold button to hold the operation and
press the button you want.
• ‘30’, ‘40’, ‘60’ and ‘95’ ˚C washing temperatures are selectable with the cotton programme.
• ‘Prewash’, ‘Rinse+’, and ‘Crease Care’ wash options are selectable with this programme.
Caution!
• If you select washing temperature ‘95’ ˚C, some cold water is supplied before the drain of main wash. This
is to protect the user from the hazard of burn injury by lowering the temperature of hot wash water instead
of directly draining it. Therefore this is not a malfuction.
(Be careful with the draining water, since it can be still hot although the temperature is lowered.)
Put the laundry in to the drum.
Then close the door.
•
In the detergent compartment, put the powder into the main wash and pre-wash
sections. Softener should be be poured into the middle section of the compartment
and be below the ‘MAX’ level.
•
Put detergent into the pre wash compartment only if you want to add prewash.
•
When you want to use bleach, put it into the main wash compartment with detergent.
1
Press the Power button.
•
The LED shows only ‘---’ and all Program Lights turn on.
2
Select the ‘Cotton’ programme using the programme selection dial.
•
(If you press the Start/Hold button after pressing the power button without selecting
a programme, the ‘Cotton’ program is selected as default program.
•
Water temperature ‘40’ ˚C, spin ‘800’ rpm and rinse ‘3’ times are selected
automatically.
•
If you want to change the water temperature, spin velocity or add wash options
(Rinse+, Crease Care), press each button.
3
Press Start/Hold button.
•
The washing machine will start operating by locking the door and supplying water.
4
Page 13
13
* ECO PROGRAM
Note
• If you want to change the setting during operation, press the Start/Hold button to hold the operation and
press the button you want.
• Only ‘60’ ˚C washing temperature is selectable with the Eco programme.
• Only ‘Rinse+’ and ‘Crease Care’ of all wash options are selectable with this programme.
Put the laundry in the drum.
Then close the door.
•
In the detergent compartment, put the powder into the main wash and pre-wash
sections. Softener should be poured into the middle section of the compartment and
be below the ‘MAX’ level.
•
Put detergent into the pre wash compartment only if you want to add prewash.
•
When you want to use bleach, put it into the main wash compartment with
detergent.
Press the Power button.
•
The LED shows only ‘---’ and all Program Lights turn on.
1
2
Select the ‘Eco’ programme using the programme selection dial.
•
Water temperature ‘60’ ˚C, spin ‘800’ rpm and rinse ‘3’ times are selected
automatically.
•
If you want to change the spin velocity or add wash options (Rinse+, Crease Care),
press each button.
3
Press Start/Hold button.
• The washing machine will start operating by locking the door and supplying
water.
4
Page 14
14
* SYNTHETIC PROGRAM
Note
• If you want to change the setting during operation, press the Start/Hold button to hold the operation and
press the button you want.
• Only ‘30’, ‘40’ and ‘60’ ˚C washing temperatures are selectable with the Synthetic programme.
• ‘Prewash’, ‘Rinse+’, and ‘Crease Care’ wash options are selectable with this programme.
• The appropriate amount of laundry for Synthetic program is below 1.5kg.
Put the laundry in the drum.
Then close the door.
•
In the detergent compartment, put the powder into the main wash and pre-wash
sections. Softener should be poured into the middle section of the compartment and
be below the ‘MAX’ level.
•
Put detergent into the pre wash compartment only if you want to add prewash.
•
When you want to use bleach, put it into the main wash compartment with
detergent.
Press the Power button.
•
The LED shows only ‘---’ and all Program Lights turn on.
1
2
Select the ‘Synthetic’ programme using the programme selection dial.
•
Water temperature ‘40’ ˚C, spin ‘800’ rpm and rinse ‘3’ times are selected
automatically.
•
If you want to change the water temperature, the spin velocity or add wash options
(Prewash, Rinse+, Crease Care), press each button.
3
Press Start/Hold button.
•
The washing machine will start operating by locking the door and supplying water.
4
Page 15
15
* DELICATE PROGRAM
Note
• If you want to change the setting during operation, press the Start/Hold button to hold the operation and
press the button you want.
• Only ‘cold’ of washing temperature is selectable with the Delicate programe.
• Only 'Rinse+' and 'Crease Care' wash options are selectable with this option but not ‘1000’ rpm of spin
velocity this programme.
• The appropriate amount of laundry for Delicate program is below 1.0kg.
Put the laundry in the drum.
Then close the door.
•
In the detergent compartment, put the powder into the main wash and pre-wash
sections. Softener should be poured into the middle section of the compartment and
be below the ‘MAX’ level.
•
Put detergent into the pre wash compartment only if you want to add prewash.
•
When you want to use bleach, put it into the main wash compartment with
detergent.
Press the Power button.
•
The LED shows only ‘---’ and all Program Lights turn on.
1
2
Select the ‘Delicate’ programme using the programme selection dial.
•
Water temperature ‘Cold’, spin ‘400’ rpm and rinse ‘2’ times are selected
automatically.
•
If you want to change the spin velocity or add wash options (Rinse+, Crease Care),
press each button.
3
Press Start/Hold button.
•
The washing machine will start operating by locking the door and supplying water.
4
Page 16
16
* WOOL PROGRAM
Note
• If you want to change the setting during operation, press the Start/Hold button to hold the operation and
press the button you want.
• Only the 'Cold' water temperature is available with the Wool programme.
• ‘1000’ rpm of spin velocity is NOT selectable with the Wool programme in order to protect the clothing from
damage.
• Only ‘Rinse+’ and ‘Crease Care’ wash options are selectable with this programme.
• The appropriate amount of laundry for the Wool programme is below 1.0kg.
• Use only special detergent for wool.
(Do not use more than the recommended amount of detergent for woollens as this may lead to too much
lather in the wash.)
Put the laundry in the drum.
Then close the door.
•
In the detergent compartment, put the powder into the main wash and pre-wash
sections. Softener should be poured into the middle section of the compartment and
be below the ‘MAX’ level.
•
Put detergent into the pre wash compartment only if you want to add prewash.
•
When you want to use bleach, put it into the main wash compartment with
Press the Power button.
•
The LED shows only ‘---’ and all Program Lights turn on.
1
2
Select the ‘Wool’ programme using the programme selection dial.
• Water
temperature ‘Cold’, spin ‘400’ rpm and rinse ‘2’ times are selected
automatically.
•
If you want to change the spin velocity or add wash options (Rinse+, Crease Care),
press each button.
3
Press Start/Hold button.
•
The washing machine will start operating by locking the door and supplying water.
4
Page 17
17
* HAND WASH
Note
• If you want to change the setting during operation, press the Start/Hold button to hold the operation and
press the button you want.
• Only ‘Cold’ and ‘30’ ˚C washing temperatures are available with the 'Hand Wash' programme.
• ‘1000’ rpm of spin velocity is NOT selectable with this programme.
• Only ‘Rinse+’ and ‘Crease Care’ wash options may be chosen with this programme.
• Use Hand Wash programme for the laundry that is marked ‘Hand wash’ in the care label.
Put the laundry in the drum.
Then close the door.
•
In the detergent compartment, put the powder into the main wash and pre-wash
sections. Softener should be poured into the middle section of the compartment and
be below the ‘MAX’ level.
•
Put detergent into the pre wash compartment only if you want to add prewash.
•
When you want to use bleach, put it into the main wash compartment with
detergent.
Press the Power button.
•
The LED shows only ‘---’ and all Program Lights turn on.
1
2
Select the ‘Hand Wash’ programme using the programme selection dial.
•
Water temperature ‘Cold’, spin ‘400’ rpm and rinse ‘3’ times are selected
automatically.
•
If you want to change the water temperature, spin velocity or add wash options
(Rinse+, Crease Care), press each button.
3
Press Start/Hold button.
•
The washing machine will start operating by locking the door and supplying water.
4
Page 18
18
* QUICK 30
Note
• If you want to change the setting during operation, press the Start/Hold button to hold the operation and
press the button you want.
• Only ‘Cold’, ‘30’ ˚C and ‘40’ ˚C washing temperatures are available with the Quick 30 programme.
• Only ‘Rinse+’ and ‘Crease Care’ wash options are may be chosen with this programme.
Put the laundry in the drum.
Then close the door.
•
In the detergent compartment, put the powder into the main wash and pre-wash
sections. Softener should be poured into the middle section of the compartment and
be below the ‘MAX’ level.
•
Put detergent into the pre wash compartment only if you want to add prewash.
•
When you want to use bleach, put it into the main wash compartment with
detergent.
Press the Power button.
•
The LED shows only ‘---’ and all Program Lights turn on.
1
2
Select the ‘Quick’ programme using the programme selection dial.
•
Water temperature ‘30’ ˚C, spin ‘800’ rpm and rinse ‘2’ times are selected
automatically.
•
If you want to change the water temperature, spin velocity or add wash options
(Rinse+, Crease Care), press each button.
3
Press Start/Hold button.
• The washing machine will start operating by locking the door and supplying
water.
4
Page 19
19
MAINTENANCE
Proper care of your washing machine can extend its life. This section explains how to care for
your machine properly and safely.
Cleaning your machine
Winter storage or moving care
Install and store your machine where it will not be subject to freezing temperatures as any water left
n hoses, etc. may damage it.
If you wish to store/move your machine during freezing weather, please take note of the following:
Non-use or vacation care
Operate your washing machine only when you are at home.
If you are on vacation or your machine is not being used for an extended period of time, you
should:
• Unplug the power supply cord or turn off eletrical power to the washer.
• Disconnect the water supply.
This helps avoid accidental flooding (due to a water pressure surge) while you are away.
Wipe up detergent, bleach, and other spills with
a soft, damp cloth or sponge as they occur.
Occasionally wipe the outside of the washer to
keep its it looking like new.
Clean interior with 250ml of chlorine bleach
mixed with 500ml of detergent.
Run washer through a complete cycle.
Repeat this process if necessary .
Exterior Interior
• Disconnect from mains.
• Disconnect and drain water inlet hoses.
• Run the washing machine on a drain and
spin setting (see page 10) for 1 minute.
• Unplug the power supply cord.
• Flush water pipes and hoses.
• Reconnect water inlet hoses.
• Reconnect to water supply.
• Reconnect power supply cord.
To winterize washer To use washer again
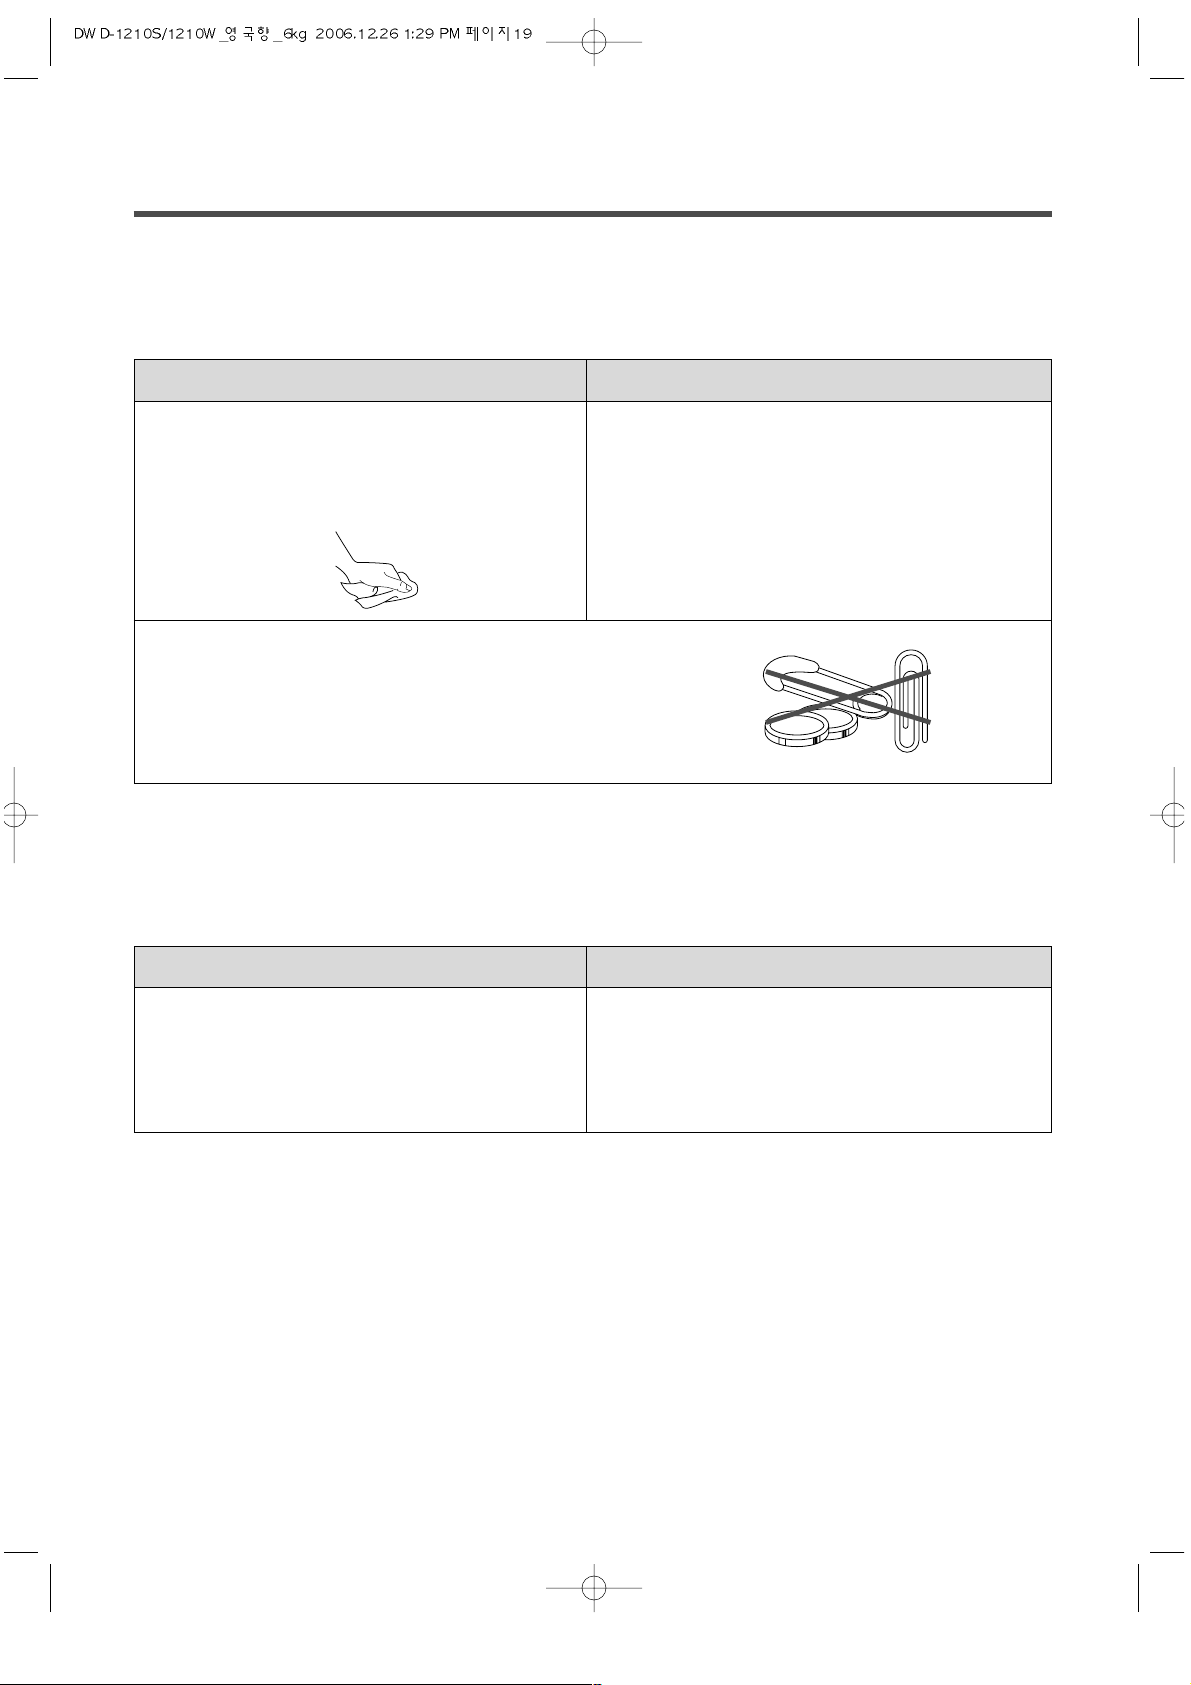
Check all pockets for sharp or metal objects eg. keys,
pins, clips, money , etc. as they may damage the interior of
your machine.
If any such items are found please do not rest/leave them
on top of the machine.
Page 20
20
HOW TO CLEAN THE FILTER
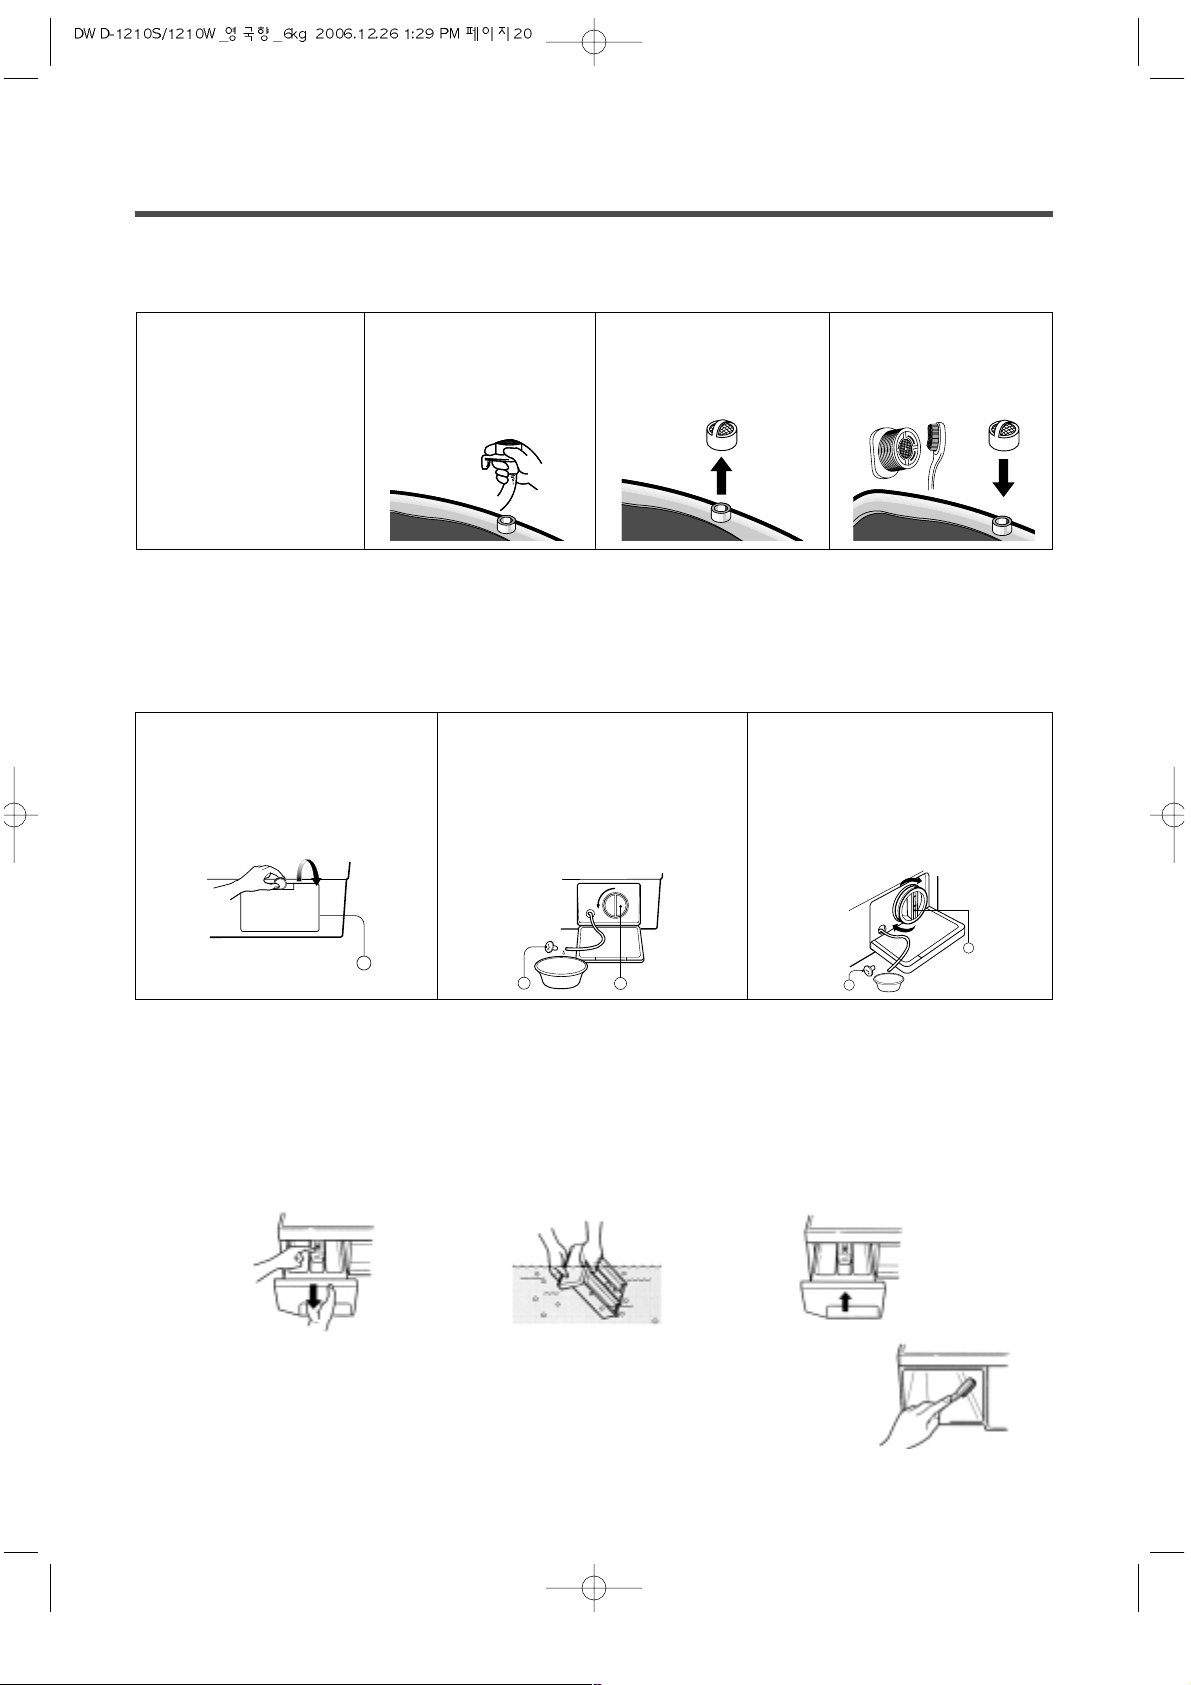
Cleaning the water inlet filter
• Clean the filter when water leaks from the water inlet.
Cleaning the drain filter
• This drain filter is used to screen foreign bodies such as threads, coins, pins, buttons etc..
• If the drain filter is not cleaned regularly (after every ten washes), drainage problems could arise.
CAUTION : Be careful when draining if the water is hot.
Cleaning the detergent case
*After a while detergent and fabric softeners leave a deposit in the drawer:
- It should be cleaned from time to time with a jet of running water.
- If necessary it can be removed completely from the machine by pressing the catch downwards
and by pulling it out.
- To facilitate cleaning, the upper part of the fabric softener compartment can be removed.
*Detergent can also accumulate inside the recess which should be
cleaned occasionally with a brush.
*Once you have finished cleaning, replace the case and run a rinse
cycle without laundry.
1 Pull the power
plug out before
cleaning it.
2 Turn off the water
supply to the
washer and
separate the inlet
hose.
3 Pull the inlet filter
out.
4 Remove the dirt
from the inlet filter
with a brush.
1. Open the lower cover(1) by
using a coin. Remove the cap
hose(2) to pull out the hose.
2.
Unplug the cap hose(2), allowing
the water to flow out. At this time
use a vessel to prevent water
flowing on to the floor. When water
does not flow any more, turn the
pump filter(3) open to the left.
3. Remove any foreign material
from the pump filter(3). After
cleaning, turn the pump filter
clockwise and insert the cap
hose(2) to the original place.
Close the lower cover.
1
100
2
3
2
3
Page 21
21
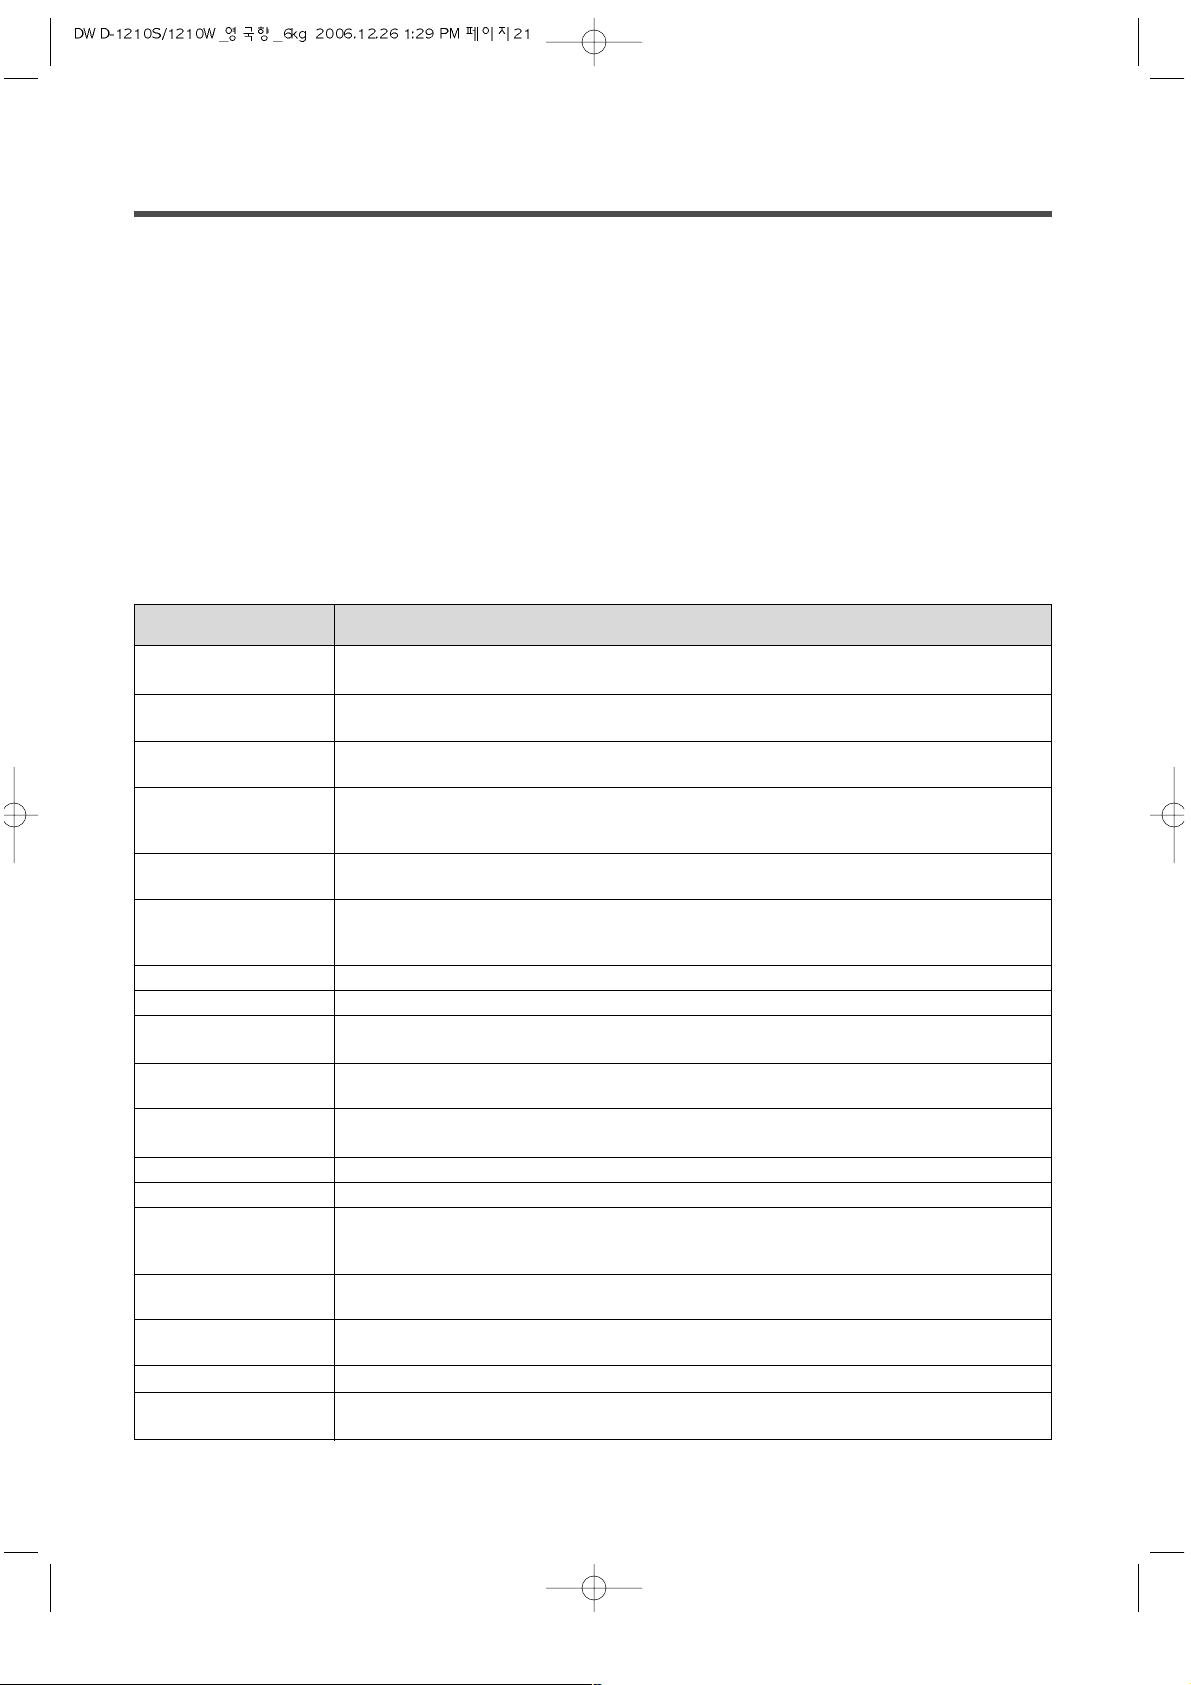
Stained, heavily-soiled, or greasy items may need to be prewashed or soaked for best results.
Soaking helps remove protein-type stains like blood, milk or grass. Prewashing helps loosen soil
before washing.
Stain removal rules
• Use warm water for soaking or prewashing stained laundry. Hot water can set stains.
• Most stains are easier to remove when they are fresh.
• Before treating any stain, find out what kind of stain it is, how old the stain is, what kind of
fabric it is, and whether the fabric is colorfast. (Check the care label)
• Washing and drying can set some stains.
• Start with cold or warm water. Hot water can set some stains.
• When bleach is recommended, use a bleach that is safe for the fabric.
• Put the stained area face down on a paper towel or white cloth. Apply the stain remover to the
back of the stain. This forces the stain off fabric instead of through it.
Stain removal guide
REMOVING STAINS
Rinse immediately in COLD water.
If stain remains, soak in cold water with an enzyme prewash.
Use ice in plastic bag to harden the gum.
Scrape off what you can and the sponge with white spirits.
Sponge with COLD water and soak in an enzyme prewash.
If stains persist, rub in a little detergent and rinse in cold water.
Blot up quickly and rinse out in COLD water.
Rub in a little detergent and wash in the maximum temperature allowed for the
fabric type.
Rinse in COLD water and wash normally.
If stain is still apparent, sponge with white spirits.
Rub affected area with white vinegar and then rinse out in COLD water.
Sponge with white spirits.
Treat stiffened areas with enzyme prewash.
Soak in a COLD enzyme prewash, rinse and wash normally.
Rub affected area with bar soap and wash normally.
Treat as soon as possible by sponging with COLD water.
Rub a little detergent on the stain and wash normally.
Sponge with white spirits.
Rub in an enzyme prewash and wash as normally.
Lay the affected area face down on an absorbent cloth and work from the back.
Sponge with white spirits or dry cleaning fluid. Wash normally.
Apply lemon juice and salt and place in the sun. Wash normally.
Sponge with white methylated spirits and wash normally.
Wash in WARM water and detergent.
Moisten area with lemon juice, dry in the sun and wash normally.
If stain persists and the fabric allows, use a bleach.
Brush off any dry mud. Rinse in cold water.
If stain persists rub in a little detergent and wash normally.
Scrape off any fresh paint and sponge with a non flammable dry cleaning fluid
and wash normally.
Treat while still wet, rinse in WARM water and wash normally.
Dampen a cloth with hydrogen peroxide, lay it over the affected area and press
with a fairly hot iron.
Blood
Chewing gum
Cocoa, Chocolate
Coffee
Cream/Milk
Ice cream
Deodorant
Egg
Fabric/Softener
Fruit stains
Grass
Grease and oil
Iron or rust
Lipstick
Mildew
Mud
Paint: oil-based
Paint: water-based
Scorch marks
ST AIN TO REMOVE
Page 22
22
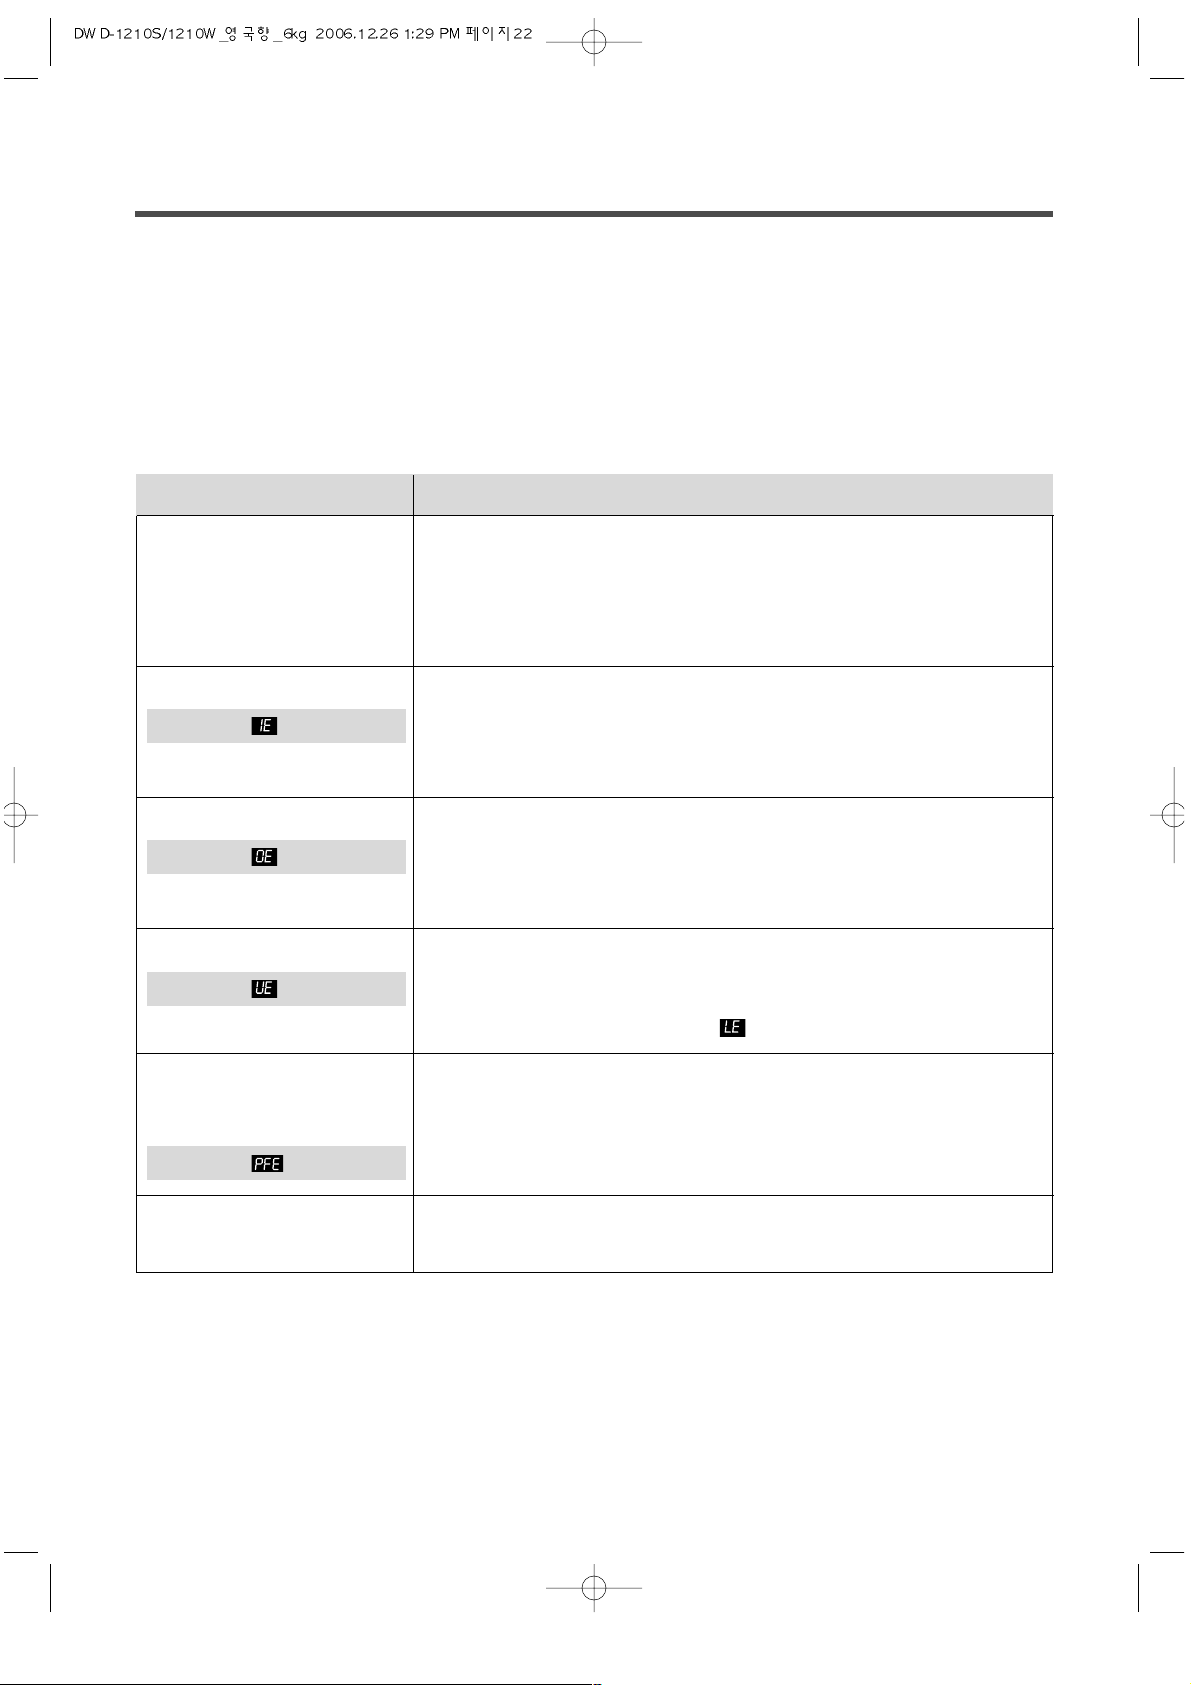
TROUBLE SHOOTING
Most problems are easily solved if you understand the cause.
Check the following list for problem before calling for service.
If the error mode such as IE, OE, UE were displayed on the control part, in order to solve these
problem, first turn off the power of the washing machine and then turn on the power pressing
Power button.
If PFE error mode was displayed on the control part, in order to solve this problem, first turn off the
power of the washing machine, second turn on the power pressing Power button, third press SPIN
button and last press Start/Hold button.
• The washer will not
operate at all.
• Water is not supplied
Error display
• The washer will not drain
Error display
• The washer will not spin
• Vibrating and too noisy
Error display
• The washer will stop
during spinning .
• Spinning is insufficient.
Error display
These cases are not malfunctions;
• The sound “wing” heard during water supply is the operating sound made by the water inlet valve.
• Is there a power failure?
• Is the power cord correctly connected to an electric outlet?
• Did you turn on the power?
• Did you press Start/Hold button?
• Is there correct amount of laundry in the washer?
• Did you connect the inlet hose and open the water tap?
• Is the inlet hose or the water tap frozen?
• Is the water supply shot off?
• Is there any foreign matter blocking up the inlet hose filter?
• Is the drain hose frozen or blocked up by dirt?
• Is the drain hose kinked or deformed?
• Is the end of the drain hose immersed in water?
• Is there excessive dirt inside the drain filter?
• Is the clothes in the drum collected on one side?
• Is the washer installed on an uneven floor or is the vibration
serious?
• Is the door open? (The lamp “” will light up in this case.)
• Is the filter of the drain pump clogged?
• Is the drain pump operated?
• Did you use the proper amount of detergent?
• Is the drain hose placed higher than 1m above floor?
• Is the washer installed on an uneven floor?
• Have all the transit bolts removed?
PROBLEM CHECK POINT
Page 23
23
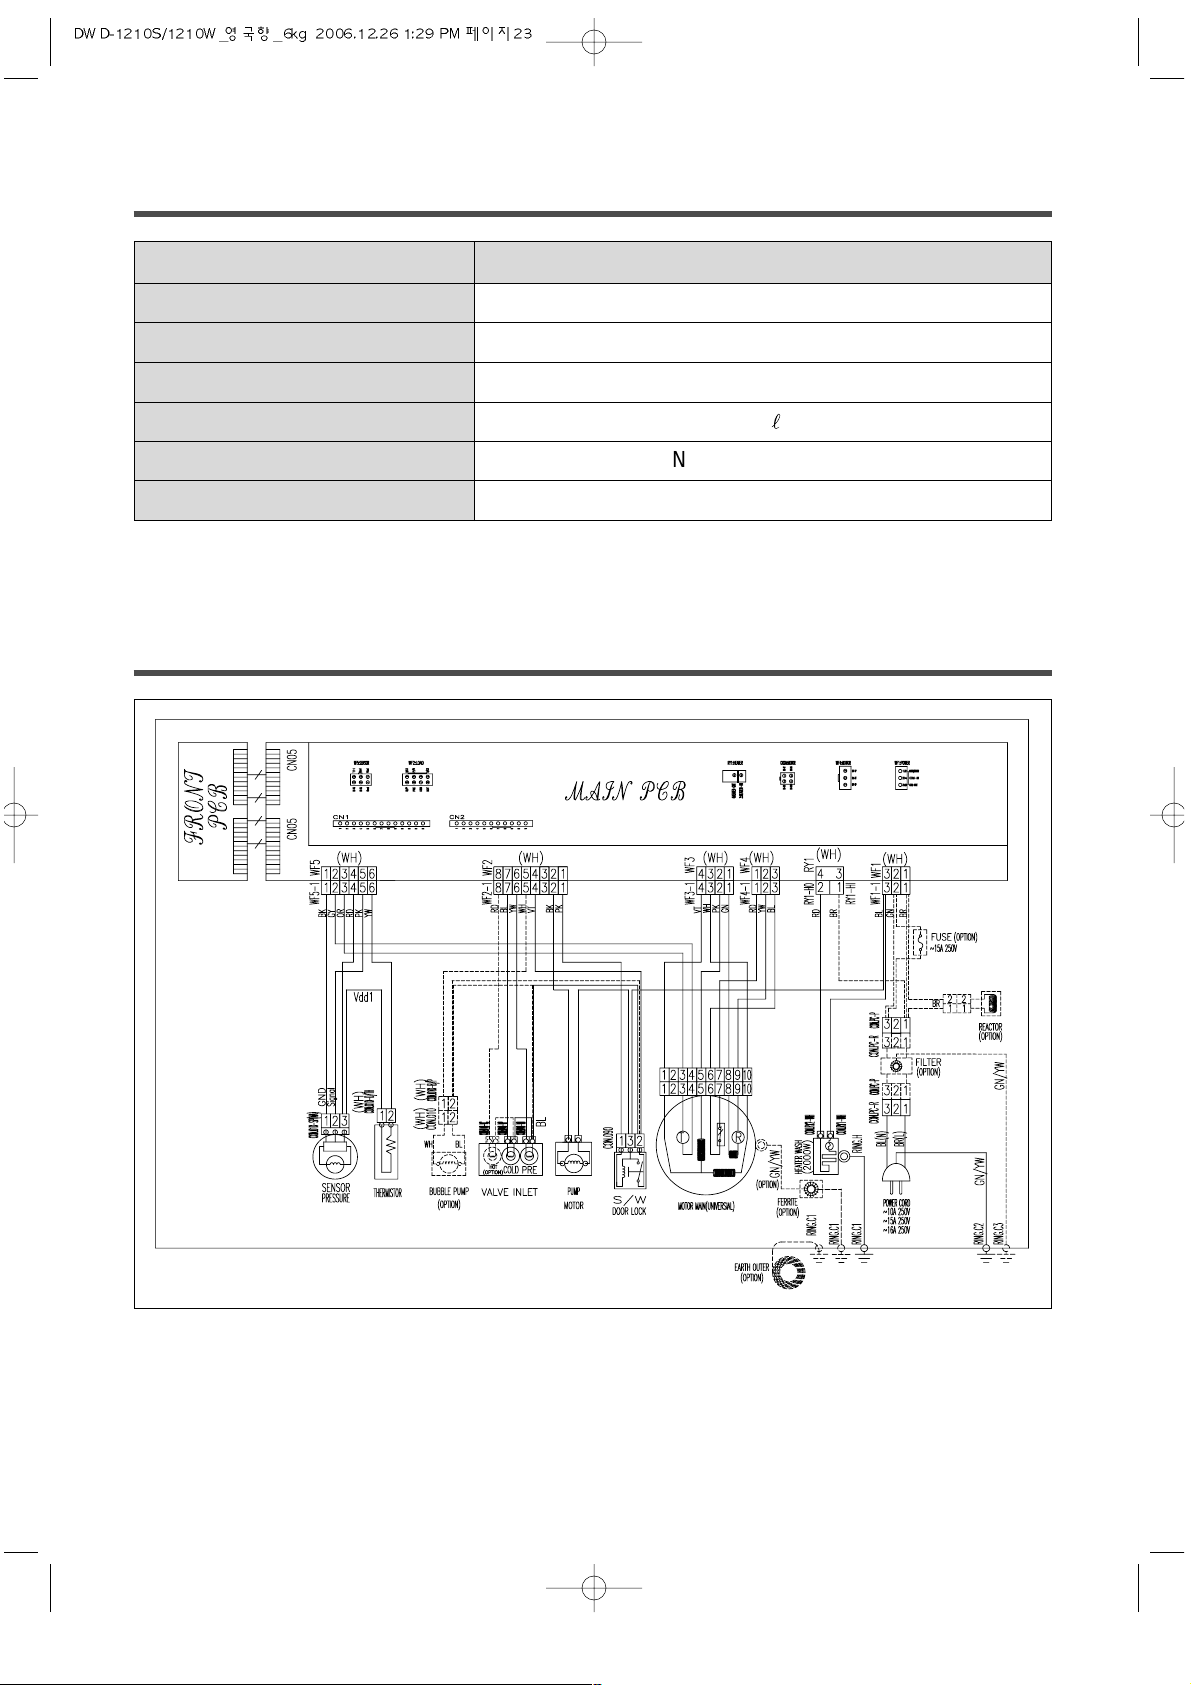
Dimension (mm)
Maximum mass of textile (kg)
Unit Weight (kg)
Standard Water Consumption
Spin Speed (RPM)
Operating Water Pressure
595 x 540 x 850 (WxHxD)
7.0
64(Net) / 68(Gross)
59
l
No Spin/400/800/1200
0.03MPa ~ 0.8MPa (0.3kgf/cm
2
~ 8kgf/cm2)
MODEL DWD-1210S/1210W
SPECIFICATION
WIRING DIAGRAM
Page 24
English
Disposal of Used Electrical & Electronic Equipment
The meaning of the symbol on the product, its
accessory or packaging indicates that this product shall
not be treated as household waste. Please, dispose of
this equipment at your applicable collection point for
the recycling of electrical & electronic equipments
waste. In the European Union and Other European
countries which there are separate collection systems
for used electrical and electronic product. By ensuring
the correct disposal of this product, you will help
prevent potentially hazardous to the environment and
to human health, which could otherwise be caused by
unsuitable waste handling of this product. The
recycling of materials will help conserve natural
resources. Please do not therefore dispose of your old
electrical and electronic equipment with your
household waste. For more detailed information about
recycling of this product, please contact your local city
office, your household waste disposal service or the
shop where you purchased the product.
Português
Eliminação de Equipamento Eléctrico e
Electrónico Usado
O símbolo no aparelho, nos seus acessórios ou na
embalagem indica que este aparelho não deve ser
tratado como resíduos domésticos. Deixe deste
aparelho no ponto de recolha de material eléctrico e
electrónico para reciclagem mais perto de si. Na
União Europeia e noutros países europeus existem
sistemas de recolha separada para produtos eléctricos
e electrónicos usados. Garantindo uma eliminação
correcta deste aparelho, ajudará a evitar possíveis
danos ambientais e/ou pessoais, que um incorrecto
tratamento do aparelho usado poderia provocar. A
reciclagem de materiais ajuda a conservar os
recursos naturais. Por isso, não deite fora os
aparelhos eléctricos e electrónicos junto com os seus
resíduos domésticos. Para informação detalhada
sobre a reciclagem deste aparelho, contacte a sua
Câmara Municipal, o seu serviço de recolha de lixo
ou a loja onde comprou o aparelho.
French
Traitement des appareils électriques et
électroniques en fin de vie (applicable dans les
pays de l’union européenne et aux autres pays
européens disposant de systèmes de collecte
sélective).
Ce symbole, apposé sur le produit ou sur son
emballage, indique que ce produit ne doit pas être
traité avec les dechets ménagers. Il doit être remis à
un point de collecte approprié pour le recyclage des
équipements électriques et électroniques. En
s’assurant que ce produit est bien mis au rebus de
manière appropriée, vous aiderez à prévenir les
conséquenses négatives potentielles pour
l’environnement et la santé humaine. Le recyclage
des matériaux aidera à conserver les ressources
naturelles. Pour toute iformation supplémentaire au
sujet du recyclage de ce produit, vous pouvez
consulter votre municipalité, votre déchetterie ou le
magasin où vous avez acheté le produit.
Deutsch
Entsorgung von gebrauchten elektrischen und
elektronischen Geräten (Anzuwenden in den
Ländern der Europäischen Union und anderen
europäischen Ländern mit einem separaten
Sammelsystem für diese Geräte)
Das Symbol auf dem Produkt oder seiner
Verpackung weist darauf hin, dass dieses Produkt
nicht als normaler Haushaltsabfall zu behandeln ist,
sondern an einer Annahmestelle für das Recycling
von elektrischen und elektronischen Geräten
abgegeben werden muss. Durch Ihren Beitrag zum
korrekten Entsorgen dieses Produkts schützen Sie die
Umwelt und die Gesundheit Ihrer Mitmenschen.
Umwelt und Gesundheit werden durch falsches
Entsorgen gefährdet. Materialrecycling hilft den
Verbrauch von Rohstoffen zu verringern. Weitere
Informationen über das Recycling dieses Produkts
erhalten Sie von Ihrer Gemeinde, den kommunalen
Entsorgungsbetrieben oder dem Geschäft, in dem Sie
das Produkt gekauft haben.
Español
Eliminación de equipamiento eléctrico y
electrónico usado
Este símbolo en el producto, sus accesorios o
embalaje indica que el producto no debe tratarse
como un residuo doméstico. Deshágase de este
equipamiento en su punto de recogida más cercano
para el reciclaje de residuos eléctricos y electrónicos.
En la Unión Europea y otros países europeos existen
diferentes sistemas de recogida de productos
eléctricos y electrónicos usados. Al asegurar la
correcta eliminación de este producto ayudará a
evitar riesgos potenciales para el medio ambiente y la
salud de las personas que podrían tener lugar si el
producto no se eliminara de forma adecuada. El
reciclaje de materiales ayudará a conservar los
recursos naturales. Por consiguiente, no elimine
equipamiento eléctrico y electrónico usado junto con
residuos domésticos. Para información más detallada
acerca del reciclaje de este producto, póngase en
contacto con su oficina municipal, el servicio de
eliminación de residuos domésticos o el
establecimiento donde adquirió el producto.
Nederlands
Verwijdering van Oude Elektrische en
Elektronische Apparaten (Toepasbaar in de
Europese Unie en andere Europese landen met
gescheiden ophaalsystemen)
Het symbool op het product of op de verpakking
wijst erop dat dit product niet als huishoudafval mag
worden behandeld. Het moet echter naar een plaats
worden gebracht waar elektrische en elektronische
apparatuur wordt gerecycled. Als u ervoor zorgt dat
dit product op de correcte manier wordt verwijderd,
voorkomt u mogelijk voor mens en milieu negatieve
gevolgen die zich zouden kunnen voordoen in geval
van verkeerde afvalbehandeling. De recyclage van
materialen draagt bij tot het vrijwaren van natuurlijke
bronnen. Voor meer details in verband met het
recyclen van dit product, neemt u het best contact op
met de gemeentelijke instanties, het bedrijf of de
dienst belast met de verwijdering van huishoudafval
of de winkel waar u het product hebt gekocht.
Page 25
»»
esky
Likvidace pouûûit˝˝ch elektrick˝˝ch a elektronick˝˝ch za¯¯ízení
Tento symbol na v˝robku, jeho p¯ísluöenství nebo obalu
oznaËuje, ûe s tímto v˝robkem nesmí b˝t zacházeno jako s
domovním odpadem. V˝robek zlikvidujte jeho p¯edáním
na sbÏrné místo pro recyklaci elektrick˝ch a elektronick˝ch
za¯ízení. V zemích evropské unie a jin˝ch evropsk˝ch
zemích existují samostatné sbÏrné systémy pro
shromaûÔování pouûit˝ch elektrick˝ch a elektronick˝ch
v˝robk˘. ZajiötÏním jejich správné likvidace pom˘ûete
prevenci vzniku potenciálních rizik pro ûivotní prost¯edí a
lidské zdraví, která by mohla vzniknout nesprávn˝m
zacházením s odpady. Recyklace odpadov˝ch materiál˘
napomáhá udrûení p¯írodních zdroj˘ surovin - z
uvedeného d˘vodu nelikvidujte prosím vaöe stará
elektrická a elektronická za¯ízení s domovním odpadem.
Pro získání podrobn˝ch informací k recyklaci tohoto
v˝robku kontaktujte prosím pracovníka ochrany ûivotního
prost¯edí místního (mÏstského nebo obvodního) ú¯adu,
pracovníky sbÏrného dvora nebo zamÏstnance prodejny,
ve které jste v˝robek zakoupili.
Slovensky
Likvidácia pouûûit˝˝ch elektrick˝˝ch a elektronick˝˝ch
zariadení
Tento symbol na v˝robku, jeho prísluöenstve alebo
obale oznaËuje, ûe sa s t˝mto v˝robkom nesmie
zaobchádzaù ako s domov˝m odpadom. V˝robok
zlikvidujte jeho odovzdaním na zbernom mieste pre
recykláciu elektrick˝ch a elektronick˝ch zariadení. V
krajinách európskej únie a v in˝ch európskych
krajinách existujú samostatné zberné systémy pre
zhromaûÔovanie pouûit˝ch elektrick˝ch a
elektronick˝ch v˝robkov. Zaistením ich správnej
likvidácie pomôûete prevencii vzniku potenciálnych
rizík pre ûivotné prostredie a æudské zdravie, ktoré by
mohli vzniknúù nesprávnym zaobchádzaním s
odpadmi. Recyklácia odpadov˝ch materiálov
napomáha udrûaniu prírodn˝ch zdrojov surovín – z
uvedeného dôvodu nelikvidujte prosím vaöe staré
elektrické a elektronické zariadenia s domov˝m
odpadom.
Pre získanie potrebn˝ch informácií k recyklácii tohto
v˝robku kontaktujte prosím pracovníka ochrany
ûivotného prostredia miestneho (mestského Ëi
obvodného) úradu, pracovníkov zberného dvora alebo
zamestnancov predajne, v ktorej ste v˝robok zakúpili.
Magyar
Feleslegessé vált elektromos és elektronikus
készülékek hulladékként való eltávolítása
(Használható az Európai Unió és egyéb európai
országok szelektív hulladékgy˚˚jtési rendszereiben)
Ez a szimbólum a készüléken vagy a csomagolásán
azt jelzi, hogy a terméket ne kezelje háztartási
hulladékként. Kérjük, hogy az elektromos és
elektronikai hulladék gy˚jtésére kijelölt gy˚jtıhelyen
adja le. A feleslegessé vált termékének helyes
kezelésével segít megelızni a környezet és az emberi
egészség károsodását, mely bekövetkezhetne, ha
nem követi a hulladék kezelés helyes módját. Az
anyagok újrahasznosítása segít a természeti
erıforrások megırzésében. A termék
újrahasznosítása érdekében további információért
forduljon a lakóhelyén az illetékesekhez, a helyi
hulladékgy˚jtı szolgáltatóhoz vagy ahhoz az
üzlethez, ahol a terméket megvásárolta.
Slovensko
Oddaja stare elektri
ËËnnee iinn eelleekkttrroonnsskkee oopprreemmee
((vveelljjaavvnnoo vv eevvrrooppsskkii uunniijjii iinn oossttaalliihh eevvrrooppsskkiihh
ddrrûû
avah s sistemom zbiranja loËËenih odpadkov)
»e se na izdelku ali a njegovi embalaûi nahaja ta
simbol, pomeni, da z izdelkom ne smete ravnati
enako kot z drugimi gospodinjskimi odpadki. Morate
ga oddati na ustrezno zbirno mesto za recikliranje
elektriËne in elektronske opreme. S pravilno oddajo
tega izdelka boste pomagali prepreËiti negativne
posledice na okolje in zdravje ljudi, do katerih bi
priölo v primeru neustreznega ravnanja ob odstranitvi
tega izdelka. Recikliranje materiala bo pripomoglo k
ohranjevanju naravnih virov. Podrobnejöe informacije
o reciklitanju tega izdelka lahko dobite pri lokalni
mestni upravi, sluûbi oddajanja gospodinjskih
odpadkov ali v trgovini, kjer ste izdelek kupili.
Odpadno elektriËno in elektronsko opremo lahko
oddate brezplaËno tudi distributerju neposredno ob
dobavi elektriËne oz. elektronske opreme.
Poland
Utylizacja niepotrzebnego sprz´´tu
elektrycznego i elektronicznego
Taki symbol na produkcie lub na jego opakowaniu
oznacza, Œe produkt nie moŒe byç traktowany jako
odpad komunalny, lecz powinien byç dostarczony do
odpowiedniego punktu zbiórki sprz´tu elektrycznego i
elektronicznego, w celu przerobu i odzysku odpadów.
W krajach Unii Europejskiej i w pozosta¬ych krajach
europejskich så odr´ bne systemy segregacji
odpadów przeznaczone do utylizacji sprz´ tu
elektrycznego i elektronicznego.
Przez takie pro ekologiczne zachowanie zapobiegajå
Pa˜stwo potencjalnym negatywnym wp¬ywom na
ßrodowisko naturalne oraz na zdrowie ludzi, jakie
mog¬yby wyståpiç w przypadku niew¬aßciwego
procesu sk¬adowania tego produktu. Przez
zagospodarowanie materia¬ów oszcz´dzamy równieŒ
surowce naturalne. Aby uzyskaç bardziej
szczegó¬owe informacje na temat przerobu i odzysku
materia¬ów elektronicznych z tego produktu, prosz´
skontaktowaç si´ z urz´dem miasta lub gminy,
lokalnym zak¬adem utylizacji sprz´tu elektrycznego i
elektronicznego lub ze sklepem, w którym produkt
zosta¬ zakupiony.
Italiano
Trattamento del dispositivo elettrico od
elettronico a fine vita (Applicabile in tutti i paesi
dell’Unione Europea e in quelli con sistema di
raccolta differenziata)
Questo simbolo sul prodotto o sulla confezione
indica che il prodotto non deve essere considerato
come un normale rifiuto domestico, ma deve invece
essere consegnato ad un punto di raccolta
appropriato per il riciclo di apparecchi elettrici ed
elettronici. Assicurandovi che questo prodotto sia
smaltito correttamente, voi contribuirete a prevenire
potenziali conseguenze negative per l’ambiente e per
la salute che potrebbero altrimenti essere causate dal
suo smaltimento inadeguato. Il riciclaggio dei
materiali aiuta a conservare le risorse naturali. Per
informazioni piú dettagliate circa il riciclaggio di
questo prodotto, potete contattare l’ufficio comunale,
il servizio locale di smaltimento rifiuti oppure il
negozio dove l’avete acquistato.
Page 26
Suomi
Käytöstä poistetun sähkö-ja
elektroniikkalaitteen hävitys (Euroopan Unioni
ja muiden Euroopan maiden keräysjärjestelmät)
Symboli, joka on merkitty Tuotteeseen tai sen
pakkaukseen, osoittaa, että tätä tuotetta ei saa
käsitellä talousjätteenä. Tuote on sen sijaan
luovutettava sopivaan sähkö-ja elektroniikkalaitteiden
kierrätyksestä huolehtivaan keräyspisteeseen. Tämän
tuotteen asianmukaisen hävittämisen varmistamisella
autetaan estämään sen mahdolliset ympäristöön ja
terveyteen kohdistuvat haittavaikutukset, joita voi
aiheutua muussa tapauksessa tämän tuotteen
epäasianmukaisesta jätekäsittelystä. Materiaalien
kierrätys säästää luonnonvaroja. Tarkempia tietoja
tämän tuotteen kierrättämisestä saa paikallisesta
kunnantoimistosta.
Svenska
Omhändertagande av gamla elektriska och
elektroniska produkter (Användbar i den
Europeiska Unionen och andra Europeiska
länder med separata insamlingssystem)
Symbolen på produkten eller emballaget anger att
produkten inte får hanteras som hushållsavfall. Den
skall i stället lämnas in på uppsamlingsplats för
återvinning av el- och elektronikkomponenter.
Genom att säkerställa att produkten hanteras på rätt
sätt bidrar du till att förebygga eventuellt negativa
miljöoch hälsoeffekter som kan uppstå om produkten
kasseras som vanligt avfall. Återvinning av material
hjälper till att bibehålla naturens resurser. För
ytterligare om återvinning bör du kontakta lokala
myndigheter eller sophämtningstjänst eller affären där
du köpte varan.
Norsk
Avhending av gamle elektriske og elektroniske
apparater (gjelder i den Europeiske Unionen og
andre europeiske land med separat
innsamlingssystem)
Dette symbolet på produktet eller innpakningen
indikerer at dette produktet ikke må håndteres som
husholdningsavfall. I stedet skal det leveres inn til
spesielt innsamlingspunkt for gjenvinning av det
elektriske og elektroniske utstyret. Ved å sørge for at
dette produktet avhendes på korrekt måte, vil du
hjelpe til med å forhindre potensielle negative
påvirkninger på miljøet og helse, som ellers kan være
resultatet av feilaktig avfallshåndtering av dette
produktet. Gjenvinning av disse materialene vil
hjelpe til med å ta vare på våre maturressurser. For
mer informasjon om gjenvinning av dette produktet,
kan du kontakte lokale myndigheter.
Dansk
Håndtering af udtjente elektriske og elektroniske
produkter (Gælder for den Europæiske Union og
andre europæiske lande med separate
indsamlingssystemer)
Dette symbol på produktet eller emballagen angiver,
at produktet ikke må behandles som
husholdningsaffald. Det skal i stedet indleveres på en
deponeringsplads specielt indrettet til modtagelse og
oparbejdning af elektriske og elektroniske produkter.
Ved at sikre at produktet bortskaffes korrekt,
forebygges de eventuelle negative miljø-og
sundhedsskadelige påvirkninger, som en ukorrekt
affaldshåndtering af produktet kan forårsage.
Genindvinding af materialer vil medvirke til at bevare
naturens ressourcer. Yderligere information om
genindvindingen af dette produkt kan fås hos
myndighederne, det lokale renovationsselskab eller
butikken, hvor produktet blev købt.
Page 27
담 당 안재영대리님 TEL
MODEL
D-FU1217EPX/D-FU1211EPX
BUYER
DDEESSUU__영영어어__영영국국향향
_
DWD-1210S/DWD-1210W
1차 06.6.19 6차
2차 06.6.20 7차
일 정 3차 8차
4차 9차
5차 10차
제 판 06.6.20(Han)
인인쇄쇄 동동일일
규격
MEMO
연연락락처처
VVIISSIIOONN
담담 당당
전지현
TEL: 730-0660 FAX: 730-3788
06.6.19-영국향_신규
06.6.19-8p,23p_수정
06.6.20-8p,23p_수정
06.6.20-전체출력
06.8.28-공장모델명_
D-FU1213EPX→D-FU1217EPX로 변경.
06.12.26-2,4,7,23-수정
VISION CREATIVE, INC.
서울 종로구 통의동 6번지
이룸빌딩4층
ABOUT THIS MANUAL
ABOUT THIS MANUAL
 Loading...