

Page 1

1
Please observe the following instructions.
1. Operate the Selector Switch to run or stop the unit.
- Do not use Main Power Switch or Auxiliary Power Switch to operate unit.
2. Do not stick anything into the air outlet or inlet.
- It is dangerous and it can cause injury or damage.
3. Avoid exposing your body directly to a continuous cool air - flow for long periods.
- It is not good for your health.
4. Do not pour water on the unit to clean it.
- It is dangerous and it can cause injury or damage.
Never use solvents or harsh chemicals when cleaning the unit.
When the air inlet grill and cabinet are dirty, wipe with luke - warm water (below 40°C or 104°F)
5. Avoid placing any obstacles near the inlet or outlet.
- If the inlet or outlet is blocked with any obstacle, it may cause damage to the unit.
6. Do not run or stop the unit frequently.
- If you run or stop the unit more then 4-5 times an hour, it can cause damage to the unit.
7. Wait at least 3 minutes before restarting the unit or in the case of power failure.
- If you turn on the unit within 3 minutes after power off, this can cause damage to the unit.
8. If the air conditioner is operated without an air filter, dust is not removed from the air, and resultant
accumulation in the unit may lead to a failure.
- Do not forget to install the air filter.
9. The air filter should be cleaned at least once every two weeks.
10. When the unit is cleaned, set the Selector Switch at off position.
- And then unplug the power plug.
11. Never store gasoline or other flammable liquid near the air conditioner.
- It is very dangerous.
12. Do not force the controls on the front panel too much.
- It can cause damage the controls and the unit.
13. Set a comfortable temperature.
- Very low temperature setting considerably increase power consumption.
14. Be careful to keep room temperature comfortable.
- Avoid continuous direct air flow on you or a sick person while sleeping.
15. Do not remove the plug by pulling the power cord.
- Damage to the cord and may cause shock hazard.
16. This air-conditioner must used 20°C(min)-43°C(max) outdoor and 20°C(min)~32°C(max) indoor on the
temperature range.
17. The appliance is not intended for use by young children or infirm persons without supervision.
18. Young children should be supervised to ensure that they do not play with the appliance.
PRECAUTIONS FOR PROPER USE OF AIR CONDITIONER
Page 2
2
1. GENERAL SPECIFICATIONS........................................................................................2
2. INSTALLATION INSTRUCTIONS..............................................................................3~6
• LOCATION OF INSTALLATION
• BEFORE INSTALLATION
• HOW TO REMOVE THE FR ONT GRILLE
• HOW TO INSTALL THE DRAIN CAP
• WINDOW INSTALLATION
3. NAMES OF MAJOR COMPONENTS............................................................................7
4. OPERATION INSTRUCTIONS.......................................................................................8
• FAN & COOLING CONTROL
• TEMPERATURE CONTROL
5. GENERAL INFORMATION.............................................................................................9
• CHANGING AIR FLOW DIRECTION
• AIR FLOW AR OUND UNIT
• DRAIN HOLE AND W ATER DRIPPING OUTSIDE
• DOOR VENT
6. CARE AND MAINTENANCE........................................................................................10
• AIR FILTER
• CLEANING THE AIR CONDITIONER
7. ELECTRICAL REQUIREMENTS .................................................................................11
• ELECTRICAL GROUNDING INSTRUCTIONS
• USE OF EXTENSION CORDS
• REPLACEMENT OF SUPPLY FLXIBLE CORD
8. BEFORE CALLING FOR SERVICE.............................................................................12
TABLE OF CONTENTS
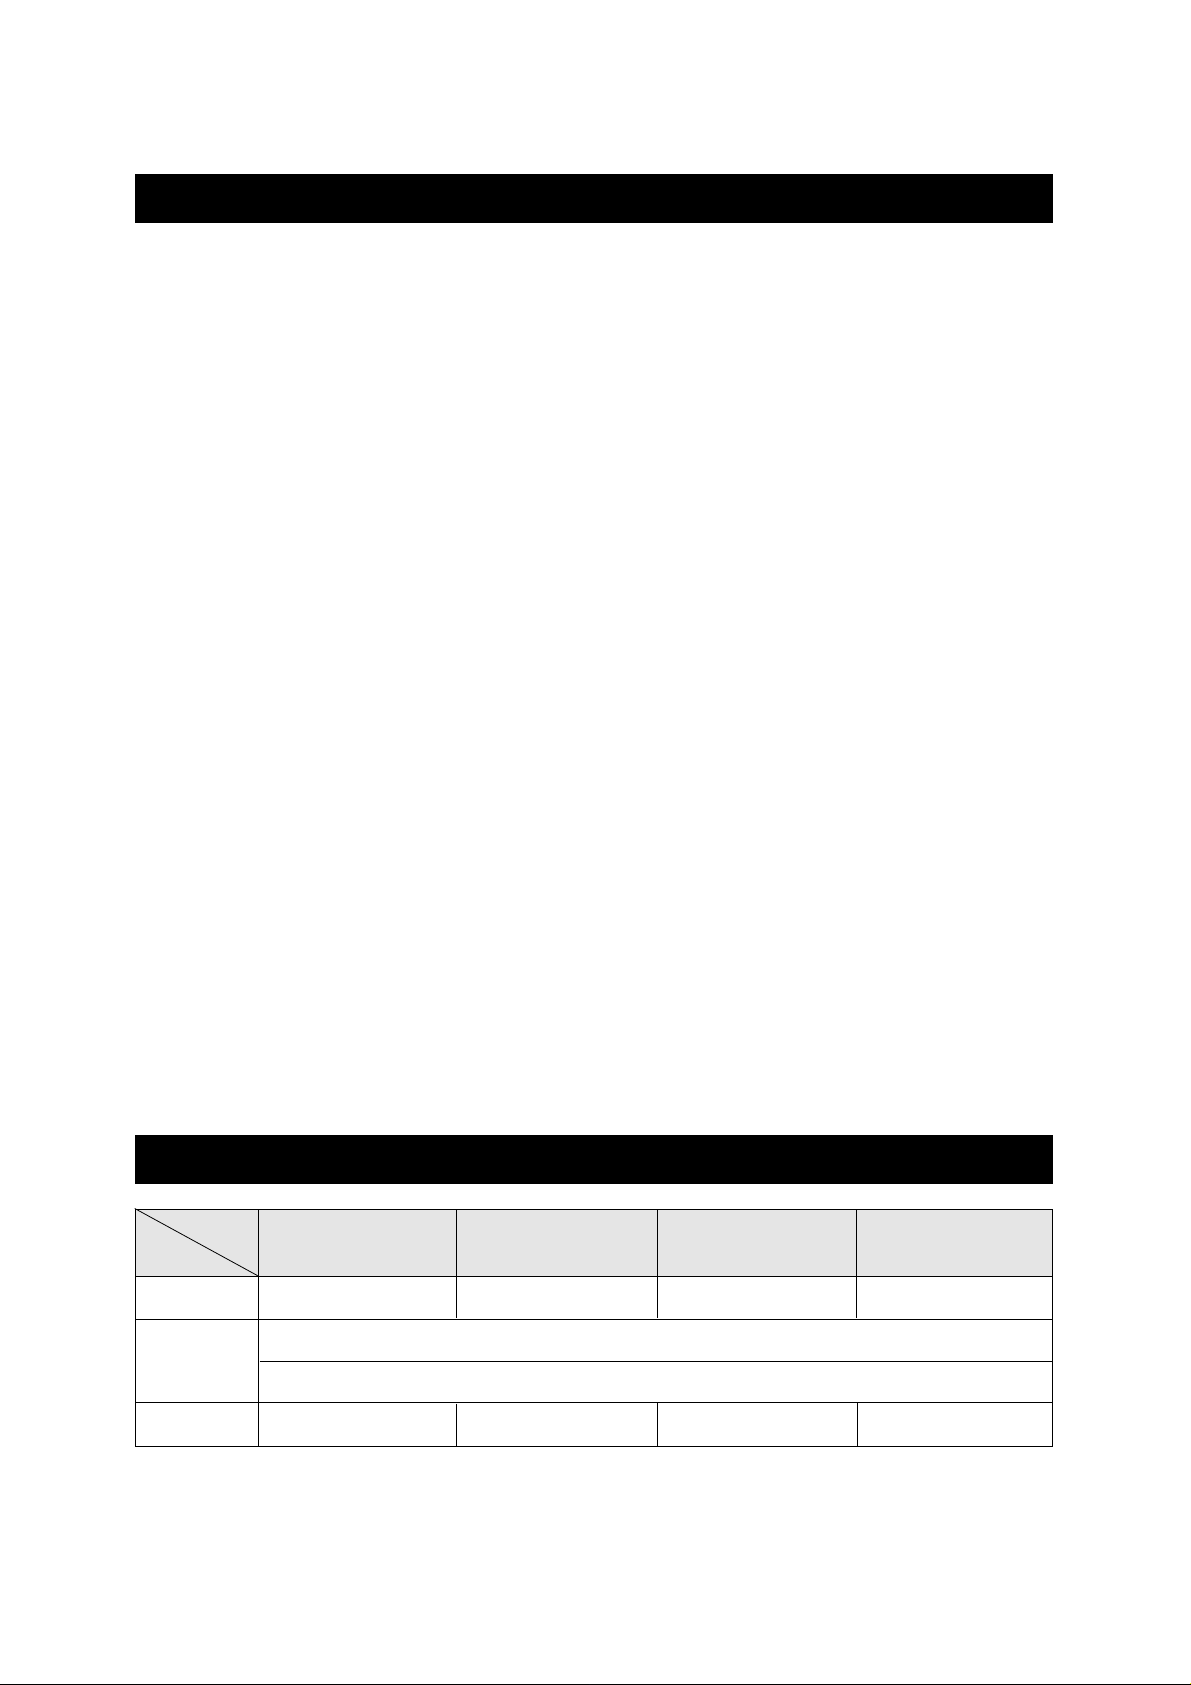
GENERAL SPECIFICATIONS
DWA-122C / DWA-122CS DWB-122C / DWB-122CS DWB-123C / DWB-123CS DWA-151C / DWA-151CS
AC 208~230V, 60Hz SINGLE PHASE AC 220~230V, 50Hz SINGLE PHASE
AC 240V, 50Hz SINGLE PHASE
AC 208~230V, 60Hz SINGLE PHASE
38.8 Kg (85.6 Ibs) – Approx. 39.8 Kg (87.7 Ibs) – Approx. 39.8 Kg (87.7 Ibs) – Approx. 42 Kg (92.6 Ibs) – Approx.
MODEL
ITEM
POWER SOURCE
DIMENSIONS
WEIGHT (NET)
600(W) x 380(H) x 535(D) mm
23.6(W) x 14.9(H) x 21.0(D) inch
Page 3
3
INSTALLATION INSTRUCTIONS
• LOCATION OF INSTALLATION
1. Install the unit at a place having sufficient strength to support the unit securely.
2. Do not install the unit at a place where leakage of combustible gas is suspected.
3. If the air conditioner is operated in an atmosphere containing oils (including machine oil), salt near a
coastal area, etc, such substances may lead to failure of the unit.
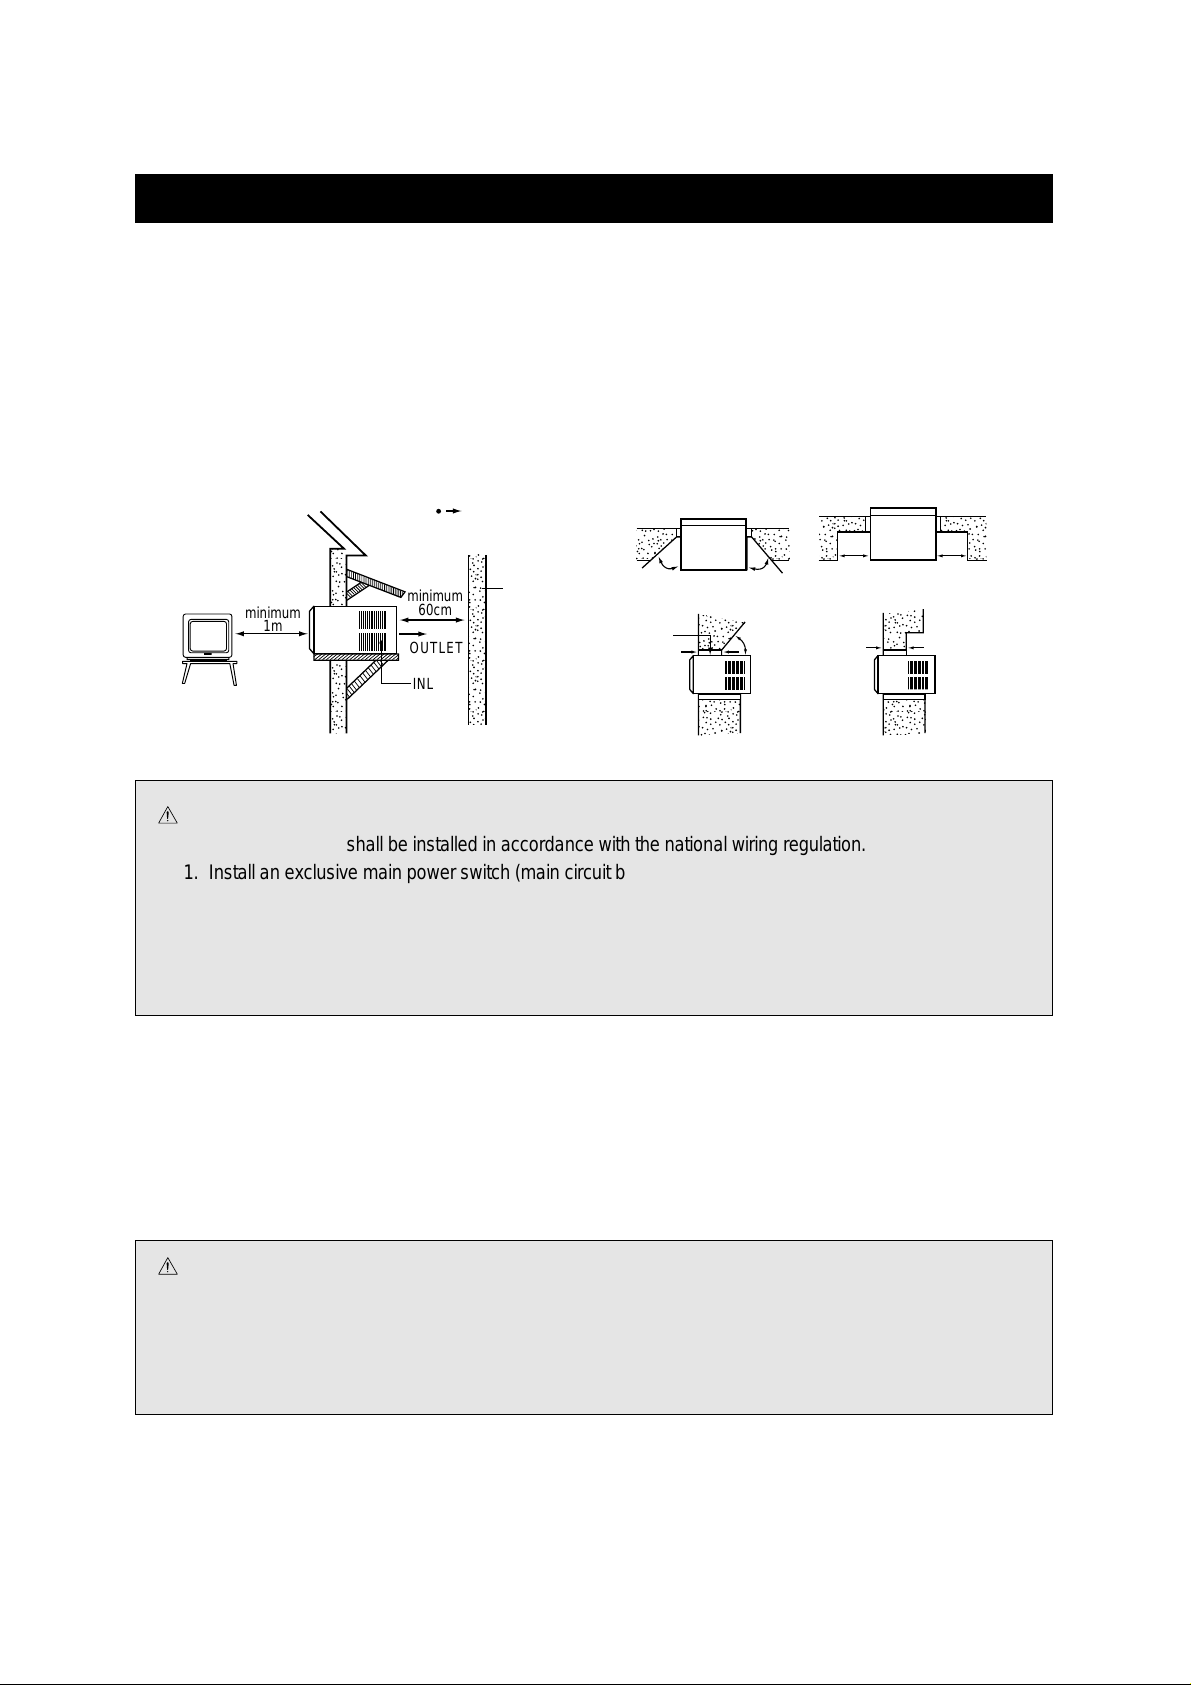
4. Provide sufficient clearance or space around the air inlet and air outlet so that air flow will not be
obstructed (See following figures).
• BEFORE INSTALLATION
Test Run Unit : Plug unit into proper power supply outlet.
Refer to operating instructions in this manual for comfortable living. Check all controls for correct
operation, then unplug unit.
Determine Correct Mounting procedure-Refer to Window Installation or Through the Wall Installation.
WARNING :
• Moving parts can cause personal injury. Be careful when test-running unit. Do not operate
unit with front grille removed .
• Be sure to use an exclusive power source.
• Contact service man for replacement of power cord.
CAUTION
• The air conditioner shall be installed in accordance with the national wiring regulation.
1. Install an exclusive main power switch (main circuit breaker) or GFI (Ground Fault Interrupted) Switch.
2. Be sure to use grounded power source.
3. Power source for DWA-122C, DWA-122CS, DWA-151C, DWA-151CS is 208~230V and DWB-122C,
DWB-122CS is 220~230V and DWB-123C, DWB-123CS is 240V.
4. Consumer must pay charges for wiring and installation.
North or East
Indoor
Indoor
minimum
1m
minimum
60cm
OUTLET
INLET
Wall or
Fence
45˚
minimum
maximum
23cm
Indoor Outdoor
minimum
minimum
45˚
45˚
30cm
minimum
Outdoor
Outdoor
Indoor Outdoor
minimum
30cm
maximum
23cm
Page 4

4
• HOW TO REMOVE THE FRONT GRILLE
1. Pull the Air-filter out of the Front Grille.
2. Loosen screw which fasten Front Grille with
driver.
3. Pull knobs out of the control.
(when the knobs are too tight to release, leave
them.)
4. Disassemble Front Grille from Chassis.
– Front Grille and chassis are fixed with snap-fit.
1) Release right-lower snap-fit.
– Push the right lower side of chassis to the left, with pushing left side of
Front Grille to the right until the snap-fit is released.
2) Release left-lower snap-fit.
– Push the left-lower side of chassis to the right, with pushing right
side of Front Grille to the right until the snap-fit is released.
3) Pull lower side of the Front Grille until it is separated from the chassis.
(when knobe remain, pull Front Grille until knobs are released from
control)
4) Push base side of the Front Grille to upper side until it is separated
from the chassis.
;
;
;
;
;
;
;
;
;
;
;
;
;
;;;;
;
;
;
;
;;;;
;
;
;
;
;;;;
Push
Push
Push
Push
;;
;;
;;
;;
;;
;;
;;
;;;
;;;
;;;
;;;
;;;
;;;
;;;
Page 5
5
5. Reinstall the unit, side screws, front grille.
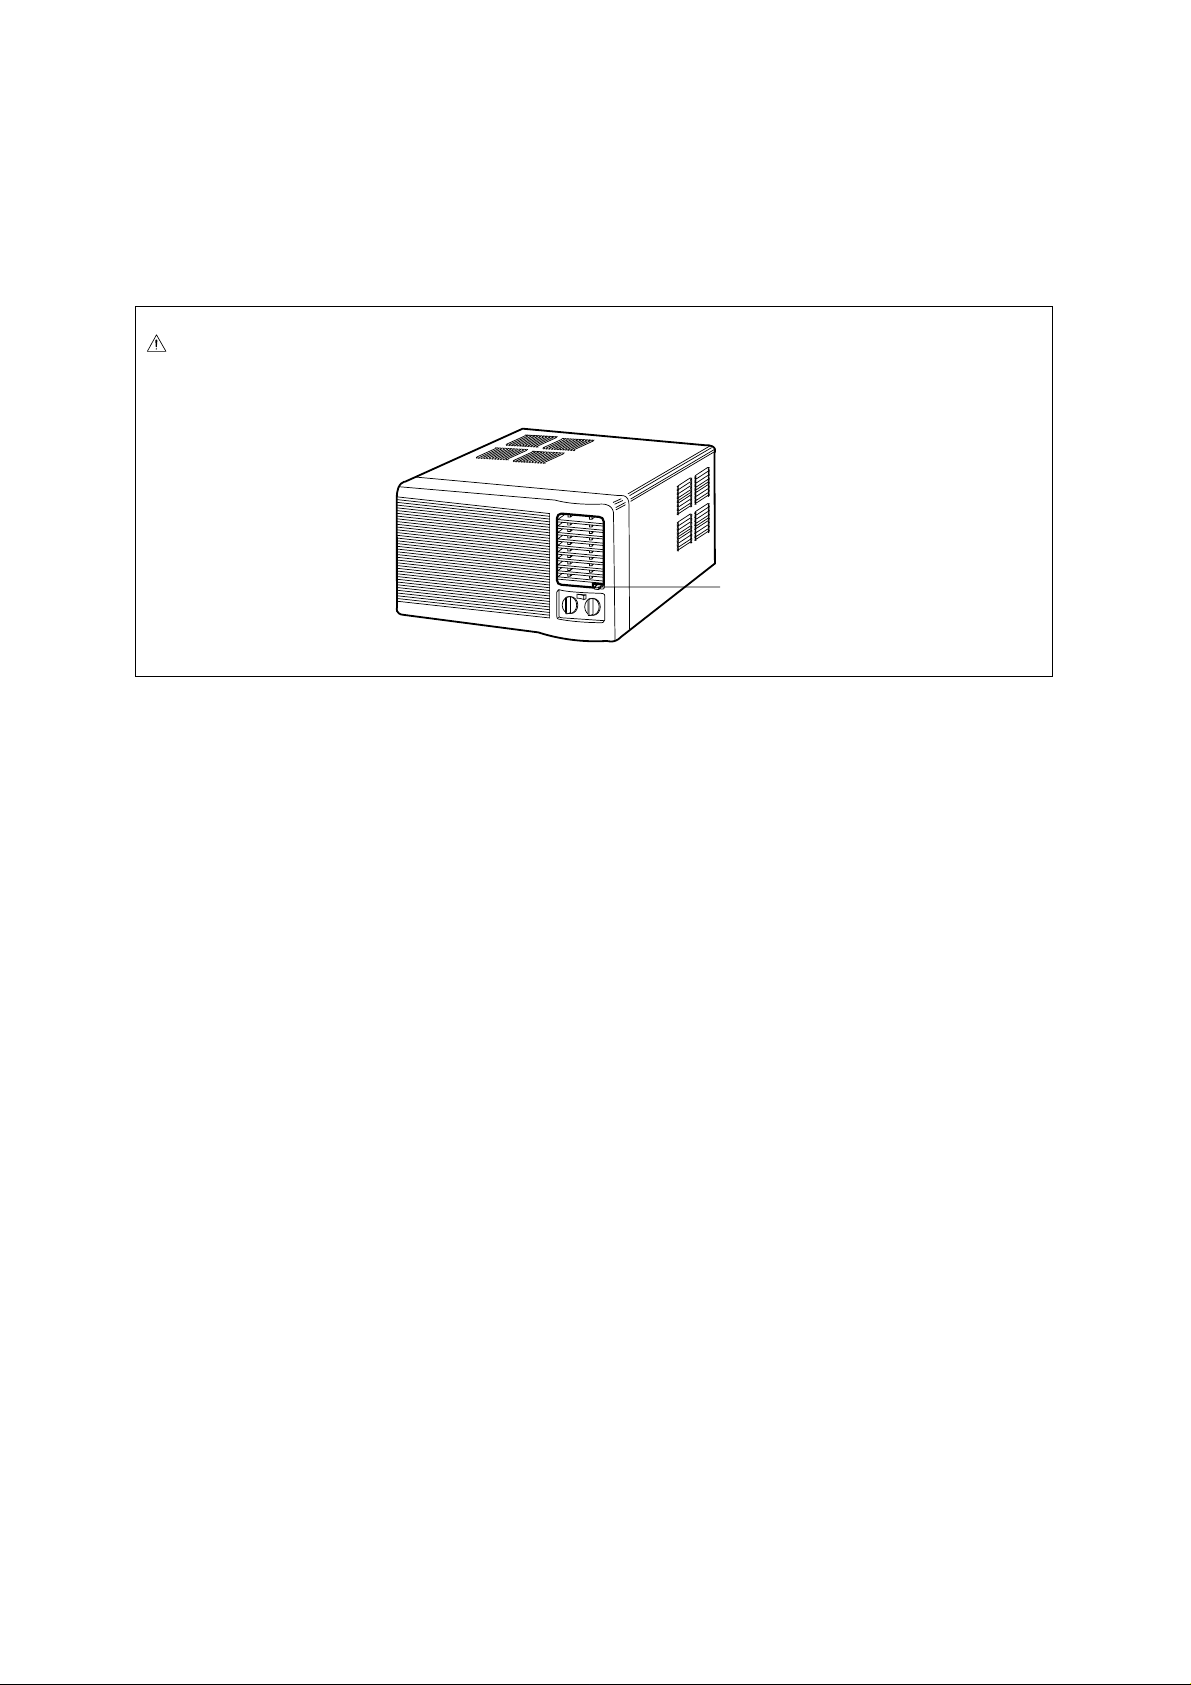
CAUTION
• When the front grille is reinstalled, the DOOR VENT should be in position first so that it would not
be bent by grille.
Door Vent
Page 6
6
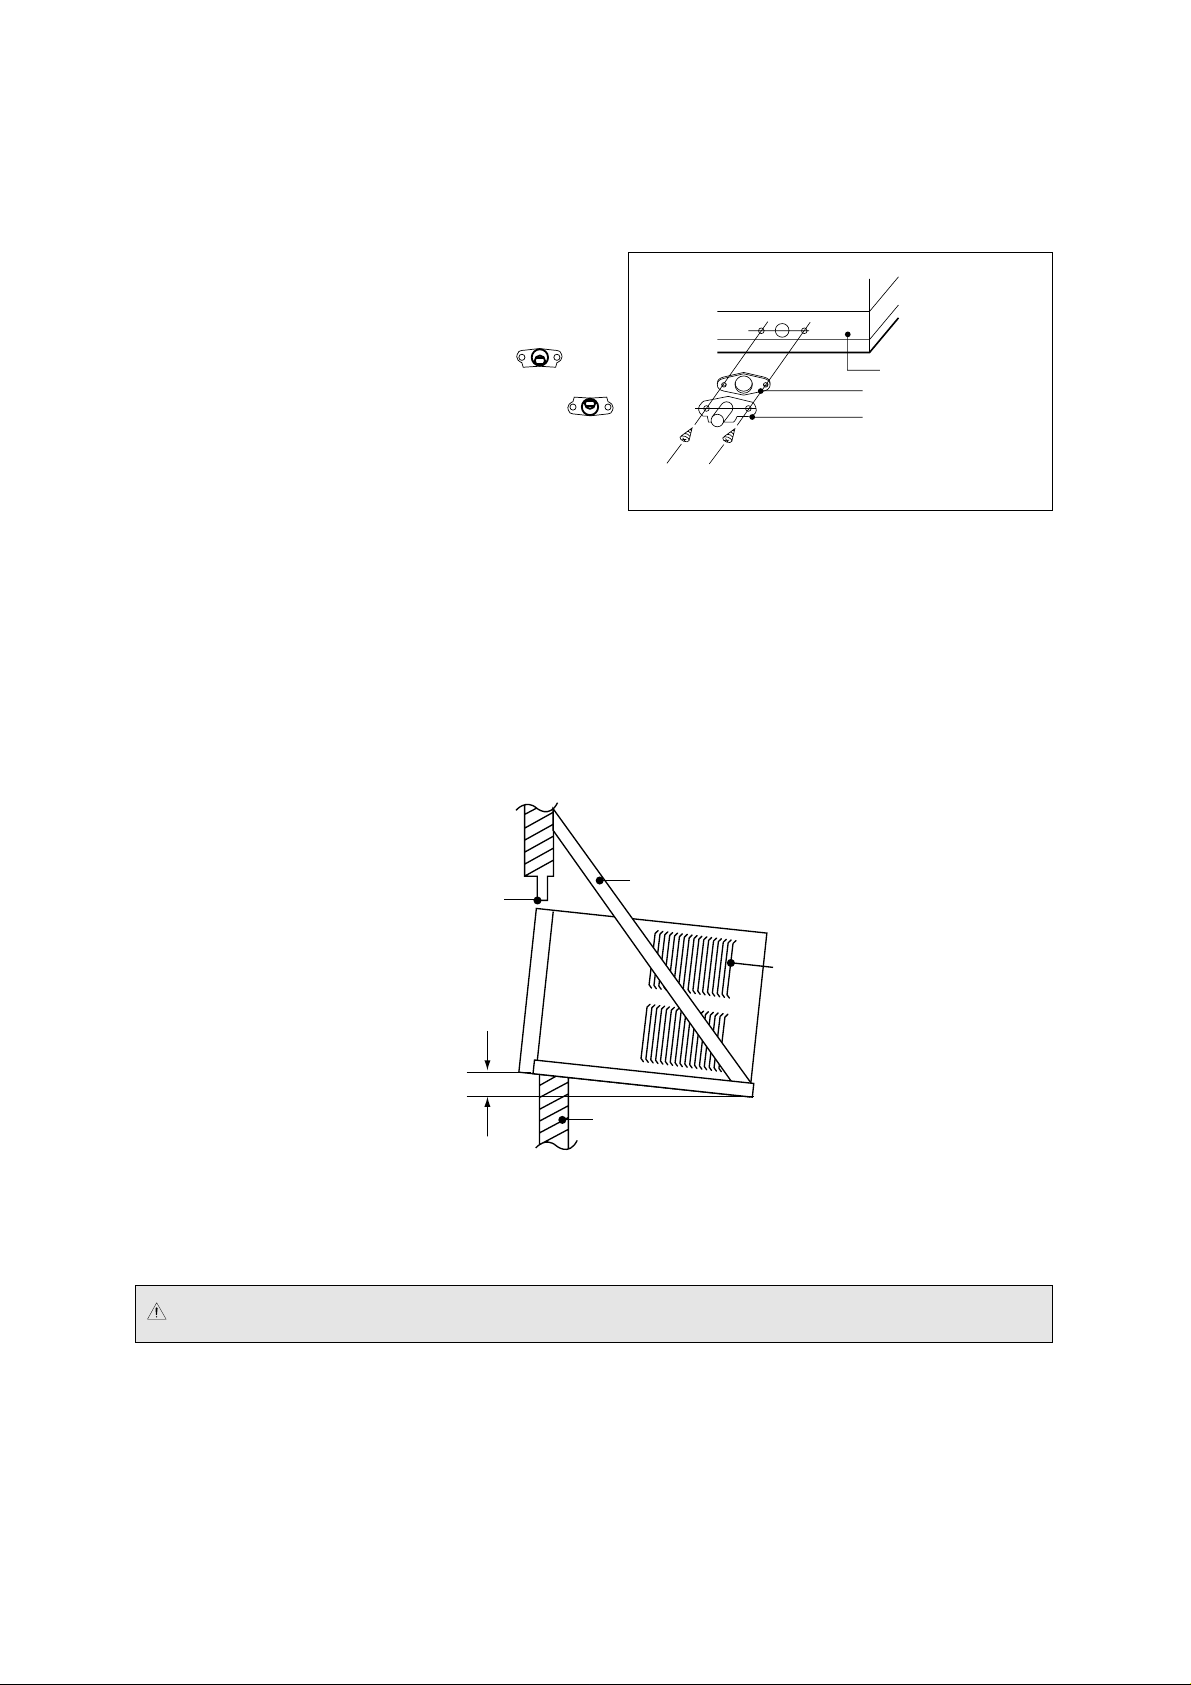
• HOW TO INSTALL THE DRAIN CAP
Install the drain cap like Fig. of the right side.
There are two kinds of method to install the drain cap.
The first method is that the shape of hole like
It is good for the household.
The second method is that the shape of hole is like
It is good for the shop.
• WINDOW INSTALLATION
1. Determine Window Location.
Determine a suitable location.
The window where the Air Conditioner is to be installed should have enough strength to bear the weight
of the Air Conditioner.
2. Measure unit’s dimensions
3. Install the Mounting Angle at the Proper Location.
Install the Air Conditioner using the Mounting Angle or other Hardware to be installed as shown in Fig.1
For proper drainage, Rear side of the unit should be inclined about 5mm lower.
4. Insert unit in window.
With 2 people, lift unit and insert it into the window opening.
5. Finish opening
Close up the gap between unit and window using the sponge or tape for insulation as shown in Fig. 1
* If through the wall installation is required, you may choose to consult an independent servicing Dealer.
CAUTION : Two people must work together to avoid personal injury.
Fig. 1 Mounting Angle Installation.
The rear side of the unit
Drain Cap
SEAL DRAIN
M4x8 SCREW: Use Screw(M4x8) only.
Close up the gap
5mm
Mounting Angle
unit
wall
Page 7
7
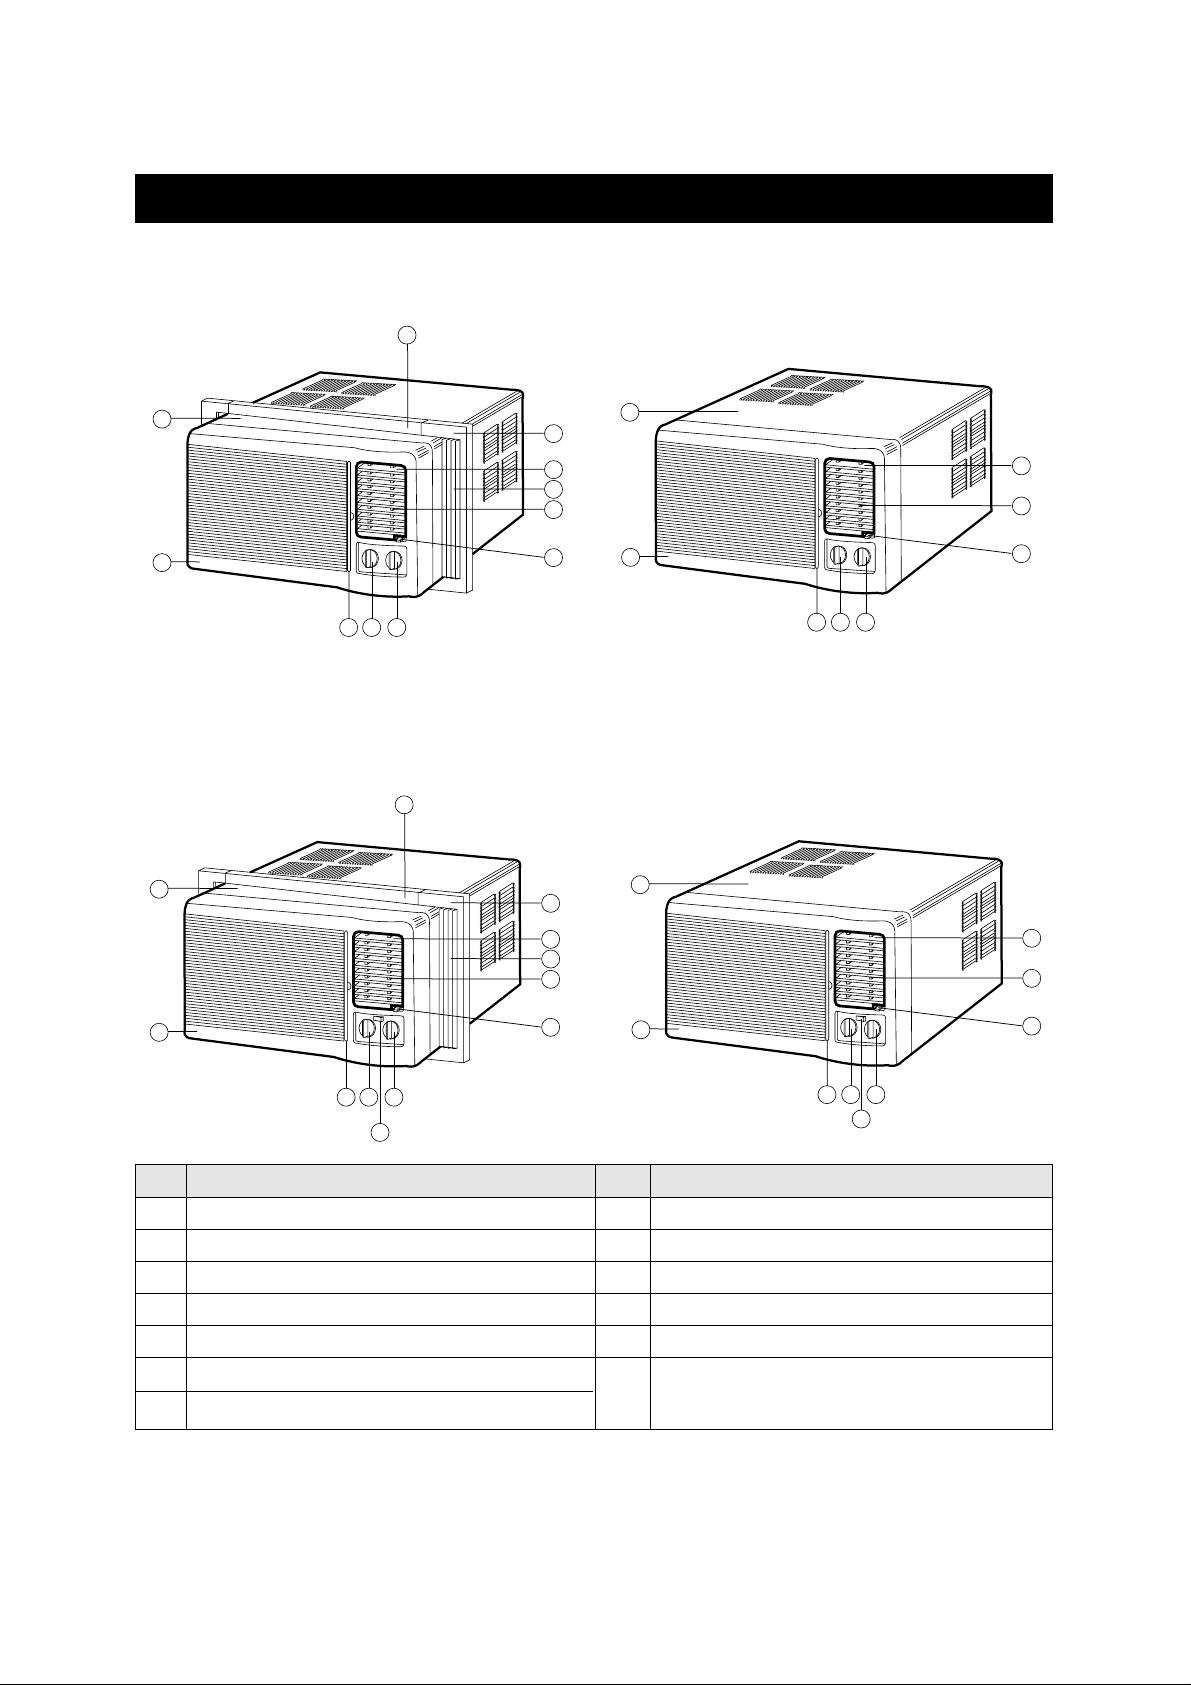
NAMES OF MAJOR COMPONENTS
• DWA-122CS / DWB-122CS / DWB-123CS / DWA-151CS
• DWA-122C / DWB-122C / DWB-123C / DWA-151C
NO PART NAME
1 AIR FILTER
2 GRILLE FRONT
3 CABINET
4 BLADE VERTICAL
5 KNOB THERMOSTAT
6 KNOB SELECTOR
NO PART NAME
7 BLADE HORIZENTAL
8 AIR VENT
9 FRAME GUIDE TOP
10 FRAME WINDOW KIT
11 SHUTTER WINDOW
12
AUTO LOUVER S/W (DWA-122CS/DWB-122CS/
DWB-123CS/DWA-151CS)
9
3
2
5
1
6
10
7
11
4
8
3
2
9
3
10
7
11
4
3
7
4
8
5
1
6
7
4
2
8
5
1
6
12
2
5
1
6
12
8
Page 8
OPERATING INSTRUCTIONS
8
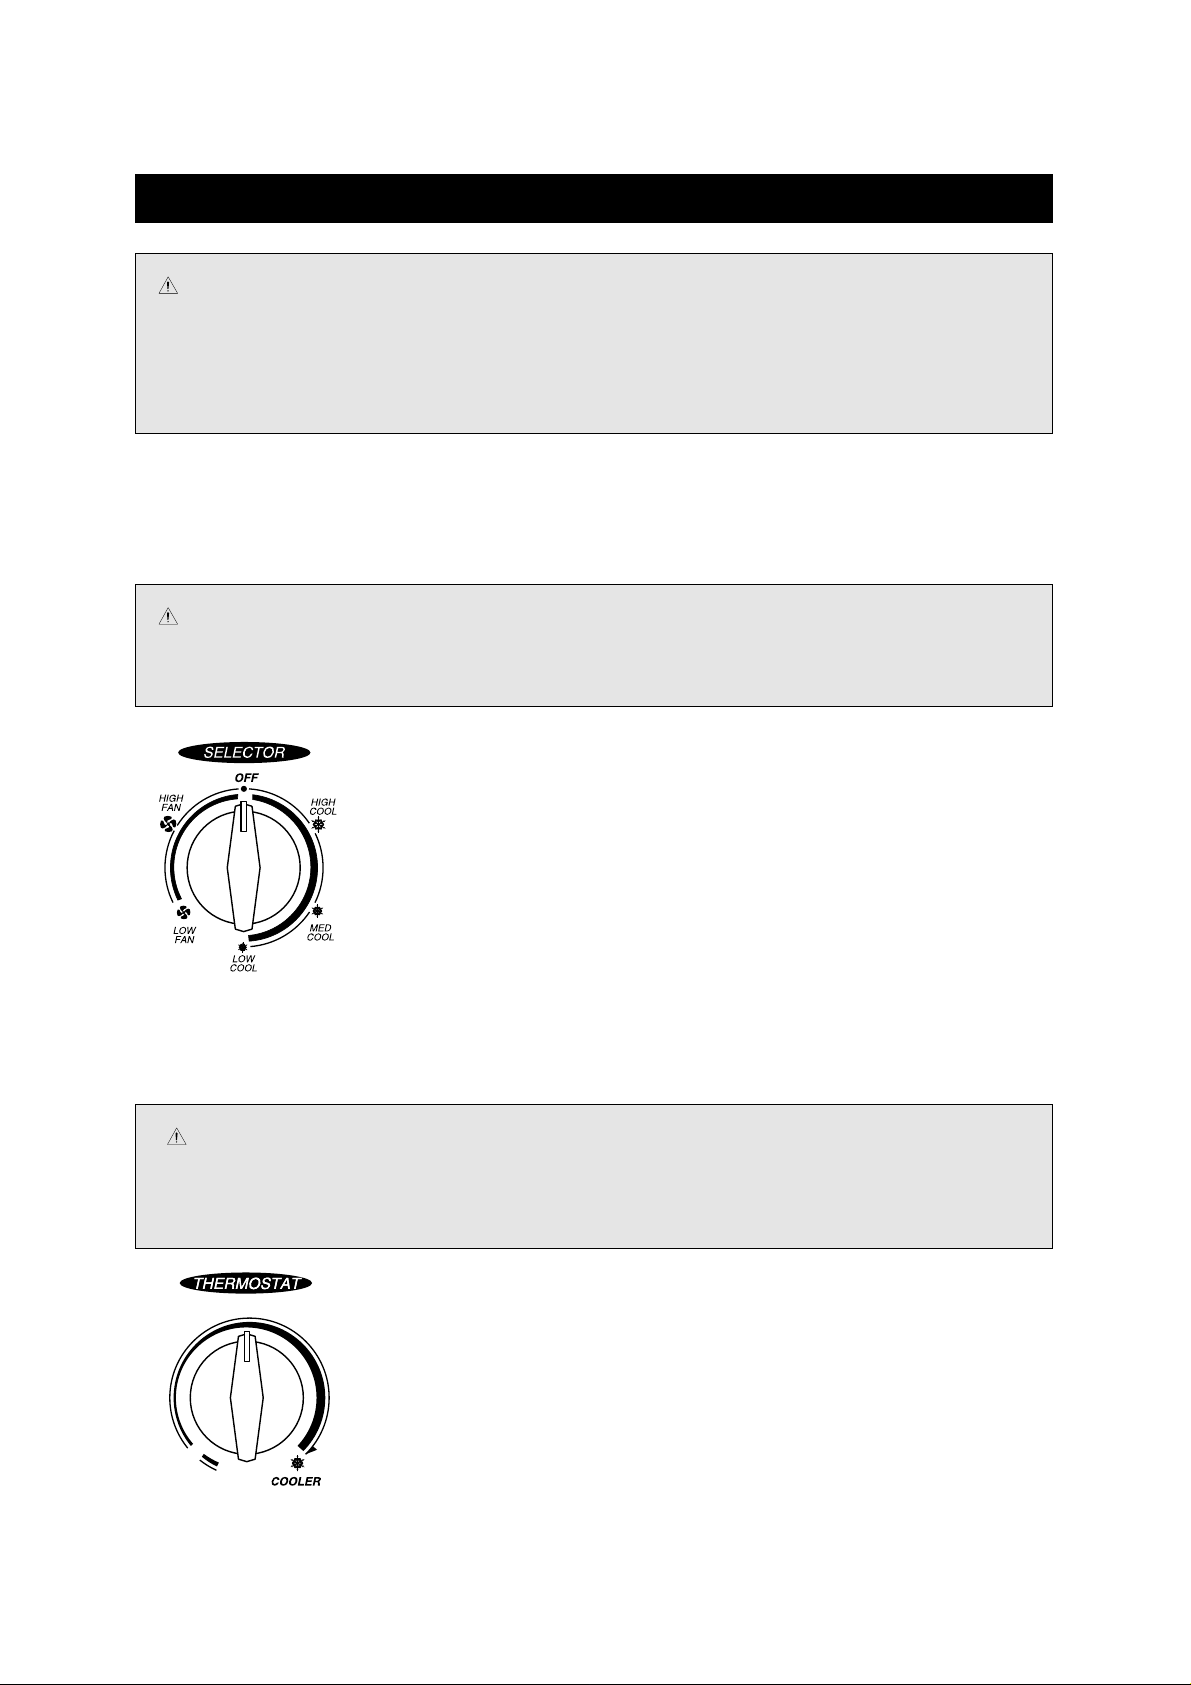
• FAN & COOLING CONTROL
The Fan Control Selector Switch has six positions.
Choose one of the speed settings by rotating the fan control Selector Switch to the appropriate position.
OFF Select this setting for stop all operation of air conditioner
HIGH FAN Select this setting for high air circulation without cooling.
LOW FAN Select this setting for quiet air circulation without cooling.
LOW COOL Select this setting for cooling operation with LOW FAN.
MED COOL Select this setting for cooling operation with MEDIUM FAN.
HIGH COOL Select this setting for cooling operation with HIGH FAN.
• TEMPERATURE CONTROL
Choose a temperature settings by rotating the knob of thermostat to the appropriate position
• The Thermostat automatically starts and stops cooling operation in
order to keep the room temperature at a proper level, and this results in
efficient use of power and economical cooling.
• Turn clockwise for a cooler room temperature.
• Turn counter-clockwise for a warmer room temperature.
NOTE
• FOR MOST ECONOMICAL USE
1. Properly control the room temperature.
2. Avoid the unit being exposed to direct sunlight. Keep direct sunlight from the room.
3. Do not leave doors and windows open.
NOTE
Setting the control at the coldest extreme of the temperature range will not cool the room any
faster. Usually the midpoint is a good starting position. If the room temperature is not satisfactory
after a reasonable period of time, adjust the temperature control to a lower or higher setting.
CAUTION
When the air conditioner has been performing its cooling operation and is turned “OFF” or set to
the ‘FAN” position, wait at least 3 minutes before resetting to the cooling operation.
Page 9
9
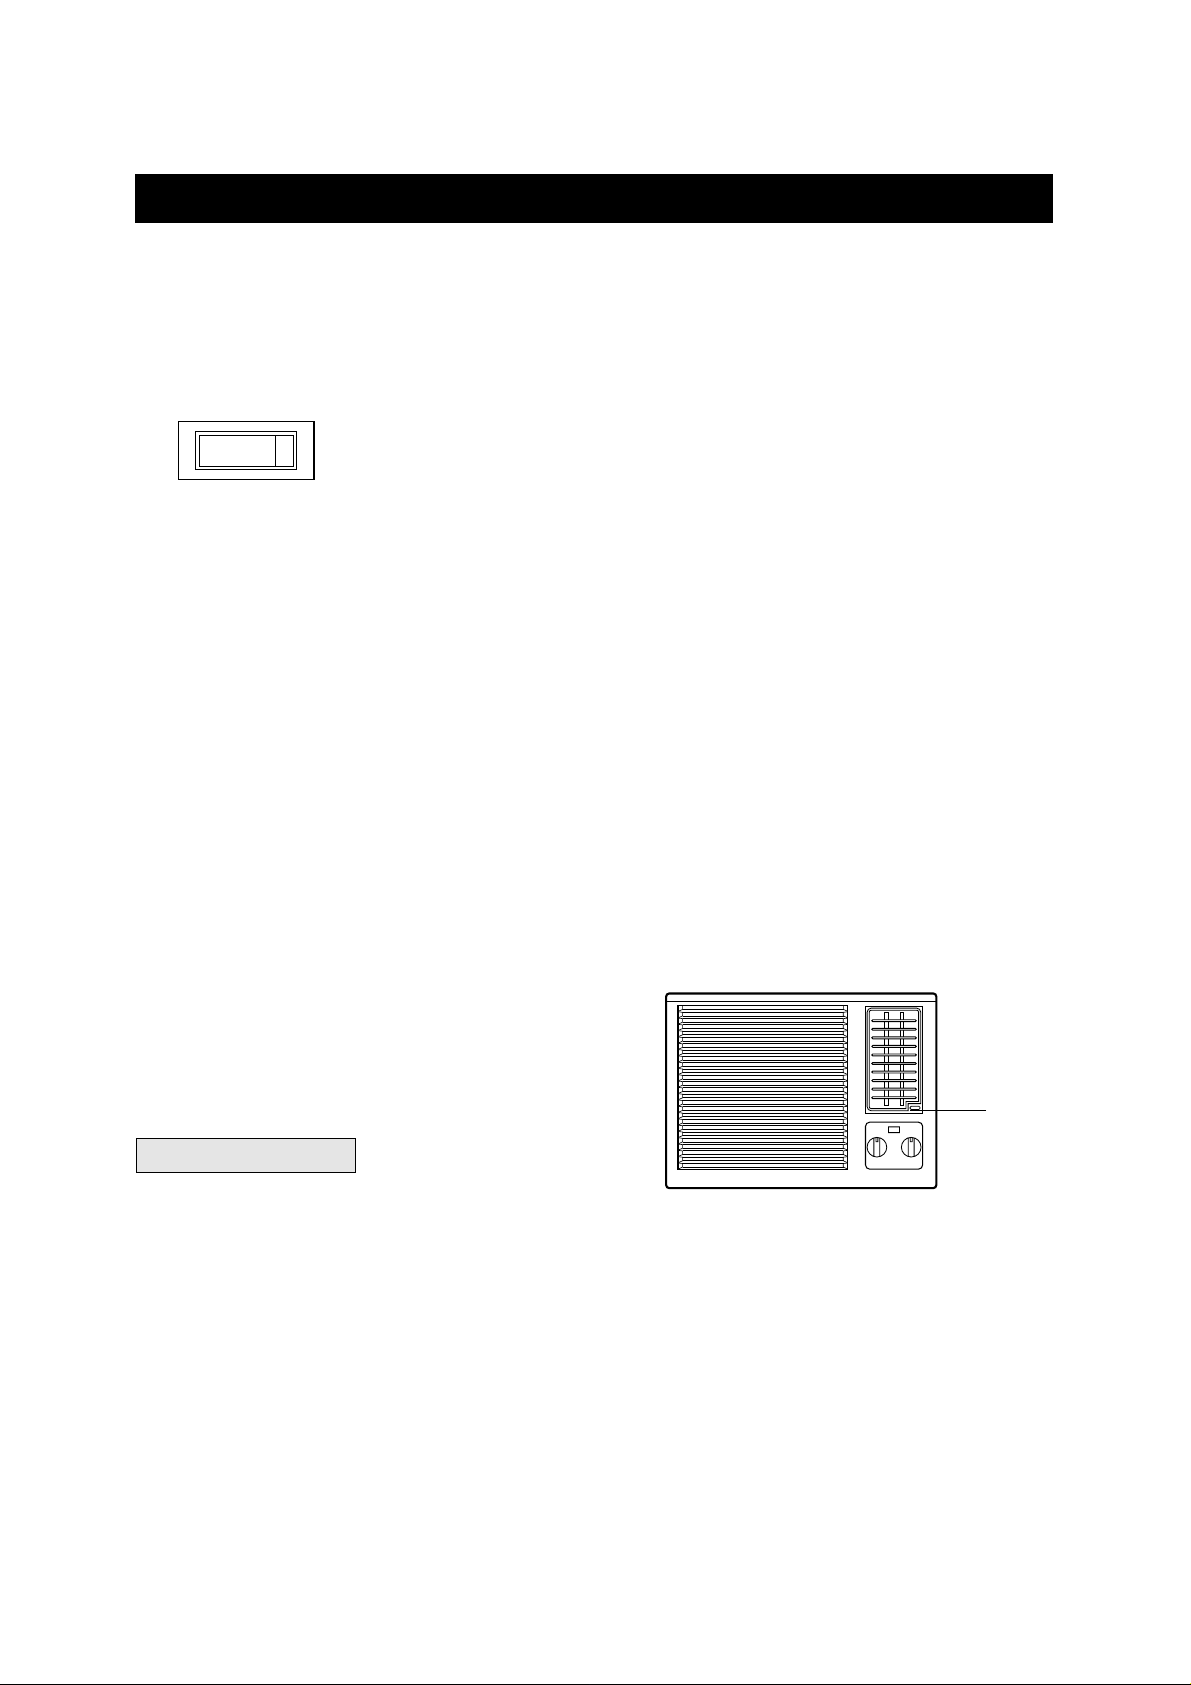
• CHANGING AIR FLO W DIRECTION
Air flow deflectors divert air from center flow to left or right and up or down.
Adjust deflectors for desired air flow pattern.
AUTO SWING (DWA-122CS, DWB-122CS, DWB-123CS, DWA-151CS)
When the auto louver switch is turned to “ON” position, the vertical louvers
automatically move right and left.
Thus, you can obtain comfortable cooling.
The vertical louvers may be stopped at any position when the auto louver switch
is turned off.
• AIR FLO W AR OUND UNIT
Check in door grill and outdoor louvers for air flow obstructions. Do not block air flow to and from unit. The
outdoor coil should be checked and periodically cleaned for debris that may collect and block unit air flow. If air
flow is obstructed or deflected back into unit, the compressor may cycle on and off rapidly, causing early
compressor failure.
• DRAIN HOLE AND WATER DRIPPING OUTSIDE
Locate drain hole at the rear or on the bottom of unit. Water in base pan is picked up by the fan blade and
thrown onto the warm outdoor coil where it evaporates. The air conditioner must be installed level or tilted
slightly to the outside for proper water disposal. On exceptionally hot and humid days the air conditioner may
permit excess water to pass thru rear drain hole or overflow. This should be considered normal.
• DOOR VENT
The door vent for the room air ventilation is lever type.
If the door vent lever moves to the left, then close the
vent and moves to the rght, then open the vent.
GENERAL INFORMATION
AUTO SWING
ON / OFF
Close Vent → Open
→
Door Vent
Page 10
10
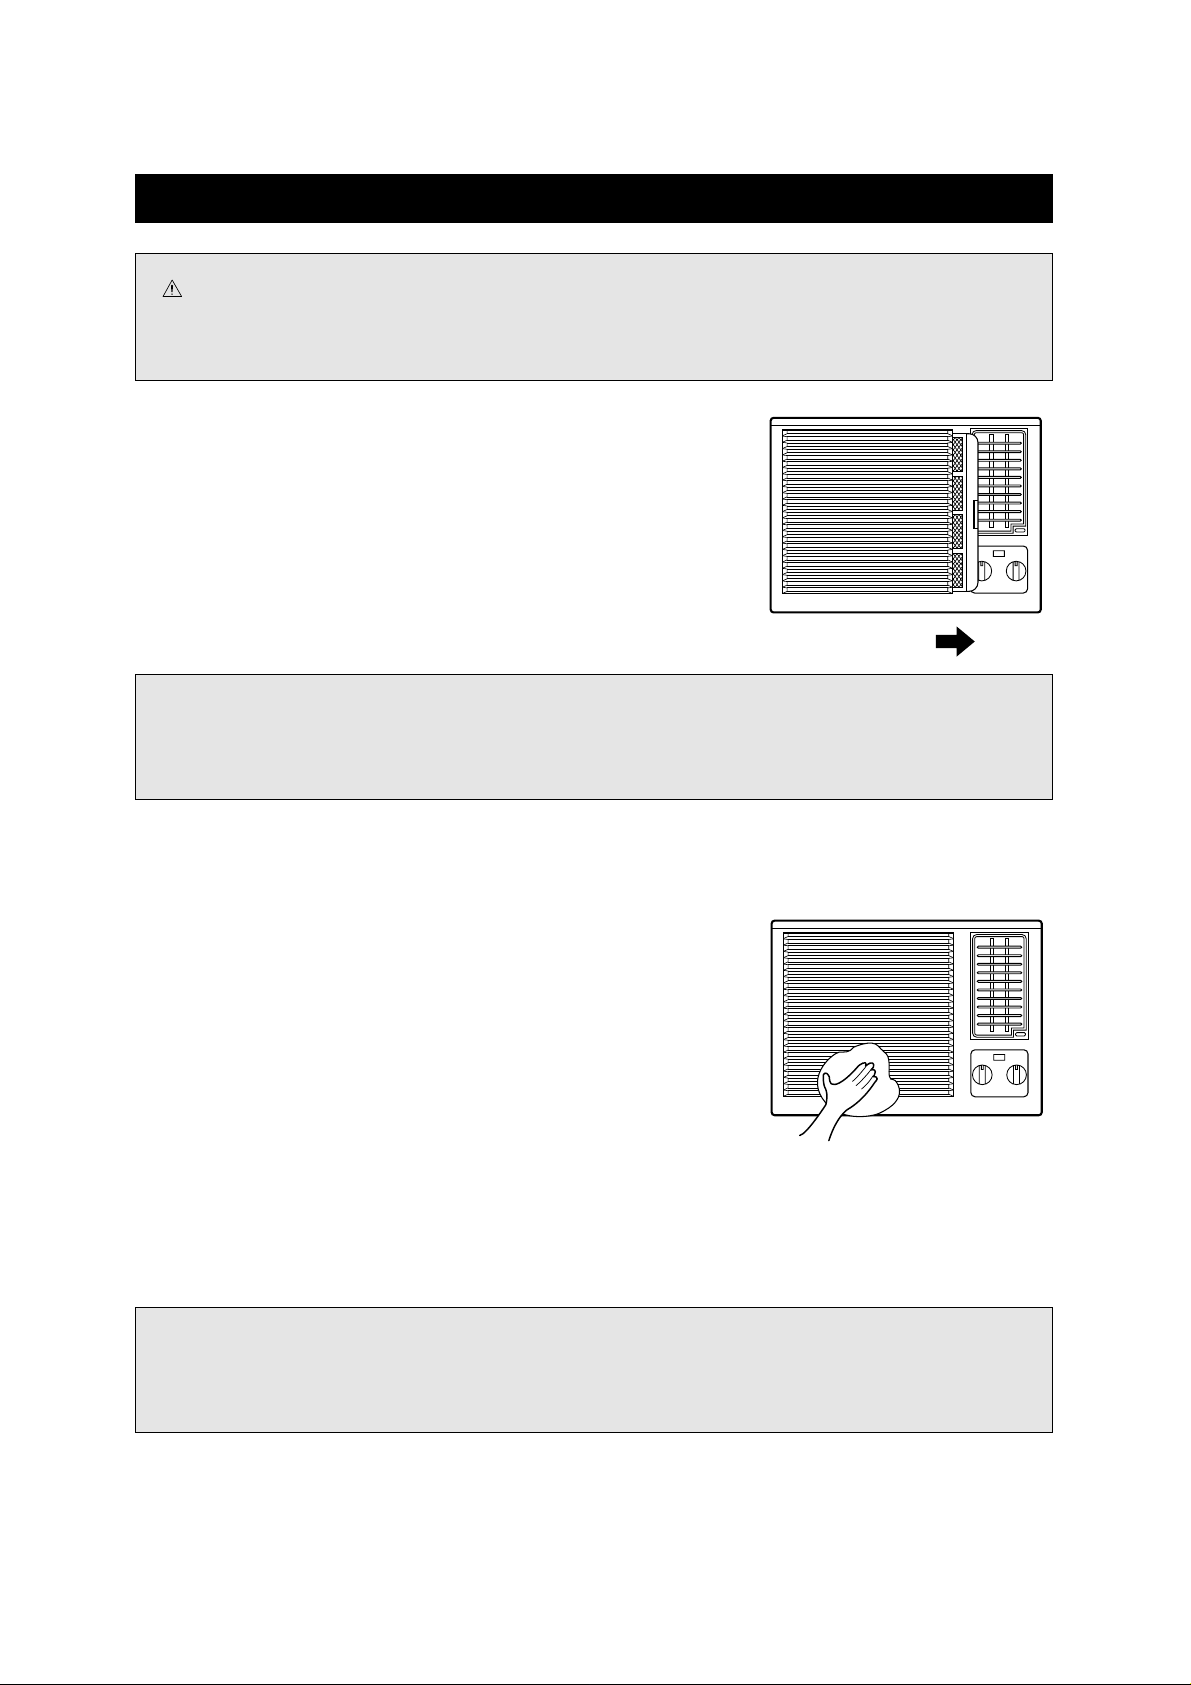
• AIR FILTER
Clean the air filter, which removes dust inside the room.
It should be washed at least once every week during operation.
1. Remove the Air Filter from the front grill by pulling to right.
2. Clean Air Filter with a vacuum cleaner or lukewarm, soapy water.
3. Shake it when clean to remove moisture completely. Reinstall.
• CLEANING THE AIR CONDITIONER
1. At least once a year, remove cabinet and thoroughly clean air
conditioner. Have the unit inspected by an authorized service man
to ensure unit is functioning properly.
2. Wash air conditioner with lukewarm, soapy water as needed.
Rinse and dry thoroghly.
3. If using concentrated liquid detergent, dilute in warm water first.
4. Front grill may be wiped off with a cloth dampened in a mild
detergent solution.
5. Cabinet may be washed with mild soap or detergent and
lukewarm water, then polished with liquid wax for appliances.
6. Condenser and Evaporator coils should be cleaned at the
beginning of each cooling season. Use a soft brush or vacuum
cleaner to clean them, making sure that the Condenser and Evaporator coils are not damaged.
7. Do not use abrasive cleaners. These items scrach, crack and discolor surfaces.
CARE AND MAINTENANCE
CAUTION
To avoid death or personal injury due to electrical shock, turn fan control OFF and unplug power cord
before cleaning or performing maintenance. After cleaning or performing maintenance, reconnect power.
NOTE
A dirty Air Filter reduces air flow and the cooling capacity.
Do not operate unit without Air Filter.
NOTE
To assure continued peak efficiency, condenser coils (weather side of unit) should be checked
periodically and cleaned if clogged with soot or dirt from the atmosphere.
Page 11
11
• ELECTRICAL GROUNDING INSTRUCTIONS
This appliance is equipped with a three-prong(grounding) plug for protection against possible shock
hazards. If a two-prong wall receptacle is encountered, the customer is required to contact a qualified
electrician and have the two-prong wall receptacle replaced with a properly grounded three-prong wall
receptacle in accordance with the National Electrical Code.
• USE OF EXTENSION CORD SET
Because of potential safety hazards under certain conditions, we strongly recommend against the use of
an extension cord set. However, if you still elect to use an extension cord, it is absolutely necessary that it
is earthed and the marked rating of the extension cord set should be 250V, 10A(Min.).
The socket-outlet shall be installed near the equipment and shall be easily accessible.
• REPLACEMENT OF SUPPLY FLEXIBLE CORD.
If the supply flexible cord is damaged, it must be replaced by the manufacturer or its service agent or
similarly qualified person in order to avoid a hazard.
ELECTRICAL REQUIREMENTS
WARNING :
To avoid death, personal injury or properly damage due to electrical shock, this unit must be
grounded.
Do not under any circumstances cut or remove the round grounding prong from the plug.
Do not use a two prong adapter.
WARNING :
To avoid death, personal injury or properly damage due to electrical shock, do not use an
extension cord or pinch the power cord.
Do not remove the warning tag from the power cord.
CAUTION :
The appliance shall be installed in accordance with national wiring regulations.
Page 12
12
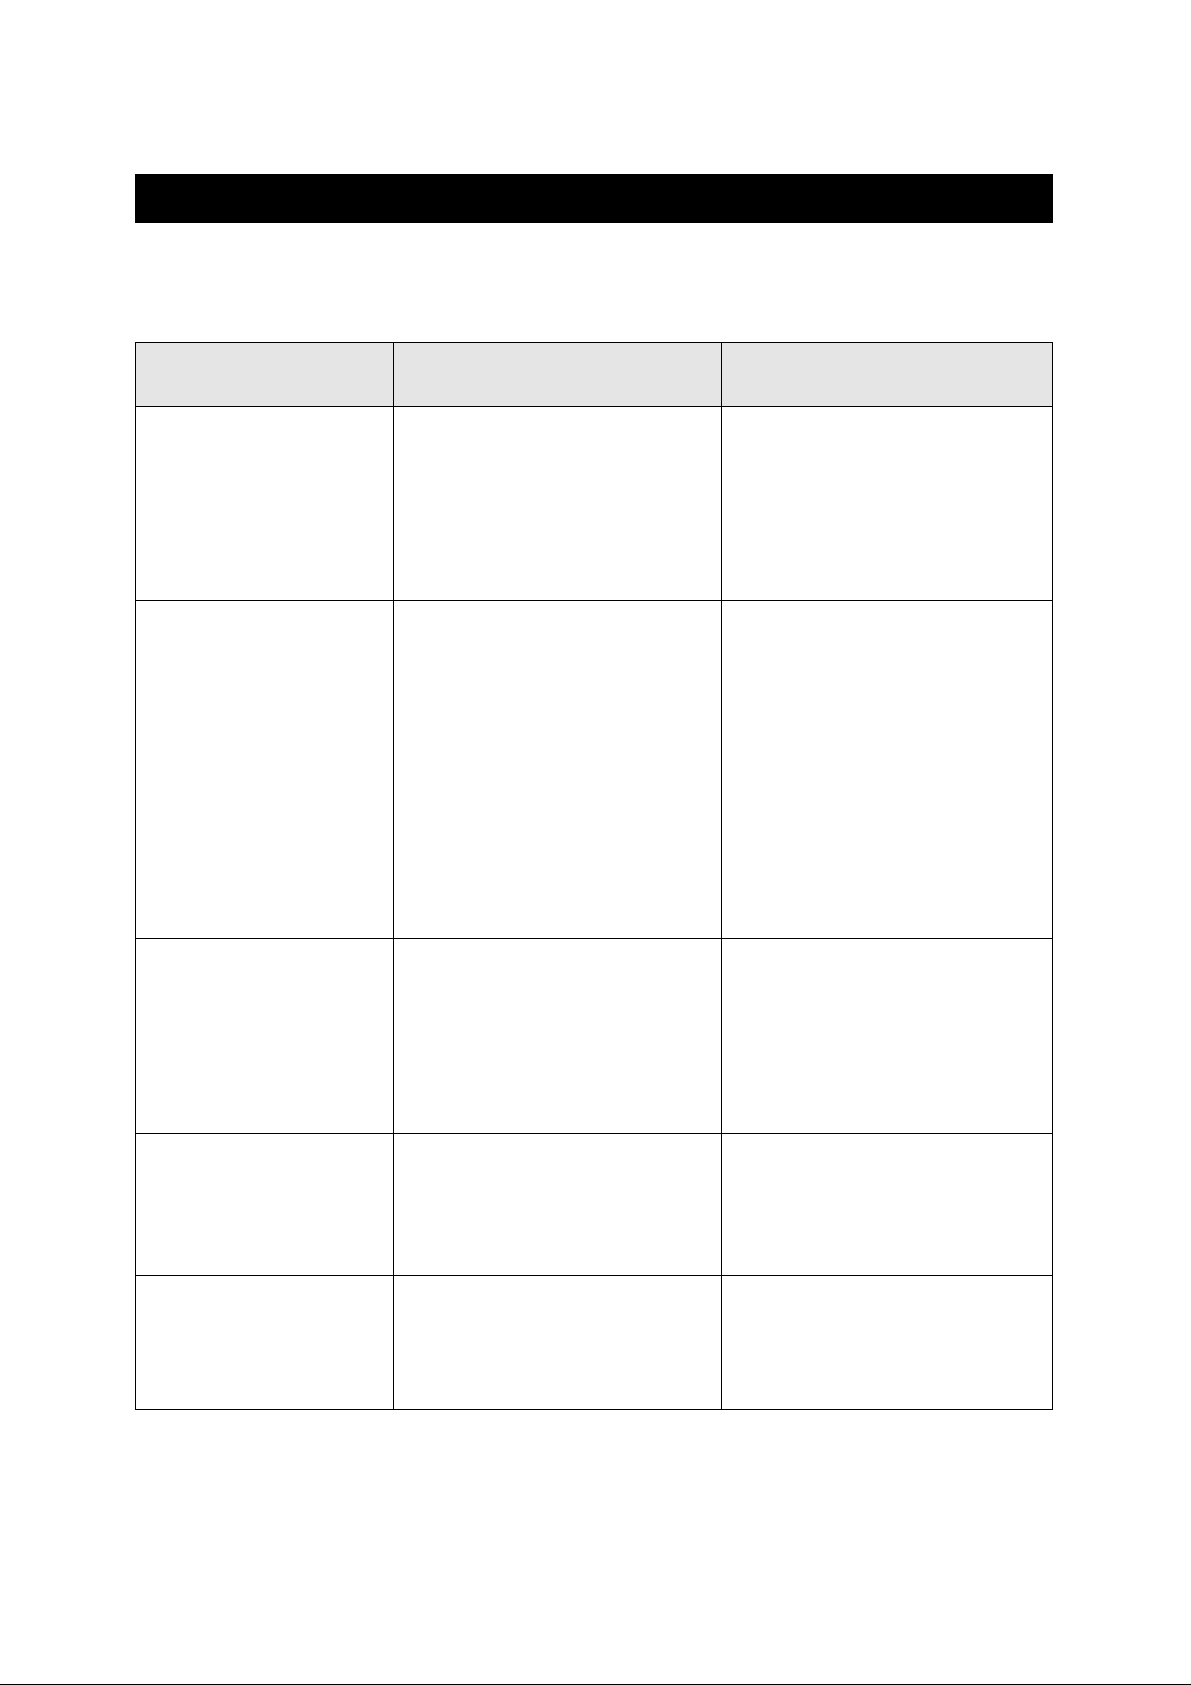
BEFORE CALLING FOR SERVICE
When you find something wrong with your room air conditioner, please carefully check the following items.
If you are unable to find the cause of trouble, contact your service dealer.
Difficulty
• Air conditioner does
not operate.
• Little or no cooling
• Noisy unit
• Ordors from unit
• Water in base pan.
Possible Cause
• No power to unit.
• Compressor lockout on initial
plug in.
• Dirty air filter
• Is there anything blocking the
front?
• Thermostat is not adjusted
correctly.
• Air conditioner undersized for
application.
• Loose parts
• Weak building construction.
• Water hitting fan.
• Mold, mildew or algae formation
on wet surfaces.
• Normal for operation in humid
areas.
Suggested Solution
• Set Fan Control Select to
position other than "OFF".
•
Confirm power cord is plugged in.
•
Verify main power switch
(main circuit breaker) or fuse
of the unit is good.
• Wait 3 to 4 minutes and restart
the unit.
• Clean air filter.
• When blocked by curtains,
blinds, or furnitures, etc., the air
flow is restricted and cooling
performance is affected.
• Adjust thermostat correctly.
• Check with dealer to determine
proper unit capacity for
application.
•Tighten any loose parts.
• Provide additional support.
• Normal in high humidity.
• Stop noise by allowing water to
drain from base fan through
drain hole.
• Place algaecide tablet in base
pan
• Remove water in base pan
through drain hole.
• Water in base pan is picked up
by the fan blade and thrown onto
the warm outdoor coil where
water then evaporates.
Page 13
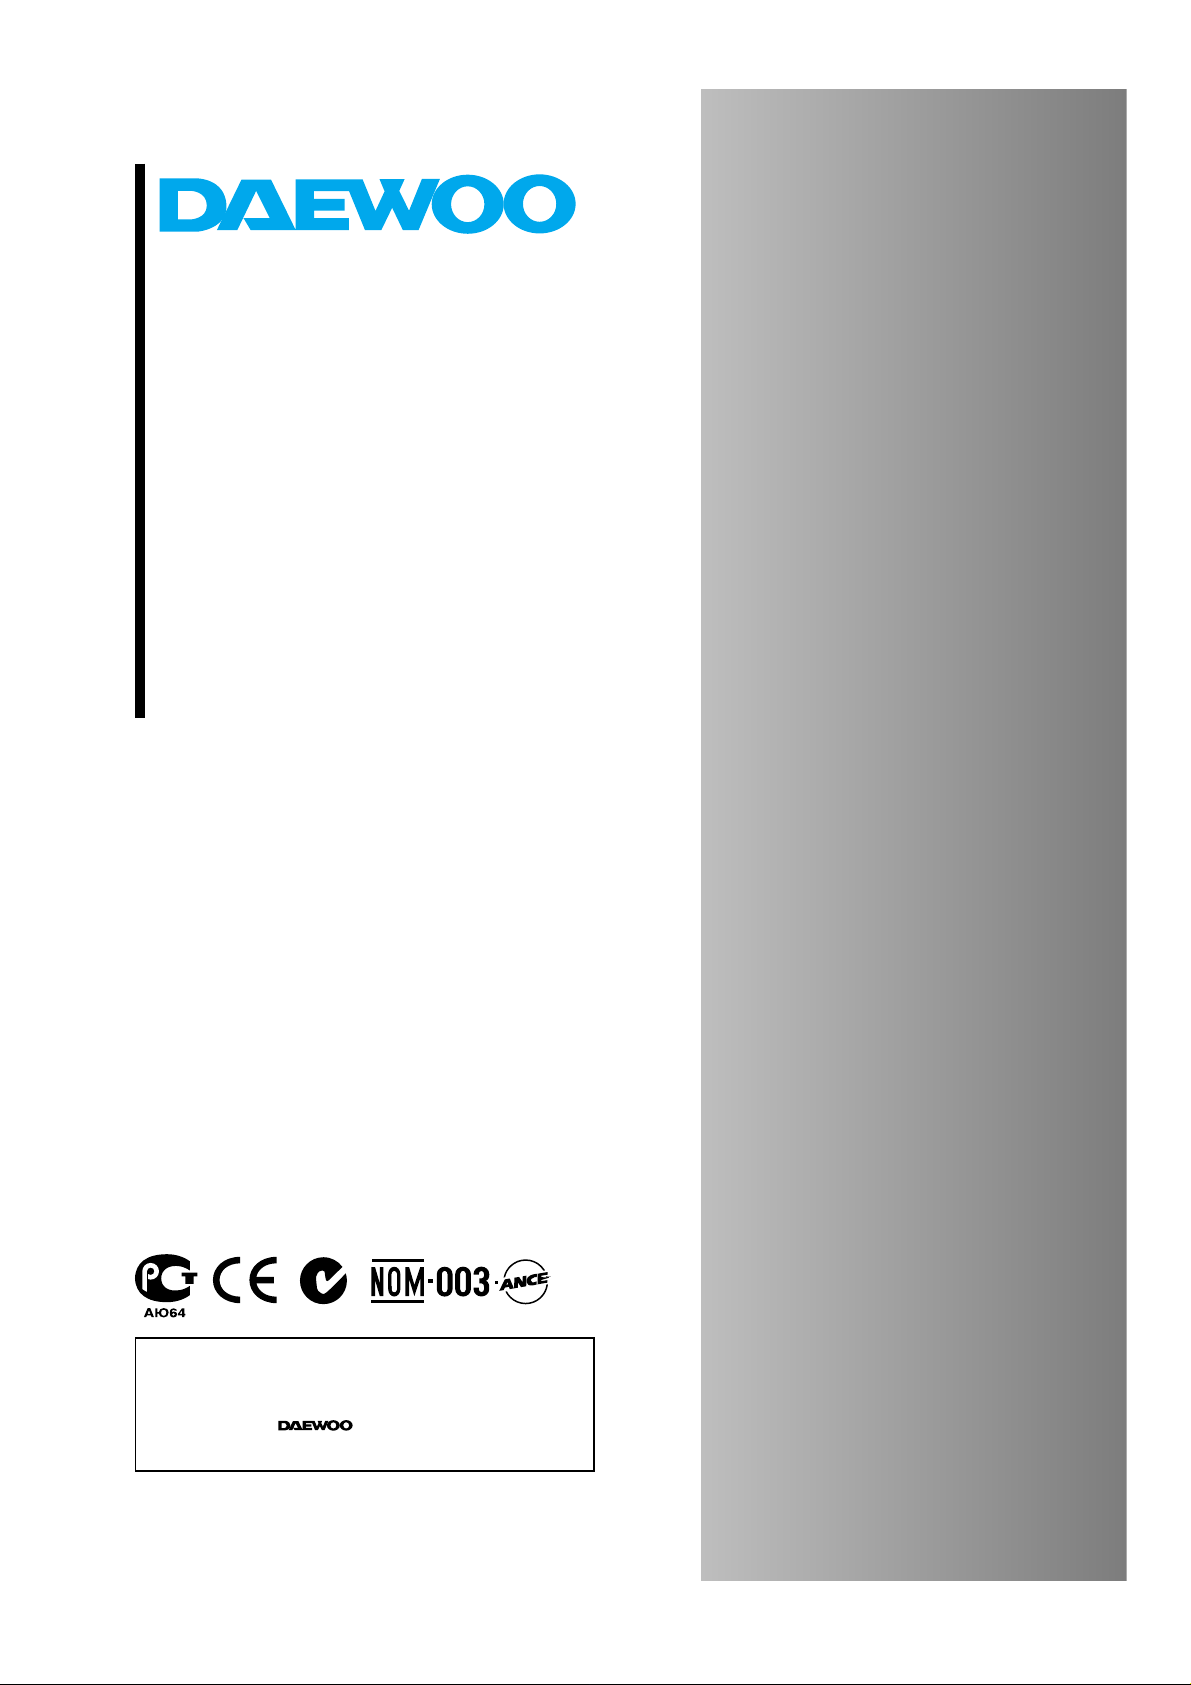
MODEL #:
DWA-122C, DWA-122CS
DWB-122C, DWB-122CS
DWB-123C, DWB-123CS
DWA-151C, DWA-151CS
ROOM AIR CONDITIONER
USE & CARE MANUAL
WINDOW TYPE ROOM AIR CONDITIONER
Please read carefully and thoroughly this manual before
operating the unit.
If you still have any difficulties or problems, consult your
dealer for help or ELECTRONICS.
Please keep this manual well.
W1
 Loading...