

Page 1
DQD-6100D/DQD-2100D
DVD-360D/DVD-320D
DVD-260D/DVD-220D
DVD PLAYER
Owner’s Manual
GB
English
Page 2
Product Information
1
CAUTION: TO REDUCE THE RISK OF ELECTRIC
SHOCK, DO NOT REMOVE COVER (OR BACK). NO
USER-SERVICEABLE PARTS INSIDE. REFER
SERVICING TO QUALIFIED SERVICE PERSONNEL.
CAUTION
RISK OF ELECTRIC SHOCK
DO NOT OPEN
The lightning flash with arrowhead symbol,
within an equilateral triangle, is intended to
alert the user to the presence of uninsulated
“dangerous voltage” within the product’s
enclosure that may be of sufficient magnitude
to constitute a risk of electric shock.
The exclamation point within an equilateral
triangle is intended to alert the user to the
presence of important operating and servicing
instructions in the literature accompanying the
appliance.
WARNING : TO REDUCE THE RISK OF FIRE OR ELECTRIC SHOCK, DO NOT EXPOSE THIS APPLIANCE TO RAIN
OR MOISTURE.
CAUTION : TO PREVENT ELECTRIC SHOCK, MATCH WIDE BLADE OF PLUG TO WIDE SLOT, FULLY INSERT.
IMPORTANT FOR LASER PRODUCTS
LASER This Digital Video Disc Player employs a Laser System. To ensure proper use of this product
please read this owner’s manual carefully and retain for future reference. Should the unit
require maintenance, contact an authorized service location - see service procedure.
Use of control adjustments or the performance of procedures other than those specified may
result in hazardous radiation exposure.
To prevent direct exposure to the laser beam, do not try to open the enclosure. Visible laser
radiation when open and interlocks defeated.
DO NOT STARE INTO THE BEAM.
DANGER Visible laser radiation when open and interlock failed or defeated.
Avoid direct exposure to beam.
CAUTION Do not open the top cover. There are no user serviceable parts
inside the Unit; leave all servicing to qualified service personnel.
CLASS 1
LASER PRODUCT
FCC NOTICE : This equipment has been tested and found to comply with the limits for a Class B digital device,
pursuant to part 15 of the FCC Rule. These limits are designed to provide reasonable protection
against harmful interference in a residential installation. This equipment generates, uses and
can radiate radio frequency energy and if not installed and used in accordance with the
instructions, may cause harmful interference to radio communications. However, there is no
guarantee that interference will not occur in a particular installation. If this equipment does
cause harmful interference to radio or television reception; which can be determined by turning
the equipment off and on, the user is encouraged to try to correct the interference by one or
more of the following measures:
• Reorientate or relocate the receiving antenna.
• Increase the separation between the equipment and receiver.
• Connect the equipment to an outlet on a circuit different from that to which the receiver is
connected.
• Consult the dealer or an experience radio/TV technical for help.
CAUTION : Any changes or modification in construction of this device which are not expressly approved by
the party responsible for compliance could void the user’s authority to operate the equipment.
Important Safeguards
Page 3

Product Information
3
Important Safeguards
2
This set has been designed and manufactured to
assure personal safety. Improper use can result in
electric shock or fire hazard. The safeguards
incorporated in this unit will protect you if you
observe the following procedures for installation, use
and servicing. This unit is fully transistorized and
does not contain any parts that can be repaired by
the user.
1 Read Instructions
All the safety and operating instructions should be
read before the unit is operated.
2 Retain Instructions
The safety and operating instructions should be
retained for future reference.
3 Heed Warnings
All warnings on the unit and in the operating
instructions should be adhered to.
4 FOLLOW INSTRUCTIONS
All operating and use instructions should be
followed.
5 Cleaning
Unplug this unit from the wall outlet before
cleaning. Do not use liquid cleaners or aerosol
cleaners. Use a damp cloth for cleaning.
6 Attachments
Do not use attachments unless recommended by
the unit’s manufacturer as they may cause
hazards.
7 Water and Moisture
Do not use this unit near water- for example, near
a bath tub, wash bowl, kitchen sink or laundry tub,
in a wet basement, or near a swimming pool. This
apparatus shall not be exposed to dripping or
splashing water and no objects filled with liquids,
such as vases, shall be placed on the apparatus.
8 Accessories
Do not place this unit on an unstable cart, stand,
tripod, bracket, or table. The unit may fall, causing
serious injury to a child
or adult as well as serious
damage to the unit. Use
this unit only with a cart,
stand, tripod, bracket, or
table recommended by the
manufacturer.
9 Ventilation
Slots and openings in the case are provided for
ventilation to ensure reliable operation of the unit
and to protect it from overheating. These openings
must not be blocked or covered. These openings
must not be blocked by placing the unit on a bed,
sofa, rug, or other similar surface. This unit should
never be placed near or over a radiator or heat
radiator. This unit should not be placed in a builtin installation such as a bookcase or rack unless
proper ventilation is provided or the
manufacturer’s instructions have been adhered to.
Keep distance about minimum 10 centimeters from
the wall when it is installed.
10 Power Sources
This unit should be operated only from the type of
power source indicated on the marking label. If
you are not sure of the type of power supply to
your home, consult your video dealer or local
power company. For units intended to operate
from battery power, or other sources, refer to the
operating instructions.
11 grounding or Polarization
This unit is equipped with a polarized alternating current line plug (a plug having one blade wider
than the other). This plug will fit into the power
outlet only one way.
This is a safety feature. If you are unable to insert
the plug fully into the outlet, try reversing the
plug. If the plug still fails to fit, contact your
electrician to replace your obsolete outlet.To
prevent electric shock, do not use this polarized
plug with an extension cord, receptacle, or other
outlet unless the blades can be fully inserted
without blade exposure. If you need an extension
cord, use a polarized cord.
12 Power-Cord Protection
Power-supply cords should be routed so that they
are not likely to be walked on or pinched by items
placed upon or against them, paying particular
attention to cords at plugs, convenience
receptacles, and the point where they exit from the
unit.
13 Lightning
For added protection for this unit during a
lightning storm, or when it is left unattended and
unused for long periods of time, unplug it from the
wall outlet and disconnect the antenna or cable
PORTABLE CART WARNING
(symbol provided by RETAC)
Important Safeguards
system. This will prevent damage to the unit due
to lightning and power line surges.
14 DISC TRAY
Keep your fingers well clear of the disc as it is
closing. It may cause serious personal injury.
15 Overloading
Do not overload wall outlets of extension cords as
this can result in a risk of fire or electric shock.
16 Object and Liquid Entry
Never push objects of any kind into this unit
through openings as they may touch dangerous
voltage points or “short-out” parts that could
result in a fire or electric shock. Never spill liquid
of any kind on the unit.
17 BURDEN
Do not place a heavy object on or step on the
product. The object may fall, causing serious
personal injury and serious damage to the product.
18 DISC
Do not use a cracked, deformed or repaired disc.
These discs are easily broken and may cause
serious personal injury and product malfunction.
19 Servicing
Do not attempt to service this unit yourself as
opening or removing covers may expose you to
dangerous voltage or other hazards. Refer all
servicing to qualified service personnel.
20 Damage Requiring Service
Unplug this unit from the wall outlet and refer
servicing to qualified service personnel under the
following conditions.
A. When the power-supply cord or plug is damaged.
B. If liquid has been spilled, or objects have fallen
into the unit.
C. If the unit has been exposed to rain or water.
D. If the unit does not operate normally by
following the operating instructions. Adjust
only those controls that are covered by the
operating instructions. Improper adjustment of
other controls may result in damage and will
often require extensive work by a qualified
technician to restore the unit to its normal
operation.
E. If the video product has been dropped or the
cabinet has been damaged.
F. When the unit exhibits a distinct change in
performance-this indicates a need for service.
21 Replacement Parts
When replacement parts are required, have the
service technician verify that the replacements he
uses have the same safety characteristics as the
original parts. Use of replacements specified by the
unit manufacturer can prevent fire, electric shock,
or other hazards.
22 Safety Check
Upon completion of any service or repairs to this
unit, ask the service technician to perform safety
checks recommended by the manufacturer to
determine that the unit is in safe operating
condition.
23 Wall or Ceiling Mounting
The product should be mounted to a wall or ceiling
only as recommended by the manufacturer.
24 Heat
The product should be situated away from heat
sources such as radiators, heat registers, stoves, or
other products (including amplifiers) that produce
heat.
Page 4

Cautions in use of DVD player are described below.
Please read carefully before using a DVD player.
Installation place and handling
• When you place this player near other devices,
they may affect poorly together.
• When you place this player near strong magnetic
materials, it may affect image or voice poorly.
• Do not spill volatile liquids like insect spray over
the player. Do not leave rubber or plastic products
in contact with the player for a long time. They
will cause deterioration or paint peel-off.
Not in use
• When the unit is not in use, be sure to remove the
disc and turn off the power.
• If you do not use the unit for a long period,
remove batteries in the remote control to prevent
leakage.
• In case you don’t use the unit for a long time, the
unit may not function properly in the future. Turn
on and use the player occasionally.
Moving
• Repack the unit as it was originally packed at the
factory. Alternatively, pack this product with towel
not to be damaged.
• Eject any disc.
Cleaning
• Dust off dirt in cabinet or control panel part
smoothly with a soft cloth.
• For heavy dirt, soak the cloth in a weak detergent
solution, wring it well and wipe. Use a dry cloth
to wipe it out.
• Follow instructions in using chemical cleaners.
• Do not use any type of solvent such as gasoline or
benzene, as they may cause deterioration or paint
peel-off.
Disc Handling
• Do not use disc having severe scratch.
• Do not store the following places.
- High temperature and humidity
- Subject generation of mold
- Subject to direct sunlight
- Much dirt or dust
- Near strong magnetic materials such as speaker
Instructions in using remote control
Hold the remote control
within an angle range of
about 30° from either side
of the remote sensor. The
remote control range is
about 23 feet (7m) from
the DVD player.
Point the front of the
remote control directly at
the front of the DVD player.
Installing the remote control batteries
1
1 Remove the battery compartment cover on the
back of the remote control.
2
2 Insert the new batteries. Match the polarities (+
and -) on the Batteries with the diagram on the
remote control.
3
3
Put the battery compartment cover back on the
remote control.
Product Information
54
Adv antages of This Pr oduct Are .....
• DVD, VCD, CD, CD-R(MP3, JPEG), CD-RW
playback function
• MP3, JPEG file playback function (CD-R
disc having records of MP3, JPEG files)
• GUI (Graphical User Interface) OSD (On
Screen Display)
By using the [DISPLAY] button on the remote
control, information on the DVD/VCD/CD player and
disc, can be displayed on the TV screen.
• Screensaver function
• 3D sound (3D sound effect using 2
speakers)
• High bit / high sampling with 27MHz /
10bit video encoder
This unit has 27MHz / 10bit capability, that enables
the faithful reproduction of fine images.
• High bit / high sampling with 96KHz /
24bit audio D/A converter
With this 96KHz / 24bit linear Pulse Code Modulated
signals, which constitute the highest specifications
in the DVD standards, you can enjoy faithfully
reproduced sound in all of its various modes. To
support 96KHz sampling / 24bit sound, the shaping
noise of this multi-level digital sigma type of D/A
converter is kept flat up to 44KHz, thus preventing
the important audio signals from being affected.
• Coaxial / Optical digital output (PCM, Dolby
Digital, dts)
You can enjoy high-level digital audio by
connecting with amp embedded with Dolby Digital /
dts decoder.
• Built-in Dolby Digital decoder
• Analog audio 2-channels output for
DOWNMIX (x1)
• Composite video out (x1)
• Slow Forward / rev er se (DVD) playback
• Fast Forward / rev er se playback
• Search of title, chapter , and time in DVD
disc, and search of track and time in VCD
and CD
• Various TV aspect (DVD)
4:3 for Pan and Scan, 4:3 for Letter Box, and 16:9
for Wide
• Repeat playback (title and chapter for DVD,
track and disc for VCD/CD)
• Repeat a defined period from A to B
• Selective Play (DVD/VCD/CD)
You can select and play the desired title / chapter
of DVD and track of Video CD/CD in STOP mode.
• Various OSD (On Screen Display) languages
function (DVD)
You can select and display OSD among various
languages.
• Parental Lock function (DVD)
This function can prevent playback of software that
may be unsuitable for children.
• Multi Audio function (DVD)
The audio soundtrack can be heard in up to 8
languages. In the case of SVCD or CVD, it depends
on the disc. (The number of audio languages
depends on the software.)
• Multi Subtitle function (DVD)
The subtitle can be seen in up to 32 languages. In
the case of SVCD or CVD, it depends on the disc.
(The number of subtitle languages depends on the
software.)
• Multi Angle function (DVD)
This function allows you to choose the viewing
angle of scenes which were shot from a number of
different angles. (The number of angles depends on
the software.)
• Screen zoom function (DVD/VCD)
Read Carefully befor e U sing
Accessories
Remote control 2 Batteries
Connecting cable to
Audio/Video jack
Owner’s Manual
• To purchase accessories or not supplied parts additionally, contact your nearest dealer or service centre. But,
owner’s manual is not sold additionally.
Page 5
6
Product Information
7
Product Information
Important Safeguards ........................................... 1
Advantage of This Product Are... ...........................4
Read Carefully before Using .................................. 5
Contents ............................................................. 6
Identification of Controls ..................................... 7
Remote Control ................................................ 10
Installation
Connecting with TV............................................. 11
Connecting with Amplifier Having 5.1-CH Analog
Terminals .......................................................... 12
Operation
Playing Discs ..................................................... 13
Playing a desired scene ...................................... 14
Confirming the current PLAY mode on screen ........ 17
AUDIO language, SUBTITLE language and
3D AUDIO ......................................................... 18
ZOOM, Multi Angle and Digest play ....................... 19
About MP3 discs ................................................ 20
About JPEG discs ............................................... 21
Displaying menus in a disc ................................. 21
Setup
Language Setup..................................................22
Video Setup........................................................ 23
Audio Setup...................................................... 24
Others Setup ..................................................... 25
The others
About DVD......................................................... 26
Before doubting about troubles ........................... 29
Specifications .................................................... 31
Contents Identification of Contr ols
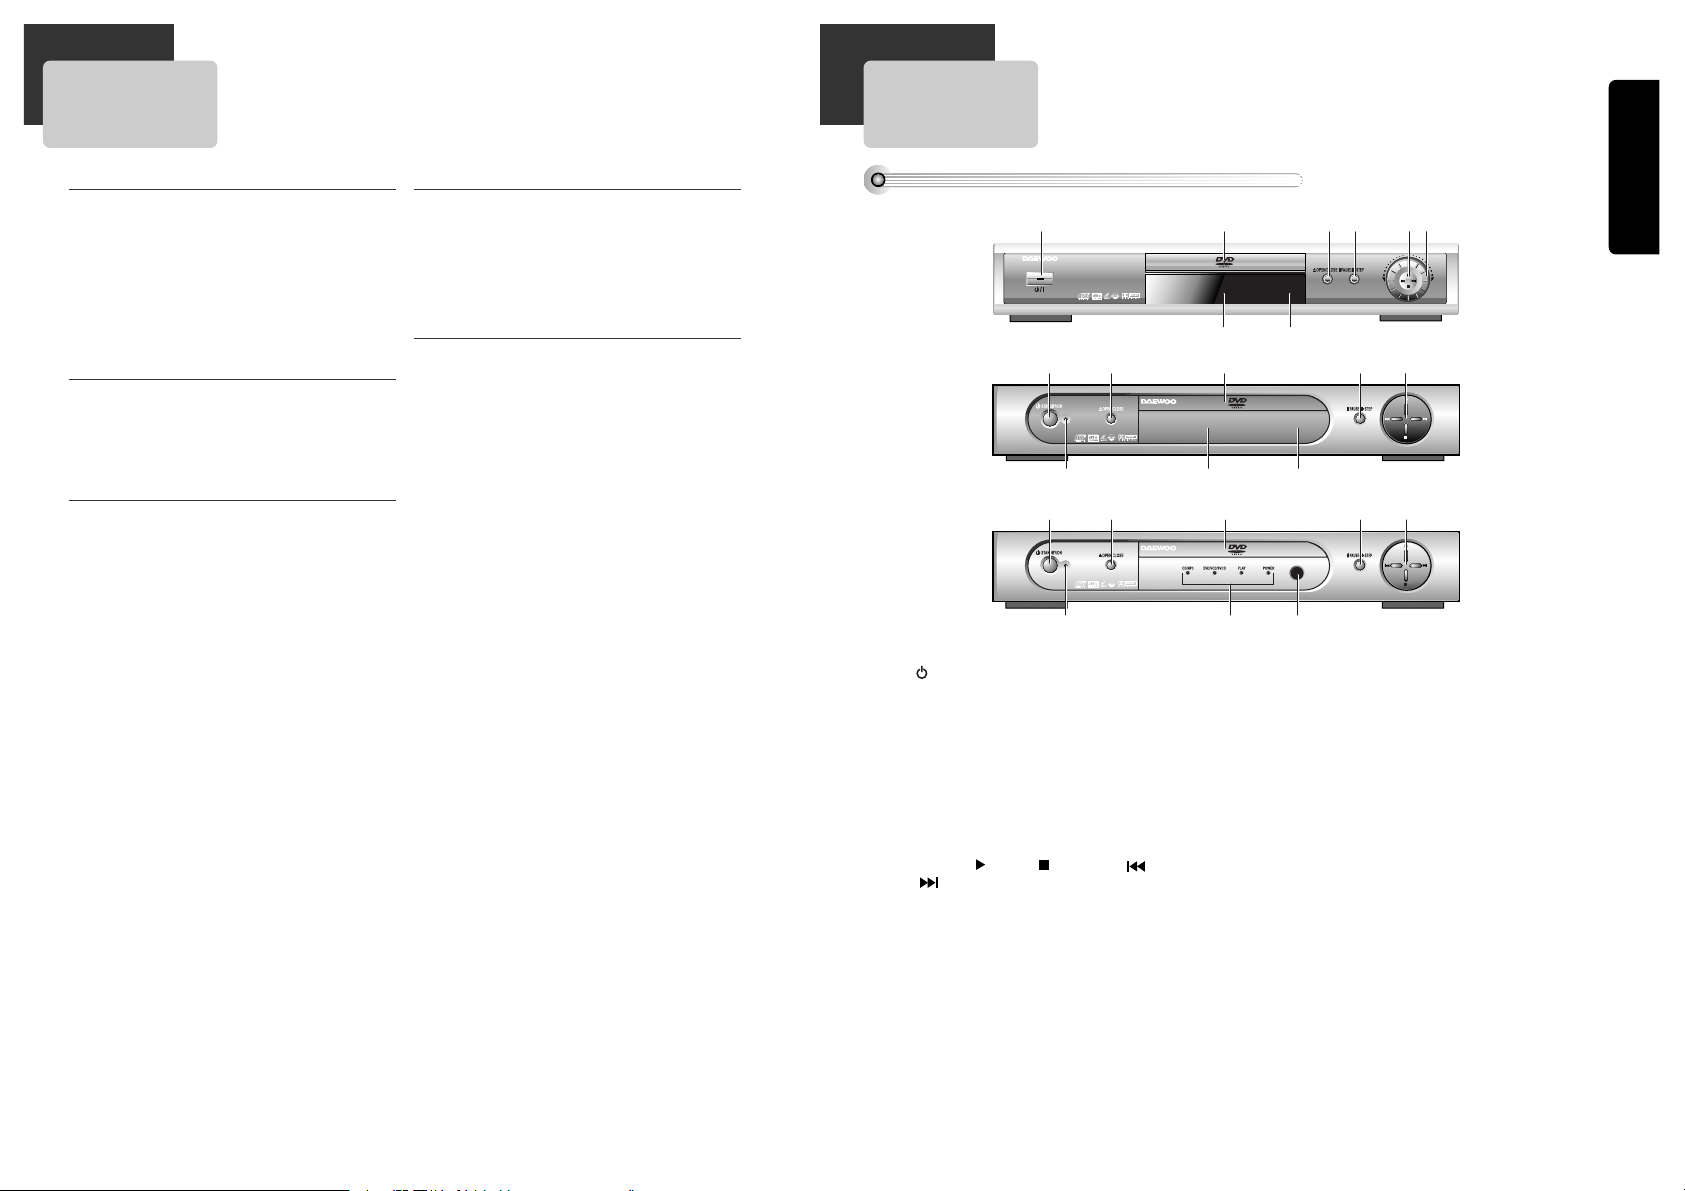
Front P anel
!
& *
@#$
% ^
! /I button
When switching off, the apparatus is not
completely switch off from the mains. (stand-by)
To disconnect it from the mains, you have to
unplug mains.
@ Disc tr ay door
# Open/Close Tr ay button
$ PAUSE/STEP button
% Oper ation button
Playback ( ), Stop ( ), Previous ( ) and Next
( ) operation can be selected with this button.
^ SHUTTLE-Ring
{DQD-6100D only}
Use to wind currently being played disc , or to
playback rapidly in clockwise. And use to rewind
currently being played disc, or to playback back
rapidly in counter-clockwise.
In Pause mode, rotating this Shuttle ring make
screen advance frame by frame.
& Oper ation Display Window
Display operation of device.
For more information, see “Operation Display
Window” in the 9 page.
* Remote Control Receiv er
( Standby indicator
) LED indicator
{DVD-260D/DVD-220D only}
CD/MP3 indicator :
This LED turns on when CD or
MP3 disc is inserted. If you insert bad disc, it
blinks.
DVD/VCD/SVCD indicator : This LED turns on
when DVD, VCD or SVCD disc is inserted. If you
insert bad disc, it blinks.
PLAY indicator : This LED turns on when you
playback various media.
POWER indicator : This LED turns on during
operation.
◆ DQD-6100D/DQD-2100D
!@#$%
*&(
◆ DVD-360D/DVD-320D
!
) *(
@#$
%
◆ DVD-260D/DVD-220D
Page 6

Product Information
9
Rear Panel
8
DIGITAL AUDIO OUT
AUDIO OUT (5.1 CH)
AUDIO OUTVIDEO OUT
!#@$%
^
! Digital AUDIO Output (CO AXIAL, OPTICAL)
Jack
To enjoy sound quality of theatre level in home,
connect this jack with amp or unit embedded with
digital audio decoder.
@ 5.1-CH Analog Audio Out Jack {DQD-
6100D/DVD-360D/DVD-260D only}
For Dolby Digital and dts, total 6 channels are
used; 3 channels for the front panel, 2 channels
for surround, and 1 channel for subwoofer.
These channels are located in right, left, centre of
front panel for 3 channels, right and left of rear
panel for 2 channels, and centre of front panel for
a channel. L and R means left side and right side
respectively, CENTRE means central side, and
WOOFER means subwoofer.
# S-VIDEO Out Jack
To obtain better screen quality, connect and use
the unit to TV or monitor inputted from S-VIDEO.
$ VIDEO Output Jack
% 2 CHANNEL (DOWNMIX) AUDIO OUT Jack
^ P o wer Cor d
It is a jack for supplying power to the unit.
Connect to outlet in a wall.
Identification of Controls
Operation Display Window
{DQD-6100D/DQD-2100D/DVD-360D/DVD-320D only}
Identification of Controls
DVD
SVCD
CDDA
MP3
PBC TITLE TRK CHP REPEAT1 ALL A-B RANDOM
DIGITAL
LPCM
!@#
32 1
$% ^ & * ( )
! Recognized DISC TYPE indicator
DVD, SVCD, VCD, CDDA, MP3
@ DISC LO AD/PLAY indicator
This indicator is lit up after recognizing disc.
# PLAY/PAUSE indicator
$ VCD2.0/SVCD PBC indicator
This indicator is lit up in selecting PBC ON while
this indicator disappears in selecting PBC OFF.
% D VD TITLE indicator
This indicator is lit up if title number is displayed
in playing DVD.
^ TRA CK/CHAPTER indicator
This indicator is lit up if Chapter (DVD) or track
(VCD / SVCD / CDDA / MP3) number is displayed.
& REPEAT MODE indicator
REPEAT 1 : In case you want to repeat and play a
chapter or track
REPEAT ALL : In case you want to repeat and play
a title or disc
REPEAT A- : In case you want to set “A- Repeat”
REPEAT A-B : In case you want to set “A-B Repeat”
* PARENTAL LOCK indicator
This indicator is lit up if parental lock in “Select
Function” menu is set items except "8 ADULT
(RELEASE)". This indicator disappears in setting
the parental lock to "8 ADULT (RELEASE)".
( RANDOM indicator
) D VD A UDIO STREAM indicator
: Dolby Digital audio
: DTS audio
LPCM : LPCM audio
1 NUMBER/CHARA CTER indicator
Title, chapter number, and time are displayed in
loading DVD disc while track number and time are
displayed in loading VCD/SVCD/CDDA/MP3 disc.
: Tray is opened
: Tray is closed
: Disc is loaded
: There is no disc in tray
: Disc has some error
: Menu screen is displayed
: Setup menu is displayed
: Power is ON
: Power is OFF
2 3D SOUND indicator
This indicator is lit up in selecting 3D SOUND [3D]
button.
3 ANGLE indicator
This indicator is lit up if disc contains Angle
screen.
DIGITAL
Page 7

Product Information Installation
1110
Remote Control
6
@
#
!
$
%
^
&
*
(
)
1
2
3
4
5
7
8
9
0
“
‘
+
=
Q
q
W
w
E
e
R
! DISC or Playback information
@ STANDBY ( )
# DVD ROOT MENU Playback, activates as RETURN button in
SVCD PBC ON
$ TITLE Menu in DVD, PBC (PlayBack Control) in
VCD2.0/SVCD
% MOVE to Up, Down, Right, Left in OSD/MENU/SETUP
mode
^ SETUP
& REPEAT (Repeat current title or chapter in DVD while
repeating current track or disc in VCD/CD)
* REPEAT a defined period from A to B
( PREVIOUS (move into a previous chapter or track)
) Fast Reverse Playback
1 PAUSE
2 SLOW Reverse
3 3D Sound
4 ZOOM
5 Numbers
6 MUTE
7 OPEN/CLOSE
8 CHAPTER/TITLE/TIME SEARCH
9 PROGRAM (play in a programmed order)
0 SELECT/CONFIRMATION
“ CLEAR button in OSD/MENU/SETUP mode
‘ AUDIO Language Select
+ SUBTITLE Language Select
= NEXT (Move into a next chapter or track)
Q PLAY
q Fast Forward Playback
W STOP
w Not available
E SLOW Forward
e ANGLE/DIGEST (Screen angle select in DVD mode, Digest
function in VCD mode)
R TV Output SYSTEM (Auto, NTSC or PAL) Selection
Manufactured under license from Dolby Laboratories.
“Dolby”, “Pro Logic”, and the double-D symbol are trademarks of Dolby Laboratories.
How to Connect
Connecting with TV
1
1 (If there is Audio/Video InPUT jack in TV) Connect Video Out jack in DVD player to Video In jack in TV,
and AUDIO Out jack in DVD player to AUDIO IN jack in TV with connecting cable of Audio/Video jack.
2
2 Use in S-VIDEO or COMPONENT In jack attached in TV.
3
3 Select either COAXIAL or OPTICAL to connect to amp.
In/Out jack in Audio/Video terminal:
- In: A jack used to receive signal required in this unit from other units.
- Out: A jack used to send signal of this unit to other units.
CAUTION
CAUTION: TO REDUCE THE RISK OF ELECTRIC SHOCK.
DO NOT REMOVE COVER (OR BACK).
NO USER SERVICEABLE PARTS INSIDE.
REFER SERVICING TO QUALIFIED SERVICE PRESONNEL.
RISK OF ELECTRIC SHOCK
DO NOT OPEN
20181614 121086 43
21191715 131197 53 1
COAXIAL
OPTICAL
AUDIO
AUDIO/VIDEO INPUTS VIDEO INPUT
DIGITAL AUDIO INPUT
VIDEO
S-VIDEO
DIGITAL AUDIO OUT
AUDIO OUT (5.1 CH)
AUDIO OUTVIDEO OUT
<Rear Panel of DVD>
<Rear Panel of TV>
<Amplifier of Dolby Digital>
Page 8

Installation Operation
13
Playing Discs
12
Connecting with Amplifier Having 5.1-CH Analog Terminals
How T o Connect
■ Apply this section just to an amplifier without digital audio input terminals.
Only when playing DVD disc, it is available of output.
1
1 Since more than three speakers are
connected, above all, set the Audio
item in DVD Unit.
2
2 You can connect a maximum of six
speakers.
SURROUND
FRONT
SUBWOOFER
CENTER
5.1 CH AUDIO INPUT
DIGITAL AUDIO OUT
AUDIO OUT (5.1 CH)
AUDIO OUTVIDEO OUT
<Rear Panel of DVD>
<5.1 Amplifier
with Channel Analog terminals>
T o control TV Sy stem
Press [SYSTEM] button to control TV Output Sy stem.
Every time the user presses [SYSTEM] button, Auto, NTSC and PAL are selected one by one.
Select your unit system.
Press [ ] button to power on.
Press [OPEN/CLOSE] button to open the
disc tray .
Place a disc firmly on the disc tray, making its label
look upward.
Insert the disc and press [OPEN/CLOSE]
button to close the tray .
The disc tray is closed and after checking the disc’s
condition, Playback or Stop function starts to
operate.
Various Playback Methods
■ If you want fast (or reverse) playback,
press [ ] or [ ] button in Playback
mode. You can watch fast playing (reverse)
screen.
* This reverse playback can be unavailable for
certain DVD. Unavailable for MP3.
■ If you want slow (or reverse) playback,
press [ ] or [ ] button in Pause mode.
You can watch the desired screen in the
slow forward (reverse) playback.
* For the case of Video CD, this reverse slow
playback function is unavailable. The
mark will appear.
■ If you want still picture, press [PAUSE]
button in Playback mode. You can watch
the desired screen in Pause status.
■ For Shuttle Ring on front panel
{DQD-
6100D only}
1
1
In playback mode, rotating this shuttle
in clockwise makes the playback speed
change in the below orders; x 2
x 20 x 30 x 80
2
2 In playback mode, rotating this shuttle
in counter clockwise makes the playback
speed change in the below orders;
x 2 x 20 x 30
x 80
3
3 In pause mode, rotating this shuttle ring
make screen advance frame by frame.
To playback it, pr ess [PLAY] button.
• In the case of DVD,
DVD menus and titles are displayed on TV screen.
• In the case of S-VCD and VCD2.0
the menus are displayed on TV screen and it is
converted into PBC(Playback Back Control) mode.
• In the case of CD, VCD1.1 and MP3,
the disc plays in order of its track numbers.
To stop it, pr ess [ ] button.
For pause, press [PAUSE] button in playback mode.
If you press [PLAY] button, it starts playback again.
Press [OPEN/CLOSE] button to remov e
the disc.
If you press no button in 5 minutes after you are
opened the tray, the player closes the tray automatically to
prevent from damage.
PLAY
S
EARCH FORWARD
S
EARCH BACKWARD
x 2
x 20
x 80
x 30
x 80
x 2
x 30
x 20
1
1
2
2
3
3
4
4
5
5
6
6
Page 9

14
T o skip scenes in a disc
Operation
15
Repeating a defined period
• Rep. Chapter : Current chapter will be repeatedly playback.
• Rep. Title : Current title will be repeatedly playback.
• Rep. One : Current track will be repeatedly playback.
• Rep. Disc : Current disc will be repeatedly playback.
• Rep. Random : Tracks in the disc will be playback in random order.
• Rep. Dir : Current directory in MP3 disc will be repeatedly playback.
• Rep. Off : Repeat playback will be cancelled.
Each time you press [REPEAT] button in playback mode , repeat
playback starts as below .
• DVD : Rep. Chapter --> Rep. Title - -> Rep. Off
• VCD : Rep. One --> Rep. Disc - -> Rep. Off
• CD : Rep. One --> Rep. Disc - -> Rep. Random --> Rep. Off
• MP3 : Rep. One --> Rep. Dir - -> Rep. Disc --> Rep. Random --> Rep. Off
Playing a desired scene
Playing a programmed or der
While STOP or Playback, press
[PROGRAM] button.
While the right figure is appearing, please input
desired Title and Chapter number with NUMBER
buttons. Press [ENTER] to go into next program
number.
* In case of VCD and CD, please input TRACK Number.
1
1
After completing setting, press [PLA Y] button.
Then, titles and chapters (track) are played in the above-programmed order.
To exit from Program Play mode, press the [SETUP] button in Program menu
screen.
2
2
Program Menu Select : ENTER
Title Chapter Title Chapter
1 - - - - 6 - - - 2 - - - - 7 - - - 3 - - - - 8 - - - 4 - - - - 9 - - - 5 - - - - 10 - - - -
Next
Play : Exit : SETUP
Playing a desired scene
To mo ve to ne xt chapter (or tr ack), press [ NEXT] button.
The current chapter (or track) moves to the next chapter (or track).
Press [ PREV] button.
The current scene moves to the previous chapter (or track) or first scene of current
chapter (or track).
Directly moving to a desir ed title
Press the [TITLE/PBC] or
[MENU]button.
A list of the titles on the disc is displayed.
For the case of VCD disc, menu screen will appear
only when the disc has PBC function and PBC ON
is activated.
1
1
Press the [ENTER] button or [PLA Y]
button after pressing the [ ]
button to select the
desired title.
The selected title now starts
playing.
2
2
■ Some movie discs may contain multiple titles. If the disc has a movie title menu recorded on it, the [TITLE]
button can be used to select the movie title. Details of operation may differ depending on the disc used.
* Selecting a title may not be available on certain DVD discs.
Repeating a defined period from A to B
■ You may repeat a defined period from A to B.
A MP3 disc may
not be repeated from
A to B.
At the point where you w ant to
start the repeat playback, press [AB] button.
The right figure appears and repeat playback
start position (A) is set.
1
1
Rep. A-
At the point where you w ant to end
the repeat playback, press [A-B]
button again.
The repeat playback end position (B) is set and
a defined period from A to B is playback
repeatedly.
2
2
To e xit from r epeat playback mode ,
press [A-B] button.
It enters into Normal Playback mode.
3
3
Rep. A-B
Rep. Off
Page 10

16
Operation
17
Confirming the current PLAY mode on screen
Confirming the current DVD disc mode
Confirming the current VCD, CD disc mode
While in playing, press [DISPLA Y]
button.
It shows the disc type, current title, current
chapter and time elapsed.
1
1
Press [DISPLA Y] button again.
It shows the DVD disc logo, subtitle selected,
2
2
While in playing, press [DISPLA Y] button.
It shows the disc logo, current track, subtitle selected,
audio selected, repeat playback mode, time elapsed and
equalizer bar.
* In case of CD, display screen appears automatically in playback
mode. But subtitle and equalizer bar indicator will not appear.
To exit from Display mode, press [DISPLAY] button again.
LR OFF1
02:00:181/2T1/8
C
VCD
00:45/30:35
1/2
T
Searching VCD and CD with a time or track time
If you want to search with a time ,
press [SEARCH] button one time.
In case of PBC OFF, the screen like the right figure
appears. Please enter the new time to be
searched using the [NUMBER] button.
1
1
In completing entering, please press [ENTER].
PLAY starts from the selected position.
* In case of MP3, press [SEARCH] button one time. When it shows track , please enter the
track number.
---
3
3
Time - - -
If you want to search with a tr ack
time, press [SEARCH] button twice .
In case of PBC OFF, the screen like the right figure
appears. It shows current track’s time. Please
enter the new track time to be searched using
the [NUMBER] button.
2
2
Track Time - - -
LR OFF
VCD
00:45/30:35
1
/2
T
LR OFF
VCD
00:45/30:35
1
/2
T
Playing a desired scene
Confirming the current MP3 disc mode
Display screen appears
automatically in Playback mode.
It shows the MP3 File information in disc, the
directory, MP3 File name and directory list.
With [ ] buttons, you can move the
cursor to directory or number of MP3 Music File.
To go to desired directory or to playback MP3 File,
1
1
JPEG
At the desired directory position,
press [ENTER] button.
It shows the track list.
2
2
00:45/30:35
1/517 128
K
T
OFF
DIR_1
DIR_3
DIR_4
DIR_5
DIR_2
00:45/30:35
1/517 128
K
T
OFF
...
TRACK_3
TRACK_4
TRACK_1
\ - - - - - - - - - - - - - - 1.MP3
\ - - - - -
TRACK_2
audio selected, dolby digital logo, repeat playback mode and current angle.
To exit from Display mode, press [DISPLAY] button again.
Searching DVD with a title number, a chapter number or a time
If you want to search with a title
number , press [SEARCH] button
one time.
It shows total title numbers , chapter numbers
and times. Please enter the new title number
to be searched using the [NUMBER] buttons.
1
1
If you want to search with a time ,
press [SEARCH] button three times.
Please enter the new time to be searched using
the [NUMBER] buttons.
In completing entering, please
press [ENTER] button.
PLAY starts from the selected time position.
3
3
Title - - -
If you want to search with a
chapter number , press [SEARCH]
button twice.
Please enter the new chapter number to be
searched using the [NUMBER] buttons.
2
2
02:00:18
1
/2
T
1
/8
C
Chapter - - -
02:00:18
1
/2
T
1
/8
C
Time - - : - - : - -
02:00:18
1
/2
T
1
/8
C
* If it is PBC ON, pressing the time number converts PBC to OFF mode automatically.
press [ENTER] key.
* The information of MP3 File means the disc type, current track, the bit rate of MP3 File,
repeat playback mode, time elapsed and equalizer bar.
Page 11

Operation
1918
ZOOM, Multi Angle and Digest play
Using a zoom function
■ The user can enlarge the current screen about 1.3 or 2 times.
Keep pressing [ZOOM] button till the
preferred zoom appears .
Every time the user presses [ZOOM] button, a zoom
magnification changes 1.3 times (X1.3) 2 times
(X2) OFF 1.3 times (X1.3) ... one by one.
Different Angle
■ If a disc includes multi angle information, the user can watch a screen in multi angles. The function is
limited to a DVD disc supporting multi angle information.
Keep pressing [ANGLE/DIGEST] button
till the preferred angle appears .
Every time the user presses [ANGLE/DIGEST] button,
an angle degrees changes in a consecutive order.
For the case of
VCD, only 2 times
Zoom is available.
2
1.3
Selecting an audio language
A UDIO language , SUB TITLE language and 3D A UDIO
■ The user may select an audio language and subtitle language if a disc includes Multi-language.
Keep pressing [A UDIO] button till the
user’s preferred language appear s.
If DVD disc includes audio information, every time the
user presses [AUDIO] button, English (ENG), French
(FRE), Spanish (SPA) and others appear one by one.
Selecting a subtitle language
Keep pressing [SUBTITLE] button till the
user’s preferred language appear s.
If a DVD disc includes subtitle information, every time
the user presses [SUBTITLE] button, English (ENG),
French (FRE), Spanish (SPA) and others appear one by
one.
A certain disc
may not support
audio select or
subtitle select.
Selecting 3D Audio
Please press [3D] button.
If the right figure appears, move the cursor with
[ ] buttons.
The user may select a “Sound fields” among Standard,
Theater, Amphitheater, Live, Concert, Church, Wide,
Hall or Stadium.
Also, select a “Graphics equalizer” among Standard,
Classic, Rock, Jazz, Pop or User.
* When setting graphics equalizer, sound fields changes to
“Standard” automatically.
To exit from 3D mode, press [3D] button again.
■ Sound Fields and Graphics Equalizer can be set.
Only activates
with VCD 1.0 or VCD 2.0
discs.
+8dB
- 8dB
Sound fields Standard
Graphics equalizer Standard
I
ENG1/3
OFFENG/3 1/1
I
ENG1/3
OFFENG/3 1/1
I
ENG1/3
OFFENG/3 1/2
A base point to be enlarged is centre and the point can
be changed with the operation of [ ] button.
Digest play
Press the [ANGLE/DIGEST] button in
playback or stop mode.
All the contents of VCD are divided to 9 parts and the
first scene of each parts are shown on the screen.
Press the [ENTER] button after moving to the desired
scene with [ ] button.
The selected scene now starts playing.
D
D
D
Page 12

Operation
2120
Playing a disc containing JPEG files
■ This unit will play JPEG files recorded on CD-R and CD-RW discs.
JPEG
If your disc is detected, screen appears with the same
format of MP3 file.
1
1
Pressing [ENTER] button in JPEG image makes the its image
appear on the screen.
At this time, i f you pr ess [PLAY] button, sliding image can
be viewed automatically from this image . Its vie wing time
can be different from the file .
* If you press [PLAY] button in JPEG image directly without pressing [ENTER] button,
sliding screen will be viewed automatically.
2
2
To stop sliding image , pr ess [ST OP] button. Pressing [ST OP]
button again makes the screen go to first list.
3
3
About JPEG discs
T o display menus in a disc
■ If a disc includes menus, the user may use them.
Press [TITLE/PBC] or [MENU] button.
• It shows menus in the disc. Also they are different according to discs.
(“Return” will appear on the OSD with VCD2.0.)
• If it is a VCD2.0, select PBC ON mode by pressing [TITLE/PBC] button.
* CD and VCD1.1 do not support the function.
1
1
Move a cursor to a relative item with arrow buttons of [ ] button and
select one with [ENTER] button or [PLAY] button.
2
2
Displaying menus in a disc
Playing a disc containing MP3 files
■ Play and Pause
Press the [PLAY] or [PAUSE] button to switch between play and pause.
■ Search for a track
The [SEARCH] button works on MP3 discs as well as CD audio.
■ To stop playback
Press the [STOP ] button.
■ To skip to the next or pr evious file
• Press the [ NEXT] button of the remote control briefly while playing, to skip
ahead to the beginning of the next file. Each time you press the button
consecutively, the beginning of the next file is located and played back.
• Press the [ PREV (Previous)] button of the remote control briefly while playing,
to skip back to the beginning of the previous file. Each time you press the button
consecutively, the beginning of the previous file is located and played back.
The ability of this unit to read MP3 discs is dependent on the followings:
• The Bit Rate must be within 64-256 kbps.
• The maximum number of directories should not exceed 32.
• The maximum depth level of directories should not exceed 4.
• File names should be named using 8 or fewer letters and/or numbers, and must incorporate
the “MP3” file extension. EXAMPLE:
********
. MP3 where each *is a letter or number.
• Use only letters and/ or numbers in file names. If you use special characters, the file and/ or
folder names may not be displayed correctly on the on-screen display.
• The CD-R or CD-RW discs should be written using the ‘disc at once’ method.
• The disc which is made with ISO 9660 format can be playback.
About MP3 discs
This unit will play MP3 files recorded on CD-R and CD-RW discs.
1
1 Turn on your television and select the channel assigned to this DVD player.
2
2 Press the DVD open [OPEN/CLOSE] button, the disc tray opens.
3
3 Put a disc containing MP3 files on the disc tray with the label side up.
4
4 Press the DVD open [OPEN/CLOSE] button, the disc tray closes.
5
5 The unit will take a short while to load the disc and display the directory structure.
6
6 Press the [ ] navigation buttons of the remote control to select the
folder, then press the [ENTER] or [PLAY] button to confirm.
7
7 Press the [ ] navigation buttons of the remote control to select the file
you want to listen to, then press the [ENTER] button and this selected file is
located and played back.
8
8
After starting playback, the track list is on-screen. You can move the highlight onto
the folder name above the track list and change folder with the [PREV] button.
Press the [SEARCH] button twice in stop mode to get back to folder tree view.
If JPEG file is
more than about
500KB, the playback
of file by pressing
[ENTER] button may
be impossible, or
sliding image may be
skipped.
Page 13

Setup
2322
Language Setup
Selecting an OSD language.
Please select a language to be displayed on DVD screen.
2
2
Selecting an Audio language.
Set it as the preferred audio language. In case the audio language is set and
recorded in the DISC, it is automatically played in the set language everytime
it is played. For example, English is set and recorded as audio language in
the DISC, it is played in English.
3
3
Selecting a Subtitle language.
Please set it as the preferred language. In case the subtitle language is set
and recorded in the DISC, it is automatically played in the set language
everytime it is played. For example, English is set and recorded as subtitle
language in the DISC, it is played in English.
* To select another subtitle language, follow the same procedure with another audio
language setting.
4
4
The user can set the language of menus in a disc, audio and subtitle.
While DISC STOP or Resume STOP,
press [SETUP] button.
1
1
OSD Language English
Audio English
Subtitle English
Disc Menu English
Selecting a DISC MENU language.
Please set it as the preferred DISC MENU language. In case the DISC MENU
language is set and recorded in the DISC, it is automatically played in the set
language everytime it is played. For example, English is set and recorded as a
DISC MENU language in the DISC, it is played in English.
5
5
In case a disc
does not include
setting languages
information, the
selected language
does not appear.
Language Video Audio Others
Video Setup
Selecting TV Aspect.
If a user selects “4:3 LB”, the user can watch
the original scene of “16:9”, but the top and
bottom of the screen look black color.
If a user selects “4:3 PS”, the user can watch
only a centre of the original scene of “16:9”.
If a disc size is originally recorded in 4:3, the
user cannot watch it in a wide screen though
the user sets a size as “16:9 Wide”.
2
2
Selecting a TV type.
The user may select a TV type.
The user may select a type among Auto, NTSC
or PAL .
3
3
A user can set up a connected TV condition and screen.
Selecting Video Out.
The user may select a Video Out between RGB
and S-Video.
4
4
While DISC STOP or Resume STOP,
press [SETUP] button.
1
1
TV Aspect 4:3 LB
TV Type PAL
Video Out RGB
TV Aspect
TV Type
Video Out
✔ 4:3 LB
4:3 PS
16:9 Wide
TV Aspect
TV Type
Video Out
Auto
NTSC
✔ PAL
TV Aspect
TV Type
Video Out
✔ RGB
S-Video
Language Video Audio Others
Language Video Audio Others
Language Video Audio Others
Language Video Audio Others
Page 14

Setup
2524
Audio Setup
Select a digital output.
Set output conditions to coaxial or optical
terminal. You can set following two values of
digital output;
• BITSTREAM : The same signal as audio
signal recorded in disc goes to digital
2
2
A user may select audio menu according to a user’s speaker set.
While DISC STOP or Resume STOP,
press [SETUP] button.
1
1
Digital out Bitstream
Speaker Setup :
Front L/R Small
Center None
Surround None
Subwoofer None
{DQD-6100D/DVD-360D/
DVD-260D only}
Digital out
Speaker Setup :
Front L/R
Center
Surround
Subwoofer
Select a Front L/R Speaker .
The user can select a Front L/R Speaker Type
between “Small” and “Large”.
3
3
✔ Bitstream
LPCM
Digital out
Speaker Setup :
Front L/R
Center
Surround
Subwoofer
Select a Center Speaker .
This submenu is valid when you are using an
amplifier, which have the 5.1-CH analog
audio input. If you have the Center speaker,
please select “Small” or “Large”. If not, select
“None”.
4
4
Digital out
Speaker Setup :
Front L/R
Center
Surround
Subwoofer
Select a Surround Speaker .
This submenu is valid when you are using an
amplifier, which have the 5.1-CH analog
audio input. If you have the Rear speaker,
please select “Small” or “Large”. If not, select
“None”.
5
5
Digital out
Speaker Setup :
Front L/R
Center
Surround
Subwoofer
Language Video Audio Others
Language Video Audio Others
Language Video Audio Others
Language Video Audio Others
Language Video Audio Others
Language Video Audio Others
✔ Small
Large
✔ None
Small
Large
✔ None
Small
Large
audio output terminal.
• LPCM : Decoded audio signal goes to digital output terminal.
Select a Subwoofer Speaker.
This submenu is valid when you are using an
amplifier, which have the 5.1-CH analog
audio input. If you have the Subwoofer
speaker, please select “Present”. If not, select
“None”.
6
6
Digital out
Speaker Setup :
Front L/R
Center
Surround
Subwoofer
✔ None
Present
Select Parental.
Press [ENTER] button to set the
selected item.
It consists of 8 levels of parental control,
violence, sexual scene, strong sexual scene
and others to protect children from watching
those scenes.
6
6
OSD On
Screensaver On
Defaults No
Parental Off
Change Password
✔ Off
1 Kids
2 G
3 PG
4 PG-13
5 PG-R
Others Setup
Select character display window.
Select "On" to make OSD(On Screen Display)
language displayed in screen.
2
2
Select screensaver.
If bright scenes continue to be displayed in
screen, TV can be damaged. Set the
screensaver to "On", the screensaver
functions automatically and DVD logo moves
continuously if the resume stop, stop, open
status is maintained for about 5 minutes.
3
3
Select defaults.
If you select defaults, every function set
returns to FACTORY Defaults except Parental.
4
4
While DISC STOP or Resume STOP,
press [SETUP] button.
1
1
Entering a password.
Input password display appears.
Enter a user’s password by pressing 4 [Digit]
buttons.
5
5
Initial Password
is “3308”. When you
forget new password,
you may input this
number.
OSD On
Screensaver On
Defaults Reset
Parental Off
OSD
Screensaver
Defaults
Parental
✔ On
Off
OSD
Screensaver
Defaults
Parental
✔ On
Off
OSD
Screensaver
Defaults
Parental
✔ Reset
OSD On
Screensaver On
Defaults Reset
Input Password ◆◆◆◆
Language Video Audio Others
Language Video Audio Others
Language Video Audio Others
Language Video Audio Others
Language Video Audio Others
Language Video Audio Others
Language Video Audio Others
Changing a password.
For the change of a user’s password, please
move to “Change Password” and enter new
password.
7
7
OSD On
Screensaver On
Defaults Reset
Parental Off
Change Password ◆◆◆◆
Page 15

The others
2726
About DVD
T erms related with D VD
DVD A DVD (abbreviation of Digital Versatile Disc or Digital Video Disc) can include 135 minutes of
video information. And for audio, it can hold up to 8 kinds of languages and 32 kinds of subtitle
languages. By using MPEG-2 video compression and digital 3D surround sound, DVD realizes highdefined screen and quality sound like a movie theater.
CDDA A CDDA (abbreviation of Compact disc digital audio) is a music disc that is currently used.
MP3 Audio compression format that enables audio files to be stored and transferred on a computer
with a relatively small file size. It enables you to enjoy CD quality music. (Short for MPEG-1 Layer
3)
PBC This is recorded on a Video CD 2.0, Video CD 3.0, SVCD and CVD. The scenes or information to be
viewed (or listened to) can be selected interactively with the TV monitor by looking at the menu
shown on the TV monitor. It stands for PlayBack Control.
CHAPTER It means the information recorded in a DVD. A title in a DVD is divided into many tracks, of which
a track is called as a chapter. A certain scene of a screen can be quickly searched with the chapter
number.
TITLE It means the information recorded in a DVD. A DVD can be divided into may titles.
TRACK It means the information recorded in a video CD and audio CD. A disc consists of many a track,
for which a user can search a certain position.
dts Digital Theatre System is a 5.1 -channel surround sound system, which is widely used in movie
theatres around the world. It enables the bit rate to be increased to provide good sound quality.
“DTS” and “DTS Digital Out” are trademarks of Digital Theater Systems, Inc.
Multi Angle Some DVD discs contain the various scenes that have been simultaneously shot from a number of
different angles.
PCM PCM (Pulse Code Modulation) means digital sound.
Dolby Digital Dolby Digital enables the delivery of mono through 5.1-channel audio at data rates from 32 kbps
to 640 kbps, thus offering flexibility and economical performance as well as uncompromised
sound quality.
Bitstream Digital audio data that is decoded into an analog signal for subsequent output to speakers.
Lt/Rt It indicates L/R of Dolby Digital 2CH Downmix Output.
L/R/C/SW/LS/RS
6 channels are using in Dolby Digital and dts. They are 3 channels for the front screen, 2 channels
for surround and 1 subwoofer. The front left speaker is referred as L, right speaker as R, centre
speaker as C, subwoofer as SW, left surround speaker as LS, right speaker as RS.
* L/R of 6CH output like upper case is displayed as Lo/Ro.
Downmix Downmix is the technology for playing proper audio in case the recorded audio channel
construction and that of output channel does not match each other. Downmix will provide 5.1
channel-audio by using 2 stereo speakers.
S-Video S-Video offers clearer and sharper screen than COMPOSITE by separately-transmitting the signal of
color (C) and brightness (Y).
REGION MANAGEMENT INFORMA TION
This unit is designed and manufactured to respond to the Region Management information that is
recorded on a DVD disc. The region number of this player is “2”. If the region number described on the
DVD discs does not correspond to the Region number of this player, the player will not play this disc.
This player will play DVD discs made for “ALL” regions. Therefore, this player will play DVD discs marked
with labels containing the region number “2” or “ALL”.
(Region 2) (Region ALL)
2
ALL
Playable Disc
About DVD
• DVD, Video CD(Version 1.1, 2.0), S-VCD and Audio CD
Disc type Playable Restriction
DVD Possible Region number 2 or Region number All
Video CD Possible Version 1.0/1.1/2.0, SVCD/CVD
CD Possible PCM or dts
CD-G Possible Only Audio playback
CD-ROM Possible MP3 File
CD-R Possible Video-CD/CD/CD-ROM (MP3 File)
CD-RW Possible Video-CD/CD/CD-ROM (MP3 File)
DVD-R Possible DVD Video
DVD-RW Possible DVD Video
DVD+RW Possible DVD Video
DVD-ROM Impossible
DVD-RAM Impossible
Photo CD Impossible
Page 16

The others
2928
Before doubting about tr oubles
• The DVD player does not play.
• No sound comes through.
• A disc is playing but screen does
not appear or poor screen
appears.
• Sound is irregular.
• Remote control does not work.
• Dolby Digital sound does not
work.
• [AUDIO] or [SUBTITLE] button
does not work.
Checks
Symptom
➤ If a DVD is from overseas, it may not be played. Please
check a DVD’s region code whether it has the relative region
code 2 or All.
➤ Please check whether a DVD is inserted in a right direction.
➤ CD-ROM, DVD-ROM isn’t playback. (CD-ROM and DVD-ROM
means the format which has simple information.)
➤ Play mode may be “SLOW” or “PAUSE/STEP” (In abnormal
speed play, no sound comes through).
➤ Did you connect the parts in right way?
➤ Please check the operative condition of TV or amplifier.
➤ From “DEFAULT” SET, please check “Audio” items.
➤ Did you turn on your TV sets?
➤ Did you connect the parts in right way?
➤ The play may be in “PAUSE”.
➤ A disc may have some contaminants or be damaged.
➤ A disc may be bad one.
➤ Please check the connection with Dolby Digital amplifier.
➤ Please check the plugs are connected with one another
tightly.
➤ Some contaminants may be remained in connection
terminal.
➤ Please check the degree of the remote control, distance or
any interruption.
➤ Battery may be weak or exhausted.
➤ Unplug the power plug and plug it again.
➤ Dolby Digital sound can be worked in the Dolby Digital
amplifier only.
➤ Please check “Dolby Digital ” mark on your DVD.
➤ In case of playing it through digital output, while pressing
[STOP], please check whether “DIGITAL OUT” is
“BITSTREAM” by pressing [SETUP].
➤ Please check the connection is correct.
➤ If a DVD does not include language information, it does not
support the function.
Keeping a disc safety
• To keep a disc in clean condition, please do not touch the side containing play information.
• Do not attach a bit of paper or sticky tape on it.
• Do not expose a disc to a direct sunlight or electric heating systems.
• After using it, please keep the disc in a case.
Cleaning a disc
Region Code
• Please rub it from centre toward outside with clean clothe.
• Do not use thinner, benzol (benzene), commercial cleaning goods or antistatic
sprays.
Macrovision
This product incorporates copyright protection technology that is protected by method claims of certain U.S
patents and other intellectual property rights owned by Macrovision Corporation and other rights owners.
Use of this copyright protection technology must be authorized by Macrovision Corporation, and is intended
for home and other limited viewing uses only unless otherwise authorized by Macrovision Corporation.
Reverse engineering or disassembly is prohibited.
About DVD
The product and all DVD disc have
region codes. So if both codes are
not coincided each other, it does
not work. Region codes are like
the below.
Page 17

The others
3130
DVD Audio output standar ds
Specifications
Power AC 230V~, 50Hz
Consumed electricity 14W (supplementary 8W)
Weight 4.25 kg
Dimension (WxHxD) 420mm x 65mm x 250.3mm
Operative temperature +5°C ~ 35°C
Installation condition Horizontal / Relative humidity under 80%
VIDEO output VIDEO output terminal, 1.0Vp-p, 75Ω, unbalanced, RCA JACK
S-VIDEO output (75Ω In load Y: 1.0Vp-p, C:0.286Vp-p), Din Jack
Euro (Scart) Jack
AUDIO output Analogue RCA JACK, 2.0Vrms, 75Ω,
Digital 0.5V p-p, 75Ω, RCA JACK
Optical Digital Optical Cable
AUDIO 90dB (EIAJ)
AUDIO dynamic range 90dB (EIAJ)
Resolution Over 500 lines (DVD Disc play)
Disc type
DVD Video-CD CD
Analogue Audio output 48/96KHz sampling 44.1KHz sampling 44.1KHz sampling
5.1-CH (R, L, C, SW, RS, LS) 48KHz sampling - Digital Audio output 48KHz sampling 44.1KHz sampling 44.1KHz sampling
Optical digital audio output 48KHz sampling 44.1KHz sampling 44.1KHz sampling
Output
Before doubting about troubles
• [ANGLE/DIGEST] button does
not work while a DVD is playing.
• “MENU” does not appear while a
DVD is playing.
• Screen shakes or appears only in
black and white.
• The file name of MP3 (CD-R)
appears with strange letters.
• Any MP3 (CD-R) file isn’t
displayed.
Checks
Symptom
➤ “ANGLE” is supported only in a DVD contains multi angle
scenes. Also a user can confirm the support with the
“ANGLE” mark on screen.
➤ Please check the degree of the remote control, distance or
any interruption.
➤ Please check a battery in the remote control whether it is
exhausted or not.
➤ A DVD may not contain menu information.
➤ The recorder may not coincide with your TV system. Please
press [SYSTEM] to match to PAL system.
➤ A disc may have some contaminants or be damaged.
➤ Please check a DVD’s region code 2.
➤ To watch the disc whose region code is ALL and its system
is NTSC, select “PAL” in TV Type.
➤ The file name of MP3 recognize only the Alphabet (A~Z,
a~z), numbers (0~9) and a special symbol on keyboard (~,
!, @, #, $ ....) and 10 letters can be displayed in maximum.
➤ The letters except above case will be displayed like “- - - -”.
➤ If the surface of disk is injured, the file display and
playback can be impossible.
 Loading...