

Page 1

INSTRUCTION MANUAL
COLOR
TELEVISION
DTY
DTY
-29Z9
-29Z9
Page 2

1
Important safeguards 2
INTRODUCTION
Features 4
Installation 4
To connect the aerial 5
To prepare the remote control 5
Identification of controls 6
Remote control 8
Turning the Power ON/OFF 9
To turn the power on/off 9
Watching TV Programmes 10
To watch a TV Programme 10
Tuning in 11
To preset programmes (Auto Search) 11
To preset programmes(SORT) 13
To preset programmes(SEARCH) 14
MFT(Manual Fine Tuning) 16
To skip unnecessary programme numbers 17
To watch VIDEO 18
Selecting outside input 18
Enjoying Wide Picture 19
16:9 Screen 19
Convenient Picture and Sound Controls
20
Sound muting and on-screen recalling 20
Selectable picture 21
Selectable sound 24
Enjoying Stereo and Bilingual Broadcasts
27
To select the stereo/bilingual mode 27
Watching Double Window 28
To display double window 28
Various double window operation 29
Watching Picture-in-picture 32
To display a sub-picture 32
Various Picture-in-Picture operations 33
Watching POP(Picture-out-picture) 34
To display a POP(Picture-out-Picture) and various
POP operations 34
Using Other Menus 35
Clock on/off timer 35
Sleep time 36
To select the language of the on-screen display 37
To select the blue screen and auto volume 38
To Connect Other machines like VIDEO
39
Names and Functions of Connective
Terminals 39
Connecting VIDEO 40
Connecting with S picture VIDEO 41
Connecting with VIDEO CAMERA
(CAMCORDER) 42
Connecting with AUDIO SET 43
Recording TV 43
Broadcast Transmission Systems
in Each Country 44
Viewing Teletext(Option)/
Use of the Teletext Buttons 45
To view text 45
To adjust teletext characters quality 49
Troubleshooting 50
Specification 51
Table of contents
Page 3
Power Sources - This set should be operated
only from the type of power source indicated on
the marking label.
Overloading - Do not overload wall outlets,
extension cords or convenience receptacles
beyond their capacity, since this can result in fire
or electric shock.
Alternate Warning - For the set with a three-wire
grounding type AC plug.
This plug will only fit into a grounding type power
outlet. This is a safety feature. lf you are unable
to insert the plug into the outlet contact your electrician to have a suitable outlet installed. Do not
defeat the safety purpose of the grounding plug.
Object and Liquid Entry - Never push objects of
any kinds into the set through openings as they
may touch dangerous voltage points or short-out
parts that could result in a fire or electric shock.
Never spill liquid of any kind on the set
Attachments - Do not use attachments not recommended by the manufacturer, as they may
cause hazards.
Cleaning - Unplug the set from the wall outlet
before cleaning it. Do not use liquid cleaners or
aerosol cleaners. Use a cloth lightly dampened
with water for cleaning the exterior of the set.
2
Water and Moisture - Do not use power-line
operated sets near water for example, near a
bathtub, washbowl, kitchen sink, or laundry tub,
in a wet basement, or near a swimming pool.
lf you pour a cold liquid into a glass, water vapor
in the air will condense on the surface of the
glass. This is moisture condensation. Moisture
condensation on the head drum, one of the
most crucial parts of the Video recorder, will
cause damage to the tape. Whenever the Video
recorder is exposed to extreme cold and heat at
the time, some condensation will occur. When
moisture is present, turn the power switch on,
and allow at least 2 hours for the Video recorder
to dry out.
Accessories - Do not place the set on an unstable cart, stand, tripod, bracket, or table. The set
may fall, causing serious injury to a child or an
adult, and serious damage to the set. Use only a
cart stand tripod, bracket, or table recommended
by the manufacturer.
Ventilation - These slots and openings in the
cabinet are provided for necessary ventilation. To
ensure reliable operation of the set, and to protect if from overheating, these slots and openings
must not be blocked or covered.
-Never cover the slots and openings with a cloth
or other materials.
-Never block the slots and openings by placing
the set on a bed, sofa, rug or other similar surface.
- Do not allow anything to rest on the power cord.
Do not locate this television equipment where the
cord will be abused by persons walking on it.
Portable Cart warning - An appliance and cart
combination should be moved with care. Quick
stops, excessive force, and uneven surfaces may
cause the appliance and cart combination to
overturn.
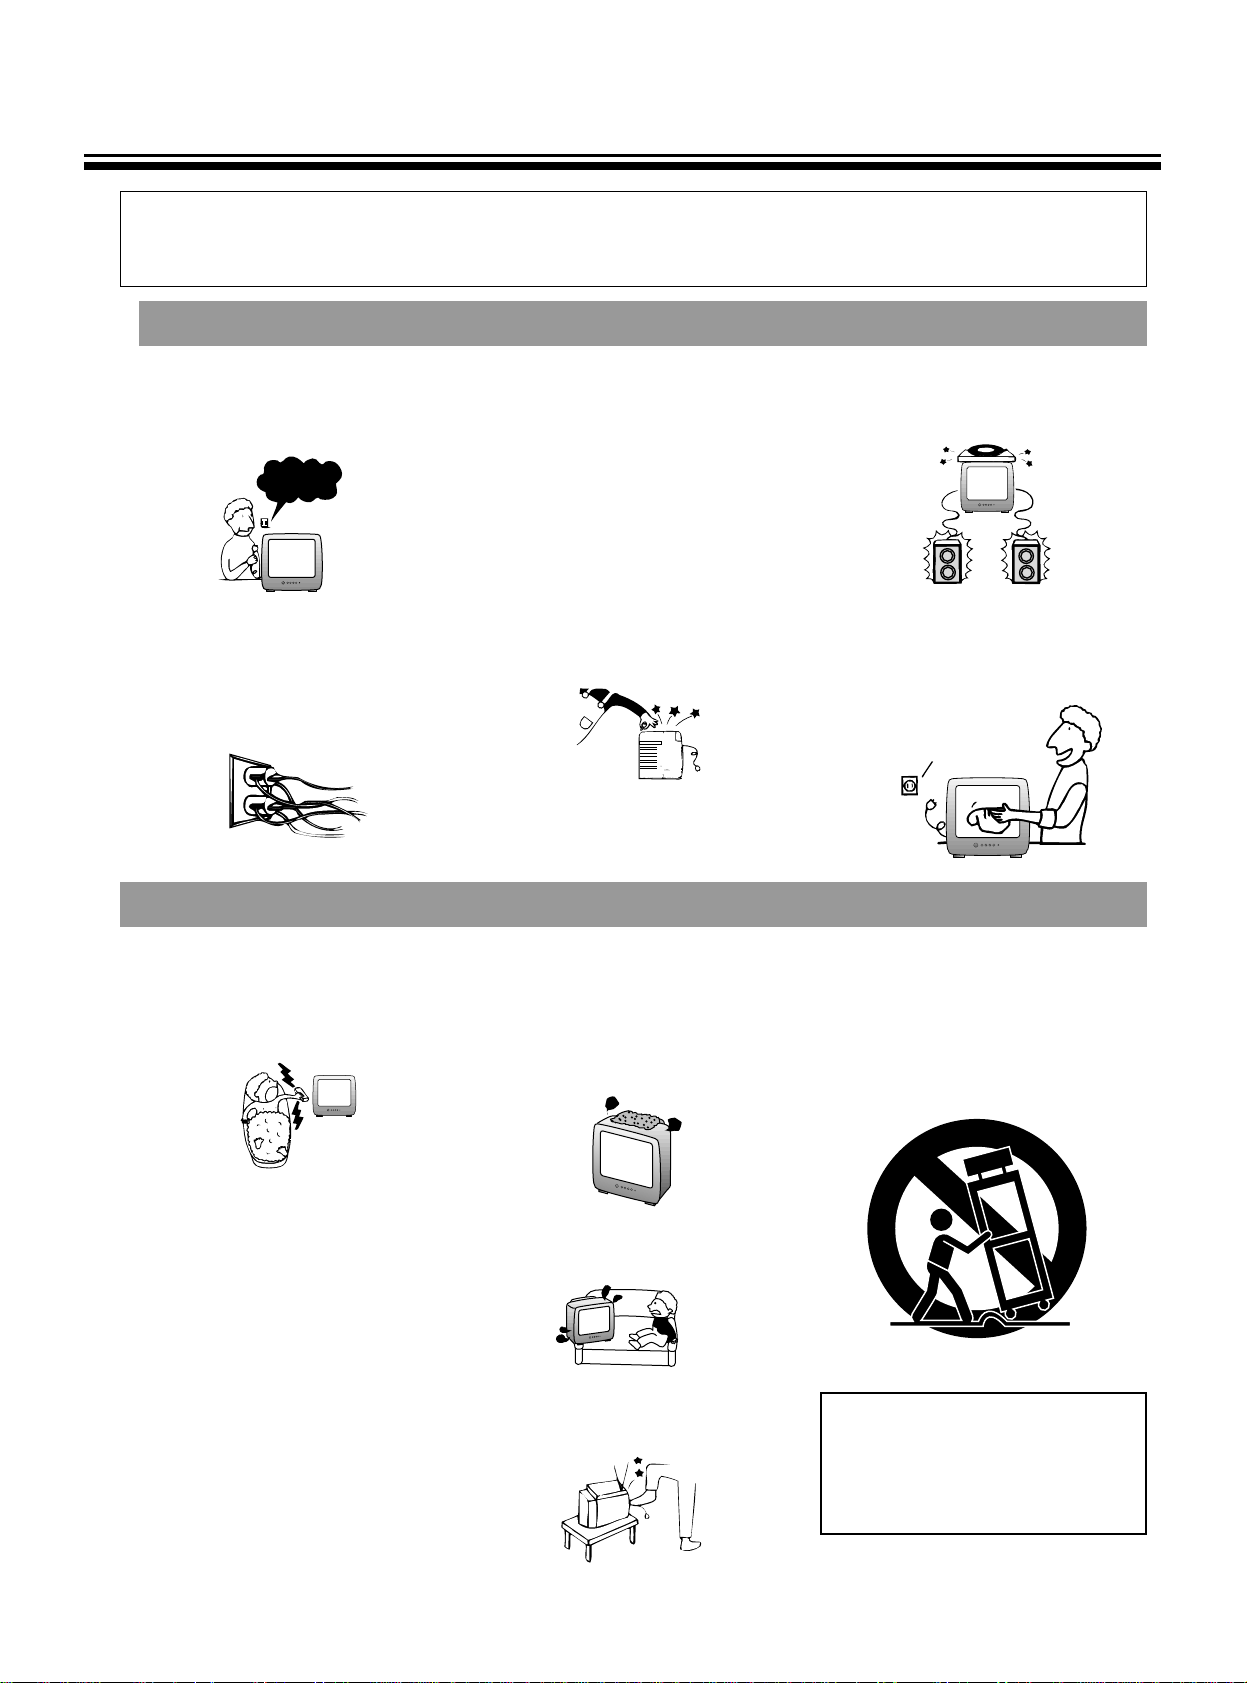
Important Safeguards
USE
INSTALLATION
For your protection, please read these safety instructions completely before operating the appliance, and keep this manual for future
reference.
Carefully observe all warnings, precautions, and instructions on the appliance, or the one described in the operating instructions and
adhere to them.
110-240V~?
UNPLUG
- The appliance is not intended for use by
young children or infirm persons without
supervision;
- Young children should be supervised to
ensure that they do not play with the
appliance.
Page 4
3
POWERLINE EXPOSURE
- Never place the set in a confined space such as
a bookcase, or built-in cabinet, unless proper
ven-tilation is provided.
Power-Cord Protection - Route the power cord
so that it is not likely to be walked on or pinched
by items placed upon or against them, paying
particular attention to the plugs, receptacles, and
the point where the cord exits from the appliance.
- Do not place the set near, over a radiator
or heat register, or where it is exposed to
direct sunlight.
Lightning-For protection for this set during a
lightning storm, or when it is left unattended
and unused for long periods of time, unplug
it from the wall outlet. This will prevent damage to the set due to lightning and powerline surges.
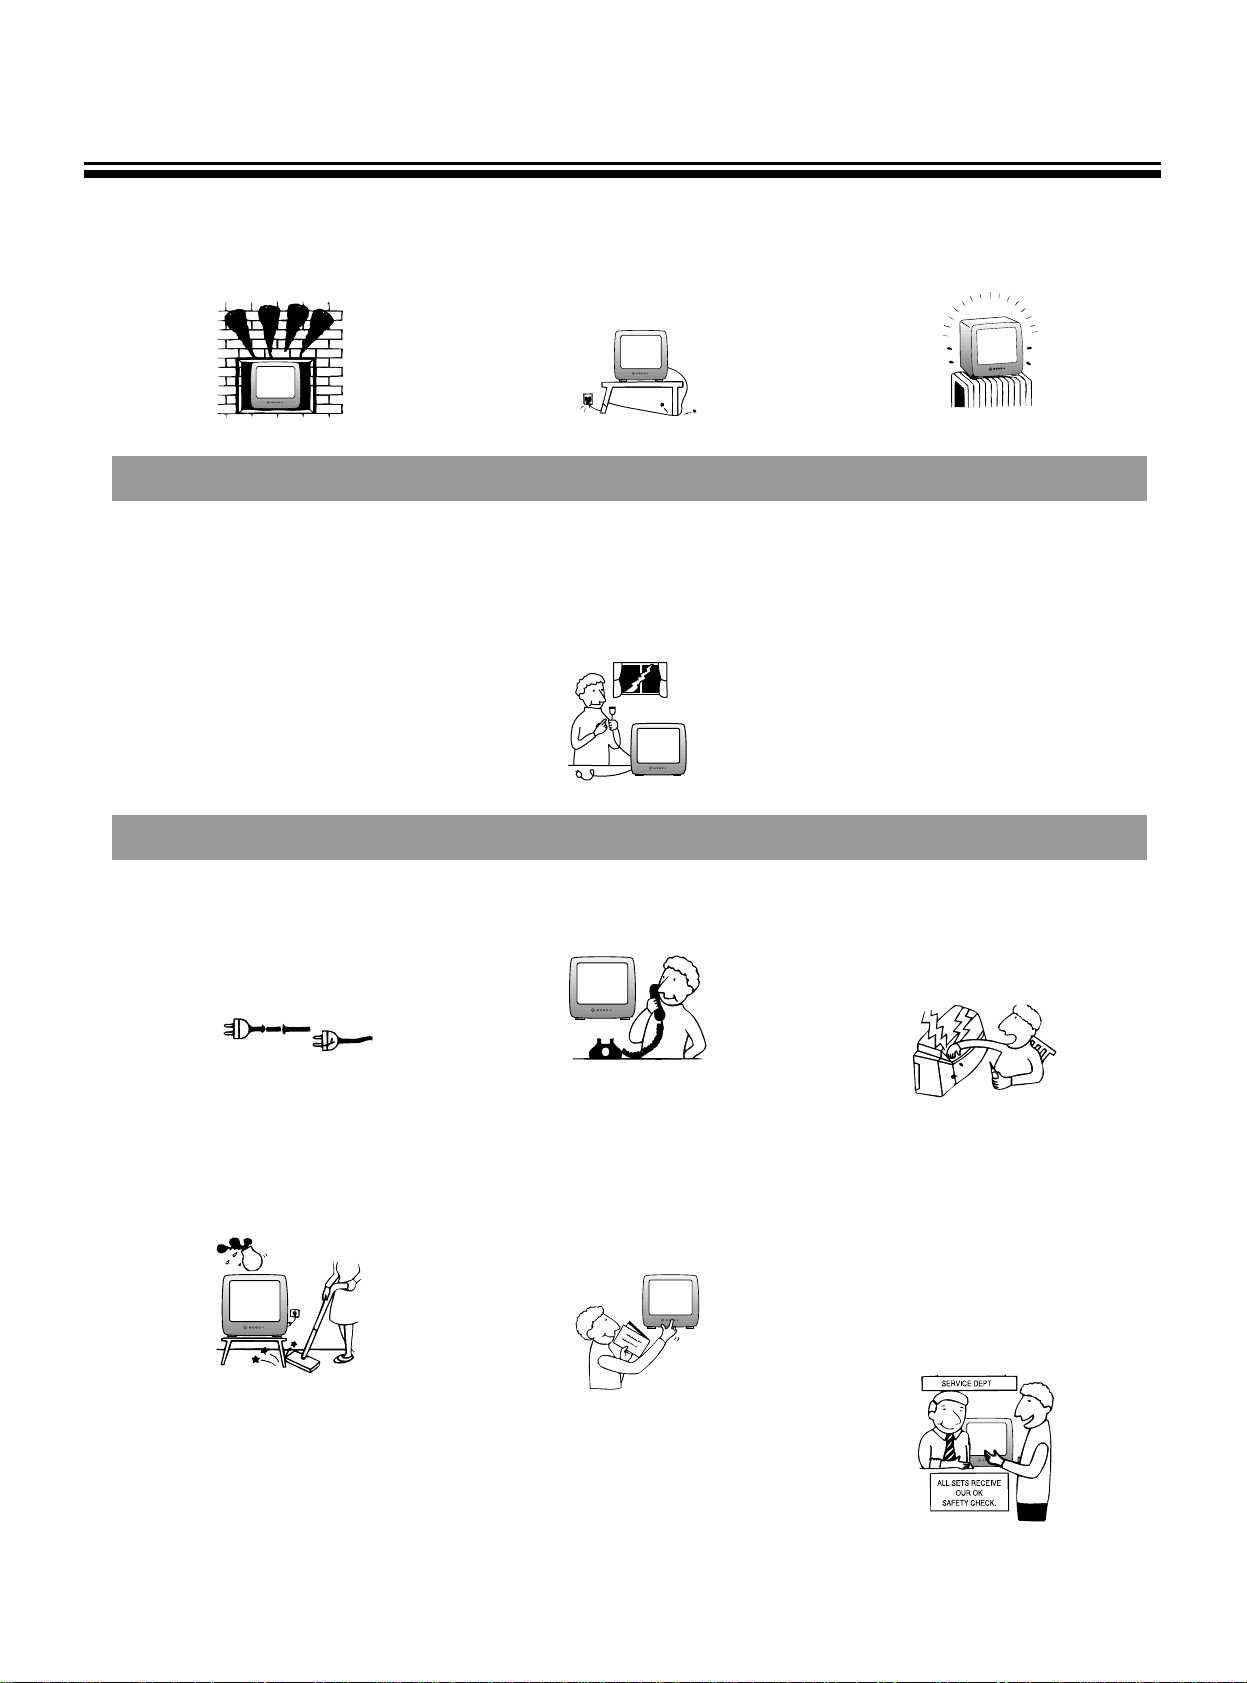
SERVICE
Damage Requiring Service - Unplug the set
from the wall outlet and refer servicing to qualified service personnel under the following conditions:
- When the power cord or plug is damaged or
frayed.
- lf liquid has been spilled or objects have
fallen into the set.
- lf the set has been subject to excessive shock
by being dropped, or the cabinet has been damaged.
- lf the set does not operate normally when following the operating instructions. Adjust only
those controls that are specified in the operating
instructions. lmproper adjustment of other controls may result in damage and will often require
extensive work by a qualified technician to
restore the set to normal operation.
- When the set exhibits a distinct change in
performance-this indicates a need for
service.
Servicing - Do not attempt to service the set
yourself as opening or removing covers may
expose you to dangerous voltage or other hazards.
Refer all servicing to qualified service personnel.
Replacement parts - When replacement parts
are required, be sure the service technician has
used replacement parts specified by the manufacturer that have the same characteristics as the
original parts. Unauthorized substitutions may
result in fire, electric shock, or other hazards.
Safety Check - Upon completion of any service
or repairs to the set, ask the service technician to
perform routine safety checks (as specified by
the manufacturer) to determine that the set is in
safe operating condition.
FRAYED OR CUT
-AC LINE
CRACKED PLUG.
Page 5

4
Features
INTRODUCTION
Installation
Double Window
You can enjoy two programs simultaneously by splitting the screen in two.
16:9 screen
You can select a desired 16:9 screen mode for movies as well as the normal 4:3 picture mode.
A variety of AV terminals for external equipment connection.
●Two sets of video/audio inputs on the rear and one set on the side.
●S-VIDEO terminals.
●One set of monitor output terminals.
●OPTION:One set of SCART JACK input/output on the rear.
Selectable picture and selectable sound
Allows one-touch selection of your favorite picture quality and tone quality.
NICAM and German stereo/bilingual broadcasts receivable
PIP (Picture-in-Picture) / POP (Picture-out-Picture)
The PIP function can show another picture on the main picture simultaneously. The POP function can show as many
as 8 different pictures (no matter how the moving pictures or still pictures) simultaneously.
Off-timer and On-timer
Turns off the TV automatically and will turn it back on at a preset time.
●INSTALL the unit in a room where direct light will not fall upon the screen.
Tonal darkness or a reflection on the picture screen may cause eyestrain. Soft and indirect lighting is
recommended for comfortable viewing.
●ALLOW enough space between the unit and the wall for proper ventilation.
●AVOID excessively warm locations to prevent possible damage to the cabinet or components.
●RATED VOLTAGE: 110-240V~, 50/60Hz
Automatic degaussing
All color television receivers are sensitive to magnetic influences usually caused by either moving the
receiver from one place to another or using certain electrical appliances near the receiver. This residual
magnetism, as it is called, sometimes causes distortion which gives rise to “blotchy”areas of color
in the picture. To avoid these effects, the receiver incorporates an automatic degaussing switch.
This circuit removes any residual magnetism in the metal parts of the picture tube and ensures that each time the
receiver is turned “ON”using the main switch, the purity of the colors displayed on the screen remains true and life-
like. If the unit is moved or made to face a different direction, the main switch must be off at least 30 minutes in order
for the automatic degaussing circuit to operate properly.
INTRODUCTION
Page 6

5
To connect the aerial
To prepare the remote control
Installation
Optimum reception of color requires a good signal and will generally mean that an outdoor aerial must be used. The
exact type and positioning of the aerial will depend upon your particular area.
Notes
●When using an outdoor aerial, disconnect the
leads of the indoor aerial, if connected, from the
aerial terminal socket.
●It is recommended that the 75-ohm coaxial cable
be used to eliminate interference and noise which
may occur due to radio wave conditions.
●The aerial cable should not be bundled with the
power cord and the like.
Using the ATT(attenuator) switch (See page 7)
When visual interference occurs, set the ATT switch to
ON using a small screwdriver.
Battery installation Tips for remote operation
1
2
Remove the battery cover.
Insert two size AA batteries matching the +/- polarities of the battery to the +/- marks inside the battery
compartment.
1
2
●When the remote control will not be used for a long
period of time or when the batteries are worn out,
remove the batteries to prevent leakage.
●Do not throw the batteries into a fire. Dispose of used
batteries in the specified manner.
●Do not drop, dampen or disassemble the remote control.
Effective range
Page 7
6
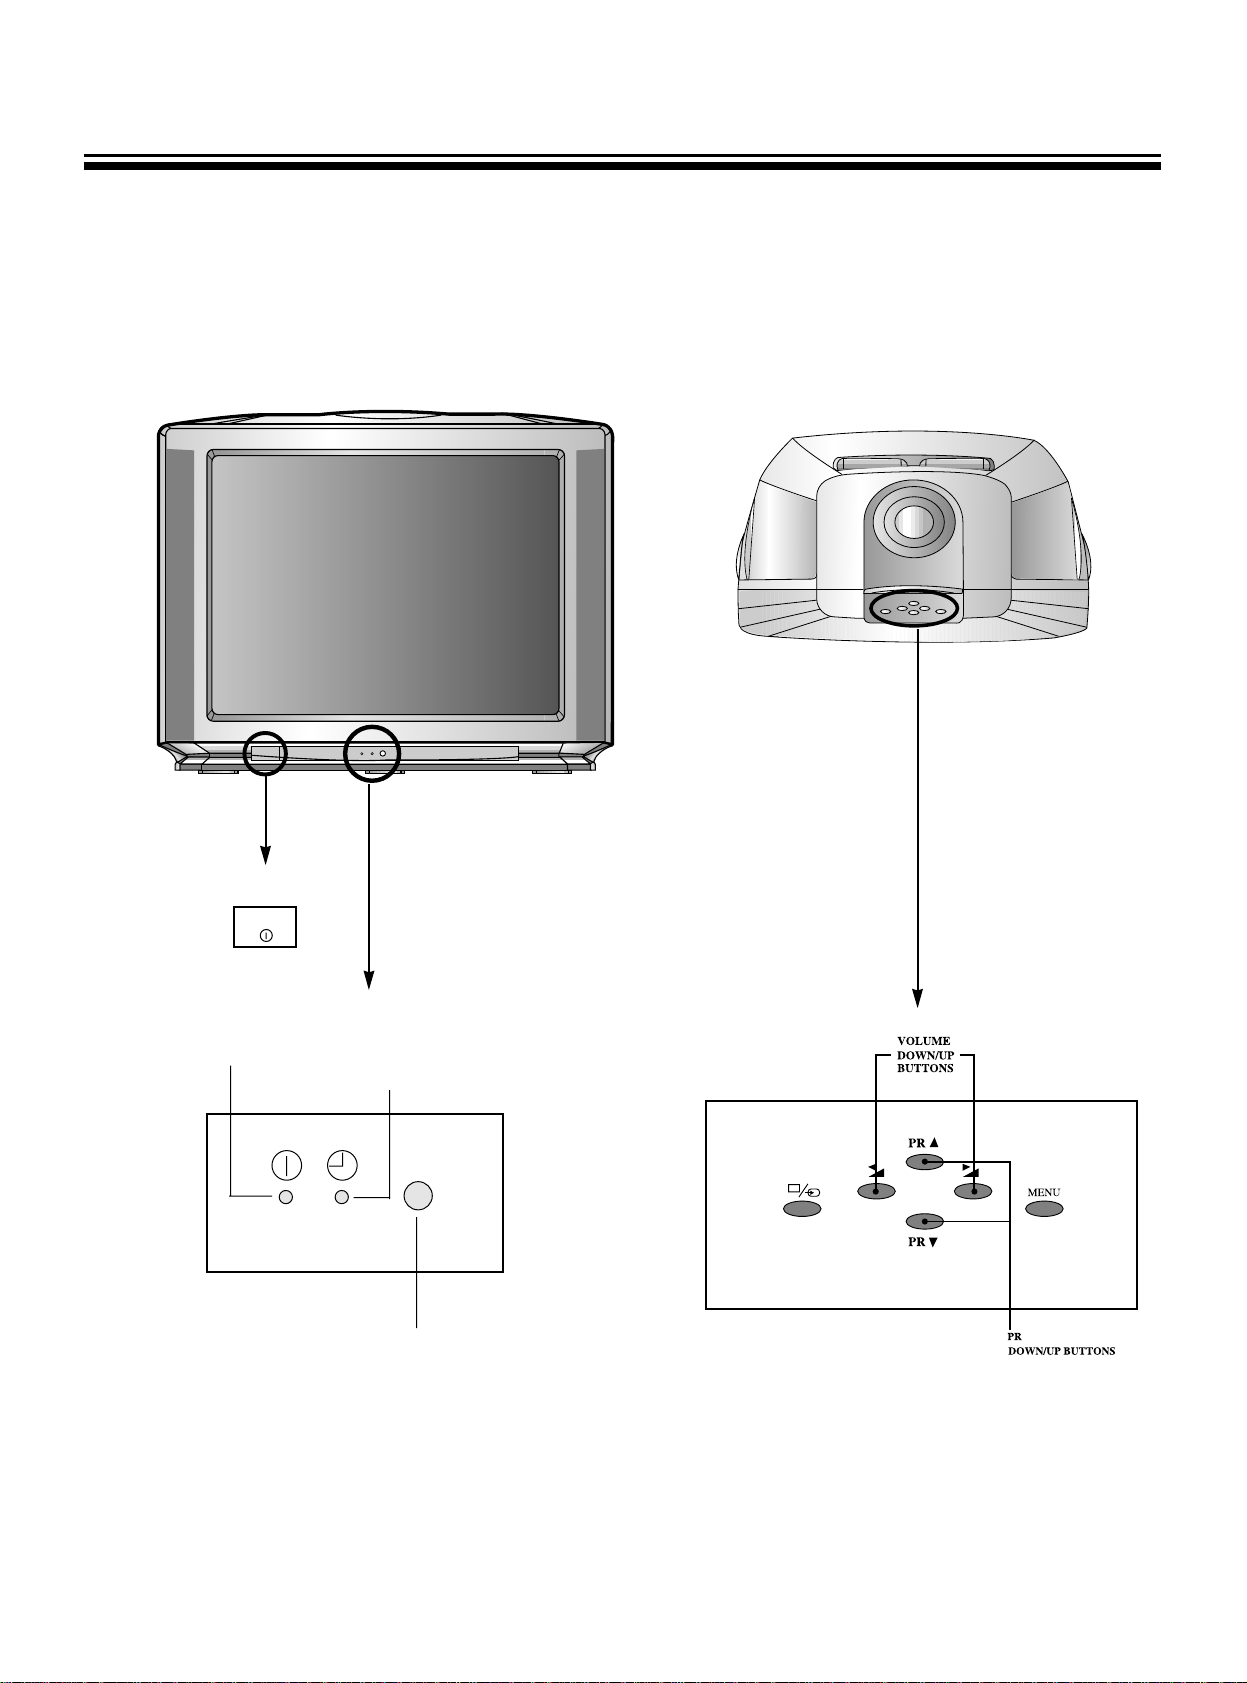
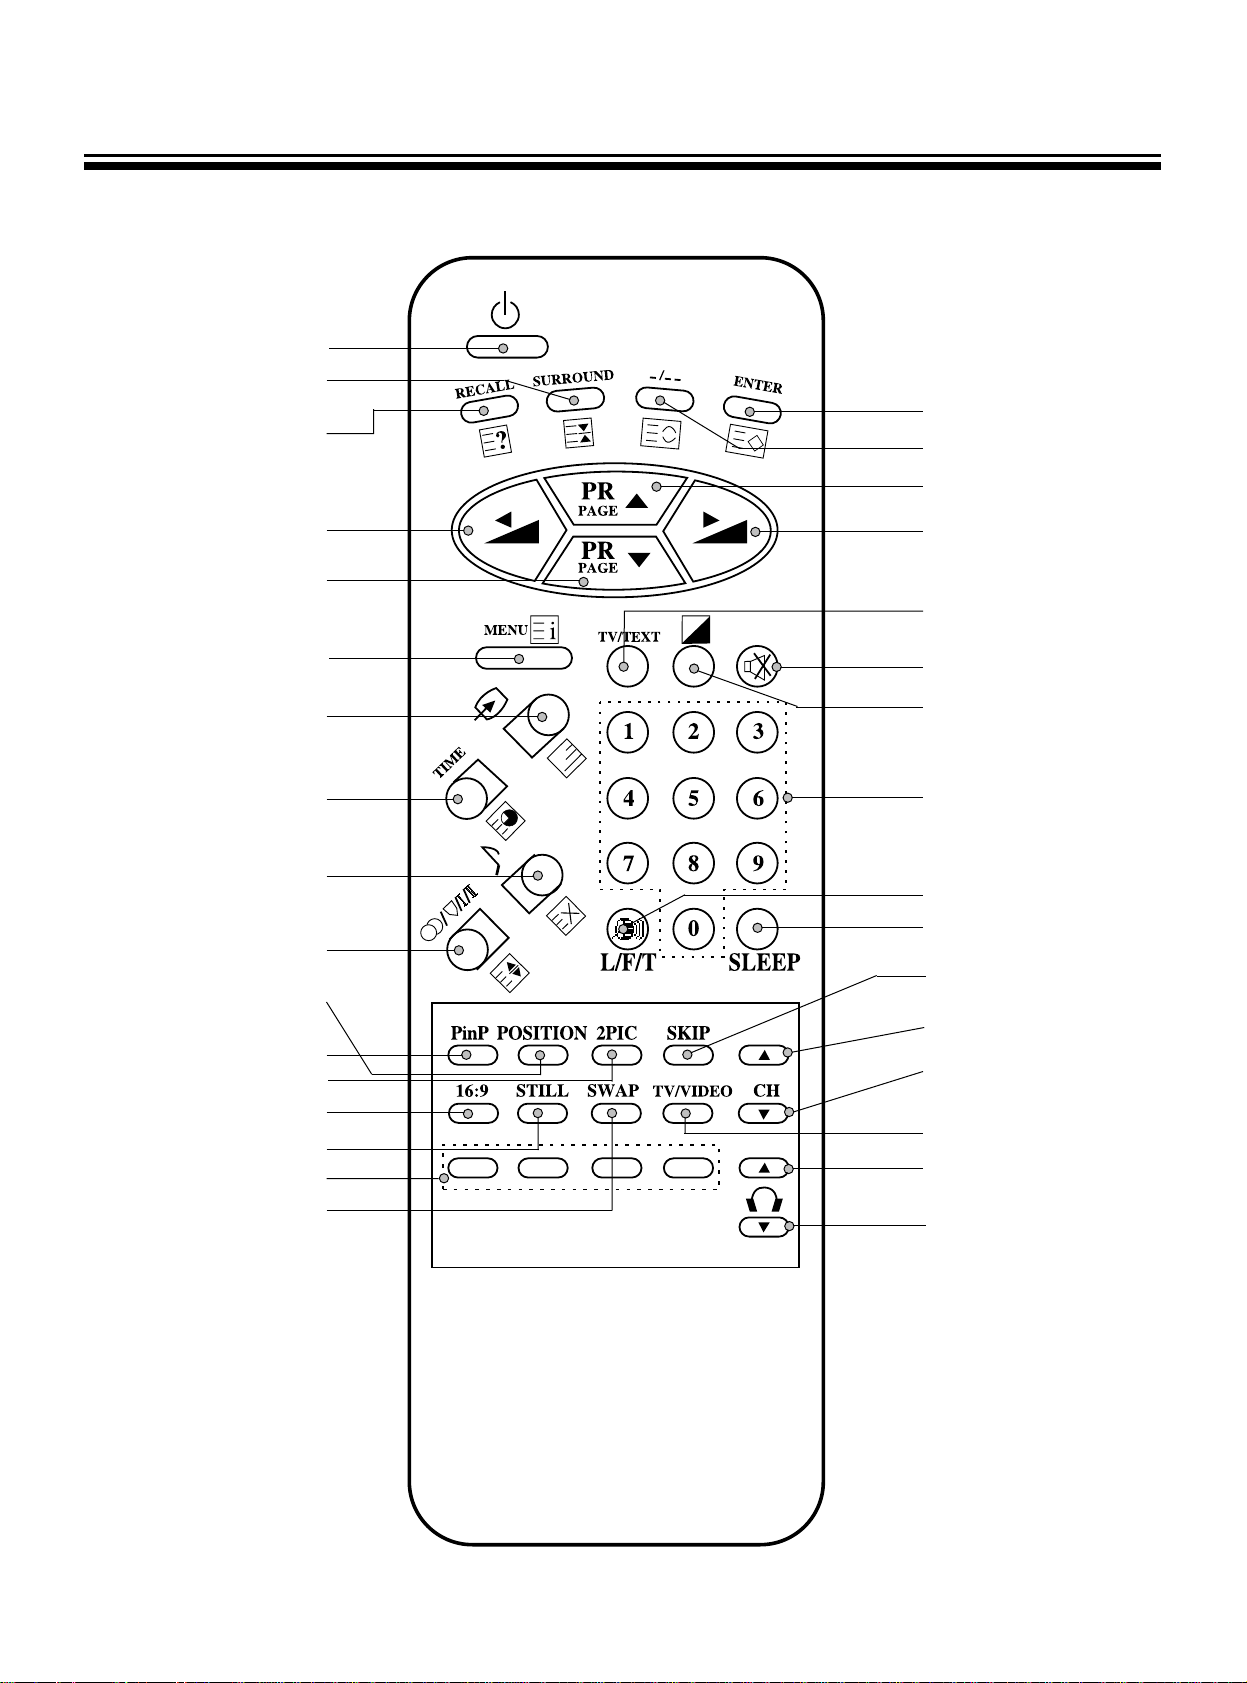
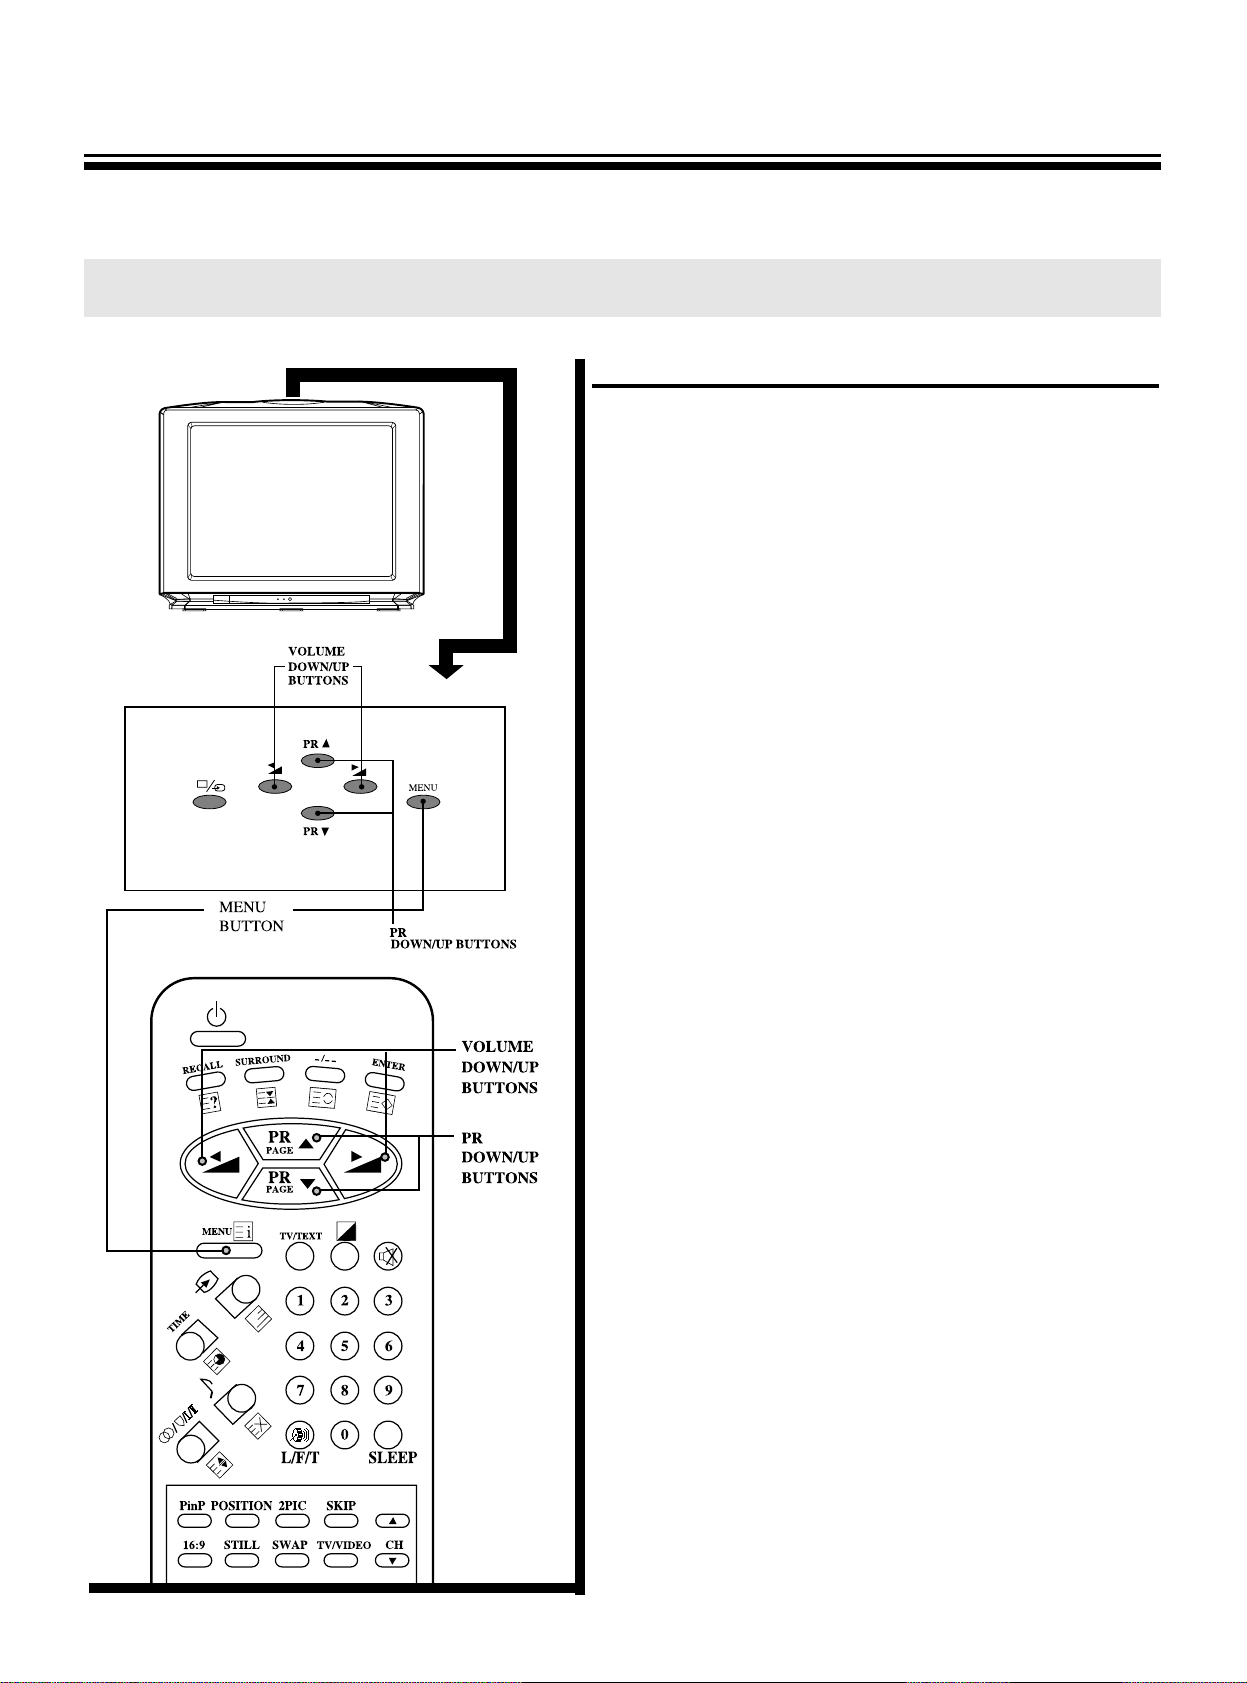
Identification of controls
*
The following describes the name of each part of the TV and remote control.
Infrared sensor
ON TIMER indicator
Main power switch
FRONT
TOP
POWER indicator
POWER
Page 8
7
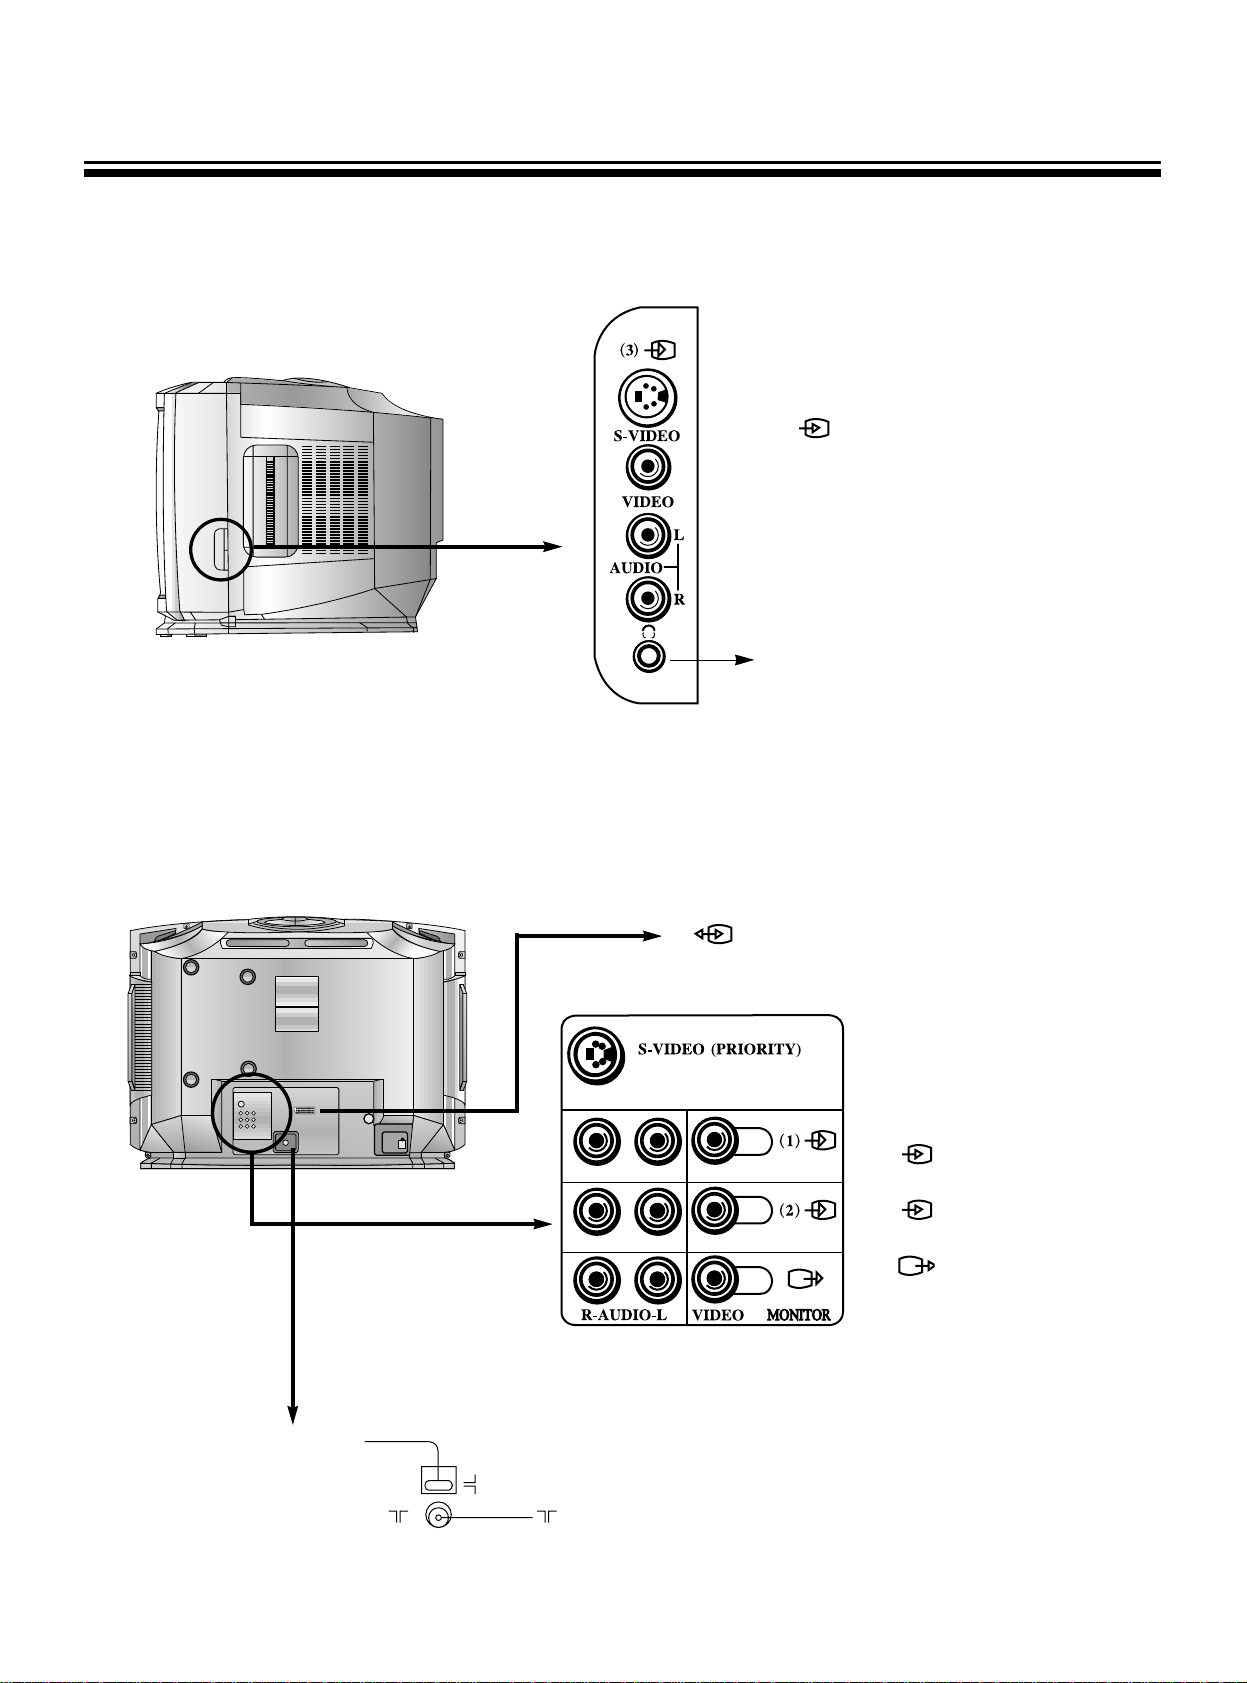
SIDE
BACK
(3) VIDEO 3 input terminals
(S-VIDEO, VIDEO, AUDIO L, R)
Use this Jack when listening to the
sound outputted to the speaker
with the headphone, and you can
listen to the sound of the right side
screen(sub-screen) when the double
window on the picture-in-picture
mode is selected.
(1) Video 1 input terminals
(S-VIDEO, VIDEO, AUDIO L, R)
(2) Video 2 input terminals
(VIDEO, AUDIO L, R)
MONITOR output terminals
(VIDEO, AUDIO L, R)
ATT(Attenuator switch)
ATT
ON
OFF
Aerial input
(4) Video 4(option) input/output terminal
(SCART JACK input/output)
Page 9
8
Remote Control
POWER ON/OFF
SURROUND ON/OFF
(HOLD)
RECALL
(REVEAL)
ENTER
(STORE)
DIGIT SELECT (BROWSE)
PR UP (PAGE UP)
VOLUME UP
(TV/TEXT)
SOUND MUTE
SELECTABLE
PICTURE
(CONTRAST MENU)
PR SELECT 0~9
(PAGE SELECTOR 0~9)
SLEEP TIME SELECT
SUPER WOOFER ON/OFF
SKIP ON/OFF
PinP, 2PIC SUB
CH UP
PinP, 2PIC SUB
CH DOWN
HEADPHONE
VOLUME UP
HEADPHONE
VOLUME DOWN
PinP, 2PIC
SUB TV/VIDEO SELECT
VOLUME DOWN
PR DOWN
(PAGE DOWN)
MENU
(INDEX)
TV/VIDEO
INPUT SELECT
(MIX)
TIME DISPLAY
(SUBCODE)
SELECTABLE SOUND
(CANCEL)
STEREO/BILINGUAL
SELECT
(SIZE)
PinP POSITION SELECT
PinP MODE SELECT
2PIC MODE SELECT
PICTURE SIZE SELECT
STILL ON/OFF
(RED, GREEN, YELLOW, CYAN)
2PIC, PIP SWAP
TEXT use identified by ( )
Page 10
9
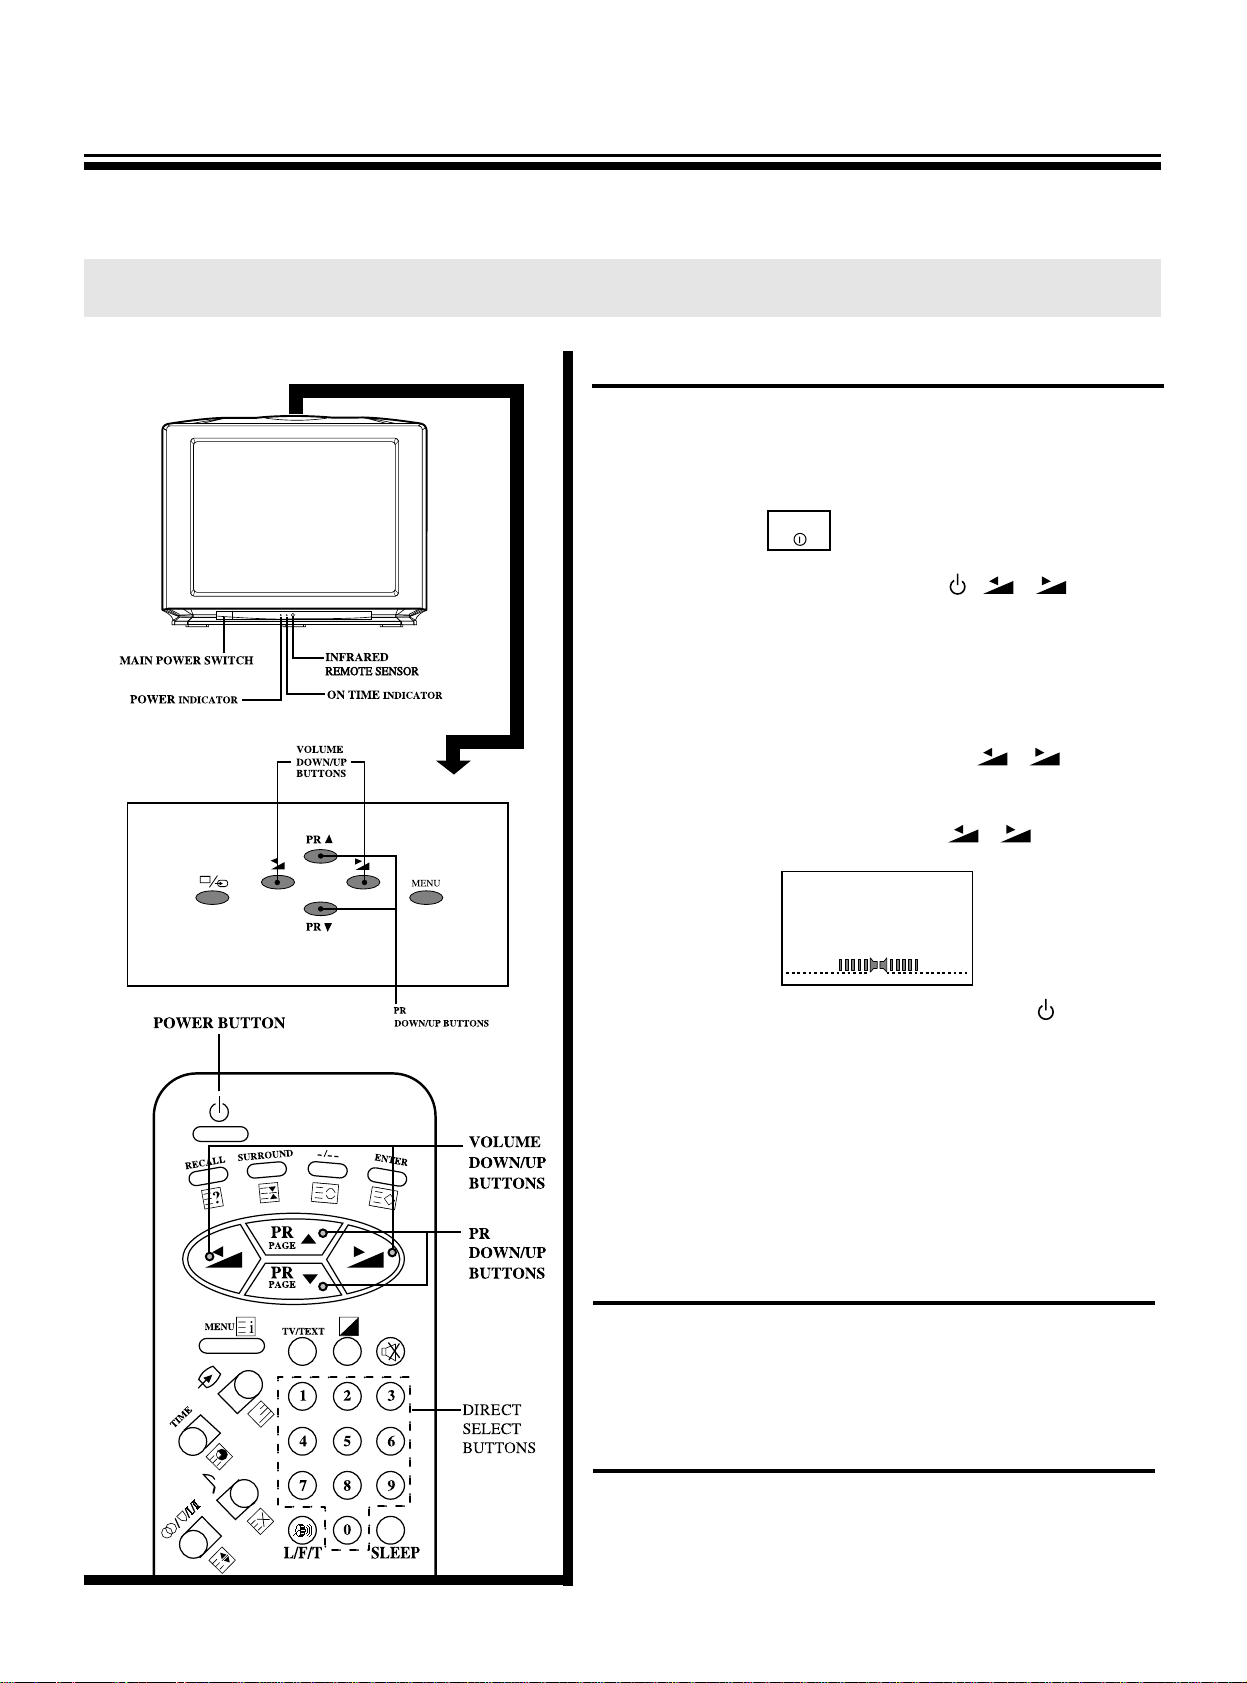
To turn the power on/off
1. Press the main power switch.
The power indicator lit up red or amber.
It displays the standby mode that the power indicator is
lit up red.
2. If no picture appears, press the
,
/,
PR▼/▲
direct select buttons(0~9). By pressing the number(one
digit only) where the programme you want to watch is
preset, you can turn on the set and programme selection
at the same time. When the TV is on, the power indicator
is lit up amber.
* When the remote control is not at your hand, you
can turn on the set by pressing the
/
or the PR
▼/▲ buttons on the TV set.
3. Adjust the sound volume with the
/
buttons
in receiver or remote control.
4. To switch to the standby mode, press the button. At
the same time the power indicator is lit up red.
5. To turn off completely, press the main power switch. At
the same time the power indicator is turned off.
* If you don’t use TV set for a long time, turn off com-
pletely by using the main power switch on the TV set.
You can decrease unnecessary power consumption.
* When you turn off completely by using the main power
switch, Sleep Time and Timer setting are cleared.
Auto-power-off
If TV broadcast for a day is finished, the TV will automatically turn off after about 15 minutes. However, if the Off -time
or Sleep time is operating, it takes precedence. This AutoPower-Off feature does not operate in the VIDEO mode.
Last-Mode-Memory
Settings of picture and sound conditions and preset programmes are stored in the memory even after turning off
the power, therefore, next time the power is turned on, the
system will function in the last setting modes.
To turn the power on/off
Turning the Power ON/OFF
●The following describes how to turn the TV on/off using the
main switch and the remote control.
POWER
Page 11
10
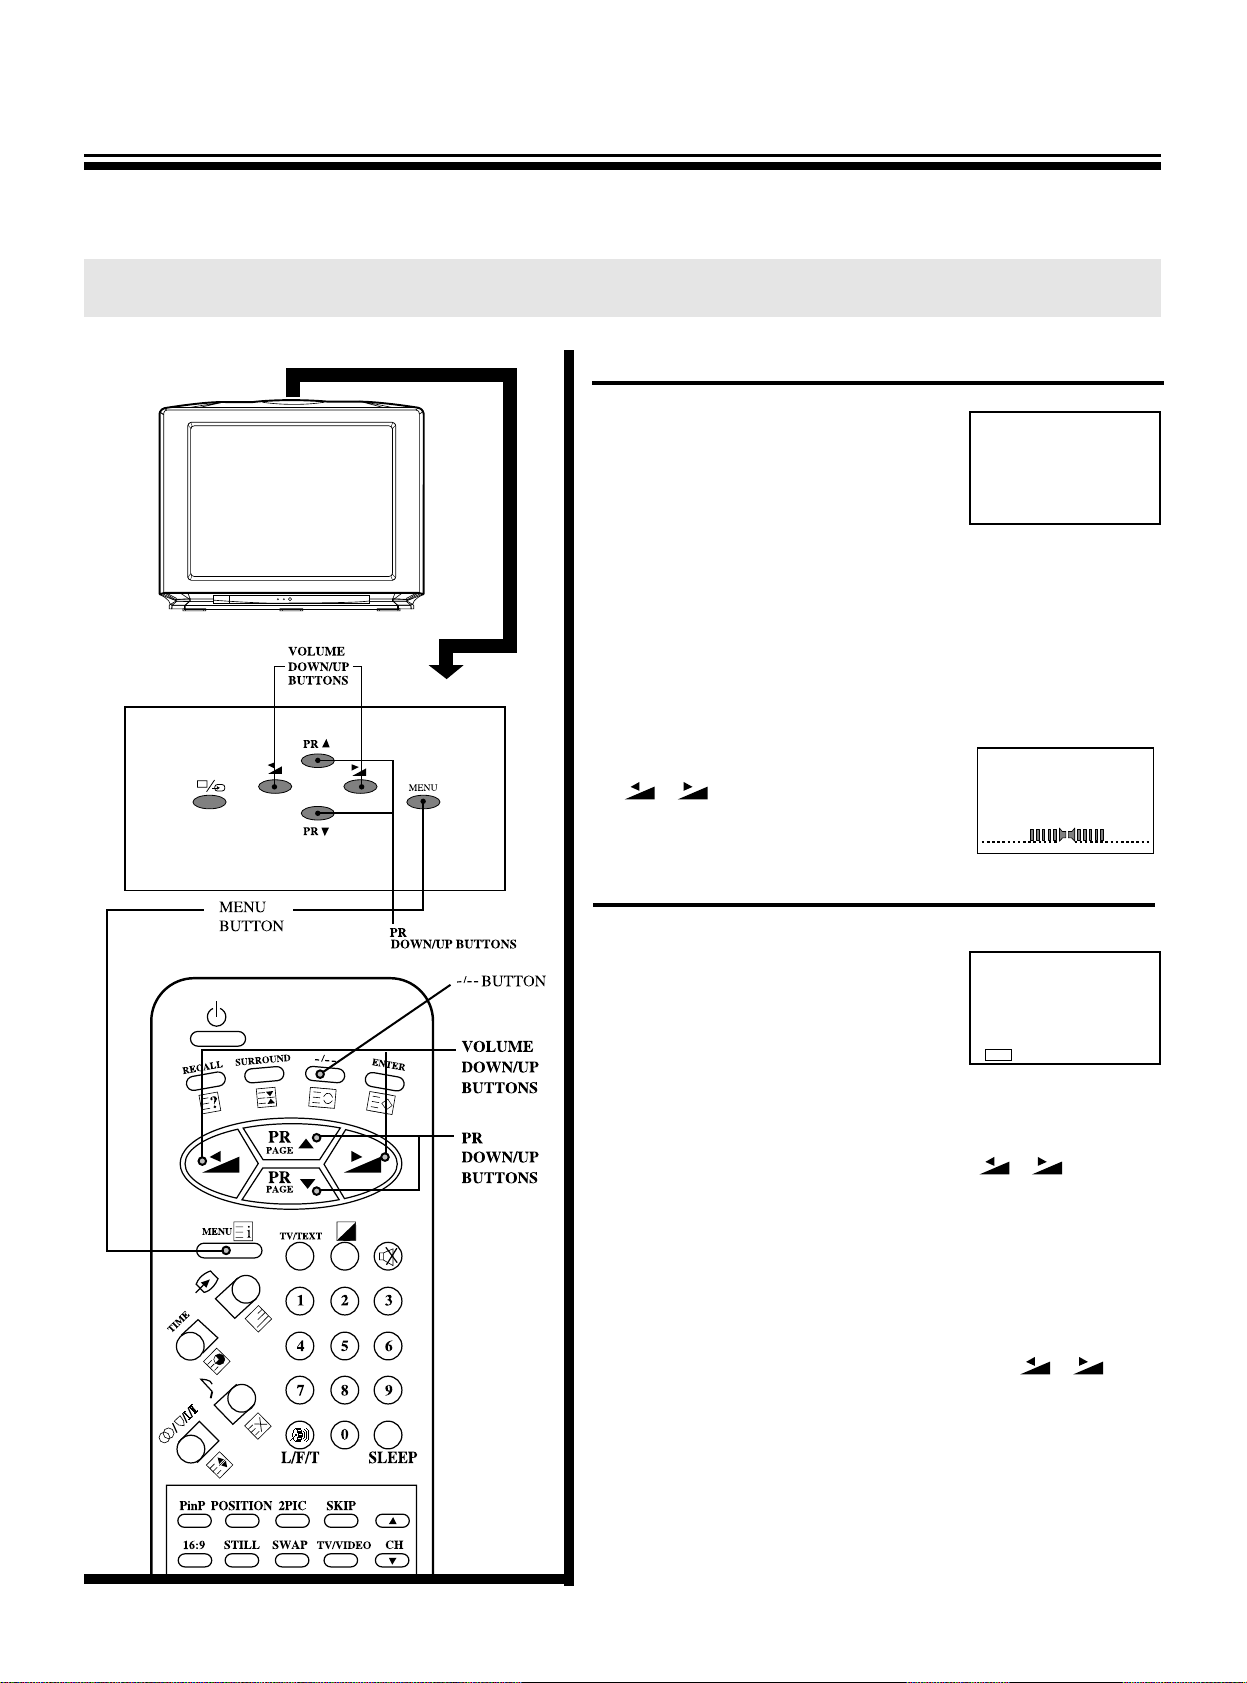
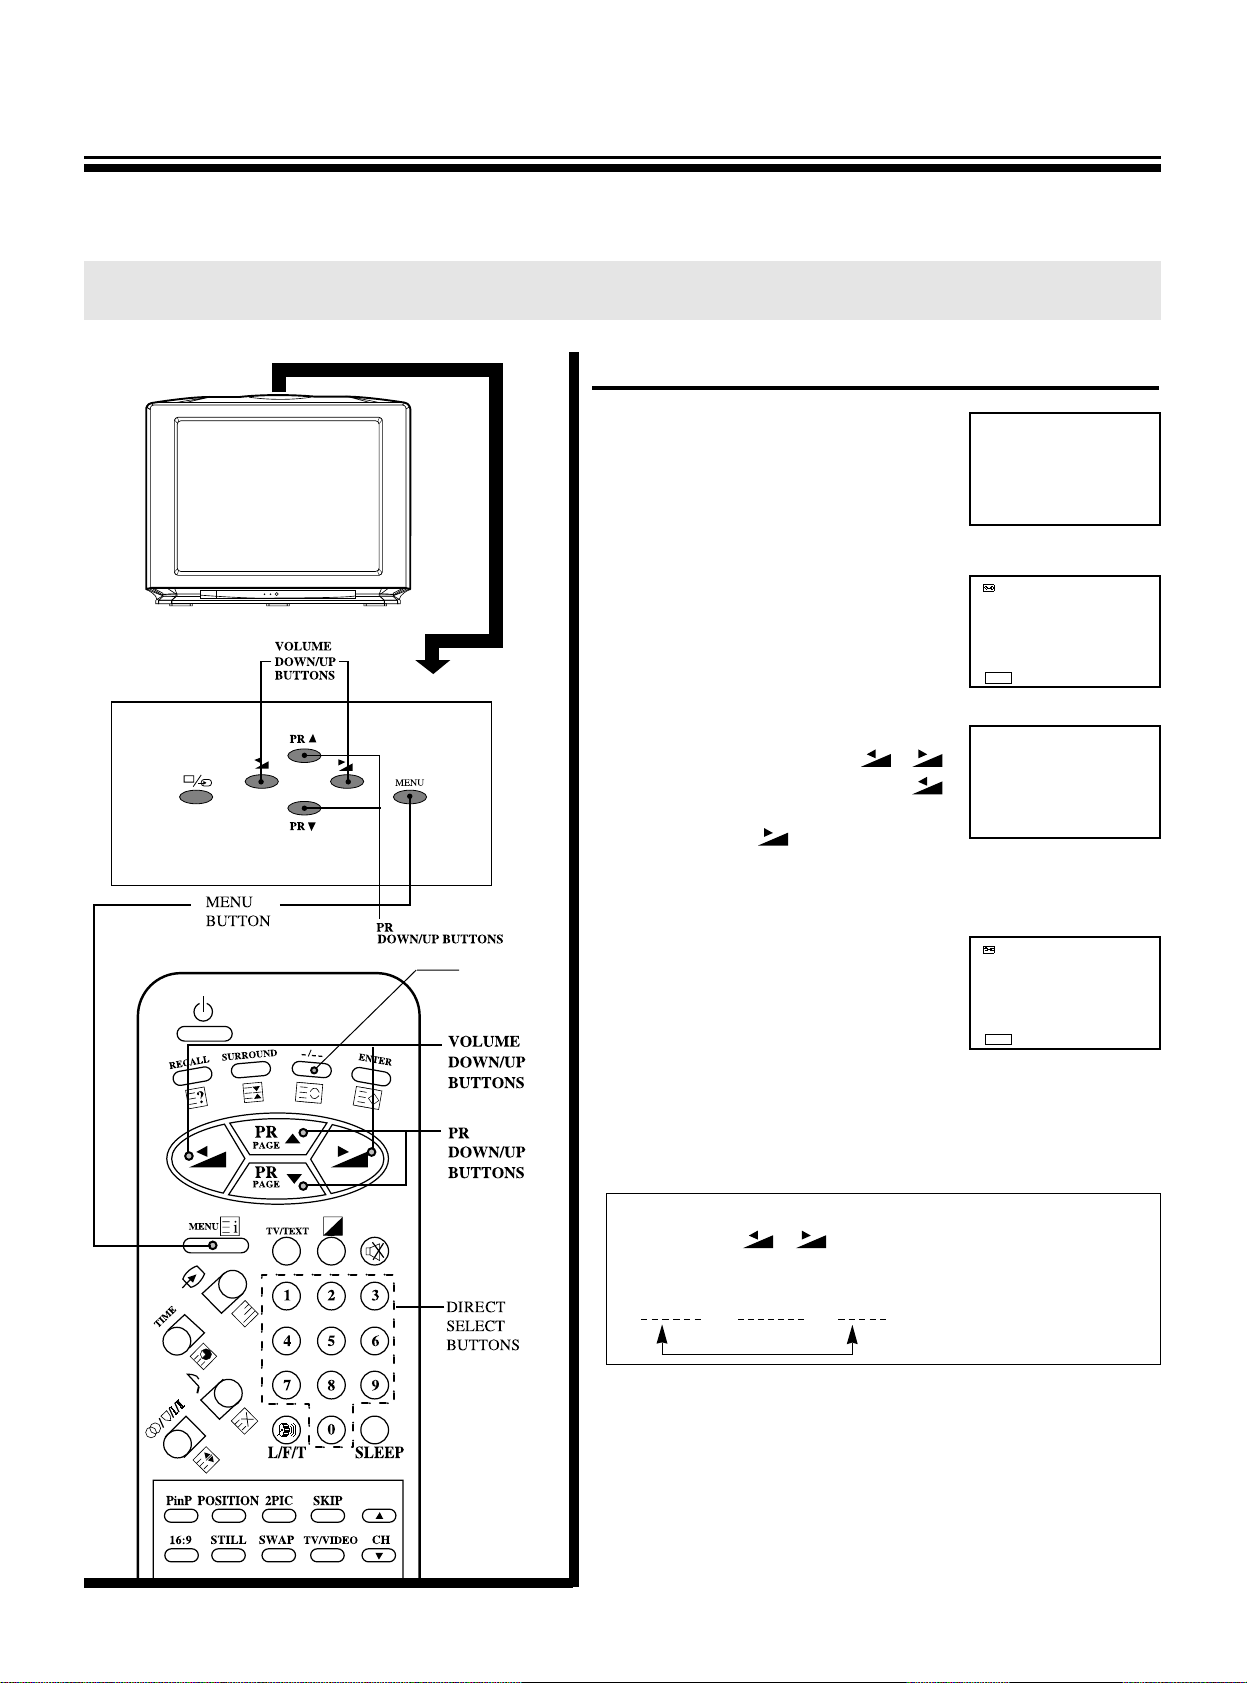
To select a TV programme
1. Select the desired programme.
Using the direct select buttons
*
To select a one-digit programme
number:
press the -/-- button to display
“-”, and 0~9 to select a num-
ber.(0~9)
*
To select a two-digit programme number : Press -/-to display “--”and press 0~9 to select a num-
ber.(10~99)
Using the PR down/up(PR▼/▲) buttons.
Press ▼ to select lower programme numbers; ▲ to
select higher ones.
2. Adjust the sound volume with the
/
buttons.
If the color or sound of a certain channel is abnormal
If the broadcast system setting is in
correct, the color or sound of a certain programme is abnormal.
Press the menu button to select
BROADCAST SYSTEM in FUNCTION to display on the right.
For the systems in each country, refer to page 44.
*
When the color of the picture is abnormal.
Select the COLOR with the PR▼/▲ buttons and select
the correct the color system with the
/ buttons.
AUTO, PAL, SECAM, 4.43NTSC and 3.58NTSC will
appear cyclically.
When the color is abnormal, even though AUTO set,
select the correct color system, refer to broadcast
transmission systems in the each country.
*
When the sound of the picture is abnormal.
Select the SOUND with the PR▼/▲ buttons and select
the correct the sound system with the
/ buttons.
AUTO, D/K, I, B/G and M and will appear cyclically.
When the sound is abnormal, even though AUTO set,
select the correct sound system, refer to broadcast
transmission systems in the each country.
*
If the sound or picture of all programmes is abnormal, you
will preset the programmes using the AUTO SEARCH.
See page 11.
To watch a TV Programme
Watching TV Programmes
●You can watch TV programmes being broadcast on the preset programme number.
11
BROADCAST SYSTEM
▶ COLOR AUTO
SOUND AUTO
▼▲SELECT ◀▶CHANGE
EXIT
MENU
Page 12
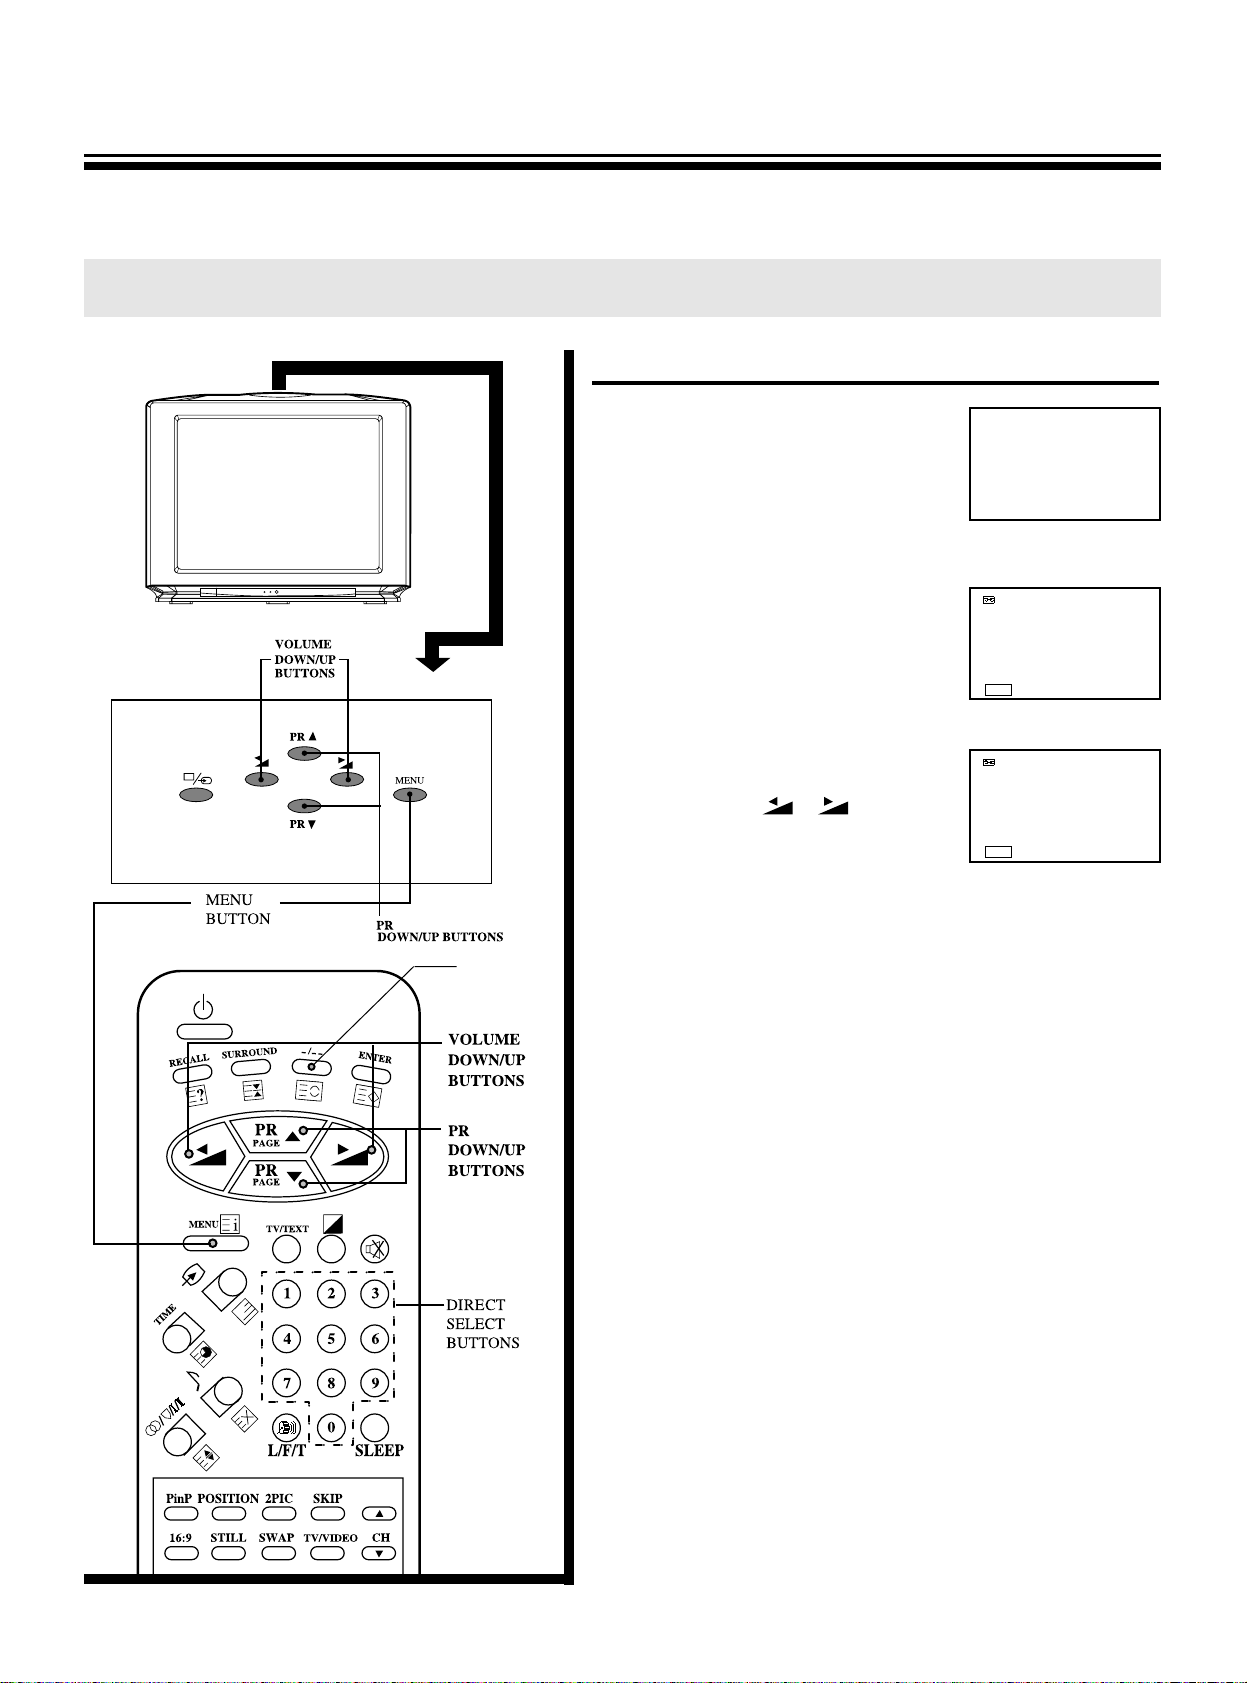
11
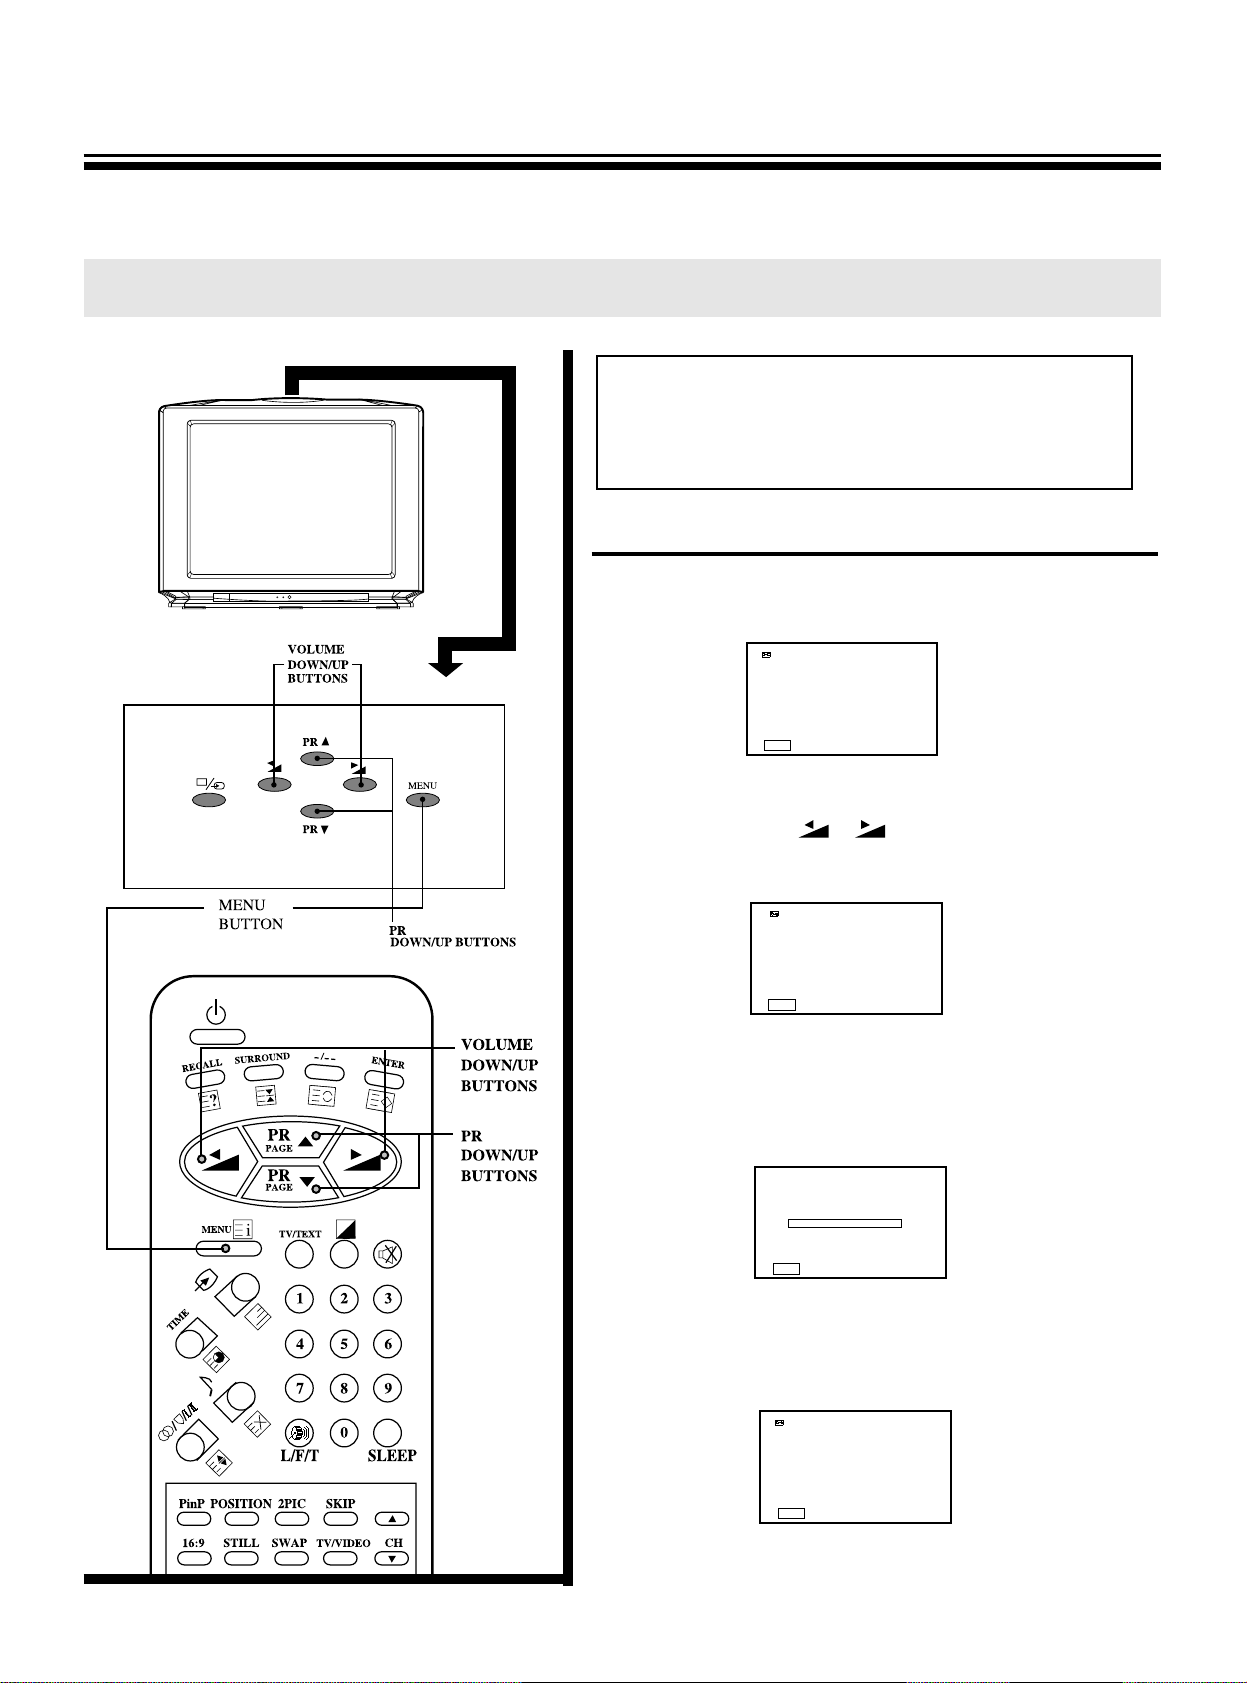
AUTO SEARCH (Automatic Search Memory)
1.Press the menu button to select SETUP and then to be
displayed on the below appearance.
2.Select the AUTO SEARCH with the PR▼/▲buttons and
then press the
/
buttons to start AUTO
SEARCH.
3.When the AUTO SEARCH starts, all active programmes
will be preset automatically at the programme number
0~99.
4.When AUTO SEARCH is completed, to be displayed the
BAND BAR of 100%.
To preset programmes (Auto Search)
Tuning in
●First, use the AUTO SEARCH function to preset all active programmes in your area automatically.
Then, memory the preset programmes at desired programme numbers with SORT, SEARCH, MFT(Manual Fine
Tuning) and SKIP functions.
SETUP
▶ AUTO SEARCH
SEARCH
PROGRAM P - MEMORY
FINE TUNE ◀▶
SORT
▼▲SELECT ◀▶ACTIVATE
EXIT
MENU
SETUP
▶ AUTO SEARCH
SEARCH
PROGRAM P 0
MEMORY
FINE TUNE ◀▶
SORT
▼▲SELECT ◀▶ACTIVATE
EXIT
MENU
SETUP
▶ AUTO SEARCH
SEARCH
PROGRAM P - MEMORY
FINE TUNE
SORT
▼▲SELECT ◀▶ACTIVATE
EXIT
MENU
0
VHF L
▶▶▶
0%
EXIT
MENU
Warning:This television has been factory pretuned
to channels 2, 7, 9, 10 and 28. If the auto
search function is activated, these preset
channels will be deleted and new channels
tuned to 1, 2, 3 ETC.
Page 13
12
After presetting
You can preset programmes, broadcast system
(color/sound) at the 100 programme numbers. (0~99)
Check the preset programmes by pressing the PR▼/▲
buttons.
*
If the color or sound of a certain programme is abnormal, automatic color/sound system selection(AUTO)
may malfunction.
In this case, select the proper color/sound system.
BROADCAST SYSTEM: COLOR/SOUND refer to page 44.
example)
1. China:
COLOR PAL
SOUND D/K
2. Russian Federation:
COLOR SECAM
SOUND D/K
*
In case of CATV, the broadcast system may differ from
the example.
*
If the color or sound of a certain programme is not
good, you will use the MFT function to the fine-tune
programme. (refer to page 16)
To preset programmes (Auto Search)
Page 14

13
Sorting
1. Press the menu button to select
SETUP and then to be displayed
on the right appearance.
2. Select the SORT with the PR▼/▲ but-
tons and then press the
/
buttons to start SORT.
3.When you start sorting, to be dis-
played on the right appearance.
Select the desired programme
number which displays the left
picture of the green or red P - with the PR▼/▲ buttons and
then change programme numbers with the
/
buttons.
Select the desired programme which displays the right
picture of the yellow P - - with the PR▼/▲ buttons and
then change programme with the
/
buttons.
4. After selecting the desired pro-
gramme. Select the MEMORY
with the PR▼/▲ buttons. When
you press the
/
buttons,
the MEMORY sign turns red
momentarily and the programme
is memorized at the current programme number.
5. After presetting, you can see the
display on the right. The right
picture and the left picture are
exchanged. When you desire to
store another programme number at another programme,
repeat the step 3 to 4.
To preset programmes(SORT)
●After presetting AUTO SEARCH, Sort the programmes with SORT menu and then you can memory programmes at
the desired programme numbers.
SETUP
▶ AUTO SEARCH
SEARCH
PROGRAM P - MEMORY
FINE TUNE ◀▶
SORT
▼▲SELECT ◀▶ACTIVATE
EXIT
MENU
SETUP
AUTO SEARCH
SEARCH
PROGRAM P - MEMORY
FINE TUNE ◀▶
▶ SORT
▼▲SELECT ◀▶ACTIVATE
EXIT
MENU
SORT 0
▶ P 0
↕↕
P 1
MEMORY
1
▼▲SELECT ◀▶ CHANGE
EXIT
MENU
SORT 0
P 0
↕↕
P 1
▶ MEMORY
1
▼▲SELECT ◀▶ ACTIVATE
EXIT
MENU
SORT 0
▶ P 0
↕↕
P 1
MEMORY
1
▼▲SELECT ◀▶ CHANGE
EXIT
MENU
Page 15
SEARCH
1. Select the desired programmes
number with PR▼/▲ buttons or
- / - -, direct select buttons.
2. Press the menu button to select
SETUP and then to be displayed
on the right appearance.
3. Select the SEARCH with the PR▼/
▲ buttons and press the
/
buttons to start searching. The
button searches for lower band programmes, the button for high-
er band programmes. To be displayed on the right appearance.
4.
When the programme is tuned,
the band display (VHF L
▶▶▶
)
disappears and the programme
enters into the memory wait status like the display on the right
appears. Repeat this process
until you can get the desired programme.
1
SETUP
▶ AUTO SEARCH
SEARCH
PROGRAM P 1
MEMORY
FINE TUNE ◀▶
SORT
▼▲SELECT ◀▶ACTIVATE
EXIT
MENU
1
VHF L
▶▶▶
SETUP
AUTO SEARCH
▶ SEARCH
PROGRAM P 1
MEMORY
FINE TUNE ◀▶
SORT
▼▲SELECT ◀▶ACTIVATE
EXIT
MENU
14
To preset programmes(SEARCH)
●Use the SEARCH function if desired programmes cannot be preset with AUTO SEARCH or if you would like to preset
the desired programmes to specific programme numbers one by one
* NOTE
Press the /
buttons and keep it pressing for
2 seconds, the band will be changed.
VHF L VHF H UHF
-/-- BUTTON
Page 16
15
SEARCH
5. When the desired programme is
shown, select the MEMORY with
the PR▼/▲ buttons. When you
press the
/
buttons
MEMORY on the display turn red
momentarily, and the programme is memorized at the current programme number.
6. When you desire to store another
programme at another programme number, repeat the
steps 3, 4. When the desired programme is showed, select the program with the PR▼/▲
buttons and input the desired programme number
with the
/
buttons.
Or press the button for the menu display to disappears and repeat the step 1 to 5.
After presetting
You can store programmes and broadcast system
(color/sound) at the 100 programme numbers. (0~99)
*
If the color or sound of a certain programme is abnormal, automatic color/sound system selection(AUTO)
may malfunction. In this case, select the proper
color/sound system. (See page 44)
BROADCAST SYSTEM: COLOR/SOUND refer to page 44.
example)
1. China:
COLOR PAL
SOUND D/K
2. Russian Federation:
COLOR SECAM
SOUND D/K
*
In case of CATV, the broadcast system may differ from
the example.
*
If the color or sound of a certain programme is not
good, you will use the MFT function to the fine-tune programme. (See page 16)
MENU
To preset programmes(SEARCH)
SETUP
AUTO SEARCH
SEARCH
PROGRAM P 1
▶ MEMORY
FINE TUNE ◀▶
SORT
▼▲SELECT ◀▶ACTIVATE
EXIT
MENU
SETUP
AUTO SEARCH
SEARCH
▶ PROGRAM P 1
MEMORY
FINE TUNE ◀▶
SORT
▼▲SELECT ◀▶INPUT
EXIT
MENU
Page 17
16
To operate the manual fine tuning(MFT)
1. Select the programme number
you want to fine-tune with the
PR▼/▲ or - / - -, direct select
buttons(0~9).
2. Press the menu button to select
the SETUP and then to be displayed on the right appearance.
3. Select FINE TUNE with the PR▼/
▲ buttons.
Hold on the
/
buttons
until the best possible picture
and sound are obtained.
◀/▶ turns red while tuning in.
MFT(Manual Fine Tuning)
●Use this function if desired programmes cannot be preset with the AUTO SEARCH and SEARCH, or if the picture and sound of a certain programme are not good.
1
SETUP
▶ AUTO SEARCH
SEARCH
PROGRAM P 1
MEMORY
FINE TUNE ◀▶
SORT
▼▲SELECT ◀▶ACTIVATE
EXIT
MENU
SETUP
AUTO SEARCH
SEARCH
PROGRAM P 1
MEMORY
▶ FINE TUNE ◀▶
SORT
▼▲SELECT ◀▶CHANGE
EXIT
MENU
-/-- BUTTON
Page 18

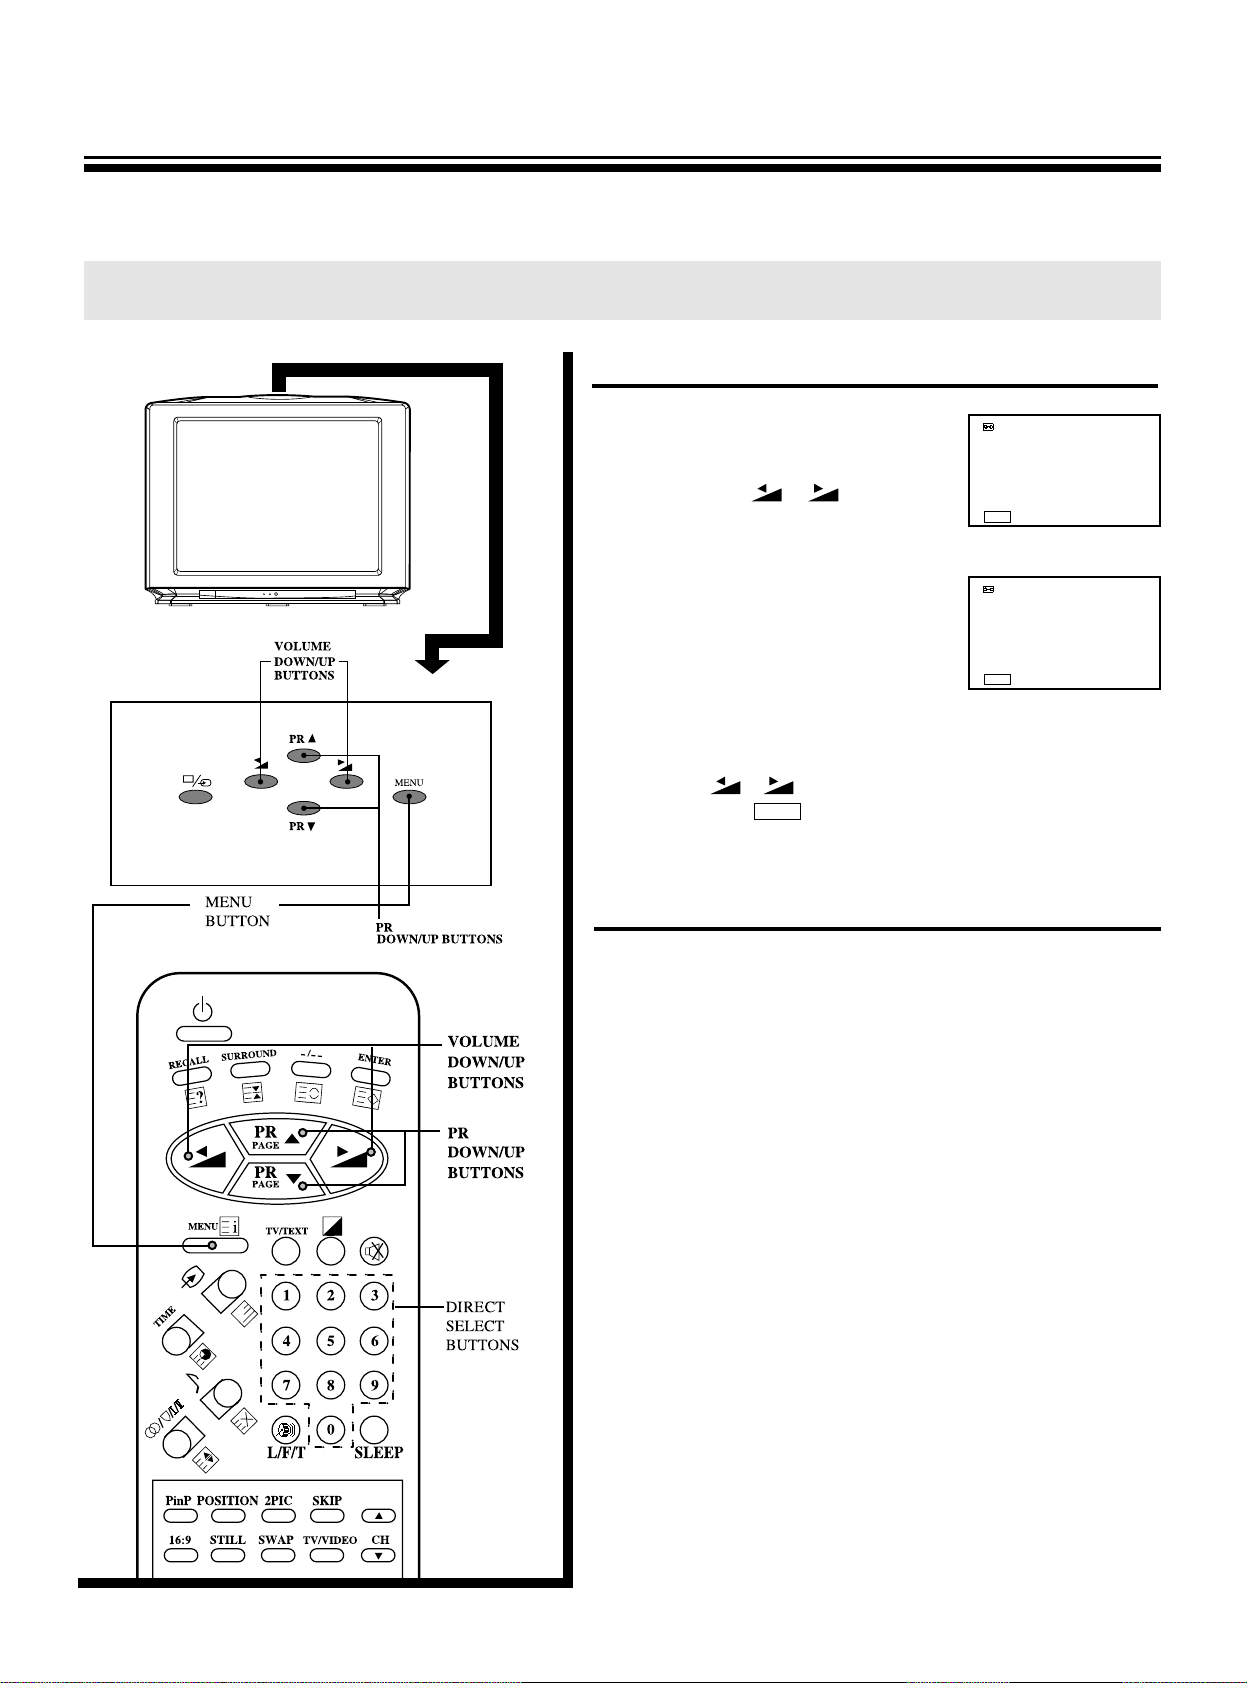
To skip a programme number
1. Select the programme number to be
skipped with the PR▼/▲ buttons or
- / - -, direct select buttons(0~9).
2. Press the SKIP button at the
remote control to make the color
of the programme number red.
3. Press the menu button to select the FUNCTION and
then to be displayed on the right
appearance.
Select the SKIP with the PR▼/▲
buttons and make SKIP ON with
the
/
buttons.
4. The programme number that is set SKIP ON will be
skipped when you select the programme number with
the PR▼/▲ buttons. You can select the programme
number that is set SKIP ON with - / - -, direct select
buttons(0~9). The color of programme number turns
red.
To restore a skipped programme number
1. Select the programme number that is skipped with the
- / - -, direct select buttons (0~9).
2. Press the skip button at remote control to make the
color of programme green.
3.Or press the menu button to select the FUNCTION and
then to be displayed on the right appearance.
Select the SKIP with PR▼/▲ but-
tons and make the SKIP OFF
with the
/
buttons.
17
To skip unnecessary programme numbers
●After presetting the programmes, when you press the PR▼/▲ buttons, you may skip unnecessary
programme numbers so that you can see programmes that you want to watch, which are selected.
1
FUNCTION
LANGUAGE
BLUE SCREEN ON
16:9 ON
BROADCAST SYSTEM
AUTO VOLUME ON
▶ SKIP ON
▼▲SELECT ◀▶CHANGE
EXIT
MENU
FUNCTION
LANGUAGE
BLUE SCREEN ON
16:9 ON
BROADCAST SYSTEM
AUTO VOLUME ON
▶ SKIP OFF
▼▲SELECT ◀▶CHANGE
EXIT
MENU
Page 19

Selecting TV and outside input
1. Pressing button, TV--> 1--> 2--> 3
--> 4(option) --> TV would be selected by the order.
2. To select the desired TV programme in outside input:
*
In case of programme of one figure, press the “- /- -”
button and display “-” sign, then press one of 0~9 buttons.
*
In case of programme of two figures, press the “- / - -”
button and display - - sign, then press 0~9 buttons.
18
Selecting outside input
To watch VIDEO
●The connection method is referred on page 39.
1
1
2
3
4
(option)
Page 20

19
To select the 16:9 screen
1. By pressing the 16:9 button in remote control, the
following two modes change cyclically.
2. Or Press the menu button
to select the FUNCTION
and then to be displayed
on the right appearance.
3. Select the 16:9 with the PR▼/▲ buttons. By pressing the
/
buttons, the following two mode change cycli-
cally.
16:9 Screen
Enjoying Wide Picture
●You can enjoy 16:9 picture with TV. In addition to regular TV screen size you can
choose from wide screen mode for viewing video in their true cinema proportions.
16:9 OFF
16:9 ON
16:9 ON
NORMAL VIEWING
CINEMA VIEWING
NORMAL VIEWING
CINEMA VIEWING
FUNCTION
▶ LANGUAGE
BLUE SCREEN ON
16:9 OFF
BROADCAST SYSTEM
AUTO VOLUME ON
SKIP ON
▼▲SELECT ◀▶ACTIVATE
EXIT
MENU
FUNCTION
LANGUAGE
BLUE SCREEN ON
▶ 16:9 OFF
BROADCAST SYSTEM
AUTO VOLUME ON
SKIP ON
▼▲SELECT ◀▶CHANGE
EXIT
MENU
FUNCTION
LANGUAGE
BLUE SCREEN ON
▶ 16:9 ON
BROADCAST SYSTEM
AUTO VOLUME ON
SKIP ON
▼▲SELECT ◀▶CHANGE
EXIT
MENU
FUNCTION
LANGUAGE
BLUE SCREEN ON
▶ 16:9 ON
BROADCAST SYSTEM
AUTO VOLUME ON
SKIP ON
▼▲SELECT ◀▶CHANGE
EXIT
MENU
16:9 OFF
16:9 OFF
Page 21

20
To mute the sound
The muting function is convenient when you need to pay
attention to surround sounds, answer a phone call,
receive a visitor, etc.
1. Press the button
in the remote control.
2. To restore the sound, press the button again.
To retain the on-screen display or erase the menu display
Generally, the programme number and (stereo) orⅠ/Ⅱ
(bilingual) reception indicator will disappear within 4 seconds once the programme number has been changed,
and the menu display will disappear within 1 minute
once the menu button has been pressed.
1. To retain the programme number on the screen, press
the RECALL button.
2. To return to automatic-disappearing mode, press the
RECALL button again.
3. To erase the menu display, press the RECALL button.
Ⅰ
Ⅱ
Sound muting and on-screen recalling
Convenient Picture and Sound Controls
●You can select and adjust the picture and sound quality as you like
RECALL
BUTTON
MUTE
BUTTON
Page 22

21
To select the picture mode
1. Press the button at remote
control to select the desired picture quality. MEMORY(user set),
MILD, STANDARD can be selected cyclically.
2. Or press the menu button to
select the PICTURE and then to
be displayed on the right appearance.
Select
AUTO with the
PR▼/▲
buttons. By pressing the
/
buttons, the following three mode change cyclically.
*
The adjusted level in MEMORY mode may be stored independently in TV, VIDEO1,VIDEO2, VIDEO3, VIDEO4(option).
To set the desired picture quality to the MEMORY position
1. Press the menu button to select the
PICTURE and then to be displayed on
the right appearance.
2. Select the ADJUSTMENT with PR ▼/
▲ buttons and then to be displayed on the right appearance.
Select the desired item with the
PR▼/▲ buttons and press with
the
/
buttons to adjust
the level.
Selectable picture
●You can select the picture quality instantly among two preset modes and one
user-set mode.
MEMORY
MODE Picture quality
MEMORY The picture quality you set
MILD Soft and moody picture
STANDARD Standard picture
ADJUSTMENT
▶ CONTRAST
BRIGHTNESS
COLOR
TINT
SHARPNESS
▼▲SELECT ◀▶CHANGE
EXIT
MENU
PICTURE
▶ AUTO MEMORY
ADJUSTMENT
NOISE REDUCER OFF
BLACK STRETCH OFF
BLUE STRETCH OFF
▼▲SELECT ◀▶CHANGE
EXIT
MENU
PICTURE
▶ AUTO MEMORY
ADJUSTMENT
NOISE REDUCER OFF
BLACK STRETCH OFF
BLUE STRETCH OFF
▼▲SELECT ◀▶CHANGE
EXIT
MENU
SELECTABLE
PICTURE
BUTTON
Page 23

*
for NTSC only
**
except the double window mode
3. Select the item with the PR▼/▲
buttons and press the
/
buttons to adjust level.
The adjustment level bar display
disappear within 4 seconds and
the adjusted level is stored in
MEMORY mode.
*
The TINT( ) is adjustable for 3.58NTSC or 4.43NTSC
broadcast system.
X display appears when the TINT( ) is selected in other
case.
*
The SHARPNESS( ) is not adjustable in the double window mode. X display appears when the SHARPNESS( ) is
selected in the double picture mode.
4. You can memory the STANDARD picture level in the MEMO-
RY position directly.
Press the
button to select the STANDARD mode and
press the ENTER button to store the STANDARD picture level in the MEMORY position and then MEMORY
display disappears within 4 seconds.
22
Item
contrast weaker stronger
brightness darker lighter
color paler deeper
tint * purplish greenish
sharpness softer sharper
Pressing
◀▶
Selectable picture
ADJUSTMENT
▶ CONTRAST
BRIGHTNESS
COLOR
TINT
SHARPNESS
▼▲SELECT ◀▶CHANGE
63
SELECTABLE
PICTURE
BUTTON
**
Page 24

23
Selectable picture
To reduce the picture noise
If the signal being received is weak and the picture is
blurry, activate the noise reducer to improved the picture.
Press the menu button to select
the PICTURE and then to be displayed on the right appearance.
Select the NOISE REDUCER with
the PR▼/▲ buttons. By pressing
the
/
buttons to change
NOISE REDUCER ON.
Black stretch, Blue stretch
By emphasizing the contrast of dark picture with
BLACK STRETCH ON, the picture is seen more deeper.
With BLUE STRETCH ON, the blue picture is seen more
bluer.
Press the menu button to select
the PICTURE and then to be displayed on the right appearance.
Select the BLACK STRETCH ON
with the PR▼/▲ buttons. By
pressing the
/
buttons to
change BLACK STRETCH ON.
*
The BLACK STRETCH is available for only NTSC3.58,
NTSC4.43 broadcast system.
PICTURE
AUTO MEMORY
ADJUSTMENT
▶ NOISE REDUCER OFF
BLACK STRETCH OFF
BLUE STRETCH OFF
▼▲SELECT ◀▶CHANGE
EXIT
MENU
PICTURE
AUTO MEMORY
ADJUSTMENT
NOISE REDUCER OFF
▶ BLACK STRETCH OFF
BLUE STRETCH OFF
▼▲SELECT ◀▶CHANGE
EXIT
MENU
Page 25

24
To select the sound mode
Press the button in the remote
control to select the desired
sound quality.
MEMORY(user set), MOVIE,
MUSIC, NEWS can be selected
cyclically.
Or press the menu button to
select the SOUND and then to be
displayed on the right appearance.
Select the AUTO with the PR▼/▲
buttons. By pressing the
/
buttons, the following four mode change cyclically.
To adjust EQUALIZER
Press the menu button to select
the SOUND and then to be displayed on the right appearance.
Select the EQUALIZER with
the PR▼/▲ buttons. By pressing
the
/
buttons to activate
the EQUALIZER.
If the EQUALIZER menu appears
on the right, you will press the
/ to select emphasized
frequency band and press
PR▼/▲
to adjust level.
Selectable sound
●You can select the sound quality instantly among three preset modes and one use
-set.
MODE Sound quality
MEMORY The sound quality you set
MOVIE Suitable for movie
MUSIC Suitable for music
NEWS Emphasize human voice
MEMORY
SOUND
▶ AUTO MEMORY
EQUALIZER
SURROUND OFF
HEADPHONE
BALANCE
SUPER WOOFER ON
▼▲SELECT ◀▶CHANGE
EXIT
MENU
▼▲SELECT ◀▶ACTIVATE
EXIT
MENU
▼▲CHANGE ◀▶SELECT
EXIT
MENU
SELECTABLE
PICTURE
BUTTON
SOUND
AUTO MEMORY
▶ EQUALIZER
SURROUND OFF
HEADPHONE
BALANCE
SUPER WOOFER ON
Page 26

25
Selectable sound
The adjusted level is stored in the MEMORY position.
To select surround effect
Press the surround button at the
remote control to select surround
effect.
The display of surround
on/off on the right appears
repeatedly whenever you press
the surround button.
Or press the menu button to select
the SOUND and then to be displayed on the right appearance.
Select the surround with the PR
▼/▲ buttons. By pressing the
/
buttons, the surround
on/off change cyclically.
To adjust the headphone volume
Press the ▼▲buttons at the
remote control to adjust headphone volume. To be displayed
of on the right appearance.
Press the ▲ button to increase
the headphone volume and the ▼
button to the decrease headphone volume.
Or press the menu button to select
the SOUND and then to be displayed on the right appearance.
Select the HEADPHONE VOLUME with the PR▼/▲ buttons.
Press the
/
buttons to adjust headphone vol-
ume.
Press the button to decrease headphone volume
and button to increase the headphone volume.
Item
0.1kHz decrease 100Hz level increase 100Hz level
0.3kHz decrease 330Hz level increase 330Hz level
1.0kHz decrease 1kHz level increase 1kHz level
3.0kHz decrease 3.3kHz level increase 3.3kHz level
10kHz decrease 10kHz level increase 10kHz level
pressing
▼▲
SURROUND ON
▼▲SELECT ◀▶CHANGE
EXIT
MENU
▼▲SELECT ◀▶CHANGE
HEADPHONE
VOLUME
DOWN/UP
BUTTONS
SOUND
AUTO MEMORY
EQUALIZER
▶ SURROUND OFF
HEADPHONE
BALANCE
SUPER WOOFER ON
SOUND
AUTO MEMORY
EQUALIZER
SURROUND OFF
▶ HEADPHONE
BALANCE
SUPER WOOFER ON
Page 27

26
To adjust the sound balance
Press the MENU button to select
the SOUND and then to be displayed on the right appearance.
Select the BALANCE with the
PR▼/▲ buttons.
Adjust the BALANCE with the
/
buttons.
Press the button to decrease the right speaker volume and the button to decrease the left speaker
volume.
To select the super woofer
You can enjoy the music, movie
programme with the dynamic
sound of super woofer.
Press the L/F/T button at the
remote control to select the super
woofer. The display of super
woofer on/off on the right
appears repeatedly whenever you
press the L/F/T button.
Or press the menu button to select
the SOUND and then to be displayed on the right appearance.
Select the SUPER WOOFER
with the PR▼/▲ buttons. By
pressing the
/ buttons,
the super woofer on/off change cyclically.
Selectable sound
* NOTE
When the Double windows, the Picture-in-Picture or the
Picture-out-Picture mode is selected, the headphone output
is sound output of sub picture. Even if the headphone is
plugged in.
The speaker sound is continued. The volume of speaker
sound may be adjusted by the volume down/up buttons with
menu off.
The volume of headphone sound may be adjusted by headphone volume down/up buttons or headphone volume menu
of menu mode. In case of the Double window, the Picture-in
Picture, the Picture-out-Picture off mode, the speaker sound
is not be continued after the headphone is plugged in.
The sound output of the present picture is only possible with
the headphone. In the headphone is plugged in, volume
down/up buttons wouldn’t be operated. The volume of headphone may be adjusted by the headphone volume menu of
menu mode or headphone volume down/up buttons.
SOUND
AUTO MEMORY
EQUALIZER
SURROUND ON
HEADPHONE
▶ BALANCE
SUPER WOOFER ON
▼▲SELECT ◀▶CHANGE
◆
SUPER WOOFER ON
SOUND
AUTO MEMORY
EQUALIZER
SURROUND ON
HEADPHONE
BALANCE
▶
SUPER WOOFER ON
▼▲SELECT ◀▶CHANGE
EXIT
MENU
HEADPHONE
VOLUME
DOWN/UP
BUTTONS
SUPER WOOFER
BUTTON
Page 28

27
Stereo programmes
1. When a stereo programme
is received, appears.
2. Press the button
to select to stereo/
monaural mode.
, appear.
Bilingual programmes
1. When a bilingual programme
is received, Ⅰ/Ⅱappears.
2.Press the button to
select the sound to be heard.
The sound differs according
to transmission system:
Ⅰ/Ⅱand appear
cyclically on the screen.
Ⅰ
Ⅱ
To select the stereo/bilingual mode
Enjoying Stereo and Bilingual Broadcasts
●The unit receivers both stereo and bilingual broadcasts transmitted in either the NICAM
or German stereo/bilingual broadcast system.
1
11
Ⅰ/Ⅱ
11
Ⅰ/Ⅱ
1
Display
Reception mode
Stereo
Monaural
Sound to be heard
NICAM
German stereo
Main sound Main sound
Sub sound Sub sound
Mono sound
Ⅰ
Ⅱ
If stereo sound is noisy
If a broadcasting signal is not strong
enough and noise-free stereo sound is not
available, press the button until the
indicator appears on the screen (monau-
ral mode). The noise should be reduced.
Ⅰ
Ⅱ
ⅠⅠ
STEREO/
BILINGUAL
BUTTON
Ⅱ
Ⅰ
Page 29

To display TV picture as double window
1. Select one of the
desired programmes.
2. Press the 2-pic button
repeatedly.
You can see the
display cyclically
on the right.
Or press the menu
button to select the
PAP and then to
be displayed on the
right appearance.
Select the
with the PR▼/▲
buttons.
Press the
/
to select the double
window ( ).
PAP
PAP ON
TV/VIDEO TV
CH P00
▶
▼▲SELECT ◀▶ CHANGE
EXIT
MENU
28
To display double window
Watching Double Window
●The unit is capable of display two pictures simultaneously. This is called the Double
window function. A TV picture or a picture from external source equipment such as a
VTR can be displayed as another picture.
●You can enjoy as two TV sets by using headphone.
1
(Normal mode)
DP
TP
Two pictures as
the ratio 16:9
picture
Two partitive
picture of full
screen
Select the desired picture.
11
Left
Picture
Right
Picture
Programme
number or
external
input number
* NOTE
•
You can not select the same programme number or video
as the main picture and sub picture simultaneously.
•
To retain the programme number or the display of external input on the screen, press the RECALL button at the
remote control.
DP picture
TP picture
PAP
▶ PAP O N
TV/VIDEO TV
CH P0 0
▼▲SELECT ◀▶CHANGE
EXIT
MENU
2-PIC on/off button
(Double window on/off)
Page 30

29
To watch a picture form a TV or an external source
1. Press button repeatedly
to select a the input for the
main picture(the left side
picture). A TV picture, the
picture from the
video input 1( 1),
video input 2( 2),
video input 3( 3), video input 4(option)( 4)
will appear cyclically. When a TV picture appears.
Select the desired TV programme using the PR▼/▲
buttons. Press PR▼ button to select lower programme
numbers and PR▲ button to select higher ones.
Or You can select the programme number, Using the / - - button and the direct select buttons(0~9).
When the menu is displayed, you can select the programme number only using the - / - - button and the
direct select button(0~9).
2. Press the TV/VIDEO button repeatedly to select the
input for the sub picture(the right side picture). A TV
picture, the picture from the video input 1 ( 1), video
input 2( 2), video input 3( 3), video input 4(option)
( 4) will appear cyclically. When a TV picture
appears, select the desired TV programme using the
CH▼/▲buttons.
Press CH▼ button to select lower programme numbers
and CH▲ button to select higher ones.
Or press the menu button to select the PAP and
then to be displayed on
the right appearance.
Select the TV/VIDEO with
the PR▼/▲ buttons.
Press the
/
button
to select the TV. Select the
CH P00 with PR▼/▲ but-
tons and select a desired TV programme number with
/
buttons. Select the TV/VIDEO with the PR▼/
▲ buttons and press the
/
buttons to select the
desired video input.
Various double window operation
12
Left
picture
Right
picture
11
Programme
number or
external
input number
PAP
▶ PAP ON
TV/VIDEO TV
CH P00
▼▲SELECT ◀▶CHANGE
EXIT
MENU
2-PIC on/off button
(Double window on/off)
Sub CH down/up
buttons (Right picture
channel down/up buttons)
Sub TV/VIDEO button
Page 31

If the color or sound of a certain programme is abnormal
The color system setting may be
incorrect, the color is abnormal.
Press the MENU button to select
the FUNCTION and to be displayed on the right appearance.
Select the broadcast system with
the PR▼/▲ buttons press the
/ to activate the broadcast system.
Select the COLOR-M(the main
picture) or the COLOR-S(the sub
picture) which is abnormal color
with the PR▼/▲ buttons and
change the color system with
/
buttons. AUTO, PAL,
SECAM, NTSC4.43, NTSC3.58
will appear cyclically.
The sound system setting may be incorrect, the sound
is abnormal.
Select the SOUND with the PR▼/▲ buttons and change
the sound system with the
/
buttons.
AUTO, D/K, I, B/G, M will appear cyclically.
refer to page 44.
To switch the double window
Press the SWAP button when double window is displayed.
The main picture(the left picture) and the sub picture
(the right picture) are switched. Press the button again
to switch again.
Various double window operation
11
Programme
number or
external
input number
30
* NOTE
If the color system of the main picture(the left picture) and
the right picture are different, the size of right picture may
differ slightly.
1
A
2
B
2
B
1
A
Left
picture
Right
picture
FUNCTION
LANGUAGE
BLUE SCREEN ON
16:9 ON
▶
BROADCAST SYSTEM
AUTO VOLUME ON
SKIP ON
▼▲SELECT ◀▶ACTIVATE
EXIT
MENU
BROADCAST SYSTEM
TV/VIDEO TV
CH P00
▶ COLOR - M COLOR - S
AUTO AUTO
SOUND AUTO
▼▲SELECT ◀▶CHANGE
EXIT
MENU
SWAP button
Page 32

To freeze the sub picture(the right picture)
When a double window is displayed, press the STILL
button.
The sub picture(the right picture) will be a still picture.
To return to a moving picture, press the STILL button
again.
To display a frozen picture for normal mode
When the PAP is off, press the STILL button to display a
still picture. To return to a moving picture, press the STILL
button again.
Use the still function to see a important scene or a message in the still mode.
31
Various double window operation
11
Programme
number or
external
input number
MOVING STILL
MOVING STILL
Left
picture
Right
picture
STILL button
Page 33

To watch a TV or an external source as a sub-picture
1.Select the desired programme.
2.Press the PinP button to
display a sub-picture.
3.Press the sub TV/VIDEO button
repeatedly to select the input for the sub picture(the
small picture). A TV picture. the picture from the
video input 1( 1), video input2( 2),
video input3( 3), video input4(option)( 4) will appear
cyclically.
4.When a TV picture appears, select the desired TV programme using the CH▼/▲ buttons.
Press CH▼ button to select lower programme numbers
and CH▲ button to select higher ones.
5. To turn off the sub-picture, press the PinP button
again.
6. Or press the menu button to select
the PAP and then to be displayed on the right appearance.
Select the with the PR
▼/▲ buttons. Press the
/
buttons to select the .
7.Select the TV/VIDEO with the PR
▼/▲ buttons. Press the
/
buttons to select the input for the
sub-picture(the small picture). A
TV picture, the picture from the
video input 1( 1),
video input2( 2), video input3( 3),
video input4(option)( 4) will appear cyclically.
8.When a TV picture appears, select the CH P00 with PR
▼/▲ buttons.
Select the desired TV programme using the
/
buttons. Press button to select lower programme
numbers and the button to select higher ones.
32
Watching Picture-in-Picture
●The unit is capable of displaying two pictures with the small sub picture simultaneously. This is
called the Picture-in-Picture function. A TV picture or a picture from external source equipment
such as a VTR can be displayed as another picture.
11
1
11
1
MAIN PICTURE
SUB PICTURE
Programme number
or external input
number of the main
picture
Programme number
or external input
number of the sub
picture
To display a sub-picture
Watching Picture-in-Picture
PAP
PAP ON
TV/VIDEO TV
CH P00
▶
▼▲SELECT ◀▶CHANGE
EXIT
MENU
PAP
PAP ON
▶
TV/VIDEO TV
CH P00
▼▲SELECT ◀▶CHANGE
EXIT
MENU
Sub CH down/up
buttons
(Right picture
channel down/up
buttons)
STILL button
PinP button
MENU button
sub TV/VIDEO button
Page 34

To switch the main and sub-picture of the PIP
Press the SWAP button when a picture-in-picture is
displayed.
The main picture(the large picture) and sub-picture(the
small picture) are switched.
Press the SWAP button again to switch again.
To freeze the sub-picture
Press the STILL button when a sub-picture is displayed.
The sub-picture will be a still picture. To return to a
moving picture, press the STILL button again.
To change the position of the sub-picture and select
the Picture-Out-Picture (POP : Multi-Strobo)
Press the position button repeatedly when a sub-picture is displayed. The display position of the sub-picture will changed in order ① to ⑤ PIP mode, and in the
POP mode.
33
A B
Various Picture-in-Picture operations
MOVING STILL
BA
④
⑤
①
③
1
2
3
4 5 6 7
②
⇧⇩
⇦
⇨
STILL button
PinP
button
POSITION button
Page 35

PAP
PAP ON
TV/VIDEO TV
CH P00
▶
▼▲SELECT ◀▶CHANGE
EXIT
MENU
POP(Multi-Strobo) select
Or press the menu button to select
the PAP and then to be displayed on the right appearance.
Select the TV/VIDEO with the PR
▼/▲ buttons.
Press the
/
buttons to
select the TV.
Press the
/
buttons to select the .
Select the with the
/
buttons to activate
POP (multi-strobo).
To stop the Multi-Strobo display temporarily
When the POP is activated, press the CH▼/▲ or the
STILL buttons. The position of the current picture is
held at that moment. To restart the POP(the multistrobo) display, press the CH▼/▲ or the STILL buttons.
POP(Multi-Strobo) POP(Multi-Strobo stop)
34
To display a POP(Picture-out-Picture) and various POP operation
Watching POP(Picture-out-Picture)
* NOTE
If the sub-picture is the video input, the POP is not available.
* NOTE
If you press the RECALL button repeatedly, the POP operation
will follow this chart.
The multi-strobo The multi-strobo stop
(OSD display)
The multi-strobo The multi-strobo stop
(OSD display) (no OSD display)
1
2
3
4 5 6 7
STILL
STILL
MOVING
STILL STILL STILL STILL
PAP
PAP ON
TV/VIDEO TV
CH P00
▶
▼▲SELECT ◀▶CHANGE
EXIT
MENU
Sub CH down/up
buttons (Right picture
channel down/up buttons)
STILL button
Recall button
Page 36

35
To set clock
Press the menu button to select
the TIMER and then to be displayed on the right appearance.
Select the CLOCK with PR▼/▲
buttons. Press the
/
buttons to activate the hour or the
minute(cyan OSD) and preset the
hour or the minute with the PR▼/
▲ buttons or the direct (0~9) buttons.
To turn off the TV automatically(OFF time)
With the CLOCK and the OFF TIME preset, the TV will
automatically switch to stand-by mode at a preset
time.
Select the CLOCK with PR▼/▲ buttons. Press the
buttons to activate the hour or the minute(cyan
OSD) and preset the hour or the minute with the PR▼/
▲ buttons or the direct (0~9) buttons.
To turn on the TV automatically(ON time)
With the CLOCK, the ON TIME, the ON TIME PROG.
preset, the TV will automatically turn on to a preset
programe number at a preset time.
Select the ON TIME with PR▼/▲ buttons. Press the
/ buttons to activate the hour or the
minute(cyan OSD) and preset the hour or the minute
with the PR▼/▲ buttons or the direct (0~9) buttons.
Select the ON TIME PROG. with PR▼/▲ buttons. Press
the
/ buttons to
activate ON TIME PROG. with
the PR▼/▲ buttons or the direct (0~9) buttons.
After setting CLOCK, ON TIME and ON TIME PROG.,
the green ON TIME INDICATOR LED is lit up.
To time display
Press the TIME button at the remote control repeatedly. The CLOCK, the OFF TIME and the ON TIME
appears cyclically.
To cancel setting clock, off time, on time, on time programme
Select the item to be cancel, press the Digit(- / - -)button. The CLOCK, the OFF TIME, ON TIME and ON
TIME PROG. are canceled to display - -.
Clock ON/OFF timer
Using Other Menus
TIMER
▶
CLOCK - - : - OFF TIME - - : - ON TIME - - : - ON TIME PROG. P - -
▼▲SELECT ◀▶ACTIVATE
EXIT
MENU
TIME
button
Page 37

Sleep Time Setting
1. With this button, up to 2 hours
every 15 minutes can be
set to the sleep timer.
2. If you press the “sleep”
button for the first time,
“O”sign of the non set
sleep-timer appears on the upper
right side of the screen.
3. When this button pressed again, 15 minutes are set
to the sleep-timer.
4. This display disappears whin 4seconds useless any
button is pressed. Whenever pressed again, the setting
time is increased by 15 minutes.
5. If this button is pressed again, during the sleep-timer
operation, the remaining time of the sleep-timer
appears on the screen.
6. In addition, if this button is pressed repeatedly, the
setting time is increased by 15 minutes continuously.
7. When the remaining time become “0”, the TV
receiver is turned off automatically.
36
Sleep time
15
O
120
15 30 90
105
SLEEP
button
Page 38

37
To select the on-screen display language
Use this function to choose the on-screen display language
1. Press the menu button to select
the FUNCTION and then to be displayed on the right appearance.
Press the PR▼/▲ buttons to
select the LANGUAGE.
Press the
/ buttons to
activate the LANGUAGE.
2.In the LANGUAGE menu display.
Press the
PR▼/▲ buttons to
select the desired LANGUAGE.
To select the language of the on-screen display
FUNCTION
▶ LANGUAGE
BLUE SCREEN ON
16:9 ON
BROADCAST SYSTEM
AUTO VOLUME ON
SKIP ON
▼▲SELECT ◀▶ACTIVATE
EXIT
MENU
Page 39

38
To select the blue screen
When no signal is being received, the TV will automatically turn blue at that time BLUE SCREEN ON.
Press the menu button to select
the FUNCTION and then to be displayed on the right appearance.
Press the PR▼/▲ buttons to
select the BLUE SCREEN.
Press the
/ buttons to
change BLUE SCREEN ON.
To select the auto volume
Different sound sources (eg. Advertisement during
movies) fairly often do not have the same volume level.
In this case, you can equalize the volume with the
AUTO VOLUME ON.
Press the MENU button to select
the FUNCTION and then to be displayed on the right appearance.
Press the PR▼/▲ buttons to
select the AUTO VOLUME.
Press the
/ buttons to
change AUTO VOLUME ON.
To select the blue screen and auto volume
* NOTE
With the AUTO VOLUME ON, the maximum volume level can be
down. You can maximize the volume level with AUTO VOLUME
OFF.
FUNCTION
LANGUAGE
▶ BLUE SCREEN ON
16:9 ON
BROADCAST SYSTEM
AUTO VOLUME ON
SKIP ON
▼▲SELECT ◀▶CHANGE
EXIT
MENU
FUNCTION
LANGUAGE
BLUE SCREEN ON
16:9 ON
BROADCAST SYSTEM
▶ AUTO VOLUME ON
SKIP ON
▼▲SELECT ◀▶CHANGE
EXIT
MENU
Page 40

39
To Connect Other machines like VIDEO
Names and Functions of Connective Terminals
✽ The output terminal of Monitor output VIDEO signals while watching VIDEO.
AUDIO SET
GAME PLAYER
VCR
CAMCORDER
LASER DISC PLAYER
Input terminals of VIDEO1
(picture, sound on left, right)
S-picture video
picture input terminal
Output terminals
of Monitor
(picture,
sound on left, right)
Input terminals of VIDEO2
(picture, sound on left, right)
Input/Output terminal of
VIDEO4(option) (SCART JACK)
Page 41

40
Connecting VIDEO
When connect the VIDEO to the back of TV
1. Prepare the connective plug(separate selling) of picture/sound.
2. Connect the VIDEO picture output terminal with the TV picture input one.
3. Connect the VIDEO sound output terminal with the TV sound input one.
4. Press the TV/VIDEO button in Remote control to tune TV into VIDEO.
● Both VIDEO1 and VIDEO2 are OK.
Side Connector
●The connection method is as same as back.
●In side connector, it’s better to connect the materials which are unusually used such like camcorder,
game player, etc.
SEPARATE
SELLING
SEPARATE SELLING
SOUND OUTPUT PICTURE OUTPUT
PICTURE OUTPUT
HI-FI STEREO VIDEO
HI-FI STEREO VIDEO
● In case of mono VIDEO, connect the VIDEO sound output terminal with right or left sound input one of TV.
SOUND OUTPUT PICTURE OUTPUT
MONO
VIDEO
SEPARATE
SELLING
SOUND OUTPUT
Page 42

41
SOUND
OUTPUT
S-PICTURE
OUTPUT
SOUND
OUTPUT
S-PICTURE
OUTPUT
SEPARATE SELLING
S-VHS CONNECTIVE PLUG
SOUND CONNECTIVE PLUG
SEPARATE SELLING
SEPARATE SELLING
Connecting with S picture VIDEO
Back connector
To watch TV in clear field by inputting S picture.
When repeating high-quality field VIDEO, you can enjoy clear and sharp picture by connecting it with
TV S-VHS terminal.
1. Connect S-VHS connective plug(separate selling) with S-VHS output terminal of VIDEO set and
S-VIDEO picture input terminal of TV set.
2. Connect sound connective plug(separate selling) with sound output terminal of VIDEO set and sound
input terminal of TV set.
3. Press the TV/VIDEO button in Remote control, and select VIDEO1.
Side Connector
●The connection method is as same as back.
Page 43

42
Connecting with VIDEO CAMERA(CAMCORDER)
To connect VIDEO CAMERA with TV
● When watching the recording by VIDEO CAMERA, it’s convenient to connect with TV side connector.
1. Prepare the connective plug(separate selling) of picture/sound.
2. Connect the picture/sound connective terminal to VIDEO CAMERA picture/sound output terminal
and the TV side picture/sound input one.
3. Press the TV/VIDEO button in Remote control three times to select VIDEO3.
4. Set the transfer switch of VIDEO CAMERA picture in/output, then replay the VIDEO CAMERA.
SEPARATE SELLING
PICTURE OUTPUT
SOUND OUTPUT
Page 44

43
Connecting with AUDIO SET
Recording TV
●When listening the sound in AUDIO powerfully, while watching the picture on TV.
●Connect external input terminal of AUDIO to right & left sound output of TV monitor display.
●Connect the picture/sound connective plug to VIDEO picture/sound input terminal, TV monitor
picture, and sound output terminal.
●The output of Monitor is as same as the present picture.
RIGHT LEFT
RIGHT
LEFT
SEPARATE SELLING
PICTURE INPUT
SOUND
INPUT
SEPARATE SELLING
Page 45

44
Broadcast Transmission Systems in Each Country
Area
System
Color Sound
Country
Asia
M. E.
China, etc.
Hong Kong
Iraq, Islamic Republic of lran, Lebanon, Saudi Arabia, etc.
Russian Federation, etc.
Myanmar, etc.
PAL B/G
PAL D/K
PAL I
SECAM B/G
SECAM D/K
NTSC M
Bahrain, Kuwait, Israel, Oman, Qatar, United Arab Emirates,
Yemen, etc.
India, Indonesia, Malaysia, Singapore, Thailand, etc.
Broadcast Transmission Systems in Each Country
Page 46

To select the text mode
First, turn on your TV SET and choose your TV programme.
Then press the TV/TEXT button to switch the receiver to
Teletext mode.
To select any other page, simply press the three of the
PAGE SELECTOR buttons or PAGE DOWN ▼or ▲UP
button. The Page number requested is displayed on the
upper left hand side of the screen and when the third
digit(each main page number consists of three digits) is
entered, the page header display changes color from white
to green to indicate that the page currently being displayed
is not yet the requested page. On receiving the new page the
header changes to white, and the rolling number in the centre is stationary.
To return to normal TV operation, the TV/TEXT button is
pressed.
Page Selector 0-9
In Teletext mode, the PAGE SELECTOR buttons are used
to enter a page number or a subcode.
During digit entry page, acquisition is stopped.
Page Down/ Page UP
Page DOWN ▼ and UP ▲ buttons decrease or increase the
current page number by 1.
HOLD
REVEAL
STORE
BROWSE
PAGE UP
TV/TEXT
CONTRAST
MENU
PAGE
SELCTOR
0-9
TXT MODE
SELECT
PAGE DOWN
INDEX
MIX
SUBCODE
CANCEL
SIZE
R, G, Y, C
●The Teletext service is carried on a TV transmission signal, therefore it is only available when a TV programme can be
received on your TV. Your choice of TV programme also governs which Teletext service you will receive.
To view text
Note that when Teletext is first selected, Index
page is automatically obtained when the TV is in
the FLOF mode. If the TV is in LIST mode, then
the Teletext page which is stored in the RED rank
is obtained.
Note that if the new page requested is a newsflash
or a subtitle page, the normal TV picture is automatically turned on and the news flash or subtitle
displayed in a box within the picture.
Viewing Teletext(Option)/ Use of the Teletext Buttons
45
Page 47

Index
When the Index button is pressed in the FLOF mode, the
Teletext decoder is set up to display the index page. Press
once for Main Index Page: press again for full index. When
the TV is in LIST mode, the teletext decoder is set up to
display the Red Rank.
Mix
In normal Teletext mode, TV picture and character data are
not displayed simultaneously.
The MIX button allows a combined display of TV picture
and character data.
Size
By pressing the SIZE button, either the top half or the bottom half of the Text display can be expanded.
Press the Size button once and the top half of the display
expanded.
Press again and the bottom half is expanded.
Press again and the display returns to normal size characters.
Browse
The BROWSE button allows the user to very easily scan
through the entire database. In its simplest sense, BROWSE
instructs the decoder to capture the next complete Teletext
page which arrives, therefore it can be seen as an almost
instant way of accessing random pages in the Teletext
database and thereby removing the need to press buttons to
glance at unfamiliar pages.
Reveal
Some Teletext pages play a role in concealing part of the
display in, for example, a quiz page with concealed
answers.
The REVEAL button releases the concealed text as long as
the REVEAL button is not pressed again.
HOLD
REVEAL
STORE
BROWSE
PAGE UP
TV/TEXT
CONTRAST
MENU
PAGE
SELCTOR
0-9
TXT MODE
SELECT
PAGE DOWN
INDEX
MIX
SUBCODE
CANCEL
SIZE
R, G, Y, C
To view text
46
Page 48

Hold
Some Teletext pages contain more information than can be
displayed simultaneously and are therefore sub-divided into
a series of two or more pages.
The first sub-page of a series of four sub-pages will, for
example, be indicated by a 1/4 displayed on the top right
hand side of the text page. These sub-pages are automatically rotated, each page being displayed for a set time before
being replaced by the next page. If you need to read a certain page for longer than is allowed, or retain a particular
subpage, then the HOLD button should be pressed. The
HOLD symbol will be displayed on the top left hand side
instead of the page number and page acquisition will be
stopped.
Normal operation is restored by pressing the HOLD button
again or by entering a new page number.
Cancel
The CANCEL button suppresses the Text display and
restores the normal TV picture while the receiver remains in
the Teletext mode.
This function allows you to request Teletext pages and alter
Teletext controls without interrupting a TV programme.
To return to normal TV operation, the cancel button is
pressed again.
R, G, Y, C
When the TV is in the LIST mode, the page numbers available for the four colored buttons (R., G., Y., C.) are displayed in the Text status row. Your selection is made by
pressing the colored button that corresponds with the
desired colored number.
HOLD
REVEAL
STORE
BROWSE
PAGE UP
TV/TEXT
CONTRAST
MENU
PAGE
SELCTOR
0-9
TXT MODE
SELECT
PAGE DOWN
INDEX
MIX
SUBCODE
CANCEL
SIZE
R, G, Y, C
To view text
47
Page 49

Subcode
For Teletext information which is longer than one page, it
may take some time for the automatically changing of subpages to reach the sub-page you require. It is possible, however, to enter the sub-page you require and continue watching a normal TV programme until the correct sub-page has
been reached.
Press SUBCODE button.
The character S(Z)***** will be displayed on the top left
hand side of the Text screen.
Enter the desired sub-page number. EG. To select sub-page
10, press 0, 0, 1, 0 buttons.
Press CANCEL button to return to normal TV programme.
When the requested sub-page is reached, the main page
number will be super-imposed on the normal TV picture.
Press the Teletext button to display the stored sub-page.
L/F/T
Press the L/F/T button to select the Teletext LIST mode.
The letter “L” and four colored page numbers will appear at
the bottom of the screen. To see one of these pages, press
the matching colored button (R., G., Y., C.).
To change the favorite page numbers, press a colored button
and then three page selector buttons on the remote control
in sequence. EG.
To select page 100 on the RED background, press the R
button, then three digits (1, 0, 0) in sequence. Page 100 will
be shown on the red background.
This can be repeated with other page numbers and colors as
required.
Store
The STORE button is used to store a list of numbers. While
the list is being stored the colored numbers turn to white for
3 seconds.
HOLD
REVEAL
STORE
BROWSE
PAGE UP
TV/TEXT
CONTRAST
MENU
PAGE
SELCTOR
0-9
TXT MODE
SELECT
PAGE DOWN
INDEX
MIX
SUBCODE
CANCEL
SIZE
R, G, Y, C
To view text
48
Page 50

1. Press the button at remote
control to adjust the desired
teletext characters quality and
then the display on the right
appears.
When you press the button
again, the display disappears.
2. Press the
/
buttons to adjust level.
49
Item
contrast weaker stronger
Pressing
◀▶
To adjust teletext characters quality
ADJUSTMENT
▶ CONTRAST
◀▶CHANGE
63
HOLD
REVEAL
BROWSE
STORE
PAGE UP
PAGE DOWN
INDEX
MIX
SUBCODE
CANCEL
SIZE
R, G, Y, C
TV/TEXT
CONTRAST
MENU
PAGE
SELCTOR
0-9
TXT MODE
SELECT
Page 51

50
SYMPTOM CHECK
No picture or sound. • Check the TV set is plugged in.
• Check the volume, Brightness and Contrast controls
are set to the minimum positions.
Picture is OK, but No • Check the Volume control is set to the minimum
Sound position.
Sound is OK, but No • Check the Brightness and Contrast controls are
Picture set to the minimum position.
No Color • Check the Color control is set to the minimum
position.
Excessive noise in picture • Check the Antenna Cable is broken or
disconnected or damaged.
Diagonal stripes appear • It may be affected by interfering signal. (ex. from
on picture nearby amateur radio transmitter or another TV set.)
• The interference can be reduced to some extent by
adjusting the direction or height of the antenna.
(If the twin lead antenna cable is used, replace it
with a coaxial cable.)
Picture has "Snow" • Check the Antenna cable is broken or disconnected
or damaged.
• Small dot on the screen caused by a weak aerial
signal.
Ghost images appear . • Check the Antenna direction has changed after
storm or strong wind etc..
• Ghost images are caused by a signal reflected from
a hill or large building etc..
• The direction or height of the antenna should be
chosen well in order to minimize the ghost images.
Sometimes some performance problems can be easily solved by checking seemingly
apparent but often overlooked possibilities. Before asking for service, to check these
items could save your time and money .
Troubleshooting
Page 52

51
Specification
TV Standard
Color system
Sound system
Rated voltage
Sound Output Power
Channel Coverage
Tuning System
Programme No. Indication
Programme Selection
Aux. Terminal
Remote Control Unit
Dimension
Weight
Picture tube
Power consumption
(at AC 220V, 50Hz)
PAL/SECAM, NTSC3.58/4.43(AV)
B/G, D/K, I, M, H
110-240V~, 50/60Hz
MAIN: 15W X 15W, Woofer: 15W
HYPER + CHINA + IVORY COAST
VHF L : K1(43.25MHz)~S7(147.25MHz)
VHF H : S8(154.25MHz)~S41(463.25MHz)
UHF : E21(471.25MHz)~C57(863.25MHz)
Frequency Synthesizer Tuning System
ON-Screen Display
100 Programmes
A V INPUT 1, 2, 3/ A V OUTPUT
A V4(INPUT/OUTPUT) : SCART JACK(Option)
R-30F(Required two 1.5V batteries type
with AA size)
721(W) × 575(H) × 510(D) mm
44.7kg
29" NF TYPE
152W
Page 53

52
MEMO
MEMO
Page 54

53
MEMO
MEMO
Page 55

54
MEMO
MEMO
Page 56

P/N:48586915E107-R0
 Loading...