

Page 1

INSTRUCTION MANUAL
Color Television
DTQ 29X9FS
DTQ 29U9FS
P/N:48586789E208-R0
Page 2
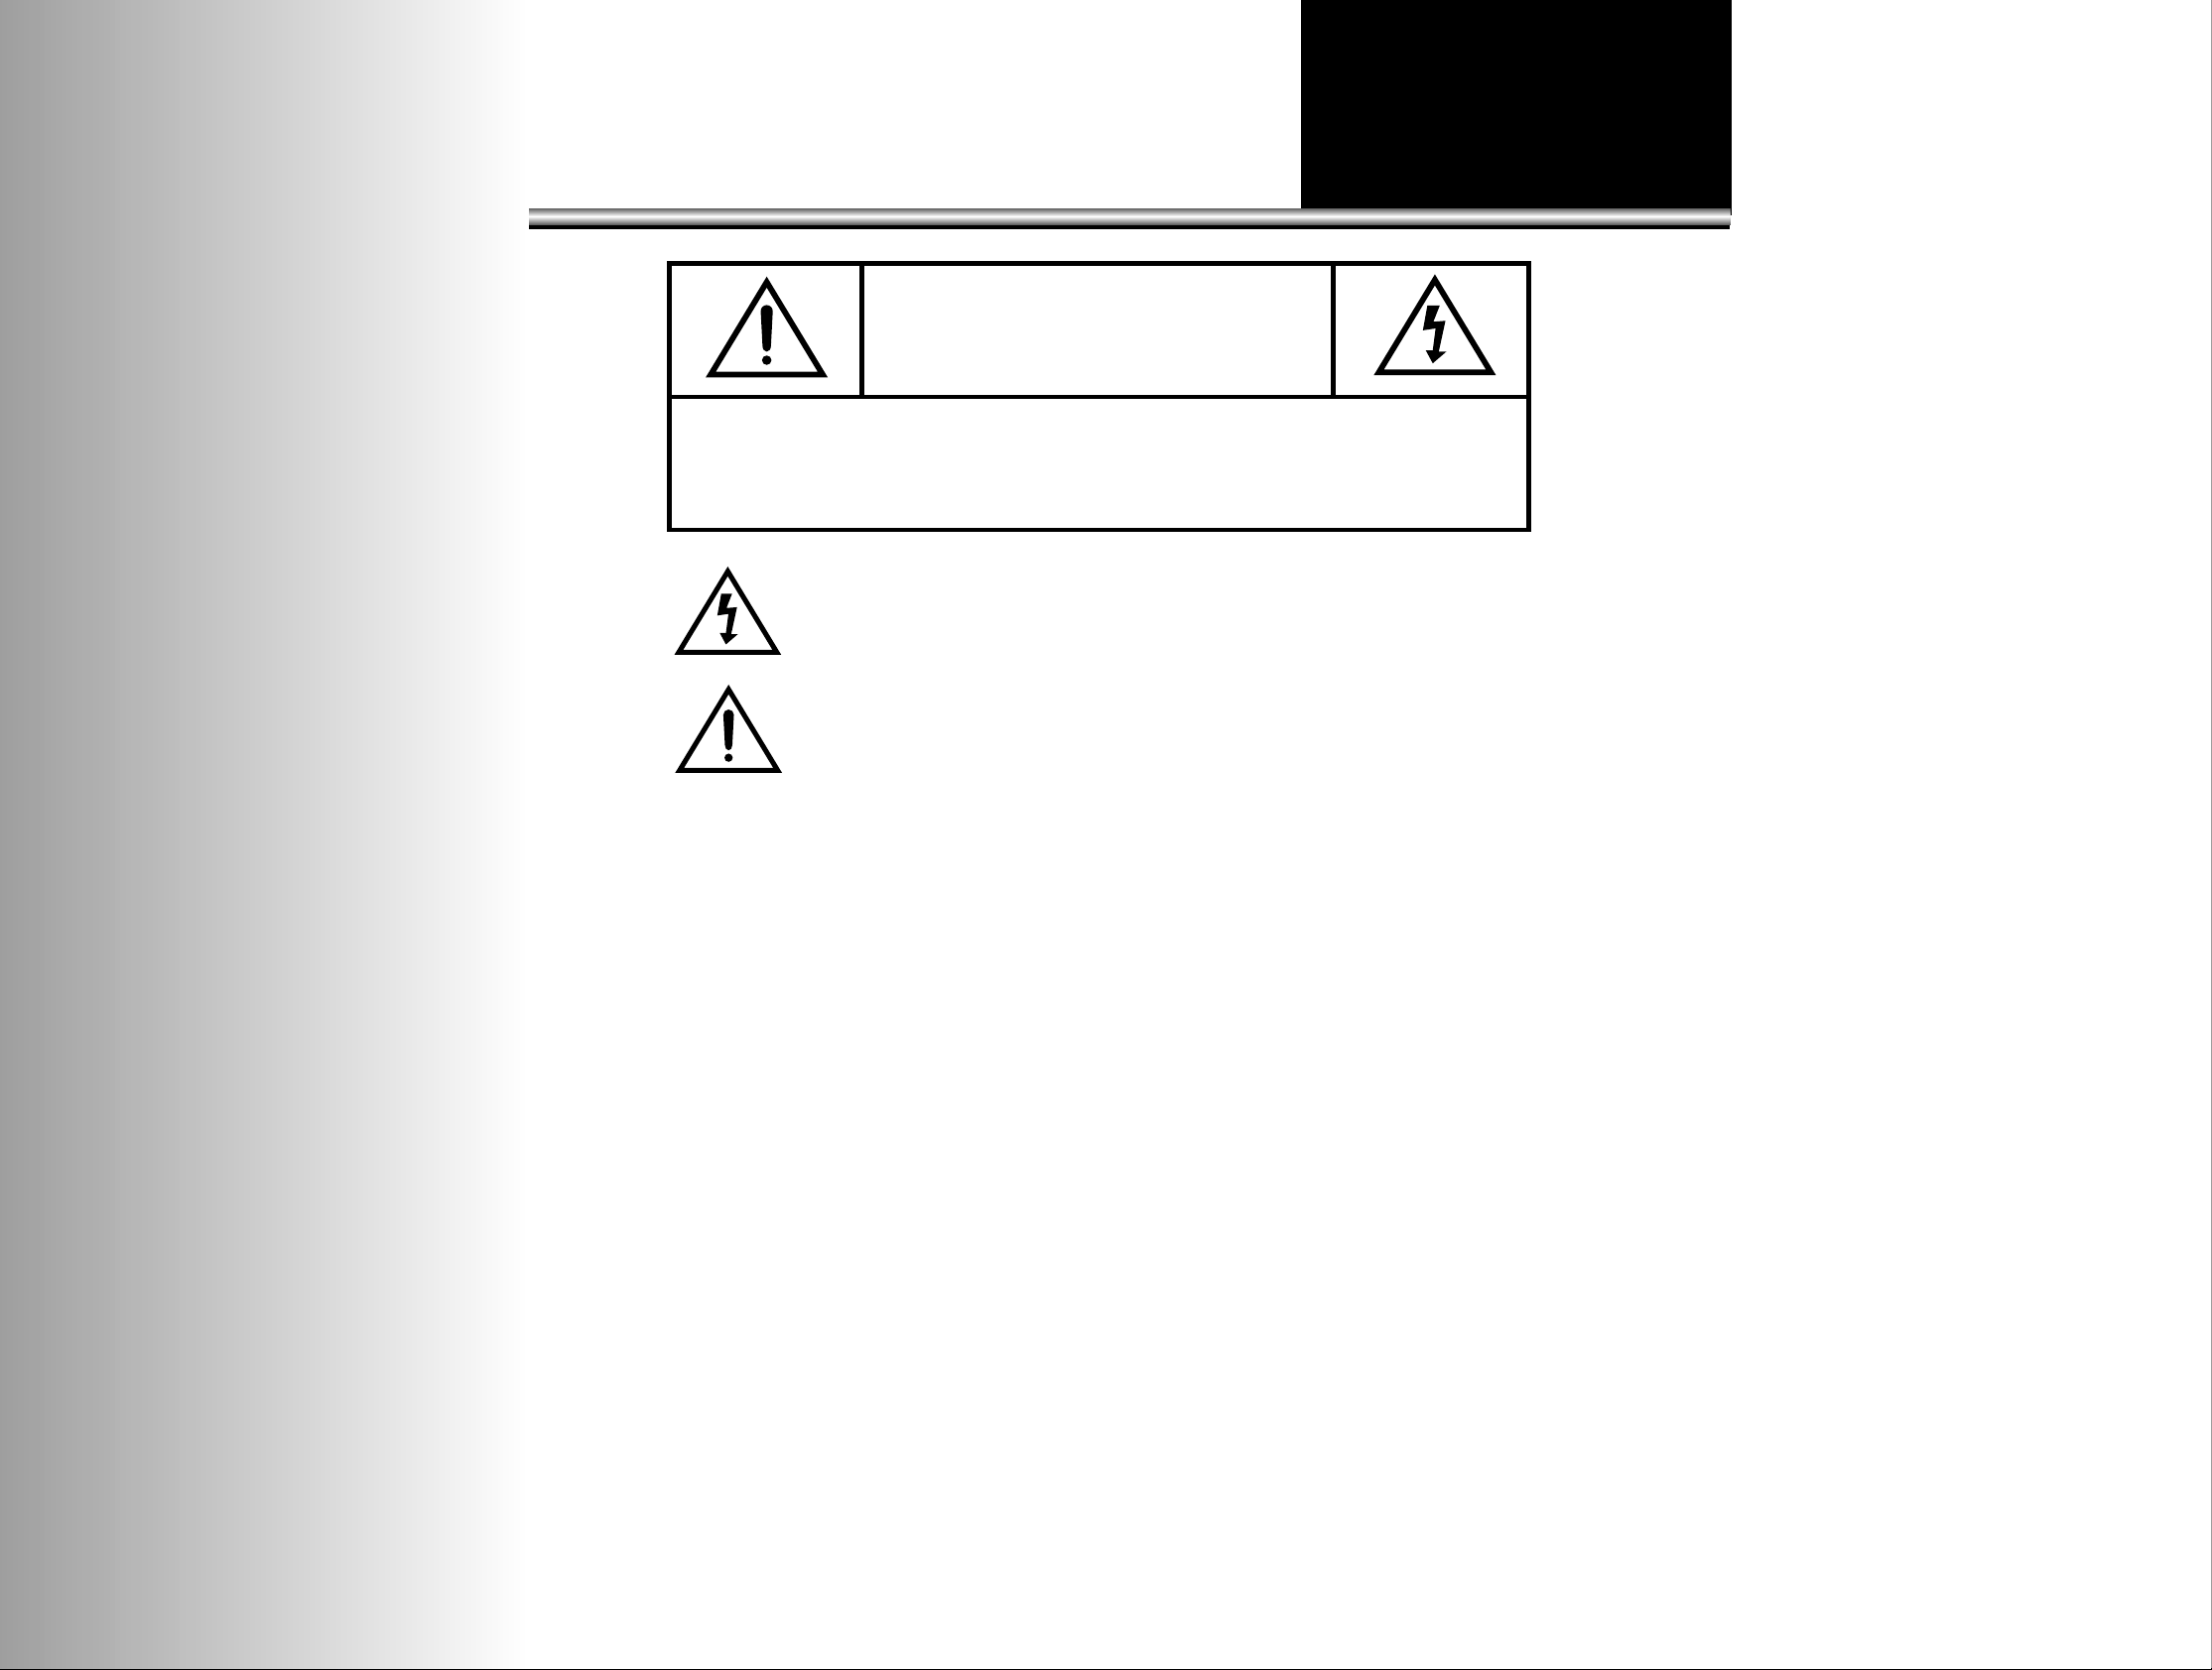
The lightning flash with arrowhead symbol, within an equilateral triangle, is intended to
alert the user to the presence of uninsulated “dangerous voltage” within the product’s
enclosure that may be of sufficient magnitude to constitute a risk electric shock.
The exclamation point within an equilateral triangle is intended to alert the user to the
presence of important operating and servicing instructions in the literature accompanying the appliance.
WARNING
TO PREVENT FIRE OR SHOCK HAZARD, DO NOT EXPOSE THIS APPLIANCE TO RAIN OR
MOISTURE.
NOTE TO CATV SYSTEM INSTALLER
THIS REMINDER IS PROVIDED TO CALL THE CATV SYSTEM INSTALLER'S ATTENTION TO
ARTICLE 820-40 OF THE NEC THAT PROVIDES GUIDELINES FOR PROPER GROUNDING
AND, IN PARTICULAR, SPECIFIES THAT THE CABLE GROUND SHALL BE CONNECTED TO
THE GROUNDING SYSTEM OF THE BUILDING, AS CLOSE TO THE POINT OF CABLE ENTRY
AS PRACTICAL.
CAUTION
The AC power cord provided with this product is polarized (one blade wider than the other).
To provide power to the TV, insert the AC plug into a standard 110/220V~ 50/60Hz polarized outlet.
NOTE
Never connect the plug to an electrical source other than one providing 110/220V~ 50/60Hz power. Use
only the attached power cord. If the polarized AC cord does not fit into a non-polarized outlet, do not cut
or file the blade. You are responsible for having the obsolete outlet replaced with a polarized outlet.
If you feel a static discharge when touching the unit, and the unit does not function, simply unplug the
unit from the outlet. When you plug the unit back in, it should work normally.
Do not install power cords near any heating element or cooking appliances.
CAUTION
RISK OF ELECTRIC SHOCK
DO NOT OPEN
CAUTION : TO REDUCE THE RISK OF ELECTRIC SHOCK,
DO NOT REMOVE COVER (OR BACK)
NO USER-SERVICEABLE PARTS INSIDE.
REFER SERVICING TO QUALIFIED SERVICE PERSONNEL.
Page 3

IMPORTANT SAFEGUARDS
PLEASE READ ALL THESE INSTRUCTIONS REGARDING YOUR TELEVISION EQUIPMENT AND RETAIN FOR FUTURE REFERENCE. FOLLOW ALL WARNINGS AND
INSTRUCTIONS MARKED ON THE TV RECEIVER.
1 Read all of these instructions.
2 Save these instructions for later use.
3 Unplug this television equipment from the
wall outlet before cleaning. Do not use
liquid cleaners or aerosol cleaners. Use a
damp cloth for cleaning.
4 Do not use attachments not recommended
by the television equipment manufacturer
as they may result in the risk of fire,
electric shock or other personal injury.
5 Do not use this television equipment near
water, for example, near a bathtub,
washbowl, kitchen sink, or laundry tub, in
a wet basement, or near a swimming pool,
or the like.
6 Do not place this television equipment on
an unstable cart, stand, or table, The
television equipment may fall, causing
serious injury to a child or adult, and
serious damage to the equipment. Use only
with a cart or stand recommended by the
manufacturer, or sold with the television
equipment. Wall or shelf mounting should
follow the manufacturer's instructions, and
should use a mounting kit approved by the
manufacturer.
6A An appliance and cart combination should
be moved with care. Quick stops,
excessive force, and uneven surface may
cause the appliance and cart combination
to overturn.
7 Slots and openings in the cabinet and the
back or bottom are provided for ventilation
and to ensure reliable operation of the
television equipment; and to protect it
from overheating, these opening, must not
be blocked or covered. The opening should
never be blocked by placing the television
equipment on a bed, sofa, rug, or other
similar surface. (This equipment should
never be placed near or over a radiator or
heat register.) This television equipment
should not be placed in a built-in
installation such as a bookcase unless
proper ventilation is provided.
8 This television equipment should be
operated only from the type of power
source indicated on the marking label. If
you are not sure of the type of power
supplied to your home, consult your
television dealer or local power company.
9 This television equipment is equipped with
a polarized alternating current line plug (a
plug having one blade wider than the
other). This plug will fit into the power
outlet only one way. This is a safety
feature. If you are unable to insert the plug
fully into the outlet, try reversing the plug.
If the plug should still fail to fit, contact
your electrician to replace your obsolete
outlet. Do not defeat the safety purpose of
the polarized plug.
10 Do not allow anything to rest on the power
cord. Do not locate this television
equipment where the cord will be abused
by persons walking on it.
11 Follow all warnings and instructions
marked on the television equipment.
12 For added protection for this television
equipment during a lightning storm, or
when it is left unattended and unused for
long periods of time, unplug it from the
wall outlet and disconnect the antenna or
cable system. This will prevent damage to
the equipment due to lightning and powerline surges.
Page 4
13 An outside antenna system should not be
located in the vicinity of overhead power
lines or other electric light or power
circuits, or where it can fall into such
power lines or circuits. When installing an
outside antenna system, extreme care
should be taken to keep from touching
such power lines or circuits as contact with
them might be fatal.
14 Do not overload wall outlets and extension
cords as this can result in fire or electric
shock.
15 Never push objects of any kind into this
television equipment through openings as
they may touch dangerous voltage points
or short-out parts that could result in a fire
or electric shock. Never spill liquid of any
kind on the television equipment.
16 Do not attempt to service this television
equipment yourself as opening or
removing covers may expose you to
dangerous voltage or other hazards. Refer
all servicing to qualified service personnel.
17 Unplug this television equipment from the
wall outlet and refer servicing to qualified
service personnel under the following
conditions:
(a) When the power-supply cord or plug is
damaged or frayed.
(b) If liquid has been spilled, or objects
have fallen into the television
equipment.
(c) If the television equipment has been
exposed to rain or water.
(d) If the television equipment does not
operate normally by following the
operating instructions. Adjust only
those controls that are covered by the
operating instructions as an improper
adjustment of other controls may result
in damage and will often require
extensive work by a qualified
technician to restore the TV receiver to
its normal operation.
(e) If the television equipment has been
dropped or the cabinet has been
damaged.
(f) When the television equipment exhibits
a distinct change in performance - this
indicates a need for service.
18 When replacement parts are required, be
sure the service technician has used
replacement parts specified by the
manufacturer that have the same
characteristics as the original part.
Unauthorized substitutions may result in
fire, electric shock or other hazards.
19 Upon completion of any service or repairs
to this television equipment, ask the
service technician to perform safety checks
to determine that the television is in a safe
operating condition.
20 If an outside antenna or cable system is
connected to the television receiver, be
sure the antenna or cable system is
grounded so as to provided some
protection against voltage surges and builtup static charges.
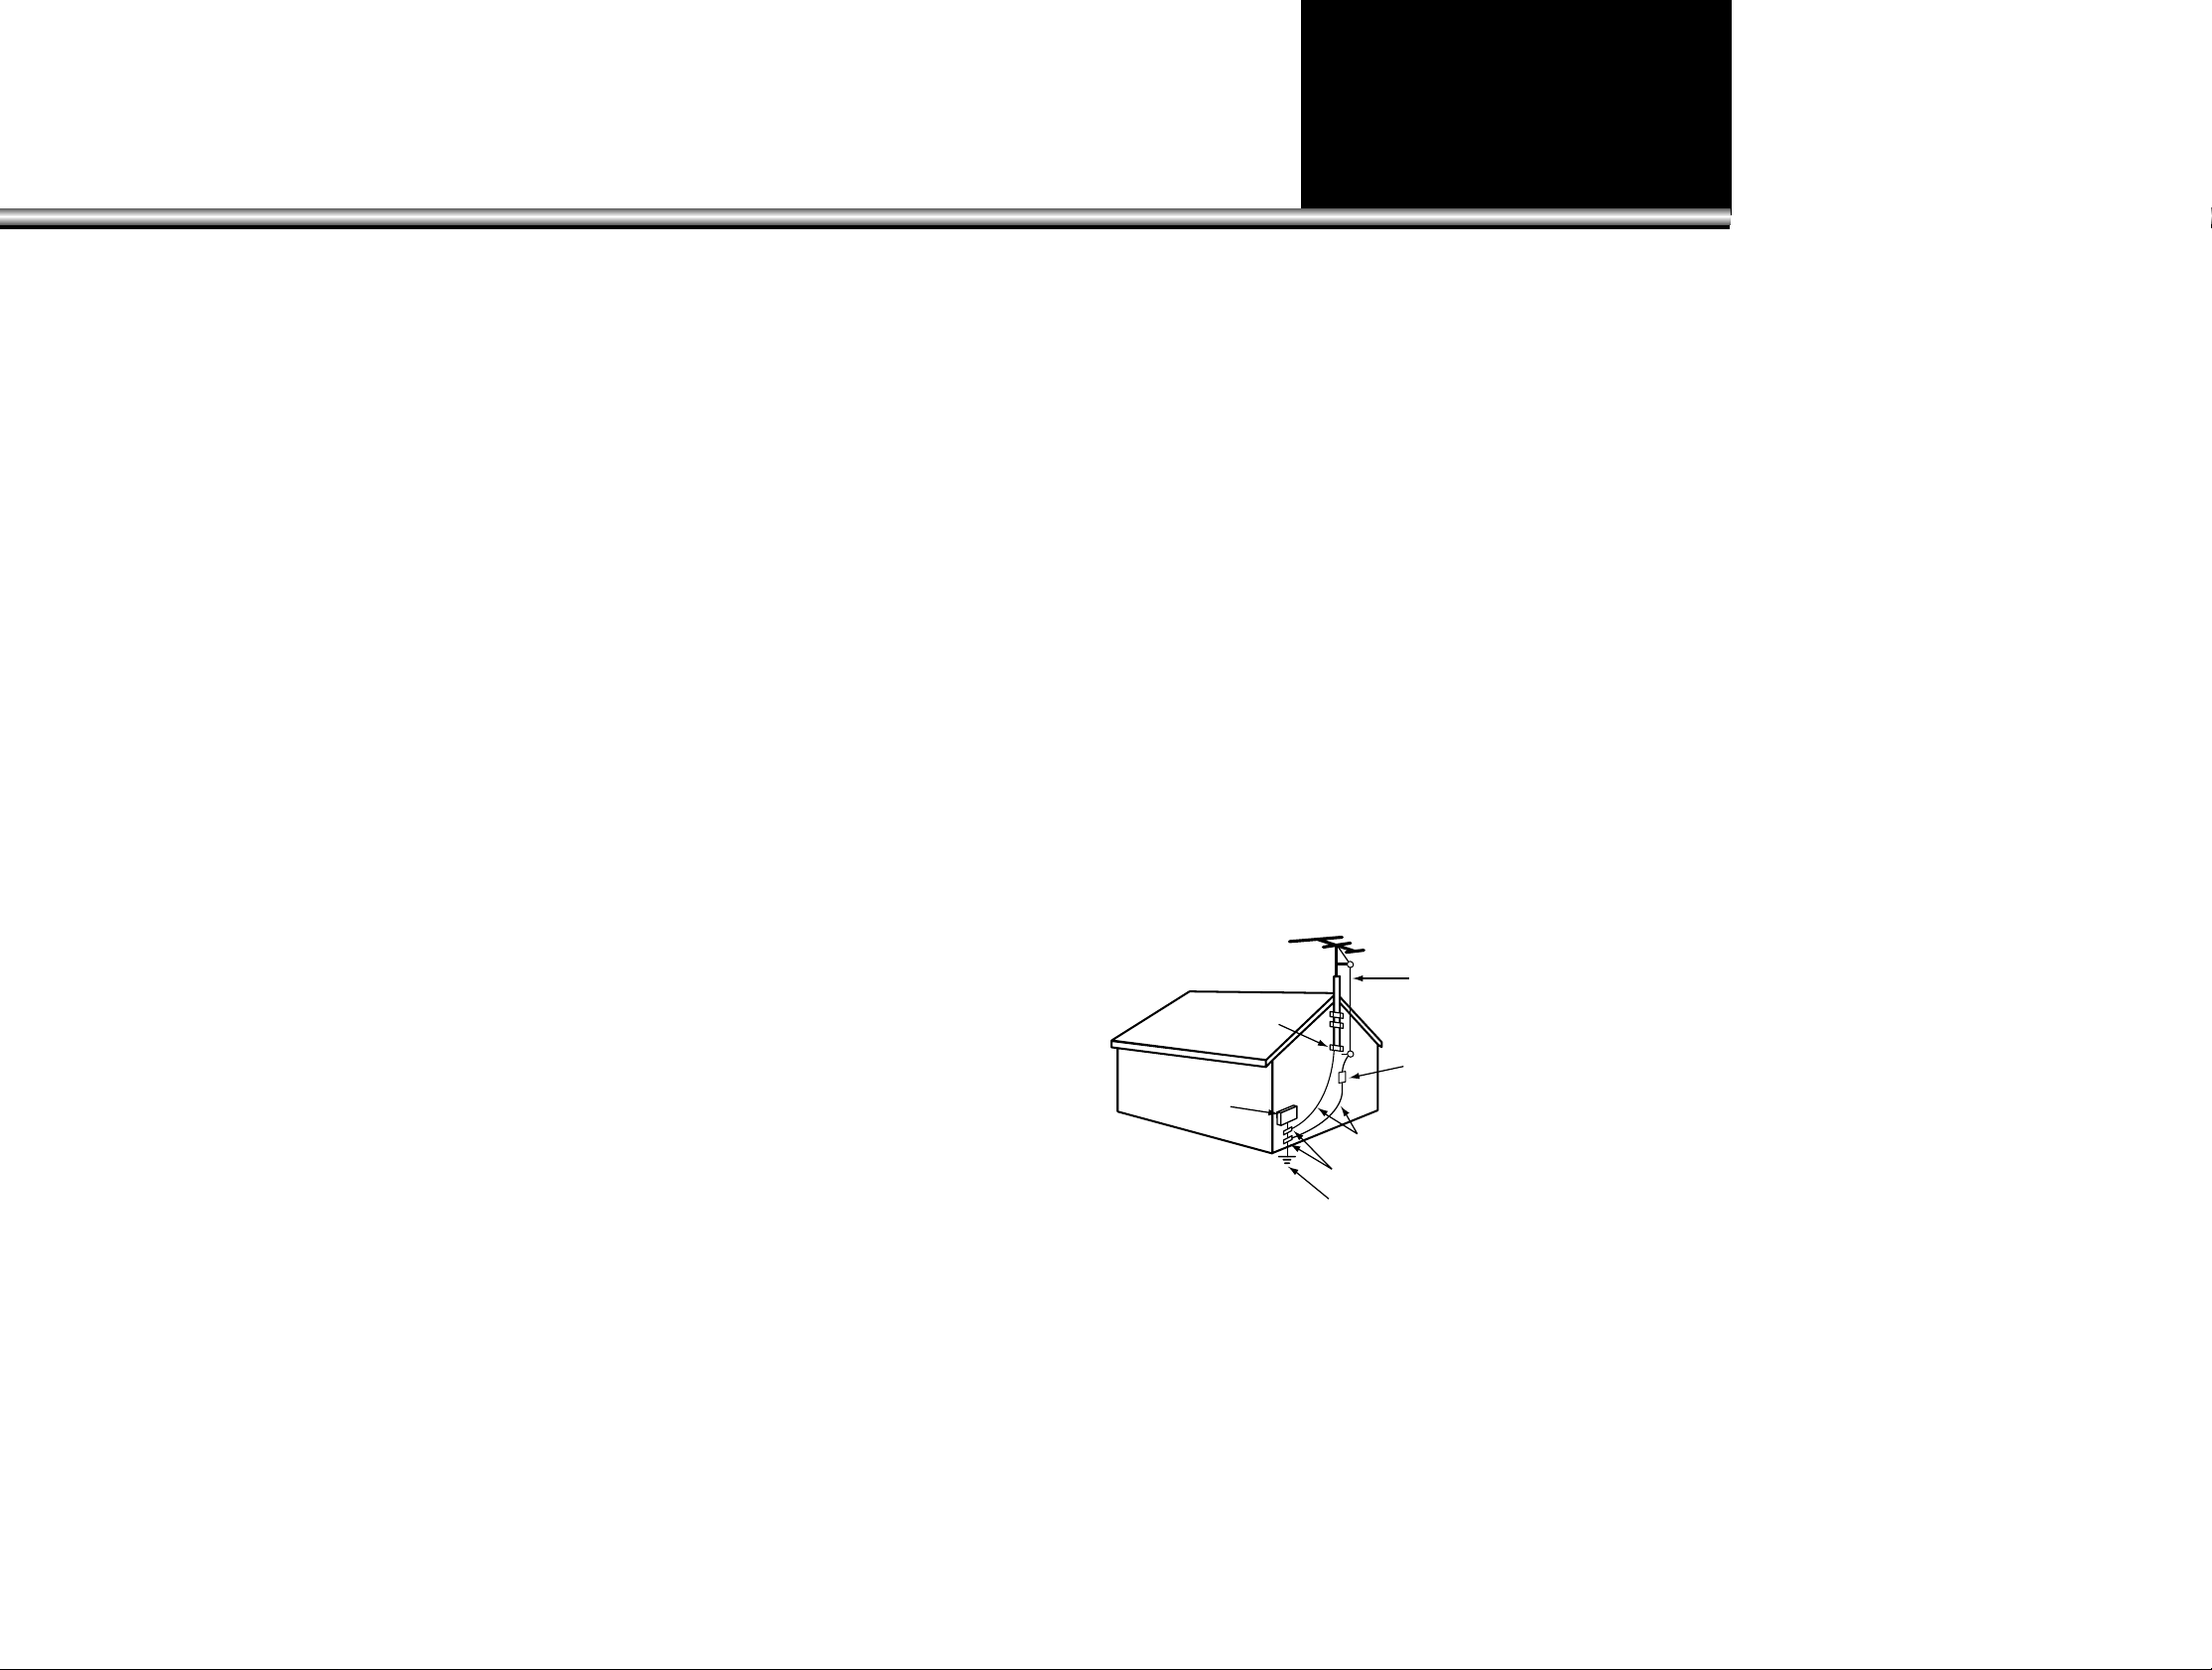
ANTEENNA
LEAD IN
WIRE
ANTENNA
DISCHARGE UNIT
(NEC SECTION 810-20)
GROUNDING CONDUCTORS
(NEC SECTION 810-20)
GROUND CLAMPS
POWER SERVICE GROUNDING
ELECTRODE SYSTEM
(NEC ART 250, PART H)
ELECTRIC
SERVICE
EQUIPMENT
NEC-NATIONAL ELECTRICAL CODE
GROUND
CLAMP
EXAMPLE OF ANTENNA GROUNDING
Page 5

CONTENTS
5
PREPARATION
•CONNECTING ANTENNA 6
•NAME OF EACH PART 7
BASIC TIPS FOR OPERATION
•TO WATCH TV 11
•ADJUSTING TWO PROGRAM WINDOWS 18
•VARIOUS FUNCTIONS OF SIMULTANEOUS WINDOWS MODE 19
•ADJUSTING VOLUME OF AN AUXILIARY WINDOW 27
UTILITIES
•OPEN FUNCTION MENU 28
•ADJUSTING THE PICTURE 29
•ADJUSTING THE SOUND 33
•TIME SETUP 36
•MEMORY FUNCTIONS 38
•SPECIAL FUNCTIONS 41
CONNECTING OTHER EQUIPMENT TO THE SET
•CONNECTING VCR OR OTHER AV SETS 53
OTHER TIPS
•TROUBLESHOOTING 58
SPECIFICATIONS 59
Page 6
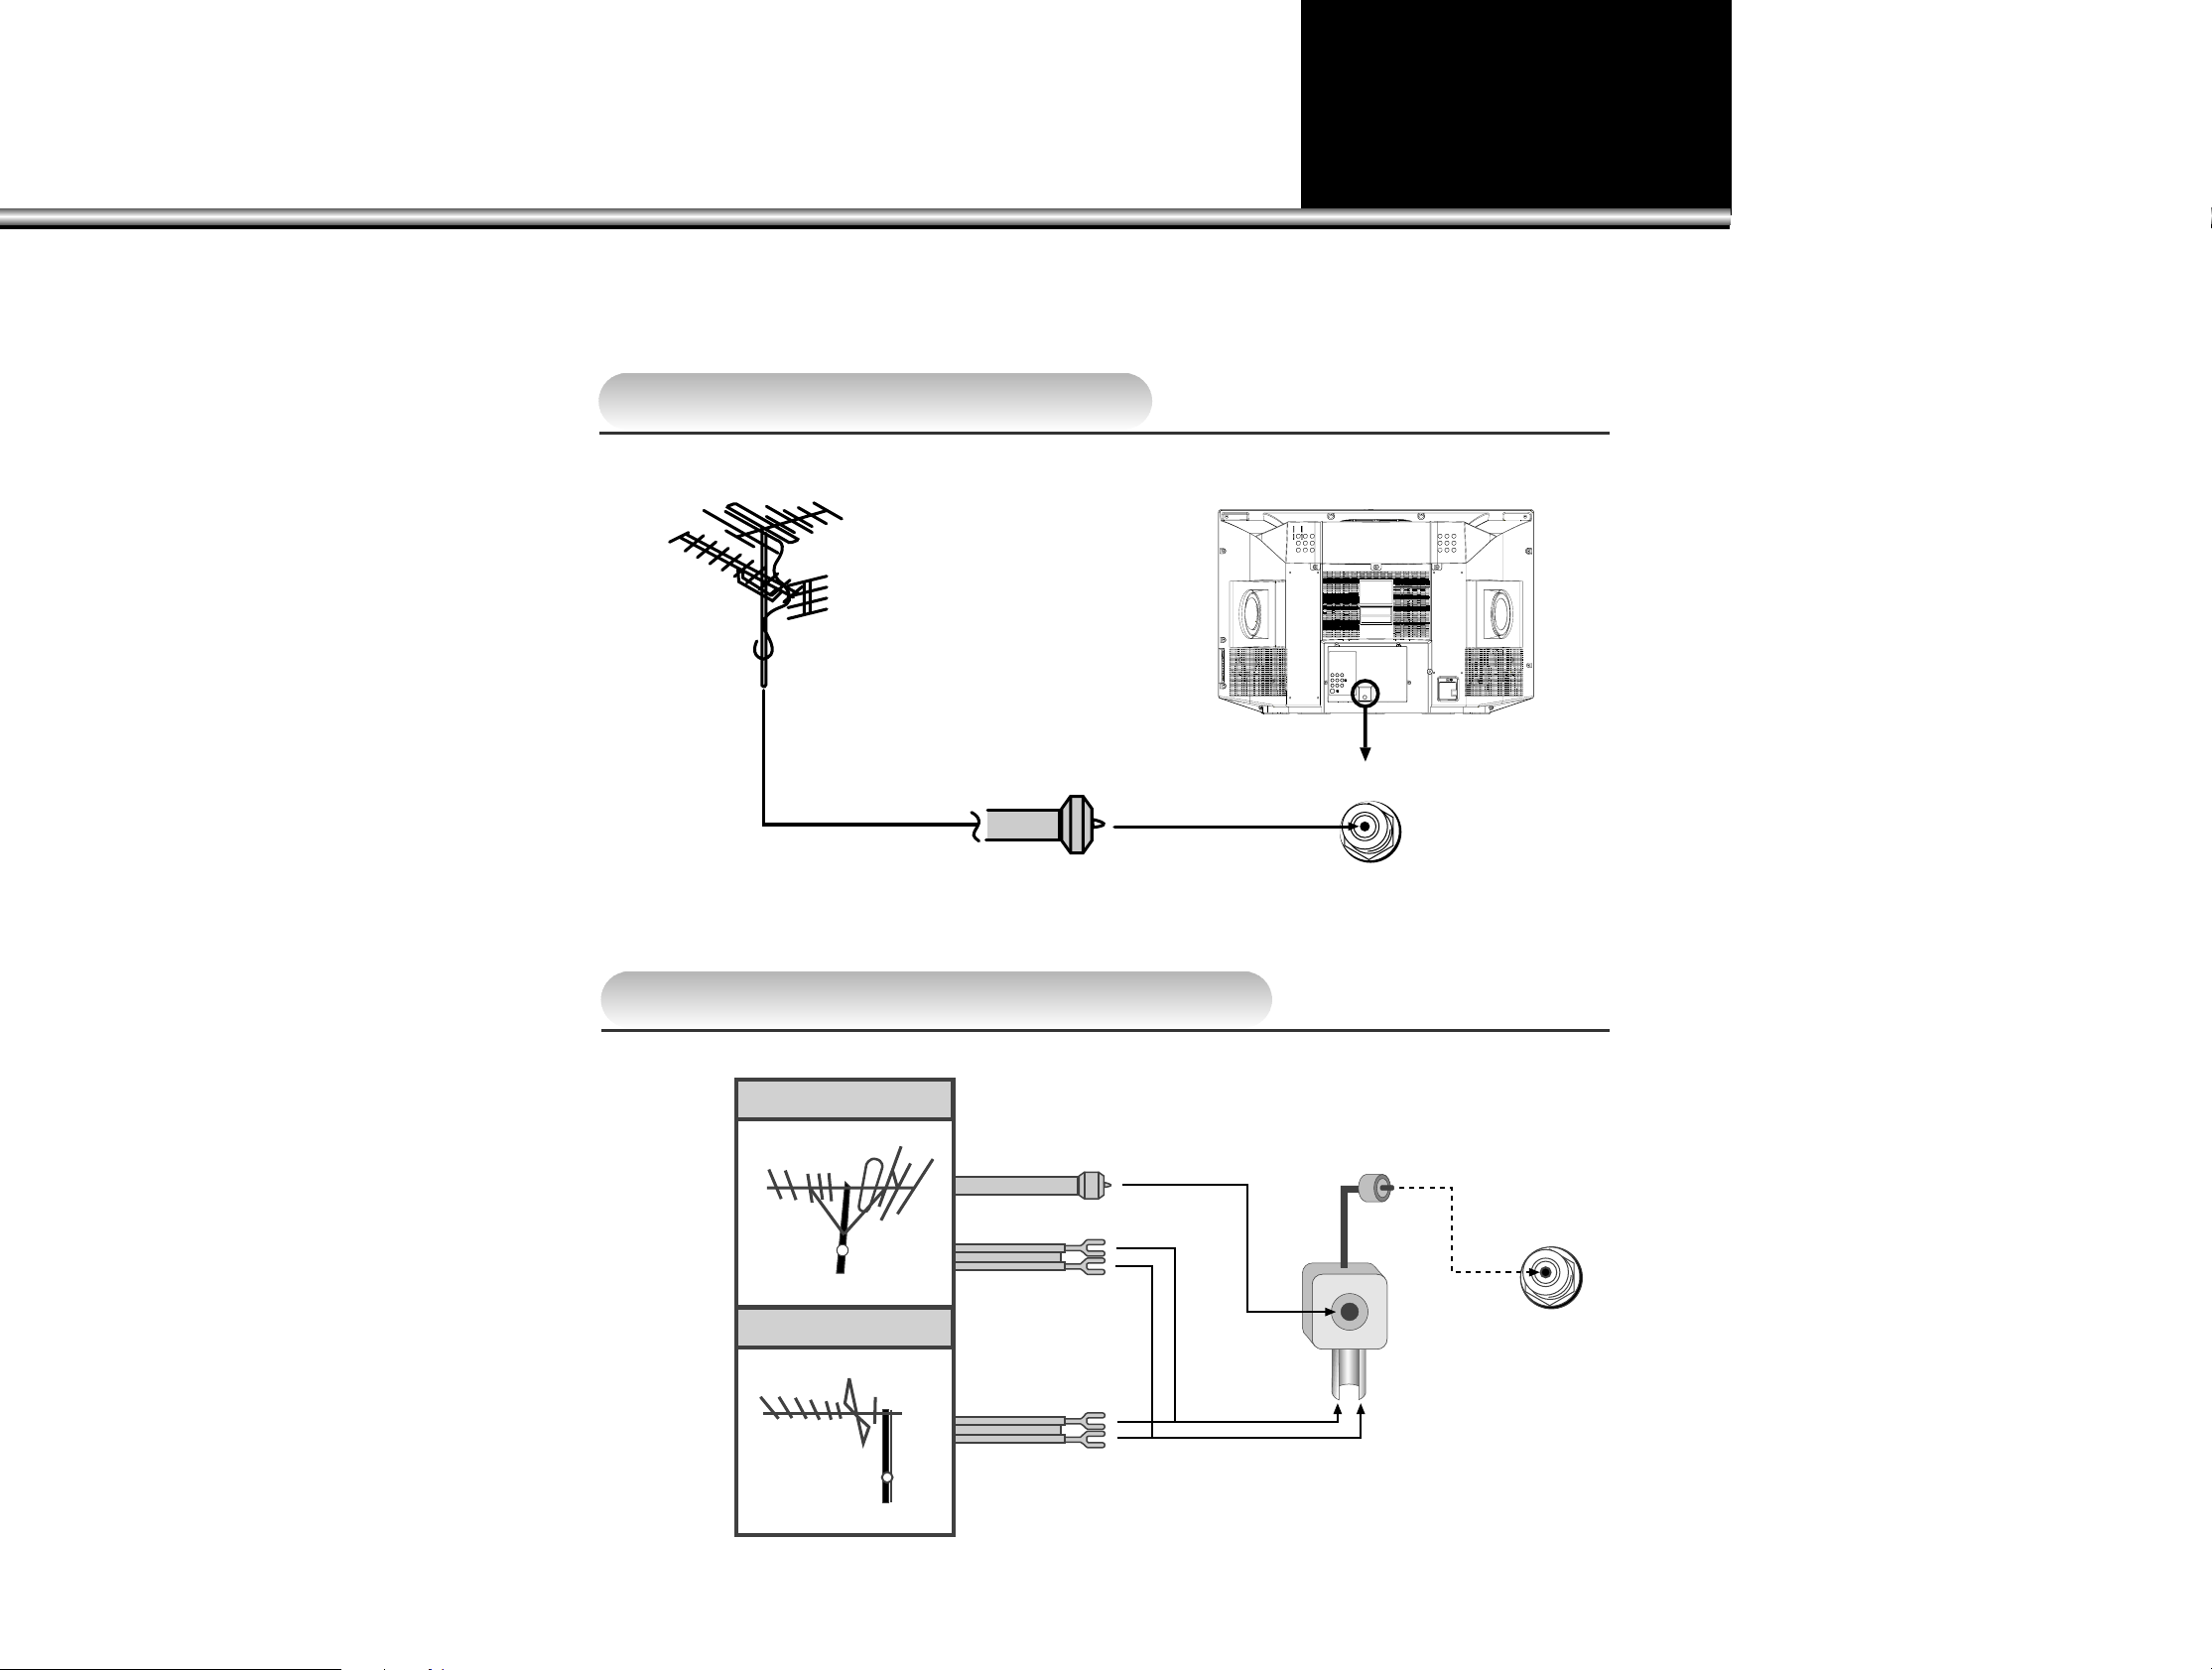
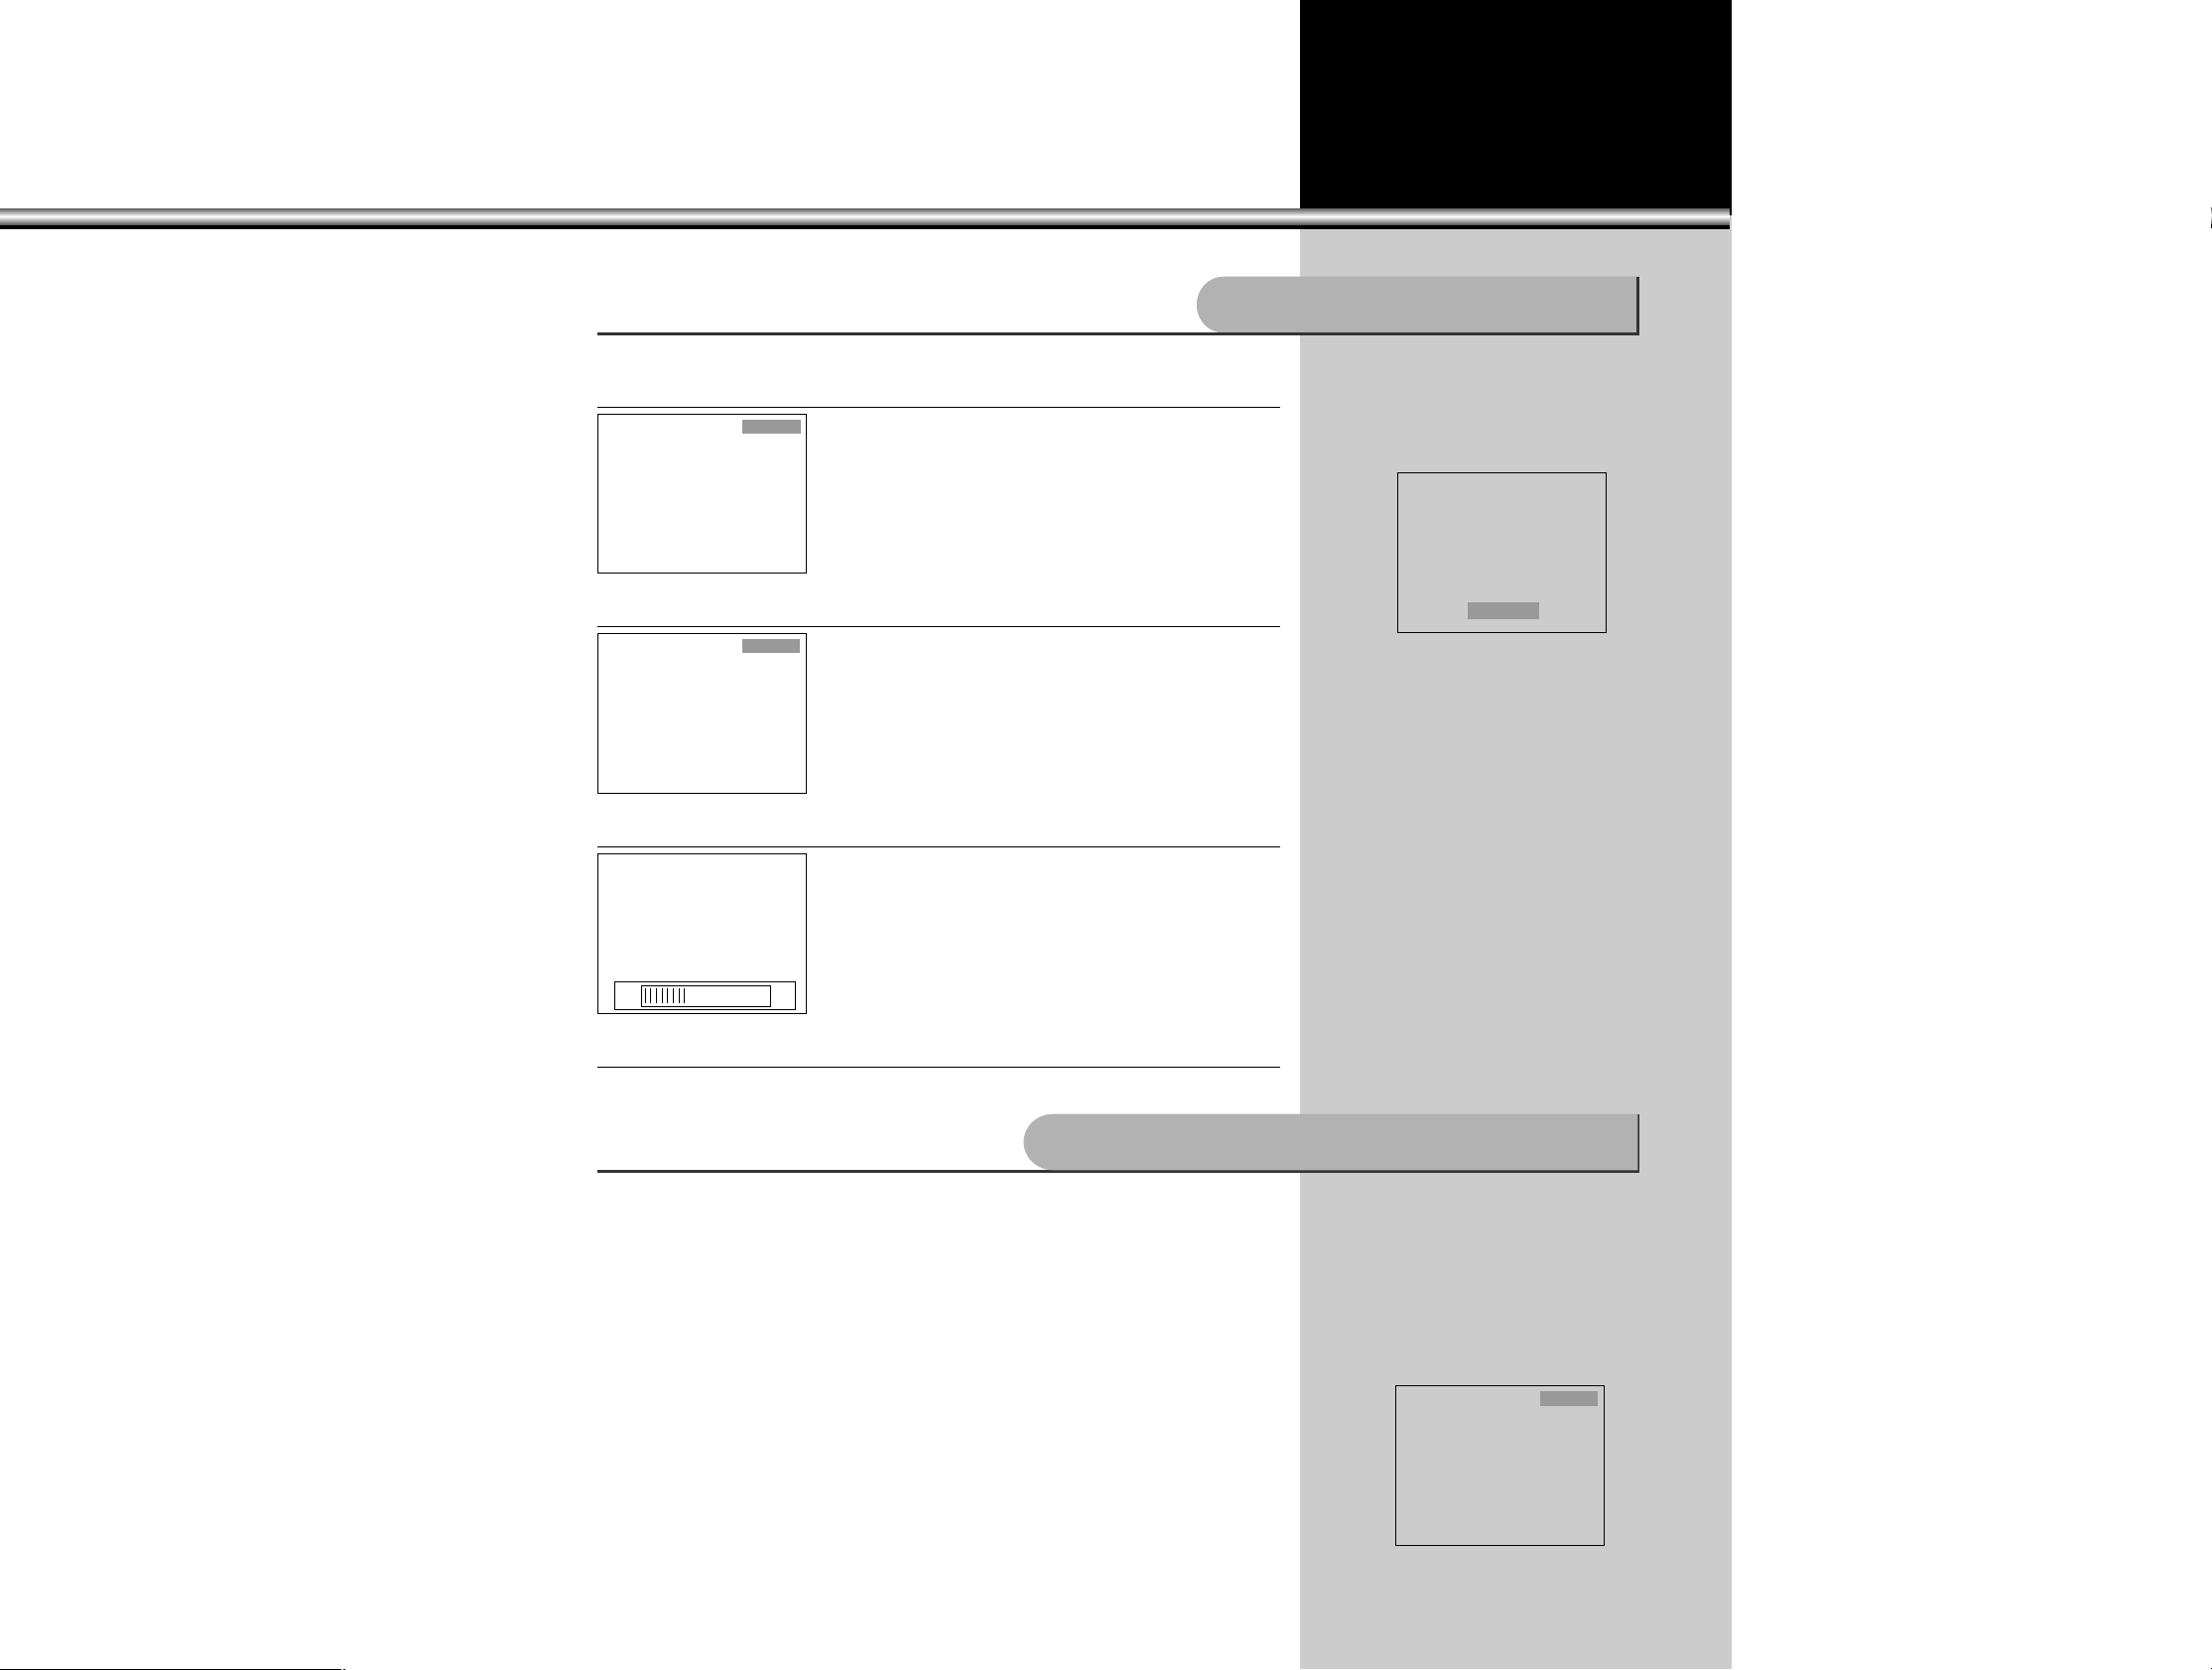
CONNECTING ANTENNA
NOTE:
Bad picture reception could often be caused by bad antenna connection.
Be sure to check the antenna direction, its height, etc.
In case of using single antenna cable:
In case of using two separate antenna cables
VHF Antenna
Coaxial Cable
Antenna in
LTo Receive Cable Programs
Plug CATV coaxial cable in the
antenna socket (unit) in the back
of TV set, and then press
TV/CABLE selection button.
UHF Antenna
VHF Antenna
UHF antenna
In case of
coaxial cable
In case of
feeder cable
Antenna
VHF/UHF OUTDOOR ANTENNAS
6
Page 7
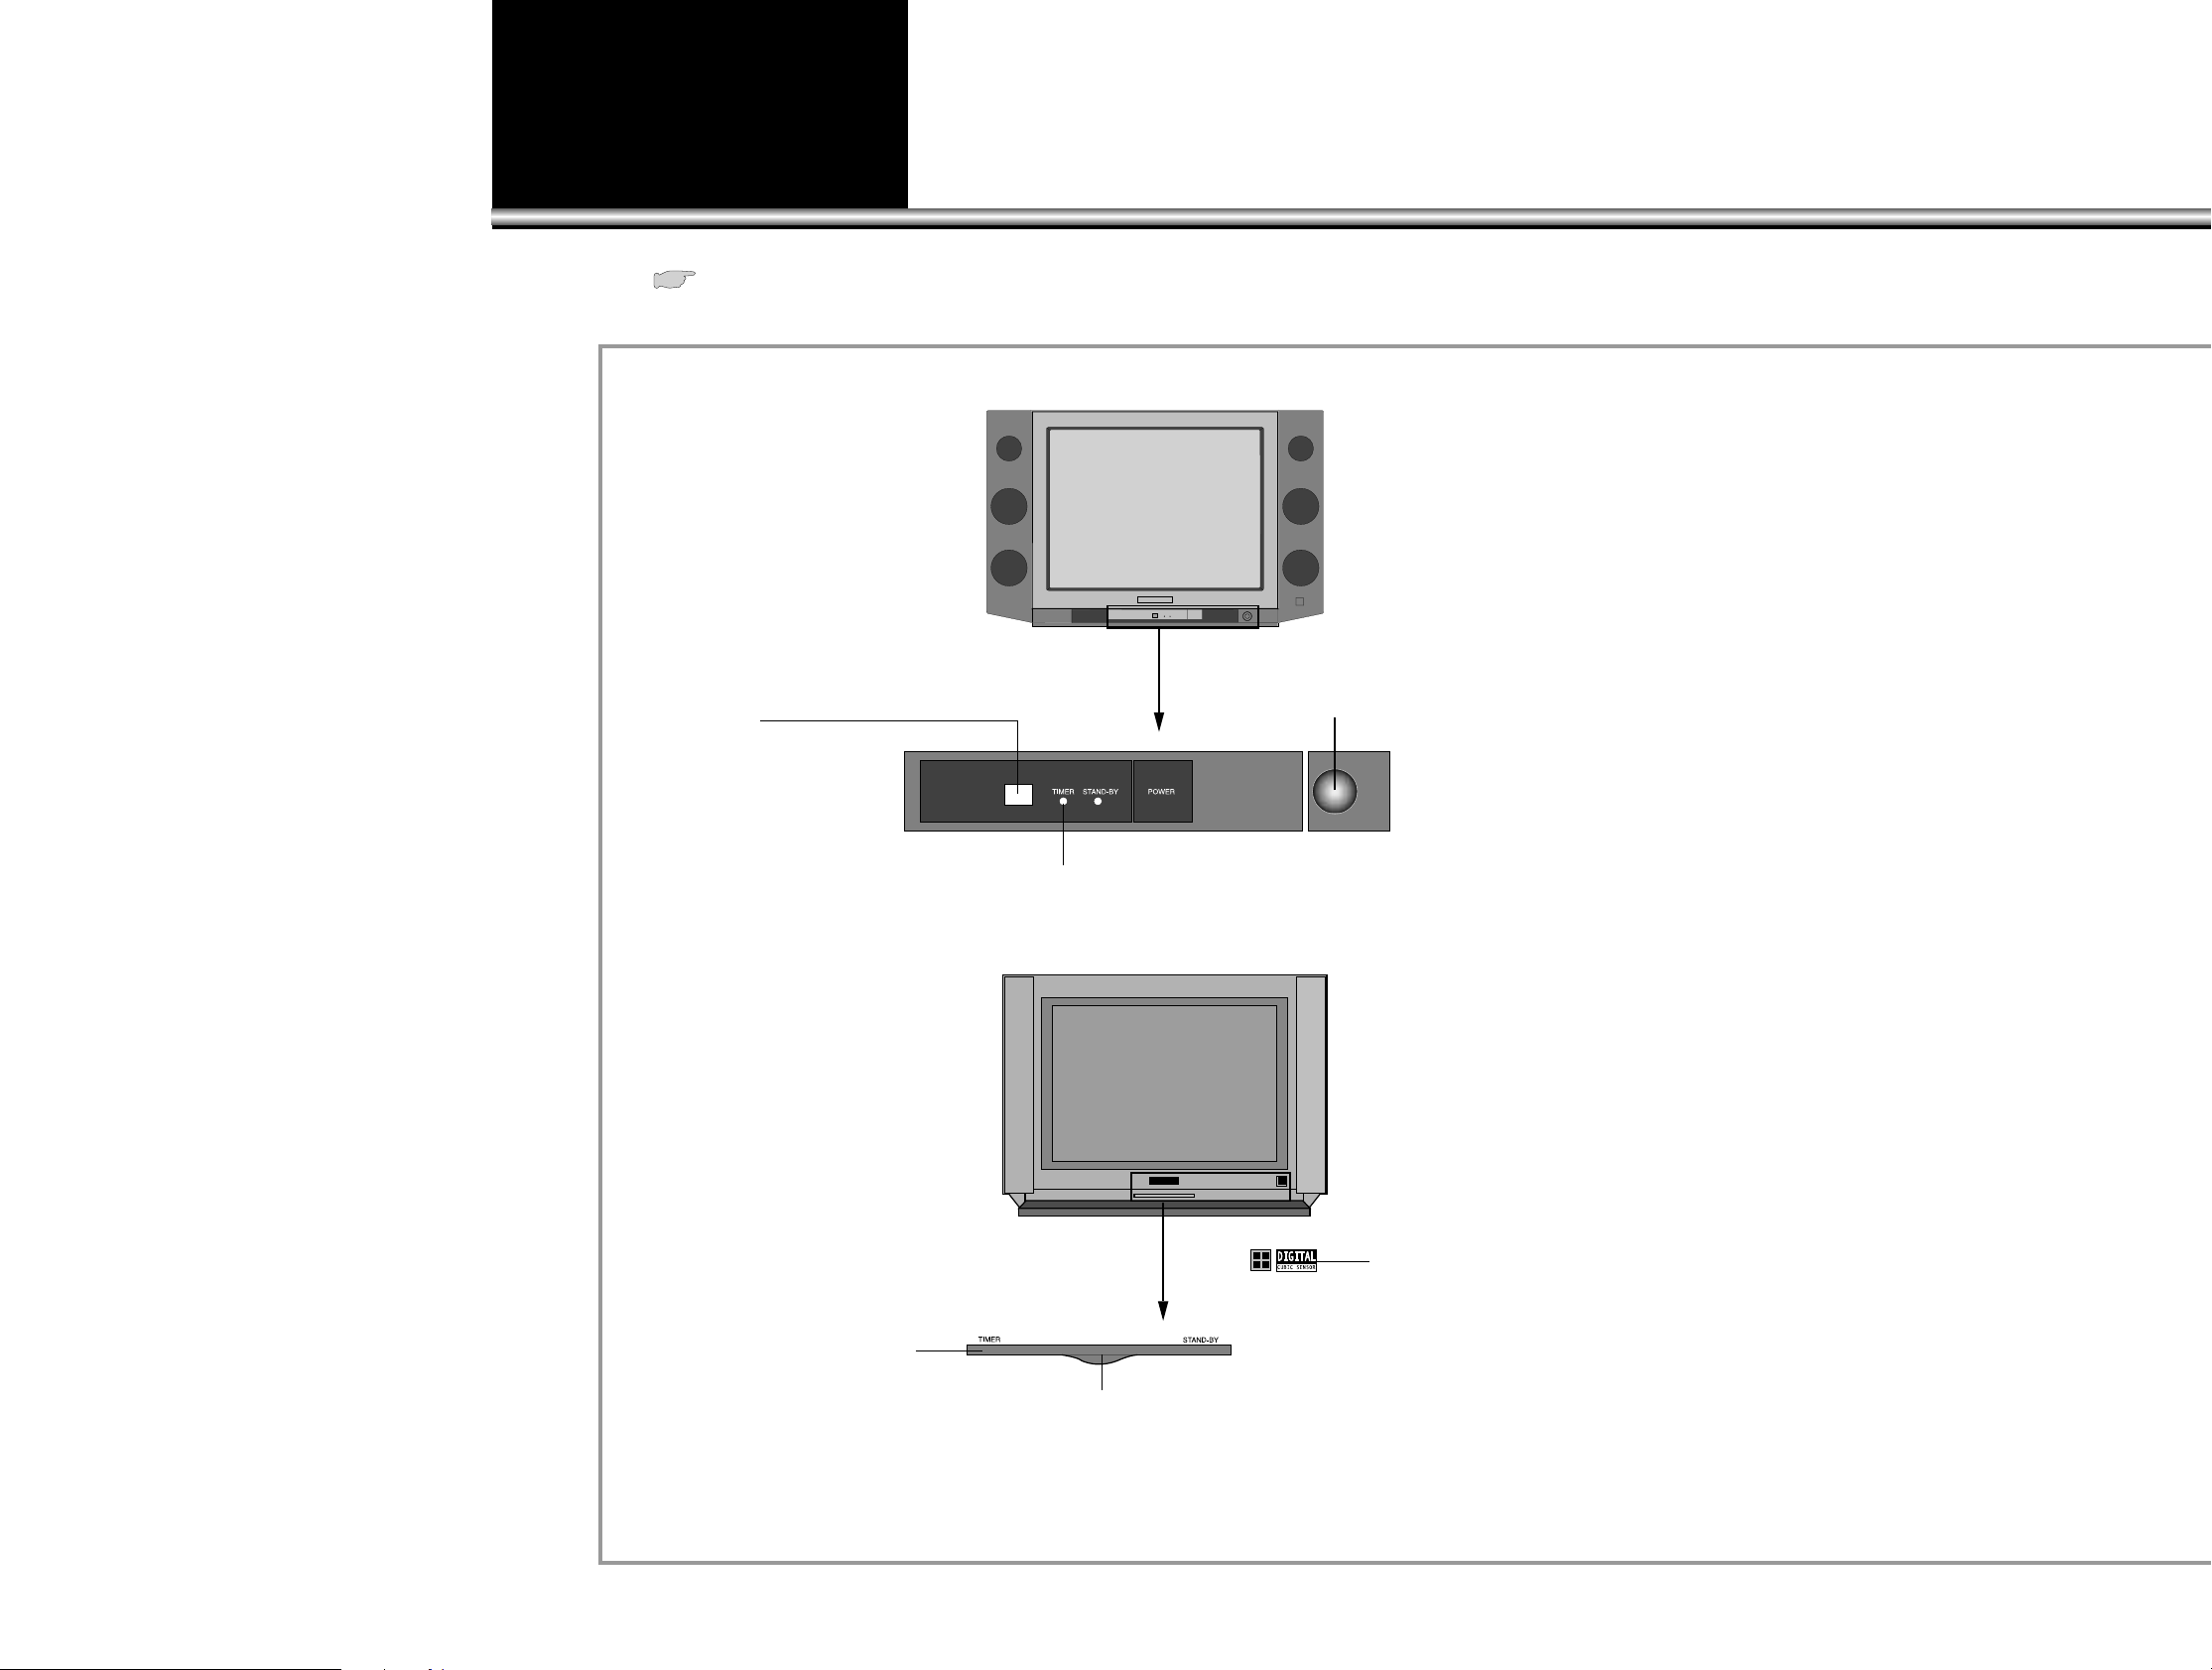
Name of each part
7
Front, Side, and Top of TV set
•The ( )numbers in the blank serve as an address which shows the page number containing detailed information on the functions of
each button.
•The buttons installed on top of the TV set function the same way as those with the same names on the Remote Control.
Timer Lamp
This lamp is lighted when
“On”or “Off” function is set
up in the timer memory.
Timer Lamp
This lamp is lighted when
“On”or “Off” function is set
up in the timer memory.
Remote Control Signal Reception Window
Through this window Remote Control signal is
transmitted to the set. First, direct the Remote
Control to this window, and then press buttons you
want. When it is blocked Remote Control does not
operate. Be careful not to block the window of
Remote Control.
Remote Control Signal Reception Window
Through this window Remote Control signal is
transmitted to the set. First, direct the Remote
Control to this window, and then press buttons
you want. When it is blocked Remote Control
does not operate. Be careful not to block the
window of Remote Control.
Digital Sensor
Sensing light automatically.
Digital Sensor
Sensing light automatically.
DTQ-29X9FS
DTQ-29U9FS
Page 8
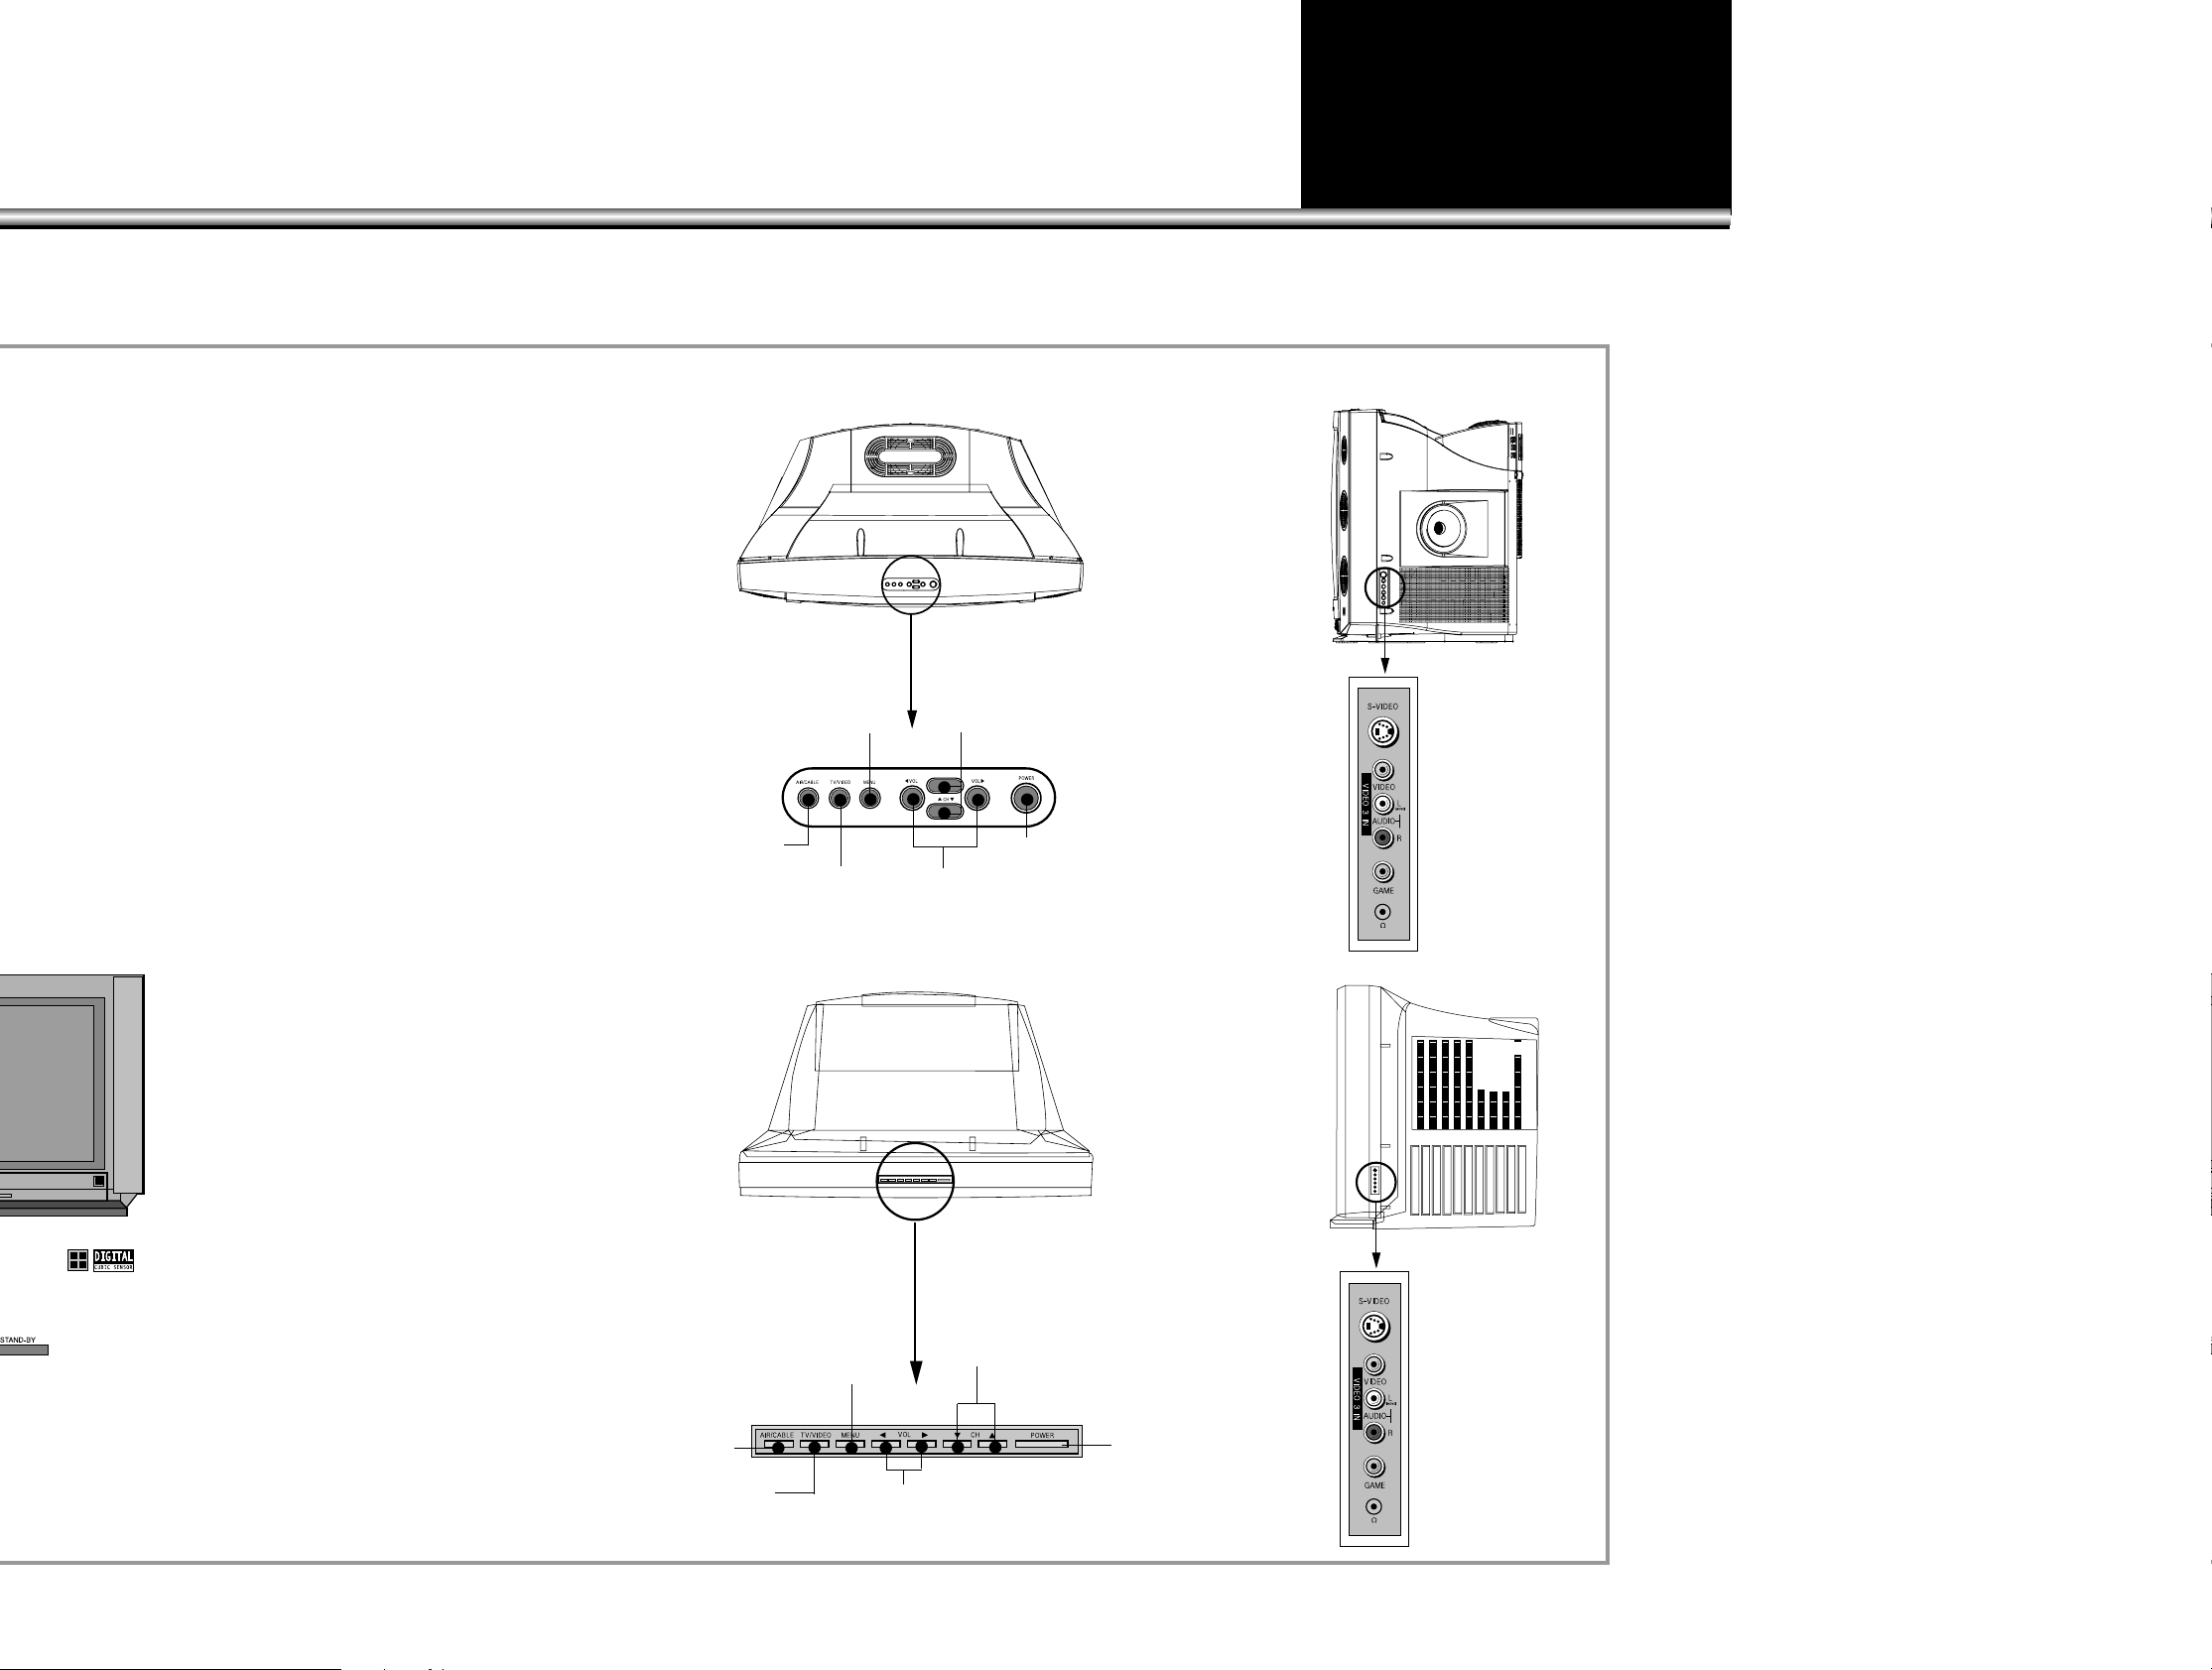
8
MENU
This button is used in adjusting the
picture, sound, time setup, and
controlling various other functions.
MENU
This button is used in adjusting the
picture, sound, time setup, and
controlling various other functions.
Power
(Button)
Channel
(Selection Button)
Channel
(Selection Button)
Volume
(Adjustment Button)
TV/CABLE
(Selection Button)
TV/VIDEO
(Selection Button)
Power
(Button)
Volume
(Adjustment Button)
AIR/CABLE
(Selection Button)
TV/VIDEO
(Selection Button)
Connection
Sockets for
auxiliary units
(sub stations)
Connection
Sockets for
auxiliary units
(sub stations)
DTQ-29X9FS
DTQ-29U9FS
Page 9
9
LL
Caution!
•Do not drop.
•Avoid moisture, heat, and dust.
LL
Installation of batteries:
•Push open the cover of Remote Control.
•Set the batteries in the battery (cell), compartment checking
the electrodes(+,–), and then shut the cover.
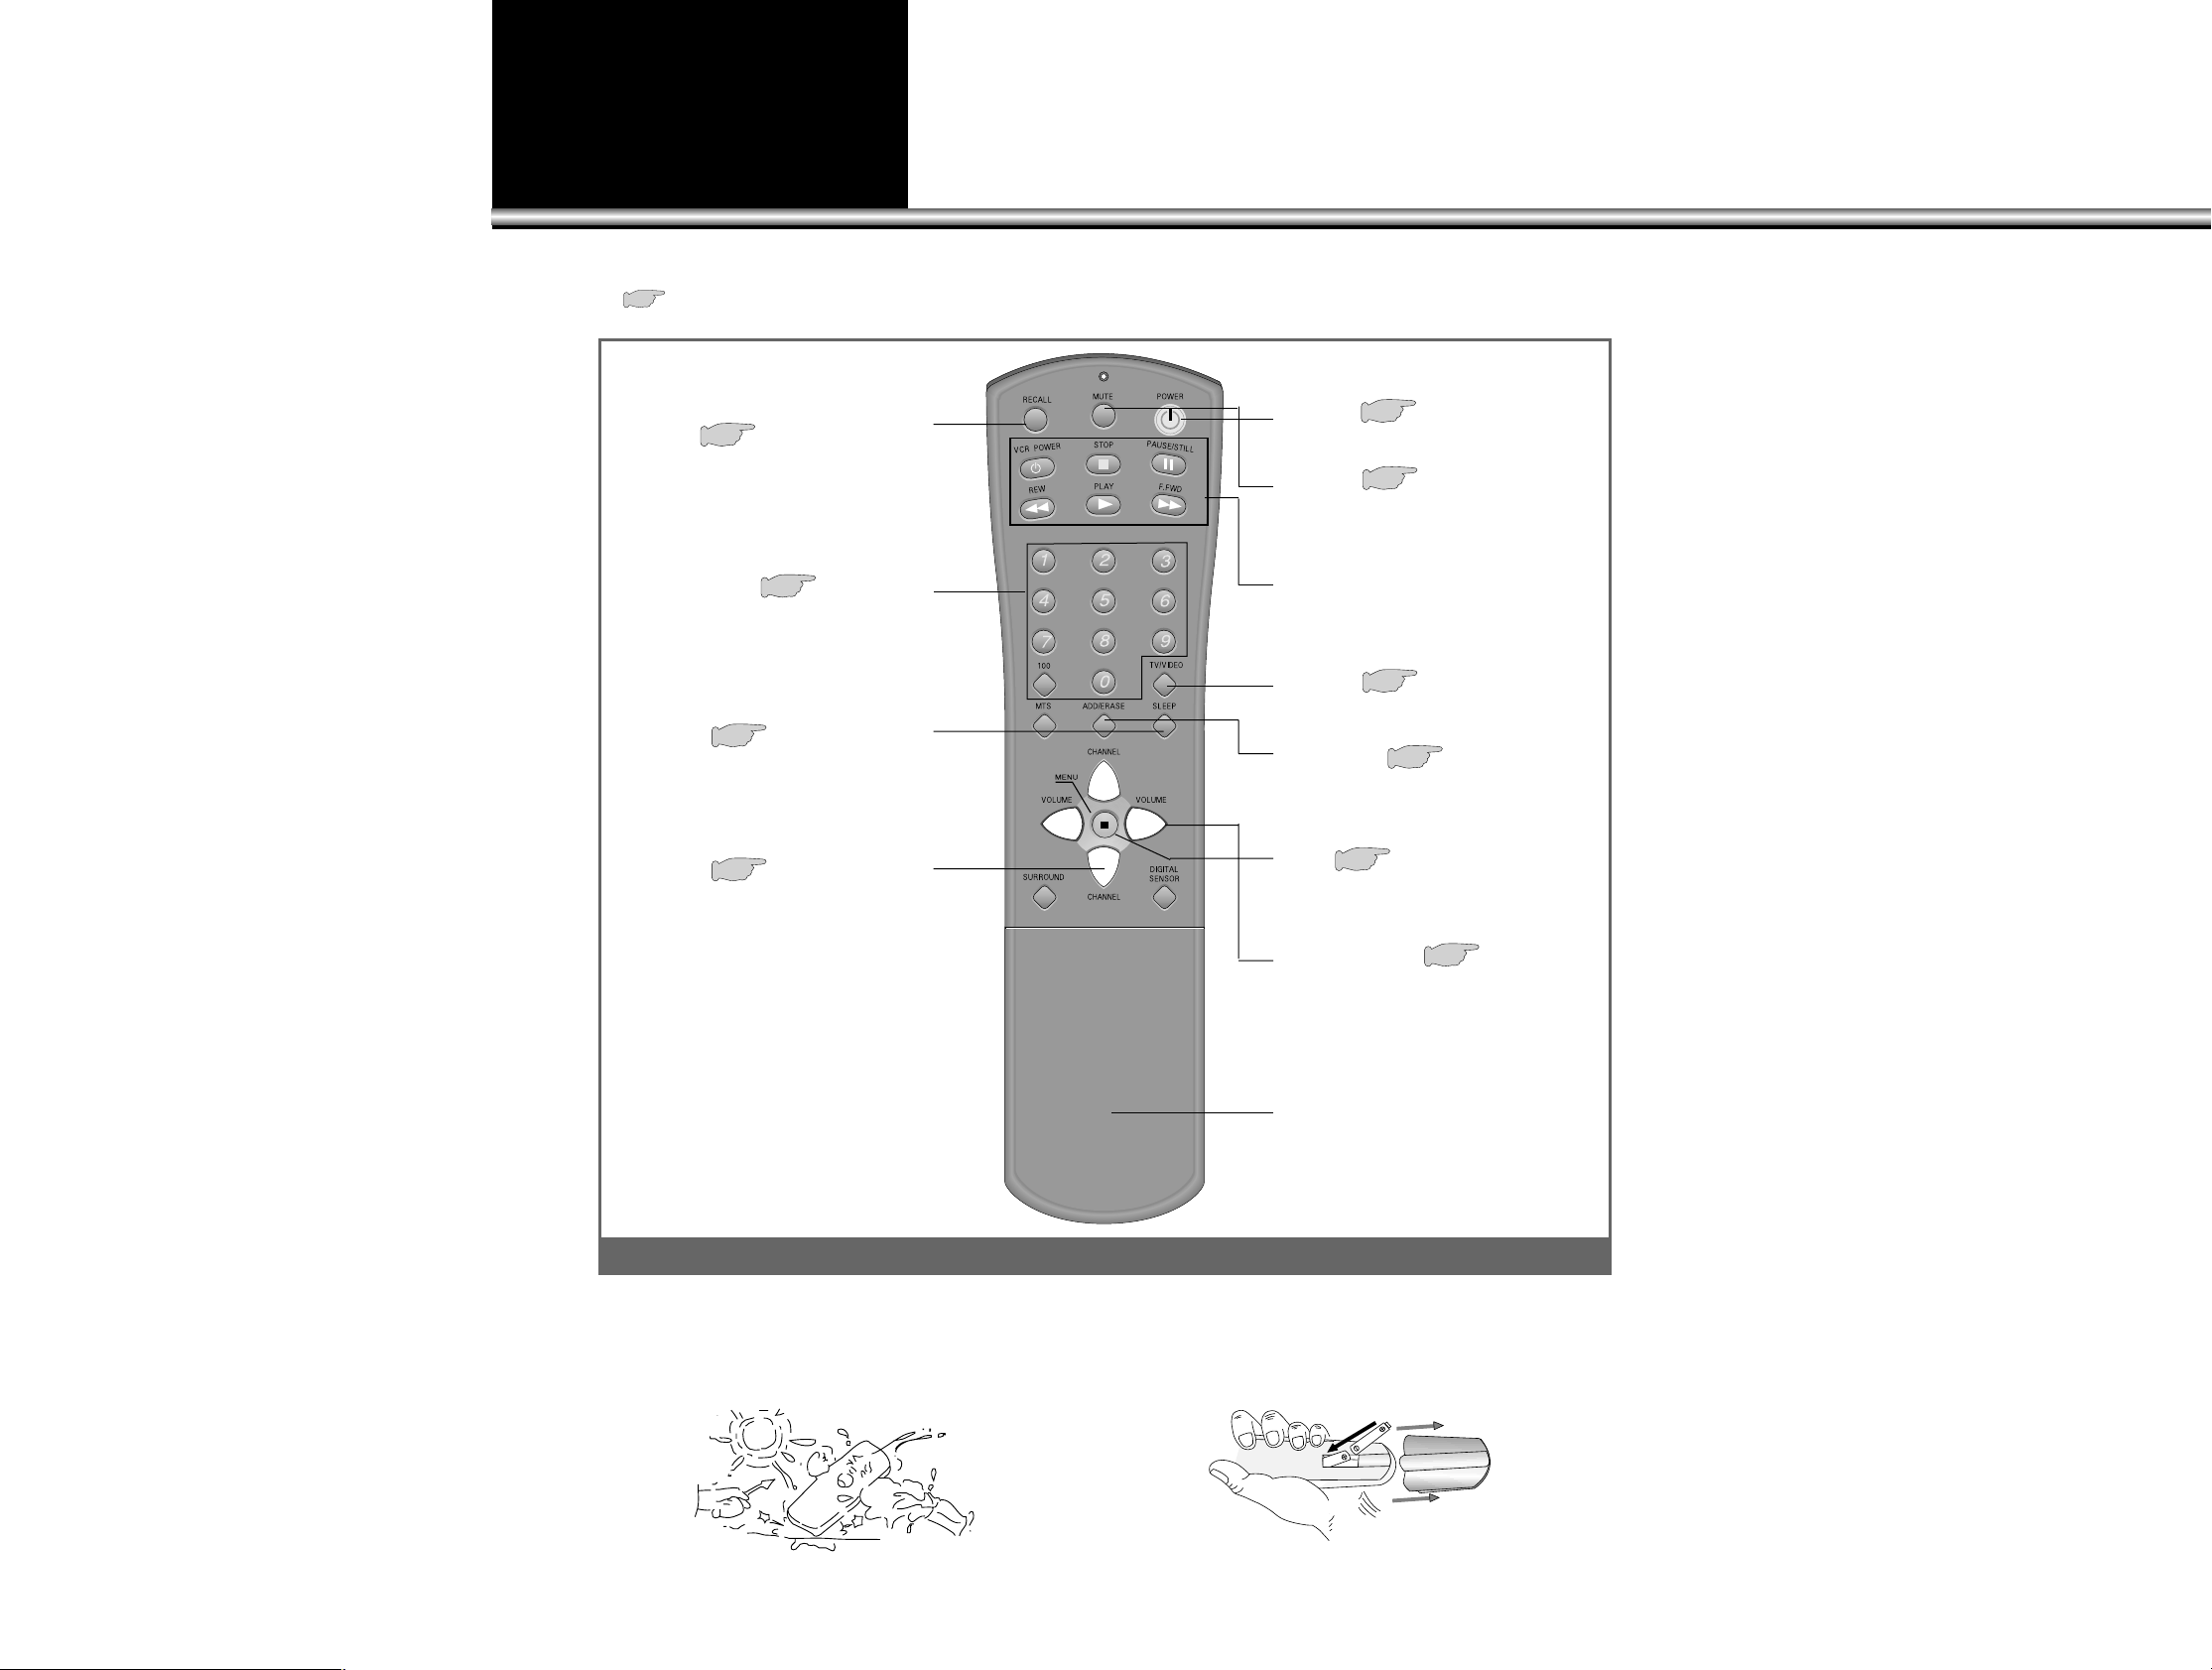
RECALL
The present modes of channel, video,
transmission signal, and equalizer can be
checked through this button.
12
ADD/ERASE
This button is used for operating channel
memory functions.
15
TV/VIDEO
(Conversion button)
17
MUTE
Press this button, and the sound goes off.
Press again, and the sound returns.
12
Cover
Volume (Control)
Press “C” button, and volume goes
down.
Press “B” button, and volume goes up.
12
MENU
You can adjust the picture, sound,
and many other functions.
13
VCR Control Board
Basic VCR functions are operated
with buttons on this board.
TV Power
12
Direct Channel
Selection Board:
Pressing the numbers on this board, you
can select program channels of the screen
directly.
16
Channel
(Number Control)
Press “x” button, and channel number
increases.
Press “y” button, and channel number
decreases.
12
SLEEP
This button is used in setting up time
memory to stop the TV automatically in a
while.
40
• ( )Numbers in the blank serve as an address, which shows the page
number containing detailed information on the functions of each button.
Remote Control
Page 10
10
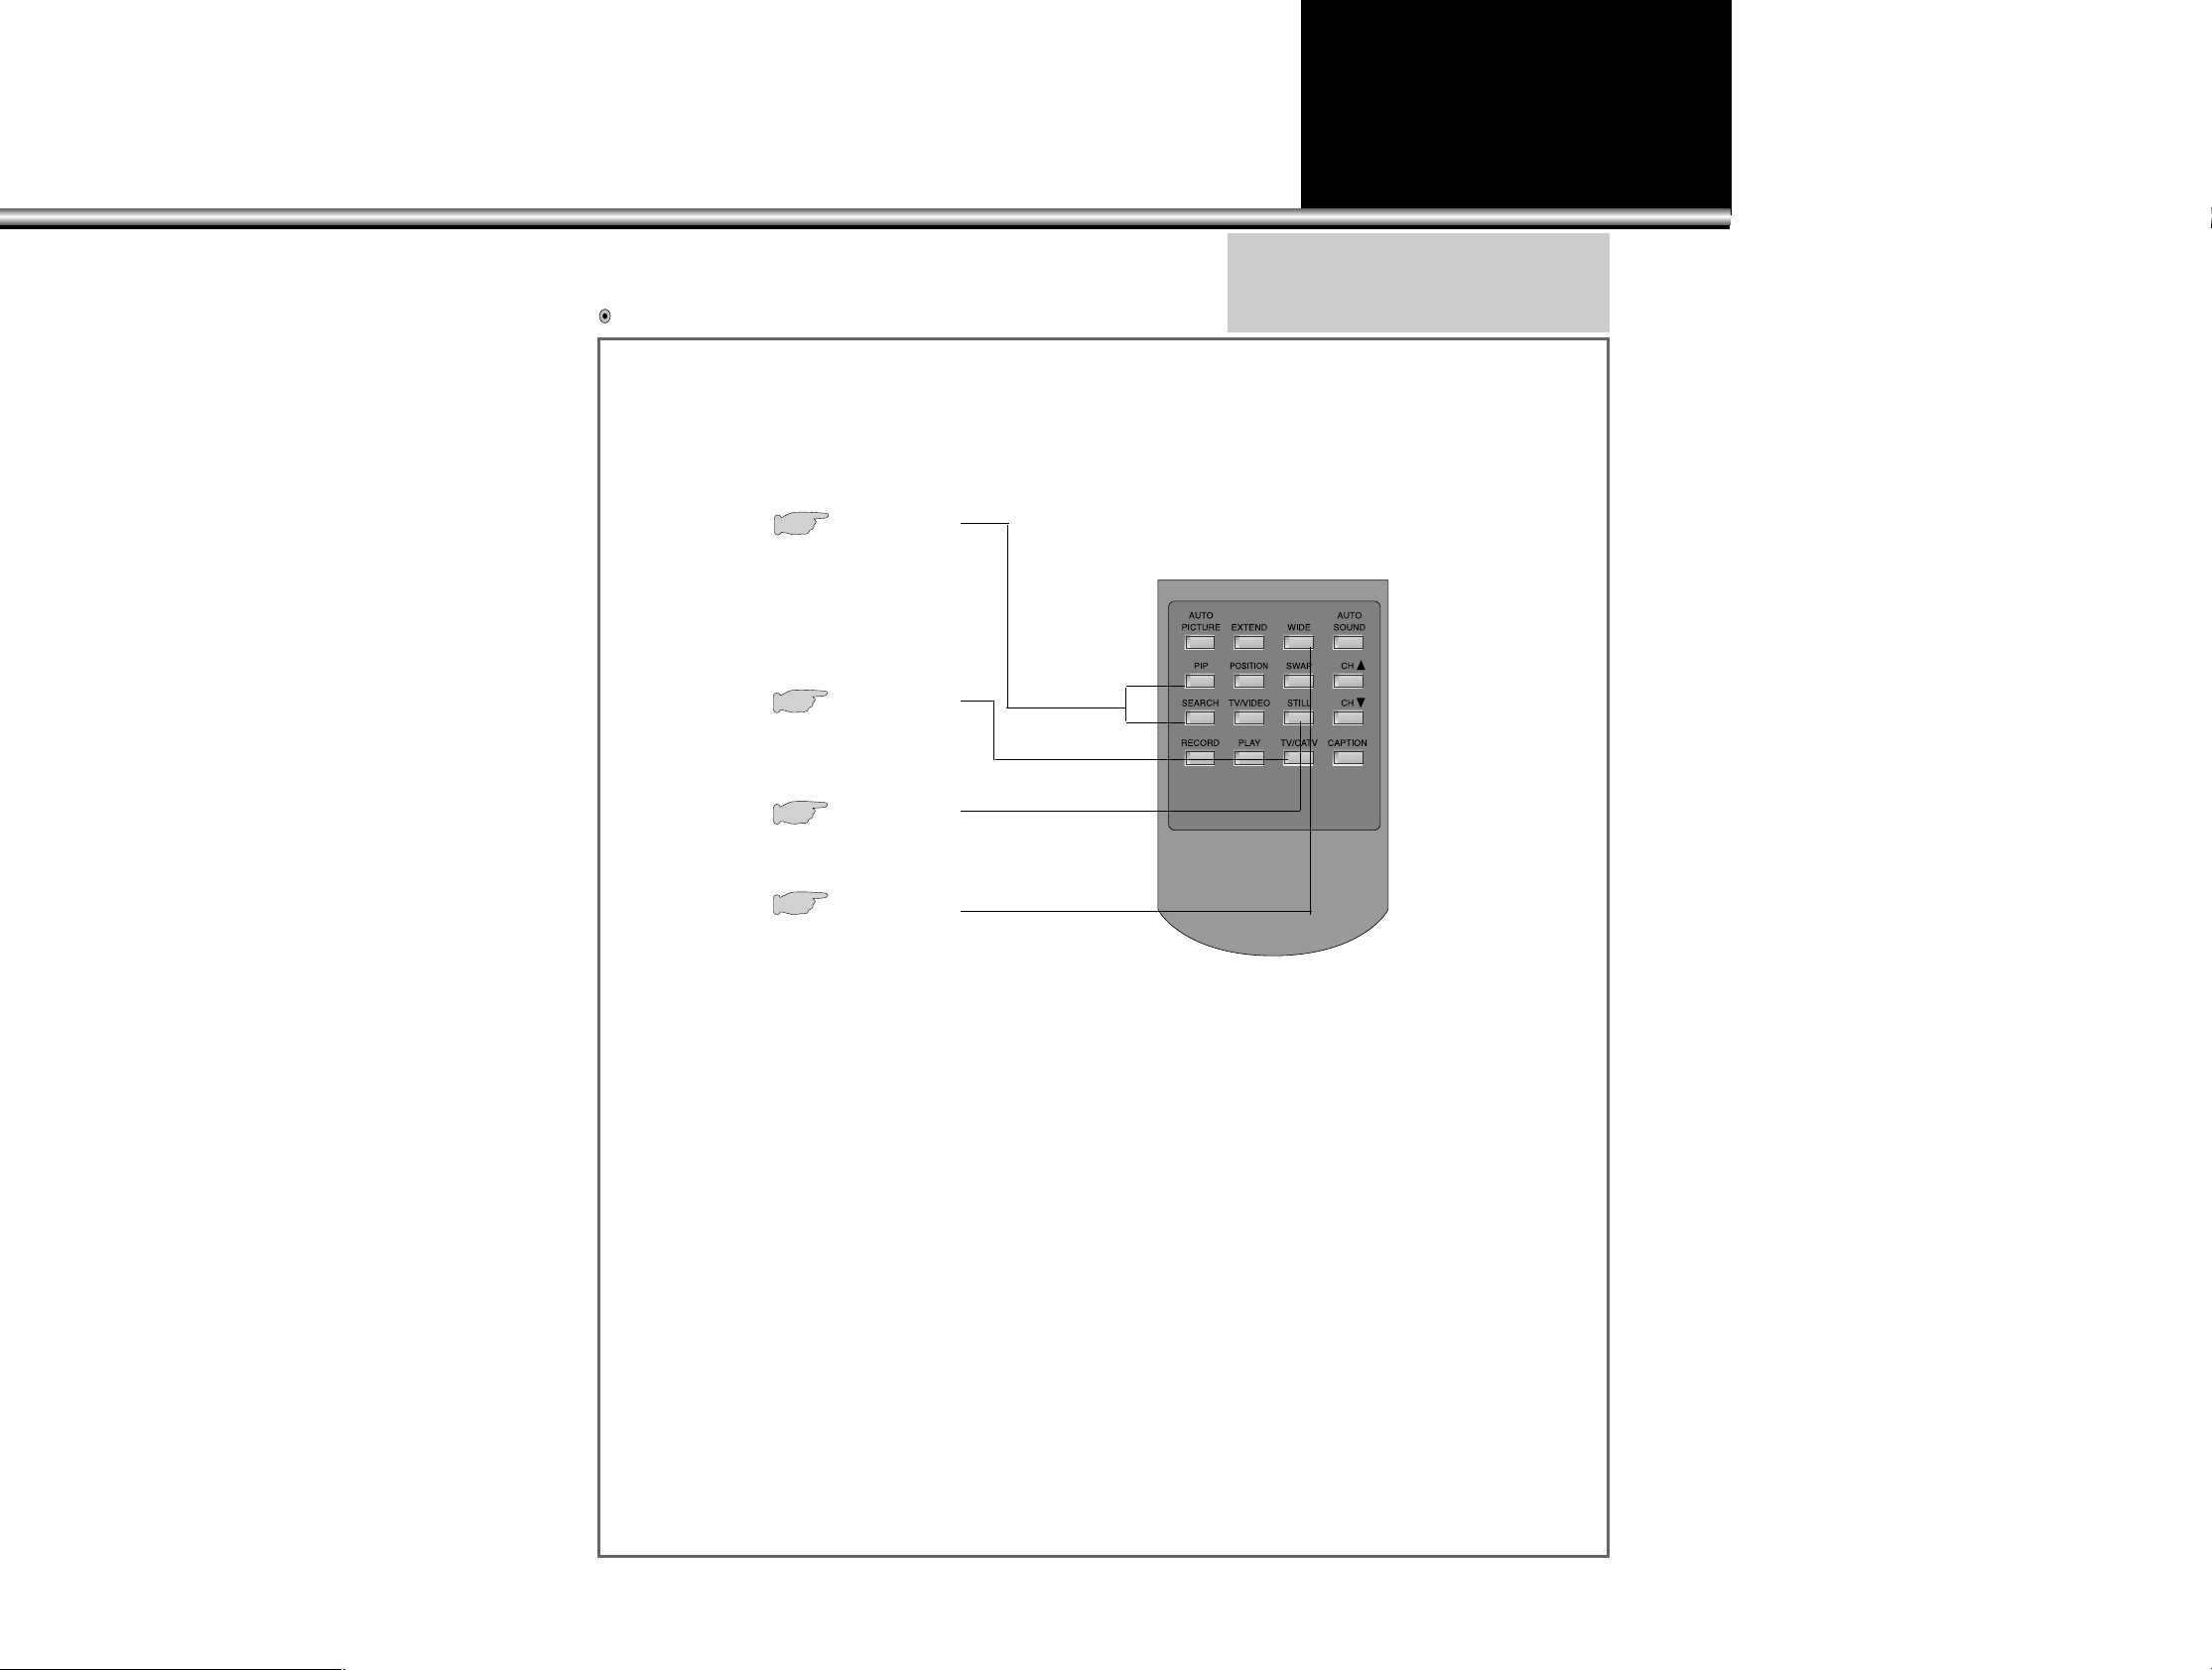
PIP SEARCH
Simultaneous window selection is
possible through the buttons of this
board, and various lay out of the
windows can be selected according to
the user’s need or desire.
10~26
TV/CATV
This button is used to convert reception
modes between aerial and cable
transmission systems.
16
STILL
The screen pauses temporarily with a
“STILL” picture.
26
WIDE
This button converts screen aspect ratios
between 4:3 and 16:9, and vice versa
16
Under the Cover of Remote Control
To use the buttons under the cover
Note:
•When batteries are weak Remote Control may not
work. Change them immediately when they get
weak.
•Be sure to use two 1.5V size AAA batteries.
Page 11
To Watch TV Program
11
Buttons on the top of TV set have the
same functions as those with the same
names on the REMOTE CONTROL.
BPress two number buttons of Remote
Control to select a channel directly
with its numbers. The numbers
should be in digits.
Examp.)
For channel 9 press “0” and “9”
It might take some time to get
channel on when only “9” is pressed.
BChange of indoor temperature and
shrinkage of TV cabinet could cause
cracking sound during or after the
use of the TV set. When picture and
sound work well, the set is normal.
1.4
3
2
To Watch TV Program:
Page 12
12
1.Press “TV POWER”button:
•Then the TV screen will become bright and the
stand-by lamp will go off as well.
2.Press “CHANNEL” buttons.
•Press “CHANNELx/y” or number buttons to
select the channel you want.
Ex) Ch 7
3.Adjust Volume.
•When “VOLUMEC” (DOWN) button is pressed, the
volume of sound goes down.
•When
“VOLUMEB
”
(UP) button is pressed, the
volume goes up.
4.Press “TV POWER” button to turn off the TV program.
•When the TV goes off, the stand-by lamp will be lighted as well.
LThis function is used when there is a
phone call or a visitor.
LPress “MUTE” button, to stop the
sound of the program.
- At the press of this button the sound
gets mute with the signal “MUTE”
on the screen.
- Press it again, and the sound gets
back.
LThe present status of channel,
broadcasting condition, and video
connection is appeared on the
screen.
LPress “RECALL” button to get the
status information on the screen.
With one more pressing, the status
signal disappears from the screen.
To Mute the sound instantly:
Air 9
Mono
Mute
Air 7
Mono
Vol
13
Checking Performance Status of TV Set:
Air 7
Mono
Page 13
13
1.Press “MENU” button.
•Then the screen appears as follows
2.Select “Setup”
•Move the cursor to the “Setup
” menu by using
“VOLUMEC/B” buttons.
•Select “Setup” sub-menu by using “CHANNELx
”
button.
3.Select Auto Program by using “
CHANNELxx/yy” buttons.
•Then the following picture will appear on the
screen
•Select an entry of the Source to shift it into Auto
Program mode by using “CHANNELx/y” buttons.
Ex) In case of selecting “Air”:
LActual broadcast channels can be
set up in the “Memory” of TV set
through this function.
With setup of automatic channel
memory, desired channels can be
selected easily with“CHANNELx/y”
buttons. Such inconvenience as
pressing channel numbers one by
one is not necessary.
LMENU mode automatically
disappears in 16 seconds when
there is no button operation. If you
want to get out of the Menu mode
yourself, press “MENU” button
several times.
LWhen setting up automatic channel
memory, only the channels with
signal get memorized. The other
channels go into erased status.
LWhile a TV program is on the signal,
“Air” appears on the screen; while
CATV program is on the signal,
“Cable TV” appears on the screen.
Select desired Source by using
“VOLUMEC/B” buttons to set up
Automatic Channel Memory.
Automatic Memory of Channel:
Move Sel. Exit
Picture
Move Sel. Exit
Set Up
Air/Cable Air
Auto Program
Ch Edit
Language Eng
Set Up
Move Sel. Prev.
Page 14
14
4.Press
“VOLUMEC/B”
buttons. Automatic Channel memory function (Auto
Program) starts.
•Checking from channel 2 to channel 69,(Cable1~125)
this function automatically memorizes only those
channels which are actually broadcast.
•When “MENU” button is pressed in the middle of
setup process, the setup operation quits.
•When the memory function is completed, a picture
will appear on the screen as follows:
•At this moment, keep pressing “MENU” button till
the menu window disappears.
5.
Check the memorized status by pressing
“
CHANNELxx/yy”
buttons.
•Only memorized channels are searched.
•When only one channel is memorized, only the
channel selected and nearby channels will be
searched.
Auto
Programming
- 13 -
Auto Program
Stop
Air/Cable Air
Auto Program
Ch Edit
Language Eng
Set Up
Move Sel. Prev.
Air 13
Mono
Page 15

1.Select a channel you want to erase.
•Select a channel you want to erase by pressing
either number buttons or “CHANNELx/y” buttons.
Ex) Ch 2
Air 2
Mono
15
1.Select a channel you want to memorize.
•Select a channel by pressing number buttons.
Ex) Ch 13
2.Press “ADD/ERASE” button.
•Whenever this button is pressed, the color of
channel sign changes from green to red, and vice
versa. Capture the Channel sign on green color.
•When a channel gets memorized, its color turns
green. When erased, it turns red.
•In an auxiliary window, memorized channels will appear white; erased channels
appear red.
•In an auxiliary window, the “ADD/ERASE” function does not work.
•Press “CHANNELx/y” button to check the memorized channel, and channel 13
gets selected.
2.Press “ADD/ERASE” button
•Whenever this button is pressed, the color of
channel sign changes from green to red, and vice
versa. Capture the channel sign on red color.
•Press “CHANNELx/y” buttons to check the
memory status, but channel 2 does not get
selected.
LWhen it is hard to put a channel in a
memory due to a weak broadcast
signal, an additional memory of the
channel is possible through this
function.
LThis is a function to erase a
memorized channel that is not
necessary.
Additional Channel Memory Function :“ADD/ERASE”
Erasing Memorized Channels : “ADD/ERASE”
Air 13
Mono
Air 13
Add
Air 2
Erase
Page 16
Press “WIDE” button.
•When “WIDE” button is pressed, the aspect ratios
of the screen shift cyclically as follows :
(4:3) (16:9) (4:3)
16
1.Press “TV/CATV” button.
•Then reception mode shifts from aerial TV to Cable
TV.
2.Select a channel.
•Select a channel by pressing either number
buttons 0 - 9 or 100.
•When the channel number is bigger than 100, do
as the following example.
Ex) If the number is 125, press number buttons:
100, 2, and 5 in sequence.
LWatching CATV programs is
possible only in areas where CATV
service is provided.
LSelect one of the two screen wide
ratios - 16:9 and 4:3 as you desire,
and you can enjoy the mood of a
cinema house at home.
Watching CATV programs:
Adjusting Screen Size:
Air 2
Mono
Air 12
Air 2
Mono
Cable 12
Cable 12
When pressed once
When pressed twice
Page 17

17
1.
Connect the video cable to the VIDEO socket in the back and side
of TV set, and press “TV/VIDEO” button on the remote control.
•The screen shifts in video mode as follows.
•Whenever this button is pressed, the screen shifts
in sequence : Channel Video1 Video2
Video3 Channel
Watching Video Programs
Video1
Page 18
1.Press “PIP” button once.
•Single PIP appears on the screen.
Adjusting Two Program Windows
18
2.Press “PIP” button once more.
•The operating program window becomes the main
window and moves to the left side of the screen;
an auxiliary window appears on the right side at
the same time.
•Use “CHANNELx/y” buttons to control the left
window.
•Use the “CHANNELx/y” buttons of Simultaneous
Window Selection board under the cover of
Remote Control to control the right window (an
auxiliary window).
•The same channel can not be received in both
windows at the same time.
•Press “SWAP” button, and the windows exchange
their locations: the left one to the right, and the
right one to the left.
3.Press “WIDE” at the “TWIN PICTURE”.
•Two windows of the same size with aspect ratio
16:9 appear on the screen.
LSound of TV set is available only in
the main program window (the left
one).
LIf you want to listen to the sound of
an auxiliary window (the right one),
use Headphone.
LWhenever “PIP” button is pressed
the screen changes cyclically as
follows:
Operating Two Program Windows:
9Air 7
Mono
Air 7
Mono
9
7Air 9
Mono
9Air 7
Mono
9
9
Air 7
Mono
Air 7
Mono
Air 7
Mono
Page 19

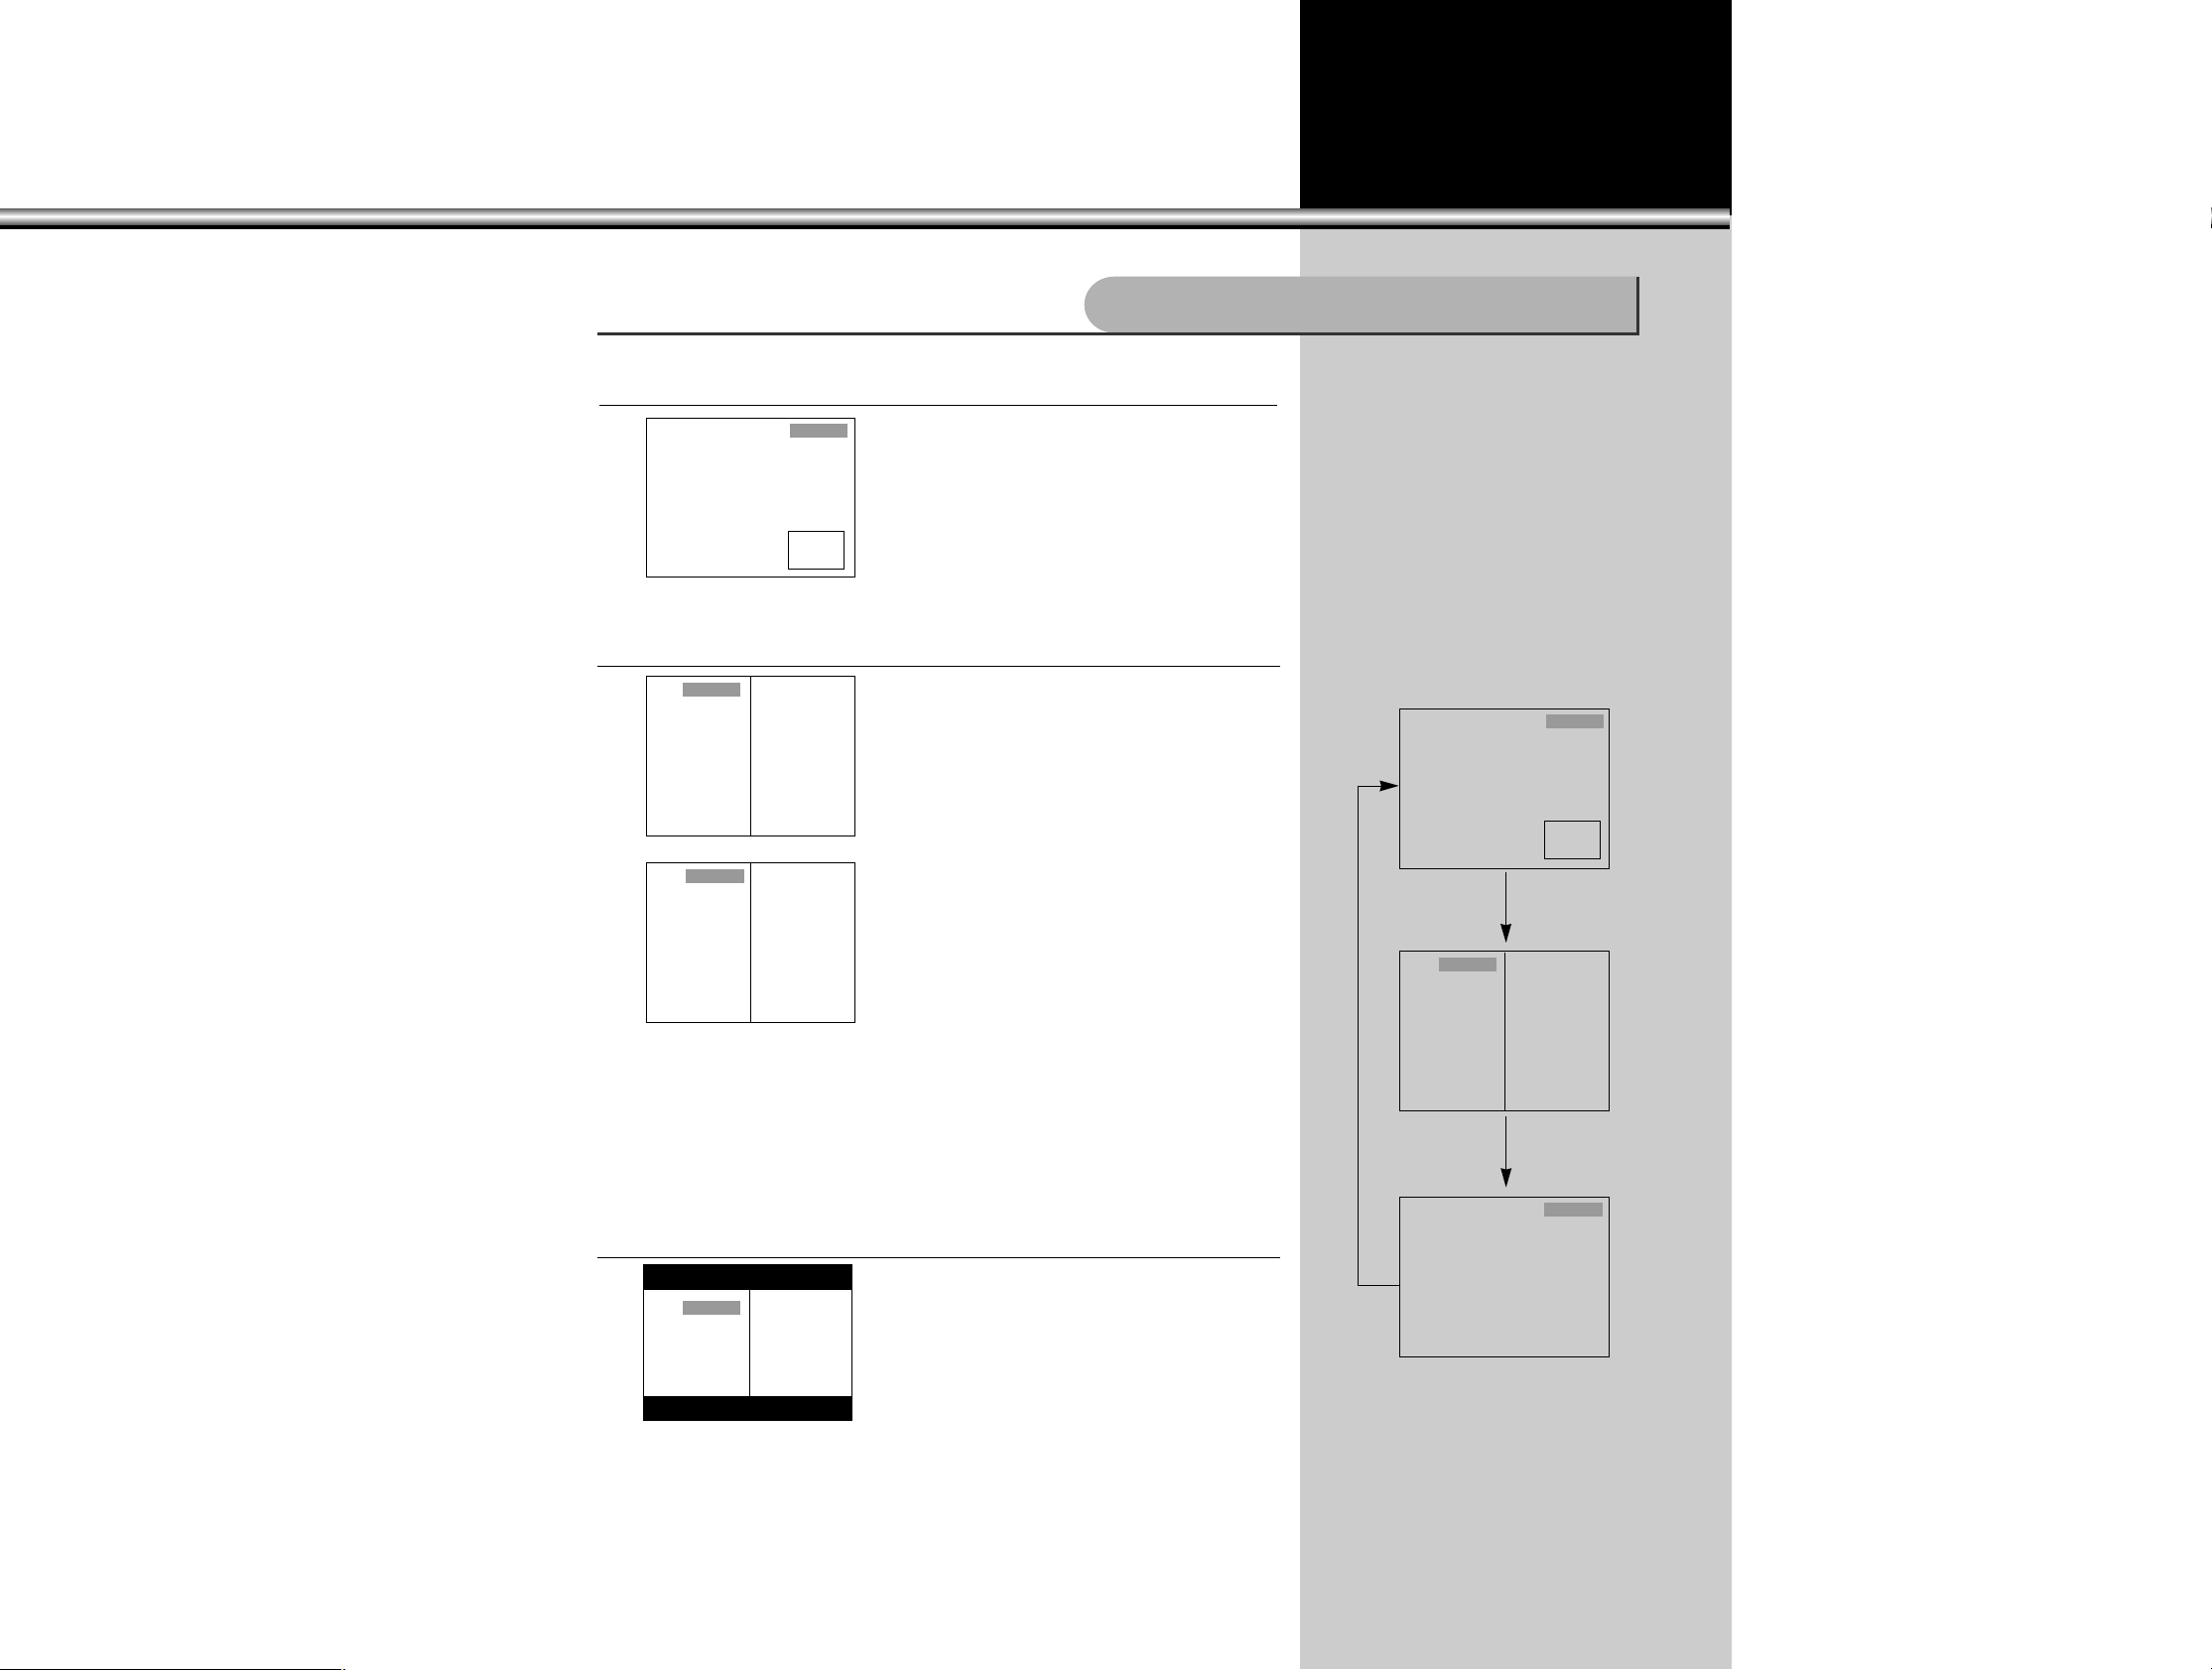
Various Functions of Simultaneous Windows Mode
19
2.Select “Funtion” button.
•Move the cursor to the “Funtion” menu by using
“VOLUMEC/B” buttons.
•Select “Funtion” Sub-menu by using “CHANNELx”
buttons.
3.Select “PIP”.
•Move the blue bar to the PIP menu by using
“CHANNELx/y” buttons. Then the screen
appears as follows: next page.
LSelect and enjoy programs you want
to watch by using various functions
of Simultaneous Windows
Various Functions of Simultaneous Window Mode:
Move Sel. Exit
Function
Timer
Child Lock
Auto Demo
Caption C1
PIP
Function
Move Sel. Prev.
4.Select “PIP Size”.
•You can adjust the “PIP Size” you want.
But single pip( ) size only can be adjusted.
Timer
Child Lock
Auto Demo
Caption C1
PIP
PIP Size 10
Function
Move Adj. Prev.
1.Press “MENU” button.
•Then the screen appears as follows.
Move Sel. Exit
Picture
Page 20

20
5.
Press
“VOLUMEC/B”
buttons, and select the window mode you want.
•When the “VOLUMEC/B” buttons is pressed, the screen shifts in sequence as
follows: Single PIP Picture Twin picture Multi-picture(4)
Multipicture(7)
Off, and vice versa.
•The MENU mode automatically disappears in 15 seconds when there is no “MENU”
button operation, and you can enjoy the selected simultaneous Window programs.
6.Press “MENU” button twice.
•The MENU mode will disappear.
Air 7
Mono
9Air 7
Mono
Single PIP Picture Twin Picture
Air 7
Mono
9
11
13
Multi-Picture(4) Multi-Picture(7)
Air 7
Mono
11
15
19
9
13
17
9
Page 21

21
1.Press “PIP” button.
•You can enjoy the two window programs
simultaneously.
•The same channel and child Lock Ch can not be
operated in both windows of the screen.
2.Select a channel you want to watch in the auxiliary window.
•Select a channel you want to watch in the auxiliary
window by using “CHANNELx/y” buttons on the
Simultaneous Window Control board under the
Remote Control cover.
Ex)Ch11
•In the auxiliary window, only a memorized channel
may be selected.
3.Select VIDEO mode with the auxiliary window.
•In order to operate VIDEO mode in the auxiliary
window, connect the video cable to the VIDEO IN
socket in the back of TV set, and press
“TV/VIDEO” button on the auxiliary Window control
board under the Remote Control cover.
•Then the auxiliary window operates in the VIDEO
mode, and the connected video program will play.
Ex) Connect VIDEO 1 and then press the “TV/VIDEO” button. The mode will be
changed in sequence as follows.
:Channel Video1 Channel
•When “SWAP” button is pressed, the window modes are shifted to each other.
LYou can enjoy two window programs
at the same time. Along with the
main window program, you can have
another TV channel program or a
Video program simultaneously. In
addition, you can have the sound of
the auxiliary window program
through headphone. It is very
convenient
Selecting Simultaneous Windows:
Air 9
Mono
7
Air 9
Mono
11
Air 9
Mono
Video1
Page 22

22
4.Press “PIP” button one more time.
•PIP mode is changed twin window.
5.
Press “PIP” button one more time, and then the auxiliary window disappears.
•Whenever the “PIP” button is pressed, the screen
mode is changed cyclically as follows:
Air 7
Mono
11
Air 9
Mono
Air 9
Mono
11
11Air 7
Mono
11Air 9
Mono
Page 23

23
1.Press “SEARCH” button.
•Four windows appear on the screen. Memorized channels are connected to each
window one-by-one in sequence, so it is easy to check the contents of the programs
on air .
•Whenever the “SEARCH” button is pressed, the screen changes cyclically as follows;
•Press the button one more time. Then 7 windows will appear on the screen, each
with a memorized channel in sequence. It is simple to check the programs on air.
•Whenever the “POSITION” button is pressed, “B” sign moves from one window to
another in sequence.
•When “SWAP” button is pressed, the window with “B” sign converts to a new main
window.
LMemorized channels could be
checked easily by selecting 4
window modes or 7 window modes.
Searching Function of Memorized Channels through 7 Window and 4 Window modes.
Air 7
Mono
Air 7
Mono
9
11
13
Air 7
Mono
11
15
19
9
13
17
Air 9
Mono
11
15
19
7
13
17
Air 13
Mono
11
15
19
7
13
17
B
B
Page 24

24
1.Press “POSITION” button.
•Bring auxiliary windows on the screen by pressing “PIP” buttons.
•Press “POSITION” button. Every time it is pressed, the locations of auxiliary windows change
as follows:
•The search sign “B” in 4 Window mode shifts its location as follows:
•The search sign “B” in 7 Window mode shifts its location as follows:
•In Twin Window mode, the “POSITION” button does not work.
Searching Location Shift among Auxiliary Windows:
Air 7
Mono
9
11
13
B
B
Air 7
Mono
11
15
19
9
13
17
11Air 9
Mono
11Air 9
Mono
Twin window mode Twin window wide mode
Page 25

25
Press “SWAP” button.
•Bring an auxiliary window by pressing “PIP” button.
•Press “SWAP” button. Every time it is pressed, the modes of the main and auxiliary
windows will shift their locations to each other as follows:
This function also operates in Twin Window mode.
•When it is in Twin Window mode 1 (4 : 3), the Twin Windows will appear as follows:
•When it is in Twin Window wide (16 : 9), the Twin Windows will appear as follows:
Window Mode SWAP
Air 9
Mono
11
Air 11
Mono
9
9Air 7
Mono
7
9Air 7
Mono
7Air 9
Mono
Air 7
Mono
9
11
13
Air 9
Mono
9
11
13
BB
This function works in Multi Window mode too.
•The window with “B” sign shifts into the main window mode.
•The movement of “B” sign is operated with “POSITION” button.
Air 9
Mono
Page 26
Air 7
Mono
26
Changing Window Modes is also Possible in Multi-Window Search.
•
The window with
“B”
sign converts to a new main window mode, and the channel of the
new main window also appears as an auxiliary window channel of the new screen.
Air 7
Mono
9
11
13
Air 9
Mono
9
11
13
B
B
Air 9
Mono
11
15
19
7
13
17
B
11
15
19
7
13
17
B
Air 9
Mono
7
11
13
B
Air 9
Mono
11
15
19
7
13
17
B
Making Pause Auxiliary Windows:
•This function makes the auxiliary window programs temporarily pause.
•When “STILL” button is pressed one time, the programs pause. When it is pressed
again, the programs resume their operations.
•In case only the program is playing:
•In case two window programs are playing:
•In case multi-window search programs are playing:
(When “STILL” button is pressed, the programs pause temporarily.)
Air 9
Mono
11
11Air 9
Mono
Page 27

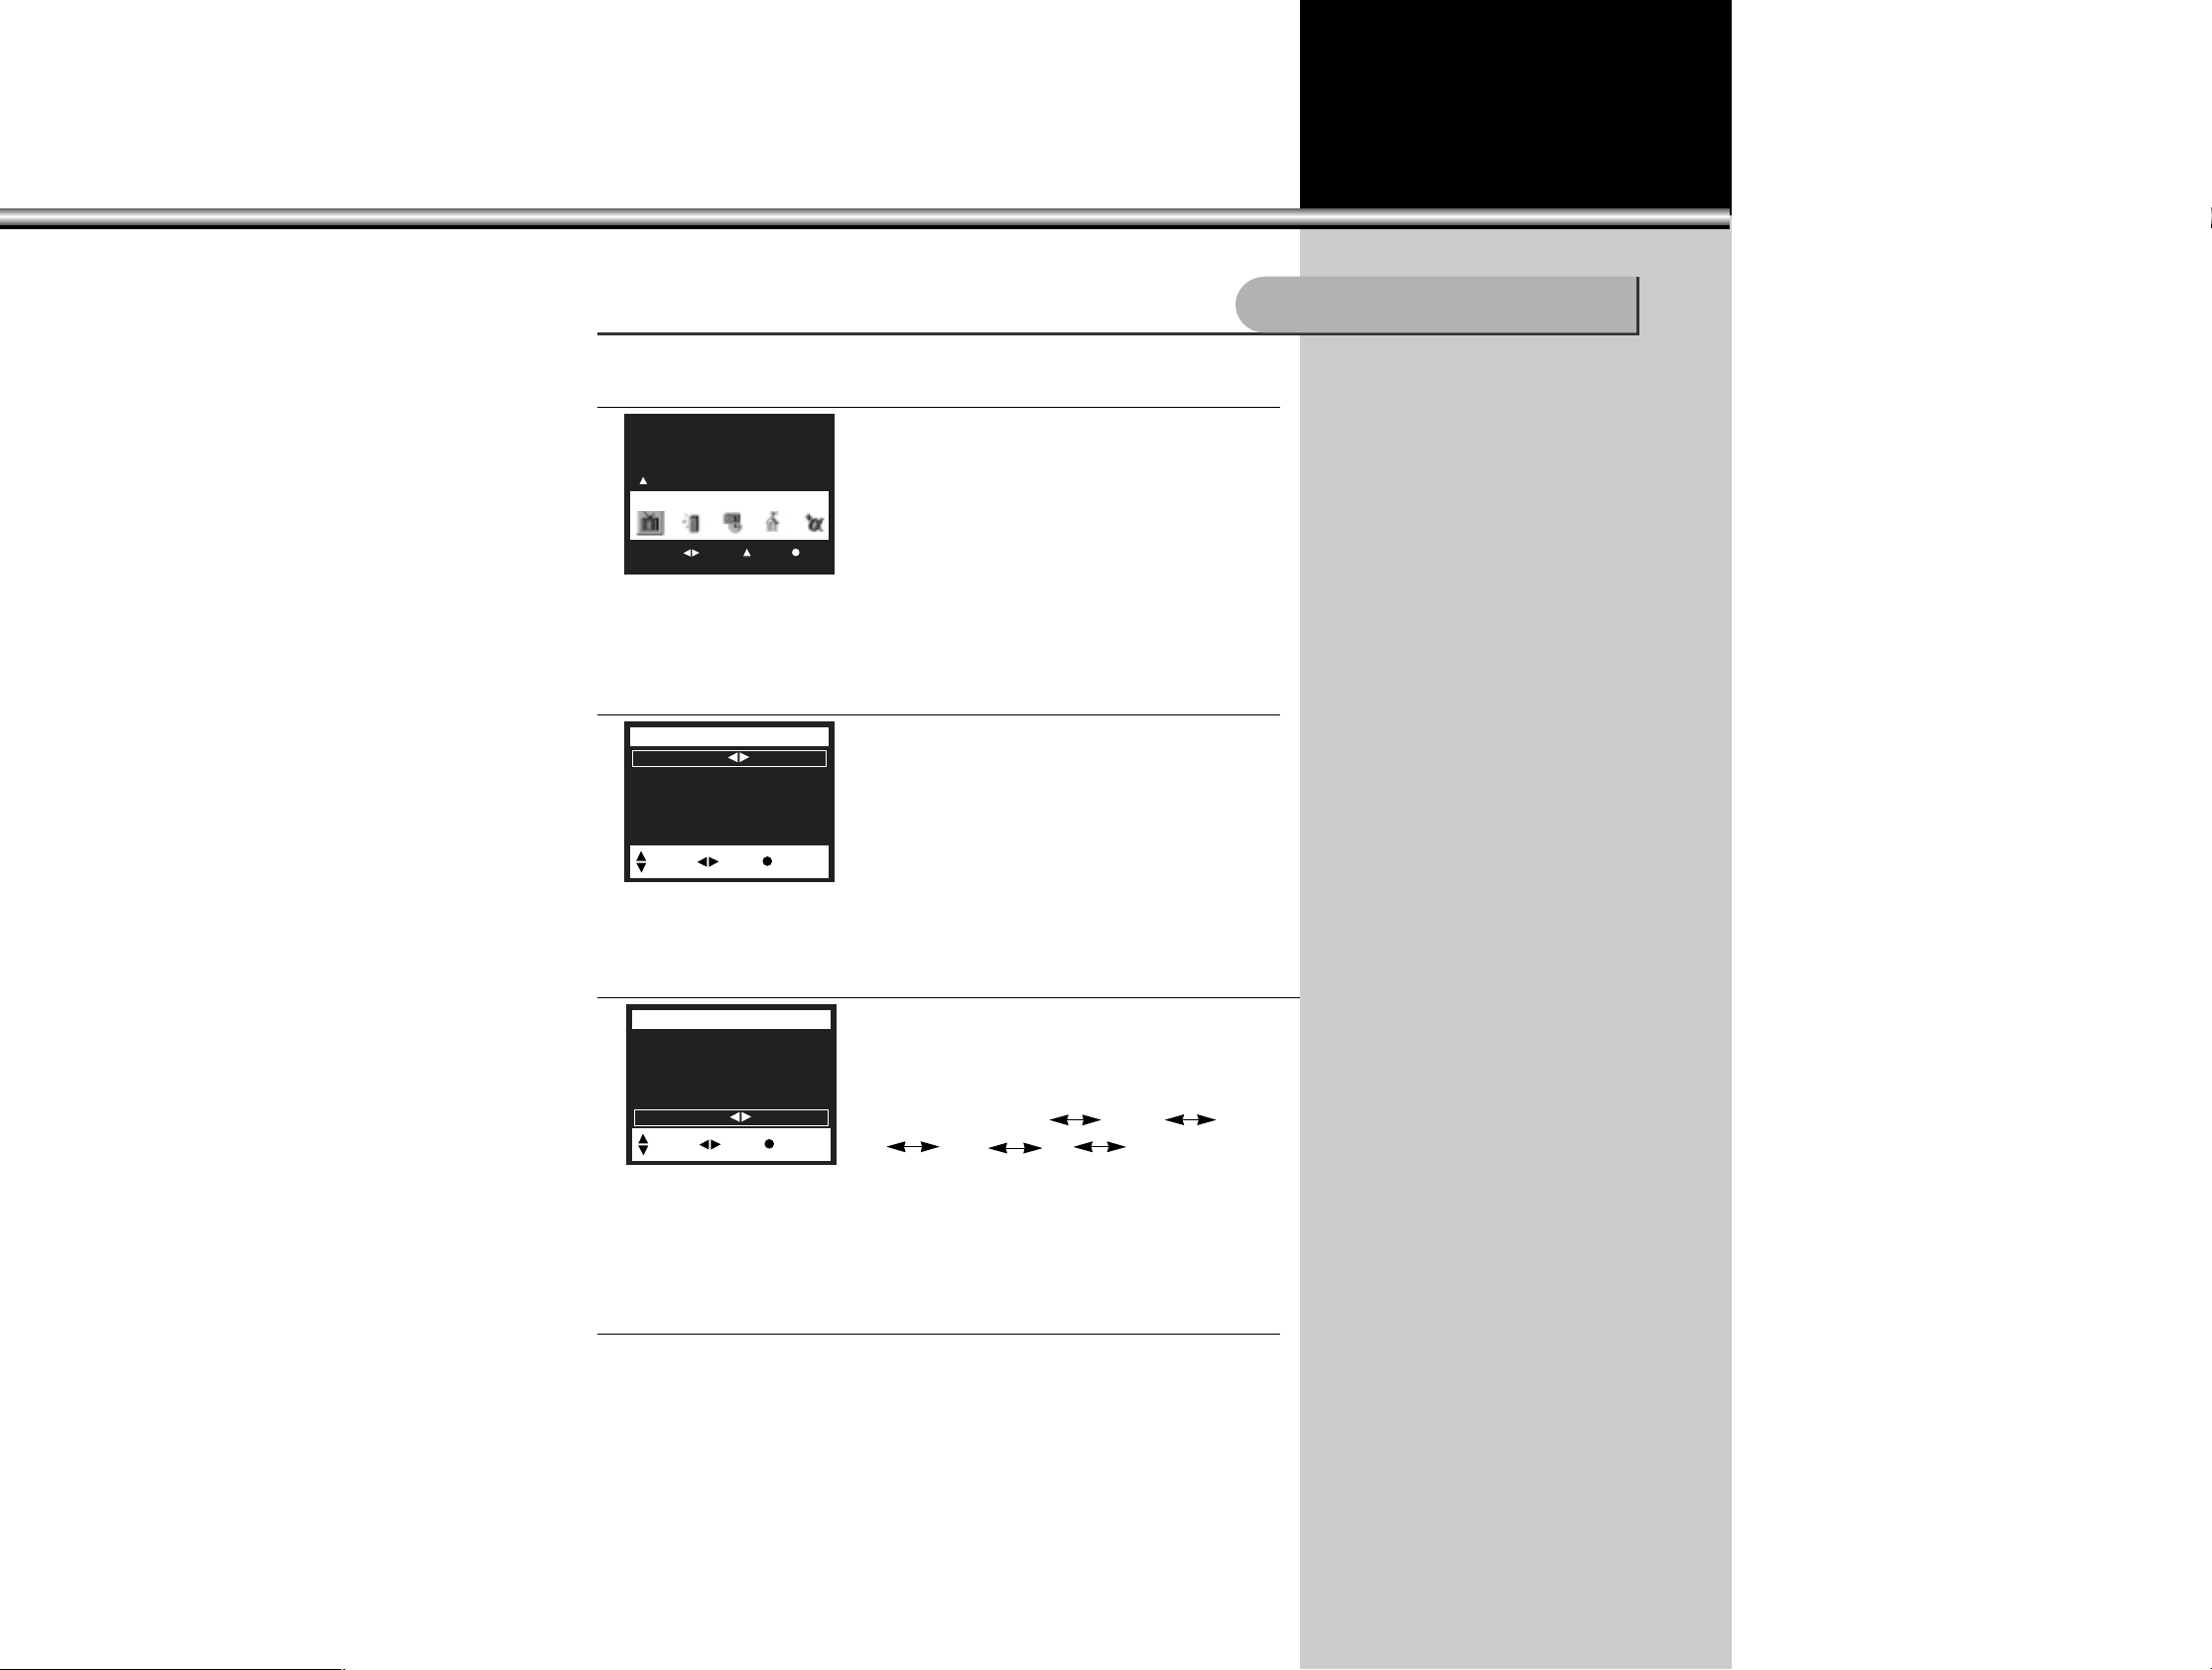
1. Press “MENU” button.
•Then the screen appears as follows.
Adjusting Volume of an Auxiliary Window
27
3. Press “CHANNELxx/yy” buttons and Select “Heaphone V olume”.
•In menu mode, sound of an auxiliary window is available through this function.
•In case of main window and single/twin windows/multi windows, sound of main
window is available through this function.
•Adjust the volume of the headphone at a proper level.
•Even while the sound of the main window is mute, the sound is available through
the headphone.
LSound of either the main window or
an auxiliary window is available
through headphone.
LVolume control of an auxiliary
window is possible only with
headphone.
LSound of an auxiliary window
program is available only through
headphone.
LIn case of Twin Window mode, the
sound of the right window program is
available through headphone.
Headphone
Move Sel. Exit
Picture
Audio Mode Mono
Balance 50:50
AVC Off
Equalizer
Headphone Volume 50
Woofer 50
Sound
Move Sel. Prev.
Audio Mode Mono
Balance 50:50
AVC Off
Equalizer
Headphone Volume 50
Woofer 50
Sound
Move Adj. Prev.
2. Select “Sound” menu by using “VOLUME
CC/BB
” buttons.
•Move the cursor to the “Sound” menu by using
“VOLUMEC/B” buttons.
•Press “Channelx” button.
Move Sel. Exit
Sound
•Then the following picture will appeared on the
screen.
Page 28

Open Function Menu
28
1. Press “MENU” button
•When this button is pressed, the screen appears
as follows.
•Then the following picture will be appeared on the
screen.
3. Press “CHANNELxx/yy” buttons.
•“Sound” mode is selected and its sub-menu
appears.
•Continue to press “CHANNELx/y” buttons, and the
selected sub-menu sign changes into blue color in
the following sequence : Audio Mode Balance
AVC Equalizer Heaphone
Volume
Woofer
•Continue to press “VOLUMEC/B” buttons at a
submenu you want.
4. Press “MENU” button twice.
•Press this button one time, and menu window appears.
Press it again, and you get the previous status of menu window. (Menu disappears)
LEnjoy programs with selected modes
by using various functions.
LSound reception of the main or an
auxiliary window is available through
Headphone.
Accessing to “Sound” sub-menu:
Move Sel. Exit
Picture
Audio Mode Mono
Balance 50:50
AVC Off
Equalizer
Headphone Volume 50
Woofer 50
Sound
Move Sel. Prev.
Audio Mode Mono
Balance 50:50
AVC Off
Equalizer
Headphone Volume 50
Woofer 50
Sound
Move Sel. Prev.
2. Select “Sound” menu by using “VOLUME
CC/BB
” buttons.
•Move the cursor to the “Sound” menu by using
“VOLUMEC/B” buttons.
•Press “Channelx” button.
Move Sel. Exit
Sound
Page 29

Adjusting the Picture
29
1. Press “AUTO PICTURE” button
•The following pictures appear on the screen in sequence and the picture adjustment
state is changed.
<For pressing “AUTO PICTURE” button once>
<For pressing “AUTO PICTURE” button many times>
2. Use this mode and get quality pictures on the screen.
•Starting from a picture above, choose a proper
picture quality you want by using “VOLUMEC/B”
buttons.
•Picture adjustment is also possible in each “Video”
mode.(Video1,Video2,Video3,Game)
•
Picture adjustment is also possible in each “S-Video”
mode.(S-Video1,3)
LUsers do not need to handle many
operation units in adjusting the
picture on the screen. Just make one
of the selections already built in by
the company’s experts.
Adjusting Picture Quality
Strong
Off
Off Soft Standard
Page 30
30
1. Press “MENU” button.
•Then the screen appears as follows :
2. Select “Picture” by using “CHANNEL
xx
” button.
•Move the cursor to the “Picture” menu by using
“CHANNEL x” button.
3. Press “CHANNELxx/yy” buttons.
•When “Picture” mode is selected, its sub-menu
appears on the screen.
•Continue to press “CHANNELx/y” buttons, and
entries of this sub-menu turns blue in the sequence
as follows : Brightness Contrast Sharpness
Color Tint Picture NR
•Select “Picture NR” function by using “VOLUMEC/B”
buttons, and then “On” and “Off” repeat in turn.
•Select “On”
4. Press “MENU” button twice.
•Press this button one time, and menu window appears.
Press it again, and you get the previous status of menu window.
(Menu disappears)
LWeak transmission signals could
cause bad picture or noise.
LThis function corrects this type of
problem.
LFor eliminating Picture noise press
select “On” in “Picture NR” mode
among “Function” sub-menu.
Picture Noise Reduction
Move Sel. Exit
Picture
Brightness 50
Contrast 90
Sharpness 50
Color 50
Tint 50:50
Picture NR Off
Picture
Move Adj. Prev.
Brightness 50
Contrast 90
Sharpness 50
Color 50
Tint 50:50
Picture NR Off
Picture
Move Sel. Prev.
Page 31

31
1.Press “MENU” button.
•Then the screen appears as follows:
2.Select “Picture” by using “CHANNEL
xx
” button.
•“Picture” mode is selected and its sub-menu
appears.
•Continue to press “CHANNELx/y” buttons, and
the selected sub-menu sign changes into blue bar
in the following sequence : Brightness Contrast
Sharpness Color Tint
Picture NR
•Press the “CHANNELx/y” buttons, and capture
“Tint” on blue bar.
LAccording to the user’s preference,
brightness, contrast, sharpness,
color and tint can be adjusted for
each of Video mode 1, Video mode
2, Video mode 3, Game mode, and
TV mode.
Brightness:
•Adjust the degree of brightness or
darkness of the whole screen.
Contrast:
•Adjust (control) the degree of
brightness between objects and
background of the picture.
Sharpness:
•Adjust the shapes of objects in the
picture making them appear soft
(blurred) or sharp (clean).
Color:
•Adjust the degree of color saturation.
Tint:
•Adjust to reproduce the correct and
natural color of objects.
Adjusting the Picture Screen to Your Preference:
Move Sel. Exit
Picture
Brightness 50
Contrast 90
Sharpness 50
Color 50
Tint 50:50
Picture NR Off
Picture
Move Adj. Prev.
Page 32

Brightness 50
Contrast 90
Sharpness 50
Color 50
Tint 50:50
Picture NR Off
4. Adjust “Brightness” by using “VOLUME
CC/BB
” buttons
•Press “VOLUMEB” button, and the Brightness
gets bright.
•Set up the brightness as you like.
32
3. Adjust “Tint” by using “VOLUME
CC/BB
” buttons.
•Press “VOLUMEC” button, and the tint of green
gets strong.
Press “VOLUMEB” button, and the tint of red gets
strong.
•Set up the tint as you like.
•In order to adjust other functions such as
brightness etc., select the function you want by
using “CHANNELx/y” buttons, and adjust the
mode as above.
5. Press “MENU” button twice.
•Press this button one time, and menu window
appears.
Press it again, and you get the previous status of
menu window.
•In order to adjust other functions such as
brightness etc., select the function you want by
using “CHANNELx/y” buttons, and you can
adjust them by using “VOLUMEC/B” buttons.
Brightness 50
Contrast 90
Sharpness 50
Color 50
Tint 50:50
Picture NR On
Picture
Move Adj. Prev.
Tint 49 51
Move Sel. Exit
Picture
Picture
Move Adj. Prev.
Brightness 51
Page 33

Adjusting the sound
33
1. Press “MENU” button.
•Then the screen appears as follows :
2. Select “Sound” menu by using “VOLUME
CC/BB
” buttons.
•Move the cursor to the “Sound” menu by using
“VOLUMEC/B” buttons.
•Press “CHANNELx” button.
•Then “Sound” menu and its sub-menu appears.
3. Select “Equalizer” by using “CHANNEL
xx/yy
” buttons.
•Capture “Equalizer” on blue bar by using
“CHANNELx/y” buttons.
LThrough this function, “Pitch” and
“Tone”can freely be adjusted
according to the user’s preference.
“Balance”
LThis function controls the volume
balance between left and right
speakers.
L“Balance” adjusting screen appears
as follows:
L“VOLUME UPB” keeps the volume
of the right speaker as it is, but
decreases the volume of the left one.
“VOLUME DOWNC” keeps that of
the left one as it is, but decreases
that of the right one.
“Equalizer”
LThis function adjusts the range of
quality sound of speakers.
Tuning as Prefered:
Move Sel. Exit
Picture
Move Sel. Exit
Sound
Audio Mode Mono
Balance 50:50
AVC Off
Equalizer
Headphone Volume 50
Woofer 50
Sound
Move Sel. Prev.
Audio Mode Mono
Balance 50:50
AVC Off
Equalizer (
Headphone Volume 50
Woofer 50
Sound
Move Sel. Prev.
Audio Mode Mono
Balance 50:50
AVC Off
Equalizer
Headphone Volume 50
Woofer 50
Sound
Move Adj. Prev.
Page 34

34
4. Select Range of Sound by using “VOLUME
CC/BB
” buttons.
•“CHANNELx” strengthens the selected range of
sound, and
“CHANNELy” does the opposite (weakens the
range of sound)
•Signal bar (-) moves up and down showing the
selected sound range.
•The selected range of sound looks pale blue, and
the range not selected looks white.
Equalizer
Move Adj. Prev.
Page 35

35
1.Press “MTS” button:
•Whenever this button is pressed the status of mode shifts in the following sequence:
Mono Stereo SAP.
•Press “RECALL” button on Remote Control to check program transmission mode.
•When the program transmission is in stereo mode, select “Stereo” to receive the
stereo sound.
•If the quality of stereo sound is not clear, set it in “Mono” mode. Then you should
have less noise.
•When the program transmission is in “SAP” mode, select “SAP” to receive “SAP”
broadcasting.
LWhen transmission signal is weak or
broadcasting condition is not good
sound might be cut off temporarily.
This type of malfunction is not
caused by TV set. In this case, press
“MTS” button and shift the mode into
“Mono” .
LThe Second Audio Program (SAP)
settings offers you the option of
listening to either of two separate
Audio programs , such as a second
language broadcast.
Receiving Stereo or SAP Mode Programs:
Mono Stereo SAP
Air 44
Mono
Off
Stereo Mono
SAP
Page 36

Time Setup
36
1. Press “MENU” button.
•Then the screen appears as follows :
2. Select “Function” by using “VOLUME
CC/BB
” buttons.
•Move the cursor to the “Function” menu by using
“VOLUMEC/B” buttons.
•Press “CHANNELx” button.
3. Press “CHANNELxx/yy” buttons.
•Then “Function” mode is selected and its submenu appears.
•Continue to press “CHANNELx/y” buttons until
the blue bar indicates “Timer”.
LBefore setting up Automatic “On” /
“Off” mode or “Sleep” mode in the
memory, the present time must be
set up ahead.
Setting up Present Time:
Move Sel. Exit
Picture
Move Sel. Exit
Function
Timer (
Child Lock
Auto demo
Caption C1
PIP
Function
Move Sel. Prev.
Page 37

37
4. Set up the Present Time.
•Press “VOLUMEC/B” buttons, and the screen
appears as shown in the left figure:
•Press “CHANNELx/y” buttons, and the letters
“AM 1:00” turn blue.
•Set up the present time by using “VOLUMEC/B”
buttons.
•Keep pressing the “CHANNELx/y” buttons, then the set up time continues to
change by the unit of one minutes until the button is released.
Clock : AM 1:00
On Time Off
- - : - -
Off Time Off
- - : - -
Timer
Move Adj. Prev.
Page 38

Memory Functions
38
1. Press the “MENU” button.
•Then the screen will appear as follows :
2. Select “Function” by using “VOLUME
CC/BB
” buttons.
•Move the cursor to the “Function” menu by using
“VOLUMEC/B” buttons.
•Press “CHANNELx” button.
3. Press “CHANNELxx/yy” buttons.
•Then “Function” mode is selected and its submenu appears.
•Continue to press “CHANNELx/y” buttons until
the the blue bar indicates “Timer”.
Time Memory Setup for Automatic “On” and “Off”:
Move Sel. Exit
Picture
Move Sel. Exit
Function
Timer (
Child Lock
Auto demo
Caption C1
PIP
Function
Move Sel. Prev.
LThis time memory function autom-
atically turns the TV set “On” or “Off”
at a planned time. Once set up, this
function works every day unless the
set time is canceled or the TV set is
unplugged. Therefore this function
could be used for a “Get Up” alarm
(Morning Call) by setting up the time
for “On” in the morning. The “present
time (local time)” must be set up
ahead of setting up other time
memories.
Page 39

5. Set up the “On Timer”.
•Press “CHANNELx/y” buttons and the letters AM
- - : - -
turn blue.
•Set up “On Timer” by using “VOLUMEC/B” buttons
•Keep pressing the “VOLUMEC/B” buttons then the
set up time continues to change by the unit of one
minute until the button is released.
Ex) Setting up the time to turn on the TV automatically
at 1 1:00 in the morning
39
4. Select the “On Time” to turn the TV set “On”
•Press “CHANNELx/y” buttons, and the screen
appears as follows:
•Press “VOLUMEC/B” buttons until “Off” sign turns
“On”.
•Keep pressing the “VOLUMEC/B” buttons, and
then the set up time will continue to change by the
unit of one minute until the button is released.
Select the time to automatically turn “On”.
6. Select “Off Time” to turn TV set “On”.
•Press “VOLUMEC/B” buttons until “Off” turns to
“On” .
•Keep pressing the “VOLUMEC/B” buttons. Then
the set up time will continue to change by the unit
of one minute until the button is released.
Clock AM 1:00
On Time Off
- - : - -
Off Time Off
- - : - -
Timer
Move Sel. Prev.
Clock AM 1:00
On Time On
- - : - -
Off Time Off
- - : - -
Timer
Move Sel. Prev.
Clock AM 12:00
Set On Time On
On Timer : PM 11:00
Set Off Time Off
Off Timer PM 09:00
Timer
Move Set Prev.
Clock AM 1:00
On Time On
: AM 11:00
Off Time Off
- - : - -
Timer
Move Adj. Prev.
Clock AM 12:00
Set On Time On
On Timer : PM 11:00
Set Off Time Off
Off Timer PM 09:00
Timer
Move Set Prev.
Clock AM 1:00
On Time On
AM 11:00
Off Time On
- - : - -
Timer
Move Sel. Prev.
Page 40

40
7. Set up the “Off Timer”.
•Press “CHANNELx/y” buttons and the letters “AM
- - : - -”
turn blue.
•Set up “Off T imer” by using “VOLUMEC/B” buttons
•Keep pressing the “VOLUMEC/B” buttons then the
set up time continues to change by the unit of one
minute until the button is released.
Ex) Setting up the time to turn off the TV
automatically at 11:30 in the evening.
8. Finish Setting up Time Memory.
•Leave out of the menu mode by using “MENU”
button.
Control of “SLEEP” function with Remote Control
•Press “SLEEP” button, and the screen appears as
follows:
•Every time the button is pressed the mode
changes in the following sequence: Sleep 0 Min.
Sleep 10 Min. Sleep 20 Min. Sleep 30 Min.
Sleep 60 Min. Sleep 90 Min. Sleep 0 Min.
•Select the time period by releasing the button.
Ex) To turn off the set automatically in 60 minutes
•The “Sleep 0 Min” sign means that the time to
automatically turn off is not set up in the memory.
LThis function is used to set up the
time period from now until the TV set
automatically turns off (10 - 90
minutes).
Setting up “SLEEP” Time:
Timer
Move Set Prev.
Clock AM 1:00
On Time On
AM 11:00
Off Time On
: PM 11:30
Timer
Move Adj. Prev.
Timer
Move Set Prev.
Sleep 0 Min.
Timer
Move Set Prev.
Sleep 60 Min.
Page 41

Special Functions
41
1.Press “MENU” button.
•Then the screen appears as follows :
2.Select “Setup” by using “VOLUME
CC/BB
” buttons.
•Move the cursor to the “Set Up” menu by using
“VOLUMEC/B” buttons.
•Press “CHANNELx” button.
3.Press “CHANNELxx/yy” buttons.
•“Set Up” mode gets selected and its sub-menu
appears.
•Continue to press “CHANNELx/y” buttons until
the blue bar indicates “Language”.
LThe language of the program on the
screen can be shifted to one of the
following On-Screen languages :
English, Spanish, Portuguese, and
Franch according to the user’s
selection.
Shifting the On-Screen Language:
Move Sel. Exit
Picture
Move Sel. Exit
Set Up
Air/Cable Air
Auto Program
Ch Edit
Language Eng
Set Up
Move Sel. Prev.
Air/Cable Air
Auto Program
Ch Edit
Language Eng
Set Up
Move Sel. Prev.
Page 42

42
4.
Select the language you want by using
“VOLUMECC/BB”
buttons.
•Press this button, and the On-Screen language sign shifts in the following order :
Eng Esp Por Fran Eng
•Select the language you want.
5.Press “MENU” button twice.
•Press this button once, and the menu window will
appear.
Press it again, and you get the previous status of
menu window.
Air/Cable Air
Auto Program
Ch Edit
Language Eng
Set Up
Move Sel. Prev.
Aire/Cable Aire
Autoprogramar
Program manual
Idioma Esp
Instalar
Mov. Sel. Volver
Ar/Cabo Ar
Sintonia auto
Sintonia manual
Idioma Por
Instalar
Mov. Sel. Retor.
Antenne/Catv Ca
Prog. auto
Montage canal
Langue Fran
Installer
Mouv. Sel. Retour
Move Sel. Exit
Set Up
Page 43

43
1.Press “MENU” button.
•Then the screen appears as follows :
2.Select “Set Up” by using “VOLUME
CC/BB
” buttons.
•Move the cursor to the “Set Up” menu by using
“VOLUMEC/B” buttons.
•Press “CHANNELx” button.
3.Press “CHANNELxx/yy” buttons.
•Then “Set Up” mode gets selected and its submenu appears.
•Continue to press “CHANNELx/y” buttons until
the blue bar indicates “Ch Edit”.
LIn addition to the numerical channel
Edit, users can add 4 letters to it.
Setting up “Channel Edit”:
Move Sel. Exit
Picture
Move Sel. Exit
Set Up
Air/Cable Air
Auto Program
Ch Edit
Language Eng
Set Up
Move Sel. Prev.
Air/Cable Air
Auto Program
Ch Edit (
Language Eng
Set Up
Move Sel. Prev.
Page 44

44
4.
Select “Ch labels” set up mode by using
“VOLUMECC/BB”
buttons.
•Press “VOLUMEC/B” buttons. Then the following
picture will appear on the screen.
•Select “Add/Erase” to turn “Add”.
•Select “CH Label” to turn “On”.
•Continue to press “CHANNELx/y” buttons until
the letter you want appears on the first flickering
cursor.
5.Select five letters.
•When this button is pressed the letter on the cursor
changes in the following order :
button “x” : A B C
............
Z -
0 1
..........
9 A
button “y” : 9 8
...........
0 -
Z
.................
B A
•Move to the second cursor by using “VOLUME B”
button, and select a letter the same way as in
number 4 above
•Select all of the four letters the same way as
above.
6.Press “MENU” button twice
•The MENU mode will disappear.
Channel 11
Add/Erase Add
CH Label Off
Ch Edit
Move Adj. Prev.
Channel 11
Add/Erase Add
CH Label Off
Ch Edit
Move Sel. Prev.
Channel 11
Add/Erase Add
CH Label On
CH Name -----
Ch Edit
Move Sel. Prev.
Page 45

45
1.Press “MENU” button.
•The screen will then appear as follows :
2.Select “Function” by using “VOLUME
CC/BB
” buttons.
•Move the cursor to the “Function” menu by using
“VOLUMEC/B” buttons.
•Press “CHANNELx” button.
3.Press “CHANNELxx/yy” buttons.
•Then “Function” mode gets selected and its submenu appears.
•Continue to press “CHANNELx/y” buttons until
the blue bar indicates “Caption”.
LCaptions are hidden words that can
be displayed on your TV screen.
There are two types of these word:
“Caption” usually follows the action
on-screen, providing a written
version of the dialogue, narration,
and sound effects: “text” is not
usually related to the action onscreen, often providing information
such as news or weather.
Setting up “Captions” function:
Move Sel. Exit
Function
Timer (
Child Lock
Auto demo
Caption C1
PIP
Function
Move Sel. Prev.
Timer
Child Lock
Auto demo
Caption C1
PIP
Function
Move Sel. Prev.
Move Sel. Exit
Picture
Page 46

46
4.Select the entry you want by using “VOLUME
CC/BB
” buttons.
•Press “VOLUME B” button and the entry changes
in the following order:
Off C1 C2 C3 C4 T1
T2 T3 T4
•Select the type of caption or text you want.
Ex) In case “Caption 1” is selected:
Ex) In case “Text 1” is selected:
5.Press “MENU” button twice.
•Press this button once, and the menu window will appear.
Press it again, and you get the previous status of menu window.
NOTE) Caption function is not used in these cases “
twin PIP, multi PIP, PIP record and PIP replay and also
not used after record display is disappeared”.
Timer
Child Lock
Auto demo
Caption C1
PIP
Function
Move Sel. Prev.
Page 47

47
1.Press “MENU” button.
•The screen will appear as follows :
2.Select “Function” by using “VOLUME
CC/BB
” buttons.
•Move the cursor to the “Function” menu by using
“VOLUMEC/B” buttons.
•Press “CHANNELx” button.
3.Press “CHANNELxx/yy” buttons.
•When “Function” mode is selected, its sub-menu
will appear.
•Continue to press “CHANNELx/y” buttons until
the blue bar indicates “Child Lock”.
LUsers can lock channels by
registering them with 4-digit codes.
LWhen “Child Lock” is set up, the
channels locked are not available on
the screen.
Setting up “Child Lock” function:
Move Sel. Exit
Picture
Move Sel. Exit
Function
Timer (
Child Lock
Auto demo
Caption C1
PIP
Function
Move Sel. Prev.
Timer
Child Lock (
Auto demo
Caption C1
PIP
Function
Move Adj. Prev.
Page 48

48
4.Select “Child Lock” function by using “VOLUME
CC/BB
” buttons.
•The screen will appear as follows:
•Install 4-digit Password by pressing the number
buttons on the Remote Control.
Ex) In case the password is 1234
•Move the cursor as in the picture below by using
“x/y”, “C/B” buttons, and select the channels you
want to lock by using “x/y” buttons.
Ex) When “Ch 5” is selected:
•After selecting the channels, move the cursor with
“C/B” buttons, and then select the period of time
with “x/y” buttons.
Ex) In case “6 hours” is selected :
•Repeating the above process, you can lock 3 TV
channels and the whole Video mode.
•Move the cursor as in the picture below by using
“x/y”, “C/B” buttons, and select the “On” at video
you want to lock by using “x/y” buttons.
•After selecting the “On”, move the cursor with
“C/B” buttons, and then select the period of time
with “x/y” buttons.
Ex) In case “1 hours” is selected :
LOCK1 2Ch 0H
LOCK2 3Ch 0H
LOCK3 4Ch 0H
LOCK AV Off 0H
Password ---LOCK set Off
Child Lock
Move Sel. Prev.
LOCK1 2Ch 0H
LOCK2 3Ch 0H
LOCK3 4Ch 0H
LOCK AV Off 0H
Password 1234
LOCK set Off
Child Lock
0~9:Sel. Prev.
LOCK1 5Ch 0H
LOCK2 3Ch 0H
LOCK3 4Ch 0H
LOCK AV Off 0H
Password 1234
LOCK set Off
Child Lock
Adj. Move Prev.
LOCK1 5Ch 6H
LOCK2 3Ch 0H
LOCK3 4Ch 0H
LOCK AV Off 0H
Password 1234
LOCK set Off
Child Lock
Adj. Move Prev.
LOCK1 5Ch 6H
LOCK2 3Ch 0H
LOCK3 4Ch 0H
LOCK AV On 0H
Password 1234
LOCK set Off
Child Lock
Adj. Move Prev.
LOCK1 5Ch 6H
LOCK2 3Ch 0H
LOCK3 4Ch 0H
LOCK AV On 1H
Password 1234
LOCK set Off
Child Lock
Adj. Move Prev.
Page 49

49
•When all the selections are completed, move to “Lock Set” function to set up the
“Child Lock” function. And select “On” there.
•The channels and video mode which are locked do not operate on the screen.
•In order to change channels locked, move to such “Menu” mode as the picture
below. Then put in the same password that was registered before.
5.Press “MENU” button twice.
•Press this button once, and the menu window will appear.
Press it again, and you will get the previous status of menu window.
LOCK1 5Ch 6H
LOCK2 3Ch 6H
LOCK3 7Ch 9H
LOCK AV On 1H
Password 1234
LOCK set On
Child Lock
Adj. Move Prev.
LOCK1 5Ch 6H
LOCK2 3Ch 6H
LOCK3 7Ch 9H
LOCK AV On 1H
Password ---LOCK set Off
Child Lock
0~9:Sel. Prev.
LOCK1 5Ch 6H
LOCK2 3Ch 6H
LOCK3 7Ch 9H
LOCK AV On 1H
Password 1234
LOCK set Off
Child Lock
0~9:Sel. Prev.
Page 50

50
1. Press “MENU” button.
•The screen will appear as follows :
2. Select “Function” by using “VOLUME
CC/BB
” buttons.
•Move the cursor to the “Function” menu by using
“VOLUMEC/B” buttons.
•Press “CHANNELx” button.
3.Press “CHANNELxx/yy” buttons.
•The “Function” mode gets selected and its submenu will appear.
•Continue to press “CHANNELx/y” buttons until
the blue bar indicates “Auto demo”.
4.Select “Auto demo” function with “VOLUME
CC/BB
” buttons.
•Select “On” with “VOLUMEC/B” buttons. Various
on-screen menus will appear automatically, in
sequence.
•Press any button on the Remote Control to stop
“Auto demo” from the screen.
LThis function brings various on-
screen menus automatically in
sequence.
Setting up “Auto Demo” function:
Move Sel. Exit
Picture
Move Sel. Exit
Function
Timer (
Child Lock
Auto demo
Caption C1
PIP
Function
Move Sel. Prev.
Timer
Child Lock
Auto demo
Caption C1
PIP
Function
Move Adj. Prev.
Demonstration
Auto Demo
Stop
Page 51

51
1. Press “SURROUND” button with Remote Control.
• Select “Special” of “OSD” with using “MENU”,
“VOLUMEC/B” and CHANNELx.
• Setup “Surround” to turn “On”.
LYou can hear live Surround
according to broadcastion program.
Surround function
Move Sel. Exit
Special
Surround On
Digital Sensor On
SpecialSpecial
Move Sel. Prev.
Move Adj. Prev.
Surround On
Move Adj. Prev.
Surround Off
Page 52

52
1. Press “MENU” button
•Then the screen appears as follows.
2. Press “Special” by using “VOLUME
CC/BB
” buttons
•Move the cursor to the “Special” menu by using
“VOLUMEC/B” buttons.
•Press “CHANNELx” button.
3. Select “Digital Sensor” by using “CHANNEL
xx/yy
” buttons.
•Setup “Digital Sensor” to turn “On”.
LYou can adjust the state of screen
according to light and surrounds
automatically.
“Digital Sensor” Function
Move Sel. Exit
Picture
Surround On
Digital Sensor On
Special
Move Sel. Prev.
Move Sel. Exit
Special
Page 53

Connecting VCR or Other AV sets
53
Names of Connection Units and Their Functions
BWhen the TV set is in Video Mode,
Monitor transmits Video signal out.
Page 54

54
Connection Unit on the side of TV set and that of VCR set
Prepare Picture/Sound connection
codes (accessories for separate
sale).
Connect “Picture Out” unit of VCR
set with “Picture In” of TV set.
Connect “Sound Out” unit of VCR
set with “Sound In” of TV set.
Convert TV set to Video mode by
pressing “TV/Video” button of
Remote Control
LThe Video set can be connected
with either Video 1 or Video 2
jack of TV set.
BThe way to connect is the same
as that of connecting the back
unit of TV set.
BIt is better to use Connection Unit
on the side with less frequently
used stations such as Camcorder,
Game Player, etc.
BWhen a Game Player is
connected to the “Game In” on
the side of TV set, the picture of
game program appears on the
screen (monitor).
BConnect the Sound unit of Game
Player to the Sound unit on the
side of the TV set as well.
Interface with Video
Connection Unit on the back of TV set, and that of VCR set
1
2
3
4
Page 55

55
Connection Unit on the side of TV set
Connect the “S-VHS Out” unit of
VCR set to the “S-VHS In” unit of
TV set with S-VHS connection
cable.
Connect the “Sound Out” unit of
VCR set to the “Video 1 Sound In”
unit of TV set with sound
connection cable.
Select “Video 1” by pressing
TV/Video button on Remote
Control.
B“S-Picture Input” does not result
in (operate) “S-Picture Out” on
the monitor.
Connection with S-Picture Video set
Connection Unit on the back of TV set
When you want to watch a clear picture image of S-Picture program on TV screen, connect High
Fidelity VCR program to S-picture Connection Unit of TV set, and you can enjoy clean and clear
picture image.
1
2
3
Page 56

56
While reproducing the camcorder recording on the TV monitor, you may also want to
record the program on your VCR. To do this, you should:
Prepare Picture and Sound
connection cables.
Connect “Picture Out” and “Sound
Out” units of Camcorder to their
counterparts “In” units of TV set
with suitable connection cables.
Select Video 3 mode by pressing
TV/Video button three times.
Set the “Picture In/Out Conversion
Switch” on “Out” and reproduce the
Camcorder recording.
Connect Camcorder and VCR as
shown in the picture.
Connect VCR and TV sets the
same way as on previous page.
Set the “Picture In/Out Conversion
Switch” on “Out” and reproduce the
Camcorder recording.
Record the program by selecting
“AV In” function of VCR Input
mode.
Connecting Camcorder (Video Camera) to TV set
Connecting Camcorder to TV set
When you want to watch the images captured by Video Camera,
connect the camcorder to the connection unit on the side of TV set.
1
1
2
3
4
2
3
4
Page 57

57
Connecting the TV set to an Audio set
When you want to have the picture of a program on TV screen and the sound of it from the
Audio set,
Connect the external “Input Terminal” (“In” jacks) to “Sound Output Terminal”(Left and Right
“Out” jacks) of TV set monitor.
To record a TV program:
Connect the Picture and Sound “In” jacks of VCR to the Picture and Sound “Out” jacks of TV monitor.
The program transmitted through TV monitor “Out” jacks is the same as the program played on the TV
monitor screen.
To operate:
1. Set the volume of TV set at
the minimum level.
2. Adjust the volume of the
connected Audio set at the
level you like.
Page 58

Troubleshooting
58
Tro
u
ble
s
h
o
oti
n
g:
Neither picture nor sound:
•Check if the set is plugged in.
•Check if the contact of sockets
(outlets) is all right.
•Check if the power of the set
is turned on.
Picture is OK, but no
sound:
•Check if Volume Down is
pressed.
•Check if the Volume control is
set to the minimum position.
•Press Volume Down button.
•Adjust the volume with
Volume Up button.
Sound is OK, but no
color:
•Check if the color control is
set to the minimum position.
•Check if the program on air is
in color, or in black and white.
•Check if the antenna
installation and its connection
is OK.
•Refer to the color section
again, and readjust the color.
•Check by turning on other
channel programs.
•Check the antenna again.
Overlapped Picture
Image:
SYMP
TOMS
•Check if the antenna direction
is correct.
•Check if the “Fine Tuning”
function is set up correctly.
INSPECT
•Direct the antenna toward the
broadcasting station.
•Adjust the Fine Tuning
function.
HANDLING
SYMP
TOMS
INSPECT HANDLING
Picture has “Snow”:
•Check if the antenna is
damaged or its connection is
all right.
•Check if there is interference
from car traffic or neon signs.
•Correct the antenna faults or
replace the connection cable.
Stripes on picture:
•Check if there is interference
by other electronic devices,
such as radio, telephone, etc.
•Keep magnetic or electronic
devices away from the set.
Bad stereo sound:
•Long distance from the station
or other radio waves could
cause bad sound reception.
•Shift the mode into Mono by
using MTS button.
Operation disorder of
Remote Control (Remote
•Check Remote Control Sensor
window.
•Check if the batteries are
weak.
•Get rid of objects blocking the
TV sensor and Remote
Control
•Replace batteries or check if
the electrodes are fitting
BB
Before Asking for Service:
Page 59

Specifications
59
BRAND DAEWOO
MODELS DTQ-29U9FS/29X9FS
MAIN VOLTAGE 110/220V~ 50/60Hz
POWER CONSUMTION 140 W
SYSTEM NTSC-M
VHF: 2-13
CHANNELS: 181 UHF: 14-69
CATV 1~125
IMPEDANCE VHF/UHF 75 Ohm
WEIGHT 29U9FS : 56 kg
29X9FS : 52,5 kg
DIMENSION 29U9FS : 843 x 592 x 504mm
29X9FS : 908 x 588 x 480 mm
CABINET PLASTICO
•FUNCIONES EN PANTALLA
•UNIDAD DE CONTROL REMOTO CON
•FUNCIONES COMPLETAS.
 Loading...