

MODEL NO. : DTK-28_
DTM-28_
DTM-29_
Colour Television
Instruction Manual
Manufactured under license from Dolby Laboratories.
"Dolby" and the double-D symbol are trademarks of Dolby Laboratories.
1
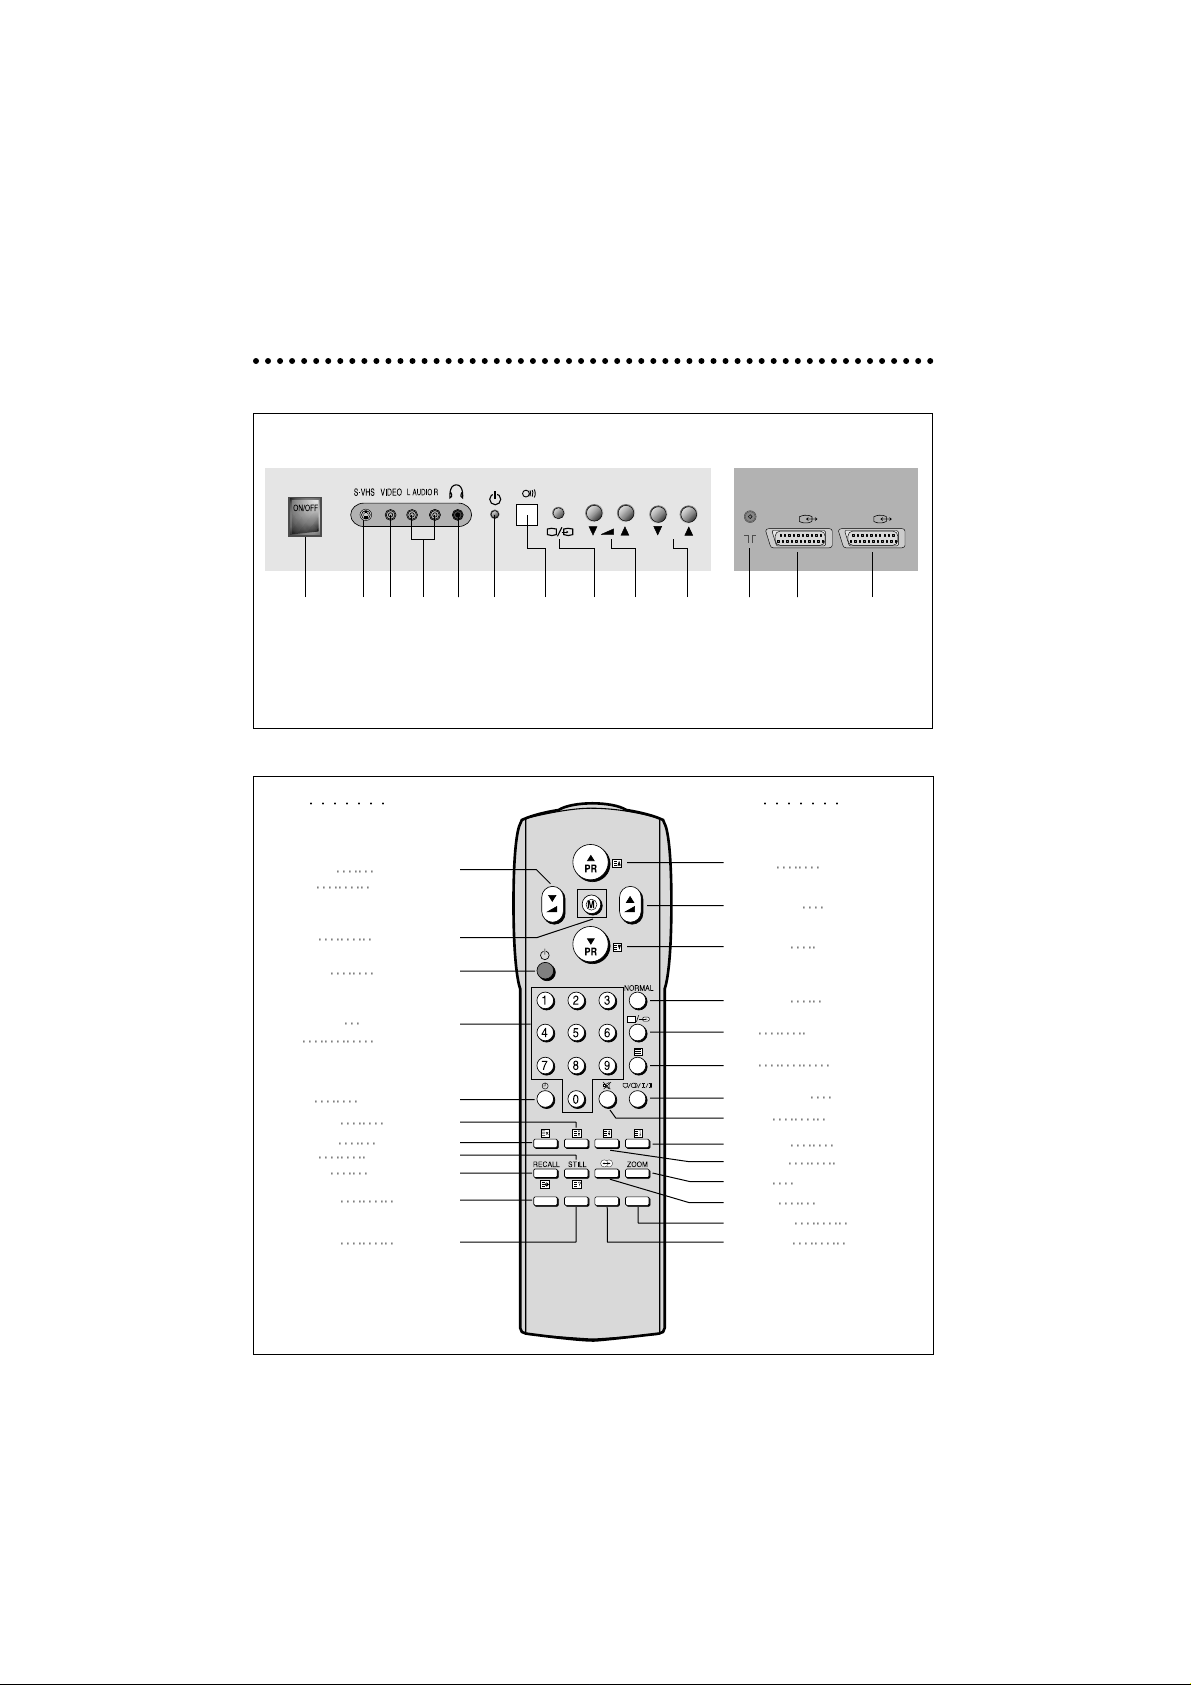
IDENTITY OF FEATURES ON LOCAL AND REMOTE CONTROL
LOCAL CONTROL
REMOTE CONTROL
MAIN
POWER
BUTTON
VOLUME
DOWN/UP
BUTTON
REMOTE
SENSOR
TV/AV
(Menu)
AUDIO
INPUT
VIDEO
INPUT
HEADPHONE
PR
ANT
AV1
PROGRAMME
DOWN/UP
BUTTON
INDICATOR
S-VHS
INPUT
(DTM-28_)
(DTM-29_)
AERIAL
TERMINAL
SCART
SOCKET 1
SCART
SOCKET 2
AV2
TV TXT
VOLUME VOLUME
DOWN
DOWN
(CURSOR LEFT)
MENU
MENU
POWER
POWER
PR NUMBER
PAGE NUMBER
0-9
0-9
SLEEP
NOT USED
NOT USED
HOLD
NOT USED
CANCEL
STILL REVEAL
RECALL
SUBPAGE
NOT USED
R
NOT USED G
TV TXT
PR UP PAGE UP
(CURSOR UP)
VOLUME UP
VOLUME UP
(CURSOR RIGHT)
PR DOWN
PAGE DOWN
(CURSOR DOWN)
NORMAL
NOT USED
AV
NOT USED
TXT
TV
SOUND MODE
NOT USED
MUTE
MUTE
NOT USED
INDEX
NOT USED
SIZE
ZOOM
DOUBLE WINDOW
EFFECT
NOT USED
NOT USED
C
NOT USED
Y
2
CONTENTS
LL
IDENTITY OF FEATURES ON LOCAL AND REMOTE CONTROL 1
LL
IMPORTANT SAFEGUARDS 2
LL
INSTALLATION
-Inserting Batteries into the Remote Control Unit 3
-Aerial connection 3
-Mains connection 3
-Switching the set on and off 4
-On screen display menu 4
-Language selection 4
-Automatic Tuning the TV Channels 4
-Programme Edit 5
-Manual Channel Setting 6
-Fine tuning 6
LL
DAIL YUSE
-Recall 7
-Selecting a Programme Number 7
-Picture Control 7
-Sound Control 7
-Timer 8
-Child Lock 9
-Aspect control 9
-Still 9
LL
TELETEXT 10
LL
CONNECTING THE EXTERNAL EQUIPMENT 11
IMPORTANT SAFEGUARDS
LL
Ventilation : Do not cover the ventilation openings in the cabinet.
Never place the set in a confined space such as a bookcase or built-in cabinet, unless
proper ventilation is provided.
Leave at least 10 cm around each side of the TV set.
LL
Heat : Never place the set near heat sources(e.g. radiator).
LL
Water / Moisture : Never install the set in the the bathroom or in a wet basement.
Do not place any containers with liquid (e.g. flower vases) on the set.
LL
Object Entry : Do not insert foreign objects, such as needles and coins, into the ventilation openings.
LL
Lightning Striking : You should disconnect your set from the mains and the aerial system during
thunderstorms.
LL
Cleaning : Unplug the set from the mains before cleaning.

3
INST ALLA TION
If the set is moved or placed in a different direction, the MAIN POWER button
must be switched off for at least 15 minutes in order to take out a colour strain
on the screen.
Press down the battery compartment grip and slide the cover.
Insert the batteries supplied (two 1.5V, type AAA).
Make sure that the polarity matches with the (+) and (-) marks inside of the battery compartment.
For better picture and sound quality, an effective aerial installation is the most
important.
When using an outdoor aerial, it is usually connected to the set by means of 75
ohm coaxial cable.
Plug the mains cable into the power socket with 220V - 240V / 50Hz AC.
INSERTING BA TTERIES INT O THE REMOTE CONTROLUNIT
AERIAL CONNECTION
MAINS CONNECTION

4
SWITCHING THE SET ON AND OFF
Switching On
• Switch the set on with the MAIN POWER (ON/OFF) button.
The INDICATOR will illuminate in Red.
That means the set is on stand-by mode.
• Press PR UP or DOWN button on the front of set or POWER button( ) or
PR UP/DOWN button or one of the NUMBER button (0..9) on the remote
controller.
The set will be switched on and then the INDICATOR will be changed in
Green from Red.
Switching Off
• Press POWER button( ) on the remote controller to return the set to its
stand-by mode.
• If you don't use the set for extended periods of time, turn it off with MAIN
POWER (ON/OFF) button .
The MENU button ( ) on the remote controller is used to call up the Main
menu and also to return to either the Main menu or a previous menu.
You can call up the Main menu by pressing and holding down the TV/AV
( ) button on the front of the set during 3 seconds
The PR UP / DOWN buttons on the remote controller or on the front of the set
are used to move the selection bar up or down the menus, change data.
The Volume ( ) UP button on the remote controller or on the front of the
set are used to call up sub-menus, adjust levels.
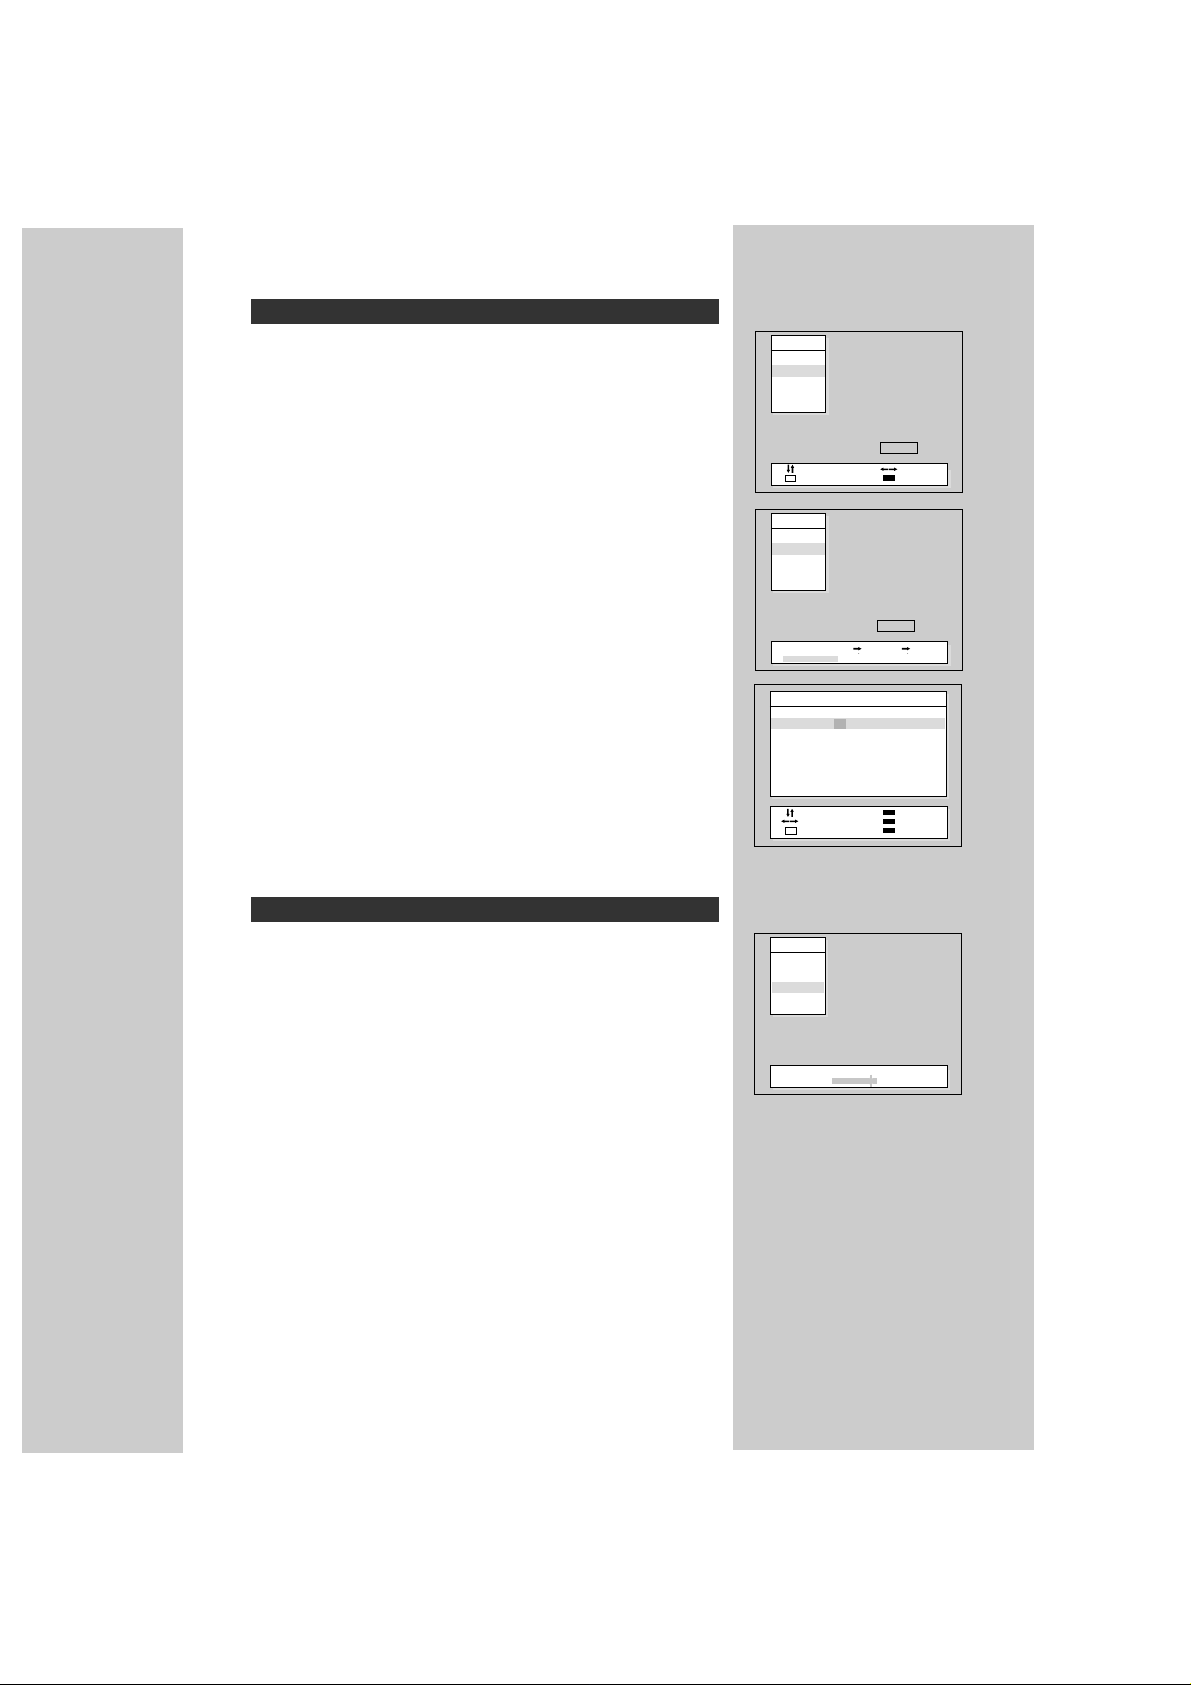
• Press the Menu button to call up the Main menu.
• Move the selection bar to the Language with UP or DOWN button.
• Press the RIGHT button.
Then the languages will be displayed.
• Press the UP/DOWN button to choose the language you want .
• Press the MENU button to return to Main Menu .
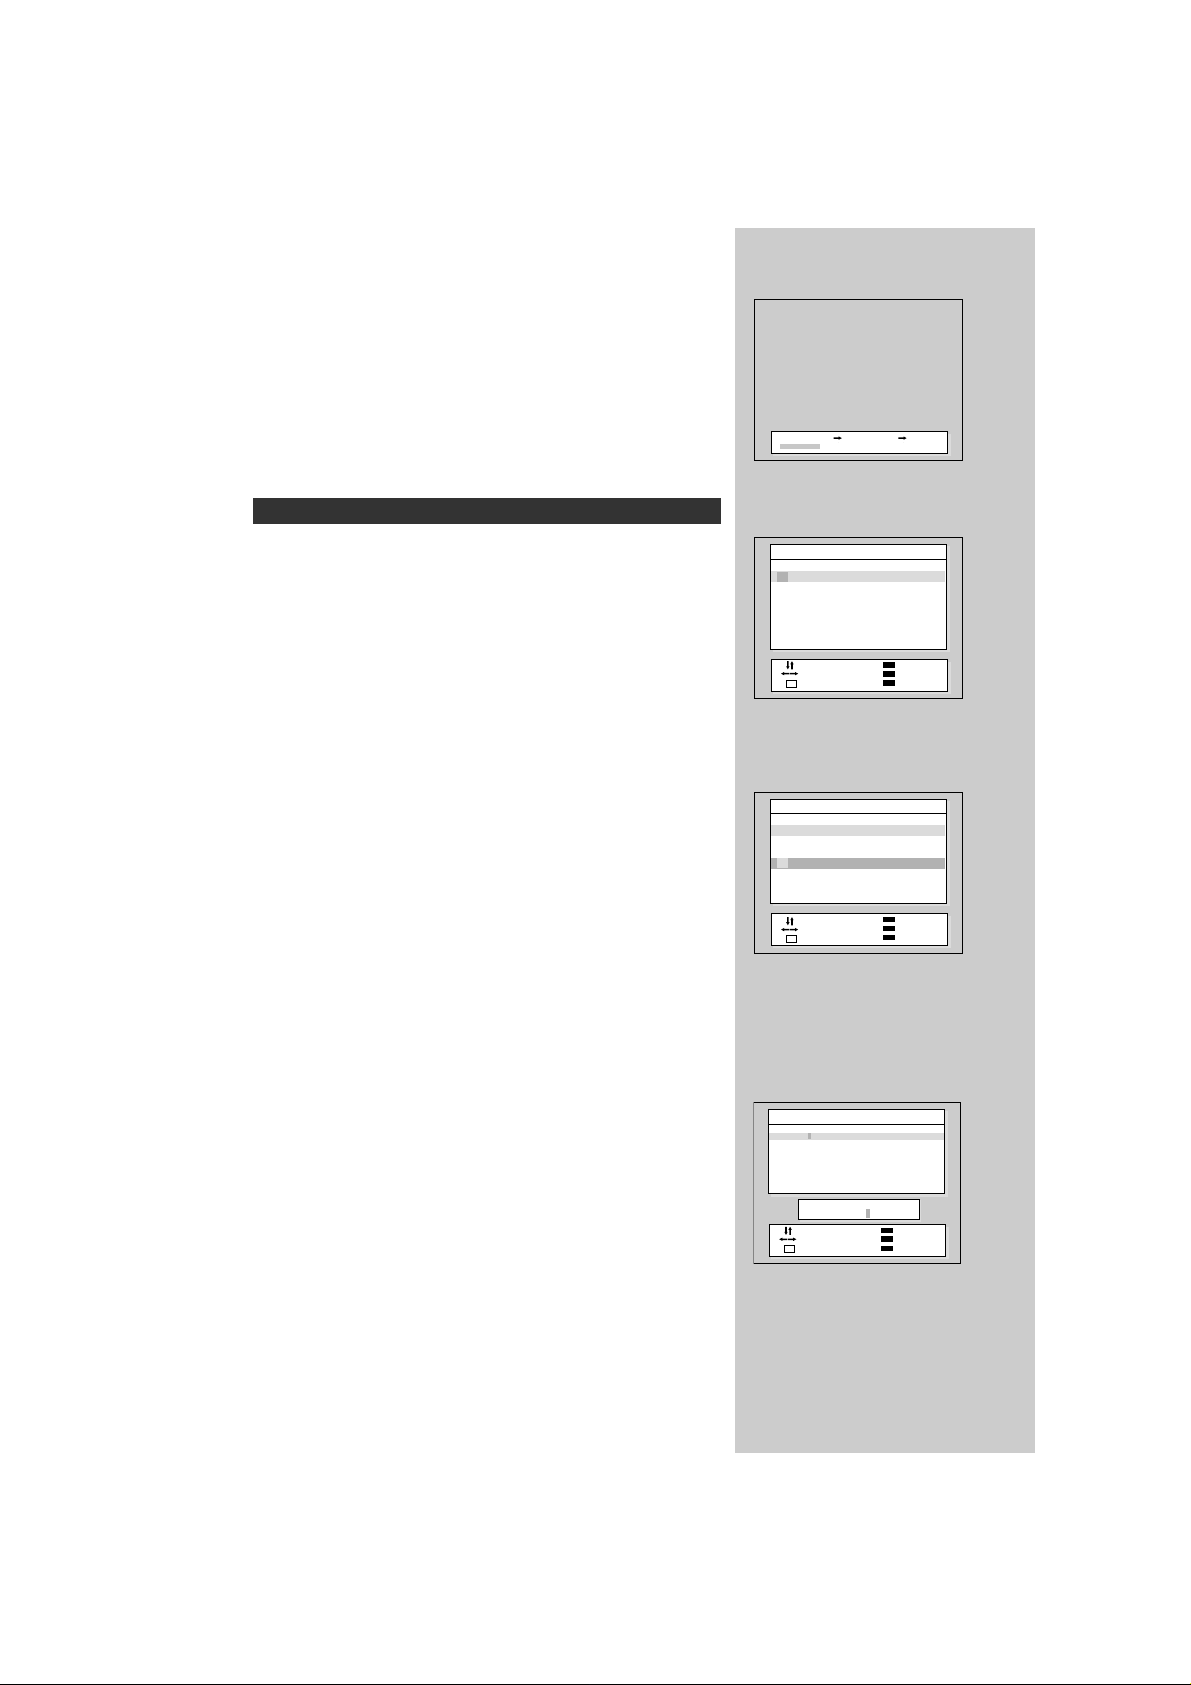
• Call up the Install menu from the Main menu.
• Place the selection bar on Auto setup and press the RIGHT button.
Then the country names will be displayed.
• Place the selection bar on the country you require with UP/DOWN button.
ON SCREEN DISPLAY MENU
LANGUAGE SELECTION
AUTOMATIC TUNING THE TV CHANNELS
Menu
Picture
Sound
Timer
Language
Install
Position Access
Return
M
Install
Auto Setup
Manual Tune
Fine Tune
Edit
Position Start
Return
M
Great Britain
Deutschland
France
Italia
Sverige
Switzerland
Nederland
Ireland
España
East Europe
Others
5
• Press the RIGHT button.
Auto setup will begin, your stations will be located and stored.
• Please wait until the Edit menu appears.
If you don’t want to edit programme now, escape from menu with the MENU
button.
You can do it later.
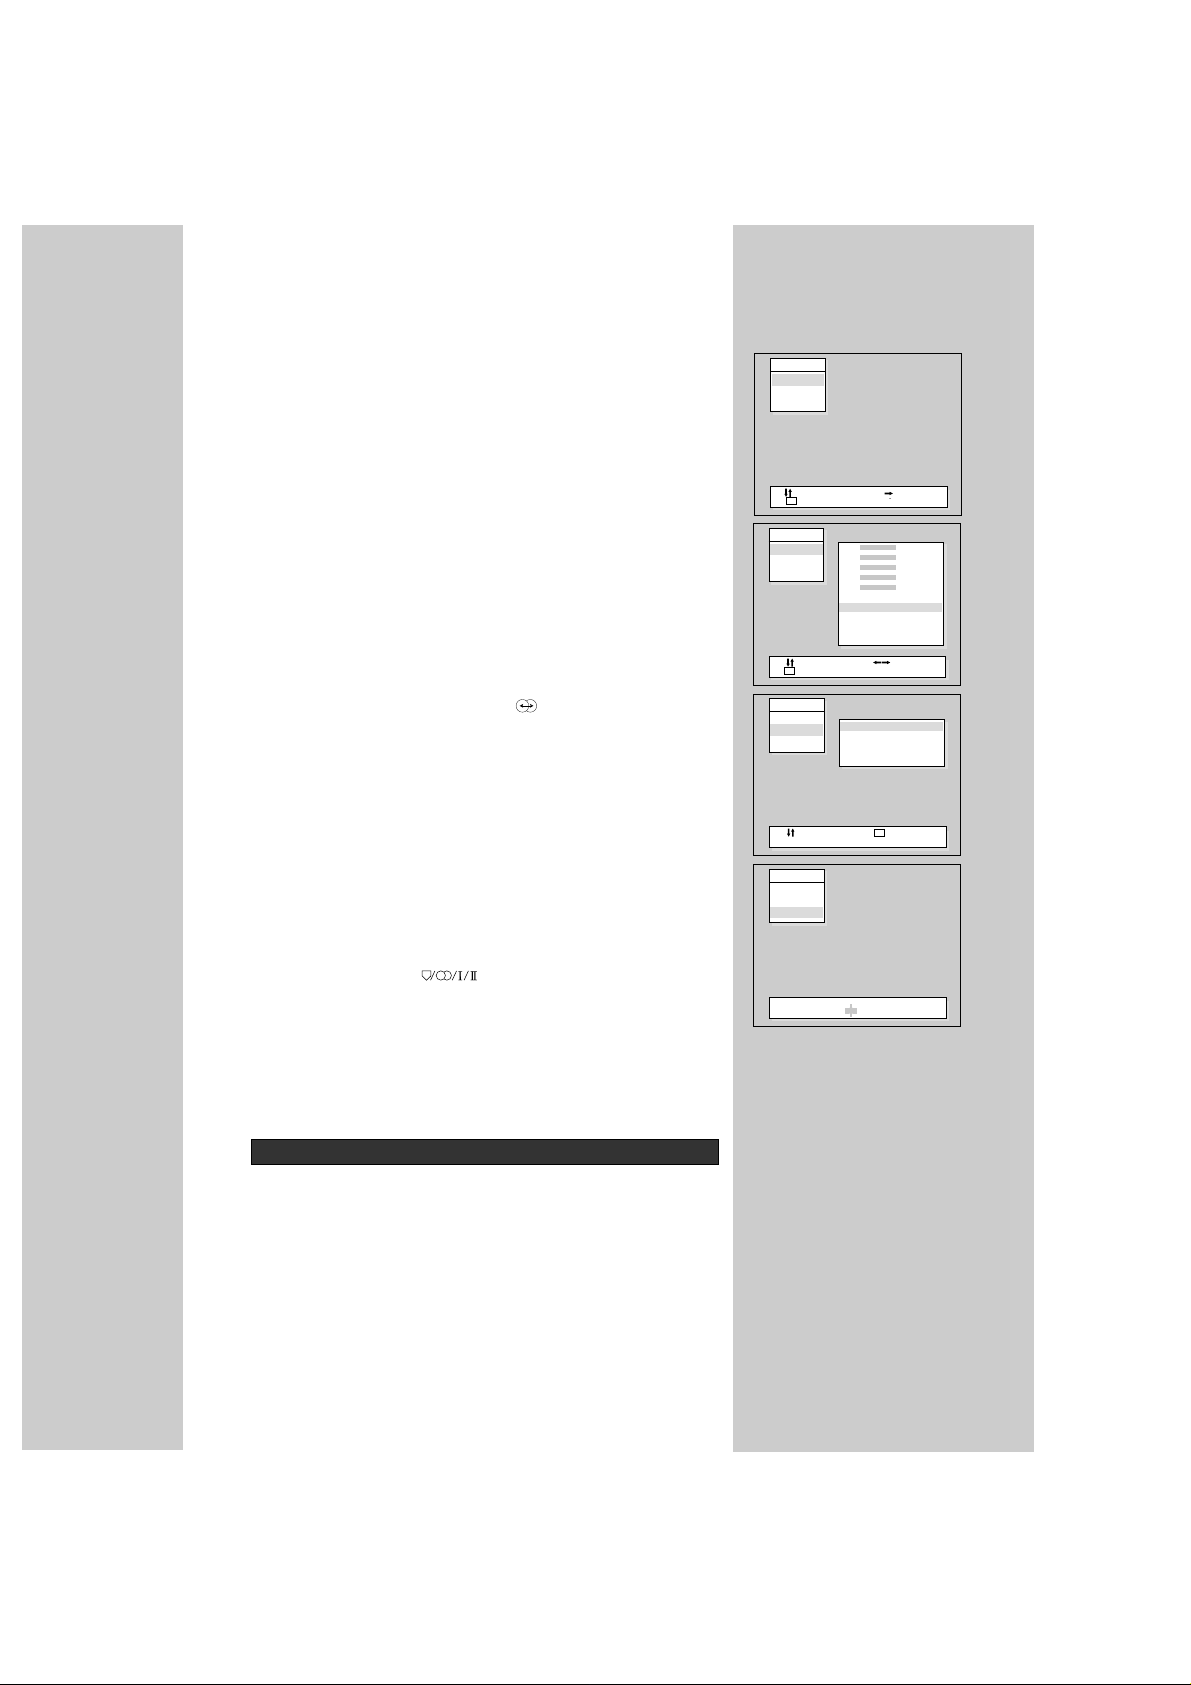
The EDIT menu shows you information as follows:
- Programme position assignment : Progamme number and Station name,
Real channel number
- Picture information : PAL, SECAM, SECAM-F
- Sound informatin : B/G, L/L’, I, D/K
- Skip information : YES, NO
NB: Terrestrial transmissions in GREAT BRITAIN are PAL I.
I.E. picture information is PAL.
sound informatin : I.
DELETING THE PROGRAMME POSITIONS
• Position the selection bar to programme number to delete with the
UP/DOWN buttons.
Note that you can move the selection bar when the cursor is on the Pr ( programme no. ).
• Press the DELETE (Yellow) button.
MOVING THE PROGRAMME POSITIONS
• Position the selection bar to programme number you want to move.
• Press the MOVE(Green) button. The color of selection bar will be changed
in Purple from Blue.
• Position the new blue selection bar to new programme number.
• Press the MOVE(Green) button.
SKIPPING THE CHANNELS
• Select SKIP "YES" or "NO" with the SKIP (Red) button. You can also use
the UP/DOWN button after moving the cursor to Skip.
• The programme marked with SKIP "YES" is skipped when changing channel using the UP / DOWN button.
A skipped programme number can be selected using the NUMBER button
0..9, will be displayed in Cyan.
ENTER A STATION NAME
• Move the cursor to Name.
Then the Alphabet, Number and symbols will appear.
• You can enter a station name with the UP / DOWN and LEFT/RIGHT buttons.
PROGRAMME EDIT
Please wait!
Auto Setup C02 Pr01
Edit
Pr Name Ch Picture Sound Skip
FR1-- C02 PAL B/G No
01
02 ----- C07 France L/L’ No
03 ----- C11 SECAM D/K No
04 ----- C25 PAL I No
05 ----- C35 PAL I No
06 ----- C50 SECAM D/K Yes
07 ----- C50 SECAM D/K Yes
Position Skip
Cursor Move
Return Delete
M
Edit
Pr Name Ch Picture Sound Skip
01 FR1-- C02 PAL B/G No
02 ----- C07 France L/L’ No
03 ----- C11 SECAM D/K No
04
----- C25 PAL I No
05 ----- C35 PAL I No
06 ----- C50 SECAM D/K Yes
07 ----- C50 SECAM D/K Yes
Position Skip
Cursor Move
Return Delete
M
Edit
Pr Name Ch Picture Sound Skip
1
01 FR1-- C02 PAL B/G No
02 ----- C07 France L/L’ No
03 ----- C11 SECAM D/K No
04 ----- C25 PAL I No
05 ----- C35 PAL I No
06 ----- C50 SECAM D/K Yes
07 ----- C50 SECAM D/K Yes
ABCDEFGHIJKLMNOPQRST
UVWXYZ+-. 0 23456789
Adjust Skip
Cursor Move
Return Delete
M
1
• Press the NUMBER buttons (0..9) or the UP/ DOWN button to select a programme number you want.
• Locate the selection bar on the Manual tune at the Install menu.
• Select the system with Picture(Cyan) button.
Select the "SECAM-F" for a French stations and "PAL or SECAM" for the
others.
• Press the RIGHTor LEFT button.
Atuning screen will appear and a cursor will move from left to right / from right
to left.
If you want to stop tuning, press the MENU button.
After searching a station, the tuning screen will disappear and then the channel will be memorized automatically.
SEARCHING A CHANNELS IN THE EDIT MENU
You can also search a channel at the Edit menu.
•
Position a selection bar to Pr number you want.
•
Position the cursor to the Picture with LEFT / RIGHT button.
•
Select the system (PAL or SECAM, SECAM-F) of channel you want to
search with the UP / DOWN button.
•
Position the cursor to C(or S) entry position with LEFT button . For special channels, select the "S" with UP / DOWN button.
Position the cursor to channel number entry position with RIGHT button.
Search a channel with UP/DOWN button.
If you are unable to get a good picture or sound because of a poor broadcasting signal, it is possible to adjust the fine tuning.
Move the selection bar to Fine tune and press the RIGHT / LEFT button to
activate fine tuning up or down.
Note that it operates while the RIGHT / LEFT button is being pressed.
The change is memorized automatically.
6
FINE TUNING
MANUAL CHANNEL SETTING
Install
Auto Setup
Manual Tune
Fine Tune
Edit
PAL
Position Adjust
Return Picture
M
Install
Auto Setup
Manual Tune
Fine Tune
Edit
PAL
Manual Tune C02 Pr01
Edit
Pr Name Ch Picture Sound Skip
02
01 FR1-- C PAL B/G No
02 ----- C07 France L/L’ No
03 ----- C11 SECAM D/K No
04 ----- C25 PAL I No
05 ----- C35 PAL I No
06 ----- C50 SECAM D/K Yes
07 ----- C50 SECAM D/K Yes
Adjust Skip
Cursor Move
Return Delete
M
Install
Auto Setup
Manual Tune
Fine Tune
Edit
Fine Tune 493.75MHz

7
DAILY USE
RECALL
The RECALL button is used to display the current status:
programme number, station name, sound system, clock.
This display appear for 2 seconds.
The set has totally 100 programme numbers, 0..99.
The NUMBER buttons 0..9 are used for direct programme selection.
To select two-digit programme, press the second numbered button within
two seconds.
You can also select a programme number by pressing step by step the
UP/DOWN buttons.
BRIGHTNESS,CONTRAST,COLOUR, SHARPNESS
• Press the MENU button.
• Press the RIGHT button to call up the Picture menu.
• You can select each function with the UP / DOWN buttons.
• The levels of each function can be adjusted the LEFT / RIGHT buttons
to suit your viewing conditions, the lightning conditions of the room and
your preference.
For Hue control Tint is displayed only when receiving a NTSC signal
from external jack.
The adjusted levels are stored automatically at Favourite mode.
Smart Picture Selection
When you press the NORMAL button repeatedly you can call up three pic-
ture settings stored in memory :
NORMALI-> NORMALII-> FAVOURITE ->
(hard picture) (soft picture) (user adjustable)
VOLUME CONTROL
Adjust the volume with the VOLUME( ) DOWN / UP buttons on the
front of the set, or with the LEFT/RIGHT button on the remote control.
MUTE
Pressing the MUTE( ) button to turns the sound off.
The mute symbol will be displayed. The sound returns
if the button is pressed once more.
SELECTING A PROGRAMME NUMBER
SOUND CONTROL
PICTURE CONTROL
Volume 21
SOUND CONTROL
• Press the MENU button.
• Place the selection bar to the Sound with UP/DOWN button.
• Press the RIGHT button to call up Sound menu.
• Select the required function by moving the selection bar ith the UP /
DOWN buttons.
• Press the RIGHT button to call up the each sub-menus.
Equalizer :
There are four possible choice considering your preference:
"Favourite, Music, Speech, Normal".
In Favourite mode you can adjust a level at each frequency band with
LEFT/RIGHT button .
Effect :
There are four possible choice considering your preference:
1. Available only for Dolby Virtual option.
Normal->Spatial->Panorama->Dolby Virtual
2. Available only for Non-Dolby Virtual option.
Normal->Spatial->MDB
Smart Sound Selection
When you press the sound effect button ( ) repeatedly, you can call up
easily one of the following:
1. Available only for Dolby Virtual option.
Normal->Favourite->Music->Speech->Spatial->Panorama->Dolby Virtual->
Normal...
2. Available only for Non-Dolby Virtual option.
Normal->Favourite->Music->Speech->Spatial->MDB
Balance :
Balance the loudness of the left and right speaker .
SOUND MODE
There may be cases of stereo broadcasts where excessive noise will be
heard due to weak incoming signal.
You may be able to eliminate this noise by selecting the MONO mode.
Press the Sound Mode ( ) button to change to MONO from
STEREO.
Then the "MONO" colour will be changed in Red.
Pressing this button again will change it back to stereo.
During a bilingual programme transmission, pressing the Sound Mode button will change the language to the second channel (DUAL
II
).
Pressing again will change it back to the main channel (DUALI).
SETTING THE CLOCK
• Position the selection bar to the Timer in the Main Menu.
• Press the RIGHT button.
• Place the cursor to Hour / Minute with LEFT /RIGHT button.
• Set the hour / minute with the UP/DOWN buttons.
• Place the cursor to Clock with LEFT/RIGHT button and then press the
Menu button to compelet.
Note that if you turn the TV off with MAIN POWER (ON/OFF) button, the
clock setting is lost and must be reset if necessary.
8
TIMER
Sound
Equalizer
Effects
Balance
Position Access
Return
M
Sound
Equalizer
Effects
Balance
Sound
Equalizer
Effects
Balance
Sound
Equalizer
Effects
Balance
L/R 00
100
300
1 K
3 K
10K
Favourite
Music
Speech
Normal
Position Adjust
Return
M
Normal
Spatial
Panorama
Dolby virtual
Position Return
M

Automatic clock setting and correction
Even though you turn the TV off with MAIN POWER (ON/OFF) button, if you
select a programme of your country which has T eletext or PDC transmission,
clock will be set and corrected automatically.
This function is only available for the countries as follows:
Deutschland, Great Britain, France, Italy, Sweden,
Switzerland, Netherlands, Ireland
SETTING THE WAKE UP TIME / PROGRAMME
• Confirm the Clock is set.
Wake up time is only available when Clock is set
• Select the Wake up to "YES".
The Wake up time and Wake up prog. will be displayed.
• Set Wake up time and prog. in a same way to the above for Clock.
The set will switch on to this time and programme number.
Note that the Wake up time is not operate in Childlock mode.
SLEEP
By pressing the SLEEP ( ) button repeatedly, you can select one of the
following setting:
00:20 -> 00:40 -> 01:00 -> 01:20 -> 01:40 -> 02:00
The set will turn off after time you select.
Automatic Switch-Off in No Broadcast Signal
If a broadcast signal is not present for about 30 minutes, the set will be automatically turned off.
In AV mode, however, this function does not operate.
9
CHILD LOCK
You can prevent the use of the TV set without the remote control.
The set is child-locked after switching off the set by pressing the R, G, Y, C,
the POWER button ( ) in sequence on the remote control within 5 second. The child-lock function is indicated by flashing the INDICATOR on the
front of set.
The set can only be switched back on using the remote control.
ASPECT CONTROL
Whenever the Zoom button is pressed, the screen will be changed as shown :
DTK-28W5_,DTK-2880_,DT -28_:
Auto
->
Normal ->4:3 ->Zoom1 ->Zoom2 ->Zoom3 ->Panorama
DTK-28G_,DTK-28A_,DTK-28B_,DTM-29__:
Auto
->
Normal ->16:9 ->Zoom1 ->Zoom2 ->Zoom3 ->Waterglass
Auto mode displayed on AV mode.
STILL
The Still button allows you to freeze the picture at anytime.
Menu
Picture
Sound
Language
Install
Timer
Adjust Cursor
Return
M
Clock --:--
Time 00:05
Prog. Pr01
Wake up
Yes

10
SWITCHING TELETEXT ON/OFF
Press the TEXT button( ).
The index page or the page viewed last will appear.
Press the TEXT button again to return to the TV mode.
COLOUR BUTTONS IN TOP/FLOF TELETEXT
A red, green, yellow and blue field is shown at the bottom of the screen.
If TOP or FLOF Teletext is transmitted by the station, pressing the corresponding colour button on the remote controller, you can select the desired page easily.
SELECTING PAGES
The NUMBER button 0..9 are used to enter a page number.
The selected page number appears at the top of the screen and the page
appears after a short time.
The UP/DOWN buttons increase or decrease the current page number by 1.
INDEX PAGE
Y ou can switch directly to the programme preview(with TOPtext) or the overview
page of the station you are currently viewing by pressing the INDEX( ) button.
PAGE HOLD
Several sub pages can be combined under a page number and are scrolled at
an interval determined by the television station.
The presence of sub pages is indicated by, for example, 3/6 beneath the time,
which means that you are looking at the 3rd page of a total of 6 pages.
If you want to look at a subpage for a longer period of time, press the HOLD
( ) button.
The " stop ! " appears beside page number and the contents of the subpage
shown are kept on the screen and no longer updated or switched to other subpages.
Pressing the HOLD button again, the current subpage appear.
CALLING UP SUBPAGE DIRECTLY
Pressing the SUBPAGE( ) button , " sub-code - - - - " appears beside page
number.
Enter the subpage number that you want to call up with the NUMBER button
0..9 ,for example, the 2nd page, sequence 0002.
The desired subpage will eventually be displayed on the screen and holds it
there. Meanwhile whilst you are waiting, it is possible to go back to the TV picture by pressing the CANCEL button on the remote and after a while, press the
CANCEL button again to revert back to the saved text sub page.
WATCHING TELEVISION DURING TELETEXT MODE
Some pages are continually updated, for example, stock market reports, sports
announcements, and the latest news.
If you want to watch television and stay informed at the same time, press
CANCEL ( ) button.
The regular programme is still visible and the teletext page number appears at
the top of the screen.
Pressing the CANCEL button, the teletext page appears with the updated information.
REVEAL ANSWER
This function can be used on certain pages to reveal the solution of riddles.
Press the REVEAL button ( ) to reveal a hidden answer and press again
to hide it.
DOUBLING CHARACTER SIZE
Repeatedly pressing the SIZE button ( ) doubles the character size in the following order:
Upper half of the page -> Lower half of the page -> Return to normal size
TELETEXT

11
BRIGHTNESS AND CONTRAST CONTROL IN TELETEXT MODE
Pressing the MENU button repeatdely in teletext mode, the brightness and
contrast control menu will be displayed in the bottom of the screen.
You can adjust these using the LEFT/RIGHT button on the remote controller.
DOUBLE WINDOW IN TEXT MODE
You can simultaneously watch TV and Teletext screen by pressing the
Zoom button in Teletext mode.
SCART JACK 1 (AV1) & SCART JACK 2 (AV2, SVH2)
The SCART 1 is used to connect a VCR, a Satellite receiver, a
Camcoder, a peri-TV decoder and a computer (RGB).
The SCART 2 is used to connect a VCR, a S-Video camcoder, a
peri-TV decoder.
In most case, the set changes automatically to AV1 or AV2 mode,
when the VCR connected is in playback mode.
If not, press the TV/AV button( ) on the remote controller or on
the front of the set.
Whenever the AV button is pressed, the on-screen display will be
changed as shown :
DTK-28_: AV1 -> AV2 -> SVH2 -> AV3 -> TV
DTM-28_, DTM-29_ : AV1 -> AV2 -> SVH2 -> AV3/S -> TV
The "AV1" will be displayed on the screen with the current programme
number.
In AV mode, you can change the TV programme number with the
UP/DOWN button or the NUMBER button 0..9.
FRONT AV JACK (AV3, AV3/S)
The AV JACK is used to connect a VCR, a camcoder.
Select "AV3", "AV3/S" mode by pressing the TV/AV button( ).
Press this button again to return to the TV mode.
* Vertical Synchronization by means of 100Hz Scan.might be
unstable in REW and CUE
Function with only 2-Head VCR.
HEADPHONE JACK
Insert the headphone plug(3.5 mm ø) into the headphone socket.
The sound from the speaker will be cut off.
You can controll the heaphone sound with the LEFT / RIGHT button.
Y ou can hear simultaneously sound from the headphones and the loud
speaker.
CONNECTING THE EXTERNAL EQUIPMENT
 Loading...